


DE Kompaktanleitung
Zubringerwagen, beheizt
ES Instrucciones abreviadas
Carro transportador, con calentamiento
EN Compac t ope r a ting ins tr uc t io ns
Delivery cart, h eat ed
FR Notice compacte
Chariot chauffé
ZUB-1
(88160101)
ZUB-2
(88160201)
ZUB-2GL
(88160203)
ZUB-3
(88160301)
ZUB-3GL
(88160303)
ZUB-4
(88160401)
Seite 2 - 3
DE Achtung!
Diese Kompaktanleitung enthält wichtige Hi nweise für den Gebrauch des Geräts.
NL Beknopte handleiding
Aanvoerwagen, verwarmd
IT Istruzioni per l’uso succinte
Carrello termi co portavivande, con
riscaldamento
page 4 – 5
page 6 - 7
página 8 - 9
pagina 10 - 11
pagina 12 - 13
EN Attention!
These compact operat ing instructions contai n im por tant information about usi ng
the unit.
FR Attention!
Cette notice abrégée c ontient des remarques import antes quant à l’utilisation de
l’appareil.
ES ¡Atención!
Estas instrucci ones abreviadas contienen información importante relativa al uso
del aparato.
NL Wees voorzichti g!
Deze beknopte handleiding bevat belangrijk e aanwijzingen voor het gebruik v an
het toestel.
IT Attenzione!
Queste istruzioni succinte contengono importanti avvertenze per l’uso
dell’apparecchio.
Compact ope r a ting ins tr uc t io ns
Delivery cart, h eat ed EN
Status 11/2005
1. Liabilit y and warrant y
The current vali d term s and conditions of sales and delivery of the company Rieber GmbH & Co. KG will apply
to all warranty cl aim s made t o the manufacturer. The terms and conditi ons of sal es and del ivery which are valid
on the invoice date shall apply.
Excluded from the warrant y are:
All fitted par ts which by their very nature are subject to wear and tear and/or mechanical wear (e.g.: power
cable, tires, cor ner bum per s).
2. Compact operating i nstructions
The compact operating instructions must always be legible and available in full where the unit is used. Steps
must be taken to ensure that all persons that work with the unit can r efer to the compact operating instructions
at all times.
3. Maintenance/ servicing
Repair work may onl y be perf ormed by Ser v ic e .
In case of malfunctions, please notify the Rieber – custo mer service stating the unit type and unit numb er
(see type label) . O nly use original spare parts, original accessories.
Recommended maintenance: annually for norm al oper ation.
4. Technical data
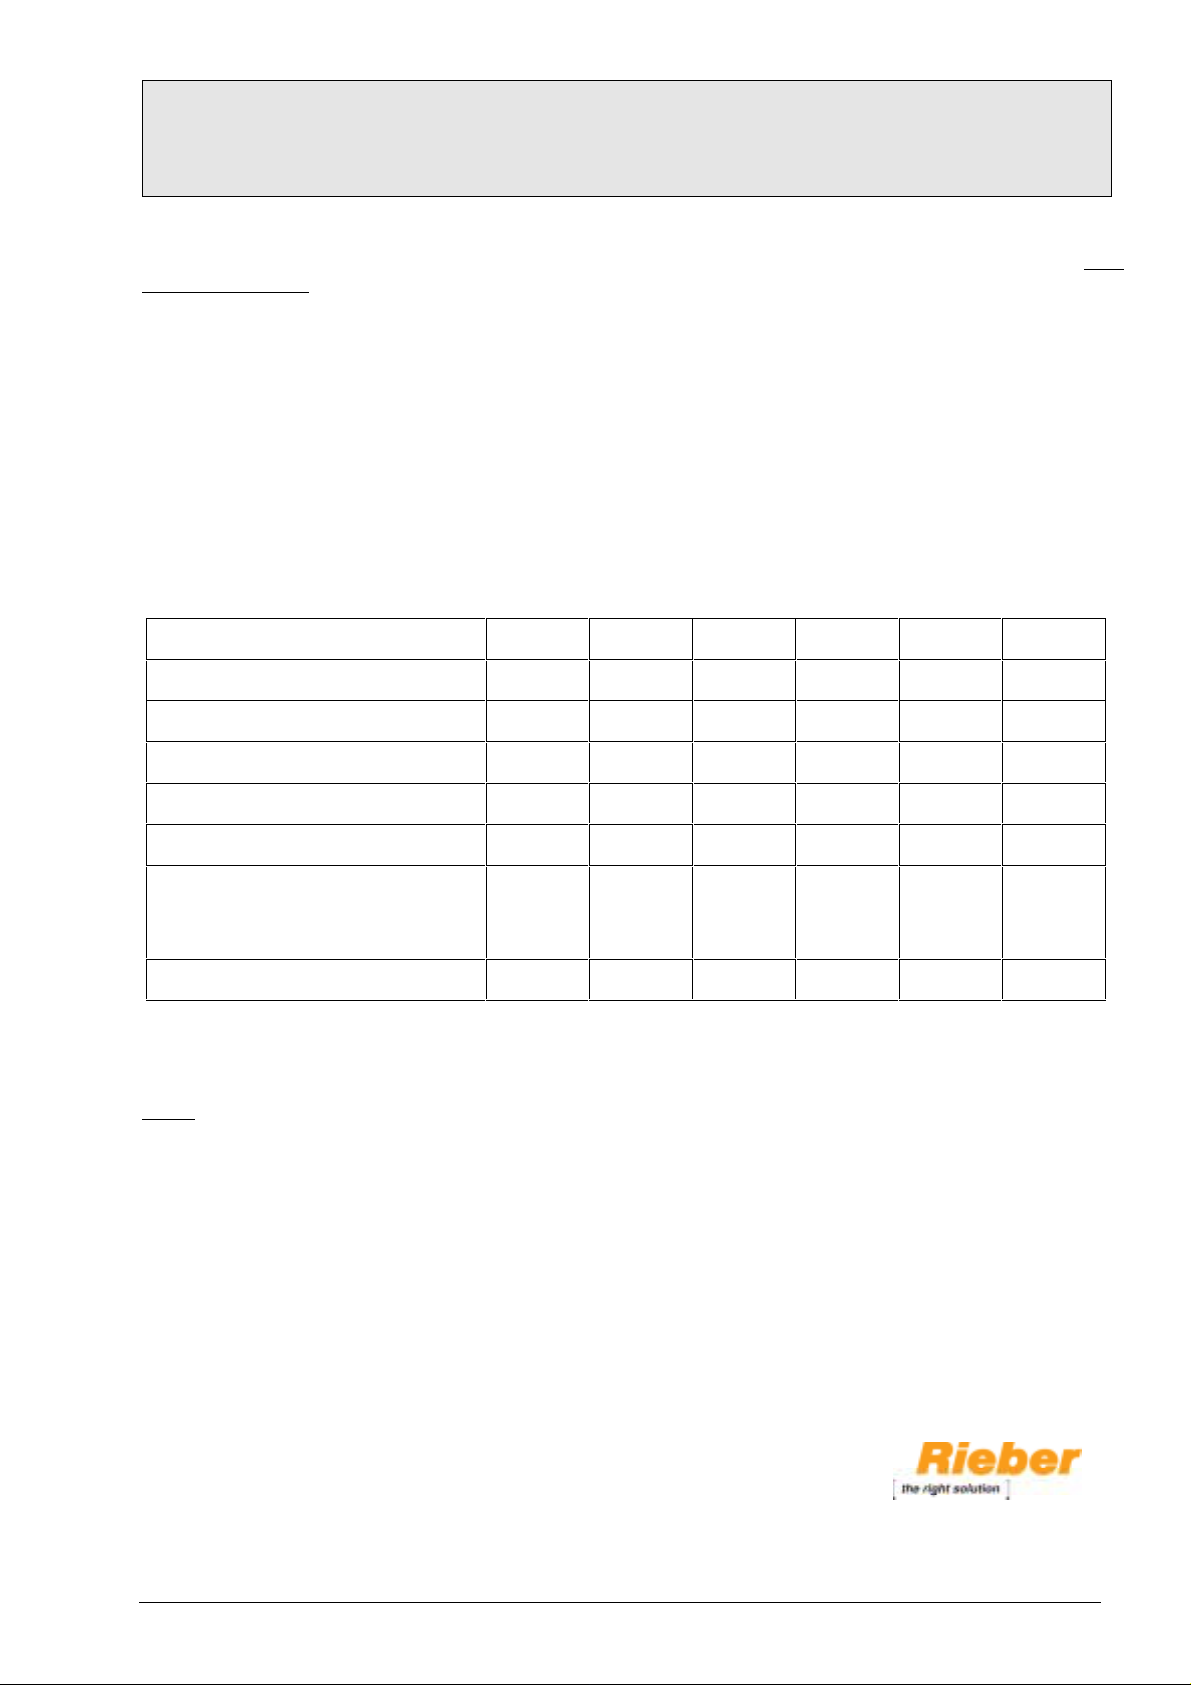
Type/model ZUB-1 ZUB-2 ZUB-2GL ZUB-3 ZUB-3GL ZUB-4
Length in mm 758 858 816 1227 1185 1562
Width in mm 475 675 717 675 717 675
Height in mm 900 900 900 900 900 900
Empty weight in kg: 223333444455
Electrical data
1 N AC 230 V 50 Hz, 16 A
Protection cl ass IP 43
Spiral cable 2.5 m long with earthed
plug, 230 V
Total connected load in kW 0.765 1.530 1.530 2.295 2.295 3.060
5. Important information
Electrical connections on site must correspond with t he details on the type label of the unit.
Before starting , chec k the unit, plug and electrical cable for visible damage – the unit may only be operated
when it is fully functional.
Never heat a heated well which has no water.
Always close the ball drainage cock before filling with water (filling level 20 mm).
Pos ition the unit horizont ally, securely and stably. The mains pl ug must be accessible at all times in order to
be able to disconnect the unit from the mains supply in an emergency. Never pull on a spiral cable.
Ambient temperat ure: Max. + 40 °C, min. +2 °C.
Mobile units: Activate brakes on mobile units. Push using the pushing handle. Do not allow the unit to roll away
in an uncontrolled manner. Do not carry units; do not lift using the pushing handle.
Cleaning: aft er each use. B efore cleaning, disconnect the unit from the mains supply and allow heated uni t to
cool down. Do not use high-pr essure c leaners.
Do not use any cleani ng agents that contain sand, soda or acids.
Food temperature: Comply with temperatures as defined by HACCP. Observe the maximum time that food
may be kept warm as defined by HACCP ( 2 hours). T he temperature of the food may not be allowed to drop
below +65 °C.
Food should be placed in the unit at a temperature of at least +85 °C.
Subject to technical changes !
Figures, f unction steps and technical data may
change slightly due to continuous further
developments.
-4-

6. Function
The delivery cart is designed for in-house transportation and distribution of food.
Heated well(s), insulated, electrically heated (wet heating), seaml essly welded into the top.
The heated well( s) is/are deep-drawn, suitable for holding 1 GN container of max. size GN 1/1, 200 mm deep,
with heated well installed below, with tubular heating elements, each 765 W/ 230 V.
Each heated well is fitted with a ball drainage cock ½ “, outlet at the bott om .
The number of heated well s 1 – 4 depends on model.
Cart with 1 pushing handle.
Switch panel with 1 thermostat, can be regulated from +30 to +110 °C, per heated well.
Sub-structure: Open tubular frame, with stainless steel shelf and impact protection consisting of 4 corner
bumpers.
2 swivel casters and 2 swivel c aster s with br ak e.
7. Commissioning, cleaning, trouble-shooting , d ecommi ssio ning
Commissioning
for the first time:
• Clean unit thoroughly (see chapter “Cleaning”)
• Check that the thermostat is in good working order (if it clic k s when turned, it is
intact). Check that the ON/OFF switch and the drainage cock are in good
working order.
• Close the drainage c oc k (toggle position horizontal)
• Fill the heated well(s) with water to a level of 20 mm (approx. 2 litres
respectively); the containers should not float
• Connect the earthed plug to the earthed socket provided on site
• Press ON/OFF switch
*UHHQFRQWUROODPSOLJKWVXS 8QLWLVVZLWFKHGRQ
• Heat up unit (when empt y ) at the maximum temperature approx. 2 times for 30
minutes.
Operation
• Hang in the Gastronorm c ontainers from the top
• Use the knob on the thermostat to set the required temperat ur e for eac h heated
well
• After a longer oper ational period, check the lev el of water in the heated well (20
mm) and if necessary refill.
Switches/display
ON/OFF switch
1 thermostat wit h
knob per well,
Ball drainage c ock
stepless
Cleaning
Close / open the
drainage cock
Decommissioning
Blind socket
• Activate br ak es on the c aster s
• Disconnect mains supply plug
• Open ball drainage coc k (toggle position vertic al) and empty water into a bucket
provided on sit e
• Clean and rinse the well
• Close the ball drainage c oc k again
• If necessary, pre-treat heavily soil ed areas
• Clean the outside of t he uni t wit h a dam p cl oth
• Allow cart to completely dry off
Warning!
Wipe the switch panel with a damp cloth. No damp may be allowed to penetrate the
switch panel. Dry the plug off after cleaning.
Toggle positi on v er tical: Drainage cock open.
Toggle positi on hor iz ontal: Drainage cock closed.
Warning! Only open the drainage cock to empty the water.
• Press ON/OFF switch
&RQWUROODPSZLOOH[WLQJXLVK 8QLWLVVZLWFKHGRII
• Disconnect the mai ns pl ug and insert into blind socket to prevent damage to the
spiral cable.
• Empty water into a buc k et prov ided on si te by opening the drainage cock.
Warning! Allow water to cool down before emptying, other wi se ther e is a danger
of scalding from the hot water.
• Close the drainage c oc k
Spare parts
Miscellaneous
Please refer t o the Rieber- Online Store at http://shop.rieber.de for spare parts.
Spare parts can also be ordered in our service department.
Circuit diagr am s and a declaration of conformity can be ordered if r equired.
-5-
 Loading...