


Issue: 2018-06-12
For baking, roasting and regenerating specially portioned food and for keeping food warm.
For system gastronomy
Observe the operating instructions
Translation of the Original Operating Instructions
DOWNLOAD: USER MANUAL
QR code on type plate

Contents
2
Rieber GmbH & Co. KG
Our solutions guarantee high quality, safety and, above all,
excellent energy efficiency and cost effectiveness.
Contents
1 Revision Index ................................................................................................................................................. 3
2 Important Information ..................................................................................................................................... 3
2.1 Using this guide ..................................................................................................................................................... 3
2.2 Representation conventions in the text ................................................................................................................. 4
2.3 Structure of safety instructions .............................................................................................................................. 4
3 General Safety Instructions ............................................................................................................................ 5
3.1 General behaviour ................................................................................................................................................. 5
3.2 On use of electrical appliances ............................................................................................................................. 5
3.3 Operator's duties ................................................................................................................................................... 6
3.4 Personnel qualification requirements .................................................................................................................... 7
3.5 Provide protective equipment for personnel ......................................................................................................... 7
3.6 Appliance-specific safety instructions ................................................................................................................... 8
3.7 Product identification ........................................................................................................................................... 10
3.8 Information about regulations to be followed ...................................................................................................... 10
3.9 Instructions on behaviour in an emergency ........................................................................................................ 10
4 Purpose .......................................................................................................................................................... 11
5 Description of device .................................................................................................................................... 12
5.1 Designation ......................................................................................................................................................... 12
5.2 Technical data ..................................................................................................................................................... 15
6 Before First Use ............................................................................................................................................. 16
6.1 Transport ............................................................................................................................................................. 16
6.2 Commissioning .................................................................................................................................................... 16
7 Use .................................................................................................................................................................. 19
7.1 Safety information with regard to use ................................................................................................................. 19
7.2 Pour drinking water into the water tank. Top it up regularly. .............................................................................. 20
7.3 Select program .................................................................................................................................................... 21
7.4 Start cooking process .......................................................................................................................................... 21
7.5 Change settings during operation ....................................................................................................................... 22
7.6 Cancel cooking process ...................................................................................................................................... 22
7.7 Keep food warm (HOLD) ..................................................................................................................................... 23
7.8 Set date and time ................................................................................................................................................ 23
7.9 How to switch off the navioven ........................................................................................................................... 24
7.10 Operation of the navioven function keys ............................................................................................................. 24
7.11 The navioven programs ...................................................................................................................................... 27

Revision Index
Rieber GmbH & Co. KG
3
Revision
Change
2011-03-31
First issue
2011-05-06
Review of controls
2011-07-05
Addition to setting time and date, control images
2011-09-19
8.9.5 Note inserted referring to 2 different saving procedures
2012-03-23
Safety note changed on page 30
2012-12-10
Technical data on page 6; images replaced
2017-08-01
Hold function, 2-stage door handle and pump function;
Register, operating manual structure; EU Declaration of
Conformity; Protective cap for core temperature sensor,
maintenance
2018-06-12
Türverschluss auf Seite 8 entfällt
► Read the operating instructions before first using the product.
► Keep this guide in a safe place and pass it onto the next owner should you wish
to part with the product.
8 Cleaning, maintenance and care ................................................................................................................. 34
8.1 Safety information relating to cleaning, maintenance and care .......................................................................... 34
8.2 Cleaning agents for stainless steel ..................................................................................................................... 36
8.3 Choose the correct cleaning method .................................................................................................................. 37
8.4 Overview of cleaning and maintenance intervals ............................................................................................... 39
8.5 Pump residual water out of the appliance, rinse the appliance .......................................................................... 40
8.6 Cleaning .............................................................................................................................................................. 41
8.7 Descale the appliance as required ..................................................................................................................... 45
8.8 Keep ready for next use in dry condition ............................................................................................................ 46
9 Fault - What now? ......................................................................................................................................... 47
10 Warranty and liability .................................................................................................................................... 49
11 Excerpt from the EU Declaration of Conformity ......................................................................................... 50
12 Manufacturer's address ................................................................................................................................ 51
13 Brief instructions .......................................................................................................................................... 52
1 Revision Index
2 Important Information
2.1 Using this guide
This guide contains important information about how you can use the appliance safely and correctly.
If there are any shortcomings in your opinion, please do not hesitate to let us know. With your help, we
will try to become even better.

Important Information
4
Rieber GmbH & Co. KG
CAUTION
indicates potential damage to property without any personal injury.
Failure to follow these instructions may cause damage to property.
User tip
► Useful information or tip
DANGER
indicates imminent danger.
Failure to follow these warning instructions will result in
serious bodily
injury or even death.
WARNING
indicates a
potentially hazardous situation
.
Failure to follow these warning instructions
may
cause
serious bodily
injury or even death
.
CAUTION
indicates a
potentially harmful situation
.
Failure to follow these warnings
may
cause
minor bodily injury
.
2.2 Representation conventions in the text
. . . Highlighting . . . , is a text fragment which needs to be emphasized
Lists are represented in this way.
Instructions on certain actions are represented in this way.
See ‘. . . ’ , cross-reference is represented in this way.
2.3 Structure of safety instructions
The signal words DANGER - WARNING - CAUTION classify the degree of risk of bodily injury in an actual
situation. You can avoid injury by complying with the behavioural rules provided.
The warning triangle symbol indicates a ‘General Danger’.

Rieber GmbH & Co. KG
5
3 General Safety Instructions
This section covers residual risks and hazards associated with the intended use of the appliance. We have
provided a list of all generally valid safety instructions which must be followed.
In the following section, safety information relating to a particular operation or situation is placed before the
appropriate operation step or description of the situation.
3.1 General behaviour
This appliance meets the current state of the art and complies with all acknowledged technical safetyrelated regulations. Nevertheless hazards may still arise.
Only use this appliance when it is in fault-free condition and according to the instructions in this
user guide.
During all phases of the product's life please ensure that the product is safely integrated into its
environment.
Refrain from rearranging or changing the device.
General Safety Instructions
3.2 On use of electrical appliances
Safety instructions according to EN 60745-1:
Work area
Keep your work area clean and tidy. A messy or unlit work area can cause accidents.
Keep children and other people away from the area when work is being carried out.
Electrical safety The plug on the unit must fit in the socket. Do not modify the plug in any way. Never use
an adapter in combination with earthed appliances. Using an unmodified plug and a
suitable socket will reduce the risk of an electric shock.
Avoid bodily contact with earthed surfaces such as pipes, heating units, cookers and
refrigerators. The risk of an electric shock is greater when your body is earthed.
Keep the device away from rain or wet. Allowing water to get into an electric appliance
will increase the risk of electric shock.
Do not use the cable for anything other than the intended purpose to disconnect the plug
from the socket. Always remove whilst holding onto the plug. Keep the cable away from
heat, oil, sharp edges or the moving parts of other appliances. Using damaged or tangled
cables increases the risk of electric shock.
When working with an electrical appliance outdoors, only use extension cables which are
permitted for outdoor use. Using an extension cable suitable for outdoor use reduces the
risk of electric shock.
Risk of fire as a result of heat build-ups possible. Unwind the cable from the cable drum
to prevent a possible heat build-up and/or cable fire. The coupling must have splash
protection, must be made of rubber or be rubber-coated. The cable cross-section must be
at least 1.5mm2.
Safety guidelines for persons Be attentive and pay attention to what you are doing, act rationally when working with an
electrical appliance. Do not use the appliance when tired or under the influence of drugs,
alcohol or medication.
Just one moment of inattention whilst using the appliance can result in serious injury.
Make sure the appliance cannot be switched on unintentionally. Double check that the
main switch is in the "OFF" position before inserting the plug in the socket. Connecting
the appliance to the power supply while it is switched on can cause an accident.

General Safety Instructions
6
Rieber GmbH & Co. KG
Careful handling and use of electrical appliances Never use an electrical appliance with a faulty switch. An electrical appliance which can
no longer be switched on or off is dangerous and must be repaired.
Keep unused electrical devices away from children. Do not allow the appliance to be
used by persons who are not familiar with it or persons who are not familiar with this user
guide. Electrical appliances are dangerous when in the hands of inexperienced persons.
Treat the device with care. Check that moving parts are functioning properly and do not
block; check whether parts are broken or damaged and impairing the functioning of the
device. Have any damaged parts repaired before using the appliance. Many accidents
are caused by poorly-maintained electrical appliances.
Use electrical appliances, accessories etc in accordance with these instructions and in a
manner that is specified for this particular appliance type. When using the appliance,
please take into account the working conditions and the work being carried out. Using
electrical appliances for other uses than that intended can lead to hazardous situations.
Service Only have the device repaired by qualified and authorised staff. Only use original spare
parts. In this way you can ensure that the appliance remains safe.
3.3 Operator's duties
Operator
The operator is the person who operates the appliance for commercial or economic purposes either
himself/herself or lets others use it and bears the legal appliance responsibility for protection of the
user, staff or any third parties during operation.
Operator's duties
The appliance is used in commercial applications. For this reason, the operator of the appliance must
meet all legal duties relating to work safety.
In addition to the safety instructions in this guide, the safety, accident prevention and environmental
protection regulation applying to the application of the appliance must be complied with.
In particular, the following shall apply:
The operator must be familiar with the applicable work safety regulations and identify, by
carrying out a risk analysis, any additional hazards which are due to the place where the
appliance is used. These hazards must be addressed in the form of operating instructions
governing the operation of the appliance.
Throughout the period of use of the device the operator must check that the operating
instructions which he has compiled comply with the current regulations and adapt them if
necessary.
The operator must clearly regulate and define the responsibilities for installation, operation,
troubleshooting, maintenance and cleaning.
The operator must ensure that all employees who use the device have read and
understood these instructions. In addition, the operator must train the personnel and inform
them of the hazards involved at regular intervals.
The operator must provide the personnel with the necessary protective equipment and
issue mandatory instructions on wearing it.

Rieber GmbH & Co. KG
7
In addition, the operator must ensure that the appliance is always in a perfect technical condition. For
this reason, the following shall apply:
The operator must ensure that the maintenance intervals defined in this guide are obeyed.
The operator must regularly check all safety devices for functionality and completeness.
The operator must ensure that the appropriate media connections are present.
The operator must ensure that structural safety measures are performed.
3.4 Personnel qualification requirements
Safe operation requires certain technical skills and personal qualification of each person.
The responsibility for organization lies with the ‘Designated Representative’ (operator).
According to EN 50110-1 a work supervisor is a person who is appointed to take direct
responsibility for the performance of work. If necessary, this responsibility can be assigned
partly to other persons. [...] The designated representative must instruct all persons
involved in the work on all hazards which may not be obvious for them’.
The work may only be performed by ‘instructed persons’ who have been trained
accordingly. Training, instructions must be repeated, proper understanding must be verified
(ideally by way of an appropriate test).
Only ‘Qualified Staff’ are allowed to carry out repair work.
IEC 60204-1 defines qualified personnel as "persons who, on account of their training and
relevant experience are in the position to recognise risks and avoid potentially dangerous
situations."
Electrical work may only be carried out by trained and experienced electricians.
Electro-technically instructed persons may only work under the supervision of a qualified
electrician.
The Circulating air heater unit housing may only be opened/closed for the purpose of
thorough cleaning by appropriately trained and authorised operating personnel. NOTE: This
is only permitted by the manufacturer's service department during the guarantee and
warranty period.
Any repairs and/or overhaul during the warranty period may only be carried out by the
manufacturer´s service department.
General Safety Instructions
‘Warranty and liability’, page 49
3.5 Provide protective equipment for personnel
Ensure that the personnel wear the personal protective equipment appropriate to the relevant
situation.
Wear sturdy shoes to prevent injuries.
Wear safety gloves to avoid burns at hands and arms.
General Safety Instructions
8
Rieber GmbH & Co. KG
WARNING
Risk of stab wounds when handling the pointed core temperature sensor.
► Be careful.
► Keep the core temperature sensor in a secure location, for example in the holder on
the left register. Do not leave the core temperature sensor lying around loose.
3.6 Appliance-specific safety instructions
This chapter describes general, appliance-specific safety instructions. In the following section, additional safety
information relating to a particular operation or situation is placed before the appropriate operation step or
3.6.1 Safety and monitoring devices
3.6.2 Transport
description of the situation.
The device features a safety cut-out. The product switches itself off automatically in the
event of a fault in the control system..
To increase your safety we recommend that you install a residual current device with a
tripping current of 30 mA upstream of the appliance.
The navioven weighs around 45 kg. Risk of injury when lifting and carrying heavy loads.
Such work may only be carried out by suitable and appropriately trained personnel. If you are not
physically fit, consult your designated representative.
When transporting the appliance hold it at the handle. Transport the appliance with 2 people.
Only transport the appliance when empty, with the mains plug disconnected and the door closed.
User tip: Use the Rieber transport equipment range.
3.6.3 Risks involved in using the sharp core temperature sensor

General Safety Instructions
Rieber GmbH & Co. KG
9
CAUTION
If the plug connector for connecting the core temperature sensor is not fastened, the
sensor may be contaminated; considerable damage is possible.
► Keep the electrical connection for the core temperature sensor closed.
► Use the dummy connector.
CAUTION
If the core temperature sensor is inserted into the ventilation grille of the circulating air
heater, the heater could be damaged; considerable damage is possible.
► Keep the core temperature sensor in a secure location, for example in the holder on
the left register. Do not insert the core temperature sensor into the grille of the
circulating air heater inside the appliance.
3.6.4 Risk of burns and scalds to hands, arms and face
Steam at temperatures of up to 200 °C is released at the back of the appliance. The temperature inside
the appliance can be up to +230 °C. The outside of the housing can reach temperatures of up to 65 °C.
Be careful.
When opening the door using the two-stage door lock allow steam to escape first of all, then open
completely.
Wear protective gloves.
Keep flammable materials away from the product.
3.6.5 Risk of fire and malfunction
Steam at temperatures of up to 200 °C is released at the back of the appliance. The outside of the
housing can reach temperatures of up to 65 °C.
Observe minimum distance for the air circulation at the back panel, ≥ 10 cm.
Keep flammable materials away from the product.

General Safety Instructions
10
Rieber GmbH & Co. KG
The type plate bears the legally required product data.
→ See back of the appliance.
Warning of hot surface
→ See front top left on the appliance, next to the control unit
Warning of electrical voltage
Warning. Unplug mains plug before opening the appliance.’
Languages German, English, French.
→ See back of the appliance.
Note on the distance to be observed at the back of the appliance, otherwise considerable
damage is possible.
→ See pictogram on the back of the appliance.
User tip
► You can find detailed information in the company's internal instructions.
► We recommend that half-yearly emergency training sessions should be carried out.
3.7 Product identification
3.8 Information about regulations to be followed
In addition to this user guide there are a range of health and safety and other regulationsthat are
relevant for the operation of this cooking station; these include HACCP food hygiene regulations for
example.
3.9 Instructions on behaviour in an emergency
In an emergency, always turn the appliance off immediately.
First Aid for burns, scalds, cuts and electric shock
Inform yourself on this before commissioning the appliance.
Store the emergency equipment, including the relevant instructions, at a readily accessible place
near the place of use.

Rieber GmbH & Co. KG
11
4 Purpose
This chapter provides information on the intended use of the product and warns against foreseeable misuse or
abuse, for your safety. Use the appliance for its intended use.
Generally, the following are intended uses for the product:
For system catering, catering, hotels, restaurants and school cafeterias.
Use as a mobile table-top appliance. The appliance is used stationary, without being
moved.
Use as a fitted kitchen appliance for installation in the Rieber ‘aircleansystem’.
Installation only intended and permitted by the Rieber company or a specialist dealer.
Installation by the operator is only permitted in exceptional cases and at the operator's own
responsibility.
For baking, cooking, cooking at core temperature, braising and regenerating meals
comprising specially portioned food and for keeping food warm.
The person responsible for the work, e.g. the chef, programs the navioven parameters.
Wear personal protective equipment such as protective gloves which will prevent you from
burning your arms or hands on hot parts such as heating elements, hot parts of the
appliance, objects and food.
For use by instructed persons only.
Purpose
Prevent any predictable misuse and abuse:
Observe minimum distance for the air circulation at the back panel, ≥ 10 cm. Do not
obstruct the fresh air supply. Steam at temperatures of up to 230 °C is released at the back
of the appliance. The outside of the housing can reach temperatures of up to 65 °C. Ensure
suitable installation conditions.
Remove the protective sheath on the tip of the core temperature sensor before first use,
otherwise there is a risk of significant damage and malfunction.
Do not insert the core temperature sensor into the grille of the circulating air heater inside
the appliance.
Do not operate the appliance unsupervised. To prevent persons from burning themselves
on hot surfaces, use of the product in public, e.g. for self-service, should only be allowed
under supervision.
Installation only intended and permitted by the Rieber company or a specialist dealer, for
example in Rieber's ‘aircleansystem’ installation station. Installation by the operator only
permitted in exceptional cases and at the operator's own responsibility.
Not intended for private use at home.
Do not lean against or sit on the appliance.
Keep any combustible or explosive fluids away from heated appliances. Otherwise a fire or
explosion may occur.
Do not use to heat up a room.

Description of device
12
Rieber GmbH & Co. KG
1 Door lock
2 Carrying handles
3 Water container
4 Control unit
5 Viewing window in the door
6 Core temperature sensor
7 Rubber feet
8 Circulating air heater
9 Left register with holder for
the core temperature sensor
10 Core temperature sensor
11 Dummy connector
12 Right register
5 Description of device
This chapter has interesting facts about the set-up and functionality of this appliance
5.1 Designation
All parts are named here to facilitate further understanding of the manual.

Description of device
Rieber GmbH & Co. KG
13
Detail
Back
Electrical connection

Description of device
14
Rieber GmbH & Co. KG
4 Dial,
protrudes when switched off
6 POWER ON
11 STOP
12 START
Programs
1 Cook
2 Core temperature
3 Fan
5 Menu
Function keys
7 Humidification with steam / emptying,
cleaning
8 Time
9 Core temperature
10 Chamber temperature
Program 1: Cook
Chamber temperature, time and steam can be set.
Program 2: Core temperature
Core temperature, chamber temperature and steam can be set.
Program 3: Fan (passive cooling)
Passive cooling with cooling pellets + circulating air
Program 6: Menu
Stored programs can be selected.
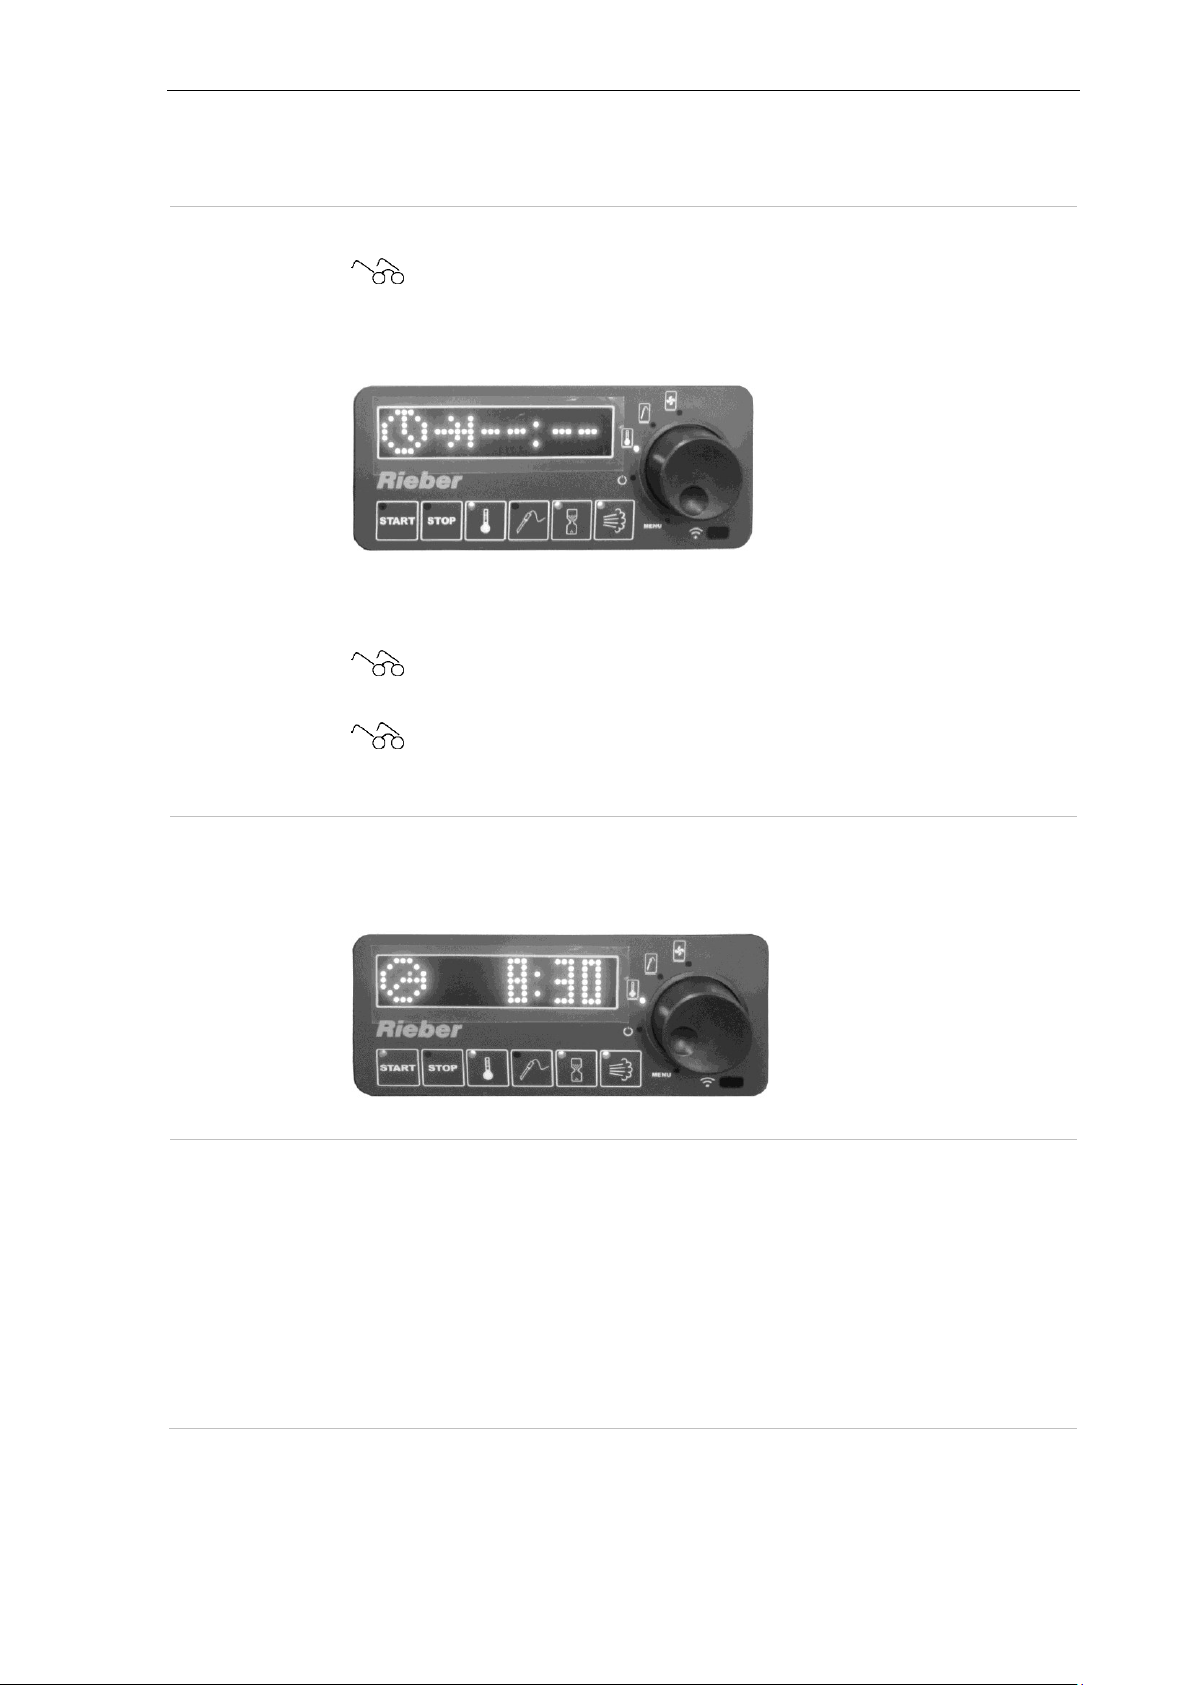
The navioven control unit

Description of device
Rieber GmbH & Co. KG
15
Examples of
displays
Meaning
The navioven is in Standby mode.
The POWER ON LED (6) flashes.
Display is black
Program XX is running.
In the lower menu bar, the Function keys flash indicating the most meaningful
adjustment options.
The current temperature is shown in the display.
F1 in the display indicates: A fault.
See ‘Troubleshooting’ chapter, page 47
Acoustic signal: 10 seconds before a task is run automatically, you will hear an
acoustic signal, e.g. 10 seconds before the cooking time is over.
Rated voltage / mains frequency
1N AC 230V 50/60Hz
Heating capacity
3.2 kW
Ambient conditions
0°C to +80°C
Protection class
IP55 as per DIN EN 60529
(dust-protected, protected against access with a wire, protection
against water jets (nozzle) from any angle)
For installation outdoors a canopy or protection from penetrating
moisture is required.
Mass
approx. 45 kg
Dimensions (W x D x H)
730 x 450 x 560 mm
Temperature range
+20°C to +230°C
Water tank
0.5 litres
Support rails
7 pairs for max. 5 x 1/1 GN 65 mm deep
Display
5.2 Technical data
Detailed specifications for measurements, order number, accessories,
circuit diagrams, spare parts, wear and tear parts:
See catalogue/brochure
If you have any questions, please contact your local Rieber Service.

Before First Use
16
Rieber GmbH & Co. KG
CAUTION
Protective foils or heat-sensitive objects at/in the appliance might damage the appliance
during heating.
► Ensure that there are no protective foils on the inside or outside of the appliance.
► Remove the protective sleeve on the tip of the core temperature sensor before first
use.
6 Before First Use
This chapter describes the measures to be taken before use.
6.1 Transport
# Check/deal with any transport damage
Immediately after delivery, visually check the appliance for any transport damage.
Document any potential transport damage on the consignment note in the presence of the haulage
contractor. Have the damage confirmed by the haulage contractor (with signature).
Decide if you wish to keep the appliance and report the defect using the consignment note, or if
you wish to reject the appliance.
▌ By following this procedure you will ensure proper claim settlement.
# Unpacking
Open the transport packaging at the positions provided for this purpose. Do not tear or cut.
Remove any packaging remnants.
# Scope of delivery
Check the scope of delivery.
6.2 Commissioning
Observe the prerequisites
Observe minimum distance for the air circulation at the back panel, ≥ 10 cm.
Installation only intended and permitted by the Rieber company or a specialist dealer, for
example in Rieber's ‘aircleansystem’ installation station. Installation by the operator is only
permitted in exceptional cases and at the operator's own responsibility.
The appliance has no defects or visible damage.
The appliance is at room temperature and is dry.

Before First Use
Rieber GmbH & Co. KG
17
CAUTION
Protective foils or heat-sensitive objects at/in the appliance might damage the appliance
during heating.
► Ensure that there are no protective foils on the inside or outside of the appliance.
► Remove the protective sleeve on the tip of the core temperature sensor before first
use.
CAUTION
Steam at temperatures of up to 230 °C is released at the back of the appliance. The
outside of the housing can reach temperatures of up to 65 °C.
If the ventilation on the back of the appliance is obstructed, the appliance can be badly
damaged; malfunctions are also possible.
► Observe minimum distance for the air circulation at the back panel, ≥ 10 cm.
► Ensure suitable installation conditions; hot steam is released.
# Dispose of packaging material
Dispose of packaging material in a proper and environmentally compatible manner.

Before First Use
18
Rieber GmbH & Co. KG
Observe the local building inspectorate regulations
Get information from the local authorities.
# Cleaning the navioven
See ‘Cleaning, maintenance and care’ chapter, page 34
# Connecting the navioven Connect the navioven to the power supply.

Rieber GmbH & Co. KG
19
WARNING
The temperature inside the appliance can be up to +230 °C. The outside of the housing
gets hot.
► Be careful.
► When opening the door using the two-stage door lock allow steam to escape first of
all, then open completely.
► Wear protective gloves.
► Keep flammable materials away from the product.
WARNING
Risk of stab wounds when handling the pointed core temperature sensor.
► Be careful.
► Keep the core temperature sensor in a secure location, for example in the holder on
the left register. Do not leave the core temperature sensor lying around loose.
7 Use
7.1 Safety information with regard to use
Use
Comply with the principles for operation
Before each use, check the appliance for any visible damage.
Observe minimum distance for the air circulation at the back panel, ≥ 10 cm.
Comply with the installation conditions.
Make sure there is always drinking water in the water tank. Top up the drinking water regularly.
The appliance is used stationary, without being moved.
Only operate the appliance with adequate lighting.
Risk of burns and scalds to hands, arms and face
Risks involved in using the sharp core temperature sensor

Use
20
Rieber GmbH & Co. KG
CAUTION
If the plug connector for connecting the core temperature sensor is not fastened, the
sensor may be contaminated; considerable damage is possible.
► Keep the electrical connection for the core temperature sensor closed.
► Use the dummy connector.
CAUTION
If the core temperature sensor is inserted into the ventilation grille of the circulating air
heater, the heater could be damaged; considerable damage is possible.
► Keep the core temperature sensor in a secure location, for example in the holder on
the left register. Do not insert the core temperature sensor into the grille of the
circulating air heater inside the appliance.
CAUTION
If the circulating air heater becomes soiled, it may be damaged.
► Prevent liquids from spilling out, use lids. Avoid any soiling.
► Use the navioven stationary, without moving it.
7.2 Pour drinking water into the water tank. Top it up regularly.
Switching on the appliance
Pour drinking water into the water tank,
up to a maximum of 1 cm below the top, ca. 0.5 l.
Make sure there is always drinking water in the tank. Top up the
drinking water regularly.
▌ No error message is given when there is no drinking water in
the container.
Insert plug.
▌ The standby display lights up.
Risks due to soiling of the circulating air heater

Rieber GmbH & Co. KG
21
Choose the program by turning the dial (4).
▌
The display shows the current chamber temperature.
▌
In the lower menu bar, the function keys for the most meaningful
adjustment options flash.
Put the product you want to cook into a GN container.
Press START button (12).
▌
The selected program is executed.
▌
The current chamber temperature is shown in the display.
▌
The respective LED on the dial lights up.
Querying values
Press the respective function key.
▌
The respective setpoint, e.g. the remaining time, is displayed.
Release the function key.
▌
The respective actual value is displayed
▌
After about 10 seconds, the current chamber temperature is shown again
in the display.
After expiry of the cooking time
A signal sounds after expiry of the cooking time.
The program continues.
The current chamber temperature is shown in the display.
7.3 Select program
Use
7.4 Start cooking process

Use
22
Rieber GmbH & Co. KG
▌
The selected program is executed.
▌
The current chamber temperature is shown in the display.
Tap the relevant function key and set the desired value on the dial (6).
▌
The control panel applies the set value for the current cooking process.
Press the STOP button (11) and hold for around 5 seconds: Back to program
selection.
▌
The currently running program is cancelled.
Press the STOP button again and hold for around 5 seconds.
▌
The appliance switches to Standby mode.
▌
The
POWER ON LED
(6) lights up.
Cancel program with real time function
See ‘Unlock the control in real time mode’, page 33
7.5 Change settings during operation
7.6 Cancel cooking process

Rieber GmbH & Co. KG
23
Press and hold down the Chamber temperature button.
With your second finger, press and hold down the STOP button.
Make sure that you do not inadvertently press the
START and STOP buttons at the same time, as in this case the set values
will be lost (RESET).
Set the required keep-warm temperature with the dial.
Then release the STOP button first
followed by the Chamber temperature button.
▌
The keep-warm temperature is saved.
Press and hold down the Time button.
With your second finger, press and hold down the STOP button.
Set the required keep-warm time with the dial.
Then release the STOP button first
followed by the Time button.
▌
The keep-warm time is saved.
In Standby mode press the Time button (8) and hold for around 5 seconds.
Place the flashing bar with the dial (4) in the desired position.
Press the dial.
▌
The value to be changed flashes in the display.
Set the desired value with the dial.
Press the dial again.
▌
The new value is saved.
To close the setting, press the STOP BUTTON (11).
▌
The device is in standby mode.
7.7 Keep food warm (HOLD)
Using the chamber temperature and core temperature settings, you can set a keep-warm phase after
the cooking process.
Use
7.8 Set date and time

Use
24
Rieber GmbH & Co. KG
Press the STOP button (11) and hold for around 5 seconds: Back to program
selection.
▌
The currently running program is cancelled.
Press the STOP button again and hold for around 5 seconds.
▌
The appliance switches to Standby mode.
▌
The current chamber temperature appears in the display.
Turn the dial (4) to the POWER ON setting.
▌
The readings in the display disappear.
Disconnect the electrical connector from the mains if necessary.
Cancel program with real time function
See ‘Unlock the control in real time mode’, page 33
Turn the dial (4) until the display for the desired program lights up.
Press the dial, to open the desired program.
▌
The LEDs on the function keys flash.
Use the function keys to set chamber temperature, core temperature, time and
humidification, depending on the desired program.
▌
The LEDs on the function keys flash.
Chamber temperature function key
Query current chamber temperature
▌
The current temperature is shown in the display, if no other function key
has been pressed.
Query set chamber temperature
Press the Chamber temperature function key (10).
▌
The set temperature is displayed.
▌
After about 10 seconds, the current chamber temperature is shown again
in the display.
Set required chamber temperature
Press and hold down the Chamber temperature function key.
Set the required chamber temperature by turning the dial (4).
Release the Chamber temperature function key.
7.9 How to switch off the navioven
7.10 Operation of the navioven function keys

Use
Rieber GmbH & Co. KG
25
▌
The set value is accepted automatically.
▌
The current chamber temperature is displayed.
Set keep-warm phase (HOLD)
See ‘Keep food warm’, page 23
Core temperature function key
Query set core temperature
Press the Core temperature function key (9).
▌
The set temperature is displayed.
▌
After about 10 seconds, the current core temperature is shown again in
the display.
Query current core temperature
Press and release the Core temperature function key.
▌
The current core temperature is displayed.
Set required core temperature
Press and hold down the Core temperature function key. Set the required core
temperature by turning the dial.
Release the Core temperature function key.
▌
The set value is accepted automatically.
▌
The current chamber temperature is shown in the display again.
Set keep-warm phase (HOLD)
See ‘Keep food warm’, page 23
Time function key
Query set time
Press the Time function key (8).
▌
The set time is displayed.
▌
After about 10 seconds, the current chamber temperature is shown again
in the display.
Query remaining time
Press and release the Time function key.
▌
The remaining time is displayed.
▌
After about 10 seconds, the current chamber temperature is shown again
in the display.
Set required time
Press and hold down the Time function key. Adjust the set time by turning the dial.
Set "--" for endless operation.
Release the Time function key.
▌
The set value is accepted automatically.
▌
The current chamber temperature is shown in the display again.
Use
26
Rieber GmbH & Co. KG
Humidification function key
In order to use this function you must fill the water tank with drinking water beforehand, up
to a maximum of 1 cm below the top, around 0.5 l.
Make sure there is always drinking water in the tank. Top up the drinking water
regularly.
Humidification levels
The air humidification function prevents cooked product from drying out and improves
heat transfer.
4 air humidification levels are available:
0 : Neutral setting, no humidification
Dry: The valve is opened
1 and 2: Controlled humidification
Query humidification level
Press the Humidification function key (7).
▌
The set level is displayed.
Set humidification level
Press and hold down the Humidification function key.
Adjust the humidification level by turning the dial.
Release the Humidification function key.
▌
The set value is accepted automatically.
▌
The current chamber temperature is shown in the display again.
▌
When 50°C is reached, the water pump starts with a pre-pumping time of
6 seconds. Water can enter the interior during this process.
Pump residual water out of the appliance, rinse the appliance
See ‘Pump residual water out of the appliance, rinse the appliance’, page 40
Descale the appliance
See ‘Descale the appliance as required, page 45’
START button
Start program
Press START button (12).
▌
The selected program starts with the saved settings.
STOP button
Reset functions at any time
Press the STOP button (11) and hold for around 5 seconds.
▌
Back to the functions. These can be reset, as described above. The
running program is interrupted.
Press the START button (12) to continue the program.
▌
The current chamber temperature is shown in the display again.
Rieber GmbH & Co. KG
27
End programs
Press the STOP button.
Press the STOP button again and hold for around 5 seconds.
▌
Back to program selection. The running program is terminated.
▌
The current chamber temperature is shown in the display again.
Switch on Standby mode
Press the STOP button again and hold for around 5 seconds.
▌
The appliance switches to
Standby
mode.
▌
The
Power ON LED
(9) lights up.
▌
The displays of the chamber temperature, time and steam function keys
flash (flashing = changeable).
Set chamber temperature, time and humidification.
Press START button (12).
▌
The 'Cook' program starts with the saved settings.
Change settings for the current cooking process
Press the STOP button (11) and hold for around 5 seconds.
▌
Back to the functions. These can be reset. The running program is
interrupted.
Press the START button to continue the program.
▌
The current chamber temperature is shown in the display again.
Cancel program
Press the STOP button and hold for around 5 seconds.
▌
Back to program selection. The running program is terminated.
Press the STOP button again and hold for around 5 seconds.
▌
The appliance switches to Standby mode.
▌
The
POWER ON LED
(6) lights up.
▌
The current chamber temperature is shown in the display again.
7.11 The navioven programs
7.11.1 Program 1: Cook
Use

Use
28
Rieber GmbH & Co. KG
▌
The displays of the core temperature, chamber temperature, time and
humidification function keys flash (flashing = changeable).
Set core temperature, chamber temperature, time and steam.
Press START button (12).
▌
The 'Core temperature' program starts with the saved settings.
Change settings for the current cooking process
Press the STOP button (11) and hold for around 5 seconds.
▌
Back to the functions. These can be reset. The running program is
interrupted.
Press the START button to continue the program.
▌
The current chamber temperature is shown in the display again.
Cancel program
Press the STOP button and hold for around 5 seconds.
▌
Back to program selection. The running program is terminated.
Press the STOP button again and hold for around 5 seconds.
▌
The appliance switches to Standby mode.
▌
The current chamber temperature is shown in the display again.
Passive cooling with circulating air + cooling pellets.
Turn dial (4) to program 3, set fan.
Press the START key.
▌
Circulating air operation begins when the program starts.
▌
The current chamber temperature is shown in the display.
Press the STOP button and hold for around 5 seconds.
▌
Back to program selection. The running program is terminated.
▌
The current chamber temperature is shown in the display again
Press the STOP button again and hold for around 5 seconds.
▌
The appliance switches to Standby mode.
▌
The
POWER ON LED
(6) lights up.
▌
The readings in the display disappear.
7.11.2 Program 2: Core temperature
7.11.3 Program 3: Fan
Cooling is only possible if the navioven contains cooling pellets.
Insert cooling pellets.
Rieber GmbH & Co. KG
29
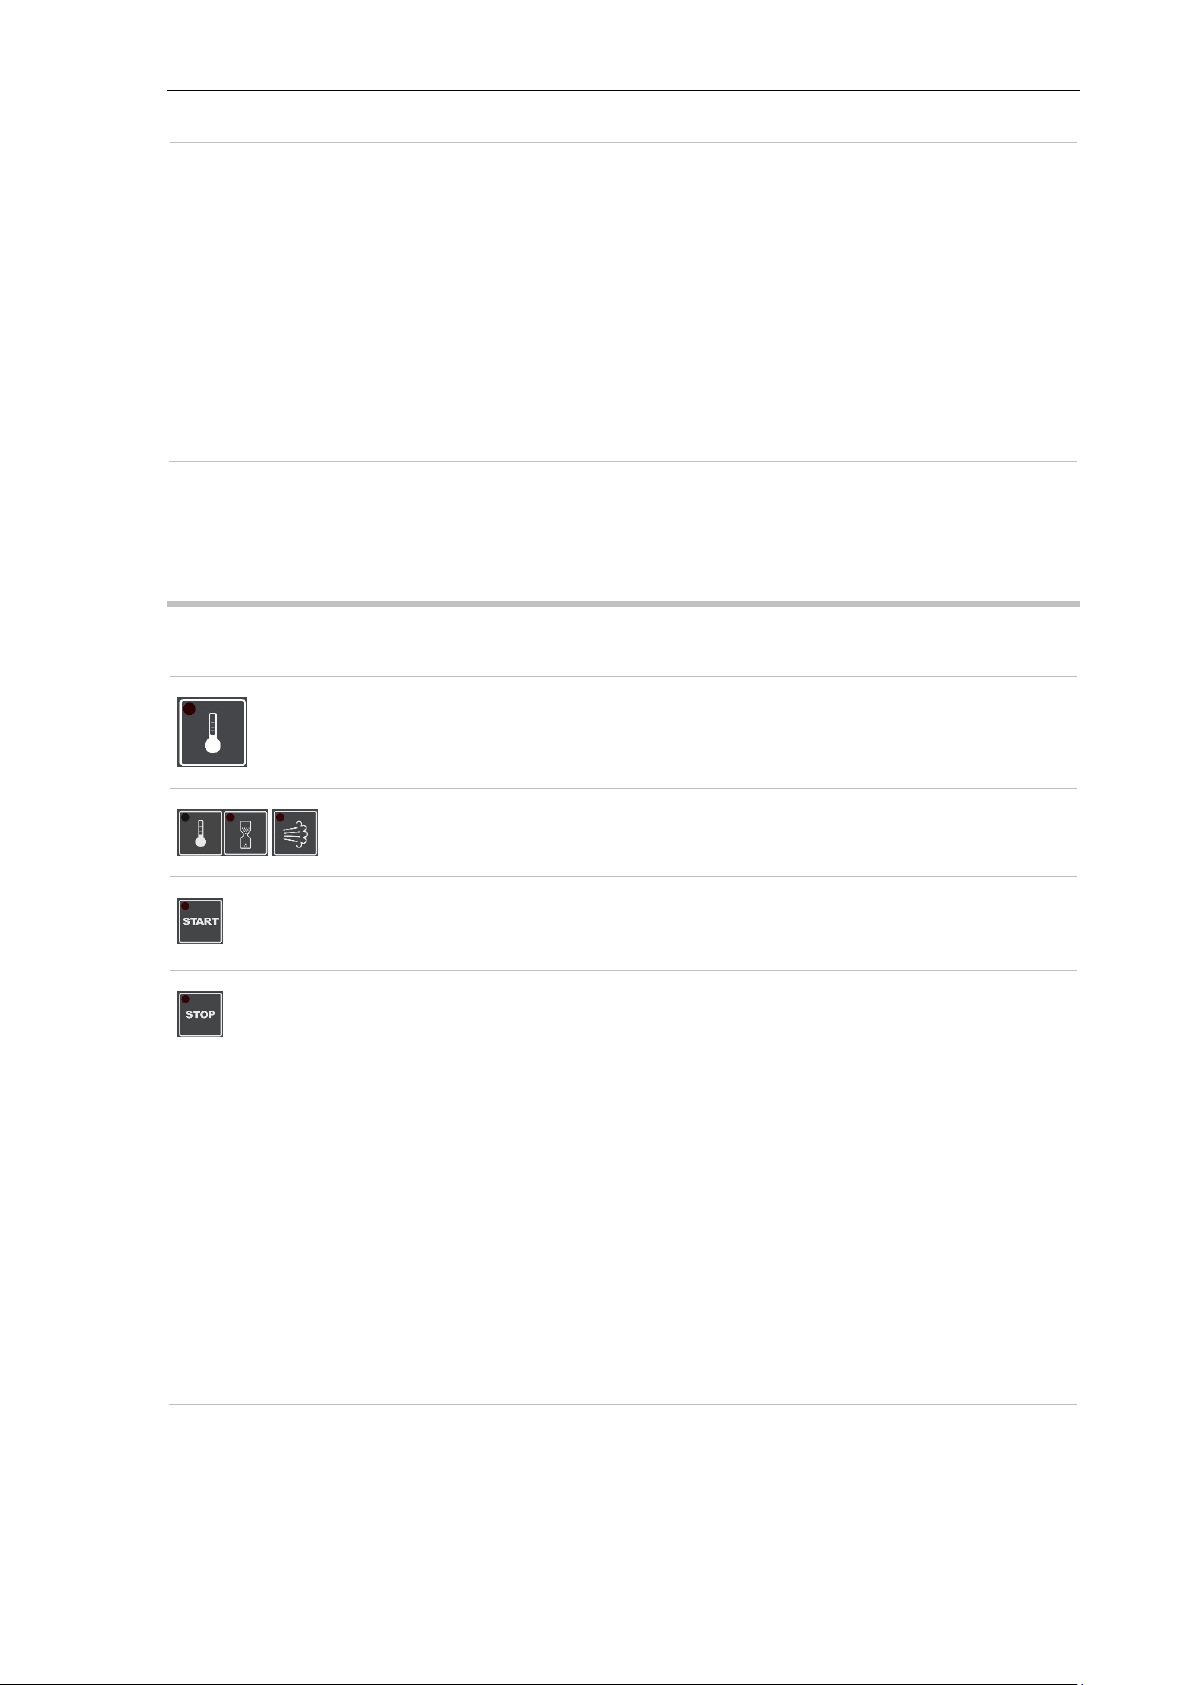
Calling up a menu with real time function
Turn the dial to the Menu position and press.
▌
Menu no. 1 is shown in the display.
Select the desired menu no. YY by turning the dial (6).
▌
The display of the program symbol for menu no. YY lights up. Menus
with real time function are identified by a T in the display.
Press the dial.
▌
First, the following picture is shown in the display:
▌
Then the display shows the start time.
▌
Menu no. YY starts with the settings made.
▌
During automatic execution of the program, the chamber temperature is
shown in the display.
7.11.4 Program 6: Menu (call up saved menus)
This operating mode is an automatic mode. Previously defined programs can be called up.
Once programmed, instructed personnel can prepare the meals easily and precisely.
There are two options for saving and calling up menus:
Timed with real time function. In real time mode no changes can be made to the settings
during execution of the menu.
or
Use
Saving a menu without real time function.

Use
30
Rieber GmbH & Co. KG
Calling up a menu without real time function
Press the dial.
Press the dial again.
▌
The display of the program symbol for menu no. YY flashes, if the
position is free, assigned menu positions are lit.
By turning the dial (6)you can select the menu number YY you want.
▌
The display of the program symbol for menu no. YY lights up.
Press the dial.
Press the START button (15).
▌
Menu no. YY starts with the settings made.
▌
During automatic execution of the program, the current chamber
temperature is shown in the display.
Change settings for the current cooking process
You can only change the settings for the current cooking process in the menu mode
without real time function.
If a value is changed during the program sequence, the change will only affect the
current process. The menu is not automatically overwritten.
Press and hold down the relevant function key.
At the dial (6)set the value you want and then release it to activate the set value.
▌
The changed settings are only adopted for the current cooking process.
The stored menu no. YY is not overwritten.
▌
The current chamber temperature is shown in the display again.
Cancel program without real time function
Press the STOP button again and hold for around 5 seconds.
▌
Back to program selection. The running program is terminated.
Press the STOP button again and hold for around 5 seconds.
▌
The appliance switches to Standby mode.
▌
The POWER ON LED (9) lights up.
▌
The readings in the display disappear.
Cancel program with real time function
See ‘Unlock the control in real time mode’, page 33
Rieber GmbH & Co. KG
31
Set required values for the program.
See chapter ‘Select program’, page 21
Press the dial for about 5 seconds.
▌
The following picture is shown in the display:
There are 2 options for saving a menu.
Variant 1
: Saving a menu
with real time function
See ‘Saving a menu with real time function’, page31
Variant 2
: Saving a menu
without real time function
See ‘Saving a menu without real time function’, page32
Saving a menu with real time function
Select the desired settings with the dial and the function keys.
Press and hold the dial.
▌
The display shows a clock, a flashing arrow and symbolically shows the
time as --:--.
▌
Use the
dial
to set the required start time
Press the dial.
▌
The next free menu number flashes. Assigned menu numbers are lit up.
Press the dial to save the entered program settings under the required menu number
XX or to overwrite. 31 different menus can be saved.
▌
The display shows: "Saving, please wait".
7.11.5 Saving a menu
Use

Use
32
Rieber GmbH & Co. KG
▌
After saving, the set start time of the program is shown in the display.
▌
The program starts automatically at the set time.
▌
During an automatically run program, the current chamber temperature is
shown.
▌
While it is running, the set values cannot be changed.
▌
When the program has finished, "Ready" is shown in the display for about
one hour.
There are 2 subsequent options:
Press the dial.
▌
The menu for the next day is opened again.
Or
The setting can be unlocked.
See ‘Unlock the control in real time mode’, page 27’.
Saving a menu without real time function
Press and hold the dial.
▌
The next free menu number flashes in the display, previously assigned
menu numbers are lit.
▌
Use the
dial
to select the menu number you want.
Press the dial to save the entered program settings under the required menu number
XX or to overwrite. 31 different menus can be saved.
▌
The display shows an OK!

Rieber GmbH & Co. KG
33
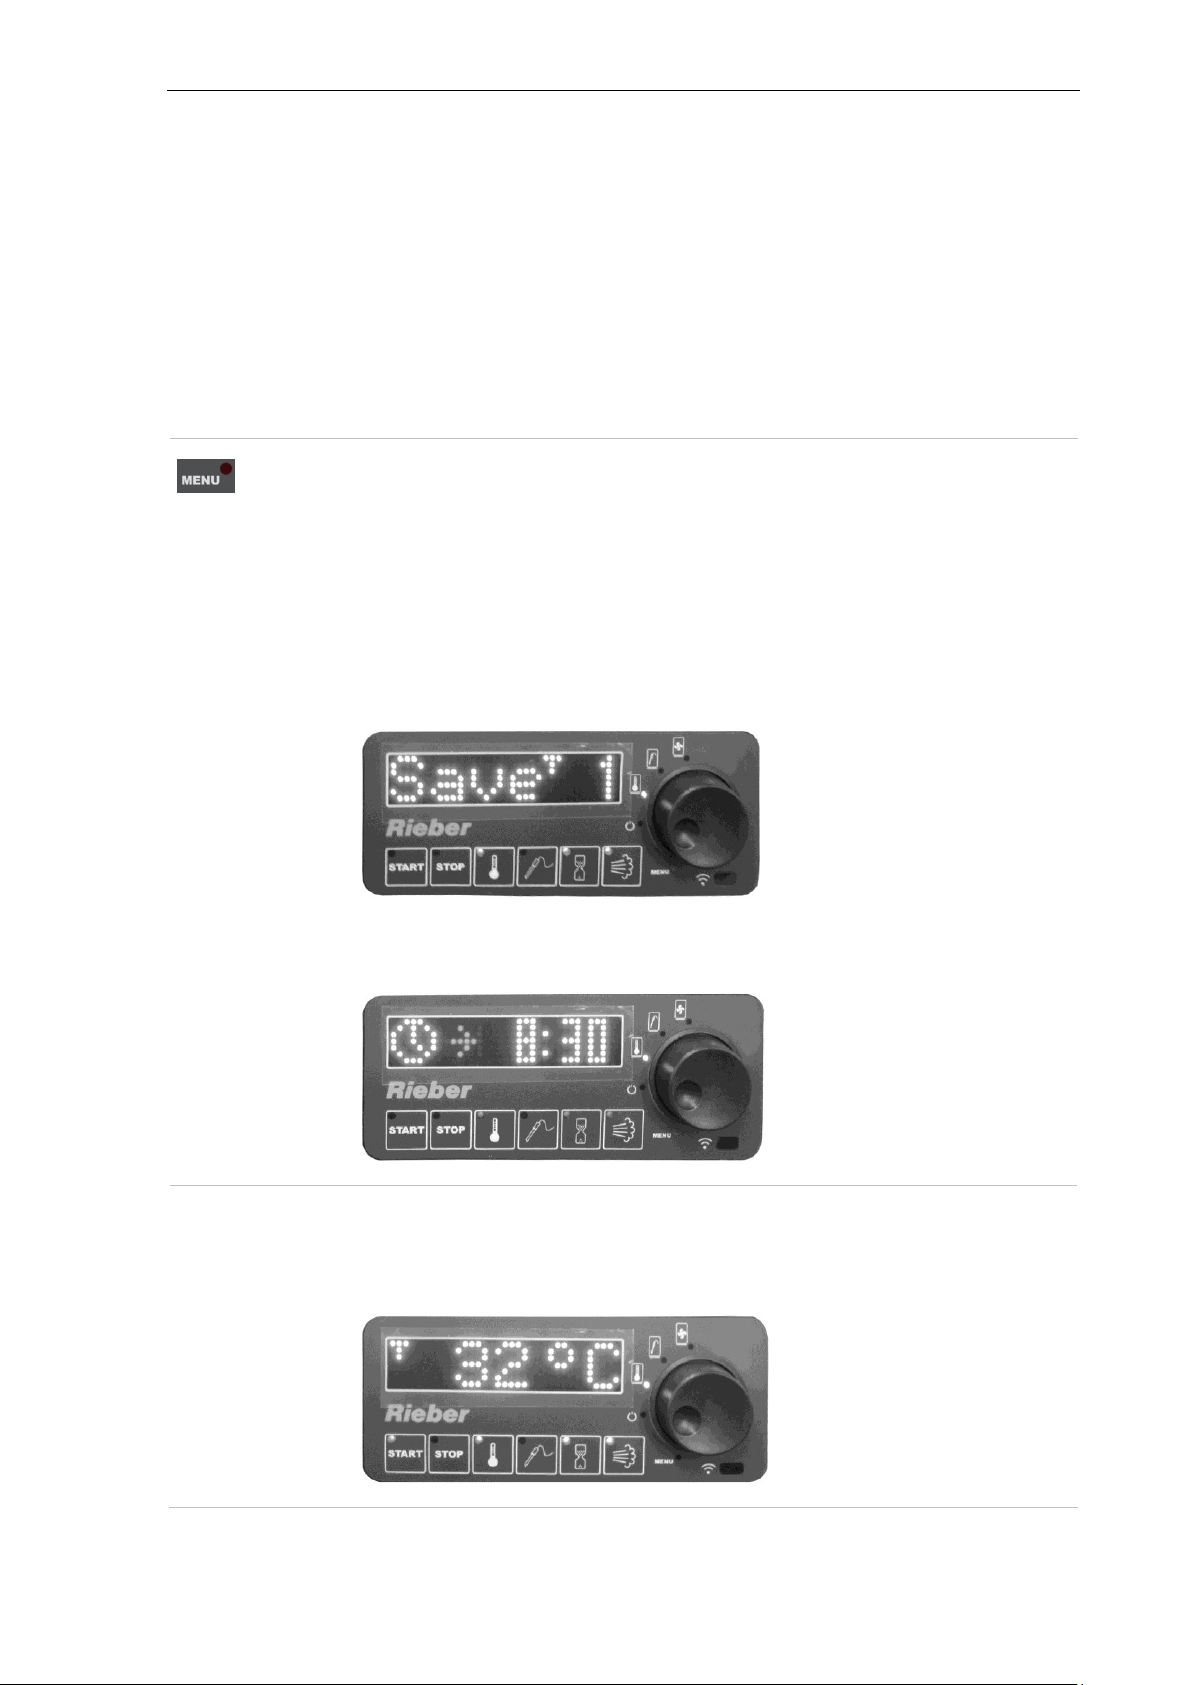
Unlock the control in real time mode
Press and hold the START button and the STOP button simultaneously.
▌
The display shows 0000
Use the dial to set the preset start time as a value, e.g. start time 14:30 – value 1430.
Press the dial. The chamber temperature is shown in the display.
If the value is no longer available: Press and hold down the Time function key, until
the start time appears in the display.
Menu
Function
Chamber
temperature
Time
(min)
Humidificati
on
Core
temperature
Comments
1
Regeneration
140 °C
90 2
Cook & Chill
2
Regeneration
140 °C
15 1
Hotel industry
3
Cook
120 °C
20 2
Rice
4
Cook
140 °C
75 0
Pork
5
Core temperature
130 °C
0 58 °C
Roast beef
6
Core temperature
130 °C
0 50 °C
Turkey breast
10
Circulating air
passive
Pellets
7.11.6 Pre-saved menus
Use

Cleaning, maintenance and care
34
Rieber GmbH & Co. KG
WARNING
The temperature inside the appliance can be up to +230 °C.
► When opening the door using the two-stage door lock allow steam to escape first of
all, then open completely.
► Allow the device to cool down.
► Wear protective gloves.
WARNING
Risk of stab wounds when handling the pointed core temperature sensor.
► Be careful.
► Keep the core temperature sensor in a secure location, for example in the holder on
the left register. Do not leave the core temperature sensor lying around loose.
CAUTION
If the plug connector for connecting the core temperature sensor is not fastened, the
sensor may be contaminated; considerable damage is possible.
► Keep the electrical connection for the core temperature sensor closed.
► Use the dummy connector.
8 Cleaning, maintenance and care
This chapter will help you to meet the hygiene requirements.
8.1 Safety information relating to cleaning, maintenance and care
Risk of burns and scalds to hands, arms and face
Risk of stab wounds when handling the pointed core temperature sensor

Cleaning, maintenance and care
Rieber GmbH & Co. KG
35
Danger of electric shock. Risk of death
► Disconnect the appliance from the mains.
► Protect the appliance against moisture. Never direct a jet of water at electrical
components such as heater, controller or ventilation grille.
► Check the heating and connecting cable for any damage.
► Do not use a steam cleaning unit to clean electrical appliances. Doing so may allow
moisture to get into the electrical system and cause a short circuit. Do not expose to
spray water. Wipe electrical parts with a moist cloth only and dry the surface using a
dry cloth.
►
1
Have electrical equipment inspected by a qualified electrician in accordance with
DGUV. Define the inspection cycle according to the conditions of use. Generally this is
every 12 months.
Turn the dial (6) to the POWER setting.
If necessary, press the dial again to switch off the appliance.
▌
The respective display is no longer lit.
Unplug the mains plug and prevent the appliance from accidentally being switched on
again.
1
Prevent risks due to electricity
# Note on switching off the appliance:
Source: DGUV Regulation 3. Electrical Systems and Equipment

Cleaning, maintenance and care
36
Rieber GmbH & Co. KG
Cleaning agent
Suitable
Brush products
Brushes with natural or synthetic bristles
Textiles
Textile material comprising natural and chemical cleaning fibres and textile
fabrics (knitted and woven fabric, cleaning cloths, floor cloth, fringed
material, fleece). Microfibre cleaning textiles are ideal for removing finger
marks from stainless steel surfaces.
Synthetic fleece
Without abrasives.
Mainly produced in the colours white, beige, yellow.
Other
Natural leather (chamois), synthetic leather, synthetic fleece, sponges,
sponge cloths
Cleaning agent
Areas of application
All-purpose cleaners
Particularly for lighter grease stains.
Neutral cleaners
For surfaces soiled with grease and oil (fingerprints); also suitable as a
dishwashing detergent.
Alcohol cleaners
As all-purpose cleaner
Alkaline cleaners
Especially for heavy grease and oil stains (dried-in oils).
Observe the manufacturer's dosage instructions.
Solvent cleaners
Depending on the type, particularly good for the removal of grease, oil, wax,
tar, adhesives, paints and lacquers.
Not suitable for plastics.
Disinfectant cleaners
Effect on pathogenic germs differs depending on active disinfectant
ingredient.
Long-term exposure to sodium hypochlorite can cause damage to the
material. It should not be used if possible. Products should be used, which
are specified in the list of the German Society of Hygiene and Microbiology
(DHGM).
8.2 Cleaning agents for stainless steel
# The following applies for all cleaning agents:
Observe the instructions for use provided by the cleaning agent manufacturer.
# Chemical cleaners for stainless steel
# Mechanical cleaners for stainless steel

Rieber GmbH & Co. KG
37
CAUTION
Incorrect cleaning can damage the surface or even destroy the appliance. Please note:
► Do not scratch the surface with sharp-edged objects. Do not use any abrasive or
aggressive cleaning agents, such as oven spray or a sponge with an abrasive surface.
► Remove dirt with cleaning and care products that are suitable for stainless steel.
► Do not mix standard cleaning agents; do not produce your own cleaning agent.
► Do not use steel wool or steel brushes.
► Avoid extended exposure of stainless steel to liquid containing salt, as this can lead to
surface discolouration and corrosion.
► Avoid direct, extended contact of stainless steel with corroding iron parts, e.g. cast
iron pans or steel kitchen sponges.
CAUTION
Incorrect cleaning can cause damage to the surface.
► A mild washing up detergent diluted in hot water is ideal. Wipe the surfaces
with a damp, non-scratch cloth. After cleaning rub the surfaces dry with a soft
cloth.
User tip
► We recommend Rieber cleaning agent for stainless steel for cleaning stainless
steel.
▌
It is an especially thorough yet gentle cleaner, produces a dazzling shine,
and cleans and protects in one.
Order no.: 72 10 24 08
8.3 Choose the correct cleaning method
Cleaning, maintenance and care
# Clean and service stainless steel parts
Applies to the stainless steel housing of the navioven, outside and inside and the door frame

Cleaning, maintenance and care
38
Rieber GmbH & Co. KG
CAUTION
Incorrect cleaning can cause damage to the surface.
► A mild washing up detergent diluted in hot water is ideal. Wipe the surfaces
with a damp, non-scratch cloth. After cleaning rub the surfaces dry with a soft
cloth.
# Clean and service plastic parts
Applies to operator's controls such as switches and control, door seal, seal of the water tank cover
Remove the door seal for cleaning if necessary.

Cleaning, maintenance and care
Rieber GmbH & Co. KG
39
Interval
Activity to be performed
Page
Daily after use
Pump out residual water, rinse appliance.
Page 40
Switch the appliance off
Page 34
cleaning the navioven
Page37, 41 et
seqq.
Clean core temperature sensor
Page41 et
seqq.
If required
Clean door seal,
at least once a week during use
Page37, 41 et
seqq.
Risk of fire
Remove fluff from the ventilation grille, at
least once a month
Page41 et
seqq.
Descale appliance,
at least every 3 months
Page 45
Every 180 working days or
6 months
Have electrical system /control checked.
Page 34
Ensure preservation of the product
identification
Page 10
8.4 Overview of cleaning and maintenance intervals

Cleaning, maintenance and care
40
Rieber GmbH & Co. KG
Place an empty GN container on the lowest support rail in the
appliance.
Turn the unit off.
Turn the dial to the POWER setting.
The corresponding LED lights up.
Press the Humidification button continuously, until you hear the water pump switch on. The
pumping out process lasts around 5 or 6 seconds. Do not interrupt the process, otherwise the
pumping out process will begin again at the next START of the appliance.
Check that the water has been completely pumped out of the water tank and the interior. Repeat
the process if necessary.
Empty the GN container.
# Rinse the appliance
Place an empty GN container on the lowest support rail in the appliance.
Pour around 0.5 litres of drinking water into the water container.
Note:
The water pump requires three pumping out processes for the 0.5 litres of water.
Press the Humidification button continuously, until you hear the water pump switch on.
When the water pump switches off again, press the Humidification button again continuously,
until you hear the water pump switch on. Repeat the process again, to pump out the water
completely.
Empty the GN container.
8.5 Pump residual water out of the appliance, rinse the appliance
# Pump out residual water
Pump residual water out of the appliance daily after use. If residual water remains in the appliance, this
can impair the taste of the food.

Cleaning, maintenance and care
Rieber GmbH & Co. KG
41
Clean the opening in the rubber plug and clear it with a thin wire if necessary.
User tip. We recommend descaling the appliance regularly,
at least once a month for intensive use,
at least once every 3 months, depending on use.
See ‘Descale the appliance as required’, page 45
Turn the dial (6) to the POWER setting.
If necessary, press the dial again to switch off the appliance.
▌
The respective display is no longer lit.
Open door and allow hot appliance to cool down.
# Clean the water container and lid
8.6 Cleaning
Prerequisite
The residual water has been pumped out of the appliance, the appliance has been rinsed.
See ‘Pump residual water out of the appliance, rinse the appliance’, page 40
WARNING
Before cleaning the device, switch it off and disconnect from the mains.

Cleaning, maintenance and care
42
Rieber GmbH & Co. KG
Risk of fire
Fluff in the ventilation area can cause a build-up of heat which could result in a fire.
► Clean the ventilation grille on the back of the appliance with a cloth or paintbrush, at
least once a month.
CAUTION
An unplugged dummy connector may be damaged or pulled off when removing the
register.
If the opening for connecting the core temperature sensor is not sealed, the sensor may be
contaminated; considerable damage is possible.
► Remove the connector of the core temperature sensor. Insert the dummy
connector into the receptacle.
# Clean door seal
Clean door seal, at least once a week.
User tip. Clean the door seal in the dishwasher.
Alternatively: A mild washing up detergent diluted in hot water is ideal. Wipe the surfaces with a
damp, non-scratch cloth. After cleaning, rub surfaces dry with a soft cloth.
# Remove fluff in the ventilation area
# Removing the registers and the core temperature sensor
WARNING
Take care when handling the pointed core temperature sensor.
Keep the core temperature sensor in a secure location. Do not leave the core temperature sensor
lying around loose.
Cleaning, maintenance and care
Rieber GmbH & Co. KG
43
4x
4x4x
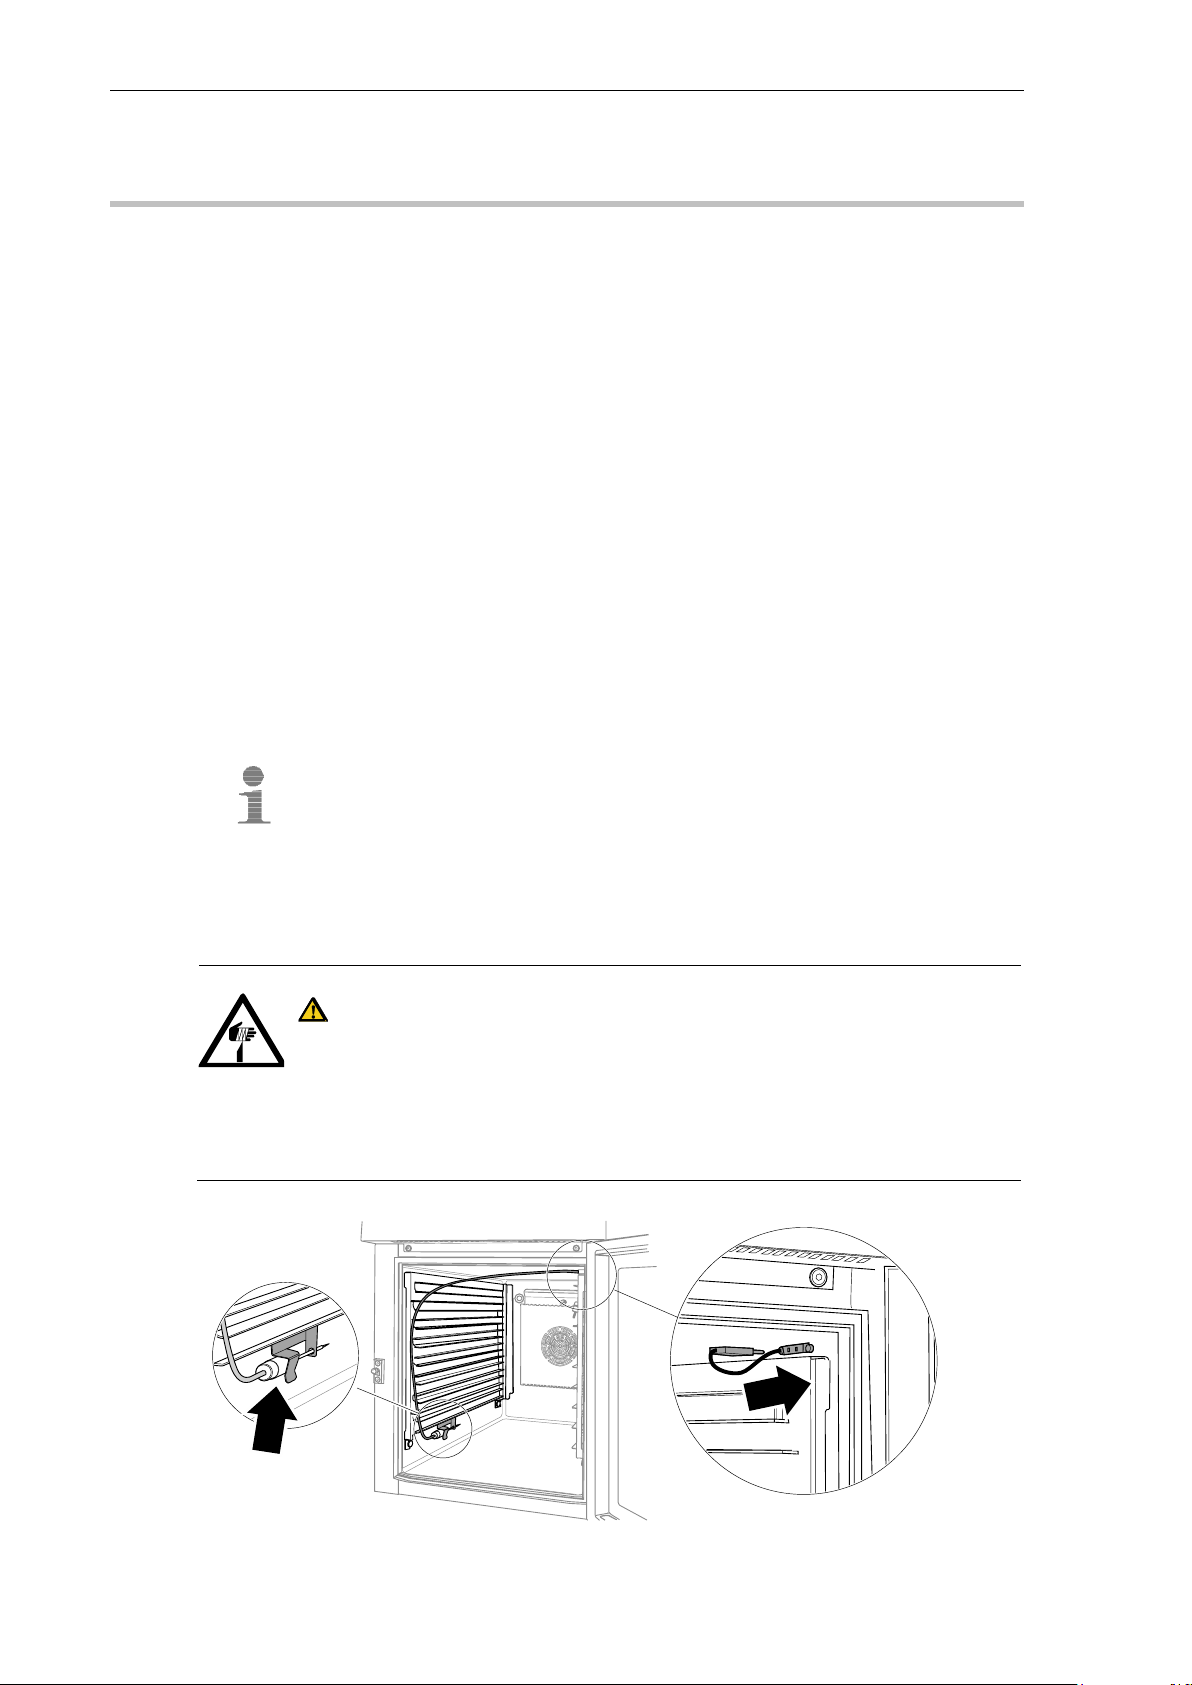
# How to remove the registers: Pull the long side of the register towards you.
Grasp the register with both hands. Pull the long side of the register towards you and remove the
part.
▌ The guide is smooth-running.
Remove the left register. The core temperature sensor can remain in the holder, if it is completely
mounted in the holder and the cable is fixed by hand.
Remove the right register.

Cleaning, maintenance and care
44
Rieber GmbH & Co. KG
4x
4x4x
CAUTION
If installed incorrectly, the plates at the bottom of the register may be bent, so that the
register would have to be replaced.
An unplugged dummy connector may be damaged or pulled off when installing the
register. If the connector is not inserted, liquid or objects such as particles of dirt may enter
the receptacle.
► Insert the dummy connector into the receptacle provided.
► Mount the register evenly on the inside at the top edge with both hands. Pay
attention to the front closure of the inside of the housing and the register.
► Then push the long side of the register into the interior until you feel the end stop.
▌
The guide is smooth-running. The register is guided back at a slight angle.
The 4x guide bolts hold the register.
WARNING
Risk of stab wounds when handling the pointed core temperature sensor.
► Be careful.
# Installing the registers and the core temperature sensor
# Clean core temperature sensor
Mild washing up detergent diluted in hot water is ideal for cleaning. After cleaning, rub surfaces
dry with a soft cloth.
# Finally insert the registers and core temperature sensor into the navioven
See ‘Installing the registers and the core temperature sensor, page 44

Rieber GmbH & Co. KG
45
User tip
Signs of calcification are visible limescale and extended processing time, increased noise
generation, intense steam generation.
► Descale the appliance before a thorough cleaning;
at least once a month for intensive use,
at least once every 3 months depending on use.
WARNING
Use a commercially available descaler for domestic appliances. Observe the
manufacturer's instructions.
Prepare the
descaling solution
with
0.5 litres of
drinking water and the quantity of
descaler specified by the manufacturer. Pour these in.
Place an empty GN container on the lowest support rail in the appliance.
Turn the dial to the POWER setting.
▌
The corresponding LED lights up.
Press the Humidification button continuously, until you hear the water pump switch
on.
Wait until the water pump switches off again and leave the descaling solution to work in
accordance with the manufacturer's instructions, around 10 minutes.
Then press the Humidification button continuously, until you hear the water pump
switch on and the descaling liquid is pumped out.
8.7 Descale the appliance as required
Cleaning, maintenance and care

Cleaning, maintenance and care
46
Rieber GmbH & Co. KG
When the water pump switches off again, press the Humidification button again
continuously, until you hear the water pump switch on and the remaining descaling
solution is pumped out. Wait until the descaling solution is completely pumped out.
Empty the GN container.
# Rinse the appliance 3x.
Place the empty GN container on the lowest support rail in the appliance.
Pour around 0.5 litres of drinking water into the water container.
Note:
The water pump requires three pumping out processes for the 0.5 litres of water.
Press the Humidification button continuously, until you hear the water pump switch
on.
When the water pump switches off again, press the Humidification button again
continuously, until you hear the water pump switch on. Repeat the process again, to
pump out the water completely.
Empty the GN container.
Repeat the complete rinsing process twice more.
Check that the water has been completely pumped out of the water tank and the
interior. Repeat the process if necessary.
See ‘Pump residual water out of the appliance, rinse the appliance’; page 40
8.8 Keep ready for next use in dry condition
Dry the inside of the appliance and leave the door open until the residual moisture has dried off.
Store appliance at room temperature.

Rieber GmbH & Co. KG
47
DANGER
Danger of electric shock. Dangerous electrical voltage.
► Disconnect appliance from mains before any repair work.
► Have all electrical repairs carried out by an authorised electrician only.
Fault
Possible cause
Possible remedy
F1 in the display
Malfunction
Call Rieber Service or
contractual partner
# User
Display is blank
Electrical connector / electrical
cable defective
Disconnect connecting
plug and lock appliance.
# Qualified electrician
Appliance does not heat up/
Temperature too high
Heating defective
Machine parameter P entered
wrongly
Controller defective
Replace
# User
Repair
# Rieber Service or
authorized partner
Control unit
Not functioning
Control unit defective
Repair
# Rieber Service or
authorized partner
Humidification does not
work
No water in the water
container
Scale or dirty
Pour drinking water into
the water container
# User
Descale, clean
# User
Residual water is not
pumped out
Water pump defective
Repair
# Rieber Service or
authorized partner
9 Fault - What now?
Repairs during the warranty period may only be carried out by the manufacturer's service department.
If there is a fault, F1 is shown in the display.
Fault - What now?

Fault - What now?
48
Rieber GmbH & Co. KG
IMPORTANT
Customer service needs information about the type and number of your appliance.
Your appliance is made of high-quality material which can be reused / recycled. For
disposal, disconnect the appliance from mains supply. Unplug the mains plug. Cut off the
cable directly at the casing. Dispose of this appliance properly via your local disposal
facility.
WARNING
Persons with limited sensory and mental ability might get locked in.
► When disposing of the unit, destroy the door lock.
Customer service, spare parts
If you have a fault you cannot remedy yourself, please get in touch with your Rieber partner or
Rieber central customer service.
Disposing of the appliance

Rieber GmbH & Co. KG
49
10 Warranty and liability
Manufacturer liability and warranty shall no longer apply if
you do not follow the information and instructions in this user guide,
do not use the device as it is intended,
See chapter ‘Intended use’
make conversions or functional modifications,
do not use original spare parts.
The "Sales and delivery terms and conditions" of Rieber GmbH & Co. KG shall apply for all warranty
claims made against the manufacturer. For instance, any repairs and/or overhaul during the warranty
period may only be performed by the manufacturer's service department of Rieber, failing which any
claims hereof may be voided. Please contact the manufacturer's service department.
Warranty and liability
not applicable
The following wear parts are not included in the warranty:

Excerpt from the EU Declaration of Conformity
50
Rieber GmbH & Co. KG
11 Excerpt from the EU Declaration of Conformity
EC Declaration of Conformity according to EC Machinery Directive 2006/42/EC
Rieber GmbH & Co. KG hereby declares that the product
navioven
complies with the basic requirements of the EC Machinery Directive 2006/42/EC, Appendix II A,
harmonised standards (DIN EN ISO 12100: Safety of Machinery ― General principles for design ―
Risk assessment and risk minimisation).
EU Declaration of Conformity in accordance with the European Directive on Electromagnetic Compatibility 2014/30/EU.
Rieber GmbH & Co. KG hereby declares that the product
navioven
complies with the basic requirements of the European Directive on Electromagnetic Compatibility
2014/30/EU in respect of its electrical equipment.
A copy of the EU Declaration of Conformity can be obtained from our sales team if required.

Rieber GmbH & Co. KG
51
Rieber GmbH & Co. KG
Hoffmannstraße 44
D 72770 Reutlingen
Tel +49 (0) 7121 518-0
FAX +49 (0) 7121 518-302
E-mail info@rieber.de
www.rieber.de
12 Manufacturer's address
Manufacturer's address

Brief instructions
52
Rieber GmbH & Co. KG
Ausgabe: 2017-04-21
13 Brief instructions
 Loading...