

Page 1

nano
TM
Quick Start Guide
99 Washington Street
Melrose, MA 02176
Phone 781-665-1400
Toll Free 1-800-517-8431
Visit us at www.TestEquipmentDepot.com
Quick Start Guide
Page 2

SeeSnake nanoReel Quick Start Guide
WARNING!
!
Read the safety information in the beginning of the nanoReel Operator’s Manual
carefully before using the nanoReel. Failure to understand and follow the contents
of the safety sections may result in electrical shock, fire, property damage, and/or
serious personal injury.
This nanoReel Quick Start Guide provides an overview of function and operation. For
more details, see the Operator’s Manual that accompanies the nanoReel.
nanoReel Components
Push Cable Guide
System Cable for
SeeSnake CCU
micro CA
Camera Monitor
-300
micro CA-
Connector Plug
300
Case Latch
Front Case
Feet
Camera Clip
Camera Head
System Cable
Slip-Ring
Module
for micro
-
300
CA
Cord Wrap
Rear Case
Camera Head Routing
1. Set the unit on a level surface and lay it on its back.
2. Unfasten the case latches on either side of the nanoReel.
3. Open the front case and route the camera head out through the push cable guide
in the front of the case.
4. Secure the camera head in the provided clip.
5. Close and relatch the case.
2 – English
Page 3

SeeSnake nanoReel Quick Start Guide
Setting Up the nanoReel
Unwrap the SeeSnake System Cable from its holder, pull back the locking sleeve, and
match the System Cable plug to the matching SeeSnake System Connector on the
CCU. To join the connectors, align the guide pin to the guide socket, push the connector
straight in. Tighten the outer locking sleeve.
Operating Instructions
1. Pull several feet of push cable from the nanoReel. Place the camera unit into the
line to be inspected.
2. Turn the SeeSnake CCU ON. Adjust the camera head LED lighting brightness and
the display image as specified by the SeeSnake CCU operator’s manual. Use the
least amount of lighting to maximize picture quality and reduce heat buildup.
3. Record the inspection as specified by the SeeSnake CCU operator’s manual.
4. If possible, run water through the system during the inspection to help keep the
system clean, to make pushing the push cable easier, and to help orient the image
at the bottom of the pipe. Shut off water flow as needed for viewing.
5. Grip the push cable and carefully feed it into the drain to be inspected.
6. To avoid damage, pay attention to the force required to feed in and withdraw the
push cable. Keep clear of sharp edges, and do not pull at sharp angles to the inlet.
Locating the Sonde
The nanoReel is equipped with a Sonde built into the camera head which transmits a
locatable 512 Hz signal and allows the detection of the camera’s location underground.
Control the Sonde from a SeeSnake CCU as described in the operator’s manual for the
SeeSnake CCU. If using the nanoReel with the micro CA-300, activate the Sonde by
turning the LED brightness control down to zero. Once the Sonde has been located, the
LEDs can be returned to normal brightness to continue the inspection.
For detailed instructions on Sonde locating, consult the operator’s manual for the locator model in use.
Retrieving the Camera
1. After completing the inspection, pull the push cable back with slow, steady force.
2. If possible, continue running water down the line to help clean the push cable.
3. Use a towel to wipe off the push cable as it is withdrawn.
4. To avoid damage, pay attention to the force required to withdraw the push cable,
keep clear of any sharp edges, and do not pull at sharp angles to the inlet.
English – 3
Page 4
SeeSnake nanoReel Quick Start Guide
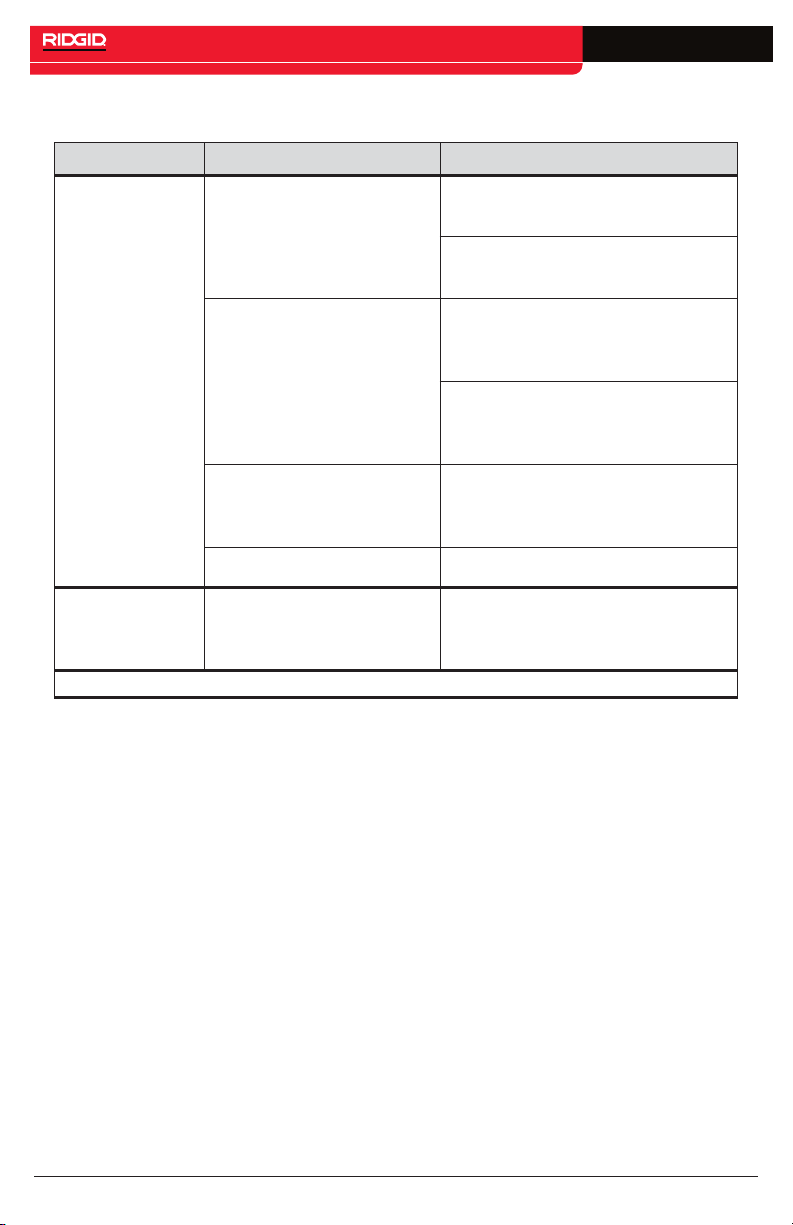
Troubleshooting
Problem Probable Fault Location Solution
No power to SeeSnake
plugged in.
CCU or micro CA-300
Check power cord is correctly
camera monitor connector
Check the switch on monitor/
display unit.
Check alignment and pins of
connection to nanoReel system
Camera image
not seen
Connections faulty
unit from CCU or display unit.
Check orientation, seating, and
pin condition in the SeeSnake
connection.
Monitor set to wrong
source
Set video source as described in
display unit
operator’s manual.
Batteries low Recharge or replace batteries.
“SOS” code
blinking on LCD*
* The light on the LCD will only blink the “SOS” code on some SeeSnake CCUs.
No video signal
Check source setting of monitor
and
re seat cable connection.
4 – English
Page 5

Printed in USA 744-034-666-0B-P3
04/22/2015 Rev A
Test Equipment Depot - 800.517.8431 - 99 Washington Street Melrose, MA 02176
TestEquipmentDepot.com
 Loading...