

Page 1

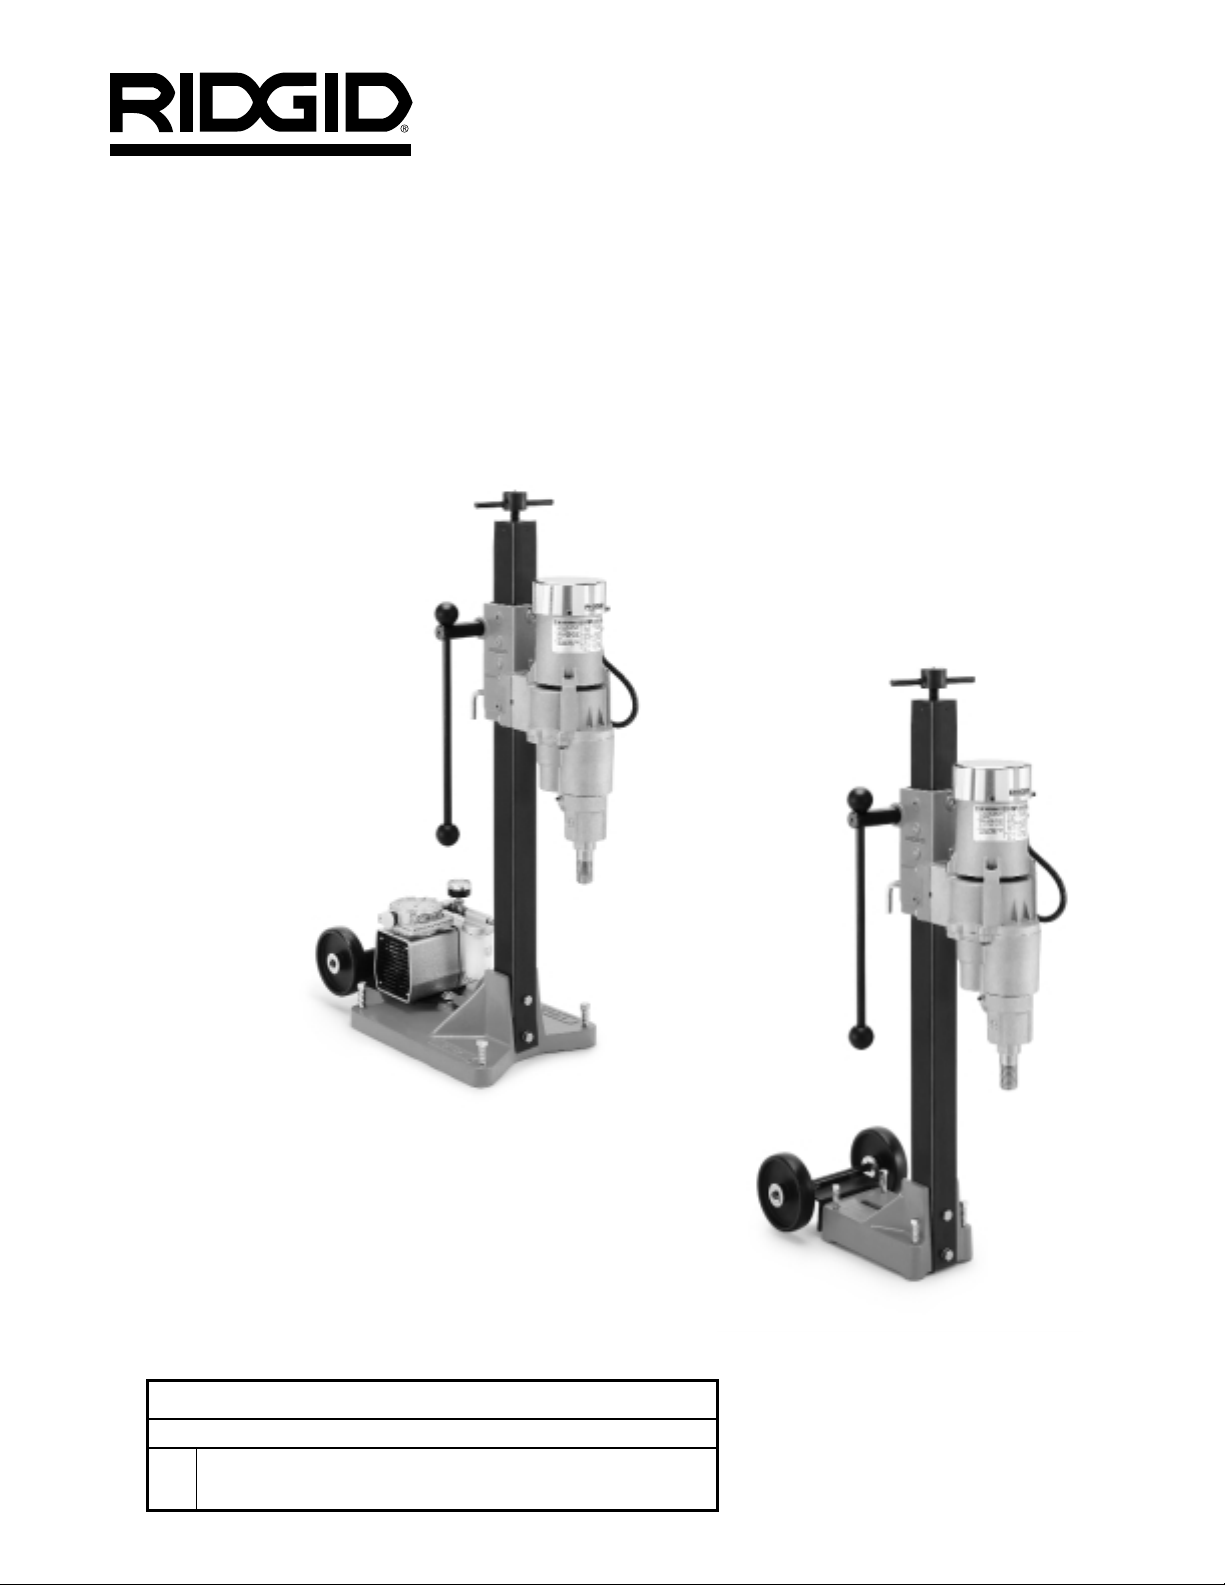
Core Drilling
Machines
OPERATOR’S
MANUAL
• Pour français voire page 13
• Para el castellano vea la
página 27
RB-214
RB-215
W ARNING!
Read this Operator’s Manual
carefully before using this
tool. Failure to understand
and follow the contents of
this manual may result in
electrical shock, fire and/or
serious personal injury.
Page 2

Table of Contents
Recording Form for Machine Model and Serial Number............................................................................................1
General Safety Information
Work Area Safety........................................................................................................................................................2
Electrical Safety...........................................................................................................................................................2
Personal Safety...........................................................................................................................................................2
Tool Use and Care......................................................................................................................................................3
Service ........................................................................................................................................................................3
Specific Safety Information
Machine Safety............................................................................................................................................................3
Description, Specifications and Equipment
Description ..................................................................................................................................................................4
Specifications..............................................................................................................................................................4
Machine Inspection .......................................................................................................................................................5
Machine and Work Area Set-Up ...................................................................................................................................5
Securing Machine
Bolt Anchor Method-to-Floor.......................................................................................................................................6
Bolt Anchor Method-to-Wall ........................................................................................................................................6
Vacuum Anchor Method-to-Floor................................................................................................................................6
Ceiling Jack Anchor Method........................................................................................................................................7
Operating Instructions..................................................................................................................................................7
Removing Cores
Breaking a Core ..........................................................................................................................................................8
Removing Broken Core Below the Surface.................................................................................................................8
Removing Broken Core Stuck in Bit............................................................................................................................8
Removing a Lodged Bit from Hole ..............................................................................................................................8
Installing Bit Extension Rods.......................................................................................................................................8
Accessories
Accessories for Core Drilling Machines.......................................................................................................................8
Maintenance Instructions
Lubrication...................................................................................................................................................................9
Ventilation....................................................................................................................................................................9
Motor Brush Replacement...........................................................................................................................................9
Bit Replacement..........................................................................................................................................................9
Shims ..........................................................................................................................................................................9
Vacuum Seal...............................................................................................................................................................9
Machine Storage............................................................................................................................................................9
Service and Repair ........................................................................................................................................................9
Wiring Diagrams..........................................................................................................................................................10
Lifetime Warranty..........................................................................................................................................Back Cover
Ridge Tool Companyii
RB-214/215 Core Drilling Machine
Page 3
Core Drilling Machines
Record Serial Number below and retain product serial number which is located on nameplate.
Serial
No.
RB-214/215
Cor e Drilling Machine
Page 4
RB-214/215 Core Drilling Machine
Ridge Tool Company2
General Safety Information
WARNING! Read and understand all instructions. Failure
to follow all instructions listed below may
result in electric shock, fire, and/or serious
personal injury.
SAVE THESE INSTRUCTIONS!
Work Area Safety
• Keep your work area clean and well lit. Cluttered
benches and dark areas invite accidents.
• Do not operate power tools in explosive atmo-
spheres, such as in the presence of flammable
liquids, gases, or dust. Tools create sparks which
may ignite the dust or fumes.
• Keep bystanders, children, and visitors away
while operating a tool. Distractions can cause you to
lose control.
Electrical Safety
• Grounded tools must be plugged into an outlet,
properly installed and grounded in accordance
with all codes and ordinances. Never remove the
grounding prong or modify the plug in any way. Do
not use any adapter plugs. Check with a qualified
electrician if you are in doubt as to whether the outlet is properly grounded. If the tools should electrically
malfunction or break down, grounding provides a low
resistance path to carry electricity away from the user.
• Avoid body contact with grounded surfaces. There
is an increased risk of electrical shock if your body is
grounded.
• Do not expose electrical tools to rain or wet con-
ditions. Water entering a tool will increase the risk of
electrical shock.
• Do not abuse cord. Never use the cord to carry the
tools or pull the plug from an outlet. Keep cord
away from heat, oil, sharp edges or moving parts.
Replace damaged cords immediately. Damaged
cords increase the risk of electrical shock.
• When operating a power tool outside, use an out-
door extension cord marked “W-A” or “W”. These
cords are rated for outdoor use and reduce the risk of
electrical shock.
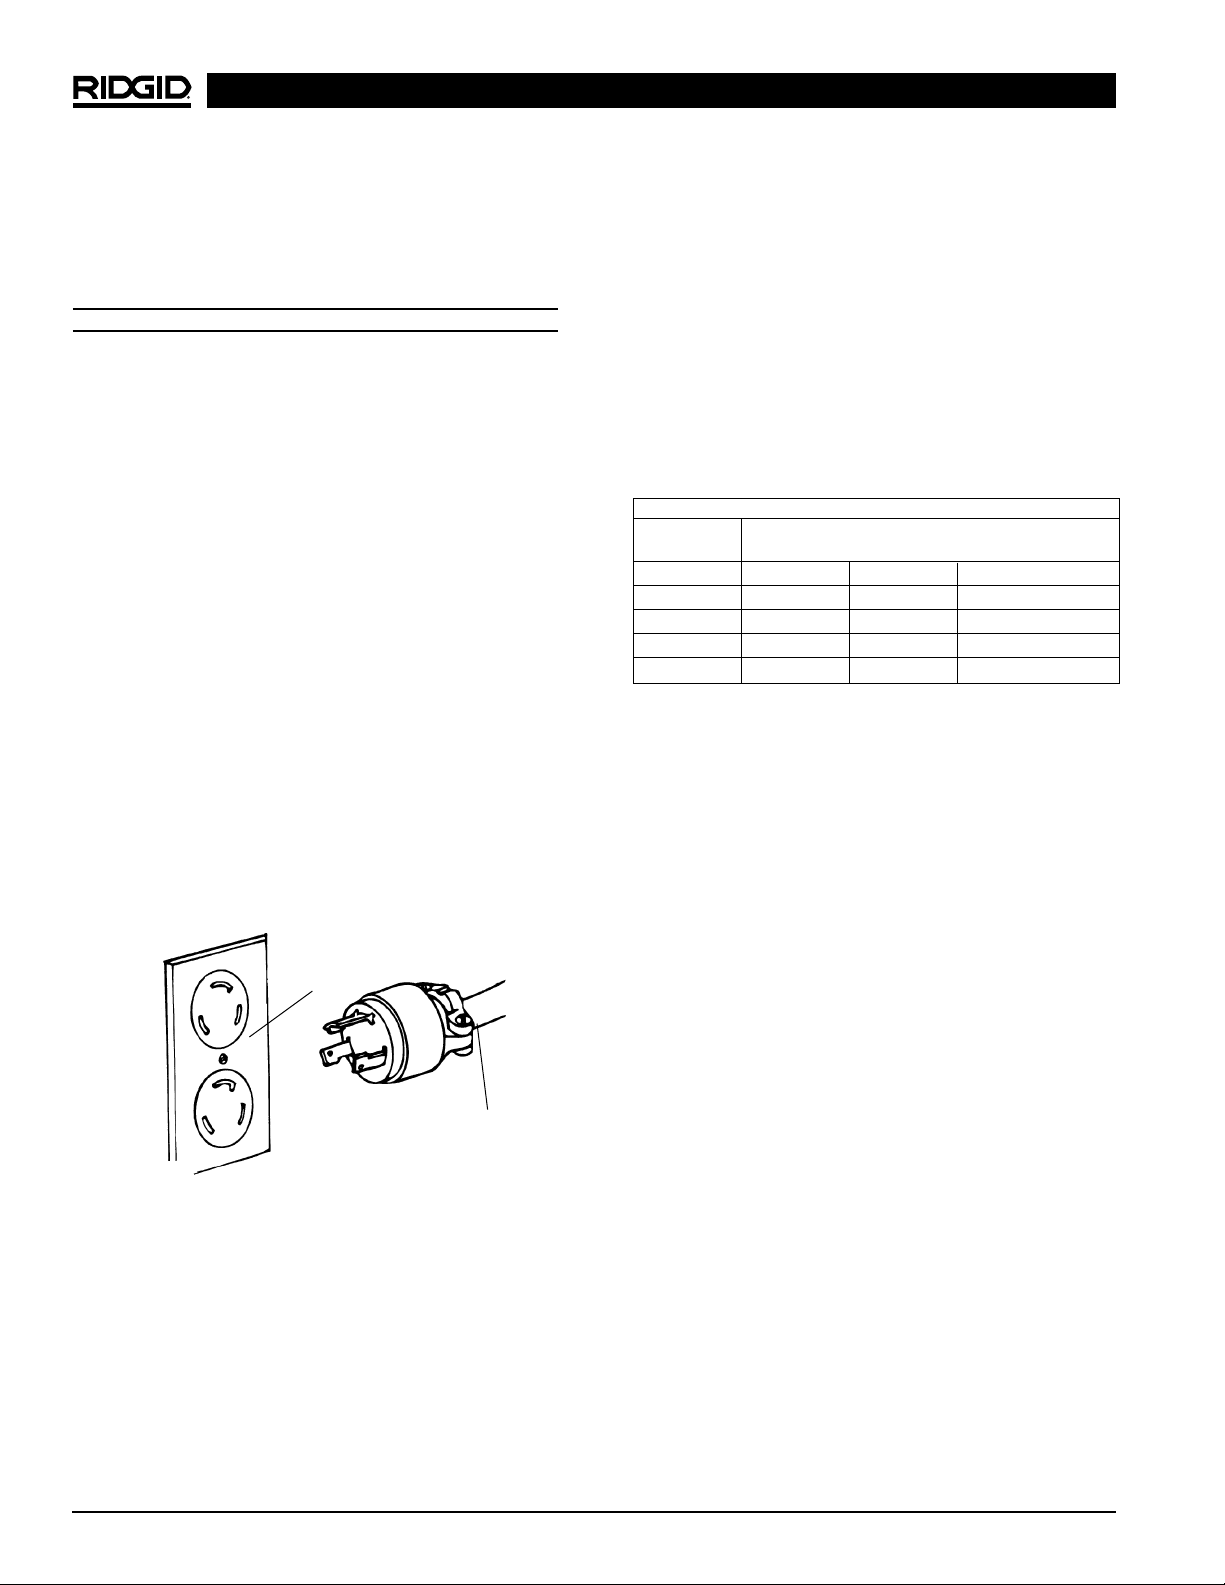
• Use only three-wire extension cords which have
three-prong grounding plugs and three-pole receptacles which accept the tool’s plug. Use of other
extension cords will not ground the tool and increase
the risk of electrical shock.
• Use proper extension cords. (See chart.) Insufficient
conductor size will cause excessive voltage drop, loss
of power.
• Keep all electric connections dry and off the
ground. Do not touch plugs or tool with wet hands.
Reduces the risk of electrical shock.
Personal Safety
• Stay alert, watch what you are doing and use common sense when operating a power tool. Do not
use tool while tired or under the influence of drugs,
alcohol, or medications. A moment of inattention
while operating power tools may result in serious personal injury.
• Dress properly. Do not wear loose clothing or jew-
elry. Contain long hair. Keep your hair, clothing, and
gloves away from moving parts. Loose clothes, jew-
elry, or long hair can be caught in moving parts.
• Avoid accidental starting. Be sure switch is OFF
before plugging in. Carrying tools with your finger on
the switch or plugging tools in that have the switch ON
invites accidents.
• Remove adjusting keys before turning the tool
ON. A wrench or a key that is left attached to a rotating
part of the tool may result in personal injury.
• Do not over-reach. Keep proper footing and bal-
ance at all times. Proper footing and balance enables
better control of the tool in unexpected situations.
• Wear hearing protectors, ear plugs or muffs when
using tool. Noise level may affect hearing with prolonged use.
• Use safety equipment. Always wear eye protec-
Grounded
Receptacle
Extension Cord
Minimum Wire Gauge for Extension Cord
Nameplate
Amps Total Length (in feet)
0 – 25 26 – 50 51 – 100
0 – 6 18 AWG 16 AWG 16 AWG
6 – 10 18 AWG 16 AWG 14 AWG
10 – 12 16 AWG 16 AWG 14 AWG
12 – 16 14 AWG 12 AWG
NOT RECOMMENDED
Page 5

RB-214/215 Core Drilling Machine
Ridge Tool Company 3
tion. Dusk mask, non-skid safety shoes, hard hat or
hearing protection must be used for appropriate conditions.
Some dust created by power sanding,
sawing, grinding, drilling and other construction activities
contains chemicals known to the State of California to
cause cancer, birth defects or other reproductive harm.
Some examples of these chemicals are:
• lead from lead-based paints
• crystalline silica from bricks and cement and other
masonry products
• arsenic and chromium from chemically-treated lumber
Your risk from these exposures varies, depending on
how often you do this type of work. To reduce your exposure to these chemicals: work in a well ventilated
area and work with approved safety equipment, such as
those dust masks that are specially designed to filter out
microscopic particles.
Tool Use and Care
• Do not use if switch does not turn it ON or OFF.
Any tool that cannot be controlled with the switch is
dangerous and must be repaired.
• Disconnect the plug from the power source before
making any adjustments, changing accessories
or storing the tool. Such preventive safety measures
reduce the risk of starting the tool accidentally.
• Store idle tools out of the reach of children and
other untrained persons. Tools are dangerous in
the hands of untrained users.
• Check for misalignment or binding of moving
parts, breakage of parts and any other condition
that may affect the tool’s operation. If damaged,
have the tool serviced before using. Many acci-
dents are caused by poorly maintained tools.
• Use only accessories that are recommended for
your tool. Accessories that may be suitable for one tool
may become hazardous when used on another tool.
• Keep handles dry and clean; free from oil and
grease. Allows for better control of the tool.
Service
• Tool service must be performed only by qualified repair personnel. Service or maintenance performed
by unqualified repair personnel could result in injury.
• When servicing a tool, use only identical replacement parts. Follow instructions in the Maintenance
Section of this manual. Use of unauthorized parts or
failure to follow maintenance instructions may create a
risk of electrical shock or injury.
Specific Safety Information
WARNING!
Read this operator’s manual carefully before using
the Core Drilling Machine. Failure to understand
and follow the contents of this manual may result in
electrical shock, fire and/or serious personal injury.
Call the Ridge Tool Company, Technical Service
Department at (800) 519-3456 if you have any questions.
Machine Safety
• Core Drilling Machine is made to drill holes in
granite, masonry and steel reinforced concrete.
Follow instructions on proper use of this machine.
Do not use for other purposes. Other uses or mod-
ifying this machine for other applications may increase
the risk of serious injury.
• Do not wear loose cloth gloves or loose clothing
when operating machine. Wear only leather gloves.
Keep sleeves and jackets buttoned. Do not reach
across the machine or drill bit. Clothing can be
caught by the machine resulting in entanglement and
serious injury.
• Use extreme caution when drilling through floors.
Provide protection of all personnel and material
below the area. Cores generally drop from the drill at
completion of the hole.
• Keep fingers and hands away from drill bit. This
practice will prevent entanglement and reduces risk of
being cut.
• Secure drill stand to the work surface. Use bolts,
ceiling jack or vacuum hold-down. Do not secure
with a vacuum hold-down when drilling on vertical
surfaces such as walls. Drill stand must be prop-
erly secured to prevent bit damage and serious injury.
• When releasing carriage locking handle, maintain
a firm grip on feed handle to prevent feed handle
from revolving due to weight of drill. Rotating han-
dle can result in injury.
• Do not force drill bit. Drill should be used at a
speed and feed rate that does not overload the
motor. When starting bits, do not use more than two
12″ extensions. Less likely to bind and lose control.
WARNING
Page 6

RB-214/215 Core Drilling Machine
Ridge Tool Company4
Figure 1A – RB-214 Core Drilling Machine
Figure 1B – RB-215 Core Drilling Machine
Description, Specifications and
Standard Equipment
Description
The RIDGID No. RB-214 and RB-215 are heavy-duty
Core Drilling Machines. Drilling bit sizes range from 1/
2
″
through 14″. The RB-214 Machine has a combination anchor/vacuum base which provides additional flexibility
by incorporating both bases in one unit. The RB-215
has an anchor base only. The Diamond Core Bits are capable of drilling through granite, masonry and steel
reinforced concrete.
Specifications
Power Source................30 amp, 115V, 60Hz
Drill Motor Type 2..........2 Speed, 20 amp, 115V, 60Hz,
Single Phase, 400/900 RPM
Drilling Capacity ............1/2″ through 14″ w/Spacer
Drill Feeding..................Rack & Pinion Gear Type
Base..............................Anchor Vacuum (13″ x 17″)
Mast...............................21/2″ sq. x 42″ high
Slide Carriage................Single Piece Aluminum
Control Panel.................Box w/Amp-Meter, 2 Switches,
2 Outlets
Vacuum System
(RB-214 Only) ...............Diaphragm Pump w/Vacuum
Gauge
Output Spindle Shaft.....Thread Size 11/4-7 UNC
Operation.......................900 RPM – 1/2″ - 4″ Bits
400 RPM – 4″ - 14″ Bits
Ceiling Jack Screw
Mast with Gear Rack
Drill
Wheel (2)
Vacuum Water Trap
Vacuum Slot Cap
Spindle
Shim Adjusting
Screw (6)
Carriage
Locking Handle
Feed Handle
Vacuum Gauge
Vacuum
Motor
Combination
Anchor/Vacuum
Base
Leveling Screw (4)
Warning Plate
Head Carriage
Vacuum Pump
Switch
Drill Motor
Switch
Amp-Meter
Needle
Page 7

RB-214/215 Core Drilling Machine
Ridge Tool Company 5
Machine Inspection
WARNING!
To prevent serious injury, inspect your Core Drilling
Machine. The following inspection procedures
should be performed on a daily basis:
1. Make sure Core Drilling Machine is unplugged and the
drill mast switch is set to the OFF position (Figure 1).
2. Inspect the vacuum seal for wear or damage. Replace
if necessary.
3. Inspect the power cord and plug for damage. If the
plug has been modified, is missing the grounding
prong or if the cord is damaged, do not use the
Threading Machine until the cord has been replaced.
4. Inspect the Core Drilling Machine for any broken,
missing, misaligned or binding parts as well as any
other conditions which may affect the safe and normal
operation of the machine. If any of these conditions
are present, do not use the machine until any problem
has been repaired.
5. Lubricate the Core Drilling Machine if necessary according to the Maintenance Instructions.
6. Use drill bits and accessories that are designed for
your Core Drilling Machine and meet the needs of your
application. The correct tools and accessories allow
you to do the job successfully and safely. Accessories
designed for use with other equipment may be hazardous when used with this Core Drilling Machine.
7. Clean any oil, grease or dirt from all handles and
controls. This reduces the risk of injury due to a tool or
control slipping from your grip.
Inspect the cutting edges of your drill bits. If necessary, have them replaced prior to using the Core
Drilling Machine. Bit is considered worn when the
crown shows excessive wear and has become flush
with tube. Dull or damaged cutting tools can lead to
binding and tool breakage.
Machine and Work Area Set-Up
WARNING!
To prevent serious injury, proper set-up of the
machine and work area is required. The following
procedures should be following to set-up the machine.
1. Check that the work area has the following:
• Adequate lighting.
• No Flammable liquids, vapors or dust that may ig-
nite.
• Grounded electrical outlet.
• Clear path to the electrical outlet that does not
contain any sources of heat or oil, sharp edges or
moving parts that may damage electrical cord.
2. Clean up the work area prior to setting up any
equipment. Move tools and debris to prevent slips
and falls.
3. Make sure drill motor ON/OFF switch is in the OFF
position.
4. When plugging the Core Drilling Machine into the
electrical outlet make sure to position the power cord
along the clear path selected earlier. Use an extension cord in good condition.
To avoid electrical shock and electrical
fires, never use an extension cord that is damaged or
does not meet the following requirements:
• The cord has a three-prong plug similar to shown
in Electrical Safety section.
• The cord is rated as “W” or “W-A” if being used
outdoors.
• The cord has sufficient wire thickness (12 AWG
below 50′). If the wire thickness is too small, the
cord may overheat, melting the cord’s insulation or
causing nearby objects to ignite.
To reduce risk of electrical shock, keep all
electrical connections dry and off the ground. Do not
touch plug with wet hands.
WARNING
WARNING
Page 8

RB-214/215 Core Drilling Machine
Ridge Tool Company6
Securing Machine
WARNING!
Drilling machine must be properly secured to the
work surface to prevent serious injury to the operator.
Movement during drilling will cause chatter of bit
against work surface, fracturing diamonds. Bit
may also bind in hole causing damage to the bit.
Vacuum Anchor method should not be used to
mount machine to a wall.
Bolt Anchor Method-to-Floor
1. Measure distance from center of anchor bolt slot in
base (Figure 2) to center of drill spindle (Figure 1).
2. To locate the anchor bolt hole, use the distance obtained in Step 1 and measure from the center of the
hole that is to be drilled.
3. Drill and set 1/2″ anchor bolt. Place Drilling Machine
over anchor hole and hand tighten anchor bolt.
4. Adjust 4 leveling screws (Figure 1) to stabilize base
and plumb mast. Secure machine by tightening anchor bolt.
Bolt Anchor Method-to-Wall
Use the same bolt anchor method procedure to anchor
as above.
Also fasten a chain to the Core Drilling
Machine and secure the chain to prevent the machine
falling and causing serious injury.
Figure 2 – Vacuum Motor and Base
Vacuum Anchor Method-to-Floor
(RB-214 Only)
The Vacuum Anchor Method is recommended for 8″
diameter holes or less. The Anchor Vacuum Method is
NOT recommended on rough or cracked floor conditions,
holes deeper than one bit length, or steel concentration
greater than standard rebar.
Do not use Vacuum Anchor Method to
mount machine to a wall.
1. Turn machine on its back and insert vacuum seal
(Figure 3) under machine base, inspecting first to ensure seal is in good condition and sealing groove is
clean.
2. Turn Drilling Machine up-right and loosen 4 base
leveling screws.
3. Plug power cord into a properly grounded receptacle and turn vacuum pump ON/OFF switch to the
ON position.
4. Insert vacuum slot cap into anchor bolt slot (Figure
2) and check vacuum and hose connections.
Vacuum gauge (Figure 2) must read a minimum
of 20″ of mercury.
5. The drilling machine should now be vacuum anchored.
If machine does not anchor, add weight by standing on
vacuum base. It should now anchor with vacuum
gauge reading 20″ of mercury minimum. If not, check
the floor and vacuum seal (Figure 3) for leaks.
Figure 3 – Installing Vacuum Seal
6. Adjust 4 leveling screws to eliminate rocking and to
stabilize machine and plumb mast. The machine is
now ready to drill.
WARNING
WARNING
Vacuum Gauge
Opening
Vacuum
Release Valve
Vacuum
Water Trap
Vacuum
Slot Cap
Anchor
Bolt Slot
Page 9

7. Frequently check the water level in the vacuum water
trap. When water trap becomes half full, stop drilling
and empty water.
8. After using, turn drill motor ON/OFF switch to the
OFF position, then turn vacuum motor ON/OFF switch
to the OFF position, unplug power cord and remove,
clean and store vacuum seal.
NOTE! Vacuum can be released by turning vacuum
release valve (Figure 2).
Ceiling Jack Anchor Method
1. Cut pipe or wood to the required length to fit between ceiling and ceiling jack screw (Figure 1) on
top of mast.
2. Tighten ceiling jack screw to force machine against
floor.
3. Stabilize and plumb machine by adjusting 4 leveling
screws on base.
Operating Instructions
WARNING!
Do not wear cloth gloves or loose clothing when
operating Drilling Machine. Keep sleeves and jackets buttoned. Do not reach across the machine.
Keep hands and fingers away from drill bits.
Do not use this Drilling Machine if the ON/OFF
switch or other controls are broken. Always wear
eye protection to protect eyes from dirt and other
foreign objects.
Do not use Drilling Machine if it is not securely anchored.
1. Thread the drilling bit (Figure 4) onto drilling spindle
(Figure 1) and tighten securely with bit wrench.
Never turn drill ON with bit resting on
the concrete.
2. Check hole alignment by lowering drill until it is about
1
/2″ from concrete.
3. Position 2-speed selector knob on drill to desired
speed. Move selector down towards spindle to select
high speed for up through 4″ bits. Move selector
up away from spindle to select low speed for bits
Ridge Tool Company 7
over 4″. Make certain speed is proper for bit diameter being used.
DO NOT move speed selector while drill
spindle is rotating.
NOTE! If a water collector ring and pump is used, plug
pump into a properly grounded 115V receptacle.
Have suitable container for draining.
4. With water control valve shut OFF. connect water
inlet hose to drill and water source.
NOTE! Water can be supplied by a standard garden
hose or by a pressure tank. Water is fed through
inlet hose, down inside of bit, washing cuttings
from under bit crown, up and outside of hole. Be
sure that any method used has adequate water
pressure to supply a flow of 1-2 gallons per
minute. Lack of water can cause diamonds to
polish or burn the bit causing bit end to turn blue.
5. With drill motor ON/OFF switch in OFF position, plug
power cord into a properly grounded receptacle.
6. Open water control valve allowing water to flow at 12 gallons per minute.
Before turning drill motor ON, be certain
that machine is securely anchored.
7. Turn drill motor ON/OFF switch to ON position.
DO NOT apply full load until entire bit
crown has penetrated the material.
8. Turn feed handle to apply load on bit. To prevent bit
from wandering, apply light pressure on feed handle
while starting to drill.
NOTE! The AMP-meter has a green and red area to in-
dicate proper pressure and drilling speed,
preventing motor overload and providing longer
bit life. The green area is the working range;
the red area indicates too much pressure being
applied. Keep Amp-meter needle in the green
area. Too little pressure can polish bit and too
much can cause undue wear.
9. Drill bit feed should be uniform without excessive
force. Drilling penetration of 1″ to 4″ per minute may
be achieved in concrete depending on material and bit
diameter. Proper feed pressure is determined by load
on motor and reading on Amp-meter. To maximize life
of drill bit, regulate feed rate so that needle on Ampmeter is in upper green area of 20 amp range. If
needle goes into red area above 20 amps, decrease
feed rate as undue bit wear will result.
NOTE! If the cooling water turns clear, it is an indication
you are drilling through rebar.
RB-214/215 Core Drilling Machine
CAUTION
CAUTION
WARNING
CAUTION
Page 10

RB-214/215 Core Drilling Machine
Ridge Tool Company8
10. Your control panel amp-meter will go into the red
area when you hit steel. When you encounter rebar,
lessen feed feed rate to allow needle to return to the
green area.
NOTE! It is recommended that after cutting steel, you
stop and break out core and any loose pieces of
steel, then proceed.
When drilling steel embedded in concrete, never switch to HIGH speed if you are drilling in
LOW speed. These bits are not designed to drill through
solid steel.
Use extreme care when drilling through
floors. Provide for protection of all personnel and material below the area. Cores generally drop from drill bit at
completion of the hole.
Removing Cores
Breaking a Core
1. If you are not drilling completely through, the core can
be easily broken by inserting a screwdriver into the
drilled groove and prying the core to the opposite side.
2. Use a second screwdriver to lift core out.
Removing Broken Core Below the Surface
1. Use a 1/8inch diameter steel rod.
2. Make a 1/4inch long 90° bend at one end.
3. Insert rod down side of broken core to depth of break,
twist 90° and lift core out.
Removing Broken Core Stuck In Bit
Unplug machine cord from power source.
1. Increase water pressure and try to free core with
your hands.
2. If unable to free core, remove bit from drill.
3. Push core gently through from top of bit with a rod
using a capped bit.
Removing a Lodged Bit from Hole
Unplug machine cord from power source.
1. Turn Water ON.
2. Using bit wrench, try to rotate bit in both directions and
lift out using feed handle.
3. If unable to free bit, turn water OFF and disconnect bit
from drill spindle. Use bit wrench again, rotating back
and forth and rocking until free.
Installing Bit Extension Rods
In order to drill deeper than the 13″ long bit will allow, bit
extension rods must be used. Drilling rate will be slower
because of the extra amount of drag on the bit walls.
NOTE! When it is necessary to place the drilling ma-
chine above the surface being drilled, do not
use a bit extension rod that is longer than 12″.
1. Drill to full depth of bit.
2. Back drill out and remove bit and core.
3. Put drill bit back into hole and connect a 4, 6 or 12″ bit
extension rod to bit and secure with spindle wrench.
4. Screw bit extension rod onto drill spindle and secure
with spindle wrench.
5. Proceed with drilling.
Accessories
Only the following RIDGID products have
been designed to function with the Core Drilling Machine.
Other accessories designed for use with other tools may
become hazardous when used on this machine. To prevent serious injury, use only the accessories listed below.
Accessories for Core Drilling Machines
Small Anchor Base (7″ x 12″)
Anchor-Vacuum Base (13″ x 17″)
Anchor-Vacuum Drill Stand
Vacuum Motor (115V) 60Hz
Vacuum Motor (230V) 50Hz Export
Vacuum Motor with Fittings (115V) 60Hz
Vacuum Motor with Fittings (230V) 50Hz
Control Panel (115V)
Control Panel (230V)
2″ Spacer Block (Applications Over 10″)
20 Amp (115V) 25-60Hz, 450/1200 RPM Motor
10 Amp (230V) 25-60Hz, 4501200 RPM Motor
Spindle Wrench
Water Collector & Pump (115V)
Water Collector & Pump (230V)
Water Collector Ring
Water Pump (115V) 50-60Hz
Water Pump (230V) 50-60Hz
NOTE! See Ridge Tool catalog or a Ridge distributor for
a complete list of Core Drill Bits, Adapters and
Bit Extensions.
CAUTION
WARNING
WARNING
WARNING
WARNING
Page 11

RB-214/215 Core Drilling Machine
Ridge Tool Company 9
Maintenance Instructions
Make sure machine is unplugged from
power source before performing maintenance or making
any adjustment.
Lubrication
Keep a light coating of oil on rack and pinion and drill
spindle.
Ventilation
Keep drill motor inlet and air passage clear to assure
proper motor ventilation.
Motor Brush Replacement
Check motor brushes every 200 hours and replace when
brushes become 1/4inch or less in length.
Bit Replacement
Bit is considered worn when the crown shows excessive
wear and has become flush with tube.
Shims
Carriage head will become loose due to vibrations.
Tighten shim adjusting screws to remove play.
Vacuum Seal
Replace vacuum seal if it becomes mushroomed on
bottom edge, cracked, pitted, or worn.
Machine Storage
Motor-driven equipment must be kept indoors or well covered in rainy weather. Always remove vacuum seal from
base of machine. Store the machine in a locked area that
is out of reach of children and people unfamiliar with
drilling machines. This machine can cause serious injury
in the hands of untrained users.
Service and Repair
WARNING!
Service and repair work on this Core Drilling Machine
must be performed by qualified repair personnel.
Machine should be taken to a RIDGID Independent
Authorized Service Center or returned to the factory. All
repairs made by Ridge service facilities are warranted
against defects in material and workmanship.
When servicing this machine, only identical replacement parts should be used. Failure to follow these
instructions may create a risk of electrical shock or
other serious injury.
If you have any questions regarding the service or repair
of this machine, call or write to:
Ridge Tool Company
Technical Service Department
400 Clark Street
Elyria, Ohio 44035-6001
Tel: (800) 519-3456
E-mail: TechServices@ridgid.com
For name and address of your nearest Independent
Authorized Service Center, contact the Ridge Tool
Company at (800) 519-3456 or http://www.ridgid.com
WARNING
Page 12

RB-214/215 Core Drilling Machine
Ridge Tool Company10
Wiring Diagram (230V, 50-60Hz) - Australia and Europe
Vacuum
Switch
8 Amp
250V AC
Motor
Switch
10 Amp
250V AC
Vacuum
Receptacle
15 Amp
250V AC
Motor
Receptacle
20 Amp
250V AC
Ammeter
Filter
Black
Black
Black
Black
Black
Black
White
White
White
Brown
Blue
250V AC
Green/Yellow
Green/Yellow
Green
Green
GRD
GRD
Wiring Diagram (115V, 60Hz)
Amp-Meter w/Current
Transformer
Motor
Switch
20 Amp
125 Volt
Vacuum
Switch
16 Amp
125 Volt
Motor
Receptacle
20 Amp
125 Volts
Vacuum
Receptacle
15 Amp
125 Volt
To Box
14 GA (White)
B
W
B
W
14 GA (Black)
12 GA (Green)
14 GA (Green)
GR
14 GA (Black)
12 GA (Black)
12 GA (White)
12 GA (Green)
12 GA (Black)
Twistlock Plug
30 Amp 125 Volt
Page 13

RB-214/215 Core Drilling Machine
Ridge Tool Company 11
Wiring Diagram (230V, 50-60Hz) - Cat. No. 16597
Vacuum
Switch
8 Amp
250V AC
Motor
Switch
10 Amp
250V AC
Vacuum
Receptacle
15 Amp
250V AC
Motor
Receptacle
20 Amp
250V AC
Ammeter
Filter
Black
Black
Black
Black
Black
White
White
White
Green/Yellow
Blue
250V AC
Green/Yellow
Green
Green
GR
GR
Brown
Red
Page 14

RB-214/215 Core Drilling Machine
Ridge Tool Company12
Page 15

Printed in U.S.A. 2/01 999-998-024.10
Ridge Tool Subsidiary
Emerson Electric Co.
Ridge Tool Company
400 Clark Street
Elyria, Ohio 44035-6001
What is covered
RIDGID®tools are warranted to be free of defects in workmanship and material.
How long coverage lasts
This warranty lasts for the lifetime of the RIDGID
®
tool. Warranty coverage ends when the prod-
uct becomes unusable for reasons other than defects in workmanship or material.
How you can get service
To obtain the benefit of this warranty, deliver via prepaid transportation the complete product
to RIDGE TOOL COMPANY, Elyria, Ohio, or any authorized RIDGID
®
INDEPENDENT SERVICE
CENTER. Pipe wrenches and other hand tools should be returned to the place of purchase.
What we will do to correct problems
Warranted products will be repaired or replaced, at RIDGE TOOL’S option, and returned at no
charge; or, if after three attempts to repair or replace during the warranty period the product
is still defective, you can elect to receive a full refund of your purchase price.
What is not covered
Failures due to misuse, abuse or normal wear and tear are not covered by this warranty. RIDGE
TOOL shall not be responsible for any incidental or consequential damages.
How local law relates to the warranty
Some states do not allow the exclusion or limitation of incidental or consequential damages,
so the above limitation or exclusion may not apply to you. This warranty gives you specific
rights, and you may also have other rights, which vary, from state to state, province to
province, or country to country.
No other express warranty applies
This FULL LIFETIME WARRANTY is the sole and exclusive warranty for RIDGID
®
products. No
employee, agent, dealer, or other person is authorized to alter this warranty or make any other
warranty on behalf of the RIDGE TOOL COMPANY.
FULL LIFETIME
Qué cubre
Las herramientas RIDGID están garantizadas contra defectos de la mano de obra y de los
materiales empleados en su fabricación.
Duración de la cobertura
Esta garantía cubre a la herramienta RIDGID durante toda su vida útil. La cobertura de la
garantía caduca cuando el producto se torna inservible por razones distintas a las de defectos
en la mano de obra o en los materiales.
Cómo obtener servicio
Para obtener los beneficios de esta garantía, envíe mediante porte pagado, la totalidad del producto a RIDGE TOOL COMPANY, en Elyria, Ohio, o a cualquier Servicentro Independiente
RIDGID. Las llaves para tubos y demás herramientas de mano deben devolverse a la tienda donde
se adquirieron.
Lo que hacemos para corregir el problema
El producto bajo garantía será reparado o reemplazado por otro, a discreción de RIDGE TOOL,
y devuelto sin costo; o, si aún resulta defectuoso después de haber sido reparado o sustituido
tres veces durante el período de su garantía, Ud. puede optar por recibir un reembolso por el valor
total de su compra.
Lo que no está cubierto
Esta garantía no cubre fallas debido al mal uso, abuso o desgaste normal. RIDGE TOOL no se
hace responsable de daño incidental o consiguiente alguno.
Relación entre la garantía y las leyes locales
Algunos estados de los EE.UU. no permiten la exclusión o restricción referente a daños incidentales o consiguientes. Por lo tanto, puede que la limitación o restricción mencionada
anteriormente no rija para Ud. Esta garantía le otorga derechos específicos, y puede que,
además, Ud tenga otros derechos, los cuales varían de estado a estado, provincia a provincia o
país a país.
No rige ninguna otra garantía expresa
Esta GARANTIA VITALICIA es la única y exclusiva garantía para los productos RIDGID. Ningún
empleado, agente, distribuidor u otra persona está autorizado para modificar esta garantía u ofrecer cualquier otra garantía en nombre de RIDGE TOOL COMPANY.
Ce qui est couvert
Les outils RIDGE
®
sont garantis contre tous vices de matériaux et de main d’oeuvre.
Durée de couverture
Cette garantie est applicable durant la vie entière de l’outil RIDGE
®
. La couverture cesse dès lors que
le produit devient inutilisable pour raisons autres que des vices de matériaux ou de main d’oeuvre.
Pour invoquer la garantie
Pour toutes réparations au titre de la garantie, il convient d’expédier le produit complet en port payé
à la RIDGE TOOL COMPANY, Elyria, Ohio, ou bien le remettre à un réparateur RIDGID
®
agréé. Les
clés à pipe et autres outils à main doivent être ramenés au lieu d’achat.
Ce que nous ferons pour résoudre le problème
Les produits sous garantie seront à la discrétion de RIDGE TOOL, soit réparés ou remplacés, puis
réexpédiés gratuitement ; ou si, après trois tentatives de réparation ou de remplacement durant
la période de validité de la garantie le produit s’avère toujours défectueux, vous aurez l’option de
demander le remboursement intégral de son prix d’achat.
Ce qui n’est pas couvert
Les défaillances dues au mauvais emploi, à l’abus ou à l’usure normale ne sont pas couvertes par
cette garantie. RIDGE TOOL ne sera tenue responsable d’aucuns dommages directs ou indirects.
L’influence de la législation locale sur la garantie
Puisque certaines législations locales interdisent l’exclusion des dommages directs ou indirects,
il se peut que la limitation ou exclusion ci-dessus ne vous soit pas applicable. Cette garantie vous
donne des droits spécifiques qui peuvent être éventuellement complétés par d’autres droits
prévus par votre législation locale.
Il n’existe aucune autre garantie expresse
Cette GARANTIE PERPETUELLE INTEGRALE est la seule et unique garantie couvrant les produits
RIDGID
®
. Aucun employé, agent, distributeur ou tiers n’est autorisé à modifier cette garantie ou à
offrir une garantie supplémentaire au nom de la RIDGE TOOL COMPANY.
WARRANTY
Against Material Defects
& Workmanship
FULL LIFETIME
WARRANTY
Against Material Defects
& Workmanship
FULL LIFETIME
WARRANTY
Against Material Defects
& Workmanship
 Loading...