

RIDGID R9937 Operator's Manual
OPERATOR’S MANUAL
MANUEL D’UTILISATION
MANUAL DEL OPERADOR
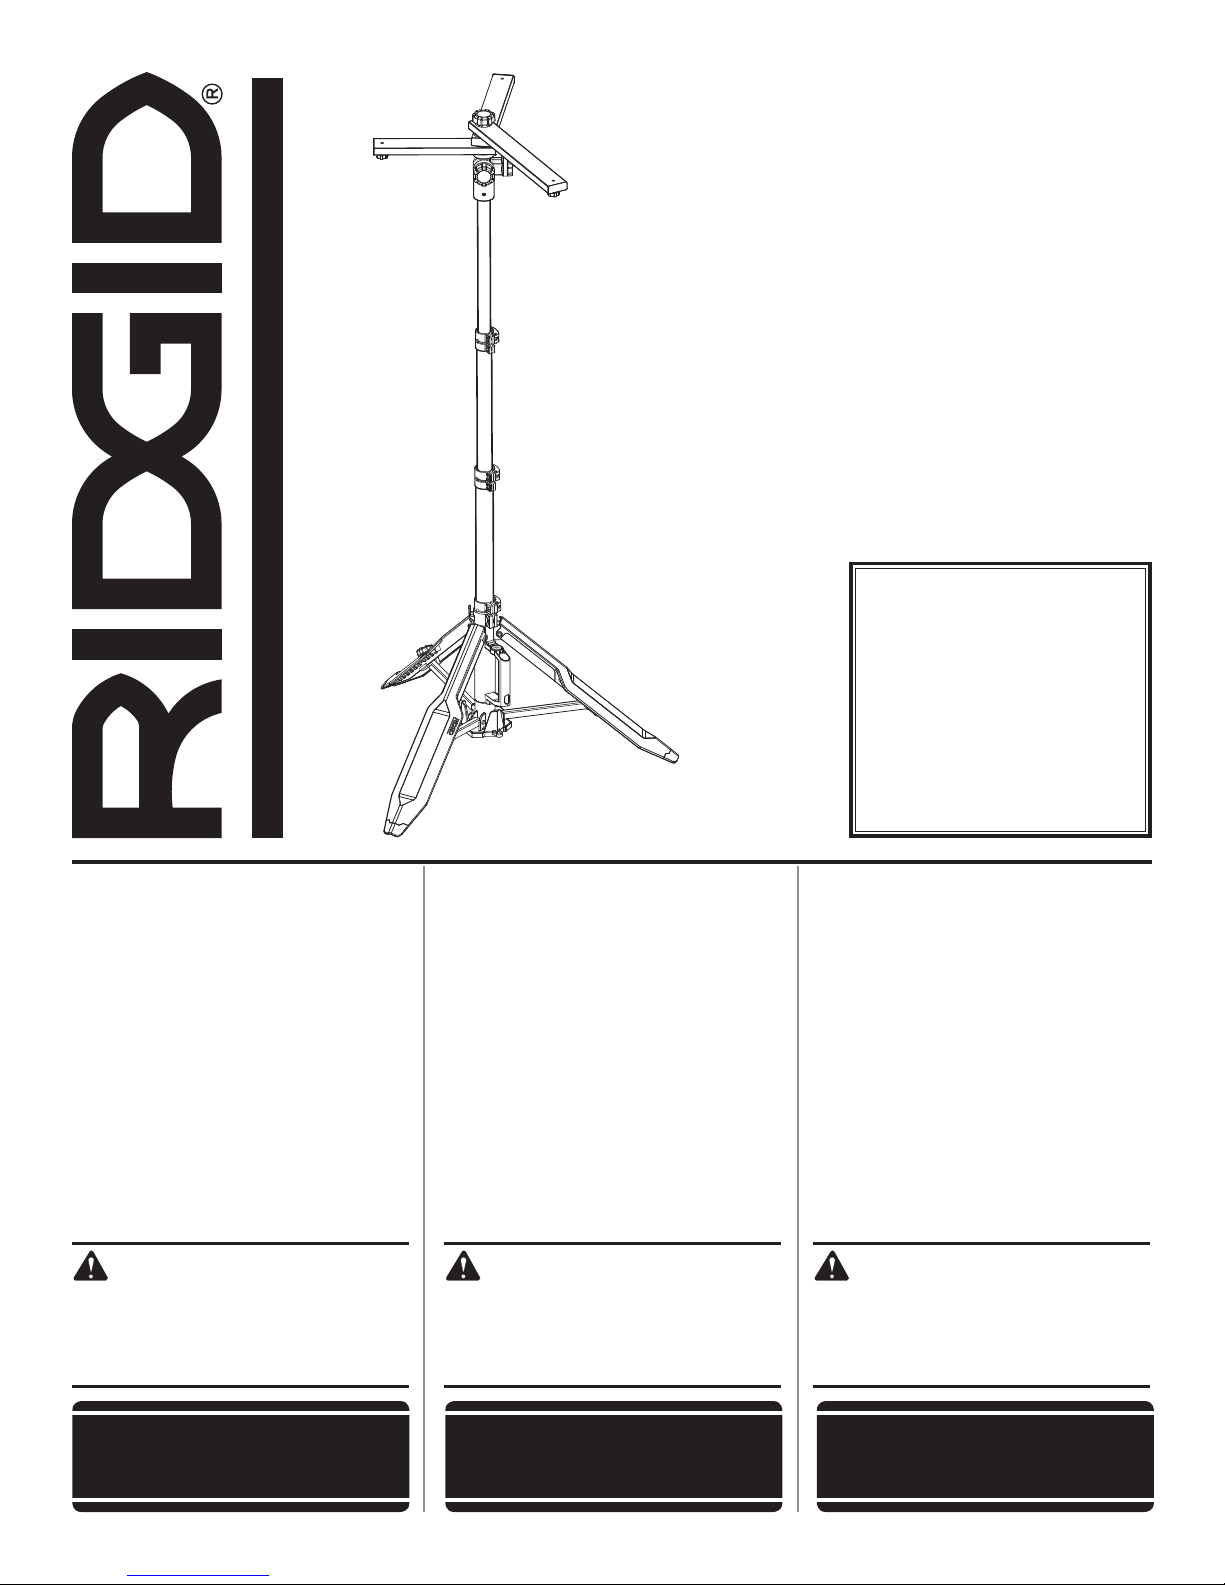
UNIVERSAL COLLAPSIBLE
TRIPOD STAND
TRÉPIED UNIVERSEL PLIABLE
TRÍPODE UNIVERSAL REBATIBLE
R9937
To register your RIDGID
product, please visit:
http://register.RIDGID.com
Pour enregistrer votre
produit de RIDGID,
s’il vous plaît la visite :
http://register.RIDGID.com
INCLUDES: Tripod, Hex Key (3 mm), and
Operator’s Manual
TABLE OF CONTENTS
****************
Rules for Safe Operation .................... 2
Features .............................................. 3
Assembly ............................................ 3
Operation .........................................3-4
Maintenance ....................................... 5
Illustrations ......................................6-8
Parts Ordering and
Service ................................Back page
WARNING:
To reduce the risk of injury, the
user must read and understand the
operator’s manual before using this
product.
INCLUT: Trépied, clé hexagonale (3 mm),
et manuel d’utilisation
TABLE DES MATIÈRES
****************
Règles pour la sécurité
d’utilisation ......................................... 2
Caractéristiques ................................. 3
Assemblage .......................................3
Utilisation .......................................3-4
Entretien ............................................. 5
Illustrations ......................................6-8
Commande de pièces et
dépannage ........................Page arrière
AVERTISSEMENT :
Pour réduire les risques de blessures,
l’utilisateur doit lire et veiller à bien
comprendre le manuel d’utilisation
avant d’utiliser ce produit.
Para registrar su producto
de RIDGID, por favor visita:
http://register.RIDGID.com
INCLUYE: Trípode, llave hexagonal (3 mm),
y manual del operador
ÍNDICE DE CONTENIDO
****************
Reglas para el manejo seguro
de la unidad .......................................2
Características ...................................3
Armado ..............................................3
Funcionamiento ............................. 3-4
Mantenimiento ...................................5
Illustraciones .................................. 6-8
Pedidos de piezas y
servicio .........................Pág. posterior
ADVERTENCIA:
Para reducir el riesgo de lesiones, el
usuario debe leer y comprender el
manual del operador antes de usar
este producto.
SAVE THIS MANUAL
FOR FUTURE REFERENCE
CONSERVER CE MANUEL
POUR FUTURE RÉFÉRENCE
GUARDE ESTE MANUAL
PARA FUTURAS CONSULTAS

RULES FOR SAFE OPERATION
WARNING:
READ AND UNDERSTAND ALL INSTRUCTIONS.
Failure to follow all instructions listed below, may
result in electric shock, fire and/or serious personal
injury.
Safe operation of this accessory requires that you read and
understand this operator’s manual, and for the tool with which
this product is intended to be used. Read and understand
all labels affixed to the tool.
READ ALL INSTRUCTIONS
Know your accessory. Read the operator’s manual
carefully. Learn the product’s applications and limitations
as well as the specific potential hazards related to this
product.
Keep the work area clean. Cluttered work areas and
work benches invite accidents.
This is a tool support. Do not use for any other purpose
than supporting tools not exceeding a maximum weight
of 30 lbs (10 lbs per arm).
Before using a tool, be sure all adjustments are secure.
Use the tripod in a dry, indoor place protected from
wet conditions.
When transporting the tripod in a vehicle, securely tie
it down to prevent movement and possible damage.
Maximum weight placed on tripod must be 30
pounds or less.
Do not use the tripod as a seat or stand.
Check to make sure tripod does not rock, slide or
move prior to use.
Put the tripod on a firm level surface where there is
plenty of room to handle and properly support the tool.
Do not mount tools that exceed the maximum weight
capacity of the tripod or cause the tripod to tip
excessively. Just because the tool can be attached to
your tripod, it does not assure safe operation.
Save these instructions. Refer to them frequently and
use them to instruct other users. If you loan someone this
product, also loan these instructions.
CALIFORNIA PROPOSITION 65
WARNING:
This product may contain chemicals, including lead, known to the State of California to cause cancer, birth defects
or other reproductive harm. Wash hands after handling.
2 - English
FEATURES
PRODUCT SPECIFICATIONS
Weight Capacity ...................... 30 lbs./10 lbs. max per arm
Maximum Height ........................................................... 7 ft.
ASSEMBLY
Mount Screw ............................................ 1/4-20 thread (4)
Size (folded) ................................34.75 in. x 7.8 in. x 6.1 in.
WARNING:
Do not use this product if it is not completely
assembled or if any parts appear to be missing or
damaged. Use of a product that is not properly and
completely assembled or with damaged or missing
parts could result in serious personal injury.
If any parts are damaged or missing, please call 1-866-539-1710 for assistance.
WARNING:
Do not attempt to modify this product or create
accessories or attachments not recommended
for use with this product. Any such alteration
or modification is misuse and could result in a
hazardous condition leading to possible serious
personal injury.
OPERATION
WARNING:
To reduce the risk of injury from unexpected tool
movement, check to make sure tripod does not
rock, slide or move prior to use.
WARNING:
Do not allow familiarity with tools to make you
careless. Remember that a careless fraction of a
second is sufficient to inflict severe injury.
SET UP
See Figures 1 - 10, pages 6 and 7.
NOTE: The tripod is shipped with the extension tubes
retracted, the legs folded in, and the adjustable head tilted
down. Follow the instructions below to raise the tripod to
the operating position.
Stand the tripod on its base.
Loosen the head lock knob and rotate the head upward.
Tighten the knob to secure the head in place.
Unlock the clamp on the lower tube to release the legs.
Move the legs away from the base.
Slide the legs down the lower tube and spread them to
their full outward positions. Lock the legs in place.
NOTE: The base will rise up as the legs are moved
outward.
WARNING:
When adjusting the height of the tripod, hold the
upper or middle tube with one hand and unlock the
clamp with the other. If not held properly, the top
portion of the tripod and any tool mounted to the
tripod could descend rapidly and cause serious
personal injury or property damage.
Unlock the clamp securing the middle tube and raise it
to your desired height. Lock the tube in place.
For added stability, securely hang weighted objects
on the ballast hooks at the base of the tripod. Do not
exceed 15 lbs per hook.
Unlock the clamp securing the upper tube and raise it to
your desired height. Lock the tube in place.
NOTE: Raise the upper tube gradually. Do not extend
the tripod beyond a stable height.
Loosen the arm lock knob and spread the arms to the
desired positions. Tighten the knob to secure the arms
in place.
WARNING:
Keep everyone - helpers, bystanders, children, and
animals - a safe distance from an extended tripod.
Serious personal injury or property damage could
occur if the tool is tipped. Unless you are adjusting
or mounting tools to the tripod, keep a minimum
distance of 15 ft. away from the unit.
3 - English
OPERATION
Before mounting any tools, find the bubble level on the
tripod handle and ensure that the unit is level.
NOTE: If adjustments are needed, loosen the leveling
knob and position the brace as needed. Tighten the
knob once the unit is level. If you cannot level the tripod
by adjusting the brace, it may be necessary to reposition
the unit. Do not mount tools to the tripod unless it is
level.
To lower the stand, reverse the steps listed above.
MOUNTING TOOLS TO THE TRIPOD
See Figures 11 - 16, pages 7 and 8.
WARNING:
To reduce the risk of a tipping hazard, always
ensure the tripod is stable before and after
mounting tools or leaving the tripod unattended. To
stabilize the tripod, reposition the arms, adjust the
leveling brace, and/or hang weights on the ballast
hooks. Do not use the tripod if it is not stable.
WARNING:
Do not mount tools that exceed the maximum
weight capacity of the tripod or cause the tripod
to tip excessively. Just because the tool can be
attached to your tripod, it does not assure safe
operation.
Locate the tripod mounting hole on the tool.
NOTE: Only tools with a 1/4-20 in. mounting hole can be
secured to the tripod.
Place the tool on the tripod mounting screw. Make sure
the screw properly engages the mounting hole on the
tool.
Hold the tool in place and rotate the knob clockwise to
secure.
Repeat this process to mount additional tools to the
remaining arms.
WARNING:
To ensure proper balance and reduce the risk of a
tipping hazard, center the weight of two or more
mounted tools over one of the tripod legs.
To mount a single tool:
Bring the adjustable arms together and rotate the head
down. Lock the arms and the head in place.
Locate the mounting screw at the base of the head and
the mounting hole on the tool.
NOTE: Only tools with a 1/4-20 in. mounting hole can be
secured to the tripod.
Place the tool on the tripod mounting screw. Make sure
the screw properly engages the mounting hole, on the
tool.
Rotate the tool clockwise to secure.
To mount multiple tools:
Choose the adjustable arm you want to mount your tool
to.
Push mounting screw knob up until the screw can be
seen above the arm.
WARNING:
Do not attach tools to the mounting screw at
the base of the head if the head is tilted upward.
This could cause the tripod to become unstable
resulting in a falling hazard.
4 - English

MAINTENANCE
ADJUSTING THE LOCK CLAMPS
WARNING:
When servicing, use only identical replacement
parts. Use of any other part could create a hazard
or cause product damage.
GENERAL MAINTENANCE
Avoid using solvents when cleaning plastic parts. Most
plastics are susceptible to damage from various types of
commercial solvents and can be damaged by their use. Use
clean cloths to remove dirt, dust, oil, grease, etc.
NOTE: ILLUSTRATIONS START ON PAGE 6 AFTER
FRENCH AND SPANISH LANGUAGE SECTIONS.
These products have a 90-Day Satisfaction Guarantee Policy, as well as a
Three-year Limited Warranty.
For Warranty and Policy details, please go to www.RIDGID.com
or call (toll free) 1-866-539-1710.
See Figure 17, page 8.
The lock clamps may become loose and move over time. If
necesary, close and reposition the clamp then use a 3 mm
hex key to tighten the cam and secure the clamp in place.
Open and close the clamp to ensure it is functioning properly.
5 - English

NOTES / NOTAS
15
 Loading...