

RIDGID R86065 Operator's Manual
OPERATOR’S MANUAL
MANUEL D’UTILISATION
MANUAL DEL OPERADOR
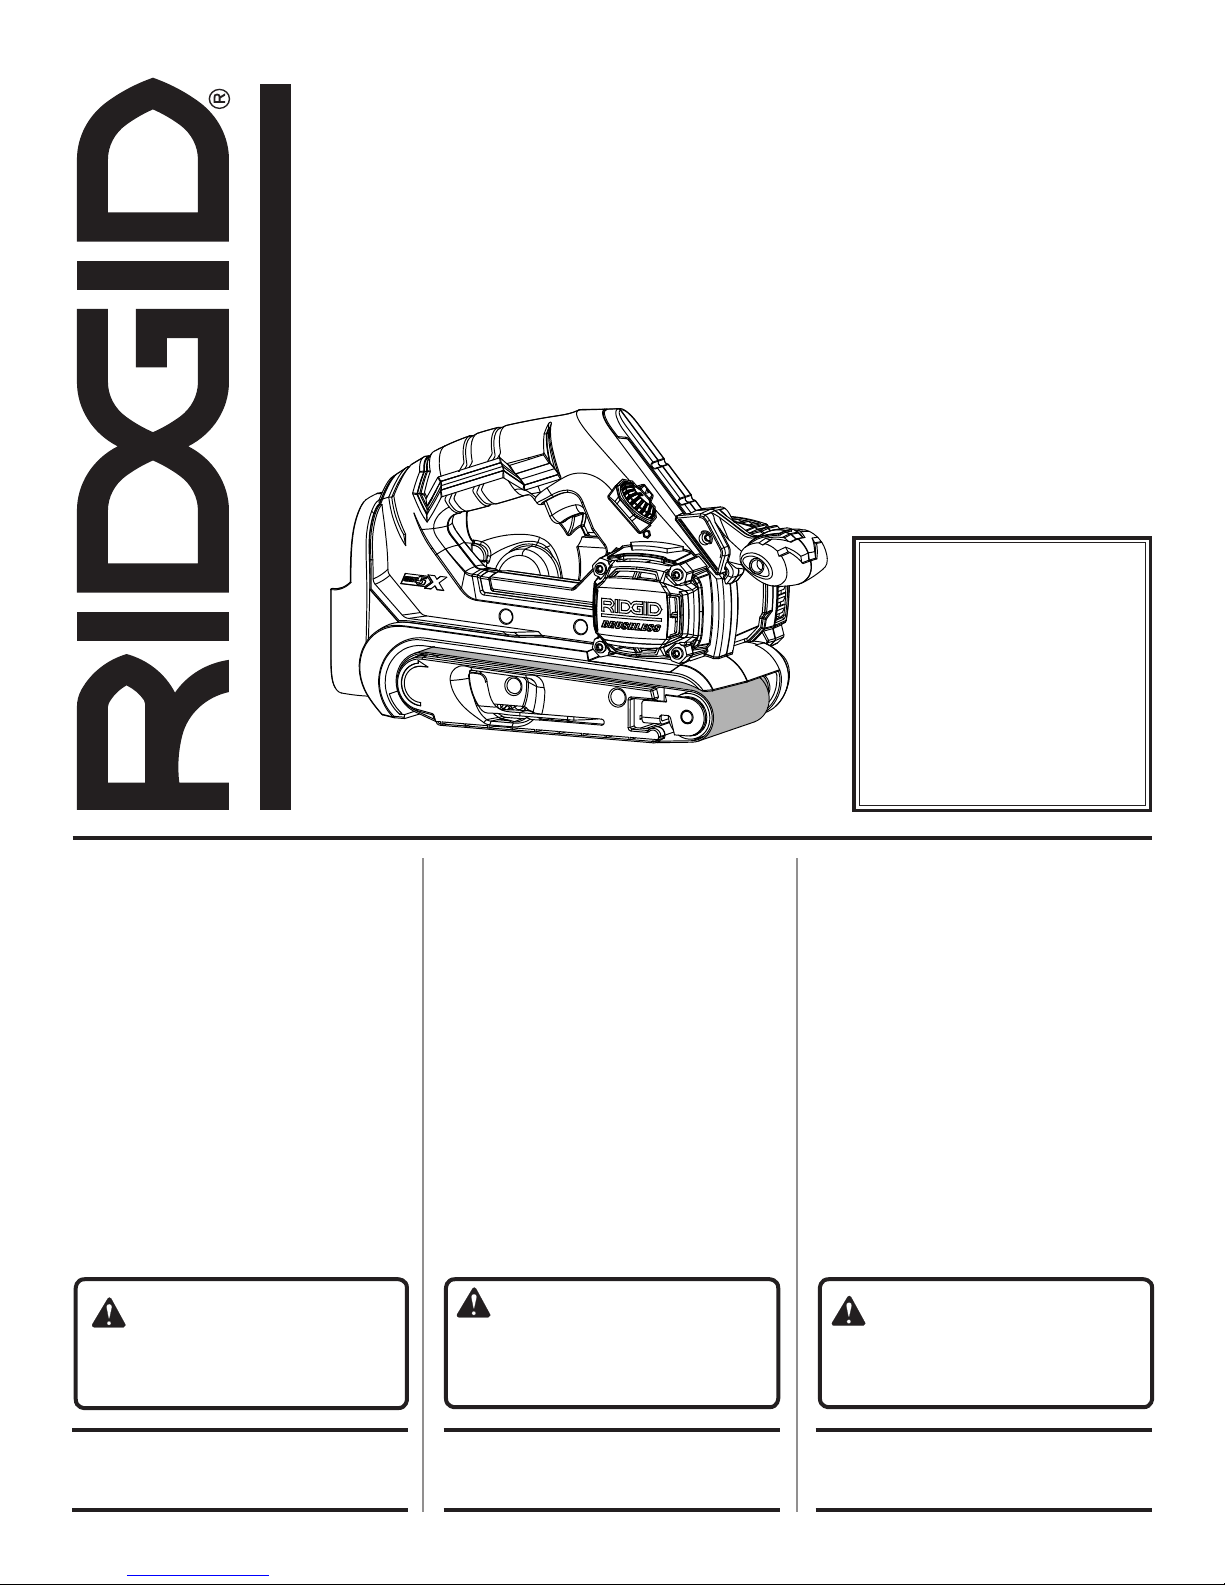
18 VOLT BRUSHLESS BELT SANDER
18 V PONCEUSE À BANDE SANS BALAI
18 V LIJADORA DE BANDA SIN ESCOBILLAS
R86065
To register your RIDGID
product, please visit:
http://register.RIDGID.com
Pour enregistrer votre produit
de RIDGID,
s’il vous plaît la visite :
http://register.RIDGID.com
Para registrar su producto de
RIDGID, por favor visita:
http://register.RIDGID.com
TABLE OF CONTENTS
****************
INCLUDES: Belt Sander, Wrench,
Operator’s Manual
General Power Tool Safety
Warnings .........................................2-3
Belt Sander Safety Warnings .............3
Symbols ..............................................4
Features .............................................. 5
Assembly ............................................ 5
Operation .........................................5-8
Maintenance ....................................... 9
Illustrations ..................................10-11
Parts Ordering and
Service ................................Back page
WARNING: To reduce the
risk of injury, the user must read and
understand the operator’s manual
before using this product.
TABLE DES MATIÈRES
****************
INCLUT : Ponceuse à bande, clé, manuel
d’utilisation
Règles de sécurité générales
relatives aux outils électriques ........2-3
Avertissements de sécurité
relatifs aux ponceuse à bande ........... 3
Symboles ............................................4
Caractéristiques .................................5
Assemblage ........................................ 5
Utilisation ........................................5-8
Entretien .............................................9
Illustrations ..................................10-11
Commande de pièces
et dépannage ....................Page arrière
AVERTISSEMENT :
réduire les risques de blessures,
l’utilisateur doit lire et veiller à bien
comprendre le manuel d’utilisation avant
d’employer ce produit.
Pour
ÍNDICE DE CONTENIDO
****************
INCLUYE: Lijadora de banda, llave,
manual del operador
Advertencias de seguridad
para herramientas eléctrica ........... 2-3
Advertencias de lijadora de banda .... 3
Símbolos ............................................4
Características ...................................5
Armado ..............................................5
Funcionamiento ............................. 5-8
Mantenimiento ...................................9
Illustraciones .............................. 10-11
Pedidos de piezas
y servicio ....................... Pág. posterior
ADVERTENCIA: Para reducir
el riesgo de lesiones, el usuario debe
leer y comprender el manual del
operador antes de usar este producto.
SAVE THIS MANUAL FOR
FUTURE REFERENCE
CONSERVER CE MANUEL
POUR FUTURE RÉFÉRENCE
GUARDE ESTE MANUAL
PARA FUTURAS CONSULTAS

GENERAL POWER TOOL SAFETY WARNINGS
Use personal protective equipment. Always wear eye
WARNING
Read all safety warnings and all instructions.
Failure to follow the warnings and instructions may
result in electric shock, fire and/or serious injury.
Save all warnings and instructions for future reference.
The term “power tool” in the warnings refers to your mainsoperated (corded) power tool or battery-operated (cordless)
power tool.
WORK AREA SAFETY
Keep work area clean and well lit. Cluttered or dark
areas invite accidents.
Do not operate power tools in explosive atmospheres,
such as in the presence of flammable liquids, gases
or dust. Power tools create sparks which may ignite the
dust or fumes.
Keep children and bystanders away while operating a
power tool. Distractions can cause you to lose control.
ELECTRICAL SAFETY
Power tool plugs must match the outlet. Never modify
the plug in any way. Do not use any adapter plugs with
earthed (grounded) power tools. Unmodified plugs and
matching outlets will reduce risk of electric shock.
Avoid body contact with earthed or grounded surfaces
such as pipes, radiators, ranges and refrigerators.
There is an increased risk of electric shock if your body
is earthed or grounded.
Do not expose power tools to rain or wet conditions.
Water entering a power tool will increase the risk of
electric shock.
Do not abuse the cord. Never use the cord for carrying,
pulling or unplugging the power tool. Keep cord away
from heat, oil, sharp edges or moving parts. Damaged
or entangled cords increase the risk of electric shock.
When operating a power tool outdoors, use an
extension cord suitable for outdoor use. Use of a cord
suitable for outdoor use reduces the risk of electric shock.
If operating a power tool in a damp location is
unavoidable, use a ground fault circuit interrupter
(GFCI) protected supply. Use of a GFCI reduces the risk
of electric shock.
Use this product only with batteries and chargers listed
in tool/appliance/battery pack/charger correlation
supplement 988000-302.
PERSONAL SAFETY
Stay alert, watch what you are doing and use common
sense when operating a power tool. Do not use a
power tool while you are tired or under the influence of
drugs, alcohol or medication. A moment of inattention
while operating power tools may result in serious personal
injury.
protection. Protective equipment such as dust mask,
non-skid safety shoes, hard hat, or hearing protection
used for appropriate conditions will reduce personal
injuries.
Prevent unintentional starting. Ensure the switch is in
the off-position before connecting to power source
and/or battery pack, picking up or carrying the tool.
Carrying power tools with your finger on the switch or
energising power tools that have the switch on invites
accidents.
Remove any adjusting key or wrench before turning
the power tool on. A wrench or a key left attached to
a rotating part of the power tool may result in personal
injury.
Do not overreach. Keep proper footing and balance
at all times. This enables better control of the power tool
in unexpected situations.
Dress properly. Do not wear loose clothing or
jewellery. Keep your hair, clothing and gloves away
from moving parts. Loose clothes, jewellery or long hair
can be caught in moving parts.
If devices are provided for the connection of dust
extraction and collection facilities, ensure these are
connected and properly used. Use of dust collection
can reduce dust-related hazards.
Do not wear loose clothing or jewelry. Contain long
hair. Loose clothes, jewelry, or long hair can be drawn
into air vents.
Do not use on a ladder or unstable support. Stable
footing on a solid surface enables better control of the
power tool in unexpected situations.
POWER TOOL USE AND CARE
Do not force the power tool. Use the correct power
tool for your application. The correct power tool will
do the job better and safer at the rate for which it was
designed.
Do not use the power tool if the switch does not turn
it on and off. Any power tool that cannot be controlled
with the switch is dangerous and must be repaired.
Disconnect the plug from the power source and/or
the battery pack from the power tool before making
any adjustments, changing accessories, or storing
power tools. Such preventive safety measures reduce
the risk of starting the power tool accidentally.
Store idle power tools out of the reach of children and
do not allow persons unfamiliar with the power tool
or these instructions to operate the power tool. Power
tools are dangerous in the hands of untrained users.
Maintain power tools. Check for misalignment or
binding of moving parts, breakage of parts and any
other condition that may affect the power tool’s
operation. If damaged, have the power tool repaired
2 — English

GENERAL POWER TOOL SAFETY WARNINGS
before use. Many accidents are caused by poorly
maintained power tools.
Keep cutting tools sharp and clean. Properly maintained
cutting tools with sharp cutting edges are less likely to
bind and are easier to control.
Use the power tool, accessories and tool bits etc.
in accordance with these instructions, taking into
account the working conditions and the work to be
performed. Use of the power tool for operations different
from those intended could result in a hazardous situation.
BATTERY TOOL USE AND CARE
Recharge only with the charger specified by the
manufacturer. A charger that is suitable for one type
of battery pack may create a risk of fire when used with
another battery pack.
Use power tools only with specifically designated
battery packs. Use of any other battery packs may create
a risk of injury and fire.
When battery pack is not in use, keep it away from
other metal objects, like paper clips, coins, keys, nails,
screws or other small metal objects, that can make a
connection from one terminal to another. Shorting the
battery terminals together may cause burns or a fire.
Under abusive conditions, liquid may be ejected from
the battery; avoid contact. If contact accidentally
occurs, flush with water. If liquid contacts eyes,
additionally seek medical help. Liquid ejected from the
battery may cause irritation or burns.
SERVICE
Have your power tool serviced by a qualified repair
person using only identical replacement parts. This will
ensure that the safety of the power tool is maintained.
When servicing a power tool, use only identical
replacement parts. Follow instructions in the
Maintenance section of this manual. Use of unauthorized
parts or failure to follow Maintenance instructions may
create a risk of shock or injury.
BELT SANDER SAFETY WARNINGS
Hold power tool by insulated gripping surfaces, when
performing an operation where the cutting accessory
may contact hidden wiring. Cutting accessory
contacting a “live” wire may make exposed metal parts
of the power tool “live” and could give the operator an
electric shock.
Know your power tool. Read operator’s manual
carefully. Learn its applications and limitations, as
well as the specific potential hazards related to this
power tool. Following this rule will reduce the risk of
electric shock, fire, or serious injury.
Always wear eye protection with side shields marked
to comply with ANSI Z87.1 when assembling parts,
operating the tool, or performing maintenance.
Following this rule will reduce the risk of serious personal
injury.
Protect your lungs. Wear a face or dust mask if the
operation is dusty. Following this rule will reduce the risk
of serious personal injury.
Protect your hearing. Wear hearing protection during
extended periods of operation. Following this rule will
reduce the risk of serious personal injury.
Battery tools do not have to be plugged into an
electrical outlet; therefore, they are always in
operating condition. Be aware of possible hazards
when not using your battery tool or when changing
accessories. Following this rule will reduce the risk of
electric shock, fire, or serious personal injury.
Do not place battery tools or their batteries near fire
or heat. This will reduce the risk of explosion and possibly
injury.
Do not crush, drop or damage battery pack. Do not
use a battery pack or charger that has been dropped
or received a sharp blow. A damaged battery is subject
to explosion. Properly dispose of a dropped or damaged
battery immediately.
Batteries can explode in the presence of a source
of ignition, such as a pilot light. To reduce the risk of
serious personal injury, never use any cordless product
in the presence of open flame. An exploded battery can
propel debris and chemicals. If exposed, flush with water
immediately.
Do not charge battery tool in a damp or wet location.
Do not use, store, or charge battery packs or products
in locations where the temperature is less than 50°F
or more than 100°F. Do not store outside or in vehicles.
Under extreme usage or temperature conditions,
battery leakage may occur. If liquid comes in contact
with your skin, wash immediately with soap and water.
If liquid gets into your eyes, flush them with clean
water for at least 10 minutes, then seek immediate
medical attention. Following this rule will reduce the risk
of serious personal injury.
Save these instructions. Refer to them frequently and
use them to instruct others who may use this tool. If you
loan someone this tool, loan them these instructions also.
3 — English
SYMBOLS
The following signal words and meanings are intended to explain the levels of risk associated with this product.
SYMBOL SIGNAL MEANING
DANGER:
WARNING:
CAUTION:
NOTICE:
Some of the following symbols may be used on this product. Please study them and learn their meaning. Proper interpretation of these symbols will allow you to operate the product better and safer.
Indicates a hazardous situation, which, if not avoided, will result in death or
serious injury.
Indicates a hazardous situation, which, if not avoided, could result in death or
serious injury.
Indicates a hazardous situation, that, if not avoided, may result in minor or
moderate injury.
(Without Safety Alert Symbol) Indicates information considered important, but
not related to a potential injury (e.g. messages relating to property damage).
SYMBOL NAME DESIGNATION/EXPLANATION
Safety Alert Indicates a potential personal injury hazard.
Read Operator’s
Manual
Eye Protection
To reduce the risk of injury, user must read and understand operator’s
manual before using this product.
Always wear eye protection with side shields marked to comply with
ANSI Z87.1.
Wet Conditions Alert Do not expose to rain or use in damp locations.
This product uses lithium-ion (Li-ion) batteries. Local, state or federal
Recycle Symbol
V Volts Voltage
min Minutes Time
Direct Current Type or a characteristic of current
n
o
.../min Per Minute Revolutions, strokes, surface speed, orbits etc., per minute
No Load Speed Rotational speed, at no load
laws may prohibit disposal of batteries in ordinary trash. Consult your
local waste authority for information regarding available recycling and/
or disposal options.
4 — English
FEATURES
PRODUCT SPECIFICATIONS
Belt Size ...............................................................................................................................................................3 in. x 18 in.
Sanding Surface .....................................................................................................................................................17.5 sq. in.
No Load Speed ..............................................................................................................................................400-935 ft./min.
ASSEMBLY
WARNING:
If any parts are damaged or missing do not operate
this product until the parts are replaced. Use of
this product with damaged or missing parts could
result in serious personal injury.
If any parts are damaged or missing, please call 1-866-539-1710 for assistance.
WARNING:
Do not attempt to modify this product or create
accessories not recommended for use with this
product. Any such alteration or modification is
misuse and could result in a hazardous condition
leading to possible serious personal injury.
OPERATION
WARNING:
Do not allow familiarity with this product to make
you careless. Remember that a careless fraction
of a second is sufficient to inflict serious injury.
WARNING:
Always remove battery pack from the tool when
you are assembling parts, making adjustments,
cleaning, or when not in use. Removing battery
pack will prevent accidental starting that could
cause serious personal injury.
WARNING:
Always wear eye protection with side shields
marked to comply with ANSI Z87.1, along with
hearing protection. Failure to do so could result
in objects being thrown into your eyes and other
possible serious injuries.
WARNING:
Do not use any attachments or accessories not
recommended by the manufacturer of this product.
The use of attachments or accessories not
recommended can result in serious personal injury.
APPLICATIONS
You may use this tool for the purposes listed below:
Sanding wood, metals, plastics, and other materials
Smoothing rough boards, chamfering, rounding edges
Removing rust, paint, varnishes, and stains
TURNING THE SANDER ON/OFF
See Figure 1, page 10.
To turn the sander on, depress the switch trigger.
To turn the sander off, release the switch trigger.
LOCK-ON BUTTON
See Figure 1, page 10.
The lock-on feature allows you to lock the switch trigger in
the on position. Locking the switch trigger on allows you to
operate the sander for extended periods of time.
Do not lock the switch trigger if you might need to suddenly
stop the sander.
To lock on:
Depress the switch trigger.
Push in the lock-on button.
Release the switch trigger.
Release the lock-on button.
NOTE: To disengage the lock, depress the trigger and
release.
5 — English

OPERATION
INSTALLING/REMOVING THE BATTERY
PACK
See Figure 2, page 10.
WARNING:
Before installing the battery pack, always make
sure the switch trigger is not in the locked-on
position. Failure to do so could result in accidental
starting of the sander, resulting in possible serious
injury.
To install:
Make sure the switch is not in the locked-on position.
Insert the battery pack.
Make sure the latches on each side of the battery pack
snap into place and the battery pack is secured in the
product before beginning operation.
To remove:
Depress the latches on each side of the battery pack.
For complete charging instructions, see the operator’s manu-
als for your battery pack and charger.
SELECTING SANDING BELTS
Selecting the correct size and type of sanding belt is an
important step in achieving a high quality sanded finish. Aluminum oxide, silicon carbide, and other synthetic abrasives
are best for power sanding.
In general, when sanding, coarse grit removes the most
material and fine grit produces the best finish. The condition of the surface to be sanded determines which grit will
do the best job. If the surface is rough, start with a coarse
grit and sand until the surface is uniform. Then use medium
grit to remove scratches left by the coarser grit. Finally, use
finer grit for finishing the surface. Always continue sanding
with each grit until the surface is uniform.
INSTALLING/CHANGING SANDING BELTS
See Figures 3 - 5, page 10.
Remove the battery pack.
Position the sander on its side.
WARNING:
Keep hands and fingers clear of both rollers and
spring mechanism at all times. Failure to do so
could result in fingers getting pinched, causing
serious injury.
Release belt tension by lifting the tension release lever.
NOTE: If you are changing sanding belts, remove the old
sanding belt.
Install the sanding belt. Make sure the arrow inside the belt
is pointing in the direction of rotation, which is clockwise
when looking into the open side of the sander.
NOTE: Match the arrow on the sanding belt to that of the
housing.
CAUTION:
If the sanding belt is not a bidirectional belt,
ensure that the arrow inside the belt is pointing
in the direction of the rotation (clockwise when
looking into the open side of the sander). Installing
unidirectional sanding belts backwards can create
a hazardous condition.
Align the sanding belt to its correct position.
Lower the tension release lever to secure the sanding
belt.
ADJUSTING SANDING BELT TRACKING
See Figures 6 -7, page 11.
After installing a new sanding belt, you may need to adjust
the sanding belt tracking several times until the belt becomes
conditioned.
Belt life is greatly increased if you regularly adjust the sanding belt tracking. When correctly adjusted, the outer edge
of the sanding belt should be even with the outer edge of
the base of the sander.
Make sure the switch is not in the locked-on position.
Install the battery pack.
Position the sander upside down.
NOTE: This position is for adjustments only. The sanding
belt should not contact a workpiece or any foreign object
when you are making belt tracking adjustments.
Depress the switch trigger and release immediately.
Choose one of these options:
•Sanding belt runs inward: Turn the tracking knob
slowly counterclockwise.
•Sanding belt runs outward: Turn the tracking knob
slowly clockwise.
NOTE: Turn the tracking knob until you are sure the sand-
ing belt is secure, and it will not come off the sander or
contact internal parts.
NOTICE:
If the sanding belt wears excessively on the inner
edge it is probably adjusted too far inward and is
rubbing against internal parts. If this is the case,
readjust with the tracking knob.
Start the sander and fine-adjust the tracking knob until
the belt stabilizes.
6 — English
OPERATION
WARNING:
Keep hands and fingers away from a moving
sanding belt. Any part of the body coming in
contact with a moving sanding belt could result
in serious injury. Do not wear loose clothing or
jewelry when operating the sander. They could get
caught in moving parts and foreign objects could
get thrown away from the sander causing injury.
DUST COLLECTION BAG
See Figure 8, page 11.
WARNING:
Do not use the dust collection bag when sanding
metal. Using the dust collection bag when sanding
metal creates a fire hazard, which could damage
the tool and lead to serious personal injury.
To attach the dust collection bag:
Remove the battery pack.
Slide the dust bag retainer over the blower exhaust hole
on the sander.
To empty the dust collection bag:
For more efficient operation, empty the dust collection bag
when it is no more than half full. This action permits the air
to flow through the bag better. Always empty and clean the
dust collection bag thoroughly upon completion of a sanding
operation and before placing the sander in storage.
WARNING:
Collected sanding dust from sanding surface
coatings such as polyurethanes, linseed oil, etc.,
can self-ignite in the sander dust collection bag
or elsewhere and cause fire. To reduce the risk of
fire, always empty the dust bag frequently (10-15
minutes) while sanding and never store or leave
a sander without totally emptying its dust bag.
Also follow the recommendations of the coatings
manufacturers.
ADJUSTING THE FRONT HANDLE
See Figure 9, page 11.
The front handle can be adjusted to one of three positions,
depending on operator preference.
Remove the battery pack.
Remove the hex key from the storage area.
Loosen and remove the set screw from the adjustable
handle.
Slide the handle to the desired operating position. Align
the hole in the handle with the channel on the rail.
Reinsert and securely tighten the set screw.
NOTE: Always make sure the handle is locked into one
of the lock positions.
Place the hex key in the storage area.
Make sure the sander is not in the locked-on position
before reinstalling the battery pack.
VARIABLE SPEED CONTROL DIAL
See Figure 10, page 11.
The sander has a variable speed control dial, A (slowest)
to F (fastest), designed to allow operator control of belt
speed. To increase belt speed, turn the variable speed control
dial to a higher setting. Turn to a lower setting to decrease
belt speed. Refer to the chart on page 8 for proper speed
selections.
PROPER HAND PLACEMENT
See Figure 11, page 11.
The front and rear handles allow two-handed operation
which aids in maintaining control, keeping sander level
with workpiece, and keeping hands clear of sanding belt.
When carrying or operating the sander always hold the front
handle with the left hand and the rear handle with the right
hand as shown.
WARNING:
Keep hands and fingers clear of moving sanding
belt, front idler roller, and drive roller assembly.
Failure to do so will result in serious personal injury.
Remove the battery pack.
Remove the dust collection bag from the sander.
Unzip the dust bag.
Shake out the dust.
Zip up the dust bag.
Replace the dust collection bag.
NOTE: Periodically turn the dust bag inside out and thor-
oughly clean it.
WARNING:
Do not let your fingers rest over the front or right
edge of the sander. If the sanding belt should run
off, or if it is not properly adjusted, your fingers
could come in contact with the moving sanding
belt, resulting in possible serious injury.
7 — English
OPERATION
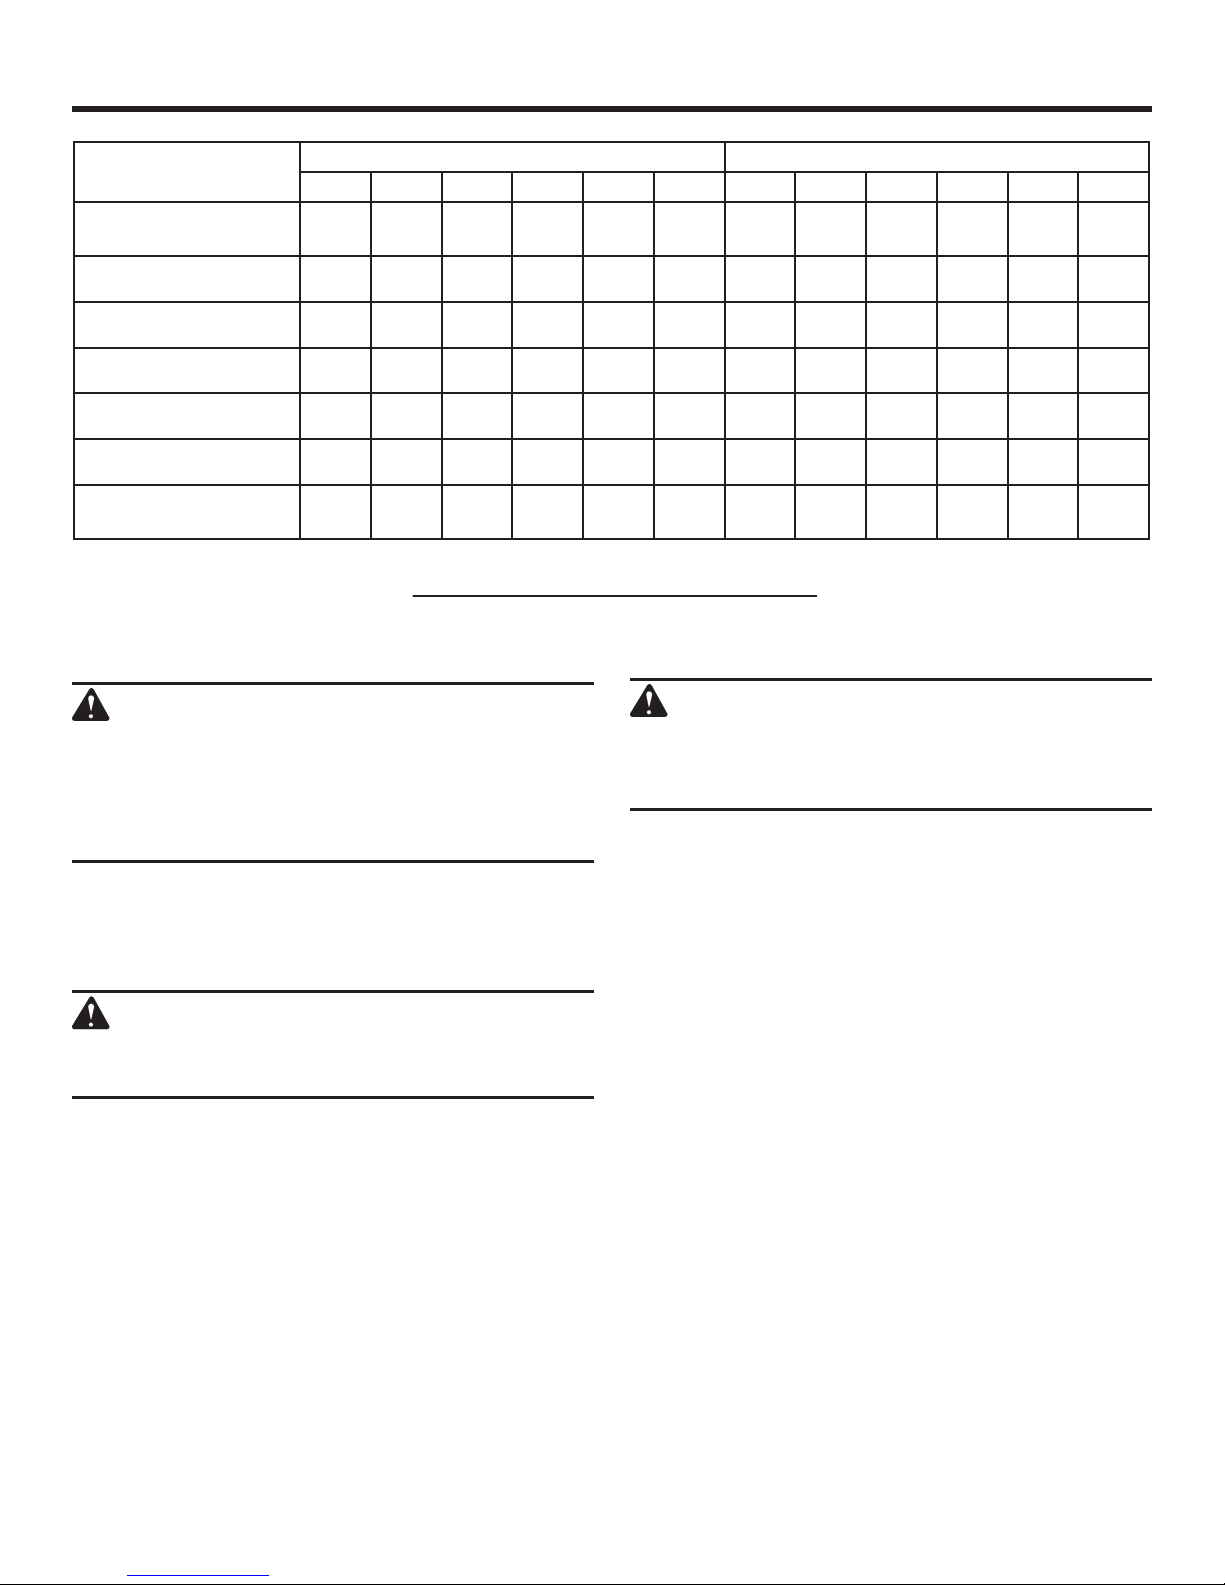
MATERIAL
UNDRESSED
LUMBER
SOFTWOOD
CHIPBOARD
LUMBER
RUST REMOVAL
PAINTED SURFACE
NON-FERROUS
METAL
A B C D E F 40 60 80 100 150 240
SPEED BELT GRIT
WARNING:
The sander is designed to be operated as shown
with both hands on the tool at all times for
maximum control. Never operate the tool overhead
or inverted from the proper operating position;
serious personal injury may result.
OPERATING THE SANDER
See Figure 12, page 11.
Secure the work to prevent it from moving under the
sander.
WARNING:
Unsecured work could be thrown towards the
operator, causing injury.
Turn the sander on and let the motor reach its maximum
speed before placing the sander on the work surface.
Lower the sander to the work surface with a slight forward
motion.
Move the sander slowly over the work surface, using the
rear handle to control the sander and the front handle to
guide the sander.
NOTE: Allowing the sander to remain in one place will
result in an uneven surface.
WARNING:
Keep a firm grip on the sander with both hands
at all times. Failure to do so could result in loss of
control leading to possible serious injury.
The sander is designed to provide the proper weight on the
sanding belt. Excessive pressure will result in the following:
Uneven work
Clogged sanding belts
Premature sanding belt wear
Possible motor burnout
Irregular sanding belt tracking
HELPFUL TIPS
If the sanding belt slips or does not track while sand-
ing, you may be applying too much pressure. When this
occurs, remove the sander from the workpiece. If you
properly adjust the belt tracking, the sanding belt will
return to its normal and correct position on the drive
roller and front roller.
Use a coarser sanding belt for heavy sanding, not heavy
pressure. The weight of the tool is sufficient to provide
adequate pressure at the correct location.
The front roller of the sander is not designed for contour
sanding. Sanding on the front roller could cause irregularity in the sanding belt tracking.
8 — English
MAINTENANCE
WARNING:
When servicing, use only identical replacement
parts. Use of any other part could create a hazard
or cause product damage.
WARNING:
Always wear eye protection with side shields
marked to comply with ANSI Z87.1. Failure to do
so could result in objects being thrown into your
eyes and other possible serious injuries.
WARNING:
To avoid serious personal injury, always remove
the battery pack from the tool when cleaning,
performing any maintenance, or when storing the
tool.
GENERAL MAINTENANCE
Avoid using solvents when cleaning plastic parts. Most
plastics are susceptible to damage from various types of
commercial solvents and can be damaged by their use. Use
clean cloths to remove dirt, dust, oil, grease, etc.
WARNING:
Do not at any time let brake fluids, gasoline,
petroleum-based products, penetrating oils, etc.,
come in contact with plastic parts. Chemicals can
damage, weaken or destroy plastic which could
result in serious personal injury.
NOTE: ILLUSTRATIONS START ON PAGE 10
AFTER FRENCH AND SPANISH LANGUAGE SECTIONS.
This product has a 90-Day Satisfaction Guarantee Policy, as well as a Three-year Limited Warranty.
For Warranty and Policy details, please go to www.RIDGID.com or call (toll free) 1-866-539-1710.
9 — English
 Loading...