

Page 1
Series
WARNING!
Read this Operator’s Manual carefully before using
this tool. Failure to understand and follow the contents of this manual may
result in electrical shock,
fire, and/or serious personal injury.
Operator’s Manual
This manual covers the
following drums:
D2A
D2B
Find Quality Products Online at: [email protected]
www.GlobalTestSupply.com
Page 2
Table of Contents
Introduction
Regulatory Statements
Safety Symbols
General Safety Rules
Work Area Safety
Electrical Safety
Personal Safety
Equipment Use and Care
Pre-Operation Inspection
SeeSnake rM200 Overview
Description
Universal Specifications
Standard Equipment
System Components
rM200A Description
D2A Specifications
rM200B Description
D2B Specifications
Specific Safety Information
SeeSnake rM200 Safety
Operating Instructions
Placement
Opening the rM200 Case
Installing the Drum
Routing the Camera
Inspection Overview
Pipe Guides
Integrated Counter
Drum Keypad
Individual Components
Handles and Docks
Stow Bin
Self-Leveling Camera
System Cable Assembly
Bearings
Docking System
Mounting the CS6x Versa onto the rM200
Mounting the CS65x onto the rM200
................................................................................................................ 8
............................................................................................................... 14
............................................................................................................ 16
................................................................................................................. 21
................................................................................................................. 22
............................................................................................. 4
......................................................................................................... 4
...................................................................................................... 5
........................................................................................................ 5
........................................................................................................ 5
......................................................................................... 6
............................................................................................ 9
................................................................................................. 9
................................................................................................ 9
.................................................................................................11
..................................................................................................11
................................................................................................ 12
................................................................................................. 12
......................................................................................... 13
....................................................................................... 14
.................................................................................................. 15
............................................................................................... 15
............................................................................................... 15
.................................................................................................. 17
................................................................................................ 20
............................................................................................. 21
......................................................................................... 21
.............................................................. 24
...................................................................... 24
2 – English – rM200
Find Quality Products Online at: [email protected]
www.GlobalTestSupply.com
Page 3

Maintenance and Support
Cleaning
Maintaining Components
Storage
Support
Service and Repair
Disposal
Appendix
Appendix A: Stow Bin Instructions
*Original Instructions – English
................................................................................................................. 25
........................................................................................ 25
................................................................................................................... 25
................................................................................................................... 25
................................................................................................. 25
.................................................................................................................. 26
.......................................................................... 26
rM200 – English – 3
Find Quality Products Online at: [email protected]
www.GlobalTestSupply.com
Page 4
Introduction
The warnings, cautions, and instructions discussed in this manual cannot cover all possible conditions
and situations that may occur. It
must be understood by the operator that common sense and caution
are factors that cannot be built into
this product, but must be supplied
by the operator.
Regulatory Statements
The EC Declaration of Conformity
(890-011-320.10) will accompany
this manual as a separate booklet
when required.
This device complies with Part 15
of FCC rules. Operation is subject
to the following two conditions:
(1) This device may not cause
harmful interference, and (2) this
device must accept any interference received, including interference that may cause undesired
operation.
Safety Symbols
In this manual and on the product, safety
symbols and signal words are used to communicate important safety information. This
section is provided to improve understanding of these signal words and symbols.
This is the safety alert symbol. It is
used to alert you to potential personal injury hazards. Obey all
safety messages that follow this
symbol to avoid possible injury or
death.
DANGER
DANGER indicates a hazardous situation
which, if not avoided, will result in death or
serious injury.
WARNING
WARNING indicates a hazardous situation
which, if not avoided, could result in death
or serious injury.
CAUTION
CAUTION indicates a hazardous situation
which, if not avoided, could result in minor
or moderate injury.
NOTICE
NOTICE indicates information that relates to the protection of property.
This symbol means read the oper-
ator’s manual carefully before
using the equipment. The manual
contains important information on
the safe and proper operation of
the equipment.
This symbol means always wear
safety glasses with side shields or
goggles when handling or using
this equipment to reduce the risk
of eye injury.
This symbol indicates the risk of
electrical shock.
4 – English – rM200
Find Quality Products Online at: [email protected]
www.GlobalTestSupply.com
Page 5
General Safety Rules
WARNING
Read all safety warnings and instructions. Failure to follow the warnings
and instructions may result in electrical
shock, fire, and/or serious injury.
SAVE THESE INSTRUCTIONS!
Work Area Safety
• Keep your work area clean and well lit.
Cluttered or dark areas invite accidents.
• Do not operate equipment in explo-
sive atmospheres, such as in the
presence of flammable liquids, gases,
or dust. Equipment can create sparks
which may ignite the dust or fumes.
• Keep children and bystanders away
while operating equipment. Distractions can cause you to lose control.
• Avoid traffic. Pay attention to moving ve-
hicles when using on or near roadways.
Wear high-visibility clothing or reflector
vests.
Electrical Safety
• Avoid body contact with earthed or
grounded surfaces such as pipes,
radiators, ranges, and refrigerators.
There is an increased risk of electrical
shock if your body is earthed or grounded.
• Do not expose equipment to rain or
wet conditions. Water entering equipment will increase the risk of electrical
shock.
• Keep all electrical connections dry
and off the ground. Touching equipment or plugs with wet hands can increase the risk of electrical shock.
• Do not abuse the cord. Never use the
cord for carrying, pulling, or unplugging
the power tool. Keep cord away from
heat, oil, sharp edges, and moving parts.
Damaged or entangled cords increase
the risk of electrical shock.
• If operating equipment in a damp lo-
cation is unavoidable, use a ground
fault circuit interrupter (GFCI) protected supply. Use of a GFCI reduces the
risk of electrical shock.
Personal Safety
• Stay alert, watch what you are doing,
and use common sense when operating equipment. Do not use equipment
while you are tired or under the influence of drugs, alcohol, or medication.
A moment of inattention while operating
equipment may result in serious injury.
• Dress properly. Do not wear loose cloth-
ing or jewelry. Loose clothes, jewelry, and
long hair can be caught in moving parts.
• Practice good hygiene. Use hot, soapy
water to wash hands and other body
parts exposed to drain contents after
handling or using drain inspection equipment. To prevent contamination from
toxic or infectious material, do not eat or
smoke while operating or handling drain
inspection equipment.
• Always use appropriate personal pro-
tective equipment when handling and
using equipment in drains. Drains may
contain chemicals, bacteria, and other
substances that may be toxic, infectious,
and cause burns or other issues. Appropriate personal protective equipment always includes safety glasses and may
include a dust mask, hard hat, hearing
protection, drain cleaning gloves or mitts,
latex or rubber gloves, face shields, goggles, protective clothing, respirators, and
steel toed, non-skid footwear.
rM200 – English – 5
Find Quality Products Online at: [email protected]
www.GlobalTestSupply.com
Page 6
• If using drain cleaning equipment and
drain inspection equipment at the
same time, wear RID GID drain cleaning gloves. Never grasp the rotating
drain cleaning cable with anything else,
including other gloves or a rag which can
become wrapped around the cable and
cause hand injuries. Only wear latex or
rubber gloves underneath RID GID drain
cleaner gloves. Do not use damaged
drain cleaning gloves.
Equipment Use and Care
• Do not force equipment. Use the cor-
rect equipment for your application. The
correct equipment does the job better
and more safely.
• Do not use equipment if the power
switch does not turn it on and off. Any
equipment that cannot be controlled with
the power switch is dangerous and must
be repaired.
• Disconnect the plug from the power
source and/or the battery pack from
the equipment before making adjustments, changing accessories, or storing. Preventive safety measures reduce
the risk of injury.
• Store idle equipment out of the reach
of children and do not allow persons unfamiliar with the equipment
or these instructions to operate the
equipment. Equipment can be danger-
ous in the hands of untrained users.
• Maintain equipment. Check for mis-
alignment or binding of moving parts,
missing parts, breakage of parts, and
any other condition that may affect the
equipment’s operation. If damaged, have
the equipment repaired before use. Many
accidents are caused by poorly maintained equipment.
• Do not overreach. Keep proper footing
and balance at all times. This enables
better control of the equipment in unexpected situations.
• Use the equipment and accessories
in accordance with these instructions,
taking into account the working conditions and the work to be performed.
Use of the equipment for operations different from those intended can result in
hazardous situations.
• Use only accessories that are rec-
ommended by the manufacturer for
your equipment. Accessories that may
be suitable for one piece of equipment
may become hazardous when used with
other equipment.
• Keep handles dry, clean, and free from
oil and grease. Clean handles give better control of the equipment.
6 – English – rM200
Find Quality Products Online at: [email protected]
www.GlobalTestSupply.com
Page 7
Pre-Operation
Inspection
WARNING
To reduce the risk of serious injury from
electrical shock or other causes, and
to prevent damage to your equipment,
inspect all equipment and correct any
problems before each use.
To inspect all equipment, follow these steps:
1. Power off your equipment.
2. Disconnect and inspect all cords, cables, and connectors for damage or
modification.
3. Clean any dirt, oil, or other contamination from your equipment to ease
inspection and to prevent it from slipping from your grip during transport or
use.
4. Inspect your equipment for any broken, worn, missing, misaligned, or
binding parts, or any other condition
which might prevent safe, normal operation.
5. Refer to the instructions for all other
equipment to inspect and make sure
it is in good, usable condition.
6. Check your work area for the following:
• Adequate lighting.
• The presence of flammable liquids, vapors, or dust that may ignite. If present, do not work in area
until sources have been identified
and corrected. The equipment
is not explosion proof. Electrical
connections can cause sparks.
• A clear, level, stable, and dry
place for the operator. Do not use
the equipment while standing in
water.
7. Examine the job to be done and determine the correct equipment for the
task.
8. Observe the work area and erect barriers as necessary to keep bystanders
aw ay.
See additional product specific safety information and warnings starting on page
13.
rM200 – English – 7
Find Quality Products Online at: [email protected]
www.GlobalTestSupply.com
Page 8
SeeSnake rM200 Overview
ax
Description
The SeeSnake® M
™
rM200 series consists of the flagship reels, cameras, and
push cables in the premier product family of
SeeSnake Max Diagnostic Systems.
The rM200 comes with your choice of drums
from the D2 drum series, giving you on-thejob flexibility when the job demands a different push cable and camera combination.
The rM200 can be used with any SeeSnake
monitor and is designed to dock with the
CS6x Versa
®
and CS65x for convenient
transport, operation, and storage.
Heavily tested for durability, the rM200’s
case helps protect your push cable, prolonging the life of your equipment. Keeping the
push cable enclosed when not in use also
helps keep surfaces around and between
your work areas clean.
Each rM200 model includes a built-in sonde
which helps locate problems in the pipe. The
rM200A and rM200B feature a FleXmitter
®
sonde inside the spring assembly. FleXmitter
sondes have longer, more powerful antennae capable of putting out a stronger signal without inhibiting the camera’s flexibility
through turns. The sonde transmits a 512Hz
signal which can be detected by receivers
such as the RIDGID SeekTech® SR-20, SR24, SR-60, Scout™, or NaviTrack® II.
The rM200 is easy to transport with its handle assembly and wheels. One stow bin
comes standard with each rM200. Store a
paint can, gloves, business cards, wrenches, or any other tool you want to keep nearby in the stow bin. Additional stow bins can
be ordered and up to two can be installed
on the rM200.
The drum’s integrated counter measures
how far the camera has traveled inside the
pipe. The water-resistant keypad lets you
control the counter’s functions, which include day, date, time, distance, and preset
or custom text overlays.
8 – English – rM200
Find Quality Products Online at: [email protected]
www.GlobalTestSupply.com
Page 9
Universal Specifications
System Cable
Length
Case Dimensions
Length 527mm [20.8in]
Depth 349mm [13.8in]
Height 610mm [24in]
3 m [10 ft]
Standard Equipment
• rM200 case
• D2 drum
• One (1) stow bin
• Operator’s manual
• CS6x Versa hanger
• Shoulder strap
• Pipe guides
Wheels Dimensions
Width 28mm [1.1in]
Diameter 173mm [6.8in]
Pull Handle Dimensions
Length 511mm [20.1in]
Height 517mm [20.4in]
Stow Bin Dimensions
Width 239mm [9.4in]
Depth 156mm [6.2in]
Height 213mm [8.4in]
Operating Environment
-40°C to 55°C
Temperature
Storage
temperature
Ingress protection
(without monitor)
Relative humidity 5 to 95 percent
Altitude
Camera depth
rating
‡ While the camera can function in
extreme temperatures, some image
quality changes may occur.
‡
[-40°F to 131°F]
-40°C to 65°C
[-40°F to 149°F]
IP×5
4,000m
[13,123ft]
Waterproof to
100m [328.1ft]
System Components
Carry Handle
Cord Wrap
Push Cable
Guide
Front
Case
Drum Access
Opening
Integrated Counter
Keypad
SeeSnake System
Cable
Case Latches
(Three Per
Side)
Camera
Clip
Camera
Wheels
rM200 – English – 9
Find Quality Products Online at: [email protected]
www.GlobalTestSupply.com
Page 10
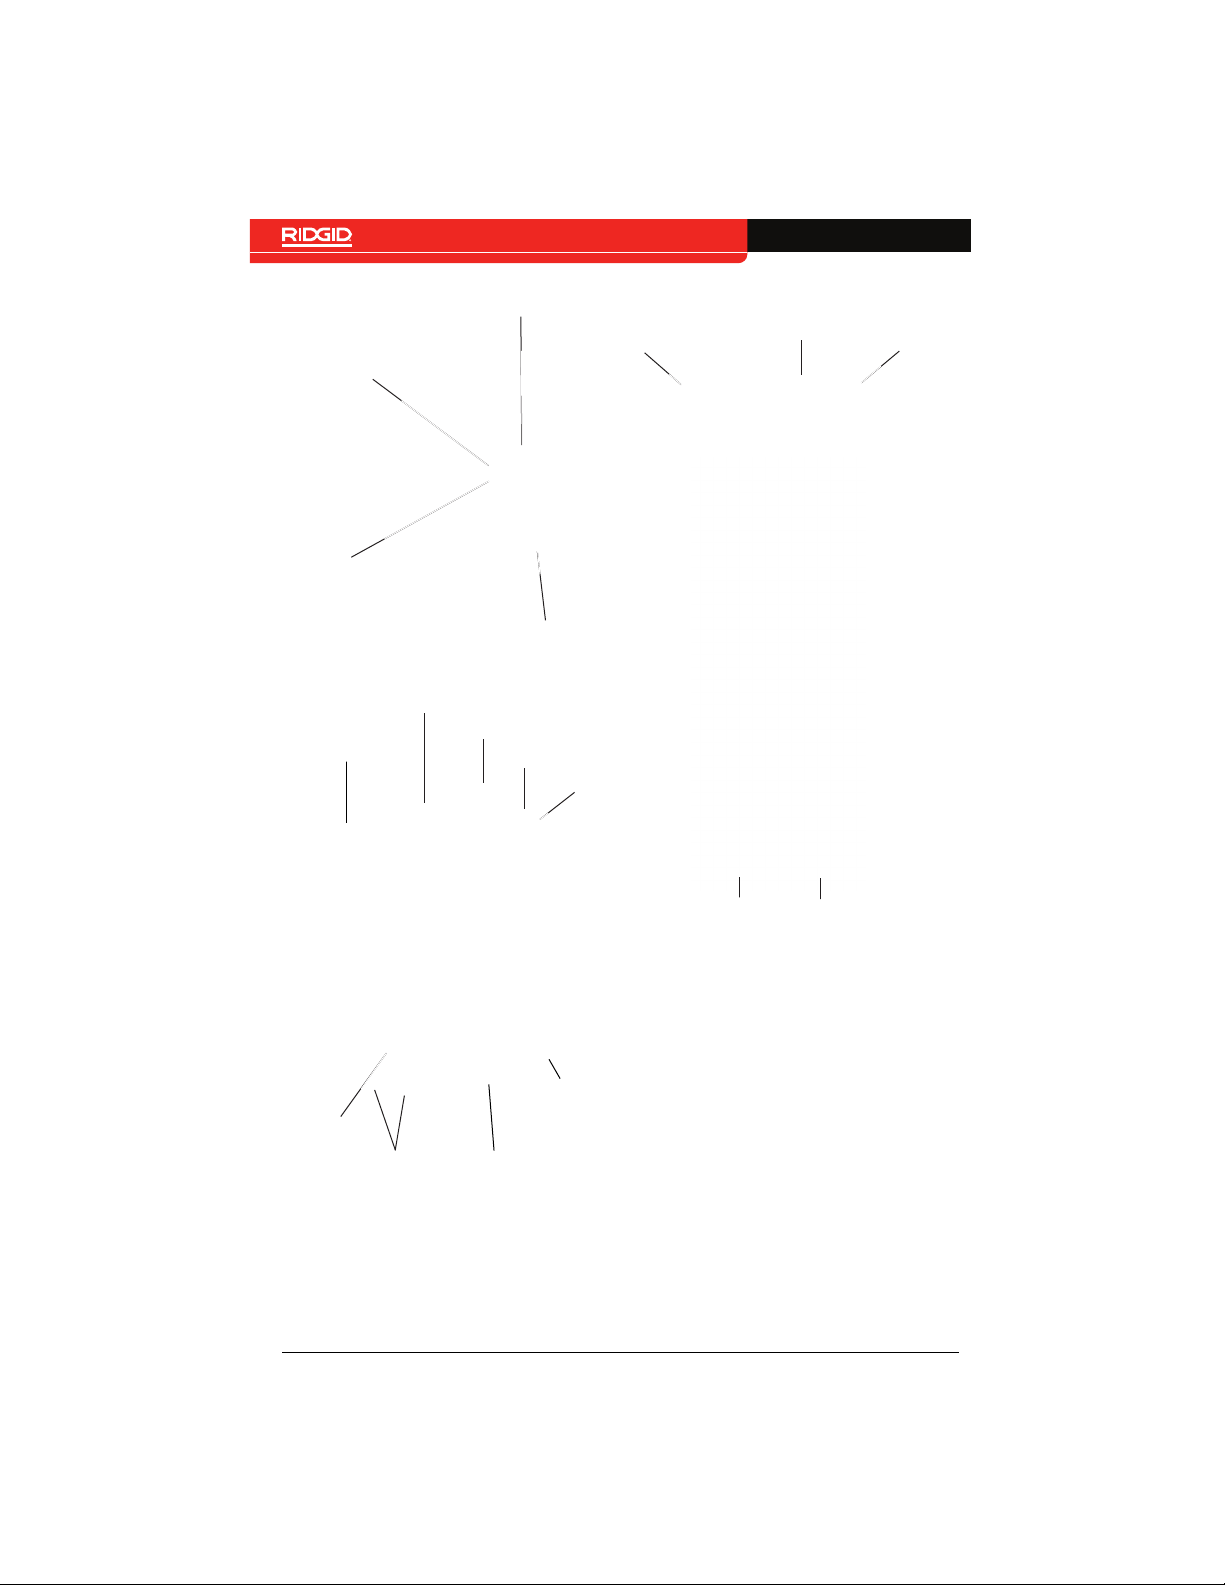
Drum ID Label
O-Ring
Pull Handle
Stow Bin
Counter Keypad
Push Cable
Handle Lock
Rear Case
Camera
CS6x Versa
Hanger
FleXmitter
(D2A and D2B)
®
Sonde
Spring
Case Latch
Feet
10 – English – rM200
Serial Number
Label
Slip-Ring
Assembly
D2A
D2B
Find Quality Products Online at: [email protected]
www.GlobalTestSupply.com
Page 11
rM200A Description
The rM200A consists of the rM200 case
with the D2A drum installed. A 61m [200ft]
long, moderately stiff push cable makes the
rM200A a versatile pipe inspection system.
The rM200A is best suited for lines 38mm
– 101 mm [1.5 in – 4in] in diameter. When
used with a 125 mm [5 in] pipe guide the
rM200A’s line capacity is 38mm – 203mm
[1.5in – 8in]. Achievable push distance depends on pipe conditions.
A FleXmitter
spring. The sonde helps locate problems in
the pipe.
®
sonde is built into the rM200A’s
D2A Specifications
Color ID Red
System Weight 16.4kg [36.1lb]
Drum Weight 7.4kg [16.3lb]
Drum Diameter 432mm [17in]
Camera
View Self-leveling
Length
26 mm [1 in]*
37mm [1.5 in]**
Diameter 25mm [1in]
Light 6LEDs
Sonde
Type FleXmitter
®
Frequency 512Hz
Resolution
NTSC 656 × 492 pixels
PA L 768 × 576 pixels
Spring assembly
Type Single
Length 316mm [12.4in]
Push cable
Length 61m [200ft]
Diameter 7.5mm [0.3in]
Fiberglass core
diameter
Minimum bend
radius
Pipe capacity
§
3.5mm [0.14in]
70mm [2.8in]
38mm – 203mm
[1.5in – 8in]
* Measured from lens to spring.
** Measured from lens to end of threads.
§ Actual pipe capacity depends on pipe
conditions.
rM200 – English – 11
Find Quality Products Online at: [email protected]
www.GlobalTestSupply.com
Page 12
rM200B Description
The rM200B consists of the rM200 case
with the D2B drum installed. The rM200B
has a 50 m [165 ft] long, stiff push cable
and a longer spring with a second, shorter spring nested inside. The dual, nested
spring gives the rM200B the ability to easily navigate multiple turns and transitions
while maintaining the stiffness necessary
to push through them and go farther down
long lines.
The rM200B is best suited for lines 51mm
– 101 mm [2 in – 4 in] in diameter. When
used with a 125 mm [5 in] pipe guide the
rM200B’s line capacity is 51mm – 203mm
[2in – 8in]. Achievable push distance depends on pipe conditions.
A FleXmitter
rM200B’s spring. The sonde helps locate
problems in the pipe.
®
sonde is built into the
D2B Specifications
Color ID Orange
System Weight 17kg [37.5lb]
Drum Weight 8.7kg [19.2lb]
Drum Diameter 432mm [17in]
Camera
View Self-leveling
Length
26 mm [1 in]*
37mm [1.5 in]**
Diameter 25mm [1in]
Light 6LEDs
Sonde
Type FleXmitter
®
Frequency 512Hz
Resolution
NTSC 656 × 492 pixels
PA L 768 × 576 pixels
Spring assembly
Type Dual, nested
12 – English – rM200
Length 435mm [17.1in]
Push cable
Length 50m [165ft]
Diameter 9mm [0.4in]
Fiberglass core
diameter
Minimum bend
radius
Pipe capacity
§
4.5mm [0.2in]
90mm [3.5in]
51mm – 203mm
[2in – 8in]
* Measured from lens to spring.
** Measured from lens to end of threads.
§ Actual pipe capacity depends on pipe
conditions.
Find Quality Products Online at: [email protected]
www.GlobalTestSupply.com
Page 13
Specic Safety
Information
WARNING
This section contains important safety
information that is specific to the rM200.
Read these precautions carefully before
using the equipment to reduce the risk
of electrical shock, fire, and/or serious
injury.
SAVE ALL WARNINGS AND
INSTRUCTIONS FOR FUTURE
REFERENCE!
SeeSnake rM200 Safety
• Read and understand this manual,
the digital reporting monitor’s manual, and the instructions for any other
equipment you are using before operating the equipment. Failure to follow all
instructions may result in property damage and/or serious injury. Keep this manual with the equipment for future use.
• Operating the equipment while in
water increases the risk of electrical shock. Do not operate the system
if operator or equipment are standing in
water.
• The equipment is not designed to pro-
vide high voltage protection and isolation. Do not use where a danger of
high voltage contact is present.
• To prevent damage to the equipment
and to decrease the risk of injury, do
not expose the equipment to mechanical shocks. Exposure to mechanical
shocks can damage equipment and increase the risk of serious injury.
• Always use appropriate personal pro-
tective equipment when handling and
using equipment in drains. Wear ap-
propriate protective equipment such as
latex or rubber gloves, goggles, face
shields, and respirators when inspecting drains that might contain hazardous chemicals or bacteria. Always wear
eye protection to protect against dirt and
other foreign objects.
rM200 – English – 13
Find Quality Products Online at: [email protected]
www.GlobalTestSupply.com
Page 14
Operating Instructions
Opening the rM200 Case
Placement
Place the rM200 and monitor near the pipe
entrance so you can manipulate the push
cable while viewing the display. Lay the
rM200 case on its back or position the pull
handle as a kick stand to make sure the
rM200 case does not tip during use.
Use the pull handle as a kick stand when
performing an inspection on a rooftop, hillside, or in a location that requires overhead
entry.
CAUTION
Make sure the camera is completely inside the drum before unlatching and
opening the rM200 case. If the camera
is not in the drum, the push cable can
unwind and cause damage or serious injury.
NOTICE
Open the rM200 case to install the drum,
replace the bearing, rewind the push cable,
install the docking handle, and to maintain
and clean the rM200 system.
To open the rM200 case, follow these steps:
1. Lock the pull handle against the rear
case.
Note: Refer to the Handles and Docks
section for instructions on how to position the handle.
2. Remove the stow bin.
Note: Refer to Appendix A for instructions on how to remove the stow bin.
3. Lay the rM200 case on its back.
4. Secure the camera in the drum by
pushing it through the drum access
opening.
Do not open the rM200
case while the camera is
stored in the camera clip.
Secure the camera inside
the drum.
Note: Refer to the Handles and Docks section for instructions on how to lock the handle into different positions.
14 – English – rM200
Find Quality Products Online at: [email protected]
www.GlobalTestSupply.com
Page 15
5. Unwrap the SeeSnake system cable
from the cord wrap.
6. Slide all six case latches toward the
handle to unlock the rM200 case.
7. Lift handle to open.
Installing the Drum
The rM200 case gives you the ability to
swap out the drum when the job requires a
different push cable and camera combination.
To install the drum, follow these steps:
1. Open the rM200 case.
2. Place the drum in the rM200 case.
3. Make sure the bearing faces down
and the counter keypad faces up.
4. Spin the drum to make sure the drum
spins freely on the bearing.
5. Lock all six (6) of the rM200 case
latches.
NOTICE
The O-ring can fall out
easily. Make sure the
O-ring is properly installed before use.
Inspection Overview
To perform a pipe inspection, connect any
See Snake monitor to the reel, power on the
system, push the push cable through the
pipe, and observe the display.
For advanced inspection options, such as
capturing media, locating the sonde, tracing
the push cable, and delivering reports, refer
to the manual that comes with your monitor.
Connecting to the Monitor
Connect the system cable to the monitor by
aligning the connector guide pin with the
socket and pushing the connector straight
in.
NOTICE
Socket
Only twist the outer locking sleeve. Never bend or
twist the connector.
Guide Pin
Connector Ridge
Routing the Camera
If the camera is inside the drum, route the
camera through the drum access opening
and the push cable guide. Secure the camera in the camera clip when not in use.
Outer Locking Sleeve
Retrieving the Camera
Pull the push cable back out of the pipe with
slow, steady force and feed small lengths
back into the drum. Wipe the push cable
with a paper towel or rag as you retrieve it.
NOTICE
Do not exert excessive
force or pull at sharp angles. Feeding longer
lengths or forcing the
push cable may cause it
to loop, kink, or break.
rM200 – English – 15
Find Quality Products Online at: [email protected]
www.GlobalTestSupply.com
Page 16
Pipe Guides
Pipe guides center the camera in the pipe,
improve picture quality, and help keep the
lens clear. Use pipe guides when possible
to reduce wear and tear on the camera system.
Pipe guides can easily be installed, adjusted, and removed to provide better camera
and push cable movement in the pipe. For
small pipes, tubes, or voids, the camera
head guide helps push the camera through
stubborn fittings. For larger pipes, ball
guides center the camera for better visibility
and light illumination.
Without Pipe Guide
Camera Head Guide Installation
Camera head guides can be used in smaller
pipes to push the camera through stubborn
fittings.
1. Loosen the screws on both sides of
the guide until it slides easily onto the
camera head.
2. Tighten the screws until the guide
stays in place, but do not over-tighten.
With Pipe Guide
16 – English – rM200
Find Quality Products Online at: [email protected]
www.GlobalTestSupply.com
Page 17
Ball Guide Installation
Ball guides are designed to slip onto the
spring and lock into place. Depending on
work conditions, you can place a ball guide
on the spring behind the camera to tilt the
camera head upward to view the top of the
pipe.
1. Make sure the ball guide is unlocked.
2. Slide the ball guide over the camera
and onto the spring.
Integrated Counter
The rM200 comes equipped with an integrated counter. The integrated counter measures the total length of the extended push
cable.
Use of the integrated counter is not required, but it is useful to keep track of how
far the push cable has gone in the line. The
integrated counter can also measure the
push cable’s distance from a temporary zero
point, such as a pipe head or joint, while still
keeping track of the total length of the push
cable.
3. Press down on the blue locks to secure the ball guide onto the spring.
4. Slide the red locks over the blue locks
to secure the ball guide into place.
Locked
NOTICE
fall off the spring. To avoid losing ball
guides and obstructing the pipe, do not
use excessive force to push through the
pipe when you feel resistance.
If a ball guide gets
snagged in a pipe, it can
Unlocked
Use the Zero key
have the rM200 with the counter keypad.
If you have the rM200 without the counter
keypad, zero the integrated counter with the
monitor’s keypad.
To measure the push cable with the integrated counter, follow these steps:
1. At any time during the inspection long
press (>3 seconds) the Zero key
set the system zero point.
2. Short press (<3 seconds) the Zero
to set a temporary zero point
key
at any time during the inspection. The
temporary zero point measurement
appears in brackets on-screen.
3. Press the Zero key again for one
second to clear the temporary measurement and return to the system
measurement.
on the rM200, if you
to
rM200 – English – 17
Find Quality Products Online at: [email protected]
www.GlobalTestSupply.com
Page 18
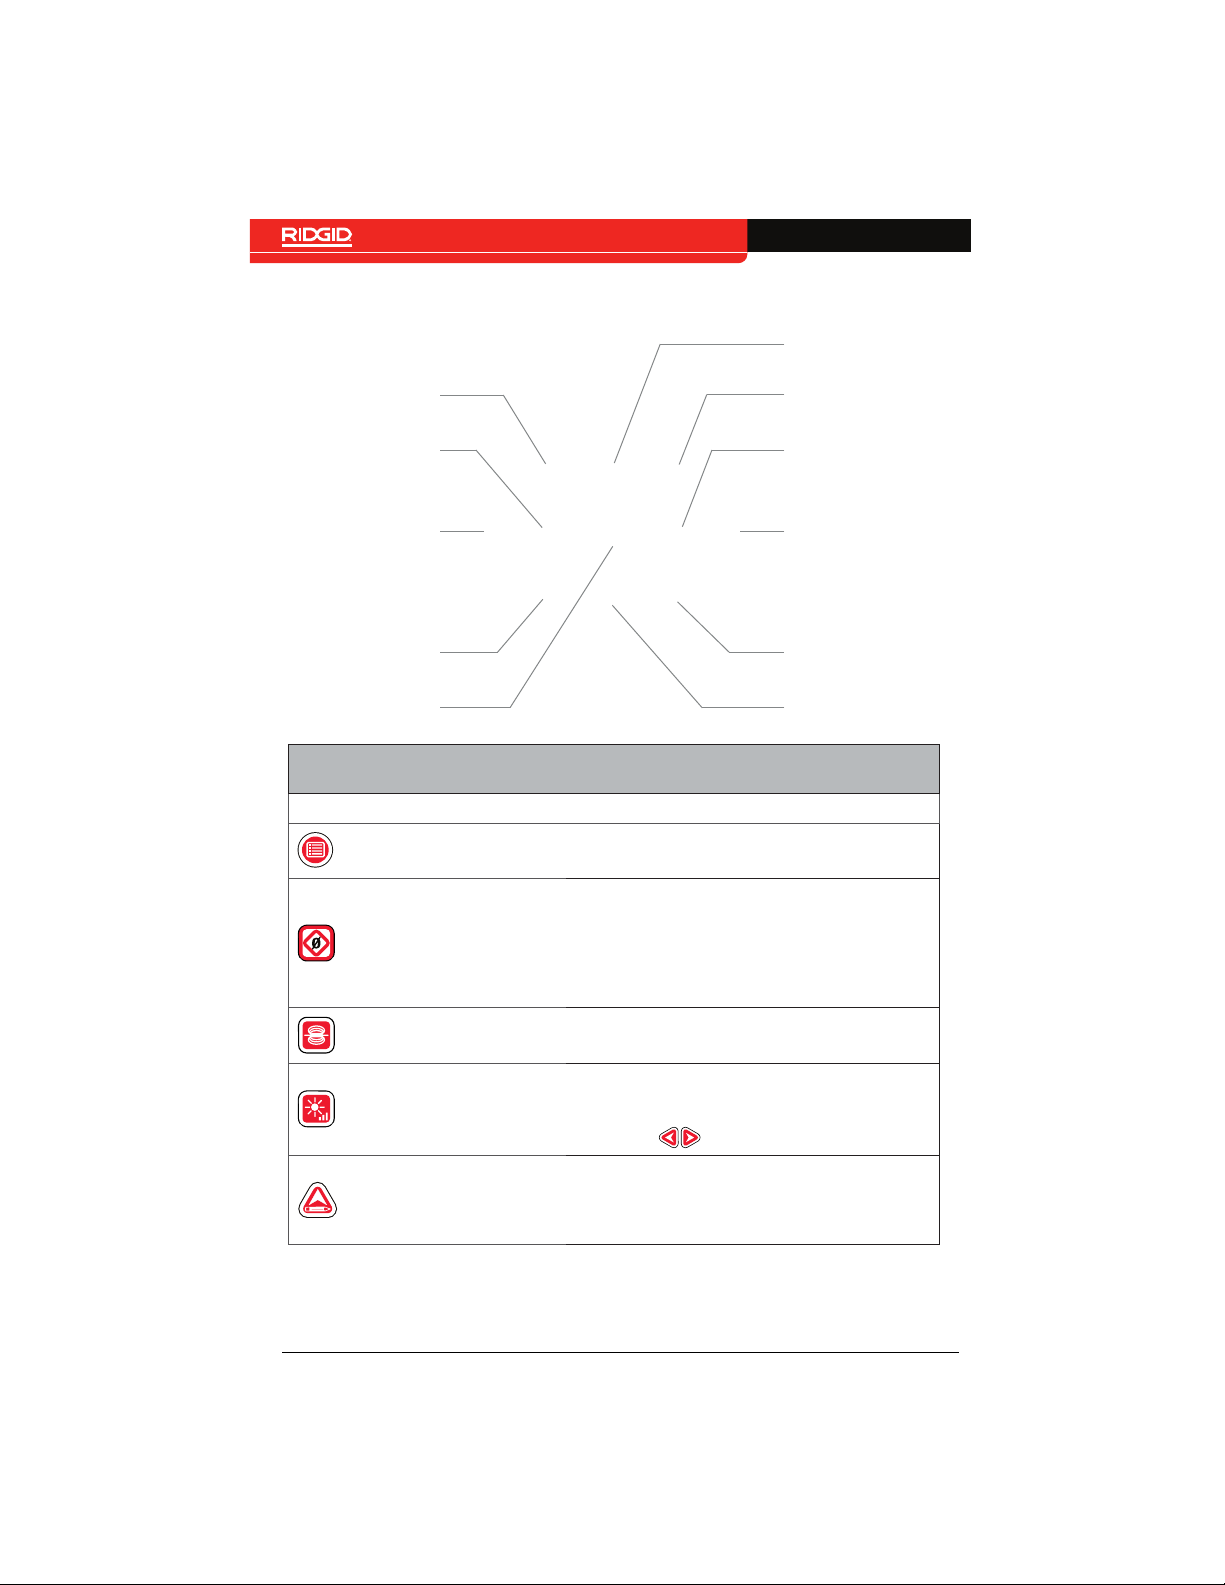
Drum Keypad
Up Arrow/Edit Key
Text Key
Left Arrow Key
Sonde Key
Distance Key
Zero/Select Key
Drum Keypad
Key Meaning
Menu/Back Key
Zero/Select Key
Sonde Key
LED Brightness Key
Up Arrow/Edit Key
Open the Main Menu and exit out of menus and
screens.
Select a highlighted menu item or long press
(>3 seconds) to set the system zero point. To
measure a temporary zero point of the total
length of push cable, press again for one second.
Press a third time to return to the total length
measurement.
Toggle the sonde on or off. When on, the LED
above the key is lit.
Control the brightness of the LEDs in the
camera. Press to increase or decrease
brightness levels or press once and use the
Arrow keys
Navigate menu choices and text characters.
Press to edit highlighted text. Refer to the OnScreen Text section for instructions on editing
on-screen text.
Menu/Back Key
Right Arrow Key
LED Brightness Key
Date/Time Key
Down Arrow Key
to adjust the brightness.
18 – English – rM200
Find Quality Products Online at: [email protected]
www.GlobalTestSupply.com
Page 19
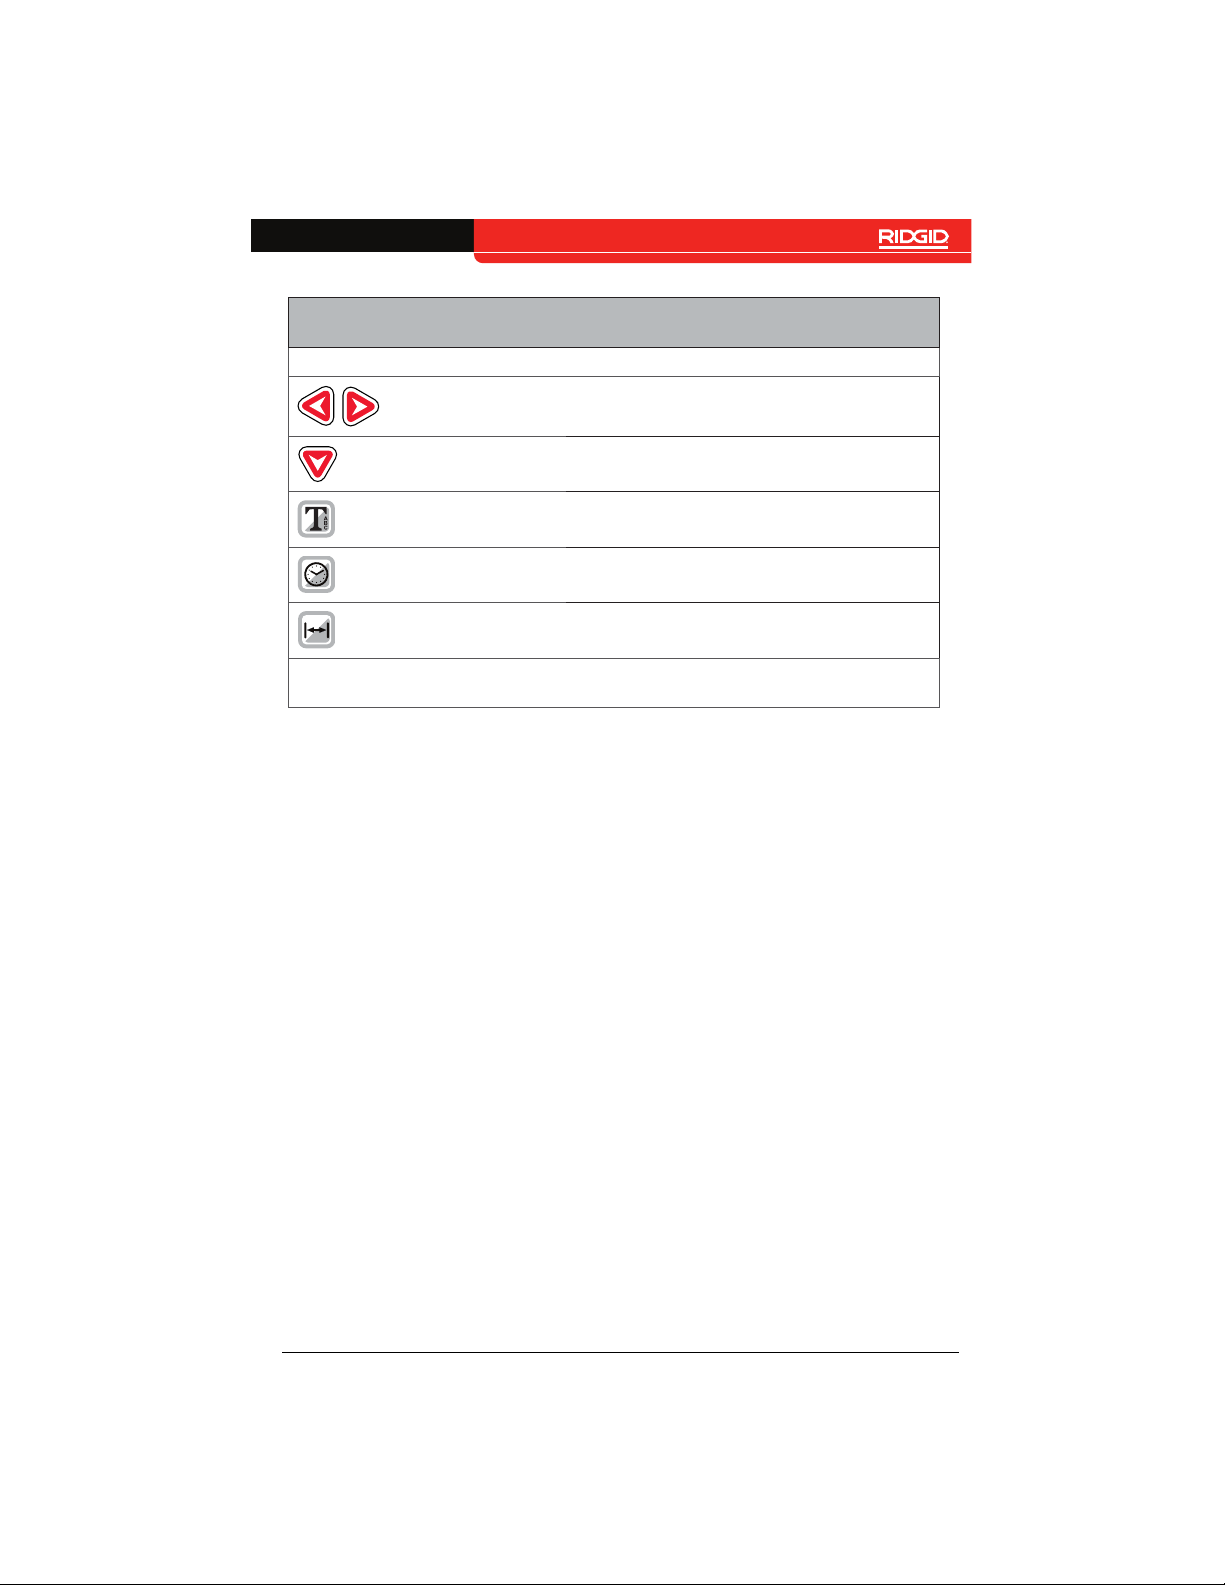
Drum Keypad
Key Meaning
Left/Right Arrow
*When toggled on, this feature is displayed on the monitor’s recorded video and
appears in the inspection report.
Keys
Down Arrow Key Navigate menu choices and text characters.
Text Key*
Date/Time Key*
Distance Key*
Navigate menu choices and text characters.
Toggle on or off to show or hide preset text or
custom text.
Toggle on or off to show or hide the date and
time of the inspection.
Toggle on or off to show or hide the integrated
counter measurement.
rM200 – English – 19
Find Quality Products Online at: [email protected]
www.GlobalTestSupply.com
Page 20
Individual Components
Handles and Docks
Carry Handle
The carry handle comes installed on the
rM200 case.
CS6x Versa Hanger
The CS6x Versa hanger lets you mount
the SeeSnake CS6x Versa Wi-Fi enabled
reporting monitor onto the rM200 for easy
transport. See page 24 for instructions on
docking the CS6x Versa hanger.
Pull Handle
The pull handle on the rM200 can be locked
in four positions. Each position has a different purpose which increases usability and
maneuverability.
• Midway for use as a kick stand.
• Upright to maneuver during transport.
• Against the rear case when in use.
• Against the front case for storage in
small spaces and transport when
going up or down ladders.
To position the pull handle, follow these
steps:
1. Set the rM200 case on its feet.
2. Press the handle lock and position the
handle.
3. Release the handle lock to lock the
handle into place.
20 – English – rM200
Find Quality Products Online at: [email protected]
www.GlobalTestSupply.com
Page 21
Stow Bin
The stow bin provides storage for gloves, a
paint can, business cards, pipe wrenches,
or other tools you want to keep nearby. The
rM200 comes with one stow bin. Up to two
(2) can be installed on the rM200.
Note: Refer to Appendix A for detailed instructions on how to install the stow bin.
Self-Leveling Camera
If using a drum that features a self-leveling camera, the bearings and weight of the
self-leveling camera may create a swinging effect when you push the push cable
through the pipe. The camera image settles
quickly when the push cable is steady.
The self-leveling camera can be removed to
troubleshoot problems, send for repair, or to
replace. Refer to Appendices C and D for instructions on how to remove and install the
camera head.
System Cable Assembly
The system cable assembly includes the following components:
• The system connector for connecting
to SeeSnake digital reporting monitors.
• 3m [10ft] of system cable.
• The slip-ring assembly, which is made
up of the slip-ring dial and the slip-ring
cavity on the frame.
Before cleaning the rM200, ensure the slipring dial is locked
Avoid getting the slip-ring assembly wet
when cleaning.
NOTICE
in the slip-ring cavity.
To avoid damaging the
slip-ring contact pins or
getting the internal electrical components wet, keep
the slip-ring assembly
locked.
rM200 – English – 21
Find Quality Products Online at: [email protected]
www.GlobalTestSupply.com
Page 22
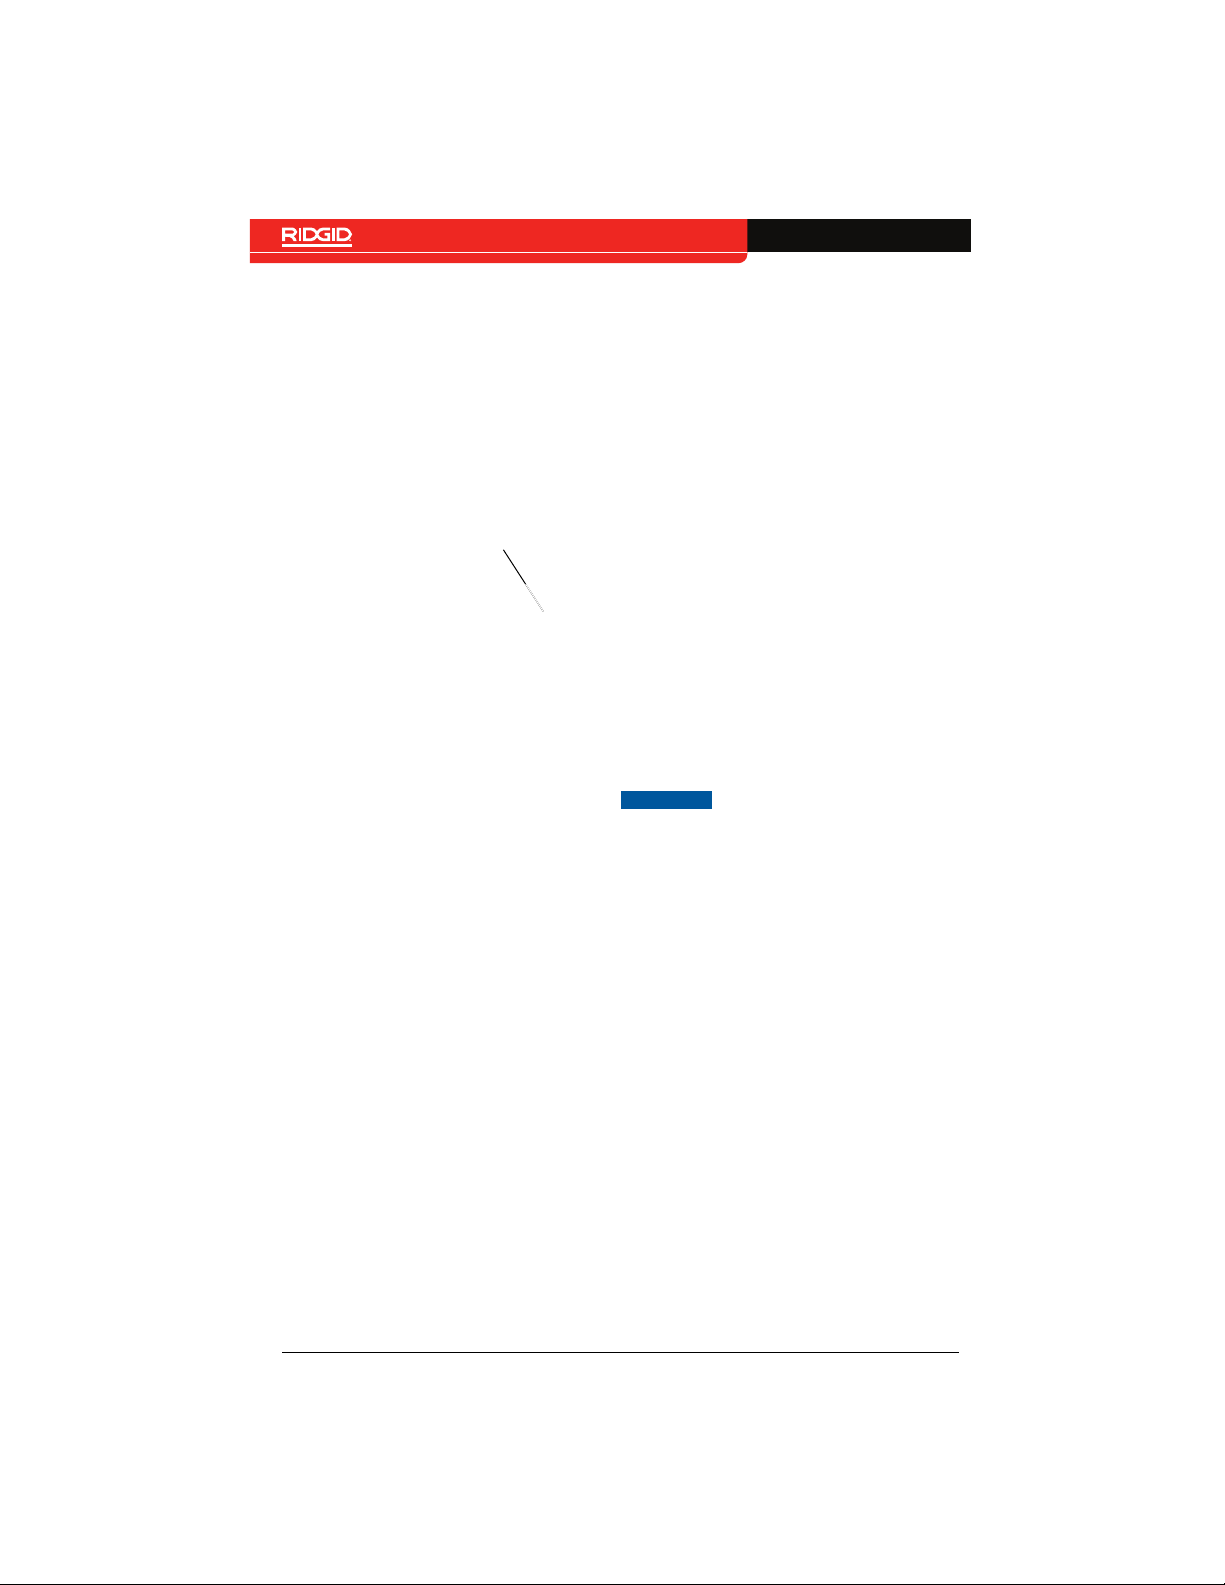
Bearings
There are two bearings in the rM200 system. The bearings allow the drum to spin
smoothly when pushing the cable and provide resistance when returning the push
cable to the drum.
One bearing attaches to the rM200 case
and is located inside the front case.
rM200
case
bearing
The second bearing attaches to the drum
and is located on the drum’s underside.
Each rM200 model has a different bearing.
The bearings can fall out. Do not substitute
the bearings.
Replacing the Bearing
The bearing is on the underside of the drum.
A different bearing comes with each D2 series drum. The bearing can become dirty
and worn. To clean, rinse in warm water and
a mild detergent.
To replace the bearing, follow these steps:
1. Open the rM200 case.
2. Lift the drum out of the rM200 case
and turn over, with the counter keypad
faced down.
3. Replace bearing.
4. Return the drum to the rM200 case
and make sure the bearing faces
down and the counter keypad faces
up.
5. Spin the drum to make sure the drum
spins freely on the bearing.
6. Lock all six (6) of the rM200 case
latches.
NOTICE
Do not use the rM200 without the bearing installed. If
the bearing is missing, the
push cable can damage or
break.
22 – English – rM200
Find Quality Products Online at: [email protected]
www.GlobalTestSupply.com
Page 23
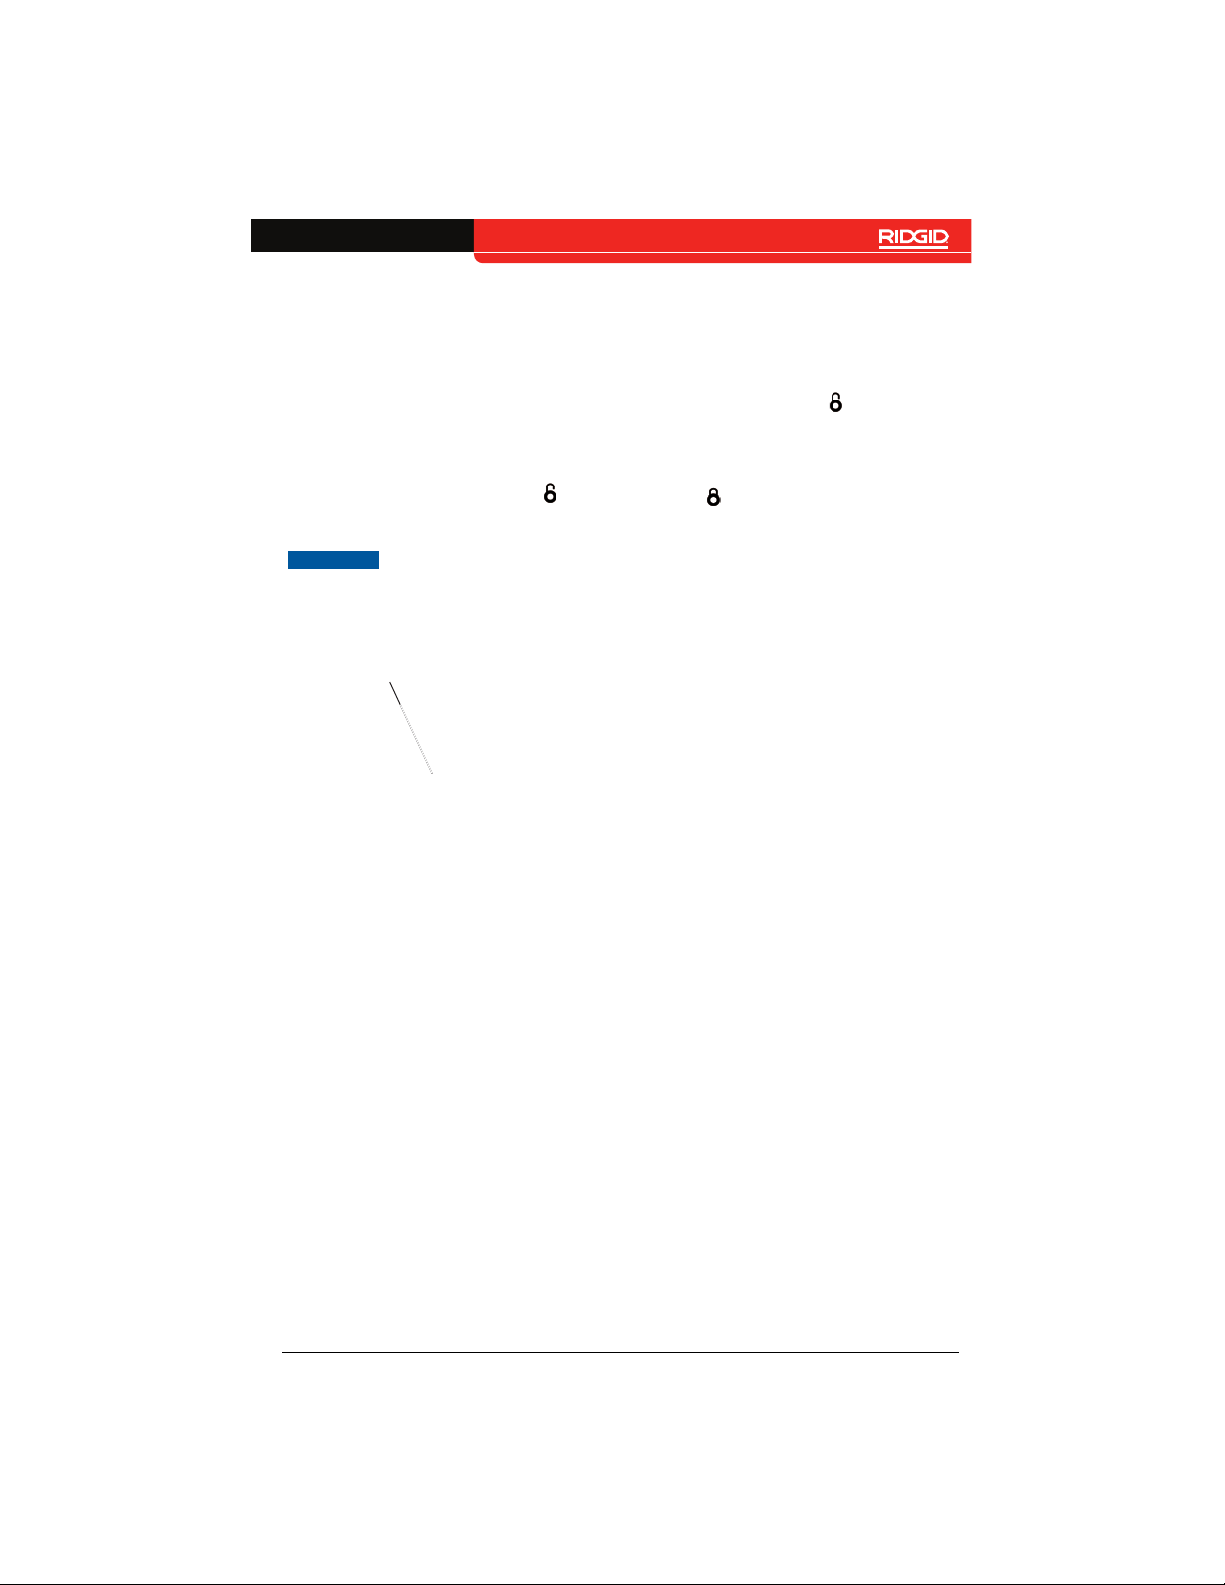
System Cable Removal
1. Disconnect the system cable from
the reporting monitor and remove the
monitor from the docking system.
2. Unwrap the system cable from the
cable wraps.
3. On the rear side of the rM200 case,
turn the slip-ring dial counter-clock-
wise to the unlocked position
4. Pull straight out.
NOTICE
Broken Contact Pin
Do not touch the contact
pins inside the slip-ring
dial. Stressing the contact
pins can cause them to
break.
.
System Cable Installation
To install the system cable, follow these
steps:
1. Align the arrow on the slip-ring dial
with the unlock symbol
and insert the slip-ring dial into the
slip-ring cavity.
2. Turn the slip-ring dial to the locked po.
sition
3. Hook the system cable into the frame
hook and snap the cable anchor onto
the frame.
4. Wrap the system cable around the
cable wraps.
on the frame
rM200 – English – 23
Find Quality Products Online at: [email protected]
www.GlobalTestSupply.com
Page 24
Docking System
WARNING
Carrying the system incorrectly can
cause the digital reporting monitor to
disengage from the docking system and
may result in property damage and/or
serious injury.
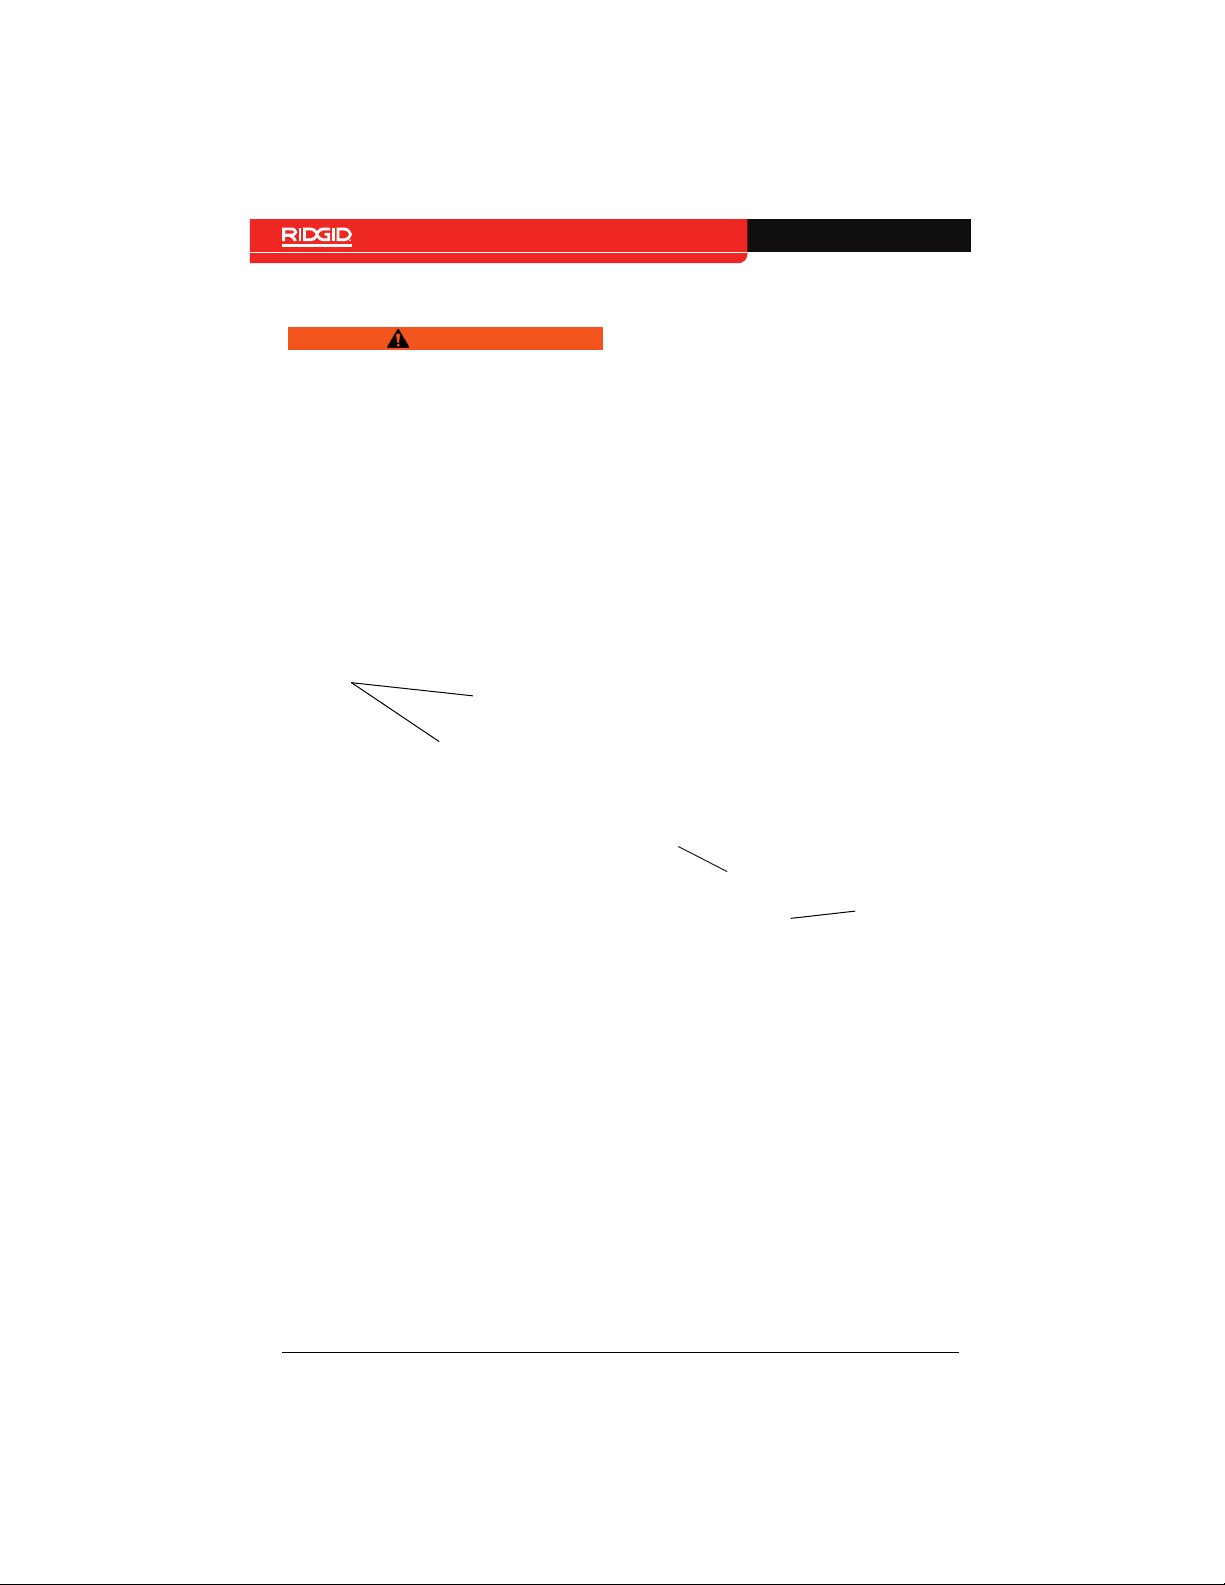
Mounting the CS6x Versa onto
the rM200
1. Push the red slide locks on the rM200
inwards.
2. Place the CS6x Versa hanger over the
rM200.
Red slide
locks
Mounting the CS65x or CS12x
onto the rM200
To mount the CS65x or CS12x monitor onto
the rM200, follow these steps:
1. Push red slide locks inwards so that
they do not obstruct the kick stand.
2. Unfold the kick stand from the bottom of the monitor, and hold the system so that it is parallel to the back
of the rM200. Place the monitor onto
the rM200.
3. Reset the red locks on the rM200 so
they lock the monitor into place.
3. Push the slide locks out so they lock
the CS6x Versa hanger into place.
4. Hang the CS6x Versa on the rM200.
To remove, push the slide locks inwards to
unlock the hanger.
24 – English – rM200
Front Cover Handle
Kickstand
To remove the monitor from the rM200, push
the red locks on the rM200 and remove the
monitor. You may return the kick stand to its
folded position.
Find Quality Products Online at: [email protected]
www.GlobalTestSupply.com
Page 25

Maintenance and
Support
Cleaning
Clean your system with rags and a soft
nylon brush. If desired, a mild detergent or
disinfectant can be used. Do not use solvents or high pressure water to clean any
part of the system.
Maintaining Components
Camera Head
Scratches on the camera have a minimal effect on its performance. Do not use scraping
tools or sand the camera to remove scratches.
Push Cable
Run a rag over the push cable and visually
inspect it for cuts and abrasions while pushing it back into the drum. Replace or repair
the push cable if the outer jacket is cut or
abraded.
Storage
The rM200 must be stored in a dry, secure
area between -40°C and 65°C [-40°F and
149°F]. Store your equipment in a locked
area out of the reach of children and people
unfamiliar with its purpose.
Support
For support and additional information
Service and Repair
Improper service or repair can cause the
camera reel to be unsafe to operate.
Service and repair of the camera reel must
be performed at a RIDGID Independent Authorized Service Center. To find your nearest service center or for any service or repair questions:
• Contact your local RIDGID distributor.
• Contact Ridge Tool Company
Technical Service Department at
rM200 – English – 25
Find Quality Products Online at: [email protected]
www.GlobalTestSupply.com
Page 26
Disposal
Parts of your system contain valuable materials that can be recycled. There are companies that specialize in recycling that may be
found locally. Dispose of the components in
compliance with all applicable regulations.
Contact your local waste management authority for more information.
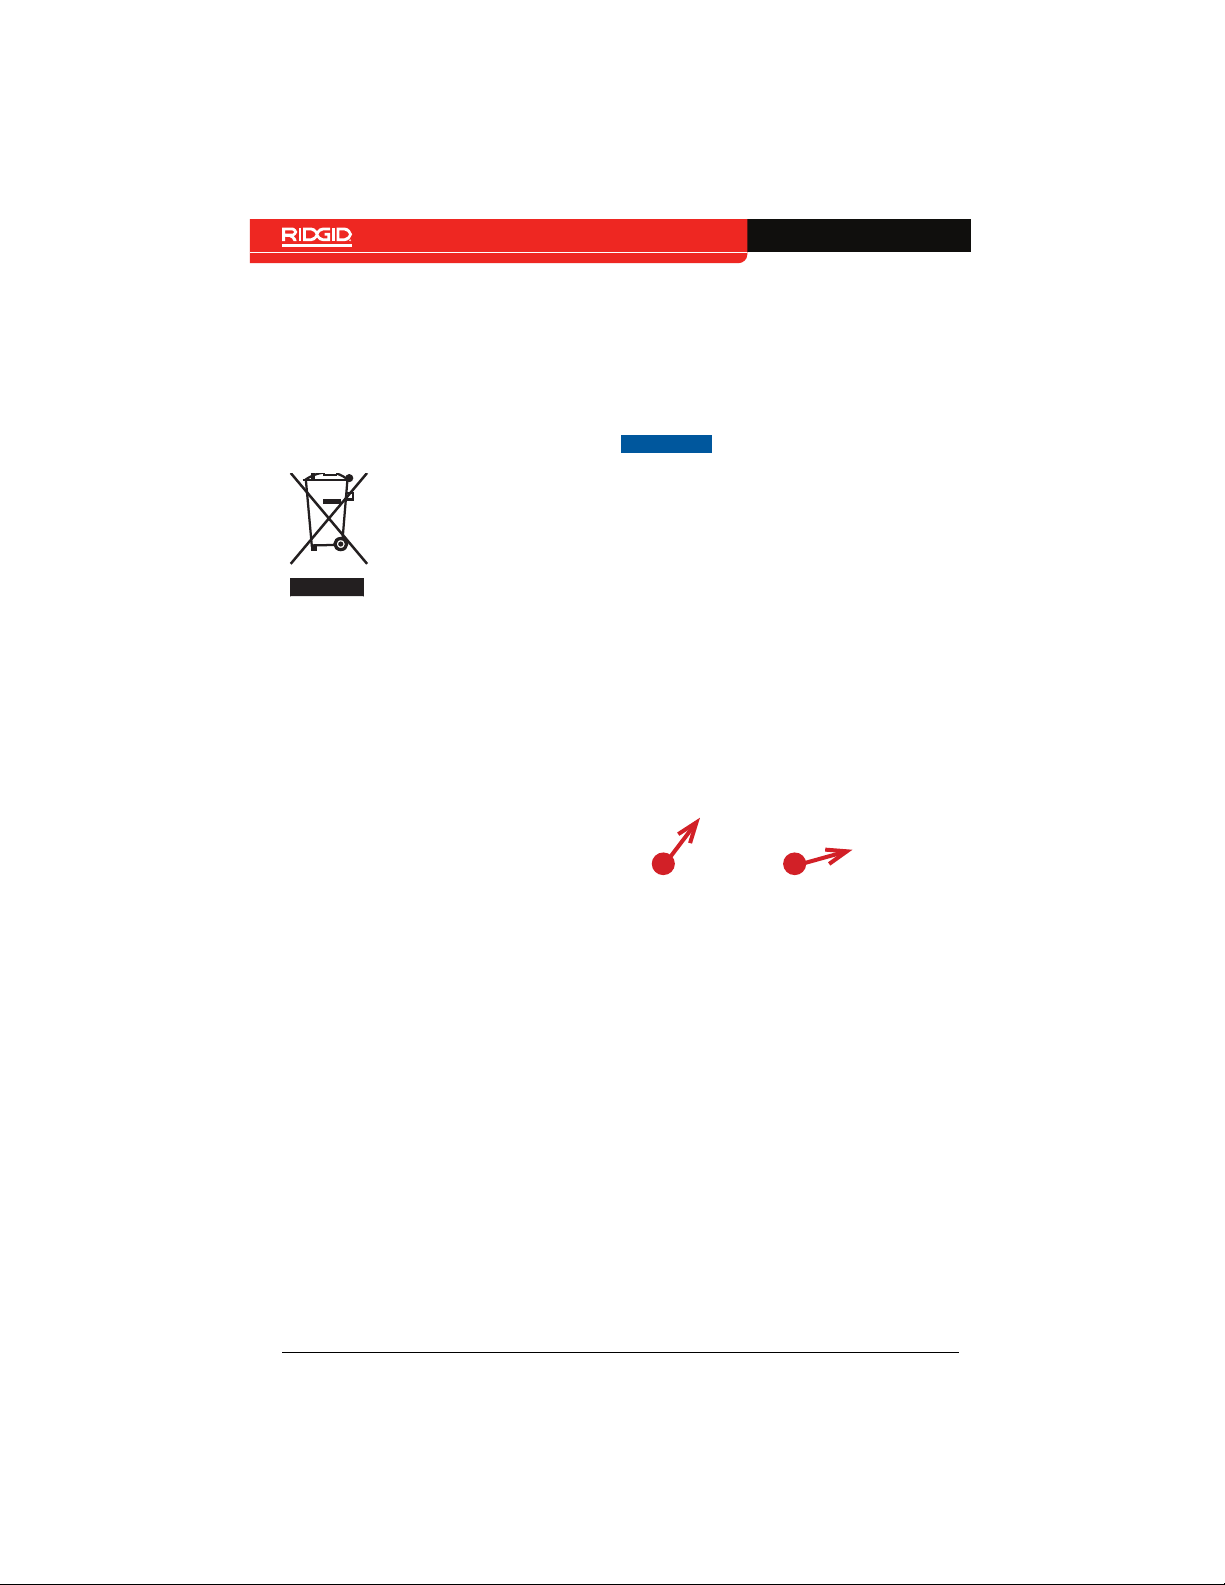
EC Countries: Do not dispose of electrical equipment
with household waste!
According to the European Guideline 2012/19/EU for
Waste Electrical and Electronic Equipment and its implementation into national
legislation, electrical equipment that is no longer usable
must be collected separately
and disposed of in an environmentally correct manner.
Battery Disposal
EC Countries: Defective or used batteries
must be recycled according to the guideline
2006/66/EEC.
Appendix
Appendix A: Stow Bin
Instructions
Can Holder Orientation
NOTICE
To orient the can holder, follow these steps:
1. Remove the can holder (Item 1) and
the replacement plate (Item 2) with a
Phillips screwdriver from inside of the
stow bin.
2
The can holder on the stow
bin must be on the front
side of the rM200 case so
that it does not interfere
with the pull handle.
1
26 – English – rM200
2. Install the can holder on the other side
of the stow bin and screw the replacement plate into place.
Find Quality Products Online at: [email protected]
www.GlobalTestSupply.com
Page 27
Stow Bin Installation
To install the stow bin on the rM200 case,
follow these steps:
1. Push the black button on the inside of
the stow bin.
2. Align the groove on the underside of
the stow bin (Item 1) with the eyelet
on the rM200 case (Item 2). Push and
fit into place.
1
2
To remove the stow bin, follow these steps:
1. Unlatch the stow bin hooks from the
rM200’s front and rear case.
2. Push the black button on the inside of
the stow bin.
3. Pull the stow bin straight off the rM200
case.
3. To secure the stow bin, pull and snap
the front and back hooks into the closest groove on the rM200 case.
Note: The stow bin comes with two rubber
plugs that can be inserted into the bottom
of the main compartment and can holder.
The can holders also contain a magnet at
the bottom to securely hold can in place.
rM200 – English – 27
Find Quality Products Online at: [email protected]
www.GlobalTestSupply.com
 Loading...