

Page 1
Pressing Tool
• Français – 13
• Castellano – pág. 27
RP 340Manual
WARNING!
Read this Operator’s Manual
carefully before using this
tool. Failure to understand
and follow the contents of
this manual may result in
electrical shock, fire and/or
serious personal injury.
Find Quality Products Online at: [email protected]
www.GlobalTestSupply.com
Page 2

ii
RP 340 Press Tool
Table of Contents
Recording Form for Machine Serial Number..............................................................................................................1
Safety Symbols..............................................................................................................................................................2
General Power Tool Safety Warnings
Work Area Safety........................................................................................................................................................2
Electrical Safety ..........................................................................................................................................................2
Personal Safety ..........................................................................................................................................................3
Power Tool Use and Care ..........................................................................................................................................3
Battery Tool Use and Care ........................................................................................................................................3
Service........................................................................................................................................................................3
Specific Safety Information
Press Tool Safety........................................................................................................................................................4
Description and Specifications
Description..................................................................................................................................................................4
Specifications..............................................................................................................................................................5
Electromagnetic Compatibility (EMC) ........................................................................................................................5
Tool Inspection..............................................................................................................................................................5
Tool and Work Area Set-Up..........................................................................................................................................6
Operating Instructions
Preparing the Connection ..........................................................................................................................................7
Pressing A Fitting With Typical Scissor Jaw Set ........................................................................................................7
Pressing A Fitting With Typical Actuator And Press Ring Set ....................................................................................8
Inspecting The Pressed Connection ..........................................................................................................................9
Maintenance Instructions
Cleaning and Lubrication ............................................................................................................................................9
Required Maintenance at RIDGID Authorized Service Center ..................................................................................9
Accessories ..................................................................................................................................................................9
Storage ........................................................................................................................................................................10
Service and Repair......................................................................................................................................................10
Disposal ......................................................................................................................................................................10
Troubleshooting..........................................................................................................................................................11
RP 340 Diagnostic Codes ..........................................................................................................................................12
Lifetime Warranty ........................................................................................................................................Back Cover
Find Quality Products Online at: [email protected]
www.GlobalTestSupply.com
Page 3
RP 340 Press Tool
Record Serial Number below and retain product serial number which is located on nameplate.
Serial
No.
Press Tool
RP 340
Find Quality Products Online at: [email protected]
www.GlobalTestSupply.com
Page 4
2
RP 340 Press Tool
General Power Tool Safety
Warnings
*
WARNING
Read all safety warnings and all instructions. Failure
to follow the warnings and instructions may result
in electric shock, fire and/or serious injury.
SAVE ALL WARNINGS AND INSTRUCTIONS
FOR FUTURE REFERENCE!
The term "power tool" in the warnings refers to your
mains-operated (corded) power tool or battery-operated
(cordless) power tool.
Work Area Safety
• Keep your work area clean and well lit. Cluttered or
dark areas invite accidents.
• Do not operate power tools in explosive atmo-
spheres, such as in the presence of flam mable
liquids, gases, or dust. Power tools create sparks
which may ignite the dust or fumes.
• Keep children and by-standers away while oper-
ating a power tool. Distractions can cause you to lose
control.
Electrical Safety
• Power tool plugs must match the outlet. Never
modify the plug in any way. Do not use any adap ter plugs with earthed (grounded) power tools.
Un modified plugs and matching outlets will reduce
risk of electric shock.
• Avoid body contact with earthed or grounded sur-
faces such as pipes, radiators, ranges and refrigerators. There is an increased risk of electrical shock
if your body is earthed or grounded.
• Do not expose power tools to rain or wet condi-
tions. Water entering a power tool will increase the risk
of electrical shock.
• Do not abuse the cord. Never use the cord for
carrying, pulling or unplugging the power tool.
Keep cord away from heat, oil, sharp edges or
moving parts. Damaged or entangled cords increase
the risk of electric shock.
• When operating a power tool outdoors, use an
extension cord suitable for outdoor use. Use of a
cord suitable for outdoor use reduces the risk of electric shock.
• If operating a power tool in a damp location is
unavoidable, use a ground fault circuit interrupter
(GFCI) protected supply. Use of a GFCI reduces
the risk of electric shock.
Safety Symbols
In this operator’s manual and on the product, safety symbols and signal words are used to communicate important safety information. This section is provided to improve understanding of these signal words and symbols.
DANGER
This is the safety alert symbol. It is used to alert you to potential personal injury hazards. Obey all safety messages that follow this
symbol to avoid possible injury or death.
DANGER indicates a hazardous situation which, if not avoided, will result in death or serious injury.
WARNING
WARNING indicates a hazardous situation which, if not avoided, could result in death or serious injury.
CAUTION
CAUTION indicates a hazardous situation which, if not avoided, could result in minor or moderate injury.
NOTICE indicates information that relates to the protection of property.
This symbol means read the operator’s manual carefully before using the equipment. The operator’s manual contains
important information on the safe and proper operation of the equipment.
This symbol means always wear safety glasses with side shields or goggles when handling or using this equipment to reduce
the risk of eye injury.
This symbol indicates the risk of hands, fingers or other body parts being crushed.
This symbol indicates the risk of electrical shock.
NOTICE
* The text used in the General Power Tool Safety Warnings section of this manual is verbatim, as required, from the applicable UL/CSA 60745 standard. This
section contains general safety practices for many different types of power tools. Not every precaution applies to every tool, and some do not apply to this tool.
Find Quality Products Online at: [email protected]
www.GlobalTestSupply.com
Page 5

3
Personal Safety
• Stay alert, watch what you are doing and use common sense when operating a power tool. Do not
use a power tool while you are tired or under the
influence of drugs, alcohol, or medication. A mo -
ment of inattention while operating power tools may
result in serious personal injury.
• Use personal protective equipment. Always wear
eye protection. Protective equipment such as dust
mask, non-skid safety shoes, hard hat, or hearing
protection used for appropriate conditions will reduce
personal injuries.
• Prevent unintentional starting. Ensure the switch
is in the OFF-position before connecting to power
source and/or battery pack, picking up or carrying
the tool. Carrying power tools with your finger on the
switch or energizing power tools that have the switch
ON invites accidents.
• Remove any adjusting key or wrench before turn-
ing the power tool ON. A wrench or a key left
attached to a rotating part of the power tool may result
in personal injury.
• Do not overreach. Keep proper footing and bal-
ance at all times. This enables better control of the
power tool in unexpected situations.
• Dress properly. Do not wear loose clothing or
jewel ry. Keep your hair, clothing, and gloves away
from moving parts. Loose clothes, jewelry, or long
hair can be caught in moving parts.
• If devices are provided for the connection of dust
extraction and collection facilities, ensure these are
connected and properly used. Use of dust collection
can reduce dust-related hazards.
Power Tool Use and Care
• Do not force power tool. Use the correct power tool
for your application. The correct power tool will do the
job better and safer at the rate for which it is designed.
• Do not use power tool if the switch does not turn it
ON and OFF. Any power tool that cannot be controlled with the switch is dangerous and must be
repaired.
• Disconnect the plug from the power source and/or
the battery pack from the power tool before making any adjustments, changing accessories, or
storing power tools. Such preventive safety mea-
sures reduce the risk of starting the power tool accidentally.
RP 340 Press Tool
• Store idle power tools out of the reach of children
and do not allow persons unfamiliar with the pow er tool or these instructions to operate the power
tool. Power tools are dangerous in the hands of
untrained users.
• Maintain power tools. Check for misalignment or
binding of moving parts, breakage of parts and any
other condition that may affect the power tool’s op er ation. If damaged, have the power tool repaired
before use. Many accidents are caused by poorly
maintained power tools.
• Keep cutting tools sharp and clean. Properly main-
tained cutting tools with sharp cutting edges are less
likely to bind and are easier to control.
• Use the power tool, accessories and tool bits etc.
in accordance with these instructions, taking into
account the working conditions and the work to be
performed. Use of the power tool for operations dif-
ferent from those intended could result in a hazardous
situation.
Battery Tool Use and Care
• Recharge only with the charger specified by the
manufacturer. A charger that is suitable for one type
of battery pack may create a risk of fire when used with
another battery pack.
• Use power tools only with specifically designated
battery packs. Use of any other battery packs may
create a risk of injury and fire.
• When battery pack is not in use, keep it away
from other metal objects, like paper clips, coins,
keys, nails, screws or other small metal objects
that can make a connection from one terminal to
another. Shorting the battery terminals together may
cause burns or a fire.
• Under abusive conditions, liquid may be ejected
from the battery; avoid contact. If contact acciden tally occurs, flush with water. If liquid contacts
eyes, additionally seek medical help. Liquid ejected
from the battery may cause irritation or burns.
Service
• Have your power tool serviced by a qualified repair
person using only identical replacement parts.
This will ensure that the safety of the power tool is
maintained.
Find Quality Products Online at: [email protected]
www.GlobalTestSupply.com
Page 6
– The instructions for any other equipment used with
this tool,
Failure to follow all instructions and warnings may
result in property damage and/or serious injury.
The EC Declaration of Conformity (890-011-320.10) will
accompany this manual as a separate booklet when
required.
Description and Specifications
Description
The RIDGID®RP 340 Press Tool, when used with appropriate jaw sets, is designed to mechanically press fittings onto tubing to create a water-tight and permanent
seal. When the switch on the RP 340 is depressed, an
internal electric motor powers a hydraulic pump which
forces fluid into the cylinder of the tool, forcing the ram forward and applying thousands of pounds of pressing force
onto specially designed fittings. Attachments are also
available for other uses.
The entire cycle duration is approximately five (5) seconds.
Once the cycle begins to deform a fitting, it will automatically continue until completion, even if the trigger switch
is released. The LED displays on the top of the tool indicate problems such as improper temperature, open jaw
mounting pin or maintenance required.
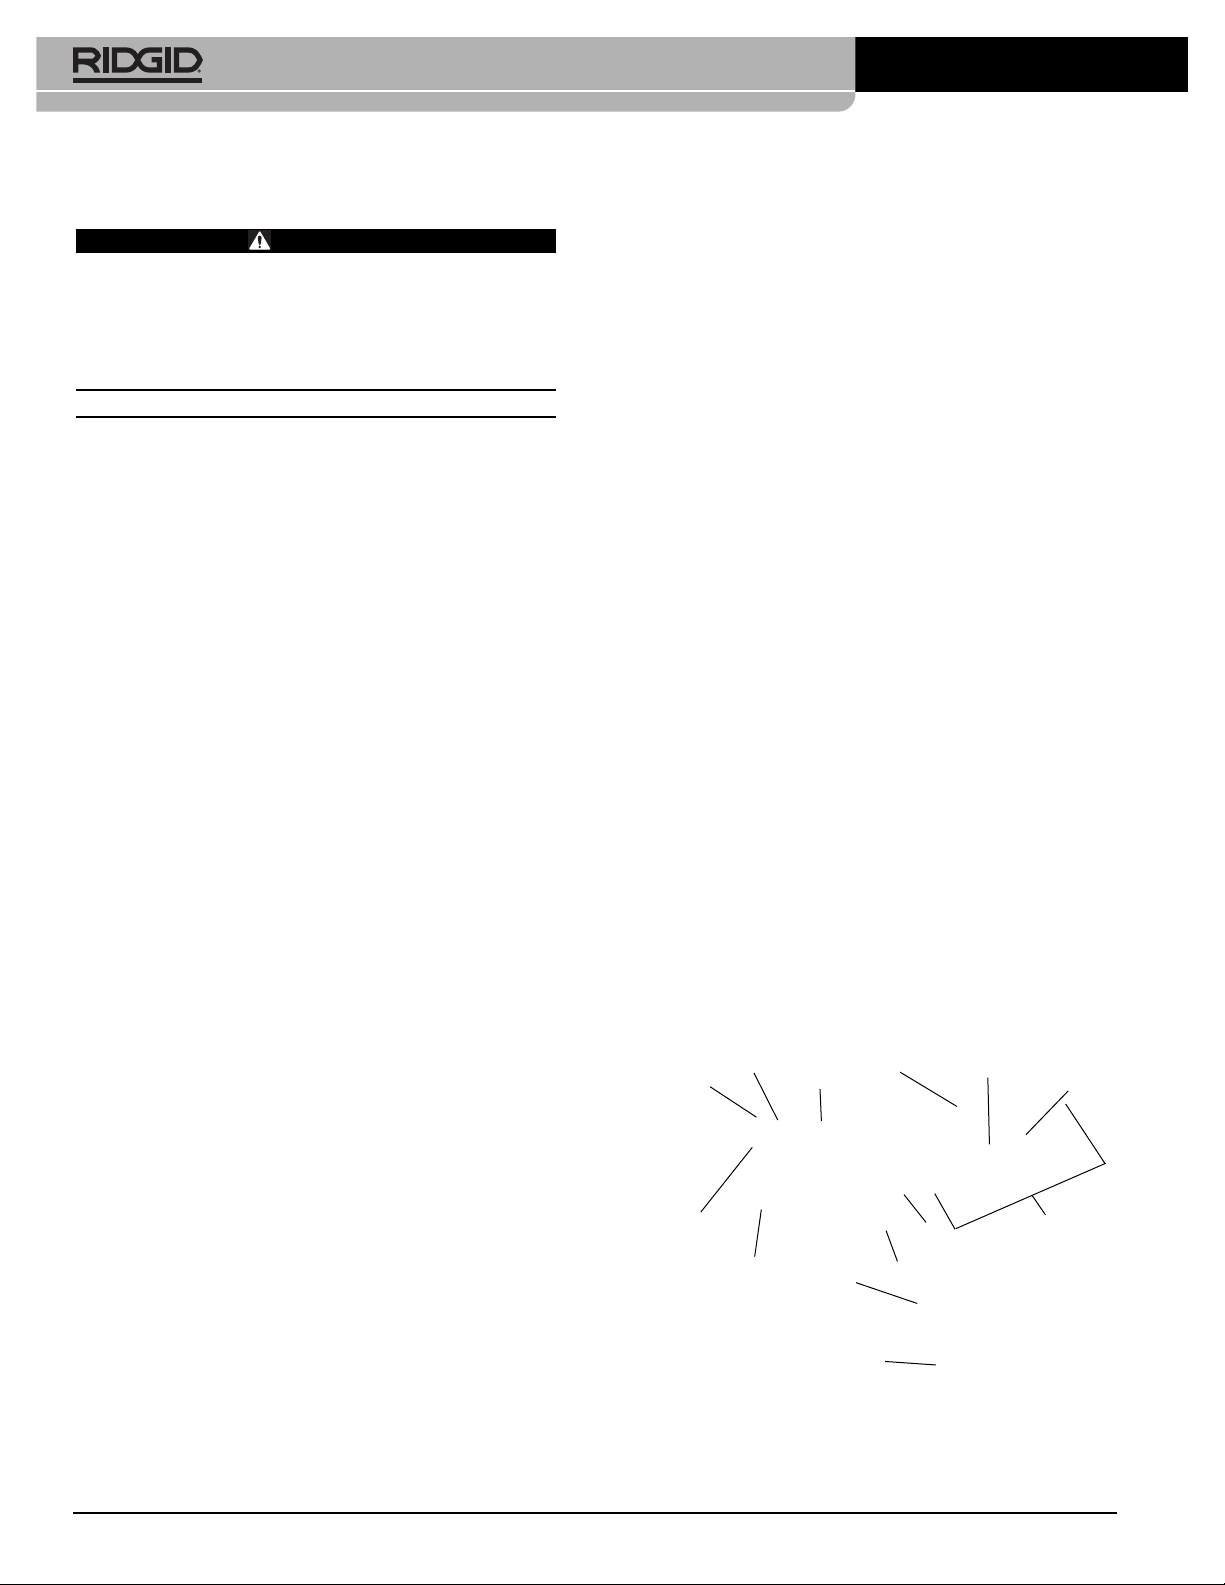
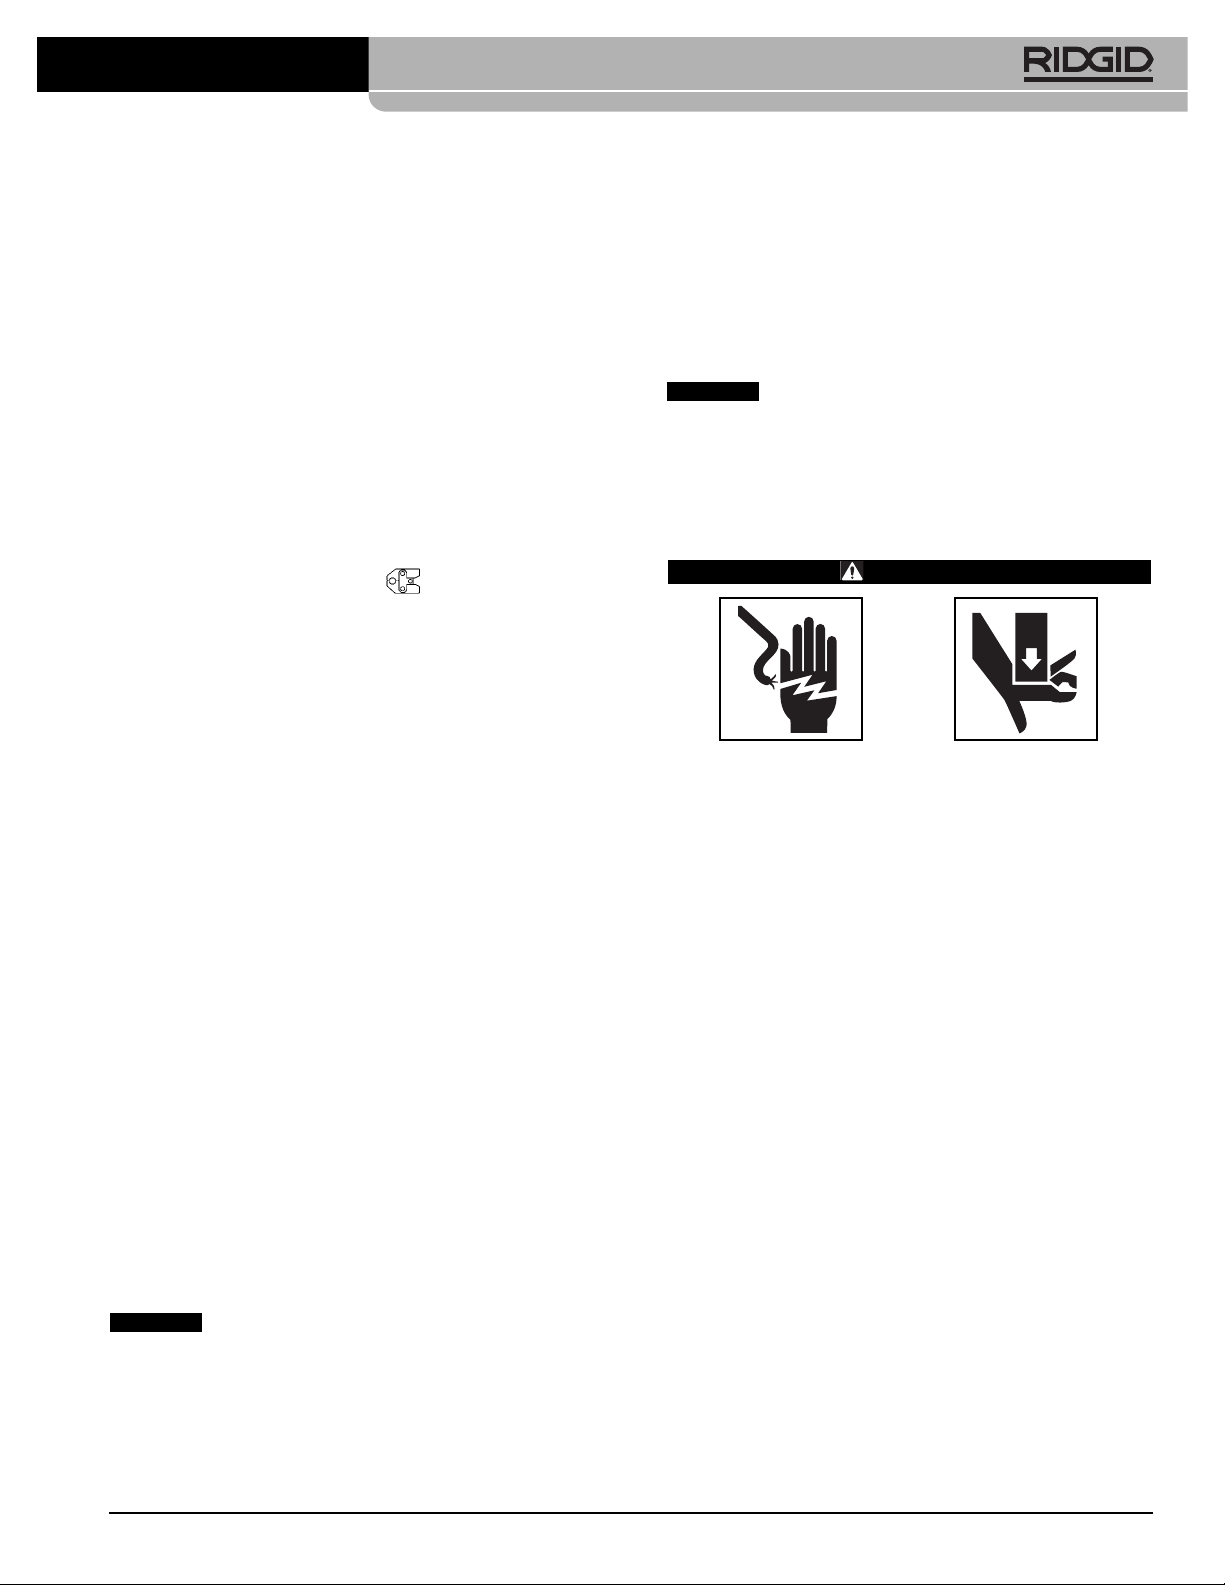
Figure 1 – RP 340 Press Tool and Jaw Set
The tool is equipped with a bright LED work light that lights
up when the trigger is pulled and remains lit four (4) min-
Specific Safety Information
WARNING
This section contains important safety information
that is specific to this tool.
Read these precautions carefully before using the
RP 340 Press Tool to reduce the risk of electrical
shock or serious personal injury.
SAVE THESE INSTRUCTIONS!
A compartment in the RP 340 carrying case is included to
keep this manual with the machine for use by the operator.
Press Tool Safety
• Use the RP 340 Press Tool only with RIDGID
®
stand ard pressing attachments (jaw set, press
ring, actuator, etc.). Other uses or modifying the RP
340 Press Tool for other applications may damage
the press tool, damage the attachments and/or cause
personal injury.
• Keep your fingers and hands away from attach-
ments during press cycle. Your fingers or hands
can be crushed, fractured or amputated if they become
caught in the attachments or between these components and any other object.
• Never attempt to repair a damaged jaw set, press
ring, actuator or other attachment. An attachment
that has been welded, ground, drilled or modified in
any manner can shatter during pressing resulting in
serious injury. Discard the entire damaged attachment. Replace with a new jaw set. Never replace
individual components except for damaged jaw return
springs. Please call Ridge Tool Technical Service
Department for availability.
• Large forces are generated during product use
that can break or throw parts and cause injury.
Stand clear during use and wear appropriate protective
equipment, including eye protection.
• Only use RIDGID Press Tools and Jaws when
specified by the press fittings manufacturer. Use of
incorrect equipment and methods can cause incomplete joints, damage the equipment, void warranties or
cause severe personal injury or death.
• Before operating a RIDGID RP 340 Press Tool,
read and understand:
– This operator’s manual,
– The attachment instructions,
– The battery/charger manual,
– The RPA 120/220 AC Power (Mains) Adapter In -
structions,
– The fitting manufacturer’s installation instructions,
4
RP 340 Press Tool
LED Display
Panel
Scissor Style
Jaw Set
Jaw Arm
Attachment
Mounting Pin
Battery
Tool Housing
Switch
Handle
Jaw
Sideplate
Pressure
Release
Button
ON/OFF
Button
Warning
Label
LED
Work Light
Find Quality Products Online at: [email protected]
www.GlobalTestSupply.com
Page 7
Electromagnetic Compatibility
(EMC)
The term electromagnetic compatibility is taken to mean
the capability of the product to function smoothly in an
environment where electromagnetic radiation and electrostatic discharges are present and without causing electromagnetic interference to other equipment.
The RIDGID Model RP 340 Press Tool conforms to all applicable EMC standards. However, the
possibility of it causing interference in other devices cannot be precluded.
Tool Inspection
WARNING
Daily before use, inspect your press tool and cor rect
any problems to reduce the risk of serious injury
from electric shock, crushing injures, attachment
failure and other causes, and prevent tool damage.
1. Make sure that the press tool is unplugged or the battery is removed. If using an AC Power Adapter,
inspect the AC Power Adapter power cord and plug
for damage or modifications. If a battery tool, inspect
the battery for damage. If any damage or modifications are found, do not use the tool until the cord or
battery has been properly repaired or re placed.
2. Clean any oil, grease or dirt from the equipment,
especially the handles and controls. This helps to
pre vent the machine or controls from slipping from
your grip.
3. Inspect the press tool for any of the following:
• Proper assembly, maintenance and completeness.
• Any broken, worn, missing, misaligned or binding
parts.
• Make sure that the attachment mounting pin moves
smoothly between the fully open and full closed
position and locks into each. Confirm that the
switch moves freely and does not bind or stick.
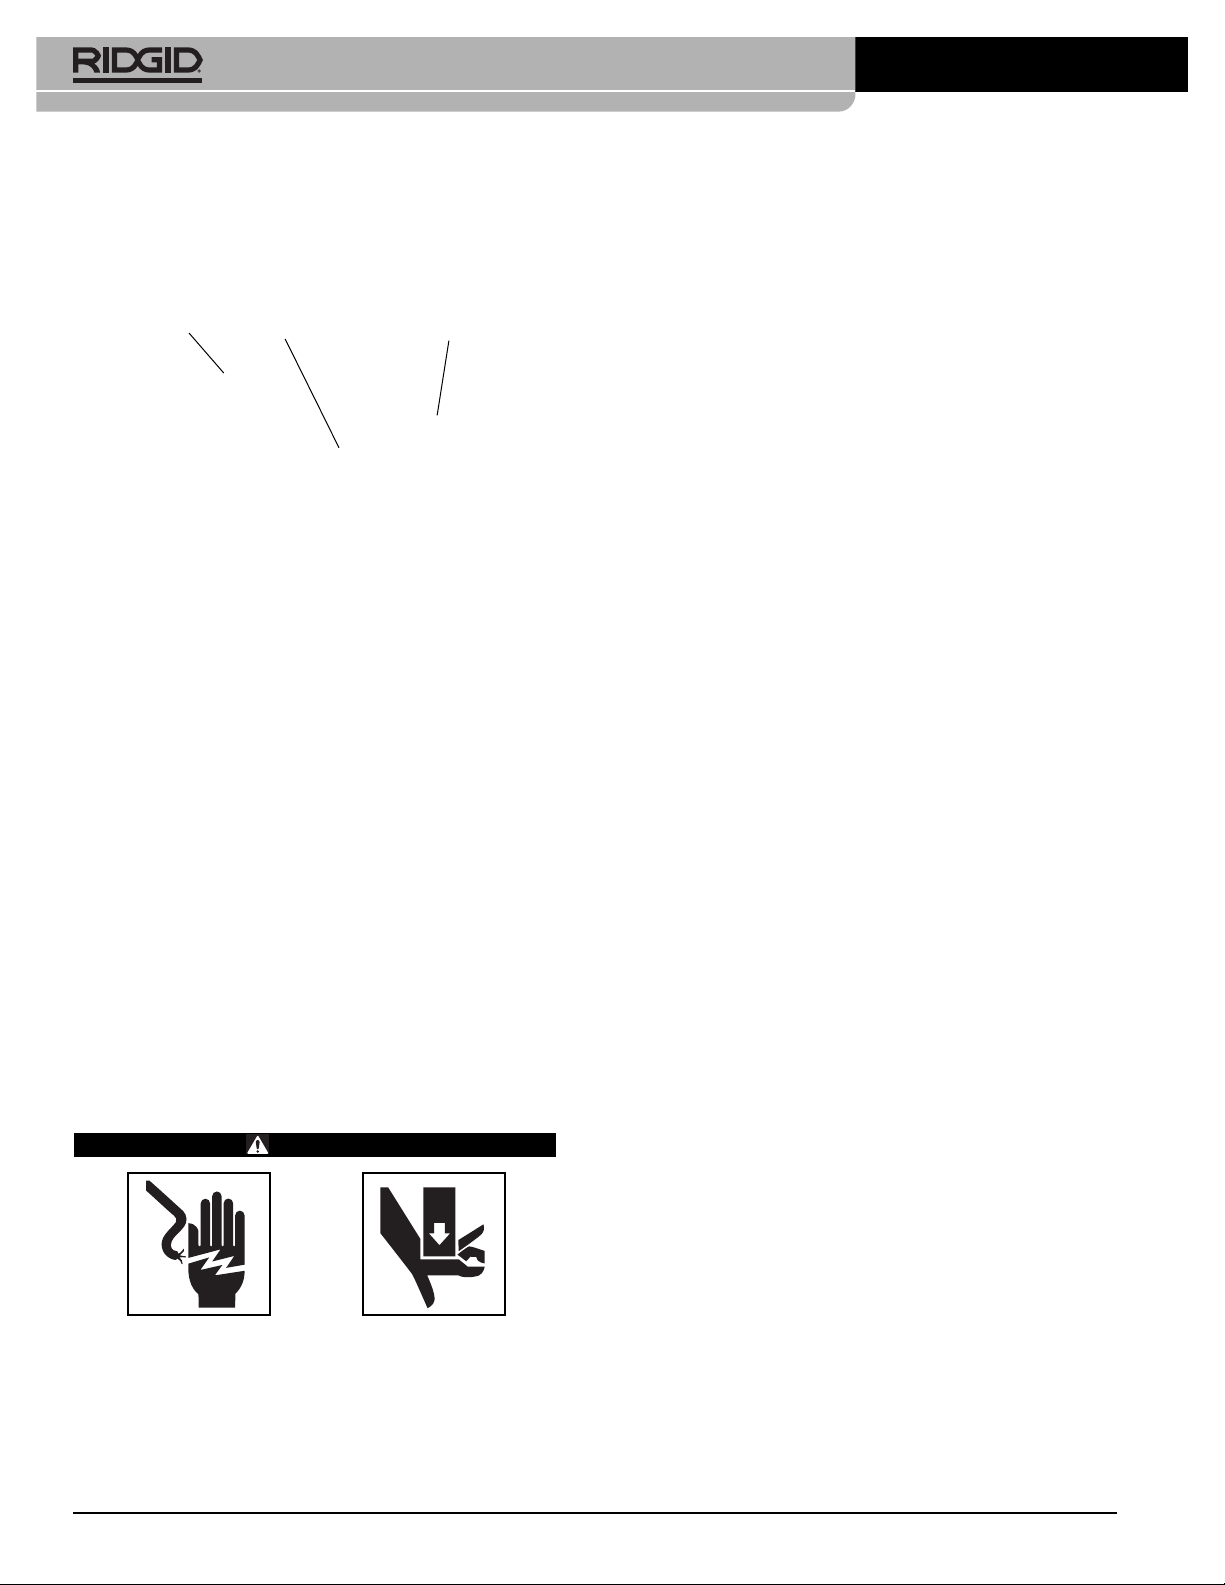
• Presence and readability of warning labels.
See
Figure 3.
• Any other condition which may prevent safe and nor-
mal operation.
utes after the trigger is released. This allows the user to
easily illuminate the work area.
Specifications
RP 340 Press Tool:
Motor
Voltage ...................18 V
Amperage ...............27.2 Amp
Power .....................490 Watts
Weight........................5.75 lbs. (2.61 kg)
Ram Force .................7,200 lbs. (32kN)
Operating Temperature
Range ...........................15°F to 122°F (-10°C to 50°C)
Duty Cycle...................3 Crimp /min.
The Press Tool serial number plate is located at the bottom of the handle as shown in
Figure 2.
The last 4 digits
indicate the month and year of the manufacture. (04 =
month, 10 = year).
Figure 2 – Press Tool Serial Label
NOTE! RIDGID jaw sets are offered in two “series”
• Standard Series
• Compact Series
These jaw sets are not interchangeable. These
series are not interchangeable. Standard series
jaw sets will only work with standard series tools
(RP 340, RP 330, 320-E, CT-400). Compact
series jaw sets will work with compact series
tools (RP 200, RP 210, 100B).
Selection of appropriate materials and joining
methods is the responsibility of the system designer
and/or installer. Before any installation is attempted, careful evaluation of the specific service environment, including chemical environment and service temperature, should
be completed. Consult Press Fitting System manufacturer
for selection information.
5
RP 340 Press Tool
NOTICE
NOTICE
Find Quality Products Online at: [email protected]
www.GlobalTestSupply.com
Page 8
If any problems are found, do not use the press tool
until the problems have been repaired.
4. Inspect and maintain the tool attachments, battery
charger, AC Power Adapter and any other equipment or material in use as directed in their instructions.
Figure 3 – Press Tool Labels
5. With dry hands, plug an inserted AC Power Adapter
into a properly grounded outlet or insert a fully
charged battery. Press the ON/OFF button on the
LED panel one time to turn the press tool ON. The
green, red and yellow LED on the display panel
should all blink one time on power up, and then the
green LED will remain on to indicate that the tool is
ready for use. If any other conditions exist, use the
Diagnostic Codes
information on
page 12
to determine the next step and do not use the tool until it is
working properly. With your hands and fingers away
from the tool ram, test the switch to confirm proper
operation. When used with an attachment, once the
tool sees enough load it will lock on to ensure that a
complete press is made.
6. Once the operation has been checked, with dry
hands unplug the tool or remove the battery.
Tool and Work Area Set-Up
WARNING
Set up the press tool and work area according to
these procedures to reduce the risk of injury from
electric shock, fire, crushing injuries and other
causes, and prevent tool and system damage.
1. Check work area for:
• Adequate lighting.
• Flammable liquids, vapors or dust that may ignite.
If present, do not work in area until sources have
been identified and corrected. The press tool is not
explosion proof and can cause sparks.
• Clear, level, stable dry place for operator. Do not
use the machine while standing in water.
• Clear path to electrical outlet that does not contain
any potential sources of damage for the power
cord.
3. Evaluate the work area and determine if any barriers
are needed to keep bystanders out. Bystanders can
distract the tool operator during use.
4. Confirm that the tool is unplugged or the battery is
removed and fully open the attachment mounting
pin.
See Figure 4.
If there is an attachment in the tool,
slide it out of the tool.
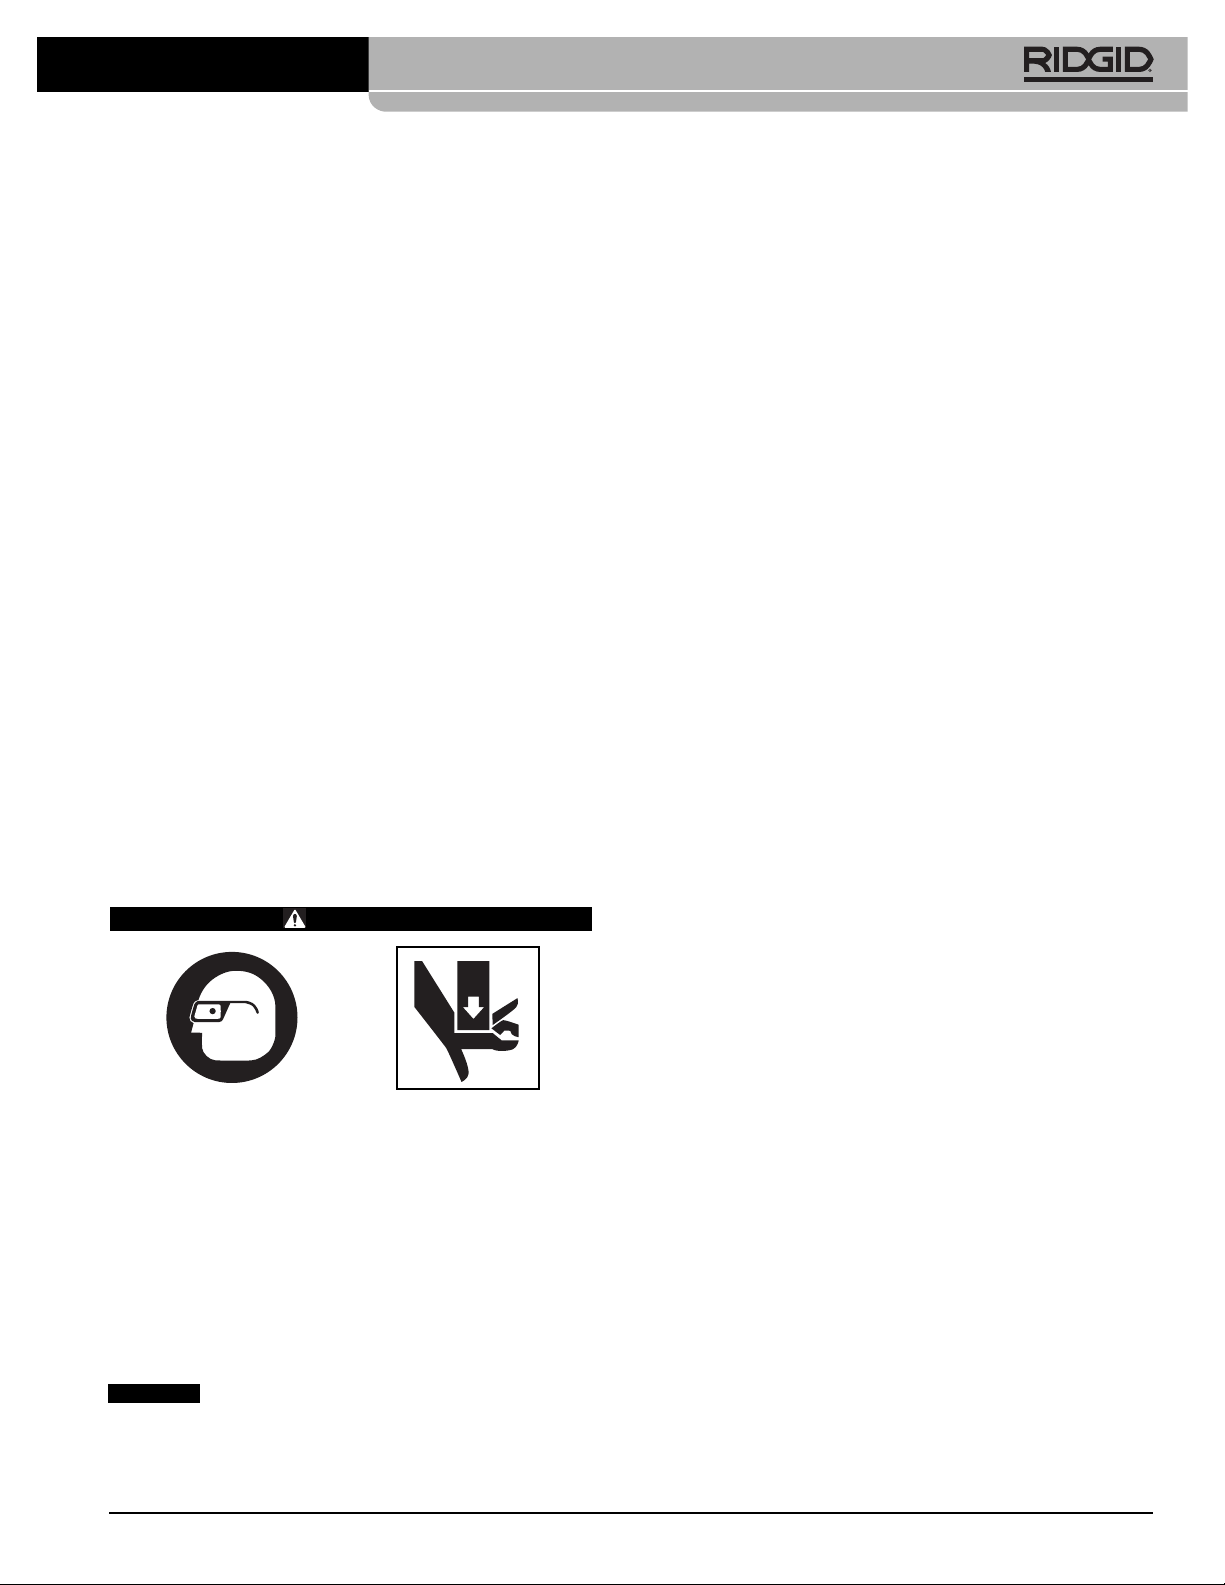
5. Slide the correct attachment into the press tool as
shown in
Figure 5
and fully close the attachment
mounting pin. The tool will not operate unless the
mounting pin is fully closed. Rings must use the
appropriate matching actuator.
Figure 4 – Fully Open Attachment Mounting Pin
6
RP 340 Press Tool
Warning Label
ON/OFF Button
LED Display Panel
Find Quality Products Online at: [email protected]
www.GlobalTestSupply.com
Page 9
7
lation instructions. Failure to follow the specific attachment
and fitting installation instructions may result in improper
press connections that can lead to extensive property
damage.
1. Make sure that the work area is free of bystanders
and other distractions and that the tool and work
area has been properly set up.
2. Prepare the connection according to the fitting manufacturer’s instructions.
3. Depress ON/OFF button on display panel one time to
turn tool ON. All three light emitting diodes (LED’s) will
blink once. Then, the green LED should be solidly
illuminated indicating the tool is ready to press.
4. Make sure the tubing is inserted to the proper depth in
fitting, as specified in the appropriate fitting system’s
operator's manual.
Pressing A Fitting With Typical Scissor
Jaw Set
1. Squeeze jaw arms to open the jaw set
(Figure 6).
2. Place open jaws around the fitting. Make sure the contour of the jaw set is properly aligned with the contour
of the fitting as specified in
Fitting Manu facturer's
Installation Instructions
. Do not hang the jaw set and
tool from fitting. Tool could unexpectedly drop and
cause serious injury or death.
Figure 6 – Opening The Scissor-Style Jaw Set
Figure 5 – Slide Attachment Into Tool
6. If using a battery tool, with dry hands insert the battery
into the tool. If using an AC Power Adapter, with dry
hands insert the AC Power Adapter into the tool, run
the cord along the previously identified clear path,
and with dry hands plug the AC Power Adapter in.
Keep all connections dry and off the ground. If the
power cord is not long enough, use an extension
cord that:
• Is in good condition
• Is appropriately rated for the use
• Has sufficient wire size (16 AWG for 50' or less, 14
AWG for 50' to 100'). Undersized wires can overheat, melting the insulation or causing fire or other
damage.
Operating Instructions
WARNING
Always wear eye protection to to reduce the risk
of eye injury.
Keep your fingers and hands away from the tool
attachment during the press cycle. Your fingers or
hands can be crushed, fractured or amputated in
the attachment or tool or between the attachment, work piece and other objects.
Follow operating instructions to reduce the risk of
injury from crushing and other causes and to prevent tool damage.
Preparing the Connection
These instructions are generalized practices
for several types of press tool attachments. Always follow
the specific instructions for the press tool attachment
being used and the fitting manufacturers’ specific instal-
RP 340 Press Tool
NOTICE
Find Quality Products Online at: [email protected]
www.GlobalTestSupply.com
Page 10

Figure 7 – RP 340 Tool Square To Tubing
3. Make sure the jaw set and tool are square to the
tubing and de press the tool switch
(Figure 7).
Keep
fingers and hands away from the jaw set to avoid
crushing injuries in jaw set and between jaw set and
sur roundings. The press cycle takes about five (5)
seconds. Once a press cycle begins and the rollers
contact the jaw arms, the tool will lock-on and auto matically complete the press cycle. Releasing the
switch will not stop the tool once the pressing process
has begun. This assures consistent, repeatable press
joint integrity.
4. Press jaw arms to open the jaw set.
5. Remove the RP 340 and jaw set from tube. Avoid
sharp edges that may have formed on the fitting during the pressing operation.
Pressing A Fitting With Typical
Actuator And Press Ring Set
1. Open the appropriate press ring and place at right
angle onto the fitting
(Figure 8).
Align ring with fitting
according to fitting manufacturer’s Installation In struc tion. Re check insertion depth before completing press
process.
2. Squeeze actuator arms to open the actuator assembly. Engage actuator ends into the actuator pockets
in the press ring
(Figure 9)
. Make sure actuator ends
are fully engaged in pockets. Do not attempt to hang
tool and actuator from press ring. Tool could unexpectedly drop causing serious injury or death.
Depress the tool switch. The press cycle takes about
five (5) seconds. Once a press cycle begins and the
rollers contact the actuator arms, the tool will lock-on
and automatically complete the press cycle. Releasing
the trigger will not stop the tool once the pressing
process has begun. This assures consistent, repeatable press joint integrity. To avoid pinch point injuries,
keep fingers away from actuator and press ring during
the press cycle.
Figure 8 – Installing Press Ring Onto Fitting
Figure 9 – Attaching Actuator to Press Ring
3. After cycle is complete, squeeze actuator arms to
open and separate actuator from press ring. Remove
the press ring from fitting by manually grasping ring
halves and opening assembly. Avoid any sharp edges
which may have formed on fitting during pressing
operation.
The RP 340 Press Tool will turn OFF automatically if the battery is too low to successfully complete a pressed connection. This will be indicated by
blinking of the green LED. A fully charged battery should
be inserted in the tool and the pressed connection should
be repeated as indicated above. To retract the rollers
and remove the tool from the fitting if battery dies or tool
malfunctions during pressed connection, it is necessary to
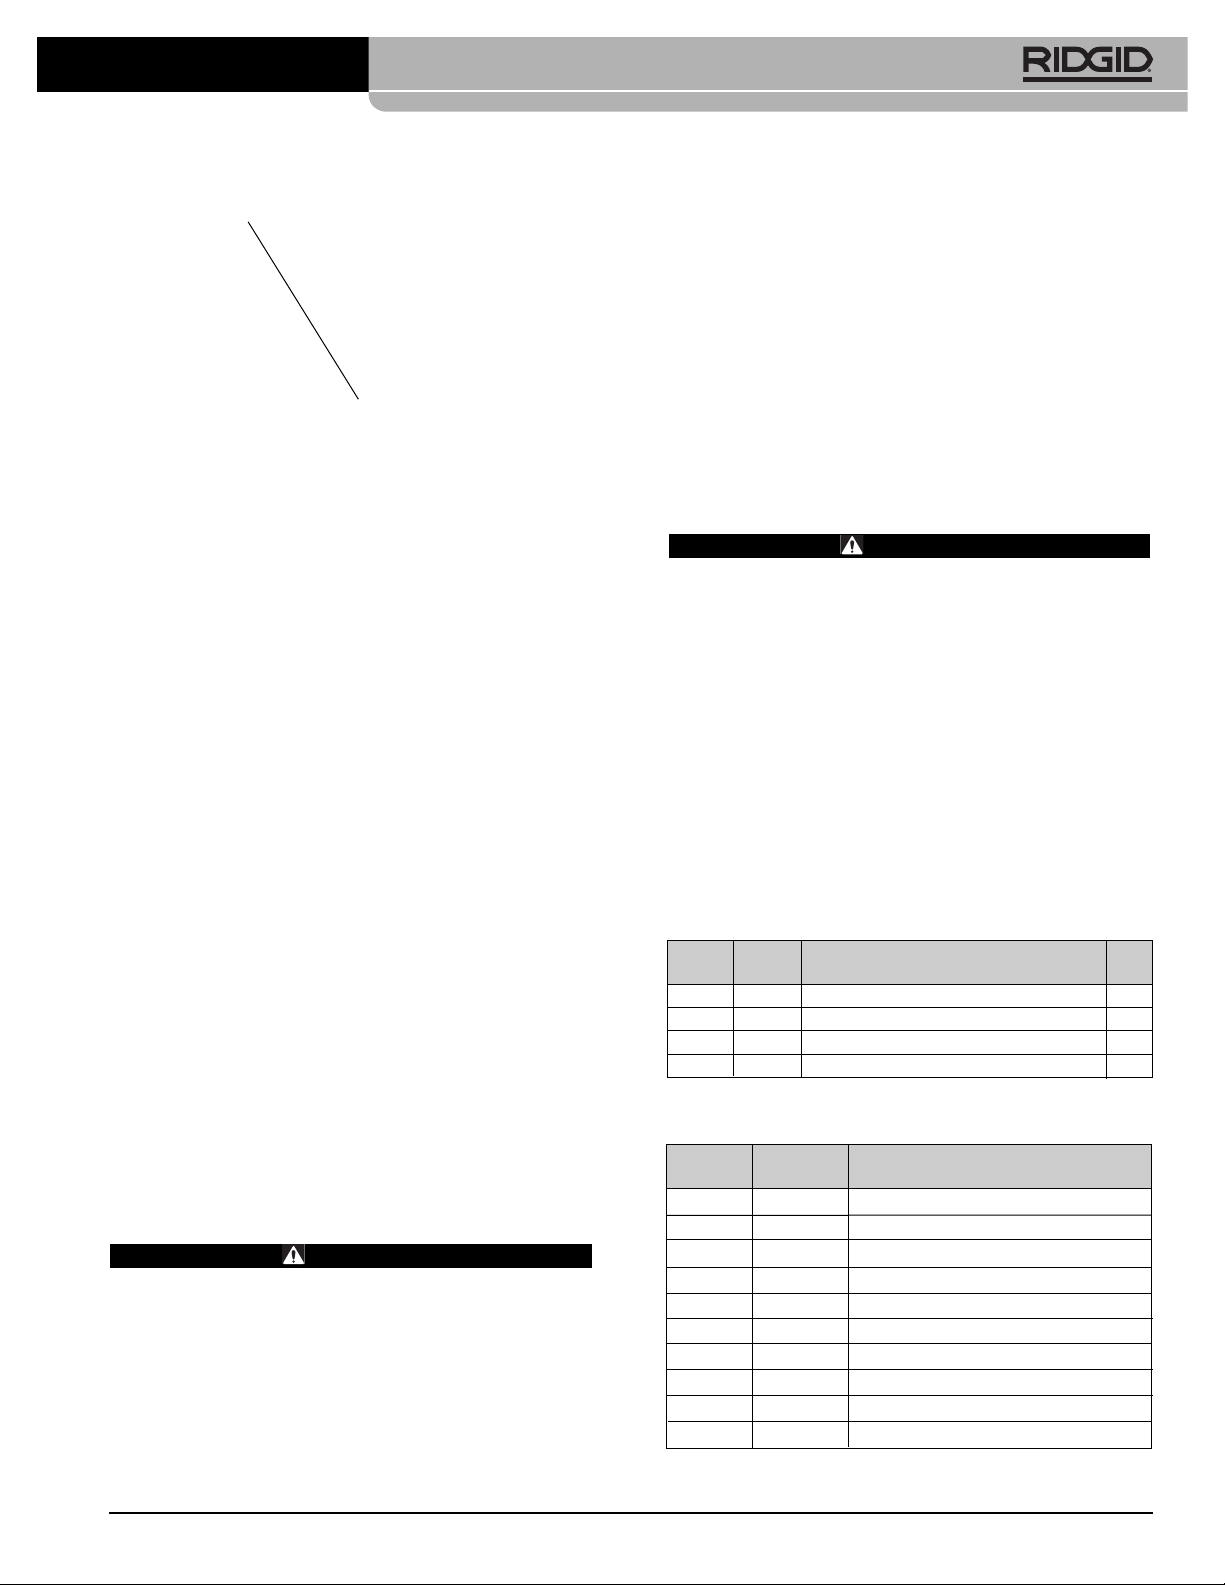
press the red pressure re lease button on the left hand side
of the tool.
(Figure 10)
8
RP 340 Press Tool
NOTICE
Find Quality Products Online at: [email protected]
www.GlobalTestSupply.com
Page 11
3. Check return springs in attachments with each use.
Attachments should open and close freely with only
moderate finger effort required.
Required Maintenance at RIDGID
Authorized Service Center
After 40,000 cycles, the tool will show a blinking yellow
LED on the display panel as long as the tool is turned on
to indicate that it is time for maintenance and recalibration.
The tool will not run if it is not maintained within 2,000
more cycles after the yellow blinking LED begins.
Accessories
WARNING
The following tool accessories have been de signed
to function with the RP 340 Press Tools. Other
accessories suitable for use with other tools may
become hazardous when used on the RP 340. To
prevent serious injury, use only the accessories
specifically designed and recommended for use
with the RP 340, such as those listed below.
Ridge Tool Company provides Standard Pressing
attachments designed specifically for use with
RIDGID Standard Press tools. Only use attachments
that are specifically designed to press the fitting
system you are installing. For a complete listing of
RIDGID attachments available for this tool, see the
Figure 10 – Pressure Release Button
Inspecting The Pressed Connection
1. Inspect the pressed fitting. If the fitting is supplied with
a control ring and/or a control label by the fitting
man ufacturer, remove it. Control rings and label are
supplied by the manufacturer to indicate that the fitting
has not yet been pressed.
Look for the following:
• Excessive misalignment of the tubes. Note that a
slight amount of misalignment at the pressed connection is considered normal.
• Tubes that are not fully inserted into the fitting –
dou ble check the insertion marks made on the
tube to see that they are still aligned with the end of
the fitting.
• Incorrect jaw or ring alignment with the fitting con-
tour, distorted or deformed fitting.
• Any other issues per the fitting manufacturer.
If any of these problems are found, then removal of
the fitting is required and a new fitting and tube will
need to be prepared and pressed in its place.
2. Test system in accordance with normal practice and
local codes.
Maintenance Instructions
WARNING
Make sure AC Battery Adapter is unplugged and
removed or battery is removed from tool before
performing maintenance or making any adjustment.
Cleaning and Lubrication
1. Daily wipe the tool clean with a clean dry cloth.
2. Inspect the attachment mounting pin and lubricate the
pin with silicone lubricant as needed.
9
RP 340 Press Tool
Pressure Release
Button
RP 340 Press Tool Accessories
Catalog
No. Capacity Region
44693 18V 2.0 Ah North & Latin America, Australia
44698 18V 4.0 Ah North & Latin America, Australia
43323 18V 2.0 Ah Europe & China
43328 18V 4.0 Ah Europe & China
31013 18V 1.1 Ah North & Latin America, Australia
32743 18V 2.2 Ah North & Latin America, Australia
31018 18V 3.3 Ah North & Latin America, Australia
32473 18V 1.1 Ah Europe & China
28218 18V 2.2 Ah Europe & China
28448 18V 3.3 Ah Europe & China
Battery Packs
All listed batteries will work with any model RBC 20 charger. The difference
between batteries for different regions is in label markings.
Catalog Plug
No. Voltage Product Region Type
44823 120V China AC Power Adapter A
43338 220V Europe AC Power (Mains) Adapter C
44468 120V North America AC Power Adapter A
27933 — Carrying Case (Plastic) —
Find Quality Products Online at: [email protected]
www.GlobalTestSupply.com
Page 12
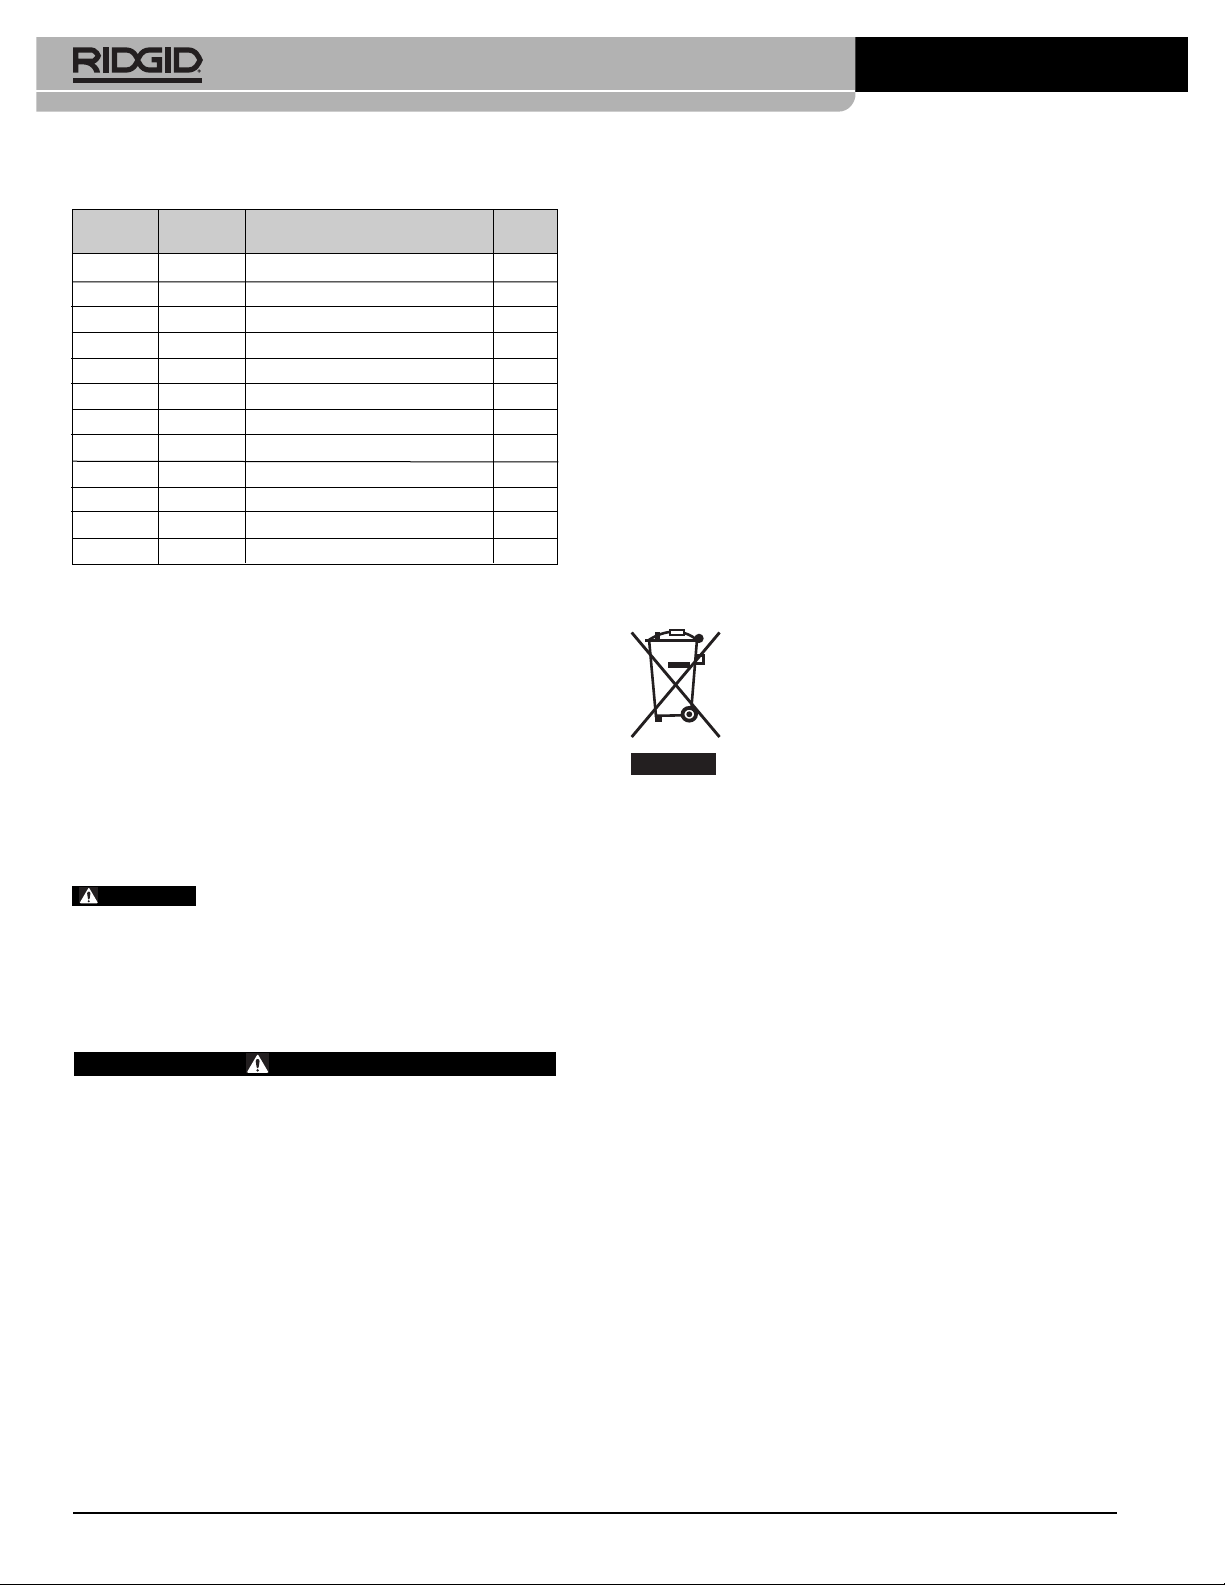
Disposal
Parts of the RIDGID RP 340 Press Tool contain valuable
materials and can be recycled. There are companies
that specialize in recycling that may be found locally.
Dispose of the com ponents in compliance with all applicable regulations. Contact your local waste management
authority for more information.
For EC Countries: Do not dispose of electrical equipment with household waste!
According to the European Guideline 2002/ 96/ EC for Waste Electrical and Electronic
Equipment and its implemen tation into nation-
al legislation, electrical equipment that is no
longer usable must be collected separately and disposed
of in an environmentally correct manner.
10
RP 340 Press Tool
Storage
Remove the battery or AC Power Adapter from the tool
and place in its carrying case. Avoid storing the tool, batteries, AC Power Adapter or charger in extreme heat or
cold. The tool temperature sensor will not allow the tool to
turn on if oil temperature is not within the temperature
range of 15°F (-10°C) to 122°F (50°C). This will be indicated by a red glowing LED on the display panel. It may
be necessary to allow the tool to warm or cool to a temperature within the operating range by placing it in a conditioned area before use.
Store the carrying case in a dry, secured,
locked area that is out of reach of children and people
unfamiliar with the RP 340 Press Tool. The tool is dangerous in the hands of untrained users.
Service and Repair
WARNING
Improper service or repair can make machine
unsafe to operate.
Service and repair on this RP 340 Press Tool must be performed by a RIDGID Authorized Service Center. The
tool fasteners have been marked to indicate if service has
been performed by unauthorized individuals.
WARNING
Catalog Plug
No. Voltage Region Type
43458 120V North America A
43333 230V Europe C
43468 120V China A
44418 230V Australia & Latin America I
44793 100V Japan A
44833 230V United Kingdom G
44798 — North America Charger Cord A
44808 — Europe Charger Cord C
44803 — China Charger Cord A
44813 — Australia & LA Charger Cord I
44818 — Japan Charger Cord A
44828 — United Kingdom Charger Cord G
RBC 20 Advanced Lithium Battery Chargers & Cords
Find Quality Products Online at: [email protected]
www.GlobalTestSupply.com
Page 13
11
RP 340 Press Tool
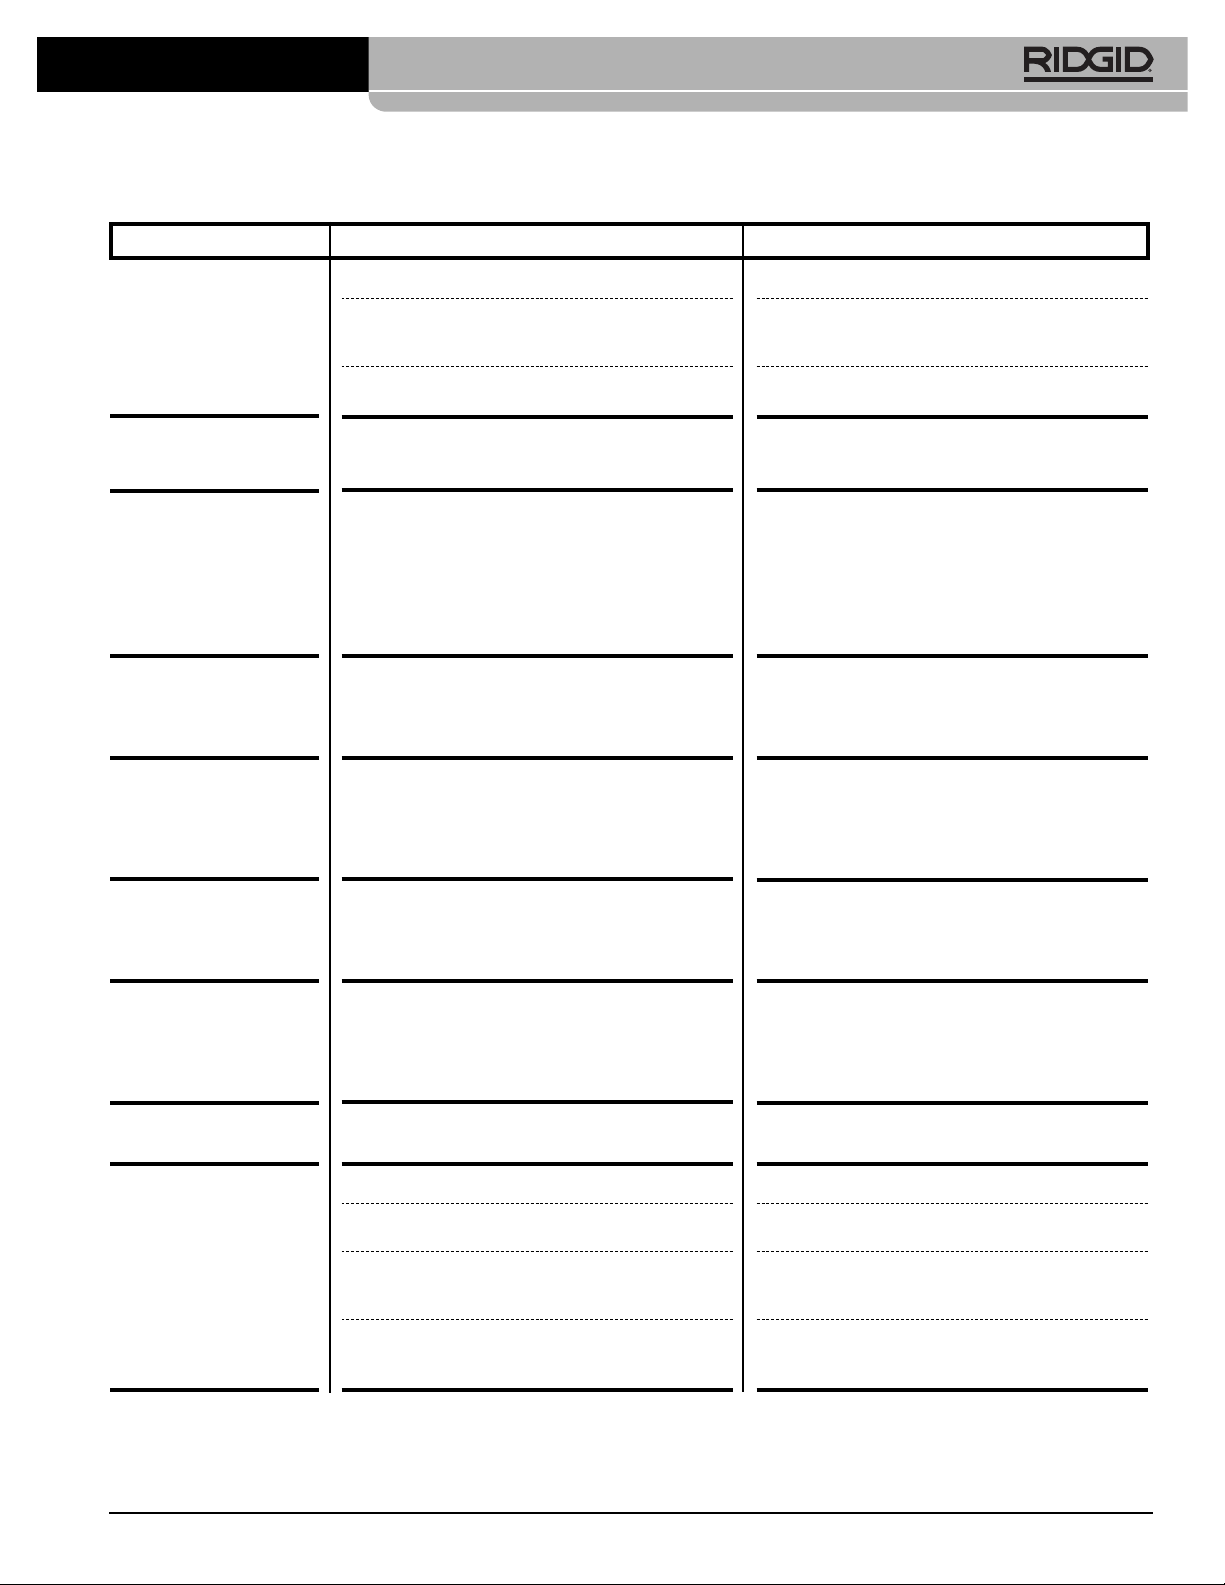
SYMPTOM POSSIBLE REASONS SOLUTION
Tool will not turn ON
when ON/OFF button on
display panel is pressed.
Tool will not run when
trigger is depressed.
Green light flashes.
Tool turns OFF either
when trigger is
de pressed or in the
middle of a press cycle.
Red LED glows.
Yellow LED blinks repeatedly as long as tool is
turned ON and tool functions properly.
Yellow LED glows continuously and tool will
not begin press cycle
when trigger switch is
depressed.
Red LED blinks repeatedly and tool will not begin
press cycle when trigger
switch is depressed.
Yellow LED glows when
tool is turned ON.
Jaws are locked onto
fitting.
The pressed connections
produced are not complete.
Troubleshooting
Electric cord damaged.
Battery is completely discharged or battery has
failed or power cord not properly inserted into
outlet.
Battery or AC Power Adapter not properly inserted
into handle of tool.
Battery is too low.
Tool, AC Power Adapter or battery is too cold or too
hot.
Scheduled maintenance/recalibration is required
after 40,000 presses.
Scheduled maintenance/recalibration is mandatory after 42,000 presses. Tool is “locked” and
will not function until tool is serviced.
Accessory mounting pin not fully closed.
Tool malfunction detected.
Press was not successfully completed.
Used wrong jaw set for the tube size or material.
The tool was not square to the tube.
Jaw contour was not aligned with the fitting contour.
Tool is in need of repair.
Inspect the cord and replace if necessary.
Insert fully charged battery/recharge dead battery
or unplug and replug power cord.
Check to assure battery or AC Power Adapter is
fully inserted.
Insert fully charged battery/recharge dead battery.
Bring tool, AC Power Adapter or battery to correct operating range between 15°F (-10°C) to
122°F (50°C) by allowing the tool to sit in a conditioned room.
NOTE! Fitting must be repressed if tool stops
in the middle of a press cycle. Failure
to do so may result in a leaking fitting.
Contact Ridge Tool Technical Service Department
(800) 519-3456 for nearest Authorized Service outlet.
Contact Ridge Tool Technical Service Department
at (800) 519-3456 for nearest Authorized Service
outlet.
Insert accessory mounting pin to the fully closed
position.
Unplug and replug power cord or remove and reinsert fully charged battery. Be sure to repress fitting.
If LED continues to glow, contact Ridge Tool
Technical Service Department at (800) 519-3456 for
nearest Authorized Service outlet.
Push pressure release button to remove jaws from
fitting. Inspect and repress fitting.
Install the correct jaw set.
Redo the joint with new fitting and new tube. Make
sure that the tool is square to the tube.
Redo the joint with new tube and new fitting. Make
sure the jaw contour is aligned with the fit ting contour.
Contact Ridge Tool Technical Service Department
at (800) 519-3456 for nearest Author ized Service
outlet.
Find Quality Products Online at: [email protected]
www.GlobalTestSupply.com
Page 14
12
RP 340 Press Tool
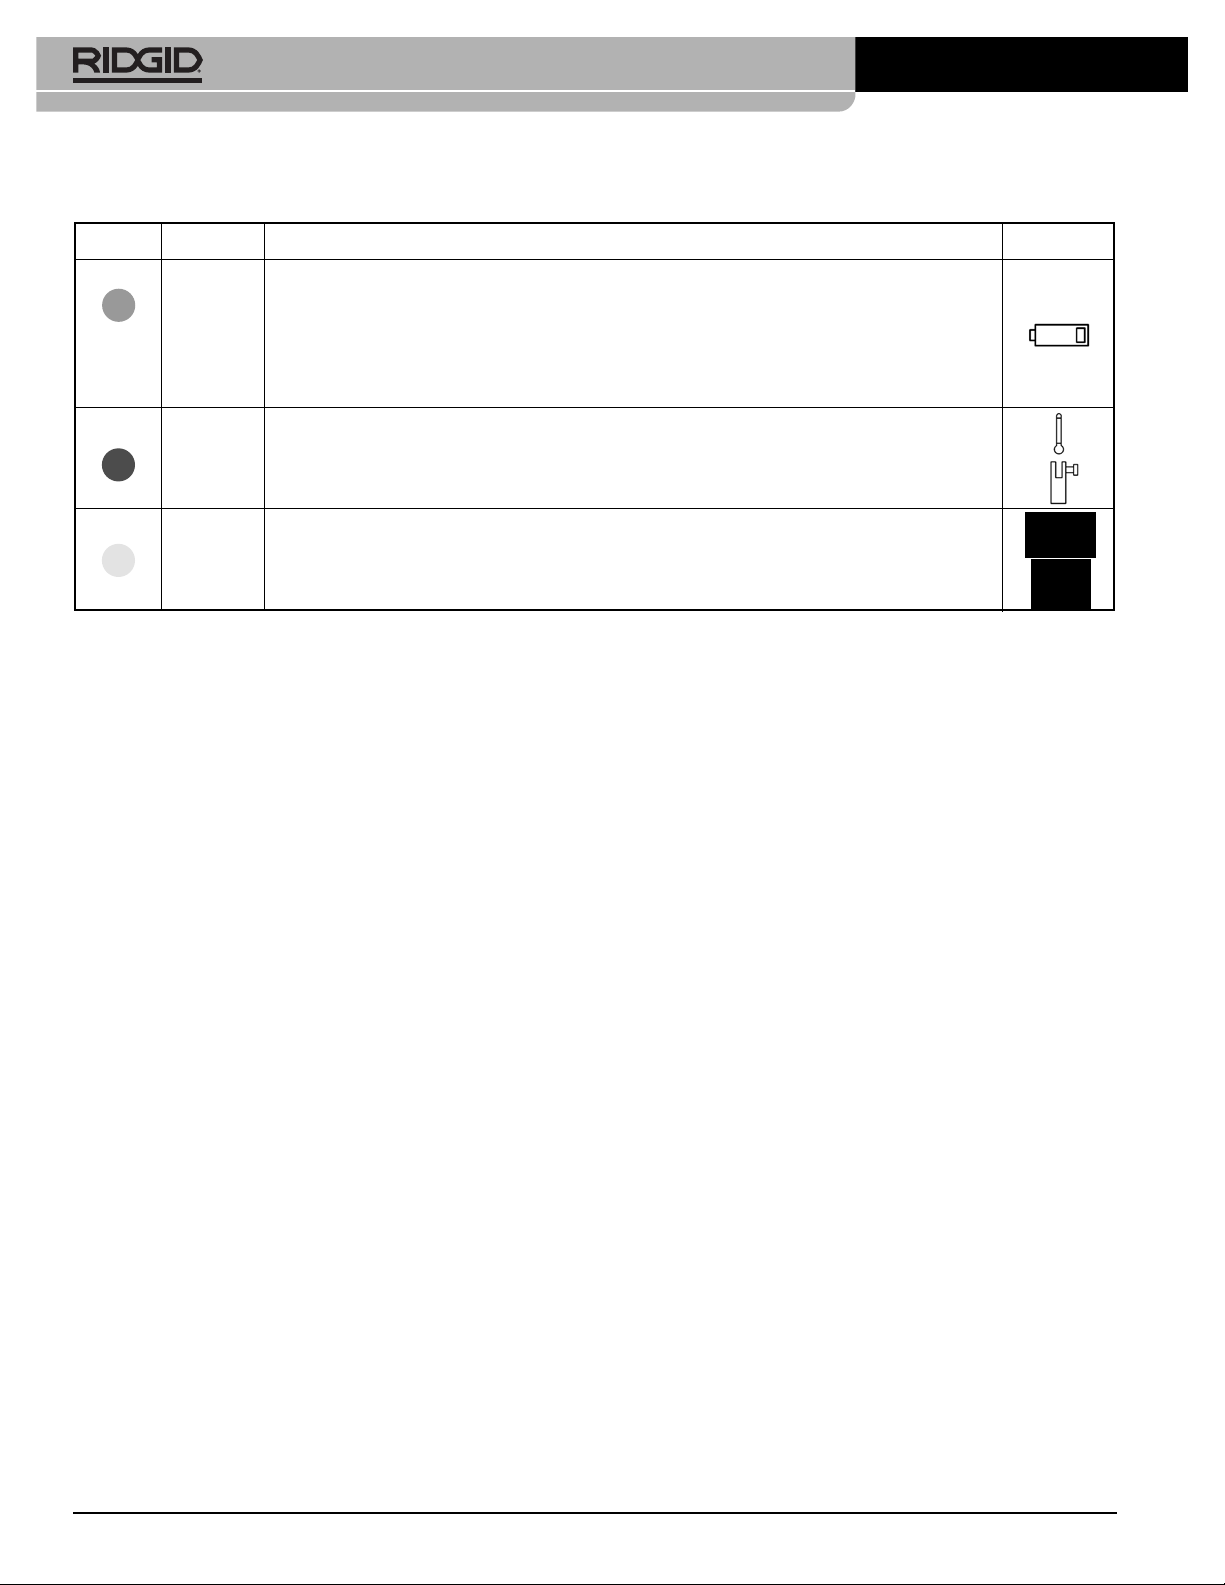
RP 340 Diagnostic Codes
LED Status Description Icon
Green
Glows Tool ON.
Blinks Out of acceptable voltage range
— Tools using a battery: Replace battery with a fully charged battery.
— Tools using an AC Power Adapter: Connect tool to a reliable voltage supply.
If using extension cord, use 16 AWG for 50' or less, 14 AWG for 50' to 100'.
Red
Glows Out of temperature range 15°F (-10°C) to 122°F (50°C).
Blinks Jaws mounting pin not fully engaged. Insert pin.
Yellow
Glows Service indicator after 40,000 cycles. NOTE: Tool will lock after 42,000 cycles.
Blinks Machine is locked – Service after 42,000 cycles or after a malfunction.
Find Quality Products Online at: [email protected]
www.GlobalTestSupply.com
Page 15
EMERSON. CONSIDER IT SOLVED.
™
What is covered
RIDGID®tools are warranted to be free of defects in workmanship and material.
How long coverage lasts
This warranty lasts for the lifetime of the RIDGID
®
tool. Warranty coverage ends when the product
becomes unusable for reasons other than defects in workmanship or material.
How you can get service
To obtain the benefit of this warranty, deliver via prepaid transportation the complete product to
RIDGE TOOL COMPANY, Elyria, Ohio, or any authorized RIDGID
®
INDEPENDENT SERVICE CENTER.
Pipe wrenches and other hand tools should be returned to the place of purchase.
What we will do to correct problems
Warranted products will be repaired or replaced, at RIDGE TOOL’S option, and returned at no charge;
or, if after three attempts to repair or replace during the warranty period the product is still
defective, you can elect to receive a full refund of your purchase price.
What is not covered
Failures due to misuse, abuse or normal wear and tear are not covered by this warranty. RIDGE
TOOL shall not be responsible for any incidental or consequential damages.
How local law relates to the warranty
Some states do not allow the exclusion or limitation of incidental or consequential damages, so the
above limitation or exclusion may not apply to you. This warranty gives you specific rights, and you
may also have other rights, which vary, from state to state, province to province, or country to country.
No other express warranty applies
This FULL LIFETIME WARRANTY is the sole and exclusive warranty for RIDGID
®
products. No
employee, agent, dealer, or other person is authorized to alter this warranty or make any other warranty on behalf of the RIDGE TOOL COMPANY.
Qué cubre
Las herramientas RIDGID
®
están garantizadas contra defectos de la mano de obra y de los
materiales empleados en su fabricación.
Duración de la cobertura
Esta garantía cubre a la herramienta RIDGID
®
durante toda su vida útil. La cobertura de la garantía
caduca cuando el producto se torna inservible por razones distintas a las de defectos en la mano de
obra o en los materiales.
Cómo obtener servicio
Para obtener los beneficios de esta garantía, envíe mediante porte pagado, la totalidad del producto
a RIDGE TOOL COMPANY, en Elyria, Ohio, o a cualquier Servicentro Independiente RIDGID
®
. Las
llaves para tubos y demás herramientas de mano deben devolverse a la tienda donde se adquirieron.
Lo que hacemos para corregir el problema
El producto bajo garantía será reparado o reemplazado por otro, a discreción de RIDGE TOOL, y
devuelto sin costo; o, si aún resulta defectuoso después de haber sido reparado o sustituido tres
veces durante el período de su garantía, Ud. puede optar por recibir un reembolso por el valor total
de su compra.
Lo que no está cubierto
Esta garantía no cubre fallas debido al mal uso, abuso o desgaste normal. RIDGE TOOL no se hace
responsable de daño incidental o consiguiente alguno.
Relación entre la garantía y las leyes locales
Algunos estados de los EE.UU. no permiten la exclusión o restricción referente a daños incidentales
o consiguientes. Por lo tanto, puede que la limitación o restricción mencionada anteriormente no rija
para Ud. Esta garantía le otorga derechos específicos, y puede que, además, Ud tenga otros derechos, los cuales varían de estado a estado, provincia a provincia o país a país.
No rige ninguna otra garantía expresa
Esta GARANTIA VITALICIA es la única y exclusiva garantía para los productos RIDGID
®
. Ningún
empleado, agente, distribuidor u otra persona está autorizado para modificar esta garantía u ofrecer cualquier otra garantía en nombre de RIDGE TOOL COMPANY.
Ce qui est couvert
Les outils RIDGID
®
sont garantis contre tous vices de matériaux et de main d’oeuvre.
Durée de couverture
Cette garantie est applicable durant la vie entière de l’outil RIDGID®. La couverture cesse dès lors que
le produit devient inutilisable pour raisons autres que des vices de matériaux ou de main d’oeuvre.
Pour invoquer la garantie
Pour toutes réparations au titre de la garantie, il convient d’expédier le produit complet en port payé
à la RIDGE TOOL COMPANY, Elyria, Ohio, ou bien le remettre à un réparateur RIDGID
®
agréé. Les clés
à pipe et autres outils à main doivent être ramenés au lieu d’achat.
Ce que nous ferons pour résoudre le problème
Les produits sous garantie seront à la discrétion de RIDGE TOOL, soit réparés ou remplacés, puis réexpédiés gratuitement ; ou si, après trois tentatives de réparation ou de remplacement durant la période
de validité de la garantie le produit s’avère toujours défectueux, vous aurez l’option de demander le remboursement intégral de son prix d’achat.
Ce qui n’est pas couvert
Les défaillances dues au mauvais emploi, à l’abus ou à l’usure normale ne sont pas couvertes par cette
garantie. RIDGE TOOL ne sera tenue responsable d’aucuns dommages directs ou indirects.
L’influence de la législation locale sur la garantie
Puisque certaines législations locales interdisent l’exclusion des dommages directs ou indirects, il se
peut que la limitation ou exclusion ci-dessus ne vous soit pas applicable. Cette garantie vous donne des
droits spécifiques qui peuvent être éventuellement complétés par d’autres droits prévus par votre législation locale.
Il n’existe aucune autre garantie expresse
Cette GARANTIE PERPETUELLE INTEGRALE est la seule et unique garantie couvrant les produits
RIDGID
®
. Aucun employé, agent, distributeur ou tiers n’est autorisé à modifier cette garantie ou à offrir
une garantie supplémentaire au nom de la RIDGE TOOL COMPANY.
Printed in U.S.A. 4/13
© 2013 RIDGID, Inc.
999-999-443.10
EC39693 REV. A
FULL LIFETIME
WARRANTY
Against Material Defects
& Workmanship
Find Quality Products Online at: [email protected]
www.GlobalTestSupply.com
 Loading...