

Page 1

Soil Pipe Cutters Manual
206/226/246/286
Soil Pipe Cutters
206/246
226
286
99 Washington Street
Melrose, MA 02176
Phone 781-665-1400
Toll Free 1-800-517-8431
Visit us at www.TestEquipmentDepot.com
Page 2
Soil Pipe Cutters
Safety Symbols
In this operator’s manual and on the product, safety symbols and signal words are used to
communicate important safety information. This section is provided to improve understanding of these signal words and symbols.
This is the safety alert symbol. It is used to alert you to potential personal injury hazards. Obey
all safety messages that follow this symbol to avoid possible injury or death.
WARNING
WARNING indicates a hazardous situation which, if not avoided, could result in
death or serious injury.
This symbol means read the operator’s manual carefully before using the equipment. The operator’s manual contains important information on the safe and proper operation of the equipment.
This symbol means always wear safety glasses with side shields or goggles when handling
or using this equipment to reduce the risk of eye injury.
Soil Pipe Cutter Safety
WARNING
Read and understand these instructions
and the warnings and instructions for
all equipment and material being used
before operating the Soil Pipe Cutters
to reduce the risk of serious personal
injury.
SAVE ALL WARNINGS
AND INSTRUCTIONS FOR
FUTURE REFERENCE!
Keep this manual with machine for use by
the operator.
• Keep bystanders out of work area while
cutting. Stand clear of the pipe. Cutting
can cause pieces of pipe to be thrown
with considerable force. This can cause
striking injuries, eye injuries, or other serious personal injury.
• Use personal protective equipment.
Always wear eye protection. Protective
equipment such as dust mask, non-skid
safety shoes, hard hat, or hearing protection
used for appropriate conditions will reduce
personal injuries.
• Do not exceed the recommended cut-
ting capacity of the tool. Use the correct
tool for your application. Do not force
tool. Cutting pipe that is too large or the
wrong type could overload the soil pipe
cutter and cause tool failure and or serious
personal injury. Do not extend the chain to
cut soil pipe greater than 8" in diameter.
• Do not use handle extensions or power
tools to activate the soil pipe cutter.
Handle extensions (cheaters) can slip and
cause serious injury. Extended handles or
power tools can overload the soil pipe cutter and cause tool failure and or serious
personal injury.
• Do not overreach. Keep proper footing
and balance at all times. Proper footing
and balance enables better control of the
tool in unexpected situations.
Description
RIDGID®Soil Pipe Cutters are used to cut a variety of cast iron soil pipe and can also be
used on concrete and clay pipe. All RIDGID
Soil Pipe Cutters use chains equipped with
cutter wheels that are tightened around the
pipe until the pipe breaks. The 226, 206 and
286 all use the same chain assembly, while the
246 is supplied with a larger chain. All tools
come standard with enough chain to cut pipe
up to 6" nominal diameter, and with the addition of one chain extension can cut pipe up to
8" nominal diameter. All of the soil pipe cutters
use a unique hooking mechanism to make
hooking the chain easier.
999-998-611.10_REV. C
1
Page 3

Soil Pipe Cutters
226 In-Place Soil Pipe Cutter
Figure 1 – 226 Soil Pipe Cutter
The RIDGID 226 In-Place Soil Pipe Cutter is
a compact tool (17" long) designed to cut
hub and no-hub soil pipe, especially where
space is limited. The handle is removable to
allow use in tight spaces. The feedscrew is
equipped with a hand knob for fast adjustment, and a 15" long 1/2" drive ratchet is
supplied for operation. If needed, the 226
can also be operated with any 1/2" drive
ratchet or 15/16" wrench.
206 and 246 Soil Pipe Cutters
The RIDGID 206 and 246 Soil Pipe Cutters
utilize an integral ratchet handle centered
on the pipe. This is especially useful when
cutting pipe in trenches, and helps keep the
width of the trench to a minimum. The 206
uses the same chain as the 226 and 286,
while the chain on the 246 is larger and allows it to cut 4" class 22 water main and 2" –
5" extra heavy duty soil pipe.
286 Soil Pipe Cutter
Figure 3 – 286 Soil Pipe Cutter
The RIDGID 286 Soil Pipe Cutter is designed
to allow soil pipe to be cut in a single stroke.
A knob is used to adjust handle position for
optimal cutting. The 286 Soil Pipe Cutter allows repeated cuts to be made quickly, as
when cutting pipe for assembly.
Figure 2 – 206/246 Soil Pipe Cutter
Specifications
Catalog Model
No. No.
68650 206 Soil Pipe Cutter No Hub 11/2-6 40-150 18 8.2 1 33670
69982 226 In-Place Soil Pipe Cutter 1
32900 246 Soil Pipe Cutter 1
59698 286 Soil Pipe Cutter 1
33665 206/226/286 Chain Extension Assy.* ——10.5 1—
34570 246 Chain Extension Assy.* ——10.5 1—
70437 – 226 Ratchet —— 1 —
* Do not use more than one chain extension except for use with clay pipe up to 15".
2
Description
Capacity Weight
in. mm lb. kg
1
/2-6 40-150 18 8.2 1 33670
1
/2-6 40-150 25 11.3 1 34575
1
/2-6 40-150 29 13.1 1 33670
Standard
Replacement
Pack
Chain
Cat #
999-998-611.10_REV. C
Page 4
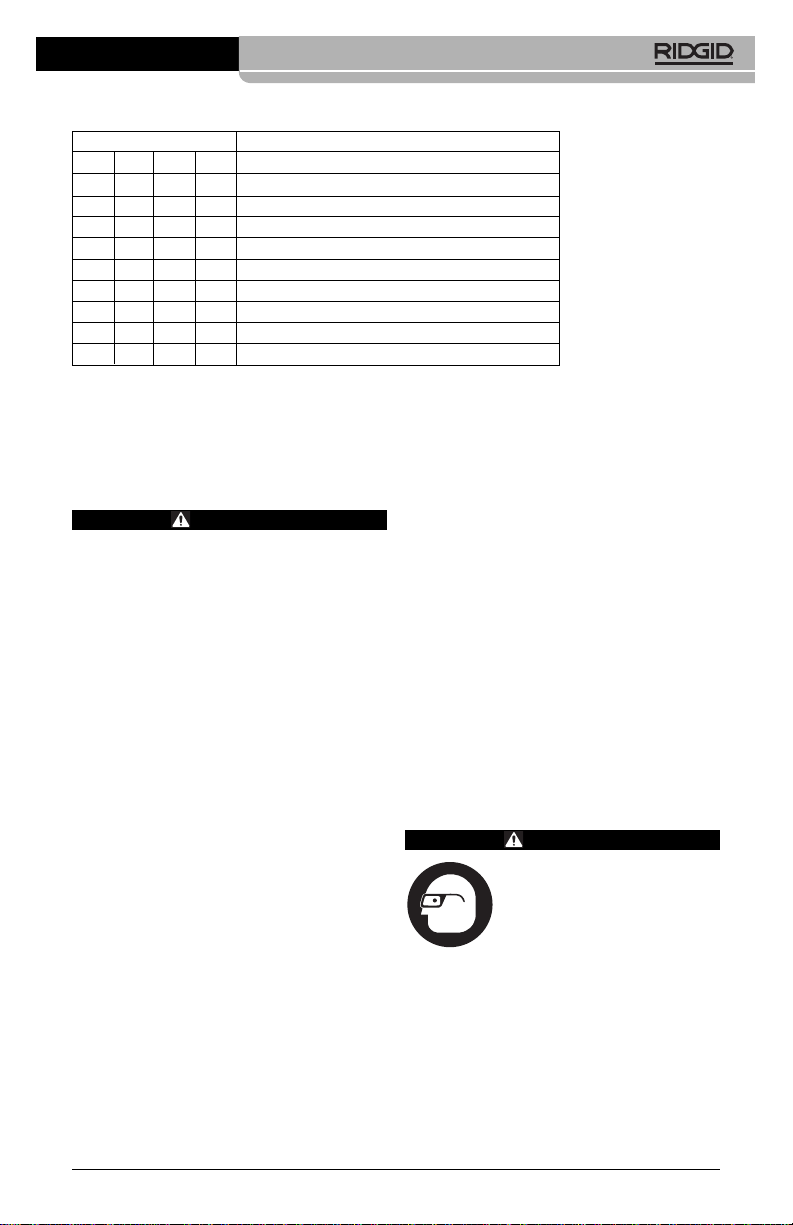
Soil Pipe Cutter Capacity Chart
Model Material/Size
226 206 286 246
(1)*(1)*(1)*(1)
*
****Service weight cast iron solid pipe, 8"
****No hub cast iron soil pipe, 8"
••••Concrete pipe, 4" - 6"
• •••Clay pipe, 1
••••Service weight cast iron soil pipe, 1
••••No hub cast iron soil pipe, 1
• Standard Length Chain. *Chain with One Chain Extension.
(1) Up to 15" Clay Pipe only can be cut with extended chain.
Clay pipe, 8"
1
⁄2" - 6"
• Class 22 water main, 4"
• Extra heavy-duty cast iron soil pipe, 2" - 5"
1
⁄2" - 6"
1
⁄2" - 6"
Soil Pipe Cutters
Pre-Operation
Inspection and
Maintenance
WARNING
Before each use, inspect your soil pipe
cutter and correct any problems to reduce the risk of serious injury from striking or impact injuries and other causes
and prevent soil pipe cutter damage.
1. Clean the soil pipe cutter and remove all
dirt, oil, grease and debris, especially
from handles and controls. This aids in inspection and helps prevent the tool from
slipping from your grip during use. If
needed, the chain can be cleaned with a
wire brush.
2. Inspect the soil pipe cutter for the following items:
• Proper assembly and com pleteness
• Broken, cracked, missing, bent or bind-
ing parts
• Excessive corrosion and wear
• Smooth, free movement of ratchet,
screws, chain and linkages
• Presence and readability of warning la-
bels
3. Inspect the chain for signs of overload or
other damage. There should be no significant gaps between the plates of the
chain. If there are large gaps between
the links of the chain or other damage,
the chain should be replaced. Check the
cutter wheels for wear and damage. Worn
and damaged cutter wheels increase cut
force and can cause poor quality cuts.
4. On the 226 Soil Pipe Cutter, press the
999-998-611.10_REV. C
release button in the center of the ratchet
head and place into the end of the feedscrew. The ratchet should lock firmly into
place. This helps to prevent the ratchet
from coming loose from the cutter when in
use. If using a different ratchet or wrench,
be aware that it could come loose during
use.
5. If any problems are found, do not use
the soil pipe cutter until corrected. Have
your tool serviced by a qualified repair
person using only identical replacement
parts. This will ensure that the safety of
the tool is maintained.
6. If needed, lubricate pivot points and the
chain with a light lubricating oil. Wipe any
excess oil off.
Tool Set-Up and
Operation
WARNING
Follow set up and operating
instructions to reduce the
risk of serious injury from
striking or impact injuries
and other causes and prevent machine damage.
Keep bystanders out of work area while
cutting. Stand clear of the pipe. Cutting
can cause pieces of pipe to be thrown
with considerable force. This can cause
striking injuries, eye injuries, or other
serious personal injury.
1. Check work area for adequate lighting
and a clear, level, stable place to work. Do
not operate in explosive atmospheres,
such as in the presence of flammable
liquids, gases, or dust. Tools can create
3
Page 5

Soil Pipe Cutters
sparks which may ignite the dust or
fumes.
2. Inspect the pipe to be cut. Determine
the size and type of material. If cutting
pipe that is already in service,
determine the pipe contents.
3. Determine the correct pipe cutter for
the application. RIDGID soil pipe
cutters can be used for soil pipe up to a
maximum of 8" diameter. See
Specification Section.
4. Make sure that the soil pipe cutter
has been properly inspected.
5. Prepare the pipe to be cut.
• Take any appropriate steps required
to
drain the pipe and/or deal with any potential spillage.
• Clean mud or corrosion off of the pipe.
Excessive corrosion or mud can cause
poor quality cuts and damage cutter
wheels.
• Make sure there is enough room to get
the chain around the pipe. The 206/226
and 286 need approximately 1½" around
the pipe for the chain to fit, the 246,
about 2". If cutting loose pipe, to protect
the cutter wheels from damage against
concrete or other hard surfaces, place the
pipe on short stands or wood block to get
the pipe off the floor or work on a softer
surface like a piece of plywood.
• When cutting short sections of pipe, if
possible, restrain the pipe to prevent it
from being thrown when cut. This can be
done by placing a smaller piece of pipe
or lumber through the center of the pipe,
or by other methods.
6. For all of the soil pipe cutters, the tool
must be fully open and the chain snugly
wrapped around the pipe before hooking
the chain. If not, the wrong pin may be
hooked and the cut may not be able to be
completed. This can also cause the cutter
to jam. If that happens, fully open the tool
and move the chain to the next tighter
chain pin and continue operation as described.
7. Choose a spot to operate the cutter from.
Keep in mind that when the pipe is cut,
parts of it may be thrown. Make sure that
the area is clear of bystanders or objects
that could be struck by pipe. Be aware
that when the pipe is cut the soil pipe
cutter and pipe could drop or fall.
226 Set-Up and Operation
The handle of the 226 Soil Pipe Cutter can be
removed for use in tight spaces. Remove the
two bolts/nuts that retain the handle to the
arms of the cutter and remove the handle.
Re-install and firmly tighten the bolts/nuts in the
arms of the cutter before use. The handle can
be placed in any of four positions if needed.
Handle
Handle
Bolts
Chain
Figure 4 – Using the 226 Soil Pipe Cutter
1. Grip the adjusting knob of the soil pipe
cutter and fully open.
2. Place the soil pipe cutter on the pipe so
the cutter wheels line up with the desired
cut point. Makes sure both hooks are
lying on the pipe with the open side up.
3. Wrap the chain snugly around the pipe
and place the nearest chain pin into the
hooks.
4. Make sure that the cutter wheels are
square to the pipe and at the desired location. Turn the adjusting knob to firmly
tighten the chain around the pipe.
5. Press the release button in the center of
the ratchet head and place into the end of
the feedscrew. The ratchet should lock
firmly into place. If using a different wrench,
it may not lock in place and may come
loose during operation. Make sure that
the ratchet is set to tighten the feedscrew.
6. Assume a stable stance, and with a firm
grip on the handle, tighten the feedscrew
with the ratchet. Continue tightening until
the pipe is cut.
Ratchet
Adjusting Knob
Hook
Chain Pin
4
999-998-611.10_REV. C
Page 6

Soil Pipe Cutters
206/246 Set-Up and Operation
1. Lift and turn the ratchet knob to the neutral
position (pin out of the groove). Grip the
adjusting knob of the soil pipe cutter and
fully open.
Ratchet Knob
Inner
Side Arm
Chain
Pin
Figure 5 – 206/246 Soil Pipe Cutter
2. If possible, while straddling the longest
section of the pipe, put the adjusting knob
to your right. When cut, the short section of pipe will be away from you.
3. Place the soil pipe cutter on the pipe so
that the cutter wheels are lined up with
the desired cut point. Makes sure both
hooks are lying on the pipe with the open
side up.
4. Wrap the chain snugly around the pipe
and place the nearest chain pin into the
hooks.
5. Make sure that the cutter wheels are
square to the pipe and at the desired location. Turn the adjusting knob to firmly
tighten the chain around the pipe. DO
NOT try to use the adjusting knob to cut
the pipe – this can damage the soil pipe
cutter.
6. Turn the ratchet knob in the close direction so that the arrow points to the word
CUT on the ratchet housing.
7. Assume a stable stance, and with a firm
grip on the handle, move the handle toward the pipe to tighten the chain.
Continue ratcheting and tightening until
the pipe is cut.
IMPORTANT
If the ratcheting action stops before the pipe is
cut, the tool has been jammed. DO NOT
FORCE the handle or adjusting knob. Lift and
turn the ratchet knob so that the arrow points to
the word OPEN on the ratchet housing. Hold
the ratchet knob in this position while moving
the handle in that direction to unjam the tool.
Fully open the tool and move the chain to the
Adjusting
Knob
Outer Side
Arm
Hook
next tighter chain pin and continue operation as
described.
286 Set-Up and Operation
Once the 286 Soil Pipe Cutter is adjusted for a
given size of pipe, it usually requires no further
adjustment for subsequent cuts.
The hooks should rotate but stay where placed
to ease chain hooking. If needed, tighten the
hook nut to adjust tension. (See Figure 6).
Hook
Chain
Pin
Hooks
Chain
Hook Nut
Chain Pin
Upper
Handle
Lower
Handle
Figure 6 – 286 Soil Pipe Cutter
Adjusting
Knob
1. Place the jaws of the tool next to and
square to the pipe, with the chain under
or around the pipe. Make sure both hooks
are lying on the pipe with the open side
up. If cutting on ground, the adjusting
knob should be up.
2. Open the handles to 90 degrees and support the upper handle with one hand.
3. With the other hand, pull the chain snugly
around the pipe and insert the closest
chain pin into the hooks. Make sure that
the excess chain is clear of the mechanism.
4. Make sure the chain is square to the pipe
and in the proper location, and carefully
close the jaws of the soil pipe making
sure that the chain pin stays hooked.
Using the adjusting knob, adjust so that
the handles are approximately 45 to 70 degrees apart for cast iron pipe and 20 to 45
degrees apart for clay or concrete pipe. If
you cannot get a proper angle using the
knob, the chain must be disengaged from
the hooks, the jaws opened further with
the knob, and the chain hooked to the
next pin.
999-998-611.10_REV. C
5
Page 7

Soil Pipe Cutters
5. Assume a stable stance. If working with
one handle on the ground, place one foot
on the flat of the lower handle. With a firm
grip on the handle, exert even downward
force until the pipe is cut.
Cutting Tips
Once the appropriate pin for a given size pipe
has been determined; marking the pin can
save time setting up subsequent cuts of the
same size.
For cleaner cuts, instead of tightening the chain
until the pipe is cut, tighten the chain enough to
mark the pipe. Then loosen the chain and
slightly rotate the pipe or the tool and make another set of marks. Do this several times to
create marks all the way around the pipe, then
tighten the chain and break the pipe.
When carrying your soil pipe cutter, do not
drag the chain. This can wear and damage the
cutter wheels, increasing cut force and cause
poor cut quality.
Lengthening Soil Pipe
Cutter Chain
WARNING
Do not exceed the recommended cutting capacity of the tool. Cutting pipe
that is too large or the wrong type could
overload the soil pipe cutter and cause
tool failure and or serious personal injury.
All RIDGID Soil Pipe Cutters come equipped
with enough chain to cut 6" pipe. The addition
of one Chain Extension Assembly (See Speci -
fication table for catalog information) will increase your chain length enough to allow 8"
soil pipe to be cut. If you are cutting clay pipe
ONLY, you can extend your chain to allow up to
15" clay pipe to be cut. Do not cut types or
sizes of pipes outside the range shown in the
cutter capacity chart, as that could overload
and damage the cutter or cause injury.
To Add A Chain Extension
Assembly To Your Chain
1. Remove the ring from the end of the
chain.
2. Place the outside links of the extension
over the inside links of the chain, and
place the cutter wheel between the inside links.
3. Place the area of the chain to be linked in
a press and properly support. Align the
holes in the links and cutter wheel and
place the pin in the hole.
4. Carefully press the pin in. Make sure to
center the pin relative to the chain links.
5. Reattach the ring to the end of the extended chain.
6
999-998-611.10_REV. C
Page 8
99 Washington Street
Melrose, MA 02176
Phone 781-665-1400
Toll Free 1-800-517-8431
Visit us at www.TestEquipmentDepot.com
Printed 8/17 999-998-611.10
EC43093 REV. C
The Emerson logo and RIDGID logo are registered trademarks of Emerson Electric Co. or RIDGID, Inc. in the U.S. and other countries.
©2002, 2017, RIDGID, Inc.
All other trademarks belong to their respective holders.
 Loading...