

Page 1
• Français – 6
• Castellano – pág. 13
WARNING!
Read this Operator’s Manual
carefully before using this
tool. Failure to understand
and follow the contents of
this manual may result in
electrical shock, fire and/or
serious personal injury.
Soil Pipe Cutters Manual
206/226/246/276
226
206/246
276
Page 2

Safety Symbols
In this operator’s manual and on the product, safety symbols and signal words are used to communicate important safety
information. This section is provided to improve understanding of these signal words and symbols.
This is the safety alert symbol. It is used to alert you to potential personal injury hazards. Obey all safety messages that follow this
symbol to avoid possible injury or death.
WARNING indicates a hazardous situation which, if not avoided, could result in death or serious injury.
This symbol means read the operator’s manual carefully before using the equipment. The operator’s manual contains important
information on the safe and proper operation of the equipment.
This symbol means always wear safety glasses with side shields or goggles when handling or using this equipment.
WARNING
Soil Pipe Cutters
Ridge Tool Company
II
Table of Contents
Safety Symbols..............................................................................................................................................................ii
General Safety Rules ....................................................................................................................................................1
Work Area Safety........................................................................................................................................................1
Personal Safety ..........................................................................................................................................................1
Tool Use and Care ......................................................................................................................................................1
Service........................................................................................................................................................................1
Specific Safety Information..........................................................................................................................................1
Description And Specifications
Description..................................................................................................................................................................1
226 In-Place Soil Pipe Cutter......................................................................................................................................2
206 and 246 Soil Pipe Cutters ....................................................................................................................................2
276 Soil Pipe Cutter....................................................................................................................................................2
Specifications..............................................................................................................................................................3
Pre-Operation Inspection/Maintenance ......................................................................................................................3
Tool Set-Up and Operation ..........................................................................................................................................3
226 Set-Up and Operation..........................................................................................................................................4
206/246 Set-Up and Operation ..................................................................................................................................4
276 Set-Up and Operation..........................................................................................................................................4
Cutting Tips....................................................................................................................................................................5
Lengthening Your Soil Pipe Cutter Chain....................................................................................................................5
To Add A Chain Extension Assembly To You Chain ....................................................................................................5
Lifetime Warranty..........................................................................................................................................Back Cover
Page 3

General Safety Rules
WARNING
Read and understand all instructions. Failure to follow all instructions listed below may result in electric shock, fire,
and/or serious personal injury.
SAVE THESE INSTRUCTIONS!
Work Area Safety
• Keep your work area clean and well lit. Cluttered or
dark areas invite accidents.
• Do not operate tools in explosive atmospheres,
such as in the presence of flam mable liquids,
gases, or dust. Tools can create sparks which may ig-
nite the dust or fumes.
• Keep children and by-standers away while operat-
ing tools. Distractions can cause you to lose control.
• Keep floors dry and free of slippery materials such
as oil. Slippery floors invite accidents.
Personal Safety
• Stay alert, watch what you are doing and use common sense when operating tools. Do not use tools
while you are tired or under the influence of drugs,
alcohol, or medication. A moment of inattention while
operating tools may result in serious personal injury.
• Use personal protective equipment. Always wear
eye protection. Protective equipment such as dust
mask, non-skid safety shoes, hard hat, or hearing protection used for appropriate conditions will reduce personal injuries.
• Do not overreach. Keep proper footing and bal-
ance at all times. Proper footing and balance enables better control of the tool in unexpected situations.
Tool Use and Care
• Do not force tool. Use the correct tool for your application. The correct tool will do the job better and
safer at the rate for which it is designed.
• Store idle tools out of the reach of children and do
not allow persons unfamiliar with the tool or these
instructions to operate the tool. Tools can be dan-
gerous in the hands of untrained users.
• Maintain tools. Check for misalignment or binding
of moving parts, breakage of parts and any other
condition that may affect the tool’s operation. If
damaged, have the tool repaired before use. Many
accidents are caused by poorly maintained tools.
• Keep handles dry and clean; free from oil and
grease. Allows for better control of the tool.
Service
• Have your tool serviced by a qualified repair person using only identical replacement parts. This will
ensure that the safety of the tool is maintained.
Specific Safety Information
WARNING
This section contains important safety information
that is specific to this tool.
Read these precautions carefully before using Soil
Pipe Cutters to reduce the risk of serious personal injury.
SAVE THESE INSTRUCTIONS!
If you have any question concerning this Ridge Tool product:
– Contact your local RIDGID distributor.
– Visit www.RIDGID.com or www.RIDGID.eu to find your
local Ridge Tool contact point.
– Contact Ridge Tool Technical Services Department
at techservices@ridgid.com, or in the U.S. and Canada
call (800) 519-3456.
• Keep others out of work area while cutting. Stand
clear of the pipe. Cutting can cause pieces of pipe to
be thrown with considerable force. This can cause
striking injuries, eye injuries, or other serious personal
injury.
• Always wear Safety Glasses. Protects your eyes
against dirt and other foreign objects.
• Do not exceed the recommended cutting capacity
of the tool. Cutting pipe that is too large or the wrong
type could overload the soil pipe cutter and cause
tool failure and or serious personal injury. Do not extend
the chain to cut soil pipe greater than 8" in diameter.
• Do not use handle extensions or power tools to ac-
tivate the soil pipe cutter. Handle extensions
(cheaters) can slip and cause serious injury. Extended
handles or power tools can overload the soil pipe cutter and cause tool failure and or serious personal injury.
Description And Specifications
Description
RIDGID®Soil Pipe Cutters are used to cut a variety of cast
iron soil pipe and can also be used on concrete and clay
pipe. All RIDGID Soil Pipe Cutters use chains equipped
with cutter wheels that are tightened around the pipe
until the pipe breaks. The 226, 206 and 276 all use the
same chain assembly, while the 246 is supplied with a
larger chain. All tools come standard with enough chain to
Ridge Tool Company
1
Soil Pipe Cutters
Page 4
cut pipe up to 6" nominal diameter, and with the addition of
one chain extension can cut pipe up to 8" nominal diameter.
See the Soil Pipe Cutter Capacity Chart
for specific information on the types of material and sizes cut with
each.
Soil Pipe Cutter Capacity Chart
226 In-Place Soil Pipe Cutter
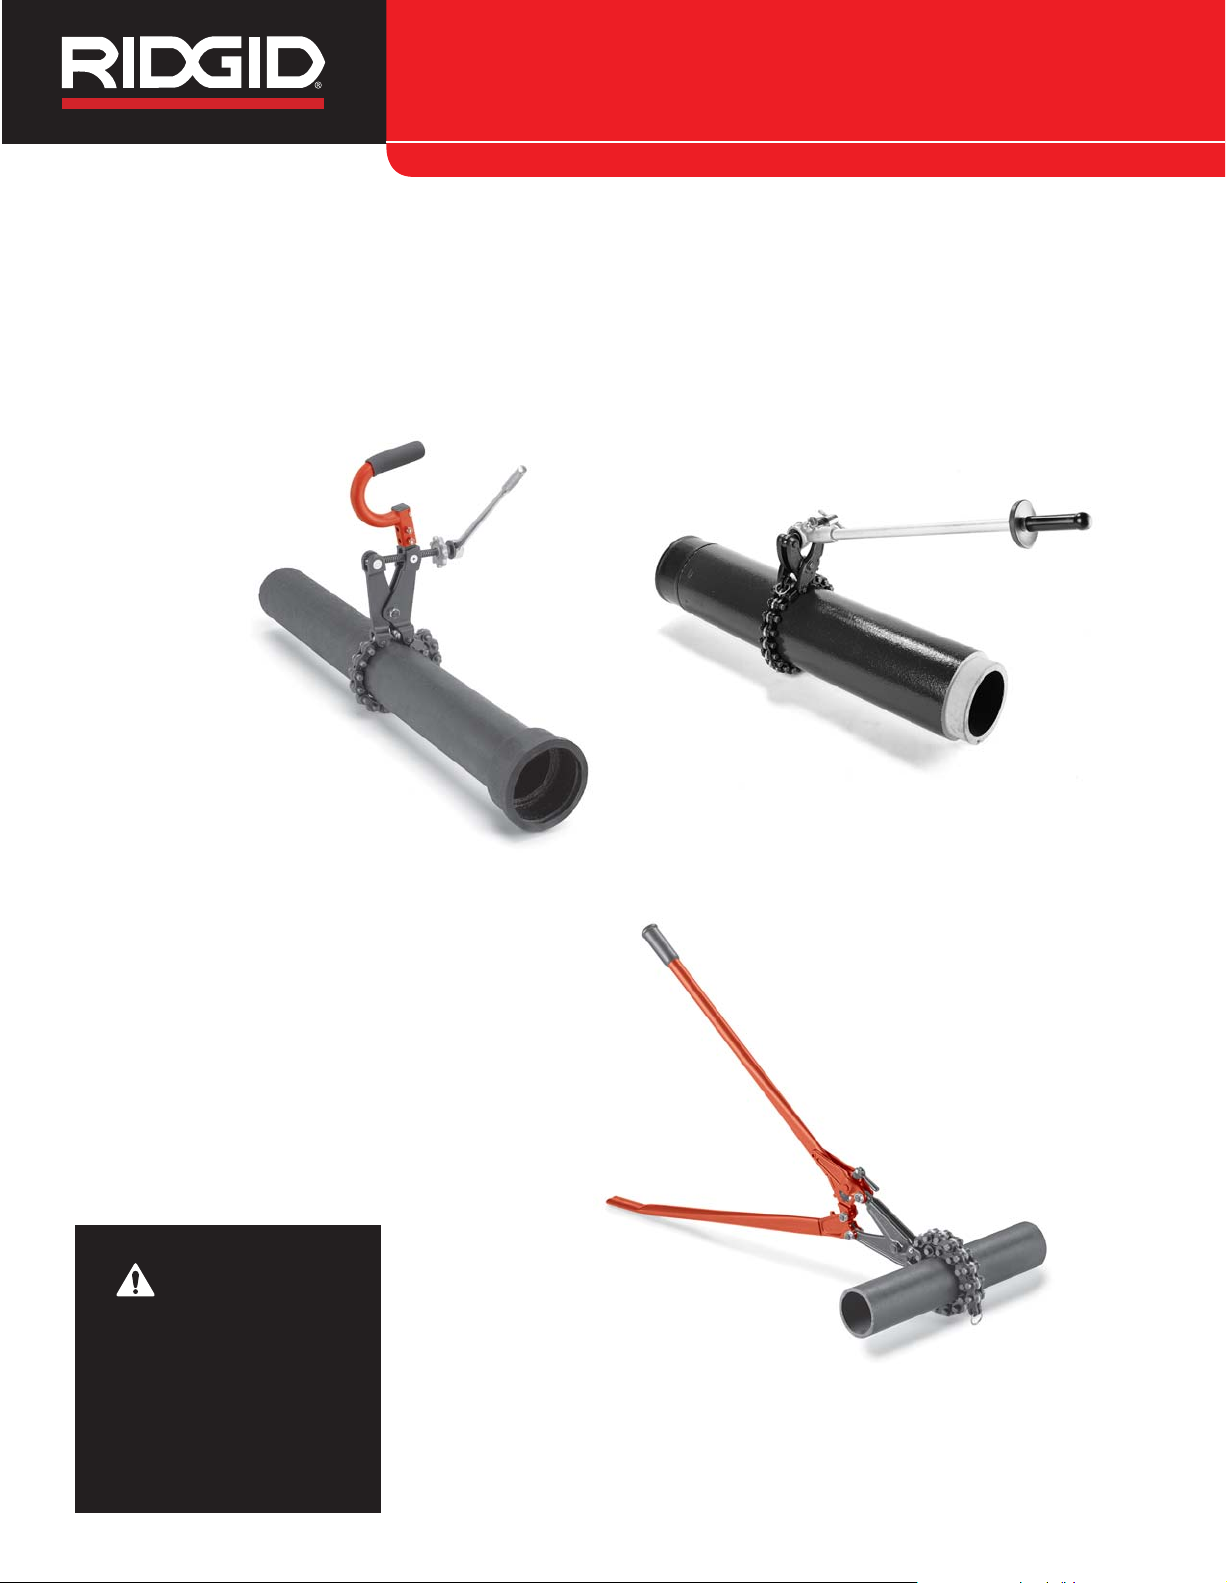
Figure 1 – 226 Soil Pipe Cutter
The RIDGID 226 In-Place Soil Pipe Cutter is a compact
tool (17" long) designed to cut hub and no-hub soil pipe,
especially where space is limited. The handle is removable
to allow use in tight spaces. The feedscrew is equipped
with a hand knob for fast adjustment, and a 15" long 1/2"
drive ratchet is supplied for operation. If needed, the 226
can also be operated with any 1/2" drive ratchet or 15/16"
wrench. The 226 uses a unique hooking mechanism to
make hooking the chain easier.
The 226 In-Place Soil Pipe Cutter is protected under various U.S. and International patents, including U.S. Patent
6,141,876.
Soil Pipe Cutters
Ridge Tool Company
2
206 and 246 Soil Pipe Cutters
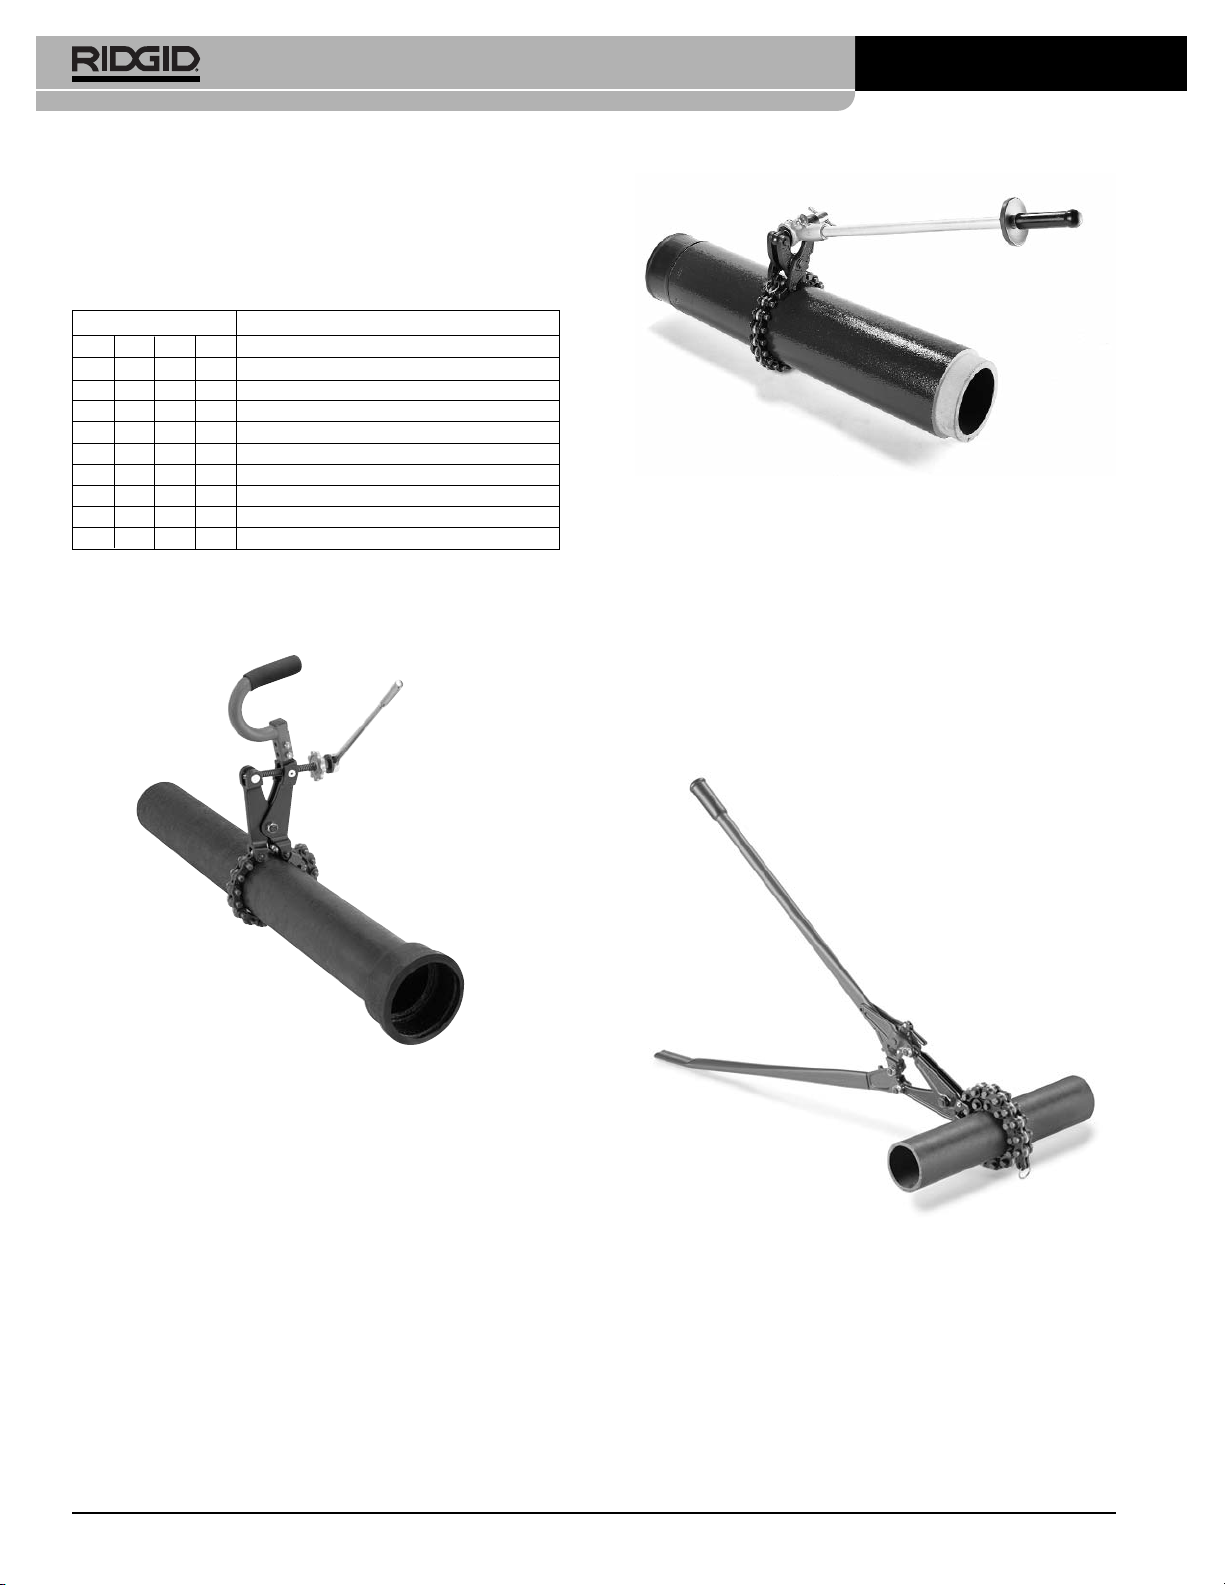
Figure 2 – 206/246 Soil Pipe Cutter
The RIDGID 206 and 246 Soil Pipe Cutters utilize an integral ratchet handle centered on the pipe. This is especially useful when cutting pipe in trenches, and helps keep
the width of the trench to a minimum. Both use a unique
hooking mechanism to make hooking the chain easier.
The 206 uses the same chain as the 226 and 276, while
the chain on the 246 is larger and allows it to cut 4" class 22
water main and 2" – 5" extra heavy duty soil pipe.
276 Soil Pipe Cutter
Figure 3 – 276 Soil Pipe Cutter
The RIDGID 276 Soil Pipe Cutter is designed to allow soil
pipe to be cut in a single stroke. This allows repeated
cuts to be made quickly.
Model Material/Size
226 206 276 246
*
(1)*(1)*(1)*(1)
Clay pipe, 8"
* * * * Service weight cast iron solid pipe, 8"
* * * * No hub cast iron soil pipe, 8"
• • • • Concrete pipe, 4" - 6"
• • • • Clay pipe, 11⁄2" - 6"
• Class 22 water main, 4"
• Extra heavy-duty cast iron soil pipe, 2" - 5"
• • • • Service weight cast iron soil pipe, 11⁄2" - 6"
• • • • No hub cast iron soil pipe, 11⁄2" - 6"
• Standard Length Chain. *Chain with One Chain Extension.
(1) Up to 15" Clay Pipe only can be cut with extended chain.
Page 5

Soil Pipe Cutters
Ridge Tool Company
3
Tool Set-Up and Operation
WARNING
Follow set up and operating instructions to reduce the risk of serious injury from striking or impact injuries and other causes and prevent machine damage.
Keep others out of work area while cutting. Stand
clear of the pipe. Cutting can cause pieces of
pipe to be thrown with considerable force. This can
cause striking injuries, eye injuries, or other serious personal injury.
Always wear eye protection to protect your eyes
against dirt and other foreign objects.
1. Check work area for adequate lighting and a clear,
level, stable place to work.
2. Inspect the pipe to be cut. Determine the size and type
of material. If cutting pipe that is already in service, determine the pipe contents.
3. Determine the correct pipe cutter for the application.
Other pipe cutters can be found in the RIDGID Cat alog
at www. RIDGID.com or www.RIDGID.eu. RIDGID
soil pipe cutters can be used for soil pipe up to a
maximum of 8" diameter.
See Specification Section.
4. Make sure that the soil pipe cutter has been properly
inspected.
5. Prepare the pipe to be cut.
• Take any appropriate steps required to drain the
pipe and/or deal with any potential spillage.
• Clean mud or corrosion off of the pipe. Excessive
corrosion or mud can cause poor quality cuts and
damage cutter wheels.
• Make sure there is enough room to get the chain
around the pipe. The 206/226 and 276 need approximately 1
1
/2" around the pipe for the chain to fit,
the 246, about 2". If cutting loose pipe, to protect the
cutter wheels from damage against concrete or
other hard surfaces, place the pipe on short stands
or wood block to get the pipe off the floor or work on
a softer surface like a piece of plywood.
• When cutting short sections of pipe, if possible,
restrain the pipe to prevent it from being thrown
when cut. This can be done by placing a smaller
piece of pipe or lumber through the center of the
pipe, or by other methods.
Specifications
Pre-Operation
Inspection/Maintenance
WARNING
Before each use, inspect and maintain your soil
pipe cutter and correct any problems to reduce the
risk of serious injury from striking or impact injuries and other causes and to prevent soil pipe
cutter damage.
1. Clean the soil pipe cutter and remove all dirt, oil,
grease and debris. If needed, the chain can be
cleaned with a wire brush. This aids in inspection
and helps prevent the tool from slipping from your grip
during use.
2. Inspect the soil pipe cutter for the following items:
• Proper assembly and completeness
• Broken, cracked, missing, bent or binding parts
• Excessive corrosion and wear
• Smooth, free movement of ratchet, screws, chain
and linkages
• Presence and readability of warning labels
3. Inspect the chain for signs of overload or other damage. There should be no significant gaps between
the plates of the chain. If there are large gaps between
the links of the chain or other damage, the chain
should be replaced. Check the cutter wheels for wear
and damage. Worn and damaged cutter wheels increase cut force and can cause poor quality cuts.
4. On the 226 Soil Pipe Cutter, press the release button
in the center of the ratchet head and place into the end
of the feedscrew. The ratchet should lock firmly into
place. This helps to prevent the ratchet from coming
loose from the cutter when in use. If using a different
ratchet or wrench, be aware that it could come loose
during use.
5. If any problems are found, do not use the soil pipe cutter until corrected.
6. If needed, lubricate pivot points and the chain with a
light lubricating oil. Wipe any excess oil off.
* Do not use more than one chain extension except for use with clay pipe up to 15".
Catalog Model
Description
Capacity Weight
Std.
Replmt.
No. No.
in. mm lb. kg
Pack
Chain
Cat #
68650 206 Soil Pipe Cutter No Hub 11/2-6 50-150 18 8.2 1 33670
69982 226 In-Place Soil Pipe Cutter 1
1
/2-6 50-150 18 8.2 1 33670
32900 246 Soil Pipe Cutter 1
1
/2-6 50-150 25 11.3 1 34575
74207 276 Soil Pipe Cutter 1
1
/2-6 50-150 233/411.7 1 33670
33665 206/226/276 Chain Extension Assy.* – – 1 3.5 1 –
34570 246 Chain Extension Assy.* – – 1 3.5 1 –
70437 – 226 Ratchet – – 1
Page 6
Soil Pipe Cutters
Ridge Tool Company
4
6. For all of the soil pipe cutters, the tool must be fully
open and the chain snugly wrapped around the pipe
before hooking the chain. If not, the wrong pin may be
hooked and the cut may not be able to be completed.
This can also cause the cutter to jam. If that happens,
fully open the tool and move the chain to the next
tighter chain pin and continue operation as described
7. Choose a spot to operate the cutter from. Keep in
mind that when the pipe is cut, parts of it may be
thrown. Make sure that the area is clear of others or
objects that could be struck by pipe. Be aware that
when the pipe is cut the soil pipe cutter and pipe
could drop or fall.
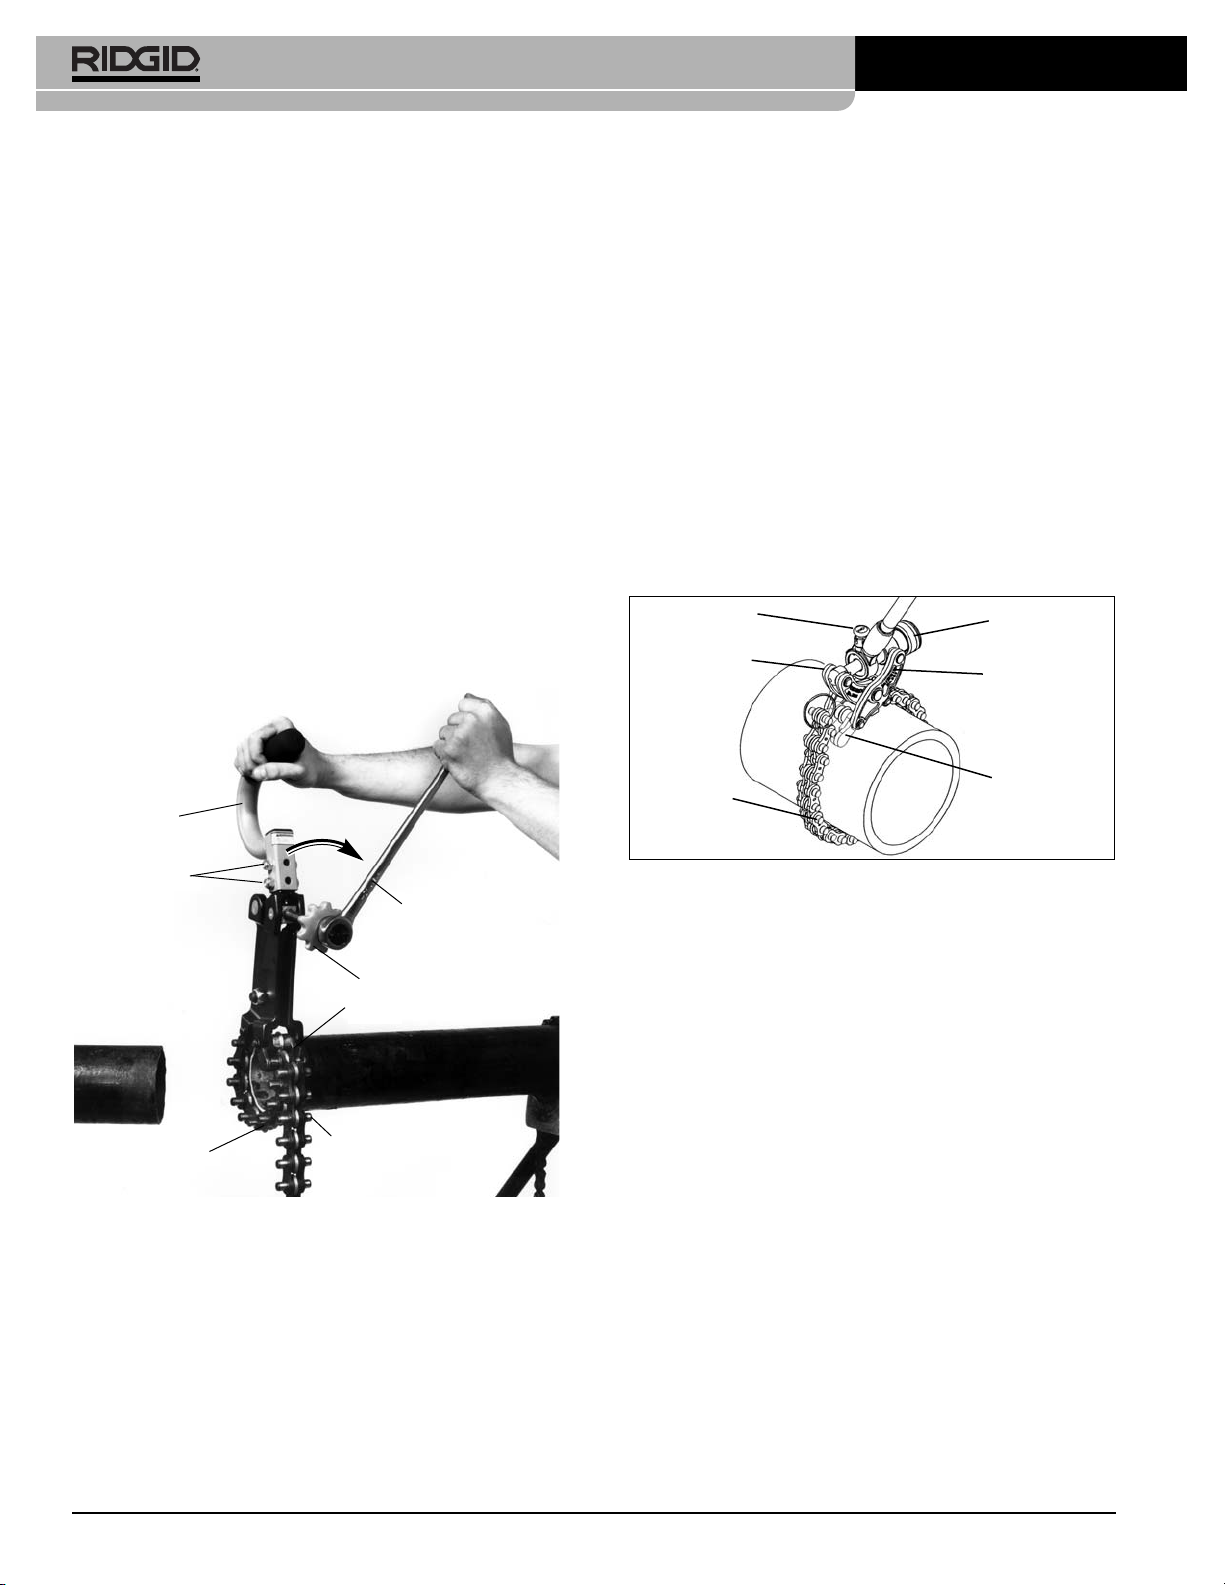
226 Set-Up and Operation
The handle of the 226 Soil Pipe Cutter can be removed for
use in tight spaces. Remove the two bolts/nuts that retain
the handle to the arms of the cutter and remove the handle. Re-install and firmly tighten the bolts/nuts in the arms
of the cutter before use. The handle can be placed in
any of four positions if needed.
Figure 4 – Using the 226 Soil Pipe Cutter
1. Grip the adjusting knob of the soil pipe cutter and fully
open.
2. Place the soil pipe cutter on the pipe so the cutter
wheels line up with the desired cut point. Makes sure
both hooks are lying on the pipe with the open side
up.
3. Wrap the chain snugly around the pipe and place
the nearest chain pin into the hooks.
4. Make sure that the cutter wheels are square to the
pipe and at the desired location. Turn the adjusting
knob to firmly tighten the chain around the pipe.
5. Press the release button in the center of the ratchet
head and place into the end of the feedscrew. The
ratchet should lock firmly into place. If using a different
wrench, it may not lock in place and may come loose
during operation. Make sure that the ratchet is set to
tighten the feedscrew.
6. Assume a stable stance, and with a firm grip on the
handle, tighten the feedscrew with the ratchet. Con tinue tightening until the pipe is cut.
206/246 Set-Up and Operation
1. Lift and turn the ratchet knob to the neutral position
(pin out of the groove). Grip the adjusting knob of the
soil pipe cutter and fully open.
Figure 5 – 206/246 Soil Pipe Cutter
2. If possible, while straddling the longest section of
the pipe, put the adjusting knob to your right. When
cut, the short section of pipe will be away from you.
3. Place the soil pipe cutter on the pipe so that the cutter wheels are lined up with the desired cut point.
Makes sure both hooks are lying on the pipe with the
open side up.
4. Wrap the chain snugly around the pipe and place the
nearest chain pin into the hooks.
5. Make sure that the cutter wheels are square to the
pipe and at the desired location. Turn the adjusting
knob to firmly tighten the chain around the pipe. DO
NOT try to use the adjusting knob to cut the pipe –
this can damage the soil pipe cutter.
6. Turn the ratchet knob in the close direction so that the
arrow points to the word CUT on the ratchet housing.
7. Assume a stable stance, and with a firm grip on the
handle, move the handle toward the pipe to tighten the
chain. Continue ratcheting and tightening until the
pipe is cut.
Ratchet
Handle
Ratchet Knob
Adjusting
Knob
Outer Side
Arm
Hook
Chain Pin
Inner Side
Arm
Hook
Handle Bolts
Adjusting Knob
Chain Pin
Chain
Page 7
Soil Pipe Cutters
Ridge Tool Company
5
IMPORTANT
If the ratcheting action stops before the pipe is cut, the tool
has been jammed. DO NOT FORCE the handle or adjusting knob. Lift and turn the ratchet knob so that the
arrow points to the word OPEN on the ratchet housing.
Hold the ratchet knob in this position while moving the handle in that direction to unjam the tool. Fully open the tool
and move the chain to the next tighter chain pin and continue operation as described.
276 Set-Up and Operation
Once the 276 Soil Pipe Cutter is adjusted for a given
size of pipe, it usually requires no further adjustment for
subsequent cuts.
Figure 6 – 276 Soil Pipe Cutter
1. Place the jaws of the tool next to and square to the
pipe, with the chain under or around the pipe. If cutting
on ground, the adjusting screw should be up.
2. Open the handles to 90 degrees and support the
upper handle with one hand.
3. With the other hand, pull the chain tight around the
pipe and insert the closest chain pin into the hook area
of the jaw. Make sure that the excess chain is clear of
the mechanism.
4. Make sure the chain is square to the pipe and in the
proper location, and carefully close the jaws of the soil
pipe making sure that the chain pin stays hooked.
Using the adjusting screw, adjust so that the handles are approximately 45 to 70 degrees apart for cast
iron pipe and 20 to 45 degrees apart for clay or concrete pipe. If you cannot get a proper angle using
the adjusting screw, the chain must be disengaged
from the hooks, the jaws opened further with the adjusting screw, and the chain hooked to the next pin.
5. Assume a stable stance. If working with one handle on
the ground, place one foot on the flat of the lower han-
dle. With a firm grip on the handle, exert even downward force until the pipe is cut.
Cutting Tips
Once the appropriate pin for a given size pipe has been
determined; marking the pin can save time setting up
subsequent cuts of the same size.
For cleaner cuts, instead of tightening the chain until the
pipe is cut, tighten the chain enough to mark the pipe. Then
loosen the chain and slightly rotate the pipe or the tool and
make another set of marks. Do this several times to create
marks all the way around the pipe, then tighten the chain
and break the pipe.
When carrying your soil pipe cutter, do not drag the chain.
This can wear and damage the cutter wheels, increasing
cut force and cause poor cut quality.
Lengthening Your Soil Pipe
Cutter Chain
Do not exceed the recommended cutting capacity of the tool. Cutting pipe that is too large or
the wrong type could overload the soil pipe cutter and
cause tool failure and or serious personal injury.
All RIDGID Soil Pipe Cutters come equipped with enough
chain to cut 6" pipe. The addition of one Chain Extension
Assembly
(see specification table for catalog informa-
tion)
will increase your chain length enough to allow 8" soil
pipe to be cut. If you are cutting clay pipe ONLY, you can
extend your chain to allow up to 15" clay pipe to be cut. Do
not cut types or sizes of pipes outside the range shown in
the cutter capacity chart, as that could overload and damage the cutter or cause injury.
To Add A Chain Extension Assembly To
Your Chain
1. Remove the ring from the end of the chain.
2. Place the outside links of the extension over the inside
links of the chain, and place the cutter wheel between the inside links.
3. Place the area of the chain to be linked in a press and
properly support. Align the holes in the links and cutter wheel and place the pin in the hole.
4. Carefully press the pin in. Make sure to center the pin
relative to the chain links.
5. Reattach the ring to the end of the extended chain.
WARNING
Lower Handle
Upper Handle
Adjusting Screw
Chain
Jaws
Page 8

226
206/246
Ridge Tool Company
6
Table des matières
Symboles de sécurité ..................................................................................................................................................7
Consignes générales de sécurité ................................................................................................................................7
Sécurité des lieux........................................................................................................................................................7
Sécurité individuelle....................................................................................................................................................7
Utilisation et entretien de l’outil ..................................................................................................................................7
Service après-vente....................................................................................................................................................7
Consignes de sécurité spécifiques ............................................................................................................................8
Description et caractéristiques techniques
Description..................................................................................................................................................................8
Coupe-tubes à chaîne nº 226 ....................................................................................................................................8
Coupe-tubes à chaîne nº 206 et nº 246......................................................................................................................9
Coupe-tubes à chaîne nº 276 ....................................................................................................................................9
Caractéristiques techniques........................................................................................................................................9
Inspection préalable et entretien ................................................................................................................................9
Préparation et utilisation de l’outil ............................................................................................................................10
Préparation et utilisation du 226 ..............................................................................................................................10
Préparation et utilisation des 206 et 246 ..................................................................................................................11
Préparation et utilisation du 276 ..............................................................................................................................12
Conseils d’utilisation ..................................................................................................................................................12
Pour rallonger la chaîne du coupe-tubes..................................................................................................................12
Rajout d’une rallonge de chaîne ..............................................................................................................................12
Garantie à vie ..........................................................................................................................................Page de garde
206/226/246/276
Coupe-tubes à chaîne
AVERTISSEMENT
Familiarisez-vous bien avec le
mode d’emploi avant d’utiliser
l’appareil. L’incompréhension ou
le non-respect des consignes ciaprès augmenteraient les risques
de choc électrique, d’incendie
et/ou d’accident grave.
276
Page 9

Consignes générales de sécurité
AVERTISSEMENT
Familiarisez-vous avec l’ensemble du manuel. Le non-respect des consignes ci-après augmenterait les risques de
choc électrique, incendie et/ou de graves blessures corporelles.
CONSERVEZ CES INSTRUCTIONS !
Sécurité des lieux
• Assurez la propreté et le bon éclairage des lieux.
Les zones encombrées ou mal éclairées sont une invitation aux accidents.
• N’utilisez pas d’outils en présence de liquides,
émanations ou poussières combustibles. Les outils peuvent créer des étincelles susceptibles d’enflammer les poussières et émanations combustibles.
• Éloignez les enfants et les curieux en cours d’opér -
ation. La moindre distraction risque de vous faire perdre le contrôle de l’outil.
• Nettoyez systématiquement les sols mouillés ou
gras. Les sols glissants sont une invitation aux accidents.
Sécurité individuelle
• Soyez attentif et faites preuve de bon sens lors de
l’utilisation de ces outils. N’utilisez pas ce type
d’outil lorsque vous êtes fatigué ou sous l’influence
de l’alcool ou de médicaments. Le moindre mo-
ment d’inattention en cours d’opération risque de
provoquer de graves blessures corporelles.
• Prévoyez les équipements de protection individu-
elle nécessaires. Portez systématiquement des
lun ettes de sécurité. Le cas échéant, le port de
masques à poussière, de chaussures de sécurité an-
tidérapantes, du casque, et/ou d’une protection auditive
permettra de limiter les risques de blessure et de lésion.
• Ne vous mettez pas en porte-à-faux. Maintenez un
bon équilibre et une bonne assise à tout moment.
Une bonne assise et un bon équilibre vous permettront
de mieux parer aux situations inattendues.
Utilisation et entretien de l’outil
• Ne forcez pas l’outil. Prévoyez l’outil le mieux
adap té à l’intervention envisagée. L’outil approprié
assurera de meilleurs résultats et une plus grande
sécurité lorsqu’il fonctionne au régime prévu.
• Rangez les outils non utilisés hors de la portée
des enfants et des individus non initiés. Ce type
d’outil peut devenir dangereux s’il tombe entre les
mains d’un novice.
• Entretenez vos outils. Examinez-les pour signes de
désalignement, de grippage, de rupture ou toute
autre anomalie susceptible de nuire à leur bon
fonctionnement. Le cas échéant, faites réparer
l’outil avant de l’utiliser. De nombreux accidents
sont le résultat d’outils mal entretenus.
• Nettoyez systématiquement les poignées de l’outil
jusqu’à éliminer toutes traces d’humidité et de
graisse. Cela assurera une meilleure prise en main et
contrôle de l’outil.
Service après-vente
• Confiez l’entretien et la révision de l’outil à un réparateur qualifié garantissant l’utilisation exclusive de pièces de rechange d’origine. Cela assurera
la sécurité de l’outil.
Symboles de sécurité
Des symboles et mots clés spécifiques, utilisés à la fois dans ce mode d’emploi et sur l’appareil lui-même, servent à signaler
d’importants risques de sécurité. Ce qui suit permettra de mieux comprendre la signification de ces mots clés et symboles.
Ce symbole sert à vous avertir aux dangers physiques potentiels. Le respect des consignes qui le suivent vous permettra d’éviter
les risques de blessures graves ou mortelles.
Le terme AVERTISSEMENT signifie une situation dangereuse potentielle qui, faute d’être évitée, serait susceptible d’entraîner la mort ou de graves blessures corporelles.
Ce symbole indique la nécessité de lire le manuel soigneusement avant d’utiliser le matériel. Le mode d’emploi renferme d’importantes informations concernant la sécurité d’utilisation du matériel.
Ce symbole indique le port obligatoire de lunettes de sécurité intégrales lors de la manipulation ou utilisation du matériel.
AVERTISSEMENT
Ridge Tool Company
7
Coupe-tubes à chaîne
Page 10

Consignes de
sécurité spécifiques
AVERTISSEMENT
Ce chapitre s’adresse aux risques spécifiquement
associés à ce type d’outil.
Afin de limiter les risques de grave blessure corporelle, familiarisez-vous avec les consignes suivantes avant d’utiliser le coupe-tubes à chaîne.
CONSERVEZ CES INSTRUCTIONS !
En cas de questions concernant cet outil :
– Contactez le distributeur RIDGID le plus proche.
– Consultez les sites www.RIDGID.com ou
www.RIDGID.eu pour obtenir les coordonnées du
représentant RIDGID le plus proche.
– Contactez les services techniques de Ridge Tool à
techservices@ridgid.com ou (à partir des États-Unis ou
du Canada) en composant le (800) 519-3456.
• Ne laisser personne s’approcher lors de la coupe
des tuyaux. Tenez-vous à l’écart du tuyau. L’opér ation de coupe risque d’entraîner de violentes projections de copeaux susceptibles de provoquer des
blessures contondantes, oculaires ou autres.
• Portez systématiquement des lunettes de sécu-
rité. Celles-ci protégeront vos yeux contre la poussière et autres débris.
• Respectez les limites de capacité de l’outil. Toute
tentative de coupe de tuyaux de type ou de taille non
conformes augmenterait les risques de rupture de
l’outil et de graves blessures corporelles. Ne pas rallonger la chaîne pour tenter de couper des tuyaux de
plus de 8 pouces de diamètre.
• Ne vous servez pas de bras de levier ou d’ap-
pareils électriques pour mouvoir un coupe-tubes à
chaîne. Les bras de levier risquent de s’échapper et
provoquer de sérieuses blessures. L’utilisation d’un
bras de levier ou d’un système d’entraînement risque
aussi de surcharger le coupe-tubes au point de rupture
et provoquer de graves blessures corporelles.
Description et caractéristiques
techniques
Description
Les coupe-tubes à chaîne RIDGID®sont plus particulièrement prévus pour la coupe des tuyaux d’évacuation
en fonte, mais ils peuvent également servir à la coupe des
tuyaux en béton ou en grès. Tous les coupe-tubes à
chaîne RIDGID sont équipés de chaînes à molettes qui
permettent de sectionner les conduites par simple serrage
rotatif. Les modèles 226, 206 et 276 utilisent tous la même
Coupe-tubes à chaîne
Ridge Tool Company
8
chaîne, tandis que le modèle 246 est équipé d’une chaîne
plus importante. Ces outils sont livrés avec une chaîne
suffisamment longue pour couper des tuyaux allant jusqu’à
6 pouces de diamètre nominal, mais l’ajout d’une seule extension de chaîne leur permet de couper des tuyaux
d’une section nominale allant jusqu’à 8 pouces. Reportezvous au tableau Capacité de coupe pour les types et
sections de tuyaux applicables.
Capacité de coupe
Coupe-tubes à chaîne de chantier n° 226
Figure 1 – Coupe-tubes à chaîne nº 226
Le coupe-tubes à chaîne de chantier RIDGID nº 226 est un
outil compact de 17 pouces de long prévu pour la coupe
des conduites avec et sans bride, notamment dans les endroits restreints. Sa poignée amovible permet son utilisation
dans les espaces exigus. Sa vis d’avancement est équipée
d’une molette permettant une plus grande rapidité de
réglage, et l’outil est livré avec une clé à rochet de 15,5
pouces de long. Le cas échéant, le nº 226 peut également
fonctionner à l’aide de toute clé à cliquet de
1
/2ou 15/
16
pouces. Le nº 226 dispose d’un mécanisme exclusif qui facilite l’accrochage de la chaîne.
Modèle Composition / Section maxi
226 206 276 246
*
(1)*(1)*(1)*(1)
Grès Ø 8"
* * * * Fonte courante Ø 8"
* * * * Fonte sans bride Ø 8"
• • • • Béton non armé Ø 4" à Ø 6"
• • • • Grès Ø 11⁄2" à Ø 6"
• Conduite d’eau catégorie 22 Ø 4"
• Fonte lourde Ø 2" à Ø 5"
• • • • Fonte courante Ø 11⁄2" à Ø 6"
• • • • Fonte sans bride Ø 11⁄2" à Ø 6"
• Chaîne de base. *Chaîne avec une rallonge.
(1) Coupe maxi avec rallonge de chaîne : 15" (tuyaux en grès uniquement).
Page 11

Coupe-tubes à chaîne
Ridge Tool Company
9
d’un seul coup. Ceci permet de multiples coupes en un
minimum de temps.
Caractéristiques techniques
Inspection préalable
et entretien de l’outil
AVERTISSEMENT
Inspectez et entretenez le coupe-tubes à chaîne
avant chaque intervention afin de corriger toute
anomalie éventuelle et limiter les risques de grave
blessure, voire éviter d’endommager l’outil.
1. Nettoyez le coupe-tubes à chaîne afin d’éliminer
toutes traces de crasse, d’huile, de graisse ou débris
éventuelles. Au besoin, servez-vous d’une brosse
métallique. Cela facilitera l’inspection de l’outil et vous
assurera d’une meilleure prise en main en cours d’utilisation.
2. Examinez le coupe-tubes à chaîne pour vérifier :
• Son assemblage complet et approprié
• La présence d’éléments brisés, fissurés, man-
quants tordus ou grippés
• Signes de corrosion ou d’usure excessive
• La fluidité de mouvement du rochet, des vis, de la
chaîne et des tringles
• La présence et la lisibilité des étiquettes de sécurité
3. Examinez la chaîne pour signes de stresse ou autres
anomalies. Il ne devrait pas y avoir d’espaces significatifs entre les platines de la chaîne. Le cas échéant,
ou en présence d’autres types d’anomalie, la chaîne
devra être remplacée. Examinez les galets de coupe
pour signes d’usure ou de détérioration. Des galets de
coupe usés ou détériorés nécessitent une plus grande
force et peuvent produire des coupes de qualité inférieure.
4. Sur le coupe-tubes nº 226, appuyez sur le bouton de
déverrouillage au centre du rochet, puis introduisezle dans l’extrémité de la vis d’avancement. Le rochet
doit se verrouiller fermement en position. Cela empêche le rochet de se séparer du coupe-tubes en
cours d’utilisation. Lors de l’emploi d’une clé à cli-
Le coupe-tubes à chaîne de chantier nº 226 est protégé
par plusieurs brevets US et internationaux, y compris le
brevet US nº 6,141,876.
Coupe-tubes à chaîne n° 206 et n° 246
Figure 2 – Coupe-tubes à chaîne nº 206/246
Les coupe-tubes RIDGID nº 206 et nº 246 sont équipés
d’une clé à rochet incorporée et centrée sur le tuyau.
Celle-ci est particulièrement utile lors des coupes en
tranchée, car elle permet de minimiser la largeur de la
fouille. Les deux sont équipés d’un mécanisme d’accrochage pour faciliter l’accrochage de la chaîne. Le nº 206
utilise la même chaîne que le nº 226 et le nº 276, tandis
que la chaîne du nº 246 est plus importante et permet de
couper les conduites d’eau catégorie 22 de 4 pouces de diamètre, ainsi que les conduites en fonte lourde de 2 à 5
pouces.
Coupe-tubes à chaîne n° 276
Figure 3 – Coupe-tubes à chaîne nº 276
Le coupe-tubes RIDGID nº 276 sert à couper les tuyaux
* Ne pas utiliser plus d’une rallonge de chaîne (sauf pour les conduites en grès Ø 15" maxi).
Réf. Modèle
Description
Capacité Poids
Cond Réf.
catalogue
po mm lb. kg
chaîne
68650 206 Coupe-tubes à chaîne 11/2-6 50-150 18 8.2 1 33670
(sans bride)
69982 226 Coupe-tubes à chaîne 1
1
/2-6 50-150 18 8.2 1 33670
de chantier
32900 246 Coupe-tubes à chaîne 1
1
/2-6 50-150 25 11.3 1 34575
74207 276 Coupe-tubes à chaîne 1
1
/2-6 50-150 233/411.7 1 33670
33665 206/226/276 Rallonge de chaîne* – – 1 3.5 1 –
34570 246 Rallonge de chaîne* – – 1 3.5 1 –
70437 – Clé à rochet n
o
226 – – 1
Page 12

Coupe-tubes à chaîne
Ridge Tool Company
10
quet ou autre type de clé, sachez que celle-ci risque
de se déloger en cours d’opération.
5. N’utilisez pas le coupe-tubes avant d’avoir corrigé
toute anomalie éventuelle.
6. Au besoin, lubrifiez les axes et la chaîne à l’aide
d’une huile légère. Éliminez toutes traces d’huile
résiduelle.
Préparation et utilisation de
l’outil
AVERTISSEMENT
Respectez les consignes de préparation et d’utilisation suivantes afin de limiter les risques de
blessures contondantes (ou autres), et de garantir
le bon fonctionnement de l’outil.
Éloignez tout autre individu du lieu de travail en
cours d’opération. Tenez-vous à l’écart du tuyau. La
coupe des tuyaux risque d’occasionner une projection de copeaux suffisamment voilante pour
provoquer de sérieuses blessures contondantes,
oculaires et autres.
Portez systématiquement des lunettes de sécurité
afin de protéger vos yeux contre la poussière et la
projection de débris.
1. Assurez-vous que les lieux disposent d’un éclairage
suffisant et d’une plate-forme dégagée, stable et de
niveau.
2. Vérifiez la section et la composition du tuyau à sectionner. S’il s’agit d’une canalisation déjà en service,
vérifiez son contenu.
3. Choisissez le coupe-tubes approprié en fonction
de l’application envisagée. D’autres coupe-tubes
se trouvent sur le catalogue RIDGID au site
www.RIDGID.com ou www.RIDGID.eu. Les coupetubes RIDGID sont prévus pour la coupe de tuyaux
d’évacuation d’un diamètre maxi de 8".
Se reporter
au chapitre « Caractéristiques techniques ».
4. Assurez-vous de l’inspection préalable du coupetubes à chaîne.
5. Préparation du tuyau :
• Prenez les mesures nécessaires pour vidanger la
canalisation et éviter les déversements éventuels.
• Nettoyez l’extérieur du tuyau afin d’éliminer toutes
traces de salissure ou de corrosion. Un encrassement ou une corrosion excessive pourrait nuire à la
qualité de coupe et endommager les galets de
coupe.
• Assurez-vous que le pourtour du tuyau a été suffisamment dégagé pour permettre le passage de la
chaîne. Les modèles 206/226 et 276 nécessite un
dégagement périphérique d’environ 11/2", tandis
que le modèle 246 en demande environ 2". Lors de
la coupe de sections de tuyau individuelles, et afin
de protéger les galets de coupe contre les surfaces dures (béton ou autres), posez le tuyau sur
des supports rapprochés ou sur des blocs en bois
afin de l’écarter du sol, ou travaillez sur une surface
plus souple, telle qu’un panneau de contre-plaqué.
• Lors de la coupe de courtes sections de tuyau,
amarrez le tuyau afin d’éviter les risques de sa
projection en cours de coupe. Ceci peut se faire, en
outre, en introduisant un tuyau de section inférieure
ou un bloc de bois dans le tuyau.
6. Dans tous les cas, l’outil doit être entièrement ouvert
et la chaîne bien collée contre le tuyau avant de l’accrocher. Sinon, la chaîne risque d’être accrochée sur
le mauvais redan, et la coupe ne sera pas effectuée.
Cela peut également entraîner le blocage du coupetubes. Le cas échéant, il sera nécessaire d’ouvrir
l’outil complètement, puis de ramener la chaîne au
redan inférieur avant de procéder.
7. Choisissez un emplacement approprié. N’oubliez pas
qu’une partie du tuyau risque d’être projeté en cours
de coupe. Assurez-vous que rien ne se trouve dans
son passage (individus, objets, etc.). N’oubliez pas que
le tuyau et le coupe-tubes risquent de tomber en fin de
coupe.
Préparation et utilisation du n° 226
La poignée du coupe-tubes à chaîne nº 226 peut être retirée pour faciliter son utilisation dans les endroits exigus. Enlevez les deux boulons/écrous de fixation de la
poignée au niveau des bras du coupe-tubes pour retirer la
poignée. Réinstallez-la en resserrant les boulons/écrous à
fond. Si nécessaire, la poignée peut être réorientée dans
l’un des quatre points cardinaux.
Page 13

Coupe-tubes à chaîne
Ridge Tool Company
11
Figure 4 – Utilisation du coupe-tubes à chaîne nº 226
1. Désengagez complètement la molette de réglage du
coupe-tubes à chaîne.
2. Positionnez le coupe-tubes sur le tuyau de manière à
aligner les galets de coupe de la chaîne sur le tracé
de coupe du tuyau. Assurez-vous que les deux crochets repose sur le tuyau avec leur ouverture vers le
haut.
3. Ramenez la chaîne contre le tuyau jusqu’à engager
l’ergot le plus serré sur les crochets.
4. Assurez-vous du bon positionnement et de l’équerrage des galets de coupe par rapport au tuyau. Serrez
la chaîne en position en vissant la molette de réglage.
5. Appuyez sur le bouton de déverrouillage de la tête du
rochet, puis introduisez son carré dans l’embout de la
vis d’avancement. Le rochet devrait alors se verrouiller en position. Une clé à cliquet ou autre dispositif
d’entraînement risque de ne pas se verrouiller de la
même manière et risque de se déloger en cours
d’opération. Assurez-vous que le loquet du rochet
se trouve en position de serrage de la vis d’avancement.
6. En vous tenant bien d’aplomb, actionnez le manche
du rochet pour serrer la vis d’avancement. Continuez
de serrer jusqu’à ce qu’à ce que le tuyau soit sectionné.
Préparation et utilisation du n° 206/246
1. Ramenez la molette du rochet à la position neutre
(broche dégagée), puis tirez sur la molette de réglage
du coupe-tubes pour la dégager complètement.
Figure 5 – Coupe-tubes à chaîne nº 206/246
2. Dans la mesure du possible, enjambez la plus grande
longueur du tuyau en mettant la molette de réglage à
votre droite afin d’avoir la chute en face de vous lors
de la coupe.
3. Positionnez le coupe-tubes sur le tuyau de manière à
aligner les galets de coupe de la chaîne sur le tracé de
coupe du tuyau. Assurez-vous que les deux crochets
repose sur le tuyau avec leur ouverture vers le haut.
4. Ramenez la chaîne contre le tuyau jusqu’à engager
l’ergot le plus serré sur les crochets.
5. Assurez-vous du bon positionnement et de l’équerrage
des galets de coupe par rapport au tuyau. Serrez la
chaîne en position en vissant la molette de réglage.
NE PAS essayer d’utiliser la molette de réglage pour
couper le tuyau, car cela risquerait d’endommager le
coupe-tubes.
6. Vissez la molette du rochet de manière à ce que la
flèche pointe vers le repère CUT du rochet.
7. En vous tenant bien d’aplomb, poussez la poignée
vers le tuyau pour serrer la chaîne. Continuez d’actionner la poignée du rochet jusqu’au sectionnement
complet du tuyau.
AVIS IMPORTANT
Si le rochet cesse de cliquer avant la coupe complète du
tuyau, c’est que l’outil s’est grippé. Le cas échéant, NE
PAS FORCER la poignée ou la molette de réglage.
Ramenez la molette du rochet vers le repère OPEN, puis
tenez-la dans cette position tout en mouvant la poignée du
rochet dans cette même direction jusqu’à ce que l’outil se
libère. Ouvrez l’outil complètement et resserrez la chaîne
d’un cran avant de reprendre l’opération.
Rochet
Poignée
Molette du rochet
Molette de
réglage
Bras extérieur
Crochet
Axe de chaîne
Bras intérieur
Crochet
Boulons de
poignée
Molette de réglage
Axe de chaîne
Chaîne
Page 14

Coupe-tubes à chaîne
Ridge Tool Company
12
Préparation et utilisation du 276
Une fois que le coupe-tubes nº 276 a été réglé pour une
section de tuyau donnée, les coupes successives ne dev raient pas nécessiter de réglages ultérieurs.
Figure 6 – Coupe-tubes à chaîne nº 276
1. Positionnez les mâchoires de l’outil contre et à l’équerre du tuyau avec la chaîne sous ou autour de
celui-ci. Lors des coupes à même le sol, la vis de
réglage devrait être orientée vers le haut.
2. Ouvrez les poignées à l’équerre, tout en soutenant la
poignée supérieure d’une main.
3. Ramenez la chaîne autour du tuyau de l’autre main,
puis engagez l’axe de chaîne le plus proche sur le crochet de la mâchoire. Assurez-vous que la longueur de
chaîne excédentaire reste à l’écart du mécanisme.
4. Assurez-vous que la chaîne est bien positionnée et
d’équerre avec le tuyau avant de refermer les mâchoires du coupe-tubes, tout en vérifiant le bon accrochage de l’axe de chaîne. Servez-vous de la vis de
réglage pour ramener les deux poignées à un écartement de 45 à 70 degrés dans le cas de tuyaux en
fonte, voire de 20 à 45 degrés pour les tuyaux en grès
ou béton. Si vous n’arrivez pas à obtenir l’angle d’écartement approprié à l’aide de la vis de réglage, il
faudra décrocher la chaîne, ouvrir les mâchoires à
l’aide de la vis de réglage, puis raccrocher la chaîne
au maillon suivant.
5. Assumez une position de travail appropriée. Si vous
travaillez avec l’une des poignées au sol, mettez un
pied sur le plat de la poignée inférieure, puis appuyez sur la poignée supérieure de manière continue et uniforme jusqu’à achever la coupe du tuyau.
Conseils de coupe
Lorsque vous avez déterminé le point d’accrochage de la
chaîne pour une section de tuyau donnée, le repérage du
maillon en question économisera du temps lors des
coupes successives sur les tuyaux de même diamètre.
Pour obtenir des coupes plus franches, plutôt que de
serrer la chaîne jusqu’à ce que le tuyau soit sectionné, serrez-la juste assez pour marquer le tuyau, puis desserrezla et tournez soit l’outil ou le tuyau à plusieurs reprises pour
créer d’autres marques semblables sur sa périphérie
avant de serrer la chaîne et sectionner le tuyau.
Ne laissez pas traîner la chaîne lors du transport du
coupe-tubes, car cela pourrait endommager ses galets de
coupe au point de nécessiter un effort supplémentaire et
produire des coupes de piètre qualité.
Rallonges de chaîne
Ne pas excéder les capacités de
coupe recommandées. La coupe de tuyaux d’un diamètre trop important ou de type non prévu risquerait
d’endommager l’outil et provoquer de graves blessures
corporelles.
Les coupe-tubes à chaîne RIDGID sont livrés avec une
chaîne suffisamment longue pour la coupe de tuyaux de
6" de diamètre. L’addition d’une rallonge de chaîne (se reporter au tableau des caractéristiques techniques) permet
la coupe additionnelle de tuyaux de 8". Des rallonges de
chaîne supplémentaires peuvent amener cette capacité de
coupe jusqu’à 15" de diamètre, mais uniquement pour les
tuyaux en grès. Ne pas tenter de couper des tuyaux de
section ou composition autres que celles indiquées au
tableau des capacités de coupe ci-devant, car cela risquerait de surcharger l’outil et provoquer de graves
blessures corporelles.
L’addition de rallonges de chaîne
1. Retirez le cerclip en bout de la chaîne.
2. Positionnez les maillons externes de la rallonge sur les
maillons internes de la chaîne, puis positionnez le
galet de coupe entre ceux-ci.
3. Positionnez le partie de chaîne à rallonger dans une
presse et soutenez-la de manière appropriée. Alignez
les orifices des maillons avec le galet de coupe, puis
introduisez l’axe.
4. Enfoncez l’axe soigneusement en vous assurant qu’il
est bien aligné sur le maillon.
5. Remontez le cerclip en bout de la rallonge de chaîne.
Poignée inférieure
Poignée supérieure
Vis de réglage
Chaîne
Mâchoires
AVERTISSEMENT
Page 15

N° 226
N° 206 y N° 246
Índice
Simbología de seguridad............................................................................................................................................14
Reglas de seguridad general ....................................................................................................................................14
Seguridad en la zona de trabajo ..............................................................................................................................14
Seguridad personal ..................................................................................................................................................14
Uso y cuidado del aparato ........................................................................................................................................14
Servicio ....................................................................................................................................................................14
Información de seguridad específica........................................................................................................................14
Descripción y especificaciones
Descripción ..............................................................................................................................................................15
Cortatubos de desagües ya instalados N° 226 ........................................................................................................15
Cortatubos de desagües N° 206 y N° 246................................................................................................................15
Cortatubos de desagües N° 276 ..............................................................................................................................16
Especificaciones ......................................................................................................................................................16
Inspección previa al funcionamiento y Mantenimiento ..........................................................................................16
Preparación y funcionamiento del aparato ..............................................................................................................17
Preparación y funcionamiento del Cortatubos N° 226..............................................................................................18
Preparación y funcionamiento del Cortatubos N° 206 y N° 246 ..............................................................................18
Preparación y funcionamiento del Cortatubos N° 276..............................................................................................19
Consejos para efectuar los cortes ............................................................................................................................19
Alargamiento de la cadena del cortatubos ..............................................................................................................19
Acoplamiento de una extensión a la cadena ............................................................................................................20
Garantía vitalicia..................................................................................................................................carátula posterior
Modelos 206, 226, 246, 276
Cortatubos de desagües
cloacales
N° 276
Ridge Tool Company
13
ADVERTENCIA
Antes de utilizar este aparato, lea
detenidamente su Manual del
Operario. Pueden ocurrir descargas eléctricas, incendios y/o
graves lesiones si no se comprenden y siguen las ins truc ciones de
este manual.
Page 16

Reglas de seguridad general
ADVERTENCIA
Lea y comprenda todas estas instrucciones. Pueden ocu rrir
descargas eléctricas, incendios y/o lesiones personales
graves si no se siguen y obedecen todas las instrucciones
detalladas a continuación.
¡GUARDE ESTAS INSTRUCCIONES!
Seguridad en la zona de trabajo
• Mantenga su área de trabajo limpia y bien alumbrada. Las zonas de trabajo desordenadas u oscuras
provocan accidentes.
• No haga funcionar equipos en atmósferas explo-
sivas, es decir, en presencia de líquidos, gases o
polvo inflamables. Los aparatos pueden generar
chispas que podrían inflamar el polvo o los gases.
• Al hacer funcionar aparatos o herramientas, man-
tenga apartados a niños y espectadores. Cualquier
distracción puede hacerle perder el control del equipo
en funcionamiento.
• Mantenga el suelo limpio y libre de materiales res-
balosos, como grasas y aceites. Los pisos resbalosos provocan accidentes.
Seguridad personal
• Manténgase alerta, preste atención a lo que está
haciendo y use sentido común cuando trabaje
con herramientas. No utilice una herramienta si
está cansado o se encuentra bajo la influencia de
drogas, alcohol o medicamentos. Sólo un breve
descuido mientras hace funcionar un aparato puede
ocasionar lesiones graves.
• Use el equipo de protección personal que corres -
ponda. Siempre use protección para sus ojos. Al
usar mascarilla para el polvo, calzado de seguridad antideslizante, casco duro o protección para los oídos,
según las circunstancias, usted evitará lesionarse.
• No trate de extender su cuerpo para alcanzar algo.
Si mantiene sus pies firmes en tierra y un buen equilibrio podrá ejercer mejor control sobre el aparato en
situaciones inesperadas.
Uso y cuidado del aparato
• No fuerce el aparato. Use el aparato correcto para
la tarea que realizará. El aparato adecuado hará un
mejor trabajo y con mayor seguridad, al ritmo para el
cual fue diseñado.
• Almacene las herramientas que no estén en uso
fuera del alcance de niños y no permita que las
hagan funcionar personas sin capacitación o
que no hayan leído estas instrucciones. Las he -
rramientas son peligrosas en manos de inexpertos.
• Hágale buen mantenimiento a su herramienta. Re -
vísele sus piezas movibles por si están desa li neadas o agarrotadas. Cerciórese de que no ten ga
piezas quebradas y que no existen condiciones
que puedan afectar su buen funciona mien to. Si
está dañada, antes de usarla, hágala componer. Los
aparatos en malas condiciones causan accidentes.
• Mantenga los mangos y controles de su aparato
limpios y secos, libres de aceite y grasa. Así no resbalarán de sus manos.
Servicio
• Encomiende el servicio de este equipo únicamente a técnicos calificados, que empleen repues tos originales. Así se garantiza el funciona -
miento seguro del aparato.
Simbología de seguridad
En este manual del operario y en el aparato mismo encontrará símbolos y palabras de advertencia que comunican información
de seguridad importante. En esta sección se describe el significado de estos símbolos.
Este es el símbolo de una alerta de seguridad. Sirve para prevenir al operario de las lesiones corporales que podría sufrir. Obedezca
todas las instrucciones que acompañan a este símbolo de alerta para evitar lesiones o muertes.
Este símbolo de ADVERTENCIA advierte de una situación de riesgo o peligro que, si no se evita, podría ocasionar la muerte o lesiones grave.
Este símbolo significa que, antes de usar el aparato, es indispensable leer detenidamente su manual del operario. El
manual del aparato contiene importante información acerca del funcionamiento apropiado y seguro del equipo.
Este símbolo señala que, durante la manipulación y funcionamiento de este aparato, el operario debe llevar puestas gafas
o anteojos de seguridad con viseras laterales.
ADVENTENCIA
Ridge Tool Company
14
Cortatubos de desagües cloacales
Page 17

Ridge Tool Company
15
Cortatubos de desagües cloacales
Información de
seguridad específica
ADVERTENCIA
Esta sección entrega información de seguridad
específica para este aparato.
Antes de usar un Cortatubos de desagües, lea
estas precauciones detenidamente para prevenir
lesiones de gravedad.
¡GUARDE ESTAS INSTRUCCIONES!
Si tiene alguna pregunta acerca de este producto de
Ridge Tool:
– Contacte al distribuidor de RIDGID en su localidad.
– Por internet visite el sitio www.RIDGID.com ó
www.RIDGID.eu para averiguar dónde se encuentran los centros autorizados de Ridge Tool más cercanos.
– Llame al Departamento de Servicio Técnico de Ridge
Tool desde EE.UU. o Canadá al (800) 519-3456 o escriba a techservices@ridgid.com.
• Mientras corte, no permita la presencia de otros en
la zona. Aléjese del tubo. Al cortarlo, pedazos del tubo
podrían volar por los aires con gran fuerza y causar lesiones graves y/o herir sus ojos.
• Use siempre anteojos de seguridad. Protegen sus
ojos contra mugres y cuerpos extraños.
• No intente cortar tubos de tamaño o consistencia
superior a la capacidad del aparato. Si se sobrepasan sus límites de corte –tubo demasiado grande
o de un tipo inaceptable-, el cortatubos de desagües
puede fallar o causar lesiones graves. No extienda la
cadena para cortar tubos de más de 8 pulgadas de
diámetro.
• No utilice extensiones para los mangos ni he -
rramientas motorizadas para accionar el cortatubos
de desagües cloacales. Las prolongaciones hechizas
de los mangos podrían resbalar de sus manos y un accio namiento motorizado, causar graves lesiones.
Ambos sobrecargan el cortatubos y podrían ocasionar
lesiones y/o daños.
Descripción y especificaciones
Descripción
Los Cortatubos de desagües cloacales de RIDGID® sirven para cortar una variedad de tubos de desagües cloacales fabricados en hierro, y también, de concreto y arcilla.
Todos estos cortatubos de RIDGID emplean cadenas
dotadas de ruedas de corte que van apretando el tubo
hasta que éste se quiebra. Los Cortatubos modelos 226,
206 y 276 emplean la misma ensambladura de cadena,
mientras que el N° 246 está provisto de una cadena más
grande. Todos vienen con una cadena lo suficientemente
larga como para cortar tubos de hasta 6 pulgadas de
diámetro nominal. Agregándoseles una extensión de cadena, es posible cortar tubos de hasta 8 pulgadas de Ø
nominal. Consulte la Tabla de Capacidad de los
Cortatubos de desagües cloacales, la cual señala los
tipos de materiales y diámetros que cada cortatubos es
capaz de cortar.
Capacidad de los Cortatubos de desagües cloacales
Cortatubos de desagües cloacales ya
instalados N° 226
Figura 1 – Cortatubos de desagües cloacales ya instala-
dos N° 226
El Cortatubos de desagües cloacales ya instalados N° 226
de RIDGID es un aparato compacto –17 pulgs. de largohecho para cortar tubos abocinados y no abocinados, especialmente en huecos restringidos. Se le puede quitar su
mango para poder introducirlo en espacios estrechos.
El tornillo de alimentación cuenta con una perilla manual
Modelo Material y Diámetro
226 206 276 246
*
(1)*(1)*(1)*(1)
Tubos de arcilla, 8 pulgs.
* * * * Tubos continuos de hierro fundido de peso
industrial, 8 pulgs.
* * * * Tubos cloacales de hierro fundido sin
abocinado, 8 pulgs.
• • • • Tubos de concreto, 4 a 6 pulgs.
• • • • Tubos de arcilla, 1
1
⁄2a 6 pulgs.
• Tubería principal tipo 22, de 4 pulgs.
• Tubos cloacales de hierro fundido de súper
servicio industrial, 2 a 5 pulgs.
• • • • Tubos cloacales de hierro fundido de peso industrial, 1
1
⁄2a 6 pulgs.
• • • • Tubos cloacales de hierro fundido sin abocinado, 1
1
⁄2a 6 pulgs.
• Cadena longitud estándar. *Cadena con una sola extensión.
(1) Con cadena prolongada, es posible cortar tubos de arcilla de un máximo de 15 pulgs.
Page 18

Cortatubos de desagües cloacales
Ridge Tool Company
16
Cortatubos de desagües cloacales N° 276
Figura 3 – Cortatubos de desagües cloacales N° 276
El Cortatubos de desagües cloacales N° 276 de RIDGID
permite cortar un tubo cloacal de un solo apretón. Con él
es posible cortar repetidamente con gran rapidez.
Especificaciones
Inspección previa al
funcionamiento y Mantenimiento
ADVERTENCIA
Antes de usarlo, revise y hágale mantenimiento a
su cortatubos de desagües cloacales y corrija
cualquier problema que detecte con el fin de evitar
lesiones provocadas por golpes u otras causas y
daños al aparato.
1. Limpie el Cortatubos: quítele la mugre, aceite, grasa
y desechos que pueda tener. Si la cadena necesita
limpieza, efectúela con una escobilla metálica. Así
para un ajuste rápido, y un trinquete de accionamiento de
1
/2pulgada y 15 pulgs. de largo. Si es necesario, el modelo
226 también puede accionarse con cualquier trinquete de
accionamiento de 1/2pulgada o bien, una llave de 15/
16
pulg. El N° 226 emplea un mecanismo de enganche
único, el cual facilita el enganche de la cadena.
El Cortatubos de desagües cloacales ya instalados N° 226
se encuentra protegido bajo varias patentes estadouni denses e internacionales, la de EE.UU. N° 6,141,876 inclusive.
Cortatubos de desagües cloacales
N°
s
206 y 246
Figura 2 – Cortatubos de desagües cloacales N°s 206
y 246
El Cortatubos de desagües cloacales N° 206 de RIDGID
utiliza un mango de trinquete integrado, centrado paralelamente al tubo. Esta característica lo hace muy útil para
cortar tubos dentro de trincheras de poca amplitud. Ambos
cuentan con un mecanismo de enganche único, el cual facilita el enganche de la cadena. El N° 206 emplea la
misma cadena que los modelos 226 y 276, mientras que la
cadena del modelo 246 es de mayor tamaño permitiéndole
cortar tuberías principales del tipo 22 de 4 pulgadas Ø
como también desagües cloacales de servicio súper pesado o industrial de 5 pulgadas Ø.
* No utilice más de una extensión de cadena salvo para cortar tubos de arcilla de Ø inferior a
15 pulgs
in.= pulgs.
Cadena
N° en el Modelo
Ø del tubo Peso
de
catálogo N°
Descripción Unidades
repuesto
pulgs. mms. lbs. Kgs N°
68650 206 Cortatubos de desagües 11/2-6 50-150 18 8,2 1 33670
cloacales no abocinados
69982 226 Cortatubos de desagües 1
1
/2-6 50-150 18 8,2 1 33670
cloacales ya instalados
32900 246 Cortatubos de desagües 1
1
/2-6 50-150 25 11,3 1 34575
cloacales
74207 276 Cortatubos de desagües 1
1
/2-6 50-150 233/411,7 1 33670
cloacales
33665 206/226/276 Ensamble de cadena – – 1 3,5 1 –
de extensión*
34570 246 Ensamble de cadena – – 1 3,5 1 –
de extensión*
70437 – Trinquete N° 226 – – 1
Page 19

Cortatubos de desagües cloacales
Ridge Tool Company
17
podrá inspeccionar el cortatubos y no resbalará de
sus manos durante su uso.
2. Inspeccione el cortatubos para cerciorarse de que:
• está completo y bien ensamblado.
• no tiene partes rotas, agrietadas, torcidas o trabadas.
• no está corroído o desgastado en exceso.
• su trinquete, tornillos, cadena y uniones se mueven
libremente.
• sus etiquetas de advertencias están presentes y
legibles.
3. Inspeccione la cadena por si muestra señales de sobrecarga u otros daños. No debe haber espacios
considerables entre las placas de los rodillos de la cadena. Si hay grandes separaciones entre sus eslabones u otros daños, la cadena debe reemplazarse.
Revise que las ruedas de corte no estén desgastadas o dañadas. Las ruedas de corte desgastadas o
dañadas exigen mayor fuerza de corte y producen
cortes defectuosos.
4. En el Cortatubos N° 226, oprima el botón de desenganche ubicado en el centro del cabezal del trinquete; métalo en el extremo del tornillo de alimen tación. El trinquete debe quedar atrapado firmemente
en su lugar. Así se evita que el trinquete se salga del
cortatubos durante su uso. Si empleará otro trinquete
o llave, tenga en mente que puede soltarse durante el
uso.
5. Si detecta algún problema, no utilice el cortatubos
hasta solucionarlo.
6. Lubrique los centros de giro y la cadena con aceite liviano, si es necesario. Limpie cualquier exceso de
aceite.
Preparación y funcionamiento
del aparato
ADVERTENCIA
Siga fielmente las instrucciones de preparación y
funcionamiento del aparato para reducir el riesgo
de herirse gravemente al ser golpeado o impactado
por alguna pieza de trabajo y/o de dañar el aparato.
Mantenga a otras personas apartadas de la zona
de trabajo. Sepárese del tubo. Pedazos del tubo
que se corta pueden salir despedidos por los aires
a gran velocidad y herir sus ojos, golpear y/o lesionarlo.
Proteja sus ojos siempre con gafas de seguridad
para que no les entren mugre ni cuerpos extraños.
1. Revise que la zona donde va a trabajar esté bien
iluminada y que usted dispondrá en ella de un lugar
despejado, nivelado y estable para efectuar su tarea.
2. Inspeccione el tubo que cortará. Establezca sus dimensiones y su material de fabricación. Si el tubo se
encuentra instalado, determine su contenido.
3. Establezca cuál cortatubos necesita para la tarea en
cuestión. Los cortatubos en el Catálogo de RIDGID
pueden verse en www.RIDGID.com ó www.RIDGID.eu.
Los Cortatubos de desagües cloacales de RIDGID
sólo sirven para cortar desagües cuyo diámetro es
inferior a 8 pulgadas. Vea la sección Especificaciones
.
4. Asegure que el cortatubos ha sido inspeccionado
correctamente.
5. Prepare el tubo que va a cortar:
• Tome todas las medidas necesarias para vaciar
el desagüe y/o recibir cualquier derrame.
• Quite el barro y/o moho que tenga el tubo. Un ex-
ceso de corrosión o barro en el tubo podrían producir cortes de mala calidad y daños a las ruedas
de corte.
• Asegure que tiene suficiente espacio para rodear el
tubo con la cadena. La cadena de los modelos
206, 226 y 276 requiere un espacio libre de 11/2pulgada alrededor del tubo; la del N° 246 necesita 2
pulgadas para caber. Si cortará tubos sueltos, no
ins talados, impida que las ruedas de corte sufran
daño al quedar en contacto con concreto o superficies duras; levante el tubo del suelo y elévelo
sobre soportes de baja altura o un tabique de
madera. O bien, proceda a cortarlo sobre una superficie más blanda, por ejemplo, un tablero contrachapado (plywood).
• Cuando vaya a cortar trozos cortos de tubo, en lo
posible manténgalos fijos para evitar que salgan
despedidos durante el corte: antes de cortarlos,
métales en su interior un tubo o un trozo de madera
de menor diámetro.
6. Para accionar cualquiera de los modelos de Corta tubos de desagües cloacales, antes de enganchar la
cadena el aparato debe estar totalmente abierto y la
cadena ceñida alrededor del tubo. De lo contrario, podría engancharse un pasador equivocado y no resultará el corte del tubo. Asimismo, el cortatubos podría trancarse. Si así ocurriera, abra el aparato por
completo y estreche la cadena alrededor del tubo
hasta enganchar el pasador que quede más ajustado.
Continúe la operación según estas instrucciones.
Page 20

Cortatubos de desagües cloacales
Ridge Tool Company
18
7. Seleccione un sitio desde donde hará funcionar el cortatubos. Tenga en mente que al cortarse el tubo,
partes de él podrían caerse o salir despedidas.
Asegure que en la zona no haya objetos que puedan
ser golpeados por el tubo. Además, recuerde que
cuando se corta un tubo tanto el cortatubos como el
tubo podrían volcar o caerse.
Preparación y funcionamiento del
Cortatubos N° 226
Para trabajar en espacios restringidos, el mango del
Cortatubos N° 226 puede extraerse. Extraiga los dos
tornillos y tuercas que fijan el mango a los brazos del
cortatubos; quite el mango. Vuelva a instalar los tornillos y
sus tuercas en los brazos del cortatubos y apriételos
firmemente. Es posible colocar el mango en cuatro posiciones diferentes.
Figura 4 – Empleo del Cortatubos N° 226
1. Agarre la perilla de ajuste del cortatubos y ábrala
por completo.
2. Monte el cortatubos sobre el tubo de tal manera que
las ruedas de corte se alineen con los puntos en el
tubo donde se desea cortarlo. Asegure que los dos
ganchos se encuentren acostados sobre el tubo con
sus aberturas apuntando hacia arriba.
3. Ciña la cadena alrededor del tubo y meta el pasador
más cercano (de la cadena) dentro de los ganchos.
4. Asegure que las ruedas de corte se posan perpendicularmente sobre el tubo en los puntos deseados.
Gire la perilla de ajuste para apretar la cadena contra
el tubo.
5. Oprima el botón de desenganche ubicado en el centro del cabezal del trinquete; métalo en el extremo del
tornillo de alimentación. El trinquete debe quedar
atrapado firmemente en su lugar. Si está empleando
un trinquete diferente o llave, puede soltarse durante
el uso. Asegure que el trinquete esté puesto de forma
que apretará el tornillo de alimentación.
6. Adopte una postura equilibrada y agarrando el mango
firmemente con una mano, proceda a apretar el
tornillo de ajuste con el trinquete. Continúe esta ma nio bra hasta que el tubo se haya cortado.
Preparación y funcionamiento
del Cortatubos N°
s
206 y 246
1. Alce y gire la perilla del trinquete a su posición neutro
(pasador fuera de la muesca). Agarre la perilla de
ajuste del cortatubos y ábrala por completo.
Figura 5 – Cortatubos de desagües cloacales N°s206
y 246
2. Mientras usted se ubica a horcajadas sobre la sección
más larga del tubo, si es posible, ponga la perilla de
ajuste a su derecha. Así, cuando corte el tubo, la
sección más corta quedará más lejos de usted.
3. Monte el cortatubos sobre el tubo de tal manera que
las ruedas de corte se alineen con los puntos en el
tubo donde desea cortarlo. Asegure que los dos ganchos se encuentren acostados sobre el tubo con sus
aberturas apuntando hacia arriba.
4. Ciña la cadena alrededor del tubo y meta el pasador
más cercano (de la cadena) dentro de los ganchos.
5. Asegure que las ruedas de corte se posan perpendicularmente sobre el tubo en los puntos deseados.
Gire la perilla de ajuste para apretar la cadena contra
el tubo. NO intente emplear la perilla de ajuste para
cortar el tubo. Le hará daño al cortatubo.
6. Gire la perilla del trinquete, cerrándola, de tal manera
que la flecha apunte hacia la palabra CUT (corte)
grabada en la carcasa del trinquete.
7. Adopte una postura equilibrada y agarrando el mango
firmemente, llévelo hacia el tubo para apretar la ca-
Trinquete
Mango
Perilla del trinquete
Perilla de
ajuste
Brazo hacia el
exterior
Gancho
Pasador de
la cadena
Brazo hacia
el interior
Gancho
Tornillos
del mango
Perilla de ajuste
Pasador
Cadena
Page 21

Cortatubos de desagües cloacales
Ridge Tool Company
19
dena. Continúe estas maniobras de trinquete y de
apriete hasta cortar el tubo.
IMPORTANTE
Si la acción del trinquete se detiene antes que se haya
cortado el tubo, el aparato se ha atascado. NO FUERCE
el mango ni la perilla de ajuste. Alce y gire la perilla del trinquete con el fin de que la flecha apunte hacia la palabra
OPEN (abierto) grabada en la carcasa del trinquete.
Mantenga la perilla del trinquete en esta posición mientras
corre el mango en la dirección indicada para destrabar el
cortatubos. Abra el cortatubos y empuje la cadena hasta
el pasador siguiente para que quede más apretada.
Continúe la operación según se ha descrito.
Preparación y funcionamiento del
Cortatubos N°276
Una vez que el Cortatubos N° 276 se ha regulado para
cortar un diámetro determinado de tubo, generalmente no
requiere ajustes posteriores.
Figura 6 – Cortatubos de desagües cloacales N° 276
1. Acerque las mordazas del cortatubos perpendicularmente al tubo, sitúe la cadena debajo o alrededor
del tubo. Si se cortará sobre el suelo, el tornillo de
ajuste debe apuntar hacia arriba.
2. Abra los mangos a 90 grados y sujete el mango superior con una mano.
3. Con la otra mano, jale la cadena apretándola alrededor del tubo e introduzca el pasador (de la cadena)
más cercano dentro del ámbito del gancho en la
mordaza. Asegure que el trozo de cadena sobrante
no interfiera con el mecanismo.
4. Asegure que la cadena se encuentra en ángulo recto
contra el tubo y en la posición deseada. Cierre cuidadosamente las mordazas del cortatubos procurando
que el pasador (de la cadena) permanezca abro cha do. Mediante el tornillo de ajuste, regule la abertura de
los mangos para que tengan una separación de unos
45 a 70 grados si se cortarán tubos de hierro fundido,
ó de 20 a 45 grados en el caso de tubos de arcilla o
concreto. Si no logra dichos ángulos de se paración
entre los mangos empleando el tornillo de ajuste, de be desengancharse la cadena, abrirse más las mor dazas mediante el tornillo de ajuste y engancharse
nuevamente la cadena en el pasador siguien te.
5. Adopte una postura equilibrada. Si trabajará con uno
de los mangos en el suelo, ponga un pie sobre la
parte plana del mango inferior. Agarre el otro mango
firmemente, ejerza con él uniforme fuerza descendente hasta cortar el tubo.
Consejos para efectuar los
cortes
Una vez que se ha establecido cuál es el pasador indicado
para cortar un diámetro determinado de tubo, haga una
marca en este pasador la que permitirá ubicarlo con rapidez para efectuar los cortes subsiguientes.
Se logran cortes bien definidos si en lugar de apretar la cadena sucesivamente hasta cortar el tubo, sólo se le aprieta lo suficiente para efectuarle marcas a la superficie del
tubo. En seguida, desapriete la cadena y gire un poco el
tu bo, o el cortatubos, y vuelva a efectuar una serie de marcas. Repita este procedimiento hasta marcar todo el contorno del tubo. Por último, apriete la cadena y quiebre el
tubo.
Cuando traslade o transporte el cortatubos, no arrastre su
cadena; se estropean las ruedas de corte. Las ruedas de
corte desgastadas o romas exigen mayor fuerza de corte
y producen cortes de mala calidad.
Alargamiento de la cadena del
cortatubos
No corte tubos que exceden la capacidad recomendada del cortatubos. De lo contrario, si
se cortan tubos de mayor diámetro o fabricados de materiales distintos a los especificados, estos aparatos
podrían causar graves lesiones y/o estropearse.
Cada uno de los Cortatubos de desagües cloacales de
RIDGID viene provisto de una cadena capaz de cortar
tubos de un máximo de 6 pulgadas de diámetro. Cuando
se las prolonga con un solo segmento de cadena de extensión (vea la Tabla de Especificaciones para encontrar las cadenas de extensión en el Catálogo RIDGID)
pueden cortar tubos de hasta 8 pulgadas Ø. Los ÚNICOS
tubos de mayor diámetro que se pueden cortar con estos
Cortatubos de desagües cloacales son los hechos de
ARCILLA. Es posible prolongarles la cadena para cortar
tubería de arcilla hasta de 15 pulgadas Ø. Por ningún motivo corte con ellos tubos de tamaños y materiales que
Mango inferior
Mango superior
Tornillo de ajuste
Cadena
Mordazas
ADVERTENCIA
Page 22

Cortatubos de desagües cloacales
Ridge Tool Company
20
están fuera de los límites especificados en la Tabla de
Capacidad de los Cortatubos de desagües cloacales:
podrían causar graves lesiones y/o estropearse.
Acoplamiento de una extensión a la cadena
1. Extraiga el anillo ubicado en el extremo de la cadena.
2. Coloque los eslabones exteriores de la cadena de extensión sobre los eslabones internos de la cadena del
cortatubos, y ponga la rueda de corte entre los eslabones internos.
3. Ponga la zona de la cadena que va a unir en una
prensa y sujétela en su lugar. Alinee los agujeros en
los eslabones con los de la rueda de corte y meta el
pasador en el agujero.
4. Empuje el pasador con cuidado. Asegure que se introduce centrado en relación con los eslabones de la
cadena.
5. Vuelva a acoplar el anillo en el extremo de la cadena prolongada.
Page 23

EMERSON. CONSIDER IT SOLVED.
™
Ridge Tool Company
400 Clark Street
Elyria, Ohio 44035-6001
What is covered
RIDGID®tools are warranted to be free of defects in workmanship and material.
How long coverage lasts
This warranty lasts for the lifetime of the RIDGID
®
tool. Warranty coverage ends when the product
becomes unusable for reasons other than defects in workmanship or material.
How you can get service
To obtain the benefit of this warranty, deliver via prepaid transportation the complete product to
RIDGE TOOL COMPANY, Elyria, Ohio, or any authorized RIDGID®INDEPENDENT SERVICE CENTER.
Pipe wrenches and other hand tools should be returned to the place of purchase.
What we will do to correct problems
Warranted products will be repaired or replaced, at RIDGE TOOL’S option, and returned at no charge;
or, if after three attempts to repair or replace during the warranty period the product is still defective,
you can elect to receive a full refund of your purchase price.
What is not covered
Failures due to misuse, abuse or normal wear and tear are not covered by this warranty. RIDGE TOOL
shall not be responsible for any incidental or consequential damages.
How local law relates to the warranty
Some states do not allow the exclusion or limitation of incidental or consequential damages, so the
above limitation or exclusion may not apply to you. This warranty gives you specific rights, and you
may also have other rights, which vary, from state to state, province to province, or country to country.
No other express warranty applies
This FULL LIFETIME WARRANTY is the sole and exclusive warranty for RIDGID
®
products. No employee, agent, dealer, or other person is authorized to alter this warranty or make any other warranty
on behalf of the RIDGE TOOL COMPANY.
Qué cubre
Las herramientas RIDGID están garantizadas contra defectos de la mano de obra y de los
materiales empleados en su fabricación.
Duración de la cobertura
Esta garantía cubre a la herramienta RIDGID durante toda su vida útil. La cobertura de la garantía caduca cuando el producto se torna inservible por razones distintas a las de defectos en la mano de
obra o en los materiales.
Cómo obtener servicio
Para obtener los beneficios de esta garantía, envíe mediante porte pagado, la totalidad del producto
a RIDGE TOOL COMPANY, en Elyria, Ohio, o a cualquier Servicentro Independiente RIDGID. Las llaves
para tubos y demás herramientas de mano deben devolverse a la tienda donde se adquirieron.
Lo que hacemos para corregir el problema
El producto bajo garantía será reparado o reemplazado por otro, a discreción de RIDGE TOOL, y devuelto sin costo; o, si aún resulta defectuoso después de haber sido reparado o sustituido tres veces
durante el período de su garantía, Ud. puede optar por recibir un reembolso por el valor total de su
compra.
Lo que no está cubierto
Esta garantía no cubre fallas debido al mal uso, abuso o desgaste normal. RIDGE TOOL no se hace
responsable de daño incidental o consiguiente alguno.
Relación entre la garantía y las leyes locales
Algunos estados de los EE.UU. no permiten la exclusión o restricción referente a daños incidentales
o consiguientes. Por lo tanto, puede que la limitación o restricción mencionada anteriormente no rija
para Ud. Esta garantía le otorga derechos específicos, y puede que, además, Ud tenga otros derechos, los cuales varían de estado a estado, provincia a provincia o país a país.
No rige ninguna otra garantía expresa
Esta GARANTIA VITALICIA es la única y exclusiva garantía para los productos RIDGID. Ningún empleado, agente, distribuidor u otra persona está autorizado para modificar esta garantía u ofrecer
cualquier otra garantía en nombre de RIDGE TOOL COMPANY.
Ce qui est couvert
Les outils RIDGE
®
sont garantis contre tous vices de matériaux et de main d’oeuvre.
Durée de couverture
Cette garantie est applicable durant la vie entière de l’outil RIDGE
®
. La couverture cesse dès lors que le
produit devient inutilisable pour raisons autres que des vices de matériaux ou de main d’oeuvre.
Pour invoquer la garantie
Pour toutes réparations au titre de la garantie, il convient d’expédier le produit complet en port payé
à la RIDGE TOOL COMPANY, Elyria, Ohio, ou bien le remettre à un réparateur RIDGID
®
agréé. Les clés
à pipe et autres outils à main doivent être ramenés au lieu d’achat.
Ce que nous ferons pour résoudre le problème
Les produits sous garantie seront à la discrétion de RIDGE TOOL, soit réparés ou remplacés, puis réexpédiés gratuitement ; ou si, après trois tentatives de réparation ou de remplacement durant la période de validité de la garantie le produit s’avère toujours défectueux, vous aurez l’option de demander
le remboursement intégral de son prix d’achat.
Ce qui n’est pas couvert
Les défaillances dues au mauvais emploi, à l’abus ou à l’usure normale ne sont pas couvertes par cette
garantie. RIDGE TOOL ne sera tenue responsable d’aucuns dommages directs ou indirects.
L’influence de la législation locale sur la garantie
Puisque certaines législations locales interdisent l’exclusion des dommages directs ou indirects, il se
peut que la limitation ou exclusion ci-dessus ne vous soit pas applicable. Cette garantie vous donne des
droits spécifiques qui peuvent être éventuellement complétés par d’autres droits prévus par votre législation locale.
Il n’existe aucune autre garantie expresse
Cette GARANTIE PERPETUELLE INTEGRALE est la seule et unique garantie couvrant les produits
RIDGID
®
. Aucun employé, agent, distributeur ou tiers n’est autorisé à modifier cette garantie ou à of-
frir une garantie supplémentaire au nom de la RIDGE TOOL COMPANY.
Printed in U.S.A. 7/09
© 2009 RIDGID, Inc.
999-998-611.10
EC36096 REV. B
Parts are available online at RIDGIDParts.com
FULL LIFETIME
WARRANTY
Against Material Defects
& Workmanship
 Loading...