


www.ridem.eu
Manuale di istruzioni • Instruction manual
RDM 8A
RDM 10A
Diffusore amplificato
Amplified Box
Ver. 1.16

2
Grazie per aver scelto
il marchio RIDEM.
Il prodotto RIDEM da Lei acquistato è frutto di
un’accurata progettazione da parte di ingenieri
specializzati. Per la sua realizzazione sono stati
impiegati materiali di ottima qualità per garantirne
il funzionamento nel tempo. Il prodotto è stato
realizzato in conformità alle severe normative di
sicurezza imposte dalla Comunità Europea, garanzia
di afdabilità e sicurezza. Vi consigliamo di leggere
attentamente questo manuale prima di cominciare ad
utilizzare l’apparecchio al ne di sfruttarne appieno le
potenzialità. Vi ringraziamo nuovamente per la ducia
riposta nel nostro marchio.
Thanks for choise
the RIDEM brand.
The RIDEM product you have purchased is the result
of careful planning by specialized engineers . High
quality materials have been used for its construction,
to ensure its functioning over time. The product is
manufactured in compliance with strict regulations
imposed by the European Union, a guarantee of
reliability and safety. Please read this manual
carefully before starting to use the xture in order to
exploit its full potential. We thank you again for your
trust in our brand.
Precauzioni ed
avvertenze
• Conservare il manuale per future consultazioni
e allegatelo se cedete l’apparecchio ad altri.
• Assicuratevi sempre di collegare l’apparecchio
con il voltaggio adeguato.
• Questo prodotto non è adatto ad usi esterni (in
presenza di umidità)
• Per evitare il rischio di incendi o cortocircuiti
non esponete mai l’apparecchio alla pioggia o
all’umidità.
• Non utilizzare con temperature ambiente
superiori ai 35C°.
• In caso di problemi di funzionamento
interrompete l’uso immediatamente.
Non tentate di riparare l’apparecchio per
conto vostro, ma rivolgetevi all’assistenza
autorizzata.
• Riparazioni effettuate da personale non
competente potrebbero creare gravi danni sia
all’apparecchio che alle persone.
• Controllate che il cavo di alimentazione non
sia rovinato.
Safety
Notes
• Keep this User Manual for future reference. If
you sell the product to another user, be sure to
give this manual to the next owner.
• Make sure the voltage of the power source used
for the product is correct.
• This product is not suitable for outdoor use.
• To avoid the risk of re or short-circuits never
expose the xture to rain or moisture.
• Do not operate the product in an ambient
temperature higher than 35°.
• In the event of a serious operating problem,
stop using the product immediately. Never try
to repair the product, but contact the authorized
technical assistance center.
• Repairs carried out by untrained people can lead
to damage both to the xture and to persons.
• Make sure the power cord is not damaged.
• Never disconnect the product from the power
source by pulling on the cord.

3
Certificato di
Garanzia
Il prodotto è coperto da garanzia in base alle
vigenti normative. Vi suggeriamo di conservare
lo scontrino o la fattura al ne di utilizzarla in
caso di necessità come attestato di acquisto.
• Sono esclusi i guasti causati da imperizia o
da uso non appropriato dell’apparecchio
• La garanzia non ha più alcun effetto qualora
l’apparecchio risulti manomesso.
• La garanzia non prevede la sostituzione del
prodotto.
• Sono escluse dalla garanzia le parti esterne,
le batterie, le manopole, gli interruttori, e le
parti asportabili o consumabili.
• Le spese di trasporto e i rischi conseguenti
sono a carico del proprietario dell’apparecchio
• A tutti gli effetti la validità della garanzia è
avallata unicamente dalla presentazione
della fattura o scontrino d’acquisto.
Warranty
Certificate
The product is covered by warranty, according
to the current regulations. We suggest to keep
the receipt or the invoice in order to use it, in
case of necessity, as purchase proof.
• Damages caused by negligence or wrong use
of the device are not covered by warranty.
• The warranty is no longer effective if the item
is modied or disassembled by not authorized
people.
• This warranty doesn’t envisage the product’s
replacement.
• External components, batteries, knobs,
switches and any removable or subject
to wear and tear parts are excluded from
warranty.
• Shipment for the return of faulty items is at
expense and risk of the owner.
• For all intents and porpuses the warranty is
effective only upon exhibition of the invoice or
of the purchase receipt
4
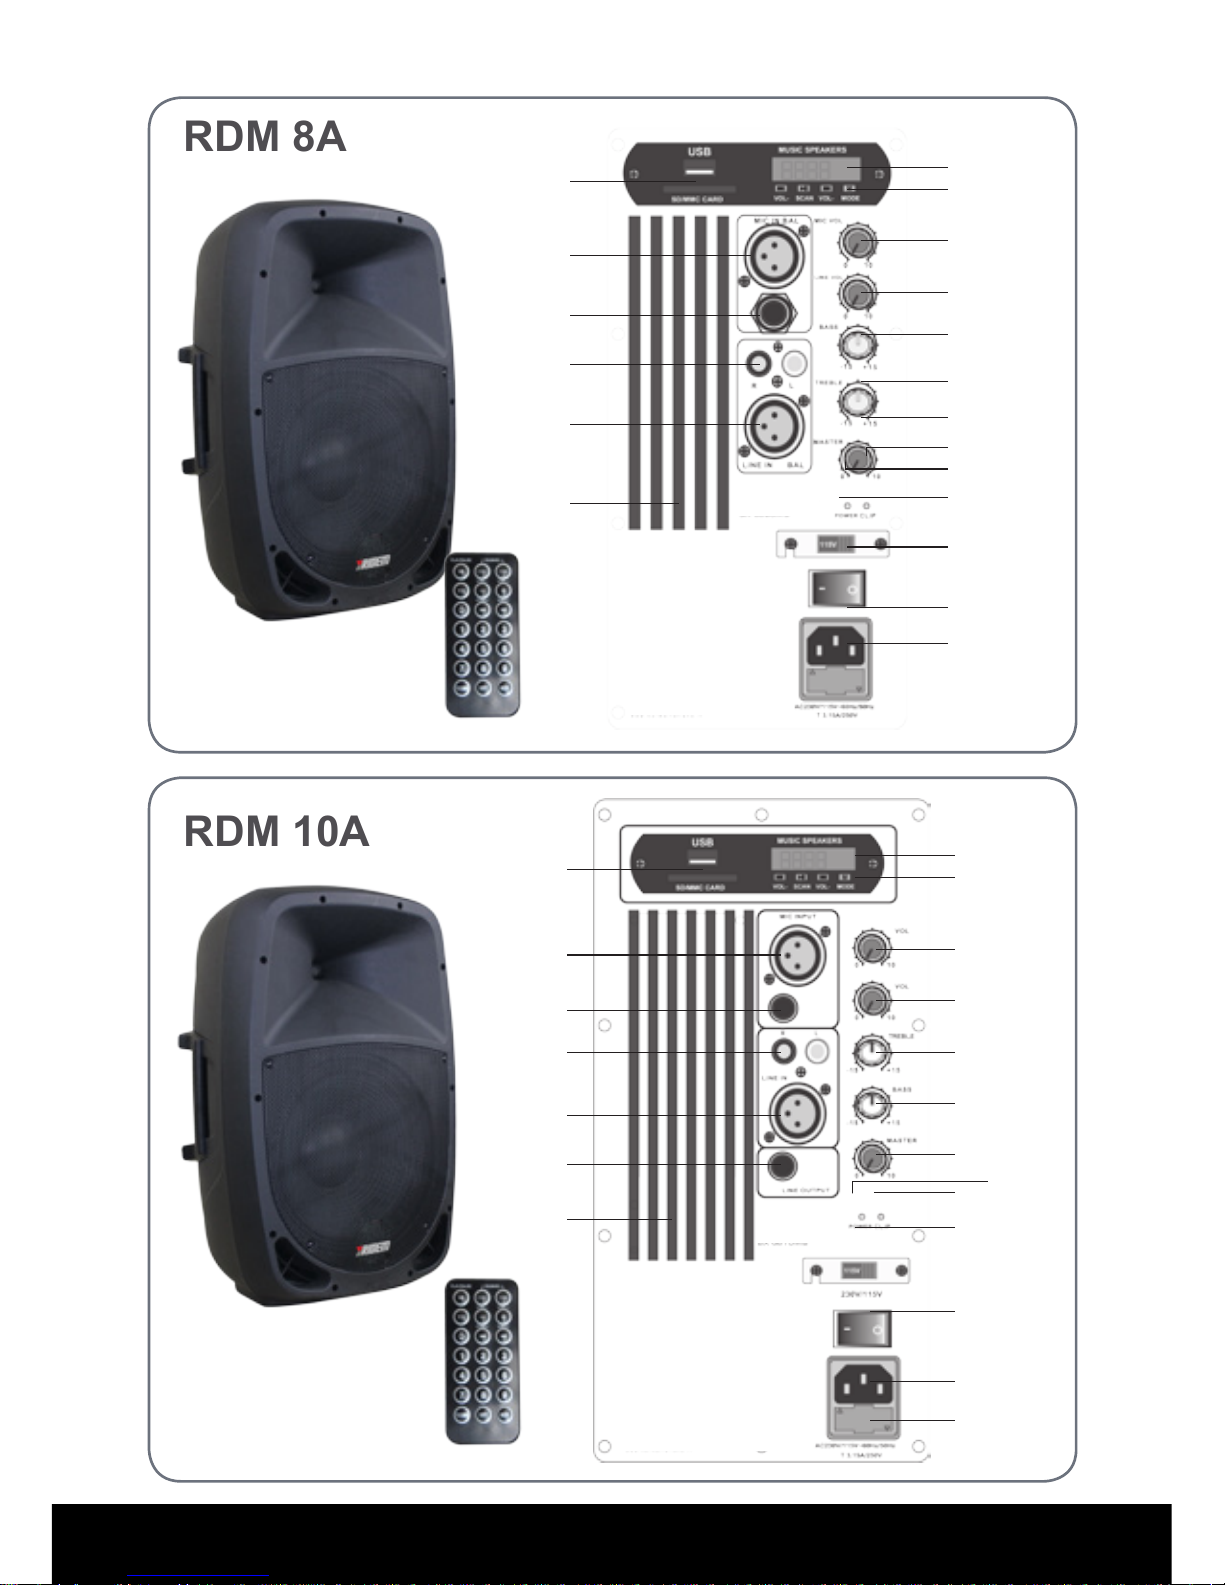
RDM 8A
RDM 10A
1
2
3
4
5
6
19
7
8
9
10
11
18
17
16
15
14
13
12
1
2
314
13
15
17
16
20
18
4
6
5
19
9
7
10
11
12
8

5
Prima di effettuare i collegamenti,
assicuratevi di aver scollegato la
spina dalla presa elettrica. Tutti i
collegamenti devono avvenire ad
apparecchio spento.
• Accertatevi che il diffusore sia
spento con tasto POWER(10) su
OFF e che il cavo di alimentazione
non sia inserito nella presa(11). Tutte
le operazioni di installazione vanno
effettuate in assenza di corrente
elettrica.
• Posizionate in un luogo idoneo
il vostro nuovo diffusore avendo
cura che tale luogo non sia umido,
esposto ai raggi diretti del sole. Per
lo spostamento utilizzate le maniglie
di trasporto laterali.
• Vericate che il voltaggio
selezionato(9) sia corretto. Voltaggi
differenti dalla corrente elettrica
presente danneggerebbe seriamente
l’apparecchio e potrebbe causare
pericolosi cortocircuiti.
• Collegate un eventuale microfono,
munito di connettore XLR alla
presa “MIC”(14). Nel caso abbiate
un microfono con connettore Jack
6,3mm mono, potrete utilizzare la
presa (15).
Before arranging any connection, be
sure to unplug the device from power
source. All connections must be
made with the xture off.
• Be sure that the speaker is switched
off with the POWER button (10) in
OFF position and that the power
cord (11) is not plugged into the
mains socket. All operations should
be carried out without power.
• Place your speaker in a suitable
place, keeping it away from
moisture and direct sun rays. Use
the side handles to move the xture.
• Check that the selected (9) voltage
is correct. A wrong voltage could
seriosly damage the xture and
cause dangerous short-circuits.
• You can plug a microphone with
XLR connector in the MIC socket
(14). If you have a microphone with
6,3 mono jack connector, you can
use the socket 15.
• The input signal, coming from a
mixer a CD player or another “line”
device, can be connected to the
RCA (16) or XLR (17) “line input”
sockets.

6
• Il segnale in ingresso, proveniente
da mixer, lettore CD o altro
apparecchio di tipo “line”, potrà
essere connesso alle prese “Line
input” di tipo RCA(16) o di tipo
XLR(17).
• L’eventuale uscita ad altro diffusore
o amplicatore è disponibile sotto
forma di segnale audio di linea, alla
presa “Line Output” di tipo Jack
6,3mm mono (20) ma è presente
solo sui modelli RDM 10A
• Se desiderate posizionare il vostro
diffusore su supporto a treppiede,
utilizzate l’apposito bicchierino posto
sulla parte inferiore. Il diametro è di
35mm
• Terminati i collegamenti, regolate
tutti i volumi dell’amplicatore sul
minimo cioè tutti ruotati in senso
antiorario. Collegate il cavo di
alimentazione alla presa(11) e quindi
alla rete elettrica 230V.
• Accendete l’amplicatore tramite il
tasto POWER(10). Il Led Power(8) si
illuminerà e ne indicherà l’avvenuta
accensione.
Qualora posizionando il tasto(10)
su ON il led(8) rimanesse spento ed
il diffusore non funzionasse, prima
• A further output for another speaker
or amplier is available as an audio
line signal, on jthe jack 6,3 mono
“line output” socket (20) (only on
model RDM 10A).
• If you wish to place your speaker
on a tripod stand, please use the
mount hole on the bottom. It has a
standard 35 mm diameter.
• Once made the connections, please
put all the amplier volumes at their
minimum position (completely turned
anti-clockwise). Connect the power
cord to the socket (11) and then to
the mains (230V)
• Turn on the amplier through the
POWER button (10). The power led
(8) will light up to indicate that the
speaker is on. If the button (10) is in
ON position and the speaker doesn’t
work, before contacting the technical
service, disconnect the power cord
and check if the protection fuse
of the power socket (12) is ok. If it
is blown replace it with one of the
same amperage. During use the
cooling wings could get very hot.
Don’t touch them to avoid the risk of
burning yourself.

7
di contattare l’assistenza tecnica,
scollegate il cavo di alimentazione
e controllate l’integrità del fusibile di
protezione contenuto nella presa di
alimentazione(12) ed eventualmente
sostituitelo con uno di uguale valore
amperometrico. Durante l’utilizzo,
le alette di raffreddamento(18)
potrebbero diventare molto calde.
Evitate di toccarle per non rischiare
di ustionarvi.
• Attivate l’eventuale apparecchiatura
che fornisce il segnale audio. Il
segnale verrà amplicato. Il volume
di ogni segnale amplicato potrà
essere regolato tramite apposito
comando: per il microfono usate il
comando rotante(3), per il segnale di
linea, utilizzate il comando rotante(4)
Il comando rotante Master(19)
regola il livello generale del segnale
in uscita. Il led CLIP o LIMIT(7)
potrà lampeggiare segnalando
eventuali picchi di segnale. Nel caso
in cui rimanga acceso per più di 2/3
secondi, abbassate immediatamente
i volumi dei segnali in ingresso per
evitare di danneggiare l’apparecchio.
• I comandi BASS(6) e TREBBLE(5)
consentono di regolare toni bassi e
alti dell’intera miscelazione.
• Turn on the xture providing the
audio signal. The signal will be
amplied. The volume of each
amplied signal can be adjusted
through the specic control: for
the microphone use the rotating
knob (3), for the line signal use the
rotating knob (4). The rotating knob
Master (19) controls the general
lever of the output signal. The
led CLIP or LIMIT(7) can ash to
indicate signal peaks. If it remains
on for more than 2 or 3 seconds,
you must immediately turn down the
volumes of input signals to avoid to
damage the xture.
• The BASS (5) and TREBLE (6)
controls allow to adjust the bass
and treble of the whole mixing. It is
possible to handle the speaker also
through the included remote control.

8
LETTORE MP3
Il vostro nuovo diffusore è provvisto di
lettore per schede SD e chiavette USB
e vi permetterà di riprodurre les MP3
in esse contenuti. E’ sufciente inserire
un supporto nell’apposita presa(13) e
agire sui tasti(2) per riprodurre, mettere
in pausa o cambiare brano. Il display(1)
mostra le principali informazioni relative al
brano riprodotto.
FUNZIONE BLUETOOTH
Premete il tasto mode e selezionate la
funzione bluetooth. Cercate sul vostro
smartphone o tablet, il diffusore nel
menù bluetooth e selezionatelo. Una
volta accoppiato, il diffusore riprodurrà la
musica pilotata dallo smartphone.
MP3 PLAYER AND RADIO
Your new speaker is provided with USB
stick and SD cards reader to play MP3
les. It is enough to plug your mobile
device into the specic socket (13) and
use the keys (2) to play, pause or change
track. The display (1) shows the main
information of the track that is being
reproduced. Use the key MODE to select
the RADIO function.
BLUETOOTH FUNCTION
Press the mode key and select the
bluetooth function. Search for the
speaker on your smartphone or tablet in
the bluetooth menu and select it. Once
matched, the speaker will play music
controlled from your smartphone.

9
Questo simbolo vi avverte della presenza di istruzioni d’uso e manutenzione importanti, nel manuale o
nella documentazione che accompagna il prodotto
This symbol alerts you to the presence of important operating and maintenance, in the manual or in the
documentation accompanying the product
Il marchio CE indica che questo prodotto è conforme alle norme della Comunità Europea: EMC
(Compatibilità Elettromagnetica) e LVD (Direttive sulla Bassa Tensione). La documentazione di
conformità in forma completa è reperibile presso la società Karma Italiana Srl.
The CE mark indicates that this product complies with the European Community standards EMC
( Electromagnetic Compatibility) and LVD ( Low Voltage Directive ). Compliance documentation in
complete form is available at the company Karma Italiana Srl.
Ai sensi dell’art. 13 del decreto Legislativo 25 Luglio 2005, n. 151 “ Attuazione delle Direttive 2002/95/CE,
2002/96/CE e 2003/108/CE, relative alla riduzione dell’uso di sostanze pericolose nelle apparecchiature
elettriche ed elettroniche, nonchè allo smaltimento dei riuti”.
Il simbolo del cassonetto barrato riportato sull’apparecchiatura indica che il prodotto alla ne della
propria vita utile deve essere raccolto separatamente dagli altri riuti. L’utente dovrà, pertanto, conferire
l’apparecchiatura integra dei componenti essenziali giunta a ne vita agli idonei centri di raccolta
differenziata dei riuti elettronici ed elettrotecnici, oppure riconsegnandola al rivenditore al momento
dell’acquisto di nuova apparecchiatura di tipo equivalente, in ragione di uno a uno. L’adeguata raccolta
differenziata per l’avvio successivo dell’apparecchiatura dimessa al reciclaggio, al trattamento e allo
smaltimento ambientale compatibile contribuisce ad evitare possibili effetti negativi sull’ambiente e sulla
salute e favorisce il riciclo dei materiali di cui è composta l’apparecchiatura. Lo smaltimento abusivo
del prodotto da parte dell’utente comporta l’applicazione delle sanzioni amministrative di cui al D.Lgs n.
152/2006 (parte 4 art.255)
The symbol of the crossed-out dustbin indicates that the product at the end of its life must be collected
separately from other waste . The user must , therefore , take the remote control integrates the essential
components come to an authorized disposal center for collection of waste electronic and electrical ,
or returning it to the dealer when buying new equipment of equivalent type , at a rate of one to one.
Appropriate separate collection for the decommissioned equipment to recycling , treatment and
environmentally compatible disposal helps to prevent negative impact on the environment and human
health and promotes recycling of the materials making up the product. Illegal dumping of the product by
the user entails the application of administrative sanctions pursuant to Legislative Decree n . 152/2006
( Art.255 Part 4 )
Questo simbolo indica la conformità del prodotto alle normative internazionali RoHS (Restriction of certain
Hazardous Substances) che limita l’impiego di determinate sostanze pericolose nelle apparecchiature
elettriche ed elettroniche immesse sul mercato europeo dal 1° luglio 2006. Fa parte di una serie di
Direttive UE sull’ambiente ed e’ connessa strettamente alla Direttiva RAEE (Riuti di Apparecchiature
Elettriche ed Elettroniche).
This symbol indicates that the product complies with international standards RoHS (Restriction of
certain Hazardous Substances) which restricts the use of certain hazardous substances in electrical
and electronic equipment put on the European market from 1 July 2006. It is part of a series of EU
Directives and environment and ‘ closely connected to the WEEE Directive ( Waste Electrical and
Electronic Equipment).

10
Alimentazione / Power Supply: 110V o 230V / 50Hz
Potenza Max / Max Power: 120 W
Potenza RMS / RMS Power: 60 W
Struttura Box / Box Structure: Stampo a iniezione di polipropilene / Mold of polypropylene injection
Woofer / Woofer: 8” (21 cm)
Magnete / Magnet: 30 oz
Impedenza Woofer / Woofer Imp.: 8 Ohms
Voice Coil / Voice Coil: 1” titanio con magnete 10 oz / 1” titan with magnet 10 oz
Tweeter / Tweeter: 25 mm, 5,4 oz, 8 Ohms
Ingressi / Input: 1 ingresso microfonico, 1 ingresso di linea
1 Mic Input, 1 Line Input
Uscita / Output: ----
Risp. in freq. / Frequency Resp.: 60 Hz - 60 KHz (-10dB)
SPL / SPL 93 dB
Lettore MP3 / Mp3 Player: Si tramite SD o USB / Yes by USB or SD
Bluetooth / Bluetooth: Si / Yes
Regolazione toni / Tone Adjust: Alti e bassi / Bass & Treble
Dimensioni / Dimensions: 250 x 385 x 190 mm
Peso / Weight: 5 Kg
RDM 8A

11
Alimentazione / Power Supply: 110V o 230V / 50Hz
Potenza Max / Max Power: 160 W
Potenza RMS / RMS Power: 80 W
Struttura Box / Box Structure: Stampo a iniezione di polipropilene / Mold of polypropylene injection
Woofer / Woofer: 10” (25 cm)
Magnete / Magnet: 30 oz
Impedenza Woofer / Woofer Imp.: 8 Ohms
Voice Coil / Voice Coil: 1” titanio con magnete 10 oz / 1” titan with magnet 10 oz
Tweeter / Tweeter: 25 mm, 5,4 oz, 8 Ohms
Ingressi / Input: 1 ingresso microfonico, 1 ingresso di linea
1 Mic Input, 1 Line Input
Uscita / Output: 1 Uscita di linea / 1 Line output
Risp. in freq. / Frequency Resp.: 55 Hz - 60 KHz (-10dB)
SPL / SPL 94 dB
Lettore MP3 / Mp3 Player: Si tramite SD o USB / Yes by USB or SD
Bluetooth / Bluetooth: Si / Yes
Regolazione toni / Tone Adjust: Alti e bassi / Bass & Treble
Dimensioni / Dimensions: 485 x 315 x 245 mm
Peso / Weight: 7 Kg
RDM 10A

Made in China
IMPORTATO DA:
KARMA ITALIANA Srl
www.karmaitaliana.it
IMPORTATED BY:
KARMA ITALIANA Srl
www.karmaitaliana.it
 Loading...