

Page 1

English 1
Deutsch 10
Français 19
日本語
中文繁體
中文简体
28
37
46
Page 2

English
A new way to enjoy
photography
Product Website
●
For the latest product information and useful hints and tips
on using this product, see the following website.
https://theta360.com/en/
Support Information
●
For support information and the entire warranty
provisions, see the following website.
https://theta360.com/en/support/
User Guide
●
For details on how to use this product, access the user
guide in the following website.
https://theta360.com/en/support/manual/
●Facebook, the Facebook logo and "f" logo are the trademarks or
registered trademarks of Facebook, Inc.
●Twitter, the Twitter logo, Twitter "t" logo and Twitter blue bird are the
registered trademarks of Twitter, Inc. in the United States and other
countries.
●Tumblr and the Tumblr logo are the trademarks or registered
trademarks of Tumble, Inc.
●Wi-Fi and the Wi-Fi logo are the registered trademarks of the Wi-Fi
Alliance.
●HDMI, the HDMI logo and High-Defi nition Multimedia Interface are
the trademarks or registered trademarks of HDMI Licensing in the
United States and other countries.
●The images, illustrations and screen captures used in this manual
may differ from those of the actual device.
1
Page 3
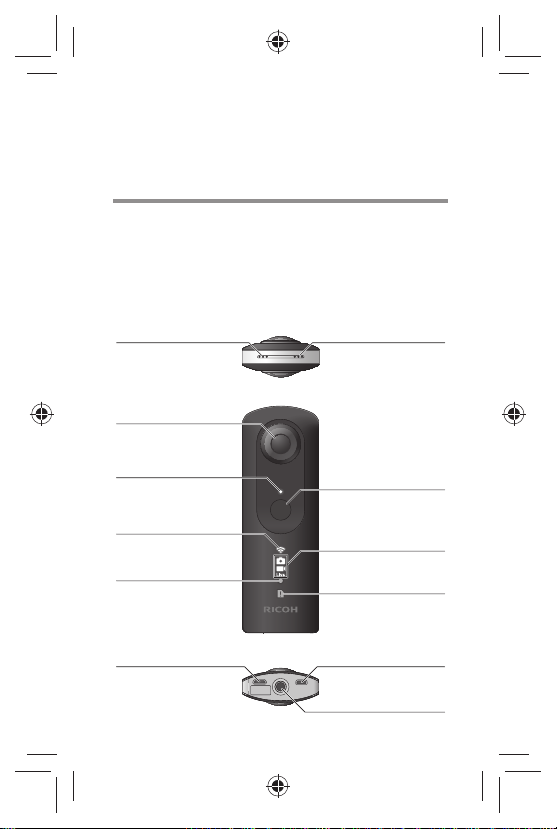
Names of Parts
This camera has a simple design that is easy to
handle, and that enables you to capture images of your
surroundings with the simplest operations.
First, familiarize yourself with the names and uses of the
parts.
Microphone Speaker
Lens
Camera status lamp
Images can be captured when
lit.
Wireless lamp
Lights when the wireless
function is on.
Video recording lamp
Lights when capturing video.
USB terminal HDMI Terminal
Connects to the provided USB
cable.
Shutter button
Press to capture images.
Capture mode lamp
Lamp that corresponds to the
selected capture mode lights.
Memory warning lamp
Lights when the memory
becomes full, and fl ashes when
the memory is almost completely
full.
Used in live streaming mode.
Tripod mount hole
2
Page 4

Power lamp
- Lights blue when the power is on.
- Flashes blue when the remaining
battery level is low.
Wireless button
Turns the wireless function on/off.
Power button
Turns the power on/off.
Capture mode button
Switches between still image
capture and video capture
modes.
Hold this button while turning
the power on to switch to live
streaming mode.
●Before use, use the provided USB cable to connect this camera to a
computer to recharge it. The power lamp lights red during charging
and goes out when the camera is fully recharged.
●Be careful when handling the lens section. Always store the camera in
the provided soft case when you are not using it.
3
Page 5

Downloading the App
This camera captures great images. You can also use a
smartphone app for shooting, viewing and sharing from
your smartphone.
Download the version of RICOH THETA S that is
compatible with your smartphone from the app download
service.
4
Page 6

Connecting to a
Smartphone
When the camera is connected to a Wi-Fi network, you
can use your smartphone to shoot remote images and
view still images or videos.
Press the power button on the camera to turn the power
on, and then press the wireless button to turn the wireless
function on. (Wireless lamp fl ashing)
Next, select the SSID of the camera in the network list of the
Wi-Fi settings on your smartphone and enter the password.
●The wireless lamp lights when the Wi-Fi connection is completed.
The serial number printed on the base of the camera is
the same as the SSID and password.
Password
(00001017 in this case)
XS00
001017
SSID
THETA + Serial number +.OSC
(THETAXS00001017.OSC in this case)
●You can change the password from your smartphone.
●The password is initialized by holding down the
wireless button when the power is on.
5
Page 7

Capturing and Viewing
Still Images
Switching to Still Image Capture Mode
●
Press the capture mode button, and the lamp lights.
Capturing Still Images
●
You can capture images from the camera or your
smartphone.
To capture images from the camera, press the shutter
button.
To capture images using a smartphone, tap
capture screen of the smartphone app.
Viewing Still Images
●
You can send captured still images to the smartphone for
viewing.
To view images stored on the smartphone, tap [App] in
the smartphone app album and select the images you
want to see.
To view the images saved on the camera, tap [Camera]
in the album and select the image that you want to view.
in the
6
Page 8

Capturing and Viewing
Videos
Switching to Video Mode
●
Press the capture mode button, and the lamp lights.
Capturing Videos
●
You can capture videos from the camera or your
smartphone.
To capture videos from the camera, press the shutter
button.
To capture videos using a smartphone, tap
capture screen of the smartphone app.
Viewing Videos
●
Captured videos can be transferred to a smartphone for
viewing.
To view videos stored on the smartphone, tap [App] in
the smartphone app album and select the video you want
to see.
To view the videos saved on the camera, tap [Camera] in
the album and select the video that you want to view.
in the
7
Page 9

Live Video Streaming
Switching to Live Streaming Mode
●
When the camera power is off, press the power button to turn
the power on while holding down the mode button. (
light)
Live Streaming
●
You can watch video live on a computer screen by connecting
the camera to a computer using a USB or HDMI cable.
●The computer needs to have an HDMI input function in order to be
able to view live video using an HDMI connection.
●The shutter button cannot be used in live streaming mode. Video is
constantly output via the USB or HDMI terminal.
●In live streaming mode, images captured by the front and back fi sheye lenses are displayed side-by-side on the screen.
●If both the USB and HDMI cables are connected, priority is given
to the HDMI cable. (HDMI connection provides higher video quality
than USB.)
and
8
Page 10

Sharing on Social
Networking Services
You can share images captured with the camera on
social networking services such as Twitter and Facebook.
Tap the Share button on the image viewing screen of the
smartphone app.
Next, confi gure the settings for the service that you want to
share the image in, and tap the Share button in the image
share screen.
●You need to register with an account on each service in order to
use the services.
●See the user guide for details on viewing and sharing images from
a computer.
URL: https://theta360.com/en/support/manual/
Unauthorized reproduction of this document in whole or
in part is strictly prohibited.
The content of this document may be changed at any
time without prior notice.
© 2015 RICOH CO., LTD.
9
 Loading...