

Page 1

®
Technesis
Integration Guide
, Inc.
Ricoh ESA
&
Technesis Quick Start Guide
Ricoh Embedded Software Architecture
Last Updated: November 2009
Technesis®, Inc. Page 1 of 50 Technesis Ricoh Java Application
Page 2

®
Technesis
Integration Guide
, Inc.
Ricoh ESA
Table of Contents
Introduction....................................................................................................................3
Purpose of this Document...................................................................................................... 3
Warnings .................................................................................................................................. 3
Copyright Protection...............................................................................................................3
Trademarks .............................................................................................................................. 3
Technesis Solution Overview....................................................................................... 4
Technesis Ricoh ESA Applications....................................................................................... 4
Integration Overview ............................................................................................................... 4
Before you Begin.....................................................................................................................5
Installation of Technesis Java Applications ............................................................... 6
Java 1.x Devices......................................................................................................................6
Java 2.x, 4.x & 5.x Devices ...................................................................................................16
Technesis iBridge Installation & Configuration........................................................ 39
Install Technesis iBridge ......................................................................................................39
Configure Technesis iBridge ............................................................................................... 39
Scheduling ............................................................................................................................. 42
Using the Technesis ESA Application....................................................................... 44
Virtual Keyboard.................................................................................................................... 44
User Login Options ............................................................................................................... 44
Billing Options ....................................................................................................................... 44
Device Enabled ...................................................................................................................... 45
Transaction Creation ............................................................................................................45
Appendix....................................................................................................................... 46
Appendix A – Technesis & Ricoh Timeouts ....................................................................... 46
Appendix B – Ricoh Service Mode ......................................................................................46
Appendix C – SP 5162 (App. Switch Method) ..................................................................... 46
Appendix D – Ricoh Models Reference............................................................................... 47
Appendix E – Fiery controller configuration ...................................................................... 48
Appendix F – Technesis, Inc. Software License Agreement............................................. 49
Technesis®, Inc. Page 2 of 50 Technesis Ricoh Java Application
Page 3

®
Technesis
Integration Guide
, Inc.
Ricoh ESA
Introduction
Purpose of this Document
This document describes the installation and setup of Technesis’ application integration on Ricoh
Embedded Software Architecture capable devices.
Warnings
1. The contents of this document may be changed without notice in the future.
2. We will not be held responsible for any of our customer’s losses, disadvantages, or demands
from a third party on using this document.
Copyright Protection
Copyright protection claimed includes all forms and matters of copyrightable material and information now
allowed by statutory or judicial law or hereinafter granted including without limitation, material generated
from the software programs which are displayed on the screen, such as icons, screen displays, looks, etc.
Use of all or a part of this document is prohibited without prior permission from Technesis, Inc.
Copyright © 2007 Technesis Corporation. All Rights Reserved.
Trademarks
o Microsoft® and Windows® are registered trademarks of Microsoft Corporation in the United
States and other countries.
o Java, JVM (CVM) and CDC are trademarks or registered trademarks of Sun Microsystems, Inc. in
the United States and other countries.
o PostScript® and Acrobat® are trademarks or registered trademarks of Adobe Systems
Incorporated in the United States and/or other countries.
o Other product names used herein are for identification purposes only and might be trademarks of
their respective companies. We disclaim any and all rights in those marks.
Technesis®, Inc. Page 3 of 50 Technesis Ricoh Java Application
Page 4
Technesis
Integration Guide
®
Ricoh ESA
Technesis Solution Overview
This section describes the basic overview of all the software components required for Technesis’
integration with the Ricoh Embedded Software Architecture (ESA) or Java Platform.
Technesis Ricoh ESA Applications
Technesis provides (2) applications that are installed within the Ricoh ESA infrastructure.
Technesis Servlet – Programmatic interface into the ESA platform that enables Technesis to
retrieve information from the device.
Technesis Xlet – Graphical user interface that displays on the Ricoh device panels for users to
enter user and/or billing information.
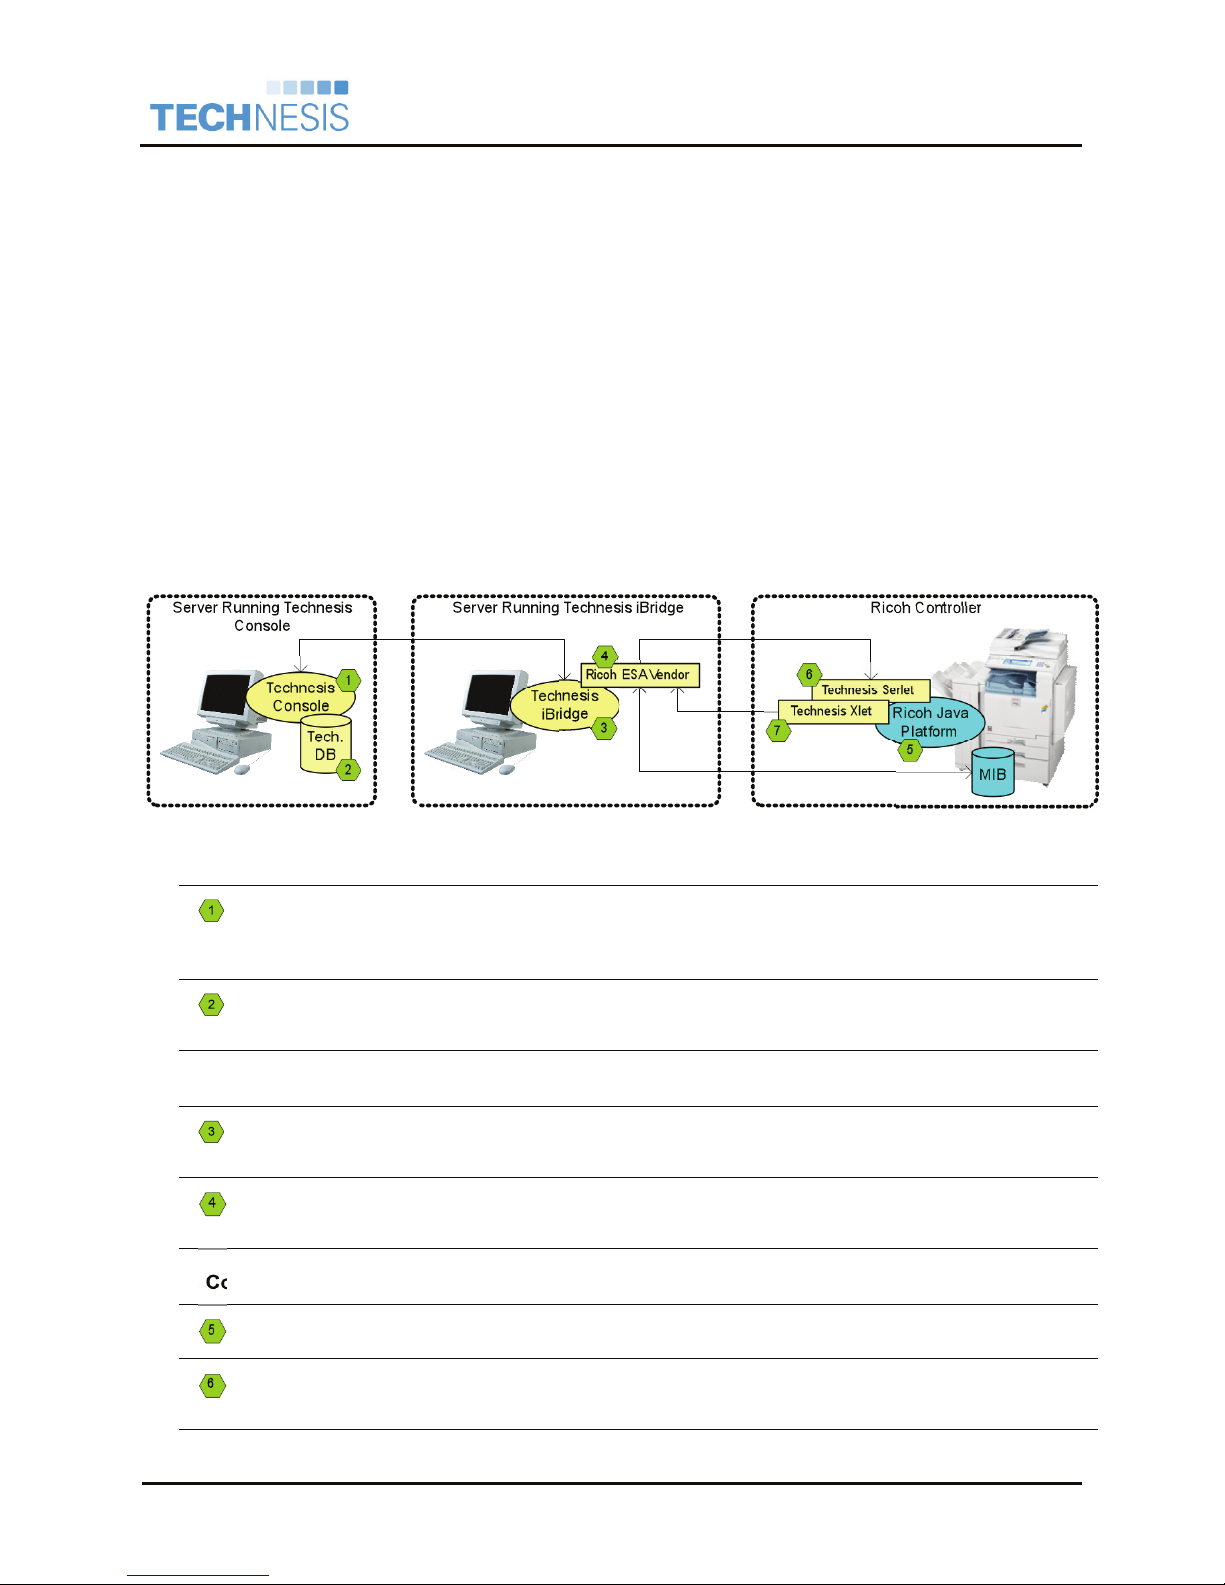
Integration Overview
The following diagram illustrates the basic communication between the Technesis Print Control System
and the Technesis ESA applications running on the Ricoh Controller.
, Inc.
Server Running Technesis Console
The Technesis Console is the base system to the entire print management and cost recovery
system. This must be installed and configured before beginning. Please consult the
Technesis NetDeploy Quick Start guide for details.
The Technesis database stores all activity and configuration information. This database can
be based on Jet or SQL Sever.
Server Running Technesis iBridge
Technesis iBridge is the component that links the main Technesis Print Control System and
the Technesis applications running within the Ricoh ESA platform.
The Technesis Ricoh ESA Vendor must be installed within the Technesis iBridge
infrastructure.
Ricoh Controller
The Ricoh Java Platform (ESA) must be installed and running on the Ricoh Controller.
The Technesis Servlet provides a programmatic interface into the ESA platform that enables
Technesis to retrieve information from the device.
Technesis®, Inc. Page 4 of 50 Technesis Ricoh Java Application
Page 5

Technesis
Integration Guide
The Technesis Xlet provides the User Interface for users to enter user and/or billing
information.
Before you Begin
• These installation instructions assume that the Ricoh Java SD™ card has already been installed
by an authorized Ricoh service technician.
• These installation instructions also assume that you have already installed the Technesis
Network Deployment version 5.5 or higher on a centralized workstation or server.
• SNMP with TCP/IP protocol must be enabled for the Technesis application to obtain meter reads
for copy and fax functions. Please verify these settings with your authorized Ricoh service
technician. These settings can be found with the Configuration – Network settings of the device.
• GLOBALSCAN NOTE: There have been reported problems with installation of the Technesis
Java application when GlobalScan has already been installed. Technesis recommends
uninstalling the GlobalScan application and reinstalling GlobalScan after the Technesis
application is installed on the device.
®
, Inc.
Ricoh ESA
Technesis®, Inc. Page 5 of 50 Technesis Ricoh Java Application
Page 6
®
Technesis
Integration Guide
, Inc.
Ricoh ESA
Installation of Technesis Java Applications
This section describes the installation and removal procedures for the Technesis java based applications.
Technesis strongly recommends installing the Technesis application with an authorized Ricoh service
technician. The installation and removal process is different for Java 1.x and Java 2.x based Ricoh
devices.
Java 1.x Devices
o Overview of the Java 1.x installation process.
o General expectations when installing Java.
o Manual installation via a SD Card.
Preparation of Java 1.x Devices
Supported Java 1.x Devices
Please refer to Appendix D – Ricoh Models Reference for a complete list of the Java 1.x Ricoh family
devices that Technesis supports. These devices will require the Java VM Card Type B provided by Ricoh.
Verify Ricoh Java 1.x Platform
The Technesis installation instructions require that the Ricoh Java SD™ card has already been installed
by an authorized Ricoh service technician. Java 1.x requires that the Java runtime engines be installed
manually via Extended Feature Settings. The Java 1.x implementation has a platform to run Xlets and
also a platform to run Servlets. Both Java platforms must be verified that they are installed and running.
Also verify the Ricoh Java Platform is version 1.4 or higher.
At this time, there is not a way to check for the Java 1.x Platform remotely and must be checked on the
device panel.
***NOTE*** Technesis only support Java Platform version 1.4 or higher.
Please contact your Ricoh service representative to upgrade your
existing Ricoh VM Card Type B.
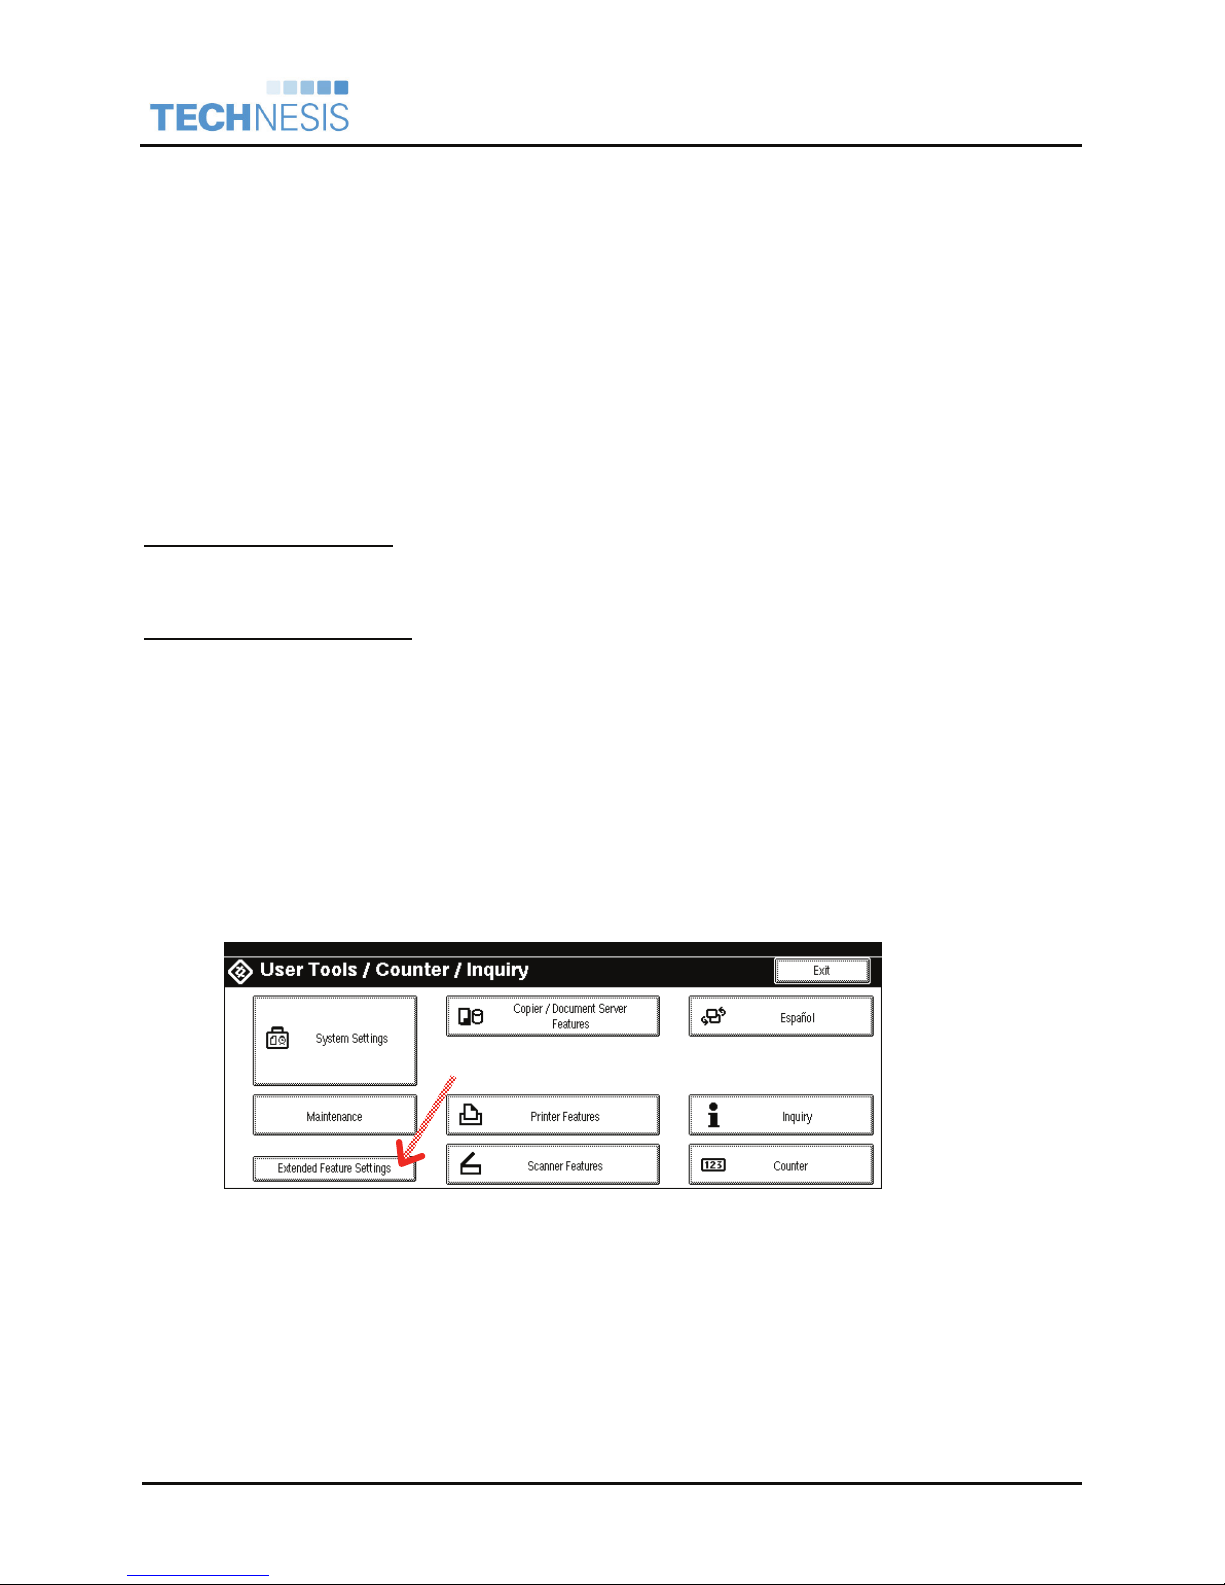
Launch User
Tools / Counter
o Select [User
Tools/Counte
r] hard key on
the device.
o Select
[Extended
Features
Settings].
Technesis®, Inc. Page 6 of 50 Technesis Ricoh Java Application
* Reference
red arrows
Page 7
®
Technesis
Integration Guide
, Inc.
Ricoh ESA
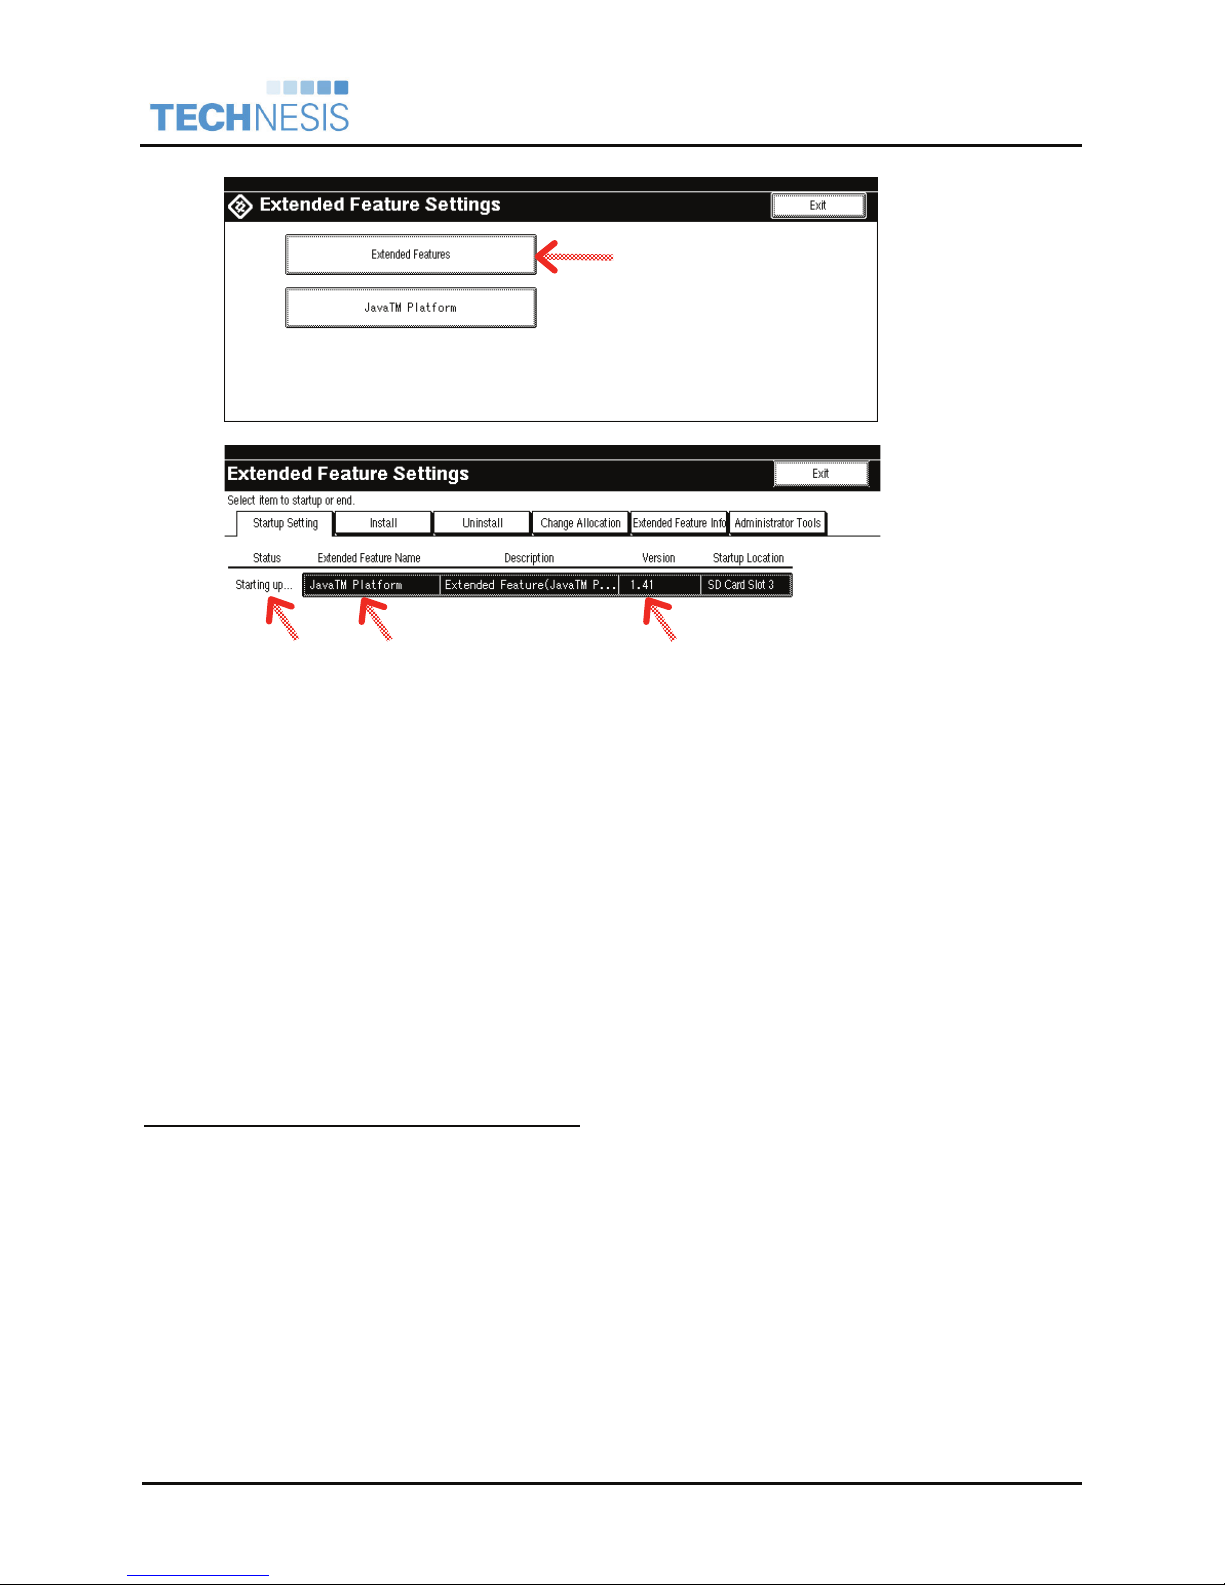
Extended
Feature Settings
o Select
[Extended
Features].
Extended
Feature Details
o Under
Extended
Feature
Name, you
should both
JavaTM
Platform and
JavaTM SVR
Platform as
loaded
features.
o The Status
for both
should be
displaying
Starting Up
o The Version
must be 1.4
or higher for
both.
If the Java platforms are not detected as an installed Extended Feature, the device is NOT
ready to install the Technesis Java Application. Please contact your Ricoh sales or service
technician.
Set Java 1.x Platform as Default Function Priority
The default function priority on the Ricoh device must be set to the Java Platform. This will ensure at
system startup the Technesis Java application launches at system startup and locks out the panel.
The following instructions can be followed to set Java as the default function priority. At this time, there is
not a way to enable this via Web Image Monitor and must be set manually at the device panel.
Technesis®, Inc. Page 7 of 50 Technesis Ricoh Java Application
Page 8
®
Technesis
Integration Guide
, Inc.
Ricoh ESA
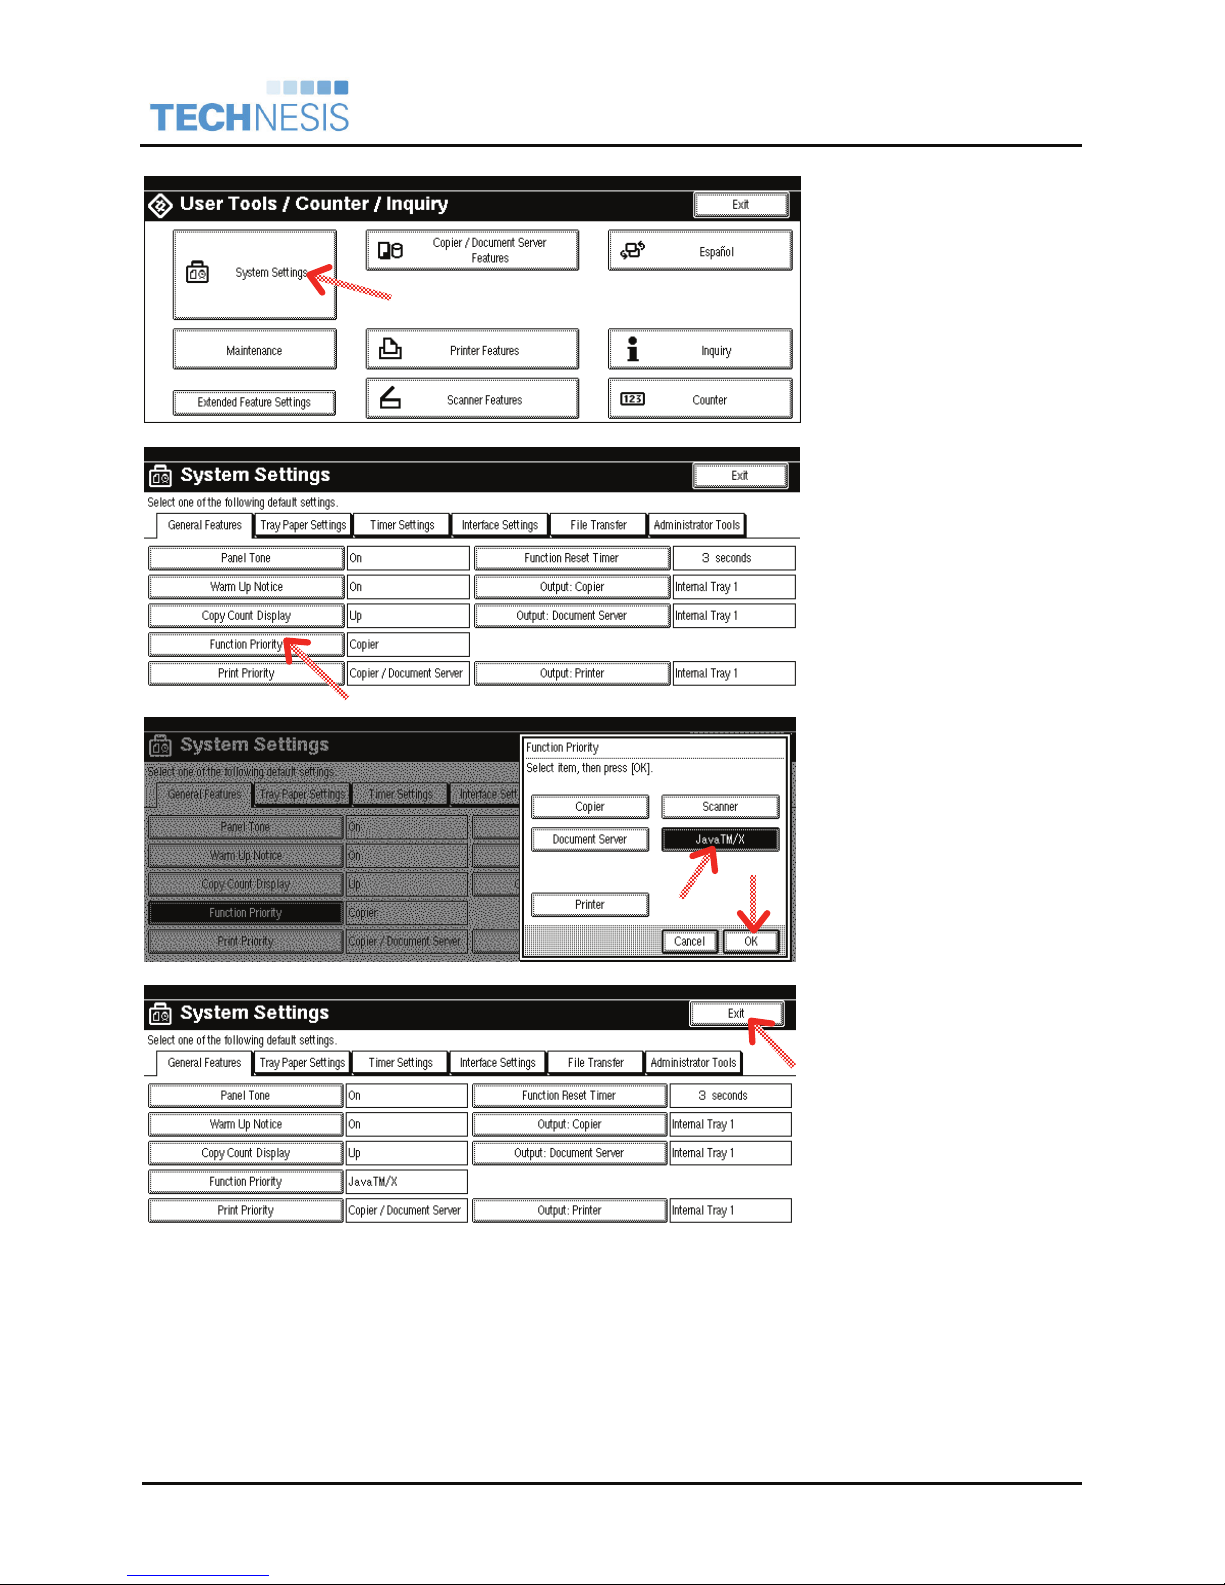
Launch User Tools / Counter
o Select [User Tools/Counter]
hard key on the device.
o Select [System Settings].
* Reference red arrows
Change Function Priority
o From the General Features
tab, select [Function
Priority].
Select Function Priority
o Select and highlight
[JavaTM/X] as the default
Function Priority.
o Select [OK] to accept
changes.
Exit System Settings
o Select [Exit] to exit System
Settings.
Technesis®, Inc. Page 8 of 50 Technesis Ricoh Java Application
Page 9
Technesis Servlet Installation Guide on Java 1.x Devices
®
Technesis
Integration Guide
, Inc.
Ricoh ESA
Technesis Servlet Installation on Java 1.x Devices
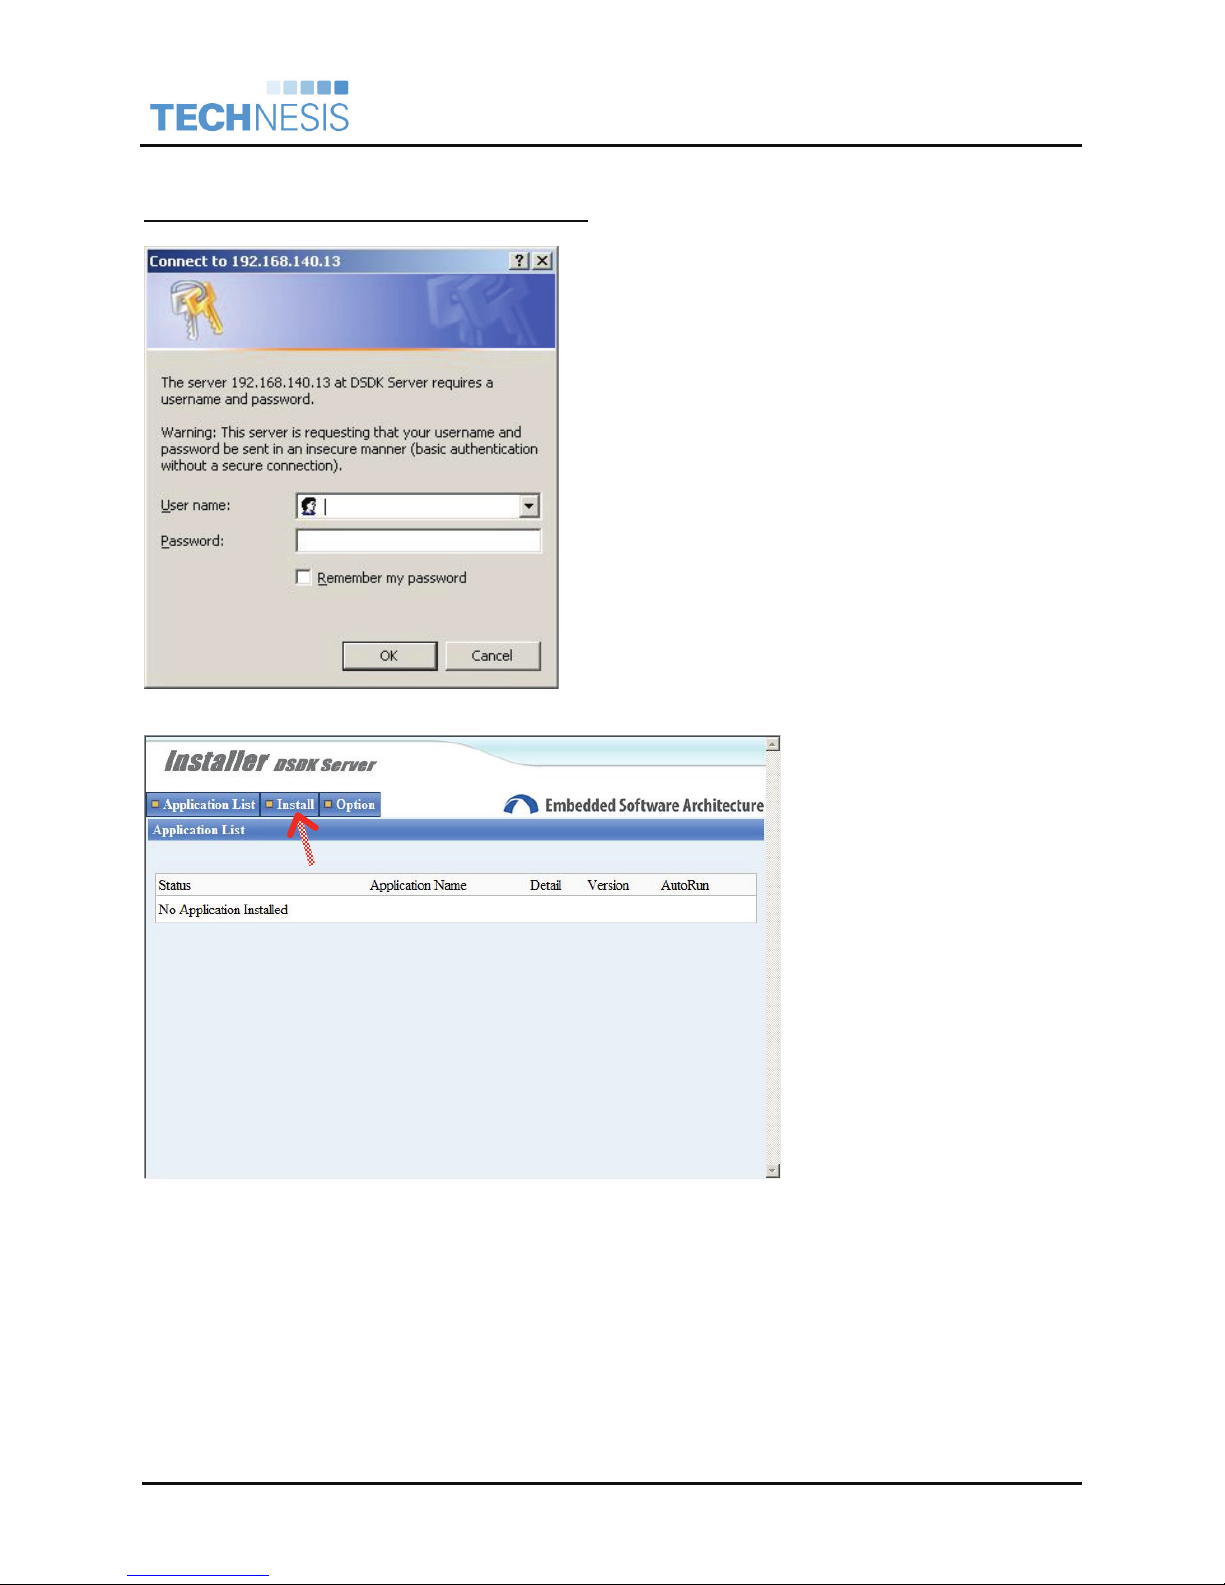
Launch Ricoh DSDK Installation Server
o Launch Ricoh ESA Installation Server from a
workstation.
o Enter the following URL:
http://<IP_Address>:8080/
Where <IP_Address> is the IP address of
your Ricoh MFP.
o Enter the appropriate credentials.
Note: The default credentials for the ESA
installer is the following:
Username: admin
Password: ricoh
Navigate to Install
o At the ESA Installer home
page, select the [Install]
tab.
* Reference red arrows
Technesis®, Inc. Page 9 of 50 Technesis Ricoh Java Application
Page 10
®
Technesis
Integration Guide
, Inc.
Ricoh ESA
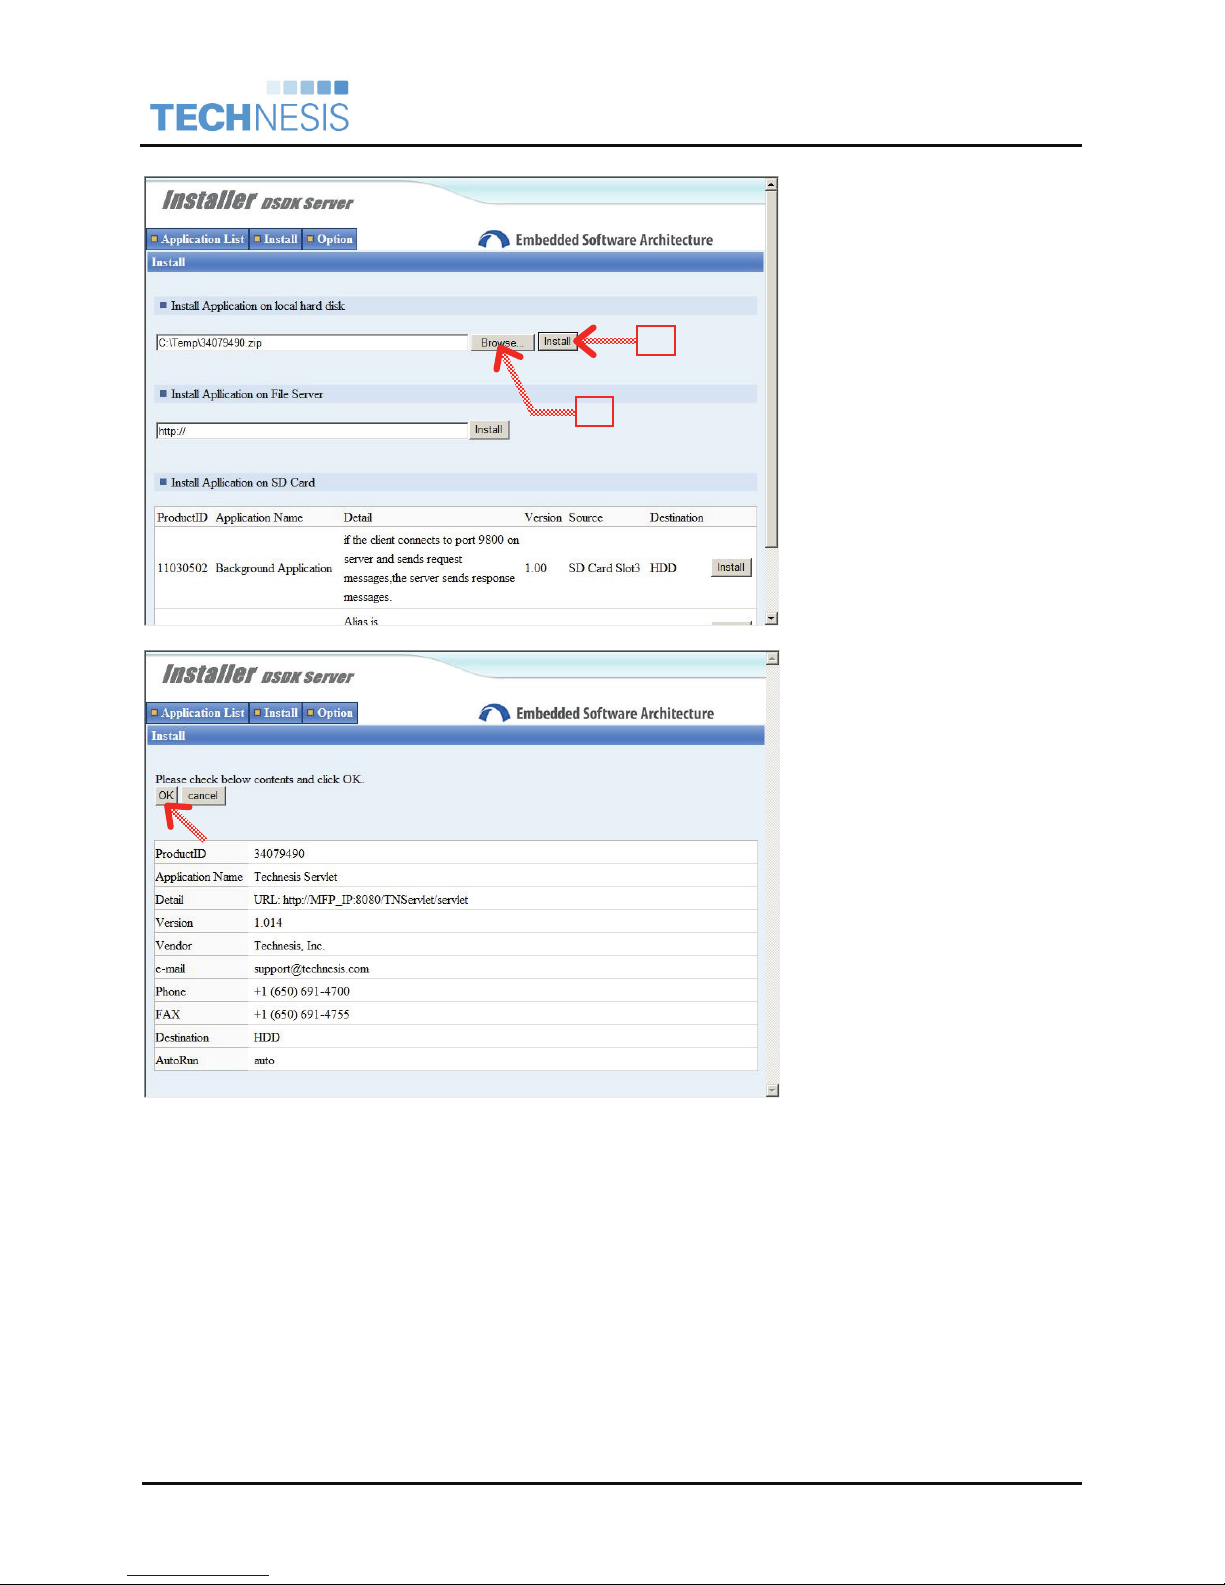
Install Technesis Servlet
o First, select [Browse…]
button and browse to the
Technesis Servlet zip file
[34079490.zip].
1
2
o Second, select [Install]
button.
Confirm Installation
o Select [OK] button to
confirm the installation of
the Technesis Servlet.
Technesis®, Inc. Page 10 of 50 Technesis Ricoh Java Application
Page 11
®
Technesis
Integration Guide
, Inc.
Ricoh ESA
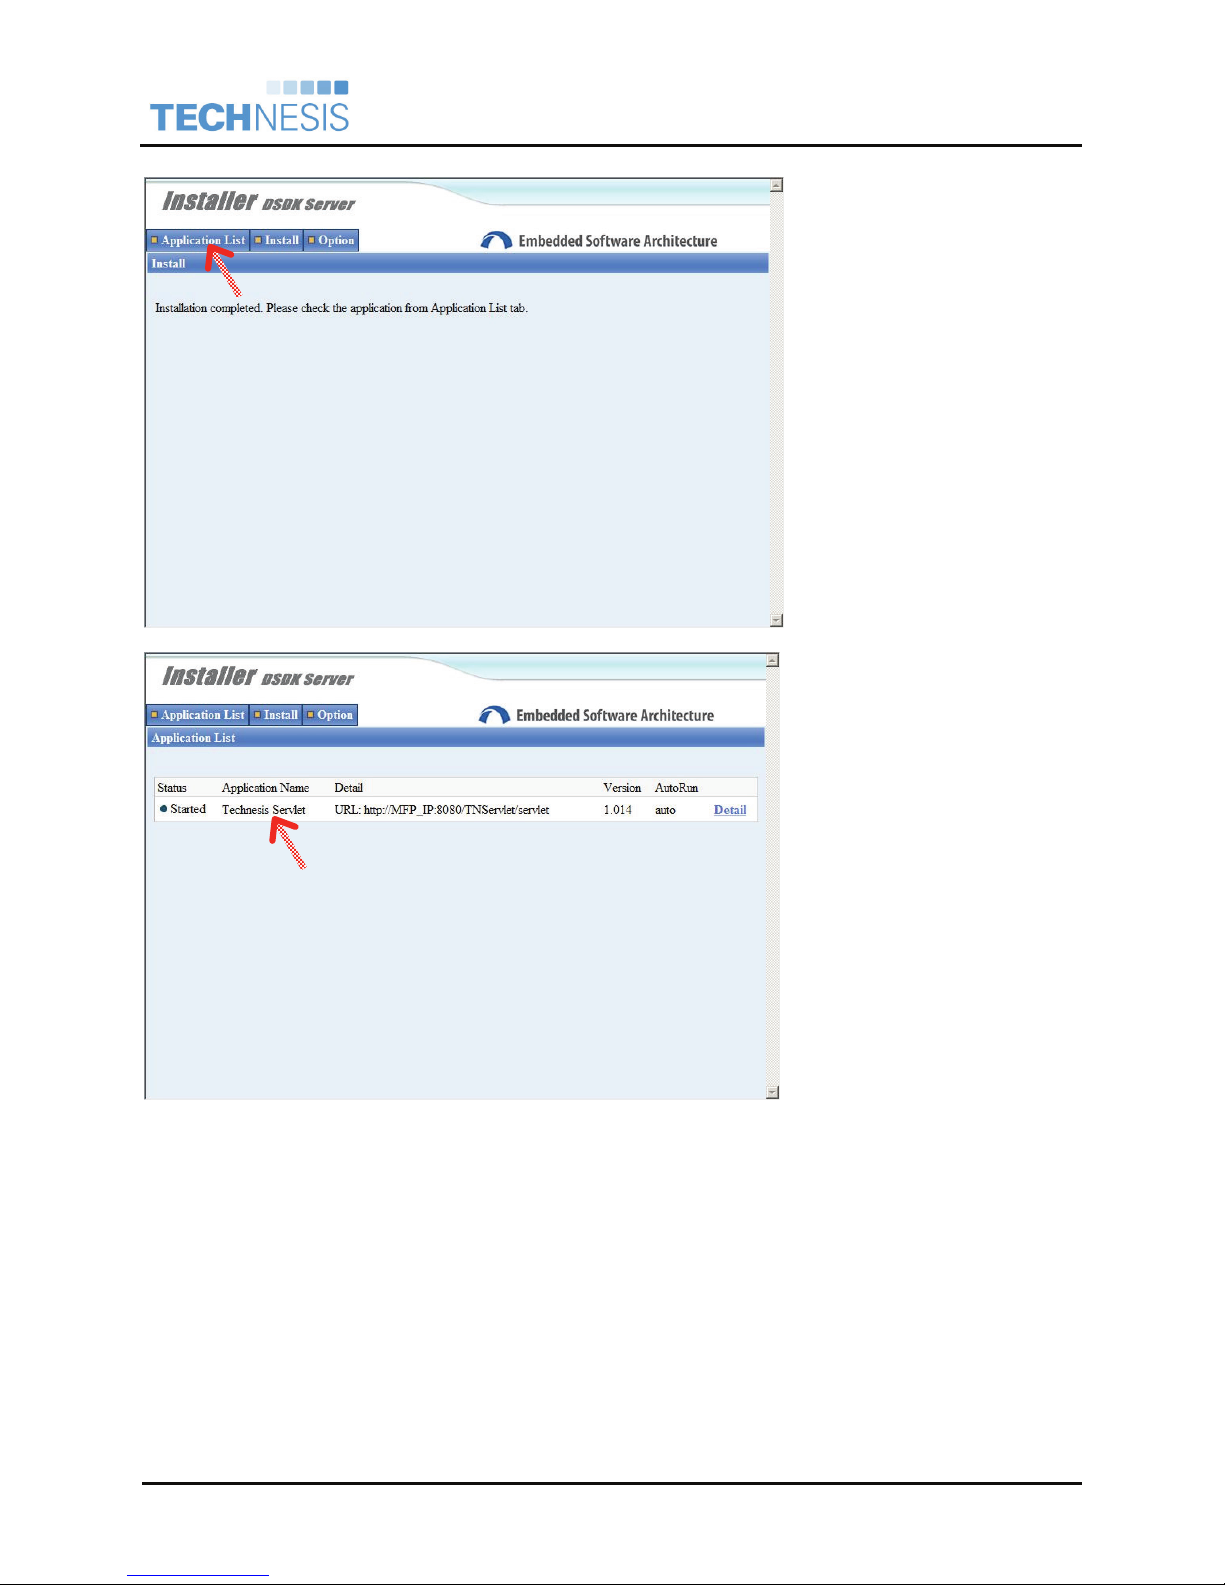
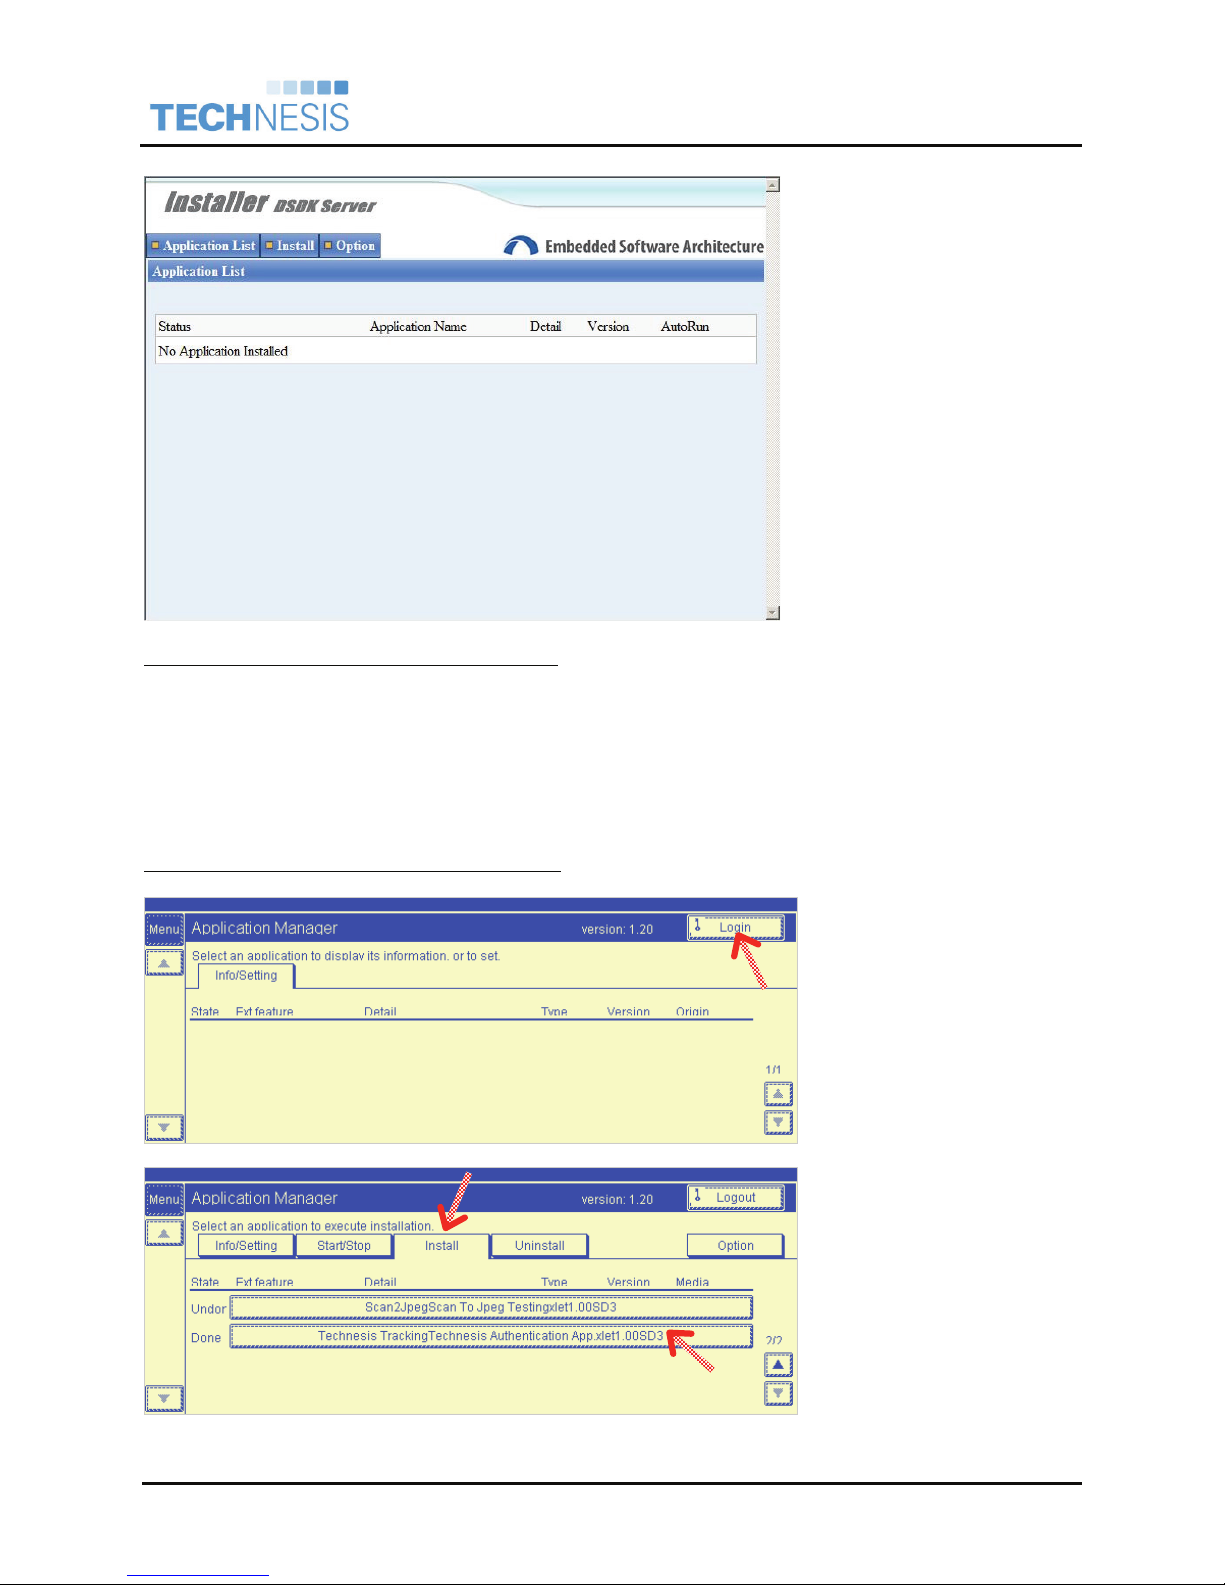
Installation Complete
The ESA installer will prompt an
Installation Complete screen.
Technesis recommends one
more step to confirm the
Technesis Servlet is installed
and running.
o Select [Application List] tab.
Verify Technesis Servlet
o Verify that [Technesis
Servlet] is listed in the
Application List.
Technesis®, Inc. Page 11 of 50 Technesis Ricoh Java Application
Page 12
Technesis Servlet Removal on Java 1.x Devices
®
Technesis
Integration Guide
, Inc.
Ricoh ESA
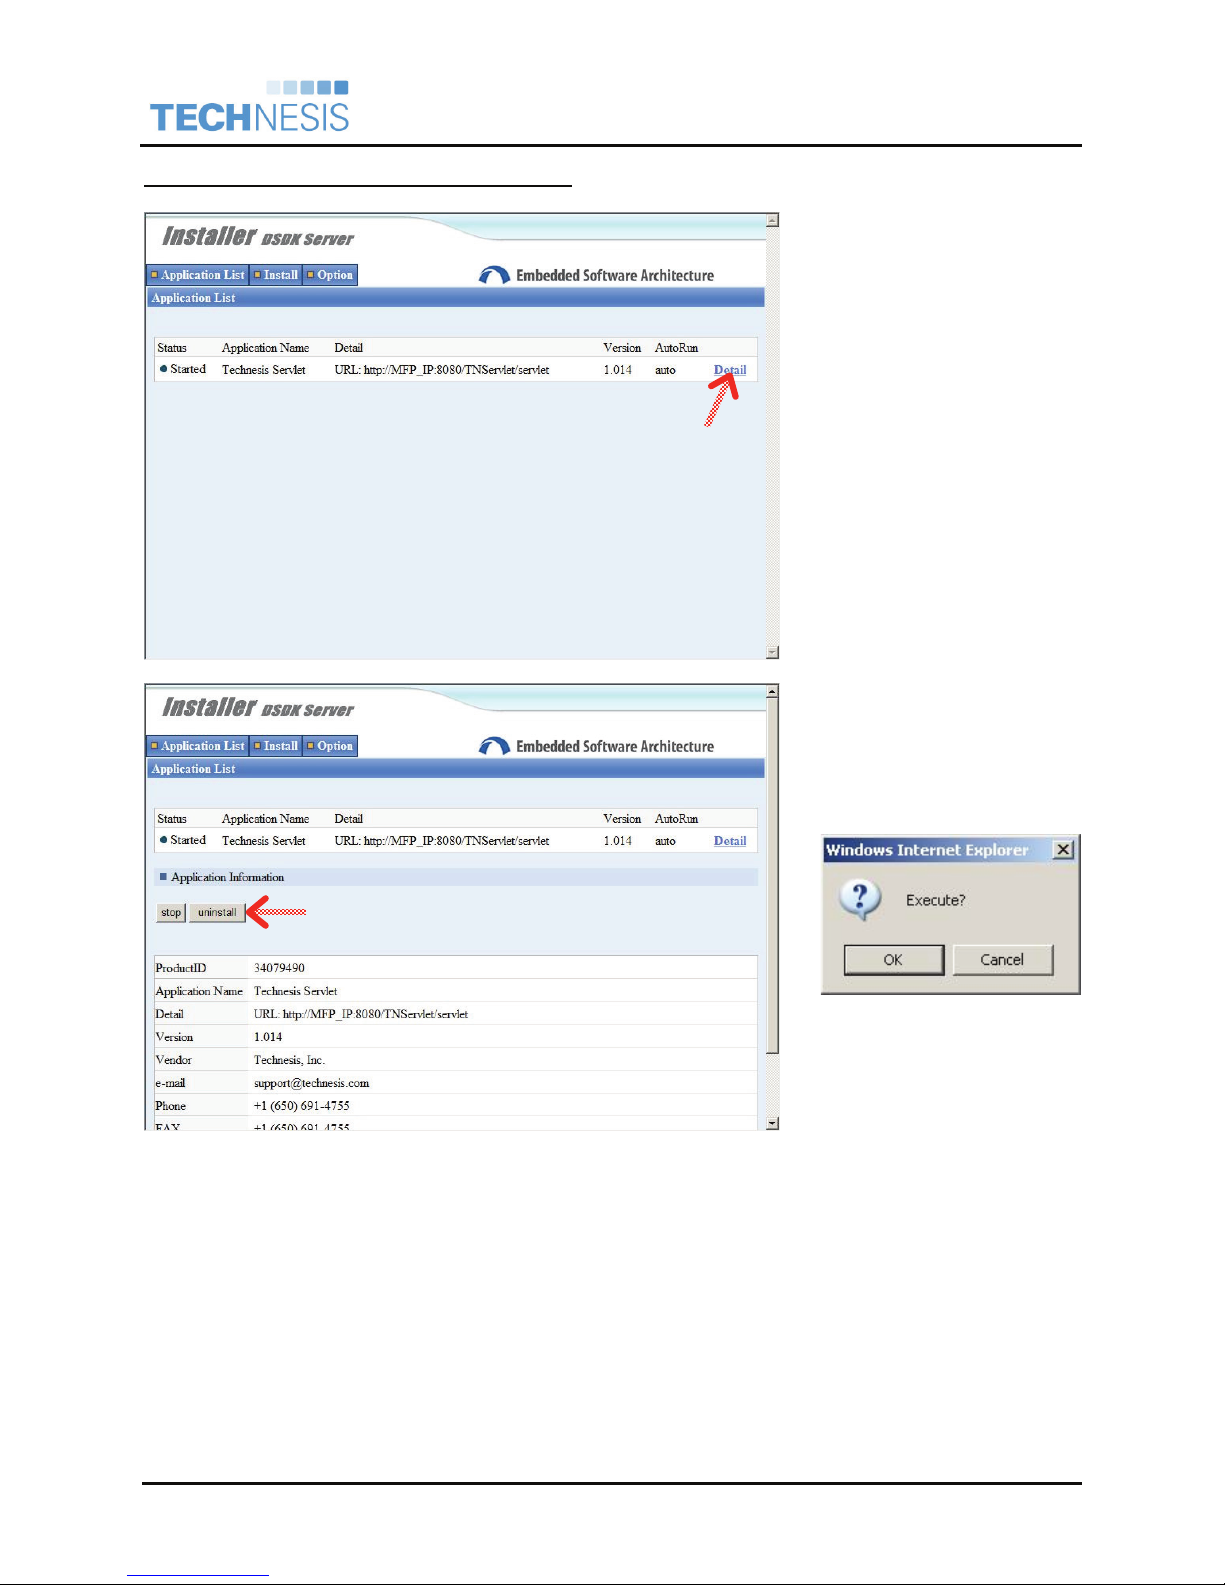
Launch ESA Installer
o Launch Ricoh ESA
Installation Server from a
workstation. Please
reference previous section
on URL and credentials.
o Select [Details] button.
* Reference red arrows
Uninstall Technesis Servlet
o Select [Uninstall] button.
o When prompted with the
following dialog, select
[OK].
Technesis®, Inc. Page 12 of 50 Technesis Ricoh Java Application
Page 13
®
Technesis
Integration Guide
, Inc.
Ricoh ESA
Verify Successful Uninstall
o Verify the Technesis
Servlet is not displayed in
the [Application List].
Technesis Servlet Update on Java 1.x Devices
1. Following the instructions above to first remove the Technesis Servlet application and reset the
device.
2. Following the instructions above to install the Technesis Servlet application.
Technesis Xlet Installation Guide on Java 1.x Devices
Technesis Xlet Installation on Java 1.x Devices
Application Manager Login
o Navigate to the Java
Application Manager.
o Select [Login] to log in as
the administrator.
* Reference red arrows
Install Technesis Xlet
o Select the [Install] tab.
Technesis®, Inc. Page 13 of 50 Technesis Ricoh Java Application
o Page down and select the
Technesis Tracking
application.
Page 14
®
Technesis
Integration Guide
, Inc.
Ricoh ESA
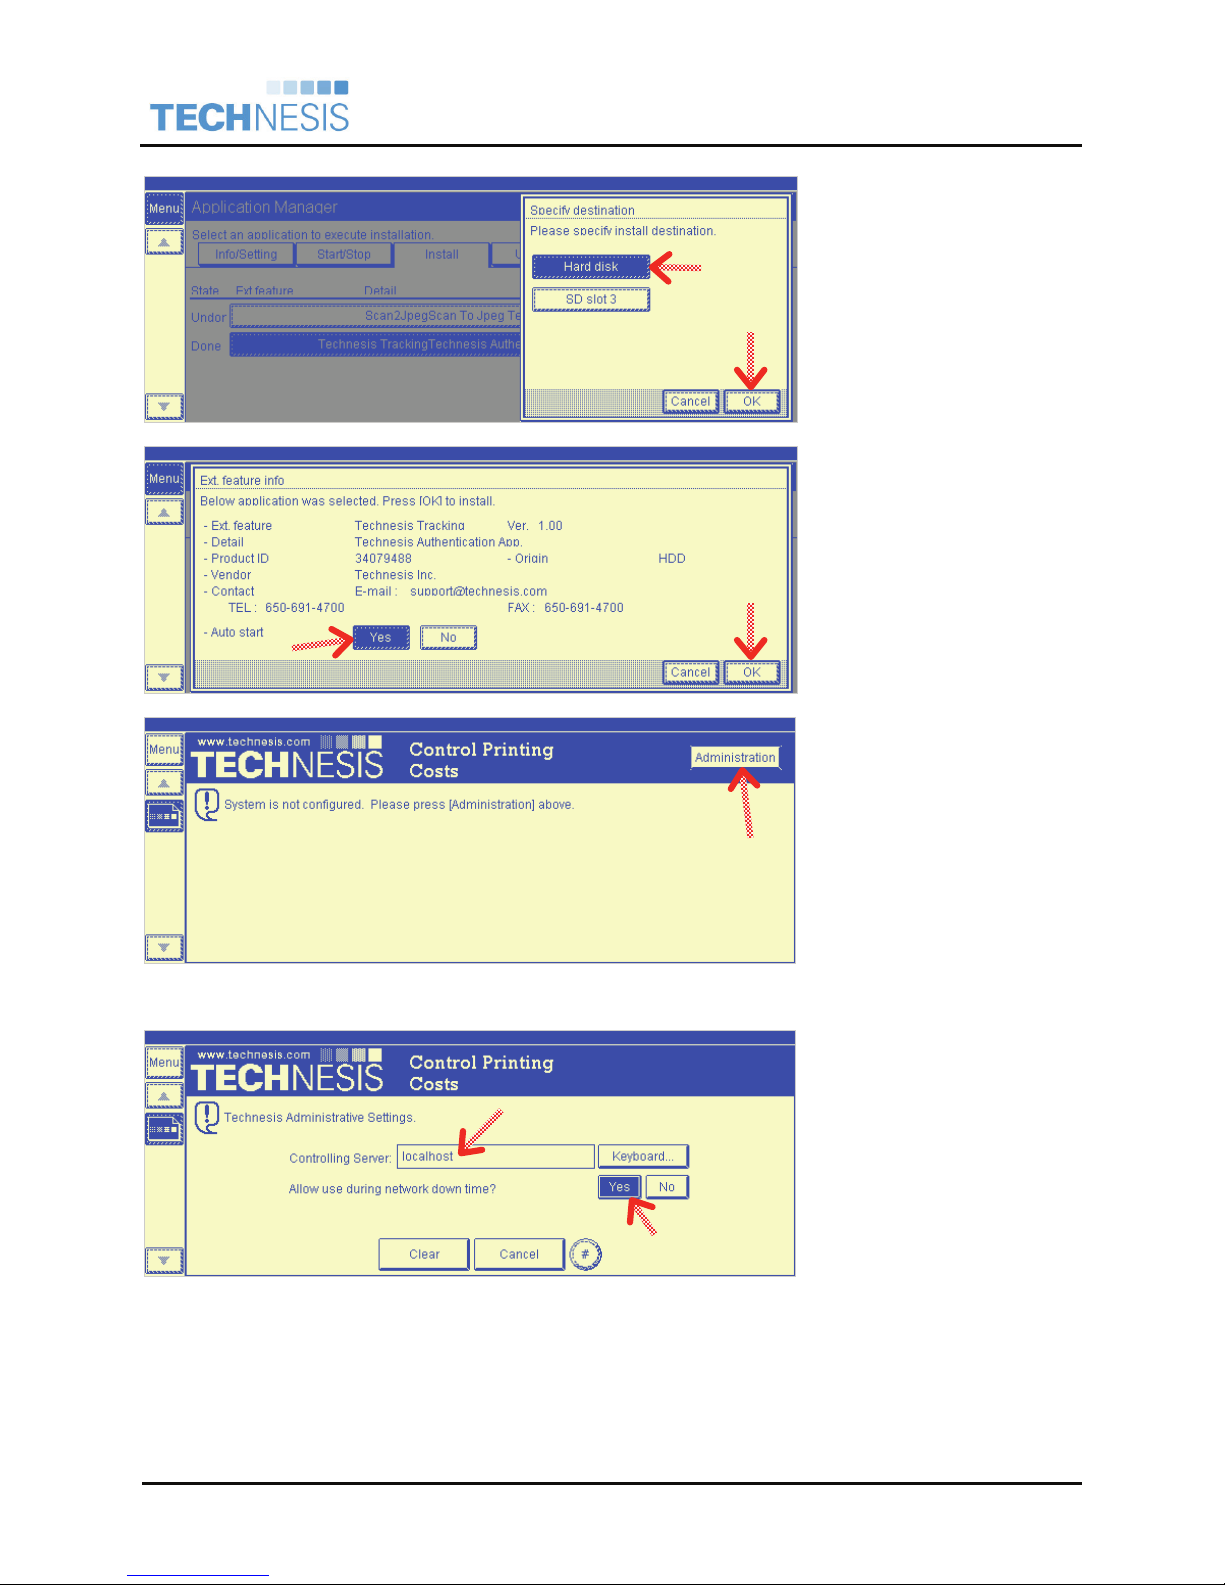
Specify Destination
o Select [Hard Disk] for the
installation destination.
o Select [OK] to accept
changes.
Auto-Start Option
o Select [Yes] for the Auto-
Start option.
o Select [OK] to accept
changes.
Note: This option will ensure
the Technesis application starts
upon boot up of the device.
Server Configuration
When the application is first
launched, you are prompted
with a message Controller
Server not configured.
• Select [Administration] to
configure the controlling
server.
Note: The default Technesis
administrative password is
8675309.
Administration Settings
• Controlling Server – Enter
the IP address or name of
the machine running the
Technesis ESA Server
application.
• Allow user during down
time? – Determines if
functions can be used
when the Technesis ESA
Server application is
unavailable.
Technesis®, Inc. Page 14 of 50 Technesis Ricoh Java Application
• Select # button to accept
changes.
Page 15

®
Technesis
Integration Guide
, Inc.
Ricoh ESA
Technesis Xlet Removal on Java 1.x Devices
Technesis recommends removing the Technesis ESA Application with assistance of an authorized Ricoh
service technician.
Application Manager Login
• Select [Menu] to access the main Application Manager screen.
• Select [Login] to log in as the administrator.
Stop Technesis Application
• Navigate to the [Start/Stop] tab.
• Select the [Technesis Tracking] application within the list.
• Select [Execute] to stop the application.
Uninstall Technesis Tracking
• Navigate to the [Uninstall] tab.
• Select the [Technesis Tracking] application from the list.
• Select [OK] to uninstall the application.
Note: Power down is required to fully uninstall the application.
Technesis Xlet Update on Java 1.x Devices
3. Following the instructions above to first remove the Technesis application and reset the device.
4. Following the instructions above to install the Technesis application.
Technesis®, Inc. Page 15 of 50 Technesis Ricoh Java Application
Page 16

Java 2.x, 4.x & 5.x Devices
o Overview of the Java 2.x, 4.x & 5.x installation process.
o General expectations when installing Java.
o Upload a zip file to the controller via Ricoh Web Image Monitor.
o BOLD note that it must be running Ricoh Java Platform 2.1 or higher.
Administrator launches the Ricoh embedded web server or Web Image Monitor.
®
Technesis
Integration Guide
, Inc.
Ricoh ESA
Via the web user interface, the Technesis java applications (Xlet and Servlet) can be installed
and updated through the Ricoh Java Platform.
The Technesis Servlet allows for HTTP access into the Ricoh Controller.
The Technesis Xlet provides the User Interface for users to enter user and/or billing
information.
Preparation of Java 2.x, 4.x & 5.x Devices
Supported Ricoh Java 2.x, 4.x & 5.x Devices
Please refer to Appendix D – Ricoh Models Reference for a complete list of the Java 2.x, 4.x & 5.x Ricoh
family devices that Technesis supports. These devices will require the Java VM Card Type C provided by
Ricoh.
Verify Ricoh Java 2.x, 4.x & 5.x Platform
The Technesis installation instructions require that the Ricoh Java SD™ card has already been installed
by an authorized Ricoh service technician. Please follow these instructions to quickly check if the Java
Runtime is installed.
Verification of the Java 2.x, 4.x & 5.x Platform can be performed remotely via a web browser.
Must be Java 2.1 or higher!
Technesis®, Inc. Page 16 of 50 Technesis Ricoh Java Application
Page 17

®
Technesis
Integration Guide
, Inc.
Ricoh ESA
Launch Web Image Monitor
o Launch Ricoh Web Image
Monitor from a workstation.
o Enter the following URL:
http://<IP_Address>
Where <IP_Address> is
the IP address of your
Ricoh MFP.
o Select [Configuration] along
the left navigation.
* Reference red arrows
Launch Extended Settings
o Select [Extended Feature
Info] under the Extended
Features Settings section.
Technesis®, Inc. Page 17 of 50 Technesis Ricoh Java Application
Page 18

®
Technesis
Integration Guide
, Inc.
Ricoh ESA
Check for JavaTM Platform
o Under Extended Feature
Name, you should see
JavaTM Platform as a
loaded feature.
o The Status should be
displaying Starting Up
o The Version must be 2.10
or higher.
If the JavaTM Platform is not
detected as an installed
Extended Feature, the device is
not ready to install the
Technesis Java Application.
Please contact your Ricoh
sales or service technician.
o Select [Back] to exit.
Set Java Platform as Default Function Priority
The default function priority on the Ricoh device must be set to the Java Platform. This will ensure at
system startup the Technesis Java application launches at system startup and locks out the panel.
The following instructions can be followed to set Java as the default function priority. At this time, there is
not a way to enable this via Web Image Monitor and must be set manually at the device panel.
Launch User Tools / Counter
o Select [User Tools] hard
key on the device.
o Select [System Settings].
* Reference red arrow
Technesis®, Inc. Page 18 of 50 Technesis Ricoh Java Application
Page 19

®
Technesis
Integration Guide
, Inc.
Ricoh ESA
Change Function Priority
o From the General Features
tab, select [Function
Priority].
Select Function Priority
o Select and highlight
[JavaTM/X] as the default
function priority.
o Select [OK] to accept
changes.
Exit System Settings
o Select [Exit] to exit System
Settings.
Technesis®, Inc. Page 19 of 50 Technesis Ricoh Java Application
Page 20

Technesis Servlet Installation Guide on Java 2.x, 4.x & 5.x Devices
®
Technesis
Integration Guide
, Inc.
Ricoh ESA
Technesis Servlet Installation on Java 2.x, 4.x & 5.x Devices
Launch Web Image Monitor
o Launch Ricoh Web Image
Monitor from a workstation.
o Enter the following URL:
http://<IP_Address>
Where <IP_Address> is
the IP address of your
Ricoh MFP.
o Select [Login] in the top
right corner.
* Reference red arrows
Administrator Login
o Enter appropriate [Login
User Name] and [Login
Password].
o Select [Login].
Technesis®, Inc. Page 20 of 50 Technesis Ricoh Java Application
Page 21

®
Technesis
Integration Guide
, Inc.
Ricoh ESA
Select Configuration
o Select [Configuration] along
the left navigation.
Launch Install Options
o Select [Install] under the
Extended Features Settings
section.
Technesis®, Inc. Page 21 of 50 Technesis Ricoh Java Application
Page 22

®
Technesis
Integration Guide
, Inc.
Ricoh ESA
Upload Technesis Java Zip File
o First, select [Local File]
radio option.
o Second, select [Browse]
button and browse to the
provided Technesis java
application zip file
2
3
1
[34079490.zip].
o Lastly, select [Display
Extended Feature List]
button.
* Reference red arrows and
numbered steps
Install Options
4
1
2
3
***Note: Pay close attention to
the following steps!
o First, select [Device HDD]
for the Install to: option.
o Second, select [On] radio
button for the Auto Start
option.
o Third, select the radio
button to select the
Technesis Servlet for
installation.
o Lastly, select the [Install]
button.
* Reference red arrows and
numbered steps
Technesis®, Inc. Page 22 of 50 Technesis Ricoh Java Application
Page 23

®
Technesis
Integration Guide
, Inc.
Ricoh ESA
Confirm Install
o Verify Technesis is the
selected Extended Feature
to install.
o Select [OK] button.
Exit Install Section
o Select [Back] button to exit
out of the Install options.
Technesis®, Inc. Page 23 of 50 Technesis Ricoh Java Application
Page 24

®
Technesis
Integration Guide
, Inc.
Ricoh ESA
Launch Startup Settings
Options
o Select [Startup Setting]
under the Extended
Features Settings section.
Startup Settings
2
1
o First, enable the radio
button to select the
Technesis Servlet for
Startup.
o Second, select [Start
Up/Stop] button.
* Reference red arrows and
numbered steps
o The Status of the
Technesis Servlet will
change to Starting Up.
Technesis®, Inc. Page 24 of 50 Technesis Ricoh Java Application
Page 25

Technesis Servlet Removal on Java 2.x, 4.x & 5.x Devices
®
Technesis
Integration Guide
, Inc.
Ricoh ESA
Launch Web Image Monitor
o Launch Ricoh Web Image
Monitor from a workstation.
o Enter the following URL:
http://<IP_Address>
Where <IP_Address> is
the IP address of your
Ricoh MFP.
o Select [Login] in the top
right corner.
* Reference red arrow
Administrator Login
o Enter appropriate [Login
User Name] and [Login
Password].
o Select [Login].
Technesis®, Inc. Page 25 of 50 Technesis Ricoh Java Application
Page 26

®
Technesis
Integration Guide
, Inc.
Ricoh ESA
Select Configuration
o Select [Configuration] along
the left navigation.
Launch Uninstall Options
o Select [Uninstall] under the
Extended Features Settings
section.
Technesis®, Inc. Page 26 of 50 Technesis Ricoh Java Application
Page 27

®
Technesis
Integration Guide
, Inc.
Ricoh ESA
Uninstall Servlet
o First, enable the radio
button to select the
Technesis Servlet for
2
1
Uninstall.
o Second, select [Uninstall]
button.
* Reference red arrows and
numbered steps.
Confirm Uninstall (#1)
o Select [OK] to confirm
Uninstall while extended
feature is starting up.
Confirm Uninstall (#2)
o Select [OK] to confirm
uninstall.
Technesis®, Inc. Page 27 of 50 Technesis Ricoh Java Application
Page 28

®
Technesis
Integration Guide
, Inc.
Ricoh ESA
Confirm Uninstall (#3)
o Verify Technesis Servlet is
not listed as an installed
Extended Feature.
o Select [Back] button.
Reset Device
The device must be reset to
fully uninstall the application.
o Select [Reset Device]
button.
Confirm Reset (#1)
o Select [OK] to confirm the
reset of the device.
Technesis®, Inc. Page 28 of 50 Technesis Ricoh Java Application
Page 29

®
Technesis
Integration Guide
, Inc.
Ricoh ESA
Confirm Reset (#2)
This screen confirms the reset
of the device. The removal of
the Technesis Servlet is
complete.
Technesis Servlet Update on Java 2.x, 4.x & 5.x Devices
1. Following the instructions above to first remove the Technesis Servlet and reset the device.
2. Following the instructions above to install the Technesis Servlet.
Technesis Xlet Installation Guide on Java 2.x, 4.x & 5.x Devices
Technesis Xlet Installation on Java 2.x, 4.x & 5.x Devices
Launch Web Image Monitor
o Launch Ricoh Web Image
Monitor from a workstation.
o Enter the following URL:
http://<IP_Address>
Where <IP_Address> is
the IP address of your
Ricoh MFP.
o Select [Login] in the top
right corner.
* Reference red arrows
Technesis®, Inc. Page 29 of 50 Technesis Ricoh Java Application
Page 30

®
Technesis
Integration Guide
, Inc.
Ricoh ESA
Administrator Login
o Enter appropriate [Login
User Name] and [Login
Password].
o Select [Login].
Select Configuration
o Select [Configuration] along
the left navigation.
Technesis®, Inc. Page 30 of 50 Technesis Ricoh Java Application
Page 31

®
Technesis
Integration Guide
, Inc.
Ricoh ESA
Launch Install Options
o Select [Install] under the
Extended Features Settings
section.
Upload Technesis Java Zip File
1
3
2
o First, select [Local File]
radio option.
o Second, select [Browse]
button and browse to the
provided Technesis java
application zip file
[34079489.zip].
o Lastly, select [Display
Extended Feature List]
button.
* Reference red arrows and
numbered steps
Technesis®, Inc. Page 31 of 50 Technesis Ricoh Java Application
Page 32

®
Technesis
Integration Guide
, Inc.
Ricoh ESA
Install Options
***Note: Pay close attention to
the following steps!
o First, select [Device HDD]
for the Install to: option.
o Second, select [On] radio
button for the Auto Start
option.
o Third, select the radio
1
2
4
3
button to select the
Technesis Xlet for
installation.
o Lastly, select the [Install]
button.
* Reference red arrows and
numbered steps
Confirm Install
o Verify Technesis is the
selected Extended Feature
to install.
o Select [OK] button.
Technesis®, Inc. Page 32 of 50 Technesis Ricoh Java Application
Page 33

®
Technesis
Integration Guide
, Inc.
Ricoh ESA
Exit Install Section
o Select [Back] button to exit
out of the Install options.
Launch Startup Settings
Options
o Select [Startup Setting]
under the Extended
Features Settings section.
Technesis®, Inc. Page 33 of 50 Technesis Ricoh Java Application
Page 34

®
Technesis
Integration Guide
, Inc.
Ricoh ESA
Startup Settings
o First, enable the radio
button to select the
2
Technesis Xlet for Startup.
o Second, select [Start
Up/Stop] button.
1
Technesis Xlet Removal on Java 2.x, 4.x & 5.x Devices
* Reference red arrows and
numbered steps
o The Status of the
Technesis Xlet will change
to Starting Up.
Launch Web Image Monitor
o Launch Ricoh Web Image
Monitor from a workstation.
o Enter the following URL:
http://<IP_Address>
Where <IP_Address> is
the IP address of your
Ricoh MFP.
o Select [Login] in the top
right corner.
Technesis®, Inc. Page 34 of 50 Technesis Ricoh Java Application
* Reference red arrow
Page 35

®
Technesis
Integration Guide
, Inc.
Ricoh ESA
Administrator Login
o Enter appropriate [Login
User Name] and [Login
Password].
o Select [Login].
Select Configuration
o Select [Configuration] along
the left navigation.
Technesis®, Inc. Page 35 of 50 Technesis Ricoh Java Application
Page 36

®
Technesis
Integration Guide
, Inc.
Ricoh ESA
Launch Uninstall Options
o Select [Uninstall] under the
Extended Features Settings
section.
Uninstall Xlet
1
2
o First, enable the radio
button to select the
Technesis Xlet for Uninstall.
o Second, select [Uninstall]
button.
* Reference red arrows and
numbered steps.
Confirm Uninstall (#1)
o Select [OK] to confirm
Uninstall while extended
feature is starting up.
Technesis®, Inc. Page 36 of 50 Technesis Ricoh Java Application
Page 37

®
Technesis
Integration Guide
, Inc.
Ricoh ESA
Confirm Uninstall (#2)
o Select [OK] to confirm
uninstall.
Confirm Uninstall (#3)
o Verify Technesis Xlet is not
listed as an installed
Extended Feature.
o Select [Back] button.
Reset Device
The device must be reset to
fully uninstall the application.
o Select [Reset Device]
button.
Technesis®, Inc. Page 37 of 50 Technesis Ricoh Java Application
Page 38

®
Technesis
Integration Guide
, Inc.
Ricoh ESA
Confirm Reset (#1)
o Select [OK] to confirm the
reset of the device.
Confirm Reset (#2)
This screen confirms the reset
of the device. The removal of
the Technesis Xlet is complete.
Technesis Xlet Update on Java 2.x, 4.x & 5.x Devices
3. Following the instructions above to first remove the Technesis Xlet and reset the device.
4. Following the instructions above to install the Technesis Xlet.
Technesis®, Inc. Page 38 of 50 Technesis Ricoh Java Application
Page 39

Technesis iBridge Installation & Configuration
Install Technesis iBridge
Install Technesis iBridge & the Ricoh ESA Vendor.
• Run WebCoreSetup.msi on the workstation running the Technesis Network Deployment.
• Run tnAuthSvc_Setup.msi on the workstation running the Technesis Network Deployment.
• Run RicohSetup.msi on the workstation running the Technesis Network Deployment.
Configure Technesis iBridge
Launch Technesis iBridge
• Technesis iBridge can be accessed
via any browser with the following
URL:
®
Technesis
Integration Guide
, Inc.
Ricoh ESA
http://server/technesis/iBridge
Where server is the name of the
workstation or server running the
Technesis iBridge software.
• Navigate to the Configurations tab
Create New Ricoh Configuration
• Highlight the New… drop-down
option and select to create a new
Ricoh Vendor.
Note: You can have multiple Configurations with different settings or have one configuration that
controls multiple Ricoh Controllers.
Technesis®, Inc. Page 39 of 50 Technesis Ricoh Java Application
Page 40

Configuration Properties
• Enter a descriptive Name for the
current configuration
Note:
The Configuration Name
is for reference only and is not
used to uniquely identify the
device in reporting.
Connections
®
Technesis
Integration Guide
, Inc.
Ricoh ESA
• Select the New Device… button to
create a connection to a Ricoh
controller
New Ricoh Device
• Enter appropriate IP Address or DNS Name
• Select Find Now
iBridge will attempt to find the Ricoh device and
prompt with information about the device. It will
always display if the device is already configured
within the iBridge system.
• Select Add Connection… to add to the
current device to the Configuration.
• Select OK to accept changes.
Connection Options
The Device is added to the list of
configured Connections for the current
Configuration. Each Connection or
device has the following Action options:
Details – Provides detailed information about the current device that is critical to the Technesis system.
Move – Enables the current Connection or Device to be moved to a different Configuration configured
on the current iBridge server.
Verify – Performs a basic verification of the current device.
Del – Deletes the Connection or Device from the system.
Technesis®, Inc. Page 40 of 50 Technesis Ricoh Java Application
Page 41

Ricoh Billing Settings
Technesis®, Inc.
Ricoh ESA
Integration Guide
User Authentication
The first option is to enable or disable
user authentication.
• Masked Pin Code Only – Leverage
pin codes (Login Codes) as defined
within Technesis Console under
Users.
• Windows Authentication – Use this
option to leverage LDAP or Active
Directory for the validation of
username & password. The
appropriate Domain and User name
formatting must be input for your
specific network conditions.
o Domain Name – Enter appropriate domain
o User Formatting – Enter appropriate user formatting.
Examples: %u@somedomain.com, somedomain/%u.
Rule: User name replaces '%u'.
Windows Authentication Note: The computer running Technesis iBridge must be joined to the
domain or sub-domain to be used for authentication.
Other Billing Fields
• Project - When enabled, displays Project information on the Xlet user interface.
• Phase – When enabled, displays Phase information on the Xlet user interface.
• Bill Type – When enabled, displays Bill Type information on the Xlet user interface.
General Field Options
Sorting – Select between Descending (Z-A) and Ascending (A-Z).
Display – Select between displaying Number + Name and Name + Number.
General Settings
Session Time Out (Minutes) - The timeout will end the Technesis ESA application after inactivity.
Pages for Auto Search List – The Xlet display at the Ricoh panel will automatically display a paging list
of available items.
Columns for Search List – This option configures the number of columns to display with paging list on
the Xlet. Values of 1,2 or 3 columns are supported.
Technesis®, Inc. Page 41 of 50 Technesis Ricoh Java Application
Page 42

®
Technesis
Integration Guide
, Inc.
Ricoh ESA
Scan Settings
Download Scan Information – Option to enable or disable the downloading of scan transactions.
History in days to check for non-processed scan jobs – This option specifies the history in number of
days to check for non-processed scans to bring into the system.
Time Zone of Device(s): - Specific the current time zone of the device, which is critical for the accurate
tracking of scanning on the configured devices. If using with devices in various time zones, a unique
Configuration must be created for the devices in each unique time zone.
Media Associations
When Technesis extracts information
from the Ricoh device, iBridge will
attempt to map a Technesis media
name to the appropriate to different
Ricoh functions. This is only required
if using Media as a billing option
within Technesis Console.
Technesis recommends creating media
types within Technesis Console that can
be used to map to Ricoh Function
Types. The following are example
media types you could create for the
association.
Ricoh Function
Technesis Media
Copy Walk-up Copy
Scan Scan-to-File
Scheduling
Automated scheduling is only used to extract scan log information from the configured connections or
Ricoh devices. All other activity (copy, facsimile and document server prints) are extracted with real-time
communication to the device via SNMP/MIBs.
Manually Running Configuration
• Navigate to the Configurations tab
• Within Actions Column, select to
Run the appropriate Ricoh
Configuration
• Select Import all Items.
• Select Run when done.
Note:
This action will download
all Scan activity from the
configured connections.
Technesis®, Inc. Page 42 of 50 Technesis Ricoh Java Application
Page 43

®
Technesis
Integration Guide
, Inc.
Ricoh ESA
Automated Running with Scheduling
• Navigate to the Configurations tab.
• Under Schedule column, select
Manual Launch to load the
scheduling options.
Task Trigger Options
• Schedule Task - There are (5)
scheduling options; Manual,
Repeat Intervals, Daily, Weekly,
and Monthly.
• Hidden in Scheduled Tasks - This
will option will flag the Scheduled
Task to be hidden to Windows
users.
Technesis®, Inc. Page 43 of 50 Technesis Ricoh Java Application
Page 44

Technesis
Ricoh ESA
Integration Guide
Using the Technesis ESA Application
The following section describes the interaction for typical end-users and includes some helpful tips.
Virtual Keyboard
By selecting [Keyboard…] users can be prompted with a virtual
keyboard on the touch panel. This is helpful when entering in
alphanumeric characters.
In most cases the end-user can also use the Number Keys on the
panel. This method of entering numbers is typically much faster
and easier for the typical user. The [#] Number Key can be used
as an [Enter] in many scenarios within the Technesis application.
®
, Inc.
User Login Options
An end-user will be prompted with one of the following login methods. This is configured within the
Technesis ESA Server application, as described in Step 1 of this Quick Start Guide.
Billing Options
An the administrator has setup the system to
Technesis®, Inc. Page 44 of 50 Technesis Ricoh Java Application
Page 45

®
Technesis
Integration Guide
, Inc.
Ricoh ESA
Device Enabled
Project Selection
If configured in the Technesis
ESA Server application, enduser will be prompted to select
a Project (Client or Account).
List Selection
Full searches and partial
searches are available. Enduser can page through the
selection list by using VCR-
Style controls along the right
side of the screen.
After supplying the appropriate information, the device is ready to perform the appropriate function. The
end-user must then select the appropriate [Function Key] as illustrated below.
To end the current tracking session, the end-user must select [Logout] or [#] on the keypad.
Transaction Creation
The copy, scan & fax activity or transactions are generated by the machine running the Technesis ESA
Server application. This information can be displayed within Technesis Console through the Activity
section or by running reports.
Technesis®, Inc. Page 45 of 50 Technesis Ricoh Java Application
Page 46

Technesis
Integration Guide
®
Ricoh ESA
Appendix
Appendix A – Technesis & Ricoh Timeouts
There are timers in both the Technesis system and Ricoh system that must be configured for your
environment. If users walk away from the device without manually logging out of the Technesis system,
the timers will automatically log them out of the system.
• Select the [User Tools/Counter] key on the main panel
• Select [System Settings]
• Select [Timer Settings] tab
Change the following timers to the appropriate values in your environment:
o Copier/Document Server Auto Reset Timer
o Printer Auto Reset Timer
o Scanner Auto Reset Timer
Appendix B – Ricoh Service Mode
Since the Technesis ESA application overtakes every function on the device, Technesis created a
backdoor password designed specifically for Ricoh Service personnel. This enables access to User
Tools, Counters, etc. without having to supply a valid user login.
, Inc.
To Login as Ricoh Service, select
[Administration] button on the login
page and type the password 5150.
Note: All copy and fax activity are
logged with the username Ricoh
Service.
Appendix C – SP 5162 (App. Switch Method)
When the Ricoh Java Platform is assigned to a specific function key on the device, the default behavior is
for the device to prompt the user whether they would like enter the function selected or the JavaTM
Platform. This default behavior is sometimes not desirable by those using the Technesis system. The
App. Switch Method (5162) setting within Ricoh service mode can be changed to not prompt the user for
this selection.
• Login at the panel into Ricoh service mode. A Ricoh Service Technician must change this setting.
• Select [COPY SP]
• Select [SP-5xxx]
• Navigate to [5162]. You will probably need to select [Page Down] to find the option.
• Select [1: Hard Key Select]
• Select [OK] then [EXIT] then [EXIT]
Note: You must select [OK] to save the setting.
Technesis®, Inc. Page 46 of 50 Technesis Ricoh Java Application
Page 47

®
Technesis
Integration Guide
, Inc.
Ricoh ESA
Appendix D – Ricoh Models Reference
Following is the reference matrix of Ricoh models and Java version. At the time of release of this Quick
Start Guide, the reference is created using November 2009 equipment data provided to Technesis. For
updates on compatibility, please refer to your Ricoh reseller.
MFPs using Java Type B Card (Java 1.x based machines)
Ricoh Lanier Savin Gestetner
2051 LD151 4051 DSm651
2060 LD160 4060 DSm660
2075 LD175 4075 DSm675
3224C LD124c C2410 DSc424
3260C LD160c C6045 DSc460
Color 5560 LC155 SDC555 CSS55
3228C LD328c C2824 DSc428
3235C LD335c C3528 DSc435
3245C LD345c C4535 DSc445
3035 LD235 8035 DSm735
3045 LD245 8045 DSm745
3025 LD225 8025 DSm725
3030 LD230 8030 DSm730
MP 2510 LD325 8025e DSm725e
MP 3010 LD330 8030e DSm730e
MP 3500 LD335 8035e DSm735e
MP 4500 LD345 8045e DSm745e
MFPs using Java Type C Card (Java 2.x based machines)
Ricoh Lanier Savin Gestetner
MP C2500 LD425C C2525 DSc525
MP C3000 LD430C C3030 DSc530
MP C3500 LD435C C3535 DSc535
MP C4500 LD445C C4540 DSc545
MP 5500 LD255 8055 DSm755
MP 6500 LD265 8065 DSm765
MP 7500 LD275 8075 DSm775
MP 9000 LD190 8090 DSm790
MP 1100 LD1110 8110 DSm7110
MP 1350 LD1135 8135 DSm7135
MFPs using Java Type F Card (Java 4.0x based machines)
Ricoh Lanier Savin Gestetner
MP 2550 LD425 9025 MP 2550
MP 3350 LD433 9033 MP 3350
MP 4000 LD040 9040 MP 4000
MP 5000 LD050 9050 MP 5000
MP C6000 LD260C C6055 MP C6000
MP C7500 LD275C C7570 MP C7500
Technesis®, Inc. Page 47 of 50 Technesis Ricoh Java Application
Page 48

MFPs using Java Type I Card (Java 4.1x based machines)
®
Technesis
Integration Guide
, Inc.
Ricoh ESA
Ricoh Lanier Savin Gestetner
*
MP C2050
MP C2550
LD520C* C9020* MP C2050*
*
LD525C* C9025* MP C2550*
MP C2800 LD528C C2828 MP C2800
MP C3300 LD533C C3333 MP C3300
MP C4000 LD540C C4040 MP C4000
MP C5000 LD550C C5050 MP C5000
* - Requires 512MB memory upgrade to run solutions
MFPs using Java Type J Card (Java 5.0x based machines)
Ricoh Lanier Savin Gestetner
MP 6001 SP LD360sp 9060sp MP 6001 SP
MP 7001 SP LD370sp 9070sp MP 7001 SP
MP 8001 SP LD380sp 9080sp MP 8001 SP
MP 9001 SP LD390sp 9090sp MP 9001 SP
Pro 907EX Pro 907EX Pro 907EX Pro 907EX
Pro 1107EX Pro 1107EX Pro 1107EX Pro 1107EX
Pro 1357EX Pro 1357EX Pro 1357EX Pro 1357EX
Appendix E – Fiery controller configuration
A number of Ricoh MFPs are configured with a Fiery print controller.
Technesis®, Inc. Page 48 of 50 Technesis Ricoh Java Application
Page 49

®
Technesis
Integration Guide
, Inc.
Ricoh ESA
Appendix F – Technesis, Inc. Software License Agreement
Copyright © 2009 Technesis, Inc., All Rights Reserved.
1. Agreement. This Software License Agreement ("Agreement") is a legal agreement between you (the
undersigned end user licensee) and Technesis INC, a California limited liability company
("Technesis"). By clicking the "I Agree" button, by using Technesis, and/or by signing and returning
this Agreement to Technesis, as applicable, you agree to be bound by the terms and conditions of
this Agreement. As used herein, "Software" means Technesis Software and related modules that you
obtain from time to time.
o This license is available only to persons who intend to use Technesis as an end user and for
such person's own internal business purposes. If you enter into this Agreement on behalf of
your employer, you hereby represent and warrant to Technesis that you have the authority to
bind your employer and any reference to "you" herein will also include your employer.
2. Evaluation License. Technesis grants to you a personal, non-transferable, non-exclusive license,
without right to sublicense, to use the evaluation copy of Technesis in machine-readable form only
and only for purposes of evaluating the use of Technesis in your, or your employer's, internal
business. Upon proper payment to Technesis, Technesis will send you a key. Without the key,
Technesis will stop working in 30 days, at the end of the evaluation period. The evaluation license is
granted for one user only and only for use on the specific machine designated by you to Technesis.
3. Security Code. You understand that only Technesis can provide security codes to you for the
Software and that the security codes are dependent upon and limited to the licensed configurations
from time to time. You further understand that Technesis has no obligation to provide any security
code for the Software to you, unless (i) Technesis has received this Software License Agreement
completed and signed by you, (ii) Technesis has been paid for the Software, and (iii) the Software
can be provided to you without violating applicable US export laws and regulations or any other laws
or regulations.
4. Regular License. Upon your payment of the license fee for the Software, Technesis hereby grants to
you (the undersigned) a personal, non-transferable, non-exclusive, perpetual license (except as set
forth in Section 9 hereof), without right to sublicense, to use the Software in machine-readable form
only and only in your internal business and for your own business purposes. You can order additional
user and network licenses for the Software from time to time, which licenses will also be governed by
the terms and conditions of this Agreement. The license fees for the Software do not include sales tax
or other applicable taxes, duties or governmental charges (which may be separately set forth on the
applicable invoice), all of which shall be paid by you.
5. Limitations. You may NOT copy, reproduce, modify, rent, lease, distribute, sell or transfer any
Software. You may not assign this license without the prior written consent of Technesis. You agree
not to make any Software available to any person except only to those of your employees whose job
performance requires access to such Software for the permitted purpose. Except for the limited use
license granted herein, all ownership of and rights in and to the Software, and all copies thereof,
including without limitation all copyright, patent rights, trade secret rights, trademark rights and other
intellectual property rights in and to the Software, are owned and retained by Technesis. You
understand that the Software is copyrighted and protected by US copyright law and international
treaties. You agree not to remove or alter any copyright or other proprietary rights notices of
Technesis in or on the Software.
o You agree not to reverse-assemble, reverse-compile, or otherwise reverse-engineer The
Software, in whole or in part, or permit others to do so, except only to the extent required by
applicable law.
6. No Warranties. THE SOFTWARE IS PROVIDED "AS IS" AND WITHOUT WARRANTIES OF ANY
KIND. TECHNESIS SPECIFICALLY EXCLUDES AND DISCLAIMS ANY IMPLIED WARRANTY OF
SATISFACTORY QUALITY, MERCHANTABILITY, FITNESS FOR A PARTICULAR PURPOSE AND
ABSENCE OF HIDDEN DEFECTS, ANY WARRANTY OF NON-INFRINGEMENT, AND ANY
WARRANTY THAT MAY ARISE BY REASON OF USAGE OF TRADE, CUSTOM OR COURSE OF
Technesis®, Inc. Page 49 of 50 Technesis Ricoh Java Application
Page 50

®
Technesis
Integration Guide
, Inc.
Ricoh ESA
DEALING.
7. No Liability. IN NO EVENT SHALL TECHNESIS OR ANY OF ITS DISTRIBUTORS BE LIABLE FOR
ANY CLAIMS AGAINST YOU BY ANY THIRD PARTY RELATING TO ANY SOFTWARE OR YOUR
USE OF ANY SOFTWARE, INCLUDING, WITHOUT LIMITATION, ANY CLAIM OF INFRINGEMENT
OF ANY INTELLECTUAL PROPERTY RIGHTS.
IN NO EVENT SHALL TECHNESIS OR ANY OF ITS DISTRIBUTORS BE LIABLE FOR ANY
INDIRECT, SPECIAL, INCIDENTAL, OR CONSEQUENTIAL DAMAGES OF ANY KIND OR
NATURE WHATSOEVER, INCLUDING, WITHOUT LIMITATION, LOSS OF PROFITS, LOSS OF
BUSINESS, BUSINESS INTERRUPTION, LOSS OF INFORMATION, OR LOSS OF OTHER
SOFTWARE, WHETHER BASED ON BREACH OF CONTRACT, BREACH OF WARRANTY,
TORT (INCLUDING NEGLIGENCE), PRODUCT LIABILITY, OR OTHERWISE, EVEN IF
TECHNESIS HAS BEEN ADVISED OF THE POSSIBILITY OF SUCH DAMAGES OR IF SUCH
DAMAGES COULD HAVE BEEN REASONABLY FORESEEN. IN ADDITION, IN NO EVENT
SHALL TECHNESIS OR ANY OF ITS DISTRIBUTORS BE LIABLE FOR THE COST OF
PROCUREMENT OF SUBSTITUTE GOODS OR SERVICES.
8. Support. Support for the Software is available from Technesis or its distributors under a separate
maintenance and support agreement upon payment of applicable annual maintenance and support
fees.
9. Government Licensee. If you are a government entity, then pursuant to the policy stated at 48 CFR
227.7202-1, as a U.S. Government user, you acknowledge that (i) the Software is commercial
computer software, (ii) this Agreement embodies the licenses customarily used by Technesis for
licenses in Software granted to the public, and (iii) the licenses set forth herein shall apply to all
possession, use and duplication of the Software by the Government (including you), except to the
extent which such licenses are inconsistent with Federal procurement law. Contractor/ manufacturer
is TECHNESIS INC, 1400 Terra Bella Ave., Suite C, Mountain View, CA 94043 USA.
10. Termination. Technesis may terminate this Agreement immediately upon written notice to you if (i)
you breach any material term of this Agreement and fail to cure such breach within thirty (30) days
following written notice to you, (ii) you violate any intellectual property right of Technesis in any
Software. Upon termination of this Agreement, for whatever reason, you will immediately return to
Technesis, or at Technesis' request destroy, all copies of the Software in you possession or under
you control, and you (if you are an entity, signed by one of your officers) shall certify to Technesis in
writing that you have done so.
11. Applicable Law. This Agreement shall be deemed entered into in the State of California, USA, and
the laws of the State of California, USA, excluding conflict of law rules and principles, shall exclusively
govern this Agreement, its interpretation and enforcement and the relations between the parties. The
application of the United Nations Convention on Contracts for the International Sale of Goods is
expressly excluded.
12. Miscellaneous. If any provision hereof is held invalid or unenforceable it shall be reformed only to the
extent necessary to make it enforceable. This Agreement sets forth the entire agreement between the
parties relating to the subject matter hereof and may be amended only by a writing executed by both
parties. The terms of this Agreement will govern and supersede all pre-printed terms and conditions
of purchase order or other business forms of either party.
13. Verification. You understand that Technesis may verify the information provided by you and may
contact you. Technesis has no obligation to provide any security code for the Software to you, unless,
among other things, Technesis is satisfied, in its discretion, that you are a bona fide end user
customer, and that the information provided by you to Technesis is accurate.
Technesis®, Inc. Page 50 of 50 Technesis Ricoh Java Application
 Loading...