

Page 1
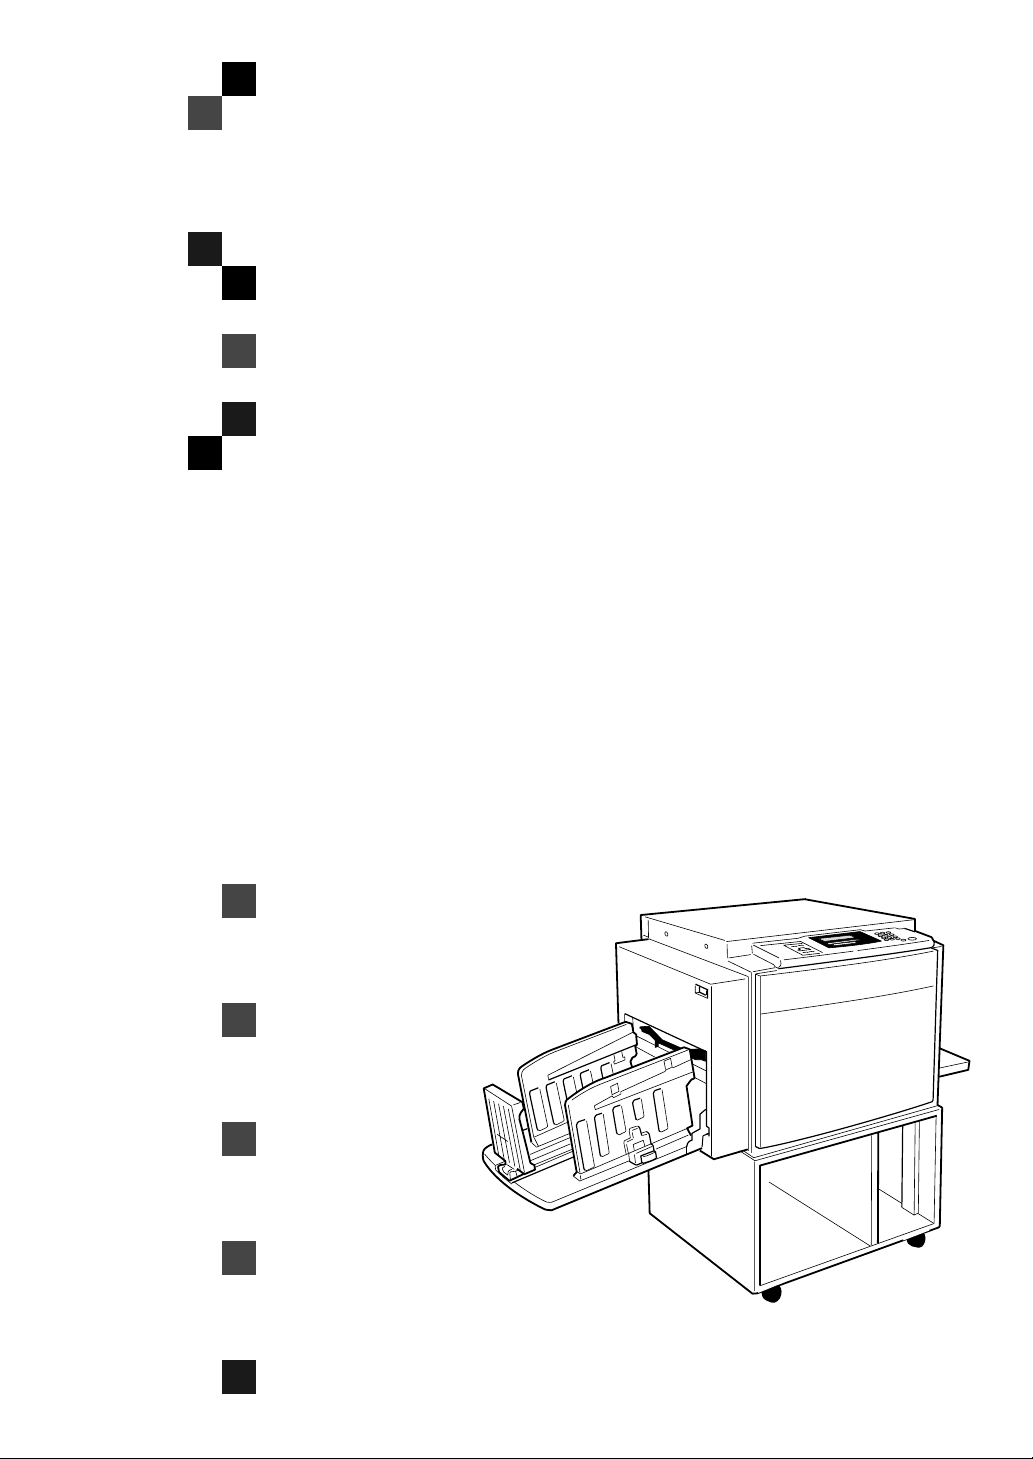
TC-II
Operating Instructions
Zbrh021e.eps
Read this manual carefully before you use this product and keep it handy for future
reference.
For safety, please follow the instructions in this manual.
Page 2

TC-II Operating Instructions
Printed in Japan
UE USA C593-8602
Page 3

Introduction
This manual contains detailed instructions on the operation and maintenance of this machine. To get
maximum versatility from this machine all operators should carefully read and follow the instructions in
this manual. Please keep this manual in a handy place near the machine.
Please read the Safety Information before using this machine. It contains important information related
to USER SAFETY and PREVENTING EQUIPMENT PROBLEMS.
Notes:
Some illustrations might be slightly different from your machine.
Certain options might not be available in some countries. For details, please contact your local dealer.
Two kinds of size notation are employed in this manual. With this machine refer to the inch version.
Power Source
120V, 60Hz, 5.5 A or more
Please be sure to connect the power cord to a power source as above. For details about power source,
⇒ P.45 “Power Connection”.
Page 4

Note to users in the United States of America
Notice:
This equipment has been tested and found to comply with the limits for a Class B digital device, pursuant to Part 15 of the FCC Rules. These limits are designed to provide reasonable protection against
harmful interference in a residential installation. This equipment generates, uses and can radiate radio
frequency energy and, if not installed and used in accordance with the instructions, may cause harmful
interference to radio communications. However, there is no guarantee that interference will not occur
in a particular installation. If this equipment does cause harmful interference to radio or television reception, which can be determined by turning the equipment off and on, the user is encouraged to try to
correct the interference by one more of the following measures:
Reorient or relocate the receiving antenna.
Increase the separation between the equipment and receiver.
Connect the equipment into an outlet on a circuit different from that to which the receiver is
connected.
Consult the dealer or an experienced radio /TV technician for help.
Warning
Changes or modifications not expressly approved by the party responsible for compliance could void
the user's authority to operate the equipment.
Note to users in Canada
Note:
This Class B digital apparatus complies with Canadian ICES-003.
Remarque concernant les utilisateurs au Canada
Avertissement:
Cet appareil numérique de la classe B est conforme à la norme NMB-003 du Canada.
In accordance with IEC 60417, this machine uses the following symbols for the main switch:
aaaa means POWER ON.
bbbb means POWER OFF.
Page 5

Safety Information
R
R
When using your equipment, the following safety precautions should always be
followed.
Safety During Operation
In this manual, the following important symbols are used:
WARNING:
CAUTION:
Indicates a potentially hazardous situation which, if instructions
are not followed, could result in death or serious injury.
Indicates a potentially hazardous situation which, if instructions are not
followed, may result in minor or moderate injury or damage to property.
R WARNING:
• Connect the power cord directly into a wall outlet and never use an extension cord.
• Disconnect the power plug (by pulling the plug, not the cable) if the
power cable or plug becomes frayed or otherwise damaged.
• To avoid hazardous electric shock, do not remove any covers or
screws other than those specified in this manual.
• To avoid injury, do not touch moving parts or insert your fingers in the
opening during machine operation. To de-energize moving parts,
open the front cover.
• Turn off the power and disconnect the power plug (by pulling the plug,
not the cable) if any of the following conditions exists:
• You spill something into the equipment.
• You suspect that your equipment needs service or repair.
• Your equipment's cover has been damaged.
i
Page 6

R CAUTION:
• Protect the equipment from dampness or wet weather, such as rain, snow,
and so on.
• Unplug the power cord from the wall outlet before you move the equipment.
While moving the equipment, you should take care that the power cord will
not be damaged under the equipment.
• When you disconnect the power plug from the wall outlet, always pull the
plug (not the cable).
• Do not allow paper clips, staples, or other small metallic objects to fall inside
the equipment.
• For environmental reasons, do not dispose of the equipment or expended
supply waste at household waste collection points. Disposal can take place
at an authorized dealer or at appropriate collection sites.
• Be careful not to cut yourself on any sharp edges when you reach inside the
machine to remove misfed sheets of paper or masters.
• Our products are engineered to meet high standards of quality and functionality, and we recommend that you only use the expendable supplies available at an authorized dealer.
ii
Page 7
How to Read This Manual
R
R
Symbols
In this manual, the following symbols are used:
WARNING:
This symbol indicates a potentially hazardous situation that might result in
death or serious injury when you misuse the machine without following the instructions under this symbol. Be sure to read the instructions, all of which are described in the Safety Information section.
CAUTION:
This symbol indicates a potentially hazardous situation that might result in minor or moderate injury or property damage that does not involve personal injury
when you misuse the machine without following the instructions under this
symbol. Be sure to read the instructions, all of which are described in the Safety
Information section.
* The statements above are notes for your safety.
Important
If this instruction is not followed, paper might be misfed, originals might be
damaged, or data might be lost. Be sure to read this.
Preparation
This symbol indicates the prior knowledge or preparations required before operating the machine.
Note
This symbol indicates precautions for operation, or actions to take after misoperation.
Limitation
This symbol indicates numerical limits, functions that cannot be used together,
or conditions in which a particular function cannot be used.
Reference
This symbol indicates a reference.
[]
Keys that appear on the machine's display panel.
{}
Keys built into the machine's operation panel.
iii
Page 8
What You Can Do with This Machine
Below is a quick summary of this machine's features and where to look in
this manual for more information.
❖❖❖❖ Standard Printing
⇒ P.15 “Standard Printing”.
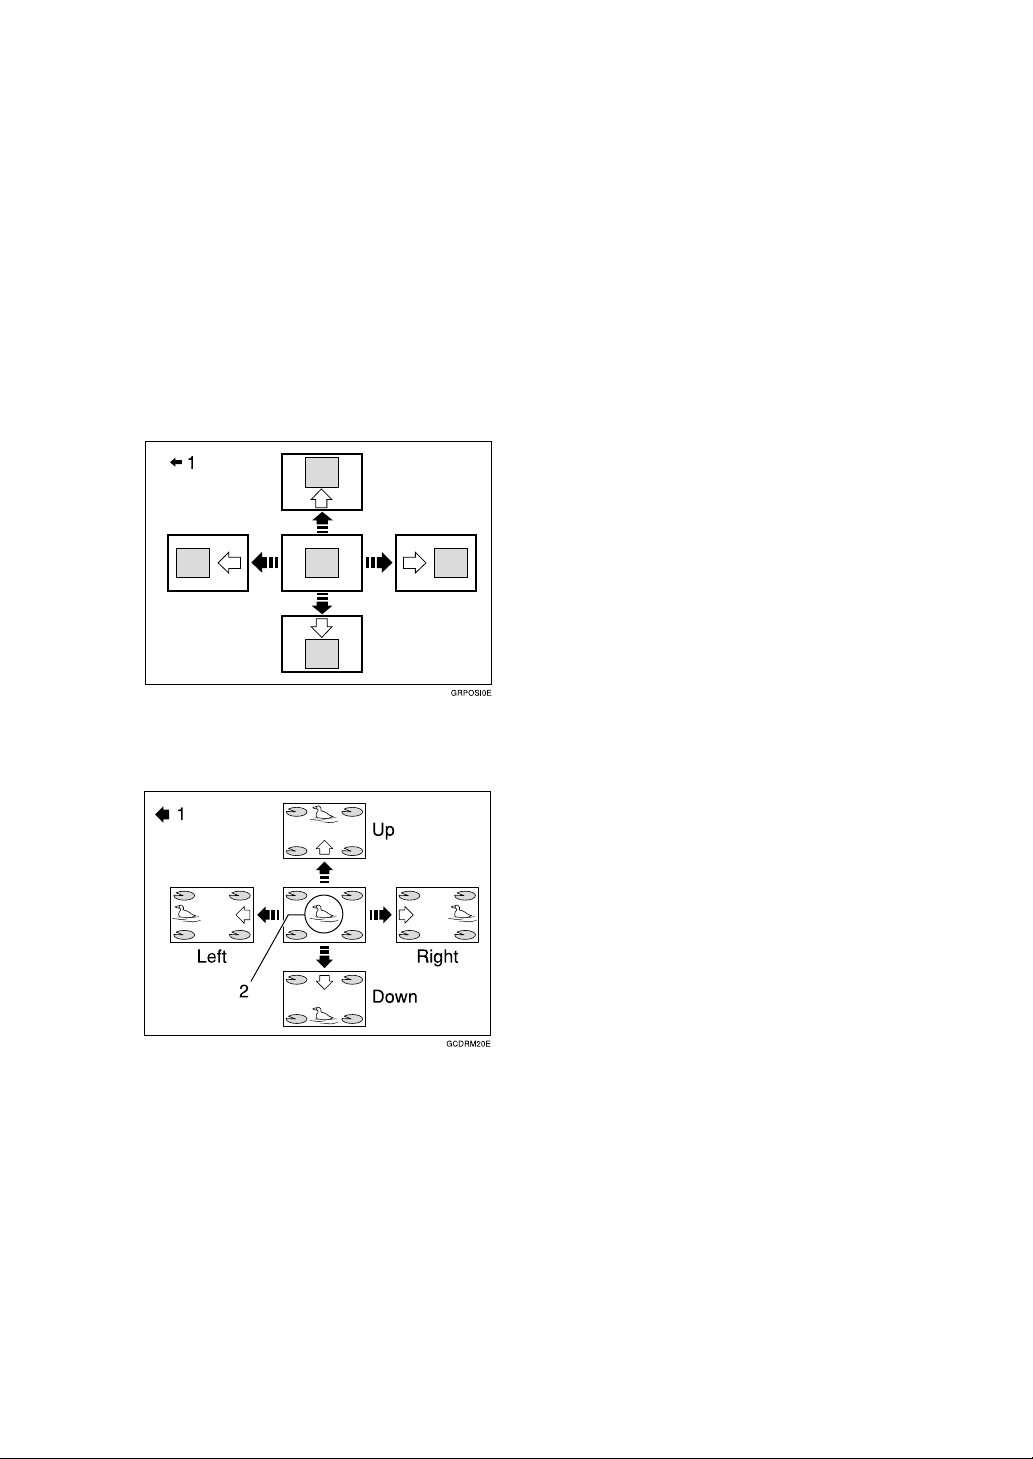
❖❖❖❖ Adjusting the Print Image Position
⇒ P.20 “Adjusting the Position of
Printed Images”.
1: Paper feed direction
1: Paper feed direction
2: Image of Drum 2
❖❖❖❖ Changing the Printing Speed
⇒ P.22 “Changing the Printing
Speed”.
iv
Page 9

TABLE OF CONTENTS
Machine Exterior........................................................................................ 1
Machine Interior......................................................................................... 2
Operation Panel......................................................................................... 4
Keys .............................................................................................................. 4
Indicators....................................................................................................... 5
1.Operation
Setting and Changing the Drum Unit....................................................... 7
Setting the Drum Unit.................................................................................... 7
Changing the Drum Unit................................................................................ 9
Printing Preparations.............................................................................. 10
Loading Paper............................................................................................. 10
Setting Up the Paper Delivery Table........................................................... 11
Turning on the Main Power ......................................................................... 12
Print Paper ............................................................................................... 13
Standard Printing .................................................................................... 15
Removing Prints.......................................................................................... 16
Printing onto Various Kinds of Paper.................................................... 17
Printing onto Thick Paper............................................................................ 17
Printing onto Standard Paper...................................................................... 17
Printing onto Special Kinds of Paper........................................................... 17
Paper Supply Adjustment............................................................................ 18
Adjusting the Position of Printed Images ............................................. 20
Changing the Printing Speed ................................................................. 22
Skip Feed Printing................................................................................... 23
2.User Tools
Accessing the User Tools....................................................................... 25
User Tools................................................................................................ 26
1. System .................................................................................................... 26
v
Page 10

3.Troubleshooting
If Your Machine Does Not Operate as You Want.................................. 29
If You Cannot Make Prints as You Want ............................................... 30
Loading Paper.......................................................................................... 31
When the Add Ink Indicator (j) Lights................................................. 32
x Clearing Misfeeds............................................................................... 34
Paper Misfeed in the Paper Feed Section .................................................. 34
Paper Misfeed in the Paper Feed Section .................................................. 35
Paper Wrapped around the Drum ............................................................... 36
Paper Misfeed in the Paper Exit Section..................................................... 38
Poor Printing............................................................................................ 39
Dirty Background......................................................................................... 39
When the Press Roller is Dirty .................................................................... 41
Faint Prints .................................................................................................. 41
4.Remarks
Do's and Don'ts ....................................................................................... 43
Where to Put Your Machine.................................................................... 44
Environment ................................................................................................ 44
Power Connection....................................................................................... 45
Machine Clearance ..................................................................................... 45
Maintaining Your Machine...................................................................... 46
Cleaning the Main Frame............................................................................ 46
5.Specifications
Main Frame............................................................................................... 47
Consumables........................................................................................... 49
INDEX........................................................................................................ 50
vi
Page 11
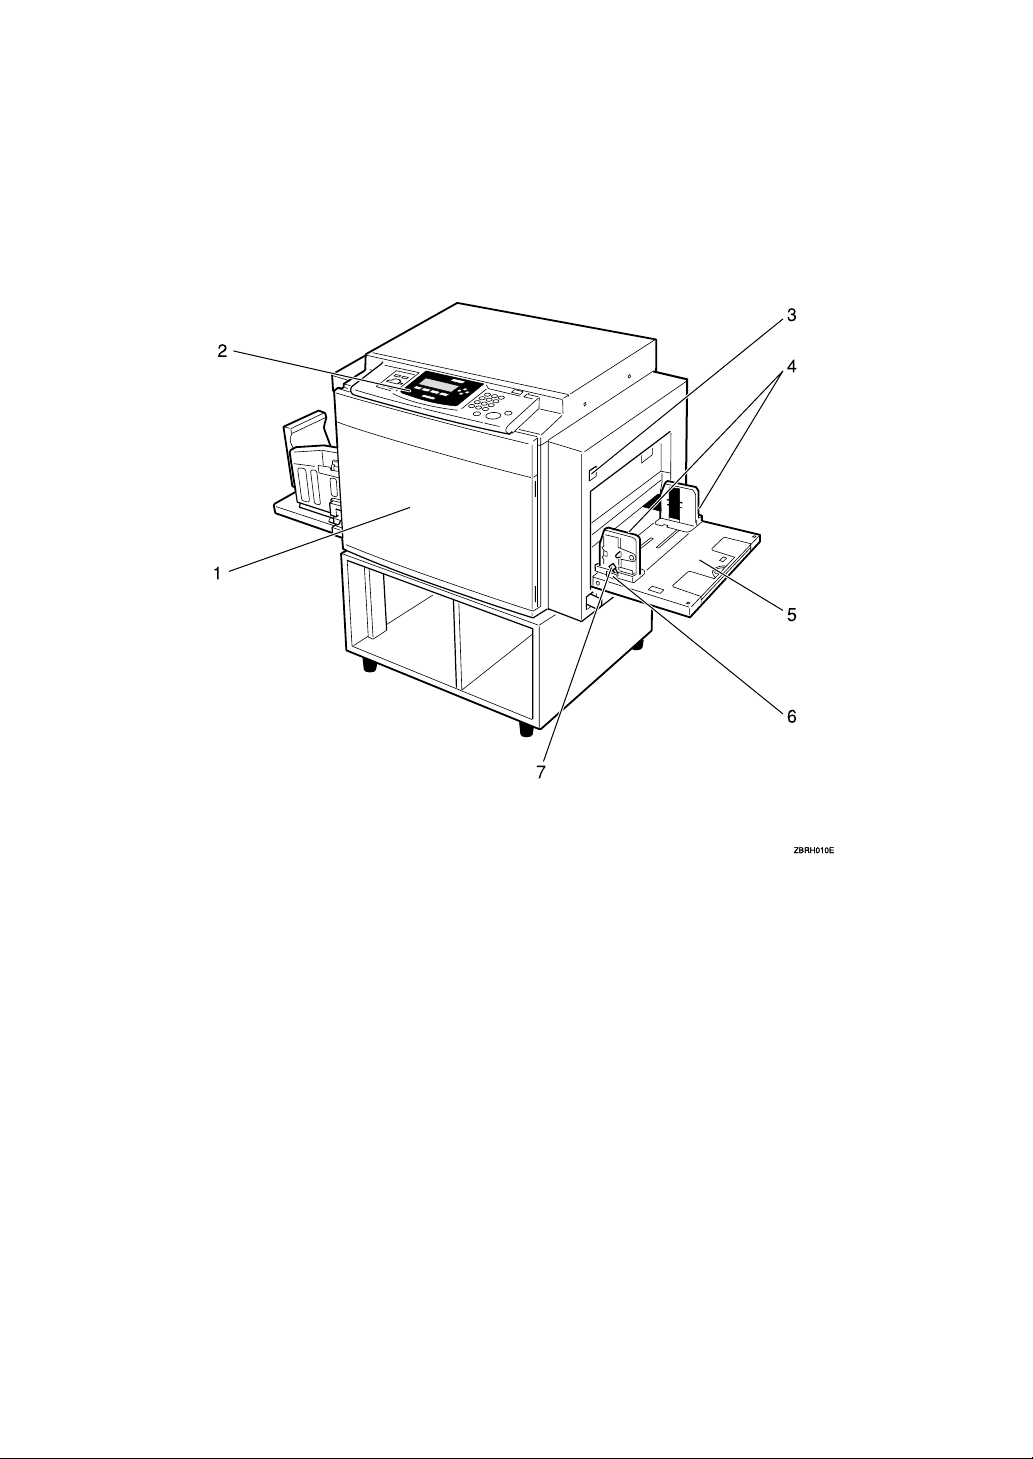
Machine Exterior
1. Front door
Open to access the inside of the machine.
2. Operation panel
⇒ P.4 “Operation Panel”.
3. Paper feed tray down key
Press to lower the Paper feed tray.
4. Paper feed side plates
Prevent paper being fed skewed.
5. Paper feed tray
Set paper here.
6. Paper feed side plates knob
Use to move the side plates.
7. Paper feed side plates knob lock
lever
Fix to the paper feed side plates knob.
1
Page 12
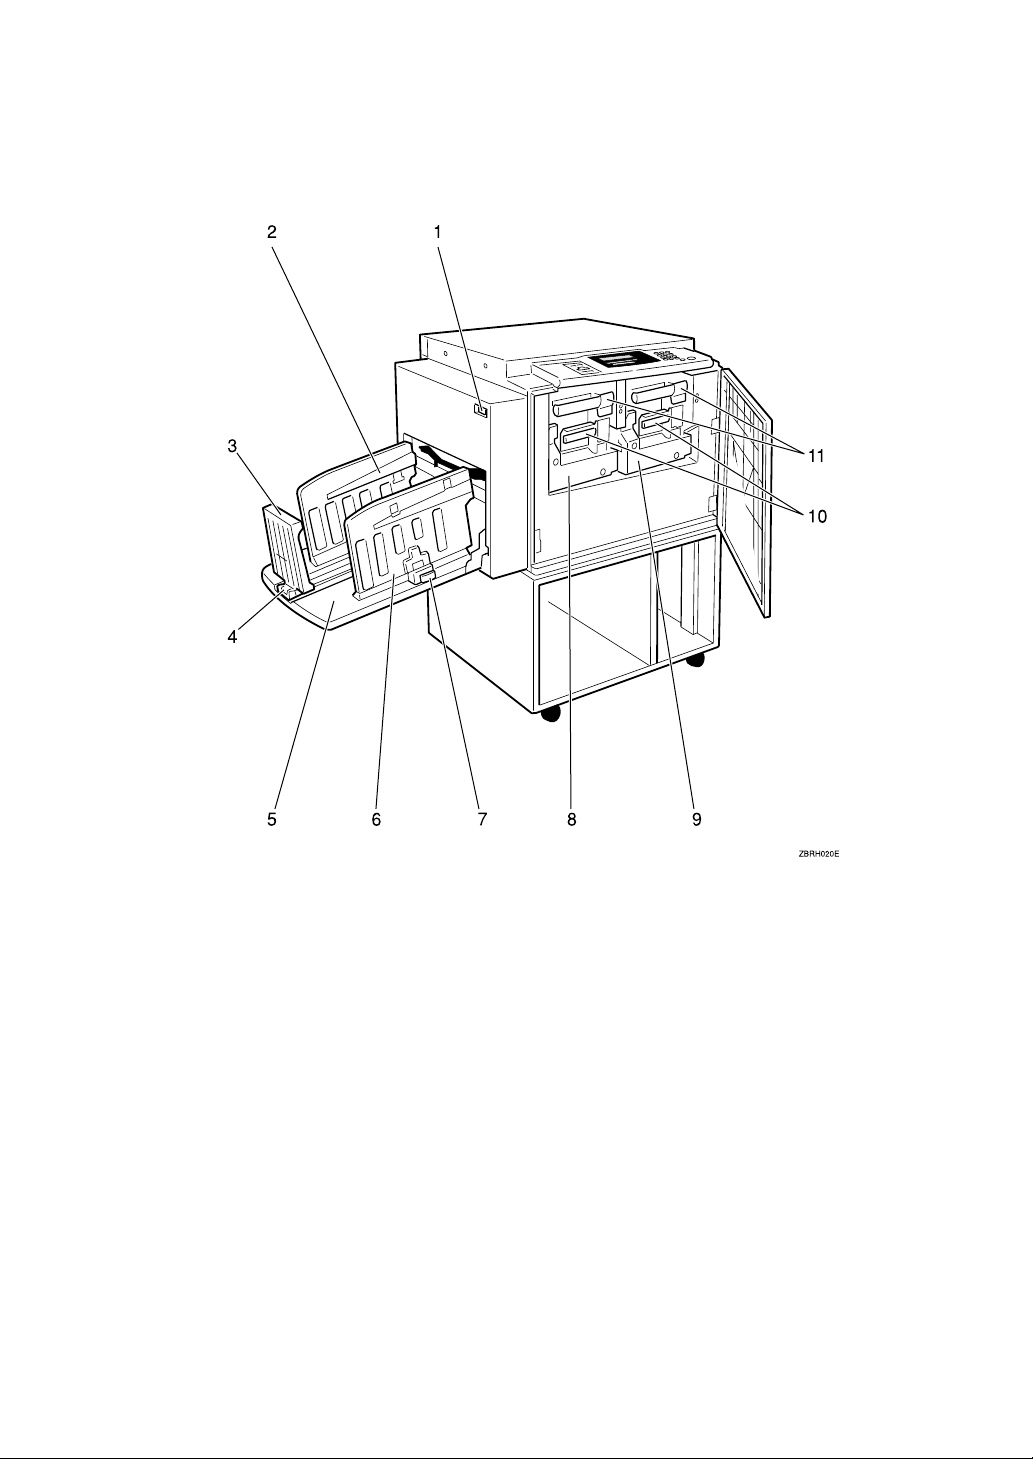
Machine Interior
1. Main switch
Use to turn the power on or off.
2. Paper alignment wings
Lift or lower the wings depending on the
type of paper being used.
3. Paper delivery end plate
This plate aligns the leading edge of
prints.
4. Paper delivery end plate knob
Use to move the end plate.
5. Paper delivery tray
Completed prints are delivered here.
6. Paper delivery side plates
These plates align the prints on the paper
delivery tray.
2
7. Paper delivery side plate knobs
Use to move the side plates.
8. Drum Unit 2
The master is wrapped around this unit.
9. Drum Unit 1
The master is wrapped around this unit.
10. Ink holder
Set the ink cartridge in this holder.
11. Drum unit lock lever B1
Lower to unlock and pull out the drum
unit.
Page 13
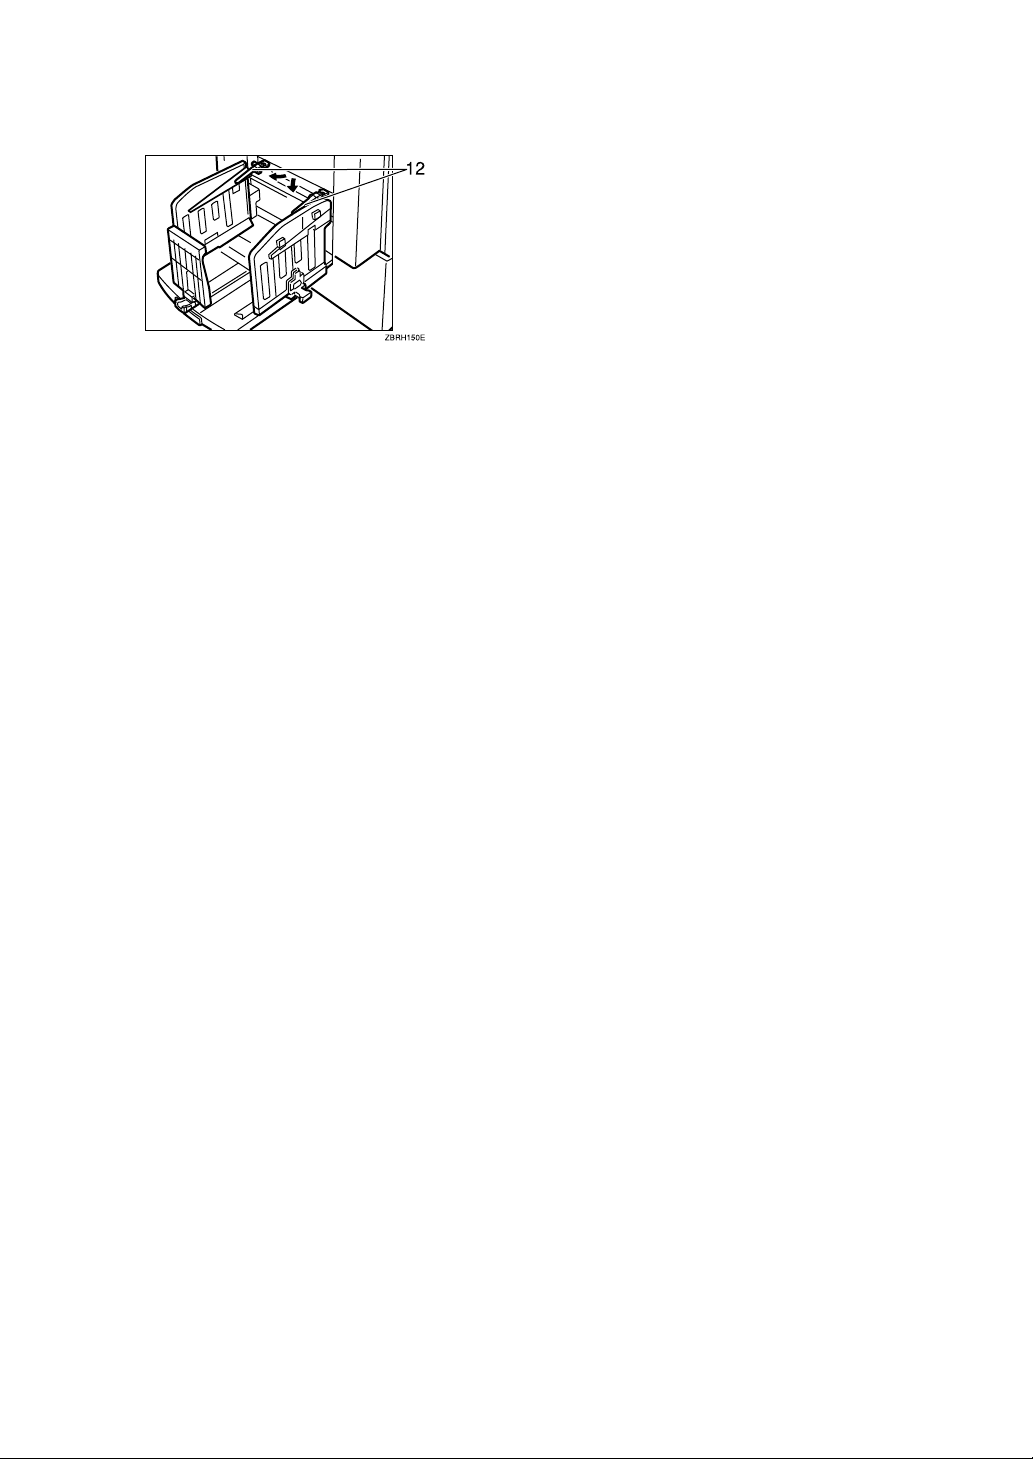
12. Trailing edge guides
Swing out these guides when you use
B5L paper.
3
Page 14
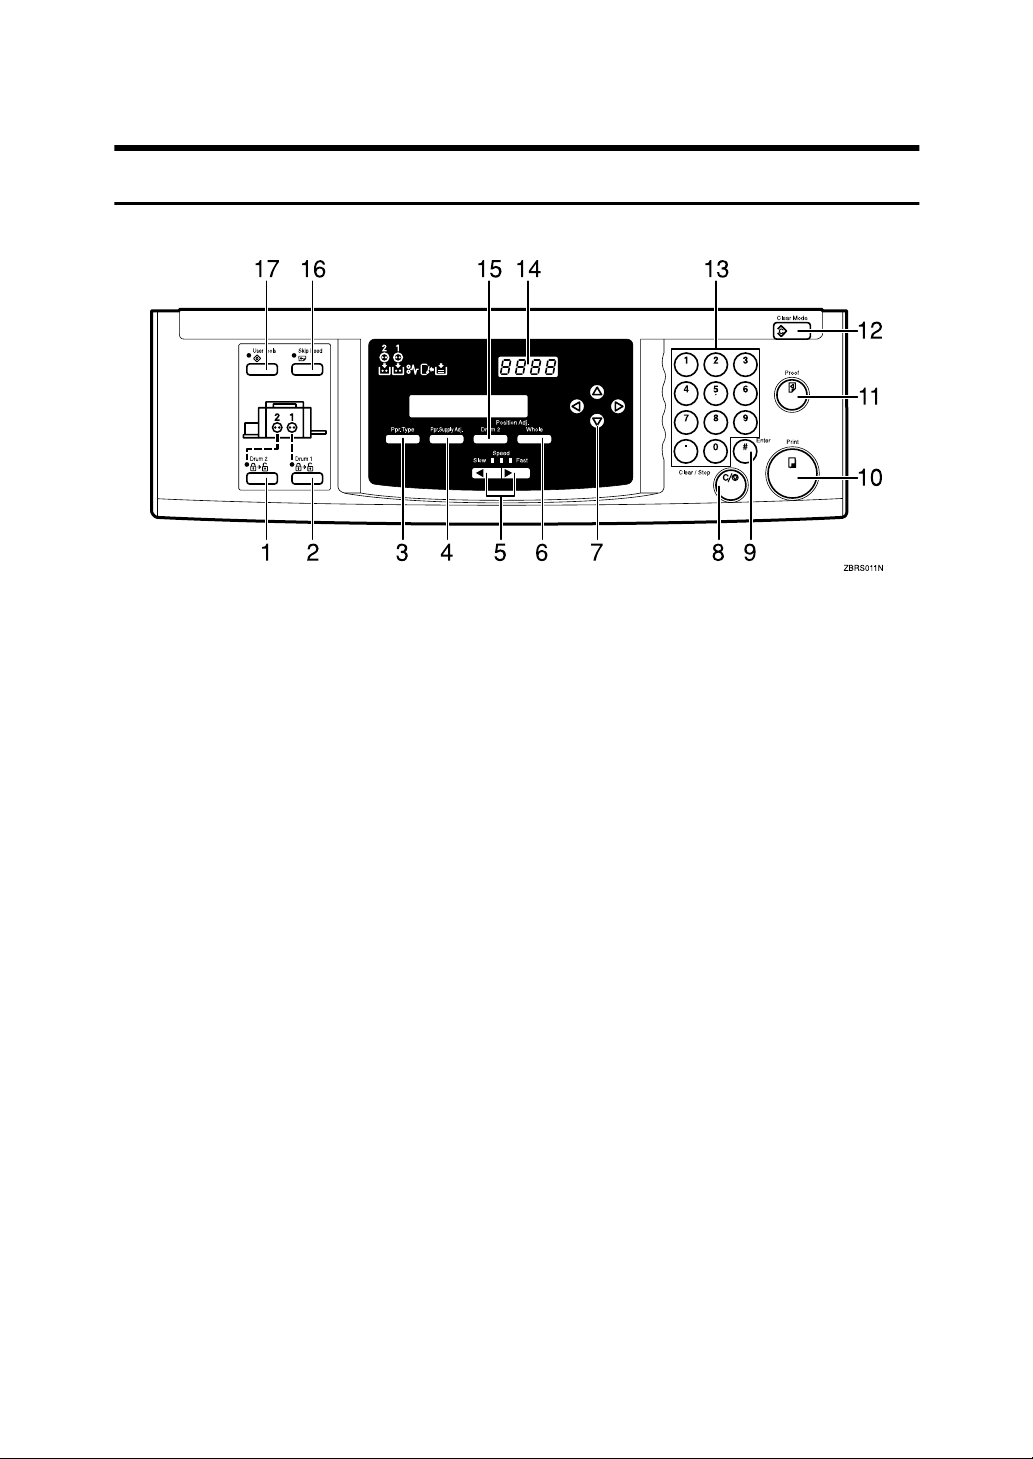
Operation Panel
Keys
1. {
{Drum2}}}} key
{{
Press when you need to set or change the
Drum 2 ⇒ P.7 “Setting the Drum Unit”.
2. {
{Drum1}}}} key
{{
Press when you need to set or change the
Drum 1 ⇒ P.7 “Setting the Drum Unit”.
3. {
{Ppr.Type}}}} key
{{
Press to select the paper type ⇒ P.17
“Printing onto Various Kinds of Paper”.
4. {
{Ppr. Supply Adj}}}} key
{{
Press to change the paper feeding ratio
and paper separation ratio. ⇒ P.18 “Paper
Supply Adjustment”.
5. {
} {{{{VVVV}}}} keys (Speed keys)
{{{WWWW}}}
Press to adjust the printing speed. ⇒ P.4
“Keys”, ⇒ P.22 “Changing the Printing
Speed”.
6. {
{Position Adj/Whole}}}} key
{{
Press to adjust the mixed image positions
of Drum1 and Drum2 ⇒ P.20 “Adjusting
the Position of Printed Images”
7. {
{{{~~~~}}}}{{{{}}}}}}}}{{{{||||}}}}{{{{{{{{}}}
Press to shift the image forward, backward, right, or left. ⇒ P.4 “Keys”, ⇒ P.20
“Adjusting the Position of Printed Images”.
Also use to highlight items you wish to
select on the panel display.
4
} keys
8. {
{Clear/Stop}}}} key
{{
Press to stop printing.
9. {
{#}}}} key
{{
Use to enter data in selected modes.
10. {
{Print}}}} key
{{
Press to start printing.
11. {
{Proof}}}} key
{{
Press to make proof prints.
12. {
{Clear Modes}}}} key
{{
Press to clear any previously entered job
settings.
13. Number keys
Press to enter the desired number of
prints and data for selected modes.
14. Counter
Displays the number of prints entered.
While printing, it shows the number of
prints remaining.
15. {
{Position Adj/Drum2}}}} key
{{
Press to adjust the image position's of Drum2.
16. {
{Skip Feed}}}} key
{{
Press to select skip feed printing. ⇒ P.23
“Skip Feed Printing”
17. {
{User Tools}}}} key
{{
Press to change the default settings to
meet your requirement.
Page 15
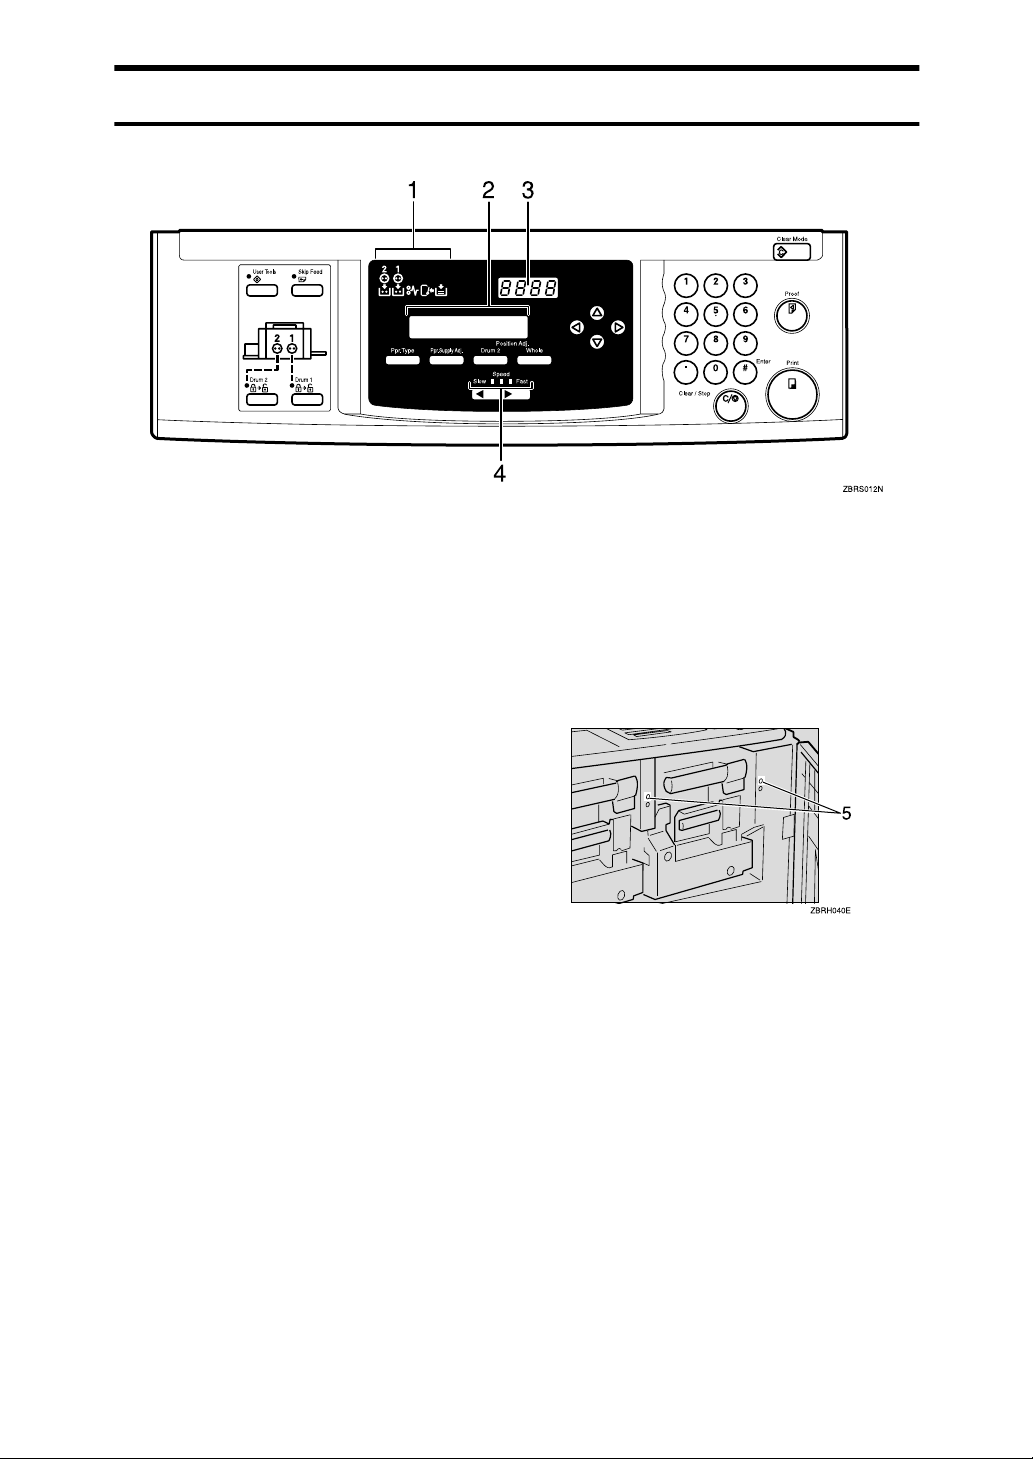
Indicators
1. Error Indicators
These indicators are lit when a non-standard condition occurs within the machine.
2. Guidance Display
Display the machine's condition.
3. Counter
Displays the number of prints entered.
While printing, it shows the number of
prints remaining.
4. Speed Indicators
These indicators show the printing speed
that is selected.
5. Drum set indicator
The green indicator lights when the
drum unit is ready to pull out. If not
ready, the red indicator lights.
5
Page 16

6
Page 17

1. Operation
Setting and Changing the Drum Unit
Before you start printing, you must
make a master print using the master
making unit. The master print is
wrapped around the drum unit.
Note
❒ Color drum units are available as
options in addition to the standard
black unit. For making color prints,
a separate drum unit is necessary
for each color.
❒ Insert the same kinds of drum unit
for both Drum 1 and Drum 2.
❒ Color Drum Type 50S/80S is not
available for this machine.
❒ A4 size master cut drum is not
available for this machine.
Setting the Drum Unit
Make sure that you select either
A
{{{{Drum1}}}} or {{{{Drum2}}}} before setting
the drum unit.
Open the Front Door.
B
Lift upper drum stay B3 a little to
C
unlock the drum unit, then push
into the drum unit while holding
drum unit handle B2 and upper
drum stay B3.
Note
❒ Make sure that the indicator is
lit.
Note
❒ Make sure the green light be-
side the drum unit lock lever is
on.
❒ If the red light is on, go back to
step 1.
7
Page 18
Operation
1
❒ Make sure that the drum unit
lock lever B1 is released.
Insert the drum unit along the
D
guide rail.
Lift drum unit lock lever B1.
F
Close the front door.
G
Slide in the drum unit until it
E
locks in position.
Note
❒ Insert the same kinds of drum
unit for both Drum1 and
Drum2.
Note
❒ If you want to set another drum
unit, go back to step 1.
❒ Make sure that the Open Cover
Indicator turns off.
8
Page 19

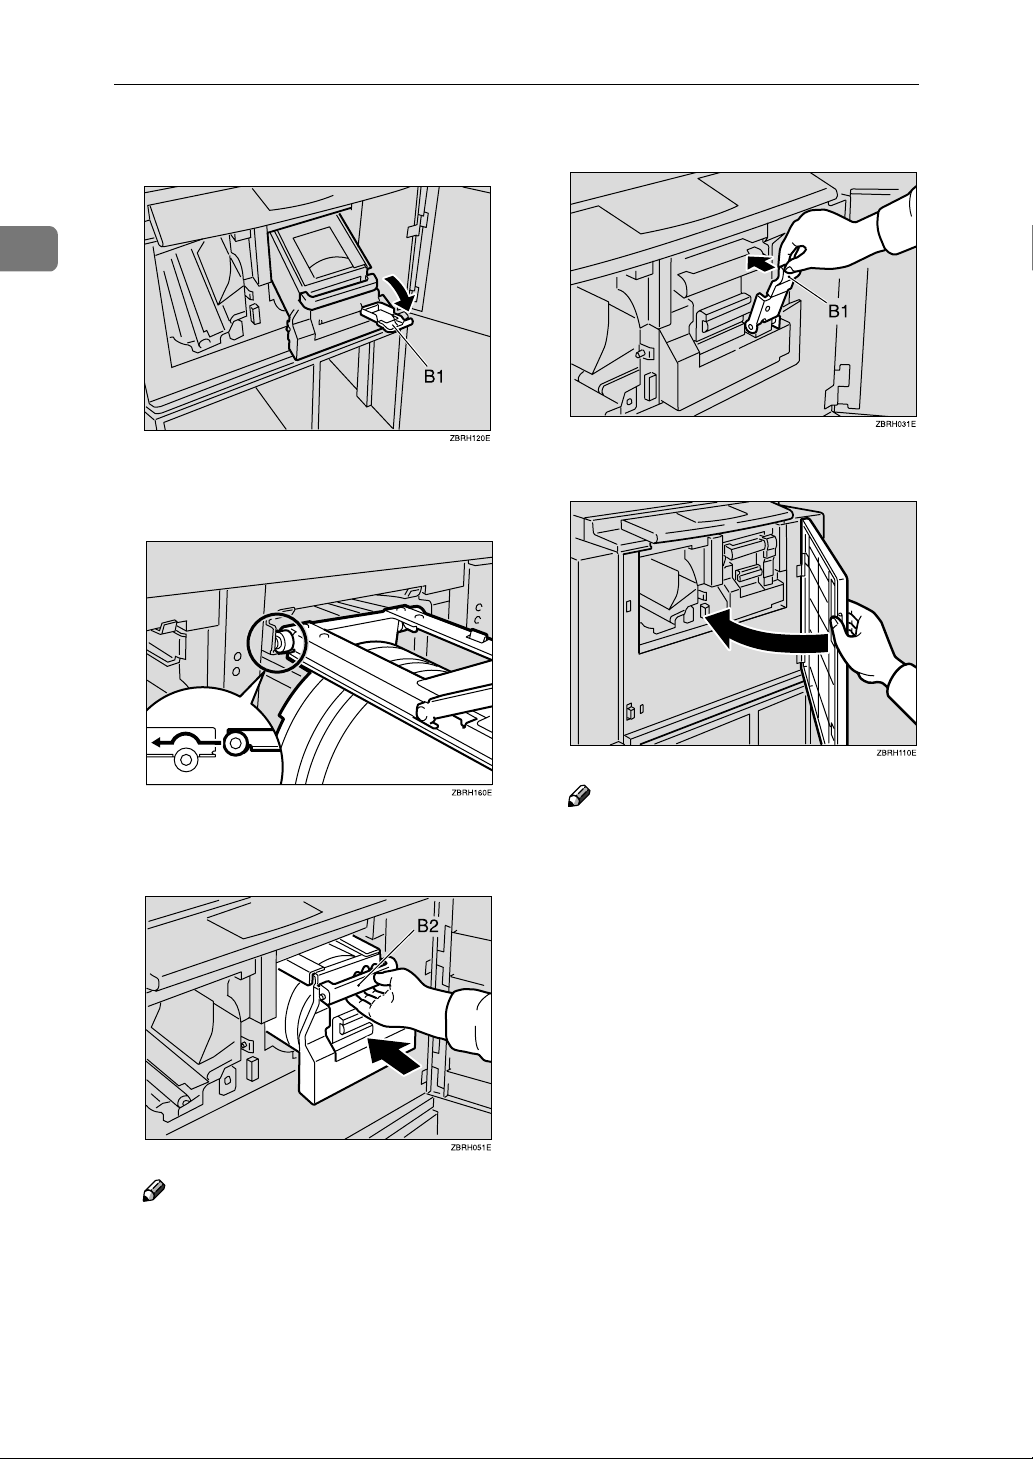
Changing the Drum Unit
Make sure that you select either
A
{{{{Drum1}}}} or {{{{Drum2}}}} before changing the drum unit.
Open the front door.
B
Make sure the green light beside
C
the drum unit lock lever is on before sliding out the drum. If the
red light is on, go back to step
Setting and Changing the Drum Unit
Lift upper drum stay B3 a little to
F
unlock the drum unit, then pull
out the drum unit while holding
drum unit handle B2 and upper
drum stay B3.
.
A
Important
❒ Be careful not to let the drum
unit fall.
1
Lower the drum unit lock lever B1.
D
Pull out drum unit handle B2 slowly.
E
Insert the color drum unit along
G
the guide rail.
Lower drum unit lock lever B1 of
H
the inserted drum.
Slide in the drum unit until it
I
locks in position.
Lift drum unit lock lever B1.
J
Close the front door.
K
Note
❒ Make sure that the Open Cover
indicator turns off.
9
Page 20
Operation
Printing Preparations
1
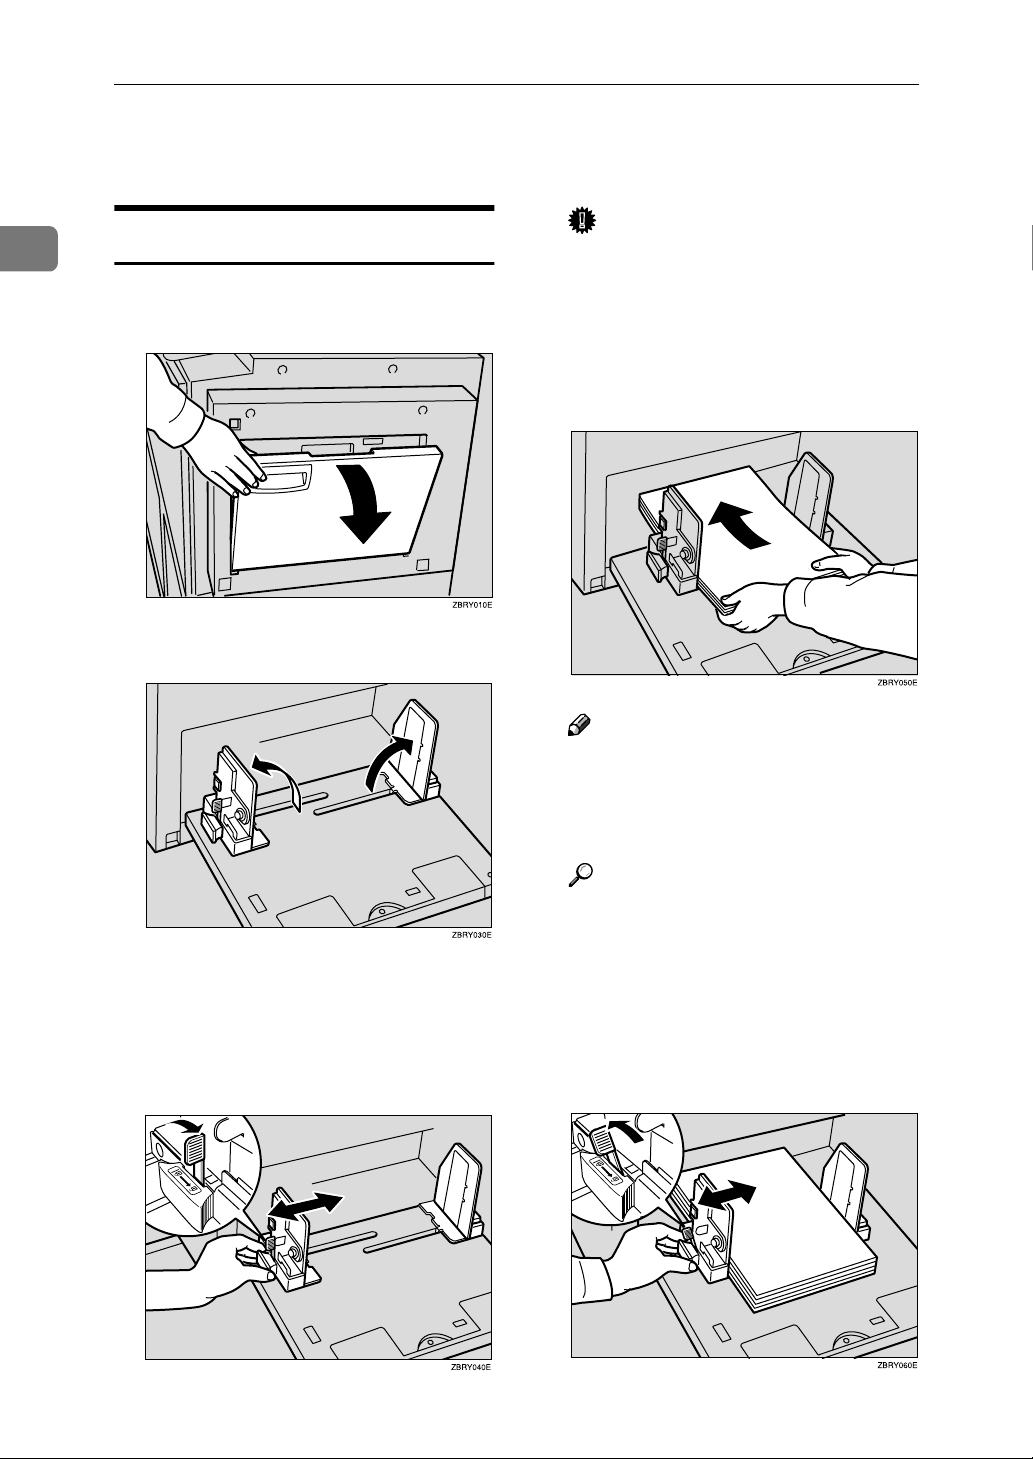
Loading Paper
Carefully open the paper feed
A
tray.
Lift the feed side/end plates.
B
Important
❒ Always adjust the position with
the lock lever for the paper feed
side plates in the raised position
(lock released).
Place the paper on the paper feed
D
tray.
Note
❒ Correct the paper curl before
loading the paper. If you cannot
do so, stack the paper with the
curl face down.
10
Make sure that the lock lever for
C
the side plate is raised (lock is released), and then grasp the side
plate knob and adjust the side
plate to match the paper size.
Reference
⇒ P.13 “Print Paper”
Make sure that the paper feed
E
side plates are touching both
sides of the paper, and then push
the lock lever for the side plates
down to lock the side plates into
position.
Page 21

Printing Preparations
Important
❒ Always make sure that you push
the lock lever for the side plates
down to lock the side plates in
position.
Note
❒ Make sure that the paper size
and direction in the panel display correspond with the actual
paper size and direction set on
the paper feed tray.
Setting Up the Paper Delivery
Table
Open the Paper Delivery Table.
A
Adjust the paper delivery end
C
plate to match the print paper
size.
Note
❒ The inside of the end plate
should align with the paper size
scale.
When you use thick paper (81.4
g/m2 to 209.3 g/m2, 21.6 lb to
55.6 lb)
1
Lift the paper delivery plates and ad-
B
just the side plates to the paper size.
Note
❒
The inside of the side plates should
align with the paper size scale.
A Adjust the side plates to match
the paper size scale on the
main frame side.
When you use standard paper
(52.3 g/m2 to 81.4 g/m2, 13.9 lb to
21.6 lb)
A Adjust the side plates to match
the paper size scale on the end
plate side.
11
Page 22

1
Operation
Lower or lift the paper alignment
D
wings.
Note
❒ When the guides are up, you
might not be able to load the
unit to full capacity (1,000
sheets) depending on the paper
you are using.
❒ Lift the paper alignment wings
when B5L prints are curled.
Turning on the Main Power
Make sure that the power cord is
A
firmly plugged into the wall outlet.
Turn on the main power switch.
B
When you use 81.4 g/m2, 21.6 lb
or thicker paper
A Lower the paper alignment
wings.
When you use B5L paper
A Swing out the trailing edge
guides.
12
Page 23

Print Paper
The following limitations apply:
Print Paper
Paper Size Paper
Metric Inch
Paper feed tray A3 L, B4 L, A4 L, B5 L,
Others (Vertical: 70 - 297mm,
Horizontal: 250 - 432mm)
11" × 17" L, 8
1
8
/2" × 11" L , Others (Vertical: 2.76" - 11.7", Horizontal: 9.84" - 17")
1
/2" × 14" L,
Weight
52.3 -
209.3g/m
13.9 - 55.6 lb
2
,
Non-recommended paper and envelope:
• Roughly cut paper/envelope
• Paper of different thickness in the same stack
• Envelopes heavier than 85g/m
2
, 22 lb.
• Folded, curled, creased, or damaged paper
•Torn paper
• Slippery paper
• Rough paper/envelope
• Paper with any kind of coating (such as carbon)
• Short grain paper
• Thin paper that has low stiffness
• Paper that is prone to generate a lot of paper dust
• Grained paper loaded with the direction of the grain perpendicular to the
feed direction
• Certain types of long thin envelopes e.g. international mail envelopes
1
• The following types of envelopes:
Note
❒ If you print on rough grained paper, the following problems may occur:
• Black-Spotted image
•Blurred image
•Damaging master
13
Page 24

1
Operation
Important
❒ Correct curls in the paper before placing it in the machine. When you cannot
correct the paper curl, stack the paper with the curl face down or face up as
shown in the illustration. If paper is curled, it might wrap around the drum
or stains might appear.
14
Page 25

Standard Printing
Standard Printing
Set the Drum Unit.
A
Reference
⇒ P.7 “Setting the Drum Unit”
Make sure that the machine is
B
ready for printing.
Make sure that there are no previ-
C
ous settings remaining.
Note
❒ To clear any previous settings,
press the {Clear Modes}.
Set the paper
D
Reference
⇒ P.10 “Loading Paper”
Select the Paper type
E
Reference
⇒ P.17 “Printing onto Various
Kinds of Paper”
❒ If the image density is slightly
dark or light, adjust the image
density, using {WWWW} {VVVV} Speed
keys. ⇒ P.22 “ Changing the
Printing Speed”.
Enter the number of prints re-
H
quired with the number keys.
Note
❒ The counter shows the number
of prints you set.
1
Set your desired settings.
F
Press the {{{{Proof}}}} Key.
G
Note
❒ If the Image position is not cor-
rect, adjust it by using {Whole}
or {Drum 2}. ⇒ P.20 “Adjusting
the Position of Printed Images”.
❒ To change the number entered,
press the {Clear/Stop} key and
enter the new number.
Press the {{{{Print}}}} key.
I
15
Page 26

Operation
1
Note
❒ To stop the machine during a
multi-print run, press the {Clear/
Stop} key.
❒ To return the machine to the ini-
tial condition after printing,
press the {Clear Modes} key.
Removing Prints
Pull the front paper delivery side
A
plate down towards you to open
it.
Remove the prints from the paper
B
delivery tray and close the paper
delivery side plate.
This function is called “Auto Reset”.
Note
❒ You can change the time the ma-
chine can waits before Auto Reset
mode starts.⇒ P.26 “User Tools”.
❒ The machine will not automatical-
ly enter Auto Reset mode in the
following cases:
• If there is no ink
• If paper misfeed occur
• If the machine is printing
• If there is no paper
• If the cover open message is dis-
played
Auto Off
If you do not operate the machine for
a certain period the machine can enter
Quality Standby mode to remove ink
from inside the machine, and then
turn itself off. This function is called
“Auto Off”.
Limitation
Quality Standby mode does not available when you use Color Drum Type
40S/50S.
Auto Reset
The machine returns to its initial condition automatically after your job is
finished.
16
Note
❒ You can change the time the ma-
chine can waits before Auto Off
mode starts.⇒ P.26 “User Tools”.
Page 27

Printing onto Various Kinds of Paper
Printing onto Various Kinds of Paper
Before printing onto thick paper, thin
paper, envelopes or special kinds of
paper loaded in the Paper feed tray,
you must select the paper type.
Printing onto Thick Paper
Printing onto Standard Paper
Press the [Ppr.Type] key.
A
1
If you wish to print onto thick (157 to
209.3g/m
paper, perform the following steps.
Press the [Ppr.Type] key.
A
Select [2:THICK] with {{{{~~~~}}}} {{{{}}}}}}}} key.
B
2
, 42 to 55.6 lb or heavier)
PAPER TYPE 1:STD
2:THICK 3:SPL **
Press the [qqqq] key.
C
Make sure that [1:STD] is selected.
B
PAPER TYPE 1:STD
2:THICK 3:SPL **
Press the [qqqq] key.
C
Printing onto Special Kinds of
Paper
Press the [Ppr.Type] key.
A
Select [3:SPL] with {{{{~~~~}}}} {{{{}}}}}}}} key.
B
PAPER TYPE 1:STD
2:THICK 3:SPL **
17
Page 28

Operation
Press the [qqqq] key.
C
Paper Supply Adjustment
1
Printing onto envelopes
A Place the envelopes in the pa-
per feed tray as shown in the illustration.
GRENVE0E
*: Paper feed direction
Note
❒ When you use envelopes, the
Paper feed tray capacity is
about 150 sheets (85g/m
lb) or enough to load a stack
up to 105mm, 4.1" high.
B If your envelopes do not feed
in well, lift the paper feed tray
a little, and then lower it so that
it slants up slightly.
2
, 22
If paper misfeeds occur frequently,
you can adjust the paper feeding ratio
and paper separation ratio.
Press the {{{{Ppr. Supply Adj}}}} key.
A
FEED PRES. 0123456**
SEPAR PRES 0123456**
Press {{{{~~~~}}}} {{{{}}}}}}}} {{{{||||}}}} {{{{{{{{}}}} or the
B
number keys to adjust the paper
feeding ratios and the paper separation ratios.
Press {{{{#}}}} key.
C
18
ZDZY030E
If the machine does not feed
enough paper
A Change the paper feeding ratio
setting as follows.
Paper type Paper feed pres-
sure ratio
Standard 5∼6(*3)
Thick 6(*5)
Special kinds of
Paper
*: Default
5∼6(*3)
Page 29

If the machine feeds too much
paper
A Change the paper separation
ratio setting as follows.
Paper type Paper feed sepa-
ration ratio
Standard 4∼6(*3)
Thick 3∼4(*2)
Printing onto Various Kinds of Paper
1
Special kinds of
Paper
*: Default
3∼4(*1)
19
Page 30

Operation
Adjusting the Position of Printed Images
1
Use the following procedure to adjust
the position of print images as required.
Note
❒ Unexpected change to the image
position may occur with the following actions:
• Switching Drum1 and 2.
• Remaking a master using the
master making unit.
• Changing the print speed.
There are two kinds of image adjustment as follows:
❖❖❖❖ Overall Image Adjustment
You can adjust the mixed image
position of Drum1 and Drum2.
❖❖❖❖ Drum2 Image Adjustment
You can adjust the image position
of Drum2.
1: Paper Feed Direction
2: Image of Drum2
Note
❒ When the main switch is turned
off, the image returns to the default
position.
Press the [Whole] or [Drum 2] key.
A
20
1: Paper feed direction
OVERALL IMAGE ADJUST
jl0.40in.hi0.40in
Adjust the image position using
B
the {{{{~~~~}}}}, {{{{}}}}}}}}, {{{{||||}}}}, and {{{{{{{{}}}} keys.
Page 31

Adjusting the Position of Printed Images
Note
❒ When you shift the image for-
ward, leave a 10mm, 0.4" margin at the leading edge. If there
is no margin, paper might wrap
around the drum and cause a
misfeed.
❒ If you adjust the image position,
a print shadow might appear.
Overall image adjustment
A You can change the overall im-
age position of both Drum 1
and 2. Use {{{{~~~~}}}} {{{{}}}}}}}} {{{{||||}}}} {{{{{{{{}}}}
keys to shift the image each
way in 0.5mm, 0.02” steps.
Up & Down Right & Left
+10mm, 0.4” or 10mm, 0.4”
+10mm, 0.4” or 10mm, 0 4”
Press the {{{{Proof}}}} key to check the
D
image position.
1
Drum 2 image adjustment
A You can change the image posi-
tion of Drum 2. Use {{{{~~~~}}}} {{{{}}}}}}}}
{|} {{} keys to shift the image
each way in 0.25mm, 0.01”
steps.
Up & Down Right & Left
Moving sums of
both adjustment
functions (Max
10mm, 0.4”)
Press the [Enter] key.
C
+5mm, 0.2” or 5mm, 0 2”
21
Page 32

1
Operation
Changing the Printing Speed
Use the {WWWW} or {VVVV} key to adjust the
printing speed. The relationship between printing speed and print quality depends on the type of paper you
use.
Press the {{{{VVVV}}}} key to increase the
A
speed and press the {{{{WWWW}}}} key to reduce the speed.
Note
❒ The following speeds are avail-
able:
• Setting 1 (default):
90 sheets/minute
• Setting 2:
105 sheets/minute
• Setting 3:
120 sheets/minute
❒ The faster the printing speed be-
comes, the lighter the printing
density is, and vice versa.
❒ If you change the print speed
while printing, a print shadow
might appear.
❒ When the machine is used in
low temperature conditions, the
image density might decrease.
In this case, use setting one.
22
Page 33

Skip Feed Printing
Skip Feed Printing
If the backs of prints are dirty, you
can increase the time between prints
using the {Skip Feed} key. By default,
when one sheet of paper is fed the
drum rotates once. However, you can
select the number of rotations of the
drum. This gives you the chance to remove prints one by one from the paper delivery tray or insert one sheet of
paper between two prints. If you use
this function, you can also use paper
longer than 432mm, 17.0" in spite of
the maximum length limitations of
paper.
Note
❒ Two rotations per sheet of paper is
the default. You can change this
default setting with the user tools.
See “No. of Skip Feed” ⇒ P.23
“Skip Feed Printing”.
❒ The maximum length of paper in
Skip Feed mode is 460mm, 18.1".
❒ When you use paper longer than
432mm, 17.0", completed prints
will not be delivered to the paper
delivery tray properly, so lower
the paper delivery end plate and
receive completed prints by hand.
If necessary, select the number of
B
rotations of the drum per sheet of
paper fed with the {{{{~~~~}}}} {{{{}}}}}}}} keys.
SKIP FEED NO SETTING
INPUT THE NUMBER *
Note
❒ You can also select the number
of rotations with the Number
keys.
❒ You can select from 2 to 9 rota-
tions.
❒ By default, the machine asks
you to confirm the number of
rotations. You can have this step
omitted by adjusting the user
tool settings. See “No. of Skip
Feed” ⇒ P.26 “User Tools”.
Press the [qqqq] key.
C
Press the {{{{Start}}}} key.
D
1
Press the {{{{Skip Feed}}}} key.
A
Check the image position of the
E
trial or proof print.
Note
❒ If the image position is not cor-
rect, adjust it using the [Whole] or
[Drum2] key (⇒ P.20 “Adjusting
the Position of Printed Images”).
Make your prints.
F
23
Page 34

1
Operation
24
Page 35

Accessing the User Tools
2. User Tools
The user tools allow you to customize
various default settings. This section
is intended for the machine administrator.
Press the {{{{User Tools}}}} key.
A
Using the {|}, or {{} key
A Search for the desired user tool
number with the {{{{||||}}}}, {{{{{{{{}}}},
key.
Using the number keys
A Enter the desired user tool
number with the Number
keys.
Change the settings by following
B
the instructions on the panel display. Then press the [qqqq] key.
Press the {{{{User Tools}}}} key to re-
C
turn to the standby display.
Note
❒ The settings are not canceled
even if the main switch is
turned off or the {Clear Modes}
key is pressed.
25
Page 36

User Tools
User Tools
Reference
For how to access the user tools, ⇒ P.25 “Accessing the User Tools”.
2
1. System
No. Mode Description
1 Auto Reset Time The machine returns to its initial condition automatically after
your job is finished. The automatic reset time can be set from 1 to
5 minutes or off (0 minute).
Note
❒ Default: Off
2 Resettable Count The counter shows the number of prints you made.
3 Clr Resettable
Count
4 Max Print The maximum print quantity can be set between 1 and 9999.
5 Total Counter Use to display the total number of prints.
6 Buzzer Off Turns the beeper on or off.
Choose whether the total number of prints is reset.
Note
❒ Default: Not clear
Note
❒ Default: 9999
Note
❒ Default:
❒ Available settings:
• 0: KEY OFF (When you press a key, the beeper does not
sound. When warning messages appear on the panel display, the beeper sounds.)
• 1: ON (The beeper sounds when you press a key or when
warning messages appear on the panel display.)
• 2: OFF (The beeper does not sound when you press keys or
when warning messages appear on the panel display.)
STD.
(standard)
26
7 Auto Off If you do not operate the machine for a certain period the machine
can enter Quality Standby mode to remove ink from inside the
machine, and then turn itself off. This function is called “Auto
Off”. The time can be set from 10 to 90 minutes.
Note
❒ Default: 60 minutes
❒ Quality Standby mode does not available when you use Color
Drum Type 40S/50S.
Page 37

User Tools
No. Mode Description
8 Jump Table You can change the angle of the wing guide depending on the pa-
per type you use.
Note
❒ Default: Auto
❒ Available settings:
• Up (Select this setting when standard thickness or thin paper misfeeds at the paper exit section occur frequently.)
• Down (Select this setting when A4-B5, 8
per is not delivered properly to the paper delivery tray.)
9 Drm Stp Mode You can select the drum which you will be able to pull out imme-
diately after you finish your job without pressing any key.
1
/2" × 11" thick pa-
Note
❒ Default: Drum 1
10 Long Sheet Mode You can select whether you can use paper longer than
432mm,17.0" or not.
Note
❒ Default: Not to use
❒ When you use paper longer than 432mm, 17.0”, lower the pa-
per delivery end plate and receive completed prints by hand.
2
11 Skip Number of
Time
Specifies the number of drum rotations in Skip Feed mode when
the power is turned on.
You can also select whether you can change the number of drum
rotations temporarily when you press the {Skip Feed} key. ⇒ P.23
“Skip Feed Printing”
Note
❒ Default:
• Number of Skip Feed: 2
12 Skip Display On
Mode
When you press {Skip Feed} key, you can select whether optional
print counts display shows up or not.
Note
❒ Default: Off
13 Total Counter
Down
The copy counter can be set to show the number of copies made
(Count Up), or the number of copies remaining to be made
(Count Down).
Note
❒ Default: Yes (Count Down)
14 Print Position You can register the settings of print image position.
15 Feed Setup You can register the settings for frequently use.
27
Page 38

2
User Tools
28
Page 39

3. Troubleshooting
If Your Machine Does Not Operate as You
Want
If a malfunction or a misfeed occurs, the following messages will appear on the
panel display.
Message Meaning
RE-ENTER COPY
NUMBER
DRUM1:
SET COMPLETELY
SC*-**TEL***********
CALL SERVICE
COLD DRUM
NOT TO USE 3RD
SPEED
DRUM1 UNSITABLE
DRUM TYPE
The number of prints exceeds the maximum print quantity.
You can change the maximum number of prints that can be made
in one operation with the user tools. ⇒ P.26
Slide in the drum until it clicks.
Make sure that the drum is completely set in position.
Turn the main switch off and on.
If the message appears again, contact your service representative.
Slow down the printing speed, and then press print key.
Insert the same kinds of drum unit for both Drum1 and Drum2.
If the message appears again, contact your service representative.
“User Tools”
.
----When a service call message is shown on the panel display panel
Turn the main switch off and back on again. If a service code appears again, contact your service representative.
29
Page 40

Troubleshooting
If You Cannot Make Prints as You Want
Problem Cause Action
3
Misfeeds occur frequently. Improper paper type is select-
ed.
Parts of the image are not
printed.
Print shadow appears. The background image densi-
The print image appears too
light.
Scratches appear on the print
image.
The images of drum 1 and 2
do not mix well together.
2nd printing with another
drum is unsatisfactory.
Roller marks appear when
you print onto the reverse side
of paper.
The image is too wide. • Set larger size paper.
ty is too high.
The print speed is too fast. Lower the print speed.
Sharp edges in the machine
may have scratched your
prints.
If the image density is too
high, the background color
might appear strong.
The 1st print image is still wet. Wait until the 1st image be-
1st printed image is still wet
and the press roller becomes
dirty.
Select proper paper type.
⇒Refer to the master making
unit's operating instructions.
• Return the drum unit to
the master making units,
and then reduce the print
image size.
• Switch drum 1 and 2.
• Set thick paper.
• Increase the print speed.
• Set thick paper.
• Switch drum 1 and 2.
• Use the image of drum 1
for background.
comes dry.
• Wait until the 1st printed
image becomes dry.
• Wipe off the ink on the
press roller. ⇒ P.41 “When
the Press Roller is Dirty”
30
An uneven solid image appears.
Large solid image wrinkles
the master.
• Increase the print speed.
• Set thick paper.
• Use Drum2 for a large sol-
id image.
• Use Quality Standby mode
by pressing the
key for more than 3 seconds.
• Return the drum unit to
the master making unit,
and then remake the master with economy mode or
quality start mode.
• When you make master,
make a few trial prints,
and then return the drum
unit to this machine.
⇒Refer to the master making
unit operating instructions.
{
Clear Mode
}
Page 41

Loading Paper
Loading Paper
The Load Paper indicator (B)lights
when the paper feed tray runs out of
paper.
Limitation
❒ Load paper when the paper feed
tray is empty. Do not add paper
when some paper is left in the tray.
Doing so may cause problems,
such as multiple feeds and misfeeds.
❒ If you use a variety of paper while
printing, a print shadow might appear.
Reference
For available paper sizes, ⇒ P.13
“Print Paper”.
Load the paper in the Paper feed
A
tray.
Adjust the paper feed side plate
B
to match the paper size.
3
Note
❒ Correct any paper curl before
loading the paper.
31
Page 42

Troubleshooting
R
R
R
R
When the Add Ink Indicator (j) Lights
The Add Ink indicator (j) lights when it is time to supply ink.
CAUTION:
• If ink comes into contact with your eyes, rinse immediately in running water.
In the case of any abnormal symptoms, consult a doctor.
CAUTION:
• Keep the ink or ink container out of the reach of children.
3
CAUTION:
• If ink is ingested, force vomiting by drinking a strong saline solution and consult a doctor immediately.
CAUTION:
• Our products are engineered to meet high standards of quality and functionality, and we recommend that you only use the expendable supplies available at an authorized dealer.
Note
❒ Be sure to supply ink of the same color as the current drum.
❒ Ink is readily removed from skin by waterless hand cleaners followed by
washing with soap and water.
❒ Be careful not to get any ink on your clothing.
❒ Store ink under low temperature and humidity conditions.
❒ Do not store ink where it will be exposed to heat or direct sunlight.
❒ Store on a flat surface.
Open the front door.
A
Pull out the ink holder.
B
32
Page 43

Remove the used ink cartridge.
C
Remove the cap of the new ink cartridge.
D
Insert the new cartridge into the ink holder.
E
When the Add Ink Indicator (j) Lights
3
Note
❒ Always supply ink of the same color.
Return the ink holder to its original position until it clicks.
F
Close the front door.
G
The machine will start idling to supply ink to the drum.
33
Page 44

Troubleshooting
R
x Clearing Misfeeds
CAUTION:
• Be careful not to cut
yourself on any sharp
yellow edges when
you reach inside the
machine to remove
misfed papers.
----To prevent paper misfeeds:
Check the following before restarting
the printing run.
• Did you select an appropriate pa-
per type with the [Ppr.Type] key?
3
Note
❒ After clearing misfeeds, make sure
that all the doors, covers, and units
are closed and the x indicator is
off.
❒ To prevent misfeeds, do not leave
any torn scraps of paper in the machine.
❒ When clearing misfeeds, do not
turn off the main switch. If you do,
your print settings will be cleared.
❒ If misfeeds occur repeatedly,
please contact your service representative.
Paper Misfeed in the Paper
Feed Section
PAPER FEED JAM
REMOVE PAPER
PAPER TYPE 1:STD
2:THICK 3:SPL **
• Are the side pads in the correct positions?
To print on thin paper (52.3g/m
13.9 lb), slide the levers behind the
paper feed side plates in the direction of the arrow (see illustration).
• When paper is curled, correct the
curl as shown.
2
,
34
MISFED REGISTRATION
REMOVE PAPER
Remove the misfed paper.
A
Z066
Page 45

• When paper edges stick together
or paper is not fed in, shuffle the
paper as shown.
Z067
• When printing onto envelopes or
thick paper, lower the printing
speed. ⇒ P.22 “Changing the Print-
ing Speed”.
x Clearing Misfeeds
Paper Misfeed in the Paper
Feed Section
REGISTRATION JAM
REMOVE PAPER
Open the front door.
A
Lower drum unit lock lever B1.
B
Take out the drum.
C
3
• When a multi-feed occurs or the
paper is skewed, make sure that
the paper feed side plates are properly adjusted. When you load paper on the paper feed tray, make
sure that the paper edge touches
the back fence and paper is placed
on the proper paper size scale.
Only use paper where the leading
edge has two right angle corners.
Pull out the misfed paper gently
D
Note
❒ For how to take out the drum
unit, ⇒ P.9 “Changing the Drum
Unit”.
35
Page 46

3
Troubleshooting
from the inside.
If you cannot remove the misfed
E
paper from the inside, remove
from the Paper feed tray.
Paper Wrapped around the
Drum
When paper is wrapped around the drum
DRUM1:PAPERFED SKEW
REMOVE PAPER
Open the front cover.
A
Lower drum unit lock lever B1.
B
Set the drum unit and close the
F
front door.
----To prevent paper misfeeds:
⇒ P.34 “Paper Misfeed in the Paper Feed
Section”.
Take out the drum.
C
Note
❒ For how to take out the drum
unit, ⇒ P.9 “Changing the Drum
Unit”.
36
Page 47

x Clearing Misfeeds
Remove the misfed paper from
D
the drum.
If you cannot find misfed paper
E
in step DDDD, remove misfed paper
from the press roller.
Set the drum unit and close the
F
front door.
When paper is misfed inside the machine
DRUM1:DELIVERY JAM
REMOVE PAPER
Open the front cover.
A
Take out the drum.
C
Note
❒ For how to take out the drum
unit, ⇒ P.9 “Changing the Drum
Unit”.
Remove the misfed paper from
D
the inside as shown in the illustration.
3
Lower drum unit lock lever B1.
B
If you cannot remove the misfed
E
paper, remove paper from the
press roller.
37
Page 48

3
Troubleshooting
Set the drum unit and close the
F
front door.
----To prevent paper misfeeds:
If the paper is curled or the original's
leading edge margin is too narrow,
the following action is necessary.
• When you use curled paper, correct the curl as shown.
Z066
• If you want to know more details
about leading edge margin, refer
to the master making unit's operating instructions.
Paper Misfeed in the Paper
Exit Section
Slowly but firmly pull out the
A
misfed paper.
----To prevent paper misfeeds:
When a thin paper misfeed in the paper exit section occurs, reduce the
printing speed with the {WWWW}{VVVV}
{Speed} keys (⇒ P.22 “Changing the
Printing Speed”). If you cannot reduce
the printing speed, move the end
plate toward the paper delivery tray
edge.
38
Page 49

Poor Printing
R
R
R
Poor Printing
Dirty Background
If the background of prints is dirty, the drum unit might be dirty.
CAUTION:
• If ink comes into contact with your eyes, rinse immediately in running water.
In the case of any abnormal symptoms, consult a doctor.
CAUTION:
• Keep the ink or ink container out of the reach of children.
CAUTION:
• If ink is ingested, force vomiting by drinking a strong saline solution and consult a doctor immediately.
Note
❒ To avoid getting dirty background prints when printing onto paper smaller
than the original image, select a suitable reduction ratio or use larger print paper.
❒ When printing onto paper that does not absorb ink well, the background of
prints might get dirty. In this case, lower the printing speed or use Skip Feed
mode to dry the ink on the prints.
Open the front cover.
A
Pull out the drum unit.
B
3
Note
❒ For how to take out the drum unit, ⇒ P.9 “Changing the Drum Unit”.
39
Page 50

3
Troubleshooting
While pressing the drum lock, turn the drum until you can see the trailing
C
edge of the master.
With a dry soft cloth, remove any ink that has accumulated on the trailing
D
edge of the drum unit.
40
Important
❒ Do not use benzine, thinner, or other organic liquids—doing so can dam-
age the machine.
Turn the drum unit and lock it until it click after cleaning it.
E
Page 51

Poor Printing
Insert the drum unit until it locks in position, then lower the drum unit
F
lock lever.
Close the front door.
G
When the Press Roller is Dirty
If the background of prints is dirty, the Press Roller might be dirty.
3
Make several prints until clear image appears.
A
Note
❒ If the print is still dirty, contact your service representative.
Faint Prints
If the machine is not used for a long period of time or you change the color drum
unit, the ink on the drum might dry causing print quality to deteriorate. To solve
this problem, set back your drum unit to the Master making unit and use Quality
Start Mode. ⇒Refer to the Master Making Unit's Operating Instructions.
If the print density is still too light even when using Quality Start mode, remake
the master.
41
Page 52

3
Troubleshooting
42
Page 53

4. Remarks
R
Do's and Don'ts
CAUTION:
• Unplug the power cord from the wall outlet before you move the equipment.
While moving the equipment, you should take care that the power cord will
not be damaged under the equipment.
Important
• While printing, do not turn off the main switch.
• While printing, do not unplug the power cord.
• While printing, do not open the door or covers.
• While printing, do not move the machine.
• Open and close the door and covers softly.
• When printing onto paper that contains images on the back, make sure
there is a 10mm (0.4”) margin at the back leading edge. If there is no margin, the machine might incorrectly detect that paper is wrapped around
the drum and stop printing ⇒Refer to the Master Making Unit's Operating
Instructions.
• When you use envelopes or pasted print paper, the leading edge of print
might be damaged.
• Make sure to make a few trial prints to check the image position because the
image position of the trial print might not correspond with that of the original.
• The leading edge of the prints might become stained if the edge touches
the image of prints on the paper delivery tray.
• Print ink on the paper delivery tray might stick to the back side of the next
print.
• Press the {Proof} key to perform a test print as the image density of the first
few prints might be light.
• When the machine is on and the power source is less than 90% of the specified amount, printing quality will decrease. Therefore, make sure the supply from your electrical outlet is at least 90% of the required amount.
• When printing a large solid area on A3, 11" x 17" paper, the sides of the
print tend to curl up after the print is fed out to the paper delivery tray. The
next sheet that feeds out pushes against the curled sheet and a paper misfeed occurs. In this case, slow the printing speed down.
• When you make a lot of prints from a small image, ink might ooze out from
the edges of the master, especially under high temperature and when
printing in two or more colors. In this case, make a new master.
• Large uneven solid image wrinkles the master and you may not print as
you want.
43
Page 54

4
R
R
R
Remarks
Where to Put Your Machine
Environment
Your machine's location should be carefully chosen because environmental conditions greatly affect its performance.
Optimum environmental conditions
CAUTION:
• Keep the equipment away from humidity and dust. Otherwise a fire or an
electric shock might occur.
• Do not place the equipment on an unstable or tilted surface. If it topples
over, it could cause injury.
CAUTION:
• If you use the equipment in a confined space, make sure there is a continuous air turnover.
CAUTION:
• After you move the equipment, use the caster fixture to fix it in place. Otherwise the equipment might move or come down to cause a personal injury.
• Temperature: 10 – 30°C, 50 – 86°F
• Humidity: 20 – 90% RH
• A strong and level floor.
• The machine must be level within 5mm, 0.2" both front to rear and left to
right.
• Be sure to locate this machine in a large well ventilated room that has an air
turnover of more than 30m
3
/hr/person.
Environments to avoid
• Locations exposed to direct sunlight or strong light (more than 1500 lux).
• Locations directly exposed to cool air from an air conditioner or heated air
from a heater (sudden temperature changes might cause condensation within
the machine).
• Places where the machine might be subjected to frequent strong vibration.
• Dusty areas.
• Areas with corrosive gases.
44
Page 55

Where to Put Your Machine
R
R
R
Power Connection
WARNING:
• Only connect the machine to the power source described on the inside
front cover of this manual. Connect the power cord directly into a wall
outlet and do not use an extension cord.
• Do not damage, break or make any modifications to the power cord.
Do not place heavy objects on it. Do not pull it hard nor bend it more
than necessary. These actions could cause an electric shock or fire.
CAUTION:
• Unplug the power cord from the wall outlet before you move the equipment.
While moving the equipment, you should take care that the power cord will
not be damaged under the equipment.
CAUTION:
• When you disconnect the power plug from the wall outlet, always pull the
plug (not the cable).
4
Make sure the plug is firmly inserted in the outlet.
Machine Clearance
Place the machine near the power source, providing clearance as shown.
❖❖❖❖ Main frame
*: Paper delivery tray
1. More than 10cm, 4.0"
2. More than 60cm, 23.7"
3. More than 60cm, 23.7"
4. More than 60cm, 23.7"
45
Page 56

4
Remarks
Maintaining Your Machine
To maintain high print quality, clean
the following parts and units regularly.
❖❖❖❖ Cleaning the machine
Wipe the machine with a soft,
damp cloth. Then wipe it with a
dry cloth to remove the water.
Important
❒ Do not use chemical cleaner or or-
ganic solvent, such as thinner or
benzene. If they get into the machine or melt plastic parts, a failure
might occur.
❒ Do not clean parts other than those
specified in this manual. Such
parts should be cleaned by your
service representative.
Cleaning the Main Frame
Cleaning the paper feed roller (Paper
feed tray)
Wipe off the paper dust on the pa-
A
per feed roller with a damp cloth,
then wipe it with a dry cloth.
Note
❒ If you do not clean the paper
feed roller, paper misfeeds tend
to occur.
46
Page 57

5. Specifications
Main Frame
❖❖❖❖ Configuration:
Floor standing (with custom table or cabinet)
❖❖❖❖ Printing Process:
Twin color press roller printing system
❖❖❖❖ Original Size & Printing Area:
Refer to the Master Making Unit's Operating Instructions
❖❖❖❖ Print Paper Size:
Maximum: 297mm × 432mm, 11.6" × 17.0"
Minimum: 70mm × 250mm, 2.8" × 9.8"
❖❖❖❖ Leading Edge Margin:
Refer to the Master Making Unit's Operating Instructions
❖❖❖❖ Print Paper Weight:
• 52.3 – 209.3g/m2, 13.9 – 55.6 lb
❖❖❖❖ Print Speed:
90.105.120cpm (3 steps)
❖❖❖❖ Color Printing:
Drum unit replacement system
❖❖❖❖ Image Position:
Up&Down Right&Left
Overall Image Adjustment +10mm, 0.4” or —10mm,
0.4”
Drum2 Image Adjustment Moving sums of both adjust-
ment functions (Max 10mm,
0.4”)
❖❖❖❖ Paper Size and Paper Capacity:
1,000 sheets (80g/m2, 20 lb)
❖❖❖❖ Paper Delivery Tray Capacity:
1,000 sheets (80g/m2, 20 lb)
+10mm, 0.4” or —10mm,
0.4”
+5mm, 0.2” or —5mm, 0.2”
47
Page 58

Specifications
❖❖❖❖ Dimensions (W ×××× D ×××× H):
Width Depth Height
Stored 920 mm, 36.2" 630 mm, 24.8" 555 mm, 21.9"
Set up 1,610 mm, 63.4" 630 mm, 24.8" 555 mm, 21.9"
❖❖❖❖ Weight:
• Machine:
Less than 88kg, 194 lb
5
❖❖❖❖ Noise Emission
*1
:
Sound Power Level
Printing Speed Noise Emission
During printing 90cpm 78dB(A)
105cpm 80dB(A)
120cpm 82dB(A)
Stand-by -- 47dB(A)
Sound Pressure Level
During printing 90cpm 65dB(A)
*1
The above measurement made in accordance with ISO 7779 are actual value.
*2
It is measured at the position of the operator.
*2
Printing Speed Noise Emission
105cpm 68dB(A)
120cpm 69dB(A)
❖❖❖❖ Power Consumption:
• Printing:
0.55kW (Max)
❖❖❖❖ Optional Equipment:
• Drum unit: color Drums
A3, 11" × 17"
Note
❒ Specifications are subject to change without notice.
48
Page 59

Consumables
Consumables
Name Size Remarks
Ink-Black 1,000ml/pack Environmental conditions: -5
to 40°C 10 – 95% RH
Ink-Red 1,000ml/pack
Ink-Blue
Ink-Green
Ink-Brown
Ink-Purple
Ink-Yellow
Ink-Navy
Ink-Maroon
Ink-Teal
Ink-Orange
Ink-Gray
Ink-Violet
Ink-Hunter green
Ink-Burgundy
Ink-Gold
Ink-Reflex Blue
Note
❒ Specifications are subject to change without notice.
5
49
Page 60

INDEX
F
,
{~}{}}{|}{{}
4
A
,
26
,
,
25
32
accessing the user tools
Add Ink Indicator (j)
adjusting the position of printed images
20
,
Auto Off
Auto Reset Time
26
B
Buzzer Off
,
26
C
26
,
22
changing the printing speed
,
,
,
49
,
34
4
4
,
clearing misfeeds
{Clear Modes} key
{Clear/Stop} key
Clr Resettable Count
consumables
,
Counter
4
D
,
,
9
,
4
4
,
27
39
,
9
,
2
dirty background
Drm Stp Mode
{Drum1} key
{Drum2} key
Drum unit
drum unit handle B2
drum unit lock lever B1
,
E
environment
,
44
,
,
,
27
1
Feed Setup
front door
I
, 32,
ink
ink holder
49
,
2
J
Jump Table
,
27
K
,
,
4
4
{#} key
keys
L
,
,
31
10
,
27
Loading Paper
loading paper
Load Paper indicator (B)
Long Sheet Mode
M
,
26
,
45
,
1
,
2
2
machine clearance
machine exterior
machine interior
main switch
maintaining your machine
Max Print
,
N
Number keys
,
4
O
48
, 1,
4
operation panel
options
,
,
,
31
46
50
Page 61

P
T
paper alignment wings
paper delivery end plate
paper delivery side plates
paper delivery tray
paper feed side plates
Paper feed side plates knob
Paper feed tray
Paper feed tray down key
paper misfeed in the paper exit section
paper misfeed in the paper feed section
paper or master wrapped around the drum
Paper Type
poor printing
{Position Adj/Drum2} key
{Position Adj/Whole} key
power connection
{Ppr. Supply Adj} key
{Ppr.Type} key
{Print} key
print paper
Print Position
{Proof} key
,
,
17
,
39
,
,
4
, 13, 17,
,
27
,
4
,
2
,
2
,
2
,
2
,
1
,
1
1
,
1
,
4
,
4
,
45
,
4
4
31
R
,
, 34,
,
38
35
36
thick paper
Total Counter
Total Counter Down
trailing edge guides
Troubleshooting
,
17
,
26
,
29
,
,
27
3
U
user tools
{User Tools} key
, 25,
26
,
4
W
what you can do with this machine
when the image density is too light
where to put your machine
{WWWW} {VVVV} keys (Speed keys)
,
,
44
4
,
,
iv
41
Remarks
Resettable Count
,
43
,
26
S
29
,
,
,
47
4
17
,
,
,
15
i
23
,
,
,
27
27
17
Safety Information
,
,
26
service call
Setting and Changing the Drum Unit
Setting Up the Paper Delivery Table
Skip Display On Mode
{Skip Feed} key
Skip Feed printing
Skip Number of Time
Special kinds of Paper
specifications
standard paper
standard printing
System
,
,
7
11
51
Page 62

MEMO
52
Page 63

MEMO
53
Page 64

MEMO
54
UE USA C593
 Loading...