

Page 1

RICOH
SwapBox
Installation Manual
TM
and SwapFTL
(Revision 1.0)
TM
Microsoft and Windows are registered trademarks of Microsoft Corp.
SwapBox and SwapFTL are trademarks of SCM Microsystems Inc.
25 May, 1998
Subject to change
Page 2

TABLE OF CONTENTS
1. INTRODUCTION.............................................................................1
1.1 PRECAUTIONS........................................................................................... 1
1.1.1 SWAPBOX AND SOFTWARE............................................................ 1
1.1.2 SOFTWARE LICENSE AGREEMENT................................................ 1
1.2 SYSTEM REQUIREMENTS ........................................................................ 1
1.3 ITEMS TO PREPARE BEFORE INSTALLATION........................................ 1
1.4 WINDOWS 95 VERSION CONFIRMATION................................................ 2
2. SWAPBOX INSTALLATION...........................................................4
2.1 HARDWARE INSTALLATION...................................................................... 4
2.2 DRIVER INSTALLATION............................................................................. 4
3. SOFTWARE (SWAPFTL) INSTALLATION ....................................5
3.1 SWAPFTL SOFTWARE INSTALLATION .................................................... 5
3.2 VERIFICATION............................................................................................ 5
3.2.1 SOFTWARE VERSION....................................................................... 5
3.2.2 FLASH MEMORY CARD AUTOMATIC DETECTION......................... 6
4. TROUBLESHOOTING....................................................................7
4.1 SWAPBOX RESOURCE CONFLICT........................................................... 7
4.1.1 IRQ AND I/O ADDRESS..................................................................... 7
4.1.2 MEMORY ADDRESS.......................................................................... 7
Conflict with a PCI device........................................................................ 7
Conflict with a plug and play ISA device.................................................. 8
Conflict with a legacy ISA device............................................................. 8
4.2 “FAILED TO OPEN PCCARD” ERROR....................................................... 9
4.3.1 TIMELAG TO LOADING DRIVER....................................................... 9
4.3.2 PCCARD NOT CONFIGURED ........................................................... 9
4.3.3 RESOURCE CONFLICT..................................................................... 9
4.3 “INVALID DYNAMIC LINK CALL FROM SWAPENUM …” ERROR............ 9
4.4 SWAPFTL PROBLEM WITH NOTEBOOK COMPUTERS.......................... 8
4.2.1 WINDOWS AND PC CARD DRIVER VERSION................................. 8
4.2.2 SYSTEM SUMMERY.......................................................................... 8
4.4 COMPLETE UNINSTALL........................................................................... 10
4.5 SCM TECHNICAL SUPPORT ................................................................... 10
Page 3

1.INTRODUCTION
1.1 PRECAUTIONS
1.1.1 SWAPBOX and Software
If you purchase SwapBox from an authorized SCM Microsystems dealer, do not use the
software enclosed with the SwapBox. You need to purchase the required software and
license additionally from Ricoh.
The software part number is:
A230 9353
1.1.2 Software License AGREEMENT
Before you use the software, you must agree to the SCM software license agreement that
is enclosed in either the SwapBox or the software.
Users must be responsible for the agreement with SCM Microsystems Inc. Ricoh Co., Ltd.
is not responsible for any legal problems caused by user’s actions contrary to the
agreement.
1.2 System Requirements
An IBM PC-AT compatible computer with ISA Plug & Play BIOS
·
One empty ISA bus slot (SBI-C2P and SBI-D2P)
·
One empty 3.5” drive bay (SBI-D2P)
·
Microsoft
·
(Refer to section 1.4 for more details.)
At least 2MB of free disk space on the system partition (the partition where Windows
·
95 is installed) for SwapFTL software installation
â
Windows â 95 operating system 4.00.950a or later version installed
1.3 ITEMS TO PREPARE BEROE INSTALLATION
Computer hardware user’s manual
·
Windows 95 installation disks or CD-ROM
·
Windows 95 service pack (Refer to section 1.4 for more details.)
·
SCM SwapBox SBI-C2P or SBI-D2P
·
SCM/RCH SwapFTL + SwapUTI (rev. 2.01 or later) software diskette, and a
·
software license
Page 4
1.4 Windows 95 Version Confirmation
Windows 95 has several different versions as shown in the following table.
Version Description Remarks
4.00.950 First version
4.00.950a First version (4.00.950) plus
service pack 1
4.00.950B
4.00.950C So called “OSR2.5 (OEM
So called “OSR2 (OEM
Service Release 2)”
Service Release 2.5)”
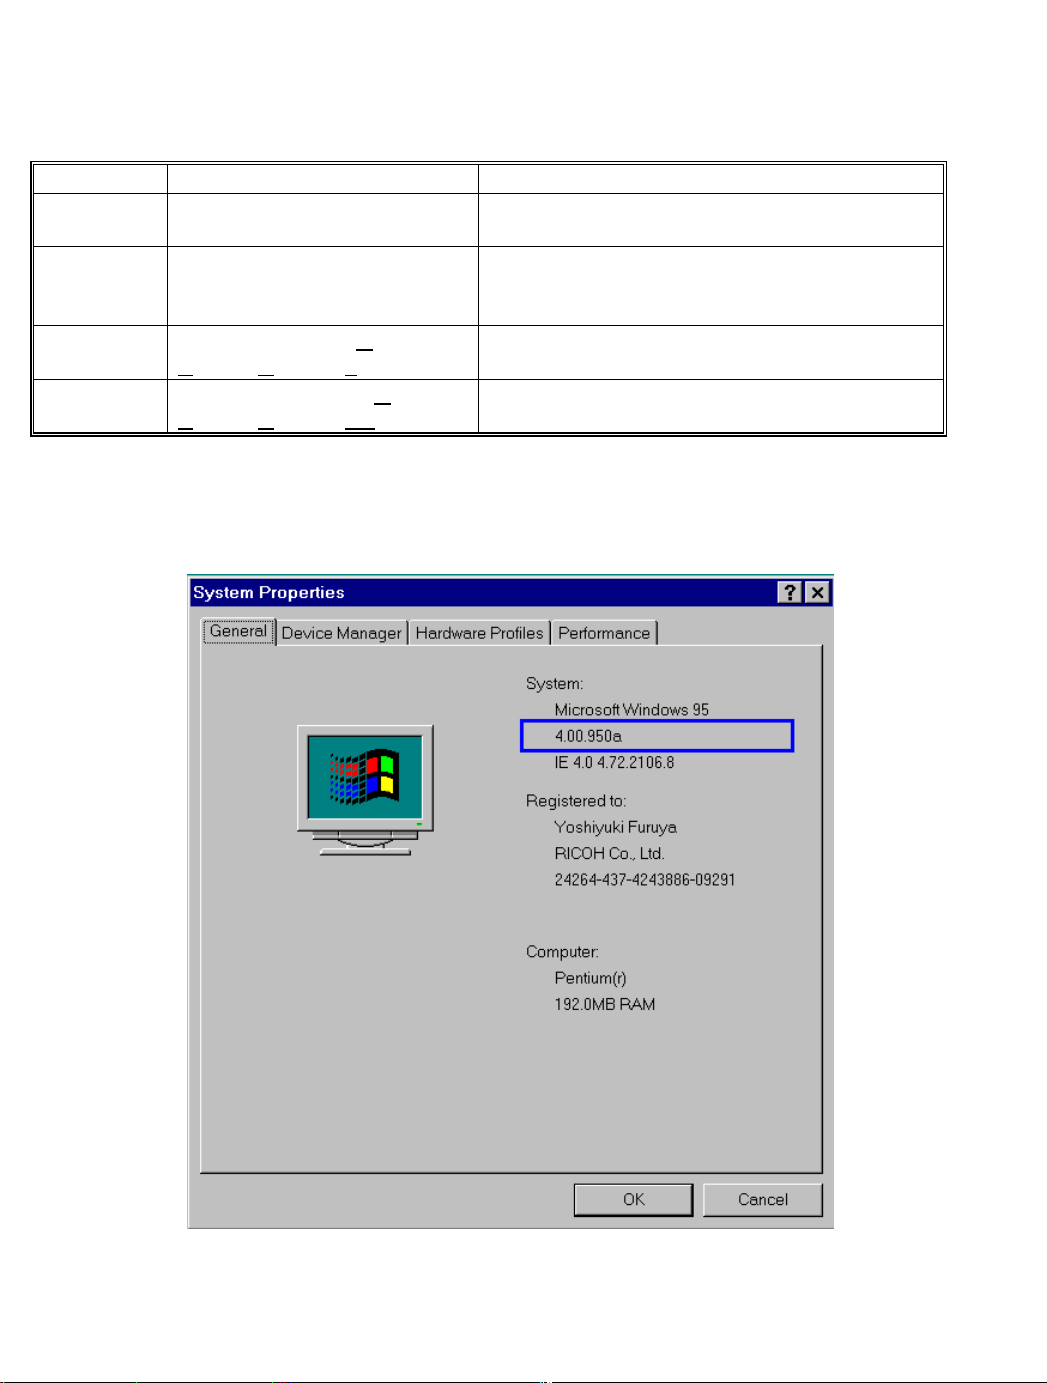
Check the Windows 95 version first, just by clicking the “System” icon in the Windows
Control Panel. If you see 4.00.950 in the box shown below, though the example version is
4.00.950a, install “Service Pack 1” into the current Windows operating system. Refer to the
next page for how to get “Service Pack 1”.
Not suitable for SwapBox and SwapFTL
installation.
Install service pack 1 (SP1) into Windows 95
version 4.00.950. SP1 is available from
Microsoft’s web site.
Only computers with Windows 95 preinstalled have had this version since 1997.
Only computers with Windows 95 preinstalled have had this version since 1998.
If the version is 4.00.950B or 4.00.950C, install SwapBox and SwapFTL without updating
Windows.
Page 5

“Service Pack 1” is available from the Microsoft web site.
For the detailed information, refer to the following Internet address.
http://www.microsoft.com/windows95/info/service-packs.htm
The service pack file can be downloaded from the following Internet location. Choose the
one that is suitable for your Windows version.
Language Internet Location
US English http://www.microsoft.com/windows95/info/service-packs.htm
Chinese (Simplified) Not available.
Chinese (Traditional) http://www.microsoft.com/windows/software/localize/tw-eu.htm
Czech http://www.microsoft.com/windows/software/localize/cz-eu.htm
Danish http://www.microsoft.com/windows/software/localize/dan-eu.htm
Dutch http://www.microsoft.com/windows/software/localize/dut-eu.htm
Finnish http://www.microsoft.com/windows/software/localize/fin-eu.htm
German http://www.microsoft.com/windows/software/localize/frn-eu.htm
Greek http://www.microsoft.com/windows/software/localize/ger-eu.htm
Hungarian http://www.microsoft.com/windows/software/localize/grk-eu.htm
Italian http://www.microsoft.com/windows/software/localize/itn-eu.htm
Japanese (PCAT) http://www.microsoft.com/windows/software/localize/jpcat-eu.htm
Korean http://www.microsoft.com/windows/software/localize/kr-eu.htm
Norwegian http://www.microsoft.com/windows/software/localize/nor-eu.htm
Pan-European http://www.microsoft.com/windows/software/localize/pan-eu.htm
Polish http://www.microsoft.com/windows/software/localize/pl-eu.htm
Portuguese
(Brazilian)
Portuguese (Iberian) http://www.microsoft.com/windows/software/localize/pt-eu.htm
Russian http://www.microsoft.com/windows/software/localize/ru-eu.htm
Slovenian http://www.microsoft.com/windows/software/localize/slv-eu.htm
Spanish http://www.microsoft.com/windows/software/localize/spa-eu.htm
Swedish http://www.microsoft.com/windows/software/localize/swe-eu.htm
Thai http://www.microsoft.com/windows/software/localize/thai2.htm
Turkish http://www.microsoft.com/windows/software/localize/trk-eu.htm
http://www.microsoft.com/windows/software/localize/brz-eu.htm
Page 6

2. SWAPBOX INSTALLATION
2.1 HARDWARE INSTALLATION
CAUTION:
Install the SwapBox as explained in Chapter 1 to 3 of the SwapBox Manual that is
enclosed in the SwapBox package.
Then go on to the next section below for the driver installation.
1) Before installing the SwapBox in a comp uter, turn off the computer
and disconnect the power cable.
2) This manual does not explain how to install an ISA board in your
computer. Refer to your computer’s users manual for how to do it.
2.2 DRIVER INSTALLATION
CAUTION:
1. Turn on the computer. “SCM SwapBox” may appear during boot-up.
2. When Windows 95 starts, it finds the SwapBox automatically and installs the
necessary driver files from the Windows installation diskette(s) or CD-ROM.
1) Do not use the software disks that are enclosed with the SwapBox.
2) Ensure that you have Windows 95 - 4.00.950a or a later version
installed in your computer. (Refer to section 1.4 for more details.)
3. After Windows starts, choose “PCCard” from the Control Panel.
If PCCard Properties is displayed, driver installation has finished.
·
You can go on to the next section.
If PCCard Wizard is displayed, go on to the next step.
·
4. In the PCCard Wizard, choose all the default settings to finish the wizard, then reboot
the computer.
5. After Windows 95 has restarted, choose “System” from the Control Panel.
6. Choose “Device Manager” and confirm that “SCM SwapBox Family Plug and Play
PCMCIA Controller” is listed in the PCMCIA socket category.
7. Double-click “SCM SwapBox Family Plug and Play PCMCIA Controller” and confirm
that the SwapBox is working properly.
Page 7

3. SOFTWARE (SWAPFTL) INSTALLATION
CAUTION:
1) If you purchased SwapBox from an authorized SCM dealer, do not
use the software diskettes that are enclosed in the SwapBox
package.
2) Use the software diskette which is labeled “SwapBox Software/ RCH
SwapFTL + SwapUTI”.
3) A software license is required to
computer.
4) The SwapFTL software may not work with some PC Card
(PCMCIA), CardBus, or ZV port controllers installed in notebook
computers.
install
a software package on a
3.1 SWAPFTL SOFTWARE INSTALLATION
1. Ensure that the SwapBox has been installed and configured under the Windows 95
environment.
2. Insert the software diskette in the floppy disk drive.
3. Choose “Run” from the Start menu.
4. Type “A:\setup” and click OK.
5. Follow the instructions on the display.
6. Reboot the computer after installation has finished.
3.2 VERIFICATION
3.2.1 SOFTWARE VERSION
1. Choose “SwapFTL Binary Utility” from the “SCMSwapFTL” program group.
2. After the utility starts, choose [Help] – [About SwapUti..].
3. Confirm that the version information is as follows:
VERSION.BMP
Page 8

3.2.2 FLASH MEMORY CARD AUTOMATIC DETECTION
1. Insert the 4MB flash memory card supplied from Ricoh into a card slot.
2. Windows 95 automatically detects the card, if this is the first time a flash card has been
used, Windows 95 installs the necessary drivers, and the “Found new hardware” dialog
box should appear automatical l y.
3. Wait about 30 s, then choose “SwapFTL Binary Utility” from the “SCMSwapFTL”
program group.
MENU.BMP
4. After the utility software starts, choose [Image] – [Read] .
If “Failed to open PCCard” appears, see Troubleshooting.
IMAGE-READ. BMP
5. Click OK to read the card.
If this works successfully, a new file is created as a temporary file, and this can be
stored on the computer.
Page 9

4. TROUBLESHOOTING
4.1 SwapBOX Resource Conflict
An ISA device must not share resources (IRQ, I/O address, and memory address) with
another device.
ISA plug and play BIOS automatically assigns necessary resources to ISA boards.
However, this could cause a problem if an ISA board requires specific resources.
The SwapBox requires a specific memory address range to activate card services. So, if
another ISA device or PCI device occupies this memory address range, the SwapBox and
SwapFTL will not work.
4.1.1 IRQ and I/O address
To identify whether an IRQ or I/O address has a conflict with another device, check the
SwapBox properties in the Windows device manager. If you find a conflict, follow the
instructions given by Windows Help.
4.1.2 MEMORY ADDRESS
The SwapBox and card services require a memory Window between 0xC8000 to
0xD3FFF.
The SwapBox properties do not tell you if the memory address is in conflict with others. To
identify whether the memory address is in conflict with another device, do the following:
1. Choose “Computer” in the Windows device manager, and click “Properties”.
2. Choose “Memory” in the “View resources” tab.
3. Check if any other device is using the address range from
a PCI device, you need to adjust the plug and play BIOS settings. If it is an ISA device,
you need to remove the device from the system.
Conflict with a PCI device
1. Shut down Windows and reboot the computer.
2. Enter BIOS setup during system boot-up.
How to enter BIOS setup and BIOS setup options depends on your system.
3. Find the ISA plug and play settings in the BIOS setup.
4. Adjust the settings so that the BIOS does not allocate the SwapBox memory range to
PCI devices.
Example:
1. Press the “DEL” key during boot-up to gain access to BIOS setup.
2 Choose “PNP AND PCI SETUP” from the main menu.
Award BIOS
0xC8000
0xD3FFF
to
. If it is
Page 10

3 Change the “ISA MEM BLOCK BASE” setting as follows:
ISA MEM BLOCK BASE: No/ICU ®
·
ISA MEM BLOCK SIZE:
·
4 Press “Esc” to exit “PNP AND PCI SETUP”.
5 Choose “SAVE & EXIT SETUP”.
Conflict with a plug and play ISA device
1. Shut down the computer.
2. Remove the ISA device that is in conflict with the SwapBox.
3. Restart the computer and see if the SwapBox and the SwapFTL work under the
Windows environment.
Conflict with a legacy ISA device
Either remove the ISA device that is in conflict with the SwapBox to change its jumper
settings, or run the setup utility of the device to change the setting.
8k
D000
4.2 “Failed to open PCCard” Error
4.2.1 TIMELAG TO LOADING DRIVER
Windows requires a certain time, which depends on system performance, to enable card
services for a flash memory card after inserting it in a PC card socket.
If you try to read, erase, or write to the card before the card service is ready, you receive a
“Failed to open PCCard” error.
Wait for about 30 s, then try again.
4.2.2 PCCard NOT CONFIGURED
If the PCCard icon in the Windows Control Panel is not configured, you receive a “Failed to
open PCCard” error when you try to access the card.
Configure the PCCard icon using Control Panel as explained in the driver installation
procedure.
4.2.3 RESOURCE CONFLICT
If you receive a “Failed to open PCCard” error even if the SwapBox looks correctly
configured in the device manager, a memory address conflict is causing the error.
Refer to section 4.1.2 to solve the problem.
Page 11

4.3 ”INVALID DYNAMIC LINK CALL FROM
SWAPENUM…” ERROR
A blue screen error with a message
xxxx service x”
activated.
Once this happens, follow the procedure below.
1. Uninstall SwapFTL (choose “SwapFTL Uninstall” from “SCM SwapFTL” program
menu).
2. Reboot the computer.
3. After Windows has restarted, double-click “System” icon in the Control Panel.
4. Choose “Device Manager” tab and double-click “SCM SwapBox” in the “PCMCIA
sockets” category.
5. If the device was not activated, activate it.
6. Reboot the computer.
7. After Windows has restarted, re-install SwapFTL.
may happen, if SwapFTL software was installed before SwapBox had been
“Invalid dynamic link call from SwapEnum to device
4.4 SWAPFTL Problem with Notebook Computers
4.4.1 Windows and PC Card driver version
Before installing the SwapFTL software into a notebook computer, ensure the following.
Windows 95 OSR2 is installed or Service Pack 1 is installed.
·
For how to identify the version of Windows 95, refer to section 1.4 for details.
The latest PC Card driver is installed.
·
Contact your computer manufacturer or PC Card controller vender.
4.4.2 System Summery
If you still have problems after updating Windows and the drivers, send your computer’s
system summary to the support database.
To prepare the system summary as a PostScript file, do the following.
1. Install a PostScript printer (e.g., HP LaserJet 4 PS).
2. Double-click the “System” icon in the Control Panel.
3. Choose the “Device manager” tab, and select “Computer” in the device map.
4. Click the “Print” button.
5. Choose the PostScript printer using the “Setup” button, choose “All devices and
system summary” as the report type, and check the “Print to file” box.
6. Click OK to make a PostScript print file.
Page 12

4.5 COMPLETE UNINSTALL
If the SwapBox and the SwapFTL software do not work due to unsuccessful configuration,
the following process helps you to restart Windows plug and play from the beginning.
This procedure uninstalls all the software and drivers that were installed for the SwapBox,
as well as deleting the Windows registry settings.
1. Uninstall the SCM SwapFTL programs.
Choose “SwapFTL uninstall” from the Start menu.
2. Delete the following files from the \Windows\System directory.
SOCKETSV.VXD
·
FLS2MTD.VXD
·
FLS1MTD.VXD
·
SRAMMTD.VXD
·
CARDDRV.EXE
·
CSMAPPER.SYS
·
PCCARD.VXD
·
3. Delete “SCM SwapBox Family Plug and Play PCMCIA Controller” from the Windows
device manager.
(Choose ‘System” from the Control panel to access the device manager.)
4. Shutdown and restart Windows.
Windows starts the plug & play process again to install the SwapBox.
 Loading...