

Page 1

RICOH
SwapFTL
TM
Binary Utility
Operation Manual
(Revision 1.0)
Microsoft and Windows are registered trademarks of Microsoft Corp.
SwapBox and SwapFTL are trademarks of SCM Microsystems Inc.
25 May, 1998
Subject to change.
Page 2

TABLE OF CONTENTS
1. OVERVIEW..................................................................................... 1
2. OPERATION................................................................................... 2
2.1 PROGRAMMING A FLASH MEMORY CARD.......................…….................... 2
2.1.1 GETTING A SOURCE FILE.................................................................2
2.1.2 PROGRAMMING A CARD WITH THE SOURCE............................... 2
NAD30/40 Copy and Fax Main Firmware...........................................2
NAD30/40 Fax Modem Firmware and Fax SRAM Backup ................3
2.2 DOWNLOADING TO A MACHINE ................................................. ..............4
2.3 SAVING DATA TO A FILE................................................ ...............…..........4
3. FUNCTIONS ........... ......................................................... ............... 5
3.1 FILE MENU ......................................................................................…….........5
3.1.1 [FILE] – [OPEN]...................................................................................5
3.1.2 [FILE] – [CLOSE] ................................................................................5
3.1.3 [FILE] – [SAVE]....................................................................................5
3.1.4 [FILE] – [SAVE AS]..............................................................................6
3.2 VIEW MENU..........................................................................................…….....6
3.2.1 [VIEW] – [TOOLBAR] ..........................................................................6
3.2.2 [VIEW] – [STATUS BAR] .....................................................................6
3.3 IMAGE MENU ............................................................................................……7
3.3.1 [IMAGE] – [ERASE] .............................................................................7
3.3.2 [IMAGE] – [READ] ...............................................................................8
3.3.3 [IMAGE] – [WRITE]..............................................................................9
1.1.4 [IMAGE] – [VERIFICATION] ..............................................................10
4.4 HELP MENU..........................................................................................……....11
4.4.1 [HELP] – [ABOUT SWAPUTI…] ....................................................….11
Page 3
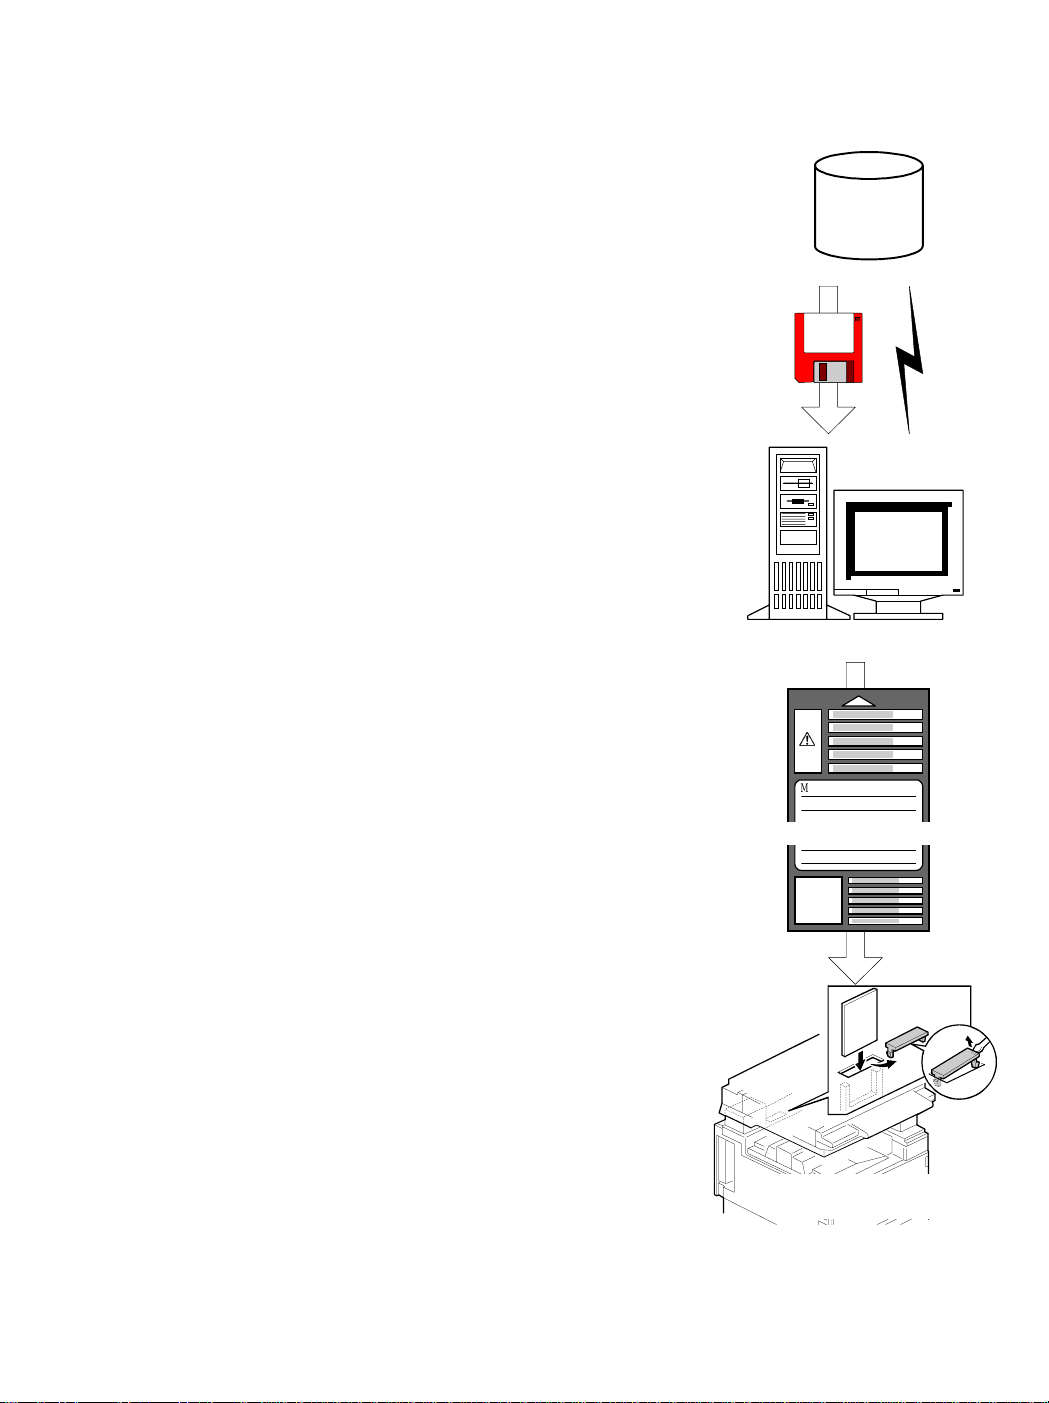
1. OVERVIEW
This software allows a flash memory card to be used as an intermediate medium between
a flash ROM (or RAM) on the machine and a Windows 95 based computer.
The basic procedure is as follows:
ROM File
1. You receive ROM files from a database either via
network or via physical medium, and save them onto
your computer’s local hard disk.
Your computer works as a flash memory card
programmer after you install a SwapBox and
SwapFTL software (this software).
2. You program the ROM file to a flash memory card using
this software.
Database
Link
Communication
3. You carry the programmed card to a machine site and
download the ROM data from the card to the machine’s
internal flash ROM.
The 4MB flash memory card that is customized for
this application is available from SPC.
You cannot use other types of flash memory
card.
4. After downloading ROM data to one machine, you can
use the same card with another machine of the same
type.
Windows 95 Computer
4MB
I
MEMO
4MB Flash Memory Card
A
Machine
(e.g., NAD Copier)
PROGRAMMING A CARD.WMF
Page 4
2. OPERATION
2.1 PROGRAMMING A FLASH MEMORY CARD
2.1.1 GETTING A SOURCE FILE
You can (or will be able to) obtain the source firmware file(s) in one of the following ways.
Notes mail or through a Notes database
·
Internet-mail
·
BBS
·
Floppy disk
·
Flash memory card (you need to save the data on the card as a file on a PC before
·
using the data.)
Others (as yet unspecified)
·
2.1.2 PROGRAMMING A CARD WITH THE SOURCE
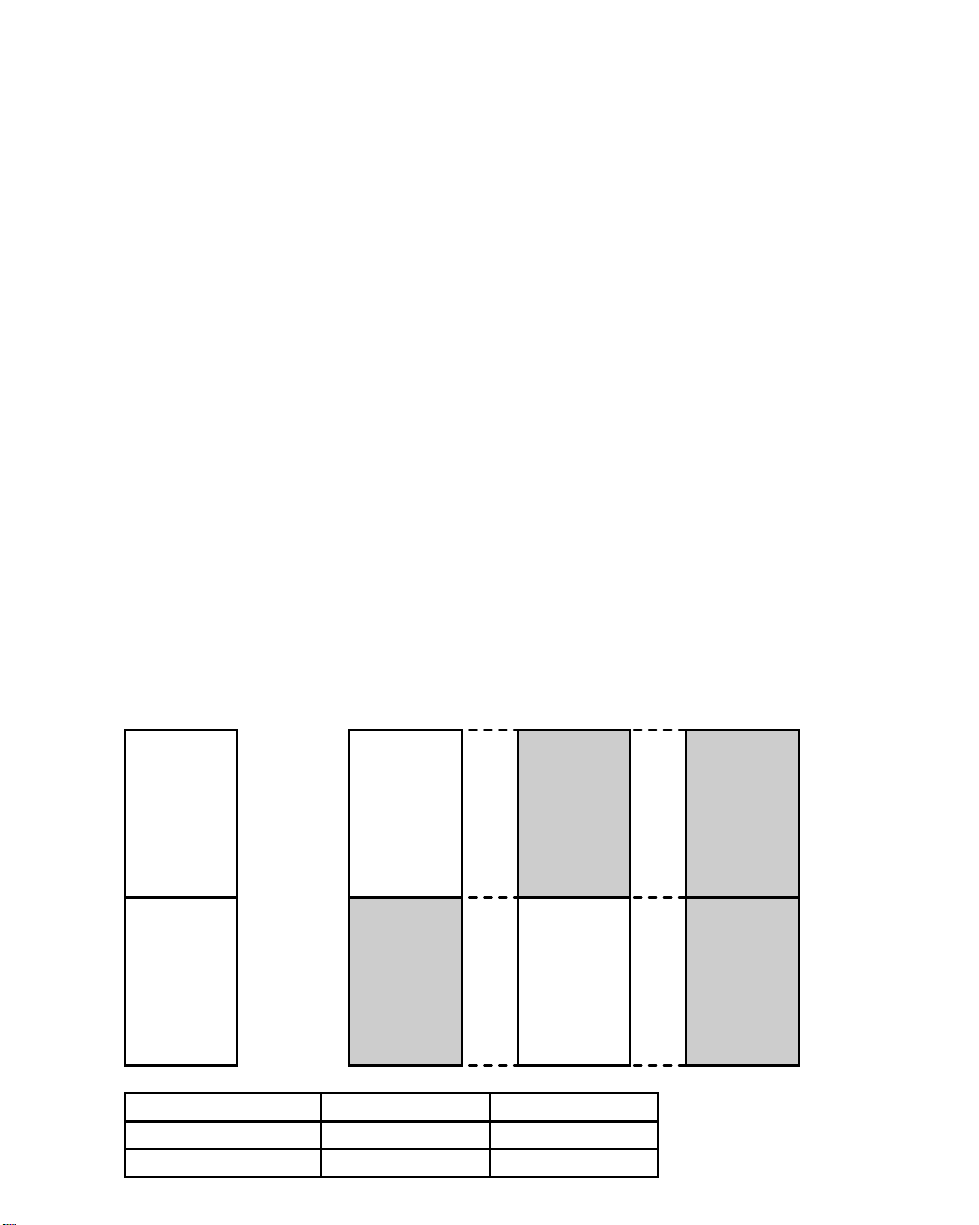
NAD30/40 Copy and Fax Main Firmware
You can program copy and fax firmware together onto one 4MB flash memory card, as
shown below.
2MB
[Hex] [Hex]Copy only Fax only
3FFFFF4MB
Fax
(FCU)
200000
1FFFFF
Copy
(BICU)
000000
0Start Address (Hex)
Length (Hex) 200000
Size (kB) 2,000 (2MB) 2,000 (2MB)
200000
200000
Copy/Fax
combined
3FFFFF
Fax
(FCU)
200000
1FFFFF
Copy
(BICU)
000000
COPY_FAX_ROM.WMF
Page 5

NAD30/40 Fax Modem Firmware and Fax SRAM Backup
Modem
Program modem firmware using the address and length settings as shown below.
You cannot program other data on the card once the modem firmware has been
programmed.
SRAM
Using Fax SP mode, you can make a backup of SRAM data onto the 4MB flash memory
card. This will help you set up multiple machines with fax options with the same settings,
or will help you restore user data if the SRAM data has been erased accidentally.
To save the SRAM backup data from a fax unit on a 4MB flash memory card as a file, or to
program a backup file from a PC onto a 4MB flash memory card, use the address and
length settings as shown below.
2MB
[Hex] [Hex]Modem
3FFFFF4MB
240000 h
200000
1FFFFF
000000
Length (Hex) 40000
Size (kB) 256 128 128 + 512
Modem
200000Start Address (Hex)
SRAM
(FCU)
220000 h
SRAM (FCU)
200000
20000
SRAM
(FCU+EXSAF)
2A0000 h
SRAM
(FCU+EXSAF)
200000
A0000
FAX_MODEM_SRAM.WMF
3FFFFF
200000
1FFFFF
000000
Page 6

2.2 DOWNLOADING TO A MACHINE
Refer to the machine’s service manual for how to download its firmware to the flash ROM
inside it.
2.3 SAVING DATA TO A FILE
Some machines can upload an internal flash ROM image to a flash memory card. To save
the image on the flash memory card as a computer file, read the card with a specific
address range setting that was mentioned in section 2.1.2, and save the read data as a
file.
Page 7

3. FUNCTIONS
3.1 File Menu
3.1.1 [File] – [Open]
FILE-OPEN.BMP
This opens a binary file.
Use “Binary Files (*.bin)” or “SwapUti Files (*.dmp). Do not use the others.
The default setting is “Binary Files (*.bin).
An 8-bit checksum is displayed at the lower left corner of the opened file.
3.1.2 [File] – [Close]
This closes an active file that has been opened.
3.1.3 [File] – [Save]
This saves an active file with the same name.
OPENED_FILE.BMP
Page 8

3.1.4 [File] – [Save As]
This saves an active file with a different name from the original.
3.2 VIEW MENU
FILE-SAVEAS-BIN.BMP
3.2.1 [View] – [Toolbar]
This switches on the toolbar display.
3.2.2 [View] – [Status bar]
This switches on the status bar display.
Page 9

3.3 IMAGE MENU
3.3.1 [Image] – [Erase]
IMAGE-ERASE.BMP
Field Description
Source Card slot number that has a flash memory card currently installed.
Start Address A “0 (zero)” appears at default.
To erase the whole card, do not change the setting
Length Hexadecimal length of the card appears at default.
To erase the whole card, do not change the setting
Base of Address/
Length
Do not change the settings.
The default setting is “Hex”.
NOTE:
If the specified start address and length do not coincide with block boundaries on
the flash memory card, the message below appears.
IMAGE-ERASE-ERR.BMP
Page 10

3.3.2 [Image] – [Read]
IMAGE-READ.BMP
Field Description
Source Card slot number that has a flash memory card currently installed.
Start Address A “0 (zero)” appears at default.
Change this setting if necessary.
Length Hexadecimal length of the card appears at default.
Change this setting if necessary.
Base of Address/
Length
Do not change the settings.
The default setting is “Hex”.
Page 11

3.3.3 [Image] – [Write]
IMAGE-WRITE .BMP
Field Description
Source Source file name that is currently active in the application.
Target Card slot number that has a flash memory card currently installed.
Card erase
before write
Start Address A “0 (zero)” appears at default.
Length Hexadecimal length of the source file appears at default.
Base of Address/
Length
If this is checked, the application erases the whole card before writing
data from the source file.
The default setting is checked (= erase).
Change this setting if necessary.
Do not change the setting.
Do not change the settings.
The default setting is “Hex”.
CHECKSUM_SWAPUTI.BMP
After writing the data to a flash memory card, an 8-bit checksum ¬ pops up, so that you
can compare it with the checksum of the source file.
Page 12

3.3.4 [Image] – [Verification]
IMAGE-VERIFY.BMP
Field Description
Source Source file name that is currently active in the application.
Target Card slot number that has a flash memory card currently installed.
Start Address A “0 (zero)” appears at default.
Change this setting if necessary.
Length Hexadecimal length of the source file appears at default.
Do not change the setting.
Base of Address/
Length
Do not change the settings.
The default setting is “Hex”.
If verification was successful, a ‘Verification OK!” message pops up.
If verification was not successful, a “Compare error !” message pops up with the source
and target addresses.
VERIFY-OK.BMP
VERIFY-ERR.BMP
Page 13

3.4 HELP MENU
3.4.1 [Help] – [About SwapUti …]
VERSION2.BMP
 Loading...