

Page 1

1,000-SHEET FINISHER
(Machine Code: B408)
Page 2
10 August, 2001 MAIN PCB
1. REPLACEMENT AND ADJUSTMENT
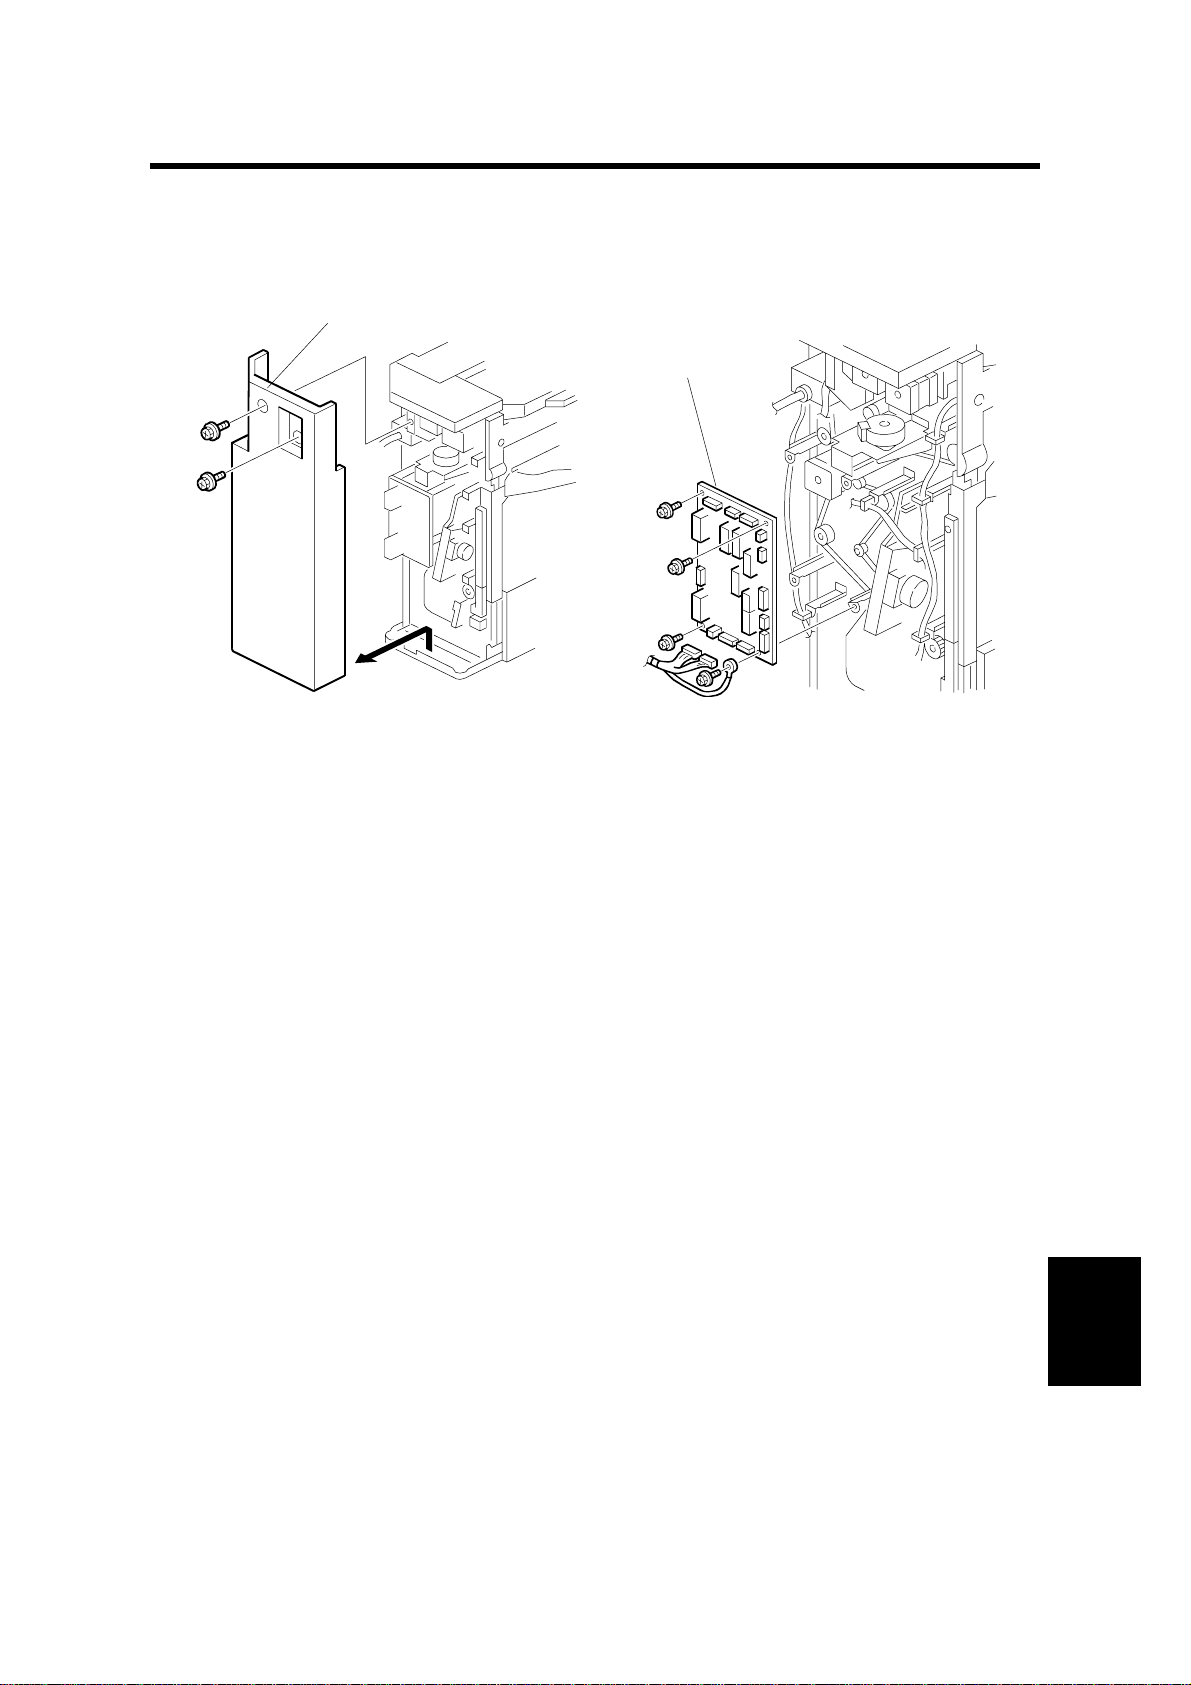
1.1 MAIN PCB
[A]
[B]
1. Rear cover [A] (!x 2)
2. Main PCB [B] (!x 4, All ")
B408R109.WMF
B408R110.WMF
B408-1
Options
Page 3

STAPLER UNIT 10 August, 2001
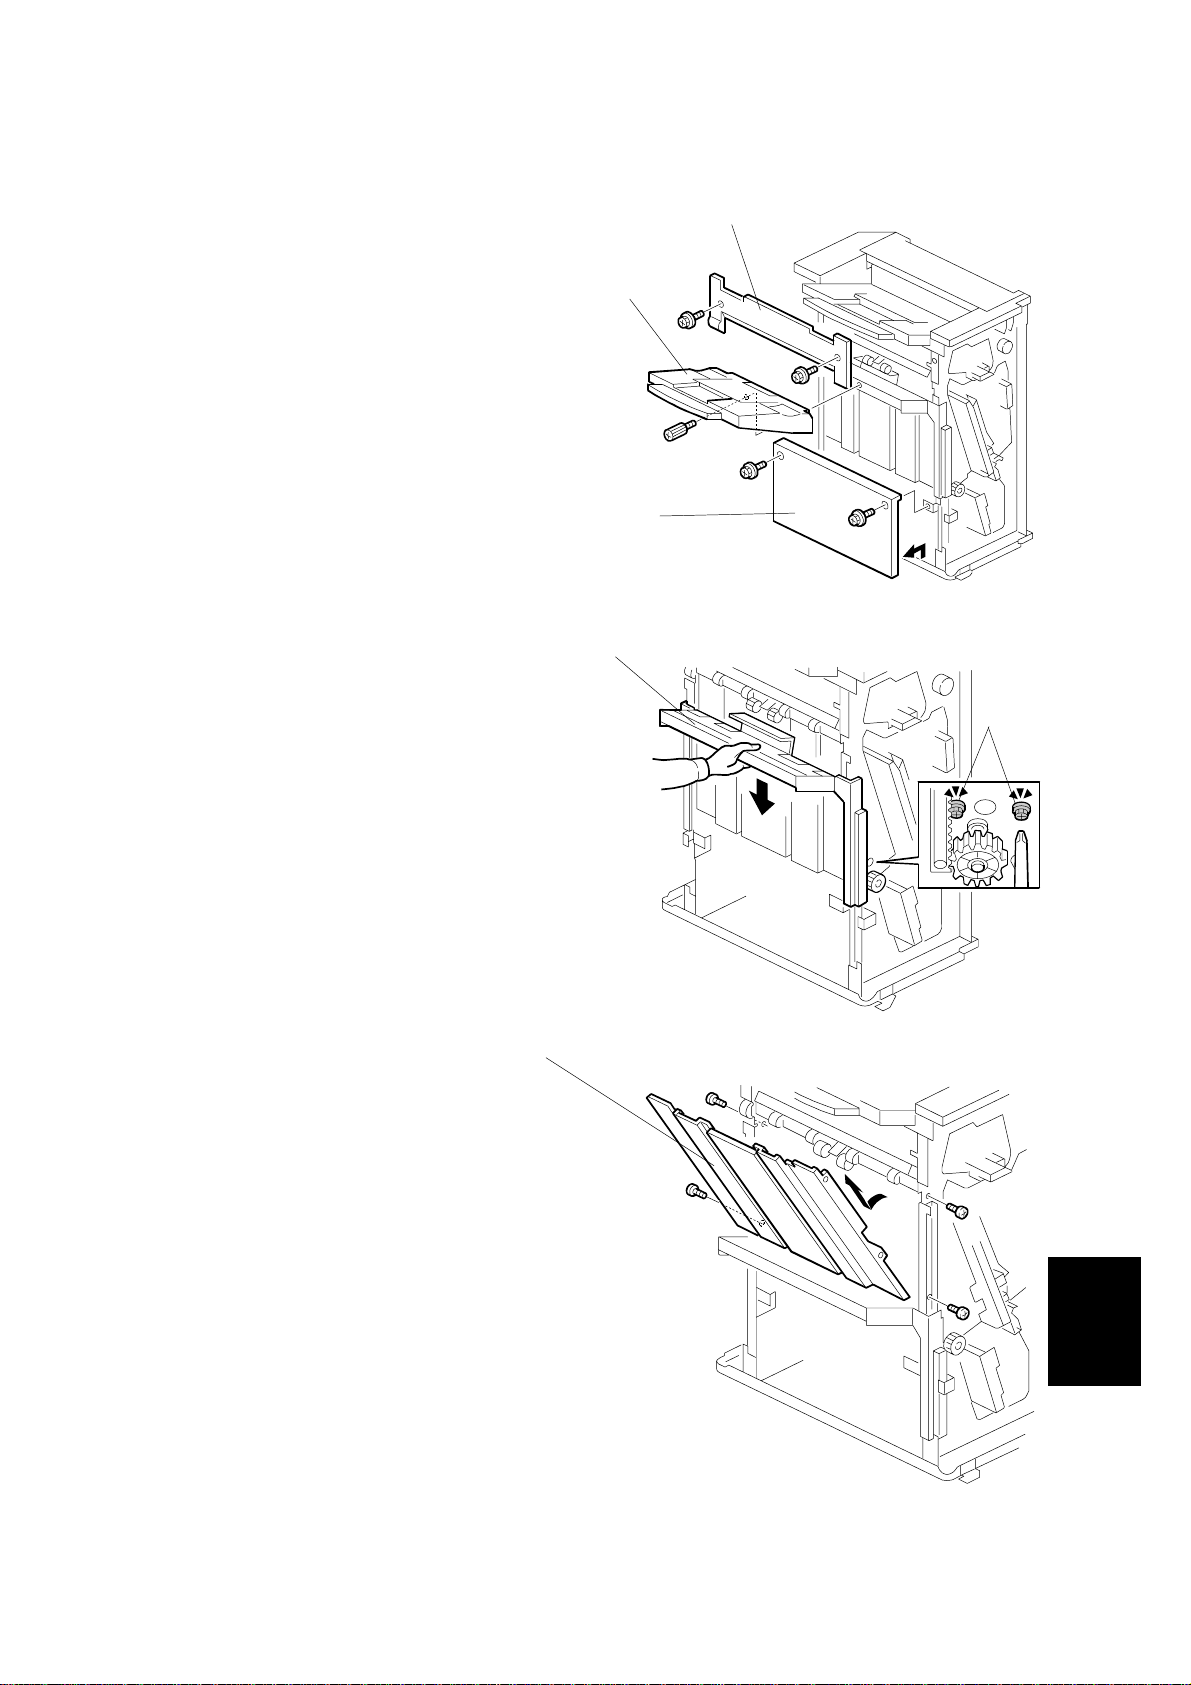
1.2 STAPLER UNIT
1. Side cover [A] (! x 2)
2. Open exit guide plate [B]
3. Upper side cover [C] (! x 2)
4. Front cover support plate [D] (! x 1)
5. Front cover [E]
6. Front inner cover [F] (! x 2)
7. Harness [G]
8. Unhook the spring [H]
9. Turn the stapler unit [I] and take it out.
10. Bracket [J] (! x 2)
[B]
[C]
[A]
B408R102.WMF
[D]
[E]
[F]
[G]
B408-2
B408R113.WMF
[J]
[H]
[I]
B408R114.WMF
Page 4

10 August, 2001 MOTORS
1.3 MOTORS
1.3.1 SHIFT MOTOR
1. Rear cover (☛1.1)
2. Shift motor [A] (! x 2, " x 1)
1.3.2 STAPLER MOTOR
1. Rear cover (☛1.1)
2. Stapler motor [B] (! x 2, " x 1)
[A]
B408R123.WMF
[B]
1.3.3 UPPER TRANSPORT MOTOR AND EXIT MOTOR
1. Rear cover (☛1.1)
2. Motor assembly [C] (! x 4, " x 2)
[C]
3. Upper transport motor [D] (! x 4)
4. Exit motor [E] (! x 4)
[D]
[E]
B408R124.WMF
Options
B408R112.WMF
B408-3
Page 5

MOTORS 10 August, 2001
1.3.4 LOWER TRANSPORT MOTOR
1. Main PCB (☛1.1)
2. Lower transport motor [A] (! x 2, " x
1)
[A]
B408R111.WMF
B408-4
Page 6
10 August, 2001 MOTORS AND SENSORS
1.4 MOTORS AND SENSORS
1.4.1 PREPARATION
1. Front cover and inner cover (☛1.2)
2. Upper side cover [A] (! x 2)
3. Shift tray [B] (! x 1)
4. Lower side cover [C] (! x 2)
5. Loosen the 2 screws [D].
6. Lower the lower tray guide plate [E].
7. Guide plate [F] (! x 4)
[A]
[B]
[C]
B408R116.WMF
[E]
[D]
[F]
B408R117.WMF
Options
B408R118.WMF
B408-5
Page 7
MOTORS AND SENSORS 10 August, 2001
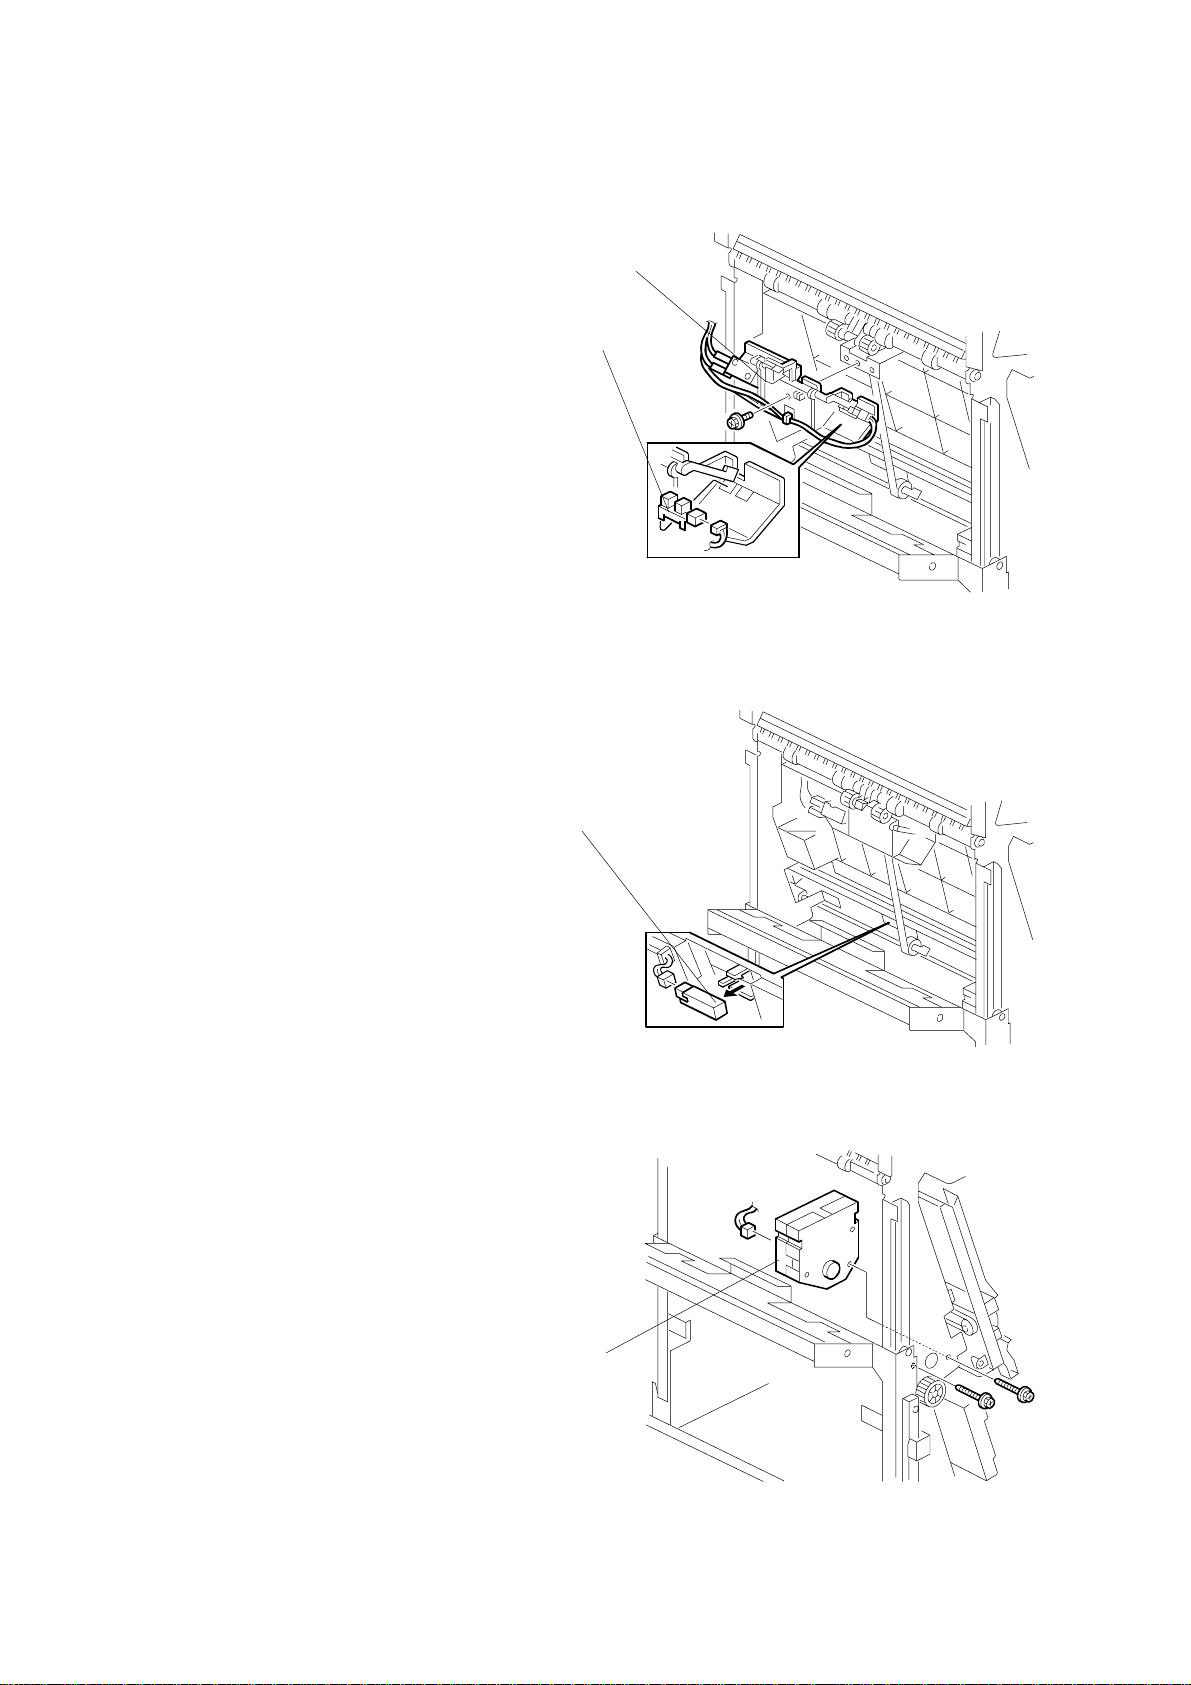
1.4.2 STACK HEIGHT SENSOR
1. Stack height sensor assembly [A] (! x
1)
[A]
2. Stack height sensor [B] (" x 1)
[B]
B408R121.WMF
1.4.3 STAPLER TRAY PAPER SENSOR
1. Stapler tray paper sensor [C] (" x 1)
[C]
1.4.4 LOWER TRAY LIFT MOTOR
1. Lower tray lift motor [D] (! x 2, " x 1)
B408R120.WMF
[D]
B408-6
B408R119.WMF
Page 8
10 August, 2001 MOTORS AND SENSORS
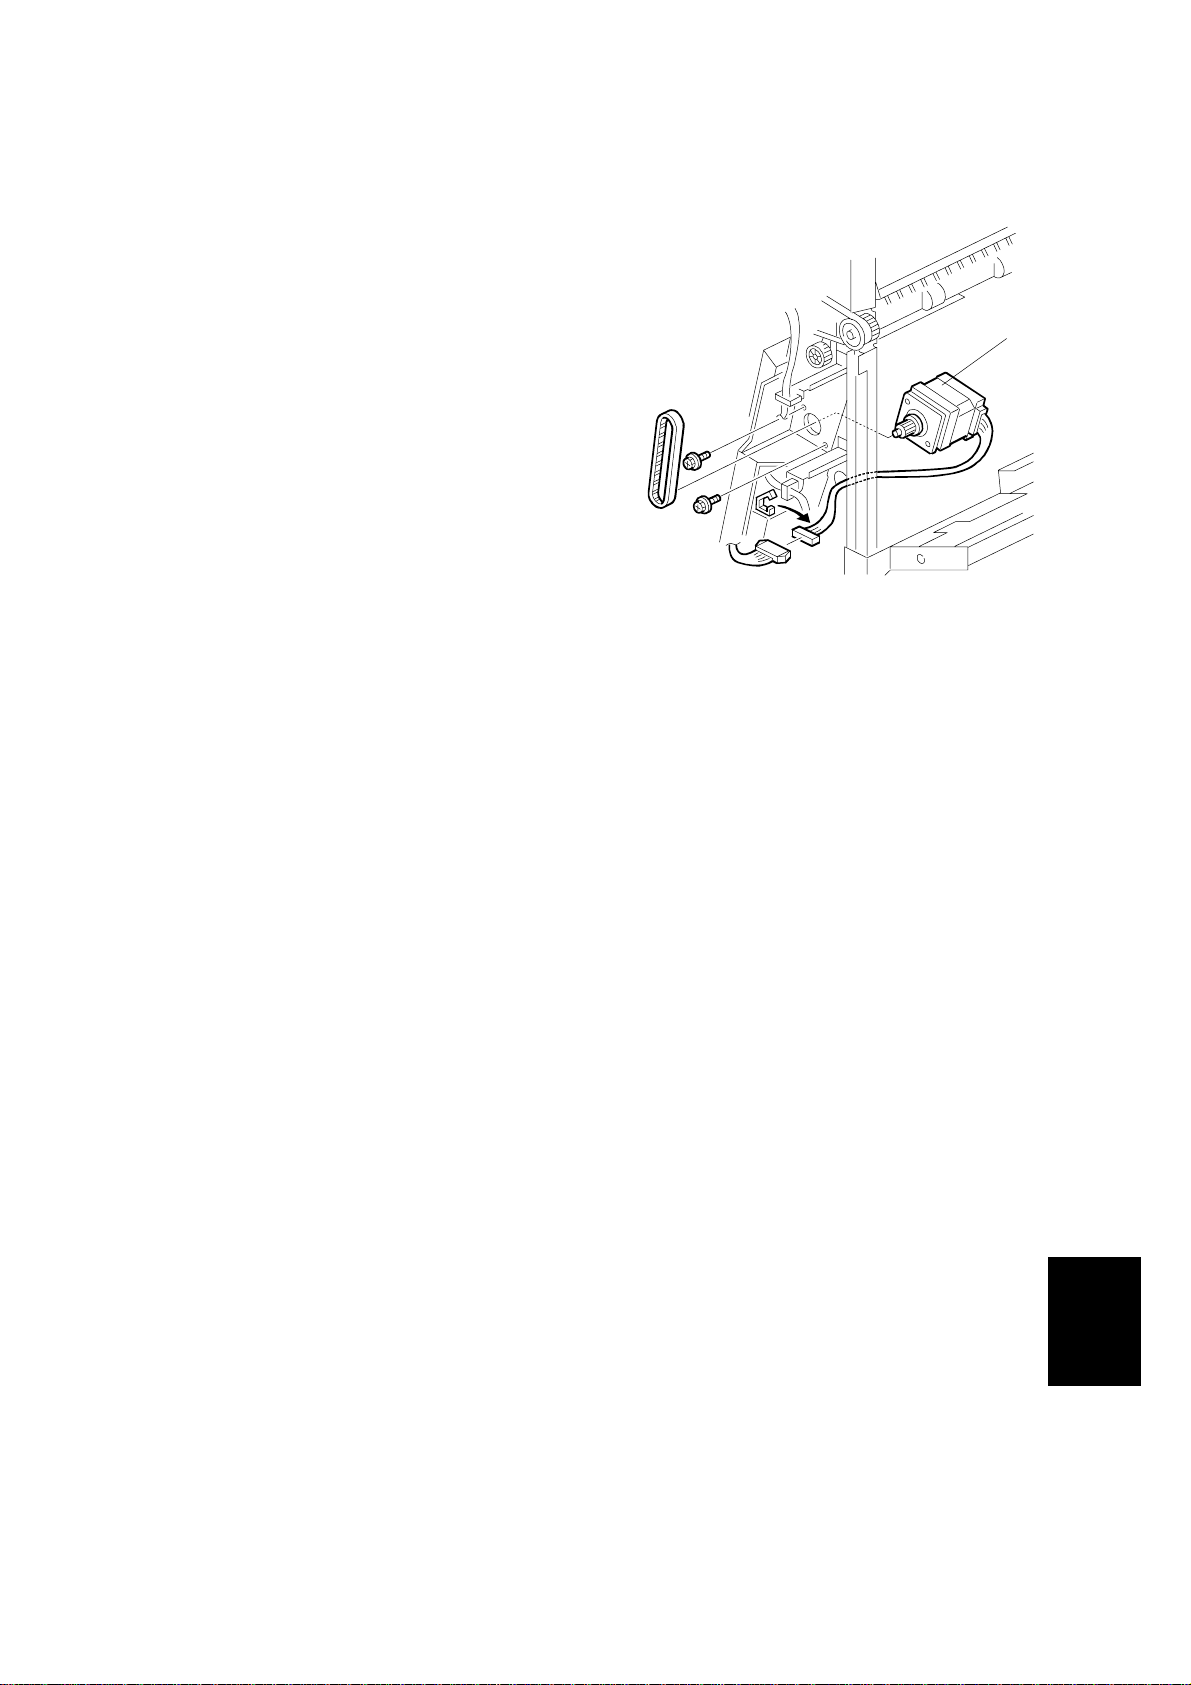
1.4.5 STACK FEED-OUT MOTOR
1. Stack feed-out motor [A] (! x 2, " x 1)
[A]
B408R122.WMF
B408-7
Options
Page 9
JAM DETECTION 10 August, 2001
2. TROUBLESHOOTING
2.1 JAM DETECTION
Mode
Shift Staple
!!
!!
!
!
!
!
!
!
Jam Content
Entrance sensor:
On check
Entrance sensor:
Off check
Lower tray exit
sensor: On check
Tray exit sensor:
Off check
Stapler tray
entrance sensor:
On check
Stapler tray
entrance sensor:
Off check
Lower tray exit
sensor:
On check
Lower tray exit
sensor:
Off check
The entrance sensor does not t urn on w ithin
the normal time after the main machine exit
sensor turns on
The entrance sensor does not t urn of f within
the normal time after it turns on.
The lower tray exit sensor does not turn on
within the normal time after the entrance
sensor turns off.
The tray exit sensor does not turn off within
the normal time after it turns on.
The stapler tray entrance sensor d oes not
switch on within the normal time after the
entrance sensor switched on.
The staple tray entrance sens or does not
turn off within the normal time after it turns
on.
The lower exit sensor does not turn on after
the feed-out pawl feeds out the o ut put s.
The lower exit sensor turns on when the
feed-out pawl returns to its HP after fe edi ng
out the outputs.
B408-8
Page 10

10 August, 2001 DIP SWITCH SETTINGS
3. SERVICE TABLES
3.1 DIP SWITCH SETTINGS
The DIP switch should not be set to any combination other than those described in
the table below.
SW100
12
0 0 Normal operation mode (Default)
1 0 Packing mode.
Description
• Before packing the machine, do the following: Set switch 1 to 1
then back to zero. The lower tray moves to the lowest position.
Then turn off the main switch.
• After unpacking the machine, do the following: After turning the
main switch back on, the lower tray returns to home position
automatically.
B408-9
Options
Page 11

GENERAL LAYOUT 10 August, 2001
4. DETAILED DESCRIPTIONS
4.1 GENERAL LAYOUT
12
2
3
1
13
4
5
6
7
11
10
1. Upper Tray
2. Upp e r Tr ay Exit Roller
3. Entrance Roller
4. Tray Junction Gate
5. Upper Transport Roller
6. Stapler Junction Gate
7. Lower Tran sport R ol lers
8
9
B408D101.WMF
8. Stapler
9. Stack Feed-out Belt
10. Positioning Roller
11. Shift Roller
12. Lower Tray
13. Lower Tray Exit Roller
B408-10
Page 12

10 August, 2001 ELECTRICAL COMPONENT LAYOUT
4.2 ELECTRICAL COMPONENT LAYOUT
10
1
2
11
9
8
1. Upper Cover Switch
2. Paper Limit Sensor
3. Entrance Sensor
4. Exit Guide Plate Motor
5. Exit Guide Plate HP Sensor
6. Front Door Safety Switch
7. Stack Height Sensor
8. Lower Tray Exit Sensor
9. Lower Tray Upper Limit Switch
10. Shift HP Sensor
11. Shift Motor
3
12
4
5
19
18
13
14
20
7
6
B408D102.WMF
21
12. Jogger Fence HP Sensor
13. Positioning Roller Solenoid
14. Stapler HP Sensor
15. Stapler Tray Entrance Sensor
16. Stapler Tray Paper Sensor
17. Stapler Hammer Motor
18. Staple Sheet Sensor
19. Stack Feed-out Belt HP Sensor
20. Stapler Rotation HP Sensor
21. Staple Sensor
17
16
15
B408D103.WMF
B408-11
Options
Page 13

ELECTRICAL COMPONENT LAYOUT 10 August, 2001
22
32
31
30
29
28
27
26
25
22. Tray Junction Gate Solenoid
23. Lower Tray Lift Motor
24. Lower Tray Lower Limit Sensor
25. Stapler Motor
26. Jogger Fence Motor
27. Stack Feed-out Motor
28. Main Board
29. Lower Transport Motor
30. Stapler Junction Gate Solenoid
31. Exit Motor
32. Upper Transport Motor
23
24
B408D104.WMF
B408-12
Page 14

10 August, 2001 ELECTRICAL COMPONENT DESCRIPTION
4.3 ELECTRICAL COMPONENT DESCRIPTION
Symbol Name Function Index No.
Motors
M1
M2
M3 Jogger Fence Drives the jogger fences. 26
M4 Staple Hammer Drives the staple hammer. 17
M5 Stack Feed-out Drives the stack feed-out belt . 27
M6 Exit Guide Plate Opens and close s t he exit guide plate. 4
M7 Exit Drives the exit roller. 31
M8 Lower Tray Lift Moves the lower tray up or down. 23
M9 Shift Moves the shift roller from side to side. 11
M10 Stapler Moves the stapler unit from side to side. 25
Sensors
S1
S2
S3
S4 Shift HP Detects when the shift ro ller is at home position. 10
S5
S6 Stapler HP Detects when the stapler is at home position. 14
S7
S8
S9 Lower Tray Exit Checks for misfeeds. 8
S10 Stack Height Detects the top of the copy paper stack. 7
S11
S12
S13 Staple Sheet Detects the leading edge of the staple sheet . 18
S14
S15
Upper
Transport
Lower
Transport
Entrance
Paper Limit Detects when the paper stack h eight in the
Jogger Fence
HP
Stack Feed-out
Belt HP
Exit Guide PlateHPDetects when the exit guide plate is at home
Stapler Tray
Entrance
Lower Tray
Lower Limit
Stapler Tray
Paper
Stapler RotationHPDetects when the staple hammer is at home
Staple Detects whether there are staples in the staple
Drives the entrance roller and upper t r ansport
rollers.
Drives the lower transport rollers and
positioning roller.
Detects copy paper entering the finisher and
checks for misfeeds.
upper tray is at its limit.
Detects when the jogger fen ce is at home
position.
Detects when the stack feed-out belt is at home
position.
position.
Detects copy paper entering the stapler tray and
checks for misfeeds.
Detects when lower tray is at it s lower limit
position.
Detects when there is copy paper in t he stapler
tray.
position.
cartridge.
32
29
3
2
12
19
5
15
24
16
20
21
Solenoids
SOL1
SOL2
Tray Junction
Gate
Stapler Junction
Gate
Drives the tray junction gate.
Drives the stapler junction g at e.
B408-13
Options
22
30
Page 15

ELECTRICAL COMPONENT DESCRIPTION 10 August, 2001
Symbol Name Function Index No.
SOL3
Switches
SW1
SW2
SW3
PCBs
PCB1
Positioning
Roller
Lower Tray
Upper Limit
Front Door
Safety
Upper Cover Cuts the dc power when the upper cover is
Main Controls the finisher and communicates with the
Moves the positioning roller.
Detects when lower tr ay is at its upper limit
position.
Cuts the dc power when the front door is
opened.
opened.
copier/printer.
13
9
6
1
28
B408-14
Page 16

10 August, 2001 DRIVE LAYOUT
4.4 DRIVE LAYOUT
1
2
4
3
5
6
B408D105.WMF
1. Exit Motor
2. Upper Transport Motor
3. Lower Transport Motor
B408D106.WMF
4. Shift Motor
5. Exit Guide Plate Motor
6. Lower Tray Lift Motor
B408-15
Options
Page 17

DRIVE LAYOUT 10 August, 2001
7
8
9
B408D107.WMF
7. Stack Feed-out Motor
8. Jogger Motor
9. Stapler Motor
B408-16
Page 18

10 August, 2001 JUNCTION GATES
4.5 JUNCTION GATES
[A]
[C]
[B]
[D]
B408D108.WMF
Depending on the finishing mode, the copies are directed up, straight through, or
down by the combination of the tray junction gate [A] and stapler junction gate [B].
These gates are controlled by the tray junction gate solenoid [C] and stapler
junction gate solenoid [D].
Upper tray mode
The tray junction gate solenoid remains off. The copies go up to the upper tray.
Sort/stack mode
The tray junction gate solenoid turns on and the stapler junction gate solenoid
remains off. The copies are sent to the lower tray directly.
Staple mode
The tray junction gate solenoid and the stapler junction gate solenoid both turn on.
The copies go down to the jogger unit.
B408-17
Options
Page 19

UPPER TRAY 10 August, 2001
4.6 UPPER TRAY
[A]
B408D109.WMF
When the paper limit sensor [A] switches on during feed-out for each of three
consecutive sheets of paper, paper overflow is detected.
B408-18
Page 20

10 August, 2001 LOWER TRAY UP/DOWN MECHANISMS
4.7 LOWER TRAY UP/DOWN MECHANISMS
[B]
[A]
[D]
[E]
[C]
B408D112.WMF
The vertical position of the lower tray [A] depends on the height of the copied paper
stack on the lower tray. The stack height sensor feeler [B] contacts the top of the
stack, and the lower tray lift motor [C] controls the tray height.
When the lower tray reaches its lowest poss ible position, the actuator [D] turns on
the lower tray lower limit sensor [E], and copying stops.
Tray Up
When the copy paper on the tray is removed, the stack height sensor turns off and
the tray lifts up. Then, the tray stops when the sensor turns on again (the tray
pushes up the feeler).
Sort/stack Mode (Tray Down)
Every five sheets of paper, the tray goes down until the sensor turns off again.
Then, it goes up until the sensor is on again.
Staple Mode (Tray Down)
After a stapled copy is fed out, the tray goes up for 220 ms and stops for 300 ms.
Then, it goes down for 1 second, waits for 500 ms, then goes up until the sensor
turns on.
Options
B408-19
Page 21

PAPER SHIFT MECHANISM 10 August, 2001
4.8 PAPER SHIFT MECHANISM
[F]
[C]
[B]
[A]
[D]
[E]
B408D110.WMF
In the sort/stack mode, the shift roller [A] moves from side to side to separate the
sets of copies.
The horizontal position of the shift roller is controlled by the shift motor [B] and the
shift gear disk [C]. After the trailing edge of the copy passes the upper transport
roller, the shift motor turns on, driving the shift gear disk and the link [D].
After the paper is delivered to the lower tray [E], the shift roller moves to the HP,
which is detected by the shift HP sensor [F]. Then, when the trailing edge of the
next copy passes the upper transport roller, the shift roller shifts again. This
operation is done every sheet.
When the trailing edge of eac h page in the next set of copies passes the upper
transport roller, the shift roller shifts in the opposite direction.
B408-20
Page 22

10 August, 2001 JOGGER UNIT PAPER POSITIONING MECHANISM
4.9 JOGGER UNIT PAPER POSITIONING MECHANISM
[F]
[E]
B408D114.WMF
[B]
B408D113.WMF
In staple mode, each sheet of copy paper is vertically and horizontally aligned
when it arrives in the jogger unit.
[D]
[A]
[C]
For the vertical paper alignment, the positioning roller solenoid [A] turns on shortly
after the stapler tray entrance sensor [B] turns off, and the positioning roller [C]
pushes the copy against the bottom of the stack stopper [D].
For the horizontal paper alignment, the jogger front fence [E] and the rear fence [F]
move to the waiting position, which is 18 mm away from the side of the paper.
When aligning the paper vertically, the jogger fence moves in 14 mm from the
waiting position. After the vertical position has been aligned, the jogger fence
pushes the paper 4 mm against the rear fence to align the paper horizontally. Then
the jogger fence moves back to the previous position.
B408-21
Options
Page 23

EXIT GUIDE PLATE 10 August, 2001
4.10 EXIT GUIDE PLATE
[B]
[C]
[A]
[D]
B408D111.WMF
When stacking a large size of paper (such as A3, DLT) in the jogger unit, the
leading edge of the paper reaches the exit rollers. To prevent the paper from
running into the exit rollers and not being aligned correctly, the exit guide plate [A]
is moved up to make a gap between the exit rollers. This operation is done for all
paper sizes, but is only needed for the larger sizes.
The exit guide plate motor [B] and exit roller release cam [C] control the exit guide
plate movement. When the exit guide plate motor starts, the cam turns and the exit
guide plate moves up. When stapling is finished, the exit gu ide plate motor turns on
again to close the exit guide plate. When the exit guide plate HP sensor [D] turns
on, the motor stops.
B408-22
Page 24

10 August, 2001 STAPLER MECHANISM
4.11 STAPLER MECHANISM
[E]
[D]
[B]
[C]
[A]
B408D116.WMF
The staple hammer motor [A] drives the staple hammer.
The staple sheet sensor [B] detects the leading edge of the staple sheet at the
stapling position to prevent the hammer from operating if there are no staples at
the stapling position.
If there is no staple cartridge in the stapler unit or no staples in the staple cartridge,
staple end is indicated on the operation panel. The stapler sensor [C] detects this.
The stapler rotation HP sensor [D] checks whether the staple hammer mechanism
returns to home position after each stack has been stapled.
When excessive load is applied to the staple hammer motor, the copier detects a
staple jam. When a staple jam has occurred, the jammed staple is inside the staple
cartridge [E]. Therefore, the jammed staple can be removed easily after pulling out
the staple cartridge.
B408-23
Options
Page 25

STAPLER UNIT MOVEMENT MECHANISM 10 August, 2001
4.12 STAPLER UNIT MOVEMENT MECHANISM
[B]
[A]
B408D117.WMF
The stapler motor moves the stapler [A] from side to side. After the start key is
pressed, the stapler moves from its home position to the stapling position.
If two-staple-position mode is selected, the stapler moves to the front stapling
position first, then moves to the rear stapling position. However, for the next copy
set, it staples in the reverse order (at the rear side first, then at the front side).
After the job is completed, the stapler moves back to its home position. The stapler
HP sensor [B] detects this.
B408-24
Page 26

10 August, 2001 PAPER FEED-OUT MECHANISM
4.13 PAPER FEED-OUT MECHANISM
[A]
[B]
[C]
[D]
B408D118.WMF
After the copies have been stapled, the stack feed-out motor [A] starts. The pawl
[B] on the stack feed-out belt [C] transports the set of stapled copies up and feeds
it to the shift roller. The shift roller takes over stack feed-out after the leading edge
reaches this roller.
Just before the stapled stack passes through the lower tray exit sensor, the stackfeed-out motor turns off until the shift rollers have completely fed the stack out to
the lower tray. Then, the stack-feed-out motor turns on again until the pawl [B]
actuates the stack feed-out belt home positio n sensor [D].
Options
B408-25
Page 27

SPECIFICATIONS 10 August, 2001
5. OVERALL MACHINE INFORMATION
5.1 SPECIFICATIONS
Upper Tray
Paper Size: A3 to A6
DLT to HLT
Power Weight: 60 to 157 g/m2 (16 to 42 lb)
Paper Capacity: 250 sheets (A4 sideways / LT sideways or smaller: 80
g/m2, 20lb)
50 sheets (A3, B4, DLT, LG: 80 g/m2, 20 lb)
Lower Tray
Paper Size: No staple mode:
A3 to B5
DLT to HLT
Staple mode:
A3, B4, A4, B5
DLT to LT
Paper Weight: No staple mode: 60 ~ 157 g/m2 (16 ~ 42 lb)
Staple mode: 64 ~ 90 g/m2 (17 ~ 24 lb)
Stapler Capacity: 30 sheets (A3, B4, DLT, LG)
50 sheets (A4, B5 sideways, LT)
Paper Capacity: No staple mode:
1,000 sheets (A4/LT or smaller: 80 g/m2, 20 lb)
500 sheets (A3, B4, DLT, LG: 80 g/m2, 20 lb)
Staple mode:
(80 g/m2, 20 lb, number of sets)
Set Size 10 to 50
Size
A4/LT sideways
B5 sideways
A4/LT Lengthwise 100 50 to 10 50 to 10
A3, B4, DLT, LG 50 50 to 10 —
2 to 9
100 100 to 20 100 to 20
10 to 30 31 to 50
Staple positions: 1 Staple: 2 positions (Front, Rear)
2 Staples: 2 positions (Upper, Left)
Staple Replenishment: Cartridge (5,000 staples/cartridge)
Power Source: 24 Vdc, 5 Vdc (from the copier/printer)
Power Consumption: 50 W
Weight: 25 kg (55.2 lbs)
Dimensions (W x D x H): 527 x 520 x 790 mm (20.8" x 20.5" x 31.1")
B408-26
Page 28

1
FINISHER (B408) Point to Point Diagram
A
B
Front Door
Safety Switch
Lower Tray Upper
Limit Switch
Upper Cover
C
D
Lower Tray Exit Sn.
E
Stapler Tray Paper
F
Stack Feed-out Belt
Jogger Fence H.P.
G
Bridge
Switch
Entrance Sn.
Paper Limit Sn.
Shift H.P. Sn.
Exit Guide Plate
H.P. Sn.
Stapler H.P. Sn.
Stapler Tray
Entrance Sn.
Lower Tray
Lower Limit Sn.
Stack Height Sn.
Sn.
H.P. Sn.
Sn.
Unit
SW2
SW1
SW3
S1
S2
S4
S9
S7
S6
S8
S11
S10
S12
S5
S3
DC Line
Pulse Signal
Signal Direction
2345678910
CN714-9
-8
-7
-6
-5
-4
-3
-2
-1
CN713-8
-7
-6
-5
-4
-3
-2
-1
CN204-3
-2
-1
CN205-3
-2
-1
CN206-3
-2
-1
CN207-3
-2
-1
CN208-3
-2
-1
CN209-3
-2
-1
CN210-3
-2
-1
CN211-3
-2
-1
CN212-3
-2
-1
CN213-3
-2
-1
CN214-3
-2
-1
CN215-3
-2
-1
SYMBOL TABLE
CN300-1
-2
CN300
CN301-1
-2
-3
CN301
CN302-1
-2
-3
CN303-1
-2
-3
CN304-1
-2
-3
CN305-1
CN306-1
-2
-3
CN306-4
-5
-6
CN302CN303
CN304
-2
-3
CN305CN306
! Active Low
" Active High
[ ] Voltage
T1
CN300-2
-1
CN301-3
-2
-1
CN302-3
-2
-1
CN303-3
-2
-1
CN304-3
-2
-1
CN305-3
-2
-1
CN306-6
-5
-4
CN306-3
-2
-1
CN100-1
CN101-1
CN102-1
CN103-1
CN104-1
CN104-3
CN105-1
CN105-4
CN105-7
-10
CN105-11
-12
-13
CN106-1
CN106-4
CN106-7
CN107-1
CN107-4
CN107-7
CN107-10
-11
-12
N.C.
-2
+24V
-3
+24V
-4
+24V
-5
+24V
-6
GND
-7
GND
-8
GND
-9
GND
GND
-2
GND
-3
+5V
-4
+5V
-5
RXD
-6
ZESM
-7
TXD
-8
+5V
+24V
-2
["24] Front Door Safety Switch
+24V
-2
["24] Lower Tray Upper Limit Switch
+24V
-2
["24] Upper Cover Switch
[!5] Entrance Sensor
-4
GND
-5
+5V
+5V
-2
[!5] Paper Limit Sensor
-3
GND
GND
-5
["5] Shift H.P. Sensor
-6
+5V
N.C.
-8
GND
-9
[!5] Lower Tray Exit Sensor
+5V
GND
["5] Exit Guide Plate H.P. Sensor
+5V
GND
-2
["5] Stapler H.P. Sensor
-3
+5V
[!5] Stapler Tray Entrance Sensor
-5
GND
-6
+5V
GND
-8
["5] Lower Tray Lower Limit Sensor
-9
+5V
GND
-2
["5] Stack Height Sensor
-3
+5V
GND
-5
["5] Stapler Tray Paper Sensor
-6
+5V
GND
-8
["5] Stack Feed-out Belt H.P.Sensor
-9
+5V
GND
["5] Jogger Fence H.P. Sensor
+5V
Main PCB
(PCB 1)
Staple Hammer Motor +[!24]
Staple Hammer Motor +[!24]
+24V
+24V
N.C.
A [24 → 24/0]
A [24 → 24/0]
B [24 → 24/0]
B [24 → 24/0]
N.C.
+24V
+24V
N.C.
A [24 → 24/0]
A [24 → 24/0]
B [24 → 24/0]
B [24 → 24/0]
+24V
+24V
N.C.
A [24 → 24/0]
A [24 → 24/0]
B [24 → 24/0]
B [24 → 24/0]
+24V
A [24 → 24/0]
A [24 → 24/0]
B [24 → 24/0]
B [24 → 24/0]
+24V
+24V
+24V
N.C.
A [24 → 24/0]
A [24 → 24/0]
B [24 → 24/0]
B [24 → 24/0]
+24V
+24V
N.C.
A [24 → 24/0]
A [24 → 24/0]
B [24 → 24/0]
B [24 → 24/0]
N.C.
+24V
+24V
N.C.
A [24 → 24/0]
A [24 → 24/0]
B [24 → 24/0]
B [24 → 24/0]
+24V
+24V
N.C.
A [24 → 24/0]
A [24 → 24/0]
B [24 → 24/0]
B [24 → 24/0]
N.C.
Lower Tray Lift Motor -[!24]
Lower Tray Lift Motor +[!24]
+24V
Tray Junction Gate [!24]
+24V
Stapler Junction Gate [!24]
+24V
Positioning Roller [!24]
+5V
Stapler Rotation Sensor ["5]
Staple Sheet Sensor ["5]
Staple Sensor ["5]
GND
Staple Hammer Motor -[!24]
Staple Hammer Motor -[!24]
CN108-1
-10
-11
-12
-13
-14
-15
CN109-1
CN110-1
CN111-1
CN112-1
-10
-11
-12
-13
-14
-15
CN113-1
-10
CN114-1
CN114-3
CN115-1
CN116-1
CN116-6
-2
-3
-4
-5
-6
-7
-8
-9
-2
-3
-4
-5
-6
-7
-2
-3
-4
-5
-6
-2
-3
-4
-5
-6
-7
-2
-3
-4
-5
-6
-7
-8
-9
-2
-3
-4
-5
-6
-7
-8
-9
-2
-4
-2
-2
-3
-4
-5
-7
-8
-9
CN216-7
-6
-5
-4
-3
-2
-1
CN217-7
-6
-5
-4
-3
-2
-1
CN218-6
-5
-4
-3
-2
-1
CN219-7
-6
-5
-4
-3
-2
-1
CN220-7
-6
-5
-4
-3
-2
-1
CN221-7
-6
-5
-4
-3
-2
-1
CN222-7
-6
-5
-4
-3
-2
-1
CN307-2
-1
CN224-2
-1
CN225-2
-1
CN226-2
-1
CN
CN
CN
CN
CN216CN217
CN218
CN219CN220CN221
CN222
307
224
225
226
CN216-1
CN217-1
CN218-1
CN219-1
CN220-1
CN221-1
CN222-1
CN307-1
CN224-1
CN225-1
CN226-1
T2
-2
-3
-4
-5
-6
-7
-2
-3
-4
-5
-6
-7
-2
-3
-4
-5
-6
-2
-3
-4
-5
-6
-7
-2
-3
-4
-5
-6
-7
-2
-3
-4
-5
-6
-7
-2
-3
-4
-5
-6
-7
-2
-2
-2
-2
CN223-1
CN227-5
CN228-4
A
Upper Transport
M1
Motor
M7
Exit Motor
B
Lower Transport
M2
Motor
Shift Motor
M9
C
Exit Guide Plate
M6
Motor
M5
M3
Stack Feed-out Motor
Jogger Fence Motor
D
E
M10
-2
M8
SOL1
SOL2
SOL3
-4
-3
-2
-1
-3
-2
-1
S14
S13
S15
M4
Stapler Motor
Lower Tray
Lift Motor
Tray Junction Gate
Stapler Junction Gate
Positioning Roller
Stapler Rotation Sn.
Staple Sheet Sn.
Staple Sn.
Staple Hammer
Motor
T3
Staple Unit
F
G
1 2345678910
Page 29

1000-SHEET FINISHER (B408) ELECTRICAL COMPONENT LAYOUT
10
11
32
31
30
1
9
8
7
22
2
3
4
5
12
19
6
B408D102.WMF
18
13
20
14
21
15
Symbol Name Index No. P to P
Motors
M1 Upper Transport 32 A9
M2 Lower Transport 29 B9
M3 Jogger Fence 26 E9
M4 Staple Hammer 17 G4
M5 Stack Feed-out 27 D9
M6 Exit Guide Plate 4 C9
M7 Exit 31 B9
M8 Lower Tray Lift 23 F9
M9 Shift 11 C9
M10 Stapler 25 E9
Sensors
S1 Entrance 3 C2
S2 Paper Limit 2 D2
S3 Jogger Fence HP 12 F2
S4 Shift HP 10 D2
S5 Stack Feed-out Belt HP 19 F2
S6 Stapler HP 14 E2
S7 Exit Guide Plate H P 5 D2
S8 Stapler Tray Entrance 15 E2
S9 Lower Tray Exit 8 D2
S10 Stack Height 7 F2
S11 Lower Tray Lower Limit 24 E2
S12 Stapler Tray Paper 16 F2
S13 Staple Sheet 18 G9
S14 Stapler Rotation HP 20 G9
S15 Staple 21 G9
29
28
27
26
25
24
B408D104.WMF
23
17
16
B408D103.WMF
Solenoids
SOL1 Tray Junction Gate 22 F9
SOL2 Stapler Junction Gate 30 F9
SOL3 Positioning Roller 13 F9
Switches
SW1 Lower Tray Upper Limit 9 C2
SW2 Front Door Safety 6 C2
SW3 Upper Cover 1 C2
PCBs
PCB1 Main 28 A5
 Loading...