

Ricoh RW480 Operating Instructions Manual

Manuals for This Machine
The following manuals describe the operational procedures of this machine. For
particular functions, see the relevant parts of the manual.
Note
❒ Manuals provided are specific to machine type.
❒ Adobe Acrobat Reader / Adobe Reader is necessary to view the manuals as
a PDF file.
❒ Two CD-ROMs are provided:
• CD-ROM 1 “Operating Instructions”
• CD-ROM 2 “Scanner Driver and Utilities”
❖❖❖❖ General Settings Guide
Provides an overview of the machine and describes System Settings (such as
Tray Paper Settings), Document Server functions, and troubleshooting.
Refer to this manual for Address Book procedures such as registering e-mail
address, and user codes.
❖❖❖❖ Security Reference
This manual is for administrators of this machine. It describes security functions that the administrators can use to protect data from being tampered, or
prevent the machine from unauthorized use.
Also refer to this manual for the procedures for registering administrators, as
well as setting user and administrator authentication.
❖❖❖❖ Network Guide (PDF file - CD-ROM1)
Provides information about configuring and operating the scanner (Type 480)
in a network environment.
For details about network settings of the scanner (RW480) and printer
(RW480), see the manual that comes with the related option.
❖❖❖❖ Copy Reference (this manual)
Describes operations, functions, and troubleshooting for the machine's copier
function.
❖❖❖❖ Scanner Reference(Scanner Unit Type 480) (PDF file - CD-ROM1)
Describes operations, functions, and troubleshooting for the machine's scanner function.
i

❖❖❖❖ Manuals for DeskTopBinder Lite
DeskTopBinder Lite is a utility included on the CD-ROM labeled “Scanner
Driver and Utilities”.
• DeskTopBinder Lite Setup Guide (PDF file - CD-ROM2)
Describes installation of, and the operating environment for DeskTopBinder Lite in detail. This guide can be displayed from the [Setup] display
when DeskTopBinder Lite is installed.
• DeskTopBinder Introduction Guide (PDF file - CD-ROM2)
Describes operations of DeskTopBinder Lite and provides an overview of
its functions. This guide is added to the [Start] menu when DeskTopBinder
Lite is installed.
• Auto Document Link Guide (PDF file - CD-ROM2)
Describes operations and functions of Auto Document Link installed with
DeskTopBinder Lite. This guide is added to the [Start] menu when Desk-
TopBinder Lite is installed.
❖❖❖❖ Other manuals
• Manuals for Printer (RW480) function.
• Manuals for Scanner (RW480) function.
ii
What You Can Do with This Machine
AHD001S
iii
iv
AHD002S
AHD051S
v

TABLE OF CONTENTS
Manuals for This Machine ......................................................................................i
What You Can Do with This Machine..................................................................iii
How to Read this Manual ......................................................................................1
Names of Major Options ............................................................................................2
Terms .........................................................................................................................2
Control Panel..........................................................................................................3
Display Panel..........................................................................................................5
1. Basics
Before Copying ......................................................................................................7
Original Output Locations...........................................................................................8
Adjusting the Original Tray.......................................................................................10
Copy Output Locations.............................................................................................10
Originals ...............................................................................................................12
Sizes and Weights of Recommended Originals.......................................................12
Placing Originals..................................................................................................15
Original Orientation ..................................................................................................16
Placing Custom Size Originals.................................................................................17
Wide Scan................................................................................................................17
Setting the Carrier Sheet..........................................................................................18
vi
2. Copying
Basic Procedure...................................................................................................21
Original Counter/Reset.............................................................................................22
Auto Start .................................................................................................................23
Job Preset................................................................................................................23
Interrupt Copy ..........................................................................................................24
Copying from the Paper Bypass ..............................................................................25
Copier Functions .................................................................................................27
Selecting Original Type Setting................................................................................27
Adjusting Copy Image Density.................................................................................28
Selecting Copy Paper ..............................................................................................29
Setting the Length of Copy Paper Cut .....................................................................30
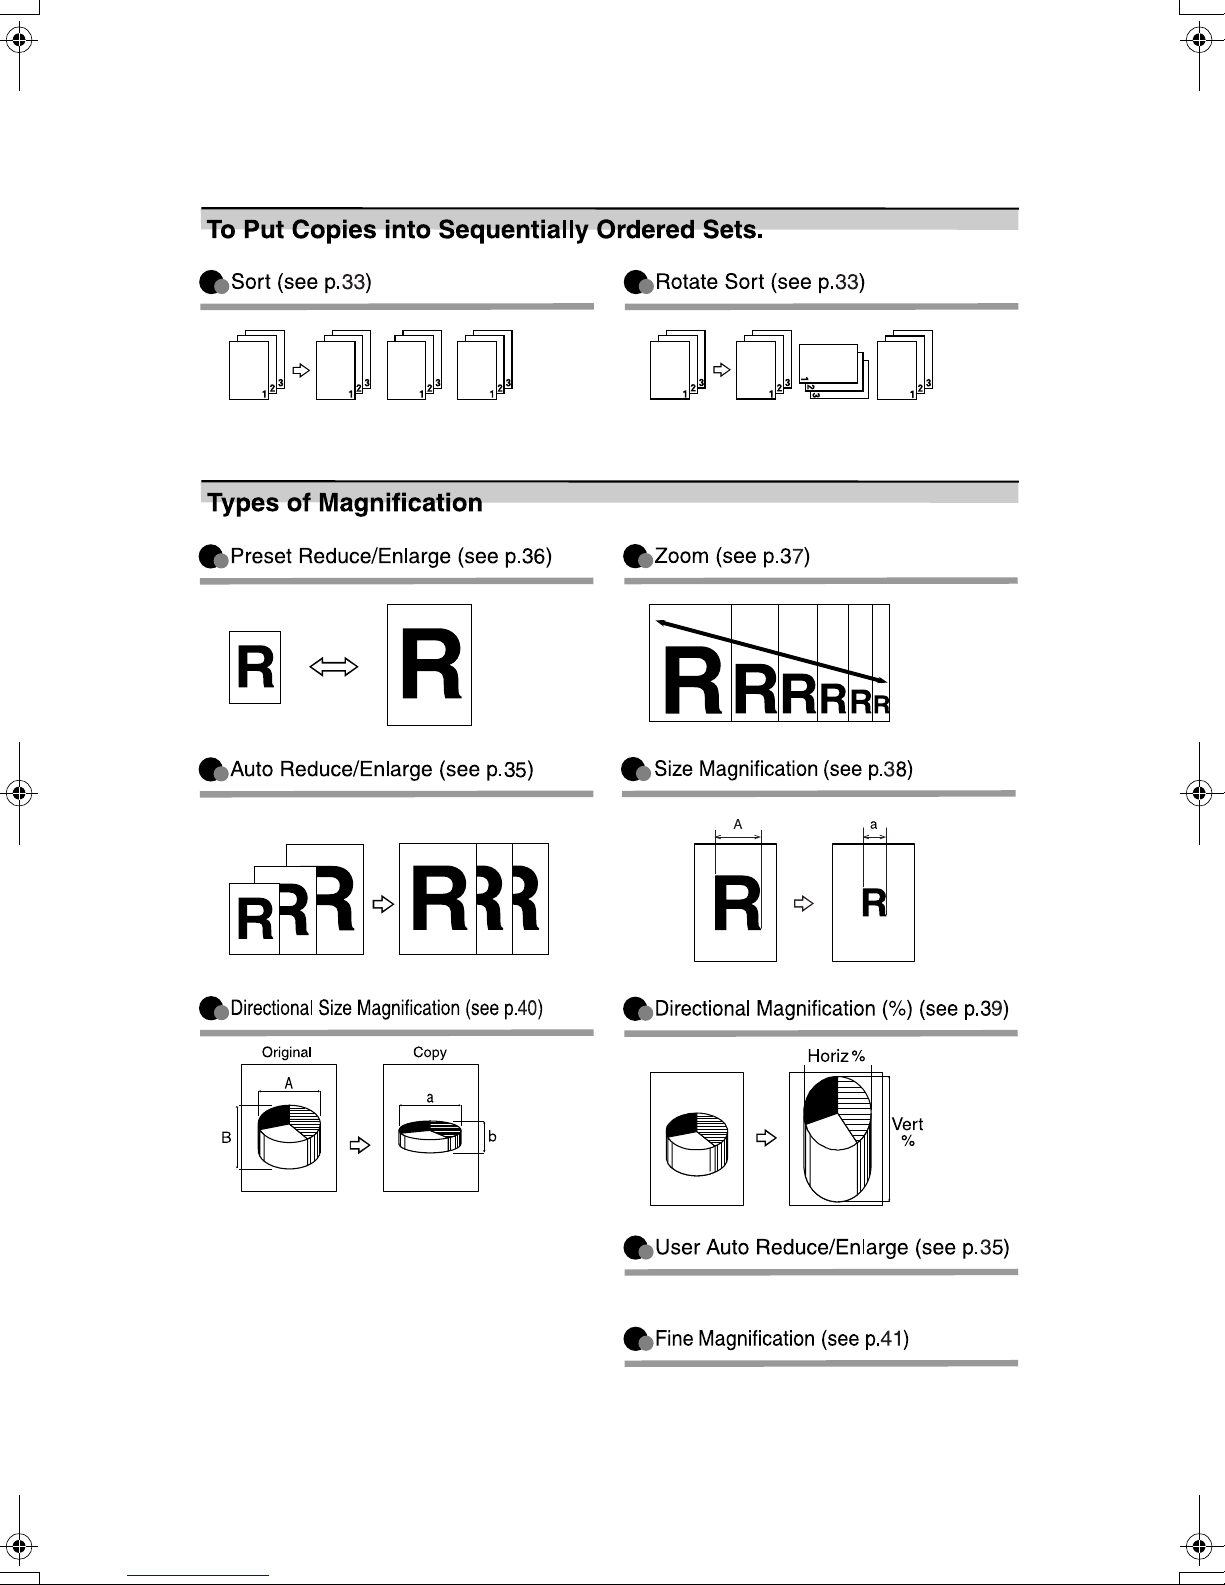
Sort/Rotate Sort .......................................................................................................33
Auto Reduce/Enlarge ...............................................................................................35
User Auto Reduce/Enlarge ......................................................................................35
Preset Reduce/Enlarge............................................................................................36
Zoom ........................................................................................................................37
Size Magnification....................................................................................................38
Directional Magnification (%) ...................................................................................39
Directional Size Magnification (inch)........................................................................40
Fine Magnification....................................................................................................41
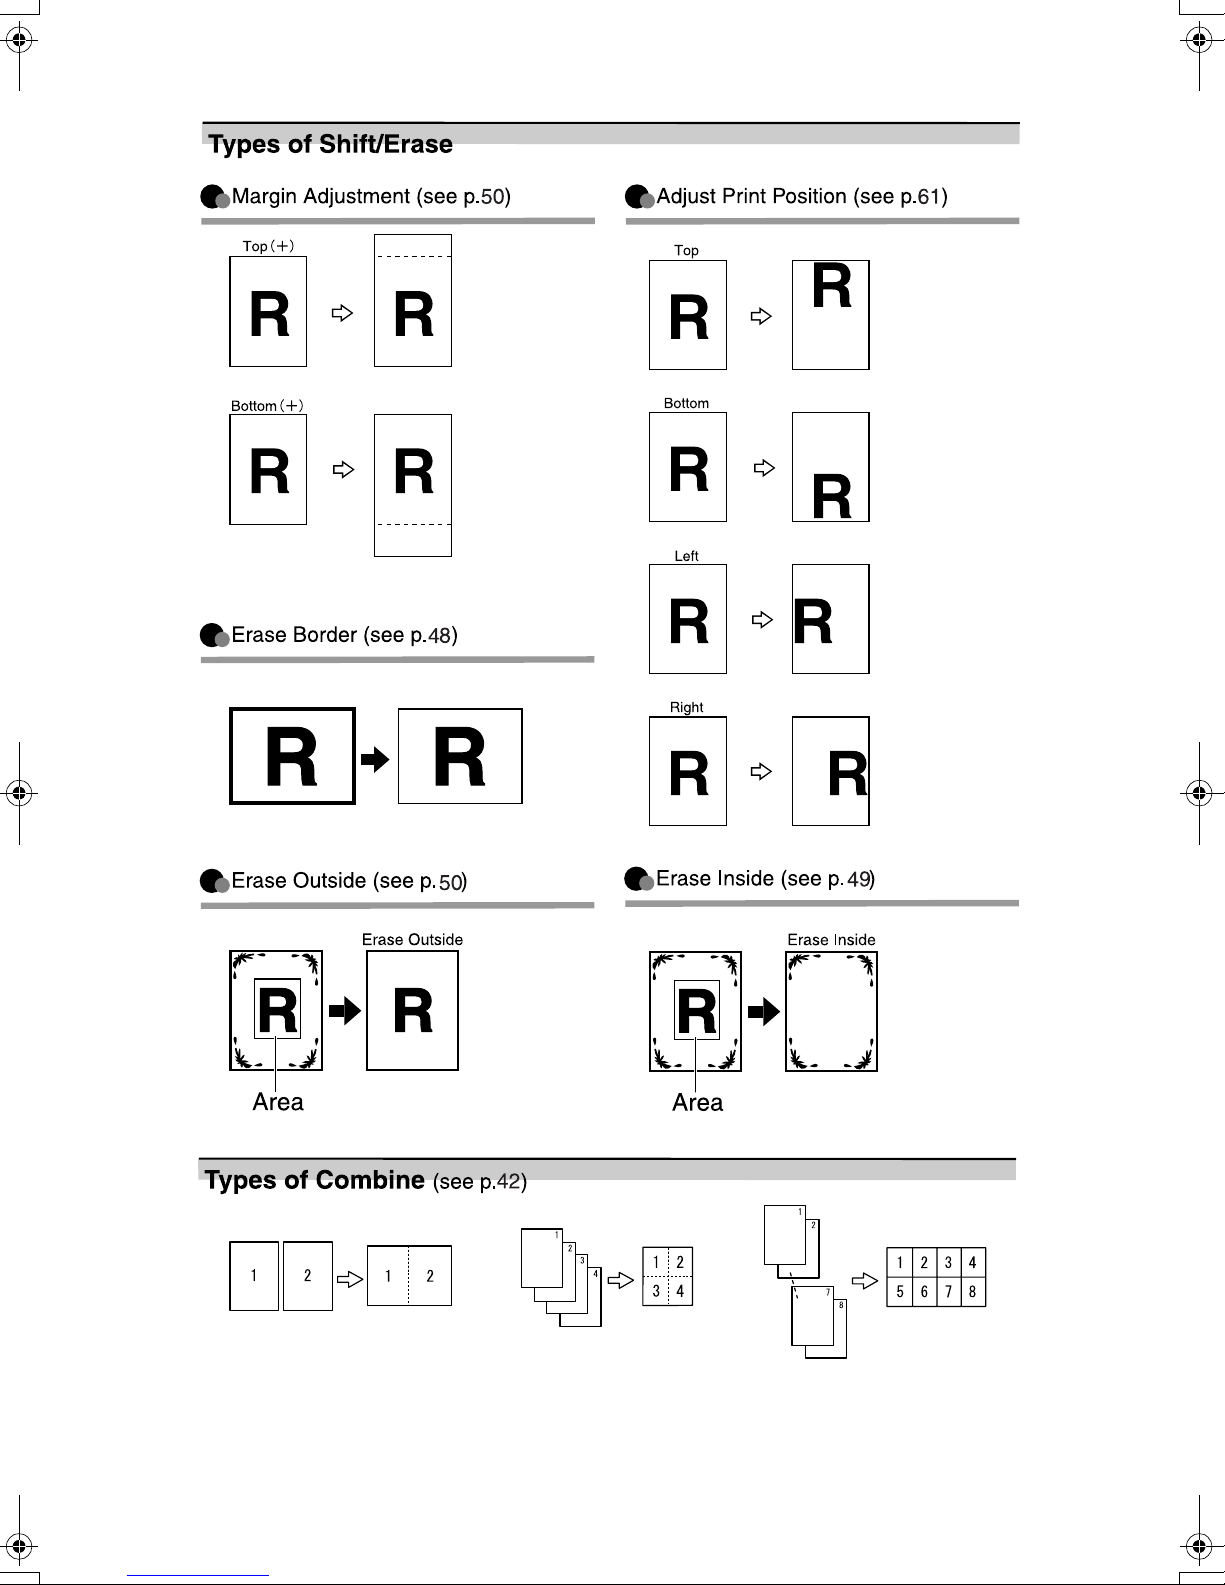
Combine...................................................................................................................42
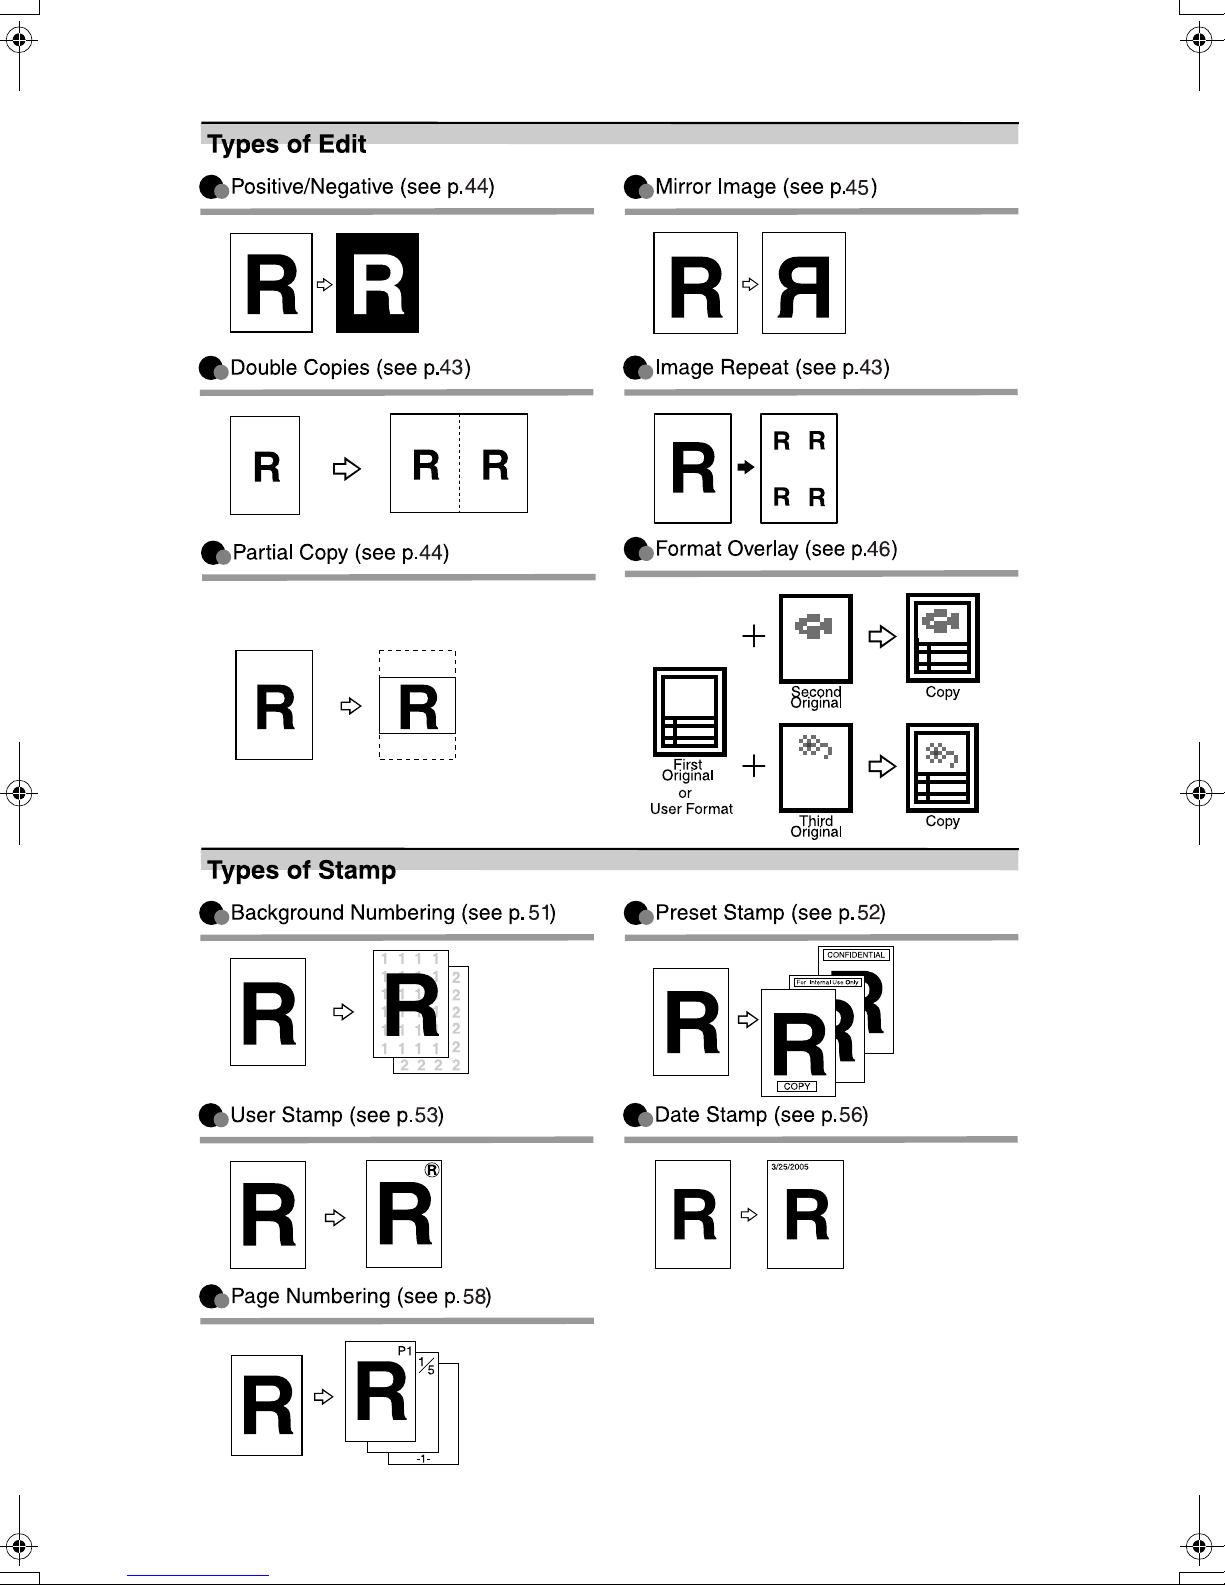
Image Repeat...........................................................................................................43
Double Copies..........................................................................................................43
Positive/Negative .....................................................................................................44
Partial Copy..............................................................................................................44
Mirror Image.............................................................................................................45

Format Overlay ........................................................................................................46
Erase Border............................................................................................................48
Erase Inside .............................................................................................................49
Erase Outside ..........................................................................................................50
Margin Adjustment ...................................................................................................50
Background Numbering ...........................................................................................51
Preset Stamp ...........................................................................................................52
User Stamp ..............................................................................................................53
Date Stamp ..............................................................................................................56
Page Numbering ......................................................................................................58
Adjust Print Position.................................................................................................61
Storing Data in the Document Server ................................................................63
Programs ..............................................................................................................65
Storing a Program ....................................................................................................65
Changing a Stored Program ....................................................................................66
Changing a Stored Program Name..........................................................................66
Deleting a Program ..................................................................................................66
Recalling a Program.................................................................................................66
3. Troubleshooting
If Your Machine Does Not Operate As You Want..............................................67
When a Message Appears.......................................................................................67
Screen......................................................................................................................69
If You Cannot Make Clear Copies.......................................................................70
If You Cannot Make Copies As You Want .........................................................73
4. User Tools (Copier / Document Server Features)
User Tools Menu (Copier / Document Server Features) ..................................75
Accessing User Tools (Copier Features)...........................................................81
Changing Default Settings .......................................................................................81
Exiting User Tools ....................................................................................................82
Settings You Can Change with User Tools .......................................................83
General Features .....................................................................................................83
Reproduction Ratio ..................................................................................................85
Edit ...........................................................................................................................87
Stamp.......................................................................................................................90
Input / Output ...........................................................................................................96
Administrator Tools ..................................................................................................96
5. Specifications
Combination Chart...............................................................................................97
Supplementary Information ................................................................................98
Scan Size Limitations, by Function..................................................................104
Settings Record Sheet.......................................................................................105
Magnification Ratio Chart.......................................................................................108
Measure Chart .......................................................................................................109
INDEX....................................................................................................... 110
vii

viii
How to Read this Manual
R
R
Symbols
The following set of symbols is used in this manual.
WARNING:
This symbol indicates a potentially hazardous situation that might result in
death or serious injury when you misuse the machine without following the instructions under this symbol. Be sure to read the instructions, all of which are described in the Safety Information section in the General Settings Guide.
CAUTION:
This symbol indicates a potentially hazardous situation that might result in minor or moderate injury or property damage that does not involve personal injury
when you misuse the machine without following the instructions under this
symbol. Be sure to read the instructions, all of which are described in the Safety
Information section in the General Settings Guide.
* The statements above are notes for your safety.
Important
If this instruction is not followed, paper might be misfed, originals might be
damaged, or data might be lost. Be sure to read this.
Preparation
This symbol indicates information or preparations required prior to operating.
Note
This symbol indicates precautions for operation, or actions to take after abnormal operation.
Limitation
This symbol indicates numerical limits, functions that cannot be used together,
or conditions in which a particular function cannot be used.
Reference
This symbol indicates where further relevant information can be found.
[]
Keys that appear on the machine's display.
{}
Keys built into the machine's control panel.
1
Names of Major Options
Major options for this machine are referred to as follows:
• Roll Holder Unit Type A→ Roll holder
• Roll Feeder Type 480→ Lower tray
• Paper Cassette Type 480 → Cut paper tray
• Original Tray Type G → Original tray
Terms
• Long length original/paper
Original/paper length longer than 1189 mm, 46.8".
2
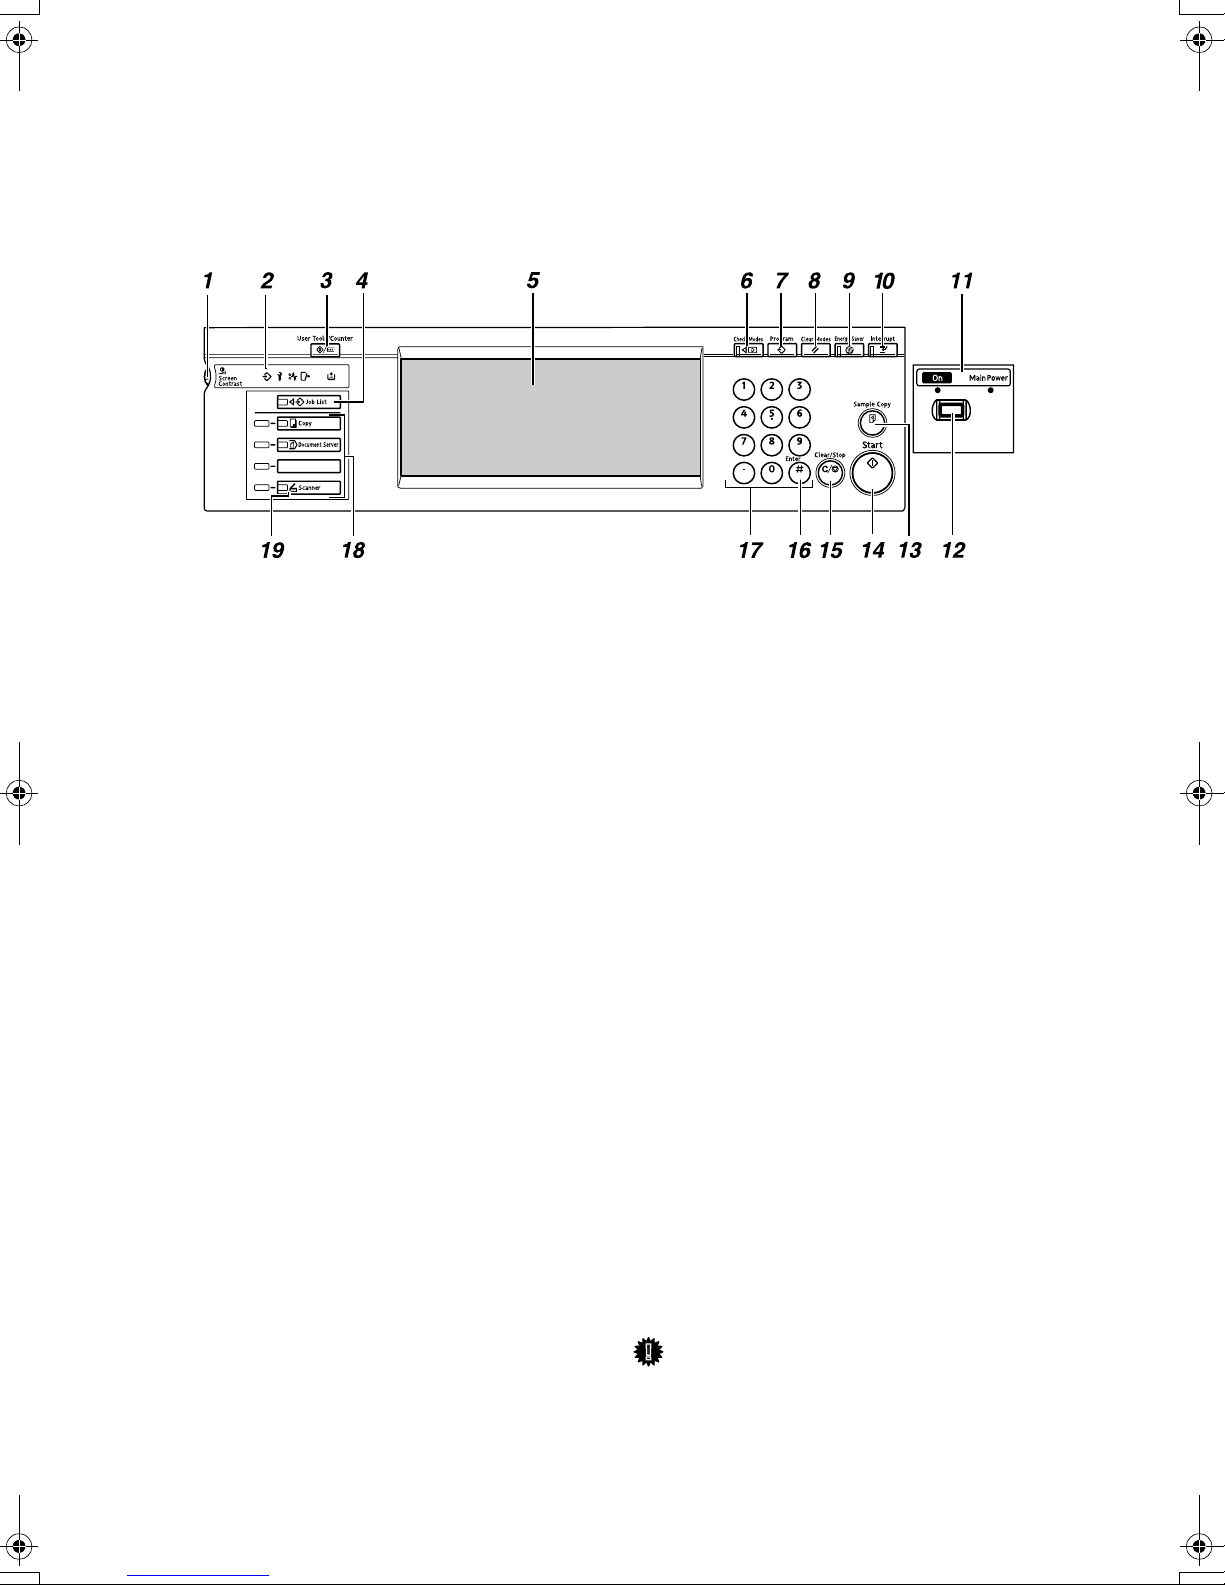
Control Panel
This illustration shows the control panel of a machine that has all options fully
installed.
AHD100S
1.
Screen contrast knob
Adjusts the brightness of the screen.
2.
Indicators
Show errors or machine status. For details, see “Control Panel”, General Settings
Guide.
m: Data In indicator
L: Service Call indicator
x: Misfeed indicator
M: Open Cover indicator
D: Add Toner indicator
3.
{{{{User Tools/Counter}}}} key
• User Tools
Press to change the default settings
and operation conditions to match
your requirements. See p.75 “User
Tools (Copier / Document Server Features)”.
• Counter
Press to check or print the counter value. For details, see “Counter”, General
Settings Guide.
4.
{{{{Job List}}}} key
Shows the job list. See “Job List”, General
Settings Guide.
5.
Display panel
Shows operation status, error messages,
and function menus.
6.
{{{{Check Modes}}}} key
Press to check the entered copying settings.
7.
{{{{Program}}}} key
Press to store or select the program
mode. See p.65 “Programs”.
8. {
{Clear Modes}}}} key
{{
Press to clear a setting's contents. The
number of copies is cleared when you
press and hold down this key for three
seconds.
9.
{{{{Energy Saver}}}} key
Press to switch to and from the Energy
Saver mode. For details, see “Saving Energy”, General Settings Guide.
10. {
{Interrupt}}}} key
{{
Press to make interrupt copies during a
copy run. See p.24 “Interrupt Copy”.
11.
Main power indicator/On indicator
When the main power switch is turned
on, the main power indicator lights.
The On indicator lights when the operation switch is on.
Important
❒ Do not turn the main power off
while the On indicator is flashing.
The hard disk may malfunction.
3
12.
Operation switch
Press this switch to turn the power on
(the On indicator goes on). To turn the
power off, press this switch again (the On
indicator goes off). See ”Turning On the
Power”, General Settings Guide.
13.
{{{{Sample Copy}}}} key
Press to make a single sample copy before starting a long copy run. By checking
the sample copy and making any necessary changes to the image quality settings
before you make multiple copies, you can
save time and paper. See p.34 “Sample
Copy”.
14.
{{{{Start}}}} key
Press to start scanning originals or copying. Press to start scanning and printing
in Document Server mode.
15.
{{{{Clear/Stop}}}} key
• Clear
Press to clear numbers entered.
• Stop
Press to stop a copy job in progress.
Press to stop scanning and printing in
Document Server mode.
16.
{{{{#}}}} key
Press to confirm values entered.
17.
Number keys
Press to enter a value, such as the number
of copies.
18.
Function keys
Press to select the following functions:
• Copy:
• Document Server:
• Scanner:
19.
Function Status indicator
These show the status of the above functions:
• Yellow: selected
• Green: active
• Red: interrupted
4
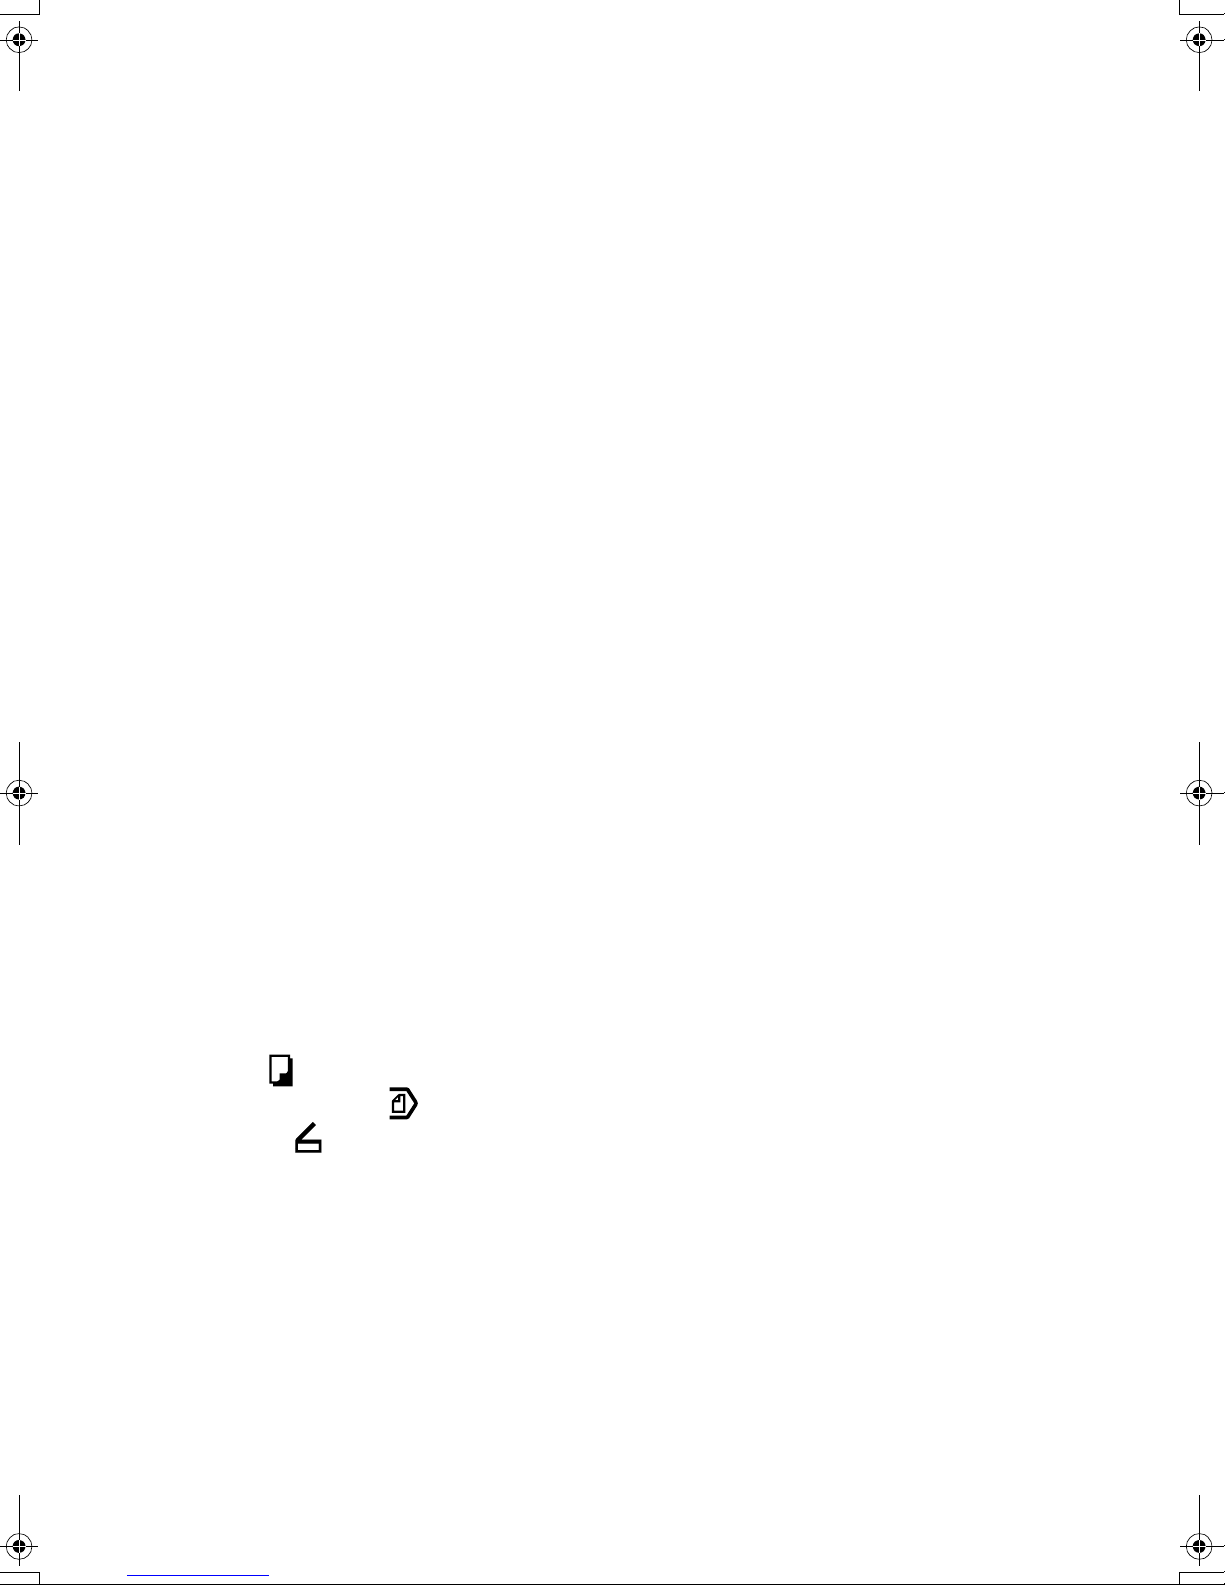
Display Panel
The function items displayed serve as selector keys. You can select or specify an
item by lightly pressing them.
When you select or specify an item on the display panel, it is highlighted like
this: . Keys appearing as cannot be used.
❖❖❖❖ When the lower tray (paper roll tray) is installed
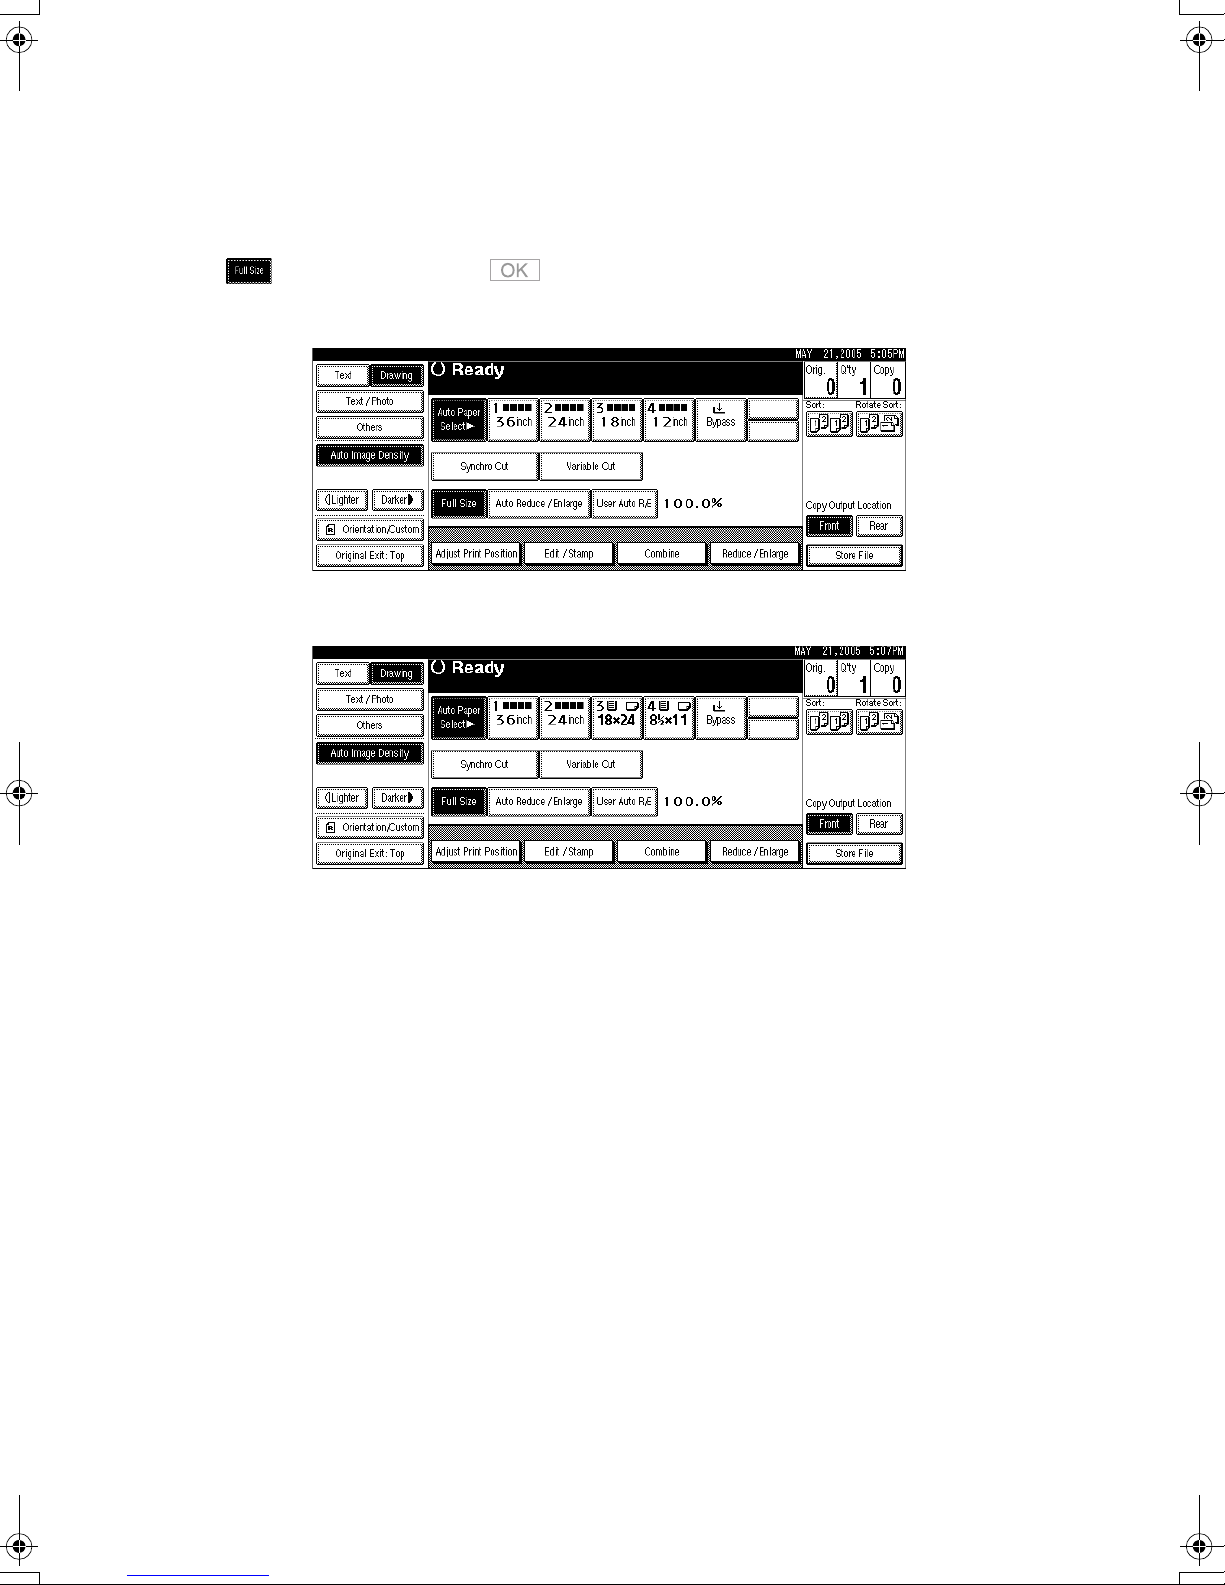
❖❖❖❖ When the cut paper trays are installed
5

6

1. Basics
Before Copying
Before you start copying, specify the original and copy paper locations.
❖❖❖❖ Paper Capacities For Each Original/Paper Output
Original output Capacities
Original Exit : Top A1 (D)L or smaller: 50 sheets (plain paper)
20 sheets (translucent paper)
• Use originals that are the same size, and of medium or high quality paper.
• Do not use paper that is long length paper, thick, curled, film,
2
folded, or translucent paper that is less than 80 g/m
weight.
• Do not load more than 10 sheets during very hot or humid conditions.
(21.3 lb) in
Original Exit : Rear
(Straight)
Original Exit : Rear
(document roller)
•
Output thick paper (104.7 g/m2 (27.9 lb) or more) to Rear (Straight).
• Translucent paper: 80 g/m2 (21.3 lb) or less, plain paper: 52.3
2
(13.9 lb) or less, and originals that are not stiff should be
g/m
output to Rear (Straight).
A0 (E) K or smaller: 1 sheet (plain paper)
1 sheet (translucent paper)
1 sheet (film)
• When output originals of A1 (E)K or larger, the ejected originals
may interfere with the copy paper and impede its progress. If this
happens, use the copy output (rear) auxiliary guide.
• When copying A0 (E) Ksize originals, remove them one by one.
A1 (D)Lor larger: 1 sheet (up to 6 m (236")) (plain
paper)
1 sheet (up to 3.6 m (141")) (translucent paper)
1 sheet (up to 3.6 m (141")) (film)
• Use face-curl originals.
• For roll originals, use originals with a diameter of roll Φ40 mm –
Φ
110 mm (Φ1.6" – Φ4.3").
• Do not use the document roller when copying on originals of size
longer than the maximum length for each paper type. Use both
hands to roll the original.
7
Basics
Copy output Capacities
1
Copy Output:
Front
Copy Output:
Rear
Roll paper Plain paper (at normal tem-
perature and humidity):
Plain paper (at high or low
temperature and humidity):
Translucent paper(vellum): 10 sheets
Film: 1 sheet
Cut sheet paper
• Same size copy paper
• Normal temperature = 23°C
Normal humidity = 65%
A1 (D)K, A0 (E): 10 sheets (plain paper)
• Same size copy paper
• When using A0 size copy paper, attach the copy output (rear) auxiliary
guide. See p.11 “Using the rear output to eject A0 (E) KPaper”.
Plain paper, and translucent
paper (vellum):
Film: 1 sheet
99 sheets
10 sheets (A1L to A2)
99 sheets (smaller than A2)
10 sheets
1 sheet (translucent paper)
1 sheet (film)
Important
❒ The paper capacity indicated assumes the use of standard copier paper, and
should only be used as a guide. If the paper exceeds the upper limit, the copies may become folded or cause paper jams.
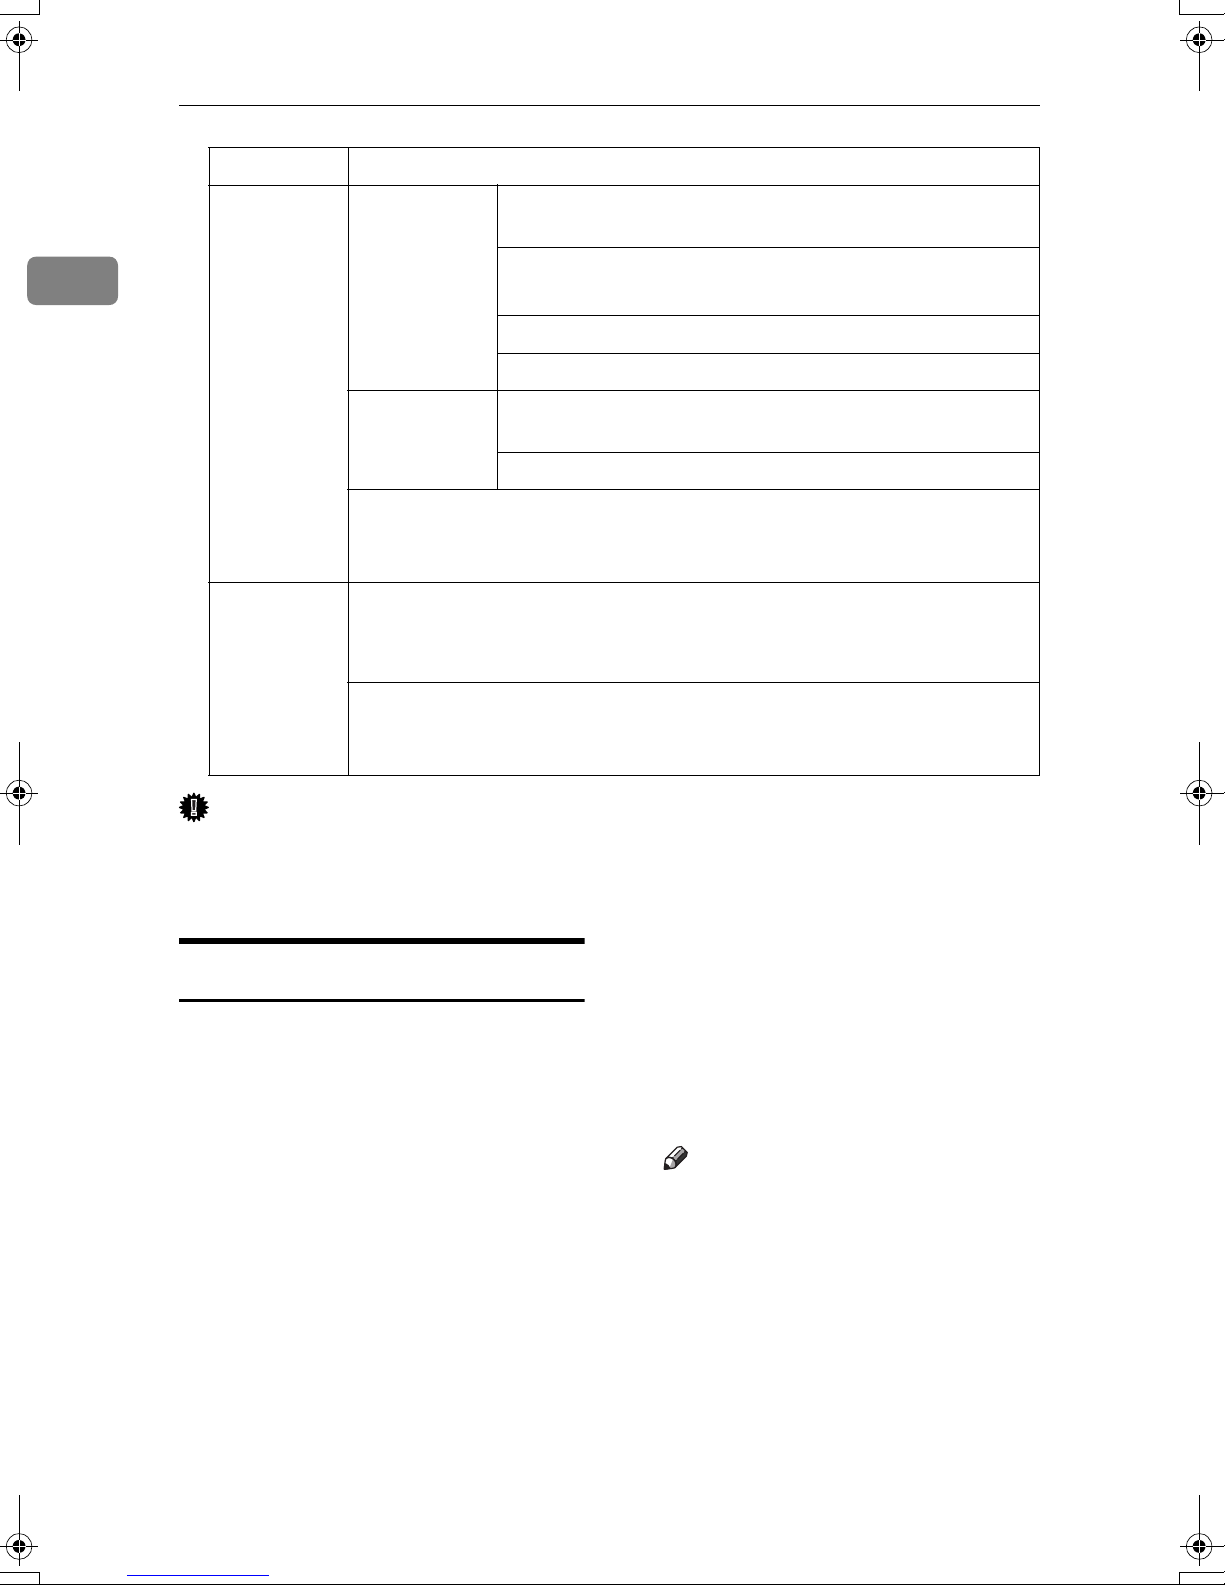
❖❖❖❖ Rear Original Exit (document roller)
Original Output Locations
When copying rolled originals
such as long length originals, select
The following original output locations are available:
this output location so that originals can be rolled and stacked by
the document roller. See p.9 “Rear
❖❖❖❖ Top Original Exit
Original Exit (Document Roller)”.
This is the basic original output location. Originals are ejected onto
the upper output stacker.
❖❖❖❖ Rear Original Exit (straight)
Note
❒ Originals of 52.3 g/m
2
(13.9 lb – 27.9 lb) can be
g/m
2
– 104.7
used with the document roller.
Originals are ejected onto the original output supports. When copying thick or hard originals, select
this output location.
❒ Do not use the document roller
when copying originals that are
longer than the maximum
length for each paper type. Use
both hands to roll the original.
8
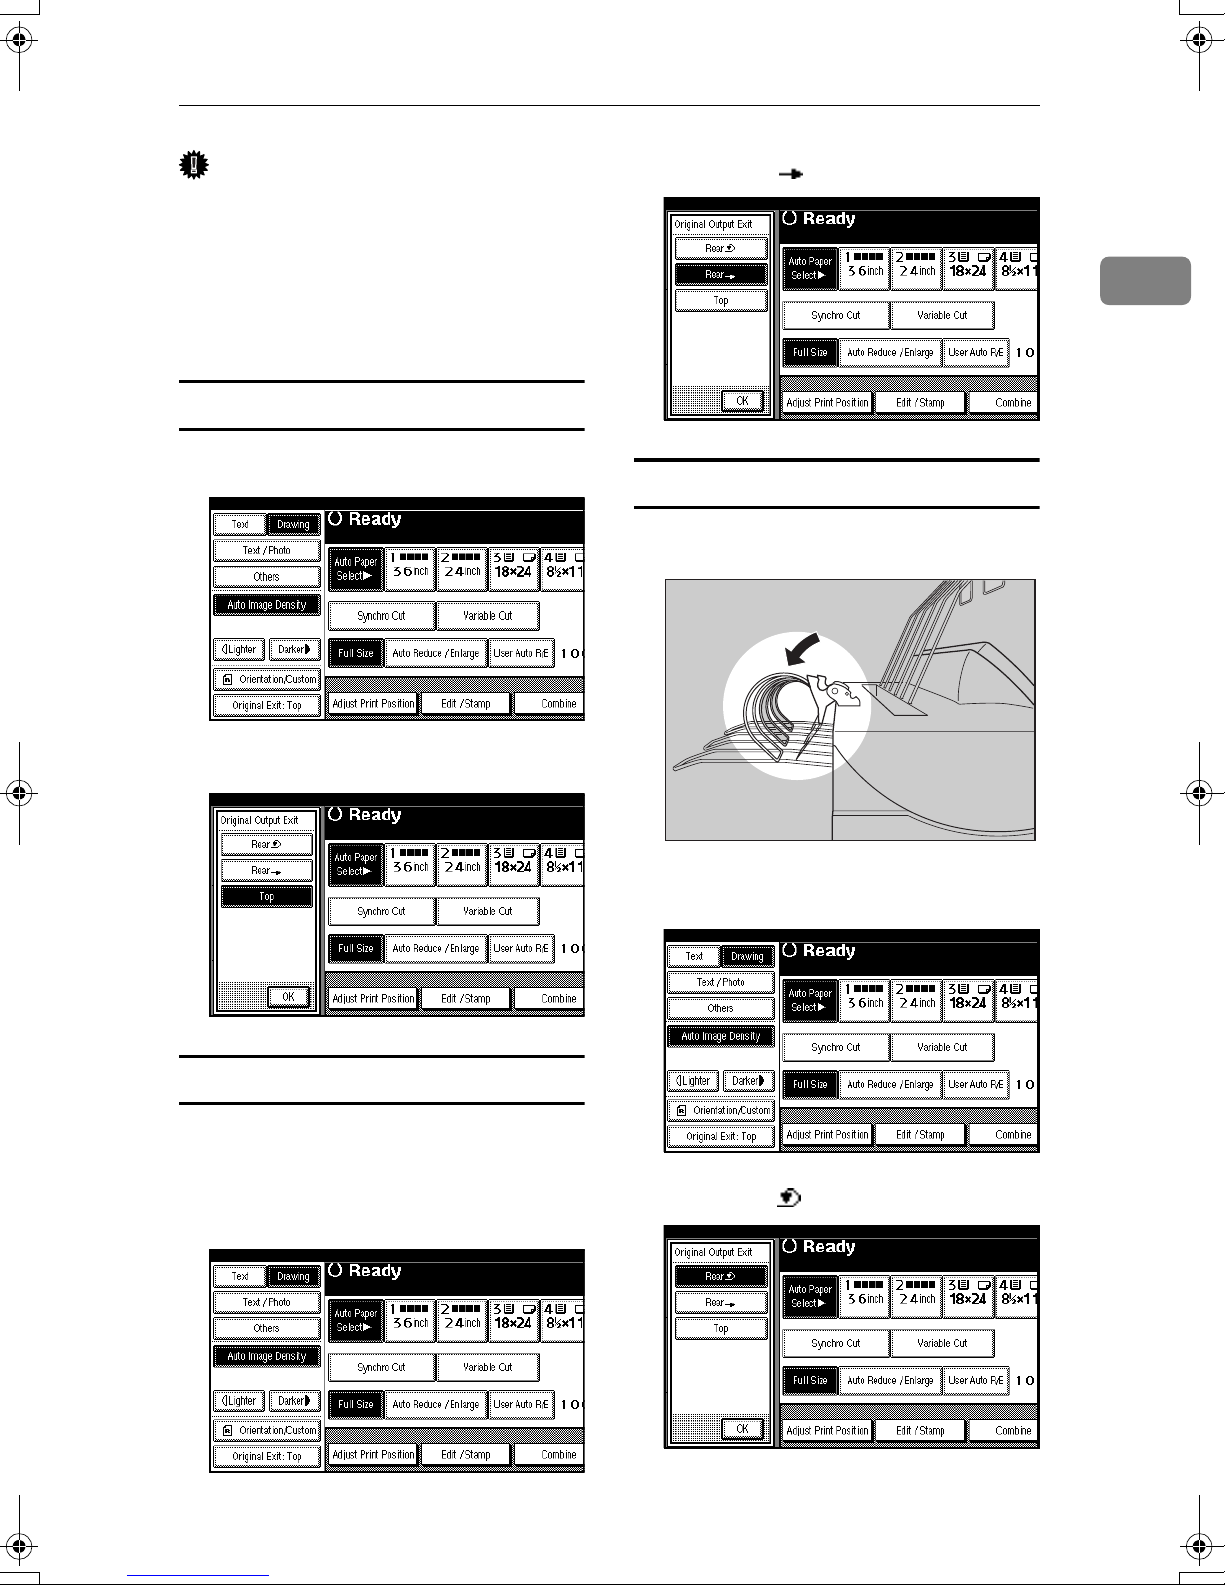
Before Copying
Important
❒ When using the optional carrier
sheet, set the original output location to rear original exit. If the original output location is set to top
original exit, the original may be
damaged.
Top Original Exit
Press [Original Exit].
AAAA
Press [Rear ], and then press [OK].
CCCC
Rear Original Exit (Document Roller)
Lower the document roller.
AAAA
1
Press [Top], and then press [OK].
BBBB
Rear Original Exit (Straight)
Check that the document roller is
AAAA
raised.
Press [Original Exit].
BBBB
Press [Original Exit].
BBBB
CCCC
Press
[Rear ]
, and then press
ZEDH140E
[OK]
.
9
1
Basics
After the original has been eject-
DDDD
ed, pull the document roller forward and remove the original.
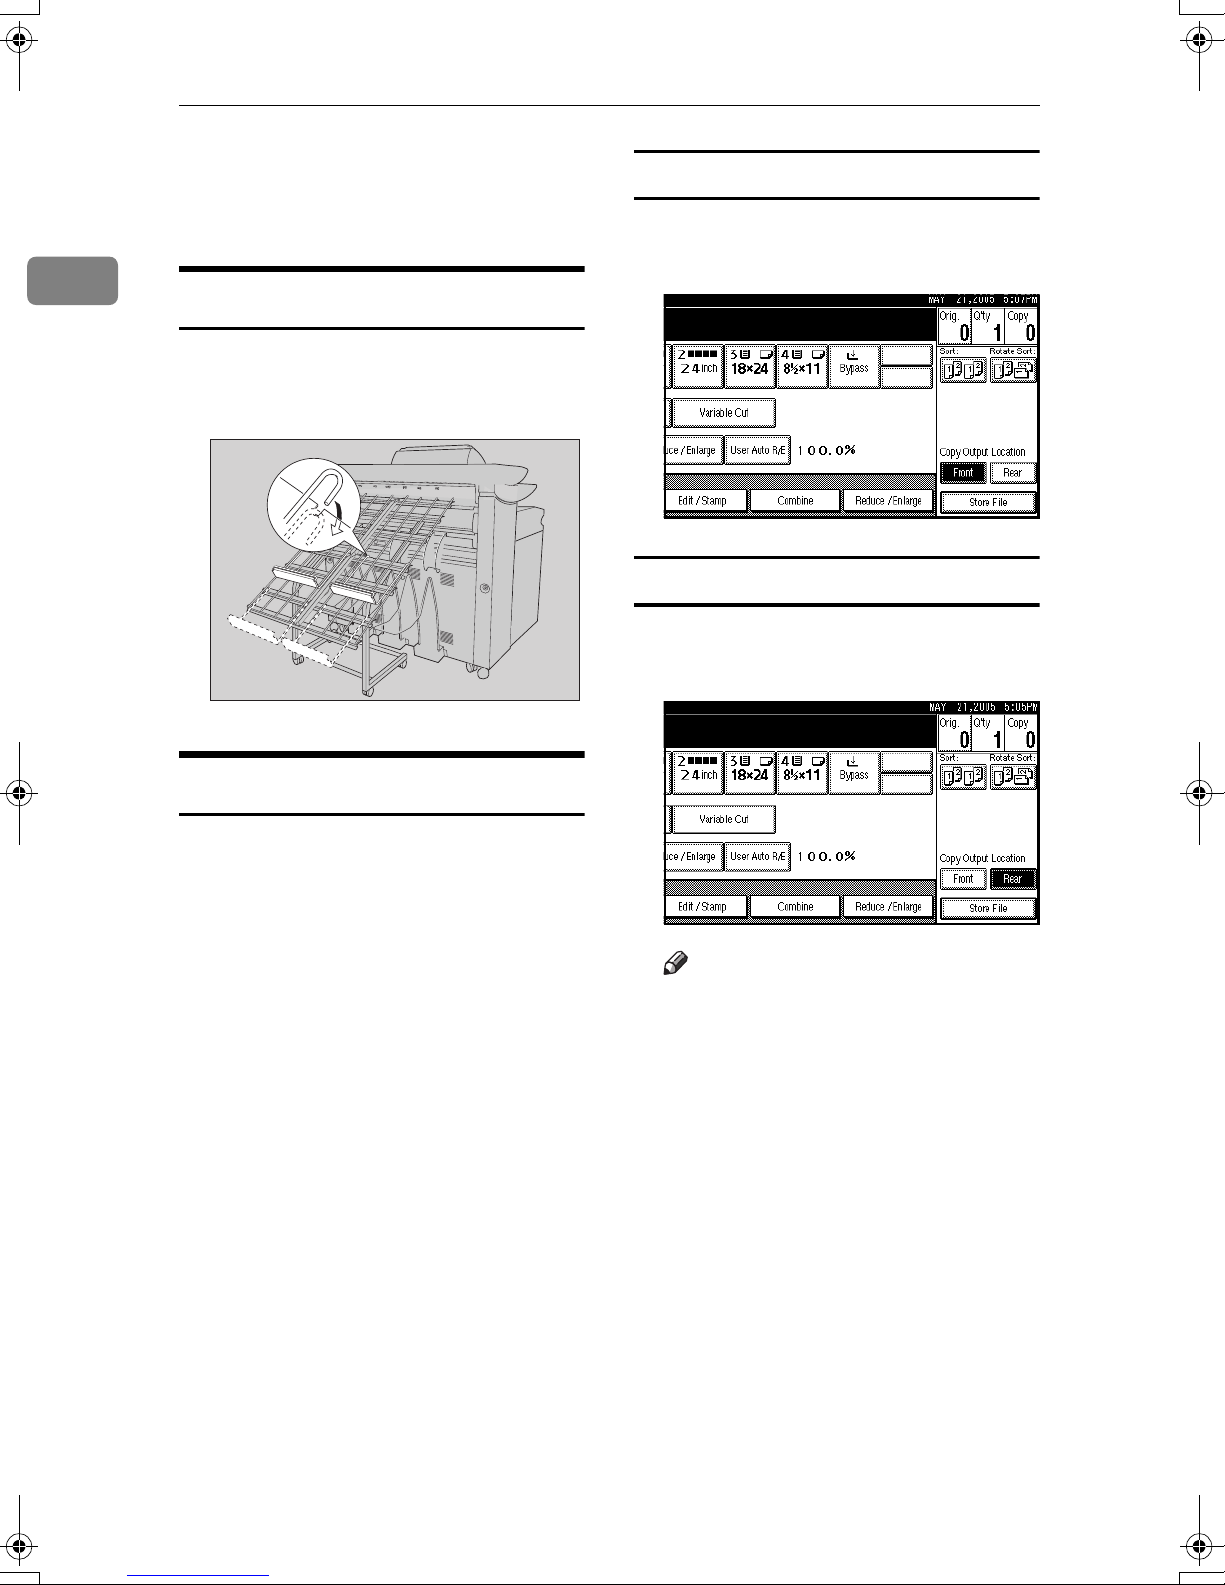
Adjusting the Original Tray
When using the optional original
tray, adjust the hook position to the
size of the original.
Front output
Press [Front] under Copy Output
AAAA
Location.
Rear output
ZEDP071E
Copy Output Locations
The following copy output locations
are available.
❖❖❖❖ Front Output
When [Front] is selected, copies are
sent to the copy output tray at the
front of the machine. When copying sizes up to A1 (D)L, select
front output.
If the output copies are badly
curled, turn the paper loaded in
the cut paper trays upside down,
or remove the copies during the
copy run.
Press [
AAAA
Location.
Note
❒ When copying onto thick paper,
the last sheet to be ejected may
remain in the exit area. If this
happens, remove it.
] under Copy Output
Rear
❖❖❖❖ Rear Output
When [
sent to the copy output tray at the
back of the machine.
When copying A1 (D)K or A0
(E)K, select rear output.
] is selected, copies are
Rear
10
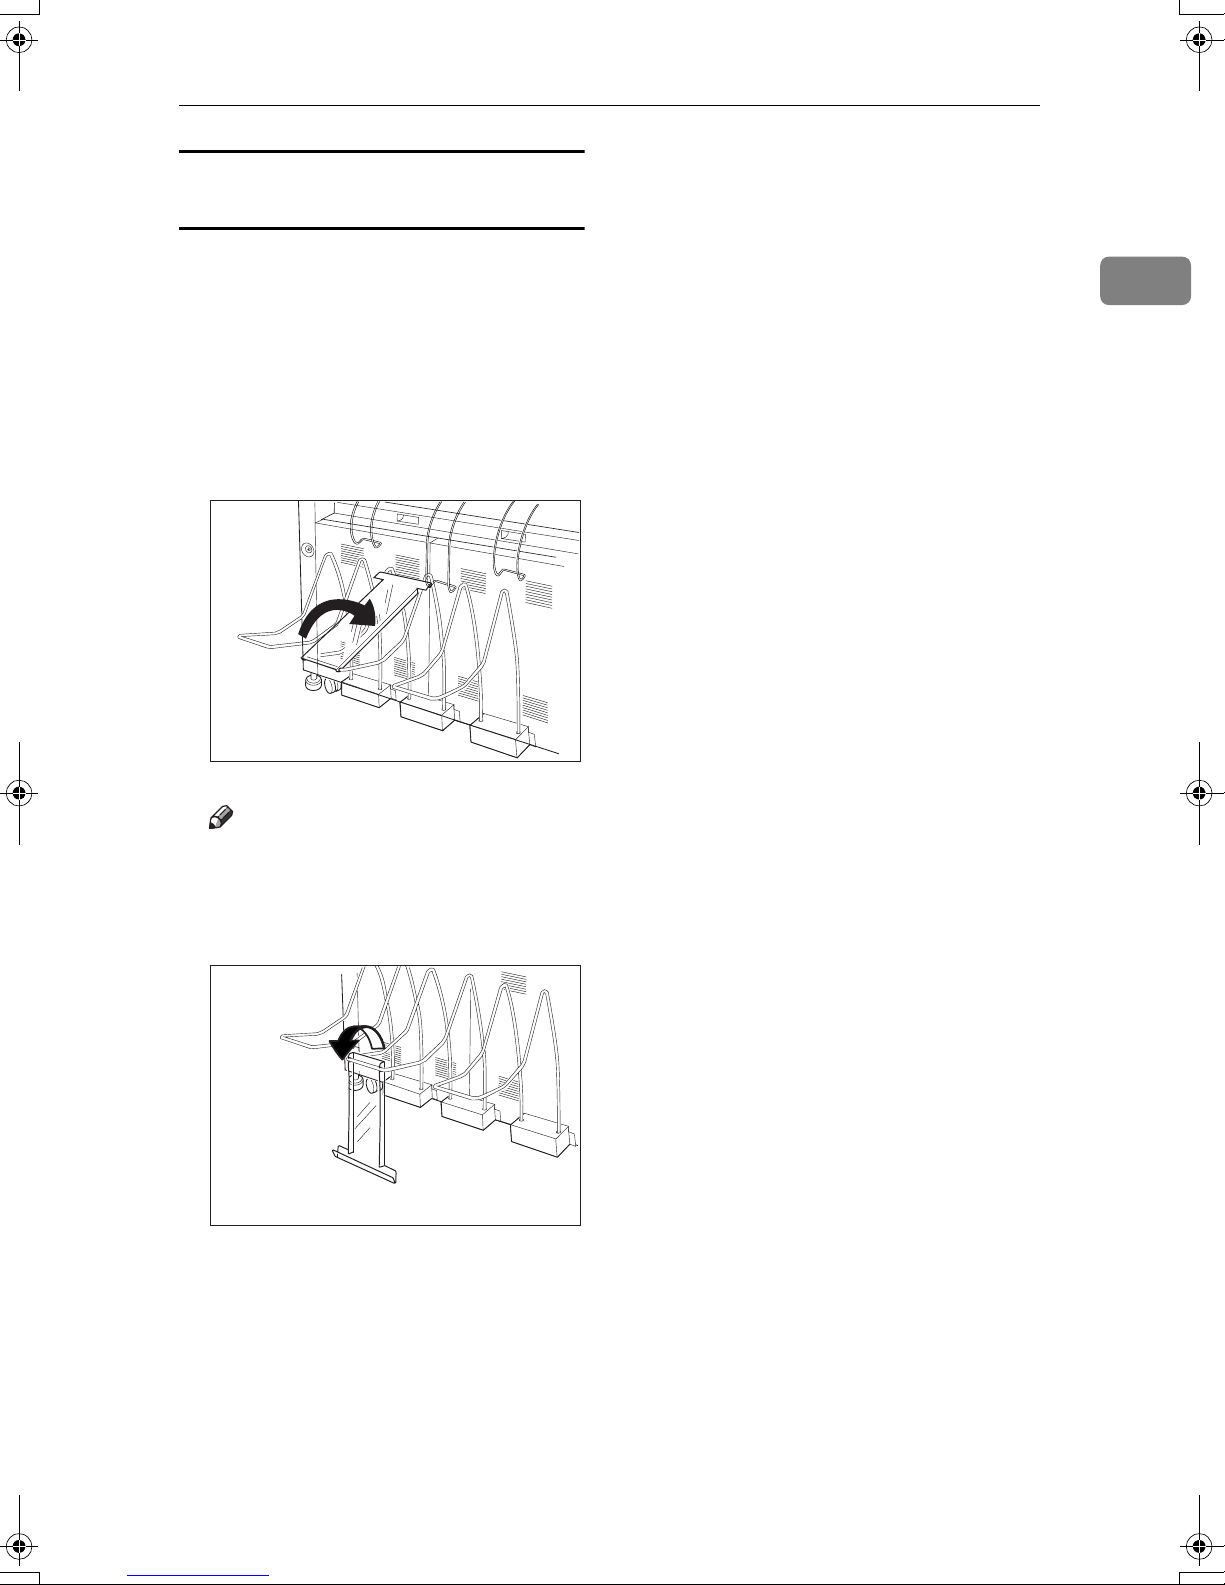
Using the rear output to eject A0 (E)
KKKKPaper
When ejecting A0 (E) Ksize paper to
the rear output, the leading edge of
the paper may become caught in the
back of the copy output tray. You can
prevent this by attaching the copy
output auxiliary guide.
Lower the copy output auxiliary
AAAA
guide and adjust the position.
Before Copying
1
ZEDH410E
Note
❒ You do not need to use the copy
output auxiliary guide when
copying on to A1 (D), or shorter
paper.
ZEDH420E
11

Basics
Originals
1
Sizes and Weights of Recommended Originals
❖❖❖❖ Metric version
Where original
is placed
Original table Standard sizes: A0K, A1KL, A2KL, A3KL,
❖❖❖❖ Inch version
Where original
is placed
Original table Standard sizes
Original size Original weight
A4KL, B1K, B2KL, B3KL, B4KL
Custom sizes:
Length 210 – 15000 mm
Width 210 – 950 mm
Original size Original weight
• Engineering
E(34"×44")K, D(22"×34")K L, C(17"×22")K L
1
B(11"×17")K L, A(8
• Architecture
E(36"×48")K, D(24"×36")KL, C(18"×24")K L
B(12"×18")K L, A(9"×12")K L
• 30"×42"K
/2"×11")K L
2
20.9 – 157 g/m
0.03 – 1 mm thick originals
5.6 - 41.8 lb. and 1.1
Mil - 40 Mil thick originals
and
12
Custom sizes
Length: 8.3" - 590.5"
Width: 8.3" - 37.5"
Originals
Originals that should be scanned using the carrier sheet
The following type of originals should be mounted on the carrier sheet. You
should also use the carrier sheet for important originals and for originals you
will copy repeatedly.
• Cut and pasted originals
• Originals with fold lines
• Wrinkled or torn originals
• Waved originals
• Punched originals
• Originals with sticky tape or adhesive
• Pasted originals
• Originals with a damaged leading edge
• Originals with surfaces that attach to glass easily such as photographs
• Originals drawn in pencil
1
Reference
p.18 “Setting the Carrier Sheet”
Non-recommended original
The following original types can cause jams, or may itself be damaged.
• Originals other than those specified in p.12 “Sizes and Weights of Recom-
mended Originals”
• Stapled or clipped originals
• Perforated or torn originals
• Bent, folded, or creased originals
• Pasted originals
• Originals with any kind of coating, such as thermal fax paper, art paper, alu-
minum foil, carbon paper, or conductive paper
• Originals with indexes, tags, or other projecting parts
• Sticky originals such as translucent paper
• Bound originals such as books
• Damp originals
• Badly curled originals
• Originals that vary in thickness
• Originals with sticky tape or adhesive
• Originals with thick leading edges
• Originals with wet ink or correction fluid
• Carbon-backed originals
13
1
Basics
• Originals not made of paper (such as glass, metal)
• Originals with a roll diameter smaller than φ35 mm (φ1.4")
• Originals with a roll diameter larger than φ110 mm (φ4.3")
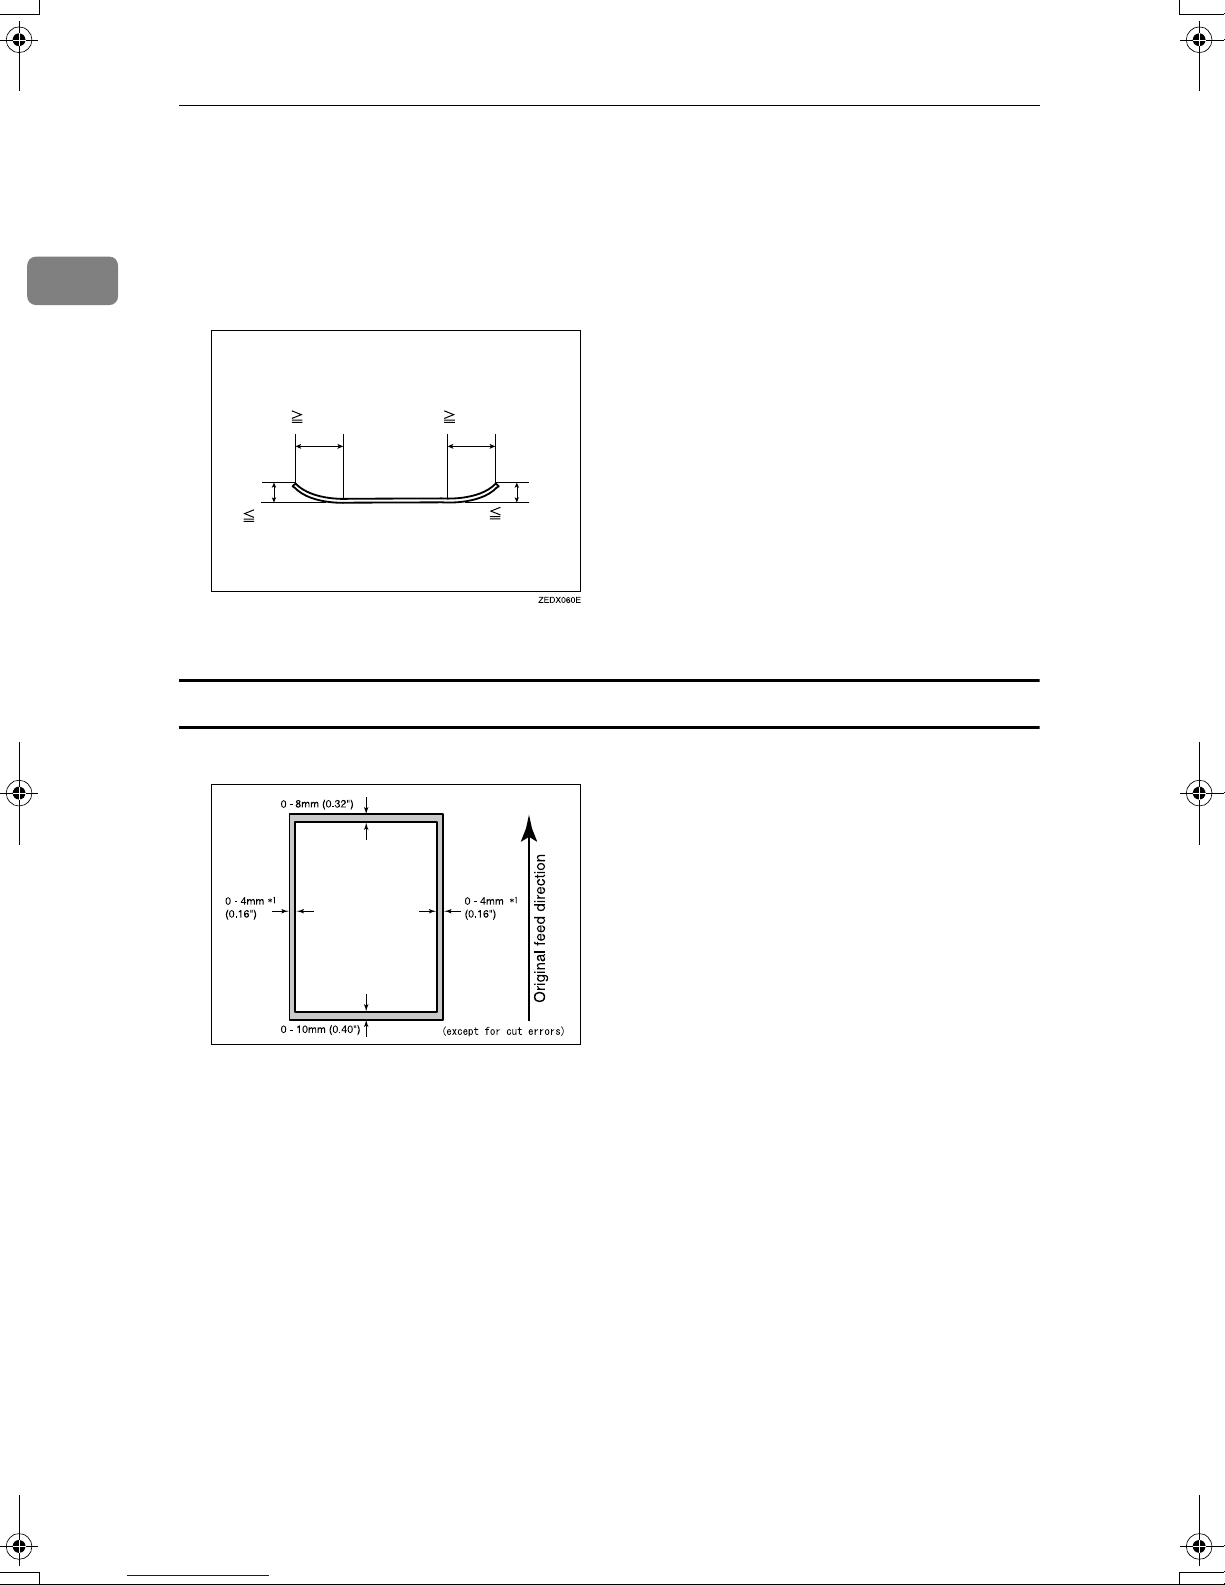
Flatten curled originals so they fit within the range shown below:
• Front and back curl; R 60 mm (2.4") or more, height 10 mm (0.4") or less
60mm (2.4") 60mm (2.4")
10mm (0.4")
10mm (0.4")
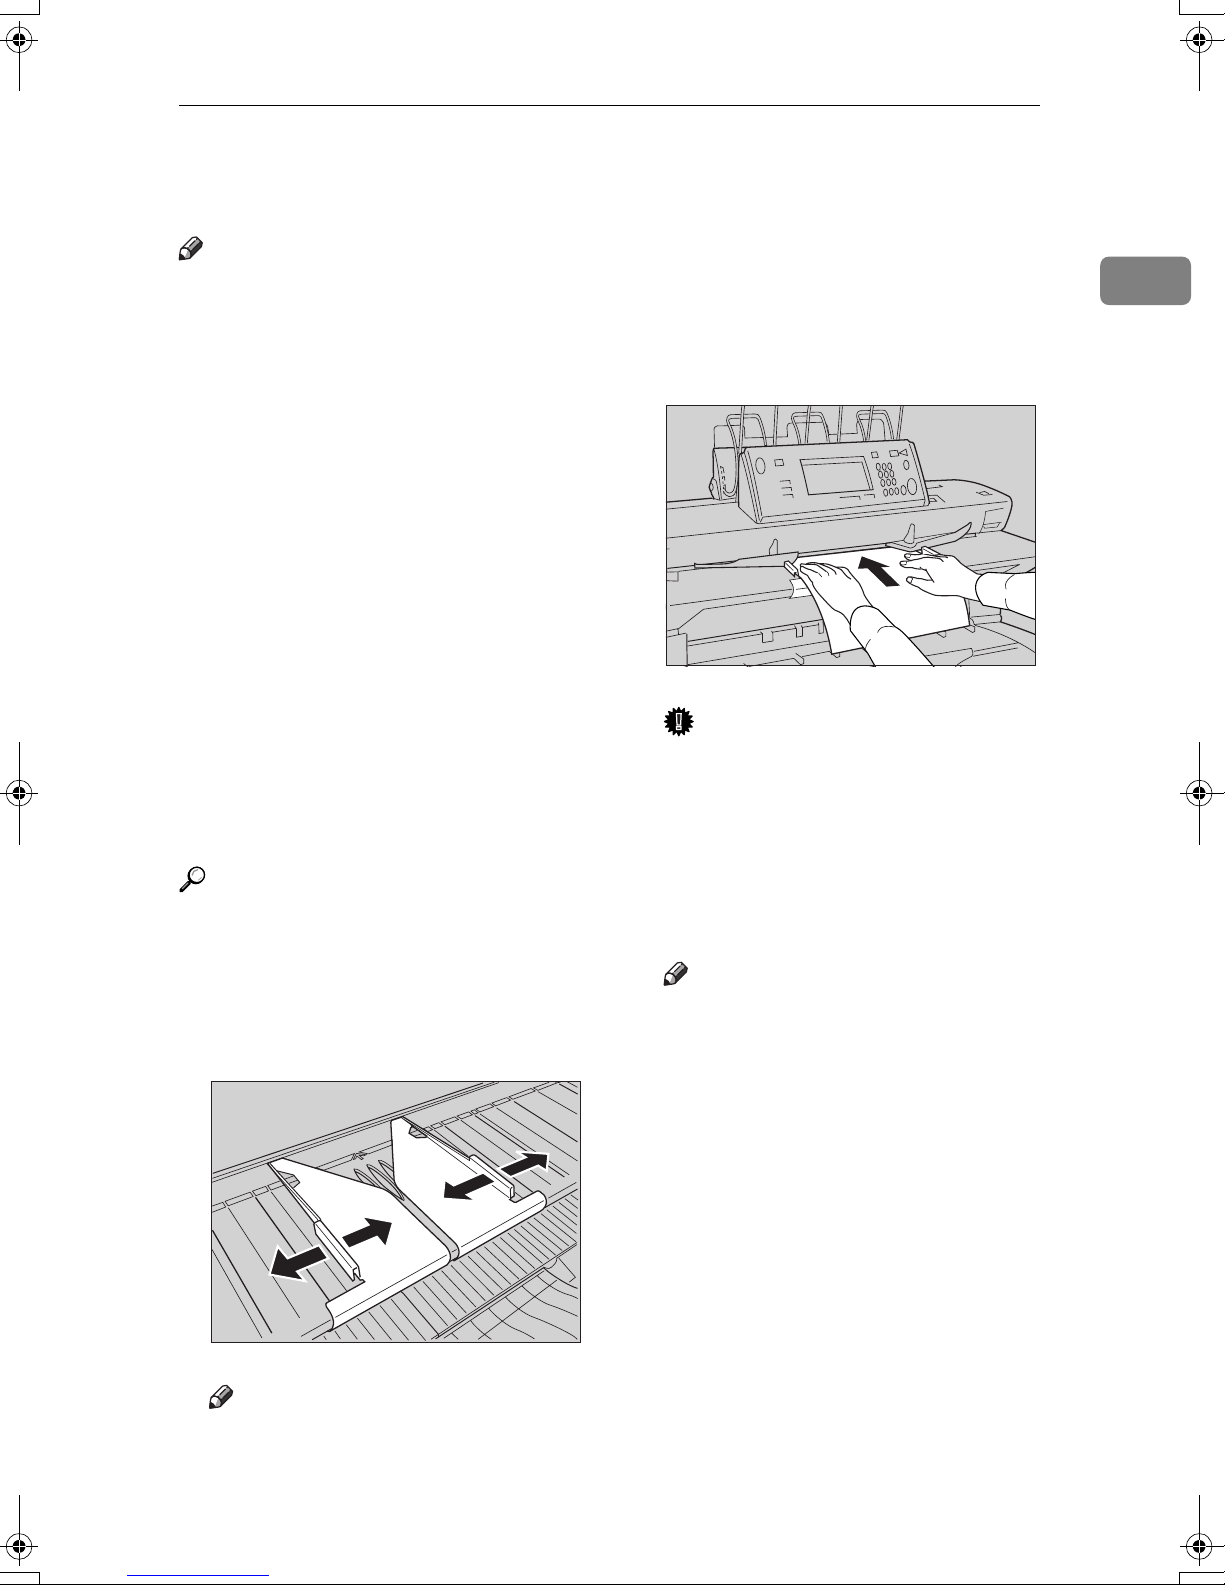
Originals that use more than 20% of the image area, may be faint.
Missing Image Area
AHD046S
As shown above, part of the original may not be copied when using paper roll
or full-size copying.
*
1: Left and right, less than 5 mm (0.2")
14
Placing Originals
Placing Originals
Note
❒ Place the original after any correc-
tion fluid or ink has completely
dried. Not taking this precaution
will result in a dirtied exposure
glass and blemished copies.
❒
Dust and residue from pencil-drawn
originals can result in a dirtied exposure glass and blemished copies. We recommend using the
carrier sheet for this type of original. See p.18 “Setting the Carrier
Sheet”.
❒ If the original's rear edge is badly
curled, smooth it out with both
hands before scanning. If the original is inserted as is, it may be damaged.
When copying curled originals, use
❒
the front copy output auxiliary
tray.
Reference
For details about precautions for
originals, see p.12 “Originals”.
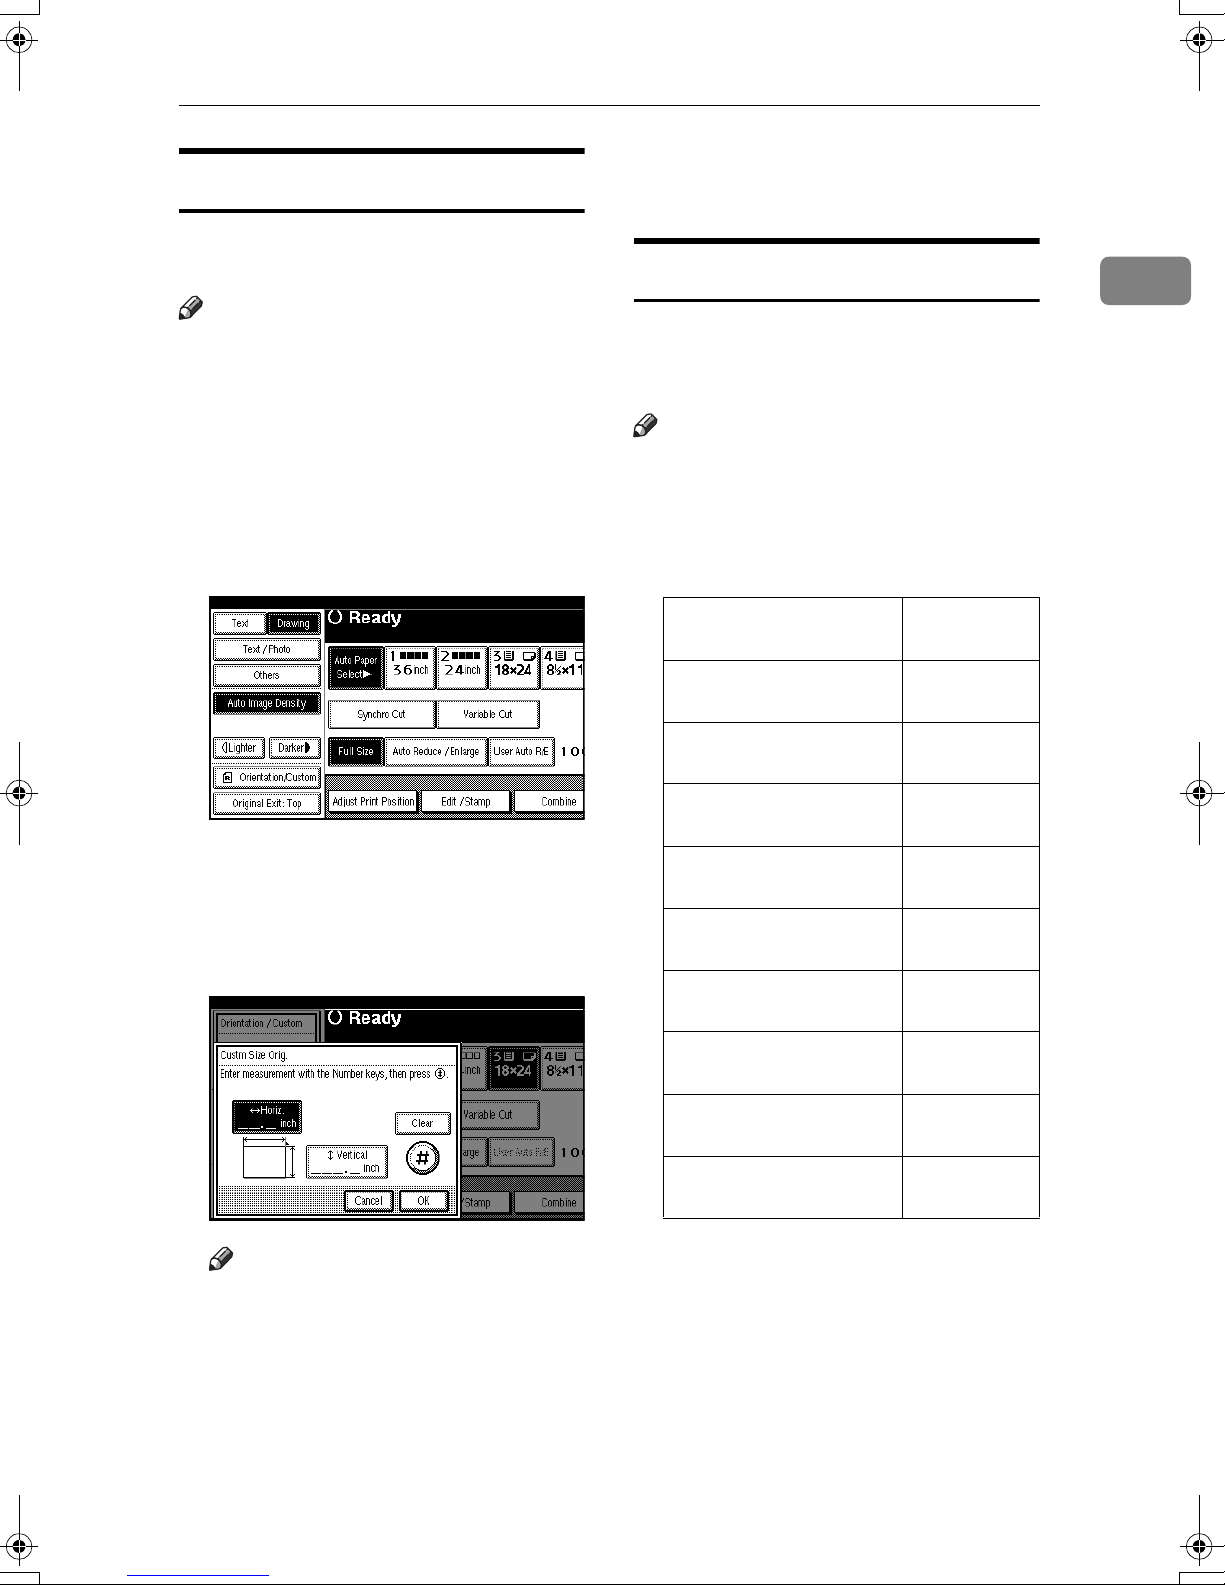
Adjust the original guides to the
AAAA
size and orientation of the original width.
❒ Do not push the original guide
side fence with force.
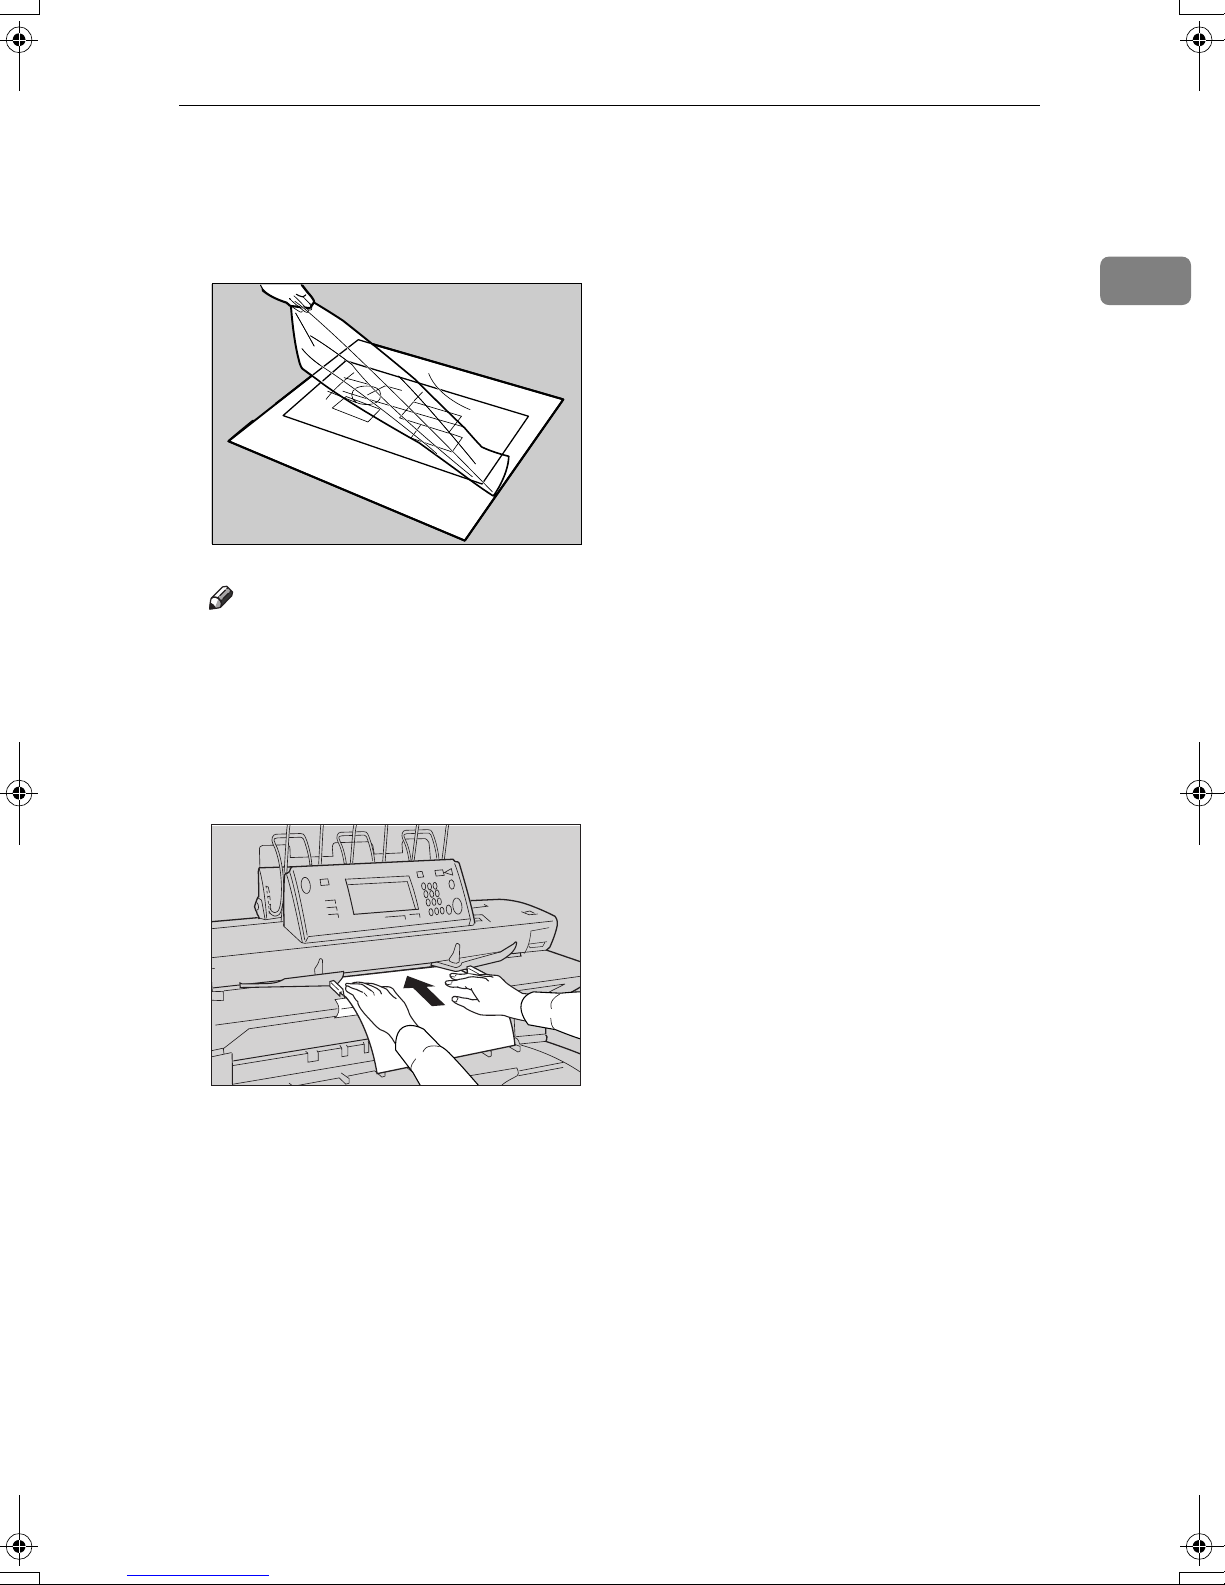
Using both hands, carefully insert
BBBB
the original between the original
guides, copy side up.
Important
❒ Once originals start to feed in,
do not push or pull them. This
may damage them.
❒ Do not operate the document
roller while originals are being
fed through the machine. Originals may be damaged.
Note
❒ Do not release your hands until
the original is pulled in. Release
when it has gone slightly in.
1
ZEDH180E
Note
❒ Make sure the original guides
are flush against the original.
ZEDH190E
❒ You can change the original
feed delay setting if originals
are repeatedly feeding in slanted, or if you need to adjust the
delay for the type of originals
you are using. See “Original
Feed Delay 1”, General Settings
Guide.
❒ If the leading edge of the origi-
nal is badly curled, smooth out
the curl, and then place the original in the insertion area.
15

1
Basics
❒
When inserting long length orig-
there may be some move-
inals,
ment to either side. If this
happens, correct the movement
manually while feeding the
originals into the machine.
Press the {{{{#}}}} key after all origi-
CCCC
nals have been scanned.
----To stop originals feeding in
If the originals are feeding in slanted,
or jamming, etc., press the {{{{Scanner
Stop}}}} key to stop them feeding in.
Original Orientation
Place the original of the same orientation as the copy paper on the original
table.
AHD005S
1.
Feeding direction
When you cannot place the original
as the above, you may not make copies as you want with particular functions. If this happens, change the
orientation by selecting [] or [].
ZEDH150E
Note
❒ When you press the {{{{Scanner Stop}}}}
key, the original stops immediately, which can cause it to jam. If this
happens, see “xClearing Misfeeds”, General Settings Guide.
❒ When you have set rear original
exit as the original output location,
the rear edge of the originals are
held at the output exit. To cancel
this, press the {{{{Scanner Stop}}}} key.
See p.8 “Original Output Locations”.
Note
❒ It is recommended that you use
this function together with the
Auto Paper Select or Preset Reduce/Enlarge function.
Press [Orientation/Custom].
AAAA
Select the original orientation,
BBBB
and then press [OK].
16
Placing Custom Size Originals
When placing custom size originals,
specify the size of the originals.
Note
❒ Paper with a vertical size of 210–
15000 mm (8.3"–590.5") and a horizontal size of 210–914 mm (8.3"–
35.9") can be specified with this
function.
❒ If you do not specify the size, parts
of the image may not be copied.
Placing Originals
Place the originals, and then press
FFFF
the {{{{Start}}}} key.
Wide Scan
The machine checks the original
width and then increases the scan size
to a slightly larger standard size.
Note
❒ Scan size differs depending on the
size of the original. See the following table for available scan sizes:
1
Press [Orientation/Custom].
AAAA
Press [Custm Size Orig.].
BBBB
Enter the horizontal size of the
CCCC
original using the number keys,
and then press [#].
❖❖❖❖ Metric version
Original width Scanning
width
Over than A4K(210 mm)
and less than 257 mm
Over than A3K(297 mm)
and less than 364 mm
Over than A2 K(420 mm)
and less than 515 mm
Over than A1K(594 mm)
and less than 728 mm
Over than A0K(841 mm)
and less than 914 mm
Over than B4K(257 mm)
and less than 297 mm
Over than B3K(364 mm)
and less than 420 mm
Over than B2K(515 mm)
and less than 594 mm
A3K(297 mm)
A2K(420 mm)
A1K(594 mm)
A0K(841 mm)
914 mm
B3K(364 mm)
B2K(515 mm)
B1K(728 mm)
Note
❒ If you make a mistake, press
[Clear] or the {{{{Clear/Stop}}}} key,
and then enter the value again.
Enter the vertical size of the origi-
DDDD
nal using the number keys, and
then press [#].
Press [OK].
EEEE
Over than B1K(728 mm)
and less than 841 mm
914 mm
❒ The machine adjusts to a scan size
of the same paper series as the
original. If you want to mix the sizes of A and B series when scanning, contact your service
representative.
17
Basics
1
❖❖❖❖ Inch version (Engineering)
Original width Scanning
width
Over than AK(8
and less than 9"
Over than BK(11") and
less than 12"
Over than CK(17") and
less than 18"
Over than DK(22") and
less than 24"
Over than 30" and less
than 36"
Over than EK(34") and
less than 36"
1
/2")
BK(11")
CK(17")
DK(22")
EK(34")
36"
36"
❖❖❖❖ Inch version (Architecture)
Original width Scanning
width
Over than AK(9") and
less than 11"
BK(12")
Press [Orientation/Custom].
AAAA
Press [Wide Scan], and then press
BBBB
[OK].
Select the paper tray.
CCCC
Note
❒ When using this function, the
Auto Paper Select function does
not work. If the paper size you
select is as the same as that of
the original, part of the image
may not be copied. Select a
slightly larger standard size.
18
Over than BK(12") and
less than 17"
Over than CK(18") and
less than 22"
Over than DK(24") and
less than 34"
Over than 30" and less
than 36"
CK(18")
DK(24")
EK(36")
36"
❒ The machine adjusts to a scan size
of the same paper series as the
original. If you want to mix the sizes of Engineering and Architecture
series when scanning, contact your
service representative.
❒ When copying custom size origi-
nals, you can use this function with
Synchro Cut to specify the copy
paper to be cut to the size of the
original.
Place the originals, and then press
DDDD
the {{{{Start}}}} key.
Setting the Carrier Sheet
Important
❒ When using the optional carrier
sheet, set the original output location to rear original exit (straight).
If the original output location is set
to top original exit, or rear original
exit (document roller), the original
may be damaged.
Note
❒ When using the carrier sheet with
Synchro Cut selected, the paper is
cut to the size of the carrier sheet.
Reference
For details about using the carrier
sheet to make copies, see p.13
“Originals that should be scanned
using the carrier sheet”.
Open the carrier sheet with the
AAAA
transparent sheet face up, and
then insert the original also face
up.
Note
❒ Align the original with the fold
of the carrier sheet.
Placing Originals
1
ZEDP020E
Using both hands, hold the origi-
BBBB
nal copy side up, and carefully insert the folded edge of the carrier
sheet into the insertion area.
ZEDH180E
19

1
Basics
20
Basic Procedure
2. Copying
Preparation
When User Code Authentication is
set, the screen for entering a user
code will be displayed. Enter your
user code (up to eight digits) using
the number keys, and then press
the {{{{#}}}} key.
Reference
For user codes, see "Registering
User Codes", General Settings
Guide.
When Basic Authentication, Windows Authentication, or LDAP
Authentication is set, the authentication screen will be displayed.
Enter your login user name and
user password, and then press [Lo-
gin]. See "When the Authentication
Screen is Displayed", General Set-
tings Guide.
Make sure no previous settings
BBBB
remain.
Note
❒ To clear settings, press the
{{{{Clear Modes}}}} key.
Select the output locations for
CCCC
originals and copies, and then
prepare to use them.
Reference
p.7 “Before Copying”
Make the necessary settings.
DDDD
Note
❒ You can press the {{{{Check Modes}}}}
key to view the settings you
have made.
Note
❒ Consult the User Administrator
about your login user name and login password.
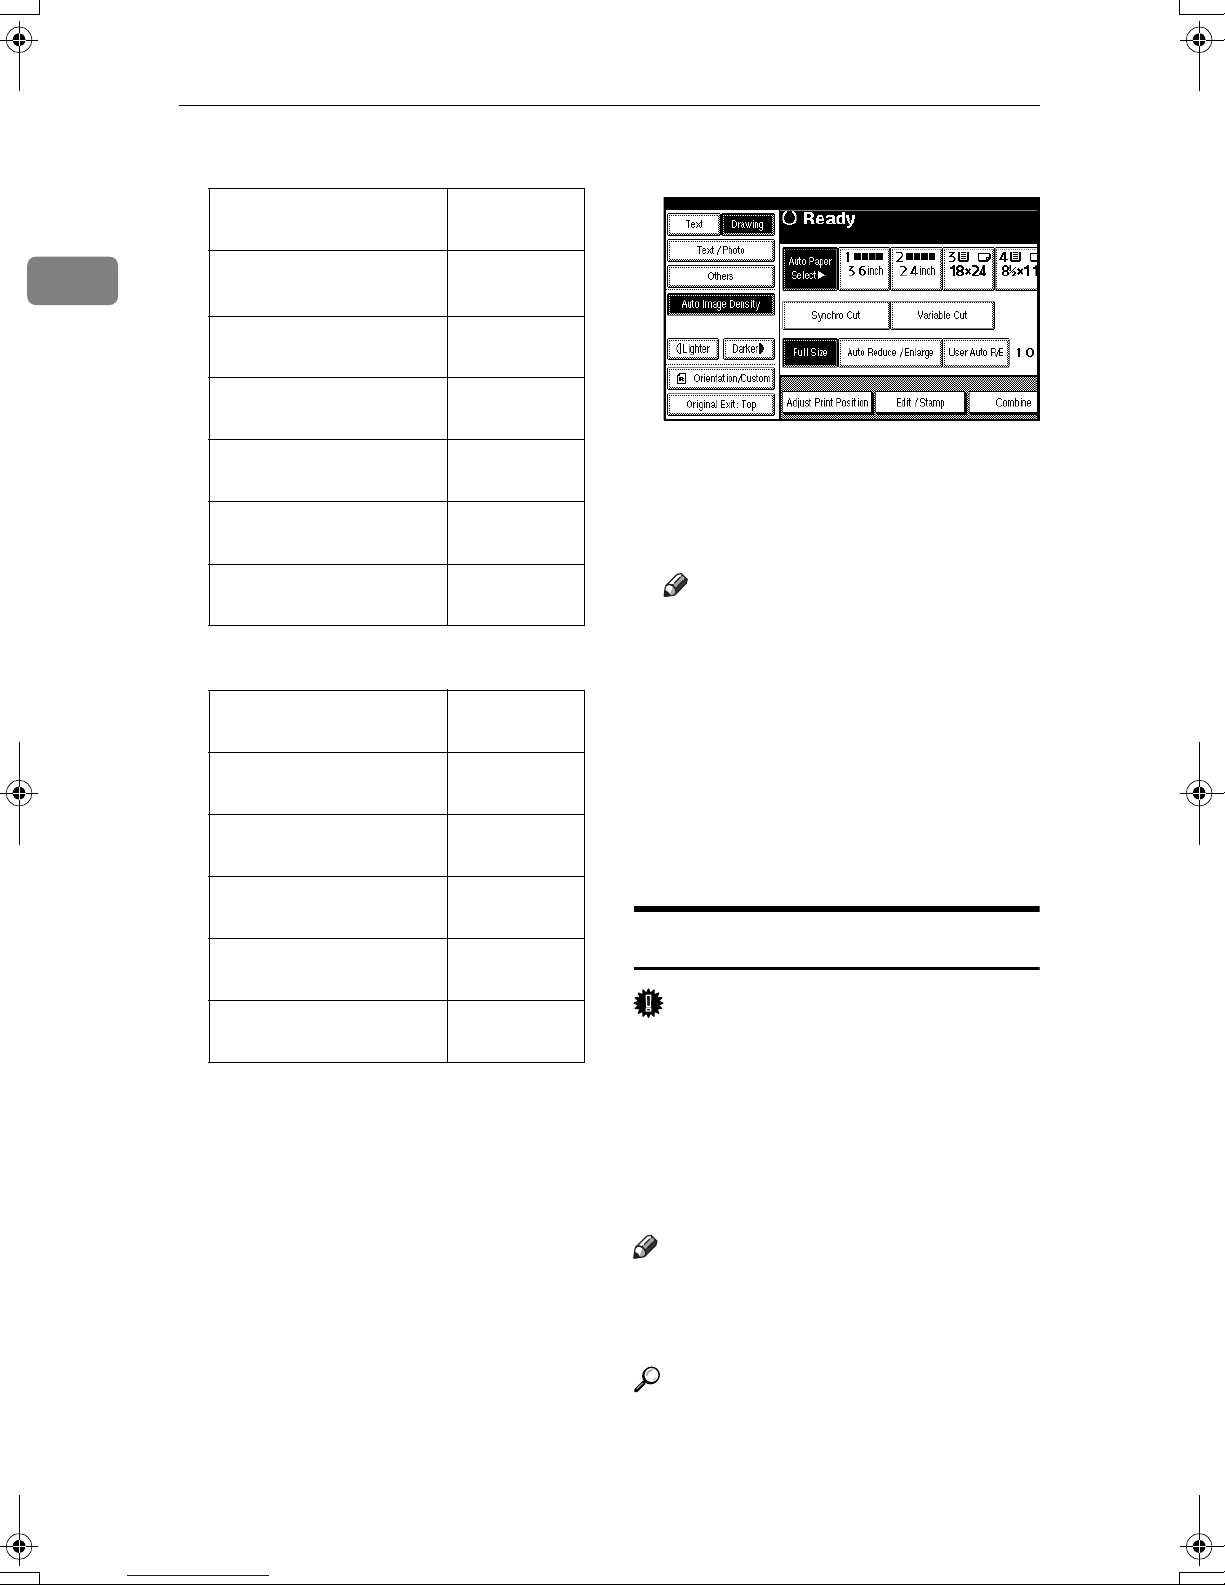
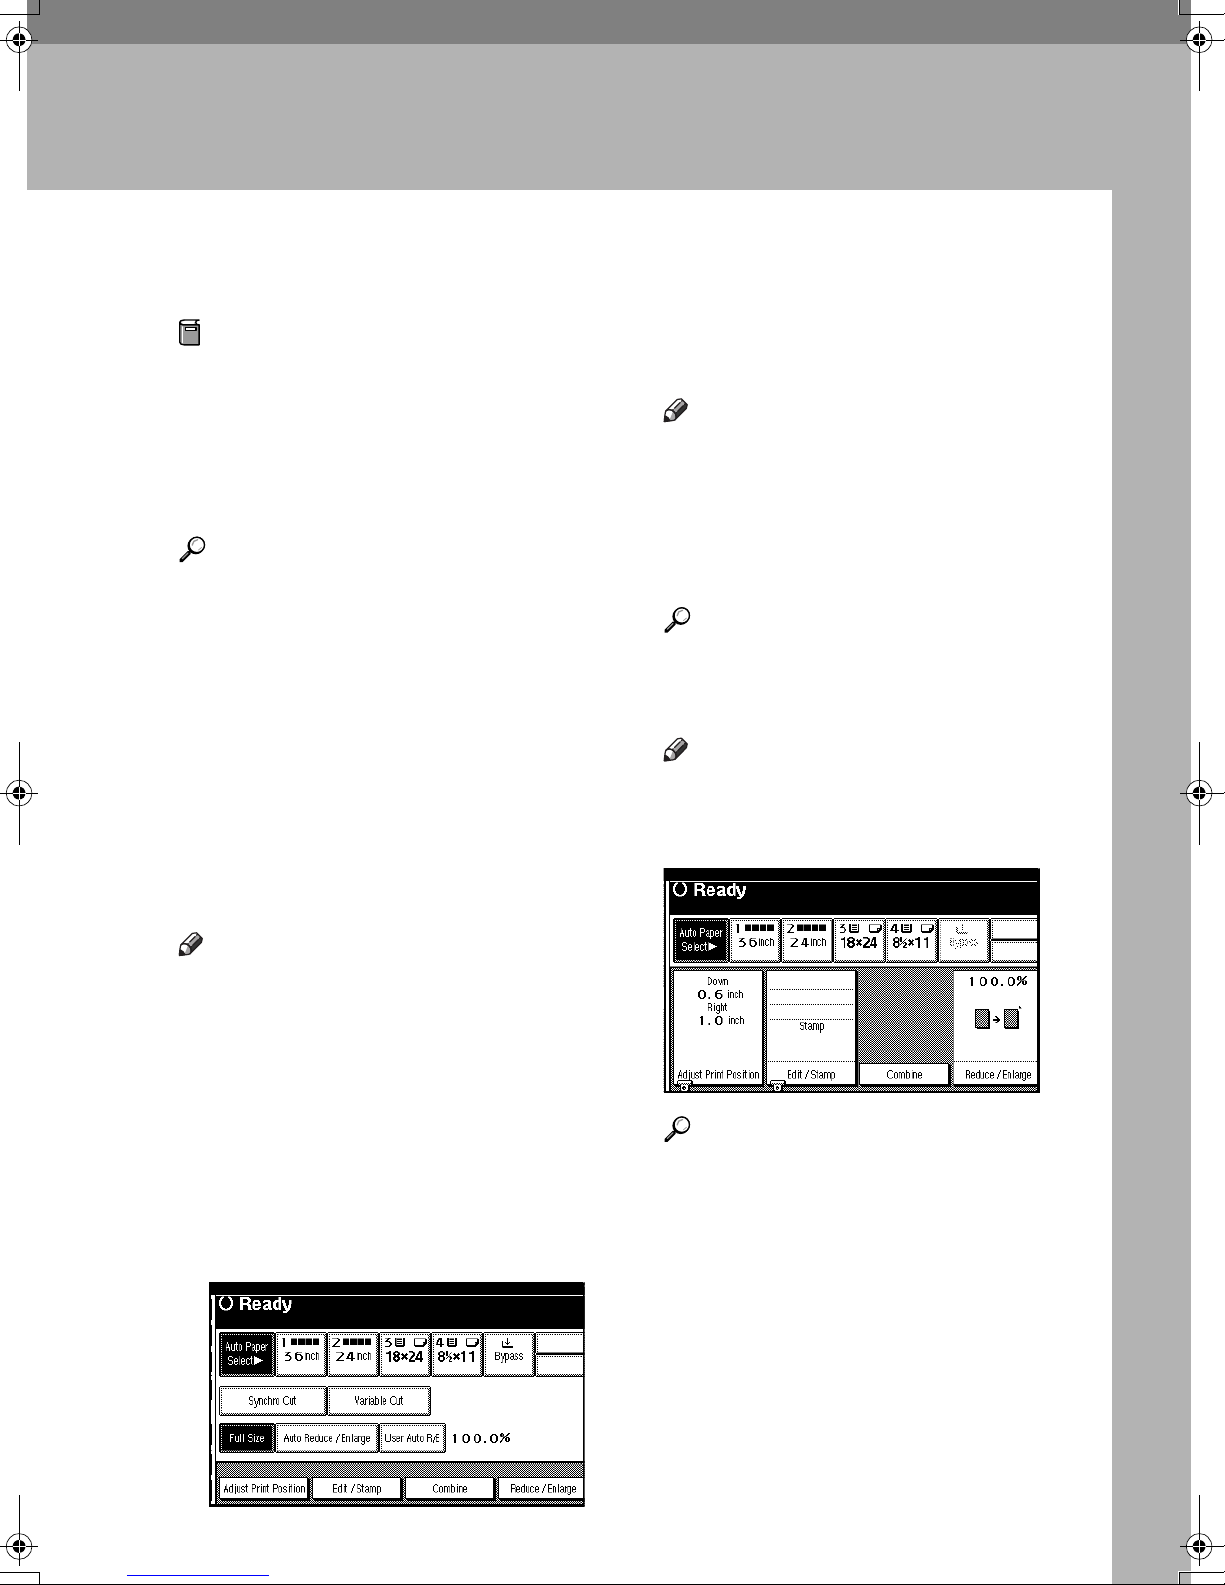
Make sure "dddd Ready" is shown
AAAA
on the display.
If any other function is displayed,
press the {{{{Copy}}}} key on the left of
the control panel.
❖❖❖❖ Initial copy display
Reference
For details, see explanations of
each function.
If you use the {{{{Program}}}} key to
access the program function,
you can store and easily recall
the settings. See p.65 “Pro-
grams”.
21
2
Copying
Enter the number of copies using
EEEE
the number keys.
Note
❒ The copy quantity is from 1 to
99.
Place the originals.
FFFF
Originals feed into the machine,
which then starts copying.
Reference
p.15 “Placing Originals”
Note
❒ When [Press Start Key] is select-
ed in the Feed Start Method,
copying starts when you press
the {{{{Start}}}} key. See “Feed Start
Method”, General Settings
Guide”.
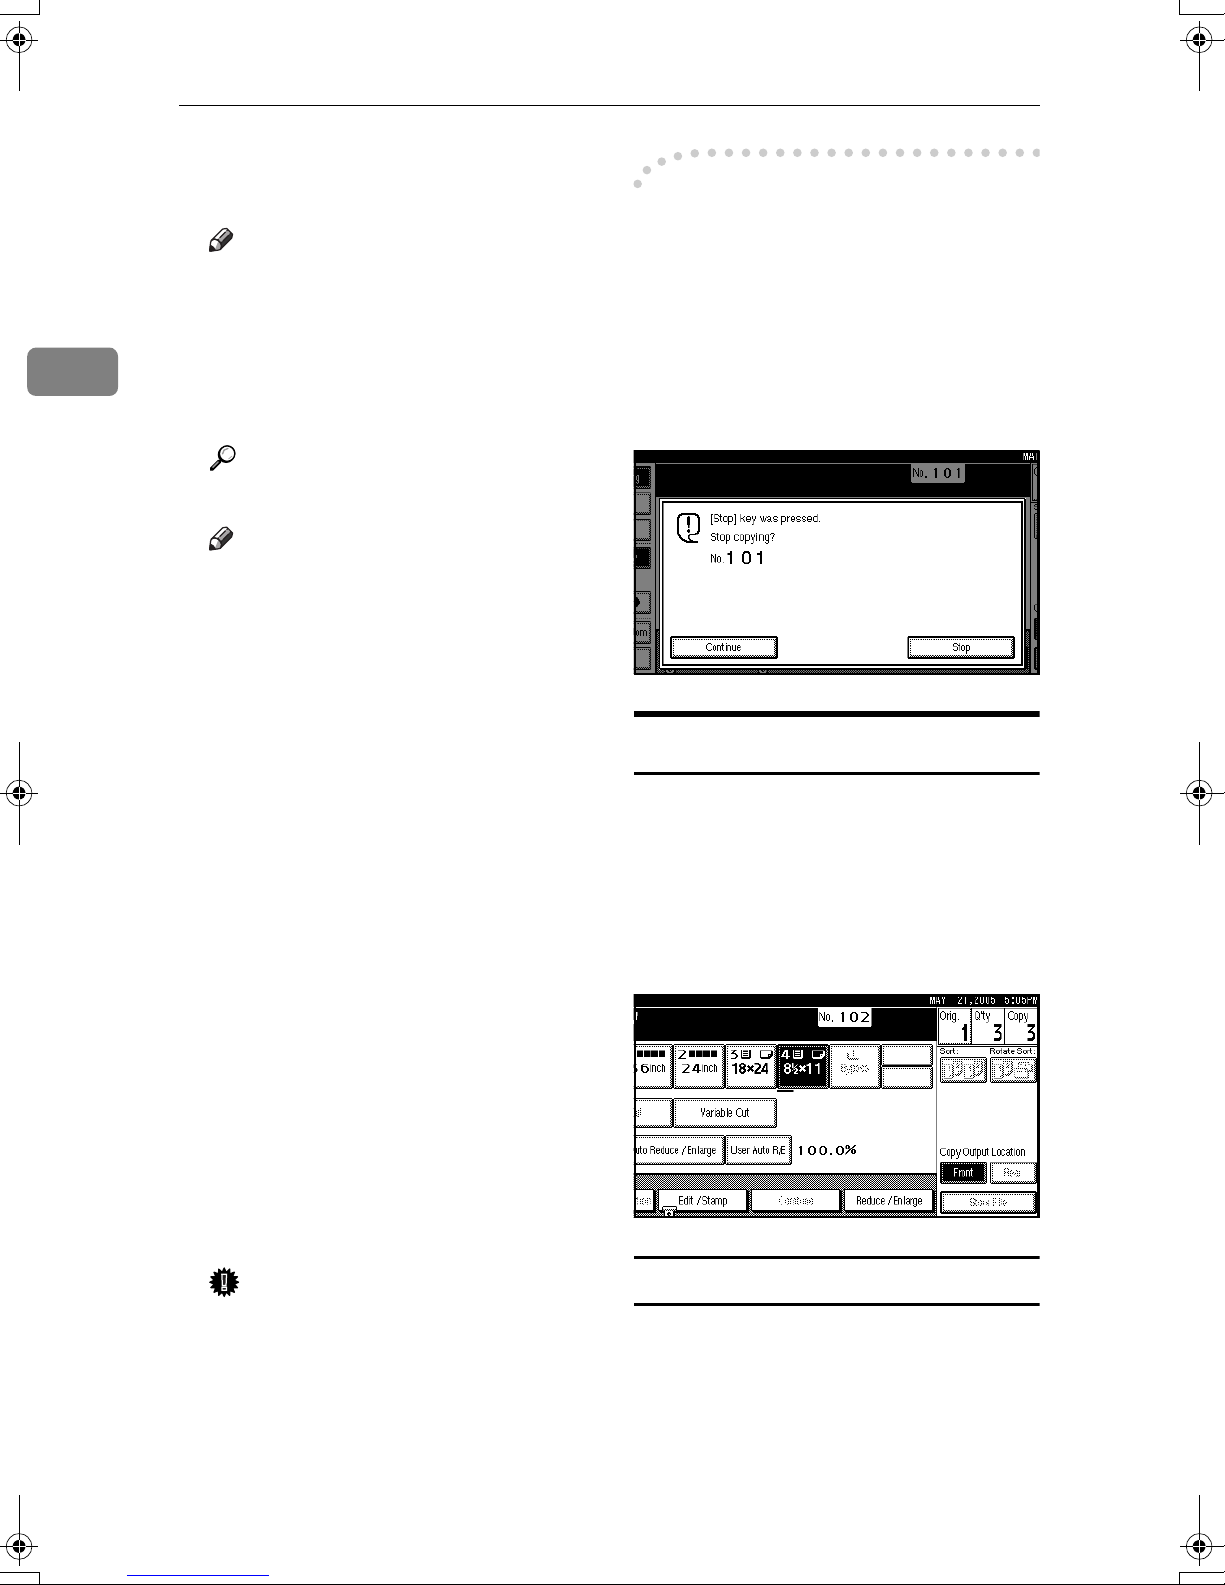
----To stop the machine during a
multi-copy run
Press the {{{{Clear/Stop}}}} key after the
originals have fed in. The machine
stops when the current copy finishes.
Press [Stop] to cancel the copy job;
press [Continue] to resume the interrupted copy job.
❒ To stop originals feeding in,
press the {{{{Scanner Stop}}}} key. See
p.16 “To stop originals feeding
in”.
❒ Insert the original so that the
right edge is aligned with the
original guide.
❒ The continuous copy speed may
be slow down to ensure the toner fuses to paper in the following cases:
• When the machine is just
turned on
• When the temperature is low
• When making a lot of contin-
ues copies (more than 30
sheets/A0, E)
Important
❒
When Basic Authentication, Win-
Authentication, or LDAP
dows
Authentication is set, always
log off when you have finished
using the machine to prevent
unauthorized users from using
the machine.
Original Counter/Reset
The number of scanned originals is
displayed in the screen's top right corner. This allows you to check the
number of originals in a job, or if any
sheets have been fed together, and the
number of copies that will be stored
in the copy output tray.
Resetting the original counter
Press [Orig.] and the counter num-
AAAA
ber in the screen's top right corner.
The number is reset to 0.
22
 Loading...