

Page 1
1. Registering Quick Dials
How to store numbers that you send to regularly in Quick Dial keys for easy access...
2. Entering Letters and Symbols
How to enter letters and symbols from the operation panel ......................................
3. Sending a Fax
How to send a fax message ...........................................................................
4. Broadcasting
How to send the fax massage to several destinations in a single operation .............
page.2
page.3
page.4
page.5
5.
6.
7.
8. Checking Communication Results
9. Send Later
10
11
Canceling a Memory Transmission
How to stop a message you do not want sent ................................ page.6
If the Machine Runs Out of Memory
How to send faxes when the machine memory is full ...................... page.7
Dialing with the Telephone Directory
How to quickly search for destinations registered in Speed Dials ..... page.7
How to check whether a transmission or reception was successful ..
How to have a message sent automatically at a specific time .......... page.9
. Sending 2-sided Originals
How to scan in both sides of an original ....................................... page.
. 2-sided Printing
How to set up your machine so it can print received messages on both sides of the paper .......
page.8
10
page.
11
FACSIMILE QUICK GUIDE
Some limitations apply to these functions. For details,
please read the Facsimile Reference.
Page 2
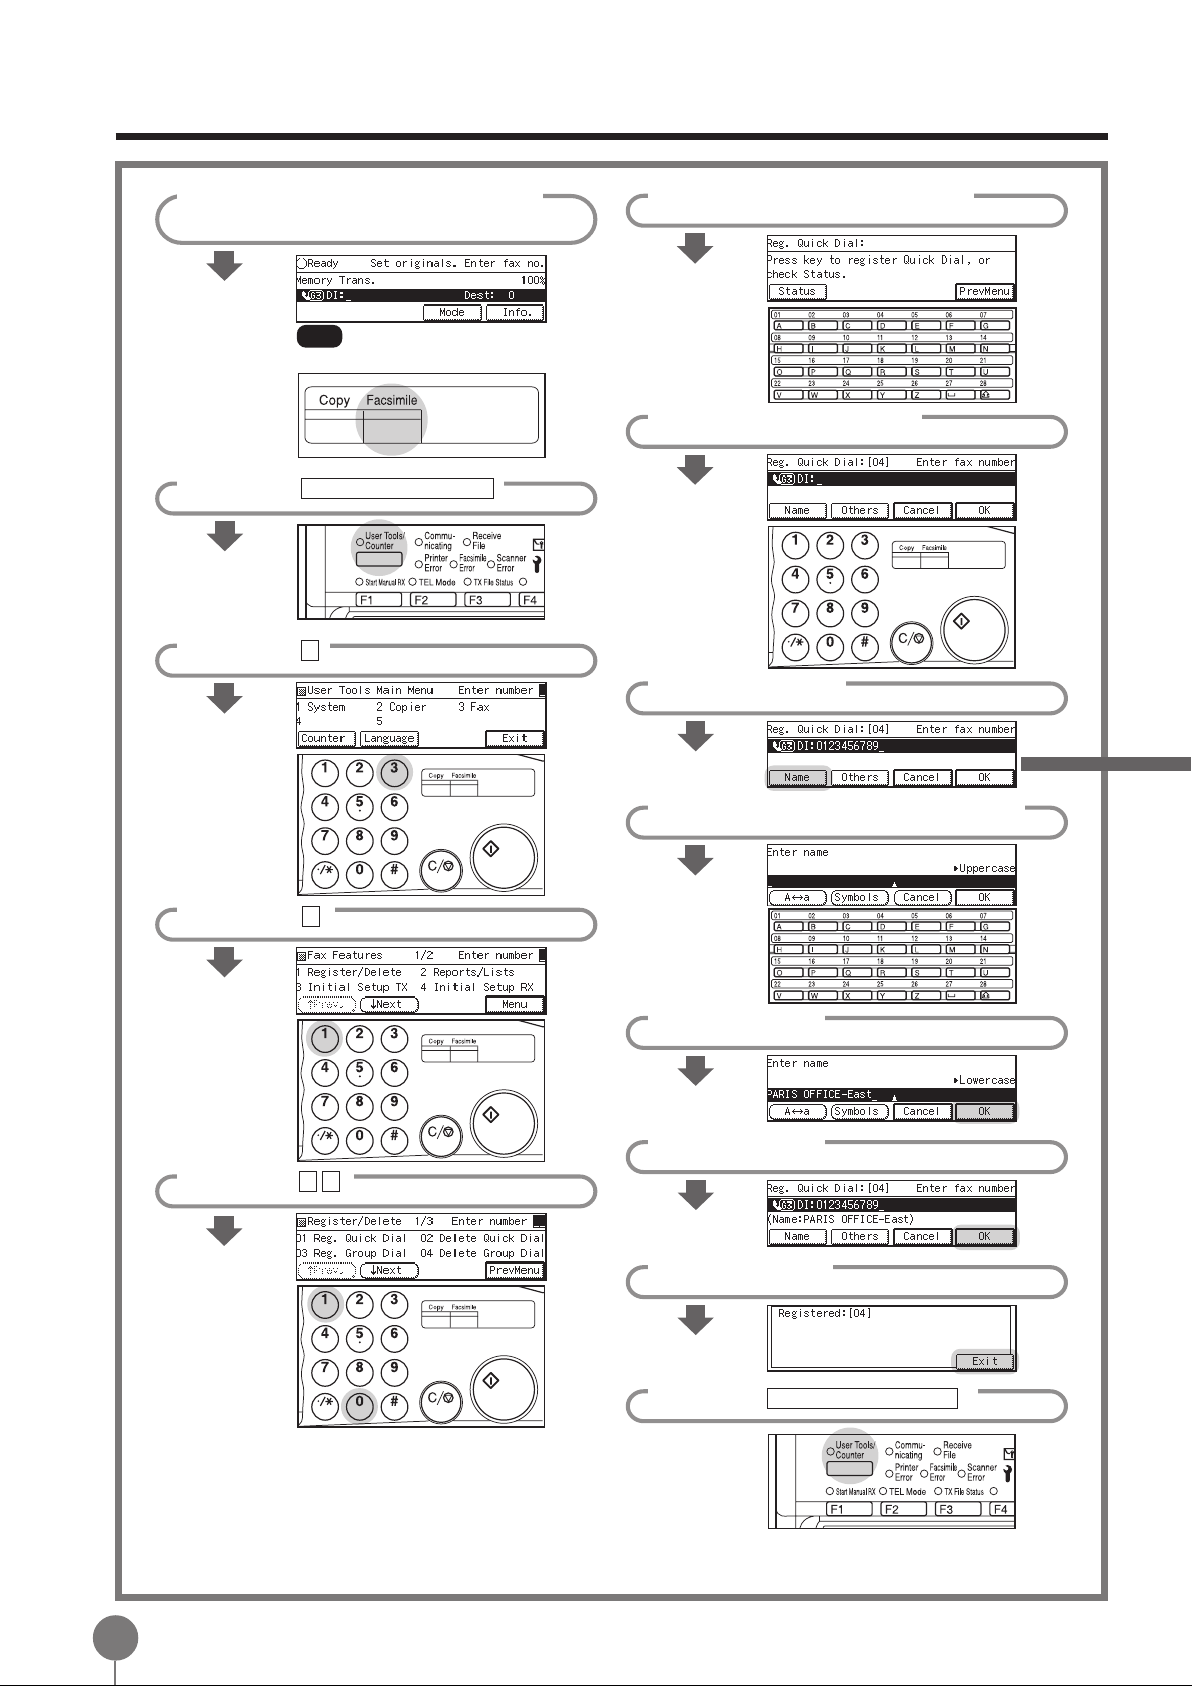
1. Registering Quick Dials
Make sure that the display is in
1
Ready mode.
Note If the standby display is not sho wn,
press the Facsimile key.
Press User Tools/Counter .
2
Press 3 .
3
Press a free Quick Dial key.
6
Enter the fax number .
7
Press [Name].
8
4
5
Press 1 .
Enter 0 1 .
Enter a name for this Quick Dial.
9
Press [OK].
10
Press [OK].
11
Press [Exit].
12
Press User Tools/Counter .
13
2
Page 3
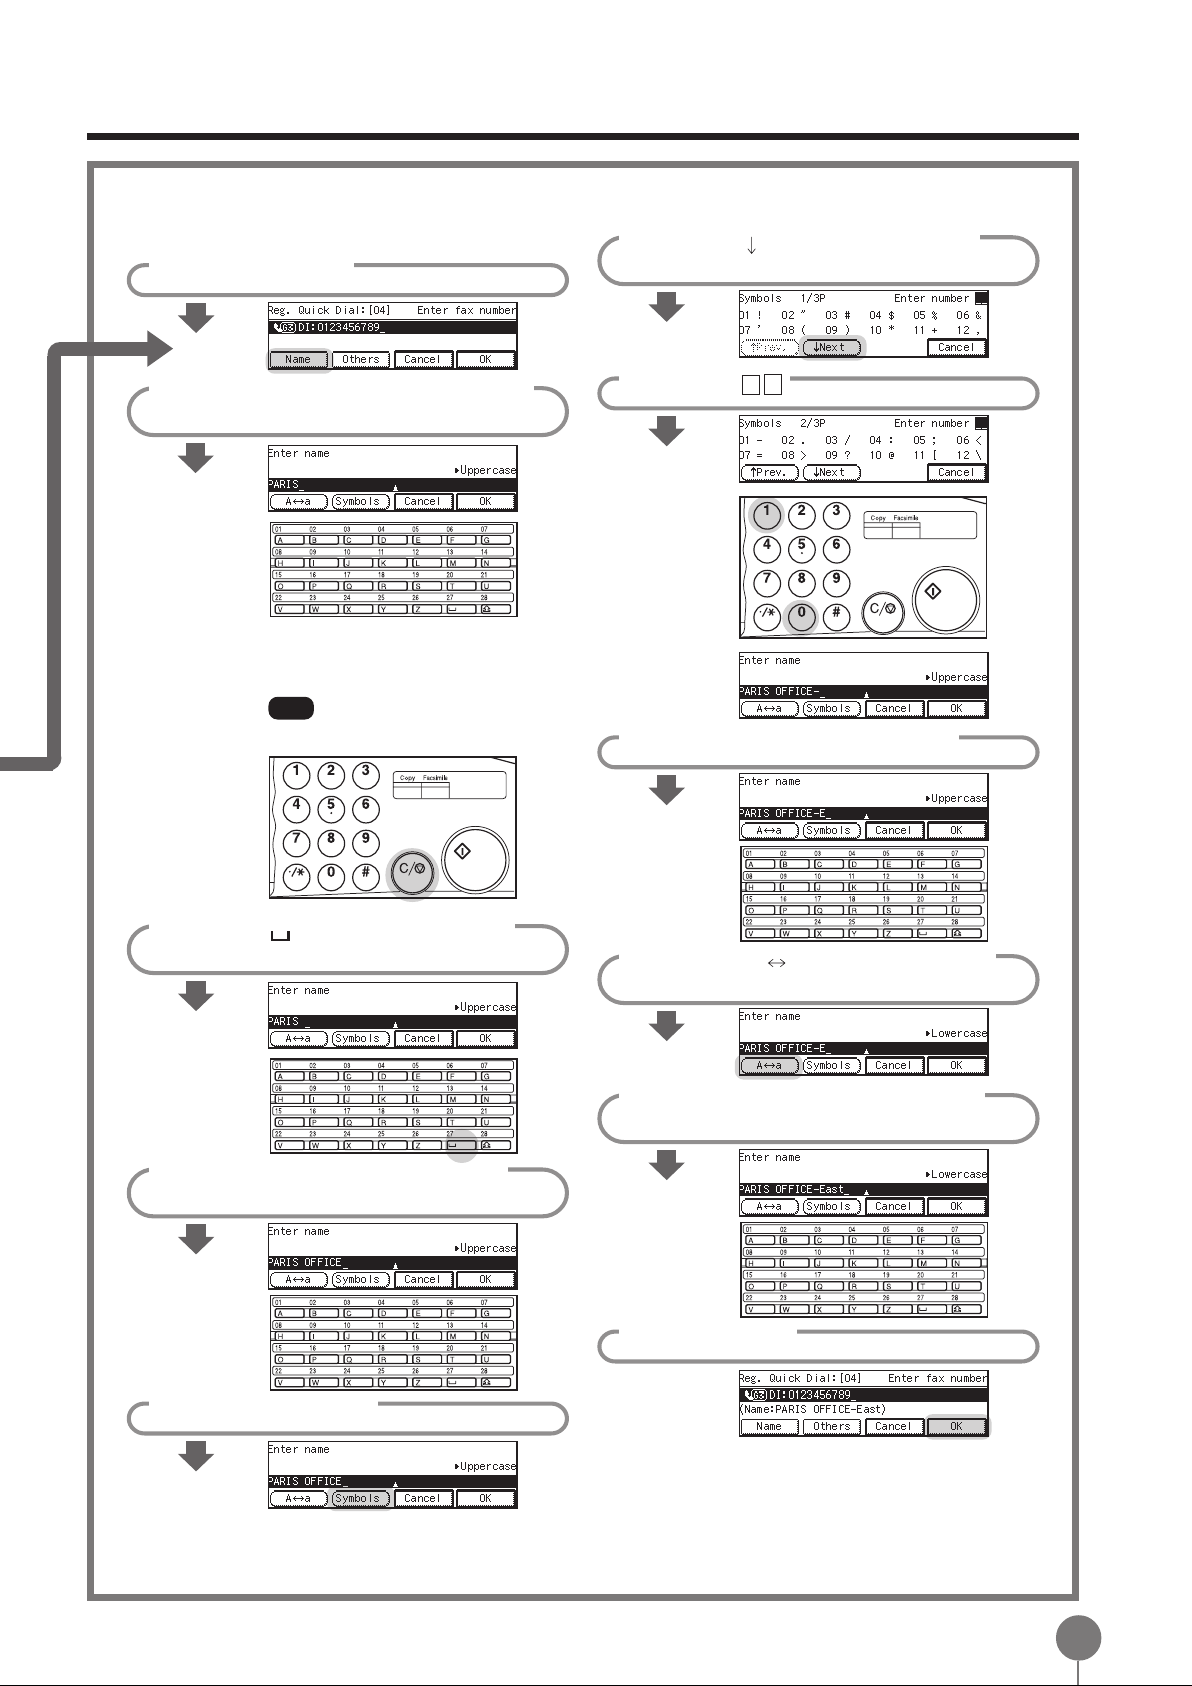
2. Entering Letters and Symbols
Example: “PARIS OFFICE - East”
Press [ Next] until you can see
6
Press [Name].
1
Enter PARIS using the Quick Dial
2
keys.
You can enter alphabetic characters with
the Quick Dial keys . Each key has a letter
marked on it.
the “-” symbol.
Enter 0 1 .
7
Note Press Clear/Stop ke y to delete a
character.
Press (Space key) to insert a
3
space.
Enter OFFICE using the Quick
4
Dial keys.
Press the “E” Quick Dial key.
8
Press [A a] to switch to lower
9
case.
Enter AST using the Quick Dial
10
keys.
Press [Symbols].
5
11
Press [OK].
3
Page 4
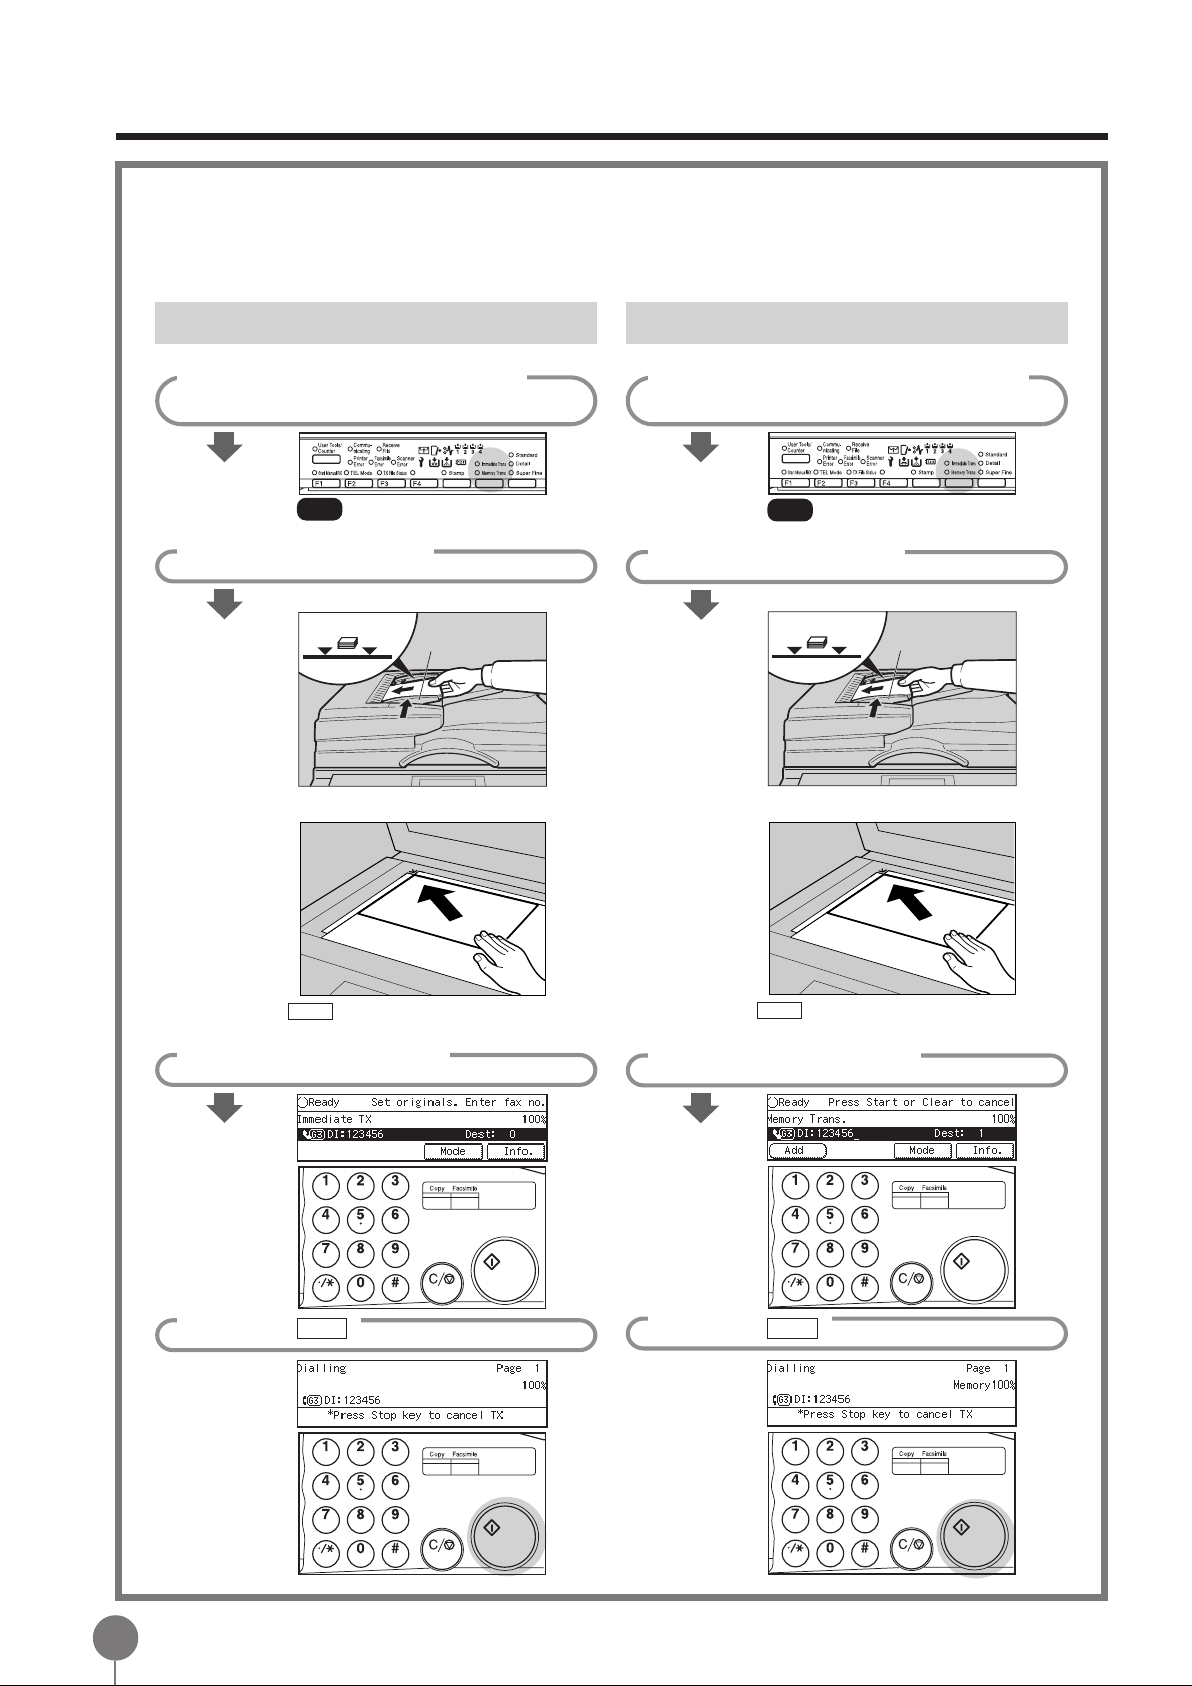
3. Sending a Fax
There are two ways to send a fax message.
• Immediate Transmission: The machine dials the destination straight awa y.
• Memory T ransmission: The machine starts scanning a document before dialling.
Immediate Transmission
Make sure that the Immediate
1
T rans. indicator is lit.
Note If it is not lit, press the
Transmission Mode key.
Set your document.
2
Document Feeder (ARDF)
Limit mark
Exposure Glass
Document guide
Memory Transmission
Make sure that the Memory T rans.
1
indicator is lit.
Note If it is not lit, press the
Transmission Mode key.
Set your document.
2
Document Feeder (ARDF)
Limit mark
Exposure Glass
Document guide
Press Start and follow the instructions on the
display.
Enter the fax number .
3
Press Start .
4
Press Start and follow the instructions on the
display.
Enter the fax number .
3
Press Start .
4
4
Page 5

4. Broadcasting
Make sure that the display is in
1
Ready mode.
Set your document.
2
Document Feeder (ARDF)
Limit mark
Exposure Glass
Document guide
Enter the next fax number .
5
Note • Quick Dial keys and Speed Dial
numbers are also available .
•T o chec k the numbers you ha ve
entered so far, press and
keys.
Repeat steps 4 and 5 for all
6
destinations.
Press Start .
7
Press Start and follow the instructions on the
display.
Enter the first fax number .
3
Press [Add].
4
Note When specifying a destination
using a Quick Dial, Speed Dial or
Group dial, the destination is
added even if you did not press
[Add].
Checking Destinations selected so far
Press Check Modes .
1
When you have finished
2
checking, press Check Mode to
return to the previous display.
5
Page 6

5.
Canceling a Memory Transmission
Be fore You Press the Start
Press Clear Modes .
While the Document is Being Scanned in
Press Clear/Stop .
When The Message Is Awaiting Transmission or Being Redialed
Press [Info.].
1
Press 1 .
2
Press and to find the file
3
you wish to erase.
Press [Delete].
4
Press [Y es].
5
Press [Exit].
6
Press [Exit].
7
6
Page 7

6.
If the Machine Runs Out of Memory
Sending Faxes when Memory is Full
If the message below appears on the display,
follow this procedure to send a fax.
Press [Exit].
1
Send your fax using Immediate
2
T ransmission.
7.
Dialing with the Telephone Directory
Set your document.
1
Press Speed Dial .
2
Press [T el.Dir .].
3
Enter the search letter by
4
pressing one of the Quick Dial
keys (A to Z).
The names of fax numbers registered in
Speed Dials are shown in numerical
order on the display.
Press the or key to select
5
the destination then press [OK].
Note If the list does not contain the
desired destination, press [ Prev.]
or [ Next].
6
Press Start .
7
Page 8

8.
Checking Communication Results
Printing the Journal
Make sure that the display is in
1
Ready mode.
Press [Info.].
2
Press [ Next] until “7 Print
3
Journal” is shown.
Press 7 .
4
Viewing the Journal on the Display
Press [Info.].
1
Press [ Next] until “3 TX Status”
2
or “4 RX Status” is sho wn.
Press 3 or 4 .
3
3 TX Status
Select the type of printout you want.
5
All:
File No: List by file numbers
Pers . Code
Press Start .
6
List all of the last 50 communication results
: List by Personal Codes
The right column shows the status.
If an error occurs, re-send the
document.
4 RX Status
The right column shows the status.
If an error occurs, ask the sender to
re-send the message.
8
Page 9

9. Send Later
Make sure that the display is in
1
Ready mode.
Set your document.
2
Document Feeder (ARDF)
Limit mark
Exposure Glass
Press Start and follow the instructions on the
display.
Press [Mode].
3
Document guide
Enter the time with number keys.
5
Example: 11:30PM
Enter 2330
Press [OK].
6
Press [Exit].
7
Enter the destination fax
8
number .
4
Enter 0 1 .
9
Press Start .
9
Page 10

10. Sending 2-sided Originals
Make sure that the display is in
1
Ready mode.
Set your document.
2
Document Feeder (ARDF)
Limit mark
Exposure Glass
Document guide
Press the [
6
between T op to Top and T op to
Bottom (see middle right corner
of the display).
Press [OK].
7
Press [Exit].
8
Enter Fax Number .
9
VV
VOrient.] key to toggle
VV
Press Start and follow the instructions on the
display.
Press [Mode].
3
Enter 0 5 .
4
If you want the first page to be
5
sent single-sided, press to
select “From 2nd sheet”.
10
Press Start .
10
Page 11

11. 2-sided Printing
The Optional Duplex T ra y is required.
Make sure that the display is in
1
Ready mode.
Press the User T ools/Counter .
2
Press 3 .
3
Press 4 .
4
Press [OK].
7
Press [PrevMenu].
8
Press [Menu].
9
Press [Exit].
10
Enter 0 6 .
5
Press or to select “On”.
6
11
Page 12

Save Money
I want to cut down on telephone charges...
•
Have your document scanned in and sent at an off-peak time when
telephone charges are lower with the Send Later feature.
I want to save electricity...
•
The Automatic Power Reception Function lets you leave the power
switch off in the evening and on weekends and still receive faxes.
Confirm Messages Are Sent
I have an important message to send but the line is
•
busy...
Use the Transmission Deadline feature to have the machine repeat-
edly redial the number for up to 24 hours into the future until the
transmission can be made.
I want to be able to quickly and easily recognize which
•
documents have been faxed...
Use the Stamp feature to have a small mark printed on documents that
you scan in through the Document F eeder (ARDF). This f eature requires
the optional Document Feeder (ARDF).
Save Time
I often dial the same fax number...
•
Store numbers you use all the time in Quick Dials or Speed Dials for
quick and easy access.
I often send the same fax message to several destina-
•
tions...
Register the fax numbers in a Group and you can send a message to
those numbers in a single operation.
A8958650
EE GB
Printed in The Netherlands
 Loading...