

Ricoh Rigel-PJ1nx Y105, Rigel-PJ1nw Y016 Service Training
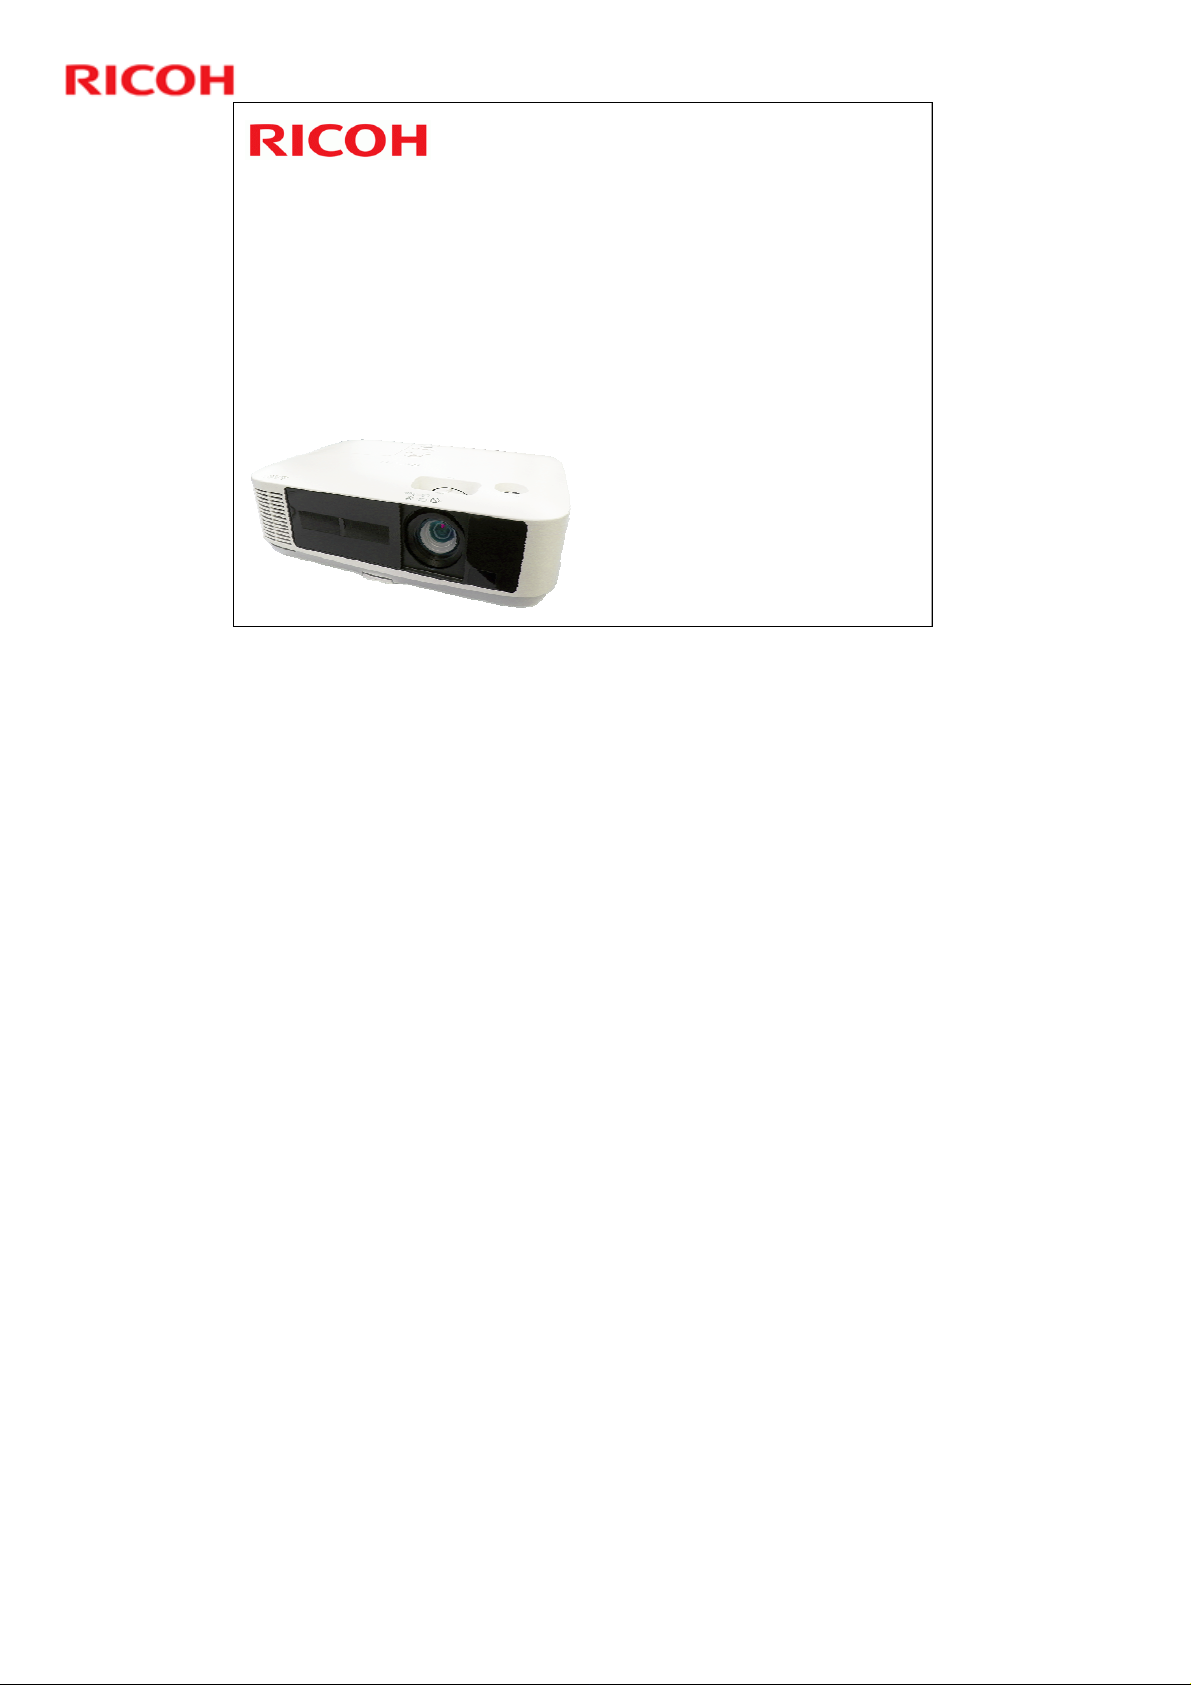
Y015/Y016
Service Training
Rigel-PJ1nx
Rigel-PJ1nx Training
Slide 1
This training course provides service technician training for the Rigel-PJ1nx
series.
This model is more similar to the Sirius-PJ1 than the other members of the RigelPJ1 series, so we made a separate training course.
This course will cover information related to service. To understand the features
of the machine, the correct ways to turn the projector on or off, about power
saving modes, and other matters that are related to operation, please study the
user guide.
Version 1.0
1

Slide 2
Rigel-PJ1nx Training
Y015/Y016
Service Training
Product Overview
This section provides an overview of the machine, and the options that can be
installed.
2

What Models are there in the Series?
Rigel-PJ1 nx (Y015): PJ X5360N
4200 lumens, XGA resolution
Rigel-PJ1 nw (Y016): PJ WX5350N
3500 lumens, WXGA resolution
These are high quality standard models for
medium size conferences and classrooms (up to
30 persons)
These models can be used over a network.
Advanced networking features can connect
quickly to a LAN
Can project from a PC with wired or wireless
network
Management and control using PJLink software
Slide 3
Rigel-PJ1nx Training
No additional notes
3
Projection Distance
Power Consumption
Slide 4
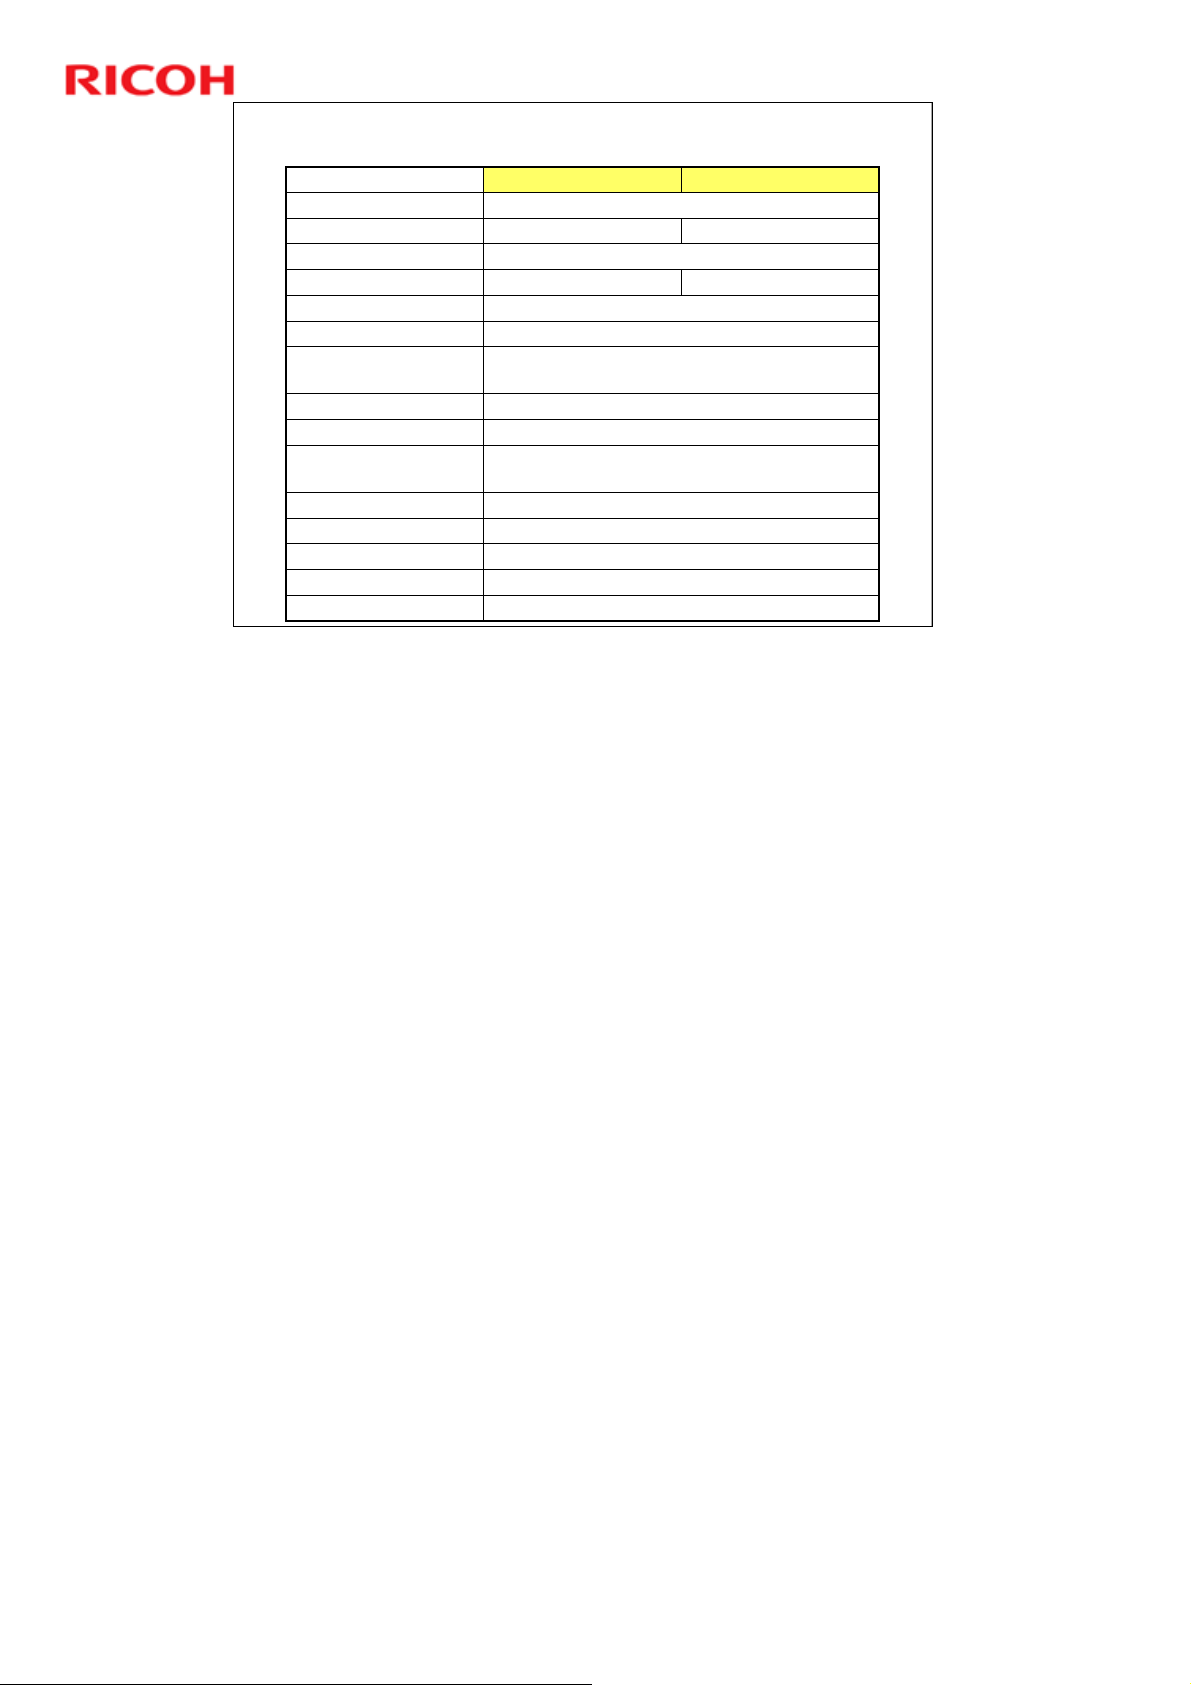
Rigel-PJ1nx Training
Main Specifications
Rigel-PJ1 nwRigel-PJ1 nx
LCDType of Projector
3500 lm4200 lmBrightness
265W mercury lamp Lamp type
WXGAXGAResolution
VerticalKeystone
25” - 300” (63.5 – 762 cm)Projection Screen Size
Rigel-PJ1 nx: 0.65 to 13.8 m (2.17 to 45.25 ft)
Rigel-PJ1 nw: 0.69 to 14.6 m (2.25 to 47.75 ft)
398 × 282 × 126.5Dimensions (W×D×H)
3.9 kg (8.6 lbs) Weight
Standard: 358W (NA), 343W (EU)
Eco Mode: 271W (NA), 264W (EU)
10W x 1Speaker
Option (USB)Wireless LAN
YesWired LAN
YesUSB
YesHDMI
See the specifications table in the service manual for more details.
4

Features
This product can be installed by users, except
when mounted on a ceiling.
This product is designed for user maintenance.
Regular on-site maintenance is not needed.
LEDs show the symptoms for troubleshooting
(blinking/lit, number of times the LEDs blink, etc).
A service mode is available.
Slide 5
Rigel-PJ1nx Training
No additional notes
5

Take Care When Tilting
Do not tilt the projector to the left to right at an angle of
more than 10 degrees.
Do not tilt upward/downward from the horizontal plane.
Slide 6
Rigel-PJ1nx Training
No additional notes
6

Low Energy Consumption
3,500 hour lamp life and lower power
consumption in Eco mode
The life of 3,500 hours is only achieved if the
lamp is always used in Eco mode.
Lamp power in Eco mode is 80% of full power.
Power consumption values:
Eco Mode Off (Normal): 358 W (100-130 V), 343
W (200-240 V)
Eco Mode: 271 W (100-130 V), 264 W (200-240
V)
Standby (Normal): 9 W (100-130 V/200-240 V)
Standby (Power saving): 0.2 W (100-130 V), 0.4
W (200-240 V)
Slide 7
Rigel-PJ1nx Training
Note that in the service mode menu, Eco Mode is referred to as ‘Low Mode’.
7

Consumables and Options
Replacement lamp (Y204)
265W mercury lamp (Replacement Lamp Type 6)
Life: 3000 hours (normal mode), 3500 hours (Eco
mode)
» There may be a 50% decrease in brightness at the end
of the lamp’s life.
Wireless LAN unit (Y106)
IEEE 802.11b/g/n are supported
Slide 8
Rigel-PJ1nx Training
Wireless LAN Unit M1: For USA, Canada, Mexico, Brazil. Colombia, and Taiwan
Wireless LAN Unit M2: For CE Countries (27 EU countries, and Iceland,
Liechtenstein, Norway, and Switzerland), UAE, Saudi Arabia, Oman, South
Africa, Turkey, Egypt, Israel, Australia, NZ, Thailand, HK, Singapore, Malaysia,
Sri Lanka, Pakistan, Vietnam, India, Philippines, Peru, Chile, Argentina, Ecuador
Wireless LAN Unit M3: For Russia
8

Projection Utility
A utility for projecting from a computer over a
network
Advanced Network Utility
This allows you to send images from a PC to
more than one projector at the same time.
JPEG Conversion Tool
@Remote
@Remote is not available on this model.
Slide 9
Rigel-PJ1nx Training
Utilities
No additional notes
9

Reliability Information
Average monthly projection time: 77 hrs/month
3.5 hrs/day x 22 working days/month
Failure Rate
1st year: 0.0013 cases/unit/month
2nd year: 0.0014 cases/unit/month
3rd year: 0.0017 cases/unit/month
The failure rate of a projector increases with its
total power-up time. This is due in part to the
failure characteristics of optical engines in
projectors.
Lamp Life
Normal Mode: 3,000 hrs
Eco Mode: 3,500 hrs
Slide 10
Rigel-PJ1nx Training
No additional notes
10

Lamp Near-end/End Alerts
There is no near-end alert.
The lamp end alert occurs when the machine calculates
that the life time has expired.
If used in Normal Mode only, the alert appears after 3,000
hrs projection time
If used in Eco Mode only, the alert appears after 3,500 hrs
projection time
If the user switches between modes, the machine
calculates when to display the alert based on how long the
lamp was used in each mode.
If the projector is used for 100 hours after the lamp has
reached the end of its life, the projector will turn off and go
into standby mode.
In this condition, the lamp hours cannot be reset using the
menu.
The user must replace the lamp, then press the Help button
on the remote control for 10 seconds to reset the lamp
clock back to zero (do this only after replacing the lamp).
Slide 11
Rigel-PJ1nx Training
No additional notes
11

Disposal of Broken Lamps
Projector lamps normally contain mercury
vapour.
These lamps can rupture due to impact or being
used longer than their life expectancy.
The time that the breakage will occur differs
widely for each lamp and its circumstances of
use.
These lamps must be disposed of in acc or dance
with local environmental regulations.
Slide 12
Rigel-PJ1nx Training
No additional notes
12
Overview
Overview
Slide 13
Slide 13
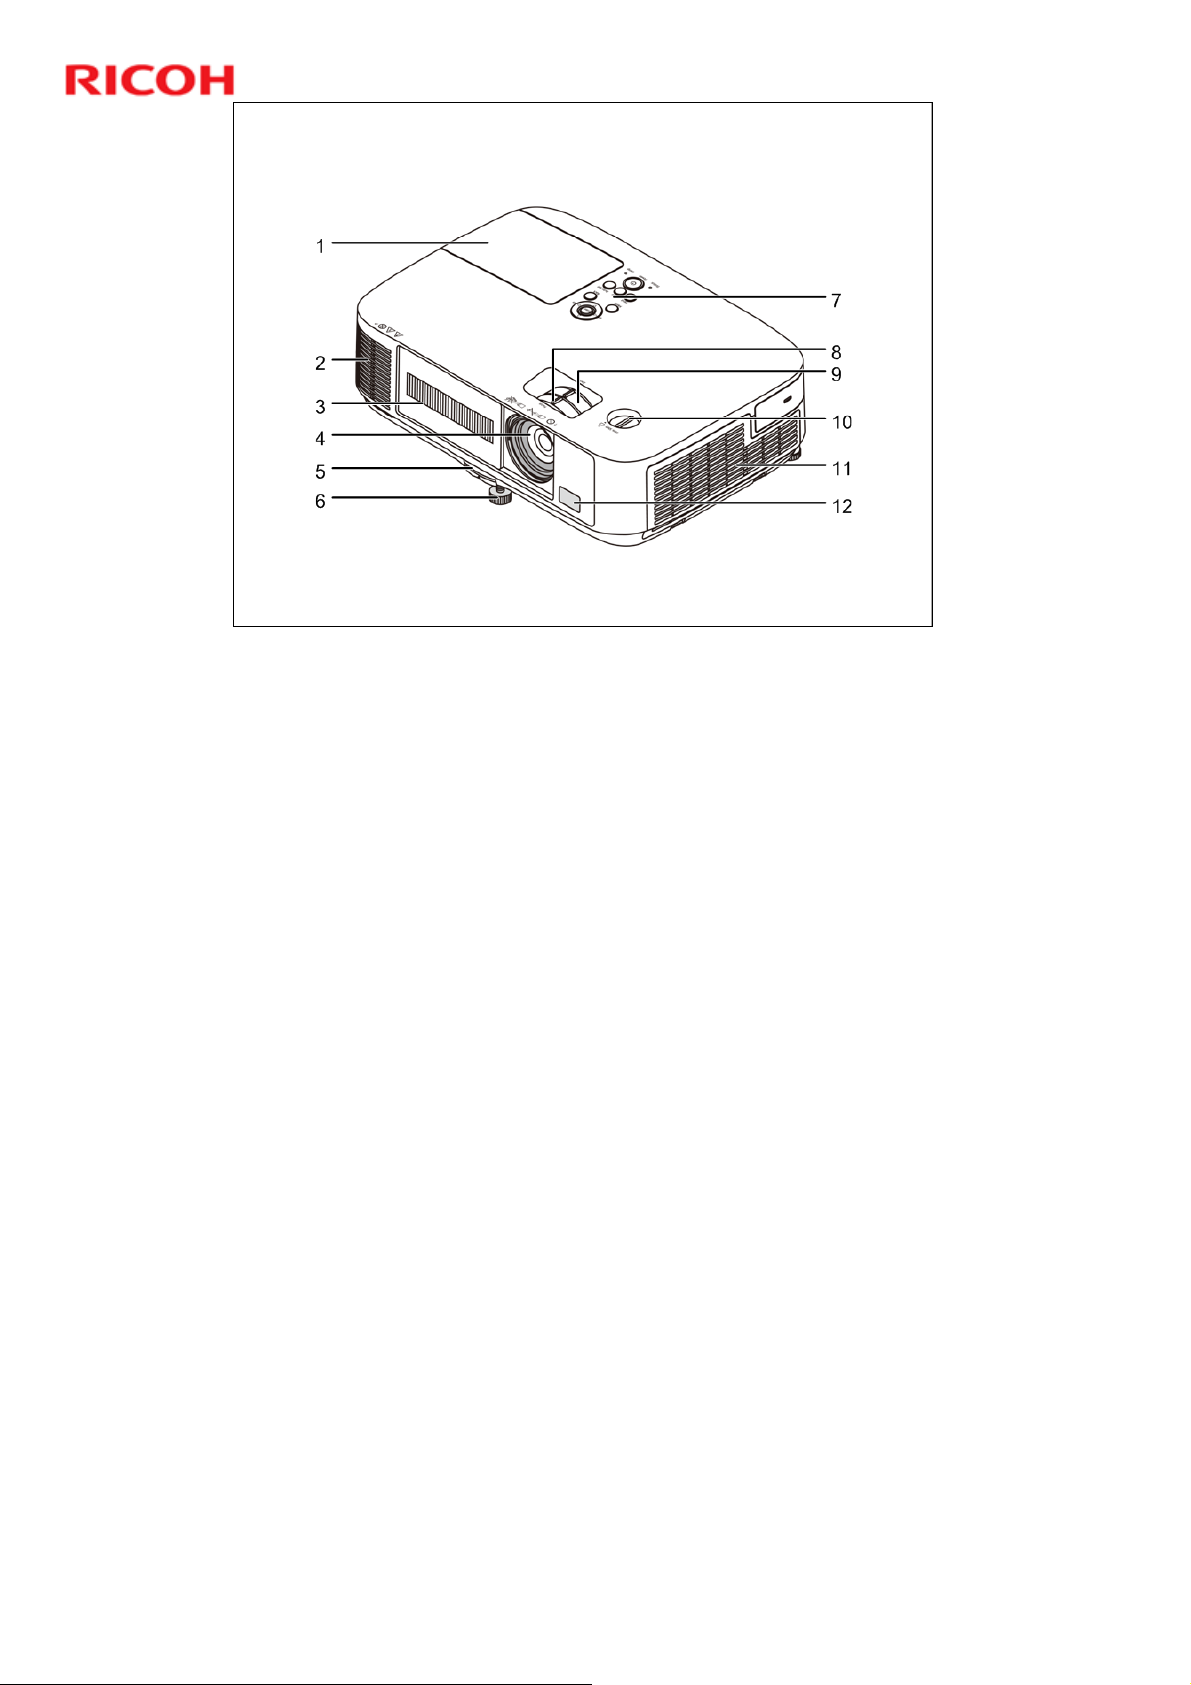
External View - Front
External View - Front
Rigel-PJ1nx Training
13
13
1. Lamp Cover
2. Ventilation (outlet)
3. Lens Cover
4. Lens
5. Adjustable Tilt Foot Lever
6. Adjustable Tilt Foot
7. Controls
8. Focus Lever
9. Zoom Lever
10. Lens Shift Dial (Vertical)
11. Ventilation (inlet) / Filter Cover
12. Remote Sensor
13
13

Overview
Overview
Slide 14
Slide 14
External View - Rear
External View - Rear
Rigel-PJ1nx Training
14
14
1. Port Cover for USB Wireless LAN Unit
2. Mono Speaker
3. Terminal Panel
4. AC Input
5. Remote Sensor
6. Built-in Security Slot
7. Security chain opening
8. Rear Foot
14
14
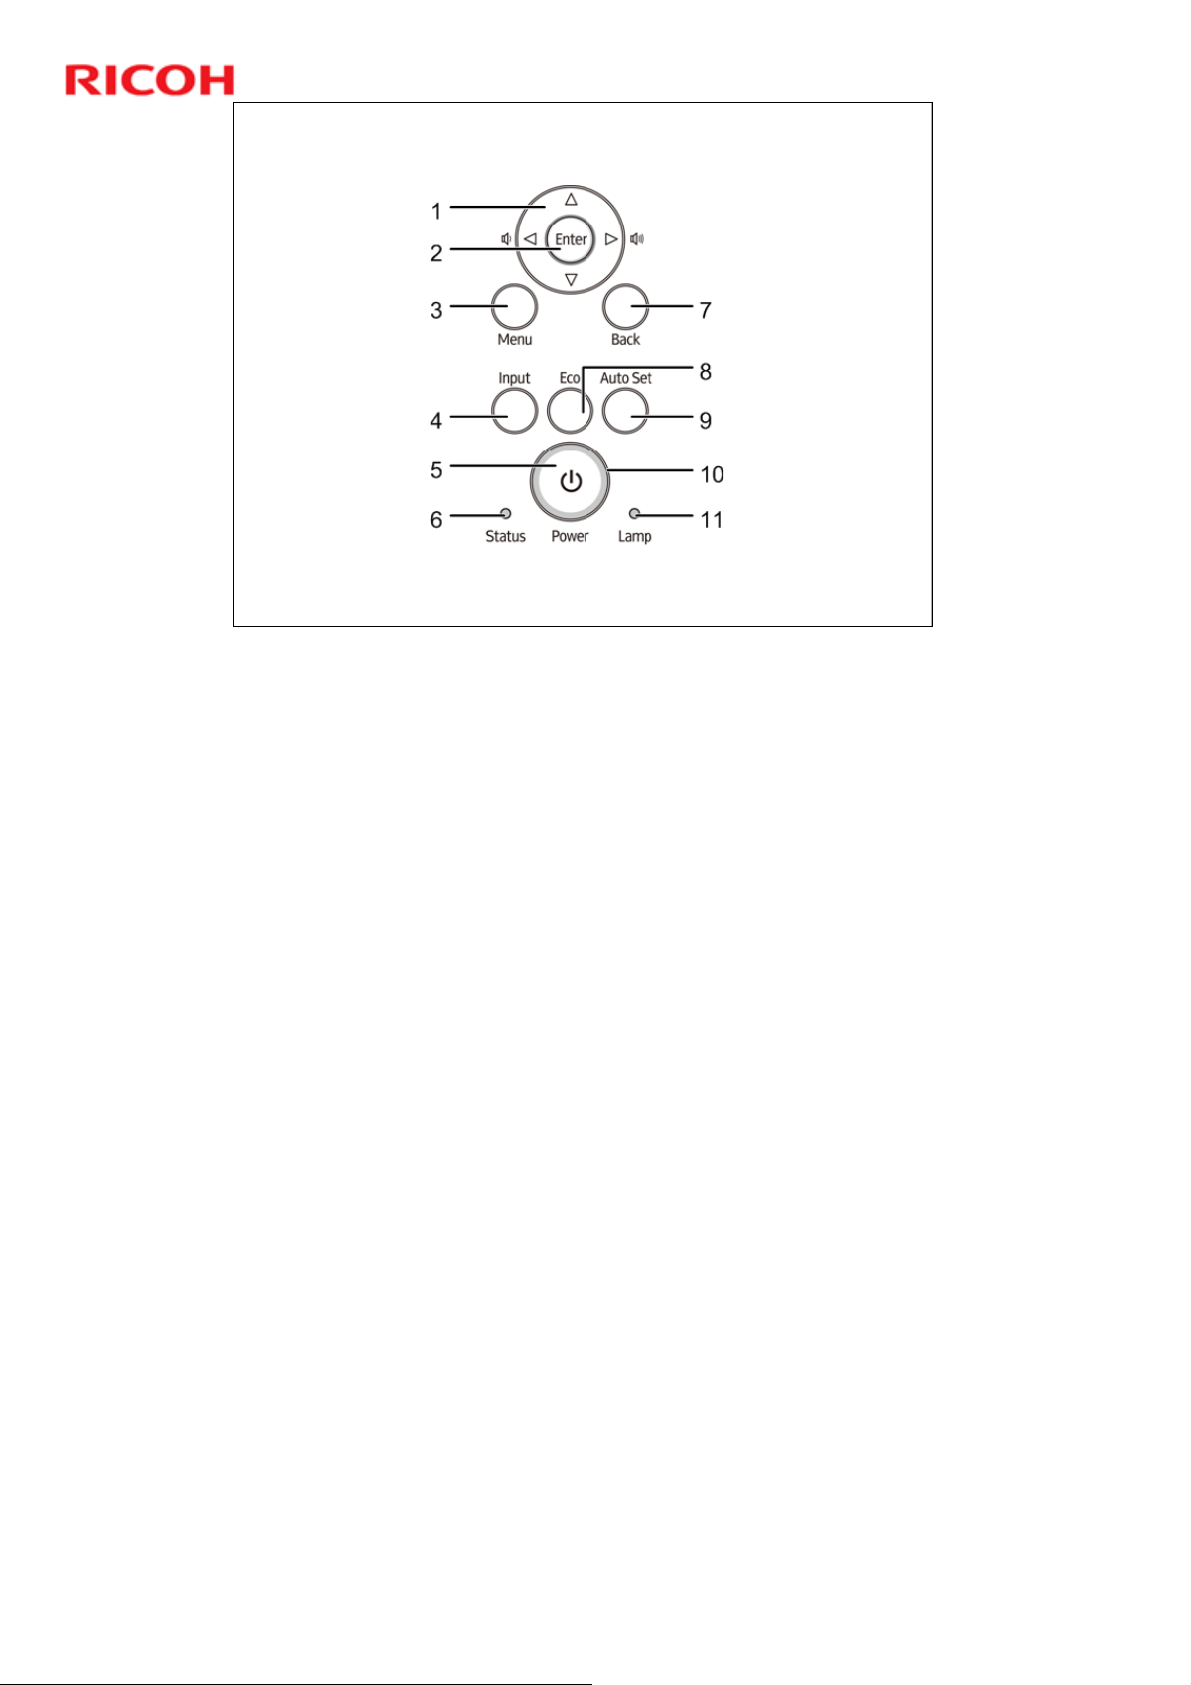
Slide 15
Rigel-PJ1nx Training
Operation Panel
For details: Service manual > 1. Product Information > Overview
2. The left and right arrow buttons can be used to adjust the speaker volume.
15
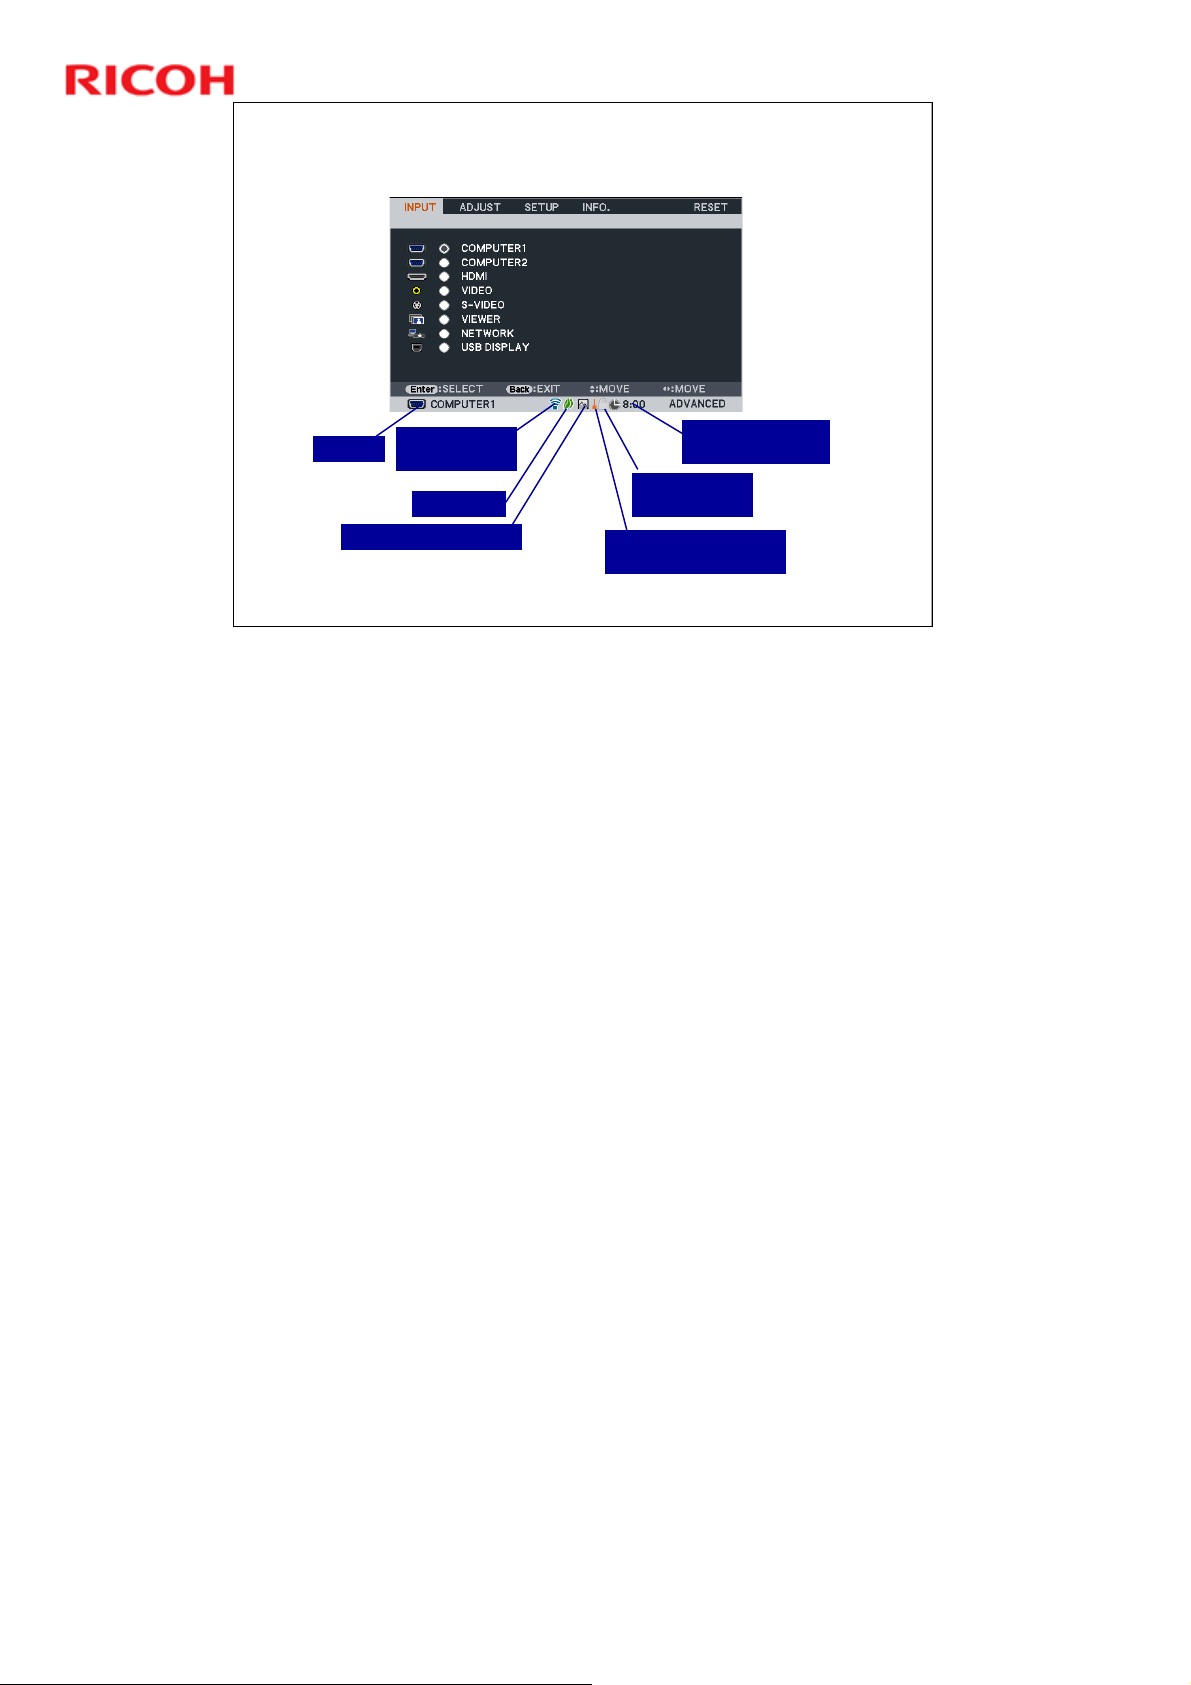
Menus
Rigel-PJ1nx Training
Off Timer
Remaining Time
Alert
Slide 16
Source
Wireless LAN
High Altitude Mode
Enabled
Eco Mode
Control Panel
Lock Enabled
High Temperature
This slide shows the Input Menu, and explains the symbols that appear on the
menu screen.
For details of all functions, see the user’s manual.
High Altitude Mode: The fans operate at a higher speed in this mode. Use this
when the projector’s location is more than 1500 m (5500 ft) above sea level
(otherwise, the projector could overheat and shut down automatically).
¾ Also, if you use high altitude mode at less than 1500 m (5500 ft) above sea
level, the projector could become too cool, causing images to flicker. Switch
[FAN MODE] to [AUTO].
High Temperature Alert: High temperature detected inside the projector, Eco
Mode is enforced
¾ If the projector overheats, it shuts down automatically. Wait a few moments
then turn back on again.
16
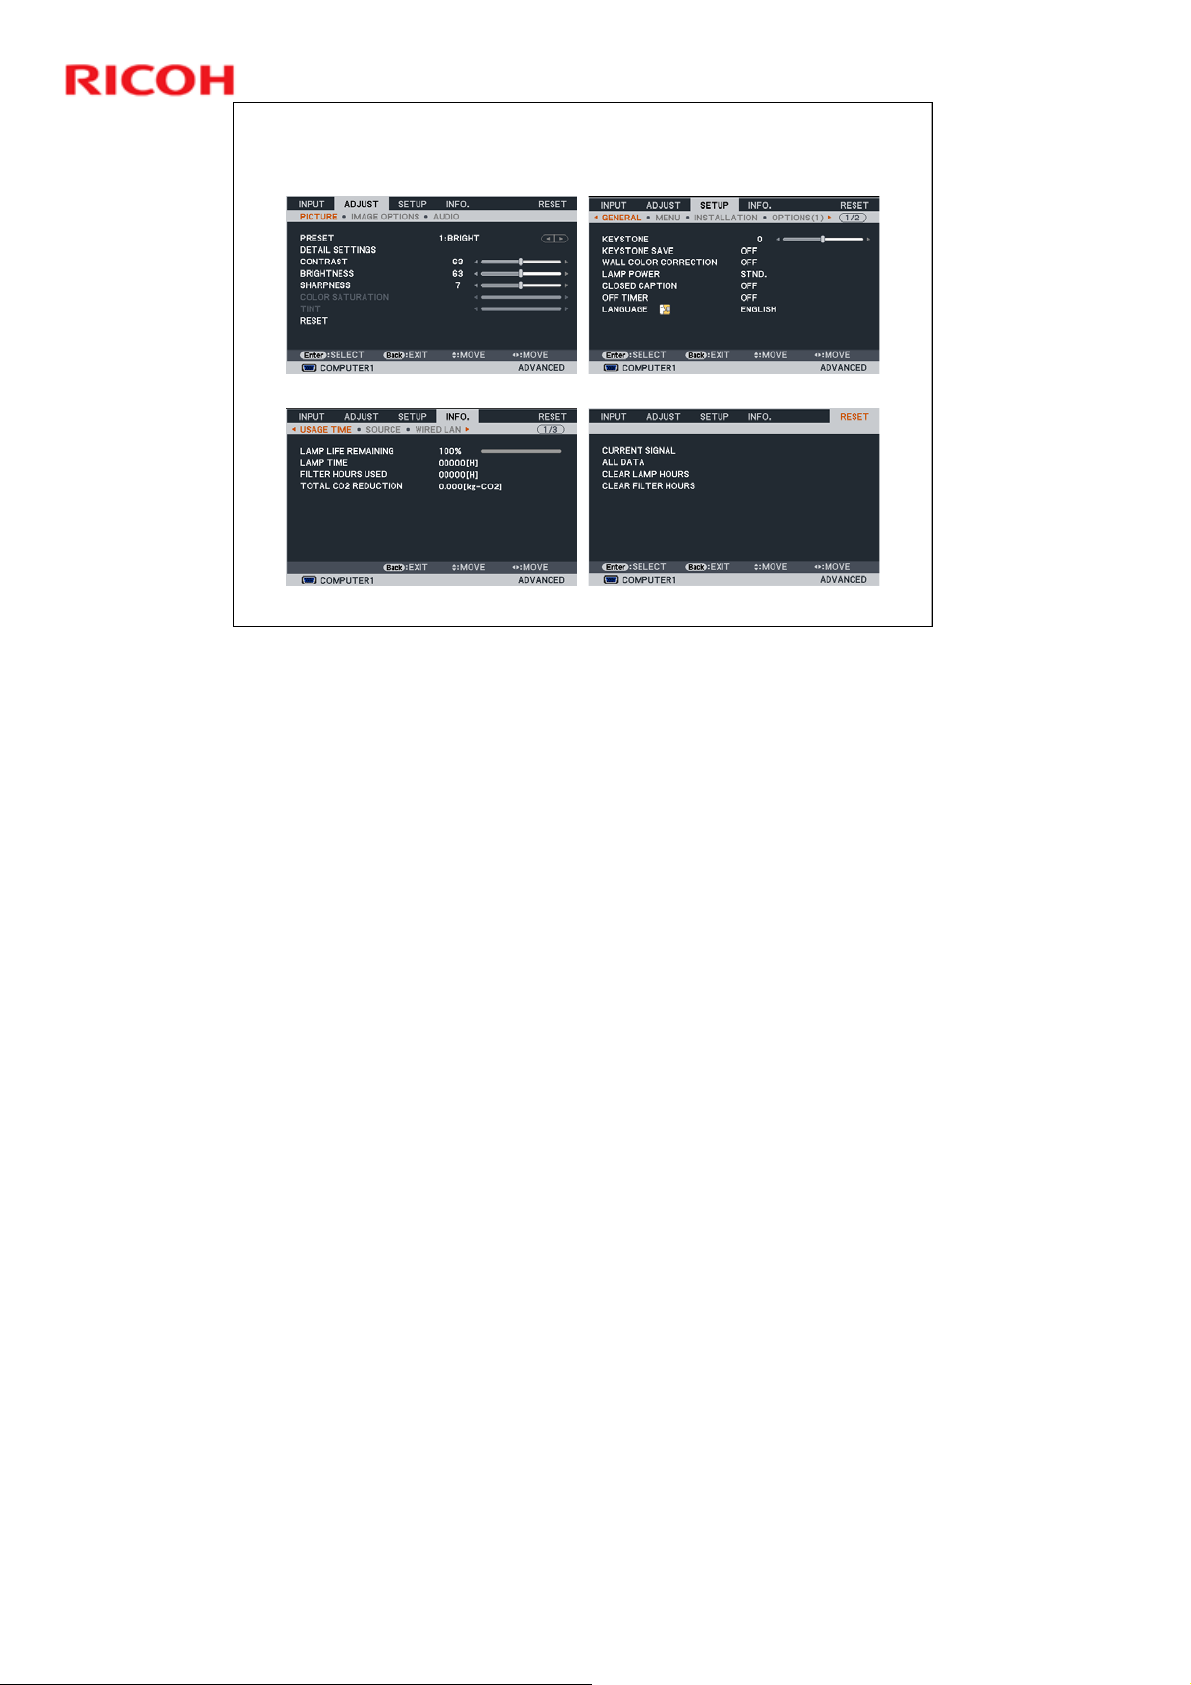
Slide 17
Rigel-PJ1nx Training
Menus
This slide shows the other four menu tabs.
Note that in the Adjust, Setup, and Info tabs, there is more than one page.
¾ For example, in the Adjust tab, there are three pages: Picture, Image
Options, and Audio.
17
Rigel-PJ1nx Training
Overview
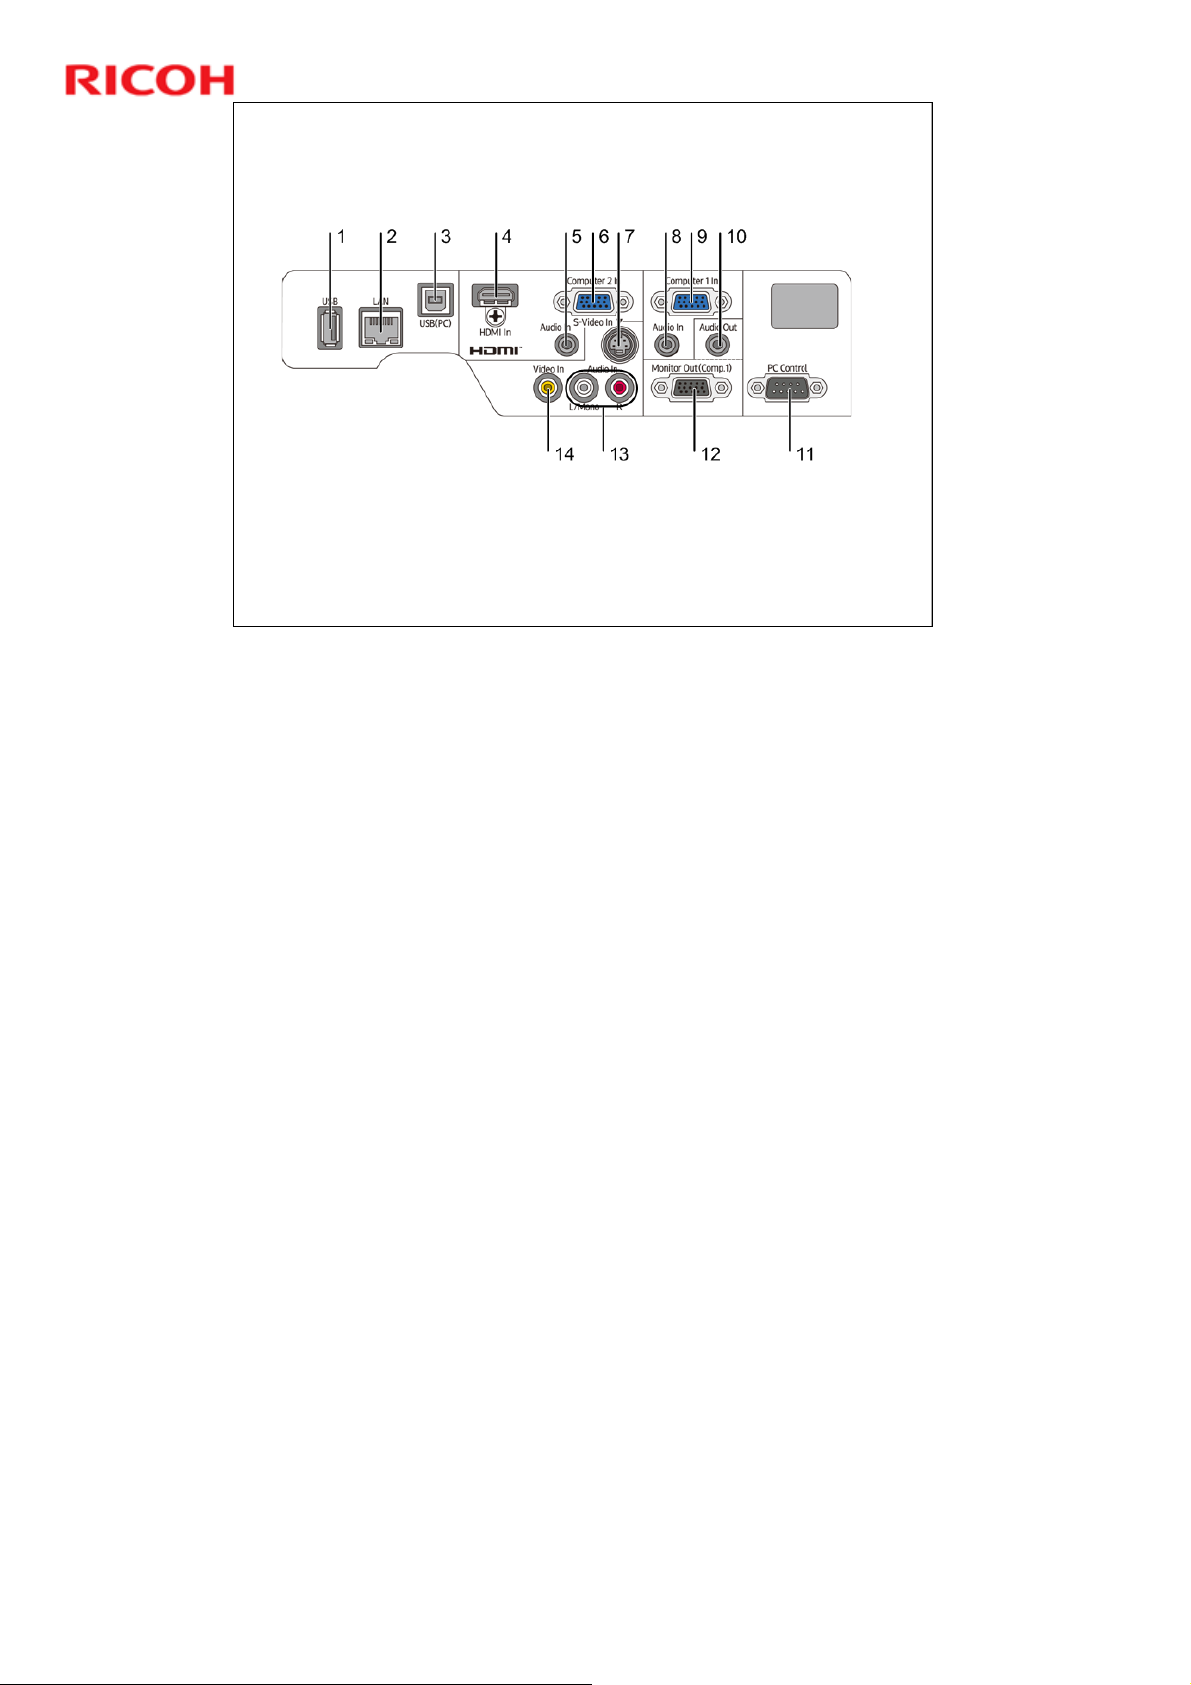
9 Interface
Slide 18
1. USB Port (Type A)
2. LAN Port (RJ-45)
Connection Ports
18
3. USB (PC) Port (Type B)
4. HDMI In Connector (Type A)
5. Computer 2 Audio In Mini Jack (Stereo Mini)
6. Computer 2 In / Component Input Connector (Mini D-Sub 15 Pin)
7. S-Video In Connector (Mini DIN 4 Pin)
8. Computer 1 Audio In Mini Jack (Stereo Mini)
9. Computer 1 In / Component Input Connector (Mini D-Sub 15 Pin)
10. Audio Out Mini Jack (Stereo Mini)
11. PC Control Port (D-Sub 9 Pin ): Use this port to connect a PC or control
system. This enables the user to control the projector using serial
communication protocol. Be sure to use a cross cable.
12. Monitor Out (Comp.1) Connector (Mini D-Sub 15 Pin)
13. Video/S-Video Audio In (L/Mono, R) Connectors (RCA)
14. Video In Connector (RCA)
18
18

Locations of Main Units - 1
Main Board
After removing the top cover, you see the main board.
This board must be removed to access the optical adjustments.
After you remove the main board, you can see these major subassemblies:
OPT BASE: Contains the LCD panels, cross prism, and projecti on lens housing
Engine unit: Contains the relay lens, field lens, polarizers and the dichroicmirrors
Integrators: These are the PBS units
Slide 19
Integrators
Rigel-PJ1nx Training
Engine Unit
OPT BASE
Please ignore the callouts [A] and red circles in the diagram.
19

Slide 20
Rigel-PJ1nx Training
Locations of Main Units - 2
Lamp
Power
Supply
Projection Lens
Please ignore the callouts [A] and red circles in the diagram.
20

Iris Unit
The Iris unit physically blocks the light path from the
projector to the screen when the projector is on but
nothing is being projected.
At these times during a presentation, a blank white screen
is often not desirable. So, there are three ways to get
around this.
1. Turn off the projector. If you do that, you have to think
about cool-down and warm-up times. Also, if you keep
turning the lamp off/on, the lamp's life can be reduced.
2. Send an all-black video signal. This can cause delicate
optical components to overheat, reducing the projector's life
3. Physically block the light path inside the projector. The
projector keeps working as normal but nothing comes out of
the projector lens. This is how the Iris unit works.
Slide 21
Rigel-PJ1nx Training
No additional notes
21

Slide 22
Rigel-PJ1nx Training
Y015/Y016
Service Training
Basic Points about Service
This section explains the basic points about servicing the machine.
22

Antistatic Clothing
To protect the components from damage, wear
anti-static clothing when you disassemble the
machine.
Slide 23
Rigel-PJ1nx Training
No additional notes
23

Special Tools
There are a lot of special tools for working on
this machine.
See the list in the service manual for details.
Slide 24
Rigel-PJ1nx Training
Service manual: 3. Replacement and Adjustment > Special Tools
24

Software Required for Service
Overview
Software for the following purposes must be
installed on the computer that you will use to
service this machine:
For writing data to the machine
» Used after replacing the Main PWB
For writing the EDID to the machine
» Used after replacing the Main PWB
For writing the serial number and model number
to the machine.
» Used after replacing the Main PWB
For service adjustments
» Used after replacing either of these components: Main
PWB, Opt Base
Slide 25
Rigel-PJ1nx Training
The next few slides explain what software must be installed, and how to install it.
Using the software will be explained later, in the ‘Adjustments after Replacing
Components’ section.
25

Software Required for Service
For Writing Data to the Machine
There is a software package to install on your
PC, and a data file (one for each model).
For writing the model-specific product data
» Writing software: PJUpgrader2.exe
» File names: modelname_mdata.bin
These programs and files can go anywhere on
the PC.
If you install new versions, uninstall the old
versions first.
Always take care to use the correct files for the
model you are working on. If you install the
wrong files on the projector, you cannot replace
them with the correct ones, so you must replace
the Main PWB.
Slide 26
Rigel-PJ1nx Training
This is the same software as used for servicing the Sirius-PJ1.
26

Software Required for Service
For Writing the EDID to the Machine
There is one software package to install on your
PC, and two data files for each model.
EDID rewriting software
» EDIDWrite.exe
EDID data (HDMI)
» modelname_EDID_HDMI_Vxxx.bin
EDID data (D-Sub)
» modelname_EDID_DSUB_Vxxx.bin
The PC must have Windows XP or 2000, with a
cross (reverse) serial cable and RGB (analog)
video connection with the projector.
Slide 27
Rigel-PJ1nx Training
This is the same software as used for servicing the Sirius-PJ1.
In the data file names, ‘xxx’ denotes the version.
27

Software Required for Service
For Writing Serial No. and Model No. to the Machine
Software: snwriter000002.zip
Decompress and install
Slide 28
Rigel-PJ1nx Training
This is the same software as used for servicing the Sirius-PJ1.
28

Software Required for Service
For Service Adjustments
Service adjustment software must be installed:
Ser_X6180NSeries.exe
The PC must use Windows XP or 2000, and either
of serial ports COM1 - COM9 must be D-SUB9-pin
To install the software, copy the following files to
any folder on the PC.
Ser_X6180NSeries.exe
Various DLL files
Slide 29
Rigel-PJ1nx Training
This is different from the Sirius-PJ1.
29
Slide 30
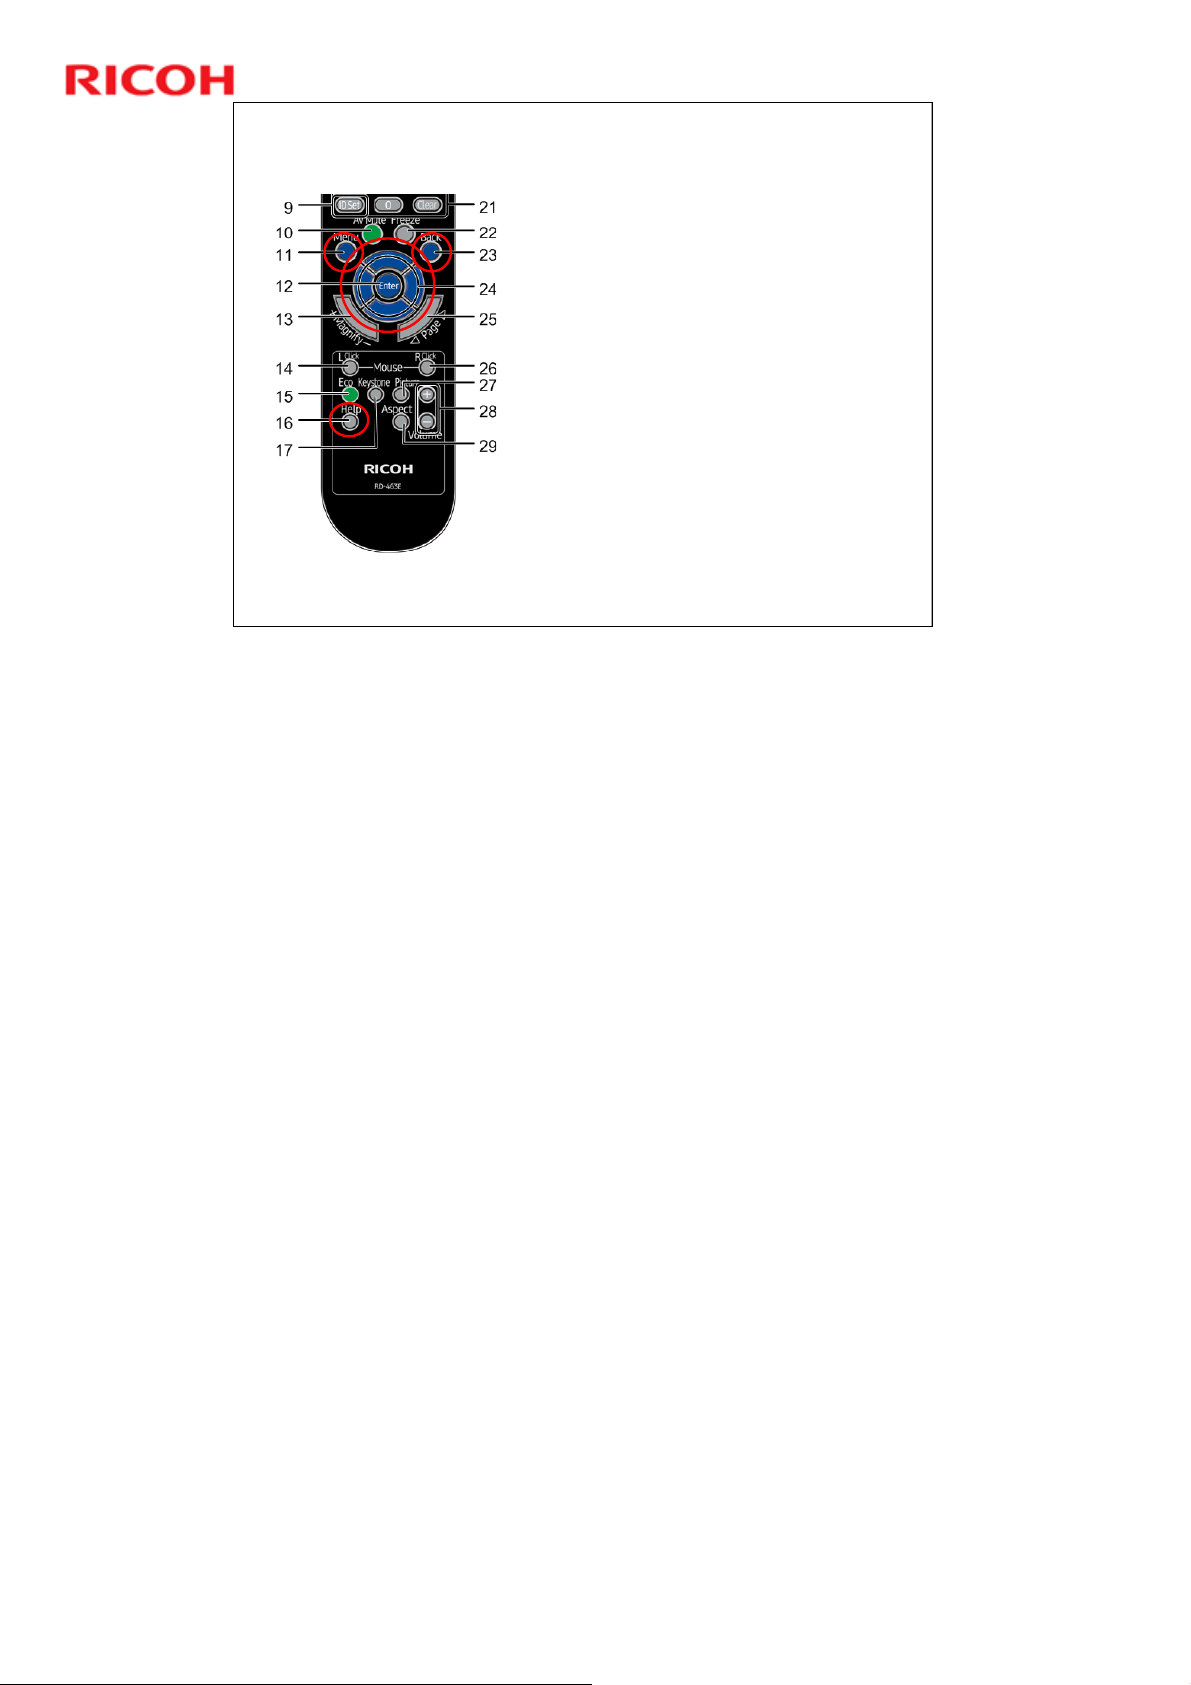
Entering Service Mode
There are two service modes.
Expert Mode
Service Mode
You need to use the remote controller to
access these modes.
Expert mode:
» Help > Up > Left > Help.
» Then press the Menu button to display the
menu.
Service mode:
» Help > Enter > Help > Enter > Help >
Enter. Then press Menu for 3 seconds.
» When the Password menu is displayed,
press Up > Right > Left > Right > Right >
Right > Up > Up > Enter
» Then press the Menu button to display the
menu.
There are two ways to leave Expert or
Service mode
Press the Back button twice when no
menu is displayed.
Otherwise, press the Power button. The
machine will go to standby mode.
Rigel-PJ1nx Training
Service manual > Troubleshooting > Service Mode > Mode change
Same method to enter service and expert modes as for Sirius-PJ1, but the layout
of the remote controller is different.
30
 Loading...