

Loading Paper into the Small Size Paper Tray
This section describes how to load paper into the small size paper tray.
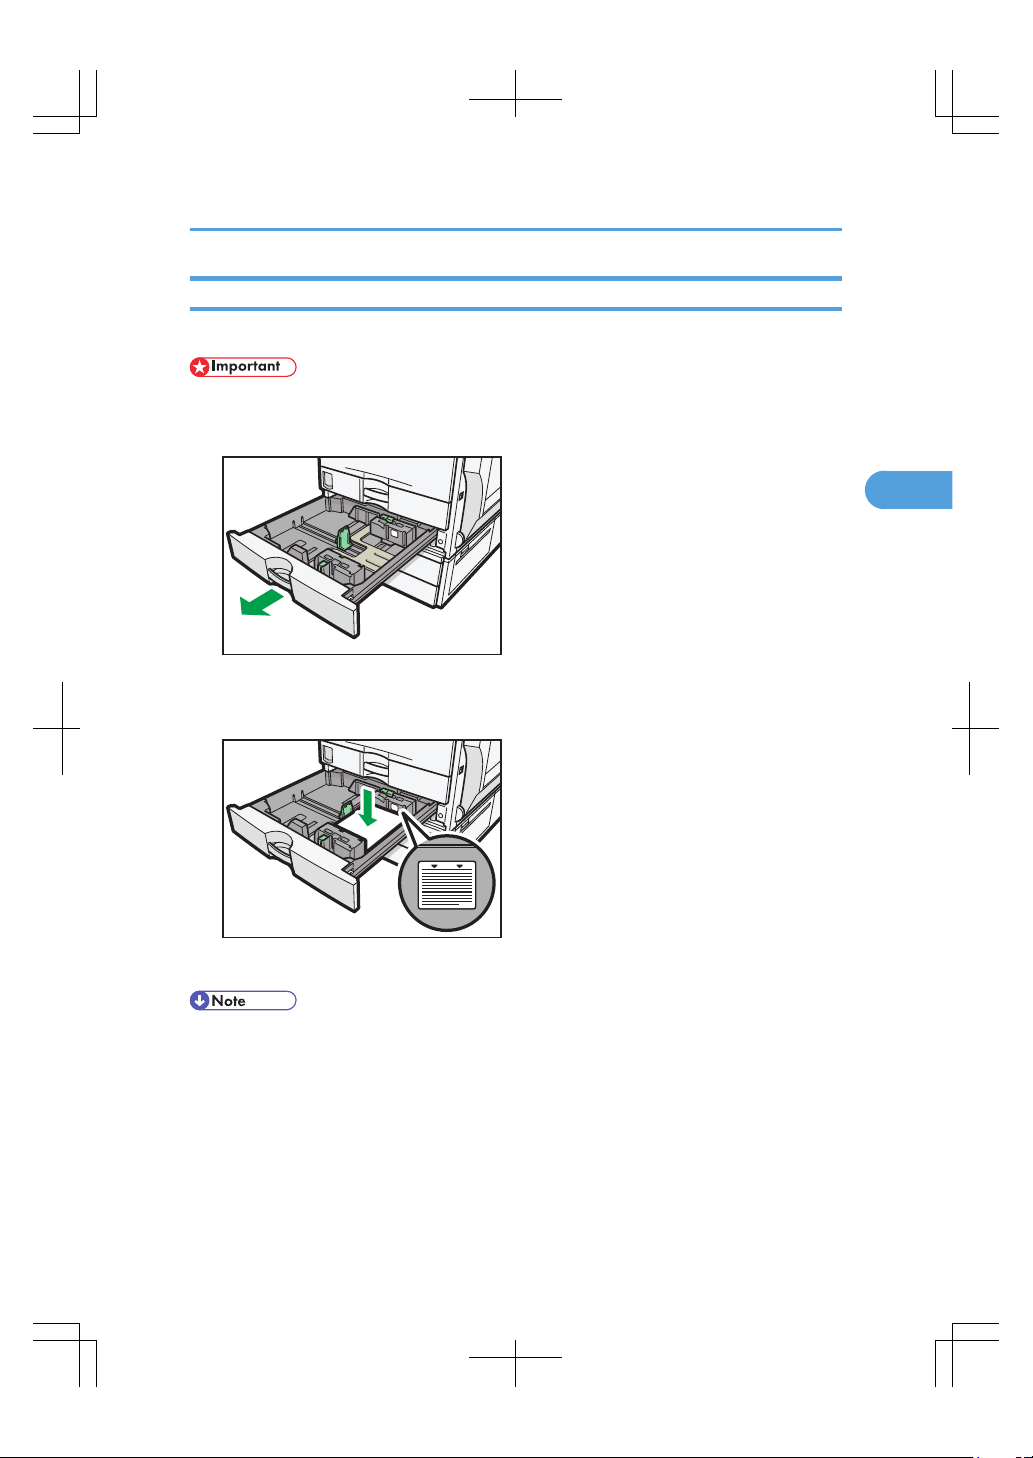
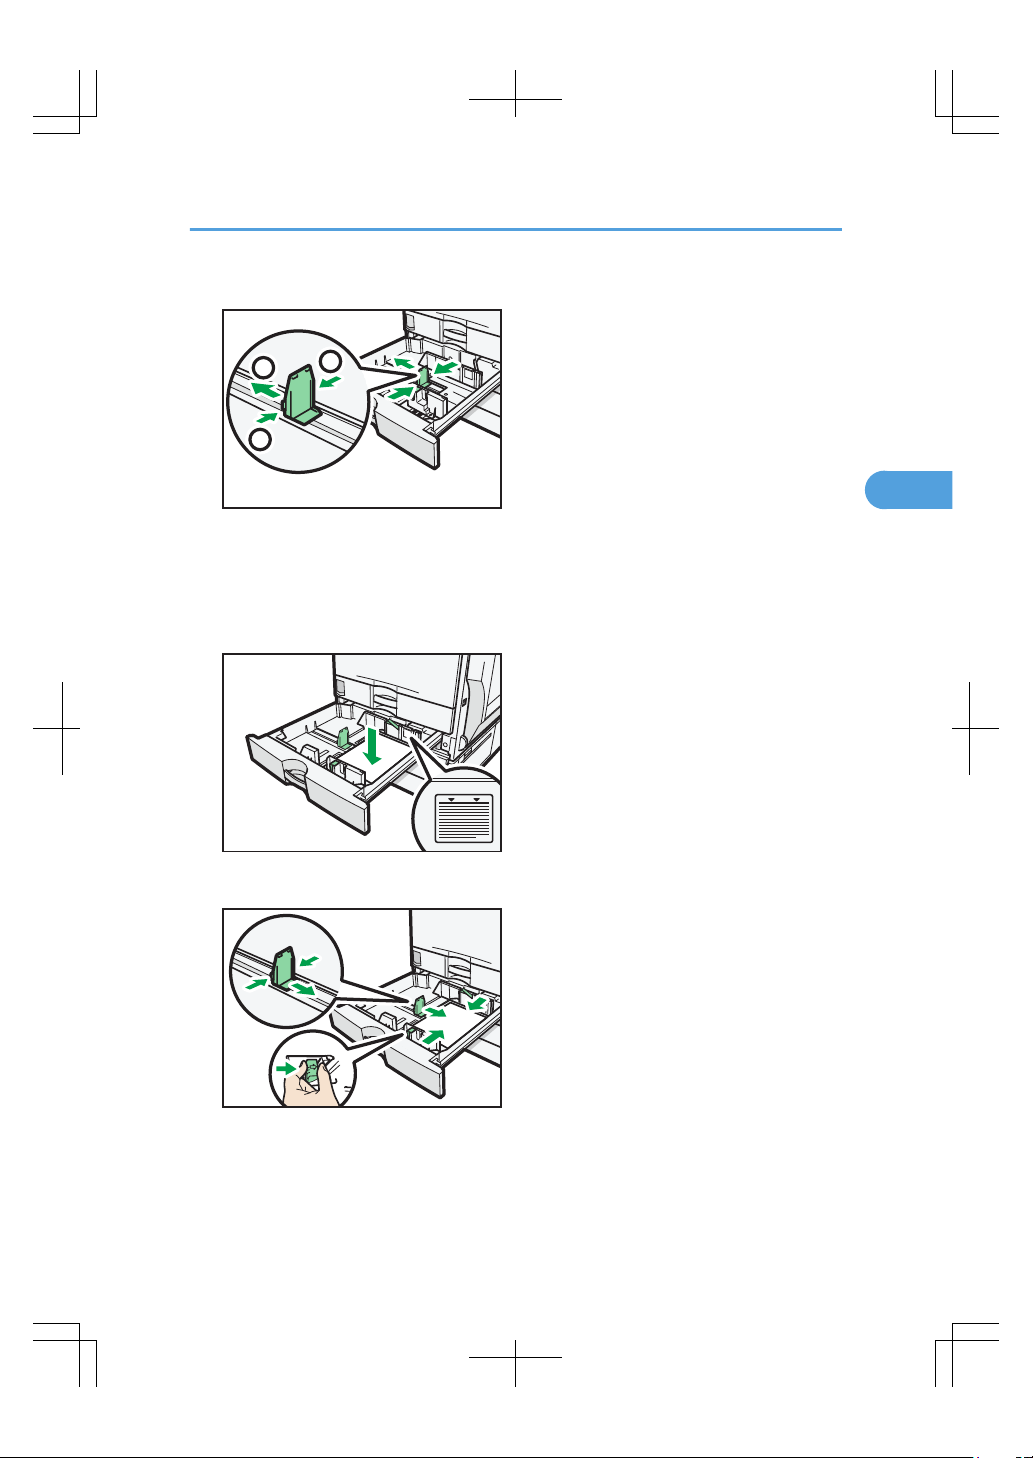
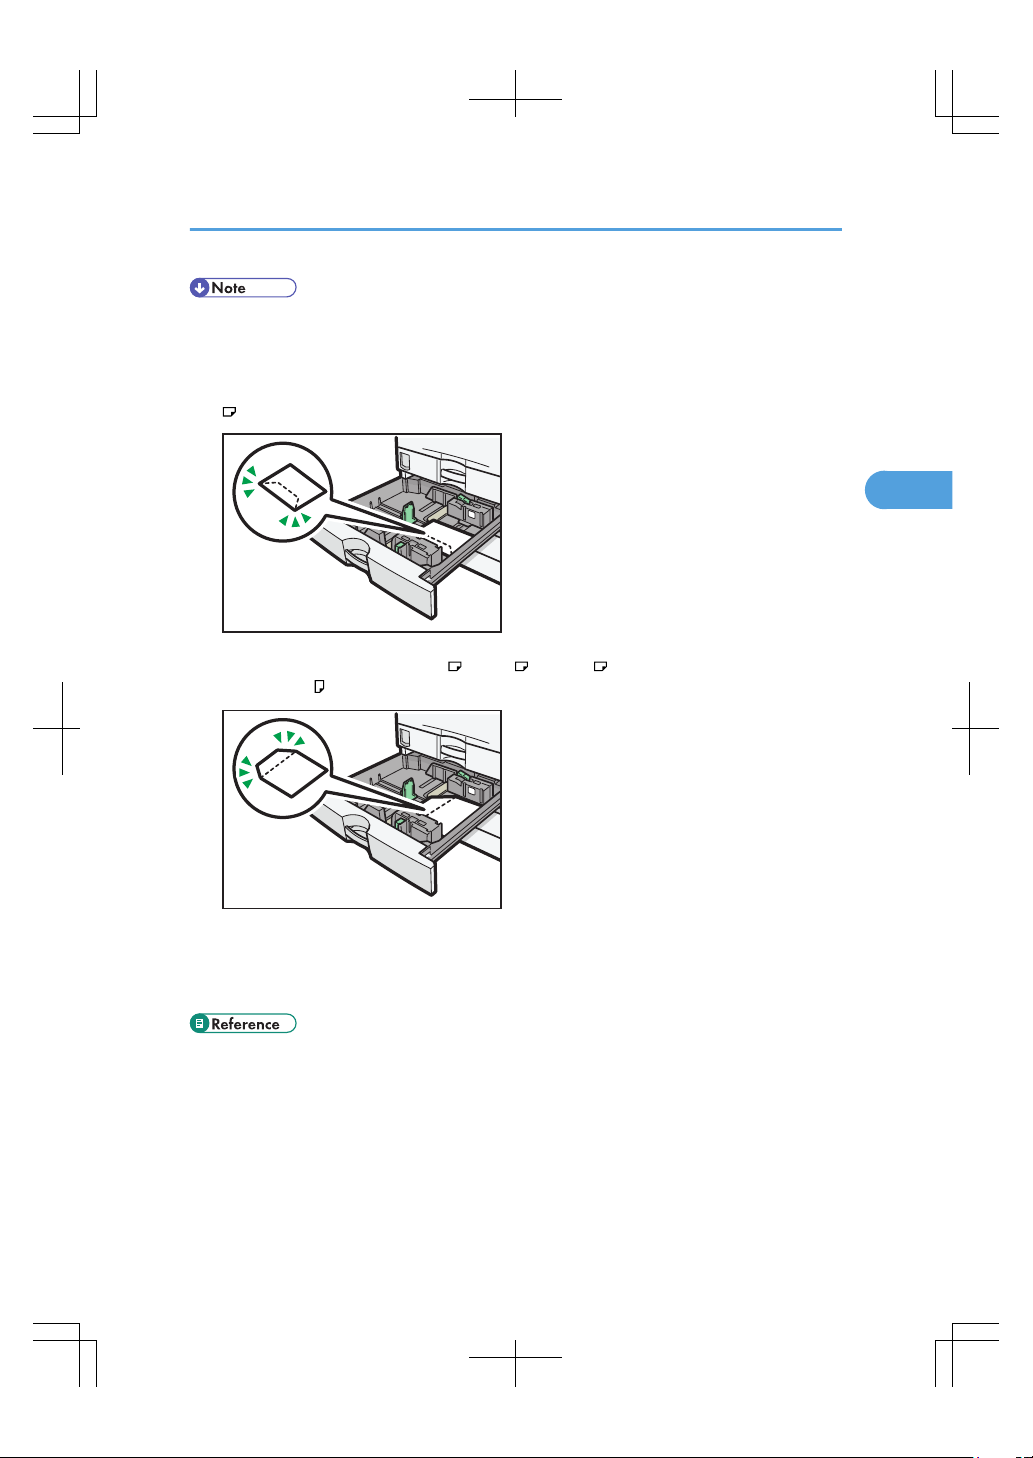
• Check the paper edges are aligned at the right side.
1. Carefully pull out the paper tray until it stops.
CAS118
2. Square the paper and load it print side up.
Do not stack paper over the limit mark.
CAS119
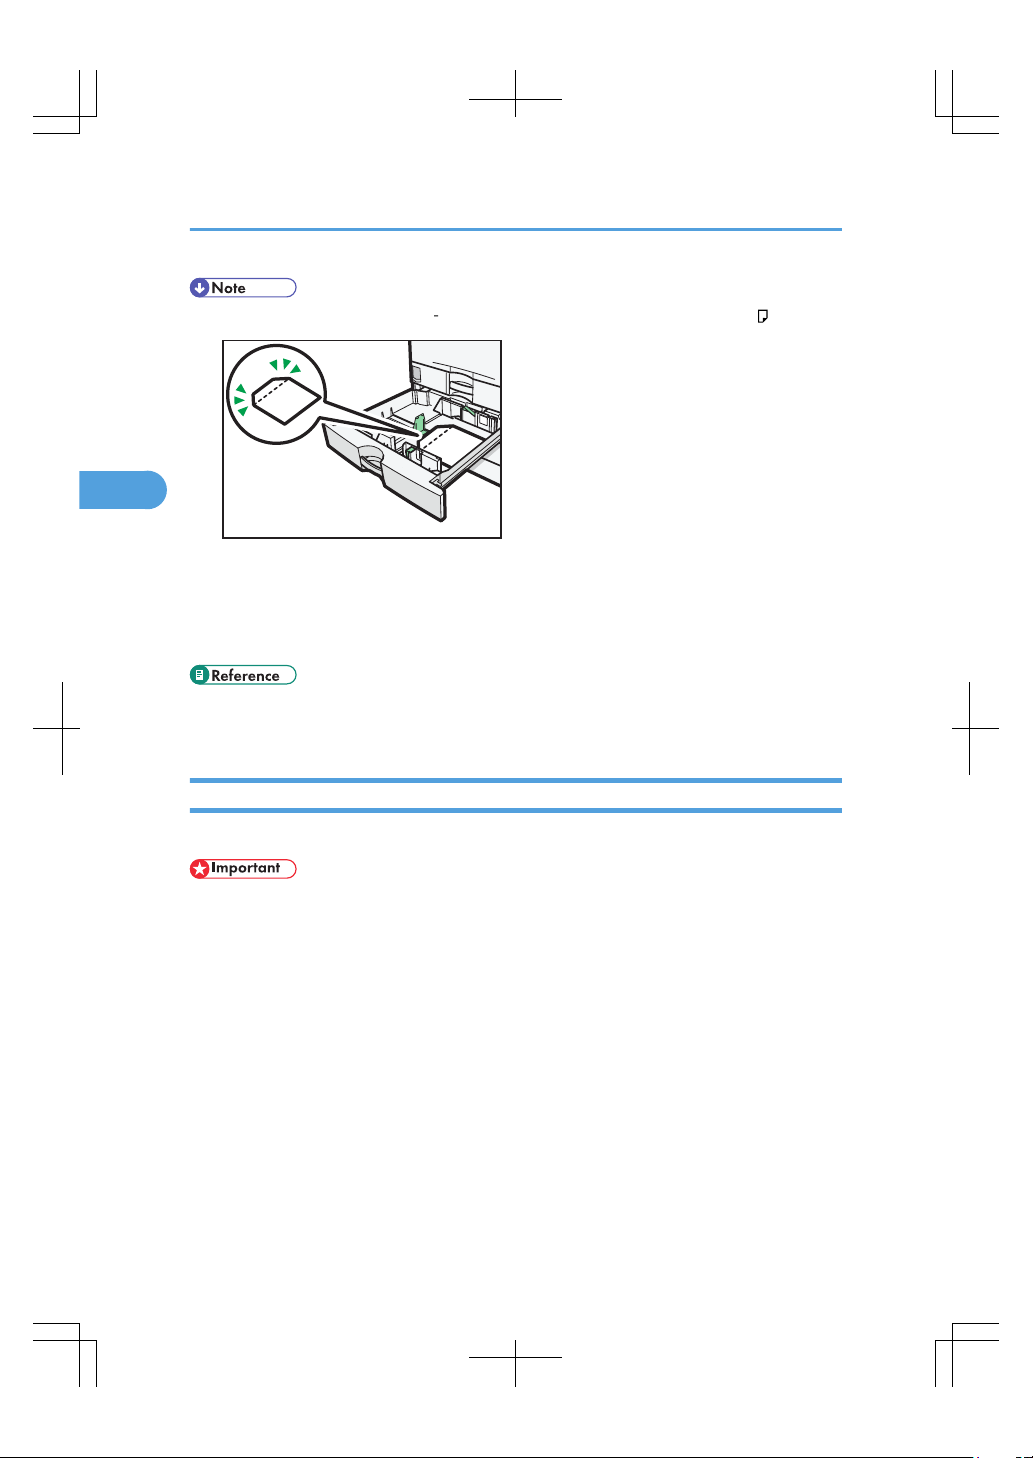
3. Carefully push the paper tray fully in.
• When loading a low number of sheets, be sure not to squeeze the side fences in too tightly. If the
paper bows, it might not feed in properly.
• If a paper tray is pushed vigorously when putting it back into place, the position of the tray's side
fences may slip out of place.
• Various sizes of paper can be loaded in the small size paper tray by adjusting the positions of side
fences and end fence. For details, see “Changing the Paper Size in the Small Size Paper Tray”.
Loading Paper
93
3
• You can load envelopes in the small size paper tray. For details about how to load envelopes, see
“Changing the Paper Size in the Small Size Paper Tray”. For details about various details about and
recommendations concerning envelopes, see “Envelopes”.
• The small size paper tray can hold up to 550 sheets.
• For details about how to install the small size paper tray, see “Installing the Small Size Paper Tray”.
• p.87 "Installing the Small Size Paper Tray"
• p.102 "Changing the Paper Size in the Small Size Paper Tray"
• p.117 "Envelopes"
Loading Paper into Tray 3 (LCT)
This section describes how to load paper into Tray 3 (LCT).
• When paper loaded in the right side of Tray 3 (LCT) runs out, paper on the left is automatically shifted
to the right. While the paper is moving, a message instructing you to wait appears. Do not pull out
the tray at this time.
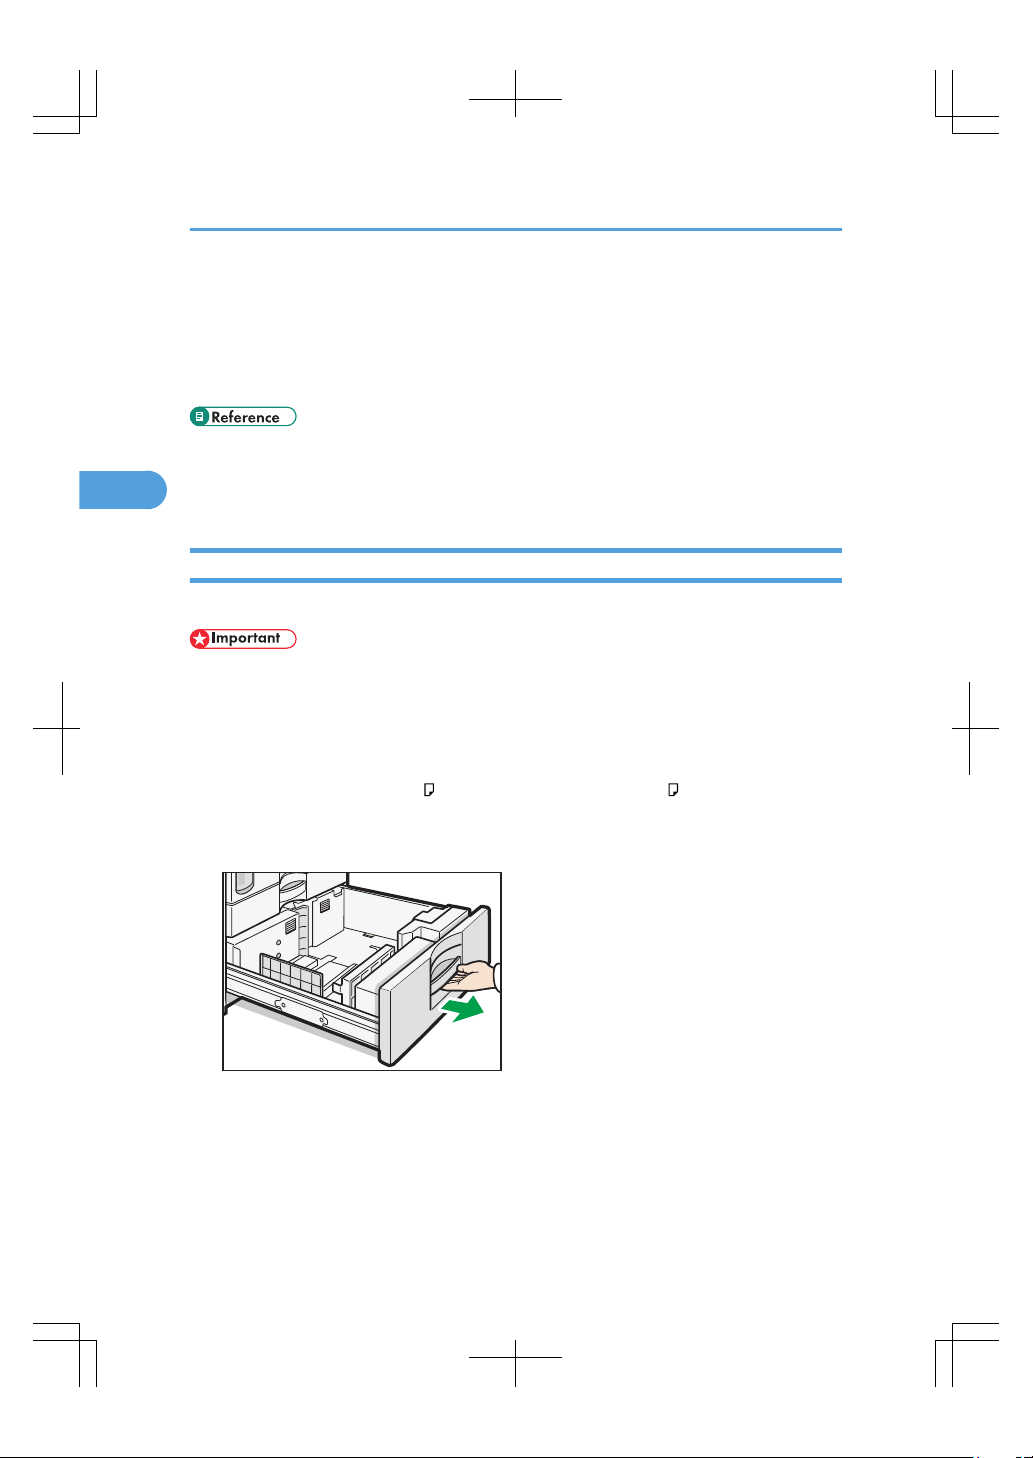
• For the right stack, align the right edge of the paper with the right edge of the tray. For the left stack,
align the left edge of the paper to the left edge of the tray.
• Tray 3 (LCT) can hold 81/2 × 11 paper only. If you want to print on A4 from Tray 3 (LCT), contact
your service representative.
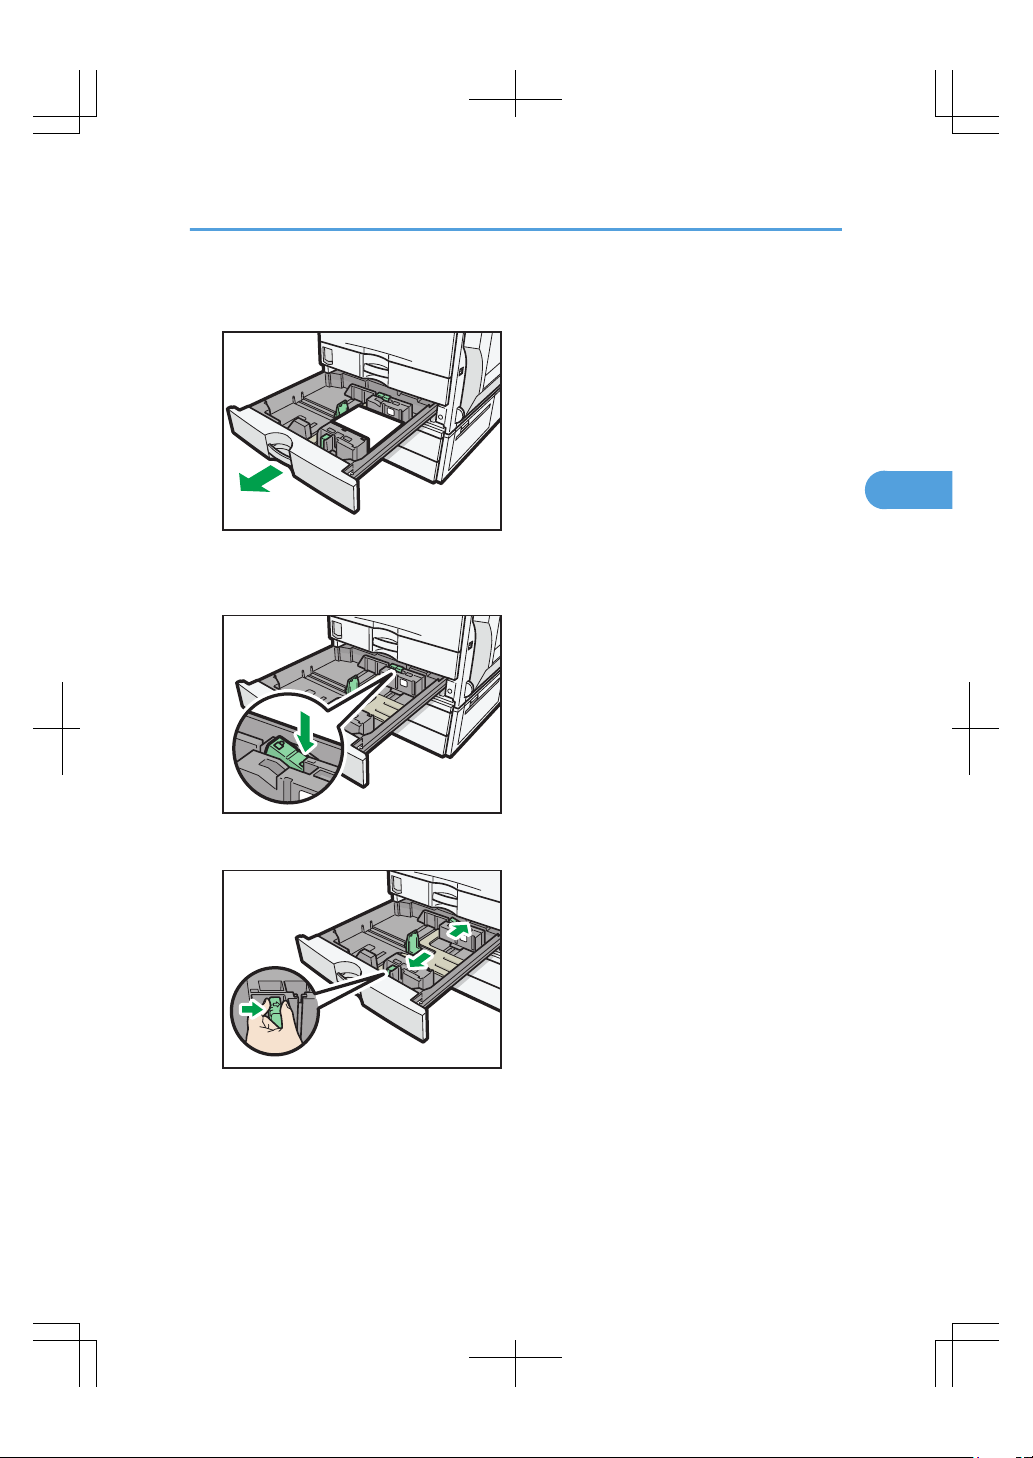
1. Carefully pull out Tray 3 (LCT) until it stops.
CAS043
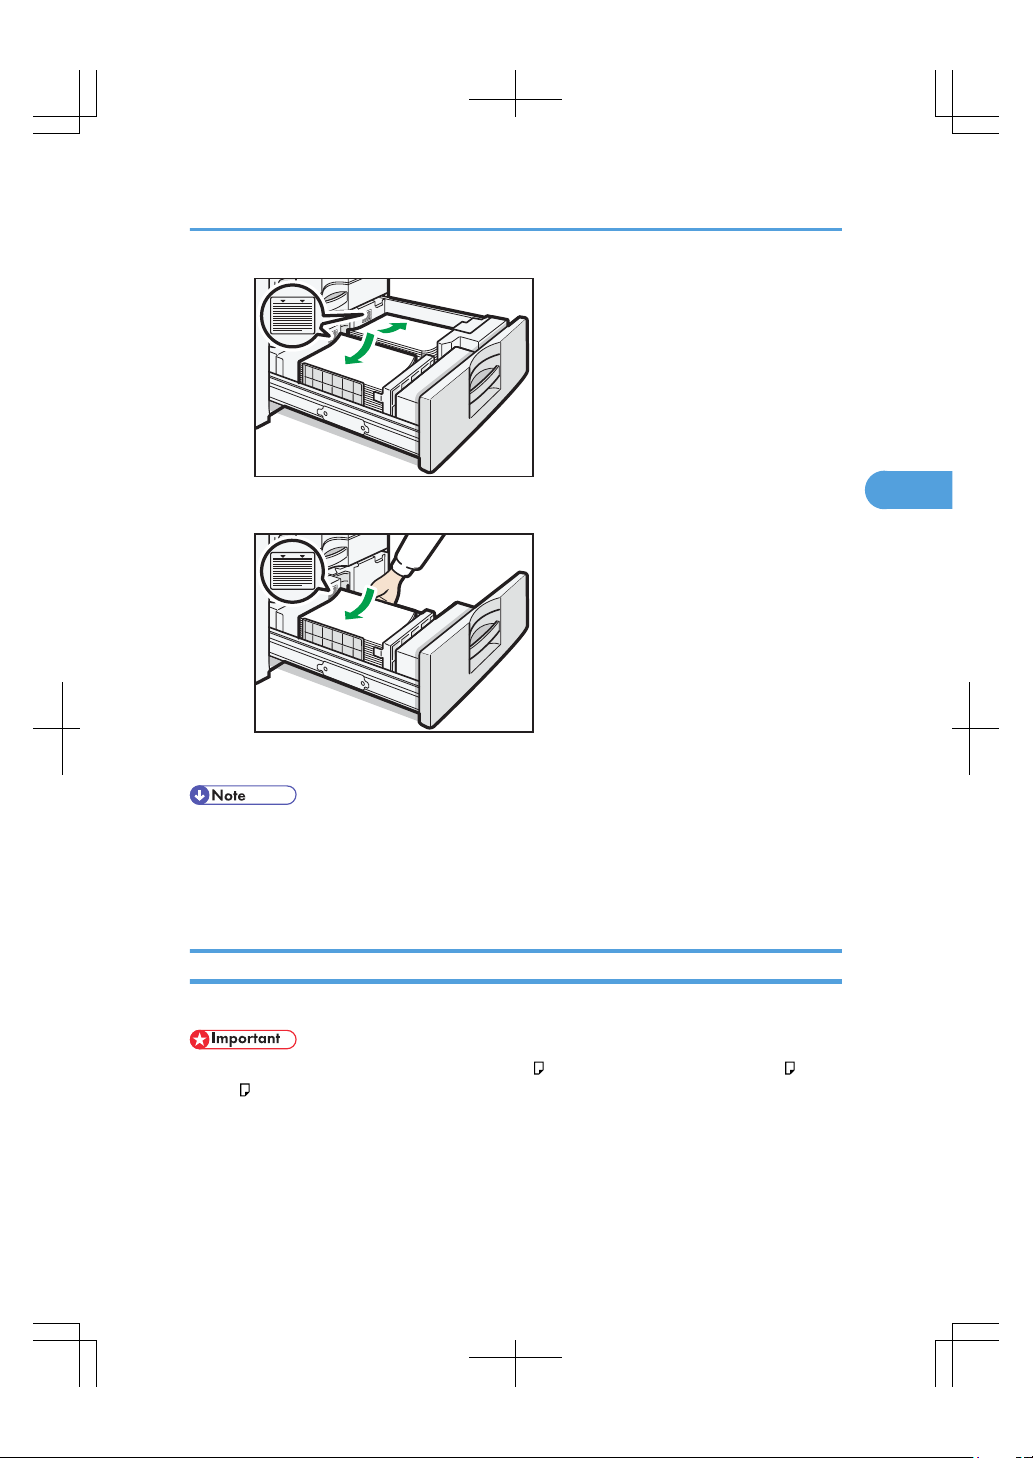
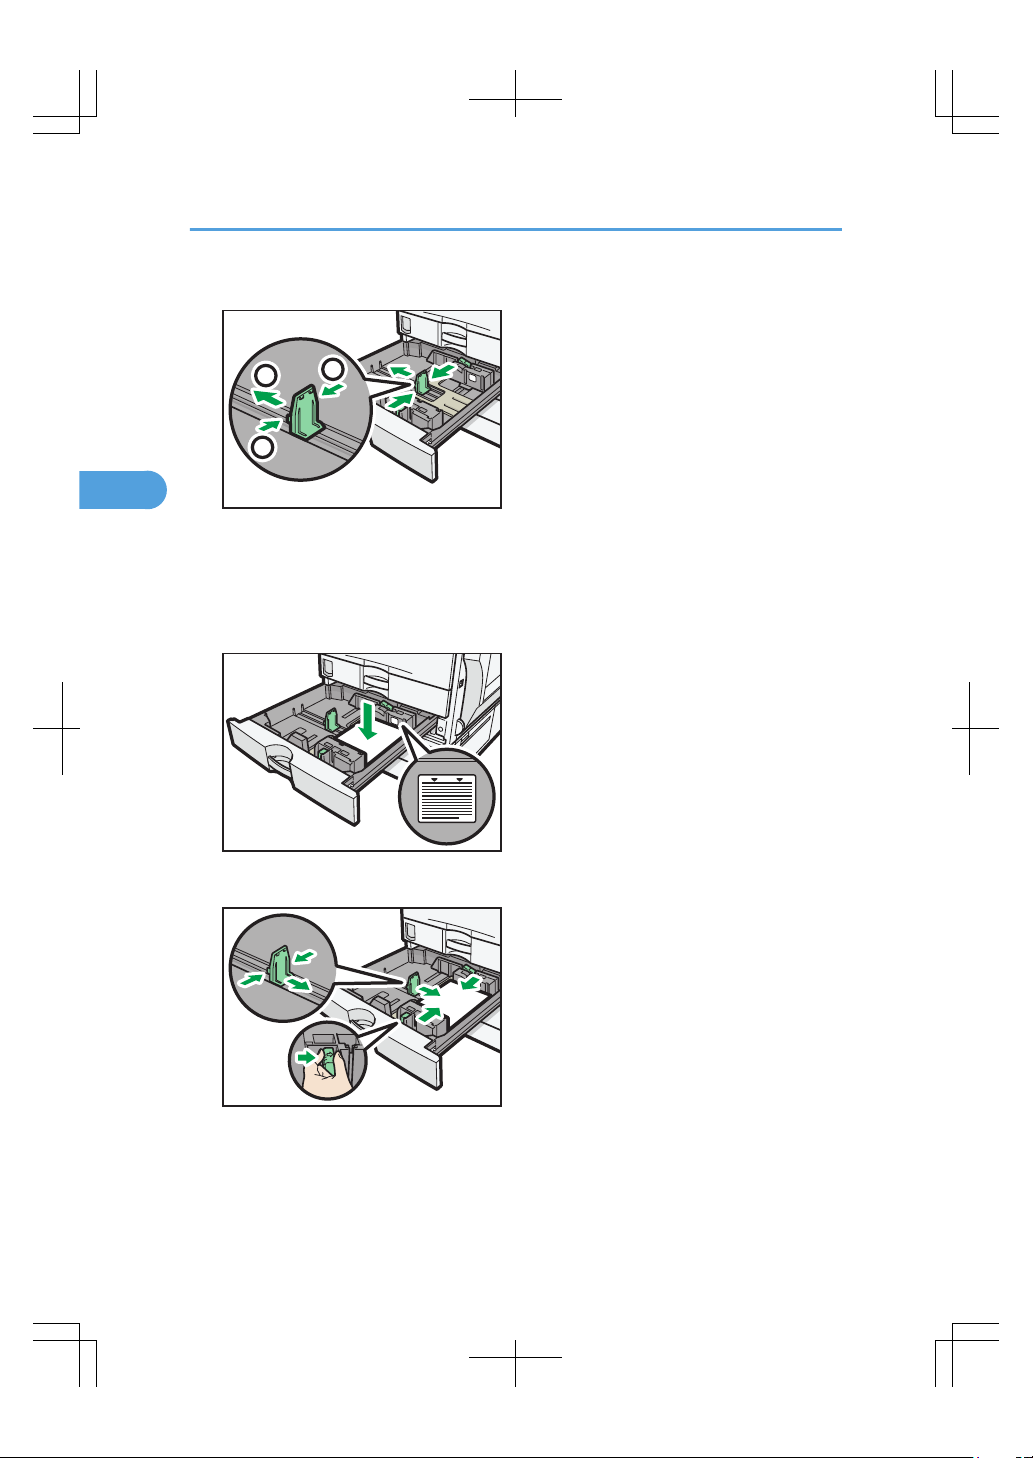
2. Square the paper and load it print side up.
Do not stack paper over the limit mark.
• Whole tray pulled out
3. Adding Paper
94
3
CAS044
• Left half of the tray pulled out
CAS045
3. Carefully push the paper tray fully in.
• You can load paper even while making copies from Tray 3 (LCT). You can pull out the left half of the
tray while copying is in.
• Load the same size and orientation paper in the other half of the tray.
• Each tray can hold up to 1,000 sheets of paper.
Loading Paper into the Large Capacity Tray (LCT)
This section describes how to load paper into the large capacity tray (LCT).
• The large capacity tray (LCT) can hold 81/2 × 11 paper only. If you want to print on A4 or B5
JIS from the large capacity tray (LCT), contact your service representative.
• Check the paper edges are aligned at the left side.
Loading Paper
95
3
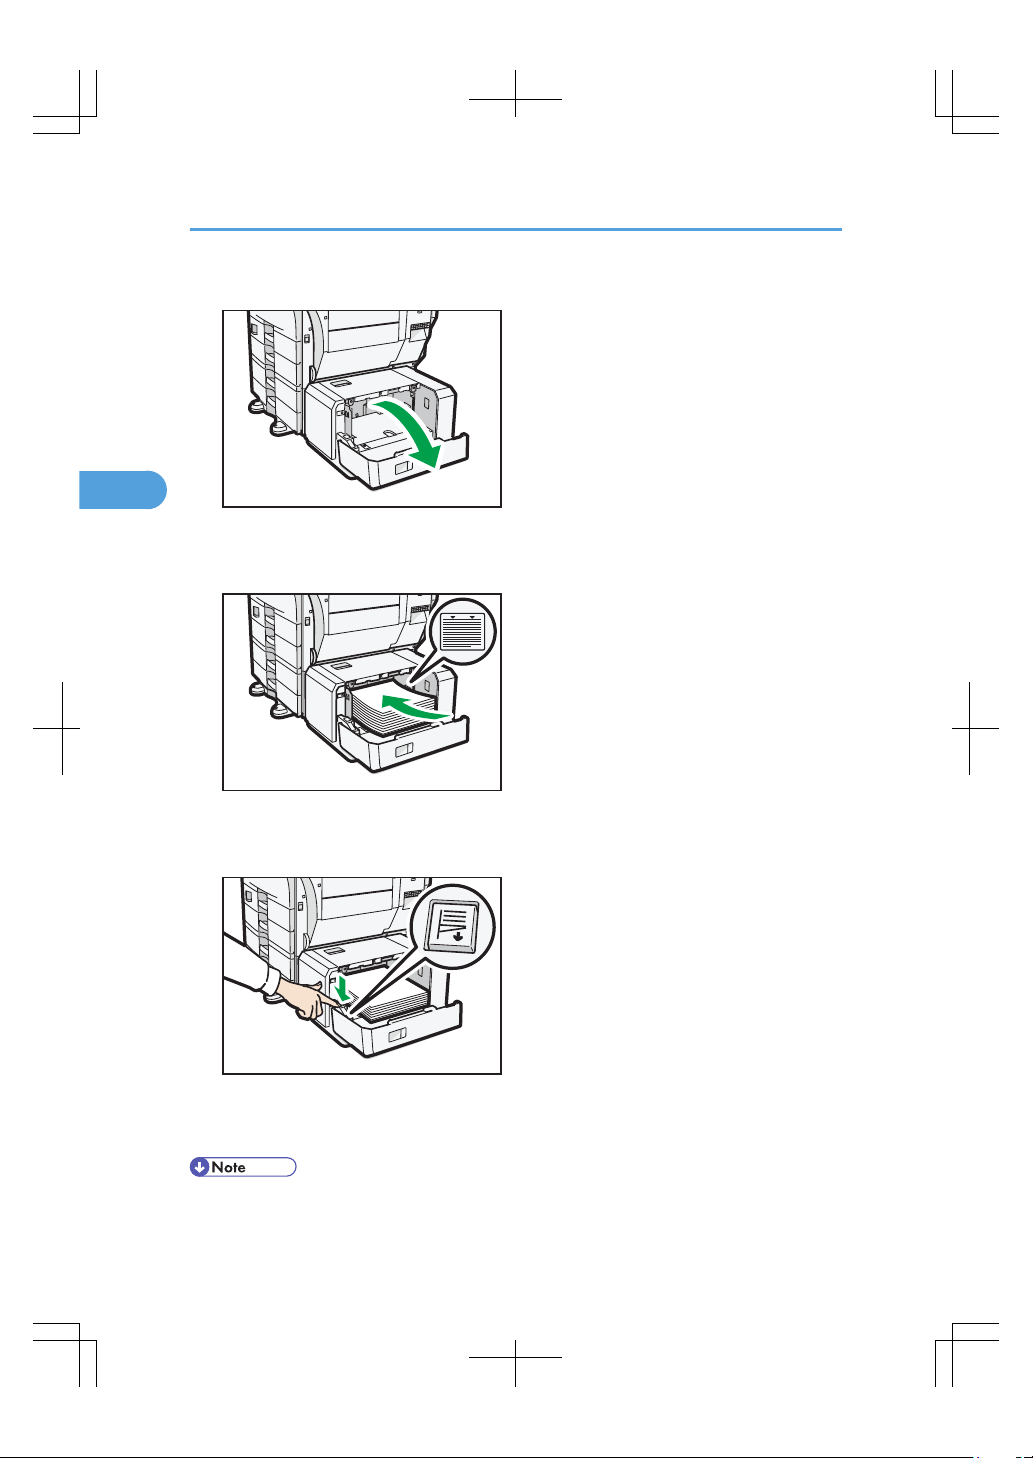
1. Open the right cover of the large capacity tray (LCT).
CAS089
2. Load the paper in the tray along the edge on the back.
Load the paper print side down.
CAS090
3. Press the [Down] key.
The bottom plate is moving down.
CAS091
4. Load paper by repeating steps 2 and 3.
5. Close the right cover of the large capacity tray (LCT).
• The tray can hold up to 1,200 sheets.
3. Adding Paper
96
3
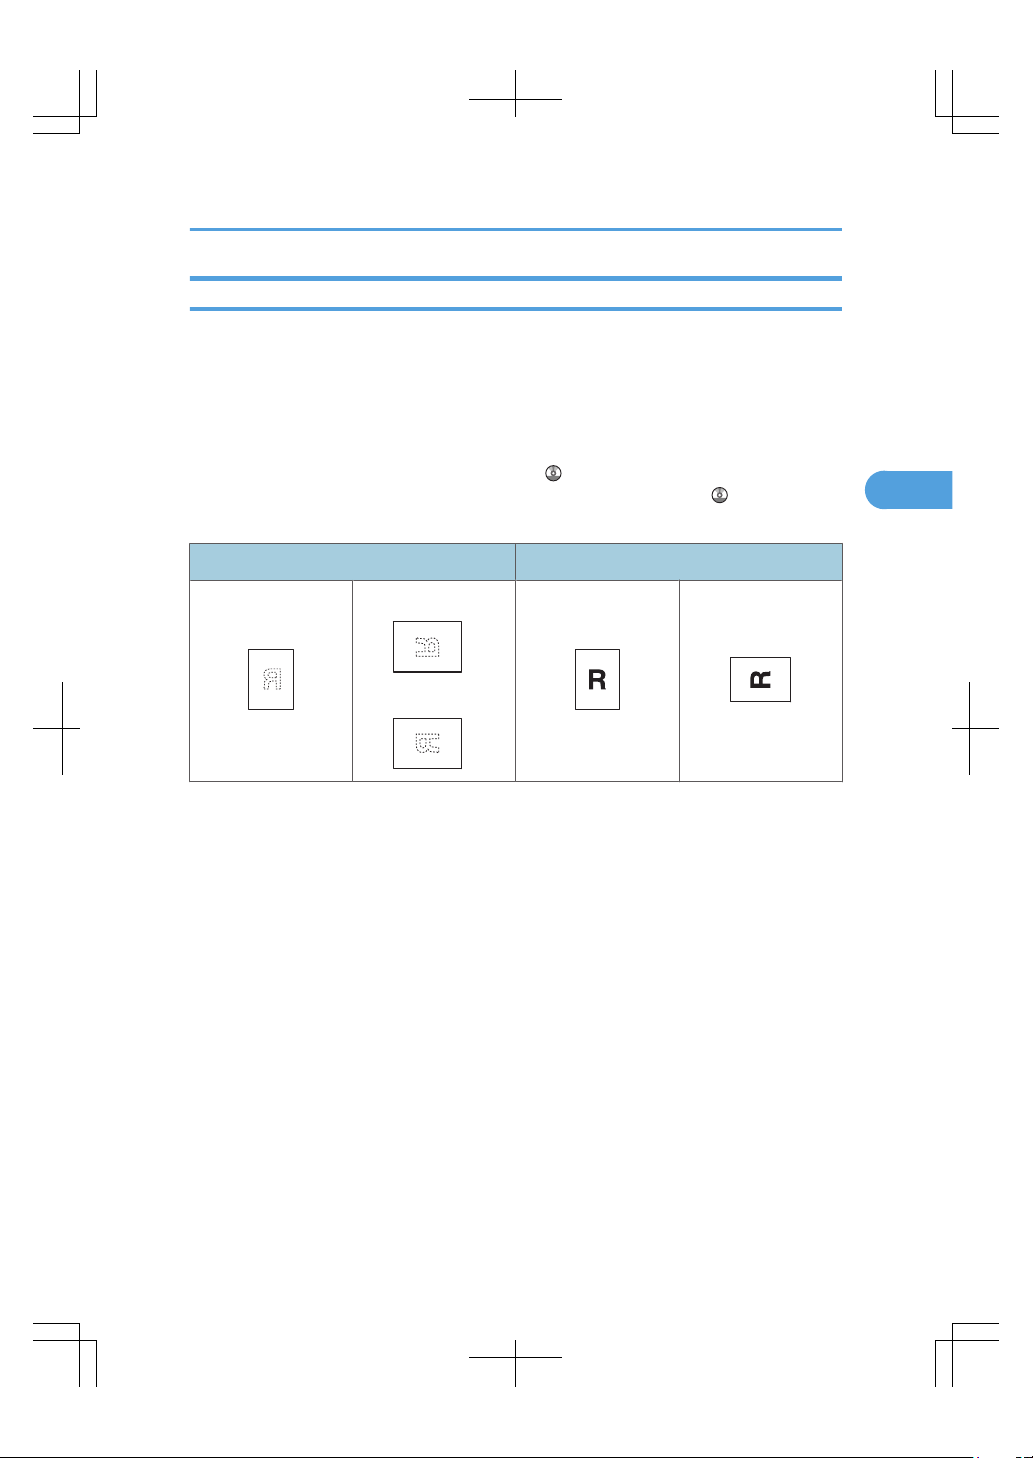
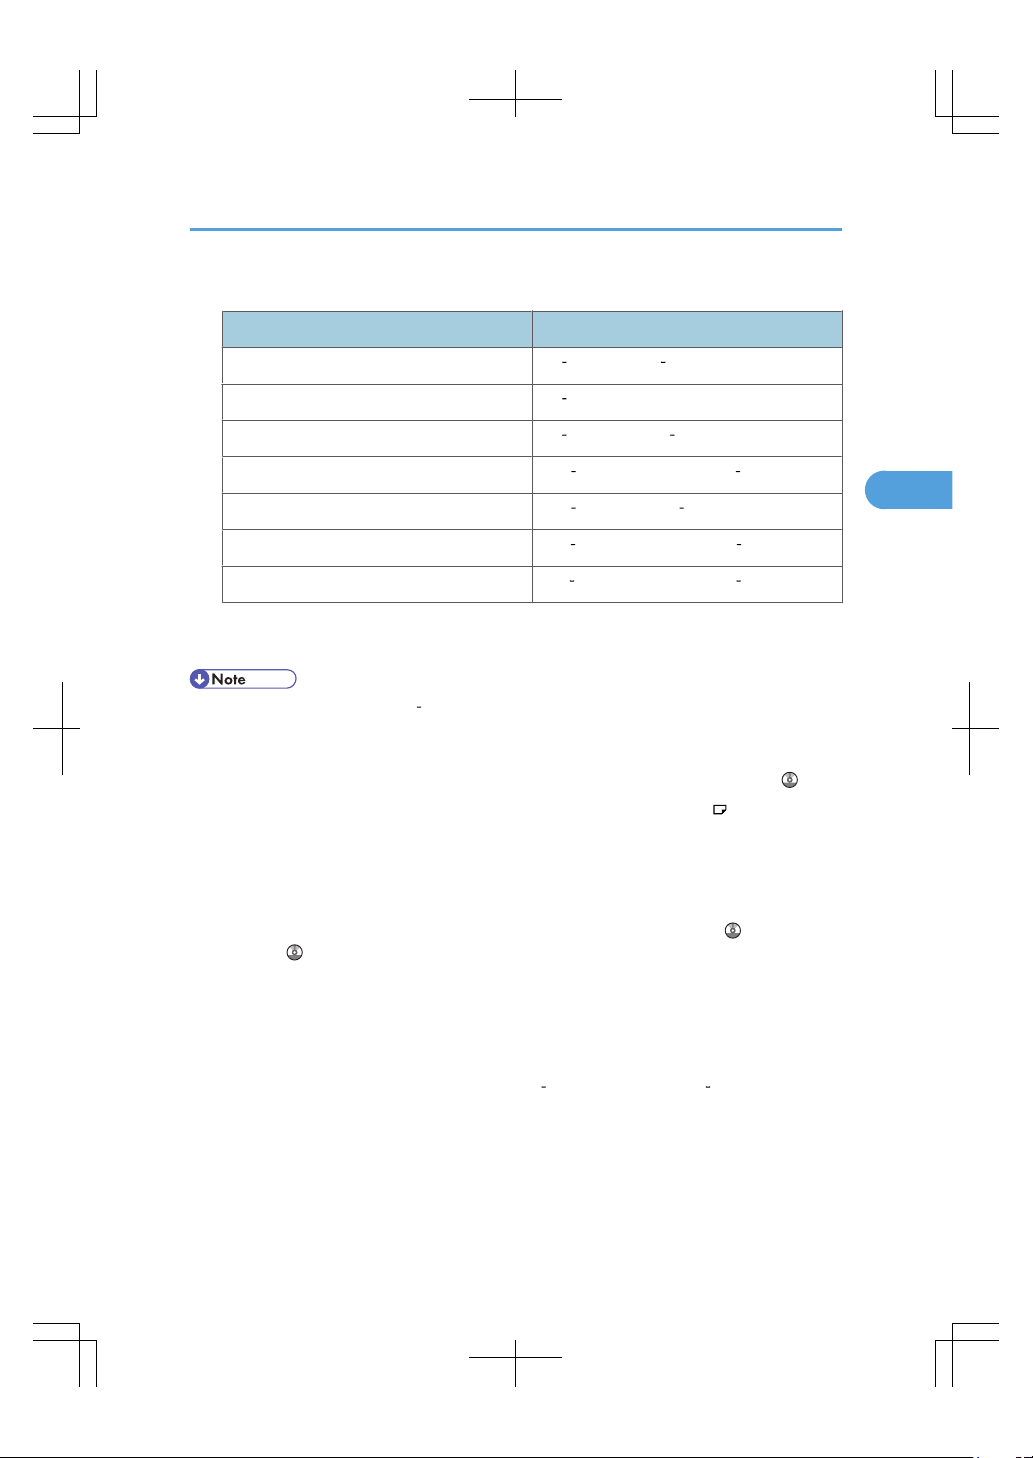
Loading Orientation-Fixed Paper or Two-Sided Paper
This section describes loading paper that has a specified orientation and printing side (such as letterhead
paper).
Orientation-fixed (top to bottom) or two-sided paper (for example, letterhead paper, punched paper, or
copied paper) might not print correctly, depending on how the originals and paper are placed. Set
[Letterhead Setting] to [Yes] in [Input / Output] under [Copier / Document Server Features], and then place
the original and paper as shown below. For details about Letterhead Setting, see “Copier and Document
Server Features”, Copy and Document Server Reference . For details about printing with the printer
function, see “Printing on Orientation-Fixed or Two-Sided Paper”, Printer Reference .
Original Orientation
Exposure glass ADF
• Copy
• Scanner
Loading Paper
97
3
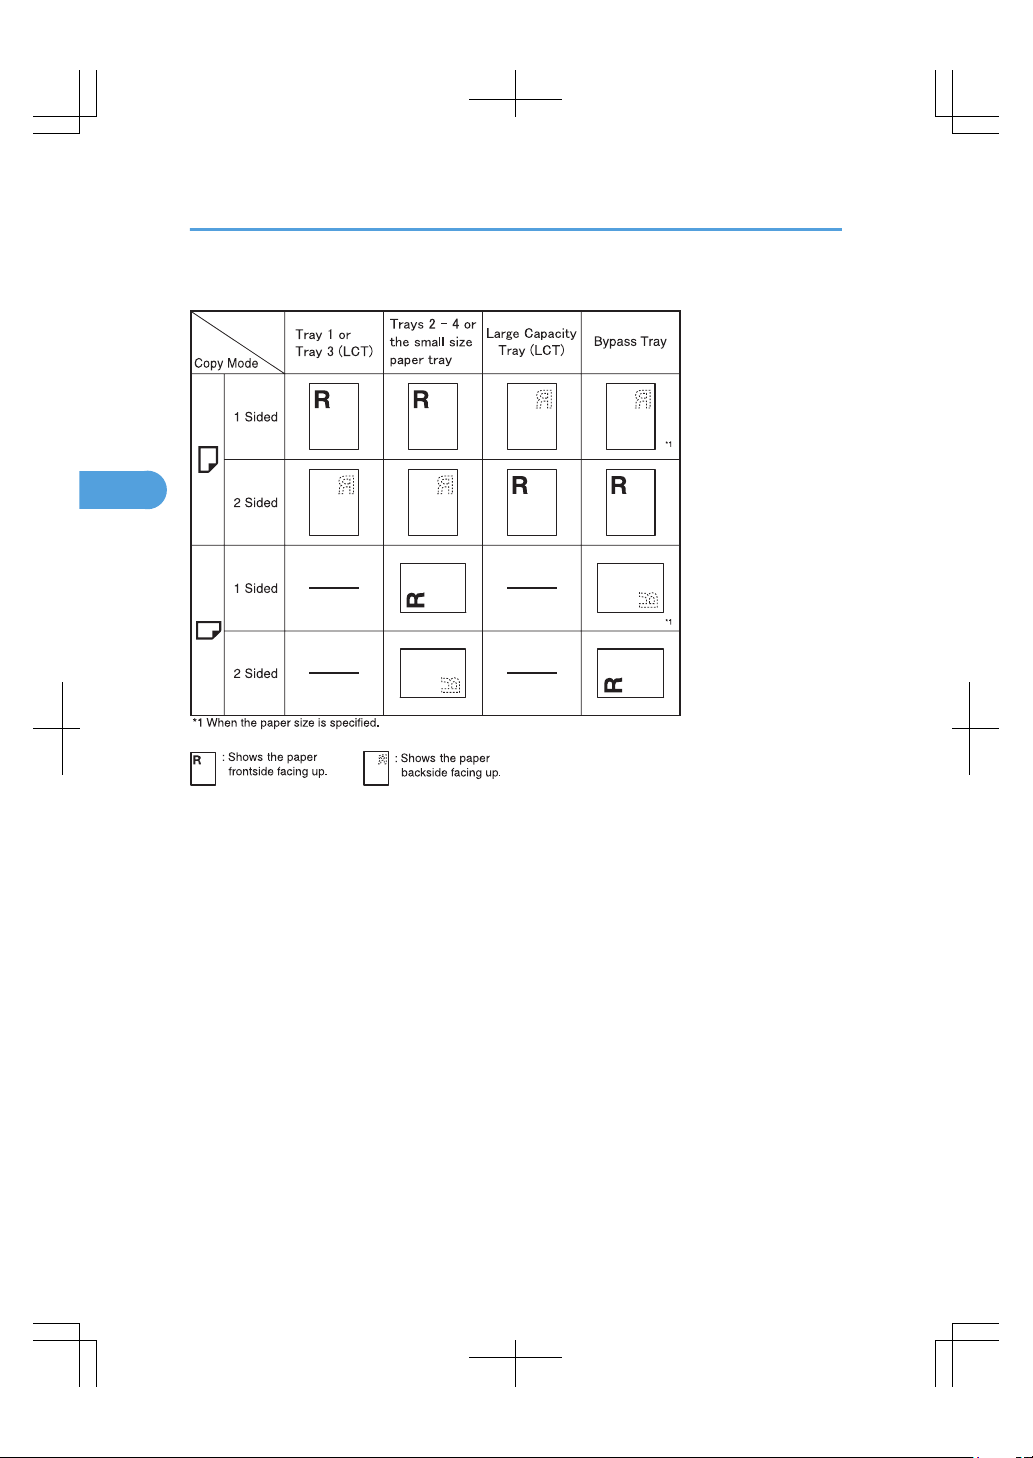
Paper Orientation
CAS049
3. Adding Paper
98
3
Changing the Paper Size
This section describes how to change the paper size.
• When loading paper, take care not to trap or injure your fingers.
• Do not stack paper over the limit mark.
• Tray 1, Tray 3 (LCT), and the large capacity tray (LCT) can hold 81/2 × 11 paper only. If you want
to print on any of the following paper sizes from these trays, contact your service representative:
• Tray 1: A4 , A5 , B5 JIS
• Tray 3 (LCT): A4
• Large capacity tray (LCT): A4 , B5 JIS
• Be sure to select the paper size with User Tools. If you do not, misfeeds might occur. For details about
Tray Paper Size, see “System Settings”, Network and System Settings Reference
.
• Fan the paper before loading.
• Straighten curled or warped paper before loading.
• For details about paper sizes and types, see “Recommended Paper Sizes and Types”.
• p.111 "Recommended Paper Sizes and Types"
Changing the Paper Size in Trays 2 - 4
This section describes how to change the paper size in trays 2 4.
The paper size setting is changed in the same way for every paper tray.
In the following example procedure, the paper size setting for tray 2 is changed.
• If a paper tray is pushed vigorously when putting it back into place, the position of the tray's side
fences may slip out of place.
• Check the paper edges are aligned at the right side.
• Slide the side fences until they are aligned with the paper size, and then re-lock the side fences.
Various sizes of paper can be loaded in trays 2 4 by adjusting the positions of the side fences and end
fence.
Changing the Paper Size
99
3
1. Check that paper in the paper tray is not being used, and then pull the tray carefully out
until it stops.
CAS051
2. Remove paper if loaded.
3. Release the lock on the side fences.
CAS052
4. While pressing down the release lever, slide the side fences outward.
CAS053
3. Adding Paper
100
3
5. Slide the end fence outward.
CAS054
1
1
2
1. Pinch the release levers of the end fence.
2. Slide the end fence outward.
6. Square the paper and load it print side up.
Do not stack paper over the limit mark.
CAS109
7. Align the back and side fences gently against the paper you loaded.
CAS110
8. Re-lock the side fences.
9. Carefully slide the paper tray fully in.
10. Check the paper size on the display.
Changing the Paper Size
101
3
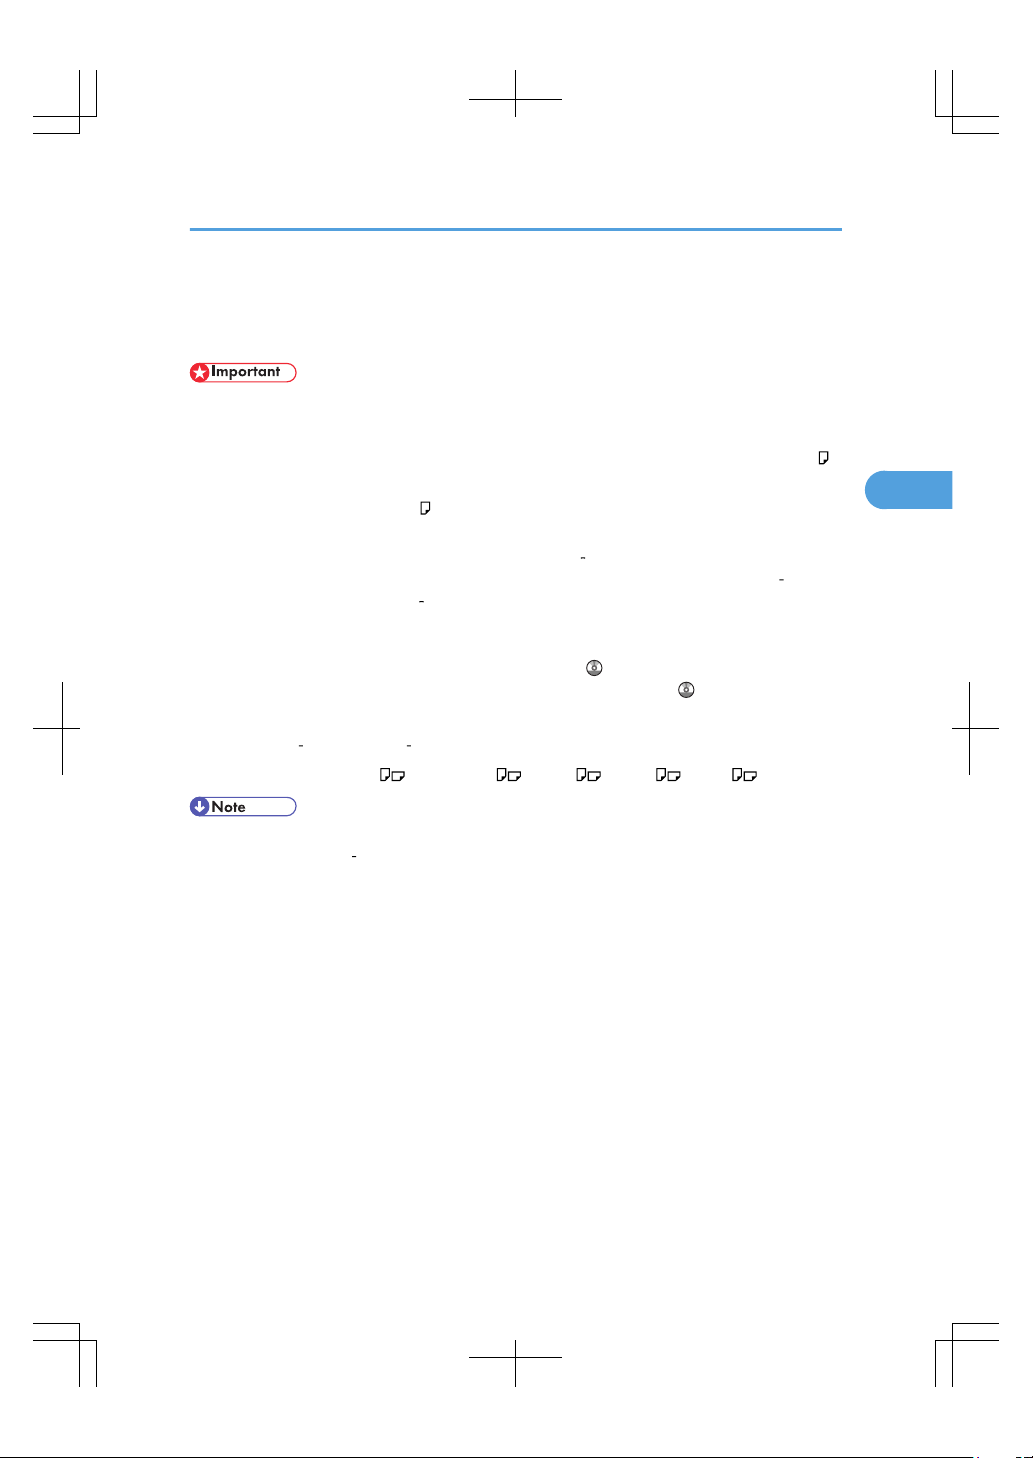
• You can load envelopes in trays 2 4. Be sure to open out their flaps and set them in the orientation.
CAS111
• For details about various details about and recommendations concerning envelopes, see
“Envelopes”.
• If you load a paper size that is not selected automatically, you will need to specify the paper size with
the control panel. For details, see “Changing to a Size That Is Not Automatically Detected”.
• p.106 "Changing to a Size That Is Not Automatically Detected"
• p.117 "Envelopes"
Changing the Paper Size in the Small Size Paper Tray
This section describes how to change the paper size in the small size paper tray.
• If a paper tray is pushed vigorously when putting it back into place, the position of the tray's side
fences may slip out of place.
• Check the paper edges are aligned at the right side.
• Slide the side fences until they are aligned with the paper size, and then re-lock the side fences.
Various sizes of paper can be loaded in the small size paper tray by adjusting the positions of the side
fences and end fence.
3. Adding Paper
102
3
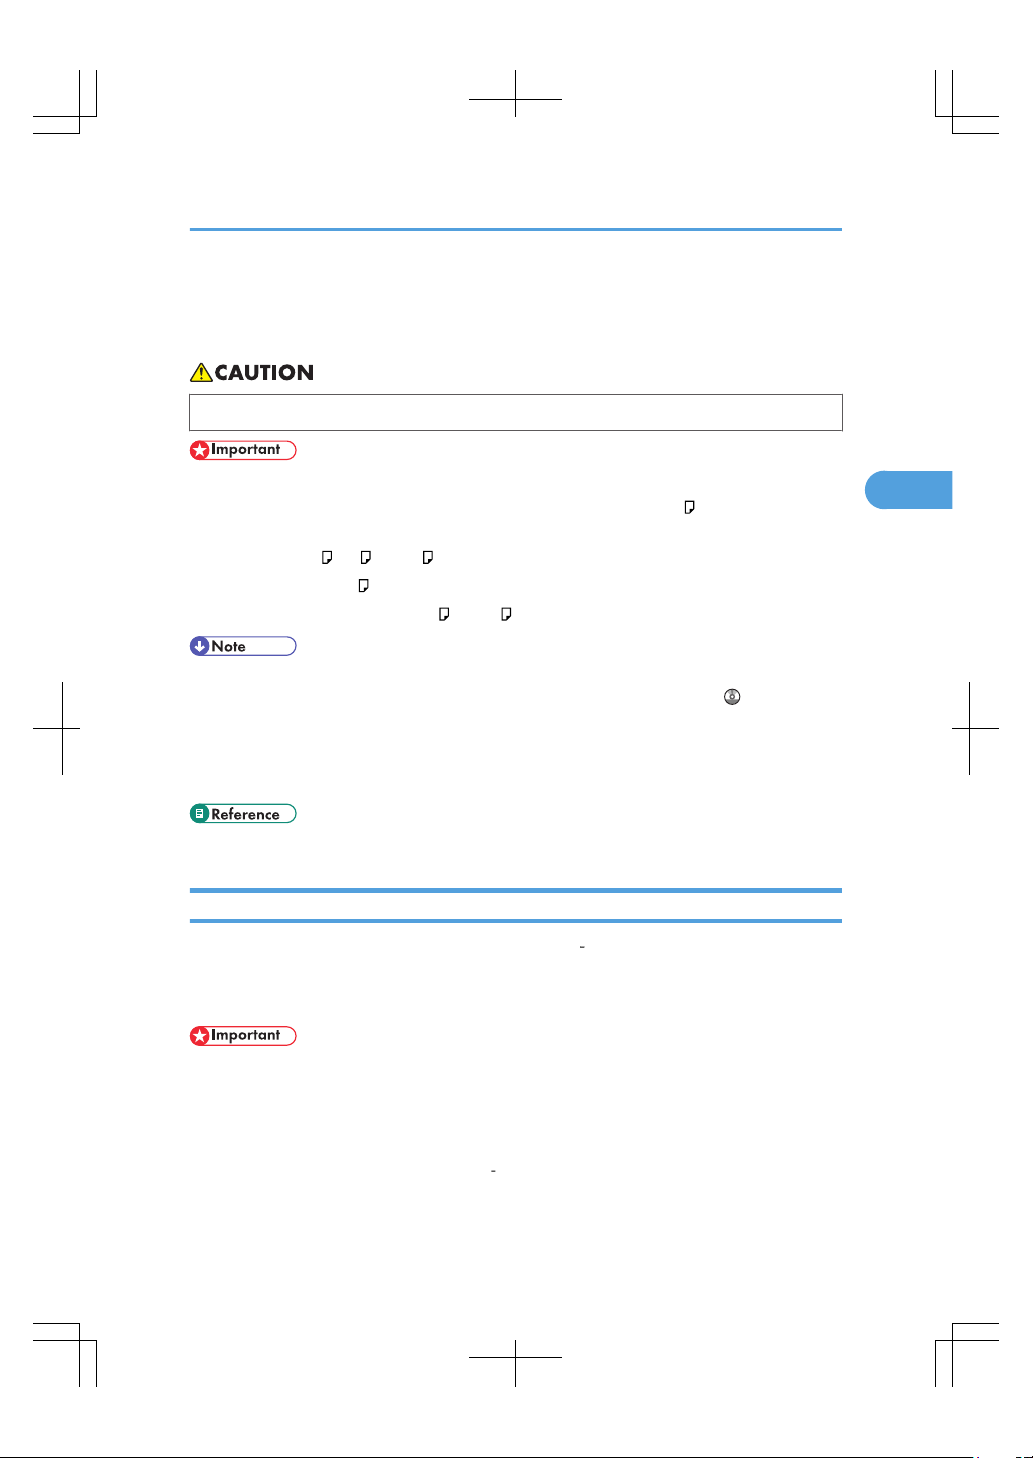
1. Check that paper in the small size paper tray is not being used, and then pull the tray carefully
out until it stops.
CAS120
2. Remove paper if loaded.
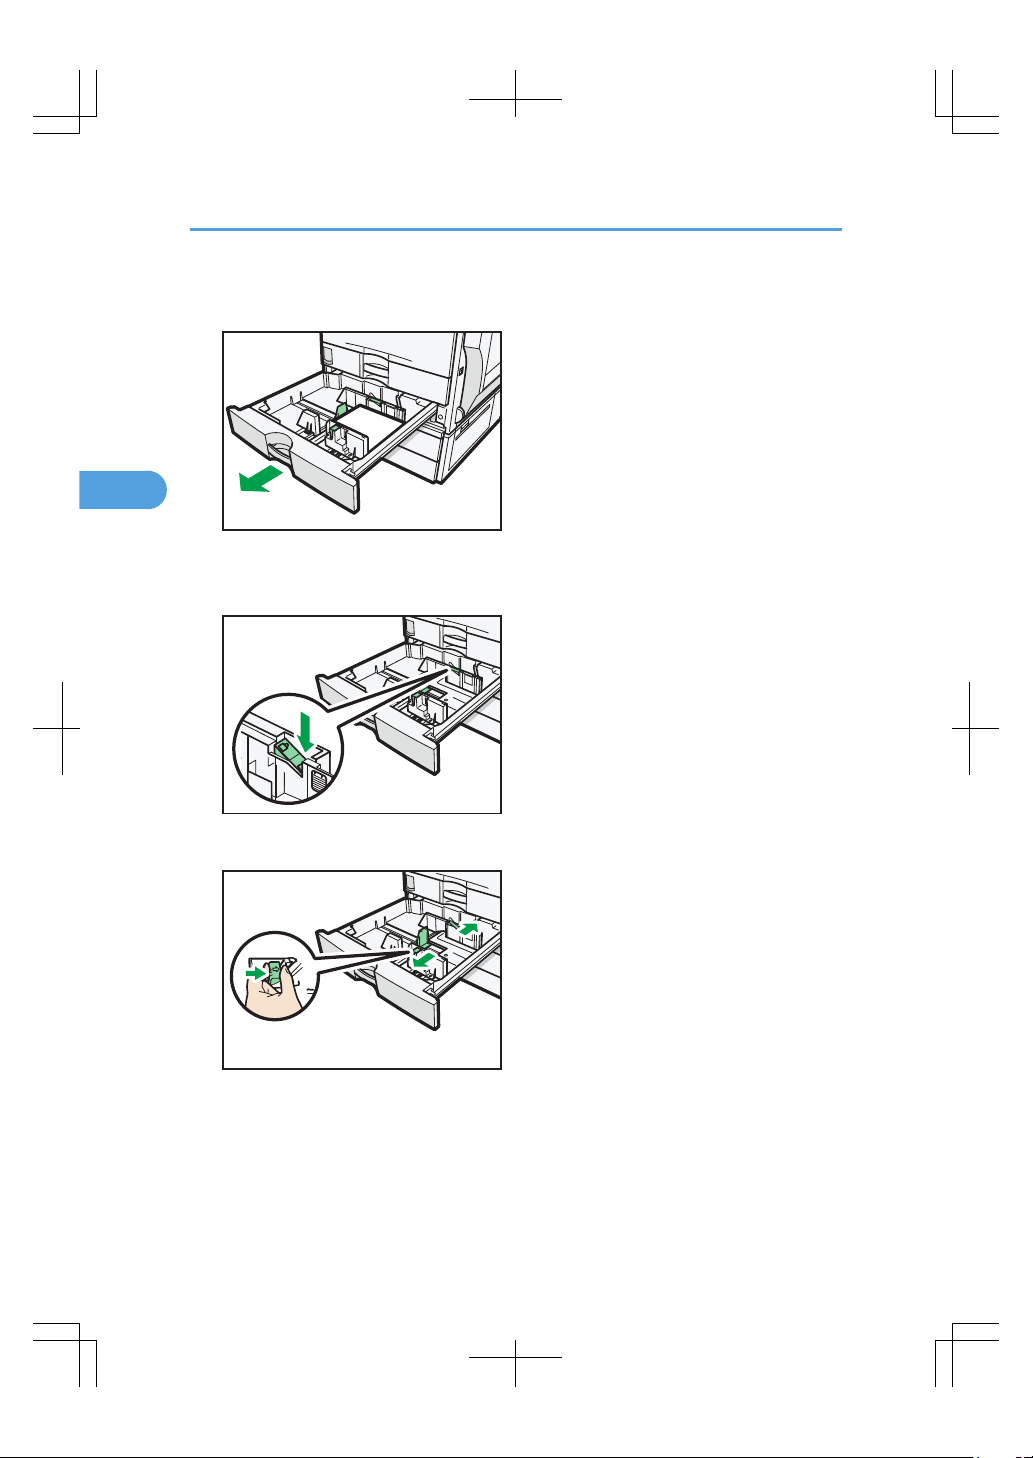
3. Release the lock on the side fences.
CAS121
4. While pressing down the release lever, slide the side fences outward.
CAS122
Changing the Paper Size
103
3
5. Slide the end fence outward.
CAS123
1
1
2
1. Pinch the release levers of the end fence.
2. Slide the end fence outward.
6. Square the paper and load it print side up.
Do not stack paper over the limit mark.
CAS124
7. Align the back and side fences gently against the paper you loaded.
CAS125
8. Re-lock the side fences.
9. Carefully slide the small size paper tray fully in.
3. Adding Paper
104
3
• The small size paper tray cannot detect the paper size automatically. When changing the paper size,
specify it with the control panel. For details, see “Changing to a Size That Is Not Automatically
Detected”.
• You can load envelopes in the small size paper tray. Be sure to close their flaps and set them in the
orientation.
CAS130
• If you are copying onto 37/8 × 71/2, C6 Env , or DL Env envelopes and they become creased,
set them in the orientation.
CAS132
• For details about various details about and recommendations concerning envelopes, see
“Envelopes”.
• For details about how to install the small size paper tray, see “Installing the Small Size Paper Tray”.
• p.87 "Installing the Small Size Paper Tray"
• p.106 "Changing to a Size That Is Not Automatically Detected"
• p.117 "Envelopes"
Changing the Paper Size
105
3
Changing to a Size That Is Not Automatically Detected
If you load a paper size that is not selected automatically, you need to specify the paper size with the
control panel. This section describes how to load such paper.
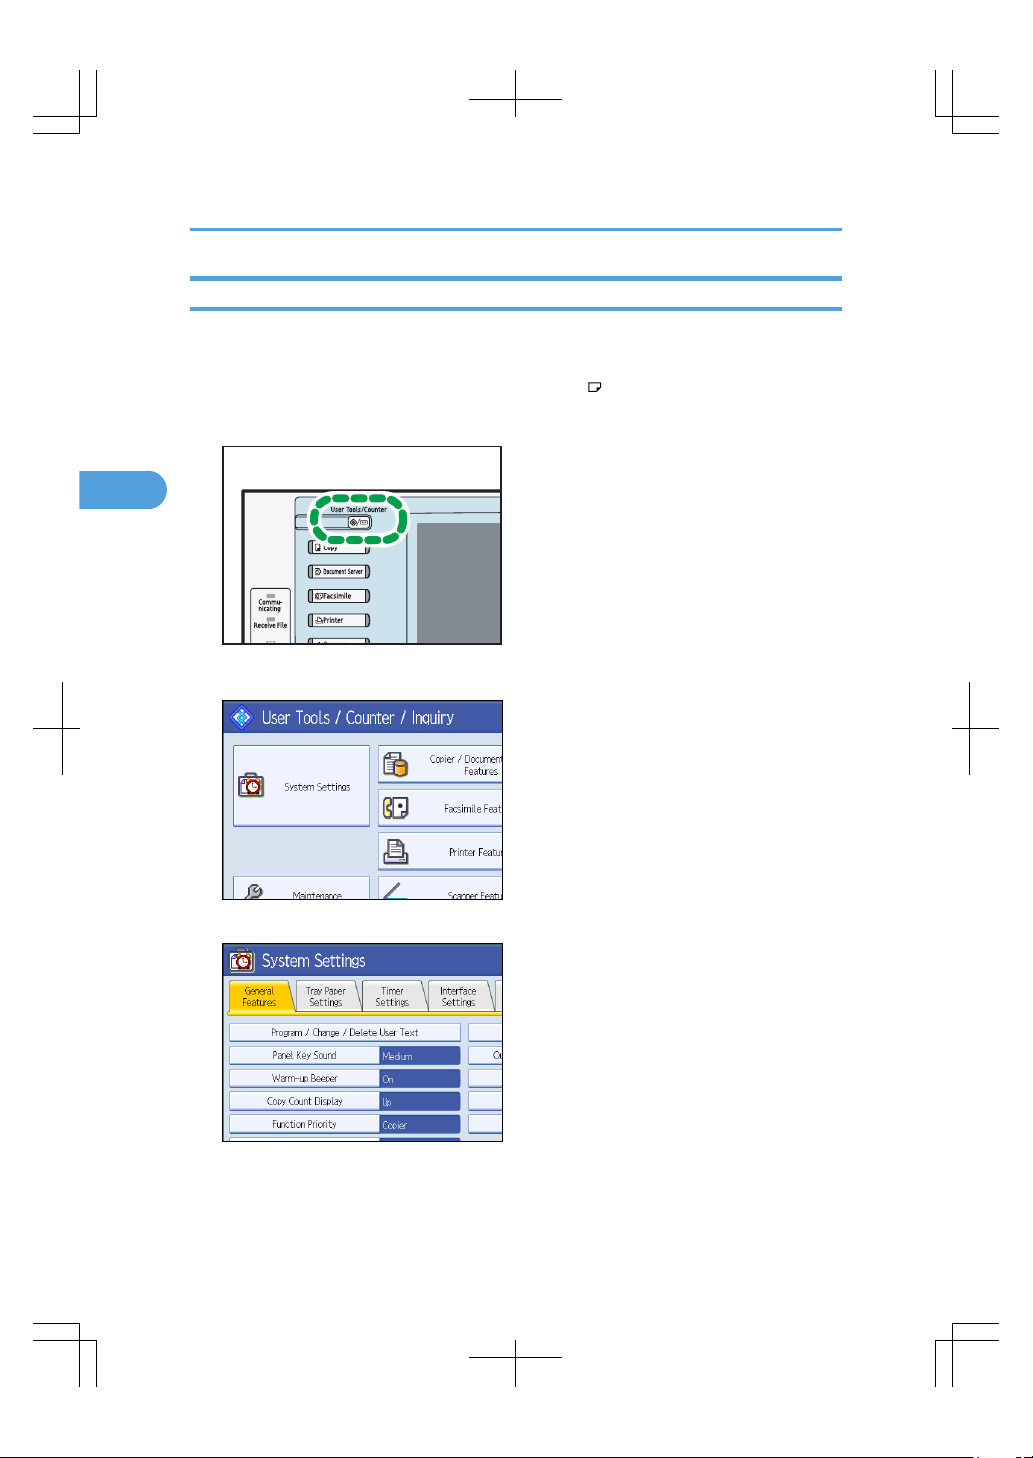
This section explains how to load these paper taking 81/4 × 14 as an example.
1. Press the [User Tools/Counter] key.
CAS098
2. Press [System Settings].
3. Press the [Tray Paper Settings] tab.
3. Adding Paper
106
3
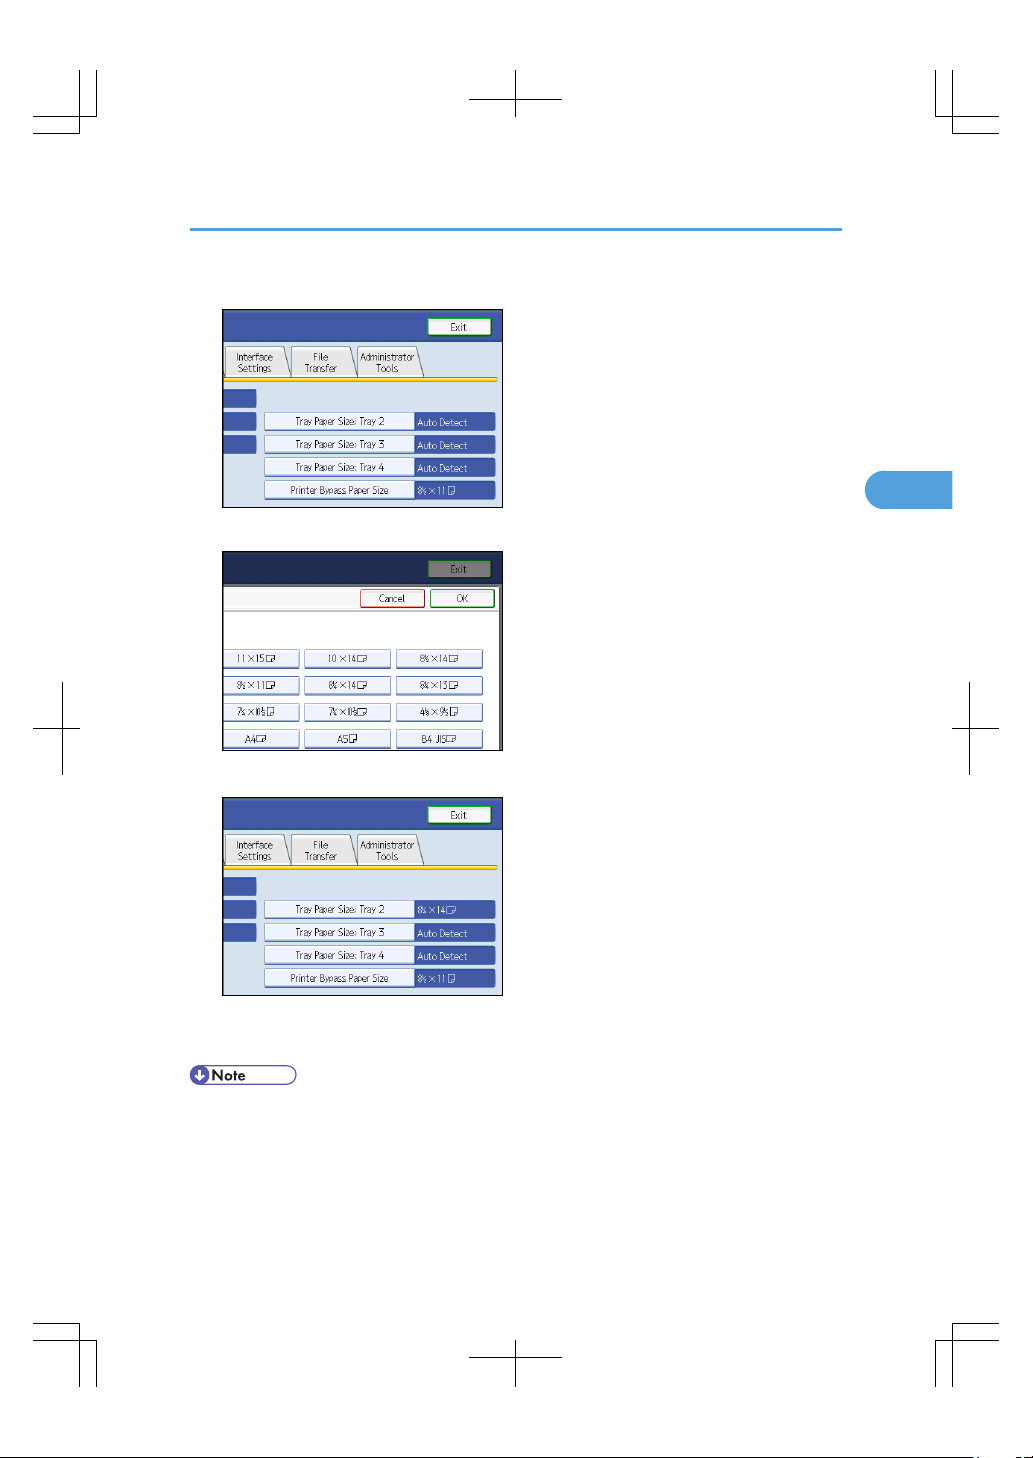
4. Select the tray for which you want to change the paper settings.
5. Select the loaded paper size and feed direction, and then press [OK].
The set paper size and feed direction is displayed.
6. Press the [User Tools/Counter] key.
The initial display is shown.
• For details about paper sizes selected automatically, see “Recommended Paper Sizes and Types”.
• If you want to print on paper that is selected automatically after printing on a paper size that is not
selected automatically, you must return the setting to “Auto Detect”. Reload the paper, and select
“Auto Detect” in step 5. The setting is returned to “Auto Detect”.
Changing the Paper Size
107
3

• p.111 "Recommended Paper Sizes and Types"
3. Adding Paper
108
3
Changing Paper Thickness Settings
Select [Plain Paper 1] or [Plain Paper 2] depending on the type of plain paper.
If in System Settings, [Tray Paper Settings], you set “Paper Thickness” to [Plain Paper] for each tray's [Paper
Type], you must then select [Maintenance], [Plain Paper Setting] and specify either [Plain Paper 1] or [Plain
Paper 2], depending on the thickness of the loaded paper.
The default setting is Plain Paper 2.
• Select [Plain Paper 1] when paper weight is between 60 g/m2 (16 lb. Bond) and 74 g/m2 (20 lb.
Bond).
• Select [Plain Paper 2] when paper weight is between 75 g/m2 (20 lb. Bond) and 81 g/m2 (20 lb.
Bond).
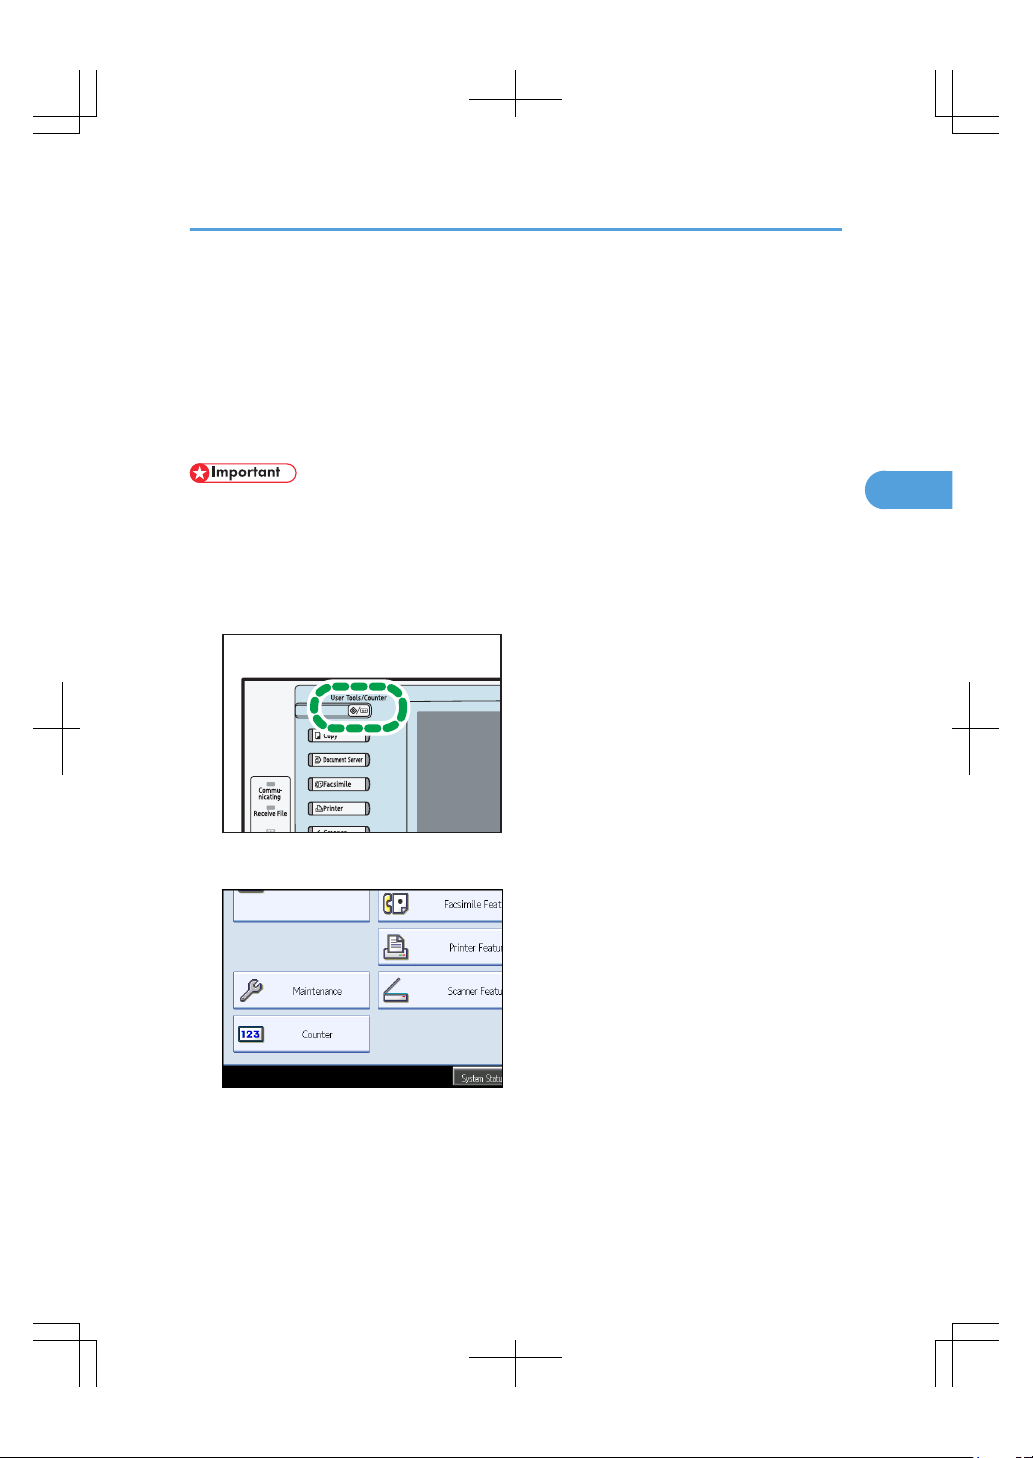
1. Press the [User Tools/Counter] key.
CAS098
2. Press [Maintenance].
Changing Paper Thickness Settings
109
3
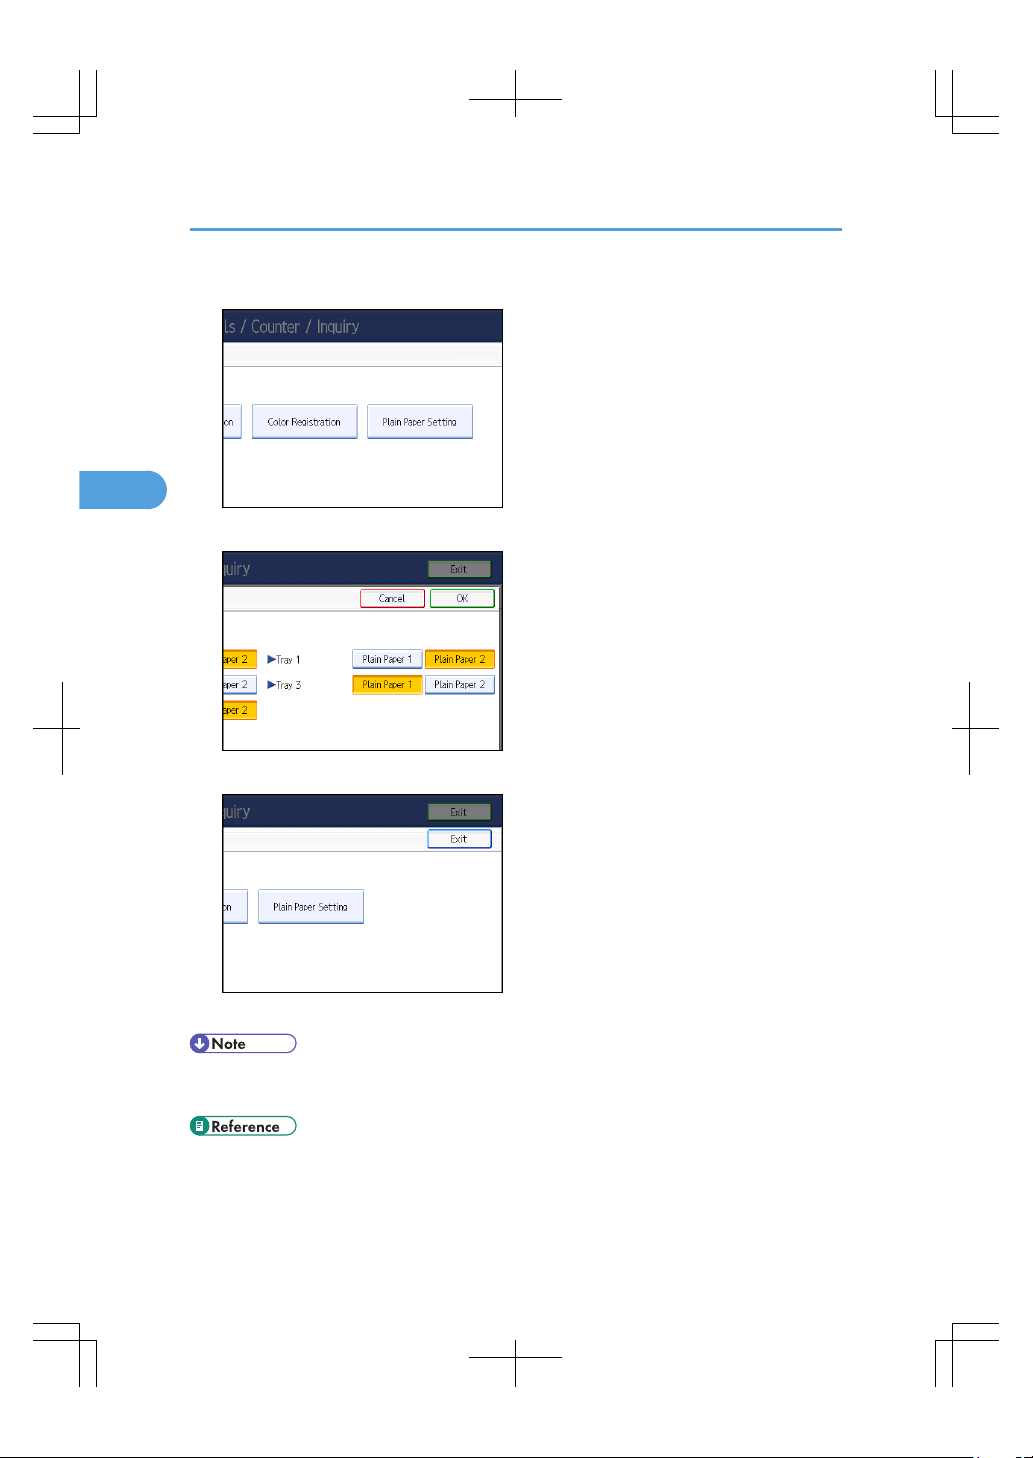
3. Press [Plain Paper Setting].
4. Select the plain paper type for each tray depending on the paper to be set and press [OK].
5. Press [Exit].
6. Press [Exit].
• In System Settings, [Tray Paper Settings], for each tray's [Paper Type] you can specify “Paper
Thickness”. For details about paper thickness, see “Recommended Paper Sizes and Types”.
• p.111 "Recommended Paper Sizes and Types"
3. Adding Paper
110
3

Recommended Paper Sizes and Types
This section describes recommended paper sizes and types.
• Do not use paper designed for inkjet printers, as these may stick to the fusing unit and cause a misfeed.
• Do not use color OHP transparencies with coatings that are easily melted by heat.
• If you use damp or curled paper, a staple clogging or paper jam may occur.
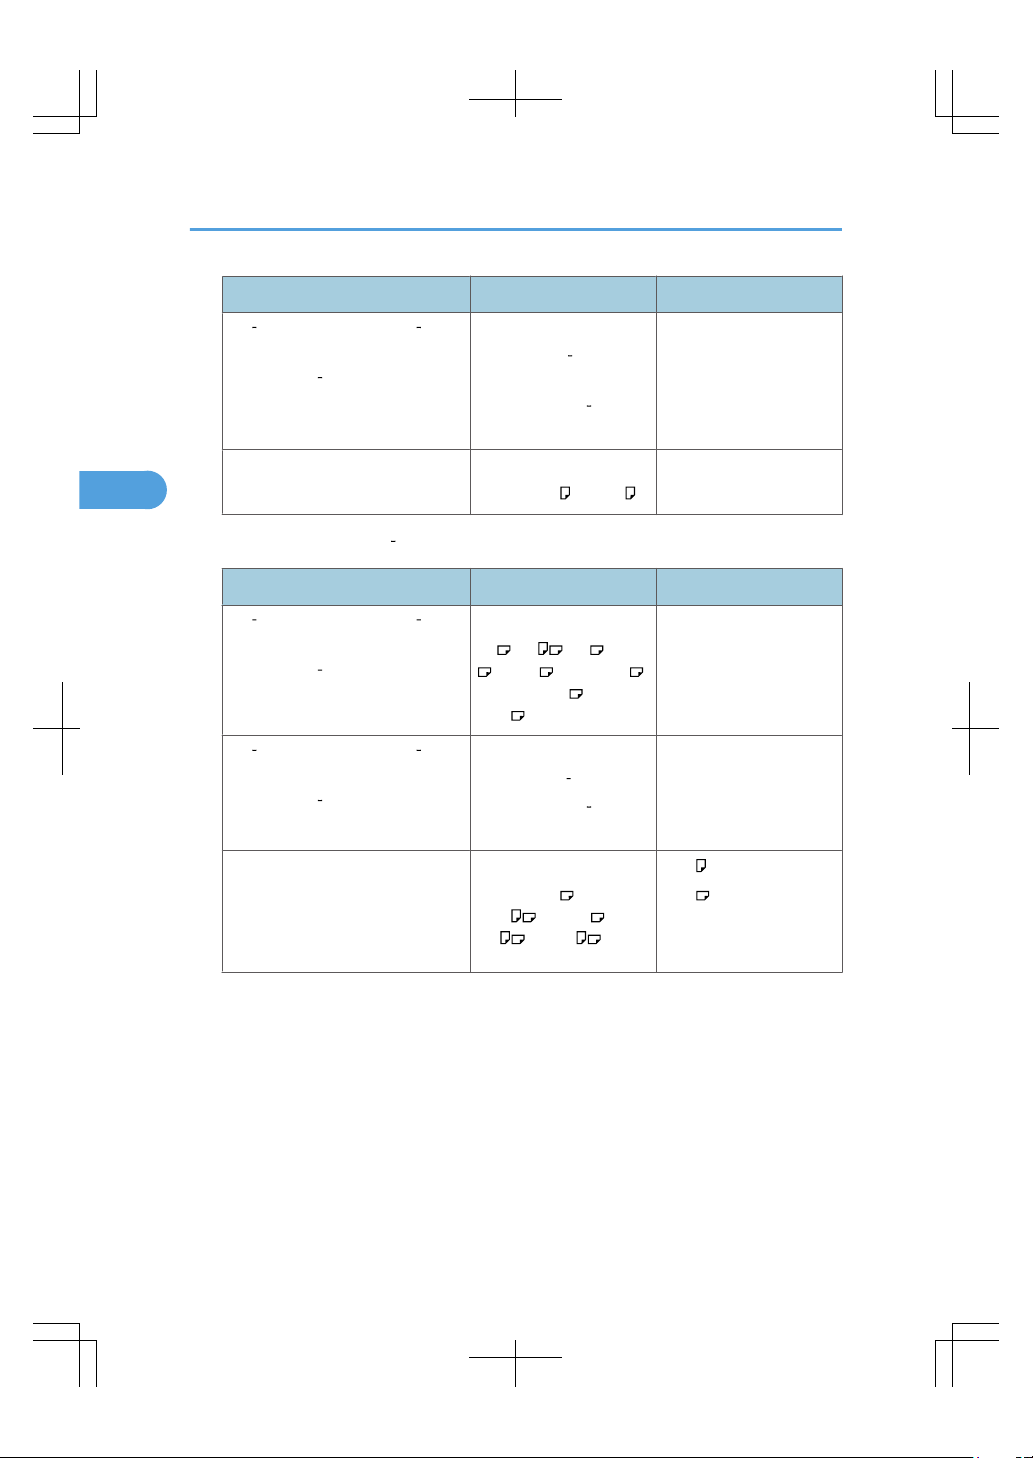
Tray 1
Paper type and weight Paper size Paper capacity
*1
60 256 g/m2 (16 lb. Bond 140
lb. Index)
Plain Paper 1 Thick Paper 3
81/2 × 11 550 sheets
60 256 g/m2 (16 lb. Bond 140
lb. Index)
Plain Paper 1 Thick Paper 3
*2
A4 , A5 , B5 JIS
550 sheets
Tray 2 4
Paper type and weight Paper size Paper capacity
*1
60 256 g/m2 (16 lb. Bond 140
lb. Index)
Plain Paper 1 Thick Paper 3
*3
A4 , A5 , B5 JIS , 11 ×
17 , 81/2 × 14 , 81/2 ×
11 , 71/4 × 101/
2
550 sheets
60 256 g/m2 (16 lb. Bond 140
lb. Index)
Plain Paper 1 Thick Paper 3
*4
A3 , A4 , B4 JIS , B5
JIS , 81/2 × 13 , 81/4 ×
14 , 81/4 × 13 , 8 × 13
, 8 × 10 , 71/4 ×
101/2, 8K , 16K ,
11 × 15 , 10 × 14
550 sheets
Recommended Paper Sizes and Types
111
3
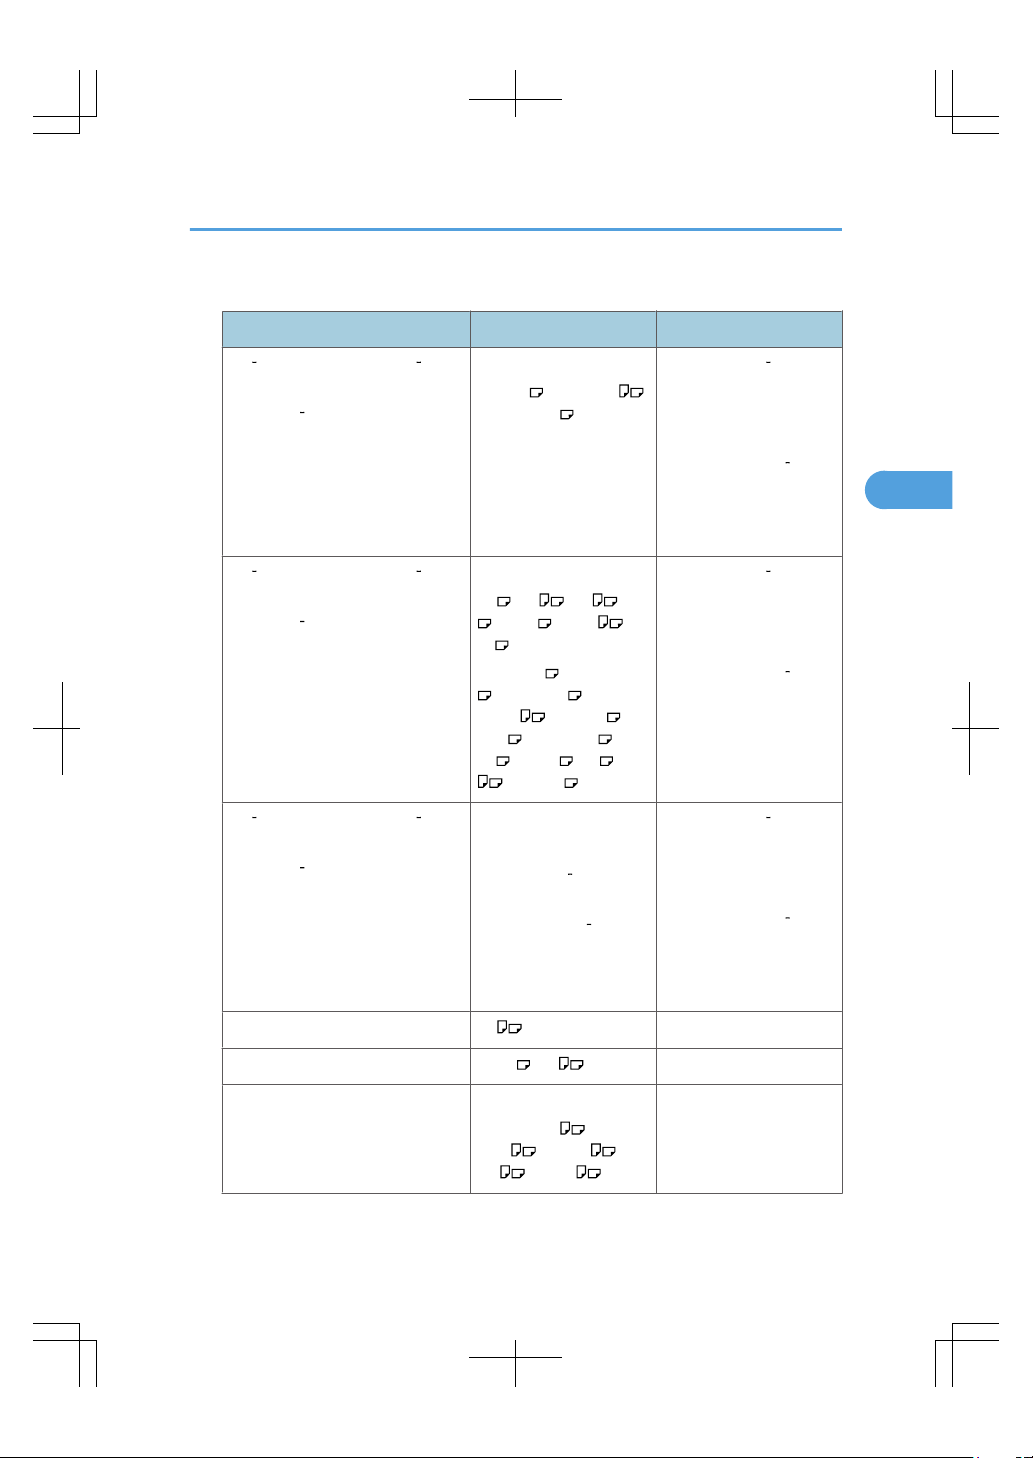
Paper type and weight Paper size Paper capacity
*1
60 256 g/m2 (16 lb. Bond 140
lb. Index)
Plain Paper 1 Thick Paper 3
Custom size
Vertical: 7.17 11.69
Inches
Horizontal: 5.83 17.00
Inches
550 sheets
Envelopes
*8 *4
41/8 × 91/2, C5 Env
50 sheets
*10
Small size paper tray (tray 2 4) (optional)
Paper type and weight Paper size Paper capacity
*1
60 256 g/m2 (16 lb. Bond 140
lb. Index)
Plain Paper 1 Thick Paper 3
*4
A4 , A5 , A6 , B5 JIS
, B6 JIS , 81/2 × 11 ,
71/4 × 101/2, 51/2 ×
81/
2
550 sheets
60 256 g/m2 (16 lb. Bond 140
lb. Index)
Plain Paper 1 Thick Paper 3
Custom size
Vertical: 3.94 8.66 Inches
Horizontal: 5.83 17.00
Inches
550 sheets
Envelopes
*8 *4
41/8 × 91/2, 37/8 ×
71/2, C5 Env , C6
Env , DL Env
• : 50 sheets
*10
• :
Double flap: 15 sheets
Single flap: 25 sheets
3. Adding Paper
112
3
Bypass tray
Paper type and weight Paper size Paper capacity
*11
60 300 g/m2 (16 lb. Bond 110
lb. Cover)
Thin Paper Thick Paper 4
*3
11 × 17 , 81/2 × 11 ,
51/2 × 81/
2
• Thin Paper Middle
Thick: 100 sheets
• Thick Paper 1: 40
sheets
• Thick Paper 2 Thick
Paper 3: 20 sheets
• Thick Paper 4: 16
sheets
60 300 g/m2 (16 lb. Bond 110
lb. Cover)
Thin Paper Thick Paper 4
*5
A3 , A4 , A5 , A6
, B4 JIS , B5 JIS , B6
JIS ,
81/2 × 14 , 81/2 × 13
, 81/4 × 13 , 71/4 ×
101/2, 11 × 15 , 10
× 14 , 81/4 × 14 , 8 ×
10 , 8 × 13 , 8K , 16K
, 12 × 18
• Thin Paper Middle
Thick: 100 sheets
• Thick Paper 1: 40
sheets
• Thick Paper 2 Thick
Paper 3: 20 sheets
• Thick Paper 4: 16
sheets
60 300 g/m2 (16 lb. Bond 110
lb. Cover)
Thin Paper Thick Paper 4
*6
Custom size
Vertical: 3.55 12.00
Inches
Horizontal: 5.83 23.62
Inches
• Thin Paper Middle
Thick: 100 sheets
• Thick Paper 1: 40
sheets
• Thick Paper 2 Thick
Paper 3: 20 sheets
• Thick Paper 4: 16
sheets
OHP transparencies
*7
A4 50 sheets
*9
Label paper (adhesive labels) B4 JIS , A4 30 sheets
*9
Envelopes
*8 *5
41/8 × 91/2, 37/8 ×
71/2, C5 Env , C6
Env , DL Env
10 sheets
*9
Recommended Paper Sizes and Types
113
3
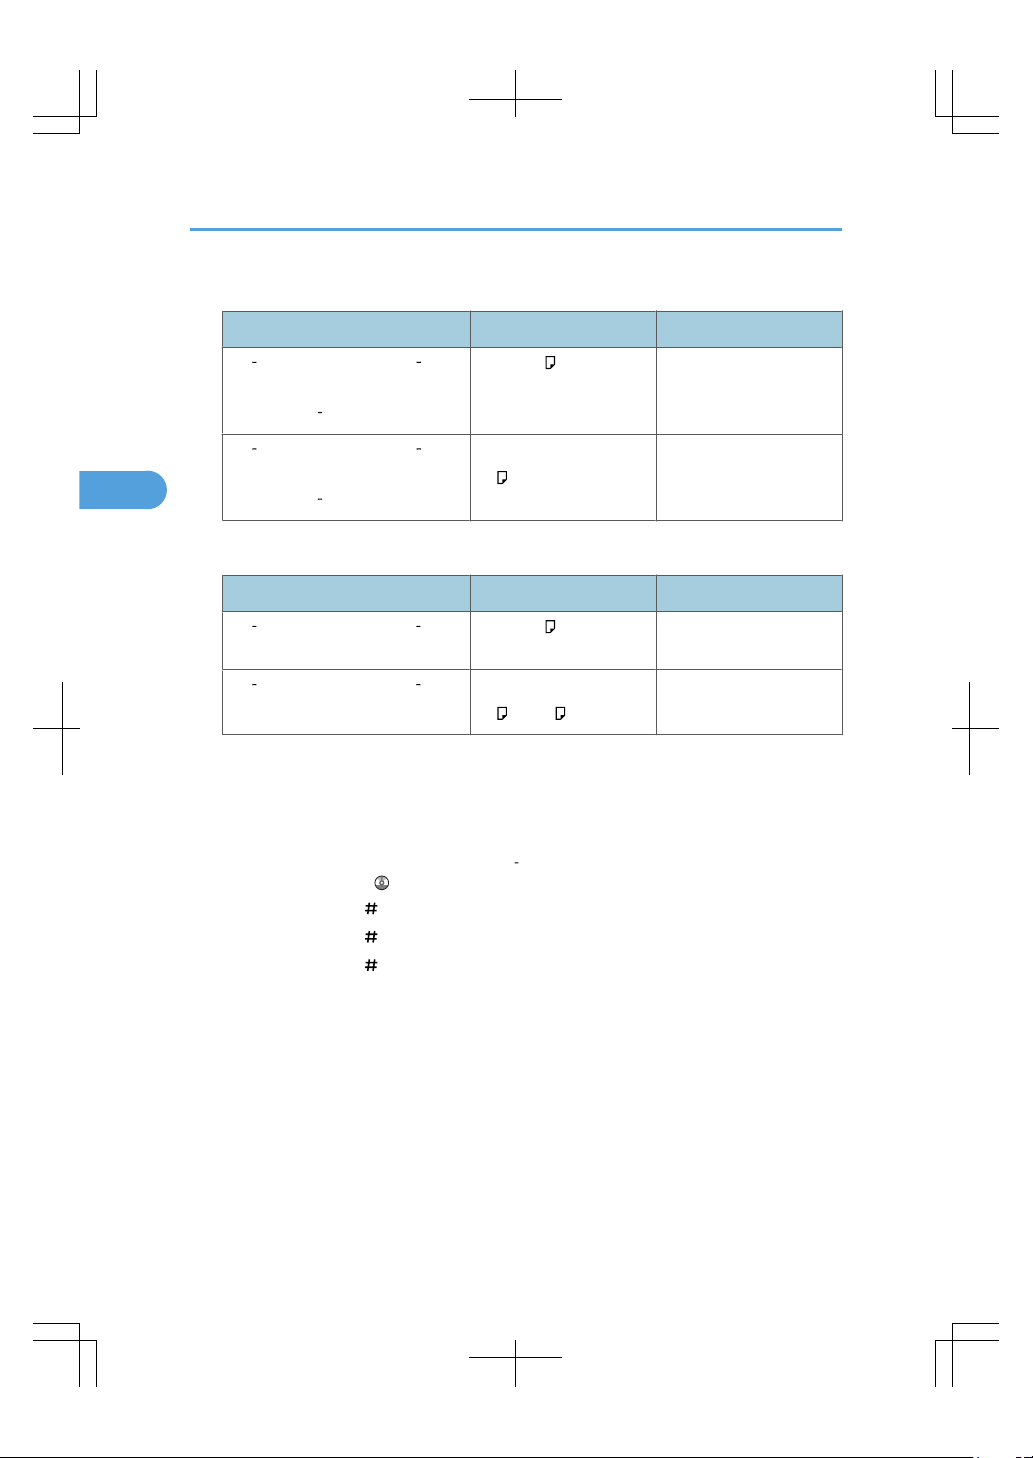
Tray 3 (LCT) (optional)
Paper type and weight Paper size Paper capacity
*12
60 256 g/m2 (16 lb. Bond 140
lb. Index)
Plain Paper 1 Thick Paper 3
81/2 × 11 1,000 sheets × 2
60 256 g/m2 (16 lb. Bond 140
lb. Index)
Plain Paper 1 Thick Paper 3
*2
A4
1,000 sheets × 2
Large capacity tray (LCT) (optional)
Paper type and weight Paper size Paper capacity
*12
60 217 g/m2 (16 lb. Bond 80 lb.
Cover)
81/2 × 11 1,200 sheets
60 217 g/m2 (16 lb. Bond 80 lb.
Cover)
*2
A4 , B5 JIS
1,200 sheets
*1
When loading paper, make sure the stack height does not exceed the limit mark of the paper tray. The amount
of paper that can be set is 55.5 mm/550 sheets approximately. See “Loading Paper”.
*2
The paper tray fence is fixed. If you wish to change the size of paper, contact your service representative.
*3
The paper size is detected automatically.
*4
Select the paper size under Tray Paper Size: Tray 2 4 in System Settings. See “System Settings”, Network and
System Settings Reference .
*5
Press [Bypass], and the [ ] key, and then select the paper size.
*6
Press [Bypass], and the [ ] key, and then enter the paper size using the number keys.
*7
Press [Bypass], and the [ ] key, and then select [OHP (Transparency)] for [Paper Type].
*8
For details about loading envelopes, see “Envelopes”.
*9
It is recommended to place one sheet at a time.
*10
Open out flaps of envelopes.
*11
When loading paper, make sure the stack height does not exceed the limit mark of the paper tray. The amount
of paper that can be set is 10 mm/100 sheets approximately. See “Loading Paper”.
*12
When loading paper, make sure the stack height does not exceed the limit mark of the paper tray. See “Loading
Paper”.
3. Adding Paper
114
3
Paper Thickness
Paper Thickness
*1
Paper weight
Plain Paper 1 60 74 g/m2 (16 20 lb. Bond)
Plain Paper 2 75 81 g/m2 (20 lb. Bond)
Middle Thick 82 105 g/m2 (20 28 lb. Bond)
Thick Paper 1 106 169 g/m2 (28 lb. Bond 90 lb. Index)
Thick Paper 2 170 220 g/m2 (65 80 lb. Cover)
Thick Paper 3 221 256 g/m2 (80 lb. Cover 140 lb. Index)
Thick Paper 4 257 300 g/m2 (140 lb. Index 110 lb. Cover)
*1
Print quality will decrease if the paper you are using is close to the minimum or maximum weight. Change
the paper weight setting to thinner or thicker.
• When loading paper in trays 1 4 or Tray 3 (LCT), place the print side face up. When loading paper
in the bypass tray or large capacity tray (LCT), place the print side face down.
• When using translucent paper or label paper, make sure to select the appropriate paper type under
Paper Type: Bypass Tray. See “System Settings”, Network and System Settings Reference .
• When you use the bypass tray, it is recommended to set the paper direction to .
• Certain types of paper produce noise when delivered. This noise does not indicate a problem and
print quality is unaffected. (Glossy paper and OHP transparencies can produce noise when
delivered.)
• When you load OHP transparencies, check the front and back of the sheets, and place them correctly,
or a misfeed might occur. For details, see Copy and Document Server Reference , and Printer
Reference .
• When you use OHP transparencies, fan them for each use.
• We recommend that you use a 4000 ANSI lumen or brighter overhead projector to project OHP
transparencies.
• When copying or printing onto OHP transparencies, the copy/print speed is slower than usual.
• When copying or printing onto thick paper of 106 300 g/m2 (28 lb. Bond 110 lb. Cover), the
copy/print speed is slower than usual.
• When copying or printing onto prepunched paper, the copy/print speed is slower than usual.
• Flatten out curled sheets before loading them.
• If multiple sheet feeding occurs, load sheets one by one.
Recommended Paper Sizes and Types
115
3
• To print on coated paper from the bypass tray, trays 2 4, Tray 3 (LCT), or the large capacity tray
(LCT): select System Settings, [Tray Paper Settings], and then, for each tray's [Paper Type] be sure to
set [Paper Type] to [Coated Paper], and [Paper Thickness] to [Thick Paper 1].
• To print on high-gloss coated paper from the bypass tray, paper trays, Tray 3 (LCT), or the large
capacity tray (LCT): select System Settings, [Tray Paper Settings], and then, for each tray's [Paper
Type], be sure to set [Paper Type] to [Coated Paper: Gloss].
• Before loading coated or glossy sheets, be sure to fan them thoroughly. If sheets feed in together,
become jammed, or produce strange noises when delivered, load them one by one from the bypass
tray.
• When copying or printing onto letterhead paper, the paper placing orientation is different depending
on which function you are using. See “Loading Orientation-Fixed Paper or Two-Sided Paper”.
• If you load paper of the same size in two or more trays, the machine automatically shifts to the other
tray when the first tray in use runs out of paper. This function is called Auto Tray Switching. (However,
if the paper type of one tray is recycled or special paper, the settings of the other trays must be the
same for the Auto Tray Switching function to work.) This saves interrupting a copy run to replenish
paper when making a large number of copies. You can set the paper type of the paper trays under
Paper Type: Tray 1 4 and Paper Type: LCT. See “System Settings”, Network and System Settings
Reference . For the setting procedure of the Auto Tray Switching function, see “Copier and
Document Server Features”, Copy and Document Server Reference .
• p.91 "Loading Paper"
• p.97 "Loading Orientation-Fixed Paper or Two-Sided Paper"
• p.117 "Envelopes"
• p.119 "Thick Paper"
3. Adding Paper
116
3
Envelopes
This section gives you various details about and recommendations concerning envelopes.
• Misfeeds might occur depending on the length and shape of the flaps.
• Do not use window envelopes.
• Only envelopes that are at least 148 mm wide and whose flaps are open can be loaded in the
orientation.
• When loading envelopes in the orientation, load them with flaps fully open. Otherwise, they might
not feed into the machine.
To print on envelopes, load them on the bypass tray, in trays 2 4, or in the small size paper tray, and be
sure to specify the appropriate paper type. For details about how to load envelopes in trays 2 4, see
“Changing the Paper Size in Trays 2 4”. For details about how to load envelopes in the small size paper
tray, see “Changing the Paper Size in the Small Size Paper Tray”. For details about how to copy onto
envelopes, see “Copying onto Envelopes from the Bypass Tray” and “Copying onto Envelopes from the
Small Size Paper Tray”, Copy and Document Server Reference . For details about how to print onto
envelopes, see “Setting Envelopes Using the Control Panel”, Printer Reference .
Specifications for envelopes are as follows:
• Weight: 82 120 g/m2 (20 32 lb. Bond)
• Paper Size: 41/8 × 91/2, 37/8 × 71/2, C5 Env , C6 Env , DL Env
• When loading envelopes on the bypass tray, place them address side facing down. When loading
envelopes in trays 2 4 or the small paper tray, place them address side facing up.
• The size of envelopes that you can load depends on a tray. For details, see “Recommended Paper
Sizes and Types”.
• Load only one size and type of envelope at a time.
• Before loading envelopes, press down on them to remove any air from inside, flatten out all four
edges. If they are bent or curled, flatten their leading edges (the edge going into the machine) by
running a pencil or ruler across them.
• Fan the envelopes before loading them to separate them and prevent the glue on them from causing
them to stick together.
• Some kinds of envelope might cause misfeeds, wrinkles or print poorly.
• Print quality on envelopes may be uneven if parts of an envelope have differing thicknesses. Print one
or two envelopes to check print quality.
• High temperature and high humidity conditions can reduce print quality and cause envelopes to
become creased.
Envelopes
117
3

• p.99 "Changing the Paper Size in Trays 2 - 4"
• p.102 "Changing the Paper Size in the Small Size Paper Tray"
• p.111 "Recommended Paper Sizes and Types"
3. Adding Paper
118
3
Thick Paper
This section gives you various details about and recommendations concerning thick paper.
When loading thick paper of 170 256 g/m2 (65 lb. Cover 140 lb. Index) in trays 1 4, the small size
paper tray, or Tray 3 (LCT), 170 217 g/m2 (65 80 lb. Cover) in the large capacity tray (LCT), or 170
300 g/m2 (65 110 lb. Cover) in the bypass tray, follow the recommendations below to prevent misfeeds
and loss of image quality.
• Store all your paper in the same environment - a room where the temperature is 20 25°C (68 77°
F) and the humidity is 30 65%.
• When loading thick sheets in trays 1 4 or the small size paper tray, be sure to load at least 20 sheets.
Also, be sure to position the side fences flush against the paper stack.
• Smooth out any curls in the paper before loading it.
• Jams and misfeeds can occur when printing on thick glossy sheets. To prevent such problems, be sure
to fan glossy sheets thoroughly before loading them. If sheets continue to become jammed or feed in
together even after they are fanned, load them one by one from the bypass tray.
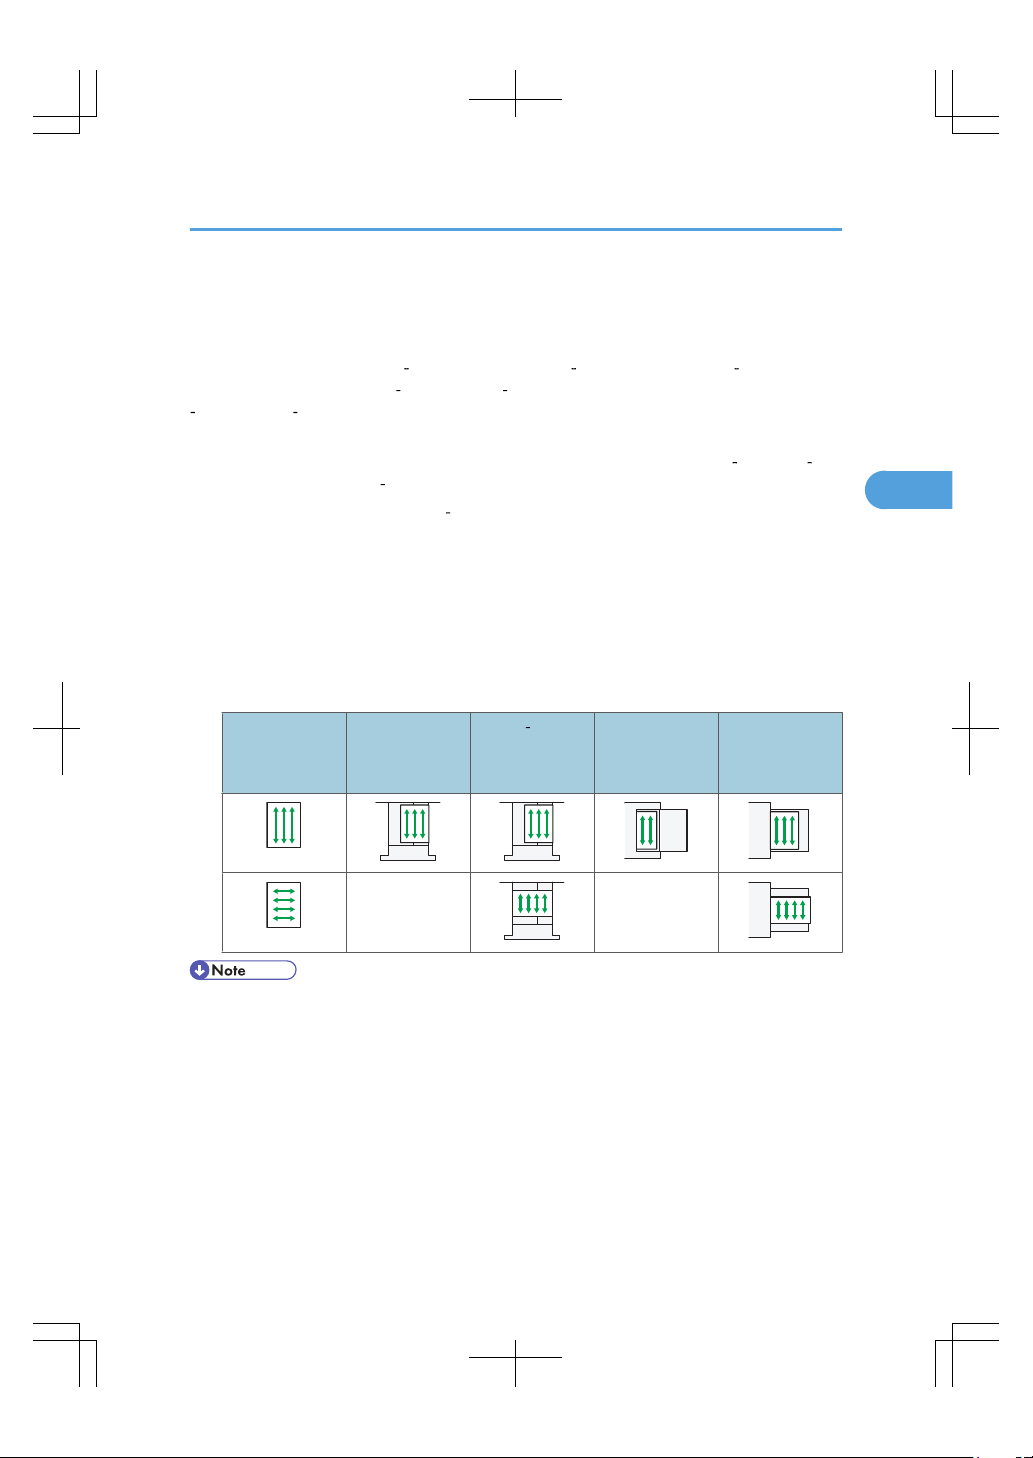
• When loading thick paper, set the paper direction according to its grain, as shown in the following
diagram:
Direction of
paper grain
Tray 1 or Tray 3
(LCT)
Tray 2 4 or the
small size paper
tray
Large capacity
tray (LCT)
Bypass tray
Not available Not available
• Even if thick paper is loaded as described above, normal operations and print quality might still not
be possible, depending on the paper type.
• Prints might have prominent vertical creases.
• Prints might be noticeably curled. Flatten out prints if they are creased or curled.
Thick Paper
119
3
Unusable Paper
This section describes paper unusable on this machine.
• Do not attempt to print on stapled sheets, aluminum foil, carbon paper, or any kind of conductive
paper. Doing so risks fire.
• To prevent faults, do not use any of the following kinds of treated paper:
• Paper for inkjet printers
• Thermal fax paper
• Art paper
• Aluminum foil
• Carbon paper
• Conductive paper
• Paper with perforated lines
• Hemmed-edge paper
• Color OHP transparencies with easily melted coatings
• Window envelopes
• Faults can occur if you copy or print onto sides that are already printed. Take care to copy or print
onto unprinted sides only.
• To prevent misfeeds, do not use the following kinds of paper:
• Bent, folded, or creased paper
• Perforated paper
• Slippery paper
• Torn paper
• Rough paper
• Thin paper with little stiffness
• Paper with a dusty surface
• Even supported types of paper may cause paper jams or malfunctions if the paper is not in good
condition.
• If you copy or print onto rough grain paper, the output image might be blurred.
3. Adding Paper
120
3

• Do not load sheets that have already been printed onto by another machine. (Sheets can become
jammed if they have been improperly stored.)
Unusable Paper
121
3

Paper Storage
This section describes how to store paper.
• When storing paper, the following precautions should always be followed:
• Do not store paper where it will be exposed to direct sunlight.
• Avoid storing paper in humid areas (humidity: 70% or less).
• Store on a flat surface.
• Do not store paper vertically.
• Under high temperature and humidity conditions, or low temperature and humidity conditions, store
paper in plastic bags.
3. Adding Paper
122
3

4. Adding Toner and Staples
This chapter explains how to replenish toner and staples when they run out.
Adding Toner
This section describes how to add and store toner.
• Do not incinerate toner (new or used) or toner containers. Doing so risks burns. Toner will ignite
on contact with naked flame.
• Do not store toner (new or used) or toner containers anywhere near naked flames. Doing so risks
fire and burns. Toner will ignite on contact with naked flame.
• Do not incinerate spilled toner or used toner. Toner dust might ignite when exposed to an open
flame.
• Do not crush or squeeze toner containers. Doing so can cause toner spillage, possibly resulting in
dirtying of skin, clothing, and floor, and accidental ingestion.
• Keep toner (used or unused) and toner containers out of reach of children.
• If toner or used toner is inhaled, gargle with plenty of water and move into a fresh air environment.
Consult a doctor if necessary.
• If toner or used toner gets into your eyes, flush immediately with large amounts of water. Consult
a doctor if necessary.
• If toner or used toner is swallowed, dilute by drinking a large amount of water. Consult a doctor
if necessary.
123
4

• When removing jammed paper or replacing toner, avoid getting toner (new or used) on your
clothing. If toner comes into contact with your clothing, wash the stained area with cold water. Hot
water will set the toner into the fabric and make removing the stain impossible.
• When removing jammed paper or replacing toner, avoid getting toner (new or used) on your skin.
If toner comes into contact with your skin, wash the affected area thoroughly with soap and water.
• Always add toner when the machine instructs you.
• Fault may occur if you use toner other than the recommended type.
• When adding toner, do not turn off the operation switch. If you do, settings will be lost.
• Store toner where it will not be exposed to direct sunlight, temperatures above 35 °C, or high humidity.
• Store toner on a flat surface.
• If the message " Check toner cartridge replacement(s)." appears, the toner has almost run out. Have
a replacement toner cartridge at hand.
• If appears when there is still toner in the cartridge, hold the cartridge with the opening upward,
shake it well, and then reinstall it.
• You can check the name of the required toner and the replacement procedure using the " Add Toner"
screen.
• Press [System Status] to check contact number where you can order supplies. See “Checking Machine
Status and Settings”, Troubleshooting .
• You can add all four color toners in the same way.
Replacing Toner
This section describes how to replace toner.
• Do not shake the toner cartridge with its mouth down after removing it. Residual toner may scatter.
• Do not repeatedly install and remove toner cartridges. This will result in toner leakage.
4. Adding Toner and Staples
124
4

CAS062
Sending Faxes or Scanned Documents When Toner Has Run Out
When the machine has run out of toner, the indicator on the display lights. Note that even if there is no
toner left, you can still send faxes or scanned documents.
• If number of communications executed after the toner has run out and not listed in the automatically
output Journal exceeds 200, communication is not possible.
1. Make sure the machine is in facsimile or scanner mode.
2. Press [Exit], and then perform transmission operation.
The error message disappears.
• Any reports are not printed.
• If the fax or scanner screen does not appear in step 1, press the [Facsimile] key or the [Scanner] key.
Used Toner
This section describes what to do with used toner.
Toner cannot be re-used.
Adding Toner
125
4

Bring the stored used container to your sales representative or service representative for recycling through
our recycling system. If you discard it on your own, treat it as general plastic waste material.
4. Adding Toner and Staples
126
4

Adding Staples
This section describes what to do when staples need replacing.
• Keep your hands clear of the booklet finisher tray when removing misfed paper, pulling out or
pushing in the finisher's staple unit. You can trap and injure your fingers if you do not.
• Stapling failures or jams may occur if you use a staple cartridge other than that recommended.
• If you cannot pull out the upper unit, there are staples remaining inside the cartridge. Use all the
staples, and do not add more.
• Refill the stapler according to the finisher type. Check the type if you are unsure. For details about
type of finisher, see “Options”.
• p.63 "Options"
Adding Staples to Finisher SR3050
This section describes how to add staples to the Finisher SR3050.
Adding Staples
127
4

CAS063
Adding Staples to Finisher SR790
This section describes how to add staples to the Finisher SR790.
4. Adding Toner and Staples
128
4

CAS064
Adding Staples to Booklet Finisher SR3000
This section describes how to add staples to the Booklet Finisher SR3000.
Adding Staples
129
4

CAS065
Adding Staples to Booklet Finisher SR3020
This section describes how to add staples to the Booklet Finisher SR3020.
4. Adding Toner and Staples
130
4

CAS066
Adding Staples to Booklet Finisher SR3020 (Saddle Stitch)
This section describes how to add staples to the Booklet Finisher SR3020 (Saddle Stitch).
Adding Staples
131
4

CAS067
Adding Staples to Finisher SR3030
This section describes how to add staples to the Finisher SR3030.
4. Adding Toner and Staples
132
4

CAS068
Adding Staples
133
4

Replacing the Stamp Cartridge
If the transmission stamp becomes faint, replace the cartridge.
• This stamp cartridge is used for facsimile and scanner functions.
• Do not add ink to the cartridge by yourself. Neglecting this can cause ink leakage.
• Be sure not to dirty your fingers with ink from the cartridge.
• Use the cartridge specified for this machine.
Replacing the Stamp Cartridge of Type 1 and 2
1. Open the ADF unit.
CAS069
2. Open the stamp cover.
CAS070
4. Adding Toner and Staples
134
4

3. Pull out the old stamp cartridge.
CAS071
4. Insert the new stamp cartridge.
Insert the cartridge until the metal parts are no longer visible.
CAS072
5. Close the stamp cover.
CAS073
6. Close the ADF unit.
Replacing the Stamp Cartridge
135
4

Replacing the Stamp Cartridge of Type 3 and 4
1. Open the ADF cover.
CAS074
2. Raise lever P2, and then pull open cover P2.
CAS075
3. Push on the area of cover P3 marked “PUSH”, and then open the cover P3.
CAS076
4. Adding Toner and Staples
136
4

4. Pull out the old stamp cartridge.
CAS077
5. Insert the new stamp cartridge.
Push in the cartridge until the metal parts are no longer visible.
CAS078
6. Close cover P3, P2, and the ADF cover.
Replacing the Stamp Cartridge
137
4

4. Adding Toner and Staples
138
4

5. Entering Text
This chapter describes how to enter characters.
Entering Text
This section explains how to enter text.
When you enter a character, it appears at the position of the cursor. If there is a character already at the
cursor position, the entered character appears before that.
Available Characters
This section explains which characters are available.
You can enter the following characters:
• Alphabetic characters
• Numerals
0123456789
Keys
This section explains the entry screen and the keys displayed on it.
You can change the entry screen using the keys below.
139
5

CAS102
• When entering uppercase or lowercase letters continuously, use [Shift Lock] to lock the case.
How to Enter Text
This section explains text entry more specifically.
Entering letters
This section explains how to enter letters.
1. Press [Shift] to switch between uppercase and lowercase.
2. Press the letters you want to enter.
Entering numbers
This section explains how to enter numbers.
1. Press numbers you want to enter.
• You can also use the number keys to enter numbers, regardless of mode.
5. Entering Text
140
5

Deleting characters
This section explains how to delete characters.
1. Press [Backspace] or [Delete All] to delete characters.
Adding user text
You can select and use a User Text that is registered in [Program / Change / Delete User Text].
For the registration procedure under Program / Change / Delete User Text, see “System Settings”, Network
and System Settings Reference .
1. Press [User Text].
2. Select the User Text you want to use.
Entering Text
141
5

5. Entering Text
142
5

6. On-screen Operating Instructions
This chapter describes the on-screen operating instructions of this machine. The on-screen operating
instructions are included in the supplied manual CD-ROMs.
Formats of the Operating Instructions
The operating instructions of this machine are provided in the following formats:
• Printed manuals
• HTML manuals
• PDF manuals
The printed and electronic versions of a manual have the same contents. For details about the contents of
each manual, see “Manuals for This Machine”. The various manuals are available in different formats. For
details about availability, see “Manuals List”.
• p.8 "Manuals for This Machine"
• p.10 "Manuals List"
143
6

Reading the HTML Manuals on the CD-ROMs
This section describes how to read the HTML manuals on the supplied manual CD-ROMs.
1. Insert the CD-ROM in the CD-ROM drive of your computer.
2. Select a language and a product, and then click [OK].
3. Click [Read HTML manuals].
4. Click the title of manual you want to read.
The browser opens, and then the manual appears.
• Recommended browser is Microsoft Internet Explorer 4.01 SP2 or later.
• Non-recommended browsers can display the simplified manual only.
• If you are using an earlier or non-recommended browser and the simplified version of the
documentation does not appear automatically, open index.htm, which can be found in the following
folder on the CD-ROM: MANUAL_HTML\LANG\(language)\(manual)\unv
• Depending on your computer's operating environment, the HTML manual you select will be one of
the following:
• Standard version
• Simplified version
• If you want to read the HTML manuals on a Macintosh, insert the CD-ROM in the CD-ROM drive,
and then click [Read HTML manuals].
• If JavaScript is disabled or unavailable in your browser, you will not be able to search or use certain
buttons in the HTML documentation.
6. On-screen Operating Instructions
144
6

Installing and Opening the HTML Manuals
This section describes how to install and open the HTML manuals on your computer.
For your convenience, we recommend you install these manuals on your computer.
1. Insert the CD-ROM in the CD-ROM drive of your computer.
2. Select a language and a product, and then click [OK].
3. Click [Install manuals].
4. Install the HTML manuals by following the on-screen instructions.
5. When the installation is complete, click [Finish].
6. Click [Exit].
7. Open the HTML manuals that you installed.
To open the manuals from an icon, double-click the icon on the desktop. To open the manuals from
the [Start] menu, point to [All Programs] (Windows 2000: [Programs]), and then [Product Name].
8. Click the title of the manual you want to read.
• You need administrator permissions to install the manuals. Log in as an Administrators group member.
• The system requirements for installing the manuals are as follows:
• Operating system: Windows 2000/XP/Vista/7, Windows Server 2003/2003
R2/2008/2008 R2
• Minimum display resolution: 800 × 600 pixels
• Hyperlinks might not work and referenced sections might not appear unless all the HTML manuals
have been installed. To display referenced sections, be sure to install all the HTML manuals.
• If you cannot install a manual, copy the “MANUAL_HTML” folder to your computer's hard drive, and
then run “Setup.exe”.
• To delete an installed manual, on the [Start] menu, click [All Programs] (Windows 2000: [Programs]),
then [Product Name], and then uninstall the data.
Installing and Opening the HTML Manuals
145
6

• Depending on the settings made during installation, menu folder names may differ.
6. On-screen Operating Instructions
146
6

Reading the PDF Manuals on the CD-ROM
This section describes how to read the PDF manuals on the supplied manual CD-ROM.
File path
The manuals are included in the following folder on the CD-ROM:
MANUAL_PDF\(language)
1. Insert the CD-ROM in the CD-ROM drive of your computer.
2. Select a language and a product, and then click [OK].
3. Click [Read PDF manuals].
4. Click the title of the manual you want to read.
• To view the PDF manuals, you need to have Adobe Acrobat Reader/Adobe Reader installed on your
computer.
• If you want to read the HTML manuals on a Macintosh, insert the CD-ROM in the CD-ROM drive,
and then click [Read PDF manuals].
Reading the PDF Manuals on the CD-ROM
147
6

6. On-screen Operating Instructions
148
6

7. Remarks
This chapter describes how to maintain and operate the machine.
Dos and Don'ts
The following items should be followed during use of this machine.
• Do not use flammable sprays or solvents in the vicinity of this machine. Doing so could result in fire
or electric shock.
• Unplug the power cord from the wall outlet before you move the machine. While moving the
machine, take care that the power cord is not damaged under the machine. Failing to take these
precautions could result in fire or electric shock.
• Do not turn the power off while the operation switch indicator is lit or blinking. Doing so may damage
the hard disk.
• Before unplugging the power cord or turning off the main power switch, make sure remaining memory
space is at 100%, as shown on the screen. See “Turning On/Off the Power”.
• Do not touch areas on or around the fusing unit. These areas get hot.
• After scanning originals continuously, the exposure glass may become warm - this is not a malfunction.
• The area around the ventilation holes might feel warm. This is caused by exhaust air and is not a
malfunction.
• When you use this machine for a long time in a confined space without good ventilation, you may
detect an odd smell. To keep the workplace comfortable, we recommend that you keep it well
ventilated.
• If the machine is moved from a cold to a warm place, condensation may form inside it. After moving
the machine, do not use it for at least an hour. The machine requires this time to adapt to its new
environment.
• The machine will malfunction if its internal temperature becomes too high. Be sure not to block the
intake and exhaust vents.
• Do not turn off the power while the machine is in operation. See “Turning On/Off the Power”.
• Do not open the covers of the machine when it is in operation. If you do, misfeeds might occur.
• Do not move or tilt the machine when the power is on.
• Do not allow small objects such as paper clips to fall into or become stuck inside the machine.
149
7

• Do not knock the machine while it is operating (for instance, do not use the machine's surfaces to
knock stacks of paper into square).
• Depending on the ambient temperature and humidity, steam may come from the exhaust vent behind
the control panel during printing. This is water vapor from the paper, not a sign of malfunction.
• If condensation forms inside the machine as a result of temperature change, the machine may not
print properly. To minimize this problem, use the optional anti-condensation heaters.
• Be sure to make a note of the registered machine settings in case they are lost due to accident or
malfunction.
• The manufacturer shall not be liable for any loss or damage resulting from a failure of the machine,
loss of settings, or use of the machine.
• p.80 "Turning On/Off the Power"
Saving Color Copies
This section explains notes on saving color copies.
• Like most prints, color prints will fade if exposed to strong light or dampness and humidity for lengthy
periods. Preserve the quality of your copies by storing them in a binder in a dark, dry place.
• Toner may melt if a print and a half-dried print are put on top of each other.
• Toner may also melt when using solvent type adhesive agents for pasting prints.
• When folding prints, toner in the folds will come off.
• Toner may melt if it is placed on mats made of chlorinated plastic in locations of high temperature for
long periods of time.
• Toner may melt if prints are placed in places of extremely high temperatures, such as near heaters.
7. Remarks
150
7

Where to Put Your Machine
This section describes precautions for installation and movement.
Machine Environment
Choose your machine's location carefully.
Environmental conditions greatly affect its performance.
Moving
This section describes precautions when moving the machine.
• Contact your service representative if you need to lift the machine (such as when relocating it to
another floor). Do not attempt to lift the machine without the assistance of your service
representative. The machine will be damaged if it topples or is dropped, resulting in malfunction
and risk of injury to users.
• Unplug the power cord from the wall outlet before you move the machine. While moving the
machine, take care that the power cord is not damaged under the machine. Failing to take these
precautions could result in fire or electric shock.
• After you move the machine, use the caster fixture to fix it in place. Otherwise the machine might
move or come down to cause an injury.
• If you have to move the machine when the optional paper tray unit is attached, do not push on the
main unit's top section. Doing so can cause the optional paper tray unit to detach, possibly resulting
in injury.
• Be careful when moving the machine. Take the following precautions:
• Turn off the main power. For details about how to turn the main power off, see “Turning On/Off
the Power”.
Where to Put Your Machine
151
7

• Unplug the power cord from the wall outlet. When you pull out the plug from the socket, grip
the plug to avoid damaging the cord, thereby reducing the risk of fire or electric shock.
• Close all covers and trays, including the front cover and bypass tray.
• Keep the machine level and carry it carefully, taking care not to jolt or tip it. Rough handling
may cause a malfunction or damage the hard disk or memory, resulting in loss of stored files.
• Do not take off the holding stand.
• Protect the machine from strong shocks. Impact can damage the hard disk and cause stored files
to be lost. As a precautionary measure, files should be copied to another computer.
• p.80 "Turning On/Off the Power"
Optimum environmental conditions
This section describes precautions when locating the machine.
• Keep the machine away from humidity and dust. Otherwise a fire or an electric shock might occur.
• Do not place the machine on an unstable or tilted surface. If it topples over, an injury might occur.
• After you move the machine, use the caster fixture to fix it in place. Otherwise the machine might
move or come down to cause an injury.
• Make sure the room where you are using the machine is well ventilated and spacious. Good
ventilation is especially important when the machine is used heavily.
• Do not expose the machine to salt-bearing air or corrosive gases. Also, do not locate the machine
in environments where chemical experiments are performed, such as in a laboratory. Doing so
could result in malfunction.
• Machine sound levels exceeding LWAd > 63 dB (A) are not suitable for desk work environments,
so place the machine in another room.
7. Remarks
152
7

• Temperature: 10 32 °C (50 89.6 °F) (humidity to be 54% at 32 °C, 89.6 °F)
• Humidity: 15 80% (temperature to be 27 °C, 80.6 °F at 80%)
• A strong and level base.
• The machine must be level within 5 mm, 0.2 inch: both front to rear and left to right.
• To avoid possible buildup of ozone, make sure to locate this machine in a large well ventilated room
that has an air turnover of more than 30 m3/hr/person.
Environments to avoid
This section describes environments to avoid when locating the machine.
• Locations exposed to direct sunlight or other sources of strong light (more than 1,500 lux).
• Locations directly exposed to cool air from an air conditioner or heated air from a heater. (Sudden
temperature changes can cause condensation to form inside the machine.)
• Locations close to machines generating ammonia, such as a diazo copy machine.
• Places where the machine will be subject to frequent strong vibration.
• Dusty areas.
• Areas with corrosive gases.
Access to the machine
This section describes the space required for the machine.
Place the machine near the power source, providing the clearance areas shown.
CAS080
1
3
2
4
1. Rear: 10 cm (4 inches) or more
2. Right: 90 cm (35.5 inches) or more
3. Front: 40 cm (15.8 inches) or more
4. Left: 10 cm (4 inches) or more
Where to Put Your Machine
153
7

• For the required space when options are installed, contact your service representative.
Power Connection
This section describes power supply.
• Do not use any power sources other than those that match the specifications shown in
“Specifications for the Main Unit” in this manual. Doing so could result in fire or electric shock.
• Do not use any frequencies other than those that match the specifications shown. Doing so could
result in fire or electric shock.
• Do not use multi-socket adaptors. Doing so could result in fire or electric shock.
• Do not use extension cords. Doing so could result in fire or electric shock.
• Do not use power cords that are damaged, broken, or modified. Also, do not use power cords
that have been trapped under heavy objects, pulled hard, or bent severely. Doing so could result
in fire or electric shock.
• Touching the prongs of the power cable's plug with anything metallic constitutes a fire and electric
shock hazard.
• The supplied power cord is for use with this machine only. Do not use it with other appliances.
Doing so could result in fire or electric shock.
• It is dangerous to handle the power cord plug with wet hands. Doing so could result in electric
shock.
7. Remarks
154
7

• Disconnect the power plug (by pulling the plug, not the cable) if the power cable or plug becomes
frayed or otherwise damaged.
• If the power cord is damaged (exposure of the core, disconnection, etc.), contact your service
representative to change a new one. Operating the machine with a damaged power cord may
cause an electric shock or fire.
• Be sure to push the plug of the power cord fully into the wall outlet. Partially inserted plugs create
an unstable connection that can result in unsafe buildup of heat.
• If this machine is not going to be used for several days or longer at a time, disconnect its power
cord from the wall outlet.
• When disconnecting the power cord from the wall outlet, always pull the plug, not the cord. Pulling
the cord can damage the power cord. Use of damaged power cords could result in fire or electric
shock.
• Be sure to disconnect the plug from the wall outlet and clean the prongs and the area around the
prongs at least once a year. Allowing dust to build up on the plug constitutes a fire hazard.
• When performing maintenance on the machine, always disconnect the power cord from the wall
outlet.
• Make sure the plug is inserted firmly in the wall outlet.
• Voltage must not fluctuate by more than +8.66% or less than -10%.
.
Where to Put Your Machine
155
7

Maintaining Your Machine
If the exposure glass or scanning glass is dirty, copy clarity may be reduced. Clean these parts if they are
dirty.
• Do not use chemical cleaners or organic solvents, such as thinner or benzene. If such substances get
inside the machine or melt plastic parts, a failure might occur.
• Do not clean parts other than those explicitly specified in this manual. Other parts should only be
cleaned by your service representative.
Cleaning the Machine
This section describes how to clean the machine.
Wipe the machine with a soft, dry cloth. If this does not remove the dirt, wipe the machine with a damp
and tightly wrung cloth. If a damp cloth still does not remove the dirt, try using a mild detergent. Wipe the
machine with a dry cloth to remove the moisture, after using a damp cloth.
Cleaning the Exposure Glass
This section describes how to clean the exposure glass and the scanning glass.
1. Wipe the exposure glass and the scanning glass.
CAS081
1
2
1. Scanning glass
2. Exposure glass
Cleaning the Auto Document Feeder
This section describes how to clean the ADF.
7. Remarks
156
7

1. Wipe the sheet and guide plate of the ADF.
CAS083
1
2
1. Sheet
2. Guide plate
Cleaning the Dustproof Glass
The dustproof glass may require cleaning if white lines appear on the print side of the document.
• Do not insert the cleaning brush forcefully, or the machine might be damaged.
Maintaining Your Machine
157
7

CAS084
• Insert the cleaning brush so that its arrow mark is pointing up.
Cleaning the Power Cord Plug
This section describes precautions for cleaning the power cord plug.
• Be sure to disconnect the plug from the wall outlet and clean the prongs and the area around the
prongs at least once a year. Allowing dust to build up on the plug constitutes a fire hazard.
7. Remarks
158
7

Backing Up Hard Disk Data
You can store data such as images and Address Book information on the machine's hard disk.
This section describes how to back up or download this data.
• If the machine's hard disk fails, data stored on it, including Address Book information might be lost.
For this reason, do not save important data on the machine's hard disk without backing it up or
downloading it. We also recommend backing up fonts, forms, and any other downloaded resources
that are stored on the hard disk. The manufacturer is not liable for damages resulting from lost data.
• You can use SmartDeviceMonitor for Admin or Web Image Monitor to back up the machine's Address
Book. For details about SmartDeviceMonitor for Admin, see the manual for SmartDeviceMonitor for
Admin. For details about Web Image Monitor, see the Help for Web Image Monitor.
• You can use Web Image Monitor to download data stored on the Document Server to your computer.
For details about how to do this, see “Downloading Stored Documents with Web Image Monitor”,
Copy and Document Server Reference , or the Help for Web Image Monitor.
Backing Up Hard Disk Data
159
7

Counter
You can display the total counter value used for all functions.
1. Press the [User Tools/Counter] key.
CAS098
2. Press [Counter].
3. To print a counter list, press [Print Counter List].
4. Press the [Start] key.
A counter list prints out.
5. Press [Exit] twice.
7. Remarks
160
7

Inquiry
The Inquiry function lets you check the telephone numbers to contact for repairs, or ordering consumables
such as toner.
Be sure to contact your service engineer to verify the following:
Consumables
• Telephone No. to order
• Toner
• Staple
• Staple (Center)
• TX Stamp Name
Machine Maintenance/Repair
• Telephone No.
• Serial No. of Machine
Sales Representative
• Telephone No.
1. Press the [User Tools/Counter] key.
CAS098
2. Press [Inquiry].
Inquiry
161
7

Inquiry information appears.
3. Press [Print Inquiry List].
4. Press the [Start] key.
Inquiry information prints out.
5. Press [Exit] twice.
7. Remarks
162
7

8. Appendix
This chapter describes the provided software and utilities CD-ROM, and specifications.
Software and Utilities Included on the CD-ROM
This section explains the software and utilities CD-ROM provided with this machine.
The following is included in the CD-ROM:
Font Manager
For installing new screen fonts, or organizing and managing fonts already in the system. For details
about Font Manager, see the manual on the CD-ROM.
Viewing the Contents of the CD-ROM
This section explains how to view the contents of the CD-ROM.
1. Insert the CD-ROM in the CD-ROM drive of your computer.
2. Select a language and a product, and then click [OK].
3. Click [Browse This CD-ROM].
Explorer starts and displays the contents of the CD-ROM.
Printer Drivers for This Machine
This section explains printer drivers for this machine.
• You can install the PCL printer drivers (PCL 5c and PCL 6), and the Adobe PostScript printer driver
from the CD-ROM provided with this machine or download them from the manufacturer's Web site.
If your operating system is Windows XP/Vista/7 x64, or Windows Server 2003/2003
R2/2008/2008 R2 x64, you must download the printer drivers from the manufacturer's Web site.
Select this machine and the operating system you are using, and then download them.
Printing requires installation of a printer driver for your operating system. The following drivers are included
on the CD-ROM.
Printer Language PCL 5c PCL 6 PostScript 3
Windows 2000
*1
OK OK OK
Windows XP
*2
OK OK OK
163
8

Printer Language PCL 5c PCL 6 PostScript 3
Windows Vista
*3
OK OK OK
Windows 7
*4
OK OK OK
Windows Server 2003
*5
OK OK OK
Windows Server 2008
*6
OK OK OK
Mac OS X
*7
OK
*1
Microsoft Windows 2000 Professional /Microsoft Windows 2000 Server/Microsoft Windows 2000
Advanced Server
*2
Microsoft Windows XP Professional Edition/Microsoft Windows XP Home Edition/Microsoft Windows XP
Media Center Edition/Microsoft Windows XP Tablet PC Edition
*3
Microsoft Windows Vista Ultimate/Microsoft Windows Vista Enterprise/Microsoft Windows Vista Business/
Microsoft Windows Vista Home Premium/Microsoft Windows Vista Home Basic
*4
Microsoft Windows 7 Home Premium/Microsoft Windows 7 Professional/Microsoft Windows 7 Ultimate/
Microsoft Windows 7 Enterprise
*5
Microsoft Windows Server 2003 Standard Edition/Microsoft Windows Server 2003 Enterprise Edition/
Microsoft Windows Server 2003 R2 Standard Edition/Microsoft Windows Server 2003 R2 Enterprise Edition
*6
Microsoft Windows Server 2008 Standard/Microsoft Windows Server 2008 Enterprise
*7
Mac OS X 10.2 or later (Native mode)
PCL printer drivers
Two kinds of PCL printer driver (PCL 5c and PCL 6) are included. These drivers allow your computer
to communicate with this machine via a printer language.
Adobe PostScript printer driver and PPD files
Adobe PostScript printer driver allows the computer to communicate with the printer using a printer
language. PPD files allow the printer driver to enable specific printer functions.
PPD files
PPD files allow the printer driver to enable specific printer functions.
• Some applications may require installation of the PCL 5c printer driver. In this case, you can install
PCL 5c without having to install PCL 6.
• For details, see “Preparing the Machine”, Printer Reference and PostScript 3 Supplement .
TWAIN Driver
This section describes the file path and system requirements of the TWAIN driver.
8. Appendix
164
8

This driver is required to scan an original using a scanner. To use the machine as a network TWAIN scanner,
this driver must be installed.
File path
The driver is included in the following folder on the CD-ROM:
\DRIVERS\TWAIN
System requirements
• Hardware
PC/AT-compatible machines that support the following operating system properly
• Operating system
Windows 2000/XP/Vista/7
Windows Server 2003/2003 R2/2008
• Display resolution
800 × 600 pixels, 256 colors or higher
LAN-Fax Driver
This section describes the file path and system requirements of the LAN-Fax driver.
• You can install the LAN-Fax driver from the CD-ROM provided with this machine or download it from
the manufacturer's Web site. If your operating system is Windows XP/Vista/7 x64, or Windows
Server 2003/2003 R2/2008/2008 R2 x64, you must download the LAN-Fax driver from the
manufacturer's Web site. Select this machine and the operating system you are using, and then
download it.
This driver is required to use LAN-Fax functions.
File path
The driver is included in the following folder on the CD-ROM:
\DRIVERS\LAN-FAX\XP_VISTA
System requirements
• Hardware
PC/AT-compatible machines that support the following operating system properly
• Operating systems
Windows 2000/XP/Vista/7
Windows Server 2003/2003 R2/2008
• Display
VGA 640 × 480 pixels or more
Software and Utilities Included on the CD-ROM
165
8

• Before beginning installation, exit all other applications.
8. Appendix
166
8

Specifications for the Main Unit
This section describes specifications for the main unit.
For Users of Type 1 and 2
This section describes specifications for the main unit of type 1 and 2.
Configuration:
Desktop
Photosensitivity type:
OPC drum
Original scanning:
One-dimensional solid scanning system through CCD
Copy process:
Laser beam scanning and electro-photographic printing
Development:
Dry two-component magnetic brush development system
Fusing:
Induction Heating (IH) fusing
Resolution:
• Scanning originals: 600 dpi
• Copying: 600 dpi
• Printing: 200 dpi/300 dpi/400 dpi/600 dpi/1200 dpi
Exposure glass:
Stationary original exposure type
Original reference position:
Rear left corner
Warm-up time (23°C (73°F), rated voltage):
23 seconds or less
Originals:
Sheet/book/objects
Maximum original size:
A3 , 11 × 17
Specifications for the Main Unit
167
8

Paper size:
• Tray 1:
A4 , 81/2 × 11 , A5 , B5 JIS
• Tray 2:
A3 , A4 , A5 , B4 JIS , B5 JIS ,
11 × 17 , 81/2 × 14 , 81/2 × 13 , 81/2 × 11 , 81/4 × 14 , 81/4 × 13 , 8 × 13
, 8 × 10 , 71/4 × 101/2,
8K , 16K , 11 × 15 , 10 × 14 , 41/8 × 91/2, C5 Env
• Tray 2 (custom size):
Vertical: 182.0 297.0 mm (7.17 11.69 inches)
Horizontal: 148.0 432.0 mm (5.83 17.00 inches)
• Bypass tray:
A3 , A4 , A5 , A6 , B4 JIS , B5 JIS , B6 JIS ,
11 × 17 , 81/2 × 14 , 81/2 × 13 , 81/2 × 11 , 81/4 × 14 , 81/4 × 13 , 8 × 13
, 8 × 10 , 71/4 × 101/2, 51/2 × 81/2,
41/8 × 91/2, 37/8 × 71/2, C5 Env , C6 Env , DL Env , 8K , 16K , 12
× 18 , 11 × 15 , 10 × 14
• Bypass tray (custom size):
Vertical: 90.0 305.0 mm (3.55 12.00 inches)
Horizontal: 148.0 600.0 mm (5.83 23.62 inches)
• Duplex:
A3 , A4 , A5 , A6 , B4 JIS , B5 JIS , B6 JIS ,
11 × 17 , 81/2 × 14 , 81/2 × 13 , 81/2 × 11 , 81/4 × 14 , 81/4 × 13 , 8 × 13
, 8 × 10 , 71/4 × 101/2,
8K , 16K , 11 × 15 , 10 × 14
Paper weight:
• Paper trays: 60 256 g/m2 (16 lb. Bond 140 lb. Index)
• Bypass: 60 300 g/m2 (16 lb. Bond 110 lb. Cover)
• Duplex: 60 169 g/m2 (16 lb. Bond 90 lb. Index)
For details about and recommendations concerning thick paper, see “Thick Paper”.
Non-reproduction area (Copier):
• Leading edge: 2.7 5.7 mm (0.11 0.23 inches)
• Trailing edge: 0.5 6.0 mm (0.02 0.24 inches)
• Left and right edges: 0.5 4.0 mm (0.02 0.16 inches)
8. Appendix
168
8

First copy/print time:
• Full Color: 7.8 seconds or less
• B&W: 5.0 seconds or less
(A4 , 81/2 × 11 , 100% reproduction, feeding from tray 1, on the exposure glass)
Copy/print speed (Full Color / B&W):
• Type 1: 30 sheets/minute (A4 , 81/2 × 11 )
• Type 2: 35 sheets/minute (A4 , 81/2 × 11 )
Reproduction ratio:
• Preset reproduction ratios:
• Enlargement: 400%, 200%, 155%, 129%, 121%
• Full size: 100%
• Reduction: 93%, 85%, 78%, 73%, 65%, 50%, 25%
• Zoom: From 25 to 400% in increments of 1%
Maximum continuous copy run:
999 sheets
Paper capacity (80 g/m2, 20 lb. Bond):
• Tray 1, 2: 550 sheets
• Bypass tray: 100 sheets
Power source:
120 127 V, 60 Hz, 12 A or more
Please be sure to connect the power cord to a power source as above. For details about power
source, see “Power Connection”.
Power consumption:
• Main unit only
Type 1 Type 2
Stand-by About 152 W About 152 W
During printing About 752 W About 766 W
Maximum 1,584 W 1,584 W
• Complete system
Type 1 Type 2
Maximum 1,584 W 1,584 W
Specifications for the Main Unit
169
8

The complete system consists of the main unit, internal tray 2 (1 bin tray), lower paper trays,
large capacity tray (LCT), bridge unit, and Booklet Finisher SR3000.
Dimensions (W × D × H up to ADF):
670 × 671 × 880 mm (26.4 × 26.5 × 34.8 inches)
Space for main unit (W × D):
1,065 × 671 mm (42.0 × 26.5 inches)
Noise emission:
• Sound power level:
• Main unit only
Type 1 Type 2
Stand-by Less than 39.0 dB (A) Less than 39.2 dB (A)
Copying Less than 64.2 dB (A) Less than 64.4 dB (A)
• Complete system
Type 1 Type 2
Stand-by Less than 38.9 dB (A) Less than 39.3 dB (A)
Copying Less than 69.3 dB (A) Less than 69.9 dB (A)
• Sound pressure level:
• Main unit only
Type 1 Type 2
Stand-by Less than 27.0 dB (A) Less than 27.3 dB (A)
Copying Less than 50.7 dB (A) Less than 51.5 dB (A)
• Complete system
Type 1 Type 2
Stand-by Less than 25.8 dB (A) Less than 27.2 dB (A)
Copying Less than 54.6 dB (A) Less than 55.2 dB (A)
• Sound power level and sound pressure level are actual values measured in
accordance with ISO 7779.
• Sound pressure level is measured from the position of the bystander.
8. Appendix
170
8

• The complete system consists of the main unit, internal tray 2 (1 bin tray), lower paper
trays, large capacity tray (LCT), bridge unit, and Booklet Finisher SR3000.
Weight:
Approx. 120 kg (264.6 lb.)
• p.119 "Thick Paper"
• p.154 "Power Connection"
For Users of Type 3 and 4
This section describes specifications for the main unit of type 3 and 4.
Configuration:
Desktop
Photosensitivity type:
OPC drum
Original scanning:
One-dimensional solid scanning system through CCD
Copy process:
Laser beam scanning and electro-photographic printing
Development:
Dry two-component magnetic brush development system
Fusing:
Induction Heating (IH) fusing
Resolution:
• Scanning originals: 600 dpi
• Copying: 600 dpi
• Printing: 200 dpi/300 dpi/400 dpi/600 dpi/1200 dpi
Exposure glass:
Stationary original exposure type
Original reference position:
Rear left corner
Warm-up time (23°C (73°F), rated voltage):
• Type 3: 22 seconds or less
• Type 4: 36 seconds or less
Specifications for the Main Unit
171
8

Originals:
Sheet/book/objects
Maximum original size:
A3 , 11 × 17
Paper size:
• Tray 1:
A4 , 81/2 × 11 , A5 , B5 JIS
• Tray 2:
A3 , A4 , A5 , B4 JIS , B5 JIS ,
11 × 17 , 81/2 × 14 , 81/2 × 13 , 81/2 × 11 , 81/4 × 14 , 81/4 × 13 , 8 × 13
, 8 × 10 , 71/4 × 101/2,
8K , 16K , 11 × 15 , 10 × 14 , 41/8 × 91/2, C5 Env
• Tray 2 (custom size):
Vertical: 182.0 297.0 mm (7.17 11.69 inches)
Horizontal: 148.0 432.0 mm (5.83 17.00 inches)
• Bypass tray:
A3 , A4 , A5 , A6 , B4 JIS , B5 JIS , B6 JIS ,
11 × 17 , 81/2 × 14 , 81/2 × 13 , 81/2 × 11 , 81/4 × 14 , 81/4 × 13 , 8 × 13
, 8 × 10 , 71/4 × 101/2, 51/2 × 81/2,
41/8 × 91/2, 37/8 × 71/2, C5 Env , C6 Env , DL Env , 8K , 16K , 12
× 18 , 11 × 15 , 10 × 14
• Bypass tray (custom size):
Vertical: 90.0 305.0 mm (3.55 12.00 inches)
Horizontal: 148.0 600.0 mm (5.83 23.62 inches)
• Duplex:
A3 , A4 , A5 , A6 , B4 JIS , B5 JIS , B6 JIS ,
11 × 17 , 81/2 × 14 , 81/2 × 13 , 81/2 × 11 , 81/4 × 14 , 81/4 × 13 , 8 × 13
, 8 × 10 , 71/4 × 101/2,
8K , 16K , 11 × 15 , 10 × 14
Paper weight:
• Paper trays: 60 256 g/m2 (16 lb. Bond 140 lb. Index)
• Bypass: 60 300 g/m2 (16 lb. Bond 110 lb. Cover)
• Duplex: 60 169 g/m2 (16 lb. Bond 90 lb. Index)
For details about and recommendations concerning thick paper, see “Thick Paper”.
8. Appendix
172
8

Non-reproduction area (Copier):
• Leading edge: 2.7 5.7 mm (0.11 0.23 inches)
• Trailing edge: 0.5 6.0 mm (0.02 0.24 inches)
• Left and right edges: 0.5 4.0 mm (0.02 0.16 inches)
First copy/print time:
• Type 3:
• Full Color: 6.2 seconds or less
• B&W: 3.9 seconds or less
• Type 4:
• Full Color: 5.2 seconds or less
• B&W: 3.2 seconds or less
(A4 , 81/2 × 11 , 100% reproduction, feeding from tray 1, on the exposure glass)
Copy/print speed (Full Color / B&W):
• Type 3: 45 sheets/minute (A4 , 81/2 × 11 )
• Type 4: 55 sheets/minute (A4 , 81/2 × 11 )
Reproduction ratio:
• Preset reproduction ratios:
• Enlargement: 400%, 200%, 155%, 129%, 121%
• Full size: 100%
• Reduction: 93%, 85%, 78%, 73%, 65%, 50%, 25%
• Zoom: From 25 to 400% in increments of 1%
Maximum continuous copy run:
999 sheets
Paper capacity (80 g/m2, 20 lb. Bond):
• Tray 1, 2: 550 sheets
• Bypass tray: 100 sheets
Power source:
120 127 V, 60 Hz, 12 A or more
Please be sure to connect the power cord to a power source as above. For details about power
source, see “Power Connection”.
Power consumption:
• Main unit only
Specifications for the Main Unit
173
8

Type 3 Type 4
Stand-by About 174 W About 174 W
During printing About 956 W About 1073 W
Maximum 1,584 W 1,584 W
• Complete system
Type 3 Type 4
Maximum 1,584 W 1,584 W
The complete system consists of the main unit, internal tray 2 (1 bin tray), lower paper trays,
large capacity tray (LCT), bridge unit, and Booklet Finisher SR3020.
Dimensions (W × D × H up to ADF):
670 × 677 × 895 mm (26.4 × 26.7 × 35.4 inches)
Space for main unit (W × D):
1,065 × 677 mm (42.0 × 26.7 inches)
Noise emission:
• Sound power level:
• Main unit only
Type 3 Type 4
Stand-by Less than 39.2 dB (A) Less than 40.0 dB (A)
Copying Less than 65.7 dB (A) Less than 67.3 dB (A)
• Complete system
Type 3 Type 4
Stand-by Less than 39.5 dB (A) Less than 39.7 dB (A)
Copying Less than 72.7 dB (A) Less than 73.6 dB (A)
• Sound pressure level:
• Main unit only
Type 3 Type 4
Stand-by Less than 28.6 dB (A) Less than 27.7 dB (A)
8. Appendix
174
8

Type 3 Type 4
Copying Less than 53.2 dB (A) Less than 54.5 dB (A)
• Complete system
Type 3 Type 4
Stand-by Less than 27.2 dB (A) Less than 27.5 dB (A)
Copying Less than 58.2 dB (A) Less than 59.1 dB (A)
• Sound power level and sound pressure level are actual values measured in
accordance with ISO 7779.
• Sound pressure level is measured from the position of the bystander.
• The complete system consists of the main unit, internal tray 2 (1 bin tray), lower paper
trays, large capacity tray (LCT), bridge unit, and Booklet Finisher SR3020.
Weight:
Approx. 130 kg (286.6 lb.)
• p.119 "Thick Paper"
• p.154 "Power Connection"
Auto Document Feeder for Type 1 and 2
Mode:
ADF mode, Batch mode, SADF mode, Mixed Sizes mode, Custom Size originals mode
Original size:
• 11 × 17 51/2 × 81/2 (1-sided originals)
• 11 × 17 51/2 × 81/2 (2-sided originals)
Original weight:
• 1-sided originals: 40 128 g/m2 (11 34 lb. Bond)
• 2-sided originals: 52 105 g/m2 (14 28 lb. Bond) (64 105 g/m2 (17 28 lb. Bond) for
11 × 17 )
Number of originals to be set:
50 sheets (80 g/m2, 20 lb. Bond)
Specifications for the Main Unit
175
8

Auto Document Feeder for Type 3 and 4
Mode:
ADF mode, Batch mode, SADF mode, Mixed Sizes mode, Custom Size originals mode
Original size:
• 11 × 17 51/2 × 81/2 (1-sided originals)
• 11 × 17 51/2 × 81/2 (2-sided originals)
Original weight:
• 1-sided originals: 40 128 g/m2 (11 34 lb. Bond)
• 2-sided originals: 52 128 g/m2 (14 34 lb. Bond)
Number of originals to be set:
100 sheets (80 g/m2, 20 lb. Bond)
Document Server
HDD (Document Server):
Approx. 78 GB
Maximum: 9,000 pages
(Total number of pages that can be accommodated stored with all functions combined)
Copier/B&W/A4 original: Approx. 4,000 pages
Copier/Full Color/A4 original: Approx. 1,000 pages
Printer/Full Color/A4 original/600 dpi, 2 bits: Approx. 9,000 pages
Scanner/Full Color/A4/200 dpi, 8 bits/JPEG: Approx. 9,000 pages
(Under the printer and scanner functions, the number of the pages that can be stored depends on the
print image and original.)
Maximum number of stored documents:
3,000 documents
(The maximum number of received faxes that can be stored is 800.)
Number of pages supported by memory sorting:
Maximum: 2,000 pages
Copier/B&W/A4 original: Approx. 2,000 pages
Printer/B&W/A4/600 dpi, 2 bits: Approx. 2,000 pages
(Under the printer function, the number of the pages that can be sorted depends on the print image.)
8. Appendix
176
8

Specifications for Finisher SR790 (1000-sheet)
(Optional)
This section describes specifications for Finisher SR790.
Finisher Upper Tray
This section describes specifications for the finisher upper tray of Finisher SR790.
Paper size:
A3 , B4 JIS , A4 , B5 JIS , A5 , B6 JIS , A6 ,
12 × 18 , 11 × 17 , 11 × 15 , 10 × 14 , 81/2 × 14 , 81/2 × 13 , 81/2 × 11 , 81/
4
× 14 , 81/4 × 13 , 8 × 13 , 8 × 10 , 51/2 × 81/2, 71/4 × 101/2,
8K , 16K , custom size
Paper weight:
60 260 g/m2 (16 lb. Bond 140 lb. Cover)
Stack capacity (80 g/m2, 20 lb. Bond):
• 250 sheets: A4, 81/2 × 11 or smaller
• 50 sheets: B4 JIS, 81/2 × 14 or larger
Finisher Shift Tray
This section describes specifications for the finisher shift tray of Finisher SR790.
Paper size:
A3 , B4 JIS , A4 , B5 JIS , A5 ,
12 × 18 , 11 × 17 , 11 × 15 , 10 × 14 , 81/2 × 14 , 81/2 × 13 , 81/2 × 11 , 81/
4
× 14 , 81/4 × 13 , 8 × 13 , 8 × 10 , 51/2 × 81/2, 71/4 × 101/2,
8K , 16K
Paper weight:
60 163 g/m2 (16 lb. Bond 90 lb. Index)
Stack capacity (80 g/m2, 20 lb. Bond):
• 1,000 sheets: A4, 81/2 × 11 or smaller
• 500 sheets: B4 JIS, 81/2 × 14 or larger
Staple paper size:
A3 , B4 JIS , A4 , B5 JIS ,
Specifications for Finisher SR790 (1000-sheet) (Optional)
177
8

11 × 17 , 11 × 15 , 10 × 14 , 81/2 × 14 , 81/2 × 11 , 71/4 × 101/2, 8 × 13 ,
81/2 × 13 , 81/4 × 14 , 81/4 × 13 , 8 × 10 ,
8K , 16K
Staple paper weight:
64 90 g/m2 (17 24 lb. Bond)
Staple capacity (80 g/m2, 20 lb. Bond):
• Without Mixed Size:
• 30 sheets: A3 , B4 JIS , 11 × 17 , 81/2 × 14 , 8 × 13 , 81/2 × 13 , 81/4 × 14
, 81/4 × 13 , 11 × 15 , 10 × 14 , 8K
• 50 sheets: A4 , B5 JIS , 81/2 × 11 , 8 × 10 , 71/4 × 101/2, 16K
• With Mixed Size:
16 sheets
Stack capacity after stapling (80 g/m2, 20 lb. Bond):
• 2 9 sheets: 100 sets (A4 , B5 JIS , 81/2 × 11 )
• 10 50 sheets: 100 20 sets (A4 , 81/2 × 11 )
• 10 50 sheets: 50 10 sets (A4 , B5 JIS , 81/2 × 11 )
• 2 9 sheets: 50 sets (A3 , B4 JIS , 11 × 17 , 81/2 × 14 )
• 10 30 sheets: 50 10 sets (A3 , B4 JIS , 11 × 17 , 81/2 × 14 )
Staple position:
3 positions (Top, Bottom, 2 Staples)
Power consumption:
50 W or less (Power is supplied from the main unit.)
Dimensions (W × D × H):
527 × 520 × 790 mm (10.7 × 20.5 × 31.2 inches)
Weight:
Approx. 25 kg (55.2 lb.)
8. Appendix
178
8

Specifications for Finisher SR3030 (3000-sheet)
(Optional)
This section describes specifications for Finisher SR3030.
Finisher Upper Tray
This section describes specifications for the finisher upper tray of Finisher SR3030.
Paper size:
A3 , B4 JIS , A4 , B5 JIS , A5 , B6 JIS , A6 ,
12 × 18 , 11 × 17 , 11 × 15 , 10 × 14 , 81/2 × 14 , 81/2 × 13 , 81/2 × 11 , 81/
4
× 14 , 81/4 × 13 , 8 × 13 , 8 × 10 , 51/2 × 81/2, 71/4 × 101/2,
8K , 16K , custom size
Paper weight:
60 163 g/m2 (16 lb. Bond 90 lb. Index)
Stack capacity (80 g/m2, 20 lb. Bond):
• 250 sheets: A4, 81/2 × 11 or smaller
• 50 sheets: B4 JIS, 81/2 × 14 or larger
Finisher Shift Tray
This section describes specifications for the finisher shift tray of Finisher SR3030.
Paper size:
A3 , B4 JIS , A4 , B5 JIS , A5 , B6 JIS , A6
12 × 18 , 11 × 17 , 11 × 15 , 10 × 14 , 81/2 × 14 , 81/2 × 13 , 81/2 × 11 , 81/
4
× 14 , 81/4 × 13 , 8 × 13 , 8 × 10 , 51/2 × 81/2, 71/4 × 101/2,
41/8 × 91/2, 37/8 × 71/2, C5 Env , C6 Env , DL Env , 8K , 16K , custom size
Paper weight:
60 256 g/m2 (16 lb. Bond 140 lb. Index)
Stack capacity (80 g/m2, 20 lb. Bond):
• 3,000 sheets: A4 , 81/2 × 11
• 1,500 sheets: A3 , B4 JIS , A4 , B5 JIS , 12 × 18 , 11 × 17 , 81/2 × 14 , 81/
2
× 11
• 500 sheets: A5
Specifications for Finisher SR3030 (3000-sheet) (Optional)
179
8

• 100 sheets: A5 , B6 JIS , A6 , 51/2 × 81/
2
Staple paper size:
A3 , B4 JIS , A4 , B5 JIS ,
11 × 17 , 11 × 15 , 10 × 14 , 81/2 × 14 , 81/2 × 11 , 71/4 × 101/2, 8 × 13 ,
81/2 × 13 , 81/4 × 14 , 81/4 × 13 , 8 × 10 ,
8K , 16K
Staple paper weight:
64 90 g/m2 (17 24 lb. Bond)
Staple capacity (80 g/m2, 20 lb. Bond):
• Without Mixed Size:
• 30 sheets: A3 , B4 JIS , 11 × 17 , 81/2 × 14 , 8 × 13 , 81/2 × 13 , 81/4 × 14
, 81/4 × 13 , 11 × 15 , 10 × 14 , 8K
• 50 sheets: A4 , B5 JIS , 81/2 × 11 , 8 × 10 , 71/4 × 101/2, 16K
• With Mixed Size:
30 sheets
Stack capacity after stapling (80 g/m2, 20 lb. Bond):
• Without Mixed Size:
• 2 19 sheets: 150 sets (A4 , 81/2 × 11 )
• 20 50 sheets: 150 60 sets (A4 , 81/2 × 11 )
• 2 14 sheets: 100 sets (A4 , B5 JIS , 81/2 × 11 )
• 15 50 sheets: 100 30 sets (A4 , B5 JIS , 81/2 × 11 )
• 2 14 sheets: 100 sets (other size paper)
• 15 30 sheets: 100 33 sets (other size paper)
• With Mixed Size:
• 2 30 sheets: 50 sets: A3 / A4 , B4 JIS / B5 JIS , 11 × 17 / 81/2 × 11
Staple position:
4 positions (Top, Top Slant, Bottom, 2 Staples)
Power consumption:
96 W or less (Power is supplied from the main unit.)
Dimensions (W × D × H):
657 × 613 × 960 mm (25.9 × 24.2 × 37.8 inches)
Weight:
• Approx. 54 kg (119.1 lb.) (without punch kit)
• Approx. 56 kg (123.5 lb.) (with punch kit)
8. Appendix
180
8

Specifications for Finisher SR3050 (500-sheet)
(Optional)
This section describes specifications for Finisher SR3050.
Paper size:
A3 , B4 JIS , A4 , B5 JIS , A5 , B6 JIS , A6 ,
11 × 17 , 11 × 15 , 10 × 14 , 81/2 × 14 , 81/2 × 13 , 81/2 × 11 , 81/4 × 14 ,
81/4 × 13 , 8 × 13 , 8 × 10 , 71/4 × 101/2, 51/2 × 81/2,
12 × 18 , 8K , 16K , custom size
Paper weight:
60 253 g/m2 (16 lb. Bond 140 lb. Index)
Stack capacity (80 g/m2, 20 lb. Bond):
• 500 sheets: A4, 81/2 × 11 or smaller
• 250 sheets: B4 JIS, 81/2 × 14 or larger
Staple paper size:
A3 , B4 JIS , A4 , B5 JIS ,
11 × 17 , 11 × 15 , 10 × 14 , 81/2 × 14 , 81/2 × 11 , 71/4 × 101/2, 8 × 13 ,
81/2 × 13 , 81/4 × 14 , 81/4 × 13 , 8 × 10 ,
8K , 16K
Staple paper weight:
60 157 g/m2 (16 lb. Bond 40 lb. Cover)
Staple capacity (80 g/m2, 20 lb. Bond):
• Without Mixed Size:
• 30 sheets: A3 , B4 JIS , 11 × 17 , 81/2 × 14 , 8 × 13 , 81/2 × 13 , 81/4 × 14
, 81/4 × 13 , 11 × 15 , 10 × 14 , 8K
• 50 sheets: A4 , B5 JIS , 81/2 × 11 , 8 × 10 , 71/4 × 101/2, 16K
• With Mixed Size:
30 sheets
Stack capacity after stapling (80 g/m2, 20 lb. Bond):
• 2 9 sheets: 55 46 sets (A4 , B5 JIS , 81/2 × 11 )
• 10 50 sheets: 45 10 sets (A4 , B5 JIS , 81/2 × 11 )
• 2 9 sheets: 55 27 sets (A4 , B5 JIS , 81/2 × 11 )
• 10 50 sheets: 25 8 sets (A4 , B5 JIS , 81/2 × 11 )
• 2 9 sheets: 55 27 sets (A3 , B4 JIS , 11 × 17 , 81/2 × 14 )
Specifications for Finisher SR3050 (500-sheet) (Optional)
181
8

• 10 30 sheets: 25 8 sets (A3 , B4 JIS , 11 × 17 , 81/2 × 14 )
Staple position:
5 positions (Top, Top Slant, Bottom, Bottom Slant, 2 Staples)
Power consumption:
50 W or less (Power is supplied from the main unit.)
Dimensions (W × D × H):
396 × 551 × 275 mm (15.6 × 21.7 ×10.9 inches)
Weight:
Approx. 12 kg (26.5 lb.)
8. Appendix
182
8

Specifications for Booklet Finisher SR3020
(2000-sheet-Booklet) (Optional)
This section describes specifications for Booklet Finisher SR3020.
Finisher Upper Tray
This section describes specifications for the finisher upper tray of Booklet Finisher SR3020.
Paper size:
A3 , B4 JIS , A4 , B5 JIS , A5 , B6 JIS , A6 ,
12 × 18 , 11 × 17 , 11 × 15 , 10 × 14 , 81/2 × 14 , 81/2 × 13 , 81/2 × 11 , 81/
4
× 14 , 81/4 × 13 , 8 × 13 , 8 × 10 , 51/2 × 81/2, 71/4 × 101/2,
8K , 16K , custom size
Paper weight:
60 163 g/m2 (16 lb. Bond 90 lb. Index)
Stack capacity (80 g/m2, 20 lb. Bond):
• 250 sheets: A4, 81/2 × 11 or smaller
• 50 sheets: B4 JIS, 81/2 × 14 or larger
Finisher Shift Tray
This section describes specifications for the finisher shift tray of Booklet Finisher SR3020.
Paper size:
A3 , B4 JIS , A4 , B5 JIS , A5 , B6 JIS , A6 ,
12 × 18 , 11 × 17 , 11 × 15 , 10 × 14 , 81/2 × 14 , 81/2 × 13 , 81/2 × 11 , 81/
4
× 14 , 81/4 × 13 , 8 × 13 , 8 × 10 , 51/2 × 81/2, 71/4 × 101/2,
41/8 × 91/2, 37/8 × 71/2, C5 Env , C6 Env , DL Env , 8K , 16K , custom size
Paper weight:
60 256 g/m2 (16 lb. Bond 140 lb. Index)
Stack capacity (80 g/m2, 20 lb. Bond):
• 2,000 sheets: A4 , 81/2 × 11
• 1,000 sheets: A3 , B4 JIS , A4 , B5 JIS , 11 × 17 , 81/2 × 14 , 81/2 × 11 , 12
× 18
• 500 sheets: A5
Specifications for Booklet Finisher SR3020 (2000-sheet-Booklet) (Optional)
183
8

• 100 sheets: A5 , B6 JIS , A6 , 51/2 × 81/
2
Staple paper size:
A3 , B4 JIS , A4 , B5 JIS ,
11 × 17 , 11 × 15 , 10 × 14 , 81/2 × 14 , 81/2 × 11 , 71/4 × 101/2, 8 × 13 ,
81/2 × 13 , 81/4 × 14 , 81/4 × 13 , 8 × 10 ,
8K , 16K
Staple paper weight:
64 90 g/m2 (17 24 lb. Bond)
Staple capacity (80 g/m2, 20 lb. Bond):
• Without Mixed Size:
• 30 sheets: A3 , B4 JIS , 11 × 17 , 81/2 × 14 , 8 × 13 , 81/2 × 13 , 81/4 × 14
, 81/4 × 13 , 11 × 15 , 10 × 14 , 8K
• 50 sheets: A4 , B5 JIS , 81/2 × 11 , 8 × 10 , 71/4 × 101/2, 16K
• With Mixed Size: 30 sheets
Stack capacity after stapling (80 g/m2, 20 lb. Bond):
• Without Mixed Size:
• 2 12 sheets: 150 sets (A4 , 81/2 × 11 )
• 13 50 sheets: 150 40 sets (A4 , 81/2 × 11 )
• 2 9 sheets: 100 sets (A4 , B5 JIS , 81/2 × 11 )
• 10 50 sheets: 100 20 sets (A4 , B5 JIS , 81/2 × 11 )
• 2 9 sheets: 100 sets (other size paper)
• 10 30 sheets: 100 33 sets (other size paper)
• With Mixed Size:
• 2 30 sheets: 50 sets (A3 /A4 , B4 JIS /B5 JIS , 11 × 17 /81/2 ×11 )
Staple position:
4 positions (Top, Top Slant, Bottom, 2 Staples)
Finisher Booklet Tray
This section describes specifications for the finisher booklet tray of Booklet Finisher SR3020.
Saddle stitch paper size:
A3 , B4 JIS , A4 , B5 JIS , 11 × 17 , 81/2 × 14 , 81/2 × 11
Saddle stitch paper weight:
64 90 g/m2 (17 24 lb. Bond)
8. Appendix
184
8

Saddle stitch capacity (80 g/m2, 20 lb. Bond):
1 set (15 sheets)
Stack capacity after saddle stitching (80 g/m2, 20 lb. Bond):
• 2 5 sheets: approx. 30 sets
• 6 10 sheets: approx. 15 sets
• 11 15 sheets: approx. 10 sets
Saddle stitch position:
Center 2 positions
Power consumption:
96 W or less (Power is supplied from the main unit.)
Dimensions (W × D × H):
657 × 613 × 960 mm (25.9 × 24.2 × 37.8 inches)
Weight:
• Approx. 63 kg (138.9 lb.) (without punch kit)
• Approx. 65 kg (143.3 lb.) (with punch kit)
Specifications for Booklet Finisher SR3020 (2000-sheet-Booklet) (Optional)
185
8

Specifications for Booklet Finisher SR3000
(1000-sheet-Booklet) (Optional)
This section describes specifications for Booklet Finisher SR3000.
Finisher Upper Tray
This section describes specifications for the finisher upper tray of Booklet Finisher SR3000.
Paper size:
A3 , B4 JIS , A4 , B5 JIS , A5 , B6 JIS , A6 ,
12 × 18 , 11 × 17 , 11 × 15 , 10 × 14 , 81/2 × 14 , 81/2 × 13 , 81/2 × 11 , 81/
4
× 14 , 81/4 × 13 , 8 × 13 , 8 × 10 , 51/2 × 81/2, 71/4 × 101/2,
8K , 16K , custom size
Paper weight:
60 105 g/m2 (16 28 lb. Bond)
Stack capacity (80 g/m2, 20 lb. Bond):
• 100 sheets: A4, 81/2 × 11 or smaller
• 50 sheets: B4 JIS, 81/2 × 14 or larger
Finisher Shift Tray
This section describes specifications for the finisher shift tray of Booklet Finisher SR3000.
Paper size:
A3 , B4 JIS , A4 , B5 JIS , A5 , B6 JIS , A6 ,
12 × 18 , 11 × 17 , 11 × 15 , 10 × 14 , 81/2 × 14 , 81/2 × 13 , 81/2 × 11 , 81/
4
× 14 , 81/4 × 13 , 8 × 13 , 8 × 10 , 51/2 × 81/2, 71/4 × 101/2,
8K , 16K , custom size
Paper weight:
60 256 g/m2 (16 lb. Bond 140 lb. Index)
Stack capacity (80 g/m2, 20 lb. Bond):
• 1,000 sheets: A4, 81/2 × 11 or smaller
• 500 sheets: B4 JIS, 81/2 × 14 or larger
Staple paper size:
A3 , B4 JIS , A4 , B5 JIS ,
8. Appendix
186
8

11 × 17 , 11 × 15 , 10 × 14 , 81/2 × 14 , 81/2 × 11 , 71/4 × 101/2, 8 × 13 ,
81/2 × 13 , 81/4 × 14 , 81/4 × 13 , 8 × 10 ,
8K , 16K
Staple paper weight:
64 90 g/m2 (17 24 lb. Bond)
Staple capacity (80 g/m2, 20 lb. Bond):
• Without Mixed Size:
• 30 sheets: A3 , B4 JIS , 11 × 17 , 81/2 × 14 , 8 × 13 , 81/2 × 13 , 81/4 × 14
, 81/4 × 13 , 11 × 15 , 10 × 14 , 8K
• 50 sheets: A4 , B5 JIS , 81/2 × 11 , 8 × 10 , 71/4 × 101/2, 16K
• With Mixed Size: 20 sheets
Stack capacity after stapling (80 g/m2, 20 lb. Bond):
• 2 9 sheets: 100 sets (A4 , 81/2 × 11 )
• 10 50 sheets: 100 20 sets (A4 , 81/2 × 11 )
• 2 9 sheets: 100 sets (A4 , B5 JIS , 81/2 × 11 )
• 10 50 sheets: 50 10 sets (A4 , B5 JIS , 81/2 × 11 )
• 2 9 sheets: 50 sets (A3 , B4 JIS , 11 × 17 , 81/2 × 14 )
• 10 30 sheets: 50 10 sets (A3 , B4 JIS , 11 × 17 , 81/2 × 14 )
Staple position:
3 positions (Top, Bottom, 2 Staples)
Finisher Booklet Tray
This section describes specifications for the finisher booklet tray of Booklet Finisher SR3000.
Saddle stitch paper size:
A3 , B4 JIS , A4 , B5 JIS , 11 × 17 , 81/2 × 14 , 81/2 × 11
Saddle stitch paper weight:
64 90 g/m2 (17 24 lb. Bond)
Saddle stitch capacity (80 g/m2, 20 lb. Bond):
1 set (10 sheets)
Stack capacity after saddle stitching (80 g/m2, 20 lb. Bond):
• 2 to 5 sheets: 20 sets
• 6 to 10 sheets: 10 sets
Specifications for Booklet Finisher SR3000 (1000-sheet-Booklet) (Optional)
187
8

Saddle stitch position:
Center 2 positions
Power consumption:
60 W or less (Power is supplied from the main unit.)
Dimensions (W × D × H):
535 × 600 × 930 mm (21.1 × 23.7 × 36.7 inches)
Weight:
• Approx. 48 kg (105.9 lb.) (without punch kit)
• Approx. 50 kg (110.3 lb.) (with punch kit)
8. Appendix
188
8

Specifications for Punch Unit (Finisher SR3030,
Booklet Finisher SR3020) (Optional)
This section describes specifications for the punch unit (Finisher SR3030, Booklet Finisher SR3020).
Paper size:
Punch unit type Paper size
2 & 4 holes type: 2 holes
: A3, B4 JIS, A4, B5 JIS, A5, 11 × 17, 81/2 × 14, 81/2 × 11,
51/2 × 81/2, 71/4 × 101/2, 8 × 13, 81/2 × 13, 81/4 × 13, 8K,
16K, 81/4 × 14, 8 × 10, 11 × 15, 10 × 14, custom size
2 & 4 holes type: 2 holes : A4, B5 JIS, A5, 81/2 × 11, 71/4 × 101/2, 16K, custom size
2 & 4 holes type: 4 holes : A3, B4 JIS, 11 × 17, 11 × 15, 8K, custom size
2 & 4 holes type: 4 holes : A4, B5 JIS, 81/2 × 11, 71/4 × 101/2, 16K, custom size
4 holes type: 4 holes
: A3, B4 JIS, A4, B5 JIS, A5, 11 × 17, 81/2 × 14, 81/2 × 11,
51/2 × 81/2, 71/4 × 101/2, 8 × 13, 81/2 × 13, 81/4 × 13, 8K,
16K, 81/4 × 14, 8 × 10, 11 × 15, 10 × 14, custom size
4 holes type: 4 holes : A4, B5 JIS, A5, 81/2 × 11, 71/4 × 101/2, 16K, custom size
2 & 3 holes type: 2 holes
: A3, B4 JIS, A4, B5 JIS, A5, 11 × 17, 81/2 × 14, 81/2 × 11,
51/2 × 81/2, 71/4 × 101/2, 8 × 13, 81/2 × 13, 81/4 × 13, 8K,
16K, 81/4 × 14, 8 × 10, 11 × 15, 10 × 14, custom size
2 & 3 holes type: 2 holes : A4, B5 JIS, A5, 81/2 × 11, 71/4 × 101/2, 16K, custom size
2 & 3 holes type: 3 holes : A3, B4 JIS, 11 × 17, 11 × 15, 10 × 14, 8K, custom size
2 & 3 holes type: 3 holes : A4, B5 JIS, 81/2 × 11, 71/4 × 101/2, 16K, custom size
Paper weight:
60 163 g/m2 (16 lb. Bond 90 lb. Index)
Power consumption:
20 W (Power is supplied from the main unit.)
Dimensions (W × D × H):
110 × 484 × 117 mm (4.4 × 19.1 × 4.7 inches)
Weight:
Approx. 2.9 kg (6.4 lb.)
Specifications for Punch Unit (Finisher SR3030, Booklet Finisher SR3020) (Optional)
189
8

Specifications for Punch Unit (Booklet Finisher
SR3000) (Optional)
This section describes specifications for the punch unit (Booklet Finisher SR3000).
Paper size:
Punch unit type Paper size
2 & 4 holes type: 2 holes
: A3, B4 JIS, A4, B5 JIS, A5, 11 × 17, 81/2 × 14, 81/2 × 11,
51/2 × 81/2, 71/4 × 101/2, 8 × 13, 81/2 × 13, 81/4 × 13, 8K,
16K, 81/4 × 14, 8 × 10, 11 × 15, 10 × 14
2 & 4 holes type: 2 holes : A4, B5 JIS, A5, 81/2 × 11, 71/4 × 101/2, 16K
2 & 4 holes type: 4 holes : A3, B4 JIS, 11 × 17, 11 × 15, 8K
2 & 4 holes type: 4 holes : A4, B5 JIS, 81/2 × 11, 71/4 × 101/2, 16K
4 holes type: 4 holes
: A3, B4 JIS, A4, B5 JIS, A5, 11 × 17, 81/2 × 14, 81/2 × 11,
51/2 × 81/2, 71/4 × 101/2, 8 × 13, 81/2 × 13, 81/4 × 13, 8K,
16K, 81/4 × 14, 8 × 10, 11 × 15, 10 × 14
4 holes type: 4 holes : A4, B5 JIS, A5, 81/2 × 11, 71/4 × 101/2, 16K
2 & 3 holes type: 2 holes
: A3, B4 JIS, A4, B5 JIS, A5, 11 × 17, 81/2 × 14, 81/2 × 11,
51/2 × 81/2, 71/4 × 101/2, 8 × 13, 81/2 × 13, 81/4 × 13, 8K,
16K, 81/4 × 14, 8 × 10, 11 × 15, 10 × 14
2 & 3 holes type: 2 holes : A4, B5 JIS, A5, 81/2 × 11, 71/4 × 101/2, 16K
2 & 3 holes type: 3 holes : A3, B4 JIS, 11 × 17, 11 × 15, 10 × 14, 8K
2 & 3 holes type: 3 holes : A4, B5 JIS, 81/2 × 11, 71/4 × 101/2, 16K
Paper weight:
60 163 g/m2 (16 lb. Bond 90 lb. Index)
8. Appendix
190
8

Specifications for Lower Paper Tray (Optional)
This section describes specifications for the lower paper tray.
Paper size:
A3 , A4 , A5 , B4 JIS , B5 JIS , 11 × 17 , 81/2 × 14 , 81/2 × 13 , 81/2 × 11
, 81/4 × 14 , 81/4 × 13 , 8 × 13 , 8 × 10 , 71/4 × 101/2, 8K , 16K , 11 × 15
, 10 × 14 , custom size
Paper weight:
60 256 g/m2 (16 lb. Bond 140 lb. Index)
Paper capacity (80 g/m2, 20 lb. Bond):
550 sheets × 1 tray
Power consumption:
55 W or less (Power is supplied from the main unit.)
Dimensions (W × D × H):
580 × 620 × 120 mm (22.9 × 24.5 × 4.8 inches)
Weight:
Approx. 15 kg (33.1 lb.)
Specifications for Lower Paper Tray (Optional)
191
8

Specifications for Lower Paper Trays (Optional)
This section describes specifications for the lower paper trays.
Paper size:
A3 , A4 , A5 , B4 JIS , B5 JIS , 11 × 17 , 81/2 × 14 , 81/2 × 13 , 81/2 × 11
, 81/4 × 14 , 81/4 × 13 , 8 × 13 , 8 × 10 , 71/4 × 101/2, 8K , 16K , 11 × 15
, 10 × 14 , custom size
Paper weight:
60 256 g/m2 (16 lb. Bond 140 lb. Index)
Paper capacity (80 g/m2, 20 lb. Bond):
550 sheets × 2 trays
Power consumption:
60 W or less (Power is supplied from the main unit.)
Dimensions (W × D × H):
580 × 620 × 260 mm (22.9 × 24.5 × 10.3 inches)
Weight:
Approx. 26 kg (57.4 lb.)
8. Appendix
192
8
 Loading...