

4. Adding Toner and Staples
4
Draft 2008/06/09
This chapter explains how to replenish toner and staples when they run out.
Adding Toner
This section describes how to replace toner.
• Do not incinerate used toner or toner containers. Toner dust might ignite when exposed to an open
flame. Dispose of used toner containers in accordance with local regulations.
• Keep toner (used or unused) and toner containers out of reach of children.
• If toner or used toner is inhaled, gargle with plenty of water and move into a fresh air environment.
Consult a doctor if necessary.
• If toner or used toner gets into your eyes, flush immediately with large amounts of water. Consult
a doctor if necessary.
• If toner or used toner is swallowed, dilute by drinking a large amount of water. Consult a doctor
if necessary.
• Avoid getting toner on your clothes or skin when removing a paper jam or replacing toner. If your
skin comes into contact with toner, wash the affected area thoroughly with soap and water.
• If toner gets on your clothing, wash with cold water. Hot water will set the toner into the fabric and
may make removing the stain impossible.
• Do not open toner containers forcefully. Toner can spill, dirtying your clothes or hands, and possibly
resulting in accidental ingestion.
101
BHL001S
4. Adding Toner and Staples
4
Draft 2008/06/09
• Always add toner when the machine instructs you.
• Fault may occur if you use toner other than the recommended type.
• When adding toner, do not turn off the operation switch. If you do, settings will be lost.
• Do not repeatedly install and remove toner cartridges. This will result in toner leakage.
• Do not shake the removed toner cartridge. Remaining toner might scatter.
• If the message " Check toner cartridge replacement(s)." appears, the toner has almost run out. Have
a replacement toner cartridge at hand.
• You can check name of the required toner name and the replacement procedure using the " Add
Toner" screen.
• Press [System Status] to check contact number where you can order supplies. See “Checking Machine
Status and Settings”, Troubleshooting .
• You can add all four color toners in the same way.
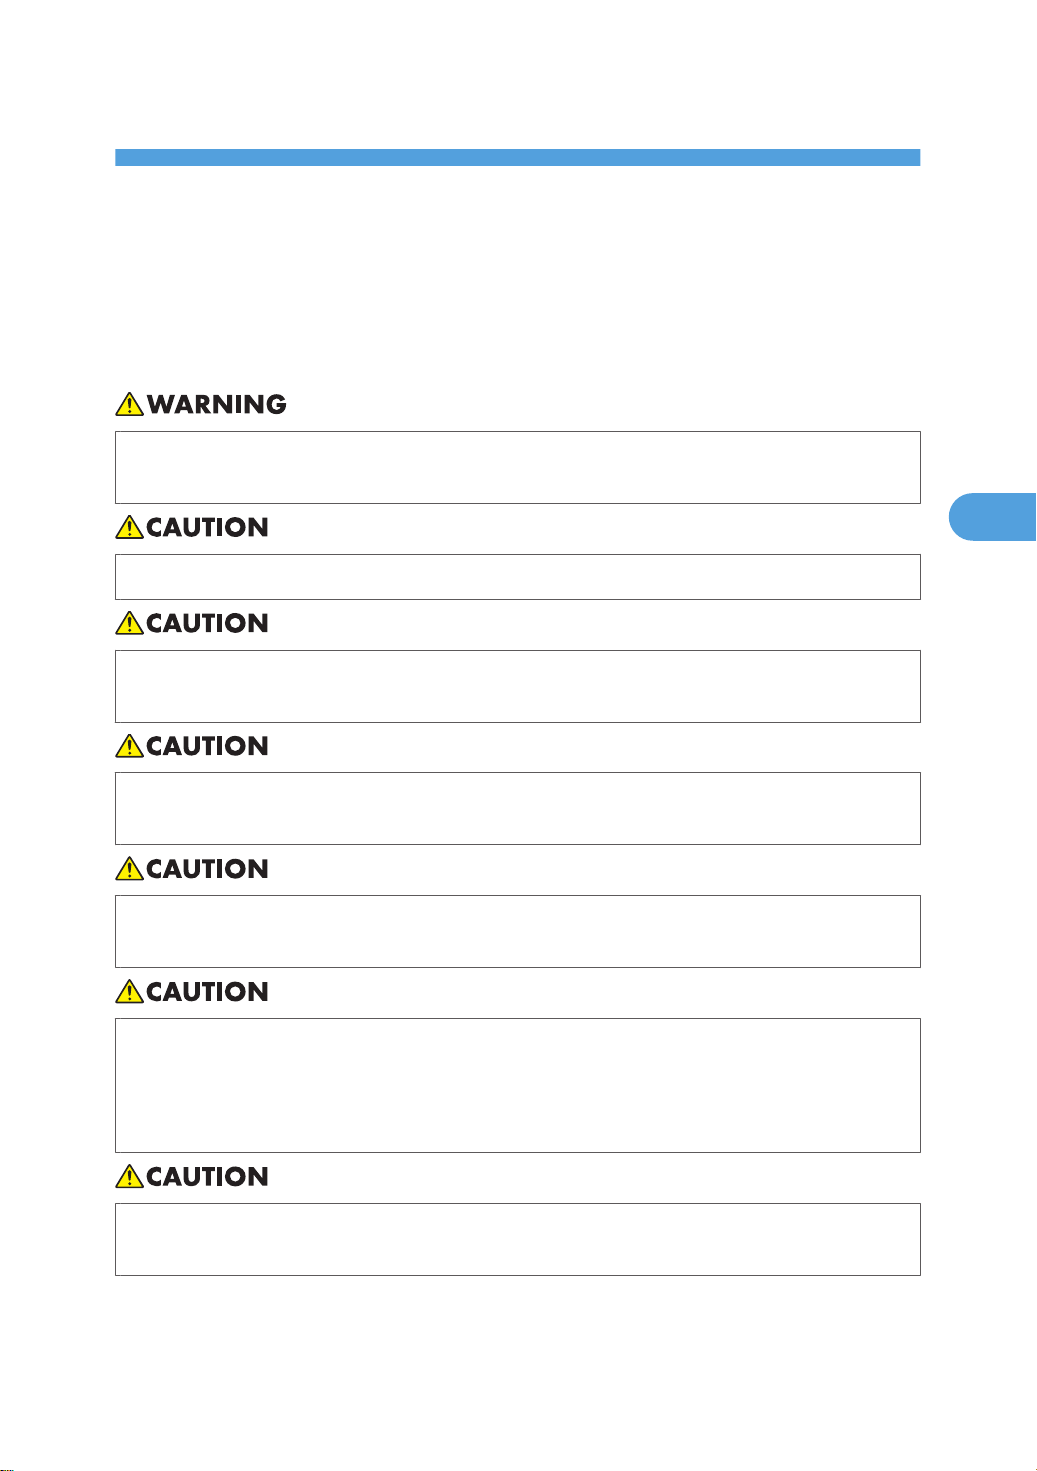
Replacing Toner
This section describes how to remove toner.
102

Adding Toner
4
Draft 2008/06/09
Sending Faxes or Scanned Documents When Toner Has Run Out
When the machine has run out of toner, the indicator on the display lights. Note that even if there is no
toner left, you can still send faxes or scanned documents.
• If number of communications executed after the toner has run out and not listed in the automatically
output Journal exceeds 200, communication is not possible.
1. Make sure the machine is in facsimile or scanner mode.
2. Press [Exit], and then perform transmission operation.
The error message disappears.
• Any reports are not printed.
• If the fax or scanner screen does not appear in step 1, press the [Facsimile] key or the [Scanner] key.
Used Toner
Toner cannot be re-used.
Bring the stored used container to your sales representative or service representative for recycling through
our recycling system. If you discard it on your own, treat it as general plastic waste material.
103

4. Adding Toner and Staples
4
Draft 2008/06/09
Adding Staples
This section describes what to do when staples need replacing.
• Keep your hands clear of the booklet finisher tray when pulling out or pushing in the finisher's staple
unit. You can trap your fingers if you do not.
• Stapling failures or jams may occur if you use a staple cartridge other than that recommended.
• If you cannot pull out the upper unit, there are staples remaining inside the cartridge. Use all the
staples, and do not add more.
• Refill the stapler according to the finisher type. Check the type if you are unsure. For details about
type of finisher, see “Appendix”.
• p.141 "Appendix"
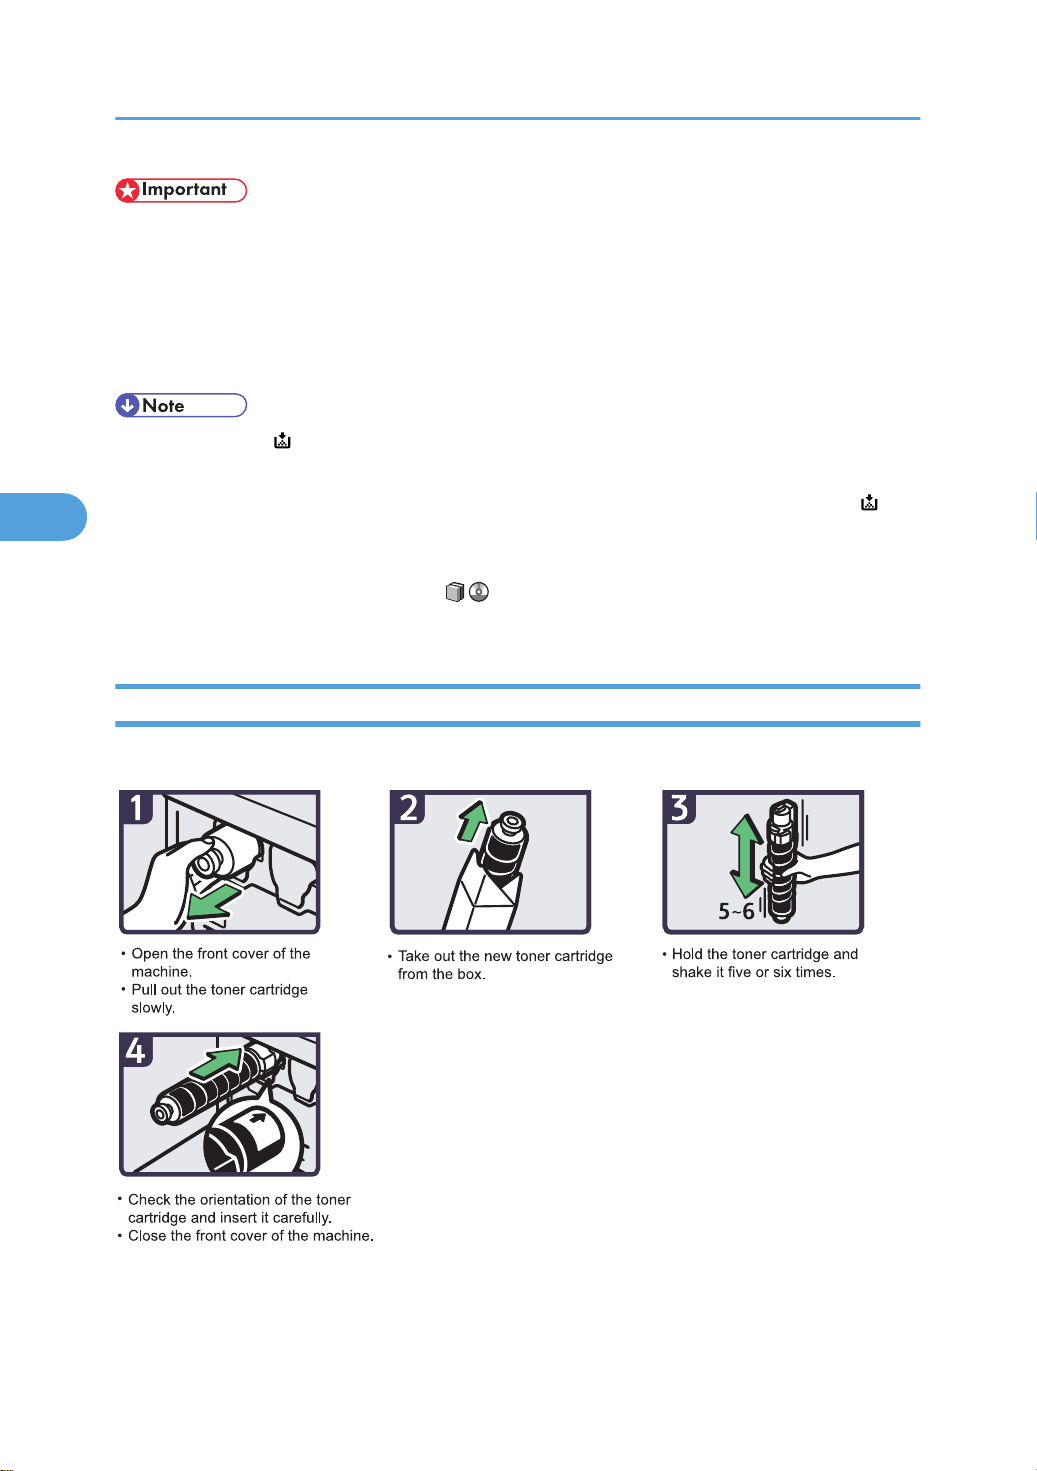
Finisher SR3010
This section describes how to add staples to the Finisher SR3010.
104
BBT023S
Adding Staples
4
Draft 2008/06/09
Finisher SR790
This section describes how to add staples to the Finisher SR790.
105
BBT024S
4. Adding Toner and Staples
4
Draft 2008/06/09
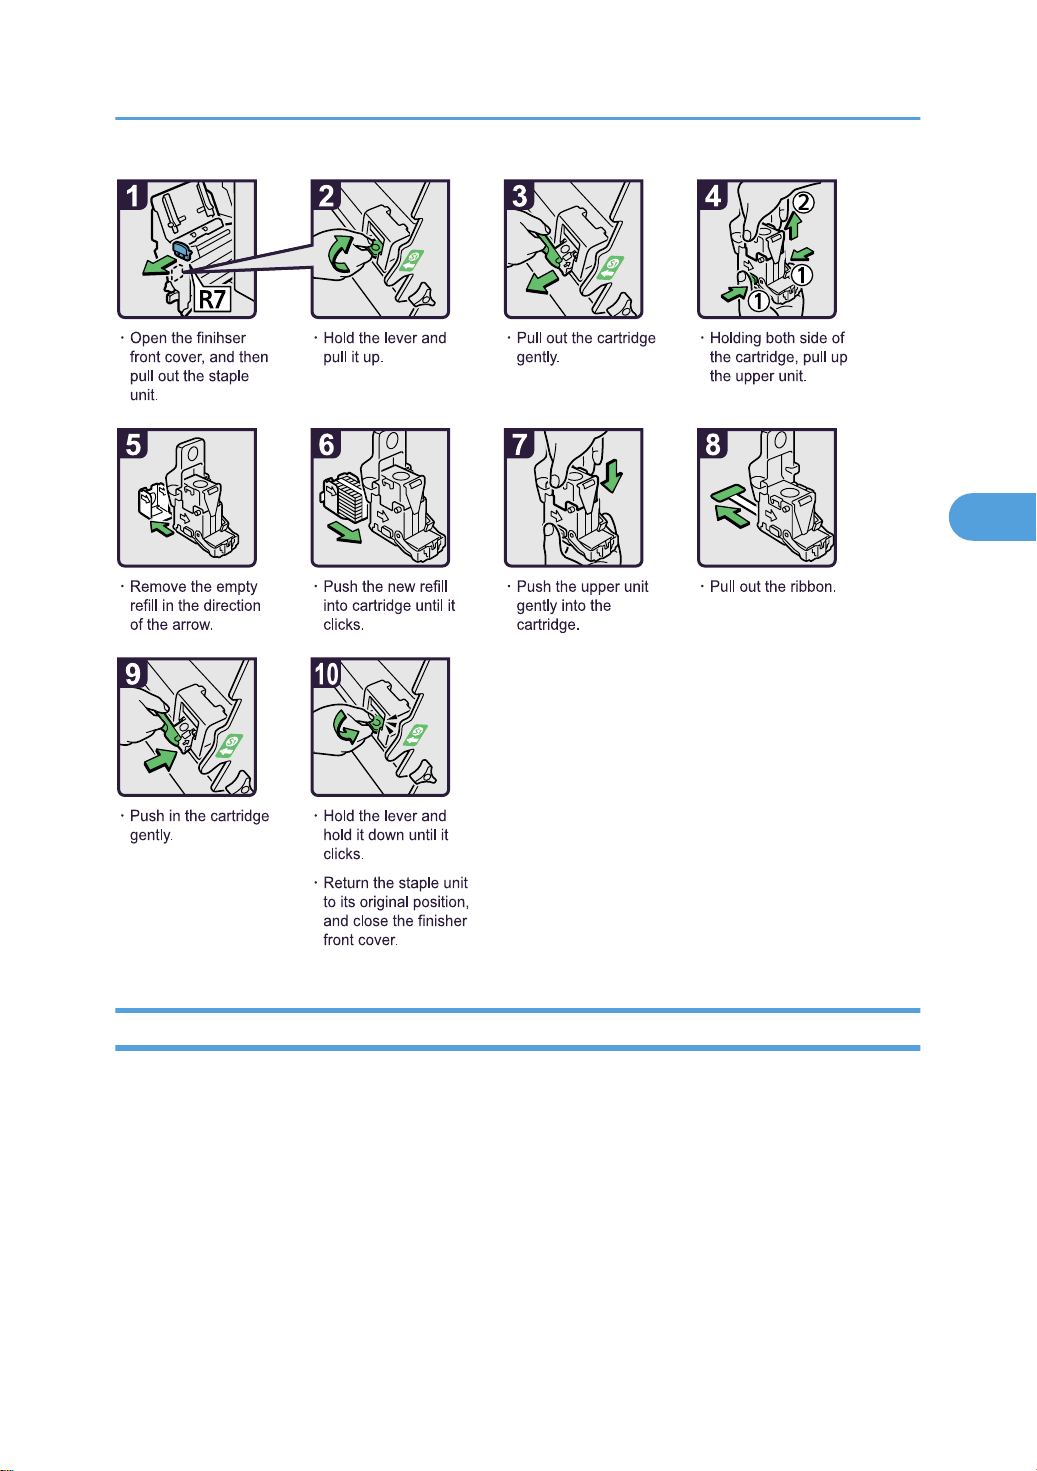
Booklet Finisher SR3000
This section describes how to add staples to the Booklet Finisher SR3000.
106
BBT025S
Adding Staples
4
Draft 2008/06/09
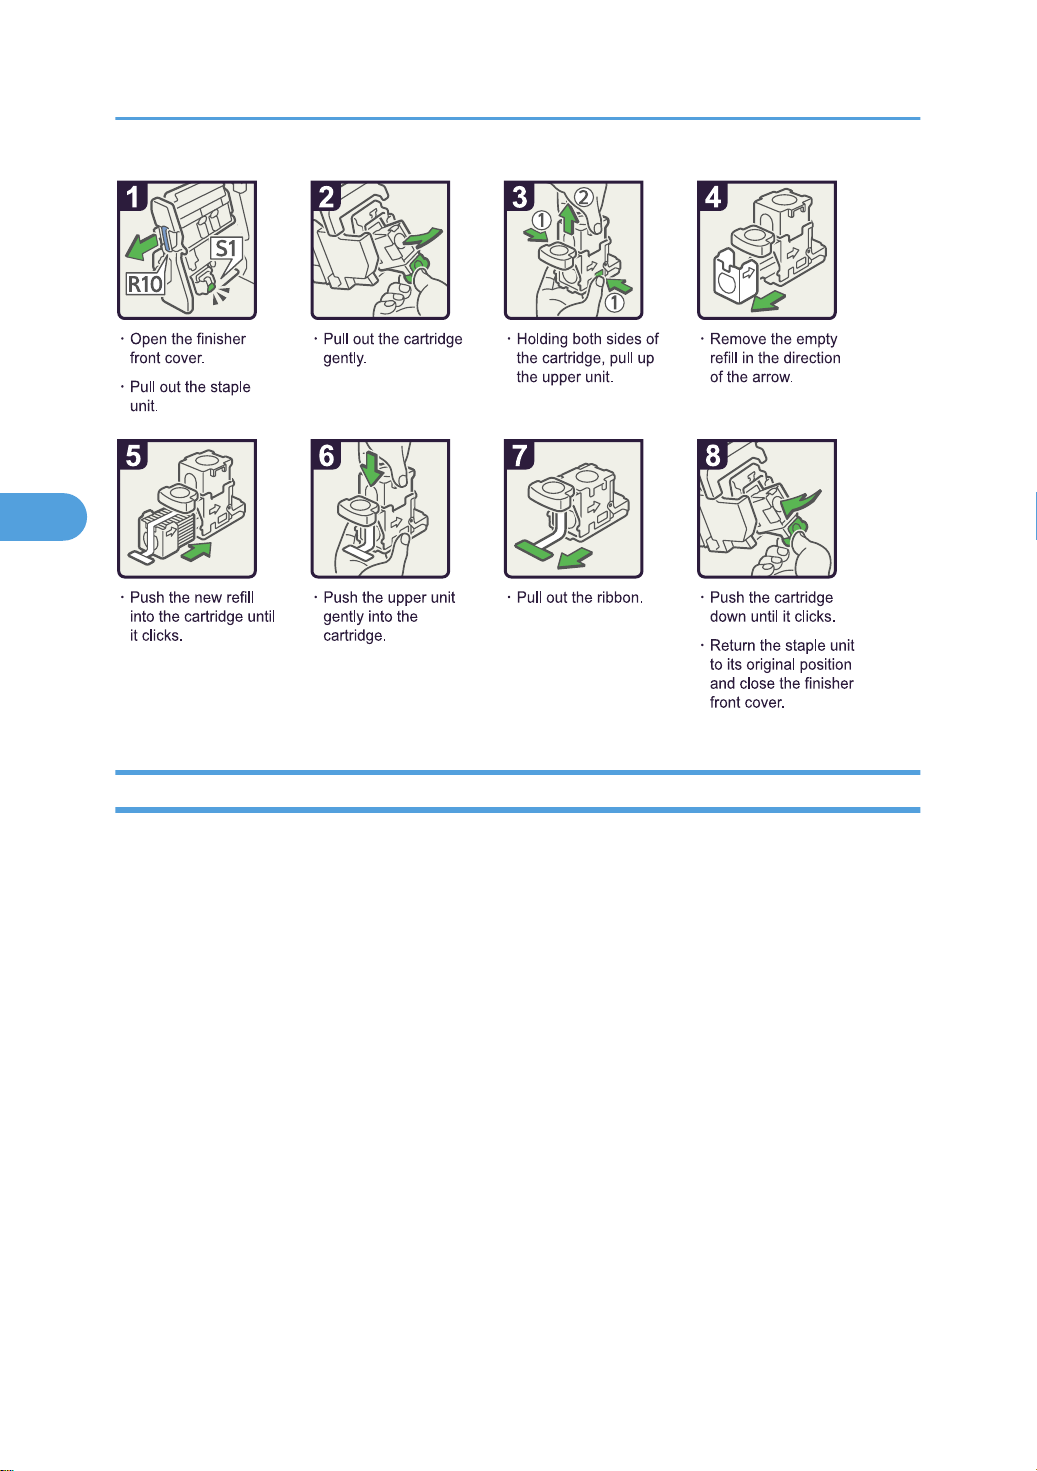
Booklet Finisher SR3020
This section describes how to add staples to the Booklet Finisher SR3020.
107
BAZ034S
4. Adding Toner and Staples
4
Draft 2008/06/09
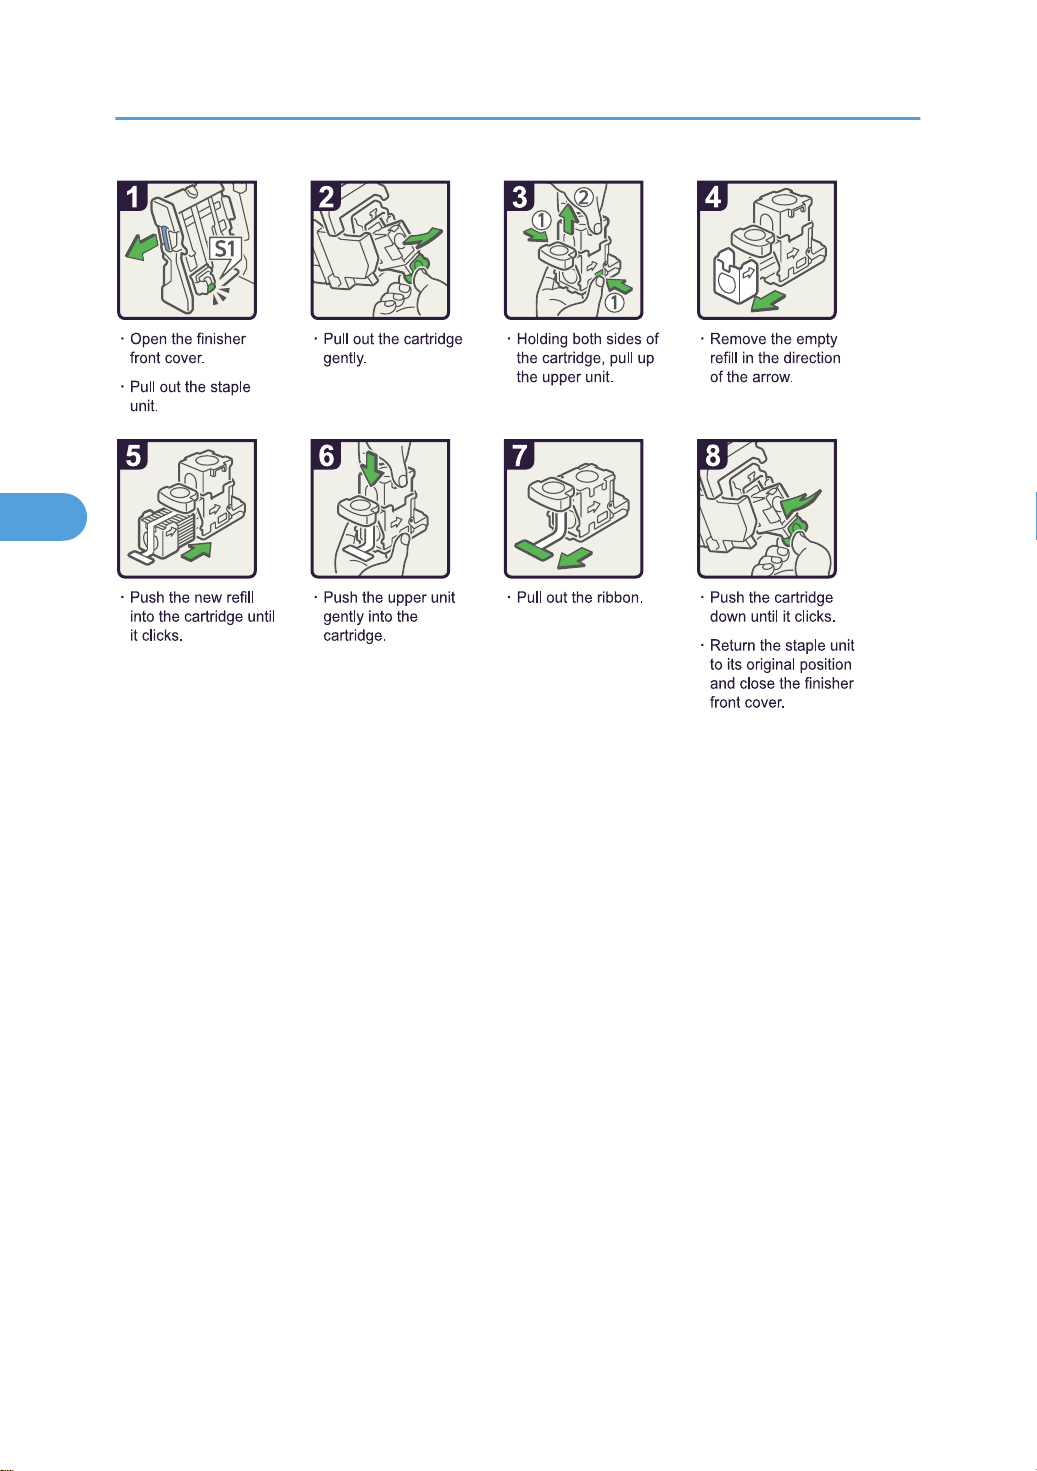
Booklet Finisher SR3020
This section describes how to add staples to the Booklet Finisher SR3020.
108

BAZ035S
Adding Staples
4
Draft 2008/06/09
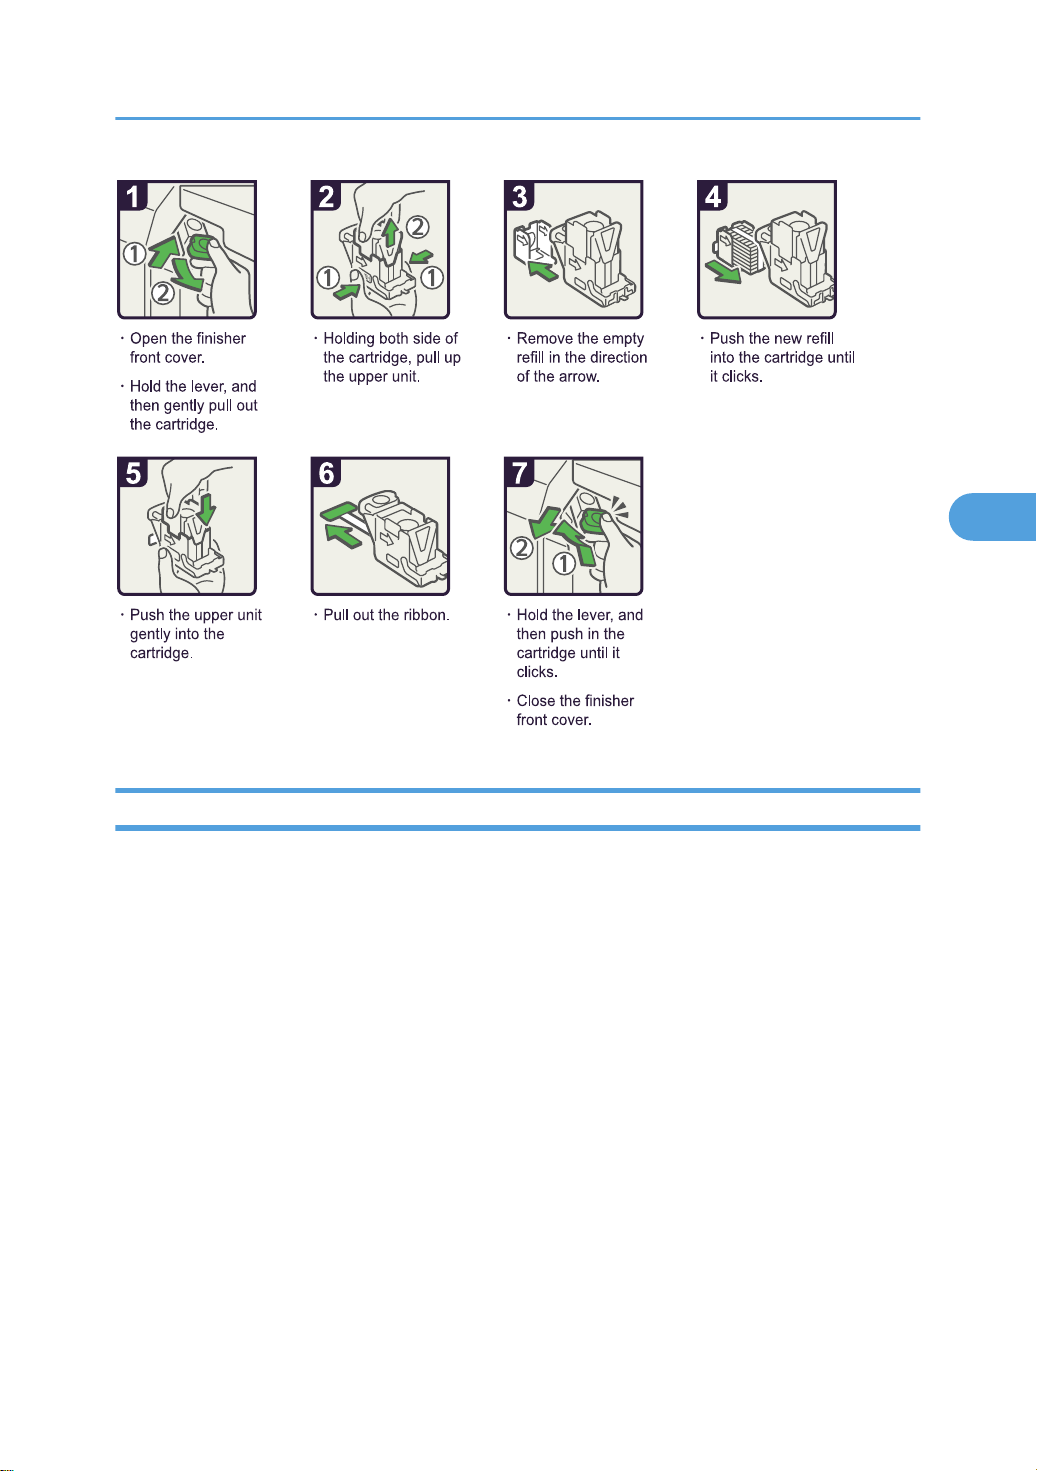
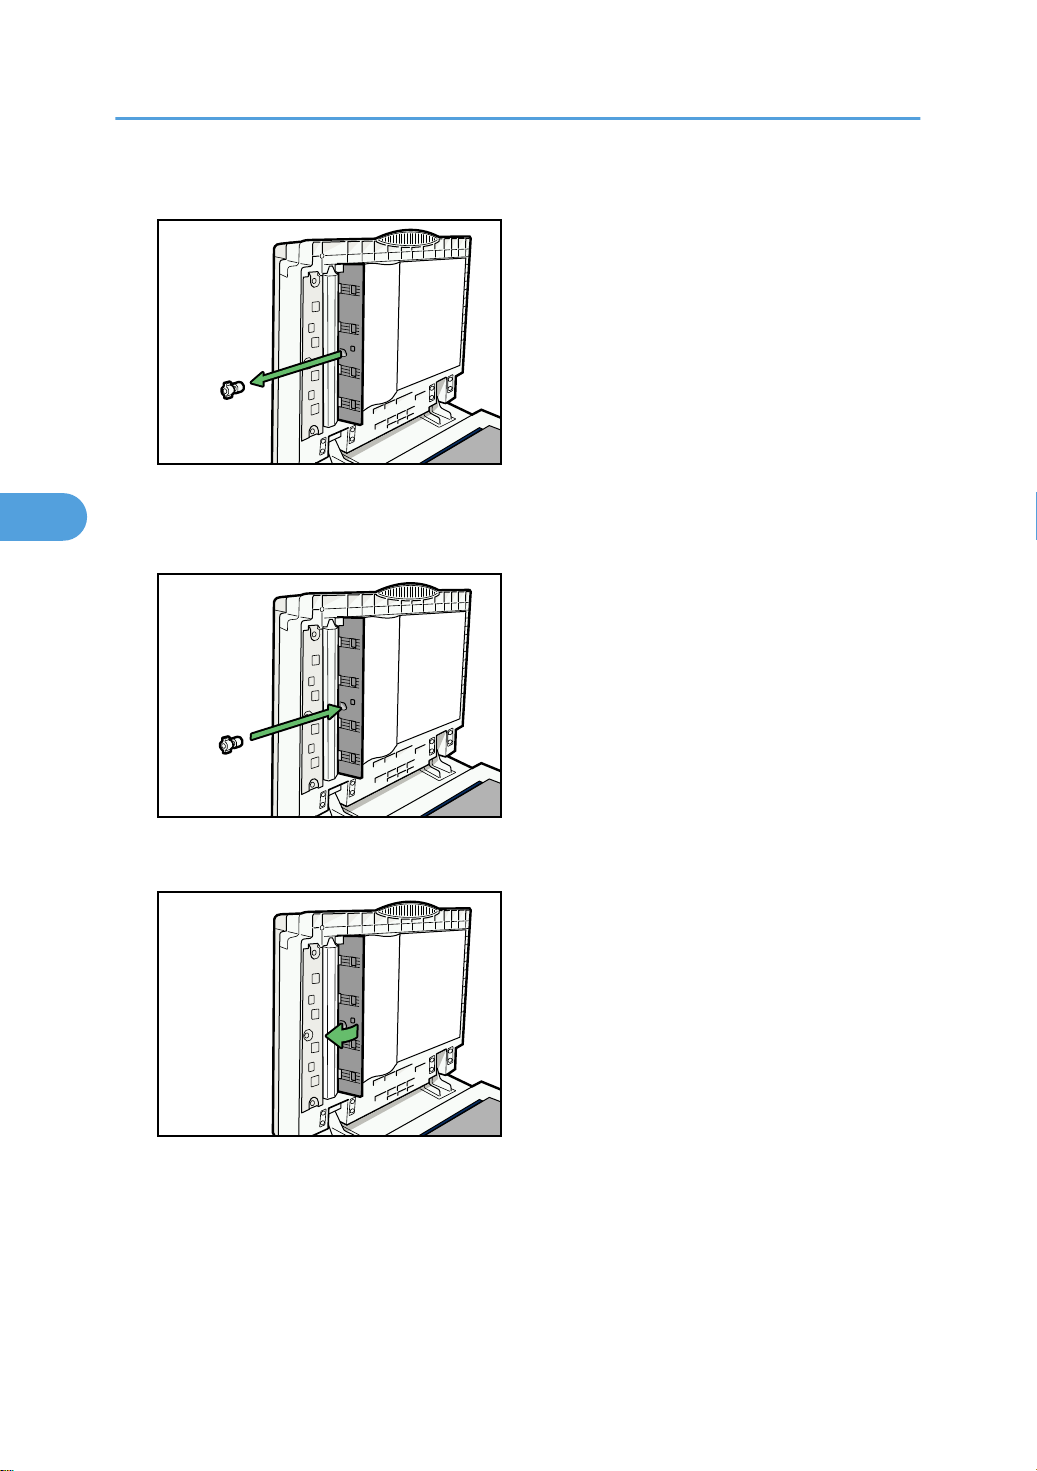
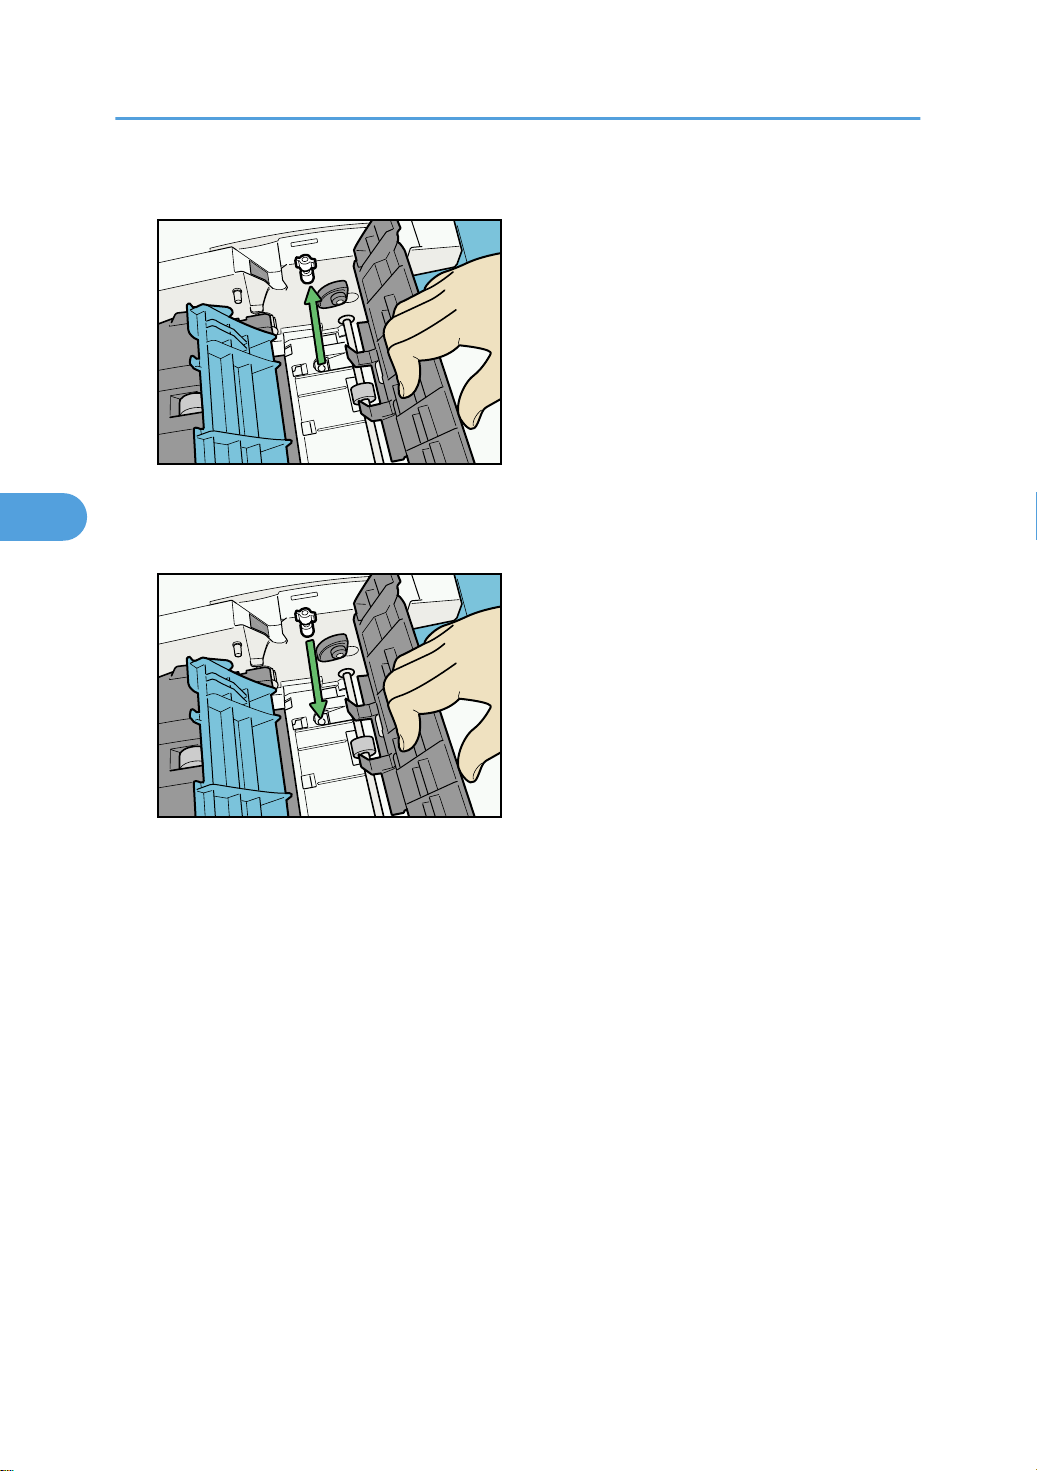
Finisher SR3030
This section describes how to add staples to the Finisher SR3030.
109
BAZ033S
4. Adding Toner and Staples
4
Draft 2008/06/09
110
BBT007S
BBT008S
Replacing the Stamp Cartridge
4
Draft 2008/06/09
Replacing the Stamp Cartridge
If the transmission stamp becomes faint, replace the cartridge.
• This stamp cartridge is used for facsimile and scanner functions.
• Do not add ink to the cartridge by yourself. Neglecting this can cause ink leakage.
• Be sure not to dirty your fingers with ink from the cartridge.
• Use the cartridge specified for this machine.
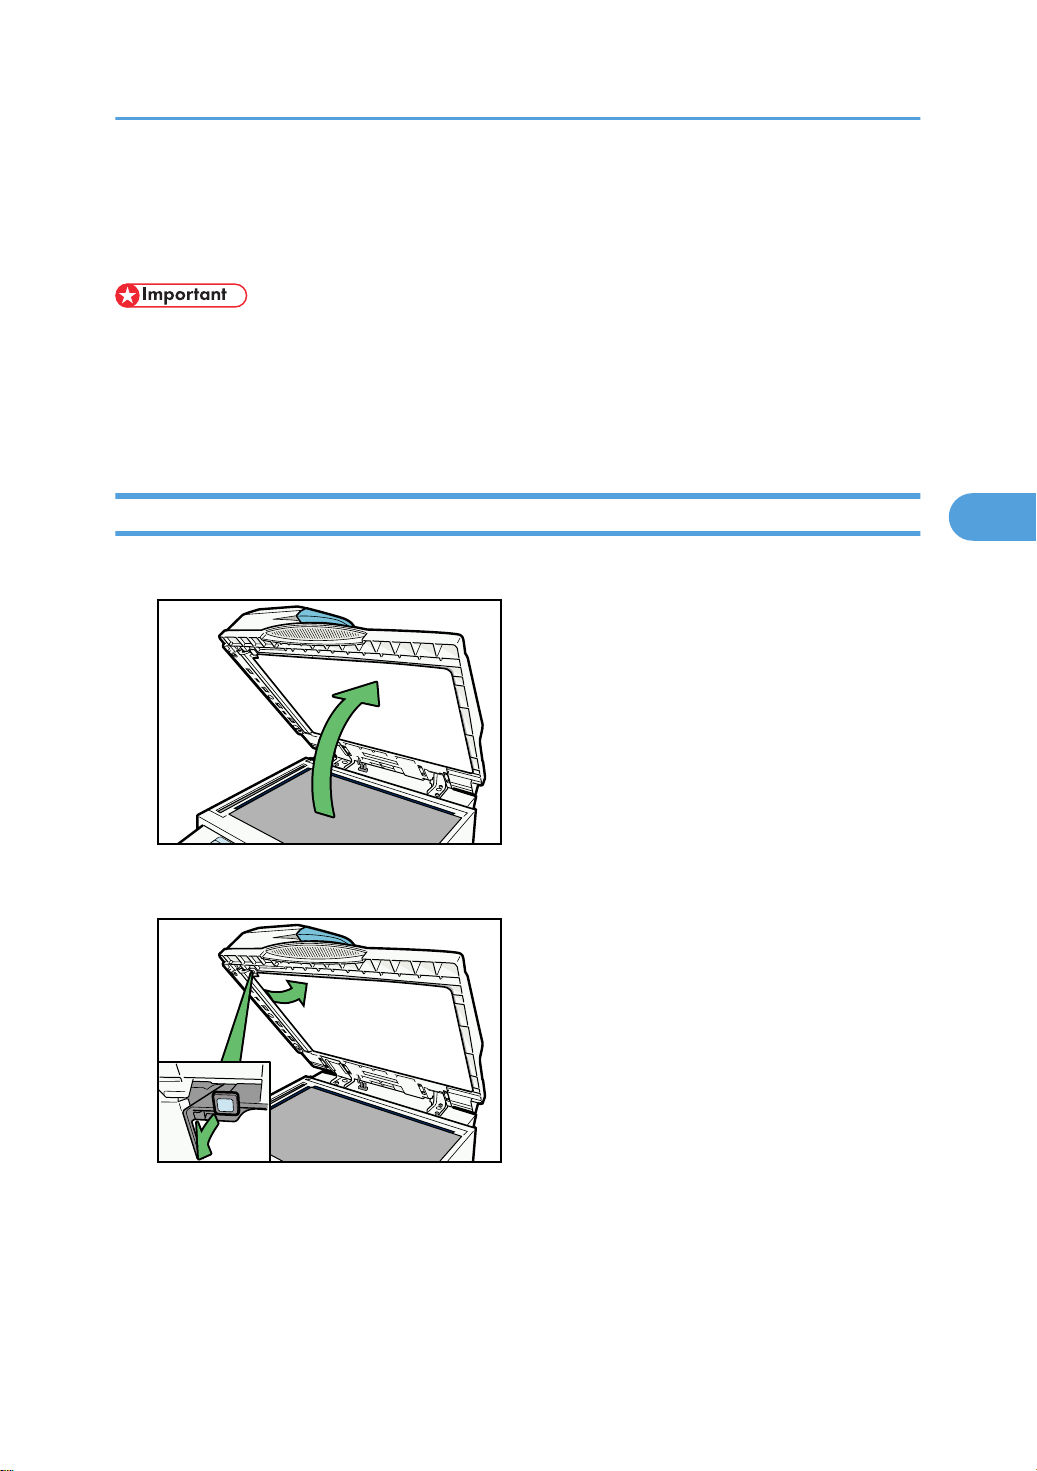
Replacing the Stamp Cartridge (Type 1, 2)
1. Open the ADF unit.
2. Open the stamp cover.
111
BBT009S
BBT010S
BBT011S
4. Adding Toner and Staples
4
Draft 2008/06/09
3. Pull out the old stamp cartridge.
4. Insert the new stamp cartridge.
Insert the cartridge until the metal parts are no longer visible.
112
5. Close the stamp cover.
6. Close the ADF unit.

Replacing the Stamp Cartridge (Type 3, 4)
BBR012S
BBR013S
BBR014S
4
Draft 2008/06/09
1. Open the ADF cover.
2. Raise lever P2, and then pull open cover P2.
Replacing the Stamp Cartridge
3. Push on the area of cover P3 marked “PUSH”, and then open the cover P3.
113
BBR015S
BBR016S
4. Adding Toner and Staples
4
Draft 2008/06/09
4. Pull out the old stamp cartridge.
5. Insert the new stamp cartridge.
Push in the cartridge until the metal parts are no longer visible.
114
6. Close cover P3, P2, and the ADF cover.

5. Entering Text
5
Draft 2008/06/09
This chapter describes how to enter characters.
Entering Text
This section explains how to enter text.
When you enter a character, it appears at the position of the cursor. If there is a character already at the
cursor position, the entered character appears before that.
Available Characters
This section explains which characters are available.
You can enter the following characters:
• Alphabetic characters
• Symbols
• Numerals
0123456789
Keys
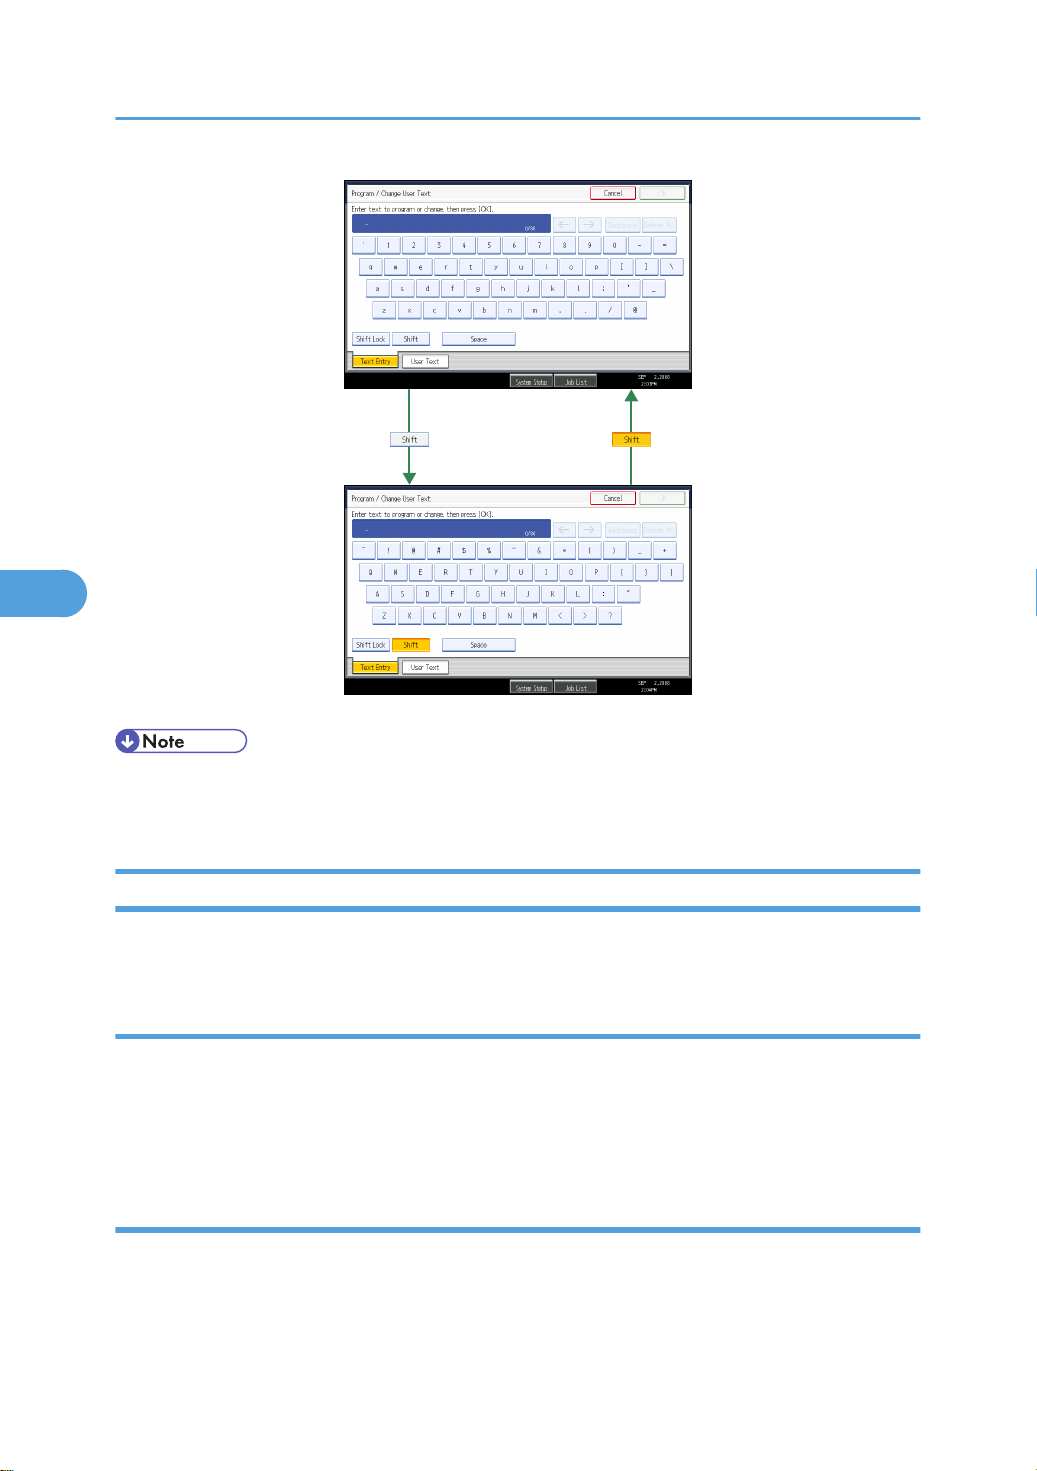
This section explains the entry screen and the keys displayed on it.
You can change the entry screen using the keys below.
115
BJB030S
5. Entering Text
5
Draft 2008/06/09
• When entering uppercase or lowercase letters continuously, use [Shift Lock] to lock the case.
• You can also use the number keys to enter numbers, regardless of mode.
How to Enter Text
This section explains text entry more specifically.
Entering letters
This section explains how to enter letters.
1. Press [Shift] to switch between uppercase and lowercase.
2. Press the letters you want to enter.
Deleting characters
This section explains how to delete characters.
1. Press [Backspace] or [Delete All] to delete characters.
116
Entering Text
5
Draft 2008/06/09
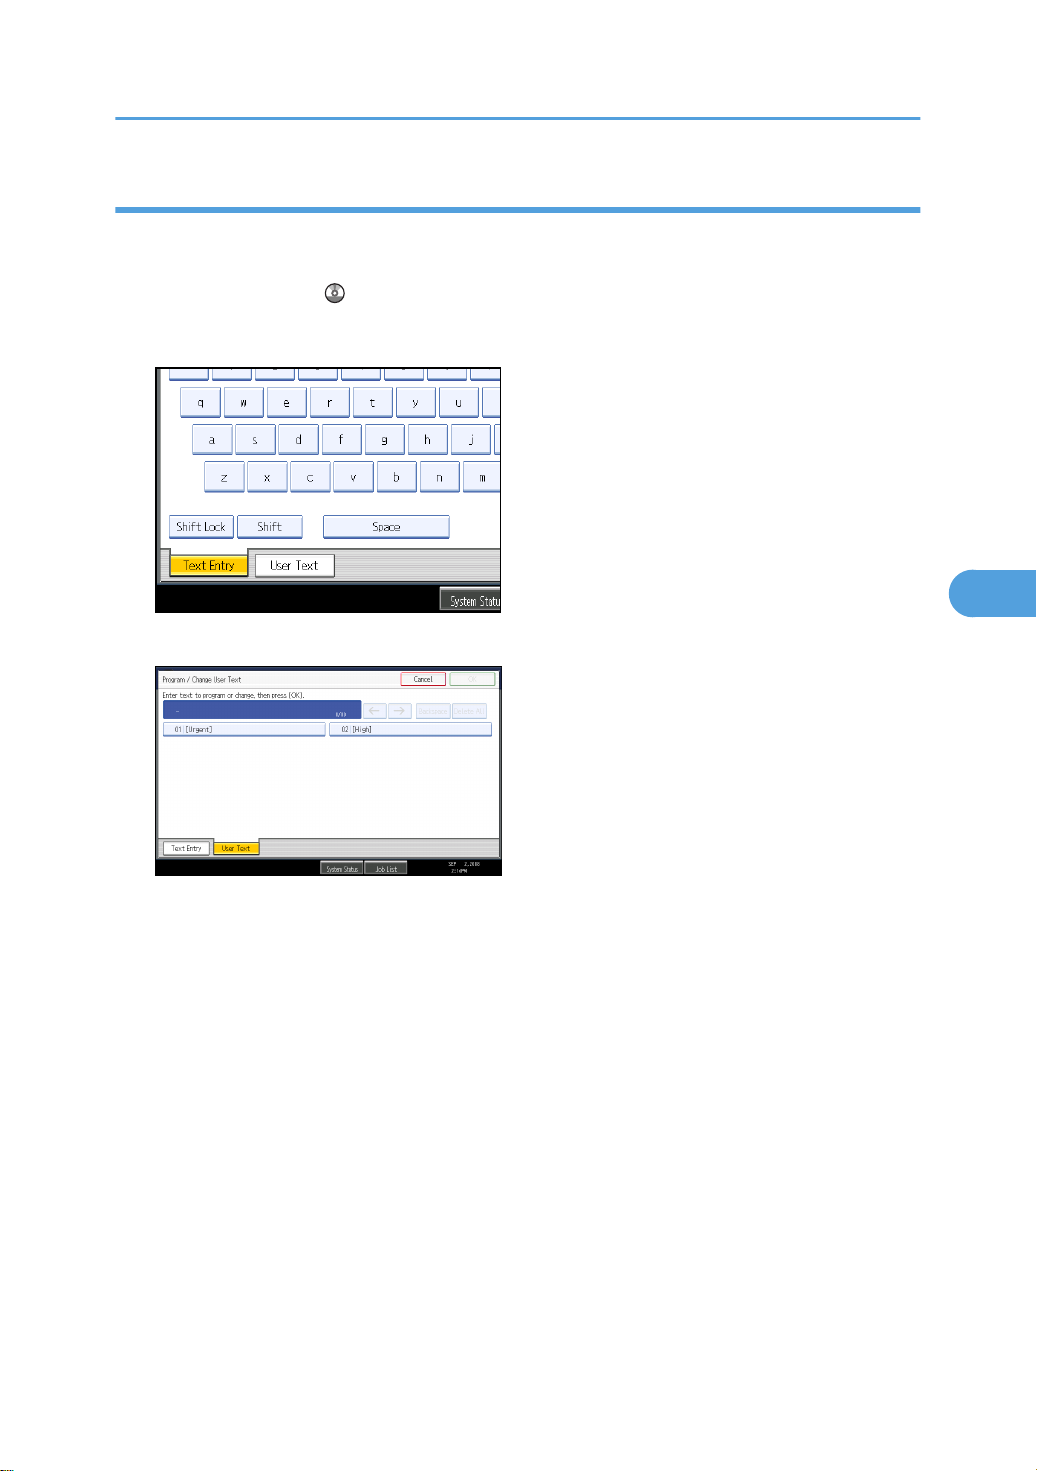
Adding user text
You can select and use a User Text that is registered in [Program / Change / Delete User Text].
For the registration procedure under Program / Change / Delete User Text, see “System Settings”, Network
and System Settings Guide .
1. Press [User Text].
2. Select the User Text you want to use.
117

5. Entering Text
5
Draft 2008/06/09
118

6. Operating Instructions
6
Draft 2008/06/09
This chapter describes the Operating Instructions of this machine.
Installing Operating Instructions
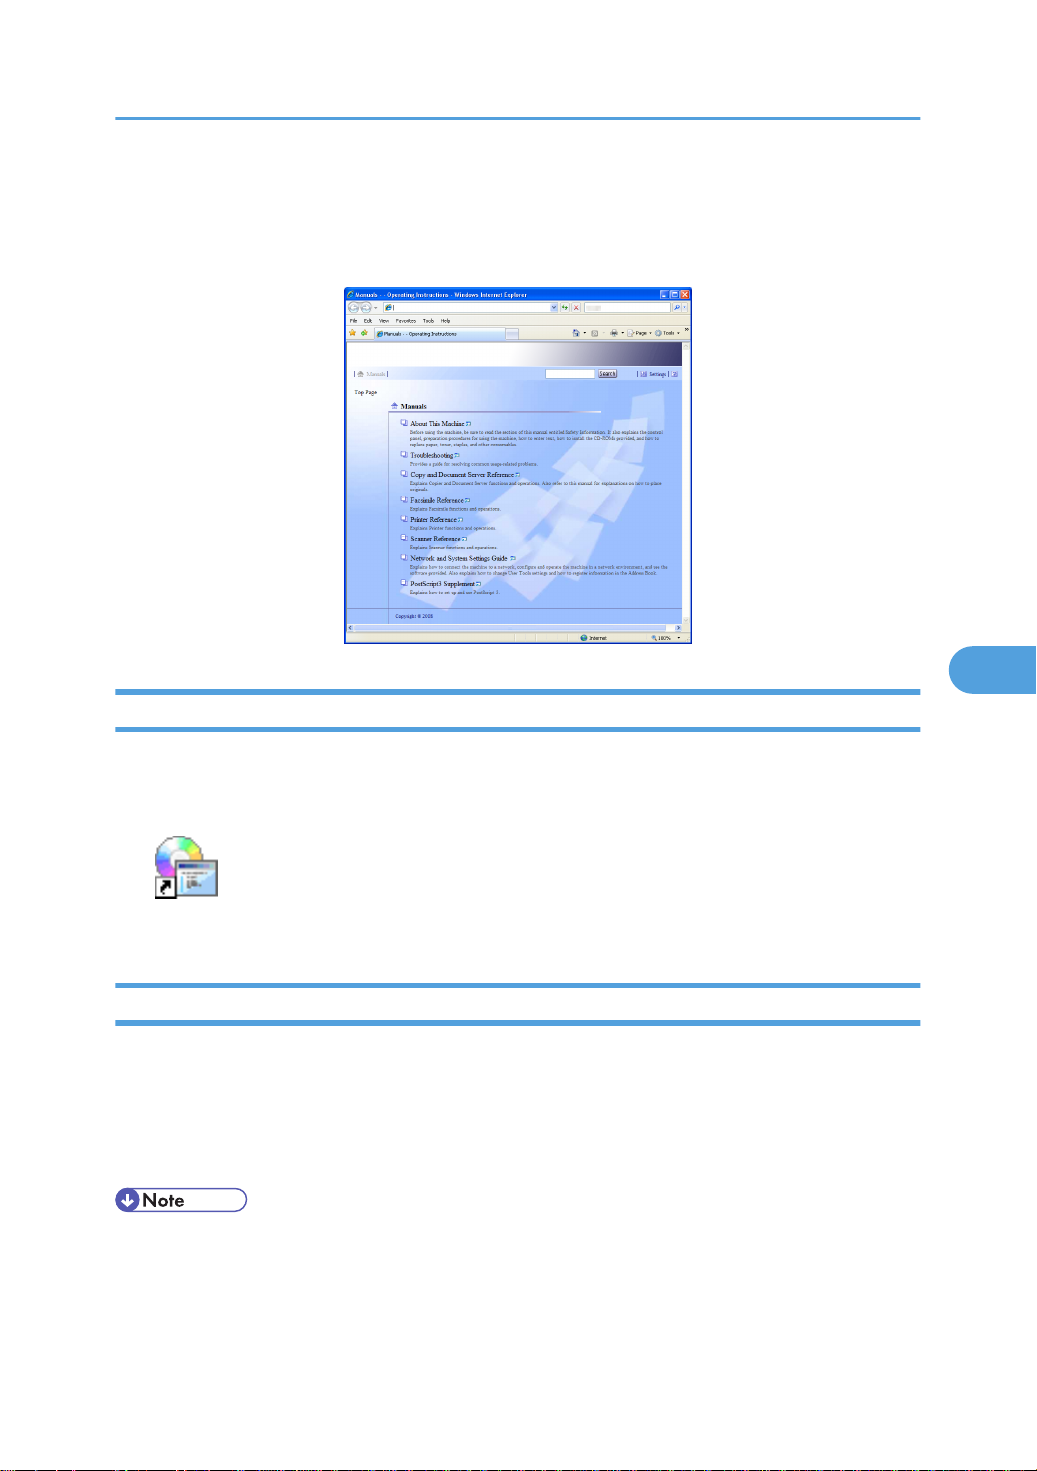
The supplied “Manuals” and “Manuals for Administrators” CD-ROMs contain HTML format manuals. For
easy access, we recommend you install the manuals on a computer.
• The “Manuals for Administrators” CD-ROM that includes Security Reference is for administrators
of the machine.
• The system requirements for installing the manuals are as follows:
• Operating system: Windows 2000/XP/Vista, Windows Server 2003 or 2003 R2
• Minimum display resolution: 800 × 600 pixels
• Recommended browsers:
• Microsoft Internet Explorer 4.01 SP2 or later
• Netscape 6.2 or later
• Non-recommended browsers can display the simplified manual only.
• HTML manuals can also be viewed on a Macintosh.
• Hyperlinks might not work and referenced sections might not appear unless all the HTML manuals
have been installed. To display referenced sections, be sure to install all the HTML manuals.
1. Select a language and a product, and then click [OK].
2. Click [Install Manuals].
If you want to read manuals from the CD-ROM, click [Read HTML manuals] or [Read PDF manuals].
3. Install the manual you require according to the displayed instructions.
4. When installation is complete, click [Finish].
5. Click [Finish].
• If you cannot install a manual, copy the “MANUAL_HTML” folder to your computer's hard drive, and
then run “Setup.exe”.
• To delete an installed manual, on the [Start] menu, click [Programs], then [Product Name], and then
uninstall the data.
• If you are installing the manuals on a Macintosh, open the “Manuals.htm” file on the CD-ROM.
119

6. Operating Instructions
6
Draft 2008/06/09
PDF Manuals
The supplied “Manuals” CD-ROM contains PDF manuals.
File path
The PDF manuals are in the following folder on the CD-ROM:
MANUAL_PDF\ENGLISH
• To view the PDF manuals, you need to have Adobe Acrobat Reader/Adobe Reader installed on your
computer.
120
How to Use the Operating Instructions
6
Draft 2008/06/09
How to Use the Operating Instructions
This section explains how to use manuals.
Opening from the Icon
This section explains how to open a manual using its desktop icon.
1. Double-click the icon on your desktop.
The browser opens and the manual appears.
Opening from the [Start] Menu
This section explains how to open a manual from the [Start] menu.
1. On the [Start] menu, point to [Programs] (Windows XP: [All Programs]), then [Product
Name], and then click the manual you want to view.
The browser opens, and then the manual appears.
• Depending on the settings made during installation, menu folder names may differ.
121

6. Operating Instructions
6
Draft 2008/06/09
Opening from the CD-ROM
This section explains how to open a manual from the supplied “Manuals” and “Manuals for Administrators”
CD-ROMs.
1. Click [Read HTML manuals].
2. Click the title of the manual you want to view.
The browser opens, and then the manual appears.
122

7. Other User Tools
BBP015S
7
Draft 2008/06/09
Initial settings allow you to switch the language as well as checking the number of printed papers by
displaying the counter.
Changing the Display Language
You can change the language used on the display. English is set as default.
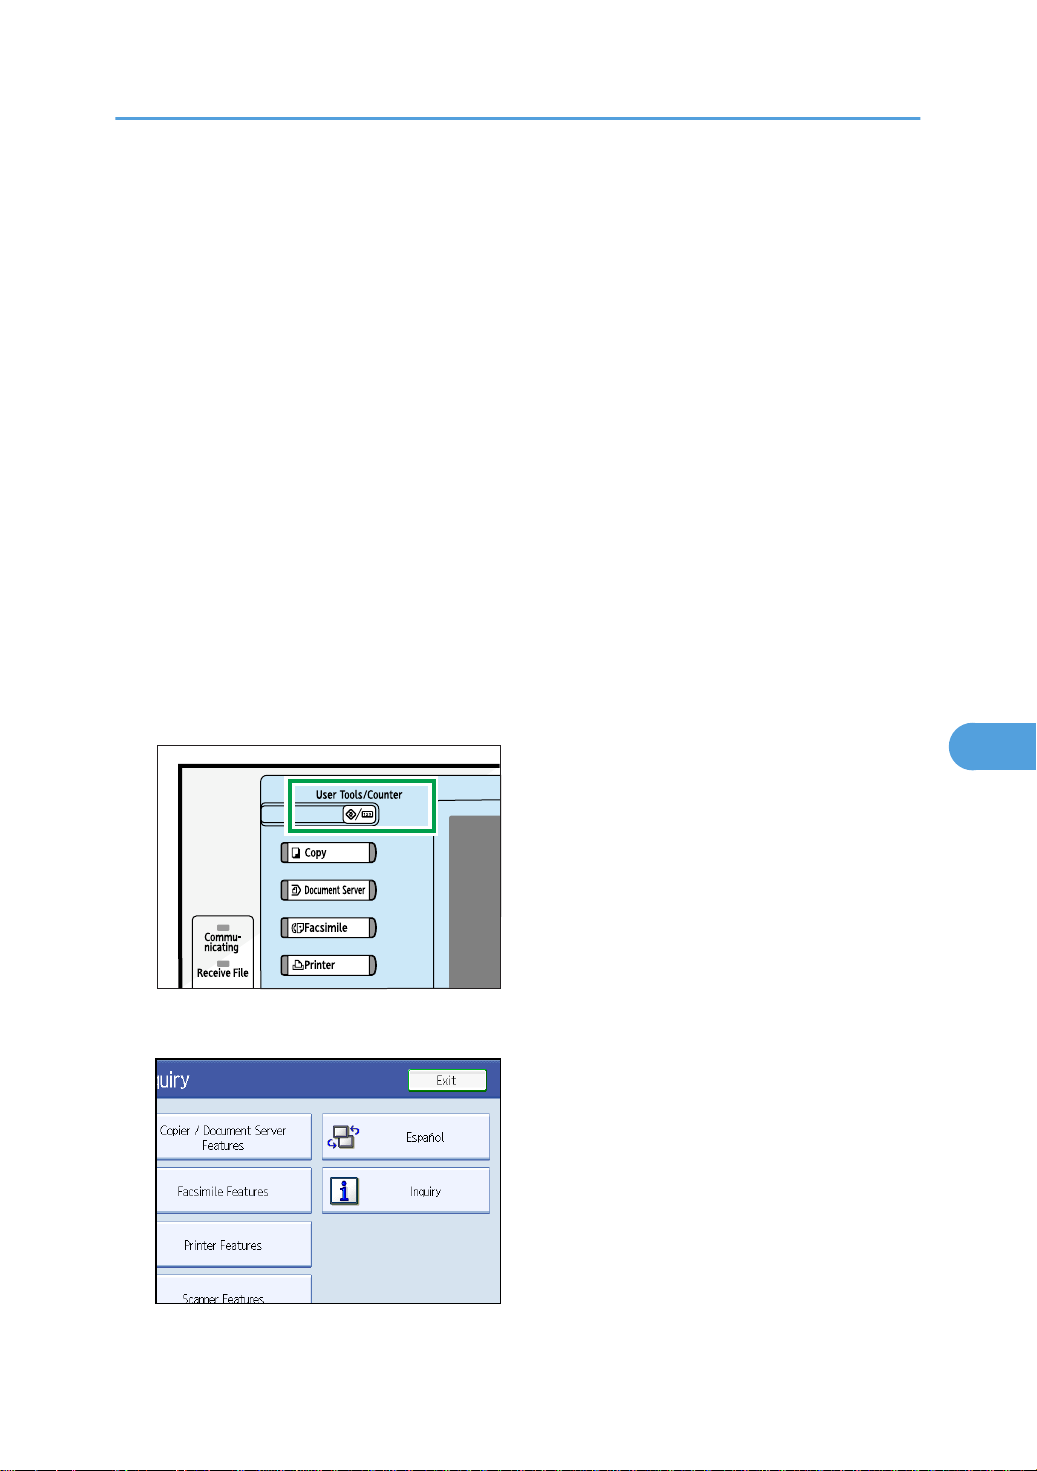
1. Press the [User Tools/Counter] key.
2. Press [Español].
The language is changed to Spanish.
123

7. Other User Tools
7
Draft 2008/06/09
3. Press [Salir].
The menu appears in Spanish.
124
BBP015S
Inquiry
7
Draft 2008/06/09
Inquiry
The Inquiry function lets you check the telephone numbers to contact for repairs, or ordering consumables
such as toner. Be sure to contact your service engineer to verify the following:
Consumables
• Telephone No. to order
• Toner
• Staple
• Staple (Center)
• TX Stamp Name
Machine Maintenance/Repair
• Telephone No.
• Serial No. of Machine
Sales Representative
• Telephone No.
1. Press the [User Tools/Counter] key.
2. Press [Inquiry].
Inquiry information appears.
125

7. Other User Tools
7
Draft 2008/06/09
3. Press [Print Inquiry List].
4. Press the [Start] key.
Inquiry information prints out.
5. Press [Exit] twice.
126
BBP015S
Changing Paper Thickness Settings
7
Draft 2008/06/09
Changing Paper Thickness Settings
Select [Plain Paper 1] or [Plain Paper 2] depending on the type of plain paper.
If in System Settings, [Tray Paper Settings], you set “Paper Thickness” to [Plain Paper] for each tray's [Paper
Type], you must then select [Maintenance], [Plain Paper Setting] and specify either [Plain Paper 1] or [Plain
Paper 2], depending on the thickness of the loaded paper.
The default setting is Plain Paper 2.
• Select [Plain Paper 1] when paper weight is between 60 g/m2 (16 lb.) and 74 g/m2 (20 lb.).
• Select [Plain Paper 2] when paper weight is between 75 g/m2 (20 lb.) and 90 g/m2 (21 lb.).
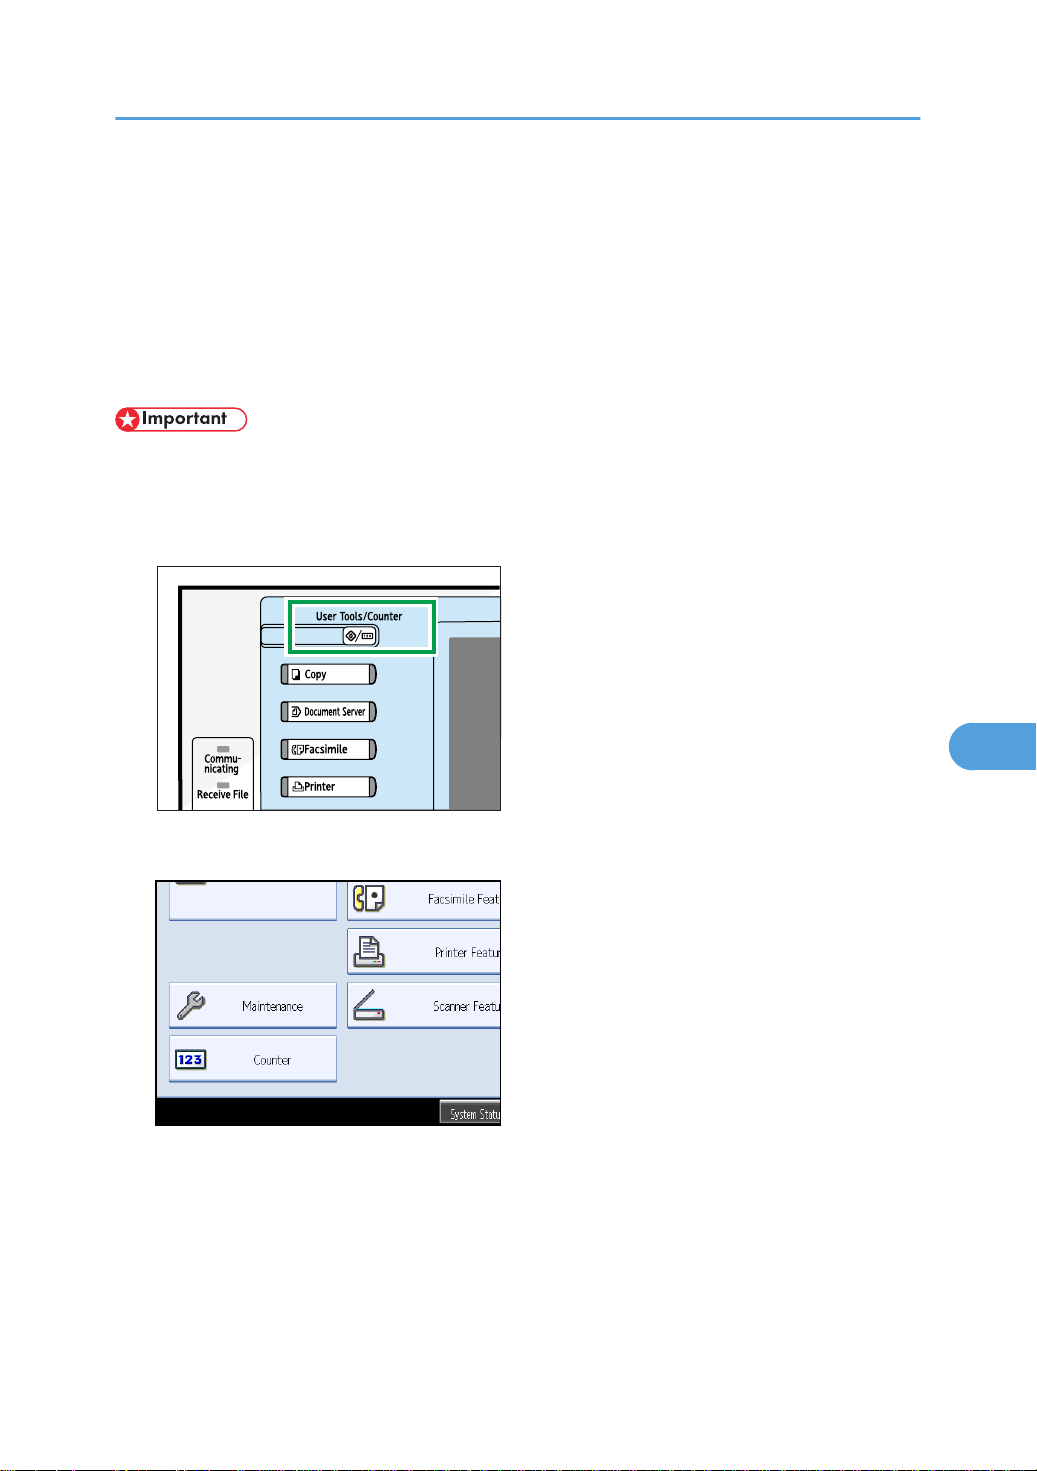
1. Press the [User Tools/Counter] key.
2. Press [Maintenance].
127
7. Other User Tools
7
Draft 2008/06/09
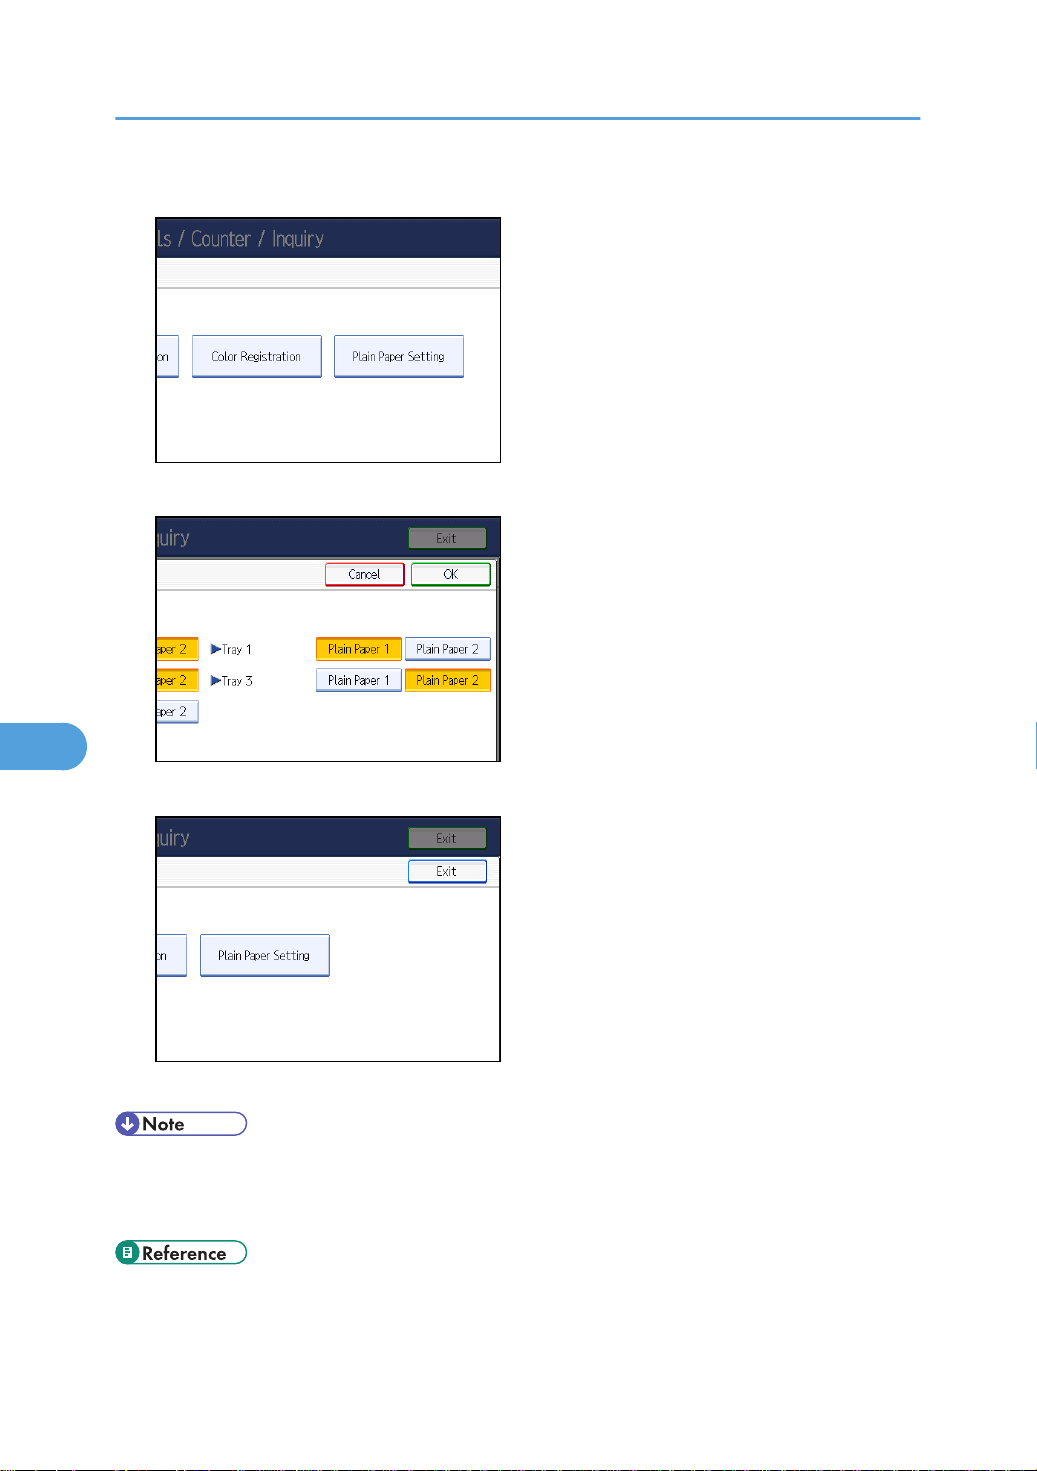
3. Press [Plain Paper Setting].
4. Select the plain paper type for each tray depending on the paper to be set and press [OK].
5. Press [Exit].
6. Press [Exit].
• In System Settings, [Tray Paper Settings], for each tray's [Paper Type] you can specify [Plain Paper],
[Middle Thick], [Thick Paper 1], [Thick Paper 2], or [Thick Paper 3]. For details about paper thickness,
see “Recommended Paper Sizes and Types”.
• p.88 "Recommended Paper Sizes and Types"
128
Counter
BBP015S
7
Draft 2008/06/09
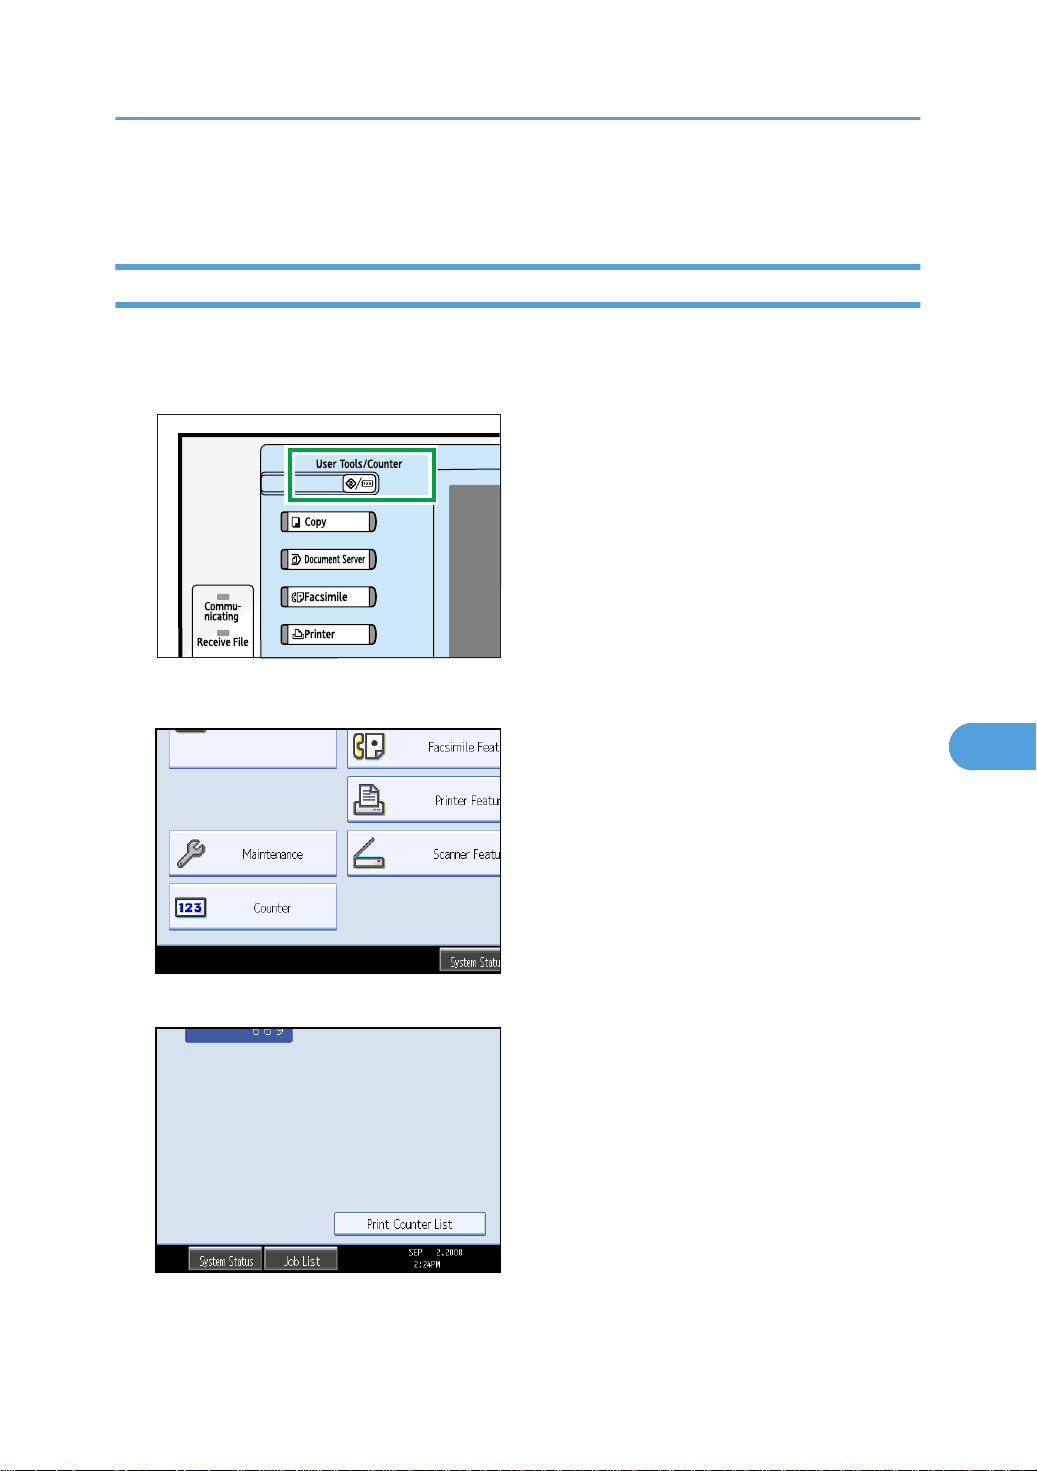
Displaying the Total Counter
You can display the total counter value used for all functions.
1. Press the [User Tools/Counter] key.
Counter
2. Press [Counter].
3. To print a counter list, press [Print Counter List].
4. Press the [Start] key.
A counter list prints out.
129

7. Other User Tools
7
Draft 2008/06/09
130

8. Remarks
8
Draft 2008/06/09
This chapter describes how to maintain and operate the machine.
Dos and Don'ts
The following items should be followed during use of this machine.
• Keep the machine away from flammable liquids, gases, and aerosols. A fire or an electric shock
might occur.
• Unplug the power cord from the wall outlet before you move the machine. While moving the
machine, you should take care that the power cord will not be damaged under the machine.
• Do not turn the power off while the operation switch indicator is lit or blinking. Doing so may damage
the hard disk.
• Before unplugging the power cord or turning off the main power switch, make sure remaining memory
space is at 100%, as shown on the screen. See “Turning On/Off the Power”.
• Do not touch areas on or around the fusing unit. These areas get hot.
• After scanning originals continuously, the exposure glass may become warm - this is not a malfunction.
• The area around the ventilation holes might feel warm. This is caused by exhaust air and is not a
malfunction.
• When you use this machine for a long time in a confined space without good ventilation, you may
detect an odd smell. To keep the workplace comfortable, we recommend that you keep it well
ventilated.
• If the machine is moved from a cold to a warm place, condensation may form inside it. After moving
the machine, do not use it for at least an hour. The machine requires this time to adapt to its new
environment.
• The machine will malfunction if its internal temperature becomes too high. Be sure not to block the
intake and exhaust vents.
• Do not turn off the power while the machine is in operation. See “Turning On/Off the Power”.
• Do not open the covers of the machine when it is in operation. If you do, misfeeds might occur.
• Do not move or tilt the machine when the power is on.
• Do not allow small objects such as paperclips to fall into or become stuck inside the machine.
131

8. Remarks
8
Draft 2008/06/09
• Do not knock the machine while it is operating (for instance, do not use the machine's surfaces to
knock stacks of paper into square).
• Depending on the ambient temperature and humidity, steam may come from the exhaust vent behind
the control panel during printing. This is water vapour from the paper, not a sign of malfunction.
• If condensation forms inside the machine as a result of temperature change, the machine may not
print properly. To minimize this problem, use the optional anti-condensation heaters.
• Be sure to make a note of the registered machine settings in case they are lost due to accident or
malfunction.
• The supplier shall not be liable for any loss or damage resulting from a failure of the machine, loss of
settings, or use of the machine.
• p.73 "Turning On/Off the Power"
Saving Color Copies
This section explains notes on saving color copies.
• Like most prints, color prints will fade if exposed to strong light or dampness and humidity for lengthy
periods. Preserve the quality of your copies by storing them in a binder in a dark, dry place.
• Toner may melt if a print and a half-dried print are put on top of each other.
• Toner may also melt when using solvent type adhesive agents for pasting prints.
• When folding prints, toner in the folds will come off.
• Toner may melt if it is placed on mats made of chlorinated plastic in locations of high temperature for
long periods of time.
• Toner may melt if prints are placed in places of extremely high temperatures, such as near heaters.
132

Where to Put Your Machine
8
Draft 2008/06/09
Where to Put Your Machine
This section describes precautions for installation and movement.
Machine Environment
Choose your machine's location carefully.
Environmental conditions greatly affect its performance.
Moving
This section describes precautions when moving the machine.
• Contact your service representative if you need to lift the machine (such as when relocating it to
another floor). Do not attempt to lift the machine without the assistance of your service
representative. The machine will be damaged if it topples or is dropped, resulting in malfunction
and risk of injury to users. The machine's various handling areas are for service engineer use only.
Do not touch these areas.
• Before moving the machine, be sure to disconnect all external connections, especially the power
cord from the wall outlet. Damaged power cords are a fire and electric shock hazard.
• Unplug the power cord from the wall outlet before you move the machine. While moving the
machine, you should take care that the power cord will not be damaged under the machine.
• Be careful when moving the machine. Take the following precautions:
• Turn off the main power. For details about how to turn the main power off, see “Turning On/Off
the Power”.
• Unplug the power cord from the wall outlet. When you pull out the plug from the socket, grip
the plug to avoid damaging the cord, thereby reducing the risk of fire or electric shock.
• Close all covers and trays, including the front cover and bypass tray.
• Keep the machine level and carry it carefully, taking care not to jolt or tip it. Rough handling
may cause a malfunction or damage the hard disk or memory, resulting in loss of stored files.
• Do not take off the holding stand.
133

8. Remarks
8
Draft 2008/06/09
• Protect the machine from strong shocks. Impact can damage the hard disk and cause stored files
to be lost. As a precautionary measure, files should be copied to another computer.
• p.73 "Turning On/Off the Power"
Optimum environmental conditions
This section describes precautions when locating the machine.
• Keep the machine away from humidity and dust. Otherwise a fire or an electric shock might occur.
• Do not place the machine on an unstable or tilted surface. If it topples over, an injury might occur.
• After you move the machine, use the caster fixture to fix it in place. Otherwise the machine might
move or come down to cause an injury.
• Make sure the room where you are using the machine is well ventilated and spacious. Good
ventilation is especially important when the machine is used heavily.
• Temperature: 10-32 °C (50-89.6 °F) (humidity to be 54% at 32 °C, 89.6 °F)
• Humidity: 15-80% (temperature to be 27 °C, 80.6 °F at 80%)
• A strong and level base.
• The machine must be level within 5 mm, 0.2 inch: both front to rear and left to right.
• To avoid possible buildup of ozone, make sure to locate this machine in a large well ventilated room
that has an air turnover of more than 30 m3/hr/person.
Environments to avoid
• Locations exposed to direct sunlight or other sources of strong light (more than 1,500 lux).
• Locations directly exposed to cool air from an air conditioner or heated air from a heater. (Sudden
temperature changes can cause condensation to form inside the machine.)
• Locations close to machines generating ammonia, such as a diazo copy machine.
• Places where the machine will be subject to frequent strong vibration.
• Dusty areas.
• Areas with corrosive gases.
134

Access to the machine
BJB012S
8
Draft 2008/06/09
Place the machine near the power source, providing the clearance areas shown.
Type 1 and 2
1 Rear 10 cm (4 inches) or more
2 Right 55 cm (21.7 inches) or more
3 Front 75 cm (29.6 inches) or more
Where to Put Your Machine
4 Left 10 cm (4 inches) or more
Type 3 and 4
1 Rear 10 cm (4 inches) or more
2 Right 60 cm (23.7 inches) or more
3 Front 70 cm (27.6 inches) or more
4 Left 60 cm (23.7 inches) or more
• For the required space when options are installed, contact your service representative.
Power Connection
This section describes power supply.
• Connect the machine only to the power source described on the inside front cover of this manual.
Connect the power cord directly into a wall outlet and do not use an extension cord.
135

8. Remarks
8
Draft 2008/06/09
• Do not damage, break or make any modifications to the power cord. Do not place heavy objects
on it. Do not pull it hard nor bend it more than necessary. These actions could cause an electric
shock or fire.
• If the power cord is damaged (exposure of the core, disconnection, etc.), contact your service
representative to change a new one. Operating the machine with a damaged power cord may
cause an electric shock or fire.
• When you disconnect the power plug from the wall outlet, always pull the plug (not the cable).
• To disconnect the power cord, pull it out by plug. Do not drag the cord itself. Doing so may result
in damage to the cord, leading to fire or electric shock.
• Make sure the plug is inserted firmly in the wall outlet.
• Voltage must not fluctuate by more than 10%.
• The wall outlet shall be installed near the machine and shall be easily accessible.
136

BJA048S
Maintaining Your Machine
8
Draft 2008/06/09
Maintaining Your Machine
If the exposure glass, scanning glass, or ADF belt is dirty, copy clarity may be reduced. Clean these parts
if they are dirty.
• Do not use chemical cleaners or organic solvents, such as thinner or benzene. If such substances get
inside the machine or melt plastic parts, a failure might occur.
• Do not clean parts other than those explicitly specified in this manual. Other parts should only be
cleaned by your service representative.
How to maintain
Cleaning the machine: Wipe the machine with a soft, dry cloth. If this does not remove the dirt, wipe
the machine with a damp and tightly wrung cloth. If a damp cloth still does not remove the dirt, try
using a mild detergent. Wipe the machine with a dry cloth to remove the moisture, after using a damp
cloth.
Cleaning the Exposure Glass
This section describes how to clean the exposure glass and the scanning glass.
Clean 1 and 2.
Cleaning the Auto Document Feeder
This section describes how to clean the ADF.
137

1
2
BJA050S
BJB008S
8. Remarks
8
Draft 2008/06/09
Clean 1 and 2.
Cleaning the Dustproof Glass
The dustproof glass may require cleaning if white lines appear on the print side of the document.
• Do not insert the brush forcefully, or the machine might be damaged.
138

• Insert the cleaning stick so that its rubber surface is pointing down.
8
Draft 2008/06/09
Maintaining Your Machine
139

8. Remarks
8
Draft 2008/06/09
140

9. Appendix
9
Draft 2008/06/09
This chapter describes the provided software and utilities CD-ROMs, specifications, and paper.
Software and Utilities Included on the CD-ROM
This section explains the software and utilities CD-ROMs provided with this machine.
Two CD-ROMs come with this machine: “Printer Drivers and Utilities”, and “Scanner Driver and Utilities”.
The following are included in these CD-ROMs:
Font Manager
For installing new screen fonts, or organizing and managing fonts already in the system. For details
about Font Manager, see the manual on the CD-ROM labeled “Printer Drivers and Utilities”.
SmartDeviceMonitor for Admin
For the system administrator to manage network printers.
DeskTopBinder-SmartDeviceMonitor for Client
For users to manage their network print status.
Printer Utility for Mac
This utility allows users to download and manage a variety of fonts as well as manage printers. For
details about this utility, see PostScript 3 Supplement .
• Some documentation about using the machine is included on the CD-ROM in PDF format. For details
about using Adobe Acrobat Reader/Adobe Reader, see Adobe Acrobat Reader/Adobe Reader
online Help.
Viewing the Contents of the CD-ROM
This section explains how to view the contents of the CD-ROMs.
1. Insert the CD-ROM into the CD-ROM drive.
The installer starts.
2. Click [Browse This CD-ROM].
Explorer starts and displays the contents of the CD-ROM.
Printer Drivers for This Machine
This section explains printer drivers for this machine.
141

9. Appendix
9
Draft 2008/06/09
• You can install the PCL printer drivers (PCL 5c and PCL 6), the RPCS printer driver, and the Adobe
PostScript printer drivers from the CD-ROM provided with this machine or download them from the
supplier's Web site. If your operating system is Windows XP x64/Vista x64, or Windows Server
2003/2003 R2 x64, you must download the printer drivers from the supplier's Web site. Select this
machine and the operating system you are using, and then download them.
Printing requires installation of a printer driver for your operating system. The following drivers are included
on the CD-ROM labeled “Printer Drivers and Utilities”.
Printer Language PCL 6 PCL 5c RPCS PostScript 3
*5
*6
*2
*3
*1
*4
OK OK OK OK
OK OK OK OK
OK OK OK OK
OK OK OK OK
Windows 2000
Windows XP
Windows Vista
Windows Server 2003
Mac OS
Mac OS X
Microsoft Windows 2000 Professional /Microsoft Windows 2000 Server/Microsoft Windows 2000
*1
Advanced Server
Microsoft Windows XP Professional/Microsoft Windows XP Home Edition
*2
Microsoft Windows Vista Ultimate/Microsoft Windows Vista Enterprise/Microsoft Windows Vista Business/
*3
Microsoft Windows Vista Home Premium/Microsoft Windows Vista Home Basic
Microsoft Windows Server 2003 Standard Edition/Microsoft Windows Server 2003 Enterprise Edition/
*4
Microsoft Windows Server 2003 Web Edition/Microsoft Windows Server 2003 Datacenter Edition/Microsoft
Windows Server 2003 R2 Standard Edition/Microsoft Windows Server 2003 R2 Enterprise Edition/Microsoft
Windows Server 2003 R2 Datacenter Edition
Versions 8.6 to 9.2 of the Mac OS (Mac OS X Classic mode is supported.)
*5
Mac OS X 10.1 or later (Native mode)
*6
OK
OK
142
PCL printer drivers
Two kinds of PCL printer driver (PCL 5c and PCL 6) are included. These drivers allow your computer
to communicate with this machine via a printer language.
RPCS printer driver
This printer driver allows the computer to communicate with the printer using a printer language. In
addition to the conventional user interface, another preset user interface is provided.

Software and Utilities Included on the CD-ROM
9
Draft 2008/06/09
Adobe PostScript Printer Drivers and PPD files
Adobe PostScript printer drivers allow the computer to communicate with the printer using a printer
language. PPD files allow the printer driver to enable specific printer functions.
PPD files
PPD files allow the printer driver to enable specific printer functions.
• Some applications may require installation of the PCL 5c printer driver. In this case, you can install
PCL 5c without having to install PCL 6.
• For details, see “Preparing for Printing”, Printer Reference , and PostScript 3 Supplement .
TWAIN Driver
This section describes the file path and system requirements of the TWAIN driver.
This driver is required to scan an original using a scanner. To use the machine as a network TWAIN scanner,
this driver must be installed.
File path
The driver is included in the following folder on the CD-ROM labeled “Scanner Driver and Utilities”
provided with this machine:
\DRIVERS\TWAIN
System requirements
• Hardware
PC/AT-compatible machines that support the following operating system properly
• Operating system
Windows 2000/XP/Vista
Windows Server 2003/2003 R2
• Display resolution
800 × 600 pixels, 256 colors or higher
• Under Windows NT with RISC-based processors (MIPS R series, Alpha AXP, or PowerPC), this driver
is not supported.
LAN-Fax Driver
This section describes the file path and system requirements of the LAN-Fax driver.
143

9. Appendix
9
Draft 2008/06/09
• You can install the LAN-Fax driver from the CD-ROM provided with this machine or download it from
the supplier's Web site. If your operating system is Windows XP x64/Vista x64, or Windows Server
2003/2003 R2 x64 you must download the LAN-Fax driver from the supplier's Web site. Select this
machine and the operating system you are using, and then download it.
This driver is required to use LAN-Fax functions.
File path
The driver is included in the following folders on the CD-ROM labeled “Printer Drivers and Utilities”:
\DRIVERS\LAN-FAX\XP_VISTA
System requirements
• Hardware
PC/AT-compatible
• Operating systems
Windows 2000/XP/Vista
Windows Server 2003/2003 R2
• Display
VGA 640 × 480 pixels or more
• Before beginning installation, exit all other applications.
DeskTopBinder Lite
This section describes the file path and system requirements of DeskTopBinder Lite.
DeskTopBinder is to be installed on the client computers for integration and management of various kinds
of files such as scan files, files created with applications, and existing scan files. This software allows you
to use various functions for stored scan files such as viewing stored files. Also, with the ScanRouter delivery
software, you can view the files stored in in-trays of the delivery server, or use other functions for stored
files.
For details about the software installed with DeskTopBinder Lite, see “DeskTopBinder Lite”, Scanner
Reference .
File path
The software is included in the following folder on the CD-ROM labeled “Scanner Driver and
Utilities” provided with this machine:
\UTILITY\DESKV2
144

Software and Utilities Included on the CD-ROM
9
Draft 2008/06/09
System requirements
• Hardware
PC/AT-compatible machines that support the operating system properly
• Operating system
• When installing all functions of DeskTopBinder:
Windows 2000 Professional SP1 or later/2000 Server SP1 or later/2000 Advanced
Server SP1 or later/XP Professional/XP Home Edition
• When installing only SmartDeviceMonitor for Client:
Windows 2000 Professional SP1 or later/2000 Server SP1 or later/XP Professional/XP
Home Edition
SmartDeviceMonitor for Admin
This section describes the file path and available functions of SmartDeviceMonitor for Admin.
SmartDeviceMonitor for Admin is an application that uses TCP/IP and IPX/SPX to monitor network printers.
It can monitor multiple network printers using IP address. We recommend that network administrators use
this application.
File path
SmartDeviceMonitor for Admin is stored in the following folder in the CD-ROM labeled “Printer Drivers
and Utilities”:
\NETWORK\DEVMON\ADMIN\DISK1
Operating system Protocol stack
Windows 2000 TCP/IP provided with Windows 2000
IPX/SPX provided with Windows 2000
NetWare Client provided with Windows 2000
Novell Client provided with Windows 2000 or Windows NT
Windows XP TCP/IP provided with Windows XP
IPX/SPX provided with Windows XP
NetWare Client provided with Windows XP
Novell Client provided with Windows XP
Windows Vista TCP/IP provided with Windows Vista
Novell Client provided with Windows Vista
145

9. Appendix
9
Draft 2008/06/09
Operating system Protocol stack
Windows Server 2003 TCP/IP provided with Windows Server 2003
IPX/SPX provided with Windows Server 2003
NetWare Client provided with Windows Server 2003
Novell Client provided with Windows Server 2003
Available functions
SmartDeviceMonitor for Admin has the functions to check the followings:
• Printer supplies such as paper or toner
• Results of print jobs executed from the computer
• For details, see “Using SmartDeviceMonitor for Admin”, Network and System Settings Guide , and
SmartDeviceMonitor for Admin Help.
DeskTopBinder-SmartDeviceMonitor for Client
This section describes the file path and system requirements of DeskTopBinder-SmartDeviceMonitor for
Client.
DeskTopBinder-SmartDeviceMonitor for Client allows you to manage and print various data such as files
created with an application, images scanned with a scanner, and existing images as one document.
File path
DeskTopBinder-SmartDeviceMonitor for Client is stored in the following folder on the CD-ROM
labeled “Printer Drivers and Utilities”:
\NETWORK\DEVMON\CLIENT\DISK1
Operating environment of the printer driver
• Applicable computer
Machines which properly work with the applicable OS below. PC/AT compatible machine.
• Applicable OS
Windows 2000/XP/Vista
Windows Server 2003/2003 R2
• See “DeskTopBinder Lite”, Scanner Reference or Help of DeskTopBinder-SmartDeviceMonitor for
Client.
146

Software and Utilities Included on the CD-ROM
9
Draft 2008/06/09
• DeskTopBinder includes SmartDeviceMonitor for Client. See Help of DeskTopBinderSmartDeviceMonitor for Client.
147

9. Appendix
9
Draft 2008/06/09
Specifications for the Main Unit
This section describes specifications for the main unit.
For users of type 1 and 2
Configuration:
Desktop
Photosensitivity type:
OPC drum
Original scanning:
One-dimensional solid scanning system through CCD
Copy process:
Dry electrostatic transfer system
Development:
Dry two-component magnetic brush development system
Fusing:
Oilless belt fusing
Scan resolution:
• 600 dpi × 600 dpi
Copy/Print resolution:
• 600 dpi × 600 dpi
• 1200 dpi × 1200 dpi (for printer function only)
Exposure glass:
Stationary original exposure type
Original reference position:
Rear left corner
Warm-up time (23°C, rated voltage):
• Type 1, 2: 45 seconds or less
Originals:
Sheet/book/objects
Maximum original size:
148
A3 , 11 × 17

Specifications for the Main Unit
9
Draft 2008/06/09
Copy paper size:
• Trays: A3 - A5 , 11 × 17 - 81/2 × 11 , 8K (267 × 390 mm) , 16K (195 × 267 mm)
• Bypass: A3 - A6 , 12 × 18 - 51/2 × 81/2, 8K (267 × 390 mm) , 16K (195 × 267
mm)
• Bypass (custom size): Vertical: 90.0 - 305.0 mm, 3.6 - 12.1 inches
Horizontal: 148.0 - 600.0 mm, 5.83 - 23.7 inches
• Duplex: A3 - A5 , 11 ×17 - 81/2 × 11 , 8K (267 × 390 mm) , 16K (195 × 267
mm)
Paper weight:
• Trays: 60.0 - 256.0 g/m2, 16 lb. - 68 lb.
• Bypass: 60.0 - 256.0 g/m2, 16 lb. - 68 lb.
• Duplex: 60.0 - 169.0 g/m2, 16 lb. - 45 lb.
For details about and recommendations concerning thick paper, see “Thick Paper”.
Non-reproduction area (Copier):
• Leading edge: 3.7 - 6.7 mm, 0.15 - 0.26 inches (2.7 - 5.7 mm, 0.10 - 0.22 inches for paper
heavier than 81 g/m2, 22.0 lb.)
• Trailing edge: 0.5 - 6.0 mm, 0.19 - 0.24 inches
• Left and Right: 0.5 - 4.0 mm, 0.19 - 0.16 inches
First copy/print time:
• Type 1, 2:
• Color: 8.0 seconds or less
• B&W: 5.0 seconds or less
(A4 , 81/2 × 11 , 100% reproduction, feeding from Tray 1, on the exposure glass)
Copying speed (Full Color / B&W):
• Type 1:
• 28/28 copies/minute (A4 , 81/2×11 )
• Type 2:
• 33/33 copies/minute (A4 , 81/2×11 )
Reproduction ratio:
Preset reproduction ratios:
• Enlargement
149

9. Appendix
9
Draft 2008/06/09
• Full size
• Reduction
Metric version Inch version
400% 400%
200% 200%
141% 155%
122% 129%
115% 121%
Metric version Inch version
100% 100%
Metric version Inch version
93% 93%
82% 85%
75% 78%
71% 73%
65% 65%
50% 50%
25% 25%
Zoom: From 25 to 400% in increments of 1%
Maximum continuous copy run:
999 sheets
Paper capacity (80 g/m2, 20 lb.):
• Tray1, 2: 550 sheets
• Bypass tray: 100 sheets
Power source:
120 V, 60 Hz, 12 A or more
150
Please be sure to connect the power cord to a power source as above. For details about power
source, see “Power Connection”.

Power consumption:
9
Draft 2008/06/09
• Main unit only
Warm-up 1440 W 1440 W
Stand-by 204 W 204 W
During printing 737 W 795 W
Maximum 1440 W 1440 W
• Complete system
Warm-up 1440 W 1440 W
Stand-by 222 W 222 W
Specifications for the Main Unit
Type 1 Type 2
Type 1 Type 2
During printing 824 W 883 W
Maximum 1440 W 1440 W
• The complete system consists of the main unit, Booklet Finisher SR3000, large capacity tray, file
format converter, IEEE 802.11b (wireless LAN) interface unit, and USB Host interface unit.
Dimensions (W × D × H up to exposure glass):
Type 1, 2: 670 × 671 × 760 mm, 26.4 × 26.5 × 30.0 inches
Space for main unit (W × D):
Type 1, 2: 1,065 × 671 mm, 42.0 × 26.5 inches
Noise emission:
• Sound power level:
• Main unit only
Type 1 Type 2
Stand-by Less than 39.5 dB (A) Less than 39.5 dB (A)
Copying Less than 63.2 dB (A) Less than 63.4 dB (A)
• Complete system
151

9. Appendix
9
Draft 2008/06/09
• Sound pressure level:
• Main unit only
• Complete system
Type 1 Type 2
Stand-by Less than 39.7 dB (A) Less than 39.7 dB (A)
Copying Less than 69.5 dB (A) Less than 70.3 dB (A)
Type 1 Type 2
Stand-by Less than 29.1 dB (A) Less than 29.1 dB (A)
Copying Less than 50.6 dB (A) Less than 50.6 dB (A)
Type 1 Type 2
Stand-by Less than 26.5 dB (A) Less than 26.5 dB (A)
Copying Less than 55.2 dB (A) Less than 56.0 dB (A)
• Sound power level and sound pressure level are actual values measured in
accordance with ISO 7779.
• Sound power level and sound pressure level are measured from the position of the
bystander.
• The complete system consists of the main unit, auto document feeder, internal tray 2
(1 bin tray), lower paper trays, large capacity tray (LCT), bridge unit, Booklet Finisher
SR3000, and punch kit for the Booklet Finisher SR3000.
Weight:
Type 1, 2: Approx. 110 kg, 242.6 lb.
• p.96 "Thick Paper"
• p.135 "Power Connection"
For users of type 3 and 4
Configuration:
152
Desktop

Photosensitivity type:
9
Draft 2008/06/09
OPC drum
Original scanning:
One-dimensional solid scanning system through CCD
Copy process:
Dry electrostatic transfer system
Development:
Dry two-component magnetic brush development system
Fusing:
Induction Heating (IH) fusing
Scan resolution:
• 600 dpi × 600 dpi
Copy/Print resolution:
• 600 dpi × 600 dpi
• 1200 dpi × 1200 dpi (for printer function only)
Specifications for the Main Unit
Exposure glass:
Stationary original exposure type
Original reference position:
Rear left corner
Warm-up time (23°C, rated voltage):
• Type 3: 21 seconds or less
• Type 4: 27 seconds or less
Originals:
Sheet/book/objects
Maximum original size:
A3 , 11 × 17
Paper size:
• Trays: A3 - A5 , 11 × 17 - 81/2 × 11 , 8K (267 × 390 mm) , 16K (195 × 267 mm)
• Bypass: A3 - A6 , 12 × 18 - 51/2 × 81/2, 8K (267 × 390 mm) , 16K (195 × 267
mm)
• Bypass (custom size): Vertical: 90.0 - 305.0 mm, 3.6 - 12.1 inches
Horizontal: 148.0 - 600.0 mm, 5.83 - 23.7 inches
153

9. Appendix
9
Draft 2008/06/09
• Duplex: A3 - A5 , 11 × 17 - 81/2 × 11 , 8K (267 × 390 mm) , 16K (195 × 267
mm)
Paper weight:
• Trays: 60.0 - 256.0 g/m2, 16 lb. - 68 lb.
• Bypass: 60.0 - 256.0 g/m2, 16 lb. - 68 lb.
• Duplex: 60.0 - 169.0 g/m2, 16 lb. - 45 lb.
For details about and recommendations concerning thick paper, see “Thick Paper”.
Non-reproduction area (Copier):
• Leading edge: 3.7 - 6.7 mm, 0.15 - 0.26 inches (2.7 - 5.7 mm, 0.10 - 0.22 inches for paper
heavier than 81 g/m2, 22.0 lb.)
• Trailing edge: 0.5 - 6.0 mm, 0.19 - 0.24 inches
• Left and Right: 0.5 - 4.0 mm, 0.19 - 0.16 inches
First copy/print time:
• Type 3:
• Color: 6.5 seconds or less
• B&W: 3.9 seconds or less
• Type 4:
• Color: 5.9 seconds or less
• B&W: 3.5 seconds or less
(A4 , 81/2 × 11 , 100% reproduction, feeding from Tray 1, on the exposure glass)
Copying speed (Full Color / B&W):
• Type 3: 40/40 copies/minute (A4 , 81/2 × 11 )
• Type 4: 50/50 copies/minute (A4 , 81/2 × 11 )
Reproduction ratio:
• Preset reproduction ratios:
• Enlargement
Metric version Inch version
400% 400%
200% 200%
141% 155%
154
122% 129%
115% 121%

• Full size
9
Draft 2008/06/09
Metric version Inch version
100% 100%
• Reduction
Metric version Inch version
93% 93%
82% 85%
75% 78%
71% 73%
65% 65%
50% 50%
Specifications for the Main Unit
25% 25%
• Zoom: From 25 to 400% in increments of 1%
Maximum continuous copy run:
999 sheets
Paper capacity (80 g/m2, 20 lb.):
• Tray 1, 2: 550 sheets
• Bypass tray: 100 sheets
Power source:
120 V, 60 Hz, 12 A or more
Please be sure to connect the power cord to a power source as above. For details about power
source, see “Power Connection”.
Power consumption:
• Main unit only
Type 3 Type 4
Warm-up 1440 W 1440 W
Stand-by 137 W 137 W
During printing 901 W 1027 W
155

9. Appendix
9
Draft 2008/06/09
Type 3 Type 4
Maximum 1440 W 1440 W
• Complete system
Type 3 Type 4
Warm-up 1440 W 1440 W
Stand-by 151 W 151 W
During printing 1123 W 1223 W
Maximum 1440 W 1440 W
• The complete system consists of the main unit, Booklet Finisher SR3020, large capacity tray
(LCT), fax unit, and printer/scanner unit.
Dimensions (W × D × H up to exposure glass):
Types 3, 4: 670 × 677 × 760 mm, 26.4 × 26.7 × 30.0 inches
Space for main unit (W × D):
Types 3, 4: 1,065 × 677 mm, 42.0 × 26.7 inches
Noise emission:
• Sound power level:
• Main unit only
Stand-by Less than 35.4 dB (A) Less than 35.4 dB (A)
Copying Less than 66.7 dB (A) Less than 67.0 dB (A)
• Complete system
Stand-by Less than 36.6 dB (A) Less than 36.6 dB (A)
Copying Less than 71.9 dB (A) Less than 72.1 dB (A)
• Sound pressure level:
• Main unit only
Type 3 Type 4
Type 3 Type 4
156

Specifications for the Main Unit
9
Draft 2008/06/09
Type 3 Type 4
Stand-by Less than 21.6 dB (A) Less than 21.6 dB (A)
Copying Less than 54.0 dB (A) Less than 54.5 dB (A)
• Complete system
Type 3 Type 4
Stand-by Less than 20.6 dB (A) Less than 20.9 dB (A)
Copying Less than 57.9 dB (A) Less than 58.0 dB (A)
• Sound power level and sound pressure level are actual values measured in
accordance with ISO 7779.
• Sound power level and sound pressure level are measured from the position of the
bystander.
• The complete system consists of the main unit, auto document feeder, internal tray 2
(1 bin tray), lower paper trays, large capacity tray (LCT), bridge unit, Booklet Finisher
SR3020, and punch kit for the Booklet Finisher SR3020.
Weight:
Types 3, 4: Approx. 110 kg, 242.6 lb.
• p.96 "Thick Paper"
• p.135 "Power Connection"
Document Server for Type 1 and 2
HDD (Document Server):
Approx. 17 GB
Maximum: 2,000 pages
(Total number of pages that can be stored with all functions combined)
Copier/Black and white mode/A4 original: 2,000
Copier/Full-color mode/A4 original: 500
Printer/Black and white/A4/600 dpi, 2 bits: about 2,000
Scanner/Full color/A4/200 dpi, 8 bits/JPEG: about 2,000
(Under the printer and scanner functions, the number of the pages that can be stored depends on the
print image and original.)
157

9. Appendix
9
Draft 2008/06/09
Maximum number of stored documents:
Maximum: 1,000
(The maximum number of received faxes that can be stored is 400.)
Number of Pages Supported by Memory Sorting:
Maximum: 1,000 pages
Copier/Black-and-white mode/A4 original: about 1,000
Printer/Black and white/A4/600 dpi, 2 bits: about 1,000
(Under the printer function, the number of the pages that can be sorted depends on the print image.)
Document Server for Type 3 and 4
HDD (Document Server):
Approx. 34 GB
Maximum: 9,000 pages
(Total number of pages that can be accommodated stored with all functions combined)
Copier/Black and white mode/A4 original: about 4,000
Copier/Full-color mode/A4 original: about 1,000
Printer/Black and white/A4/600 dpi, 2 bits: about 9,000
Scanner/Full color/A4/200 dpi, 8 bits/JPEG: about 9,000
(Under the printer and scanner functions, the number of the pages that can be stored depends on the
print image and original.)
Maximum number of stored documents:
Maximum: 3,000
(The maximum number of received faxes that can be stored is 400.)
Number of Pages Supported by Memory Sorting:
Maximum: 2,000 pages
Copier/Black-and-white mode/A4 original: about 2,000
Printer/Black and white/A4/600 dpi, 2 bits: about 2,000
(Under the printer function, the number of the pages that can be sorted depends on the print image.)
158

Specifications for Auto Document Feeder
9
Draft 2008/06/09
Specifications for Auto Document Feeder
This section describes specifications for auto document feeder.
Specifications for Auto Document Feeder (ARDF DF3030)
This section describes specifications for auto document feeder ARDF DF 3030.
Mode:
ADF mode, Batch mode, SADF mode, Mixed Size mode, Custom Size originals mode
Original size:
Metric version:
• 1-sided originals: A3 - A5
• 2-sided originals: A3 - A5
Inch version:
• 1-sided originals: 11 × 17 - 51/2 × 81/
• 2-sided originals: 11 × 17 - 51/2 × 81/
Original weight:
• 1-sided originals: 40 - 128 g/m2 (11 - 34 lb.)
• 2-sided originals: 52 - 105 g/m2 (14 - 28 lb.) (64 - 105 g/m2 (17 - 28 lb.) for 11 × 17 )
Number of originals to be set:
50 sheets (81.4 g/m2, 22 lb.)
Maximum power consumption:
Less than 50 W (Power is supplied from the main unit.)
Dimensions (W × D × H):
550 × 491 × 120 mm, 21.7 ×19.4 ×4.8 inches
Weight:
Approx. 10 kg, 22 lb.
• Specifications are subject to change without notice.
2
2
Specifications for Auto Document Feeder (ARDF DF3010)
This section describes specifications for auto document feeder ARDF DF3010.
159

9. Appendix
9
Draft 2008/06/09
Mode:
ADF mode, Batch mode, SADF mode, Mixed Size mode, Custom Size originals mode
Original size:
• Metric version:
• 1-sided originals: A3 - B6 JIS (Japanese Industrial Standard)
• 2-sided originals: A3 - A5
• Inch version:
• 1-sided originals: 11 × 17 - 51/2 × 81/
• 2-sided originals: 11 × 17 - 51/2 × 81/
Original weight:
• 1-sided originals: 40 - 128 g/m2 (10 - 34 lb.)
• 2-sided originals: 52 - 128 g/m2 (14 - 34 lb.)
Number of originals to be set:
100 sheets (80 g/m2, 20 lb.)
Maximum power consumption:
Less than 60 W (Power is supplied from the main unit.)
Dimensions (W × D × H):
570 × 520 × 135 mm, 22.5 × 20.5 × 5.4 inches
Weight:
Approx. 12 kg, 26.5 lb.
• Specifications are subject to change without notice.
2
2
160

Specifications for Finishers (Optional)
9
Draft 2008/06/09
Specifications for Finishers (Optional)
This section describes specifications for finishers.
Specifications for Finisher SR790 (1000-sheet) (Optional)
This section describes specifications for the Finisher SR790.
Finisher Upper Tray
This section describes specifications for the finisher upper tray of the Finisher SR790.
Paper size:
A3 , B4 JIS , A4 , B5 JIS , A5 , B6 JIS , A6 , 12 × 18 , 11 × 17 , 11 × 15 ,
11 × 14 , 10 × 15 , 10 × 14 , 81/2 × 14 , 81/2 × 13 , 81/2 × 11 ,
81/4 × 14 , 81/4 × 13 , 8 × 13 , 8 × 101/
, 8K , 16K , custom size
Paper weight:
52 - 260 g/m2, 14 - 68 lb.
Stack capacity (80 g/m2, 20 lb.):
• 250 sheets: A4, 81/2 × 11 or smaller
• 50 sheets: B4 JIS, 81/2 × 14 or larger
, 8 × 10 , 51/2 × 81/2, 71/4 × 101/
2
Finisher Shift Tray
This section describes specifications for the finisher shift tray of the Finisher SR790.
Paper size:
A3 , B4 JIS , A4 , B5 JIS , A5 , 12 × 18 , 11 × 17 , 11 × 15 , 11 × 14 , 10 ×
15 , 10 × 14 , 81/2 × 14 , 81/2 × 13 , 81/2 × 11 , 81/4 × 14 ,
81/4 × 13 , 8 × 13 , 8 × 101/
Paper weight:
52 - 163 g/m2, 14 - 43 lb.
, 8 × 10 , 51/2 × 81/2, 71/4 × 101/
2
2
2
, 8K , 16K
Stack capacity (80 g/m2, 20 lb.):
• 1,000 sheets: A4, 81/2 × 11 or smaller
• 500 sheets: B4 JIS, 81/2 × 14 or larger, and A5
• 100 sheets: A5 , 51/2 × 81/
2
161

9. Appendix
9
Draft 2008/06/09
Staple paper size:
A3 , B4 JIS , A4 , B5 JIS , 11 × 17 , 11 × 15 , 11 × 14 , 10 × 15 , 10 × 14 ,
81/2 × 14 , 81/4 × 14 , 81/2 × 13 , 81/4 × 13 , 8 × 13 , 81/2 × 11 ,
8 × 101/
Staple paper weight:
64 - 90 g/m2, 17 - 28 lb.
Staple capacity (80 g/m2, 20 lb.):
• 50 sheets: A4, 81/2 × 11 or smaller
• 30 sheets: B4 JIS, 81/2 × 14 or larger
Stack capacity after stapling (80 g/m2, 20 lb.):
• 2 - 9 sheets: 100 sets (A4 , B5 JIS , 81/2 × 11 )
• 10 - 50 sheets: 100 - 20 sets (A4 , 81/2 × 11 )
• 10 - 50 sheets: 50 - 10 sets (A4 , B5 JIS , 81/2 × 11 )
• 2 - 9 sheets: 50 sets (A3 , B4 JIS , 11 × 17 , 81/2 × 14 )
• 10 - 30 sheets: 50 - 10 sets (A3 , B4 JIS , 11 × 17 , 81/2 × 14 )
Staple position:
3 positions (Top, Bottom, 2 Staples)
Power consumption:
50 W (Power is supplied from the main unit.)
Dimensions (W × D × H):
, 8 × 10 , 71/4 × 101/
2
2
162
527 × 520 × 790 mm, 20.8 × 20.5 × 31.2 inches
Weight:
Approx. 25 kg, 55.2 lb.
Specifications for Finisher SR3030 (3000-sheet) (Optional)
This section describes specifications for the Finisher SR3030.
Finisher Upper Tray
This section describes specifications for the finisher upper tray of the Finisher SR3030.
Paper size:
A3 , B4 JIS , A4 , B5 JIS , A5 , B6 JIS , A6 , 12 × 18 , 11 × 17 , 11 × 15 ,
11 × 14 , 10 × 15 , 10 × 14 , 81/2 × 14 , 81/2 × 13 , 81/2 × 11 ,

Specifications for Finishers (Optional)
9
Draft 2008/06/09
81/4 × 14 , 81/4 × 13 , 8 × 13 , 8 × 101/
, 8 × 10 , 51/2 × 81/2, 71/4 × 101/
2
, 8K , 16K , custom size
Paper weight:
52 - 163 g/m2, 14 - 43 lb.
Stack capacity (80 g/m2, 20 lb.):
• 250 sheets: A4, 81/2 × 11 or smaller
• 50 sheets: B4 JIS, 81/2 × 14 or larger
Finisher Shift Tray
This section describes specifications for the finisher shift tray of the Finisher SR3030.
Paper size:
A3 , B4 JIS , A4 , B5 JIS , A5 , B6 JIS , A6 , 12 × 18 , 11 × 17 , 11 × 15 ,
11 × 14 , 10 × 15 , 10 × 14 , 81/2 × 14 , 81/2 × 13 , 81/2 × 11 ,
81/4 × 14 , 81/4 × 13 , 8 × 13 , 8 × 101/
, 8K , 16K , custom size
Paper weight:
52 - 256 g/m2, 14 - 68 lb.
, 8 × 10 , 51/2 × 81/2, 71/4 × 101/
2
2
2
Stack capacity (80 g/m2, 20 lb.):
• 3,000 sheets: A4
, 81/2 × 11
• 1,500 sheets: A3 , B4 JIS , A4 , B5 JIS , 11 × 17 , 81/2 × 14 , 81/2 × 11 , 12
× 18
• 500 sheets: A5
• 100 sheets: A5 , B6 JIS , A6 , 51/2 × 81/
2
Staple paper size:
A3 , B4 JIS , A4 , B5 JIS , 12 × 18 , 11 × 17 , 11 × 15 , 11 × 14 , 10 × 15 , 10
× 14 , 81/2 × 14 , 81/4 × 14 , 81/2 × 13 , 81/4 × 13 , 8 × 13 ,
81/2 × 11 , 8 × 101/
, 8 × 10 , 71/4 × 101/
2
2
, 8K , 16K
Staple paper weight:
64 - 90 g/m2, 17 - 24 lb.
Staple capacity (80 g/m2, 20 lb.):
• Without Mixed Size:
• 30 sheets: A3 , B4 JIS , 12 × 18 , 11 × 17 , 81/2 × 14
• 50 sheets: A4 , B5 JIS , 81/2 × 11
• With Mixed Size:
163

9. Appendix
9
Draft 2008/06/09
• 30 sheets: A3 / A4 , B4 JIS / B5 JIS , 11 × 17 /81/2 × 11
Stack capacity after stapling (80 g/m2, 20 lb.):
• Without Mixed Size:
• 2 - 19 sheets: 150 sets (A4 , 81/2 × 11 )
• 20 - 50 sheets: 150 - 60 sets (A4 , 81/2 × 11 )
• 2 - 14 sheets: 100 sets (A4 , B5 JIS , 81/2 × 11 )
• 15 - 50 sheets: 100 - 30 sets (A4 , B5 JIS , 81/2 × 11 )
• 2 - 14 sheets: 100 sets (other size paper)
• 15 - 30 sheets: 100 - 33 sets (other size paper)
• With Mixed Size:
• 2 - 30 sheets: 50 sets: A3 / A4 , B4 JIS / B5 JIS , 11 × 17 /81/2 × 11
Staple position:
4 positions (Top, Top Slant, Bottom, 2 Staples)
Power consumption:
Approx. 96 W (Power is supplied from the main unit.)
Dimensions (W × D × H):
657 × 613 × 960 mm, 25.8 × 24.2 × 37.8 inches
Weight:
• Approx. 54 kg, 119.1 lb. (without punch kit)
• Approx. 56 kg, 123.5 lb. (with punch kit)
Specifications for Finisher SR3010 (500-sheet) (Optional)
This section describes specifications for Finisher SR3010.
Paper size:
A3 , B4 JIS (Japanese Industrial Standard) , A4 , B5 JIS , 11 × 17 , 11 × 15 , 11 × 14
, 10 × 15 , 10 × 14 , 81/2 × 14 , 81/4 × 14 , 81/2 × 13 , 81/2 × 11 , 81/4 × 13
, 8 × 13 , 8 × 101/2, 8 × 10 , 71/4 × 101/
Paper weight:
52 - 253 g/m2, 14 - 67.5 lb.
Stack capacity (80 g/m2, 20 lb.):
• 500 sheets: A4, 81/2 × 11 or smaller
• 250 sheets: B4 JIS, 81/2 × 14 or larger
2
164

Specifications for Finishers (Optional)
9
Draft 2008/06/09
Staple paper size:
A3 , B4 JIS , A4 , B5 JIS , 11 × 17 , 11 × 15 , 11 × 14 , 10 × 15 , 10 × 14 ,
81/2 × 14 , 81/4 × 14 , 81/2 × 13 , 81/2 × 11 , 81/4 × 13 , 8 × 13 , 8 × 101/
, 8 × 10 , 71/4 × 101/
Staple paper weight:
52 - 253 g/m2, 14 - 67.5 lb.
Staple capacity (80 g/m2, 20 lb.):
• Without Mixed Size:
• 50 sheets: A4, 81/2 × 11 or smaller
• 30 sheets: B4 JIS, 81/2 × 14 or larger
• With Mixed Size:
• 30 sheets: A3 / A4 , B4 JIS / B5 JIS , 11 × 17 /81/2 × 11 , 81/2 × 14 /
81/2 × 11
Stack capacity after stapling (80 g/m2, 20 lb.):
• 2 - 9 sheets: 55 - 46 sets (A4 , B5 JIS , 81/2 × 11 )
2
2
• 10 - 50 sheets: 45 - 10 sets (A4 , B5 JIS , 81/2 × 11 )
• 2 - 9 sheets: 55 - 27 sets (A4 , B5 JIS , 81/2 × 11 )
• 10 - 50 sheets: 25 - 8 sets (A4 , B5 JIS , 81/2 × 11 )
• 2 - 9 sheets: 55 - 27 sets (A3 , B4 JIS , 11 × 17 , 81/2 × 14 )
• 10 - 30 sheets: 25 - 8 sets (A3 , B4 JIS , 11 × 17 , 81/2 × 14 )
Staple position:
5 positions (Top, Top Slant, Bottom, Bottom Slant, 2 Staples)
Power consumption:
Approx. 50 W (Power is supplied from the main unit.)
Dimensions (W × D × H):
396 × 551 × 275 mm, 15.6 × 21.7 ×10.2 inches
Weight:
Approx. 12 kg, 26.5 lb.
165

9. Appendix
9
Draft 2008/06/09
Specifications for Booklet Finisher (Optional)
This section describes specifications for booklet finisher.
Specifications for Booklet Finisher SR3020 (2000-sheet-Booklet) (Optional)
This section describes specifications for Booklet Finisher SR3020.
Finisher Upper Tray
This section describes specifications for the finisher upper tray of Booklet Finisher SR3020.
Paper size:
A3 , B4 JIS , A4 , B5 JIS , A5 , B6 JIS , A6 , 12 × 18 , 11 × 17 , 11 × 15 ,
11 × 14 , 10 × 15 , 10 × 14 , 81/2 × 14 , 81/2 × 13 , 81/2 × 11 ,
81/4 × 14 , 81/4 × 13 , 8 × 13 , 8 × 101/
, 8K , 16K , custom size
Paper weight:
52 - 163 g/m2, 14 - 43 lb.
Stack capacity (80 g/m2, 20 lb.):
• 250 sheets: A4, 81/2 × 11 or smaller
• 50 sheets: B4 JIS, 81/2 × 14 or larger
, 8 × 10 , 51/2 × 81/2, 71/4 × 101/
2
Finisher Shift Tray
This section describes specifications for the finisher shift tray of Booklet Finisher SR3020.
Paper size:
A3 , B4 JIS , A4 , B5 JIS , A5 , B6 JIS , A6 , 12 × 18 , 11 × 17 , 11 × 15 ,
11 × 14 , 10 × 15 , 10 × 14 , 81/2 × 14 , 81/2 × 13 , 81/2 × 11 ,
81/4 × 14 , 81/4 × 13 , 8 × 13 , 8 × 101/
, 8K , 16K , custom size
Paper weight:
52 - 256 g/m2, 14 - 68 lb.
, 8 × 10 , 51/2 × 81/2, 71/4 × 101/
2
2
2
166
Stack capacity (80 g/m2, 20 lb.):
• 2,000 sheets: A4 , 81/2 × 11
• 1,000 sheets: A3 , B4 JIS , A4 , B5 JIS , 11 × 17 , 81/2 × 14 , 81/2 × 11 , 12
× 18

• 500 sheets: A5
9
Draft 2008/06/09
Specifications for Booklet Finisher (Optional)
• 100 sheets: A5 , B6 JIS , A6 , 51/2 × 81/
Staple paper size:
A3 , B4 JIS , A4 , B5 JIS , 12 × 18 , 11 × 17 , 11 × 15 , 11 × 14 , 10 × 15 , 10
× 14 , 81/2 × 14 , 81/4 × 14 , 81/2 × 13 , 81/4 × 13 , 8 × 13 ,
81/2 × 11 , 8 × 101/
Staple paper weight:
64 - 90 g/m2, 17 - 24 lb.
Staple capacity (80 g/m2, 20 lb.):
• Without Mixed Size:
• 30 sheets: A3 , B4 JIS , 12 × 18 , 11 × 17 , 81/2 × 14
• 50 sheets: A4 , B5 JIS , 81/2 × 11
• With Mixed Size:
• 30 sheets: A3 / A4 , B4 JIS / B5 JIS , 11 × 17 /81/2 × 11
Stack capacity after stapling (80 g/m2, 20 lb.):
• Without Mixed Size:
• 2 - 12 sheets: 150 sets (A4 , 81/2 × 11 )
• 13 - 50 sheets: 150 - 40 sets (A4 , 81/2 × 11 )
, 8 × 10 , 71/4 × 101/
2
2
, 8K , 16K
2
• 2 - 9 sheets: 100 sets (A4 , B5 JIS , 81/2 × 11 )
• 10 - 50 sheets: 100 - 20 sets (A4 , B5 JIS , 81/2 × 11 )
• 2 - 9 sheets: 100 sets (other size paper)
• 10 - 30 sheets: 100 - 33 sets (other size paper)
• With Mixed Size:
• 2 - 30 sheets: 50 sets: A3 / A4 , B4 JIS / B5 JIS , 11 × 17 /81/2 × 11
Staple position:
4 positions (Top, Top Slant, Bottom, 2 Staples)
Finisher Booklet Tray
This section describes specifications for the finisher booklet tray of Booklet Finisher SR3020.
Saddle stitch paper size:
A3 , B4 JIS , A4 , B5 JIS , 11 × 17 , 81/2 × 14 , 81/2 × 11
Saddle stitch paper weight:
64 - 90 g/m2, 17 - 24 lb.
167

9. Appendix
9
Draft 2008/06/09
Saddle stitch capacity (80 g/m2, 20 lb.):
1 set: 15 sheets
Stack capacity after saddle stitching (80 g/m2, 20 lb.):
• 2 - 5 sheets: 30 sets
• 6 - 10 sheets: 15 sets
• 11 - 15 sheets: 10 sets
Saddle stitch position:
Center 2 positions
Power consumption:
Approx. 96 W (Power is supplied from the main unit.)
Dimensions (W × D × H):
657 × 613 × 960 mm, 25.8 × 24.2 × 37.8 inches
Weight:
• Approx. 63 kg, 138.9 lb. (without punch kit)
• Approx. 65 kg, 143.3 lb. (with punch kit)
Specifications for Booklet Finisher SR3000 (1000-sheet-Booklet) (Optional)
This section describes specifications for Booklet Finisher SR3000.
Finisher Upper Tray
This section describes specifications for the finisher upper tray of Booklet Finisher SR3000.
Paper size:
A3 , B4 JIS , A4 , B5 JIS , A5 , B6 JIS , A6 , 11 × 17 , 81/2 × 14 , 81/2 × 13
, 81/2 × 11 , 8 × 13 , 51/2 × 81/2, 71/4 × 101/
Paper weight:
52 - 105 g/m2, 14 - 28 lb.
Stack capacity (80 g/m2, 20 lb.):
• 100 sheets: A4, 81/2 × 11 or smaller
• 50 sheets: B4 JIS, 81/2 × 14 or larger
Finisher Shift Tray
This section describes specifications for the finisher shift tray of Booklet Finisher SR3000.
2
168

Specifications for Booklet Finisher (Optional)
9
Draft 2008/06/09
Paper size:
A3 , B4 JIS , A4 , B5 JIS , 11 × 17 , 81/2 × 14 , 81/2 × 13 , 81/2 × 11 , 81/4 ×
13 , 8 × 13 , 71/4 × 101/
Paper weight:
52 - 256 g/m2, 14 - 68 lb.
Stack capacity (80 g/m2, 20 lb.):
• 1,000 sheets: A4, 81/2 × 11 or smaller
• 500 sheets: B4 JIS, 81/2 × 14 or larger
Staple paper size:
2
A3 , B4 JIS , A4 , B5 JIS , 11 × 17 , 81/2 × 14 , 81/2 × 11 , 71/4 × 101/
8 × 13 , 81/2 × 13 , 81/4 × 13
Staple paper weight:
64 - 90 g/m2, 17 - 24 lb.
Staple capacity (80 g/m2, 20 lb.):
• 50 sheets: A4, 81/2 × 11 or smaller
• 30 sheets: B4 JIS, 81/2 × 14 or larger
Stack capacity after stapling (80 g/m2, 20 lb.):
• 2 - 9 sheets: 100 sets (A4 , 81/2 × 11 )
• 10 - 50 sheets: 100 - 20 sets (A4 , 81/2 × 11 )
• 2 - 9 sheets: 100 sets (A4 , B5 JIS , 81/2 × 11 )
• 10 - 50 sheets: 50 - 10 sets (A4 , B5 JIS , 81/2 × 11 )
• 2 - 9 sheets: 50 sets (A3 , B4 JIS , 11 × 17 , 81/2 × 14 )
• 10 - 30 sheets: 50 - 10 sets (A3 , B4 JIS , 11 × 17 , 81/2 × 14 )
Staple position:
3 positions (Top, Bottom, 2 Staples)
,
2
Finisher Booklet Tray
This section describes specifications for the finisher booklet tray of Booklet Finisher SR3000.
Saddle stitch paper size:
A3 , B4 JIS , A4 , B5 JIS , 11 × 17 , 81/2 × 14 , 81/2 × 11
Saddle stitch paper weight:
64 - 90 g/m2, 17 - 24 lb.
169

9. Appendix
9
Draft 2008/06/09
Saddle stitch capacity (80 g/m2, 20 lb.):
1 set: 10 sheets
Stack capacity after saddle stitching (80 g/m2, 20 lb.):
• 2 - 5 sheets: 20 sets
• 6 - 10 sheets: 10 sets
Saddle stitch position:
Center 2 positions
Power consumption:
Approx. 60 W (Power is supplied from the main unit.)
Dimensions (W × D × H):
535 × 600 × 930 mm, 21.1 × 23.7 × 36.7 inches
Weight:
• Approx. 48 kg, 105.9 lb. (without punch kit)
• Approx. 50 kg, 110.3 lb. (with punch kit)
170

Specifications for Punch Kit (Optional)
9
Draft 2008/06/09
Specifications for Punch Kit (Optional)
This section describes specifications for punch kit.
Specifications for Punch Kit (Finisher SR3030, Booklet Finisher SR3020)
(Optional)
This section describes specifications for the punch kit (Finisher SR3030, Booklet Finisher SR3020).
Paper size:
Punch unit type Paper size
2 & 4 holes type: 2 holes
2 & 4 holes type: 2 holes
2 & 4 holes type: 4 holes
2 & 4 holes type: 4 holes
4 holes type: 4 holes
4 holes type: 4 holes
: A3, B4 JIS, A4, B5 JIS, A5, 11 × 17, 81/
× 14, 81/2 × 11, 51/2 × 81/2, 71/4 ×
101/2, 8 × 13, 81/2 × 13, 81/4 × 13, 81/4 ×
14, 8 × 101/2, 8 × 10, 11 × 15, 11 × 14, 10
× 15, 10 × 14, 8K, 16K
: A4, B5 JIS, A5, 81/2 × 11, 71/4 × 101/2,
8 × 101/2, 8 × 10
: A3, B4 JIS, 11 × 17, 11 × 15, 11 × 14,
71/4 × 101/2, 8K
: A4, B5 JIS, 81/2 × 11, 8 × 101/2, 71/4 ×
101/2, 16K
: A3, B4 JIS, A4, B5 JIS, A5, 11 × 17, 81/
× 14, 81/2 × 11, 51/2 × 81/2, 71/4 ×
101/2, 8 × 13, 81/2 × 13, 81/4 × 13, 81/4 ×
14, 8 × 101/2, 8 × 10, 11 × 15, 11 × 14, 10
× 15, 10 × 14, 8K, 16K
: A4, B5 JIS, A5, 81/2 × 11, 71/4 × 101/2,
8 × 101/2, 8 × 10
2
2
2 & 3 holes type: 2 holes
2 & 3 holes type: 2 holes
: A3, B4 JIS, B5 JIS, A5, 11 × 17, 81/2 × 14,
81/2 × 11, 51/2 × 81/2, 71/4 × 101/2, 8 ×
13, 81/2 × 13, 81/4 × 13, 81/4 × 14, 8 ×
101/2, 8 × 10, 11 × 15, 11 × 14, 10 × 15, 10
× 14, 8K, 16K
: A4, B5 JIS, A5, 81/2 × 11, 71/4 × 101/2,
8 × 101/2, 8 × 10
171

9. Appendix
9
Draft 2008/06/09
Punch unit type Paper size
2 & 3 holes type: 3 holes
2 & 3 holes type: 3 holes
Paper weight:
52 - 105 g/m2, 14 - 28 lb.
Power consumption:
20 W (Power is supplied from the main unit.)
Dimensions (W × D × H):
110 × 484 × 117 mm, 4.4 × 190.6 × 46.1 inches
Weight:
Approx. 2.9 kg, 6.4 lb.
: A3, B4 JIS, 11 × 17, 11 × 15, 11 × 14, 10
× 15, 10 × 14, 71/4 × 101/2, 8K
: A4, B5 JIS, 81/2 × 11, 8 × 101/2, 8 × 10,
71/4 × 101/2, 16K
Specifications for Punch Kit (Booklet Finisher SR3000) (Optional)
This section describes specifications for the punch kit (Booklet Finisher SR3000).
Paper size:
172
Punch unit type Paper size
: A3, B4 JIS, A4, B5 JIS, A5, 11 × 17, 81/
2 & 4 holes type: 2 holes
2 & 4 holes type: 2 holes
2 & 4 holes type: 4 holes : A3, B4 JIS, 11 × 17
2 & 4 holes type: 4 holes : A4, B5 JIS, 81/2 × 11, 71/4 × 101/
4 holes type: 4 holes
4 holes type: 4 holes
× 14, 81/2 × 11, 51/2 × 81/2, 71/4 ×
101/2, 8 × 13, 81/2 × 13, 81/4 × 13
: A4, B5 JIS, A5, 81/2 × 11, 71/4 × 101/2,
51/2 × 81/
: A3, B4 JIS, A4, B5 JIS, A5, 11 × 17, 81/
× 14, 81/2 × 11, 51/2 × 81/2, 71/4 ×
101/2, 8 × 13, 81/2 × 13, 81/4 × 13
: A4, B5 JIS, A5, 81/2 × 11, 71/4 × 101/2,
51/2 × 81/
2
2
2
2
2

Specifications for Punch Kit (Optional)
9
Draft 2008/06/09
Punch unit type Paper size
: A3, B4 JIS, A4, B5 JIS, A5, 11 × 17, 81/
2 & 3 holes type: 2 holes
2 & 3 holes type: 2 holes
2 & 3 holes type: 3 holes : A3, B4 JIS, 11 × 17
2 & 3 holes type: 3 holes : A4, B5 JIS, 81/2 × 11, 71/4 × 101/
Paper weight:
52 - 105 g/m2, 14 - 28 lb.
× 14, 81/2 × 11, 51/2 × 81/2, 71/4 ×
101/2, 8 × 13, 81/2 × 13, 81/4 × 13
: A4, B5 JIS, A5, 81/2 × 11, 71/4 × 101/2,
51/2 × 81/
2
2
2
173

9. Appendix
9
Draft 2008/06/09
Specifications for Paper Trays (Optional)
This section describes specifications for paper trays.
Specifications for Lower Paper Tray (Optional)
This section describes specifications for the lower paper tray.
Paper size:
A3 , B4 JIS , A4 , B5 JIS , A5 , 11 × 17 , 81/2 × 14 , 81/2 × 11 , 81/2 × 13
, 81/4 × 13 , 8 × 13 , 51/2 × 81/2, 71/4 × 101/
× 10 , 11 × 15 , 10 × 14
Paper weight:
60 - 256 g/m2, 16 - 68 lb.
Paper capacity (80 g/m2, 20 lb.):
550 sheets × 1 tray
, 81/4 × 14 , 8 × 101/
2
, 8
2
Power consumption:
Maximum 50 W (Power is supplied from the main unit.)
Dimensions (W × D × H):
580 × 620 × 120 mm, 22.9 × 24.5 × 4.8 inches
Weight:
Approx. 15 kg, 33.1 lb.
Specifications for Lower Paper Trays (Optional)
This section describes specifications for the lower paper trays.
Paper size:
A3 , B4 JIS , A4 , B5 JIS , A5 , 11 × 17 , 81/2 × 14 , 81/2 × 11 , 81/2 × 13
, 81/4 × 13 , 8 × 13 , 51/2 × 81/2, 71/4 × 101/
10 , 11 × 15 , 10 × 14
Paper weight:
60 - 256 g/m2, 16 - 68 lb.
Paper capacity (80 g/m2, 20 lb.):
550 sheets × 2 trays
, 81/4 × 14 , 8 × 101/
2
, 8 ×
2
174
Power consumption:
Maximum 50 W (Power is supplied from the main unit.)

Dimensions (W × D × H):
9
Draft 2008/06/09
580 × 620 × 260 mm, 22.9 × 25.6 × 10.3 inches
Weight:
Approx. 26 kg, 57.4 lb.
Specifications for Tray 3 (LCT) (Optional)
This section describes specifications for the tray 3 (LCT).
Paper size:
A4 , 81/2 × 11
Paper weight:
60 - 256 g/m2, 16 - 68 lb.
Paper capacity (80 g/m2, 20 lb.):
1,000 sheets × 2 trays
Power consumption:
Specifications for Paper Trays (Optional)
Maximum 50 W (Power is supplied from the main unit.)
Dimensions (W × D × H):
580 × 650 × 260 mm, 22.9 ×25.6 × 10.3 inches
Weight:
Approx. 26 kg, 57.4 lb.
Specifications for Large capacity tray (LCT) (Optional)
This section describes specifications for the large capacity tray (LCT).
Paper size:
A4 , 81/2 × 11
Paper weight:
60 - 256 g/m2, 16 - 68 lb.
Paper capacity (80 g/m2, 20 lb.):
1,200 sheets
Power consumption:
Maximum 55 W (Power is supplied from the main unit.)
Dimensions (W × D × H):
348 × 540 × 290 mm, 13.8 × 21.3 × 11.5 inches
175

9. Appendix
9
Draft 2008/06/09
Weight:
Approx. 14 kg, 30.9 lb.
176

Specifications for Bridge Unit (Optional)
9
Draft 2008/06/09
Specifications for Bridge Unit (Optional)
This section describes specifications for the bridge unit.
Stack capacity (80 g/m2, 20 lb.):
• 250 sheets: A4, 81/2 × 11 or smaller
• 125 sheets: B4 JIS, 81/2 × 14 or larger
Power consumption:
Approx. 10 W (Power is supplied from the main unit.)
Dimensions (W × D × H):
415 × 412 × 111 mm, 16.4 × 16.3 × 4.4 inches
Weight:
Approx. 4 kg, 8.9 lb.
177

9. Appendix
9
Draft 2008/06/09
Specifications for Internal Tray 2 (Optional)
This section describes specifications for the internal tray 2 (1 bin tray).
Number of bins:
1
Paper size:
A3 , B4 JIS , A4 , B5 JIS , A5 , 11 × 17 , 81/2 × 14 , 81/2 × 11 , 51/2 × 81/
, 71/4 × 101/
, 11 × 15 , 10 × 14 , 10 × 15 , 8K , 16K , custom size
Paper weight:
60 - 105 g/m2, 16 - 28 lb.
Paper capacity (80 g/m2, 20 lb.):
125 sheets
Power consumption:
Approx. 10 W (Power is supplied from the main unit.)
Dimensions (W × D × H):
565 × 410 × 115 mm, 22.3 × 16.2 × 4.6 inches
Weight:
Approx. 2.5 kg, 5.6 lb.
, 81/2 × 13 , 81/4 × 14 , 81/4 × 13 , 8 × 13 , 8 × 10 , 11 × 14
2
2
178

Specifications for Internal Shift Tray (Optional)
9
Draft 2008/06/09
Specifications for Internal Shift Tray (Optional)
This section describes specifications for the shift sort tray.
Paper capacity (80 g/m2, 20 lb.):
• 250 sheets: A4, 81/2 × 11 or smaller
• 125 sheets: B4 JIS, 81/2 × 14 or larger
Power consumption:
Maximum 10 W (Power is supplied from the main unit.)
Dimensions (W × D × H):
423 × 468 × 114 mm, 16.7 × 18.5 × 4.5 inches
Weight:
Approx. 2 kg, 4.5 lb.
179

9. Appendix
9
Draft 2008/06/09
Specifications for IEEE 1284 Interface Board
(Optional)
This section describes specifications for the IEEE 1284 interface board.
Transmission spec.:
IEEE 1284
Required cable:
Standard IEEE 1284 compliant Micro Centronics 36 pin cable
180

Specifications for Wireless LAN Board (Optional)
9
Draft 2008/06/09
Specifications for Wireless LAN Board
(Optional)
This section describes specifications for the wireless LAN board.
Transmission spec.:
• Based on IEEE 802.11a/b/g (wireless LAN)
Protocol:
TCP/IP, IPX/SPX, AppleTalk
Data transfer speed:
Auto select from the following speed:
1 Mbps, 2 Mbps, 5.5 Mbps, 6 Mbps, 9 Mbps, 11 Mbps, 12 Mbps, 18 Mbps, 24 Mbps, 36 Mbps,
48 Mbps, 54 Mbps
Frequency range:
• IEEE 802.11a/b/g wireless LAN:
• 2412 - 2472 MHz (1 - 13 channels)
• 5180 - 5320 MHz (36, 40, 44, 48, 52, 56, 60, and 64 channels)
Transmission mode:
• Ad hoc mode
• Infrastructure mode
• SmartDeviceMonitor and Web Image Monitor are supported.
181

9. Appendix
9
Draft 2008/06/09
Specifications for Bluetooth Interface Unit
(Optional)
This section describes specifications for the Bluetooth interface unit.
Supported Profiles:
• SPP (Serial Port Profile)
• HCRP (Hardcopy Cable Replacement Profile)
• BIP (Basic Imaging Profile)
Frequency Range:
2.45 GHz ISM band
Data Transmission Speed:
723 kbps
Maximum Range:
10 m
• The transmission speed is adjusted according to factors such as the distance and obstacles between
the devices, radio signal condition and Bluetooth adaptor.
182

Specifications for Gigabit Ethernet (Optional)
9
Draft 2008/06/09
Specifications for Gigabit Ethernet (Optional)
This section describes specifications for the Gigabit Ethernet.
Interface Connector:
• Ethernet (10Base-T, 100Base-TX, 1000Base-T)
Data Transmission Speed:
• Ethernet: 1000 Mbps, 100 Mbps, 10 Mbps
Protocol:
TCP/IP, IPX/SPX, AppleTalk
Distance Between Devices:
• Ethernet: 100 m
183

9. Appendix
9
Draft 2008/06/09
Specifications for Other Options
This section describes specifications for other options.
Copy Data Security Unit
The Copy Data Security Unit deletes images and prints the gray ground color of the paper when the
documents marked unauthorized are copied.
DataOverWriteSecurity Unit
The DataOverWriteSecurity Unit automatically overwrites the data that remains on the hard disk.
184

Trademarks
9
Draft 2008/06/09
Trademarks
Adobe, Acrobat, Acrobat Reader, PostScript, and Reader are either registered trademarks or trademarks
of Adobe Systems Incorporated in the United States and/or other countries.
AppleTalk, Macintosh and Mac OS are registered trademarks of Apple Inc.
The Bluetooth® word mark and logos are registered trademarks owned by Bluetooth SIG, Inc. and any
use of such marks by Ricoh Company, Ltd. is under license.
Microsoft®, Windows®, Windows NT®, Windows Server®, and Windows Vista® are either registered
trademarks or trademarks of Microsoft Corporation in the United States and/or other countries.
Netscape and Netscape Navigator are registered trademarks of Netscape Communications Corporation.
Novell, NetWare, NDS and NDPS are registered trademarks of Novell, Inc.
PCL® is a registered trademark of Hewlett-Packard Company.
PowerPC® is a trademark of International Business Machines Corporation in the United States, other
countries, or both.
UNIX is a registered trademark in the United States and other countries, licensed exclusively through X/
Open Company Limited.
Other product names used herein are for identification purposes only and might be trademarks of their
respective companies. We disclaim any and all rights to those marks.
The proper names of the Windows operating systems are as follows:
• The product names of Windows 2000 are as follows:
Microsoft® Windows® 2000 Professional
Microsoft® Windows® 2000 Server
Microsoft® Windows® 2000 Advanced Server
• The product names of Windows XP are as follows:
Microsoft® Windows® XP Professional
Microsoft® Windows® XP Home Edition
Microsoft® Windows® XP Media Center Edition
Microsoft® Windows® XP Tablet PC Edition
• The product names of Windows Vista are as follows:
Microsoft® Windows Vista® Ultimate
Microsoft® Windows Vista® Enterprise
Microsoft® Windows Vista® Business
Microsoft® Windows Vista® Home Premium
Microsoft® Windows Vista® Home Basic
• The product names of Windows Server 2003 are as follows:
185

9. Appendix
9
Draft 2008/06/09
Microsoft® Windows Server® 2003 Standard Edition
Microsoft® Windows Server® 2003 Enterprise Edition
Microsoft® Windows Server® 2003 Web Edition
Microsoft® Windows Server® 2003 Datacenter Edition
• The product names of Windows Server 2003 R2 are as follows:
Microsoft® Windows Server® 2003 R2 Standard Edition
Microsoft® Windows Server® 2003 R2 Enterprise Edition
Microsoft® Windows Server® 2003 R2 Datacenter Edition
186

INDEX
Draft 2008/06/09
1 bin tray.................................................58, 60, 178
A
About the guide on the internal tray 2.................56
Access to the machine........................................135
Adding staples.....................................................104
Adding toner........................................................101
Address book.........................................................17
ADF...................................................20, 51, 54, 159
Adhesive labels.....................................................88
Adjusting colors.....................................................11
Adjusting image qualities......................................11
Alert indicator........................................................63
Authentication screen............................................67
Auto document feeder.............................20, 51, 54
Auto Off..................................................................76
Auto Reduce/Enlarge...........................................11
Available characters...........................................115
B
Bluetooth interface unit.................................60, 182
Booklet...................................................................11
Booklet Finisher...................................................166
Booklet Finisher SR3000.............................58, 106
Booklet Finisher SR3020.....................60, 107, 108
Bridge unit...............................................58, 60, 177
Browser Unit...........................................................60
Bypass tray.........................................52, 55, 88, 96
C
Caster Table for Lower paper tray.......................58
CAUTION........................................................27, 33
CD-ROM...........................119, 120, 121, 122, 141
Changing modes...................................................71
Changing Paper Thickness Settings...................127
Changing the Display Language.......................123
Changing the paper size......................................83
Changing the paper size in the paper trays........83
Changing to a size that is not automatically
Detected.................................................................85
Check.....................................................................48
Cleaning the auto document feeder..................137
Cleaning the Dustproof Glass............................138
Cleaning the exposure glass..............................137
Clear Modes key...................................................62
Clear/Stop key.....................................................63
Collate....................................................................12
Color.......................................................................48
Color copy....................................................11, 132
Colors.....................................................................19
Combine.................................................................11
Communicating indicator......................................63
Components...........................................................51
Computer...............................................................17
Confidential File indicator.....................................63
Contents of the CD-ROM...................................141
Control panel........................52, 54, 62, 67, 68, 69
Copier..............................................................11, 71
Copy Data Security Unit........................17, 60, 184
Copy speed...........................................................22
Counter................................................................129
Counterfeit bank bills............................................19
D
Data In indicator....................................................63
DataOverWriteSecurity Unit.................16, 60, 184
Deleting characters.............................................116
DeskTopBinder................................................12, 13
DeskTopBinder Lite..............................................144
DeskTopBinder-SmartDeviceMonitor for Client......
.....................................................................141, 146
Display panel............................................23, 62, 65
Displaying the Total Counter..............................129
Document Server.............................................12, 71
Document Server for Type 1 and 2...................157
Document Server for Type 3 and 4...................158
Dos and Don'ts....................................................131
Duplex....................................................................11
Duplex priority.......................................................40
E
E-mail Transmission...............................................14
Energy Saver.........................................................76
Energy Saver key..................................................63
Energy Saving Functions.......................................41
ENERGY STAR Program.......................................40
Energy-saving........................................................40
187

Enlarge...................................................................11
Draft 2008/06/09
Enter key (# key)...................................................64
Entering letters.....................................................116
Entering text................................................115, 116
Entry screen.........................................................115
Envelope................................................................49
Envelopes........................................................11, 94
Environments to avoid.........................................134
Environments where the machine can be used........
................................................................................27
Ethernet..........................................................13, 183
Exposure glass................................................51, 54
Extender...........................................................52, 55
External options.....................................................57
Extra G3 Interface Unit.........................................60
F
Facsimile.............................................13, 14, 15, 71
Fax unit...................................................................60
FCC Rules...............................................................24
File Format Converter.....................................12, 60
Finisher.................................................................161
Finisher Booklet Tray (Booklet Finisher SR3000)....
..............................................................................169
Finisher Booklet Tray (Booklet Finisher SR3020)....
..............................................................................167
Finisher Shift Tray (Booklet Finisher SR3000).........
..............................................................................168
Finisher Shift Tray (Booklet Finisher SR3020).........
..............................................................................166
Finisher Shift Tray (Finisher SR3030)................163
Finisher Shift Tray (Finisher SR790)...................161
Finisher SR3010...........................................58, 104
Finisher SR3030...........................................60, 109
Finisher SR790.......................................58, 60, 105
Finisher Upper Tray (Booklet Finisher SR3000)......
..............................................................................168
Finisher Upper Tray (Booklet Finisher SR3020)......
..............................................................................166
Finisher Upper Tray (Finisher SR3030).............162
Finisher Upper Tray (Finisher SR790)...............161
Font Manager......................................................141
Front Cover......................................................52, 54
Function keys.........................................................62
G
Gigabit Ethernet..................................................183
Gigabit Ethernet (1000BASE-T)..........................60
Grain......................................................................96
Guide to components of type 1 and 2................51
Guide to components of type 3 and 4................53
H
Handling power cords..........................................28
Handling power plugs..........................................28
Handling the machine's interior............................30
Handling the machine's supplies..........................31
Handling the main machine..................................29
HDD Encryption Unit.............................................60
Hold Print................................................................12
How to enter text.................................................116
How to use the operating instructions................121
HTML manuals.....................................10, 119, 121
I
IEEE 1284 interface board................................180
IEEE 1284 Interface Board..................................60
Important................................................................19
Important symbols.................................................27
Inquiry..................................................................125
Install......................................................................49
Installing operating instructions..........................119
Internal options......................................................60
Internal shift tray.....................................57, 59, 179
Internal Tray 1.................................................52, 54
Internal tray 2.........................................58, 60, 178
Internet Fax............................................................14
Interrupt key...........................................................63
IP-Fax......................................................................14
Items.......................................................................20
K
Key arrangement................................................115
Key Color...............................................................66
L
Label paper (adhesive labels)..............................88
LAN-Fax........................................................13, 143
LAN-Fax driver....................................................143
188

Large capacity tray...............................................20
Draft 2008/06/09
Large capacity tray (LCT)..................58, 59, 79, 90
LCT...................................................................20, 90
Legal prohibition....................................................19
Loading paper.......................................................77
Loading paper into the large capacity tray (LCT)...
................................................................................79
Loading paper into the paper trays.....................77
Loading paper into the tray 3 (LCT).....................78
Local connection....................................................12
Locked Print............................................................12
Login.................................................................68, 70
Login/Logout key..................................................64
Logout..............................................................69, 70
Low Power mode............................................40, 41
Lower paper tray...................................................58
lower paper trays..................................................88
Lower paper trays...........................................58, 59
Lower Paper Trays..........................................52, 55
Lower Right Cover...........................................53, 55
M
Machine environment.........................................133
Machine types.......................................................22
Magazine..............................................................11
Mail to Print............................................................14
Main power.....................................................73, 75
Main power indicator...........................................63
Main power switch...................................52, 54, 73
Maintaining your machine.................................137
Manuals............................119, 120, 121, 122, 141
Manuals for this machine........................................8
Manuals list............................................................10
Media slot........................................................57, 59
Moving.................................................................133
N
Names of major Items...........................................20
Network.................................................................15
Network connection..............................................12
Network delivery scanner....................................15
Note.................................................................24, 26
Note to users..........................................................24
Note to users in the state of California................26
Notes on lamp(s) inside this machine..................25
Notice.....................................................................19
Number keys..........................................................63
O
Off mode................................................................40
OHP transparencies........................................11, 88
Opening manuals from the [Start] menu...........121
Opening manuals from the CD-ROM...............122
Opening manuals from the icon........................121
Operating instructions.........................................121
Operation switch................................52, 55, 63, 73
Optimum environmental conditions...................134
Options...................................................57, 60, 184
Orientation-fixed paper or two-sided paper......81
P
Paper................................................................47, 77
Paper grain............................................................96
Paper setting direction...........................................96
Paper sizes.............................................................88
Paper storage........................................................99
Paper trays................................................52, 54, 96
Paper types............................................................88
Paperless fax reception.........................................13
Paperless fax transmission....................................13
Password................................................................16
PCL........................................................................141
PDF manuals..................................................10, 120
PictBridge card......................................................60
Plain Paper Setting..............................................123
Positions of WARNING and CAUTION labels for
users of type 1 and 2............................................33
Positions of WARNING and CAUTION labels for
users of type 3 and 4............................................36
PostScript.............................................................141
Power...............................................................73, 74
Power connection................................................135
Power supply.........................................................73
PPD.......................................................................141
Preventing an unauthorized copy........................17
Print speed..............................................................22
Printed manuals.....................................................10
Printer...............................................................12, 71
189

Printer driver............................................68, 70, 141
Draft 2008/06/09
Printer Drivers and Utilities........141, 143, 145, 146
Printer Utility for Mac..........................................141
Printing a PDF file directly.....................................12
Printing with the finisher.........................................12
Program key...........................................................63
Punch................................................................11, 12
Punch Kit..............................................................171
R
Receiving File indicator.........................................63
Recommended paper sizes and types.................88
Reduce...................................................................11
Register/Change/Delete.....................................47
Replacing the stamp cartridge...........................111
Replacing Toner..................................................102
RPCS.....................................................................141
S
Safety during operation........................................27
Safety information.................................................27
Safety Labels of This Machine..............................33
Safety precautions to be followed.......................27
Sample Copy key..................................................64
Sample Print...........................................................12
Saving color copies............................................132
Saving paper.........................................................11
Scanner............................................................15, 71
Scanner Accessibility Unit.....................................59
Scanner Driver and Utilities..............141, 143, 144
ScanRouter.............................................................15
Searching by Keyword.........................................47
Searching by what you want to do......................43
Security functions...................................................16
Sending faxes or scanned documents when toner
has run out...........................................................103
Sending scan files by e-mail.................................15
Sending scan files by Scan to Folder...................15
Simplified Display..................................................65
Simplified Display key....................................64, 65
Sleep mode.....................................................40, 41
SmartDeviceMonitor for Admin..........17, 141, 145
SmartDeviceMonitor for Client..................144, 146
Software included on the CD-ROM..................141
Sort.........................................................................11
Specifications......................................................184
Specifications for Auto Document Feeder.........159
Specifications for Auto Document Feeder (ARDF
DF3010)..............................................................159
Specifications for Auto Document Feeder (ARDF
DF3030)..............................................................159
Specifications for Bluetooth interface unit.........182
Specifications for Booklet Finisher.....................166
Specifications for Booklet Finisher SR3000 (1000-
sheet-Booklet)......................................................168
Specifications for Booklet Finisher SR3020 (2000-
sheet-Booklet)......................................................166
Specifications for Bridge Unit.............................177
Specifications for Finisher SR3010 (500-sheet).....
..............................................................................164
Specifications for Finisher SR3030 (3000-sheet)...
..............................................................................162
Specifications for Finisher SR790 (1000-sheet).....
..............................................................................161
Specifications for Finishers.................................161
Specifications for Gigabit Ethernet....................183
Specifications for IEEE 1284 interface board.........
..............................................................................180
Specifications for Internal shift tray....................179
Specifications for internal tray 2........................178
Specifications for Large capacity tray (LCT).....175
Specifications for Lower Paper Tray..................174
Specifications for Lower Paper Trays................174
Specifications for Paper Trays............................174
Specifications for Punch Kit................................171
Specifications for Punch Kit (Booklet Finisher
SR3000)..............................................................172
Specifications for Punch Kit (Finisher SR3030,
Booklet Finisher SR3020)...................................171
Specifications for the Main Unit.........................148
Specifications for the main unit for users of type 1
and 2....................................................................148
Specifications for the main unit for users of type 3
and 4....................................................................152
Specifications for Tray 3 (LCT)...........................175
Specifications for wireless LAN board..............181
Stamp.....................................................................11
Stamp cartridge...................................................111
Staple...............................................................11, 12
Staples..................................................................104
190

Start key.................................................................64
Draft 2008/06/09
Stored Print.............................................................12
Storing paper.........................................................99
Storing received documents.................................13
Symbols..................................................................20
System Reset..........................................................72
T
Text..............................................................115, 116
Thick paper......................................................88, 96
Thin paper..............................................................88
Toner....................................................................101
Trademarks..........................................................185
Translucent paper..................................................88
Tray 1........................................................52, 54, 88
Tray 2........................................................52, 54, 88
Tray 3........................................................54, 58, 59
Tray 3 (LCT).....................................................78, 90
Turning off the main power...................................75
Turning off the power......................................73, 74
Turning on the main power...................................73
Turning on the power......................................73, 74
TWAIN driver......................................................143
Wireless LAN board.....................................60, 181
U
Unauthorized copy prevention............................17
Unusable paper.....................................................98
Used toner...........................................................103
User Code Authentication..............................67, 68
User Text..............................................................117
User Tools/Counter key.......................................62
Using the Print Job function...................................12
Utilities included on the CD-ROM.....................141
V
Ventilation holes....................51, 52, 53, 54, 55, 56
Viewing the contents of the CD-ROM...............141
VM card.................................................................60
W
WARNING.....................................................27, 33
Web Image Monitor..........................12, 13, 17, 70
Where to put your machine................................133
Wireless LAN................................................13, 181
191

MEMO
USA
Draft 2008/06/09
192 EN
D029-7604

Copyright © 2008
Draft 2008/06/09

Operating Instructions About This Machine
Draft 2008/06/09
Type for C2828/MP C2800/LD528C/Aficio MP C2800
Type for C3333/MP C3300/LD533C/Aficio MP C3300
Type for C4040/MP C4000/LD540C/Aficio MP C4000
Type for C5050/MP C5000/LD550C/Aficio MP C5000
Type for C2828G/LD528CG/Aficio MP C2800G
Type for C3333G/LD533CG/Aficio MP C3300G
Type for C4040G/LD540CG/Aficio MP C4000G
Type for C5050G/LD550CG/Aficio MP C5000G
D029-7603EN USA
 Loading...