

Page 1
Technical Bulletin No. RTB-010
SUBJECT: Blurred copy problem on editor board DATE: Dec.31,’93
PAGE: 1 of 3
PREPARED BY: T. Okajima
CHECKED BY:
CLASSIFICATION:
Action Required
Trouble shooting
Retrofit Information
Revision of service manual
Information only
Other
FROM: Technical Support Group
MODEL:
PDC-1E (Editor Board)
1. Problem
When making copies with the PDC-1E using the editor board, blurred images might appear
on copies.
2. Cause
This problem occurs due to the deformed pressure pads (mirror surface). The deformed
pad cannot press an original completely and there is a gap between the original and the
exposure glass. The focal depth of the scanner is only 0.25mm. If this gap is 0.25mm or
wider, an image in that part will be blurred.
The present pressure pad is made of polypropylen, which starts to deform from about
79°C (174.2°F) or higher. We suppose that the editor board suffers temperatures of 79°C
or higher during transportation.
The pressure pad of the platen cover for the PDC-1E is the same as that of the editor
board. However, the pressure pad of the platen cover does not have the deformation
problem because during transportation, the pressure pad is on the exposure glass which is
flat. Even under high temperature (higher than 79°C) it will not be deformed by the
exposure glass.
3. Countermeasure
3-1. Material
We have changed the material of the pressure pad from polypropylen to polycarbonate
which does not deform at temperatures under 130°C (266°F).
3-2. Part number for the new pressure pad
Old Part Number New Part Number Description
A0491576 A0921594
This part number will be available as a
service part in February 1994.
Original Pressure Pad
Page 2
Technical Bulletin No. RTB-010
SUBJECT: Blurred Copy Problem on Editor Board DATE: Dec.31,’93
PAGE: 2 of 3
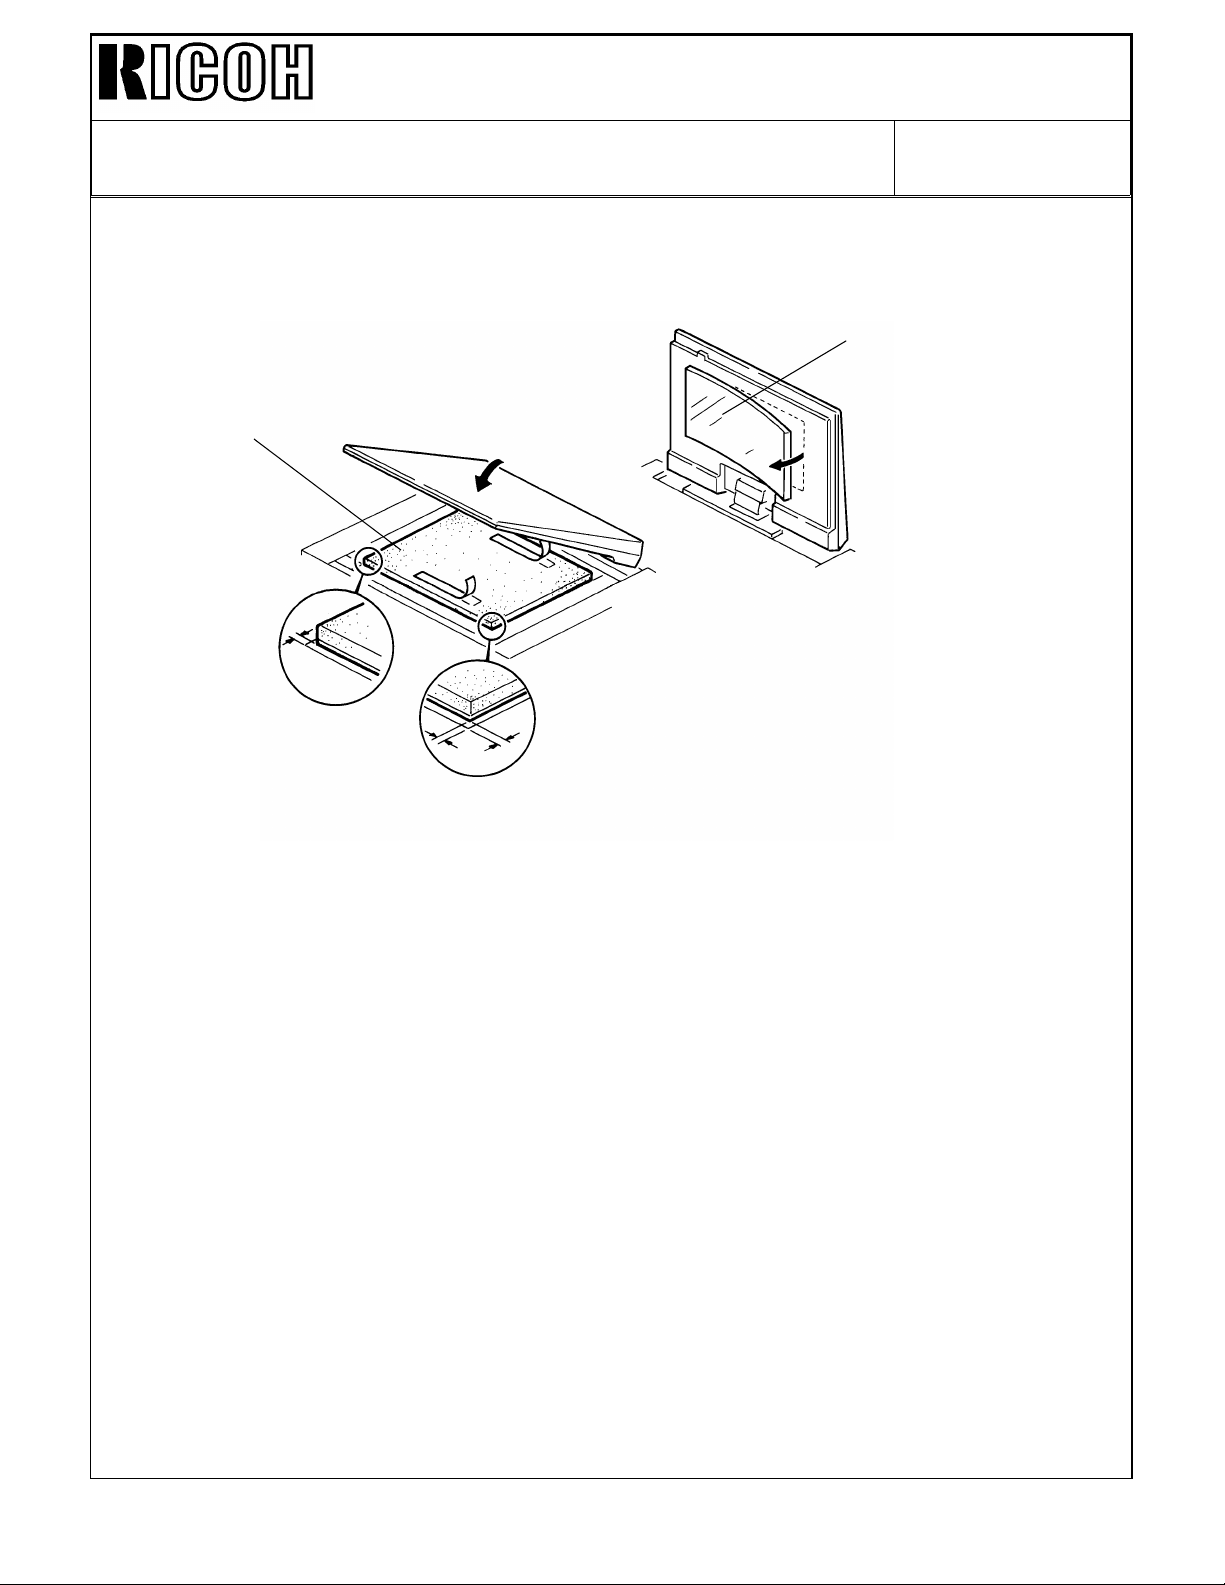
3-3. Modification procedure for the field machine
[A]
[B]
W
W
W
W: 1 mm (0.04 inch)
1. Remove the pressure pad [A] from the editor board.
NOTE: As some adhesive tape or sponge might remain on the editor board, make sure
to check and remove everything.
2. Put the new pressure pad [B] as shown in the illustration.
Make a 1mm (0.04 inch) space between the front scale and the front edge of the
pressure pad, and between the right scale and the right side of the pressure pad.
3. Peel off the cover from the two adhesive tapes, close the editor board and press the
editor board by hand. Especially, press the part directly above the tapes.
4. Confirm that there is no blurred image on the copy.
Page 3

Technical Bulletin No. RTB-010
SUBJECT: Blurred Copy Problem on Editor Board DATE: Dec.31,’93
PAGE: 3 of 3
3-4. Cut-in Serial Number
Machine Code Cut-in Serial Number
A988-17 From Oct. 1993 production run (#A3223100001–)
and #A3223080001, 06, 19, 20, #A3223090001, 03
A988-25 From Oct. 19 93 produc tion run (# 429310 0001–)
A988-27 From Oct. 1993 production run (#A3223100001–)
and #A3223070047, 50, 51, 52
4. Others
We do not recommend that you modify the editor board when it is not on the copier, it is
very difficult to adjust the position for setting the pressure pad. You might have matching
problems when the editor board is docked to the copier (e.g.. the pressure pad falls on the
scale or the space between the edge of the pressure pad and the scale is much larger).
 Loading...