

Page 1

Camera Operation Manual
To ensure correct use of your
camera, read this manual
carefully before use. Keep the
manual handy for future use.
Page 2

Introduction
Thank you for purchasing a Ricoh RDC-i500. This manual explains the correct handling
procedures and precautions for your camera. To ensure the best performance, please
read the manual thoroughly before using the camera. Keep the manual handy for quick
future reference.
Ricoh Co., Ltd.
Test Shots
Check that your camera is recording the images correctly by taking a number of test
shots.
Copyright
Reproduction or alteration of copyrighted documents, magazines, music and other
materials, other than for personal, home or similarly limited purposes, without the
consent of the copyright holder is prohibited.
Exemption from Liability
Ricoh Co., Ltd. assumes no liability for failure to record or play back images caused
by malfunction of the RDC-i500.
Warranty
This product is manufactured to local specifications and the warranty is valid within
the country of purchase. Should the product fail or malfunction while you are abroad,
the manufacturer assumes no responsibility for servicing the product locally or bearing the expenditure incurred therefor.
Radio Interference
Operating the RDC-i500 in the vicinity of other electronic equipment may adversely
affect the performance of both devices. In particular, operating the camera close to
a radio or television may lead to interference. If interference occurs, follow the procedures below.
– Move the camera as far away as possible from the TV, radio or other device
– Reorient the TV or radio antenna.
– Plug the devices into separate electrical outlets.
• This publication may not be reproduced in whole or part without the express written permission of Ricoh.
©2001 Ricoh Co., Ltd. All rights reserved.
• Ricoh reserves the right to change the contents of this publication without notice. Considerable care was
taken in preparing this manual. If, however, you have questions about any part of the manual, or note
mistakes or inaccuracies, please contact us at the address listed on the back cover.
Microsoft, MS and Windows are registered trademarks of Microsoft Corporation in the United States of America
and other countries.
Macintosh is a registered trademark of Apple Computer, Inc., in the United States of America and other countries.
CompactFlash is a registered trademark of SunDisk Corporation in the United States of America.
SmartMedia is a trademark of Toshiba Corporation.
All trademarked company and product names mentioned in this manual are the property of their respective owners.
Page 3
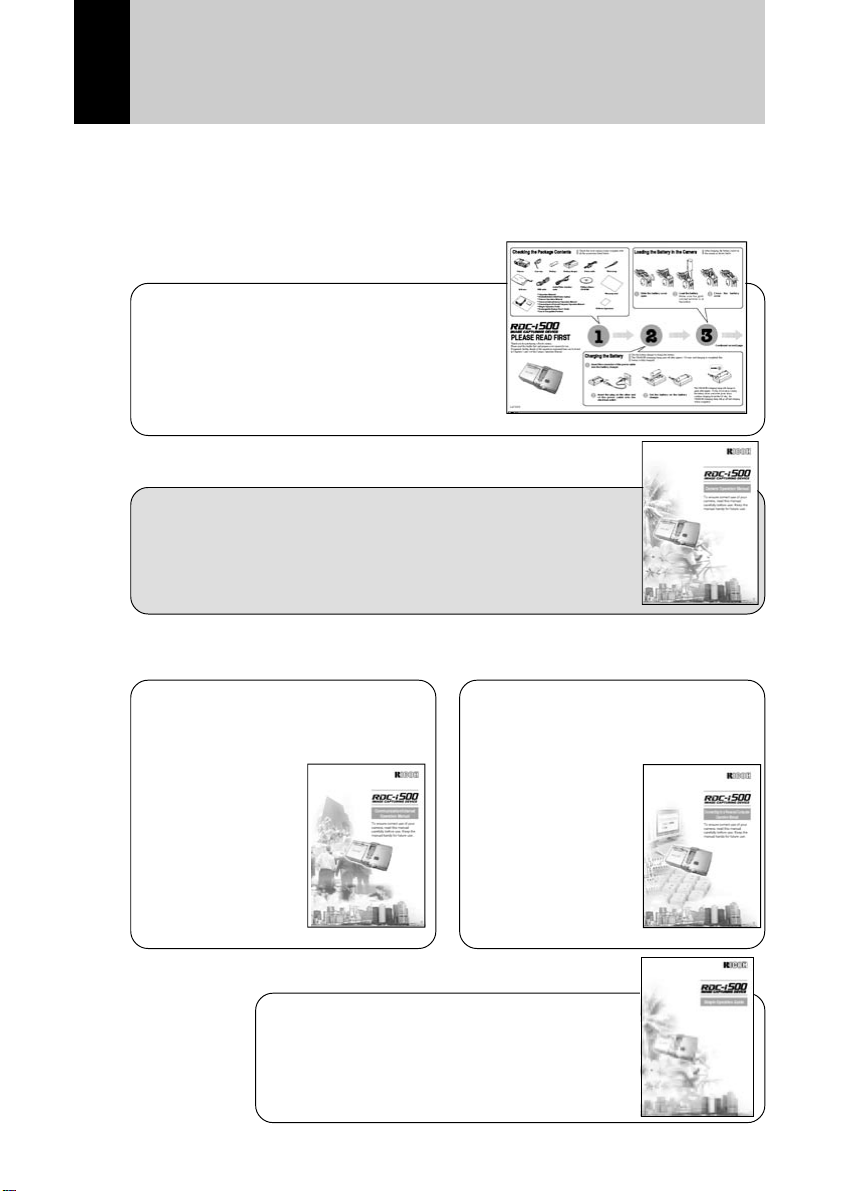
How to Use the Operation Manuals
Five operation manuals are supplied with this camera.
Use each operation manual as shown below to suit the purpose.
Open the package
➜
Read This Before Proceeding!
These instructions explain the procedure
for checking the contents of the package
and loading the battery to enable you to
use the camera straightaway.
➜➜
Basic operation
Camera Operation Manual (this manual)
This manual explains in detail the preparations to take
before using the camera together with the procedures for
shooting and playback using the various functions.
➜
Using the communication
and Internet functions
Sending and receiving data
using the camera and a PC
Communication/Internet
Operation Manual
This manual
explains the
procedures for
transmitting images
and using Internet
functions.
Simple Operation Guide
This guide explains the basic setting
procedures of recording, transmitting images
and transferring them to a PC.
Connecting to a
Personal Computer
Operation Manual
This manual explains
the procedures for
connecting the
camera to a PC,
transmitting images
from the camera to
the PC and operating
the camera from the
PC.
1
Page 4

CONTENTS
How to Use the Operation Manuals...................................................... 1
Parts & Names ...................................................................................... 6
Safety Precautions................................................................................ 8
Chapter 1 Getting Started
Before Using the Camera ................................................................... 1 4
Attaching the Wrist Strap ..................................................................... 14
Attaching the Lens Cap........................................................................ 14
Powering the Camera ......................................................................... 15
Charging the Battery ............................................................................ 15
Loading the Battery .............................................................................. 16
Connecting an AC Adapter .................................................................. 18
Storage Memory ................................................................................. 19
Inserting a Memory Card ..................................................................... 20
Chapter 2 Basic Operations
Turning On/Off the Camera ................................................................ 24
How to Use the Mode Dial .................................................................. 25
LCD Monitor and LCD Panel .............................................................. 26
Recording Mode ................................................................................... 26
Play Mode ............................................................................................ 27
How to Select the Items...................................................................... 28
Character Input ................................................................................... 30
Registering the Camera Information .................................................. 31
Setting the Date and Time ................................................................... 31
Checking Owner Information ............................................................... 34
Before You Start Recording................................................................ 35
Formatting the Storage Memory .......................................................... 35
Adjusting the Viewfinder Diopter ......................................................... 36
Adjusting the LCD Monitor Brightness................................................. 37
How to Hold the Camera...................................................................... 37
At the end of this manual troubleshooting for error
messages, alphabetical index and index by functions are
listed for your convenience.
2
Page 5

Chapter 3 Shooting
Basic Shooting .................................................................................... 40
Operation Flow ..................................................................................... 40
Selecting a Recording Mode................................................................ 41
Selecting the Storage Memory ............................................................ 42
Selecting a Folder ................................................................................ 43
Selecting an Image Quality Mode........................................................ 44
Checking the Position of the Subject................................................... 45
Setting the Size of the Subject ........................................... (Zoom) ... 46
Shooting .......................................................... (Still Picture Mode)... 47
Special Shooting Functions ................................................................ 50
Recording Text (Text Mode) ................................................................ 50
Recording Voice Memo................................. (Voice Memo Mode) ... 51
Shooting Motion Pictures ............................ (Motion Picture Mode)... 52
Continuous Shooting........................ (Continuous Shooting Mode) ... 52
Shooting Still Pictures and Text with Voice Memo
Changing Flash Modes ........................................................................ 55
Setting the Exposure Compensation ................................................... 58
Changing the White Balance Mode ..................................................... 59
Using the Self-Timer .................................................... (Self-timer) ... 62
Close-up Shooting.....................................................(Macro Mode)... 63
Shooting by Switching the Focus ...................................... (Focus)... 64
Shooting in Redeye Reduction Mode ................. (Redeye Reduc.) ... 66
Shooting with the Date.............................................. (Date Imprint) ... 67
Shooting by Splitting the Screen .............................. (Split-Screen)... 68
Shooting in Sharpness Mode...................................... (Sharpness) ... 71
Shooting in Monochrome Mode ...............................(Monochrome)... 72
Shooting in Interval (Time-lapse) Mode ........................... (Interval)... 73
Shooting in Auto Bracket Mode ............................... (Auto Bracket) ... 74
Changing the ISO Sensitivity ..................................... (ISO Setting) ... 75
Changing the Exposure Metering System ................. (Photometry) ... 76
Shooting in Time Exposure Mode........................ (Time Exposure)... 77
Shooting with Signature ............................................... (Signature) ... 78
(Recording with Voice Memo)... 54
3
Page 6

Chapter 4 Playback/Deleting
Basic Playback.................................................................................... 82
Files Playable on the Camera.............................................................. 82
Playing a Still Picture, Text or Continuous Shooting File.................... 82
Playing a Voice Memo File .................................................................. 83
Playing a Motion Picture File ............................................................... 84
Playback Using a TV............................................................................ 86
Special Playback Functions................................................................ 87
Displaying Several Files at Once................ (Thumbnail Playback)... 87
Magnifying a File ................................................. (Zoom Playback) ... 88
Copying Files....................................................................... (Copy)... 88
Protecting a File ............................................................... (Protect) ... 92
Playing Back Images Automatically..................... (Auto Playback) ... 95
Setting the Digital Printing Service ....................... (DPOF Setting)... 96
Adding a Voice Memo .............................................. (Voice Memo). 102
Deleting a File ................................................................................... 103
Deleting a Selected File ..................................................................... 103
Deleting All Files or a Single File....................................................... 104
Chapter 5 Camera Settings and Other Functions
Changing Camera Settings............................................................... 106
Adding or Deleting a Folder ............................................................... 106
Keep Settings ..................................................................................... 108
Changing the LCD Confirmation Time............................................... 109
Auto Power Off Setting ...................................................................... 110
Beep Sound Setting ........................................................................... 111
Setting the Power Saving Mode ........................................................ 112
Changing the Display Language........................................................ 113
Changing the Video-out Signal Method (NTSC/PAL) ....................... 114
Setting a Signature............................................................................. 115
Changing the File Numbering Method............................................... 116
Turning the Camera On When the LCD Monitor is Opened ............. 117
Initializing the Settings ....................................................................... 118
Using the Remote Control ................................................................ 120
Using the DR-4 Remote Control ........................................................ 120
Using the DR-3 Remote Control ........................................................ 123
4
Page 7

Appendix
Troubleshooting ................................................................................ 128
Error Messages................................................................................. 131
Using Your Camera in Other Countries............................................ 133
Recording Capacities........................................................................ 134
Accessories....................................................................................... 135
Handling Precautions........................................................................ 136
Care and Storage.............................................................................. 137
Specifications.................................................................................... 138
About the Warranty and Servicing.................................................... 140
Index.................................................................................................. 142
Functional Index ................................................................................. 142
Alphabetical Index.............................................................................. 146
Tips
Tips to Extend the Recording and Playback Times ......................... 17
Auto Power Off.................................................................................. 24
How to Verify the Date and Time...................................................... 33
LCD Monitor Display (Recording Mode)........................................... 41
Focus Lock Shooting ........................................................................ 49
Remote Control.................................................................................63
Shutter Release Button..................................................................... 64
LCD Monitor Display (Play Mode) .................................................... 8 5
5
Page 8
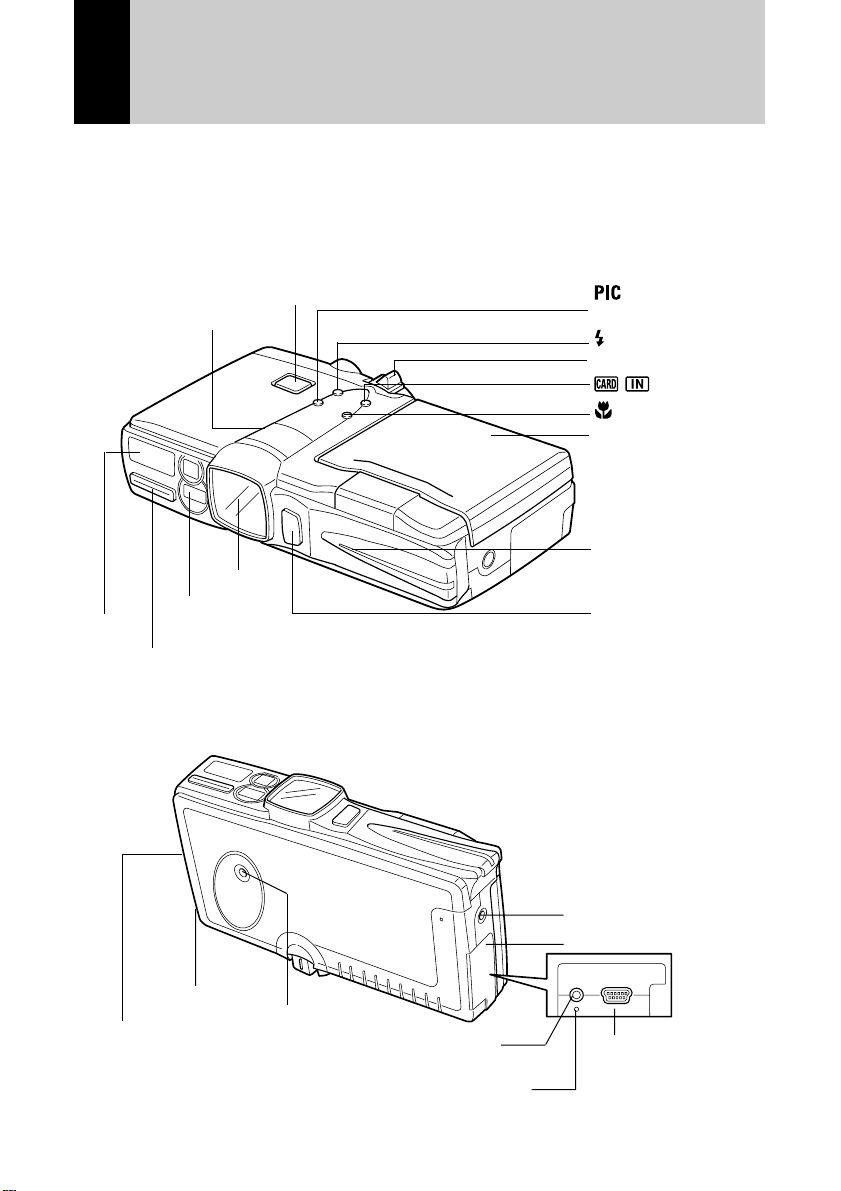
Parts & Names
■ Camera Body
Front
LCD Panel (P.26)
Flash
Microphone
Back
Lens
AF Window
Shutter Release Button (P.38)
(Picture Mode)
Button (P.44)
Button (P.55)
Zoom Lever (P.46)
/ Button (P.42)
Button (P.63)
LCD Monitor (P.26)
Self Timer Lamp
Sub Shutter Release
button (P.38)
Speaker
Strap Eyelet (P.14)
6
Tripod Screw Hole
Reset Switch (P.133)
AV Output
Terminal (P.86)
Power Supply Terminal
(DC Input) (P.18)
Terminal Cover
Digital (USB)
Terminal
Page 9

Operating Parts
Remote Control Reception
LCD Monitor (P.26)
CF Card Slot (P.20)
EJECT Button
Operation Panel
Mode Dial (P.25)
Viewfinder
• Flash Lamp
• Auto Focus Lamp
Battery Cover (P.16)
Diopter adjuster (P.36)
Power Switch (P.24)
■ Battery/Battery Charger
Battery Charger (BJ-1)
Power Cord
Rechargeable Battery (DB-20L)
■ Remote Control Unit (optional)
DR-4 (available in the near future*) DR-3
* As of April, 2001
■ AC Adapter (optional)
• AC-3 (100 V – 240 V)
Power Cord
Connection Cable
7
Page 10

Safety Precautions
Warning Symbols
Various symbols are used throughout this operation manual and on the product to
prevent physical harm to you or other people and damage to property. The symbols
and their meanings are explained below.
RWarning
RCaution
Sample Warnings
This symbol indicates matters that may lead to death or serious
injury if ignored or incorrectly handled.
This symbol indicates matters that may lead to injury or physical
damage if ignored or incorrectly handled.
The o symbol alerts you to actions that must be performed.
o
The m symbol alerts you to prohibited actions.
m
Observe the following precautions to ensure safe use of this equipment.
RWarning
o
The m symbol may be combined with other symbols to indicate
that a specific action is prohibited.
● Examples
Do not touch
n
● Turn off the power immediately in the event of irregularity,
such as the equipment emitting smoke or a strange smell.
Remove the battery as soon as possible, being careful to
avoid electric shocks or burns. If you are drawing power
from a household electrical outlet, be sure to unplug the
power cord from the outlet to avoid fire or electrical hazards.
Discontinue use of the equipment immediately if it is
malfunctioning. Contact the nearest service center at your
earliest convenience.
Do not disassemble
q
8
Page 11

RWarning
o
o
●
Turn off the power immediately if any metallic object, water,
liquid or other foreign object gets into the equipment. Remove
the battery as soon as possible, being careful to avoid electric
shocks or burns. If you are drawing power from a household
electrical outlet, be sure to unplug the power cord from the
outlet to avoid fire or electrical hazards. Discontinue use of
the equipment immediately if it is malfunctioning. Contact the
nearest service center at your earliest convenience.
● Avoid any contact with the liquid crystal inside the LCD
monitor, should the monitor be damaged. Follow the
emergency measures below in the following circumstances.
• SKIN: If any of the liquid crystal gets on your skin, wipe it
off and rinse the affected area thoroughly with water, then
wash well with soap.
• EYES: If it gets in your eyes, wash your eyes with clean
water for at least 15 minutes and seek medical advice
immediately .
• INGESTION: If any of the liquid crystal is ingested, rinse
the mouth out thoroughly with water. Have the victim drink
a large amount of water and induce vomiting. Seek
medical assistance immediately.
m
o
● Follow these precautions to prevent the battery from
leaking, overheating, igniting or exploding.
• Do not use a battery other than that specifically
recommended for the equipment.
• Do not carry or store the battery with metallic ballpoint
pens, necklaces, coins, hairpins, etc.
• Remove the battery from the camera or battery charger
immediately in the event of irregularity, such as a strange
smell or discoloration, during use or recharging.
● Whenn using the communication card with the antenna on,
pay attention to the direction of the antenna.
9
Page 12

RWarning
m
o
m
● Observe the following precautions to prevent fire, electric
shock or explosion caused by the battery charger.
• Do not use a power source voltage other than that
indicated. Avoid putting several loads on one power outlet
or using an extension cable.
• Do not cut, damage, tie in a bundle or alter the power cord.
Do not place heavy objects on the power cord, pull it or
bend it excessively.
• Do not plug or unplug the power cord with wet hands.
When unplugging the power cord, be sure to hold the plug.
• Do not wrap the battery in cloth, etc.
● Keep the battery used in this equipment out of the reach of
children to prevent accidental ingestion. Consumption is
harmful to human beings. If swallowed, seek immediate
medical assistance.
● Keep the equipment out of the reach of children. Their
inability to read and understand warning and safety
precautions may lead to accidents.
n
q
10
● Do not touch the internal components of the equipment if
they become exposed as a result of being dropped or
damaged. The high-voltage circuitry in the equipment could
lead to an electric shock. Remove the battery as soon as
possible, being careful to avoid electric shocks or burns.
Take the equipment to your nearest dealer or service center
if it is damaged.
● Do not attempt to disassemble, repair or alter the equipment
yourself. The high-voltage circuitry in the equipment poses a
significant electrical hazard.
● Do not use the equipment in the kitchen or bathroom where
it would be exposed to steam or humidity as this could result
in fire or electric shock.
Page 13

RWarning
m
o
m
● Do not use the equipment near flammable gases, gasoline,
benzine, thinner or similar substances to avoid the risk of
explosion, fire or burns.
● Do not use the equipment in aircraft or other locations
where usage is restricted or prohibited as this may lead to
disasters or accidents.
● Wipe off any dust that accumulates on the electrical plug as
this may lead to fire.
● Use only the specified AC adapter for this equipment
(optional AC-3) in household electrical outlets. Other
adapters pose the risk of fire, electric shock or failure.
● To avoid the risk of fire, electric shock or failure, do not use
the AC adapter with commercially available electronic
transformers when traveling abroad.
11
Page 14

Observe the following precautions to ensure safe use of this equipment.
RCaution
● Contact with fluid leaking from the battery can lead to burns.
o
o
m
m
If part of your body comes in contact with a damaged
battery, wash the area with water immediately. (Do not use
soap.) If the battery starts to leak, remove it from the
equipment and wipe the battery chamber thoroughly before
replacing it with a new battery.
● Plug the power cord securely into the electrical outlet. Loose
cords pose a fire hazard.
● Do not allow the camera to get wet. In addition, do not
operate it with wet hands. Both pose the risk of electric
shock.
● Do not fire the flash at drivers of vehicles such as bicycles,
cars and trains, as this may cause the driver to lose control
and result in a traffic accident.
Safety Warning for Accessories
• Safety warnings for the optional accessories such as the remote control unit and
AC adapter are contained in the operation manual provided with each product
and should be read thoroughly before operating the equipment.
12
Page 15

Chapter
1
Getting Started
Before Using the Camera ....... 14
Attaching the Wrist Strap .............14
Attaching the Lens Cap................ 14
Powering the Camera .............15
Charging the Battery .................... 15
Loading the Battery ......................16
Connecting an AC Adapter ..........18
Storage Memory ......................19
Inserting a Memory Card..............20
Page 16

Before Using the Camera
Before using the camera, attach the wrist strap, and lens cap.
Attaching the Wrist Strap
A Pass the small loop of the strap
through the strap eyelet and pass the
other end through the loop as
illustrated.
Important
• Do not swing the camera around by
Note
its strap.
Attaching the Lens Cap
A Push the lens cap on in the direction
shown by the arrow.
To remove the lens cap, take hold and push
off.
14
• Attach the lens cap to the strap to
Note
prevent it being lost.
Page 17

Powering the Camera
This section explains how to load and recharge the battery and how to power
the camera from a household electrical outlet.
Charging the Battery
When using the battery for the first time or when the battery symbol is
displayed, follow the procedure below and charge the battery to its full capacity.
A Insert the connector of the power cord in the battery charger.
B Insert the power plug at the other end of the power cord in the
electrical outlet.
C Set the battery in the battery charger.
Charging will start and the battery can be charged as shown in the table below.
When charging is finished, remove the power plug from the electrical outlet.
CHARGE(Charging) Lamp Explanation
Lights red Charging starts
Lights green 75-minute charging has finished (battery is
90% charged)
* If you are in a hurry, the battery can be used
at this point.
Green light goes off Battery is fully charged after charging for about
35 minutes after lamp lights green
■ Precautions Regarding Use
• Use only the specified battery (DB-20L).
• Use only the specified battery charger (BJ-1) to charge the battery.
• Do not use the battery charger to charge batteries other than the DB-20L battery.
• Charge the battery in a well ventilated place with an ambient temperature in
the range of 10°C to 40°C (50°F to 104°F).
• When the battery approaches the end of its service life, its operating time
becomes shorter even when properly charged. Replace with a new battery.
• The battery may feel warm after charging, but this is not a malfunction.
• After charging is finished, remove the power plug from the electrical outlet.
Leaving the plug in the outlet may result in fire.
1
Getting Started
15
Page 18

Loading the Battery
Load the rechargeable lithium ion battery (DB-20L) to operate the camera.
Important
• When using the camera for the first time, be sure to charge the battery.
Note
(The battery is not charged when the camera leaves the factory.) →
P.15 “Charging the Battery”
A Check that the camera is turned off,
and then open the battery cover by
pressing the catch and sliding it in
the direction shown.
• P.24 “Turning On/Off the Camera”
See
B Load the battery.
Important
• Do not bring metallic objects into
Note
contact with the battery contact
surfaces or electrical connections.
Electrostatic damage could result.
C Close the battery cover.
Close the battery cover until it clicks into
position.
● Shooting and Playback Guidelines
The table below gives the approximate recording and playback times that are
available, as measured under the following test conditions.
[Test conditions]
During shooting: Shoot continuously in a recording mode (shoot at intervals of
30 seconds, without turning the camera off in the middle, with
the flash fired 50%, at an ambient temperature of 20°C (68°F).
During playback: Leave the camera continuously turned on in a playback mode
at an ambient temperature of 20°C (68°F).
Battery Type
Lithium ion battery DB-20L
Approximate Approximate
Recording Time Playback Time
50 minutes 60 minutes
16
(fully charged)
Page 19

Tips
Tips to Extend the Recording and Playback
Times
• The battery lives indicated on the previous page may decrease
depending on the ambient environment.
In an extremely cold environment, warming the battery by hand, for
example, may allow you to take more pictures.
• Increased use of the flash or zoom feature or the LCD monitor may
speed up the exhaustion of the battery. Reduce their usage to a
minimum.
• Copying or erasing images repeatedly may also accelerate the
exhaustion of the battery.
• Taking pictures with the LCD monitor display turned off will help to
extend the life of the battery.
■ Handling Precautions
• Before using the battery, be sure to read the accompanying operation
manual.
• Use the specified battery. → P.135 “Accessories”
• Wipe the terminals of the battery and the contacts of the camera with a dry
cloth.
• Continued use of the battery for long periods may cause the battery to
become hot. Wait until it cools before removing it.
• Store the battery charger and the battery separately except when charging.
• Store the battery in the case provided.
• When not using the camera for a long period of time, discharge the battery
completely before removing it, and store it in a cool place. Before using the
camera again, fully charge the battery.
1
Getting Started
• If a power source is available nearby, you can economize on the
Note
battery by using an AC adapter (optional). → P.18 “Connecting an AC
Adapter”
• You are advised to have a spare battery available when powering the
camera from the battery alone.
• When the battery symbol appears on the LCD panel, it indicates that
the battery voltage is low. Recharge the battery. → P.15 “Charging the
Battery”
17
Page 20

Connecting an AC Adapter
When using the camera for extended periods of time to shoot or playback
images, or connecting with a PC, connect an AC adapter (optional) to the
camera and power the camera from a household electrical source.
Using the AC Adapter
Before using the AC adapter, be sure to read the safety precautions in the
accompanying manual.
A Check that the camera is turned off, and connect the AC adapter
connection cable to the power supply terminal (DC input) on the
camera.
• P.24 “Turning On/Off the Camera”
See
B Insert the power plug into the electrical outlet.
• If the battery is loaded in the camera while it is connected to a
Note
household power source, the camera is powered from the AC source
and not by the battery. If the AC adapter is to be used for a long time,
remove the battery.
Important
• Insert the power plug and connection cable securely. If the plug or
Note
cable works loose during recording, the data may be lost or damaged.
• If you connect or disconnect the AC adapter while operating the
camera (recording, playback, or erasing), the camera will switch off to
determine the power source. This may cause the data to be lost or
damaged. To avoid this, connect or disconnect the AC adapter while
the camera is turned off.
• When not using the camera for a long period of time, remove the AC
adapter from the camera and power source.
18
Page 21

Storage Memory
Files shot with this camera can be recorded on the following two types of
memory:
Storage Memory Capacity
CF card
Internal memory Max. 7 MB (available area for recording images)
• There are various kinds of CF cards in the market. Use a
Note
recommended memory card. → See the separate list of Compatible
Products.
• The card represented in this operation manual indicates both the CF
card and the Microdrive.
Microdrive
Using this camera, you can record images on the Microdrive. Be sure to read
the instruction manual provided and the following cautions before use.
• Be sure to turn the power off before inserting or removing the Microdrive.
• Insert the Microdrive in the same way as the CF card. → P.20 “Inserting a
Memory Card”
• The indication
in the card slot.
• Use of the Microdrive causes noise in the following situation when the
drive is accessed:
When you record in Voice Memo mode, Motion Picture mode or in Still
Picture or Text mode with voice memo
16 MB, 32 MB, 48 MB, 64 MB, 96 MB, 128 MB, 192 MB (3.3 V)
will be displayed when the Microdrive has been inserted
1
Getting Started
■ Handling Precautions
• Never remove the card while data is being recorded or erased.
• Do not bend, subject to strong force or shock, or drop the card.
• Avoid using or storing memory cards in environments that are subject to static
electricity or electrical interference.
• Avoid using or storing memory cards in environments that are subject to high
temperature and humidity, where dust accumulates, or in atmospheres where
corrosive substances are present.
• Keep the card slot free from dust or foreign matter.
• To avoid possible hazards, keep memory cards away from flames and do not
dispose of them in fire.
• Memory cards have a limited service life. Cards that have been used over an
extended period of time may fail to record additional files.
19
Page 22

■ Data
• Data recorded on a card may be lost by improper handling by the customer or
a third party, by being subjected to static electricity or electrical interference,
or during camera malfunction or repair. Ricoh Co., Ltd. assumes no liability
for damages incurred by such loss of recorded data.
• Do not remove the battery from the camera, turn off the camera, or connect
the AC adapter while data is being recorded on the card. The data stored on
the memory card could be lost or damaged.
• You are advised to copy valuable data from the memory card onto other
memory, such as floppy disks or hard disks.
Inserting a Memory Card
Check that the camera is turned off before inserting the card.
Important
• Be sure to turn the power off before inserting or removing the card,
Note
otherwise the data on the card may be lost or damaged and the
camera may malfunction.
• Before using a new card or a card that has been used on another
device (such as a PC), you need to format (initialize) it with the
camera. → P.35 “Formatting the Storage Memory”
• Do not remove the card while data is being recorded or erased. The
data stored on the card could be lost or damaged.
■ Inserting Card
A Check that the camera is turned off.
• P.24 “Turning On/Off the Camera”
See
B Insert the card into the card slot.
Push the card into the card slot fully into
position, with the label surface facing up.
Important
• The card will pop out of the card slot when you press the EJECT
Note
button once and press it again.
20
Page 23

■ Removing Card
A Check that the camera is turned off,
and extract the EJECT button by
pressing it once.
• P.24 “Turning On/Off the Camera”
See
B Press the EJECT button again,
keeping it straight.
C Remove the card by pulling it
horizontally out of the slot.
• Press the EJECT button to return it
Note
to its original position.
1
Getting Started
21
Page 24

22
 Loading...