

Page 1

Color Controller
RC-200
OPERATING INSTRUCTIONS
PRINTER REFERENCE
Model number : G528-17
Printed in Japan
UE USA G528-8607
Read this manual carefully before you use this product
and keep it handly for future reference.
For safety, please follow the instructions in this manual.
Page 2

Introduction
This manual contains detailed instructions on the operation and maintenance of this machine. To get
maximum versatil ity from this ma chine all opera tors sho uld careful ly read an d follow the ins tructi ons in
this manual.
Please read the Safety Information in the “Copy Reference” before using this machine. It contains important information related to USER SAFETY and PREVENTING EQUIPMENT PROBLEMS.
Important
Parts of this manual are subject to change without prior notice. In no event will the company be liable
for direct, indirect, special, incidental, or consequential damages as a result of handling or operating
the machine.
Trademarks
®
RICOH-SCRIPT2
is a registered trademark of Ricoh Company.
Microsoft® and Windows® are registered trademark s of Micros oft Corporati on in the Uni ted States an d/
or other countries.
®
Ethernet
is a registered trademark of Xerox Corporation.
Adobe®, PostScript®, Acrobat® and PageMaker® are registered tradem ark s o f Ad ob e Sy st em In corporated.
AppleTalk, Apple, Macintosh, TrueType, LaserWriter and ColorSync are registered trademarks of Apple Computer, Incorporated.
Other product names us ed herei n are for iden tifica tion purp oses on ly and migh t be tradem arks of th eir
respective companies. We disclaim any and all rights in those marks.
Warning:
Use of controls or adjustment or performance of procedures other than those specified in this manual
might result in hazardous radiation exposure.
Notes:
Some illustrations might be slightly different from your machine.
Certain options migh t no t be av ail abl e in some countries. F or de tails, please contac t yo ur local dealer.
Note
The proper names of Windows operating system are as follows:
®
•Microsoft
Windows® 95 operating system
•Microsoft® Windows® 98 operating system
•Microsoft® Windows NT® Server operating system Version 4.0
®
•Microsoft
Windows NT® Workstation operating system Version 4.0
Page 3

Note to users in the United States of America
Notice:
This equipment has be en tes ted and found t o com ply w ith the limi ts for a Cl ass B d igital devic e, purs uant to Part 15 of the FCC Rules. These limits are designed to provide reasonable protection against
harmful interference i n a resid ential instal lation . This e quipm ent gene rates, u ses an d can rad iate rad io
frequency energy and, if not instal led and used in accorda nce with the ins tructions , may caus e harmful
interference to radio communications.
However, there is no guarantee that interference will not occur in a particular installation. If this equipment does cause harmfu l interference to radio or television reception, whic h can be determined by turning the equipment off and on, the user is encouraged to try to correct the interference by one more of
the follo wing measures:
Reorient or relocate the receiving antenna.
Increase the separation between the equipment and receiver.
Connect the equipment into an outlet on a circuit different from that to which the recei ver is
connected.
Consult the dealer or an experienced radio/TV technician for help.
Warning
Changes or modifications not expressly approved by the party responsible for compliance could void
the user's authority to operate the equipment.
Caution (in case of 100BASE-TX environment):
Properly shielded and grounded cables (STP) and connectors must be used for connections to host
computer (and/or peripheral) in order to meet FCC emission limits.
STP with ferrite core must be used for RF interference suppression.
Declaration of Conformity
Product Name: Printer Controller
Model Number: Color Controller RC-200
Responsible party: Ricoh Corporation
Address: 5 Dedrick Place, West Caldwell, NJ 07006
Telephone number: 973-882-2000
This device complies with part 15 of FCC Rules.
Operation is subject to the follow ing two conditions:
1. This device may not cause harmful interference, and
2. this device must accept any interference received,
including interference that may cause undesired operation.
Note to users in Canada
Note:
This Class B digital apparatus complies with Canadian ICES-003.
Remarque concernant les utilisateurs au Canada
Avertissement:
Cet appareil numérique de la classe B est conforme à la norme NMB-003 du Canada.
Copyright © 1999
Page 4

Manuals for this Machine
There are five manuals that describe the operational procedures separately for
the operation and maintenance of the machine.
This manual, the Printer Reference, contains detailed instructions for using this
machine as a printer.
To ensure safe and efficient operation of the machine, all users should read and
follow the instructions contained in the following manuals.
❖
Operating Instructions that Describes the Copy Functions
Describes the procedures and functions for using this machine as a copier.
❖
Printer Reference Provided as a Paper Manual
Describes the system settings, procedures and functions for using this machine as a printer. (This Manual)
❖
Printer Reference Provided as a PDF File
Describes the procedures and provides necessary information on using this
machine as a printer. The manual is included as a PDF file in the CD-ROM.
❖
RICOH-SCRIPT2 Operating Instructions
Describes the menus and features you can set using the RICOH-SCRIPT2
printer driver. The manual is included as a PDF file in the CD-ROM.
❖
Network Interface Board Operating Instructions
Describes the procedures and provides necessary information on setting up
and using the printer under the network environment. The manual is included as a PDF file in the CD-ROM.
i
Page 5

How to Read this Manual
R
Symbols
In this manual, the following symbols are used:
R
WARNING:
This symbol indicates a potentially hazardous situation which, if instructions
are not followed, could result in death or serious injury.
CAUTION:
This symbol indicates a potentially hazardous situation which, if instructions
are not followed, may result in minor or moderate injury or damage to property.
* The statements above are notes for your safety.
Important
If this instruction is not followed, paper might be misfed, originals might be
damaged, or data might be lost. Be sure to read this.
Preparation
This symbol indicates the prior knowledge or preparations required before operating.
Note
This symbol indicates precautions for operation, or actions to take after misoperation.
Limitation
This symbol indicates numerical limits, functions that cannot be used together,
or conditions in which a particular function cannot be used.
Reference
This symbol indicates a reference.
[]
Keys that appear on the machine's panel display.
Keys and buttons that appear on the computer's display.
{}
Keys built into the machine's operation panel.
Keys on the computer's keyboard.
ii
Page 6

TABLE OF CONTENTS
1.Getting Started
Connecting the Machine........................................................................... 1
Requirements....................... ................................................................. ........ 1
Connecting the Machine Using the Network Interface Board ....................... 3
Connecting the Machine to the Host Using a Parallel Cable ........................ 4
Features of this Machine.......................................................................... 6
Printer Drivers for this Machine..................................................................... 7
Software and Utilities Included in the CD-ROM ............................................ 7
Guide to this Machine............................................................................... 9
Operation Panel............................................................................................ 9
2.Configuring the Printer for the Network with the Operation Panel
Configuring the Printer for the Network with the Operation Panel..... 13
3.Installing the Printer Driver and Software
Before Installing...................................................................................... 20
Auto Run Program................................................................................... 21
Installing by Auto Run ................................................................................ 21
Installing the IPDL-C Printer Driver ....................................................... 23
Windows 95/98 - Installing the IPDL-C Printer Driver................................. 23
Windows NT 4.0 - Installing the IPDL-C Printer Driver ............................... 24
Installing the RICOH-SCRIPT2 Printer Driver ....................................... 25
Windows 95/98 - Installing the RICOH-SCRIPT2 Printer Driver................. 25
Windows NT 4.0 - Installing the RICOH-SCRIPT2 Printer Driver. .............. 27
Using Adobe PageMaker Version 6.0 or 6.5 in Windows ........................... 30
Macintosh..................... .................................................. ............................. 31
INDEX........................................................................................................ 36
iii
Page 7

iv
Page 8
1. Getting Started
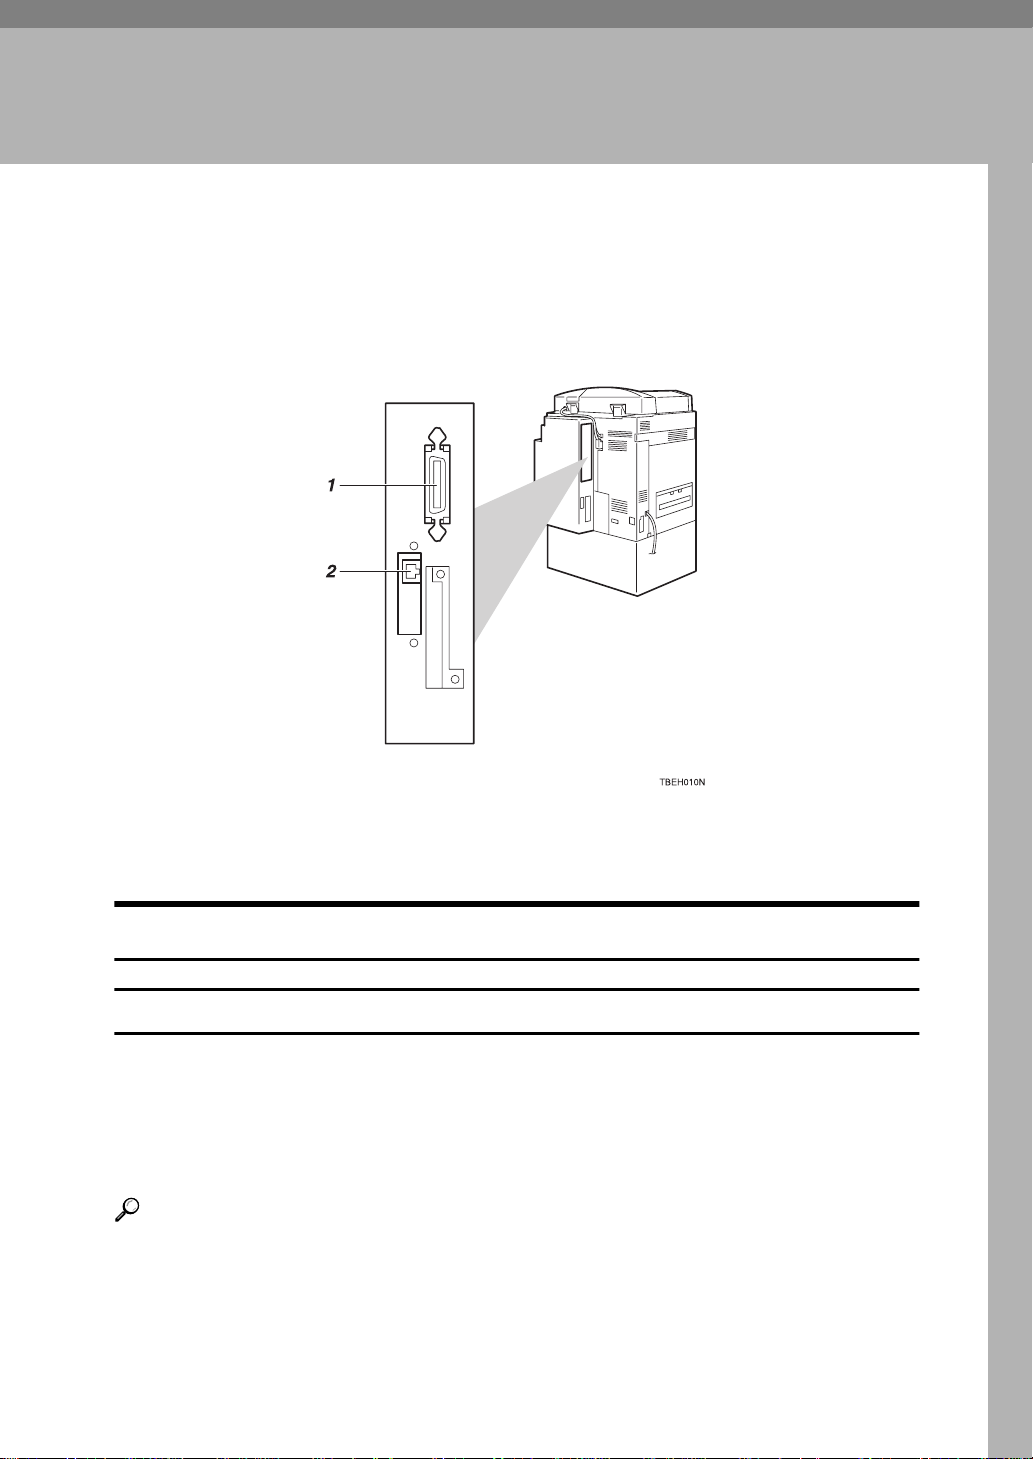
Connecting the Machine
Confirm that the shape and the position of the connectors are as shown in the
illustration.
1. Parallel Port
2. 10BASE-T/100BASE-TX
Requirements
Requirements
Before using this machine, confirm that all the environmental and electrical requirements have been met. Connect the machine to your host computer using
the Parallel Port, Network Interface Board, or both.
Confirm that all the cables, connectors, and electrical outlets necessary to attach
the machine to your host computer or network are present.
Reference
For more information on using the Parallel Port, see P.4 “Connecting the Machine to the Host Using a Parallel Cable”
For more information on using a network, see P.2 “Network connections”
1
Page 9
1
Getting Started
Network connections
The Network Interface Board supports 10BASE-T or 100BASE-TX connections.
You can use the machine in the following network environments:
• Using the appropriate network management software and printer driver.
• Attaching the machine to a networked computer set up as a server.
Client
Driver
File Server
Protocol
*1
Under Windows NT 4.0, only x86 CPU is supported.
*2
Only RICOH-SCRIPT2 is available.
*3
Under Windows 95/98/NT 4.0 only.
Windows 95, 98, NT 4.0
IPDL-C, RICOH-SCRIPT2
NetWare 3.x, NetWare 4.x, NetWare 5
IPX/SPX, TCP/IP, AppleTalk, NetBEUI
*1
, Mac OS 7.6~8.6
*2
*3
In a mixed network environment, the protocol switches automatically.
Reference
For more information on resolving network connection problems, see the
“Operating Instructions” of Network Interface Board included as a PDF file
in the CD-ROM.
Note
❒
Consult your network administrator before connecting the machine to a network.
Important
❒
Rating voltage of the 10BASE-T/100BASE-TX connector; Max. DC 5V.
Paralle l cable requirements
Connect the machine to the host computer using a Parallel Port. This machine
does not provide the parallel cable to connect the machine to the host computer.
The machine's parallel interface is a standard bi-directional interface. It requires
a standard 36-pin parallel cable compliant with IEEE 1284 and a Parallel Port
available on the host computer.
Note
❒
Do not use a parallel cable that is longer than 2.5 meters (8.2 feet).
Important
❒
Rating voltage of the parallel interface connector for the computer; Max. DC
5V.
2
Page 10
Connecting the Machine
Connecting the Machine Using the Network Interface Board
Connect the machine to the network using the Network Interface Board.
Follow these steps to connect the machine.
A Confirm that you have the correct cable.
Note
❒
In a 100BASE-TX environment, be sure to use a properly shielded and
grounded cable (STP) for the connection to your host computer (and/or
HUB) in order to meet FCC and EMC Directive 89/336/EEC emission
guidelines.
B Confirm that the machine is turned off.
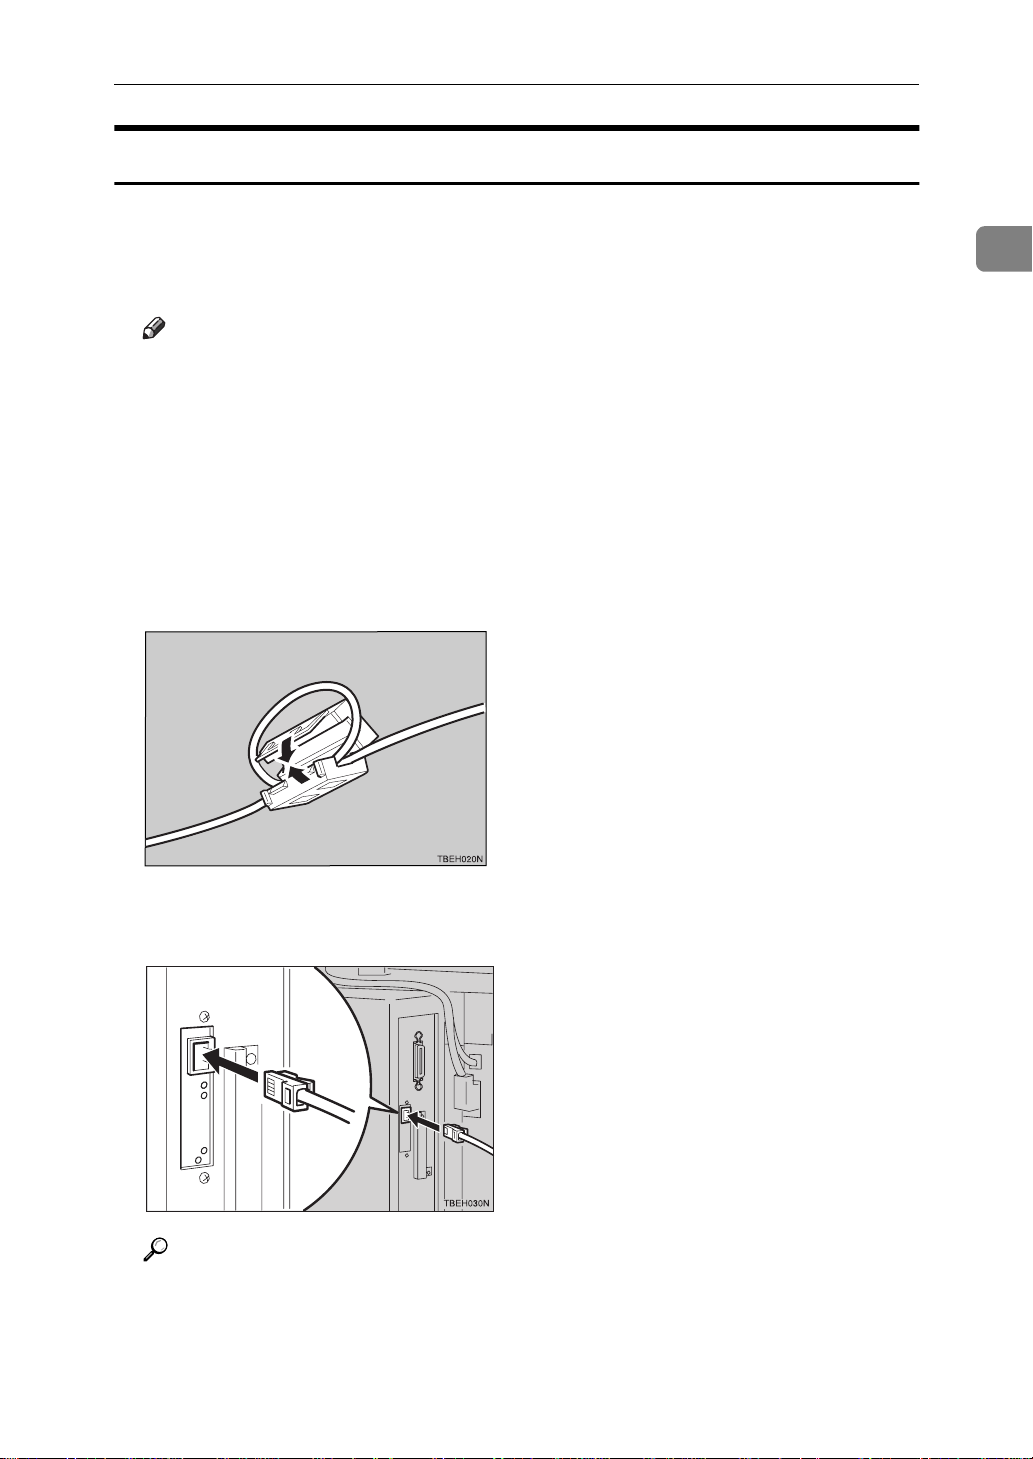
C Loop the network interface cable. The loop should be about 15 cm (6”) from
the end of the cable on the end closest to the printer.
D Attach the ferrite core to the loop.
1
E Attach the network interface cable to the 10BASE-T/100BASE-TX port on
the printer.
Reference
See P.1 “Connecting the Machine” to be sure of the position of the 10BASE-
T/100BASE-TX port.
3
Page 11
1
Getting Started
Note
❒
Confirm that the cable is connected to the 10BASE-T/100BASE-TX port.
Important
❒
Rating voltage of the 10BASE-T/100BASE-TX connector; Max. DC 5V.
F Connect the other end of the cable to the network.
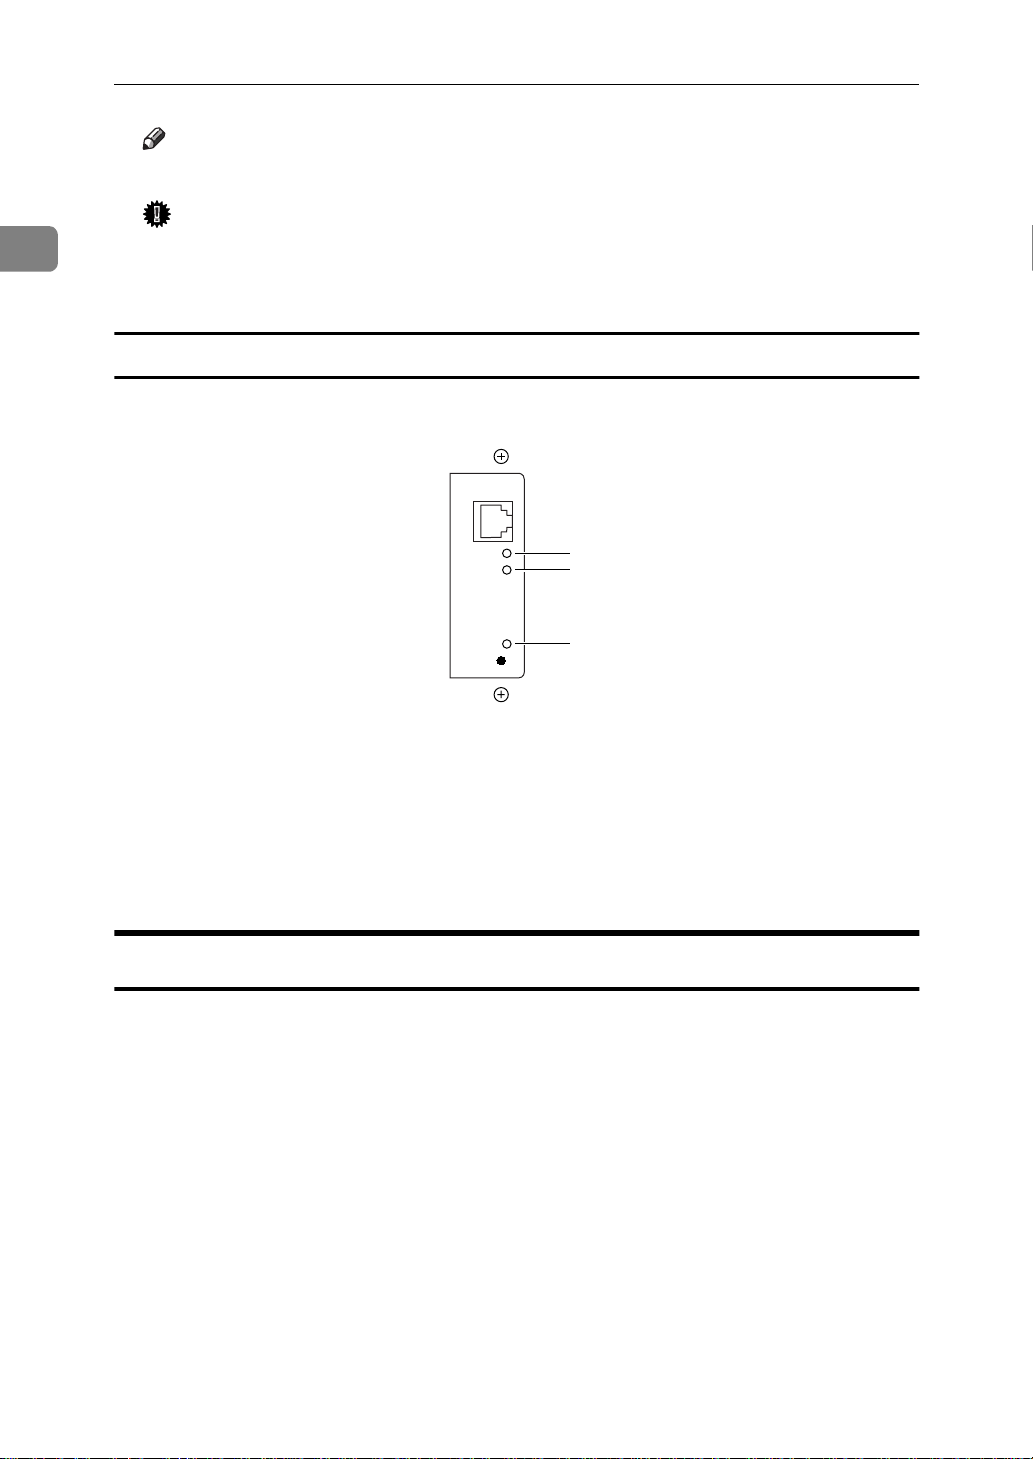
Indicators on the Network Interface Board
1
2
3
1. Indicator (green)
Is on while the machine is in a network
environment.
3. Indicator (orange)
Is on while the Network Interface Board
is working.
2. Indicator (green)
Is on while the 100BASE-TX is working.
Stays off while 10BASE-T is working.
Connecting the Machine to the Host Using a Parallel Cable
Connect the machine to the host computer using a parallel cable compliant with
IEEE 1284 (supplied by you).
Follow these steps to connect the machine to your host computer.
A Confirm that you have the correct cable.
B Confirm that both the machine and the host computer are turned off.
4
Page 12
Connecting the Machine
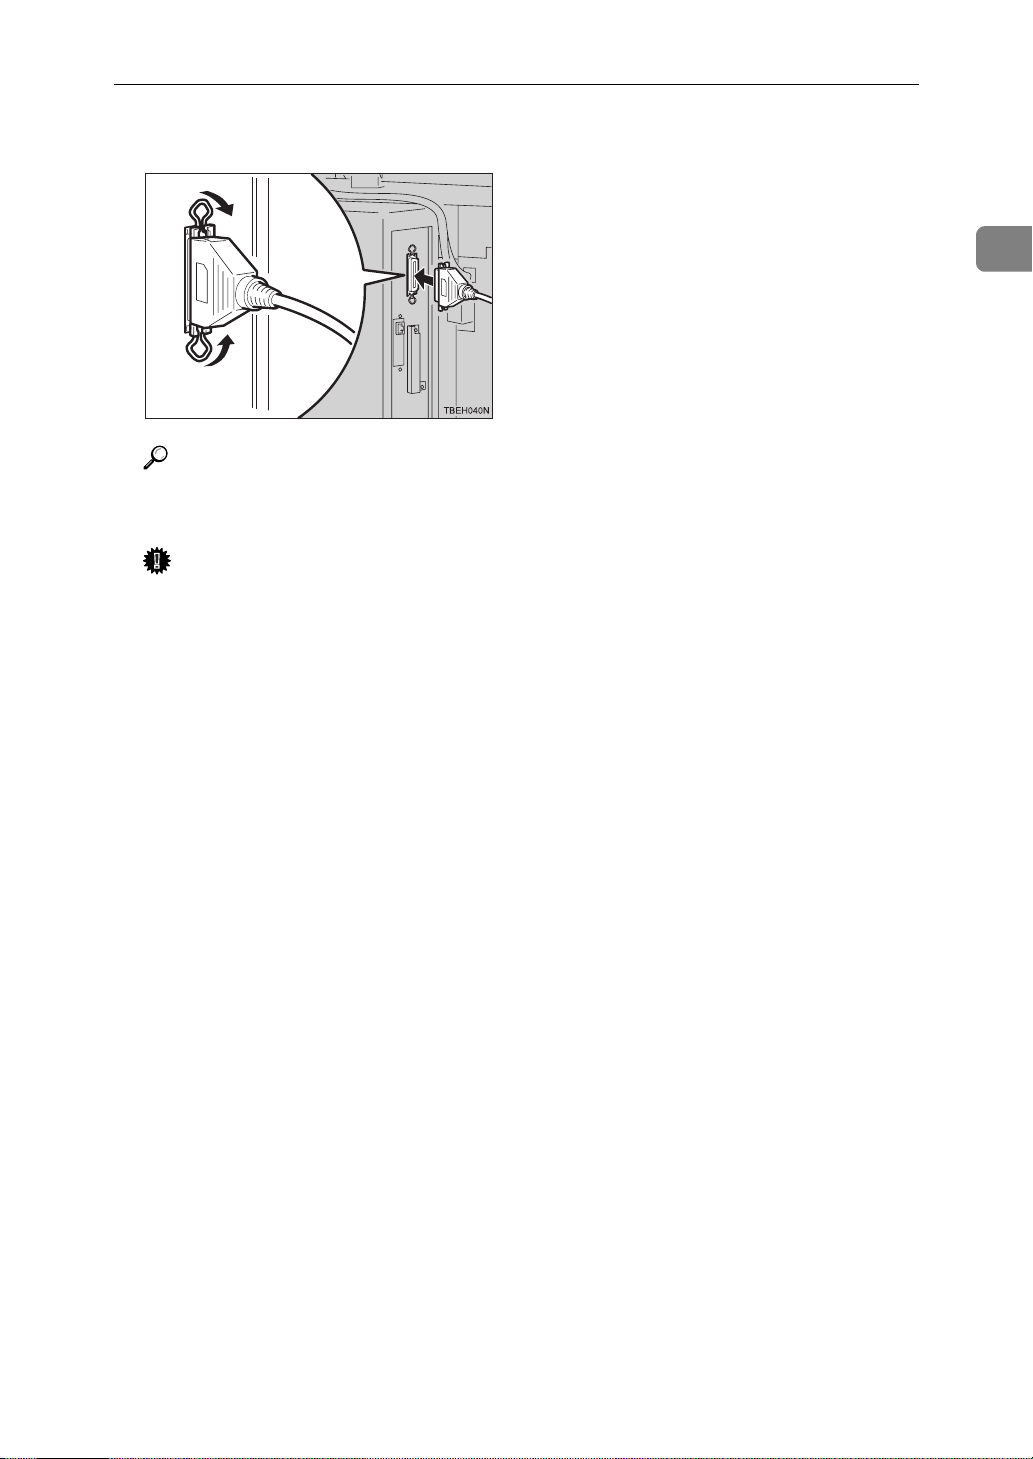
C Plug the 36-pin end of the parallel cable into the Parallel Port of the printer.
Reference
See P.1 “Connecting the Machine” to be sure of the position of the Parallel
Port.
Important
❒
Rating voltage of the parallel interface connector for the computer; Max.
DC 5V.
1
D Squeeze the wire clips on each side of the connector together until they
snap into place. The clips hold the cable securely in place.
E Plug the other end of the parallel cable into the computer's Parallel Port.
5
Page 13

1
Getting Started
Features of this Machine
This printer is designed especially for office workgroups, both for shared usage
within a network environment, and for one-to-one usage by being connected directly to your computer.
❖
Effective Performance with Windows
This printer provides you with rapid and high quality color printing under
the Windows environment.
❖
PostScript Capabilities
Using RICOH-SCRIPT2 provides your printer with PostScript capabilities.
You can use the printer in Windows or Macintosh environments.
❖
Time Saving
You can reduce the amount of time you spend printing.
• Printing Speed
Monochrome 14 ppm 18 ppm
*1
Simplex machine Duplex machine
Full color 4 ppm 4 ppm
*1
A4K, 81/2"× 11"K, maximum printing speed.
❖
Network Connectivity
The printer is network ready with the Network Interface Board.
❖
Easy Handling for Administration
You can set up User Codes for individuals or as a unit of a department. This
allows you to keep records of the printing done for each User Code. You can
also set up a User ID for each print job. To print a job log or a statistics report
shows you color category, result and status of printing per each User Code
and User ID. Viewing the contents of a job log or a statistics report through
the PRINTER MANAGER is available.
Maximum 100 User Code and 64 User ID can be set.
❖
Major Specifications
Maximum Print Quality 600 dpi resolutions
Printer Language IPDL-C
RICOH-SCRIPT2
Maximum Input Paper Size Paper Type: A3, 11" × 17"
Bypass Tray: 12" × 18"(DL+)
*1
Standard and Maximum Memory Size 96MB
*1
Emulations
6
Page 14

Features of this Machine
Printer Drivers fo r th is Mac h in e
Printing requires installation of a printer driver for your operating system. The
following drivers are included in the CD-ROM that comes with this machine.
Printer Language IPDL-C
Operating system
Windows 95
Windows 98
Windows NT 4.0
Mac OS
*1
RICOH-SCRIPT2
*2
Microsoft Windows 95 operating system
*3
Microsoft Windows 98 operating system
*4
Microsoft Windows NT Server operating system version 4.0, Microsoft Windows NT
Workstation operating system version 4.0
*5
Required system is 7.6 ~ 8.6.
*2
*3
*4
*5
√√
√√
√√
RPS2
√
*1
1
❖
IPDL-C printer drivers
IPDL-C printer drivers are included in the CD-ROM that comes with this machine. IPDL-C printer drivers allow the computer to communicate with the
printer via a printer language.
⇒ P.23 “Installing the IPDL-C Printer Driver”
⇒ P.24 “Windows NT 4.0 - Installing the IPDL-C Printer Driver”
❖
RICOH-SCRIPT2 Printer Drivers and PPD (PostScript Printer Description) files
RICOH-SCRIPT2 printer drivers and the PPD files are included in the CDROM that comes with this machine. RICOH-SCRIPT2 printer driver allows
the computer to communicate with the printer via a printer language. The
PPD files allow the printer driver to enable printer specific functions.
⇒ P.25 “Windows 95/98 - Installing the RICOH-SCRIPT2 Printer Driver”
⇒ P.27 “Windows NT 4.0 - Installing the RICOH-SCRIPT2 Printer Driver”
⇒ P.31 “Macintosh”
Software and Utilities Incl uded in the CD-ROM
❖
PRINTER MANAGER FOR ADMINISTRATOR
A utility for the system administrator to manage printers on the network.
Reference
For the name of the PRINTER MANAGER FOR ADMINISTRATOR, see
the “Operation Instructions” for the Network Interface Board included as
a PDF file in the CD-ROM.
See the PRINTER MANAGER FOR ADMINISTRATOR Online Help for
details on using the PRINTER MANAGER FOR ADMINISTRATOR.
7
Page 15

1
Getting Started
❖
PRINTER MANAGER FOR CLIENT
A utility for users to manage their own print jobs on the network.
Reference
For the name of the PRINTER MANAGER FOR CLIENT, see the “Operation Instructions” for the Network Interface Board included as a PDF file
in the CD-ROM.
See the PRINTER MANAGER FOR CLIENT Online Help for details on using the PRINTER MANAGER FOR CLIENT.
❖
Multidirect Print
A utility for printing on a "Peer-to-Peer" network.
Reference
For more information on Multidirect Print, see the “Operating Instructions” for Network Interface Board included as a PDF file in the CD-ROM.
❖
Acrobat Reader
A utility that allows you to read PDF (Portable Document Format) files.
Note
❒
Documentation on using the printer is included in the CD-ROM in PDF
format. For details, see the Readme text in the CD-ROM or “Manuals for this
Machine” in this manual.
8
Page 16

Guide to this Machine
Guide to this Machine
Operation Panel
Important
❒
Do not press any operation panel keys while the Data In indicator is flashing
on the operation panel.
1234
5
6 78 910 11
1
12
1. Panel Display
The display shows the current status of
the printer and error messages.
2. On Line Indicator
Tells you whether the printer is online or
offline.
Is on while the printer is online (a state in
which the printer can receive data from
the computer).
Is off when the printer is offline (a state in
which printer cannot receive data).
3. Error Indicator
Lights up whenever any printer error occurs. A message describing the cause of
the error also appears on the panel display.
4. Data In Indicator
Blinks while the printer is receiving data
from a computer.
Is on if there is data to be printed.
9
Page 17

Getting Started
1
key
}
}
key
}
key
keys
5.
On Line
{
Press this key to switch the printer between online and offline.
6.
Reset
{
Pressing this key when the printer is offline resets the printer to its power on default settings.
Pressing this key during the online condition cancels the ongoing print job.
7.
Escape
{
Press this key to return to the previous
condition on the panel display.
8.
{U}{T}
Use these keys to increase or decrease
values on the panel display when making
settings.
9.
# Enter
{
Press this key to execute menu items selected on the panel display.
10.
Media
{
Use this key to select a tray, change the
paper size, and to make other settings for
printing.
11.
Menu
{
Press this key to make and check the
printer settings.
12. Power Indicator
Stays on while the power is on. Stays off
when the power is turned off or while the
machine is in the Energy Saver mode.
key
}
}
key
}
key
Selecting the printer language
This shows how to select the printer language on the operation panel. Selecting
the IPDL-C or the RICOH-SCRIPT2 (RPS2) printer language is required when
you set the “menu” for each printer language.
The printer language changes automatically when printing is processed.
A Press
The following message appears on the panel display.
Menu
{
.
}
<Menu> j
IPDL-C Menu l
B Press
{U}
or
to display “System Menu”.
{T}
10
Page 18

Guide to this Machine
C Press
The following message appears on the panel display.
# Enter
{
.
}
<System Menu> j
1.Paper Tray l
D Press
{U}
or
to display “8. PrinterLang.”.
{T}
<System Menu> j
8.PrinterLang. l
E Press
The following message appears on the panel display.
# Enter
{
.
}
1
<PrinterLang.> j
*IPDL-C l
F Press
{U}
or
to display “RPS2”.
{T}
<PrinterLang.> j
*RPS2 l
G Press
The following message appears on the panel display.
# Enter
{
.
}
<System Menu> j
8.PrinterLang. l
11
Page 19

Getting Started
1
H Press
The following message appears on the panel display.
On Line
{
.
}
Take Offline
Then Press Reset
I Press
The On Line indicator turns off.
J Press
On Line
{
Reset
{
to enter the offline mode.
}
.
}
12
The printer resets and enters the RICOH-SCRIPT2 mode.
Page 20

2.
Configuring the Printer for the
Network with the Operation Panel
Configuring the Printer for the Network with the Operation Panel
Configure the printer for the network
using the printer's operation panel.
The following table shows the operation panel settings and their default
settings. These are included in the
”System Menu”.
Items Default
32 IP Address 011.022.033.044
33 Subnet Mask 000.000.000.000
34 Gateway Add
(Gateway Address)
35 Access CTL.
(Access Control
Address)
36 Access Mask
(Access Control
Mask)
37 Net Boot
(Network Boot)
38 Frame NW
(Frame type NetWare)
39 Active PTL.
(Active Protocol)
000.000.000.000
000.000.000.000
000.000.000.000
None
Auto Select
All Active
A Press
The following message appears on
the panel display.
Menu
{
.
}
<Menu> j
IPDL-C Menu l
B Press
tem Menu”.
{U}
or
to display “Sys-
{T}
<Menu> j
System Menu l
C Press
The following message appears on
the panel display.
# Enter
{
.
}
<System Menu> j
1.Paper Tray l
13
Page 21

Configuring the Printer for the Network with the Operation Panel
2
D Select the protocol you want to
use. You can select one of the
items on the table below.
Menu item on
the panel
display
All Active
(Default Setting)
None
TCP/IP Only
NetWare Only
TCP & NetWare
EtherTalk Only
TCP & EtherTalk
NetW & EtherTalk
TCP & NW &
Ether Talk
NetBEUI Only
TCP & NetBEUI
NetW & NetBEUI
TCP & NW &
NB
ETalk & NetBEUI
TCP & ETK &
NB
NW & ETK &
NB
•' means that this protocol is active.
• Blank cell means that this protocol is not active.
*1
TCP/IP
*2
NetWare
*3
Ether Talk
*4
NetBEUI
Note
❒
You should not select protocols
that are not used on your network.
Active Protocol
*1
TCP
''''
'
''
''
'''
''
'' '
'''
*2
NW
'
''
''
'''
*3
ET
'
''
NB
*4
'
A Press
{U}
or
to display
{T}
“39.Active PTL.”.
<System Menu> j
39.Active PTL. l
B Press
# Enter
{
The current setting appears on
the panel display.
.
}
<Active PTL.> j
*All Active l
C Press
protocol you want to use.
D Press
The actual procedure may differ
depending on the protocol you
use. Follow the appropriate
procedure.
TCP/IP EVFVGVHVJ
NetWare IVJ
AppleTalk J
NetBEUI J
{U}
# Enter
{
or
to display the
{T}
.
}
E If you use TCP/IP, you should as-
sign the IP address to the printer.
Note
❒
To get the IP address for the
printer, contact your network
administrator.
A Press
lowing message appears.
<System Menu> j
32.IP Address l
B Press
The current IP address appears
on the panel display.
011.022.033.044
j jl/#
{U}
# Enter
{
or
until the fol-
{T}
.
}
14
Page 22

Configuring the Printer for the Network with the Operation Panel
C Press
{U}
or
to set the left-
{T}
most digit of the IP address.
111.022.033.044
j jl/#
D Press
# Enter
{
The pointer (U) moves to the
next digit as shown.
.
}
111.022.033.044
j jl/#
Note
❒
You can return the pointer
(U) to the previous (left) digit
by pressing
❒
If you press
Escape
{
Escape
{
.
}
}
when
the pointer (U) is on the leftmost position, the selected IP
address is reset.
E Press
{U}
or
to set the sec-
{T}
ond digit of the IP address.
191.022.033.044
j jl/#
F Press
# Enter
{
G Repeat steps E and F to set
the rest digit of the IP address.
.
}
191.168.015.016
j
Check if the pointer (U) is at the
rightmost digit, and press
to register the IP address
ter
}
# En-
{
you selected.
<System Menu> j
32.IP Address l
F If you use TCP/IP, you should as-
sign “33.Subnet Mask” and
“34.Gateway Add” following the
same procedure for setting the IP
address.
G If you use TCP/IP, set the “35.Ac-
cess CTL.” and “36.Access Mask”
following the same procedure for
setting the IP address, if necessary.
H If you use TCP/IP, you should
make settings for “37.Net Boot”.
You can select how to assign the
printer's address using the computer. Select one of the items on
the table below.
Menu item on
the panel
display
None
(Default Setting)
RARP+TFTP
BOOTP
RARP & BOOTP
DHCP
ARP+PING
ARP & RARP
ARP & BOOTP
ARP & RARP &
BOOTP
*1
ARP+PING
*2
RARP+TFTP
*3
BOOTP
*4
DHCP
Note
❒
You must configure your server
to use “RARP+TFTP”, “BOOTP”
or “DHCP”.
Available method
*1
AR
'
''
''
'''
*2
RA
'
''
BO
*3
'
DH
'
*4
2
15
Page 23

Configuring the Printer for the Network with the Operation Panel
2
A Press
“37.Net Boot”.
{U}
or
to display
{T}
<System Menu> j
37.Net Boot l
B Press
The current setting appears on
the panel display.
# Enter
{
.
}
<Net Boot> j
*None l
C Press
method you want to use.
D Press
{U}
# Enter
{
or
to display the
{T}
.
}
I If you use NetWare, select the
frame type for NetWare.
Select one of items below if necessary.
• Auto Select (Default)
• Ethernet 802.3
• Ethernet 802.2
• Ethernet 2
• EthernetSNAP
Note
❒
Usually, use the default setting
(“Auto Select”). However, if
you select “Auto Select”, the
frame type detected by the
printer first is adopted. If your
network can use more than two
frame types, the printer may fail
to select the correct frame type,
if “Auto Select” is selected. In
this case, select the appropriate
frame type.
B Press
The current setting appears on
the panel display.
# Enter
{
.
}
<Frame NW> j
*Auto Select l
C Press
frame type you want to use.
D Press
{U}
# Enter
{
or
to display the
{T}
.
}
J Reset the printer to apply the set-
tings.
A Press
fline condition.
The On Line indicator turns off.
B Press
On Line
{
Reset
{
to enter the of-
}
.
}
K Print the configuration page to
check settings you have made.
A Press
B Press
”List Print”.
C After confirming that “Con-
fig.Page” is on the display,
press
D Press
The configuration page is now
printed. Check the contents of
the configuration page.
E Press
The “Ready” message appears
on the panel display.
Menu
{
{U}
# Enter
{
# Enter
{
On Line
{
.
}
or
}
}
.
.
}
{T}
to display
16
A Press
“38.Frame NW”.
{U}
or
to display
{T}
<System Menu> j
38.Frame NW l
Page 24

Configuring the Printer for the Network with the Operation Panel
Address
-
❖
Subnet Mask
A number used to mathematically
“mask” or hide an IP address on
the network by eliminating those
parts of the address that are alike
for all the machines on the network.
❖
Gateway Address
A gateway is a connection or interchange point that connects two
networks. A gateway address is for
the router or host computer used
as a gateway.
Note
❒
To get the addresses, contact
your network administrator.
❖
Access Control Address and Access
Control Mask
Access Control Address and Access Control Address are used to
control the IP addresses that have
access to the computer used for
printing, with the IP address. If it is
not necessary for you to control the
access rights, select “0.0.0.0”.
Access Control
Mask
0. 0. 0. 0 xxx.xxx.xxx.xxx
255. 0. 0. 0 192.xxx.xxx.xxx
255.255. 0. 0 192.168.xxx.xxx
255.255.255. 0 192.168. 15.xxx
255.255.255.255 192.168. 15. 16
IP Address that
have access
2
Note
❒
When the Access Control Address settings coincide with the
masked result of the IP address
of the computer, print jobs from
that IP address can be accepted
by the Network Interface Board.
❒
For example, if you assign
192.168.15.16 as the Access Control Address to the Network Interface Board, the combination
of the Access Control Mask and
IP address that can have access
are as follows. (xxx : for any numerical value)
17
Page 25

2
Configuring the Printer for the Network with the Operation Panel
18
Page 26

3. Installing the Printer Driver
and Software
All of the procedures in this manual assume that you are familiar with general
Windows procedures and practices. If you are not, see the documentation that
comes with Windows for details.
Some applications require their own specific settings, which may be different
from those provided by the printer driver. Be sure to check the documentation
that comes with your applications for detail.
Considerable hard disk space is required on your computer for printing complex
documents.
19
Page 27

Installing the Printer Driver and Software
Before Installing
❖
PRINTER MANAGER
Installable PRINTER MANAGER may differ depending on the machine. See
the table below.
Name of machine Name of PRINTER MANAGER
Ricoh Aficio Color 3006, 4006, 4106 Aficio Manager for Admin
Aficio Manager for Client
3
Gestetner CS206, CS206d, CS206de
Savin SDC306, SDC306A, SDC306E
Lanier 5706AG, 5706AH, 5806AG,
5806AH, 5806E AG, 5806E AH
Note
❒
Do not install another version of “Administrator” or “Client” at the same
time.
❖
User Code
• With the IPDL-C printer driver, if you want to set a User Code, you must
do it when installing the printer driver.
• With the RICOH-SCRIPT2 printer driver, only
The numerical value cannot be changed. If
automatically set as a default. So if you want to distinguish between the
RICOH-SCRIPT2 and the IPDL-C printer drivers, set the different User
Code in the IPDL-C printer driver.
• In Windows 95/98, if you want to change the User Code, reinstalling the
printer driver is required.
• In Windows 95/98, changing the printer name makes the User Code ineffective. If you want to set the User Code again, reinstalling the printer driver is required.
Net Vision for Admin
Net Vision for Client
Lanier Net Manager for Admin
Lanier Net Manager for Client
or
[
]
Off
is selected, “99999999” is
[
]
On
can be selected.
[On]
20
Page 28

Auto Run Program
Auto Run Program
You can install the printer driver and utilities by using the Auto Run program.
Auto Run is available for the following operating systems:
• Windows 95/98
• Windows NT 4.0
If you install the RICOH-SCRIPT2 (RPS2) printer driver, Auto Run is not avail-
able.
See P.25 “Installing the RICOH-SCRIPT2 Printer Driver”
Important
❒
Before starting this installation, close all documents and applications. In a network environment, confirm that users who are logged on are disconnected.
Be sure to do this when it creates the least interference with other users.
Reference
For more information on the software and utilities included in the CD-ROM,
see P.7 “Software and Utilities Included in the CD-ROM”.
Note
❒
The Auto Run program might not automatically work with certain OS settings. In this case, start "Insttool.EXE" to install the printer driver on the root.
❒
If you want to cancel the Auto Run program, insert the CD-ROM while pressing the
❒
Recommended PC requirements.
• Memory: 32MB or more
• CPU: Pentium® 100MHz or more
• Free Hard disk space: 100MB or more
SHIFT
{
key until your computer finishes accessing the CD-ROM.
}
3
Installing by Auto Run
Follow these steps to install the printer driver and utilities on Windows 95/98/
Windows NT 4.0.
Important
❒
Never have two versions of the same printer driver installed on your system
at the same time. When upgrading to a new version of the printer driver, delete the old version, and then install the new one.
Note
❒
If the "plug and play" function is started by Auto Run, click
dialog box or
[
New Hardware Found
CD-ROM.
the version of Windows 95/98.
[
New Hardware Found
]
[
Device Driver Wizard
or
]
[
Device Driver Wizard
, and then insert the
]
appears depending on
]
[
Cancel
in the
]
21
Page 29

Installing the Printer Driver and Software
A Close all applications that are currently running.
B Insert the CD-ROM in the CD-ROM drive.
C Select a language.
Note
❒
The IPDL-C Printer Driver supports English, French, German, Italian or
Dutch. If you have selected any other language, English Printer Driver will
be installed. After installation, you can switch to another language in the
Printer Properties.
3
D Follow the instructions on the screen.
E Restart your computer after installation is complete.
F You should set up the options with the printer driver.
22
Page 30

Installing the IPDL-C Printer Driver
Installing the IPDL-C Printer Driver
Windows 95/98 - Installing the IPDL-C Printer Driver
Installing the printer driver
Install the driver in accordance with the steps explained. ⇒ P.21 “Installing by
Auto Run”
Setting up options
Note
❒
When setting up options, you should access the
from Windows. You cannot set up options when accessing the
dialog box from an application.
]
er
[
Configure Printer
dialog box
]
[
Configure Print-
3
A Click
The
[
]
[
Start
Printers
, point to
window appears.
]
[
Settings
, and then click
]
[
Printers
.
]
B Select the icon of the printer you want to use by clicking it. On the
menu, click
C Click the
The
[
Setup - Configure Printer
D Use the
Selecting the wrong tray here will make it impossible to use your tray correctly.
*1
Among the optional sorter units, the 3-bin sorter does not support 51/2"
1
8
/2"K(HalfLetter).
Important
❒
If the optional tray is selected, be sure of the paper direction and paper
size.
❒
With a duplex machine, select a duplex tray.
E Click
F Click
[
[
[
Properties
tab, and then click
]
[
Setup
[
Option Selection
to close the dialog box.
]
OK
to close the printer's Properties dialog box.
]
OK
.
]
[
Configure Printer
dialog box appears.
]
list box to select the optional tray and sorter unit
]
.
]
[
File
*1
]
.
×
23
Page 31

Installing the Printer Driver and Software
Windows NT 4.0 - Installing the IPDL-C Printer Driver
Limitation
❒
Installing a printer driver requires Full Control access permission. Members
of the Administrators, Server Operators, Print Operators, and Power Users
groups have Full Control permission by default. When you install a printer
driver, log on using an account that has Full Control permission.
Installing the printer driver
3
Install the driver in accordance with the steps explained. ⇒ P.21 “Installing by
Auto Run”
Install the printer driver of Windows 95/98 for the alternative driver from the
following folder in the CD-ROM:DRIVERS\IPDL_C\WIN95_98\DISK1
Setting up options
A Click
The
[
Printers
[
Start
, point to
]
window appears.
]
[
Settings
B Select the icon of the printer you want to use by clicking it. On the
menu, click
C Click the
D Use the
Selecting the wrong tray here will make it impossible to use your tray correctly.
*1
Among the optional sorter units, the 3-bin sorter does not support 51/2"
1
8
/2"K(HalfLetter).
Important
❒
If the optional tray is selected, be sure of the paper direction and paper
size.
❒
With a duplex machine, select a duplex tray.
[
Properties
[
Configure Printer
[
Option Selection
.
]
list box to select the optional tray and sorter unit
]
, and then click
]
tab.
]
[
Printers
.
]
[
File
*1
×
]
.
24
E Click
to close the printer properties.
]
[
OK
Page 32

Installing the RICOH-SCRIPT2 Printer Driver
Installing the RICOH-SCRIPT2 Printer Driver
Windows 95/98 - Installing t he RICOH-SCRIPT2 Printer Dri ver
With Windows 95/98, you should install both the Windows 95/98 PostScript
printer driver and the PPD file.
Note
❒
Be sure to install the PPD file for Windows 95/98. Be careful not to install the
PPD file for Windows NT 4.0 accidentally.
Installing the printer driver
Preparation
The Windows 95/98 operating system CD-ROM or diskettes are required for
installation.
The following procedure describes installation when the printer is connected
to the computer via a parallel interface.
3
A Close all applications that are currently running.
B Click
The
[
Printers
C Double-click the
[
Add Printer Wizard
D Click
E Check
A dialog box for selecting the printer manufacturer and model name appears.
F Click
A dialog box for installing a driver from a disk appears.
, point to
]
[
Start
window appears.
]
.
]
[
Next
[
Local printer
[
Have Disk
[
Settings
[
Add Printers
starts.
]
, and click
]
.
]
G Insert the CD-ROM in the CD-ROM drive, while pressing the
until the computer finishes accessing the CD-ROM.
If the Auto Run program starts, click
H Click
❒
[
Browse
Note
The Windows 95/98 printer driver is on the following folder in the CDROM: \DRIVERS\RPS2\WIN95_98\(language)
.
]
, and then click
]
icon.
]
.
[
]
Next
[
Cancel
.
]
[
Printers
.
]
SHIFT
{
key
}
25
Page 33

Installing the Printer Driver and Software
3
I Use the
J In the
double-click the folder of the appropriate language. Finally, click
*1
K Click
[
Drives:
[
Folders
RPS2 is the short name of RICOH-SCRIPT2.
]
[
OK
list box to select the CD-ROM drive.
]
box, double-click
]
.
[
DRIVERS
], [
RPS2
]
*1
and
[
WIN95_98
. Then
]
[
OK
.
]
L Select the name of the printer whose driver you want to install by clicking
it, and then click
The port selection dialog box appears.
Note
❒
If the printer is a simplex machine, select "Color Controller RC-200".
❒
If the printer is a duplex machine, select "Color Controller RC-200(D)".
M In the
click
[
Available ports
.
[
]
Next
N Change the name of the printer if you want, and then click
O Select whether or not you want to print a test page, and then click
The installer copies the printer driver files from the CD-ROM to your computer's hard disk.
.
]
[
Next
box, select the printer port by clicking it, and then
]
]
[
Next
.
[
Finish
]
.
P If you are asked to insert the Windows 95/98 system disk, insert it in the
computer, and then click
[
OK
.
]
Q If you are asked to provide the location of the required file for Windows 95/
98, do the following:
• Select the folder
• Navigate to the folder where Windows is installed. Then, select the appropriate folder. The location of the appropriate folder may differ depending
on the version of your operating system. The following are examples:
\WINDOWS\SYSTEM\OPTION\CABS
\WINDOWS\OPTION\CABS
[
WIN95
R If you are asked if you want to restart Windows, select
asked, restart Windows after completing the installation.
or
]
[
WIN98
in the system disk.
]
. If you are not
]
[
Yes
S After Windows restarts, set up any options you have installed to the print-
er.
Reference
⇒ P.27 “Setting up options”
26
Page 34

Setting up options
Installing the RICOH-SCRIPT2 Printer Driver
A Click
The
[
]
[
Start
Printers
, point to
window appears.
]
[
Settings
, and then click
]
[
Printers
.
]
B Select the icon of the printer you want to use by clicking it. On the
menu, click
The Printer Properties appears.
C Click the
D In the
printer.
The current settings are displayed in the
Note
❒
The following items are available here:
*1
Among the optional sorter units, the 3-bin sorter does not support 51/2"
1
8
/2"K(HalfLetter).
E Use the
selected option.
F Click
[
[
Properties
[
Device Options
[
Installable Options
[
Change settings for:
to apply the settings you made.
]
Apply
.
]
tab.
]
box, select the options you have installed on the
]
list box.
], [
]
Sorter
*1
.
]
[
Change settings for:
[
Paper feed Tray
list box to select the appropriate setting for the
]
[
File
]
3
×
G After configuring the appropriate settings, click
Properties dialog box.
Reference
You can confirm that the options are properly set by printing a configuration page.
to close the Printer
]
[
OK
Windows NT 4.0 - Installing the RICOH-SCRIPT2 Printer Driver
With Windows NT 4.0, you should install both the Windows NT 4.0 PostScript
driver and the PPD file.
Limitation
❒
Installing a printer driver requires Full Control access permission. Members
of the Administrators, Server Operators, Print Operators, and Power Users
groups have Full Control permission by default. When you install a printer
driver, log on using an account that has Full Control permission
❒
We recommend that you upgrade your Windows NT 4.0 operating system to
the latest version before installing the printer driver. Contact your Windows
retailer for details about the latest version available.
❒
Be sure to install the PPD file for Windows NT 4.0. Do not accidentally install
the PPD file for Windows 95/98.
27
Page 35

3
Installing the Printer Driver and Software
Installing the printer driver
Preparation
The CD-ROM containing the Windows NT Server operating system version
4.0, or the Windows NT Workstation operating system is required for install-
ing the printer driver.
The following procedure describes installation when the printer is connected
to the computer via a parallel interface.
A Close all applications that are currently running.
B Click
The
[
]
[
Start
Printers
, point to
window appears.
]
[
Settings
, and then click
]
[
Printers
.
]
C Double-click the
[
Add Printer Wizard
[
Add Printer
starts.
]
D After confirming that the
A dialog box for selecting the printer port appears.
E Check the check box of the port you want to use, and then click
A dialog box for selecting the printer manufacturer and model appears.
F Click
A dialog box for installing a driver from a disk appears.
[
Have Disk
.
]
G Insert the CD-ROM in the CD-ROM drive, while pressing the
until the computer finishes accessing the CD-ROM.
If the Auto Run program starts, click
icon.
]
[
My Computer
option is selected, click
]
[
Cancel
.
]
[
Next
[
Next
SHIFT
{
]
.
.
]
}
key
H Change the drive name in the list box to the name of the CD-ROM drive,
and then click
Note
❒
The Windows NT 4.0 printer driver is in the following folder on the CDROM: \DRIVERS\RPS2\NT4\(language).
[
Browse
.
]
I In the
click the folder of the appropriate language. Finally, click
J Click
A printer model selection dialog box appears.
[
Folders
[
OK
box, double-click
]
.
]
[
DRIVERS
], [
RPS2
and
]
. Then double-
[
]
NT4
[
Open
K Select the name of the printer whose driver you want to install by clicking
it, and then click
A dialog box for changing the printer name appears.
28
[
Next
.
]
.
]
Page 36

Installing the RICOH-SCRIPT2 Printer Driver
Note
❒
If the printer is a simplex machine, select "Color Controller RC-200".
❒
If the printer is a duplex machine, select "Color Controller RC-200(D)".
L Change the name of the printer if you want, and then click
M Click
[
Next
.
]
N In the next dialog box asking if you want to print a test page, select
then click
The installer copies the printer driver files from the CD-ROM to your computer's hard disk.
Note
❒
Print a test page after completing installation and restarting Windows.
[
Finish
.
]
[
Next
.
]
and
]
[
No
O If you are asked to insert the Windows NT 4.0 system disk, insert it in the
computer, and then click
[
OK
.
]
P If you are asked to provide the drive of the system disk, use the drive con-
taining the Windows NT 4.0 system disk.
Q If you are asked to provide the location of the required file, select the ap-
propriate folder. The location of the appropriate folder may differ depending on the version of your operating system. The following is an example:
• folder named
After installation is completed, the
the newly installed printer.
of the Windows NT 4.0 system disk.
[
]
i386
[
Printers
window appears with the icon of
]
3
R If you are asked if you want to restart Windows, select
asked, restart Windows after completing the installation.
. If you are not
]
[
Yes
S After Windows restarts, set up any options you have installed to the print-
er.
Reference
⇒ P.29 “Setting up options”
Setting up options
A Click
The
[
Printers
[
Start
, point to
]
window appears.
]
[
Settings
B Select the icon of the printer you want to use by clicking it. On the
menu, click
The Printer Properties appears.
[
Properties
.
]
, and then click
]
[
Printers
.
]
[
File
]
29
Page 37

Installing the Printer Driver and Software
3
C Click the
D Under
er.
The current settings are displayed in the
of the tab.
Note
❒
The following items are available here:
*1
E Use the
option.
[
Device Settings
[
Installable Options
Among the optional sorter units, the 3-bin sorter does not support 51/2"
1
8
/2"K(HalfLetter).
[
Change Setting
F After making the settings you want, click
close the Printer Properties dialog box.
Reference
You can confirm that the options are properly set by printing a configuration page.
tab.
]
, select the options you have installed on the print-
]
[
Change Setting
[
Paper feed Tray
box to select the appropriate setting for the selected
]
to register the settings and
]
[
OK
box in the lower part
]
and
]
[
Sorter
Using Adobe PageMaker Version 6. 0 or 6.5 in Windows
*1
.
]
×
You should install the PPD file for PostScript printing with Adobe PageMaker.
Installing the PPD files
A Close Adobe PageMaker if it is currently running.
B Insert the CD-ROM in the CD-ROM drive, while pressing the
until the computer finishes accessing the CD-ROM.
If the Auto Run program start, click
[
Cancel
.
]
SHIFT
{
key
}
C Select the CD-ROM drive.
D In the
double-click the folder of the appropriate language.
You can see the PPD file.
❒
❒
❒
[
Folders
Note
For Windows 95/98/NT 4.0, use the same PPD file included in the folder
named DRIVERS\RPS2\WIN95_98\(language) in the CD-ROM that
comes with the printer.
If the printer is a simplex machine, select "ricrc202.ppd".
If the printer is a duplex machine, select "ricrc2D2.ppd".
box, double-click
]
[
DRIVERS
], [
RPS2
and
]
[
WIN95_98
. Then
]
30
Page 38

Installing the RICOH-SCRIPT2 Printer Driver
E Copy the PPD file into the appropriate folder. The location of the appropri-
ate folder may differ depending on the version of software or how you installed the software on your operating system. The following are examples:
• Adobe PageMaker version 6.0: PM6\RSRC\PPD4
• Adobe PageMaker version 6.5: PM65\RSRC\(language)\PPD4
Selecting the PPD files
A Launch Adobe PageMaker.
B On the
The
[
Print Document
C From the
Note
❒
Confirm that “RPS” is shown after the printer name.
D In the
menu, click
]
[
File
dialog box appears.
]
list box, select the printer you want to use.
]
list box, select the printer you want to use.
[
PPD
[
Printers
]
[
Print
.
]
Macintosh
Use the Macintosh LaserWriter 8 driver that comes with your operating system.
Important
❒
See the documentation that comes with your operating system for details on
the functions of the LaserWriter 8 printer driver.
❒
The PPD file is not compatible with QuickDrawGX.
❒
The LaserWriter printer driver for a Macintosh does not come with this printer. Use the appropriate printer driver that comes with the Macintosh operating system you are using.
3
Reference
This manual describes only the settings specific for this printer. Settings actually may differ depending on the version of the LaserWriter driver you are using. See the documentation that comes with the Macintosh for details on the
LaserWriter functions.
Note
❒
The versions of the LaserWriter driver are separated into two categories.
"LaserWriter 8.3x or earlier" refers to the LaserWriter 8.3x driver and all drivers before that. "LaserWriter 8.4x or later" refers to LaserWriter 8.4x, 8.5x and
8.6x. LaserWriter 8.5x was used to make this manual. The settings may differ
depending on the version of the LaserWriter driver being used.
31
Page 39

Installing the Printer Driver and Software
Installing the PPD files
Limitation
❒
Be sure to install the PPD file correctly. Otherwise, you cannot use the option,
even though it is physically installed to the printer.
A Start the Macintosh.
3
B Double-click the icon of your hard disk to open it, and then open the
tensions
]
folder inside the
[
System Folder
by double-clicking it.
]
C Insert the CD-ROM in the CD-ROM drive.
D Double-click the CD-ROM icon.
The contents of the CD-ROM appear.
E Double-click the
ble-click the folder having the appropriate language name to open it.
[
Printer Description
folder in the CD-ROM, and then dou-
]
F Select the appropriate PPD file for the printer.
Note
❒
If the printer is a simplex machine, install the PPD file named Printer Description:(language):Color Controller RC-200 in the CD-ROM.
❒
If ther printer is a duplex machine, install the PPD file named Printer Description:(language):Color Controller RC-200(D) in the CD-ROM.
G Copy the PPD file in the
folder.
]
sions
The PPD file is installed.
[
Printer Descriptions
folder located inside the
]
[
Exten-
[
Ex-
Installing the ColorSync profiles
ColorSync profiles make it possible for the printer to print colors of similar intensity to those that appear on your computer display. You must install the ColorSync profiles to use this feature.
Note
❒
The ColorSync profiles conform with the color characteristics defined by the
International Color Consortium (ICC).
❒
Some computer displays may require particular settings to be controlled by
ColorSync. See the documentation that comes with your display for details.
The following profiles are provided for the printer.
32
Page 40

Installing the RICOH-SCRIPT2 Printer Driver
❖
RC–200 Transparency
Adjusts the image density to optimize the output for the OHP projection. This
profile is selected automatically whenever
the paper type.
❖
RC–200 Pre sentation
Enhances the reproduction of documents that contain text and graphics. This
profile is best for printing charts, colored graphs, presentation materials and
so on.
❖
RC–200 Photograph
Use this profile to enhance the reproduction of photos and graphics that include midtones.
❖
RC–200 Solid Color
Use this profile for printing specific colors, logos and so on.
The following procedure shows how to install the ColorSync Profiles.
[
OHP Transparency
is selected as
]
A Start the Macintosh.
B Double-click the icon of the hard disk to open it, and then open the appro-
priate folder for installing the ColorSync profiles.
3
Note
❒
The location of the appropriate folder may differ depending on the version
of the operating system. The following are examples:
• System:Preferences:ColorSync Profiles
• System:ColorSync Profiles
C Insert the CD-ROM in the CD-ROM drive.
The icon of the CD-ROM appears.
D Double-click the CD-ROM icon.
The contents of the CD-ROM appear.
E Double-click the
F Copy all four files in the
The ColorSync profiles are installed.
Setting up PPD file
Preparation
Confirm that the printer is connected to an AppleTalk network before performing the following procedure.
[
ColorSyncTM Profiles
[
ColorSyncTM Profiles
folder in the CD-ROM to open it.
]
folder.
]
A On the Apple menu, select
[
Chooser
.
]
33
Page 41

Installing the Printer Driver and Software
3
B Click the
C In the
to use by clicking it, and then click
Note
❒
If your network has multiple zones, click the name of the zone the printer
belongs to in the
dialog box.
[
LaserWriter 8
[
Select a PostS cript Printer
D Select the name of the printer by clicking it, and then click
Note
❒
Be sure to select the PPD file correctly. Otherwise, you may not use options
because options that you can use depend on the printer.
The PPD file is set up and the LaserWriter 8 icon appears at the left of the
printer name in the list. Next, follow the procedure on P.34 “Setting up op-
tions” to make the option settings, or to close the
Setting up options
A On the Apple menu, select
icon.
]
list, select the name of the printer you want
]
[
AppleTalk Zones
[
Chooser
[
Create
list in the lower left side of the
]
.
]
.
]
[
Select
[
Chooser
dialog box.
]
[
Chooser
.
]
]
B Click the
C In the
to use by clicking it, and then click
Note
❒
If your network has multiple zones, click the name of the zone the printer
belongs to in the
dialog box.
D Click
A list of options appears.
[
LaserWriter 8
[
Select a PostS cript Printer
.
[
Configure
]
icon.
]
list, select the name of the printer you want
]
[
AppleTalk Zones
Setup
.
]
[
list in the lower left side of the
]
[
Chooser
E Select the option you want to set up and the appropriate settings for it.
Note
❒
If the option you want to set up does not appear, the PPD file has not been
set up correctly. Check the name of the PPD file shown in the dialog box.
Reference
For more information on setting up options, see the “Operating Instructions” for RICOH-SCRIPT2 provided as a PDF file which is included in the
CD-ROM.
]
34
Page 42

Installing the RICOH-SCRIPT2 Printer Driver
F Click
The list of options closes.
G Click
The
[
Installing screen fonts
The screen fonts described below can be found in the CD-ROM, in the folder
named
Screen fonts are 10, 12, 14, 18 and 24 point bitmap fonts. Other sizes make characters appear with ragged edges on your computer screen, but they print with
smooth edges.
Note
❒
The screen fonts included in the CD-ROM are as follows: AG-Ricoh, HNRicoh, CS-Ricoh, BM-Ricoh, ZC-Ricoh, ZD-Ricoh.
.
]
[
OK
.
]
[
OK
Chooser
]
[
Fonts
dialog box appears.
]
.
A Start the Macintosh.
B Insert the CD-ROM in the CD-ROM drive.
The CD-ROM icon appears.
3
C Double-click the CD-ROM icon.
The contents of the CD-ROM appear.
D Copy the fonts you want to install in the
A confirmation dialog box appears.
E Click
The fonts are installed.
[
OK
.
]
[
System
folder.
]
F Restart the Macintosh.
Note
❒
The names of the fonts you have installed appear in the pull-down menu
when you select fonts with applications.
Screen Fonts
-
Screen fonts are bitmap fonts, which are formed by grouping dots together. Because of this, screen fonts appear jagged on your computer screen when you enlarge or reduce them. It is recommended that you install as many different sizes
as possible for each font to avoid such jagged appearances. Screen fonts are provided for this printer in 10, 12, 14, 18 and 24 point sizes.
35
Page 43

INDEX
N
10BASE-T/100BASE-TX
A
Access Control Address
Access Control Mask
,
21
,
,
13
,
,
21
Active Protocol
Adobe PaerMaker
PPD, installing
Auto Run
Installing
D
Data In indicator
,
9
E
,
10
# Enter
{
Error indicator
Escape
{
key
}
}
key
,
,
10
9
F
Frame type NetWare
G
,
, 13,
, 13,
30
30
,
13
1
17
17
Network Boot
Network Connections
Network Interface Boad
,
13
O
,
10
,
,
9
On Line indicator
On Line
{
Operation Panel
Options
key
}
, 23, 24, 27, 29,
P
,
,
,
9
, 2,
1
,
7
4
10
Panel Display
Parallel Cable
Parallel Port
Power indicator
printer driver
PRINTER MANAGER
R
,
10
key
Reset
{
}
RICOH-SCRIPT2
Windows 95/98 - Install
Windows NT 4.0 - Install
,
7
,
2
,
3
9
34
,
20
,
25
,
27
Gateway Address
I
IP Address
IPDL-C
,
13
,
7
Windows 95/98 - Install
Windows NT 4.0 - Install
L
LaserWriter
,
M
Macintosh
Media
{
Menu
{
,
31
ColorSync, installing
PPD, installing
PPD, Seting up
,
10
key
}
,
10
key
}
31
, 13,
,
,
32
33
17
,
,
32
,
23
24
S
Screen Fonts
Subnet Mask
U
User Code
statistics report
User ID
job log
,
,
,
35
, 13,
20
6
17
,
6
36 UE USA G528
 Loading...