


For safe and correct use, be sure to read Safety Information before
using the machine.
Appendix
Configuring Network Settings Using OS X
Troubleshooting
Maintaining the Machine
Configuring the Machine Using Utilities
Configuring the Machine Using the Control
Panel
Printing Documents
Paper Specifications and Adding Paper
Guide to the Machine
User’s Guide


TABLE OF CONTENTS
How to Find Information about Operations and Troubleshooting................................................................. 7
Operating Manual (Printed)..........................................................................................................................7
Operating Manual (Digital Format)..............................................................................................................7
How to Read This Manual................................................................................................................................. 9
Introduction..................................................................................................................................................... 9
Symbols Used in This Manual....................................................................................................................... 9
Model-Specific Information...........................................................................................................................9
Disclaimer.....................................................................................................................................................10
Notes............................................................................................................................................................ 10
Note to Administrator.................................................................................................................................. 11
List of Option................................................................................................................................................ 11
About IP Address......................................................................................................................................... 11
1. Guide to the Machine
Guide to Components......................................................................................................................................13
Exterior..........................................................................................................................................................13
Interior...........................................................................................................................................................15
Control Panel................................................................................................................................................15
Installing Option...............................................................................................................................................18
Attaching Paper Feed Unit.......................................................................................................................... 18
Installing the Wireless LAN Interface Board..............................................................................................20
About Operation Tools.................................................................................................................................... 22
Using RICOH Smart Device Connector......................................................................................................... 24
Connecting a Smart Device to the Machine Using NFC.............................................................................. 25
Writing the Machine's Information to the NFC tag with a Smart Device................................................ 25
Using the Application on a Smart Device by Using NFC.........................................................................25
2. Paper Specifications and Adding Paper
Workflow for Loading Paper and Configuring Paper Sizes and Types...................................................... 27
Loading Paper.................................................................................................................................................. 28
Loading Paper into Tray1 and 2................................................................................................................ 28
Loading Paper into Bypass Tray................................................................................................................. 32
Loading Envelopes.......................................................................................................................................34
Specifying Paper Type and Paper Size Using the Control Panel.................................................................37
Specifying the Paper Type.......................................................................................................................... 37
1

Specifying the Standard Paper Size...........................................................................................................38
Specifying a Custom Paper Size................................................................................................................ 38
Specifying Paper Type and Paper Size Using Smart Organizing Monitor.................................................40
Specifying a Custom Paper Size................................................................................................................ 41
Specifying Paper Type and Paper Size Using Web Image Monitor...........................................................42
Specifying a Custom Paper Size................................................................................................................ 42
Specifying Paper Type and Paper Size Using the Printer Driver..................................................................43
When Using Windows................................................................................................................................ 43
When Using OS X........................................................................................................................................44
Supported Paper.............................................................................................................................................. 45
Specifications of Paper Types.....................................................................................................................48
Non-Recommended Paper Types.............................................................................................................. 54
Paper Storage.............................................................................................................................................. 55
Print Area......................................................................................................................................................55
3. Printing Documents
What You Can Do with the Printer Function...................................................................................................57
Configuring Option Settings for the Printer.................................................................................................... 58
Conditions for Bidirectional Communication.............................................................................................58
If Bidirectional Communication is Disabled............................................................................................... 58
Displaying the Printing Preferences Dialog Box.............................................................................................60
Displaying the Printing Preferences Dialog Box from the [Start] Menu................................................... 60
Displaying the Printing Preferences Dialog Box in an Application.......................................................... 60
Basic Operation of Printing............................................................................................................................. 62
If a Paper Mismatch Occurs....................................................................................................................... 63
Canceling a Print Job...................................................................................................................................64
Printing Confidential Documents..................................................................................................................... 66
Storing a Locked Print file............................................................................................................................66
Printing a Locked Print File...........................................................................................................................67
Deleting a Locked Print File......................................................................................................................... 67
Printing with Mopria.........................................................................................................................................68
Using Various Print Functions...........................................................................................................................69
Print Quality Functions................................................................................................................................. 69
Print Output Functions..................................................................................................................................70
2

4. Configuring the Machine Using the Control Panel
Basic Operation............................................................................................................................................... 73
Menu Chart.......................................................................................................................................................74
Administrator Tools Menu................................................................................................................................75
Printer Features Menu...................................................................................................................................... 77
List/Test Print.................................................................................................................................................77
System...........................................................................................................................................................77
System Settings Menu...................................................................................................................................... 81
Tray Paper Settings Menu............................................................................................................................... 84
Wi-Fi Setup Wizard......................................................................................................................................... 86
Network Settings Menu................................................................................................................................... 87
List/Test Print Menu..........................................................................................................................................91
Printing the Configuration Page..................................................................................................................91
Types of Lists/Reports..................................................................................................................................91
5. Configuring the Machine Using Utilities
Available Setting Functions Using Web Image Monitor and Smart Organizing Monitor.........................93
Using Web Image Monitor............................................................................................................................. 94
Displaying Top Page........................................................................................................................................95
Changing the Interface Language..............................................................................................................96
Installing the Help Source File.................................................................................................................... 96
Displaying Help........................................................................................................................................... 96
Checking the System Information....................................................................................................................98
Status Tab..................................................................................................................................................... 98
Counter Tab..................................................................................................................................................99
Machine Information Tab............................................................................................................................99
Configuring the System Settings................................................................................................................... 100
Tray Paper Settings Tab............................................................................................................................ 100
Interface Tab..............................................................................................................................................103
Configuring the Network Settings................................................................................................................ 104
Network Status Tab...................................................................................................................................104
IPv6 Configuration Tab.............................................................................................................................105
Network Application Tab......................................................................................................................... 105
DNS Tab.................................................................................................................................................... 106
3

Auto E-mail Notification Tab.................................................................................................................... 107
SNMP Tab................................................................................................................................................. 108
SMTP Tab...................................................................................................................................................109
POP3 Tab...................................................................................................................................................109
Wireless Tab.............................................................................................................................................. 110
Google Cloud Tab.................................................................................................................................... 112
Airprint Tab................................................................................................................................................ 112
Certificate Tab........................................................................................................................................... 113
Configuring the IPsec Settings.......................................................................................................................116
IPsec Global Settings Tab.........................................................................................................................116
IPsec Policy List Tab...................................................................................................................................116
Printing Lists/Reports..................................................................................................................................... 120
Configuring the Administrator Settings.........................................................................................................121
Administrator Tab...................................................................................................................................... 121
Reset Settings Tab......................................................................................................................................121
Backup Setting Tab................................................................................................................................... 121
Restore Setting Tab....................................................................................................................................122
Help Source File Setting Tab.................................................................................................................... 123
Energy Saver Mode Tab.......................................................................................................................... 123
PCL6 Mode................................................................................................................................................124
Using Smart Organizing Monitor.................................................................................................................125
Displaying the Smart Organizing Monitor Dialog................................................................................. 125
Checking the Status Information...............................................................................................................125
Configuring the Machine Settings............................................................................................................126
Printing the Configuration Page................................................................................................................128
6. Maintaining the Machine
Replacing the Print Cartridge........................................................................................................................129
Cautions When Cleaning..............................................................................................................................133
Cleaning the Friction Pad and Paper Feed Roller....................................................................................... 134
Moving and Transporting the Machine....................................................................................................... 137
Disposal......................................................................................................................................................138
Where to Inquire....................................................................................................................................... 138
4

7. Troubleshooting
Error and Status Messages on the Control Panel........................................................................................139
Panel Indicator...............................................................................................................................................142
Error and Status Messages Appear on Smart Organizing Monitor..........................................................143
Removing Paper Jams....................................................................................................................................145
Removing Printing Jams.............................................................................................................................145
When You Cannot Print Test Page............................................................................................................... 155
Paper Feed Problems.....................................................................................................................................156
Print Quality Problems................................................................................................................................... 159
Checking the Condition of the Machine..................................................................................................159
Checking the Printer Driver Settings.........................................................................................................160
Printer Problems............................................................................................................................................. 162
When You Cannot Print Properly............................................................................................................. 162
When You Cannot Print Clearly...............................................................................................................164
When Paper Is Not Fed or Ejected Properly...........................................................................................166
Other Printing Problems............................................................................................................................ 167
Common Problems.........................................................................................................................................168
8. Configuring Network Settings Using OS X
Connecting the Machine to a Wired Network........................................................................................... 169
Using a USB Cable................................................................................................................................... 169
Using an Ethernet Cable...........................................................................................................................170
Connecting the Machine to a Wireless Network........................................................................................172
Installing the Printer Driver........................................................................................................................ 172
Installing Smart Organizing Monitor.......................................................................................................172
Using the Wi-Fi Setup Wizard................................................................................................................. 173
Using the WPS Button............................................................................................................................... 174
Using a PIN Code..................................................................................................................................... 175
9. Appendix
Transmission Using IPsec...............................................................................................................................177
Encryption and Authentication by IPsec.................................................................................................. 177
Security Association.................................................................................................................................. 178
Encryption Key Exchange Settings Configuration Flow......................................................................... 179
Specifying Encryption Key Exchange Settings........................................................................................179
5

Specifying IPsec Settings on the Computer............................................................................................. 180
Enabling and Disabling IPsec Using the Control Panel..........................................................................182
Notes About the Toner.................................................................................................................................. 183
Specifications of the Machine...................................................................................................................... 184
General Function Specifications.............................................................................................................. 184
Printer Function Specifications..................................................................................................................186
Paper Feed Unit PB1130..........................................................................................................................186
Consumables..................................................................................................................................................187
Print Cartridge............................................................................................................................................187
Information for This Machine........................................................................................................................188
User Information on Electrical & Electronic Equipment (mainly Europe and Asia)..........188
Note for the Battery and/or Accumulator Symbol (For EU countries only)......................................... 189
Environmental Advice for Users (mainly Europe)............................................................... 189
Notice To Wireless LAN Interface Users (mainly Europe).................................................190
Notes to users in the state of California (Notes to Users in USA)..........................................................191
Notes to users in the United States of America.......................................................................................191
Notes to Canadian Users of Wireless Devices.......................................................................................192
ENERGY STAR Program........................................................................................................................... 193
Saving Energy............................................................................................................................................193
Trademarks.....................................................................................................................................................195
INDEX...........................................................................................................................................................199
6

How to Find Information about Operations and Troubleshooting
You can find support information about operating the machine and troubleshooting in the Operating
Manual (printed), Operating Manual (digital format), and Help (online).
Operating Manual (Printed)
The following manuals are provided with this machine.
Safety Information
This manual explains the safety precautions that should be followed when using the machine. Be
sure to read this manual before using the machine.
Setup Guide
This manual explains how to set up the machine. It also explains how to remove the machine from
the packaging and how to connect it to a computer.
Operating Manual (Digital Format)
Operating manuals can be viewed from Ricoh's website or from the provided CD-ROM.
Viewing from a web browser
Access the Internet from a web browser.
Confirm that the computer or the machine is connected to the network.
Download the operating manuals from http://www.ricoh.com/.
Viewing from the provided CD-ROM
Operating manuals can also be viewed from the provided CD-ROM.
• When using Windows
1. Insert the CD-ROM into the CD-ROM drive.
2. Click [Read Manual] and follow the instructions on the screen.
The PDF file manual opens.
• When using OS X
1. Insert the CD-ROM into the CD-ROM drive.
2. Double-click Manuals.htm file, located on the CD-ROM root directory.
3. Select the language.
4. Click [Read PDF manuals].
7

5. Click the manual you want to refer to.
The PDF file manual opens.
8

How to Read This Manual
DUE202
Introduction
This manual contains detailed instructions and notes on the operation and use of this machine. For your
safety and benefit, read this manual carefully before using the machine. Keep this manual in a handy
place for quick reference.
Symbols Used in This Manual
This manual uses the following symbols:
Indicates points to pay attention to when using the machine, and explanations of likely causes of paper
misfeeds, damage to originals, or loss of data. Be sure to read these explanations.
Indicates supplementary explanations of the machine’s functions, and instructions on resolving user
errors.
[ ]
Indicates the names of keys on the machine's display or control panels.
Model-Specific Information
This section explains how you can identify the region your machine belongs to.
There is a label on the rear of the machine, located in the position shown below. The label contains
details that identify the region your machine belongs to. Read the label.
9

The following information is region-specific. Read the information under the symbol that corresponds to
the region of your machine.
(mainly Europe and Asia)
If the label contains the following, your machine is a region A model:
• CODE XXXX -27
• 220–240 V
(mainly North America)
If the label contains the following, your machine is a region B model:
• CODE XXXX -17
• 120–127 V
• Dimensions in this manual are given in two units of measure: metric and inch. If your machine is a
Region A model, refer to the metric units. If your machine is a Region B model, refer to the inch
units.
Disclaimer
To the maximum extent permitted by applicable laws, in no event will the manufacturer be liable for any
damages whatsoever arising out of failures of this machine, losses of the registered data, or the use or
non-use of this product and operation manuals provided with it.
Make sure that you always copy or have backups of the data registered in this machine. Documents or
data might be erased due to your operational errors or malfunctions of the machine.
In no event will the manufacturer be responsible for any documents created by you using this machine or
any results from the data executed by you.
For good output quality, the manufacturer recommends that you use genuine toner from the
manufacturer.
Notes
Contents of this manual are subject to change without prior notice.
The manufacturer shall not be responsible for any damage or expense that might result from the use of
parts other than genuine parts from the manufacturer with your office products.
Two kinds of size notation are employed in this manual.
Some illustrations in this manual might be slightly different from the machine.
10
Note to Administrator
Password
Certain configurations of this machine can be password-protected to prevent unauthorized modifications
by others. We strongly recommend you to create your own password immediately.
The following are the operations that can be password-protected:
• Entering the [Network Settings], [Wi-Fi Setup Wizard], or [Admin. Tools] menu using the control
panel
You can access these menus without a password by factory default.
The setting for creating a password can be found in [Admin. Tools].
• Configuring the machine using Web Image Monitor
You can configure the machine using Web Image Monitor without a password by factory default.
The setting for creating a password can be found in [Administrator Settings].
For details about creating passwords, see page 121 "Configuring the Administrator Settings".
List of Option
Option List Referred to as
Paper Feed Unit PB1130 Paper feed unit
xxxx Wireless LAN interface board
• If Paper feed unit is attached, "Tray 2" appears on the machine's control panel.
About IP Address
In this manual, "IP address" covers both IPv4 and IPv6 environments. Read the instructions that are
relevant to the environment you are using.
11

12
1. Guide to the Machine
DUE208
5
6
7
8
9
11 10
12
12 34
This chapter describes preparations for using the machine and its operating instructions.
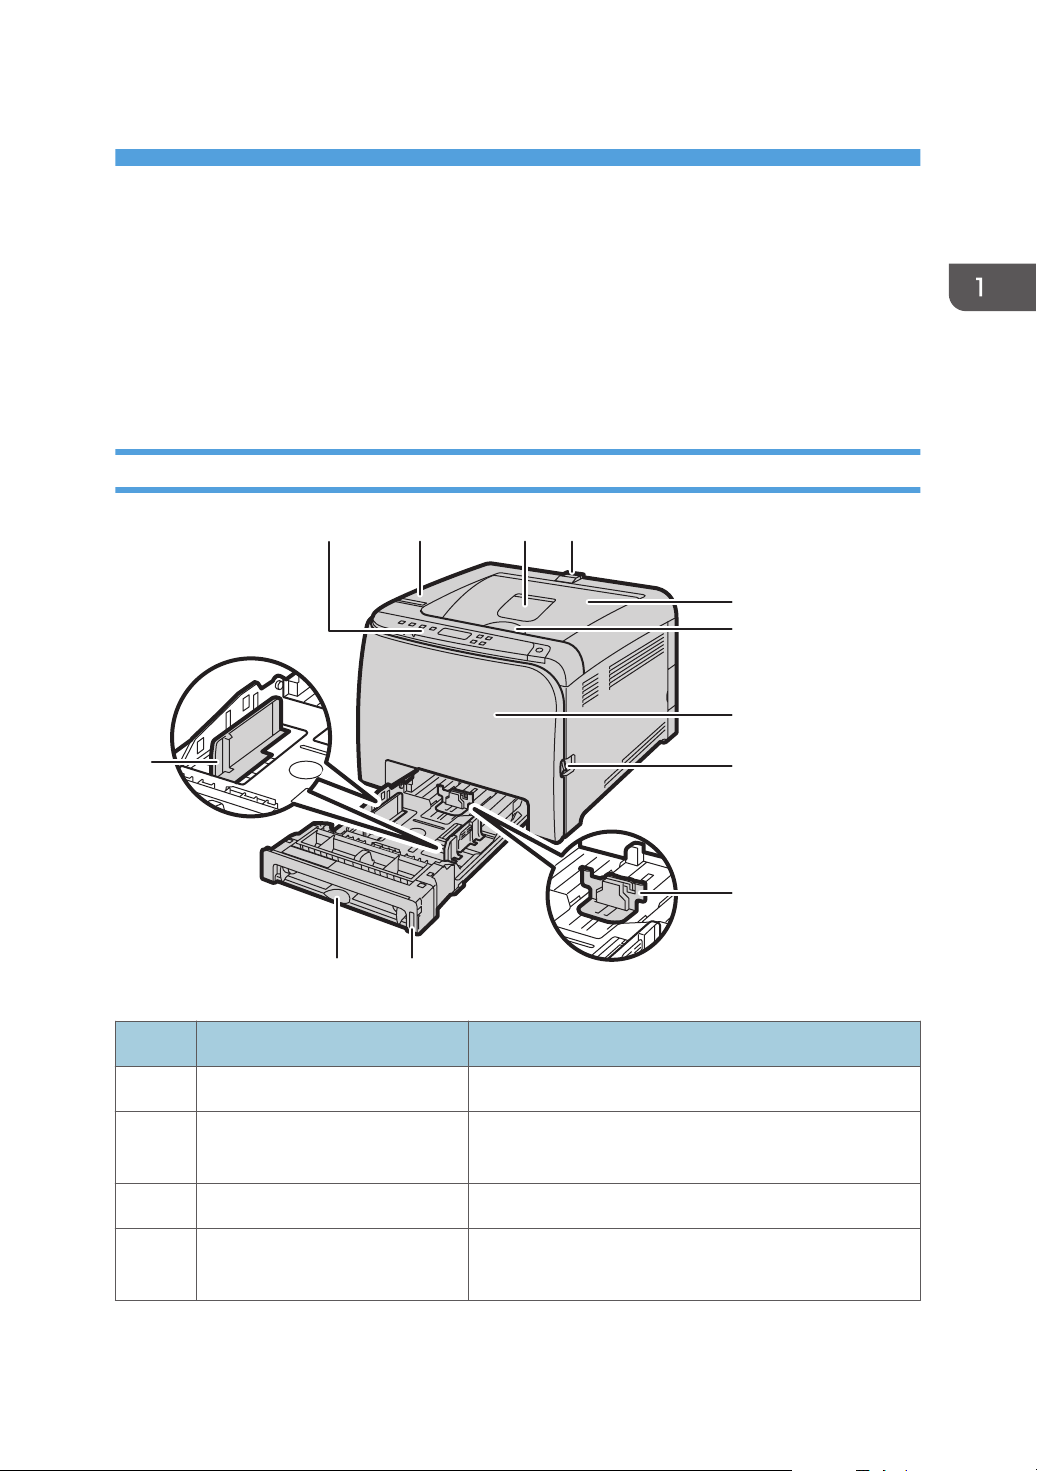
Guide to Components
This section introduces the names of the various parts on the front and rear side of the machine and
outlines their functions.
Exterior
No. Name Description
1 Stop Fence Raise this fence to prevent paper from falling off.
2 Standard Tray Printed paper is output here. Up to 125 sheets of plain
paper can be stacked here.
3 Controller Board For connecting the wireless LAN interface board.
4 USB Port Use a USB cable to connect the printer to the host
computer.
13

1. Guide to the Machine
No. Name Description
5 Ethernet Port Use a network interface cable to connect the printer to
the network.
6 Tray 1 Rear Cover This cover opens when you load paper longer than A4
in Tray 1
7 Rear Cover Open this cover to remove jammed paper or to lower
the levers inside before printing on envelopes.
8 Side Fence Adjust this fence to the paper size.
9 Bypass Tray This tray can hold up to 50 sheets of plain paper.
10 Tray 1 This tray can hold up to 250 sheets of plain paper.
11 End Fence Adjust this fence to the paper size.
12 Front Cover Open this cover to replace consumables or clear a
paper jam.
13 Control Panel The keys to operate the machine and the indicators for
checking the status of the machine are on this control
panel.
14
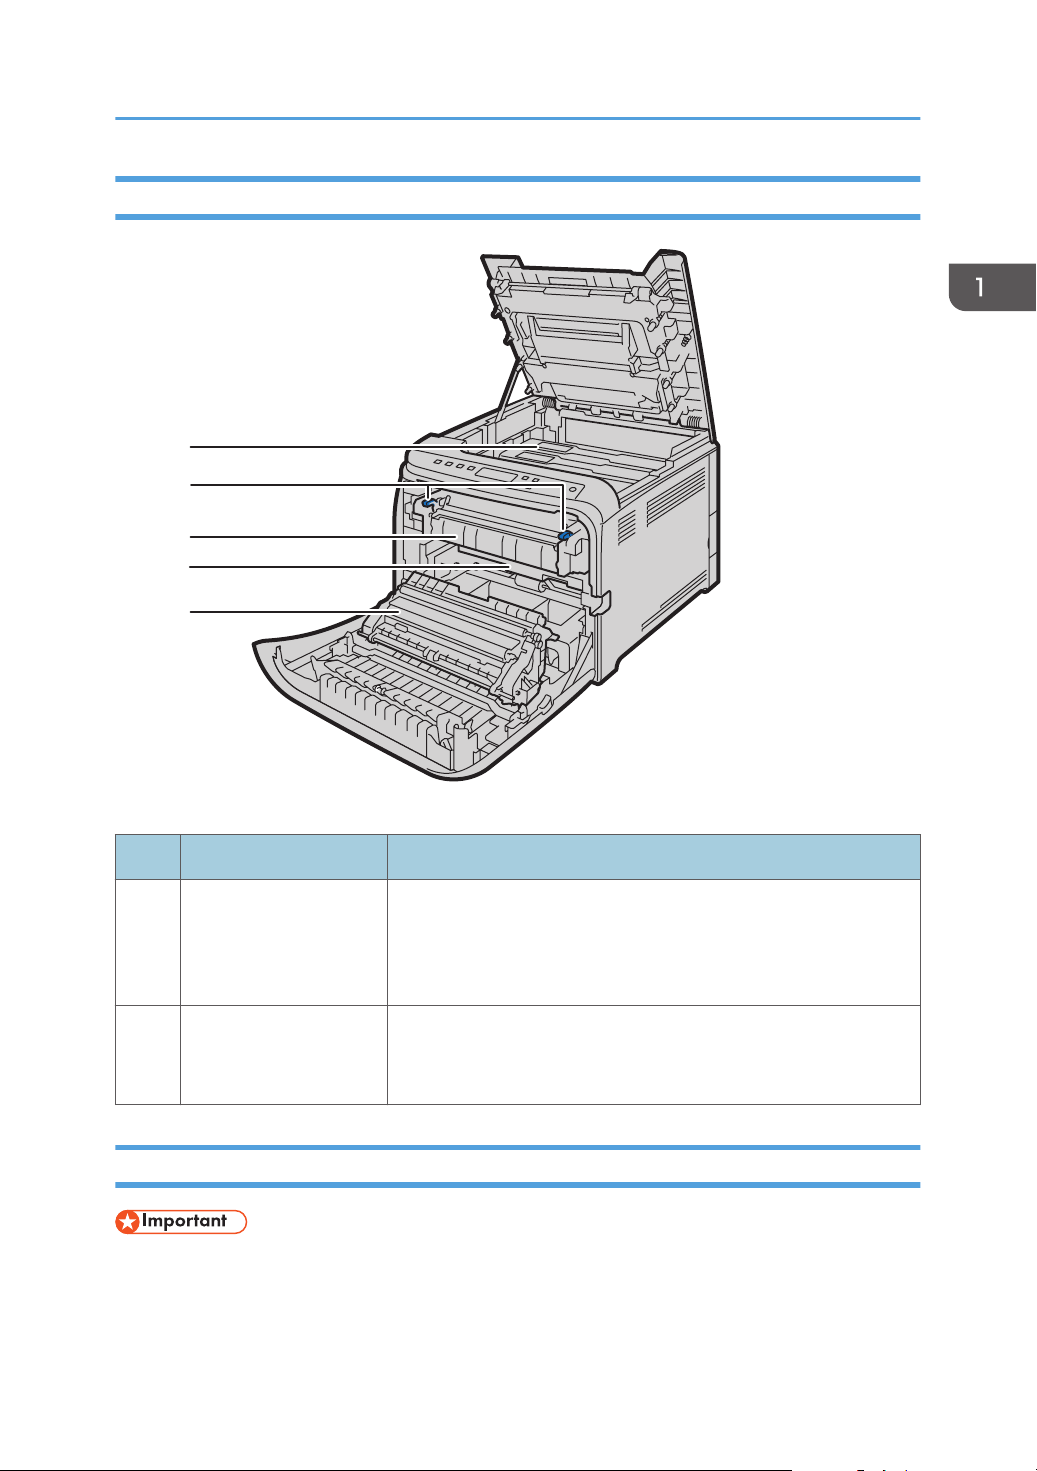
Interior
1
2
3
4
5
DUE213
Guide to Components
Control Panel
No. Name Description
1 Print Cartridge A replacement consumable that is required to make prints on
paper. It needs to be replaced when the alert indicator flashes red.
For details about replacing the cartridge, see page 129
"Replacing the Print Cartridge".
2 Envelope Levers Lower these levers when copying or printing on envelopes. Pull up
these levers back when copying or printing on paper other than
envelopes.
• When you push the [Power] key, wait at least a second after the indicator has lit up or gone out.
15

DYG319
1
2
3
4
5
67
8
9
10
11
1. Guide to the Machine
No. Name Description
1 Display Displays the current status and messages.
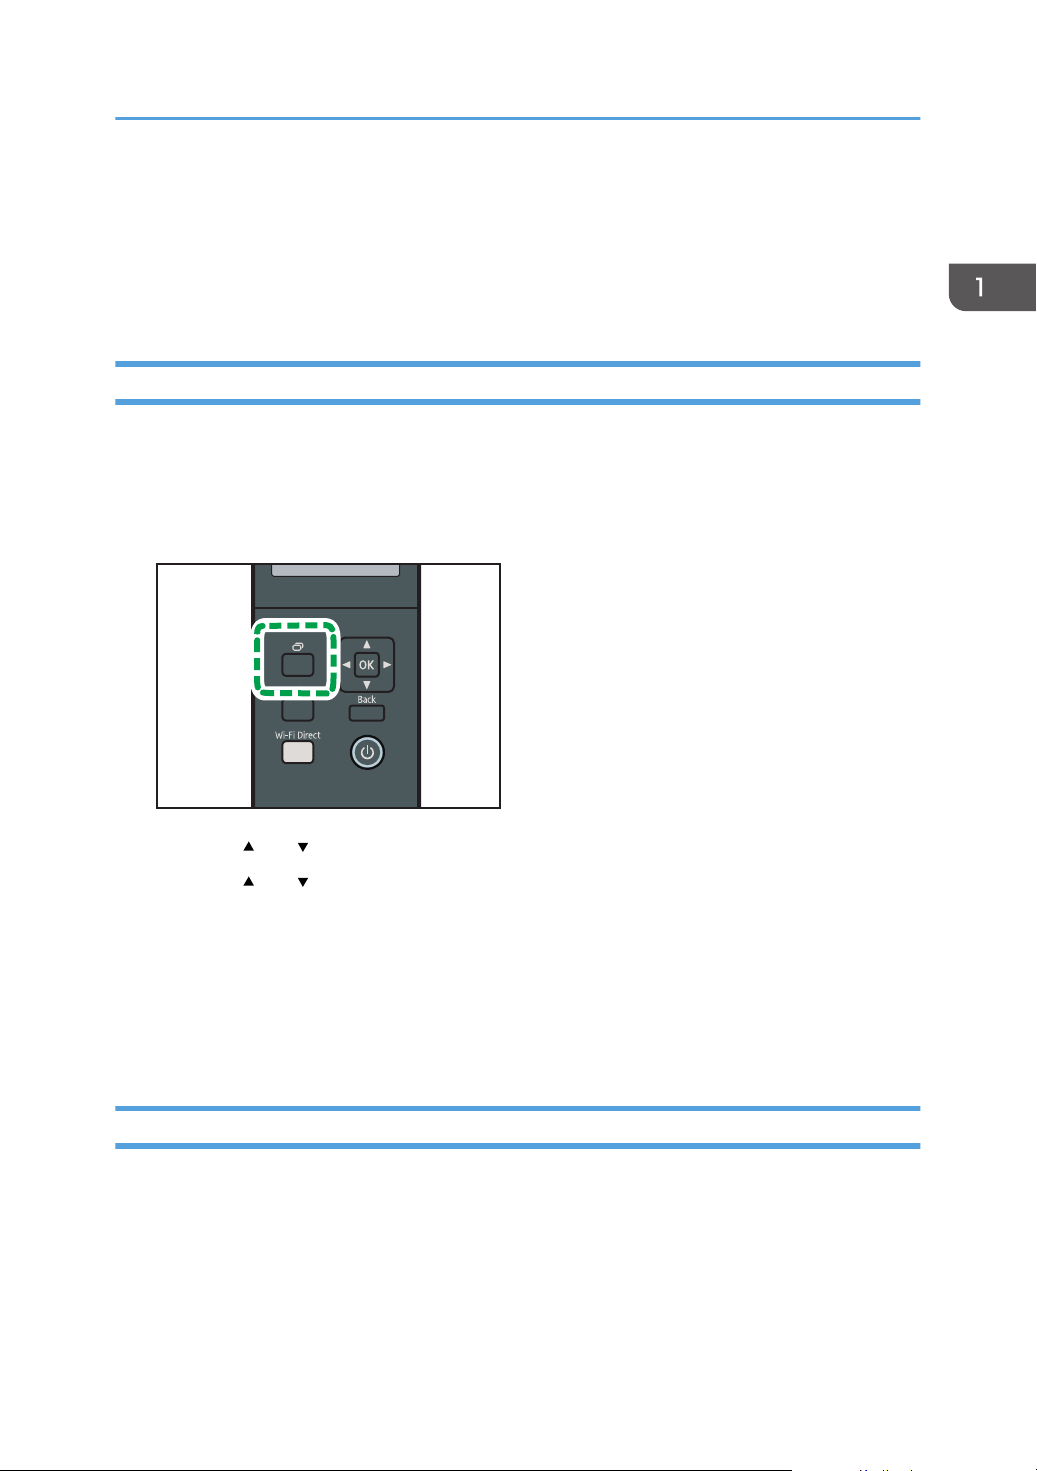
2 [Menu] key Press this key to configure or check the machine settings.
Press the [Menu] key again to return to the initial screen.
Also, you can use this key to enter numerical values when
specifying settings.
3 [Job Reset] key Press this key to cancel a job that is currently being printed
or received.
4 [Wi-Fi Direct] key Pressing this key while Wi-Fi is disabled activates Wi-Fi and
reboots the machine automatically. Press this key while Wi-Fi
is enabled to activate or deactivate the Wi-Fi Direct function.
This indicator lights up blue when the Wi-Fi Direct function is
active. After a long press of this key, configure the WPS
using the PIN code or in PBC mode. For details, see Setup
Guide.
To use this key, the wireless LAN interface board needs to
be installed to the machine.
16

Guide to Components
No. Name Description
5 NFC tag Connects a smart device to the machine when you touch this
tag on a smart device.
6 Data In Indicator Flashes when the machine is receiving data from a
computer. This indicator lights up when there is a Locked
Print file stored in the machine.
7 Alert Indicator Flashes when the toner is nearly empty, or lights up red
when the machine runs out of toner or a machine error
occurs.
8 [Power] key Press to turn the main power on or off.
This indicator lights up blue when the machine is turned on.
To turn off the machine, press and hold down this key for at
least three seconds.
If you press this key for less than 3 seconds, the machine
switches to Energy Saver mode. To recover Energy Saver
mode, press this key again for less than 3 seconds.
9 [Back] key Press to cancel the last operation or to return to the previous
level of the menu tree.
10 [OK] key Press this key to confirm settings and setting values, or move
to the next menu level.
11 Scroll Keys Press to move the cursor in the direction indicated by the key.
17
1. Guide to the Machine
Installing Option
This section explains how to install options.
Attaching Paper Feed Unit
• Touching the prongs of the power cable's plug with anything metallic constitutes a fire and
electric shock hazard.
• It is dangerous to handle the power cord plug with wet hands. Doing so could result in electric
shock.
• Before installing or removing options, always disconnect the power cord plugs from the wall
outlet and allow time for the main unit to fully cool. Failing to take these precautions could result
in burns.
• The printer weighs approximately xx kg (xx lb.). Lift the printer using the inset grips on both sides
of the printer, and then move it horizontally to the place where you want to use it.
• Lifting the paper feed unit carelessly or dropping may cause injury.
• Before moving the machine, unplug the power cord from the wall outlet. If the cord is
unplugged abruptly, it could become damaged. Damaged plugs or cords can cause an
electrical or fire hazard.
• Tray 1 is required to print using the optional paper feed unit. Without Tray 1, paper jams will occur.
• Do not hold the tray to lift the machine.
1. Turn off the machine's power, and then pull the power plug out of the wall outlet.
18
DYG315
DUD470
DYG316
Installing Option
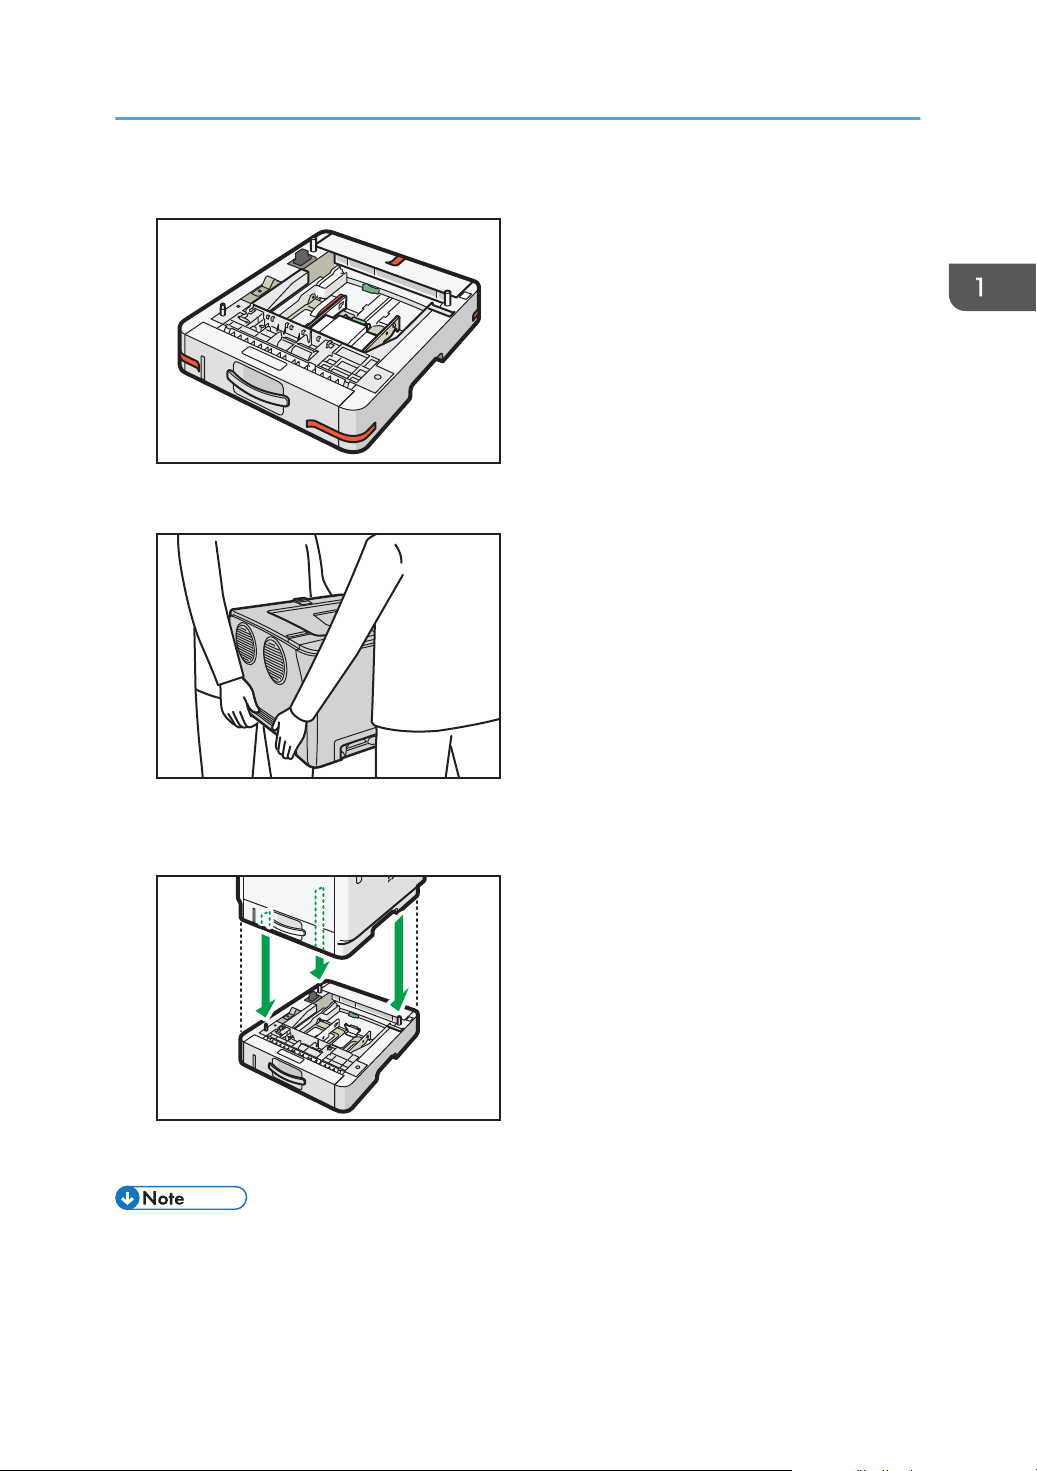
2. Remove the adhesive tape and the cushioning material from the optional paper feed unit.
3. Lift the machine using the inset grips on both sides of the machine.
4. There are three upright pins on the optional paper feed unit. Align the holes of the
machine with the pins, and then lower the machine slowly.
5. Insert the power plug into the wall outlet, and then turn on the power.
• After installing the optional paper feed unit, select Tray 2 in the printer driver. For details, see the
printer driver Help.
• If the new device is listed in the column of configuration options, it has been properly installed.
19
DYG339
1. Guide to the Machine
• If the optional paper feed unit is not installed properly, try to install it again by repeating the
procedure. If the problem persists, contact your sales or service representative.
• For details about printing the configuration page, see page 91 "List/Test Print Menu".
Installing the Wireless LAN Interface Board
• Before beginning work, ground yourself by touching something metal to discharge any static
electricity. Static electricity can damage the interface units.
• Do not subject the interface units to physical shocks.
• Be sure to turn off the machine before installing the wireless LAN interface board.
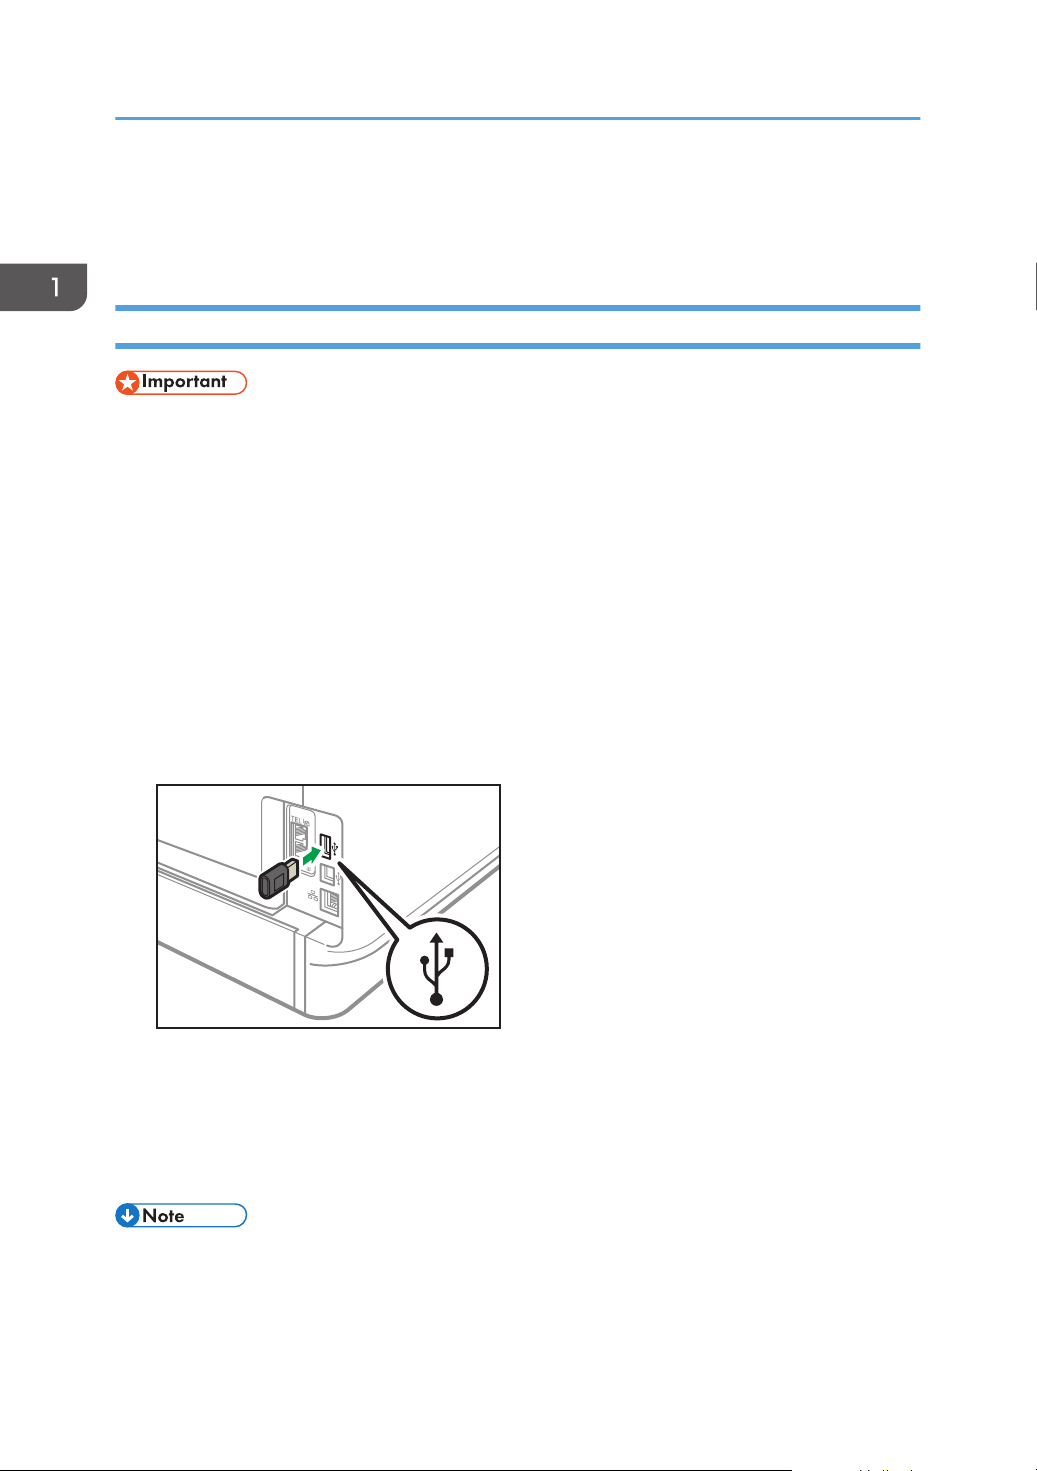
• Insert the wireless LAN interface board into the controller board of the back of the machine. Do not
insert it into the USB flash disk port of the front of the machine.
• We recommend installing the printer driver on your computer after completing the configuration for
the wireless LAN interface board.
1. Check the contents of the package.
2. Turn the machine off and unplug the power cord.
3. Fully insert the interface board.
Check that the interface board is firmly connected to the controller board.
4. Plug in the power cord, and then turn on the machine.
5. Configure settings from the control panel.
For details, see Setup Guide.
• Check that the board was correctly installed by printing the configuration page. If it is correctly
installed, "Wireless (Wi-Fi)" will appear for "Network Settings" on the configuration page. For
details about printing the configuration page, see page 91 "List/Test Print Menu".
20

Installing Option
• If the board was not installed properly, repeat the procedure from the beginning. If it cannot be
installed correctly even after trying the installation a second time, contact your sales or service
representative.
• Before using the board, you must configure settings from the control panel. For details, see Setup
Guide.
21
1. Guide to the Machine
About Operation Tools
This section explains the operation tools of this machine.
Control Panel
The control panel contains keys for controlling the machine.
For details about how to use the control panel, see page 73 "Configuring the Machine Using the
Control Panel".
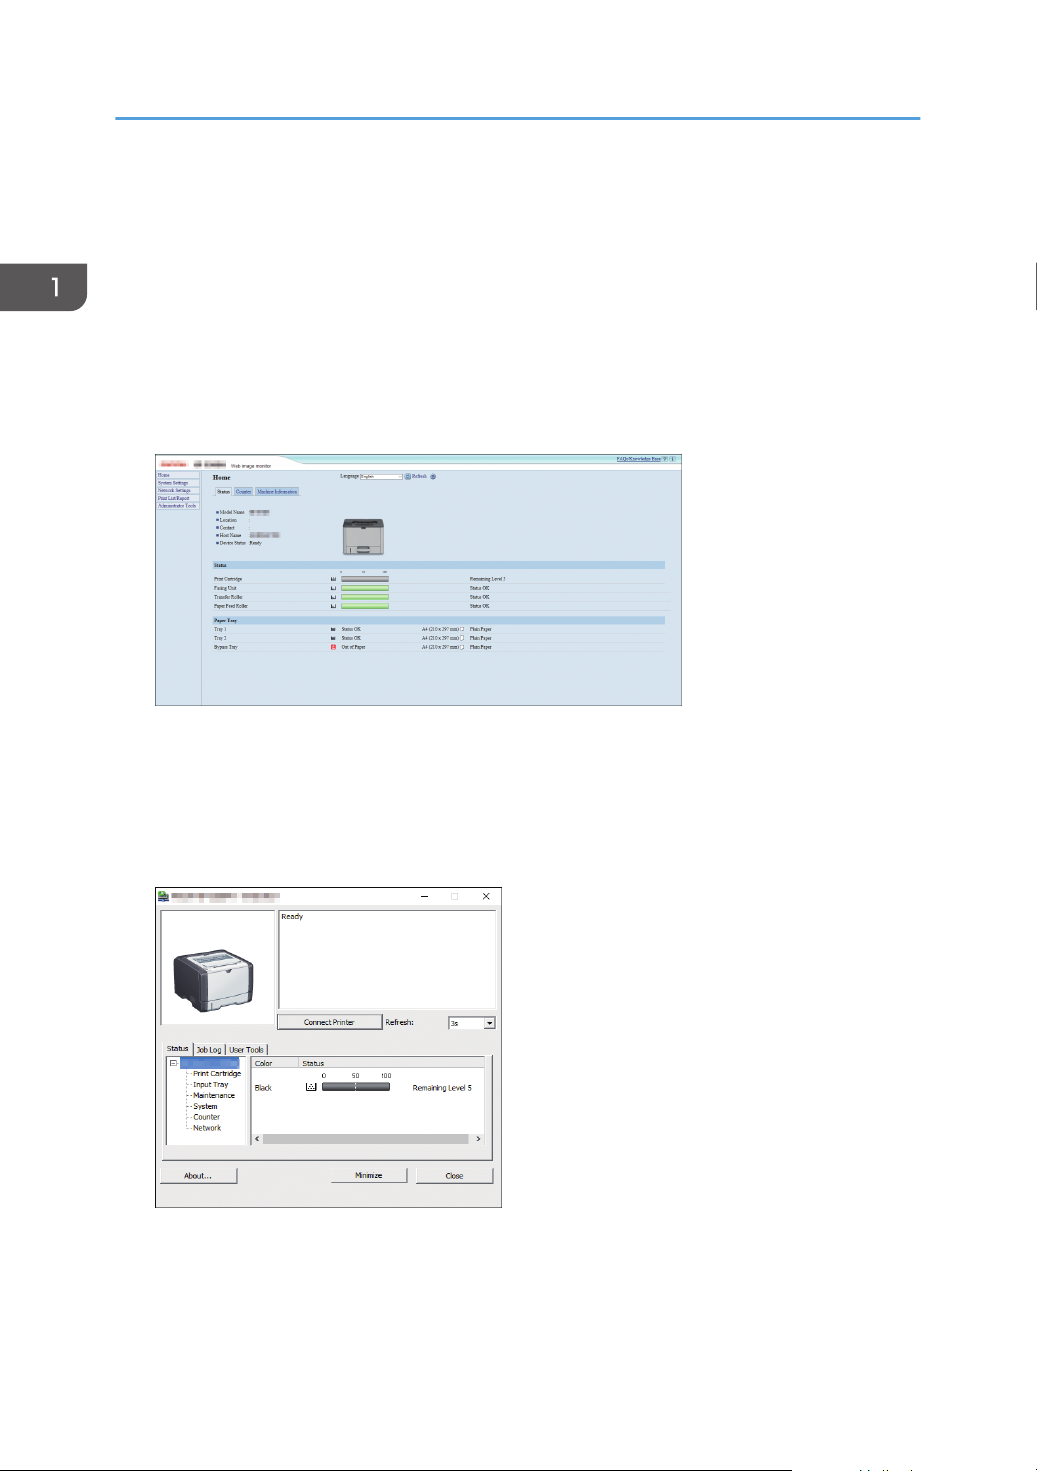
Web Image Monitor
You can check the machine's status and configure its settings by accessing the machine directly
using Web Image Monitor.
For details about how to use Web Image Monitor, see page 93 "Configuring the Machine Using
Utilities".
Smart Organizing Monitor
Install this utility on your computer from the included CD-ROM before using it.
Using Smart Organizing Monitor, you can check the machine's status, configure its settings, and
use other functions.
22

About Operation Tools
For details about how to use Smart Organizing Monitor, see page 125 "Using Smart Organizing
Monitor".
23
DYG337
1. Guide to the Machine
Using RICOH Smart Device Connector
To use RICOH Smart Device Connector, access the App Store or Google Play with your smart device,
search for and download the "RICOH Smart Device Connector" application from the site.
Check the App Store or Google Play to see the functions you can use on RICOH Smart Device
Connector.
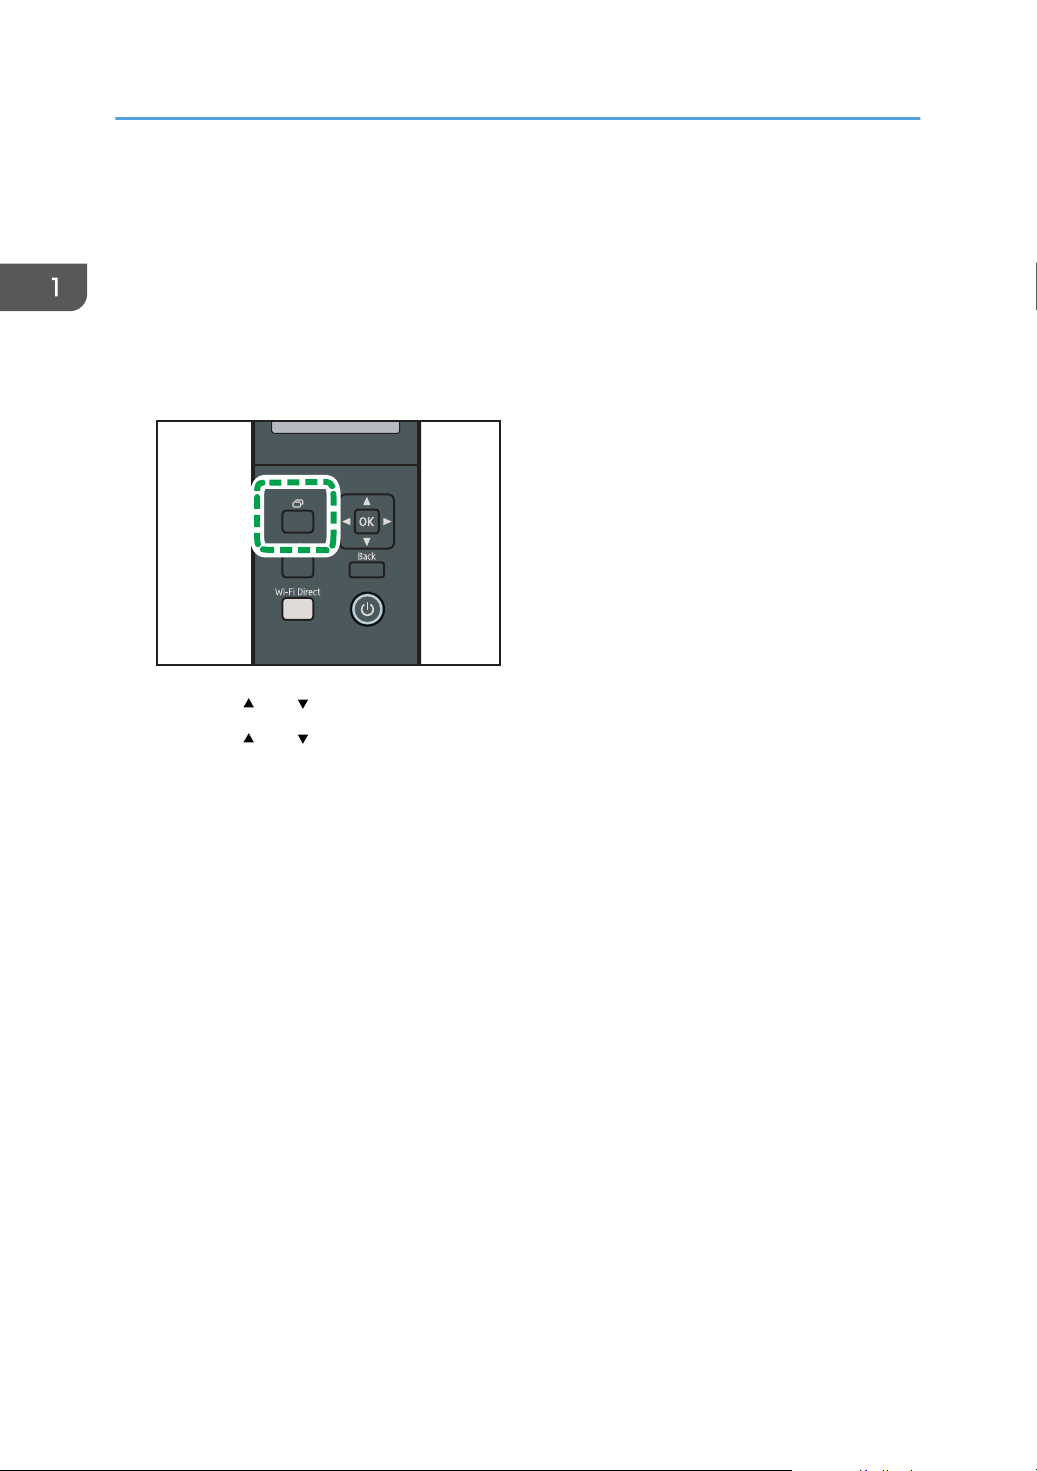
1. Press the [Menu] key.
2. Press the [ ] or [ ] key to select [Print List/Report], and then press the [OK] key.
3. Press the [ ] or [ ] key to select [Maintenance Page], and then press the [OK] key.
4. When a message appears, press the [OK] key.
The Maintenance page including the QR code is printed.
5. Start the application on the smart device, and then read the QR code.
Follow the instructions displayed on the application.
For details about how to connect a smart device to the machine using Near-field communication
(NFC), see page 25 "Connecting a Smart Device to the Machine Using NFC".
24
DYG337
Connecting a Smart Device to the Machine Using NFC
Connecting a Smart Device to the Machine
Using NFC
This section describes how to connect your smart device to the machine using NFC.
Writing the Machine's Information to the NFC tag with a Smart Device
1. Configure the network connection of the machine.
2. Access the App Store or Google Play from your smart device, search for and download
the "RICOH Smart Device Connector" application from the site.
3. Press the [Menu] key.
4. Press the [ ] or [ ] key to select [Print List/Report], and then press the [OK] key.
5. Press the [ ] or [ ] key to select [Maintenance Page], and then press the [OK] key.
6. When a message appears, press the [OK] key.
The Maintenance page including the QR code is printed.
7. Start the application on the smart device, and then read the QR code.
8. Write the machine's network information to the NFC tag using the application, and then
touch the NFC tag with the smart device.
Using the Application on a Smart Device by Using NFC
1. Start the application on the smart device, and then touch the NFC tag with the smart
device.
2. Print using "RICOH Smart Device Connector" by touching the NFC tag.
25

1. Guide to the Machine
26
2. Paper Specifications and Adding
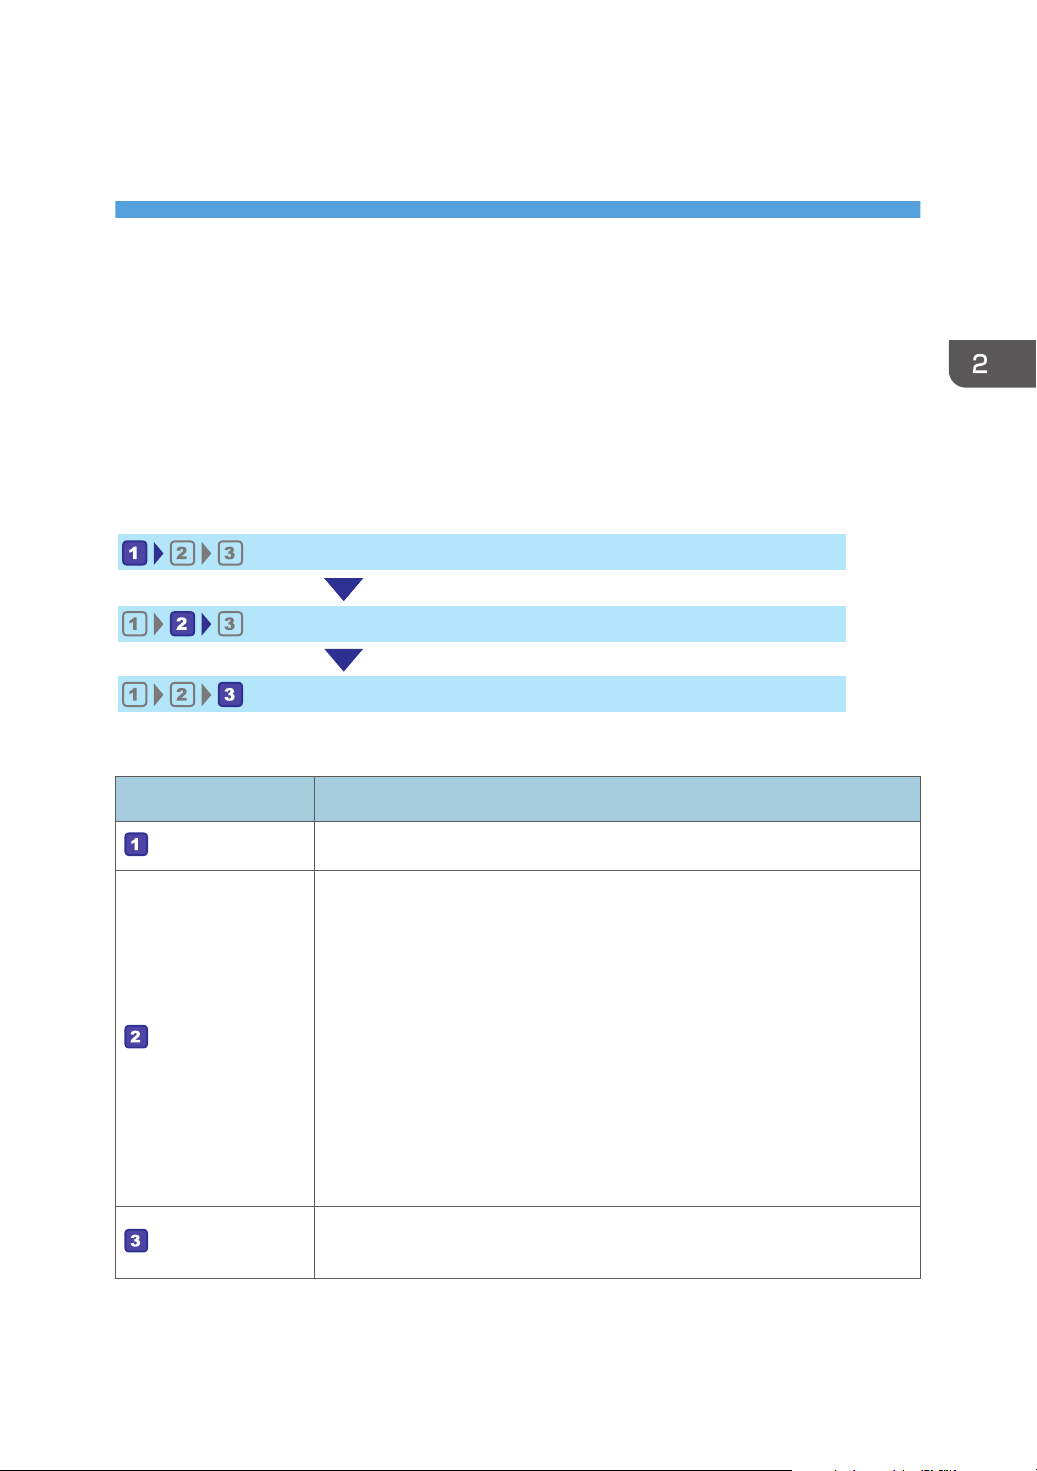
Load paper into the paper tray.
Specify the paper type and size.
Specify the paper type and size on the printer driver.
Paper
This chapter describes how to load paper and originals and about their specifications.
Workflow for Loading Paper and Configuring Paper Sizes and Types
This section explains how to load paper and operations required after paper is loaded.
After following the procedures below, you can print on the paper that is loaded in the machine.
For details about the procedures, refer to the next page.
Procedure Reference
See page 28 "Loading Paper".
There are two ways to specify the paper type and size.
• When using the control panel
See page 37 "Specifying Paper Type and Paper Size Using the
Control Panel".
• When using Web Image Monitor
See page 42 "Specifying Paper Type and Paper Size Using Web
Image Monitor".
• When using Smart Organizing Monitor
See page 40 "Specifying Paper Type and Paper Size Using Smart
Organizing Monitor".
See page 43 "Specifying Paper Type and Paper Size Using the Printer
Driver".
For details about supported paper, see page 45 "Supported Paper".
27

2. Paper Specifications and Adding Paper
Loading Paper
This section explains how to load paper into the paper tray and the bypass tray.
• When loading paper, take care not to trap or injure your fingers.
For information about supported paper, precautions for storing paper and print areas, see page 45
"Supported Paper".
Loading Paper into Tray1 and 2
The following example explains the loading procedure for the standard paper tray (Tray 1).
The same procedure applies to loading paper in Tray 2.
• Before printing on paper other than envelopes, make sure to pull up the levers on the machine rear,
inside the rear cover. Leaving the levers lowered can cause print quality problems when printing on
paper other than envelopes.
• Curled paper may jam. Straighten curled paper before loading.
• After loading paper in the tray, specify the paper type and size using the control panel to avoid
printing problems. This machine does not detect the paper size automatically.
• Make sure the paper stack does not exceed the upper limit mark inside the paper tray. Excessive
stacking can cause paper jams.
• If paper jams occur frequently, flip the paper stack in the tray.
• Do not mix different types of paper in the same paper tray.
• After loading paper, specify the paper size using the control panel and paper type using the
control panel. When printing a document, specify the same paper size and type in the printer
driver as specified on the printer.
• Do not move the side fences and end fence forcefully. Doing so may damage the tray.
• Do not slide the paper tray in forcefully when inserting the loaded tray into the printer. Otherwise,
the side and end fences or the paper guide of the bypass tray might move.
28
 Loading...