

Page 1

Operating Instructions
For safe and correct use, be sure to read "Safety Information" before using the machine.
Page 2

Page 3

TABLE OF CONTENTS
Introduction.........................................................................................................................................................5
Copyrights to Images.....................................................................................................................................5
Important.........................................................................................................................................................5
Notes to Users Viewing 3D Images..............................................................................................................5
Manuals Provided with the Projector................................................................................................................7
Manuals for the Projector..............................................................................................................................7
Manuals List....................................................................................................................................................7
Viewing the PDF Manual on the CD-ROM.......................................................................................................9
How to Read This Manual...............................................................................................................................10
Symbols........................................................................................................................................................10
Notes............................................................................................................................................................10
1. Preparations for Using the Projector
Main Functions.................................................................................................................................................11
Checking the Accessories................................................................................................................................13
Projector Parts and Their Functions.................................................................................................................15
Control Panel (Top View)............................................................................................................................15
Front and Left-Side View.............................................................................................................................16
Rear and Right-Side View...........................................................................................................................17
Remote Control Parts and Their Functions......................................................................................................18
How to Use the Remote Control......................................................................................................................20
Effective Range of the Remote Control.......................................................................................................20
Loading Batteries into the Remote Control.................................................................................................21
Inputting Text................................................................................................................................................22
Operating a Computer with the Remote Control......................................................................................23
Operating Multiple Projectors with the Remote Control...........................................................................24
Positioning the Projector...................................................................................................................................26
Relationship Between the Projection Distance and the Screen Size........................................................26
Connecting Equipment to the Projector..........................................................................................................28
Connecting a Computer..............................................................................................................................28
Connecting AV Equipment..........................................................................................................................29
Connecting the Power Cord............................................................................................................................30
2. Projecting an Image
Basic Operations..............................................................................................................................................33
1
Page 4

Turning On the Projector.............................................................................................................................34
Selecting an Input Signal.............................................................................................................................35
Adjusting the Angle of the Projection.........................................................................................................36
Adjusting the Image.....................................................................................................................................37
Adjusting the Volume of the Speaker.........................................................................................................40
Manipulating Images with the Remote Control.........................................................................................40
Turning Off the Projector.............................................................................................................................44
Projecting Images from a USB Memory Device or Digital Camera.............................................................46
Connecting the USB Device........................................................................................................................47
Projecting Still Images..................................................................................................................................47
Projecting Videos.........................................................................................................................................48
Disconnecting the USB Device....................................................................................................................49
Converting Presentation Files to JPEG Files................................................................................................49
3. Using the Projector via a Network
Connecting the Projector to a Network..........................................................................................................53
Connecting Using an Ethernet Cable.............................................................................................................55
Connecting Using a Wireless LAN.................................................................................................................57
Wireless LAN Connection Workflow.........................................................................................................57
Simple Wireless LAN Setup........................................................................................................................59
Projecting Images Using Network Utility........................................................................................................61
What Is Network Utility?.............................................................................................................................61
Simple 1:1 Connection................................................................................................................................62
Network Connection...................................................................................................................................63
Settings Using a USB Memory Device.......................................................................................................64
Using the Projection Server Function..............................................................................................................67
Configuring the Network Server.................................................................................................................67
Configuring the Projector............................................................................................................................68
Projecting Files that Are Stored on the Server...........................................................................................68
4. Changing the Projector Settings
Viewing the Menu Screen...............................................................................................................................71
Using the Menu Screen...................................................................................................................................73
Restoring Settings to Their Default Settings....................................................................................................77
List of Menu Items.............................................................................................................................................79
2
Page 5

Image Adjustment Menu..................................................................................................................................83
Display Settings Menu.....................................................................................................................................87
Default Settings Menu......................................................................................................................................90
Network/USB Settings Menu.........................................................................................................................95
USB Settings.................................................................................................................................................95
Network Settings..........................................................................................................................................96
Network Application Settings...................................................................................................................103
Display Status.................................................................................................................................................105
5. Troubleshooting
Indicator Display List......................................................................................................................................107
Common Problems.........................................................................................................................................110
6. Maintenance
Operating Precautions..................................................................................................................................115
Cleaning the Projector...................................................................................................................................116
Cleaning the Projection Window.............................................................................................................116
Cleaning the Projector..............................................................................................................................116
Replacing the Lamp.......................................................................................................................................117
Managing the Projector Using Projector Management Utility...................................................................120
Installing Projector Management Utility...................................................................................................120
Settings Required to Use Projector Management Utility........................................................................121
Starting Projector Management Utility.....................................................................................................121
Consumables..................................................................................................................................................123
7. Appendix
Specifications.................................................................................................................................................125
Specifications for the Projector.................................................................................................................125
List of Compatible Signals.............................................................................................................................127
Computer Input..........................................................................................................................................127
Y/Pb/Pr Input............................................................................................................................................129
Video Input.................................................................................................................................................130
HDMI Input................................................................................................................................................130
Specifications for Ports..................................................................................................................................134
Computer In Port........................................................................................................................................134
Control Port................................................................................................................................................135
3
Page 6

Copyrights......................................................................................................................................................137
Where to Inquire............................................................................................................................................138
Trademarks.....................................................................................................................................................139
INDEX...........................................................................................................................................................141
4
Page 7

Introduction
Copyrights to Images
When projecting images using the projector, be careful not to infringe the copyright of protected
materials.
The following are examples that may infringe the copyright of protected materials.
• Broadcasting images or movies for commercial purposes
• Modifying images or movies using functions such as freeze, magnify, or zoom to broadcast images
for commercial purposes or public viewing
• Varying the aspect ratio of images or movies using a function that changes the screen size to
broadcast images for commercial purposes or public viewing
Important
In no event will the company be liable for direct, indirect, special, incidental, or consequential damages
as a result of handling or operating the machine.
The manufacturer shall not be responsible for any damage or expense that might result from the use of
parts other than genuine parts from the manufacturer with your office products.
Notes to Users Viewing 3D Images
Pay attention to the following points when viewing images using 3D glasses with the projector:
• How 3D images are viewed may vary according to the individual.
• Do not use 3D glasses for viewing any material other than 3D images.
• Before viewing 3D images, make sure to read the manuals provided with your 3D glasses and 3D
compatible content.
• Avoid viewing 3D images for a long period of time. Take a break of 15 minutes or longer after
every hour of viewing.
• If you feel sick while viewing 3D images, stop viewing them. If you continue to feel sick, consult a
doctor.
• When viewing 3D images in a room where an LED lighting system or fluorescent lights are used,
you may feel that the light in the room flickers. If this is the case, dim the lights until you do not
notice any flickers, or turn off the lights.
• If you or any member of your family has a history of light-sensitive seizures, consult a doctor before
viewing 3D images.
5
Page 8

• To view 3D images, sit in front of the screen so that your eyes are parallel and level with the screen.
• Viewing 3D images from a place that is too close to the screen may result in eye strain. The
distance between the screen and you should be at least three times the height of the screen.
• Adult supervision is required for children using 3D glasses.
• Viewing 3D images is not recommended for children under 6 years old. It may negatively affect
development of their vision. Consult a doctor before using 3D glasses.
6
Page 9
Manuals Provided with the Projector
Manuals for the Projector
Read this manual carefully before you use the projector.
Refer to the manuals that are relevant to what you want to do with the projector.
• The manuals are provided in various formats.
• Adobe® Acrobat® Reader®/Adobe Reader must be installed in order to view the manuals as PDF
files.
Safety Information
Provides information about safe usage of the projector.
To avoid injury and prevent damage to the projector, be sure to read Safety Information.
Setup Guide
Provides basic information about how to install the projector. Since the contents of this manual are
a summary of Operating Instructions, see Operating Instructions for detailed information.
Operating Instructions
Provides information about how to install the projector, how to project images using the projector,
and how to configure the projector. It also provides information about troubleshooting and
maintenance.
• The following software products are referred to using general names:
Product name General name
RICOH PJ Network Utility Type A Network Utility
RICOH JPEG Conversion Tool Type A JPEG Conversion Tool
Manuals List
Manual Name
Safety Information Yes No
Setup Guide Yes No
Printed Manuals
Provided
PDF Manuals Provided
7
Page 10

Manual Name
Operating Instructions No Yes
Printed Manuals
Provided
PDF Manuals Provided
8
Page 11

Viewing the PDF Manual on the CD-ROM
This section describes how to view the PDF manual on the supplied manual CD-ROM.
File path
The manual is included in the following folder on the CD-ROM:
Manual\(language)
1. Insert the CD-ROM in the CD-ROM drive of your computer.
2. Specify a language.
The launcher screen appears.
3. Click [Read PDF manuals].
The PDF manual is displayed on the screen.
• To view the PDF manuals, you need to have Adobe Acrobat Reader/Adobe Reader installed on
your computer.
9
Page 12

How to Read This Manual
Symbols
This manual uses the following symbols:
Indicates points to pay attention to when using the projector.
Indicates supplementary explanations of the projector’s functions, and instructions on resolving user
errors.
[ ]
Indicates the names of buttons on the control panel and remote control. It also indicates items displayed
on the menu screens.
Notes
Contents of this manual are subject to change without prior notice.
Two kinds of size notation are employed in this manual.
Some illustrations in this manual might be slightly different from the machine.
Certain options might not be available in some countries. For details, please contact your local dealer.
Depending on which country you are in, certain units may be optional. For details, please contact your
local dealer.
10
Page 13

1. Preparations for Using the Projector
This chapter explains the names and functions of the different parts of the projector and remote control,
and how to use them. It also explains how to position the projector and how to connect it to other
equipment.
Main Functions
The projector features the following functions that you can use.
Auto set function
The projector detects the signal and adjusts for flickering and the position of the projected image if
you press the [Auto set] button when the projector is connected to a computer.
Auto keystone function
The projector automatically adjusts the shape of the projected image according to the angle at
which the projector is positioned.
AV Mute/Freeze
Pressing the [AV Mute] button mutes the sound and blanks the screen. Pressing the [Freeze] button
pauses the image temporarily.
Magnify/Zoom
Pressing the [Magnify] button enlarges the projected image. Pressing the [Zoom] button reduces the
projected image.
Wall color correction
You can adjust the hue of the image in accordance with the color of the wall on which it is
projected.
Password setting/Key lock
You can specify a password for the projector to limit the people that can use it. The buttons on the
control panel can be disabled with the key lock setting to prevent misoperation.
Administrator authentication
Enable administrator authentication so that only the administrator can change the security settings.
This improves the security of the projector because general users cannot change the settings.
User logo function
The projector can project a registered logo or image when there is no signal or when it is starting
up.
Presentations without a computer
The projector can project JPEG or MPEG files from a USB memory device that is connected to it.
JPEG files stored on a digital camera can also be projected.
11
Page 14

1. Preparations for Using the Projector
It is possible to convert PowerPoint materials to JPEG format using JPEG Conversion Tool and then
project them using the projector.
Mouse remote control
You can operate the mouse pointer on a computer by using the remote control provided with the
projector.
Network Utility
Network Utility is an application that is provided with the projector and is used for connecting the
projector and a computer to project images. You can also easily specify wireless LAN settings using
this application.
12
Page 15

Checking the Accessories
Checking the Accessories
The projector is provided with the following accessories. Make sure that everything is included in the
package.
If anything is missing or damaged, contact your sales representative or service representative.
Remote control
AAA battery LR03 (2 ea)
RGB cable (3 m)
Power cord
Mouse remote control receiver
Carrying bag
Safety Information
Setup Guide
CD-ROM
Warranty card
13
Page 16

1. Preparations for Using the Projector
• The bundled accessories may vary depending on the location that this product was purchased.
• Use only the RGB cable provided with the projector.
• Use only the power cord set provided with the projector.
• The Operating Instructions and various applications are on the provided CD-ROM. For procedures
about how to read Operating Instructions, see p.9 "Viewing the PDF Manual on the CD-ROM". For
instructions about using the applications, see p.51 "How to use JPEG Conversion Tool", p.61
"How to use Network Utility", and p.120 "Managing the Projector Using Projector Management
Utility".
14
Page 17
Projector Parts and Their Functions
7
521 643
CLB009
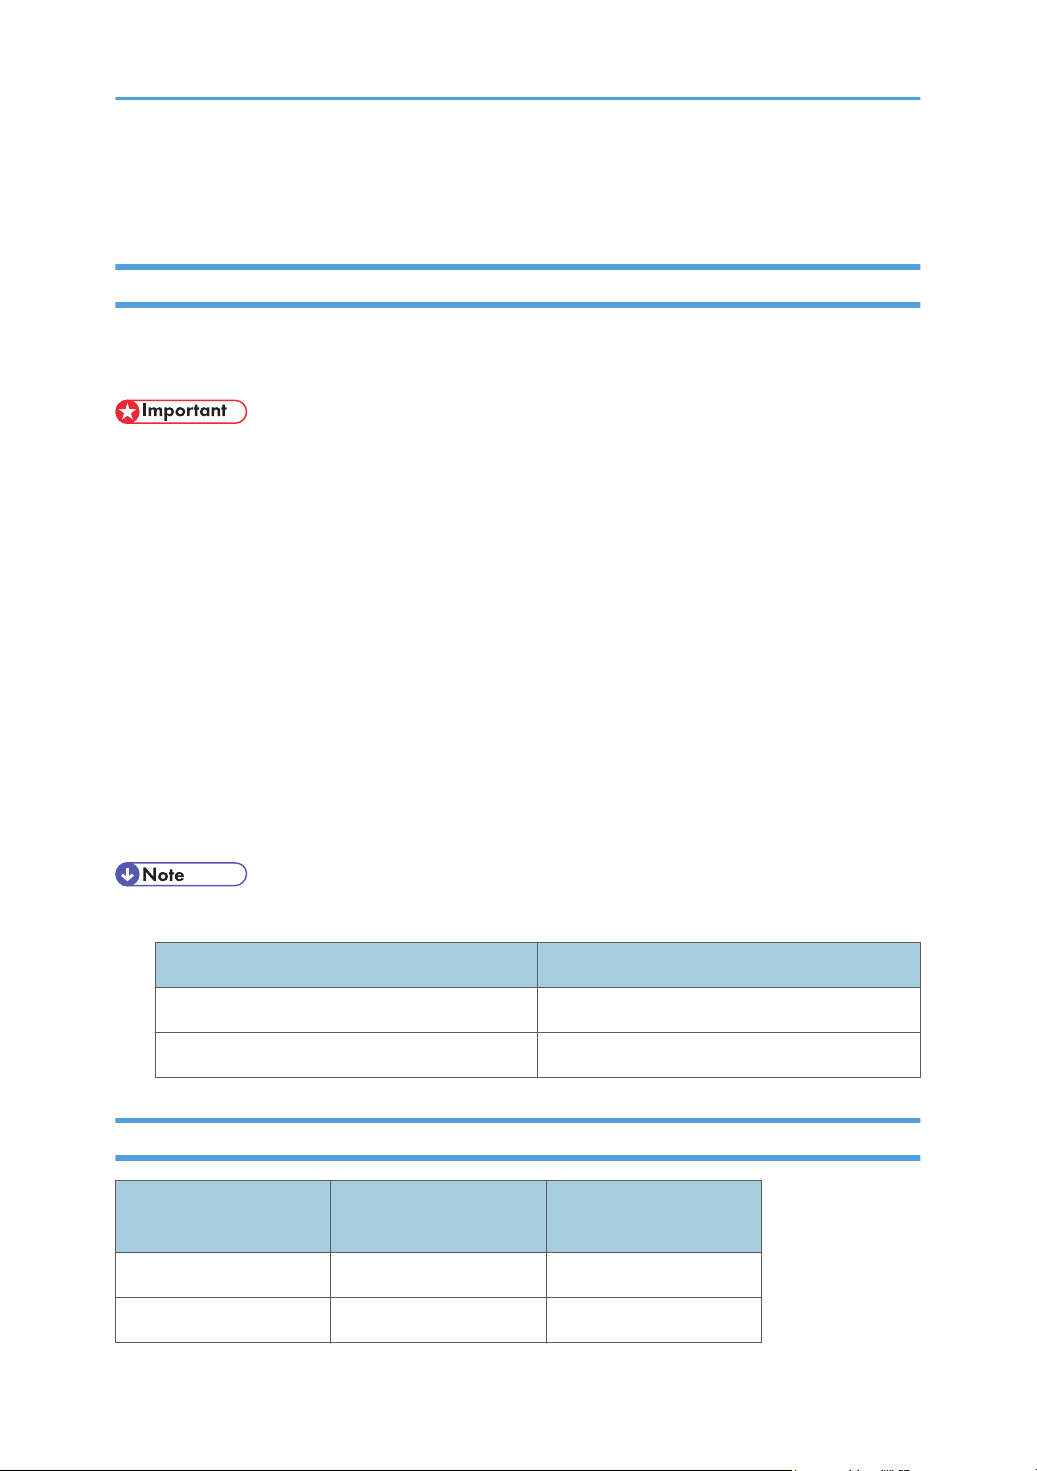
Control Panel (Top View)
Projector Parts and Their Functions
1. [Power] button
Turns the projector on and off. You can confirm the status of the projector with the indicator.
• On: Power is on.
• Off: Power is off.
• Flashing at 1 or 3 second intervals: Standby.
• Flashing at short intervals: Starting up or cooling.
2. [Input] button
Switches the signal input. The input signal changes each time the button is pressed.
3. [AV Mute] button
Temporarily blanks the screen and mutes the audio.
4. [Menu] button
Displays the menu screen. Press it again to close the menu screen.
5. [Enter] button
Enters the selected mode.
15
Page 18
CLB010
1
2
3
4
5
1. Preparations for Using the Projector
6. Arrow buttons
Used to operate the menu screen. The [ ] and [ ] buttons are used to adjust the size of the projected image.
The [ ] and [ ] buttons are used to adjust the volume.
7. Projection window
Enlarges and projects the image (light).
• The top of the projector is covered with a protective film when it is shipped. Remove the film before
using the projector.
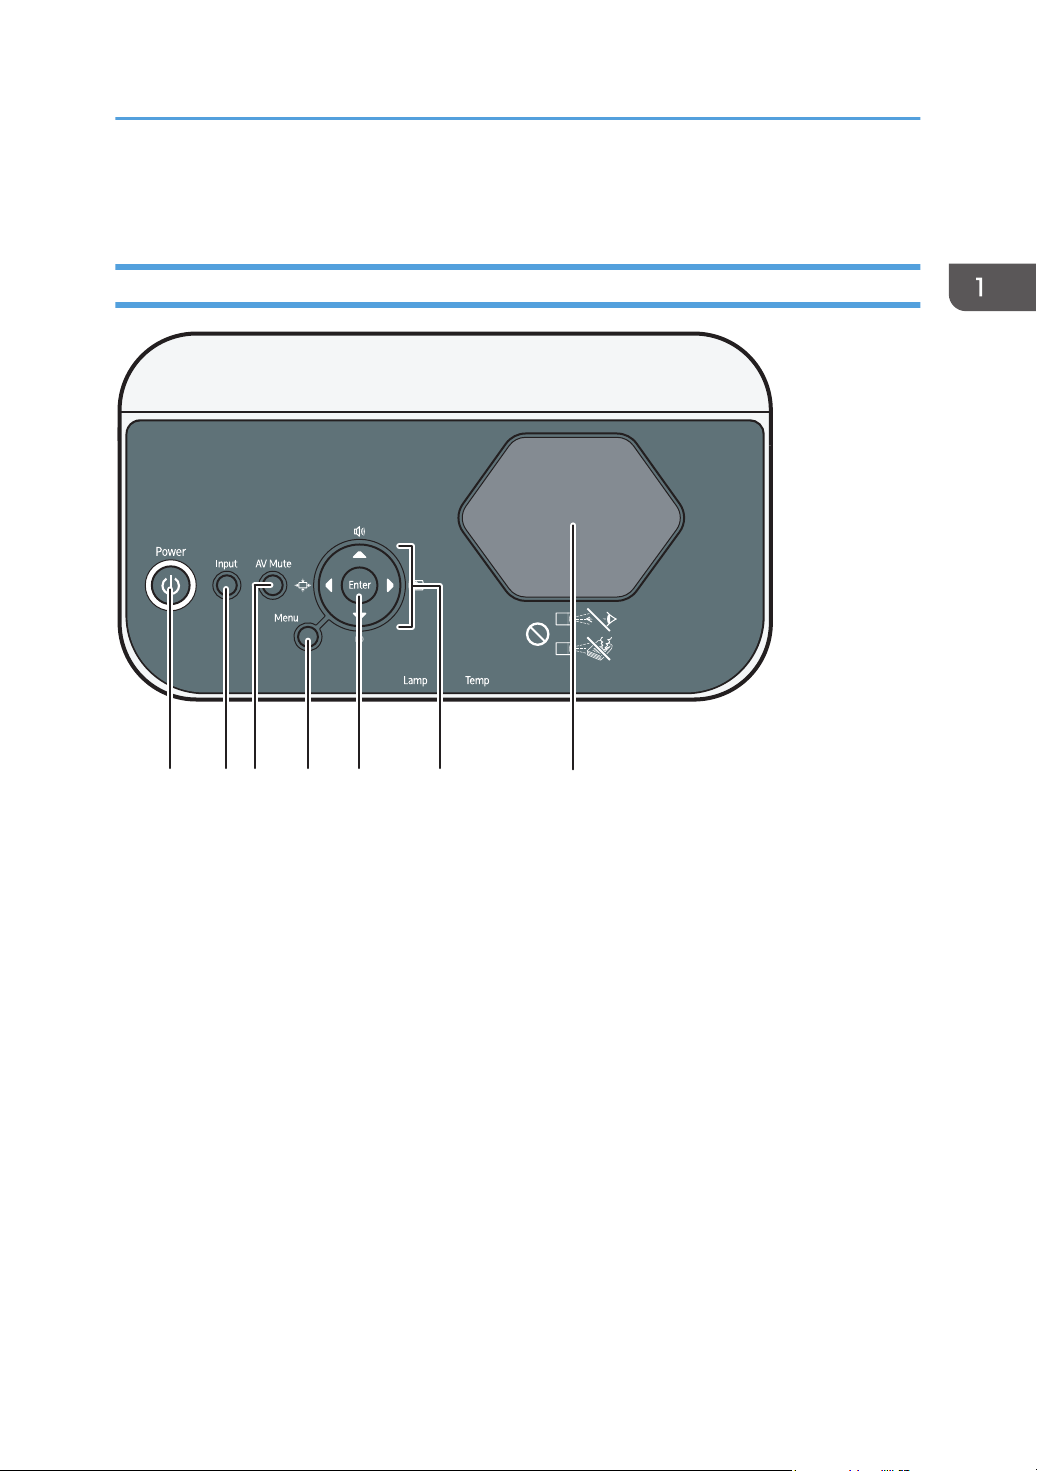
Front and Left-Side View
1. Remote control receiver, LED indicators
Receives the signal from the remote control. You can confirm the status of the projector by referring to the LED
indicators. The left LED shows the status of the lamp, and the right LED shows the temperature inside the
projector. For details, see p.107 "Indicator Display List".
2. Speaker
Outputs the audio input from an external device.
3. Focus lever
Adjusts the focus of the image.
4. Adjustable feet
Adjusts the angle of the projection.
5. Exhaust vents
Releases hot air from inside the projector.
16
Page 19

Rear and Right-Side View
9
876543
21
CLB011
1. USB port
For connecting a USB memory device or USB device cable.
2. HDMI port
For connecting an HDMI (High-Definition Multimedia Interface) cable.
3. LAN port
For connecting an Ethernet cable.
4. Computer In port (Y/Pb/Pr)
For inputting RGB signals from a computer or component image signals (Y/Pb/Pr) from a video player.
5. Video In port
For inputting image signals from a video player.
6. Audio In port
For inputting audio signals from a computer or video player.
7. Intake vents
For circulating air from the outside to cool the projector.
8. AC In socket
For connecting the power cord set provided with the projector.
9. Security slot
For connecting an anti-theft cable.
Projector Parts and Their Functions
17
Page 20

6
1
2
8
7
13
19
18
12
4
5
10
11
9
3
21
22
23
24
25
15
16
17
20
14
CLB013
1. Preparations for Using the Projector
Remote Control Parts and Their Functions
1. [Menu] button
Displays the menu screen. Press it again to close the menu screen.
2. [Input] button
Switches the signal input. The signal that is input changes each time the button is pressed.
3. [Page] buttons
Changes slides, such as in a PowerPoint presentation. Press [ ] to go to the next page. Press [ ] to go to the
previous page. These buttons can be used when the mouse remote control receiver is connected to a
computer.
4. [Magnify] buttons
Enlarges the image. Press the [ ] button to enlarge the image. Press the [ ] button to reduce the image to its
original size.
5. [Keystone] buttons
Adjusts for keystone distortion. Press the [ ] button to increase the correction value. Press the [ ] button to
decrease the correction value.
6. [Power] button
Turns the projector on and off.
7. [Freeze] button
Temporarily pauses the image.
8. [AV Mute] button
Temporarily blanks the screen and mutes the audio.
18
Page 21

Remote Control Parts and Their Functions
9. [Enter] button
Enters the selected item or mode.
10. [Volume] buttons
Adjusts the volume of the speaker. Press the [ ] button to increase the volume. Press the [ ] button to decrease
the volume.
11. [Zoom] buttons
Reduces the image. Press the [ ] button to reduce the image. Press the [ ] button to enlarge the image to its
original size.
12. [HDMI] button
Switches to HDMI input mode.
13. [Computer] button
Switches to computer input mode. If only the Y/Pb/Pr signal is input, the Y/Pb/Pr screen appears when you
press this button.
14. Number buttons
Used to enter numbers.
15. [Auto set] button
Automatically adjusts the image to match the signal input from a computer.
16. [Picture] button
Switches the screen mode.
17. [Clear] button
Deletes entered characters.
18. [Network] button
Switches to network input mode.
19. [USB] button
Switches to USB input mode.
20. Arrow buttons
Used to operate the menu screen.
21. [R-Click] button
Used to operate the computer with the remote control. It is the same as the right-click button on a mouse.
22. [Guide] button
Displays the operation guide for slideshows.
23. [Aspect] button
Switches the size of the projected image.
24. [Eco] button
Switches the lamp power level.
25. [ID] button
Registers the remote control ID.
19
Page 22
CLB014
2
1
1. Preparations for Using the Projector
How to Use the Remote Control
You can use the remote control to turn the projector on and off, and to change the signal of the image
being input and projected. You can also enlarge or reduce the image and mute the audio.
Note the following precautions when using the remote control:
• Do not drop or hit the remote control.
• Do not place the remote control in a place that is very hot or very humid.
• Do not get the remote control wet. Also, do not place it on anything that is wet.
• Do not dismantle the remote control.
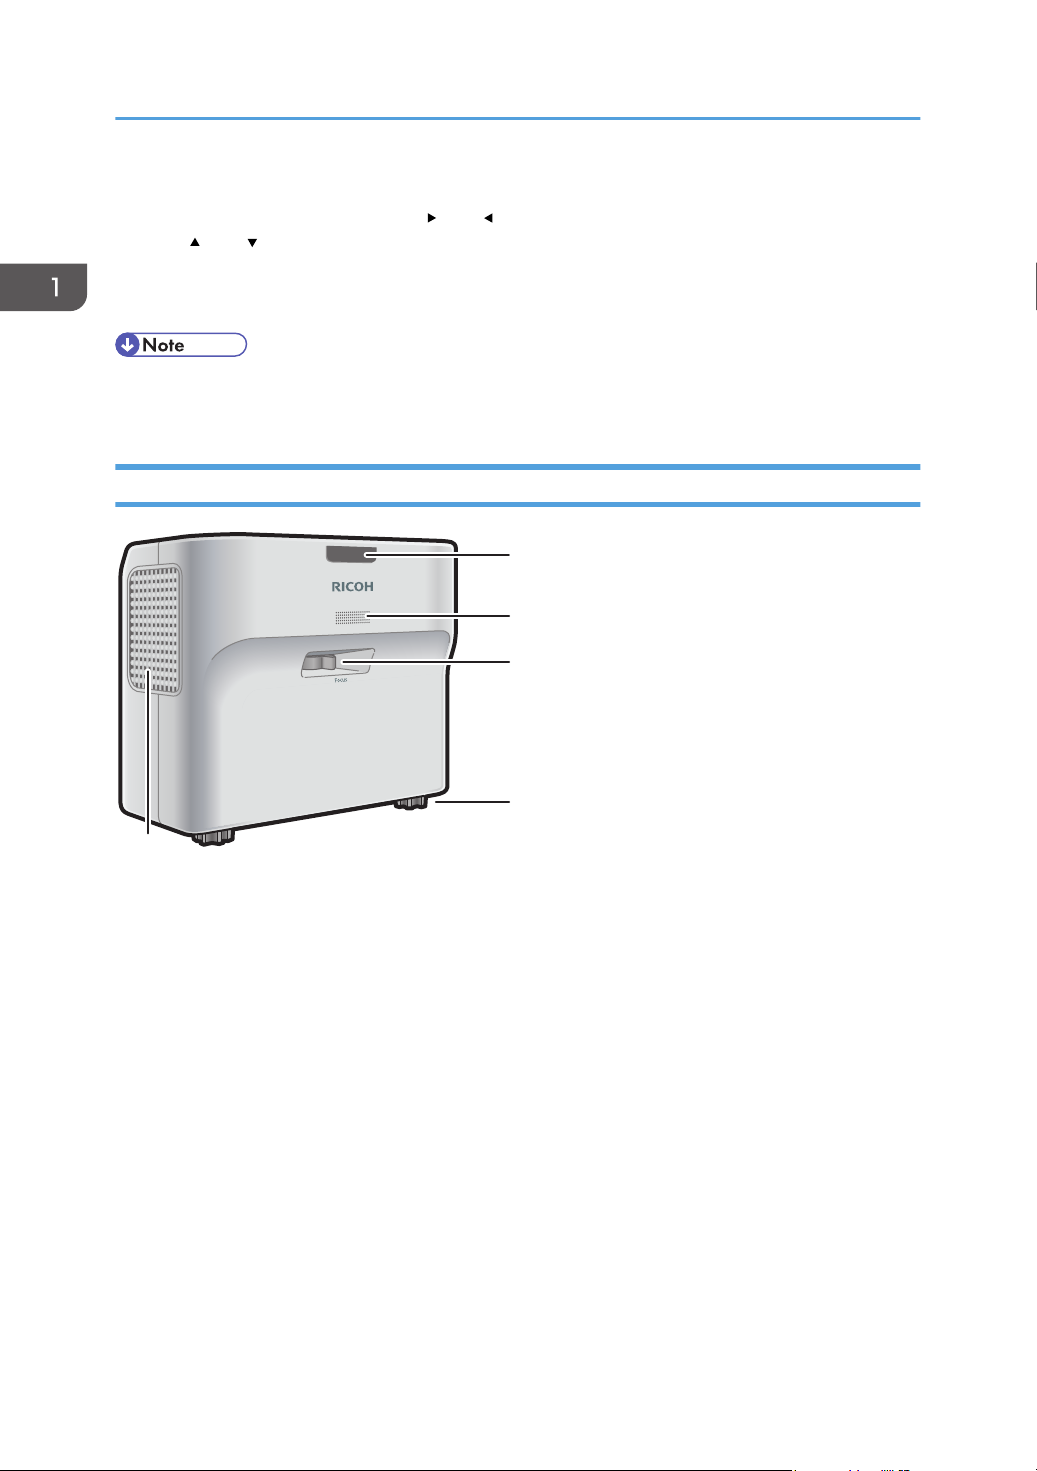
Effective Range of the Remote Control
Point the remote control at the remote control receiver on the projector to use it.
The effective range of the remote control is about 4.5 meters (14.7 feet) from the receiver and at an
angle of about 15 degrees to the remote control receiver on the projector.
20
1. Distance: up to 4.5 meters (14.7 feet)
2. Angle: within 15 degrees
• The remote control may not be effective in some areas and in some conditions. If this happens,
point the remote control at the projector and try it again.
• The remote control may not work if the remote control receiver on the projector is exposed to
sunlight, fluorescent light, or strong light.
Page 23
CLB015
How to Use the Remote Control
Loading Batteries into the Remote Control
• For safe operation, follow the warnings below regarding the batteries used in the remote
control. If you use the batteries incorrectly, it may result in fire or injury due to batteries leaking
or exploding.
• Do not use batteries other than the ones specified.
• Do not mix and use batteries that are different types or that are new and old.
• Correctly insert batteries according to the polarity ( / ).
• Do not charge non-rechargeable batteries.
• Do not heat or throw the batteries into fire or water.
• Do not connect the positive and negative terminals on a battery with a wire.
• Remove the batteries from the remote control that are past their suggested use period or
that are depleted.
• Remove the batteries when they will not be used for extended periods.
• Keep the batteries out of the reach of children. Children may swallow or choke on the
batteries. If this happens, contact a doctor immediately.
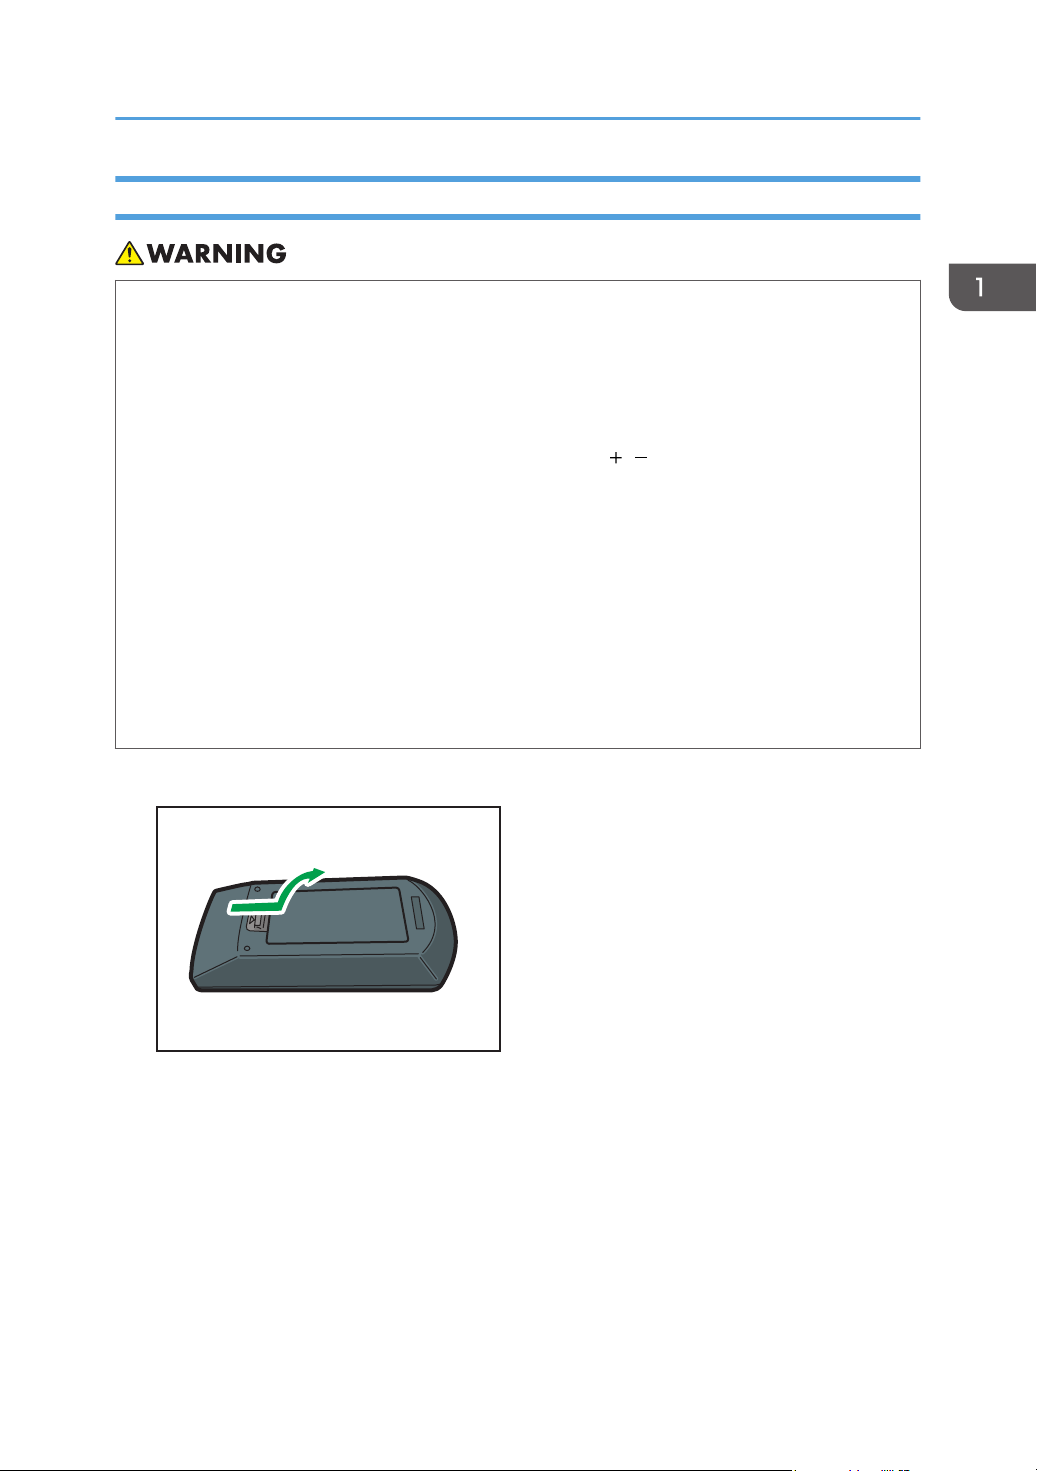
1. Remove the battery cover from the remote control.
21
Page 24

CLB016
CLB017
1. Preparations for Using the Projector
2. Insert the batteries.
Note the direction of the positive and negative terminals when inserting the batteries.
3. Close the battery cover.
• Replace the batteries if the remote control does not work or if the effective distance becomes too
narrow.
Inputting Text
Use the keyboard that is displayed on screen to input text on the setting screen.
1. Use the [
screen.
The selected character is highlighted in orange.
22
], [ ], [ ], and [ ] buttons on the remote control to select a character on the
Page 25
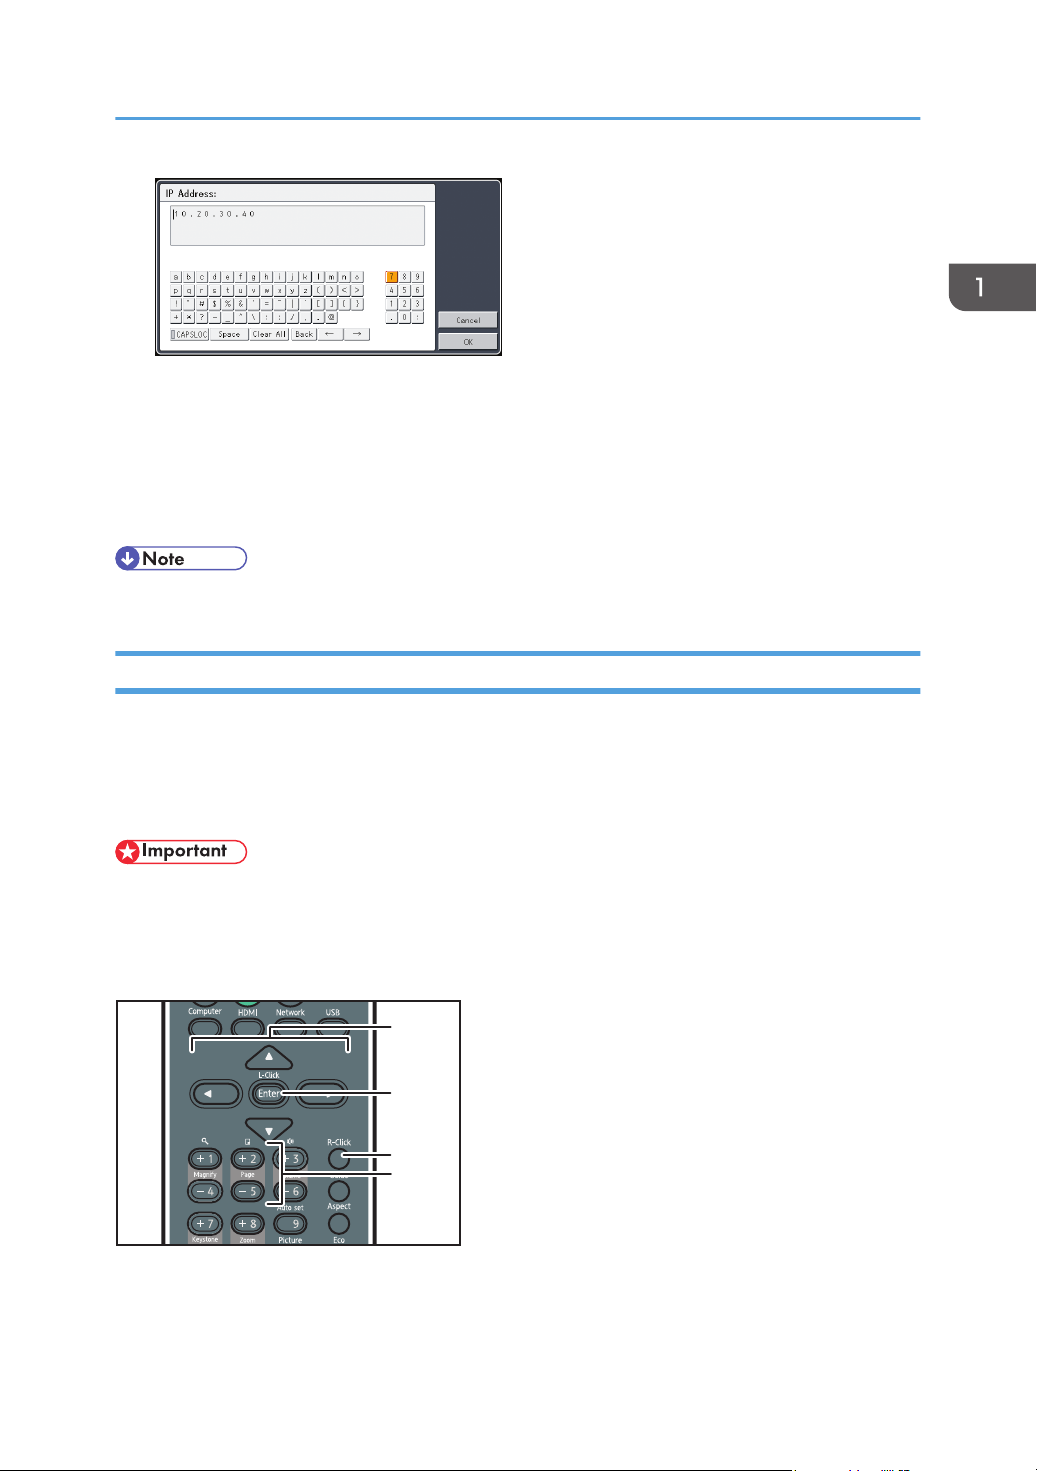
2. Press the [Enter] button.
CLB018
2
1
3
4
The selected character appears in the text area.
3. After inputting all the characters, select [OK].
4. Press the [Enter] button.
The text is input.
• You can also use the number buttons on the remote control to input numbers.
Operating a Computer with the Remote Control
How to Use the Remote Control
You can operate a computer using the projector's remote control. This function can be used when the
mouse remote control receiver is connected to a computer.
A computer with a USB port that supports USB 2.0 can be used. Supported operating systems are
Windows XP, Vista, and 7.
• Connect the mouse remote control receiver to a computer only when operating the computer with
the remote control. When operating the projector with the remote control while the mouse remote
control receiver is connected to the computer, the pointer on the computer screen also moves
according to the key operations of the remote control.
1. Arrow buttons
Moves the mouse pointer. Press the button that corresponds to the direction you want to move the pointer.
23
Page 26

CLB020
1. Preparations for Using the Projector
2. [Enter] button
Left clicks.
3. [R-Click] button
Right clicks.
4. [Page] button
The [ ] and [ ] buttons change the pages in a PowerPoint presentation.
1. Connect the mouse remote control receiver to the computer.
2. Point the remote control at the mouse remote control receiver and press the buttons.
• Some computers cannot be operated using the projector's remote control.
• The remote control may not work if the mouse remote control receiver is exposed to sunlight,
fluorescent light, or strong light. If this happens, change the position or orientation of the mouse
remote control receiver.
• To drag-and-drop, hold down the [Enter] button while moving the pointer with the arrow buttons,
and then release the button at the targeted location.
Operating Multiple Projectors with the Remote Control
You can operate multiple projectors with a single remote control. It is possible to operate a maximum of
four projectors.
You need to specify an ID number to assign to each projector in [Remote Control ID] under [Default
Settings] in advance.
1. While pressing the [ID] button, press the number button that corresponds to the ID
number of the projector to be operated for three seconds or more.
The ID number assigned to the remote control is changed.
2. Operate the projector.
24
Page 27

How to Use the Remote Control
• The remote control cannot operate a projector unless the ID on the remote control is the same as
the controller ID specified in the projector's Default Settings menu.
• The ID number specified in the remote control is effective until a different ID number is specified.
• The ID number in the remote control must be specified again if the batteries are changed.
25
Page 28
CLB021
CLB022
1. Preparations for Using the Projector
Positioning the Projector
When positioning the projector, place it so that the projector's rear side faces the screen. Make sure the
projector and the screen are parallel to each other.
Adjust the distance between the projector and the screen according to the size of the projected image.
For details, see p.26 "Relationship Between the Projection Distance and the Screen Size".
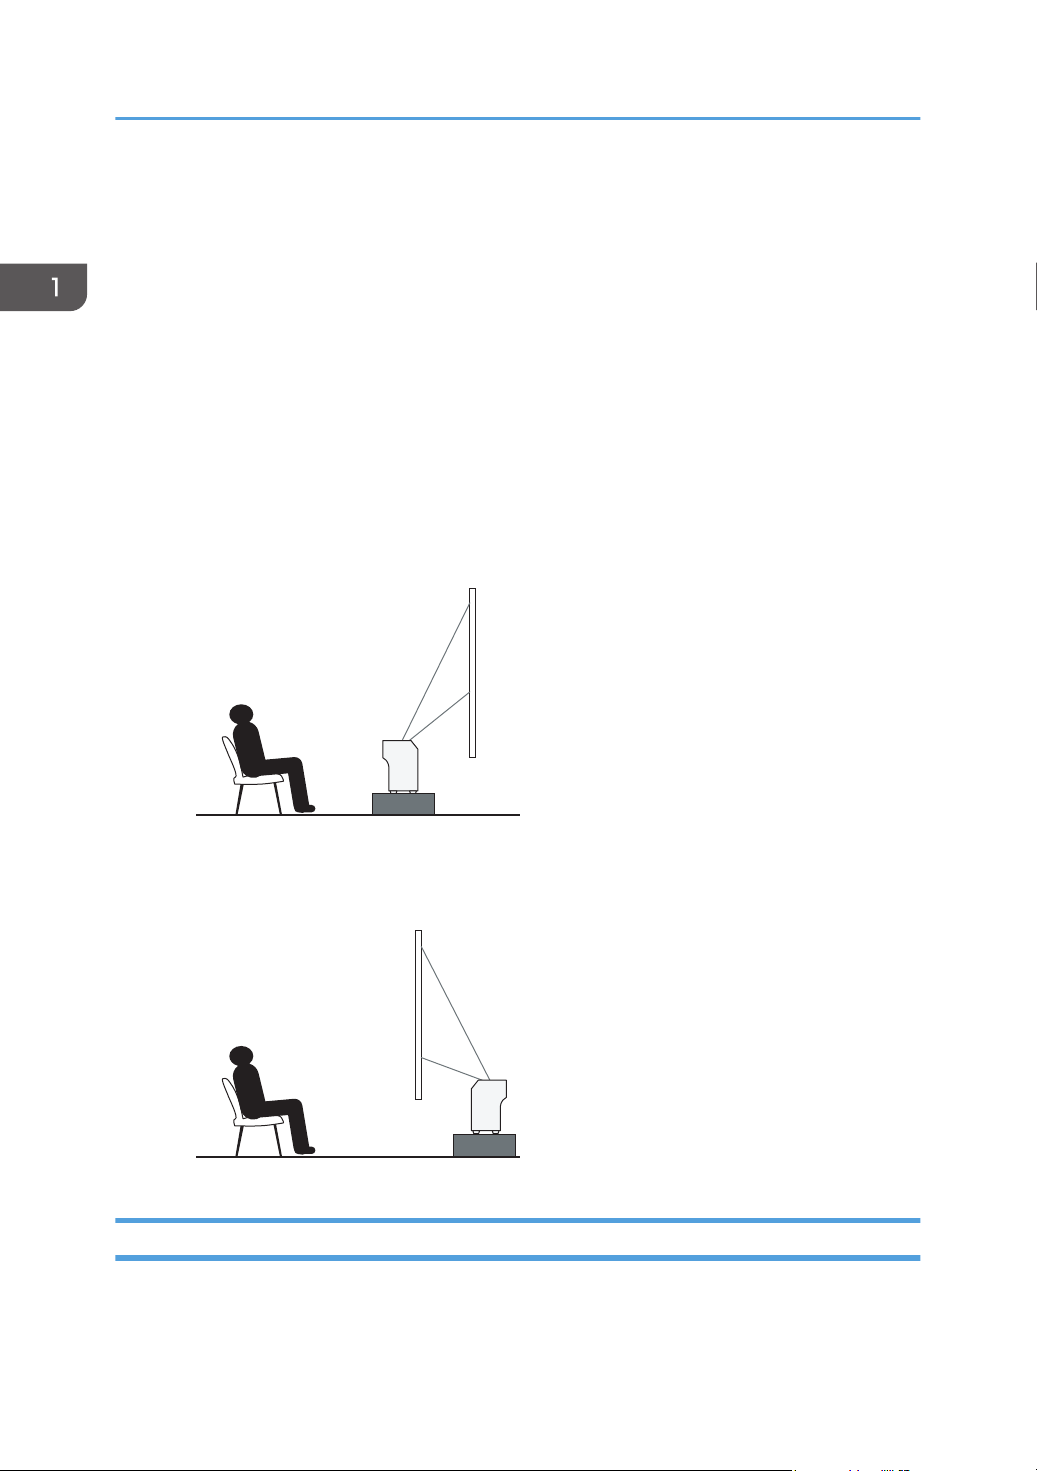
Projection Mode
You can position the projector in one of two ways.
Select the setting according to the position of the projector in [Projection Mode] under [Default
Settings]. For details, see p.90 "Default Settings Menu".
• Standard
The projector is placed in front of a screen onto which the images are projected.
• Rear
The projector is placed behind a screen onto which the images are projected.
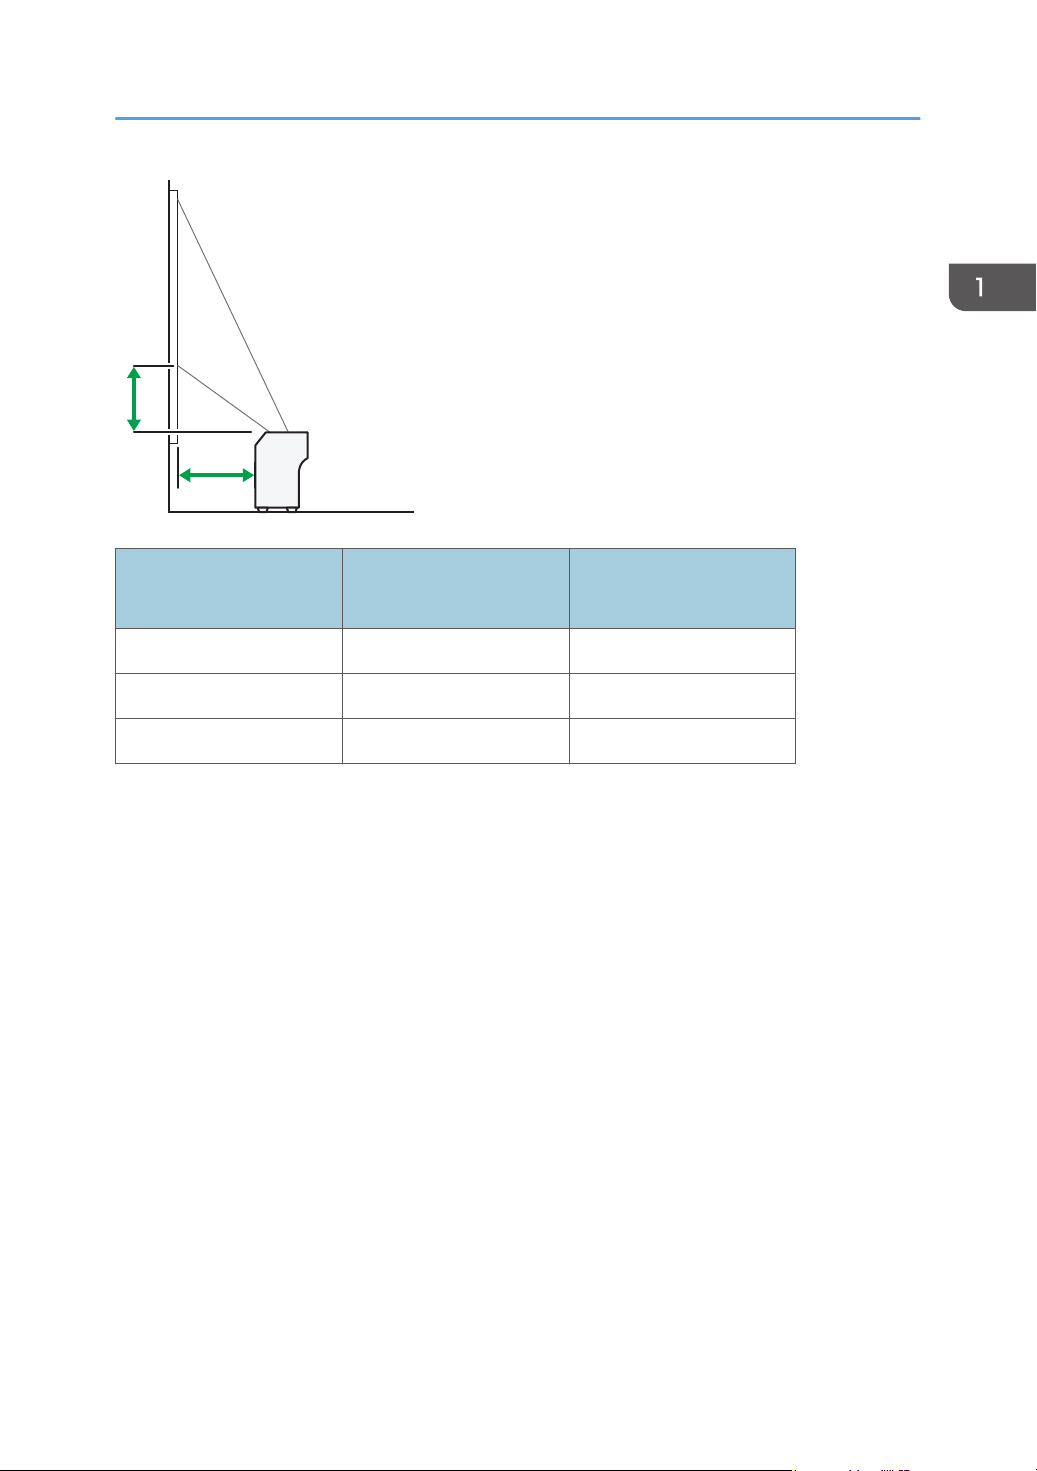
Relationship Between the Projection Distance and the Screen Size
The size of the projected image varies according to the distance from the projector to the screen.
Refer to the following table to position the projector in a suitable position.
26
Page 29
a
b
CLB023
Positioning the Projector
Projection size
*1
a
Projection distance
b
Projection height
48 inches 12 cm (4.6 inches) 9 cm (3.7 inches)
60 inches 17 cm (6.5 inches) 12 cm (4.7 inches)
80 inches 25 cm (9.8 inches) 16 cm (6.2 inches)
The sizes of the projected images are for a full size image without keystone adjustment.
*1
27
Page 30
CLB024
2
1
3
1. Preparations for Using the Projector
Connecting Equipment to the Projector
• Do not place the power cord and connection cable in a way that might cause someone to trip
and fall. The product might fall over and cause an injury.
Various equipments can be connected to the projector.
Turn off the power to any equipment before connecting it to the projector. Be sure to read the manual for
the applicable equipment before connecting it to the projector.
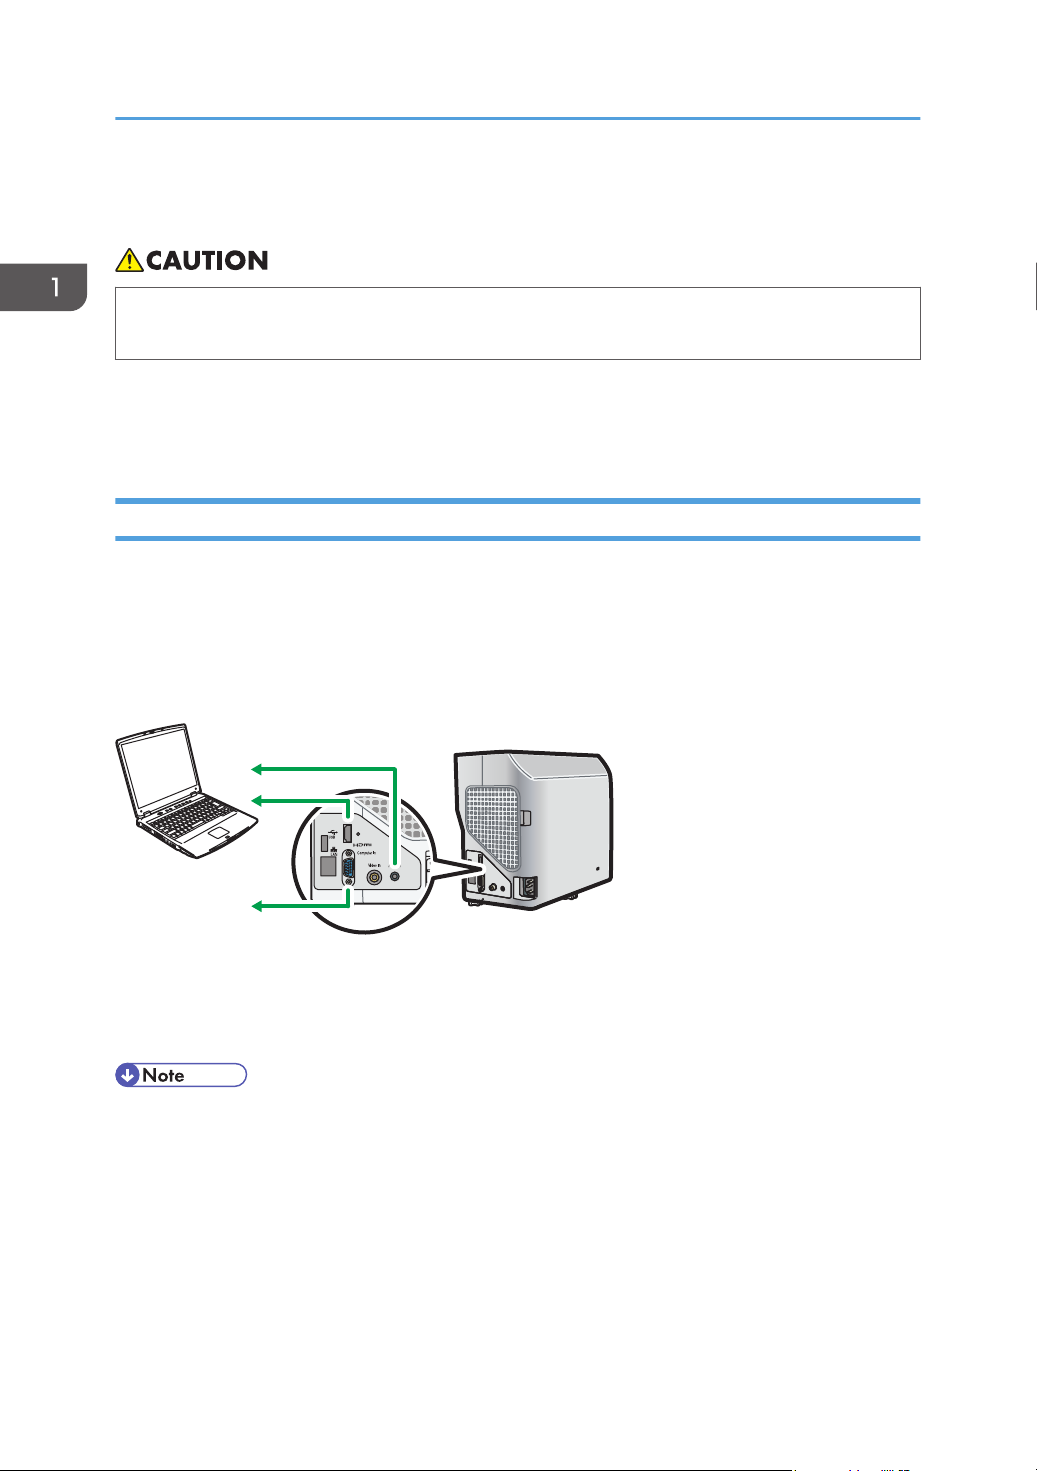
Connecting a Computer
Connect an RGB cable to the Computer In port of the projector and to the RGB output of a computer. To
input audio signals, connect an audio cable to the Audio In port of the projector and to the audio output
of a computer.
If an HDMI interface is available on a computer you want to use, connect an HDMI cable to the HDMI
ports of the projector and the computer.
28
1. To the audio output
2. To the HDMI port
3. To the RGB output
• Some computers cannot be connected to the projector. Before connecting a computer to the
projector, check the output terminals and signal compatibility.
• To input a DVI signal to the projector, connect a conversion adapter or cable to the Computer In
port or the HDMI port of the projector.
• The Audio In port is used for equipment that connects to the Computer In port or Video In port.
Page 31

CLB026
4
3
6
7
1
2
5
Connecting Equipment to the Projector
Connecting AV Equipment
Use a cable that supports the signal being input when connecting AV equipment.
To connect a DVD recorder, connect a conversion adapter BNC-pin to the Computer In port of the
projector and to the Y/Pb/Pr output of the recorder.
To connect a video recorder or a DVD player, connect a video cable to the Video In port of the
projector and to the video output of the recorder or the player.
To input audio signals, connect an audio cable to the Audio In port of the projector and to the audio
output of the recorder or the player.
If an HDMI interface is available on a device you want to use, connect an HDMI cable to the HDMI
ports of the projector and the device.
1. Video player, DVD player
2. DVD recorder
3. To the audio output
4. To the video output
5. To the HDMI port
6. To the Y/Pb/Pr output
7. To the audio output
• The Audio In port is used for equipment that connects to the Computer In port or Video In port.
• Some devices may not operate properly when connected using HDMI.
• Use only an HDMI cable that has the HDMI logo. To input 1080p image signals, use a high-speed
HDMI cable. A conventional HDMI cable may not work properly.
29
Page 32

1. Preparations for Using the Projector
Connecting the Power Cord
• Do not use any power sources other than those that match the specifications shown. Doing so
could result in fire or electric shock.
• Do not use any frequencies other than those that match the specifications shown. Doing so could
result in fire or electric shock.
• The supplied power cord is for use with this machine only. Do not use it with other appliances.
Doing so could result in fire or electric shock.
• It is dangerous to handle the power cord plug with wet hands. Doing so could result in electric
shock.
• Do not place the power cord and connection cable in a way that might cause someone to trip
and fall. The product might fall over and cause an injury.
• Push the power plug all the way into the power outlet. Do not use a power outlet with a loose
connection. Doing so may result in heat buildup. Plug the power cord in the correct direction
into the base. If they are not plugged in correctly, it could result in smoke, fire, or electric shock.
• When disconnecting the power cord from the wall outlet, always pull the plug, not the cord.
Pulling the cord can damage the power cord. Use of damaged power cords could result in fire
or electric shock.
30
Page 33

CLB028
Connecting the Power Cord
1. Insert the connector of the power cord set into the AC In socket on the right side of the
projector.
2. Insert the power plug into a power outlet.
• Do not place anything near the power outlet.
• When [Power On Method] in [Default Settings] is specified as [Auto.], the projector turns on as
soon as the power plug is inserted in a power outlet (direct power on).
31
Page 34

1. Preparations for Using the Projector
32
Page 35

2. Projecting an Image
This chapter explains the procedure for projecting an image.
Basic Operations
• Do not look into the projection window or vent when the product is on. The bright light may
damage your eyes. Be especially careful in an environment with children.
• Do not place low heat resistant material near the exhaust vents. Hot air may come from the
exhaust vents, resulting in damage to the product or an accident.
• Do not block the projection light when it is on. If you do so, the part that is blocking the
projection light may get quite hot and deform, deteriorate or cause a burn or fire. The reflected
light may make the projection window hot and cause a product failure. To temporarily suspend
projection, select the mute function. To suspend longer, turn off the product.
• Unplug the power cord if the projector will not be used for an extended period of time.
• If the lamp is used for an extended period of time, it may not light up or the image may become
dark. If this happens, replace the lamp. In some rare cases, the lamp's brightness may vary slightly
due to the characteristics of a lamp.
• The projector supports various RGB signals, but signals that are not WXGA signals are expanded
or compressed when displayed and the image quality is slightly decreased. We recommend setting
the computer's output to WXGA to get better image quality.
• The motion of images in videos projected using the DVD software on a computer may seem
unnatural.
• Connect the projector and equipment before using the projector. For details, see p.28 "Connecting
Equipment to the Projector".
• If [Key Lock] in [Default Settings] is specified as [On], you cannot operate the projector from its
control panel. Use the remote control.
• If you press a button that is disabled, the projector beeps and an error icon appears on the screen.
• If [Beep] in [Default Settings] is specified as [Off], the projector does not beep.
33
Page 36

CLB030
2. Projecting an Image
Turning On the Projector
Make sure that the power plug is inserted into a power outlet. For details, see p.30 "Connecting the
Power Cord".
1. Press the [Power] button.
The projector beeps and the indicator flashes blue.
The start-up screen is displayed.
• Make sure the projector is positioned squarely in front of the screen. For details, see p.26
"Positioning the Projector".
• When the projector is turned on for the first time after it is purchased, the start menu appears.
Specify the display language and lamp power level. For details, see p.34 "When the start menu
is displayed".
• The password input screen is displayed if a password for the projector is specified in [Password]
under [Default Settings]. Enter a password.
• When [Power On Method] in [Default Settings] is specified as [Auto.], the projector turns on as
soon as the power plug is inserted in a power outlet (direct power on).
• The start-up screen closes shortly after appearing. You can specify that the start-up screen not
appear in [Start-up Screen] under [Display Settings].
When the start menu is displayed
When the projector is turned on for the first time after it is purchased, specify the display language and
lamp power level.
1. Select the display language, and then press the [Enter] button.
2. Select the lamp power level, and then press the [Enter] button.
34
Page 37

CLB019
Basic Operations
• The start menu is only displayed the first time the projector is used. However, the start menu is
displayed when the projector is turned on after [Reset All] in [Default Settings] is executed.
• The display language and lamp power level can also be changed in the menu screen. For details,
see p.90 "Default Settings Menu".
Selecting an Input Signal
Select a signal that is compatible with the equipment that is connected to the projector.
1. Turn on the equipment that is connected to the projector.
To project the image of a video player, press the play button on the video player.
2. Press the [Input] button.
The input signal is detected automatically and the image is projected. The input signal changes
each time the [Input] button is pressed.
• In step 2, the input signal selection screen appears if [Off] is specified for [Auto Input Search] in
[Default Settings]. Select a signal that is compatible with the equipment that is connected.
• Switch the computer's image output when projecting a notebook computer's screen. For details, see
p.36 "When projecting the screen of a notebook computer".
• You can also select the input signal directly with the [Computer], [HDMI], [Network], or [USB]
button on the remote control.
• The standby screen for the network input is displayed if the signal is lost or there is no signal being
input from the connected equipment. Check that the equipment is turned on and that it is properly
connected to the projector.
• If the project does not support the input signal, a "Unsupported signal" message is displayed.
35
Page 38

2. Projecting an Image
When projecting the screen of a notebook computer
When connecting a notebook computer to the projector, switch the computer's image output.
In Windows operating systems, the image output can be switched with a function key. While pressing
and holding the [Fn] key, press the key, the key, or the LCD/VGA function key.
Examples of various computers
Computer brand Key combination
MSI [Fn] + [F2]
Everex, Mitsubishi, NEC, Panasonic, Sotec [Fn] + [F3]
Gateway, HP [Fn] + [F4]
acer, Sharp, Sotec, Toshiba [Fn] + [F5]
Hitachi, IBM, lenovo, Sony [Fn] + [F7]
Asus, Dell, Epson, Hitachi [Fn] + [F8]
Fujitsu [Fn] + [F10]
• Depending on the computer, the image may not be projected properly if it is displayed on the
computer's LCD display while being projected onto the screen by the projector. If this happens, turn
off the computer's LCD display. For details about switching the display, see the manual provided
with the computer.
• For details about operating the computer, see the manual provided with the computer.
Adjusting the Angle of the Projection
You can adjust the height of the projected image by using the adjustable feet to change the angle of the
projector.
36
Page 39

CLB031
Basic Operations
1. Lift the front of the projector and adjust the length of the adjustable feet.
Turn the adjustable feet to the left to make it longer. Turn the adjustable feet to the right to make it
shorter.
• Adjust the height of the right and left adjustable feet so the projector is level. If the projector is
inclined too much, an error occurs and operation cannot be performed.
• The projector automatically adjusts the projected image for keystone distortion according to the
projection angle. If [Auto Keystone] in [Default Settings] is specified as [Off], manually adjust for
keystone distortion. For details, see p.39 "Adjusting for keystone distortion".
Adjusting the Image
Adjust the focus of the projected image with the focus lever. If there is any keystone distortion, adjust it
with the [Keystone] buttons on the remote control.
If the projected image is larger than the screen, adjust the size of the image using the [Zoom] buttons.
Changing the size of the projected image
Reduces and displays the image. The image can be reduced in a range of 80 to 100%.
If the projected image is larger than the screen, reduce the size of the image using the [Zoom] buttons.
37
Page 40

CLB037
CLB032
1
2. Projecting an Image
1. Press the [Zoom ] button to reduce the image.
The ratio decreases each time the [ ] button is pressed. You can confirm the current ratio on the
value bar at the bottom of the screen.
2. Press the [Zoom ] button to enlarge the image.
The ratio increases each time the [ ] button is pressed. The image is enlarged until it reaches the
original size.
• You can also adjust the size of the projected image from the control panel on the projector.
• The image may sometimes be disrupted while it is reduced.
Adjusting the focus
Adjust the focus of the projected image.
1. Move the focus lever on the front of the projector to the left or right.
The shape of the projected image changes slightly when the focus lever is moved.
1. Focus lever
38
Page 41

CLB033
CLB063
Basic Operations
Adjusting for keystone distortion
If the projector is placed at an angle, the projected image will be distorted. This is called keystone
distortion.
If [Auto Keystone] in [Default Settings] is specified as [Off], manually adjust for keystone distortion.
1. Press the [Keystone ] and [Keystone ] buttons to adjust the keystone distortion.
The value bar appears at the bottom of the screen. Press the [ ] button to increase the correction
value. Press the [ ] button to decrease the correction value.
• Some data may be lost or the image quality may be degraded depending on the degree of the
keystone adjustment and the type of the image.
• You can manually adjust for keystone distortion even if [Auto Keystone] is specified as [On].
However, if you change the angle of the projector, it is automatically adjusted again.
• The keystone adjustment level stays registered even if the projector is turned off. We recommend
that you specify [Auto Keystone] to [Off] if the projector and screen are permanently installed.
Automatically adjusting the image
The image quality and position are automatically adjusted according to the input signal.
This function is available when you select [Computer] as an input signal.
39
Page 42

CLB034
CLB035
2. Projecting an Image
1. Press the [Auto set] button.
• Depending on the type of input signal, some images may not be displayed or correctly adjusted. If
this happens, adjust the image with [Position] in [Image Adjustment]. For details about the types of
signals that can be input to the projector, see p.127 "List of Compatible Signals".
Adjusting the Volume of the Speaker
1. Press the [Volume ] and [Volume ] buttons to adjust the volume.
The value bar appears at the bottom of the screen. Press the [ ] button to increase the volume.
Press the [ ] button to decrease the volume.
• You can also adjust the volume of the speaker from the control panel on the projector.
Manipulating Images with the Remote Control
Use the remote control to manipulate projected images.
40
Page 43

CLB036
Basic Operations
Enlarging the image
Enlarges and displays a part of the image. The image can be enlarged in a range of 100 to 200%.
The enlarged image becomes grainy due to the digital processing.
1. Press the [Magnify ] button to enlarge the image.
The ratio increases each time the [ ] button is pressed.
Pressing the [ ], [ ], [ ], and [ ] buttons moves the display position of the enlarged image.
2. Press the [Magnify ] button to reduce the image.
The ratio decreases each time the [ ] button is pressed. The image is reduced until it reaches the
original size.
• An icon appears on the screen when the image is enlarged.
• The Magnify function is canceled automatically if any operation is performed.
• The image may sometimes be disrupted while it is enlarged or while moving the enlarged portion.
Temporarily blanking the image and muting the audio
Temporarily blanks the screen and mutes the audio.
This is useful when projecting images from another projector or an OHP.
41
Page 44

CLB038
CLB041
2. Projecting an Image
1. Press the [AV Mute] button.
The image blanks and the audio mutes.
2. To cancel this function, press the [AV Mute] button again.
• An icon appears on the screen when mute is used.
• The mute function is canceled automatically if any button on the control panel is pressed.
• You can also use the [AV Mute] button on the projector's control panel.
Pausing the image
Pauses the video or moving image that is being projected.
1. Press the [Freeze] button.
The image is paused.
2. To cancel this function, press the [Freeze] button again.
42
• An icon appears on the screen when freeze is used.
• The Freeze function is canceled automatically if any operation is performed.
Page 45

CLB039
CLB040
Basic Operations
• When the [Freeze] button is pressed, the image that is being projected at that time is stored in
memory, and that image is projected. Because of this, even though the projector has paused the
image, the equipment continues to play the video.
Changing the image quality
1. Press the [Picture] button.
2. Select a setting from the list using the [ ] and [ ] buttons, and then press the [Enter]
button.
• You can also change the screen mode with [Image Adjustment]. For items that can be specified,
see p.83 "Image Adjustment Menu".
Changing the aspect ratio of the projected image
1. Press the [Aspect] button.
2. Select a setting from the list using the [ ] and [ ] buttons, and then press the [Enter]
button.
43
Page 46

CLB042
CLB030
2. Projecting an Image
• You can also change the aspect with [Display Settings]. For items that can be specified, see p.87
"Display Settings Menu".
Switching the lamp mode
Select eco mode if the image is too bright or when projecting images in a dark room.
1. Press the [Eco] button.
The mode changes each time the button is pressed.
• You can also change the lamp power level with [Default Settings]. For items that can be specified,
see p.87 "Display Settings Menu".
Turning Off the Projector
1. Press the [Power] button.
The confirm screen appears.
44
Page 47

Basic Operations
2. Press the [Power] button.
The projector beeps and the projector turns off.
• After turning the projector off, wait about five minutes for the lamp to cool before turning the
projector on again. The lamp may not light if it is very hot.
• The projector turns off as soon as the power plug is removed from the power outlet (direct power
off).
45
Page 48

2. Projecting an Image
Projecting Images from a USB Memory Device or Digital Camera
The projector can project JPEG and MPEG files stored on a USB memory device that is connected to the
projector. JPEG files stored in digital cameras can also be projected. Images can be displayed easily
even if a computer is not connected.
The USB devices must support USB 2.0.
• It is recommended to back up the data saved to a USB device before using it. The manufacturer is
not responsible for any damage due to the loss of data.
• Do not disconnect the power plug while the USB device is being accessed. Doing so may cause
malfunction or data loss.
The following file extensions are compatible with the projector.
• Files stored on a USB memory device
• jpg, jpeg, JPG, JPEG, mpg, mpeg, MPG, MPEG, m2ts, m2t, M2TS, M2T
• Files stored on a digital camera
• jpg, jpeg, JPG, JPEG
The supported video file formats are MPEG-2 Video Compression and MPEG Audio Compression
Layer-3.
• The maximum number of files that can be displayed in the list is 512 per folder.
• Characters that can be used for file names and folder names are single-byte letters and numbers
and characters used in the language specified in [Language] under [Default Settings]. If characters
for languages other than the language specified are used, the file name or folder name will not be
displayed properly.
• The folder name or file name can be 255 characters max.
• Data in a folder that is stored six levels or more into a hierarchy cannot be accessed.
• Depending on the file type, the projector may not be able to project the image.
• Depending on the type of USB memory device, it may not be usable with the projector. USB
memory devices with passwords cannot be used.
• For information about which digital cameras can be used with the projector, contact your sales
representative or service representative.
46
Page 49

CLB043
Projecting Images from a USB Memory Device or Digital Camera
Connecting the USB Device
Connect the USB memory device or digital camera to the projector.
The USB device can be connected even if the projector is already on.
1. Connect the USB device to the USB port on the projector.
Check the port orientation before connecting.
• If the projector does not recognize the USB device when it is connected, disconnect and reconnect
the USB device.
• The provided mouse remote control receiver, and commercially available mouse controllers and
USB hubs cannot be connected.
Projecting Still Images
Connect the USB memory device or digital camera to the projector. For details, see p.47 "Connecting
the USB Device".
A projected image can be controlled using the remote control.
• Right arrow button ( ): Displays the next image.
• Left arrow button ( ): Displays the previous image.
• Up arrow button ( ): Rotates the image 90° to the right.
• Down arrow button ( ): Rotates the image 90° to the left.
• [Enter] button: Starts an automatic slide show. Pressing the [Enter] button again stops the slide
show. You can switch the images manually.
• [Menu] button: Displays the file list while an image is being projected.
47
Page 50

CLB044
2. Projecting an Image
1. Press the [USB] button.
The input signal switches to the USB, and the files within the root directory are displayed.
2. Use the [ ] and [ ] buttons to select the JPEG file or folder.
3. Press the [Enter] button.
If you select a JPEG file, its image is projected. If you select a folder, the file list within the folder is
displayed. Repeat steps 2 and 3 until you can display the file you want to project.
• You can also control the projected images using the control panel on the projector.
• Images are displayed in the numerical and alphabetical order of their file name headers.
• If [Auto Demo] in [USB Settings] is specified as [On], the images in the root directory are played
automatically.
• Depending on the JPEG file, the projector may not be able to display it. If the file cannot be
displayed, converting the file with JPEG Conversion Tool may enable the projector to display it. For
details about JPEG Conversion Tool, see p.49 "Converting Presentation Files to JPEG Files".
Projecting Videos
Connect the USB memory device to the projector. For details, see p.47 "Connecting the USB Device".
A projected video can be controlled using the remote control.
• Right arrow button ( ): Displays the next video. If a video is being projected, this button fast
forwards the video.
• Left arrow button ( ): Displays the previous video. If a video is being projected, this button rewinds
the video.
• [Enter] button: Pause. Press the [Enter] button again to restart the playback. If a video is paused,
pressing the left or right arrow buttons switches the video.
• [Menu] button: Displays the file list while a video is being projected.
48
Page 51

CLB044
Projecting Images from a USB Memory Device or Digital Camera
1. Press the [USB] button.
The input signal switches to the USB, and the files within the root directory are displayed.
2. Use the [ ] and [ ] buttons to select the MPEG file or folder.
3. Press the [Enter] button.
If you select an MPEG file, the video plays. If you select a folder, the file list within the folder is
displayed. Repeat steps 2 and 3 until you can display the file you want to project.
• You can also control the projected videos from the control panel on the projector.
• The rewind and fast forward speed increases three levels each time the button is pressed. To
reduce the speed to its original, pause the video by pressing the [Enter] button, and then press it
again to restart the video.
Disconnecting the USB Device
1. Press the [Menu] button while the video is being projected.
2. Select [Remove Device] on the [USB File Projection] screen.
The confirmation screen is displayed.
3. Select [OK].
4. Disconnect the USB device.
• A USB device can be disconnected by selecting [Remove Device] in [USB Settings].
Converting Presentation Files to JPEG Files
Microsoft PowerPoint presentation files can be converted to JPEG files, which are compatible with the
projector.
49
Page 52

2. Projecting an Image
You can do presentations without a computer if you save converted JPEG files to a USB memory device
and then display the slides using the projector.
The converted files can also be transferred to a server.
Operating Environment
• Supported operating system
Windows XP (32-bit version) Professional Edition and Home Edition, SP3 or later
Windows XP (64-bit version) Professional Edition SP2 or later
Windows Vista (32-bit and 64-bit versions) Ultimate, Business, Home Premium, and Home
Basic, SP2 or later
Windows 7 (32-bit and 64-bit versions) Home Premium, Professional, Ultimate, Enterprise
• Memory size
Recommended memory size for the operating system of the computer you are using
1. Double-click the "JPEG Conversion Tool" icon.
JPEG Conversion Tool starts.
2. Drag and drop the PowerPoint file to be converted into the "JPEG Conversion Tool" dialog
box.
To manually specify the file, enter the file name in [File Location:].
3. Specify the destination to which you want to save the converted file.
To save to a computer, select [Local PC].
To save to a server, select [Server], and then select the server to which you want to save the file.
4. Click [Convert&Save].
5. Click [OK].
• To convert PowerPoint files, Microsoft PowerPoint 2003, 2007, or 2010 must be installed on the
computer to you are using.
• JPEG Conversion Tool is compatible with still images that have a ".ppt" or ".pptx" extension.
Animations and audio are not compatible.
• To convert PowerPoint files with the ".pptx" extension, Microsoft PowerPoint 2007 or later must be
installed on the computer you are using.
• The number of JPEG files created is equivalent to the number of slides. The file name after
conversion is "slide + File Number + .jpg".
• For the settings method when saving converted files to the server, refer to the JPEG Conversion Tool
Help.
50
Page 53

Projecting Images from a USB Memory Device or Digital Camera
How to use JPEG Conversion Tool
JPEG Conversion Tool is included on the supplied CD-ROM.
1. Insert the CD-ROM in the CD-ROM drive of your computer.
2. Specify a language.
The launcher screen appears.
3. Click [JPEG Conversion Tool Type A].
4. Specify a destination to save the application.
The "RICOH JPEG Conversion Tool Type A" folder is copied to the computer.
5. To create a shortcut icon on the desktop, click [OK].
6. Close the screen.
To start JPEG Conversion Tool, double-click the shortcut icon on the desktop or "RICOH JPEG
Conversion Tool TypeA.exe" in the folder.
• You can also use JPEG Conversion Tool by dragging and dropping the "RICOH JPEG Conversion
Tool Type A" folder that is on the provided CD-ROM to the computer. JPEG Conversion Tool is
copied to the computer.
• To delete JPEG Conversion Tool, delete the JPEG Conversion Tool folder that was copied to the
computer.
51
Page 54

2. Projecting an Image
52
Page 55

3. Using the Projector via a Network
This chapter explains the settings for using the projector via a network. This chapter also explains the
operations that use Network Utility.
Connecting the Projector to a Network
The projector can be connected to a network using a wireless LAN or an Ethernet cable. For details, see
p.55 "Connecting Using an Ethernet Cable", or p.57 "Connecting Using a Wireless LAN".
To use the projector via a network, you must specify settings such as the IP address in [Network Settings].
The required settings are described below:
Wired LAN
Item Wired LAN Wireless LAN
Wired LAN Settings As necessary -
TCP/IP Settings Required -
Wireless LAN
Item Wired LAN Wireless LAN
Simple Settings - As necessary
Wireless LAN Settings - As necessary
Security - As necessary
TCP/IP Settings - Required
LAN Common
Item Wired LAN Wireless LAN
Network Interface Required Required
DNS Settings As necessary As necessary
Projector Search Settings As necessary As necessary
HTTP Client Settings As necessary As necessary
HTTP Server Settings As necessary As necessary
53
Page 56

3. Using the Projector via a Network
For details, see p.96 "Network Settings".
• When operating the projector from a computer via a network, use Network Utility which is
provided with the projector. For details, see p.61 "Projecting Images Using Network Utility".
54
Page 57

CLB072
1
23
CLB045
Connecting Using an Ethernet Cable
Connecting Using an Ethernet Cable
• Do not place the power cord and connection cable in a way that might cause someone to trip
and fall. The product might fall over and cause an injury.
The projector is compatible with 10BASE-T, 100BASE-TX, and 1000BASE-T Ethernet interfaces.
• If the projector is turned on, turn it off before connecting the Ethernet cable.
Status of the network connection
You can confirm the status of the network connection by the patterns in which the LEDs on the
Ethernet interface light up. If the projector is not connected to a network, no LEDs light up.
1. When 1000BASE-T is active (orange and green LEDs light up)
2. When 100BASE-TX is active (orange LED lights up)
3. When 10BASE-T is active (green LED lights up)
1. Insert the Ethernet cable into the Ethernet interface.
2. Connect the other end of the Ethernet cable to a network device such as a hub.
3. Turn the projector on.
55
Page 58

3. Using the Projector via a Network
• Use an Ethernet cable that is shielded.
• To use the projector via a network, you must specify settings such as the IP address in the Network
Settings menu. For items that must be specified, see p.53 "Connecting the Projector to a Network".
56
Page 59

Connecting Using a Wireless LAN
Connecting Using a Wireless LAN
• Do not use a wireless LAN if there is electromagnetic interference from other equipment. Doing
so may cause an accident due to the other equipment malfunctioning from the electromagnetic
interference.
The projector has a built-in wireless LAN board.
Wireless uses radio waves to exchange information instead of an Ethernet cable. The wireless LAN
radio waves pass through barriers such as walls within a fixed area, so the following problems may
occur:
Leak of Personal Information
• Information such as IDs, passwords, credit card numbers, and the contents of e-mails, etc.,
may be stolen by a third party.
Illegal Access to the Network
• Data and systems may be corrupted or manipulated by a virus.
• An imposter may access information illegally.
• Confidential information may be accessed illegally.
To minimize the possibility of these problems occurring, it is recommended to check the functions built
into the wireless LAN devices, such as the projector and wireless LAN access points, and to specify
security settings.
• If the wireless network reception is poor, the connection may be interrupted or disabled. If the
wireless reception of the projector and access points is poor, try the following:
• Move the projector and access points closer to each other.
• Make sure there is a clear line of sight between the access point and the projector.
• Make sure the access point and projector are close to each other, and move devices that emit
radio signals such as microwave ovens further away.
Wireless LAN Connection Workflow
The projector is compatible with ad hoc mode and infrastructure mode. Select the communications mode
according to the network environment of the site to be used.
57
Page 60

3. Using the Projector via a Network
Ad Hoc mode
This mode communicates with the computer directly, and not via an access point. No other equipment is
required, so this mode is suited for locations that have no network environment.
If you use ad hoc mode, make the following settings:
Settings Using Simple 1:1 Connection
Action Method Refer to
Wireless LAN settings Simple 1:1 Connection (Network Utility)
Image projection Simple 1:1 Connection (Network Utility)
Settings Using a USB Memory Device
When the computer is in ad hoc mode, use the following method:
Action Method Refer to
Wireless LAN settings
Image projection Network Connection (Network Utility)
• As the radio wave range is limited, use an office or conference room with a good line of sight.
• If you are using ad hoc mode, other computers cannot access the projector.
Write Settings to USB Memory (Network
Utility)
p.62 "Simple 1:1
Connection"
p.62 "Simple 1:1
Connection"
p.64 "Copying
computer settings to
the projector"
p.63 "Network
Connection"
Infrastructure mode
This mode can communicate with networks in which both wireless and wired LAN devices are connected
via a wireless LAN access terminal. It is necessary to user greater security since all communication is via
a network. Use infrastructure mode in environments in which a wireless LAN has already been
configured.
If you use infrastructure mode, make the following settings:
58
Page 61

Settings Using Simple Wireless LAN Setup
CLB046
Action Method Refer to
Connecting Using a Wireless LAN
Wireless LAN settings Simple Wireless LAN Setup
Image projection Network Connection (Network Utility)
p.59 "Simple
Wireless LAN Setup"
p.63 "Network
Connection"
Simple Wireless LAN Setup
To use the projector via a wireless LAN, the network settings must be configured. If you use the wireless
LAN simple setup function, the infrastructure settings can be easily configured.
The simple wireless LAN setup function acquires the wireless LAN settings registered in the access point,
and configures those settings for the projector automatically. The access point must also be compliant
with the simple wireless LAN setup function.
Select [Wireless LAN] in [Network Interface] under [Network Settings] beforehand. Further, specify the
IP address and DHCP server using [TCP/IP Settings] in [Wireless LAN].
Setup Method
• Using push buttons
Press the projector and access point keys or buttons to get them to connect to each other and
register the settings.
• Enter the access point's PIN code in the projector
Enter the PIN code that was generated by the access point in the projector to get them to
connect to each other and register the settings. The access point's PIN code must be registered
in the PIN code field of the projector.
1. Press the [Menu] button.
2. Select the [Network/USB Settings] menu.
59
Page 62

3. Using the Projector via a Network
3. Select [Network Settings].
4. Select [Wireless LAN].
5. Select either [Connect by PIN] or [Connect by Push] in [Simple Wireless LAN Setup].
6. If [Connect by PIN] is selected, enter the PIN code generated by the access point in the
projector, and then proceed to step 7.
You must preconfigure the access point's simple wireless LAN setup function.
7. If [Connect by Push] is selected, press the access point push button.
8. Select [OK] on the confirmation screen.
The wireless LAN setup is complete.
60
Page 63

Projecting Images Using Network Utility
Projecting Images Using Network Utility
What Is Network Utility?
Network Utility is a software application that connects the projector and a computer to project images.
Images that can be projected are computer screens and still images.
The main Network Utility functions are described below:
Simple 1:1 Connection
Projects images by connecting the computer and projector using a wireless LAN in ad hoc mode.
Network Connection
Projects images by connecting to the projector that is connected to the network using an Ethernet
cable or a wireless LAN.
Settings Using a USB Memory Device
Specifies the wireless LAN settings using a USB memory device. There are two methods to do this:
one method is to copy the computer settings to the projector, and the other method is to copy the
projector settings to the computer.
Network Utility operating environment is described below.
• Supported operating system
• Windows XP (32-bit version) Professional Edition, Home Edition, SP3 or later
• Windows Vista (32-bit and 64-bit versions) Ultimate, Business, Home Premium, Home Basic,
SP2 or later
• Windows 7 (32-bit and 64-bit versions) Home Premium, Professional, Ultimate, and
Enterprise
• Memory size
Recommended memory size for the operating system of the computer you are using
• To configure the wireless LAN settings using the following methods, log in to the computer with
administrator privileges:
• Simple 1:1 Connection
• Settings using a USB memory device
• For detailed Network Utility operating methods, refer to the Network Utility Help.
How to use Network Utility
Network Utility is included on the supplied CD-ROM.
61
Page 64

CLB074
3. Using the Projector via a Network
1. Insert the CD-ROM in the CD-ROM drive of your computer.
2. Specify a language.
The launcher screen appears.
3. Click [PJ Network Utility Type A].
4. Specify a destination to save the application.
The "RICOH PJ NetworkUtility Type A" folder is copied to the computer.
5. To create a shortcut icon on the desktop, click [OK].
6. Close the screen.
To start Network Utility, double-click the shortcut icon on the desktop or "RICOH PJ NetworkUtility
TypeA.exe" in the folder.
• You can also use Network Utility by dragging and dropping the "RICOH PJ NetworkUtility Type A"
folder that is on the provided CD-ROM into the computer or a USB memory device.
• To delete Network Utility, delete the Network Utility folder.
Simple 1:1 Connection
To connect the computer and projector using the wireless LAN in ad hoc mode, select [Simple 1:1
Connection].
Make sure the projector's communication mode is "ad hoc". You can confirm the projector's LAN status
on Network Information displayed on the screen.
1. Turn the projector on.
2. Press the [Network] button.
3. Press the [Enter] button.
The connection wait screen is displayed.
62
Page 65

CLB074
Projecting Images Using Network Utility
4. Double-click the "Network Utility" icon on the computer.
Network Utility starts.
5. Click the [Simple 1:1 Connection] tab.
6. Select the projection method.
7. If you select [Transmit Still Image File], specify the file to be projected.
8. Click [Start].
A number appears on both the projected screen and on the computer's screen.
9. If the numbers displayed on both screens are the same, click [OK].
The computer screen or selected file is projected.
• When Network Utility ends, the computer wireless LAN settings automatically reset to their preconnection settings.
• To close Network Utility, either select [Exit], or click [ ] to close the window.
Network Connection
When connecting to a projector that is connected to the network using an Ethernet cable or a wireless
LAN, select [Network Connection].
A maximum of four projectors can be selected at the same time. If you select multiple projectors, they will
all project the same image.
1. Turn the projector on.
2. Press the [Network] button.
3. Double-click the "Network Utility" icon on the computer.
Network Utility starts.
4. Click the [Network Connection] tab.
63
Page 66

3. Using the Projector via a Network
5. Select the connected projector from [Select Projector(s) to Use (Up to 4 devices):].
If you want to manually enter the projector IP address, select [Connect by Manual Entry], and enter
the IP address.
6. Select the projection method.
7. If you select [Transmit Still Image File], specify the file to be projected.
8. Click [Start].
The computer screen or selected file is projected.
• To close Network Utility, either select [Exit], or click [ ] to close the window.
Settings Using a USB Memory Device
The wireless LAN settings information can be shared between the computer and projector using a USB
memory device. This is useful when you are setting up multiple devices at one time.
The wireless LAN settings information is stored on the USB memory device. There are two methods to do
this: one method is to copy the computer settings to the projector, and the other method is to copy the
projector settings to the computer.
Copying computer settings to the projector
1. Insert the USB memory device into the computer USB port.
2. Double-click the "Network Utility" icon.
Network Utility starts.
3. Click [Menu].
4. Click [Write Settings to USB Memory].
5. Click [Execute] in [Copy Setting Information].
The computer's wireless LAN settings are displayed on the screen.
6. Click [OK].
The settings are saved to the USB memory device.
7. Turn the projector on.
64
Page 67

CLB074
CLB046
Projecting Images Using Network Utility
8. Press the [Network] button.
9. Insert the USB memory device into the USB port on the projector.
The confirmation screen is displayed.
10. Select [OK].
The wireless LAN settings saved to the USB memory device are reflected in the projector.
11. Select [OK].
• If the conformation screen does not appear when you insert the USB memory device into the
projector's USB port, remove the USB memory device. Press the [Network] button, and then reinsert
the device.
• It is also possible to change the wireless LAN settings on the computer using Network Utility, and to
save the settings to the USB memory device. For details, see Help.
Copying projector settings to the computer
1. Turn the projector on.
2. Insert the USB memory device into the USB port on the projector.
3. Press the [Menu] button.
65
Page 68

3. Using the Projector via a Network
4. Select the [Network/USB Settings] menu.
5. Select [Network Settings].
6. Select [Wireless LAN]
7. Select [Enable] in [Wireless Connection via USB] under [Simple Wireless LAN Setup].
8. Select [Simple Connection (USB Memory)], and then press the [Enter] button.
The wireless LAN settings for the projector are saved to the USB memory device.
9. Select [OK].
10. Press the [Menu] Button.
11. Select [USB Settings].
12. Select [OK] in [Remove Device].
13. Disconnect the USB memory device.
14. Insert the disconnected USB memory device into the USB port on the computer.
15. Double-click the "Network Utility" icon on the computer.
Network Utility starts.
16. Click [Menu].
17. Click [Read Settings from USB Memory].
18. Click [OK].
19. When the USB memory device selection screen is displayed, select the USB memory
device from which to read the settings, and click [OK].
20. When the wireless LAN adapter selection screen is displayed, select the wireless LAN
adapter that you want to store of, and click [OK].
The computer settings are complete.
66
Page 69

Using the Projection Server Function
Using the Projection Server Function
The projector accesses the network server to project JPEG files saved on the server.
You do not need to carry a storage device or computer that has the files to be used. Therefore, it is useful
to protect information.
Accessing folders on the server can be controlled by registering an access number.
Configuring the Network Server
A network server on which IIS (Internet Information Services) is installed can be used as a projection
server.
Projection server operations have been verified for the following operating systems:
• Windows Server 2003 R2 Standard (32-bit version) SP2 and IIS 6
IIS 6 is not provided with a URL rewrite module. Use a URL rewrite module provided by a third
party.
• Windows Server 2008 R2 Standard (64-bit version) SP1 and IIS 7
Install the URL Rewrite Module that can be downloaded from Microsoft Download Center. If the
ASP (Active Server Pages) Execution Environment is not available on the network server, install the
ASP module.
The following settings are required on the network server that is used as a projection server:
Creating a virtual directory
Create a directory (virtual directory) that the projector accesses on the network server.
Register the alias name and directory path of the virtual directory by following the wizard
instructions. For detailed procedures, see the Microsoft Web site.
• Alias name
An alias name is required when the projector accesses the virtual directory.
The settings must be configured in [Projection Server] under [Network Application Settings].
For details, see p.68 "Configuring the Projector".
• Directory path
This is a path for the directory in which files projected by the projector are stored.
To store files converted by JPEG Conversion Tool on the network server, register the directory
path. For details, see JPEG Conversion Tool Help.
Storing the folder management file for the projection server
The folder management file for the projection server is stored in the "Projection Server" folder on the
supplied CD-ROM. Copy the folder management file to the virtual directory on the network server.
67
Page 70

3. Using the Projector via a Network
Registering a URL rewrite rule
Using a URL rewrite module, register a rule to rewrite "original characters" to "rewritten characters":
• Original characters: ^alias name of the virtual directory/(.*)
• Rewritten characters: /alias name of the virtual directory/name of the folder management file
If you use IIS 7, and if the alias name is "ABC" and the folder management file name is "xyz.asp",
the characters become the following:
• Original characters: ^ABC/(.*)
• Rewritten characters: /ABC/xyz.asp
Configuring the Projector
Configure the settings for the projection server in [Projection Server] under [Network Application
Settings] beforehand.
• Validate Projection by Projection Server
Specify to [Enable].
• Server URL
Enter the projection server URL and the alias name of the virtual directory in the following format:
Projection server URL/alias name/{n}
If the projection server URL is "http://hostname" and the alias name is "document", enter "http://
hostname/document".
An IP address can be used as the projection server URL.
If you select [Access Number] in [Access Restriction Type], add "/{n}" at the end of the Server
URL.
Specify other settings in [Projection Server], if necessary.
• To use the projection server function, you must specify the network settings in advance. For details,
see p.53 "Connecting the Projector to a Network".
• For details about how to change the settings, see p.73 "Using the Menu Screen". For details
about the setting items, see p.103 "Network Application Settings".
Projecting Files that Are Stored on the Server
Store files to be projected using the projector in the virtual directory on the network server.
If you select [Access Number] in [Access Restriction Type], create a folder whose name is the number
that you specify as Access Number. After this, store the files to be projected in the folder. To project the
files stored in the folder, enter the access number when accessing the projection server.
68
Page 71

A projected image can be controlled using the remote control.
CLB074
• Right arrow button ( ): Displays the next image.
• Left arrow button ( ): Displays the previous image.
• [Menu] button: Displays the file list while an image is being projected.
1. Turn the projector on.
2. Press the [Network] button.
Using the Projection Server Function
3. Press the [Enter] button.
The confirmation screen is displayed.
4. Select [OK].
The list of files in the root directory is displayed.
5. Select the file to be projected.
If you select a folder, the file list within the folder is displayed. Repeat these steps until you can
display the file you want to project.
6. To quit the projection, press the [Menu] button to display the file list, and the select [Exit].
• If [Access Restriction Type] is specified for [Access Number] after step 3, the access number input
screen is displayed. Contact your server administrator for your access number.
69
Page 72

3. Using the Projector via a Network
70
Page 73

4. Changing the Projector Settings
CLB065
6
4
5
1
2
3
This chapter explains the settings on the menu screen and how to change the settings.
Viewing the Menu Screen
1. Image Adjustment menu tab
Enables the image items to be adjusted and configured.
For the Image Adjustment menu settings, see p.83 "Image Adjustment Menu".
2. Display Settings menu tab
Enables the screen display items to be configured.
For the Display Settings menu settings, see p.87 "Display Settings Menu".
3. Default Settings menu tab
Enables the installation status, etc., to be configured.
For the Default Settings menu settings, see p.90 "Default Settings Menu".
4. Network/USB Settings menu tab
Enables the network and USB settings to be configured.
71
Page 74

4. Changing the Projector Settings
For the Network/USB Settings menu settings, see p.95 "Network/USB Settings Menu".
5. Display Status tab
Enables information such as input signals and lamp usage time, etc., to be displayed.
For item that can be displayed, see p.105 "Display Status".
6. Settings
The settings and information for each menu can be displayed.
For the list of possible settings for each menu, see p.79 "List of Menu Items".
72
Page 75

CLB046
Using the Menu Screen
Using the Menu Screen
This section explains the methods for changing the menu screen using the remote control.
1. Press the [Menu] button.
2. Select the menu tab using the [ ] and [ ] buttons.
If you select the Display Status tab, you can confirm the information in this step.
3. Press the [
] button.
73
Page 76

4. Changing the Projector Settings
4. Select the item to be changed using the [ ] and [ ] buttons.
If [To settings] is displayed on the right, the item has a submenu. Press the [Enter] button to display
the submenu screen.
5. Press the [Enter] button.
If [Execute] is displayed to the right of the item you select, the function is executed in this step.
6. Change the settings.
The method for changing the settings depends on the item.
• Adjusting values using the values bar
Change the value using the [ ] and [ ] buttons, and then press the [Enter] button.
74
Page 77

Using the Menu Screen
• Selecting the value from a list
Change the value using the [ ], [ ], [ ], and [ ] buttons, and then press the [Enter] button.
• Inputting numbers
Use the number buttons on the remote control to input numbers.
75
Page 78

4. Changing the Projector Settings
• Inputting text
Use the keyboard that is displayed on screen to input text. You can also use the number
buttons on the remote control to input numbers.
• The control panel on the projector can be used for operations, but numbers for settings cannot be
inputted.
• A confirmation screen appears before some functions are executed or some settings are changed.
• The Network/USB Settings menu has three submenu screens, [USB Settings], [Network Settings],
and [Network Application Settings]. Open the submenu according to the settings you want to
change, and then go to step 2 to change the settings.
• Changes to the settings are automatically applied when you close the menu screen. You do not
need to press the [Enter] button.
• Settings in the Network/USB Settings menu are not applied until you select [Reflect] on the
confirmation screen.
76
Page 79

CLB046
Restoring Settings to Their Default Settings
Restoring Settings to Their Default Settings
This section explains the method for restoring the projector settings to the default values using the remote
control.
1. Press the [Menu] button.
2. Select the Default Settings menu tab, and then press the [Enter] button.
77
Page 80

4. Changing the Projector Settings
3. Select [Reset All], and then press the [Enter] button.
4. Select [OK] in the confirm screen, and then press the [Enter] button.
78
• The following settings cannot be reset with this function:
• [User Logo] in [Display Settings]
To reset the registered user logo, select [Reset Logo] in [Display Settings].
• [Password] in [Default Settings]
• [Administrator Password] in [Network/USB Settings]
To reset the registered passwords, contact your service representative.
Page 81

List of Menu Items
Image Adjustment menu
Item Summary
Picture Mode Select the picture mode.
Contrast Adjust the image contrast.
Brightness Adjust the image brightness.
Color Saturation Adjust the color saturation of the image.
Tint Adjust the tint of the image.
Sharpness Adjust the sharpness of the image.
Noise Reduction Select whether or not to use the function to reduce
the Y/Pb/Pr (480i/576i) or video signal noise.
List of Menu Items
R-level Adjust the level of red in the image.
G-level Adjust the level of green in the image.
B-level Adjust the level of blue in the image.
RGB Input Range Select the RGB input range.
Auto Set Automatically adjust the items set for the image
according to the type of input signal.
Equalizer Select the strength of the functions that reduce the
HDMI signal noise.
Position Adjust the values for the image position.
Display Settings menu
Item Summary
Keystone Adjust for image keystone distortion.
Aspect Select the screen size of the image.
Display Position Move the image if the projected image is smaller or
larger than the screen size.
79
Page 82

4. Changing the Projector Settings
Item Summary
Wall Color Correction Select the image hue according to the projection
surface when the image is being projected on
something other than a screen.
Background on NoSignal Select the image display when there is no input
signal.
Display Help Select whether or not to display Help when there is
no input signal.
Display Icon Select whether or not to display icons when
switching the input signals and settings.
Start-up Screen Select whether or not to display the start-up screen
when the projector is turned on.
User Logo Register and confirm user logos.
Default Settings menu
Item Summary
Auto Input Search Select whether or not to only select inputs with
signals when switching input signals.
Auto Keystone Select whether or not to implement keystone
correction automatically depending on the angle of
the projector's position.
Projection Mode Select the projection method according to how the
projector is positioned.
Closed Caption Select the closed caption display method.
3D Projection Specify 3D projection.
Language Select the language in which to display menus, etc.
Beep Select whether or not to beep during use.
Remote Control ID Select the projector remote control ID.
Power Off on No Signal Select the time from the final operation to automatic
power shutdown when there are no input signals.
80
Page 83

Item Summary
Power On Method Select whether or not to use the auto power on
function.
Standby Energy Saving Select the level of energy saving while on standby.
Lamp Power Select the lamp power level.
High Altitude Mode Select whether or not to increase the speed of the
fan.
Key Lock Select whether or not to lock the buttons on the
control panel.
Reset All Reset all menus to their defaults.
Password Register a password for the projector.
Network/USB Settings menu
List of Menu Items
• USB Settings
Item Summary
Settings Specify the file projection method using a USB
device.
Display Status Confirm the status of the USB device.
• Network Settings
Item Summary
Wired LAN Specify the wired LAN settings.
Wireless LAN Specify the wireless LAN settings.
LAN Common Specify the common wired LAN and wireless
LAN settings.
Projector ID Enter an ID to identify the projector on the
network.
Display Status Confirm the status of network settings.
• Network Application Settings
81
Page 84

4. Changing the Projector Settings
Item Summary
PJLink Specify the PJLink settings.
Security Specify the security settings.
Projection Server Specify the projection server settings.
Display Status Confirm the status of the network application
settings.
Display Status
Item Summary
Input Displays the selected input signals.
Resolution Displays the resolution.
Frequency Displays the synchronous frequency.
Sync Displays the synchronous signal polarity.
Signal Format Displays the Y/Pb/Pr signal format.
Video Mode Displays the video signal color format.
Lamp Time Displays the lamp usage time.
Lamp Reset Count Displays the number of lamp replacements.
Total Time Displays the projector usage time.
Total CO2 Reduction Displays the total CO2 amount that can be reduced
by setting the lamp mode to eco mode.
Eco Time Ratio Displays the ratio of the time eco mode was used to
the total use time.
Main FW Version Displays the version of the firmware on the main
board.
82
Page 85

Image Adjustment Menu
Image Adjustment Menu
Picture Mode
Select the picture mode.
This function is not available when you select [On] in [3D Projection] under [Default Settings].
Default: [Standard]
• Bright
This image mode makes it easier to see the projection in bright locations.
• Standard
This is the standard image mode.
• Natural
Photos appear more natural in this mode.
Contrast
Adjust the image contrast.
The greater the value, the stronger the image contrast.
Default: 0
• -16 to +16
Brightness
Adjust the image brightness.
The greater the value, the brighter the image.
Default: 0
• -16 to +16
Color Saturation
Adjust the color saturation of the image.
The greater the value, the richer the image.
This function is available when you select [Y/Pb/Pr] or [Video] as an input signal.
Default: 0
• -16 to +16
Tint
Adjust the tint of the image.
This function is available when you select [Y/Pb/Pr], [HDMI] (Y/Pb/Pr signals), or [Video] as an
input signal.
Default: 0
83
Page 86

4. Changing the Projector Settings
• -16 to +16
Sharpness
Adjust the sharpness of the image.
The greater the value, the sharper the image.
Default: 0
• -8 to +8
Noise Reduction
Select whether or not to use the function to reduce the Y/Pb/Pr (480i/576i) or video signal noise.
This function is available when you select [Y/Pb/Pr] (480i/576i) or [Video] as an input signal.
Default: [Off]
• On
• Off
R-level
Adjust the level of red in the image.
The greater the value, the stronger the color red is in the image.
Default: 0
• -16 to +16
G-level
Adjust the level of green in the image.
The greater the value, the stronger the color green is in the image.
Default: 0
• -16 to +16
B-level
Adjust the level of blue in the image.
The greater the value, the stronger the color blue is in the image.
Default: 0
• -16 to +16
RGB Input Range
Select the RGB input range.
When connecting an AV equipment which outputs a full-range RGB signal by HDMI cable, the
image becomes clearer by selecting [Full].
This function is available when you select [HDMI] (RGB signals) as an input signal.
84
Default: [Full]
Page 87

• Stnd.
• Full
Auto Set
Automatically adjust the items set for the image according to the type of input signal.
This function is available when you select [Computer] as an input signal.
Equalizer
Select the strength of the functions that reduce the HDMI signal noise.
This function is available when you select [HDMI] as an input signal.
Default: [Low]
• Low
• High
Position
Adjust the values for the image position.
This function is available when you select [Computer] as an input signal.
• Phase
Image Adjustment Menu
Adjust to eliminate image flicker.
Default: +16
• 0 to +31
• Frequency
Adjust to eliminate moiré patterns and flicker when you project images with thin verticalstripes.
Default: 0
• -64 to +64
• H-position
Adjust the horizontal position of the image.
Default: 0
• -64 to +64
• V-position
Adjust the vertical position of the image.
Default: 0
• -32 to +32
• Clamp Pulse 1
Adjust the clamp pulse position.
85
Page 88

4. Changing the Projector Settings
• 0 to +255
• Clamp Pulse 2
Adjust the clamp pulse width.
• 0 to +255
86
Page 89

Display Settings Menu
Display Settings Menu
Keystone
Adjust for image keystone distortion.
This setting changes automatically depending on the angle of the projector position if you select
[On] in [Auto Keystone] under [Default Settings].
Default: 0
• -32 to +32
Aspect
Select the screen size of the image.
This function is not available when you select [USB Memory] as an input signal.
Default: [Normal]
• Normal
Display in full screen without changing the input signal aspect ratio.
• 16:9
Display using 16:9 aspect ratio (1280 × 720 resolution).
• Full
Display using 1280 × 800 resolution.
• Native
Display the image without changing the resolution of the input signal.
• Zoom
Display the image width as the projection screen width while maintaining the input signal
aspect ratio.
Display Position
Move the image if the projected image is smaller or larger than the screen size.
You can move the image using the [ ], [ ], [ ], and [ ] buttons.
This function is not available when you select [Network] or [USB Memory] as an input signal.
Wall Color Correction
Select the image hue according to the projection surface when the image is being projected on
something other than a screen.
Default: [Off]
• Off
• Whiteboard
• Beige
87
Page 90

4. Changing the Projector Settings
• Gray
• Blackboard (Green)
Background on NoSignal
Select the image display when there is no input signal.
Default: [Logo]
• Logo
• Blue
• None
Display Help
Select whether or not to display Help when there is no input signal.
Default: [On]
• On
• Off
Display Icon
Select whether or not to display icons when switching the input signals and settings.
Default: [On]
• On
• Off
Start-up Screen
Select whether or not to display the start-up screen when the projector is turned on.
Default: [On]
• On
• Off
User Logo
Register and confirm user logos.
User logos can be displayed in the start-up screen or as the background when there are no input
signals.
• Register Logo
Register a user logo. You can register an image with a resolution of up to 1280 × 800 pixels.
Project the image to be registered as a user logo, and then execute this function.
This function is available when you select [Computer], [HDMI] (RGB signals), or [Network] as
an input signal.
• Confirm Logo
88
Display the registered user logo.
Page 91

• Reset Logo
Delete the registered user logo.
Display Settings Menu
89
Page 92

4. Changing the Projector Settings
Default Settings Menu
Auto Input Search
Select whether or not to only select inputs with signals when switching input signals.
Default: [On]
• On
• Off
Auto Keystone
Select whether or not to implement keystone correction automatically depending on the angle of
the projector's position.
Default: [On]
• On
• Off
Projection Mode
Select the projection method according to how the projector is positioned.
Default: [Stnd.]
• Stnd.
Select this mode when the projector is placed in front of a screen.
• Rear
Select this mode when the projector is placed behind a screen.
Closed Caption
Select the closed caption display method.
The projector supports closed captioning, which allows subtitles to be displayed at the bottom of
the picture. This is pursuant to the regulations set forth by the US Federal Communications
Commission (FCC).
Select [CC-1] to [CC-4] to display the dialogue and narration of TV programs and videos that are
closed captioned.
This function is available when you select [Video] as an input signal.
Default: [Off]
• Off
• CC-1
• CC-2
• CC-3
90
• CC-4
Page 93

3D Projection
Specify 3D projection.
• 3D Projection
Select whether or not to use 3D projection.
The image will be slightly darker if this is set to [On].
Default: [Off]
• On
• Off
• DLP Link
Select whether or not to synchronize 3D images and DLP images.
Default: [On]
• On
• Off
• L/R Reverse
Select whether or not to reverse left and right in a 3D image.
Default Settings Menu
Default: [Normal]
• Normal
• Reverse
Language
Select the language in which to display menus, etc.
Default: [English]
Beep
Select whether or not to beep during use.
Default: [On]
• On
• Off
Remote Control ID
Select the projector remote control ID.
Specify the ID for each projector when operating multiple projectors using one remote control.
Default: [1]
• 1
• 2
• 3
91
Page 94

4. Changing the Projector Settings
• 4
Power Off on No Signal
Select the time from the final operation to automatic power shutdown when there are no input
signals.
Default: [Off]
• Off
• 5 min.
• 10 min.
• 20 min.
• 30 min.
Power On Method
Select whether or not to use the auto power on function.
Default: [Manual]
• Manual
Turn the projector on when the [Power] button is pressed.
• Auto.
Automatically turn on the projector when the power cord is connected.
Standby Energy Saving
Select the level of energy saving while on standby.
You can save power by using this function. The energy saving level is highest when you select
[High] and lowest when you select [None]. However, this function affects network functions and
start-up time. Select a mode according to how you use the projector.
Default: [Medium]
• High
Wired LAN and Wireless LAN are disabled when the projector is in standby.
• Medium
Wired LAN is enabled but Wireless LAN is disabled when the projector is in standby.
• Low
Wired LAN and Wireless LAN are enabled.
• None
Wired LAN and Wireless LAN are enabled. Start-up time is faster.
Lamp Power
Select the lamp power level.
92
Select [Eco] if the image is too bright or when projecting images in a dark room.
Page 95

Default Settings Menu
Default: [Stnd.]
• Eco
• Stnd.
High Altitude Mode
Select whether or not to increase the speed of the fan.
The number of fan rotations is high when set to [On]. Select [On] only when using the projector at
an altitude of more than 1,500 meters (4,921 feet). Do not select [On] when the altitude is less
than 1,500 meters (4,921 feet).
Default: [Off]
• On
• Off
Key Lock
Select whether or not to lock the buttons on the control panel.
You can change this setting to [Off] by pressing the [AV Mute] button on the projector's control
panel for 10 seconds.
Default: [Off]
• On
• Off
Reset All
Reset all menus to their defaults.
This function cannot restore the default settings of [User Logo] in [Display Settings], [Password] in
[Default Settings], and [Administrator Password] in [Network/USB Settings].
Password
Register a password for the projector.
• Register Password
Enter a 6-digit password.
The current password is required to change the password.
Default: [000000]
• Password Protect
Select whether or not to enter a password when the projector is turned on. If this is selected, a
password must be entered when the projector is turned on after the power cord has been
unplugged. However, a password is not required when turning the projector on from the
standby mode.
A password is required to change this setting.
Default: [Off]
93
Page 96

4. Changing the Projector Settings
• On
• Off
94
Page 97

Network/USB Settings Menu
Network/USB Settings Menu
USB Settings
You can specify how to project files from a USB device and confirm the status of the USB device.
Settings
• Auto Demo
Select whether or not to start a slide show automatically when the projector is connected to
the USB device.
Default: [Off]
• On
• Off
• Repeat
Select whether or not to repeat video playback.
Default: [Off]
• On
• Off
• Display Interval (sec.)
Enter the slide show switching interval from 5 to 999 seconds.
Default: 5 seconds
• Remove Device
The USB device can be removed when this command is executed.
Display Status
• USB Memory
Display the USB device status.
• USB Memory Free Space (KB)
Display the space available on the USB device (Displayed in KB).
• USB Memory Access Status
Display whether or not the USB device can be accessed.
• Firmware Version
Display the firmware version.
• Network/USB Function Firmware Version
Display the firmware version of the network and USB functions.
95
Page 98

4. Changing the Projector Settings
• Energy Saving IO Firmware Version
Display the energy-saving IO firmware version.
Network Settings
Enables the wired LAN and wireless LAN settings, projector ID registration, and network status to be
verified.
Wired LAN
Specify the wired LAN settings.
• Wired LAN Settings
• Transmission Speed
Select the wired LAN speed.
Select a speed that matches your network environment. It is recommended that [AutoNegotiation] be selected.
Default: [Auto-Negotiation]
• Auto-Negotiation
• 10BASE-T Full Duplex
• 10BASE-T Half Duplex
• 100BASE-TX Full Duplex
• 100BASE-TX Half Duplex
• MAC Address
Display the projector's MAC address.
• TCP/IP Settings
• DHCP
Select whether to enable or disable DHCP.
The IP address is allocated automatically from the DHCP server when [Enable] is
selected. When [Disable] is selected, enter the IP address, subnet mask, and default
gateway manually.
Default: [Enable]
• Enable
• Disable
• IP Address
Enter the projector's IP address.
96
Default: 0.0.0.0
Page 99

• Subnet Mask
Enter the subnet mask.
Default: 0.0.0.0
• Default Gateway
Enter the default gateway.
Default: 0.0.0.0
Wireless LAN
Specify the wireless LAN settings.
• Simple Settings
• Wireless Connection via USB
Select whether or not to use the wireless LAN settings function using a USB memory
device.
Default: [Enable]
• Enable
• Disable
Network/USB Settings Menu
• Simple Connection (USB Memory)
Save the wireless LAN settings of the projector to the USB memory device.
You can copy the wireless LAN settings saved in the USB memory device to a computer.
• Simple Wireless LAN Setup
Acquire the wireless LAN settings registered in the access point, and specify
infrastructure mode wireless LAN settings for the projector automatically.
This function may not work depending on the access point.
• Wireless LAN Settings
• SSID
Enter the SSID to identify the network to which the projector is connected via wireless
LAN. Enter up to 32 characters.
• MAC Address
Display the projector's MAC address.
• Communication Mode
Select the wireless LAN communication mode.
Default: [Adhoc]
• Infrastructure
• Adhoc
• Channel
97
Page 100

4. Changing the Projector Settings
Select the channel to use when [Adhoc] is selected.
Select the channel that matches the type of wireless LAN being used.
The channels available might differ depending on the country.
Default: [11]
For IEEE 802.11 b/g/n (2.4 GHz): 1, 2, 3, 4, 5, 6, 7, 8, 9, 10, 11
• Security
• Authentication Method
Select the wireless LAN authentication method.
Only [Open System] is selectable when you select [Adhoc] in [Communication Mode].
Default: [Open System]
• Open System
• WEP Shared Key
• WPA-PSK
• WPA2-PSK
• Encryption Method
Select the wireless LAN encryption method.
If you select [No Encryption], the communication is not encrypted. [No Encryption] is
selectable only when you select [Open System] in [Authentication Method].
Select [WEP] when you select [Open System] or [WEP Shared Key] in [Authentication
Method].
Select [TKIP] or [CCMP] when you select [WPA-PSK] or [WPA2-PSK] in [Authentication
Method].
Default: [No Encryption]
• No Encryption
• WEP
• TKIP
• CCMP
• Transmission WEP Key Number
Select the Key number used to authenticate and encrypt transmissions when you select
[WEP] in [Encryption Method].
Default: [1]
• 1
• 2
98
• 3
 Loading...