

Ricoh PJ K7000 User Manual

Read this manual carefully before you use this machine and keep
it handy for future reference. For safe and correct use, be sure to
read the Precautions in this manual before using the machine.
Appendices
User Controls
Installation
Introduction
4.
3.
2.
1.
User’s Manual

Safety Information
This chapter describes safety information for this machine.
Information
Introduction
This manual contains detailed instructions and notes on the operation and use of
this machine. For your safety and benet, read this manual carefully before using
the machine. Keep this manual in a handy place for quick reference.
Important
Contents of this manual are subject to change without prior notice.
In no event will the company be liable for direct, indirect, special, incidental, or
consequential damages as a result of handling or operating the machine.
Some illustrations in this manual might be slightly different from the machine.
Caution
The manufacturer shall not be responsible for any damage or expense that might
result from the use of parts other than genuine parts from the manufacturer with
your ofce products.
2

Safety Information
When using this machine, the following safety precautions should always be followed.
Safety During Operation
In this manual, the following important symbols are used:
WARNING
Indicates a potentially hazardous situation which, if instructions are not followed,
could result in death or serious injury.
CAUTION
Indicates a potentially hazardous situation which, if instructions are not followed,
may result in minor or moderate injury or damage to property.
Safety Precautions to Be Followed
This section explains safety precautions that should always be followed when using
this machine.
Environments where the machine can be used
This section explains safety precautions about environments where the machine
can be used.
WARNING
Do not place vases, plant pots, cups, toiletries, medicines, small metal
objects, or containers holding water or any other liquids, on or close to this
machine. Fire or electric shock could result from spillage or if such objects or
substances fall inside this machine.
WARNING
Keep the product and attachments out of the reach of children. If the product
is near children, it might fall over and cause an injury.
3
CAUTION
Keep the machine away from humidity and dust. Otherwise a re or an elec-
tric shock might occur.
CAUTION
Do not place any objects on the machine. Doing so may cause the machine
to topple over, possibly resulting in injury.
CAUTION
Do not place the machine on an unstable or tilted surface. If it topples over,
an injury might occur.
CAUTION
Do not place the product or use it in an environment where it might get wet
such as from snow, rain, or being near water. Doing so could result in re or
electric shock.
CAUTION
Do not put your face or hand near the exhaust vents. Doing so could result in
burns or an accident due to hot air coming from the exhaust vents.
CAUTION
Do not use the product on soft material such as paper or cloth that might get
sucked into the intake vents. Doing so may cause heat buildup inside the
product, resulting in malfunction, burns, or re.
CAUTION
Do not place the power cord and connection cable in a way that might cause
someone to trip and fall. The product might fall over and cause an injury.
CAUTION
Do not place the product in a location where air ow is poor. Doing so may
cause re due to internal components becoming overheated.
4

CAUTION
Do not place or store the product in a location where direct sunlight or heat
generation might occur. The heat may deform or wear out the exterior parts
or negatively affect internal parts. Doing so could result in re.
CAUTION
Do not place low heat resistant material near the exhaust vents. Hot air may
come from the exhaust vents, resulting in damage to the product or an ac-
cident.
CAUTION
Do not expose the product to salt air or corrosive gas. Also, do not place the
product in a laboratory or other location where a chemical reaction might occur. Doing so may cause the product to malfunction.
CAUTION
Do not obstruct the machine’s vents. Doing so risks re caused by overheat-
ed internal components.
Handling power cords and power cord plugs
This section explains safety precautions about handling power cords and power
cord plugs.
WARNING
Do not use any power sources other than those that match the specications
shown. Doing so could result in re or electric shock.
WARNING
Do not use any frequencies other than those that match the specications
shown. Doing so could result in re or electric shock.
WARNING
Do not damage, break, or modify the power cord. Also, do not place heavy
objects on the power cord, or pull the cord or bend it severely. Doing so could
result in re or electric shock.
5
WARNING
Touching the prongs of the power cable’s plug with anything metallic consti-
tutes a re and electric shock hazard.
WARNING
The supplied power cord is for use with this machine only. Do not use it with
other appliances. Doing so could result in re or electric shock.
WARNING
It is dangerous to handle the power cord plug with wet hands. Doing so could
result in electric shock.
WARNING
Be sure to disconnect the plug from the wall outlet at least once a year.
There are burn marks on the plug.
The prongs on the plug are deformed.
If any of the above conditions exist, do not use the plug and consult your
dealer or service representative. Use of the plug could result in re or electric
shock.
WARNING
Be sure to disconnect the power cord from the wall outlet at least once a
year.
The power cord’s inner wires are exposed, broken, etc.
The power cord’s coating has a crack or dent.
When bending the power cord, the power turns off and on.
Part of the power cord becomes hot.
The power cord is damaged.
If any of the above conditions exist, do not use the power cord and consult
your dealer or service representative. Use of the power cord could result in
re or electric shock.
6

WARNING
Do not use the connection cable if it is deformed, cracked, or damaged.
Doing so could result in re or electric shock. If the connection cable is deformed, cracked, or damaged, contact your service representative to request
a replacement cable.
WARNING
When using an extension cord or power strip, only connect equipment whose
total power consumption is within the power rating for the extension cord or
power strip. If the power rating is exceeded, it may cause heat buildup and
result in re.
WARNING
Do not place the power cord and connection cable in front of the lens or ex-
haust vents when the product is turned on. Doing so may result in re.
CAUTION
Push the power plug all the way into the power outlet. Do not use a power
outlet with a loose connection. Doing so may result in heat buildup. Plug the
power cord in the correct direction into the base. If they are not plugged in
correctly, it could result in smoke, re, or electric shock.
CAUTION
If this machine is not going to be used for several days or longer at a time,
disconnect its power cord from the wall outlet.
CAUTION
When disconnecting the power cord from the wall outlet, always pull the plug,
not the cord. Pulling the cord can damage the power cord. Use of damaged
power cords could result in re or electric shock.
CAUTION
Be sure to disconnect the plug from the wall outlet and clean the prongs and
the area around the prongs at least once a year. Allowing dust to build up on
the plug constitutes a re hazard.
7

CAUTION
When performing maintenance on the machine, always disconnect the power
cord from the wall outlet.
Handling the main machine
This section explains safety precautions about handling the main machine.
WARNING
If the machine emits smoke or odours, or if it behaves unusually, you must
turn off its power immediately. After turning off the power, be sure to disconnect the power cord plug from the wall outlet. Then contact your service representative and report the problem. Do not use the machine. Doing so could
result in re or electric shock.
WARNING
If metal objects, or water or other uids fall inside this machine, you must turn
off its power immediately. After turning off the power, be sure to disconnect
the power cord plug from the wall outlet. Then contact your service representative and report the problem. Do not use the machine. Doing so could result
in re or electric shock.
WARNING
Do not touch this machine if a lightning strike occurs in the immediate vicinity.
Doing so could result in electric shock.
WARNING
The following explains the warning messages on the plastic bag used in this
product’s packaging.
Keep the polythene materials (bags, etc.) supplied with this machine
away from babies and small children at all times. Suffocation can result if
polythene materials are brought into contact with the mouth or nose.
8
WARNING
If the machine topples, or if a cover or other part gets broken, you must turn
off its power immediately. After turning off the power, be sure to disconnect
the power cord plug from the wall outlet. Then contact your service representative and report the problem. Do not use the machine. Doing so could result
in re or electric shock.
WARNING
Contact your sales or service representative to clean or replace parts for a
projector that is installed on a wall or ceiling.
Do not attempt to clean or replace parts for a projector that is installed in
a high location on a wall or ceiling. Doing so may cause it to fall down,
resulting in an injury.
Do not open the lamp cover of a projector that is installed on a wall or
ceiling. Doing so may cause the lamp cover to fall down. If the lamp is
broken, pieces of glass may fall and cause an injury.
WARNING
If a projector is incorrectly installed on a wall or ceiling, it may fall down and
cause an injury. Contact your sales or service representative if you want to
install a projector on a wall or ceiling.
Use brackets that are strong enough to support the projector. The projec-
tor weighs about 14.3kg (31.8lb.) (Projector weight with lens).
The projector must be installed in a location that is sturdy enough to sup-
port the full weight of the projector and brackets.
CAUTION
The machine may be very hot after it is turned off, especially the vents and
the lower part of the unit where the lamp is located. Avoid touching these
areas. Doing so may result in burns.
CAUTION
Do not place the product on other equipment or vice versa. Doing so may
cause heat buildup inside the product or cause the other equipment to malfunction.
9
CAUTION
Do not increase the volume unless you are listening while increasing the
volume. Also, lower the volume before turning off the power, because a loud
sound may be emitted when the power is turned on and cause hearing damage.
Handling the machine’s interior
This section explains safety precautions about handling the machine’s interior.
WARNING
Do not remove any covers or screws that are not mentioned in this manual.
There are high voltage components inside the product that may cause elec-
tric shock. Contact your service representative if any of the product’s internal
components require maintenance, adjustment, or repair.
Do not disassemble or modify the product. Doing so may cause injury or
malfunction.
CAUTION
If the machine’s interior is not cleaned regularly, dust will accumulate. Fire
and breakdown can result from heavy accumulation of dust inside this
machine. Contact your sales or service representative for details about and
charges for cleaning the machine’s interior.
10
About the batteries
Explains things that you should follow in regard to the batteries.
WARNING
For safe operation, follow the warnings below regarding the batteries used in
the remote control. If you use the batteries incorrectly, it may result in re or
injury due to batteries leaking or exploding.
Do not use batteries other than the ones specied.
Do not mix and use batteries that are different types or that are new and
old.
Correctly insert batteries according to the polarity (+/-).
Do not charge non-rechargeable batteries.
Do not heat or throw the batteries into re or water.
Do not connect the positive and negative terminals on a battery with a
wire.
Remove the batteries from the remote control that are past their sug-
gested use period or that are depleted.
Remove the batteries when they will not be used for extended periods.
Keep the batteries out of the reach of children. Children may swallow or
choke on the batteries. If this happens, contact a doctor immediately.
WARNING
What to do if a battery has leaked
If leakage from a battery adheres to your skin, rinse it with water immedi-
ately, and then contact a doctor.
Wipe off the leakage with tissue paper while being careful not to touch it.
Soak the tissue paper that you used in water, and then throw it away as
burnable trash.
11
About the lamp
Explains things that you should follow in regard to the lamp.
WARNING
Do not look into the lens or vent when the product is on. The bright light may
damage your eyes. Be especially careful in an environment with children.
WARNING
Before replacing the lamp, turn off the power and wait at least one hour to
allow the product to cool completely. If it is not completely cool, you may burn
or injure yourself due to the inside of the product and lamp unit being hot.
If you replace the lamp without unplugging the power cord from the power
outlet, electric shock or explosion may occur.
Be careful when handling the used lamp so that it does not break. If it breaks,
it may cause injury.
CAUTION
The product’s light uses a mercury vapor lamp that becomes high pressure
when it is turned on. The lamp has the following characteristics, so be sure to
handle it with care after understanding the contents.
Deterioration or shock can cause the lamp’s life span to end or the lamp
to explode. If the lamp explodes, it may make a big noise.
The time that it takes for the lamp to reach its life span or explode de-
pends on each individual lamp and its operating conditions. It is possible
that it might explode the rst time it is used.
If you use the lamp past its replacement period, the possibility of explo-
sion increases.
If the lamp explodes, broken glass pieces may be scattered around the
inside of the product and ejected from the vent or other opening.
If the lamp explodes, a very small amount of mercury vapor in the lamp
tube and broken glass pieces may be ejected from the vents or other
opening.
12
CAUTION
What to do if a lamp has exploded
If the lamp explodes, remove the power cord from the product, leave the
room while making sure it is thoroughly ventilated.
If the lamp explodes and you think that you have gotten glass particles
or mercury vapor in your eyes or have inhaled either, contact a doctor
immediately.
Clean up the area around the product completely while being careful not
to get injured from any broken glass pieces.
Throw away any food that was near the product.
Ask your service representative to replace the lamp and inspect the
product.
CAUTION
Do not block the projection light when it is on. If you do so, the part that is
blocking the projection light may get quite hot and deform, deteriorate or
cause a burn or re. The reected light may make the lens hot and cause a
product failure. To temporarily suspend projection, select the mute function.
To suspend longer, turn off the product.
CAUTION
Be sure to always use a dedicated replacement lamp that is new when
replacing the lamp. If you use a lamp that is not dedicated, it may result in an
explosion and injury.
Moving
This section explains safety precautions about moving the machine.
CAUTION
Unplug the power cord from the wall outlet before you move the machine.
While moving the machine, take care that the power cord is not damaged
under the machine. Failing to take these precautions could result in re or
electric shock.
13
Safety Labels of This Machine
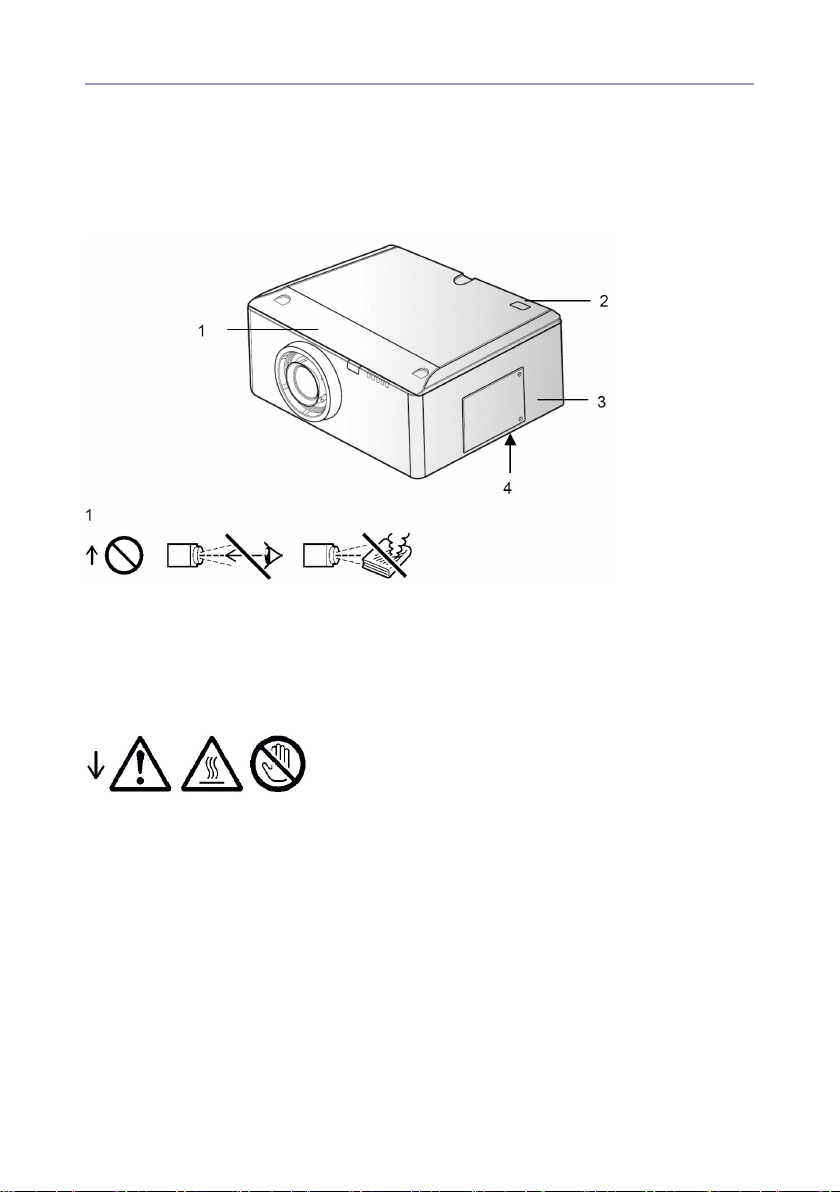
Positions of WARNING and CAUTION labels
This machine has labels for WARNING and CAUTION at the positions shown below. For safety, please follow the instructions and handle the machine as indicated.
Main unit
(bottom)
Do not look into the lens when the product is on. The bright light may damage your
eyes.
Do not place anything in front of the lens. The object may become very hot and
cause a re or burn. To blank the image temporarily, turn on the mute function.
2
Do not put your face or hand near the exhaust vents. Doing so could result in burns
or an accident due to hot air coming from the exhaust vents.
14
3
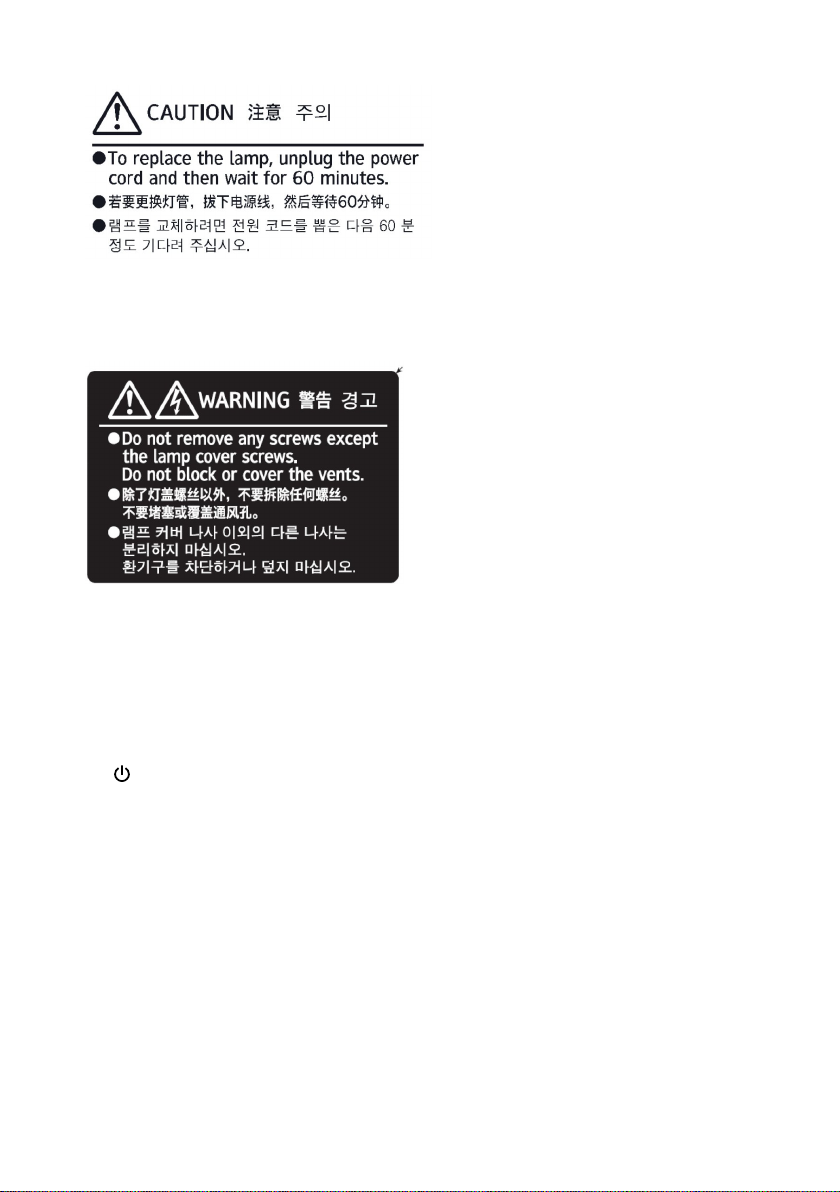
To replace the lamp, rst unplug the power cord then wait for more than 60 minutes.
The lamp might be broken. Be careful of pieces of broken glass.
4
Do not remove any screws except the lamp cover screws.
Do not block or cover the vents.
Power Switch Symbols
The meanings of the symbols for the switches on this machine are as follows:
: STANDBY
15

Laws and Regulations
User Information on Electrical and Electronic Equipment
If you wish to discard this product, please contact your local authorities, the shop where you
bought this product, your local dealer or sales/service representatives.
16

17
Table of Contents
Safety Information .................................. 2
Introduction 18
Product Features .................................. 18
Package Overview ............................... 19
Product Overview ................................. 20
Main Unit .......................................... 20
Control Panel ................................... 21
Connection Ports ............................. 22
Remote Control ................................ 23
Installation 25
Installing the Projector Lens ................. 25
Connecting to Computer/Notebook ...... 26
Connecting to Video Sources ............... 27
Powering On/Off the Projector ............. 28
Powering On the Projector ............... 28
Powering Off the Projector ............... 29
Warning Indicator ............................. 30
LED Lighting Message ..................... 30
Adjusting the Projected Image ............. 31
Adjusting the Projector’s Height ....... 31
Adjusting the Projecting Image’s Posi-
tion ................................................... 32
User Controls 34
Using the Control Panel ....................... 34
On-screen Display Menus .................... 35
How to operate ................................ 35
Structure .......................................... 36
PICTURE ......................................... 40
PICTURE | Advanced ...................... 42
SCREEN .......................................... 44
SCREEN | Geometry ....................... 45
SCREEN | PIP / POP ....................... 48
SETTING ......................................... 50
SETTING | Lens Function ................ 51
SETTING | Security ......................... 52
SETTING | Signal (RGB) ................. 53
SETTING | Signal (Video) ................ 54
SETTING | Audio Settings ............... 55
SETTING | Advanced ....................... 56
SETTING | Network ......................... 57
SETTING | Image Blending ............. 61
OPTIONS ......................................... 62
OPTIONS | Lamp Settings ............... 64
OPTIONS | Remote Settings ........... 65
OPTIONS | Advanced ...................... 66
Appendices 67
Troubleshooting .................................... 67
Image Problems ............................... 67
Projector Problems .......................... 70
On Screen Messages ...................... 73
Replacing the Lamp ............................. 74
Compatibility Modes ............................. 76
Remote Key Code ................................ 78
RS232 Pin Assignments ....................... 79
Specications ....................................... 80

18
Introduction
Product Features
XGA (1024x768), support resolution: Up to WUXGA @60Hz (Reduced `
Blanking) and UXGA @60Hz
Single lamp system `
Power Zoom/Focus `
Power lens shift `
Dynamic Aperture `
10W x 1 speaker `
Filter module `
Support PIP/POP function `
Support network management for remote control and monitoring `
19
Package Overview
AA
AA
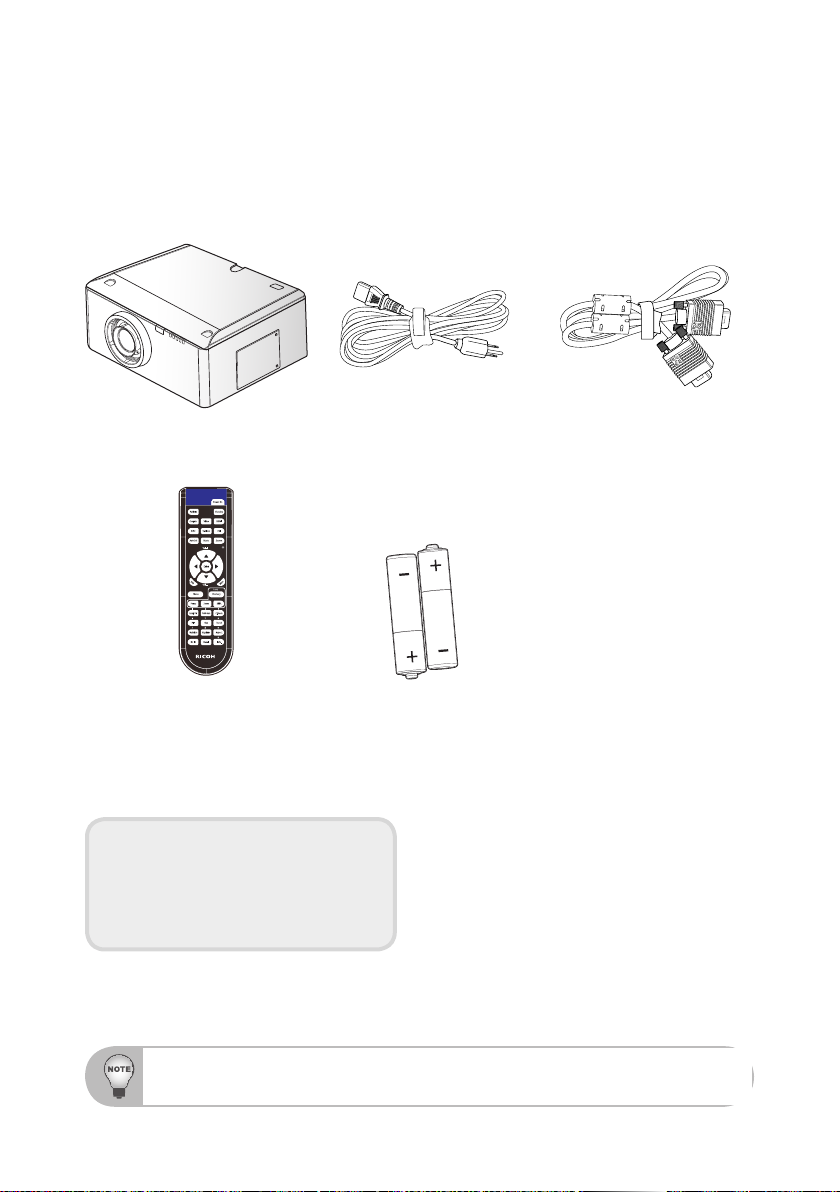
Unpack and inspect the box contents to ensure all parts listed below are in
the box. If something is missing, please contact our customer service.
Projector with lens cover
Remote Control
Documentation:
User’s Manual (CD and Paper) y
Warranty Card y
Power Cord
AA (R6) Batteries x 2
(For remote control)
VGA Cable
Due to different applications in each Country, some regions may have different accessories.
20
Product Overview
Main Unit
1
2
3
4
3
5
(Front View)
11
6
7
8
9
10
12
13
14
(Rear View)
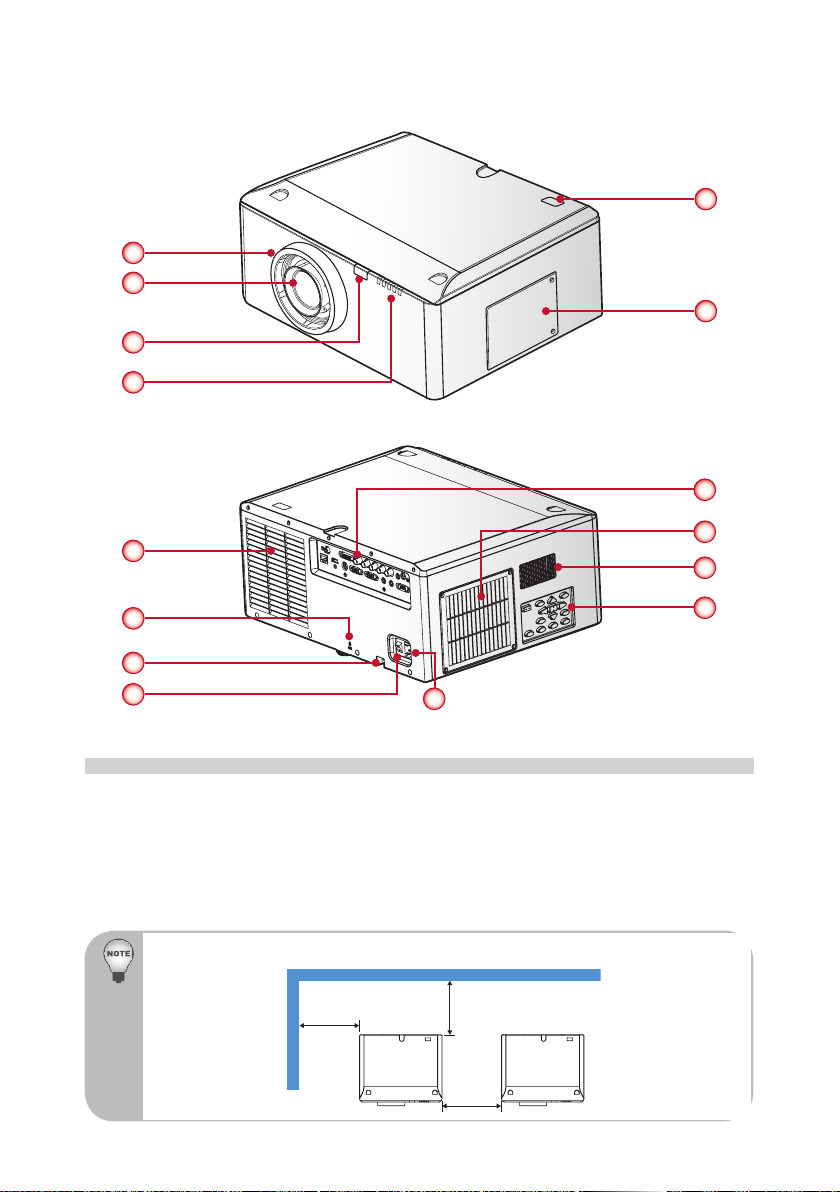
Lens Ring1.
Zoom Lens2.
IR Receivers3.
LED Indicators4.
Lamp Door5.
Do not block projector in/out air vents and keep 30cm clearance around vents for air ow concern.
Min.
30cm
Outlet Vent6.
Kensington Lock7.
Security Bar8.
Power Switch9.
Connector Panel11.
Inlet Vent & Filter12.
Audio Vent13.
Keypad Panel14.
Power Connector10.
Min.
30cm
Min.
30cm

21
Control Panel
Input
Info.
Auto
Lens
1. / Power key
Menu key2.
Enter key3.
Exit key4.
Lens key5.
Auto key6.
Focus key7.
Zoom key8.
Input key9.
Info key10.
Four directional select keys11.
65 7
2
4
31
98
10
11
22
Connection Ports
Serial
Trigger out
(12V)
Computer In Monitor out
LAN
321 64 5
7 9
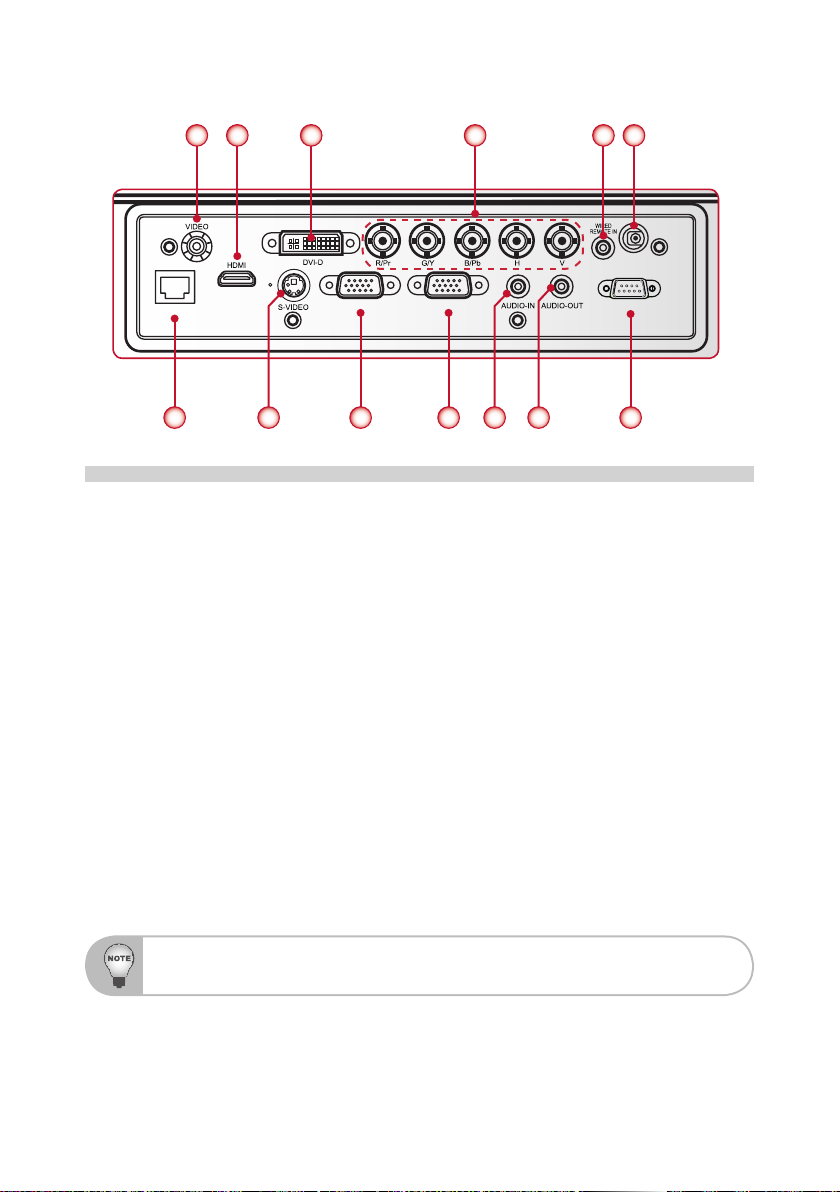
Composite Video Input Connector1.
HDMI Connector2.
DVI-D Connector3.
BNC Connector4.
Wired Remote Input Connector5.
Trigger out 12V Connector6.
LAN Connector7.
S-Video Input Connector8.
Computer In Connector9.
Monitor out Connector10.
Audio Input Connector11.
Audio Output Connector12.
Serial Connector (9-pin Dsub Type) 13.
Use cross cable for serial control with a PC.
8
10 11 1312

23
Remote Control
Power ON 1.
Power on the projector.
Pattern 2.
Display a test pattern.
Computer 3.
Switch to Computer source.
BNC 4.
Switch to Component video
source.
Auto set 5.
Auto adjust projector with
source.
Blank 6.
Switch to a blank screen.
Four Directional Select Keys 7.
Press up, down, left, right
direction buttons to select
items or make adjustments.
Exit 8.
Exit a menu.
Menu 9.
Launch the OSD main menu.
Focus 10.
Adjust the lens focus.
Lamp PW 11.
Adjust lamp power.
PIP 12.
Launch the Picture-in-Picture
function.
MyButton 13.
Launch a user-dened
setting.
RC ID 14.
Set the remote control ID.
Reset 15.
Reset the projector to factory
default settings.
Standby 16.
Turn off the projector.
Video 17.
Switch to Composite Video
source.
1
2
3
4
5
6
7
8
9
10
11
12
13
14
15
16
17
18
19
20
21
22
23
24
25
26
27
28
29
30
31
32
33
34

24
HDMI 18.
Switch to HDMI source.
S-Video 19.
Switch to S-Video source.
DVI 20.
Switch to DVI source.
Source 21.
Automatically scans for connected source.
Enter 22.
Conrm your item selection.
Mute 23.
Turn the projector audio off/on.
Memory 24.
Save the current lens shift settings to the memory.
Zoom 25.
Adjust the lens zoom function.
Shift 26.
Adjust the lens shift up/down/left/right.
RGB Gain 27.
Enter the color management setting page.
C.Mode 28.
Select the display mode (Presentation, Bright, Movie, sRGB, DICOM SIM, and
User).
Geo 29.
Enable geometric correction function.
Blend 30.
Adjust display blend function.
Keystone 31.
Adjust image distortion caused by tilting the projector.
Aspect 32.
Adjust the aspect ratio of the projected screen.
Information (i) 33.
Display the projector information.
Numeric Keypad 34.
Press “0~9” to input a numeric value such as a password in the “Security”
settings.
When using the number keypad for password input, do not use “0” as part of the password.

25
Installation
Installing the Projector Lens
Please contact to the dealer for installation of the projection lens.
Warning: Do not transport the projector with any lens installed.
 Loading...