

Ricoh Pentax K-S2 Start Manual
SLR Digital Camera
Start Guide
Thank you for purchasing the PENTAX K-S2
digital camera.
This Start Guide provides information on how
to get your PENTAX K-S2 ready for use and its
basic operations. To ensure proper operation,
please read this Start Guide before using the
camera.
For details on how to use the various shooting
methods and settings, please refer to the
Operating Manual (PDF) posted on our website.
Refer to p.63 for details on the Operating Manual.
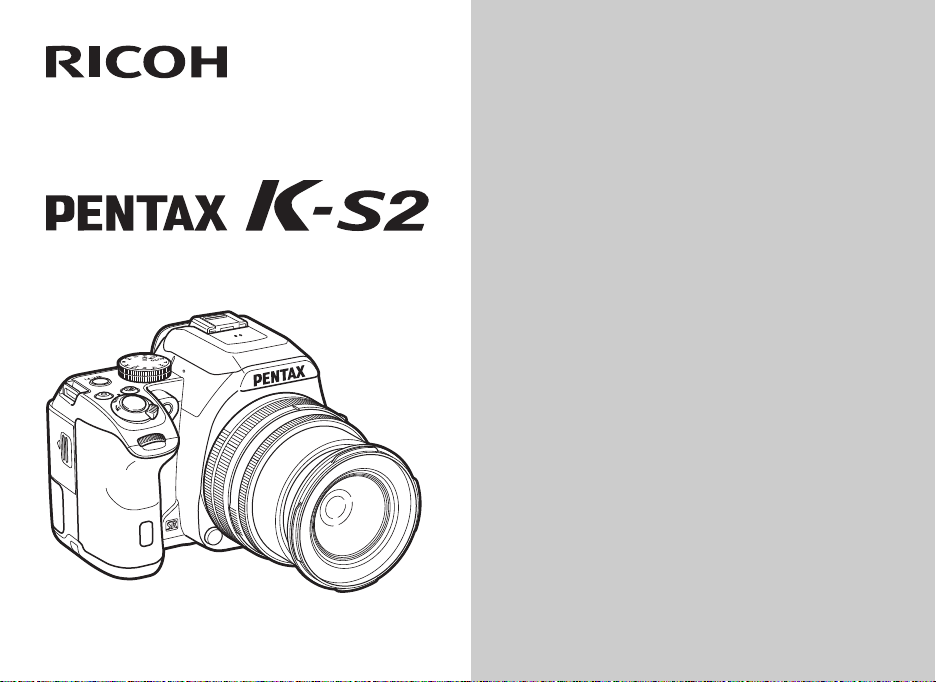
Checking the Contents of the Package
Hot shoe cover FK
(Installed on camera)
Battery charger
D-BC109
Start Guide (this manual)
Lenses you can use
Lenses that can be used with this camera are DA, DA L, D FA and FA J lenses and lenses that have an 9 (Auto) position on the
aperture ring. To use any other lens or accessory, see p.43.
(Installed on camera)
AC plug cord Strap
Eyecup F
R
Body mount cover
(Installed on camera)
O-ST132
Rechargeable
Lithium-ion Battery
D-LI109
Software (CD-ROM)
S-SW156

Contents
Names and Functions of the Working Parts ...........3
Operating Controls ......................................................... 4
Monitor ........................................................................... 6
Viewfinder ...................................................................... 9
Electronic Level ............................................................. 9
How to Change Function Settings ........................10
Using the Direct Keys .................................................. 10
Using the Control Panel ............................................... 10
Using the Menus .......................................................... 11
Menu List ..............................................................12
Rec. Mode Menus ........................................................ 12
Movie Menu ................................................................. 15
Playback Menu ............................................................ 16
Set-up Menus .............................................................. 17
Custom Setting Menus ................................................ 19
Getting Your Camera Ready for Use ....................21
Attaching the Strap ...................................................... 21
Attaching a Lens .......................................................... 21
Charging the Battery .................................................... 22
Inserting/Removing the Battery ................................... 22
Inserting/Removing a Memory Card ............................ 23
Opening the Monitor .................................................... 23
Setting the Display Language and Date/Time ............. 24
Formatting a Memory Card .......................................... 26
Basic Shooting Operation .....................................26
Shooting with the Viewfinder ....................................... 26
Shooting While Viewing the Live View Image .............. 28
Capture Modes for Still Pictures .................................. 29
Setting the Sensitivity .................................................. 32
Compensating the Exposure ....................................... 33
Recording Movies ........................................................33
Setting the Flash Mode ................................................ 34
Setting the Drive Mode ................................................ 35
Setting the White Balance ............................................ 36
Reviewing Images ................................................ 37
Playing Back Movies .................................................... 37
Playback Mode Palette ................................................38
Sharing Images .................................................... 38
Enabling the Wi-Fi Function ......................................... 38
Restrictions on Each Capture Mode .................... 40
Restrictions on the Combinations
of Special Functions ..................................................... 42
Functions Available with Various Lenses ............. 43
Main Specifications .............................................. 44
Operating Environment for USB Connection
and Provided Software ................................................. 49
Index ....................................................................51
For Using Your Camera Safely ............................ 54
Care to be Taken During Handling ....................... 56
WARRANTY POLICY .......................................... 60
Information on the Operating Manual ................... 63
There is a possibility that the illustrations and the display screen
of the monitor in this manual are different from the actual ones.
1

Regarding copyrights
Images taken with this camera that are for anything other
than personal enjoyment cannot be used without permission
according to the rights as specified in the Copyright Act.
Please take care, as there are cases where limitations
are placed on taking pictures even for personal enjoyment
during demonstrations, performances or of items on display.
Images taken with the purpose of obtaining copyrights also
cannot be used outside the scope of use of the copyright
as laid out in the Copyright Act, and care should be taken
here also.
To users of this camera
• Do not use or store this camera in the vicinity of equipment
that generates strong electromagnetic radiation or magnetic
fields. Strong static charges or the magnetic fields produced
by equipment such as radio transmitters could interfere
with the monitor, damage the stored data, or affect the
camera’s internal circuitry and cause camera misoperation.
• The liquid crystal panel used for the monitor is
manufactured using extremely high precision technology.
Although the level of functioning pixels is 99.99% or better,
you should be aware that 0.01% or fewer of the pixels may
not illuminate or may illuminate when they should not.
However, this has no effect on the recorded image.
• In this manual, the generic term “computer(s)” refers
to either a Windows PC or a Macintosh.
• In this manual, the term “battery(ies)” refers to any type
of batteries used for this camera and its accessories.
2
Regarding User Registration
In order to better serve you, we request that you complete
the user registration, which can be found on the CD-ROM
supplied with the camera or on our website.
Thank you for your cooperation.
http://www.ricoh-imaging.com/registration/
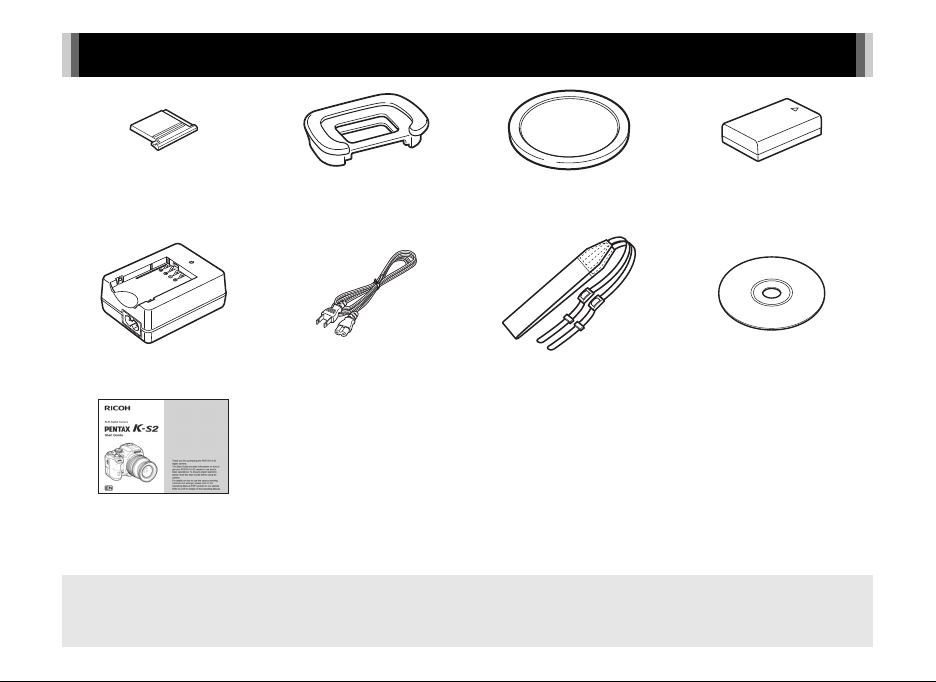
Names and Functions of the Working Parts
Remote control receiver
Lens unlock button
Lens information
contacts
Lens mount index
Speaker
AF assist light
Built-in flash
AF coupler
Mirror
Strap lug
Hot shoe
Microphone
Image plane indicator
Microphone terminal
Strap lug
Card access lamp
USB terminal (micro B)
Terminal cover
HDMI terminal (type D)
Microphone
NFC mark
Card slot for SD
Memory Cards
Diopter adjustment lever
Viewfinder
Vari-angle monitor
Connection cable cover
Battery cover unlock lever
Battery cover
Tripod socket
3
1
0
8
c
e
b
6
4
3
5
9
f
g
h
2
7
a
d
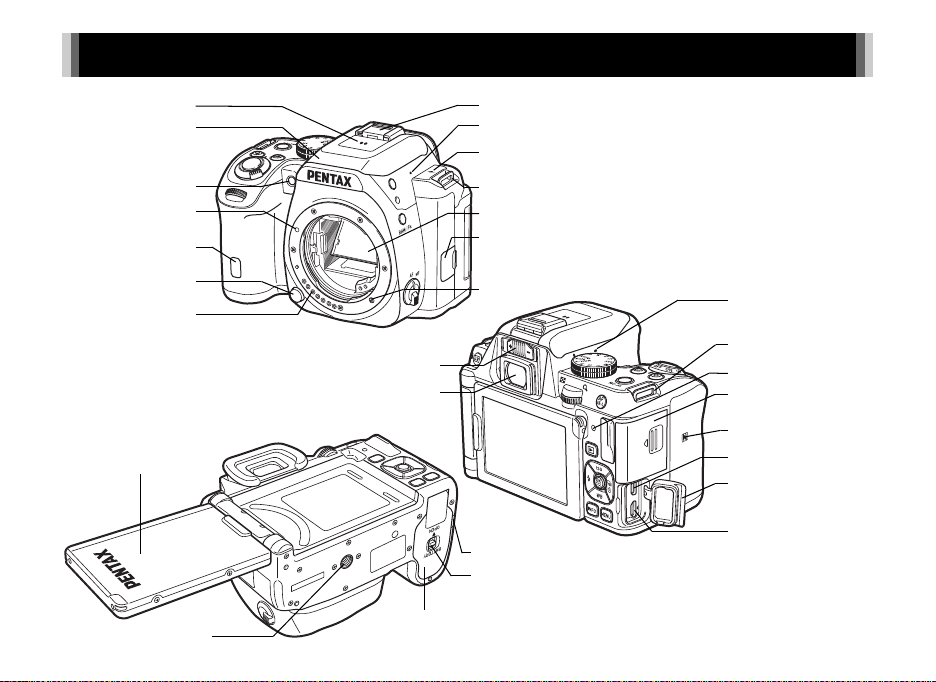
Operating Controls
4
1 EV Compensation button (J)
Press to change the exposure compensation value. (p.33)
In playback mode, the last JPEG image taken can also be
saved in RAW format. (p.37)
2 Green button (M)
Resets the value being adjusted.
3 Shutter release button (0)
Press to capture images. (p.27)
In playback mode, press halfway to switch to capture mode.
4 Main switch
Turns the power on/off, or switches to C (movie) mode.
(p.24, p.33)
When the camera is turned on, it enters A (still picture)
mode and the indicator lamp lights green. When the switch
is turned to C, the camera enters C mode and the lamp
lights red.
5 Front e-dial (Q)
Changes the values for camera settings such as exposure.
(p.32)
You can change the menu category when a menu screen
is displayed. (p.11)
In playback mode, use this to select a different image.
6 Flash pop-up button (1)
Press to pop up the built-in flash. (p.35)
7 RAW/Fx button (P)
You can assign a function to this button.
8 Focus mode switch
Changes the focus mode. (p.27)
9 Live View/Delete button (K/L)
Displays the Live View image. (p.28)
In playback mode, press to delete images. (p.37)

0 Rear e-dial (R)
Changes the values for camera settings such as exposure.
(p.32)
You can change the menu tabs when a menu screen
is displayed. (p.11)
You can change the camera settings when the control panel
is displayed. (p.10)
In playback mode, use this to magnify an image or display
multiple images at the same time. (p.37)
a Four-way controller (ABCD)
Displays the Sensitivity, White Balance, Flash Mode
or Drive Mode setup menu. (p.10)
When a menu or the control panel is displayed, use
this to move the cursor or change the item to set.
Press B in single image display of the playback mode
to display the playback mode palette. (p.38)
b INFO button (G)
Changes the style of the display on the monitor. (p.6, p.8)
c Mode dial
Changes the capture mode. (p.27)
d Self-portrait shutter button
When shooting with Live View, this button can be used as
a shutter release button and facilitates taking self-portraits
by holding the camera with the lens facing you. The indicator
lamp lights green or red when the button can be used as
a shutter release button. (p.28)
At all other times, this button is used to switch the Wi-Fi
function on or off. (p.39)
e AF/AE Lock button (f)
Available for adjusting focus, instead of pressing 0
halfway, and for locking the exposure value before shooting.
f Playback button (3)
Switches to playback mode. (p.37)
Press the button again to switch to capture mode.
g OK button (E)
When a menu or the control panel is displayed,
press this button to confirm the selected item.
When the power is t urn ed o n, t he indicator lamp lights blue.
The lamp turns off after a while.
h MENU button (F)
Displays a menu. Press this button while the menu
is displayed to return to the previous screen. (p.11)
About the four-way controller
In this manual, each button of the fourway controller is indicated as shown
in the illustration on the right.
5
Monitor
1/
2 5 0
1 6 0 0
F
5. 6
99 999
1/
2 5 0
1 6 0 0
F
5. 6
99 999
10: 23
99 999
Status Screen
Custom Image
Bright
02/ 02/201 5
Standby mode
(Status screen)
Shooting Info Display
selection screen
Control panel
Capture Mode
With this camera, you can take pictures while looking through
the viewfinder or while viewing the image on the monitor.
When using the viewfinder, you can take pictures while
checking the status screen displayed on the monitor and looking
through the viewfinder. (p.26) When not using the viewfinder,
you can take pictures while viewing the Live View image
displayed on the monitor. (p.28)
The camera is in “standby mode” when it is ready to shoot, such
as when the status screen or Live View image is displayed.
Press G in standby mode to display the “control panel” and
change settings. (p.10) You can change the type of information
displayed in standby mode by pressing G while the control
panel is displayed.
1/
250
F
5.6
1600
99999
1/
250
F
5.6
1600
99999
G
Status Screen
Status Screen
Custom Image
Custom Image
Bright
Bright
02/02/2015
G
99999
10:23
6
Status Screen
1/
2 5 0
1 6 0 0
F
5. 6
12 345
5´ 0 0˝
+1 .0
G1 A1
+1. 7
EV
1/
200 0
F2. 8
160 0
99999
±0EV
1/
200 0
F2. 8
160 0
99999
1/
F
+1.0
250
5.6
12345
1600
G1A1
5´ 00˝
123
11
11
14
11
11
21 22
24
2523
12
13
16
1 Capture mode 17 Flash Mode
2 AE Lock 18 Focusing area (AF point)
3 Focus Method 19 Drive Mode
4 Custom Image 20 White Balance
5 Digital Filter/
HDR Capture
21 Flash Exposure
Compensation
6 GPS positioning status 22 White Balance
7 Wireless LAN status
fine-tuning
8 AE Metering 23 File Format
9 Shake Reduction/
Horizon Correction
24 Memory card
25 Image storage capacity
10 Battery level 26 Number of shots during
11 E-dial guide
12 Shutter speed
13 Aperture value
14 EV Compensation/
Bracketing
Multi-exposure, Interval
Shooting, or Interval
Composite/Maximum
tracking duration of
ASTROTRACER
15 EV bar scale 27 Operation guide
16 Sensitivity
45 678910
16
17 1918
15
20
17 19 20
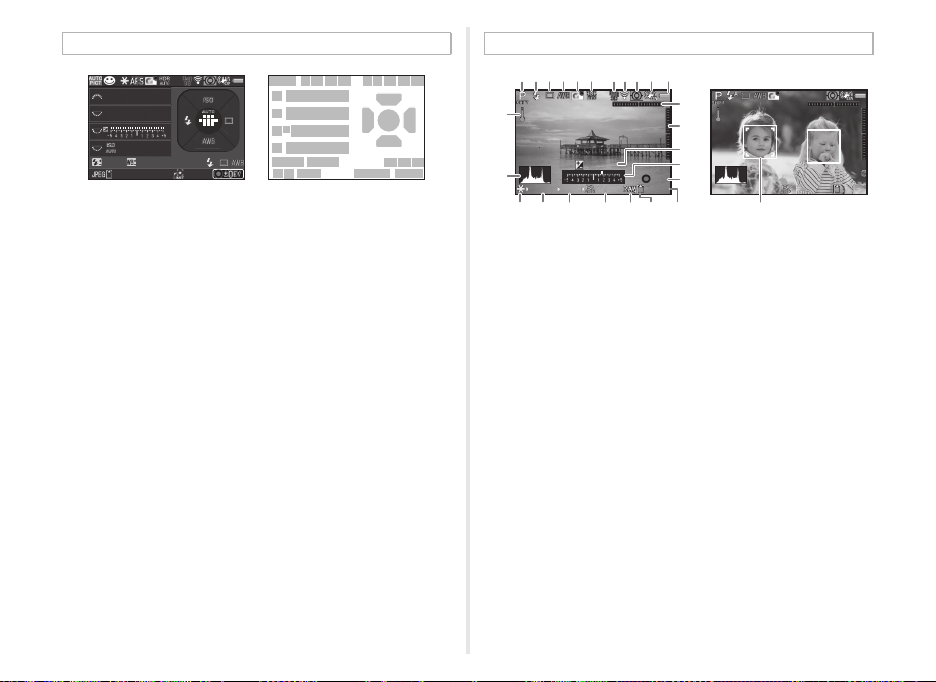
Live View
123456 91011
12
2726
13
1/
2000
F2.8
+1.7
87
EV
1600
23
14
15
16
17
±0EV
18
1/
99999
2000
24 2519 20 21 22 26
F2.8
1600
99999
1 Capture mode 15 Electronic Level
2 Flash Mode
(vertical tilt)
3 Drive Mode 16 EV Compensation
4 White Balance 17 EV bar scale
5 Custom Image 18 Operation guide, and
6 Digital Filter/
HDR Capture
7 GPS positioning status
8 Wireless LAN status
number of shots during
Multi-exposure, Interval
Shooting or Interval
Composite
9 AE Metering 19 AE Lock
10 Shake Reduction/
Horizon Correction/
Movie SR
20 Shutter speed
21 Aperture value
22 Sensitivity
11 Battery level 23 File Format
12 Temperature warning 24 Memory card
13 Histogram 25 Image storage capacity
14 Electronic Level
(horizontal tilt)
26 Face detection frame
(when [Contrast AF] is
set to [Face Detection])
7

Control Panel
10: 23
12 345
Custom Image
Bright
02/ 02/201 5
10: 23
12 345
02/ 02/201 5
Custom Image
Bright
When shooting with Live View
10: 23
1: 23' 4 5"
02/ 02/201 5
Custom Image
Bright
C mode
1/
200 0
F2. 8
200
+0. 3
100 -0001
1/
200 0
F2. 8
200
+0. 3
100 -0001
Standard Information Display
Single image display
(Standard Information
Display)
Playback Info Display
selection screen
A mode
Custom Image
Custom Image
Bright
Bright
02/02/2015
10:23
12345
1
2
657
11
10
16
15
21
20
26 27
15 AF Mode/Contrast AF 22 JPEG Quality
16 AF Active Area/
Focus Peaking
34
12
17
22
98
13
14
18
19
23
17 AF Assist Light 24 Framerate
18 High-ISO NR 25 Recording Sound Level
19 Slow Shutter Speed NR 26 Current date and time
20 File Format 27 Destination
21 JPEG Recorded Pixels/
Movie Recorded Pixels
23 Shake Reduction/
Movie SR
Custom Image
Custom Image
Bright
Bright
10:23
02/02/2015
Custom Image
Custom Image
Bright
Bright
10:23
02/02/2015
1 Function name 7 HDR Capture
2 Setting 8 Clarity Enhancement
3 Memory card 9 AA Filter Simulator
4 Number of recordable
still pictures/
Movie recordable time
5 Custom Image/
Scene Mode
6 Digital Filter 14 Shadow Correction
8
12345
10
15
20
1:23'45"
15
21
10 Distortion Correction
11 Peripheral Illumination
Correction
12 AE Metering
13 Highlight Correction
1
2
657
11
12
17
22
26 27
1
2
17
25 23
26 27
13
18
23
13
16
21
657
16
24
34
98
14
19
34
128
14
Playback Mode
The captured image and shooting information are displayed
in single image display of the playback mode.
Press G to change the type of information displayed in
single image display. Use CD to select the type and press E.
100-0001
1/
2000
F2.8
200
+0.3
G
Standard Information Display
1/
2000
F2.8
200
100-0001
+0.3
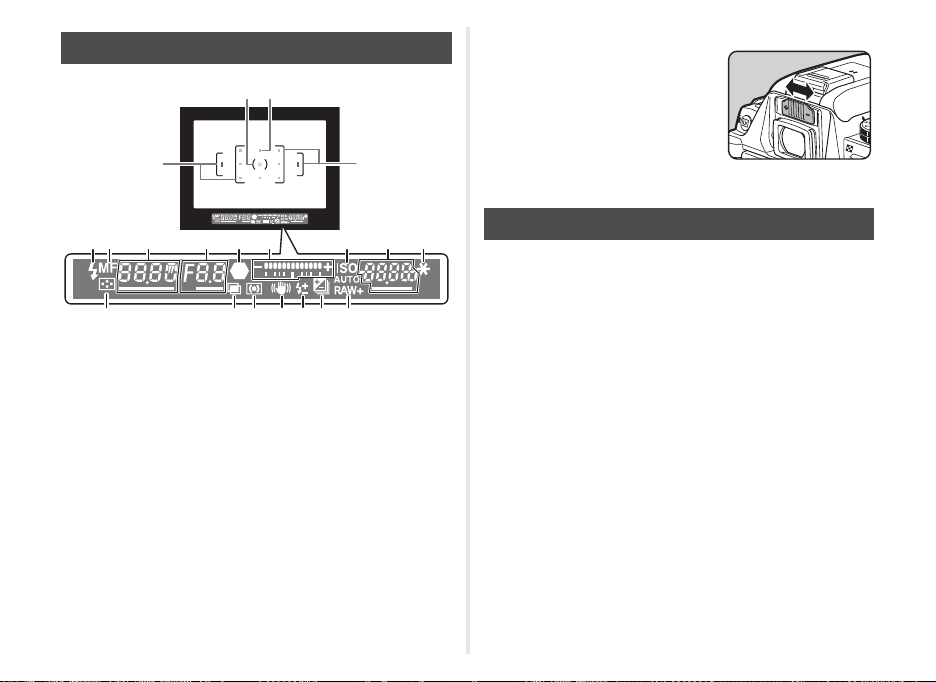
Viewfinder
t Memo
• You can adjust the image
sharpness in the viewfinder using
2
3
1
1
the diopter adjustment lever.
If it is difficult to move the diopter
adjustment lever, lift up and
remove the eyecup. Adjust the
diopter setting until the AF frame in
the viewfinder looks sharp and clear.
61011
4
5 7 8 9
181716151413
19
1 AF frame 11 Sensitivity/Exposure
2 Spot metering frame
3 AF point 12 AE Lock
4 Flash indicator 13 Change AF Point
5 Focus Method 14 Multi-exposure
6 Shutter speed 15 AE Metering
7 Aperture value 16 Shake Reduction
8 Focus indicator 17 Flash Exposure
9 EV bar scale/
Electronic Level 18 EV Compensation/
10 ISO/ISO AUTO
compensation value
Compensation
Bracketing
19 File Format
12
Electronic Level
You can check whether the camera is tilted by displaying the
electronic level. The electronic level for the horizontal camera
angle can be displayed in the EV bar scale in the viewfinder,
and the electronic levels for the vertical and horizontal camera
angles can be displayed on the Live View screen. (p.7)
Select whether to display the electronic level in [Electronic
Level] of the A3 menu. (p.13)
9
How to Change Function Settings
99 99 9
10: 23
99 99 9
File Format
Cancel
OK
File Format
02/ 02/ 2015
Use ABCD to select an item.
Use R to change
settings.
Press F to cancel
the setting operation.
Press E to confirm the
selected item and return to
the control panel.
Press E to make
detailed settings.
The camera functions and their settings can be selected and
changed by using the following ways.
Direct keys Press ABCD in standby mode.
Control panel
Menus Press F.
Press G in standby mode.
(indicated with the v icon in this manual)
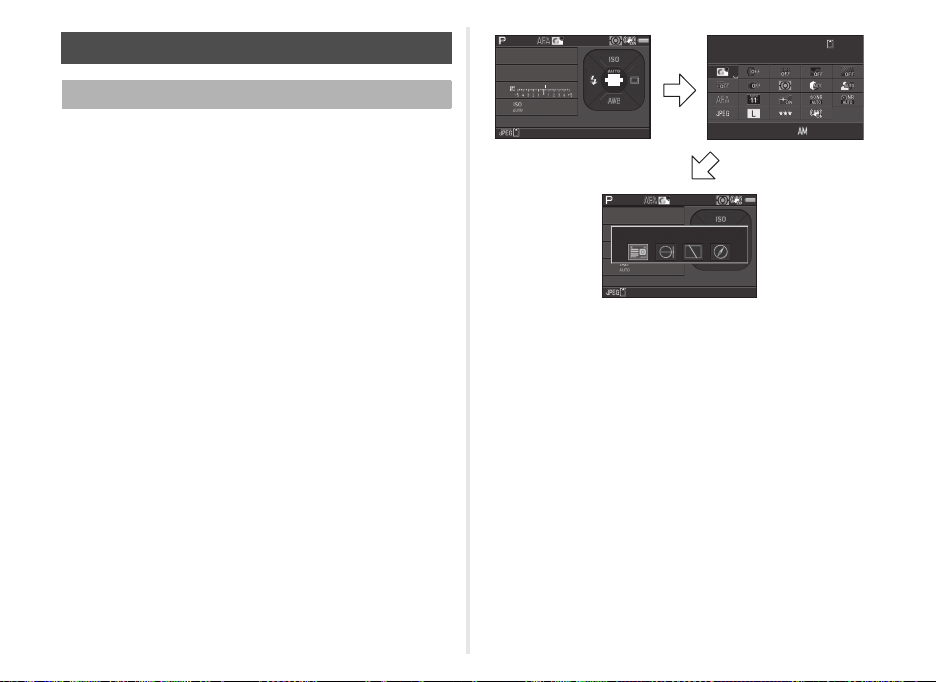
Using the Control Panel
You can set frequently used shooting functions.
Press G in standby mode.
File Format
File Format
99999
G
Using the Direct Keys
A
B
C
D
10
Sensitivity p.32
White Balance p.36
Flash Mode p.34
Drive Mode p.35
02/02/2015
File Format
Cancel
10:23
99999
OK

Using the Menus
GPS
GPS
PE F
Custom Image
Image Capture Settings
AF Settings
AE Metering
Digital Filter
HDR Capture
Exit
Lens Correction
Clarity Enhancement
D-Range Settings
High-ISO NR
Slow Shutter Speed NR
Lens Correction
Clarity Enhancement
D-Range Settings
High-ISO NR
Slow Shutter Speed NR
Exit
Cancel
OK
Custom Image
Image Capture Settings
AF Settings
AE Metering
Exit
Digital Filter
HDR Capture
File Format
JPEG Recorded Pixels
Image Capture Settings
JPEG Quality
RAW File Format
Use AB to select an item.
Press F to exit the
menu screen.
Menu tabs
Press D to display the
pop-up menu.
Press D to display
the submenu.
Press E to confirm
the selected item.
Press F to cancel
the pop-up menu.
Press F to return to the previous screen.
Use AB to select an item.
Use Q to change the menu category.
Use R to switch between menu tabs.
Most functions are set from the menus. The functions that can be set on the control panel can also be set from the menus.
1
Custom Image
Image Capture Settings
AF Settings
AE Metering
Digital Filter
HDR Capture
2
Clarity Enhancement
Lens Correction
D-Range Settings
High-ISO NR
Slow Shutter Speed NR
GPS
Exit
2
Clarity Enhancement
Lens Correction
D-Range Settings
High-ISO NR
Slow Shutter Speed NR
GPS
Cancel
Exit
OK
1
Custom Image
Image Capture Settings
AF Settings
AE Metering
Digital Filter
HDR Capture
Exit
Image Capture Settings
File Format
JPEG Recorded Pixels
JPEG Quality
RAW File Format
PEF
F
11

Menu List
Rec. Mode Menus
Menu Item Function Default Setting
Temporarily changes the exposure mode when the mode dial
is set to O or P.
Sets the image finishing tone such as color and contrast before
shooting an image.
Selects the scene mode that best suits the situation. (S mode) Portrait
Sets the file format of images. JPEG
Sets the recording size of JPEG images.
*4
Sets the quality of JPEG images.
Selects the autofocus method when shooting with the viewfinder.
Selects the area to adjust the focus when shooting with the
*4
viewfinder.
*4
Discharges the assist light when autofocusing in dark locations. On
Selects the part of the sensor to use for measuring brightness
and determining exposure.
Applies a digital filter effect when taking pictures. No Filter
*4
Sets the type of high dynamic range shooting. Off
*4
Sets the amount to change the exposure. ±2EV
G
Bright
q
m
z
Auto
(11 AF Points)
Multi-segment
A1
Exposure Mode
Custom Image
Scene Mode
*3 *4
File Format
Image
Capture
Settings
JPEG Recorded
Pixels
JPEG Quality
RAW File Format Sets the RAW file format. PEF
AF Mode
AF
Settings
AF Active Area
AF Assist Light
AE Metering
Digital Filter
HDR
Capture
*4
*4
HDR Capture
Bracket Value
Auto Align Sets whether to automatically adjust the composition. On
*1
*2 *4
*4
*4
*4
12

Menu Item Function Default Setting
Clarity Enhancement
Distortion
Correction
Lens
Correction
Peripheral
Illumin. Corr.
Lat-Chromatic-Ab
Adj
*4
*4
Enhances the texture and surface details of the subject. Off
Reduces distortions occurring due to lens properties. Off
Reduces peripheral light fall-off occurring due to lens properties. Off
*4
Reduces lateral chromatic aberrations occurring due to lens
properties.
On
Diffraction Correction Corrects blur caused by diffraction when using a small aperture. On
A2
D-Range
Settings
High-ISO NR
Slow Shutter Speed NR
Highlight
Correction
Shadow
Correction
*4
*4
*4
*4
Expands the dynamic range and prevents overexposed areas
from occurring.
Expands the dynamic range and prevents underexposed areas
from occurring.
Sets the Noise Reduction setting when shooting with a high
ISO sensitivity.
Sets the Noise Reduction setting when shooting with a slow
shutter speed.
Auto
Auto
Auto
Auto
GPS Sets the camera action when the optional GPS unit is used. –
A3
Live View
Electronic
Level
Contrast AF
*4
Focus Peaking
Grid Display Displays the grid during Live View. Off
Histogram Display Displays the histogram during Live View. Off
Highlight Alert Sets overexposed areas to blink red during Live View. Off
Viewfinder Displays the electronic level in the EV bar scale in the viewfinder. Off
Live View
Sets the autofocus mode for shooting with Live View. Face Detection
Emphasizes the outline of the subject in focus and makes
*4
it easier to check the focus.
Displays the electronic level in Standard Information Display of
Live View.
Off
On
Horizon Correction Corrects horizontal tilt when in A mode. Off
13

Menu Item Function Default Setting
AA Filter Simulator
A3
Shake Reduction
Input Focal Length
*4
*4
Applies a low-pass filter effect using the Shake Reduction
mechanism.
Off
Activates the Shake Reduction function. On
Sets the focal length when using a lens of which focal length
information cannot be obtained.
35mm
Display Time Sets the Instant Review display time. 1sec.
Zoom Review Displays the magnified image during Instant Review. On
Instant
Review
Save RAW Data Saves the RAW data during Instant Review. On
Delete Deletes the displayed image during Instant Review. On
Histogram Display Displays the histogram during Instant Review. Off
Highlight Alert Sets overexposed areas to blink red during Instant Review. Off
I, J, XG
–, ISO, –
I, –, –
–, J, –
I, J, GLINE
I, J, GLINE
–, J, –
–, –, –
–, J, GLINE
I, J, GLINE
I, J, GLINE
A4
E-Dial
Programming
G
H
I
J
K
L
M
m
n
p
o
Sets the Q / R / M operation for each exposure mode.
Rotation Direction Reverses the effect obtained when Q or R is turned. Rotate Right
14
Menu Item Function Default Setting
RAW/Fx Button Sets the function for when P is pressed.
Button
Customization
AF/AE-L Button Sets the function for when f is pressed. Enable AF1
AF/AE-L Button
(Movie)
Self-portrait Shutter
Button
Sets the function for when f is pressed in C mode. Enable AF1
Sets whether to use the self-portrait shutter button as the shutter
release button when taking self-portraits.
A4
Memory Determines which settings to save when the power is turned off.
Save USER Mode
*1 The function appears only when the mode dial is set to O or P.
*2 The function appears in modes other than S mode.
*3 The function appears in S mode.
*4 The function can also be set from the control panel.
You can save frequently used capture settings to O or P of the
mode dial.
One Push
File Format
On
On for settings
other than Digital
Filter, HDR
Capture, Clarity
Enhancement,
and Shooting Info
Display
–
Movie Menu
Menu Item Function Default Setting
Movie Capture Settings
Recording Sound Level
C1
Digital Filter
HDR Capture
*1
*1
Clarity Enhancement
Movie SR
*1 The function can also be set from the control panel.
*1
*1
*1
*1
Sets the number of recorded pixels and the framerate
of the movie.
u/30p
Sets the Recording Sound Level for recording. Auto
Applies a digital filter effect when recording a movie. No Filter
Sets the type of high dynamic range shooting. Off
Enhances the texture and surface details of the subject. Off
Activates the Shake Reduction function. On
15
Playback Menu
Menu Item Function Default Setting
Slideshow
Quick Zoom Sets the initial magnification when magnifying images. Off
B1
Highlight Alert
Auto Image Rotation
Protect All Images Protects all stored images at once. –
Delete All Images Deletes all stored images at once. –
Display Duration Sets an image display interval. 3sec.
Screen Effect Sets a transition effect when the next image is displayed. Off
Repeat Playback
Auto Movie Playback Plays back movies during the slideshow. On
Starts the slideshow again from the beginning after the last image
is displayed.
Sets overexposed areas to blink red in Standard Information
Display or Histogram Display in playback mode.
Rotates images which were captured with the camera held
vertically or of which the rotation information has been changed.
16
Off
Off
On
Set-up Menus
Menu Item Function Default Setting
Language/W Changes the display language. English
Date Adjustment Sets the date and time and the display format. 01/01/2015
World Time
Text Size Magnifies the text size when selecting a menu item. Std.
D1
Sound Effects
LCD
Display
LCD Display Settings Adjusts the brightness, saturation and the color of the monitor. 0
USB Connection Sets the USB connection mode when connecting to a computer. MSC
HDMI Out
Folder Name Sets the folder name in which images are stored. Date
Create New Folder Creates a new folder on the memory card. –
File Name Sets the file name assigned to an image. IMGP/_IMG
D2
File No.
Copyright Information
Guide Display Displays the operation guides when the capture mode is changed. On
Display Color
Sequential
Numbering
Reset File Number
Switches between the date and time display of your hometown
city and that of a specified city.
Switches the operation sound on/off and changes the volume
for In-focus, AE-L, Self-timer, Remote Control, Change AF Point,
One Push File Format, Shake Reduction, and Wi-Fi operations.
Sets the display color of the status screen, control panel and menu
cursor.
Sets the output format when connecting to an AV device with
an HDMI input terminal.
Continues the sequential numbering for the file name when
a new folder is created.
Resets the file number setting and returns to 0001 each time
a new folder is created.
Sets the photographer and copyright information embedded
in the Exif data.
Hometown
Volume 3/
All On
1
Auto
On
–
Off
17

Menu Item Function Default Setting
Flicker Reduction Cuts down on the screen flicker by setting the power frequency. 50Hz
Auto Power Off
Other Indicator
Lamps
Indicator
D3
Lamps
Wi-Fi Activates the built-in Wi-Fi function. Off
Reset
Pixel Mapping Maps out and corrects any defective pixels on the sensor. –
Dust Removal Cleans the sensor by shaking it. Off
Sensor Cleaning
D4
Format Formats a memory card. –
Firmware Info/Options
Certification Marks
Self-timer
Remote Control
Sets the time until the camera turns off automatically
if no operations are made for a certain period of time.
Lights up the main switch lamp, self-portrait shutter button lamp,
and E lamp when the power is turned on.
Lights up the remote control receiver lamp during the countdown
for Self-timer shooting.
Lights up the remote control receiver lamp during the standby and
countdown for Remote Control shooting and after Remote Control
shooting.
Resets the settings of the direct keys and for the items of the A
menu, C menu, B menu, D menu, control panel, and playback
mode palette.
Locks the mirror in the up position for cleaning the sensor with
a blower.
Displays the camera’s firmware version. You can check
the current firmware version before running an update.
Displays the certification marks of conformance to wireless
technical standards.
1min.
High
On
On
–
–
–
–
18

Custom Setting Menus
Menu Item Function Default Setting
1 EV Steps Sets the adjustment steps for exposure. 1/3 EV Steps
2 Sensitivity Steps Sets the adjustment steps for ISO sensitivity. 1 EV Step
3 Meter Operating Time Sets the meter operating time. 10sec.
4 AE-L with AF Locked Sets whether to lock the exposure value when the focus is locked. Off
E1
5 Link AE and AF Point
6 Auto EV Compensation
7 Bulb (B) Mode Options Sets the camera operation when pressing 0 in M mode. Type1
8 Bracketing Order Sets the order for Bracketing shooting. 0 - +
9 One-Push Bracketing Shoots all frames with one release when using Bracketing. Off
10 Interval Shooting Options
11 AF in Interval Shooting
E2
12 WB Adjustable Range
13 WB When Using Flash Sets the white balance setting when using a flash.
14 AWB in Tungsten Light
Sets whether to link the exposure and AF point in the focusing
area.
Automatically compensates the exposure when the correct
exposure cannot be achieved with the current settings.
Sets whether to start counting the time of interval from when
exposure starts or when exposure ends for Interval Shooting,
Interval Composite, and Interval Movie Record.
Sets whether t o lo ck t he f ocu s po sition used when the first picture
is taken or perform autofocus for each exposure for Interval
Shooting and Interval Composite.
Sets whether to automatically fine-tune the white balance when
the light source is specified for the white balance setting.
Sets the tungsten light color tone when the white balance is set to
[Auto White Balance].
Off
Off
Interval
Locks focus at
1st exposure
Fixed
Auto White
Balance
Strong Correction
19
 Loading...