

Ricoh Pentax K-70 Operating Manual

Introduction
1
SLR Digital Camera
Operating Manual
Getting Started
Shooting
Playback
Sharing
Settings
Appendix
To ensure the best performance from your
camera, please read the Operating Manual
before using the camera.
2
3
4
5
6
7

For Using Your Camera Safely
We have paid close attention to the safety of this camera. When using this
camera, we request your special attention regarding items marked with the
following symbols.
Warning
Caution
About the Camera
Warning
• Do not disassemble or modify the camera. High voltage areas are
present inside the camera, with the risk of electric shock.
• If the camera interior is exposed due to dropping or otherwise damaging
the camera, never touch the exposed portion. There is a risk of electric
shock.
• Do not aim the camera at the sun or other strong light sources when
taking pictures or leave the camera sitting in direct sunlight with a lens
cap off. Doing so may cause the camera to malfunction or cause a fire.
• Do not look at the sun or other strong light sources through a lens. Doing
so may lead to a loss of eyesight or cause vision to be impaired.
• If any irregularities occur during use, such as smoke or a strange odor,
stop using the camera immediately, remove the battery or the AC
adapter, and contact your nearest service center. Continued use can
cause a fire or electric shock.
Caution
• Do not place your finger over the flash when discharging the flash. You
may burn yourself.
• Do not cover the flash with clothing when discharging the flash.
Discoloration may occur.
• Some portions of the camera heat up during use. There is a risk of low
temperature burns when holding such portions for long periods.
This symbol indicates that ignoring this item could
cause serious personal injuries.
This symbol indicates that ignoring this item could
cause minor or medium personal injuries, or loss
of property.
• Should the monitor be damaged, be careful of glass fragments. Also, be
careful not to allow the liquid crystal to get on your skin or in your eyes
or mouth.
• Depending on your individual factors or physical condition, the use of the
camera may cause itching, rashes or blisters. In case of any
abnormality, stop using the camera and get medical attenti on
immediately.
About the Battery Charger and AC Adapter
Warning
• Always use the battery charger and AC adapter exclusively developed
for this camera, with the specified power and voltage. Using a battery
charger or AC adapter not exclusive to this camera, or using the
exclusive battery charger or AC adapter with an unspecified power or
voltage can cause a fire, el ectric shock, or camera bre akdown. The
specified voltage is 100 - 240V AC.
• Do not disassemble or modify the product. This can cause a fire or
electric shock.
• If the generation of smoke or strange odor from the product or other
abnormality occurs, immediately discontinue using and consult your
nearest service center. Continued use can cause a fire or electric shock.
• If water should happen to get inside the product, consult your nearest
service center. Continued use can cause a fire or electric shock.
• If you see a lightning flash or hear thunder during use of the battery
charger or AC adapter, unplug the power plug and discontinue using.
Continued use can cause damage to the product, fire or electric shock.
• Wipe off the power plug if it should become covered with dust.
Accumulated dust may cause a fire.
• To reduce the risk of hazards, use only CSA/UL certified power supply
cord set, cord is Type SPT-2 or heavier, minimum NO.18 AWG copper,
one end with a molded-on male attachment plug cap (with a specified
NEMA configuration), and the other is p rovided with a molded-on female
connector body (with a specified IEC nonindustrial type configuration) or
the equivalent.
Caution
• Do not place or drop heavy objects on or forcefully bend the AC plug
cord. Doing so may damage the cord. Should the AC plug cord be
damaged, consult your nearest service center.

• Do not touch or short-circuit the terminal area of the AC plug cord while
the cord is plugged in.
• Do not handle the power plug with wet hands. This can cause an electric
shock.
• Do not drop the product, or subject it to violent impact. This can cause
the product to breakdown.
• Do not use the battery charger D-BC109 to charge batteries other than
the rechargeable lithium-ion battery D-LI109. Attempting to charge other
types of batteries may cause an explosion or heating, or may damage
the battery charger.
About the Rechargeable Lithium-ion Battery
Warning
• If any leakage from the battery should come in contact with your eyes,
do not rub them. Flush your eyes with clean water and get medical
attention immediately.
Caution
• Only use the specified battery with this camera. Use of other batteries
may cause an explosion or fire.
• Do not disassemble the battery. Disassembling the battery may cause
an explosion or leakage.
• Remove the battery from the camera immediately if it becomes hot or
begins to smoke. Be careful not to burn yourself during removal.
• Keep wires, hairpins, and other metal objects away from the + and -
contacts of the battery.
• Do not short the battery or dispose of the battery in fire. This can cause
an explosion or fire.
• If any leakage from the battery should come in contact with skin or
clothing, it may cause irritation to the skin. Wash the affected areas
thoroughly with water.
• Precautions for D-LI109 Battery Usage:
- USE SPECIFIED CHARGER ONLY.
- DO NOT INCINERATE.
- DO NOT DISASSEMBLE.
- DO NOT SHORT CIRCUIT.
- DO NOT EXPOSE TO HIGH TEMP. (140°F / 60°C)
Keep the Camera and its Accessories out of the
Reach of Small Children
Warning
• Do not place the camera and its accessories within the reach of small
children.
1. If the product falls or is operated accidentally, it may cause serious
personal injuries.
2. Wrapping the strap around a neck may cause suffocation.
3. To avoid the risk of a small accessory such as the battery or memory
cards from being swallowed by mistake, keep them out of the reach
of small children. Seek medical attention immediately if an accessory
is accidentally swallowed.
1

Checking the Contents of the Package
Hot shoe cover FK
(Installed on camera)
Battery charger
D-BC109
Start Guide
Lenses you can use
Lenses that can be used with this camera are DA, DA L, D FA, FA J, and FA lenses and lenses that have an 9 (Auto) position
on the aperture ring. To use any other lens or accessory, see p.121.
(Installed on camera)
AC plug cord Strap
Eyecup F
R
Body mount cover
(Installed on camera)
O-ST132
Rechargeable lithium-ion
battery D-LI109
Software (CD-ROM)
S-SW168
2

Introducing the K-70
1
Getting Started
Taking Pictures
Playback Functions
Sharing Images
Changing the Settings
Appendix
2
3
4
5
6
7
3

How to Use This Manual
1
How to Use This Manual
Introducing the K-70 ............................p.9
Gives you an overview of the K-70.
Read this and get to know your K-70!
Names and Functions of the Working Parts
.......................................................................p.9
Display Indicators .......................................p.12
How to Change Function Settings .............p.20
Menu List ......................................................p.24
2
Getting Started........................................p.36
Explains how to get your K-70 ready for shooting as
well as basic operations.
Attaching the Strap .....................................p.36
Attaching a Lens .........................................p.36
Using the Battery and Charger ..................p.37
Inserting a Memory Card ............................p.40
How to Open the Monitor ............................p.41
Initial Settings ..............................................p.42
4
Basic Shooting Operation ..........................p.45
Reviewing Images .......................................p.47
3
Taking Pictures.......................................p.49
Once you’ve confirmed that the camera works
properly, try out the camera and take lots of pictures!
Configuring the Capture Settings ..............p.49
Taking Still Pictures ....................................p.50
Recording Movies .......................................p.54
Setting the Exposure ..................................p.56
Using the Built-in Flash ..............................p.59
Setting the Focus Method .......................... p.61
Setting the Drive Mode ...............................p.65
Setting the White Balance .......................... p.72
Controlling the Image Finishing Tone .......p.75
Correcting Images .......................................p.78

4
Playback Functions..............................p.83
Explains various operations for playing back and
editing images.
Playback Mode Palette Items .....................p.83
Changing the Playback Method ................. p.84
Editing and Processing Images .................p.88
5
Sharing Images.......................................p.94
Explains how to connect your K-70 to a computer or
communication device to operate the camera and
use images in the camera.
Copying an Image to a Computer ..............p.94
Using the Camera with a Communication
Device ...........................................................p.95
6
Changing the Settings ........................p.106
Explains how to change other settings.
Camera Settings ..........................................p.106
File Management Settings ..........................p.114
7
Appendix....................................................p.118
Provides other resources to get the most from your
K-70.
Restrictions on Each Capture Mode ..........p.118
Functions Available with Various Lenses
.......................................................................p.121
Functions when Using an External Flash
.......................................................................p.125
Using the GPS Unit .....................................p.126
Troubleshooting ..........................................p.129
Main Specifications .....................................p.133
Index .............................................................p.140
Care to be Taken During Handling ............ p.145
WARRANTY POLICY ...................................p.149
There is a possibility that the illustrations and the display screen
of the monitor in this manual are different from the actual ones.
How to Use This Manual
5

Contents
Checking the Contents of the Package ..............2
Contents
How to Use This Manual .........................4
Introducing the K-70 ................................9
Names and Functions of the Working Parts ......9
Operating Controls ....................................................... 10
Display Indicators ...............................................12
Monitor ......................................................................... 12
Viewfinder .................................................................... 18
Electronic Level ........................................................... 19
How to Change Function Settings ....................20
Using the Direct Keys .................................................. 20
Using the Control Panel ............................................... 20
Using the Menus .......................................................... 22
Menu List .............................................................24
Rec. Mode Menus ........................................................ 24
Movie Menus ............................................................... 29
Playback Menu ............................................................ 30
Set-up Menus .............................................................. 31
Custom Setting Menus ................................................ 34
Getting Started .......................................36
Attaching the Strap ............................................36
Attaching a Lens .................................................36
Using the Battery and Charger ..........................37
Charging the Battery .................................................... 37
Inserting/Removing the Battery ................................... 38
6
Using the AC Adapter .................................................. 39
Inserting a Memory Card ...................................40
How to Open the Monitor ...................................41
Initial Settings .....................................................42
Turning the Camera On ............................................... 42
Setting the Display Language ...................................... 42
Setting the Date and Time ........................................... 43
Setting the LCD Display ............................................... 44
Formatting a Memory Card .......................................... 44
Basic Shooting Operation .................................45
Shooting with the Viewfinder ........................................ 45
Shooting while Viewing the Live View Image ............... 47
Reviewing Images ..............................................47
Taking Pictures ......................................49
Configuring the Capture Settings ..................... 49
Image Capture Settings ............................................... 49
Movie Capture Settings ................................................ 49
Taking Still Pictures ...........................................50
Scene Modes ............................................................... 50
Exposure Modes .......................................................... 51
Recording Movies ...............................................54
Playing Back Movies .................................................... 56
Setting the Exposure ..........................................56
Sensitivity ..................................................................... 56
EV Compensation ........................................................ 58
AE Metering ................................................................. 58
Using the Built-in Flash .....................................59

Setting the Focus Method ..................................61
Setting the Autofocus when Shooting with the
Viewfinder .................................................................... 61
Setting the Autofocus when Shooting with Live
View ............................................................................. 63
AF Fine Adjustment ..................................................... 65
Setting the Drive Mode .......................................65
Continuous Shooting ................................................... 66
Self-timer ..................................................................... 67
Remote Control ............................................................ 67
Bracketing .................................................................... 68
Mirror Lock-up Shooting .............................................. 69
Multi-exposure ............................................................. 70
Interval Shooting .......................................................... 71
Setting the White Balance .................................72
Adjusting the White Balance Manually ........................ 74
Adjusting the White Balance with Color
Temperature ................................................................ 75
Controlling the Image Finishing Tone ..............75
Custom Image ............................................................. 75
Digital Filter .................................................................. 77
Correcting Images ..............................................78
Brightness Adjustment ................................................. 78
Lens Correction ........................................................... 80
Quality Level and Texture Adjustment ......................... 80
Playback Functions ...............................83
Playback Mode Palette Items ............................ 83
Changing the Playback Method ........................84
Displaying Multiple Images .......................................... 84
Displaying Images by Folder ....................................... 85
Displaying Images by Shooting Date ........................... 85
Playing Back Images Continuously (Slideshow) .......... 86
Displaying Rotated Images .......................................... 86
Connecting the Camera to an AV Device .................... 87
Editing and Processing Images ........................88
Changing the Image Size ............................................. 88
Correcting Color Moiré ................................................. 89
Processing Images with Digital Filters ......................... 89
Editing Movies .............................................................. 91
Developing RAW Images ............................................. 92
Sharing Images ......................................94
Copying an Image to a Computer ..................... 94
Using the Camera with a Communication
Device ..................................................................95
Enabling the Wi-Fi Function ......................................... 95
Operating the Camera with a Communication
Device .......................................................................... 97
Changing the Settings .........................106
Camera Settings ...............................................106
Customizing the Button/E-dial Functions ................... 106
Setting the Monitor and Indicator Lamps ................... 110
Saving Frequently Used Settings ............................... 111
Displaying the Local Date and Time of the Specified
City ............................................................................. 113
Selecting Settings to Save in the Camera ................. 113
File Management Settings ...............................114
Protecting Images from Deletion (Protect) ................. 114
Selecting the Folder/File Settings .............................. 115
Setting the Copyright Information .............................. 117
Contents
7

Appendix...............................................118
Restrictions on Each Capture Mode ............... 118
Restrictions on the Combinations of Special
Contents
8
Functions ................................................................... 120
Functions Available with Various Lenses ...... 121
Using the Aperture Ring ............................................ 123
Performing Catch-in Focus Shooting ......................... 124
Setting the Focal Length ............................................ 125
Functions when Using an External Flash ......125
Using the GPS Unit ...........................................126
Shooting Celestial Bodies (ASTROTRACER) ........... 127
Troubleshooting ...............................................129
Sensor Cleaning ........................................................ 130
Error Messages ......................................................... 131
Main Specifications ..........................................133
Operating Environment for USB Connection and
Provided Software ..................................................... 139
Index ..................................................................140
Care to be Taken During Handling .................. 145
WARRANTY POLICY ........................................149
Regarding copyrights
Images taken with this camera that are for anything other
than personal enjoyment cannot be used without permission
according to the rights as specified in the Copyright Act.
Please take care, as there are cases where limitations are
placed on taking pictures even for personal enjoyment during
demonstrations, performances or of items on display. Images
taken with the purpose of obtaining copyrights also cannot be
used outside the scope of use of the copyright as laid out in
the Copyright Act, and care should be taken here also.
To users of this camera
Do not use or store this camera in the vicinity of equipment
•
that generates strong electromagnetic radiation or magnetic
fields. Strong stati c charges or the magnetic fi elds produced
by equipment such as radio transmitters could interfere with
the monitor, damage the stored data, or affect the camera’s
internal circuitry and cause camera misoperation.
• The liquid crystal panel used for the monitor is
manufactured using extremely high precision technology.
Although the level of fu nctioning pixels is 99.99% or better,
you should be aware that 0.01% or fewer of the pixels may
not light up or may light up when they should not.
However, this has no effect on the recorded image.
• In this manual, the generic term “computer(s)” refers to
either a Windows PC or a Macintosh.
• In this manual, the term “battery(ies)” refers to any type of
batteries used for this camera and its accessories.
Regarding User Registration
In order to better serve you, we request that you complete
the user registration, which can be found on the CD-ROM
supplied with the camera or on our website.
Thank you for your cooperation.
http://www.ricoh-imaging.com/registration/
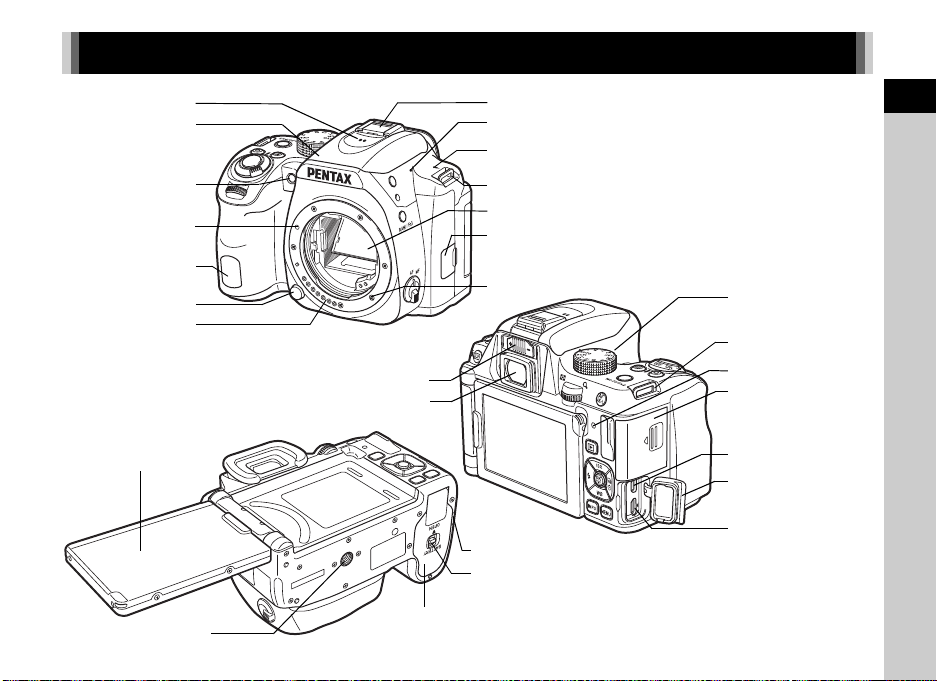
Names and Functions of the Working Parts
Strap lug
Card access lamp
USB terminal (micro B)
Terminal cover
Diopter adjustment lever
HDMI termi nal (type D)
Viewfinder
Microphone
Card slot for SD
Memory Card
Tripod socket
Battery cover
Remote control receiver
AF coupler
Mirror
Lens unlock button
Lens information
contacts
Strap lug
Hot shoe
Lens mount index
Speaker
AF assist light
Microphone
Image plane indicator
Vari-angle monitor
Built-in flash
Connection cable cover
Battery cover unlock lever
Microphone/cable release terminal
1
Introduction
9
1
0
8
c
e
b
6
4
3
5
9
f
g
h
2
7
a
d
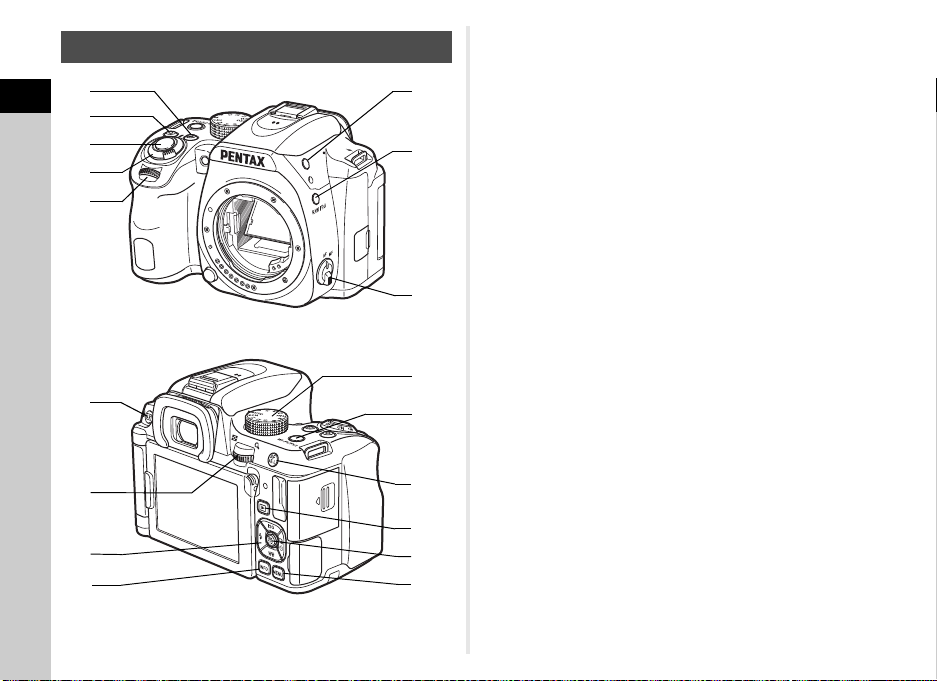
Operating Controls
1
Introduction
10
1 EV Compensation button (J)
Press to change the exposure compensation value. (p.58)
In playback mode, press to save the last JPEG image taken
also in RAW format. (p.48)
2 Green button (M)
Resets the value being adjusted.
3 Shutter release button (0)
Press to capture images. (p.46)
In playback mode, press halfway to switch to capture mode.
4 Main switch
Turns the power on or off, or switches to C (movie) mode.
(p.42, p.54)
When the camera is turned on, it enters A (still picture)
mode and the indicator lamp lights green. When the switch
is turned to C, the camera enters C mode and the lamp
lights red.
5 Front e-dial (Q)
Changes the values for camera settings such as exposure.
(p.52)
You can change the menu category when a menu screen is
displayed. (p.22)
In playback mode, use this to select a different image.
6 Flash pop-up button (1)
Press to pop up the built-in flash. (p.59)
7 RAW/Fx1 button (X)
You can assign a function to this button. (p.106)
By default, the function that temporarily changes the file
format (One Push File Format) is assigned.
8 Focus mode switch
Changes the focus method. (p.61)

9 Live View/Delete button (K/L)
Displays the Live View image. (p.47)
In playback mode, press to delete images. (p.48)
0 Rear e-dial (R)
Changes the values for camera settings such as exposure.
(p.52)
You can change the menu tabs when a menu screen is
displayed. (p.22)
You can change camera settings when the control panel is
displayed. (p.20)
In playback mode, use this to magnify the image or display
multiple images at the same time. (p.48, p.84)
a Four-way controller (ABCD)
Displays the Sensitivity, White Balance, Flash Mode or
Drive Mode setup menu. (p.20)
When a menu or the control panel is displayed, use this to
move the cursor or change the item to set.
Press B in single image display of the playback mode to
display the playback mode palette. (p.83)
b INFO button (G)
Changes the style of the display on the monitor. (p.12, p.16)
c Mode dial
Changes the capture mode. (p.45, p.50)
d Wi-Fi/Fx2 button (Y)
You can assign a function to this button. (p.106)
In playback mode, press to turn the Wi-Fi function on or off.
(p.96)
e AF/AE Lock button (f)
Available for adjusting focus, instead of pressing 0
halfway, and for l ocking the exposure value before sh ooting.
(p.53, p.61)
f Playback button (3)
Switches to playback mode. (p.47) Press the button again to
switch to capture mode.
g OK button (E)
When a menu or the control panel is displayed, press this
button to confirm the selected item.
Press and hold this button when [AF Active Area] is set to
9 or 8, or to 0 or h to switch the function of the arrow
keys to the AF ar ea change mode or the direct ke y operation
mode. (p.62, p.64)
h MENU button (F)
Displays a menu. Press this button while the menu is
displayed to return to the previous screen. (p.22)
About the Main Switch Lamp
The main switch lamp turns off in the following situations.
• From the time when 0 is pressed halfway until the
end of shooting
• During Interval Shooting
• During Optical Preview
• During playback mode
• While a menu is displayed
• During Auto Power Off
You can set the lamp illumination setting in [Other Indicator
Lamps] of [Indicator Lamps] in the D2 menu. (p.110)
About the Four-way Controller
In this manual, each button of the fourway controller is indicated as shown in
the illustration on the right.
1
Introduction
11
Display Indicators
G
G
99 99999999
99 99999999
AUTOAUTO
16001600
FF
5.65.6
10: 2310:23
99 99999999
Status ScreenStatus ScreenStatus Screen
Outdoor View SettingOutdoor View SettingOutdoor View Setting
05/ 05/201 605/05/2016
Standby mode
(Status screen)
Shooting Info Display
selection screen
Control panel
1
Monitor
Introduction
Capture Mode
With this camera, you can take pictures while looking through
the viewfinder or while viewing the image on the monitor.
When using the viewfinder, you can take pictures while
checking the status scre en displayed on the monitor and looking
through the viewfinder. (p.45) When not using the viewfinder,
you can take pictures while viewing the Live View image
displayed on the monitor. (p.47)
The camera is in “standby mode” when it is ready to shoot, such
as when the status screen or Live View image is displayed.
Press G in standby mode to display the “control panel” and
change settings. (p.20) You can change the type of information
displayed in standby mode by pressing G while the control
panel is displayed. (p.15)
12
t Memo
• You can set the display color of the status screen, control
panel, and menu cursor in “Initial Settings” (p.42).

Status Screen
123 11
12
12
12
12 13
15
17
16
14
18 20 21
29
24
18 2019
15
21
22 23
27 2825
26
45678910
1/1/
250250
5120 051200
FF
5.65.6
99 99999999 2 00 02000
+1 .0+1.0
G1 A1G1A1
+1. 7
EV
1/
200 0
F2. 8
102 400
9999
±0EV
1/
200 0
F2. 8
160 0
9999
Live View
1 Capture mode (p.50) 16 EV Compensation
2 AE Lock
(p.58)/Bracketing (p.68)
3 Focus Method (p.61) 17 EV bar scale
4 Custom Image (p.75) 18 Flash Mode (p.59)
5 Clarity (p.80)/Skin Tone
(p.80)/Digital Filter
(p.77)/HDR Capture
(p.79)/Pixel Shift
Resolution (p.81)
6 AA Filter Simulator (p.81)
7 GPS positioning status
(p.126)
8 Wi-Fi connection status
(p.95)
19 Focusing area (AF point)
(p.62)
20 Drive Mode (p.65)
21 White Balance (p.72)
22 Flash Exposure
Compensation (p.59)
23 White Balance fine-
tuning (p.73)
24 External Input Devices
(p.55)
9 AE Metering (p.58) 25 File Format (p.49)
10 Shake Reduction/
Horizon Correction
11 Battery level
12 E-dial guide
26 Memory card
27 Number of recordable
still pictures/Movie
recordable time
13 Shutter speed 28 Number of shots during
14 Aperture value
15 Sensitivity (p.56)
Multi-exposure or
Interval Shooting
29 Operation guide
123456 8 10
11
12
13
1/
2000
+1.7
F2.8
14
20
EV
102400
97
±0EV
9999
25
15
16
17
18
19
1/
F2.8
2000
1600
1
Introduction
9999
26 2721 22 23 24
1 Capture mode (p.50) 15 Electronic Level
2 Flash Mode (p.59)
(horizontal tilt) (p.19)
3 Drive Mode (p.65) 16 Electronic Level (vertical
4 White Balance (p.72)
tilt) (p.19)
5 Custom Image (p.75) 17 EV Compensation (p.58)
6 Clarity (p.80)/Skin Tone
(p.80)/Digital Filter
(p.77)/HDR Capture
(p.79)/Pixel Shift
Resolution (p.81)
7 Wi-Fi connection status
(p.95)
18 EV bar scale
19 Operation guide, and
number of shots during
Multi-exposure or
Interval Shooting
20 AE Lock
21 Shutter speed
8 AE Metering (p.58) 22 Aperture value
9 Shake Reduction/
Horizon Correction/
Movie SR
23 Sensitivity (p.56)
24 File Format (p.49)
25 Memory card
10 Battery level 26 Number of recordable
11 External Input Devices
(p.55)
12 GPS positioning status
(p.126)
13 Temperature warning
14 Histogram
still pictures/Movie
recordable time
27 Face detection frame
(when [AF Active Area] is
set to [Face Detection])
(p.63)
13
t Memo
10: 2310:23
1
2
34
98
11
16
21
10
15
20
12
65
7
17
22
13
18
23 24
14
19
28 3029
99 99999999
Custom ImageCustom ImageCustom Image
BrightBrightBright
05/ 05/201 605/05/2016
10: 2310:23
1
2
128
65
7
28
3029
9: 59’ 59 ”9:59’59”
34
16
26
15
21
1727182325
Highlight CorrectionHighlight CorrectionHighlight Correction
AutoAutoAuto
05/ 05/201 605/05/2016
C mode
A mode
•
1
Introduction
14
In [Live View] of the A5 and C2 menus, you can change the
display settings of Live View. (p.26, p.30)
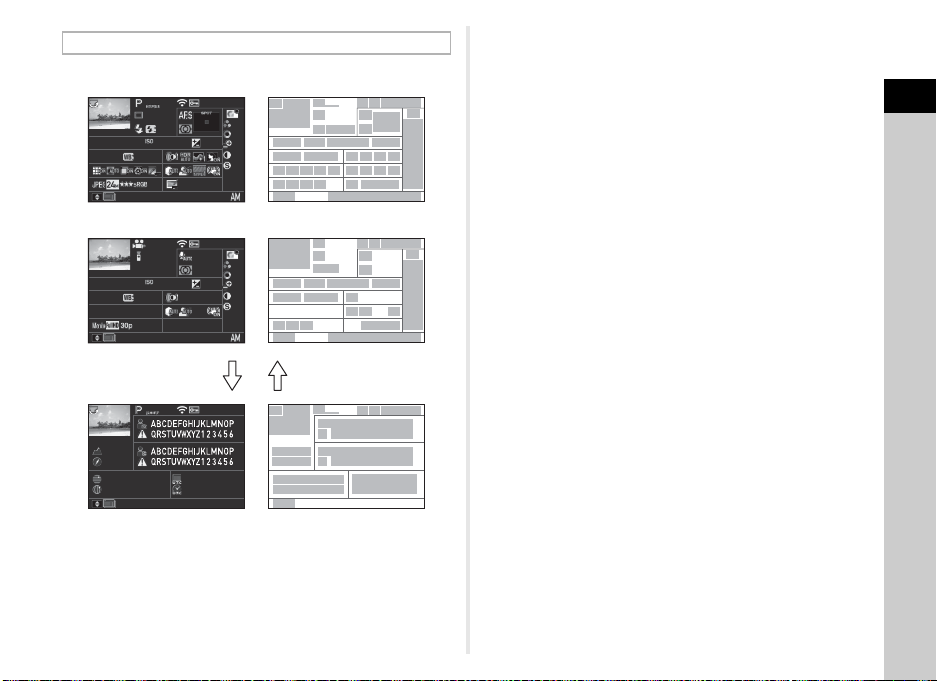
Control Panel
The following functions are displayed with the default setting.
1 Function name 11 Skin Tone (p.80)
2 Setting 12 Digital Filter (p.77)
3 Memory card 13 HDR Capture (p.79)
4 Number of recordable
still pictures/Movie
recordable time
5 Outdoor View Setting
(p.110)
14 Pixel Shift Resolution
(p.81)
15 AF Mode (p.62)
16 AF Active Area (p.62,
p.64)
6 Custom Image (p.75) 17 AF Assist Light (p.62)
7 Highlight Correction
(p.78)
8 Shadow Correction
(p.78)
9 High-ISO NR (p.57)
10 Clarity (p.80)
18 AE Metering (p.58)
19 AA Filter Simulator (p.81)
20 File Format (p.49)
21 JPEG Recorded Pixels
(p.49)/Movie Recorded
Pixels (p.49)
22 JPEG Quality (p.49) 27 Recording Sound Level
99 999
1/
250
F
5.6
1600
Status Screen
1/
2501/250 F5.6F5.6 160 01600 0.00.0
Example:
Tilted 1.5° to the left (yellow)
Vertically level (green)
1/
2501/250 F5.6F5.6 160 01600 0.00.0
10: 00:0010:00:00
0°
N 36° 45.410 'N 36°45.410'
W14 0°02.0 00'W140°02.000'
89m89m
05/ 05/201 605/05/2016
23 Shake Reduction/Movie
(p.55)
SR 28 Current date and time
24 Horizon Correction 29 Destination (p.113)
25 External Input Devices
(p.55)
26 Framerate (p.49)
30 Operation guide for the
control panel
customization (p.21)
t Memo
• Refer to “Using the Control Panel” (p.20) for how to use the
control panel.
• The functions displayed on the control panel can be
customized. (p.21)
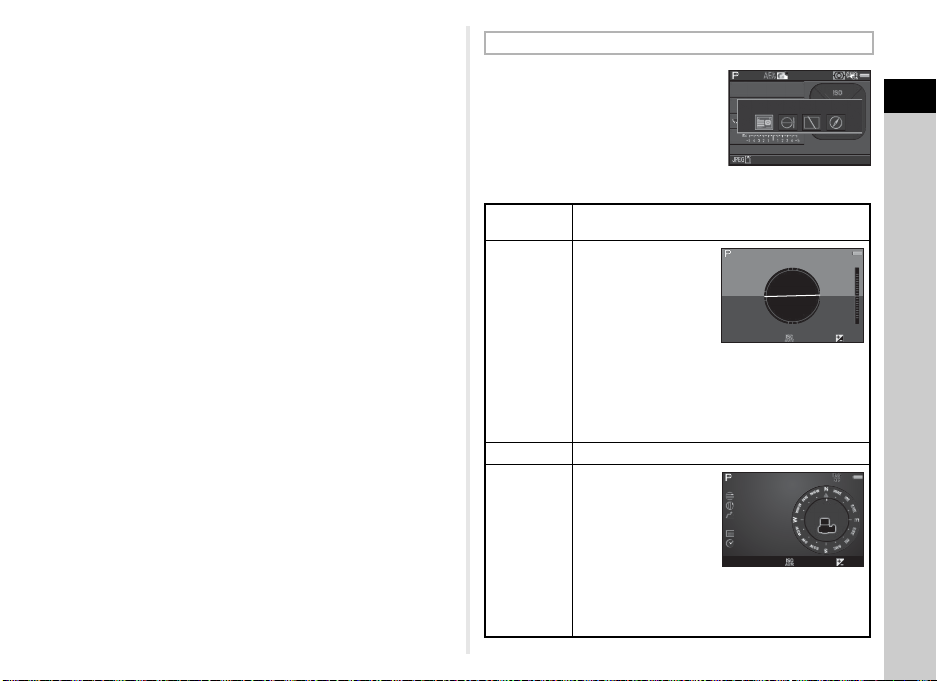
Shooting Info Display
You can change the type of
information displayed in standby
mode by pressing G while the
control panel is displayed. Use CD
to select the type and press E.
1/
250
F
5.6
1600
99999
When shooting with the viewfinder
Status
Screen
Electronic
Level
Displays the settings for shooting with the
viewfinder. (p.13)
Displays the camera
angle.
A bar scale indicating
the horizontal camera
angle appears at the
center of the screen,
and a bar scale
indicating the vertical
camera angle
appears on the right
side. When the angle exceeds the range that
can be displayed in each scale, the indicator
segments of the scale are displayed in red.
Display Off Nothing is displayed on the monitor.
Displays the current
latitude, longitude,
altitude, direction,
Coordinated Universal
Electronic
Compass
Time (UTC), capture
mode, and exposure
value. Turn the
camera off and on
again to return to the status screen.
Available only when the optional GPS unit is
attached to the camera and is operating. (p.126)
Status Screen
1
Introduction
15

When shooting with Live View
Single image disp lay
(Standard Information Disp lay)
Playback Info Display selection
screen
1/
200 01/2000 F2.8F2.8 200200 +0.3+0.3
100 -0001100-0001
1/
200 01/2000 F2.8F2.8 200200 +0.3+0.3
100 -0001100-0001
G
Standard Information DisplayStandard Information Display
1
Introduction
Standard
Information
Display
Electronic
Level
No Information
Display
The Live View image and the settings for
shooting with Live View are displayed. (p.13)
The same electronic level as when shooting
with the viewfinder is displayed.
Certain icons, such as those for the capture
mode and drive mode, are not displayed.
t Memo
• The status screen is displayed when the camera is turned off
and on again. If [Shooting Info Display] is set to Z (On) in
[Memory] of the A5 menu, the screen selected on the
Shooting Info Display selection screen appears when the
camera is turned off and on again. (p.113)
Playback Mode
The captured image and shooting information are displayed in
single image display of the playback mode.
Press G to change the type of information displayed in
single image display. Use CD to select the type and press E.
Standard
Information
Display
Detailed
Information
Display
Histogram
Display
RGB
Histogram
Display
No Information
Display
Captured image, file format, exposure
parameters, and operation guide indicators
are displayed.
Detailed information on how and when the
image was taken is displayed. (p.17)
Captured image and brightness histogram
are displayed. (p.18)
Not available during movie playback.
Captured image and RGB histogram are
displayed. (p.18)
Not available during movie playback.
Only the captured image is displayed.
t Memo
• You can set overexposed areas to blink red in Standard
Information Display, Histogram Display, and No Information
Display. Set in [Highlight Alert] of [LCD Display] in the B1
menu.
• The screen selected in the Playback Info Display selection
screen is displayed in playback mode when the camera is
turned off and on again. If [Playback Info Display] is set to Y
(Off) in [Memory] of the A5 menu, the Standard Information
Display always appears first when the camera is turned on.
(p.113)
16
1
334
9
14
18
24 25 26
33
41
40
40
40
41
34 35
32 33 44
36 37
27 28 29 30 31
32
19 20 21 22
23
15 16
17
1817
10
8
12
13
1413
38
39
38
39
11
65
45
45
6
6
46
47
45
4549
50
51
52
48
43
11
3
7
42
15 16
19
28 29 31
37
7
2
2
1
1
+1. 0+1.0
1/
200 01/2000 F2 .8F2.8
55. 0mm55.0mm
102 400102400
500 0K5000K
100 -0001100-0001
+1. 5+1.5
±0±
0
±0±
0
±0±
0
±0±
0
±0±
0
10: 3010:30
10' 10"10'10"
G1A 1G1A1
100 -0001100-0001
0m0m
123 °123°
N
36° 45.410 'N
36°45.410'
10: 00:0010:00:00
W14 0°02.0 00'W140°02.000'
1/
1251/125 F8.0F8.0
55. 0mm55.0mm
160 01600
500 0K5000K
100 -0001100-0001
+1. 5+1.5
±0±
0
±0±
0
±0±
0
±0±
0
±0±
0
10: 3010:30
G1A 1G1A1
05/ 05/201 605/05/2016
05/ 05/201 605/05/2016
05/ 05/201 605/05/2016
Still pictures
Movies
Page 2
BA
Detailed Information Display
1 Captured image 6 Folder number-File
2 Rotation information
3 Capture mode (p.50) 8 Flash Mode (p.59)
(p.86) 7 Drive Mode (p.65)
4 Wi-Fi connection status
(p.95)
5 Protect setting (p.114) 10 Focus Method (p.61)
number (p.115)
9 Flash Exposure
Compensation (p.59)
11 AE Metering (p.58) 31 Shake Reduction/
12 Focusing area (AF point)
(p.62)
Horizon Correction/
Movie SR
13 Shutter speed 32 File Format (p.49)
14 Aperture value 33 JPEG Recorded Pixels
15 Sensitivity (p.56)
16 EV Compensation (p.58)
(p.49)/Movie Recorded
Pixels (p.49)
17 White Balance (p.72) 34 JPEG Quality (p.49)
18 White Balance fine-
tuning (p.73)
35 Color Space (p.49)
36 Color Moiré Correction
(p.89)19 Digital Filter (p.77)
20 HDR Capture (p.79)/
Pixel Shift Resolution
(p.81)
37 Lens focal length
38 Custom Image setting
(p.75)
21 Clarity (p.80) 39 Custom Image
22 Skin Tone (p.80)
23 Distortion Correction
(p.80)
24 Peripheral Illumination
Correction (p.80)
25 Lateral Chromatic
Aberration Adjustment
(p.80)
26 Diffraction Correction
(p.80)
27 Color Fringe Correction
(p.93)
28 Highlight Correction
(p.78)
29 Shadow Correction
(p.78)
parameters
40 Operation guide
41 Shooting date and time
42 Length of time of the
recorded movie
43 Recording Sound Level
(p.55)
44 Framerate (p.49)
45 Tampered image
warning
46 Photographer (p.117)
47 Copyright Holder (p.117)
48 Altitude
49 Lens direction
50 Latitude
51 Longitude
30 AA Filter Simulator (p.81) 52 Universal Coordinated
me
Ti
1
Introduction
17

Histogram Display
100 -0001
1/
200 0
F2. 8
200
+0. 3
100 -0001
1/
200 0
F2. 8
200
+0. 3
Brightness histogram
RGB histogram
BA
1
4
19
181716151413
61011
12
2
1
3
5 7 8 9
Use AB to switch between the brightness histogram and RGB
histogram.
1
Introduction
134
2
1/
2000
F2.8
200
6 7 8 9 10
1/
2000
F2.8
6 7 8 109
200
18
100-0001
34251
100-0001
+0.3
+0.3
1 Histogram (Brightness)
5
2 RGB histogram/
Brightness histogram
3 Protect setting
4 Folder number-File
number
5 Save RAW Data
6 File Format
7 Shutter speed
8 Aperture value
9 Sensitivity
10 EV Compensation
11 Histogram (R)
11
12 Histogram (G)
12
13 Histogram (B)
13
Viewfinder
When shooting with the viewfinder, information appears in the
viewfinder.
1 AF frame (p.46) 10 ISO/ISO AUTO
2 Spot metering frame
(p.58)
3 AF point (p.62)
4 Flash indicator (p.59) 12 AE Lock
5 Focus Method (p.61) 13 Change AF Area (p.62)
6 Shutter speed/Exposure
time for timed exposure
in M mode/Number of
shots for Bracketing
7 Aperture value/Bracket
value for Bracketing
9 EV bar scale/Electronic
Level (p.19)
11 Sensitivity (p.56)/
Exposure compensation
value
14 Multi-exposure (p.70)
15 AE Metering (p.58)
16 Shake Reduction
17 Flash Exposure
Compensation (p.59)
18 EV Compensation
(p.58)/Bracketing (p.68)8 Focus indicator (p.46)
19 File Format (p.49)
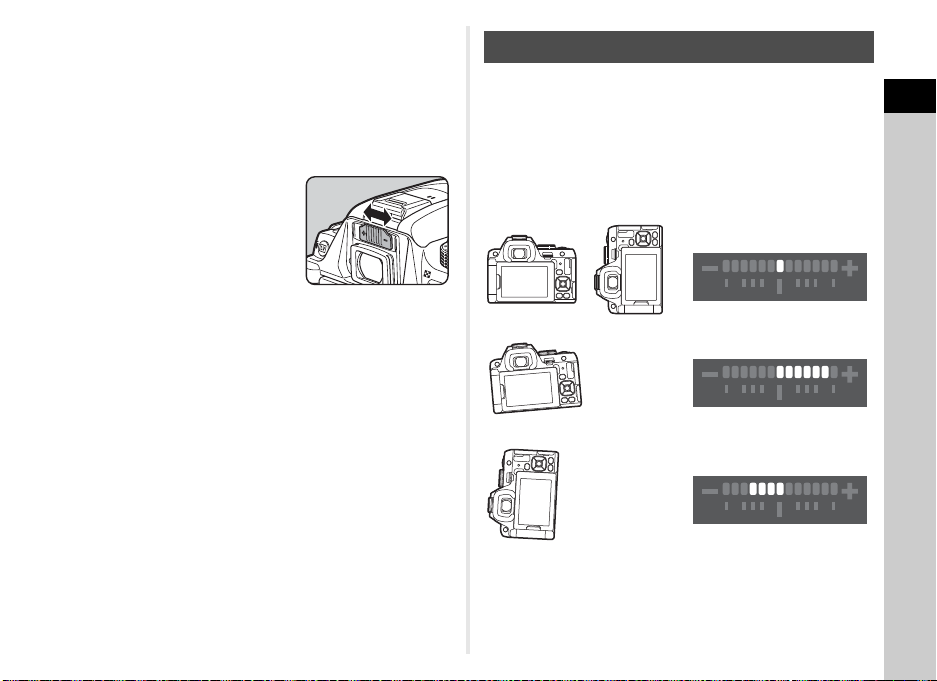
t Memo
When level (at 0°)
When tilted 5° to the left
When held vertically and tilted 3° to the right
• The information is displayed in the viewfinder when 0
is pressed halfway, or during the meter operating time
(default setting: 10 sec.).
• The AF point in use for autofocus appears in red
(Superimpose AF Area) when 0 is pressed halfway.
You can turn this function off in [Superimpose AF Area] of
[Viewfinder Overlay] in the A5 menu. (p.26)
• You can adjust the viewfinder
image sharpness using the diopter
adjustment lever. If it is difficult to
move the diopter adjustment lever,
lift up and remove the eyecup.
Adjust the diopter setting until the
AF frame in the viewfinder looks
sharp and clear.
Electronic Level
You can check whether the camera is tilted by displaying
electronic levels. The electronic level for the horizontal camera
angle can be displayed in the viewfinder, and the electronic
levels for the vertical and horizontal camera angles can be
displayed on the Live View screen. (p.13)
Select whether to display the electronic levels in [Viewfinder
Overlay] and [Live View] of the A5 menu. (p.26)
Examples of Electronic Level in the Viewfinder
t Memo
• When [Electronic Level] is assigned to X or Y in [Button
Customization] of the A5 menu, you can turn the electronic
level display on or off by a simple button operation. (p.106)
1
Introduction
19
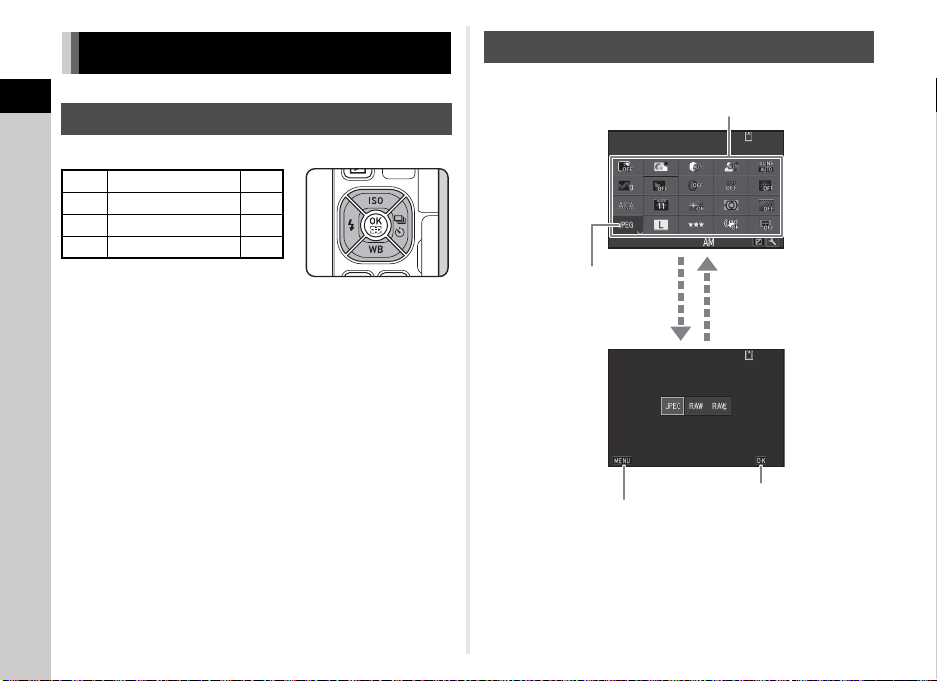
How to Change Function Settings
99 99 999999
99 99 999999
10: 2310:23
File FormatFile Format
CancelCancel OKOK
05/ 05 /20 1605/05/2016
File FormatFile FormatFile Format
Use ABCD to select an item.
Use R to change
settings.
Press F to cancel
the setting operation.
Press E to confirm the
selected item and return to
the control panel.
Press E to make
detailed settings.
1
Using the Direct Keys
Introduction
Press ABCD in standby mode.
A Sensitivity p.56
B White Balance p.72
C Flash Mode p.59
D Drive Mode p.65
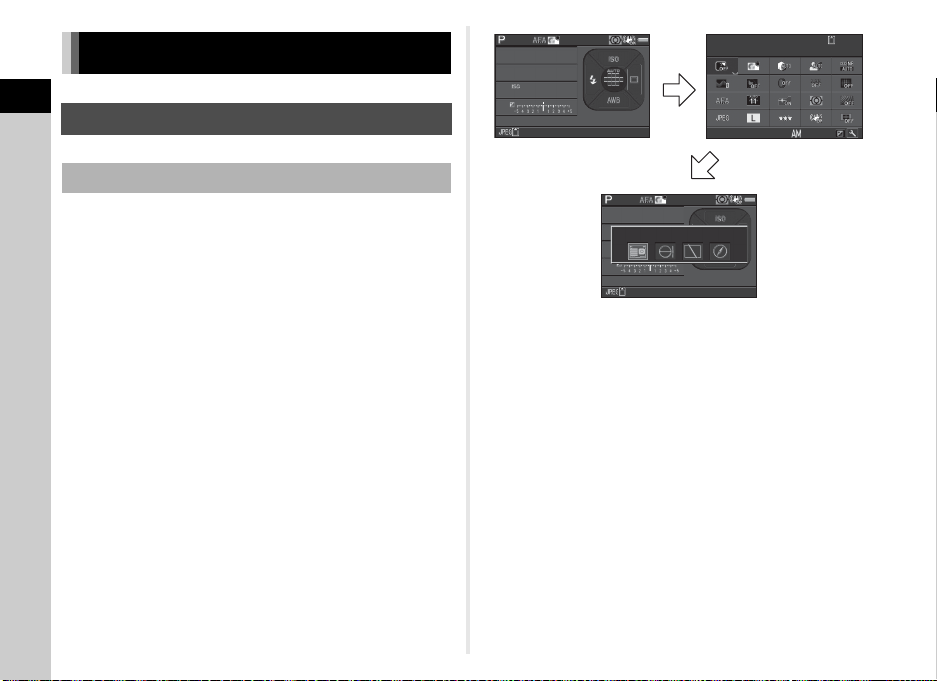
Using the Control Panel
Press G in standby mode.
20
t Memo
• The functions that can be selected vary depending on the
current camera setup.
• If no operations are made within approximately 1 minute
while the control panel is displayed, the camera returns to
standby mode.
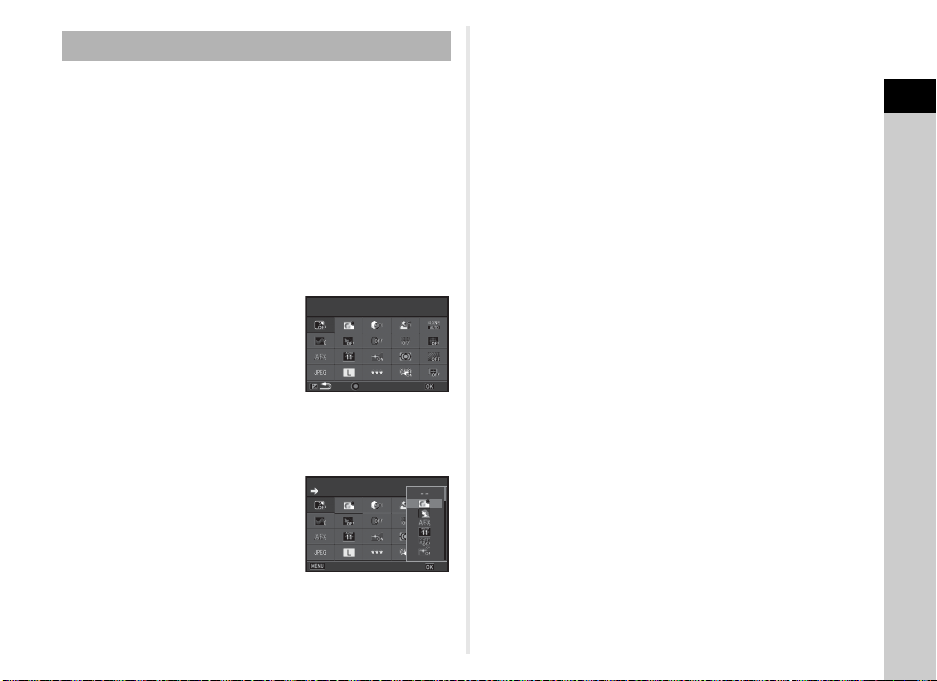
Customizing the Control Panel
Select the location of the
item you want to change
Reset
OK
Outdoor View Setting
Custom Image
Cancel
OK
The functions displayed on the control panel can be
customized.
Some functions in the A, C, and D menus can be saved on
the control panel. Refer to “Menu List” (p.24) for details on the
functions that can be saved.
1 Press G in standby mode.
The control panel appears.
2 Press J.
The customization screen appears.
7 Press J.
The control panel reappears.
8 Press F.
The camera returns to standby mode.
1
Introduction
3 Use ABCD to select the
function to change.
Press M to reset to the default
settings.
4 Press E.
Selectable functions are displayed in the pop-up menu.
5 Use AB to select the
function to save.
Select [--] if you do not want to
save any function.
6 Press E.
The screen of Step 3 reappears.
Select the location of the
Select the location of the
item you want to change
item you want to change
Reset
Outdoor View Setting
Outdoor View Setting
Custom Image
Custom Image
Cancel
OK
OK
21
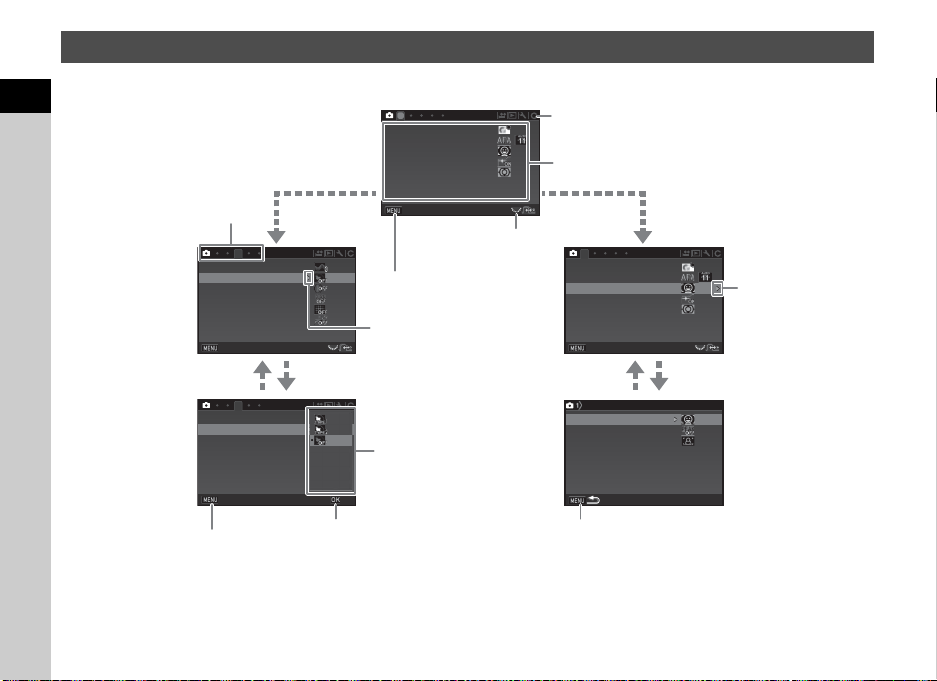
Using the Menus
1
3
3
1
AF with ViewfinderAF with Viewfinder
AF Assist LightAF Assist Light
AE MeteringAE Metering
Custom ImageCustom Image
AF with Live ViewAF with Live View
ExitExit
Skin ToneSkin Tone
ClarityClarity
HDR CaptureHDR Capture
Digital FilterDigital Filter
Pixel Shift ResolutionPixel Shift Resolution
ASTROTRACERASTROTRACER
Skin ToneSkin Tone
ClarityClarity
HDR CaptureHDR Capture
Digital FilterDigital Filter
Pixel Shift ResolutionPixel Shift Resolution
ASTROTRACERASTROTRACER
ExitExit
CancelCancel OKOK
ExitExit
AF Active AreaAF Active Area
Focus PeakingFocus Peaking
AF with Live ViewAF with Live View
AF.S SettingAF.S Setting
AF with ViewfinderAF with Viewfinder
AF Assist LightAF Assist Light
AE MeteringAE Metering
Custom ImageCustom Image
AF with Live ViewAF with Live View
Use AB to select an item.
Use R to switch
between menu tabs.
Press F to exit the
menu screen.
Menu tabs
Press D to display the
pop-up menu.
Press D to display
the submenu.
Press E to confirm the
selected item.
Press F to cancel the
pop-up menu.
Press F to return to the previous screen.
Use AB to select an item.
Use Q to change the menu category.
Most functions are set from the menus.
1
Introduction
22

t Memo
• For the Custom Setting menus (E menus), you can show the setting screen of the next item in order of the menus on the monitor
by turning R while the submenu of the currently selected item is displayed.
• Press F to display the first tab of the most appropriate menus for the camera settings at that time. To display the menu tab last
selected first, set in [21 Save Menu Location] of the E3 menu.
• The settings changed with the A menus, C menus, B menu, D menus, direct keys, control panel, and playback mode palette
are returned to their default values with [Reset] of the D5 menu. To reset the settings in the Custom Setting menus to the defaults,
use [Reset Custom Functions] of the E4 menu. (Some settings do not apply.)
1
Introduction
23

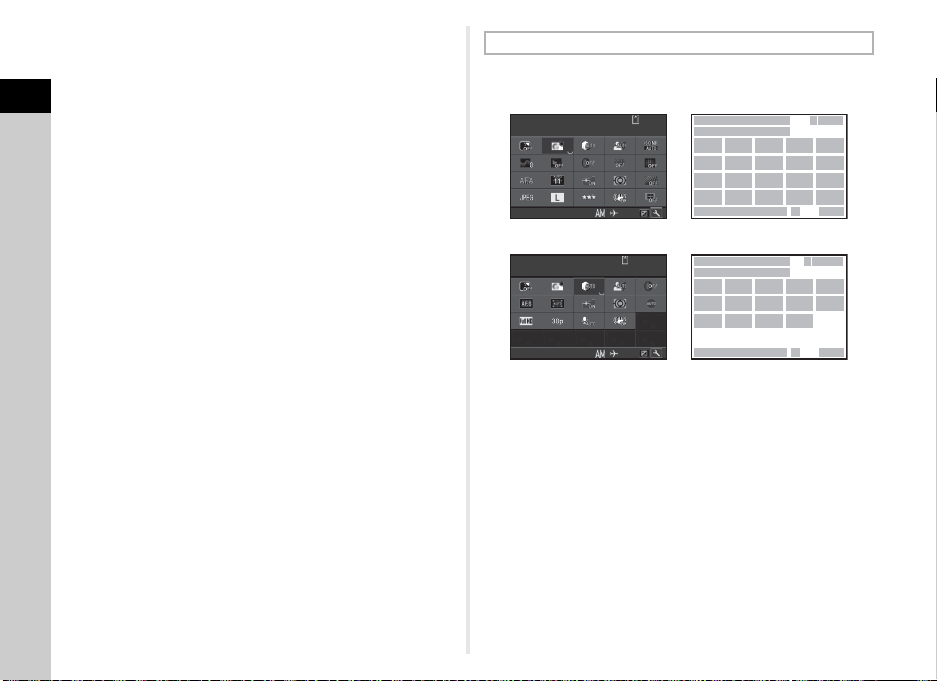
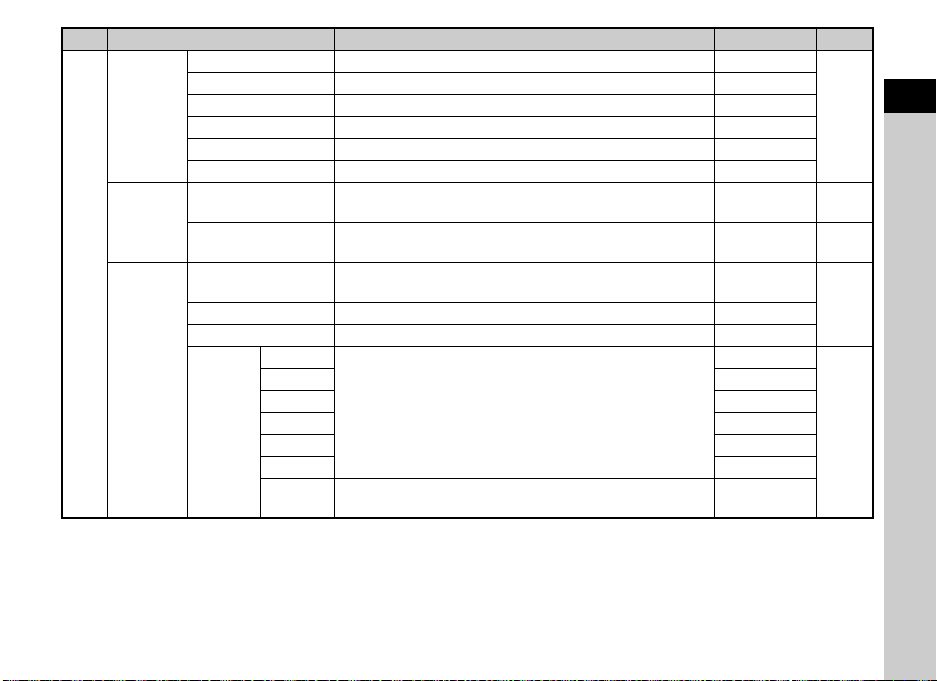
Menu List
1
Rec. Mode Menus
Introduction
Menu Item Function Default Setting Page
Custom Image
Scene Mode
AF with
Viewfinder
A1
AF with
Live View
AF Assist Light
*1 *2
*1
*3
AF Mode
AF Active Area
AF.S Setting
1st Frame Action in
AF.C
Action in AF.C Cont.
Hold AF Status
AF Active Area
Focus Peaking
AF.S Setting Sets the action priority for when 0 is fully pressed. Focus-priority
*1
*1
Sets the image finishing tone such as color and contrast
before shooting an image.
Selects the scene mode that best suits the situation. (S
mode)
Selects the AF mode for shooting with the viewfinder. z p.62
Selects the area to adjust the focus for shooting with the
*1
viewfinder.
Sets the action priority for when the autofocus mode is set to
x and 0 is fully pressed.
Sets the action priority for the first frame when the autofocus
mode is set to y and 0 is fully pressed.
Sets the action priority during Continuous Shooting when the
autofocus mode is set to y.
Maintains the focus for a certain amount of time when the
subject happens to move out of the selected focusing area
after being focused.
Selects the area to adjust the focus for shooting with Live
*1
View.
Emphasizes the outline of the subject in focus and makes it
*1
easier to check the focus.
Discharges the assist light when autofocusing in dark
locations.
Portrait p.50
(11 AF Points)
Focus-priority p.61
Face Detection
Bright p.75
Auto
Auto p.61
Auto p.61
Low p.61
Off
On p.62
p.62
p.63
24

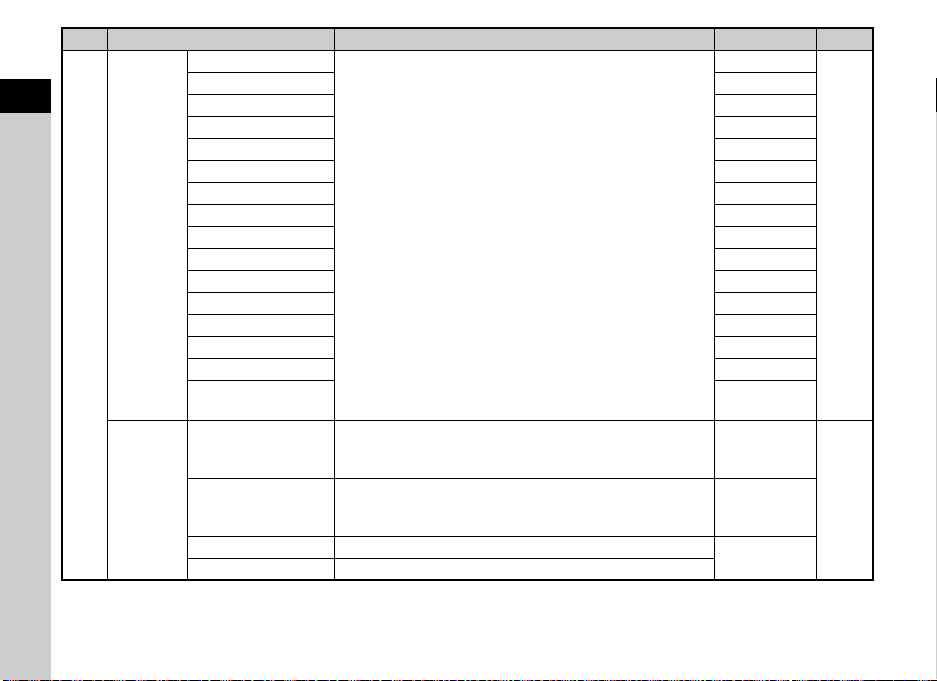
Menu Item Function Default Setting Page
AE Metering
A1
Exposure Mode
Image
Capture
Settings
A2
D-Range
Settings
Noise
Reduction
*1
Clarity
Skin Tone
Digital Filter
A3
HDR Capture
Pixel Shift Resolution
ASTROTRACER
*1
*4
File Format
JPEG Recorded
Pixels
*1
*1
JPEG Quality
RAW File Format Sets the RAW file format.
Color Space Sets the color space to use.
Highlight
Correction
Shadow
Correction
Slow Shutter Speed
NR
*1
*1
*1
High-ISO NR
*1
*1
*1
*1
*1
Selects the part of the se nsor to use for measuring brightness
and determining the exposure.
Multi-segment p.58
Temporarily change s the exposure mode when the mode dial
is set to one of the modes from O to Q.
Sets the file format of images.
Sets the recording size of JPEG images.
*1
Sets the quality of JPEG images.
Expands the dynamic range and prevents overexposed
areas from occurring.
Expands the dynamic range and prevents underexposed
areas from occurring.
Sets the Noise Reduction setting when shooting with a slow
shutter speed.
Sets the Noise Reduction setting when shooting with a high
*1
ISO sensitivity.
Changes the clarity of images using an image processing
program.
Enhances the skin tone of the subject in the image using an
image processing program.
Applies a digital filter effect when taking pictures. No Filter p.77
Sets the type of high dynamic range shooting. Off, ±2EV, On p.79
Merges four images shifted pixel by pixel and outputs a highdefinition image.
Makes settings to track and capture celestial bodies. Off p.127
–p.112
JPEG
q
m
p.49
PEF
sRGB
Auto
p.78
Auto
Auto p.52
Auto p.57
±0 p.80
Off p.80
Off p.81
1
Introduction
25

Menu Item Function Default Setting Page
Applies a low-pass filter effect using the Shake Reduction
mechanism.
Activates the Shake Reduction function. On –
Corrects horizontal tilt when in A mode. Off –
Reduces distortions occurring due to lens properties. Off
Reduces peripheral light fall-off occurring due to lens
properties.
Reduces lateral chromatic aberrations occurring due to lens
properties.
Corrects blur caused by diffraction when using a small
aperture.
Sets the focal length when using a lens of which focal length
information cannot be obtained.
*1
Displays the electronic level at the bottom of the viewfinder. Off p.19
Displays the active AF point in red in the viewfinder. On p.19
Sets the type and color of the grid lines displayed during Live
View.
*1
Displays the electronic level during Live View. On
Off, Black
1
Introduction
AA Filter Simulator
Shake Reduction
Horizon Correction
A4
Lens
Correction
Input Focal Length
Viewfinder
Overlay
A5
Live View
*1
*1
*1
Distortion
Correction
Peripheral Illumin.
Corr.
Lat-Chromatic-Ab
Adj
Diffraction
Correction
*1
*1
*1
*1
*1
Electronic Level
Superimpose AF
Area
Grid Display
*1
Electronic Level
Histogram Display Displays the histogram during Live View. Off
Highlight Alert Sets overexposed areas to blink red during Live View. Off
Flicker Reduction
Cuts down on the Live View screen flicker by setting the
power frequency.
Off p.81
Off
On
On
35mm
50Hz
p.80
p.125
p.13
26
Menu Item Function Default Setting Page
Display Time Sets the Instant Review display time. 1sec.
Zoom Review Displays the magnified image during Instant Review. On
Instant
Review
Other
Display
Settings
A5
Button
Customization
Save RAW Data Saves the RAW data during Instant Review. On
Delete Deletes the displayed image during Instant Review. On
Histogram Display Displays the histogram during Instant Review. Off
Highlight Alert Sets overexposed areas to blink red during Instant Review. Off
Guide Display
Display Color
Fx1 Button Sets the function for when X is pressed.
Fx2 Button Sets the function for when Y is pressed. Wi-Fi
AF/AE-L Button Sets the function for when f is pressed. Enable AF1
G
H
E-Dial
Programming
I
J
K
L
Rotation
Direction
Displays operation guides when the capture mode is
changed.
Sets the display color of the status screen, control panel, and
menu cursor.
Sets the Q / R / M operation for each exposure mode.
Reverses the effect obtained when Q or R is turned. Rotate Right
On p.45
1
One Push
File Format
I, J, XG
–, ISO, –
I, –, –
–, J, –
, J, GLINE
I
I
, J, GLINE
p.46
p.44
p.106
p.109
1
Introduction
27
Menu Item Function Default Setting Page
Sensitivity
1
Introduction
Memory
A5
Save
USER
Mode
*1 Available as a function in the control panel.
*2 The function appears in modes other than S mode.
*3 The function appears in S mode.
*4 The function appears only in O to Q modes.
28
EV Compensation On
Flash Mode On
Flash Exposure Comp.
Drive Mode On
White Balance On
Custom Image On
Clarity Off
Skin Tone Off
Digital Filter Off
HDR Capture Off
Pixel Shift Resolution
Shooting Info Display
Playback Info Display
Outdoor View Setting
Night Vision LCD
Display
Save Settings
Rename USER Mode
Check Saved Settings
Reset USER Mode Resets all the settings saved in USER modes to the defaults.
Determines which settings to save when the power is turned
off.
You can save frequently used capture settings to O to Q
of the mode dial.
Changes the names of the saved USER modes to display on
the monitor.
Displays the settings saved in USER modes.
CLEAR TONE,
HDR LANDSCAPE,
ASTROPHOTO
CLEAR TONE,
HDR LANDSCAPE,
ASTROPHOTO
On
On
p.113
Off
Off
On
Off
Off
p.111
–
 Loading...