

Ricoh Pentax K-3 Operating Manual
To ensure the best performance from your
camera, please read the Operating Manual
before using the camera.
Introduction
1
2
Getting Started
3
Shooting
4
Playback
5
Settings
6
Appendix
SLR Digital Camera
Operating Manual
PENTAX
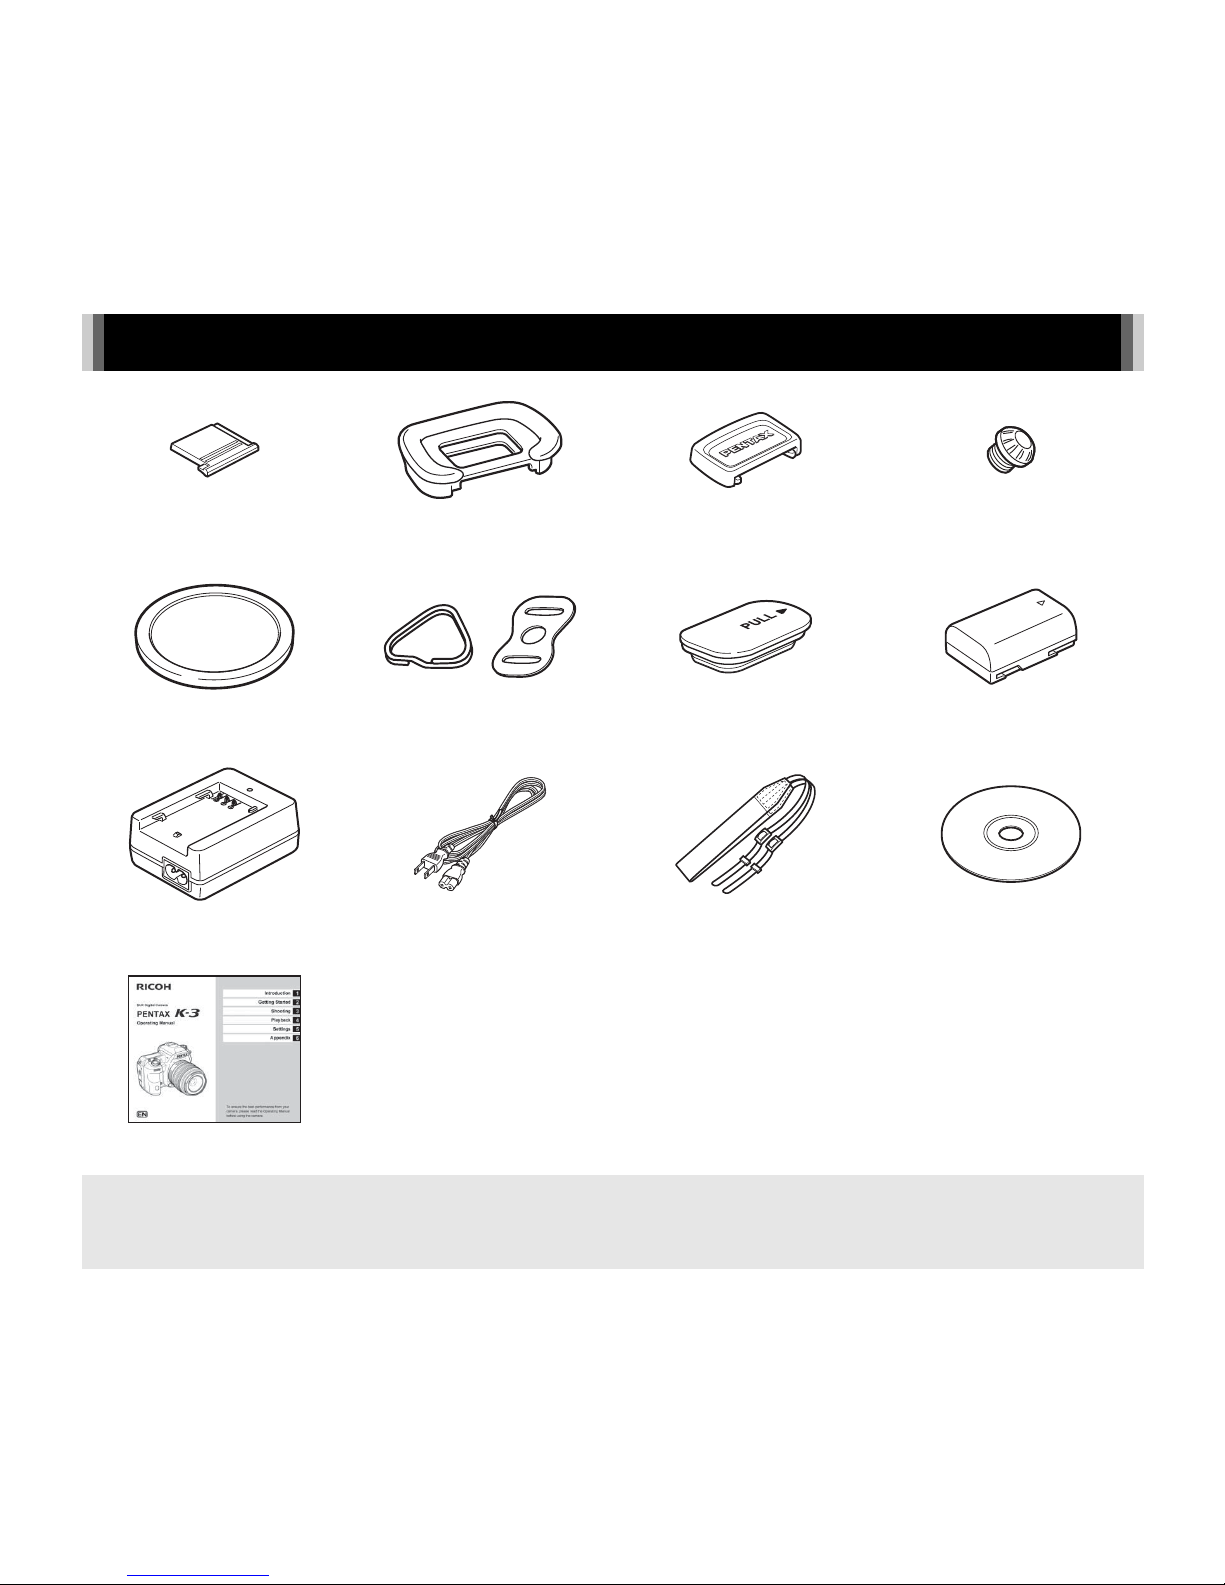
Checking the Contents of the Package
Hot shoe cover FK
(Installed on camera)
Eyecup F
s
(Installed on camera)
ME viewfinder cap Sync socket 2P cap
(Installed on camera)
Body mount cover
(Installed on camera)
Triangular ring and protective cover
(Installed on camera)
Battery grip terminal cover
(Installed on camera)
Rechargeable Lithium-ion
Battery D-LI90
Battery charger
D-BC90
AC plug cord Strap
O-ST132
Software (CD-ROM)
S-SW140
Operating Manual (this manual)
Lenses you can use
Lenses that can be used with this camera are DA, DA L, D FA and FA J lenses and lenses that have an 9 (Auto) position on the
aperture ring. To use any other lens or accessory, see p.81.

1
1
2
3
4
5
6
Introducing the K-3
Getting Started
Taking Pictures
Playback Functions
Changing the Settings
Appendix

How to Use This Manual
2
v
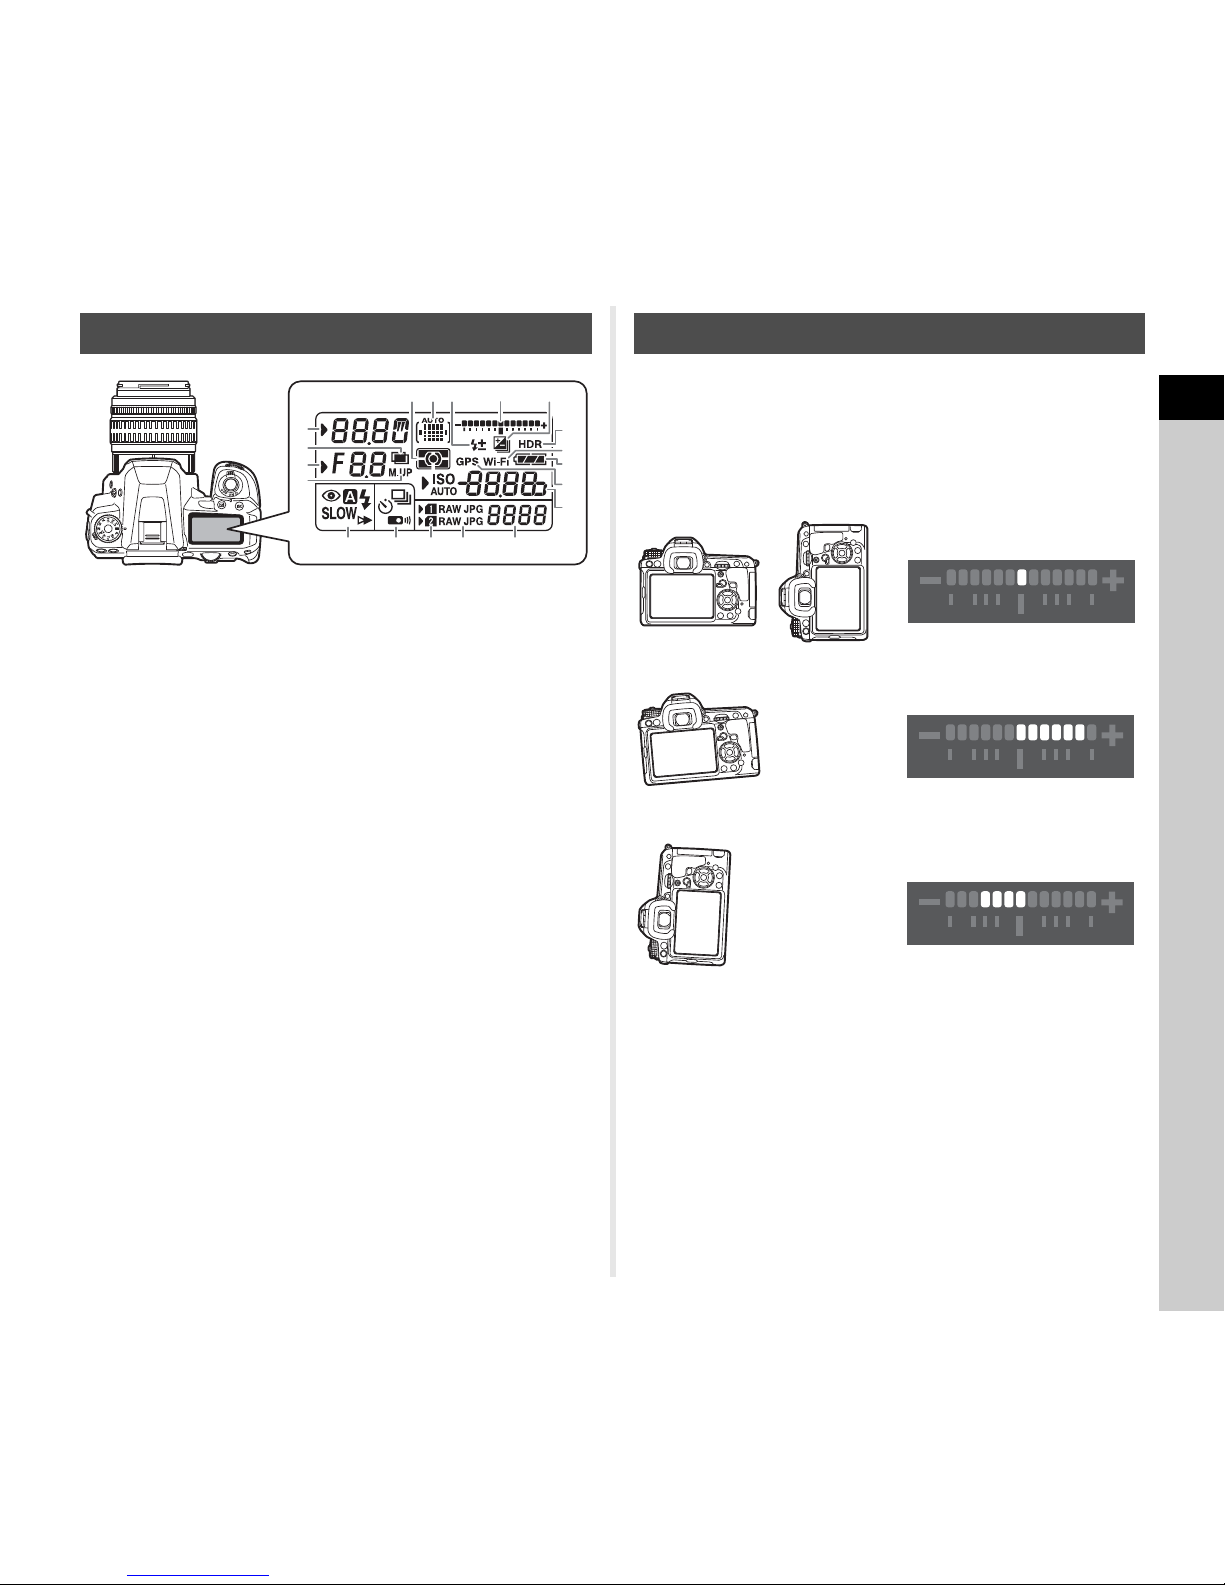
Names and Functions of the Working
Parts .............................................................p.7
How to Change Function Settings ............. p.16
Menu List ......................................................p.18
Attaching the Strap .....................................p.25
Attaching a Lens .........................................p.25
Using the Battery and Charger ..................p.26
Inserting a Memory Card ............................p.28
Initial Settings ..............................................p.29
Basic Shooting Operation ..........................p.31
Reviewing Images .......................................p.34
Configuring the Capture Settings ..............p.35
Taking Still Pictures ....................................p.36
Recording Movies .......................................p.38
Setting the Exposure ..................................p.39
Using the Built-in Flash ..............................p.41
Setting the Focus Method ..........................p.42
Setting the Drive Mode ...............................p.47
Setting the White Balance .......................... p.52
Controlling the Image Finishing Touch .....p.54
Correcting Images .......................................p.57
How to Use This Manual
1
Introducing the K-3...............................p.7
Gives you an overview of the K-3.
Read this and get to know your K-3!
2
Getting Started .......................................p.25
Explains how to get your K-3 ready for shooting as
well as basic operations.
3
Taking Pictures ......................................p.35
Once you’ve confirmed that the camera works
properly, try out the camera and take lots of
pictures!

How to Use This Manual
3
Playback Mode Palette Items .....................p.59
Changing the Playback Method .................p.60
Connecting the Camera to a Computer ..... p.64
Editing and Processing Images .................p.65
Camera Settings ..........................................p.71
File Management Settings ..........................p.75
Restrictions on the Combinations of Special
Functions .....................................................p.80
Functions Available with Various
Lenses ..........................................................p.81
Functions when Using an External
Flash .............................................................p.84
Using the GPS Unit .....................................p.85
Troubleshooting ..........................................p.86
Main Specifications .....................................p.90
Index .............................................................p.96
For Using Your Camera Safely ...................p.100
Care to be Taken During Handling ............p.101
WARRANTY POLICY ...................................p.104
There is a possibility that the illustrations and the display screen
of the monitor in this manual are different from the actual ones.
4
Playback Functions..............................p.59
Explains various operations for playing back and
editing images.
5
Changing the Settings ........................p.71
Explains how to change other settings.
6
Appendix ...................................................p.80
Provides various resources.

Contents
4
How to Use This Manual .........................2
Introducing the K-3 ..................................7
Names and Functions of the Working Parts ......7
Buttons and Dials ........................................................... 8
Monitor Display .............................................................. 9
Viewfinder .................................................................... 14
LCD Panel ................................................................... 15
Electronic Level ........................................................... 15
How to Change Function Settings ....................16
Using the Direct Keys .................................................. 16
Using the Control Panel ............................................... 16
Using the Menus .......................................................... 17
Menu List .............................................................18
Rec. Mode Menu ......................................................... 18
Movie Menu ................................................................. 21
Playback Menu ............................................................ 21
Set-up Menu ................................................................ 22
Custom Setting Menu .................................................. 23
Getting Started .......................................25
Attaching the Strap ............................................25
Attaching a Lens .................................................25
Using the Battery and Charger ..........................26
Charging the Battery .................................................... 26
Inserting/Removing the Battery ................................... 27
Using the AC Adapter .................................................. 28
Inserting a Memory Card ...................................28
Initial Settings .....................................................29
Turning the Camera On ............................................... 29
Setting the Display Language ...................................... 29
Setting the Date and Time ........................................... 30
Formatting a Memory Card .......................................... 31
Basic Shooting Operation .................................31
Shooting with Live View ............................................... 33
Reviewing Images ..............................................34
Taking Pictures ......................................35
Configuring the Capture Settings ..................... 35
Memory Card Settings ................................................. 35
Image Capture Settings ............................................... 35
Movie Capture Settings ................................................ 35
Taking Still Pictures ...........................................36
EV Compensation ........................................................ 37
Recording Movies ...............................................38
Playing Back Movies .................................................... 39
Setting the Exposure ..........................................39
Sensitivity ..................................................................... 39
AE Metering ................................................................. 40
Using the Built-in Flash .....................................41
Setting the Focus Method .................................. 42
Setting the AF Mode when Shooting with the
Viewfinder .................................................................... 43
Setting the AF Mode during Live View ......................... 44
AF Fine Adjustment ..................................................... 45
Checking the Depth of Field (Preview) ........................ 46
Setting the Drive Mode .......................................47
Continuous Shooting .................................................... 48
Self-timer ...................................................................... 48
Remote Control ............................................................ 49
Exposure Bracketing .................................................... 49
Mirror Lock-up Shooting ............................................... 50
Multi-exposure ............................................................. 50
Interval Shooting .......................................................... 51
Interval Composite ....................................................... 51
Interval Movie Record .................................................. 52
Contents

Contents
5
Setting the White Balance .................................52
Adjusting the White Balance Manually ........................ 53
Adjusting the White Balance with Color
Temperature ................................................................ 54
Controlling the Image Finishing Touch ............54
Custom Image ............................................................. 54
Digital Filter .................................................................. 56
Correcting Images ..............................................57
Brightness Adjustment ................................................. 57
Lens Correction ........................................................... 57
Composition Adjustment .............................................. 58
Anti-Aliasing Filter Simulator ........................................ 58
Playback Functions ...............................59
Playback Mode Palette Items ............................ 59
Changing the Playback Method ........................60
Displaying Multiple Images .......................................... 60
Displaying Images by Folder ....................................... 61
Displaying Images by Shooting Date ........................... 61
Playing Back Images Continuously (Slideshow) .......... 62
Displaying Rotated Images .......................................... 62
Connecting the Camera to an AV Device .................... 63
Connecting the Camera to a Computer ............64
Editing and Processing Images ........................65
Copying an Image ........................................................ 65
Changing the Image Size ............................................ 65
Correcting Color Moiré ................................................. 66
Processing Images with Digital Filters ......................... 66
Creating a Composite Image (Index) ........................... 68
Editing Movies ............................................................. 68
RAW Development ...................................................... 69
Changing the Settings ...........................71
Camera Settings .................................................71
Customizing the Button/E-dial Functions ..................... 71
Saving Frequently Used Settings ................................ 73
Displaying the Local Date and Time of the Specified
City ............................................................................... 74
Selecting Settings to Save in the Camera ................... 75
File Management Settings .................................75
Protecting Images from Deletion (Protect) ................... 75
Selecting the Folder/File Settings ................................ 76
Setting the Copyright Information ................................ 78
Using a Wireless Memory Card ................................... 78
Appendix.................................................80
Restrictions on the Combinations of Special
Functions ............................................................80
Functions Available with Various Lenses ........81
Setting the Focal Length .............................................. 82
Using the Aperture Ring ............................................... 83
Functions when Using an External Flash ........84
Using the GPS Unit .............................................85
Shooting Celestial Bodies (ASTROTRACER) ............. 85
Troubleshooting .................................................86
Sensor Cleaning .......................................................... 87
Error Messages ............................................................ 88
Main Specifications ............................................90
Operating Environment for USB Connection and
Provided Software ........................................................ 94
Index ....................................................................96
For Using Your Camera Safely ........................ 100
Care to be Taken During Handling ..................101
WARRANTY POLICY ........................................104

1
Introduction
6
Regarding copyrights
Images taken with this camera that are for anything other
than personal enjoyment cannot be used without permission
according to the rights as specified in the Copyright Act.
Please take care, as there are cases where limitations are
placed on taking pictures even for personal enjoyment
during demonstrations, performances or of items on display.
Images taken with the purpose of obtaining copyrights also
cannot be used outside the scope of use of the copyright as
laid out in the Copyright Act, and care should be taken here
also.
To users of this camera
• Do not use or store this camera in the vicinity of equipment
that generates strong electromagnetic radiation or
magnetic fields. Strong static charges or the magnetic
fields produced by equipment such as radio transmitters
could interfere with the monitor, damage the stored data,
or affect the camera’s internal circuitry and cause camera
misoperation.
• The liquid crystal panel used for the monitor is
manufactured using extremely high precision technology.
Although the level of functioning pixels is 99.99% or better,
you should be aware that 0.01% or fewer of the pixels may
not illuminate or may illuminate when they should not.
However, this has no effect on the recorded image.
• In this manual, the generic term “computer(s)” refers to
either a Windows PC or a Macintosh.
• In this manual, the term “battery(ies)” refers to any type of
batteries used for this camera and its accessories.
1
Introduction
7
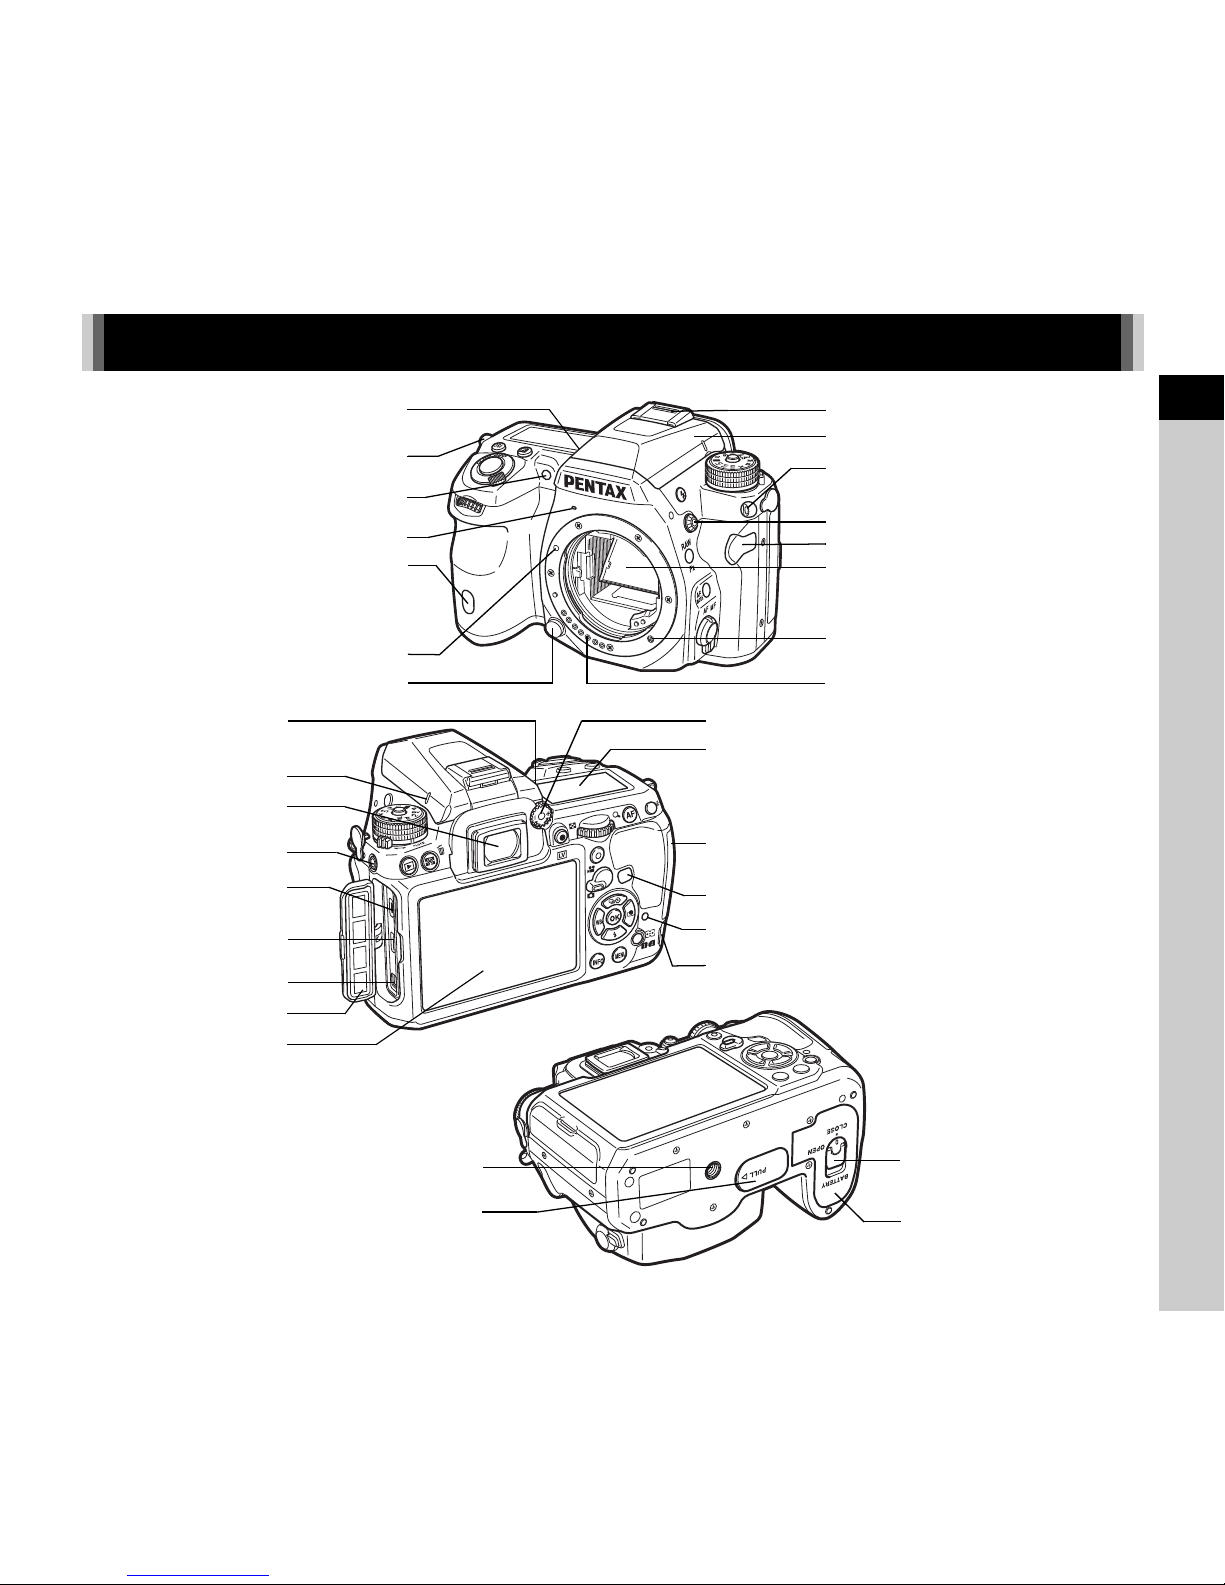
Names and Functions of the Working Parts
Self-timer lamp/
Remote control receiver
AF coupler
Mirror
Lens unlock button Lens information contacts
Strap lug
Hot shoe
Lens mount index
Speaker
X-sync socket
Strap lug
AF assist light
Card access lamp
USB terminal (micro B)
DC input terminal
LCD panel
Terminal cover
Cable switch terminal
Self-timer lamp/
Remote control receiver
Diopter adjustment dial
HDMI terminal (type D)
Microphone terminal
Microphone
Image plane indicator
Viewfinder
Monitor
Dual card slot for SD Memory Cards
Tripod socket
Battery cover
Battery cover unlock knob
Battery grip contacts
Headphone terminal
Built-in flash
Dial indicator
1
Introduction
8
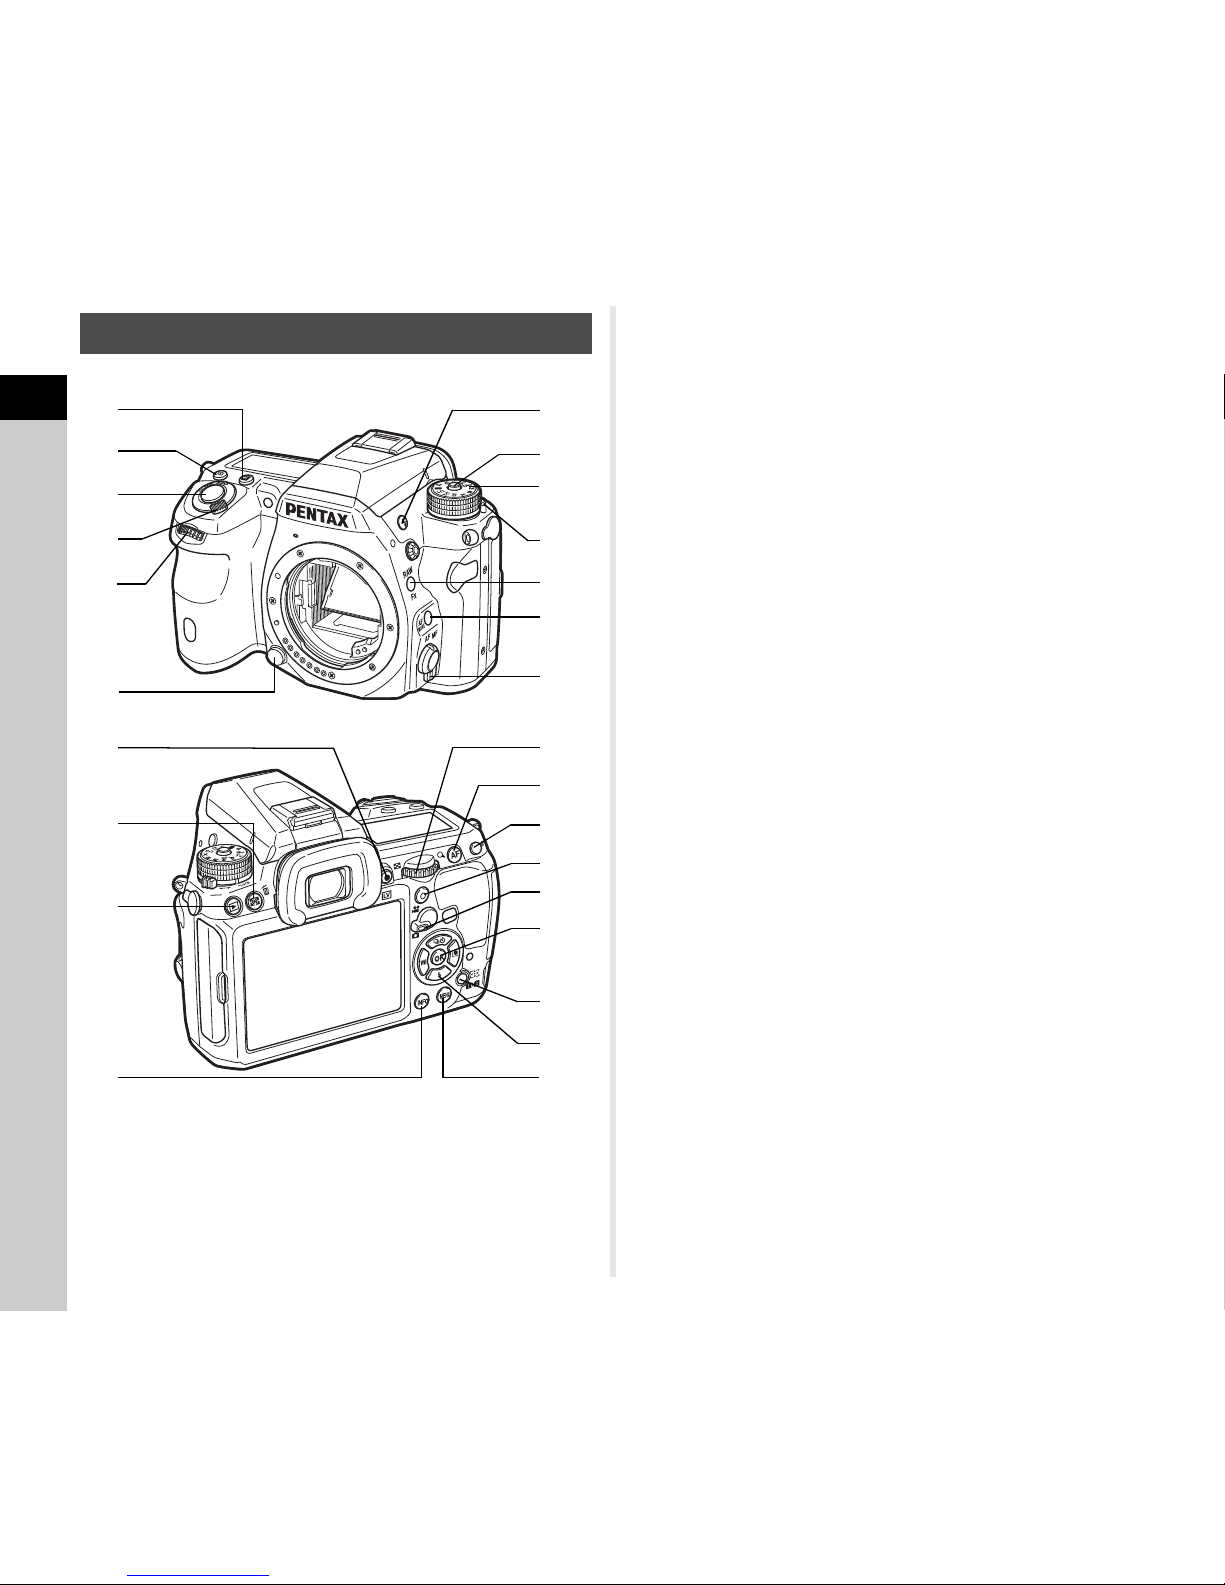
1 EV Compensation button (J)
Press to change the exposure compensation value. (p.37)
2 ISO button (N)
Press to change the ISO sensitivity. (p.39)
3 Shutter release button
Press to capture images. (p.32)
In playback mode, press halfway to switch to capture mode.
4 Main switch
Move to turn the power on/off or to preview. (p.29, p.46)
5 Front e-dial (Q)
Changes the value for camera settings such as exposure. (p.36)
You can change the menu category when a menu screen is
displayed. (p.17)
In playback mode, use this to select a different image.
6 Lens unlock button
Press to detach a lens. (p.25)
7 Flash pop-up button (1)
Press to pop up the built-in flash. (p.41)
8 Mode dial lock button
Press to allow the mode dial to be turned. (p.32)
9 Mode dial
Changes the exposure mode. (p.32)
0 Mode dial lock release lever
Use this lever to release mode dial lock to operate the mode
dial without pressing the mode dial lock button. (p.32)
a RAW/Fx button (P)
You can assign a function to this button. (p.71)
b AF Mode button (b)
Press to change the AF Mode or AF point. (p.43)
c Focus mode switch
Press to change the focus mode. (p.42)
d Live View/REC button (K/a)
Displays the Live View image. (p.33)
Starts/stops recording a movie in C mode. (p.38)
e AE Metering/Delete button (2/L)
Press to change the metering method. (p.40)
In playback mode, press to delete images. (p.34)
f Playback button (B)
Switches to playback mode. (p.34) Press the button again to
switch to capture mode.
g INFO button (G)
Changes the style of the display on the monitor. (p.9, p.12)
Buttons and Dials
6
2
f
c
j
k
n
p
9
8
g
i
h
o
7
4
3
a
0
5
1
e
d
l
b
m

1
Introduction
9
h Rear e-dial (R)
Changes the value for camera settings such as exposure. (p.36)
You can change the menu tabs when a menu screen is
displayed. (p.17)
You can change the settings when the control panel is
displayed. (p.16)
In playback mode, use this to magnify an image or display
multiple images at the same time. (p.34, p.60)
i AF button (I)
Available for adjusting focus, instead of pressing the shutter
release button halfway. (p.42)
j AE Lock button (H)
Locks the exposure value before shooting.
In playback mode, the JPEG image that was just taken can
also be saved in RAW format. (p.34)
k Green button (M)
Resets the values being adjusted.
Switches to ISO AUTO when adjusting the sensitivity.
l Stills/Movies switch
Switches between A (Still capture) mode and C (Movie
recording) mode. (p.31)
m OK button (E)
When a menu or the control panel is displayed, press this
button to confirm the selected item.
n Change AF Point/Card slot switch button (c / d)
In capture mode, press this button to enable changing the
AF point. (p.44)
In playback mode, press this button to switch between the
memory cards inserted in the two slots, SD1 and SD2.
(p.34)
o Four-way controller (ABCD)
Displays the Drive Mode/Flash Mode/White Balance/
Custom Image setup menu. (p.16)
When a menu or the control panel is displayed, use this to
move the cursor or change the item to set.
Press B in single image display of playback mode to display
the playback mode palette. (p.59)
When selecting the area of an image to magnify or to use as
a focusing area, you can move the area diagonally by
pressing two keys at the same time.
p MENU button (F)
Displays a menu. Press this button while the menu is
displayed to return to the previous screen. (p.17)
With this camera, you can take pictures while looking through
the viewfinder or while viewing the image on the monitor.
When using the viewfinder, you can take pictures while
checking the status screen displayed on the monitor and the
viewfinder. When not using the viewfinder, you can take
pictures while viewing the Live View image displayed on the
monitor.
The camera is in “standby mode” when it is ready to shoot, such
as when the status screen or Live View image is displayed.
Press G in standby mode to display the “control panel” and
change settings. (p.16) You can change the type of information
displayed in standby mode by pressing G while the control
panel is displayed. (p.12)
Monitor Display
Capture Mode
100-320 0
100-3200
10: 30
10:30
12 34 5
12345
12 34 5
12345
12 34 5
12345
12 34 5
12345
1/
1/
F
F
25 0
250
16 0 0
1600
5.6
5.6
12 34 5
12345
12 34 5
12345
1/
1/
F
F
25 0
250
16 0 0
1600
5.6
5.6
St a tu s Sc r een
Status Screen
IS O A UTO Se t tin g
ISO AUTO Setting
Ad j us t m en t Ra n ge
Adjustment Range
09/ 09 /2 01 3
09/09/2013
Standby mode
(Status Screen)
Shooting Info Display selection screen
Control panel
1
Introduction
10
t Memo
•
In [Live View] of the A3 menu, you can change the settings of
the items displayed on the monitor during Live View. (p.19)
Status Screen
1 Exposure Mode (p.36) 14 AE Metering (p.40)
2 AE Lock 15
Focus Method (p.42)
3 Digital Filter (p.56)/HDR
Capture (p.57)
16 Card slot number (p.35)
17 File Format (p.35)
4 Wireless LAN status
(p.78)
18 Image storage capacity
19 Flash Exposure
Compensation (p.41)5 GPS positioning status
(p.85)
20 White Balance fine-
tuning (p.53)6 Shake Reduction/
Horizon Correction
21 Drive Mode (p.47)
7 Battery level 22
White Balance (p.52)
8 E-dial guide 23 AF point (p.44)
9 Shutter speed 24 Custom Image (p.54)
10 Aperture value 25
Flash Mode (p.41)
11 EV Compensation
(p.37)/Exposure
Bracketing (p.49)
26 Operation guide, and
number of shots during
Multi-exposure, Interval
Shooting or Interval
Composite
12 EV bar scale
13 Sensitivity (p.39)
123
8
9
11
8
8
12
13
10
14 15
17 18 19
21
25
24
26
2322
16
17 18 2016
8
4567
12 34 512345
20 002000
G1 A1G1A1
12 34 512345
1/1/
FF
40 004000
12 80 012800
5.65.6
+1 .0+1.0
Live View
1 Exposure Mode (p.36) 14 Electronic Level (vertical
tilt) (p.15)
2 Flash Mode (p.41)
3 Drive Mode (p.47) 15 Histogram
4 White Balance (p.52) 16 EV Compensation (p.37)
5 Custom Image (p.54) 17 EV bar scale
6 Digital Filter (p.56)/HDR
Capture (p.57)
18 Operation guide
19 AE Lock
7 Wireless LAN status
(p.78)
20 Shutter speed
21 Aperture value
8 GPS positioning status
(p.85)
22 Sensitivity (p.39)
23 File Format
9 AE Metering (p.40) 24 Card slot number in use
(p.35)
10 Shake Reduction/
Horizon Correction/
Movie SR
25 Image storage capacity
26 Face detection frame
(when [Contrast AF] is
set to [Face Detection])
(p.44)
11 Battery level
12 Temperature warning
13 Electronic Level
(horizontal tilt) (p.15)
1/
20001/2000 F2.8F2.8 16001600 9999999999
+1.7EV+1.7
EV
1/
20001/2000 F2.8F2.8 160 01600 9999999999
± 0E V ±0EV
123456 91011
23
87
13
14
17
16
18
24 2519 20 21 22 26
12
15
1
Introduction
11
A mode
t Memo
• Items that can be selected vary depending on the current
camera setup.
• If no operations are made within 1 minute while the control
panel is displayed, the camera will return to standby mode.
• You can change the display color of the status screen, menu
cursor and control panel in [Display Color] of [LCD Display] in
the D1 menu. (p.22)
Control Panel
1 Function name 16 AF Mode (p.43)/Contrast
AF (p.44)
2 Setting
3 Card slot number (p.35) 17 AF point (p.44)/Focus
Peaking (p.45)
4 Number of recordable
still pictures/movie
recordable time
18 Memory Card Options
(p.35)
5 ISO AUTO Setting (p.39) 19 File Format (p.35)
6 Highlight Correction
(p.57)
20 JPEG Recorded Pixels
and Quality Level (p.35)/
movie recorded pixels
(p.35)
7 Shadow Correction
(p.57)
8 Digital Filter (p.56) 21 Shake Reduction/Movie
SR
9 HDR Capture (p.57)
10 AF Assist Light (p.43) 22 AA Filter Simulator (p.58)
11 High-ISO NR (p.40) 23 Exposure Setting (p.38)
12 Slow Shutter Speed NR 24 Recording Sound Level
(p.38)
13 Distortion Correction
(p.57) 25 Playback Sound Volume
14 Lateral Chromatic
Aberration Adjustment
(p.57)
26 Framerate (p.35)
27 Current date and time
28 Destination (p.74)
15 Peripheral Illumination
Correction (p.57)
1
2
334
4
576
9
14
19
8
13
18
10
15
20
11
16
21
12
17
22
6
17
20
23
16
18
7
10
26
8
24
21
9
25
27 28
1
2
334
4
27 28
10:3010:30
1:2 3' 4 5 "1:23'45"
1:2 3' 4 5 "1:23'45"
100-3200100-3200
10:3010:30
123 4512345
123 4512345
IS O A UTO Se t tin gISO AUTO Setting
Ad j us t m en t Ra n g eAdjustment Range
09/09 /2 01 309/09/2013
Ex p os u r e S e tt i n gExposure Setting
Pr o gr a m A EProgram AE
09/09 /2 01 309/09/2013
C mode
1
Introduction
12
You can change the type of information displayed in standby
mode by pressing G while the control panel is displayed. Use
CD to select the type and press E.
When shooting with the viewfinder
When shooting with Live View
The captured image and shooting information are displayed in
single image display of the playback mode.
Press G to change the type of information displayed in single
image display. Use CD to select the type and press E.
t Memo
•
The display selected in Playback Info Display selection screen appears in
playback mode when the camera is turned off and on again. If [Playback Info
Display] is set to [Off] in [Memory] of the
A
4 menu, the [Standard Information
Display] always appears first when the camera is turned on. (p.75)
Shooting Info Display
Status
Screen
Displays the settings for shooting with the
viewfinder. (p.10)
Electronic
Level
Displays the camera
angle.
A bar scale indicating
the horizontal camera
angle appears at the
bottom of the screen,
and a bar scale
indicating the vertical
camera angle a ppears
on the right side. If the camera angle cannot be
detected, both ends and the center of the bar
scales flash red.
Display Off Nothing is displayed on the monitor.
Electronic
Compass
The current latitude, longitude, altitude,
direction, and Coordinated Universal Time
(UTC) are displayed. Turn the camera off and on
again to return to the status screen.
Available only when the optional GPS unit is
attached to the camera and is operating. (p.85)
Standard
Information
Display
The Live View image and the settings for
shooting with Live View are displayed. (p.10)
No
Information
Display
Certain icons, such as those for the Exposure
Mode and Drive Mode, are not displayed.
Example:
Tilted 1.5° to the left (yellow)
Vertically level (green)
When the camera is held vertically
When the camera is rotated to the vertical
position, the status screen and control
panel are displayed in a vertical position.
To not display images in the vertical
position, set [Auto Screen Rotation] to
[Off] in [LCD Display] of the D1 menu.
(p.22)
Playback Mode
Standard
Information Display
Captured image, file format, exposure value,
and operation guide indicators are displayed.
Detailed
Information Display
Detailed information on how and when the
image was taken is displayed (p.13).
Histogram Display
Captured image and brightness histogram are displayed (p.13).
Not available during movie playback.
RGB Histogram
Display
Captured image and RGB histogram are displayed (p.13).
Not available during movie playback.
No Information
Display
Only the captured image is displayed.
12 34 5
12345
12 34 5
12345
1/
1/
F
F
25 0
250
16 0 0
1600
5.6
5.6
1/
200 01/2000 F 2.8F2.8 200200 + 0. 3+0.3
100 -0 00 1100-0001
1/
200 01/2000 F2.8F2.8 2 00200 +0. 3+0.3
100 -0 00 1100-0001
St and a rd In f or mat io n D i sp layStandard Information Display
Single image display
(Standard Information Display)
Playback Info Display
selection screen

1
Introduction
13
Use AB to switch between the Histogram Display and RGB
Histogram Display.
Detailed Information Display
1 Captured image 10 Flash Mode (p.41)
2 Rotation information
(p.62)
11 Flash Exposure
Compensation (p.41)
3 Exposure Mode (p.36) 12 Color Moiré Correction
(p.66)
4 Digital Filter (p.56)/HDR
Capture (p.57) 13 Shutter speed
5 Transferred via Wireless
LAN (p.78)
14 Aperture value
15 Shake Reduction/
Horizon Correction/
Movie SR
6 Protect setting (p.75)
7 Card slot number in use
8 Folder number-File
number (p.76)
16 Sensitivity (p.39)
17 EV Compensation (p.37)
9 Drive Mode (p.47) 18 Focus Method (p.42)
1
3
4567 8
12
35
11109
2
2
13 14 15 18
191716
21
25
28 37
26 27 29 30 3132 33 34
22 24
20
36
1
3
4567 8
40
35
389
13 14 15 39
191716
21
253726 41 29 30
22 24
23
36
1
3
42
44
45
46
48
49
47
47
43
657 8
+1.0+1.0
1/
20001/2000 F2.8F2.8
55.0m m55.0mm
55.0m m55.0mm
16001600
5000K5000K
5000K5000K
100-0 00 1100-0001
+1.5+1.5
±0±
0
±0±
0
±0±
0
±0±
0
±0±
0
±0±
0
±0±
0
10:3010:30
10'10 "10'10"
1/
1251/125 F8. 0F8.0
G1A1G1A1
100-0 00 1100-0001
0.00.0
16001600
G1A1G1A1
±0±
0
±0±
0
±0±
0
±0±
0
±0±
0
±0±
0
±0±
0
10:3010:30
100 -0 00 1100-0001
0m0m 123 °123°
N 3 6° 45 .4 10 'N 36°45.410'
09/ 09 /2 01 309/09/2013
10: 00 :0 010:00:00
ABC DEF GH IJK LMNOP QRSTU VWXYZABCDEFGHIJKLMNOPQRSTUVWXYZ
123 45 6123456
ABC DEF GH IJK LMNOP QRSTU VWXYZABCDEFGHIJKLMNOPQRSTUVWXYZ
123 45 6123456
W14 0° 02 .0 00 'W140°02.000'
09/09 /2 01 309/09/2013
09/09 /2 01 309/09/2013
Still pictures
Movies
Page 2
AB
19 AE Metering (p.40) 34 Color Fringe Correction
(p.69)
20 AF point (p.44)
21 White Balance (p.52) 35 Custom Image setting
(p.54)
22
White Balance fine-tuning
(p.53) 36
Custom Image parameters
23
AA Filter Simulator (p.58)
37 Shooting date and time
24 Lens focal length 38 Length of time of the
recorded movie
25 File Format (p.35)
26 JPEG Recorded Pixels
(p.35)/movie recorded
pixels (p.35)
39 Volume
40 Sound
41 Framerate (p.35)
27 JPEG Quality (p.35) 42 Altitude (p.85)
28 Color Space (p.24) 43 Lens direction (p.85)
29
Highlight Correction (p.57)
44 Latitude (p.85)
30
Shadow Correction (p.57)
45 Longitude (p.85)
31
Distortion Correction (p.57)
46 Universal Coordinated
Time
32
Lateral Chromat ic Aberration
Adjustment (p.57)
47 Information tampering
warning
33 Peripheral Illumination
Correction (p.57) 48 Photographer (p.78)
49 Copyright Holder (p.78)
Histogram Display/RGB Histogram Display
1 Histogram (Brightness) 5 Folder number-File
number
2 Switch RGB histogram/
Brightness histogram 6 Save RAW Data
3 Protect setting 7 File Format
4 Card slot number in use 8 Shutter speed
100 -0 00 1
100-0001
100 -0 00 1
100-0001
1/
200 0
1/
2000
F2. 8
F2.8
200
200
+0. 3
+0.3
1/
200 0
1/
2000
F2. 8
F2.8
200
200
+0. 3
+0.3
145
6
32
12
13
14
7 8 9 10 11
45326
7 8 9 1110
1
Brightness histogram
AB
RGB histogram
1
Introduction
14
When shooting with the viewfinder, the following information
appears in the viewfinder.
t Memo
• The information is displayed in the viewfinder when the
shutter release button is pressed halfway, or during the meter
operating time (default setting: 10 sec.).
• The AF point in use for autofocus appears in red
(Superimpose AF Area) when the shutter release button is
pressed halfway. You can set it to [Off] in [14. Superimpose
AF Area] of the E2 menu.
• You can adjust the diopter in the
viewfinder using the diopter
adjustment dial. Adjust the dial until
the AF frame in the viewfinder is
focused.
9 Aperture value 12 Histogram (R)
10 Sensitivity 13 Histogram (G)
11 EV Compensation 14 Histogram (B)
Viewfinder
1 AF frame (p.32) 11 Sensitivity (p.39)/
Exposure compensation
value
2 Spot metering frame
(p.40)
3 AF point (p.44) 12 AE Lock
4 Flash indicator (p.41) 13 Change AF Point (p.44)
5 Focus Method (p.42) 14 Multi-exposure (p.50)
6 Shutter speed 15 AE Metering (p.40)
7 Aperture value 16 Shake Reduction
8 Focus indicator 17 Flash Exposure
Compensation (p.41)
9 EV bar scale/Electronic
Level (p.15) 18 EV Compensation
(p.37)/Exposure
Bracketing (p.49)
10 ISO/ISO AUTO
19 File Format (p.35)
1
4
19
181716151413
61011
12
2
1
3
5 7 8 9
1
Introduction
15
t Memo
• You can change the LCD panel backlight setting in [22. LCD
Panel Illumination] of the E4 menu. (p.24) You can also set
the camera so that the LCD panel illumination turns on or off
when P is pressed. (p.71)
You can check whether the camera is tilted horizontally by
displaying the electronic level. The electronic level can be
displayed in the EV bar scale in the viewfinder and/or LCD
panel, or on the Live View screen.
Select whether to display the electronic level in [Electronic
Level] of the A3 menu. (p.19)
LCD Panel
1 Shutter speed 12 Battery level
2 Multi-exposure (p.50) 13 GPS unit connected
(p.85)
3 Aperture value
4 Mirror Lock-up Shooting
(p.50)
14 Sensitivity (p.39)/EV
Compensation (p.37)
5 AE Metering (p.40) 15 Flash Mode (p.41)
6 AF point (p.44) 16 Drive Mode (p.47)
7 Flash Exposure
Compensation (p.41)
17 Card slot number (p.35)
18 File Format (p.35)
8 EV bar scale/Electronic
Level (p.15)
19 Remaining image
storage capacity/USB
Connection mode (p.64)/
External flash channel
(p.84)/Sensor cleaning in
progress
9 EV Compensation
(p.37)/Exposure
Bracketing (p.49)
10 HDR Capture (p.57)
11 Wireless LAN
connection (p.78)
3
1
2
4
10
11
12
13
14
67 8 9
191716
5
15 18
Electronic Level
When level (at 0°)
When tilted 5° to the left
When held vertically and tilted 3° to the right
1
Introduction
16
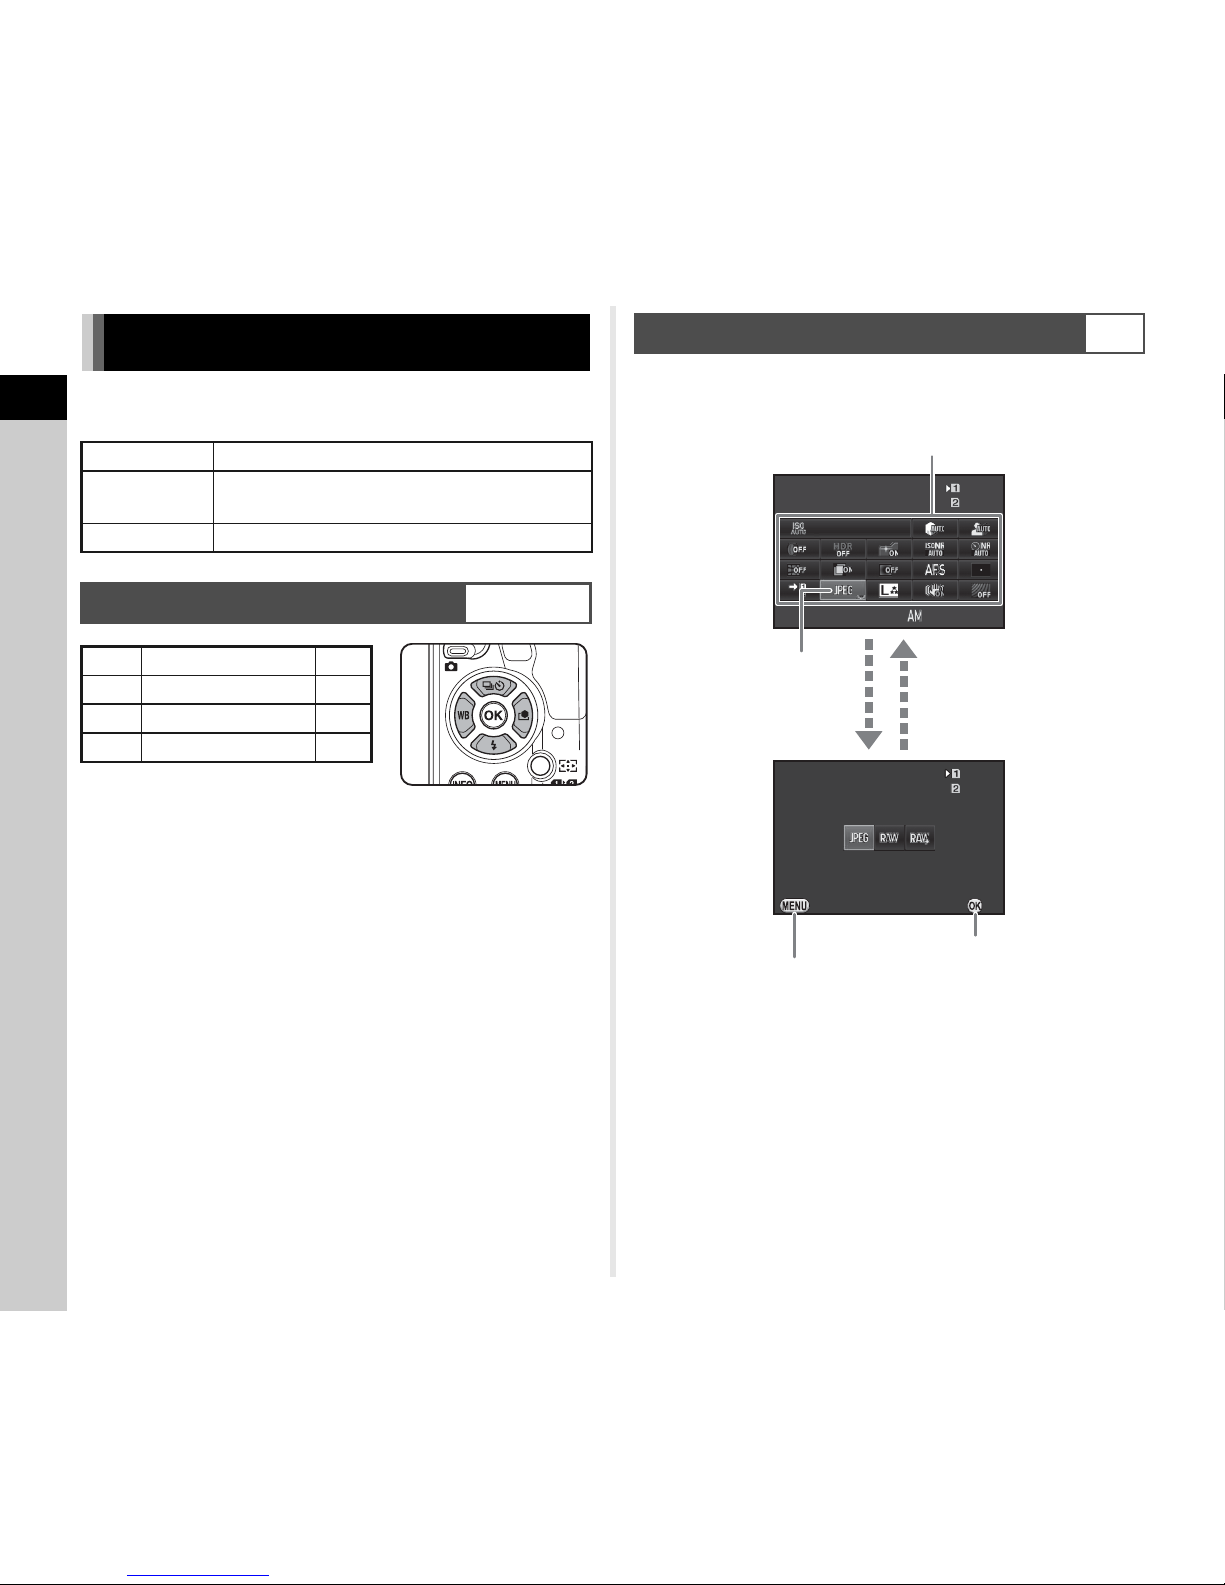
The camera functions and their settings can be selected and
changed by using the following ways.
You can set frequently used shooting functions. Press G in
standby mode.
How to Change Function Settings
Direct keys Press ABCD in standby mode.
Control panel
Press G in standby mode.
(indicated with the v mark in this manual)
Menus Press F.
Using the Direct Keys
WXYZ
A Drive Mode p.47
B Flash Mode p.41
C White Balance p.52
D Custom Image p.54
Using the Control Panel
G
10:23
10:23
123 4 5
12345
123 4 5
12345
123 4 5
12345
123 4 5
12345
100-3200
100-3200
Fi l e For m a t
File Format
09/09/ 20 13
09/09/2013
Fi l e For m a t
File Format
Ca n c el
Cancel
OK
OK
Use ABCD to select an item.
Use R to change
settings.
Press F to
cancel setting
operation.
Press E to confirm the
selected item and return to
the control panel.
Press E to make
detailed settings.
1
Introduction
17
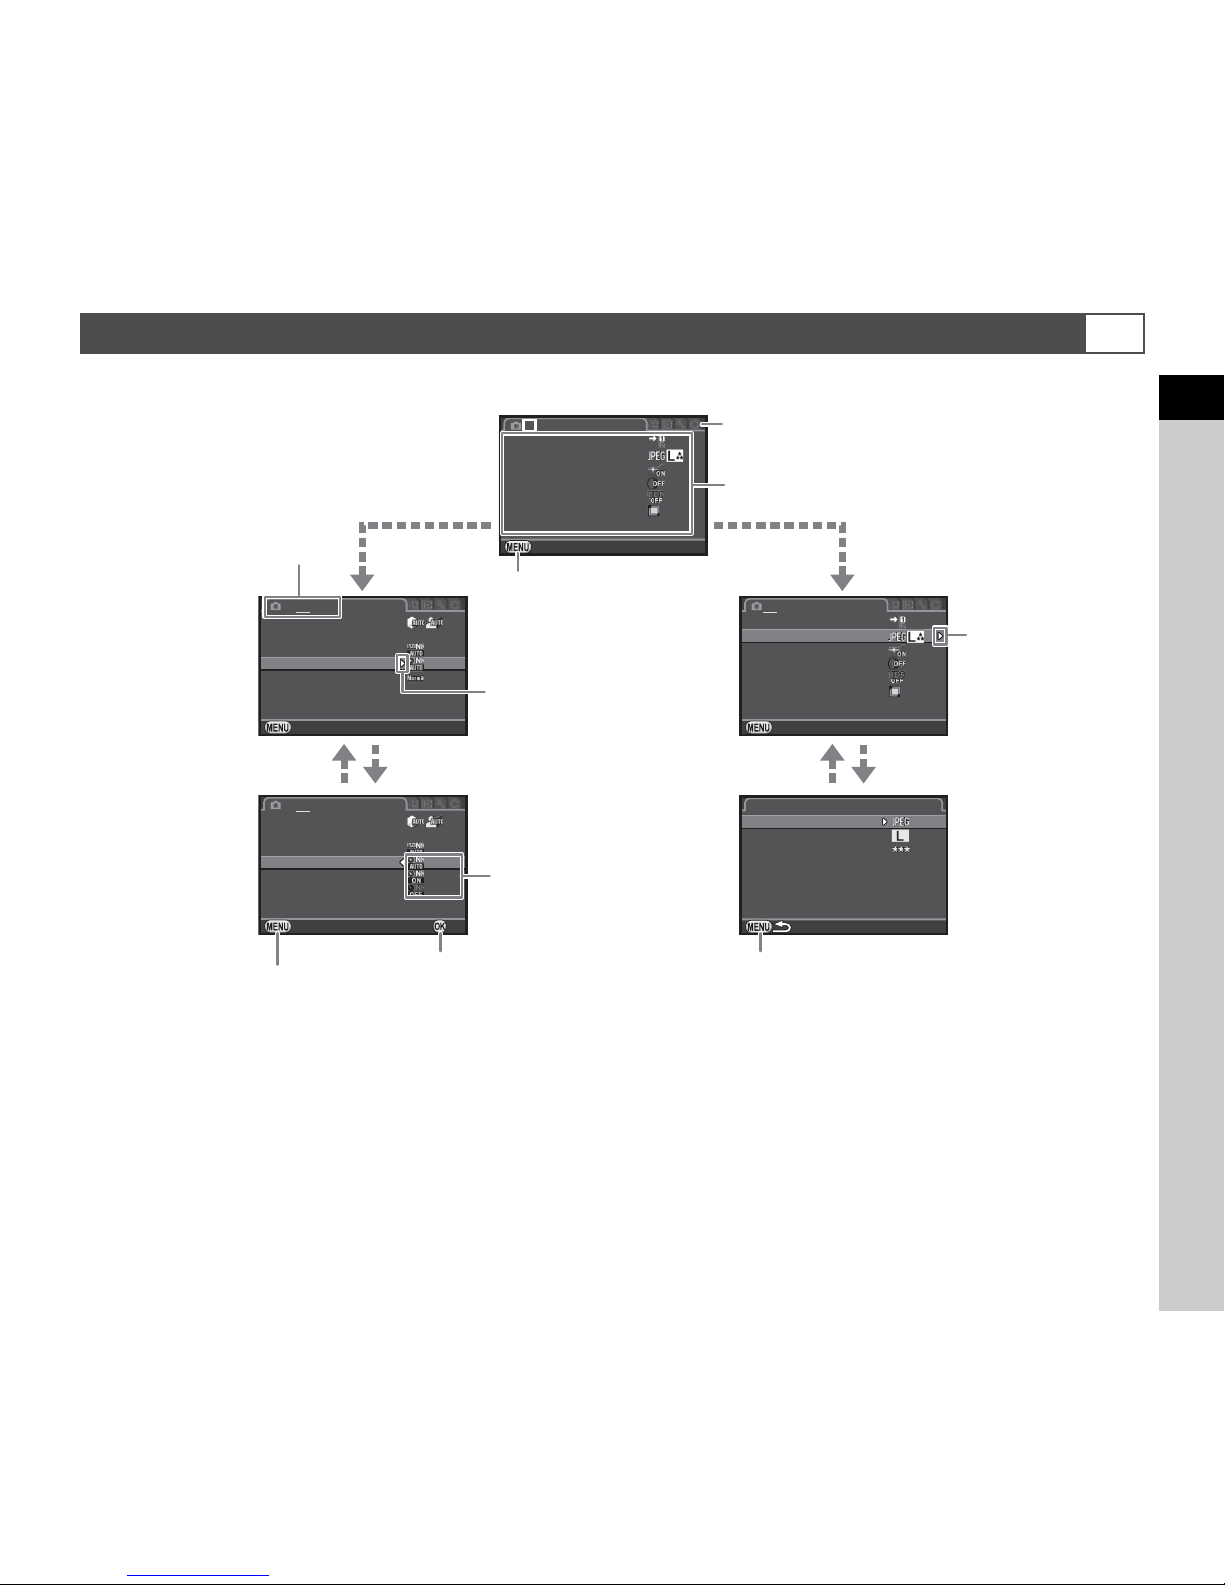
Most functions are set from the menus. Functions that can be set on the control panel can also be set from the menus.
t Memo
• For the Custom Setting menu (E1-4), you can show the setting screen of the next item in order of the menu on the monitor by
turning R while the submenu of the currently selected item is displayed.
• Press F to display the first tab of the menu that is appropriate to the current conditions. To display the menu tab last selected
first, set in [24. Save Menu Location] of the E4 menu.
• Settings are returned to their default values with [Reset] of the D3 menu. To reset all the settings in the Custom Setting menu to
the defaults, use [Reset Custom Functions] of the E4 menu. (Some settings do not apply.)
Using the Menus
F
Me m ory Car d Op t ion sMemory Card Options
Im a ge C apt u re S ett i ngsImage Capture Settings
Di g ita l Fi l terDigital Filter
HD R Ca p tur eHDR Capture
Le n s C o rre c tio nLens Correction
Ex i tExit
1 234
AF A s sis t Li g h tAF Assist Light
D- R ang e Se t tin g sD-Range Settings
IS O A UTO Set t ingISO AUTO Setting
Sl o w S h utt e r S p eed NRSlow Shutter Speed NR
Pr o gra m Li n eProgram Line
GP SGPS
Ex i tExit
1 2 34
Hi g h-I S O N RHigh-ISO NR
D- R ang e Se t tin g sD-Range Settings
IS O A UTO Set t ingISO AUTO Setting
Sl o w S h utt e r S p eed NRSlow Shutter Speed NR
Pr o gra m Li n eProgram Line
GP SGPS
Ca n celCancel
1 2 34
Hi g h-I S O N RHigh-ISO NR
OKOK
Me m ory Car d Op t ion sMemory Card Options
Im a ge C apt u re S ett i ngsImage Capture Settings
Di g ita l Fi l terDigital Filter
HD R Ca p tur eHDR Capture
Le n s C o rre c tio nLens Correction
Ex i tExit
1 234
AF A s sis t Li g h tAF Assist Light
Fi l e F o rma tFile Format
JP E G R e cor d ed P ixe l sJPEG Recorded Pixels
Im a ge C apt u re S ett i ngsImage Capture Settings
JP E G Q u ali t yJPEG Quality
RAW F il e Fo r m atRAW File Format
PE FPEF
Use AB to select an item.
Use R to switch between menu tabs.
Press F to exit the
menu screen.
Menu numbers
Press D to display the
pop-up menu.
Press D to display
the submenu.
Press E to confirm the
selected item.
Press F to cancel the pop-up menu.
Press F to return to the
previous screen.
Use AB to select an item.
Use Q to change the menu category.
1
Introduction
18
Menu List
Rec. Mode Menu
Menu Item Function Default Setting Page
A1
Exposure Modes
*1
Temporarily changes the exposure mode when the mode dial is
set to O, P or Q.
G p.74
Memory Card Options
*2
Sets the recording method for when two memory cards are inserted.
W p.35
Image
Capture
Settings
File Format
*2
Sets the file format of images. JPEG
p.35
JPEG Recorded
Pixels
*2
Sets the recording size of images saved in JPEG format. q
JPEG Quality
*2
Sets the quality of images saved in JPEG format. m
RAW File Format Sets the RAW file format. PEF
AF Assist Light
*2
Sets whether to use the assist light when autofocusing in dark
locations.
On p.43
Digital Filter
*2
Specifies a digital filter effect when taking pictures. No Filter p.56
HDR
Capture
HDR Capture
*2
Sets the type of high dynamic range shooting. Off
p.57
Exposure Bracket
Value
*2
Sets the range in which to change the exposure. ±2EV
Auto Align Sets whether to automatically adjust the composition. On
Lens
Correction
Distortion
Correction
*2
Reduces distortions occurring due to lens properties. Off
p.57
Lat-Chromatic-Ab
Adj
*2
Reduces lateral chromatic aberrations occurring due to lens
properties.
On
Peripheral Illumin.
Corr.
*2
Reduces peripheral light fall-off occurring due to lens properties. Off
A2
D-Range Settings
*2
Expands the dynamic range and prevents bright and dark areas
from occurring.
Auto/Auto p.57
ISO AUTO Setting
*2
Sets the range of automatic correction in ISO AUTO and AUTO
ISO Parameters.
ISO 100 to ISO
3200/Standard
p.39
High-ISO NR
*2
Sets the Noise Reduction setting when shooting with a high ISO
sensitivity.
Auto p.40
1
Introduction
19
A2
Slow Shutter Speed NR
*2
Sets the Noise Reduction setting when shooting with a slow
shutter speed.
Auto –
Program Line Selects Program Line. Normal p.37
GPS Sets the camera action for when the optional GPS unit is used. – p.85
A3
Live
View
Contrast AF
*2
Sets the AF Mode for shooting with Live View. Face Detection p.44
Focus Peaking
*2
Emphasizes the outline of the subject in focus and makes it
easier to check the focus.
Off p.45
Grid Display Displays the grid during Live View. Off
p.10Histogram Display Displays the histogram during Live View. Off
Highlight Alert Bright (overexposed) areas blink red during Live View. Off
Composition
Adjust.
Allows you to adjust the composition of your image using the
Shake Reduction mechanism.
Off p.58
Electronic
Level
Viewfinder
Displays the electronic level in the EV bar scale in the viewfinder
and/or LCD panel.
Off p.15
Live View Displays the electronic level during Live View. On p.10
Horizon Correction Corrects horizontal tilt of the camera. Off –
AA Filter Simulator
*2
Applies low-pass filter effects using the Shake Reduction
mechanism.
Off p.58
Shake Reduction
*2
Activates the Shake Reduction function. On –
Input Focal Length
Sets the focal length when using a lens of which focal length
information cannot be obtained.
35mm p.82
A4
Instant
Review
Display Time Sets the Instant Review display time. 1sec.
p.32
Zoom Instant
Review
Sets whether to display a magnified image during Instant
Review.
On
Save RAW Data
Sets whether to save the RAW image during Instant Review.
On
Delete Sets whether to delete the image during Instant Review. On
Histogram Display Displays the histogram during Instant Review. Off
Highlight Alert Bright (overexposed) areas blink red during Instant Review. Off
Menu Item Function Default Setting Page
1
Introduction
20
*1 Appears only when the mode dial is set to O, P, or Q.
*2 Can also be set from the control panel.
A4
Digital
Preview
Zoom Instant
Review
Sets whether to display a magnified image during Digital
Preview.
On
p.46
Save Preview
Image
Sets whether to enable saving an image displayed in Digital
Preview.
On
Histogram Display Displays the histogram during Digital Preview. Off
Highlight Alert Bright (overexposed) areas blink red during Digital Preview. Off
E-Dial
Programming
G
Sets the Q / R / M operation for each exposure mode.
I, J, XG
p.71
H
-, ISO, -
I
I, -, -
J
-, J, -
K
I
, J, GLINE
L
I
, J, GLINE
M
-, J, -
N
-, J, -
m -, -, n -, J, GLINE
p I
, J, GLINE
o I, J, G
LINE
Rotation Direction Reverses the effect obtained when Q or R is turned. Rotate Right
Button
Customization
RAW/Fx Button Sets the P operation.
One Push File
Format
p.71AF Button Sets the I operation. Enable AF1
Preview Dial
Sets the camera action for when the main switch is turned to the
U position.
Optical
Preview
Memory Determines which settings to save when the power is turned off.
On for settings
other than
Digital Filter
and HDR
Capture
p.75
Save USER Mode
You can save frequently used capture settings to O, P or Q
of the mode dial.
–p.73
Menu Item Function Default Setting Page
1
Introduction
21
*1 Can also be set from the control panel.
Movie Menu
Menu Item Function Default Setting Page
C1
Exposure Setting
*1
Sets the exposure mode for C mode. m p.38
Memory Card Options
*1
Selects one of memory cards inserted in SD1 and SD2 slots for
recording movies.
SD1 p.35
Movie Capture Settings
*1
Sets the number of recorded pixels and framerate. u/30p p.35
Recording Sound Level
*1
Sets the Recording Sound Level and the volume level for
recording.
Auto –
Digital Filter
*1
Sets a digital filter effect when taking pictures. No Filter p.56
HDR Capture
*1
Sets the type of high dynamic range shooting when the drive
mode is set to [Interval Movie Record].
Off p.57
Movie SR
*1
Activates the Movie Shake Reduction function. On –
Playback Menu
Menu Item Function Default Setting Page
B1
Slideshow
Display Duration Sets an image display interval. 3sec.
p.62
Screen Effect Sets a transition effect when the next image is displayed. Off
Repeat Playback
Starts the slideshow again from the beginning after the last
image is displayed.
Off
Auto Movie
Playback
Plays back movies during the slideshow. On
Quick Zoom Sets the initial magnification when magnifying images. Off –
Highlight Alert
Bright (overexposed) portions blink red in Standard Information
Display or Histogram Display in playback mode.
Off –
Auto Image Rotation
Images are rotated when playing back images captured with the
camera held vertically or images for which the rotation
information has been changed.
On p.62
Protect All Images Protects all images stored in the memory card at once. – –
Delete All Images Deletes all images stored in the memory card at once. – –
1
Introduction
22
Set-up Menu
Menu Item Function Default Setting Page
D1
Language/W Changes the display language. English p.29
Date Adjustment Sets the date and time or display format. 01/01/2013 p.30
World Time
Switches between the date and time display of your hometown
city and that of a specified city.
Hometown p.74
Text Size Sets whether to magnify the text size when selecting a menu. Standard p.30
Sound Effects
Switches the operation sound on/off and changes the volume for
In-focus, AE-L, Self-timer, Remote Control, Mirror Up, Change
AF Point, and the P button operation.
Volume 3/
All On
–
LCD
Display
Guide Display
Sets whether to display the operation guides when the exposure
mode is changed.
On p.32
Auto Screen
Rotation
Sets whether to display the status screen and control panel
vertically if the camera is held vertically.
On p.12
Display Color
Sets the display color of the status screen, menu cursor, and
control panel.
1 p.11
LCD Display Settings Adjusts the brightness, saturation and the color of the monitor. 0 –
D2
USB Connection Sets the USB connection mode when connecting to a computer. MSC p.64
HDMI Out
Sets the output format when connecting to an AV device with an
HDMI input terminal.
Auto p.63
Folder Name Sets the folder name in which images are stored. Date p.76
Create New Folder Creates a new folder on the memory card. – p.76
File Name Sets the file name assigned to the image. IMGP/_IMG p.77
File No.
Sequential
Numbering
Sets whether to continue the sequential numbering for the file
name when a new folder is created.
On
p.77
Reset File Number
Resets the file number setting, and returns to 0001 each time a
new folder is created.
–
Copyright Information
Sets the photographer and copyright information embedded in
Exif.
Off p.78
D3
Flicker Reduction Cuts down on screen flicker by setting the power frequency. 50Hz –
Auto Power Off
Sets the time until the camera turns off automatically if no
operations are made for a certain period of time.
1 min. p.29
Select Battery
Sets the camera action for when the optional battery grip is
attached to the camera.
Auto Select/
Auto-detect
p.27
1
Introduction
23
D3
Wireless Memory Card
Sets the camera action for when an Eye-Fi card or a Flucard is
used.
– p.78
Reset
Resets the settings of the direct keys and for the items of the A
menu, C menu, B menu, D menu, control panel, and
playback mode palette.
––
D4
Pixel Mapping
Maps out and corrects any defective pixels on the CMOS sensor.
– p.86
Dust Alert
Detects dust adhering to the CMOS sensor and visually displays
the location of the dust on the monitor.
– p.87
Dust Removal Cleans the CMOS sensor by shaking it. – p.86
Sensor Cleaning
Locks the mirror in the up position for cleaning the CMOS sensor
with a blower.
– p.87
Format Formats a memory card. – p.31
Firmware Info/Options Displays the camera’s firmware version. – –
Custom Setting Menu
Menu Item Function Default Setting Page
E1
1. EV Steps Sets the adjustment steps for exposure. 1/3 EV Steps p.37
2. Sensitivity Steps Sets the adjustment steps for ISO sensitivity. 1 EV Step p.39
3. Meter Operating Time Sets the meter operating time. 10sec. –
4. AE-L with AF Locked
Sets whether to lock the exposure value when the focus is locked.
Off –
5. Link AE and AF Point
Sets whether to link the exposure and AF point in the focusing
area.
Off p.40
6. Auto EV Compensation
Sets whether to automatically compensate when the proper
exposure cannot be determined.
Off –
7. Bulb (B) Mode Options
Sets the camera operation when pressing the shutter release
button in M mode.
Mode1 –
E2
8. Bracketing Order Sets the order for Exposure Bracketing shooting. 0 - + p.49
9. One-Push Bracketing
Sets whether to shoot all frames with one release when using
Exposure Bracketing.
Off p.49
10. WB Adjustable Range
Sets whether to automatically fine-tune the white balance when
the light source is specified for the white balance setting.
Fixed p.53
11. WB When Using Flash Sets the white balance setting for when using flash.
Auto White
Balance
p.53
Menu Item Function Default Setting Page

1
Introduction
24
E2
12. AWB in Tungsten Light
Sets the tungsten light color tone for when the white balance is
set to g (Auto White Balance).
Subtle
Correction
p.53
13. Color Temperature Steps Sets the adjustment steps for color temperature. Kelvin p.54
14. Superimpose AF Area
Sets whether to display the active AF point in red in the viewfinder.
On p.14
E3
15. AF.S Setting
Sets the action priority for when the focus mode is set to x
and the shutter release button is fully pressed.
Focus-priority p.43
16. 1st Frame Action in AF.C
Sets the action priority for the first frame when the focus mode is
set to y and the shutter release button is fully pressed.
Release-
priority
p.43
17. Action in AF.C Continuous
Sets the action priority during continuous shooting when the
focus mode is set to y.
Focus-priority p.43
18. Hold AF Status
Sets whether to maintain the focus for a certain amount of time
when the subject happens to move out of the selected focusing
area after being focused.
Off p.43
19. AF with Remote Control
Sets whether to use autofocus when shooting with a remote
control unit.
Off p.49
20. Release While Charging
Sets whether to release the shutter while the built-in flash is
being charged.
Off p.41
21. Color Space Sets the color space to use. sRGB –
E4
22. LCD Panel Illumination Sets the illumination for the LCD panel. High p.15
23. Save Rotation Info Sets whether to save rotation information when shooting. On p.62
24. Save Menu Location
The last menu tab displayed on the monitor is saved, and it is
displayed again the next time F is pressed.
Reset Menu
Location
p.17
25. Catch-in Focus
Sets whether to enable Catch-in Focus shooting when a manual
focus lens is attached, and the shutter is released automatically
when the subject comes into focus.
Off –
26. AF Fine Adjustment
Allows you to precisely fine tune your lenses with the camera’s
autofocus system.
Off p.45
27. Using Aperture Ring
Sets whether to enable shutter release when the lens aperture
ring is set to a position other than 9.
Disable p.83
Reset Custom Functions
Resets all the settings of the Custom Setting menu to the
defaults.
––
Menu Item Function Default Setting Page
2
Getting Started
25
1 Pass the end of the strap
through the protective
cover and triangular ring.
2 Secure the end of the strap
on the inside of the clasp.
1 Make sure that the camera is turned off.
2 Remove the body mount
cover (1) and lens mount
cover (2).
After removing the cover, be sure
to put the lens down with the lens
mount side facing upward.
3 Align the lens mount index
(red dots: 3) on the
camera and the lens, and
secure by turning the lens
clockwise until it clicks.
To remove the lens
Attach the lens cap turn the
lens counterclockwise while
pressing the lens unlock button
(4).
Attaching the Strap Attaching a Lens
3
4
2
Getting Started
26
u Caution
• When attaching or removing the lens, choose an environment
that is relatively free of dirt and dust.
• Keep the body mount cover on the camera when a lens is not
attached.
• Be sure to attach the lens mount cover and lens cap to the
lens after removing it from the camera.
• Do not insert your fingers inside the lens mount of the camera
or touch the mirror.
• The camera body and lens mount incorporate lens
information contacts. Dirt, dust, or corrosion may damage the
electrical system. Please contact your nearest service center
for professional cleaning.
• We assume no responsibility nor liability for accidents,
damages and malfunctions resulting from the use of lenses
made by other manufacturers.
t Memo
• Refer to “Functions Available with Various Lenses” (p.81) for
details on the functions of each lens.
Use the battery D-LI90 and battery charger D-BC90 exclusively
developed for this camera.
1 Connect the AC plug cord to the battery charger.
2 Plug the AC plug cord into the power outlet.
3 Face the A mark on the battery up, and insert it
into the battery charger.
The indicator lamp is lit while charging and turns off when
the battery is fully charged.
u Caution
• Do not use the battery charger D-BC90 to charge batteries
other than D-LI90. Charging other batteries may cause
damage or heating.
• Replace the battery with a new one in the following cases:
• If the indicator lamp blinks or does not light after the battery
is inserted correctly
• If the battery starts to run down more quickly even after
being charged (the battery may have reached the end of its
service life)
Using the Battery and Charger
Charging the Battery
Lithium-ion
battery
Battery charger
Indicator lamp
AC plug cord
3
1
2
2
Getting Started
27
t Memo
• The maximum charging time is approximately 390 minutes (it
depends on temperature and remaining battery power).
Charge in a location where the temperature is between 0°C
and 40°C (32°F and 104°F).
u Caution
• Insert the battery correctly. If the battery is inserted
incorrectly, it may not be removed.
• Wipe the electrodes of the battery with a soft dry cloth before
inserting.
• Do not open the battery cover or remove the battery while the
power is on.
• Be careful as the camera or battery may become hot when
the camera is used continuously for a long period of time.
• Remove the battery when you will not use the camera for a
long time. The battery may leak and damage the camera if left
installed during prolonged periods of non-use. If the removed
battery will not be used for six months or longer, charge the
battery for about 30 minutes before storing it, and after that,
recharge the battery every six to twelve months.
• Store the battery in a location where the temperature will
remain at or below room temperature. Avoid locations with
high temperatures.
• The date and time may be reset if you leave the battery out of
the camera for long periods of time. If this happens, set the
current date and time.
1 Open the battery cover.
Lift the battery cover unlock
knob, turn it towards OPEN to
unlock, and then pull the cover
open.
2 Face the A mark on the
battery towards outside of
the camera, and insert the
battery until it locks into
place.
To remove the battery, push the
battery lock lever in the direction
of 3.
3 Close the battery cover.
Turn the battery cover unlock
knob towards CLOSE to lock.
t Memo
• The battery level may not be displayed properly if the camera
is used at low temperatures or when performing continuous
shooting for a long time.
• Battery performance temporarily decreases as the
temperature decreases. When using the camera in cold
climates, have extra batteries at hand and keep them warm in
your pocket. Battery performance will return to normal when
returned to room temperature.
• Have extra batteries ready when traveling overseas, or taking
a lot of pictures.
• When the optional Battery Grip D-BG5 is used, the following
settings can be made in [Select Battery] of the D3 menu.
• Priority of battery use
• Type of AA batteries used
Inserting/Removing the Battery
2
1
3
4
5
2
Getting Started
28
We recommend the use of the optional AC adapter kit K-AC132
when using the monitor for a long time or when connecting the
camera to a computer or AV device.
1 Make sure that the camera
is turned off, and open the
terminal cover.
2 Align the A marks on the
DC terminal of the AC
adapter and DC input
terminal of the camera, and
connect.
3 Connect the AC adapter to the AC plug cord, and
plug the cord into the power outlet.
u Caution
• Make sure the camera is turned off before connecting or
disconnecting the AC adapter.
• Make sure connections are secure between the terminals.
The memory card or data may be corrupted if the connection
to the power supply is lost while the card is being accessed.
• Be sure to read the manual of the AC adapter kit before using
the AC adapter.
The following memory cards can be used with this camera.
• SD Memory Card, SDHC Memory Card, and SDXC Memory
Card
• Eye-Fi card
• Flucard compatible with this camera
In this manual, they are referred to as memory cards.
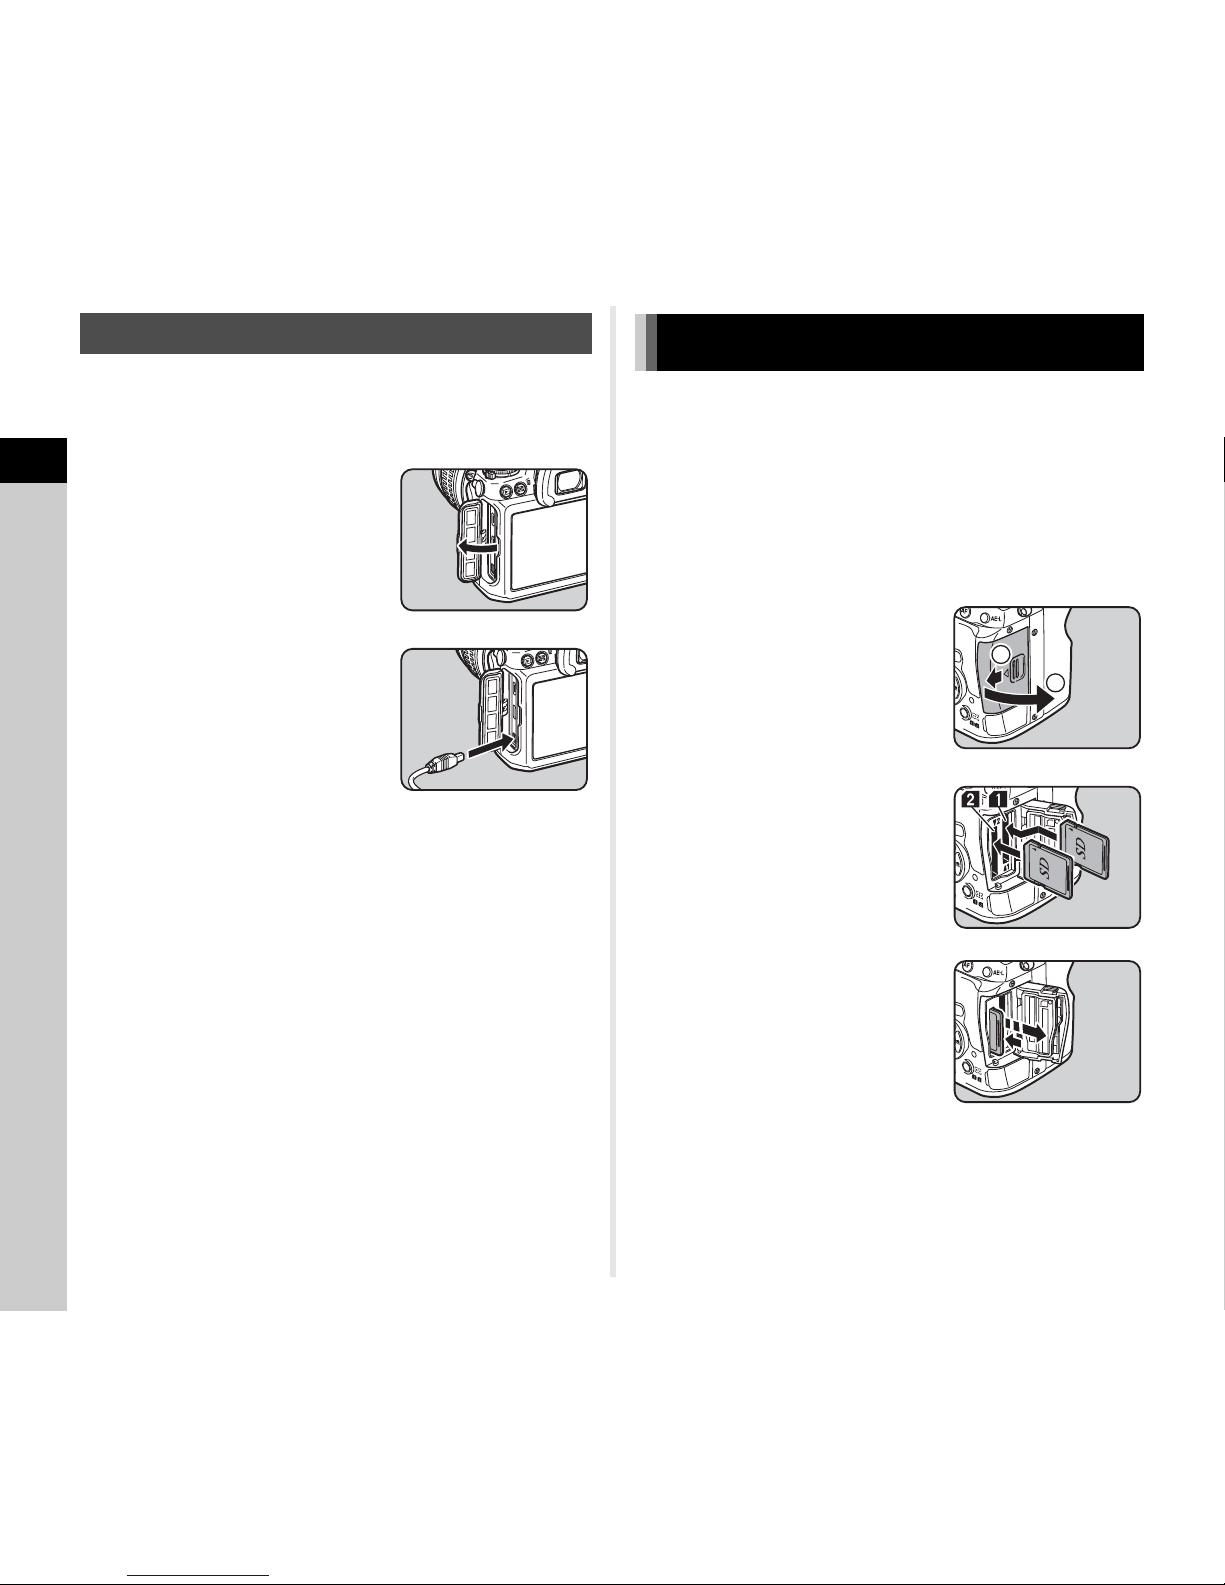
1 Make sure that the camera is turned off.
2 Slide the card cover in the
direction of 1.
3 Insert the card all the way
into the memory card slot
with the memory card label
facing toward the monitor.
Insert the card in the SD2 slot to
use an Eye-Fi card or a Flucard.
Push the memory card in once to
remove.
Using the AC Adapter
Inserting a Memory Card
2
1
 Loading...