

Page 1
Ricoh Product Line Segment 2 thru 6
MP C2000, MP2550, MP3300, MP4000/5000, MP C5000/6000,P7000/8000, MP6001/7001, MP8001/9001, MP906EX
www.ricoh-usa.com
907EX, MP301, MP3352, MP5002, MP7001, MP8001, MP9001, MPC400, MPC5502 and MPC6501
900 Grant Street, Upper Basement • Denver, CO 80203
Phone (720) 423-3411 •
•
servicecenter.dpsk12.org
Page 2
Copying Documents
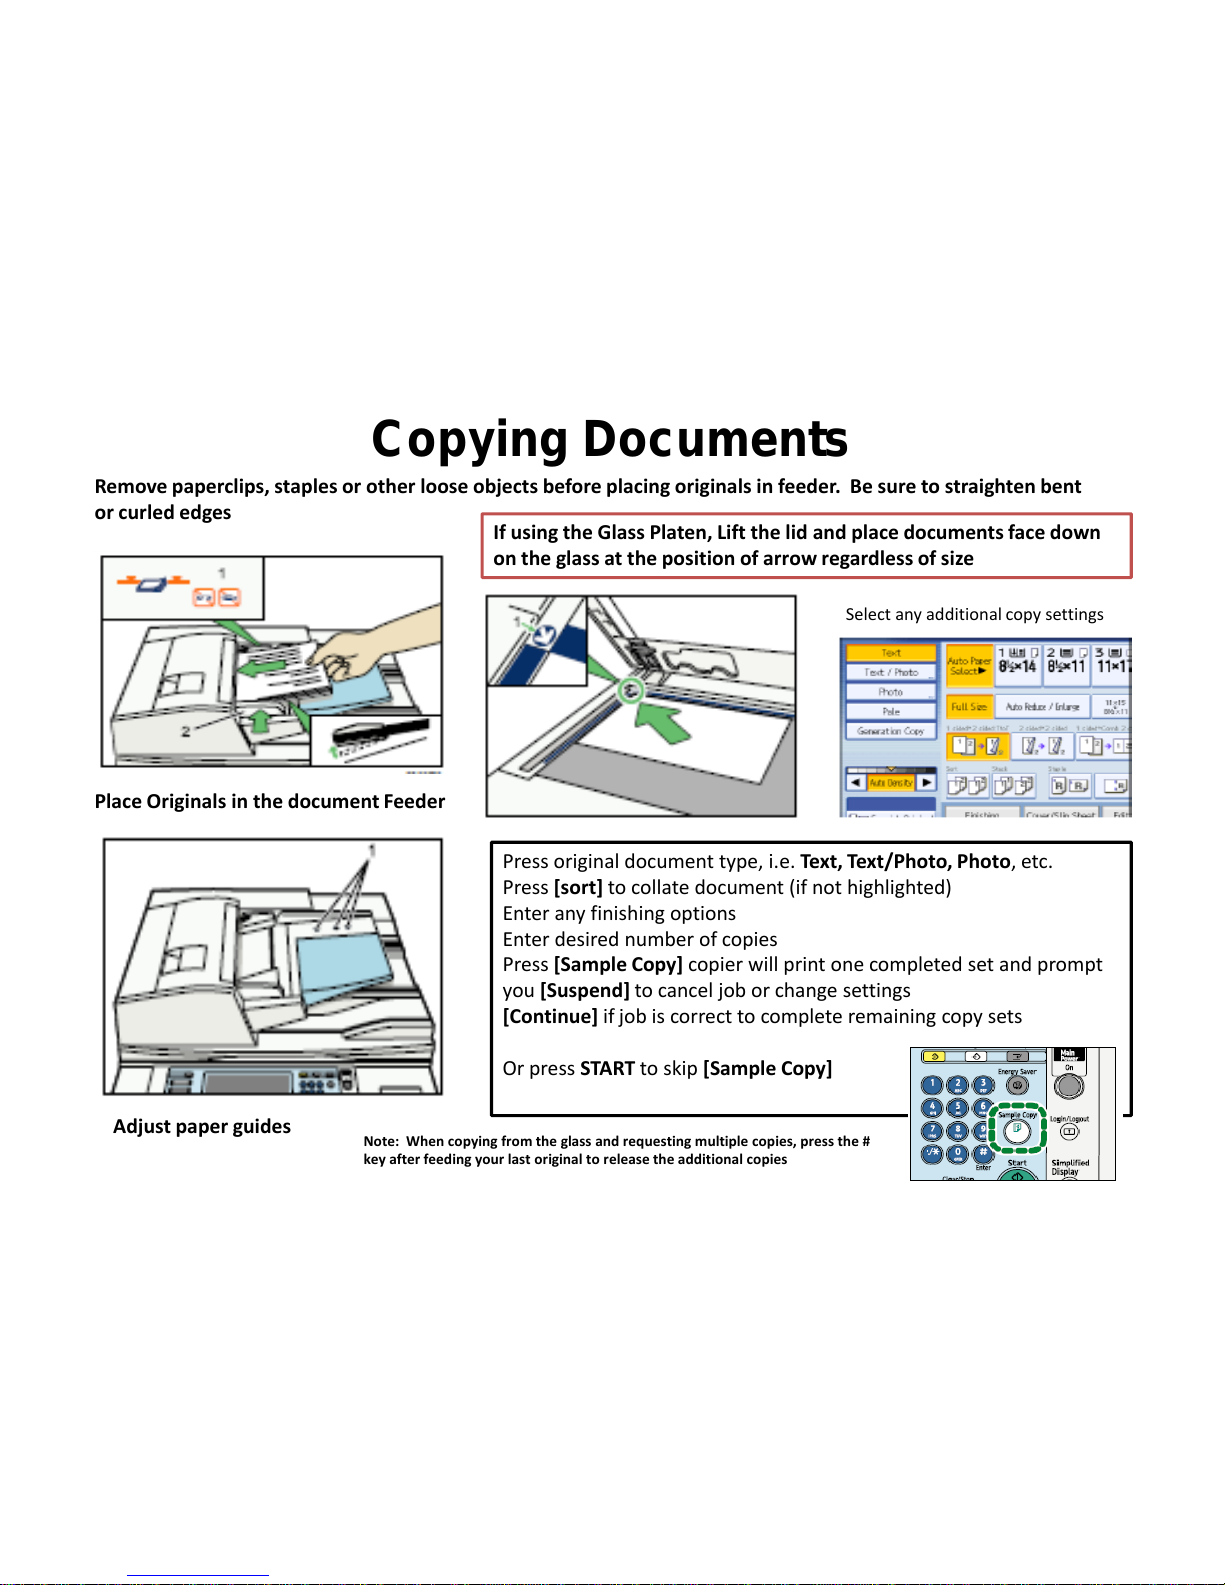
Place Originals in the document Feeder
Adjust paper guides
Remove paperclips, staples or other loose objects before placing originals in feeder. Be sure to straighten bent
or curled edges
If using the Glass Platen, Lift the lid and place documents face down
on the glass at the position of arrow regardless of size
Select any additional copy settings
Press original document type, i.e. Text, Text/Photo, Photo, etc.
Press [sort] to collate document (if not highlighted)
Enter any finishing options
Enter desired number of copies
Press [Sample Copy] copier will print one completed set and prompt
you [Suspend] to cancel job or change settings
[Continue] if job is correct to complete remaining copy sets
Or press START to skip [Sample Copy]
Note: When copying from the glass and requesting multiple copies, press the #
key after feeding your last original to release the additional copies
Page 3
Using Batch Mode
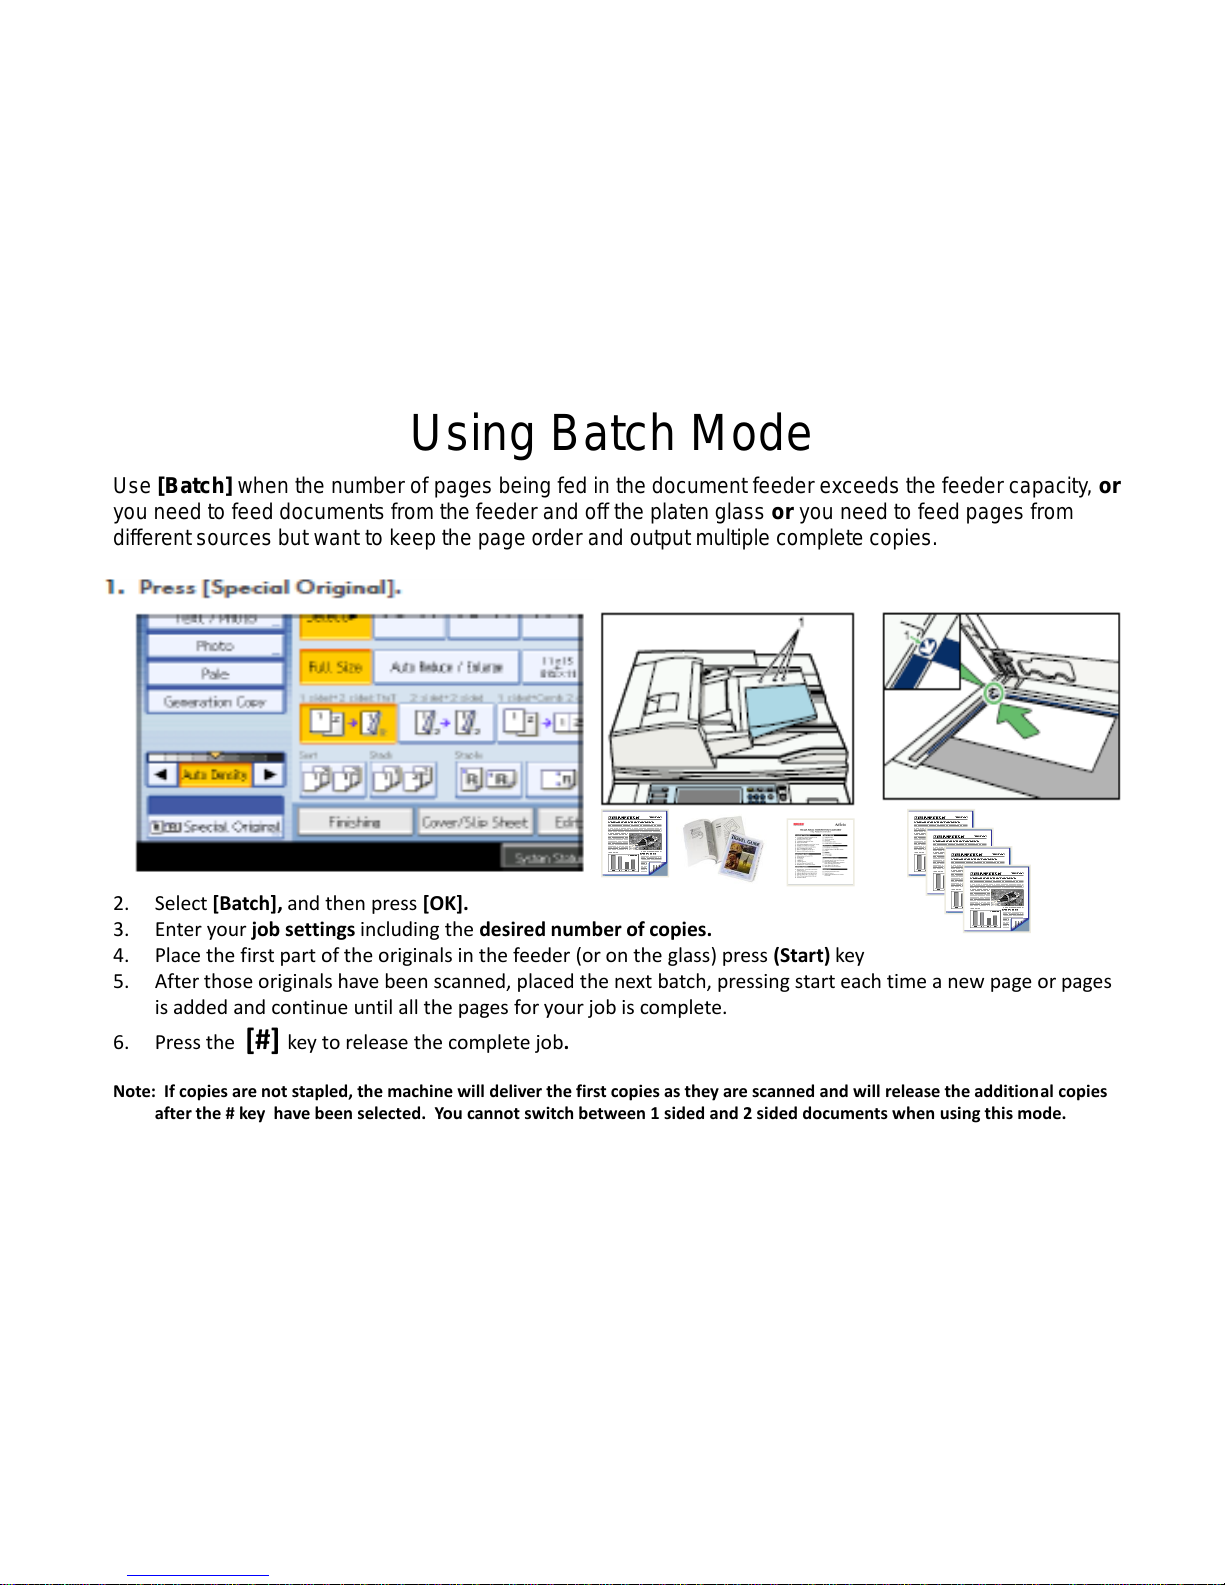
Use [Batch] when the number of pages being fed in the document feeder exceeds the feeder capacity, or
you need to feed documents from the feeder and off the platen glass or you need to feed pages from
different sources but want to keep the page order and output multiple complete copies.
2. Select [Batch], and then press [OK].
3. Enter your job settings including the desired number of copies.
4. Place the first part of the originals in the feeder (or on the glass) press (Start) key
5. After those originals have been scanned, placed the next batch, pressing start each time a new page or pages
is added and continue until all the pages for your job is complete.
6. Press the [#] key to release the complete job.
Note: If copies are not stapled, the machine will deliver the first copies as they are scanned and will release the additional copies
after the # key have been selected. You cannot switch between 1 sided and 2 sided documents when using this mode.
Page 4

Sort/Stack & Rotate Sort Output
SORT Rotate/Sort – the machine assembles copies as sets in sequential order. Use [Sort] when placing multiple
page document to maintain page order - Same as [Collate]. When a finisher is installed with the device the
machine will output the document in the Sort/Shift Sort order, separating the first set from the next set.
STACK – groups together copies of each page in a multi-page original. Use
Stack when setting multiple pages in the document feeder and requiring
the same copy number count per page to be stacked.
ROTATE SORT– Use Rotate Sort when your machine does not have a finisher
to keep jobs separated . To use this option you must have one paper tray
loaded with 8.5x11 paper in landscape orientation and the other tray loaded
with 11x8.5 portrait and select this option from the finishing mode or from
the short cut menu on copier screen.
Page 5

Stapling Documents
1. Place Documents in the document Feeder
2. On bottom of touch screen - select the staple
position that match you job output.
– Select Top Left (straight)
– Top Left Slant
– Bottom Left (for landscape documents fed through feeder
in portrait orientation
– Double Staple Left (portrait Orientation)
– Double Staple Top (landscape orientation)
– Booklet stapling (for booklet folded at center stapling)
3. Press OK
4. Press Start
2. Select desired staple position
3. Press [OK]
4. Place documents in feeder
5. Press [START]
Note: The number of pages and stapling positions will vary by machine depending on
the model and type of finisher installed
Page 6
2 & 3 Hole Punch
Page 7
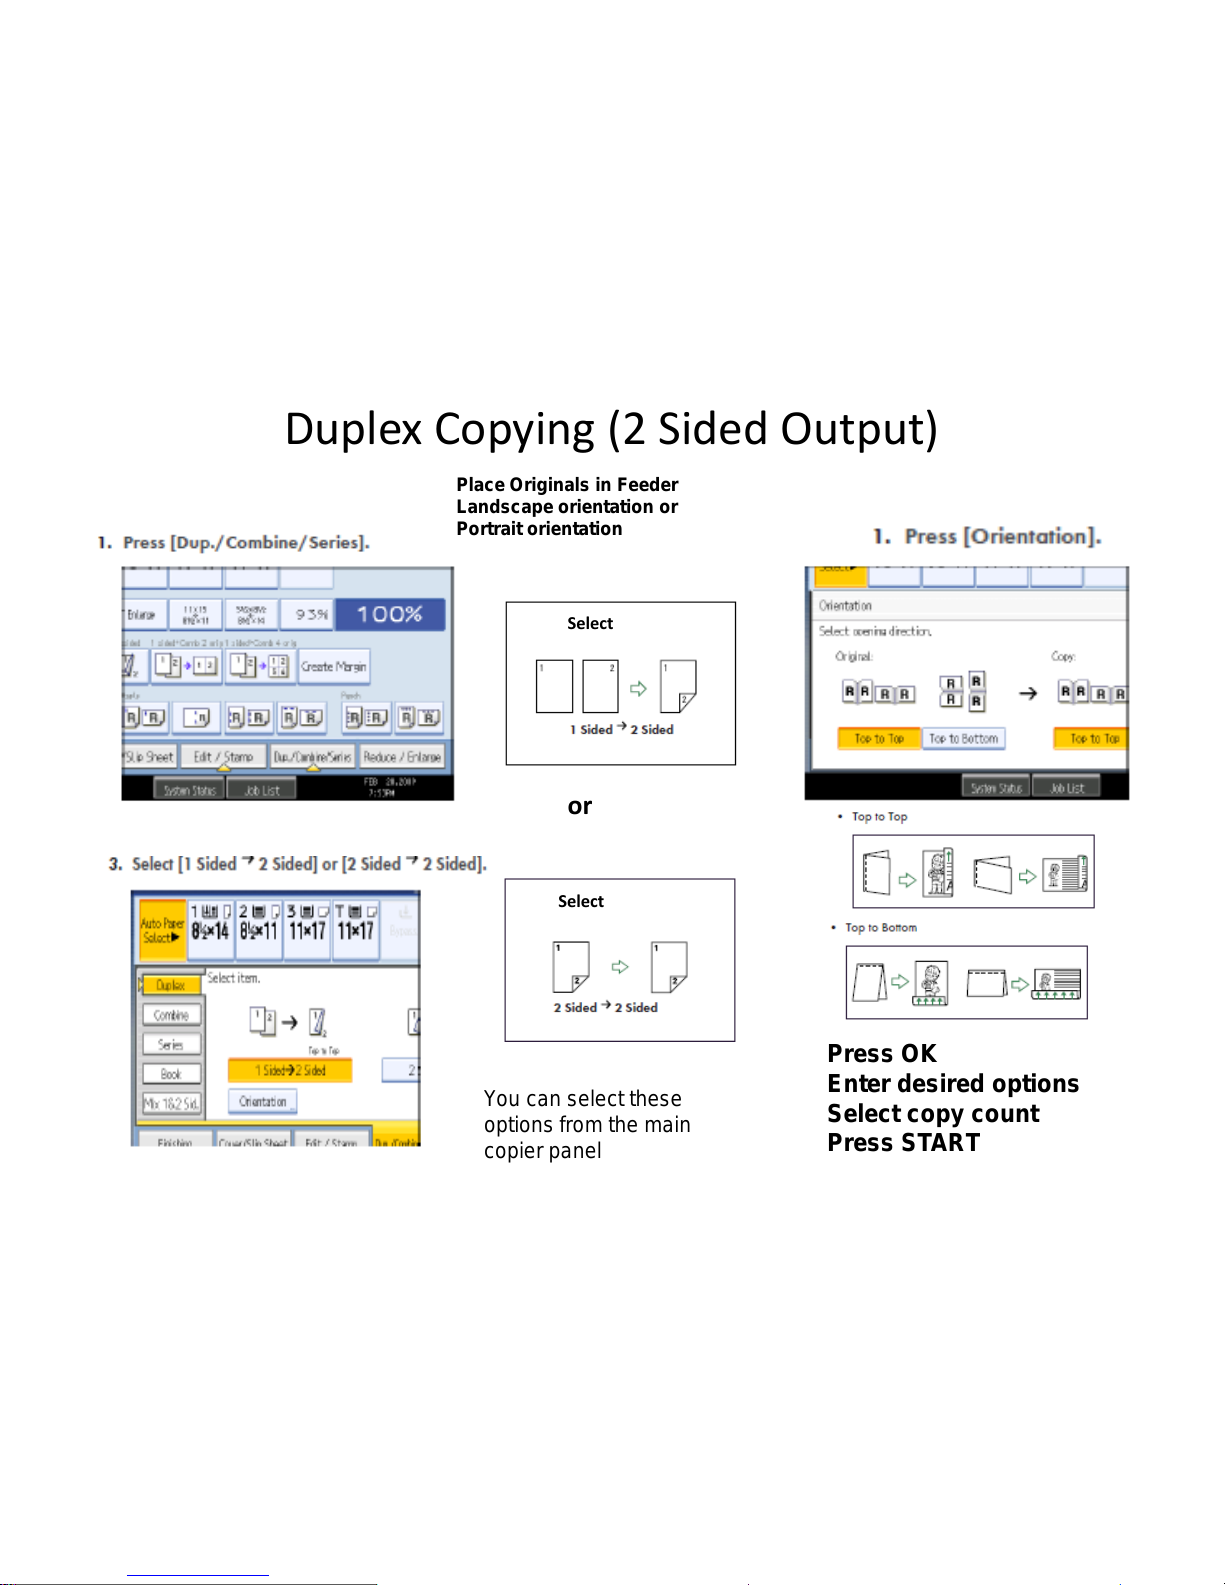
Duplex Copying (2 Sided Output)
Place Originals in Feeder
Landscape orientation or
Portrait orientation
Press OK
Enter desired options
Select copy count
Press START
Select
or
You can select these
options from the main
copier panel
Select
Page 8
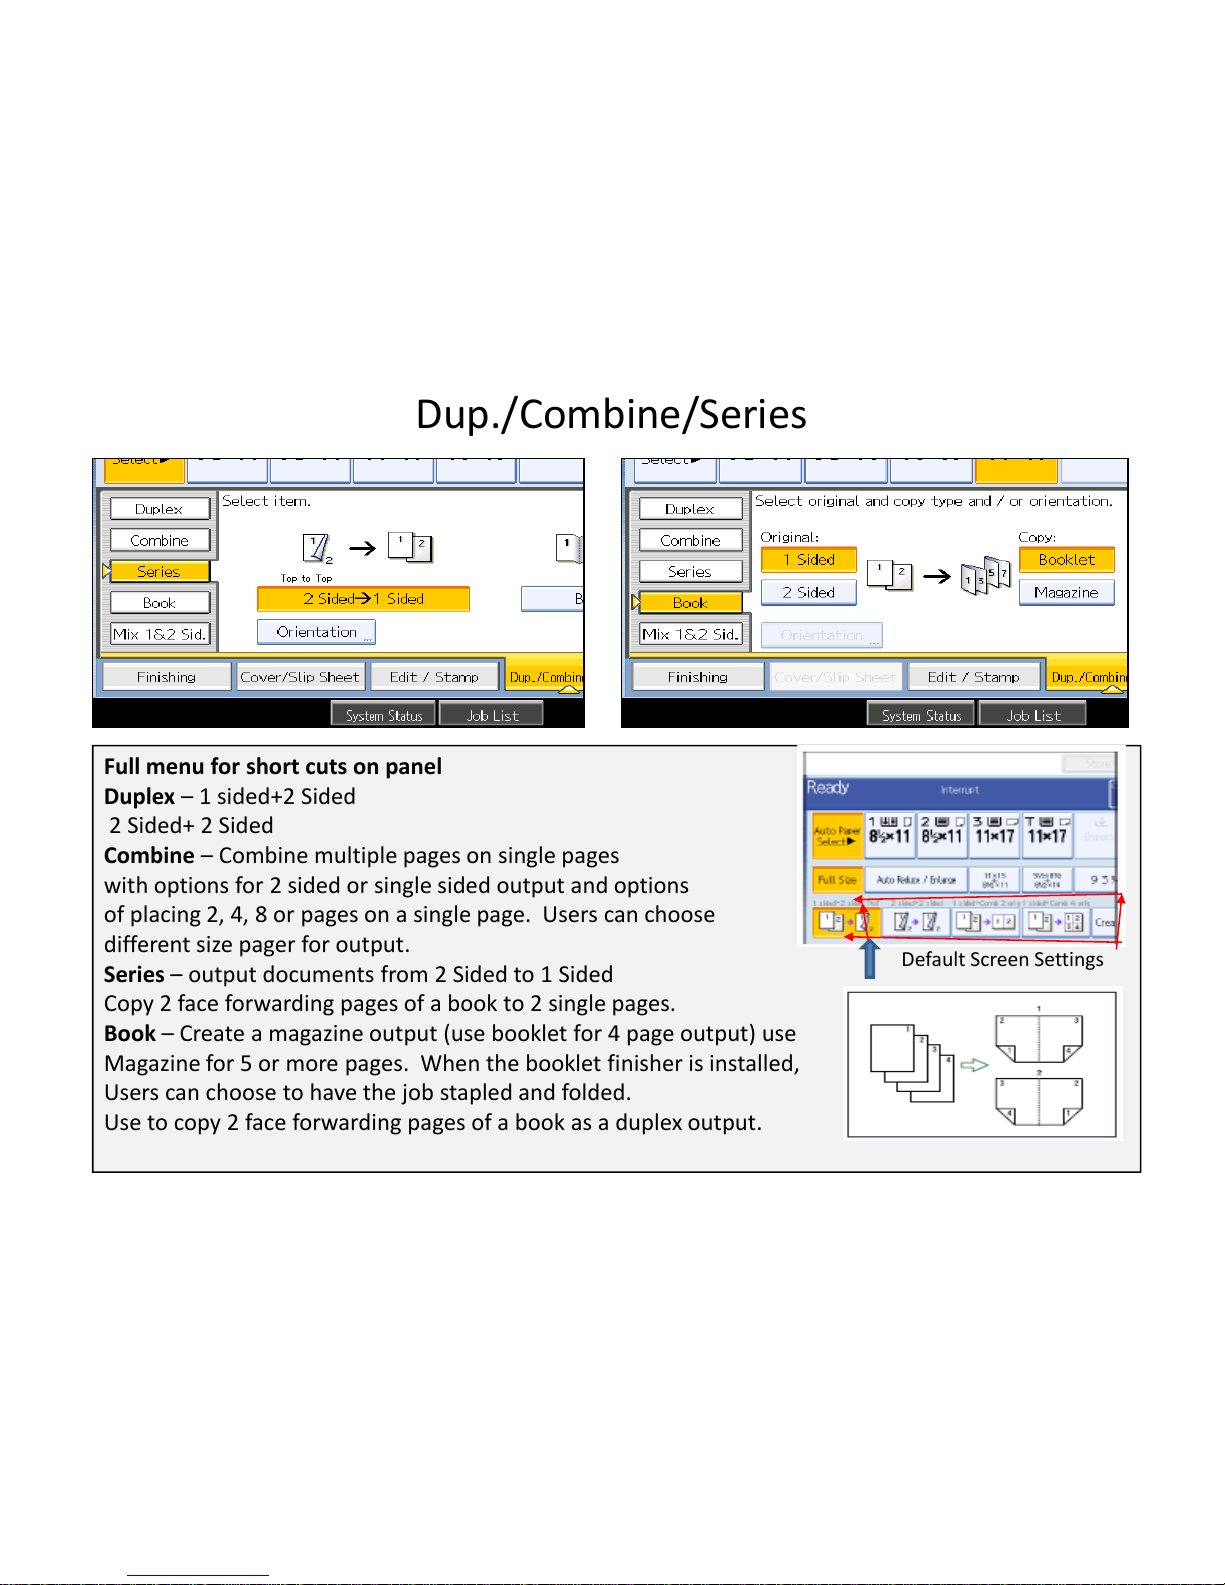
Dup./Combine/Series
Full menu for short cuts on panel
Duplex – 1 sided+2 Sided
2 Sided+ 2 Sided
Combine – Combine multiple pages on single pages
with options for 2 sided or single sided output and options
of placing 2, 4, 8 or pages on a single page. Users can choose
different size pager for output.
Series – output documents from 2 Sided to 1 Sided
Copy 2 face forwarding pages of a book to 2 single pages.
Book – Create a magazine output (use booklet for 4 page output) use
Magazine for 5 or more pages. When the booklet finisher is installed,
Users can choose to have the job stapled and folded.
Use to copy 2 face forwarding pages of a book as a duplex output.
Default Screen Settings
Page 9
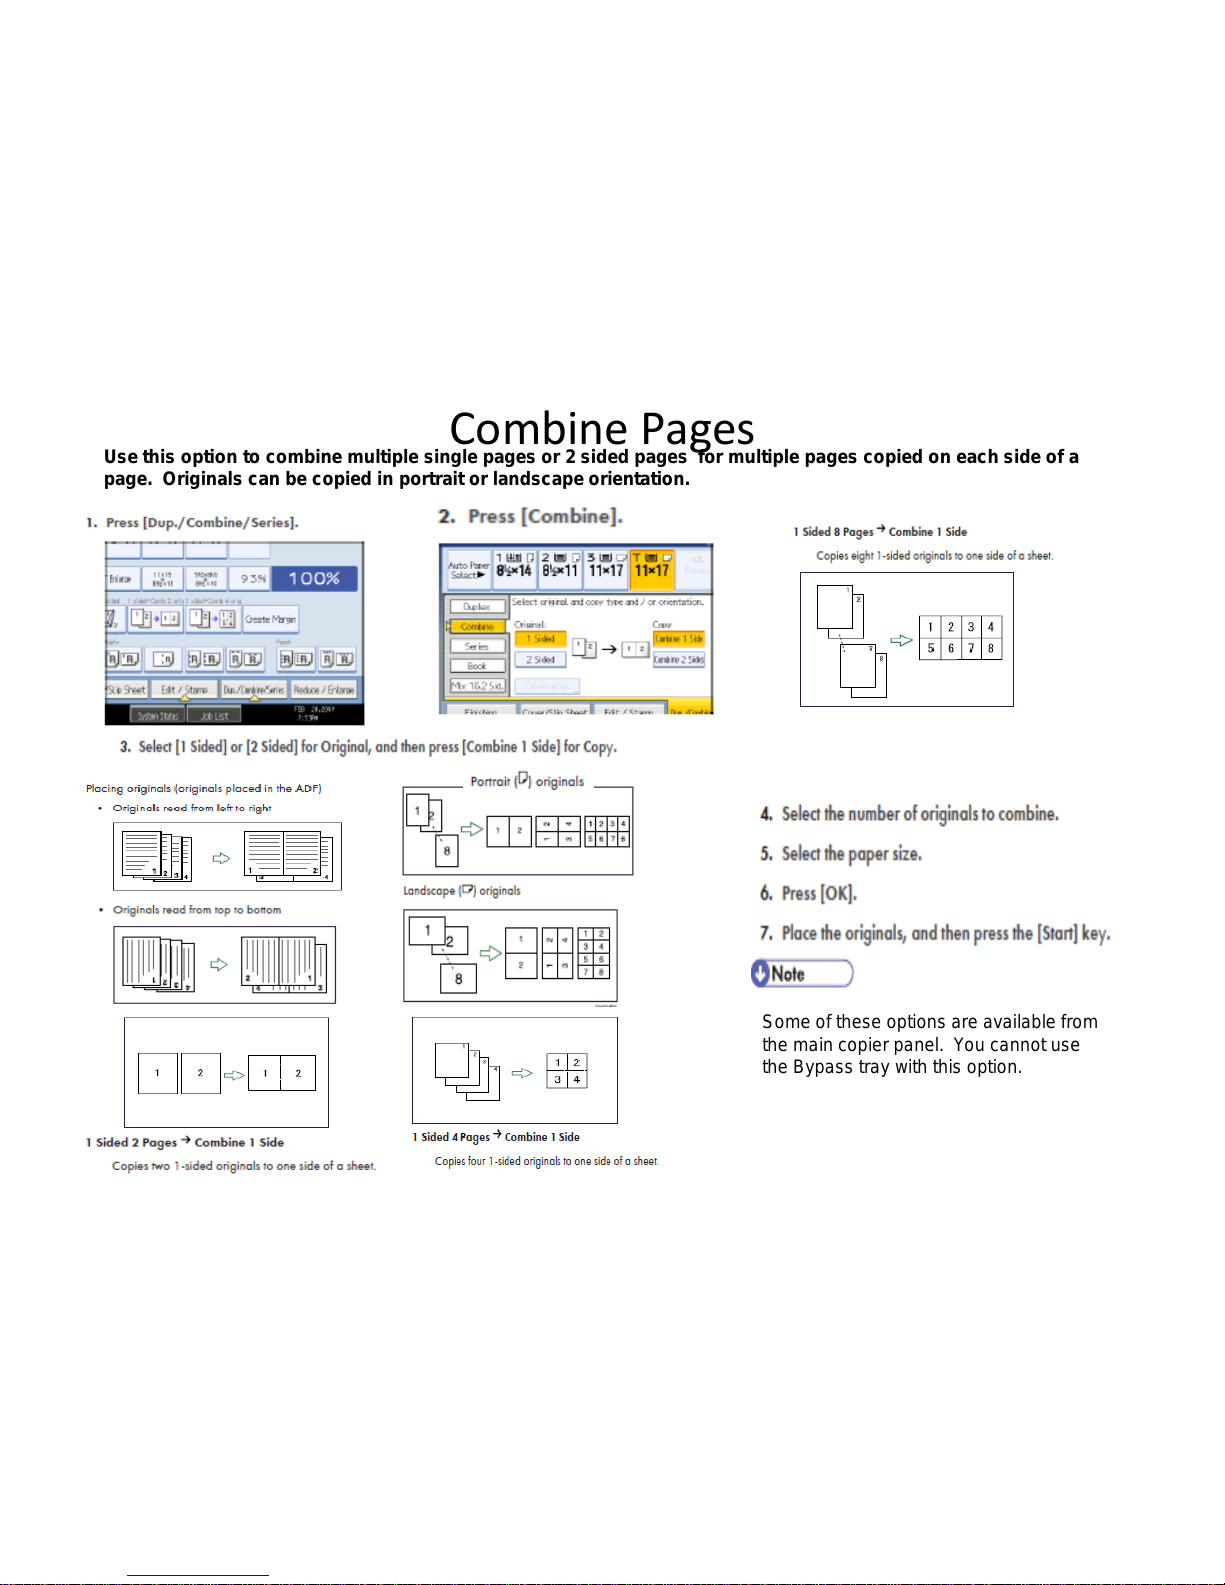
Combine Pages
Some of these options are available from
the main copier panel. You cannot use
the Bypass tray with this option.
Use this option to combine multiple single pages or 2 sided pages for multiple pages copied on each side of a
page. Originals can be copied in portrait or landscape orientation.
Page 10
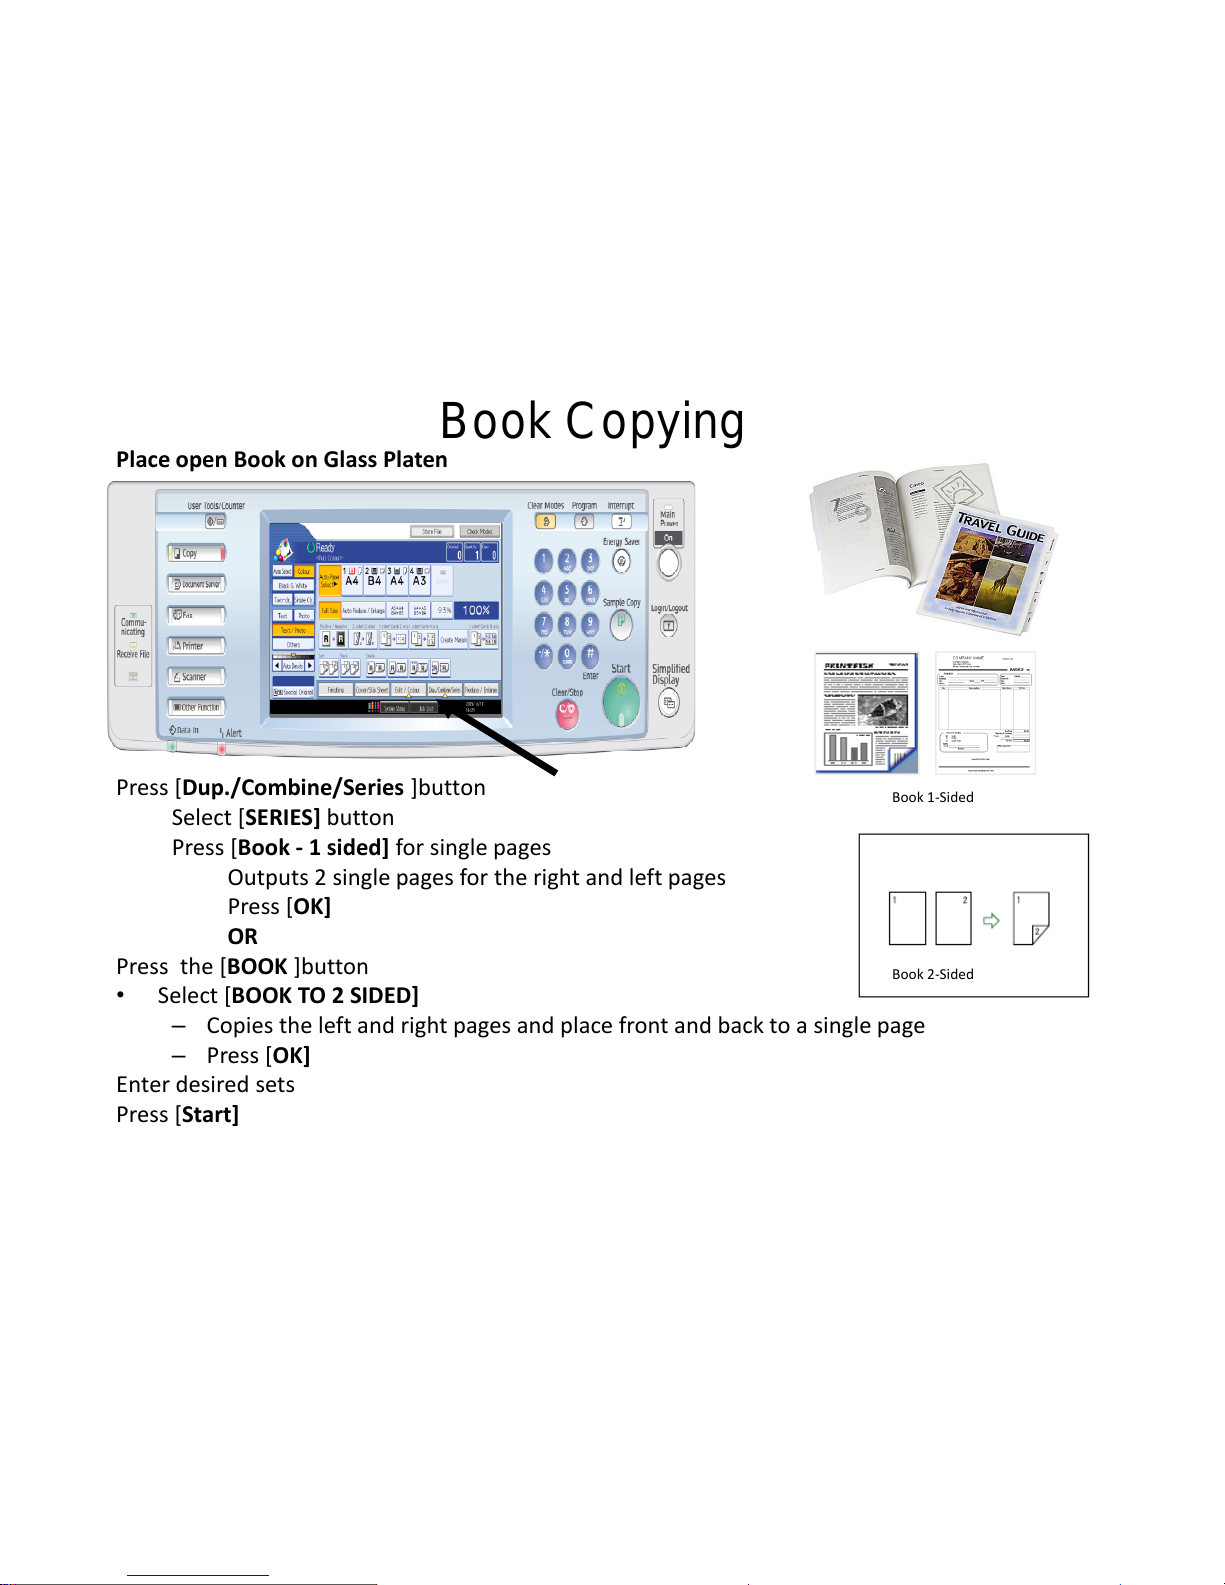
Book Copying
Place open Book on Glass Platen
Press [Dup./Combine/Series ]button
Select [SERIES] button
Press [Book - 1 sided] for single pages
Outputs 2 single pages for the right and left pages
Press [OK]
OR
Press the [BOOK ]button
• Select [BOOK TO 2 SIDED]
– Copies the left and right pages and place front and back to a single page
– Press [OK]
Enter desired sets
Press [Start]
Book 1-Sided
Book 2-Sided
Page 11
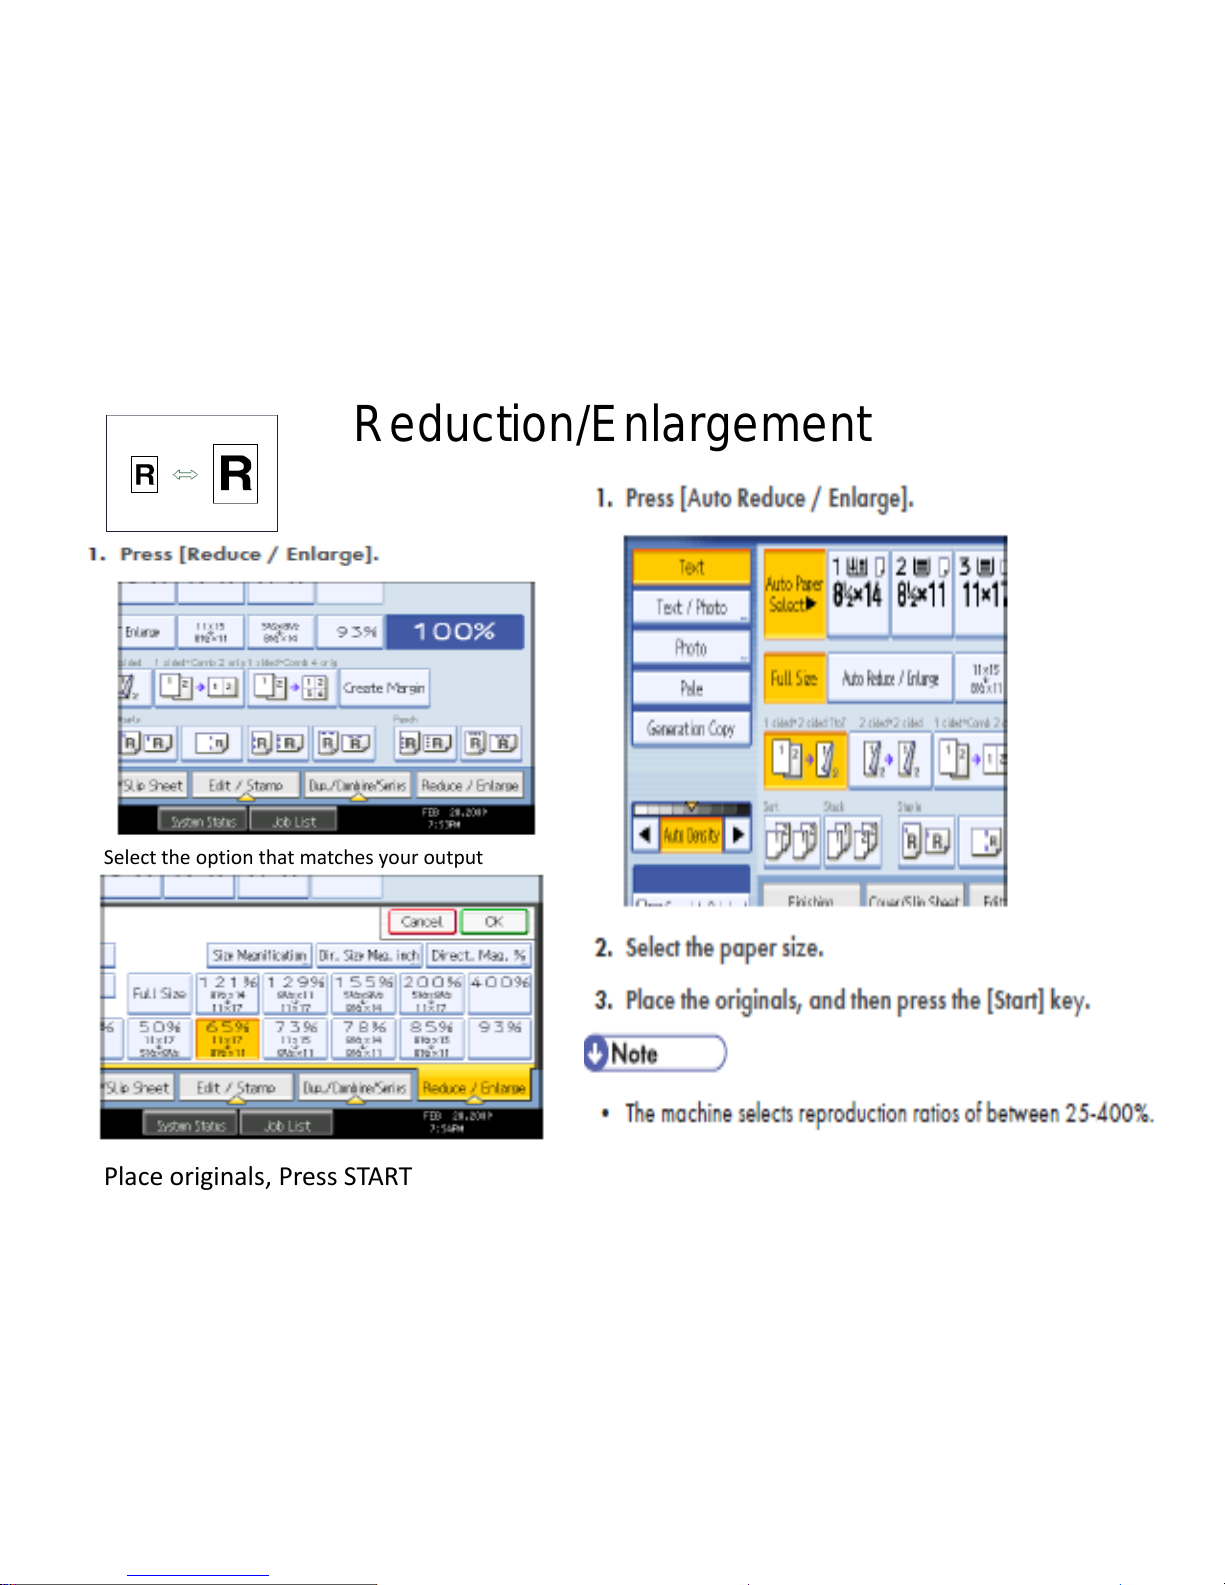
Reduction/Enlargement
Select the option that matches your output
Place originals, Press START
Page 12
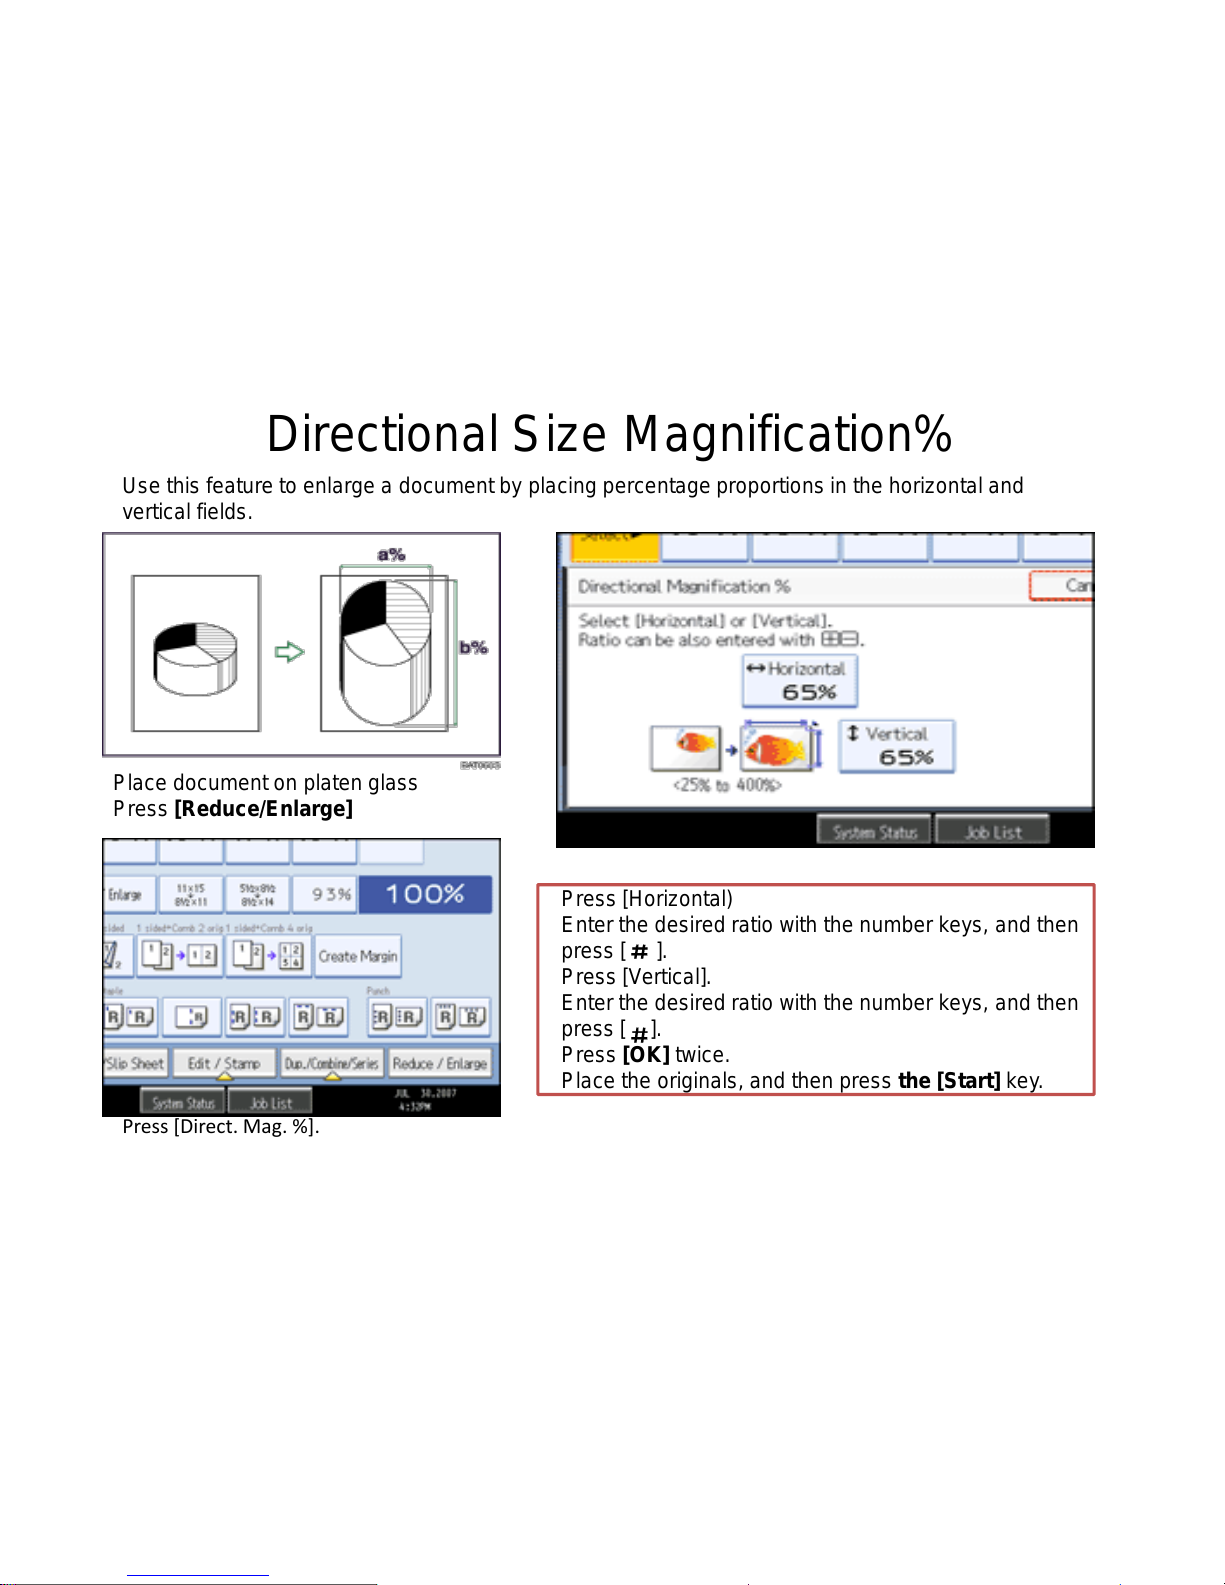
Directional Size Magnification%
Use this feature to enlarge a document by placing percentage proportions in the horizontal and
vertical fields.
Place document on platen glass
Press [Reduce/Enlarge]
Press [Direct. Mag. %].
Press [Horizontal)
Enter the desired ratio with the number keys, and then
press [ ].
Press [Vertical].
Enter the desired ratio with the number keys, and then
press [ ].
Press [OK] twice.
Place the originals, and then press the [Start] key.
Page 13
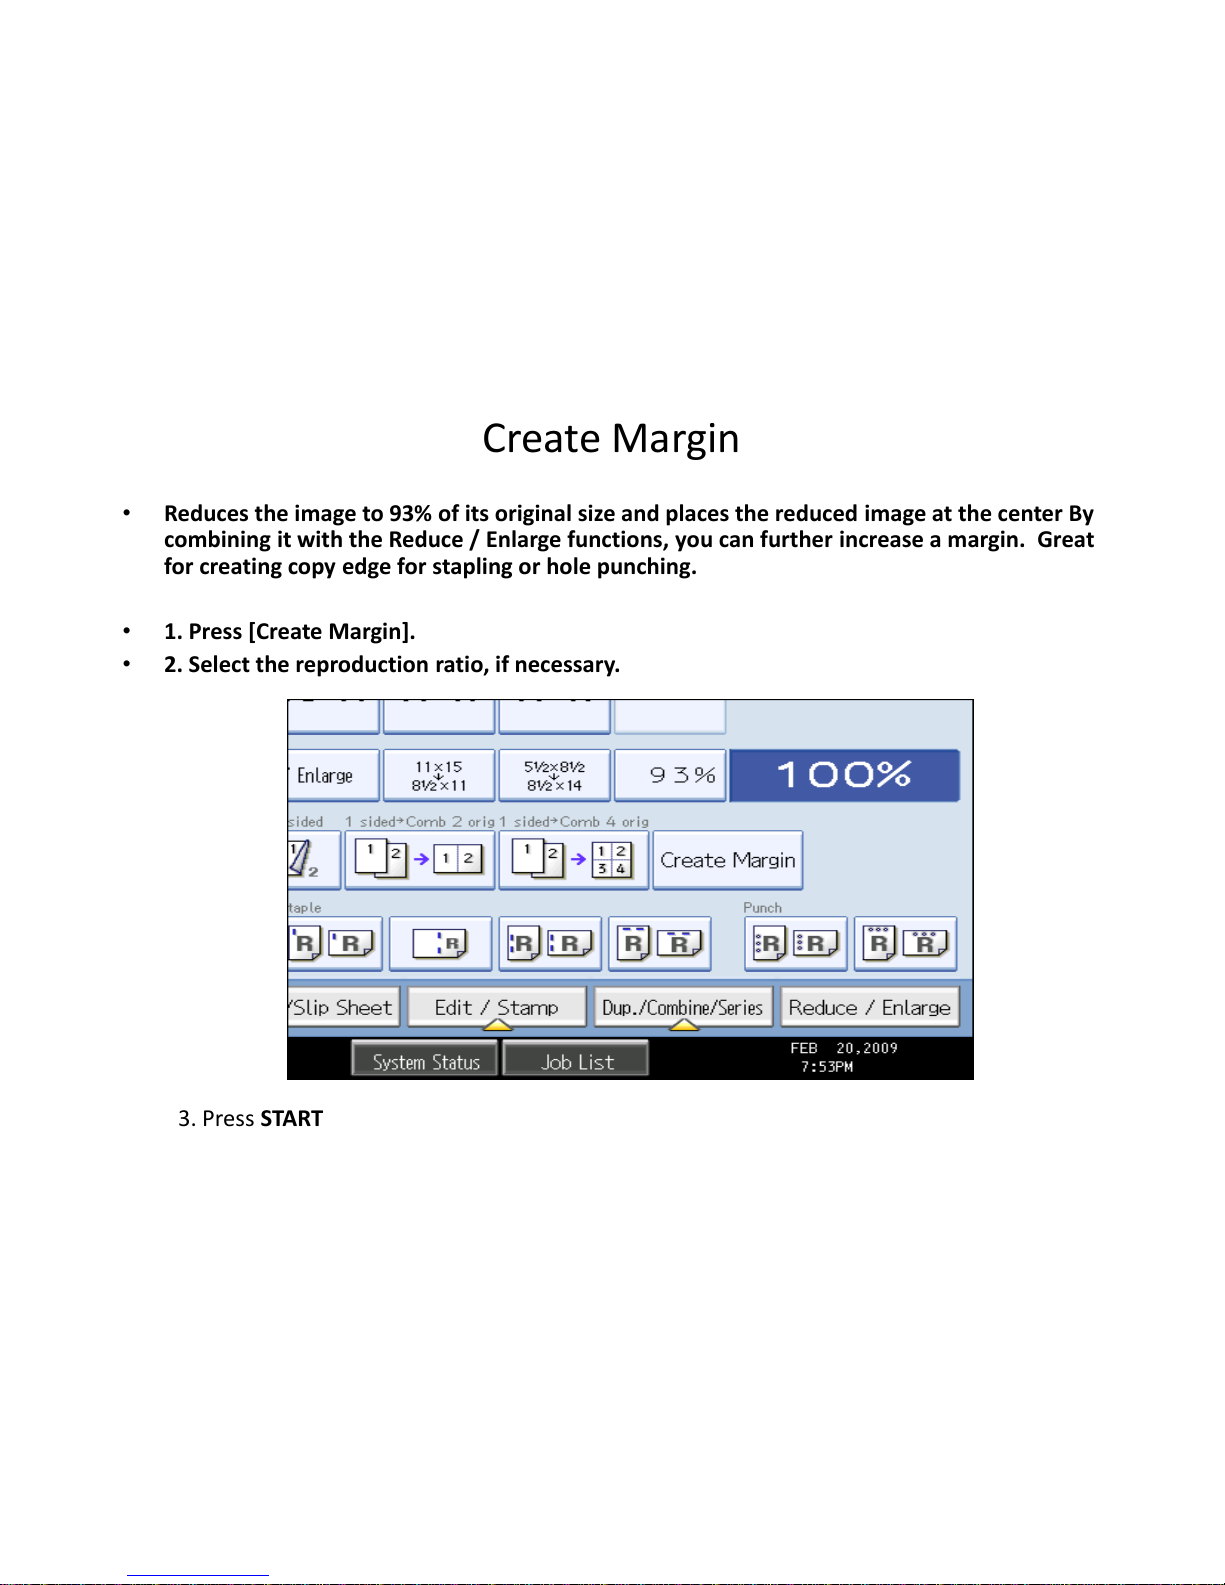
Create Margin
• Reduces the image to 93% of its original size and places the reduced image at the center By
combining it with the Reduce / Enlarge functions, you can further increase a margin. Great
for creating copy edge for stapling or hole punching.
• 1. Press [Create Margin].
• 2. Select the reproduction ratio, if necessary.
3. Press START
Page 14
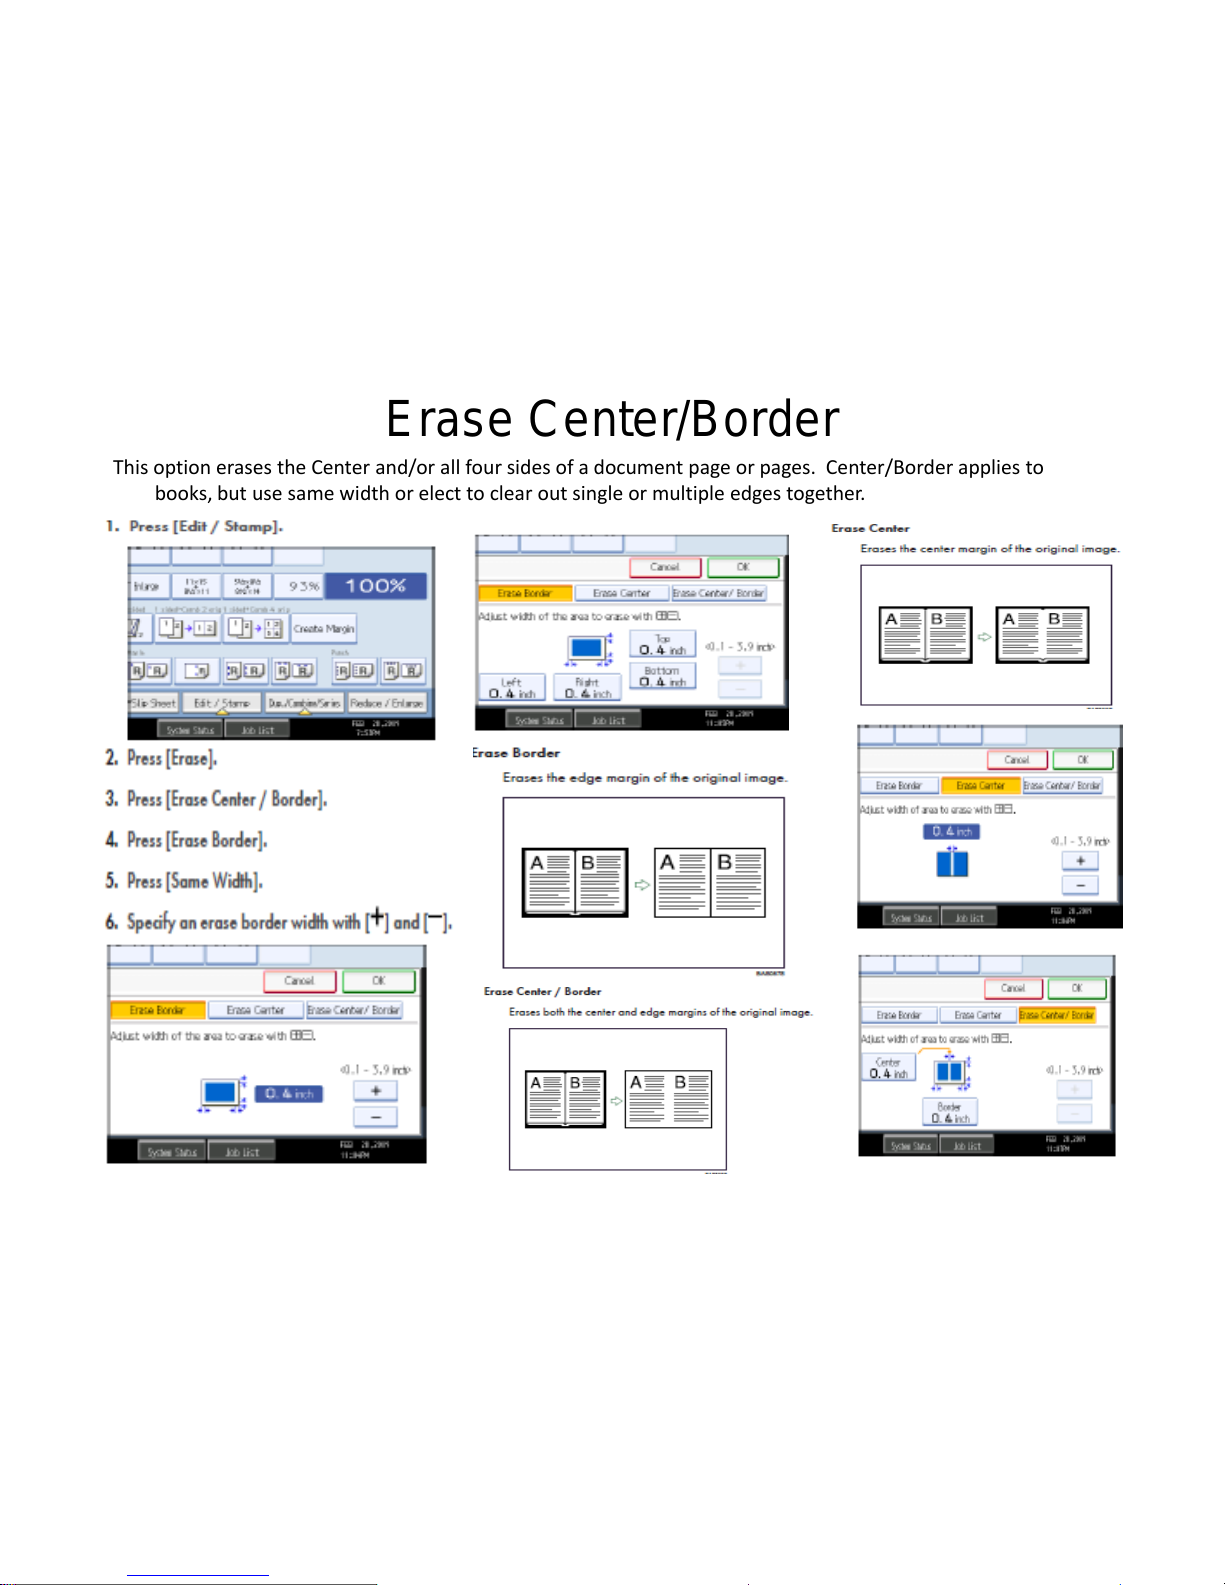
Erase Center/Border
This option erases the Center and/or all four sides of a document page or pages. Center/Border applies to
books, but use same width or elect to clear out single or multiple edges together.
Page 15
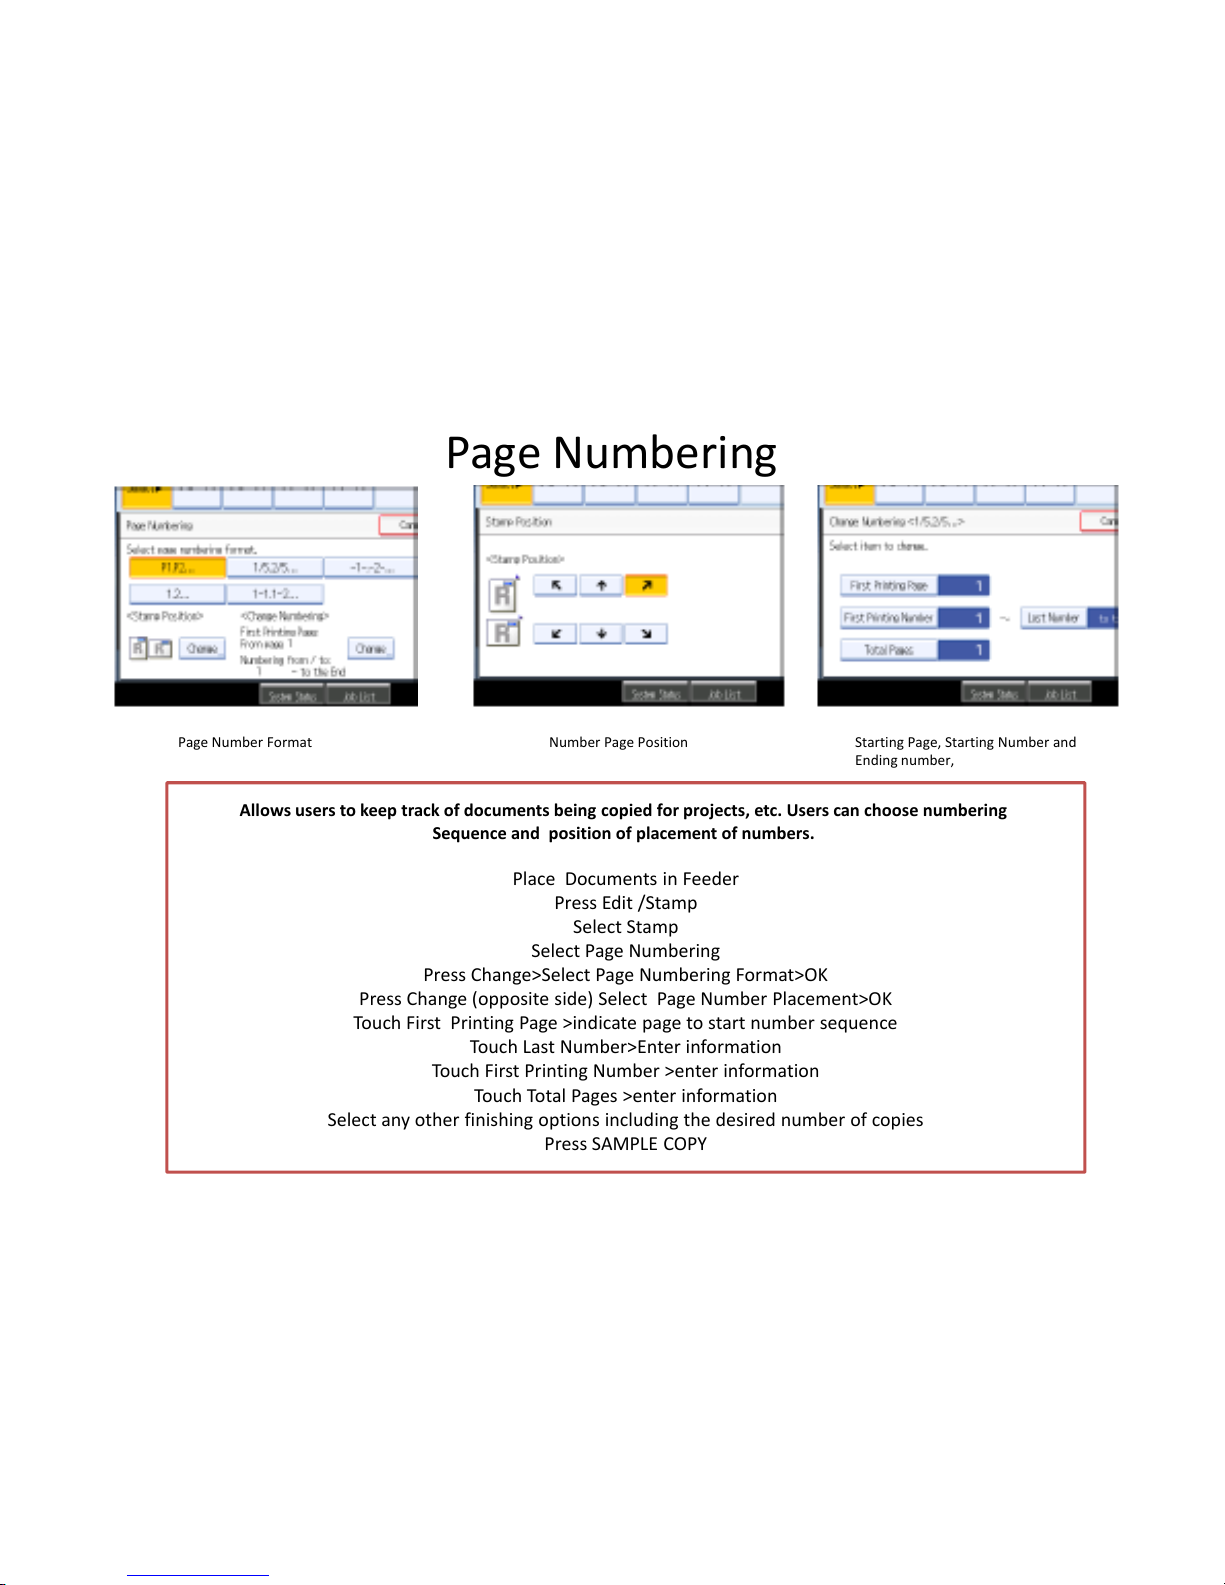
Page Numbering
Allows users to keep track of documents being copied for projects, etc. Users can choose numbering
Sequence and position of placement of numbers.
Place Documents in Feeder
Press Edit /Stamp
Select Stamp
Select Page Numbering
Press Change>Select Page Numbering Format>OK
Press Change (opposite side) Select Page Number Placement>OK
Touch First Printing Page >indicate page to start number sequence
Touch Last Number>Enter information
Touch First Printing Number >enter information
Touch Total Pages >enter information
Select any other finishing options including the desired number of copies
Press SAMPLE COPY
Page Number Format Starting Page, Starting Number and
Ending number,
Number Page Position
Page 16
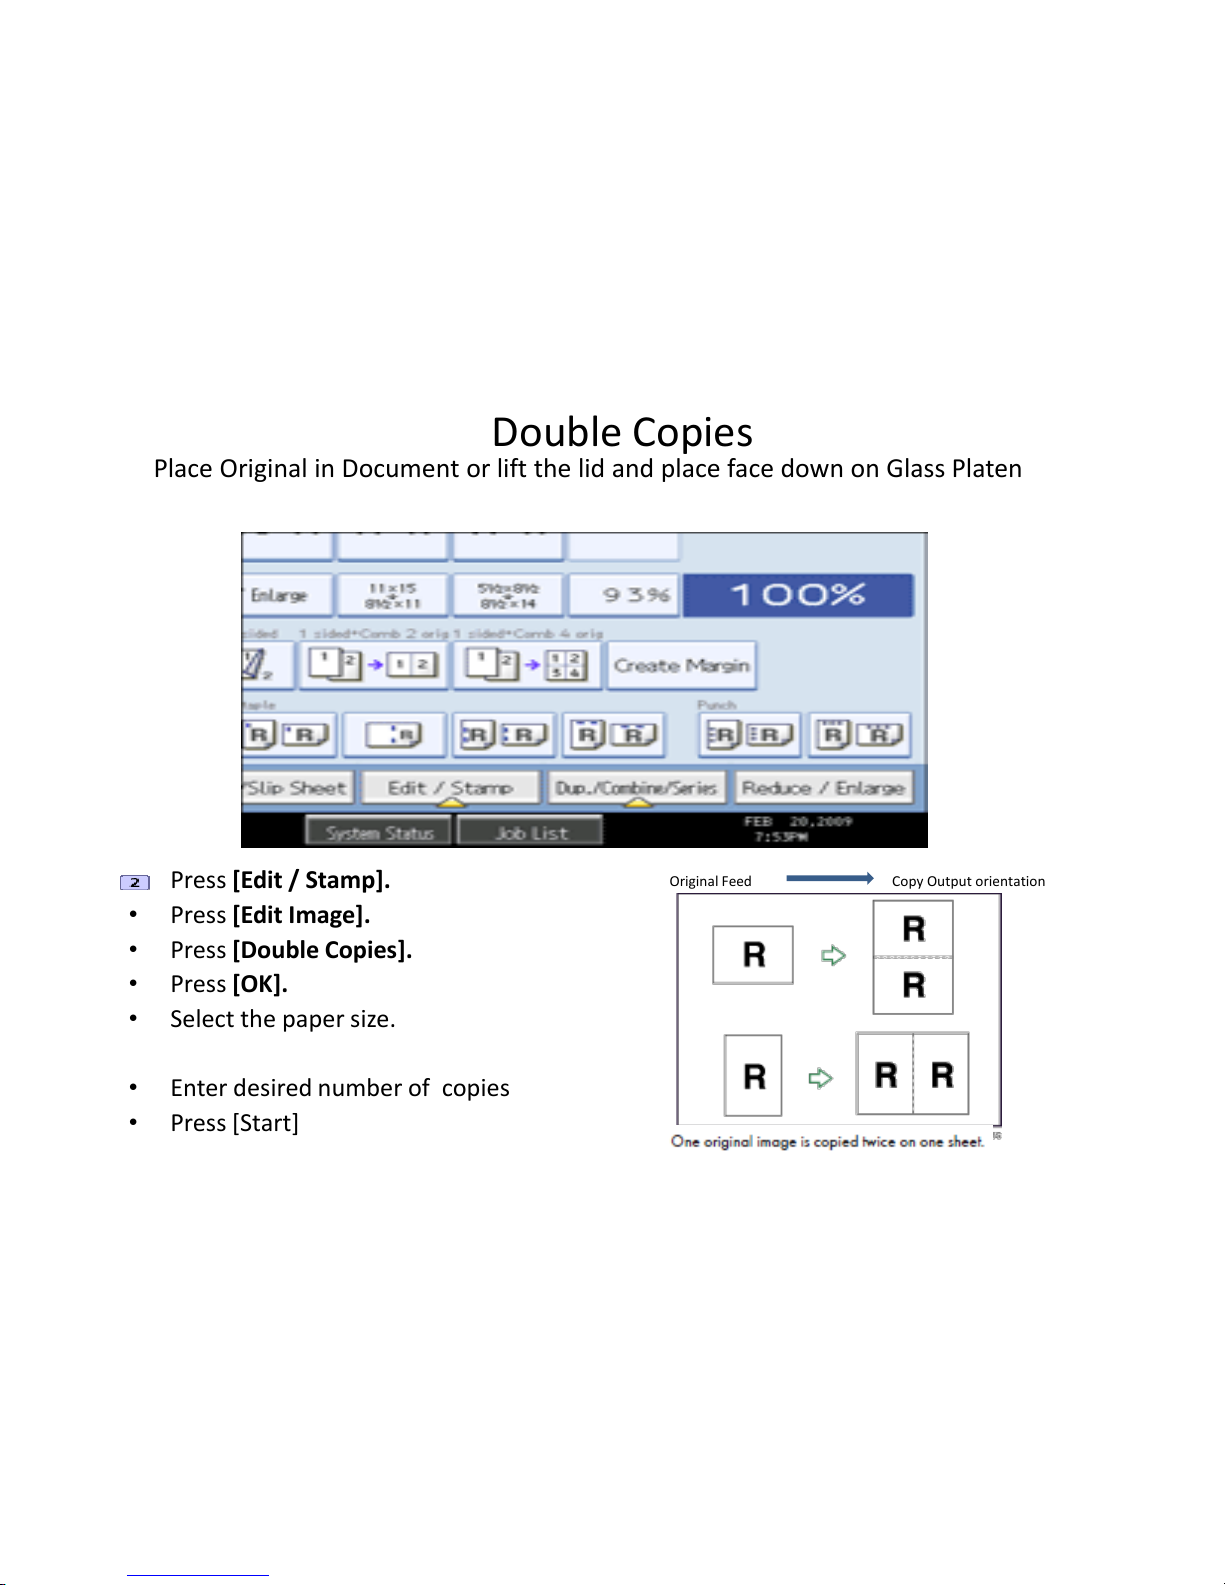
Double Copies
• Press [Edit / Stamp].
• Press [Edit Image].
• Press [Double Copies].
• Press [OK].
• Select the paper size.
• Enter desired number of copies
• Press [Start]
Place Original in Document or lift the lid and place face down on Glass Platen
Original Feed Copy Output orientation
Page 17
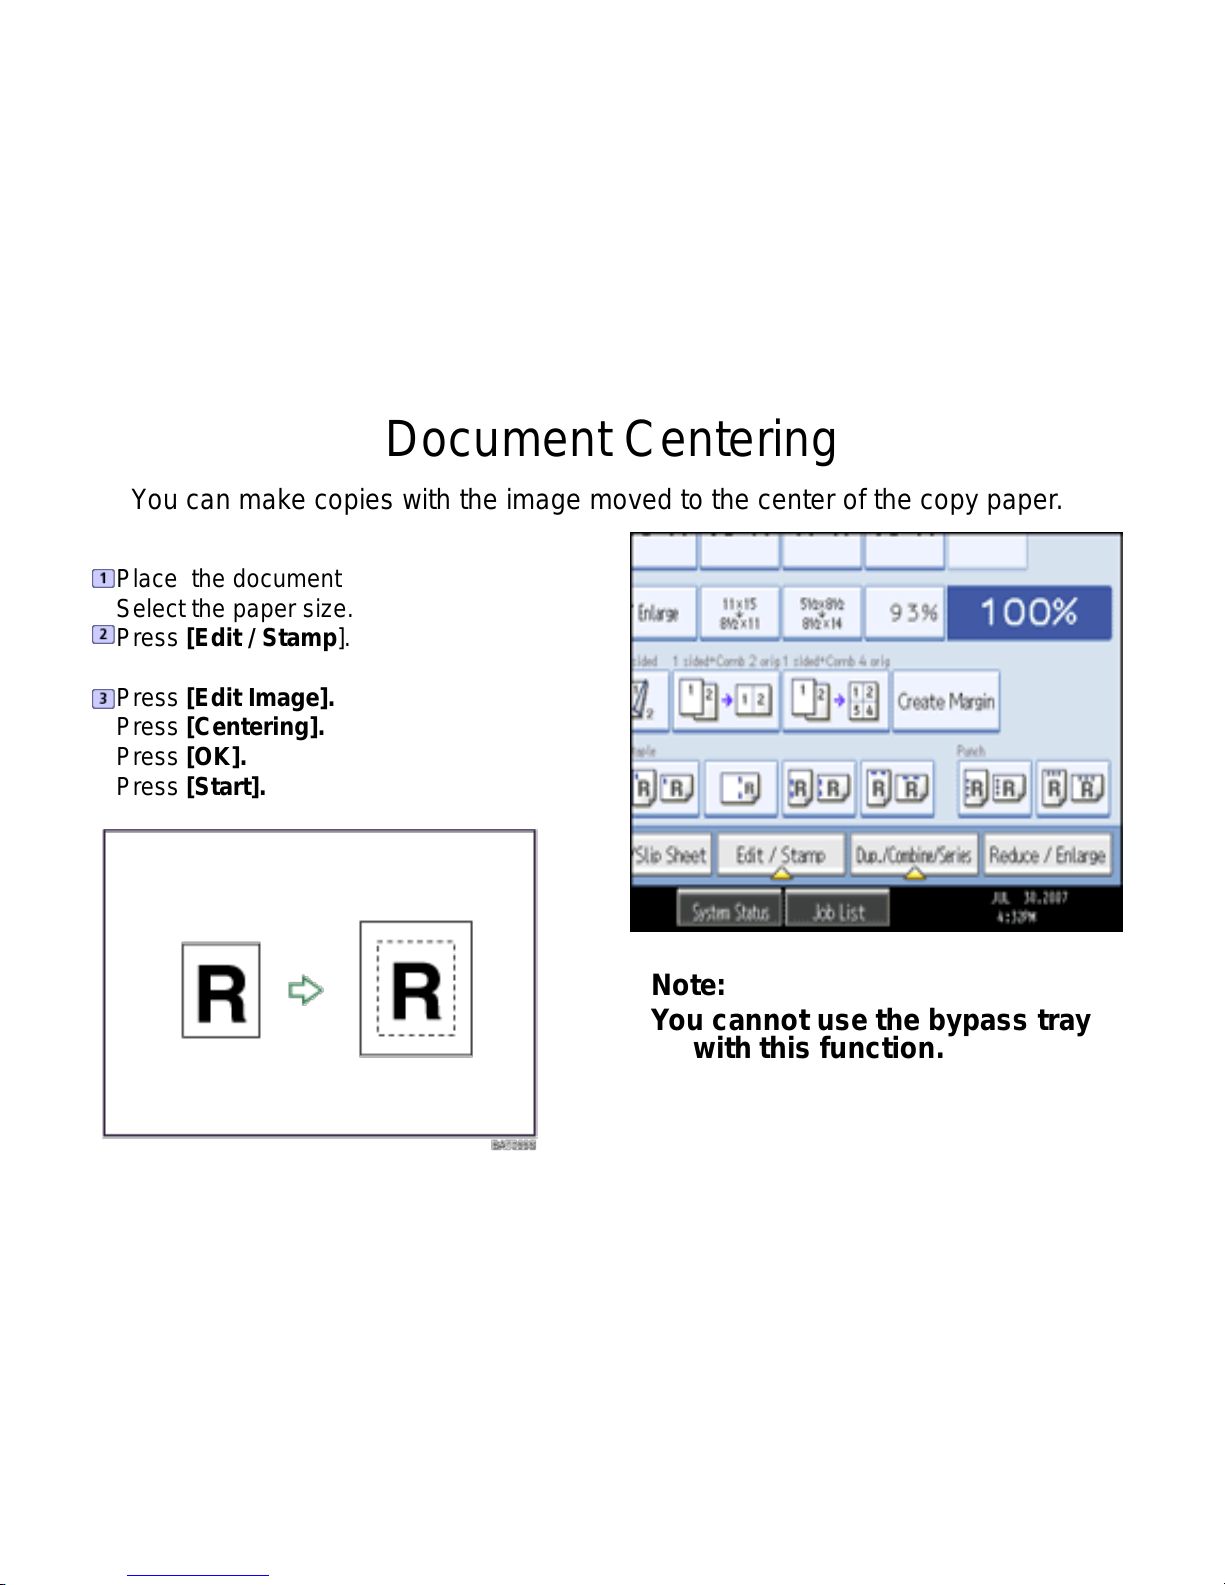
Document Centering
Note:
You cannot use the bypass tray
with this function.
You can make copies with the image moved to the center of the copy paper.
Place the document
Select the paper size.
Press [Edit / Stamp].
Press [Edit Image].
Press [Centering].
Press [OK].
Press [Start].
Page 18
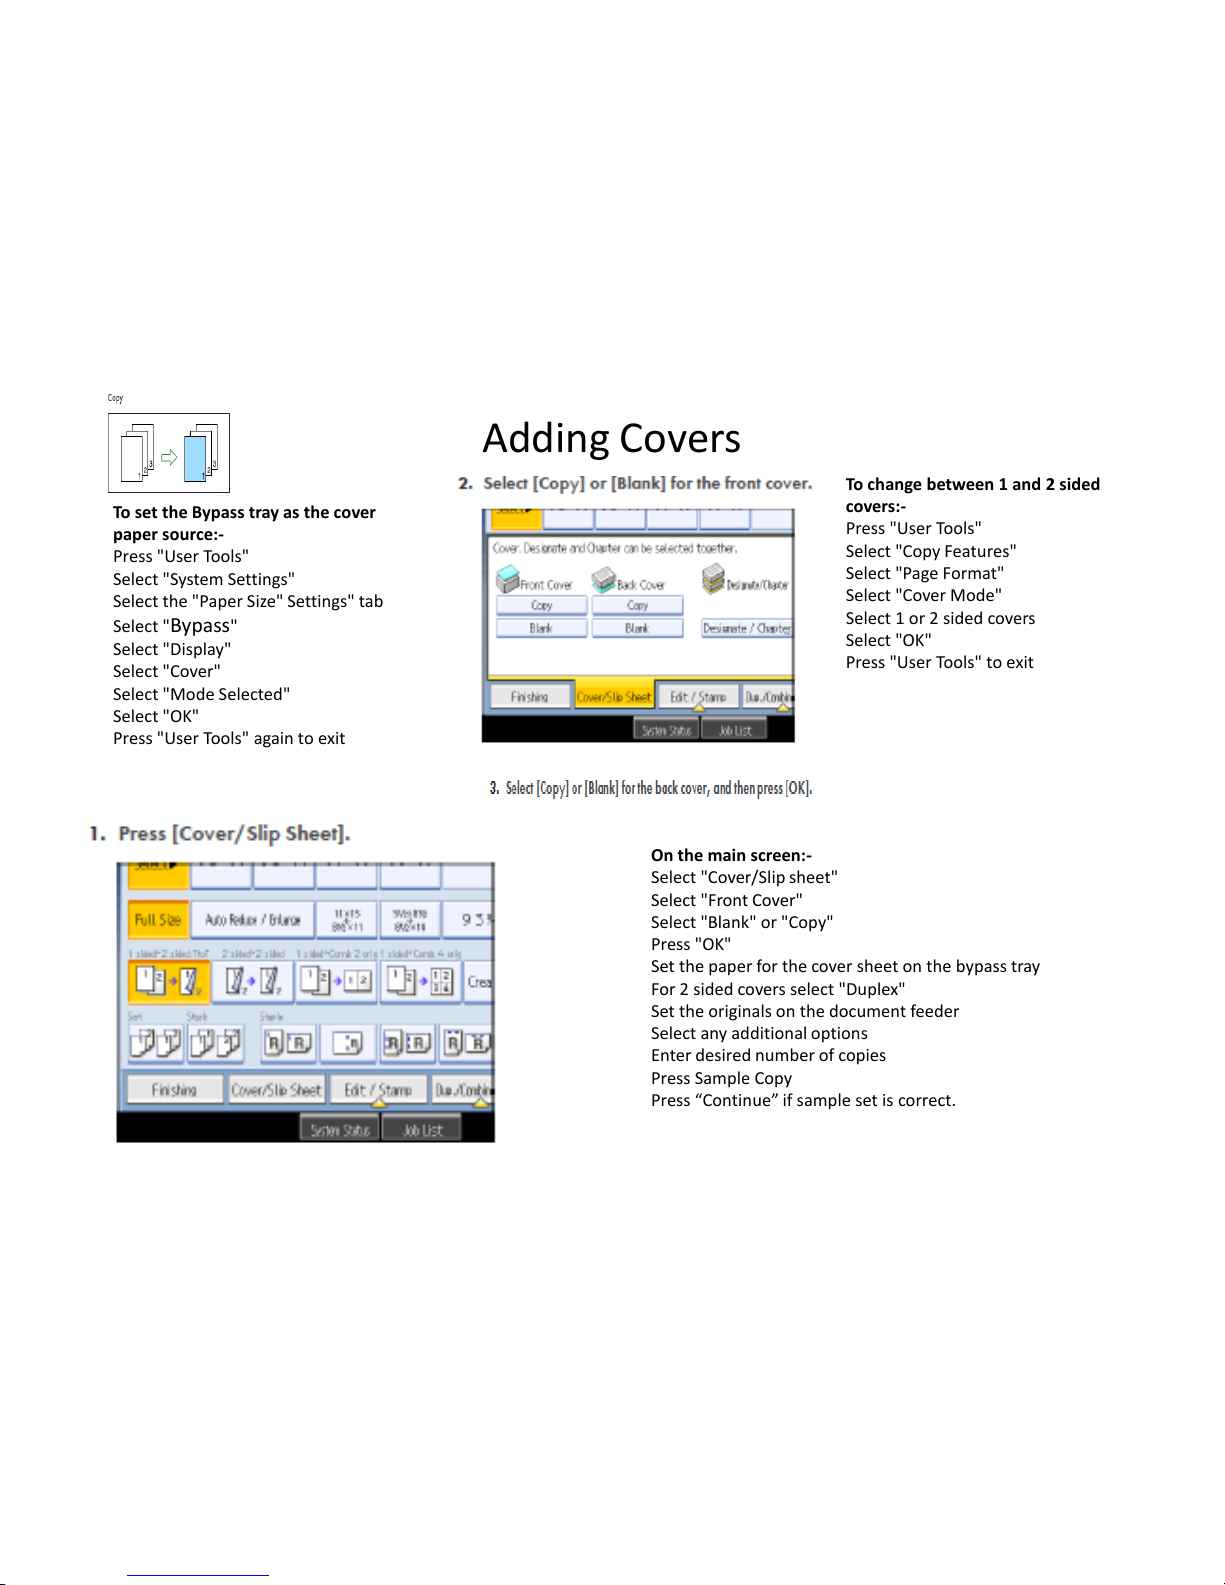
Adding Covers
To set the Bypass tray as the cover
paper source:-
Press "User Tools"
Select "System Settings"
Select the "Paper Size" Settings" tab
Select "Bypass"
Select "Display"
Select "Cover"
Select "Mode Selected"
Select "OK"
Press "User Tools" again to exit
On the main screen:-
Select "Cover/Slip sheet"
Select "Front Cover"
Select "Blank" or "Copy"
Press "OK"
Set the paper for the cover sheet on the bypass tray
For 2 sided covers select "Duplex"
Set the originals on the document feeder
Select any additional options
Enter desired number of copies
Press Sample Copy
Press “Continue” if sample set is correct.
To change between 1 and 2 sided
covers:-
Press "User Tools"
Select "Copy Features"
Select "Page Format"
Select "Cover Mode"
Select 1 or 2 sided covers
Select "OK"
Press "User Tools" to exit
Page 19
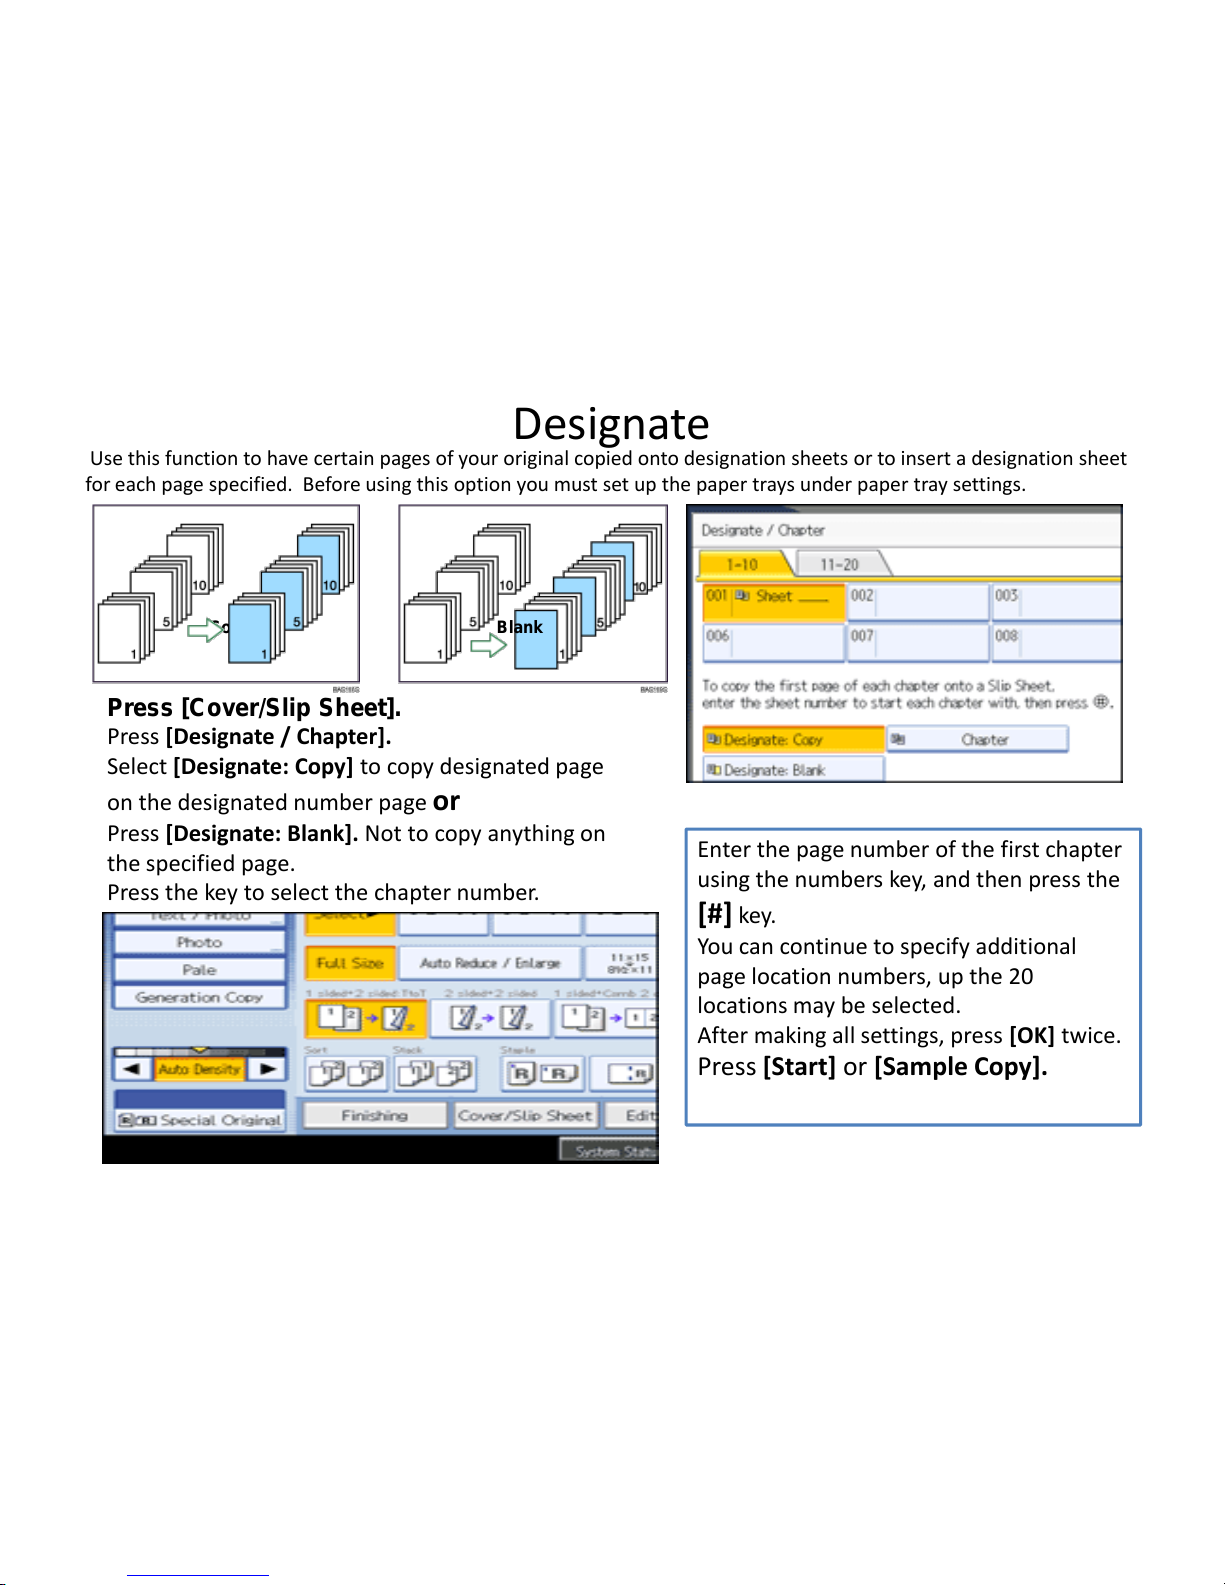
Designate
Use this function to have certain pages of your original copied onto designation sheets or to insert a designation sheet
for each page specified. Before using this option you must set up the paper trays under paper tray settings.
Copy Blank
Press [Cover/Slip Sheet].
Press [Designate / Chapter].
Select [Designate: Copy] to copy designated page
on the designated number page or
Press [Designate: Blank]. Not to copy anything on
the specified page.
Press the key to select the chapter number.
Enter the page number of the first chapter
using the numbers key, and then press the
[#] key.
You can continue to specify additional
page location numbers, up the 20
locations may be selected.
After making all settings, press [OK] twice.
Press [Start] or [Sample Copy].
Page 20
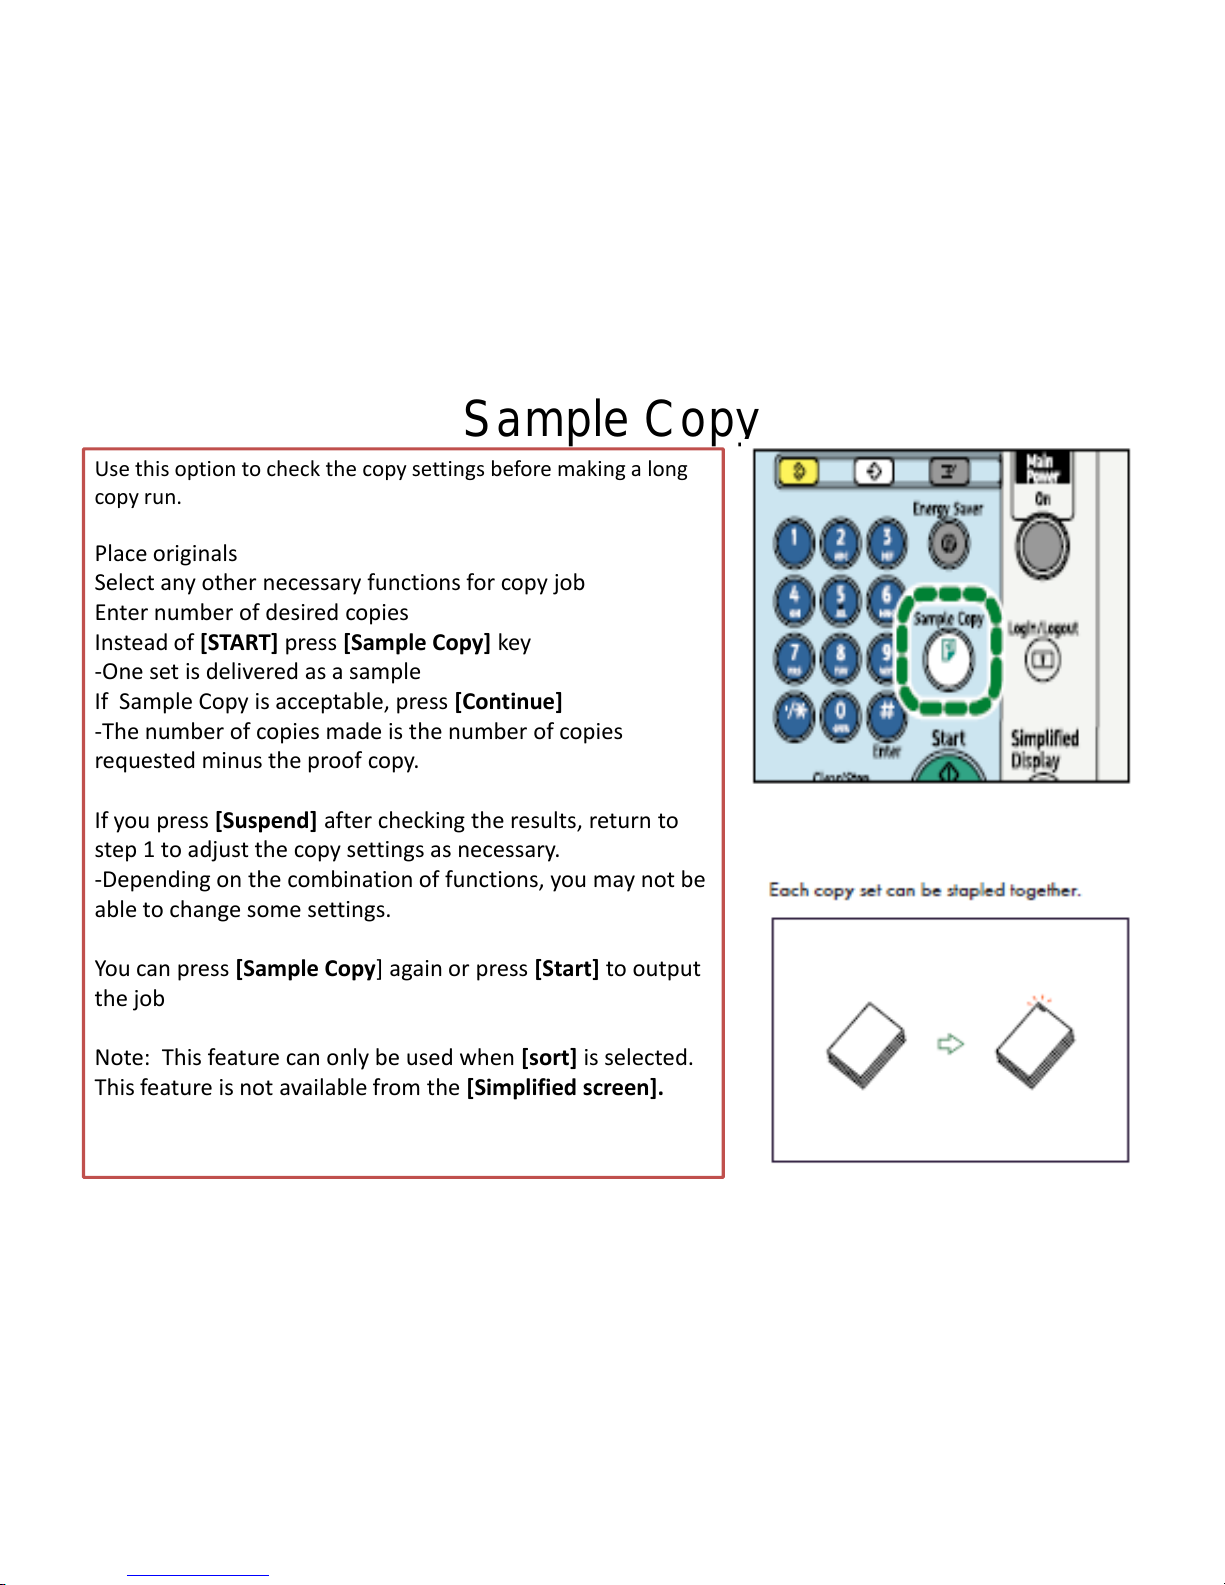
Sample Copy
Screen settings will change and display “continue” or Suspend.
Use this option to check the copy settings before making a long
copy run.
Place originals
Select any other necessary functions for copy job
Enter number of desired copies
Instead of [START] press [Sample Copy] key
-One set is delivered as a sample
If Sample Copy is acceptable, press [Continue]
-The number of copies made is the number of copies
requested minus the proof copy.
If you press [Suspend] after checking the results, return to
step 1 to adjust the copy settings as necessary.
-Depending on the combination of functions, you may not be
able to change some settings.
You can press [Sample Copy] again or press [Start] to output
the job
Note: This feature can only be used when [sort] is selected.
This feature is not available from the [Simplified screen].
Page 21
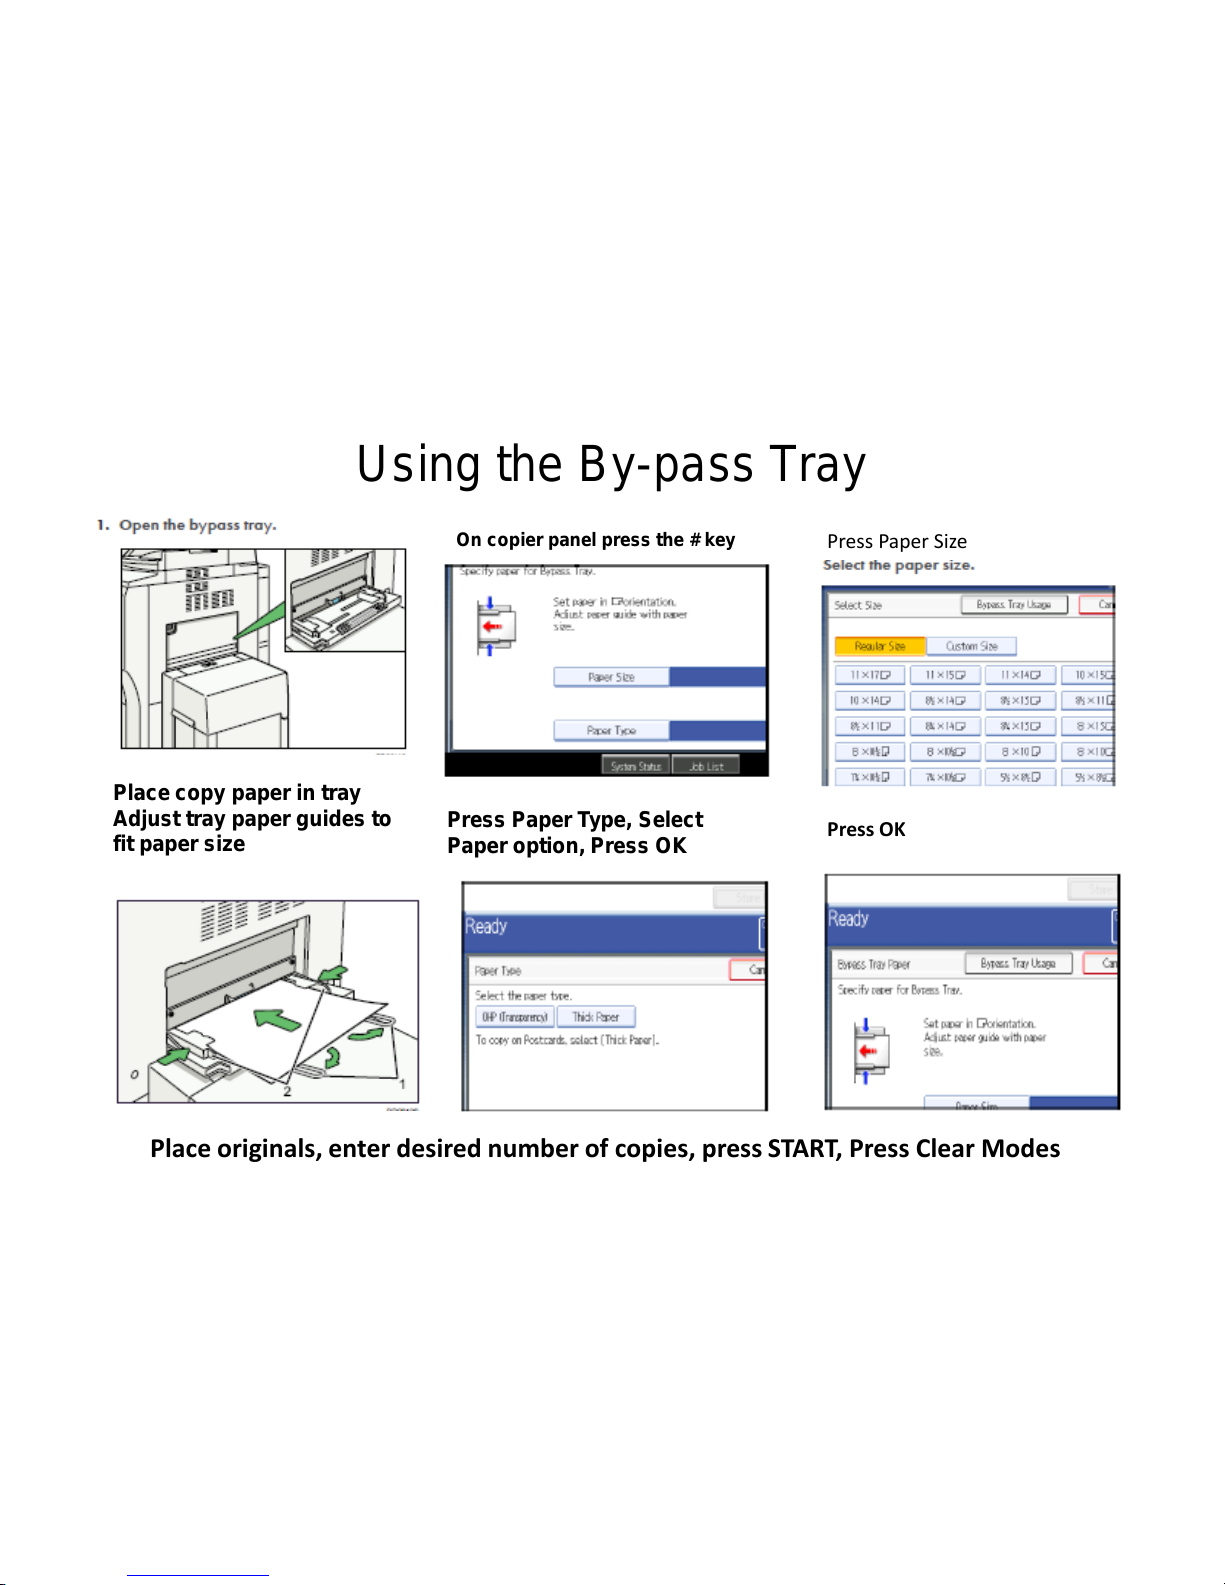
Using the By-pass Tray
Place copy paper in tray
Adjust tray paper guides to
fit paper size
On copier panel press the # key
Press Paper Type, Select
Paper option, Press OK
Press OK
Place originals, enter desired number of copies, press START, Press Clear Modes
Press Paper Size
Page 22
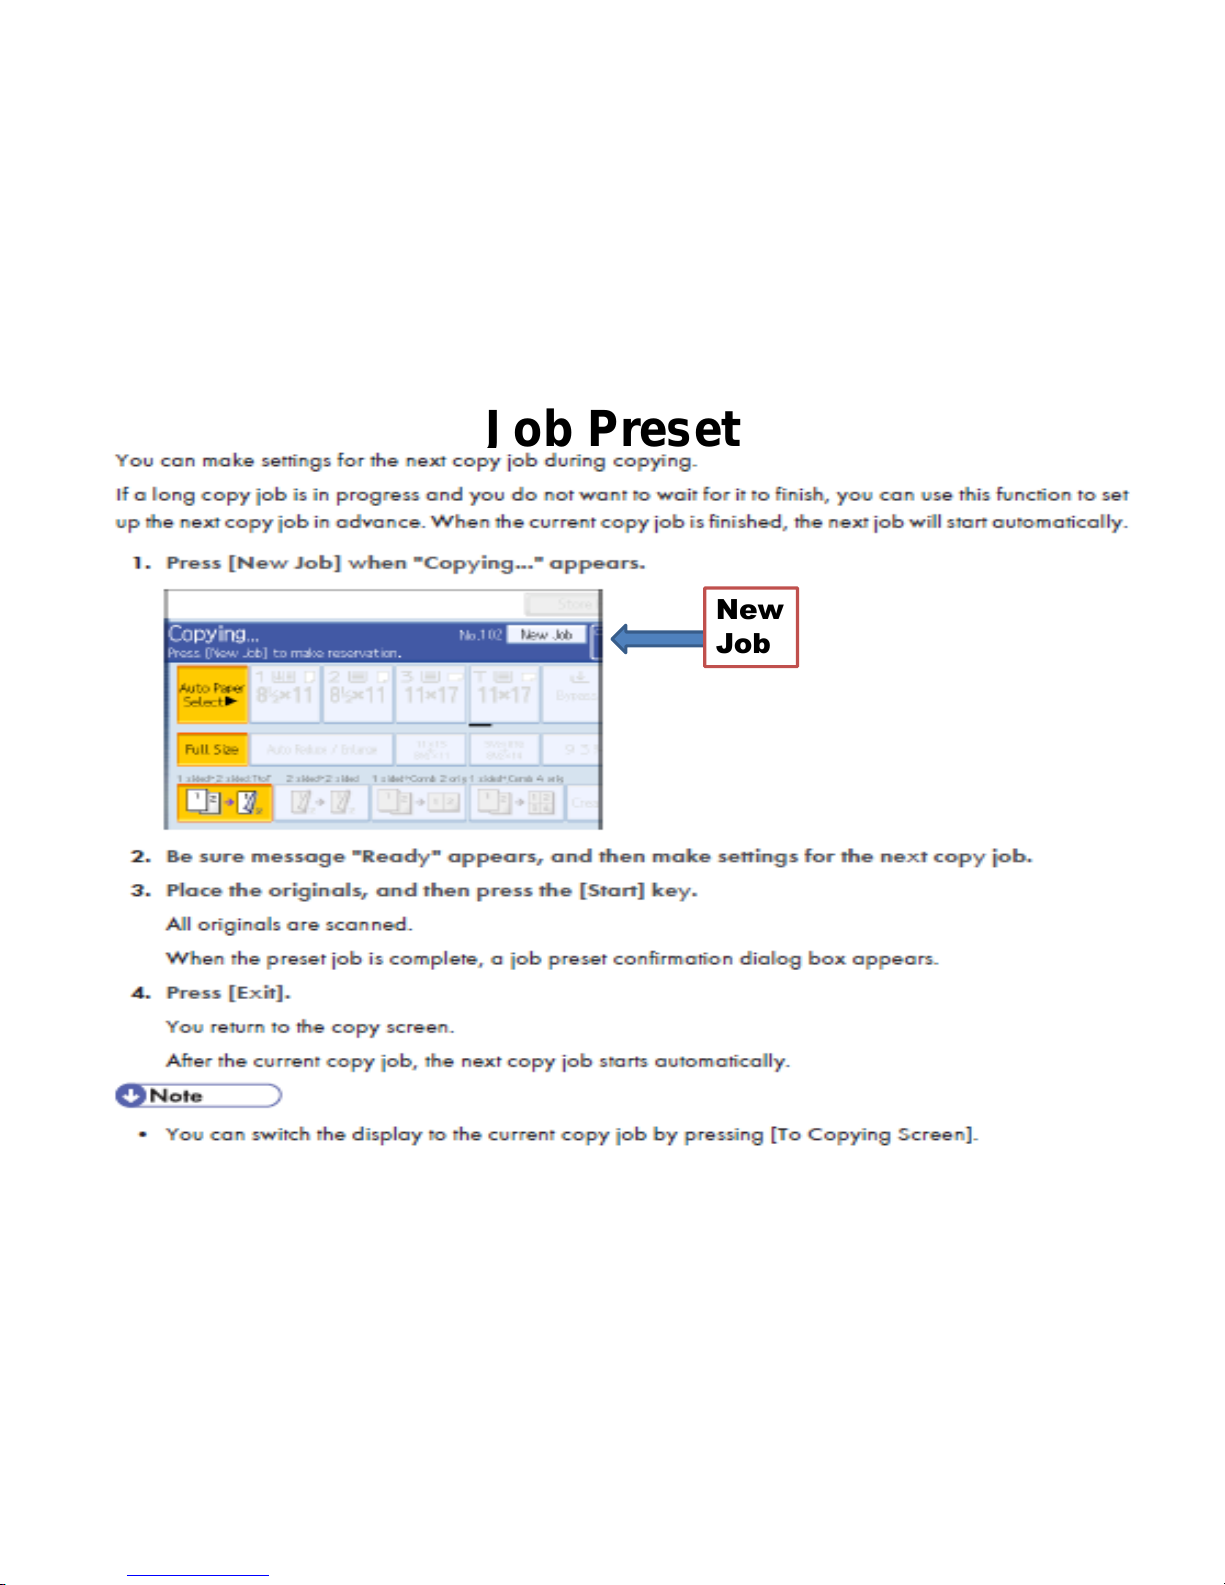
Job Preset
New
Job
Page 23
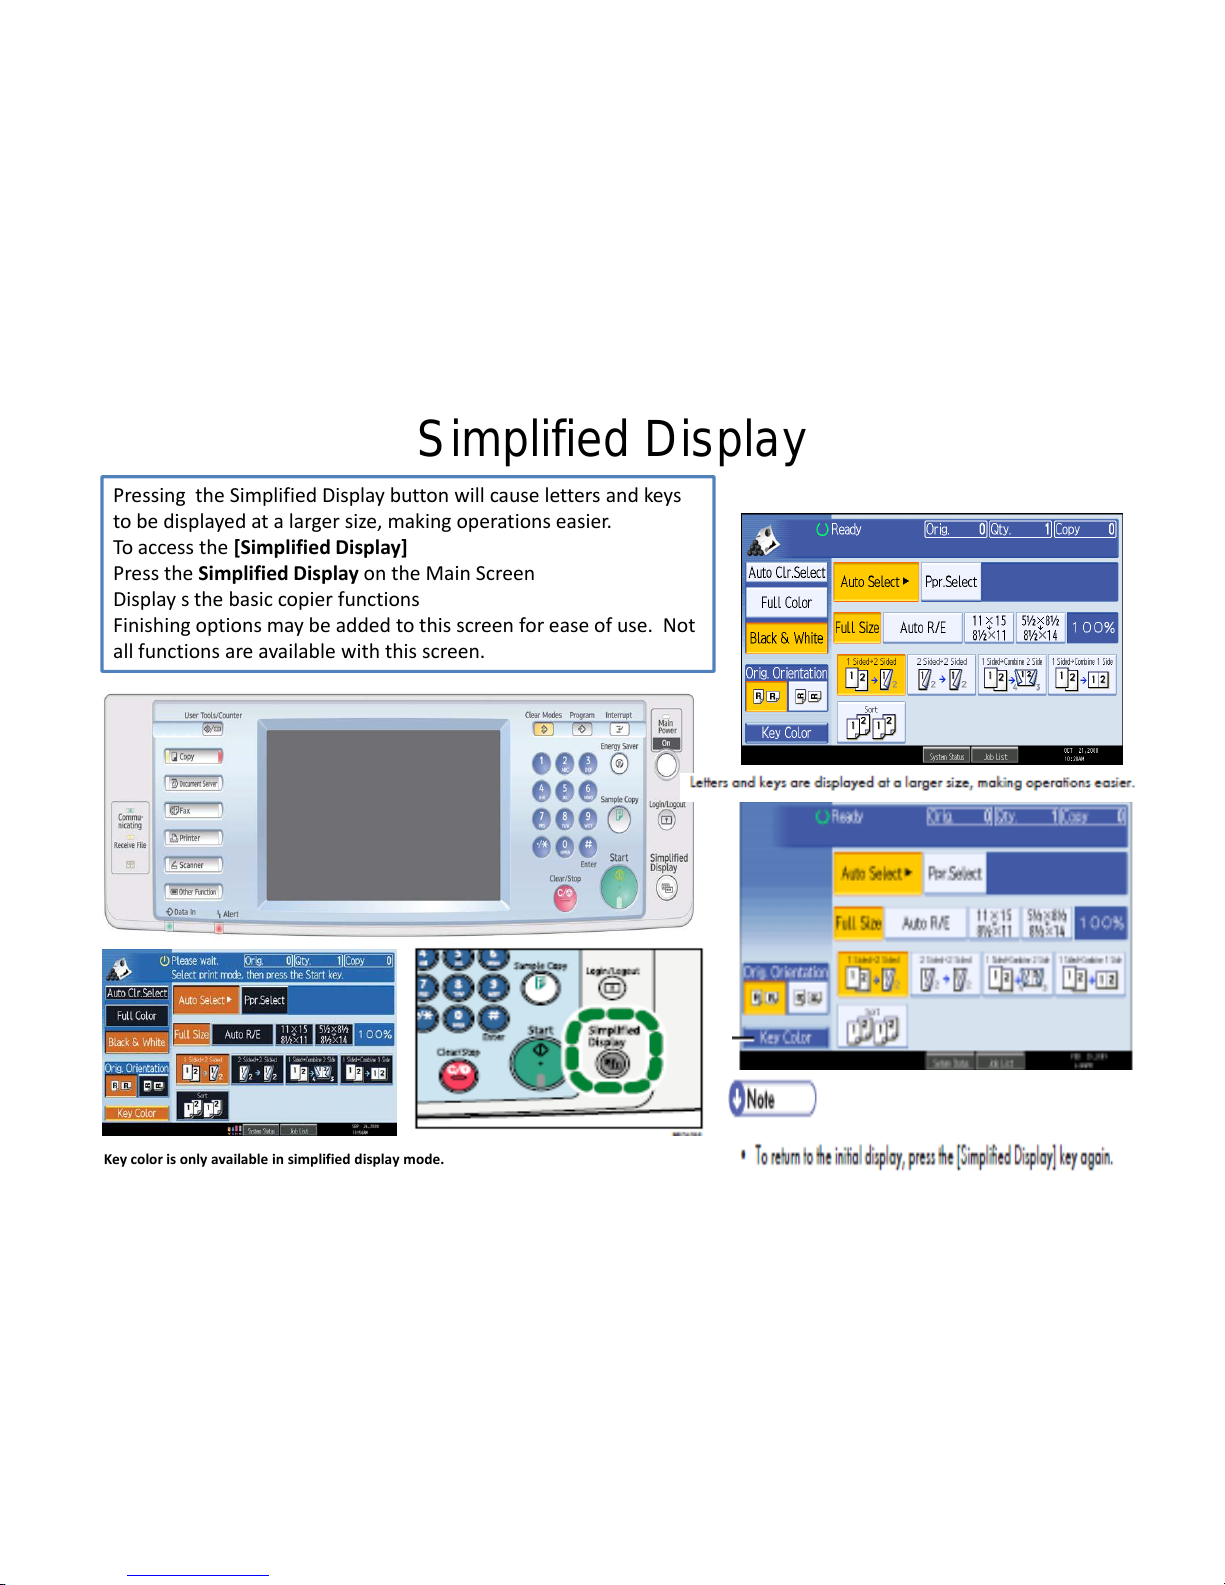
Simplified Display
Pressing the Simplified Display button will cause letters and keys
to be displayed at a larger size, making operations easier.
To access the [Simplified Display]
Press the Simplified Display on the Main Screen
Display s the basic copier functions
Finishing options may be added to this screen for ease of use. Not
all functions are available with this screen.
Key color is only available in simplified display mode.
Page 24
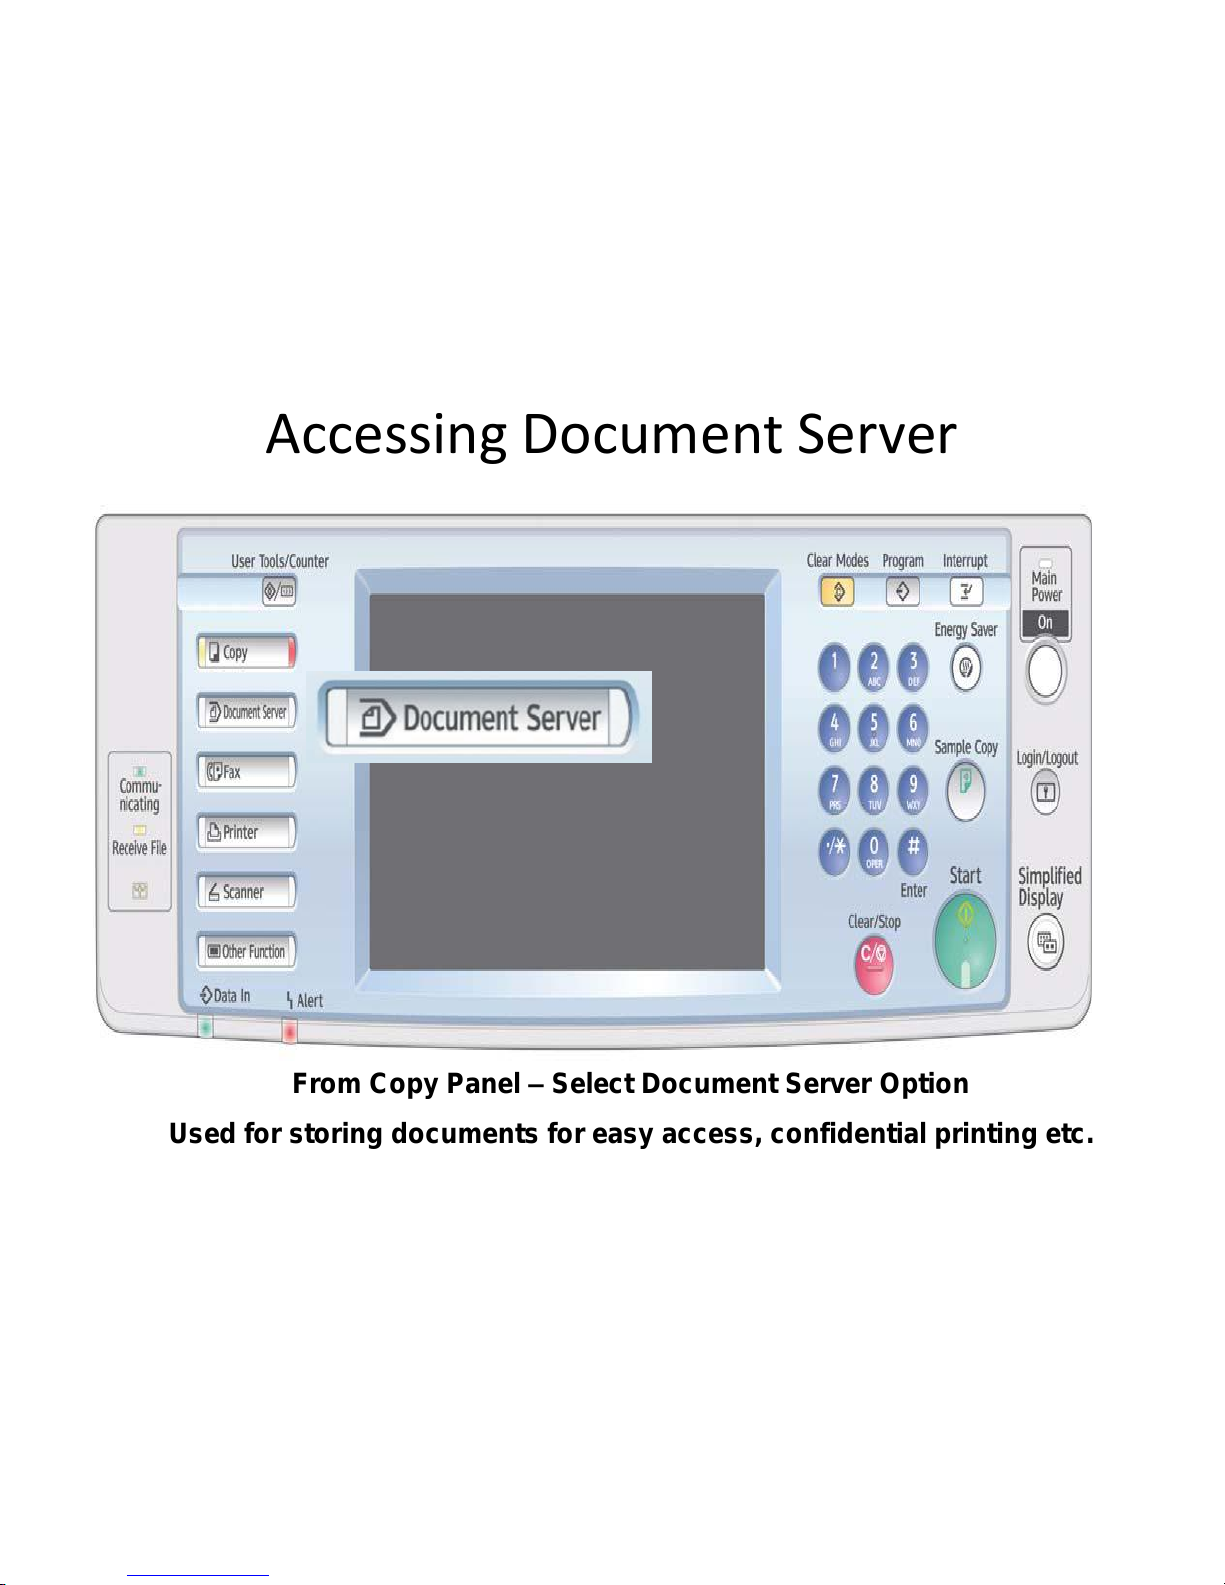
Accessing Document Server
From Copy Panel – Select Document Server Option
Used for storing documents for easy access, confidential printing etc.
Page 25
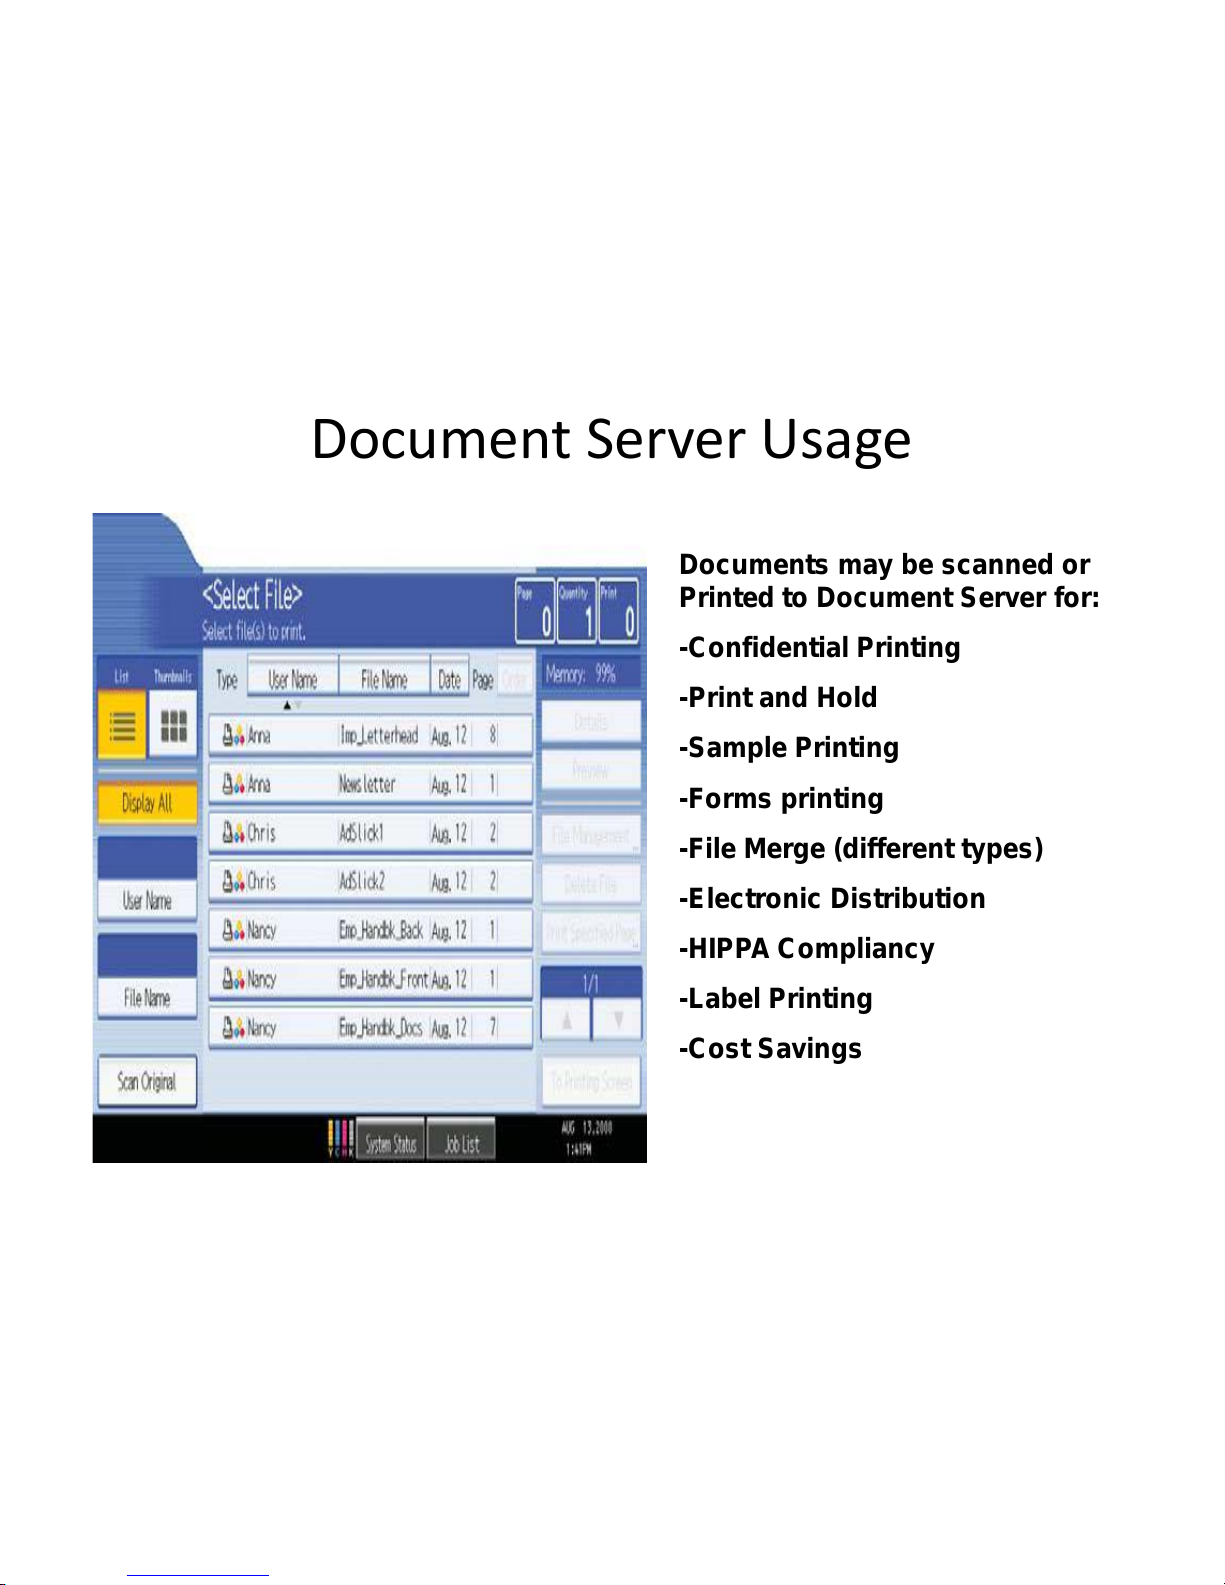
Document Server Usage
Documents may be scanned or
Printed to Document Server for:
-Confidential Printing
-Print and Hold
-Sample Printing
-Forms printing
-File Merge (different types)
-Electronic Distribution
-HIPPA Compliancy
-Label Printing
-Cost Savings
Page 26
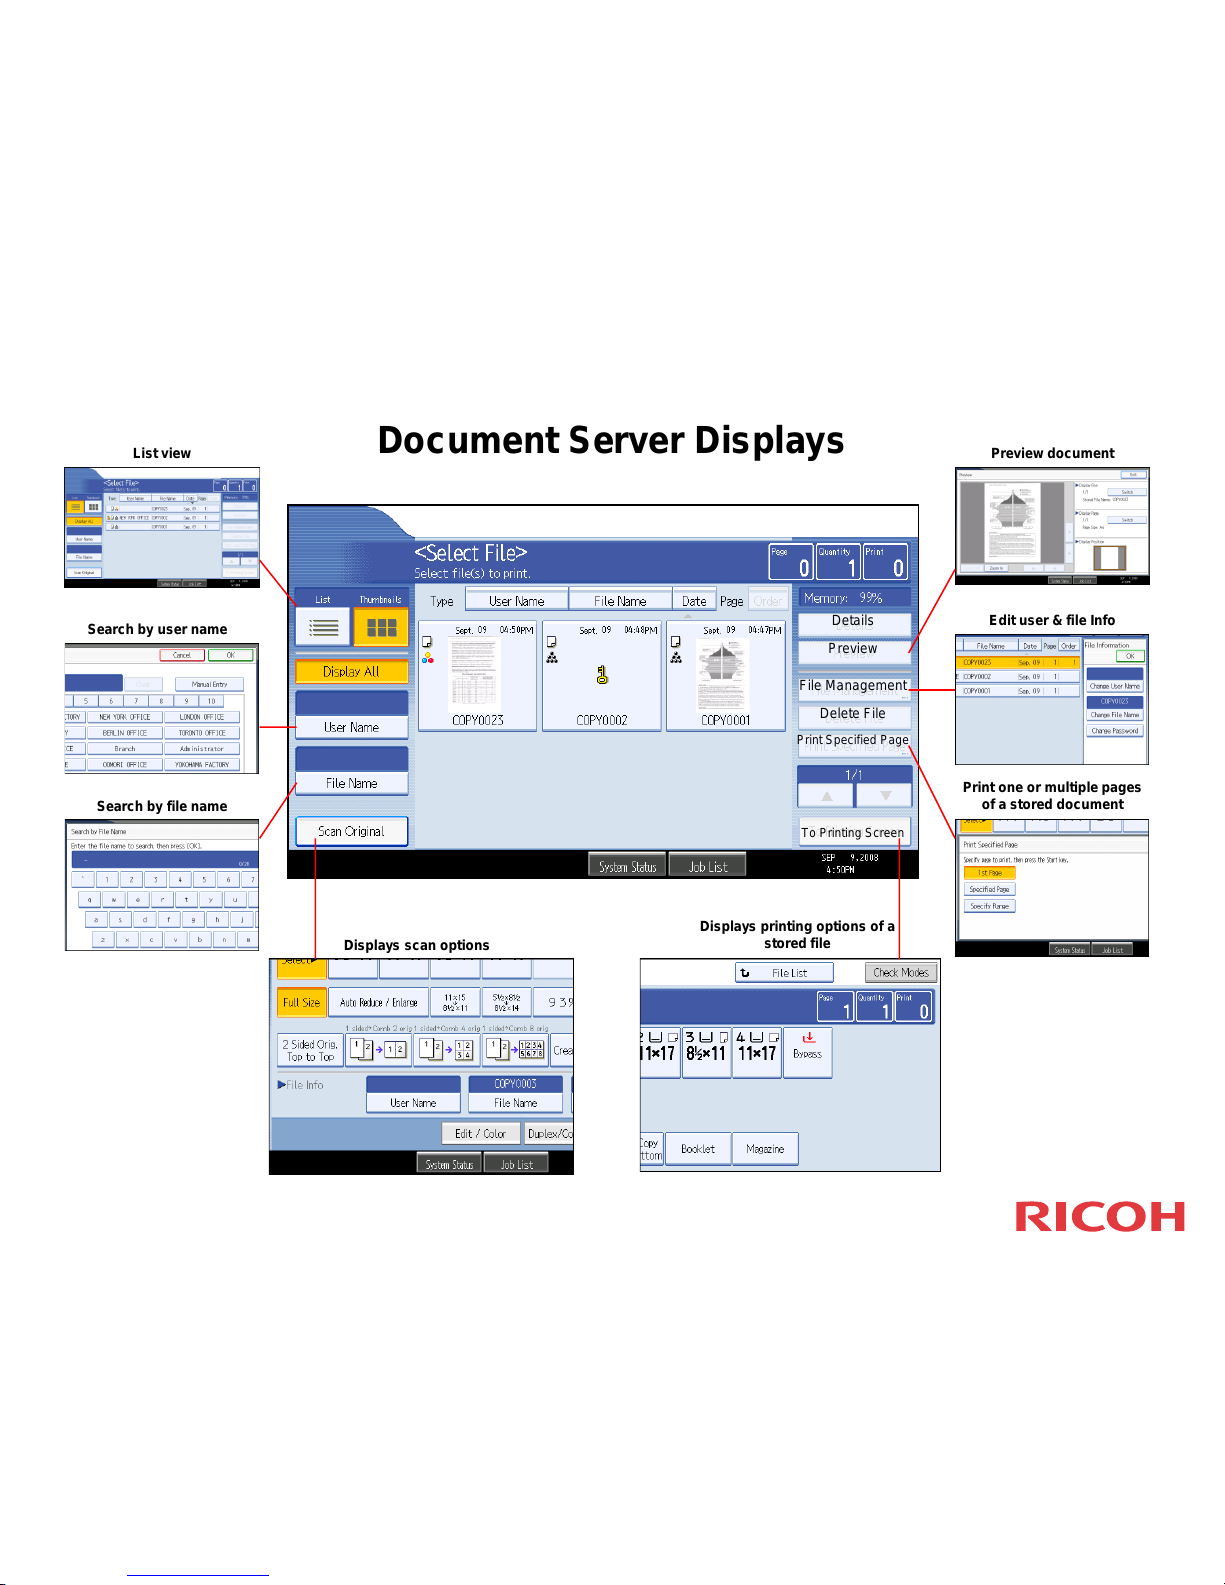
Document Server Displays
List view Preview document
Edit user & file Info
Print one or multiple pages
of a stored document
Search by user name
Search by file name
Displays scan options
Displays printing options of a
stored file
Preview
File Management
Delete File
Print Specified Page
Details
To Printing Screen
Page 27
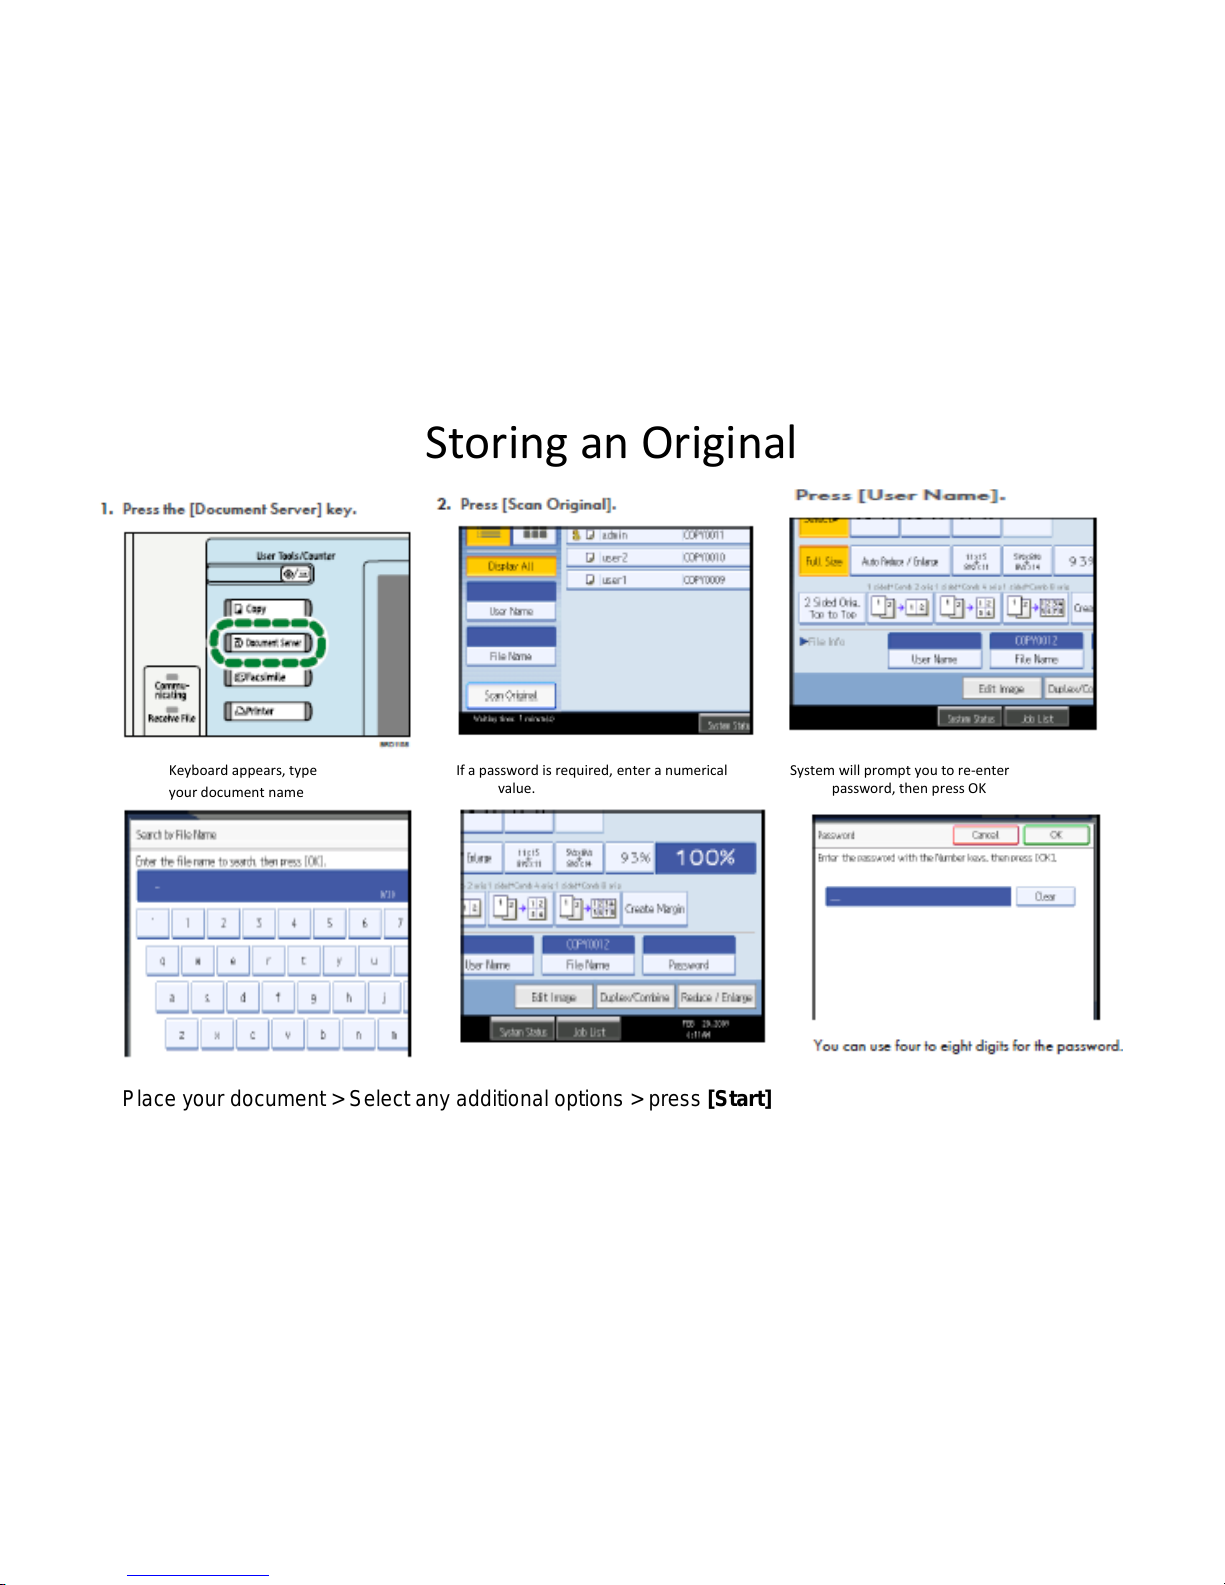
Storing an Original
Keyboard appears, type
your document name
If a password is required, enter a numerical
value.
System will prompt you to re-enter
password, then press OK
Place your document > Select any additional options > press [Start]
Page 28
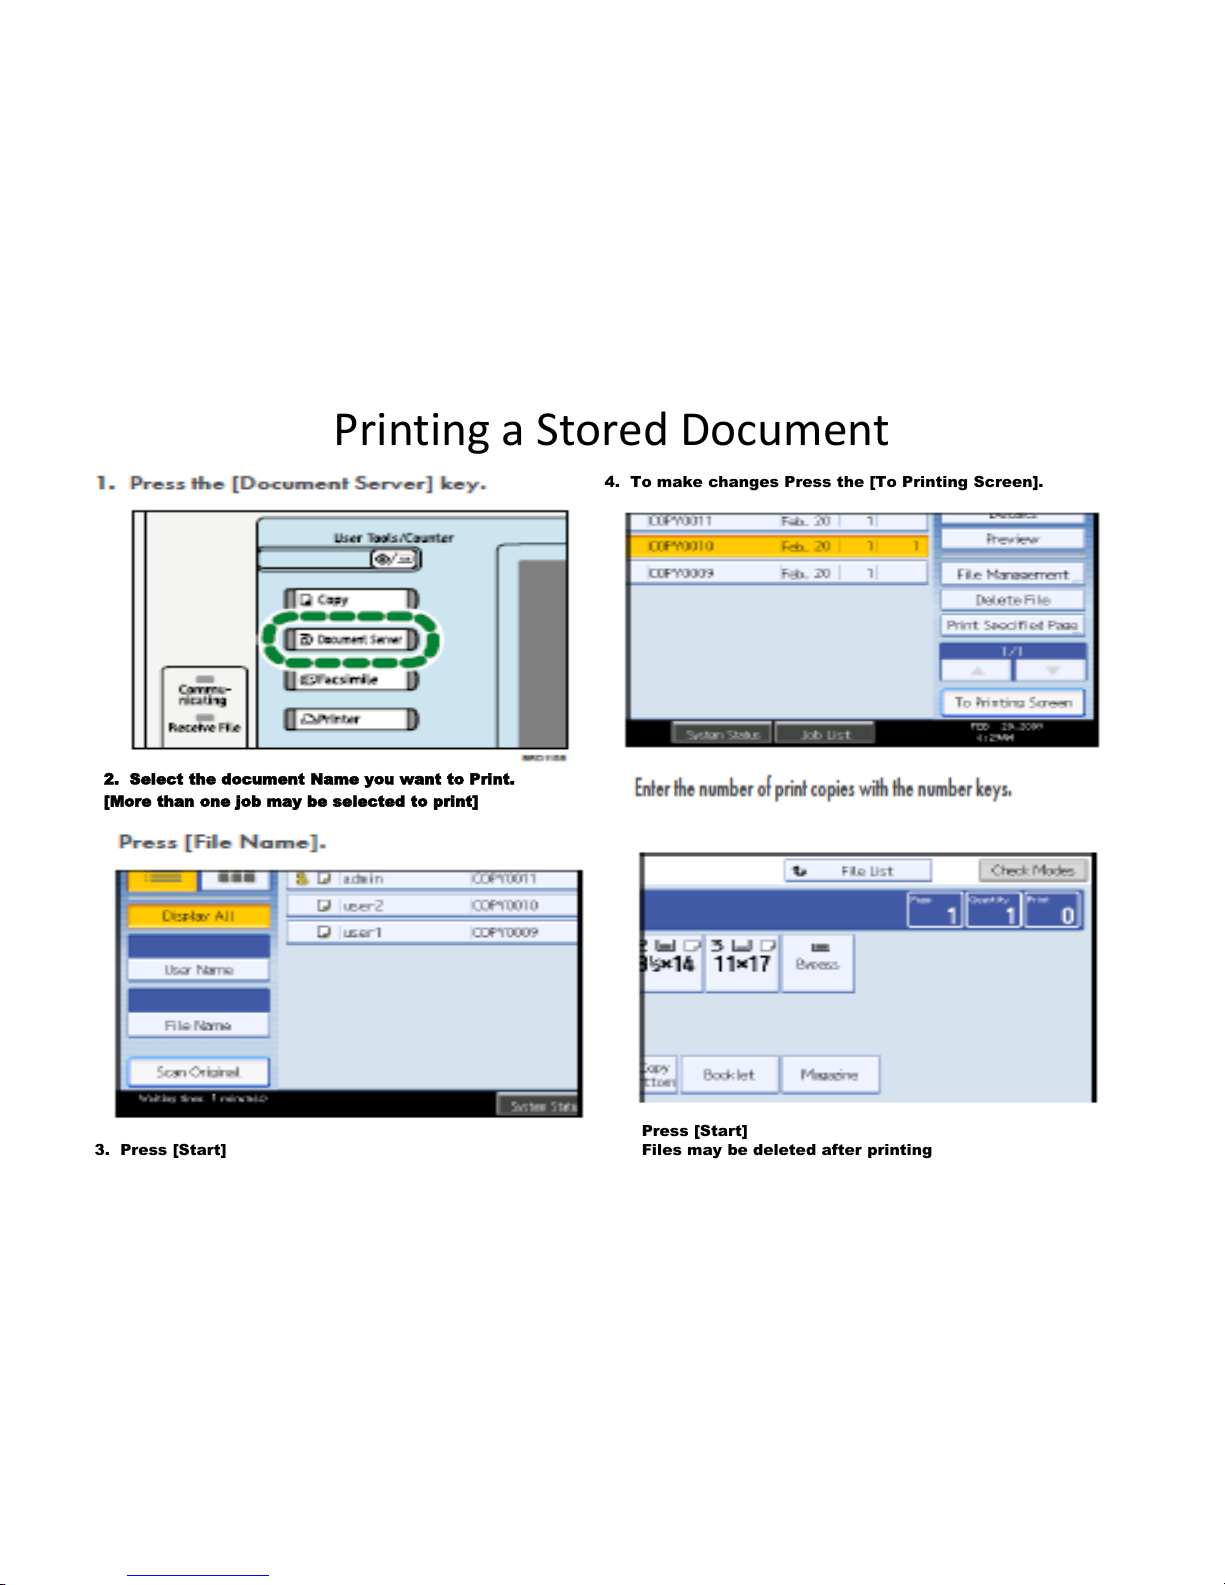
Printing a Stored Document
2. Select the document Name you want to Print.
[More than one job may be selected to print]
4. To make changes Press the [To Printing Screen].
Press [Start]
Files may be deleted after printing3. Press [Start]
Page 29
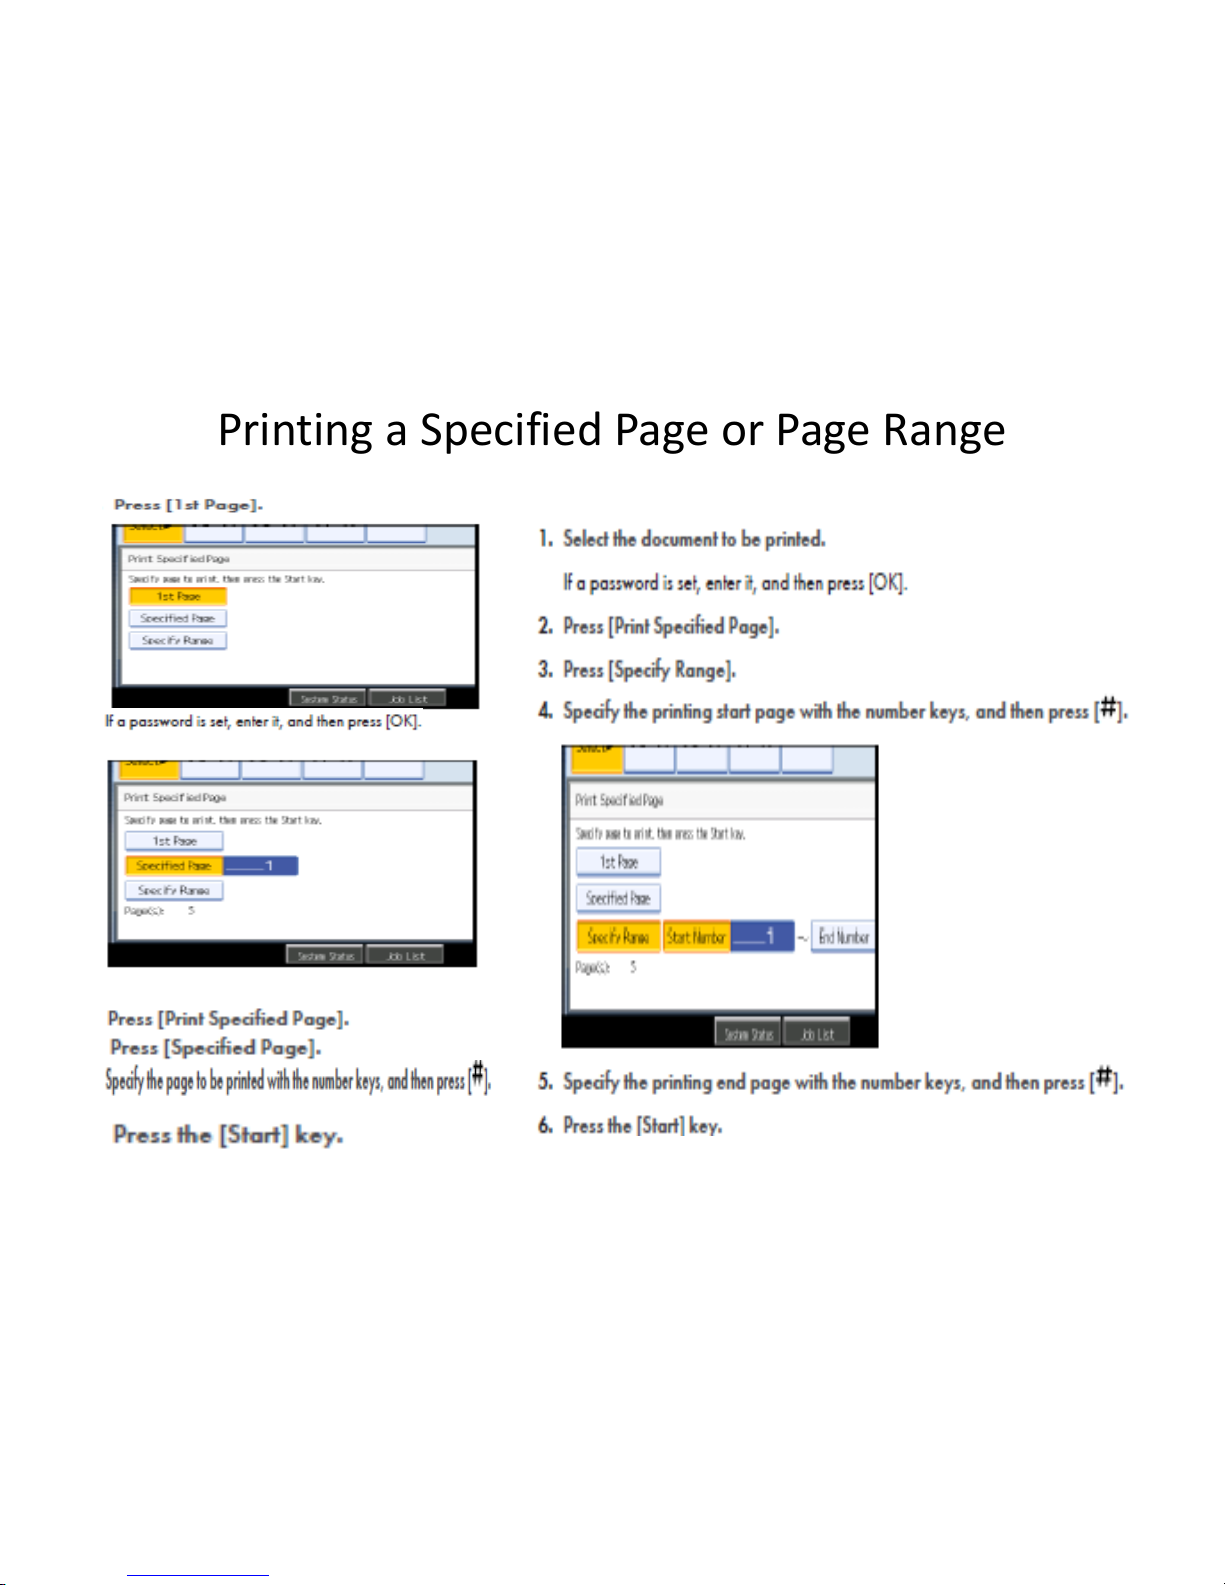
Printing a Specified Page or Page Range
Page 30
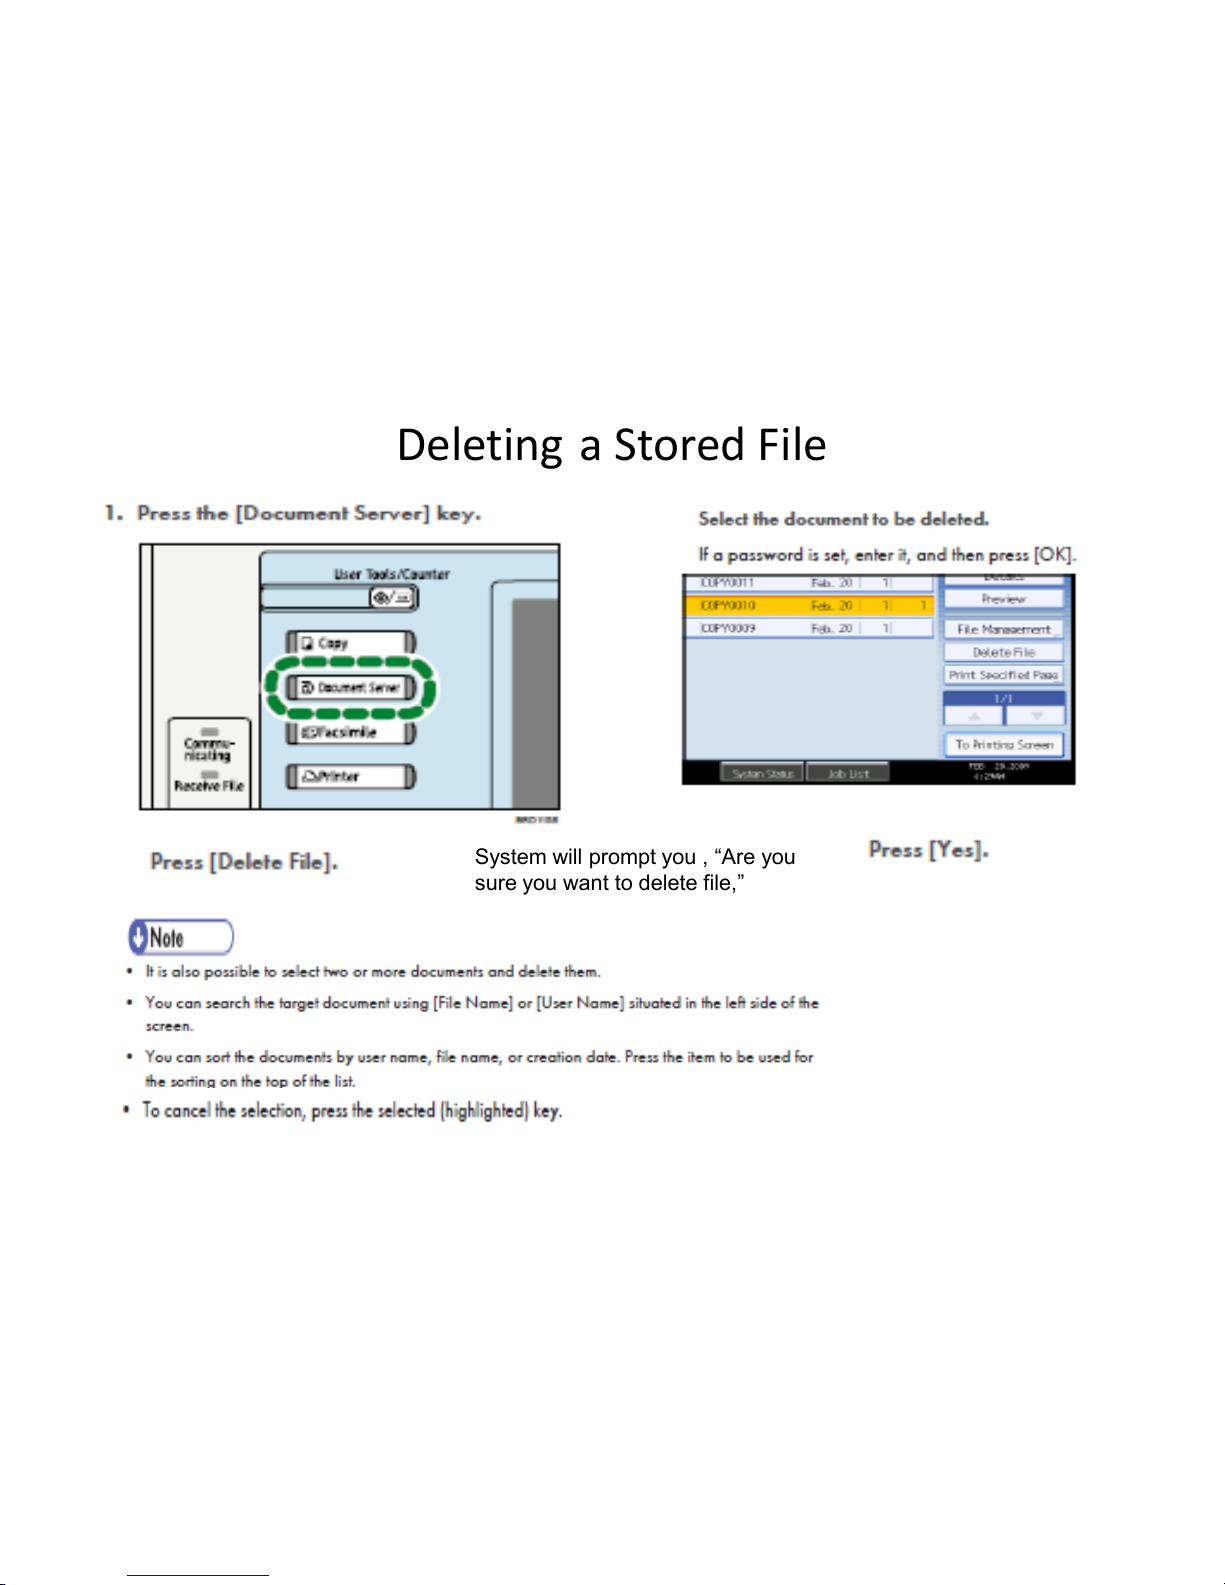
Deleting a Stored File
System will prompt you , “Are you
sure you want to delete file,”
Page 31
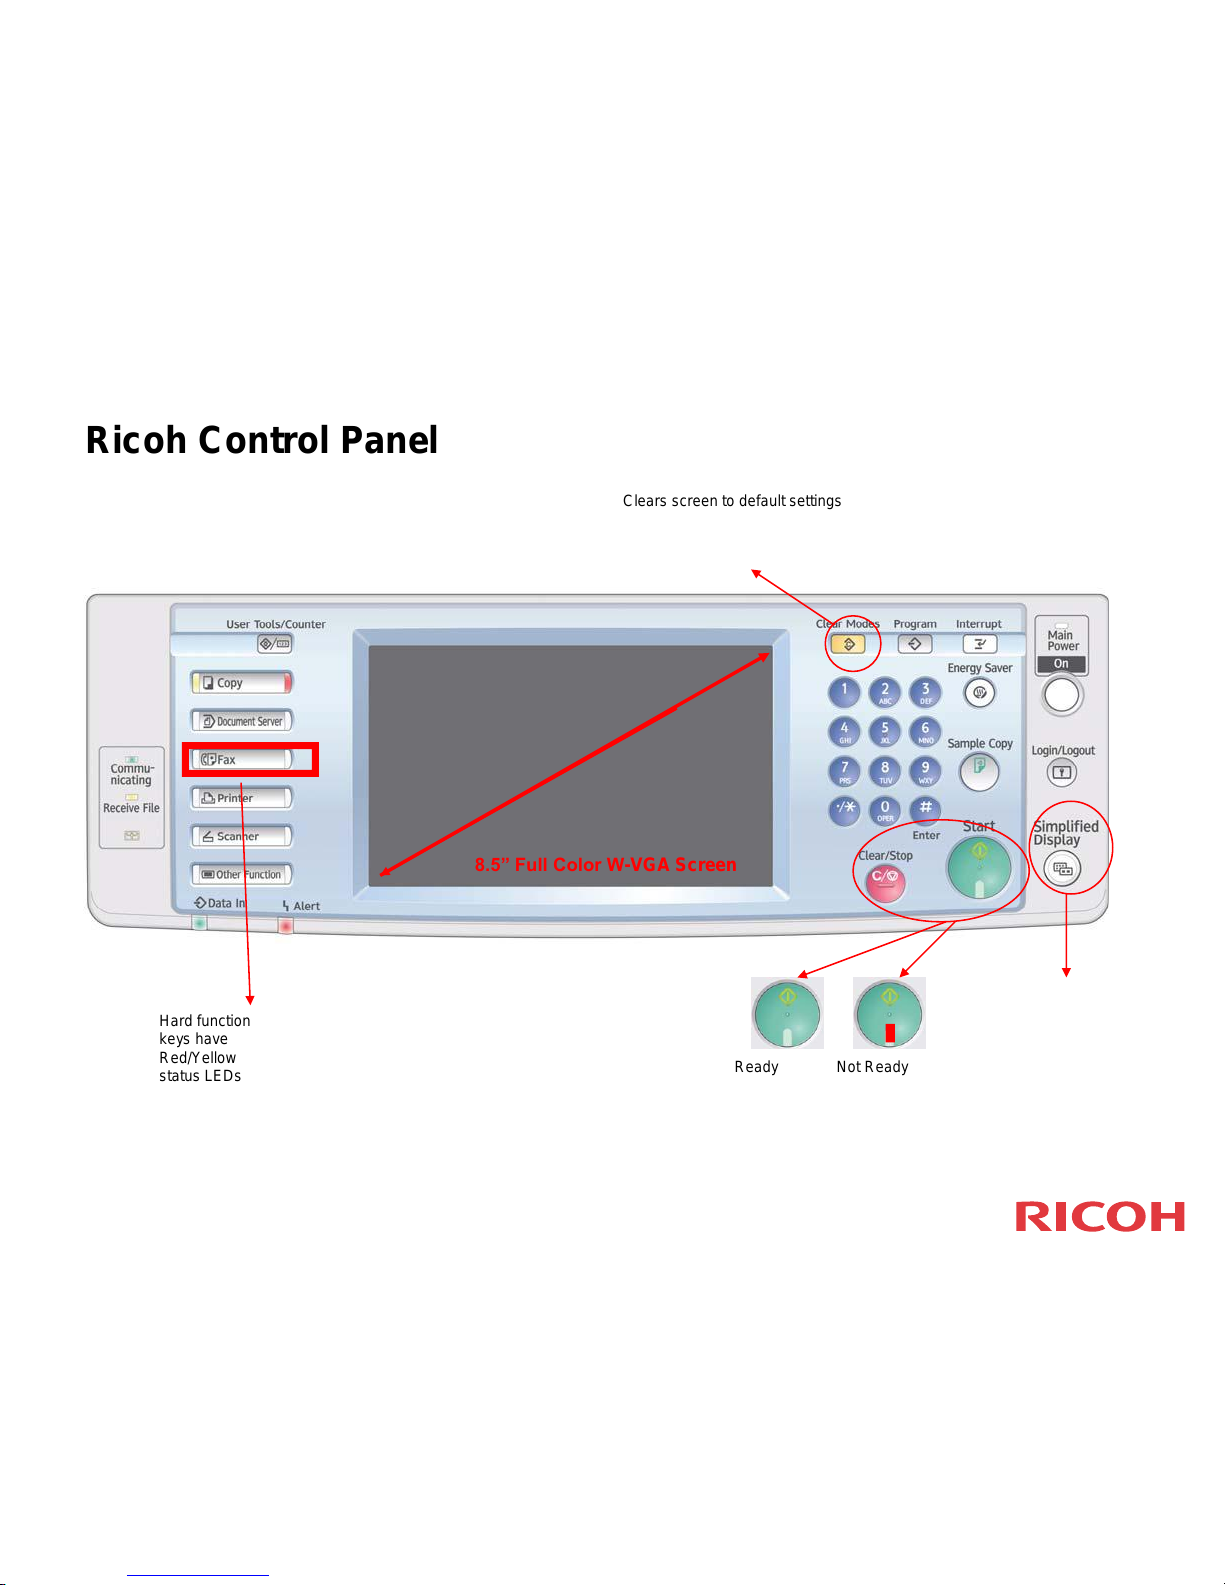
Hard function
keys have
Red/Yellow
status LEDs
Ready Not Ready
Ricoh Control Panel
Clears screen to default settings
8.5” Full Color W-VGA Screen
Page 32
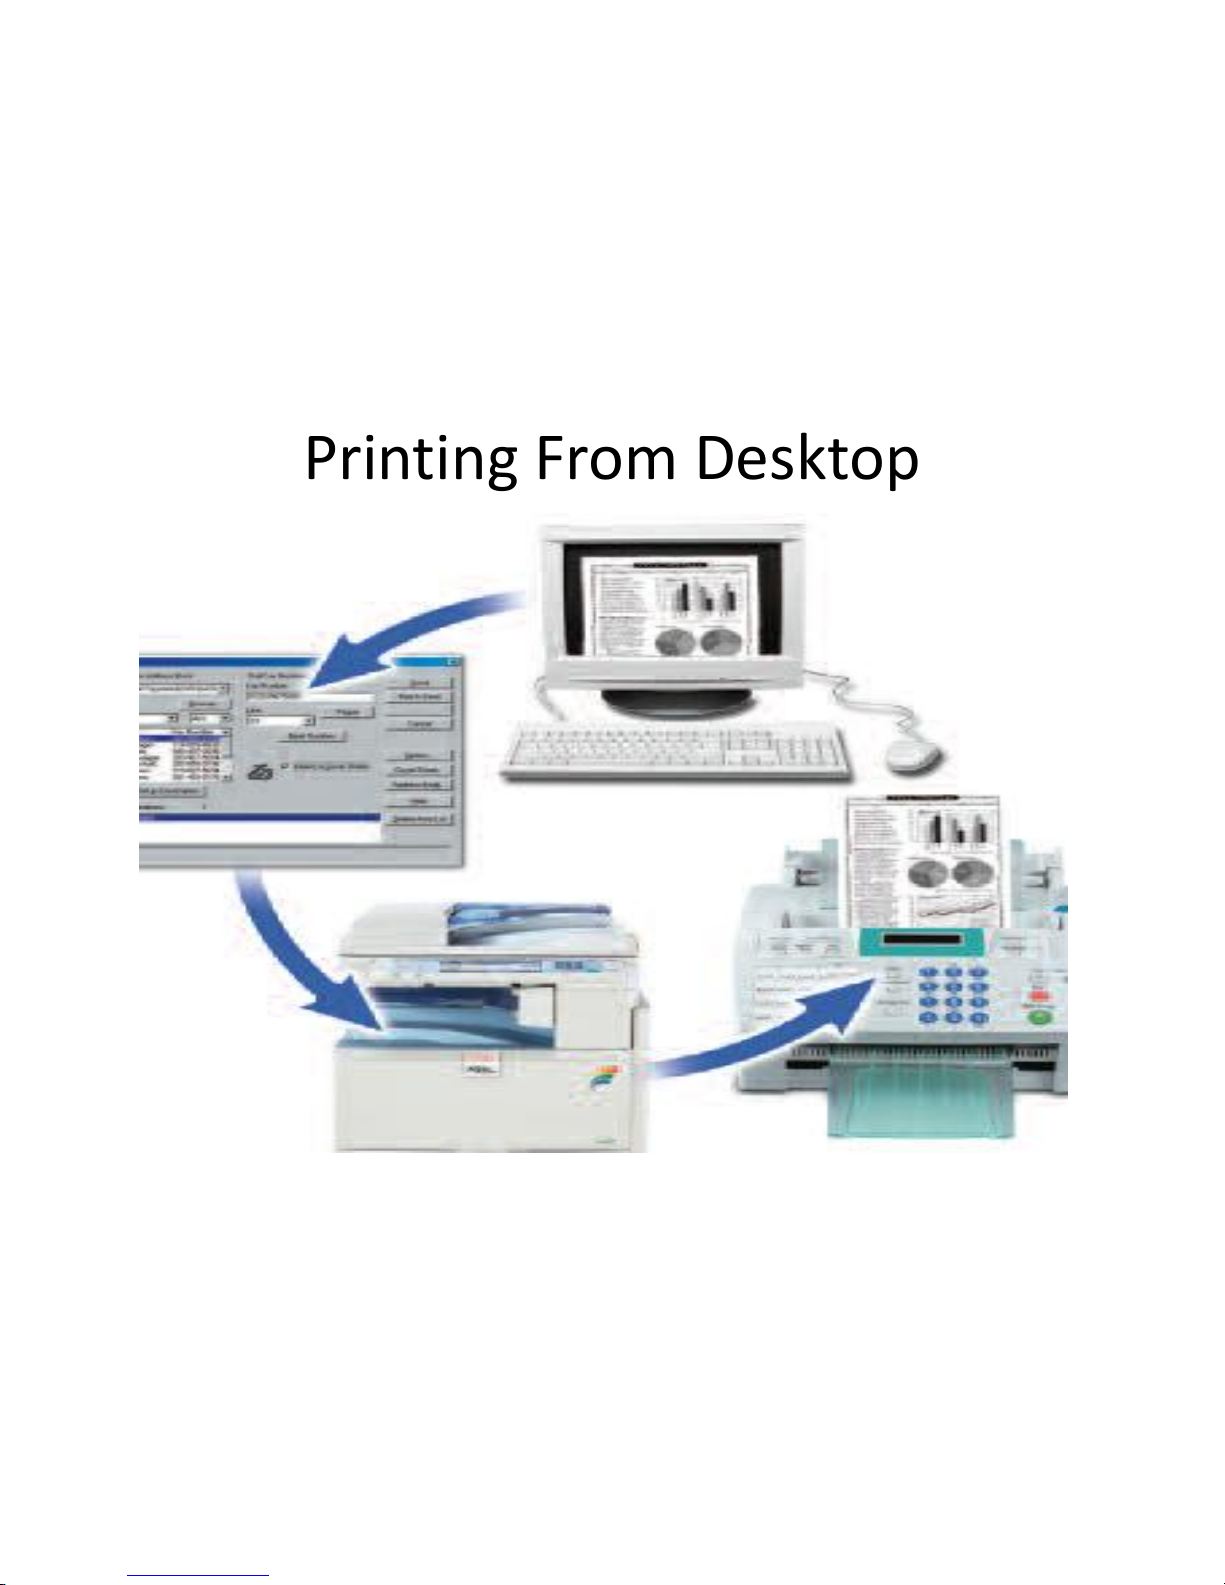
Printing From Desktop
Page 33
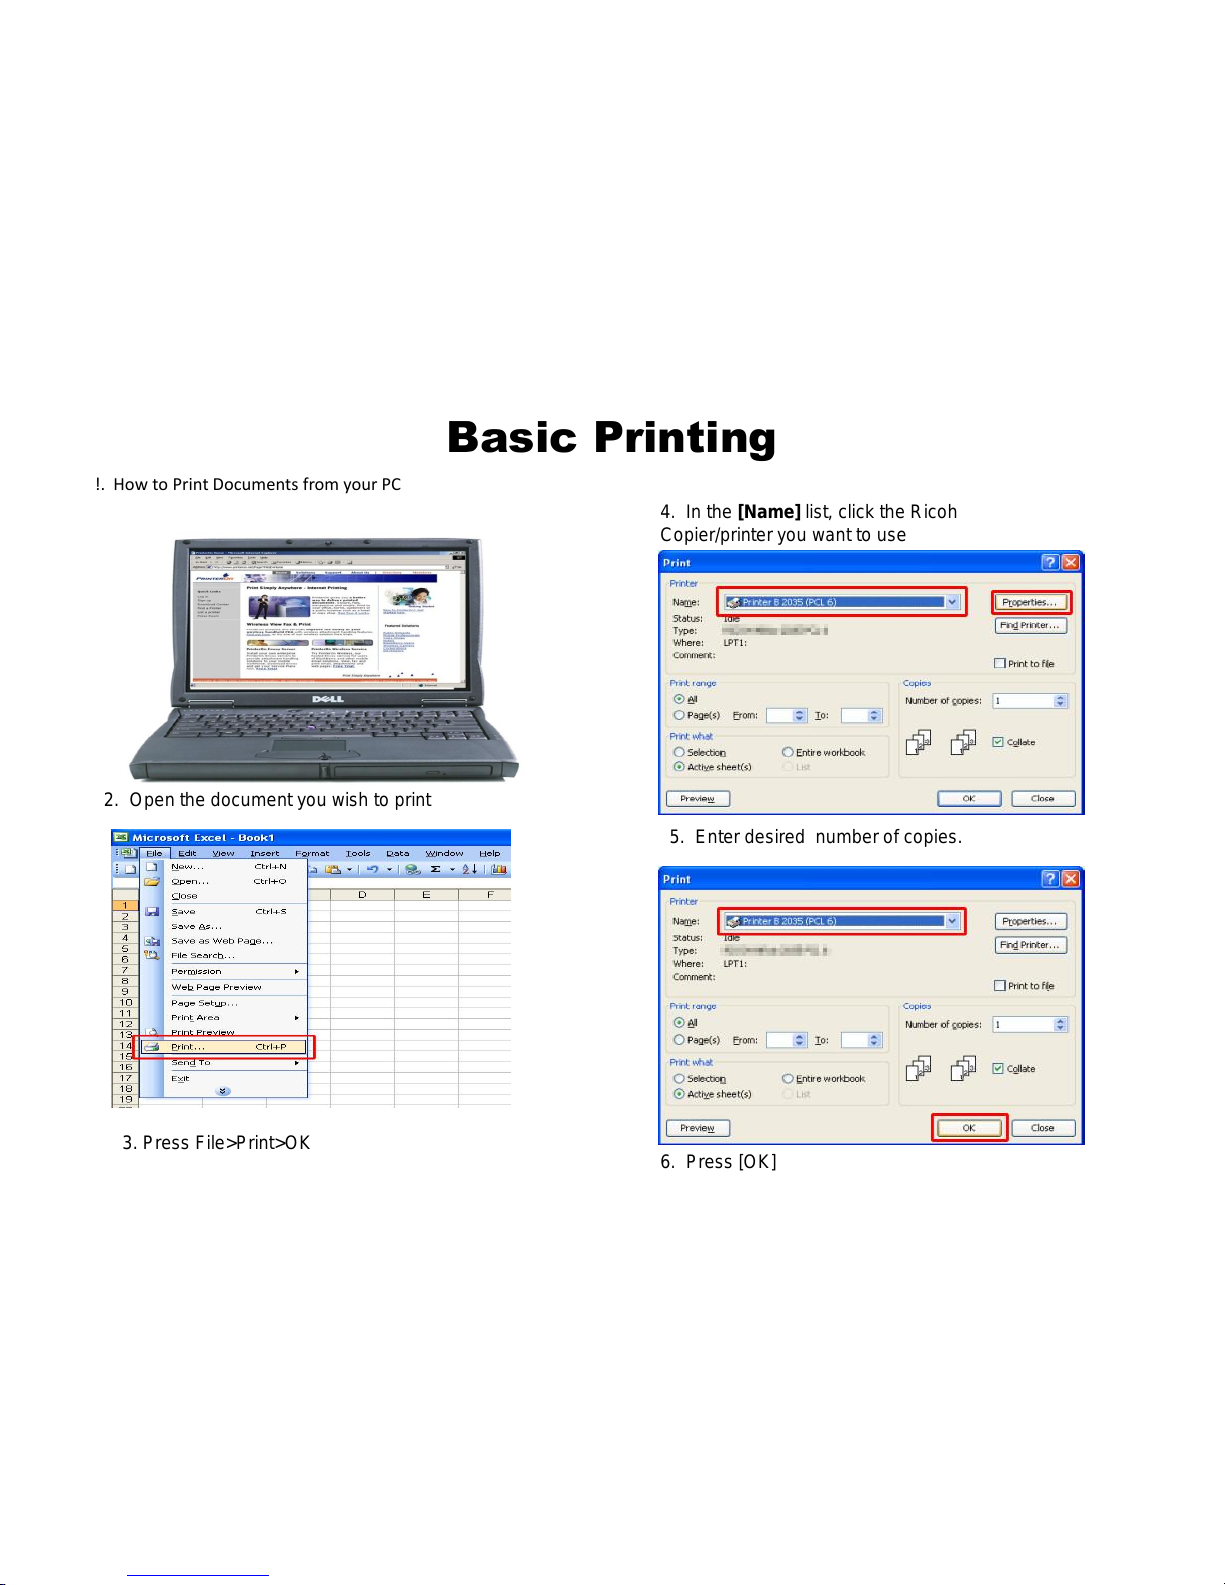
Basic Printing
!. How to Print Documents from your PC
2. Open the document you wish to print
4. In the [Name] list, click the Ricoh
Copier/printer you want to use
3. Press File>Print>OK
5. Enter desired number of copies.
6. Press [OK]
Page 34
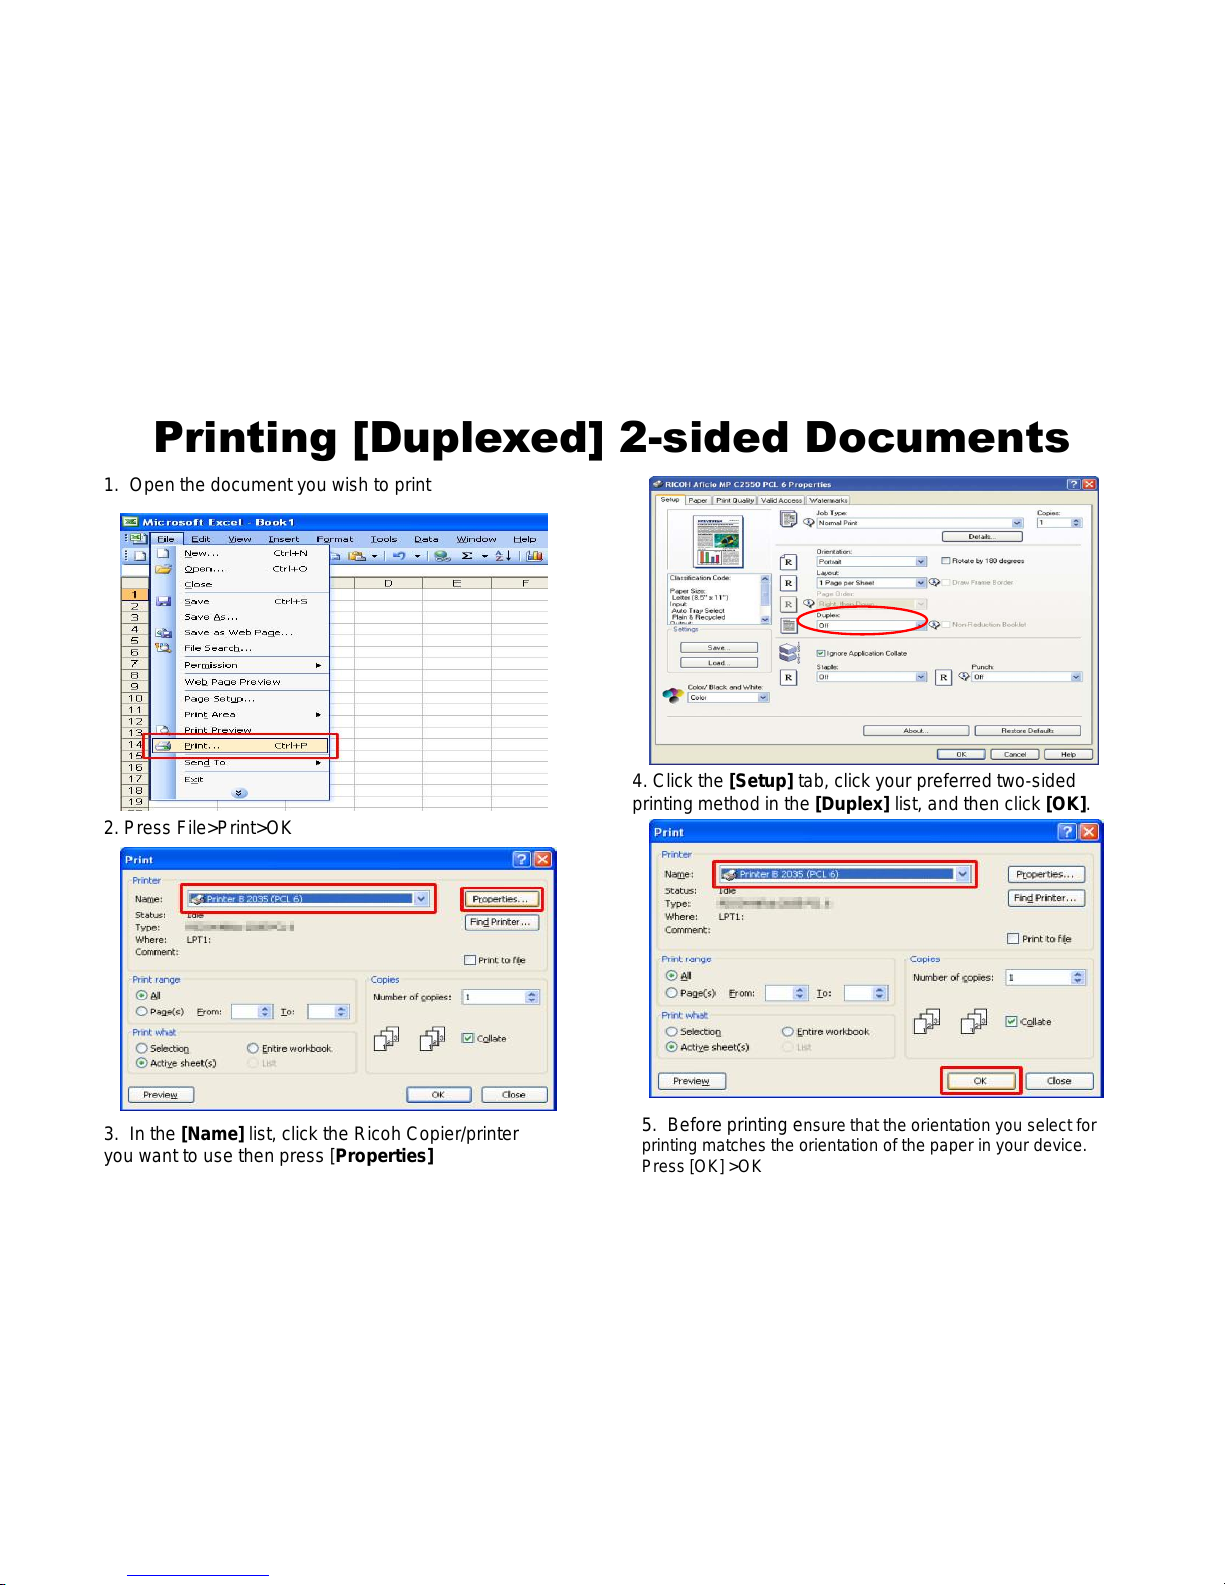
Printing [Duplexed] 2-sided Documents
1. Open the document you wish to print
3. In the [Name] list, click the Ricoh Copier/printer
you want to use then press [Properties]
2. Press File>Print>OK
4. Click the [Setup] tab, click your preferred two-sided
printing method in the [Duplex] list, and then click [OK].
5. Before printing ensure that the orientation you select for
printing matches the orientation of the paper in your device.
Press [OK] >OK
Page 35
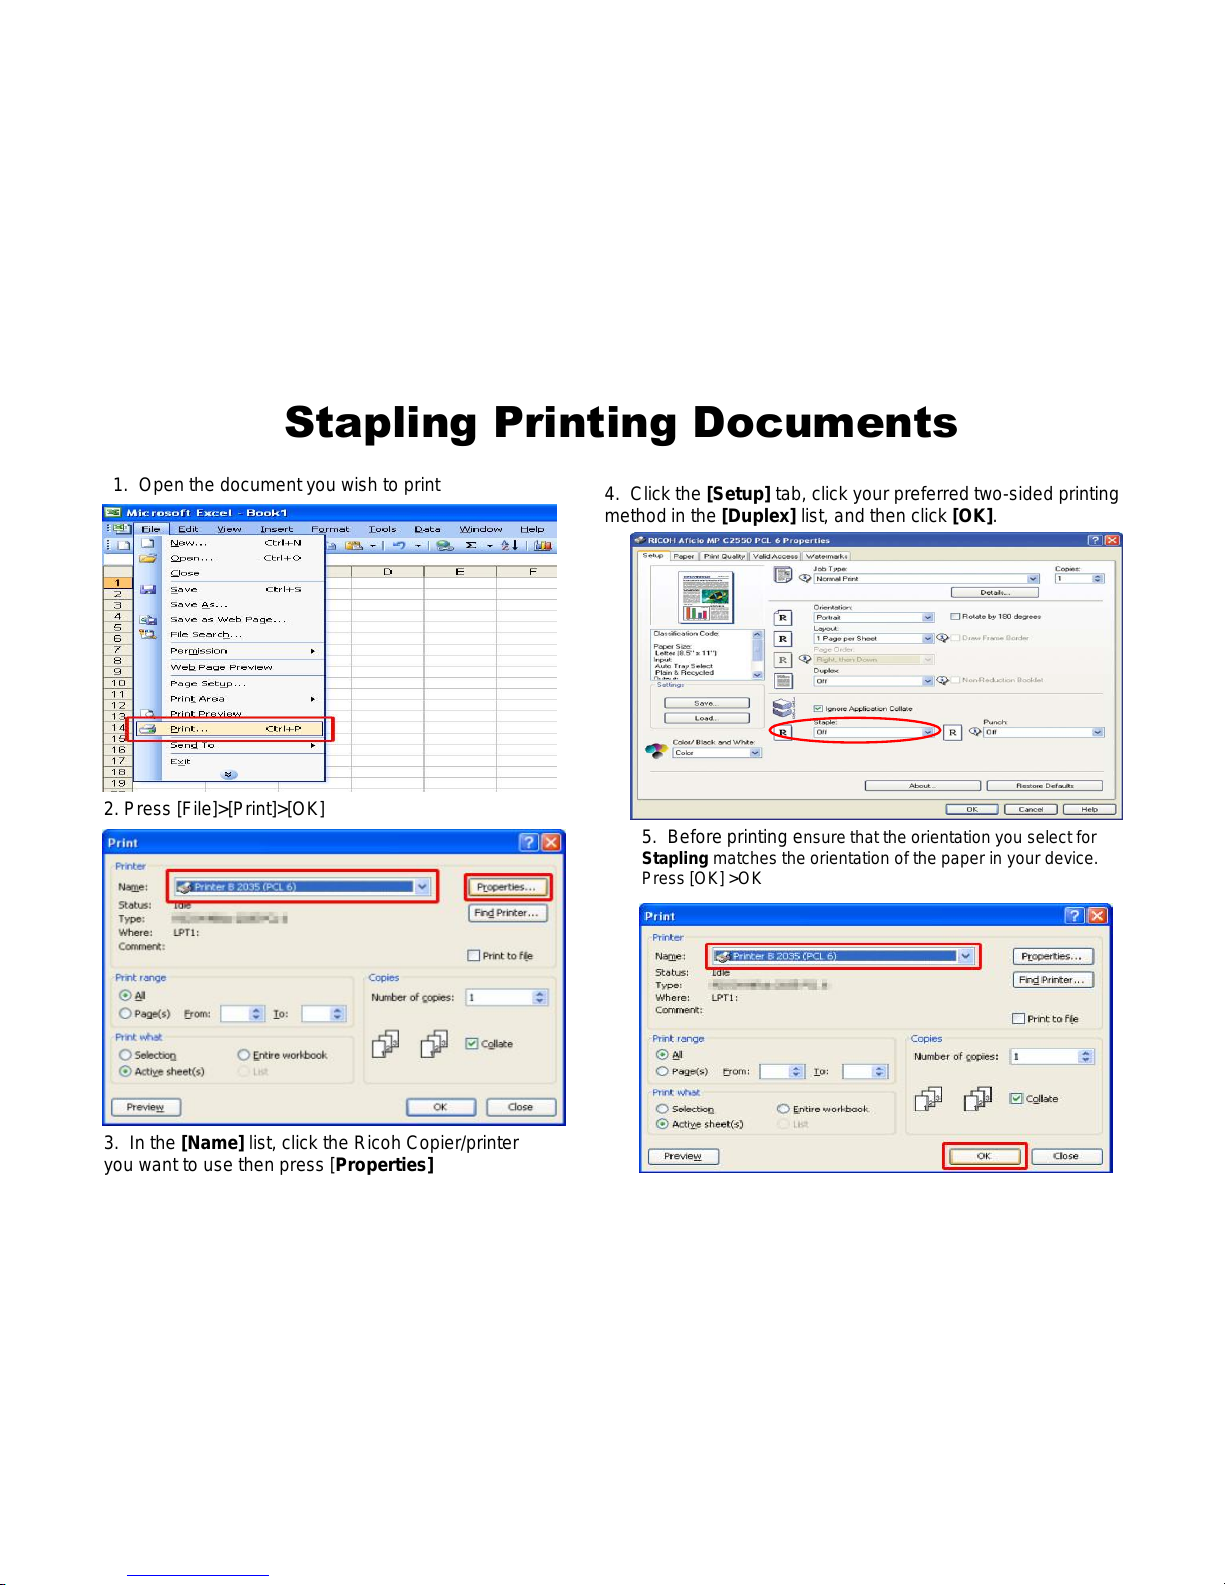
Stapling Printing Documents
1. Open the document you wish to print
3. In the [Name] list, click the Ricoh Copier/printer
you want to use then press [Properties]
2. Press [File]>[Print]>[OK]
4. Click the [Setup] tab, click your preferred two-sided printing
method in the [Duplex] list, and then click [OK].
5. Before printing ensure that the orientation you select for
Stapling matches the orientation of the paper in your device.
Press [OK] >OK
Page 36
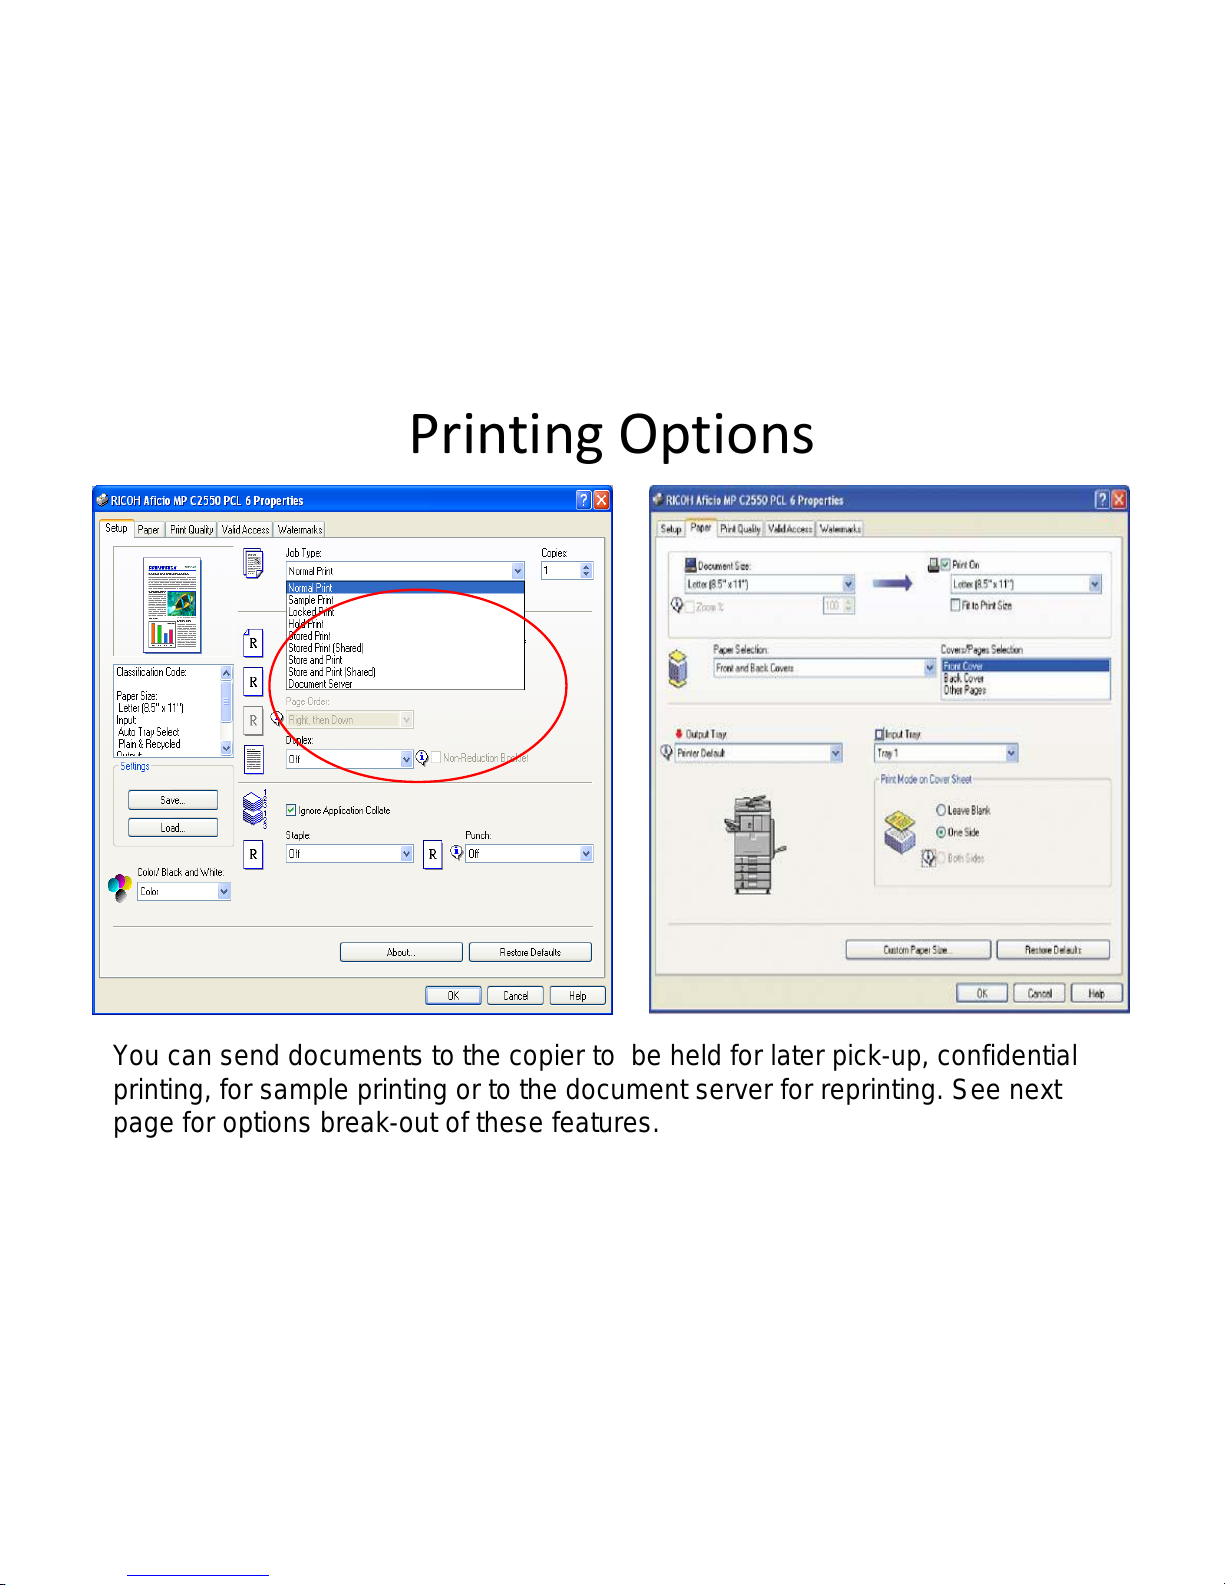
Printing Options
You can send documents to the copier to be held for later pick-up, confidential
printing, for sample printing or to the document server for reprinting. See next
page for options break-out of these features.
Page 37
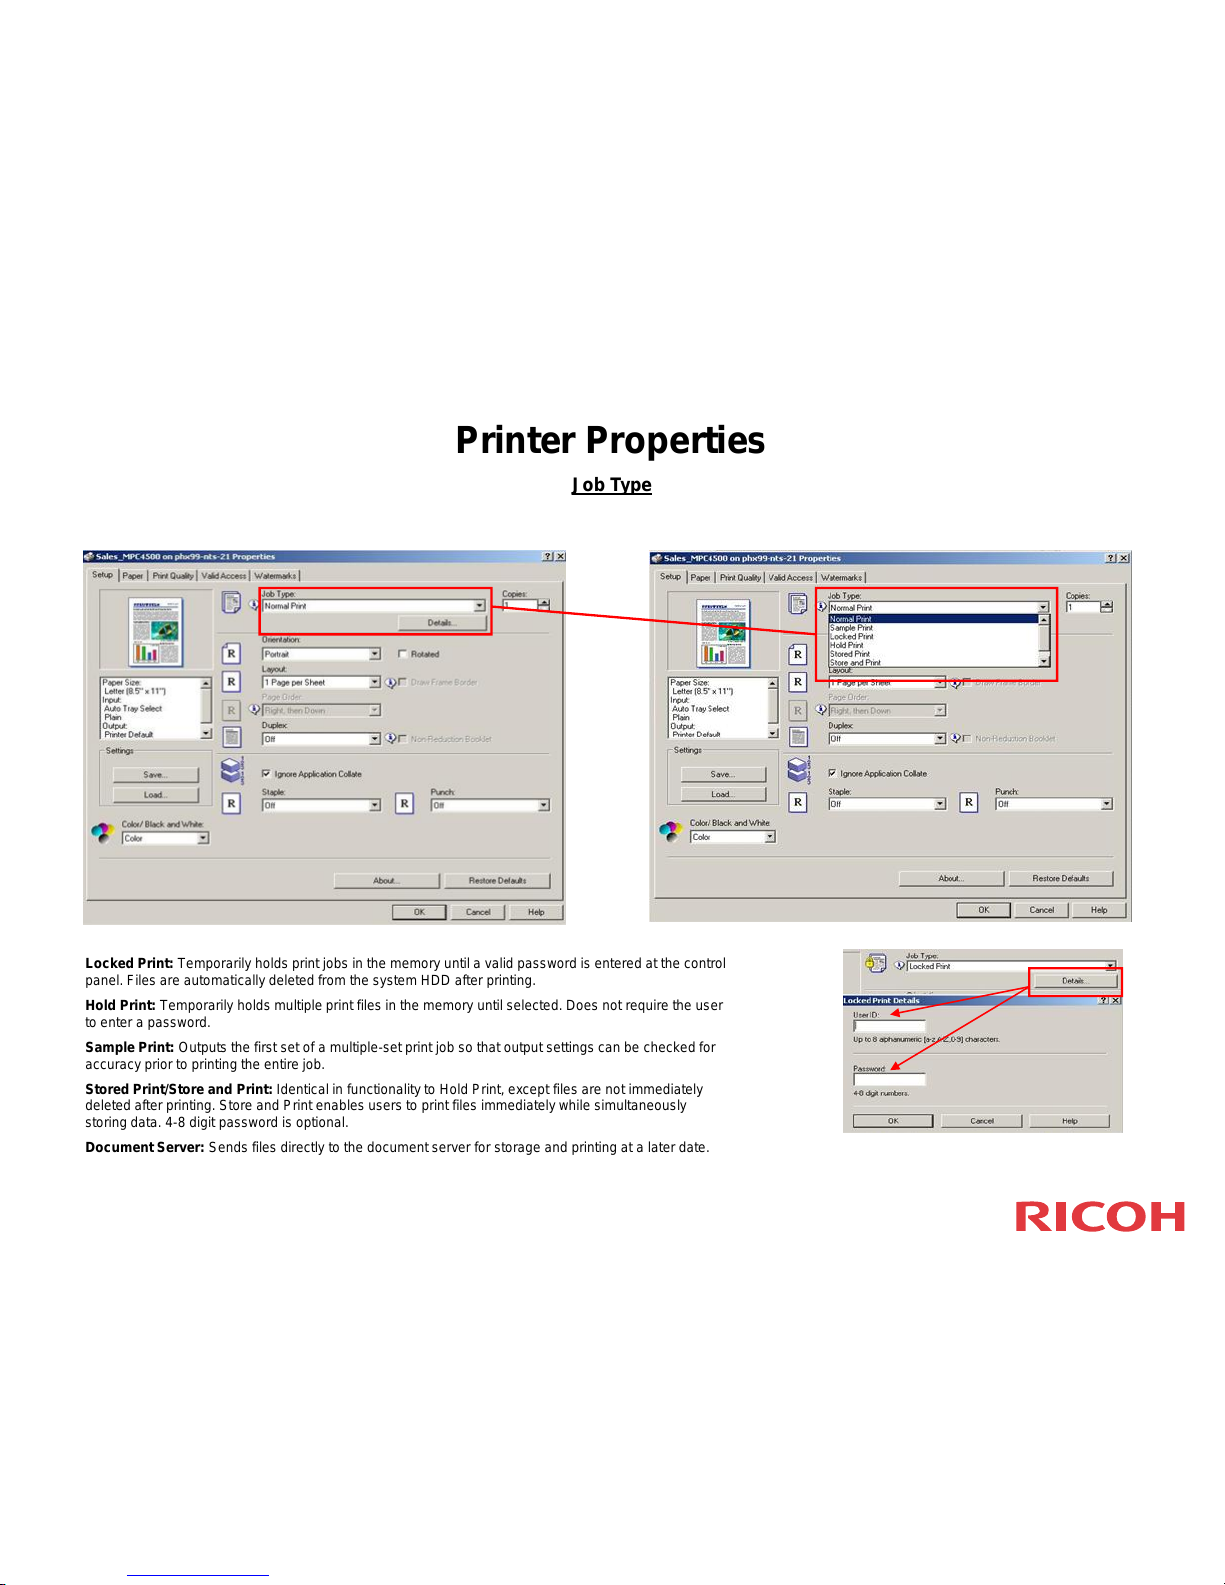
Printer Properties
Job Type
Locked Print: Temporarily holds print jobs in the memory until a valid password is entered at the control
panel. Files are automatically deleted from the system HDD after printing.
Hold Print: Temporarily holds multiple print files in the memory until selected. Does not require the user
to enter a password.
Sample Print: Outputs the first set of a multiple-set print job so that output settings can be checked for
accuracy prior to printing the entire job.
Stored Print/Store and Print: Identical in functionality to Hold Print, except files are not immediately
deleted after printing. Store and Print enables users to print files immediately while simultaneously
storing data. 4-8 digit password is optional.
Document Server: Sends files directly to the document server for storage and printing at a later date.
Page 38
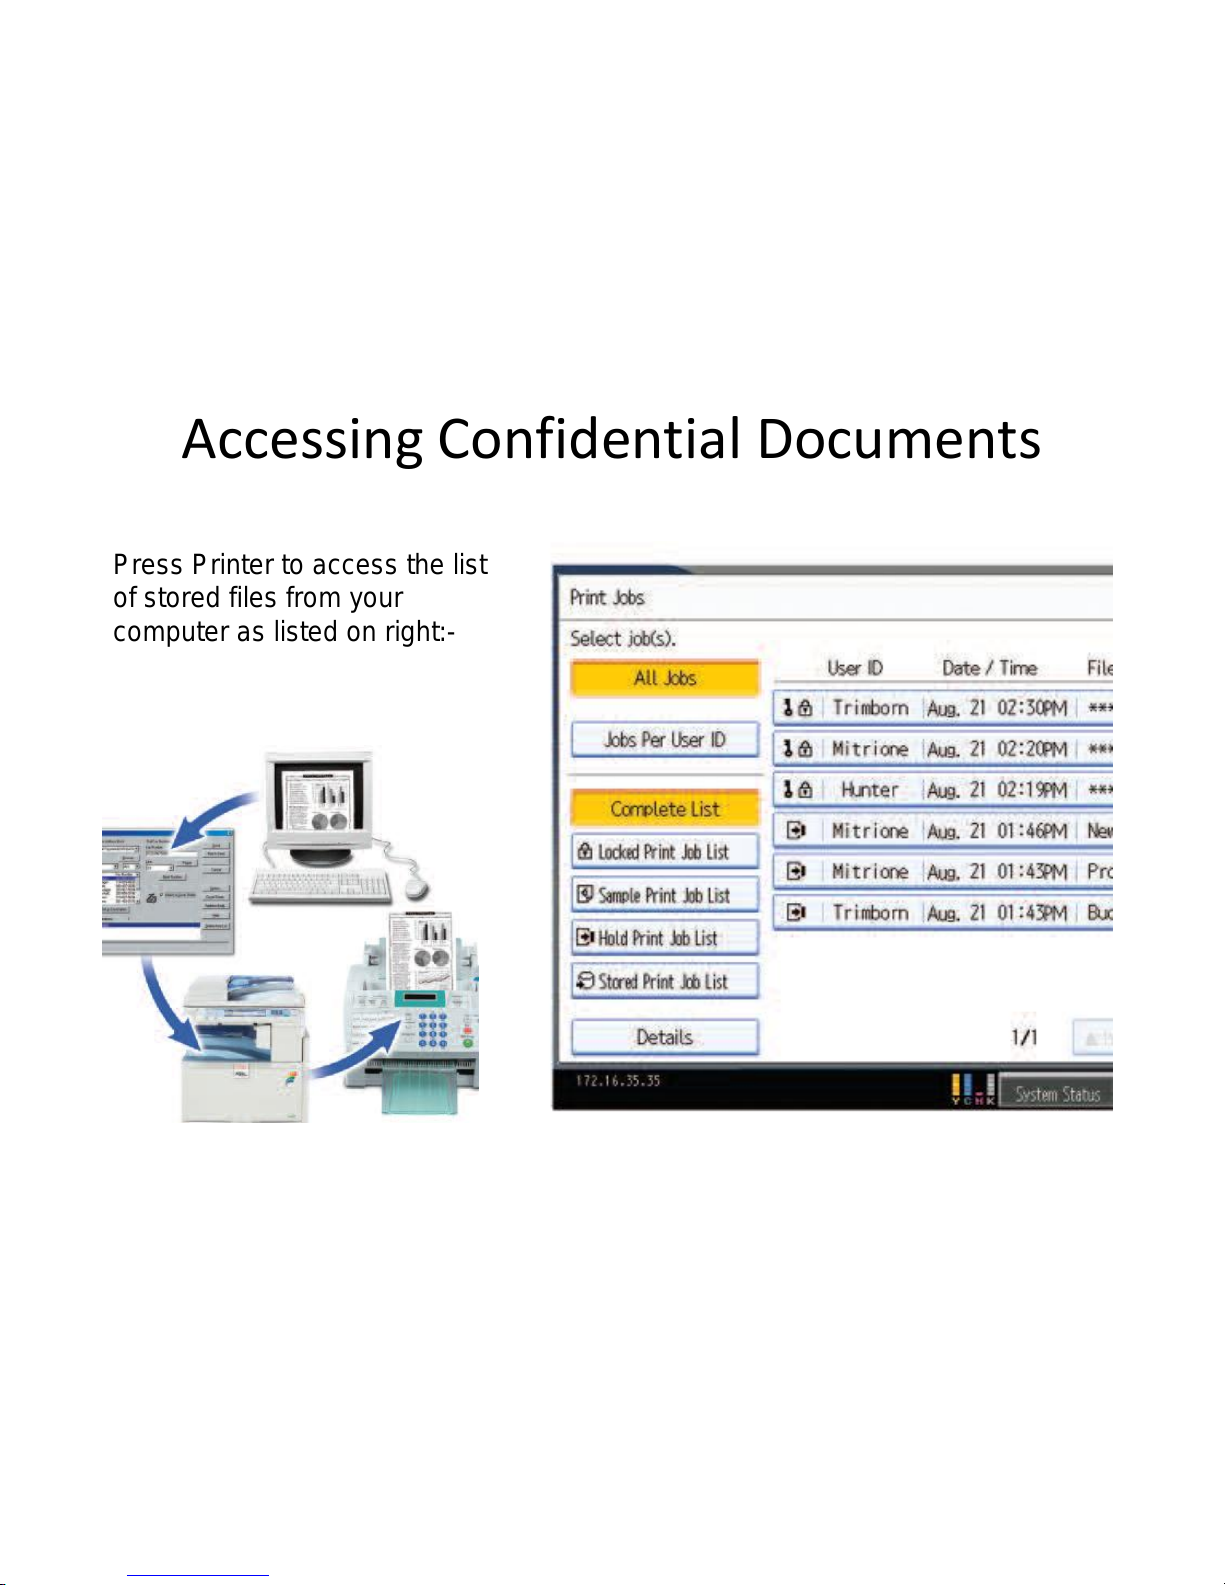
Accessing Confidential Documents
Press Printer to access the list
of stored files from your
computer as listed on right:-
Page 39
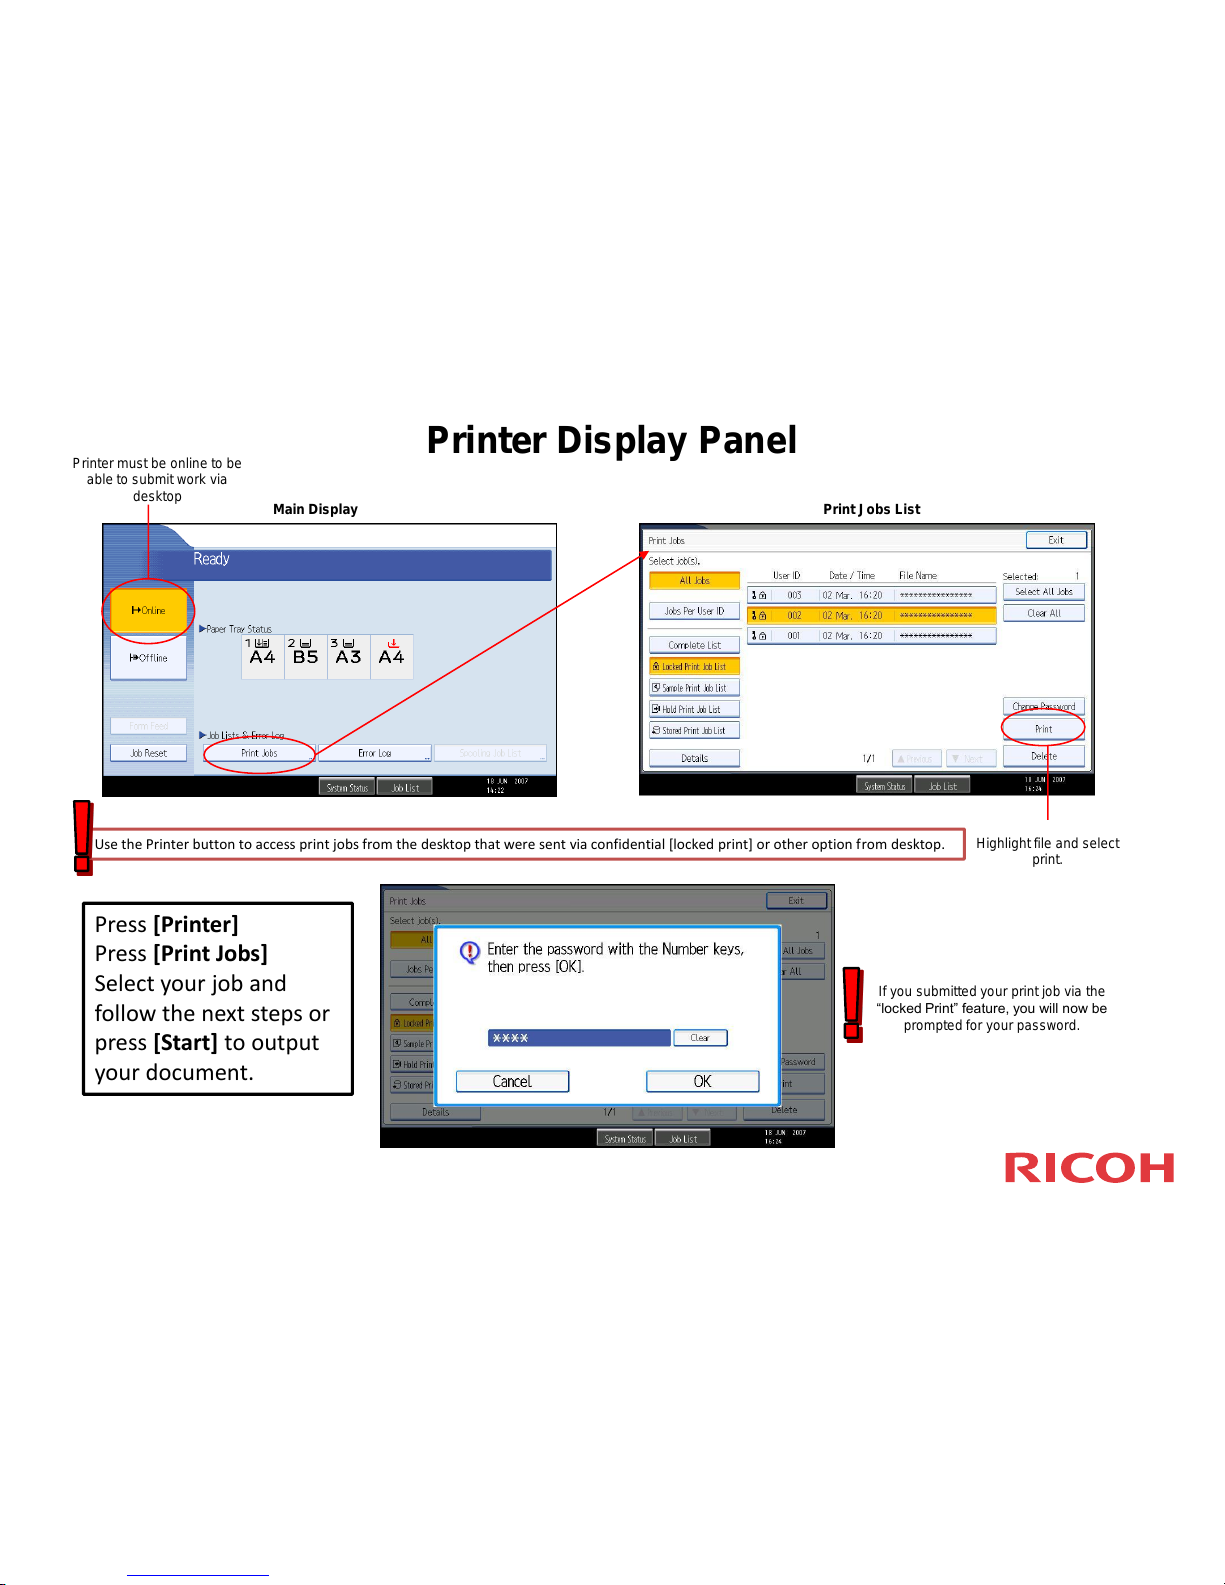
Printer Display Panel
Printer must be online to be
able to submit work via
desktop
Main Display Print Jobs List
Highlight file and select
print.
If you submitted your print job via the
“locked Print” feature, you will now be
prompted for your password.
Use the Printer button to access print jobs from the desktop that were sent via confidential [locked print] or other option from desktop.
Press [Printer]
Press [Print Jobs]
Select your job and
follow the next steps or
press [Start] to output
your document.
Page 40
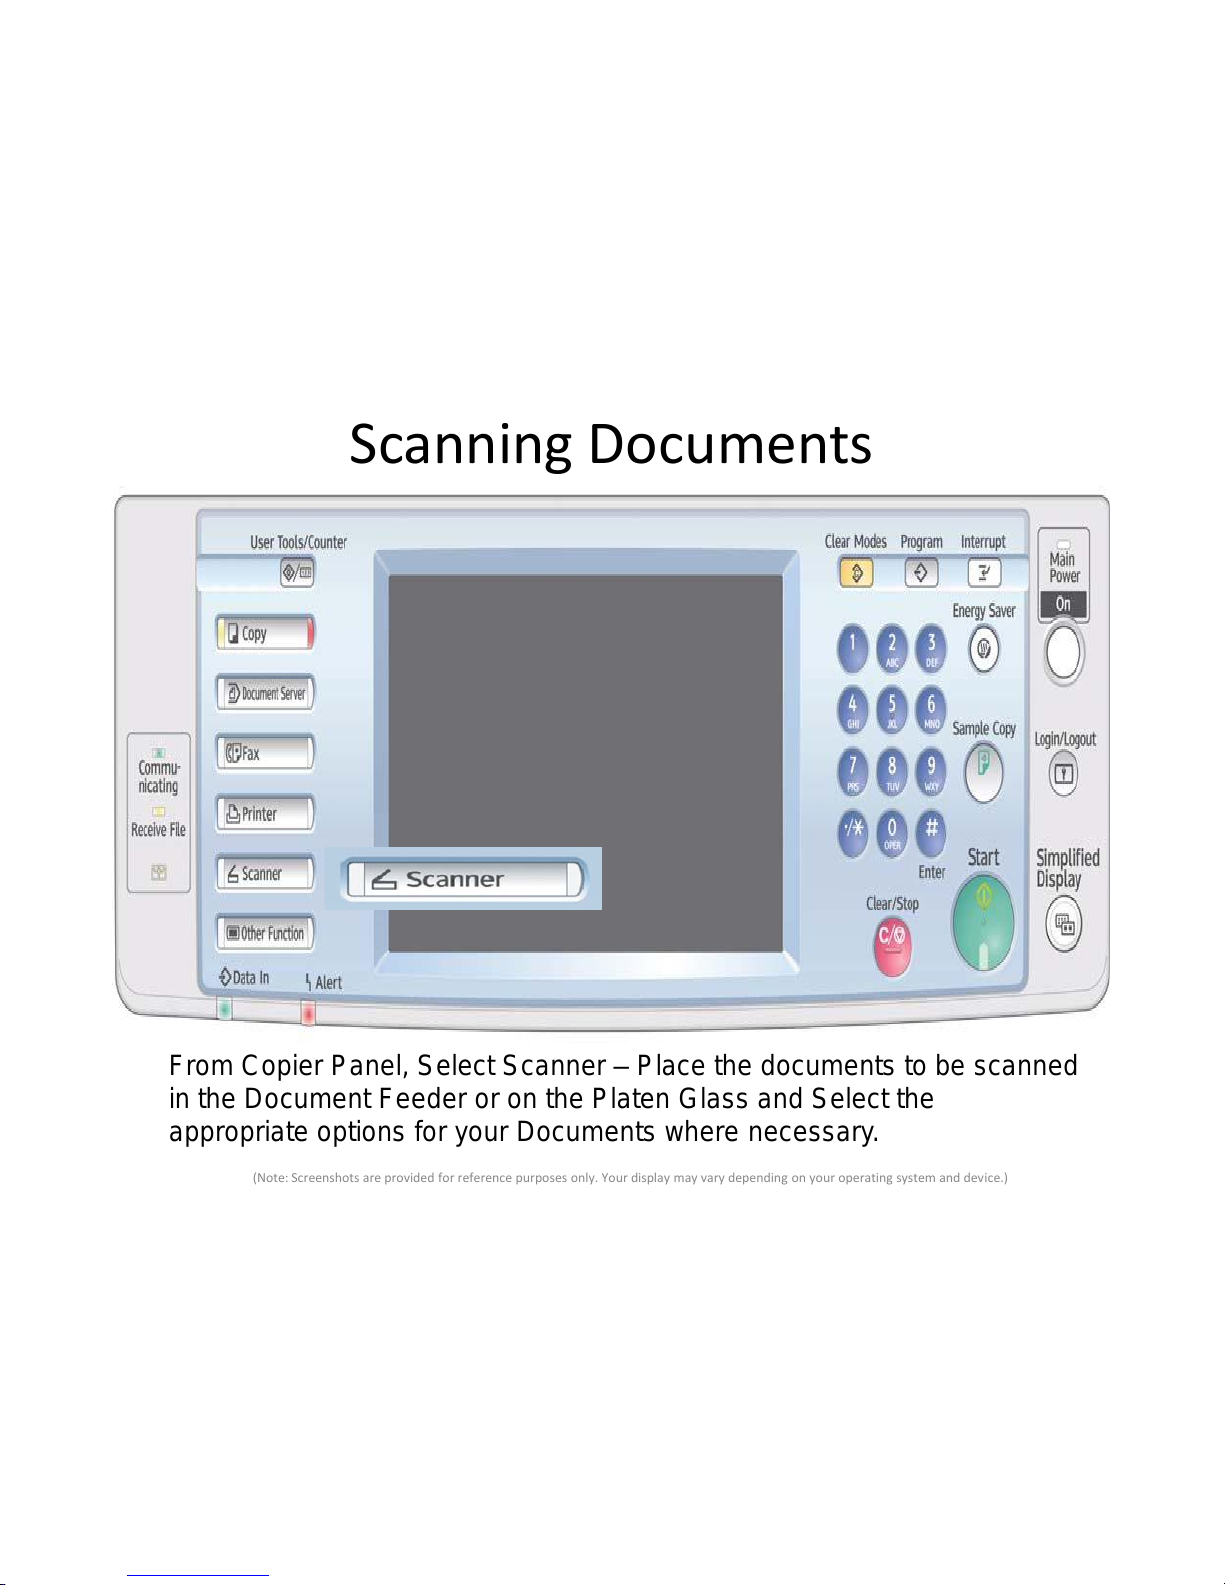
Scanning Documents
From Copier Panel, Select Scanner – Place the documents to be scanned
in the Document Feeder or on the Platen Glass and Select the
appropriate options for your Documents where necessary.
(Note: Screenshots are provided for reference purposes only. Your display may vary depending on your operating system and device.)
Page 41
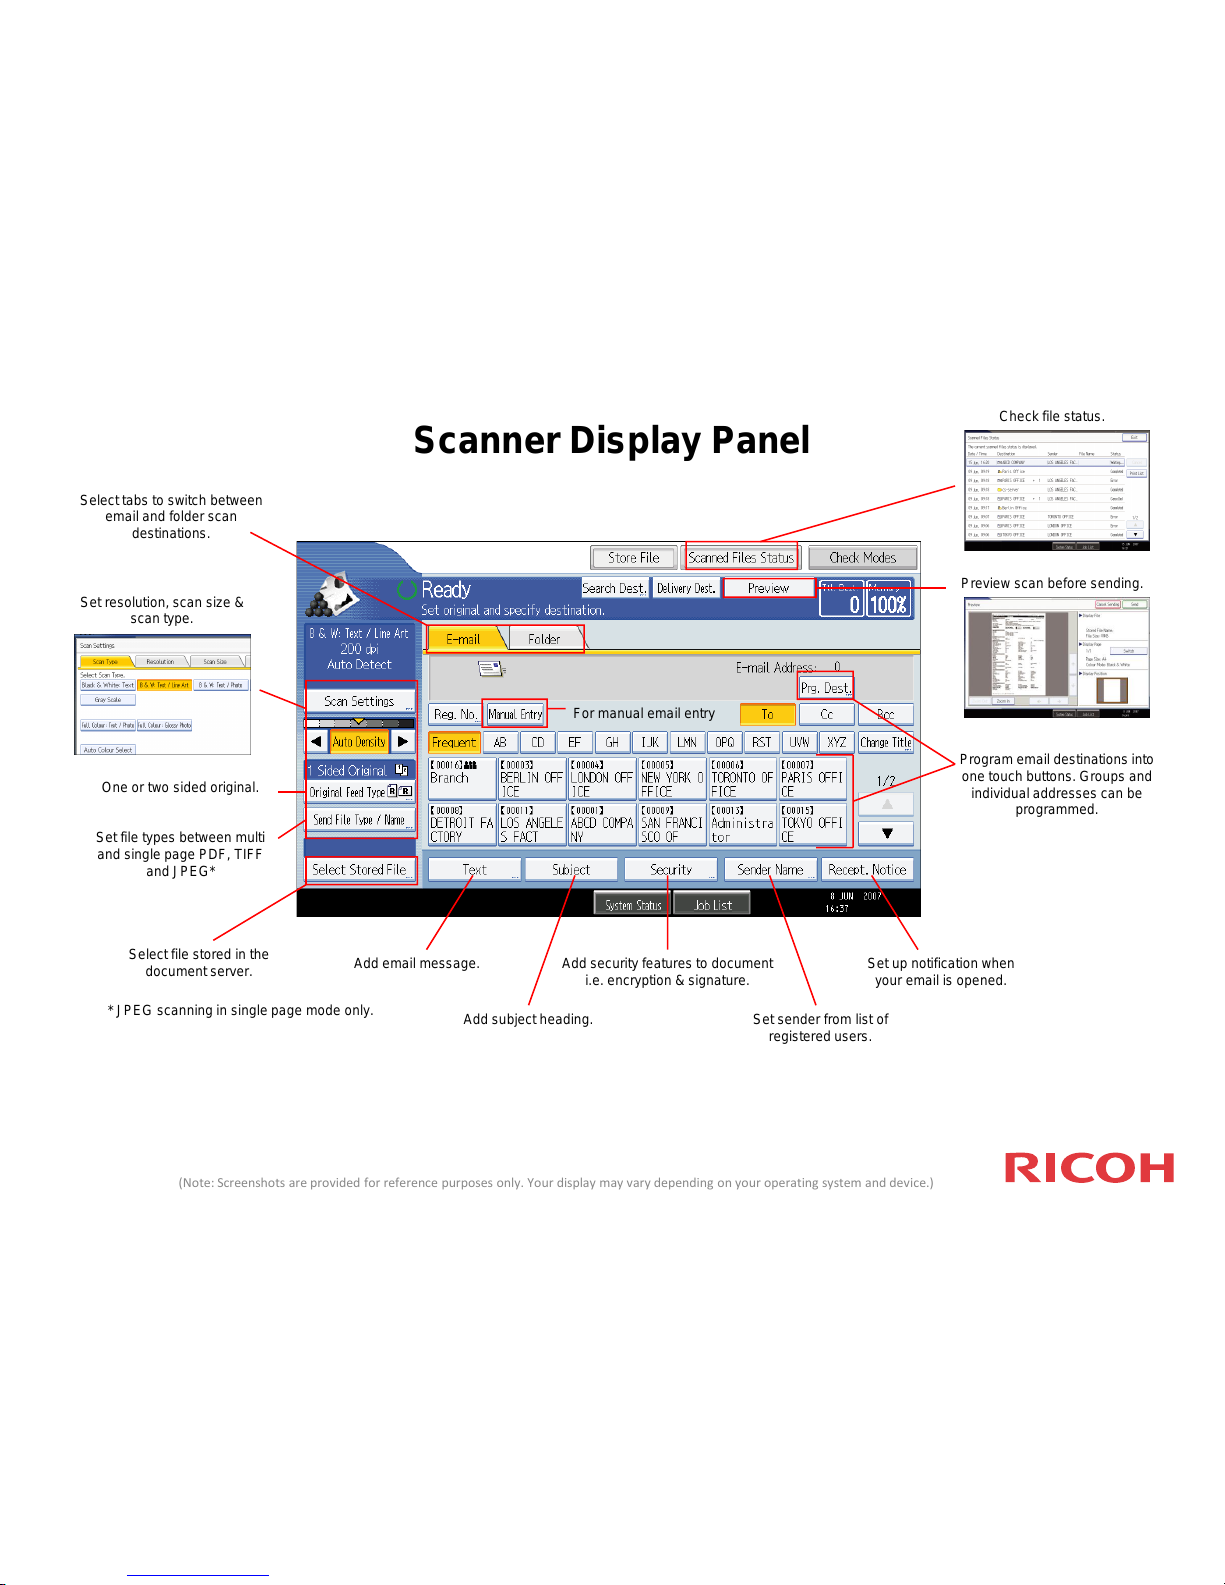
Scanner Display Panel
Preview scan before sending.
Select tabs to switch between
email and folder scan
destinations.
Add email message.
Add subject heading.
Add security features to document
i.e. encryption & signature.
Set up notification when
your email is opened.
Set sender from list of
registered users.
Check file status.
Select file stored in the
document server.
Set resolution, scan size &
scan type.
One or two sided original.
Set file types between multi
and single page PDF, TIFF
and JPEG*
* JPEG scanning in single page mode only.
Program email destinations into
one touch buttons. Groups and
individual addresses can be
programmed.
For manual email entry
(Note: Screenshots are provided for reference purposes only. Your display may vary depending on your operating system and device.)
Page 42
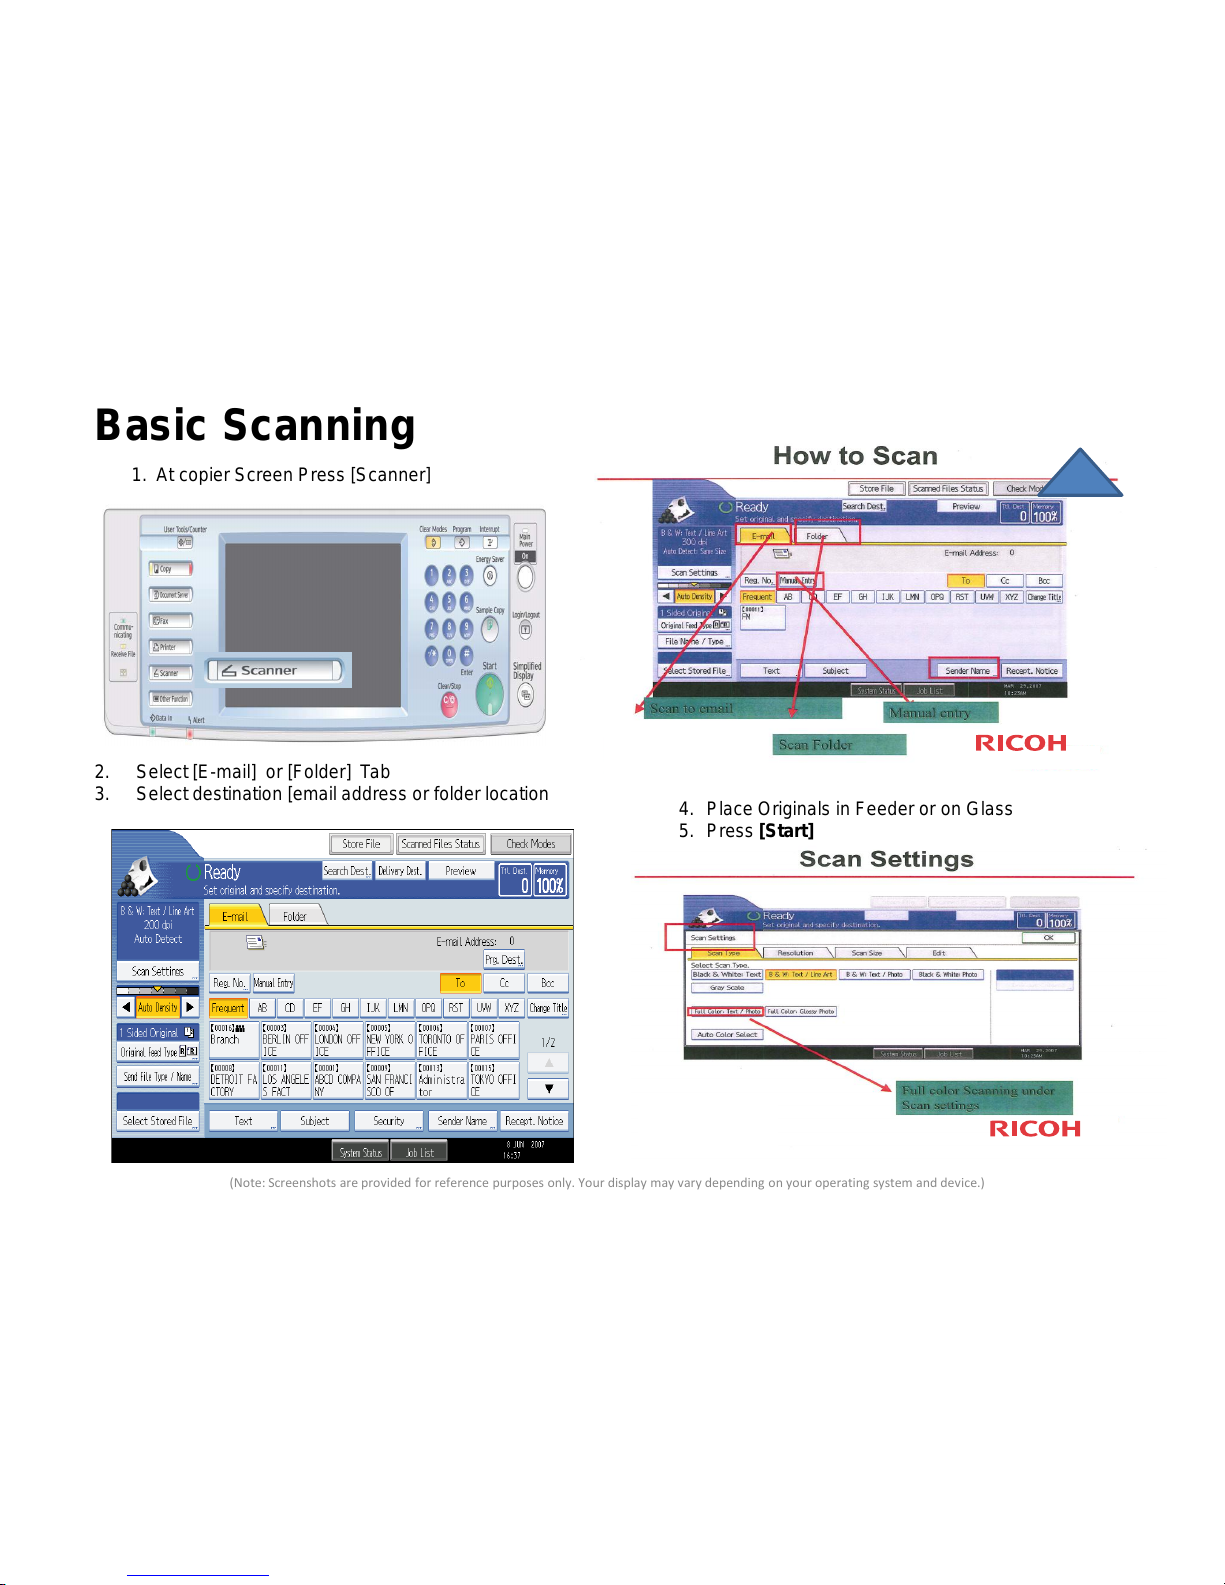
(Note: Screenshots are provided for reference purposes only. Your display may vary depending on your operating system and device.)
1. At copier Screen Press [Scanner]
2. Select [E-mail] or [Folder] Tab
3. Select destination [email address or folder location
Basic Scanning
4. Place Originals in Feeder or on Glass
5. Press [Start]
Page 43
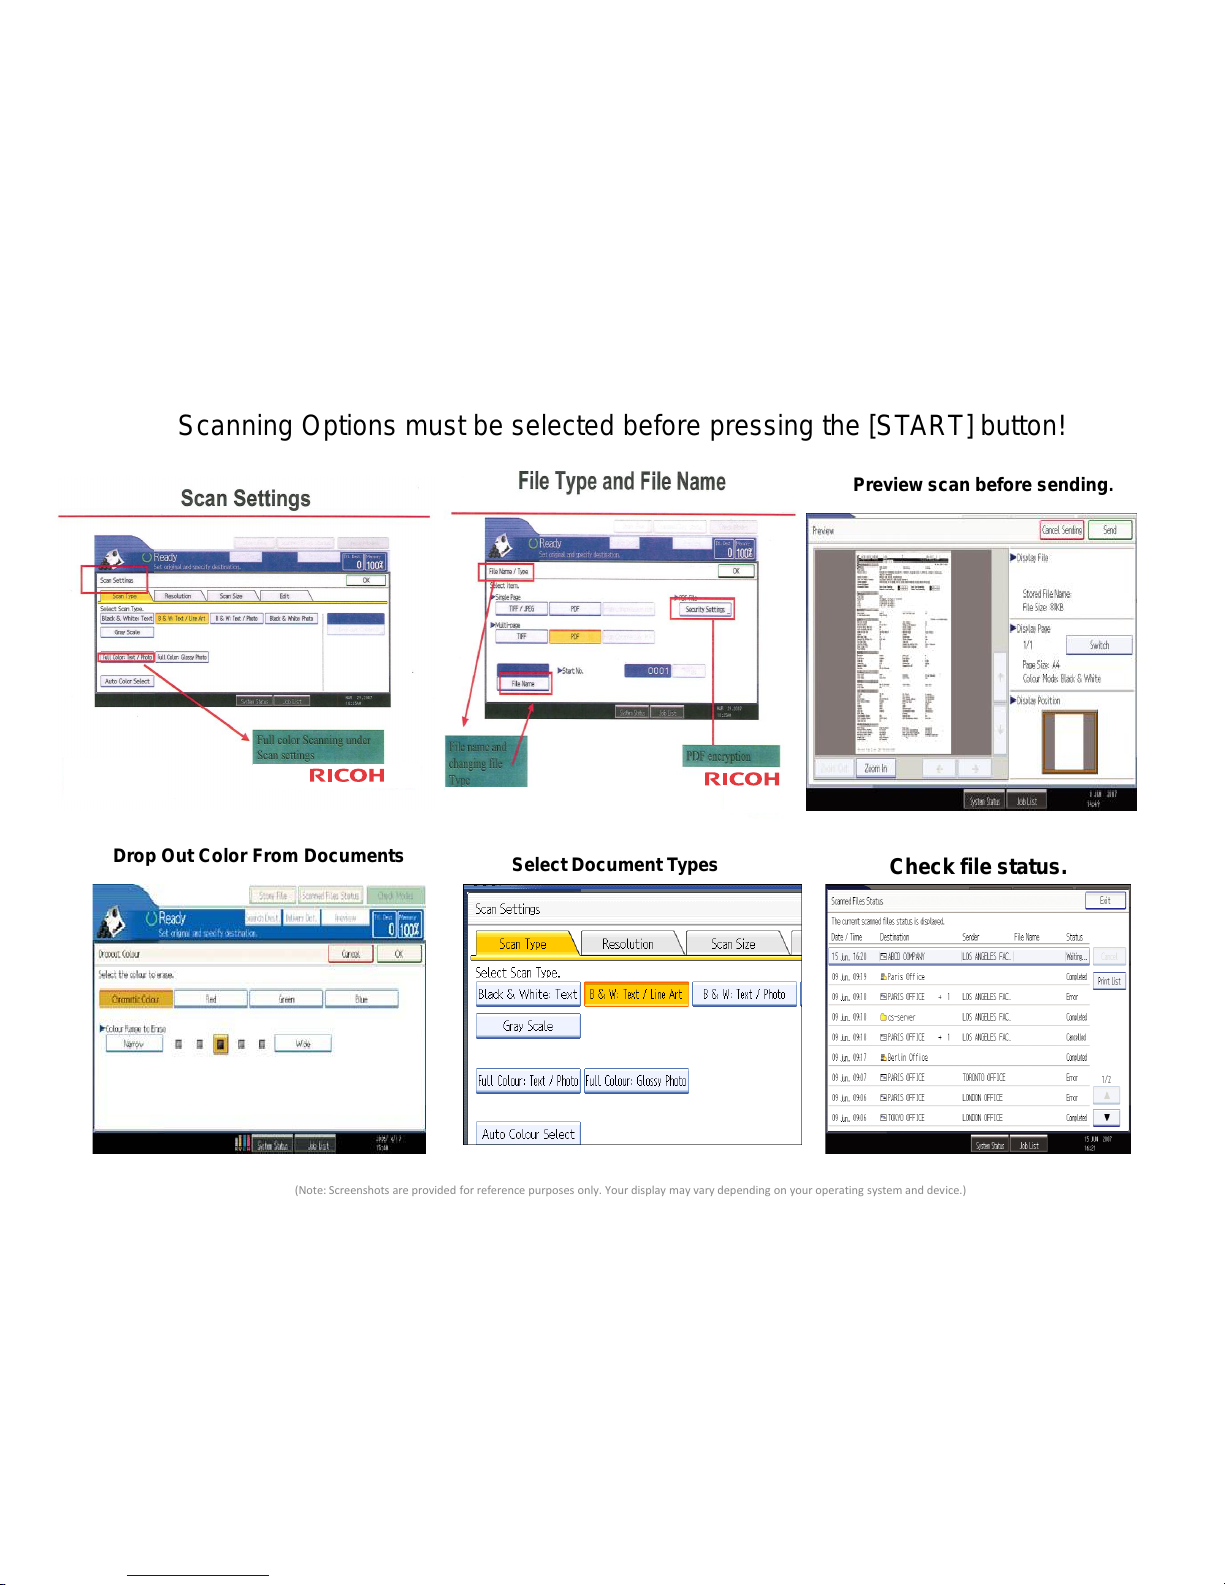
(Note: Screenshots are provided for reference purposes only. Your display may vary depending on your operating system and device.)
Preview scan before sending.
Check file status.
Select Document Types
Drop Out Color From Documents
Scanning Options must be selected before pressing the [START] button!
Page 44
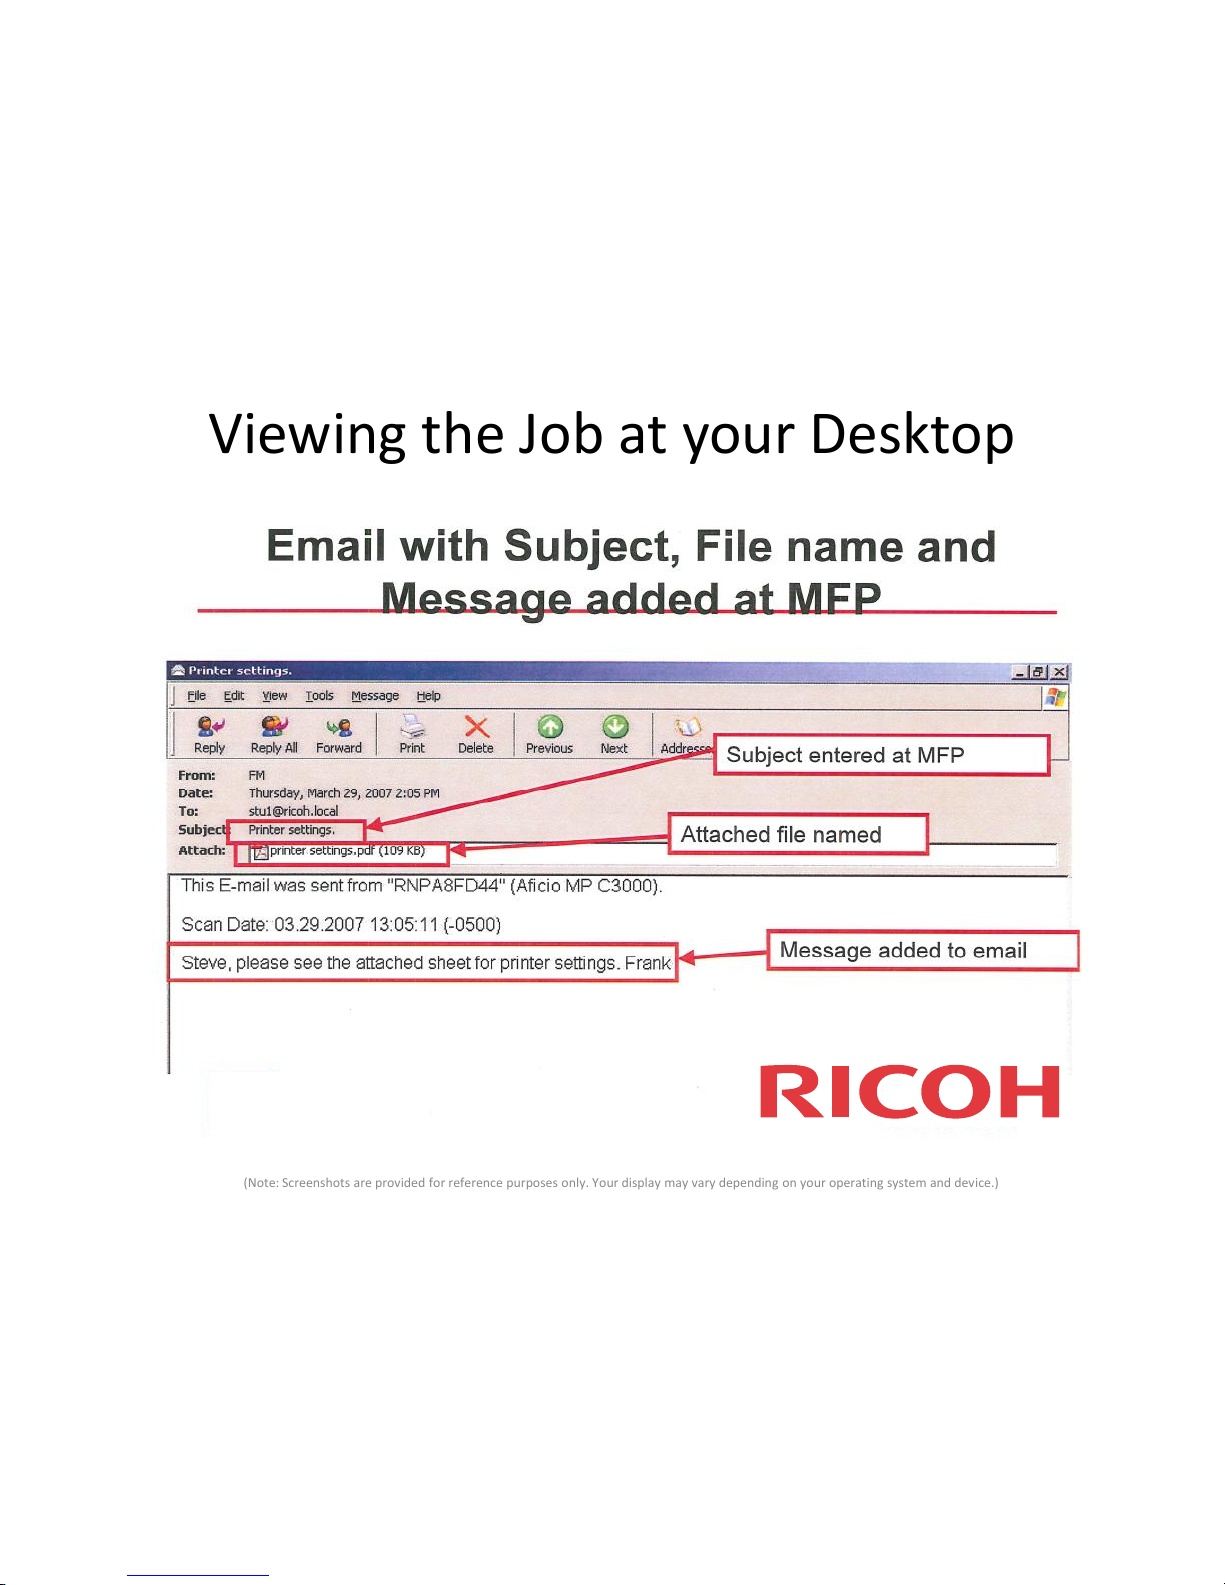
Viewing the Job at your Desktop
(Note: Screenshots are provided for reference purposes only. Your display may vary depending on your operating system and device.)
 Loading...