


Fax Connection Unit Type D
Operating Instructions
For safe and correct use, be sure to read the Safety Information in "Read This First" before using the machine.


TABLE OF CONTENTS
How to Read This Manual................................................................................................................................. 2
Symbols Used in This Manual....................................................................................................................... 2
1. Getting Started
Remote Fax Overview........................................................................................................................................3
Functions Available for Remote Fax..............................................................................................................3
Required Configuration......................................................................................................................................6
Options............................................................................................................................................................6
Settings............................................................................................................................................................ 6
2. Sending/Receiving Documents Using Remote Fax
Remote Transmission...........................................................................................................................................7
Confirming Files in Memory of a Remote Fax..............................................................................................8
Printing Received Documents from the Sub-Machine......................................................................................9
If you use [Remote Reception Setting per Line]............................................................................................9
If you use [Remote Reception Setting per Sender]...................................................................................... 9
Checking the Communication Results of Remote Fax....................................................................................11
Viewing the Communication Results of Remote Fax..................................................................................11
Printing the Communication Results of Remote Fax...................................................................................11
Messages and Solutions..................................................................................................................................12
Information about Security Functions..............................................................................................................15
Data Overwritten by Auto Erase Memory................................................................................................. 15
Operation Privileges for Settings................................................................................................................ 15
1
How to Read This Manual
This manual explains how to set up the remote fax function and use its basic features.
You can use the remote fax function if you install Fax Connection Unit Type D on your machine.
For information not included in this manual, such as how to use the machine or specifications of the
machine, see the manuals provided with the machine.
Symbols Used in This Manual
This manual uses the following symbols:
Indicates supplementary explanations of the machine's functions, and instructions on resolving user
errors.
[ ]
Indicates the names of keys on the machine's display or control panels.
2
1. Getting Started
CJQ612
This chapter is an overview of the configuration of the remote fax function.
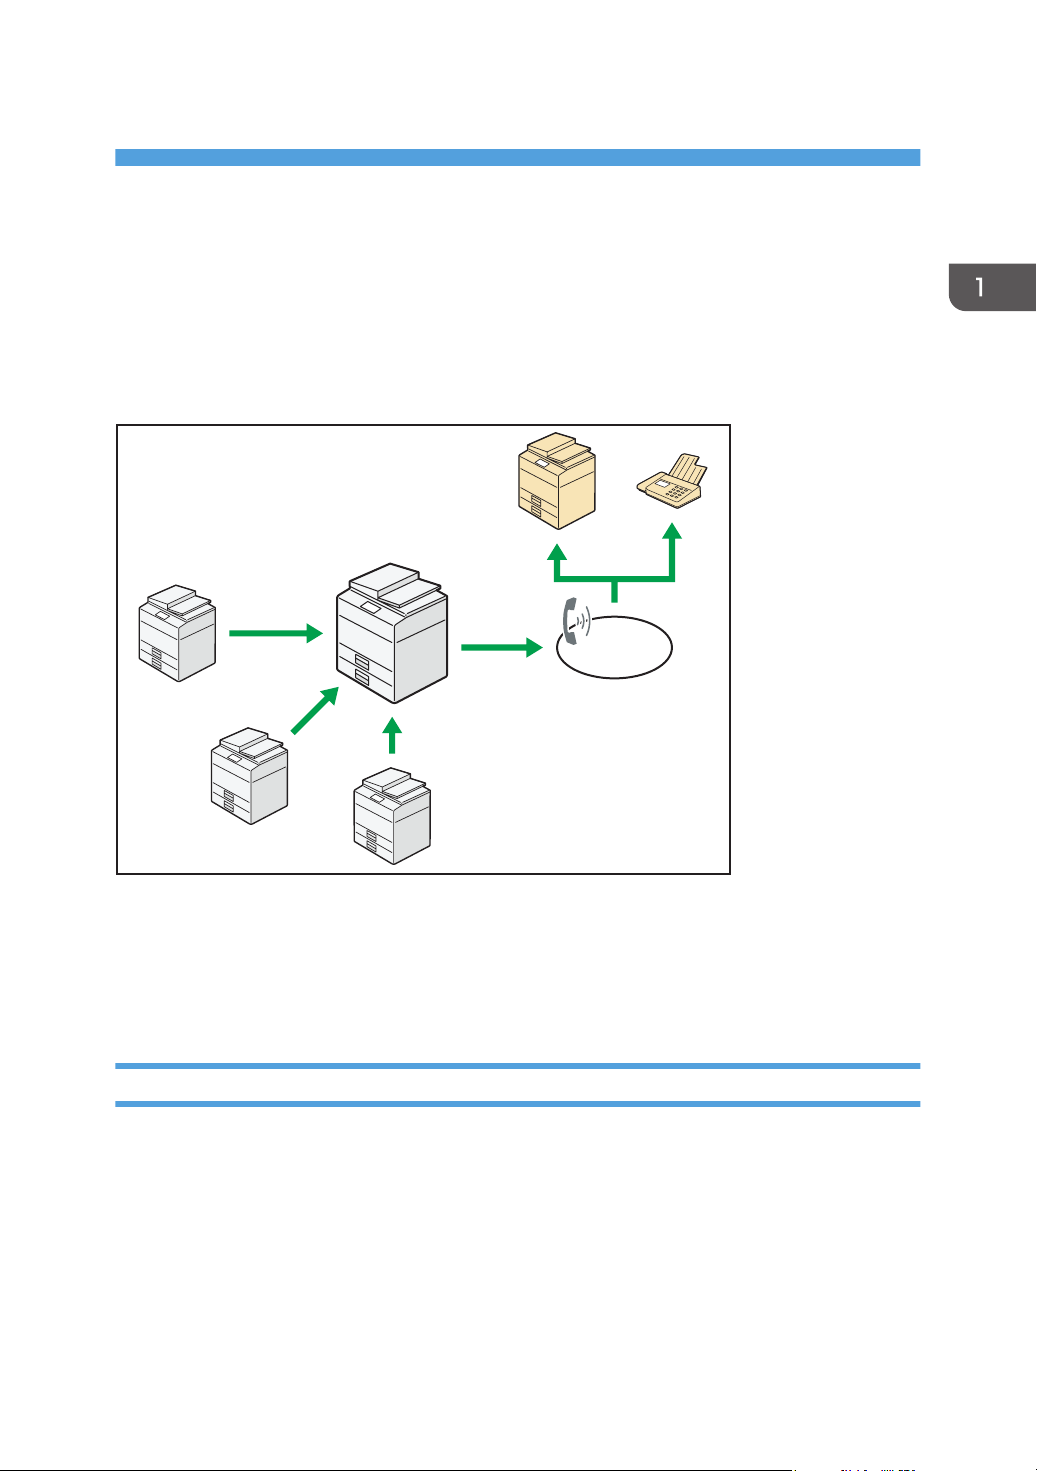
Remote Fax Overview
You can send and receive faxes from a machine that does not have a fax function (the sub-machine) if
you can use the remote fax function to connect to a machine that has a fax function (the main machine).
The procedure for sending faxes is as same as that of for the machine with the fax unit. When a job has
finished, confirm results displayed on sending history or printed on reports.
You can forward the received documents from the main-machine with facsimile function to the submachine.
Functions Available for Remote Fax
You can instruct a main-machine to send a fax by displaying the [Remote Fax] screen on the submachine. From the [Remote Fax] screen, you can send scanned documents to the main-machine and
instruct it to fax the document.
Remote fax transmissions are possible on a G3 line.
On the sub-machine you can also set the user tools for the remote fax function and add fax numbers to
the Address Book.
3
1. Getting Started
• If using user authentication, select the same authentication method between the sub-machine and
the main-machine. For details about the machine's authentication settings, see Security Guide.
Functions Available on the Fax's Initial Display for Remote Fax
You can specify the following items on the fax's initial display on the sub-machine:
Memory Transmission, Type of Original, Resolution, Scan Size, Auto Density, Manual Density, Original
Orientation, Original Settings, Fax Header Print, Program Destination, Select Line, Check/Stop
Transmission File, Transmission File Status, Reception File Status
• The machine supports the functions, transmission capability, reception capability, and available
paper size of the main-machine equipped with a facsimile function. Otherwise, the functions that
the main-machine does not have are not available.
• You can select the same G3 line as the main-machine.
• You can select one of two fax headers.
Functions Available on the Facsimile Features Screen for Remote Fax
You can specify the following items for the Facsimile Features menu on the sub-machine:
General Settings
• Quick Operation Key (1–3)
If [On] is selected, the Quick Operation keys can be registered with the following items:
Fax Header Print, TX File Status (Transmission File Status), RX File Status (Reception File
Status), TX Status Report
• Switch Title
• Search Destination
See "General Settings", Fax.
Scan Settings
• Program/Change Scan Size
• Delete Scan Size
See "Scan Settings", Fax.
Reception Settings
• 2 Sided Print
• Paper Tray
See "Reception Settings", Fax.
4

Initial Settings
• Parameter Setting
You can configure the following User Parameter Switches to change function settings. Do not
change any bit switches other than the following:
• Print sheet is limited to that which has highest priority (Just size printing) (switch 05, bit 5)
• Empty tray alert (Paper Empty Warning) even when one paper tray is empty (switch 05,
• Detect and report nearly blank documents when scanning (switch 11, bit 2)
• Reset when function changed (switch 14, bit 3)
• Selecting the available paper feed tray (switch 15, bit 2, 1, 0)
• Whether or not to select the available paper feed tray (switch 15, bit 5)
• Whether you need to press [Add] after specifying a destination with the destination key
• Whether or not to reset the settings when original is scanned (switch 17, bit 3)
• The sub-machine beeps to let you know when it has printed a received document (switch
Remote Fax Overview
bit 7)
when broadcasting (switch 17, bit 2)
37, bit 6)
• Program Fax Information (Fax Header)
• Menu Protect
See "Initial Settings" and "Parameter Settings", Fax.
5

1. Getting Started
Required Configuration
This section describes options and settings required for the remote fax function.
Options
To use the remote fax function, both the main-machine and the sub-machines must have the following
options:
• Fax connection unit
• HDD
• The main machine must have the fax function.
• A machine that has the fax function cannot be used as a sub-machine.
Settings
To use the remote fax function, you must first specify all of the machines' IP addresses or host names on
each of the machines.
The machine's IP address or host name can be specified in [Program/Change/Delete Remote Machine]
on the [Administrator Tools] tab on the System Settings menu.
Follow the procedure below.
1. Connect the sub-machine to the main-machine over the network.
For details about how to connect the machine to a network, see "Connecting the Machine",
Connecting the Machine/ System Settings.
2. In [Program/Change/Delete Remote Machine] on the main-machine, specify the IP address or the
host name of the sub-machine.
You can specify up to six sub-machines.
If you cannot register the sub-machine on the main-machine, check the sub-machine's settings. You
cannot register the sub-machine if another machine is registered in [Program/Change/Delete
Remote Machine] on the sub-machine machine.
For details about how to change the System Settings, see "Accessing User Tools", Connecting the
Machine/ System Settings.
3. In [Program/Change/Delete Remote Machine] on the sub-machine, specify the IP address or the
host name of the main-machine.
You can specify one main-machine.
6

2. Sending/Receiving Documents
CMR612
Using Remote Fax
This chapter describes how to send and receive faxes using the remote fax function.
Remote Transmission
Before the operation, confirm that the main power switch of the main-machine is turned on.
1. Press the [Home] key on the top left of the control panel.
2. Press the [Remote Fax] icon on the [Home] screen.
3. Place the original into the Auto Document Feeder (ADF) or on the exposure glass.
4. Make the scan settings you require.
5. Specify a destination.
6. Press the [Start] key.
• For details about how to use the fax features, see Fax.
• For the following functions, use information stored or registered on the sub-machine:
• Information registered in the Address Book
• LDAP server settings
7

2. Sending/Receiving Documents Using Remote Fax
Confirming Files in Memory of a Remote Fax
Use this function to check the contents of a file that is stored in memory and not yet sent. Also, use this
function to cancel a transmission from the sub-machine.
You can check these files as you check standard faxes.
For details about confirming files in memory, see "Confirming Files in Memory", Fax.
All files that the main-machine has in memory are displayed on the [Check/Stop Transmission File]
screen.
When documents are transmitted from a sub-machine to the main-machine,
To update status of the transmission file, press [Refresh Status] on the [Check/Stop Transmission File]
screen.
appears.
8

Printing Received Documents from the Sub-Machine
Printing Received Documents from the SubMachine
You can forward or route received documents from the main-machine equipped with a facsimile
function. By registering the sub-machine without a facsimile function as a forwarding destination, you
can print received documents from the sub-machine.
For example, you can make the main-machine forward the documents for the sales department to the
sales department's machine, and forward the documents for the personnel division to the personnel
division's machine. The sales department's machine and the personnel division's machine print the
documents individually.
To forward or route received documents, in the Facsimile Features menu on the main-machine equipped
with a facsimile function, configure the forwarding or routing settings in advance.
You can forward or route received documents per line or sender.
If you use [Remote Reception Setting per Line]
On the main-machine, you can specify a sub-machine to print documents received over a G3 line.
Sub-machines that you can specify are machines using the Remote Fax function.
For details about how to change the Facsimile Features, see "Accessing User Tools", Connecting the
Machine/ System Settings.
To specify Remote Reception Setting per Line, follow the procedure below.
1. Press [Facsimile Features].
2. Press [Reception Settings].
3. Press [ ] twice, and then press [Remote Reception Setting per Line].
4. Press [G3].
5. Press [Select] to the right of the machine you want to connect to, and then press [OK].
6. Press [OK].
7. Press [Exit] twice.
If you use [Remote Reception Setting per Sender]
If this function is enabled and documents are received, they are forwarded to a specified sub-machine.
Register a special sender in [Program Special Sender] in the Facsimile Features menu, and then set
[Remote Reception Setting] to [On]. Specify the sub-machine as an end receiver in [Remote Machine].
9

2. Sending/Receiving Documents Using Remote Fax
Before using this function, make sure that [Special Reception Function] is set to [On] in [Initial Set Up]
under [Program Special Sender].
For details about [Initial Set Up] and how to specify the sender name, see "Special Senders to Treat
Differently", Fax.
For details about how to change the Facsimile Features, see "Accessing User Tools", Connecting the
Machine/ System Settings.
To specify Remote Reception Setting per Sender, follow the procedure below.
1. Press [Facsimile Features].
2. Press [Reception Settings].
3. Press [Program Special Sender].
4. Press [Program/Change].
5. Select the sender to program or change.
To program new sender, press [Not Programmed].
6. Enter a sender name, and then press [OK].
Enter a sender name using own name or own fax number.
7. Press [Full Agreement] or [Partial Agreement].
Select the matching criteria to compare the registered name and actual sender's name.
8. Press [Remote Reception Setting].
9. Press [On].
10. Press [Select] to the right of the machine you want to specify, and then press [OK].
11. Press [OK] twice.
12. Press [Exit] four times.
10

Checking the Communication Results of Remote Fax
Checking the Communication Results of
Remote Fax
You can confirm remote transmission and reception results on the screen or printed reports.
Viewing the Communication Results of Remote Fax
Use this function to display the transmission or reception results of the main-machine.
You can check results as you check standard faxes.
For details about confirming transmission results on the screen, see "Viewing the Transmission Result",
Fax.
For details about confirming reception results on the screen, see "Viewing the Reception Result", Fax.
All transmission and reception results for the main-machine are displayed on the screen.
If a document is transmitted from the sub-machine to the main-machine, "-RmFx (IP address of the submachine) ->" appears. To check if the document is sent to the receiver, check the status of the file number
of the documents transmitted from the sub-machine to the main-machine.
Printing the Communication Results of Remote Fax
Use this function to print lists and reports automatically from the sub-machine. You can check remote
transmission or reception results.
You can check the following lists and reports:
• Communication Result Report
• Communication Failure Report
• Error Report
• Power Failure Report
• Depending on the settings for the machine equipped with a facsimile function, lists and reports
might not be printed.
11

2. Sending/Receiving Documents Using Remote Fax
Messages and Solutions
This section explains the machine's main messages. If other messages appear, follow their instructions or
see Troubleshooting.
Message Causes Solutions
"Check whether there are
any network problems."
[16-00]
"Authentication with rmt
machine failed. Check rmt
machine's auth settings."
• No IP address has
been registered.
• A network is not
connected properly.
Authentication failed while
using the remote fax
function. The likely causes
are as follows:
• An attempt was made
to connect to a device
that does not support
the remote function.
• User authentication on
the remote machine has
failed.
• Check that the correct IP address
is specified for the machine in
[System Settings]. For details
about IP address, see "Interface
Settings", Connecting the
Machine/ System Settings.
• For details about network
problems, contact your
administrator.
For details about user authentication,
see Security Guide.
12

Messages and Solutions
Message Causes Solutions
"Connection with remote
machine failed. Check the
remote machine status."
"Connection with remote
machine failed. Check the
remote machine status."
A network error occurred
while using the remote fax
function.
User Code Authentication is
set on the device connected
via the remote fax function.
• Check that the remote machine
supports the remote fax function.
• Check that the remote machine is
working normally.
• Check that the correct IP address
or host name is set for the remote
machine in [System Settings]. For
details about these settings, see
"Interface Settings", Connecting
the Machine/ System Settings.
• Check that the LAN cable is
correctly connected to the
machine.
• For details about network
problems, contact your
administrator.
The remote fax function does not
support User Code Authentication.
Disable User Code Authentication on
the remote machine.
"Connection with remote
machine failed. Check the
remote machine status."
"Connection with remote
machine failed. Check the
remote machine status."
• User authentication of
the device connected
via the remote fax
function has failed.
• The user does not have
permission to use the
function on the remote
machine.
A timeout error occurred
while an attempt was made
to connect the device via
remote fax function.
For details about user authentication
and how to set permissions, see
Security Guide.
• Check that the LAN cable is
correctly connected to the
machine.
• Check that the remote machine is
working correctly.
• For details about connection with
remote machine, see p.6
"Settings".
13

2. Sending/Receiving Documents Using Remote Fax
Message Causes Solutions
"Remote fax is not available
because [User Code
Authentication] is active."
"Transfer error has occurred.
Check status of remote
machine."
"The HDD of the remote
machine is full."
The remote fax function does
not support User Code
Authentication.
A network error occurred
during transfer.
The hard disk became full
after using the remote fax
function to scan an original.
When using the remote fax function,
disable User Code Authentication. For
details about User Code
Authentication, see Security Guide.
• Check that the correct IP address
or host name is set for the remote
machine in [System Settings]. For
details about these settings, see
"Interface Settings", Connecting
the Machine/ System Settings.
• Check that the remote machine is
working correctly.
• Check that the LAN cable is
correctly connected to the
machine.
• For details about transmission,
contact your administrator.
Delete unnecessary files.
14
"Specified operation cannot
be performed. The file is in
use or the file transmission
has completed."
When you attempt to check
the status of a job on the
main-machine from the submachine, the job had
already been sent.
To check the details of a job, under
[Comm. Status/Print], see the [Check/
Stop Transmission File] screen.

Information about Security Functions
Information about Security Functions
This section describes security information for the remote fax function.
Data Overwritten by Auto Erase Memory
You can overwrite the data of faxes sent and received using the remote fax function by overwriting the
data with "Auto Erase Memory".
Operation Privileges for Settings
This section describes the administrator and user operation privileges for the remote fax settings when
administrator authentication or user authentication is enabled.
[System Settings] - [Administrator Tools]
Settings User Mach N/W File Unset Set
Program / Change / Delete Remote
Machine
[Facsimile Features] - [Reception Settings]
Settings User Mach N/W File Lv.1 Lv.2
Remote Reception Setting per Line R R/W R R R R
Web Image Monitor - [Device Management] - [Configuration] - [Program/Change/Delete
Remote Machine]
Settings User Mach N/W File Unset Set
Program – R/W – – R/W –
Change – R/W – – R/W –
Delete – R/W – – R/W –
• Understanding headers
• User
– R/W – – R/W R
The user administrator has privileges for this operation.
• Mach
15

2. Sending/Receiving Documents Using Remote Fax
GB
US
AU
The machine administrator has privileges for this operation.
• N/W
The network administrator has privileges for this operation.
• File
The file administrator has privileges for this operation.
• Unset
The logged in user has privileges for this operation.
In cases where no settings are selected in the available settings of [Administrator
Authentication Management].
• Set
The logged in user has privileges for this operation.
Status when settings are selected in the available settings of [Administrator Authentication
Management].
• Lv.1
In cases where the [Menu Protect] setting is set to [Level 1].
• Lv.2
In cases where the [Menu Protect] setting is set to [Level 2].
• Understanding the symbols
R/W: Execute, change and reading possible.
R: Reading is possible.
-: Execute, change and reading are not possible.
16 EN
EN
EN
D118-7525


GB
US
AU
EN
EN
EN
D118-7525 © 2012
 Loading...