

Ricoh MPC 1800 Quick Manual

Quick Guide
Control Panel
Troubleshooting
Using the Basic Copier and
Fax Functions
Registering Fax Destinations
and Forwarding Received Faxes
Printing Files and Scanned
Copies On Envelopes
Unusable Paper Types and
Manuals for This Machine
This Quick Guide is stored on the supplied CD-ROM and is provided in
the following language versions: English, French, German, Italian,
Spanish, Dutch, Swedish, Norwegian, Danish, Finnish, Portuguese,
Polish, Czech, Hungarian, Russian, Turkish, and Catalan.
Read this manual carefully before you use this machine and keep it handy
for future reference. For safe and correct use, be sure to read the Safety
Information in "About This Machine" before using the machine.

Index
1
Control Panel
2
Troubleshooting
3
Using the Basic Copier
and Fax Functions
4
Registering Fax Destina-
● Control Panel P3
● Troubleshooting Problems with Prints P4
● Cleaning the Print Heads P5
● Flushing the Print Heads P8
● Adjusting the Print Heads P9
● Changing the Paper Size P11
● Using Various Types of Paper P12
● Using the Basic Copier Functions P14
● Auto Reduce/Enlarge P15
● Sending a Fax
● Sending a Fax
● Checking the Transmission Result
● Registering a Fax Destination P19
● Forwarding Received Faxes P20
tions and Forwarding
(Memory Transmission) P16
(Immediate Transmission) P17
(TX File Status) P18
Received Faxes
5
Printing Files and
Scanned Copies On
Envelopes
6
Unusable Paper Types and
Manuals for This Machine
● Guide to Components P22
● Printing onto Envelopes P23
● Copying onto Envelopes P29
● About Unusable Paper P31
● About the Manuals for This Machine P31
2
Control Panel
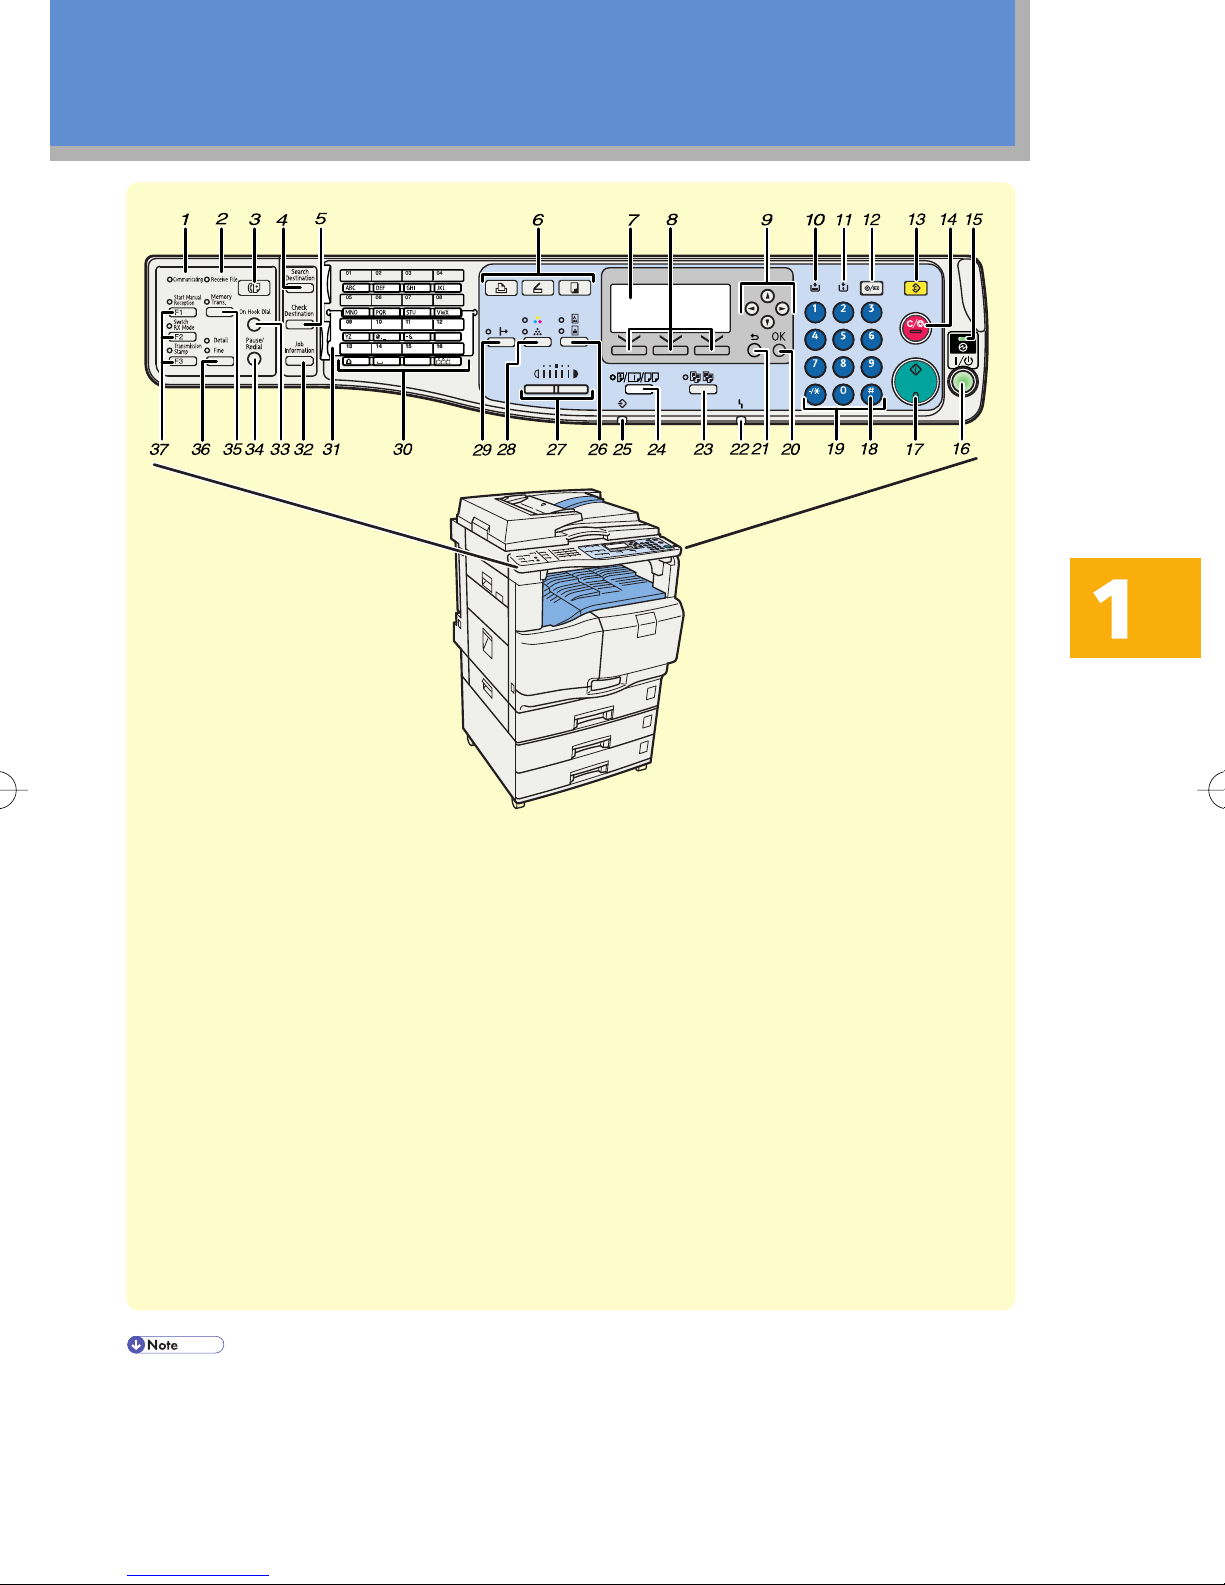
BDZ001S
1 Communicating indicator
(facsimile mode)
2 Receive File indicator
(facsimile mode)
3{Facsimile} key
4{Search Destination} key
(scanner and facsimile mode)
5{Check Destination} key
(scanner and facsimile mode)
6 Function keys
7 Display panel
8 Selection keys
9 Scroll keys
10B Load Paper indicator
11G Add Ink indicator
12{User Tools/Counter} key
13{Clear Modes} key
14{Clear/Stop} key
⋅ The above illustration shows the main unit with the optional duplex unit and Lower Paper Trays in-
stalled.
⋅ Available functions depend on the model of your machine and the options that are installed on it. For
details, see “Options” and “Specifications for Options”, About This Machine on the supplied CD-ROM.
15 Main power indicator
16 Operation switch
17{Start} key
18
{q}
key (Enter key)
19 Number keys
20{OK} key
21{Escape} key
22hAlert indicator
23{Sort} key (copier mode)
24{Duplex/Combine/Series} key
(copier mode)
25mData In indicator
(printer mode)
26{Original} key
(copier, scanner, and facsimile mode)
27{Lighter} key, {Darker} key
(copier, scanner, and facsimile mode)
28{Full Colour/B&W} key
(copier and scanner mode)
29
{f
Online} key
(printer mode)
30 Quick Dial keys
31 Quick Dial Flip Plate
32{Job Information} key
(scanner and facsimile mode)
33{On Hook Dial} key
(facsimile mode)
34{Pause/Redial} key
(facsimile mode)
35{Memory Trans.} key
(facsimile mode)
36{Resolution} key
(facsimile mode)
37 User Function keys
(facsimile mode)
3
2 Troubleshooting
Troubleshooting Problems with Prints
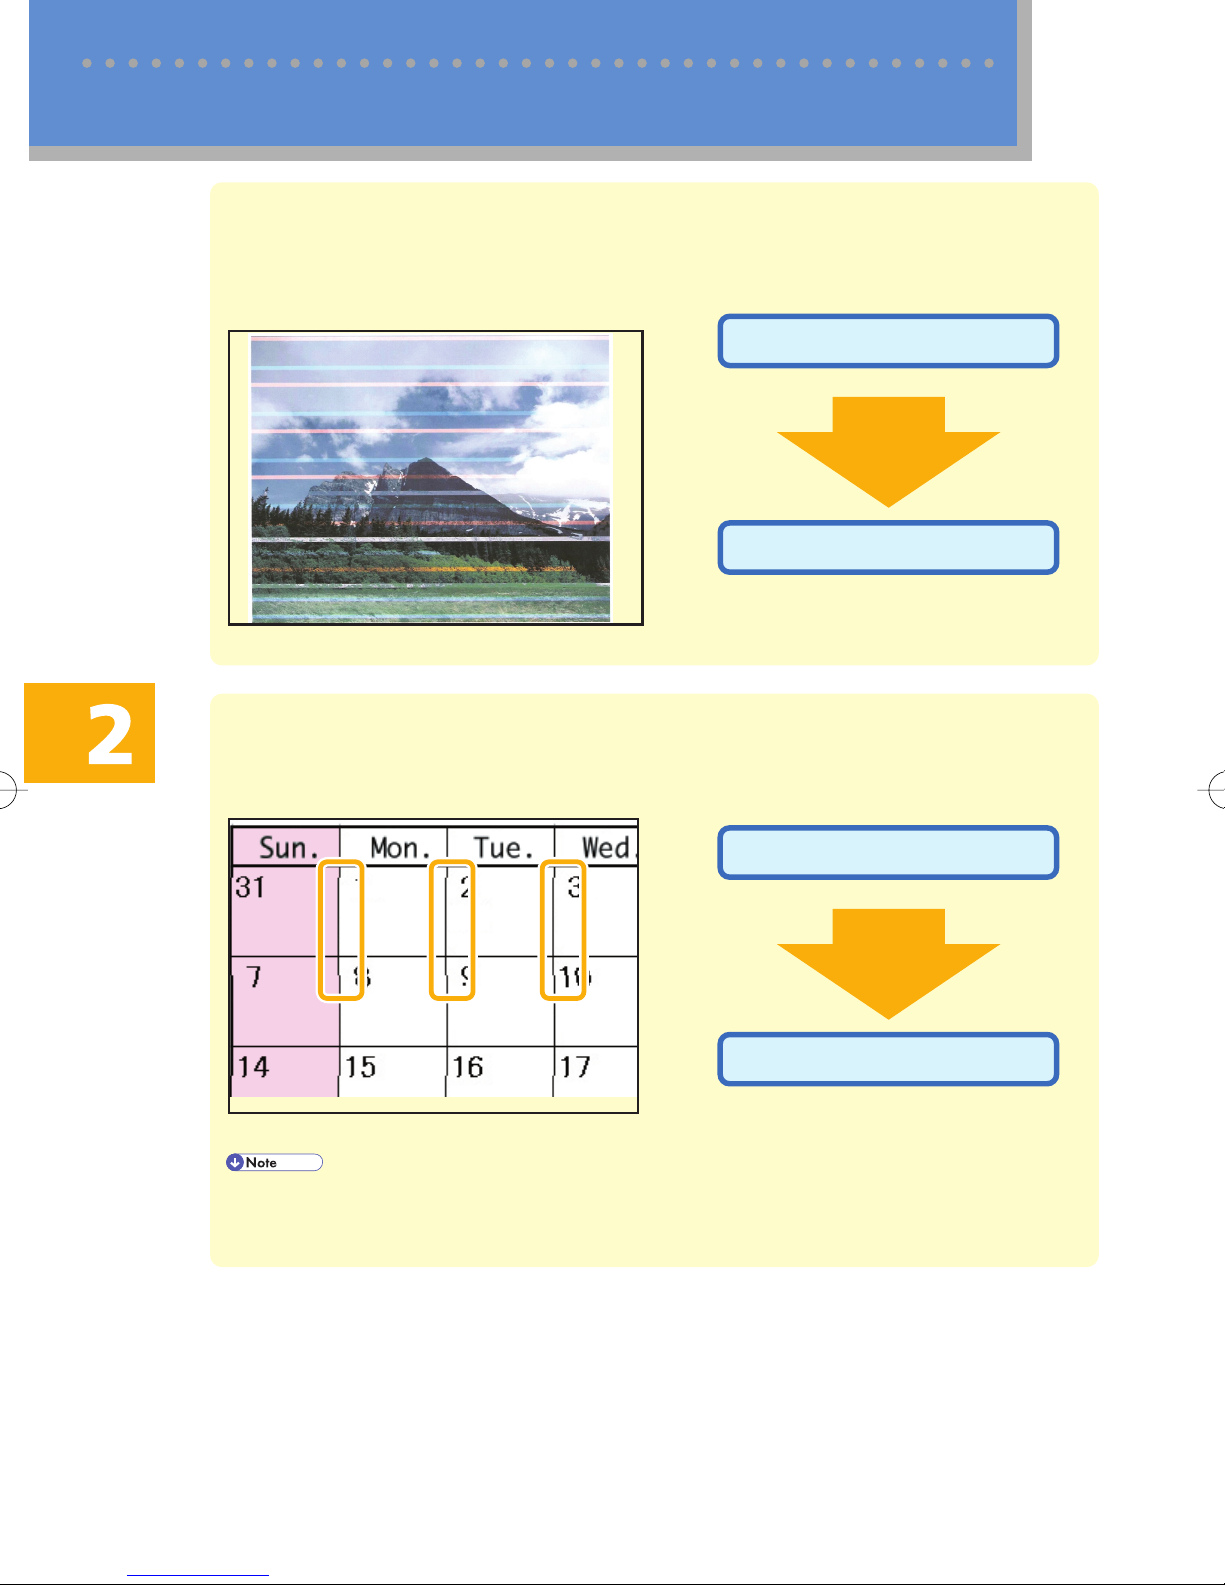
Colour misregistration occurs or white lines appear on prints
Do the following if colour misregistration occurs or white lines appear on prints:
This is how a print will appear if the print head nozzles
are clogged.
clean the print heads ( p.5 - 7 )
if the problem persists
flush the print heads ( p.8 )
AZG019S
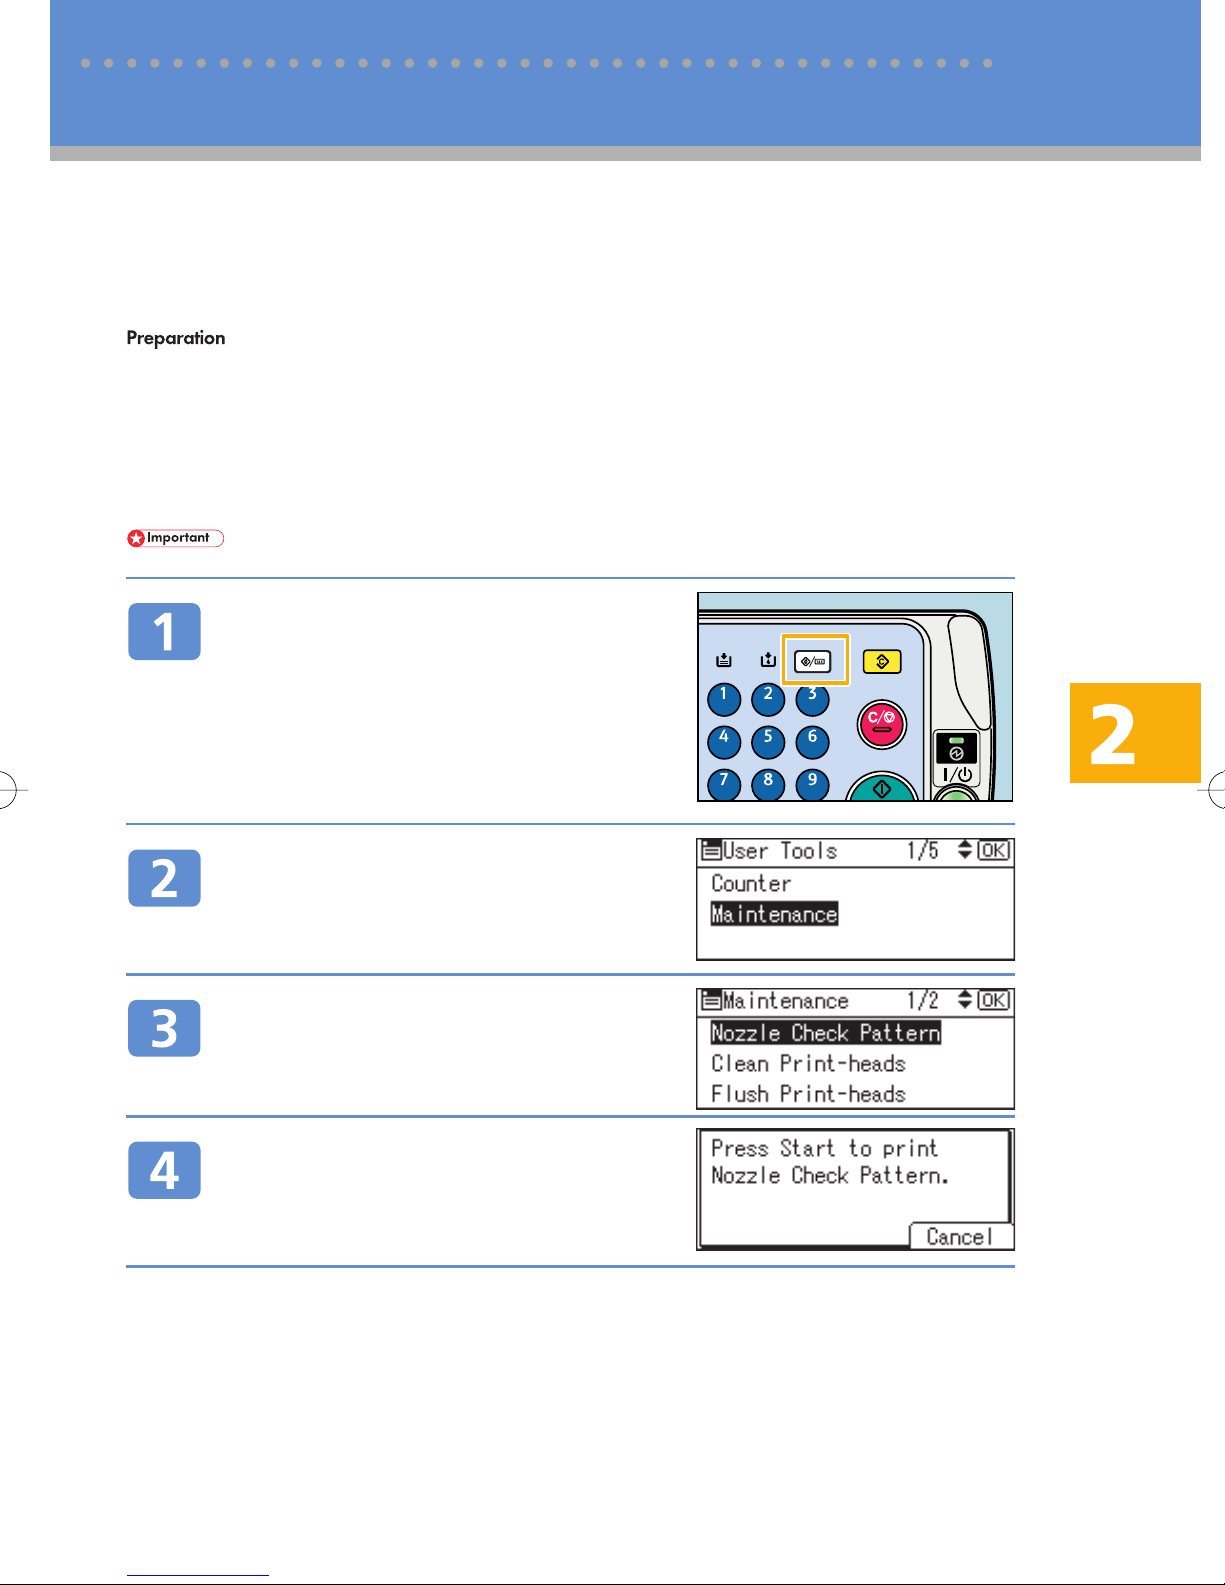
Print is blurred or vertical lines are broken.
If the print is blurred or vertical lines appear broken, do the following:
This is how broken lines will appear on prints.
clean the print heads ( p.5 - 7 )
if the problem persists
adjust the print heads ( p.9 - 10 )
BDZ012S
⋅ If lines are broken when printing using the printer function, you might be able to resolve the prob-
lem by setting [Print priority according to selected paper] to [Quality] on the [Print Quality] tab in
the printer properties dialog box. Note that printing is slower with [Quality] selected.
4
BDZ003S
2 Troubleshooting
Cleaning the Print Heads
Printing the Nozzle Check Pattern
This machine prints by ejecting ink from its print head nozzles, which can occasionally become clogged. If you
notice that prints are patchy or do not contain a certain colour, the nozzles might be clogged. To check
whether this is the case, print the nozzle check pattern using the following procedure. If the test pattern
indicates that the nozzles are clogged, clean the print heads.
⋅ Make sure the envelope lever is raised. If it is not, you will be unable to print. For details about the
envelope lever position, see p. 22, “Names and Locations”.
⋅ Make sure that both the one-sheet bypass tray and the one-sheet output tray are closed. The machine
cannot print if any tray is left open.
⋅ Check that A4L or 8
printed.
⋅ Only plain or recycled paper can be used for this procedure.
⋅ Do not attempt any other operations while the nozzle check pattern is printing out.
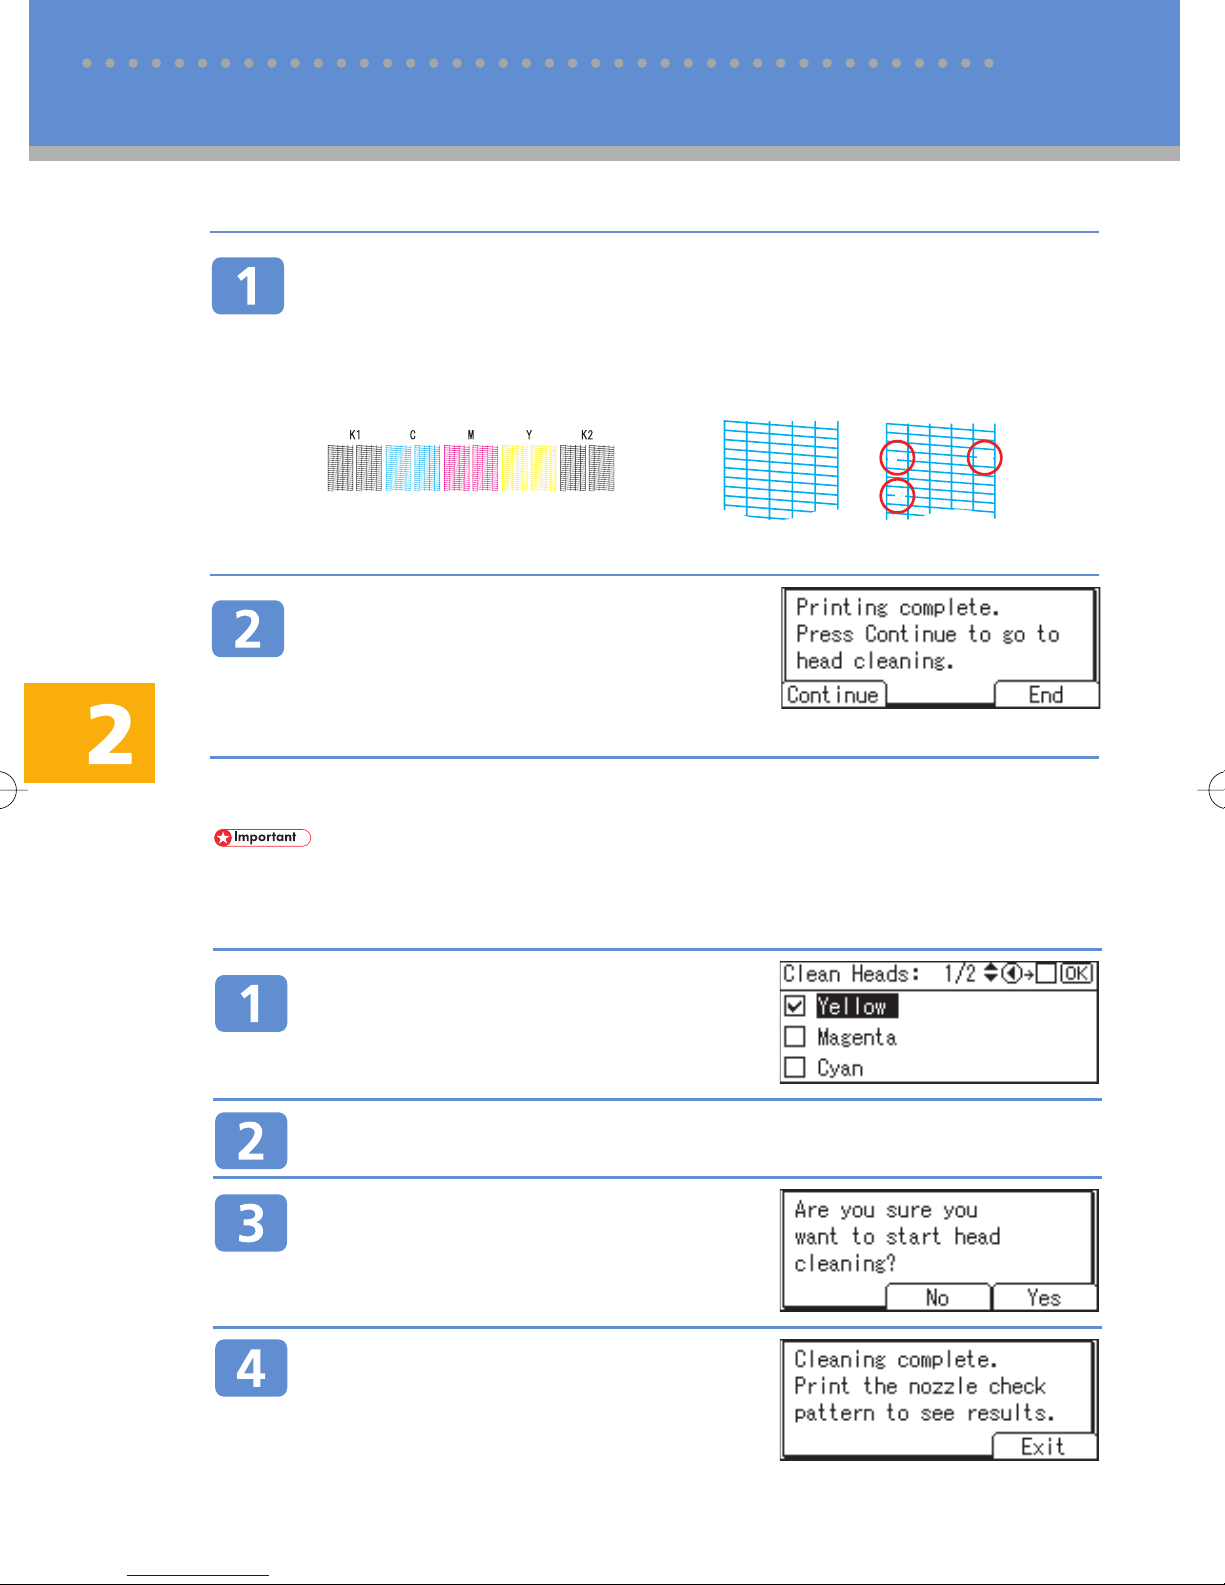
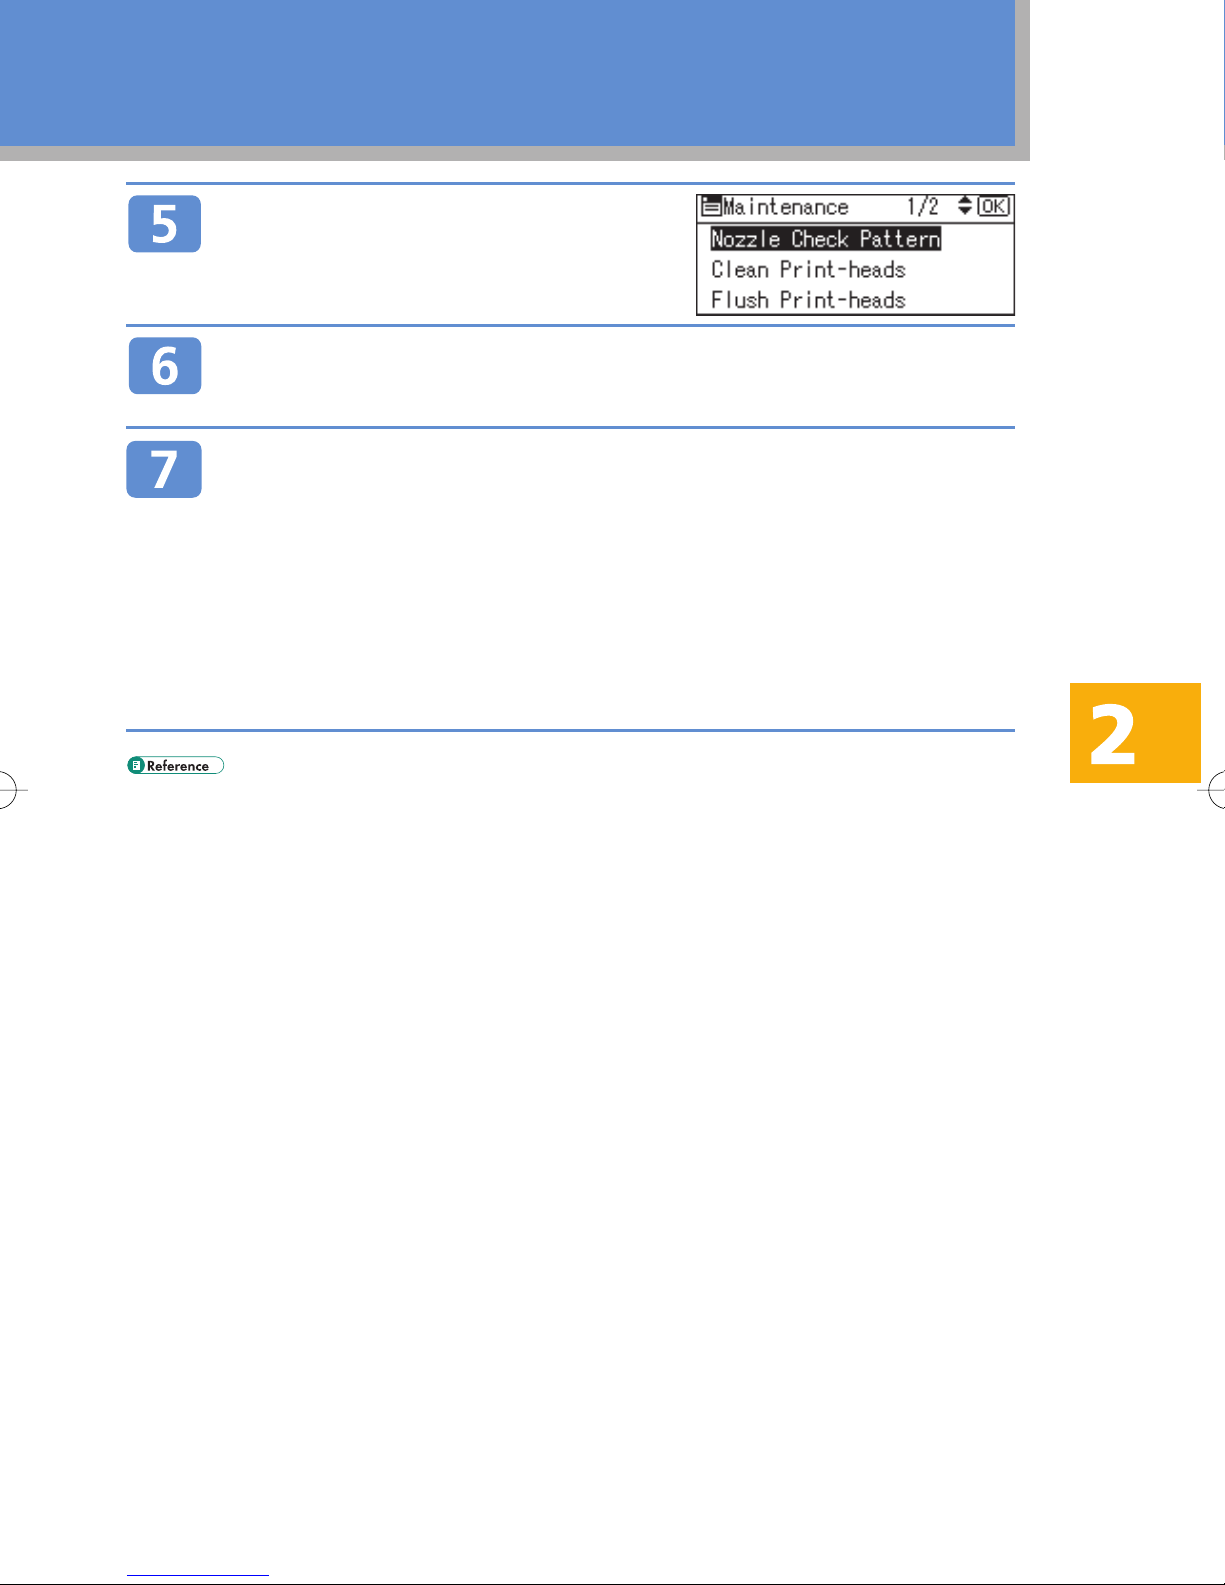
Press the {User Tools/Counter} key.
1
/2 x 11L size paper is loaded in Tray 1. If it is not, the test pattern cannot be
Select [Maintenance] using {U} or
{T} , and then press the {OK} key.
Select [Nozzle Check Pattern] using
{U} or {T} , and then press the {OK}
key.
Press the {Start} key.
The nozzle check pattern is printed.
Inspect the nozzle check pattern. For details about inspecting the nozzle check pattern, see p. 6, “Inspecting
the Nozzle Check Pattern”.
5
2 Troubleshooting
AZG002S
Cleaning the Print Heads (cont.)
Inspecting the Nozzle Check Pattern
Check the print results of the nozzle check pattern.
In the test pattern, "K1", "C", "M", "Y", and "K2" correspond to the colours [Black 1], [Cyan], [Magenta], [Yellow], and [Black 2] respectively. These colours can be selected under [Flush Printheads] or [Clean Print-heads] in [Maintenance] in [User Tools/Counter].
For example, if the test pattern indicates that "K1" is clogged, you can unclog it by selecting [Black
1] under [Clean Print-heads] or [Flush Print-heads].
AZG003S
Normal pattern:
If a nozzle is clogged:
Press [Continue] to clean the print
heads.
If the test pattern is satisfactory, press [End], and then
press the {User Tools/Counter} key.
Cleaning the Print Heads
⋅ Print head cleaning consumes ink.
⋅ Do not attempt any other operations during print head cleaning.
⋅ Print head cleaning is not possible if any of the colours have run out.
⋅ Cleaning might not be completed if a cartridge is almost empty or becomes empty during printing.
Select the colour of the print head
that you want to clean using {U} or
{T} , and then press the {V} key to
record your selection.
Press the
Press [Yes].
Head cleaning begins.
Press [Exit], and then print the nozzle
check pattern.
6
{{
{OK
{{
}}
} key.
}}
Select [Nozzle Check Pattern] using
{U} or {T} , and then press the {OK}
key.
Press the {Start} key.
The nozzle check test pattern is printed.
If the pattern is satisfactory, press [End], and then press the
{{
{User Tools/Counter
{{
If the nozzle check pattern continues to indicate problems even after repeated head cleaning,
flush the print heads or adjust the print head position based on the problem indicated in the test
pattern.
$
Problem: Nozzles are clogged.
Flush the print heads. For details about flushing the print heads, see p. 8, “Flushing the Print
Heads”.
$
Problem: Lines are misaligned.
Adjust the print head position. For details about adjusting the print head position, see p. 10, “Ad-
justing the Print Head Position”.
⋅ You can also perform print head cleaning directly from the System Settings menu. For details, see
“Maintenance” ,Troubleshooting on the supplied CD-ROM.
}}
} key to exit [Clean Print-heads].
}}
7

2 Troubleshooting
BDZ003S
Flushing the Print Heads
If the nozzle check pattern continues to indicate problems even after repeated head cleaning, flush the print
heads. Flushing cleans the print heads more thoroughly but consumes more ink than print head cleaning.
⋅ Flushing consumes ink. Do it only when necessary.
⋅ Do not attempt any other operations during flushing.
⋅ Flushing is not possible if any of the colours have run out.
⋅ Cleaning might not be completed if a cartridge is almost empty or becomes empty during printing.
Press the {User Tools/Counter} key.
Select [Maintenance] using {U} or
{T} , and then press the {OK} key.
Select [Flush Print-heads] using {U}
or {T} , and then press the {OK} key.
Select the colour of the print head
you want to flush using {U} or {T} ,
and then press the {V} key to record
your selection.
{{
Press the
{OK
{{
}}
} key.
}}
Press [Yes].
Flushing begins.
Press [Exit], and then print the nozzle
check pattern.
When you press [Exit], the setting screen shown in step
3 reappears. On this screen, select [Nozzle Check Pattern] to print the test pattern.
If the pattern is satisfactory, press [End], and then press the
{{
{User Tools/Counter
{{
8
}}
} key to exit [Flush Print-heads].
}}
BDZ003S
2 Troubleshooting
Adjusting the Print Heads
Printing the Test Pattern for Adjusting the Print Head Position
This machine uses the inkjet printing system. Because the ink is sensitive to environmental conditions, variations in temperature or humidity for example can result in blurring or broken vertical lines. Clean the print
heads if blurring occurs or vertical lines appear broken on prints.
⋅ Make sure the envelope lever is raised. If it is not, you will be unable to print. For details about the
envelope lever position, see p. 22, “Names and Locations”.
⋅ Make sure that both the one-sheet bypass tray and the one-sheet output tray are closed. The machine
cannot print if any tray is left open.
⋅
Check that A4L or 81/2 x 11L size paper is loaded in Tray 1. If it is not, the test pattern cannot be printed.
⋅ Do not attempt any other operations while the test pattern is printing out.
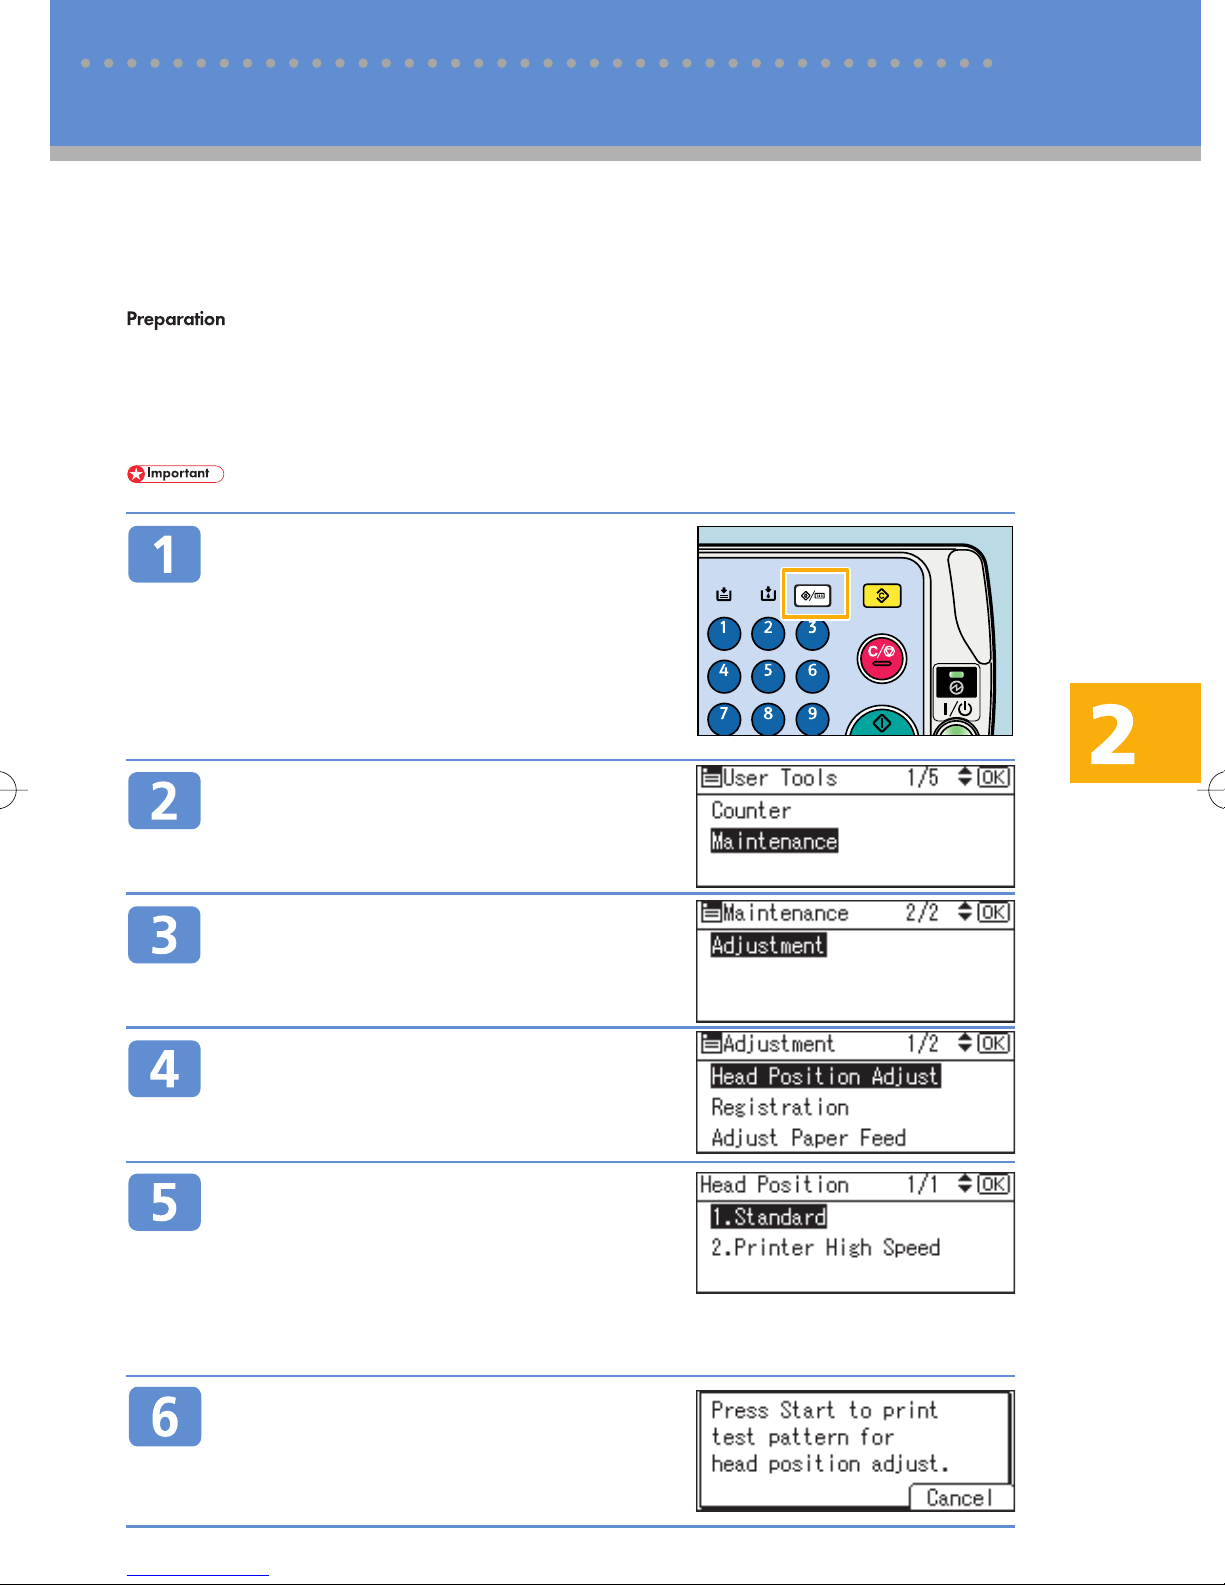
Press the {User Tools/Counter} key.
Select [Maintenance] using {U} or
{T} , and then press the {OK} key.
Select [Adjustment] using {U} or {T},
and then press the {OK} key.
Select [Head Position Adjust] using
{U} or {T} , and then press the {OK}
key.
Select the type of print head position
adjustment you require using {U} or
{T} , and then press the {OK} key.
The type of print head position adjustment you should select depends on the write mode for the
print heads you want to adjust. Select [2.Printer High Speed] to adjust the print heads for printing
on plain paper in fast mode (300 dpi). Otherwise, select [1.Standard].
Press the {Start} key.
The test pattern for print head position adjustment is
printed. Check the test pattern. For details about checking the test pattern, see p. 10, “Checking the Test Pattern to Adjust the Print Head Position”.
9

BDZ021S
2 Troubleshooting
Adjusting the Print Heads (cont.)
Checking the Test Pattern to Adjust the Print Head Position
Use the test pattern to obtain the
optimal adjustment value
The optimal adjustment value is the number above the
square pattern that has faintest colour closest to gray
and aligned verticals on both sides. If the value in column “A” is “+2”, the adjustment value of [A] is [+2].
Press [Adjust] to adjust the print
head position.
Pattern meeting the criteria
Adjusting the Print Head Position
Select the item you want to adjust,
and then press the {OK} key.
Enter the optimal adjustment value
shown on the test pattern, and then
press the {OK} key.
Press [End].
When you press [End], the display returns to that of step
4 on p. 9, “Printing the Test Pattern for Adjusting the Print
Head Position”.
Print and check the test pattern.
When the optimal adjustment value is 0 for all lines, adjustment is complete.
Press [End], and then press the
exit from the print head position adjustment setting.
10
{{
{User Tools/Counter
{{
BDZ020S
}}
} key to
}}
 Loading...