

Page 1
Ricoh Family Group Companies
User Account Limits Application
Installation Guide
Application Summary
The User Account Limits Application was created to provide a way to limit copy and
print activity by using user codes on a Ricoh device. The application was created in the Java
Programming language. An administrator will be able to set limits to individual
User codes. The administrator will also have the ability to Add, Reset, Modify, and
delete users from the application.
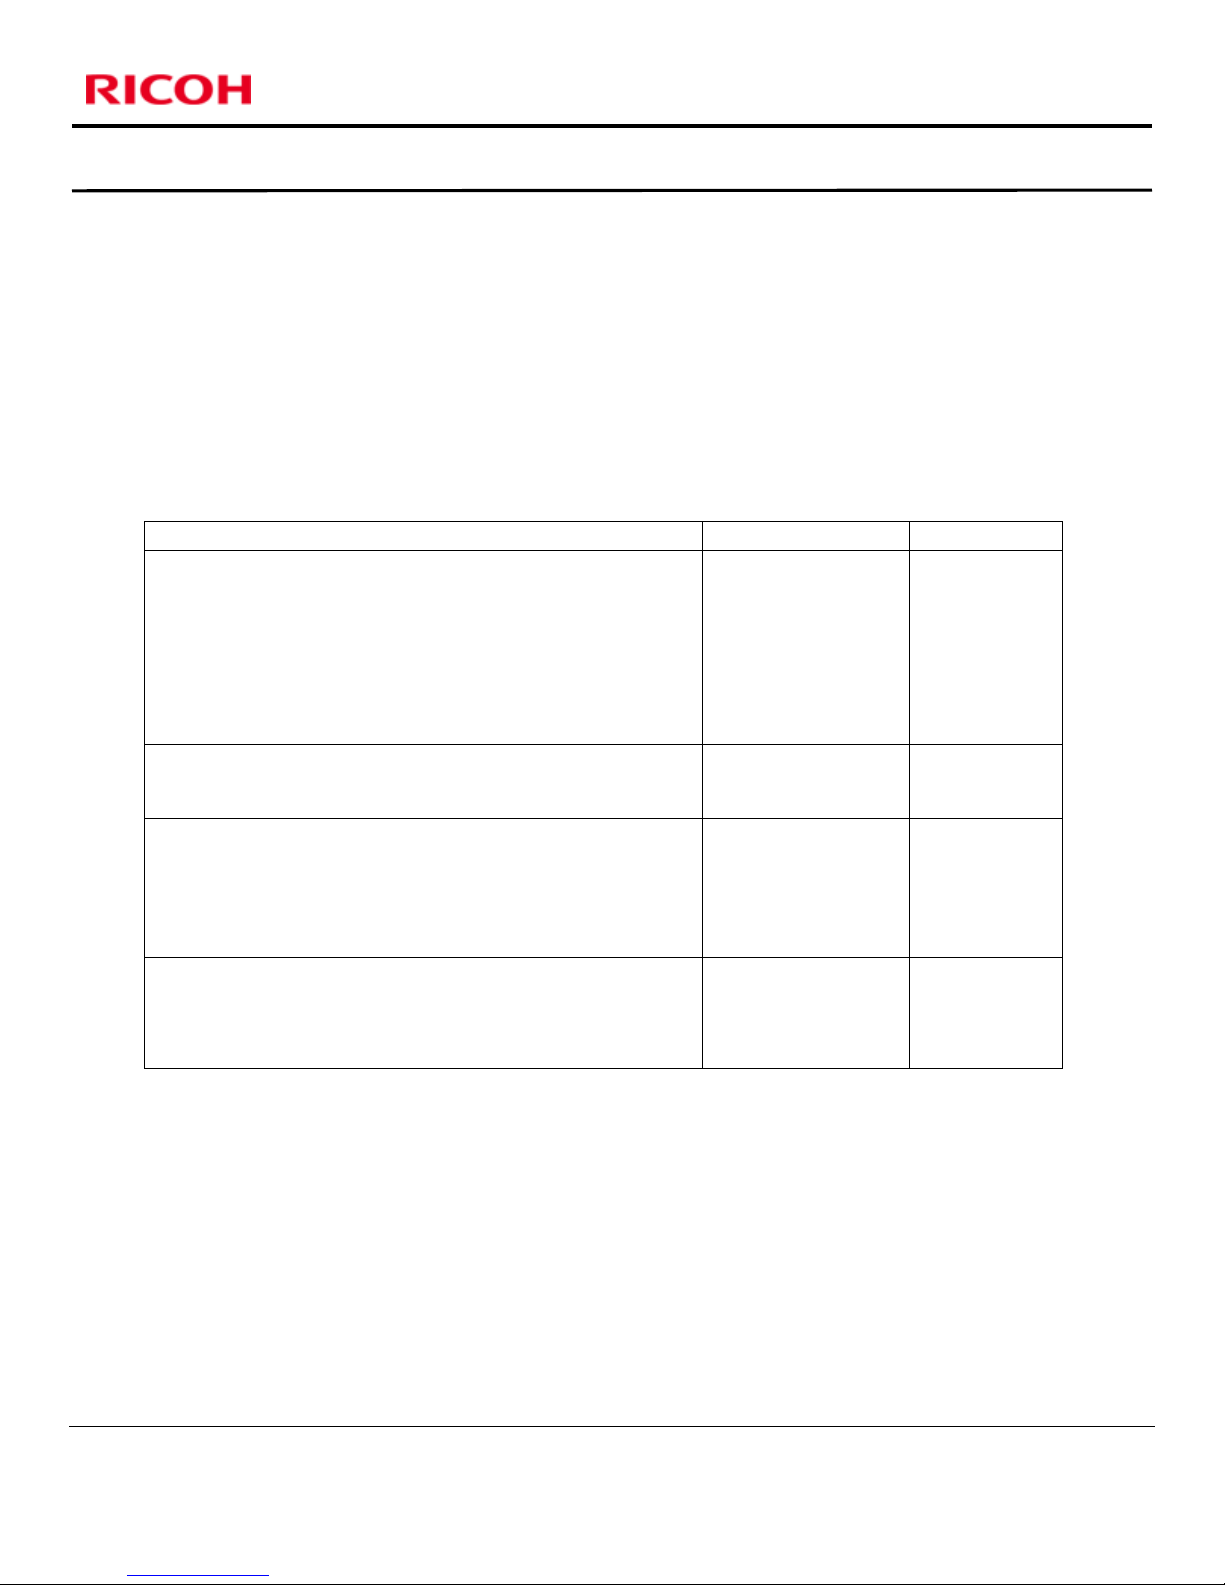
Models Supported
Models Java VM Card Version
MP4000B* / MP4000SP / MP4000SPF
MP2550B* / MP2550SP / MP2550 SPF
MP5000B* / MP5000SP / MP5000 SPF
MP3350B* / MP3350SP / MP3350SPF
MPC6000* / MPC7500*
MP 2851 / 3351
MP 4001 / 5001
MPC6501**/ MPC7501**
MPC2050 / MPC2050SPF
MPC2800 / MPC2800SPF MPC4000 / MPC4000SPF
MPC2550 / MPC2550SPF
MPC3300 / MPC3300SPF
MPC5000 / MPC5000SPF
MP6001* / MP6001SP
MP8001* / MP8001SP
MP7001* / MP7001SP MP9001* /MP9001SP
Pro907EX* / Pro1107EX / Pro1357EX
Type F
EDP Code
414004
Type M
part#
D0815790
Type I
EDP Code
414710
Type J
EDP Code
404230
4.15 or later
7.00 or later
4.15 or later
5.04 or later
All models require HDD and Extended Memory
(*) Requires Printer Scanner Kit
(**) Note: Java Card with ApptoMe installed comes standard with the MFP.
Java CVM Card (Type M) can also be ordered using part # D0815790 if needed.
Version 1.0 Page 1 of 16
May Not Be Used Or Disclosed Outside Ricoh Corporation Except Pursuant To A Written Agreement.
PRIVATE/PROPRIETARY
Contains Private and/or Proprietary Information.
Page 2

Required Hardware for Installation
PC / Laptop
Crossover cable or network access to the target MFP
SD Card Reader (only if installing using Method 2)
Required Software
1. Java Type VM Card at recommended version. (1 per device).
Java card update files with instructions are available on the TSC website.
http://tscweb.net/snoitulosorp/java_solutions.asp
2. User Account Limits Application software. (UsrActLim.zip)
Installation Procedure
Ricoh Family Group Companies
User Account Limits Application
Installation Guide
1. Install the Java VM Card
Power OFF the MFP
Insert The Java VM Card into the service slot on the MFP.
Power on the MFP.
2. Configure SP Mode on MFP
Enter Service Program Mode (SP Mode)
Press System Sp
Go to SP 5113-1 Confirm that is set to 0
Go to SP 5113-2
Set to 1:Expansion device 1
Press OK
Exit
Exit
3. Confirm that User Authentication is OFF
Enter User Tools
Press System settings
Press Administrator Tools
Press Next
Select User Authentication Management
Confirm that is turned OFF
Press OK
Exit
Exit
Version 1.0 Page 2 of 16
May Not Be Used Or Disclosed Outside Ricoh Corporation Except Pursuant To A Written Agreement.
PRIVATE/PROPRIETARY
Contains Private and/or Proprietary Information.
Page 3
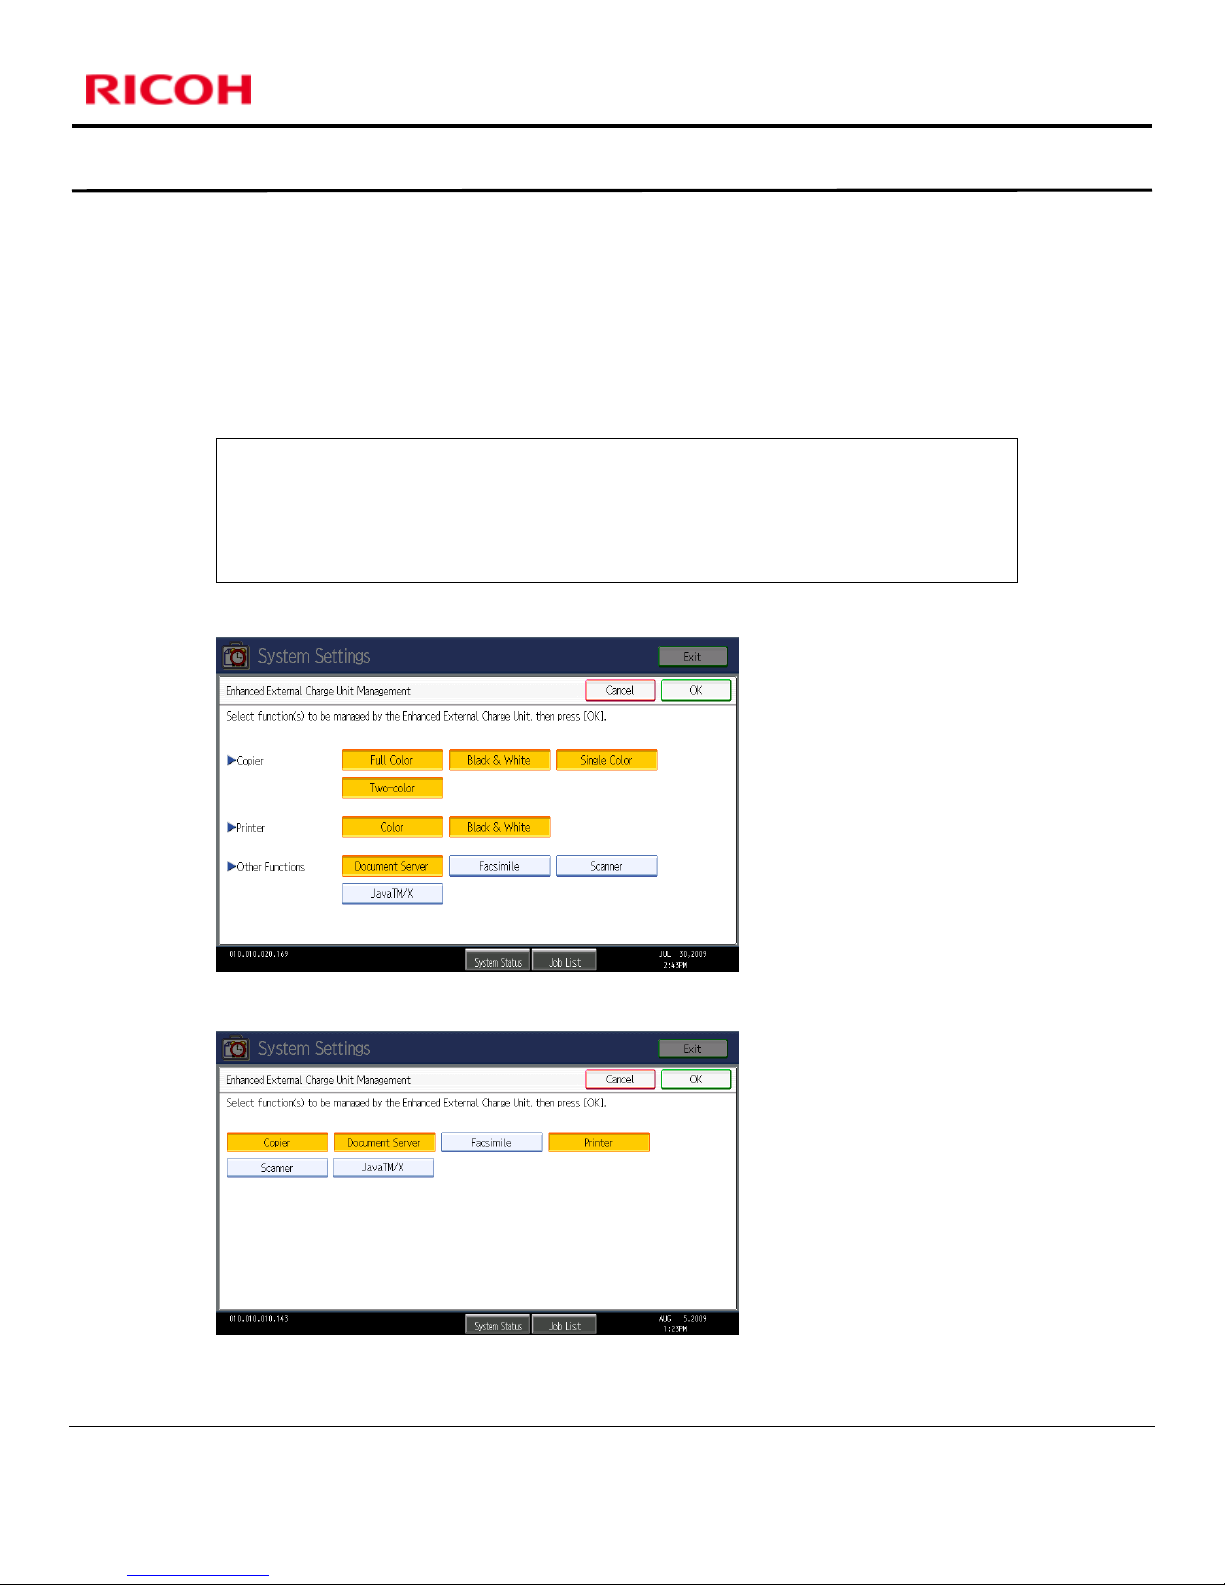
4. Configure Restriction Settings
Enter User Tools
Press System Settings
Press Administrator Tools
Press Next
Select Enhanced External Charge Unit Management button
Select All Copier, Printer, and Document Server buttons (see examples on next page)
“Note: If the Enhanced External Charge Unit Management button does
not show up in User Tools, go back to Step 2 and make sure SP 5113-2 is set
correctly.”
Color Models
Ricoh Family Group Companies
User Account Limits Application
Installation Guide
B&W Models
Press OK
Exit
Exit
Version 1.0 Page 3 of 16
May Not Be Used Or Disclosed Outside Ricoh Corporation Except Pursuant To A Written Agreement.
PRIVATE/PROPRIETARY
Contains Private and/or Proprietary Information.
Page 4
Ricoh Family Group Companies
User Account Limits Application
Note: The message “To use the following function(s) set the Key Card” may
show on the Operators Panel. This is normal.
5. Set the Function Priority to Java TM
Enter User Tools
Press System Settings
Press Function Priority
Press JavaTM/X
Press OK
Press Exit
Press Exit
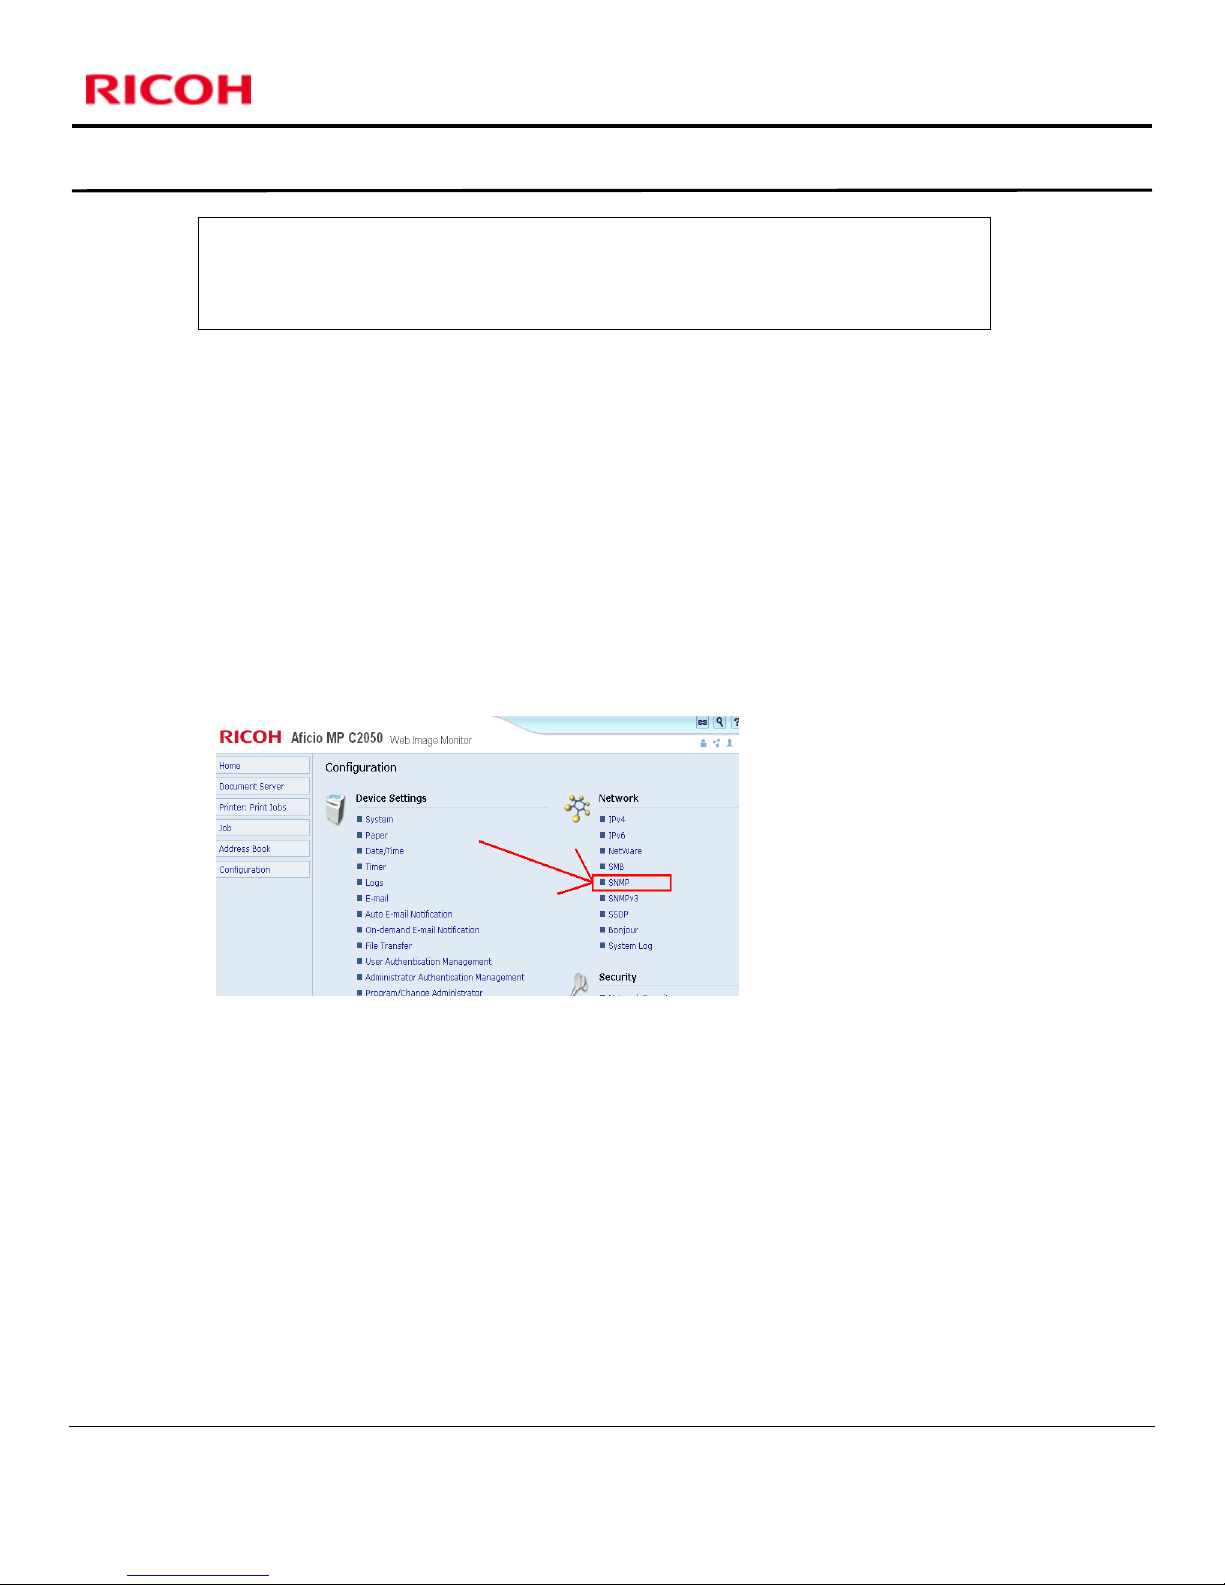
6. Connect to Web Image Monitor (Through network or crossover cable.)
Login to WIM as an administrator (admin)
Click on Configuration
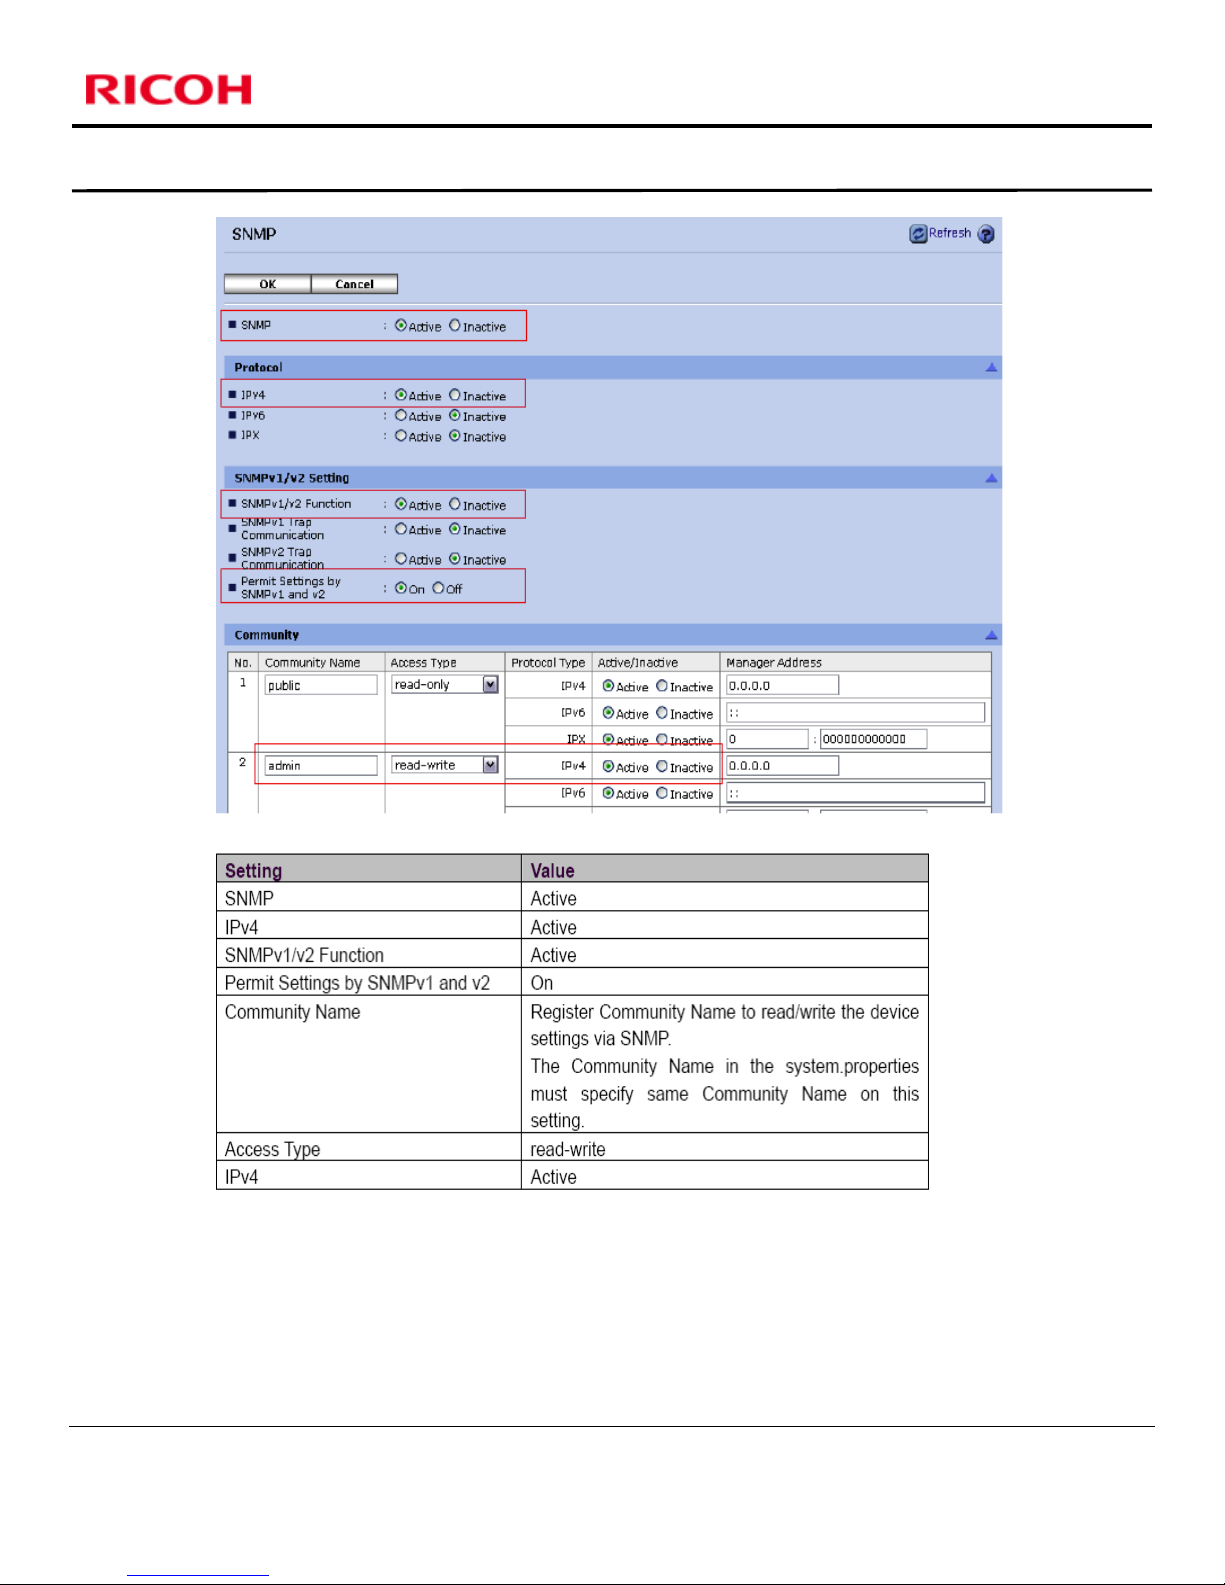
Configure SNMP as shown.
Installation Guide
Version 1.0 Page 4 of 16
May Not Be Used Or Disclosed Outside Ricoh Corporation Except Pursuant To A Written Agreement.
PRIVATE/PROPRIETARY
Contains Private and/or Proprietary Information.
Page 5
Ricoh Family Group Companies
User Account Limits Application
Installation Guide
Note: The Default Community names are “public “and “admin”.
7. Install the User Account Limits Application Software on the MFP
There are two different methods of installing the User Account Limits Application onto an MFP.
Method 1 is to install the application via the Web Image Monitor, method 2 is to create a
preconfigured Java SD card and install at the MFP panel. This guide will show both methods.
Version 1.0 Page 5 of 16
May Not Be Used Or Disclosed Outside Ricoh Corporation Except Pursuant To A Written Agreement.
PRIVATE/PROPRIETARY
Contains Private and/or Proprietary Information.
Page 6
Ricoh Family Group Companies
User Account Limits Application
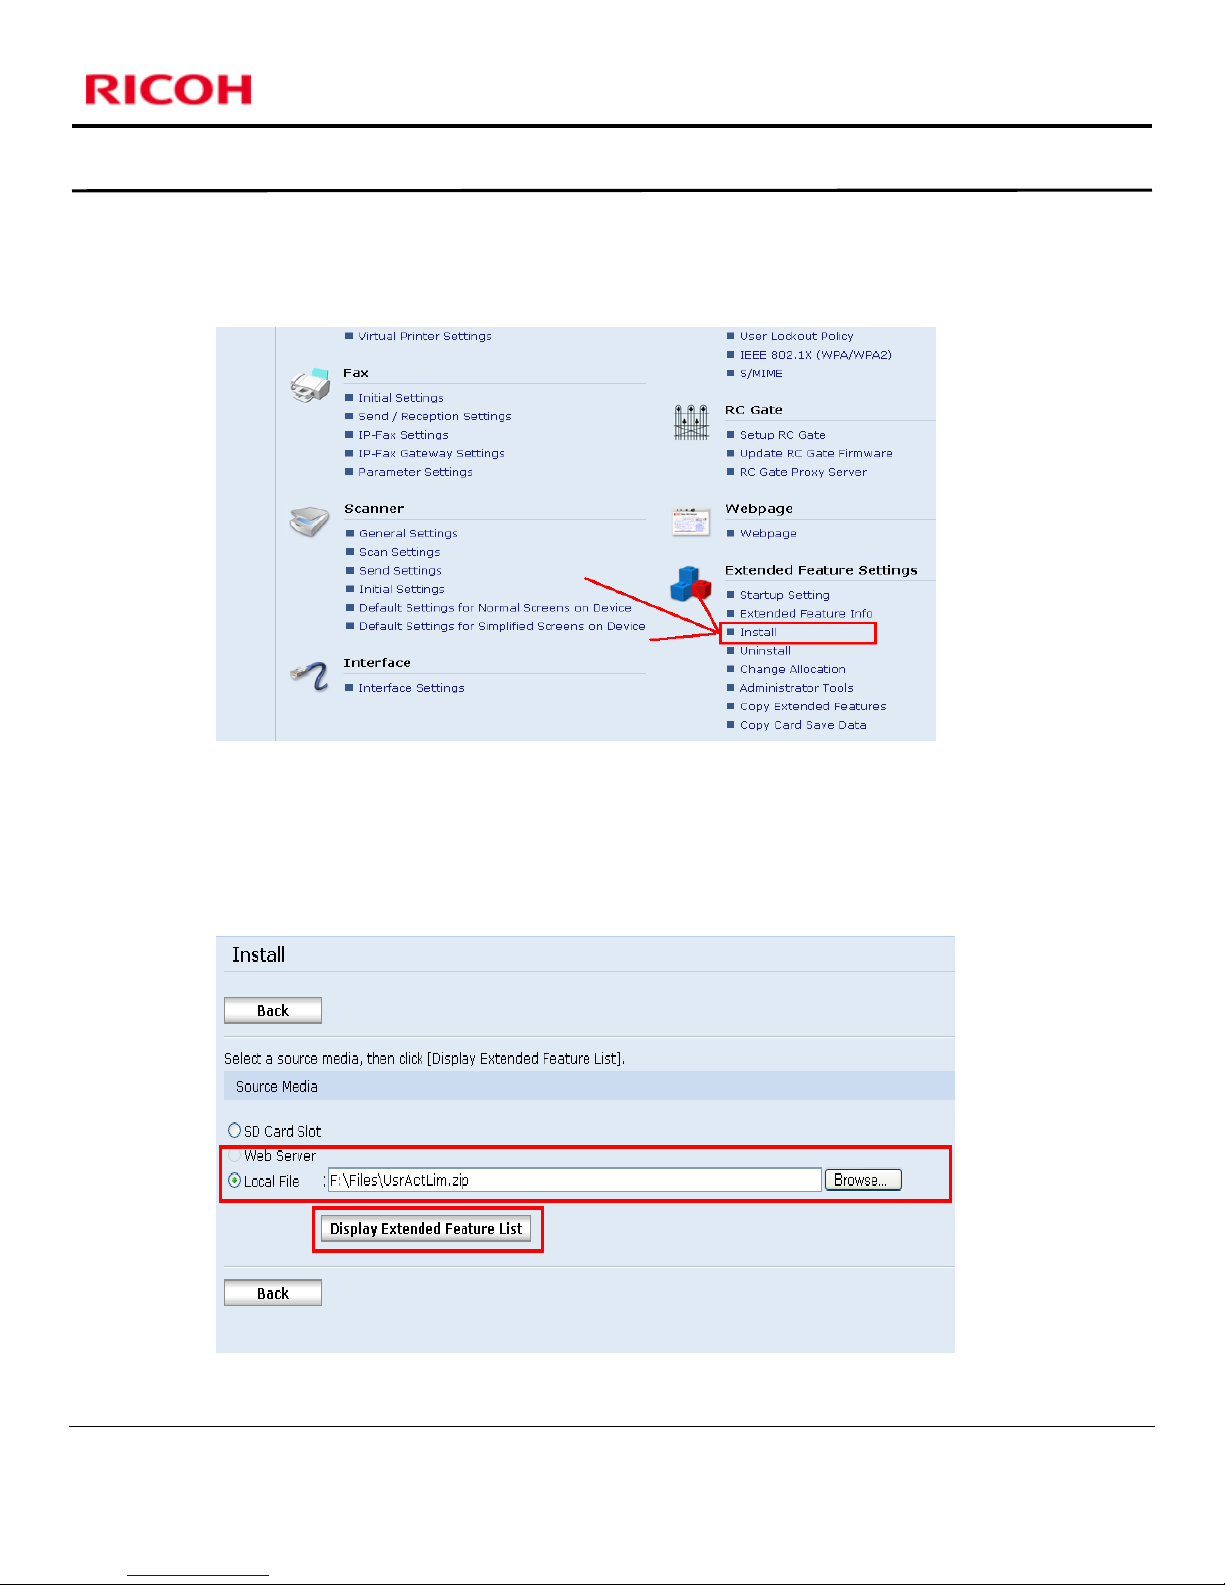
Method 1 – Installing User Account Limits through WIM
In WIM, click on Install in the Extended Features Settings Section
Installation Guide
Click on Local File, then the Browse button and select the User Account Limits Installation
file (UsrActLim.zip) that is located on your PC.
Click the Display Extended Feature List button.
(This step will take a few minutes)
Version 1.0 Page 6 of 16
May Not Be Used Or Disclosed Outside Ricoh Corporation Except Pursuant To A Written Agreement.
PRIVATE/PROPRIETARY
Contains Private and/or Proprietary Information.
Page 7
Ricoh Family Group Companies
User Account Limits Application
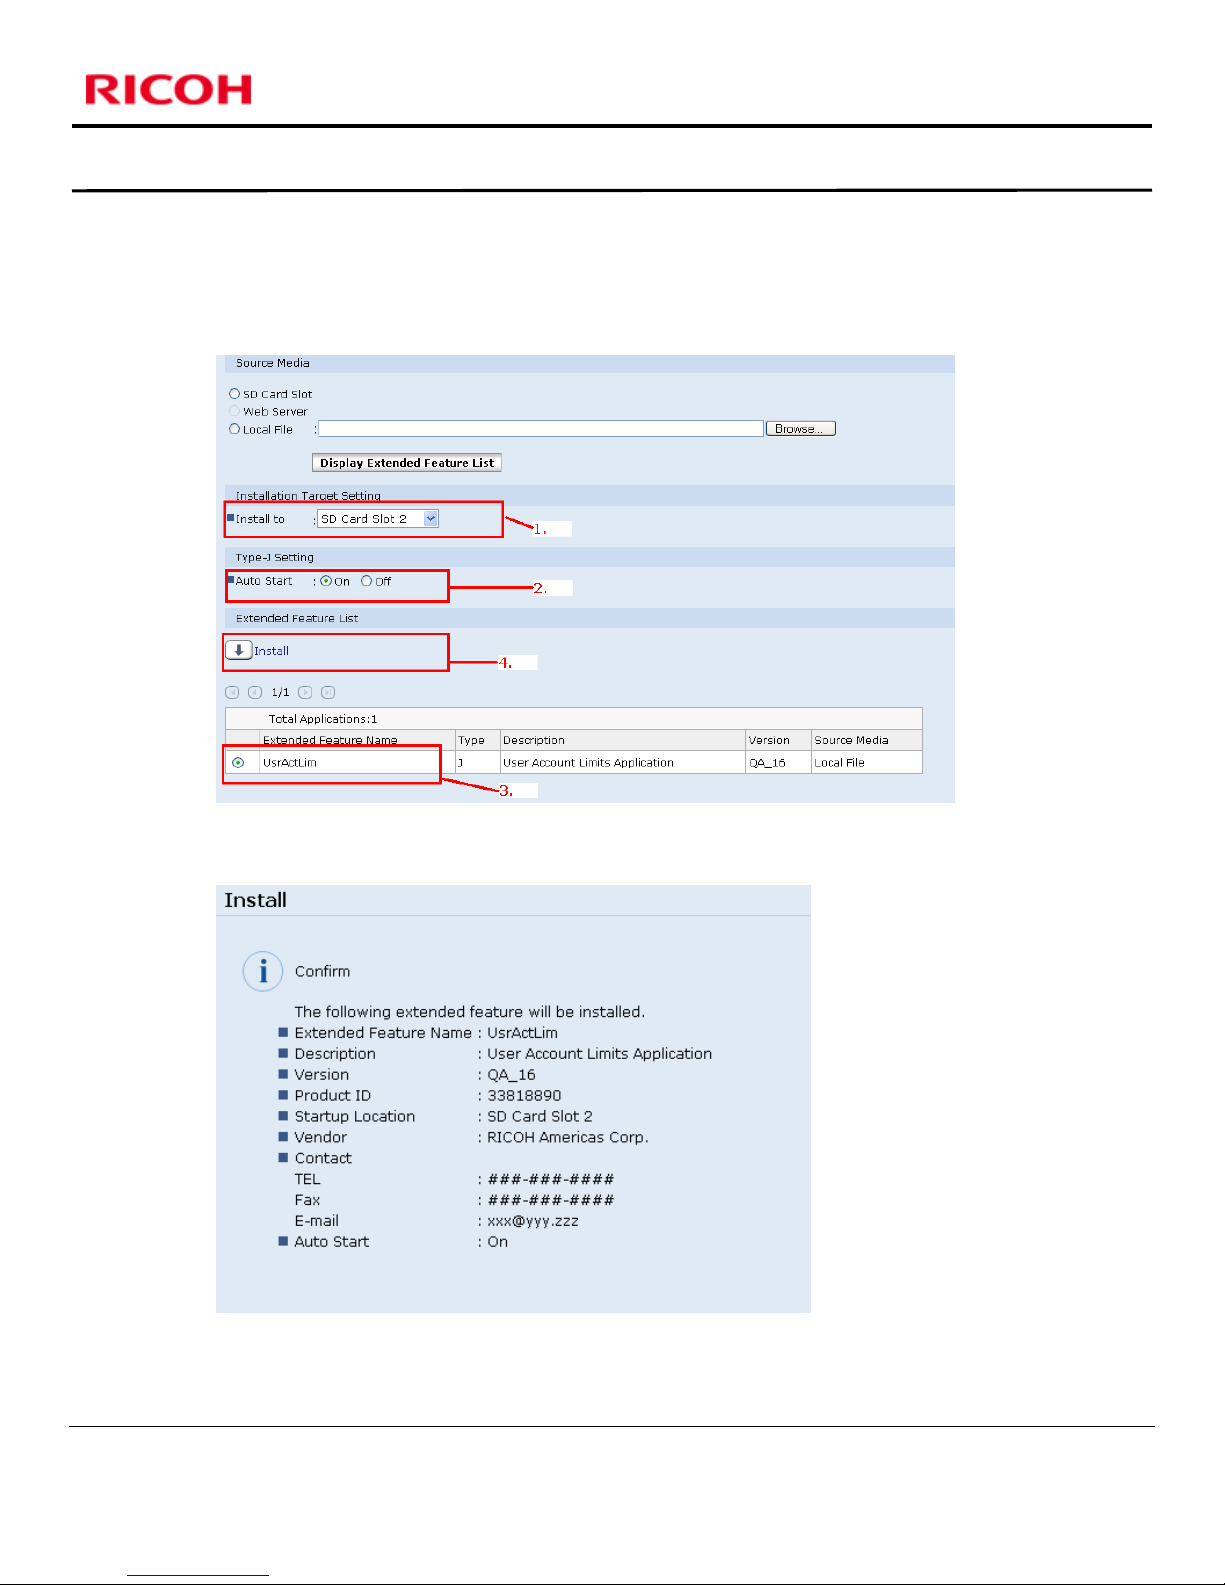
Choose the SD Card slot where the Java card is installed (1)
Set to Auto Start to ON (2)
Select User Account Limits Application (3)
Click on the Install Button (4)
Installation Guide
Click on OK to confirm
After the screen refreshes, the Installation is complete
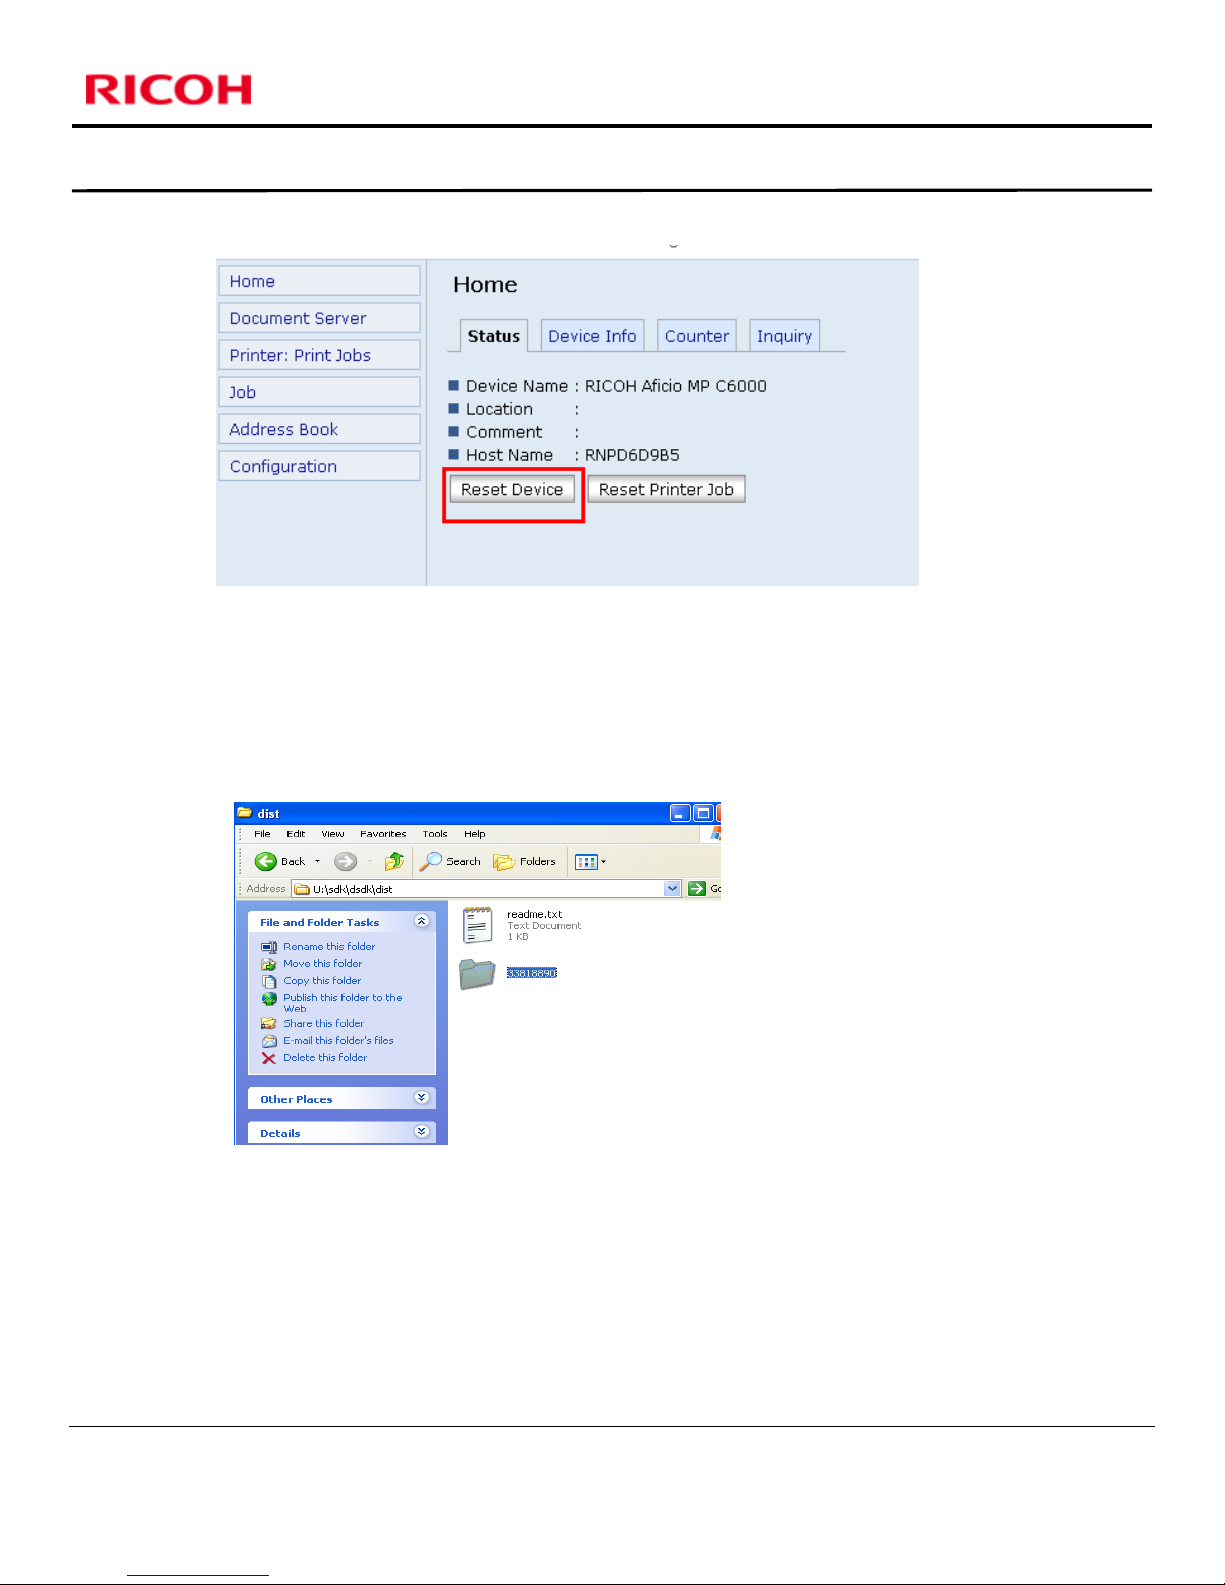
Restart the MFP using the Reset Device Button in Web Image Monitor.
Version 1.0 Page 7 of 16
May Not Be Used Or Disclosed Outside Ricoh Corporation Except Pursuant To A Written Agreement.
PRIVATE/PROPRIETARY
Contains Private and/or Proprietary Information.
Page 8
Ricoh Family Group Companies
User Account Limits Application
Installation Guide
Method 2 - Installing User Account Limits from a Preconfigured Java SD Card.
(SD Card reader is needed)
Preconfigure the Java VM Card
Insert a Java VM SD card into a card reader on your PC
Create a folder called 33818890 in the \sdk\dsdk\dist\ directory on the Java SD card.
Extract all files from UsrActLim.zip
Copy all extracted files to the \sdk\dsdk\dist\33818890 folder on the Java SD card
Version 1.0 Page 8 of 16
May Not Be Used Or Disclosed Outside Ricoh Corporation Except Pursuant To A Written Agreement.
PRIVATE/PROPRIETARY
Contains Private and/or Proprietary Information.
Page 9
Ricoh Family Group Companies
Remove the Java SD Card from the card reader.
Installing on the MFP
Make sure the MFP is turned off.
Insert the preconfigured Java Card into the MFP.
Power ON the MFP
Wait for Java to Start
User Account Limits Application
Installation Guide
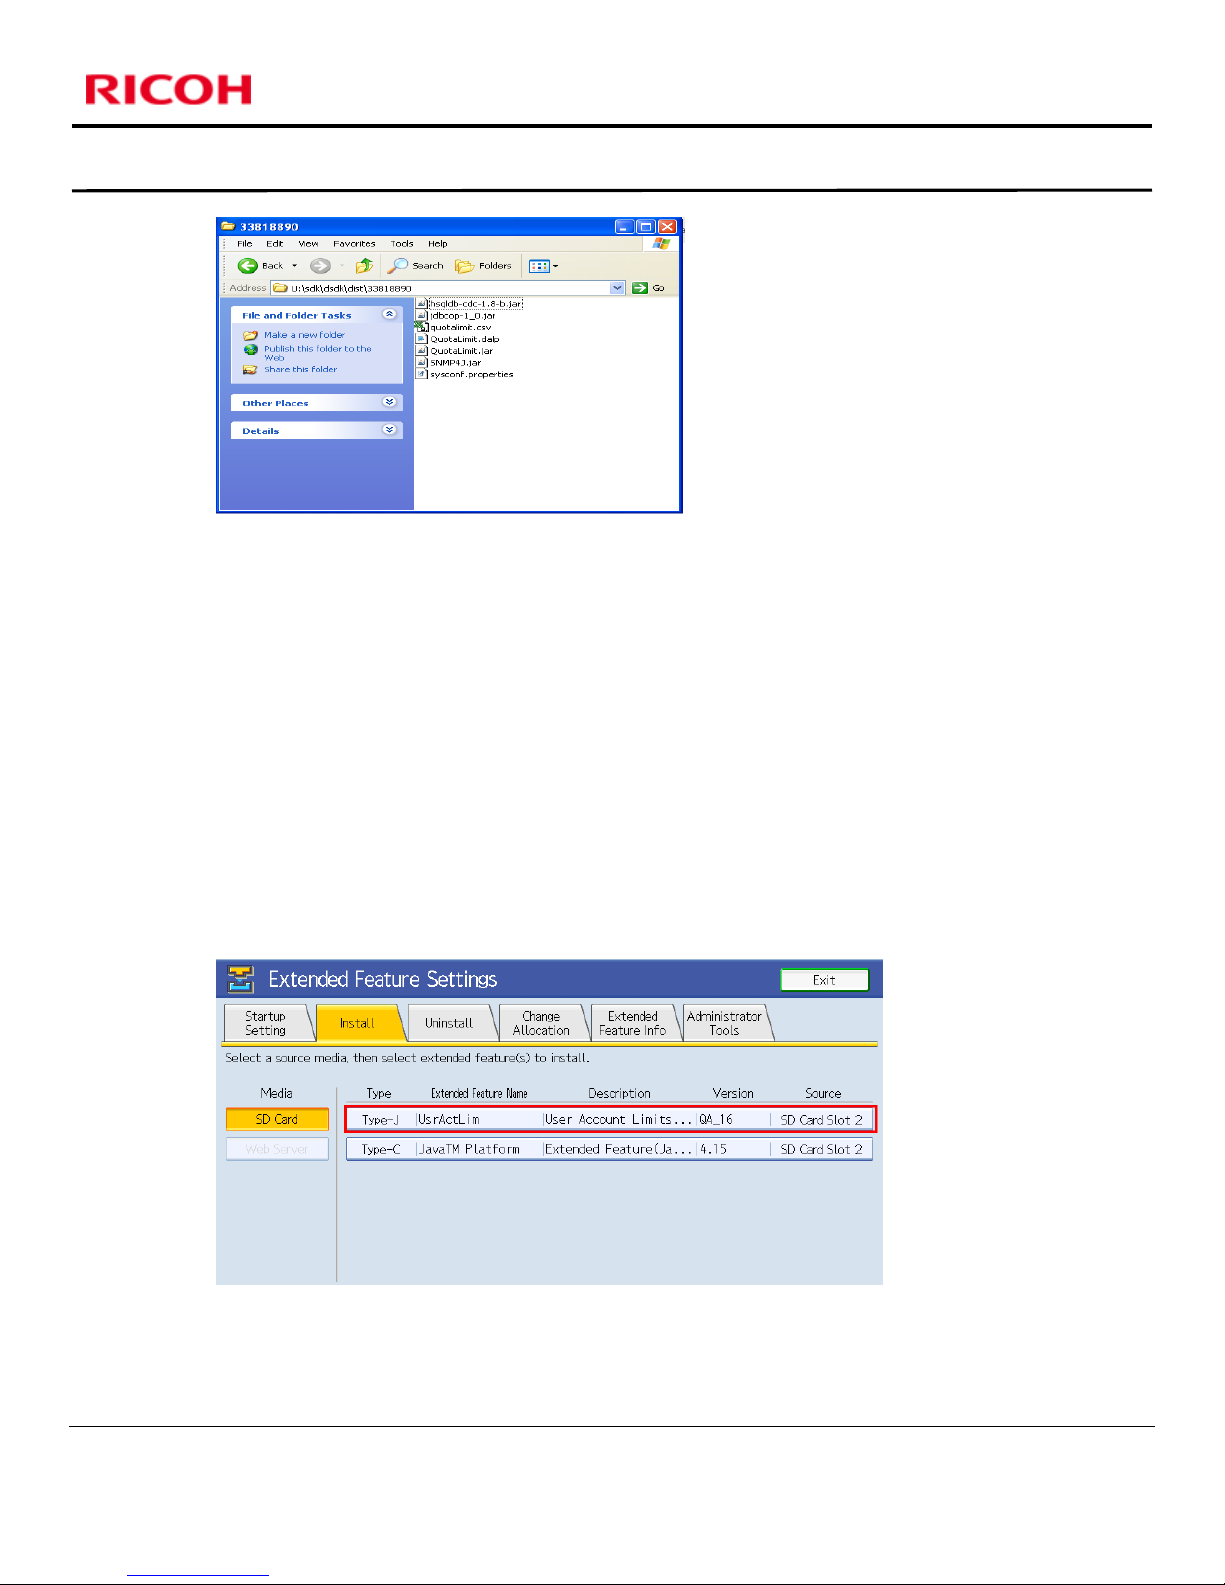
Enter User Tools
Press the Extended Feature Settings button
Press Extended Feature Settings button
Press the Install Tab
Press the SD Card Button
Select the User Account Limits Application
Install the application to the slot where the Java VM card is located.
Select Auto Start
Press Next
Version 1.0 Page 9 of 16
May Not Be Used Or Disclosed Outside Ricoh Corporation Except Pursuant To A Written Agreement.
PRIVATE/PROPRIETARY
Contains Private and/or Proprietary Information.
Page 10
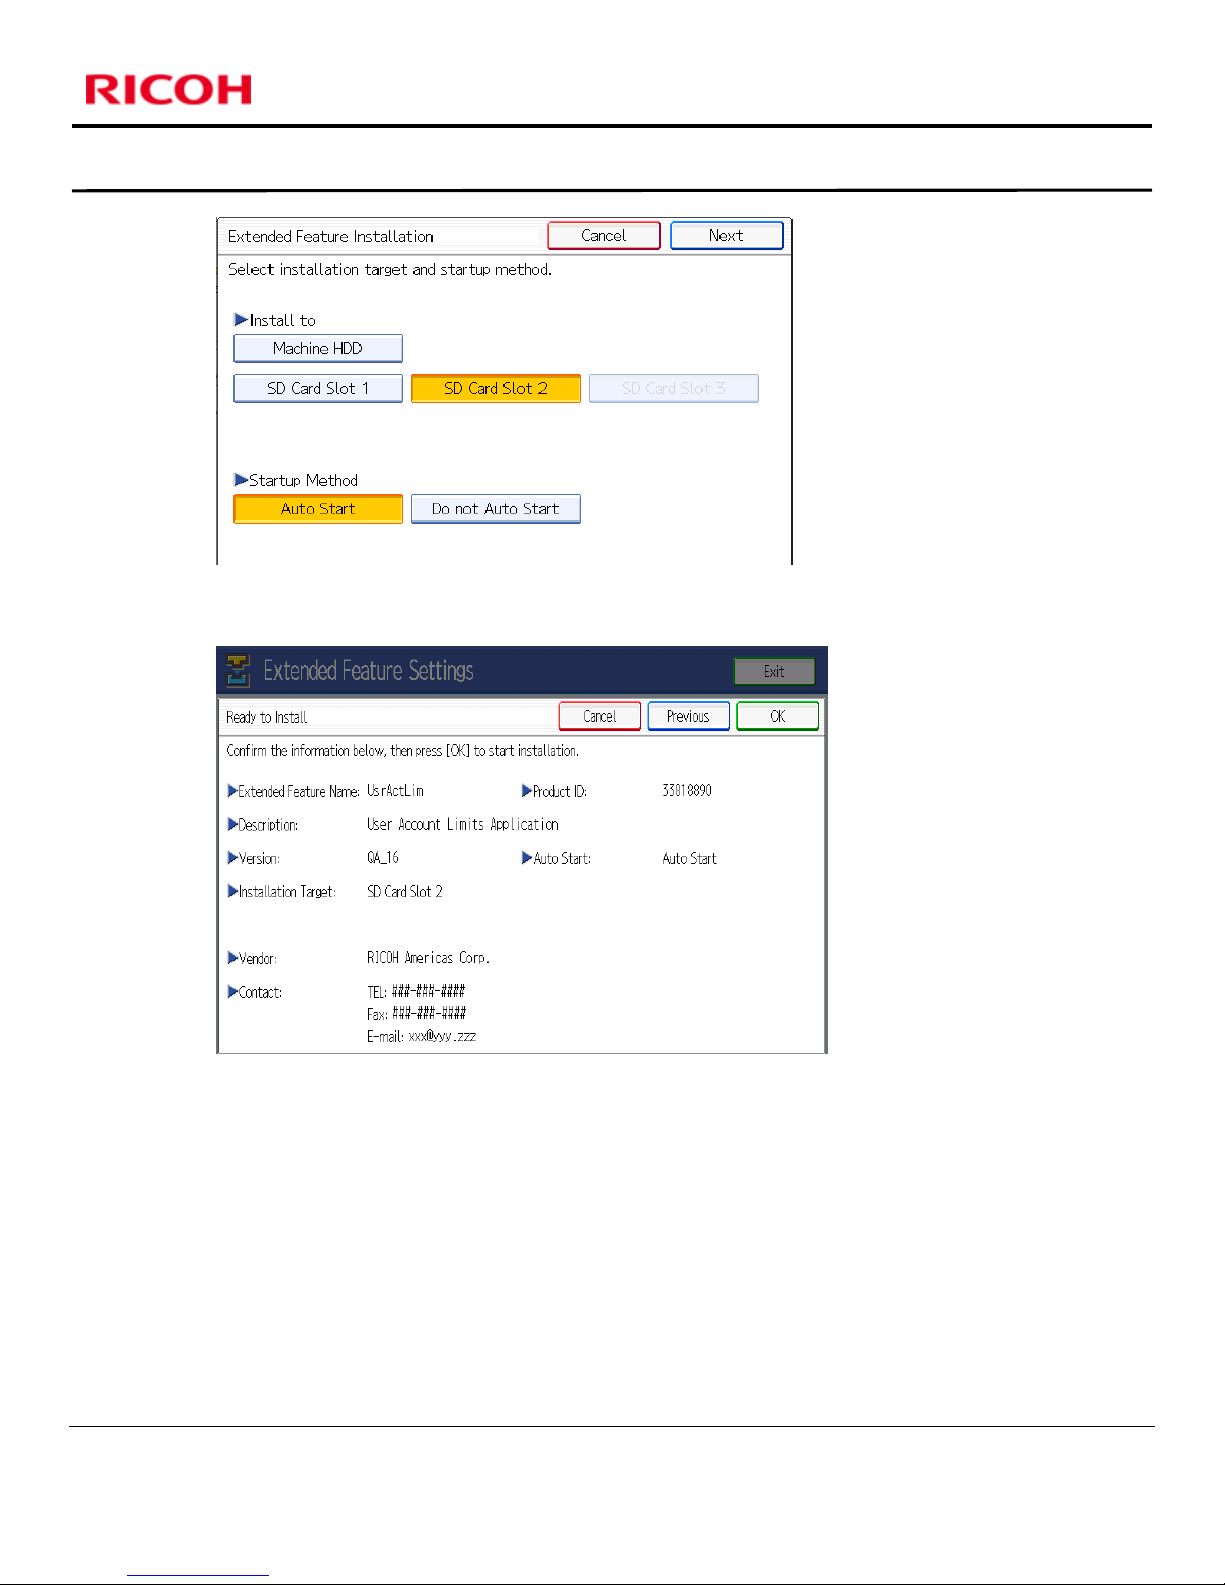
Confirm settings and press OK
Ricoh Family Group Companies
User Account Limits Application
Installation Guide
Press Exit.
Version 1.0 Page 10 of 16
May Not Be Used Or Disclosed Outside Ricoh Corporation Except Pursuant To A Written Agreement.
PRIVATE/PROPRIETARY
Contains Private and/or Proprietary Information.
Page 11
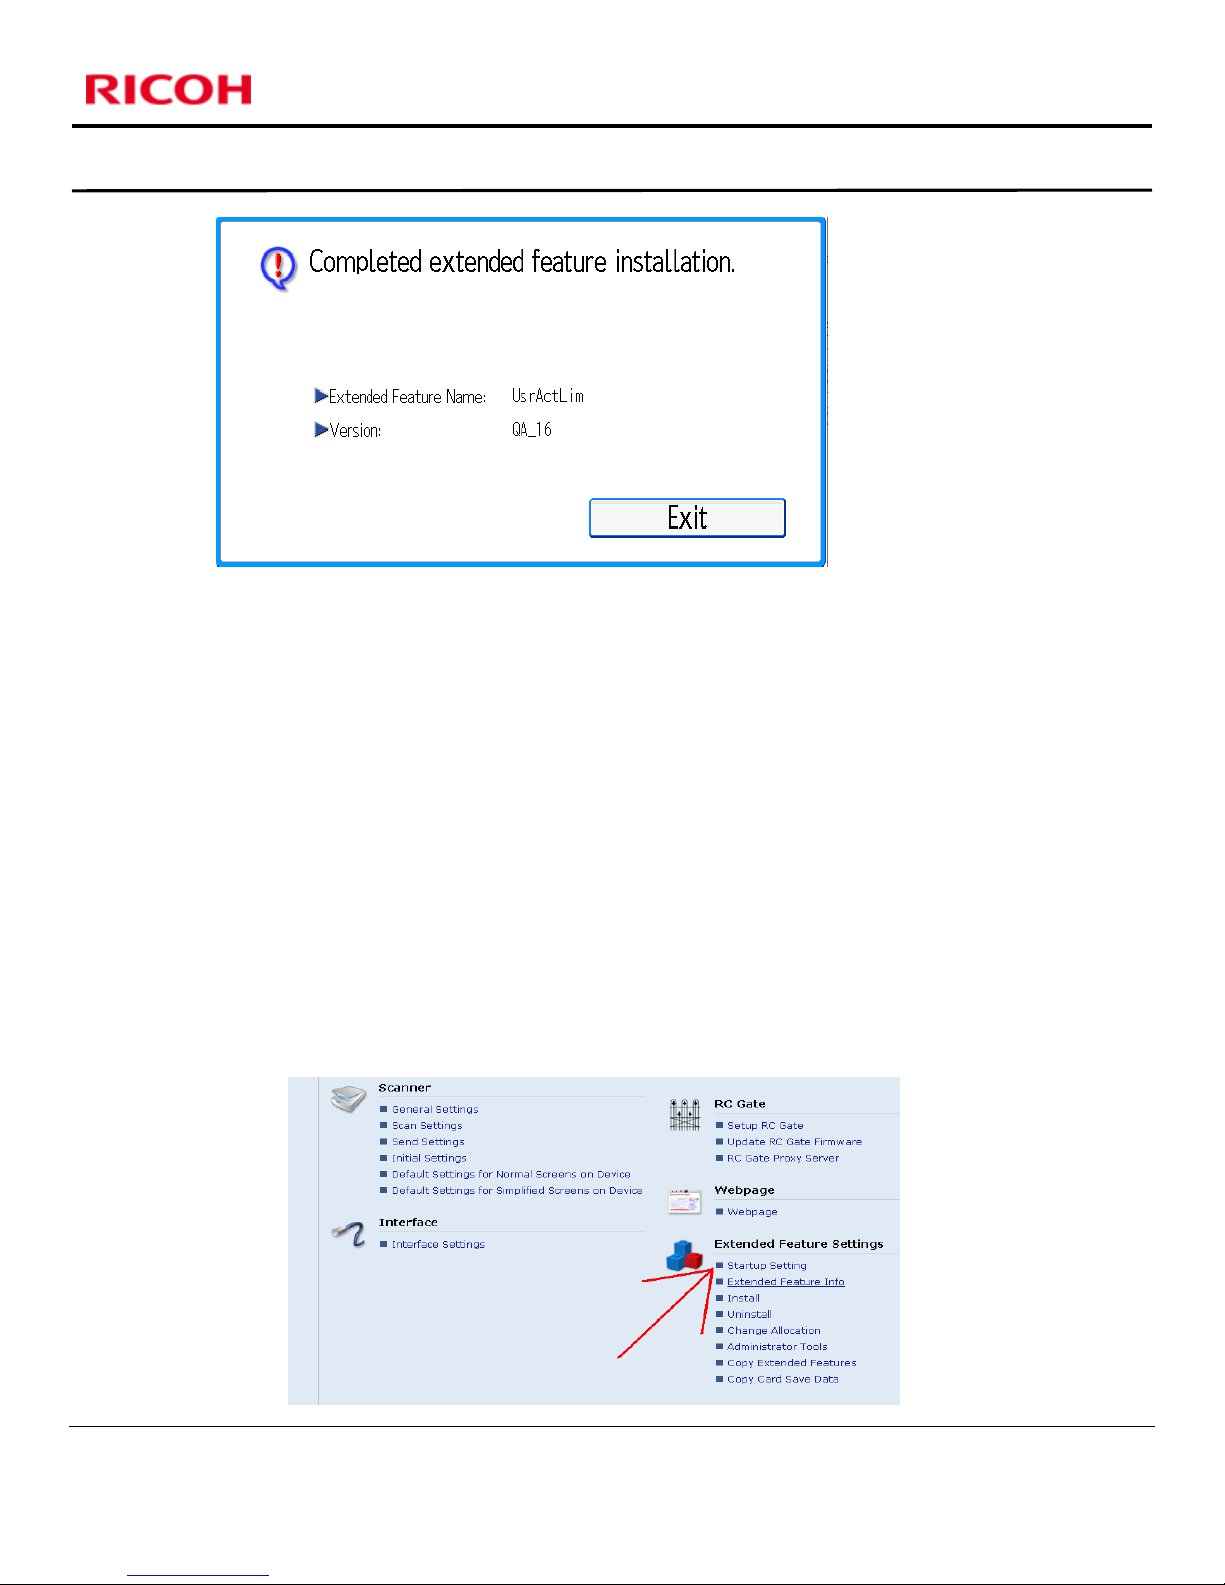
The Installation is complete.
Exit out of User Tools.
Restart the MFP
Ricoh Family Group Companies
User Account Limits Application
Installation Guide
Uninstall Procedure
Step 1 – Remove the Application
As with the Installation, the User Account Limits Application can be
removed through the WIM or at the Operators Panel. This guide will show
both Methods.
Uninstall the User Account Limits through WIM
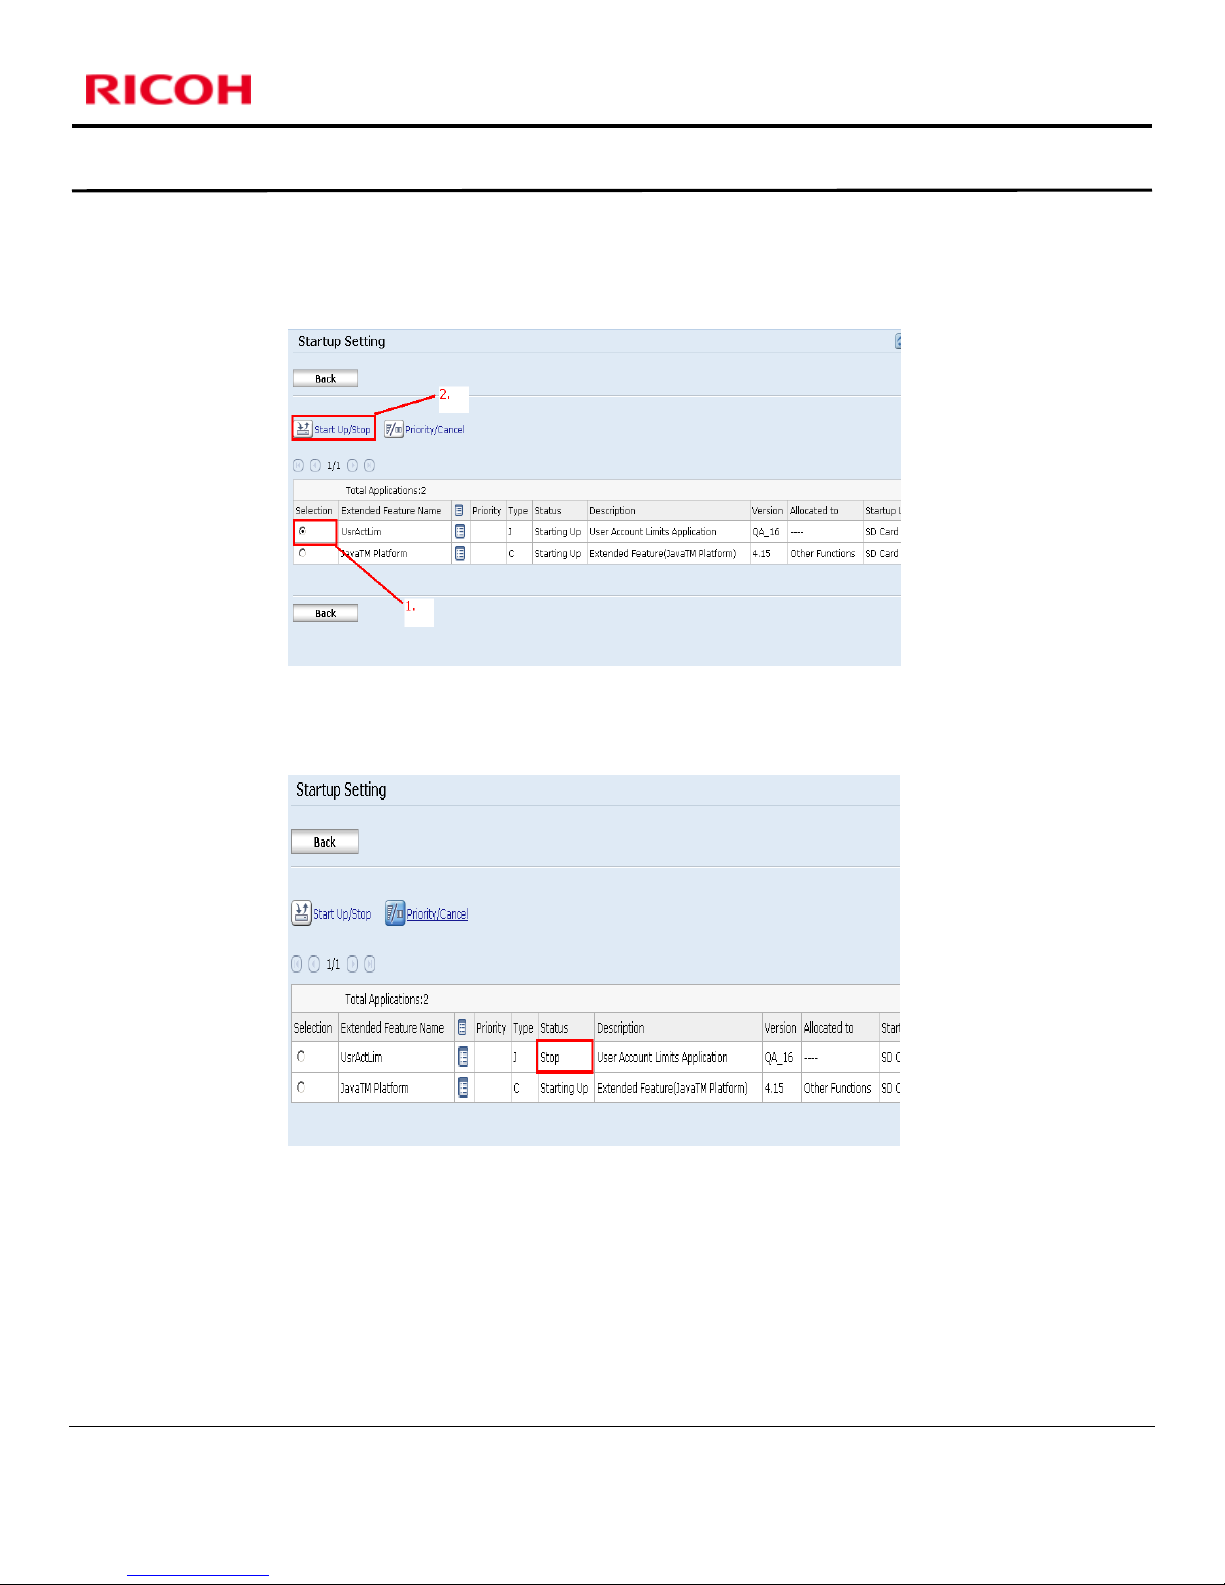
Stop The User Account Limits Application
Connect to Web Image Monitor (Through network or crossover cable.)
Login to WIM as an administrator (admin)
Click on Configuration.
Click on Extended Features –Startup Setting
Version 1.0 Page 11 of 16
May Not Be Used Or Disclosed Outside Ricoh Corporation Except Pursuant To A Written Agreement.
PRIVATE/PROPRIETARY
Contains Private and/or Proprietary Information.
Page 12
Ricoh Family Group Companies
Select the UsrActLim Application (1.)
Select Startup/Stop (2.)
User Account Limits Application
Installation Guide
Note: that application status should now show “Stop”.
Select the Back Button
Uninstall the User Account Limits Application
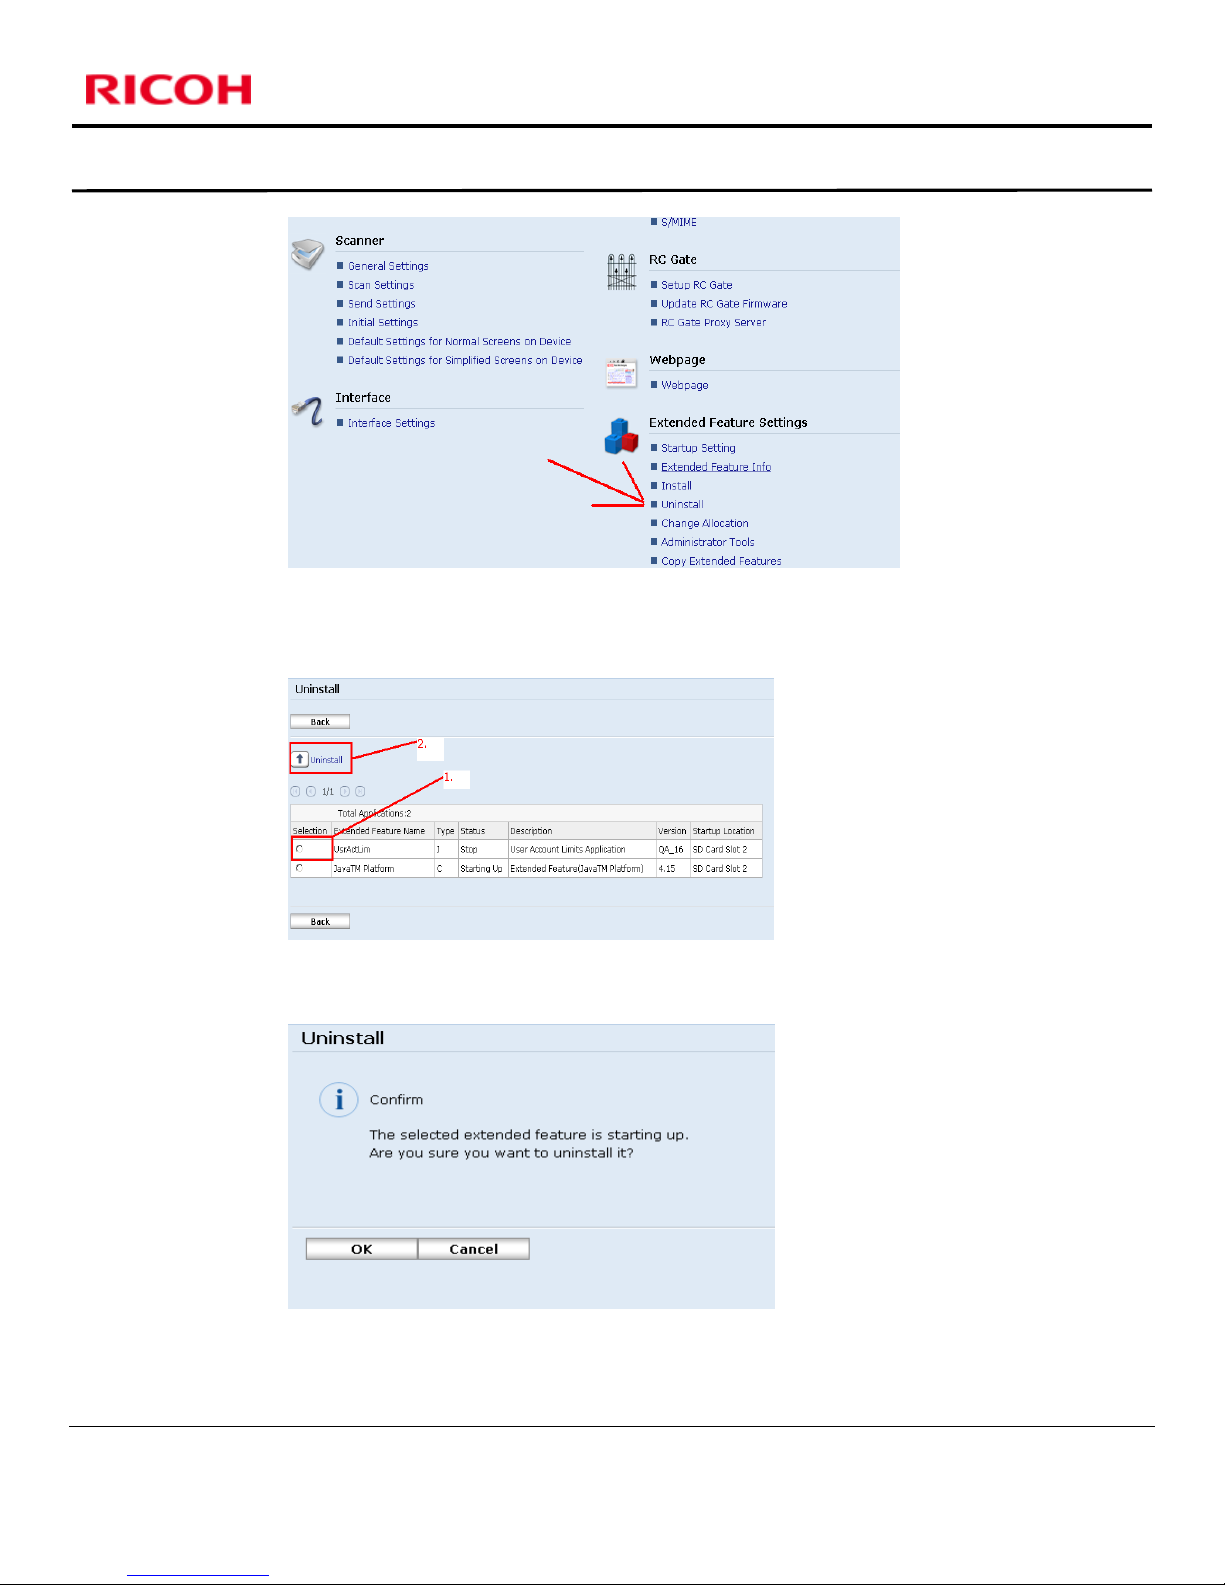
Click on Extended Features –Uninstall
Version 1.0 Page 12 of 16
May Not Be Used Or Disclosed Outside Ricoh Corporation Except Pursuant To A Written Agreement.
PRIVATE/PROPRIETARY
Contains Private and/or Proprietary Information.
Page 13
Ricoh Family Group Companies
Select the UsrActLim Application (1.)
Select Uninstall (2.)
User Account Limits Application
Installation Guide
Select OK
Select OK
Version 1.0 Page 13 of 16
PRIVATE/PROPRIETARY
May Not Be Used Or Disclosed Outside Ricoh Corporation Except Pursuant To A Written Agreement.
Contains Private and/or Proprietary Information.
Page 14
Ricoh Family Group Companies
User Account Limits Application
The application is now uninstalled
Go to Step 2 to return MFP Settings to standard.
Uninstalling User Account Limits from The Operators Panel
Installation Guide
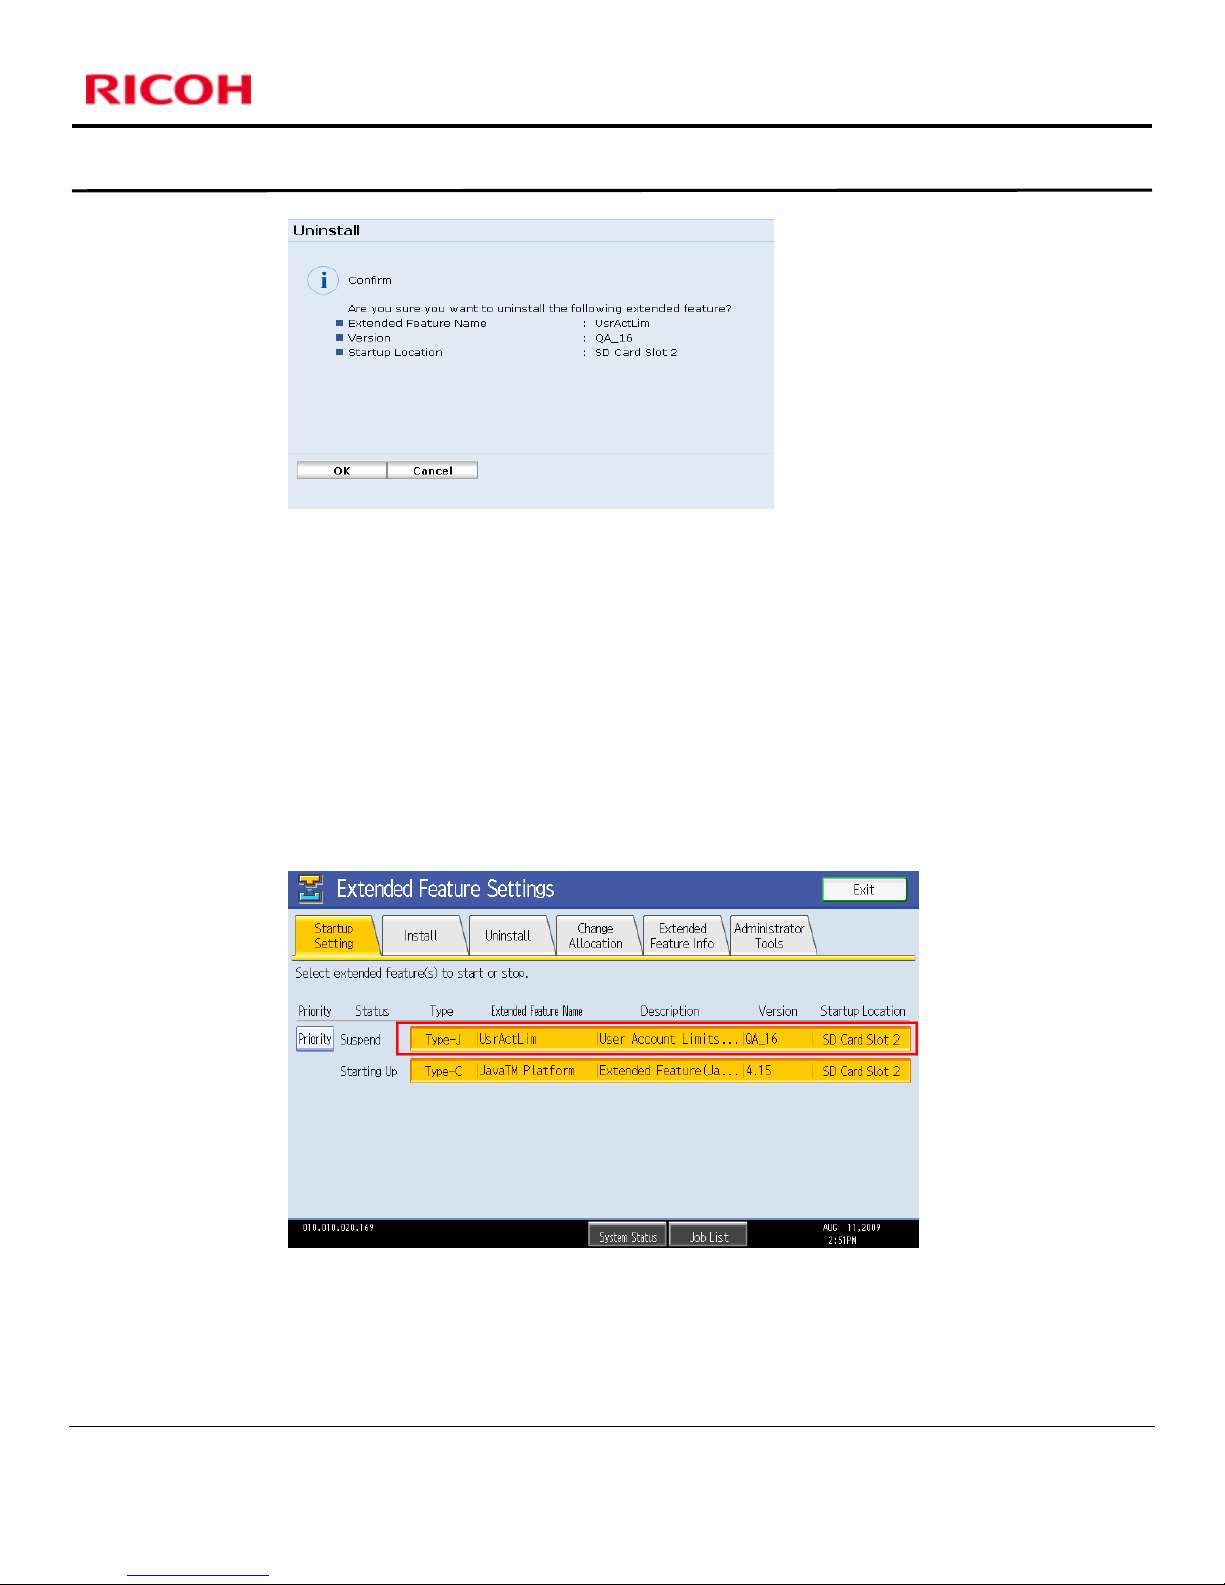
Stop the Application
Enter User Tools
Press the Extended Feature Settings button
Press Extended Feature Settings button
Press the Startup Tab
Select the User Account Limits Application
Remove the Application
Select the Uninstall Tab.
Verify that the application status is “Stop”
Select the User Account Limits Application
Version 1.0 Page 14 of 16
May Not Be Used Or Disclosed Outside Ricoh Corporation Except Pursuant To A Written Agreement.
PRIVATE/PROPRIETARY
Contains Private and/or Proprietary Information.
Page 15
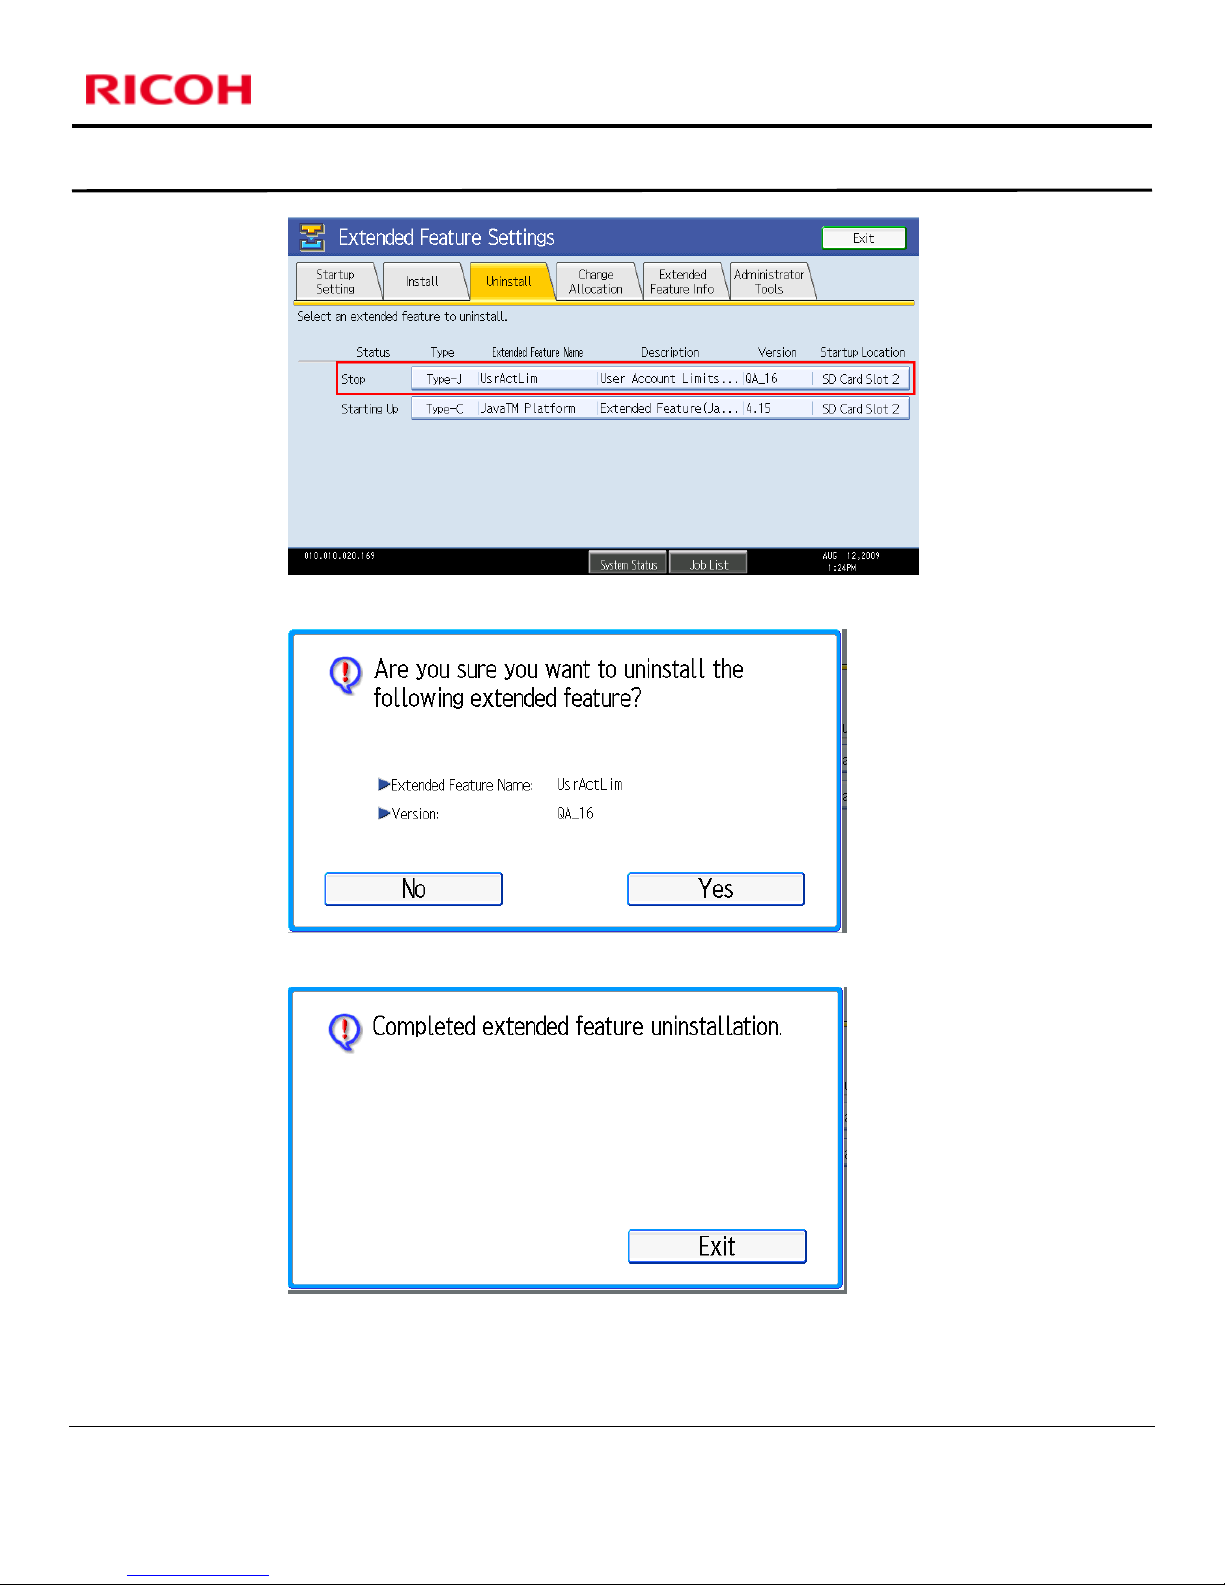
Select Yes
Ricoh Family Group Companies
User Account Limits Application
Installation Guide
Select Exit
The application is now uninstalled
Exit out of User Tools
Go to Step 2
Version 1.0 Page 15 of 16
PRIVATE/PROPRIETARY
May Not Be Used Or Disclosed Outside Ricoh Corporation Except Pursuant To A Written Agreement.
Contains Private and/or Proprietary Information.
Page 16

Step 2 – Return MFP Settings
Unselect Restriction Settings
Enter User Tools
Press System Settings
Press Administrator Tools
Press Next
Select Enhanced External Charge Unit Management button
Unselect All Copier, Printer, and Document Server buttons
Change the Function Priority
other than Java TX
Enter User Tools
Press System Settings
Press Function Priority
Press Desired Function (ie.COPY)
Press OK
Press Exit
Press Exit
Ricoh Family Group Companies
User Account Limits Application
Installation Guide
Configure SP Mode on MFP
Enter Service Program Mode (SP Mode)
Press System Sp
Go to SP 5113-2
Set to 1:Expansion device to 0
Press OK
Exit
Exit
Restart the MFP
The uninstall is now complete.
Version 1.0 Page 16 of 16
May Not Be Used Or Disclosed Outside Ricoh Corporation Except Pursuant To A Written Agreement.
PRIVATE/PROPRIETARY
Contains Private and/or Proprietary Information.
 Loading...