

Page 1
QUICK-START
GUIDE
For Ricoh Monochrome and
Color Products
with 8.5” Touch Panel
and Services-Led Platform
MP 4002/5002
MP C3002/3502/4502/5502
Page 2
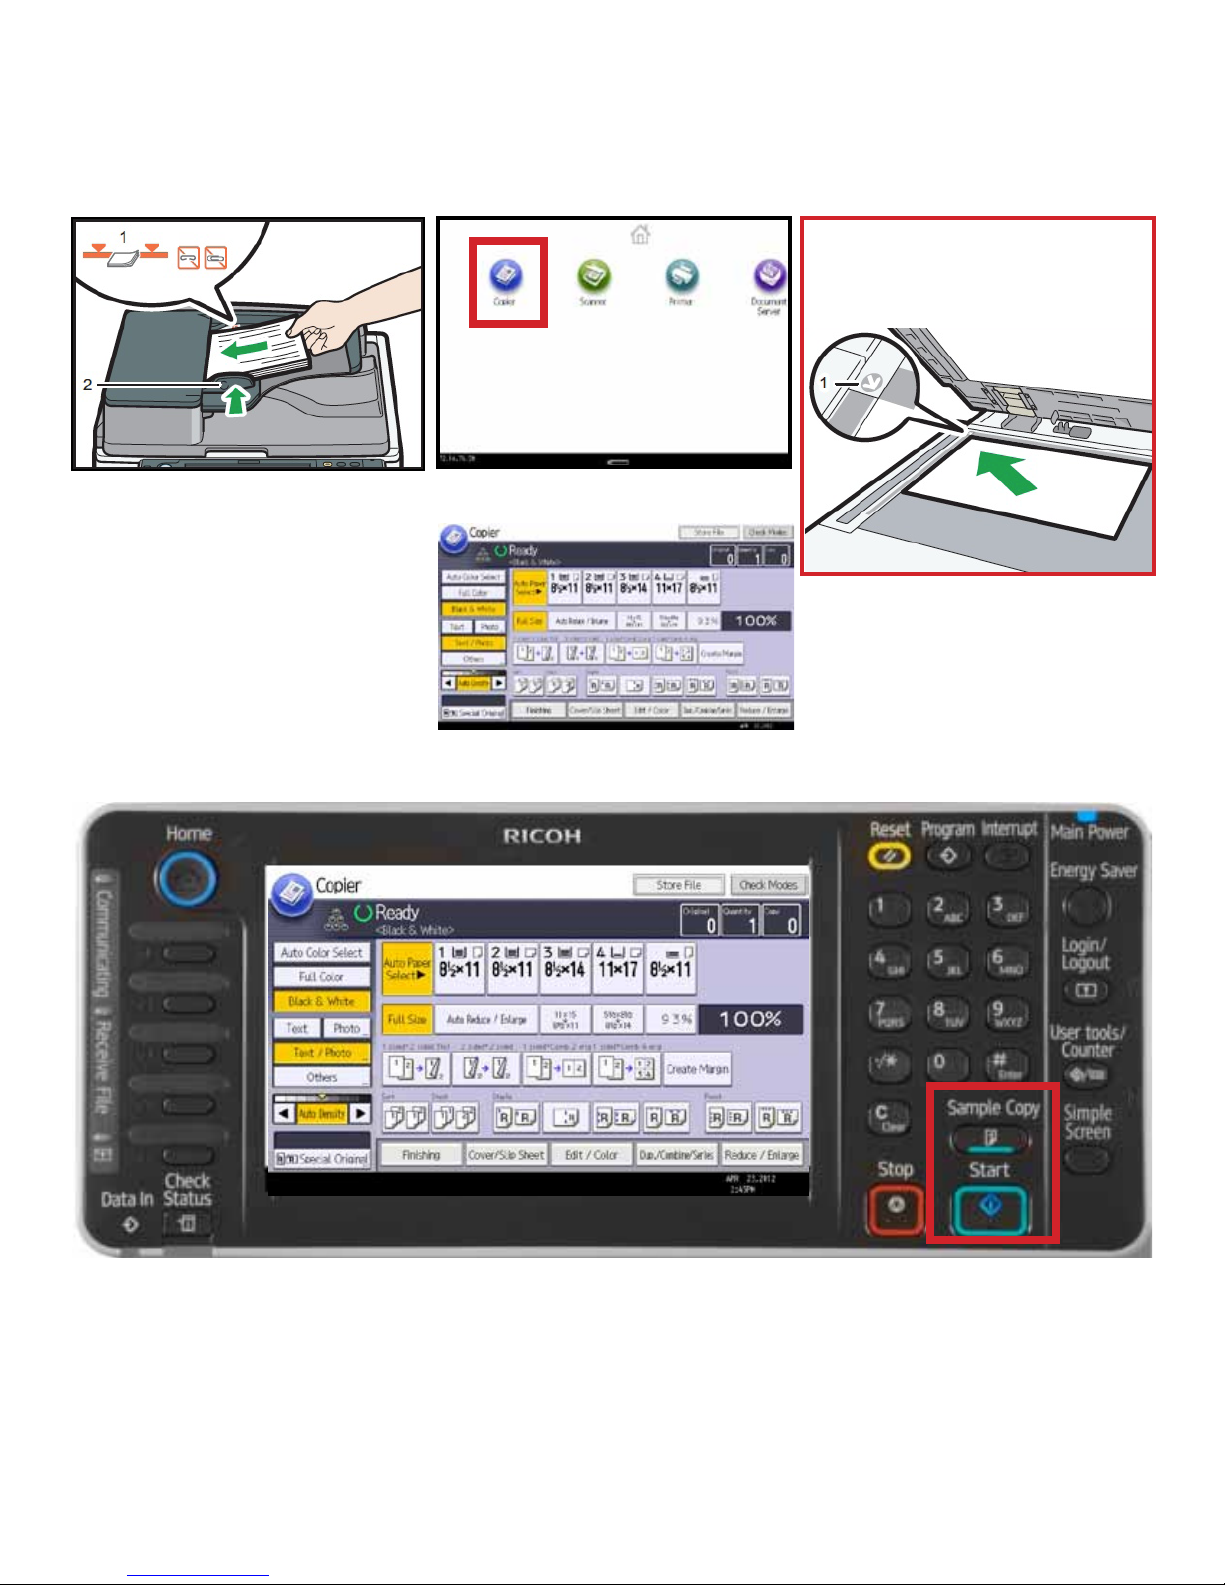
Copying Documents
Remove paperclips, staples or other loose objects before placing originals in feeder. Be sure to straighten bent or curled
edges.
Alternate: If using the Platen Glass,
lift the lid and place documents face
down on the glass at the position of
arrow, regardless of size.
1. Place Originals in the Document
Feeder
2. Adjust paper guides.
3. Select Copier from the Home Screen
4. Select any additional copy settings
Press original document type, i.e. Text, Text/Photo, Photo, etc.
Press [sort] to collate document (if not highlighted)
Enter any nishing options
Enter desired number of copies
Press [Sample Copy] copier will print one completed set and prompt you to:
[Suspend] to cancel job or change settings
[Continue] if job is correct to complete remaining copy sets
Or, press START to skip [Sample Copy]
Page 2
Page 3
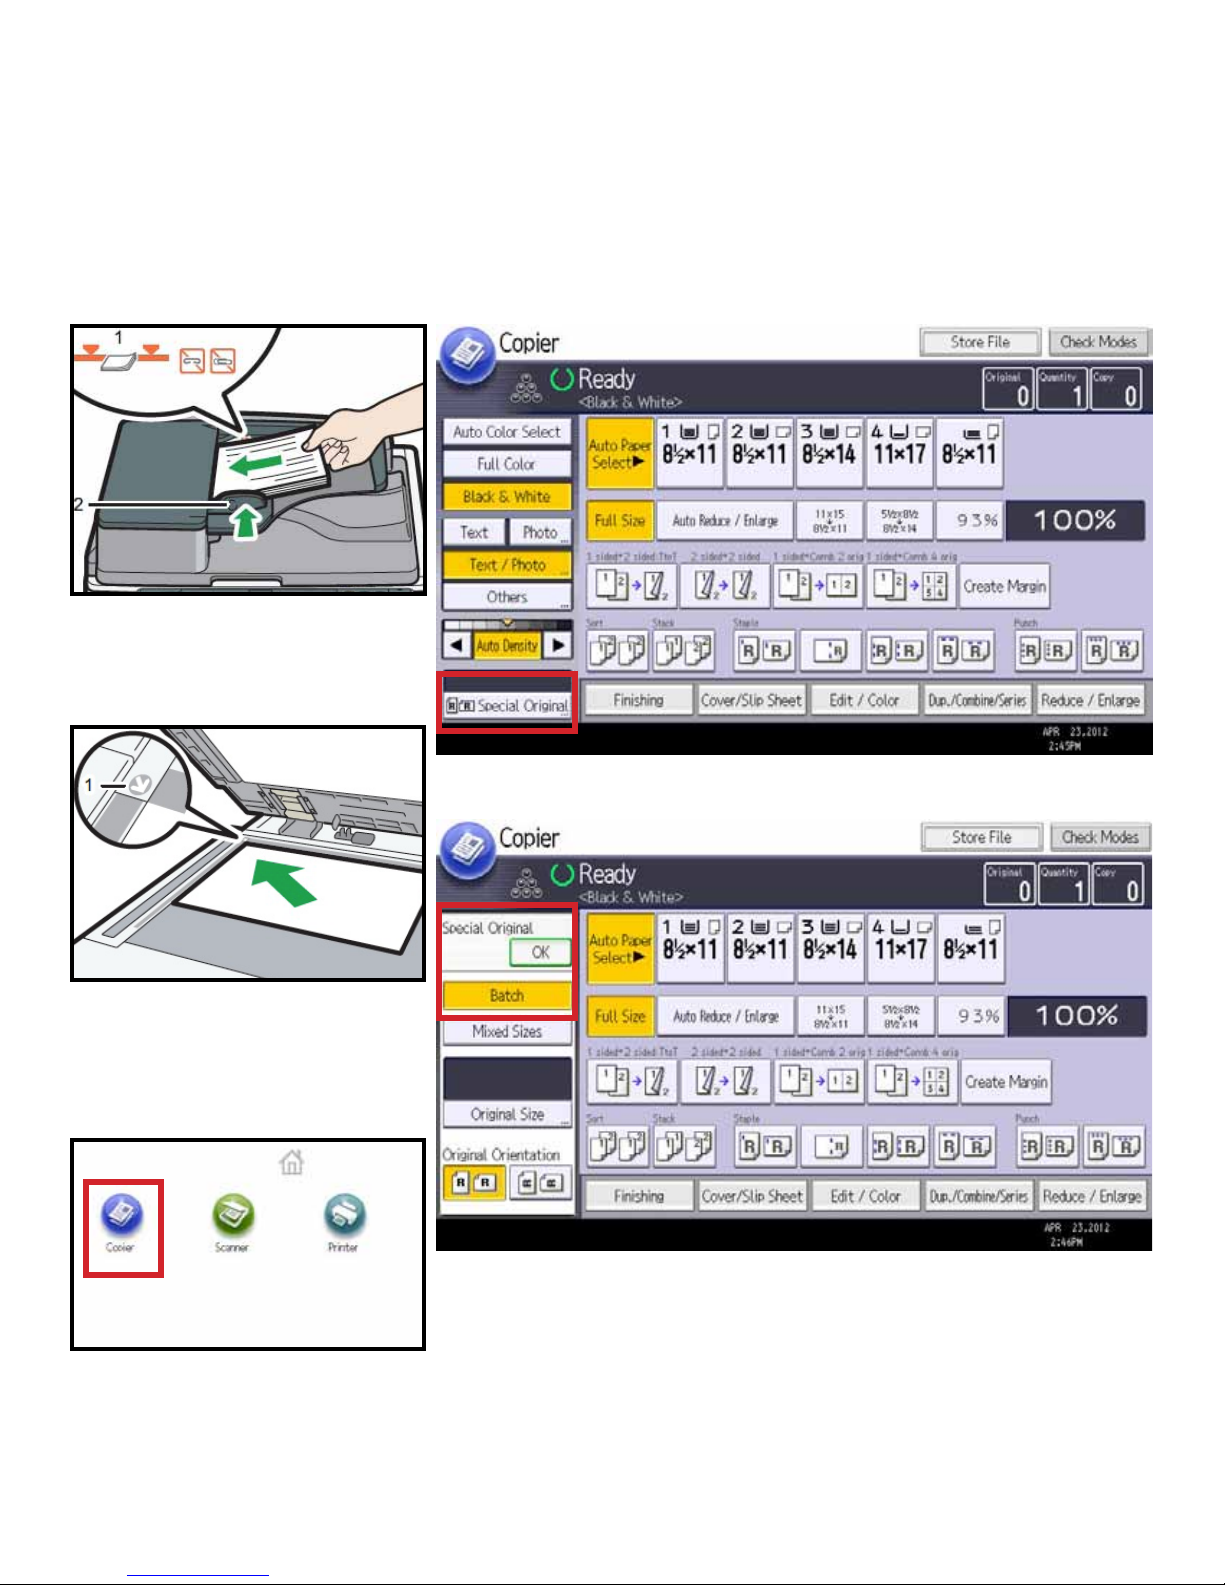
Using Batch Mode
Use [Batch] mode when:
a) the number of pages being fed into the document feeder exceeds the feeder capacity, or
b) you need to feed documents from the feeder and from the platen glass, or
c) you need to feed pages from different sources, but want to keep the page order and output
multiple complete sets.
1. Insert pages in the document feeder
2. Adjust guides
-or-
1.
Lift the Platen Glass lid and place
documents face down on the glass at
the position of arrow, regardless of size.
3. Select Copier from the Home Screen
4. Select Special Original from the Copier Screen
5. Select [Batch], and then press [OK].
6. Enter your job settings, including the desired number of copies.
7. Place the rst part of the originals in the feeder (or on the glass) and press [Start] key.
8. After those originals have been scanned, place the next batch, pressing [Start] each time a new
page (platen) or group of pages (feeder) is added, and continue until all the pages for your job are
complete.
9. Press the [#] key to release the complete job.
Note: if copies are not stapled, the machine will deliver the rst copies as they are scanned and
will release the additional copies after the # key has been selected.
Page 3
Page 4
Sort/Stack & Rotate Sort Output
3
2
1
3
2
1
3
2
1
3
2
1
3
2
1
3
2
1
3
2
1
3
2
1
3
2
1
1
1
1
3
2
1
3
2
1
3
2
1
3
2
1
3
2
1
1
1
1
3
2
1
3
2
1
3
2
1
3
2
1
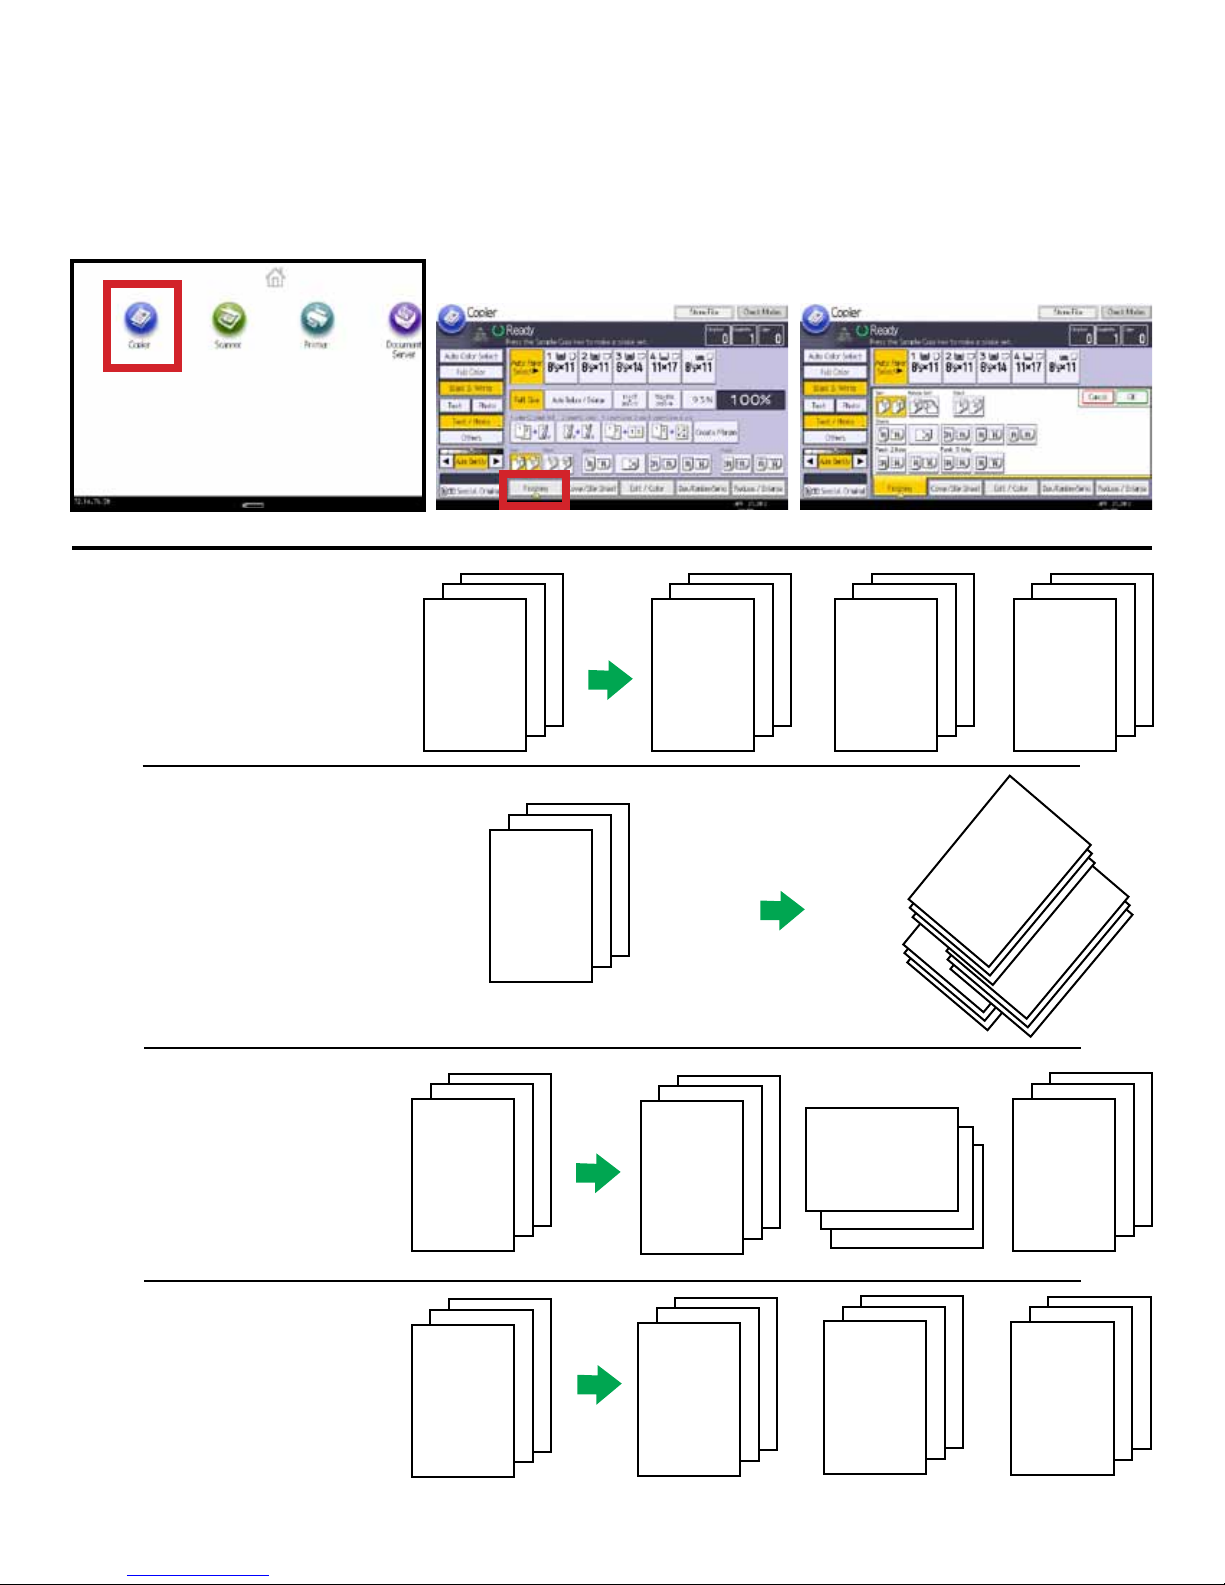
SORT Rotate/Sort - The machine assembles copies as sets in sequential order. Use [Sort] when copying multiple-page
document to maintain page order (same as [Collate]). When a nisher is installed on the MFP, the device will output the
document in the Sort/Shift Sort order, separating the rst set from the next set.
1. Select Copier from the Home Screen 2. Select Finishing Tab 3. Select Select Desired Sort Option
SORT: Copied sets are produced
in the same page order as the
original.
3
2
1
3
2
1
3
2
1
2
1
3
SHIFT SORT: Copied sets are
produced in the same page order
as the original, and offset for
easier separation.
ROTATE SORT: Copied sets are
produced in the same page order
as the original, and every other
set is rotated for easier separation. To use Rotate Sort, you must
have paper loaded in both Portrait
and Landscape Orientations in the
paper trays.
STACK: Copied sets are produced in stacks with each page
separate from the next.
3
2
1
3
2
1
1
1
1
2
1
1
3
2
3
3
2
1
3
2
1
1
1
1
2
2
2
3
3
3
Page 4
Page 5
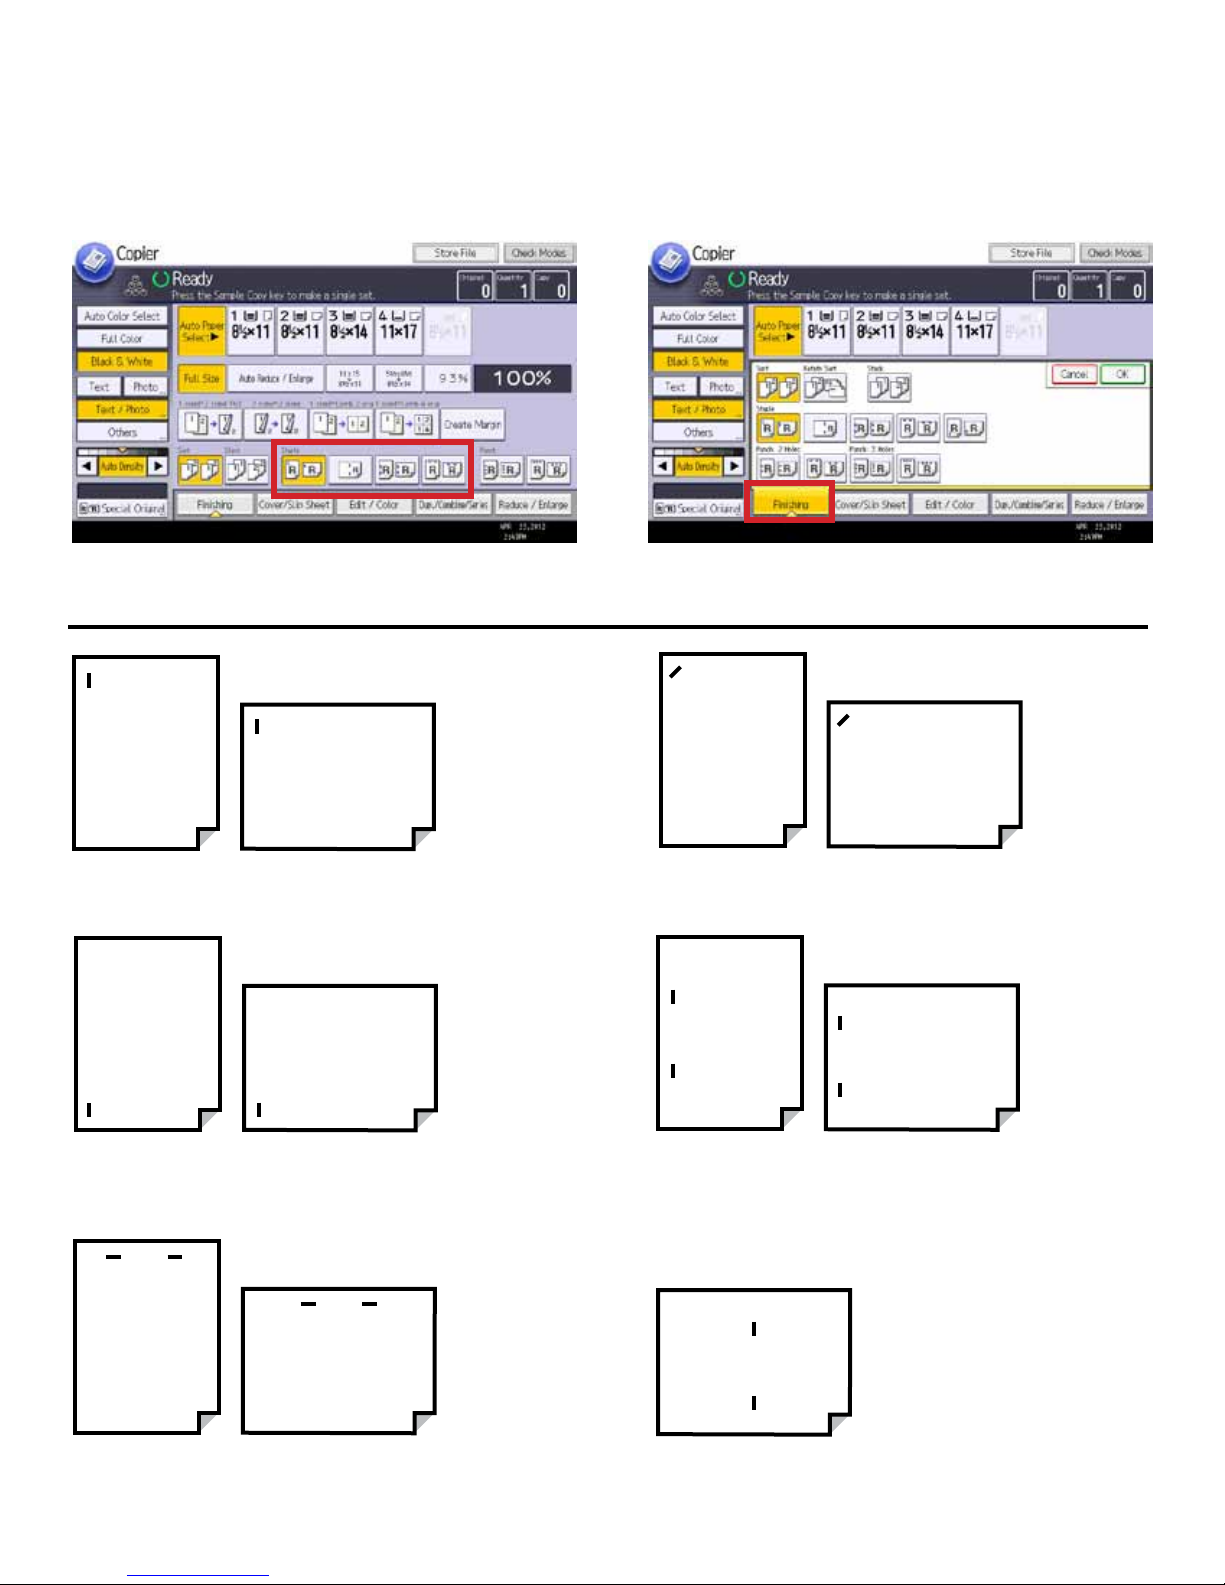
Stapling Documents
R
R
R
R
R
R
R
R
R
R
R
R
R
R
R
R
R
R
R
R
R
R
R
R
R
R
R
R
Devices that have a Finisher allow stapling of sets when copying or printing.
1. Select Staple position. 2. If staple position not shown, select Finishing tab to see
all Staple positions.
R
Top Left (Straight)
R
Bottom Left (for landscape orientation
documents fed through the feeder in
portrait orientation)
R
R
Top Left Slant
R
Double Staple Left (portrait orientation)
R
R
Double Staple Top (landscape orientation)
Page 5
R
Booklet stapling (for folded booklet with
center stapling)
Page 6
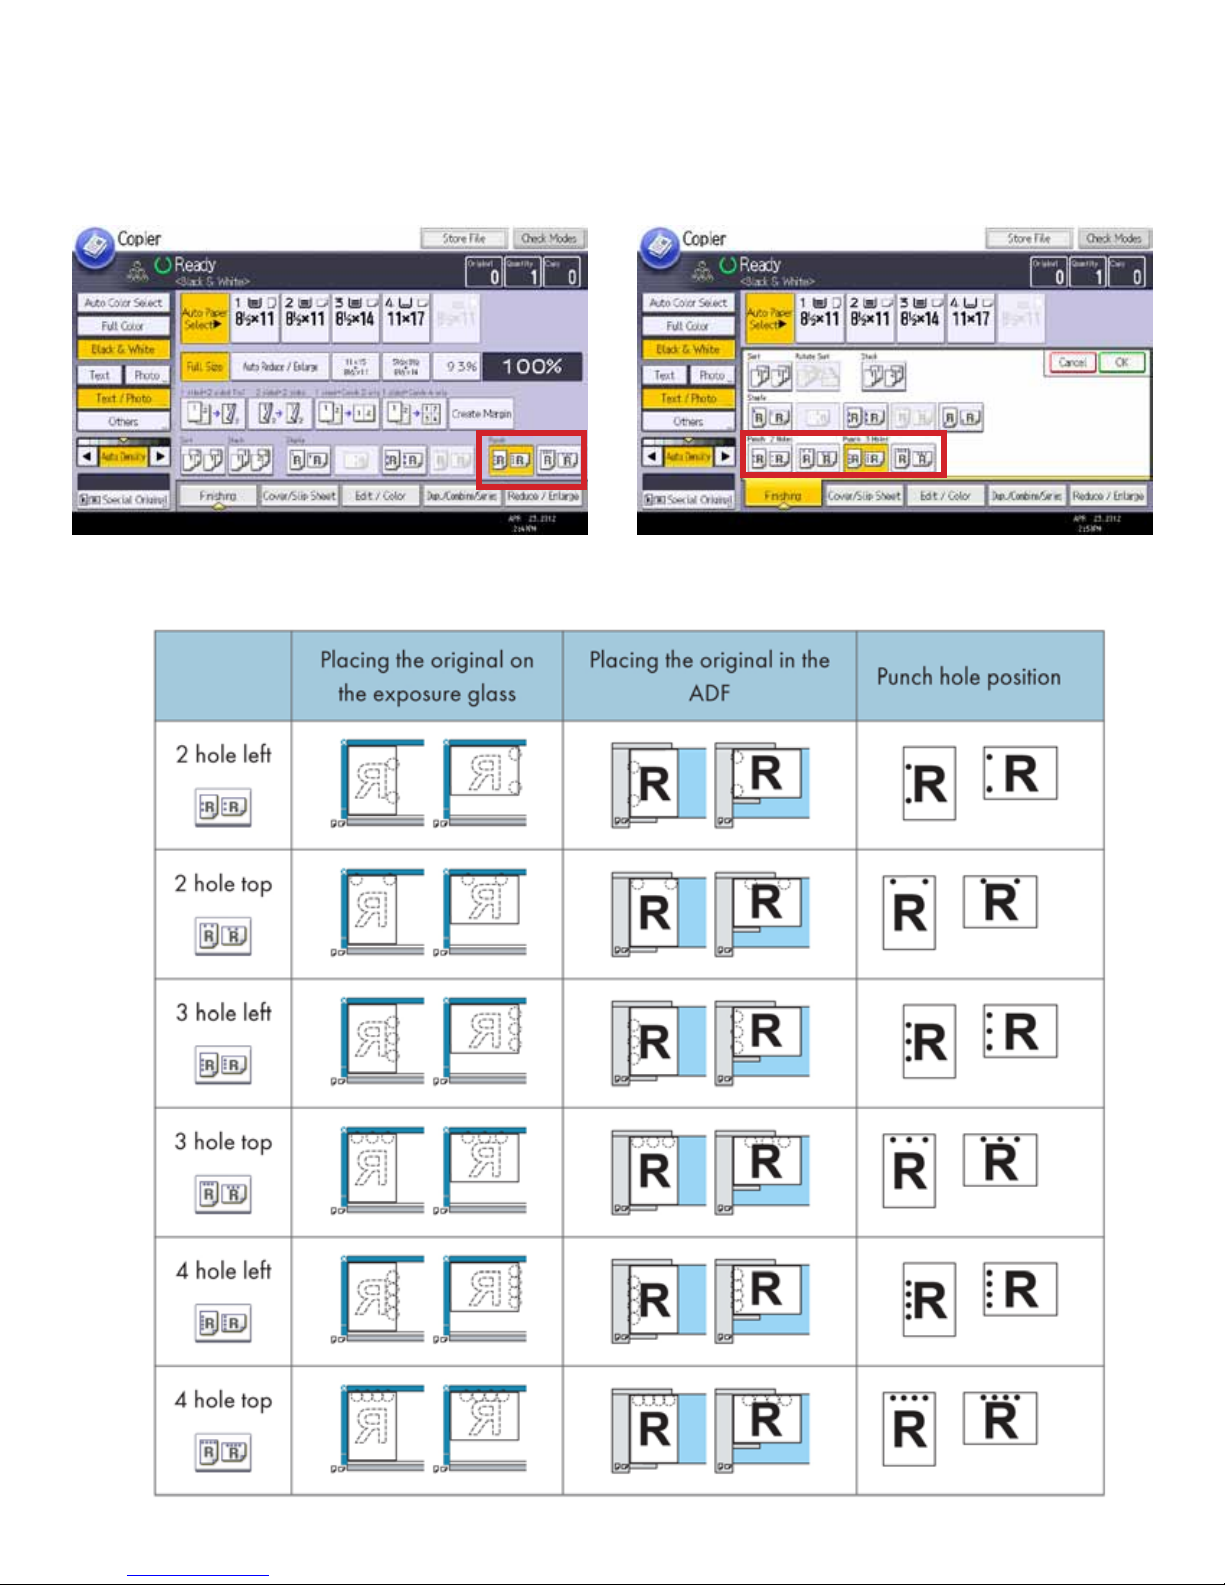
2- & 3-Hole Punch
If your MFP has a hole-punch nisher, you can select from several hole-punch positions. Note: you cannot use the bypass
tray with this function.
1. Select the hole punch position, if showing. 2. If your hole punch position is not displayed, select Fin-
ishing to see all hole punch positions.
Page 6
Page 7
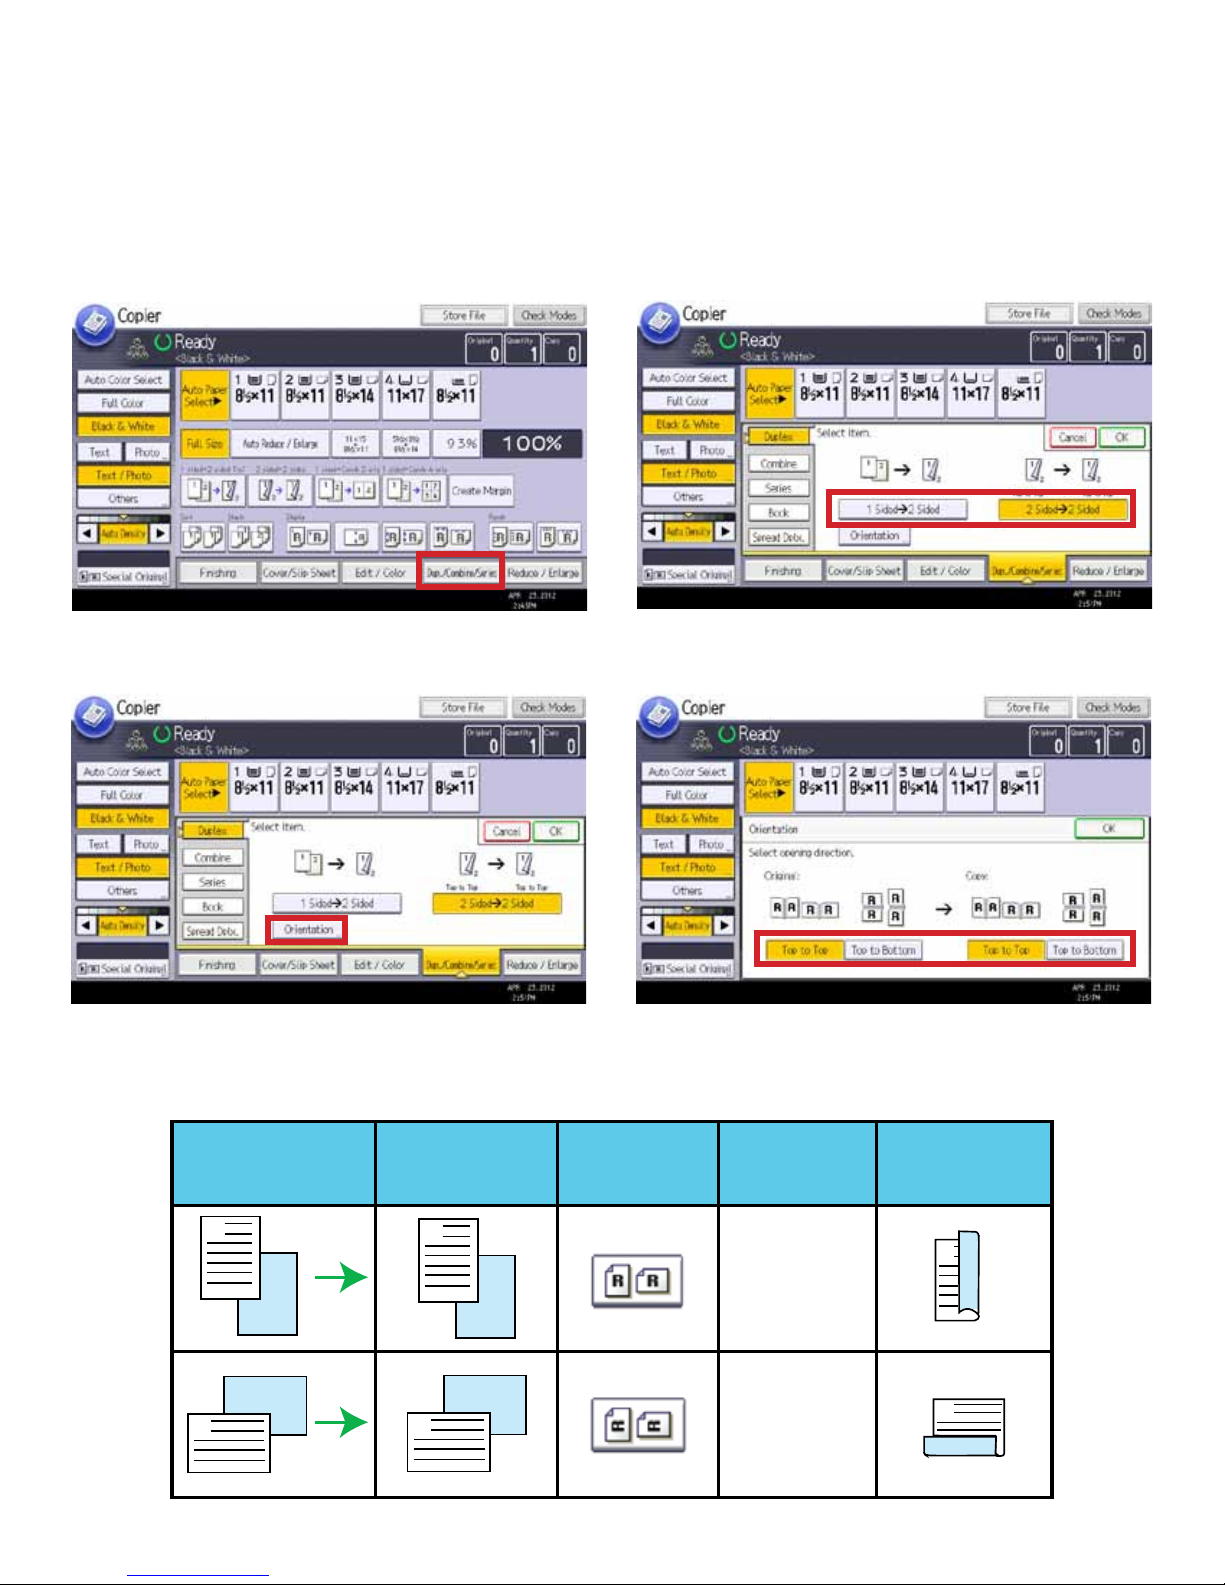
Duplex Copying (2-Sided Output)
Duplex allows you to print on both sides of the paper. Your originals can be one-sided or two-sided, but your nal output
will be 2-sided.
Place Originals in feeder, in either Landscape or Portrait orientation, depending on the original. They should be right-read-
ing in the feeder. This means you can read the upright text when you are standing in front of the MFP.
1. Select [Dup./Combine/Series].
3. Select [Orientation].
Original
Placing
Originals
2. Select 1-Sided-->2-Sided or 2-Sided-->2-Sided, depending
on whether your originals are one-sided or two-sided.
4. Select the appropriate orientation for your document. See
chart below.
Original
Orientation
Selected
Orientation
Output
A
B
B
A
A
B
B
A
Top To Top
Top to Bottom
B
A
A
B
Page 7
Page 8
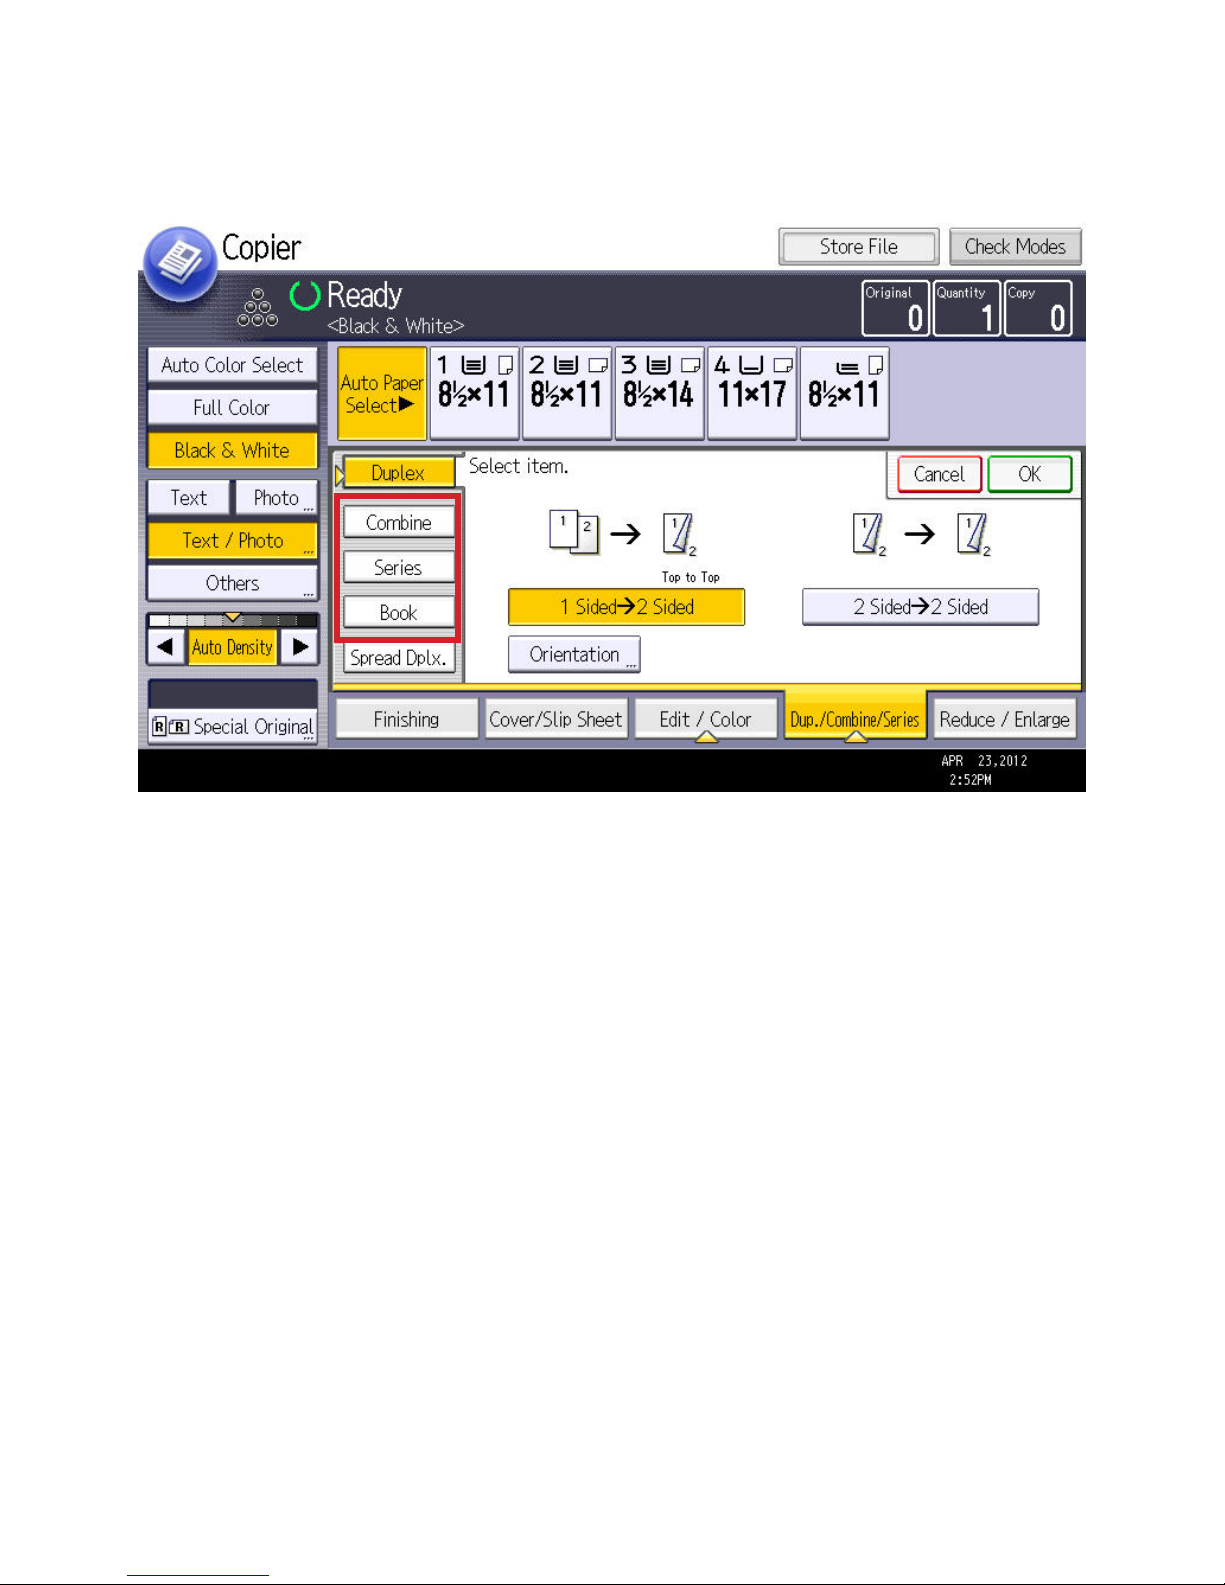
Dup./Combine/Series
This will describe the additional settings that are in the Duplex/Combine/Series menu.
Combine - Combine multiple pages onto single pages
Combine gives you options for 2-sided or single-sided output, and options of placing 2, 4, or 8 pages
onto a single side of a page. Users can also choose different size paper for output.
Series - Output documents from 2-Sided to 1-Sided
Copy two face-forwarding pages of a book, or a spread, to two single pages.
Book - Create a magazine output
Use booklet for 4-page output. Use Magazine for 5 or more pages. When the Booklet Finisher is
installed, users can choose to have the job stapled and folded. This can also be used to copy two
forward-facing pages of a book as a duplex output.
Page 8
Page 9
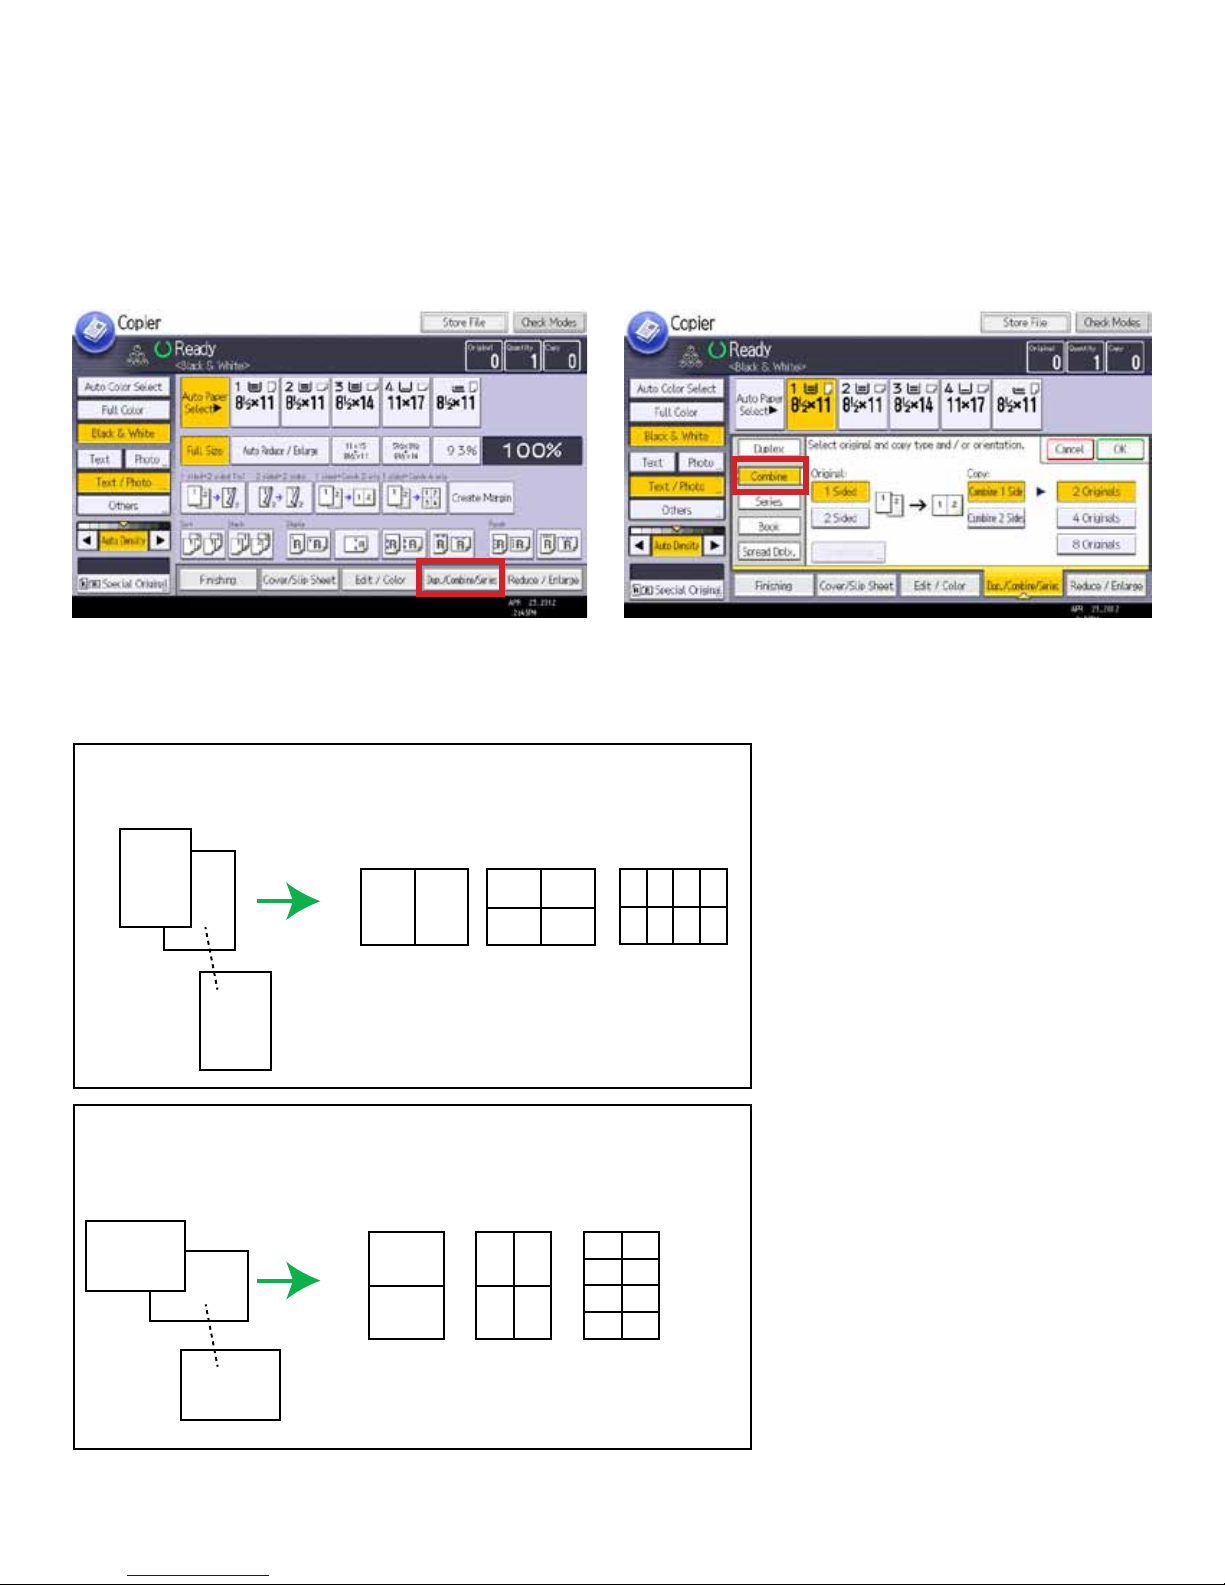
Combine Pages
Use this option to combine multiple single pages, or 2-sided pages, for multiple pages copied onto each side of a page.
Originals can be copied in both portrait or landscape orientation, depending on the number of images on the page.
1. Select [Dup./Combine/Series]. 2. Select [Combine].
Portrait
Originals
1
2
8
Landscape
Originals
1
2
Resulting Page
1 2
2
1
Resulting Page
2
1 2
1
3. Select whether your original is 1-sided
or 2-sided, and whether you want your
result to be 1-sided or 2-sided.
4. Select the number of originals per
1
4
3
2 3
4
5
6 7
8
page: either 2, 4, or 8.
5. Select OK.
6. Select the paper size.
7. Place the originals in the feeder, and
press the [Start] key.
Note: You cannot use the bypass tray
with this option.
2
1
4
3
4
3
5
6
7
8
8
Page 9
Page 10
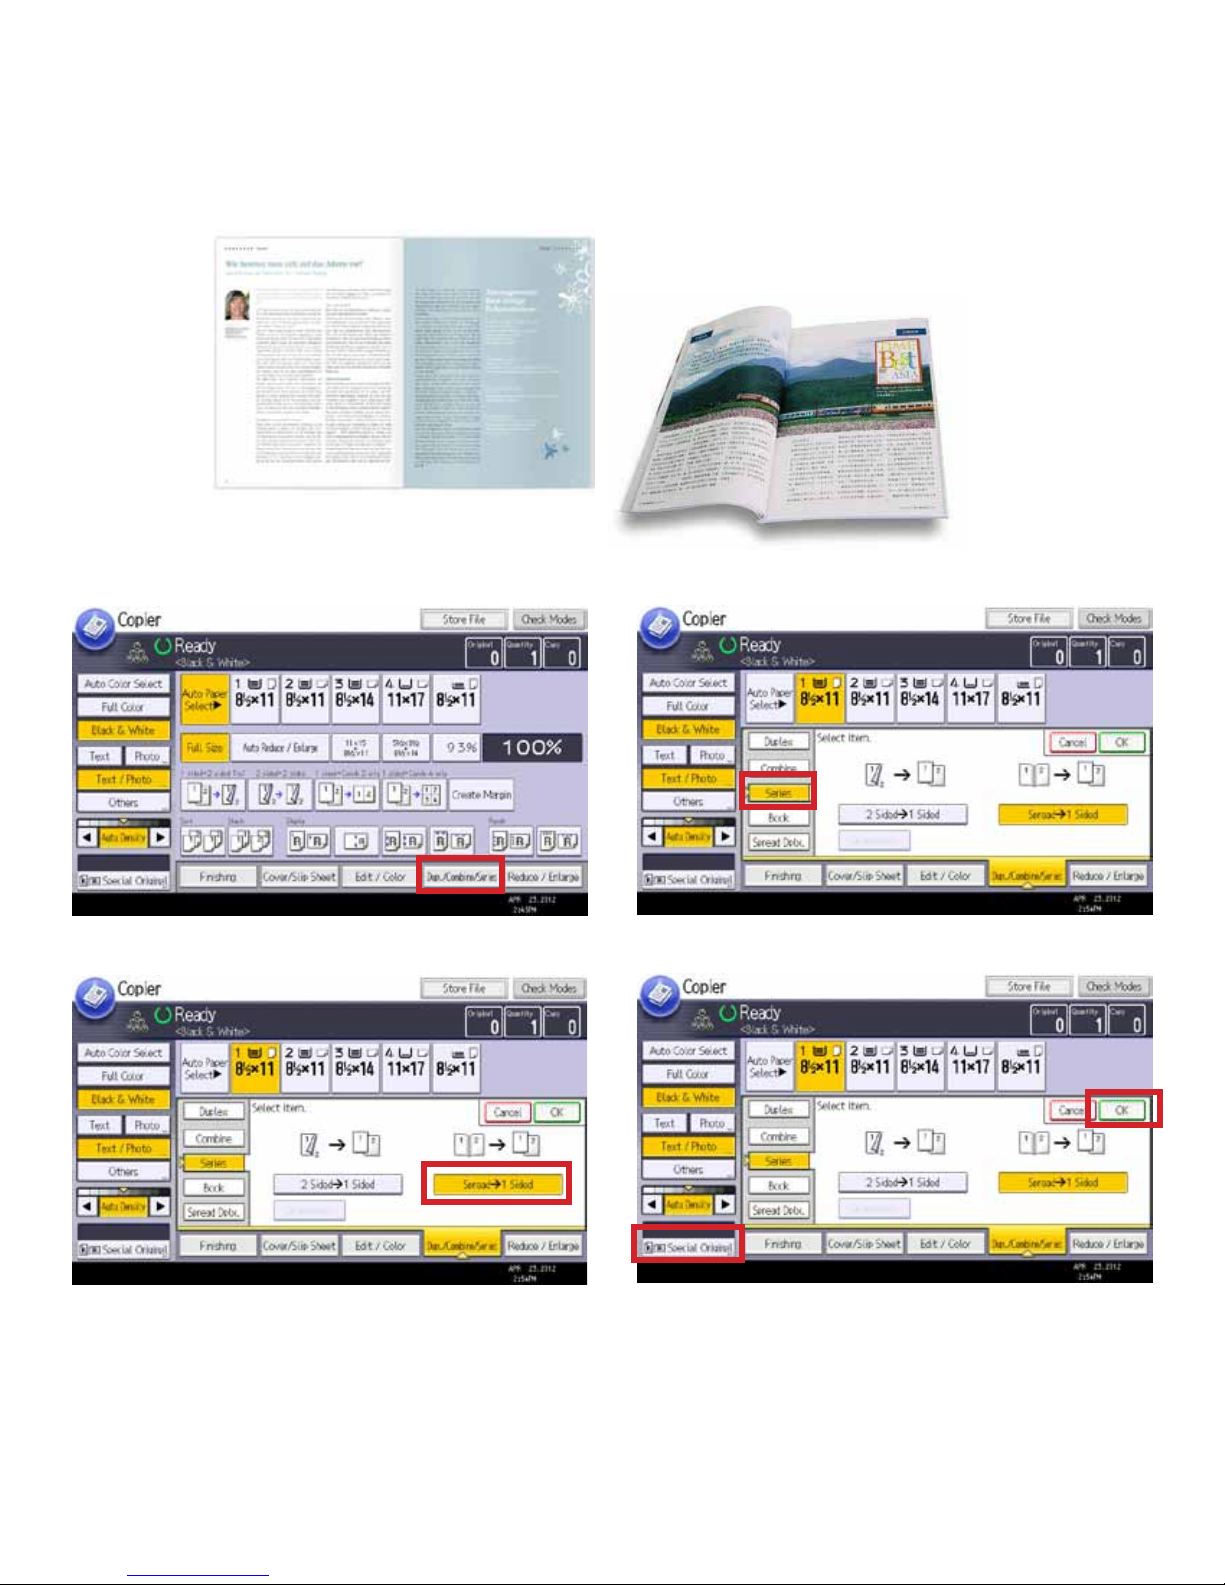
Book/Magazine Copying
When copying a book or magazine, you should place the open book or magazine face down on the platen glass. Then,
you can have the book or magazine pages copied onto single pages using the [Series] button.
1. Select [Dup./Combine/Series].
3. Select [Spread-->1 Sided]. This will make two individual
pages out of the right and left sides of the book/magazine.
2. Select [Series] button
4. Select [OK] button, or, if book is an odd size, or if you
get a “can’t detect original size”, select [Special Original],
[Original Size], [Custom Size], enter the horizontal inches,
vertical inches, and then [OK]
5. Press [Start].
Page 10
Page 11
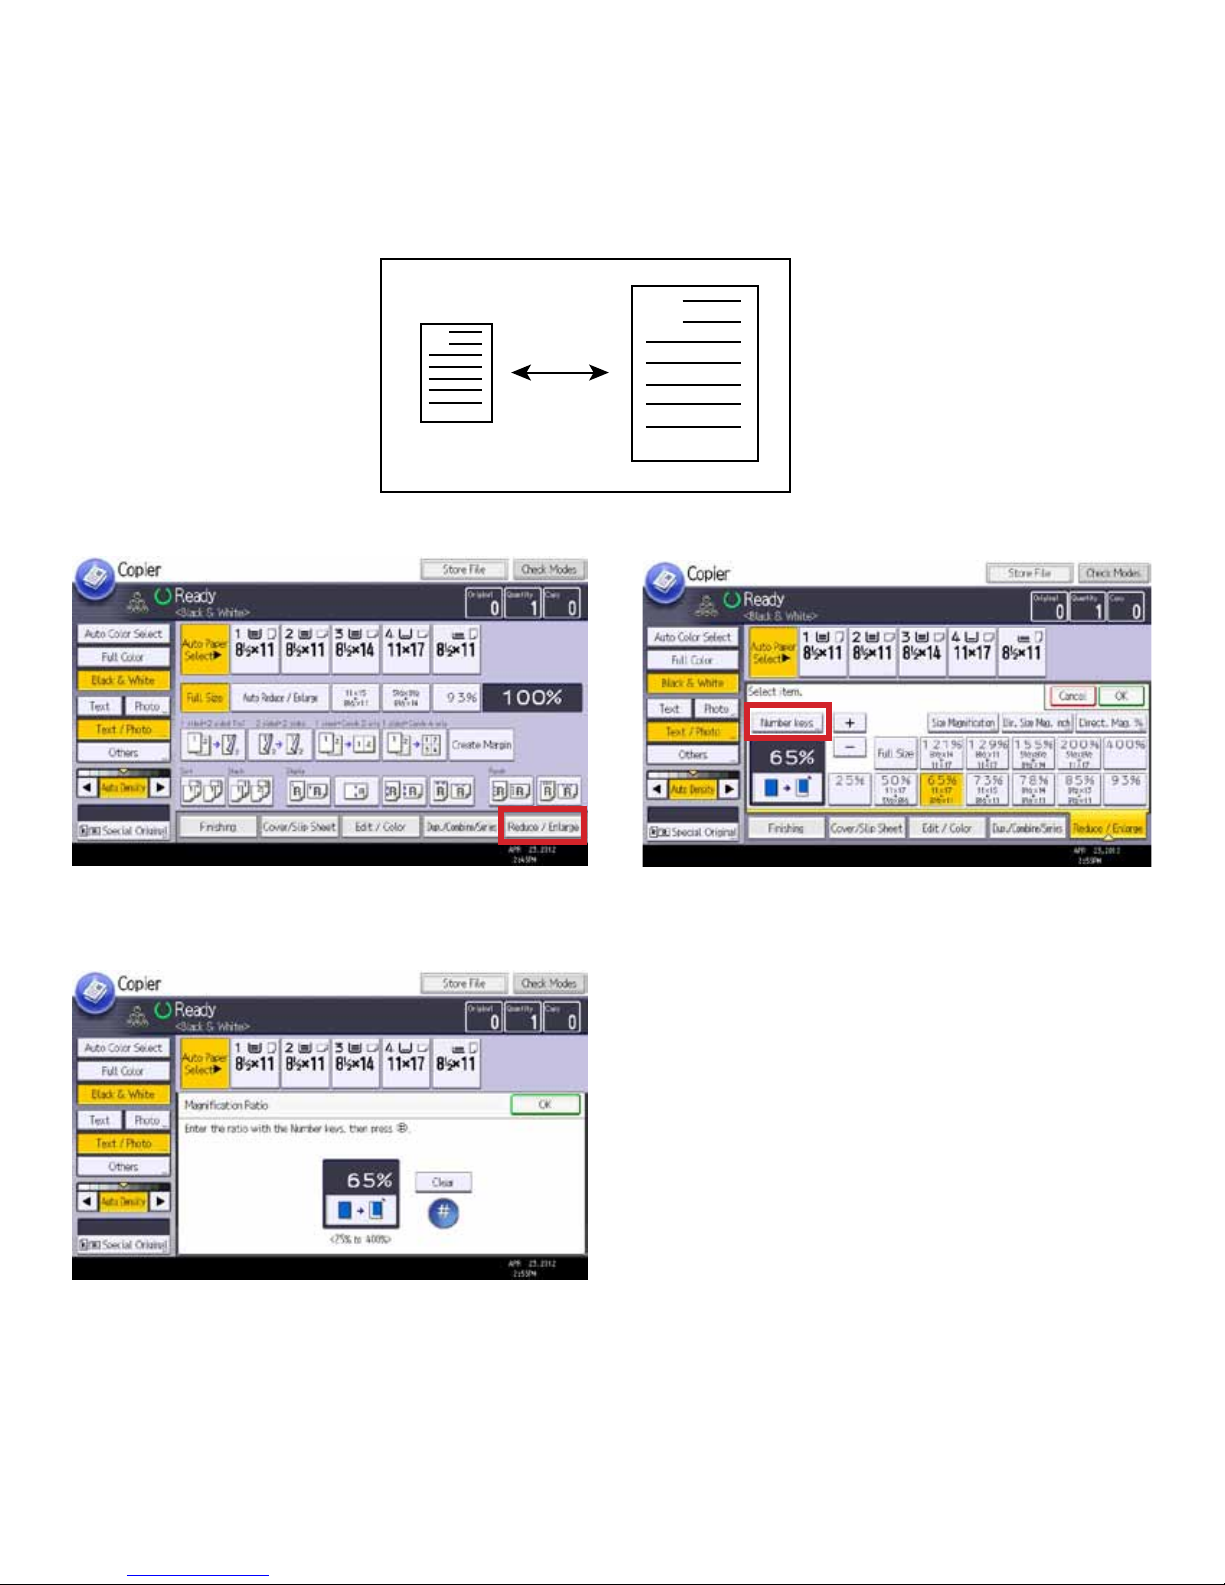
Reduction / Enlargement
You can reduce or enlarge your document using pre-set reduction/enlargement percentages, based on the common paper
sizes, or you can manually specify a percentage of reduction/enlargement anywhere from 25% (one quarter of the original
size) to 400% (four times the original size).
1. Select [Dup./Combine/Series].
A
A
2. Select [pre-set percentage] button, or select [Number
Keys] to enter your own percentage.
3. Enter the percentage of reduction or enlargement,
anywhere from 25% (one-quarter the original size) to 400%
(four times the original size), and press the [#] key.
4. Select [OK].
5. Place originals and press [Start].
Page 11
Page 12
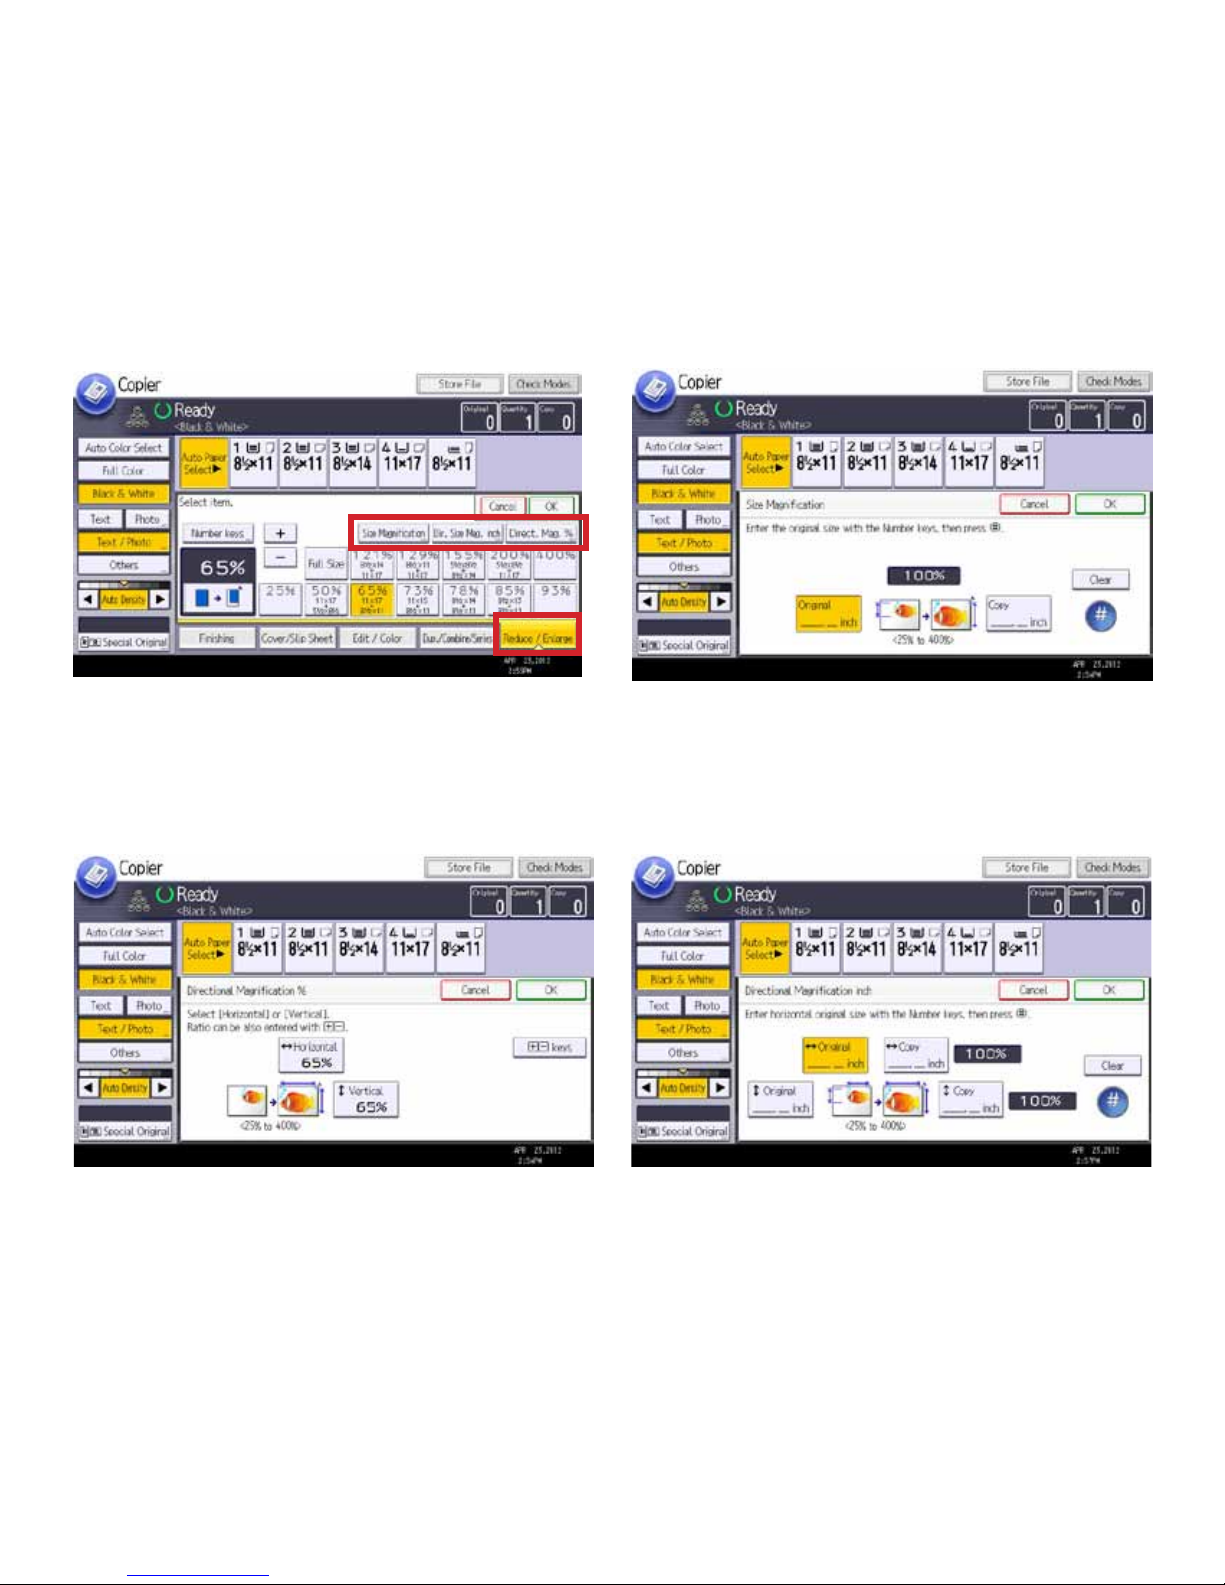
Directional/Size Magnication
There are three Directional/Size Magnication types:
1. Directional Magnication %, which allows you to do non-proportional enlargement/reduction by entering different per-
centages for horizontal and vertical directions.
2. Size Magnication, which allows you to enter the original size in inches, the copy size in inches, and it will do the calculation of the percentage for you. This allows for proportional enlargment/reduction only.
3. Directional Magnication Inch, which allows you to enter original size in inches, and the copy size in inches, individually
for horizontal and vertical directions. It will calculate the percentages for you, and it allows for non-proportional enlargement/reduction.
1. Select [Reduce/Enlarge] button, and then [Size Magnication], [Dir. Size Mag. Inch], or [Direct. Mag. %]
DIRECTIONAL MAGNIFICATION %
2. Enter the desired [Horizonal %] and [Vertical %], and the
resulting image will be either proportional or non-proportional, depending on whether the percentages were the
same or different.
3. Press [OK]
SIZE MAGNIFICATION
2. Enter [Original size in inches], the desired [Copy size in
inches], and it will calculate the percentage for you. This
results in Proportional enlargment/reduction only.
3. Press [OK].
DIRECTIONAL MAGNIFICATION INCH
2. Enter the [Horizonal Original Size in inches], the desired
[Horizontal Copy size in inches], the [Vertical Original Size
in inches], the desired [Vertical Copy size in inches], and the
percentages in each direction will be automatically calculated. This can result in a non-proportional enlargement/
reduction.
3. Press [OK].
4. Place the originals and press [Start].
Page 12
Page 13
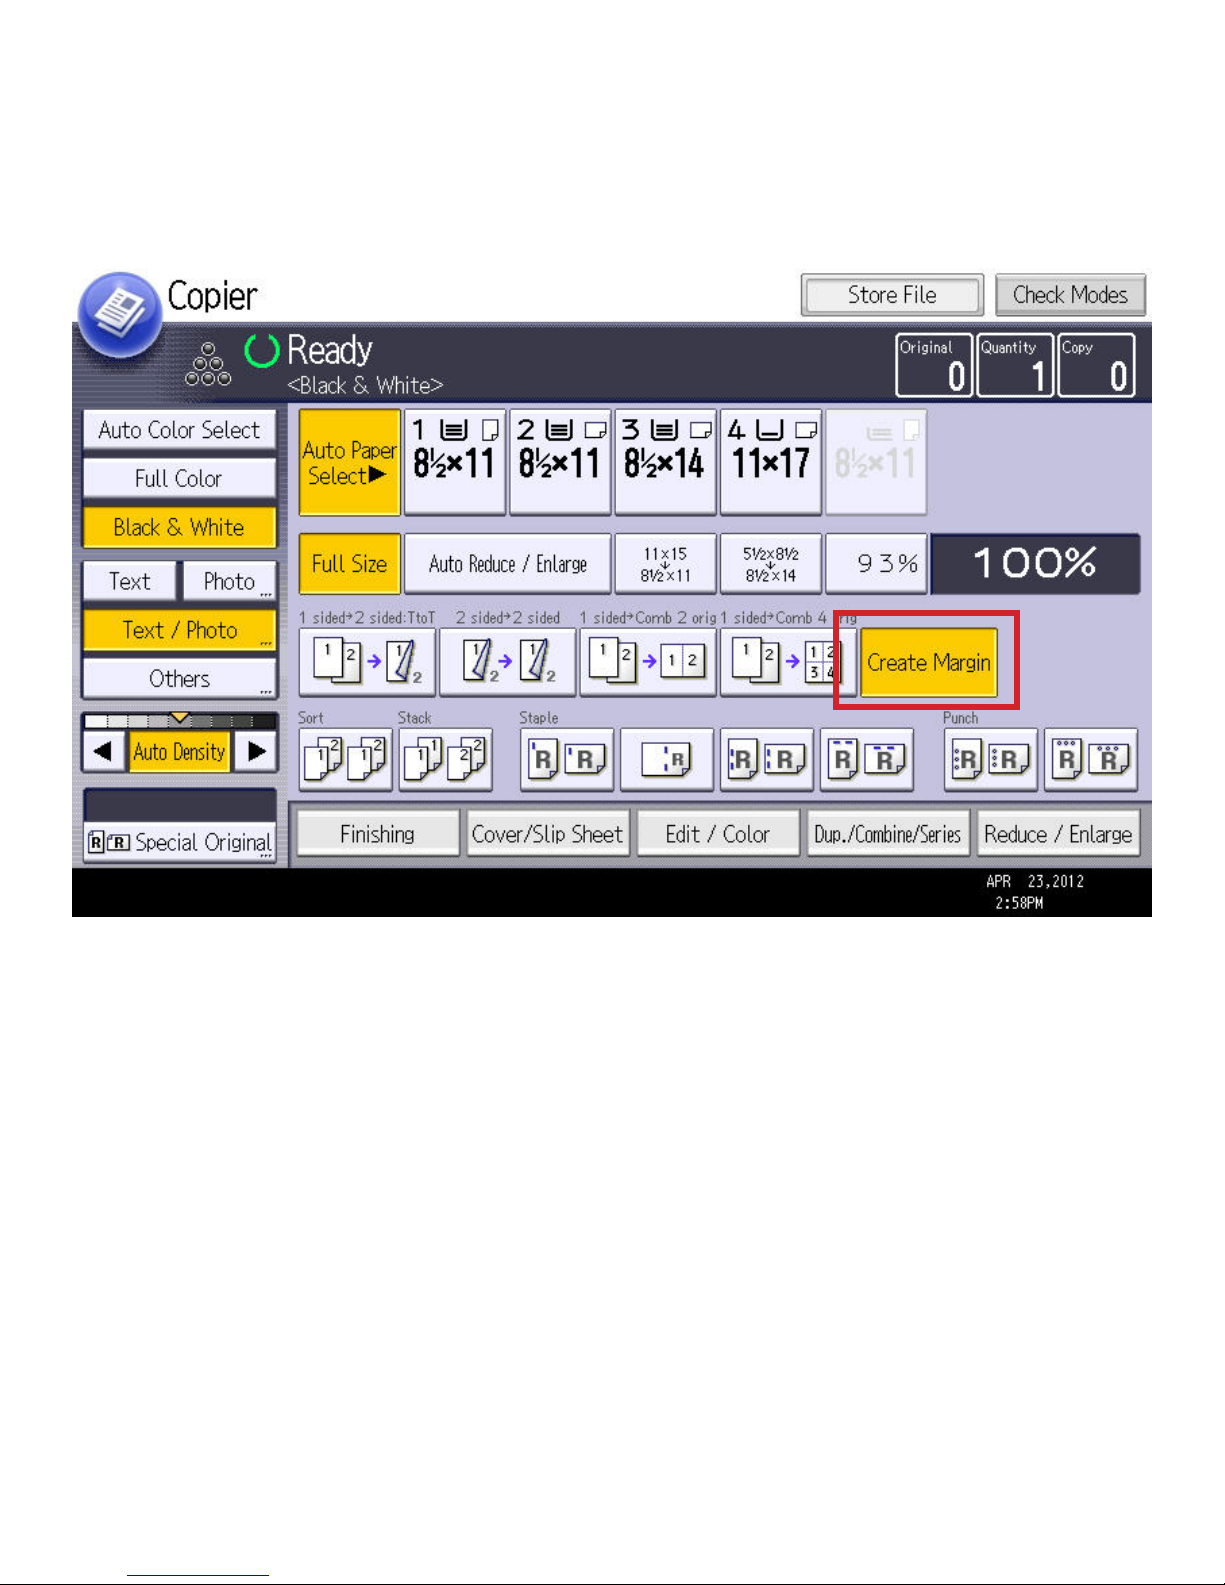
Create Margin
This feature will reduce the image to 93% of its original size, and places the reduced image at the center of the page. By
combining it with the Reduce/Enlarge functions, you can further increase the margin size. This feature is good for creating
a copy edge for stapling or hole punching.
1. Press [Create Margin].
2. Select reproduction ration, if necessary.
3. Press Start
Note: This function cannot be used in conjunction with the bypass tray.
Page 13
Page 14
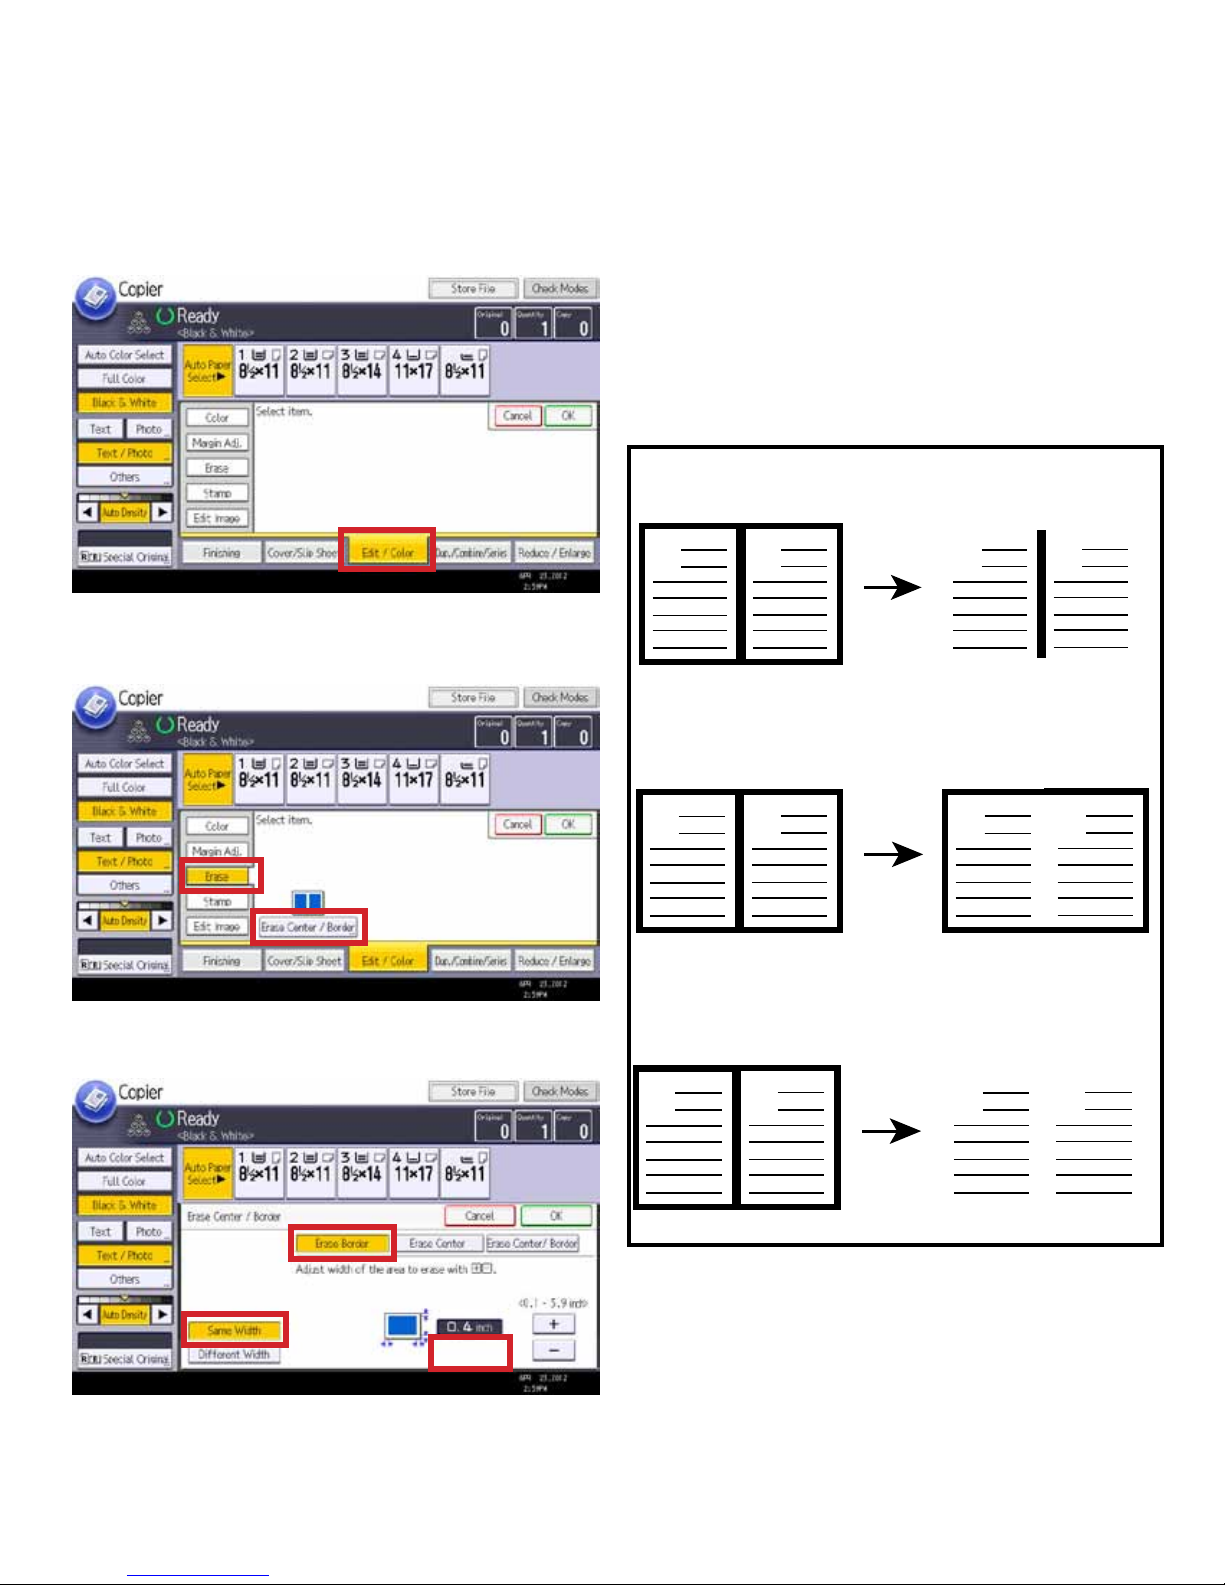
Erase Center / Border
This option erases the center and/or all four sides of a document page or pages. Center/Border usually applies to books
and magazines, but it can also be used for side-by-side pages laid on the platen glass.
Erase Border
Erases the edge margin of the original image.
1. Select [Edit/Color] button (Edit/Stamp on B/W device)
2. Select the [Erase] tab, and then [Erase Center / Border].
A
A
Erases both the edge margin and the center of the original image.
A
B
Erase Center
Erases the center margin of the original image.
B
Erase Center / Border
B
A
A
A
B
B
B
3. Select [Erase Border]. Then, press [Same Width], and
enter the width to erase around the border. If desired, select
[Different width] for different borders around each side.
Page 14
Page 15
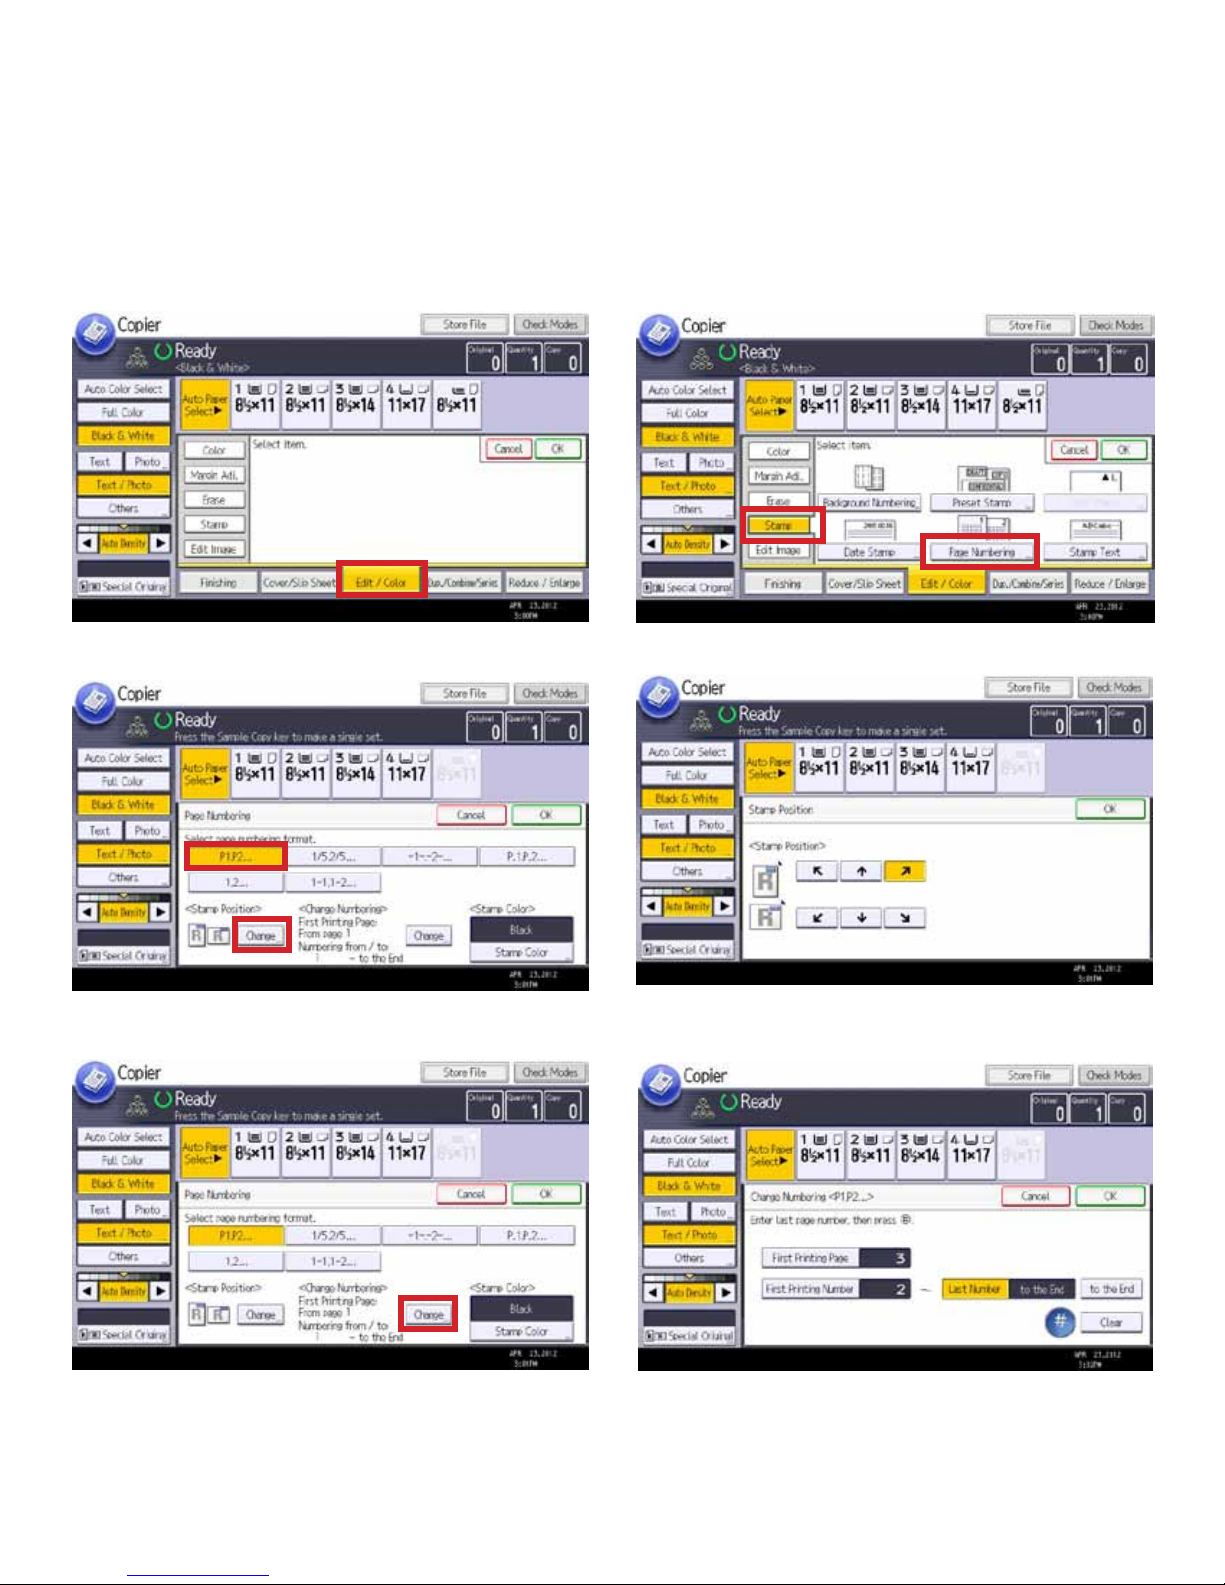
Page Numbering
Page Numbering allows users to organize and keep track of pages in documents being copied for projects, etc. Users can
choose the numbering sequence as well as the position of the numbers on the page.
Note: The original document will not be numbered. Only the copy will have page numbers.
1. Select [Edit/Color] button (Edit/Stamp on B/W device) 2. Select the [Stamp] tab, and then [Page Numbering].
3. Select numbering format, then [Change] Stamp Position.
5. If you need to change the starting page or starting number,
select [Change] Numbering.
4. Choose the position for the page numbers, then [OK].
6. Enter the page on which the rst page number should
appear, the number to start with, and the last number that
should appear, then [OK].
Page 15
Page 16
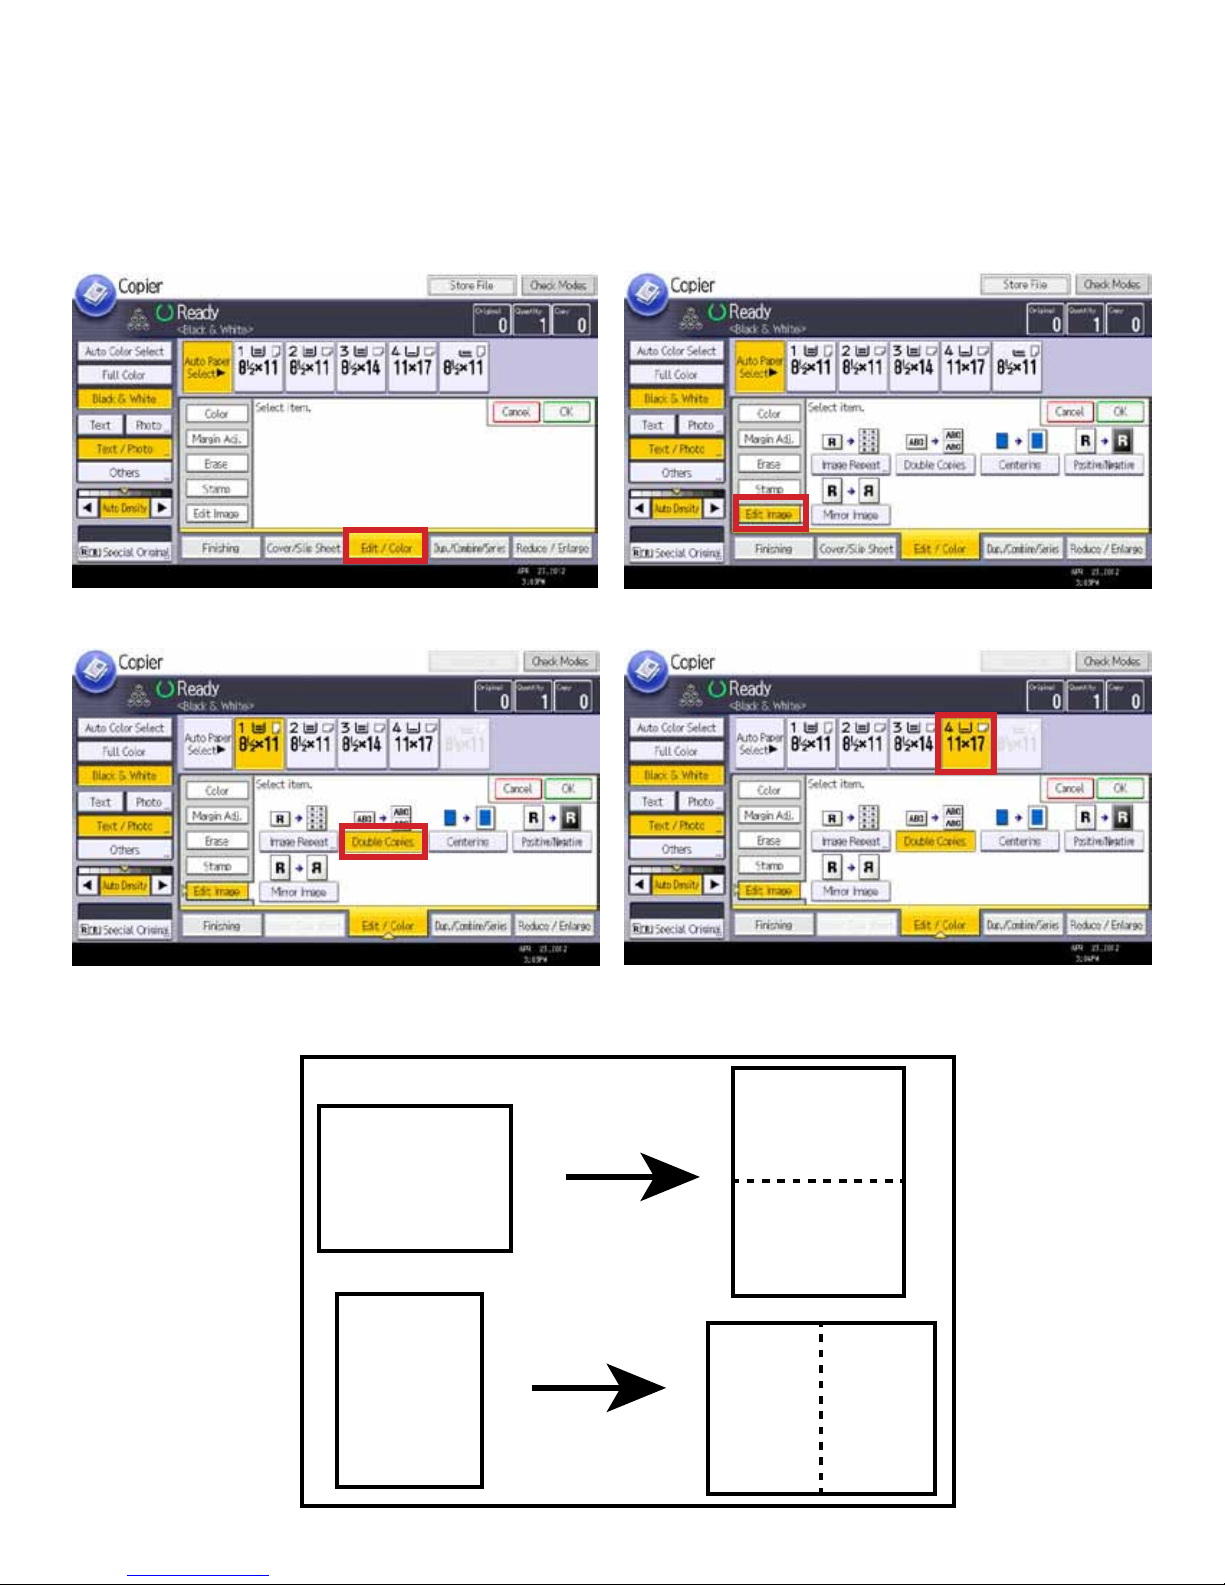
Double Copies
Double Copies is a feature used to duplicate your original document two times on the page. If you do not change the
paper size, your image will be reduced. To make same-size copies, adjust the paper size accordingly. For example, if your
original is Letter size, you will have to choose Tabloid (Ledger) size for the output size. For more than two copies, select
Image Repeat instead of Double Copies.
1. Select [Edit/Color] button (Edit/Stamp on B/W models). 2. Select [Edit Image] tab.
3. Select [Double Copies] button. 4. Select output paper size, then [OK].
R
R
Page 16
R
R
R
R
Page 17
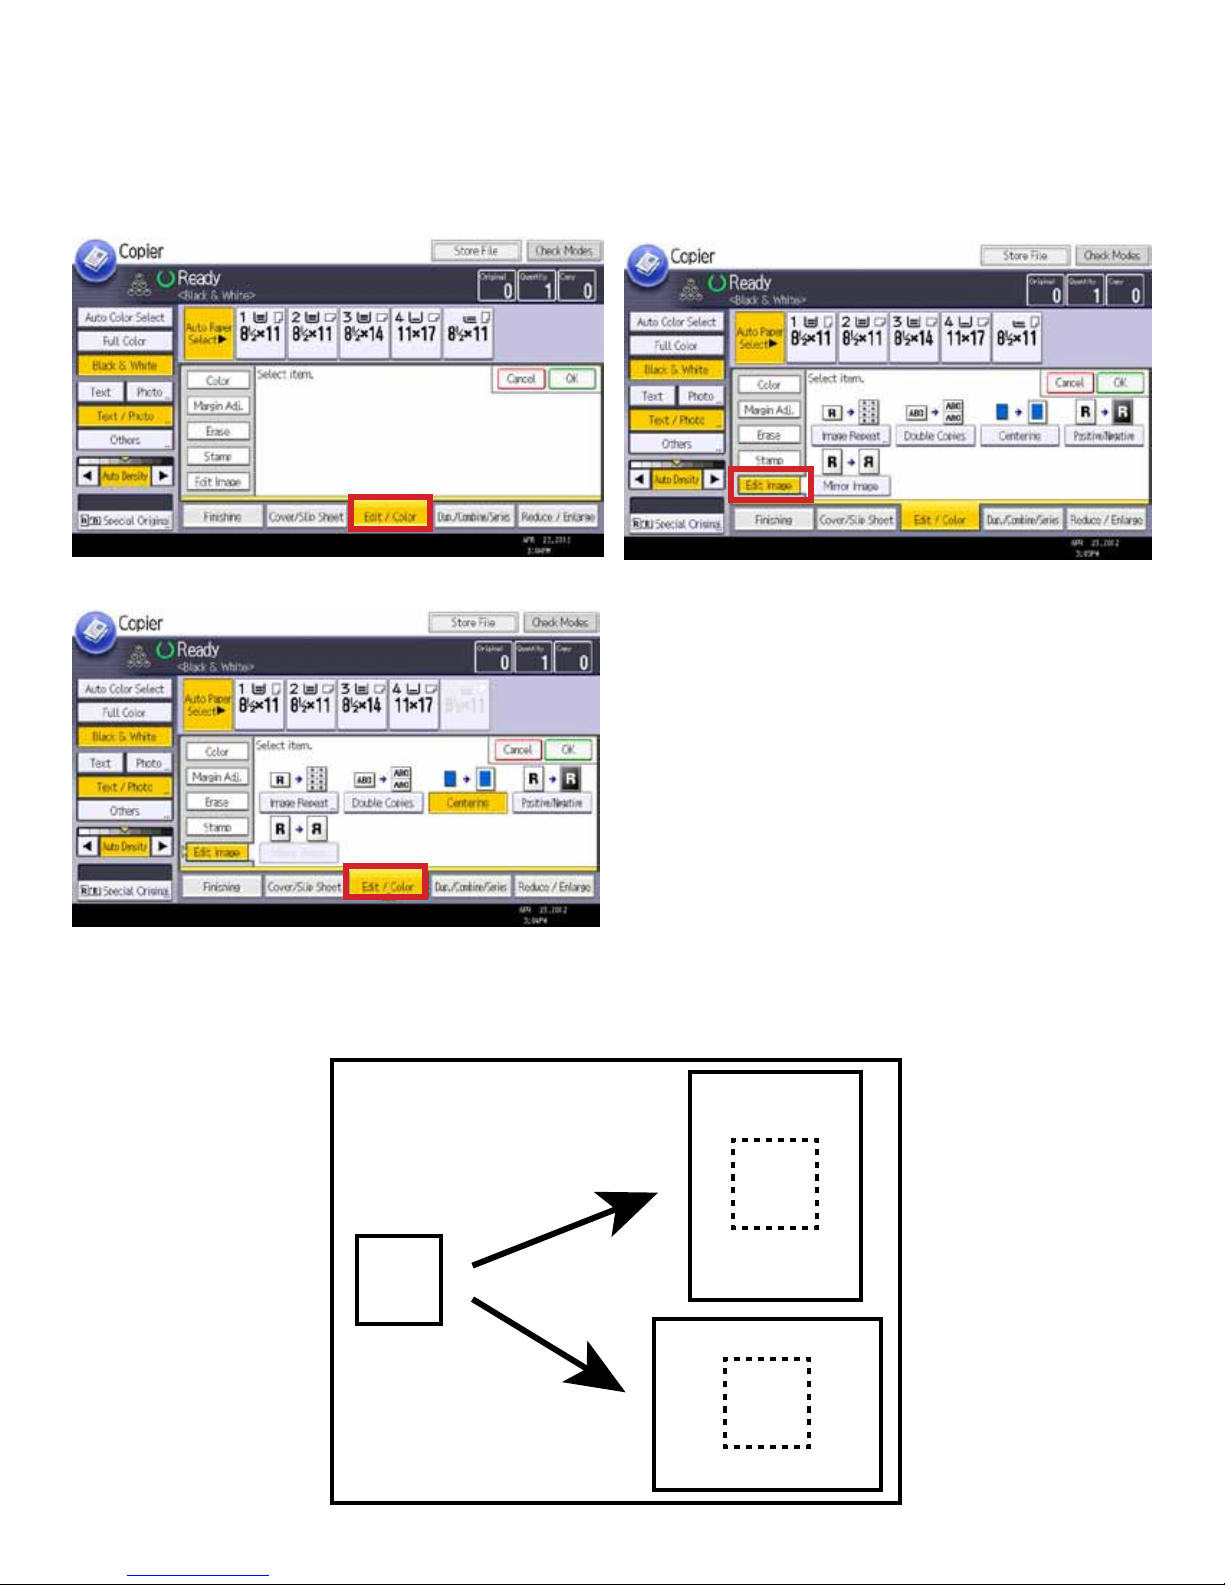
Image Centering
If your image is smaller than the full page, you can center the image on the paper.
Note: You cannot use the bypass tray with this function.
1. Select [Edit/Color] button (Edit/Stamp on B/W models).
3. Select [Centering], and [OK]. Then, select the output paper
size, and your image will be centered on the page.
2. Select the [Edit Image] tab.
R
R
R
Page 17
Page 18
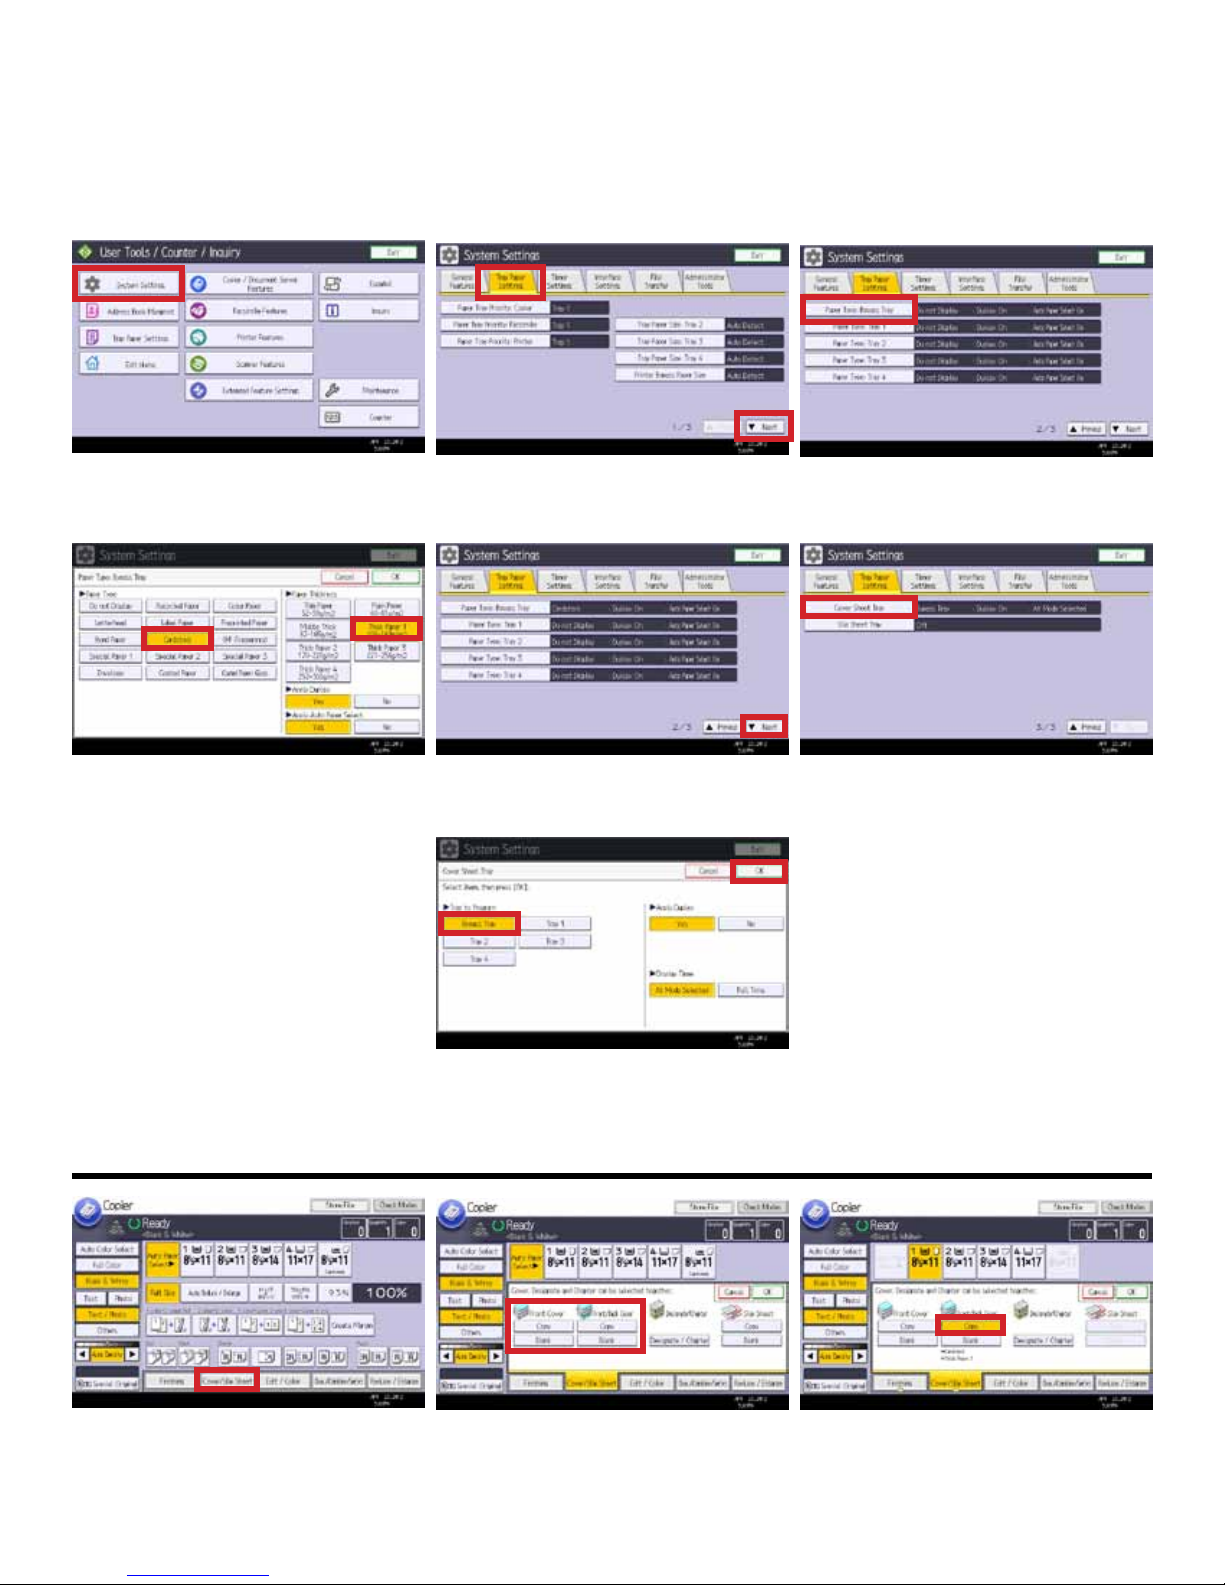
Adding Covers
There are two steps to adding covers to a document. First, you must dene the type of paper being used for the Cover in
User Tools, and next, you have to select the cover during the copy process. Both procedures are shown below.
1. In User Tools, select [System Settings]. 2. Select the [Tray Paper settings] tab,
and then [Next] to go to page 2.
4. Select Cardstock as the paper type,
and select the paper thickness of your
cover stock. For this example, we chose
Thick Paper 1. Then, select [OK].
5. To get to the next setting, select
[Next].
3. Select the [Paper Type: Bypass Tray]
button (if that’s where your cover stock
is loaded).
6. On page 3, select [Cover Sheet Tray].
8. While copying, select [Cover/Slip
Sheet].
7. Select [Bypass Tray] to dene the
Bypass Tray as the one with the cover
stock. Then, select [OK], and [Exit] User
Tools.
9. Depending upon whether or not you
want to copy onto the cover, you can
select [Copy] or [Blank].
Page 18
9. For our example, we are copying
onto both front and back covers, so we
selected [Front/Back Cover Copy].
Page 19
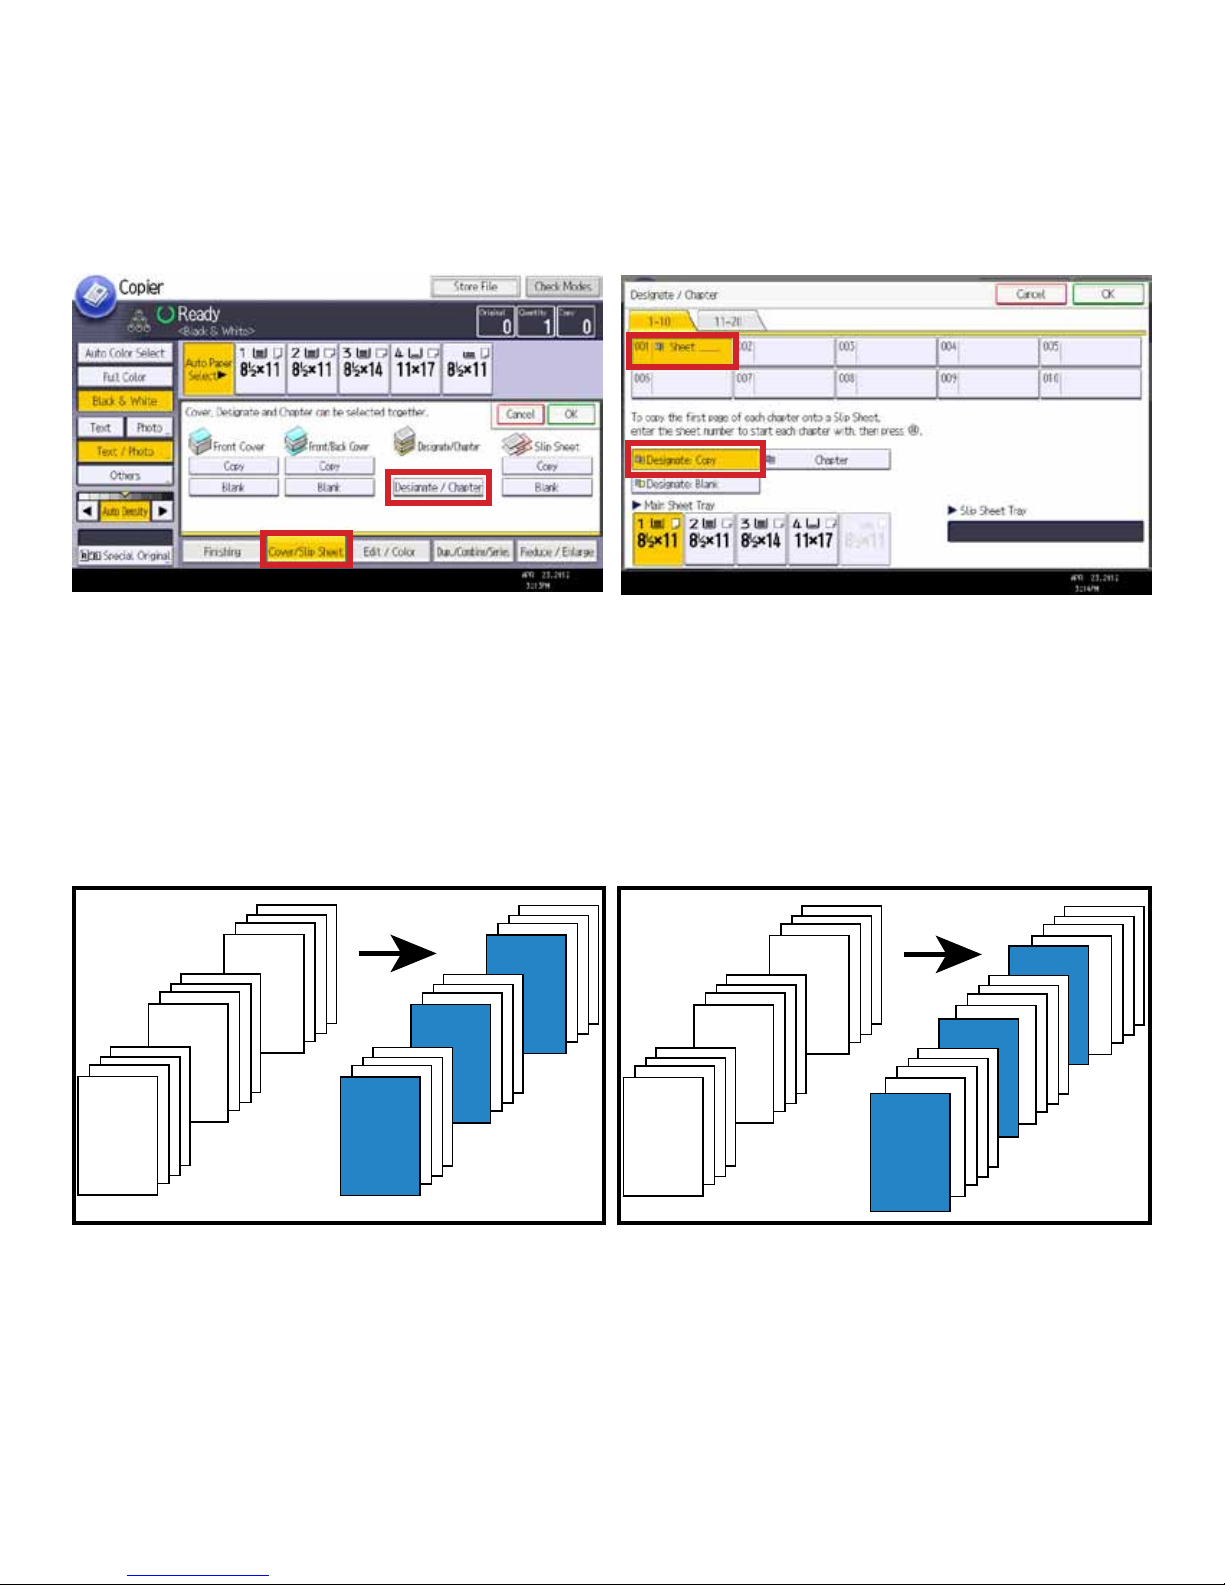
Designate Pages
10
5
1
10
5
1
This function is used to have specic pages of your original copied onto designated sheets, or to insert a designated sheet
for each specied page. Before using this function, you must set up the paper trays under User Tools: Paper Tray Set-
tings. See previous page for instructions on User Tools: Paper Tray Settings.
1. Select [Cover/Slip Sheet]. Then, select [Designate/Chapter].
Copy onto Designated Page
1
5
10
1
10
5
2. Specify which page will be the designated sheet, and
whether the designated sheet will be copied or blank. Then,
select OK. See results below.
Insert Blank Page
10
5
1
1
5
10
Page 19
Page 20
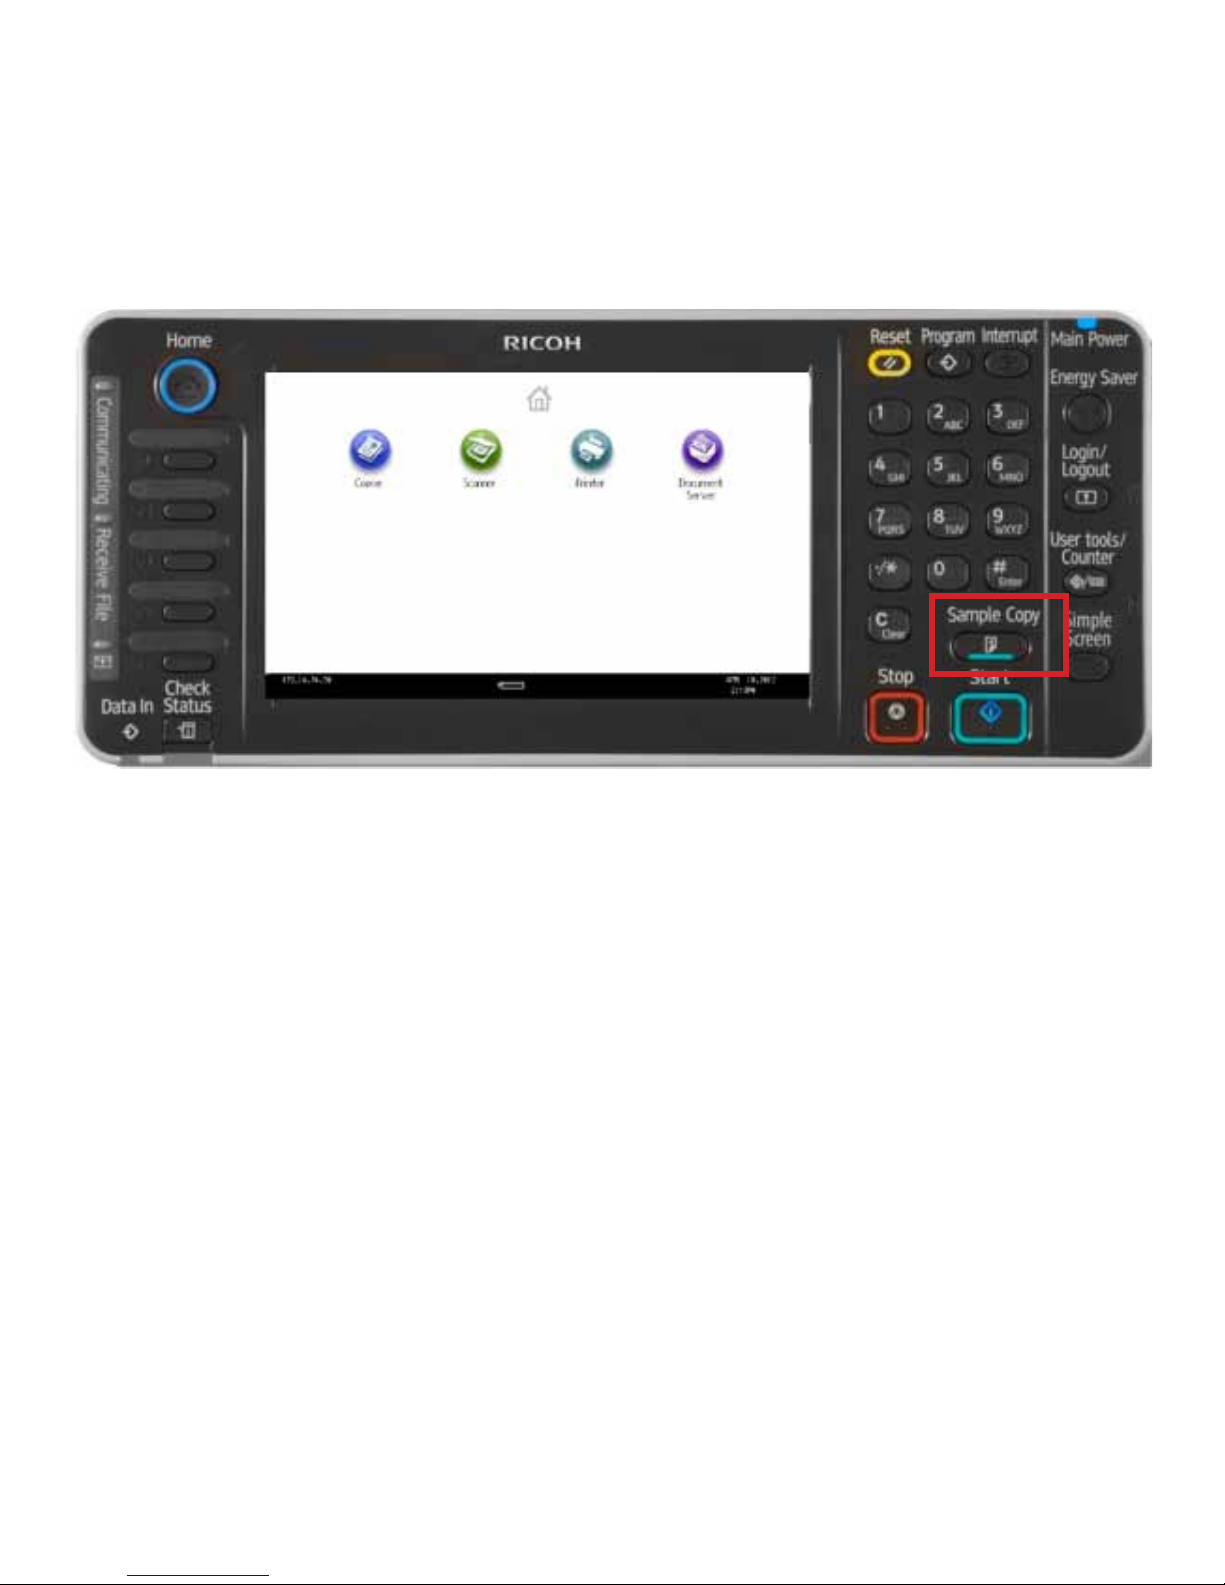
Sample Copy
This function is used when you have many sets of copies to do and want to check the rst set before making the long
copy job. It is especially useful if you have chosen many different nishing options and want to check that it is correct be-
fore continuing the rest of the job. After the Sample Copy, you can choose to cancel, adjust, or continue the job.
1. Place originals in Document Feeder.
2. Select the paper type, orientation,
nishing options, etc. for the copy job.
3. Enter the total number of desired
copies.
4. Select [Sample Copy] instead of the
[Start] key. See indicated button, above.
- One set will be delivered -
If the Sample Copy is acceptable, press [Continue]
If the Sample Copy needs adjustment, press [Suspend],
and adjust the copy settings as desired. Depending on
the combination of functions, some settings may not be
able to be changed.
You can select [Sample Copy] again, or select [Start] to output
the job.
Note: This feature can only be used when [Sort] is selected.
This feature is not available from the [Simplied Screen].
Page 20
Page 21
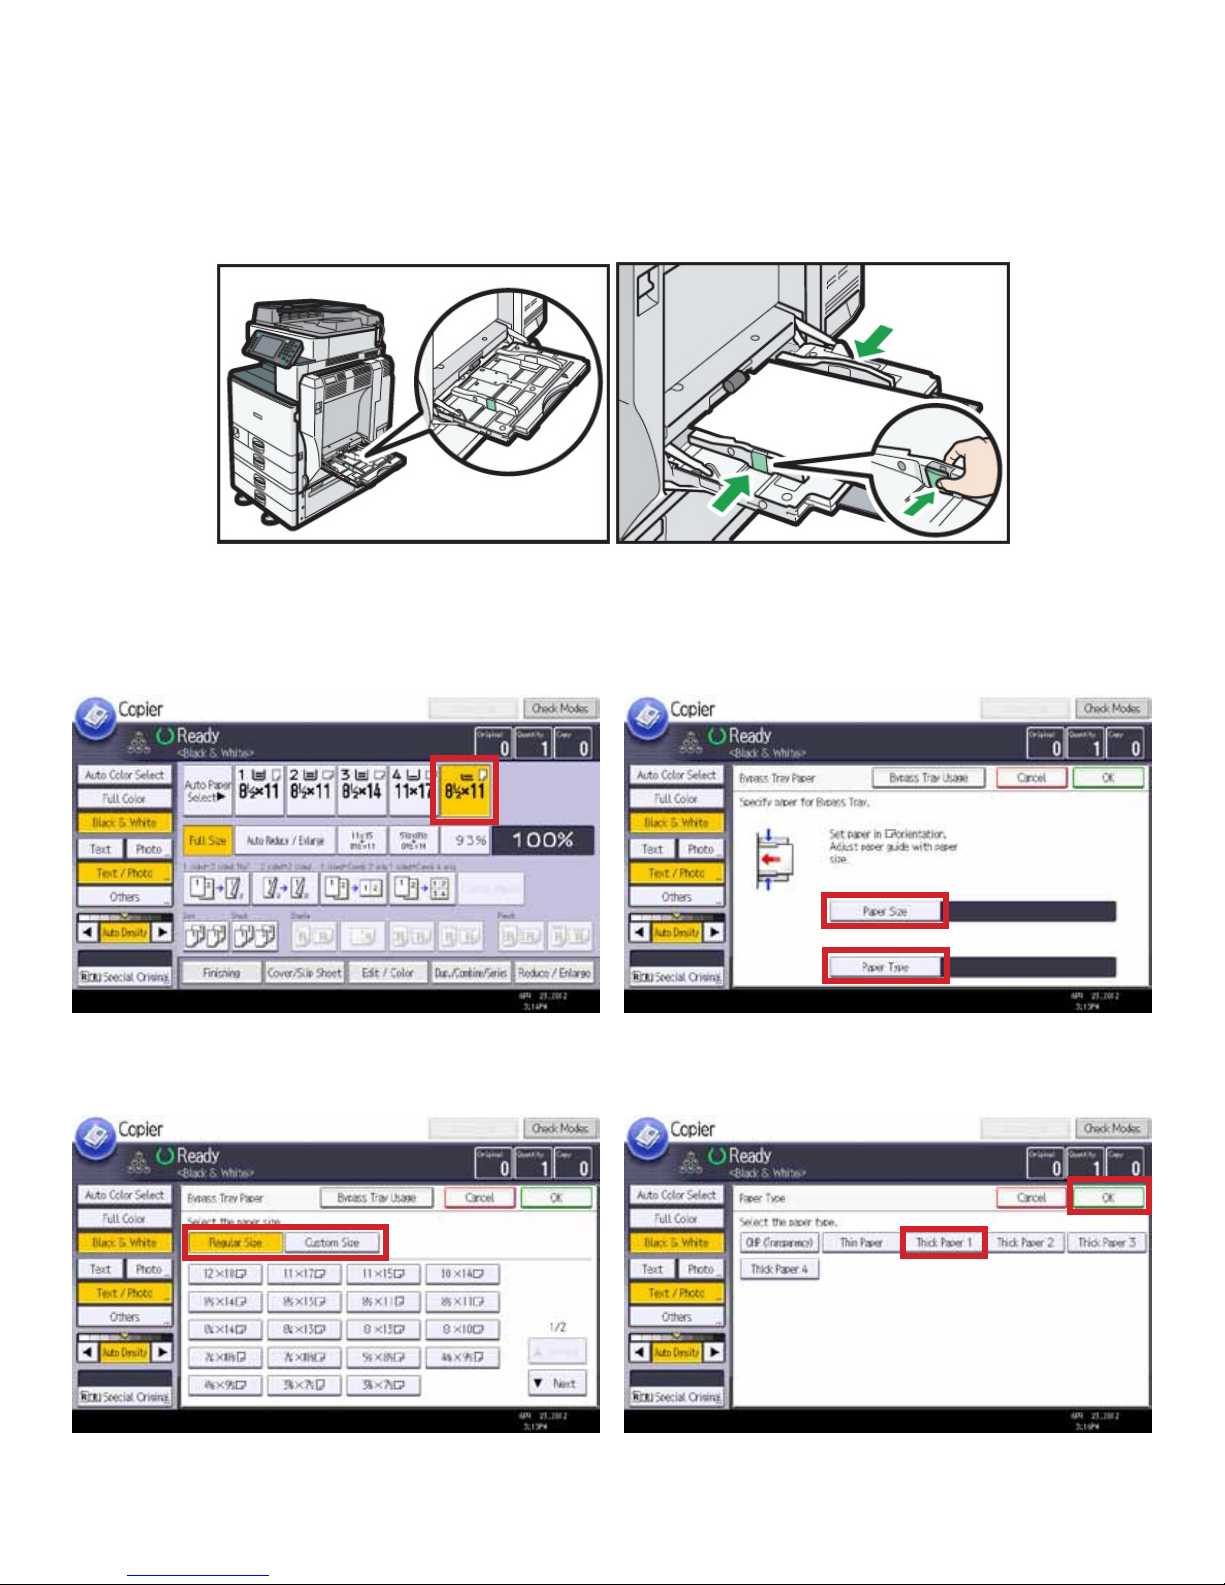
Using the Bypass Tray
The Bypass Tray can be used for paper that isn’t normally loaded in the paper trays, or for paper that is too heavy to pass
through the paper trays. It can also be used for odd-sized paper, one-time use paper, overhead transparencies, or enve-
lopes. The paper size and type should be dened before use.
Open the bypass tray from the side of the
MFP.
1. The paper size in the Bypass Tray is displayed.
Insert paper face down until you hear a beep,
and adjust the guides tightly to the paper. If
the guides are not ush to the paper, misfeeds or skewed images might occur.
2. Once you insert paper into the Bypass Tray, you will see
the Bypass Tray Paper screen. To dene the paper size,
select [Paper Size]. Later, you will dene [Paper Type].
3. Select your paper size, or select [Custom Size] to manually
dene a non-standard size. Then, select [OK].
4. Select [Paper Type], and then select the type of paper
inserted into the Bypass Tray. Then, select [OK].
Page 21
Page 22
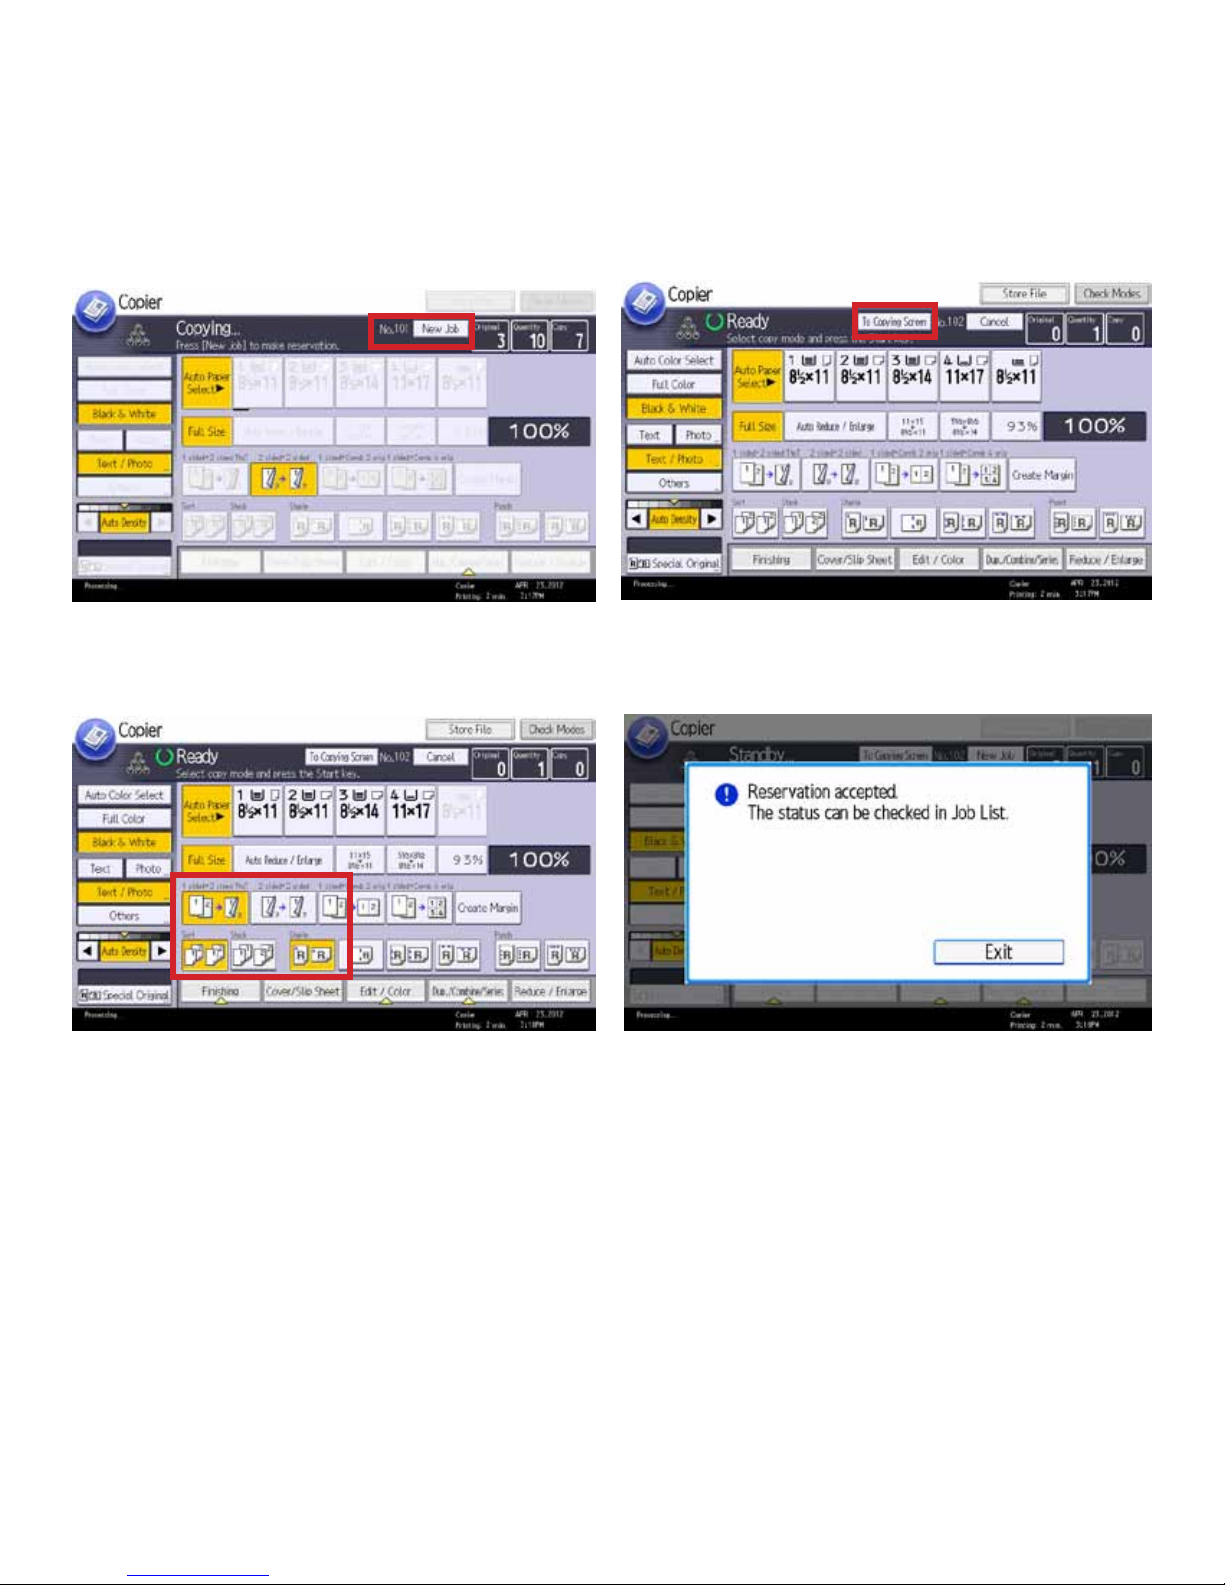
Job Preset
If a long job is in progress, you can start the next job in advance while the rst job is still copying. This allows you to dene
the settings for the next job without waiting for the rst job to complete. When the current copy job is nished, the next job
will start automatically.
1. While the rst job is copying, you’ll see that most buttons
are grayed out. To begin a second job, select [New Job].
3. Select the options you want for job #2. In our case, we
selected [1-sided to 2-sided], [Sort] and [Staple].
4. Place the originals in the Document Feeder, and select
[Start].
2. Now that you’re on job number 2, the buttons are no longer
grayed out. You can always return to Job #1 by selecting [To
Copying Screen].
5. You will be notied when the job has been scanned, and
that it can be checked in the Job List. Select [Exit]. Your job
will start immediately after the previous job has completed.
Page 22
Page 23
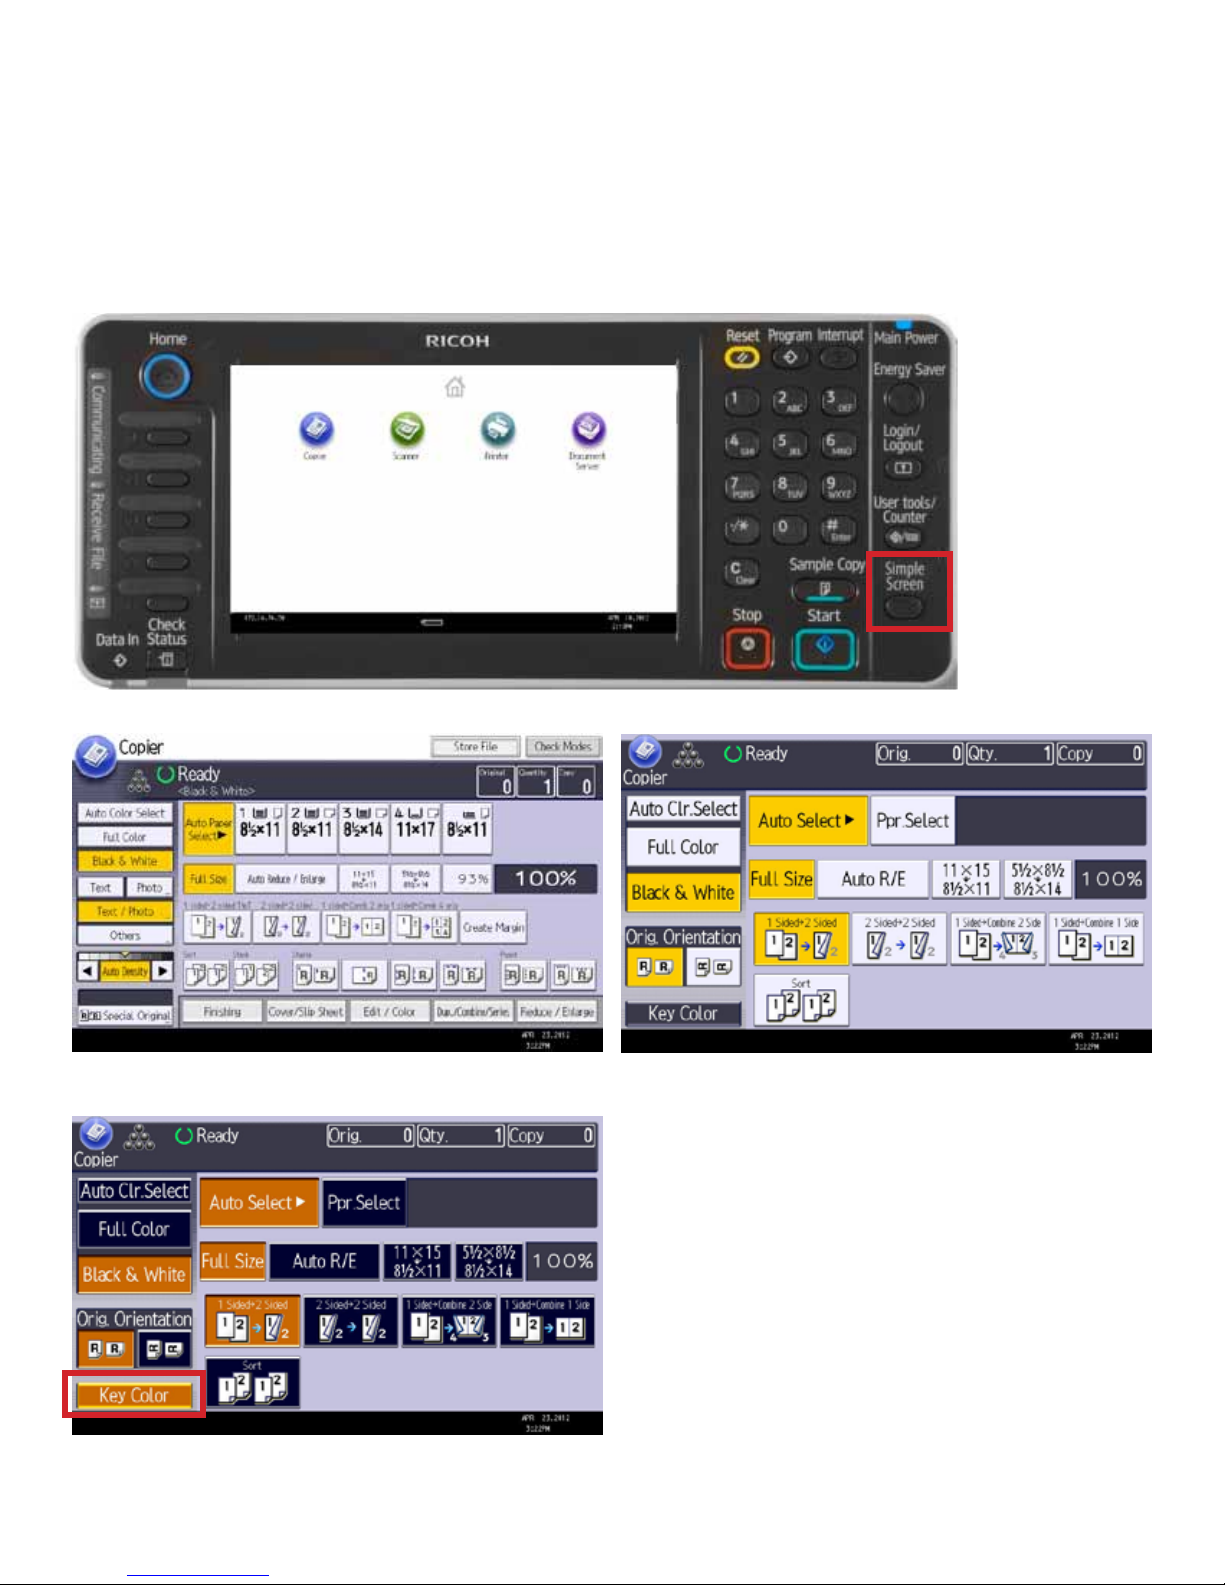
Simple Screen
The Simple Screen button is used to display the common buttons in a larger, more easily readable format. Simple Screen
will show the basic copier functions. Finishing options may be added to this screen for ease of use. However, not all functions are available with this screen.
Key Color is for color blind users, or for users who prefer a darker display. Key Color is only available from the Simple
Screen.
To access the Simple
Screen, select the
[Simple Screen] button from the copier
panel.
Normal Display
Key Color Display
Simple Display
Page 23
 Loading...