

Page 1
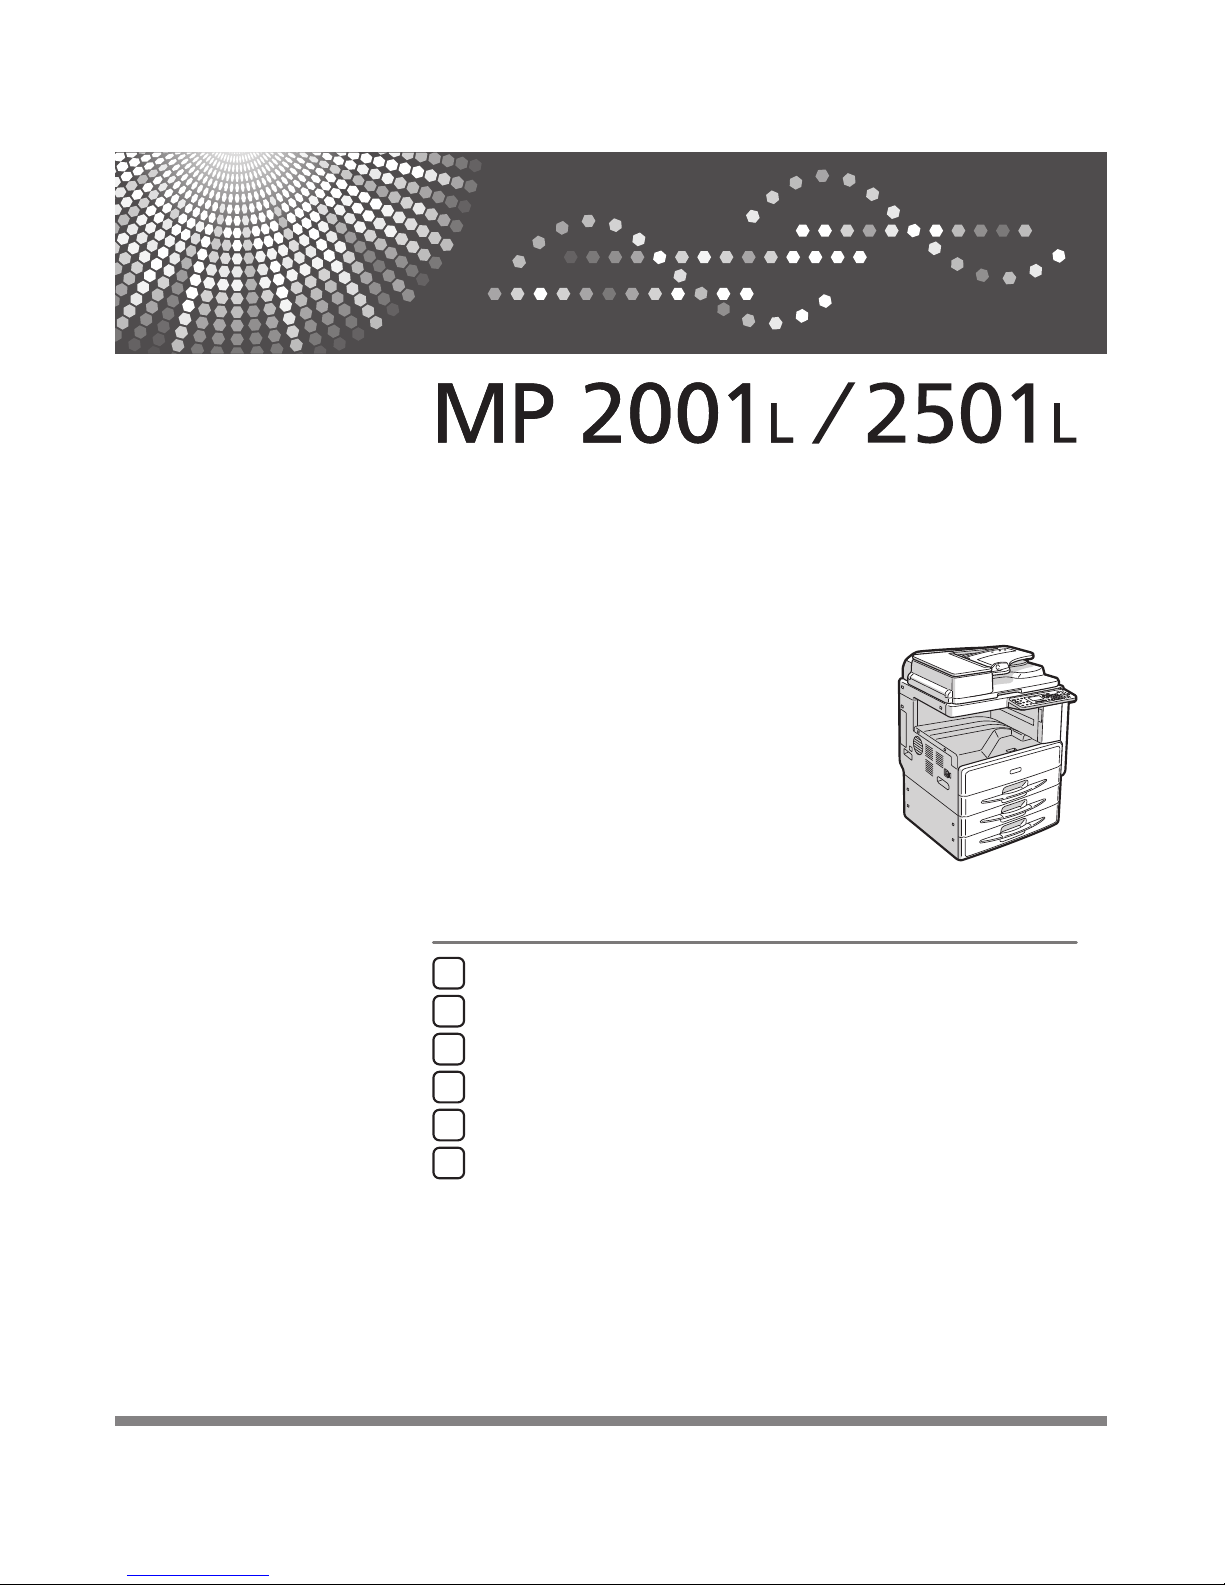
Placing Originals
Copying
Troubleshooting
User Tools (Copier Features)
Remarks
Specifications
1
2
3
4
5
6
Read this manual carefully before you use this machine. For safe and correct use, be sure to read the Safety Information in this manual before using
the machine.
Copy Reference
Operating Instructions
Page 2
Introduction
This manual contains detailed instructions and notes on the operation and use of this machine. For your safety and
benefit, read this manual carefully before using the machine. Keep this manual in a handy place for quick
reference.
Important
Contents of this manual are subject to change without prior notice.
To the maximum extent permitted by applicable laws, in no event will the manufacturer be liable for any damages
whatsoever arising out of failures of this machine, losses of the registered data, or the use of this product and
operation manuals provided with it.
Make sure that you always copy or have backups of the data registered in this machine. Documents or data might
be erased due to your operational errors or malfunctions of the machine.
In no event will the manufacturer be responsible for any documents created by you using this machine or any
results from the data executed by you.
Notes
Some illustrations in this manual might be slightly different from the machine.
Certain options might not be available in some countries. For details, please contact your local dealer.
Laser Safety:
This machine complies with the requirements of IEC60825-1:2007 (EN60825-1:2007) for class 1 laser product.
This machine contains one AlGaInP laser diode, 9 milliwatts, 648-663 nanometer wavelength. The beam
divergence angle is 28 degrees (minimum) and 35 degrees (maximum) in the vertical direction, and 7 degrees
(minimum) and 10 degrees (maximum) in the horizontal direction, and laser beams are generated in Continuous
Wave (CW) mode.
The following label is attached on the rear side of the machine:
Caution:
Use of controls or adjustments or performance of procedures other than those specified in this manual might result
in hazardous radiation exposure.
Notes:
The model names of the machines do not appear in the following pages. Check the type of your machine before
reading this manual. (For details, see page 19 “Machine Types”.)
. Type 1: 20 copies/minute (A4 , 81/2" 11" )
. Type 2: 25 copies/minute (A4 , 81/2" 11" )
Certain types might not be available in some countries. For details, please contact your local dealer.
Two kinds of size notation are employed in this manual. With this machine refer to the metric version.
For good output quality, the manufacturer recommends that you use genuine toner from the manufacturer.
The manufacturer shall not be responsible for any damage or expense that might result from the use of parts other
than genuine parts from the manufacturer with your office products.
Power Source
220 - 240V, 50/60Hz, 8A
Please be sure to connect the power cord to a power source as above. For details about power source, see page 99
“Power Connection”.
Page 3

TABLE OF CONTENTS
Manuals for This Machine................................................................................................................................. 4
Notice..................................................................................................................................................................5
Important.........................................................................................................................................................5
How to Read This Manual................................................................................................................................. 6
Symbols...........................................................................................................................................................6
Names of Major Option................................................................................................................................6
Safety Information...............................................................................................................................................8
Safety During Operation............................................................................................................................... 8
Safety Precautions to Be Followed................................................................................................................8
Positions of WARNING and CAUTION labels.............................................................................................17
Machine Types.................................................................................................................................................19
Control Panel....................................................................................................................................................20
Display..........................................................................................................................................................22
Reading the Display and Using Keys.........................................................................................................23
Turning On the Power...................................................................................................................................... 24
Turning On the Main Power........................................................................................................................24
Turning On the Power..................................................................................................................................24
Turning Off the Power..................................................................................................................................25
Turning Off the Main Power........................................................................................................................25
Saving Energy.............................................................................................................................................. 26
1. Placing Originals
Originals........................................................................................................................................................... 27
Sizes and Weights of Recommended Originals....................................................................................... 27
Sizes Detectable with Auto Paper Select................................................................................................... 28
Missing Image Area.................................................................................................................................... 30
Placing Originals..............................................................................................................................................31
Original Orientation.................................................................................................................................... 31
Placing Originals on the Exposure Glass...................................................................................................31
Placing Originals in the ADF ......................................................................................................................32
Specifying the Original Size When a Paper Tray is Selected..................................................................33
Specifying the Original Size When the Bypass Tray is Selected.............................................................36
2. Copying
Basic Procedure................................................................................................................................................41
1
Page 4

Copying from the Bypass Tray........................................................................................................................43
Copier Functions...............................................................................................................................................48
Adjusting Image Density..............................................................................................................................48
Selecting Original Type Setting.................................................................................................................. 48
Selecting Copy Paper..................................................................................................................................49
Preset Reduce/Enlarge............................................................................................................................... 50
Zoom.............................................................................................................................................................52
Auto Reduce/Enlarge................................................................................................................................. 53
Sort................................................................................................................................................................54
Changing the number of sets...................................................................................................................... 56
Duplex...........................................................................................................................................................57
One-Sided Combine................................................................................................................................... 60
Two-Sided Combine....................................................................................................................................63
Series Copies............................................................................................................................................... 66
ID Card Copy...............................................................................................................................................68
3. Troubleshooting
If Your Machine Does Not Operate As You Want....................................................................................... 71
When a Message Is Displayed.................................................................................................................. 71
If You Cannot Make Clear Copies................................................................................................................. 73
If You Cannot Make Copies As You Want.................................................................................................... 75
When Memory Is Full.................................................................................................................................. 76
Loading Paper.................................................................................................................................................. 78
Precautions for Loading Paper....................................................................................................................78
Loading Paper into Paper Trays..................................................................................................................78
Orientation-Fixed Paper or Two-Sided Paper...........................................................................................80
Adding Toner....................................................................................................................................................83
Handling Toner............................................................................................................................................ 83
Toner Storage...............................................................................................................................................84
Used Toner................................................................................................................................................... 84
Removing Toner................................................................................................................................................85
Inserting Toner.................................................................................................................................................. 86
4. User Tools (Copier Features)
Accessing User Tools (Copier Features).........................................................................................................87
2
Page 5

Changing Default Settings...........................................................................................................................87
Quitting User Tools...................................................................................................................................... 88
Settings You Can Change with User Tools.....................................................................................................89
APS/ Auto R/E Priority................................................................................................................................89
Auto Tray Switching.....................................................................................................................................89
Original Type Setting...................................................................................................................................89
Duplex Mode Priority.................................................................................................................................. 90
Orientation................................................................................................................................................... 90
Max. Number of Sets.................................................................................................................................. 91
Original Count Display................................................................................................................................91
Reproduction Ratio...................................................................................................................................... 91
Preset R/E Priority........................................................................................................................................ 92
Duplex Margin.............................................................................................................................................92
Rotate Sort.................................................................................................................................................... 92
Rotate Sort:Auto Continue...........................................................................................................................92
Letterhead Setting........................................................................................................................................ 93
5. Remarks
Do's and Don'ts................................................................................................................................................ 95
Where to Put Your Machine............................................................................................................................97
Machine Environment..................................................................................................................................97
Moving......................................................................................................................................................... 98
Power Connection....................................................................................................................................... 99
Access to the Machine..............................................................................................................................101
Maintaining Your Machine...........................................................................................................................103
Cleaning the Exposure Glass................................................................................................................... 103
Cleaning the Exposure Glass Cover........................................................................................................103
Cleaning the ADF ..................................................................................................................................... 104
6. Specifications
Combination Chart........................................................................................................................................ 105
Supplementary Information...........................................................................................................................107
INDEX...........................................................................................................................................................111
3
Page 6

Manuals for This Machine
The following manuals describe the operational procedures of this machine. For particular functions, see
the relevant parts of the manual.
• Manuals provided are specific to machine type.
• Adobe® Acrobat® Reader®/Adobe Reader must be installed in order to view the manuals as PDF
files.
• Two CD-ROMs are provided:
• CD-ROM 1 "Operating Instructions"
• CD-ROM 2 "Printer and Scanner Drivers"
General Settings Guide
Provides an overview of the machine and describes System Settings (paper trays, Administrator
Tools, etc.), and troubleshooting.
Network Guide
Describes procedures for configuring the machine and computers in a network environment.
Copy Reference (this manual)
Describes operations, functions, and troubleshooting for the machine's copier function.
Printer/Scanner Reference
Describes system settings, functions, troubleshooting and operations for the machine's printer and
scanner functions.
4
Page 7

Notice
Important
Do not copy or print any item for which reproduction is prohibited by law.
Copying or printing the following items is generally prohibited by local law:
bank notes, revenue stamps, bonds, stock certificates, bank drafts, checks, passports, driver's licenses.
The preceding list is meant as a guide only and is not inclusive. We assume no responsibility for its
completeness or accuracy. If you have any questions concerning the legality of copying or printing
certain items, consult with your legal advisor.
5
Page 8

How to Read This Manual
Symbols
This manual uses the following symbols:
This symbol indicates a potentially hazardous situation that might result in death or serious injury when
you misuse the machine without following the instructions under this symbol. Be sure to read the
instructions, all of which are described in the Safety Information section.
This symbol indicates a potentially hazardous situation that might result in minor or moderate injury or
property damage that does not involve personal injury when you misuse the machine without following
the instructions under this symbol. Be sure to read the instructions, all of which are described in the
Safety Information section.
* The statements above are notes for your safety.
If this instruction is not followed, paper might be misfed, originals might be damaged, or data might be
lost. Be sure to read this.
This symbol indicates information or preparations required prior to operating.
This symbol indicates precautions for operation, or actions to take after abnormal operation.
This symbol indicates numerical limits, functions that cannot be used together, or conditions in which a
particular function cannot be used.
This symbol indicates a reference.
[ ]
Indicates the names of keys on the machine's display or control panels.
Names of Major Option
Major option of this machine are referred to as follows in this manual:
6
Page 9

• Auto Document Feeder ADF
7
Page 10
Safety Information
When using this machine, the following safety precautions should always be followed.
Safety During Operation
In this manual, the following important symbols are used:
Indicates a potentially hazardous situation which, if instructions are not followed, could result in death
or serious injury.
Indicates a potentially hazardous situation which, if instructions are not followed, may result in minor
or moderate injury or damage to property.
Safety Precautions to Be Followed
This section explains safety precautions that should always be followed when using this machine.
Environments where the machine can be used
This section explains safety precautions about environments where the machine can be used.
• Do not use flammable sprays or solvents in the vicinity of this machine. Doing so could result in
fire or electric shock.
• Do not place vases, plant pots, cups, toiletries, medicines, small metal objects, or containers
holding water or any other liquids, on or close to this machine. Fire or electric shock could result
from spillage or if such objects or substances fall inside this machine.
• Keep the machine away from humidity and dust. Otherwise a fire or an electric shock might
occur.
8
Page 11
• Do not place the machine on an unstable or tilted surface. If it topples over, an injury might
occur.
• Do not place heavy objects on the machine. Doing so can cause the machine to topple over,
possibly resulting in injury.
• Make sure the room where you are using the machine is well ventilated and spacious. Good
ventilation is especially important when the machine is used heavily.
• Keep the machine away from salt-bearing air and corrosive gases. Also, do not install the
machine in places where chemical reactions are likely (laboratories, etc.), as doing so will
cause the machine to malfunction.
• Do not obstruct the machine's vents. Doing so risks fire caused by overheated internal
components.
Handling power cords and power cord plugs
This section explains safety precautions about handling power cords and power cord plugs.
• Do not use any power sources other than those that match the specifications shown on the inside
front cover of this manual. Doing so could result in fire or electric shock.
• Do not use any frequencies other than those that match the specifications shown. Doing so could
result in fire or electric shock.
• Do not use multi-socket adaptors. Doing so could result in fire or electric shock.
9
Page 12

• Do not use extension cords. Doing so could result in fire or electric shock.
• Do not use power cords that are damaged, broken, or modified. Also, do not use power cords
that have been trapped under heavy objects, pulled hard, or bent severely. Doing so could
result in fire or electric shock.
• Touching the prongs of the power cable's plug with anything metallic constitutes a fire and
electric shock hazard.
• The supplied power cord is for use with this machine only. Do not use it with other appliances.
Doing so could result in fire or electric shock.
• It is dangerous to handle the power cord plug with wet hands. Doing so could result in electric
shock.
• If the power cord is damaged and its inner wires are exposed or broken, contact your service
representative for a replacement. Use of damaged power cords could result in fire or electric
shock.
• Be sure to disconnect the plug from the wall outlet at least once a year and check for the
following:
• There are burn marks on the plug.
• The prongs on the plug are deformed.
• If any of the above conditions exist, do not use the plug and consult your dealer or service
representative. Use of the plug could result in fire or electric shock.
10
Page 13
• Be sure to disconnect the power cord from the wall outlet at least once a year and check for the
following:
• The power cord's inner wires are exposed, broken, etc.
• The power cord's coating has a crack or dent.
• When bending the power cord, the power turns off and on.
• Part of the power cord becomes hot.
• The power cord is damaged.
• If any of the above conditions exist, do not use the power cord and consult your dealer or
service representative. Use of the power cord could result in fire or electric shock.
• Be sure to push the plug of the power cord fully into the wall outlet. Partially inserted plugs
create an unstable connection that can result in unsafe buildup of heat.
• If this machine is not going to be used for several days or longer at a time, disconnect its power
cord from the wall outlet.
• When disconnecting the power cord from the wall outlet, always pull the plug, not the cord.
Pulling the cord can damage the power cord. Use of damaged power cords could result in fire
or electric shock.
• Be sure to disconnect the plug from the wall outlet and clean the prongs and the area around
the prongs at least once a year. Allowing dust to build up on the plug constitutes a fire hazard.
• When performing maintenance on the machine, always disconnect the power cord from the
wall outlet.
Handling the main machine
This section explains safety precautions about handling the main machine.
11
Page 14
• Be sure to locate the machine as close as possible to a wall outlet. This will allow easy
disconnection of the power cord in the event of an emergency.
• If the machine emits smoke or odours, or if it behaves unusually, you must turn off its power
immediately. After turning off the power, be sure to disconnect the power cord plug from the
wall outlet. Then contact your service representative and report the problem. Do not use the
machine. Doing so could result in fire or electric shock.
• If metal objects, or water or other fluids fall inside this machine, you must turn off its power
immediately. After turning off the power, be sure to disconnect the power cord plug from the
wall outlet. Then contact your service representative and report the problem. Do not use the
machine. Doing so could result in fire or electric shock.
• Do not touch this machine if a lightning strike occurs in the immediate vicinity. Doing so could
result in electric shock.
• The following explains the warning messages on the plastic bag used in this product's
packaging.
• Keep the polythene materials (bags, etc.) supplied with this machine away from babies
and small children at all times. Suffocation can result if polythene materials are brought into
contact with the mouth or nose.
• Unplug the power cord from the wall outlet before you move the machine. While moving the
machine, take care that the power cord is not damaged under the machine. Failing to take these
precautions could result in fire or electric shock.
• If you have to move the machine when the optional paper tray unit is attached, do not push on
the main unit's top section. Doing so can cause the optional paper tray unit to detach, possibly
resulting in injury.
12
Page 15
• After you move the machine, use the caster fixture to fix it in place. Otherwise the machine might
move or come down to cause an injury.
• If the lower paper tray or lower paper trays is installed, do not pull out more than one tray at a
time when you are changing or replenishing paper or resolving paper jams. Pressing down
forcefully on the machine's upper surfaces can result in malfunctions and/or user injury.
• Contact your service representative if you need to lift the machine (such as when relocating it to
another floor). Do not attempt to lift the machine without the assistance of your service
representative. The machine will be damaged if it topples or is dropped, resulting in
malfunction and risk of injury to users. The machine's various handling areas are for service
engineer use only. Do not touch these areas.
• Do not look into the lamp. It can damage your eyes.
• Do not hold the control panel while moving the machine. Doing so may damage the control
panel, cause a malfunction, or result in injury.
• Protect the machine from dampness or wet weather, such as rain and snow.
• For environmental reasons, do not dispose of the machine or expended supply waste at
household waste collection points. Disposal can take place at an authorized dealer.
• Keep your hands away from the hinges and exposure glass when lowering the ADF. Not doing
so may result in an injury if your hands or fingers are pinched.
Handling the machine's interior
This section explains safety precautions about handling the machine's interior.
13
Page 16
• Do not remove any covers or screws other than those explicitly mentioned in this manual. Inside
this machine are high voltage components that are an electric shock hazard and laser
components that could cause blindness. Contact your sales or service representative if any of the
machine's internal components require maintenance, adjustment, or repair.
• Do not attempt to disassemble or modify this machine. Doing so risks burns and electric shock.
Note again that exposure to the laser components inside this machine risks blindness.
• Some of this machine's internal components get very hot. For this reason, take care when
removing misfed paper. Not doing so could result in burns.
• The inside of the machine could be very hot. Do not touch the parts with a label indicating the
"hot surface". Otherwise, an injury might occur.
• When removing jammed paper, make sure not to trap or injure your fingers.
• When loading paper, take care not to trap or injure your fingers.
• During operation, rollers for transporting the paper and originals revolve. A safety device has
been installed so that the machine can be operated safely. But take care not to touch the
machine during operation. Otherwise, an injury might occur.
• If the machine's interior is not cleaned regularly, dust will accumulate. Fire and breakdown can
result from heavy accumulation of dust inside this machine. Contact your sales or service
representative for details about and charges for cleaning the machine's interior.
Handling the machine's supplies
This section explains safety precautions about handling the machine's supplies.
14
Page 17
• Do not incinerate toner (new or used) or toner containers. Doing so risks burns. Toner will ignite
on contact with naked flame.
• Do not store toner (new or used) or toner containers anywhere near naked flames. Doing so
risks fire and burns. Toner will ignite on contact with naked flame.
• Do not incinerate spilled toner or used toner. Toner dust might ignite when exposed to an open
flame.
• Do not use the cleaner to suck spilled toner (including used toner). Sucked toner may cause
firing or explosion due to electrical contact flickering inside the cleaner. However, it is possible
to use the cleaner designed for dust explosion-proof purpose. If toner is spilled over the floor,
sweep up spilled toner slowly and clean remainder with wet cloth.
• The following explains the warning messages on the plastic bag used in this product's
packaging.
• Keep the polythene materials (bags, etc.) supplied with this machine away from babies
and small children at all times. Suffocation can result if polythene materials are brought into
contact with the mouth or nose.
• Do not crush or squeeze toner containers. Doing so can cause toner spillage, possibly resulting
in dirtying of skin, clothing, and floor, and accidental ingestion.
• Store toner (new or used), toner containers, and components that have been in contact with
toner out of reach of children.
• If toner or used toner is inhaled, gargle with plenty of water and move into a fresh air
environment. Consult a doctor if necessary.
15
Page 18
• If toner or used toner gets into your eyes, flush immediately with large amounts of water. Consult
a doctor if necessary.
• If toner or used toner is swallowed, dilute by drinking a large amount of water. Consult a doctor
if necessary.
• When removing jammed paper or replacing toner, avoid getting toner (new or used) on your
clothing. If toner comes into contact with your clothing, wash the stained area with cold water.
Hot water will set the toner into the fabric and make removing the stain impossible.
• When removing jammed paper or replacing toner, avoid getting toner (new or used) on your
skin. If toner comes into contact with your skin, wash the affected area thoroughly with soap and
water.
• Do not attempt to print on stapled sheets, aluminum foil, carbon paper, or any kind of
conductive paper. Doing so risks fire.
16
Page 19
Positions of WARNING and CAUTION labels
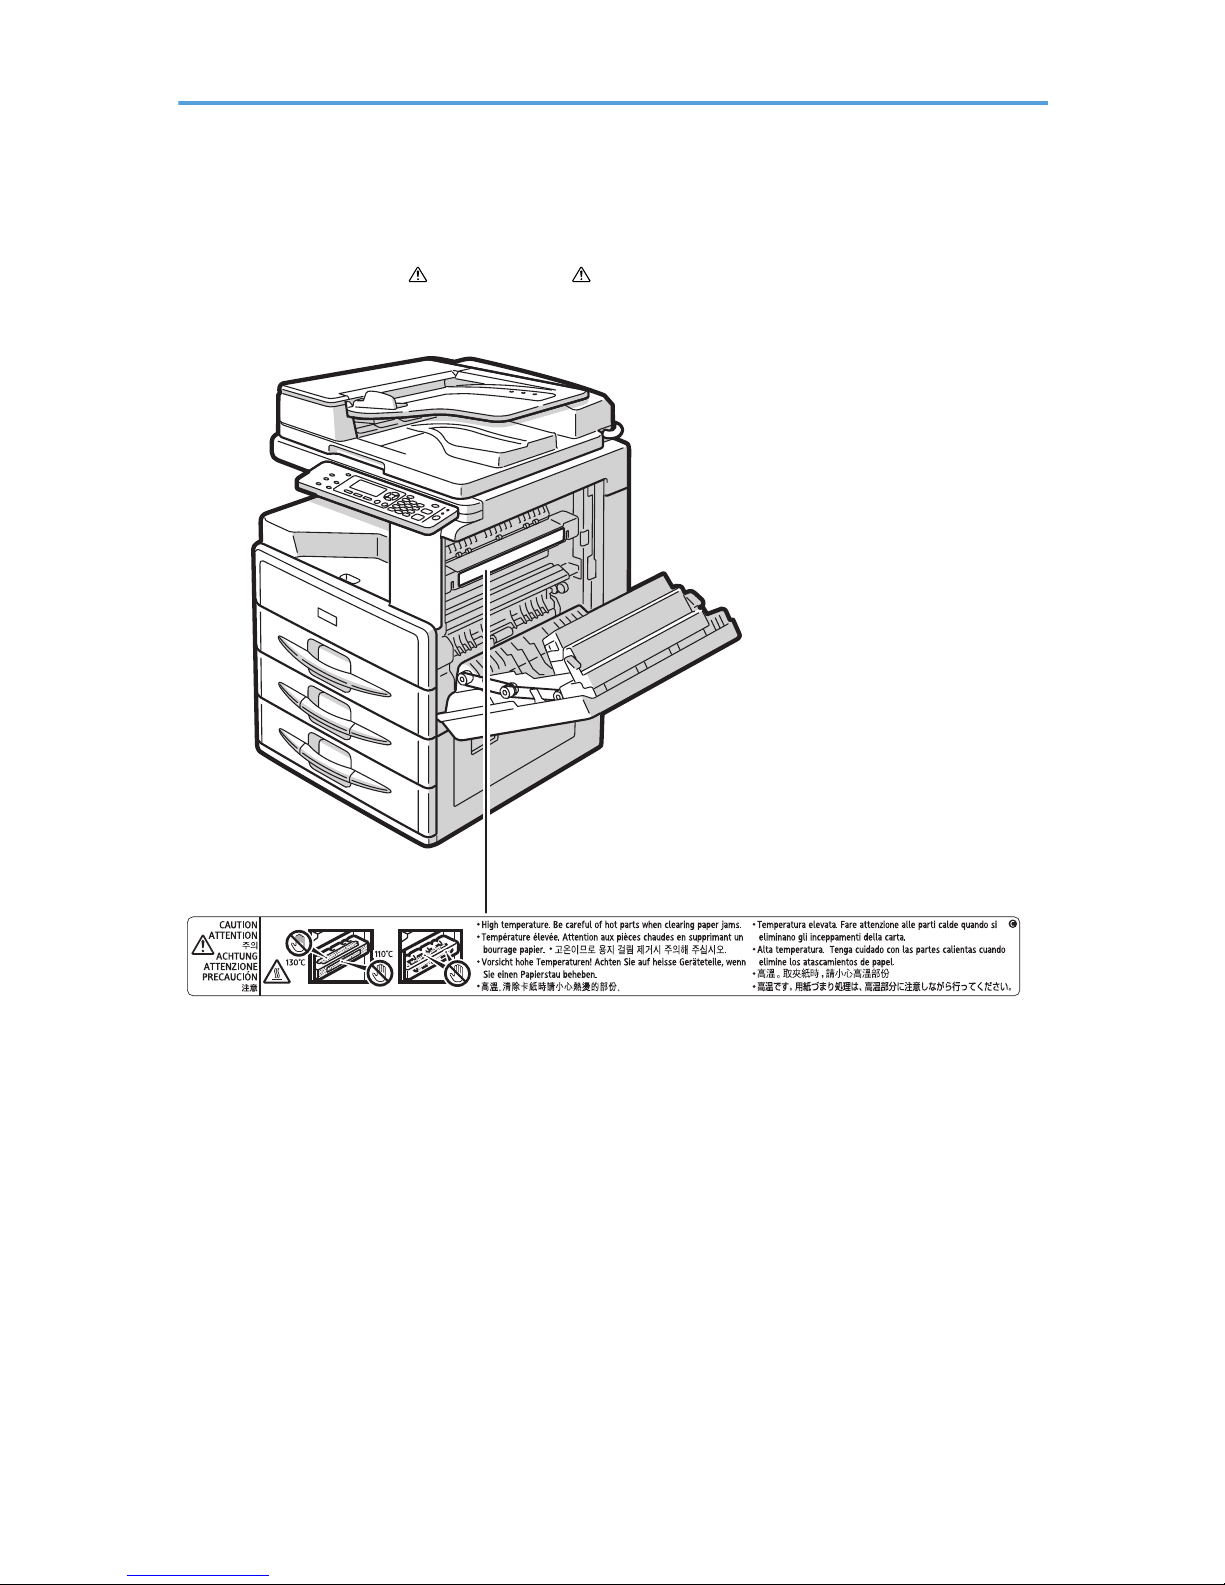
This machine has labels for WARNING and CAUTION at the positions shown below. For safety,
please follow the instructions and handle the machine as indicated.
CUA101
1
1.
High temperature. Be careful of hot parts when clearing paper jams.
17
Page 20
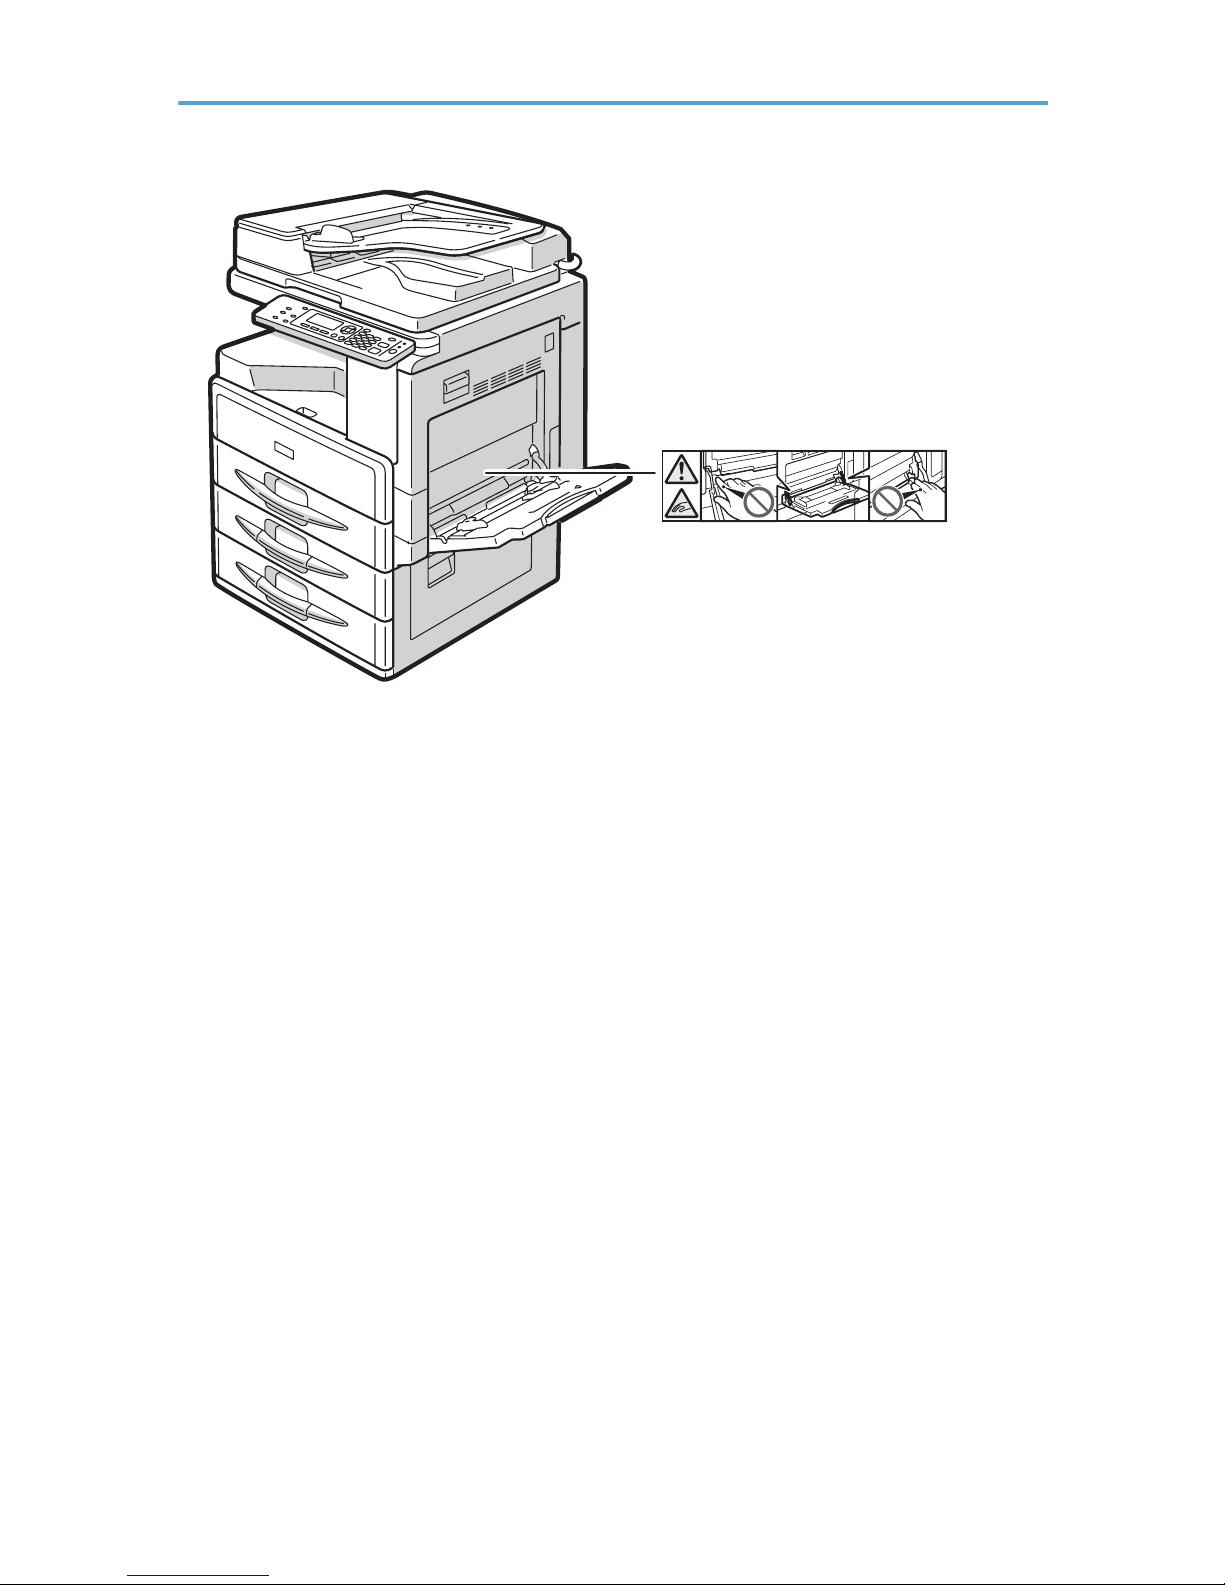
CUA142
2
2.
Be careful not to injure your fingers or get them caught in the rotating cams on either side of the bypass
tray when printing or making copies from the bypass tray, when turning on the main power, or when
removing misfed paper.
18
Page 21
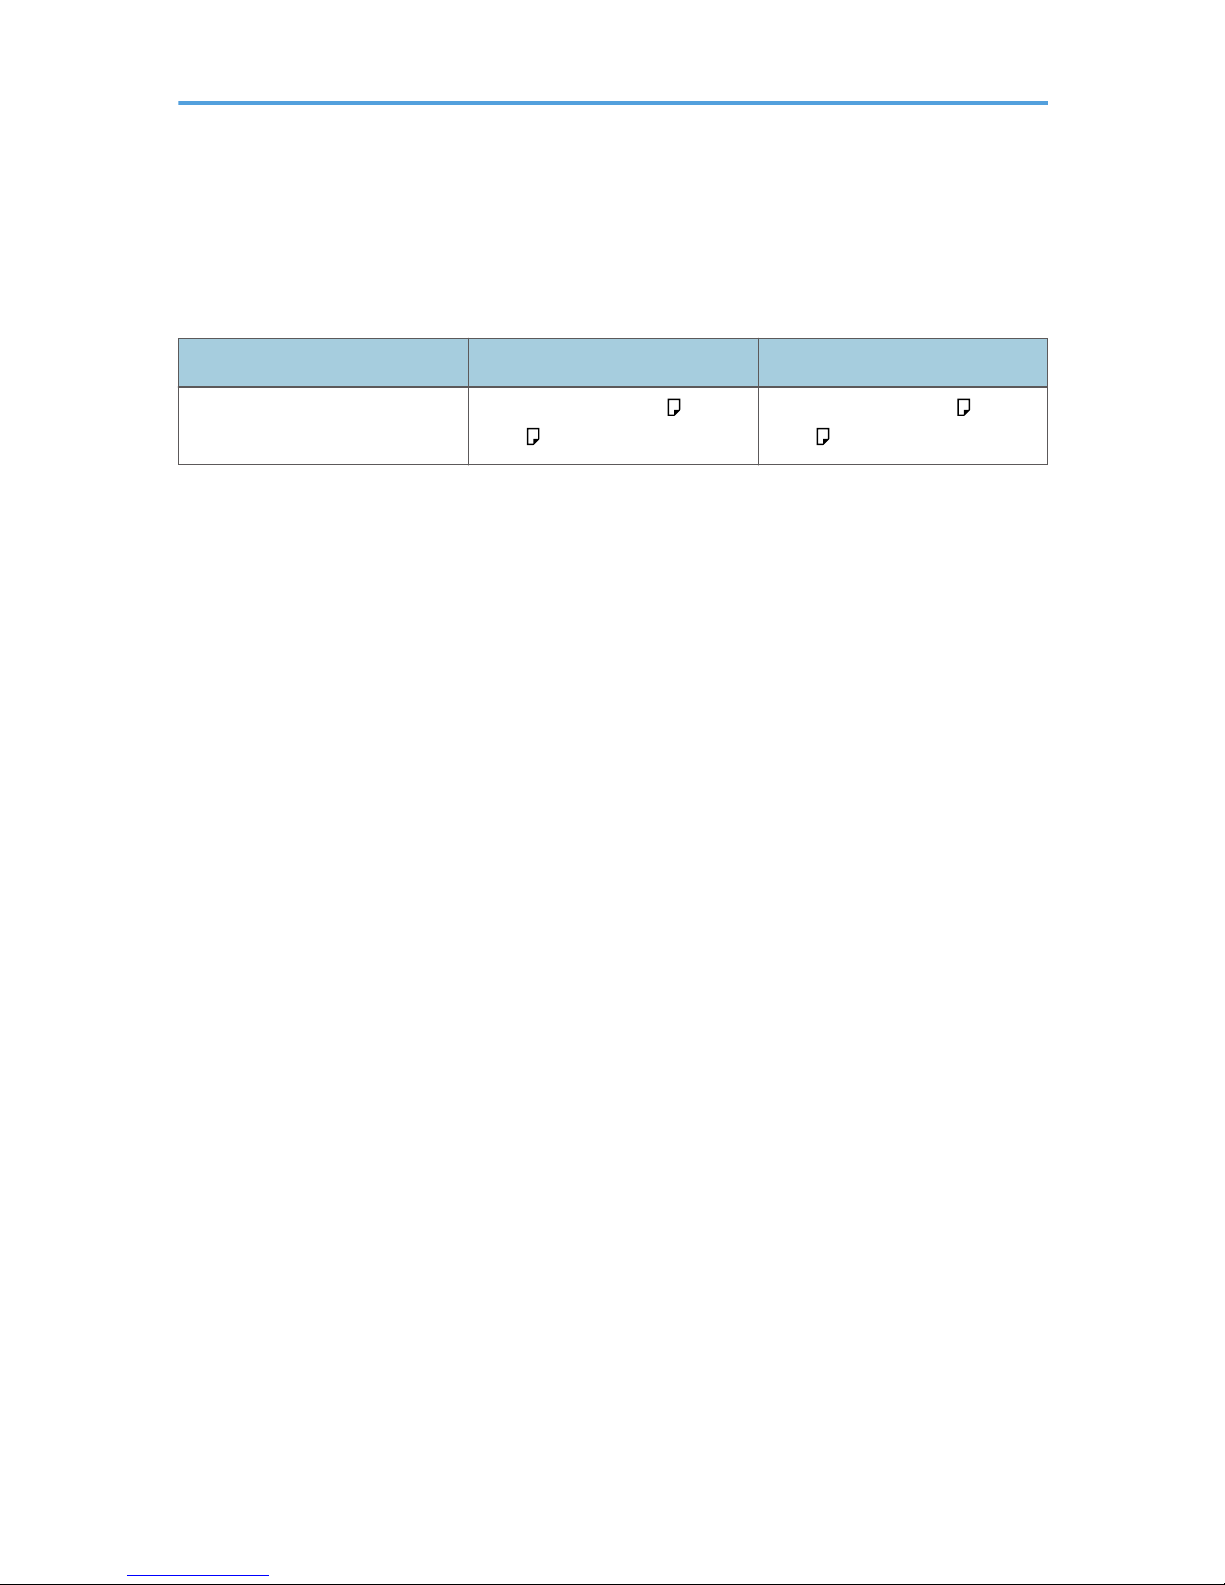
Machine Types
This machine comes in two models which vary by copy speed. To make sure which model you have, see
the inside front cover of this manual.
Type 1 Type 2
Copy Speed 20 copies/minute (A4 , 81/2"
× 11" )
25 copies/minute (A4 , 81/2"
× 11" )
19
Page 22
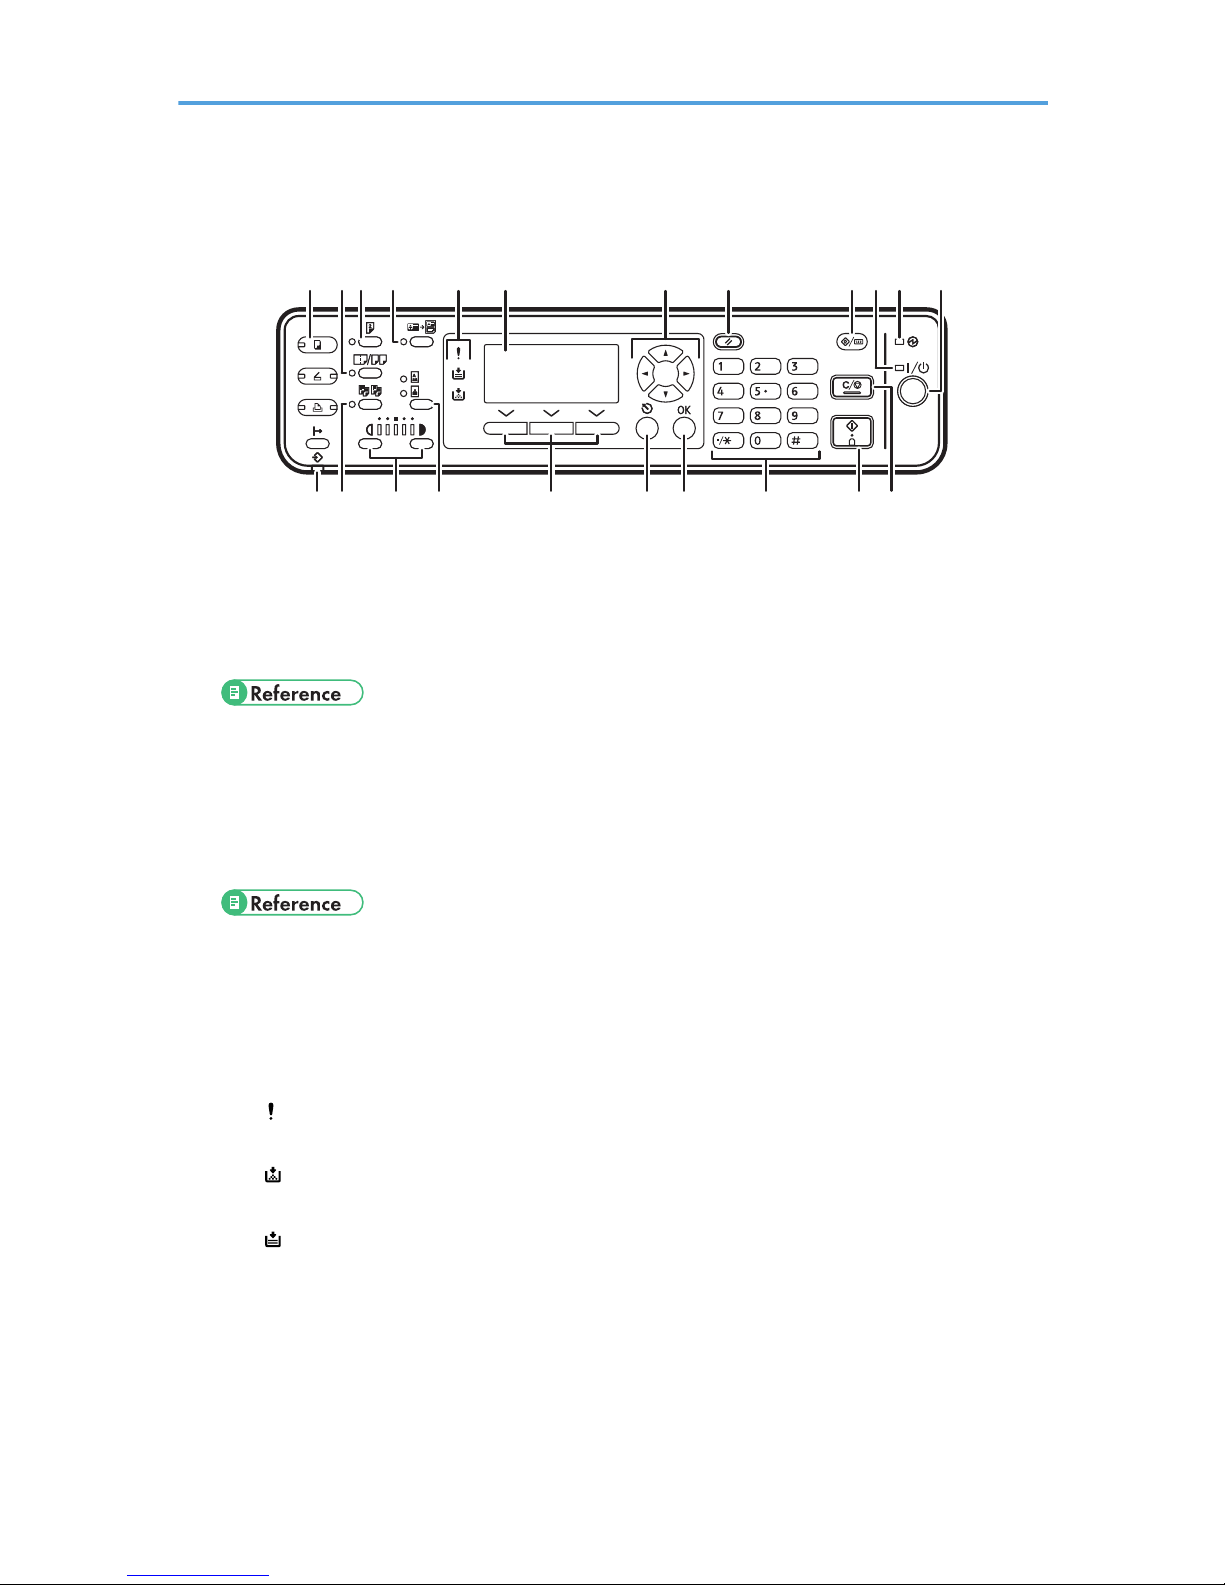
Control Panel
CUA102
1 3
16
2 4
7 985 6 1110 12
1513 17 18 19 20 222114
1. [Copy] key
Press to activate the copier function.
2. [Combine/Series] key
Press to make combine or series copies.
• page 60 "One-Sided Combine"
• page 63 "Two-Sided Combine"
• page 66 "Series Copies"
3. [Duplex] key
Makes two-sided copies.
• See page 57 "Duplex".
4. [ID Card Copy] key
Press to enter ID card copy mode for the current job.
5. Indicators
Display errors and machine status.
• : Error indicator
See "Control Panel", General Settings Guide.
• : Add Toner indicator
See page 83 "Adding Toner".
• : Load Paper indicator
See page 78 "Loading Paper".
6. Display
Displays operation status and messages.
7. Scroll keys
Press to select an item.
20
Page 23

[ ]: scroll upward
[ ]: scroll downward
[ ]: scroll right
[ ]: scroll left
• See page 23 "Reading the Display and Using Keys".
8. [Reset] key
Press to clear the current settings.
9. [User Tools/Counter] key
Press to change default or operation parameters according to requirement.
10. On indicator
The On indicator lights when the operation switch is turned on.
11. Main power indicator
Lights when the main power switch is turned on.
• Do not turn off the main power switch while the On indicator is lit or blinking. Doing so may damage the
memory.
• page 24 "Turning On the Power"
12. Operation switch
Press to turn the power on. The On indicator lights. To turn the power off, press again.
• This key is inactivated during scanning or while setting defaults.
• page 24 "Turning On the Power"
13. Data In indicator
Blinks while the printer is receiving data from a computer or printing. Lit when preparing to print.
14. [Sort] key
Automatically sorts copies.
15. [Lighter] and [Darker] keys
Press to change the image density setting. Select the image density in five increments, Lighter to Darker.
16. [Original Type] key
Press to select the original type registered in [Original Type 1 (Text)] or [Original Type 2 (Photo)]. When the
original type is selected, the corresponding indicator lights.
17. Selection keys
Correspond to items on the display. Press to select the corresponding item.
21
Page 24
18. [Escape] key
Press to cancel an operation or return to the previous display.
19. [OK] key
Press to set a selected item or entered numeric value.
20. Number keys
Press to enter numeric values.
21. [Start] key
Press to start copying, printing, or scanning.
22. [Clear/Stop] key
• Clear:
Clears an entered numeric value.
• Stop:
Stops a job in progress, such as scanning or printing.
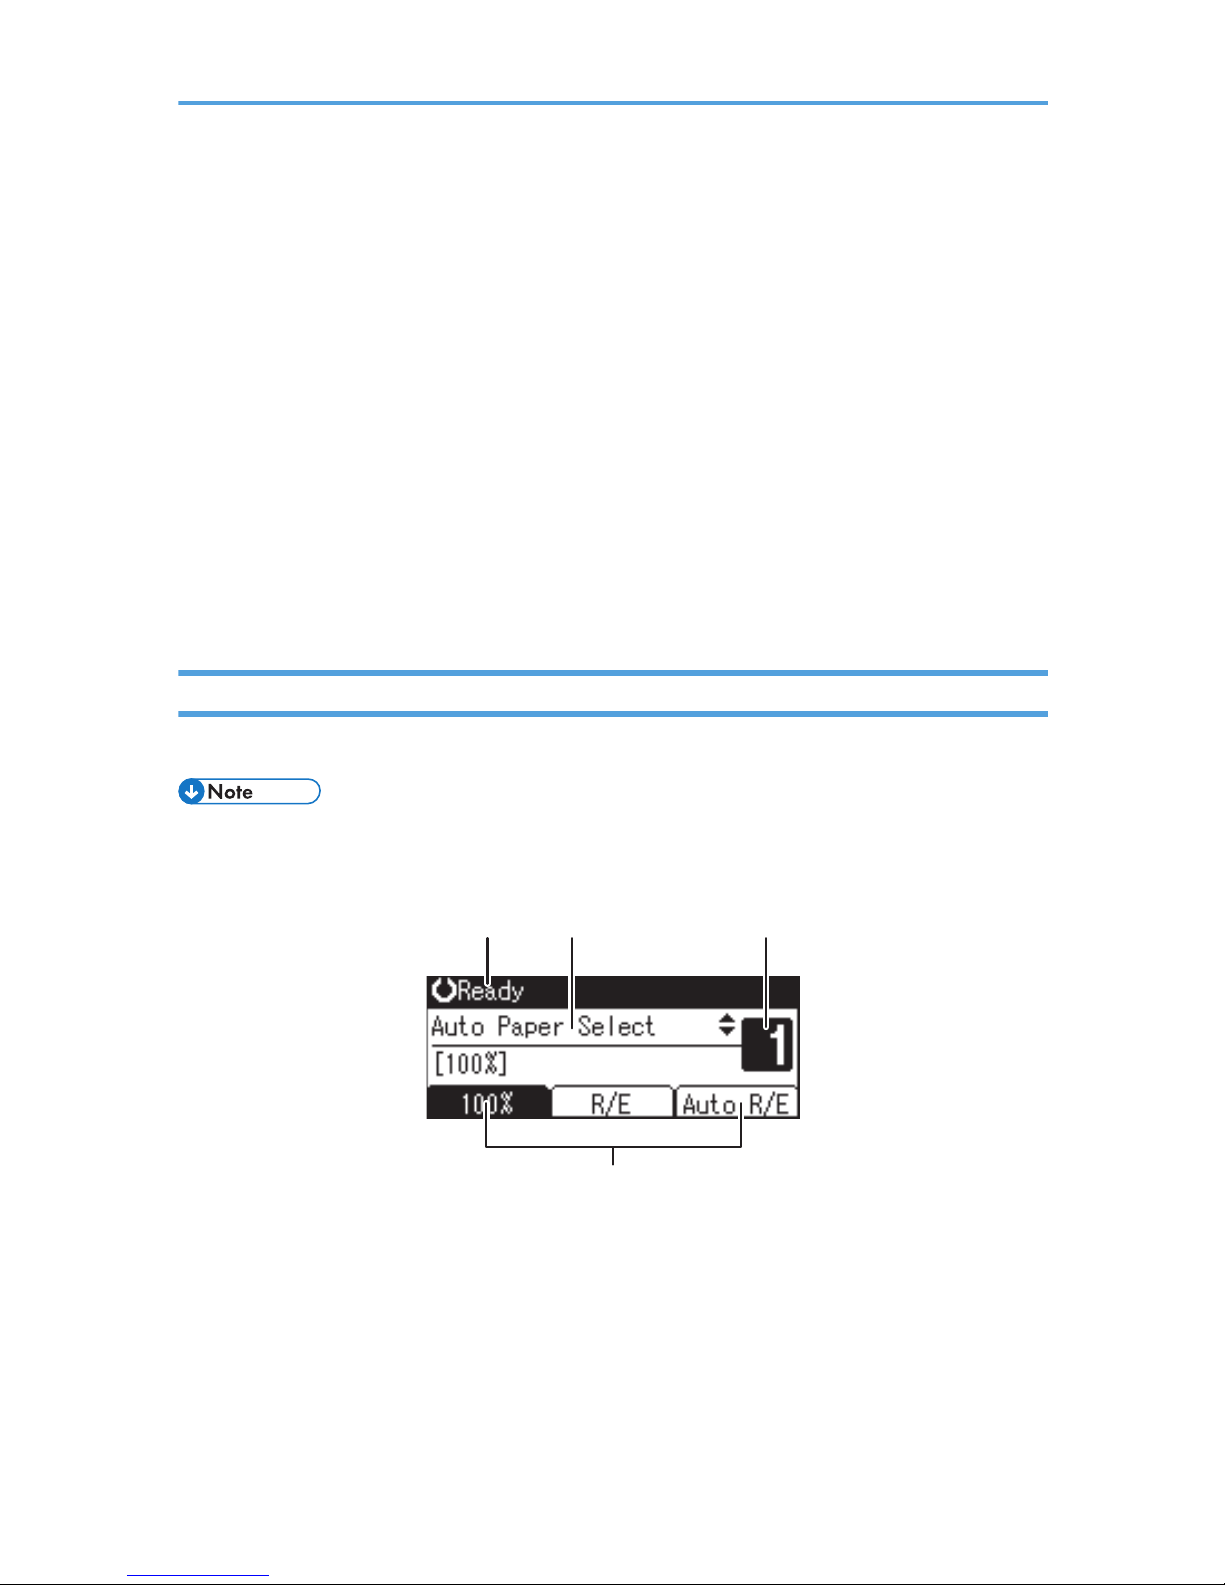
Display
This section explains how to read the display and use the selection keys for the initial copy display.
• The copy display is set as the default screen when the machine is turned on.
Initial copy display
1
1
3
3
2
2
4
4
CUA140
1. Operational status or messages
2. Messages and the selected tray appear here. Currently selected items appear in brackets.
3. Number of copies set.
4. Reduce/Enlarge ratio function for non-fixed ratios.
22
Page 25
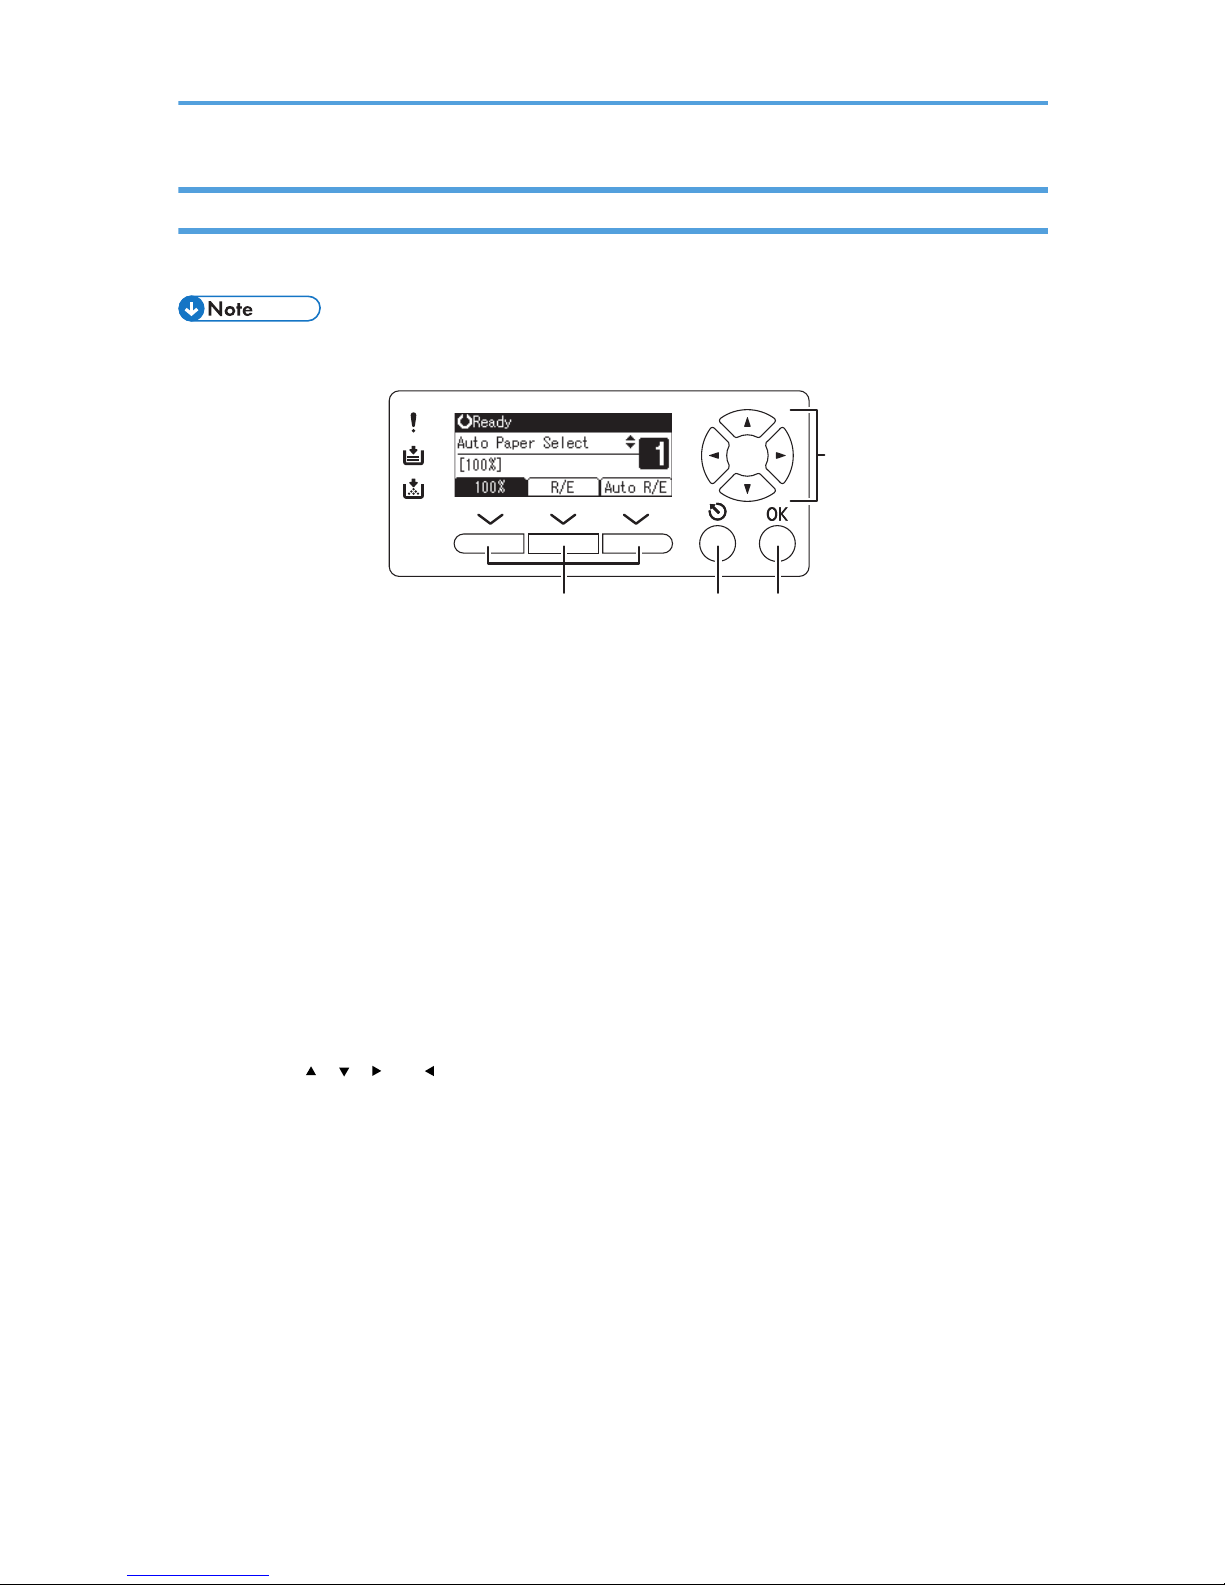
Reading the Display and Using Keys
This section explains how to read the display and use the selection keys for the initial copy display.
• The copy display is set as the default screen when the machine is turned on.
CUA005
123
4
1. Selection keys
Correspond to items at the bottom line on the display.
Example: initial copy display
• When the instruction "press [100%]" appears in this manual, press the left selection key.
• When the instruction "press [R/E]" appears in this manual, press the center selection key.
• When the instruction "press [Auto R/E]" appears in this manual, press the right selection key.
2. [Escape] key
Press to cancel an operation or return to the previous display.
3. [OK] key
Press to set a selected item or entered numeric value.
4. Scroll keys
Press to move the cursor to each direction one by one.
When the [ ], [ ], [ ], or [ ] key appears in this manual, press the scroll key of the same direction.
23
Page 26
Turning On the Power
This machine has two power switches.
Operation switch (right side of the control panel)
Press to activate the machine. When the machine has finished warming up, you can operate the
machine.
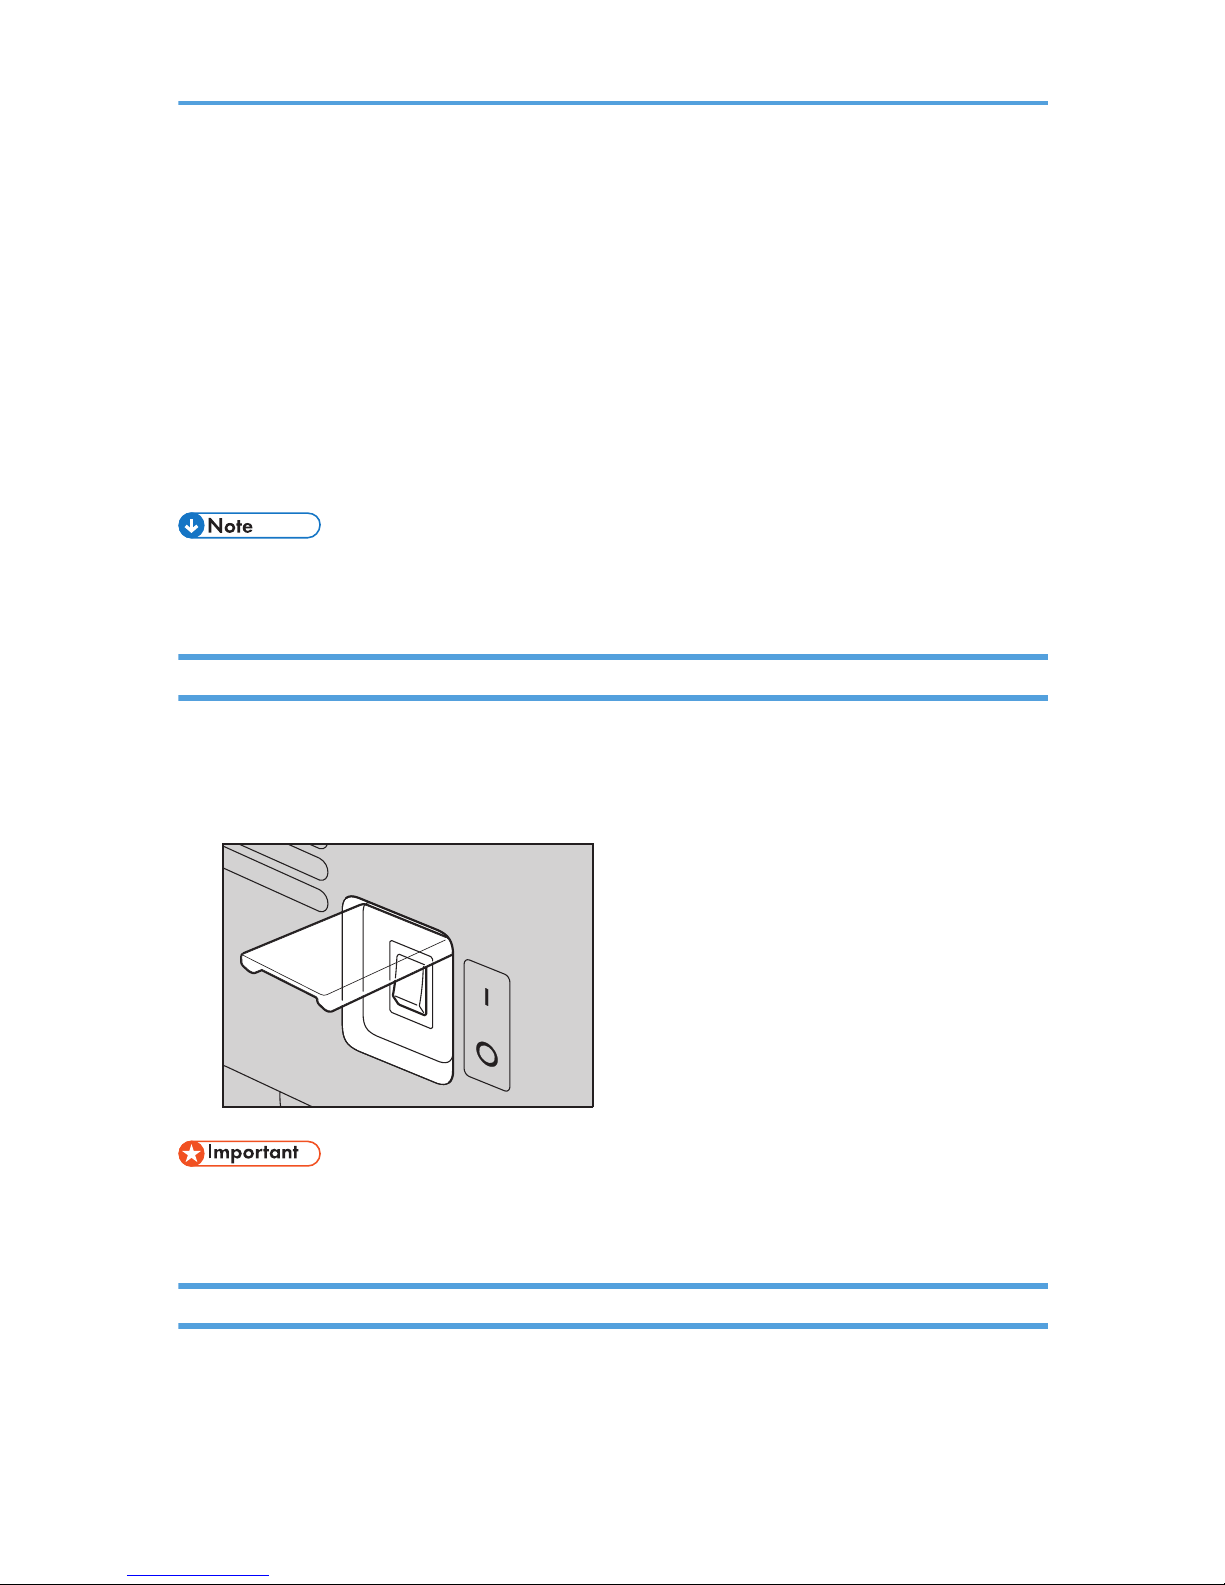
Main power switch (left side of the machine)
Turning off this switch makes the main power indicator on the right side of the control panel go off.
When this is done, machine power is completely off.
• This machine automatically turns the panel off or turns itself off if you do not use it for a while. See
General Settings Guide.
Turning On the Main Power
1. Make sure the power cord is firmly plugged into the wall outlet.
2. Turn on the main power switch.
The main power indicator goes on.
CUA103
• Do not turn off the main power switch immediately after turning it on. Doing so may result in
damage to the memory, leading to malfunctions.
Turning On the Power
1. Press the operation switch.
The On indicator goes on.
24
Page 27
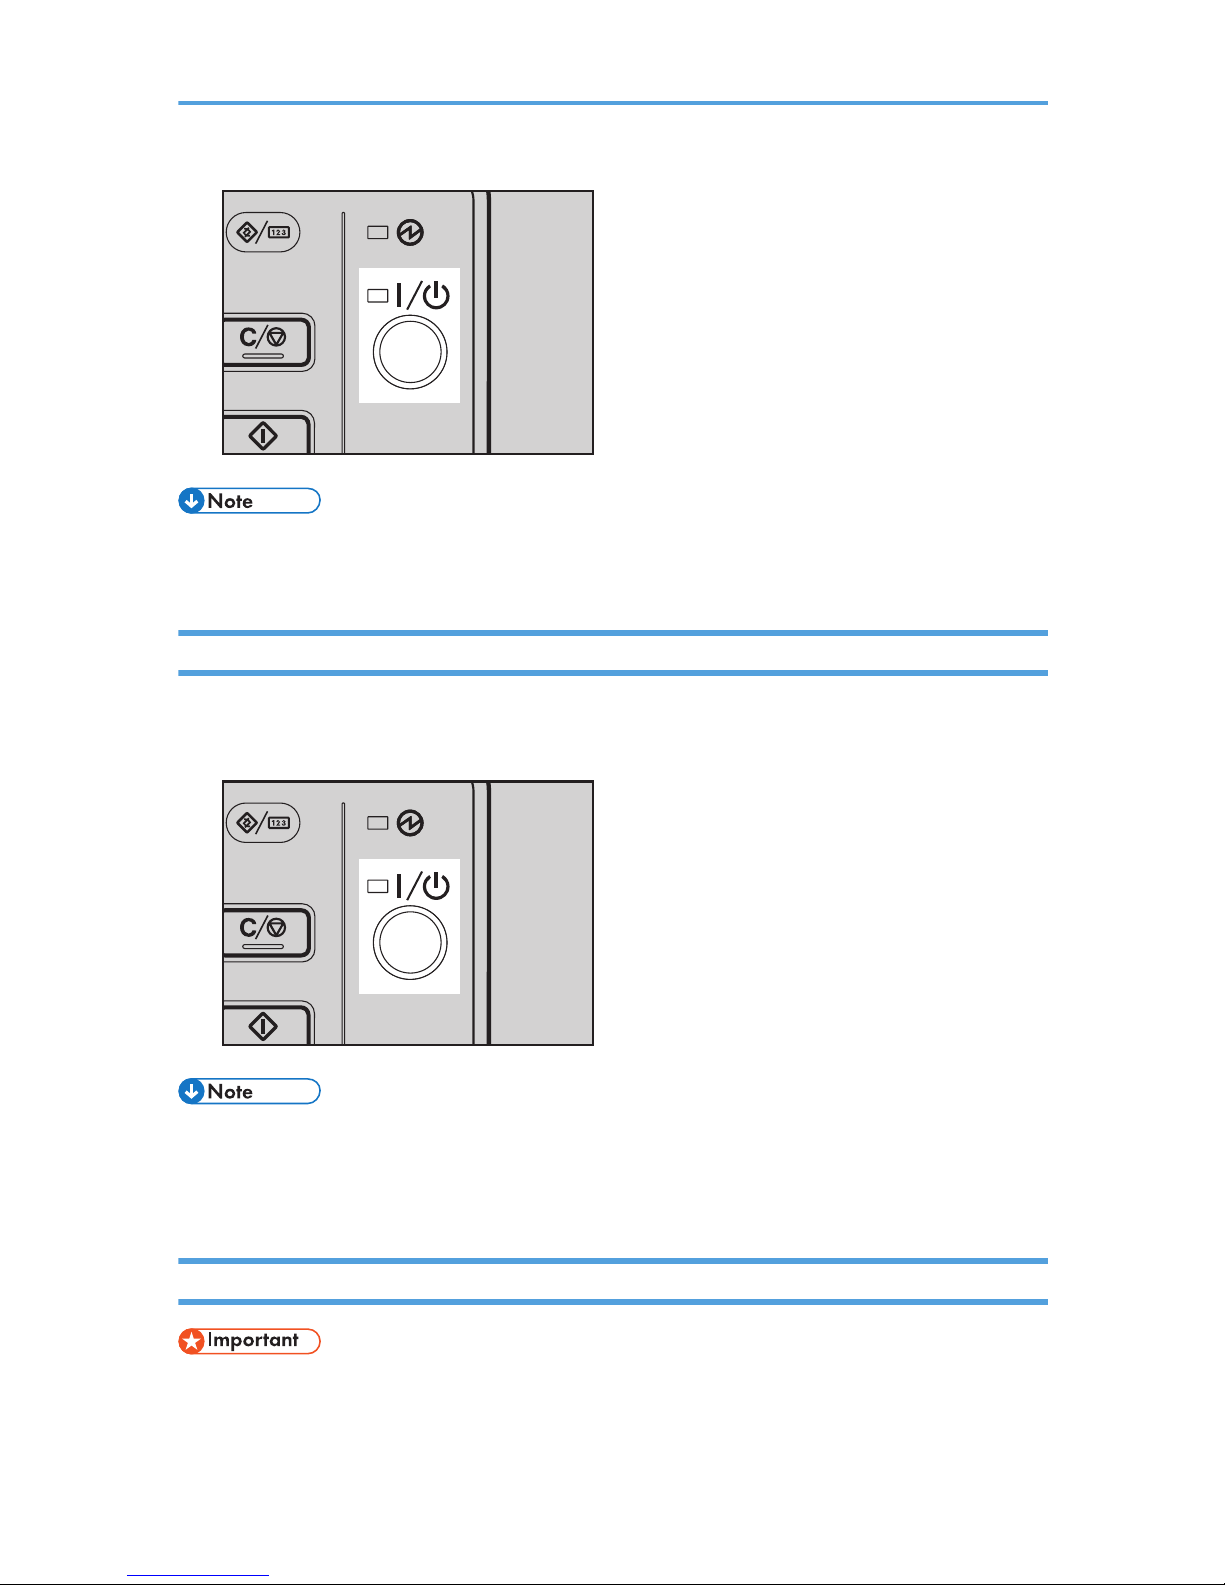
CUA104
• If the power does not come on when the operation switch is pressed, check the main power switch
is on. If it is off, turn it on.
Turning Off the Power
1. Press the operation switch.
The On indicator goes off.
CUA104
• Even if you press the operation switch, the indicator does not go out, but blinks in the following
cases:
• During communication with external equipment.
Turning Off the Main Power
• Do not turn off the main power switch when the On indicator is lit or blinking. Doing so may result in
damage to the memory.
25
Page 28

• Be sure to turn off the main power switch before pulling out the power plug. Not doing this may
result in damage to the memory.
1. Be sure the On indicator is not lit.
2. Turn off the main power switch.
The main power indicator goes out.
Saving Energy
Auto Off
The machine automatically turns itself off when the job is finished, after a certain period of time has
elapsed. This function is called "Auto Off".
• You can change the Auto Off time. See "Timer Settings", General Settings Guide.
• The Auto Off function will not operate in the following cases:
• When a warning message appears
• When the service call message appears
• When paper is jammed
• When the cover is open
• When the "Add Toner" message appears
• When toner is being replenished
• When the User Tools screen is displayed
• When fixed warm-up is in progress
• When the printer or other functions are active
• When operations are suspended during printing
• When the Data In indicator is on or blinking
26
Page 29
1. Placing Originals
Originals
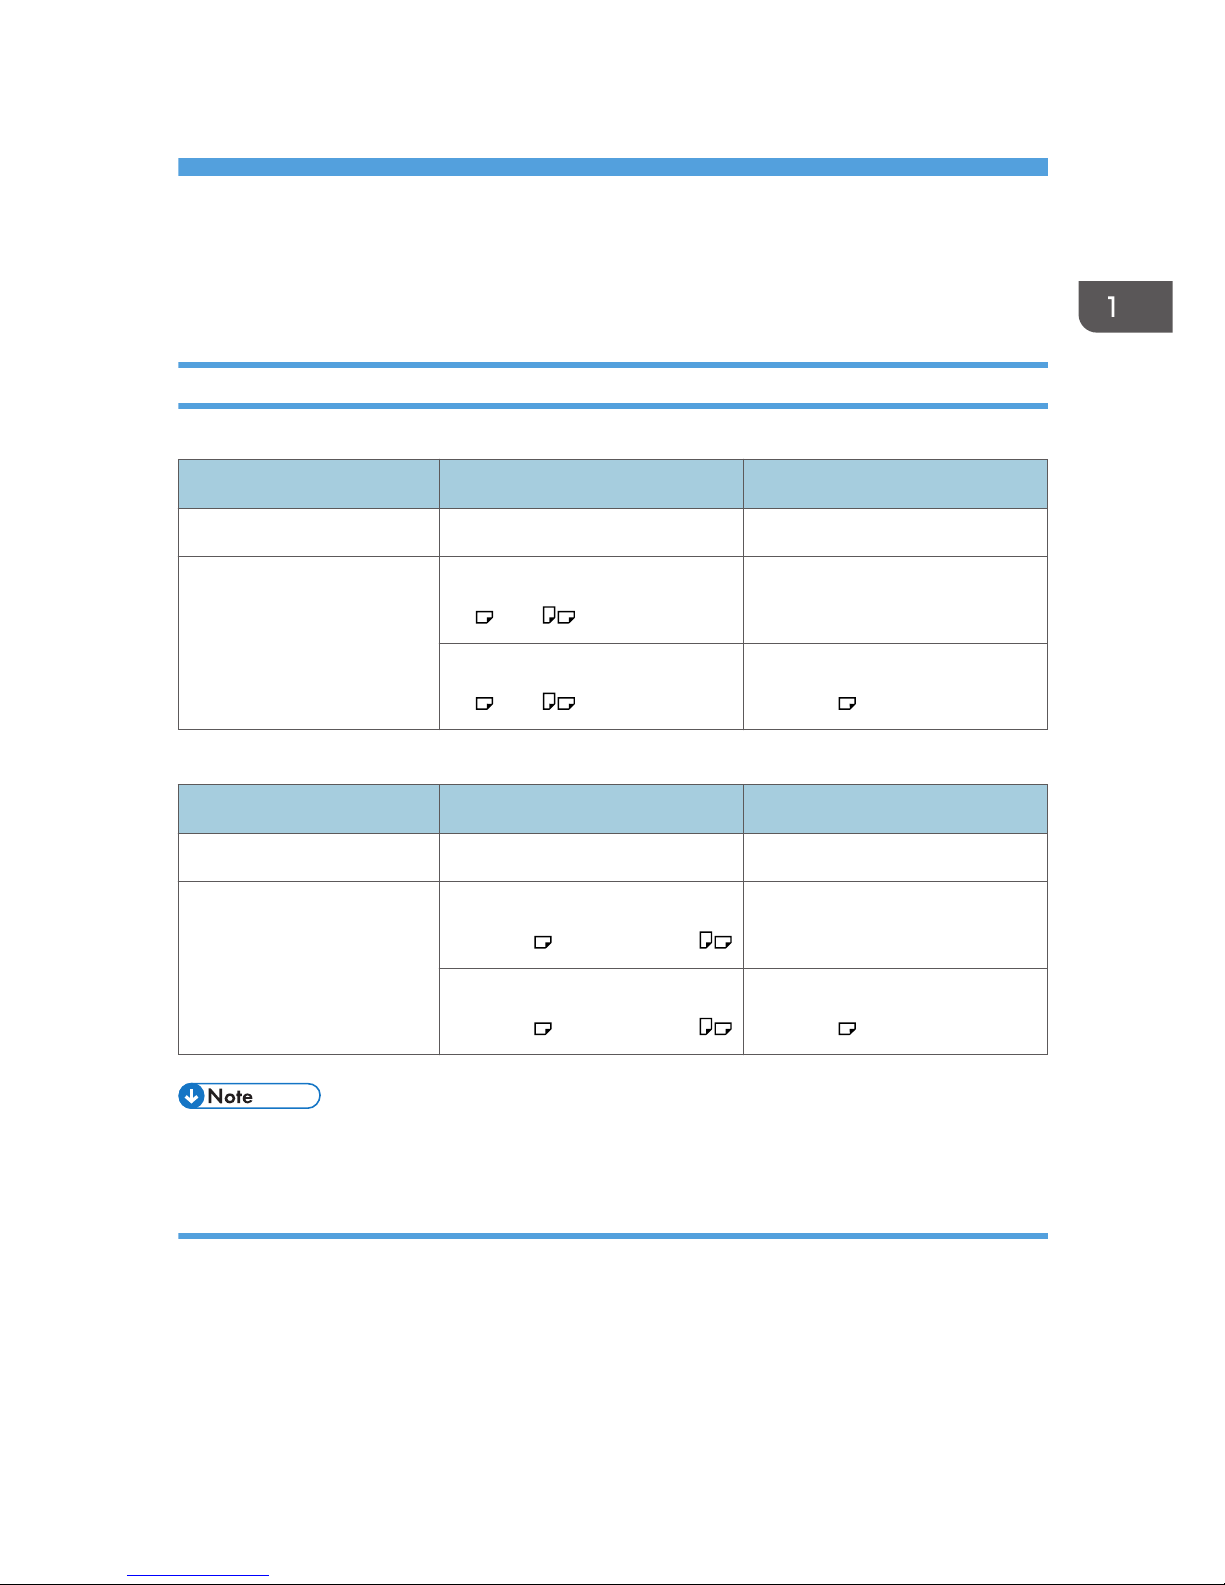
Sizes and Weights of Recommended Originals
Metric version
Original location Original size Original weight
Exposure glass Up to A3 –
ADF One-sided originals:
A3 – A5
40–128 g/m
2
Two-sided originals:
A3 – A5
52–105 g/m
2
11" × 17" : 64–105 g/m
2
Inch version
Original location Original size Original weight
Exposure glass Up to 11" × 17" –
ADF One-sided originals:
11" × 17" – 51/2" × 81/2"
11–34 lb.
Two-sided originals:
11" × 17" – 51/2" × 81/2"
14–28 lb.
11" × 17" : 17–28 lb.
• About 50 originals can be placed in the ADF.
Non-compatible originals for the ADF
Placing the following types of originals in the ADF can cause paper misfeeds or result in damage to the
originals. Place these originals on the exposure glass instead.
• Originals other than those specified on page 27 "Sizes and Weights of Recommended Originals"
• Stapled or clipped originals
• Perforated or torn originals
27
Page 30
• Curled, folded, or creased originals
• Pasted originals
• Originals with any kind of coating, such as art paper, aluminum foil, carbon paper, or conductive
paper
• Originals with perforated lines
• Originals with indexes, tags, or other projecting parts
• Sticky originals such as translucent paper
• Thin, highly flexible originals
• Thick originals such as postcards
• Bound originals such as books
• Transparent originals such as OHP transparencies or translucent paper
• The original might become dirty if it is written with a pencil or a similar tool.
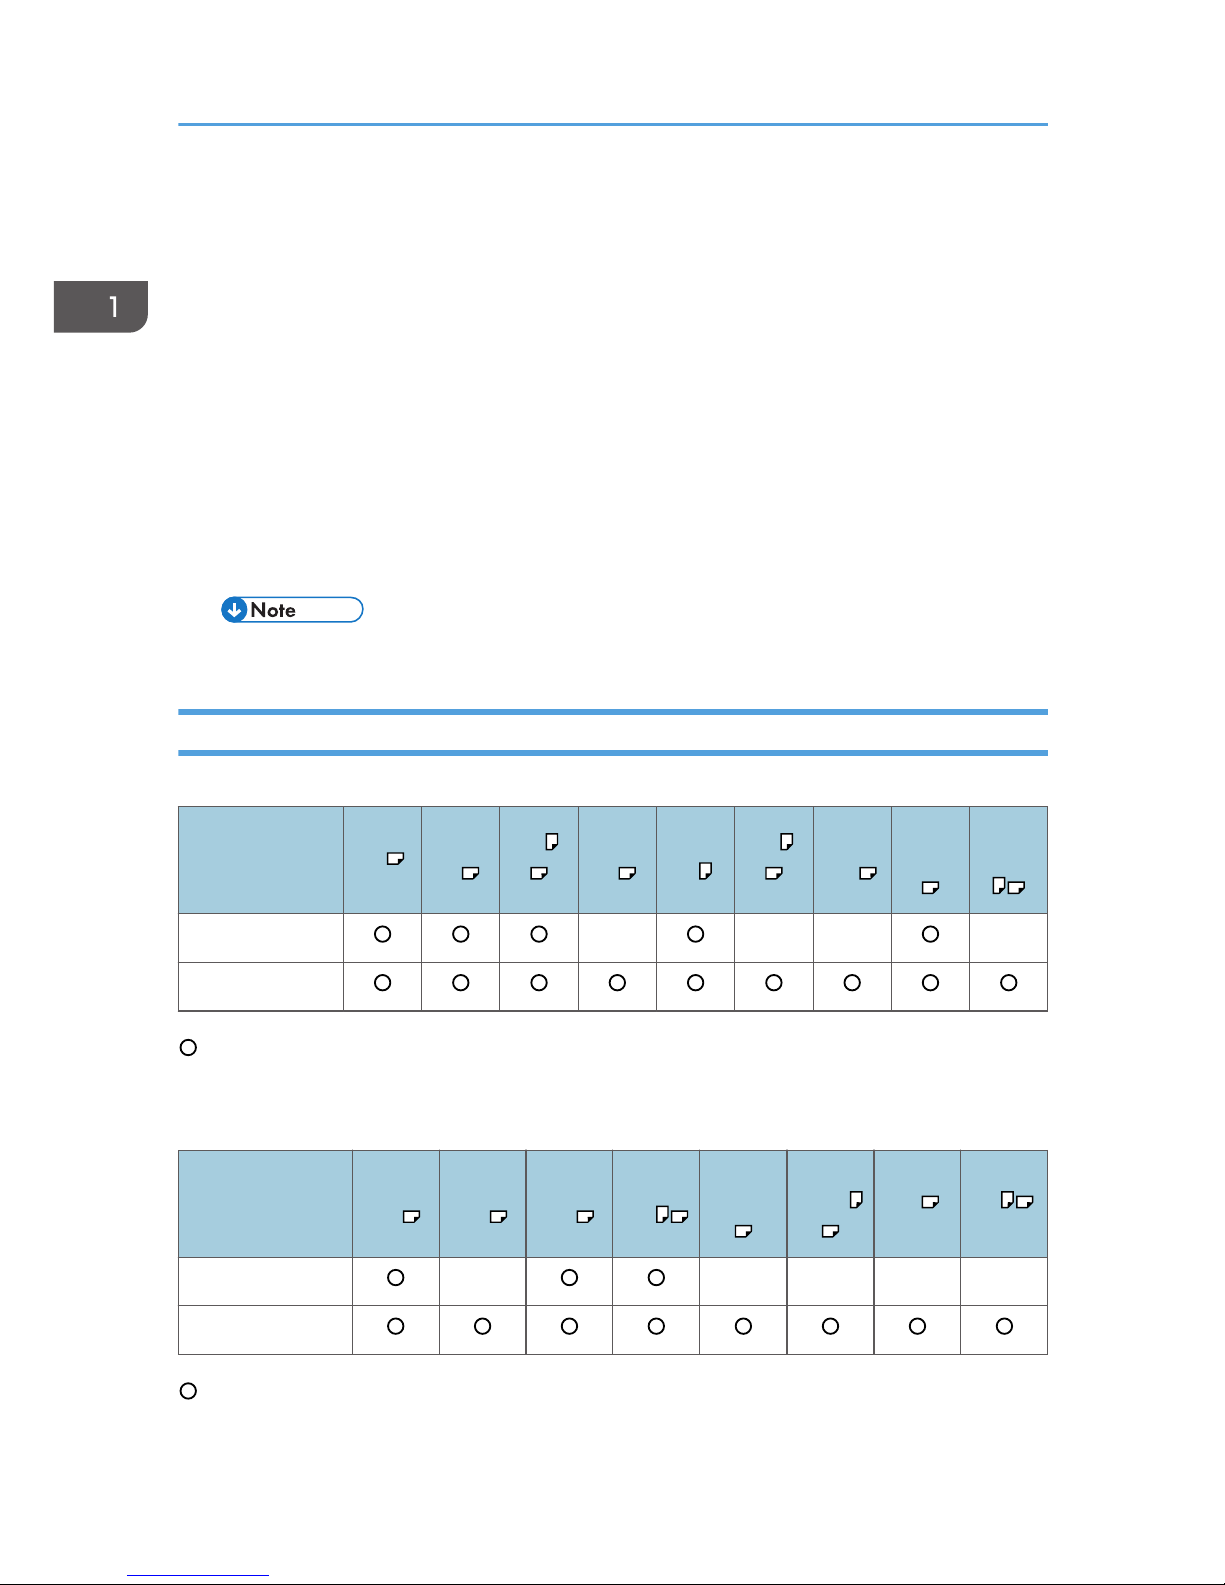
Sizes Detectable with Auto Paper Select
Metric version
Original location A3
B4 JIS*1A4 B5 JIS*1B5 JIS*1A5 11" ×
17"
81/2"
× 13"
81/2"
× 11"
Exposure glass × × × ×
ADF
: Detectable size ×: Undetectable size
*1
JIS: Japanese Industrial Standard
Inch version
Original location
11" ×
17"
10" ×
14"
81/2" ×
14"
81/2" ×
11"
71/4" ×
101/2"
51/2" ×
81/2" A3 A4
Exposure glass × × × × ×
ADF
: Detectable size ×: Undetectable size
1. Placing Originals
28
Page 31
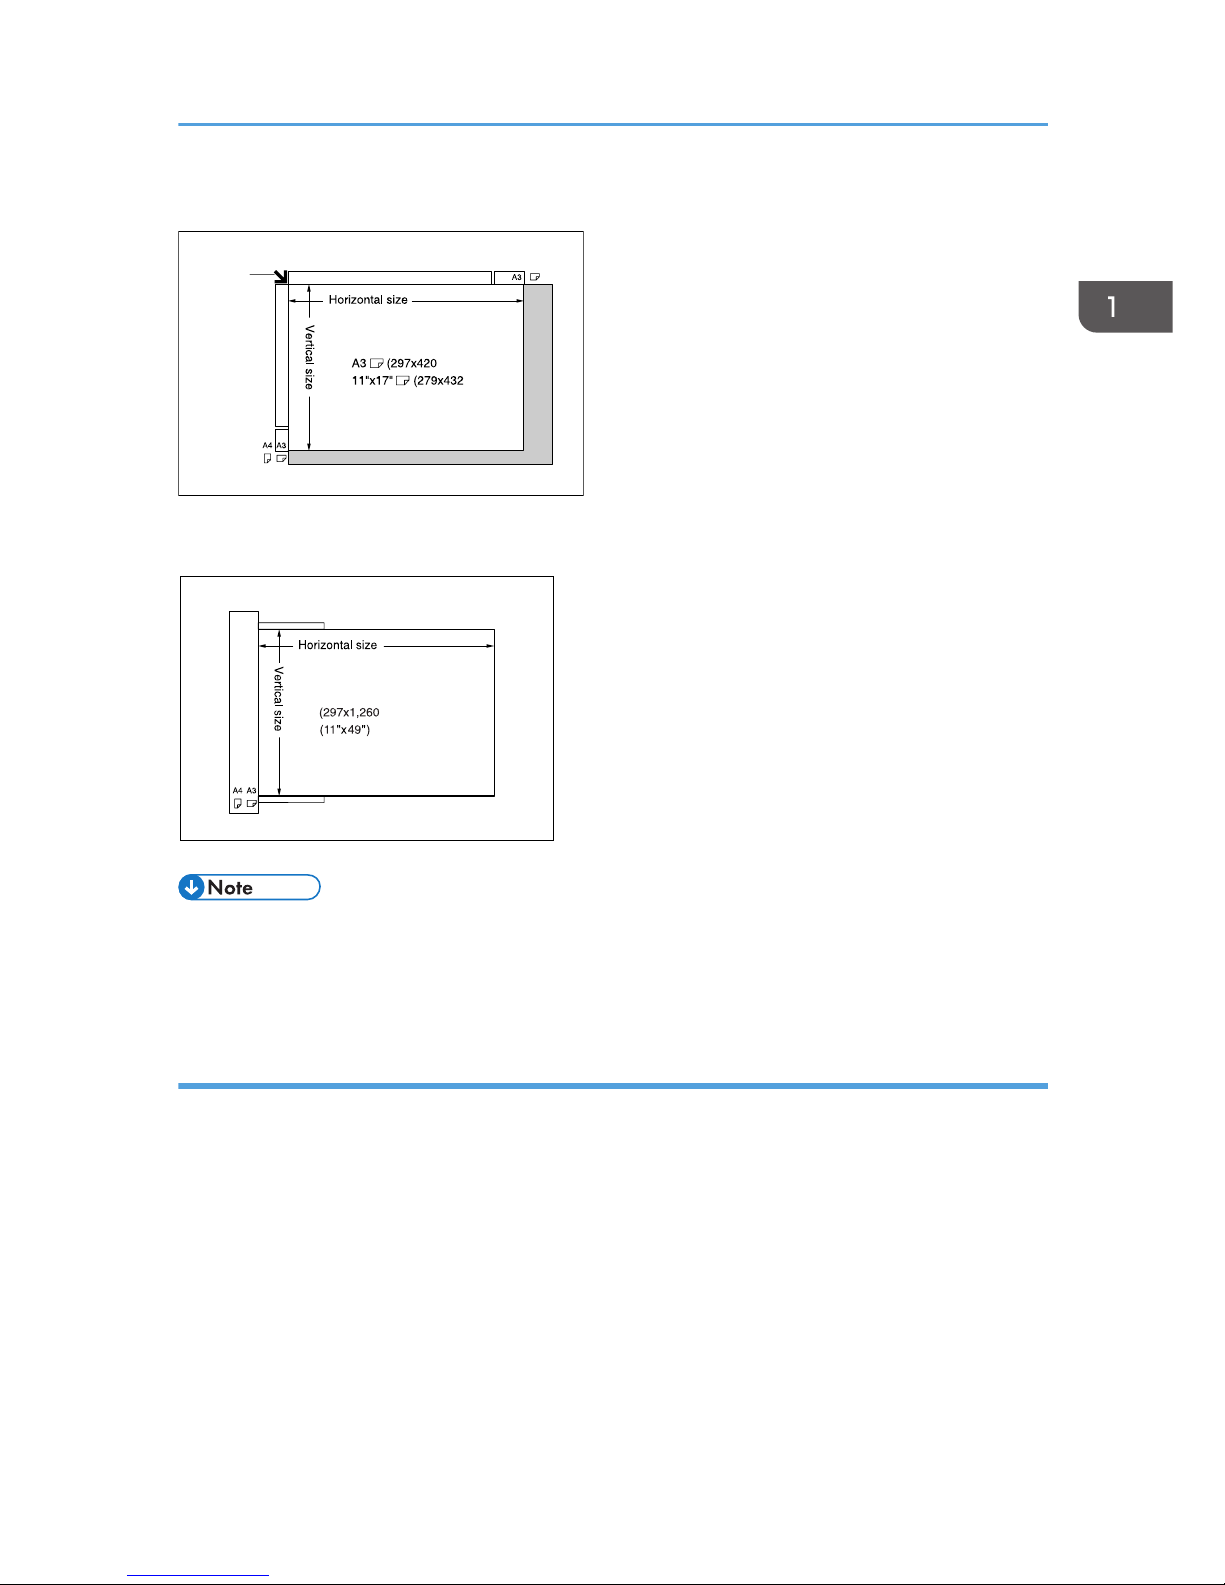
Exposure glass
GCSIZE1E
Positioning
mark
Maximum scanning area
mm)
mm)
ADF
GCSIZE2E
Maximum scanning area
mm)
• When you copy custom size originals, make sure you specify the size of the originals. If not, the
image may not be copied properly. See page 35 "Placing custom size originals" or page 37
"Placing custom size originals".
Sizes difficult to detect
It is difficult for the machine to detect the sizes of the following originals, so select the paper size
manually.
• Originals with indexes, tags, or other projecting parts
• Transparent originals such as OHP transparencies or translucent paper
• Dark originals with lots of text and drawings
• Originals partially consisting of a solid image
• Originals that have solid images around their edges
Originals
29
Page 32
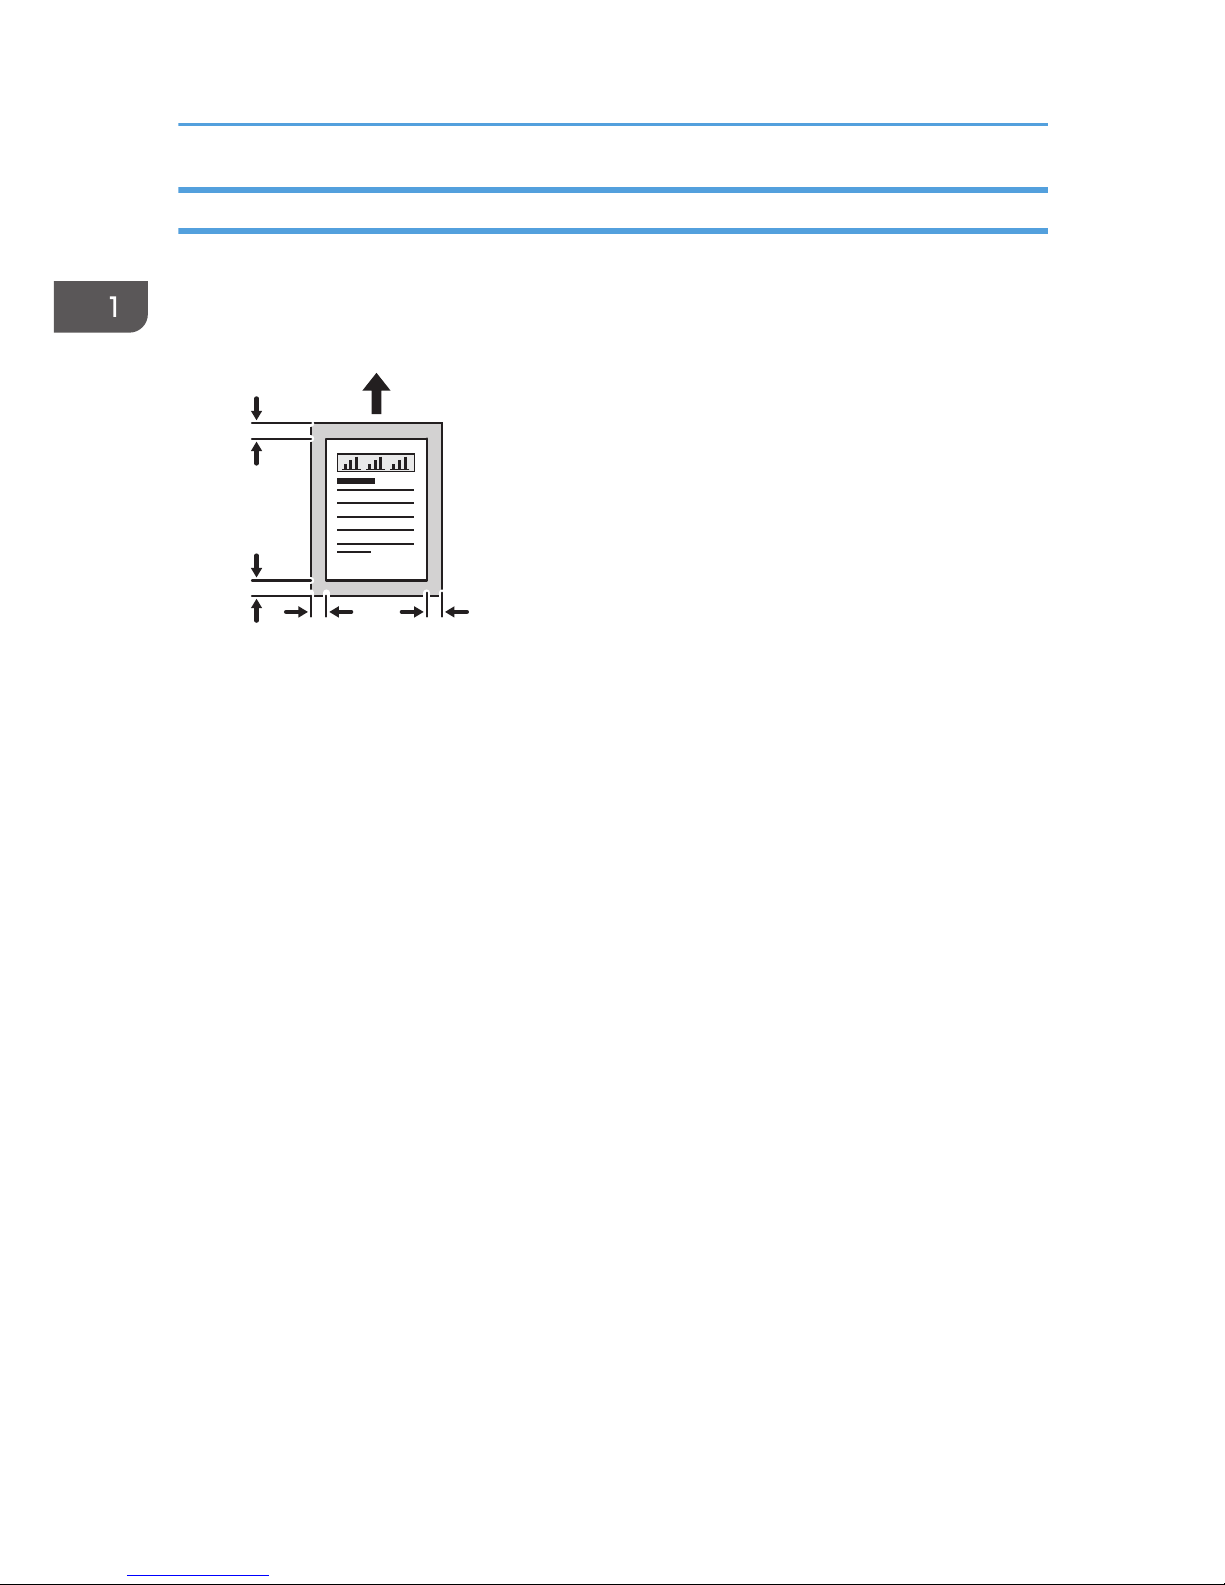
Missing Image Area
Even if you place originals in the ADF or on the exposure glass correctly, margins of a few millimeters on
all four sides of the original might not be copied.
Missing Image Area
CUA134
1
1
2
2
3
3
4
4
1. Leading edge: 3 ± 2 mm (0.12" ± 0.08")
2. Trailing edge: 3 ± 2 mm (0.12" ± 0.08") (4.2 ± 2 mm (0.17" ± 0.08") for even pages when using
the duplex function.)
3. Left edge: 2 ± 1.5 mm (0.08" ± 0.06")
4. Right edge: 2 +2.5/-1.5 mm (0.08" +0.1"/-0.06")
Missing image area of envelopes is 10 mm (0.40") and that of Thick Paper is 5 mm (0.20").
1. Placing Originals
30
Page 33
Placing Originals
• Take care to place originals only after any correction fluid and ink has completely dried. Not
taking this precaution could cause marks on the exposure glass that will be copied onto paper.
• For original sizes you can set, see page 27 "Originals".
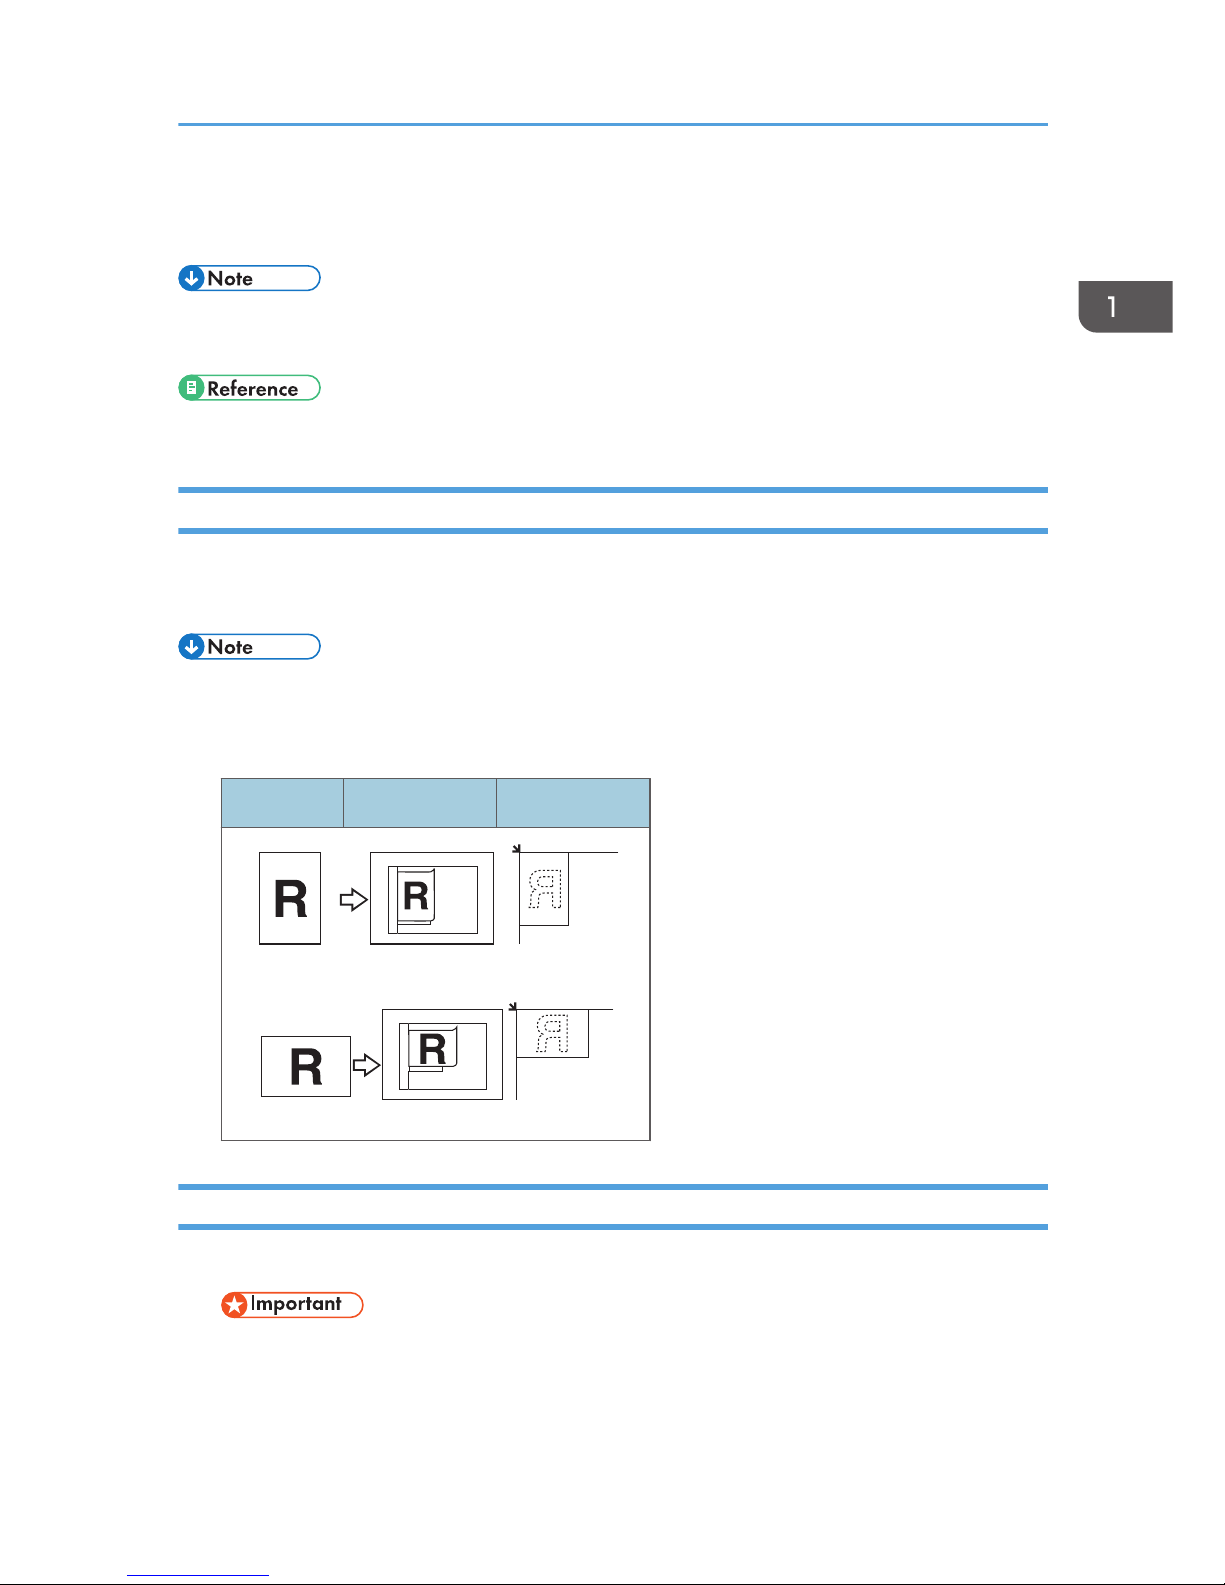
Original Orientation
You can set the original orientation in the following ways.
This function is useful for copying torn or large originals.
• Originals should normally be aligned to the rear left corner. However, some copy functions may
produce different results depending on the orientation of the originals. For details, see the
explanations of each function.
Originals ADF Exposure glass
CUA135
CUA136
Placing Originals on the Exposure Glass
1. Lift the exposure glass cover or ADF.
• Do not lift the exposure glass cover or ADF forcefully. If you do, the ADF cover might open or
be damaged.
Placing Originals
31
Page 34
• Be sure to lift the exposure glass cover or ADF by more than 30°. Otherwise, the size of the
original might not be detected correctly.
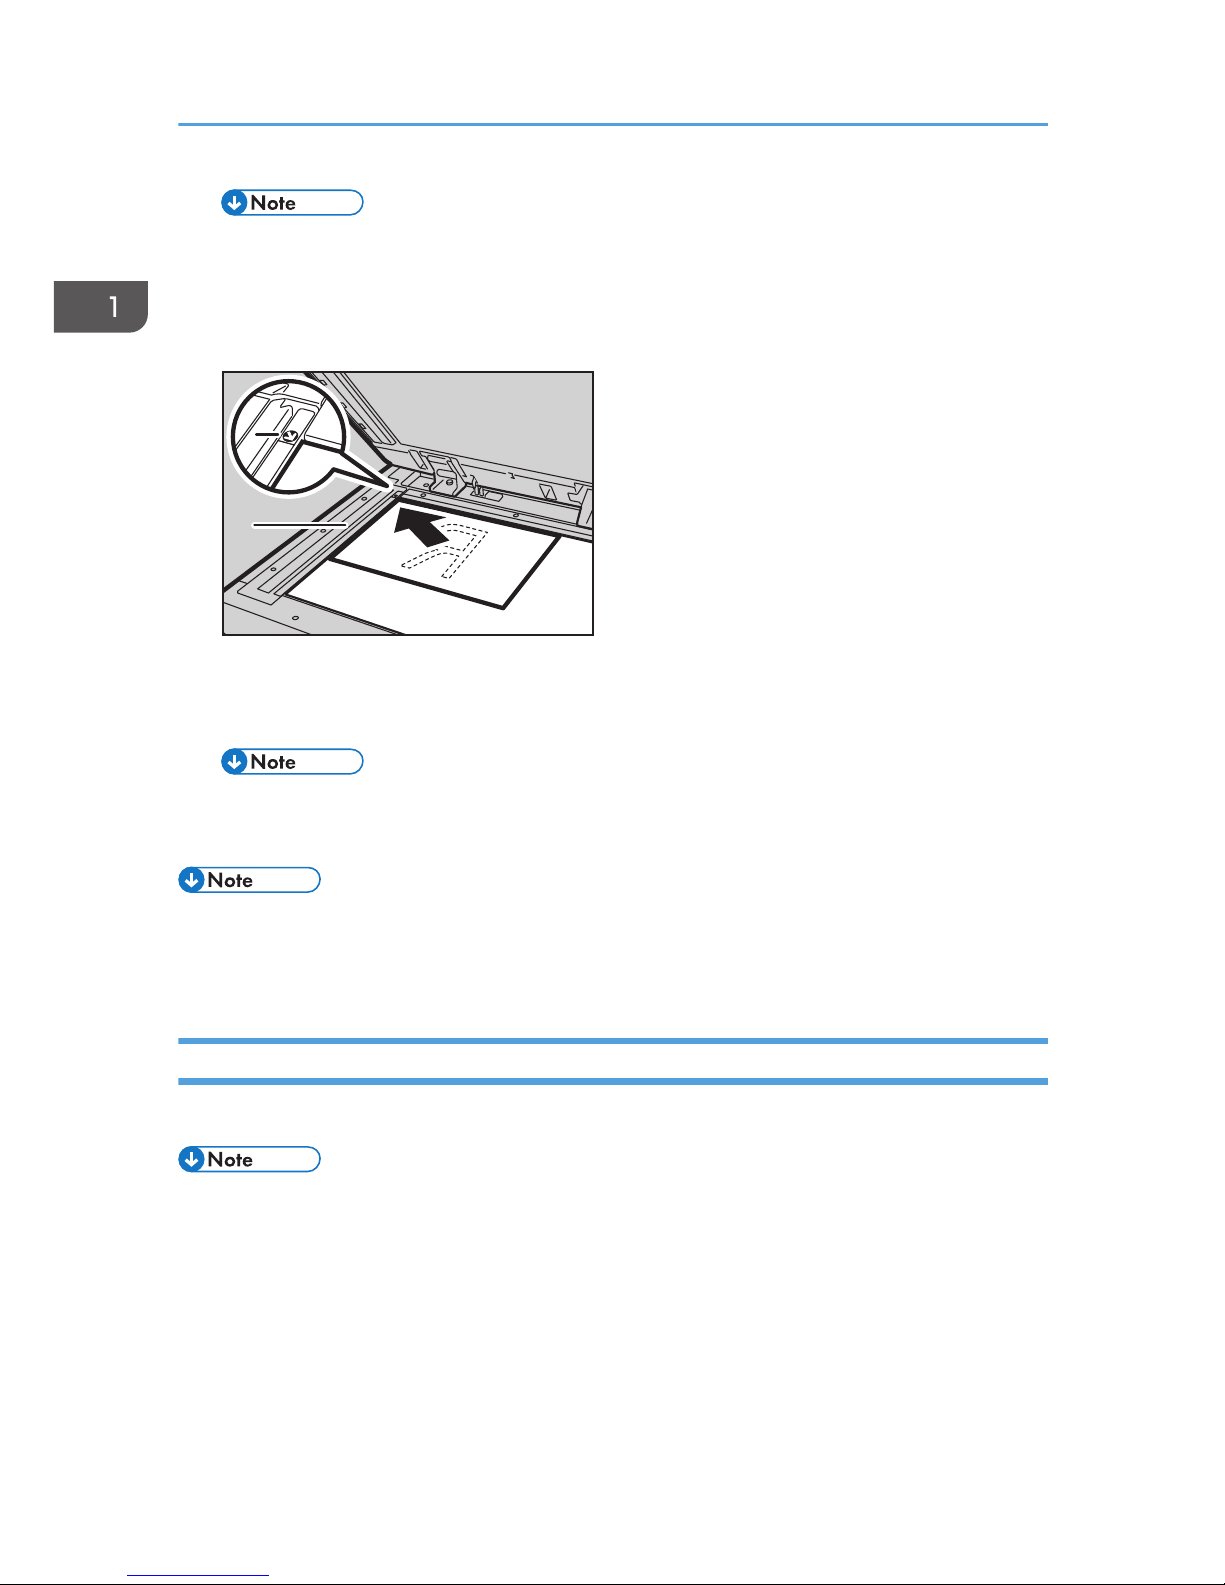
2. Place the original face down on the exposure glass. It should be aligned with the rear left
corner.
CUA105
1
1
2
2
1. Positioning mark
2. Left scale
• Start with the first page to be copied.
3. Lower the exposure glass cover or ADF.
• For details about how to specify the size of the originals, see page 33 "Specifying the Original
Size When a Paper Tray is Selected" or page 36 "Specifying the Original Size When the Bypass
Tray is Selected".
Placing Originals in the ADF
Settings should be made in the following situations:
• Do not stack originals over the limit mark on the side fence of the ADF.
• The last page should be on the bottom.
• Do not cover the sensors with your hands, or place objects on them. Doing so could cause the size
to be detected incorrectly, or the paper misfeed error message to appear. Also, do not place
anything on the cover, as this too could cause a malfunction.
1. Placing Originals
32
Page 35
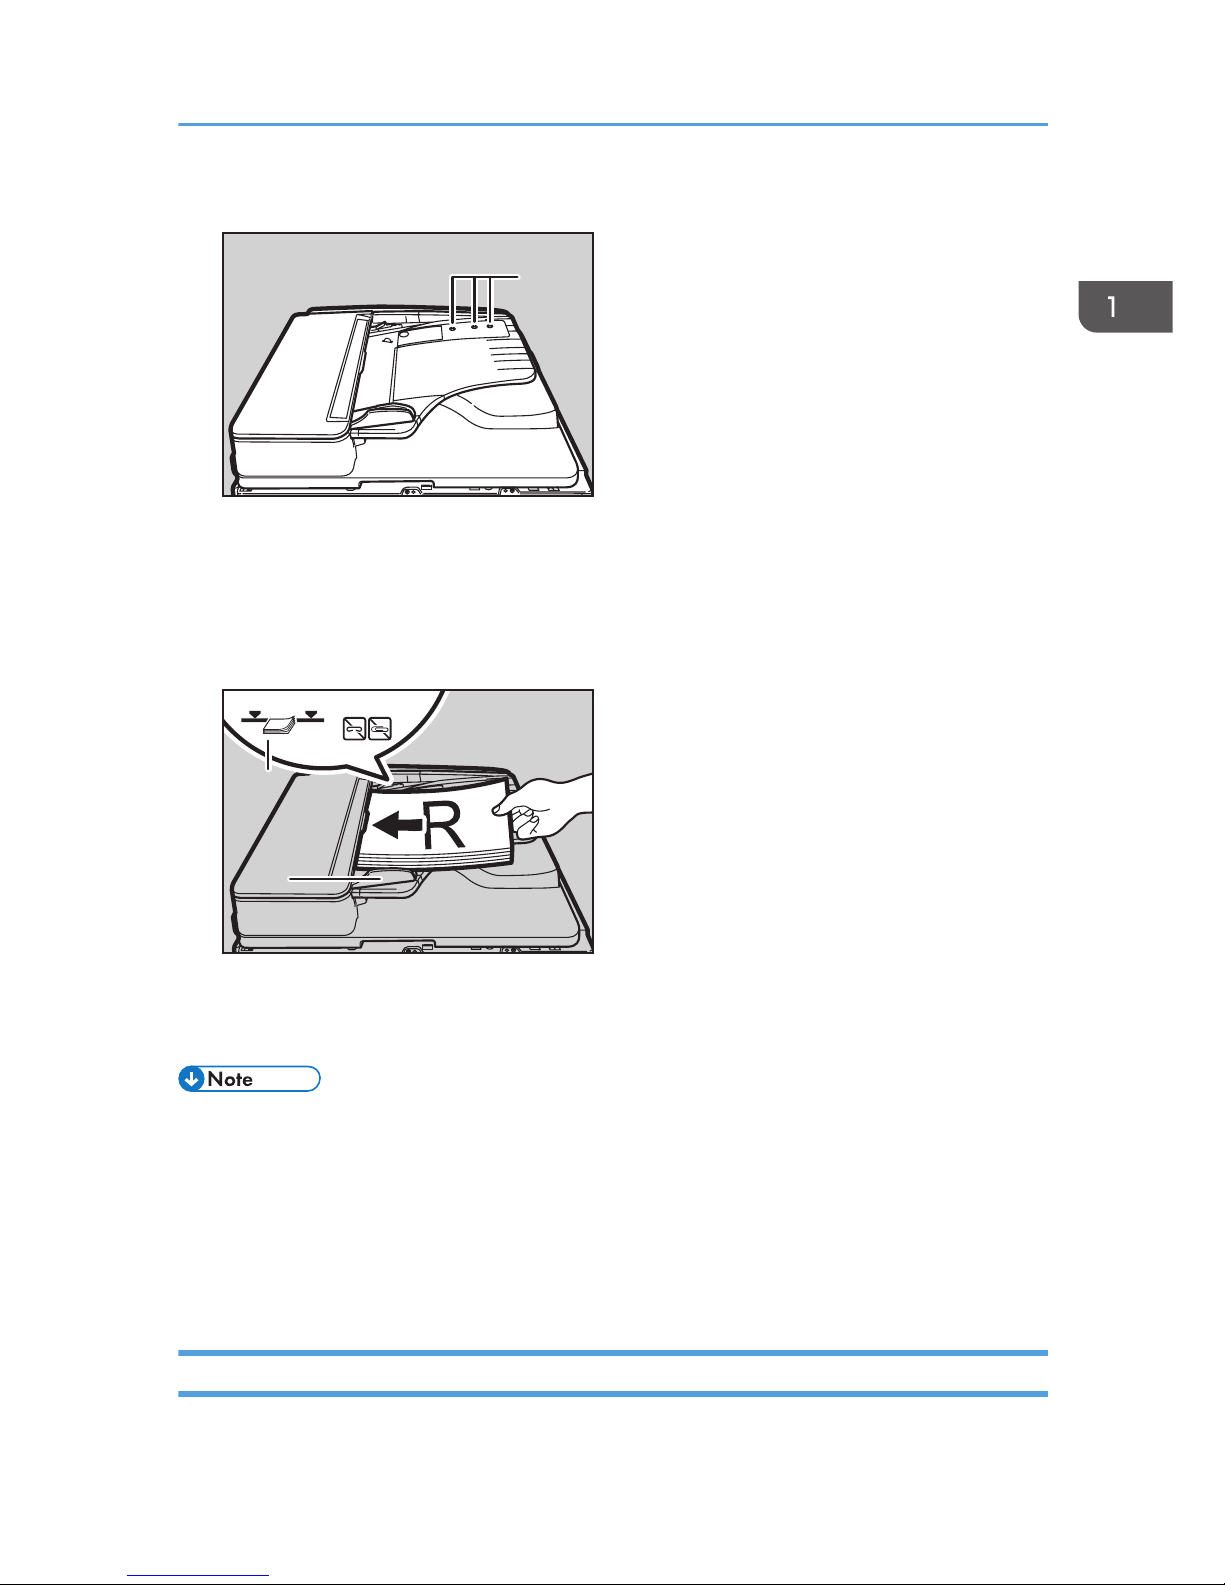
ADF
1
CUA106
1. Sensor
1. Set the document guide to the original size.
2. Align the edges of the originals and place them in the ADF with the side to be copied
facing up.
2
2
CUA107
1
1
1. Limit mark
2. Document guide
• Straighten curls in the originals before placing them in the ADF.
• To prevent multiple sheets feeding in at once, fan the originals before placing them in the ADF.
• Set the original squarely.
• For details about how to specify the size of the originals, see page 33 "Specifying the Original
Size When a Paper Tray is Selected" or page 36 "Specifying the Original Size When the Bypass
Tray is Selected".
Specifying the Original Size When a Paper Tray is Selected
You can select either regular or custom for the size of the original when a paper tray is selected.
Placing Originals
33
Page 36
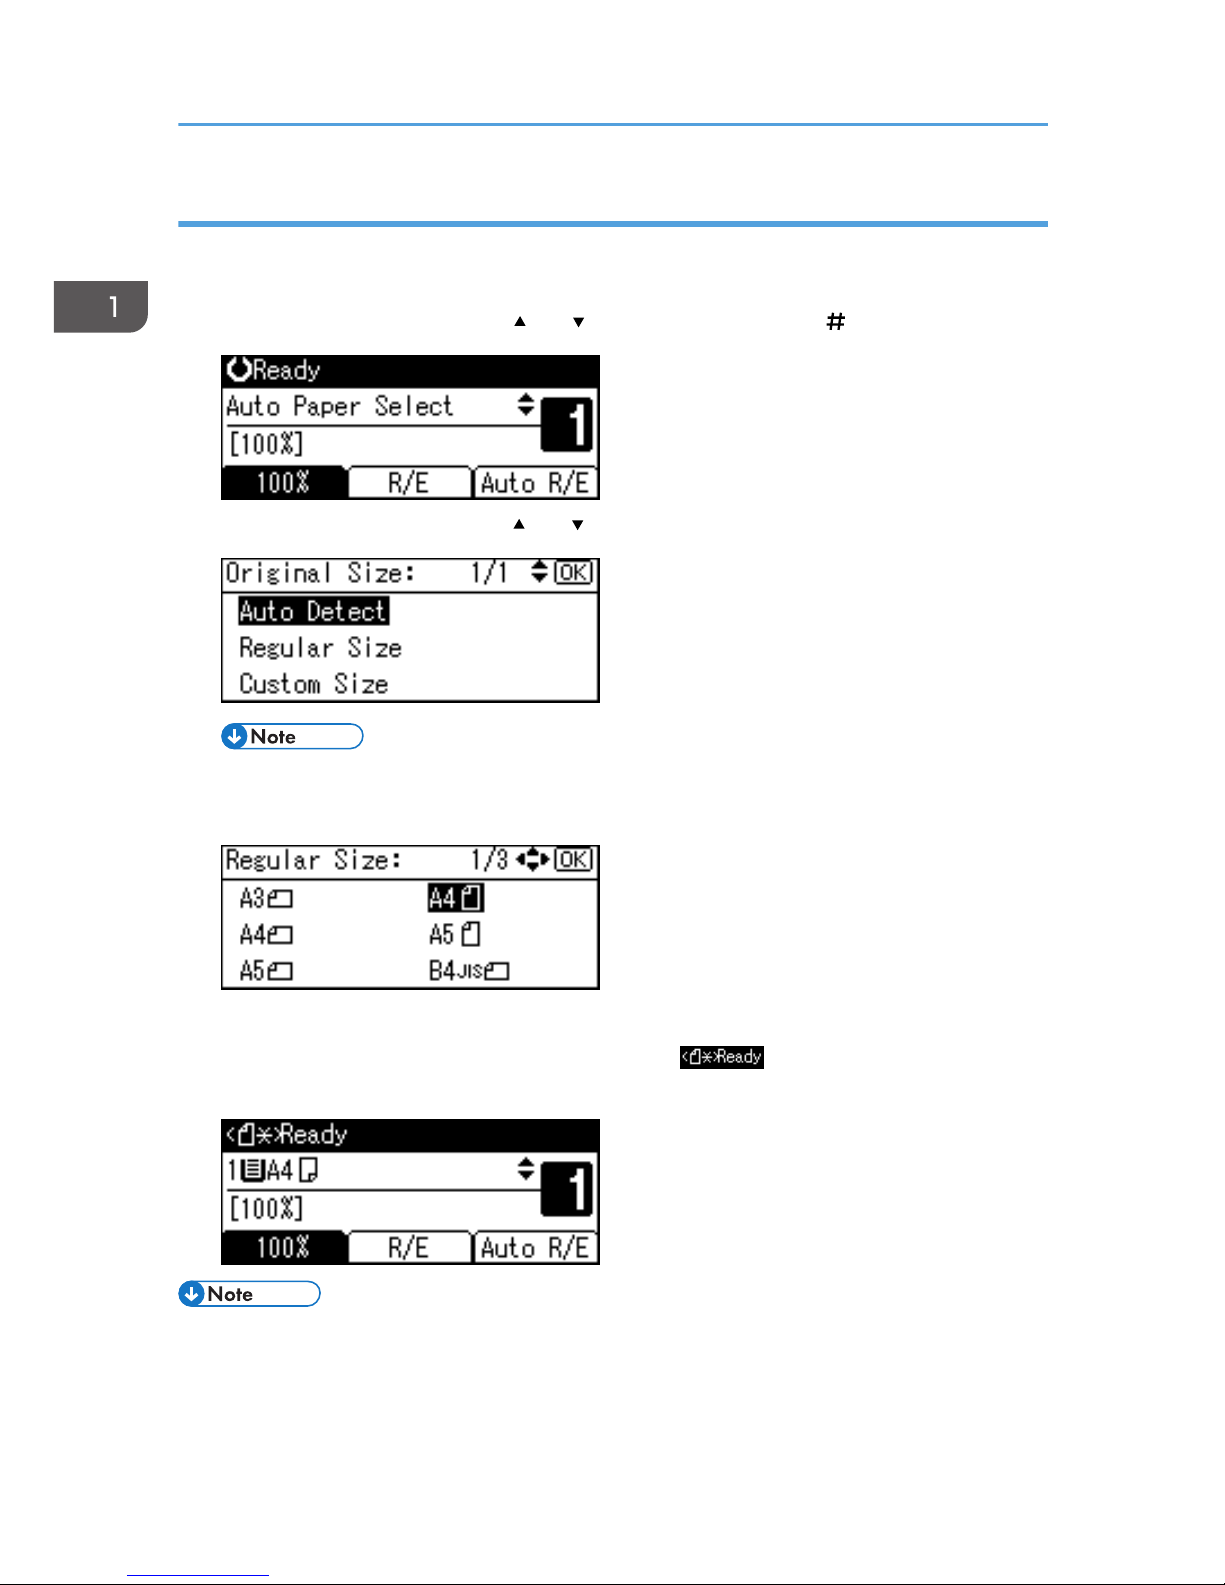
Placing regular size originals
When placing regular size originals on the exposure glass or in the ADF, select the size of the originals
from the regular sizes shown on the display.
1. Select the paper tray using the [ ] or [ ] key, and then press the [ ] key.
2. Select [Regular Size] using the [ ] or [ ] key, and then press the [OK] key.
• When [Auto Detect] is selected, the size of the placed original will be detected automatically.
3. Select the paper size using the scroll keys, and then press the [OK] key.
The "Programmed" message appears.
When the regular size originals settings are registered, appears on the top of copy
display.
• To cancel the size you have set, press the [Reset] key.
1. Placing Originals
34
Page 37
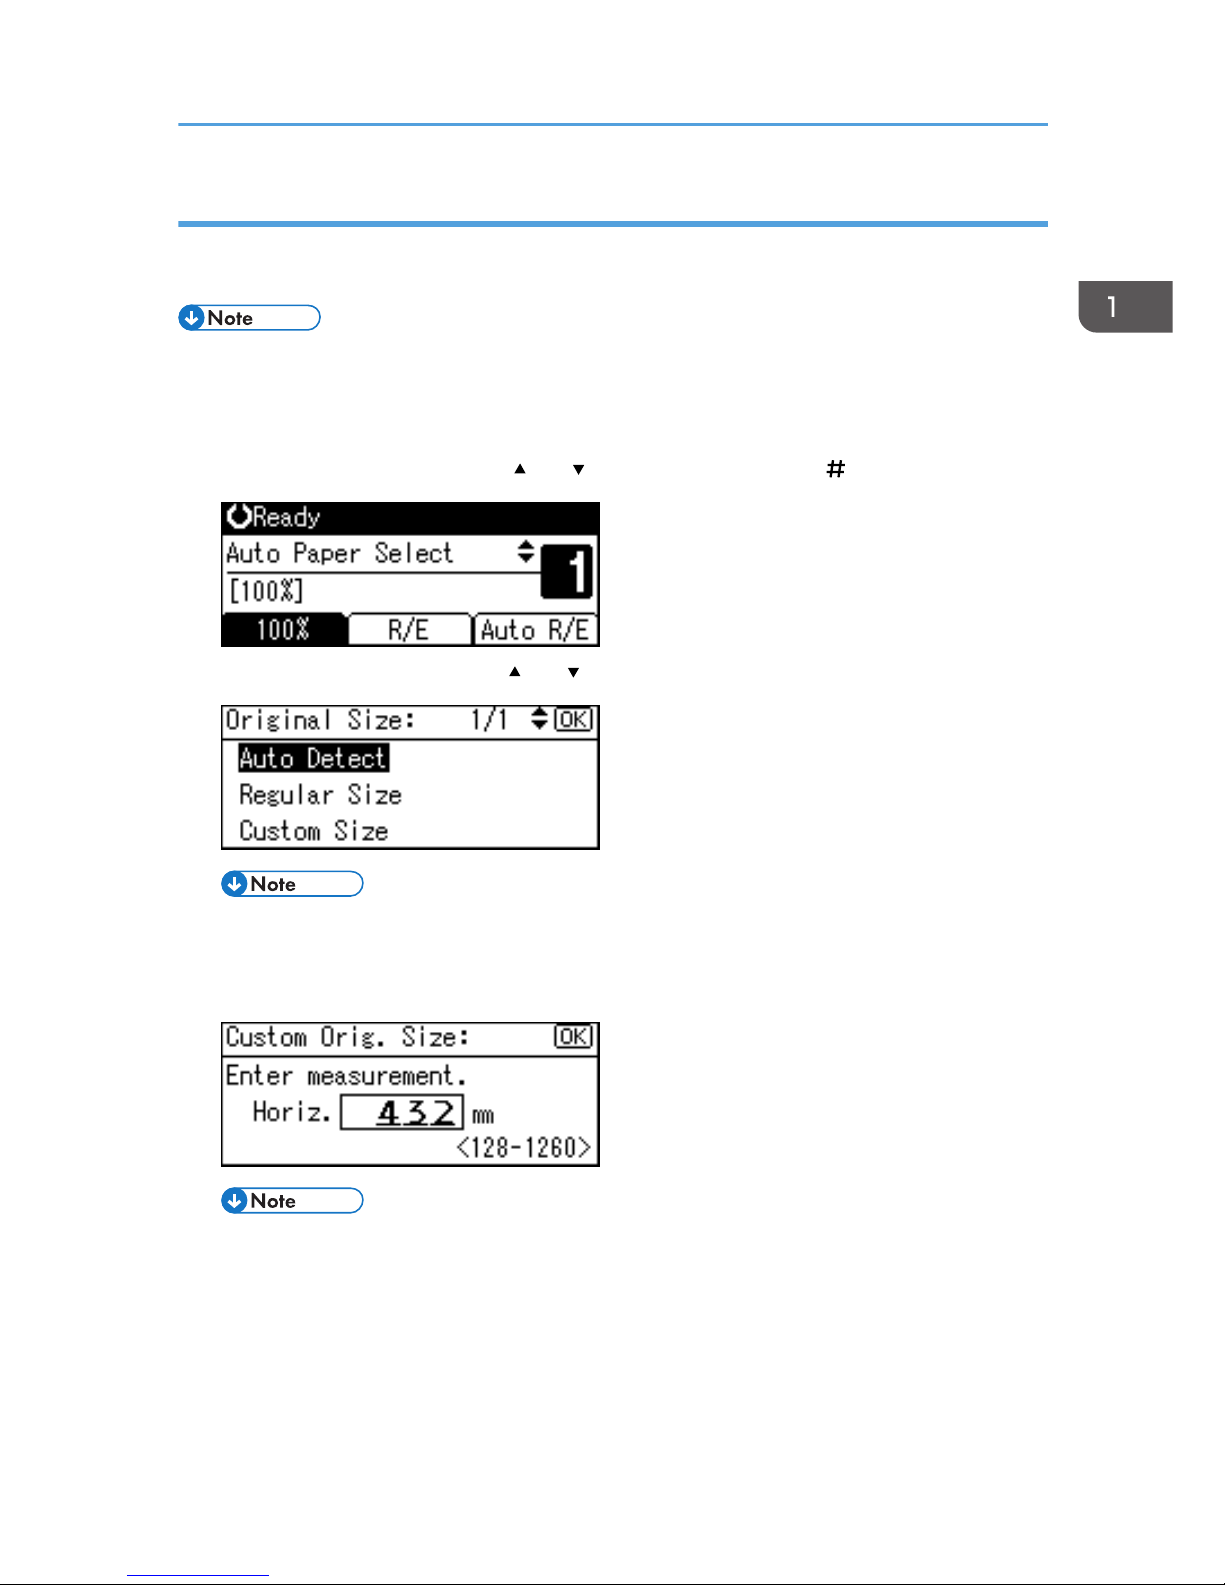
Placing custom size originals
When placing custom size originals on the exposure glass or in the ADF, specify the size of the originals
using the number keys.
• Originals that have a vertical length of 105–297 mm (4.2"–11.6") and a horizontal length of
128–1260 mm (5.1"–49.6") can be specified.
• For 2-sided originals, the horizontal size is 128–432 mm (5.1"–17").
1. Select the paper tray using the [ ] or [ ] key, and then press the [ ] key.
2. Select [Custom Size] using the [ ] or [ ] key, and then press the [OK] key.
• When [Auto Detect] is selected, the size of the placed original will be detected automatically.
3. Enter the horizontal size of the original using the number keys, and then press the [OK]
key.
• If you make a mistake, press the [Clear/Stop] key, and then enter the value again.
Placing Originals
35
Page 38
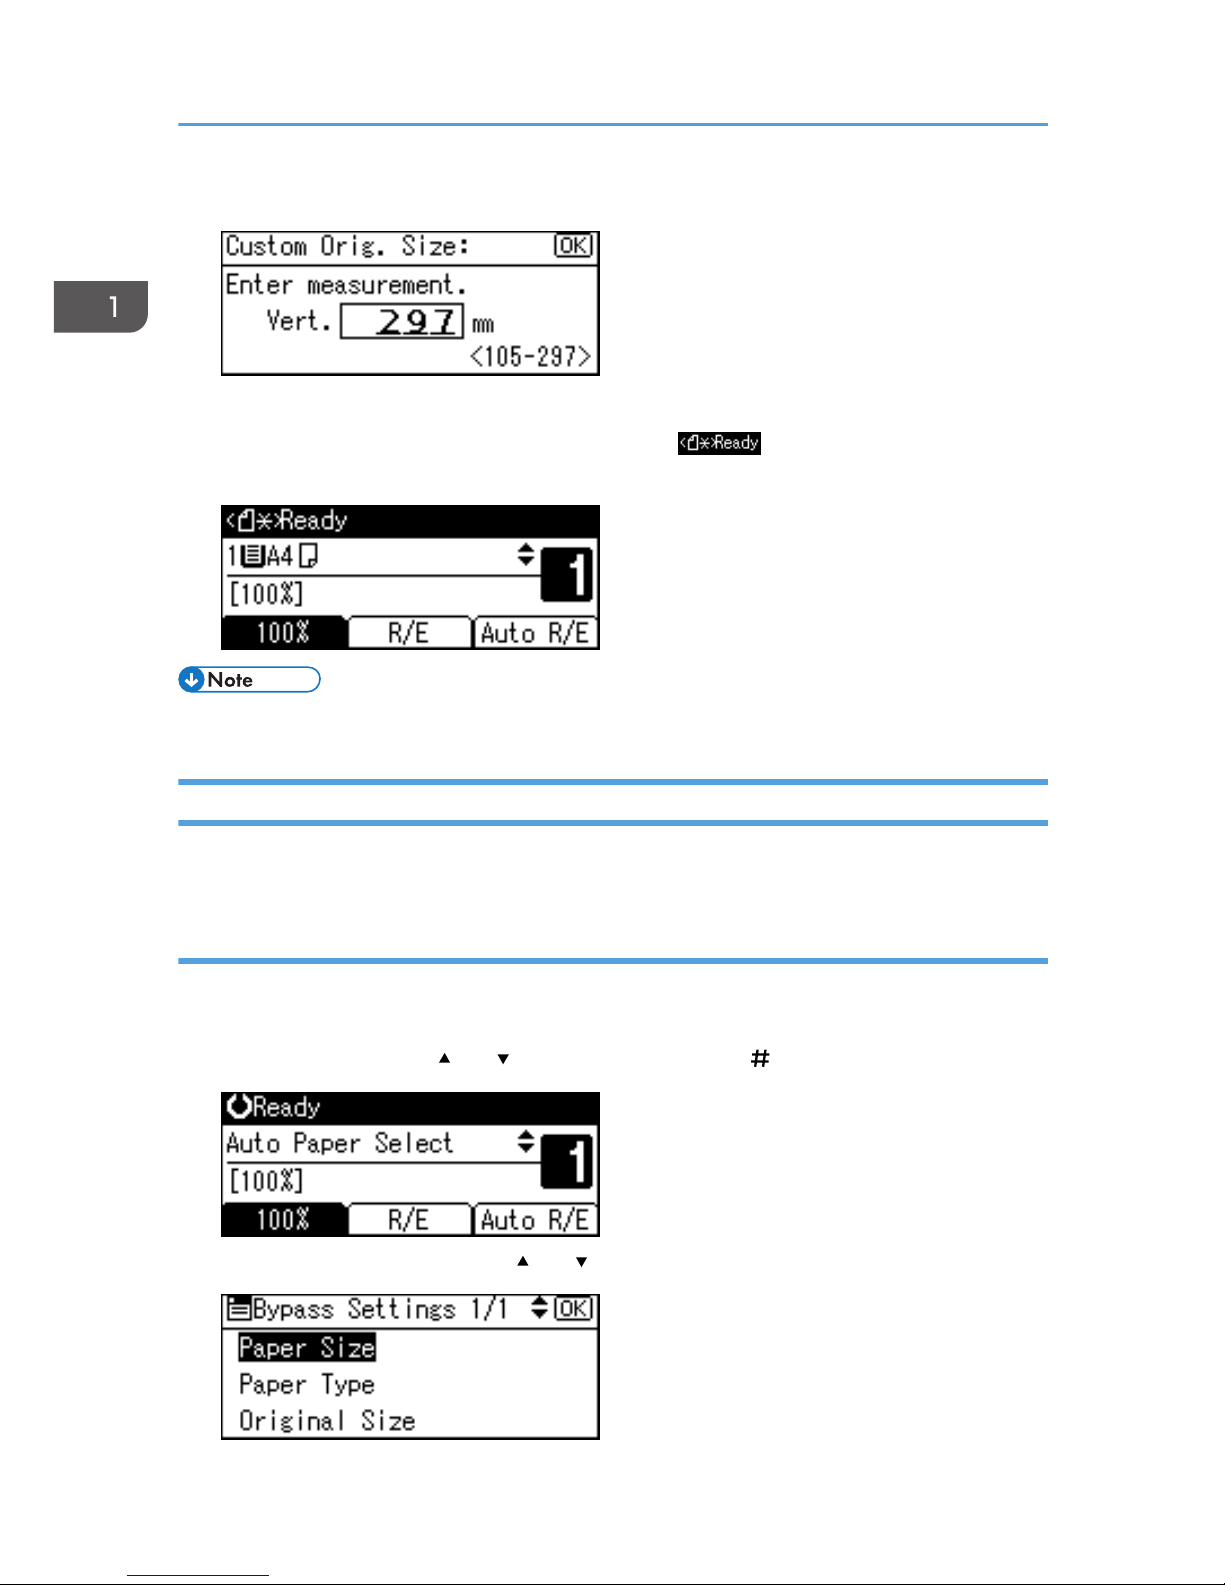
4. Enter the vertical size of the original using the number keys, and then press the [OK] key.
The "Programmed" message appears with your set original size.
When the custom size originals settings are registered, appears on the top of copy
display.
• To cancel the size you have set, press the [Reset] key.
Specifying the Original Size When the Bypass Tray is Selected
You can select either regular or custom for the size of the original when the bypass tray is selected.
Placing regular size originals
When placing regular size originals on the exposure glass or in the ADF, select the size of the originals
from the regular sizes shown on the display.
1. Select [Byp.] using the [ ] or [ ] key, and then press the [ ] key.
2. Select [Original Size] using the [ ] or [ ] key, and then press the [OK] key.
1. Placing Originals
36
Page 39
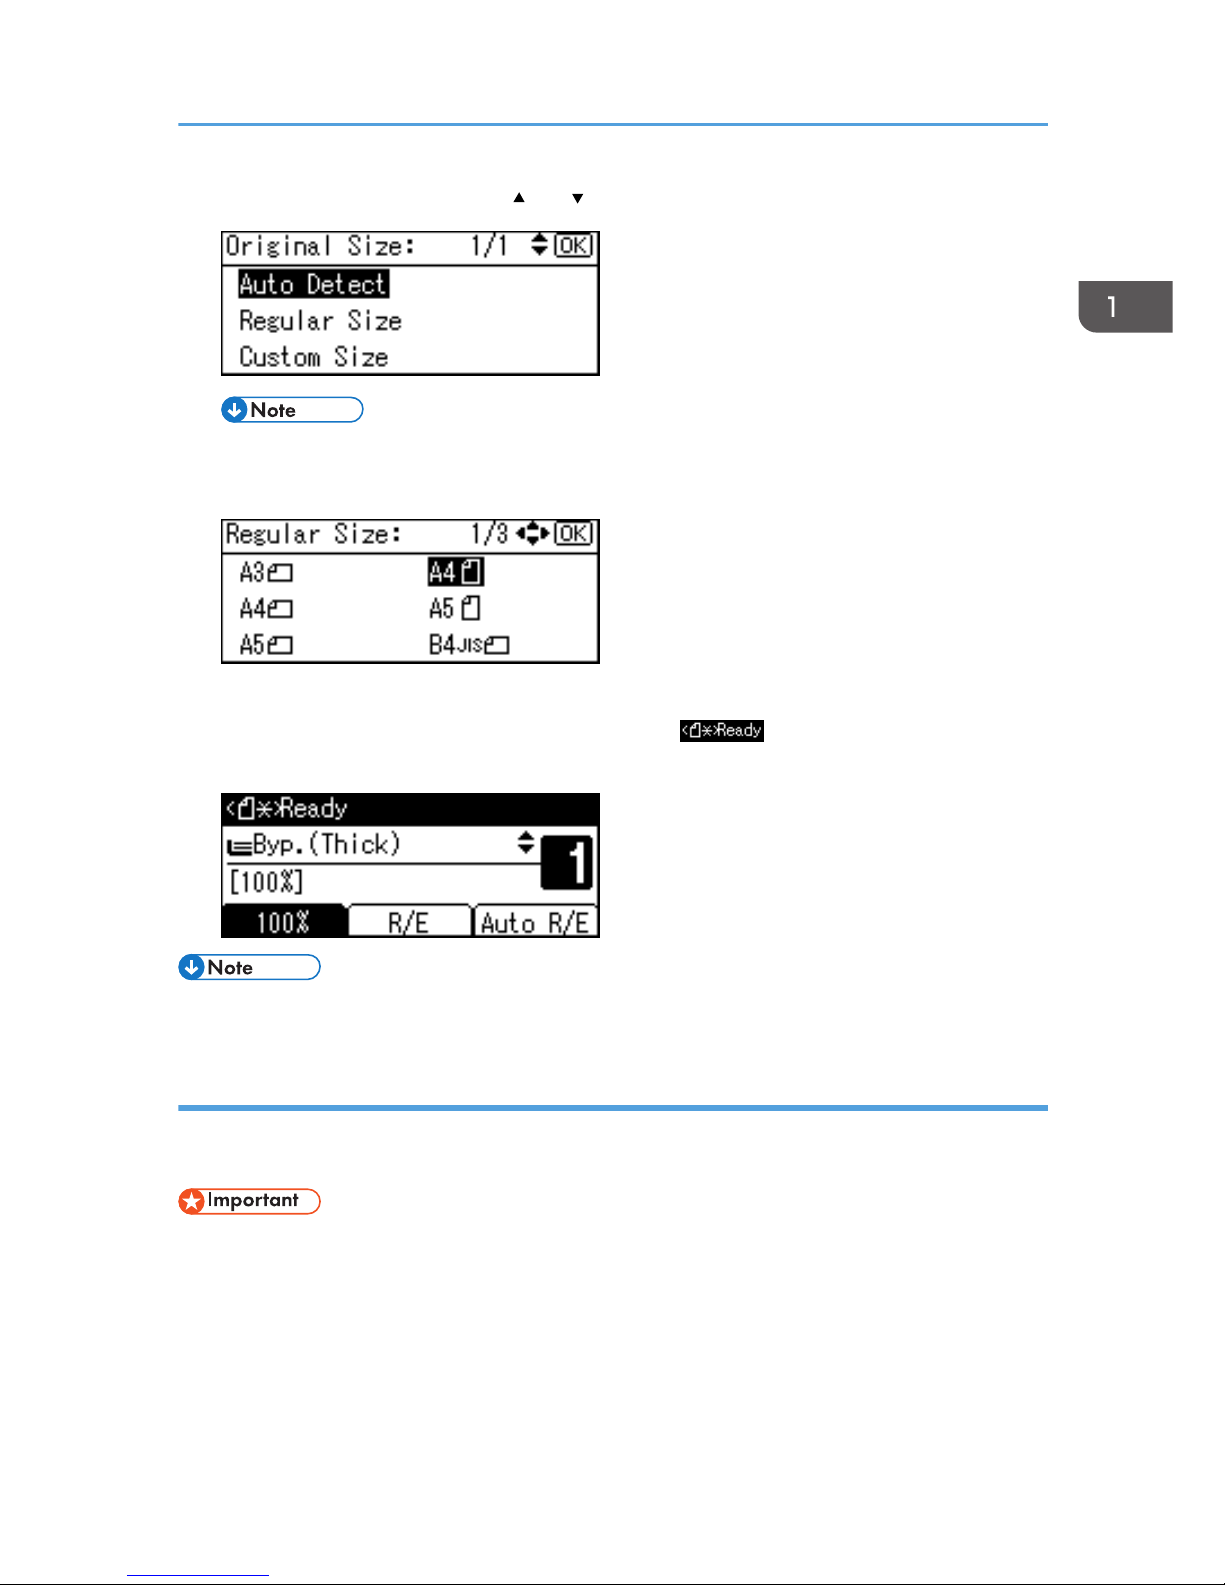
3. Select [Regular Size] using the [ ] or [ ] key, and then press the [OK] key.
• When [Auto Detect] is selected, the size of the placed original will be detected automatically.
4. Select the original size using the scroll keys, and then press the [OK] key.
The "Programmed" message appears.
When the regular size originals settings are registered, appears on the top of copy
display.
• To cancel the size you have set, press the [Reset] key.
Placing custom size originals
When placing custom size originals on the exposure glass or in the ADF, specify the size of the originals
using the number keys.
• Originals that have a vertical length of 105–297 mm (4.2"–11.6") and a horizontal length of
128–1,260 mm (5.1"–49.6") can be specified.
Placing Originals
37
Page 40
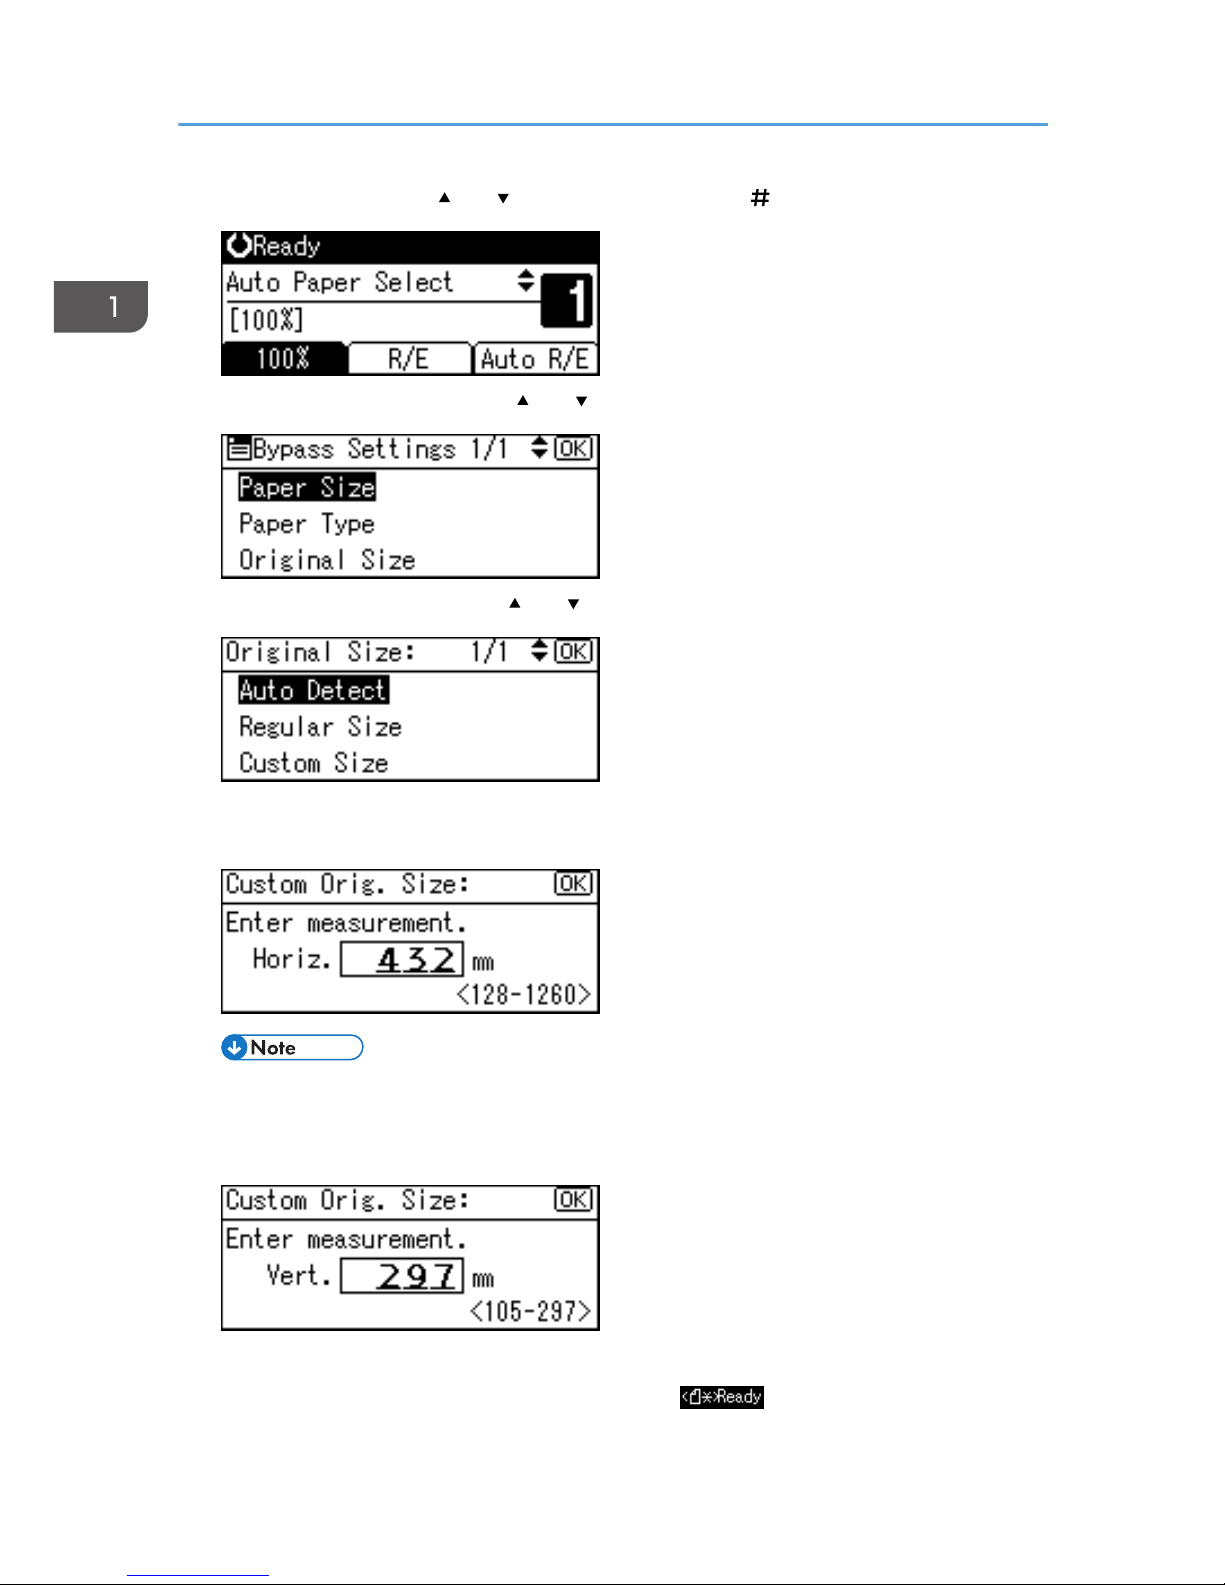
1. Select [Byp.] using the [ ] or [ ] key, and then press the [ ] key.
2. Select [Original Size] using the [ ] or [ ] key, and then press the [OK] key.
3. Select [Custom Size] using the [ ] or [ ] key, and then press the [OK] key.
4. Enter the horizontal size of the original (Horiz.) with the number keys, and then press the
[OK] key.
• If you make a mistake, press the [Clear/Stop] key, and then enter the value again.
5. Enter the vertical size of the original (Vert.) with the number keys, and then press the [OK]
key.
The "Programmed" message appears.
When the regular size originals settings are registered, appears on the top of copy
display.
1. Placing Originals
38
Page 41
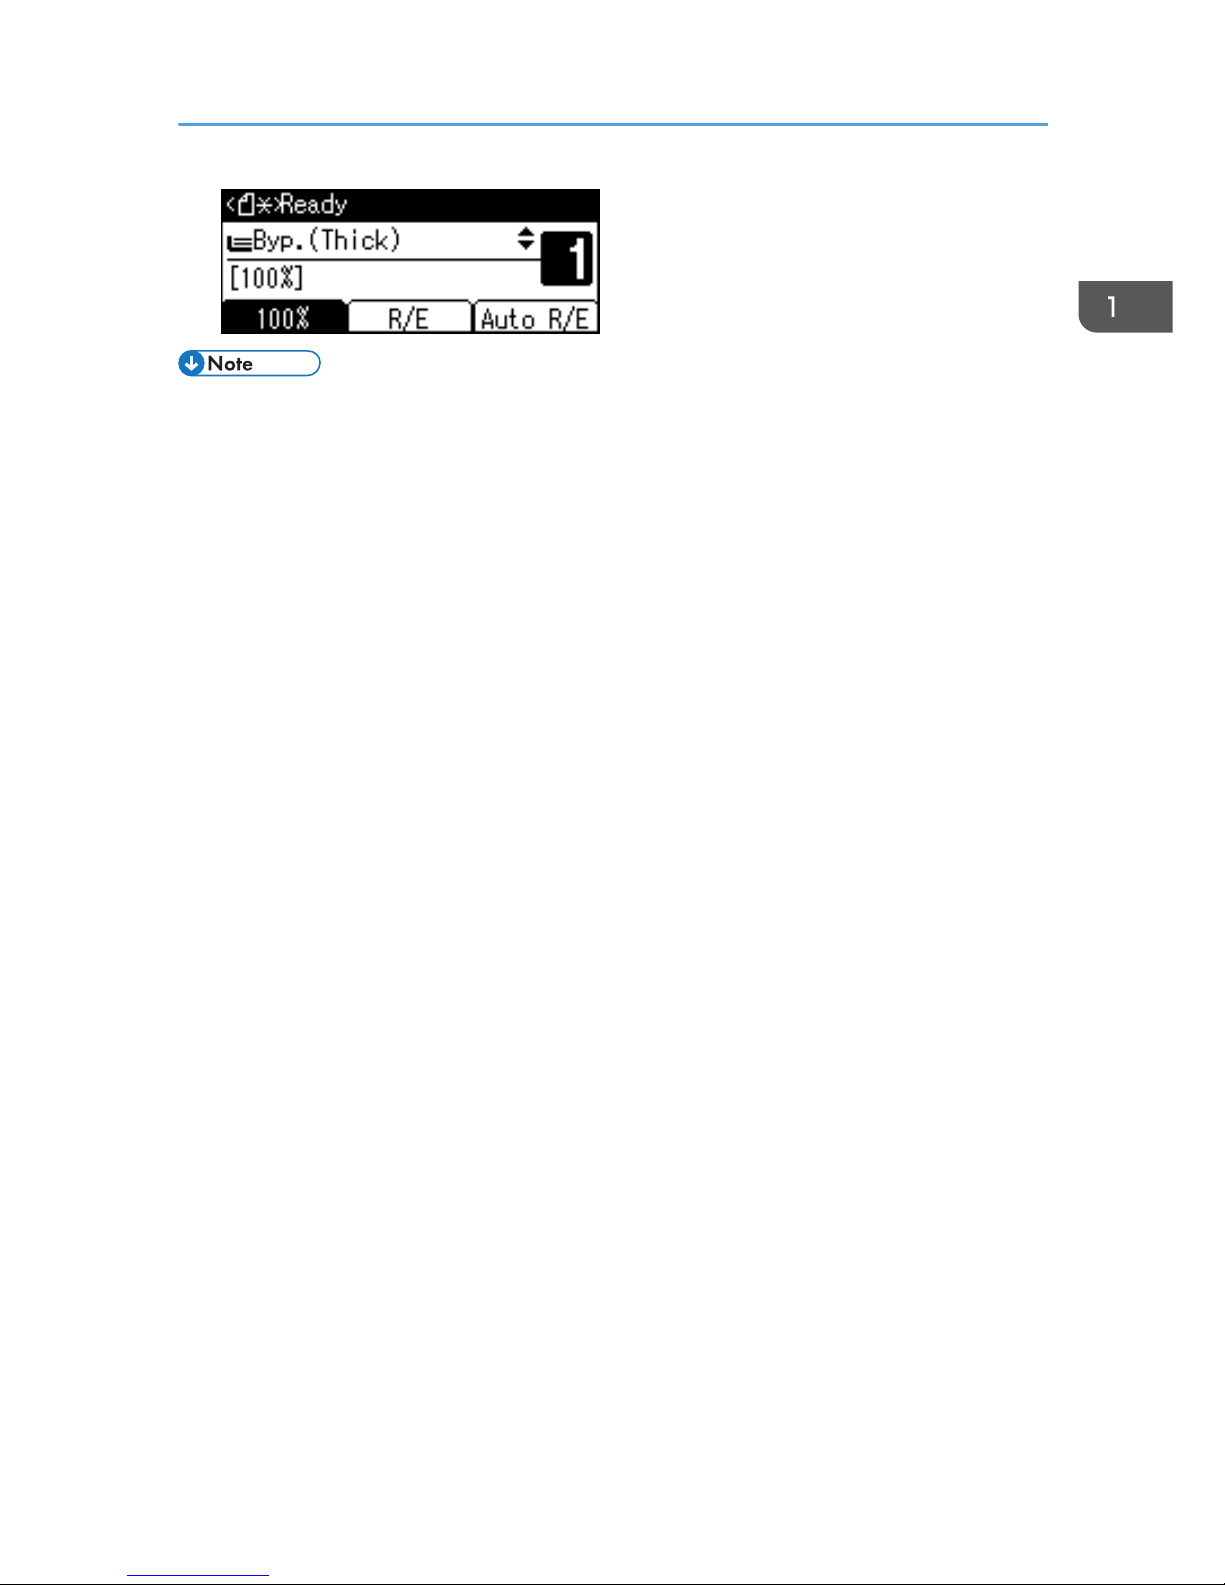
• To cancel the size you have set, press the [Reset] key.
Placing Originals
39
Page 42

1. Placing Originals
40
Page 43
2. Copying
Basic Procedure
1. If the machine has user codes set, enter a user code (up to eight digits) using the number
keys, and then press the [OK] or [ ] key.
The machine is ready to copy.
• For user codes, see "Administrator Tools", General Settings Guide.
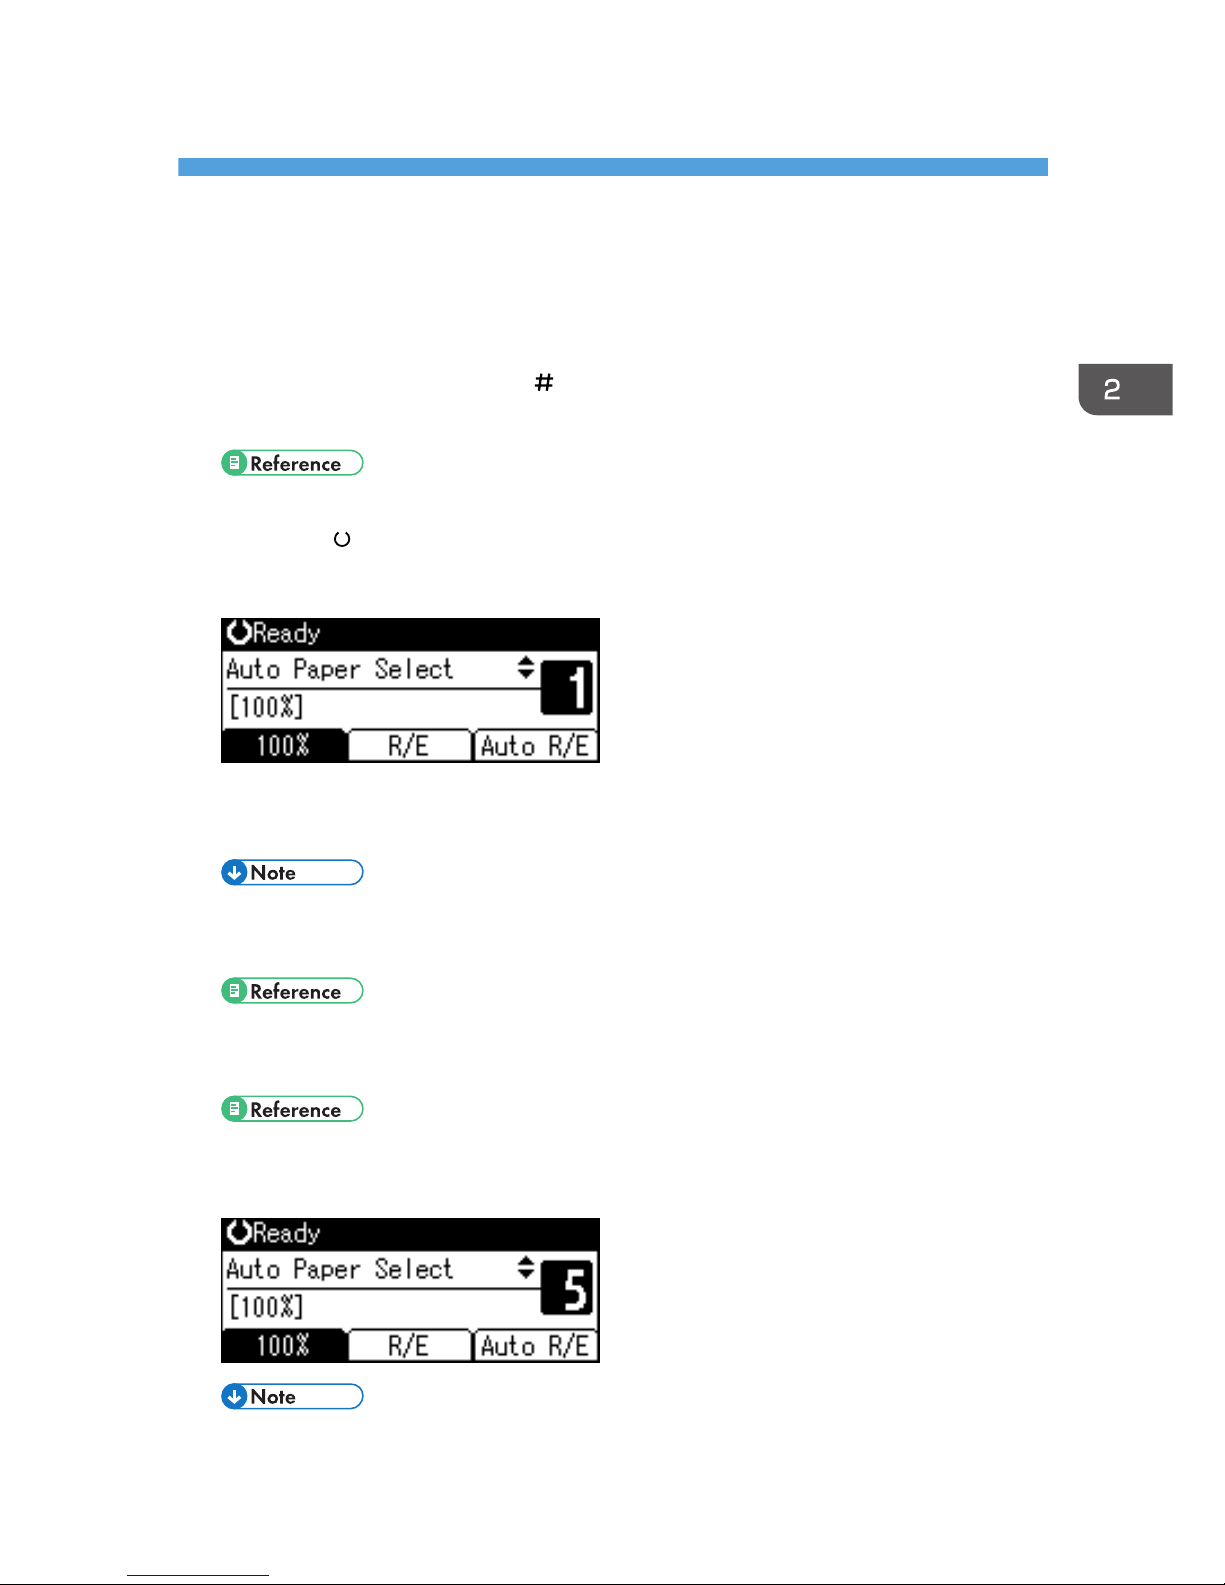
2. Make sure " Ready" appears on the display.
Initial copy display
If any other function is displayed, press the [Copy] key.
3. Make sure no previous settings remain.
• When there are previous settings remaining, press the [Reset] key.
4. Place your originals.
• page 31 "Placing Originals"
5. Make the necessary settings.
• See the explanations for each function.
6. Enter the number of copies using the number keys.
• The maximum copy quantity that can be set is 99.
41
Page 44

7. Press the [Start] key.
Copying starts.
• Copies are delivered face down.
How to operate
• To switch between pages or select functions:
Press the scroll key.
• To stop the machine during a multicopy run:
Press the [Clear/Stop] key.
• To return the machine to the initial condition after copying:
Press the [Reset] key.
• To clear an entered value.
Press the [Clear/Stop] key.
2. Copying
42
Page 45
Copying from the Bypass Tray
Use the bypass tray to copy onto OHP transparencies, thick paper, envelopes and copy paper that
cannot be loaded in the paper trays.
• Paper longer than 433 mm may become wrinkled, may not feed in, and may jam.
• If you do not use standard size copy paper, or if you use special paper, you should enter its
vertical and horizontal dimensions. The sizes you can enter are as follows:
Metric version • Vertical: 90–297 mm
• Horizontal: 148–600 mm
Inch version • Vertical: 3.55"–11.69"
• Horizontal: 5.83"–23.62"
• The machine can automatically detect the following sizes as regular size copy paper:
Metric version A3 , B4 JIS , A4 , B5 JIS , A5 , B6 JIS
Inch version 11" × 17" , 81/2" × 11" , 51/2" ×81/2"
• When copying onto OHP transparencies or paper heavier than 82 g/m2 (about 20 lb.), you need
to specify the paper type.
• The maximum number of sheets you can load at the same time depends on paper type. Load only
as much paper as can be held between the paper guides on the bypass tray.
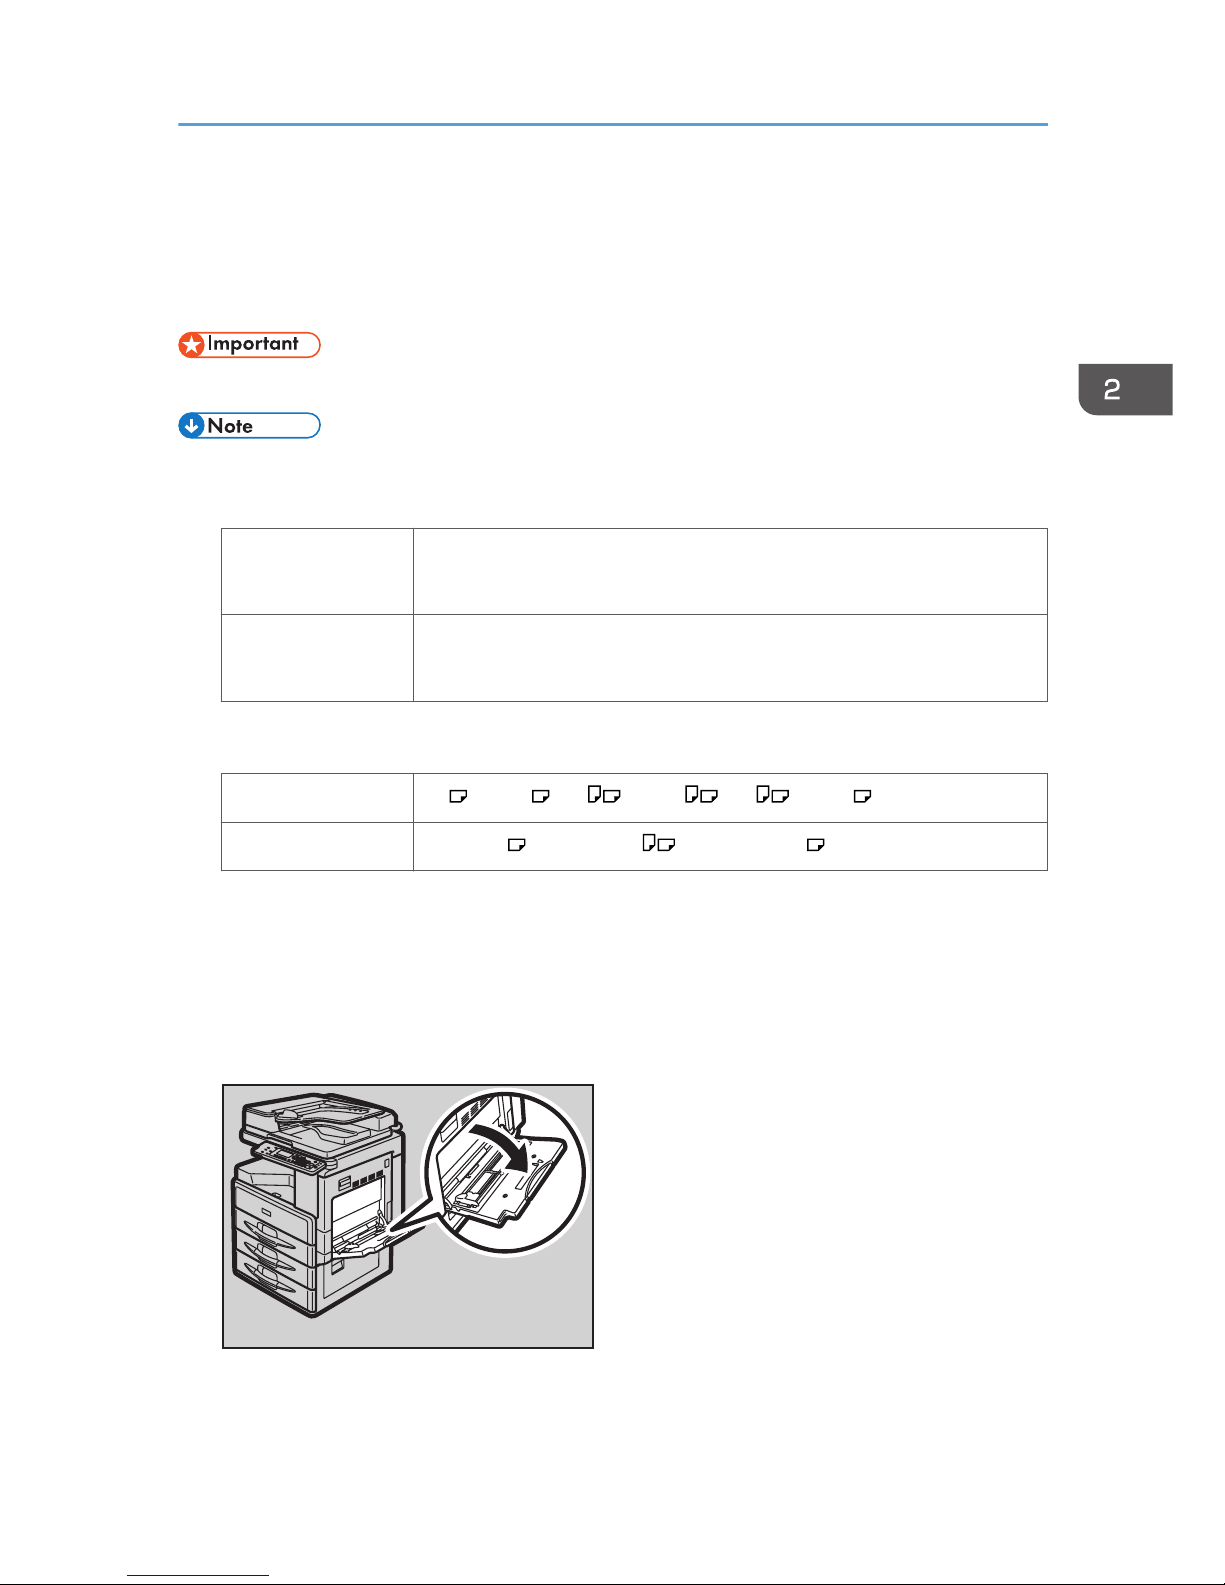
1. Open the bypass tray.
CUA108
Copying from the Bypass Tray
43
Page 46
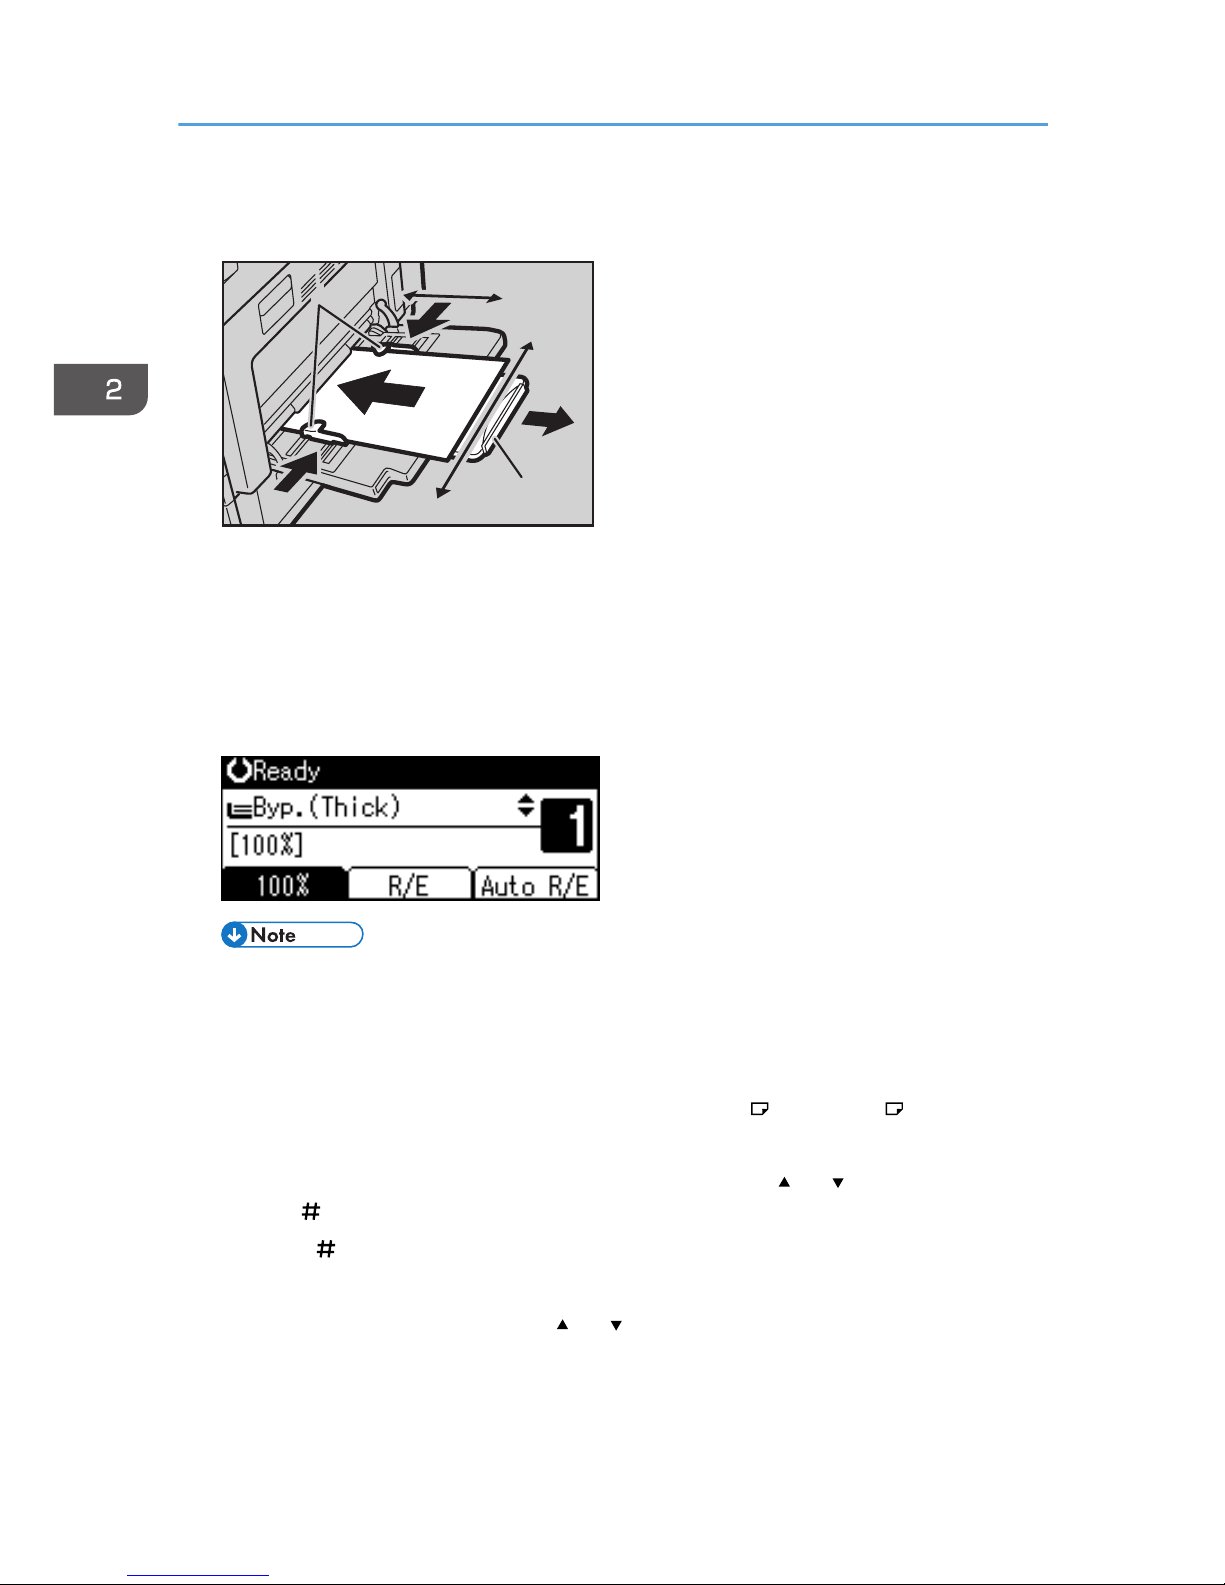
2. Insert the paper with the side you want to copy facing down, and then adjust the paper
guide with the paper size.
CUA109
1
1
232
3
4
4
1. Horizontal size
2. Vertical size
3. Extender
4. Paper guides
The bypass tray is selected on the display.
• If the guides are not flush against the copy paper, images might be skewed or paper misfeeds
might occur.
• Load only as much paper as can be held between the guides on the bypass tray.
Overloading the bypass tray can result in misfeeds and skewed images.
• Pull the extender out to support paper sizes larger than A4 , 81/2" × 11" .
• Fan paper to get air between the sheets and avoid a multi-sheet feed.
• If [Byp.] is not selected on the display, select [Byp.] using the [ ] or [ ] key, and then press
the [ ] key.
3. Press the [ ] key, and then select the paper size and type.
When copying onto regular size paper
1. Select [Paper Size] using the [ ] or [ ] key, and then press the [OK] key.
2. Copying
44
Page 47
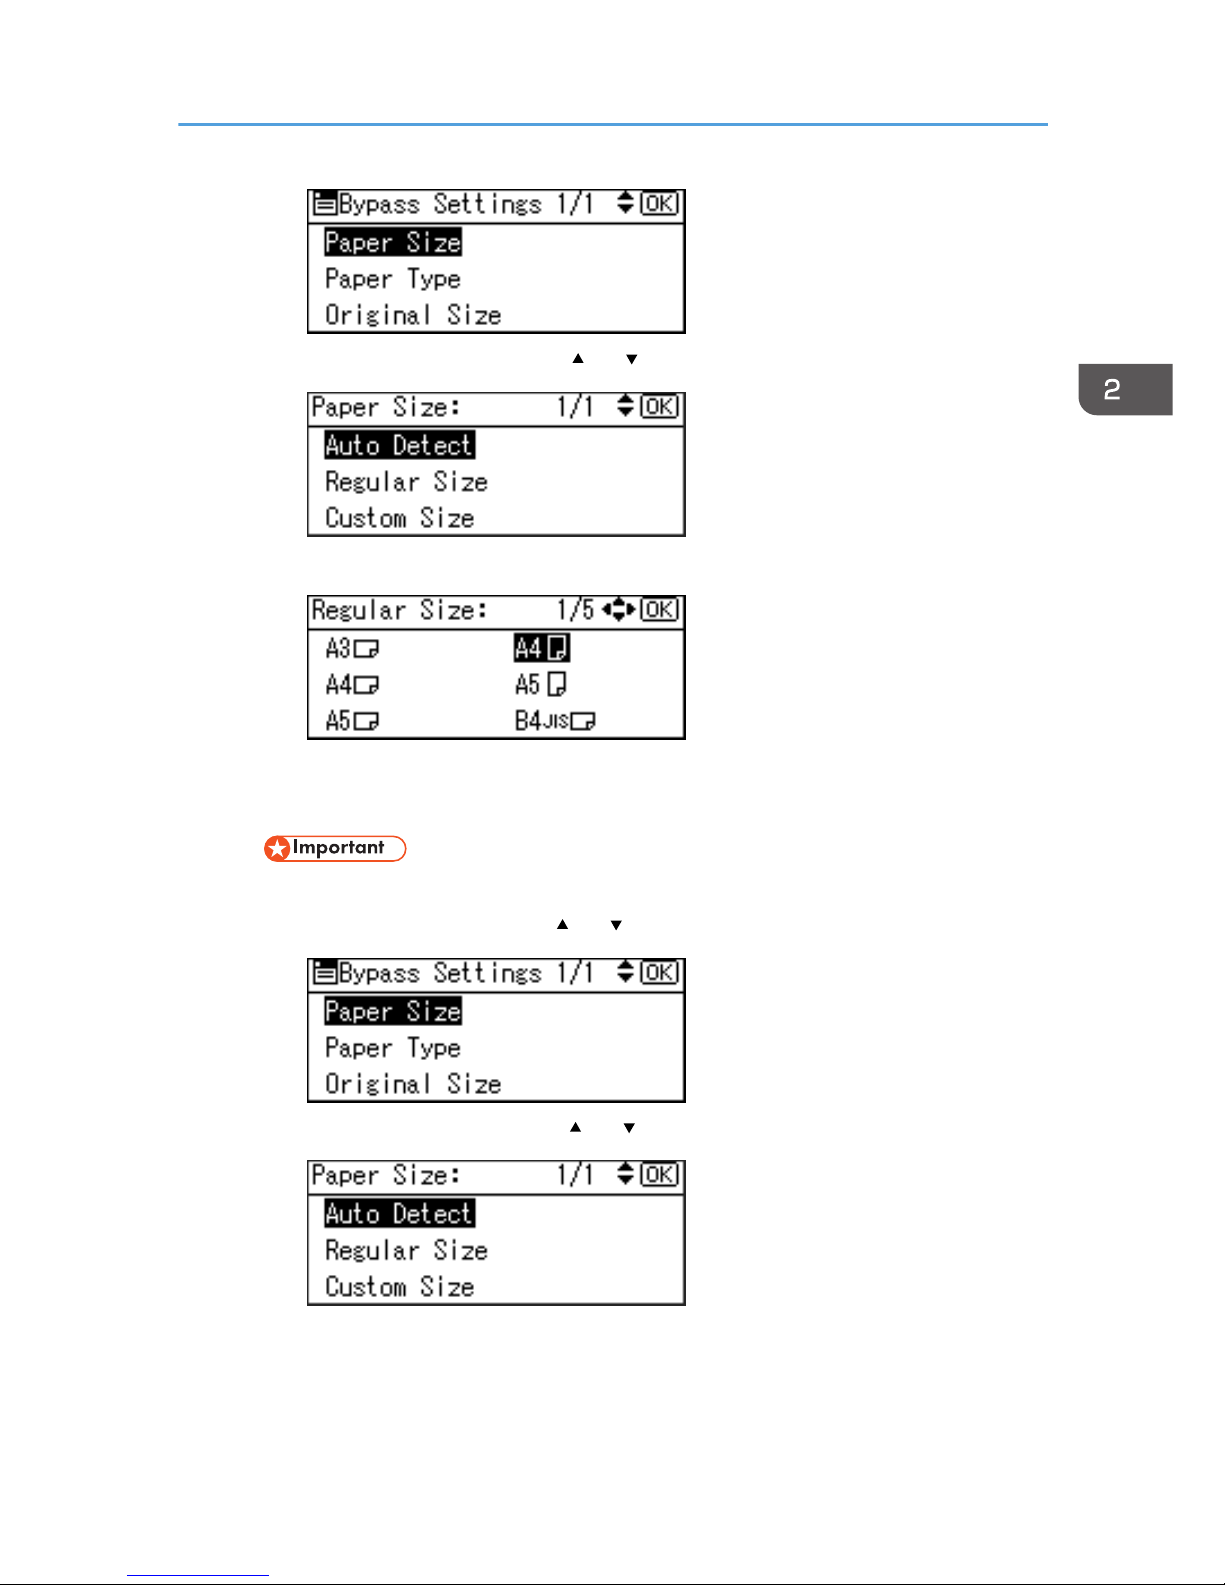
2. Select [Regular Size] using the [ ] or [ ] key, and then press the [OK] key.
3. Select the paper size using the scroll keys, and then press the [OK] key.
The "Programmed" message appears.
When copying onto custom size paper
• You should specify the size of copy paper to avoid paper misfeeds.
1. Select [Paper Size] using the [ ] or [ ] key, and then press the [OK] key.
2. Select [Custom Size] using the [ ] or [ ] key, and then press the [OK] key.
3. Enter the horizontal size of the original using the number keys, and then press the [OK]
key.
Copying from the Bypass Tray
45
Page 48
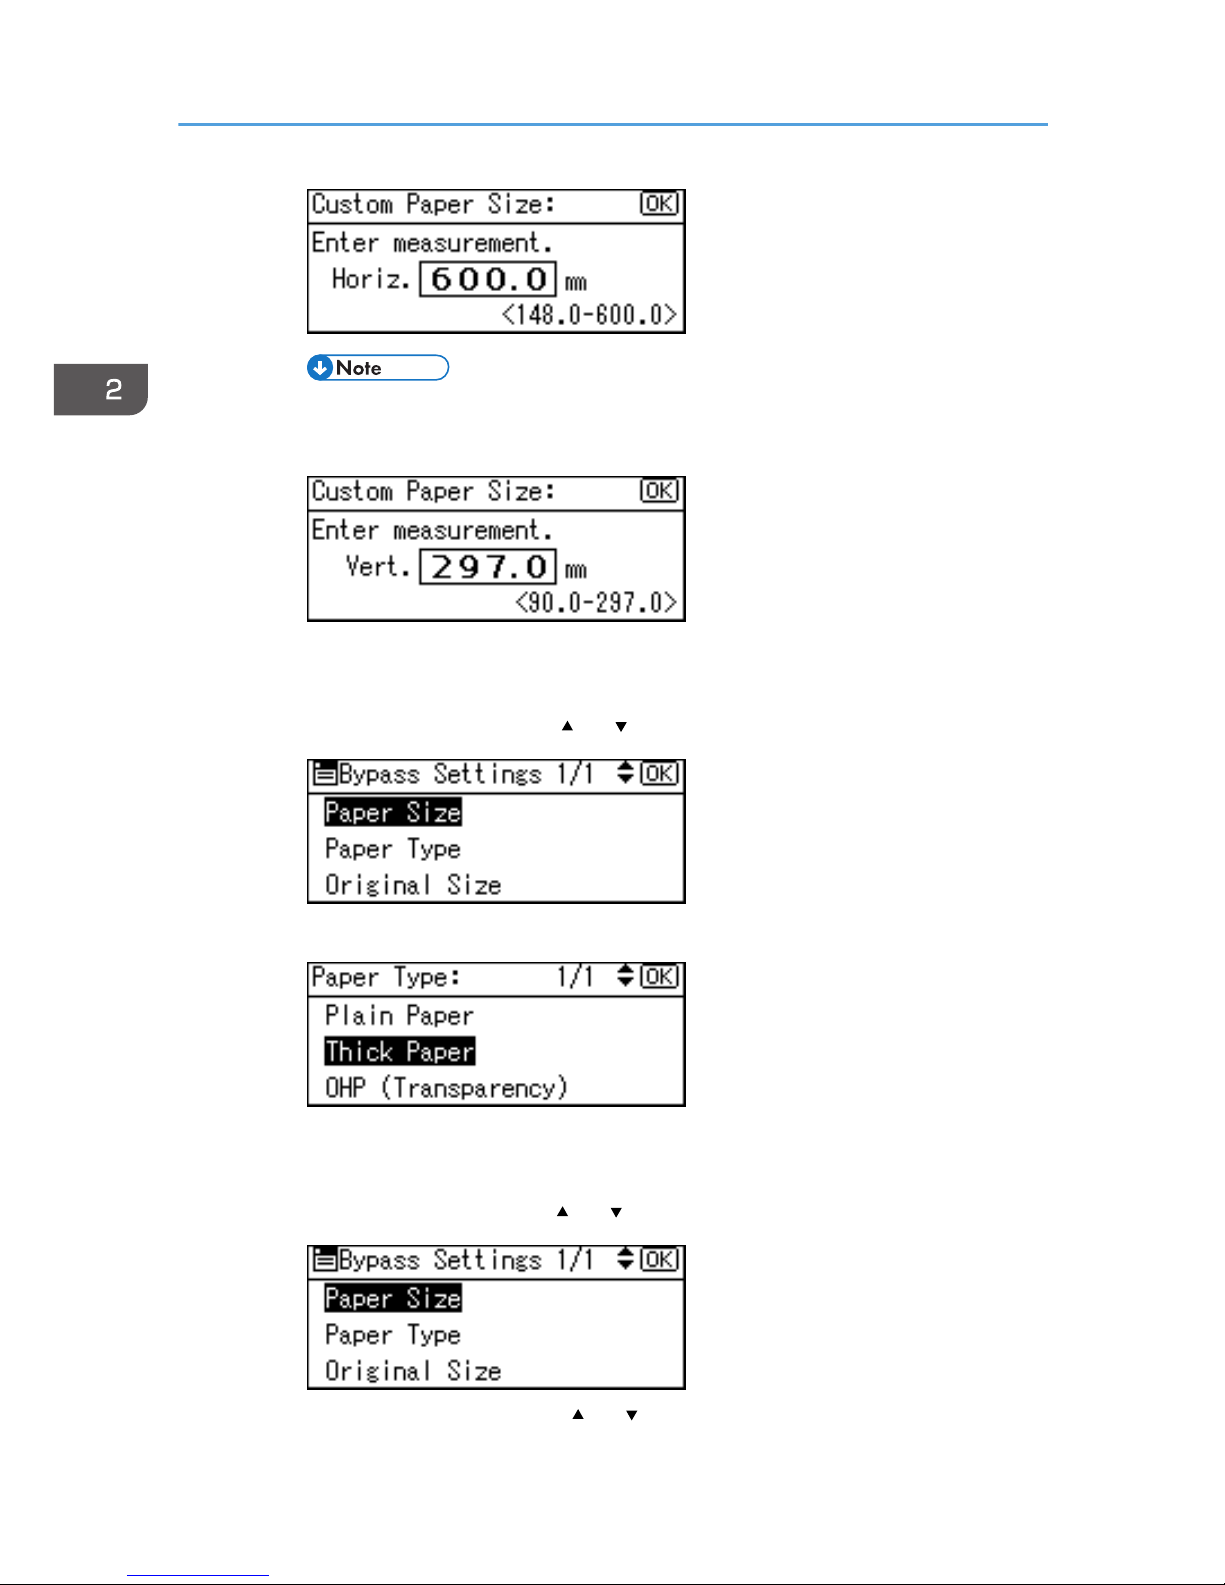
• If you make a mistake, press the [Clear/Stop] key, and then enter the value again.
4. Enter the vertical size of the original using the number keys, and then press the [OK] key.
The "Programmed" message appears.
When copying onto special paper
1. Select [Paper Type] using the [ ] or [ ] key, and then press the [OK] key.
2. Select the paper type, and then press the [OK] key.
The "Programmed" message appears.
When copying onto envelopes
1. Select [Paper Size] using the [ ] or [ ] key, and then press the [OK] key.
2. Select [Regular Size] using the [ ] or [ ] key, and then press the [OK] key.
2. Copying
46
Page 49
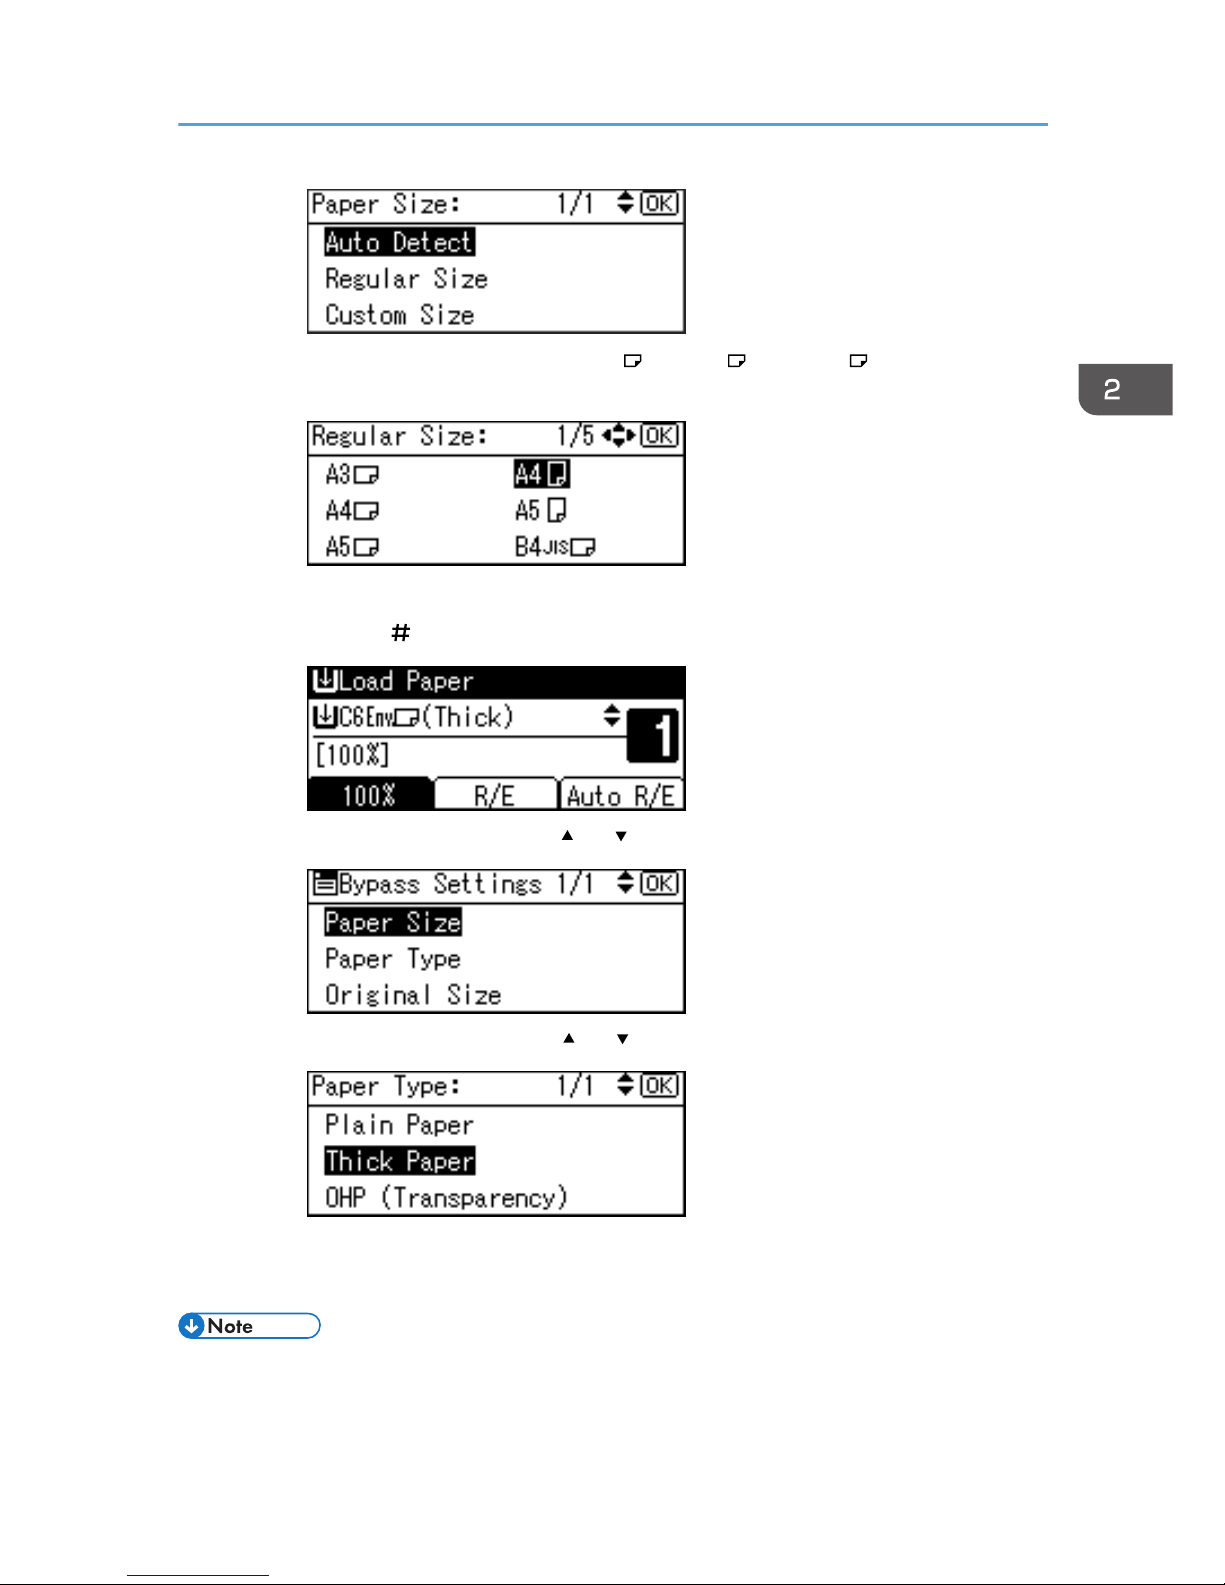
3. Select the envelope size from [C6 Env ], [C5 Env ], or [DL Env ], and then press the
[OK] key.
The "Programmed" message appears.
4. Press the [ ] key.
5. Select [Paper Type] using the [ ] or [ ] key, and then press the [OK] key.
6. Select [Thick Paper] using the [ ] or [ ] key, and then press the [OK] key.
The "Programmed" message appears.
4. Place your originals, and then press the [Start] key.
• When copying onto OHP transparencies, remove copied sheets one by one.
Copying from the Bypass Tray
47
Page 50
Copier Functions
Adjusting Image Density
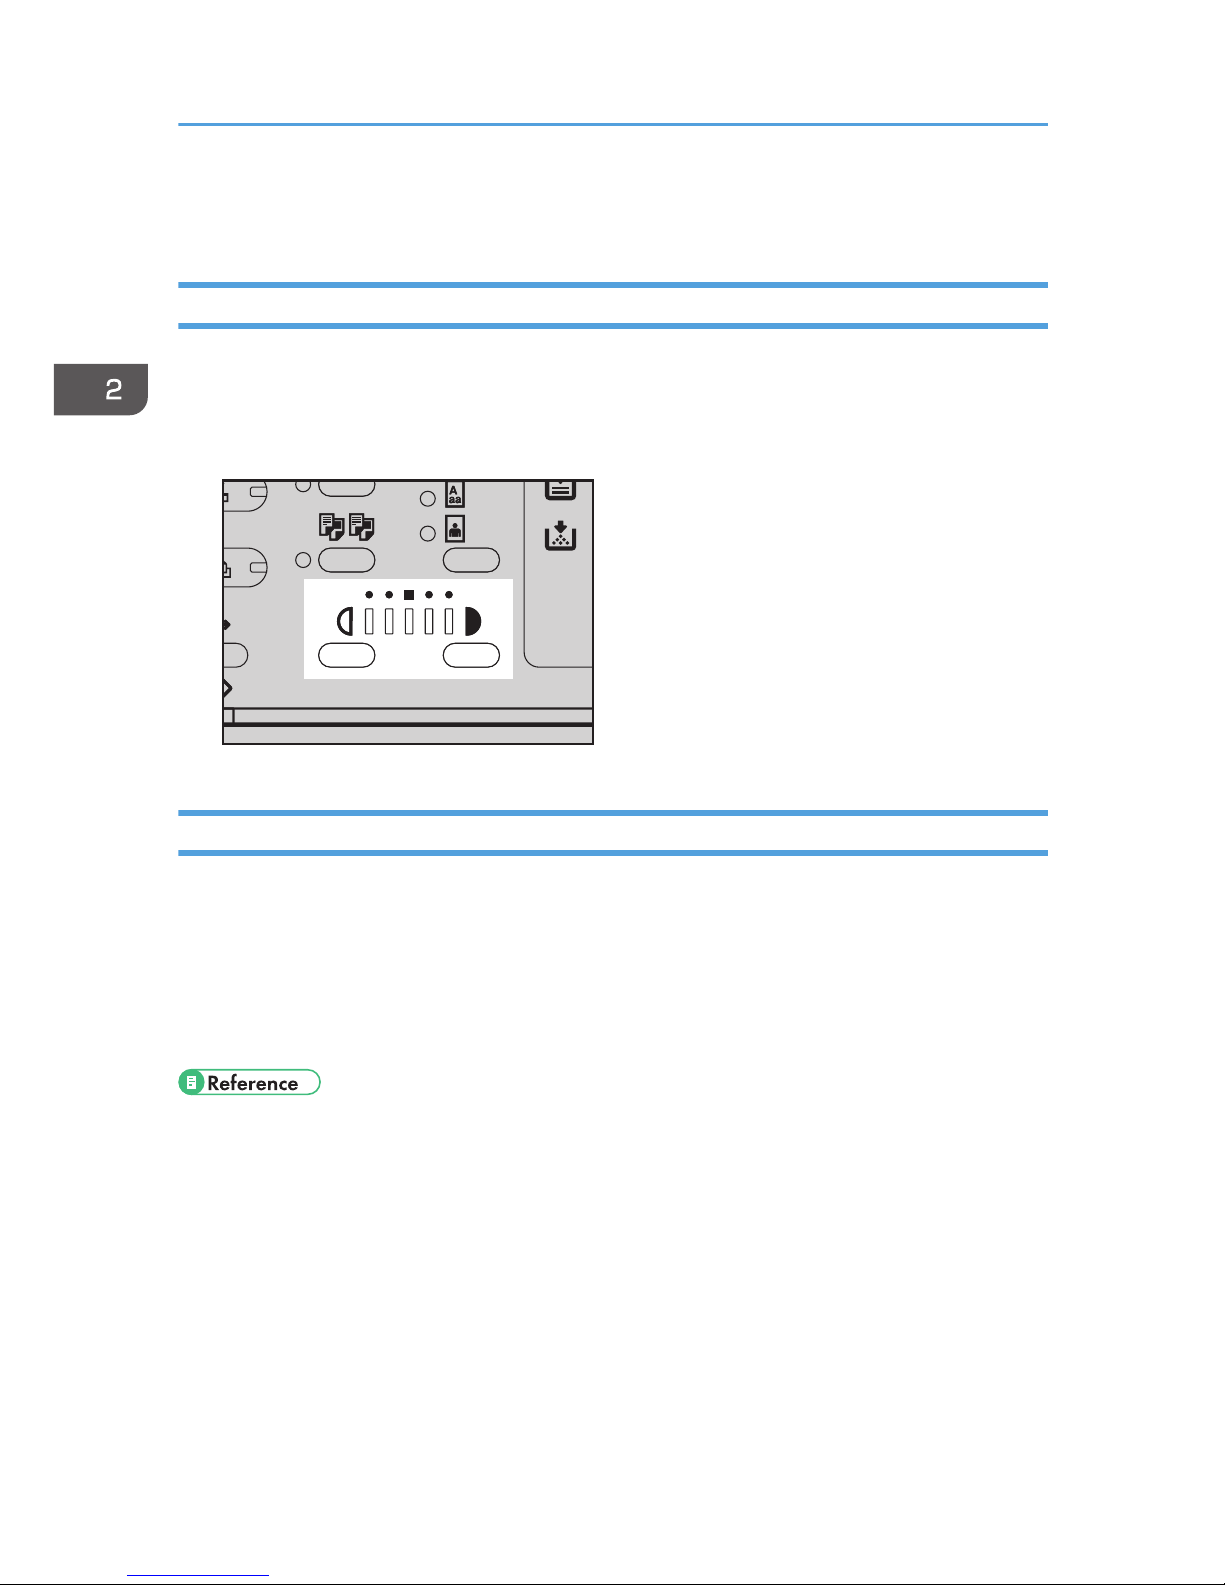
You can adjust copy image density to match your originals.
If you require darker or lighter copies, adjust image density accordingly.
1. Press the [Lighter] or [Darker] key to adjust the density.
CUA110
Selecting Original Type Setting
Select one of the following two types to match your originals:
Text
Select this when your originals contain only text (no pictures).
Photo
This can reproduce delicate tones of photographs and pictures.
• page 89 "Original Type Setting"
2. Copying
48
Page 51
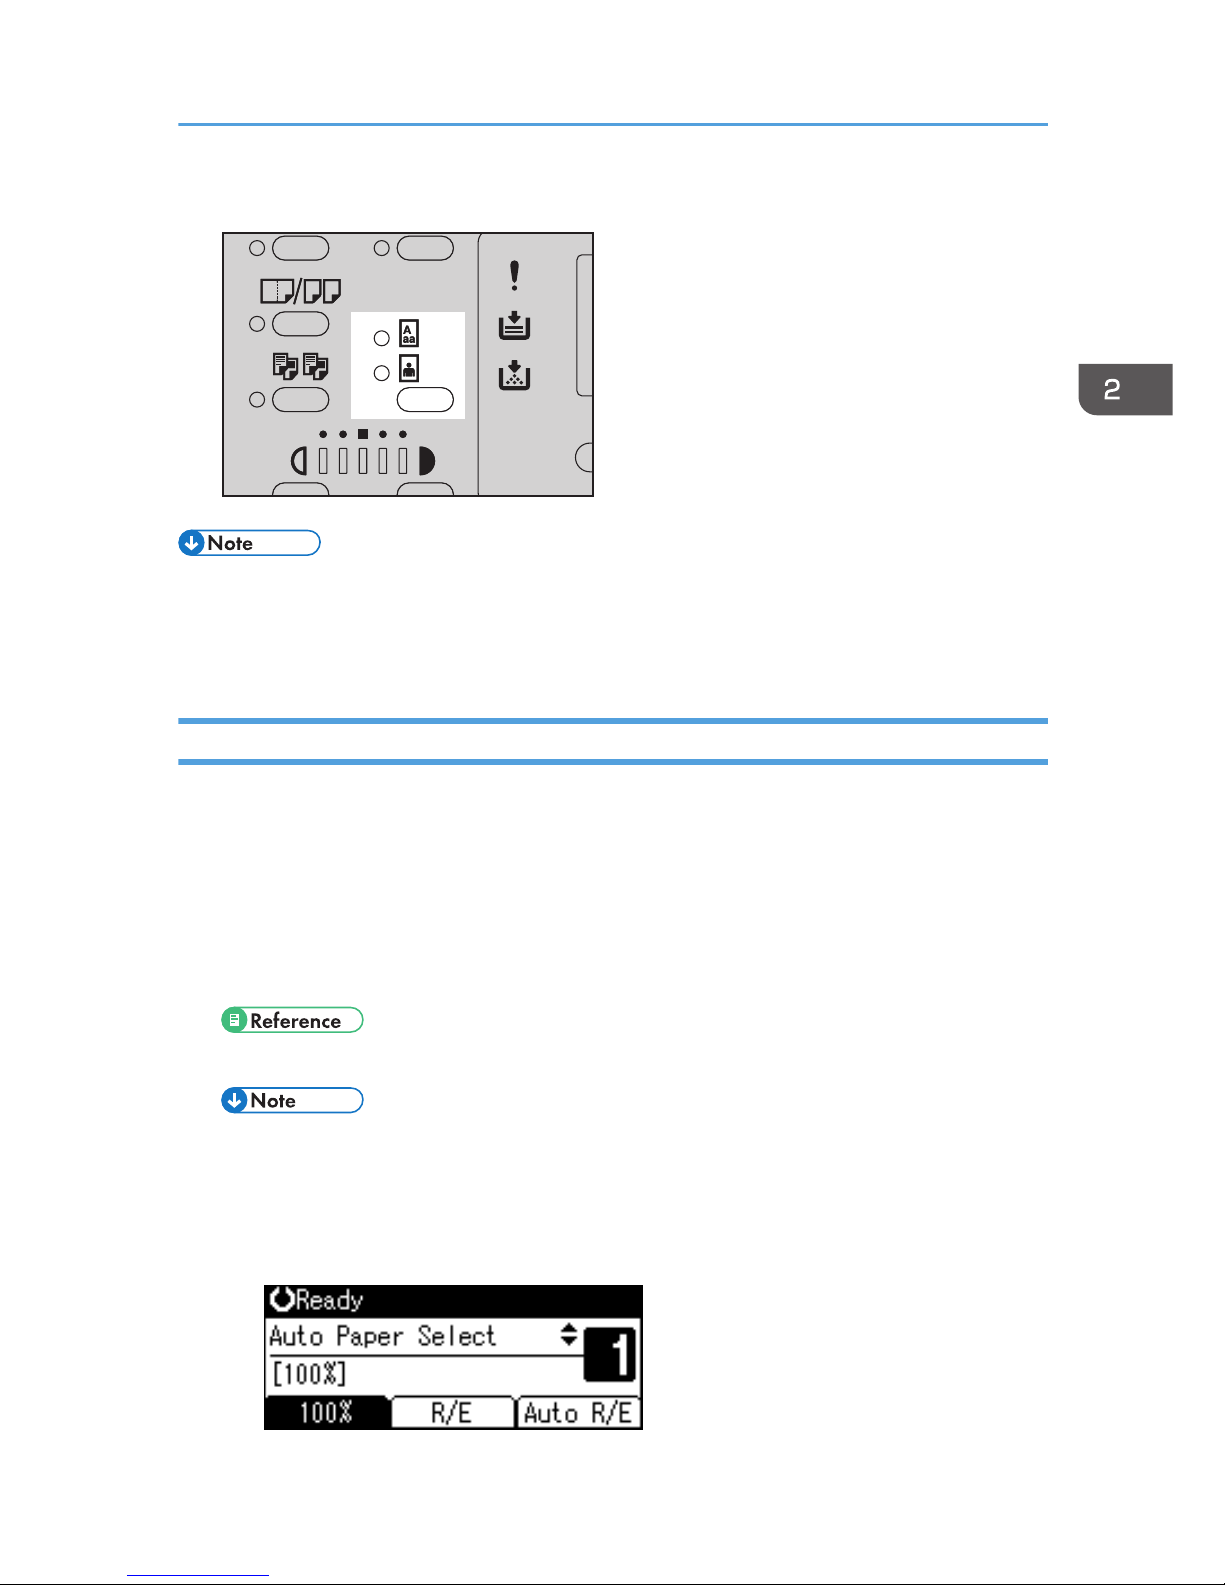
1. Press the [Original Type] key and select the original type.
CUA111
• Press the [Original Type] key to go through the following types:
• Upper indicator lit: Text
• Lower indicator lit: Photo
Selecting Copy Paper
There are two ways to select copy paper:
Auto Paper Select
The machine selects a suitable size of copy paper automatically based on original size and
reproduction ratio.
Manual Paper Select
Choose the tray containing the paper you want to copy onto: a paper tray or the bypass tray.
• page 29 "Sizes difficult to detect"
• If you specify all paper trays as containing special paper, you cannot use the Auto Paper
Select function.
Auto Paper Select
1. Make sure [Auto Paper Select] is selected.
Copier Functions
49
Page 52
Manual Paper Select
1. Select the paper tray or bypass tray using the [ ] or [ ] key.
The selected tray and the paper size appear.
• page 43 "Copying from the Bypass Tray"
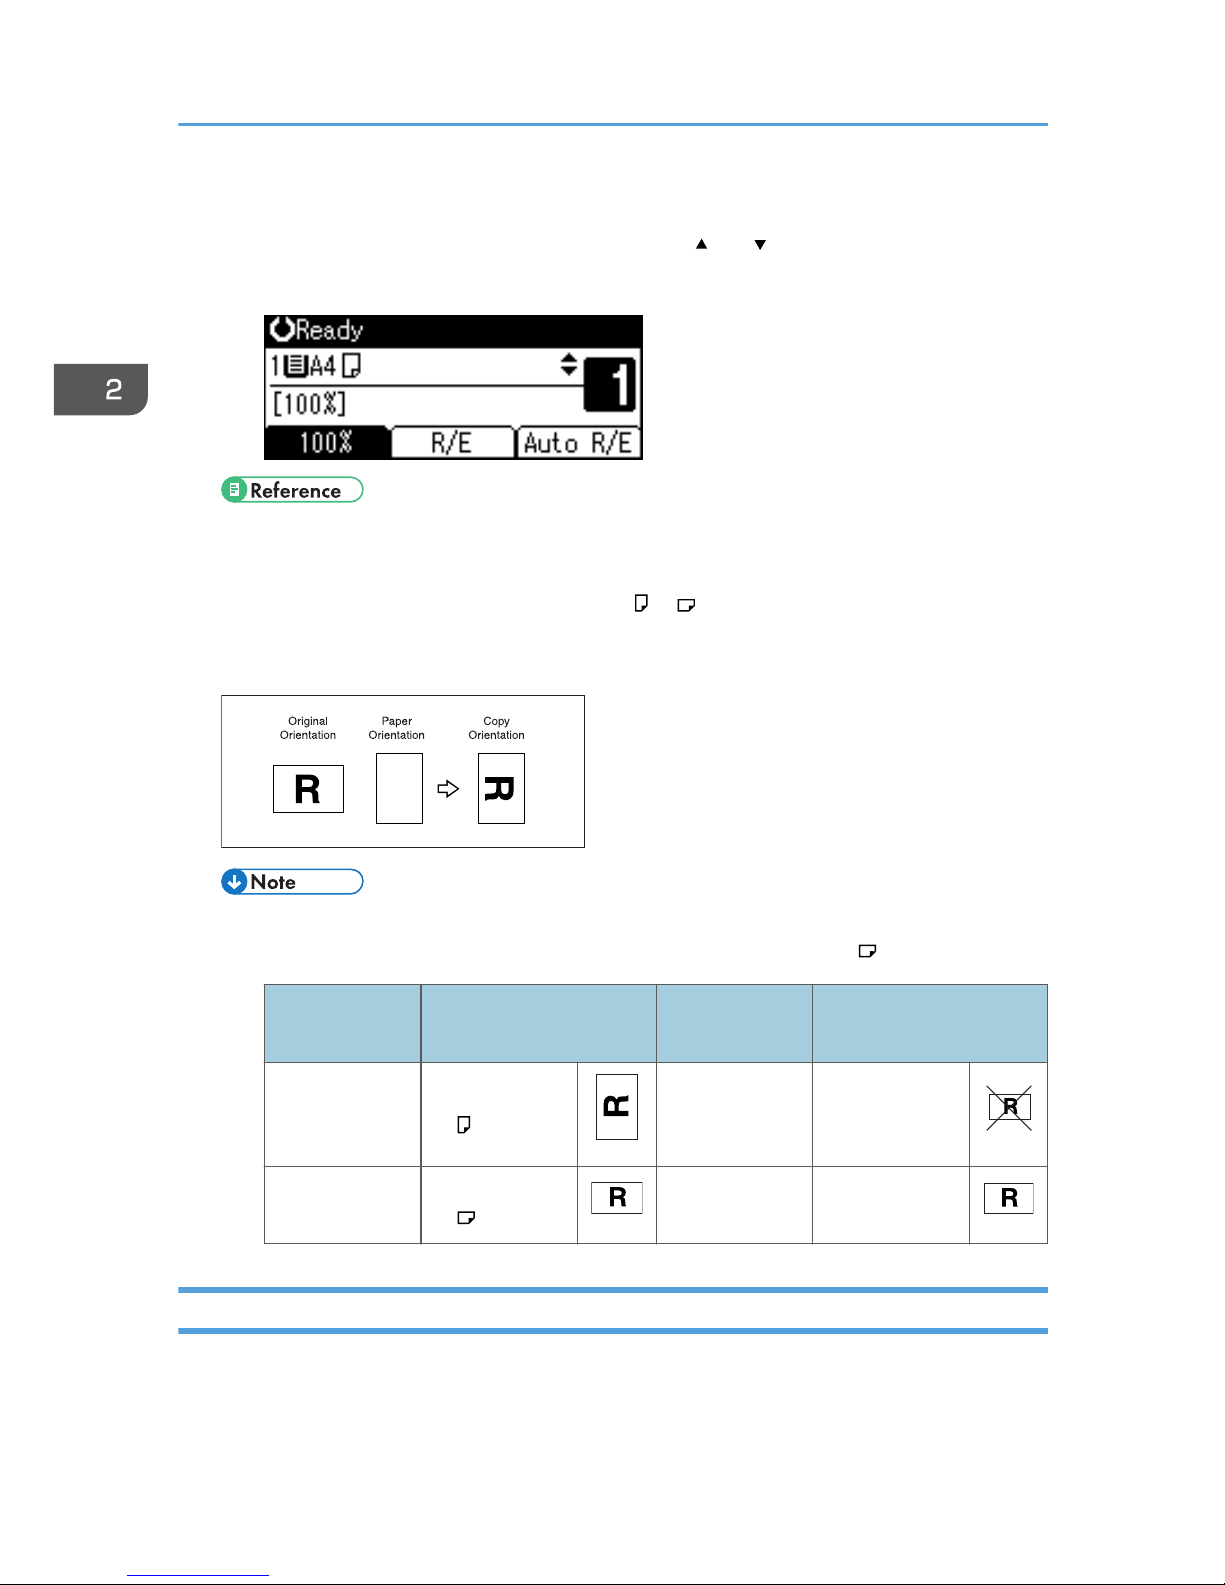
Rotated copy
If the orientation in which your original is placed ( or ) is different from that of the paper you
are copying onto, this function rotates the original image by 90° to fit it on the copy paper. This
function works when [Auto Paper Select] or [Auto Reduce/ Enlarge] is selected.
GCROTA0E
• You cannot use the Rotated Copy function when enlarging onto A3, B4 JIS, 11" × 17", 81/2"
× 13", or 81/2" × 14" size paper. To do this, place your original in the orientation.
Original size and
orientation
Original size and
orientation
You cannot
rotate:
A4, B5 JIS, or
A5
GCROTA1E
When enlarging
to:
B4 JIS, A3
GCROTA2E
However, you
can use:
A4, B5 JIS, or
A5
GCROTA3E
When enlarging
to:
B4 JIS, A3
GCROTA4E
Preset Reduce/Enlarge
You can select a preset ratio for copying.
2. Copying
50
Page 53
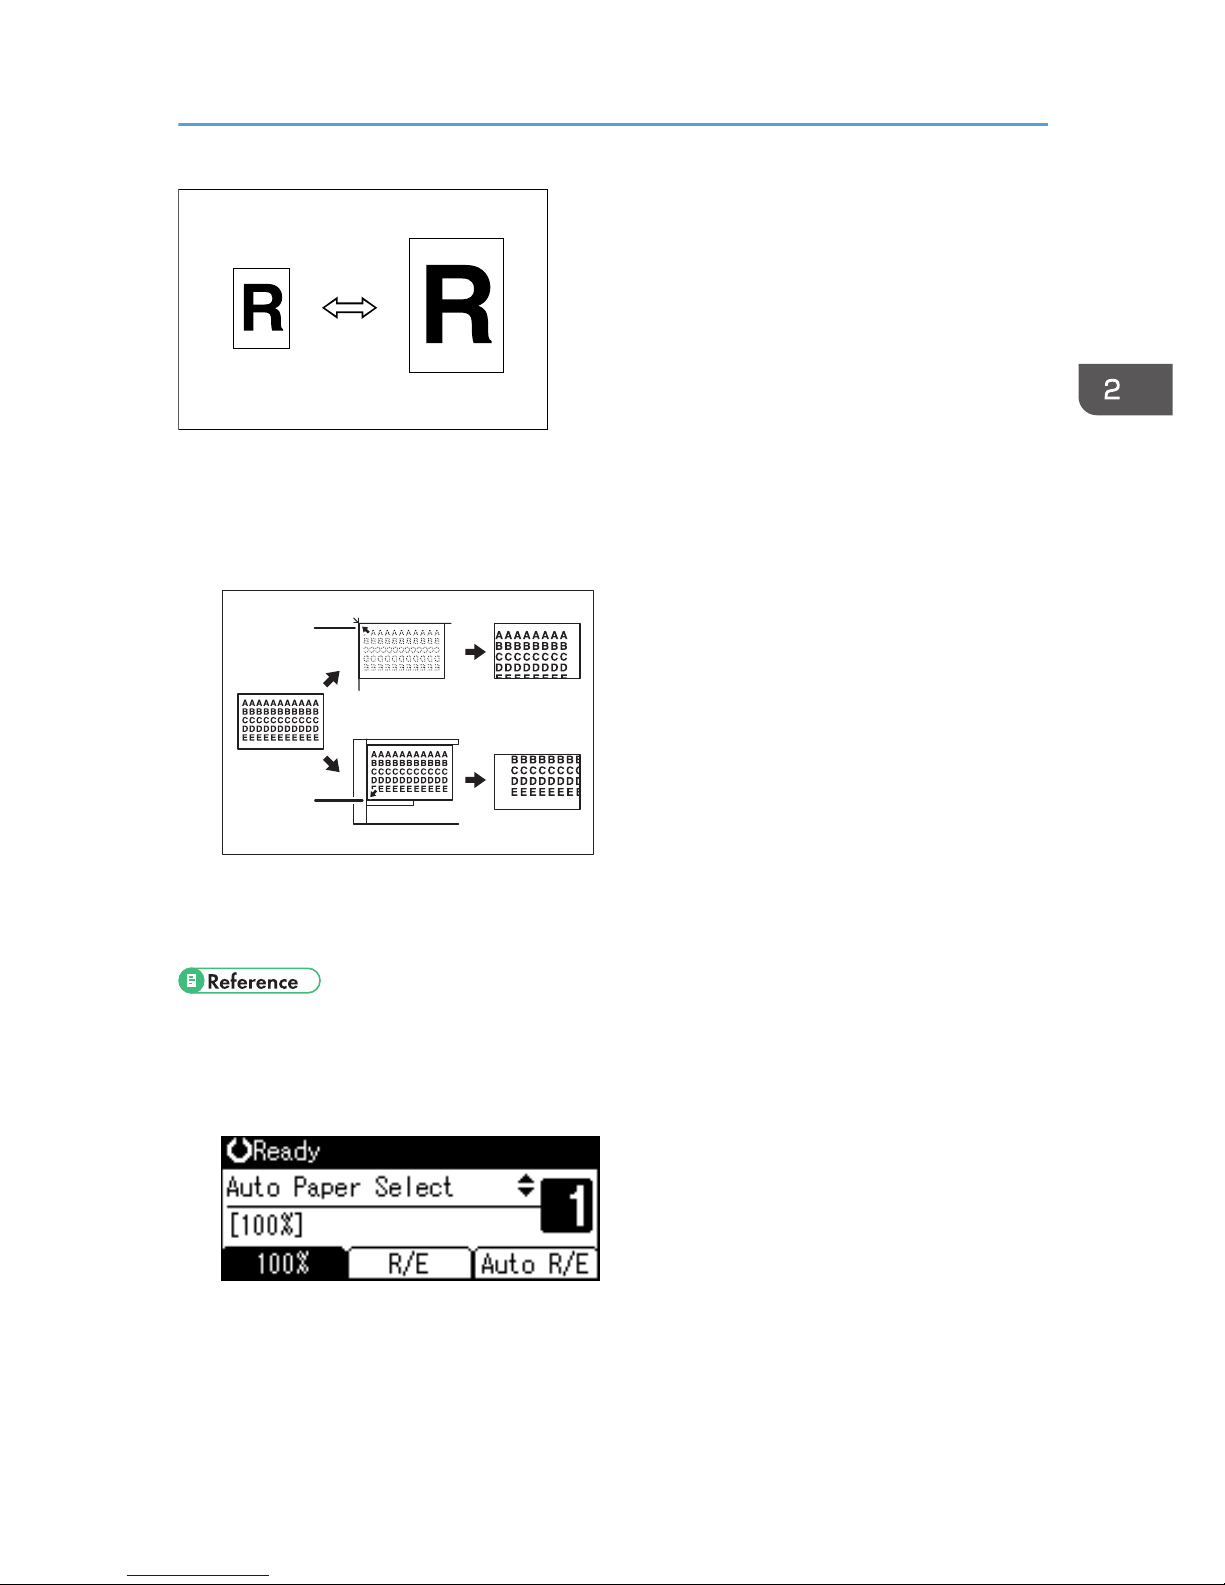
Base Point
The base point of Reduce/Enlarge differs depending on how the original is scanned. When the
original is placed on the exposure glass, the upper left corner is the base point. When placed in the
ADF, the bottom left corner is the base point.
CUA141
1
2
1. Base point when placing on the exposure glass.
2. Base point when placing in the ADF.
• page 91 "Reproduction Ratio"
• page 92 "Preset R/E Priority"
1. Press [R/E].
Copier Functions
51
Page 54
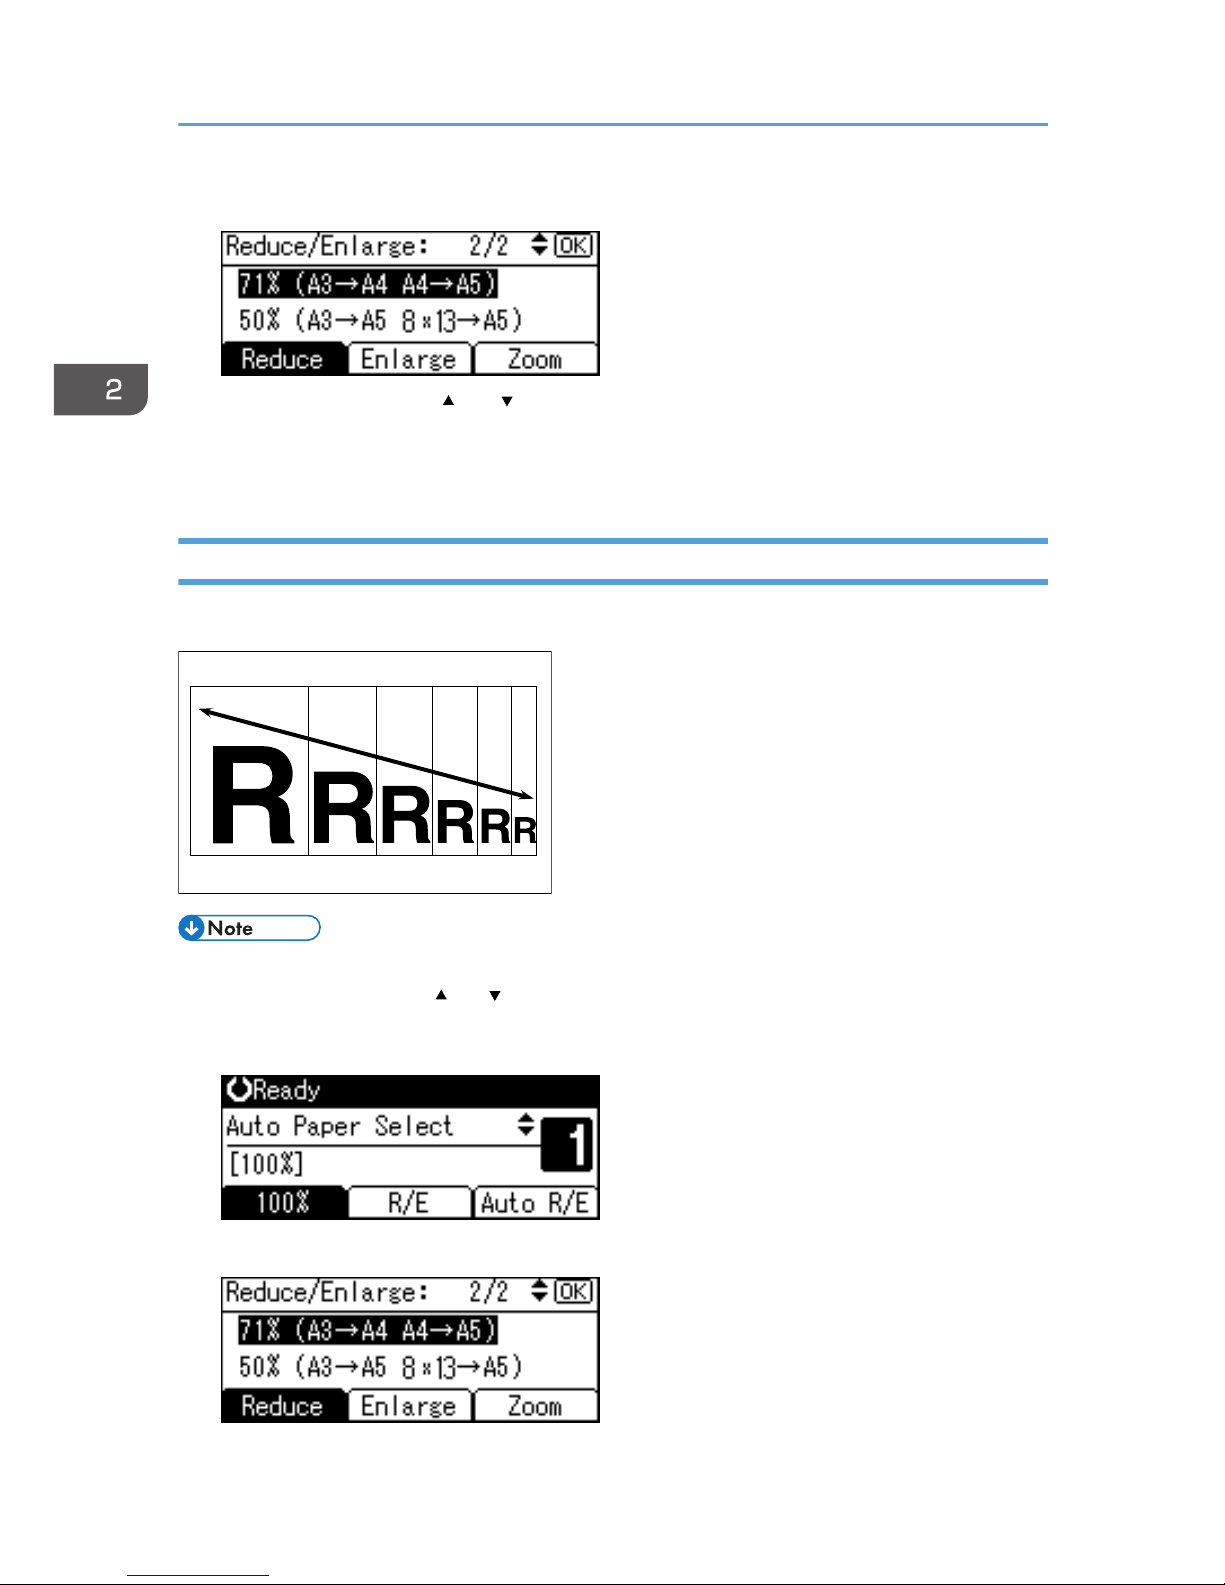
2. Press [Reduce] or [Enlarge].
3. Select a ratio using the [ ] or [ ] key, and then press the [OK] key.
The "Programmed" message appears.
4. Place your originals, and then press the [Start] key.
Zoom
You can change the reproduction ratio in increments of 1%.
• You can also select a preset ratio close to the desired ratio using [Reduce] or [Enlarge], and then
adjust the ratio using the [ ] or [ ] key.
1. Press [R/E].
2. Press [Zoom].
2. Copying
52
Page 55
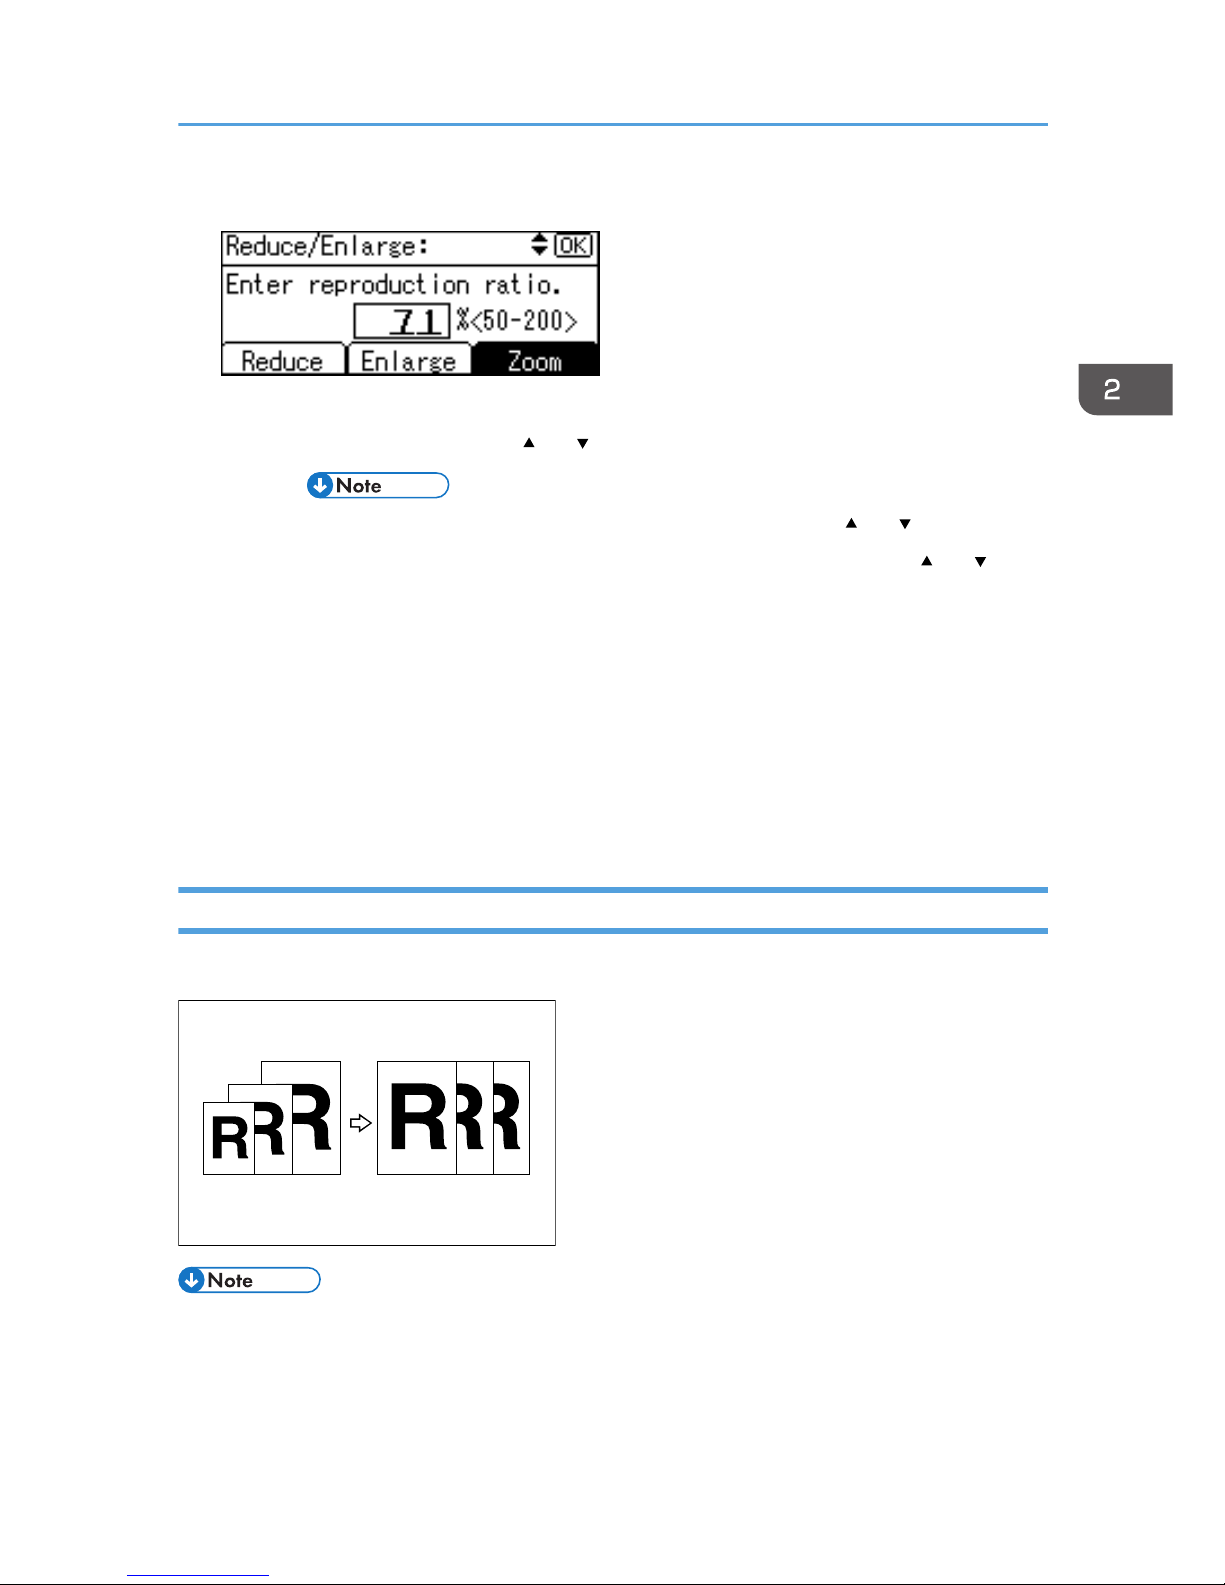
3. Enter the ratio.
To select the ratio using the scroll keys
1. Adjust the ratio using the [
] or [ ] key.
• If you have incorrectly entered the ratio, readjust using the [ ] or [ ] key.
• To change the ratio in increments of 10%, press and hold down the [ ] or [ ] key.
2. Press the [OK] key.
The "Programmed" message appears.
To enter the ratio using the number keys
1. Enter the desired ratio using the number keys.
2. Press the [OK] key.
The "Programmed" message appears.
4. Place your originals, and then press the [Start] key.
Auto Reduce/Enlarge
You can choose an appropriate reproduction ratio based on the paper and original sizes you select.
• You cannot use the bypass tray with this function.
• See the following table for original sizes and orientations you can use:
Copier Functions
53
Page 56
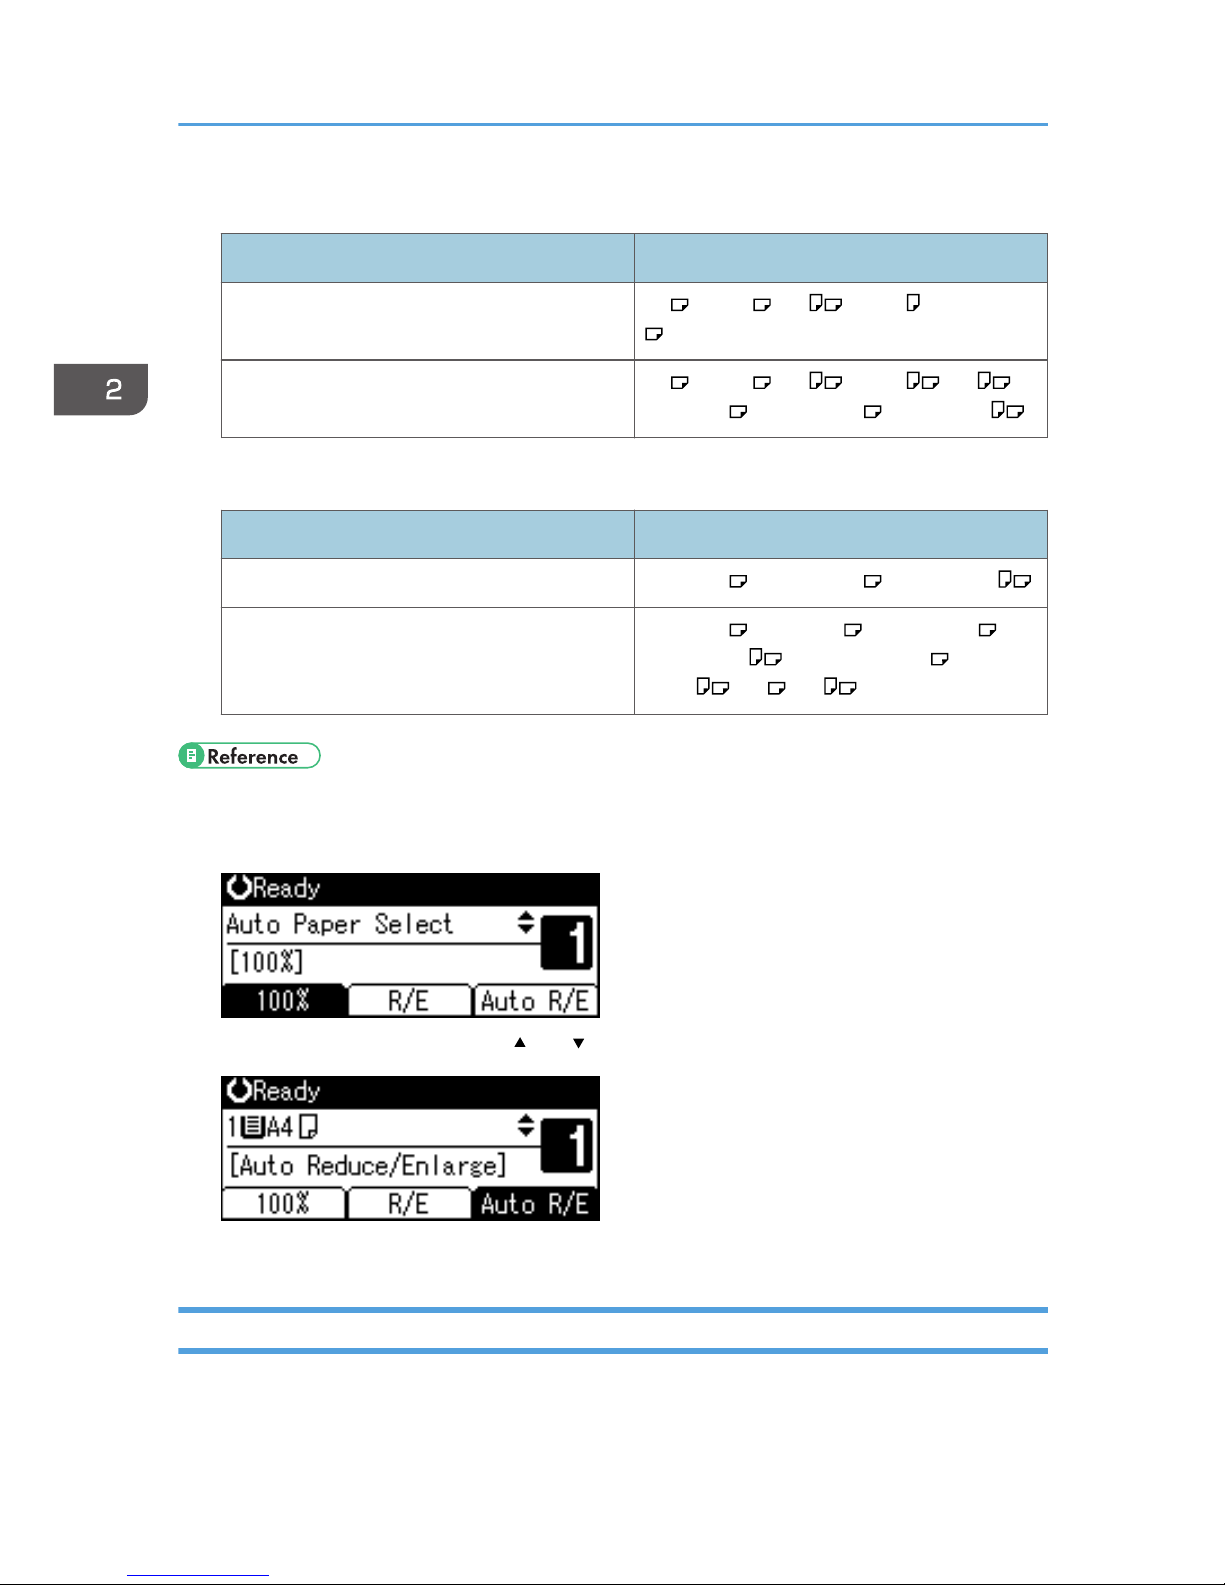
Metric version
Original location Original size and orientation
Exposure glass A3 , B4 JIS , A4 , B5 JIS , 81/2" × 13"
ADF A3 , B4 JIS , A4 , B5 JIS , A5 ,
11" × 17" , 81/2" × 13" , 81/2" × 11
Inch version
Original location Original size and orientation
Exposure glass 11" × 17" , 81/2" × 14" , 81/2" × 11"
ADF 11" × 17" , 10" × 14" , 81/2" × 14" ,
81/2" × 11" , 71/4" × 101/2" , 51/2" ×
81/2" , A3 , A4
• page 29 "Sizes difficult to detect"
1. Press [Auto R/E].
2. Select the paper tray using the [ ] or [ ] key.
3. Place your originals, and then press the [Start] key.
Sort
You can scan originals into memory and automatically sort copies.
2. Copying
54
Page 57
• page 89 "Auto Tray Switching"
• page 92 "Rotate Sort"
• page 92 "Rotate Sort:Auto Continue"
Sort
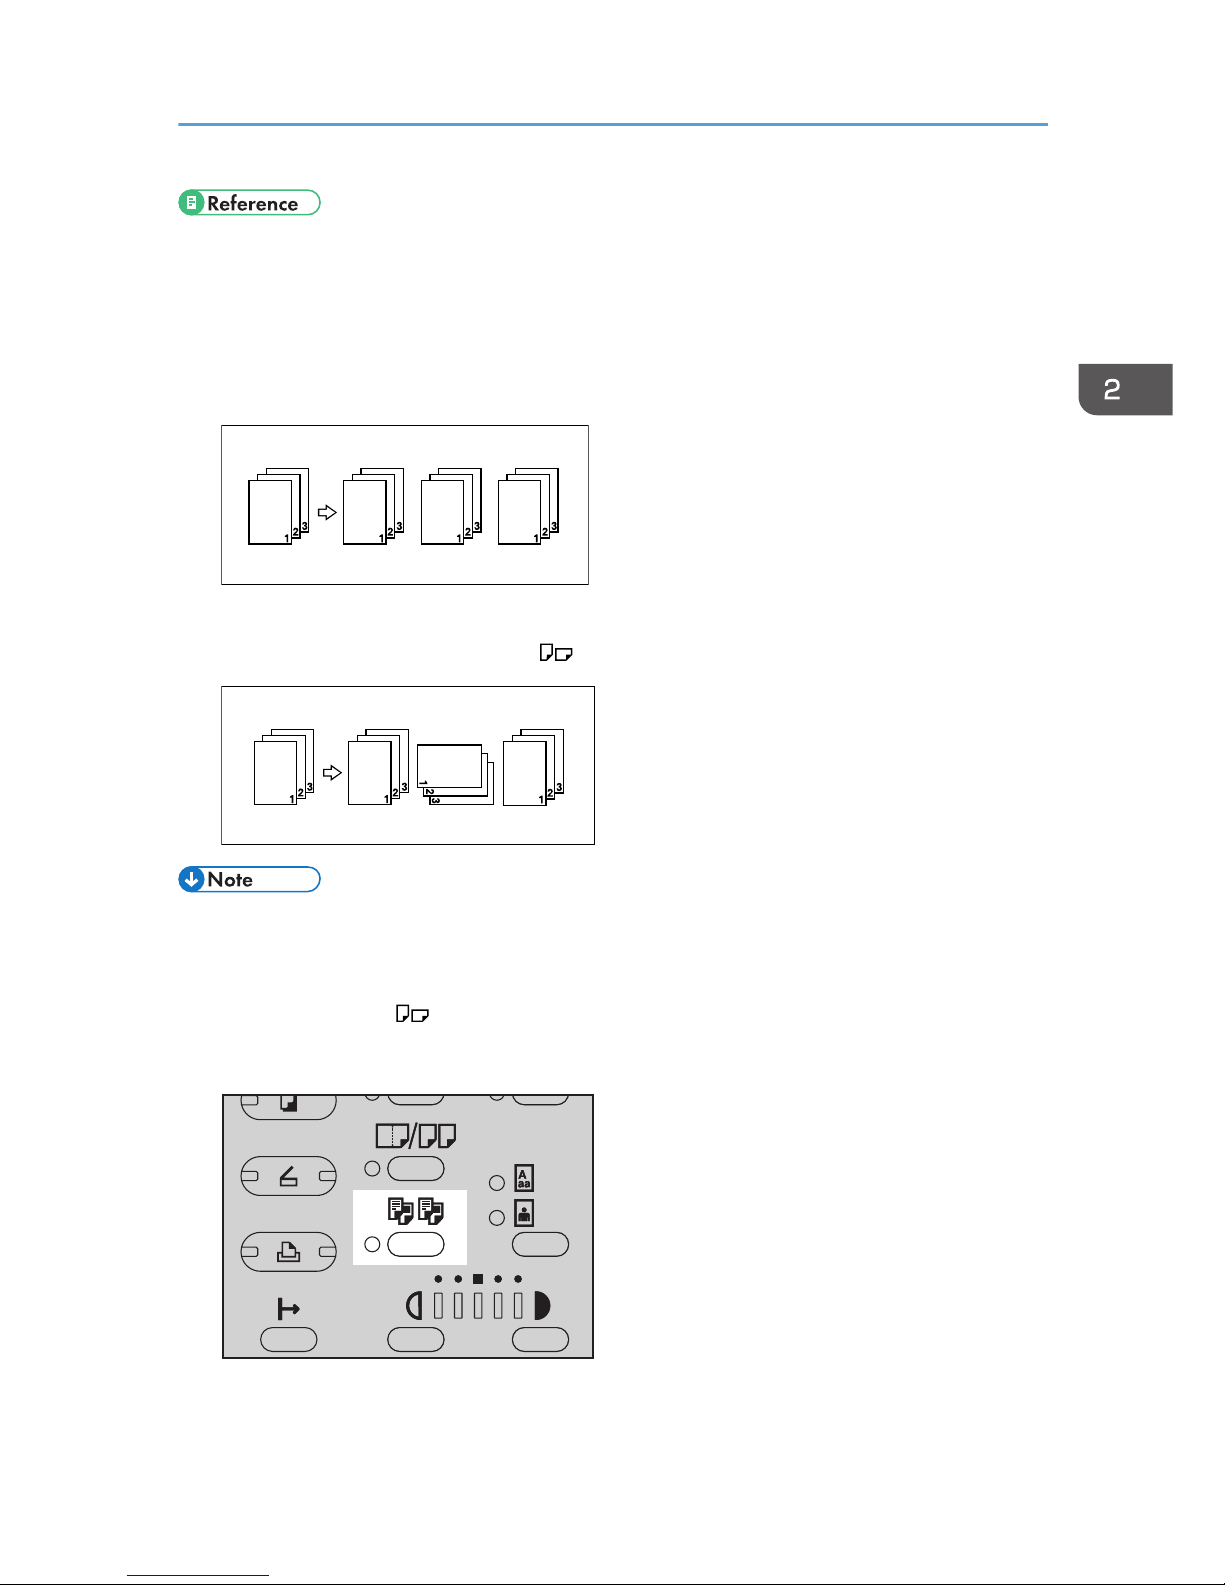
Copies are assembled as sequentially ordered sets.
Rotate Sort
Every other copy set is rotated by 90° and delivered to the copy tray.
• To use the Rotate Sort function, select [On] in [Rotate Sort] under [Copier Features] (User Tools).
See page 92 "Rotate Sort".
• To use the Rotate Sort function, two paper trays loaded with the same size and type paper, but in
different orientation ( ), are required. See "Tray Paper Settings", General Settings Guide.
1. Press the [Sort] key.
CUA112
Copier Functions
55
Page 58
• When canceling the Sort function, press the [Sort] key, and make sure the [Sort] key indicator
is off.
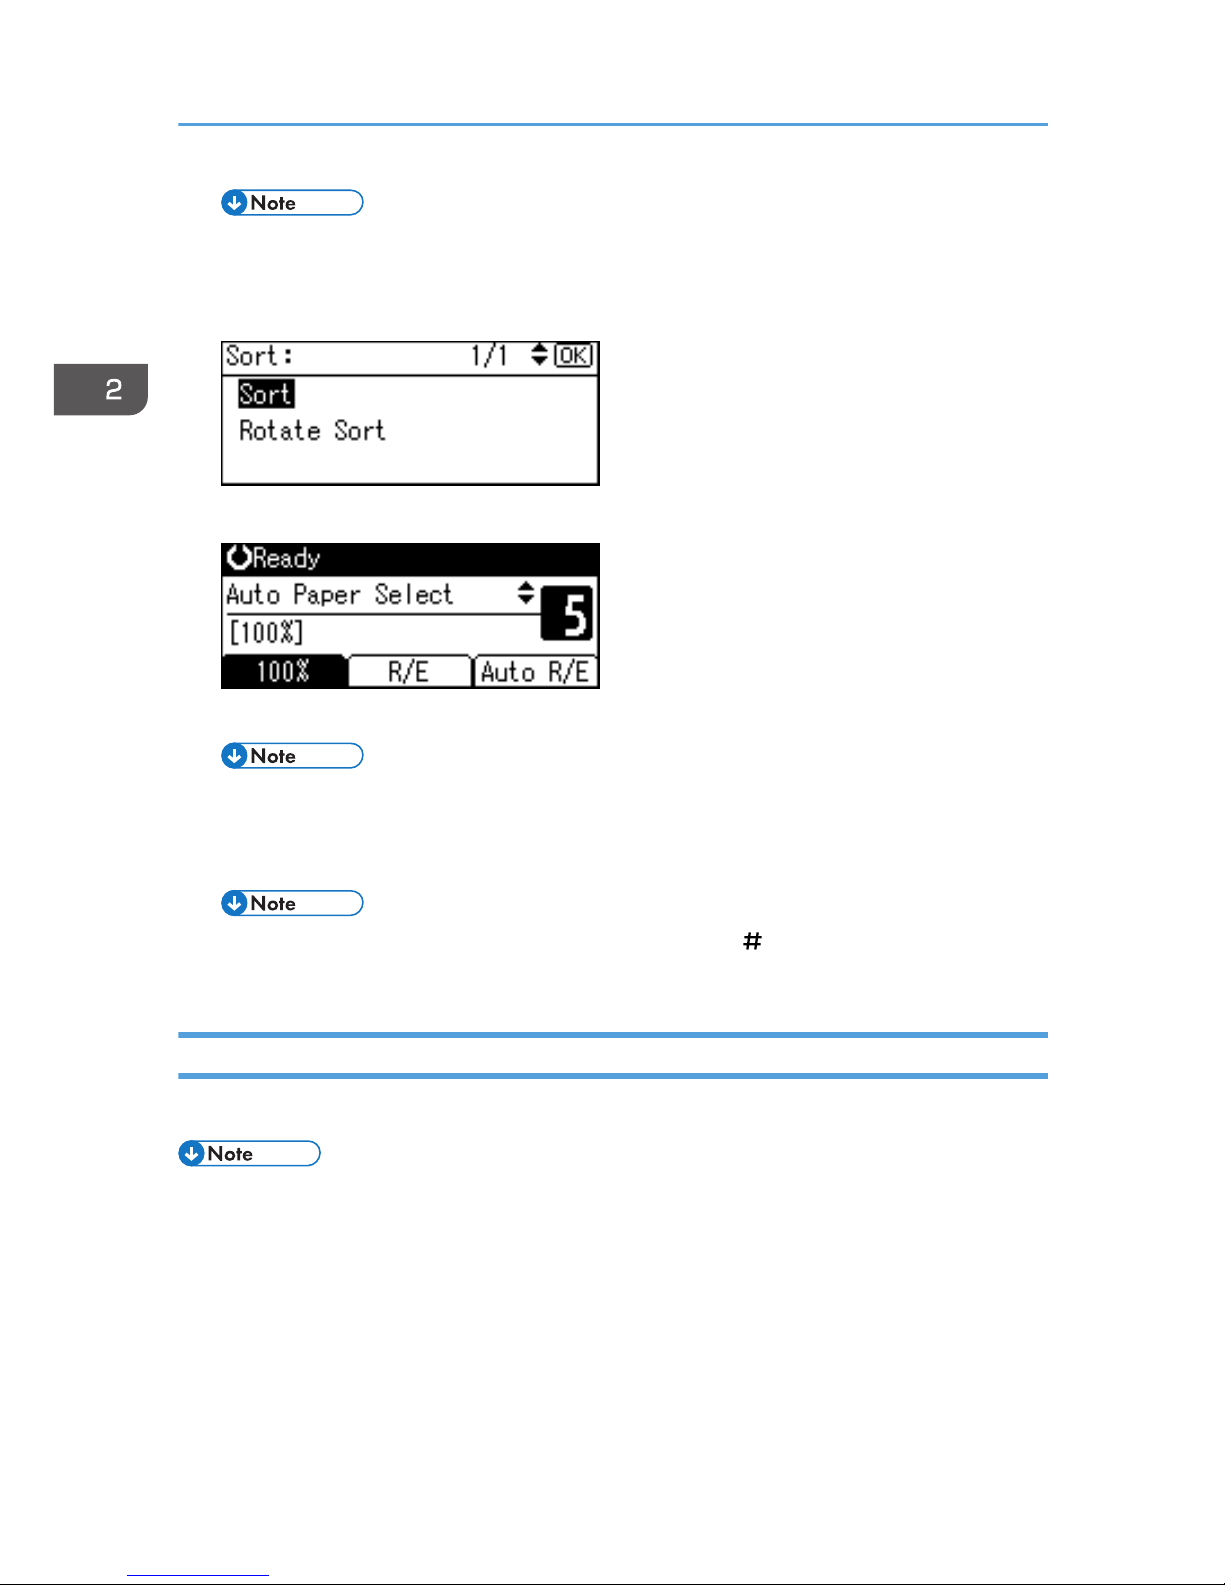
2. Select [Sort] or [Rotate Sort], and then press the [OK] key.
3. Enter the number of copy sets using the number keys.
4. Place your originals.
• When placing originals on the exposure glass, start from the first page to be copied. When
placing originals in the ADF, set the first page on top.
5. Press the [Start] key.
• When placing originals on the exposure glass, press the [ ] key after all originals are
scanned.
Changing the number of sets
You can change the number of copy sets during copying.
• This function can only be used when the Sort function is selected.
1. While "Copying..." is displayed, press the [Clear/Stop] key.
2. Copying
56
Page 59
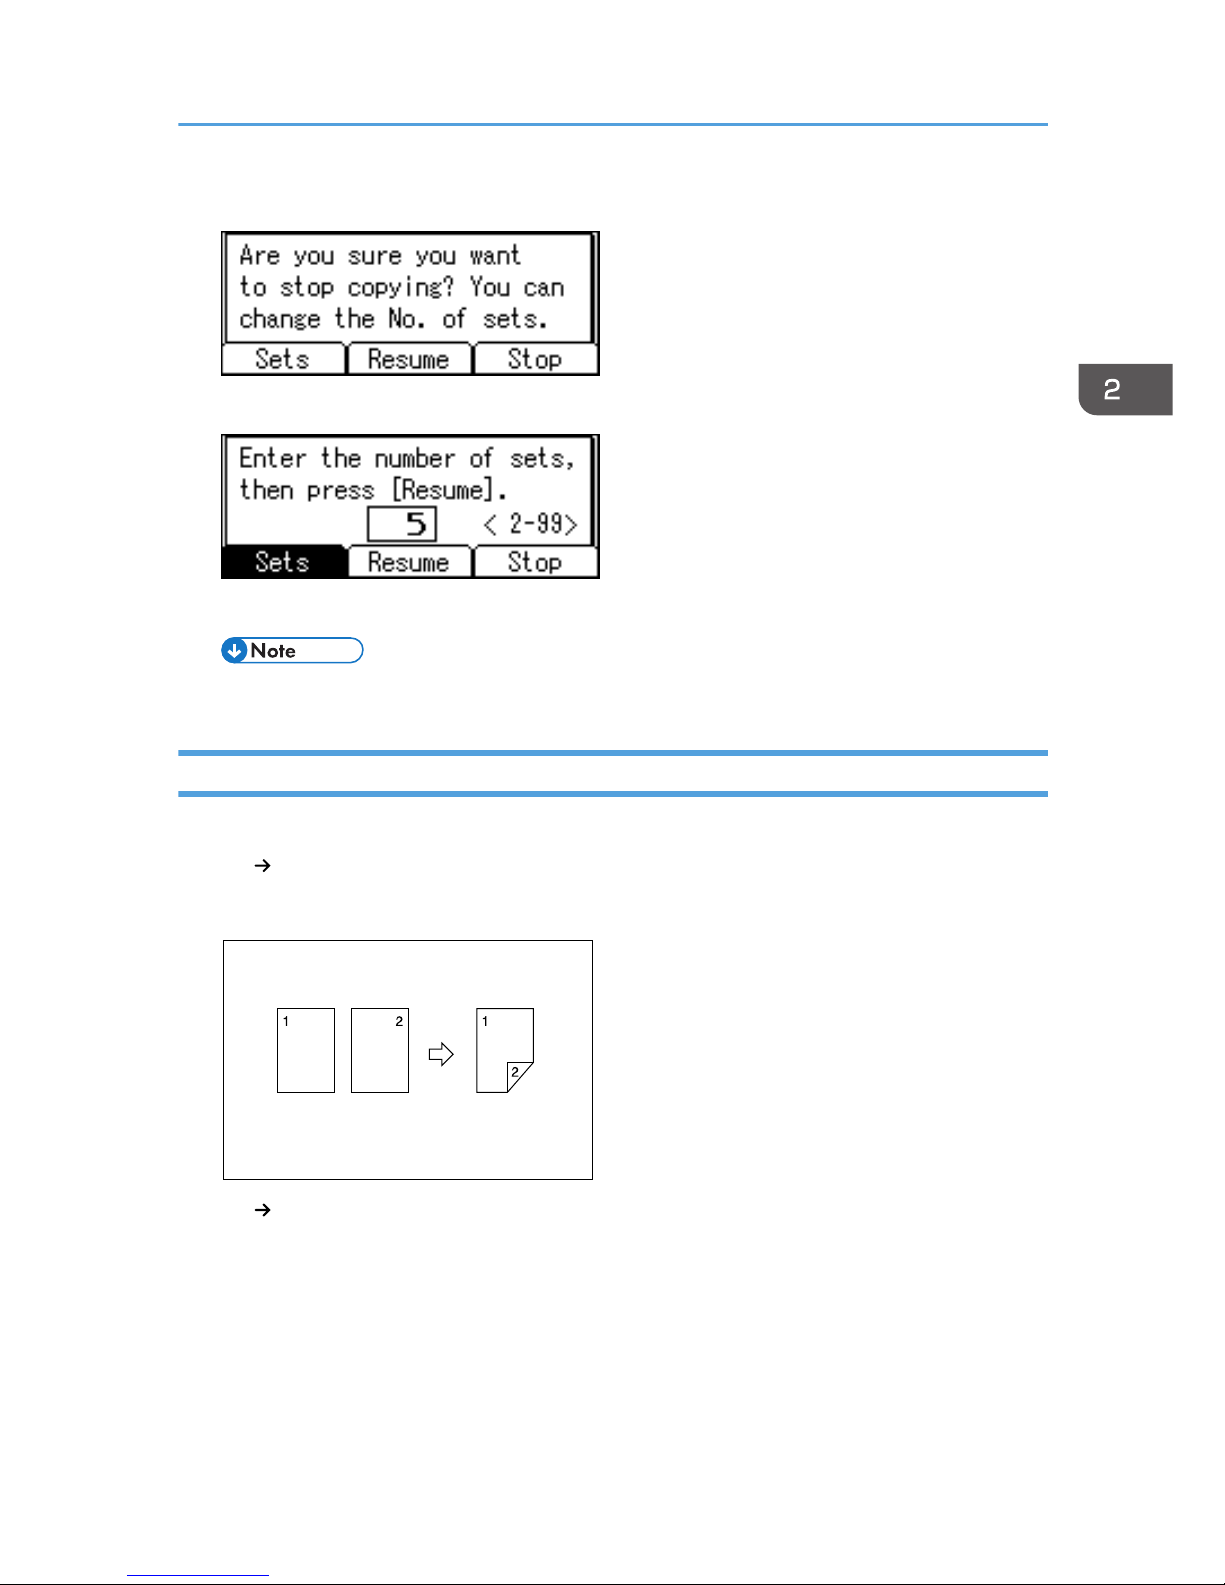
2. Press [Sets].
3. Enter the number of copy sets with the number keys, and then press [Resume].
Copying starts again.
• The number of sets you can enter differs depending on when the [Clear/Stop] key is pressed.
Duplex
There are two types of duplex:
1 Sided
2 Sided
Copies 2 one-sided pages onto 1 two-sided page.
2 Sided 2 Sided
Copies 1 two-sided page onto 1 two-sided page.
Copier Functions
57
Page 60
Original orientation and completed copies
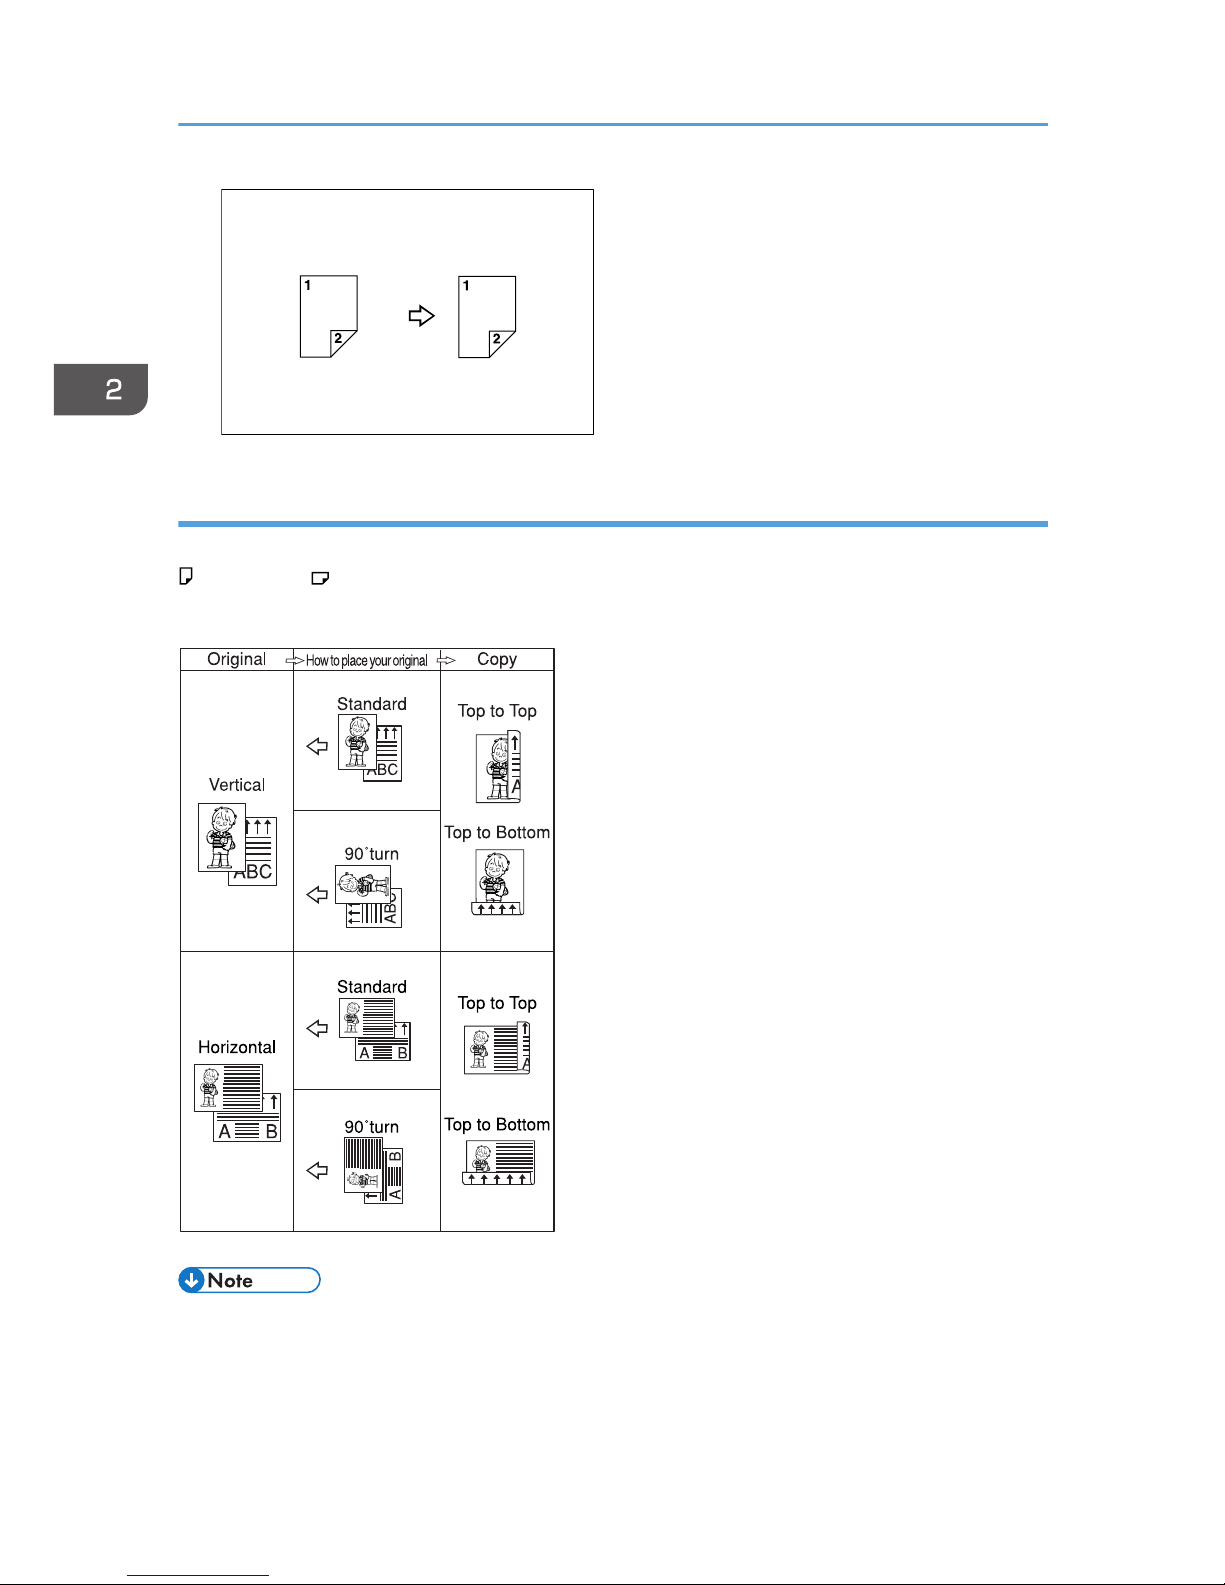
The resulting copy image will differ according to the orientation in which you place the originals (vertical
or horizontal ).
The table shows the orientation of images on the front and back of copies, not the orientation of delivery.
GCRYOU1E
• You cannot use the bypass tray with this function.
• The maximum paper weight that can be used with duplex copying is 64–90 g/m2, 20–24 lb.
• You can change the margin. See page 92 "Duplex Margin".
2. Copying
58
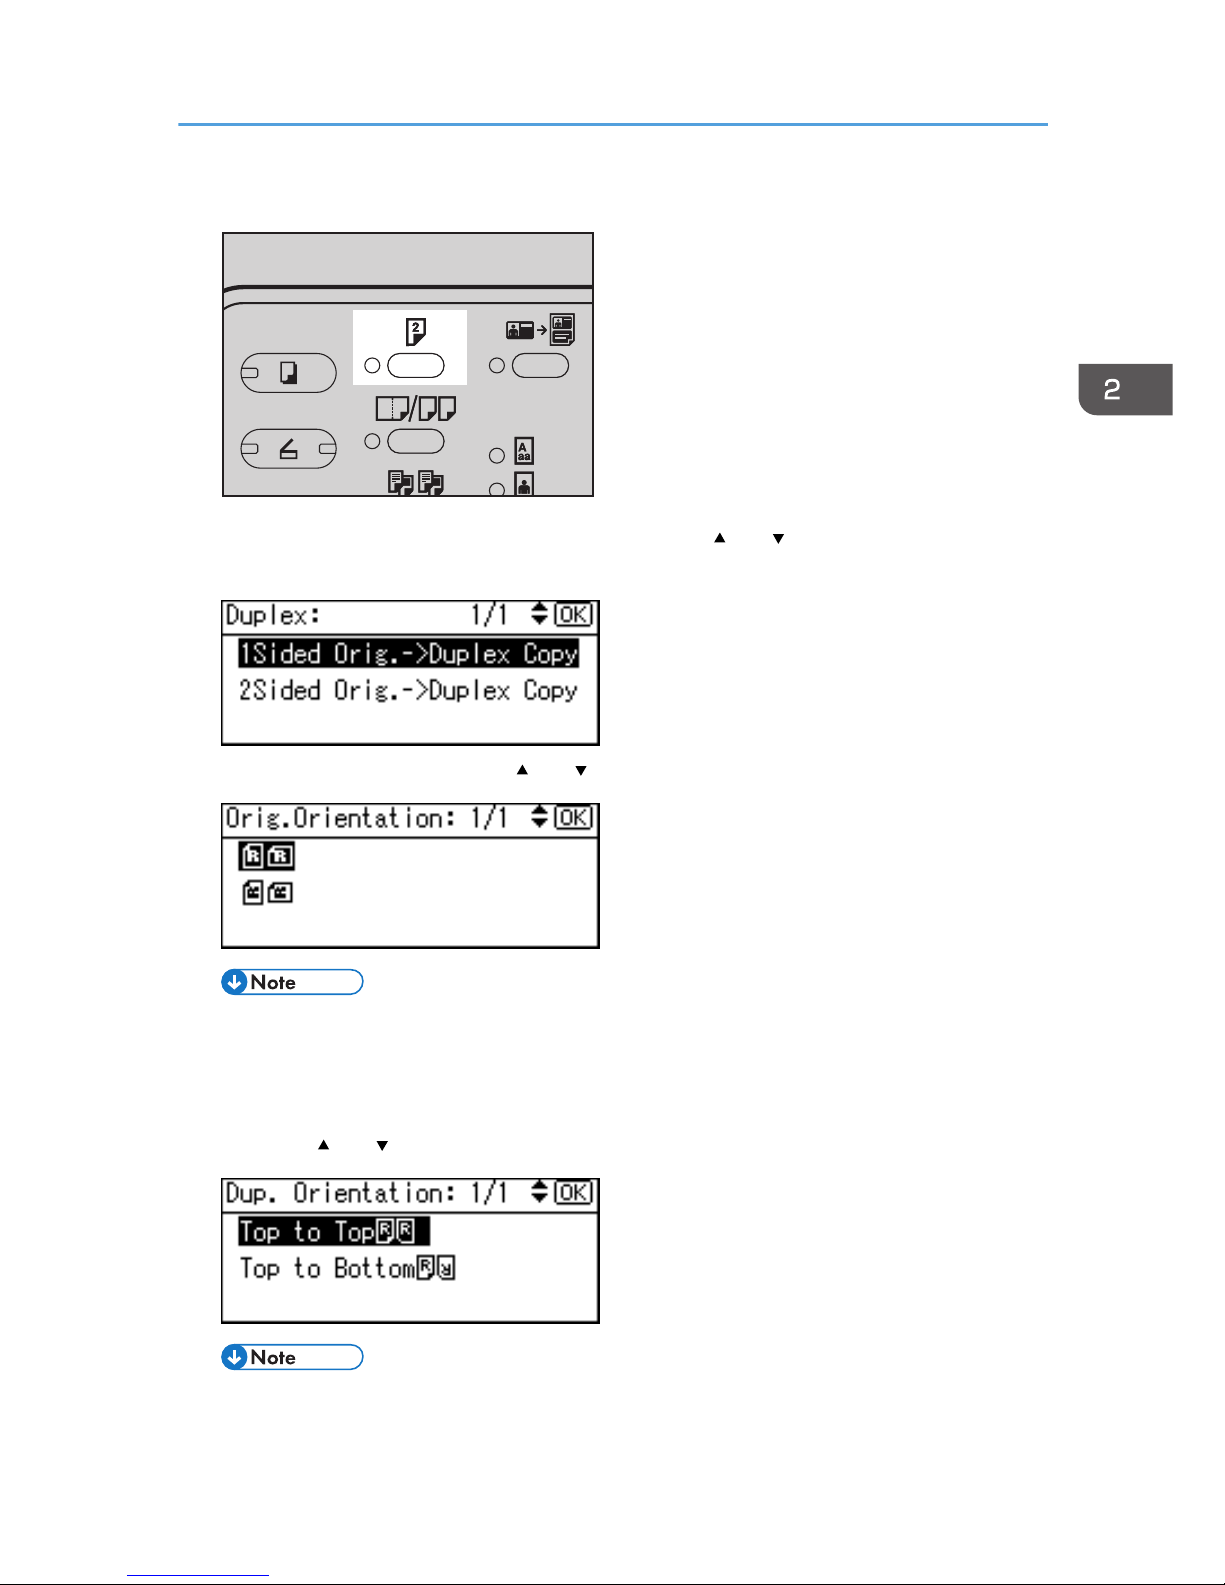
Page 61
1. Press the [Duplex] key.
CUA113
2. Select the setting of original and copy type using the [ ] or [ ] key, and then press the
[OK] key.
3. Select the orientation using the [ ] or [ ] key, and then press the [OK] key.
• You can select the orientation of originals and copying paper when [Always Specify] is
specified for [Orientation] under [Copier Features] (User Tools). See page 90 "Orientation".
If it was not specified for, proceed to step 5.
4. When selecting two-sided copying, select the orientation [Top to Top] or [Top to Bottom]
using the [ ] or [ ] key, and then press the [OK] key.
• To change the copy orientation, select the original icon whose orientation is that required. See
page 58 "Original orientation and completed copies".
Copier Functions
59
Page 62
The "Programmed" message appears.
5. Place your originals.
When placing originals on the exposure glass
1. Place the original, and then press the [Start] key.
• Start from the first page to be copied.
2. Place the next original, and then press the [Start] key.
When placing a stack of originals in the ADF
1. Place your originals, and then press the [Start] key.
• Place the first page on top.
One-Sided Combine
You can combine several pages onto one side of a sheet.
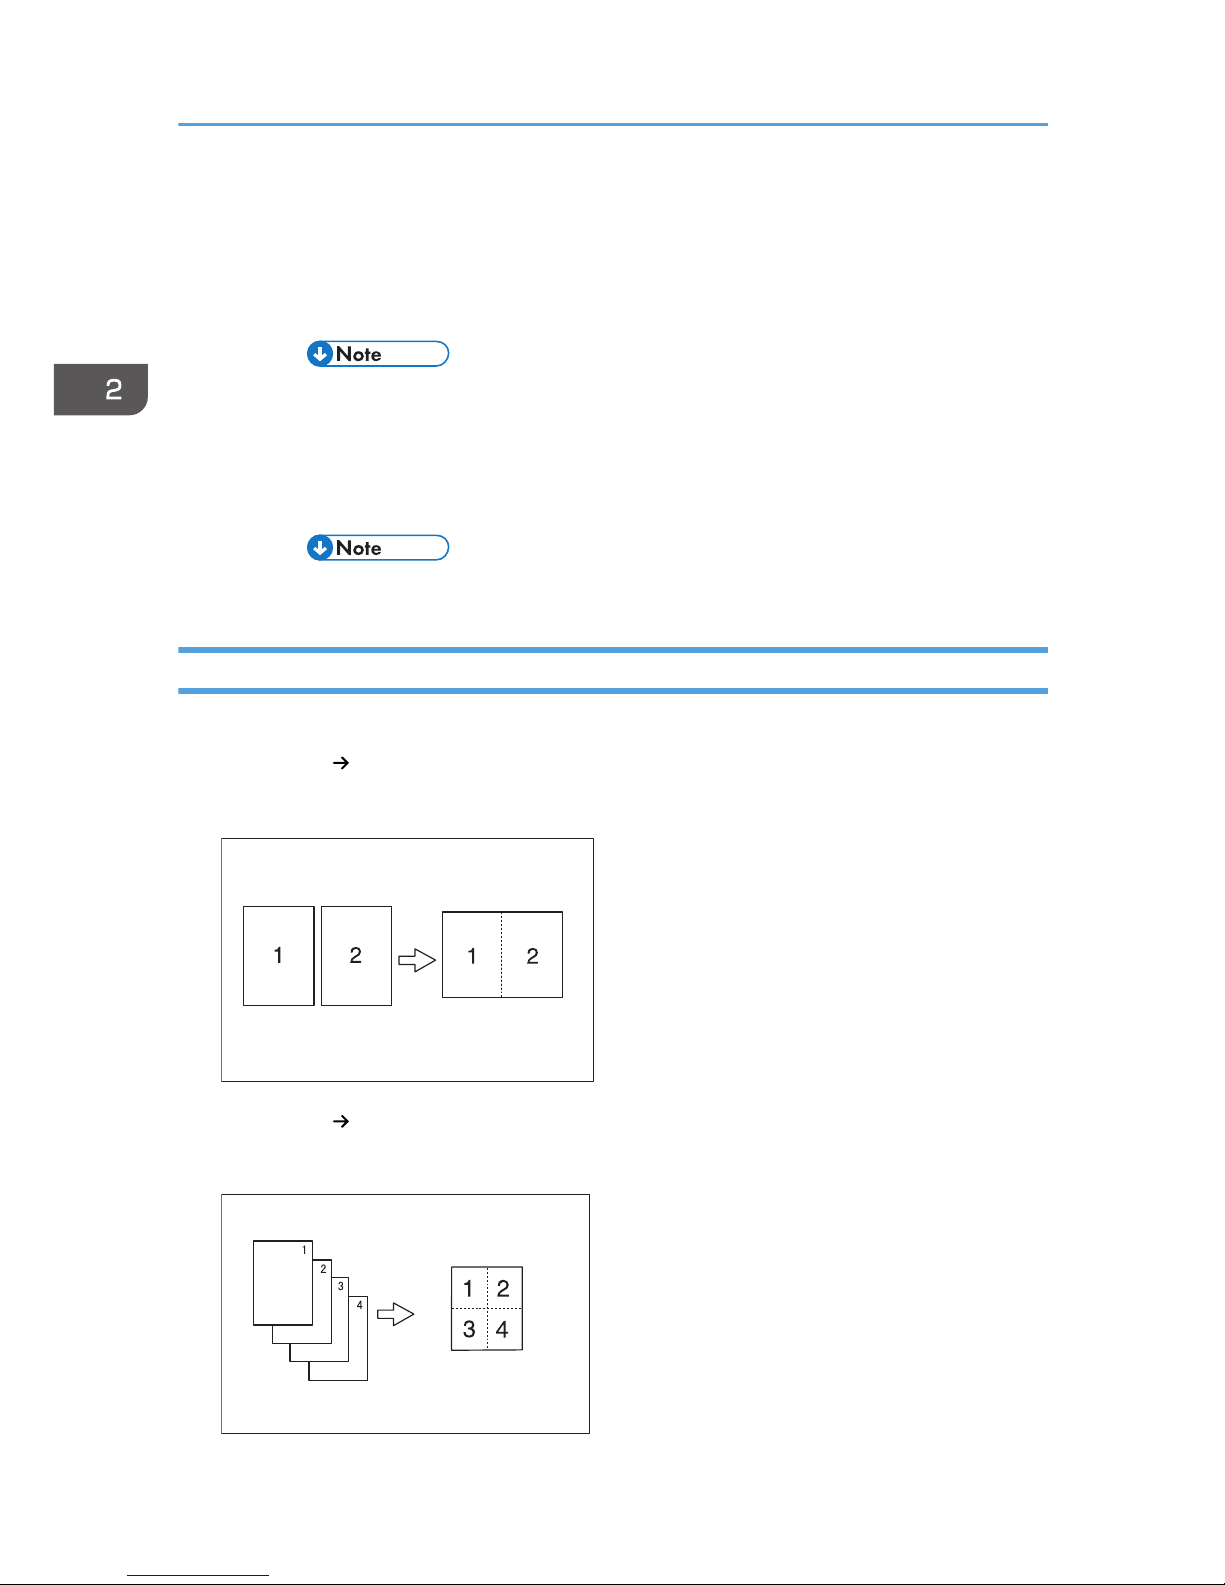
1 Sided 2 Pages
Combine 1 Side
Copies 2 one-sided originals onto one side of a sheet.
GCSHVY7E
1 Sided 4 Pages Combine 1 Side
Copies 4 one-sided originals onto one side of a sheet.
GCSHVY8J
2. Copying
60
Page 63
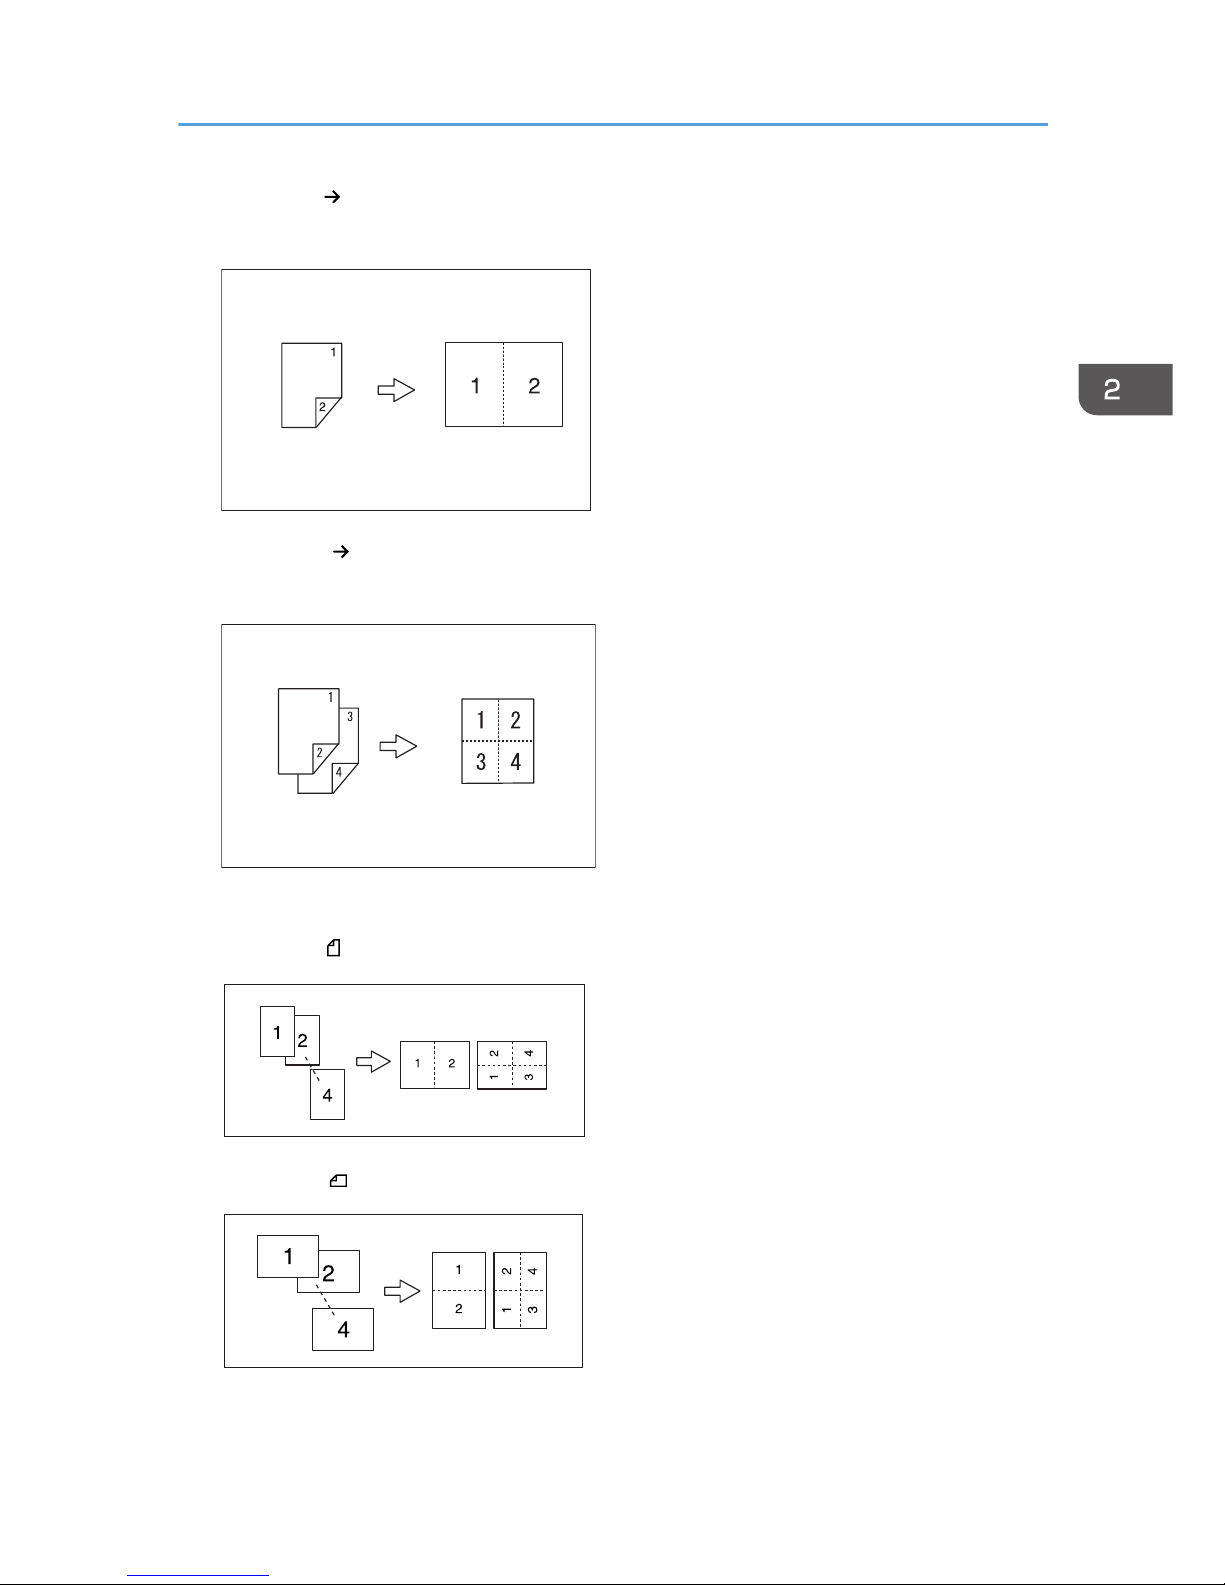
2 Sided 1 Page Combine 1 Side
Copies 1 two-sided original onto one side of a sheet.
GCSHVYOJ
2 Sided 2 Pages Combine 1 Side
Copies 2 two-sided originals onto one side of a sheet.
GCSHVYBJ
Orientation of the original and image position of combine
Open to left originals
GCSHUY3E
Open to top originals
GCSHUY4E
Copier Functions
61
Page 64
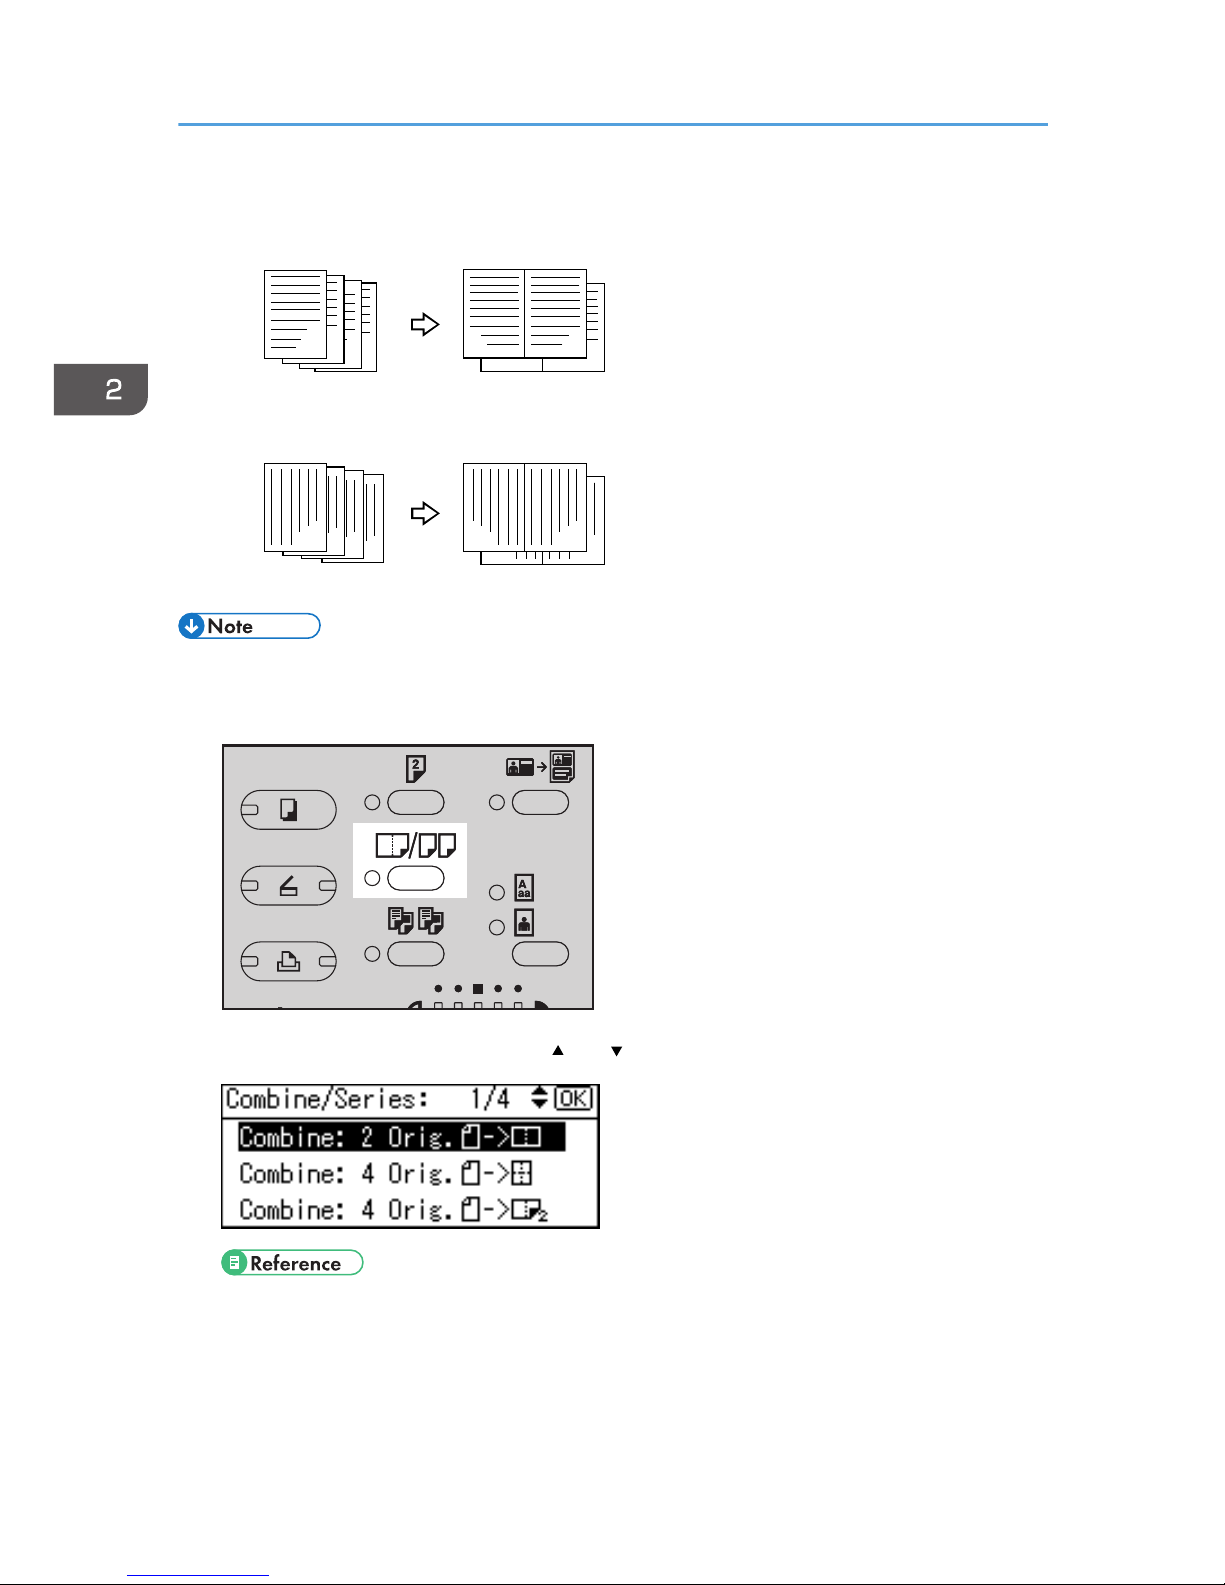
Placing originals (in the ADF)
• Originals read from left to right
3
4
1
2
4
3
2
1
Combine5
• Originals read from top to bottom
Combine6
3
4
1
2
4
3
2
1
• You cannot use the bypass tray with this function.
1. Press the [Combine/Series] key.
CUA114
2. Select the combine mode using the [ ] or [ ] key, and then press the [OK] key.
• page 58 "Original orientation and completed copies"
2. Copying
62
Page 65
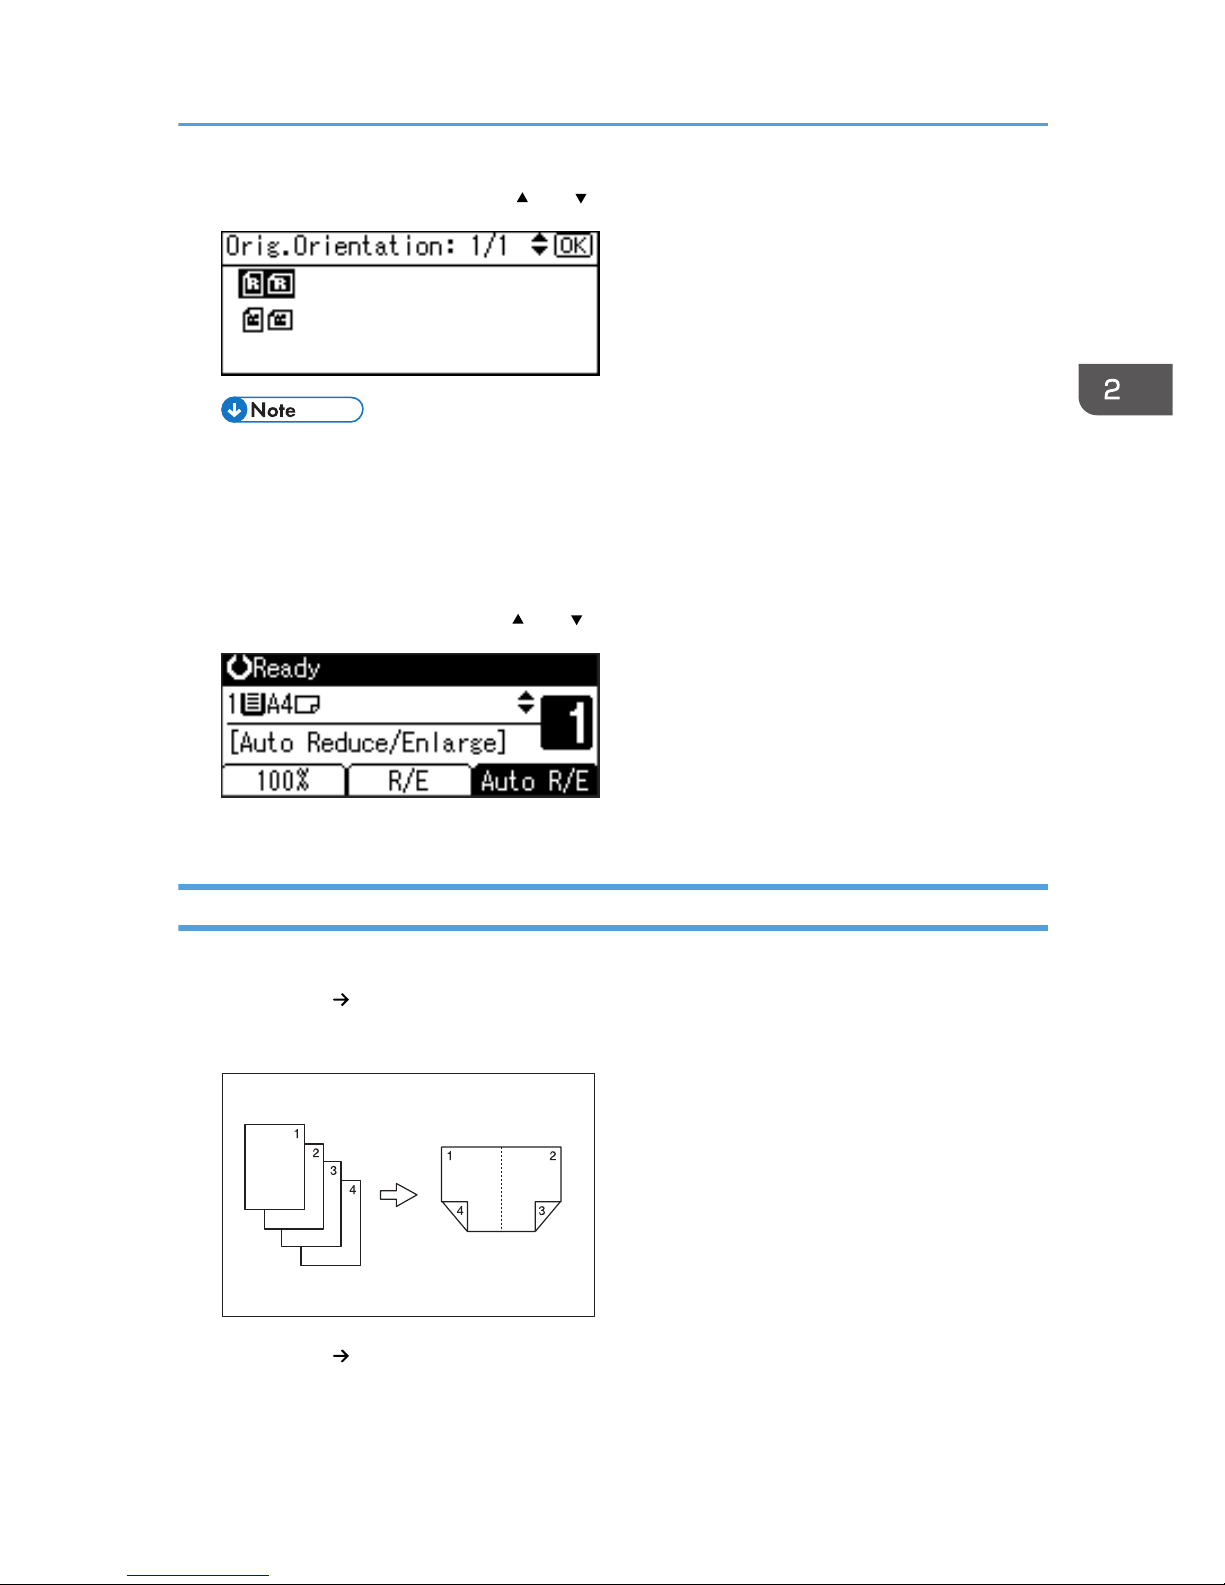
3. Select the orientation using the [ ] or [ ] key, and then press the [OK] key.
• You can select the orientation of originals and copying paper when [Always Specify] is
specified for [Orientation] under [Copier Features] (User Tools). See page 90 "Orientation".
If it was not specified for, proceed to step 4.
• To change the copy orientation, select the icon which orientation of originals is used.
The "Programmed" message appears.
4. Select the paper size using the [ ] or [ ] key.
5. Place your originals, and then press the [Start] key.
Two-Sided Combine
You can combine various pages of originals into one sheet with two sides.
1 Sided 4 Pages
Combine 2 Side
Copies 4 one-sided originals onto one sheet with two pages per side.
GCSHVY9E
1 Sided 8 Pages Combine 2 Side
Copies 8 one-sided originals onto one sheet with four pages per side.
Copier Functions
63
Page 66
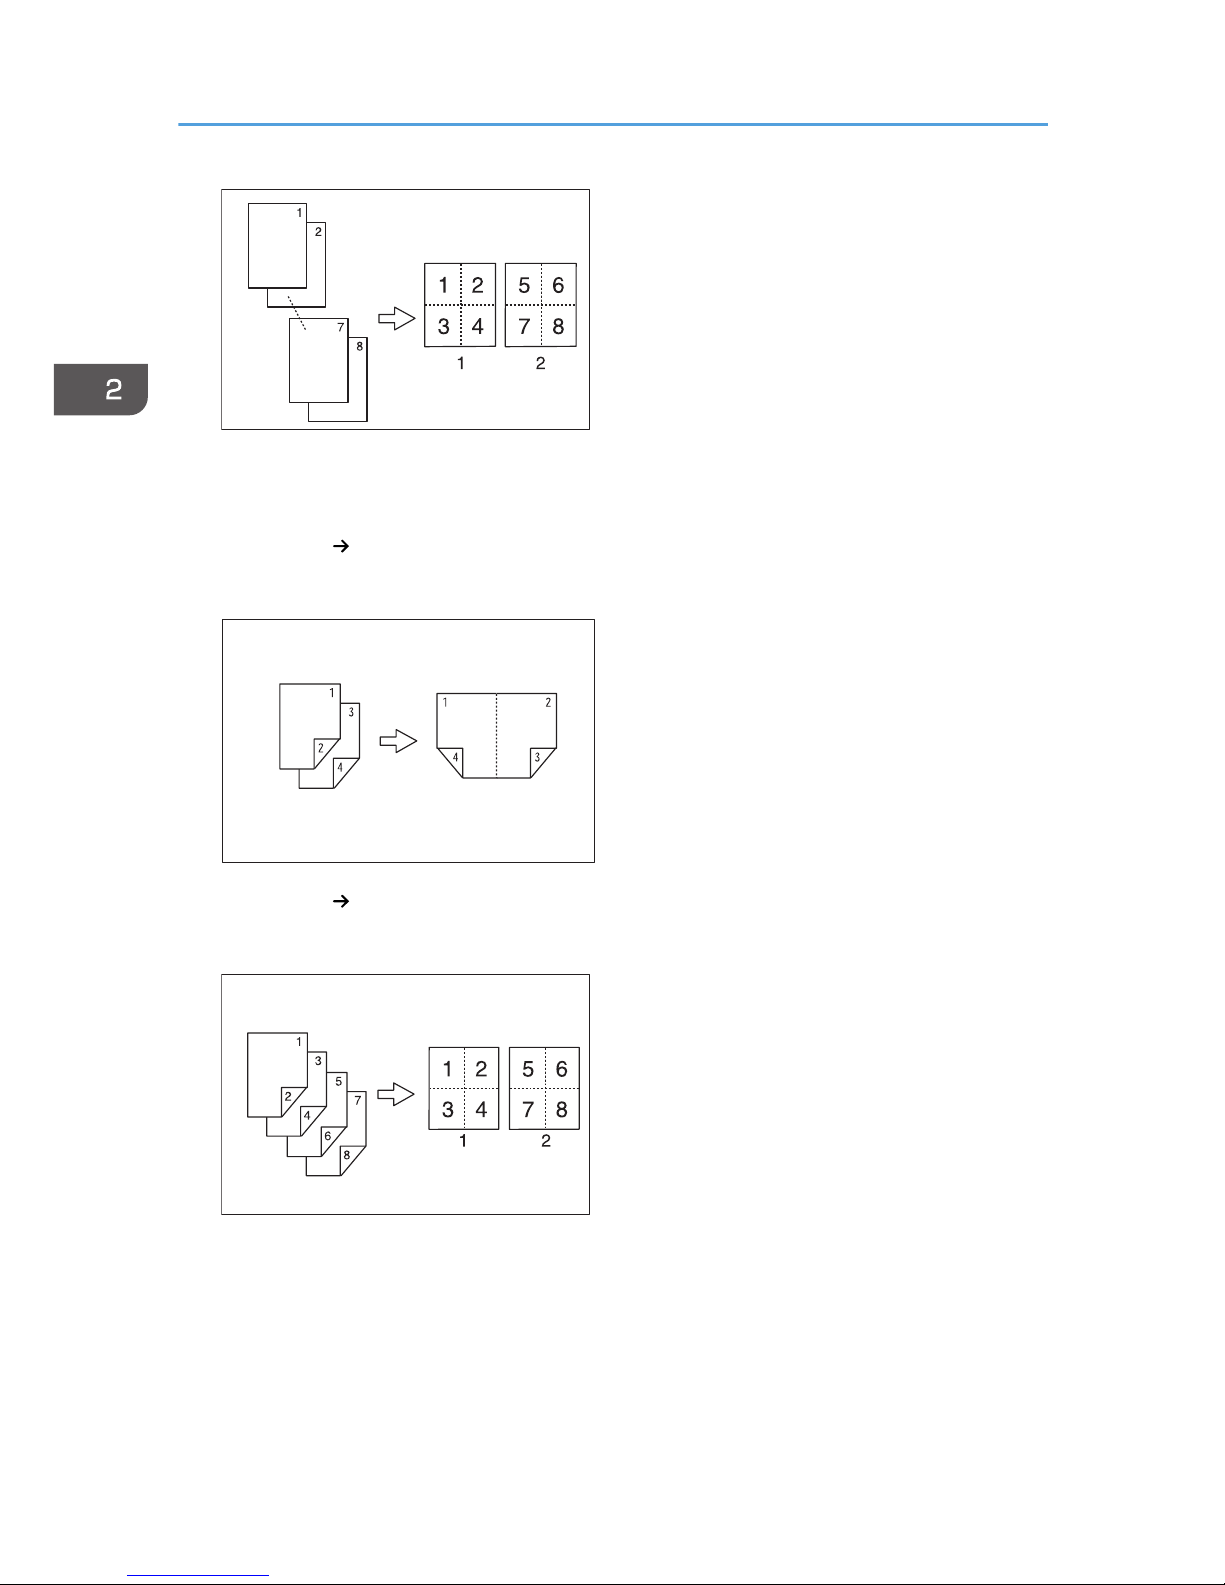
GCSHVYAE
1. Front
2. Back
2 Sided 4 Pages Combine 2 Side
Copies 2 two-sided originals onto one sheet with two pages per side.
GCSHVY1E
2 Sided 8 Pages Combine 2 Side
Copies 4 two-sided originals onto one sheet with four pages per side.
GCSHVY2E
2. Copying
64
Page 67
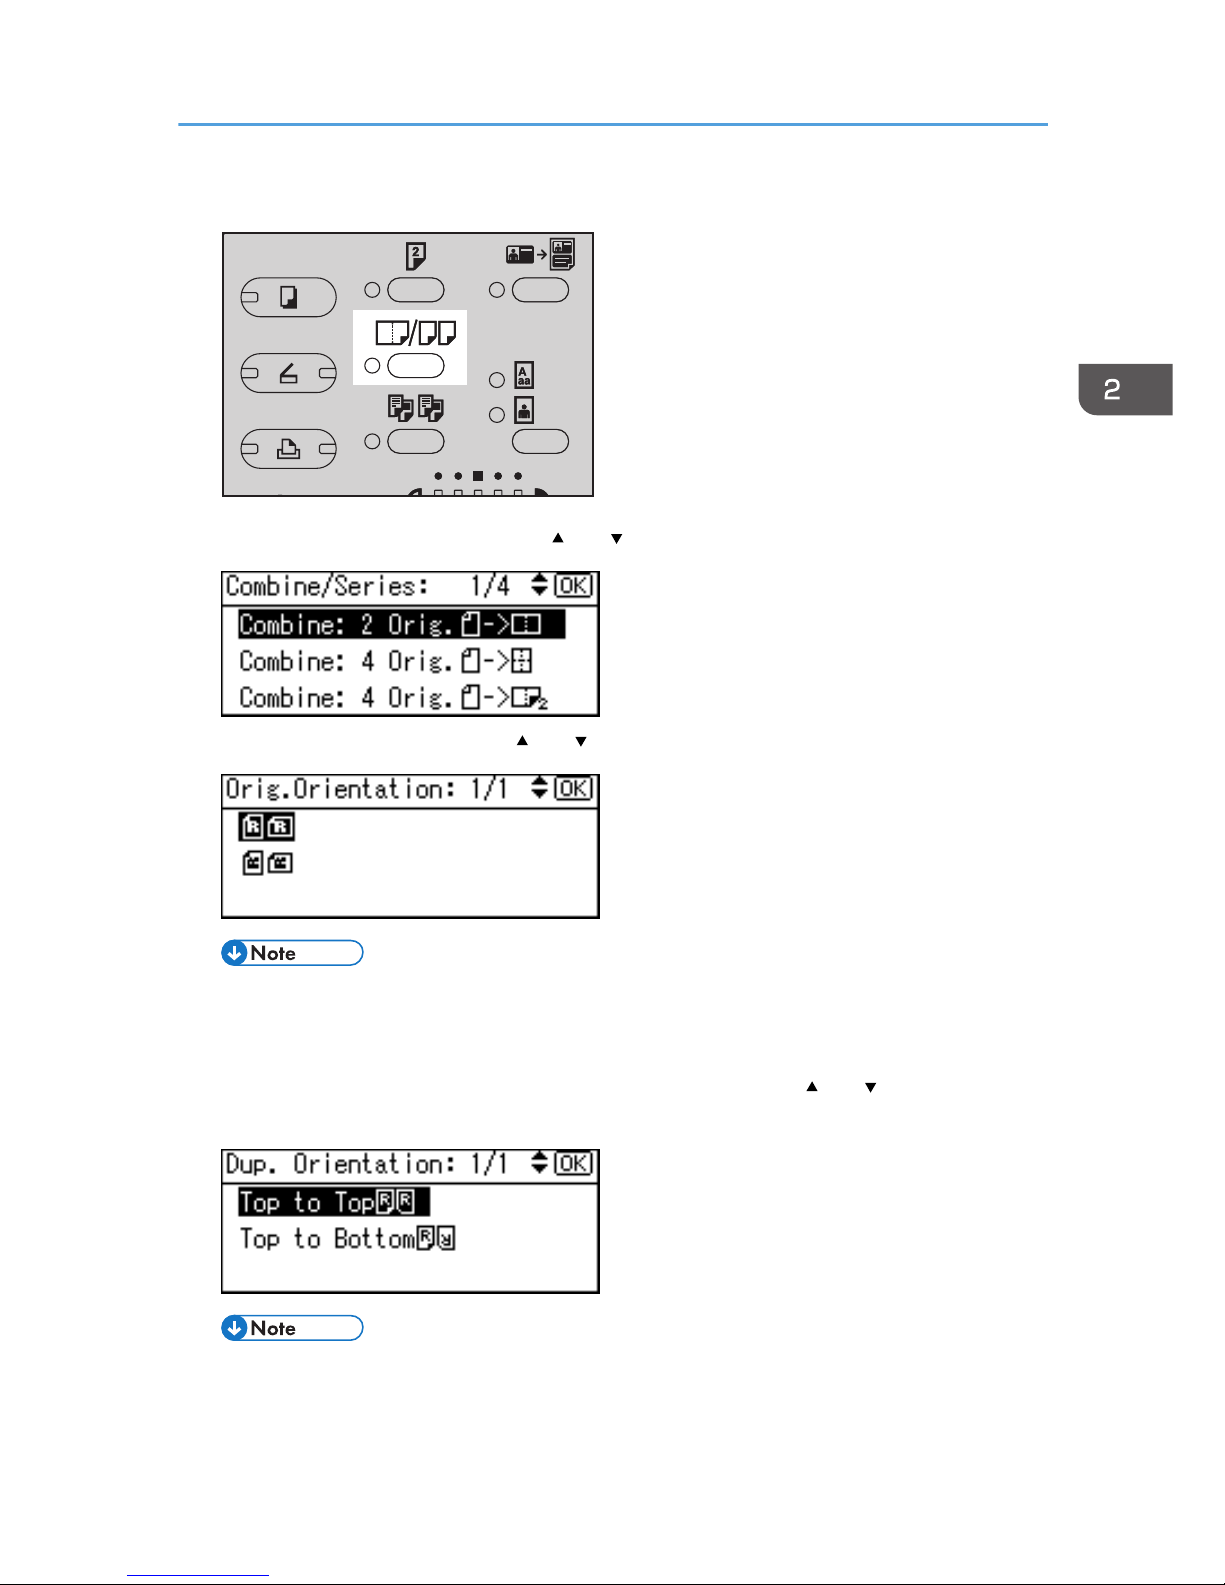
1. Press the [Combine/Series] key.
CUA114
2. Select the combine mode using the [ ] or [ ] key, and then press the [OK] key.
3. Select the orientation using the [ ] or [ ] key, and then press the [OK] key.
• You can select the orientation of originals and two-sided copying paper when [Always
Specify] is specified for [Orientation] under [Copier Features] (User Tools). See page 90
"Orientation". If it was not specified for, proceed to step 5.
4. Select the orientation [Top to Top] or [Top to Bottom] using the [ ] or [ ] key, and then
press the [OK] key.
• To change the copy orientation, select the original icon whose orientation is that required. See
page 58 "Original orientation and completed copies".
The "Programmed" message appears.
Copier Functions
65
Page 68
5. Select the paper size using the [ ] or [ ] key.
6. Place your originals, and then press the [Start] key.
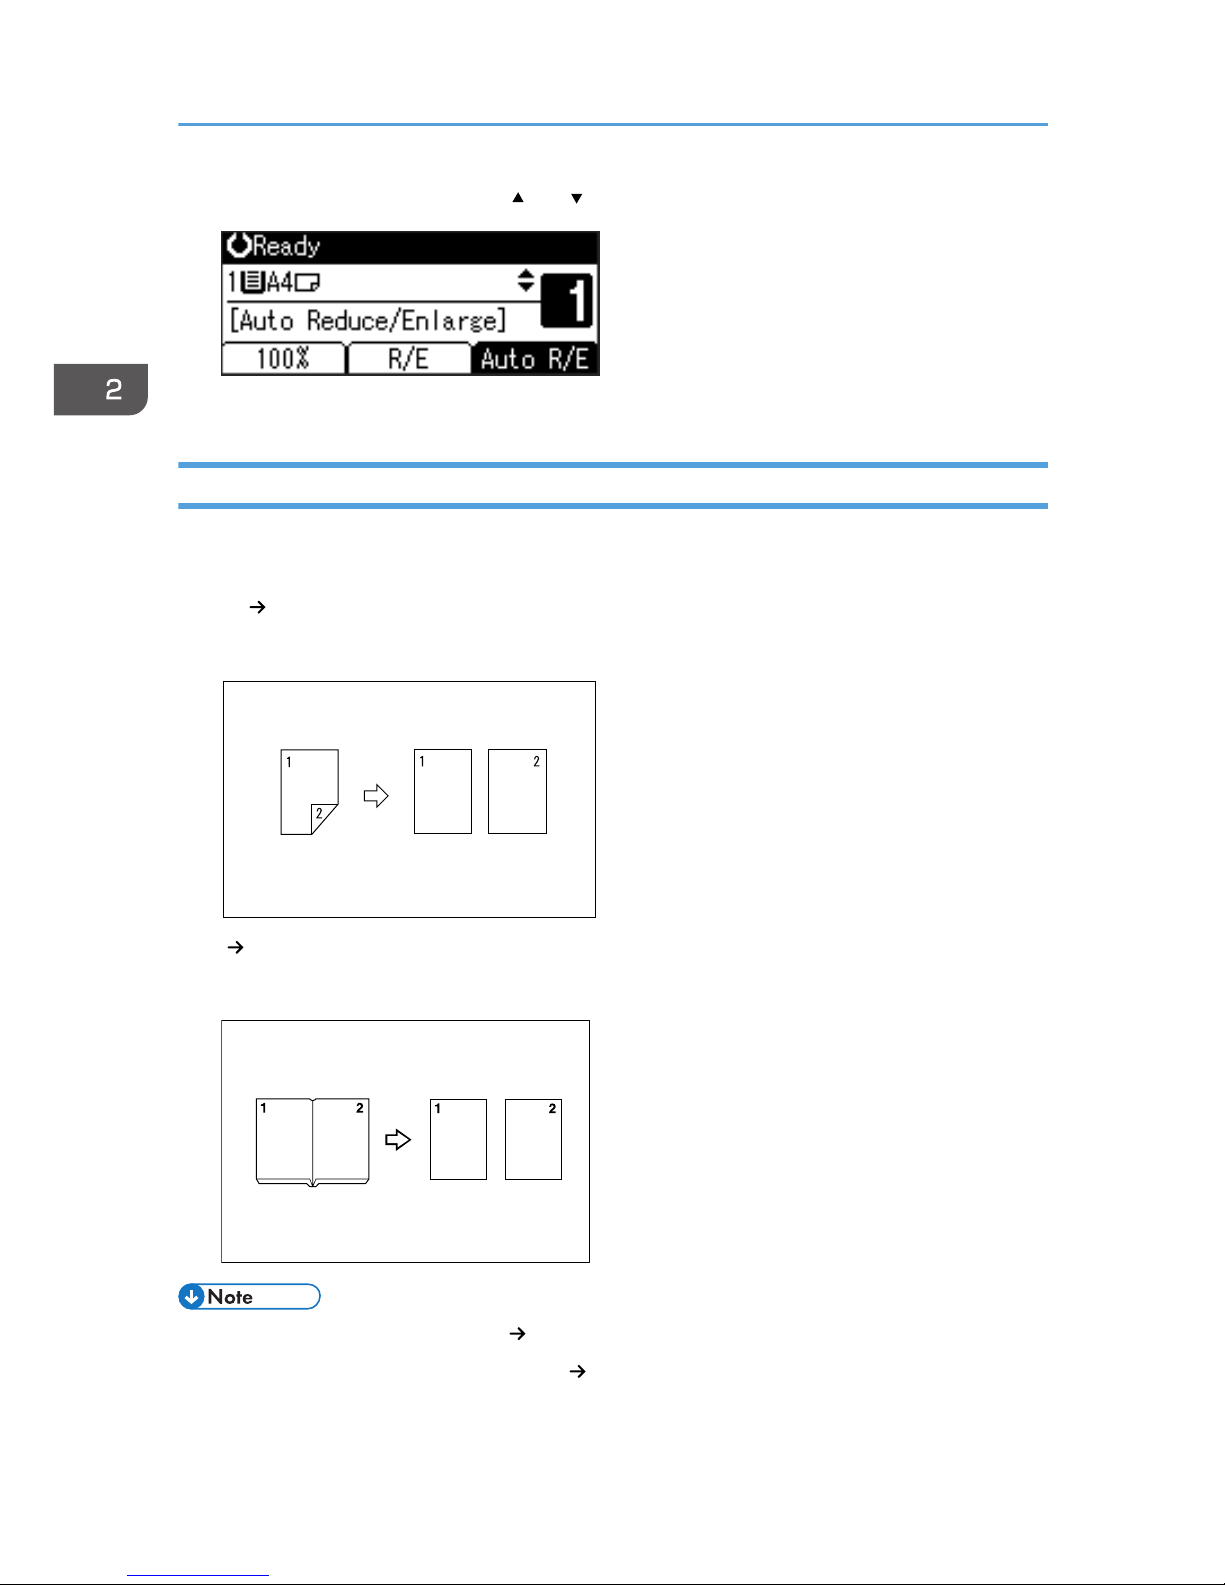
Series Copies
You can separately copy the front and back of a two-sided original or two facing pages of a bound
original onto two sheets.
2 Sided 1Sided
Copies each side of a two-sided original onto two separate pages.
Book 1Sided
Copies two facing pages of a bound original (book) onto two separate pages.
• You cannot use the ADF with Book 1 Sided function.
• You cannot use the bypass tray with Book 1 Sided function.
2. Copying
66
Page 69
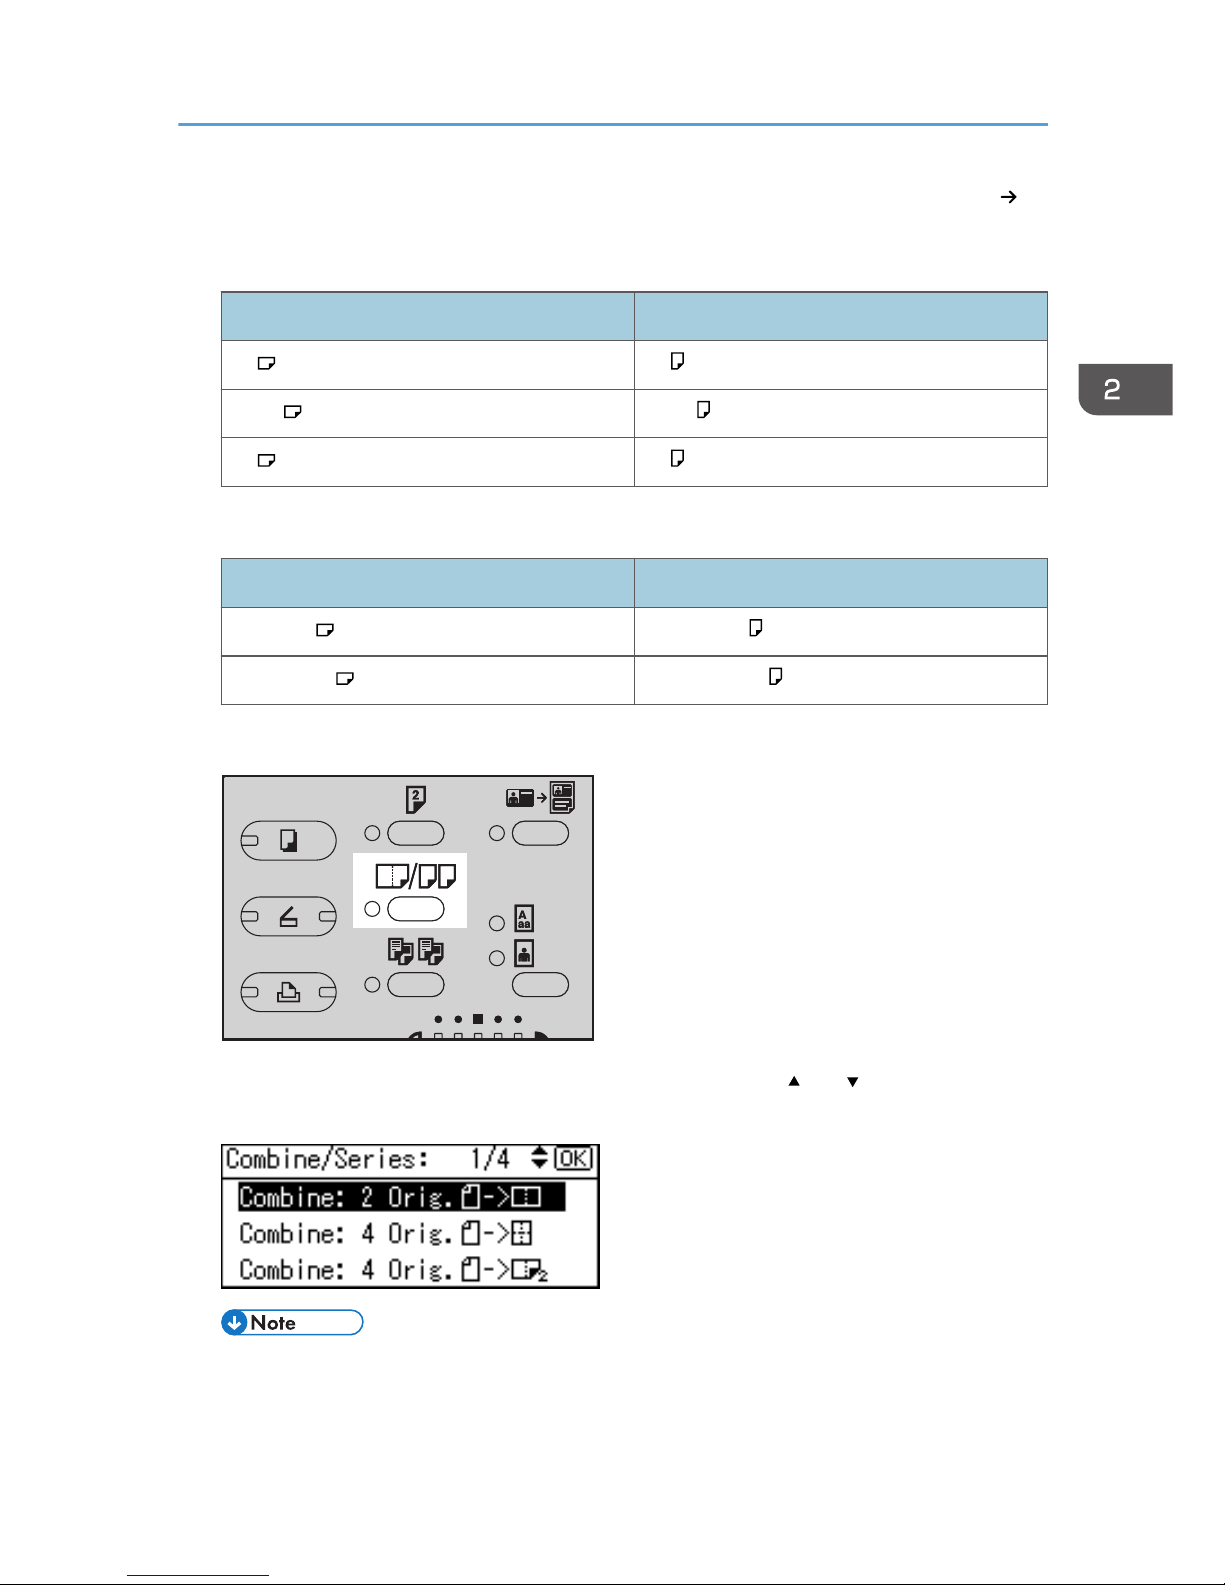
• See the following table for original and copy paper sizes when using a 100% ratio with Book 1
Sided function.
Metric version
Original Paper for one-sided copy
A3 A4 × 2 sheets
B4 JIS B5 JIS × 2 sheets
A4 A5 × 2 sheets
Inch version
Original Paper for one-sided copy
11" × 17" 81/2" × 11" × 2 sheets
81/2" × 11" 51/2" × 81/2" × 2 sheets
1. Press the [Combine/Series] key
CUA114
2. Select [Series: Book Orig.] or [Series:2Sided Orig.] using the [ ] or [ ] key, and then
press the [OK] key.
• When selecting [Series: Book Orig.], proceed to step 4.
Copier Functions
67
Page 70
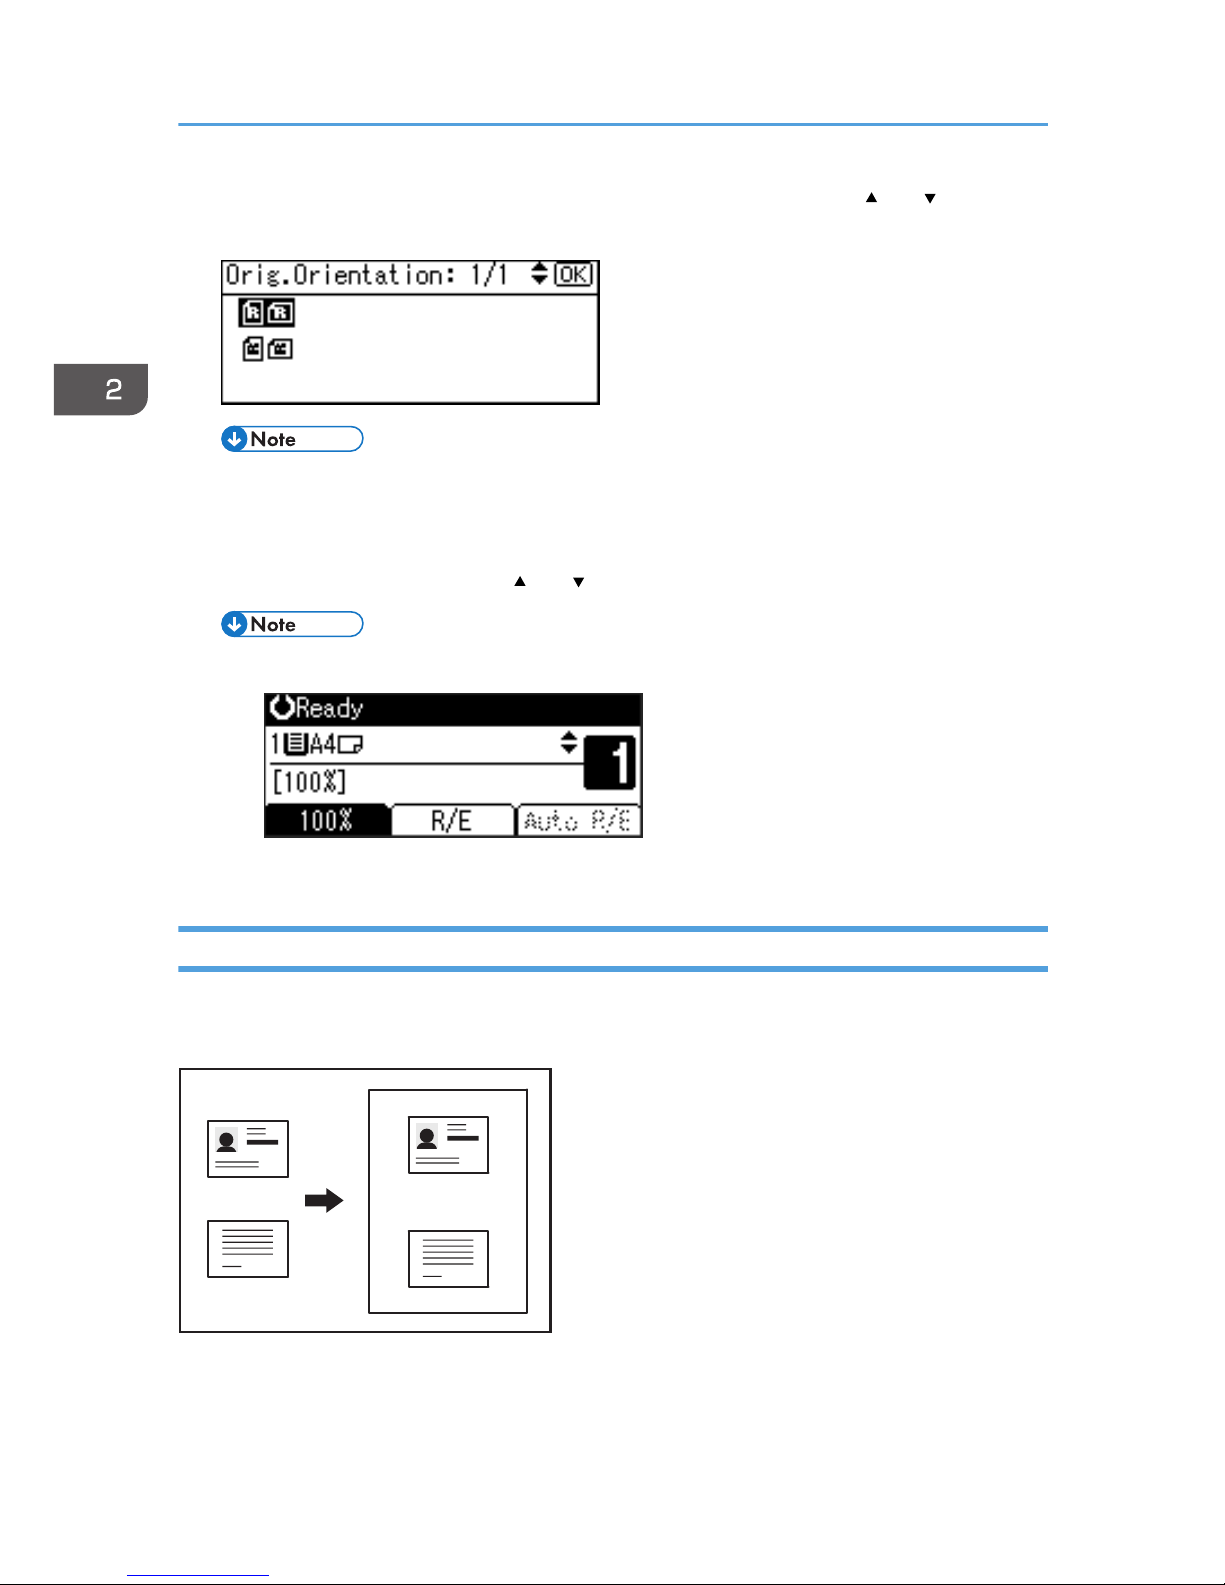
3. When selecting [Series:2Sided Orig.], select the orientation using the [ ] or [ ] key, and
then press the [OK] key.
• You can select the orientation of originals when [Always Specify] is specified for [Orientation]
under [Copier Features] (User Tools). See page 90 "Orientation".
The "Programmed" message appears.
4. Select the paper tray using the [ ] or [ ] key.
• When you select [Series: Book Orig.], the following display appears.
5. Place your original, and then press the [Start] key.
ID Card Copy
This section describes how to copy the front and back sides of an ID card, or other small original, onto
one side of a sheet of paper.
1
2
CUA131
1. Front
2. Back
2. Copying
68
Page 71
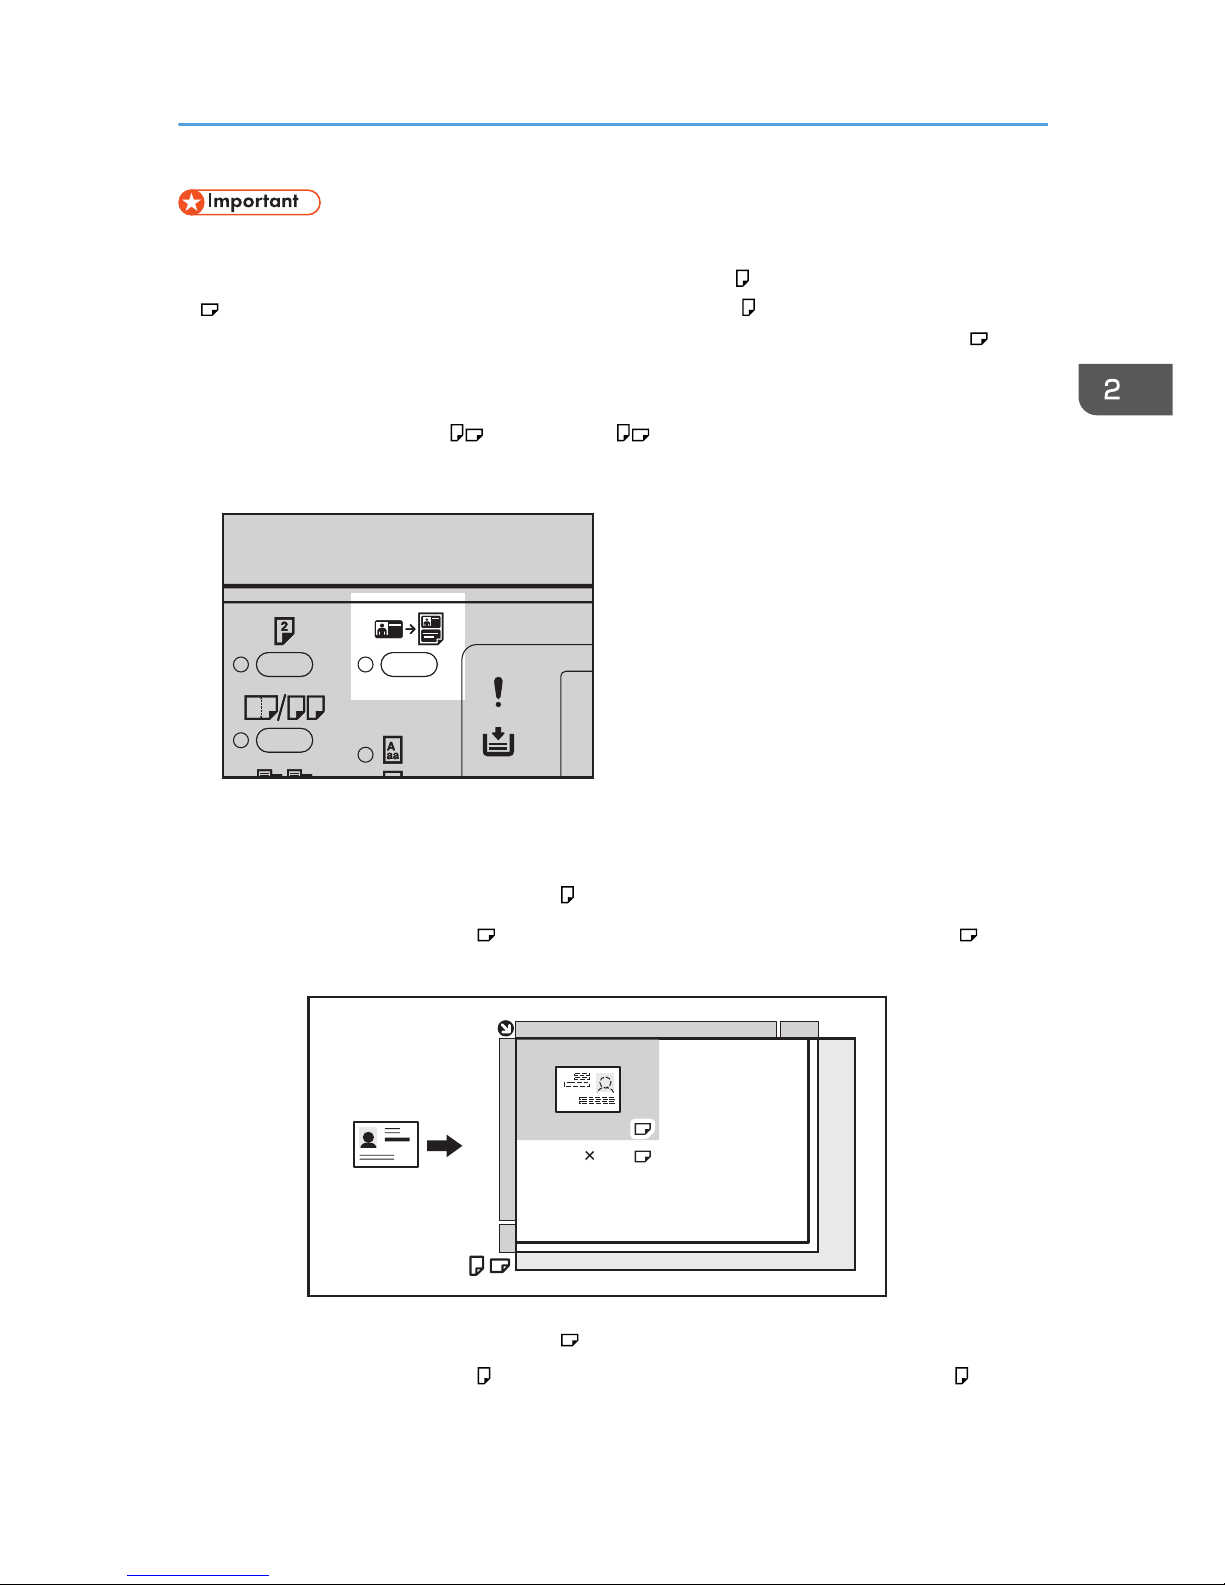
• Duplex function cannot be used with this function.
This function copies the original on to the top and bottom halves of paper or the right and left halves
of paper. For example, when copying onto an A4 (81/2" × 11") size sheet of paper, the front of
the original is copied onto the top half of the paper in a space the same as A5 (51/2" × 81/2") and
the back of the original is copied onto the bottom half. Place the original in the center of the scanning
area when using this function.
We recommend that you use A4 or 81/2" × 11" size paper with this function.
1. Press the [ID Card Copy] key.
CUA137
2. Select the paper tray.
3. Place the original front side down on the exposure glass.
When copying onto A4 (81/2" × 11") size paper
1. Place the original in orientation and in the center of the A5 (51/2" × 81/2") scan
area.
CUA132
A5
A5
(51/2” 81/2” )
When copying onto A4 (81/2" × 11") size paper
1. Place the original in orientation and in the center of the A5 (51/2" × 81/2") scan
area.
Copier Functions
69
Page 72
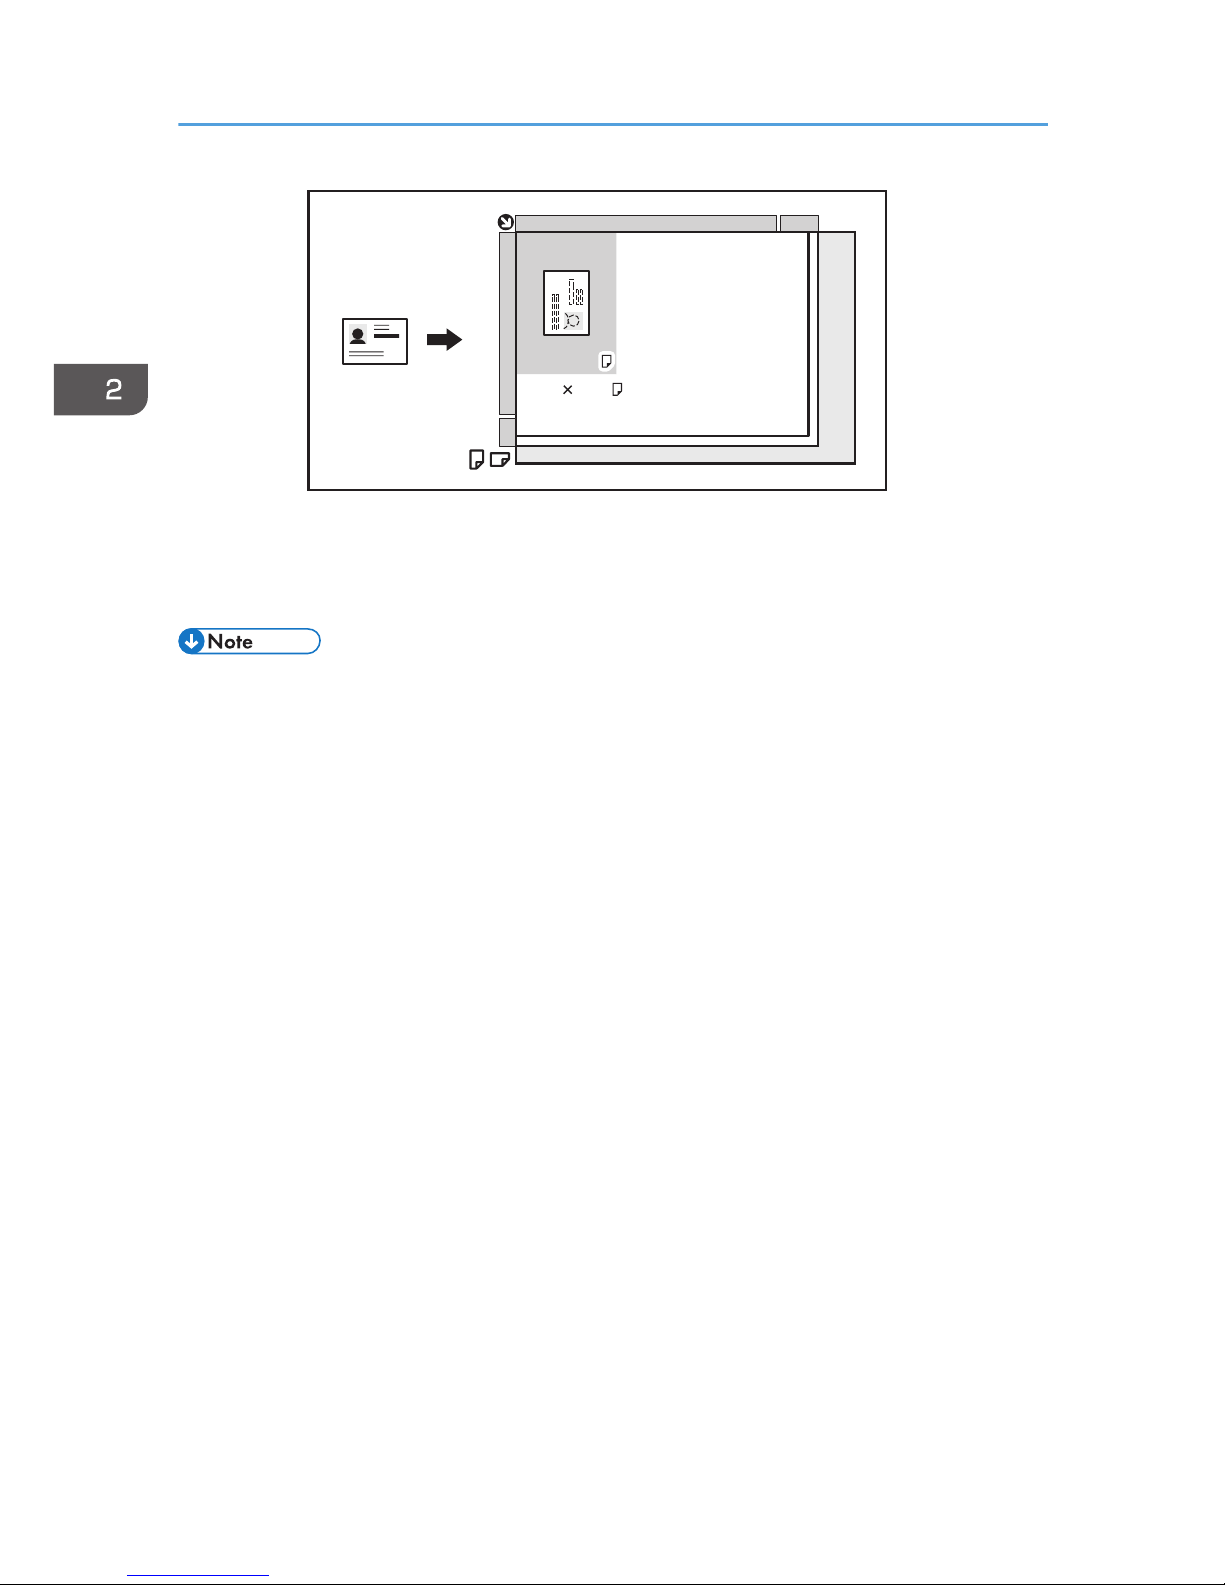
CUA133
A5
A5
(51/2” 81/2” )
4. Press the [Start] key.
5. Press the original back side down on the exposure glass, and then press the [Start] key
again.
• If you press the [ID Card Copy] key after specifying the reproduction ratio, the reproduction ratio is
canceled.
2. Copying
70
Page 73
3. Troubleshooting
If Your Machine Does Not Operate As You
Want
When a Message Is Displayed
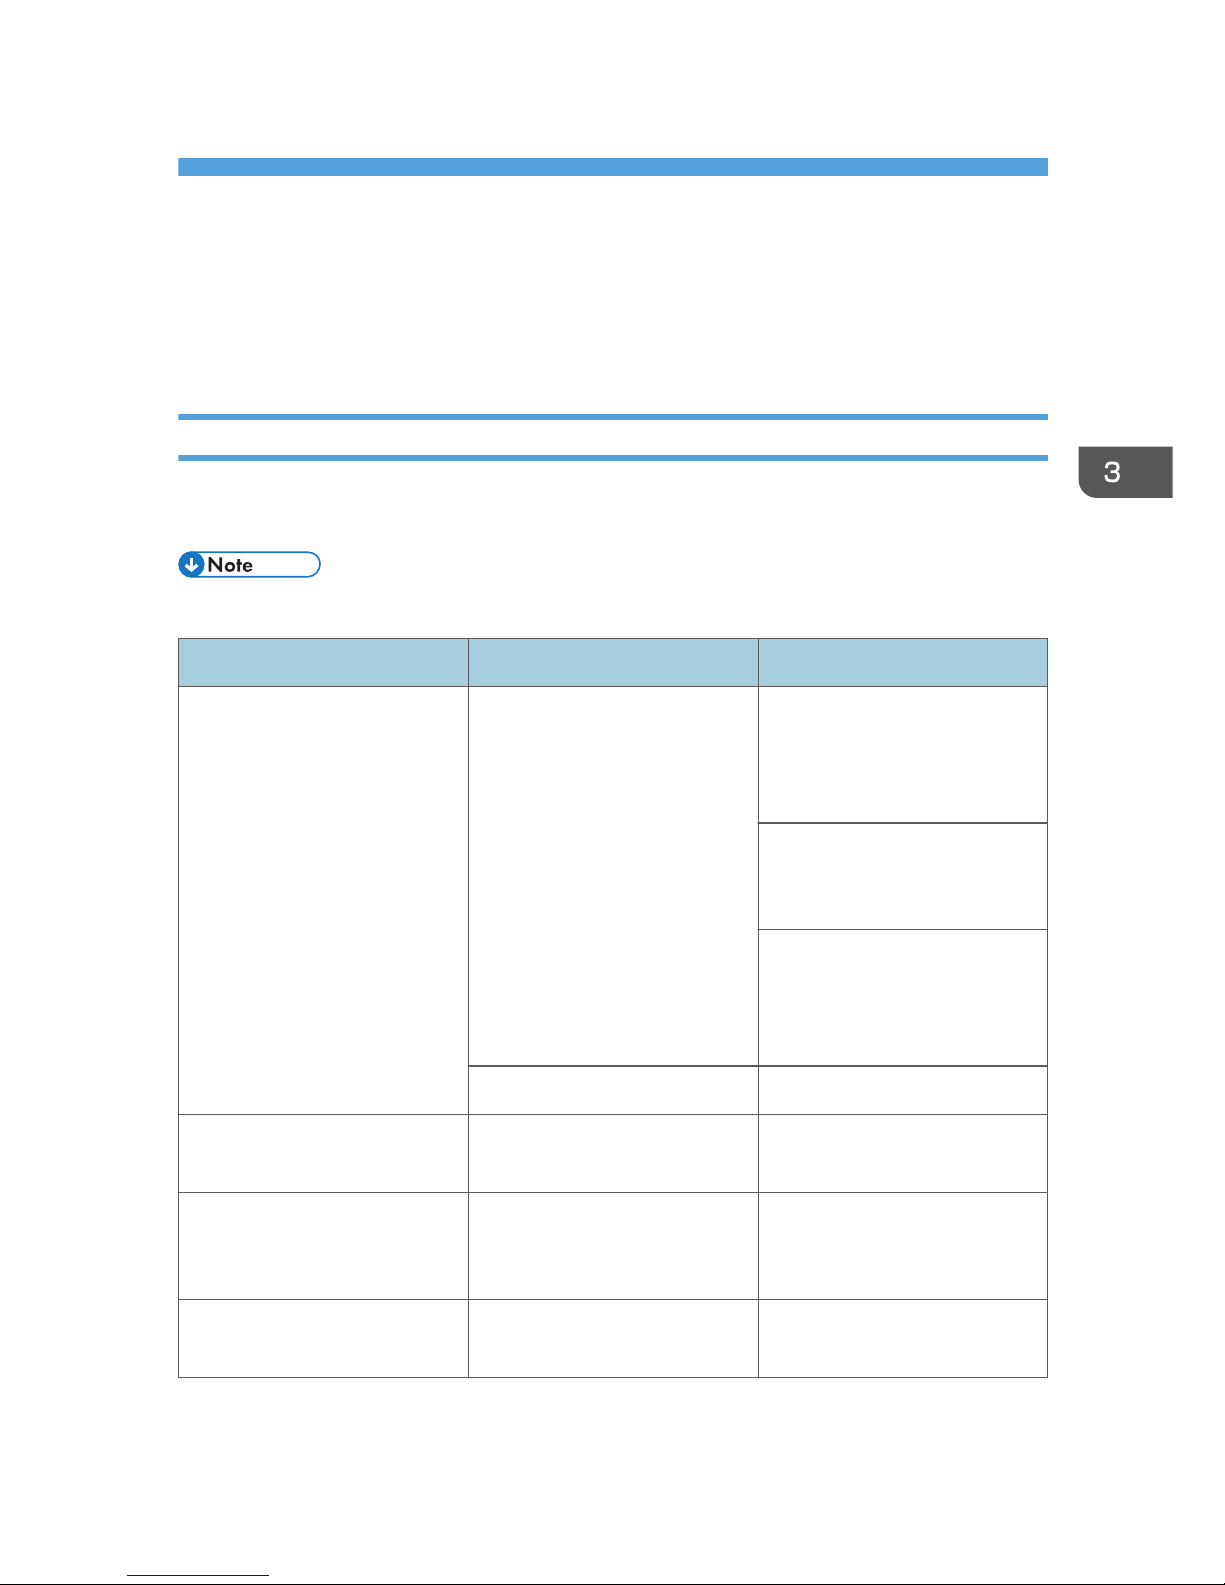
The following chart contains explanations for common messages. If other messages appear, follow the
instructions as they are displayed.
• For messages not listed here, see General Settings Guide.
Message Causes Solutions
"Cannot detect original size" Improper original is placed. See
page 29 "Sizes difficult to
detect".
Select paper manually, not with
the Auto Paper Select function,
and do not use the Auto
Reduce/Enlarge function.
Input the both horizontal and
vertical sizes of the nonstandard original.
Place the original on the
exposure glass. See page 31
"Placing Originals on the
Exposure Glass".
Original is not placed. Place your originals.
"Check original orientation." Original is not placed in the
proper orientation.
Change original orientation.
"Check paper size." Improper paper size is set. If you press the [Start] key, copy
will start onto the selected
paper.
"Rotate Sort is unavailable with
this paper size."
A size of paper for which Rotate
Sort is not available is selected.
Select a proper paper size. See
page 54 "Sort".
71
Page 74

Message Causes Solutions
"Cannot dup. copy this size." A paper size not available with
the Duplex function has been
selected.
For details about a paper size
for Duplex, see page 107
"Supplementary Information".
"Max. number of sets is *." The number of copies exceeds
maximum copy quantity.
You can change the maximum
copy quantity. See page 91
"Max. Number of Sets".
3. Troubleshooting
72
Page 75

If You Cannot Make Clear Copies
Problem Causes Solutions
Copies appear dirty. Image density is too dark. Adjust the image density. See
page 48 "Adjusting Image
Density".
The reverse side of an original
image is copied.
Image density is too dark. Adjust the image density. See
page 48 "Adjusting Image
Density".
A shadow appears on copies if
you use pasted originals.
Image density is too dark. Adjust the image density. See
page 48 "Adjusting Image
Density".
Change the orientation of the
original.
Put mending tape over the
pasted areas.
The same copy area is dirty
whenever making copies.
The exposure glass or ADF is
dirty.
Clean them. See page 103
"Maintaining Your Machine".
Copies are too light. Image density is too light. Adjust the image density. See
page 48 "Adjusting Image
Density".
A light copy may result when
you use damp or rough grain
paper.
• Use the recommended
paper.
• Use paper that has been
stored in the recommended
temperature and humidity
conditions.
See "Copy Paper", General
Settings Guide.
Toner bottle is almost empty. Add toner. See page 83
"Adding Toner".
Parts of the paper are not
copied.
The original is not placed
correctly.
Place originals correctly. See
page 31 "Placing Originals".
An improper paper size is
selected.
Select the proper paper size.
If You Cannot Make Clear Copies
73
Page 76
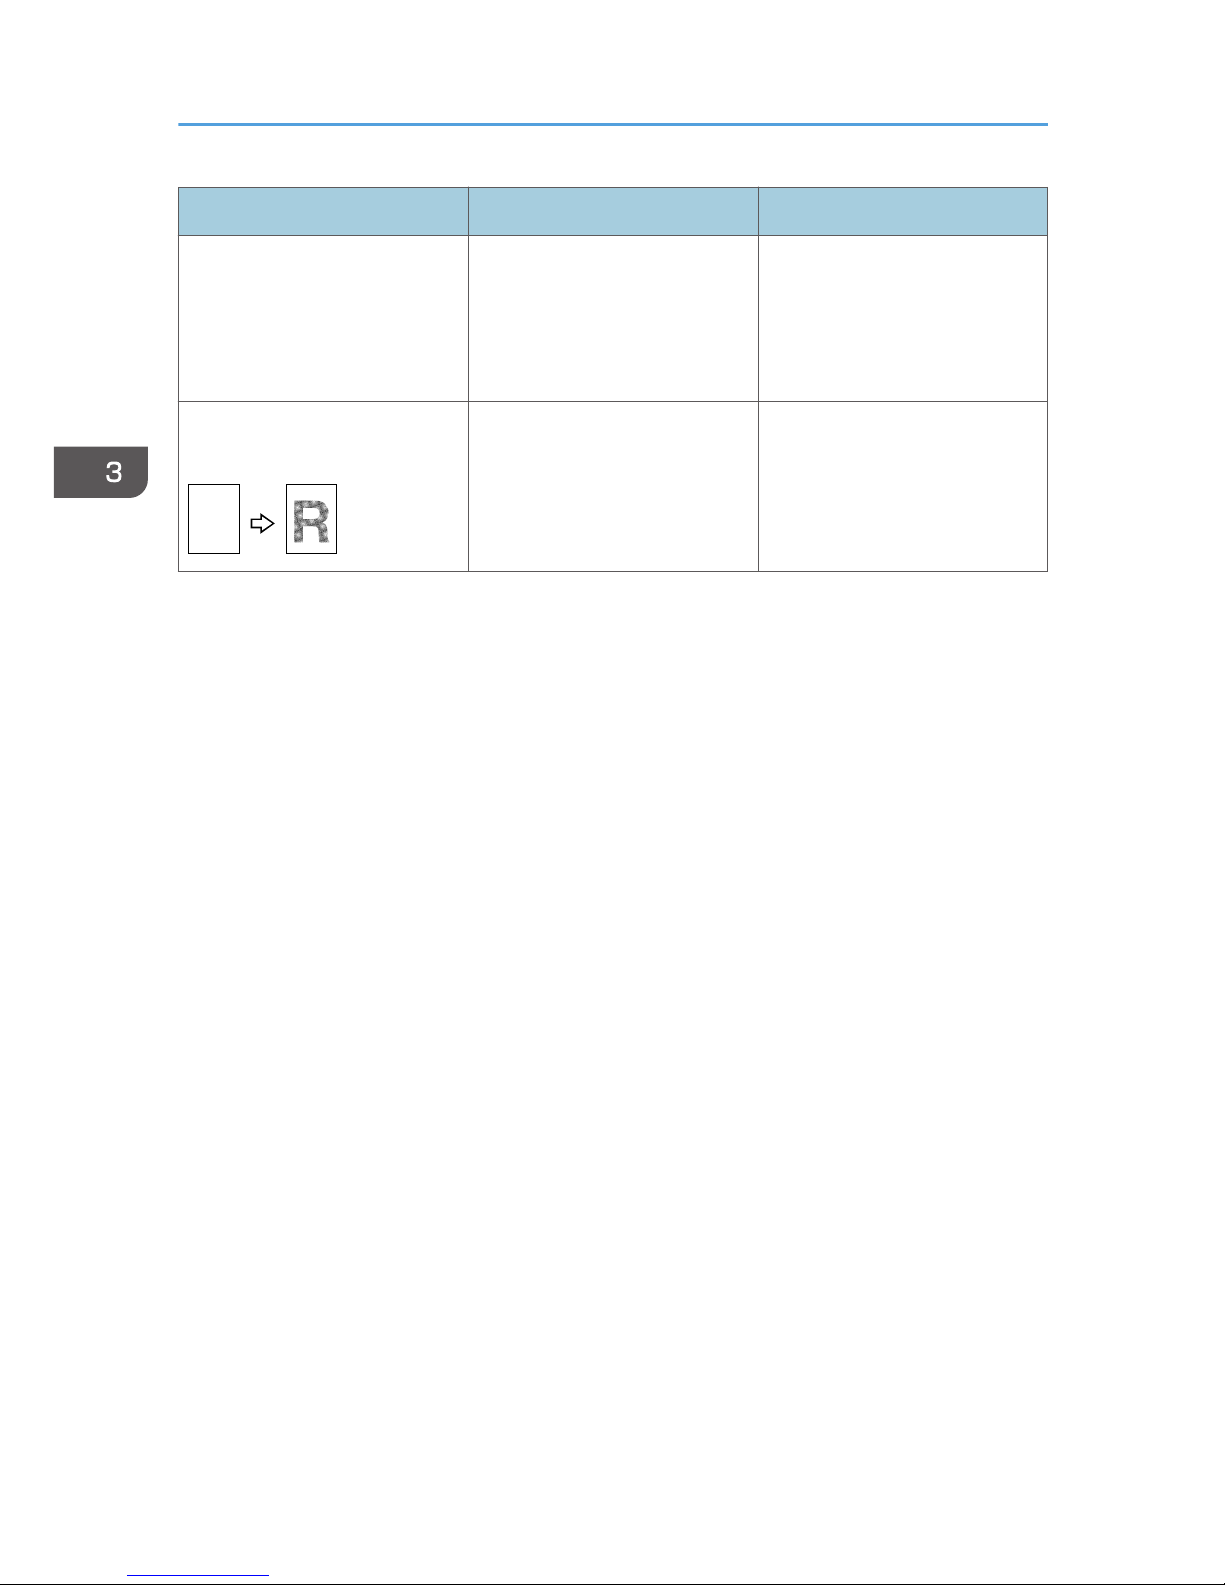
Problem Causes Solutions
Copies are blank. The original is not placed
correctly.
When using the exposure glass,
place originals face down.
When using the ADF, place
them face up. See page 31
"Placing Originals".
A moire pattern is produced on
copies.
R
Your original has a dot pattern
image or many lines.
Place the original on the
exposure glass at a slight angle.
3. Troubleshooting
74
Page 77
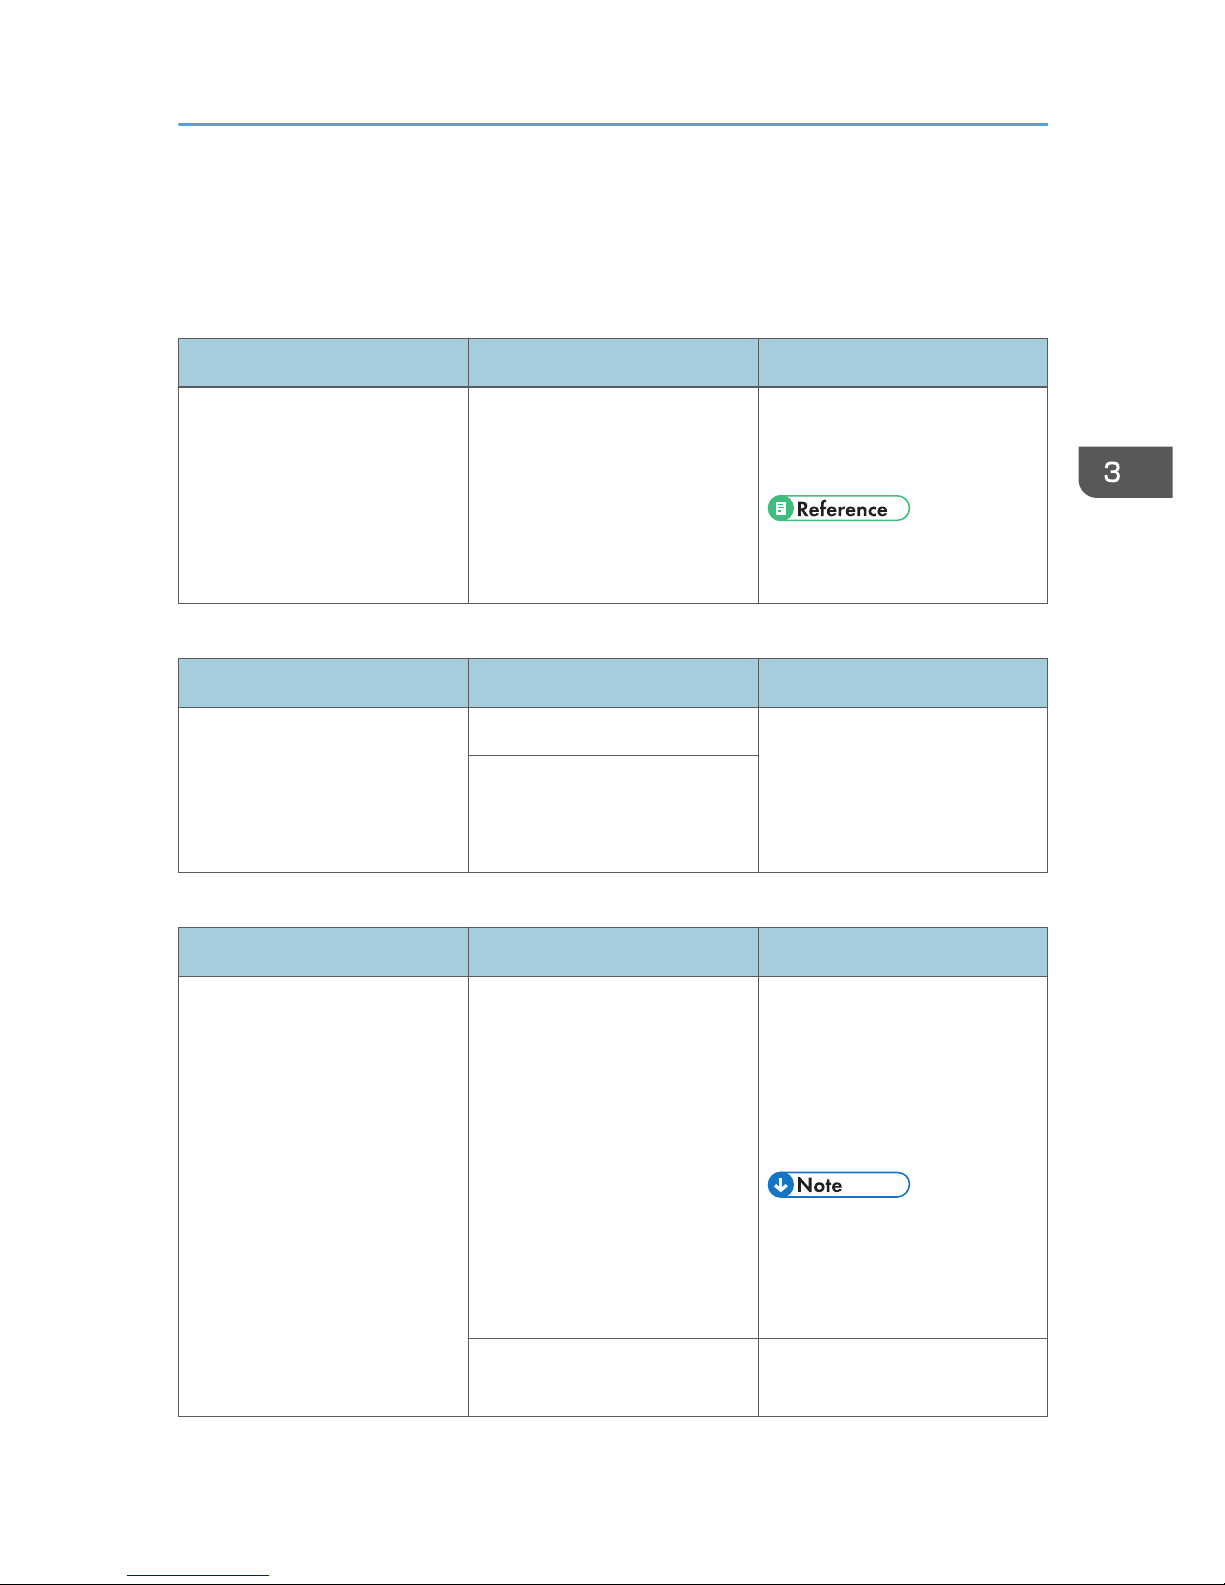
If You Cannot Make Copies As You Want
This section explains causes and remedies when copy results are not as expected.
Basic
Problem Causes Solutions
You cannot combine several
functions.
Selected functions cannot be
used together.
Check the combination of
functions and make the settings
again.
• page 105 "Combination
Chart"
Edit
Problem Causes Solutions
When using the Duplex Margin
function, parts of the original
image are not copied.
You set a wide erased margin. Set a narrower margin with
User Tools. You can set the
width between 0–50 mm (0"–
2"). See page 92 "Duplex
Margin".
There is a lack of margin space
on the opposite side of the
binding position.
Combine
Problem Causes Solutions
When using Combine, parts of
the image are not copied.
You specified a reproduction
ratio that does not match the
sizes of your originals and copy
paper.
When you specify a
reproduction ratio using the
Manual Paper Select function,
make sure the ratio matches
your originals and the copy
paper.
• Select the correct
reproduction ratio before
using the Combine
function.
Your originals are not identical
in size and direction.
Use originals that are identical
in size and direction.
If You Cannot Make Copies As You Want
75
Page 78

Problem Causes Solutions
Copies are not in correct order. You placed the originals in the
incorrect order.
When placing a stack of
originals in the ADF, the last
page should be on the bottom.
If you place an original on the
exposure glass, start with the
first page to be copied.
Duplex
Problem Causes Solutions
Order of copies is not correct. You set originals in the incorrect
order.
When setting a stack of
originals in the ADF, the last
page should be on the bottom.
If you set an original on the
exposure glass, start with the
first page to be copied.
In Duplex Margin mode, parts
of the original image are not
copied.
The margin is too wide. Set a narrower margin with the
user tools. See page 92
"Duplex Margin".
When using Duplex, copy is
made Top to Top even though
Top to Bottom is selected.
You placed the originals in the
wrong orientation.
Place the originals in the correct
orientation. See page 31
"Original Orientation".
When Memory Is Full
Messages Causes Solutions
"Memory is full. [Print] scanned
orig., [Clear] to cancel/clear
memory."
[Clear] [Print]
• Copying will stop and this
message will be displayed
when the memory is full.
The scanned original exceeds
the number of pages that can
be stored in memory.
Press [Print] to copy scanned
originals and cancel the
scanning data. Press [Clear] to
cancel the scanning data and
not copy.
3. Troubleshooting
76
Page 79

Messages Causes Solutions
"Memory is full. Cannot scan." Memory reached capacity. Reduce the number of originals,
and then try print or copy again.
"Reset * orig., then press
[Resume] to scan and copy the
remaining originals."
[Stop] [Resume]
The machine checks if the
remaining originals should be
copied, after the scanned
original has been printed.
To continue copying, remove all
copies, and then press
[Resume]. To stop copying,
press [Stop].
If You Cannot Make Copies As You Want
77
Page 80
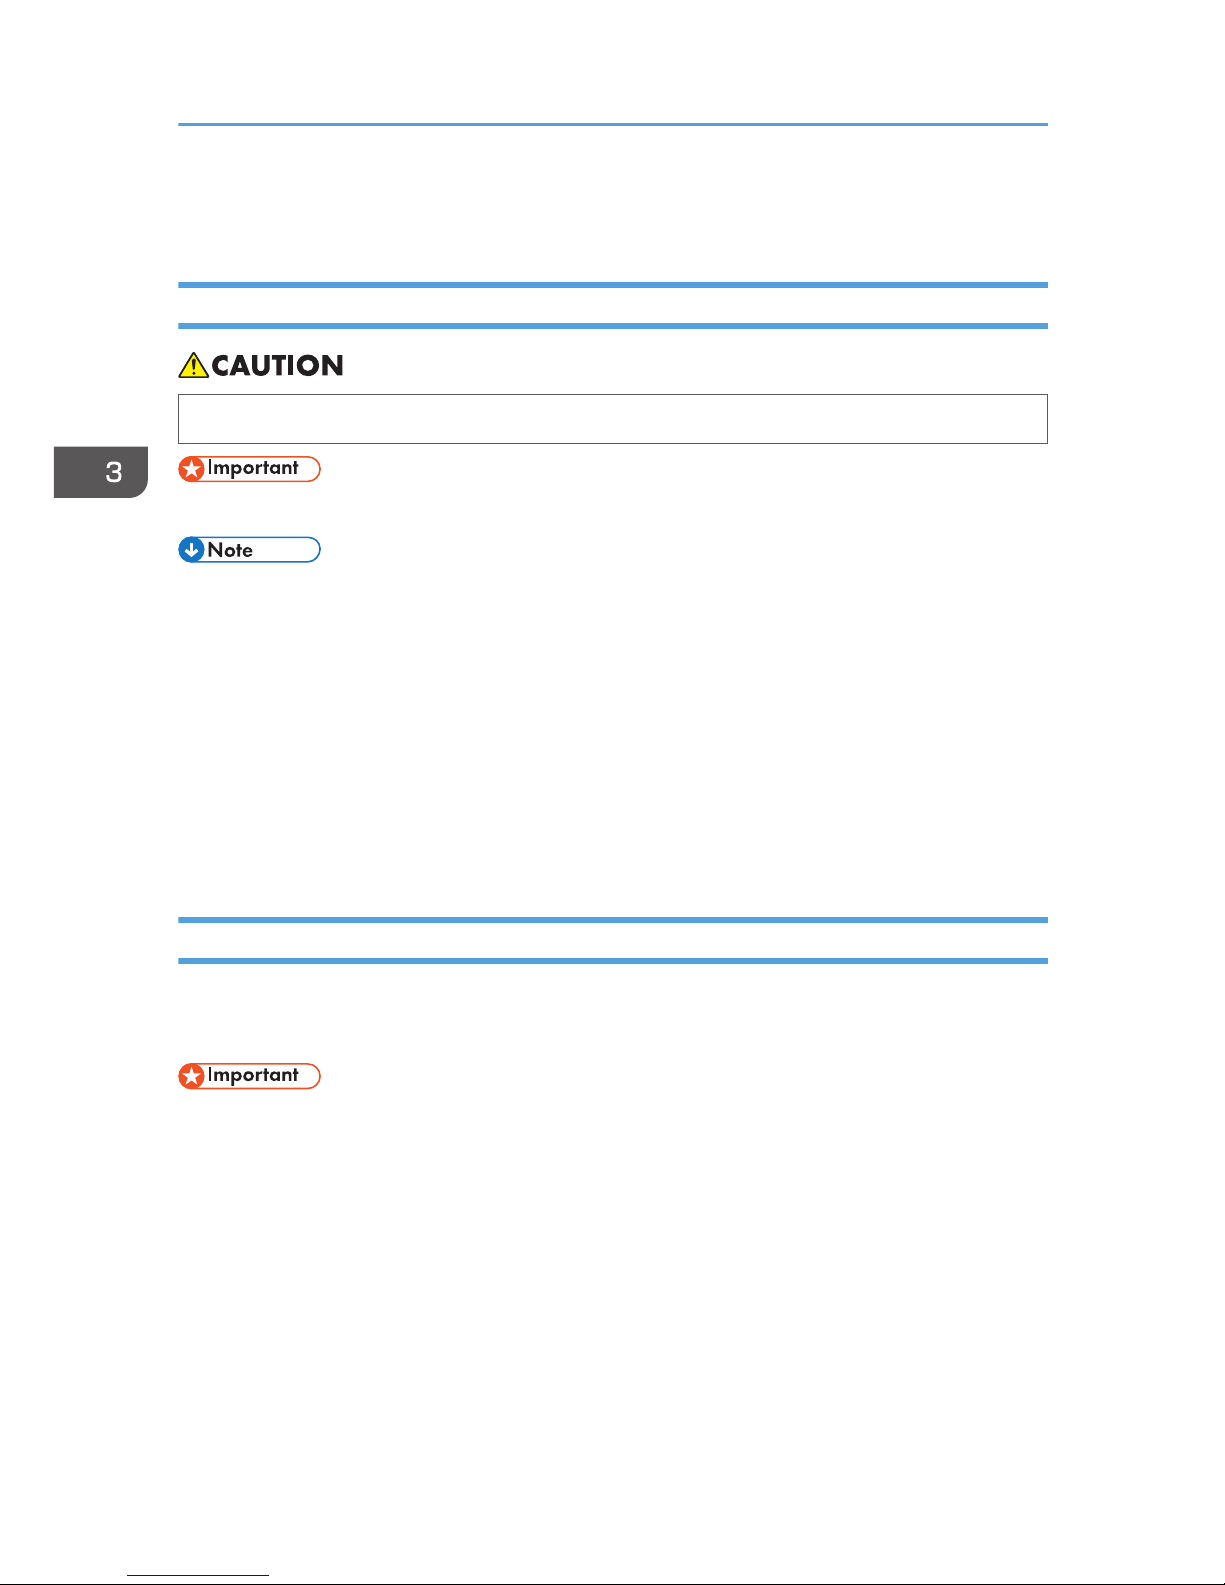
Loading Paper
Precautions for Loading Paper
• When loading paper, take care not to trap or injure your fingers.
• Do not stack paper over the limit mark.
• To prevent multiple sheets from being fed at once, fan the paper before loading it.
• If you load paper when only a few sheets of paper remain in the tray, multiple sheet feeding may
occur. Remove any remaining paper, stack them with the new sheets of paper, and then fan the
entire stack before loading it into the tray.
• Straighten curled or warped paper before loading.
• For details about paper sizes and types, see "Recommended Paper Sizes and Types", General
Settings Guide.
• You might at times hear a rustling noise from paper moving through the machine. This noise does
not indicate a malfunction.
Loading Paper into Paper Trays
Every paper tray is loaded in the same way.
In the following example procedure, paper is loaded into Tray 1.
• If a paper tray is pushed vigorously when putting it back into place, the position of the tray's side
fences may slip out of place.
• Check the paper edges are aligned at the right side.
• When loading a low number of sheets, be sure not to squeeze the side fences in too tightly. If the
side fences are squeezed too tightly against the paper, the edges may crease or the paper may be
misfed.
3. Troubleshooting
78
Page 81
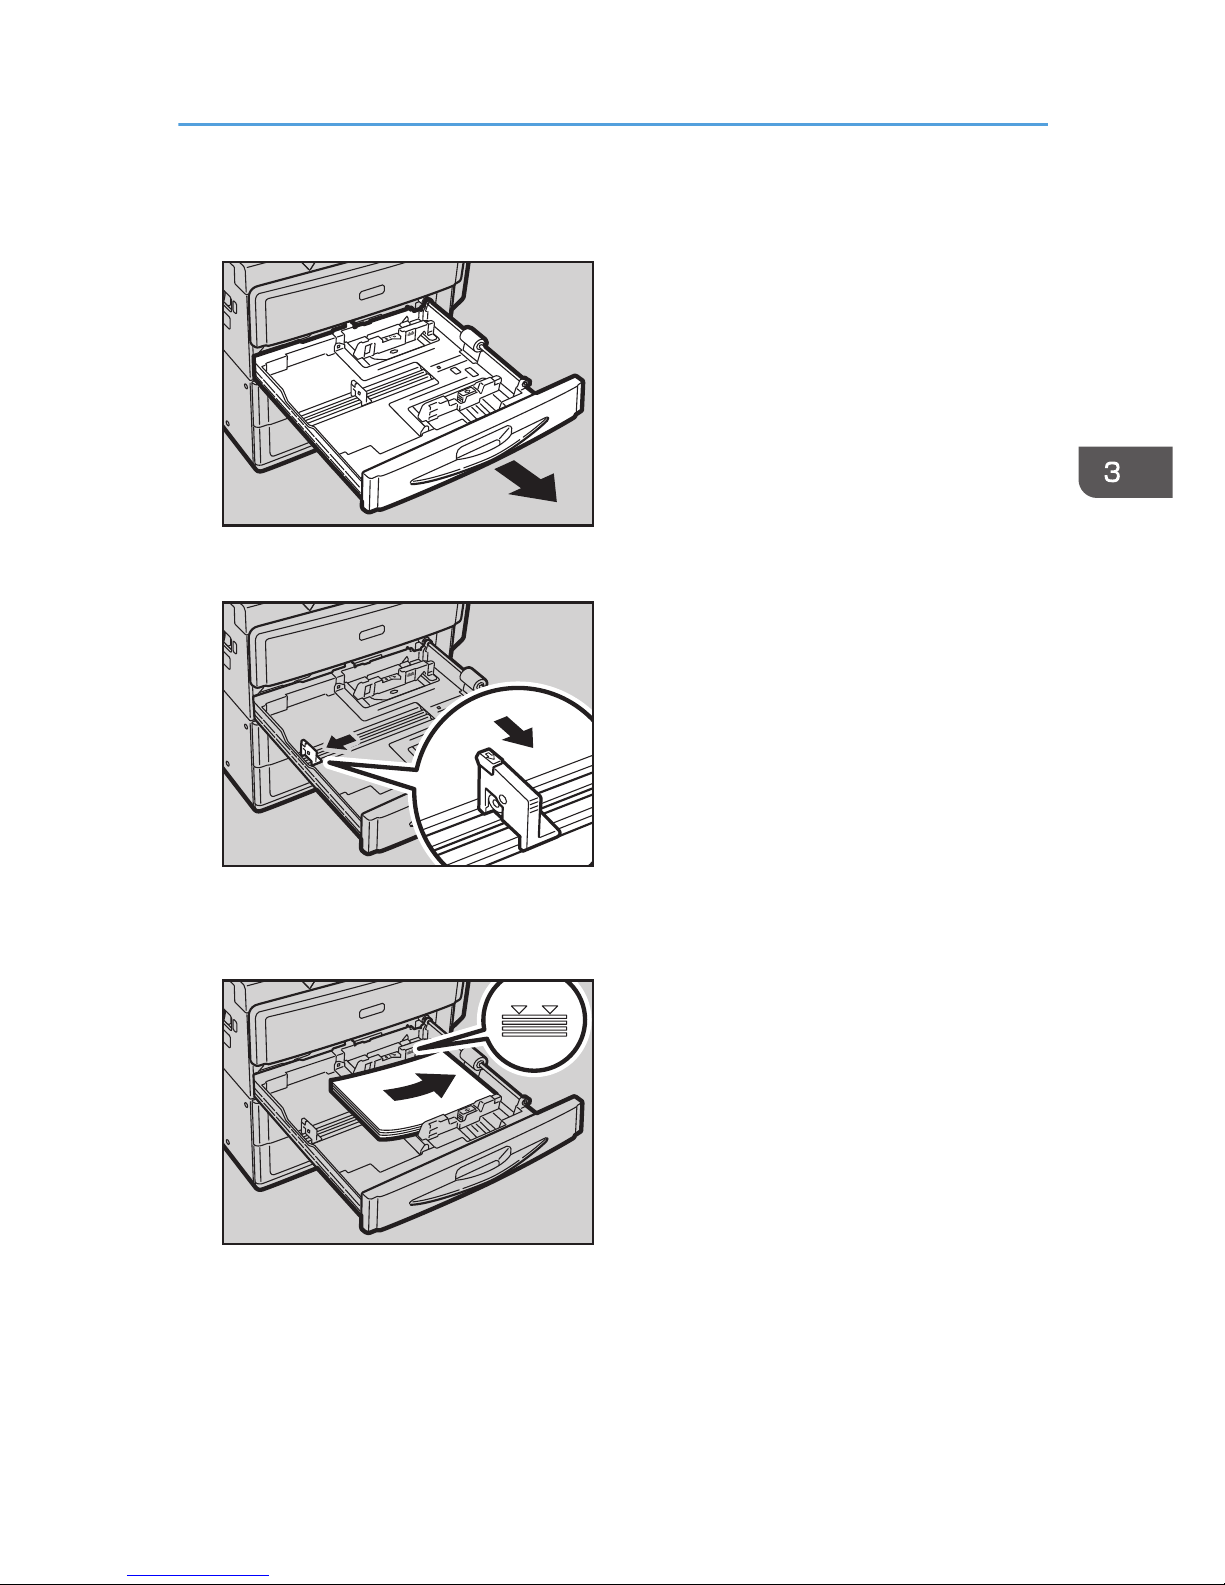
1. Check that paper in the paper tray is not being used, and then pull the tray carefully out
until it stops.
CUA115
2. While pinching the release lever of the end fence, slide the end fence outward.
CUA116
3. Square the paper and load it print side up.
Do not stack paper over the limit mark.
CUA117
Loading Paper
79
Page 82
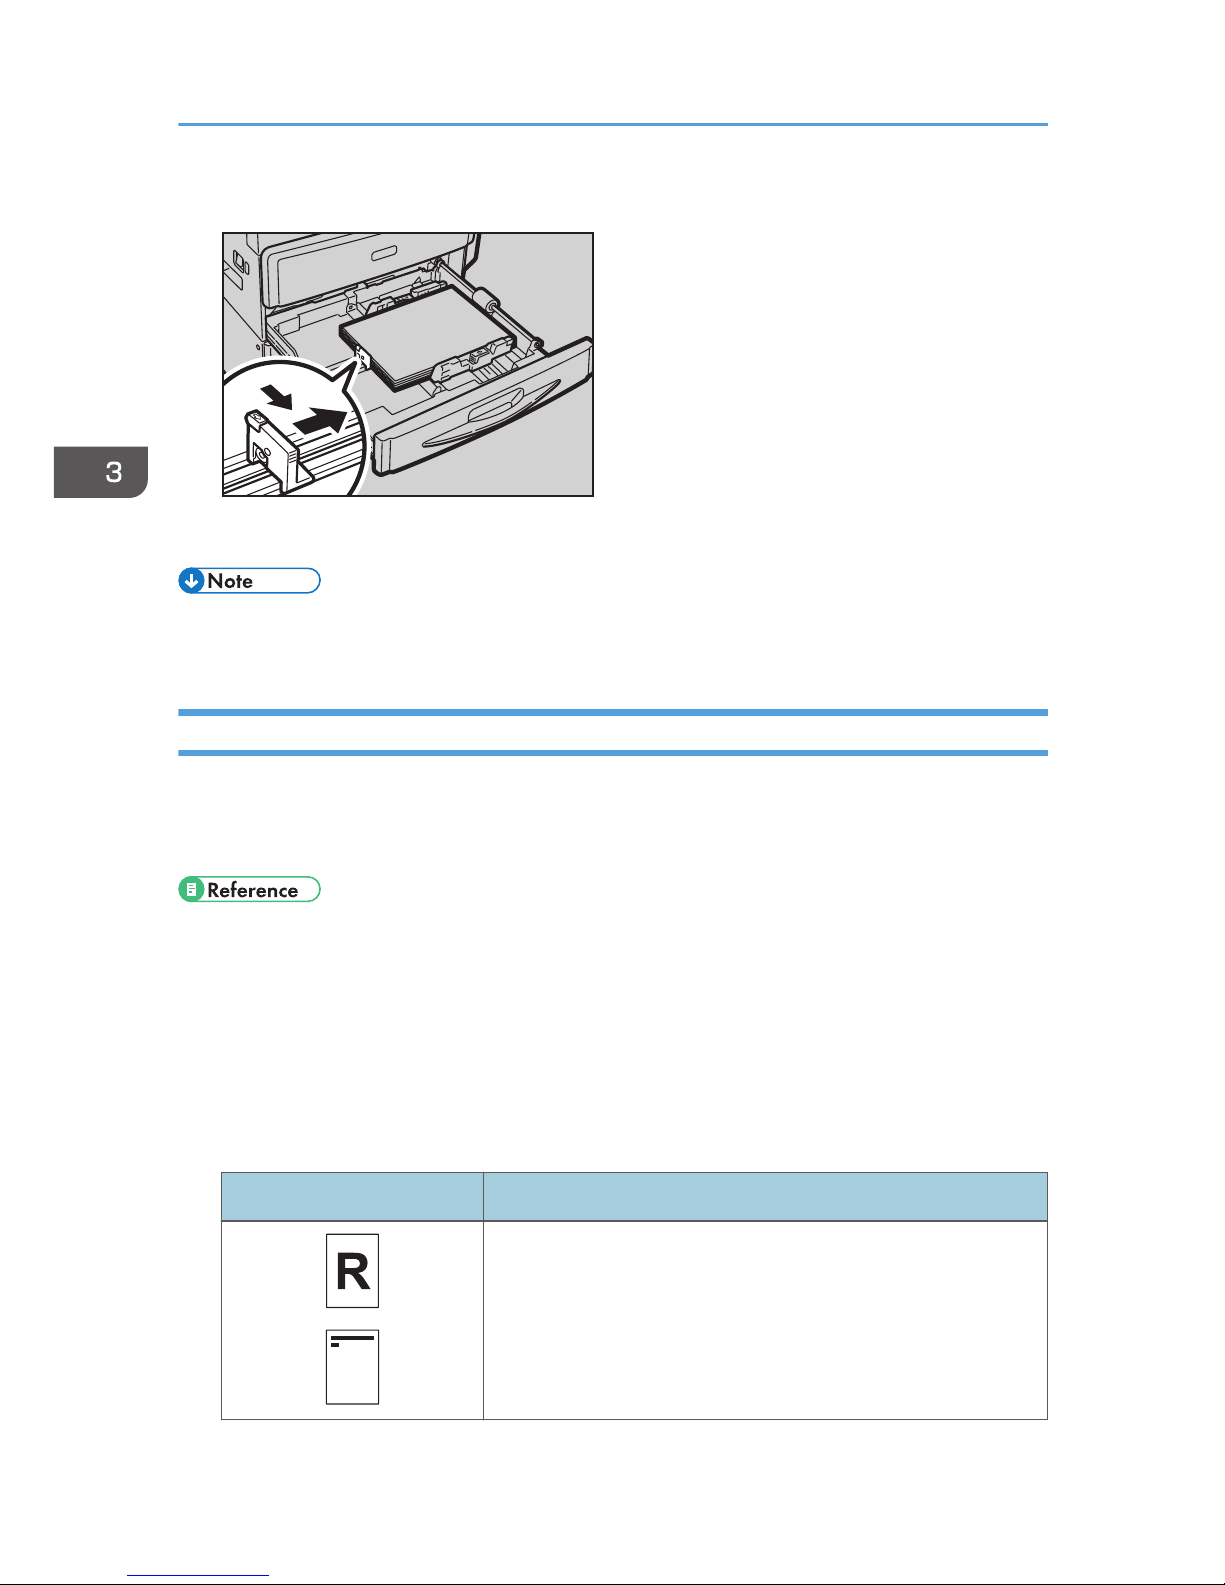
4. Align the end fence gently against the paper you loaded.
CUA118
5. Carefully slide the paper tray fully in.
• Various sizes of paper can be loaded in the paper trays by adjusting the positions of side fences
and end fence. For details, see "Changing the Paper Size", General Settings Guide.
Orientation-Fixed Paper or Two-Sided Paper
Orientation-fixed (top to bottom) or two-sided paper (for example, letterhead paper, prepunched
paper, or copied paper) might not print correctly, depending on how the originals and paper are
placed.
• page 93 "Letterhead Setting"
Settings for the User Tools
Select [On] in [Letterhead Setting] under [Copier Features] (User Tools), and then place the
original and paper as shown below. When printing with the printer function, placing orientation is
the same.
Original orientation and paper orientation
The meanings of the icons are as follows:
Icon Meaning
Place or load paper scanned or printed side face up.
3. Troubleshooting
80
Page 83
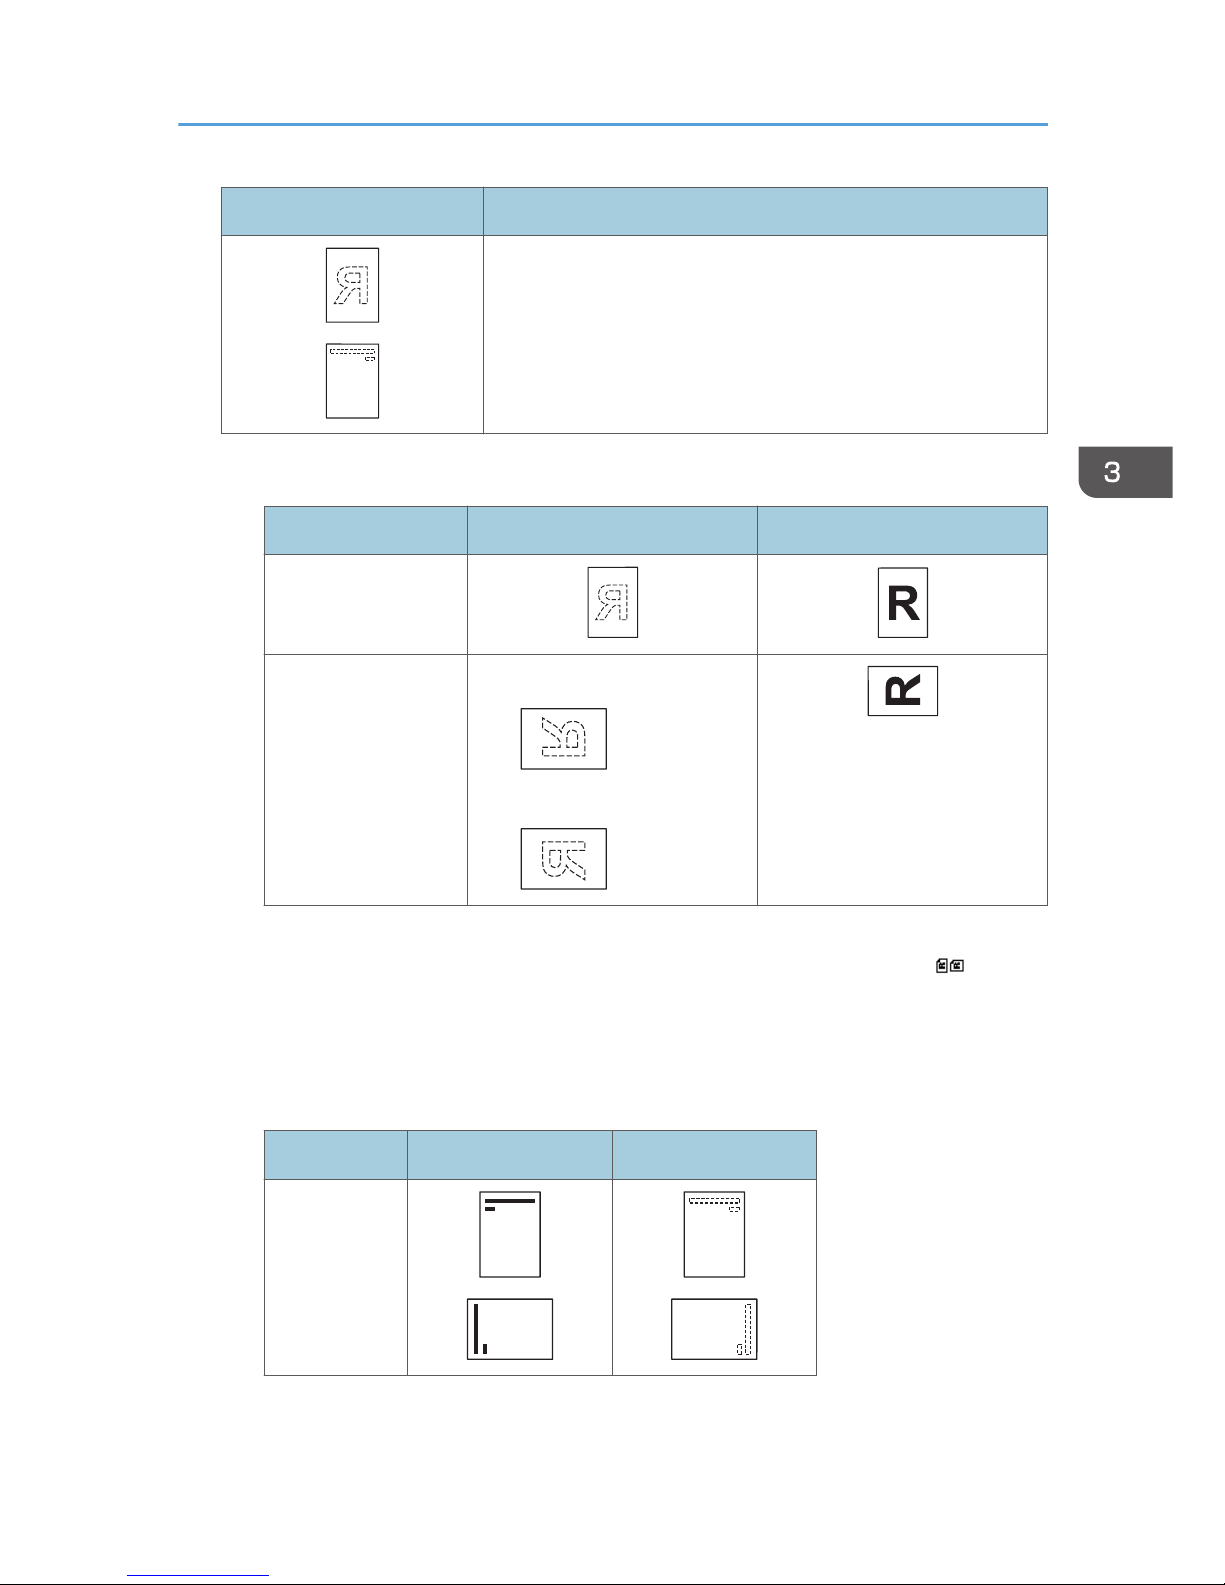
Icon Meaning
Place or load paper scanned or printed side face down.
• Original orientation
Original orientation Exposure glass ADF
Readable orientation
Unreadable
orientation
• One-sided
• Two-sided
*1
*1
*1
When copying in this orientation using the duplex function, select [Always Specify] in
[Orientation] under [Copier Features] (User Tools). Place originals, and then select as the
original orientation.
• Paper orientation
When placing originals in the ADF and copying on orientation-fixed paper from the bypass
tray, specify the paper size.
Copy side Paper trays Bypass tray
One-sided
Loading Paper
81
Page 84
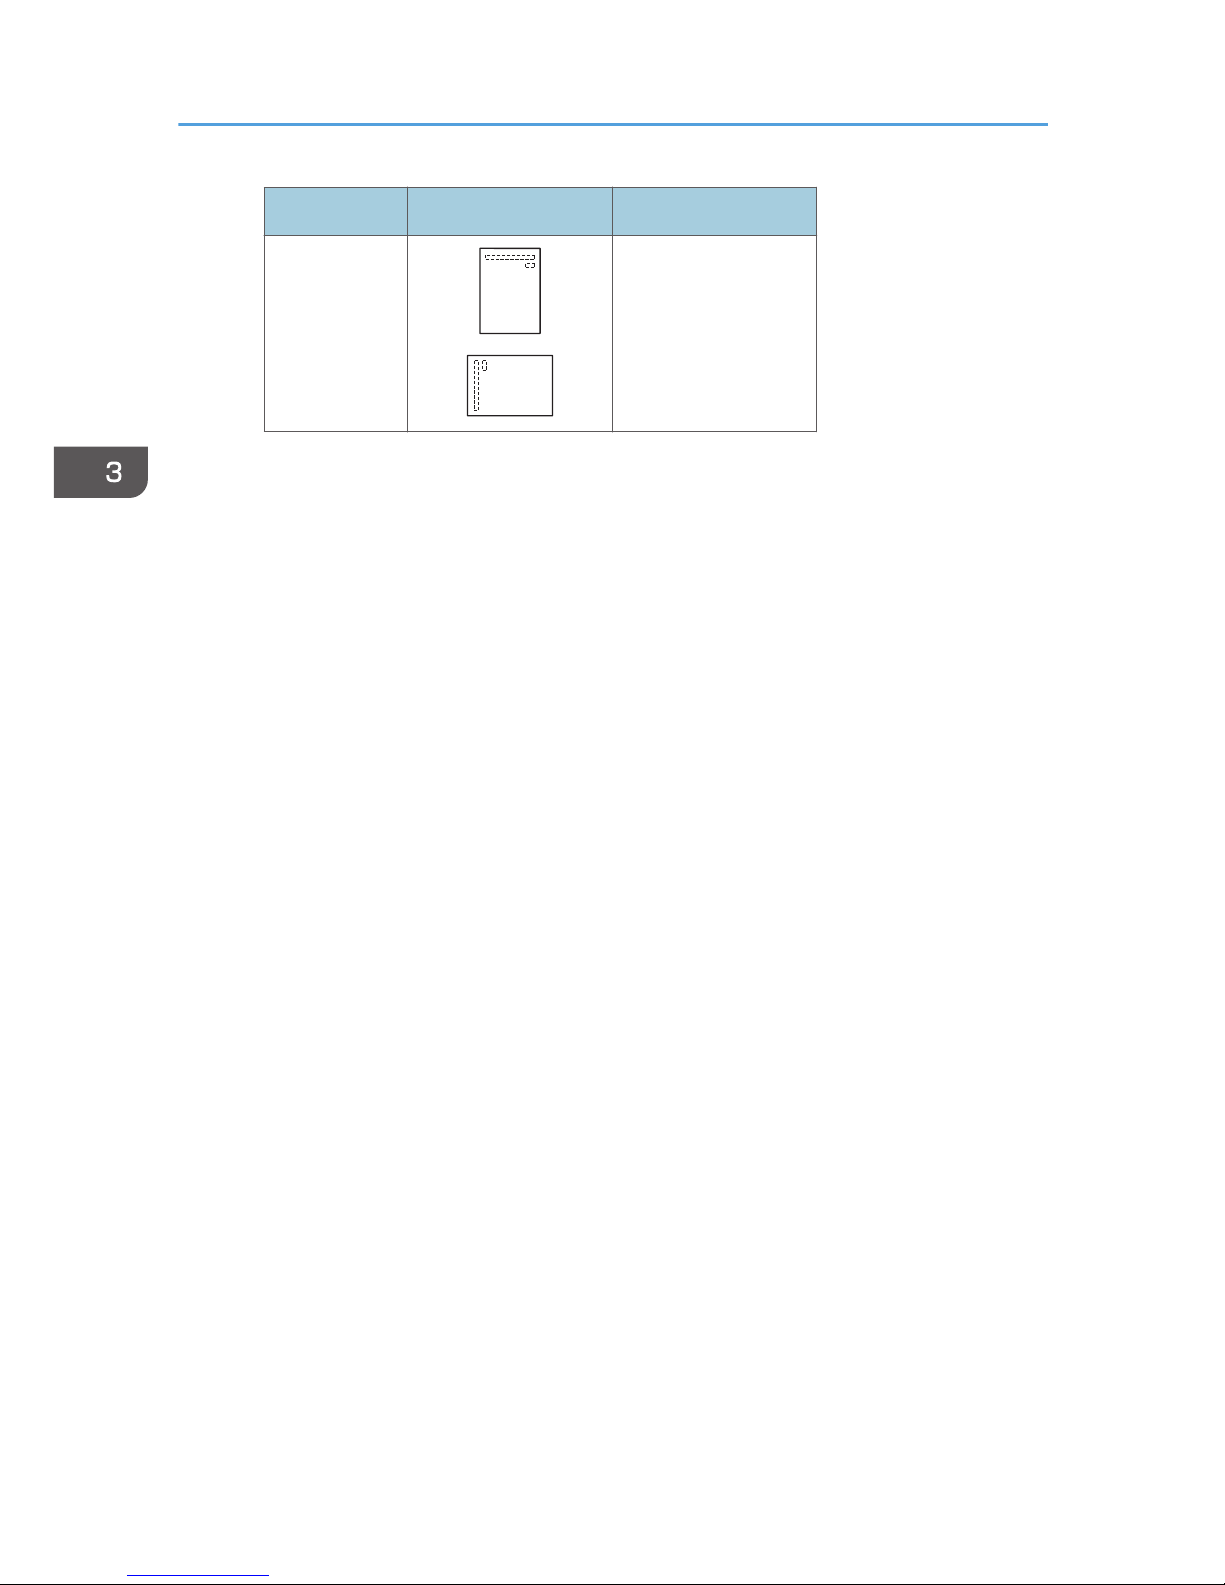
Copy side Paper trays Bypass tray
Two-sided
Unavailable
3. Troubleshooting
82
Page 85
Adding Toner
When appears, it is time to add toner.
Handling Toner
• Do not incinerate toner (new or used) or toner containers. Doing so risks burns. Toner will ignite
on contact with naked flame.
• Do not store toner (new or used) or toner containers anywhere near naked flames. Doing so
risks fire and burns. Toner will ignite on contact with naked flame.
• Do not use the cleaner to suck spilled toner (including used toner). Sucked toner may cause
firing or explosion due to electrical contact flickering inside the cleaner. However, it is possible
to use the cleaner designed for dust explosion-proof purpose. If toner is spilled over the floor,
sweep up spilled toner slowly and clean remainder with wet cloth.
• Do not crush or squeeze toner containers. Doing so can cause toner spillage, possibly resulting
in dirtying of skin, clothing, and floor, and accidental ingestion.
• Store toner (new or used), toner containers, and components that have been in contact with
toner out of reach of children.
• If toner or used toner is inhaled, gargle with plenty of water and move into a fresh air
environment. Consult a doctor if necessary.
• If toner or used toner gets into your eyes, flush immediately with large amounts of water. Consult
a doctor if necessary.
Adding Toner
83
Page 86
• If toner or used toner is swallowed, dilute by drinking a large amount of water. Consult a doctor
if necessary.
• When removing jammed paper or replacing toner, avoid getting toner (new or used) on your
clothing. If toner comes into contact with your clothing, wash the stained area with cold water.
Hot water will set the toner into the fabric and make removing the stain impossible.
• When removing jammed paper or replacing toner, avoid getting toner (new or used) on your
skin. If toner comes into contact with your skin, wash the affected area thoroughly with soap and
water.
• Faults may occur if you use toner other than the recommended type.
• When adding toner, do not turn off the operation switch. If you do, settings will be lost.
• Always add toner when the machine instructs you.
• Do not repeatedly install and remove toner bottles. This will result in toner leakage.
• Do not shake the removed toner bottle. Remaining toner might scatter.
• You can make about 50 copies even after the symbol begins flashing, but replace toner early to
prevent poor copy quality.
Toner Storage
When storing toner, the following precautions should always be followed:
• Store toner containers in a cool, dry place free from direct sunlight.
• Store on a flat surface.
Used Toner
• Toner cannot be re-used.
3. Troubleshooting
84
Page 87
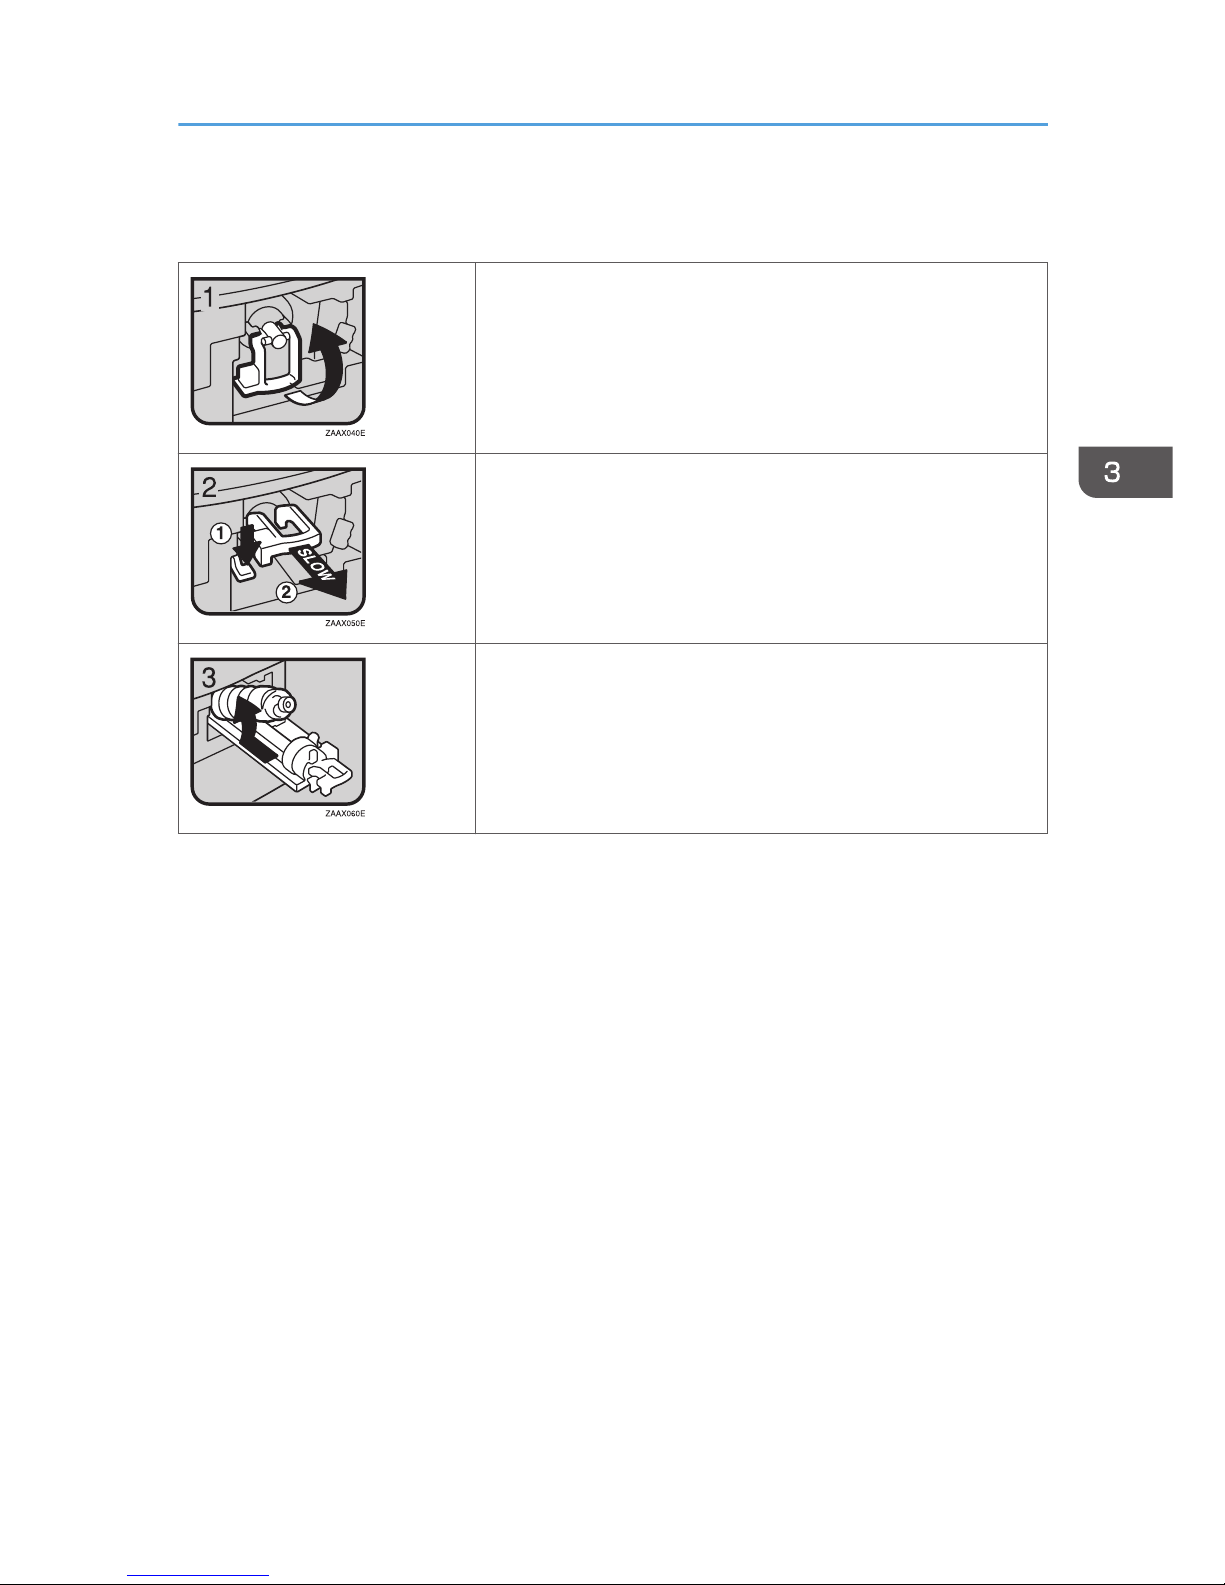
Removing Toner
• 1: Open the front cover of the machine.
• 2: Lift the green lever.
• 3: Push the green lever, and then gently pull out the holder.
• 4: Press the toner bottle back to raise its top, and then gently
pull it out.
Removing Toner
85
Page 88
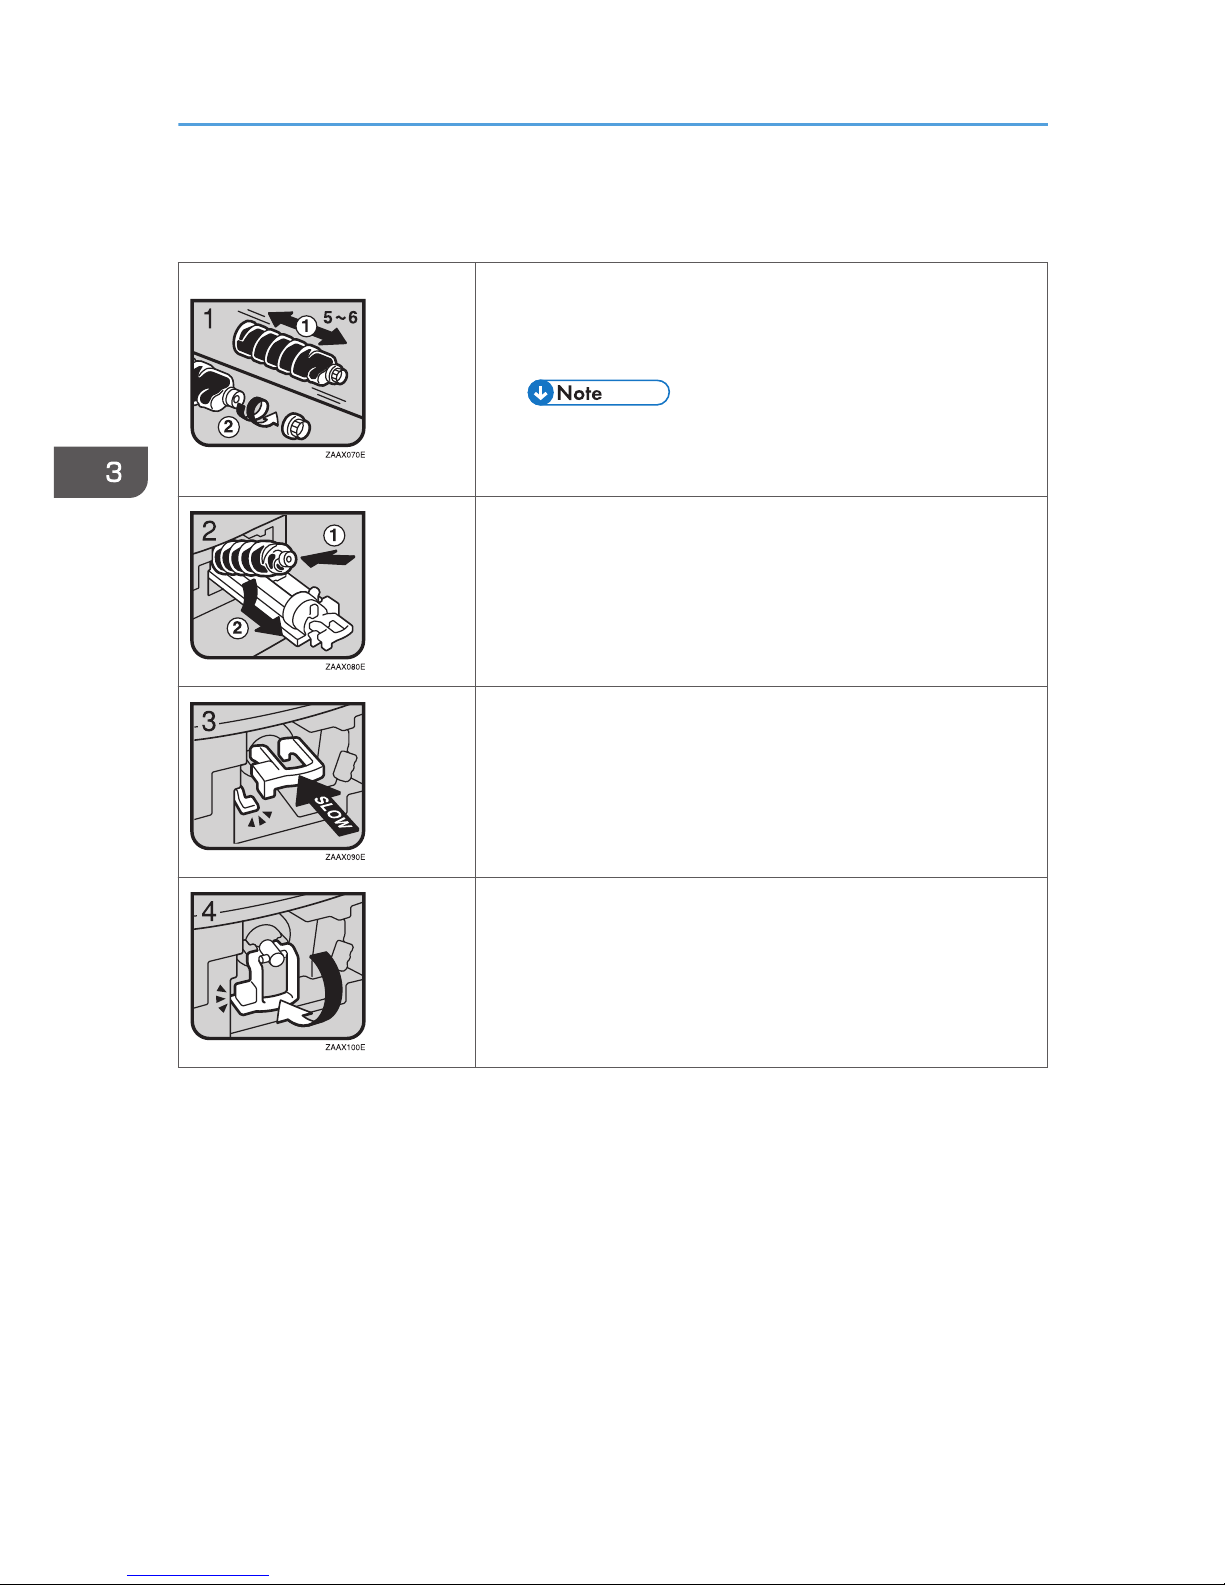
Inserting Toner
• 1: Hold the new bottle horizontally and shake it from side to
side five or six times.
• 2: Remove the black cap.
• Do not remove the black cap before shaking.
• Do not remove the inner cap.
• 3: Put the toner bottle on the holder, and then pull its top
forward.
• 4: Push in the green lever until it clicks.
• 5: Press down the green lever.
• 6: Close the machine's front cover.
3. Troubleshooting
86
Page 89
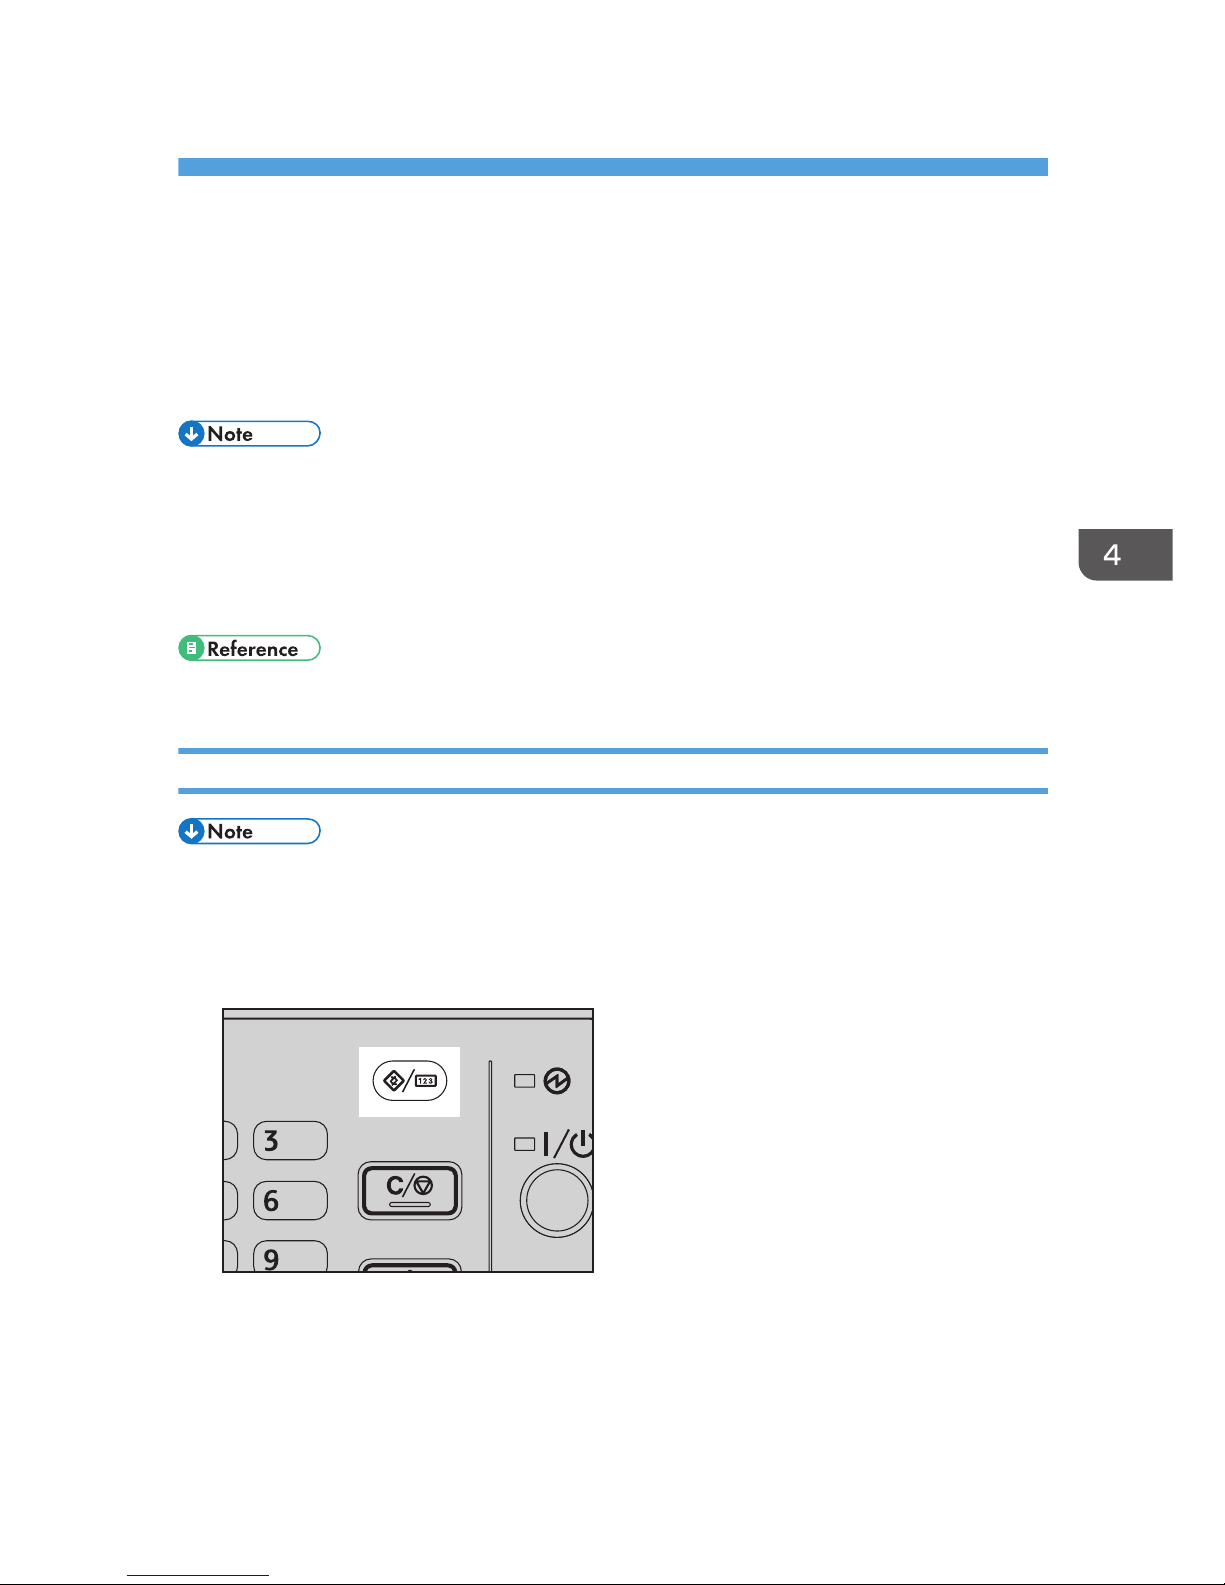
4. User Tools (Copier Features)
Accessing User Tools (Copier Features)
This section is for administrators in charge of this machine.
Administrators can change or make default settings.
• Be sure to quit User Tools and return to the initial copy display when all settings are complete. This
section describes system settings for the copier function.
• Selected settings are highlighted.
• Any changes made with User Tools remain in effect even if the main power switch or operation
switch is turned off, or the [Reset] key is pressed.
• For details, see "User Tools (System Settings)", General Settings Guide.
Changing Default Settings
• If an administrator code is set, the administrator code input display appears before you can
change the default settings. For details about access codes, see "Administrator Tools", General
Settings Guide.
1. Press the [User Tools/Counter] key.
CUA007
87
Page 90
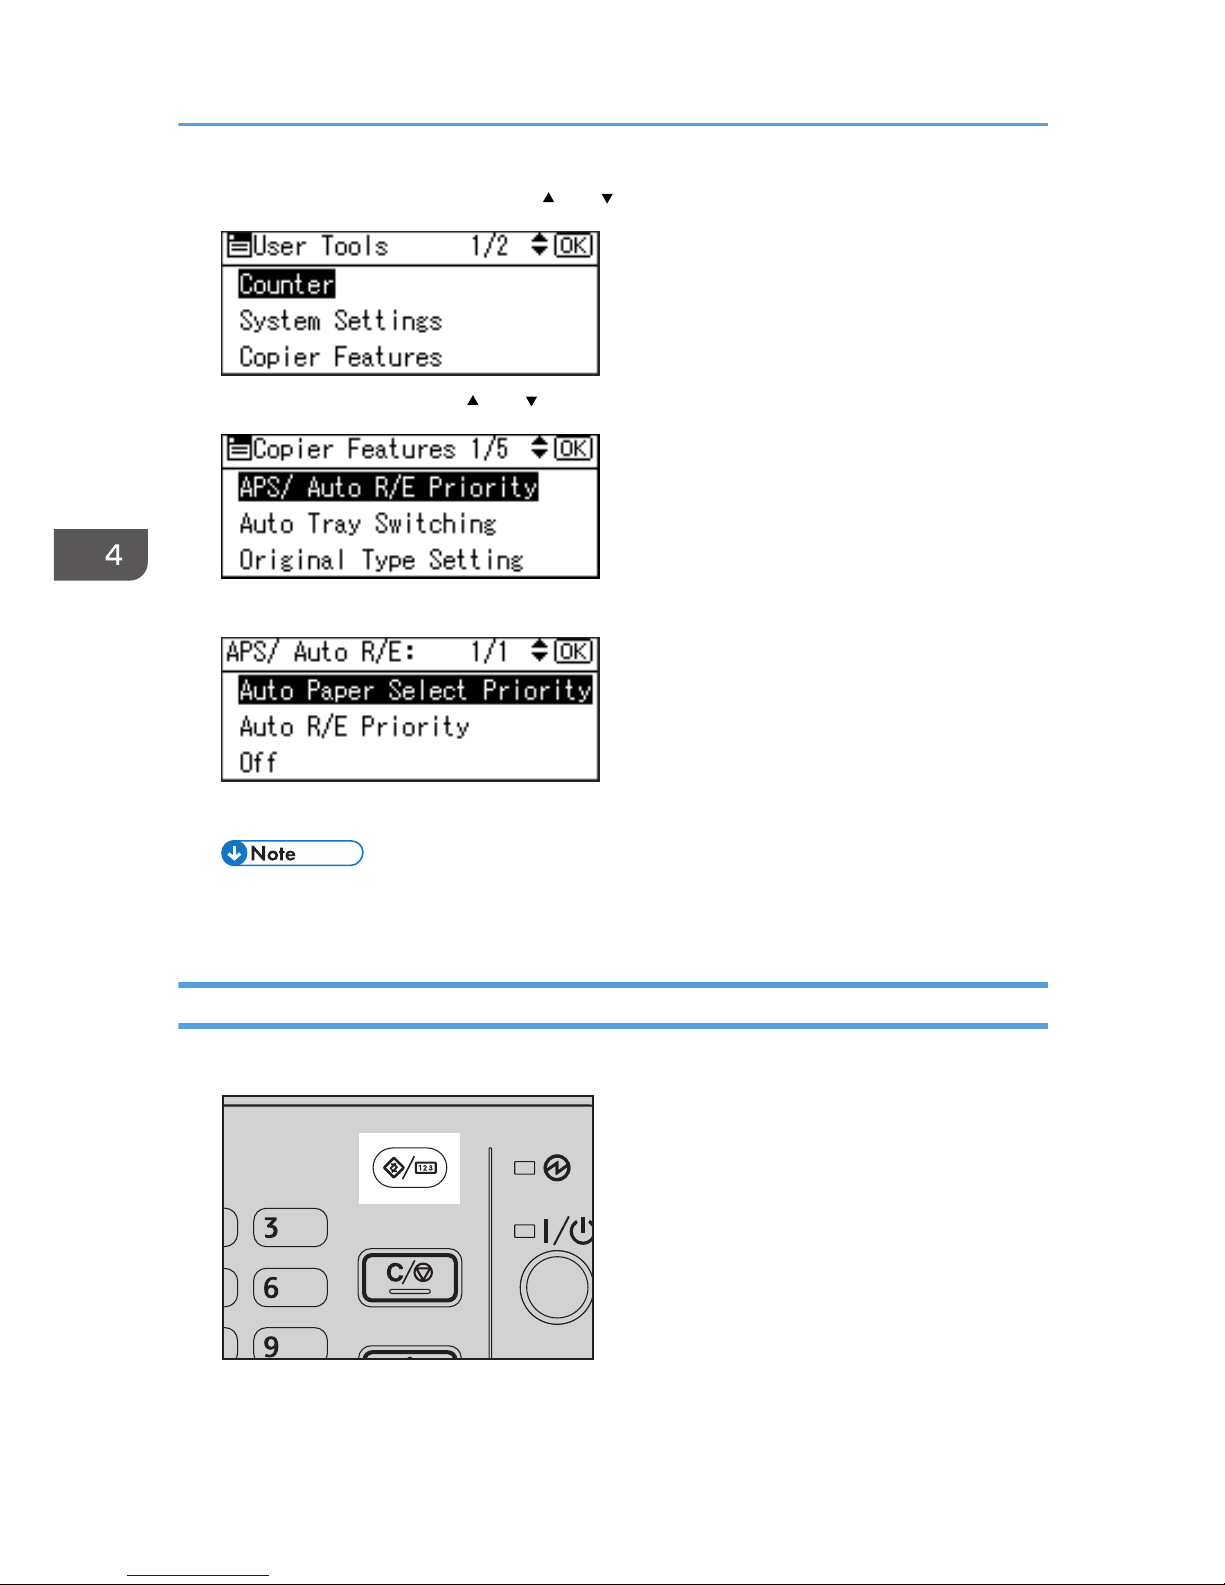
2. Select [Copier Features] using the [ ] or [ ] key, and then press the [OK] key.
3. Select the menu using the [ ] or [ ] key, and then press the [OK] key.
4. Change settings by following instructions on the display, and then press the [OK] key.
The "Programmed" message appears.
• To cancel changes made to setting and return to the initial display, press the [User Tools/
Counter] key.
Quitting User Tools
1. Press the [User Tools/Counter] key.
CUA007
The change is made, and the machine is ready to copy.
4. User Tools (Copier Features)
88
Page 91
Settings You Can Change with User Tools
APS/ Auto R/E Priority
You can select [Auto Paper Select Priority] (APS Priority) or [Auto R/E Priority] (Auto Reduce/Enlarge
Priority). When you cancel this setting, select [Off].
• Default: Auto Paper Select Priority
Auto Tray Switching
If you load same size paper in two or more trays, the machine automatically shifts to the other tray using
image rotation when the first tray runs out of paper (if [On] is selected.) This function is called "Auto Tray
Switching". This setting specifies whether to use Auto Tray Switching or not.
• Default: On
• Off: When a paper tray runs out of paper, copying is interrupted and the "Load paper" message
appears.
Original Type Setting
You can adjust copy finish quality level according to original type. You can choose these functions after
selecting [Original Type 1 (Text)] or [Original Type 2 (Photo)].
• Text Mode 1
Normal text originals
• Text Mode 2
Newspapers, semi-transparent originals (reverse side print faintly visible)
• Photo Mode 1
Text/photo images containing mostly photo areas
• Photo Mode 2
Text/photo images containing mostly text areas
• Photo Mode 3
Actual photographic paper
• Special Mode 1
Settings You Can Change with User Tools
89
Page 92
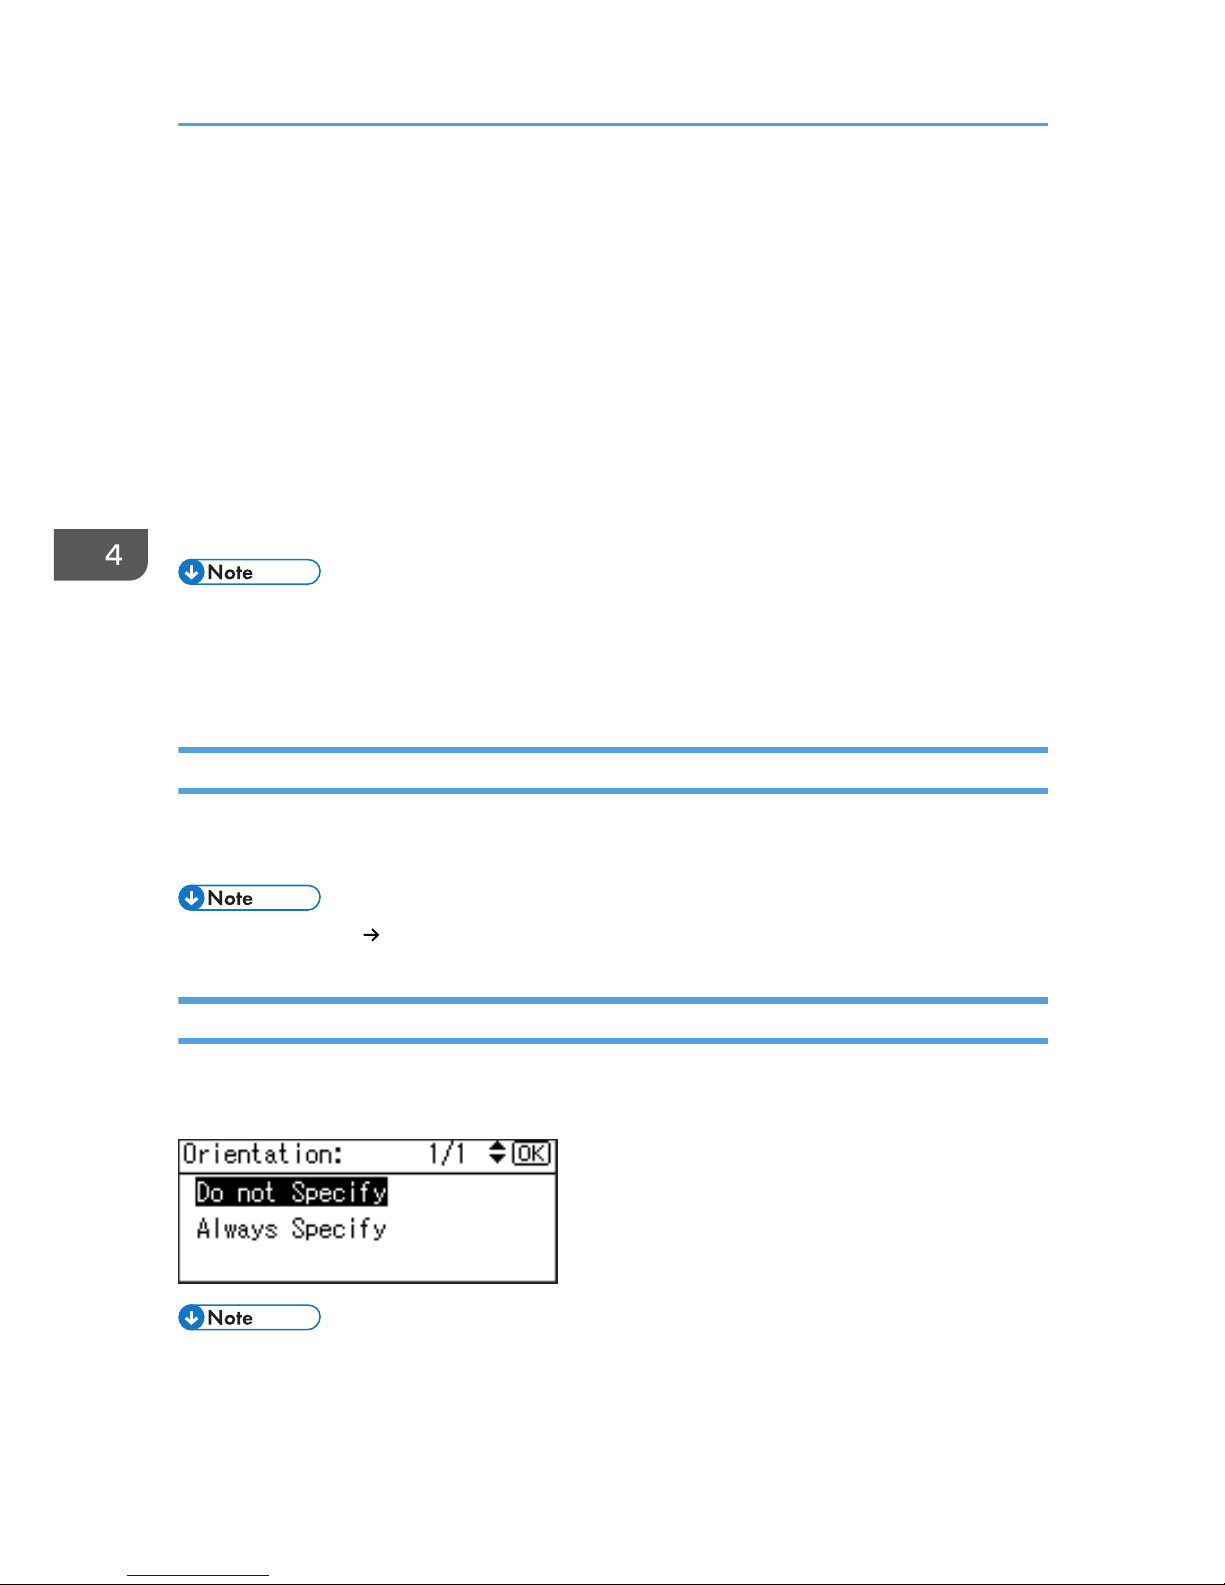
Highly transparent originals (reverse side clearly visible), or light text on a colored background.
Also for originals with very grainy backgrounds (some newspapers) and light text.
• Special Mode 2
Originals with colored text and lines
• Special Mode 3
Photo images created by dithering (visible dots), such as newspaper photos - normal resolution
• Special Mode 4
Photo images created by dithering (visible dots), such as newspaper photos - coarse resolution
• Special Mode 5
Normal text originals (reproducing the background)
• Default:
• Original Type 1 (Text): Text Mode 1
• Original Type 2 (Photo): Photo Mode 1
Duplex Mode Priority
You can select the type of Duplex function effective when the machine is turned on, reset, or modes are
cleared.
• Default: 1 Sided 1 Sided
Orientation
You can select the original orientation when using the Combine/Series, or two-sided originals to onesided Duplex function.
• Default: Do not Specify
• When you select [Always Specify], you must select the orientation of originals.
4. User Tools (Copier Features)
90
Page 93
Max. Number of Sets
The maximum copy quantity can be set between 1 and 99 using number keys.
• Default: 99 sheets
Original Count Display
You can set to display the count of originals and copying pages on the display when [On] is selected.
• Default: Off
Reproduction Ratio
You can select which reduce, enlarge, or input ratio is shown on the display with priority when [Reduce]
or [Enlarge] is selected.
• Default:
• Metric version:
• Ratio 1: 50%
• Ratio 2: 71%
• Ratio 3: 82%
• Ratio 4: 93%
• Ratio 5: 122%
• Ratio 6: 141%
• Ratio 7: 200%
• Inch version:
• Ratio 1: 50%
• Ratio 2: 65%
• Ratio 3: 78%
• Ratio 4: 93%
• Ratio 5: 121%
• Ratio 6: 129%
• Ratio 7: 155%
Settings You Can Change with User Tools
91
Page 94
Preset R/E Priority
You can set the ratio with priority when [R/E] is selected.
• Default:
• Metric version: 71%
• Inch version: 65%
Duplex Margin
You can specify left margin on the back side of copies, and top margin on the front side. Select [Top
Margin] or [Left Margin], and then set the required value.
• Top Margin: 0–50 mm, 0"–2"
• Left Margin: 0–50 mm, 0"–2"
• Default:
• Metric version: 5 mm
• Inch version: 0.2 inch
Rotate Sort
You can select a Sort function: [On] or [Off].
When you select [On], you can select [Rotate Sort]. See page 54 "Sort".
When you select [Off], you cannot select [Rotate Sort]. If you press the [Sort] key, only Sort is enabled.
• Default: Off
• When using Type 1 without the optional tray, you cannot use this setting.
Rotate Sort:Auto Continue
If you select [Off] when the paper tray in use runs out of paper, the machine stops, allowing you to add
paper so all copies can be rotate-sorted.
• Default: Off
4. User Tools (Copier Features)
92
Page 95
• When using Type 1 without the optional tray, you cannot use this setting.
Letterhead Setting
If you select [On] for this function, the machine rotates the image correctly.
• Default: Off
• Orientation-fixed (top to bottom) or two-sided paper might not print correctly, depending on how
the originals and paper are placed.
• When using letterhead paper, check its orientation is correct. See page 80 "Orientation-Fixed
Paper or Two-Sided Paper".
Settings You Can Change with User Tools
93
Page 96

4. User Tools (Copier Features)
94
Page 97
5. Remarks
Do's and Don'ts
• Do not place vases, plant pots, cups, toiletries, medicines, small metal objects, or containers
holding water or any other liquids, on or close to this machine. Fire or electric shock could result
from spillage or if such objects or substances fall inside this machine.
• Do not use flammable sprays or solvents in the vicinity of this machine. Doing so could result in
fire or electric shock.
• Do not obstruct the machine's vents. Doing so risks fire caused by overheated internal
components.
• Unplug the power cord from the wall outlet before you move the machine. While moving the
machine, take care that the power cord is not damaged under the machine. Failing to take these
precautions could result in fire or electric shock.
• Do not turn the power off while the On indicator is lit or blinking. Doing so may damage the
memory.
• Turn off the main power switch before unplugging the power cord. See page 25 "Turning Off the
Main Power".
• When you use this machine for a long time in a confined space without good ventilation, you may
detect an odd smell. To keep the workplace comfortable, we recommend that you keep it well
ventilated.
• Do not touch areas on or around the fusing unit. These areas get hot.
• After making copies continuously, the exposure glass may become warm–this is not a malfunction.
• The area around the ventilation hole might feel warm. This is caused by exhaust air and is not a
malfunction.
• When the machine is not in use and in stand-by mode, you may hear a small noise inside. This is
caused by the image stabilization process and is not a malfunction.
95
Page 98

• Do not turn off the operation switch while copying or printing. Make sure all copying or printing
has finished first.
• The machine might not produce good copy images if condensation forms inside as a result of rapid
temperature change.
• Do not open the covers of the machine while copying or printing. If you do, misfeeds might occur.
• Do not move the machine during copying or printing.
• If you operate the machine improperly or a machine failure occurs, settings might be lost. Be sure to
make a note of your machine settings.
• The manufacturer shall not be liable for any loss or damage resulting from mechanical failure, loss
of settings, or use of the machine.
5. Remarks
96
Page 99
Where to Put Your Machine
Machine Environment
Choose your machine's location carefully. Environmental conditions greatly affect its performance.
Optimum environmental conditions
• Be sure to locate the machine as close as possible to a wall outlet. This will allow easy
disconnection of the power cord in the event of an emergency.
• Keep the machine away from humidity and dust. Otherwise a fire or an electric shock might
occur.
• Make sure the room where you are using the machine is well ventilated and spacious. Good
ventilation is especially important when the machine is used heavily.
• Temperature: 10–32°C (50–89.6°F) (humidity to be 54% at 32°C, 89.6°F)
• Humidity: 15–80% (temperature to be 27°C, 80.6°F at 80%)
• A strong and level base.
• The machine must be level within 5 mm, 0.2 inches: both front to rear, and left to right.
• To avoid possible buildup of ozone, be sure to locate this machine in a large well ventilated room
that has an air turnover of more than 30 m3/hr/person.
Environments to avoid
• Do not place the machine on an unstable or tilted surface. If it topples over, an injury might
occur.
Where to Put Your Machine
97
Page 100
• Keep the machine away from salt-bearing air and corrosive gases. Also, do not install the
machine in places where chemical reactions are likely (laboratories, etc.), as doing so will
cause the machine to malfunction.
• Locations exposed to direct sunlight or other sources of strong light (more than 1,500 lux).
• Locations directly exposed to cool air from an air conditioner or heated air from a heater. (Sudden
temperature changes can cause condensation to form inside the machine.)
• Locations close to machines generating ammonia, such as a diazo copy machine.
• Places where the machine will be subject to frequent strong vibration.
• Dusty areas.
• Areas with corrosive gases.
Moving
• It is dangerous to handle the power cord plug with wet hands. Doing so could result in electric
shock.
• Unplug the power cord from the wall outlet before you move the machine. While moving the
machine, take care that the power cord is not damaged under the machine. Failing to take these
precautions could result in fire or electric shock.
• If you have to move the machine when the optional paper tray unit is attached, do not push on
the main unit's top section. Doing so can cause the optional paper tray unit to detach, possibly
resulting in injury.
• When disconnecting the power cord from the wall outlet, always pull the plug, not the cord.
Pulling the cord can damage the power cord. Use of damaged power cords could result in fire
or electric shock.
• Do not hold the control panel while moving the machine. Doing so may damage the control
panel, cause a malfunction, or result in injury.
5. Remarks
98
 Loading...