

Page 1
Page 2

Page 3

The Ricoh Ml0 is a desktop plain paper copier
is
carefully manufactured to exacting standards of high performance. It consistently yields high contrast copies
a superior matte finish.
tion and care of the
To get the maximum versatility
from
copter, all operators should carefully read and
follow the
in this manual. Please keep this
manual in the holder provided on the machine.
1. Copies everything from business cards to 84 (10” x
2.
3.
5
and
operation.
Easy-to-maintain
desrgn
Compact,
for easy transport
“Clam-shell” destgn allows easy mlsfeed clearance.
Page 4
1 INSTALLATION
1
l-1 Unpacking procedure
1
1-2
procedure
3
1-3 Installation requirements
6
2 GUIDE TO COMPONENTS
2-l Overall machine layout
2-2 Operation panel
2-3 Operator controls
3 COPYING
3-l.
the copter
3-2 Normal
3-3. Two-sided
3-4
4 REPLENISHING SUPPLIES
4-1
paper
4-2 Adding toner
5 REPLENISHING THE MASTER UNIT
6. TROUBLESHOOTING
6-l Clearing mlsfeeds
6-2 Troubleshooting gurde
6-3 Service codes
7 MAINTENANCE
8 TRANSPORTING THE COPIER
9 DO’S AND DON’TS
10
10
11
12
14
14
14
16
17
18
18
20
22
24
24
26
30
31
32
32
10. SPECIFICATIONS
33
ADDING TONER
APPLICATIONS
COPYING
CONTROLS/INDICATORS
DOS AND DONTS
INSTALLATION
LOADING PAPER
MAINTENANCE
Page 5
Box I
Blocks
3
5.
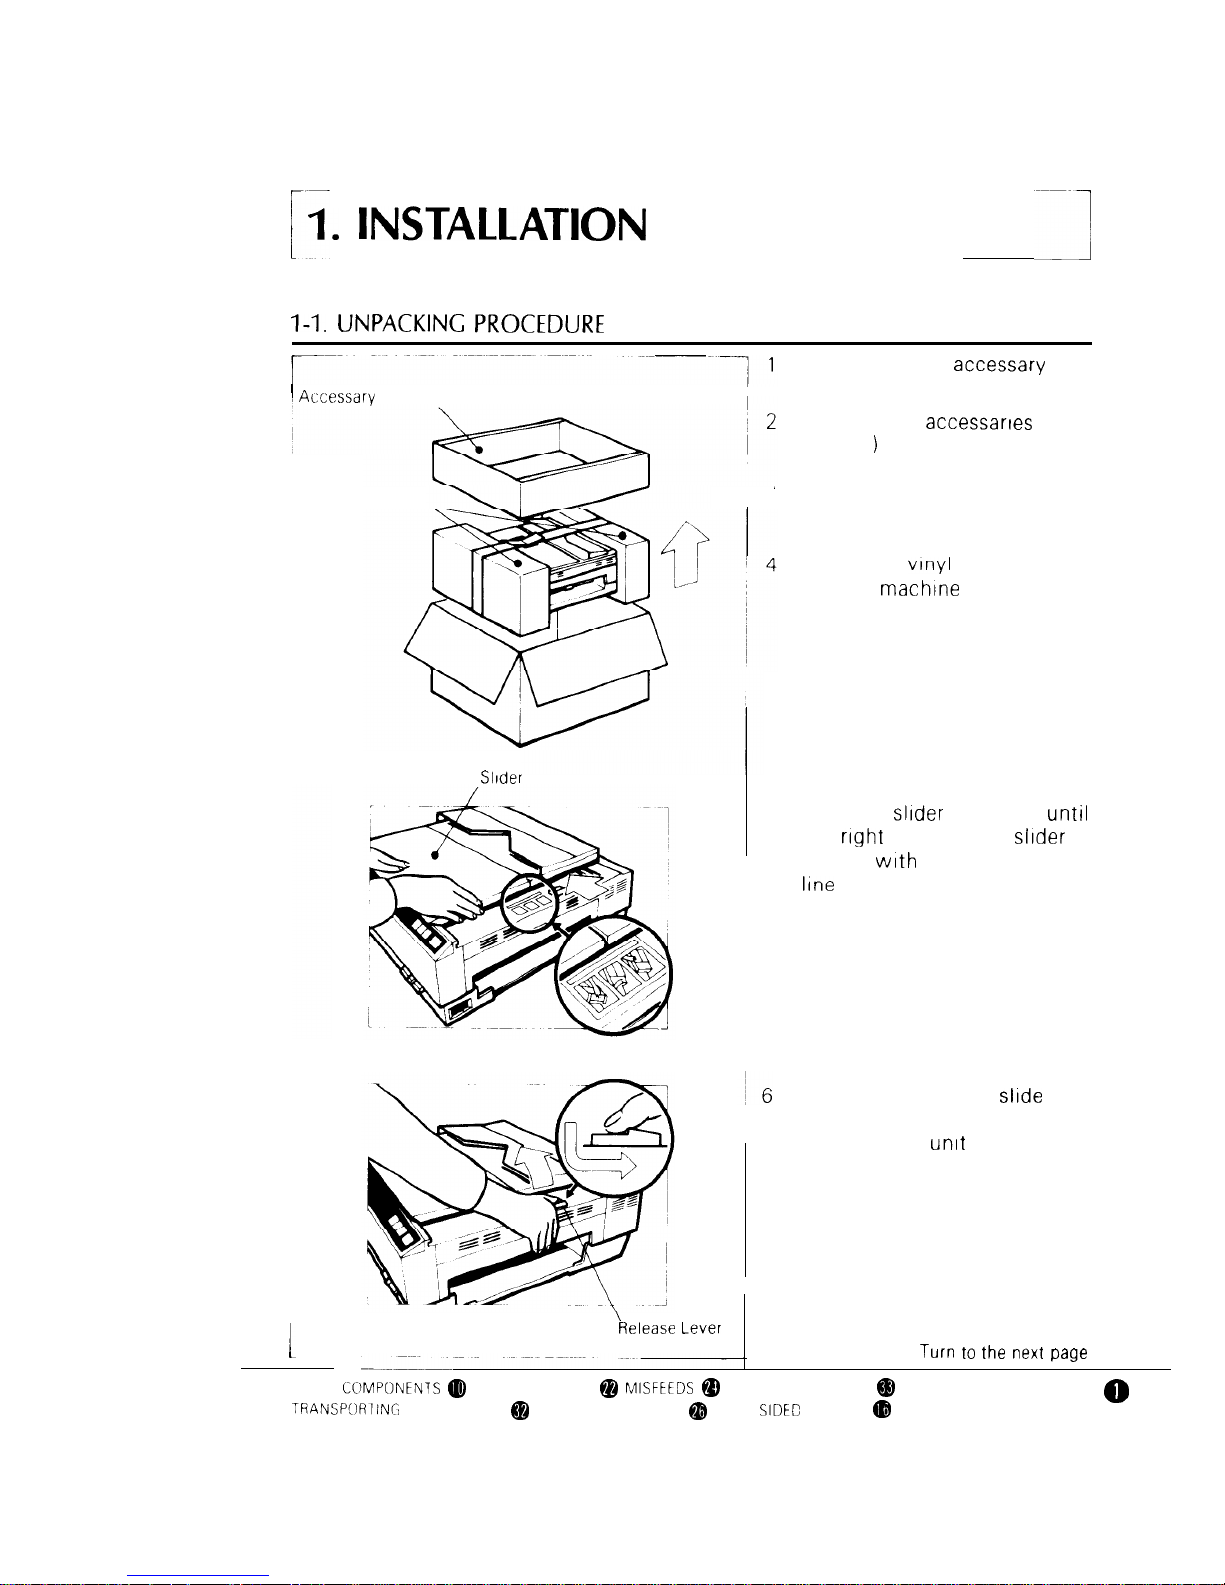
Take out the accessary box
and the machine
Check the accessarles (See
page 2
Remove
the two cushion
blocks
Open the
bag and take
out the
Move the
to the left untrl
the
edge of the
IS
aligned
the heavy orange
Push down and slide the
release lever to the right to
open the top
to the
MAIN
MASTER UNIT
SPECIFICATIONS
TROUBLESHOOTING
TWO
COPIES
Page 6
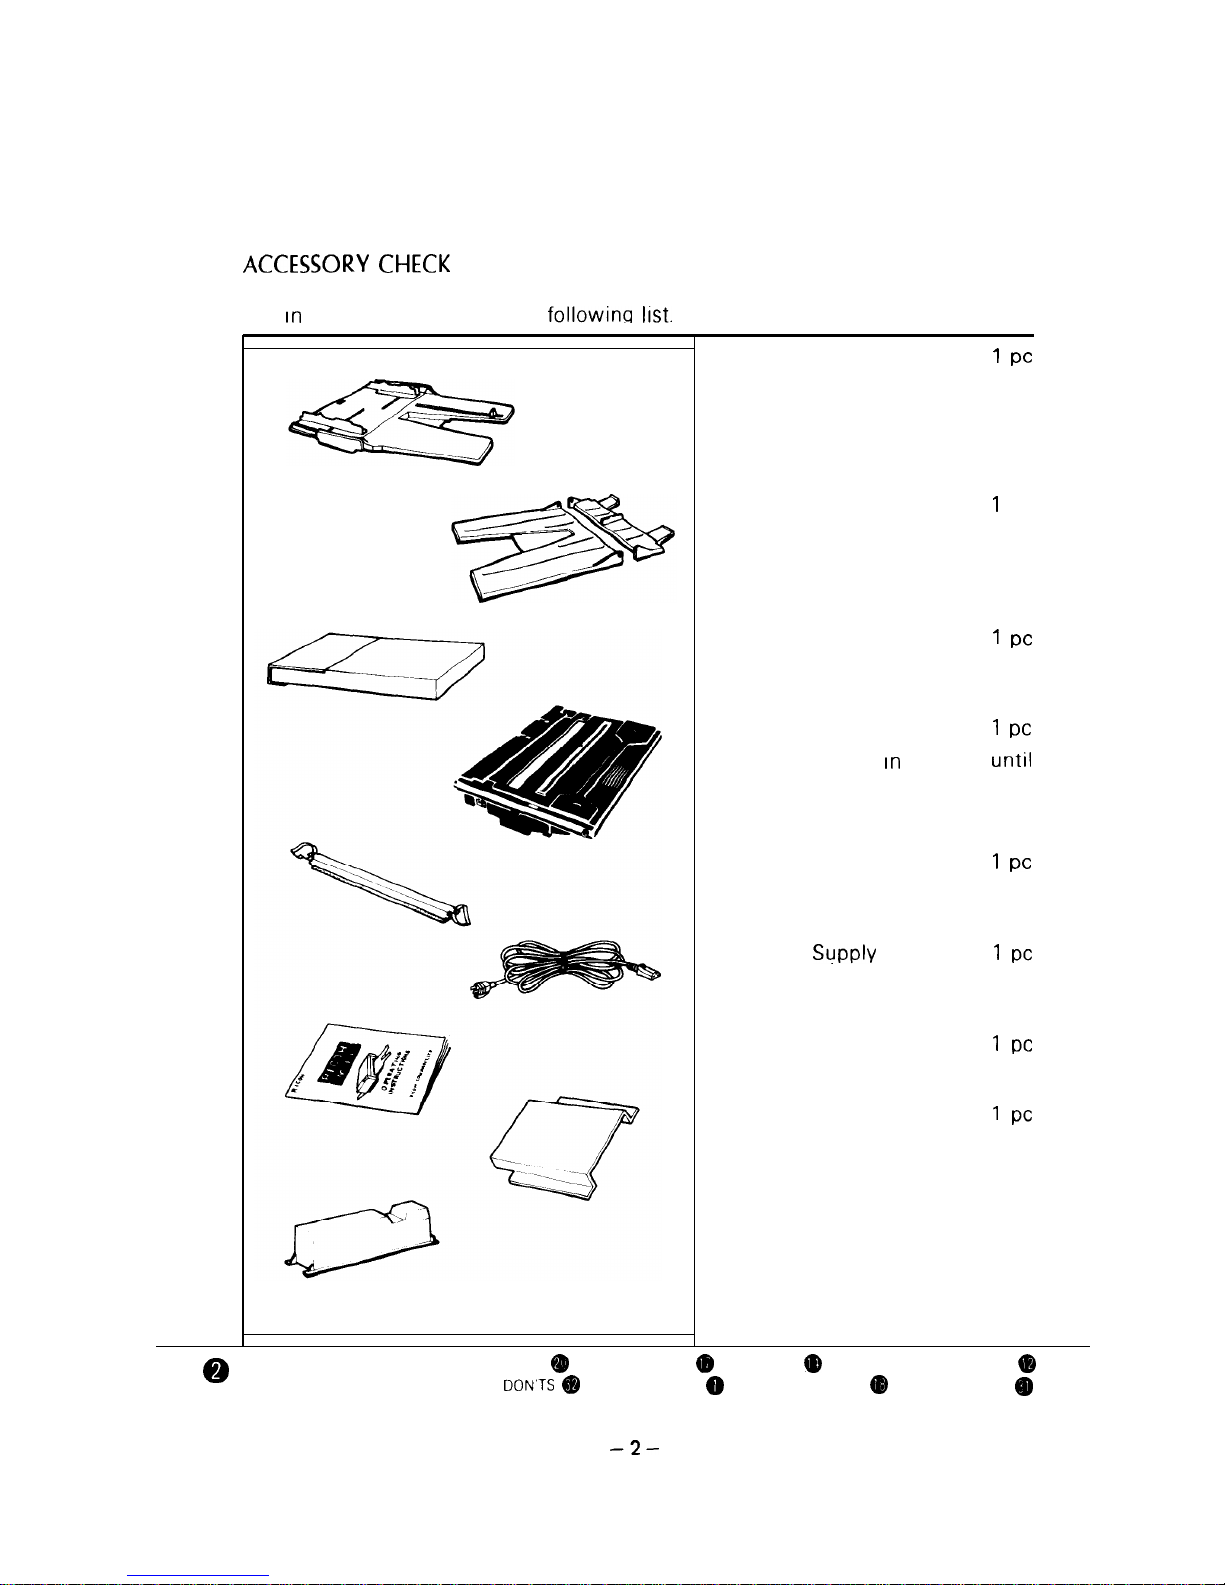
Make sure you have all the following accessories.
Check the quantity of the accesso-
ries
the box according to the
list.
1 Paper Tray
2. Copy Tray
PC
3 Paper Holder
4. Master Unit
Note: Keep it
the box
installing It
to the
copier.
5. Fusing Pad
6. Power
Cord
7.
Operating
Instructions
8.
Operating
Instructions
Holder
9.
Toner
1
cartridge
ADDING TONER
APPLICATIONS
COPYING
CONTROLS/INDICATORS
DOS AND
INSTALLATION
LOADING PAPER
MAINTENANCE
Page 7
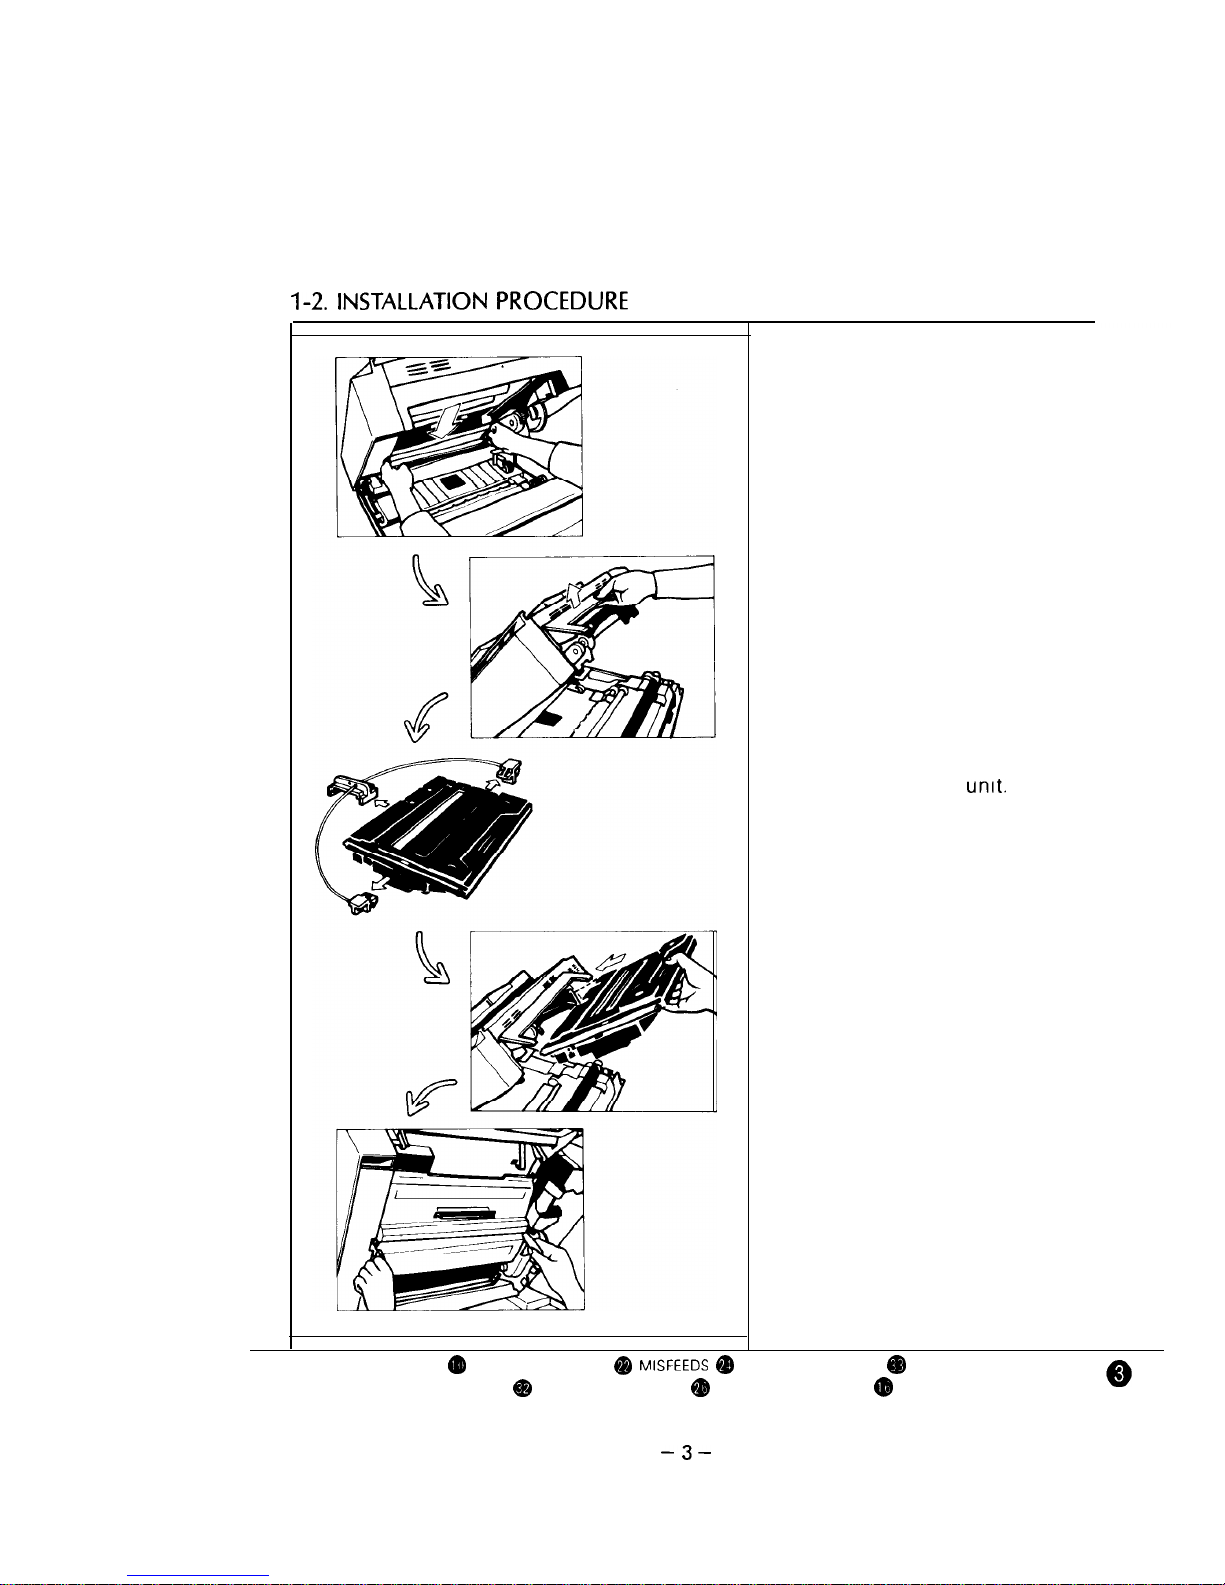
PROCEDURE
1.
Insert the fusing pad in the
mounting slot of the fusing
unit.
2. Open the master unit cover.
3. Remove the three wedges
from the master unit.
Note: Do not touch the master
(purple material) and
avoid exposing it to
light.
4.
Insert the master unit into the
copier until it stops.
5.
Peel the polyester cover off of
the master.
Turn to the next page
MAIN COMPONENTS
MASTER UNIT
SPECIFICATIONS
TRANSPORTING THE COPIER
TROUBLESHOOTING
TWO-SIDED COPIES
Page 8

6 Shut the master
cover
7
Shake a cartridge of toner well,
and then Insert
Into the
cartrldge holder (Insert the
front end
8 Strip off the cartrldge seal,
then lower the top
Note At Installation,
IS re-
commended to load two
cartridges of toner
Caution
Hold the cartrldge
pe-
eling off the seal
To
over the development
be careful not to pull the
seal to the
3
Install the operating Instructions holder on the back side of
the machine
ING
DO
ANC:
TS
Page 9
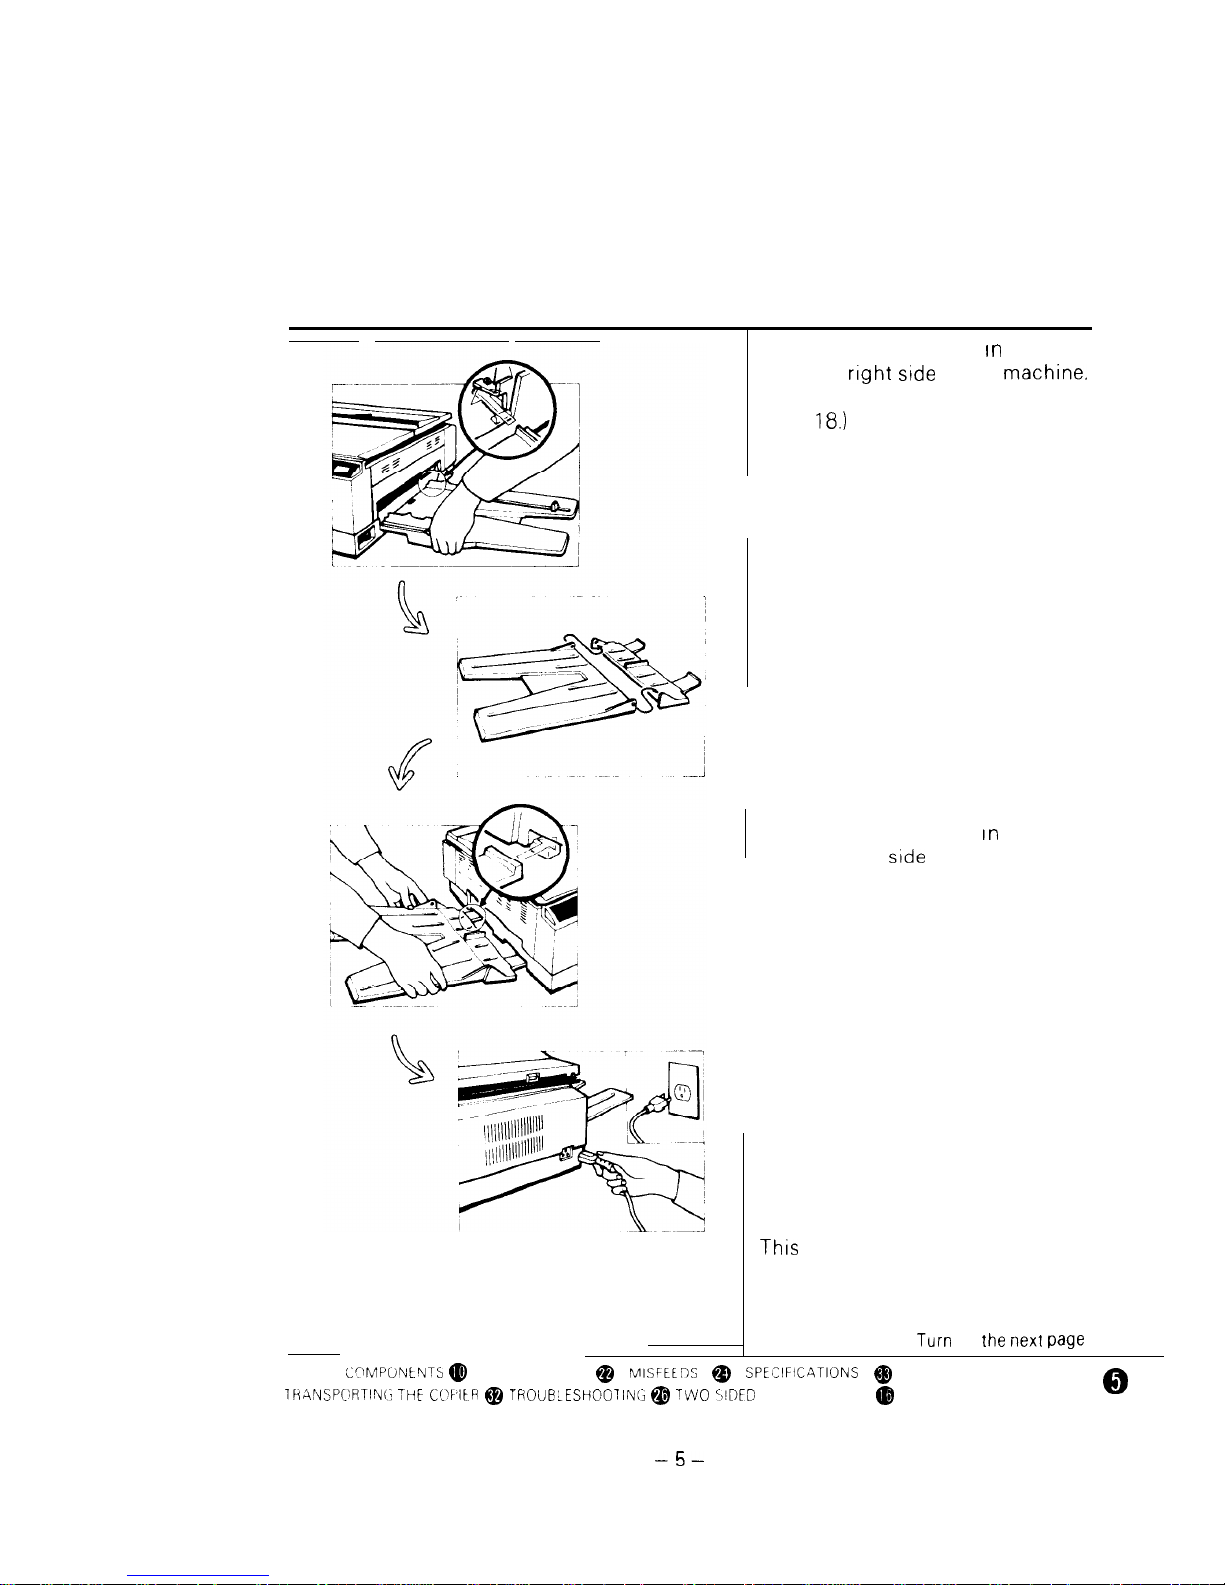
10
Set the paper tray
place on
the
of the
and load paper (See page
11
Assemble the copy tray as
shown to the left
12
Set the copy tray
place on
the left side of the machine
13. Connect the power supply
cord
tion
to
MAIN
MASTER UNIT
COPIES
Page 10

REQUIREMENTS
The
should be carefully chosen because envrronmental condi-
tions greatly affect the performance of a copier
envrronmental
l Temperature
l
l Well-ventilated and
room
ventrlatton:
turnover 3
l On a strong and level base
sturdy desk, etc.)
l The
must be level
5mm (13/64”) both front to rear
and left to right
ADDING TONER
APPLICATIONS
COPYING
CONTROLS/INDICATORS
DO’S AND DON’TS
INSTALLATION
LOADING PAPER
MAINTENANCE
Page 11
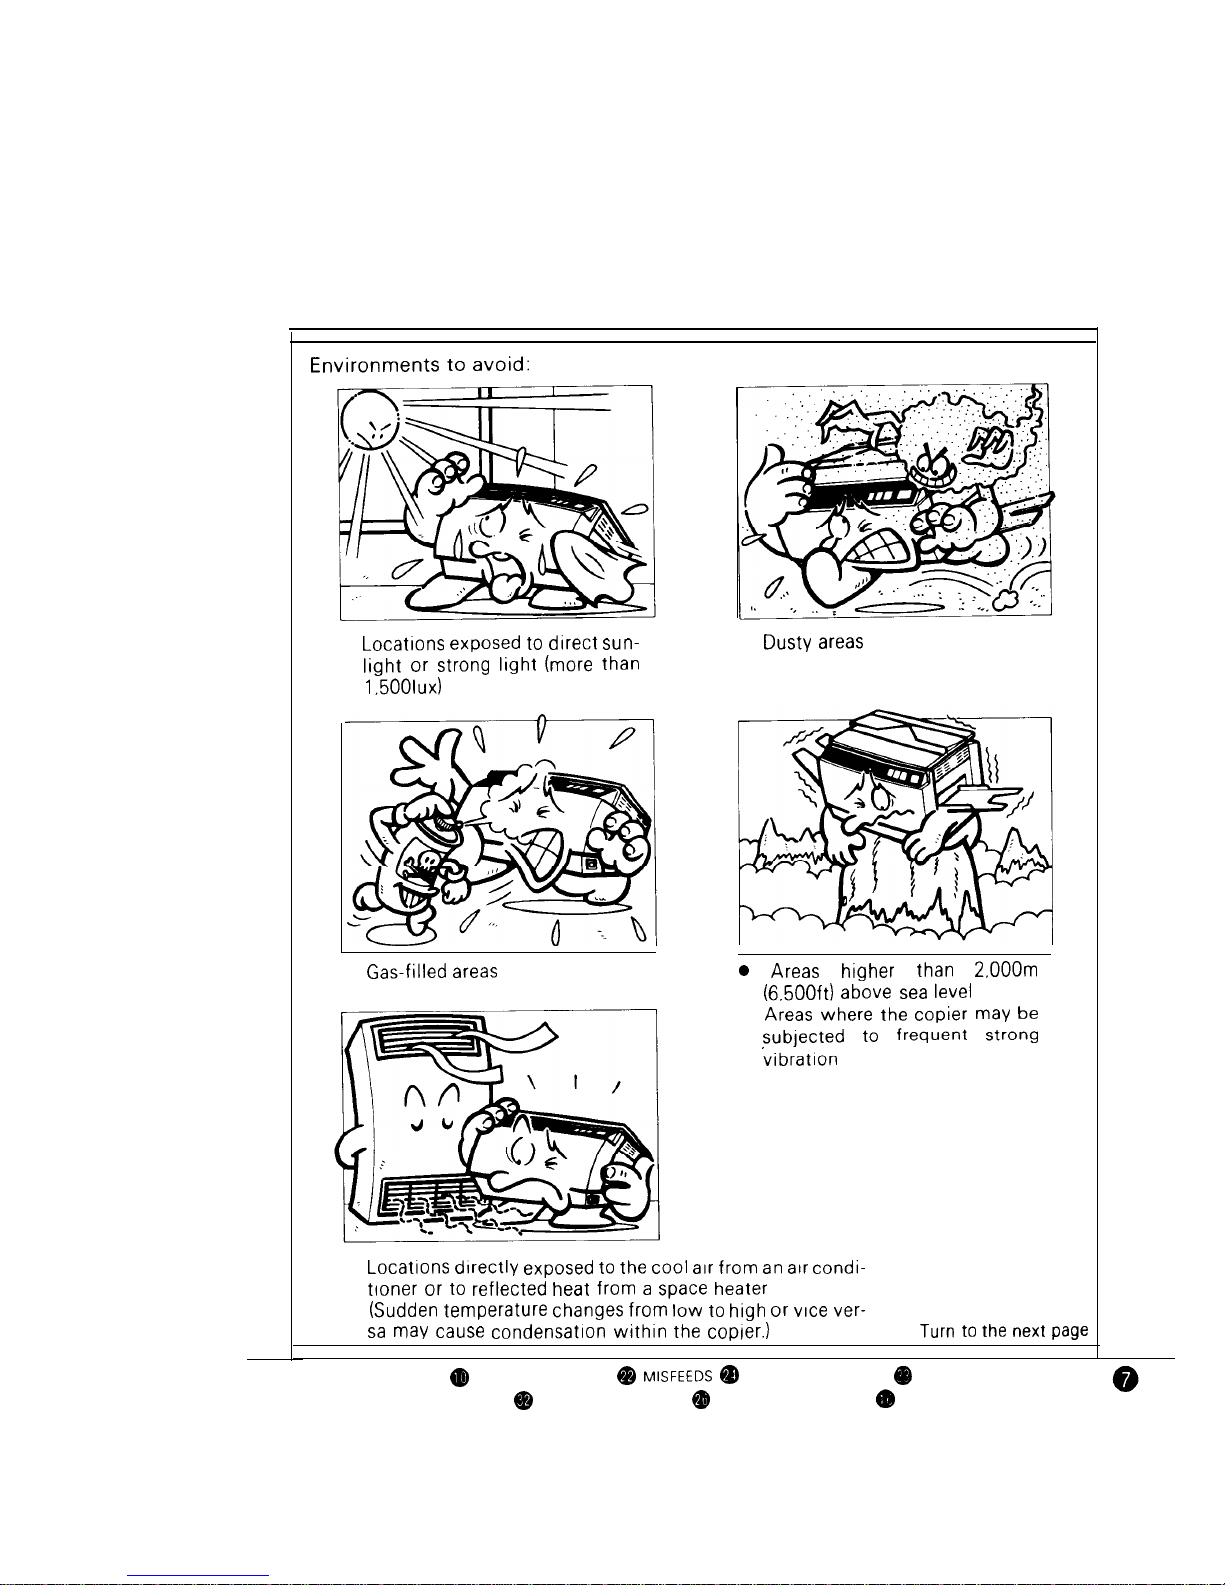
l
to
sun-
or strong
(more
l Gas-filled
l
areas
I
I
Areas
than
level
l Areas
the
may
to
strong
l
exposed to the cool air from
air
or to
heat from
space heater
changes from
to high or
ver-
may cause
the
next
MAIN COMPONENTS
MASTER UNIT
SPECIFICATIONS
TRANSPORTING THE COPIER
TROUBLESHOOTING
TWO SIDED COPIES
Page 12
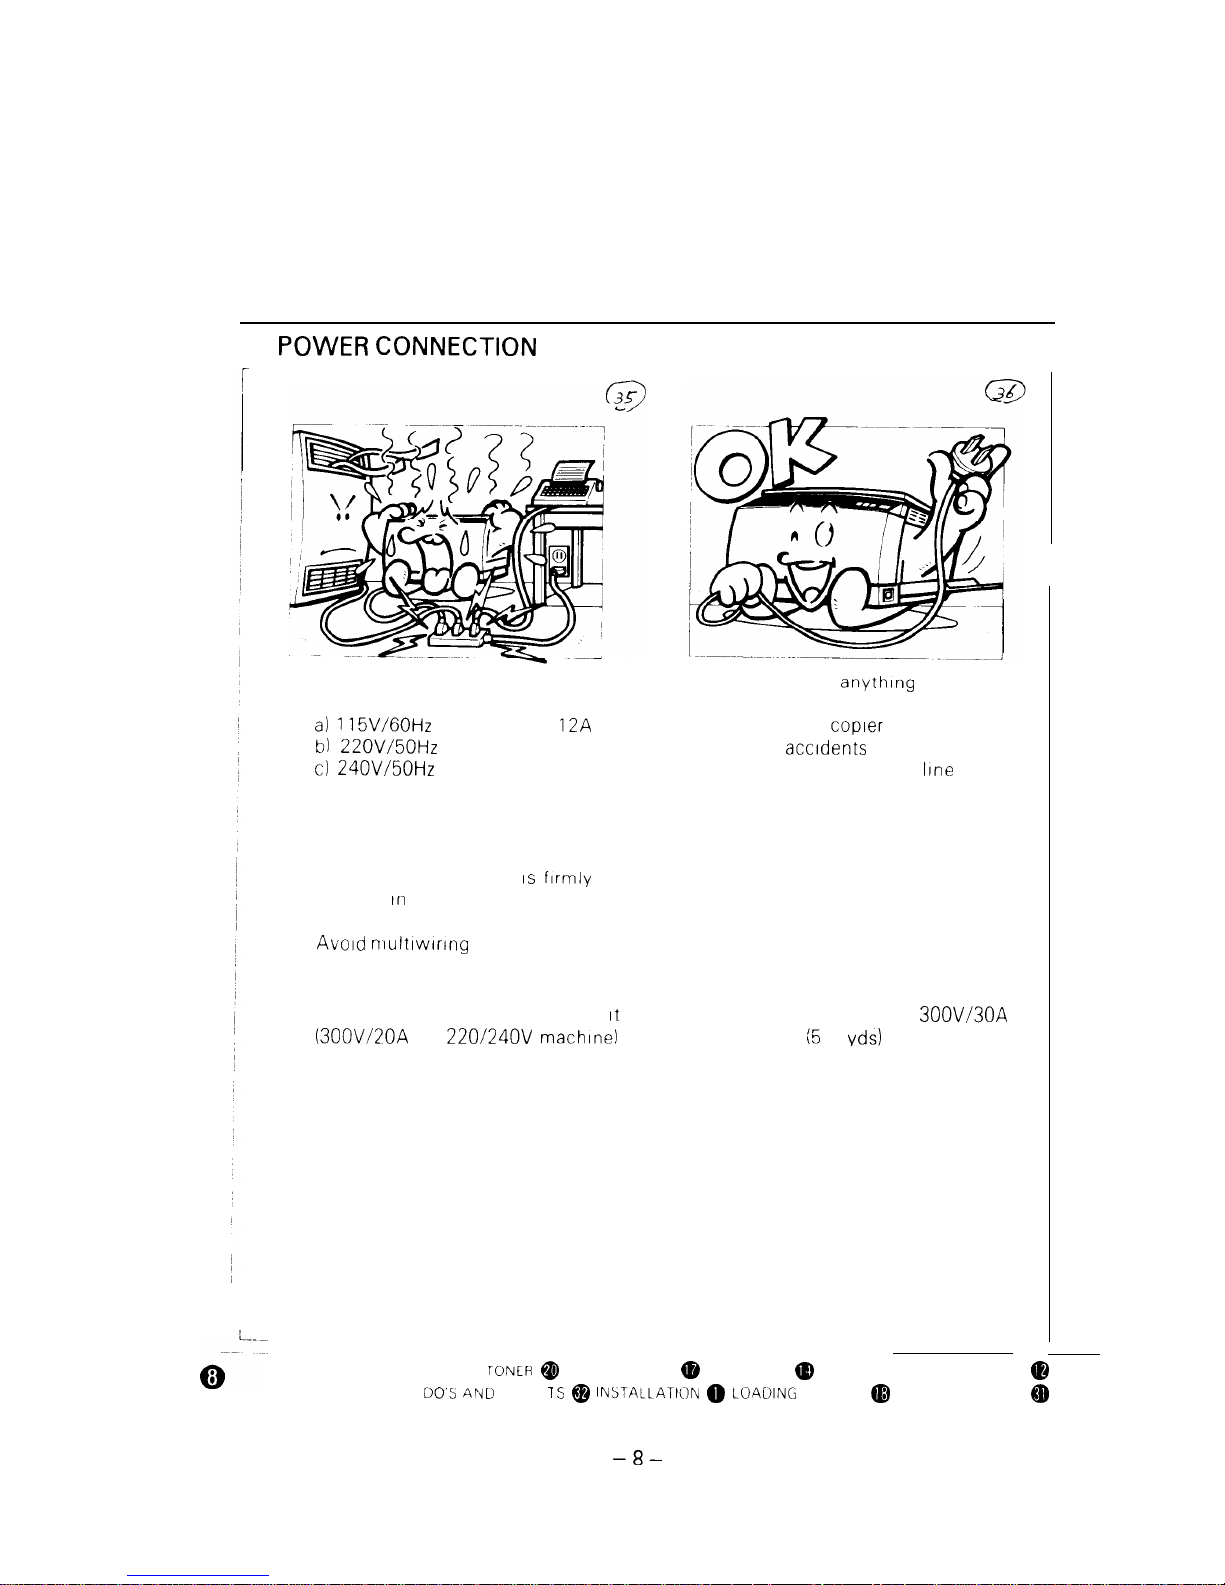
l
l Connect the power cord to a
power source as shown below
More than 12A
More than 6A
More than 6A
l Voltage must not fluctuate more
than 10%
l Do not set
on the
power cord
l Ground the
properly to
prevent
Do not ground to a gas line
l Make sure the plug
Inserted
the outlet
l
l If an extension cord must be used,
must have a capacity of more than 300V/30A
for
machine) and be less than 5m
5 vds) long
ADDING
APPLICATIONS
COPYING
CONTROLS/INDICATORS
INbTALLATII)N
LOAUING PAPER
MAINTENANCE
Page 13
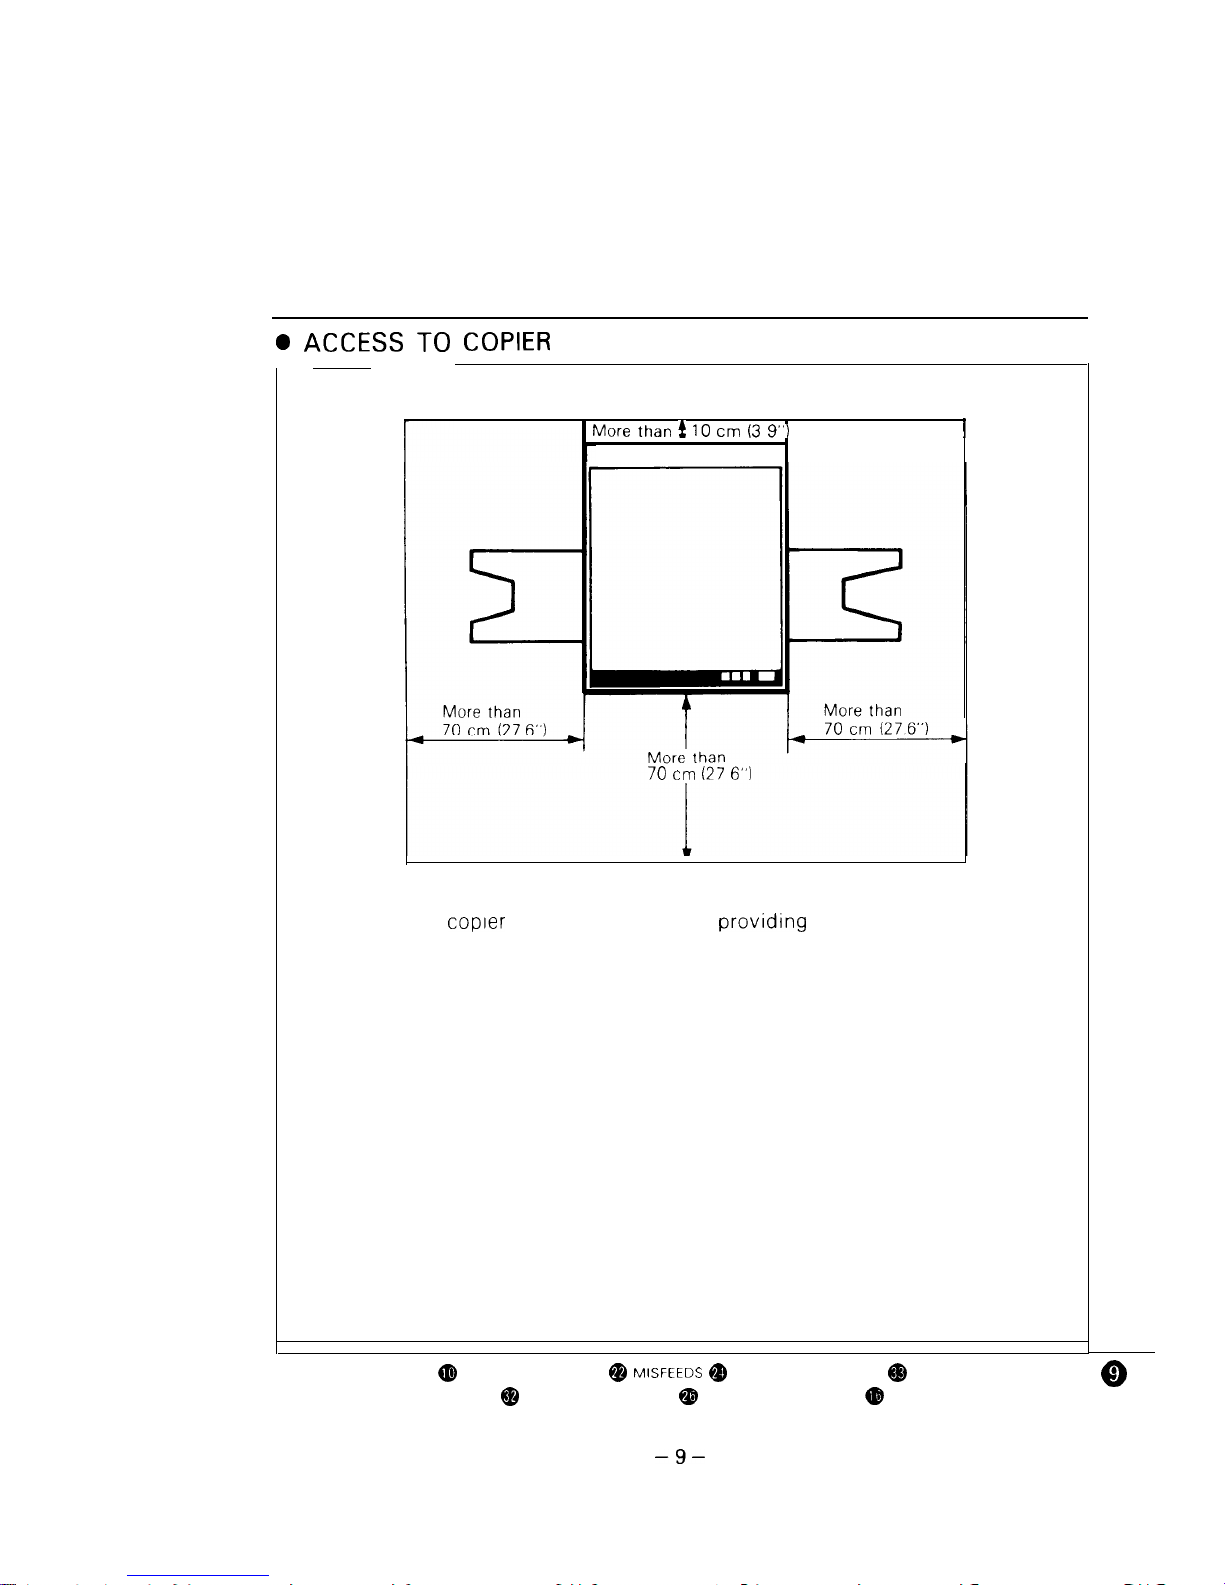
10
(27
l Place the
near a power source
clearance as shown
MAIN COMPONENTS
MASTER UNIT
SPECIFICATIONS
TRANSPORTING THE COPIER
TROUBLESHOOTING
TWO SIDED COPIES
Page 14
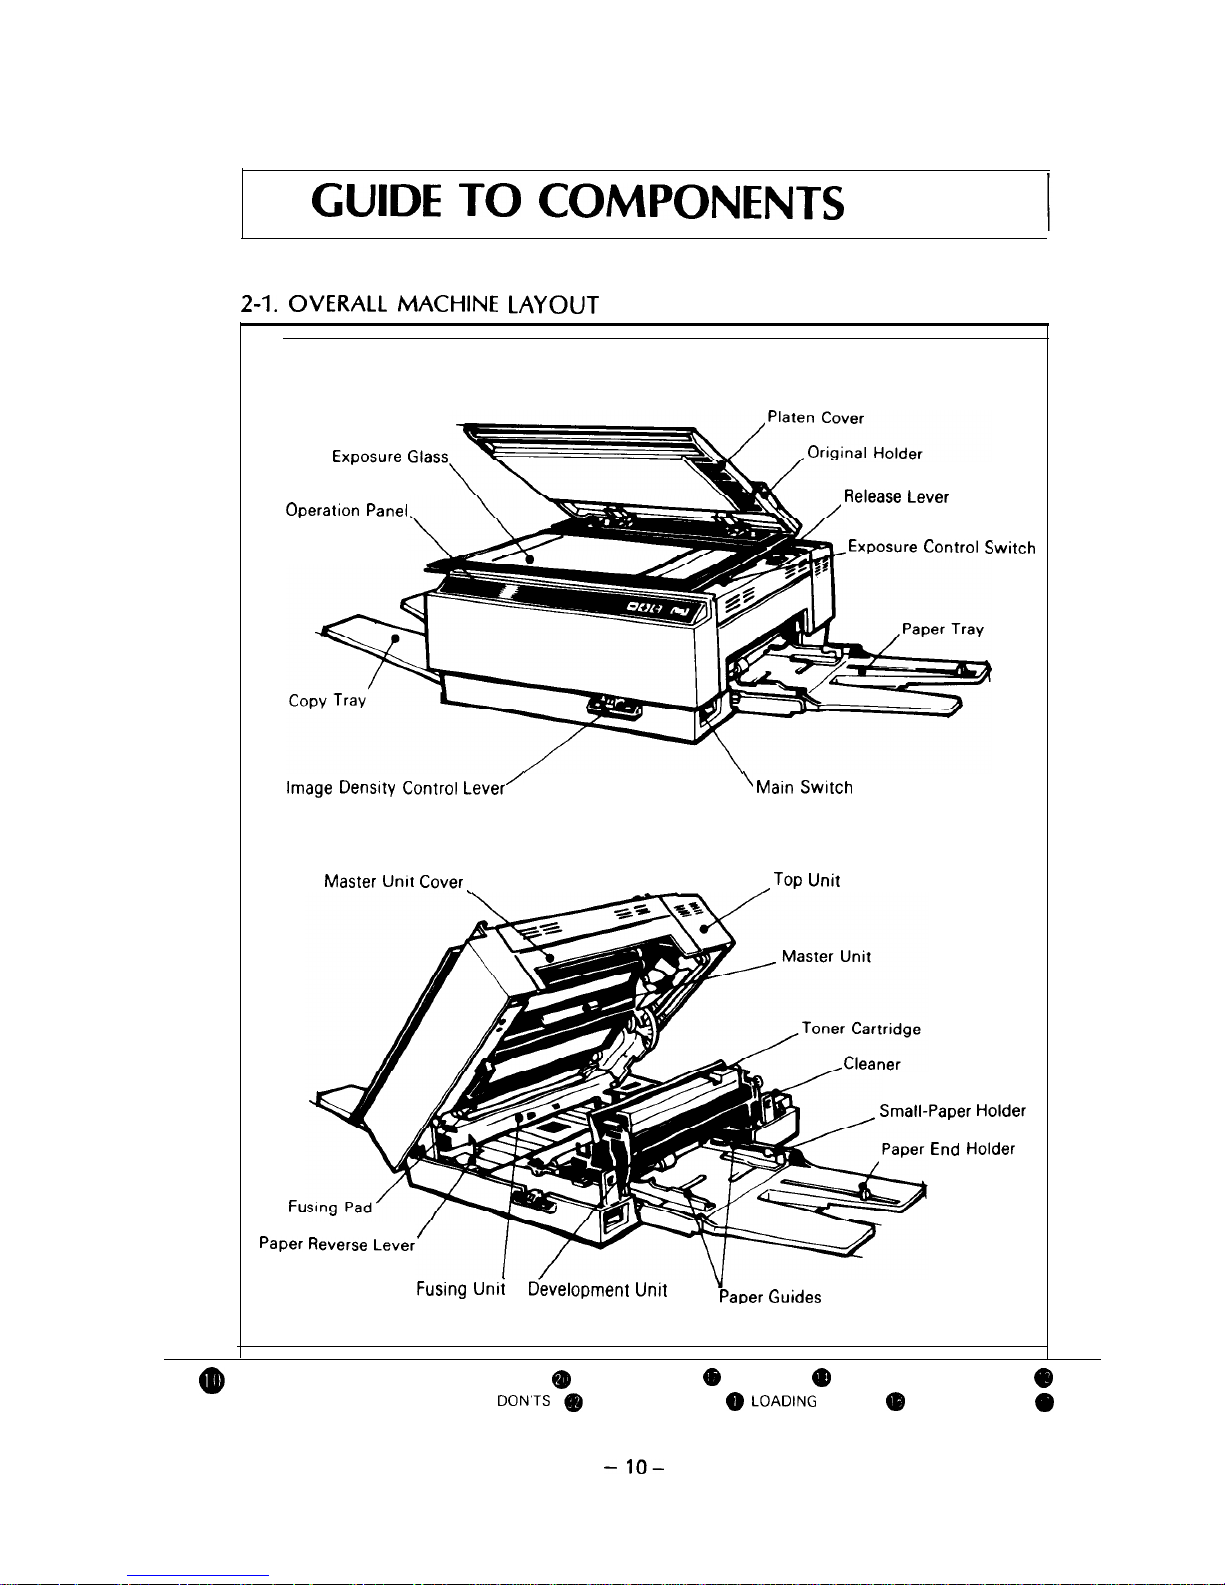
2.
COMPONENTS
OVERALL
Glass
Panel
ADDING TONER
APPLICATIONS
COPYING
CONTROLS/INDICATORS
DO’S AND
INSTALLATION
LOADING PAPER
MAINTENANCE
Page 15
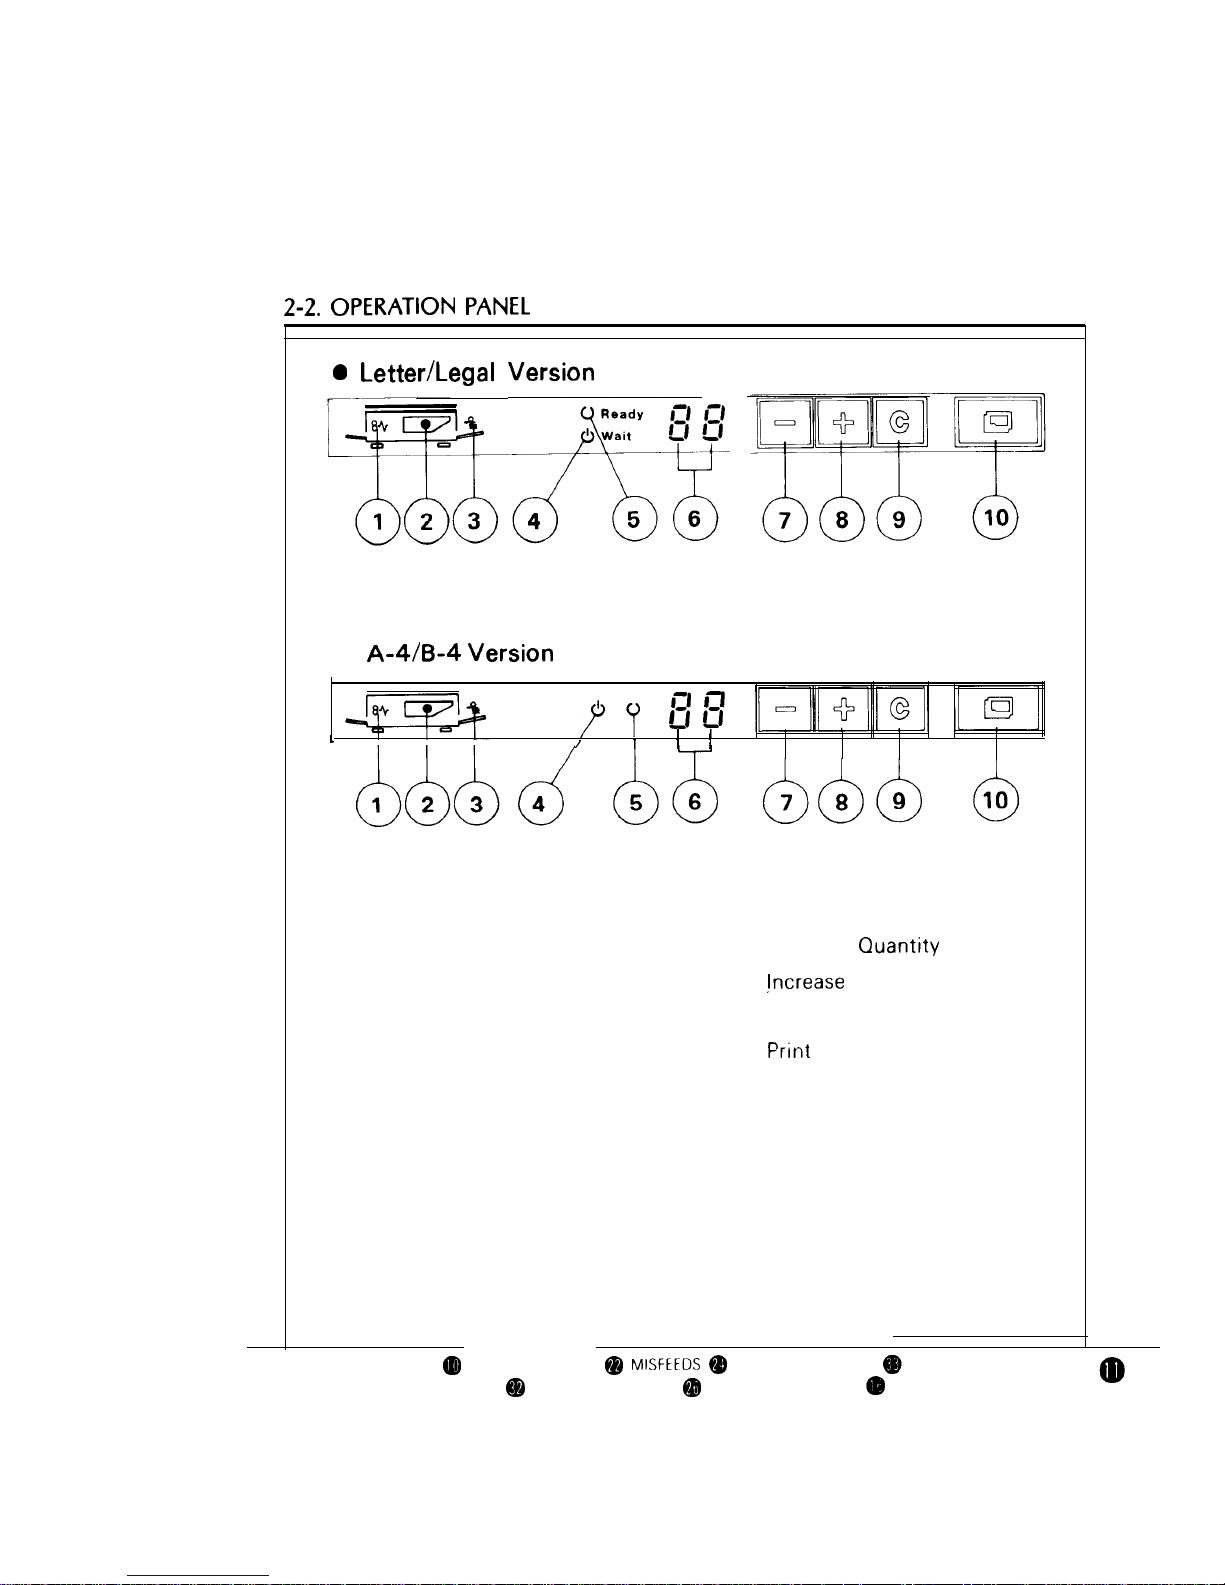
OPERATION
l
Version
l-l
1.
Check Paper Path Indicator
6.
2.
Replace Master Unit
7.
Indicator
8.
3.
Check Paper Tray Indicator
9.
4.
Wait Indicator
10
5
Ready Indicator
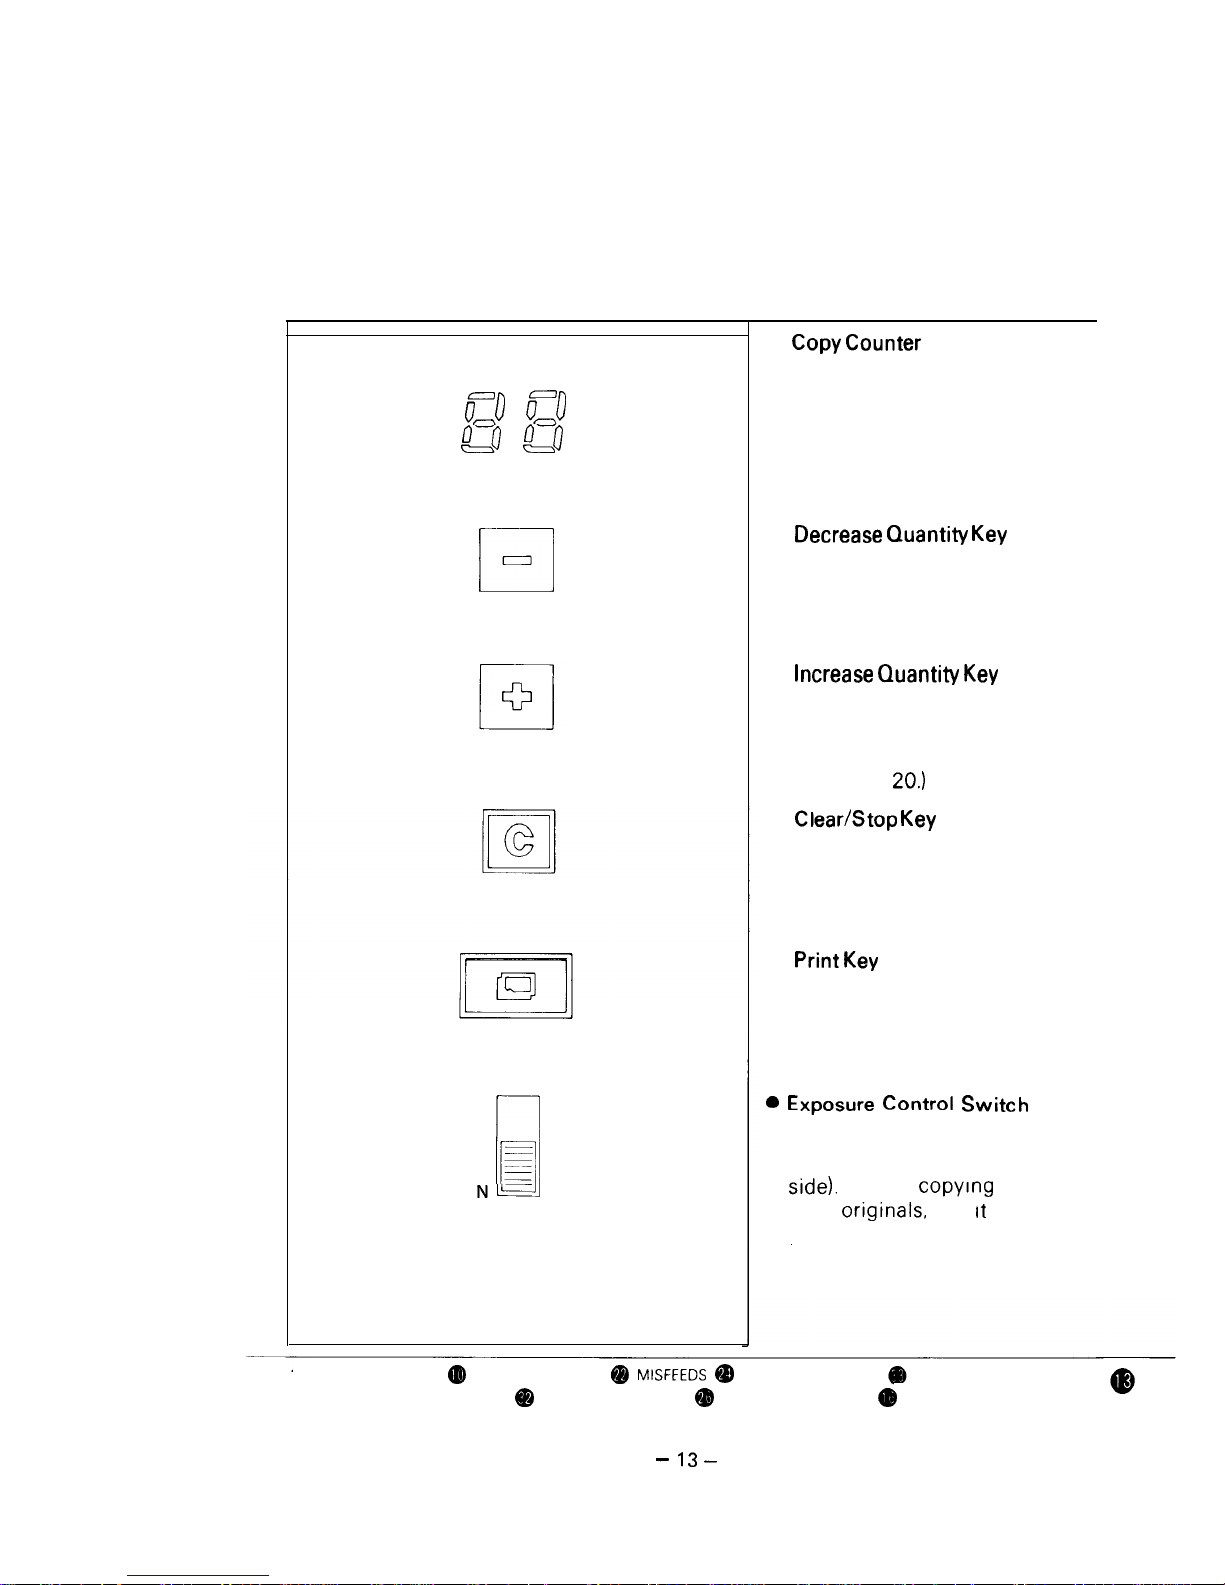
Copy Counter
Decrease
Key
Clear/Stop Key
MAIN COMPONENTS
MASTER UNIT
SPECIFICATIONS
TRANSPORTING THE COPIER
TROUBLESHOOTING
TWO SIDED COPIES
Page 16
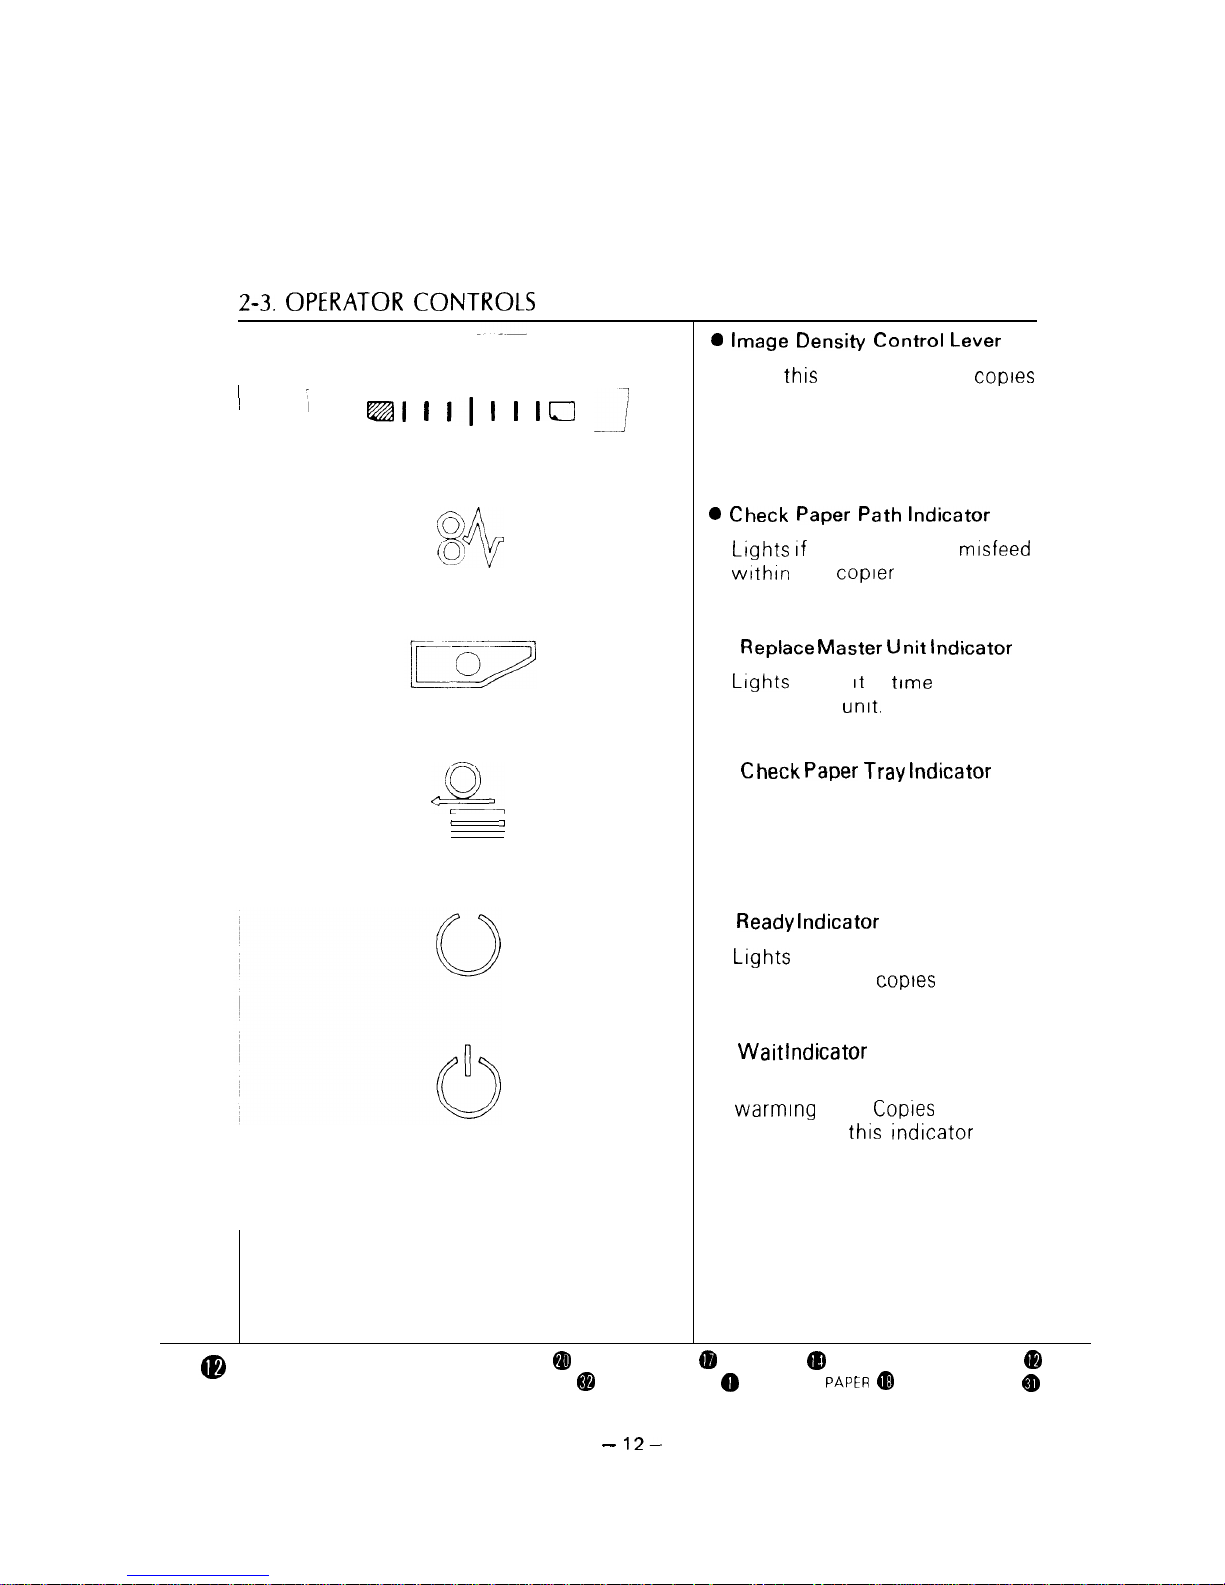
OPERATOR
Use
lever to make copies
darker or lighter
there IS a paper mlsfeed
the
l
when
IS
to change
the master unit.
l
Lights when there IS no paper
on the paper tray.
l
Indicator
when the machine IS
ready to make coptes
l
Indicator
Lights when the copier IS
up Copies cannot be
made when this
IS on
ADDING TONER
APPLICATIONS
COPYING
CONTROLS/INDICATORS
DOS AND DON TS
INSTALLATION
LOADING
MAINTENANCE
Page 17
L
l
Shows the number of copies
entered. While copying, this
counter shows the number of
copies made. (Count up type.)
l
Press to reduce the copy entry
number.
l
Press to Increase the copy entry
number. (The maximum number of copies that can be
entered IS
l
Press to cancel the copy number entered. While copying,
press to stop copy operatron.
l
Press to start copy operatron.
Normally leave this switch set
to the “N” position (operator
low con-
trast
set
to the “L”
positron.
MAIN COMPONENTS
MASTER UNIT
SPECIFICATIONS
TRANSPORTING THE COPIER
TROUBLESHOOTING
TWO-SIDED COPIES
Page 18
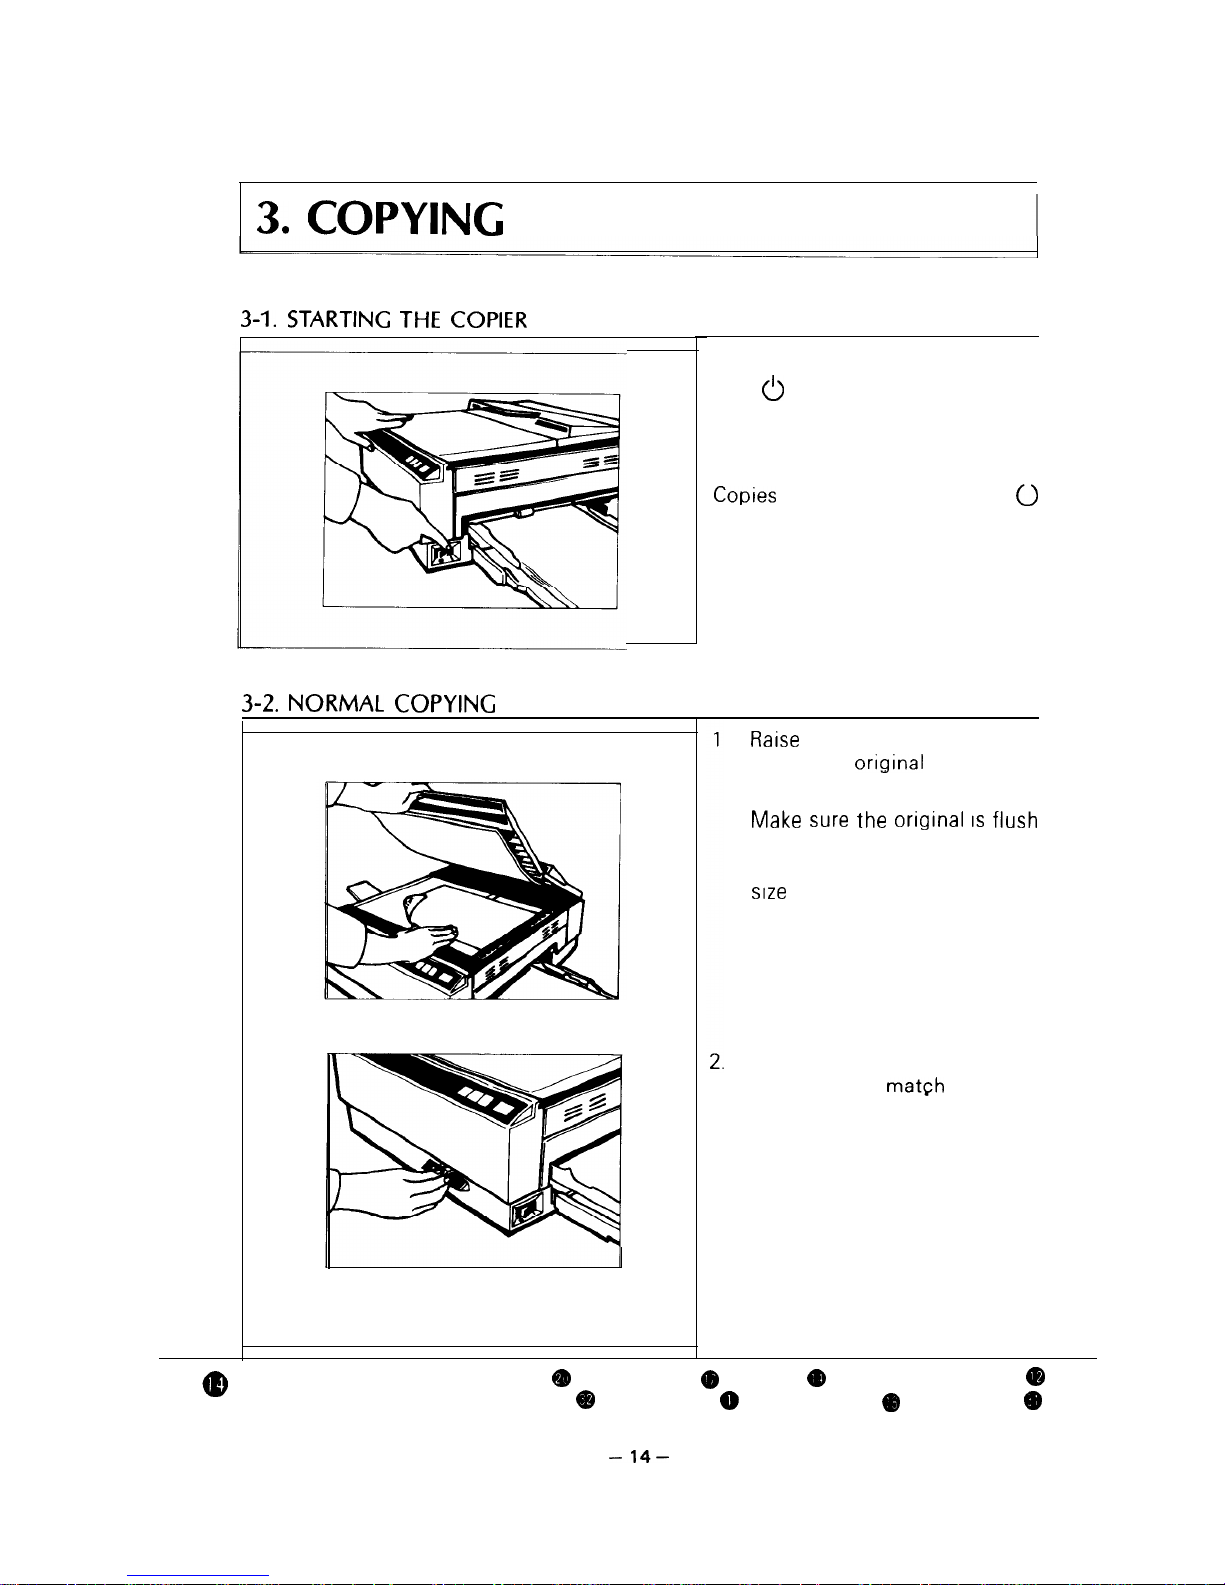
Turn on the main switch.
The
(Wait) indicator will turn
on.
This means the copier is warming
“P
(Ready) turns on.
NORMAL
the platen cover and
place the
face down
on the exposure glass.
flush
with the right scale and
aligned with the proper paper
marks.
Adjust the image density control lever to
the type
and quality of original.
ADDING TONER
APPLICATIONS
COPYING
CONTROLS/INDICATORS
DO’S AND DON TS
INSTALLATION
LOADING PAPER
MAINTENANCE
Page 19
MAIN COMPONENTS
MASTER UNIT
SPECIFICATIONS
TRANSPORTING THE COPIER
TROUBLESHOOTING
TWO-SIDED COPIES
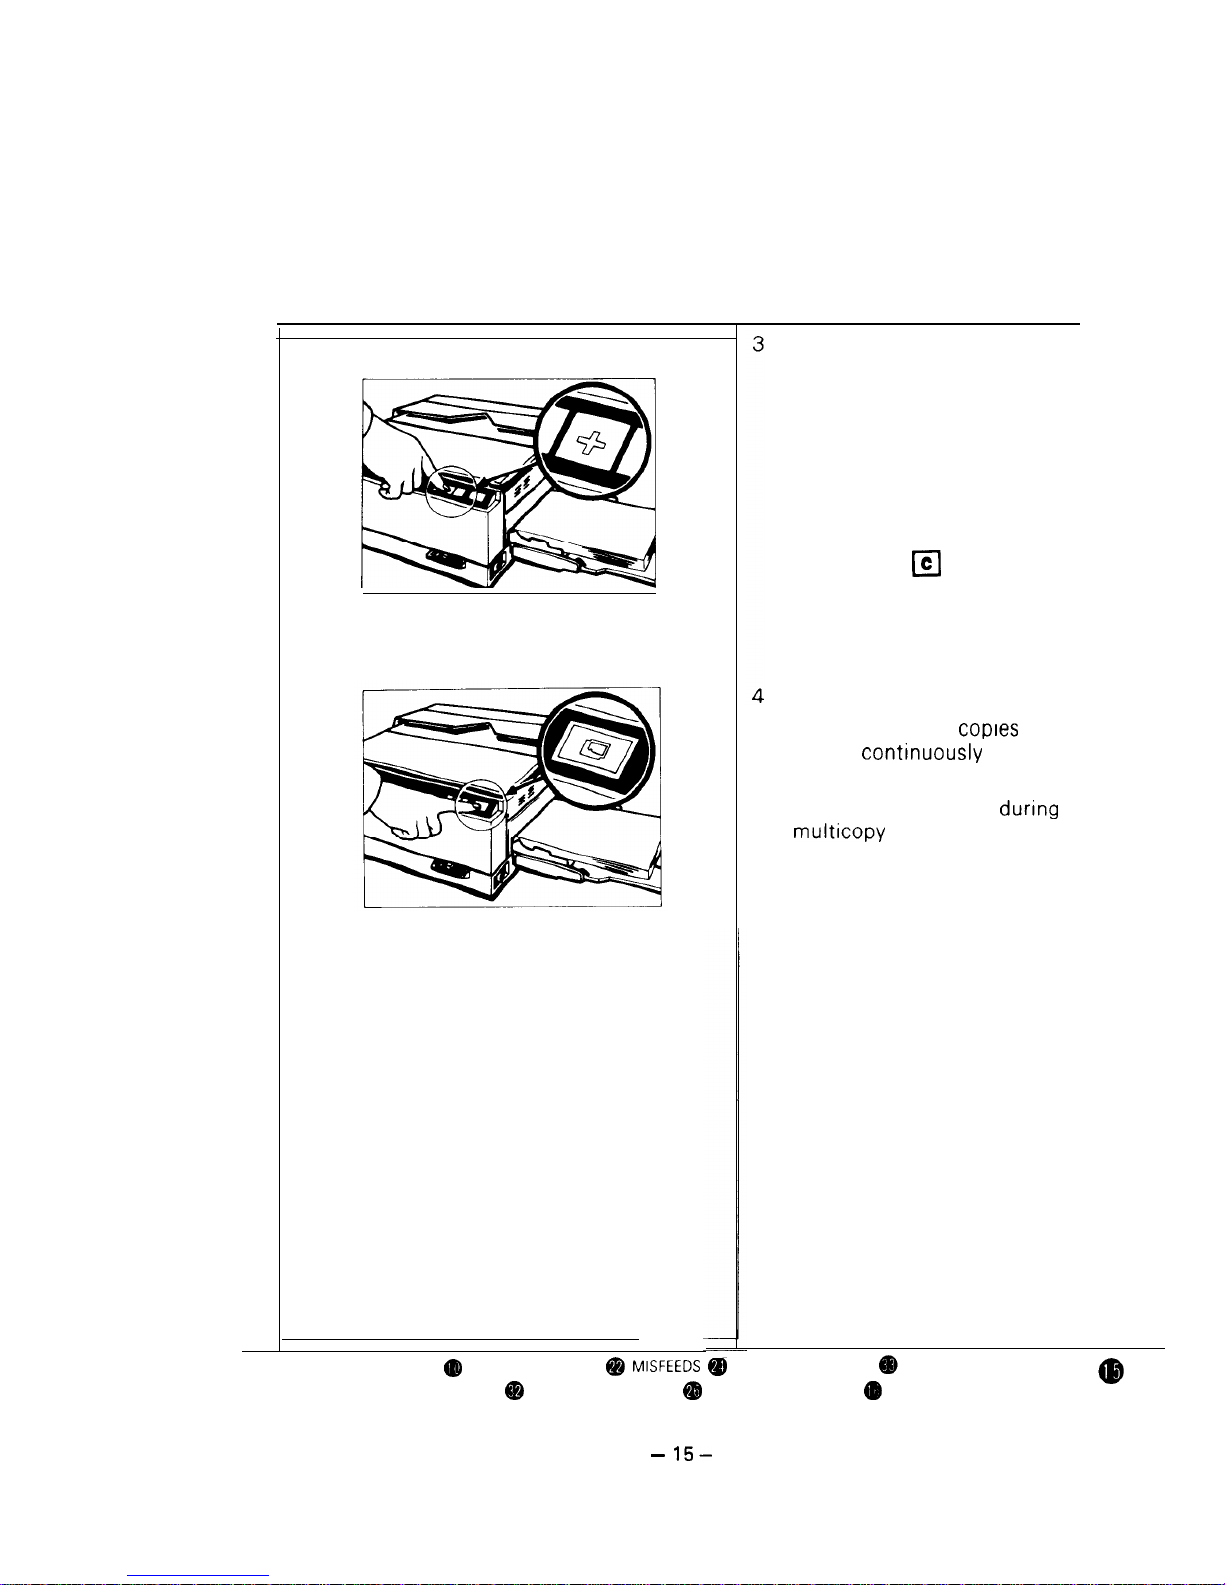
Enter the number of copies
required by pressing the
Increase Quantity Key.
(Use the Decrease Quantity
Key if you enter too many
copies.)
l Up to 20 copies can be
entered at one time.
l Press the
Key to cancel
the entry
Press the Print Key
The number of copies made
will be
shown by
the copy counter.
(To stop the machine
a
run, press the q
Key.)
Page 20
1
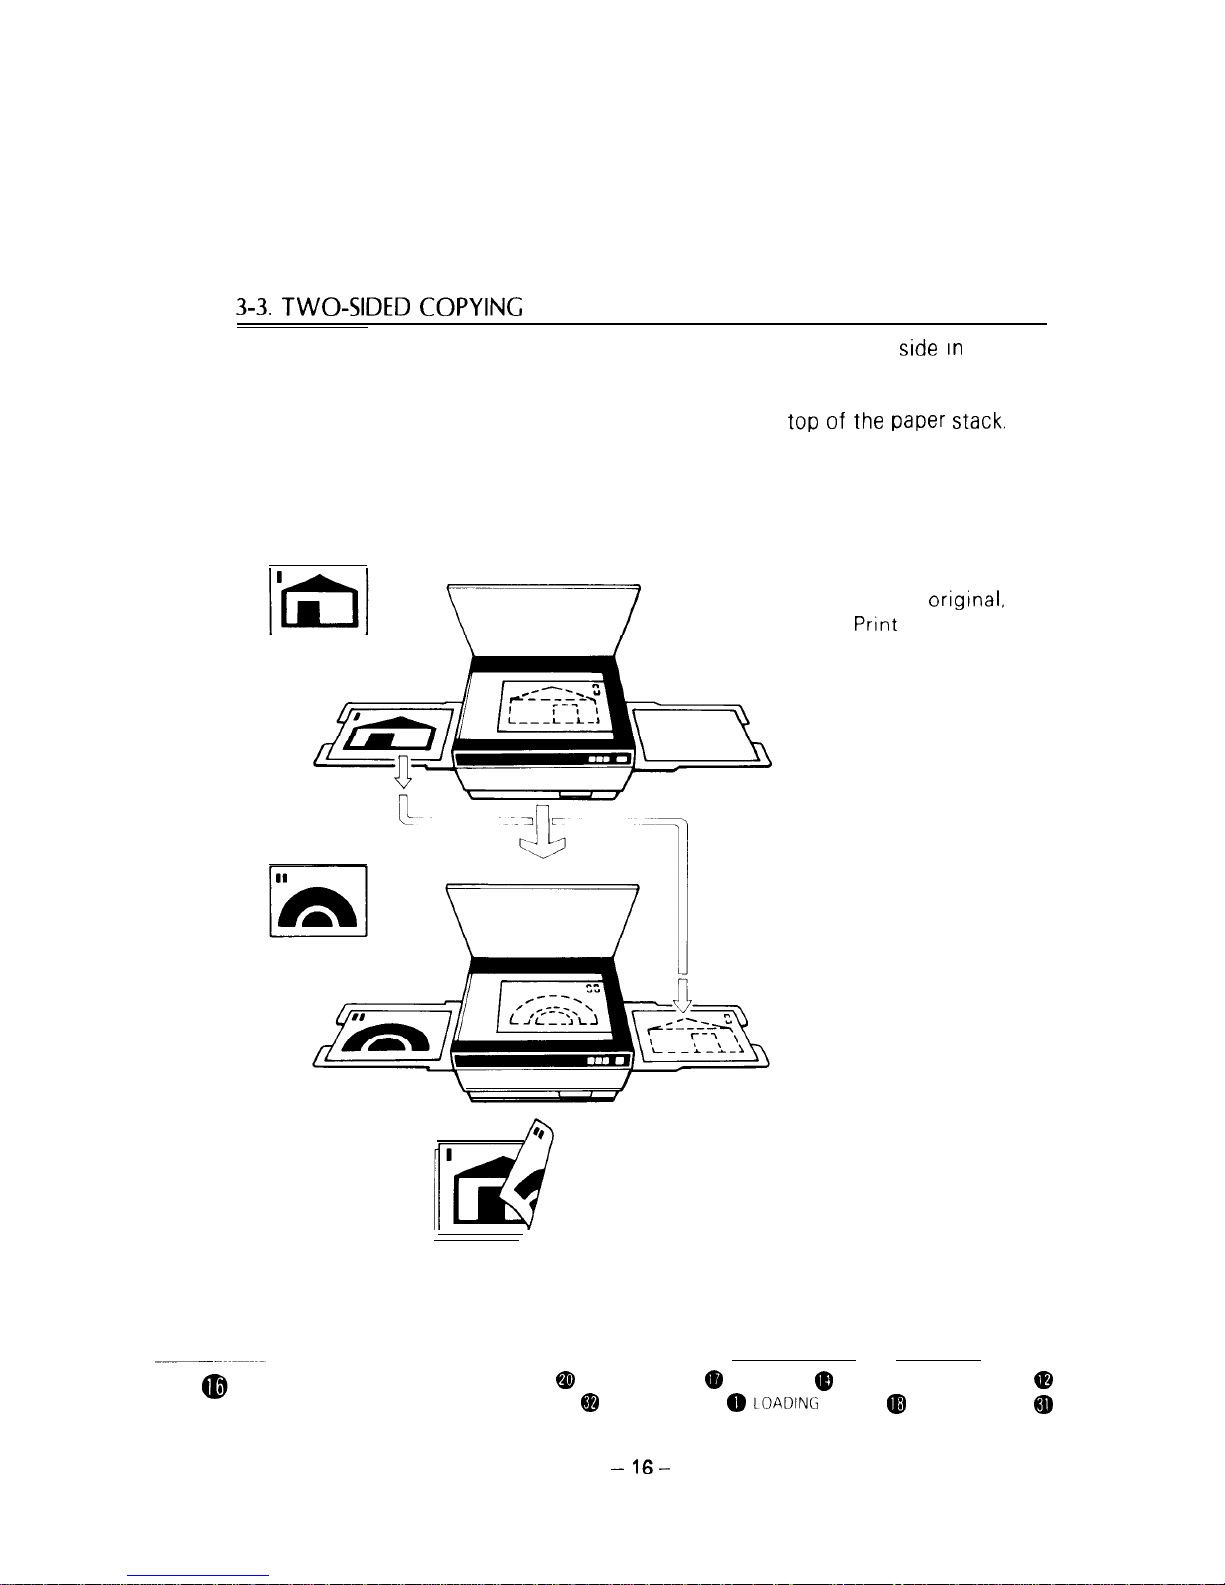
Copy the first side
the normal manner. Then, insert the
copy into the paper entrance
on
of
stack.
Important.
The copy must be Inserted
facedown
2 Set the second
press the Print Key
and
ADDING TONER
APPLICATIONS
COPYING
CONTROLS/INDICATORS
DOS AND DON TS
INSTALLATION
LOADlNti PAPER
MAINTENANCE
Page 21
APPLICATIONS
MAIN COMPONENTS
MASTER UNIT
SPECIFICATIONS
TRANSPORTING THE COPIER
TROUBLtSHOOTlNG
TWO SIDED COPIES
Page 22
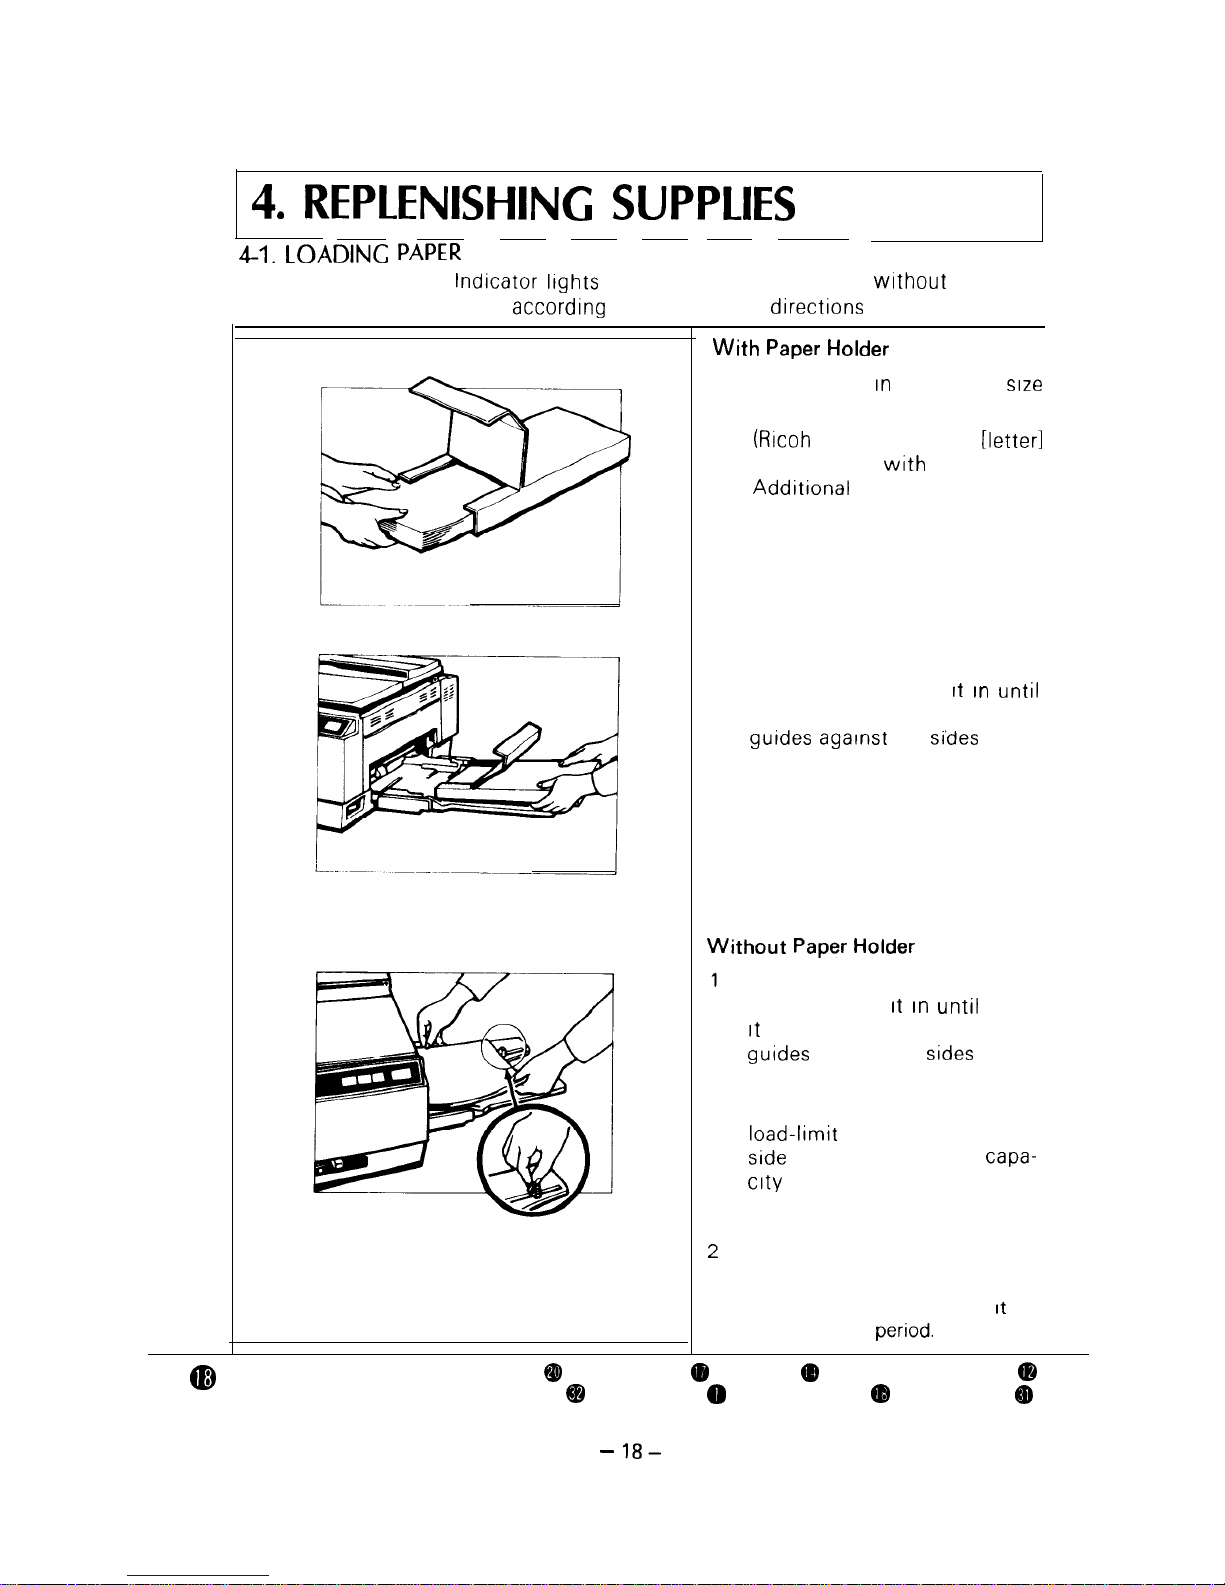
LOADING
The Check Paper Tray
ltghts when operating the machine
paper on
the paper tray Load paper
to the following
1
Insert paper
the proper size
paper holder
paper holder
the Ml0
paper holders are
available as options.)
2 Set the paper holder on the
paper tray, and push
it
stops
Slide the paper
the
of the
paper holder.
Set the paper on the paper
tray, and push
stops. Move the paper
against the sides of the
stack of paper
Do not load paper past the
marks inside the rear
(The capa-
is approximately 100
sheets)
Set the paper end holder.
Note: Keep the paper in a vinyl
bag when not using
for
a long
ADDING TONER
APPLICATIONS
COPYING
CONTROLS/INDICATORS
DOS AND DON TS
INSTALLATION
LOADING PAPER
MAINTENANCE
Page 23
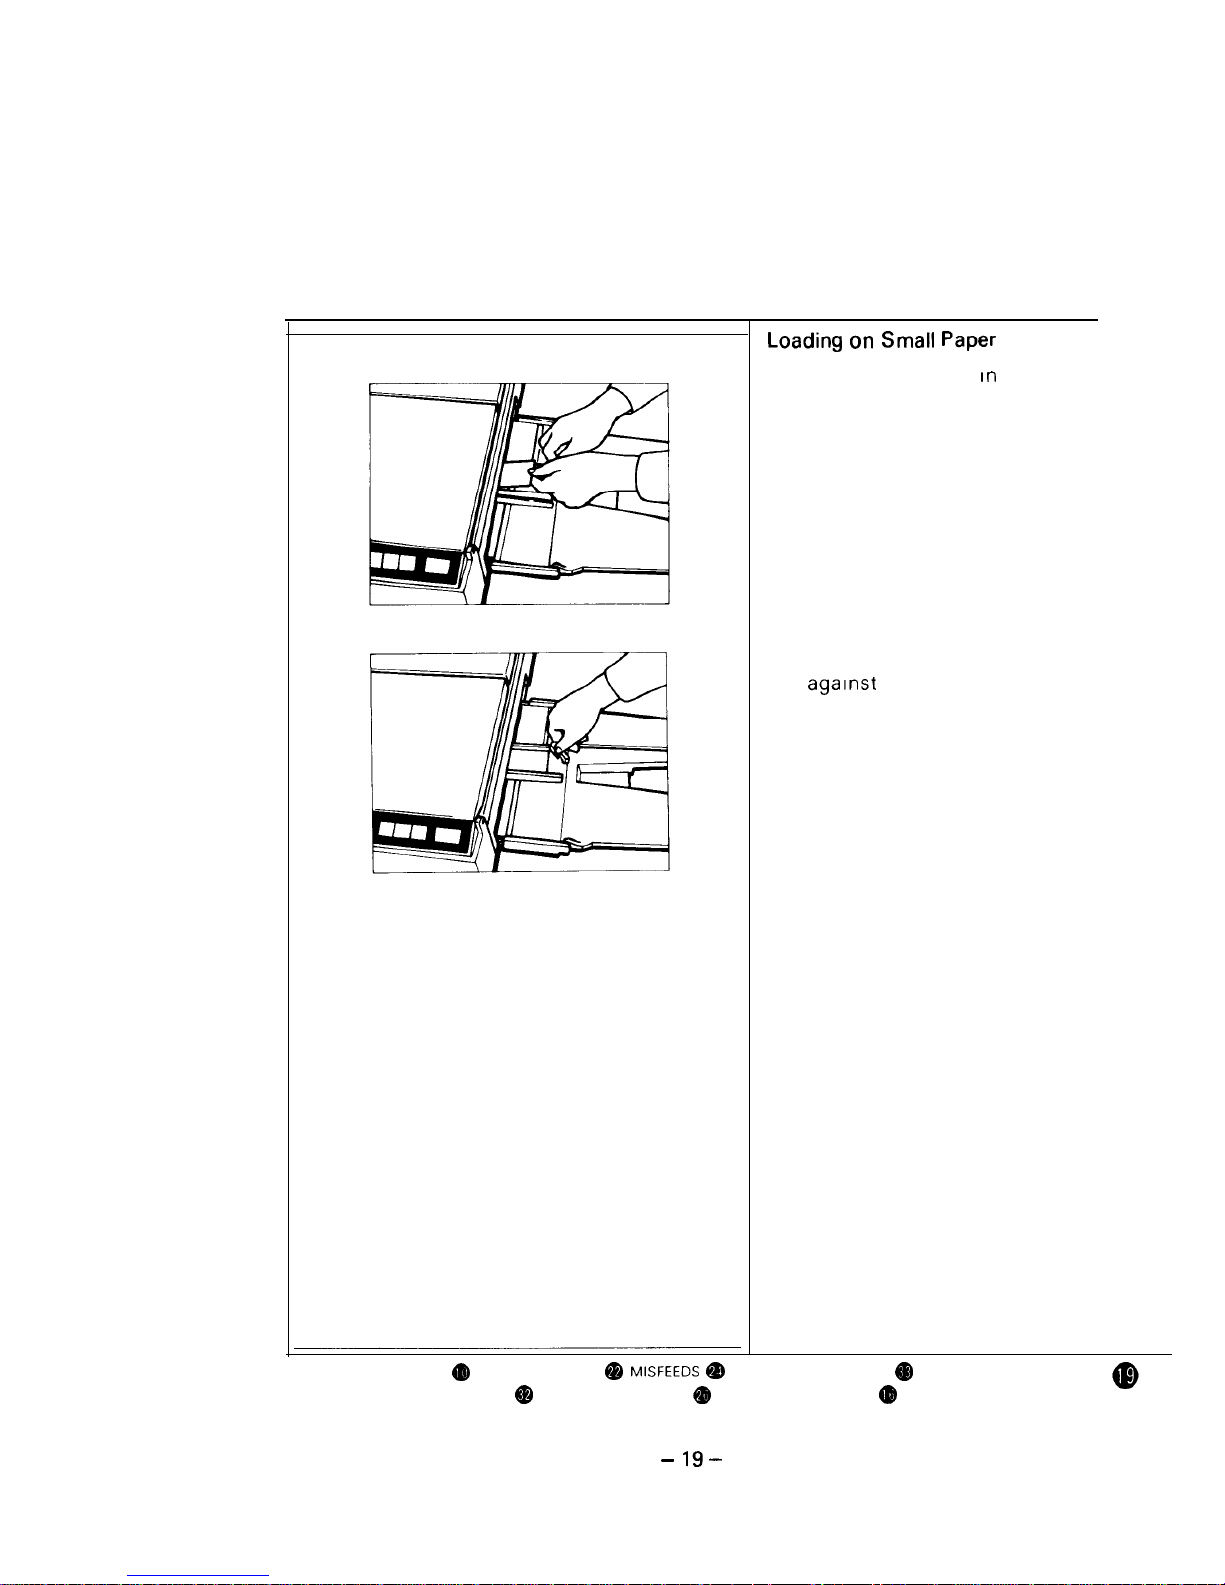
on
1. Load small paper
the same
manner as normal copy paper.
2 Turn the small-paper holder
the end of the paper.
MAIN COMPONENTS
MASTER UNIT
SPECIFICATIONS
TRANSPORTING THE COPIER
TROUBLESHOOTING
TWO SIDED COPIES
Page 24
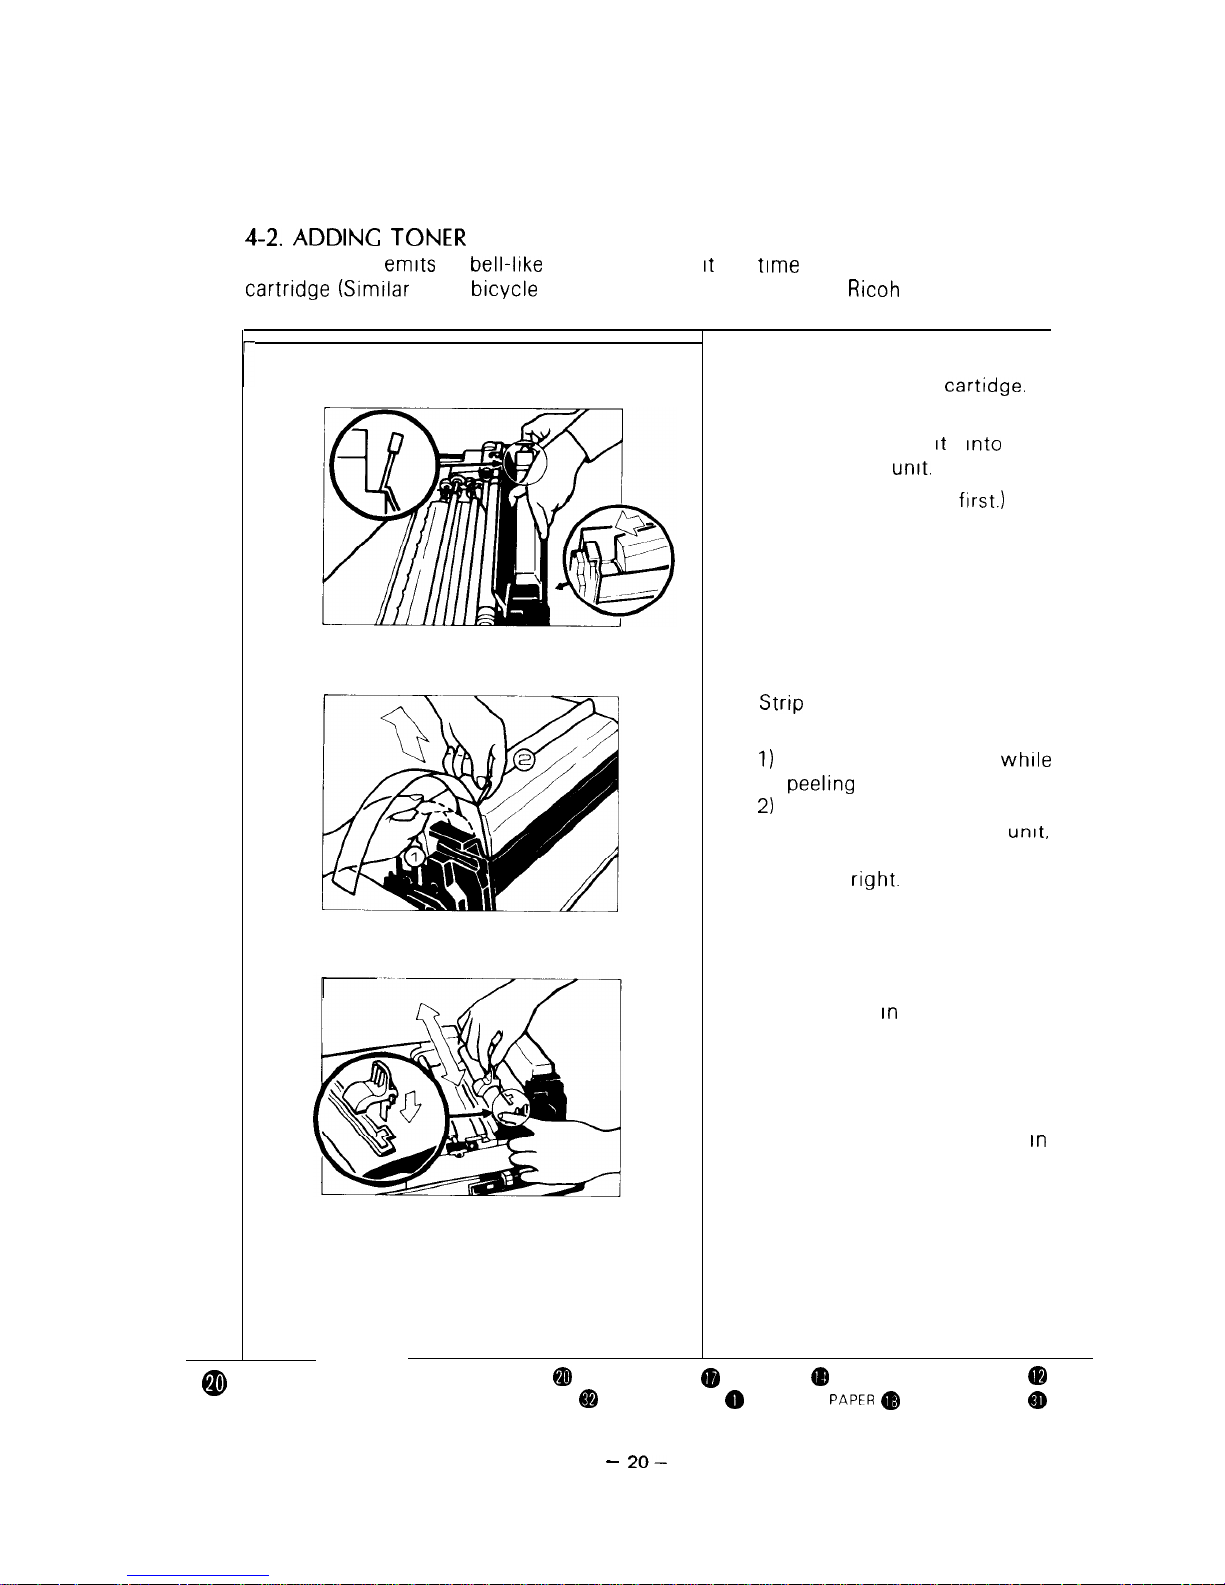
The copier
a
sound when
IS
to replace the toner
(Srmrlar to a
bell.) Add one cartridge of Ricoh Ml0 toner as
follows
1. Open the top unit.
2.
Take out the toner
3
Shake a new cartridge of toner
well and Insert
Into the
development unit.
(Insert the front end
4.
off the cartridge seal.
Caution:
Hold the cartridge
off the seal.
To avoid possibly tipping
over the development unit,
be careful not pull the seal
to the
5. Insert the narrow tab of the
toner agitator
the slot of the
development unit cover
Then slide the agitator from
end to end of the slot several
times
Note. The toner agitator IS
the toner cartridge box.
ADDING TONER
APPLICATIONS
COPYING
CONTROLS/INDICATORS
DOS AND DON TS
INSTALLATION
LOADING
MAINTENANCE
Page 25
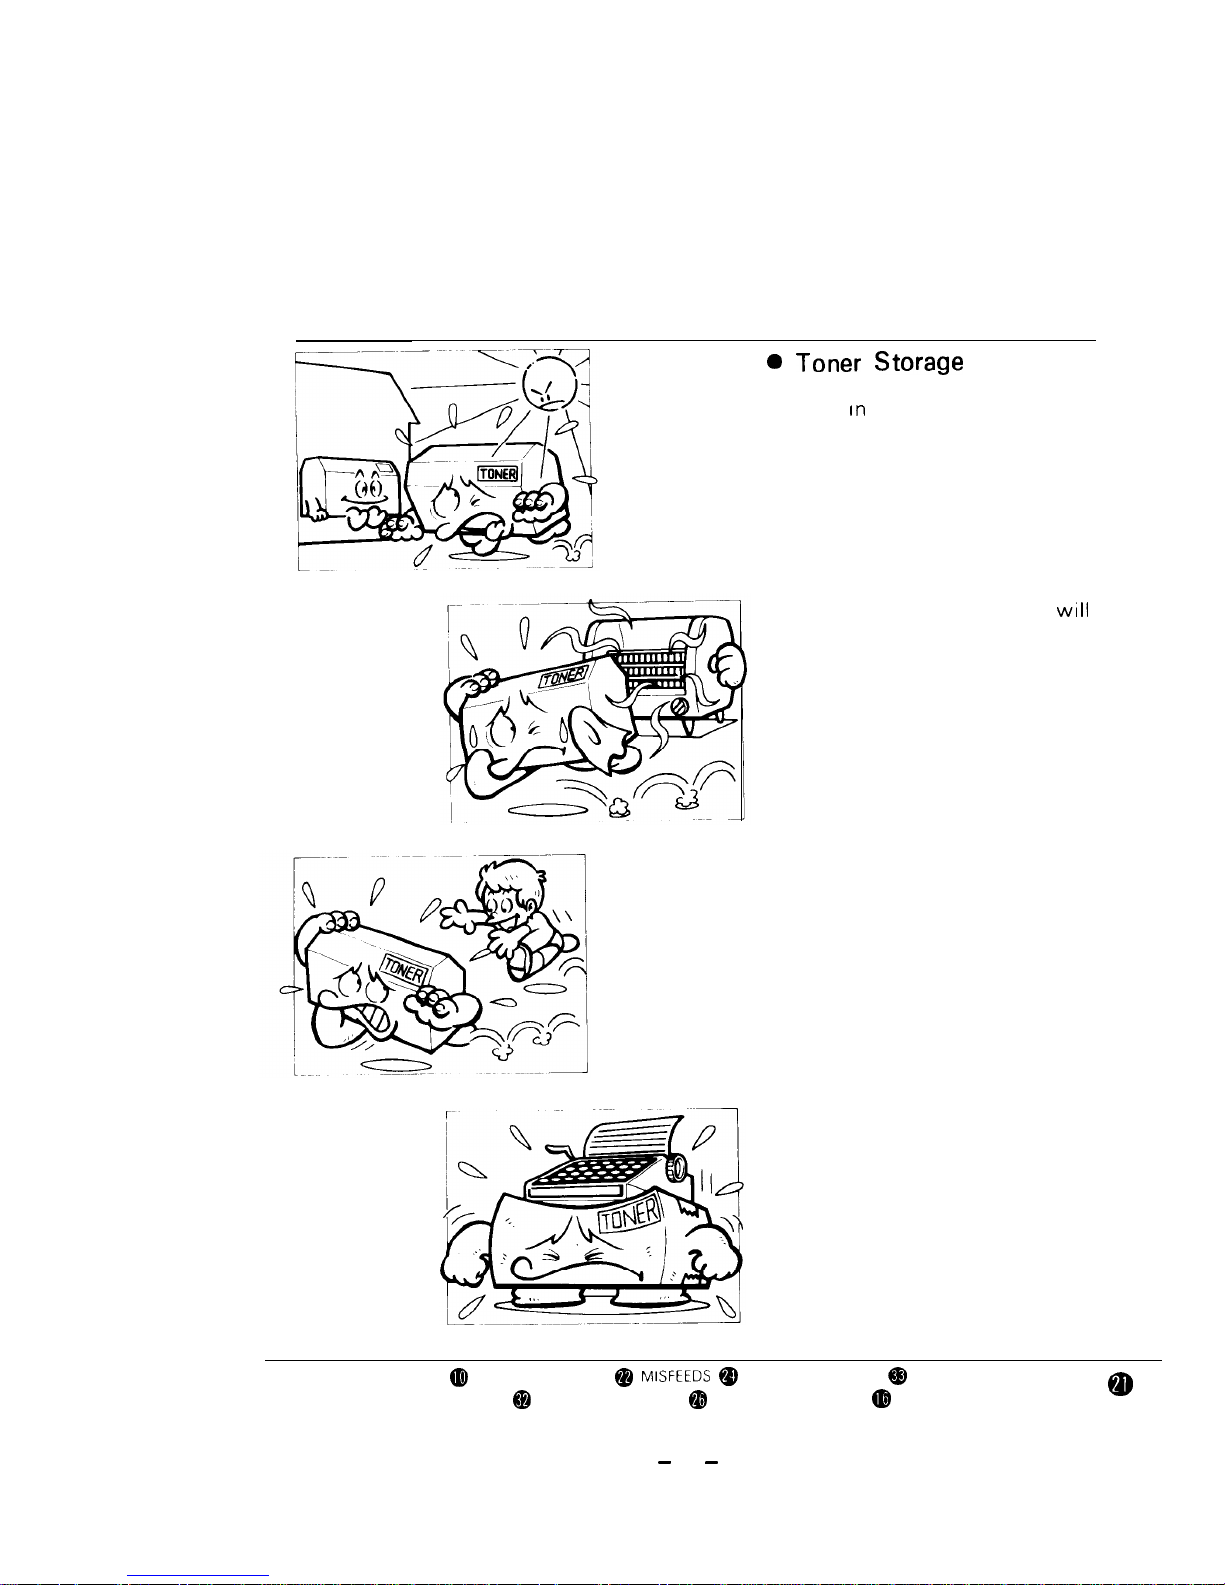
l Store
a COOL, DARK place.
l NEVER store toner where it
be exposed to heat
l Keep out of reach of children
l Do not take Internally
l Do not lay anything heavy on
toner
MAIN COMPONENTS
MASTER UNIT
SPECIFICATIONS
TRANSPORTING THE COPIER
TROUBLESHOOTING
TWO SIDED COPIES
21
Page 26
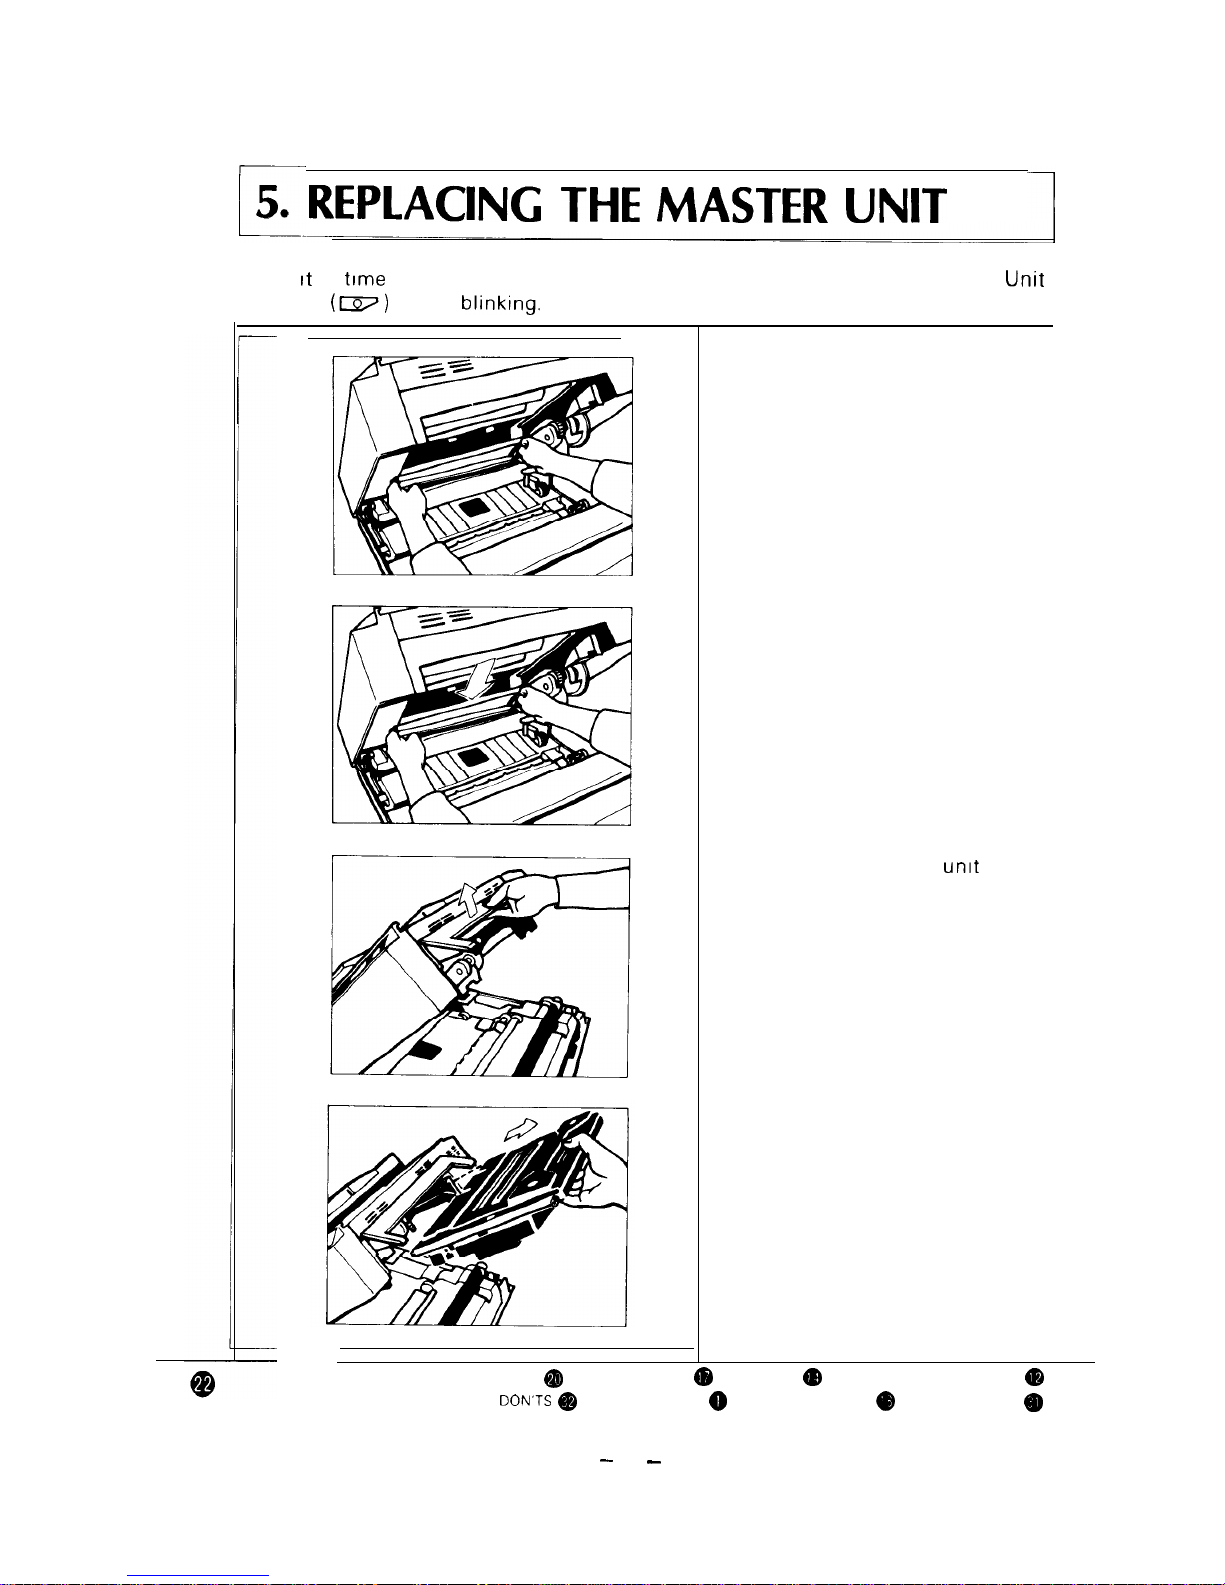
When
is
to replace the master unit and the fusing pad, the Replace Master
Indicator
starts
1.
Open the top unit and remove
the used fusing pad.
Caution: The fusing unit and
pad will be hot if you
have been using the
copier. So, handle
the used pad by the
straps on the’ ends
only.
2. Install the new fusing pad.
Note: The new fusing pad is
packed with the new
master unit.
3. Open the master
cover
and take out the used master
unit.
Note: Dispose of both the
used unit and fusing
pad using a vinyle bag.
ADDING TONER
APPLICATIONS
COPYING
CONTROLS/INDICATORS
DO’S AND
INSTALLATION
LOADING PAPER
MAINTENANCE
22
Page 27
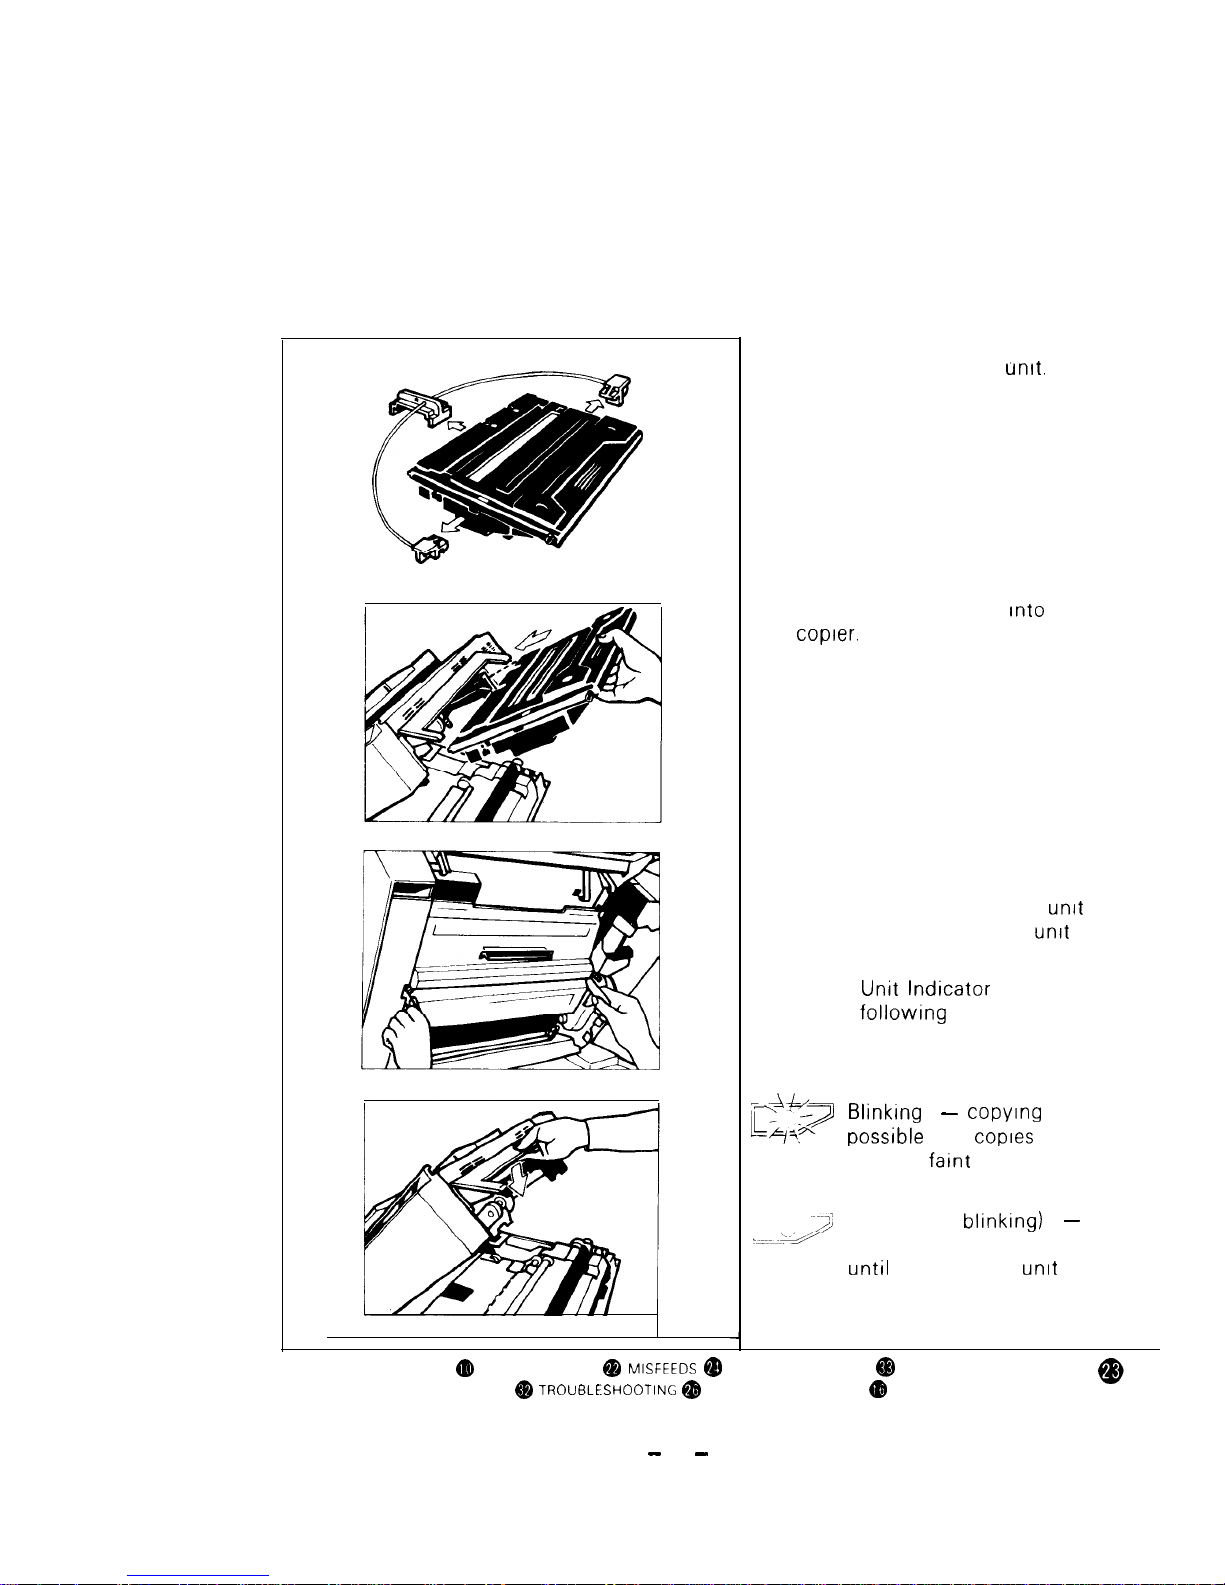
4. Remove the three wedges
from the new master unit.
5
Insert the master unit
the
6. Peel off the polyester cover
that protects the master Shut the master
cover and lower the top unrt
Note. The Replace Master
has the
two modes.
is
become
ON (not blrnkrng)
copying IS Impossible
IS
replaced
MAIN COMPONENTS
MASTER UNIT
SPECIFICATIONS
TRANSPORTING THE COPIER
TWO SIDED COPIES
23
Page 28
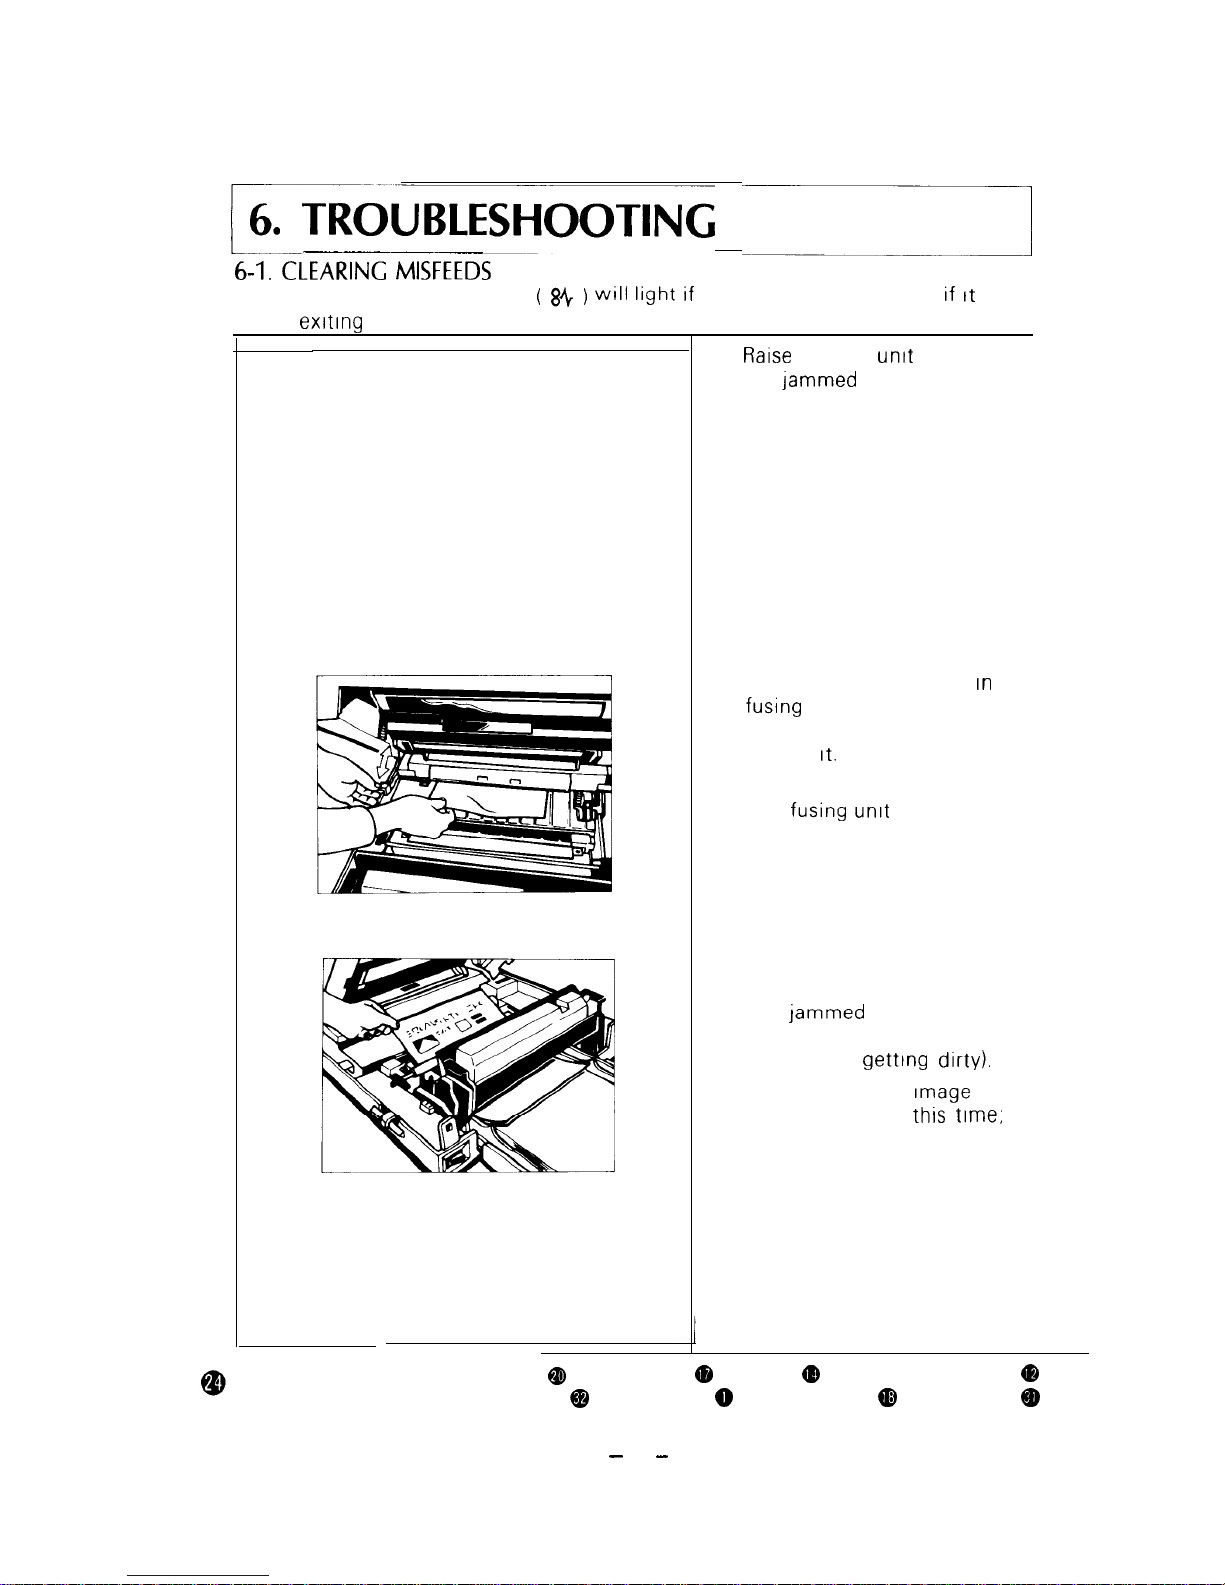
The Check Paper Path Indicator
84
copy paper falls to feed or stops
before
the copier.
1.
the top
and remove
the
paper
Note: Do not touch the master
(purple material).
2. If the paper IS caught
the
unit, move the Paper
Reverse Lever up and down to
release
WARNING:
The fusing
is hot
Be careful.
3 If the paper IS caught under
the development unit, remove
the
paper by pulling
the leading edge (to keep
rollers from
Note. The copy Image IS not
fused at
be
careful not to get hands
or clothing dirty
ADDING TONER
APPLICATIONS
COPYING
CONTROLS/INDICATORS
DOS AND DON TS
INSTALLATION
LOADING PAPER
MAINTENANCE
24
Page 29
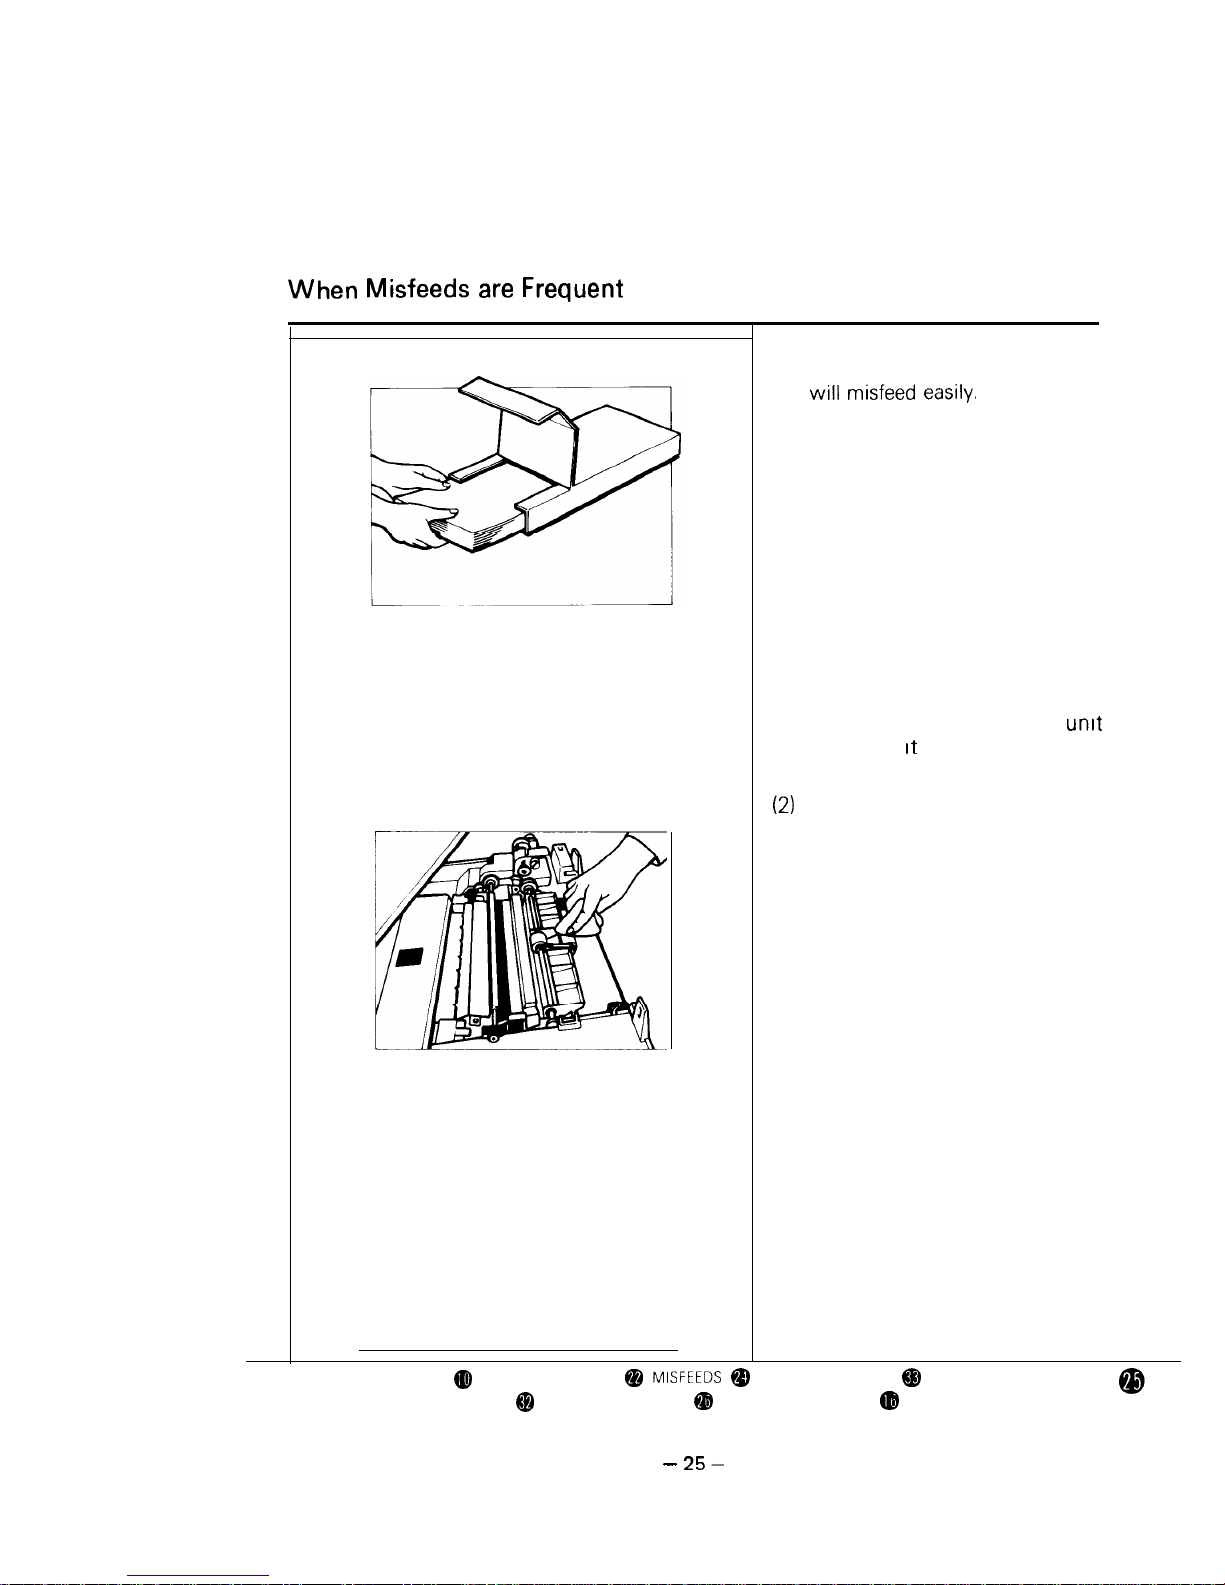
Frequent
1
Check copy paper quality.
Wrinkled, damp, or curled paper
Use only dry, undamaged paper.
For best copying, use the paper
holder.
2 Clean the Feed Rollers
(1) Take out the development
and place
on a clean sheet of
paper.
Remove the paper tray
(3) Clean the rollers with a damp
cloth.
MAIN COMPONENTS
MASTER UNIT
SPECIFICATIONS
TRANSPORTING THE COPIER
TROUBLESHOOTING
TWO SIDED COPIES
Page 30
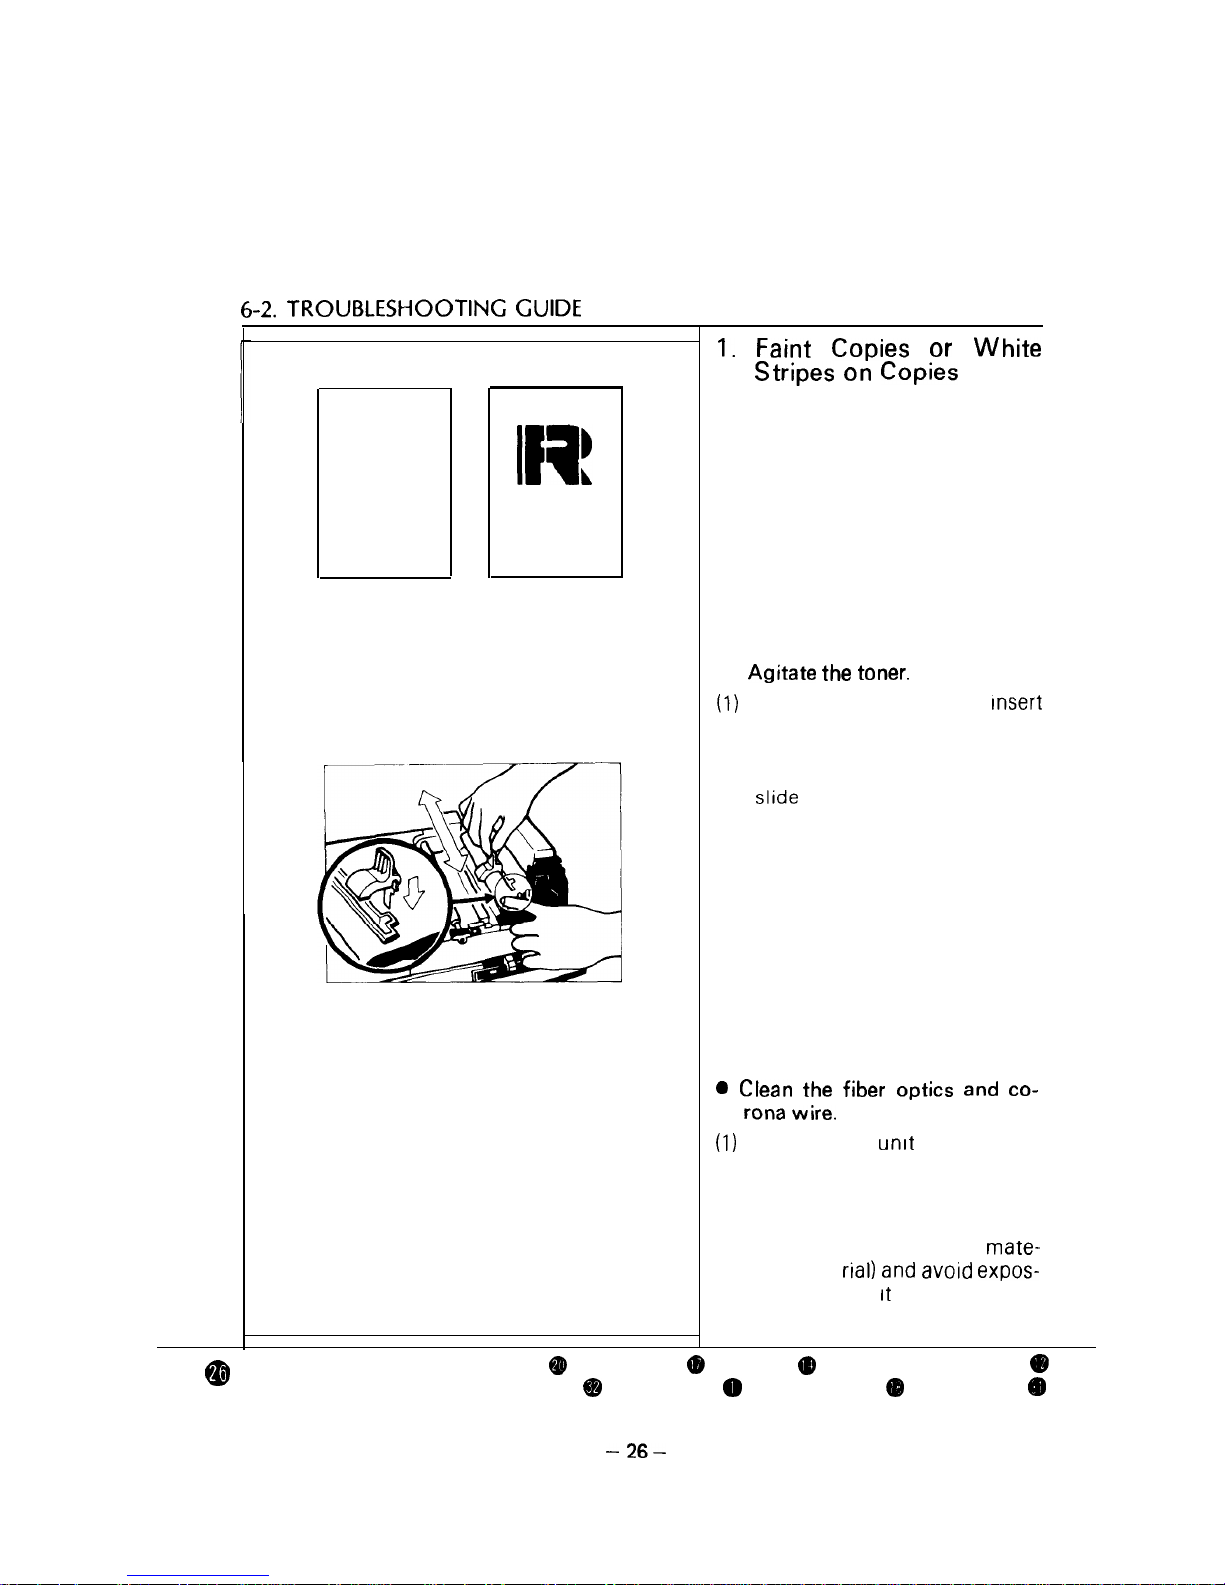
TROUBLESHOOTING
R
Faint Copies or
Copies
l Agitate
Open the top unit and Insert
the narrow tab of the toner
agitator into the slot in the
development unit cover, and
it from end to end several
times.
If the problem still exists after the
above, do the following:
fiber
Open the top
and take out
the master unit. Set it on a
clean sheet of paper.
Caution: Do not touch the
master (purple
ing
to light
ADDING TONER
APPLICATIONS
COPYING
CONTROLS/INDICATORS
DOS AND DON TS
INSTALLATION
LOADING PAPER
MAINTENANCE
Page 31
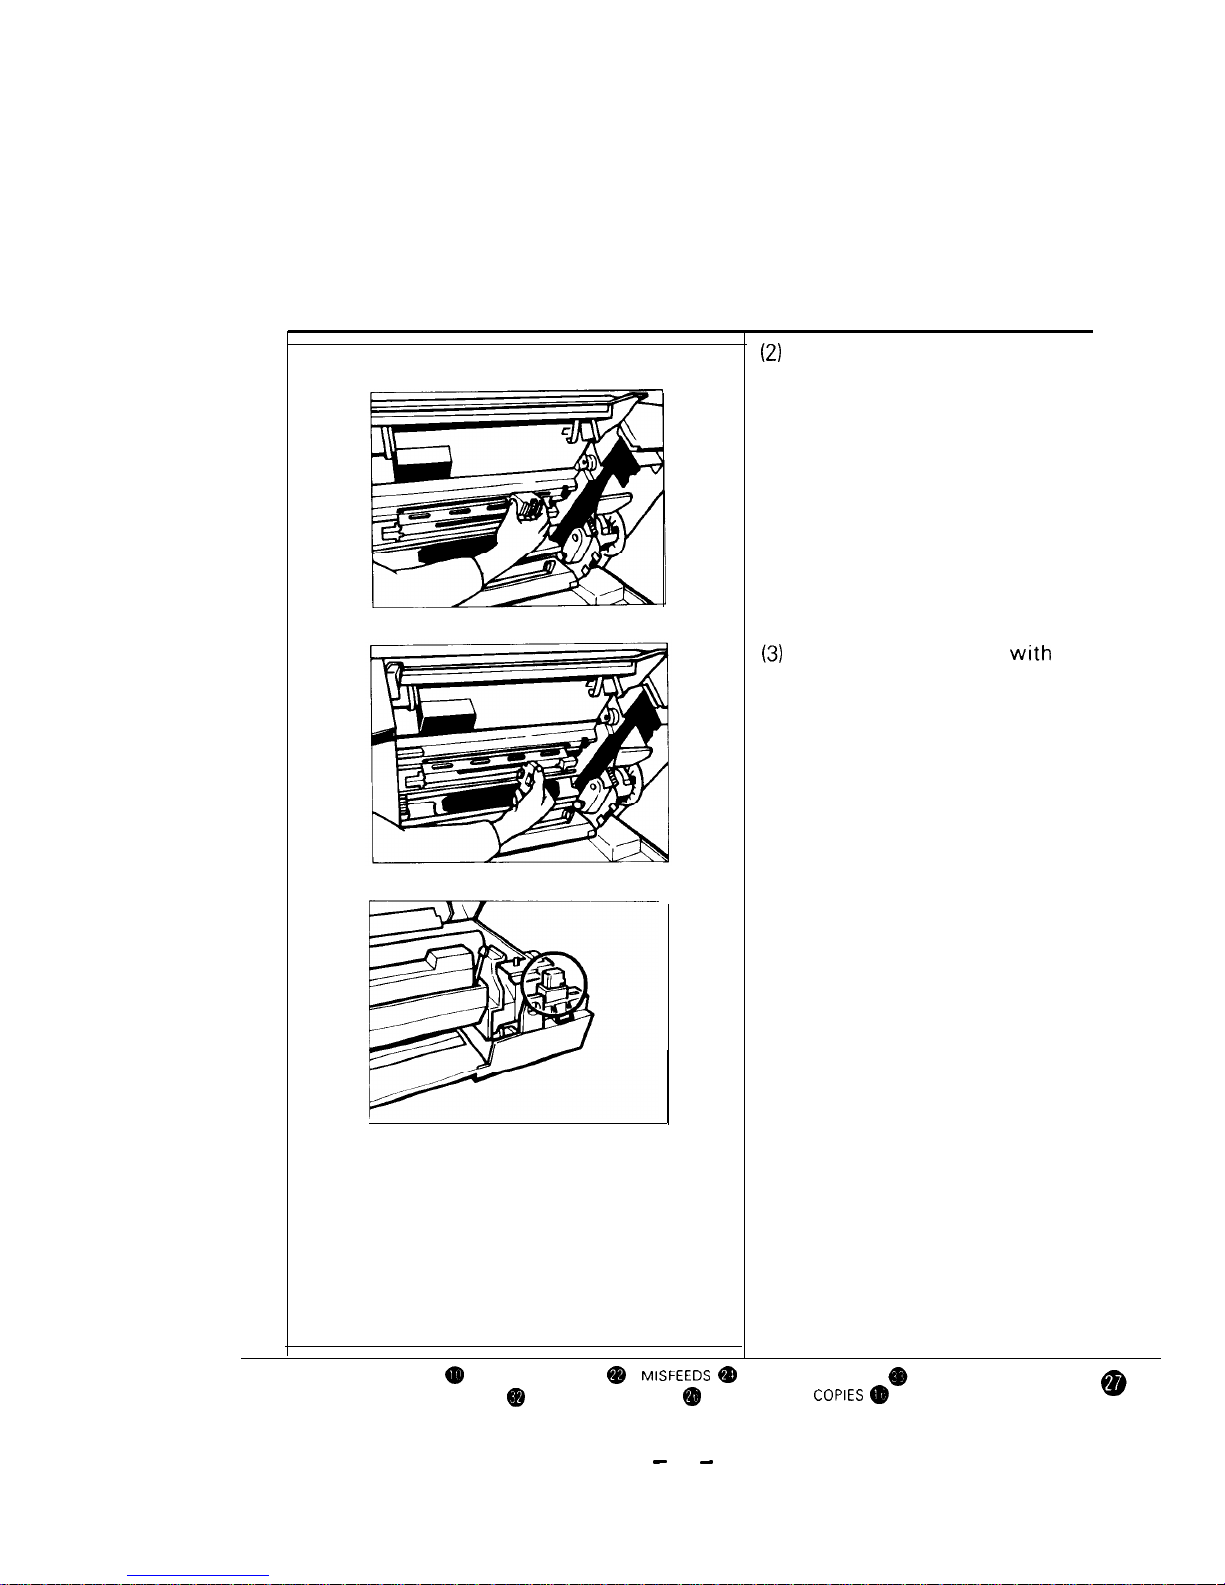
Insert the long pad of the
cleaner in the fiber optics slot,
and slide it end to end.
Clean the corona wire
the
short pad of the cleaner.
Gently rub the cleaner along
the wire.
Note: Keep the cleaner on the
holder inside the copier.
Turn to the next page.
MAIN COMPONENTS
MASTER UNIT
SPECIFICATIONS
TRANSPORTING THE COPIER
TROUBLESHOOTING
TWO-SIDED
27
Page 32
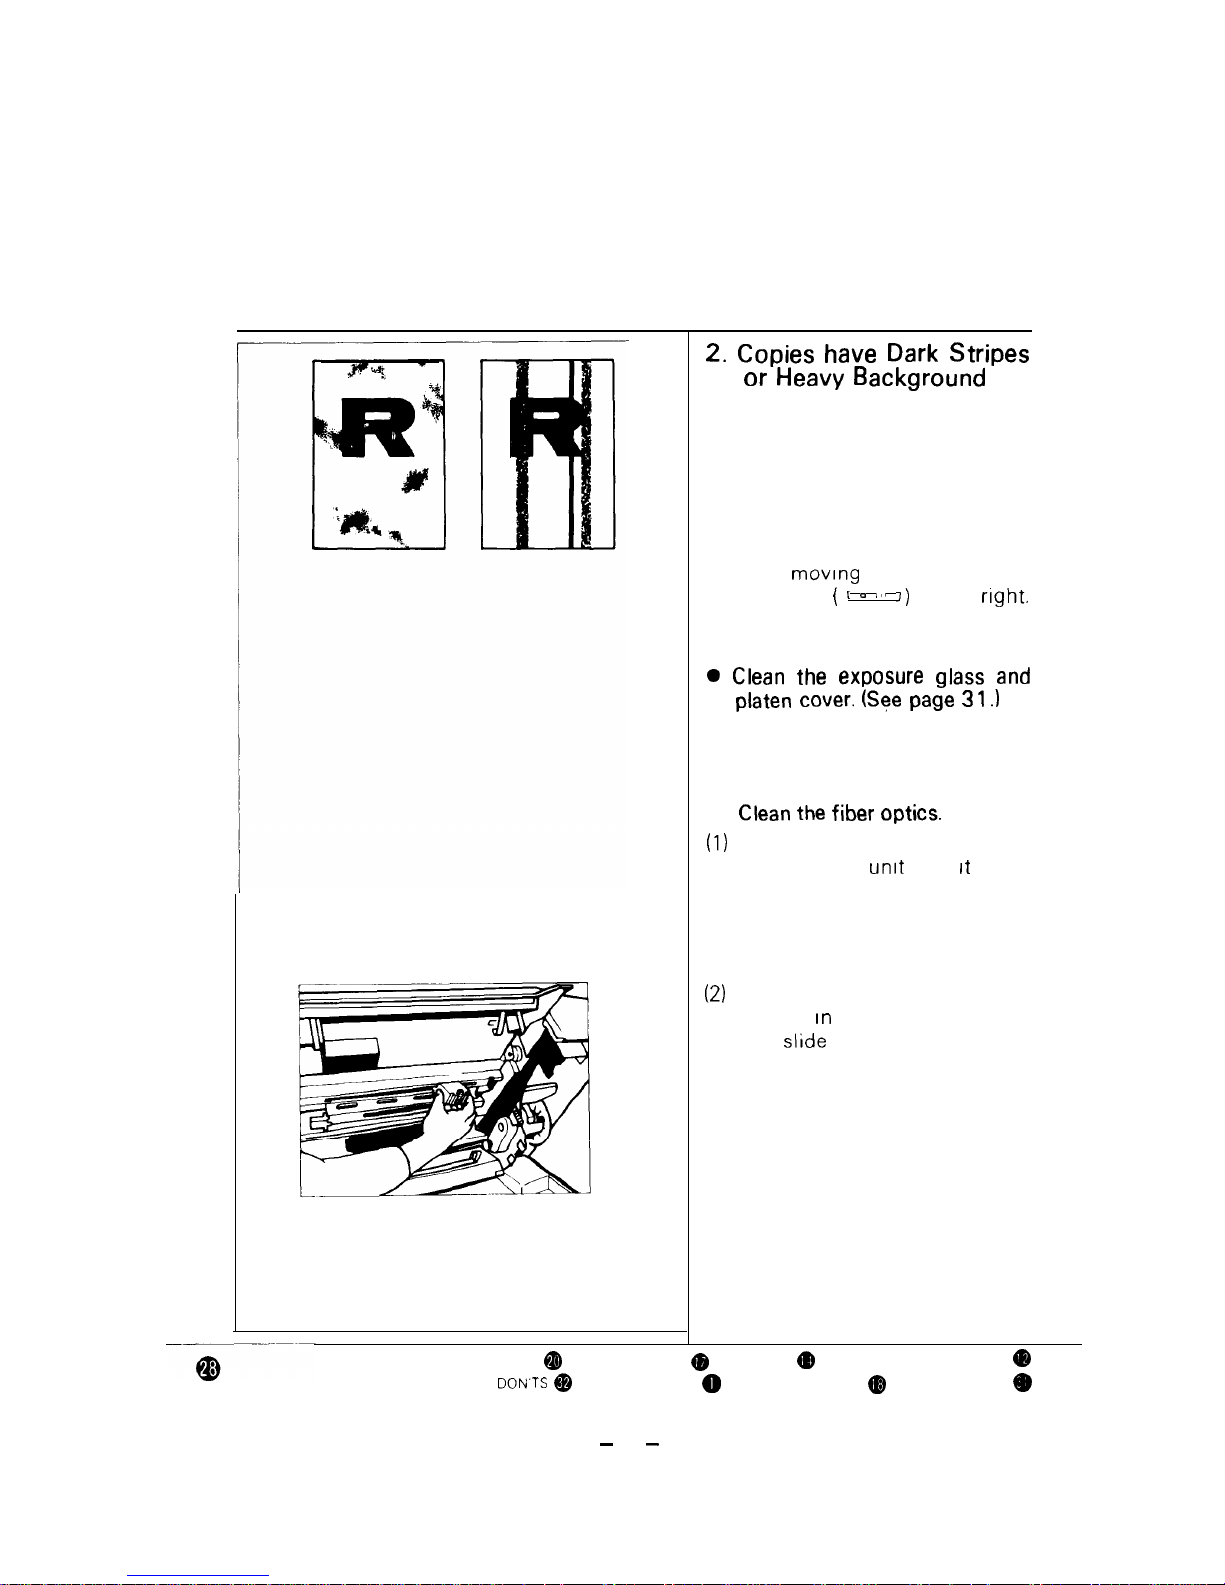
Copies
First, try
the Image Density
Control Lever
to the
If that does not help, do the follow-
ing:
l
fiber
Open the top unit and take out
the master
Set
on a
clean sheet of paper.
Insert the long pad of the
cleaner
the fiber optics slot.
and
it end to end.
ADDING TONER
APPLICATIONS
COPYING
CONTROLS/INDICATORS
DOS AND
INSTALLATION
LOADING PAPER
MAINTENANCE
28
Page 33
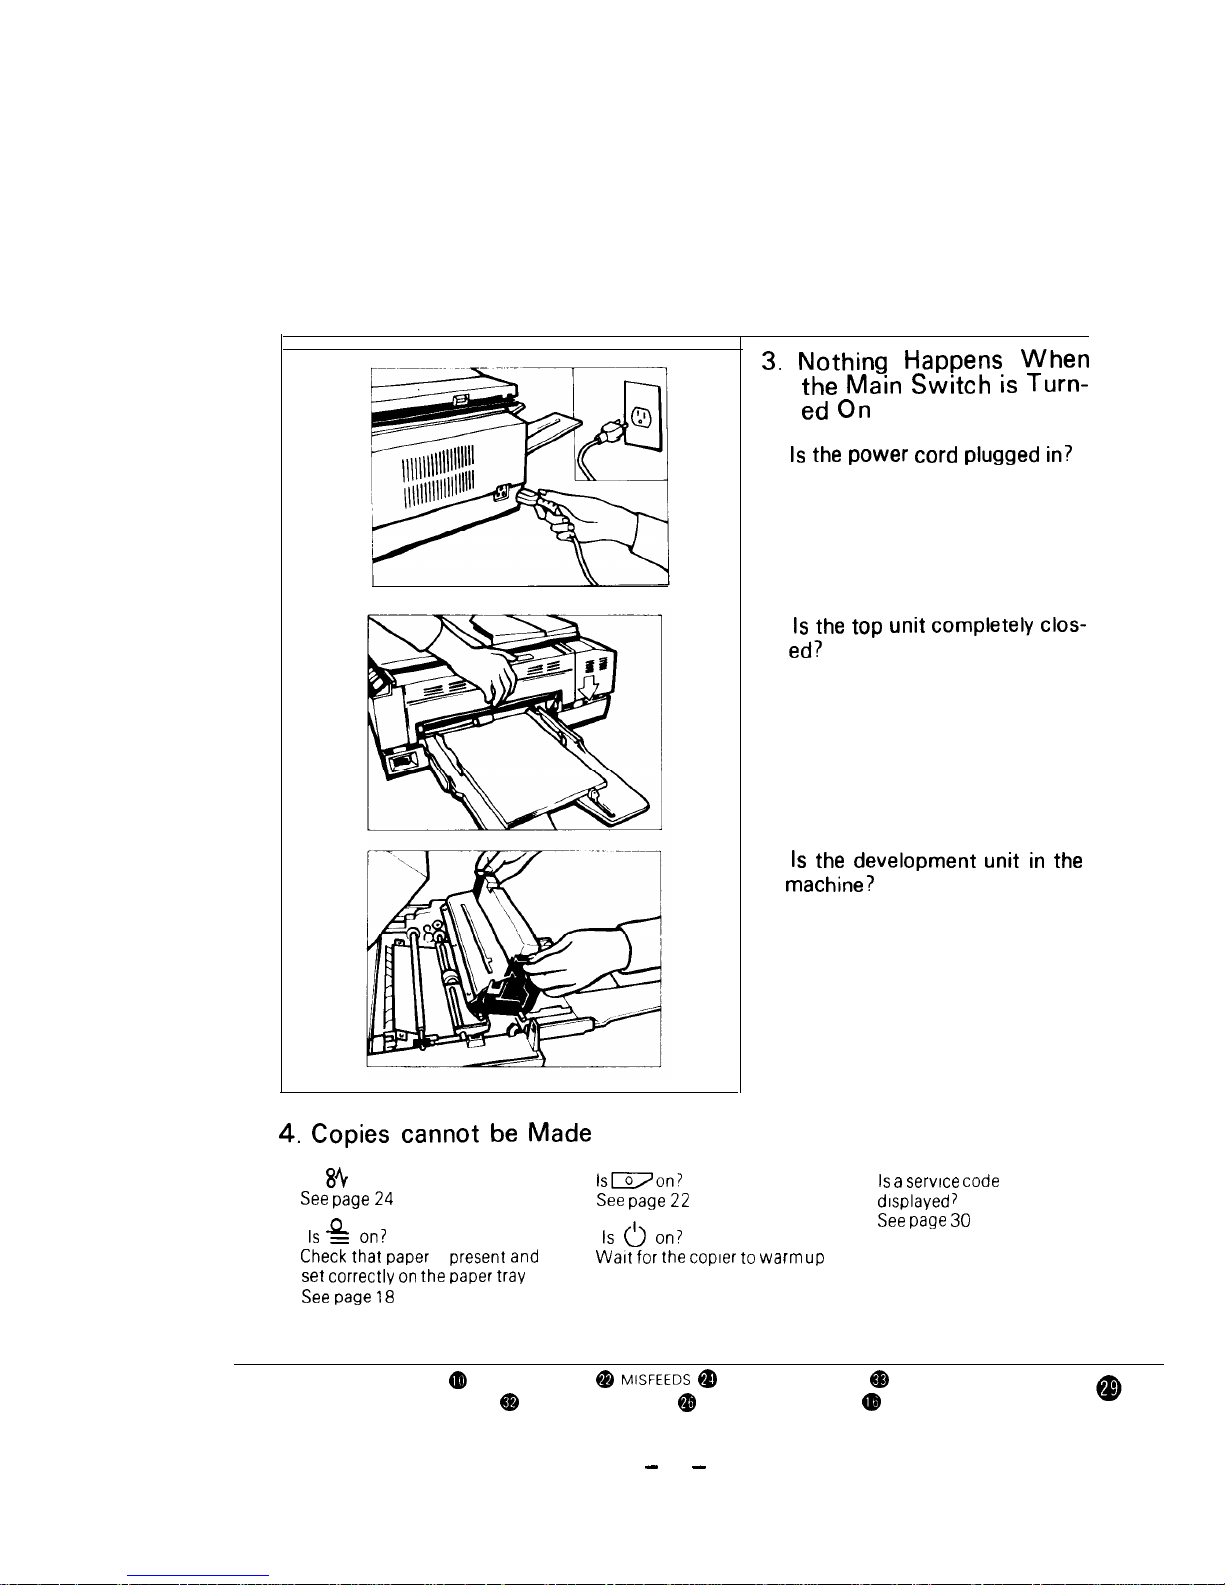
Copies cannot
Made
l Is
on?
l
on?
l
l
on?
IS
and IS
on
18
up
Nothing Happens
Turn-
l
l
l
l
MAIN COMPONENTS
MASTER UNIT
SPECIFICATIONS
TRANSPORTING THE COPIER
TROUBLESHOOTING
TWO SIDED COPIES
29
Page 34
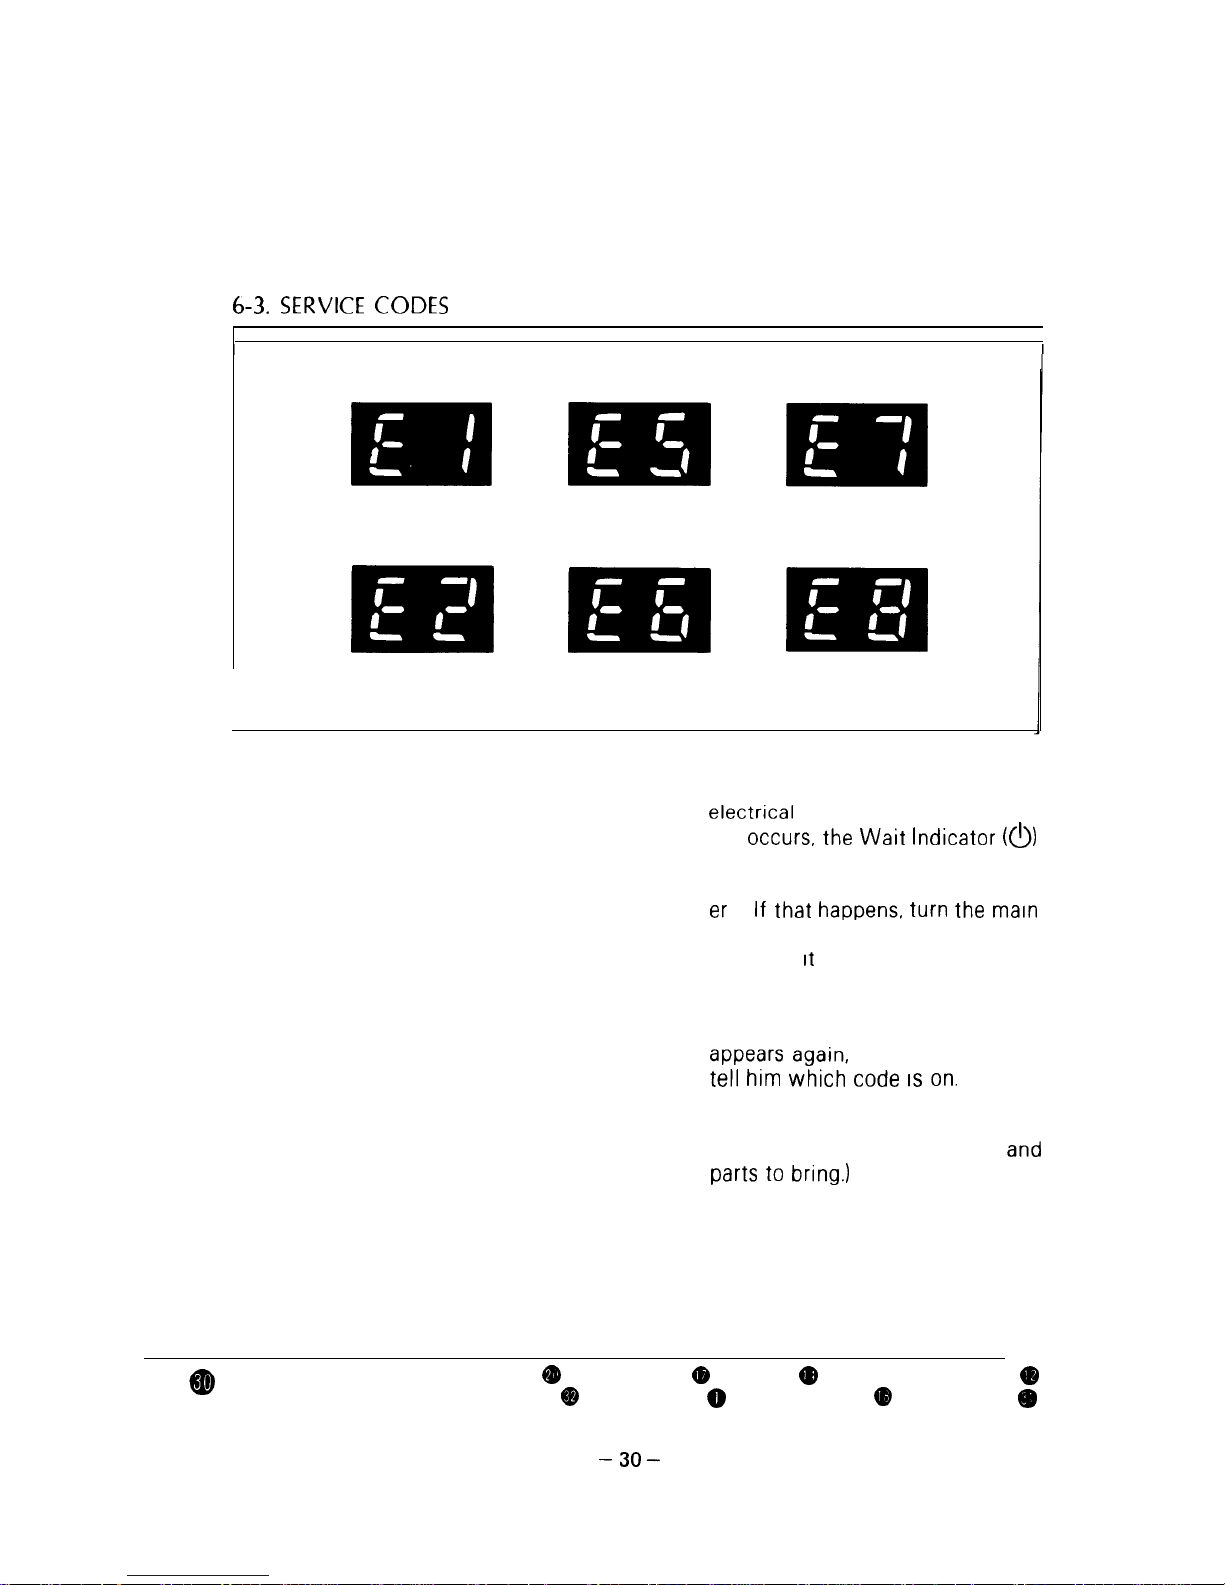
CODES
The copier’s microcomputer constantly monitors mechanical and
functions. If a malfunc-
tion occurs,
will turn on and a service code will
be displayed in the copy count-
happens,
switch off, wait a few seconds, and
then turn
on.
Then, try operating the copier
again. If the service code display
call your dealer and
him
on.
(The service code tells the service
representative which tools and
bring.)
ADDING TONER
APPLICATIONS
COPYING
CONTROLS/INDICATORS
DOS AND DON’TS
INSTALLATION
LOADING PAPER
MAINTENANCE
Page 35
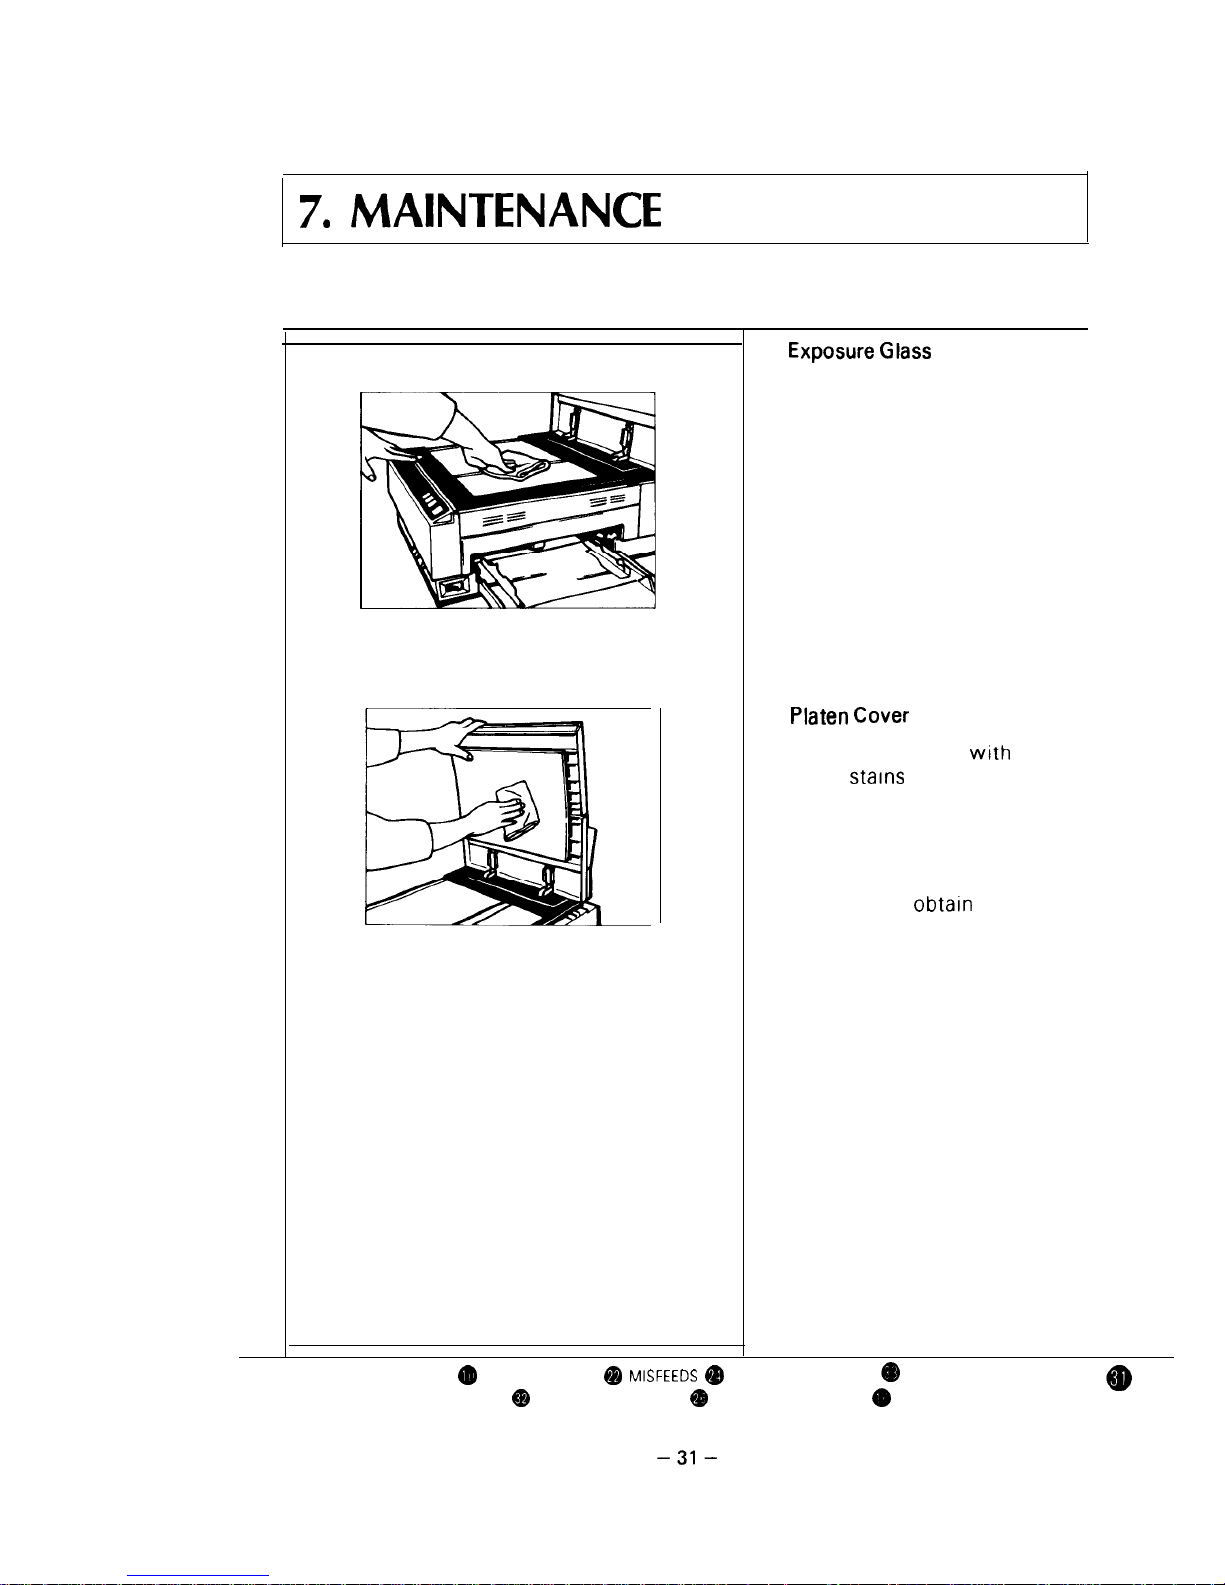
MAINTENANCE
To maintain a high copy quality, clean the exposure glass and platen cover regularly.
l
Clean the exposure glass with a
soft cloth and commercial glass
cleaner.
l
Clean the platen cover
a damp
cloth. If stains do not come off,
use a weak cleaning solution.
Note: If the waterproof paper
covering the platen cover
pad becomes badly stained,
you can
a new one
from your dealer.
MAIN COMPONENTS
MASTER UNIT
SPECIFICATIONS
TRANSPORTING THE COPIER
TROUBLESHOOTING
TWO-SIDED COPIES
Page 36
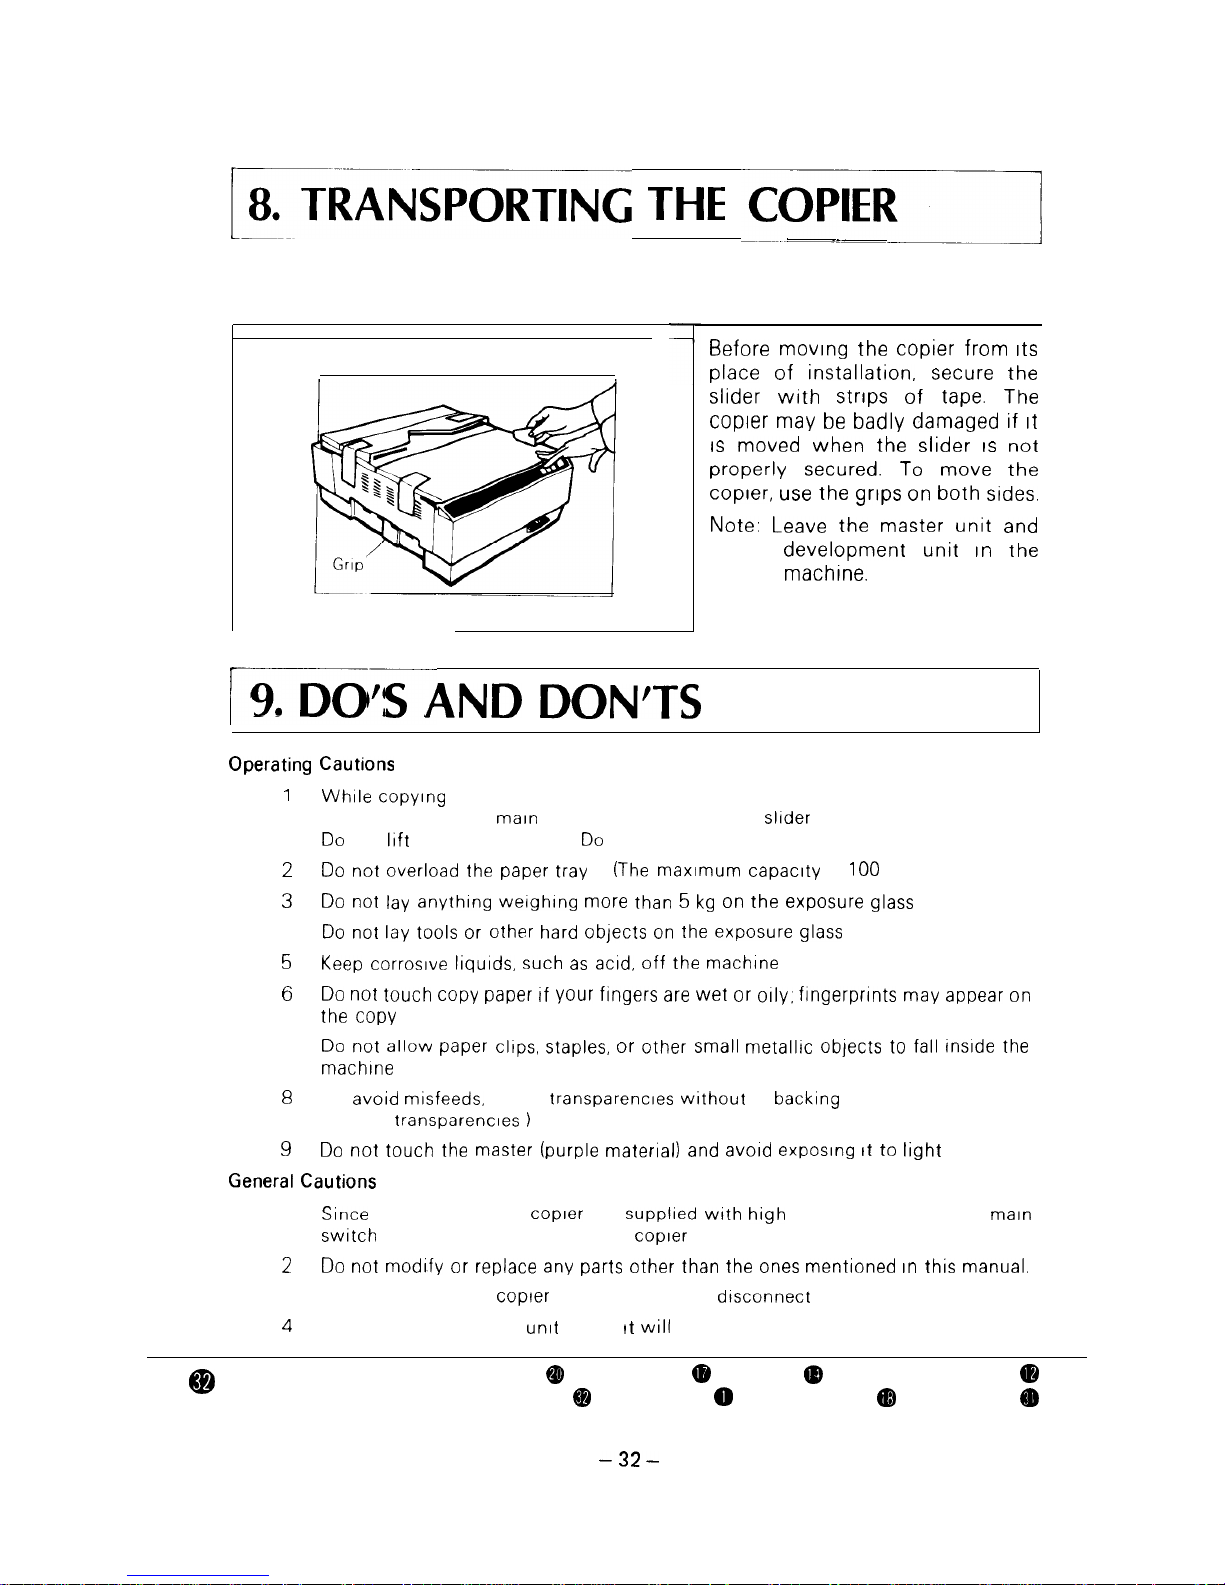
Its
To
In
AND
Do not turn off the maln switch Do not hold the
not
the platen cover
not unplug the power cord
not
the paper
IS 100 sheets)
not lay
more than on the
glass
4
not lay
or
hard
on the
glass
Ilqulds, such
acid,
the
not
paper
or
may appear on
7
not
paper clips, staples, or
small
to fall inslde the
To avold
copy
a
sheet
(Use recom-
mended
not
the master (purple material) and
It to
1
some parts of the
are
voltage, make sure the
IS off before working on the
not
or replace any parts
than the ones
manual.
3
When not using the
for a long period,
the power supply plug.
Never store the master
where
be exposed to heat
ADDING TONER
APPLICATIONS
COPYING
CONTROLS/INDICATORS
DO’S AND DON TS
INSTALLATION
LOADING PAPER
MAINTENANCE
Page 37
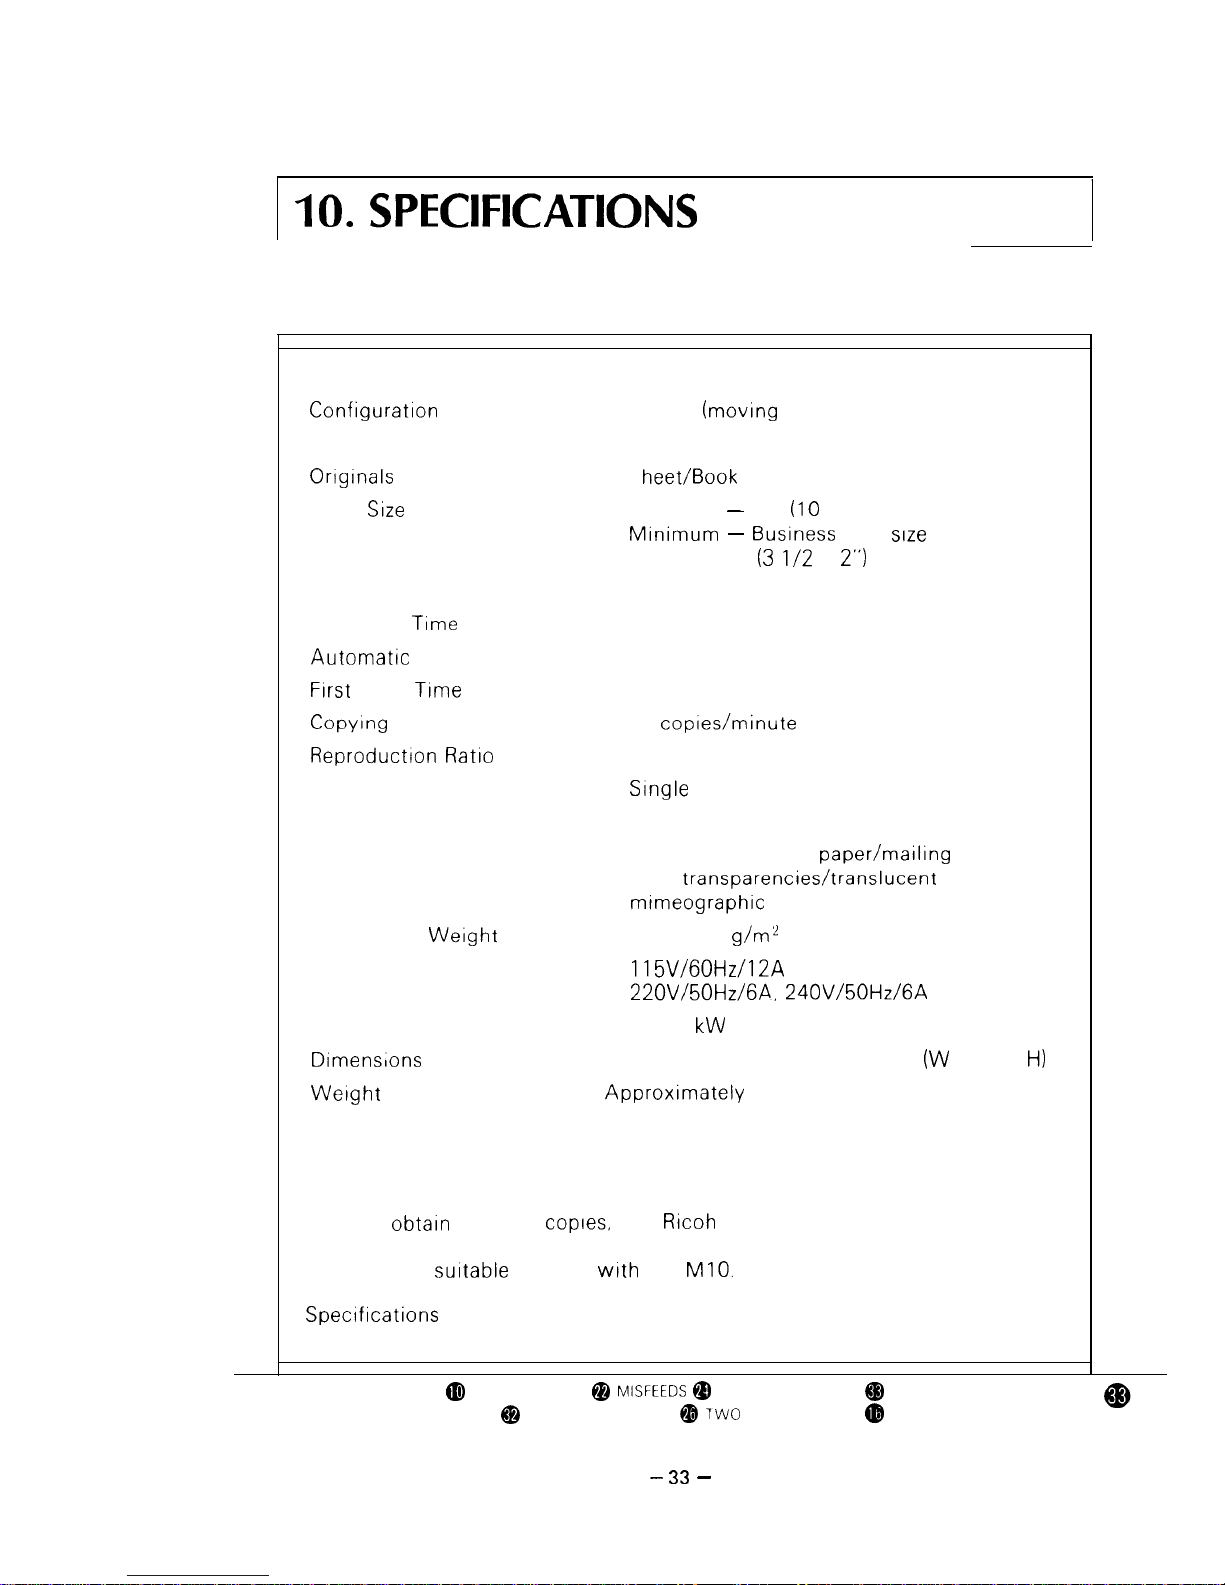
SPECIFICATIONS
Copy Process
Copy
Multiple Copying
Warm-Up Time
Reset
Ratio
Paper Feed
Toner Supply
Copy Paper
Copy Paper
Power Source
Power Consumption
Desktop (movrng platen)
Dry process (mono-component toner)
S
Maximum
B4
x 14”)
card
(84 x 49 mm)
x 2”)
up to 20
35 seconds or less
After 60 seconds
10 seconds
10
1 1
tray (100 sheets)
Cartridge
Bond paper/colored
labels
OHP
paper
paper
52 to 128 g/m2
138
420 mm x 520 mm x 212 mm
x D x
27 kg
Note To
the best copres, use Rlcoh FT paper or a similar bond paper
Ask your sales or service representative to recommend a brand of paper
that IS
for use
the
MAIN COMPONENTS
MASTER UNIT
SPECIFICATIONS
TRANSPORTING THE COPIER
TROUBLESHOOTING
SIDED COPIES
Page 38

 Loading...