

Page 1

User's Guide
For safe and correct use, be sure to read the "Safety Information" before
using the machine.
Page 2

Page 3

TABLE OF CONTENTS
How to Find Information about Operations and Troubleshooting...............................................................11
Operating Manual (Printed)....................................................................................................................... 11
Operating Manual (Digital Format)........................................................................................................... 11
How to Read This Manual...............................................................................................................................13
Introduction...................................................................................................................................................13
Symbols Used in This Manual.....................................................................................................................13
Model-Specific Information........................................................................................................................ 13
Disclaimer.....................................................................................................................................................14
Notes............................................................................................................................................................ 14
Note to Administrator.................................................................................................................................. 15
List of Option................................................................................................................................................ 15
About IP Address......................................................................................................................................... 16
1. Guide to the Machine
Guide to Components......................................................................................................................................17
Exterior: Front View......................................................................................................................................17
Exterior: Rear View...................................................................................................................................... 19
Interior...........................................................................................................................................................21
Control Panel................................................................................................................................................22
Installing Option...............................................................................................................................................25
Attaching Paper Feed Unit.......................................................................................................................... 25
How to Use the [Home] Screen...................................................................................................................... 28
Displaying the [Home] Screen....................................................................................................................28
How to Use the [Home] Screen..................................................................................................................28
Customizing the [Home] Screen..................................................................................................................... 31
How to Customize the [Home] Screen.......................................................................................................31
Adding to the [Home] Screen Shortcuts to Favorite Items........................................................................ 31
Changing the Order of Icons on the [Home] Screen................................................................................31
Deleting an Icon on the [Home] Screen.....................................................................................................32
Registering Frequently Used Functions........................................................................................................... 33
Registering Functions in a Favorite Item..................................................................................................... 33
Recalling a Favorite Item.............................................................................................................................34
Deleting a Favorite Item.............................................................................................................................. 35
Displaying Frequently Used Modes Preferentially........................................................................................ 36
1
Page 4

Multi-access......................................................................................................................................................37
About Operation Tools.................................................................................................................................... 41
Entering Characters..........................................................................................................................................42
Character Entry Display.............................................................................................................................. 42
Available Characters...................................................................................................................................43
Entering Text.................................................................................................................................................43
Using RICOH Smart Device Connector......................................................................................................... 45
Connecting a Smart Device to the Machine Using NFC.............................................................................. 46
Writing the Machine's Information to the NFC with a Smart Device.......................................................46
Using the Application on a Smart Device by Using NFC.........................................................................46
2. Paper Specifications and Adding Paper
Workflow for Loading Paper and Configuring Paper Sizes and Types...................................................... 47
Loading Paper.................................................................................................................................................. 48
Loading Paper into Tray1 and 2................................................................................................................ 48
Loading Paper into Bypass Tray................................................................................................................. 53
Loading Envelopes.......................................................................................................................................54
Specifying Paper Type and Paper Size Using the Control Panel.................................................................56
Specifying the Paper Type.......................................................................................................................... 56
Specifying the Standard Paper Size...........................................................................................................57
Specifying a Custom Paper Size................................................................................................................ 57
Specifying Paper Type and Paper Size Using Web Image Monitor...........................................................59
Specifying a Custom Paper Size................................................................................................................ 59
Specifying Paper Type and Paper Size Using the Printer Driver..................................................................60
When Using Windows................................................................................................................................ 60
When Using OS X/macOS........................................................................................................................ 61
Supported Paper.............................................................................................................................................. 62
Specifications of Paper Types.....................................................................................................................65
Non-Recommended Paper Types.............................................................................................................. 72
Paper Storage.............................................................................................................................................. 72
Print Area......................................................................................................................................................73
Placing Originals..............................................................................................................................................76
Placing Originals on the Exposure Glass...................................................................................................76
Placing Originals in the Auto Document Feeder....................................................................................... 76
2
Page 5

About Originals............................................................................................................................................77
3. Printing Documents
What You Can Do with the Printer Function...................................................................................................81
Configuring Option Settings for the Printer.................................................................................................... 82
Conditions for Bidirectional Communication.............................................................................................82
If Bidirectional Communication is Disabled............................................................................................... 82
Displaying the Printing Preferences Dialog Box.............................................................................................85
Displaying the Printing Preferences Dialog Box from the [Start] Menu................................................... 85
Displaying the Printing Preferences Dialog Box in an Application.......................................................... 85
Basic Operation of Printing............................................................................................................................. 87
When Using Windows................................................................................................................................ 87
When Using macOS/OS X........................................................................................................................ 87
If a Paper Mismatch Occurs....................................................................................................................... 88
Canceling a Print Job...................................................................................................................................89
Printing Confidential Documents..................................................................................................................... 91
Storing a Locked Print file............................................................................................................................91
Printing a Locked Print file............................................................................................................................92
Deleting a Locked Print file..........................................................................................................................93
Using Various Print Functions...........................................................................................................................95
Print Quality Functions................................................................................................................................. 95
Print Output Functions..................................................................................................................................96
4. Copying Originals
What You Can Do with the Copier Function..................................................................................................99
Copier Mode Screen.................................................................................................................................... 100
Basic Operation of Copying.........................................................................................................................102
Canceling a Copy.....................................................................................................................................103
Making Enlarged or Reduced Copies......................................................................................................... 105
Specifying Reduce/Enlarge.....................................................................................................................106
Copying Single-Sided Originals with 2-Sided and Combined Printing....................................................107
Specifying Combined and 2-sided Copies.............................................................................................110
Copying 2-Sided Originals with 2-Sided and Combined Printing............................................................112
Duplex Copying Using the ADF............................................................................................................... 113
Duplex Copying Manually Using the Exposure Glass...........................................................................115
3
Page 6

Copying an ID Card......................................................................................................................................117
Specifying Scan Settings for Copying..........................................................................................................120
Adjusting Image Density........................................................................................................................... 120
Selecting the Document Type According to Original.............................................................................120
5. Scanning Originals
What You Can Do with the Scanner Function.............................................................................................123
Scanner Mode Screen.................................................................................................................................. 124
Registering Scan Destinations.......................................................................................................................126
Modifying Scan Destinations....................................................................................................................132
Deleting Scan Destinations....................................................................................................................... 132
Testing Transmission.................................................................................................................................. 133
Basic Operation of Scan to Folder...............................................................................................................135
Printing the Check Sheet.......................................................................................................................135
Confirming the User Name and Computer Name.............................................................................136
Creating a Shared Folder on a Computer..........................................................................................138
Specifying Access Privileges for the Created Shared Folder............................................................ 140
Registering a Shared Folder in the Machine's Address Book........................................................... 140
Send Scanned Files to a Shared Folder..............................................................................................141
Basic Operation of Scan to E-mail...............................................................................................................144
Configuring SMTP and DNS Settings..................................................................................................144
Registering Destination E-mail Addresses to the Address Book........................................................ 145
Sending Scanned Files by E-mail........................................................................................................ 145
Basic Operation of Scan to FTP....................................................................................................................148
Configuring FTP Server Settings...........................................................................................................148
Sending Scanned Files to an FTP Server.............................................................................................148
Specifying the Scan Destination Using [Resend].........................................................................................151
Basic Procedures for Saving Scan Files on a USB Flash Memory Device................................................ 152
Basic Operation for RICOH Scan Utility V2................................................................................................155
Preparations for Using RICOH Scan Utility V2.......................................................................................155
Using RICOH Scan Utility V2 to Scan to a Computer............................................................................155
Basic Operation for TWAIN Scanning........................................................................................................159
Using TWAIN scanner..............................................................................................................................159
TWAIN scanning.......................................................................................................................................159
4
Page 7

Settings you can configure in the TWAIN dialog box........................................................................... 160
Basic Operation for WIA Scanning............................................................................................................. 162
Basic Operation for ICA Scanning...............................................................................................................163
Installing the ICA Driver............................................................................................................................ 163
Using ICA Scanner....................................................................................................................................163
ICA Scanning.............................................................................................................................................163
Settings you can configure in the ICA dialog box..................................................................................164
Using SANE scanning................................................................................................................................... 166
Specifying Scan Settings for Scanning........................................................................................................ 167
Specifying the Scanning Size According to the Size of the Original....................................................167
Adjusting Image Density........................................................................................................................... 168
Specifying Resolution................................................................................................................................169
6. Sending and Receiving a Fax
What You Can Do with the Fax Function.....................................................................................................171
Fax Setting Workflows.................................................................................................................................. 172
Fax Mode Screen.......................................................................................................................................... 173
Setting the Date and Time............................................................................................................................. 175
Registering Fax Destinations......................................................................................................................... 176
Registering Fax Destinations Using the Control Panel............................................................................176
Registering Fax Destinations Using Web Image Monitor...................................................................... 178
Preventing Transmission to the Wrong Destination.................................................................................180
Sending a Fax................................................................................................................................................182
Selecting Transmission Mode...................................................................................................................182
Internet Fax Transmission..........................................................................................................................183
Basic Operation for Sending a Fax......................................................................................................... 184
Canceling a Transmission......................................................................................................................... 186
Specifying the Fax Destination................................................................................................................. 188
Useful Sending Functions..........................................................................................................................191
Specifying Scan Settings for Faxing........................................................................................................ 193
Using the Fax Function from a Computer (LAN-Fax)..................................................................................196
Basic Operation for Sending Faxes from a Computer...........................................................................196
Configuring Transmission Settings............................................................................................................198
Configuring the LAN-Fax Address Book................................................................................................. 198
5
Page 8

Editing a Fax Cover Sheet........................................................................................................................ 201
Receiving a Fax..............................................................................................................................................202
Selecting Reception Mode....................................................................................................................... 202
Receiving an Internet Fax..........................................................................................................................206
Forwarding or Storing Faxes in Memory................................................................................................ 208
Receiving or Rejecting Faxes from Special Senders...............................................................................212
Lists/Reports Related to Fax......................................................................................................................... 214
7. Configuring the Machine Using the Control Panel
Basic Operation.............................................................................................................................................215
Menu Chart.................................................................................................................................................... 216
Copier Settings...............................................................................................................................................217
Scanner Settings............................................................................................................................................ 222
Fax Settings.................................................................................................................................................... 224
Address Book.................................................................................................................................................233
System Settings...............................................................................................................................................234
Printer Settings................................................................................................................................................242
Paper Settings................................................................................................................................................ 246
Administrator Tools Settings..........................................................................................................................251
Printing Lists/Reports..................................................................................................................................... 259
Printing the Configuration Page................................................................................................................259
Types of Lists/Reports............................................................................................................................... 259
Network Settings............................................................................................................................................261
@Remote.........................................................................................................................................................266
8. Configuring the Machine Using Utilities
Available Setting Functions Using Web Image Monitor............................................................................ 267
Using Web Image Monitor...........................................................................................................................268
Displaying Top Page..................................................................................................................................... 269
Changing the Interface Language........................................................................................................... 270
Checking the System Information................................................................................................................. 271
Status Tab...................................................................................................................................................271
Counter Tab............................................................................................................................................... 272
Machine Information Tab......................................................................................................................... 275
Configuring the System Settings................................................................................................................... 276
6
Page 9

Sound Volume Adjustment Tab................................................................................................................ 276
Tray Paper Settings Tab............................................................................................................................ 276
Copier Tab.................................................................................................................................................280
Fax Tab.......................................................................................................................................................280
Priority Tray Tab.........................................................................................................................................282
Toner Saving Tab...................................................................................................................................... 283
I/O Timeout Tab....................................................................................................................................... 284
Black-and-White Print Priority Tab...........................................................................................................284
Registering Destinations................................................................................................................................ 285
Registering Fax Special Senders.................................................................................................................. 286
Restricting Machine Functions According to User.......................................................................................287
Enabling the User Restriction Settings......................................................................................................287
When Machine Functions are Restricted..................................................................................................... 291
Configuring the Network Settings................................................................................................................ 293
Network Status Tab...................................................................................................................................293
IPv6 Configuration Tab.............................................................................................................................294
Network Application Tab......................................................................................................................... 294
DNS Tab.................................................................................................................................................... 295
Auto E-mail Notification Tab.................................................................................................................... 296
SNMP Tab................................................................................................................................................. 297
SMTP Tab...................................................................................................................................................298
POP3 Tab...................................................................................................................................................299
Internet Fax Tab.........................................................................................................................................299
Wireless Tab.............................................................................................................................................. 300
Certificate Tab........................................................................................................................................... 302
Configuring the IPsec Settings.......................................................................................................................304
IPsec Global Settings Tab.........................................................................................................................304
IPsec Policy List Tab...................................................................................................................................304
Printing Lists/Reports..................................................................................................................................... 308
Configuring the Administrator Settings.........................................................................................................309
Administrator Tab...................................................................................................................................... 309
Reset Settings Tab......................................................................................................................................309
Backup Setting Tab................................................................................................................................... 310
7
Page 10

Restore Setting Tab....................................................................................................................................311
Set Date/Time Tab....................................................................................................................................311
Energy Saver Mode Tab.......................................................................................................................... 312
9. Maintaining the Machine
Replacing the Print Cartridge........................................................................................................................313
Replacing the Waste Toner Bottle................................................................................................................ 318
Replacing a Component............................................................................................................................... 324
Replacing the Intermediate Transfer Unit.................................................................................................324
Replacing the Fusing Unit and Transfer Roller........................................................................................ 324
Cautions When Cleaning..............................................................................................................................325
Cleaning the Toner Density Sensor.............................................................................................................. 326
Cleaning the Friction Pad and Paper Feed Roller....................................................................................... 328
Cleaning the Registration Roller and Paper Tray........................................................................................ 331
Cleaning the Exposure Glass........................................................................................................................334
Cleaning the Auto Document Feeder...........................................................................................................335
Moving and Transporting the Machine....................................................................................................... 337
Disposal......................................................................................................................................................338
Where to Inquire....................................................................................................................................... 338
10. Troubleshooting
Error and Status Messages on the Screen...................................................................................................339
Removing Paper Jams....................................................................................................................................349
Removing Printing Jams.............................................................................................................................349
Removing Scanning Jams......................................................................................................................... 357
When You Cannot Print Test Page............................................................................................................... 359
Paper Feed Problems.....................................................................................................................................360
Print Quality Problems................................................................................................................................... 363
Checking the Condition of the Machine..................................................................................................363
Checking the Printer Driver Settings.........................................................................................................364
Printer Problems............................................................................................................................................. 366
When You Cannot Print Properly............................................................................................................. 366
When You Cannot Print Clearly...............................................................................................................370
When Paper Is Not Fed or Ejected Properly...........................................................................................374
Other Printing Problems............................................................................................................................ 375
8
Page 11

Copier Problems............................................................................................................................................ 376
When You Cannot Make Clear Copies..................................................................................................376
When You Cannot Make Copies as Wanted.........................................................................................377
Scanner Problems.......................................................................................................................................... 378
When You Cannot Browse the Network to Send a Scan File............................................................... 378
When Scanning Is Not Done As Expected............................................................................................. 378
Fax Problems..................................................................................................................................................379
When You Cannot Send or Receive Fax Messages As Wanted.......................................................... 379
When an Error Is Notified via a Report or E-mail...................................................................................382
Error Code................................................................................................................................................. 384
Common Problems.........................................................................................................................................389
11. Configuring Network Settings
Connecting the Machine to a Wired Network........................................................................................... 391
Configuring the IPv4 Setting.....................................................................................................................391
Configuring the IPv6 setting......................................................................................................................391
Connecting the Machine to a Wireless Network........................................................................................393
Using the Wi-Fi Setup Wizard................................................................................................................. 393
Using the WPS Button............................................................................................................................... 394
Using a PIN Code..................................................................................................................................... 396
12. Appendix
Transmission Using IPsec...............................................................................................................................399
Encryption and Authentication by IPsec.................................................................................................. 399
Security Association.................................................................................................................................. 400
Encryption Key Exchange Settings Configuration Flow......................................................................... 401
Specifying Encryption Key Exchange Settings........................................................................................401
Specifying IPsec Settings on the Computer............................................................................................. 402
Enabling and Disabling IPsec Using the Control Panel..........................................................................404
Notes About the Toner.................................................................................................................................. 406
Specifications of the Machine...................................................................................................................... 407
General Function Specifications.............................................................................................................. 407
Printer Function Specifications..................................................................................................................409
Copier Function Specifications.................................................................................................................410
Scanner Function Specifications...............................................................................................................411
9
Page 12

Fax Function Specifications...................................................................................................................... 412
Paper Feed Unit TK1220..........................................................................................................................414
Consumables..................................................................................................................................................416
Print Cartridge............................................................................................................................................416
Waste Toner Bottle....................................................................................................................................417
Information for This Machine........................................................................................................................418
User Information on Electrical & Electronic Equipment (mainly Europe and Asia)..........418
Note for the Battery and/or Accumulator Symbol (For EU countries only)......................................... 419
Environmental Advice for Users (mainly Europe)............................................................... 419
Note to Users EU Countries......................................................................................................................420
NOTES TO USERS REGARDING FACSIMILE UNIT (NEW ZEALAND)............................................. 421
Notes to users in the state of California (Notes to Users in USA)..........................................................421
Notes to users in the United States of America.......................................................................................422
Notes to Canadian Users of Wireless Devices.......................................................................................424
Notes to Canadian Users regarding Facsimile Unit...............................................................................425
ENERGY STAR Program ....................................................................................................... 426
Saving Energy............................................................................................................................................426
Trademarks.....................................................................................................................................................429
INDEX...........................................................................................................................................................431
10
Page 13

How to Find Information about Operations and Troubleshooting
You can find support information about operating the machine and troubleshooting in the Operating
Manual (printed), Operating Manual (digital format), and Help (online).
Operating Manual (Printed)
The following manuals are provided with this machine.
Safety Information
This manual explains the safety precautions that should be followed when using the machine. Be
sure to read this manual before using the machine.
Setup Guide
This manual explains how to set up the machine. It also explains how to remove the machine from
the packaging and how to connect it to a computer.
Operating Manual (Digital Format)
Operating manuals can be viewed from Ricoh's website or from the provided CD-ROM.
Viewing from a web browser
Access the Internet from a web browser.
Confirm that the computer or the machine is connected to the network.
Download the operating manuals from https://www.ricoh.com/.
Viewing from the provided CD-ROM
Operating manuals can also be viewed from the provided CD-ROM.
• When using Windows
1. Insert the CD-ROM into the CD-ROM drive.
2. Click [Read Manual] and follow the instructions on the screen.
The PDF file manual opens.
• When using OS X/macOS
1. Insert the CD-ROM into the CD-ROM drive.
2. Double-click Manuals.htm file, located on the CD-ROM root directory.
3. Select the language.
4. Click [Read PDF manuals].
11
Page 14

5. Click the manual you want to refer to.
The PDF file manual opens.
12
Page 15
How to Read This Manual
ECC101
Introduction
This manual contains detailed instructions and notes on the operation and use of this machine. For your
safety and benefit, read this manual carefully before using the machine. Keep this manual in a handy
place for quick reference.
Symbols Used in This Manual
This manual uses the following symbols:
Indicates points to pay attention to when using functions. This symbol indicates points that may result in
the product or service becoming unusable or result in the loss of data if the instructions are not obeyed.
Be sure to read these explanations.
Indicates supplementary explanations of the product's functions and instructions on resolving user errors.
[ ]
Indicates the names of keys on the machine's display or control panels.
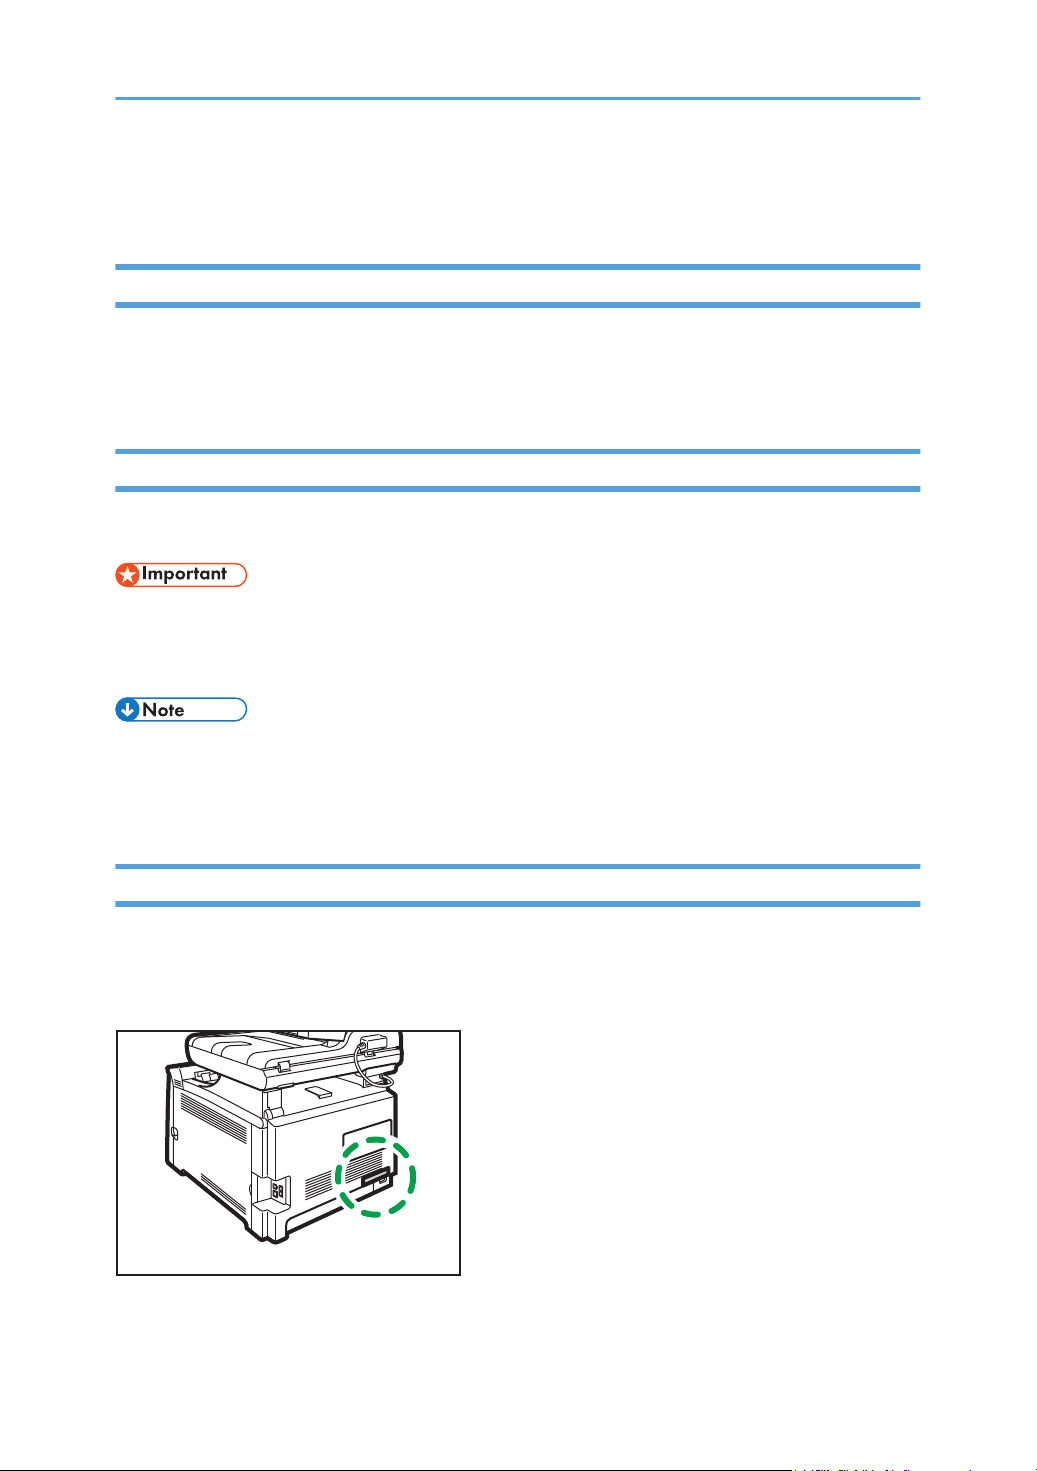
Model-Specific Information
This section explains how you can identify the region your machine belongs to.
There is a label on the rear of the machine, located in the position shown below. The label contains
details that identify the region your machine belongs to. Read the label.
13
Page 16

The following information is region-specific. Read the information under the symbol that corresponds to
the region of your machine.
(mainly Europe and Asia)
If the label contains the following, your machine is a region A model:
• CODE XXXX -27
• 220–240 V
(mainly North America)
If the label contains the following, your machine is a region B model:
• CODE XXXX -17
• 120–127 V
• Dimensions in this manual are given in two units of measure: metric and inch. If your machine is a
Region A model, refer to the metric units. If your machine is a Region B model, refer to the inch
units.
Disclaimer
To the maximum extent permitted by applicable laws, in no event will the manufacturer be liable for any
damages whatsoever arising out of failures of this machine, losses of the registered data, or the use or
non-use of this product and operation manuals provided with it.
Make sure that you always copy or have backups of the data registered in this machine. Documents or
data might be erased due to your operational errors or malfunctions of the machine.
In no event will the manufacturer be responsible for any documents created by you using this machine or
any results from the data executed by you.
Notes
Contents of this manual are subject to change without prior notice.
Two kinds of size notation are employed in this manual.
Some illustrations in this manual might be slightly different from the machine.
Certain options might not be available in some countries. For details, please contact your local dealer.
Depending on which country you are in, certain units may be optional. For details, please contact your
local dealer.
For good output quality, the manufacturer recommends that you use genuine toner from the
manufacturer.
14
Page 17

The manufacturer shall not be responsible for any damage or expense that might result from the use of
parts other than genuine parts from the manufacturer with your office products.
Note to Administrator
Password
Certain configurations of this machine can be password-protected to prevent unauthorized modifications
by others. We strongly recommend you to create your own password immediately.
The following are the operations that can be password-protected:
• Entering the [Address Book], [Network Settings], or [Administrator Tools] menu using the control
panel
You can access these menus without a password by factory default.
The setting for creating a password can be found in [Administrator Tools].
• Configuring the [System Settings], [Quick Dial Destination], [Scan Destination], [Fax Speed Dial
Destination], [Special Sender], [Restrict Available Functions], [Network Settings], [IPsec Settings],
or [Administrator Tools] menu using Web Image Monitor
You can configure the machine using Web Image Monitor without a password by factory default.
The setting for creating a password can be found in [Administrator Settings].
For details about creating passwords, see page 309 "Configuring the Administrator Settings".
User Restriction
You can restrict the use of certain functions of this machine to users with proper authentication.
Using Web Image Monitor, you can select the functions you want to restrict, and register the users who
can use that function upon authentication.
• For details about creating passwords and configuring the user restriction settings, see page 287
"Restricting Machine Functions According to User".
List of Option
Option List Referred to as
Paper Feed Unit TK1220 Paper feed unit
15
Page 18

• If Paper feed unit is attached, "Tray 2" appears on the machine's control panel.
About IP Address
In this manual, "IP address" covers both IPv4 and IPv6 environments. Read the instructions that are
relevant to the environment you are using.
16
Page 19

1. Guide to the Machine
ECC102
15
14
13
12
11
10 9
8
7
6
5
4
3
21
This chapter describes preparations for using the machine and its operating instructions.
Guide to Components
This section introduces the names of the various parts on the front and rear side of the machine and
outlines their functions.
Exterior: Front View
17
Page 20

1. Guide to the Machine
No. Name Description
1 Input Tray for the ADF (Auto
document feeder)
Place stacks of originals here. They will feed in
automatically.
This tray can hold up to 50 sheets of plain paper.
2 Auto Document Feeder
(Exposure Glass Cover)
The ADF is integrated with the exposure glass cover.
Open this cover to place originals on the exposure
glass.
3 Exposure Glass Place originals here sheet by sheet.
4 Extender for the ADF Tray Extend these when placing paper longer than A4 in the
input tray for ADF.
5 Standard Tray/Top Cover Printed paper is delivered to this tray. Up to 150 sheets
of plain paper can be stacked here.
Open this to replace the print cartridges.
6 Front Cover Open this cover to replace the waste toner bottle or
remove jammed paper.
7 Front Cover Open Lever To open the front cover, pull this lever on the right side
of the machine.
8 End Fence Adjust this fence to the paper size.
18
9 Tray 1 This tray can hold up to 250 sheets of plain paper.
10 Bypass Tray Load paper here sheet by sheet.
11 Side Fence Adjust this fence to the paper size.
12 Control Panel Contains a screen and keys for machine control.
13 USB Flash Disk Port Insert a USB flash disk for using the Scan to USB
function.
14 Output Tray for the ADF Originals scanned with the ADF are delivered from
here.
15 ADF Cover Open this cover to remove originals jammed in the ADF.
Page 21
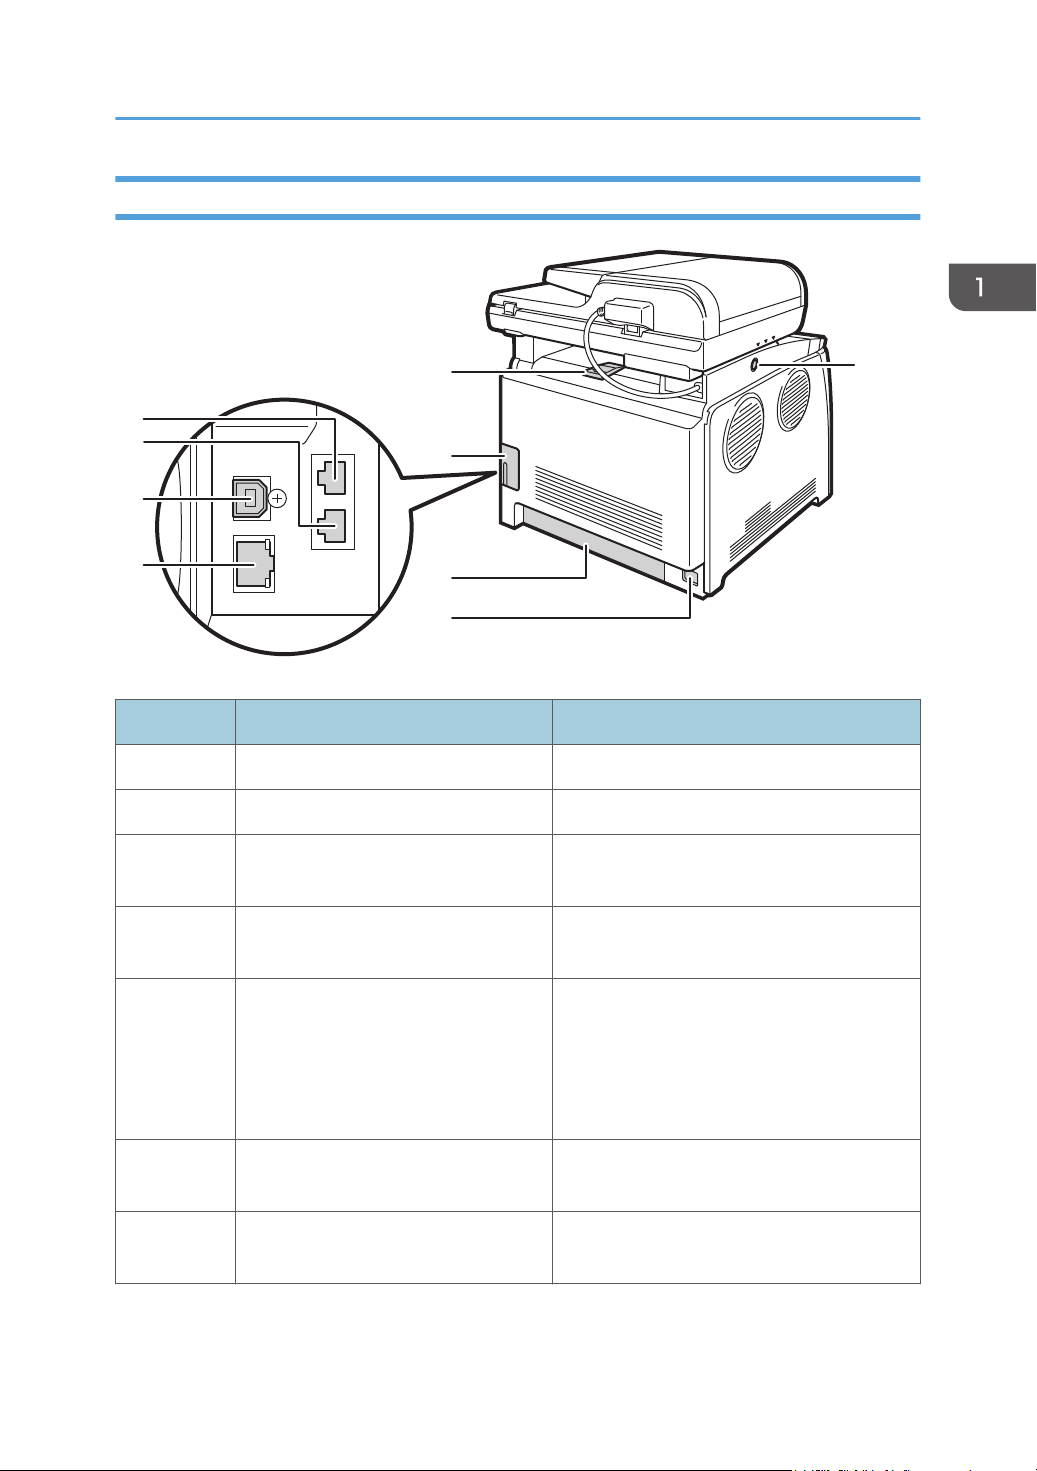
Exterior: Rear View
ECC103
9
8
7
6
5
4
3
2
1
Guide to Components
No. Name Description
1 G3 (analog) Line Interface Connector For connecting a telephone line.
2 External Telephone Connector For connecting an external telephone.
3 USB Port For connecting the machine to a computer
using a USB cable.
4 Ethernet Port For connecting the machine to the network
using a network interface cable.
5 Stop Fences Pull up this fence to prevent paper falling off
when printing a large amount of paper at a
time.
The fence can be adjusted at the A4/Letter
or Legal size position.
6 Cable Cover Remove this cover when connecting cables
to the machine.
7 Rear Cover Remove this cover when loading paper
longer than A4 in Tray 1.
19
Page 22

DUE205
ECC104
1. Guide to the Machine
No. Name Description
8 Power Socket For connecting the power cord to the
machine.
9 Button for Sliding the ADF Press to slide the ADF towards the rear of the
machine and hold it in that position, if paper
output to the output tray is difficult to retrieve.
• As shown, slide the ADF while pressing the button for sliding the ADF. Be sure to check that the ADF
is closed in advance. Be careful not to trap your fingers when sliding.
• Pull up the retainer as shown below to prevent A4- or Letter-size printed copies from falling off.
• Pull up the retainer as shown below to prevent Legal-size printed copies from falling off.
20
Page 23
3
2
1
ECC105
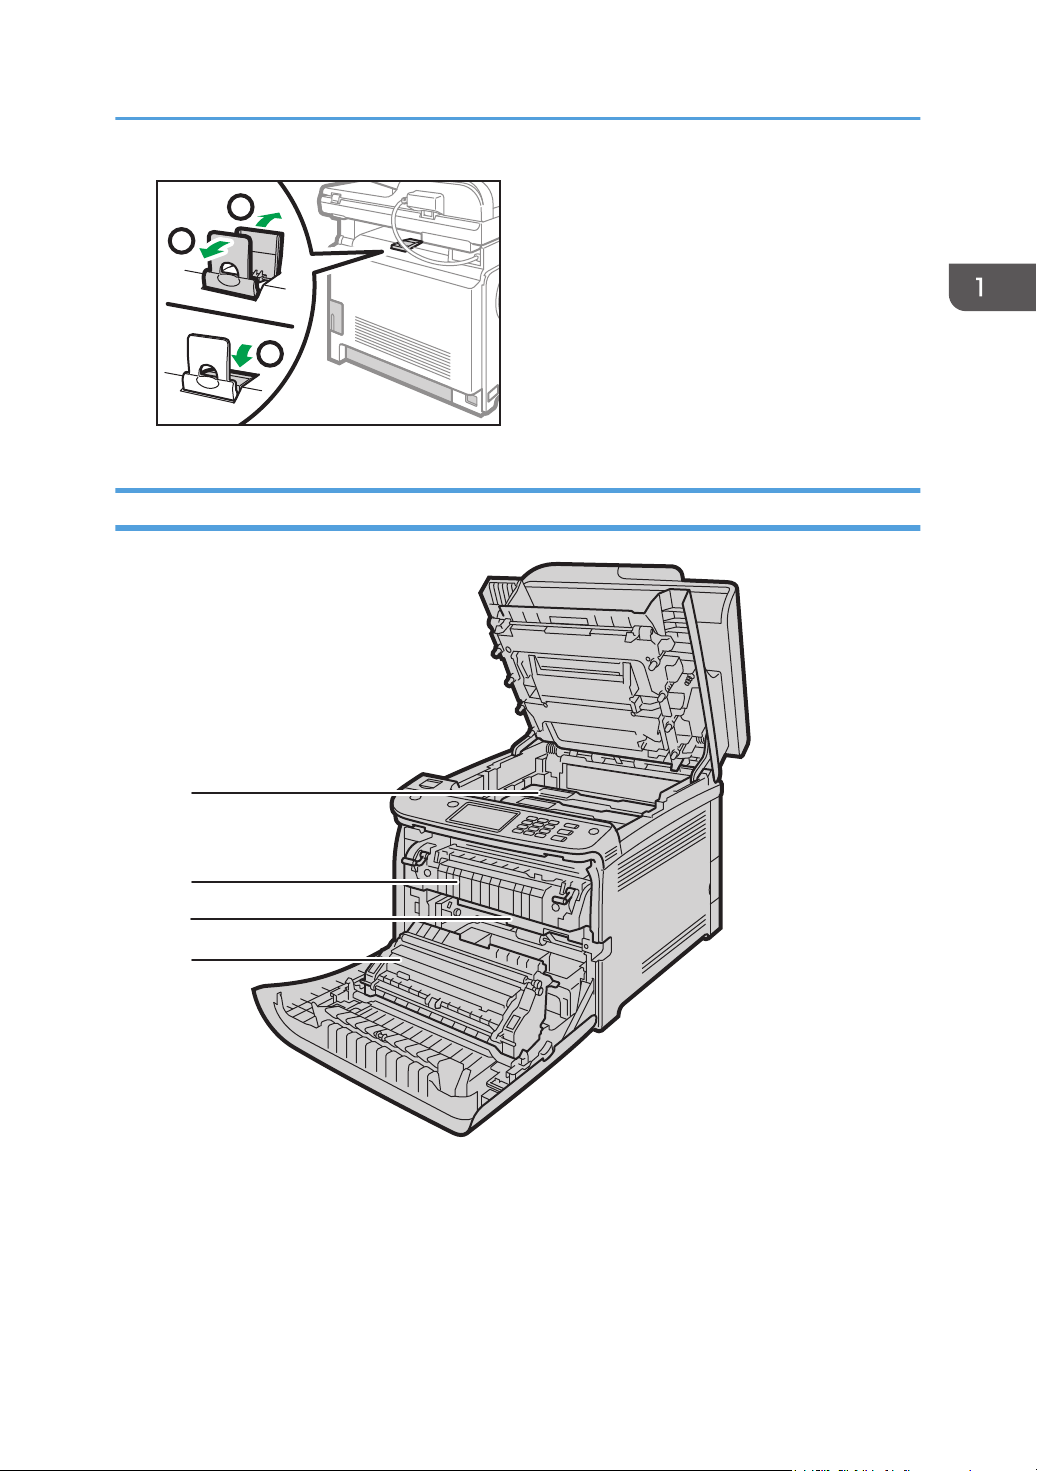
Interior
ECC106
4
3
2
1
Guide to Components
21
Page 24
ECC201
10 9 8
7654321
1. Guide to the Machine
No. Name Description
1 Print Cartridge Install the print cartridges from the machine rear, in the order of
cyan (C), magenta (M), yellow (Y), and black (K). Messages
appear on the screen when print cartridges need to be replaced,
or new ones need to be prepared.
2 Fusing Unit Fuses toner to the paper.
You might have to move this unit to check for or remove jammed
paper.
3 Waste Toner Bottle Collects toner that is wasted during printing.
4 Transfer unit You need to remove this when you replace the waste toner bottle.
• For details about the messages that appear on the screen when consumables need to be replaced,
see page 339 "Error and Status Messages on the Screen".
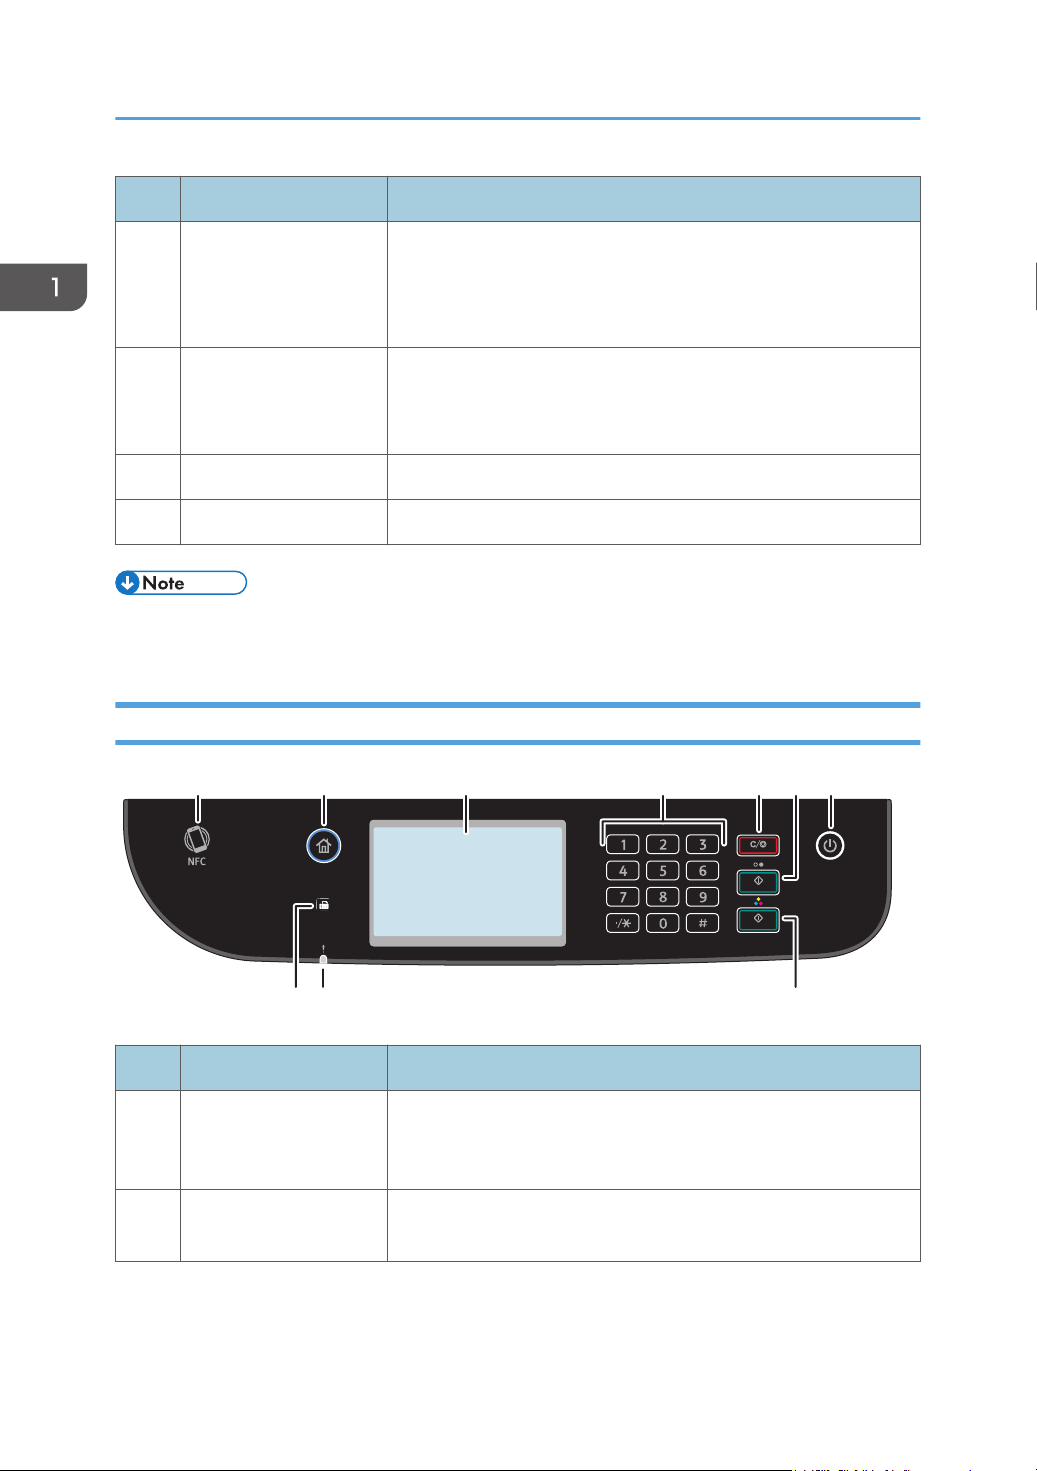
Control Panel
No. Name Description
1 NFC Allows you to connect a smart device to the machine when you
touch NFC on a smart device using the application corresponding
to the machine.
2 [Home] key Press to display the [Home] screen. For details, see page 28
"How to Use the [Home] Screen".
22
Page 25

Guide to Components
No. Name Description
3 Display panel This is a touch panel display that features icons, keys, and
shortcuts that allow you to navigate the screens of the various
functions and provide you with information about operation status
and other messages.
You can display the software keyboard by double tapping the
entry area on the display.
4 Number keys Use to enter the numbers for copies, fax numbers and data for the
selected function.
5 [Clear/Stop] key • While the machine is processing a job: press to cancel the
current job.
• While configuring the machine settings: press to cancel the
current setting and return to standby mode.
• While in standby mode: press to cancel temporary settings
such as image density or resolution.
6 [B&W Start] key Press to scan or copy in black and white, or start sending a fax.
7 [Power] key Press to turn on and turn off the main power. To turn off the
machine, press and hold down this key for at least three seconds.
This indicator lights up blue when the machine is turned on.
If the machine's system is busy, the power may not be turned off
even though you press and hold down this key for three seconds. If
this is the case, press and hold down the [Clear/Stop] key and
[Power] key simultaneously for at least three seconds to force the
machine to turn off.
Do not accidentally press the [Power] key within 3 minutes of
disconnecting the power cord.
8 [Color Start] key Press to scan or copy in color.
9 Alert indicator Flashes yellow when the machine will require maintenance soon
(such as replacing consumables), or lights up red when a machine
error occurs.
When an alert is issued, check the messages on the screen. For
details about the messages that appear on the screen, see
page 339 "Error and Status Messages on the Screen".
23
Page 26

1. Guide to the Machine
No. Name Description
10 Fax indicator Indicates the status of the fax functions. Lights up when received
faxes that have not been printed out exist in the machine's
memory. Flashes when the machine is unable to print out the faxes
due to machine errors such as an empty paper tray or a paper
jam.
• The backlight of the screen is turned off when the machine is in Energy Saver mode.
• When the machine is processing a job, you cannot display the menu for configuring the machine.
You can confirm the machine's status by checking messages on the screen. If you see messages
such as "Printing...", "B&W Copying...", "Color Copying...", or "Processing...", wait until the current
job is finished.
24
Page 27
Installing Option
This section explains how to install options.
Attaching Paper Feed Unit
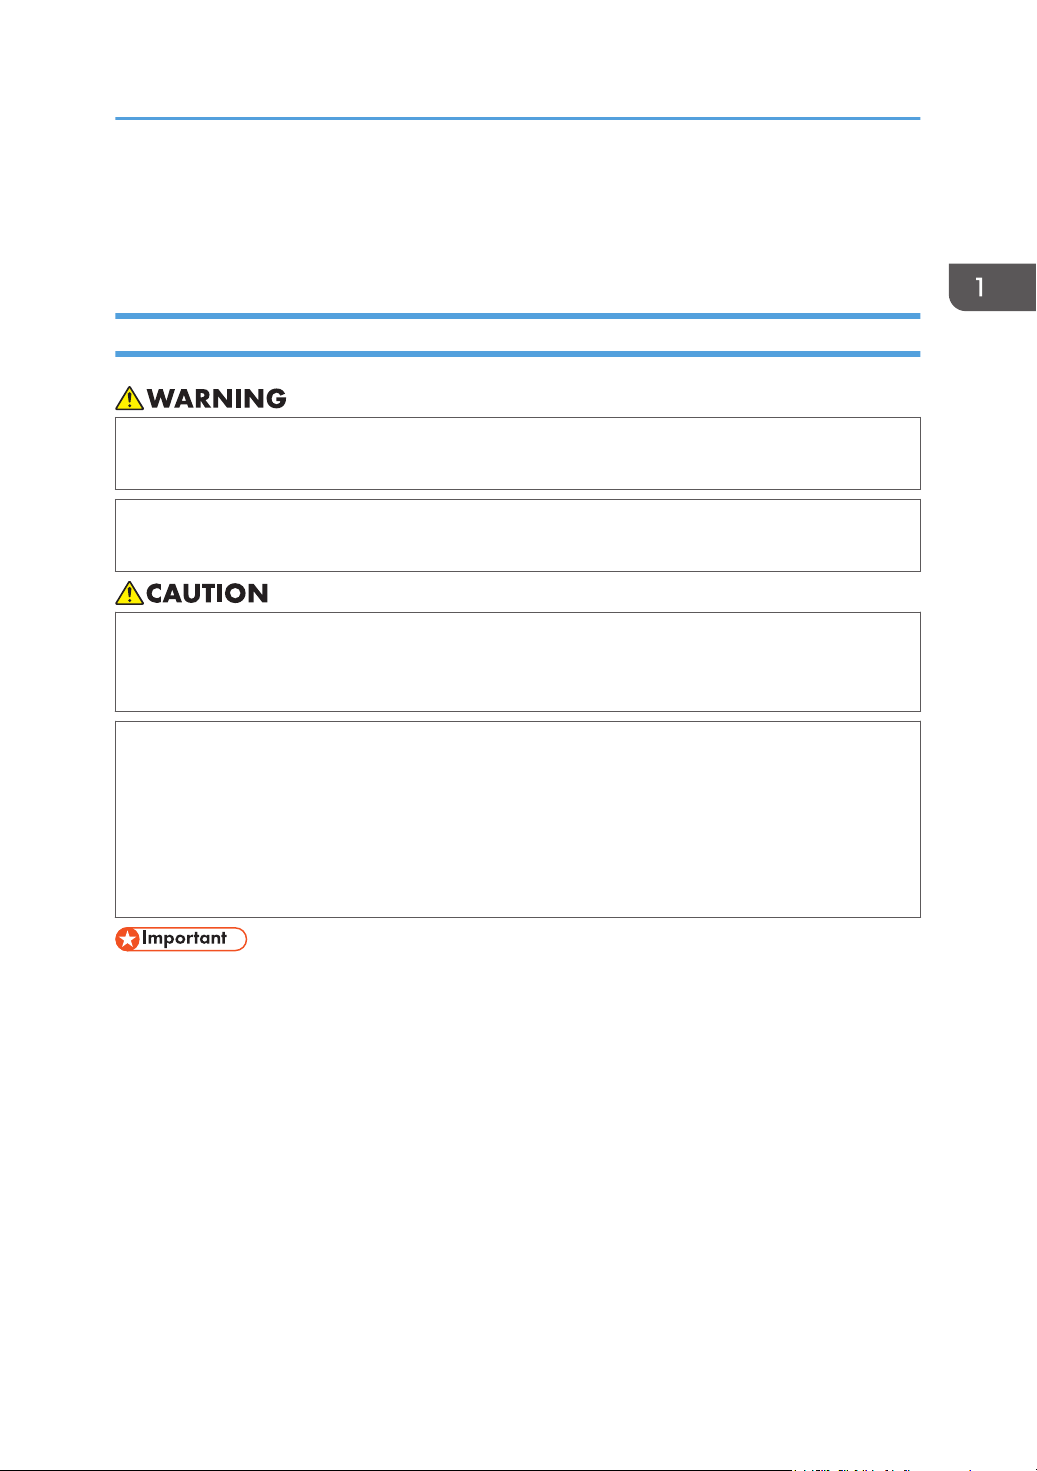
• Touching the prongs of the power cable's plug with anything metallic constitutes a fire and
electric shock hazard.
• It is dangerous to handle the power cord plug with wet hands. Doing so could result in electric
shock.
• Before installing or removing options, always disconnect the power cord plugs from the wall
outlet and allow time for the main unit to fully cool. Failing to take these precautions could result
in burns.
Installing Option
• The machine weighs approximately 30 kg (67 lb.). When moving the machine, use the inset
grips on both sides, and lift slowly in pairs.
• Lifting the paper feed unit carelessly or dropping may cause injury.
• Before moving the machine, unplug the power cord from the wall outlet. If the cord is
unplugged abruptly, it could become damaged. Damaged plugs or cords can cause an
electrical or fire hazard.
• Tray 1 is required to print using the optional paper feed unit. Without Tray 1, paper jams will occur.
• The machine must be lifted by two people.
• Do not hold the tray to lift the machine.
1. Confirm that the following is true: The machine's cord is unplugged from the wall outlet.
25
Page 28
DPP210
DUE287
ECC107
1. Guide to the Machine
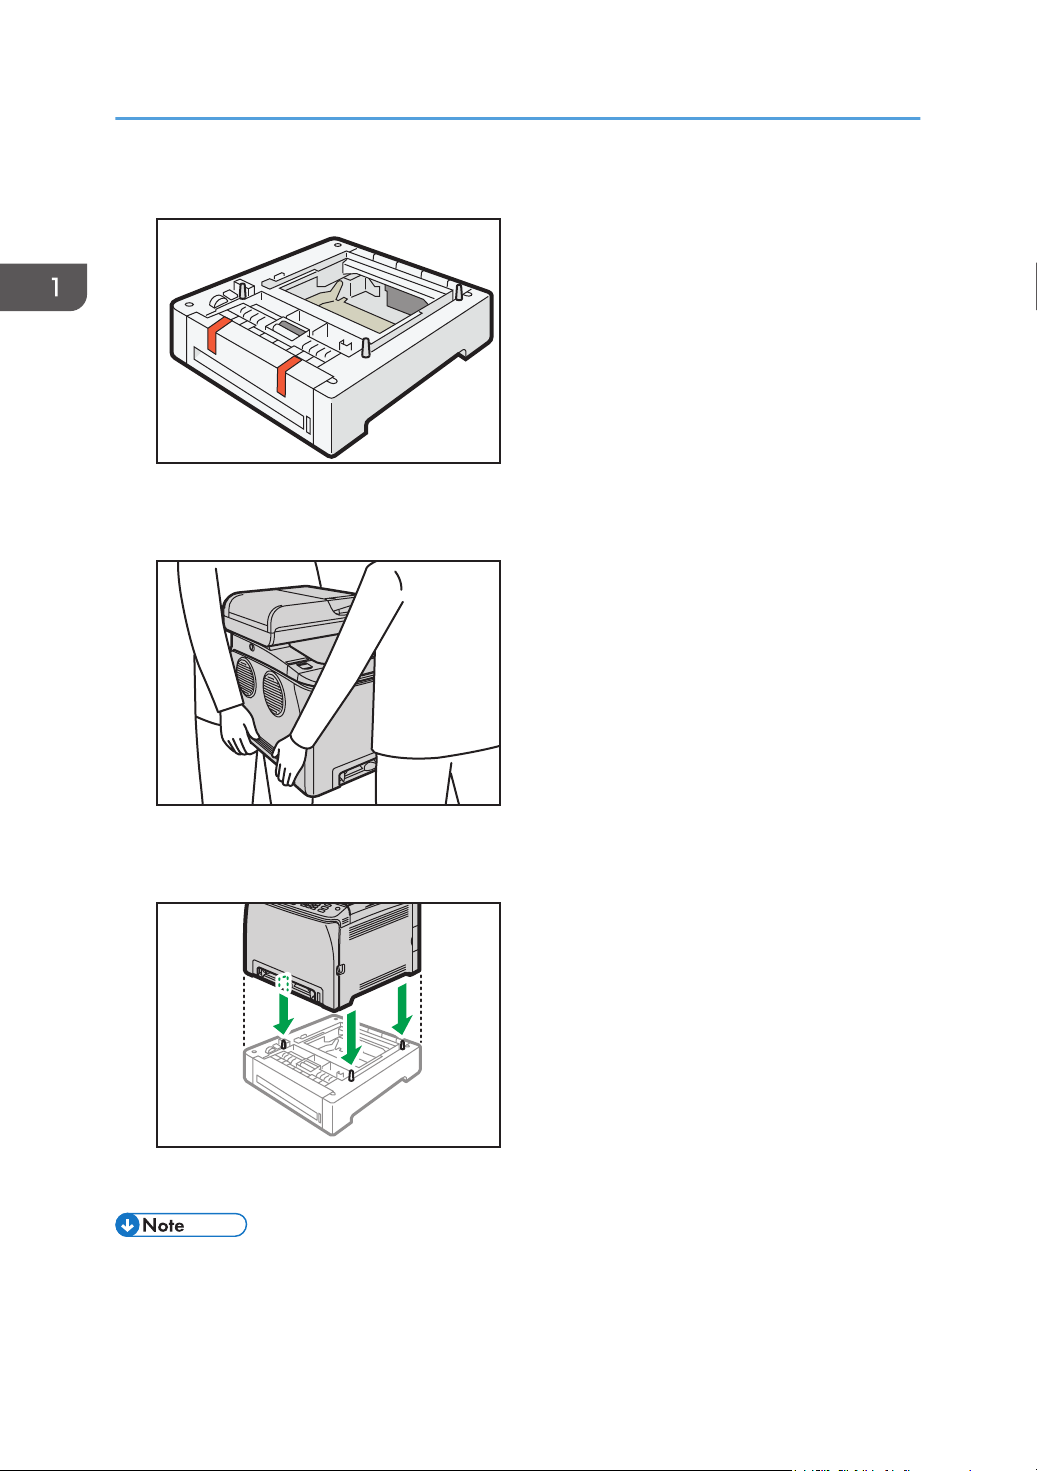
2. Remove the adhesive tape from the optional paper feed unit.
3. Standing at the front and back of the machine, two persons should lift the machine using
the inset grips on the sides.
26
4. There are three upright pins on the optional paper feed unit. Align the holes of the
machine with the pins, and then lower the machine slowly.
5. Plug the machine's cord back into the wall outlet, and then turn on the power.
• After installing the optional paper feed unit, select Tray 2 in the printer driver. For details, see the
printer driver Help.
• If the new device is listed in the column of configuration options, it has been properly installed.
Page 29

Installing Option
• If the optional paper feed unit is not installed properly, try to install it again by repeating the
procedure. If the problem persists, contact your sales or service representative.
• For details about printing the configuration page, see page 259 "Printing Lists/Reports".
27
Page 30

ECC202
1. Guide to the Machine
How to Use the [Home] Screen
• The [Home] screen is set as the default screen when the machine is turned on. You can change this
default setting under Function Priority. See page 251 "Administrator Tools Settings".
Displaying the [Home] Screen
1. Press the [Home] key.
• Function or shortcut icons will be displayed on the [Home] screen. For details, see page 28 "How
to Use the [Home] Screen".
• To use a different function, press the icon of the function you want to use.
How to Use the [Home] Screen
The icons of each function are displayed on the [Home] screen.
You can add shortcuts to favorite items to [Home] screens 2 and 3. The icons of added shortcuts appear
on the [Home] screen. You can recall favorite items by pressing the shortcut icons.
To display the [Home] screen, press the [Home] key.
28
Page 31

[Home] screen 1
DUE303
1
2 3
5
67
4
8
9
DUE304
10
[Home] screen 2
How to Use the [Home] Screen
1. Supply Information icon
Displays the remaining amount of toner.
2. [Scanner]
Press to scan originals and save images as files.
For details about how to use the scanner function, see page 123 "Scanning Originals".
3. [Fax]
Press to send or receive faxes.
For details about how to use the fax function, see page 171 "Sending and Receiving a Fax".
29
Page 32

1. Guide to the Machine
4. Wireless LAN icon
Press to display the [Wi-Fi Configuration] screen.
This icon appears when Wireless LAN is enabled.
When wireless LAN connection is enabled, the icon appears.
When Wi-Fi Direct connection is enabled, the icon appears.
5. /
Press to switch pages when the icons are not displayed on 1 page.
6. [Setting]
Press to customize the default settings of the machine to meet your requirements.
7. [Status]
Press to check the machine's system status, operational status of each function, and Locked Print jobs. You can
also display the machine's maintenance information.
8. [Card]
Press to make ID card copies.
9. [Copier]
Press to make copies.
For details about how to use the copy function, see page 217 "Copier Settings".
10. Shortcut icon
You can add shortcuts to favorite items to the [Home] screen. For details about how to register shortcuts, see
page 31 "Adding to the [Home] Screen Shortcuts to Favorite Items".
For details about examples of shortcuts that you can register, see page 34 "Example of favorite items".
30
• You can change the order of favorite item icons. For details, see page 31 "Changing the Order
of Icons on the [Home] Screen".
Page 33

Customizing the [Home] Screen
Customizing the [Home] Screen
You can add shortcuts to favorite items in the [Home] screen. You can recall favorite items by pressing
the shortcut icons. You can rearrange the order of the function and shortcut icons.
How to Customize the [Home] Screen
You can customize the [Home] screen to make it more accessible.
The icons of each application are displayed on the [Home] screen. You can also add shortcuts to
favorite items registered in some applications.
For details about the items on the [Home] screen, see page 28 "How to Use the [Home] Screen".
• When you register a favorite item, the shortcut to the favorite item appears on [Home] screens 2 or
3. If [Home] screens 2 and 3 do not have enough space for more icons, registering any more
favorite items becomes impossible.
• You can register a total of 12 icons for shortcuts to favorite items, 6 icons on each of the 2 pages.
Adding to the [Home] Screen Shortcuts to Favorite Items
When you register frequently used settings for functions such as copier and fax functions as favorite
items, the shortcuts to them appear on [Home] screens 2 or 3. For details about how to register a
favorite item, see page 33 "Registering Functions in a Favorite Item".
Changing the Order of Icons on the [Home] Screen
You can change the order of the favorite item icons on [Home] screen 2 and 3 to make them more
accessible.
1. Press and hold an icon that you want to move.
31
Page 34

1. Guide to the Machine
2. Select [Move Up] or [Move Down].
The position of an icon switches from that of another icon located ahead or behind.
• You cannot change the order of the icons on the [Home] screen 1.
Deleting an Icon on the [Home] Screen
Delete unused favorite item icons. You can only display icons and shortcuts that you use.
When a shortcut to a favorite item on the [Home] screen is deleted, the registered favorite item is also
deleted. For details about how to delete a favorite item, see page 35 "Deleting a Favorite Item".
• You cannot delete icons on the [Home] screen 1.
32
Page 35

Registering Frequently Used Functions
Registering Frequently Used Functions
You can store frequently used job settings in the machine memory and recall them easily.
Registering Functions in a Favorite Item
You can register up to 12 favorite items for each function.
The following settings can be registered to favorite items:
• Copier:
Sim to Dup, Dup to Dup, Paper Tray, Reduce/Enlarge, Quantity, Original Settings, Original Type,
Other Settings, Sort
• Fax:
Immed. TX, TX Settings
• Scanner:
Original Settings, Scan Setting
This section explains how to register functions to a favorite item by using each application.
1. Edit the settings so all functions you want to register to a favorite item are selected on the
[Copier], [Fax], [Scanner], or [ID Card Copy] screen.
2. Press the favorite item icon ( ) in the upper right of the screen.
3. Press the [Input favorite item name:] box.
4. Enter the favorite item name, and then press [OK].
5. Confirm the name you entered is displayed, and then press [OK].
6. Press the [Home] key.
The favorite item is registered to the [Home] screen.
• You can enter up to 8 characters for a favorite item name.
• Favorite items are not deleted by turning the power off or by pressing the [Clear/Stop] key unless
the favorite item is deleted or overwritten.
• Favorite items can be registered to the [Home] screen, and can be recalled easily. For details, see
page 31 "Adding to the [Home] Screen Shortcuts to Favorite Items".
33
Page 36

1. Guide to the Machine
Example of favorite items
Copier
Favorite item name Favorite item description Effect
Eco copy Specify [Sim to Dup]. You can save paper and
toner.
Thumbnail copy Specify settings to combine
and print a multiple pages on
one side or both sides of
paper in [Other Settings...].
Fax
Favorite item name Favorite item description Effect
Departmental fax transmission In [TX Settings], specify [Fax
Header].
• The names of favorite items given above are just examples. You can assign any name to a favorite
item according to your objectives.
• Depending on your business details or the type of documents to be scanned, registering a favorite
item cannot be recommended.
You can copy up to four
pages onto one side of a
sheet, so that you can save
paper.
This setting can be used if the
receiver specifies forwarding
destinations by senders.
Recalling a Favorite Item
You can recall the favorite item and operate the machine using the stored settings.
34
Page 37

1. Press the [Home] key.
ECC202
ECC202
2. Press [ ] until the favorite item icon you want appears.
3. Press the favorite item icon.
• Using the favorite item causes the previous settings to be cleared.
Registering Frequently Used Functions
Deleting a Favorite Item
1. Press the [Home] key.
2. Press [ ] until the favorite item icon you want appears.
3. Press and hold down the favorite item icon.
4. Press [Delete].
35
Page 38

ECC202
1. Guide to the Machine
Displaying Frequently Used Modes Preferentially
Specify the mode to be displayed immediately after the operation switch is turned on, or when System
Reset mode is turned on.
1. Press the [Home] key.
2. Press the [Setting] icon.
3. Press [Administrator Tools].
4. Press [ ].
5. Press [Function Priority].
6. Specify the mode to be displayed preferentially.
7. Press the [Home] key.
• For details about which modes you can specify, see "page 251 "Administrator Tools Settings".
36
Page 39

Multi-access
Multi-access
This machine can perform multiple jobs using different functions, such as copying and faxing, at the
same time. Performing multiple functions simultaneously is called "Multi-access".
The following table shows the functions that can be performed simultaneously.
Current job Types of jobs that can be executed simultaneously
• Fax memory transmission
• Fax memory reception
Copying
Scanning
• Internet Fax reception
• Receiving a LAN-Fax job from a computer
• LAN-Fax transmission
• Fax memory transmission
• Fax memory reception
• Printing
*1
• Printing a fax received in the machine's memory
• Fax immediate printing
• Receiving a LAN-Fax job from a computer (except when
TWAIN scanning)
• LAN-Fax transmission (except when TWAIN scanning)
• Internet Fax reception
• Mobile printing (from a device)
*7
*6
*6
*6
*6
*6
*6
Scan to USB
• Fax memory transmission
• Fax memory reception
• Printing
• Printing a fax received in the machine's memory
• Fax immediate printing
*1
*6
*6
• Receiving a LAN-Fax job from a computer (except when
TWAIN scanning)
*6
• LAN-Fax transmission (except when TWAIN scanning)
• Internet Fax reception
• Mobile printing (from a device)
*6
*6
37
Page 40

1. Guide to the Machine
Current job Types of jobs that can be executed simultaneously
Fax immediate transmission
(scanning an original and
sending it simultaneously)
Fax memory transmission
(sending a fax that has already
been stored in the machine's
memory)
Fax receiving and printing
Fax memory reception (storing
a received fax into the
machine's memory)
• Internet Fax reception
• Printing
*4
• Mobile printing (from a device)
• Copying
• Scanning
• Internet Fax reception
• Printing
*4
• Mobile printing (from a device)
• Internet Fax reception
• Scanning
*5
*7
• Copying
• Scanning
• Printing a Fax job in the machine's memory
• Internet Fax transmission
• Internet Fax reception
• Printing
*1
38
Printing a Fax job in the
machine's memory
• Receiving a LAN-Fax job
from a computer
• LAN-Fax transmission
• Mobile printing (from a device)
• Fax memory reception
• Receiving a LAN-Fax job from a computer
• LAN-Fax transmission
• Internet Fax reception
• Scanning
*5
*7
• Copying
• Printing a Fax job in the machine's memory
• Internet Fax transmission
• Internet Fax reception
• Scanning
*5
Page 41

Current job Types of jobs that can be executed simultaneously
• Fax reception (no printing)
• Fax memory reception
• Receiving a LAN-Fax job from a computer
Multi-access
Internet Fax transmission
Internet Fax reception
• LAN-Fax transmission
• Internet Fax reception
• Printing
*4
• Mobile printing (from a device)
• Fax memory transmission
• Fax memory reception
• Receiving a LAN-Fax job from a computer
• LAN-Fax transmission
• Internet Fax transmission
• Internet Fax reception
• Scanning
*6
*7
• Fax immediate transmission (scanning and sending)
• Copying
• Scanning
• Fax immediate transmission
• Fax reception
• Printing a Fax job in the machine's memory
• Internet Fax reception
• Printing
• Mobile printing (from a device)
*8
*8
*8
*8
*8
*8
*8
*8
*6
Printing
• Scanning
*2
• Fax immediate transmission
• Fax memory transmission
*3
• Fax memory reception
• Internet Fax transmission
• Internet Fax reception
*7
*3
39
Page 42

1. Guide to the Machine
Current job Types of jobs that can be executed simultaneously
• Fax memory transmission
• Internet Fax reception
*7
Mobile printing (from a
device)
Printing starts after scanning is finished if [Gradation:] is set to [Standard] or [Fine] (PCL printer driver), or
*1
when printing from the PostScript 3 printer driver.
Scanning is not possible if [Gradation:] is set to [Standard] or [Fine] (PCL printer driver), or when printing
*2
from the PostScript 3 printer driver.
Fax transmission is not possible if [Gradation:] is set to [Fine] (PCL printer driver), or when printing from the
*3
PostScript 3 printer driver.
Printing may be canceled if [Gradation:] is set to [Standard] or [Fine] (PCL printer driver), or when printing
*4
from the PostScript 3 printer driver.
Fax printing may take longer than normal if you scan using the control panel at the same time, especially
*5
when scanning multiple pages using the exposure glass.
Multi-access is possible when each job is performed using the exposure glass or ADF on the M C250FWB.
*6
Multi-access is not possible when each job is performed using the exposure glass or ADF on the M C250FW.
Internet faxes that are received cannot be printed.
*7
Simultaneous processing is possible only when the current job is to receive an Internet fax but not to print it.
*8
• Fax memory reception
• Scanning
*6
• Fax immediate transmission
• Internet Fax transmission
*6
*6
40
• If you try to use a function that cannot be performed simultaneously, you will hear a beep sound
from the machine or see a failure message pop up on your computer screen. In this case, try again
after the current job is finished.
Page 43

About Operation Tools
About Operation Tools
This section explains the operation tools of this machine.
Control Panel
The control panel contains a screen and keys for controlling the machine. They allow you to
configure the machine's various settings.
For details about how to use the control panel, see page 215 "Configuring the Machine Using the
Control Panel".
Web Image Monitor
You can check the machine's status and configure its settings by accessing the machine directly
using Web Image Monitor.
For details about how to use Web Image Monitor, see page 267 "Configuring the Machine Using
Utilities".
41
Page 44

ECC206
9 10 9 8 7
6
5
4321
1. Guide to the Machine
Entering Characters
This section describes how to enter text on the screens of the functions such as copier or fax or on the
Setting screen.
The cursor appears if you tap the text field. If you tap the text field again after the cursor appears, the
keyboard appears.
Character Entry Display
This section explains the entry screen and the keys displayed on it.
1. Characters you enter are displayed on the text field.
2. Cancels the entered text and closes the character entry display.
3. Deletes the character to the left of the cursor.
4. Confirms text and closes the character entry display.
5. Deletes all characters that have been input.
6. Enters characters.
7. Switches between uppercase and lowercase.
8. Enters a space.
9. You can switch the input method from the menu displayed pressing this key. Press to enter numbers,
symbols, and some special characters.
10. Displays the current input method.
42
Page 45

Available Characters
You can enter the following characters:
• Alphabetic characters
• Symbols
• Numerals
0123456789
Entering Text
When you enter a character, it appears at the position of the cursor.
Entering letters
1. Press the letters you want to enter.
Entering Characters
Entering alphanumeric characters and symbols
1. Press [ ] or [ ].
2. Press [123] or [,.-&@%].
3. Press the numbers or symbols you want to enter.
43
Page 46

1. Guide to the Machine
Deleting characters
1. Press [ ] to delete characters.
44
Page 47

ECC202
Using RICOH Smart Device Connector
Using RICOH Smart Device Connector
To use RICOH Smart Device Connector, access the App Store or Google Play with your smart device,
search for and download the "RICOH Smart Device Connector" application from the site.
Check the App Store or Google Play to see the functions you can use on RICOH Smart Device
Connector.
1. Press the [Home] key.
2. Press the [Status] icon on the [Home] screen.
3. Press the [Machine info] tab.
The QR code is displayed on the screen.
4. Start the application on the smart device, and then read the QR code.
Follow the instructions displayed on the application.
For details about how to connect a smart device to the machine using Near-field communication
(NFC), see page 46 "Connecting a Smart Device to the Machine Using NFC".
45
Page 48

ECC202
1. Guide to the Machine
Connecting a Smart Device to the Machine Using NFC
This section describes how to connect your smart device to the machine using NFC.
Writing the Machine's Information to the NFC with a Smart Device
1. Configure the network connection of the machine.
2. Access the App Store or Google Play from your smart device, search for and download
the application corresponding to the machine from the site.
3. Press the [Home] key.
4. Press the [Status] icon on the [Home] screen.
5. Press the [Machine info] tab.
The QR code is displayed on the screen.
6. Start the application on the smart device, and then read the QR code.
7. Write the machine's network information to the NFC using the application, and then touch
the NFC with the smart device.
Using the Application on a Smart Device by Using NFC
1. Start the application on the smart device, and then touch the NFC with the smart device.
2. Print using application corresponding to the machine by touching the NFC or execute a
scan using the application.
46
Page 49

2. Paper Specifications and Adding
Load paper into the paper tray.
Specify the paper type and size.
Specify the paper type and size on the printer driver.
Paper
This chapter describes how to load paper and originals and about their specifications.
Workflow for Loading Paper and Configuring Paper Sizes and Types
This section explains how to load paper and operations required after paper is loaded.
After following the procedures below, you can copy or print on the paper that is loaded in the machine.
For details about the procedures, refer to the next page.
Procedure Reference
See page 48 "Loading Paper".
There are two ways to specify the paper type and size.
• When using the control panel
See page 56 "Specifying Paper Type and Paper Size Using the
Control Panel".
• When using Web Image Monitor
See page 59 "Specifying Paper Type and Paper Size Using Web
Image Monitor".
See page 60 "Specifying Paper Type and Paper Size Using the Printer
Driver".
For details about supported paper, see page 62 "Supported Paper".
47
Page 50

2. Paper Specifications and Adding Paper
Loading Paper
This section explains how to load paper into the paper tray and the bypass tray.
• When loading paper, take care not to trap or injure your fingers.
For information about supported paper, precautions for storing paper and print areas, see page 62
"Supported Paper".
Loading Paper into Tray1 and 2
The following example explains the loading procedure for the standard paper tray (Tray 1).
The same procedure applies to loading paper in Tray 2.
• Curled paper may jam. Straighten curled paper before loading.
• After loading paper in the tray, specify the paper type and size using the control panel to avoid
printing problems. This machine does not detect the paper size automatically.
• Be sure to select the correct paper size and feed direction using the paper size dial on the tray.
Otherwise, the printer might be damaged, or printing problems might occur.
• Make sure the paper stack does not exceed the upper limit mark inside the paper tray. Excessive
stacking can cause paper jams.
• If paper jams occur frequently, flip the paper stack in the tray.
• Do not mix different types of paper in the same paper tray.
• After loading paper, specify the paper size using the control panel and paper type using the
control panel. When printing a document, specify the same paper size and type in the printer
driver as specified on the printer.
• Do not move the side fences and end fence forcefully. Doing so may damage the tray.
• Do not slide the paper tray in forcefully when inserting the loaded tray into the printer. Otherwise,
the side and end fences or the paper guide of the bypass tray might move.
• When loading label paper, load it one by one.
48
Page 51

1. Pull out the paper tray carefully with both hands.
ECC076
ECC077
ECC078
Place the tray on a flat surface.
2. Push the metal plate down until it clicks.
Loading Paper
3. Align the side fences and end fence with the paper size.
49
Page 52

DAC344
ECC108
ECC080
2. Paper Specifications and Adding Paper
4. Fan the paper before loading it.
5. Load the paper in the tray with the print side faced up.
Make sure the paper is not stacked higher than the upper limit marked inside the tray.
Make sure the paper is not stacked higher than the projection on the side fences. (Tray 1 only)
50
6. Check there are no gaps between the paper and the fences; both side and end fences.
7. Carefully push the paper tray straight into the machine.
To avoid paper jams, make sure the tray is securely inserted.
Page 53

ECC081
ECC109
Loading Paper
• The upper limit differs depending on the paper type (thin or thick paper). See the label inside the
tray to check the upper limit.
• The remaining paper indicator on the right front side of the paper tray shows approximately how
much paper is remaining.
Extending Tray 1 to load paper
This section explains how to load paper longer than A4 (297 mm) into the machine.
1. Remove the rear cover using a coin.
2. Pull out tray 1 carefully with both hands.
Place the tray on a flat surface.
51
Page 54

ECC077
ECC110
ECC111
2. Paper Specifications and Adding Paper
3. Push the metal plate down until it clicks.
4. Pinch the extender, and then pull out the extender until it clicks.
52
After extension, check that the arrows on the extender and tray are aligned.
5. Follow Steps 3 to 7 in "Loading Paper into Tray1 and 2".
• To reinsert the extender, you might have to push it with moderate force.
Page 55

Loading Paper into Bypass Tray
ECC112
ECC113
• Do not load paper while the machine is printing.
• Load paper with the print side down and in the short-edge feed direction.
• Curled paper may jam. Straighten curled paper before loading.
• Duplex printing is not possible.
• Tray 1 and 2 are unavailable if paper is loaded in the bypass tray.
• You cannot load paper into the bypass tray while the machine is in Energy Saver mode.
1. Insert the top edge of the paper into the machine.
Loading Paper
2. Adjust the paper guides to the paper size.
53
Page 56

ECC114
2. Paper Specifications and Adding Paper
3. Support the paper with both hands, and insert it carefully until it stops.
Loading Envelopes
• Avoid using self-adhesive envelopes. They may cause machine malfunctions.
• Check there is no air in the envelopes before loading.
• Load only one size and type of envelope at a time.
• Before loading envelopes, flatten their leading edges (the edge going into the machine) by running
a pencil or ruler across them.
• Some kinds of envelope might cause misfeeds, wrinkles or print poorly.
• Print quality on envelopes may be uneven if parts of an envelope have different thicknesses. Print
one or two envelopes to check print quality.
• In a hot and humid environment, the envelope might be output creased or improper printing
quality.
For details about loading an envelope, see page 48 "Loading Paper into Tray1 and 2", and page 53
"Loading Paper into Bypass Tray". Note that you cannot load an envelope in Tray 2.
• If printed envelopes come out badly creased, load the envelopes in the opposite direction, and
then rotate the print object by 180 degrees using the printer driver before printing. For details, see
the printer driver Help.
• When Using Tray 1
• If the envelope flap is on a short side, place the envelope with the flap side in the tray recess.
If the envelope flap is on a long side, place the envelope with the flap side on the right.
54
Page 57

ECC118
• When Using the Bypass Tray
ECC119
• If the envelope flap is on a short side, place the envelope with the flap side in the front part of
the tray. If the envelope flap is on a long side, place the envelope with the flap side on the
right.
Loading Paper
55
Page 58

ECC202
2. Paper Specifications and Adding Paper
Specifying Paper Type and Paper Size Using the Control Panel
This section describes how to specify the paper size and paper type using the control panel.
• Paper type and size can also be specified using the printer driver. For details, see the printer driver
Help.
• For prints from the bypass tray or Tray 1, you can select to print according to either the printer
driver settings or the control panel settings with [Bypass Tray Priority] or [Tray 1 Priority] under
[Paper Settings]. For details about [Bypass Tray Priority] and [Tray 1 Priority], see page 246
"Paper Settings".
• If [Auto Continue] under [System Settings] is enabled, printing stops temporarily if a paper type/
size error is detected. The printing restarts automatically with the settings made with the control
panel after about ten seconds. For details about [Auto Continue], see page 234 "System Settings".
Specifying the Paper Type
This section describes how to specify the paper type.
1. Press the [Home] key.
2. Press the [Setting] icon on the [Home] screen.
3. Press [Paper Settings].
4. Select the tray for which you want to specify the paper type.
5. Select the desired paper type.
6. Press the [Home] key.
56
Page 59

ECC202
Specifying Paper Type and Paper Size Using the Control Panel
Specifying the Standard Paper Size
This section describes how to specify the standard paper size.
1. Press the [Home] key.
2. Press the [Setting] icon on the [Home] screen.
3. Press [Paper Settings].
4. Select the tray for which you want to specify the paper size.
5. Select the desired paper size.
6. Press the [Home] key.
Specifying a Custom Paper Size
This section describes how to specify a custom paper size.
• Custom size paper cannot be loaded in tray 2.
• When you perform printing, make sure that the paper size specified with the printer driver matches
the paper size specified with the control panel. If a paper size mismatch occurs, a message
appears on the display. To ignore the error and print using mismatched paper, see page 88 "If a
Paper Mismatch Occurs".
57
Page 60

ECC202
2. Paper Specifications and Adding Paper
1. Press the [Home] key.
2. Press the [Setting] icon on the [Home] screen.
3. Press [Paper Settings].
4. Select the tray for which you want to specify the paper size.
5. Press [ ] twice.
6. Press [Custom Size].
7. Select [mm] or [inch].
8. Press the box next to [Horiz:].
9. Enter the horizontal size, and then press [OK].
You can display the software keyboard by double tapping the entry area on the display.
10. Press the box next to [Vert:].
11. Enter the vertical size, and then press [OK].
12. Confirm the size you entered is displayed, and then press [OK].
13. Press the [Home] key.
58
Page 61

Specifying Paper Type and Paper Size Using Web Image Monitor
Specifying Paper Type and Paper Size Using
Web Image Monitor
This section describes how to specify paper sizes and types using Web Image Monitor.
1. Start the web browser and access the machine by entering its IP address.
The top page of Web Image Monitor appears.
2. Click [System Settings].
3. Click [Tray Paper Settings] tab.
4. Select the paper type and paper size for the tray you want to use.
5. Enter the administrator password if required.
6. Click [OK].
7. Close the web browser.
Specifying a Custom Paper Size
1. Start the web browser and access the machine by entering the IP address.
2. Click [System Settings].
3. Click [Tray Paper Settings] tab.
4. Select [Custom Size] in the [Paper Size] list.
5. Select [mm] or [inch] and specify the width and length.
6. Enter the administrator password if required.
7. Click [OK].
8. Close the web browser.
59
Page 62

2. Paper Specifications and Adding Paper
Specifying Paper Type and Paper Size Using the Printer Driver
• Make sure that the paper type and size specified with the printer driver matches the type and size
of the paper loaded in the tray. Since this machine does not detect paper sizes automatically, the
type or size of the paper may be mismatched and the print job may not print correctly.
When Using Windows
The procedure in this section is an example based on Windows 10. The actual procedure may vary
depending on the operating system you are using.
1. Open the [Printing preferences] dialog box from the printer driver.
For information of how to open the printer driver properties from [Devices and Printers], see
page 85 "Displaying the Printing Preferences Dialog Box".
The [Printing Preferences] dialog box appears.
60
Page 63

ECC251
Specifying Paper Type and Paper Size Using the Printer Driver
2. Click the [Paper] tab.
3. In the [Input Tray:] list, select the paper tray you want to use for printing.
4. In the [Paper Type:] list, select the type of paper that is loaded in the paper tray.
5. Select the [Print On] check box and select the size of the paper that is loaded in the paper
tray.
Clear the [Fit to Print Size] check box as necessary.
6. Click [OK].
When Using OS X/macOS
The procedure in this section is an example based on macOS 10.13. The actual procedure may vary
depending on the operating system you are using.
1. Open the document to print.
2. Select [Print...] on the [File] menu.
3. In the [Printer] list, select the printer you are using.
4. In the [Paper Size] list, select the size of the document to be printed.
61
Page 64

2. Paper Specifications and Adding Paper
Supported Paper
• After loading paper in the tray, specify the paper type and size using the control panel. This
machine does not detect the paper size automatically.
• When loading custom size paper into Tray 1 or the bypass tray, specify the width and length using
the control panel and the printer driver.
• When printing on custom size paper from the bypass tray, you can print without specifying the
paper type or paper size from the control panel depending on the settings for [Bypass Tray
Priority].
Tray 1
Type Size Weight Capacity*
1
Plain Paper 1
Plain Paper 2
Middle Thick Paper
Recycled Paper
Thick Paper 1
Thick Paper 2
Thin Paper
Letterhead
Preprinted Paper
Label Paper
Prepunched Paper
Bond Paper
Cardstock
Color Paper
Envelope
A4, B5 JIS, A5 LEF, A5 SEF, B6
JIS, A6, 81/2 × 14, 81/2 × 11,
51/2 × 81/2, 71/4 × 101/2, 8
× 13, 81/2 × 13, 81/4 × 13,
16K, 41/8 × 91/2, 37/8 ×
71/2, C5 Env, C6 Env, DL Env,
81/2 × 132/5, 81/2 × 133/
5
60 to 163 g/m
(16 to 43 lb.)
2
250
(80 g/m2, 20 lb.)
62
Page 65

Supported Paper
Type Size Weight Capacity*
Plain Paper 1
Plain Paper 2
Middle Thick Paper
Recycled Paper
Thick Paper 1
Thick Paper 2
Thin Paper
Letterhead
Preprinted Paper
Label Paper
Prepunched Paper
Bond Paper
Cardstock
Color Paper
Envelope
Custom size:
90 to 216 mm in width,
148 to 356 mm in length
(3.54 to 8.50 inches in width,
5.83 to 14.0 inches in length)
60 to 163 g/m
(16 to 43 lb.)
2
250
(80 g/m2, 20 lb.)
1
*
1 The number of envelopes that can be loaded is up to 10.
Tray 2 (option)
Type Size Weight Capacity
Thin Paper
Plain Paper 1
A4
Letter (81/2 × 11 inches)
Plain Paper 2
Middle Thick Paper
Thick Paper 1
Recycled Paper
Color Paper
Preprinted Paper
Prepunched Paper
Letterhead
60 to 105 g/m
(16 to 28 lb.)
2
500
(80 g/m2, 20 lb.)
63
Page 66

2. Paper Specifications and Adding Paper
Bypass tray
Type Size Weight Capacity
Plain Paper 1
Plain Paper 2
Middle Thick Paper
Recycled Paper
Thick Paper 1
Thick Paper 2
Thin Paper
Letterhead
Envelope
Label Paper
Prepunched Paper
Bond Paper
Cardstock
Color Paper
Plain Paper 1
Plain Paper 2
Middle Thick Paper
A4, B5 JIS, A5 LEF, A5 SEF, B6
JIS, A6, 81/2 × 14, 81/2 × 11,
51/2 × 81/2, 71/4 × 101/2, 8
× 13, 81/2 × 13, 81/4 × 13,
16K, 41/8 × 91/2, 37/8 ×
71/2, C5 Env, C6 Env, DL Env,
81/2 × 132/5, 81/2 × 133/
5
Custom size:
90 to 216 mm in width,
148 to 356 mm in length
60 to 163 g/m
(16 to 43 lb.)
60 to 163 g/m
(16 to 43 lb.)
2
1
2
1
64
Recycled Paper
Thick Paper 1
(3.54 to 8.50 inches in width,
5.83 to 14.0 inches in length)
Thick Paper 2
Thin Paper
Letterhead
Envelope
Label Paper
Prepunched Paper
Bond Paper
Cardstock
Color Paper
• You cannot print on Legal size paper in the following cases:
Page 67

Supported Paper
• PCL printer driver
When [Gradation:] in [Print Quality] is set to [Fine]
• PostScript 3 printer driver
When [Print Quality] in [Printer Features] is set to [Best Quality]
Specifications of Paper Types
The following tables describe the types of paper that can be used with this machine.
• Depending on the paper type, the toner may take a while to dry. Before handling printed sheets,
make sure that they have fully dried. Otherwise, the toner may smudge.
• Print quality can be guaranteed only if recommended paper is used. For more information about
the recommended paper, contact your sales or service representative.
Plain Paper 1
Item Description
Paper thickness 66 to 74 g/m2 (18 to 20 lb.)
Supported paper tray Can be used with any of the paper trays.
Duplex supported size A4, B5 JIS, 81/2 × 14, 81/2 × 11, 71/4 × 101/2, 8 × 13, 81/2 × 13,
81/4 × 13, 16K, 81/2 × 132/5, 81/2 × 133/
5
Plain Paper 2
Item Description
Paper thickness 75 to 81 g/m2 (20 to 22 lb.)
Supported paper tray Can be used with any of the paper trays.
Duplex supported size A4, B5 JIS, 81/2 × 14, 81/2 × 11, 71/4 × 101/2, 8 × 13, 81/2 × 13,
81/4 × 13, 16K, 81/2 × 132/5, 81/2 × 133/
5
65
Page 68

2. Paper Specifications and Adding Paper
Middle Thick Paper
Item Description
Paper thickness 82 to 90 g/m2 (22 to 24 lb.)
Supported paper tray Can be used with any of the paper trays.
Duplex supported size
A4, B5 JIS, 81/2 × 14, 81/2 × 11, 71/4 × 101/2, 8 × 13, 81/2 × 13,
81/4 × 13, 16K, 81/2 × 132/5, 81/2 × 133/
5
Thick Paper 1
Item Description
Paper thickness 91 to 105 g/m2 (24 to 28 lb.)
Supported paper tray Can be used with any of the paper trays.
Duplex supported size None
Notes The number of sheets that can be printed per minute is approximately half
that of middle thick paper.
Thick Paper 2
Item Description
Paper thickness 106 to 163 g/m2 (28 to 43 lb.)
66
Supported paper tray Tray 1 and bypass tray
Duplex supported size None
Notes The number of sheets that can be printed per minute is approximately half
that of middle thick paper.
Thin Paper
Item Description
Paper thickness 60 to 65 g/m2 (16 to 17 lb.)
Page 69

Supported Paper
Item Description
Supported paper tray Can be used with any of the paper trays.
Duplex supported size A4, B5 JIS, 81/2 × 14, 81/2 × 11, 71/4 × 101/2, 8 × 13, 81/2 × 13,
81/4 × 13, 16K, 81/2 × 132/5, 81/2 × 133/
5
Recycled Paper
Item Description
Paper thickness 75 to 90 g/m2 (20 to 24 lb.)
Supported paper tray Can be used with any of the paper trays.
Duplex supported size A4, B5 JIS, 81/2 × 14, 81/2 × 11, 71/4 × 101/2, 8 × 13, 81/2 × 13,
81/4 × 13, 16K, 81/2 × 132/5, 81/2 × 133/
Notes If the paper thickness is outside the specified range, select [Thin Paper],
[Plain Paper], [Thick Paper 1], or [Thick Paper 2].
5
Color Paper
Item Description
Paper thickness 75 to 90 g/m2 (20 to 24 lb.)
Supported paper tray Can be used with any of the paper trays.
Duplex supported size A4, B5 JIS, 81/2 × 14, 81/2 × 11, 71/4 × 101/2, 8 × 13, 81/2 × 13,
81/4 × 13, 16K, 81/2 × 132/5, 81/2 × 133/
5
Notes If the paper thickness is outside the specified range, select [Thin Paper],
[Plain Paper], [Thick Paper 1], or [Thick Paper 2].
Preprinted Paper
Item Description
Paper thickness 75 to 90 g/m2 (20 to 24 lb.)
Supported paper tray Tray 1 and Tray 2
67
Page 70

2. Paper Specifications and Adding Paper
Item Description
Duplex supported size A4, B5 JIS, 81/2 × 14, 81/2 × 11, 71/4 × 101/2, 8 × 13, 81/2 × 13,
81/4 × 13, 16K, 81/2 × 132/5, 81/2 × 133/
5
Notes If the paper thickness is outside the specified range, select [Thin Paper],
[Plain Paper], [Thick Paper 1], or [Thick Paper 2].
Prepunched Paper
Item Description
Paper thickness 75 to 90 g/m2 (20 to 24 lb.)
Supported paper tray Can be used with any of the paper trays.
Duplex supported size A4, B5 JIS, 81/2 × 14, 81/2 × 11, 71/4 × 101/2, 8 × 13, 81/2 × 13,
81/4 × 13, 16K, 81/2 × 132/5, 81/2 × 133/
5
Notes If the paper thickness is outside the specified range, select [Thin Paper],
[Plain Paper], [Thick Paper 1], or [Thick Paper 2].
Letterhead
Item Description
Paper thickness 75 to 90 g/m2 (20 to 24 lb.)
Supported paper tray Can be used with any of the paper trays.
Duplex supported size A4, B5 JIS, 81/2 × 14, 81/2 × 11, 71/4 × 101/2, 8 × 13, 81/2 × 13,
81/4 × 13, 16K, 81/2 × 132/5, 81/2 × 133/
5
Notes Paper that has a thickness outside the specified range cannot be printed
onto.
Bond Paper
Item Description
68
Paper thickness 106 to 163 g/m2 (28 to 43 lb.)
Supported paper tray Tray 1 and bypass tray
Page 71

Item Description
Duplex supported size None
Notes • The number of sheets that can be printed in one minute is
approximately half that of middle thick paper.
• If the paper thickness is outside the specified range, select [Thick Paper
1].
Cardstock
Item Description
Paper thickness 106 to 163 g/m2 (28 to 43 lb.)
Supported paper tray Tray 1 and bypass tray
Duplex supported size None
Supported Paper
Notes • The number of sheets that can be printed in one minute is
approximately half that of middle thick paper.
• If the paper thickness is outside the specified range, select [Thick Paper
1].
Label Paper
Item Description
Supported paper tray Tray 1 and bypass tray
Duplex supported size None
Notes • The number of sheets that can be printed per minute is approximately
half that of middle thick paper.
• Avoid using adhesive label paper on which glue is exposed. Glue
may stick to the inner parts of the machine, which can cause paper
feed problems, deterioration in print quality, or premature wear of the
print cartridge's photo conductor unit.
69
Page 72

CER112
2. Paper Specifications and Adding Paper
Envelope
Item Description
Supported paper tray Tray 1 and bypass tray
Duplex supported size None
Notes
• Avoid using self-adhesive envelopes. They may cause machine malfunctions.
• The number of envelopes that can be printed per minute is approximately half that of middle thick
paper.
• Paper can be loaded only up to the lower of the two paper limit marks of the tray.
• If printed envelopes come out badly creased, load the envelopes in the opposite direction. Also,
configure the printer driver to rotate the print object 180 degrees. For details about changing the
orientation see the printer driver Help.
• Environmental factors can degrade the print quality on both recommended and non-recommended
envelopes.
• If envelopes are severely curled after printing, flatten them by bending them back against the curl.
• After printing, envelopes sometimes have creases along their long edges and toner smear on their
unprinted sides. Print images might also be blurred. When printing large, black-solid areas, striping
can occur as a result of the envelopes overlapping.
• To correctly specify the length of an envelope whose flap opens along its short edge, be sure to
include the open flap when measuring.
• Fan envelopes, and then align their edges before loading.
70
Page 73

DAC573
DAC574
DAC575
Supported Paper
• When fanning envelopes, make sure they are not stuck together. If they are stuck together,
separate them.
• When fanning envelopes, make sure the envelope flaps are not stuck. If they are stuck, separate
them.
• Before loading envelopes, flatten them out so that their curl does not exceed that shown as shown
below.
• If the curl is severe, flatten out the envelopes using your fingers, as shown below.
• You may not be able to perform duplex printing on 8 × 13, 81/2 × 13, Folio (81/4 × 13 inches),
or 16K (195 mm × 267 mm) size paper in the following cases:
71
Page 74

2. Paper Specifications and Adding Paper
• PCL printer driver
When [Gradation:] in [Print Quality] is set to Fine
• PostScript 3 printer driver
When [Print Quality] in [Printer Features] is set to [Best Quality]
Non-Recommended Paper Types
Do not use the following types of paper:
• Ink-jet printer paper
• Bent, folded, or creased paper
• Curled or twisted paper
• Torn paper
• Wrinkled paper
• Damp paper
• Dirty or damaged paper
• Paper that is dry enough to emit static electricity
• Paper that has already been printed onto, except a preprinted letterhead paper.
Malfunctions are especially likely when using paper printed on by other than a laser printer
(e.g.monochrome and color copiers, ink-jet printers, etc.)
• Special paper, such as thermal paper and carbon paper
• Paper weighing heavier or lighter than the limit
• Paper with windows, holes, perforations, cutouts, or embossing
• Adhesive label paper on which glue or base paper is exposed
• Paper with clips or staples
• When loading paper, take care not to touch the surface of the paper.
• Even if paper is adequate for the machine, poorly stored paper can cause paper misfeeds, print
quality degradation, or malfunctions.
Paper Storage
• Store paper appropriately. If the paper is stored incorrectly, misfeeds, lower printing quality, or
malfunctions may result.
72
Page 75

When storing paper:
DAC571
1
2
4
3
3
4
• Do not store paper in a humid place.
• Do not store paper in direct sunlight.
• Do not stand paper on its edge.
• Store any leftover paper in a wrapping or box supplied with the paper.
Print Area
The diagram below shows the area of the paper that the machine can print on.
From the printer driver
Supported Paper
1. Print area
2. Feed direction
3. Approx. 4.2 mm (0.2 inches)
4. Approx. 4.2 mm (0.2 inches)
73
Page 76

4
1
2
3
3
3
DAC577
2
3
3
1
4
4
DAC580
2. Paper Specifications and Adding Paper
Envelope
1. Print area
2. Feed direction
3. Approximately 10 mm (0.4 inches)
4. Approximately 15 mm (0.6 inches)
Copier function
1. Print area
2. Feed direction
3. Approx. 4 mm (0.2 inches)
4. Approx. 3 mm (0.1 inches)
74
Page 77

Fax function
2
3
3
1
4
4
DAC580
1. Print area
2. Feed direction
Supported Paper
3. Approx. 4.2 mm (0.2 inches)
4. Approx. 2 mm (0.08 inches)
• Borderless printing is not supported.
• The print area may vary depending on the paper size, printer language and printer driver settings.
• For better envelope printing, we recommend you set the right, left, top, and bottom print margins to
at least 15 mm (0.6 inches) each.
75
Page 78

ECC120
2. Paper Specifications and Adding Paper
Placing Originals
This section describes the types of originals you can set and how to place them.
Placing Originals on the Exposure Glass
This section describes the procedure for placing originals on the exposure glass.
• Do not place originals before any correction fluid and toner has completely dried. Doing so may
make marks on the exposure glass that will appear on copies.
• The original in the ADF takes precedence over the original on the exposure glass if you place
originals both in the ADF and on the exposure glass.
• Be careful not to hold the input tray when lifting the ADF, for the tray might be damaged.
1. Lift the ADF.
2. Place the original face down on the exposure glass. The original should be aligned to the
rear left corner.
3. Lower the ADF.
Hold down the ADF with your hands when using thick, folded, or bound originals and when the
ADF cannot be lowered completely.
Placing Originals in the Auto Document Feeder
By using the ADF, you can scan multiple pages at once.
• Do not place different size originals in the ADF at once.
• Straighten curls in the originals before placing them in the ADF.
76
Page 79

ECC121
ECC122
Placing Originals
• To prevent multiple sheets from being fed at once, fan the pages of your original before placing
them in the ADF.
• Place the original squarely.
1. Open the cover of the input tray for the ADF and adjust the guides according to the size of
the original.
2. Place the aligned originals face up in the ADF. The last page should be on the bottom.
• When placing originals longer than A4 or 81/2 × 11, pull out the ADF tray's extenders.
About Originals
This section describes the types of originals that can be placed and the parts of the original that are
unscannable.
Recommended size of originals
This section describes the recommended size of the original.
Exposure glass
Up to 216 mm (8.5 inches) in width, up to 297 mm (11.7 inches) in length
77
Page 80

2. Paper Specifications and Adding Paper
ADF
• Paper size: 140 to 216 mm (51/2 to 81/2 inches) in width, 140 to 356 mm (51/2 to 14
inches) in length
• Paper weight: 52 to 105 g/m2 (13.8 to 28.0 lb.)
• Only 1 sheet of an original can be placed on the exposure glass at a time.
• In the ADF, up to 50 sheets of originals can be placed at once (when using paper weighing 80
g/m2, 20 lb.).
Types of originals not supported by the Auto Document Feeder
If placed in the ADF, the following types of original might be damaged or become jammed, or result in
gray or black lines appearing on prints:
• Originals larger or heavier than recommended
• Stapled or clipped originals
• Perforated or torn originals
• Curled, folded, or creased originals
• Pasted originals
• Originals with any kind of coating, such as thermal fax paper, art paper, aluminum foil, carbon
paper, or conductive paper
• Originals with perforated lines
• Originals with indexes, tags, or other projecting parts
• Sticky originals such as translucent paper
• Thin, highly flexible originals
• Thick originals such as postcards
• Bound originals such as books
• Transparent originals such as OHP transparencies or translucent paper
• Originals that are wet with toner or white out
Unscannable image area
Even if you correctly place originals in the ADF or on the exposure glass, margins of a few millimeters on
all four sides of the original might not be scanned.
78
Page 81

DAC579
Margins when using exposure glass
In copier mode In scanner mode In fax mode
Top 4 mm (0.2 inches) 0 mm (0 inches) 1 mm (0.05 inches)
Right 3 mm (0.1 inches) 0 mm (0 inches) 1 mm (0.05 inches)
Placing Originals
Left 3 mm (0.1 inches) 0 mm (0 inches) 1 mm (0.05 inches)
Bottom 4 mm (0.2 inches) 0 mm (0 inches) 2 mm (0.08 inches)
Margins when using ADF
In copier mode In scanner mode In fax mode
Top 4 mm (0.2 inches) 0 mm (0 inches) 0 mm (0 inches)
Right 3 mm (0.1 inches) 0 mm (0 inches) 1 mm (0.05 inches)
(Letter, Legal)
0 mm (0 inches) (other
sizes)
Left 3 mm (0.1 inches) 0 mm (0 inches) 1 mm (0.05 inches)
(Letter, Legal)
0 mm (0 inches) (other
sizes)
Bottom 4 mm (0.2 inches) 2 mm (0.08 inches) 2 mm (0.08 inches)
79
Page 82

2. Paper Specifications and Adding Paper
80
Page 83

3. Printing Documents
DSG261
1
2
3
DSG262
This chapter describes how to configure settings on the printer driver and print documents.
What You Can Do with the Printer Function
Duplex printing
You can print on both sides of a sheet of paper. For details, see the printer driver Help.
Combined printing
You can combine multiple pages and print them on a single sheet of paper. For details, see the
printer driver Help.
81
Page 84

3. Printing Documents
Configuring Option Settings for the Printer
When bidirectional communication works correctly, your computer obtains information about option,
paper size and paper feed direction settings from the machine automatically. Bidirectional
communication also allows you to monitor machine status.
Conditions for Bidirectional Communication
To support bidirectional communication, the following conditions must be met:
When connected with the network
• The Standard TCP/IP port must be used.
• In addition to the above, one of the following conditions must also be met:
• The TCP/IP protocol or the IPP protocol is used. (When using the IPP protocol, the IPP
port name must include the IP address.)
When connected with USB
• The machine must be connected to the computer's USB port using the USB interface cable.
• The computer must support bidirectional communication.
• [Enable bidirectional support] must be selected, and [Enable printer pooling] must not be
selected on the [Ports] tab with the printer driver.
If Bidirectional Communication is Disabled
This section describes how to set up option and setting of paper size for each tray on your computer
manually.
• Manage Printers permission is required to change the printer properties. Log on as an
Administrators group member.
When Using Windows
The procedure in this section is an example based on Windows 10.
1. On the [Start] menu, select [Control Panel] under [Windows System].
2. Click [View devices and printers].
82
3. Right-click the machine's icon, and then click [Printer properties].
Page 85

ECC252
ECC253
Configuring Option Settings for the Printer
4. Click the [Accessories] tab.
5. Select options installed from the [Options] area, and then make the necessary settings.
6. Click [Paper Size Settings] tab.
7. In [Input Tray:] select which trays to use, and then, in [Paper Size:] select the size of the
paper that you want to load in each tray.
Click [Update] to apply the setting for each tray.
8. Click [Apply].
9. Click [OK] to close the printer properties window.
When Using OS X/macOS
The following procedure is explained using macOS 10.13 as an example.
83
Page 86

3. Printing Documents
1. Start System Preferences.
2. Click [Printers & Scanners].
3. Select the printer you are using, and then click [Options & Supplies...].
4. Click [Options], and then configure settings as needed.
5. Click [OK].
6. Quit System Preferences.
84
Page 87

Displaying the Printing Preferences Dialog Box
Displaying the Printing Preferences Dialog Box
To change the default settings of the printer driver, configure settings in the [Printing Preferences] dialog
box.
To change the default settings of all applications, open the [Printing Preferences] dialog box from the
OS. For details, see page 85 "Displaying the Printing Preferences Dialog Box from the [Start] Menu".
To change the default settings of a specific application, open the [Printing Preferences] dialog box from
that application. For details, see page 85 "Displaying the Printing Preferences Dialog Box in an
Application".
Displaying the Printing Preferences Dialog Box from the [Start] Menu
This section explains how to open the [Printing Preferences] dialog box from [Devices and Printers].
• When the printer driver is distributed from the print server, the setting values specified by the server
are displayed as the default for [Printing Defaults...].
• You cannot configure different print settings for each user. The settings configured in this dialog box
are used as the default.
1. On the [Start] menu, click [Control Panel] under [Windows System].
2. Click [View devices and printers].
3. Right-click the icon of the printer you want to use.
4. Click [Printing preferences].
Displaying the Printing Preferences Dialog Box in an Application
You can make printer settings for a specific application. To make printer settings for a specific
application, open the [Printing Preferences] dialog box from that application.
The settings displayed in the [Printing Preferences] dialog box opened from the [Devices and Printers]
window are applied as the default in the [Printing Preferences] dialog box opened in an application.
When printing from an application, modify the settings as required.
The screens displayed may differ depending on the application. The following procedure explains how
to print documents from an application using WordPad in Windows 10 as an example.
Displaying the Printing Preferences Dialog Box in an Application When Using Windows
1. Click [File] in the upper left corner of the window, and then click [Print].
85
Page 88

3. Printing Documents
2. In the [Select Printer] list, select the printer you want to use.
3. Click [Preferences].
• Procedures for opening the [Printing Preferences] dialog box vary depending on the application.
For details, see the printer driver Help or the manuals provided with the application.
Displaying the Printing Preferences Dialog Box in an Application When Using OS X/ macOS
The following procedure is explained using macOS 10.13 as an example.
1. Open the document to print.
2. Select [Print...] on the [File] menu.
3. Check that the machine name or IP address you are using is selected in the [Printer:]
popup menu.
If the machine name or IP address you are using is not selected in the [Printer:] list, click the list, and
then select the machine.
86
Page 89

Basic Operation of Printing
Basic Operation of Printing
The following procedure explains how to perform basic printing.
• Duplex printing is selected as the default setting.
When Using Windows
The procedure in this section is an example based on Windows 10. The actual procedure may vary
depending on the operating system you are using.
For details of printing options, see the printer driver Help.
1. Open the printer properties dialog box in your document's application.
For details about each setting, click [Help]. You can also click the information icons to show
configuration information.
2. Set printing options as necessary, and then click [OK].
The printer properties dialog box closes.
3. Click [Print].
When Using macOS/OS X
The procedure in this section is an example based on macOS 10.13. The actual procedure may vary
depending on the operating system you are using.
87
Page 90

3. Printing Documents
1. Open the printer properties dialog box in your document's application.
For details, see page 86 "Displaying the Printing Preferences Dialog Box in an Application When
Using OS X/macOS".
2. Set printing options as necessary, and then click [OK].
The printer properties dialog box closes.
3. Click [Print].
• When printing a job (Color/B&W or B&W only) is restricted, specify the user code in the printer
properties of the printer driver before printing. For details about user code, see page 287
"Restricting Machine Functions According to User".
• You can specify which paper tray is selected first in [Paper Tray Priority] under [Paper Settings]
when the trays are automatically selected while you are printing. For details about [Paper Tray
Priority], see page 246 "Paper Settings".
• If a paper jam occurs, printing stops after the current page has been printed out. After the jammed
paper is removed, printing restarts from the jammed page automatically. For details about how to
remove the jammed paper, see page 349 "Removing Paper Jams".
If a Paper Mismatch Occurs
The machine reports an error if:
• The paper type does not match the print job's settings when [Input Tray:] is set to [Auto Tray Select].
There are two ways to resolve these errors:
Continue printing using mismatched paper
Ignore the error and print using mismatched paper.
Cancel the print job
Cancel printing.
• If [Auto Continue] under [System Settings] is enabled, the machine ignores the paper type and size
settings and prints on whatever paper is loaded. Printing stops temporarily when the error is
detected, and restarts automatically after about ten seconds using the settings made on the control
panel. For details about [Auto Continue], see page 234 "System Settings".
Continuing printing using mismatched paper
If the paper is too small for the print job, the printed image will be cropped.
1. Press [FormFeed] while the error message is being displayed.
88
Page 91

ECC272
Basic Operation of Printing
Canceling a Print Job
You can cancel print jobs using either the machine's control panel or your computer, depending on the
status of the job.
Canceling a print job before printing has started
• Windows
1. Double-click the printer icon on the task tray of your computer.
2. Select the print job you want to cancel, click the [Document] menu, and then click
[Cancel].
3. Click [Yes].
• OS X and macOS
1. Start System Preferences.
2. Click [Printers & Scanners].
3. Select the printer you are using, and then click [Open Print Queue...].
4. Select the queue you want to delete.
5. Click [×].
• If you cancel a print job that has already been processed, printing may continue for a few pages
before being canceled.
• It may take a while to cancel a large print job.
89
Page 92

ECC203
3. Printing Documents
Canceling a print job while printing
1. Press the [Clear/Stop] key.
Press [Print Jobs] on the [Cancel Jobs] screen.
2.
90
Page 93

ECC254
Printing Confidential Documents
Printing Confidential Documents
By the Locked Print function, you can password-protect print jobs.
This means that your job is printed only after you enter the password using the machine's control panel.
This function prevents unauthorized users from seeing sensitive documents at the machine.
• This function is available for M C250FW only.
• This function is only available when using the PCL printer driver, and printing from a computer
running a Windows operating system.
• The procedure in this section is an example based on Windows 10.
Storing a Locked Print file
This section explains how to store a Locked Print file in the machine using the printer driver.
1. Open the file you want to print on your computer.
2. On the [File] menu, click [Print...].
3. In the [Select Printer] area, select the name of this machine, and then click [Preferences].
4. Click the [Setup] tab, and then select the [Locked Print] check box.
The [Password:] and [User ID:] text boxes become available.
The [User ID:] text box contains the login user name of your computer account or the user code
used for the previous Locked Print job.
91
Page 94

3. Printing Documents
5. Type the password (containing 4 to 8 digits) and user ID (containing 1 to 9 alphanumeric
characters), and then click [OK].
The user code will be used to identify your Locked Print file on the machine's control panel.
6. Execute a print command.
The print job is stored in the machine as a Locked Print file. You can print the file by entering the
password using the control panel.
• The Locked Print file is automatically erased from the machine's memory when it is printed out, or
when the machine's power is turned off.
• The machine can store up to 5 jobs or 5 MB of Locked Print data at a time.
• Even if the machine cannot store any more Locked Print files, the machine holds a new Locked Print
file for the period of time specified in [Locked Print] under system settings before canceling the job.
Within this time, you can print or delete the new Locked Print file. You can also print or delete an
existing Locked Print file so that the new Locked Print file can be stored in the machine.
Printing a Locked Print file
When there is a Locked Print file stored in the machine, "Locked Print Job" appears on the machine's
control panel display when the machine is in the copier, fax, scanner, or ID card copy mode.
Also, "Locked Print Job" appears on the [Status] screen.
Use the following procedure to unlock and print the Locked Print file.
92
Page 95

1. Press the [Home] key.
ECC202
2. Press the [Status] icon on the [Home] screen.
3. Press the [Locked Print] tab.
4. Select the file you want to print.
Identify the Locked Print file by checking its time stamp and user ID.
5. Press [Print Jobs].
6. Press the [Locked Print Password:] box.
Printing Confidential Documents
7. Enter the password, and then press [OK].
8. Press [OK].
• You cannot print a Locked Print file while the machine is currently printing. The machine beeps if
you try to do so.
• While entering a password using the control panel, the machine cannot process other print jobs.
• The Locked Print file is automatically erased from the machine's memory when it is printed out, or
when the machine's power is turned off.
Deleting a Locked Print file
When there is a Locked Print file stored in the machine, “Locked Print Job” appears on the machine's
control panel display when the machine is in the copier, fax, scanner, or ID card copy mode.
93
Page 96

ECC202
3. Printing Documents
Also, "Locked Print Job" appears on the [Status] screen.
Use the following procedure to delete a Locked Print file. You do not need to enter a password to delete
a Locked Print file.
1. Press the [Home] key.
94
2. Press the [Status] icon on the [Home] screen.
3. Press the [Locked Print] tab.
4. Select the file you want to delete.
Identify the Locked Print file by checking its time stamp and user ID.
5. Press [Delete Jobs].
The Locked Print file is deleted.
• You can also display the Locked Print file list by pressing [Check] on the [Status] tab in Step 3.
Page 97

Using Various Print Functions
Using Various Print Functions
This section briefly describes various print functions that you can configure with the printer driver to make
printouts appropriate for your purposes.
Print Quality Functions
Print quality and color tone can be adjusted to suit the print data. Some of the print quality settings you
can configure are described below.
Printing color documents in black and white
The black produced in black and white printing is a more distinct black than that produced in color
printing.
Separating the print data into CMYK and printing in designated color only
Normally, all four colors (CMYK) are used for color printing. If you do not want to use certain
colors, you can disable the use of those colors and print using other colors only.
Saving toner when printing (Economy Color printing)
You can save toner by printing with lower toner consumption.
Changing the image printing method
You can select to print with priority on print quality or print speed. When printing images, the higher
the resolution of images is, the longer the time is required for printing.
Changing the dither pattern
A dither pattern is a pattern of dots used to simulate a color or shade of an image. If the pattern is
changed, the characteristics of the image will also change. You can select a pattern suitable for the
image to be printed.
Changing the color profiling pattern
You can select a color profiling pattern to adjust the tone of colors according to the colors
displayed on the computer screen.
Because colors on the computer screen are created using the three RGB colors while colors for
printing are composed of the four CMYK colors, colors need to be converted during the printing
process. Therefore, images on the printed paper may look different from those on the computer
screen if adjustment is not performed.
Printing grayscale images using black or CMYK
You can print black or gray sections of an image using black toner only, instead of using all CMYK
toners. Compared to the black printed with CMYK toner, this results in a black that is flatter and
purer.
95
Page 98

3. Printing Documents
Using ICM (Image Color Matching)
You can use Windows ICM function to reproduce colors that appear on the computer screen as
close as they are on printed paper.
To use this function, the color profile must be added to the computer. You can find the color profile
in the ICM folder stored on the provided printer driver CD-ROM. For information about adding a
color profile, search Windows Help for "color profile", and then see the appropriate topic.
• Some of the functions described above might not be available depending on the printer driver or
operating system. For details, see the printer driver Help.
Print Output Functions
You can specify the form of print outputs according to your purposes. This section briefly describes some
of the settings that you can specify.
Printing multiple sets of a document
You can print multiple sets of the same document.
Collating the output in document batches
You can print complete sets of a multiple-page document one set at a time (P1, P2, P1, P2 ...). If this
function is not used when printing multiple sets, prints will be output in page batches (P1, P1, P2,
P2 ...). This function is useful when, for example, making presentation materials.
Changing orientation or rotating the image
You can change the orientation of an image to portrait or landscape. You can also rotate the
image by 180 degrees. Use rotation to prevent an image from being printed upside down when
using paper with a predefined top and bottom (such as letterhead paper).
Printing multiple pages per sheet
You can print multiple pages onto one sheet of paper.
When using this function, a suitable reduction ratio is selected automatically based on the paper
size and the number of pages you want to fit on each sheet.
Printing on both sides of paper (duplex printing)
You can print on both sides of paper.
Reducing or enlarging the document
You can reduce or enlarge documents by a specific ratio, from 25% to 400% in 1% increments.
You can also reduce or enlarge documents automatically to fit a specific paper size. This function is
useful, for example, when printing Web pages.
96
If the [Enable Large Papers] option is selected, A3/11 × 17/B4/8K documents can be scaled to
a size that the machine supports, so that it can then be printed out.
Page 99

Using Various Print Functions
Not printing of blank pages (only PostScript 3 printer driver)
If a print job contains blank pages, they can be prevented from being printed.
Note that this setting has higher priority than [Blank Page Print] under [Printer Settings] of the control
panel.
Printing with a cover page
You can add a cover page to the print job.
You can select to leave the cover page blank, or print the first page of the document on the cover
page. If a cover page is inserted into a duplex job, you can print on its back side also.
Paper for the cover page can either be the same as or different from the remaining pages.
Printing on custom size paper
You can print using non-standard size paper by specifying the size of the paper as custom size.
To specify the custom paper size, select [Custom Paper Size] from the [Document Size:] list, and
then click the [Custom Paper Size...] button in the lower part of the dialog box to configure the
paper size.
Superimposing text on prints (watermark)
You can superimpose watermark text on prints. Various predefined watermarks are provided. You
can also create your own watermarks.
• Some of the functions described above might not be available depending on the printer driver or
operating system. For details, see the printer driver Help.
97
Page 100

3. Printing Documents
98
 Loading...