

Ricoh M156, M176, M157, M177, M154 Service Training
...
1
Rm-MF1/Rm-P1 Training
Slide 1
M156/M157/M176/M177 (Rm-MF1)
M154/M155/M174/M175 (Rm-P1)
Service Training
Version 1.0
These models are similar to the Rn series of printers and copiers.

2
Rm-MF1/Rm-P1 Training
Slide 2
M156/M157/M176/M177 (Rm-MF1)
M154/M155/M174/M175 (Rm-P1)
Service Training
Product Overview
No additional notes

3
Rm-MF1/Rm-P1 Training
Slide 3
What Models are in this Series?
Rm-MF1a
Rm-MF1a
M156: SP 311SFN, No AIO refill
M176: SP 310SFN, AIO can be refilled
Rm-MF1aw
M157: SP 311SFNw, Wireless LAN, No AIO refill
M177: SP 310SFNw, Wireless LAN, AIO can be refilled
Type A and B models
M15x is also known as Type A; M17x is also known as
Type B
For Type B there are two sub-types, based on destination:
» For CHN: The AIO has hole through which the AIO can be
refilled with toner. Bags of toner for refilling are also sold.
» For EU/AA/NA: The AIO has no hole. The machine is
designed for refill, but bags of toner for refilling are not sold
No additional notes

4
Rm-MF1/Rm-P1 Training
Slide 4
What Models are in this Series?
Rm-P1a
Rm-P1a
M154: SP 311DN, No AIO refill
M174: SP 310DN, AIO can be refilled
Rm-P1aw
M155: SP 311DNw, Wireless LAN, No AIO refill
M175: SP 310DNw, Wireless LAN, AIO can be
refilled
The note about Type A and Type B models on the
previous slide also applies here.
No additional notes
5
Rm-MF1/Rm-P1 Training
Slide 5
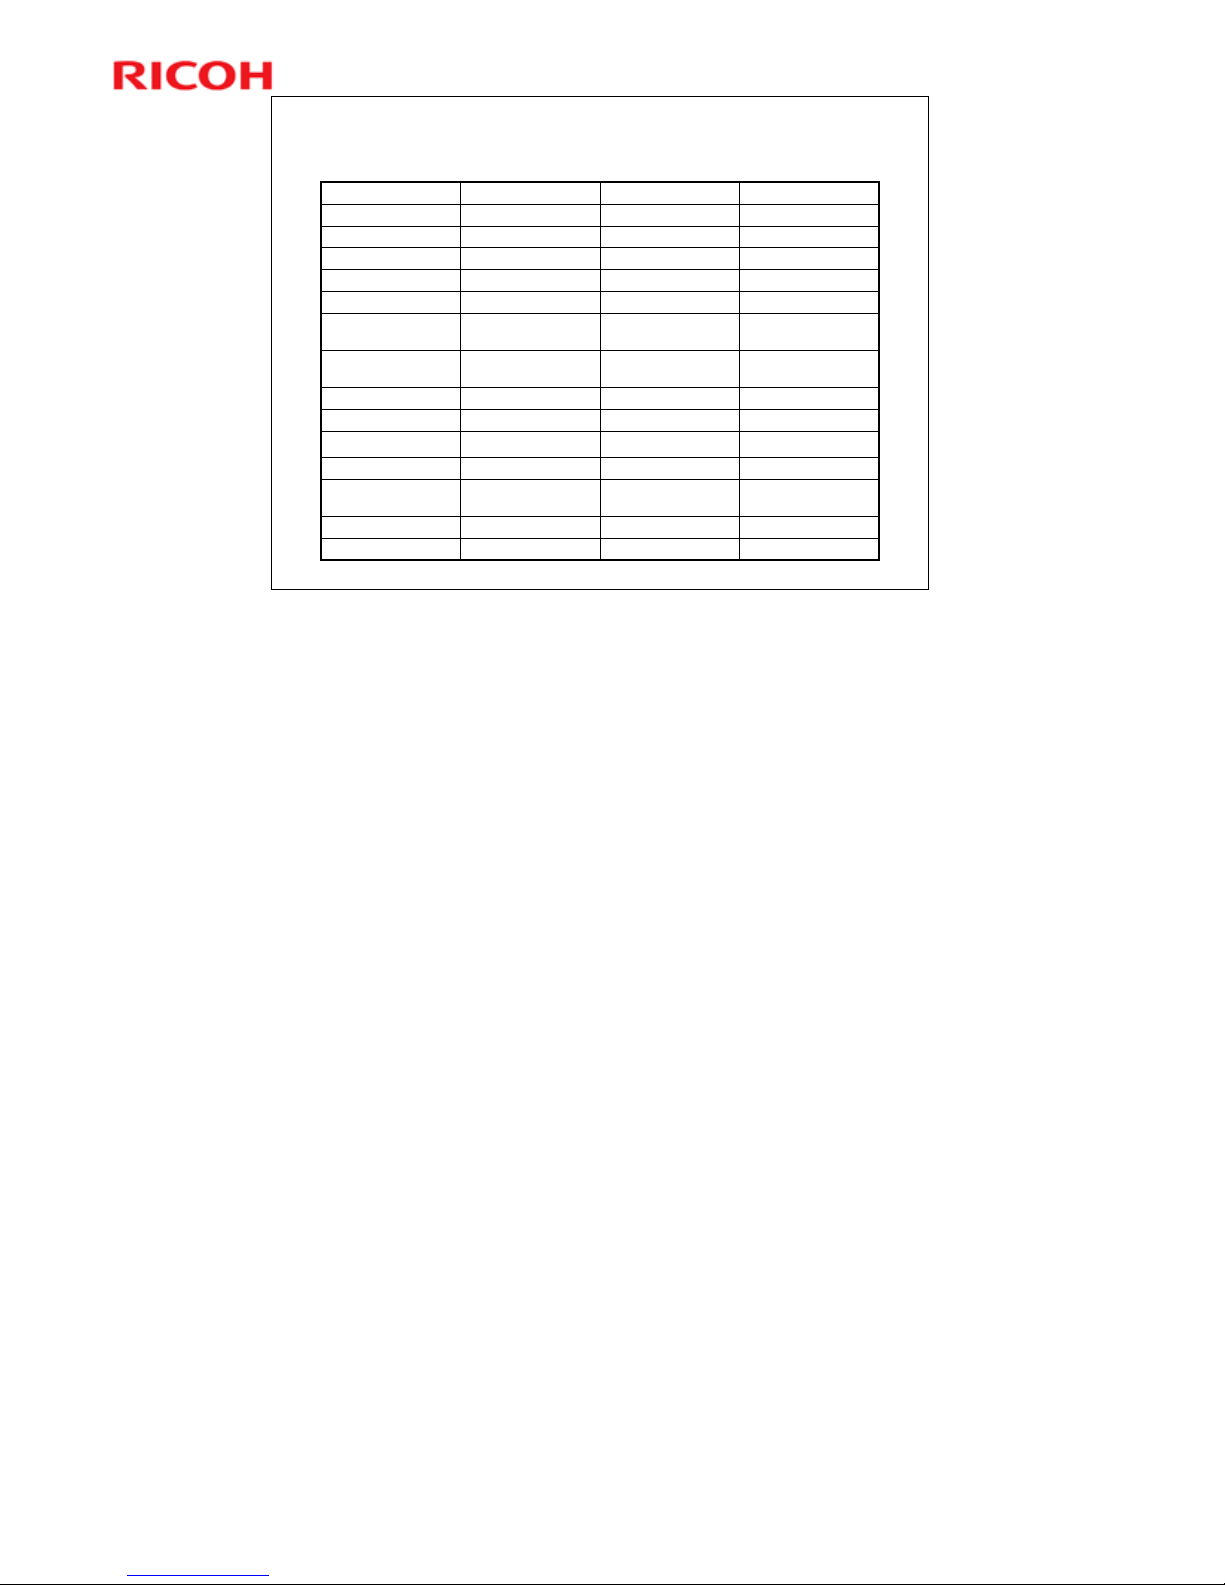
Differences from Previous Models
Rm-MF1 vs Rn-MF1/MF2
PCLPCL/PS3PCL/PS3PDL
NoYesYesOptional Tray
Some models (China
only)
NoNoAIO Refill
200k350k200kMachine Life
Some modelsNoNoWireless LAN
50 sheets125 sheets125 sheetsOutput Capacity
All modelsSome modelsSome models Duplex
2 boards1 board1 boardPSU and High
Voltage Power Pack
1 board2 boards2 boardsController and
Engine Boards
4 lines2 lines2 linesDisplay Panel
China onlyNoNoHandset
CISCCDCCDScanner
ADFADF/ARDFADFADF
282828PPM (A4)
Rm-MF1Rn-MF2Rn-MF1
No additional notes
6
Rm-MF1/Rm-P1 Training
Slide 6
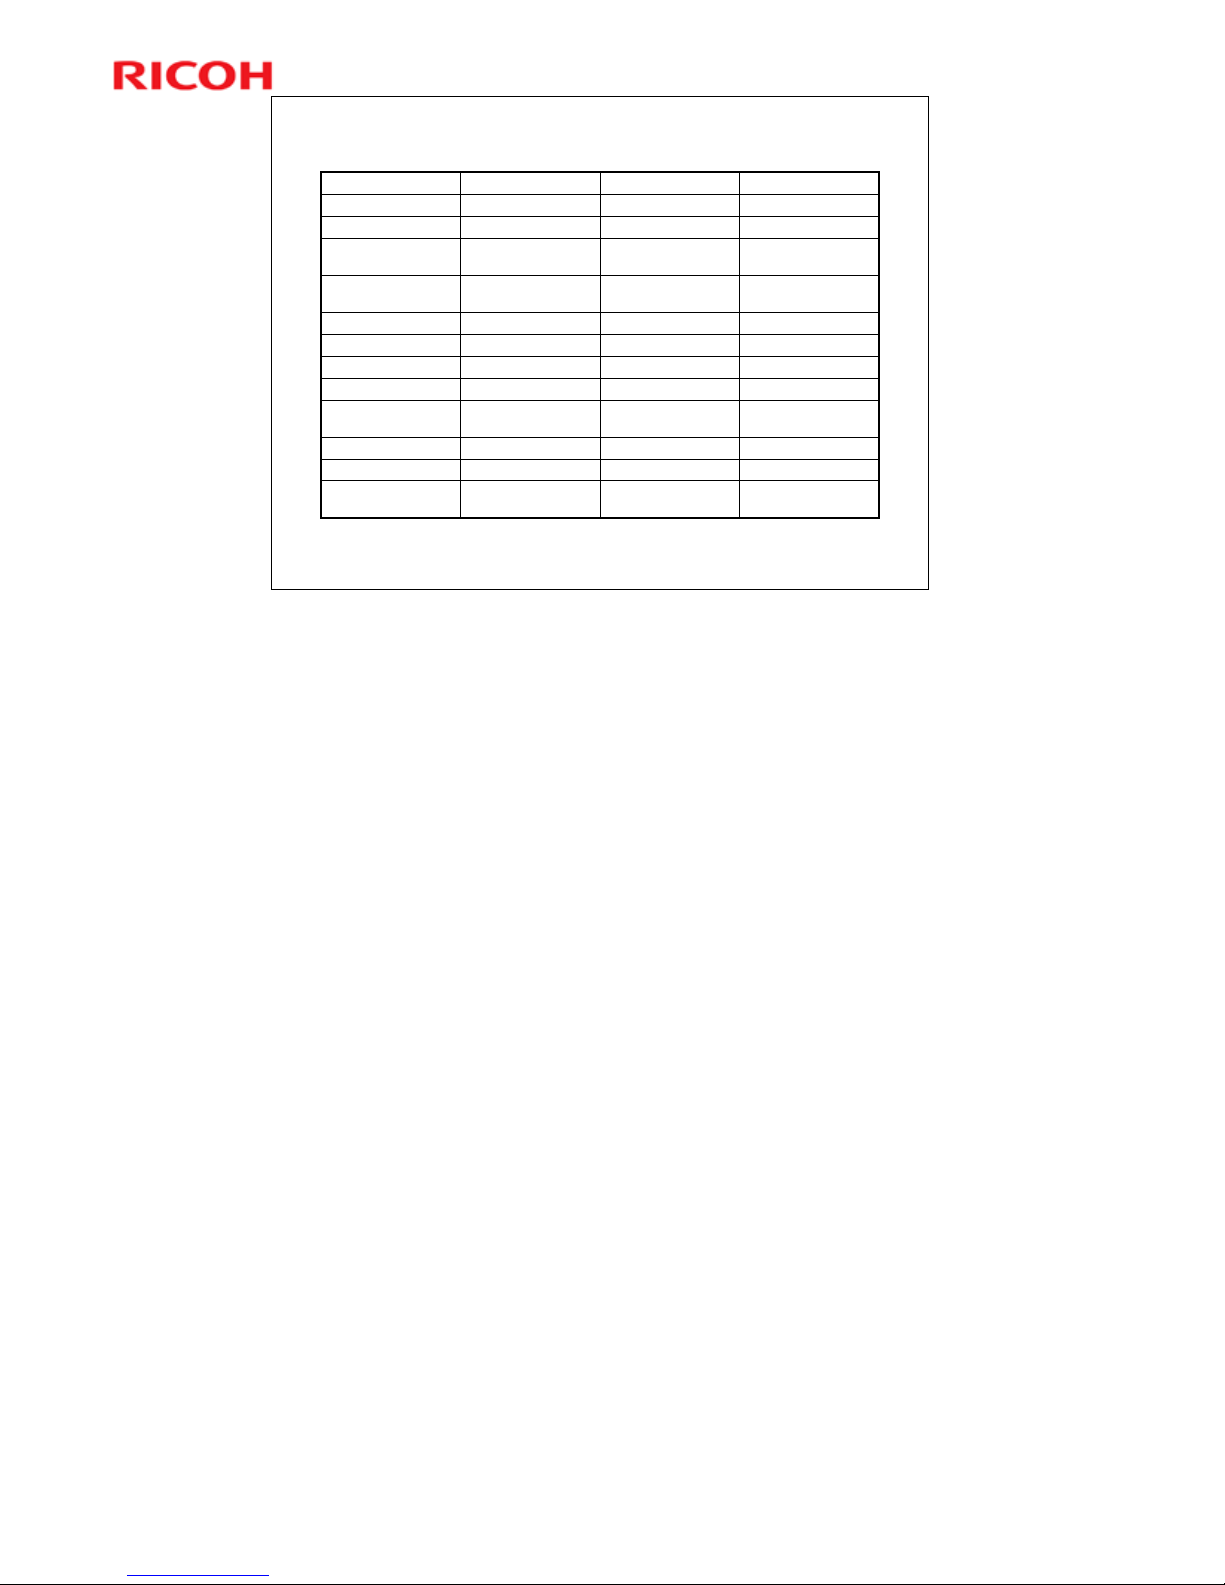
Differences from Previous Models
Rm-P1 vs Rn-P1/P2
YesNoYesSOM (Smart
Organizing Monitor)
PCLPCL/PS3PCL/PS3PDL
NoYesYesOptional Tray
Some models (China
only)
NoNoAIO Refill
200k350k200kMachine Life
Some modelsNoNoWireless LAN
125 sheets125 sheets125 sheetsOutput Capacity
All modelsSome modelsSome models Duplex
2 boards1 board1 boardPSU and High
Voltage Power Pack
1 board2 boards2 boardsController and
Engine Boards
No2 linesNoDisplay Panel
282828PPM (A4)
Rm-P1Rn-P2Rn-P1
No additional notes

7
Rm-MF1/Rm-P1 Training
Slide 7
Other Points
Rm-MF1/P1 do not have a USB host or the scan
to USB feature.
No additional notes

8
Rm-MF1/Rm-P1 Training
Slide 8
M156/M157/M176/M177 (Rm-MF1)
M154/M155/M174/M175 (Rm-P1)
Service Training
Specifications
No additional notes

9
Rm-MF1/Rm-P1 Training
Slide 9
General Specifications (1)
Printing Speed, A4(LT): 28 ppm (LT: 30 ppm)
First Print Speed: Less than 8 sec (A4, LT SEF)
Duplex Printing: Auto (Standard, approx 50% productivity)
Memory: 128 MB (no optional memory)
Resolution: 1200 x 600 / 600 x 600 dpi
Interfaces
MF1a/P1a: USB2.0, 10BASE-T/100BASE-TX Ethernet
MF1aw/P1aw: USB2.0, 10BASE-T/100BASE-TX Ethernet,
IEEE802.11b/g/n
PDL: PCL5e, PCL6
Network Protocols: TCP/IP, IPP
No additional notes

10
Rm-MF1/Rm-P1 Training
Slide 10
General Specifications (2)
Input capacity
Standard Tray: 250 sheets (80 g/m2)
Bypass tray: 50 sheets (80 g/m2)
Output capacity (Standard Tray, Face down)
MF1: Up to 50 sheets
P1: Up to 125 sheets (A4/LT or 80 g/m2, 20lb)
Input Paper Size
Standard Tray: A4,B5,A5,B6,A6,Legal,Letter,HLT,Exective,F,Foolscap,Folio,16K
» Custom size: Min. 100mm x 148mm (3.9" x 5.92"), Max. 216mm x 356mm (8.64" x 14.24")
Bypass Tray: A4,B5,A5,B6,A6,Legal,Letter,HLT,Exective,16K,Envelope:
#10,Monarch,C5,C6,DL
» Custom size: Min. 90mm x 140mm (3.6" x 5.92"), Max. 216mm x 356mm (8.64" x 14.24")
Media Type
Standard Tray: Plain Paper, Recycled Paper, Thick Paper, Thin Paper
Bypass Tray: Plain Paper, Recycled Paper, Thick Paper, Thin Paper
Paper Weight
Standard Tray: 52-162g/m2 (14-43lb)
Bypass tray: 52-162g/m2 (14-43lb)
Duplex: 60-105g/m2 (16-28lb)
ADF
Capacity: 35 sheets
Original size
» Min: 139.7mm x 139.7mm (5.5'' x 5.5''), Max: 215.9mm x 355.6mm (8.5'' x 14'')
Original weight: 52-105g/m2 (14-28lb)
No additional notes

11
Rm-MF1/Rm-P1 Training
Slide 11
General Specifications (3)
Power Consumption
US version
» Max.: 800W
» Energy Saver
– Normal mode (Energy saver 2): 5W
– Quick mode (Energy saver 1) : 70W
EU /CHN versions
» Max.: 890W
» Energy Saver
– Normal mode (Energy saver 2): 5W
– Quick mode (Energy saver 1): 70W
Warm-up Time:
MF1: Less than 30 sec
P1: Less than 26 sec
Energy Save Mode (MF1, P1)
» Normal (Energy Save Mode 2): Less than 20 sec.
» Quick (Energy Save Mode 1): Less than 10 sec.
No additional notes

12
Rm-MF1/Rm-P1 Training
Slide 12
Options
There are no optional units for these models.
The Rn series has an optional paper tray. The Rm series does not.

13
Rm-MF1/Rm-P1 Training
Slide 13
AIO Cartridges
There are 4 types:
Starter AIO: About 1k per cartridge
Low yield AIO: About 2k per cartridge
» Two types: Refill, or no refill, depending on the model
High yield AIO:
» Type A: 3.5k, no refill
» Type B: 5k, refill is possible
No additional notes

14
Rm-MF1/Rm-P1 Training
Slide 14
Targets
Monthly Print Volume
Average: 0.7K
Maximum: 5.8K
Estimated Unit Life: 5 years or 200K prints
whichever comes first
No additional notes

15
Rm-MF1/Rm-P1 Training
Slide 15
M156/M157/M176/M177 (Rm-MF1)
M154/M155/M174/M175 (Rm-P1)
Service Training
Maintenance
No additional notes

16
Rm-MF1/Rm-P1 Training
Slide 16
PM Intervals
There are no PM parts.
There are three "yield parts", but given the ACV
(Average Copy Volume) for this machine, these
"yield parts" are expected to outlast the life of
the machine.
Yield Parts
Paper Feed Roller (120 K)
Transfer Roller (120 K)
Fusing Unit (120 K)
The counters for each yield part can be
monitored using either of the following methods:
Web Image Monitor
Configuration Page in the “List/Test Print” menu
No additional notes

17
Rm-MF1/Rm-P1 Training
Slide 17
Note to Service Personnel
Yield parts are rated to last for 120 K, which
should be longer than the machine's rated
lifespan of five years.
For customers who are very heavy users, it may
be necessary to change yield parts during the life
of the machine.
After installing new yield parts, the counters must
be reset.
The counter reset procedure is not a user
function and must be done by a trained
technician.
See the replacement procedures in the FSM
(Field Service Manual) for the reset procedures
for each yield part.
No additional notes

18
Rm-MF1/Rm-P1 Training
Slide 18
Access to Service Functions
For MF models: To access Maintenance Mode, do
the following:
1. Type the following keys, in sequence:
[Clear/Stop] .. [1] .. [0] .. [7]
2. Hold down the [Start] key until the Maintenance
Mode screen is displayed.
» Note: This should take about 3 seconds.
For P models
To access the SP mode of Smart Organizing
Monitor, open the Printer Configuration screen
by inputting the field technician access code:
“Admin074”
No additional notes
19
Rm-MF1/Rm-P1 Training
Slide 19
Image Adjustment
This adjustment can be
done by both technicians
and users.
Technicians:
Maintenance Mode
(MF1)
SOM (P1)
Users:
User Mode
See FSMs (Field Service
Manuals) for procedures.
No additional notes

20
Rm-MF1/Rm-P1 Training
Slide 20
Firmware Updating
A computer is necessary for updating the
firmware.
Use the correct procedures (see the service
manual for details) to update the firmware.
No additional notes

21
Rm-MF1/Rm-P1 Training
Slide 21
M156/M157/M176/M177 (Rm-MF1)
M154/M155/M174/M175 (Rm-P1)
Service Training
Machine Overview
No additional notes
22
Rm-MF1/Rm-P1 Training
Slide 22
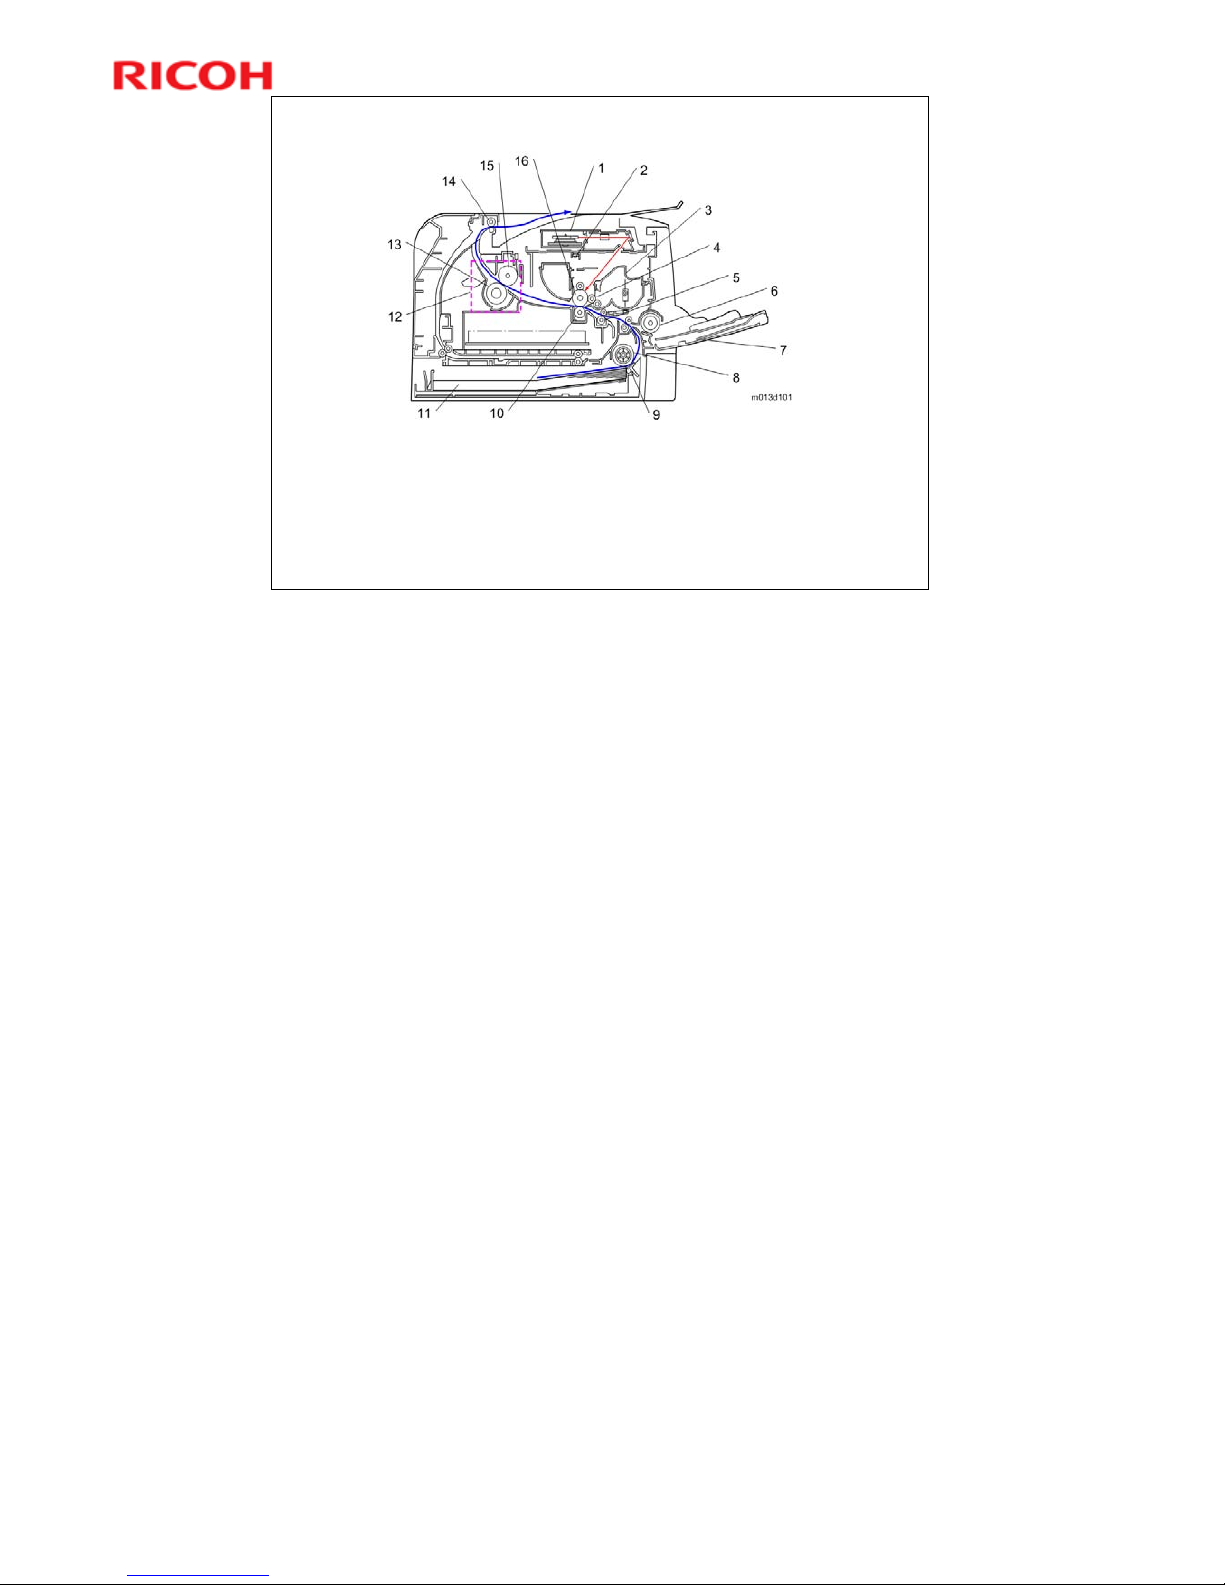
Component Layout – Rm-P1
1. Laser unit
2. Quenching lamp
3. Cartridge (AIO-type)
4. Development roller
5. Registration roller
6. By-pass feed roller
7. By-pass feed tray
8. Paper feed roller
9. Friction pad
10. Transfer roller
11. Paper Tray
12. Fusing Unit
13. Pressure Roller
14. Paper exit roller
15. Hot Roller
16. Drum
No additional notes
23
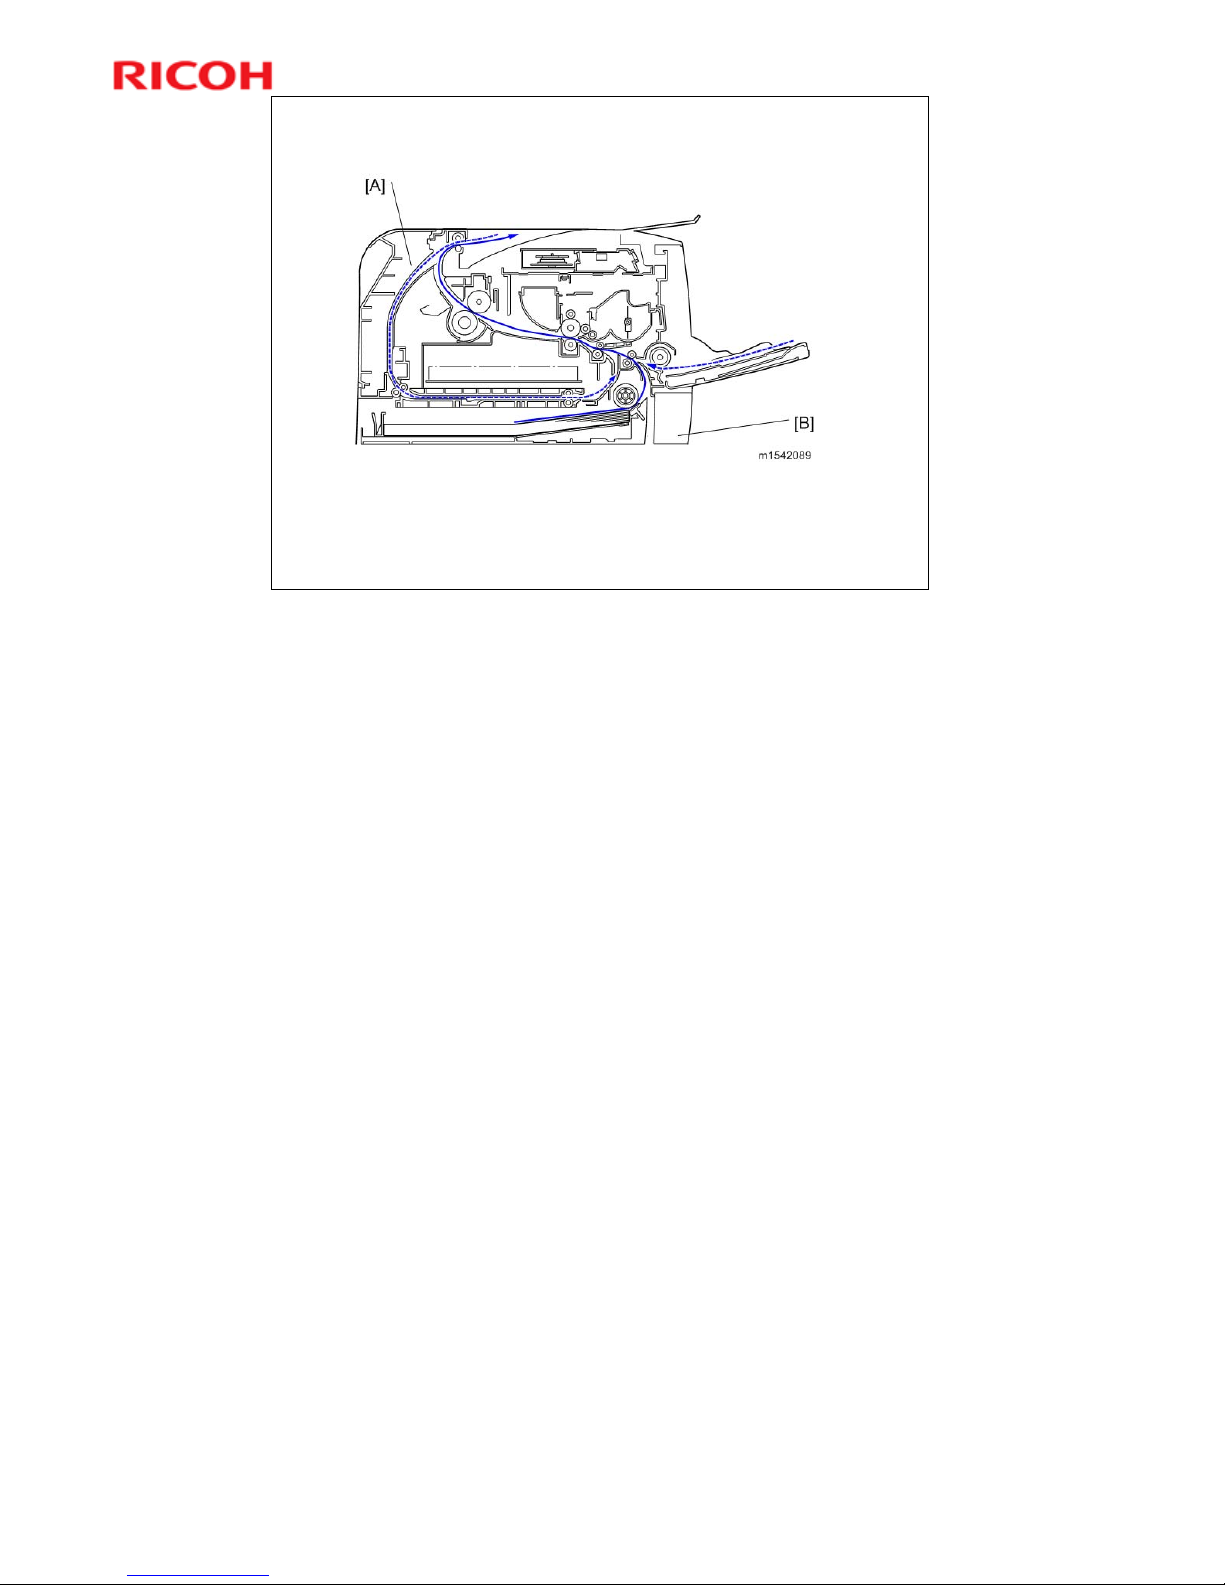
Rm-MF1/Rm-P1 Training
Slide 23
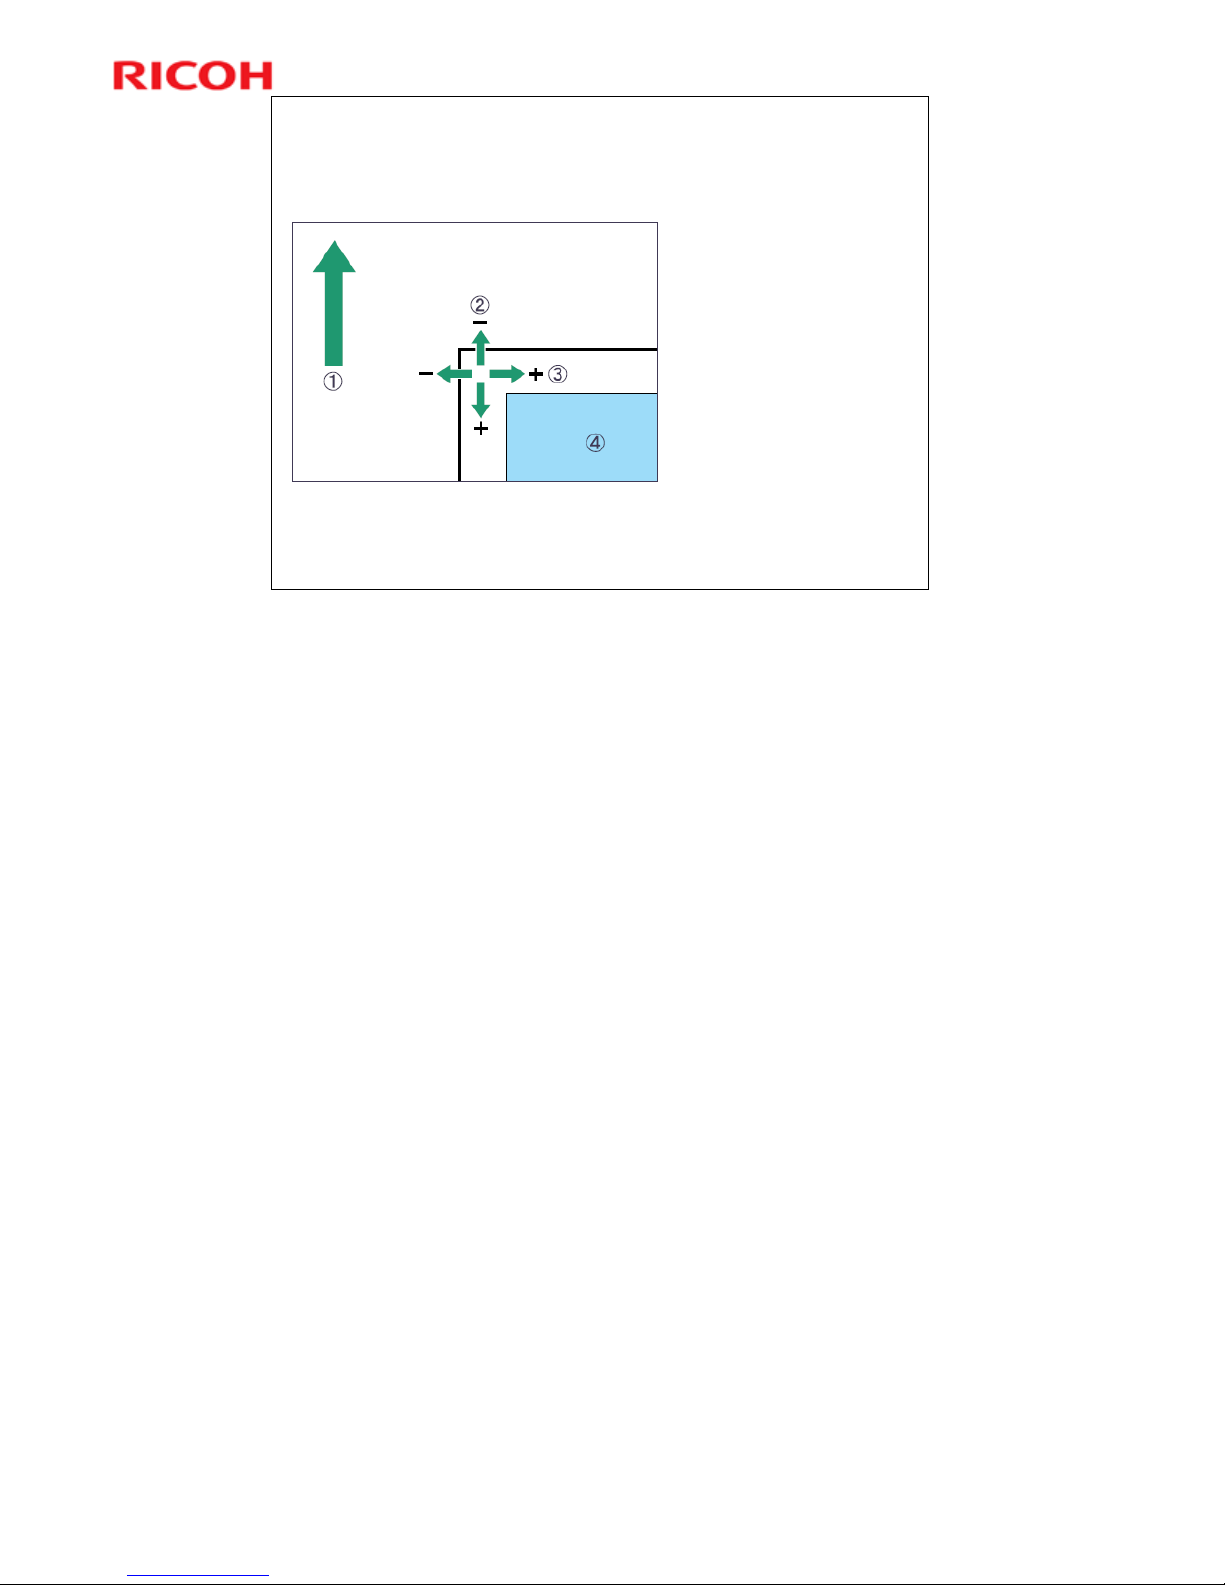
Paper Path – Rm-P1
[A]: Duplex section
[B]: Paper tray
No additional notes
24
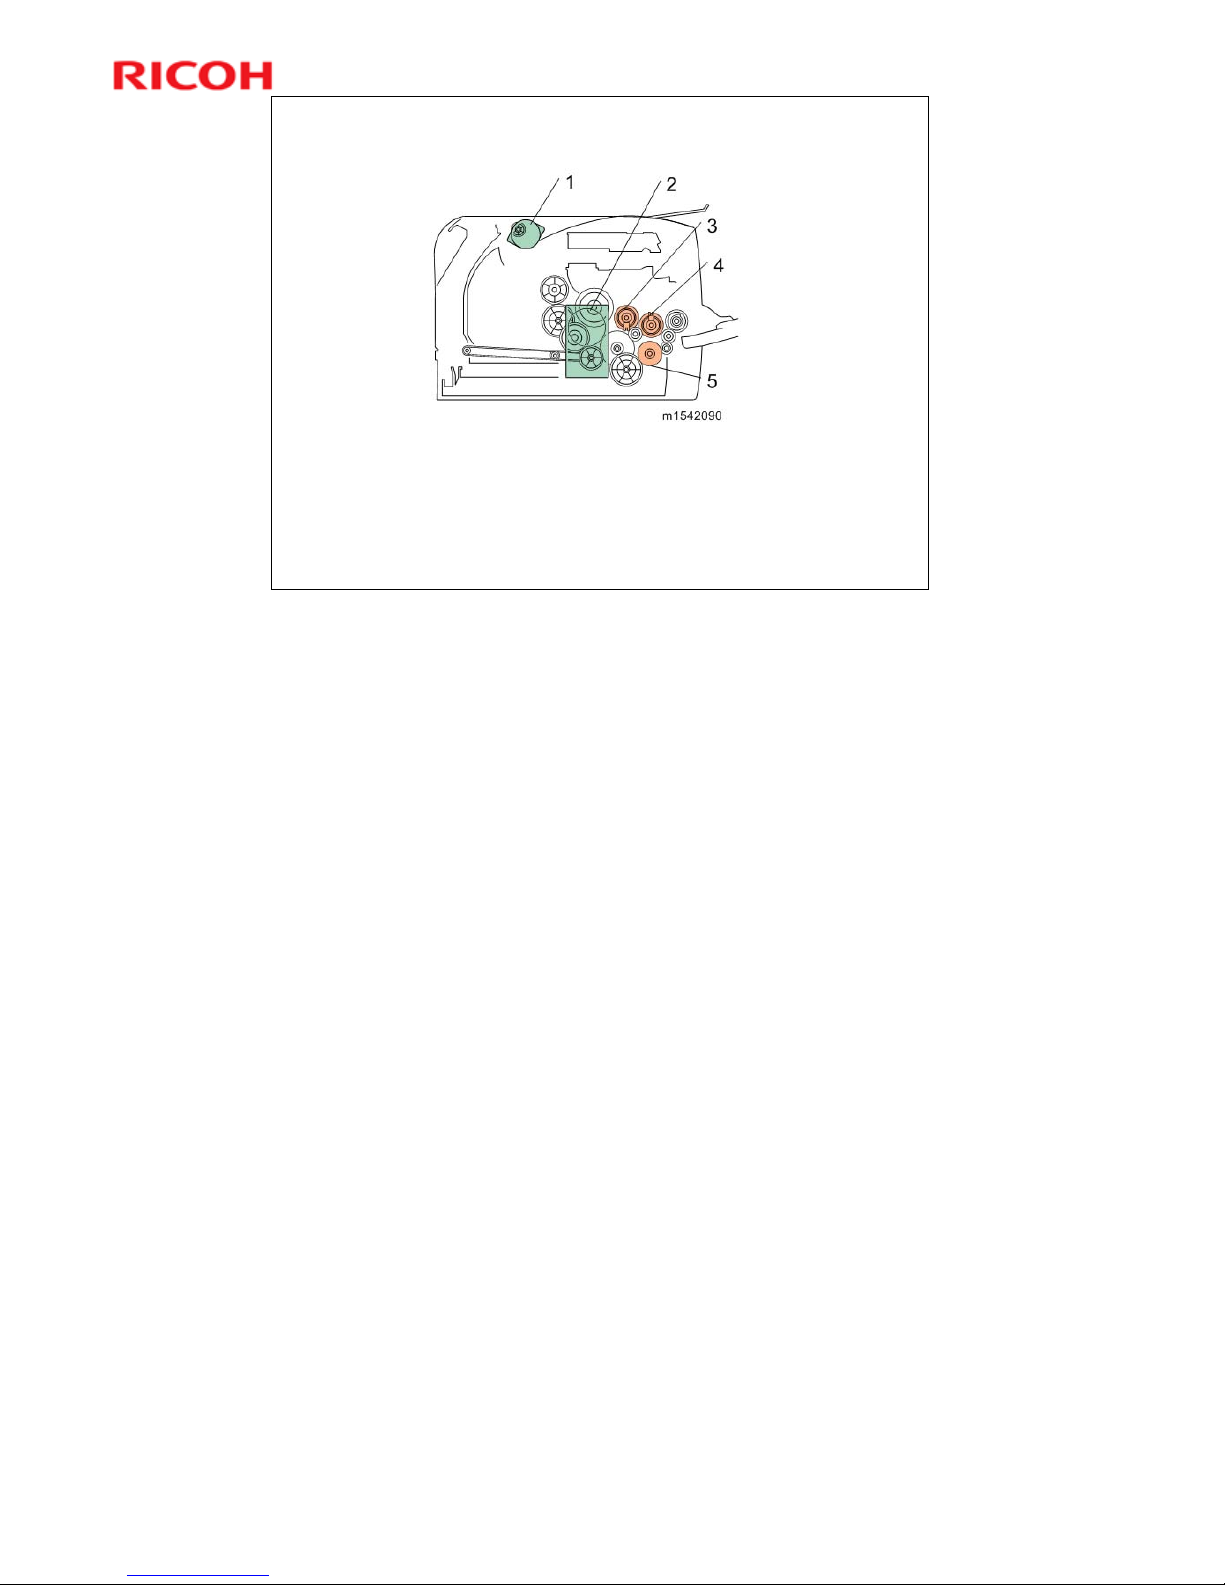
Rm-MF1/Rm-P1 Training
Slide 24
Drive Layout – Rm-P1
1. Duplex Motor
2. Main Motor
3. Registration Clutch
4. Relay Clutch
5. Paper Feed Clutch
No additional notes

25
Rm-MF1/Rm-P1 Training
Slide 25
M156/M157/M176/M177 (Rm-MF1)
M154/M155/M174/M175 (Rm-P1)
Service Training
Cover Removal & Part Replacement
No additional notes

26
Rm-MF1/Rm-P1 Training
Slide 26
General Precautions
Before starting to work on the machine:
If there are printer jobs in the machine, print out
all jobs in the printer buffer.
Turn off the main power switch and unplug the
machine.
The slides in this presentation only cover a few
important points. For full details of all
procedures, see the field service manual.
Follow the notes and cautions in all procedures.
No additional notes
27
Rm-MF1/Rm-P1 Training
Slide 27
General Precautions
Many of the parts are held
in place with plastic
latches which can break
easily.
Release them carefully,
pushing the hook end of
the latch away from the
part to which it is latched.
No additional notes

28
Rm-MF1/Rm-P1 Training
Slide 28
Removing Covers
The covers have a lot of hooks and tabs.
Disconnect these carefully, as explained on the
previous slide.
See the procedures in the service manual for the
locations of the hooks and tabs, and follow the
instructions carefully to remove the covers
properly.
No additional notes
29
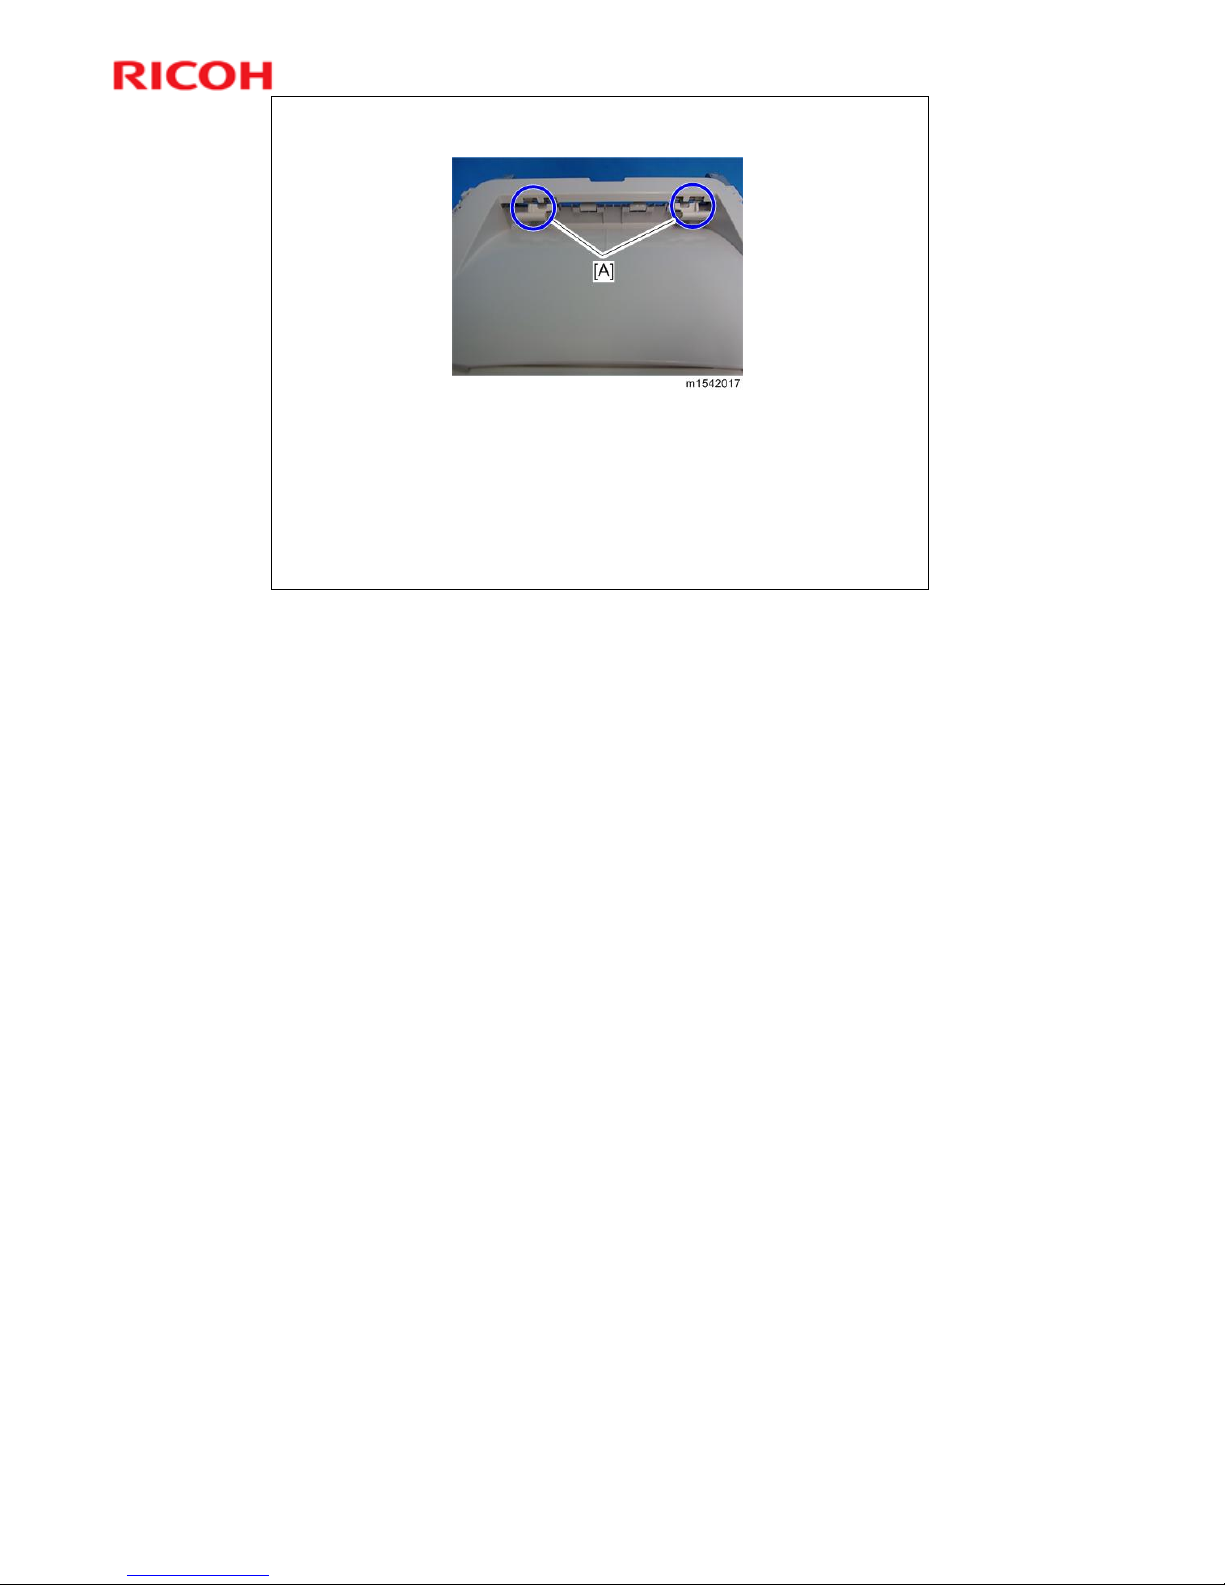
Rm-MF1/Rm-P1 Training
Slide 29
Re-installing the Top Cover
When re-installing the top cover, alway s verify that the two
paperweights [A] are lifted. If they are not lifted to fit into
the paper slot, the paperweights could be damaged.
Make sure that these paperweights can be move d smoothly
(up and down) after installing the top cover. If these
paperweights do not move smoothly, install the top cover
again.
No additional notes
30
Rm-MF1/Rm-P1 Training
Slide 30
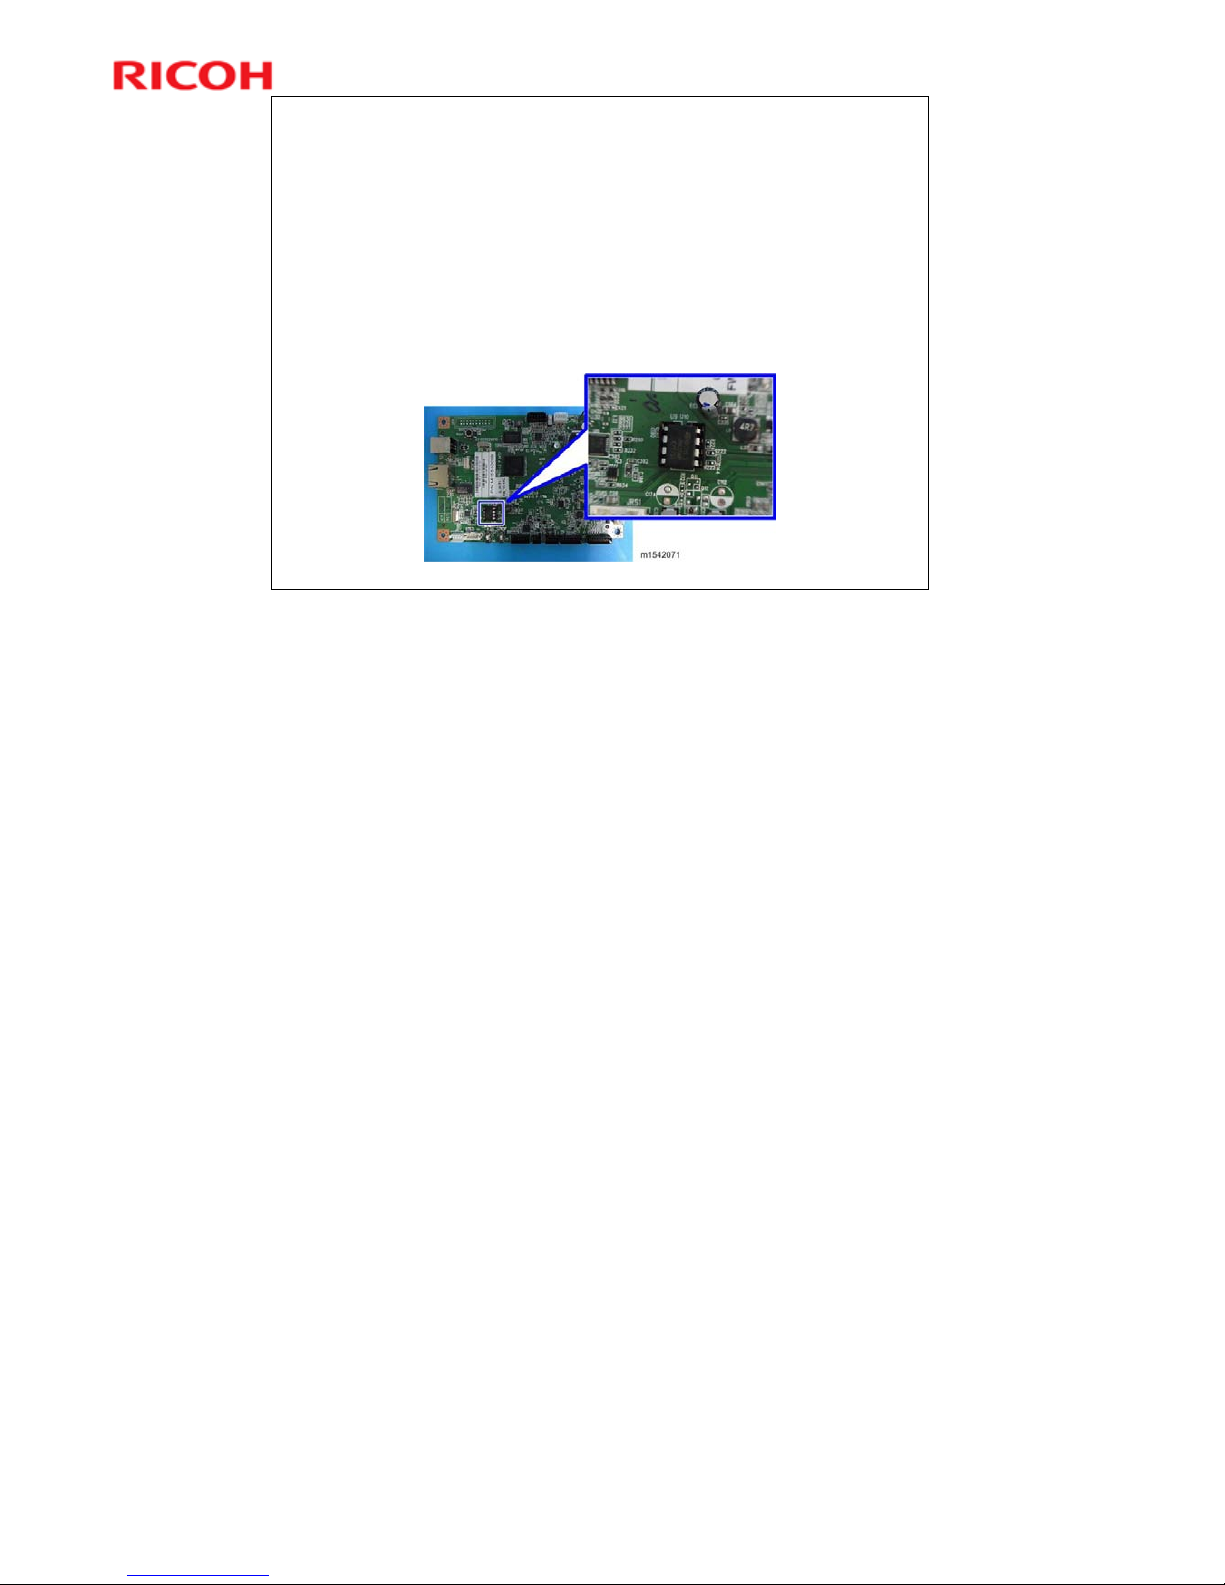
Replacing the Main Board
Do not connect any connectors to JRS1 and JRS2 when
reinstalling the main board [A]. These are only used at the
factory.
Do not adjust the dip switch. The dip switch is only for
factory use.
Remove the EEPROM from the old board (see below), and
install it on the new one.
No additional notes
 Loading...