

Page 1

Paper type: OK Prince Eco G100(55kg), Paper Thickness=80 µm // Pages in book=92 // Print scale=81%
Gap (when printed at 81% scale) = Pages in book × Paper thickness / 2 = 3.680000 mm
Operating Instructions Facsimile Reference <Advanced Features>
Operating Instructions
Facsimile Reference
<Advanced Features>
Printed in China
UE USA B465-8657
Read this manual carefully before you use this product and keep it handy for future
reference.
For safety, please follow the instructions in this manual.
Page 2

Paper type: OK Prince Eco G100(55kg), Paper Thickness=80 µm // Pages in book=92 // Print scale=81%
Gap (when printed at 81% scale) = Pages in book × Paper thickness / 2 = 3.680000 mm
Introduction
This manual contains detailed instructions on the operation and maintenance of this machine. To get
maximum versatility from this machine all operators should carefully read and follow the instructions in
this manual. Please keep this manual in a handy place near the machine.
Please read the Safety Information in the Copy Reference manual before using this machine. It contains important information related to USER SAFETY and PREVENTING EQUIPMENT PROBLEMS.
Notes:
Some illustrations might be slightly different from your machine.
Certain options might not be available in some countries. For details, please contact your local dealer.
Two kinds of size notation are employed in this manual. With this machine refer to the inch version.
Machine Types
The model names of the machines do not appear in the following pages. Check the type of your machine before reading this manual. (For details, see Chapter1 “ Machine Types” in the Basic Features
manual.)
Important
Parts of this manual are subject to change without prior notice. In no event will the company be liable
for direct, indirect, special, incidental, or consequential damages as a result of handling or operating
the machine.
Copyright © 2001
Page 3
R
R
StellaCEN-advanced_V4_FM.book Page i Tuesday, July 17, 2001 1:01 PM
How to Read this Manual
Symbols
In this manual, the following symbols are used:
WARNING:
This symbol indicates a potentially hazardous situation that might result in
death or serious injury when you misuse the machine without following the instructions under this symbol. Be sure to read the instructions, all of which are described in the Safety Information section in the Copy Reference manual.
CAUTION:
This symbol indicates a potentially hazardous situation that might result in minor or moderate injury or property damage that does not involve personal injury
when you misuse the machine without following the instructions under this
symbol. Be sure to read the instructions, all of which are described in the Safety
Information section in the Copy Reference manual.
* The statements above are notes for your safety.
Important
If this instruction is not followed, paper might be misfed, originals might be
damaged, or data might be lost. Be sure to read this.
Preparation
This symbol indicates the prior knowledge or preparations required before operating.
Note
This symbol indicates precautions for operation, or actions to take after misoperation.
Limitation
This symbol indicates numerical limits, functions that cannot be used together,
or conditions in which a particular function cannot be used.
Reference
This symbol indicates a reference.
{}
Keys built into the machine's operation panel.
i
Page 4
StellaCEN-advanced_V4_FM.book Page ii Tuesday, July 17, 2001 1:01 PM
Manuals for This Machine
Two Facsimile Reference manuals are provided, the Basic Features manual and
the Advanced Features manual. Please refer to the manual that suits your needs.
Advanced Features (this manual)
The Advanced Features manual describes more advanced functions and also explains settings for key operators.
Basic Features
The Basic Features manual explains the most frequently used fax functions and
operations.
❖❖❖❖ Chapter 1 Getting Started
Names and describes the parts of the control panel and machine.
❖❖❖❖ Chapter 2 Faxing
Explains basic transmission. You can also learn about other types of transmissions.
❖❖❖❖ Chapter 3 Registering
Explains how to make initial settings, such as the Own Name and Own Fax
Number settings. Also explains the Quick Dial, Speed Dial and Group keys.
These keys allow you to store numbers and save time when dialing. This
chapter also explains how to enter letters and symbols.
❖❖❖❖ Chapter 4 Troubleshooting
Explains how to adjust the volume of sounds generated by the machine and
how to interpret error messages. When the display or indicator lights show
unusual information, check the list and take appropriate action.
ii
Page 5
StellaCEN-advanced_V4_FM.book Page iii Tuesday, July 17, 2001 1:01 PM
TABLE OF CONTENTS
1.Transmission Options
Sending at a Specific Time (Send Later).................................................. 1
Fax Header Print ......................................................................................... 3
Label Insertion ............................................................................................ 4
Calling to Request a Message (Polling Reception)................................. 5
File Reserve Report (Polling RX) ................................................................... 7
Communication Result Report (Polling RX) ................................................... 7
2.Job Information
Canceling Transmission or Reception..................................................... 9
Printing a List of Files in Memory (Print File List)................................. 10
Printing a Stored Message (Print TX File).............................................. 11
Printing a Memory-locked Message ...................................................... 12
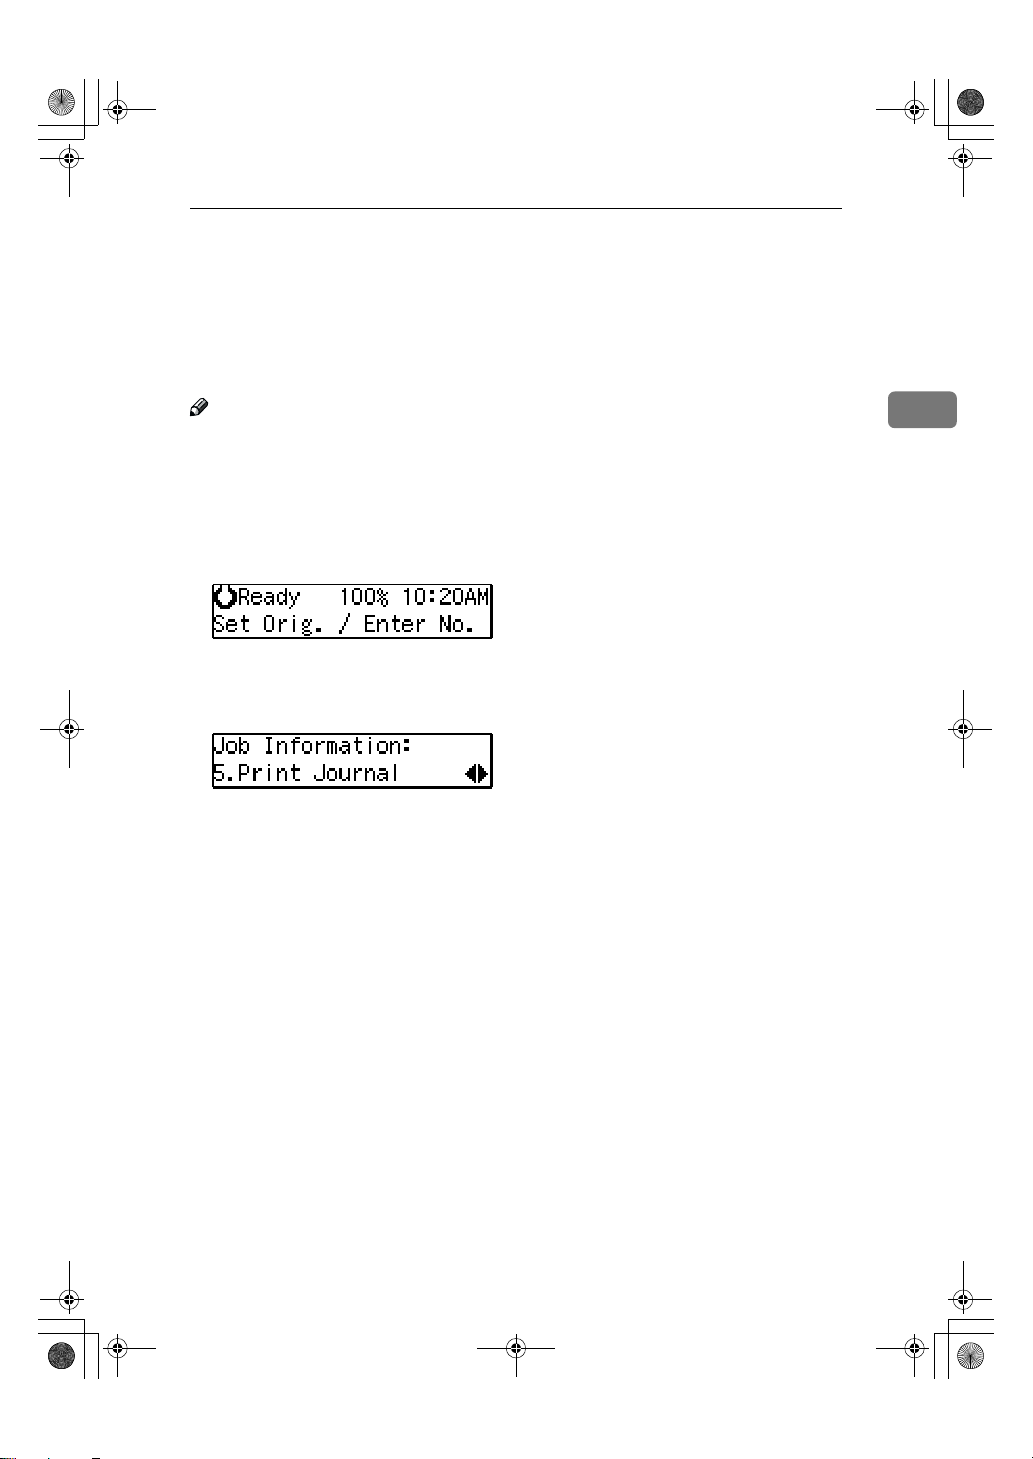
Printing the Journal.................................................................................. 13
Report Formats ............................................................................................ 14
3.Other Transmission Features
Handy Dialing Functions ......................................................................... 15
Chain Dial..................................................................................................... 15
Telephone Directory..................................................................................... 16
Redial ........................................................................................................... 16
On Hook Dial ............................................................................................. 17
Manual Dial................................................................................................ 18
Transmission Features ............................................................................ 19
SEP Code .................................................................................................... 19
SUB Code .................................................................................................... 20
More Transmission Functions ................................................................ 22
If Memory Runs Out While Storing an Original ............................................ 22
Checking the Transmission Result............................................................... 22
Broadcasting Sequence ............................................................................... 23
Sending a Fax Message Immediately .......................................................... 23
Broadcasting : Checking Progress............................................................... 23
Automatic Redial.......................................................................................... 23
Batch Transmission...................................................................................... 23
Dual Access ................................................................................................. 24
ECM (Error Correction Mode) ...................................................................... 24
Parallel Memory Transmission..................................................................... 24
iii
Page 6
StellaCEN-advanced_V4_FM.book Page iv Tuesday, July 17, 2001 1:01 PM
Printed Reports......................................................................................... 25
File Reserve Report (Switch 03, Bit 2) ......................................................... 25
Communication Result Report (Switch 03, Bit 0) ......................................... 25
Communication Failure Report (Switch 03, Bit 0) ........................................ 25
Transmission Result Report (Immediate Transmission) (Switch 03, Bit 5)
4.Reception Features
General ...................................................................................................... 27
Immediate Reception ................................................................................... 27
Memory Reception....................................................................................... 27
Printing Documents that have been Received into Memory (Substitute Reception)
Receiving Messages in Telephone Mode .................................................... 29
Auto Fax Reception Power-up ..................................................................... 29
Printing Options ....................................................................................... 30
Center Mark ................................................................................................. 30
Checkered Mark........................................................................................... 30
TSI Print ....................................................................................................... 30
Reception Time............................................................................................ 31
Page Separation and Length Reduction ..................................................... 31
When There is No Paper of the Correct Size............................................... 32
5.Facsimile User Tools
... 26
... 28
User Function Keys.................................................................................. 35
Functions You Can Assign to User Function Keys ...................................... 35
Making a User Function Key Assignment .................................................... 36
Using a User Function Key .......................................................................... 37
Deleting a User Function Key ...................................................................... 37
Printing Reports/Lists .............................................................................. 39
Adjusting the Display Contrast ............................................................... 42
Setting the Date and Time ...................................................................... 43
Setting the Auto Ring Time .................................................................... 45
Setting the Fax Reset Timer .................................................................... 46
On Hook Timeout...................................................................................... 47
iv
Page 7
StellaCEN-advanced_V4_FM.book Page v Tuesday, July 17, 2001 1:01 PM
6.Key Operator Settings
Function List............................................................................................. 49
Using Key Operator Settings................................................................... 50
Memory Lock................................................................................................ 50
Forwarding ................................................................................................... 52
User Parameters.......................................................................................... 58
Personal Codes............................................................................................ 63
ID Code ........................................................................................................ 66
Line Type ..................................................................................................... 67
PSTN Access Number ................................................................................. 68
Memory File Transfer ................................................................................... 69
RDS (Remote Diagnostic System) ............................................................... 70
7.Troubleshooting
Reading Reports....................................................................................... 71
Error Report ................................................................................................ 71
Power Failure Report ................................................................................... 71
8.Appendix
Connecting to a Telephone Line and a Telephone................................ 73
Connecting the Optional Handset and an External Telephone............ 74
Specifications ........................................................................................... 75
Base Machine .............................................................................................. 75
Available Options ......................................................................................... 76
Originals....................................................................................................... 76
Maximum Values ...................................................................................... 78
Advanced Transmission Features.......................................................... 79
Job Information ........................................................................................ 80
User Tools ................................................................................................. 81
Key Operator Tools .................................................................................. 83
INDEX......................................................................................................... 84
v
Page 8
StellaCEN-a dvanced_V 4_FM.book Page vi Tuesday , July 17, 20 01 1:01 PM
vi
Page 9
StellaCEN-advanced_V4_FM.book Page 1 Tuesday, July 17, 2001 1:01 PM
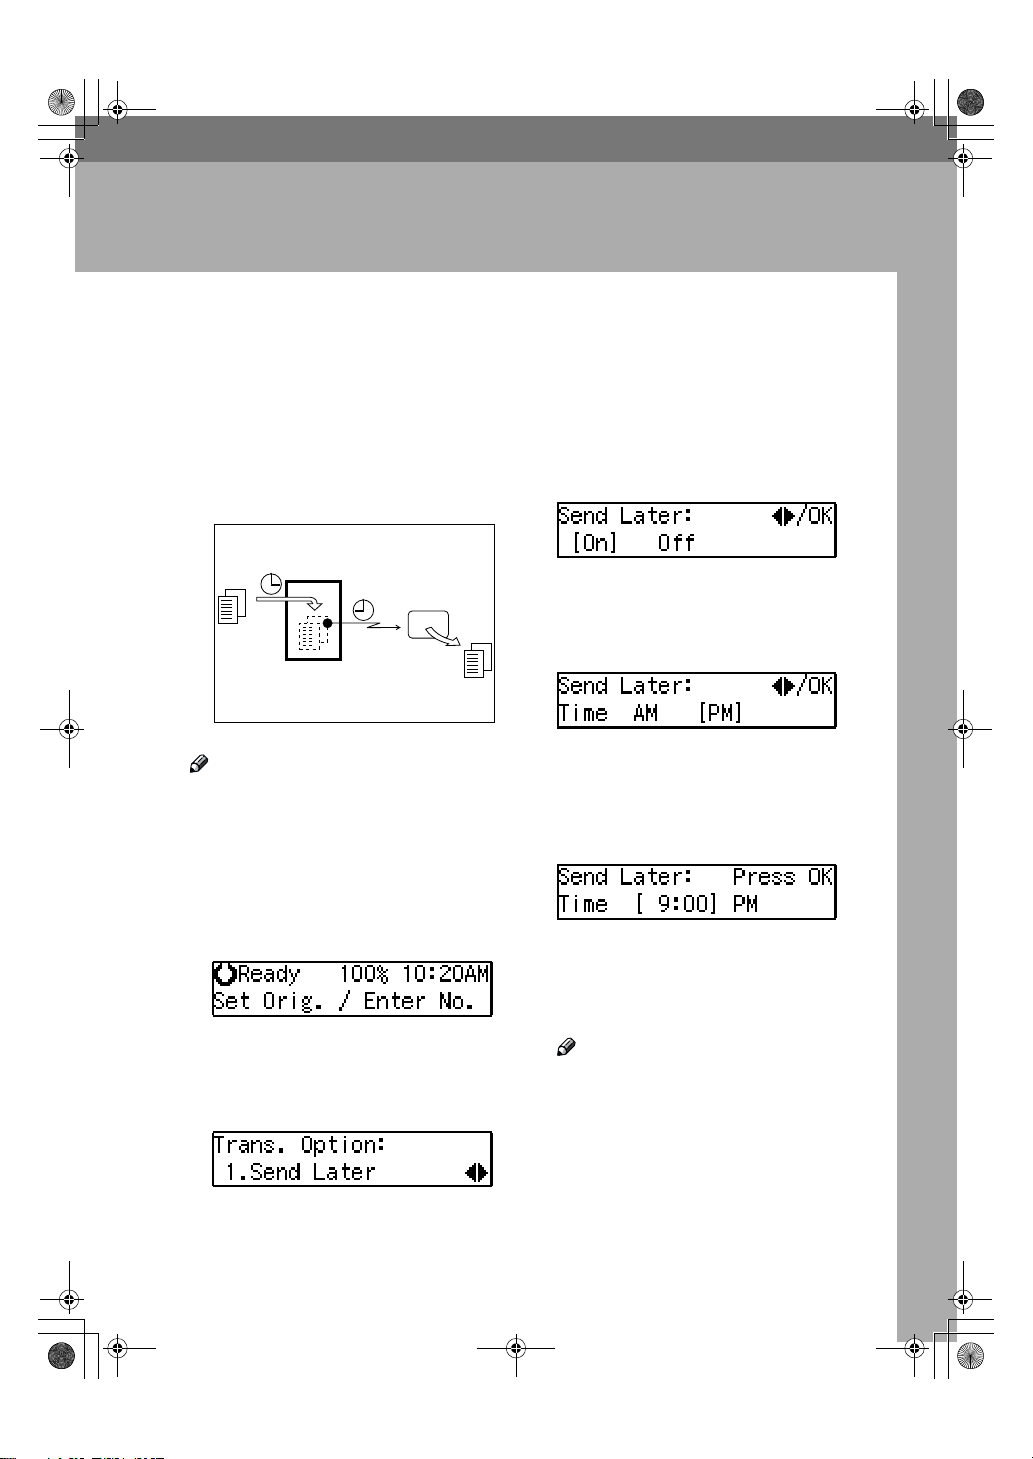
1. Transmission Options
Sending at a Specific Time (Send Later)
Using the Send Later function, you
can delay transmission of your fax
message until a specified time. This
allows you to take advantage of offpeak telephone line charges without
having to be by the machine at the
time of transmission.
Transmitter
Receiver
Send Later
at 21:00 (9:00PM)
ND1X01E4
Note
❒ You can not specify a time more
than 24 hours later.
❒ This function is only available with
Memory Transmission.
Make sure that the machine is in
AAAA
Facsimile mode and the standby
display is shown.
Confirm that " 1. Send Later " is
DDDD
displayed.
Press the {{{{OK}}}} key.
EEEE
Press 0000 or 1111 to select "On".
FFFF
Press the {{{{OK}}}} key.
GGGG
Press 0000 or 1111 to select “AM” or
HHHH
“PM”.
Press the {{{{OK}}}} key.
IIII
Enter the time that you want to
JJJJ
send the fax message with the
number key.
Enter the hour setting (1 to 12).
Then press 0 or 1.
Then enter a 2-digit number for the
minute setting (00 to 59).
Place your original and select any
BBBB
scan settings you require.
Press the {{{{Transmission Option}}}} key.
CCCC
Note
❒ When entering numbers small-
er than 10, add a leading zero.
❒ If you make a mistake, press the
{{{{Clear/Stop}}}} key and try again.
❒ If the current time shown on the
display is not correct, change it.
See p.43 “Setting the Date and
Time”.
1
Page 10
StellaCEN-advanced_V4_FM.book Page 2 Tuesday, July 17, 2001 1:01 PM
Transmission Options
Press the {{{{OK}}}} key.
KKKK
The specified time is set.
Specify the destination.
LLLL
1
If you want to specify another destination, press the {{{{OK}}}} key and
repeat step L.
Press the {{{{Start}}}} key.
MMMM
Note
❒ You can cancel a message trans-
mission set for Send Later. See
p.9 “Canceling Transmission or
Reception”.
2
Page 11
StellaCEN-advanced_V4_FM.book Page 3 Tuesday, July 17, 2001 1:01 PM
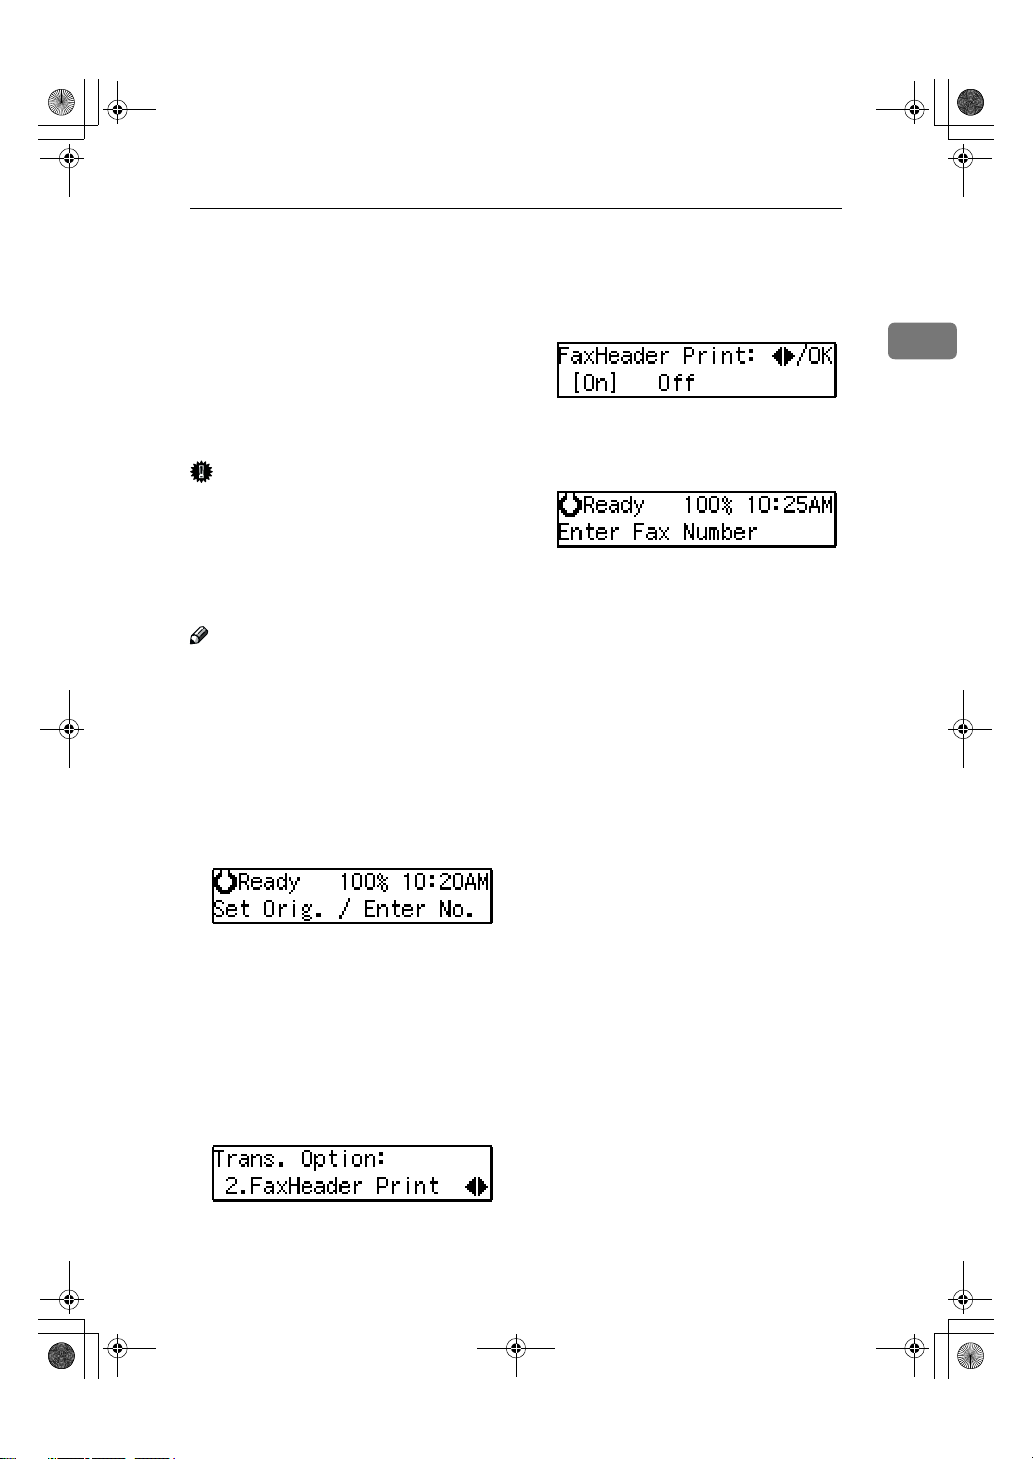
Fax Header Print
Fax Header Print
Normally, the Fax Header programmed in your machine is printed
at the top of each of the pages you
transmit when they are received at
the other end. The top of the image
will be overprinted if there is no margin at the top of the transmitted page.
Important
❒ In the USA, this must contain the
telephone number of the line your
machine is connected to. It will be
printed on the header of every
page you send. Required in the
USA.
Note
❒ In the USA, law requires that your
fax number be included in the Fax
Header. Register the fax number
and switch on Fax Header Print
with the User Parameters. See p.58
“User Parameters” (Switch06, Bit0)
Make sure that the machine is in
AAAA
Facsimile mode and the standby
display is shown.
Press 0000 or 1111 to select "On".
FFFF
Press the {{{{OK}}}} key.
GGGG
Press the {{{{Transmission Option}}}} key.
HHHH
Specify the destination.
IIII
If you want to specify another destination, press the {{{{OK}}}} key and
repeat step I.
Press the {{{{Start}}}} key.
JJJJ
1
Place your original, and then se-
BBBB
lect any scan settings you require.
Press the {{{{Transmission Option}}}} key.
CCCC
The Transmission Option menu
appears.
Press 0000 or 1111 until “2. Fax Header
DDDD
Print” is displayed.
Press the {{{{OK}}}} key.
EEEE
3
Page 12
StellaCEN-advanced_V4_FM.book Page 4 Tuesday, July 17, 2001 1:01 PM
Transmission Options
Label Insertion
With this function, you can have the
1
receiver's name programmed in
Quick Dial or Speed Dial printed on
the message when it is received at the
Note
❒ You can set this function for each
destination.
other end. The name will be printed
at the top of the page and will be preceded by "To".
If you program the Label Insertion
function in a Quick Dial or Speed Dial, the function is enabled when you
select “On”. This function cannot be
used if the other party's name is not
programmed.
If you select the Label Insertion function then enter your personal code,
your personal code will also appear
on the page. "From" is automatically
inserted before your personal code.
This function is available when personal code is registered and the Restricted Access is turned on.
FEB. 1.2001 9:15AM ABC COMPANY
TO:DEF COMPANY
12
1.
Name that is registered in the
NO.005 P. 1
FROM:DEF
GFATEN1J
Quick Dial or Speed Dial key.
2.
Name that is assigned to the Per-
sonal Code.
Reference
To program the Label Insertion
function in the Quick Dial, see
Chapter 3 “ Quick Dial “ in the Basic Features manual.
To program the Label Insertion
function in the Speed Dial, see
Chapter 3 “ Speed Dial “ in the Basic Features manual.
For details about Personal Codes,
see p.63 “Personal Codes”.
4
Page 13
StellaCEN-advanced_V4_FM.book Page 5 Tuesday, July 17, 2001 1:01 PM
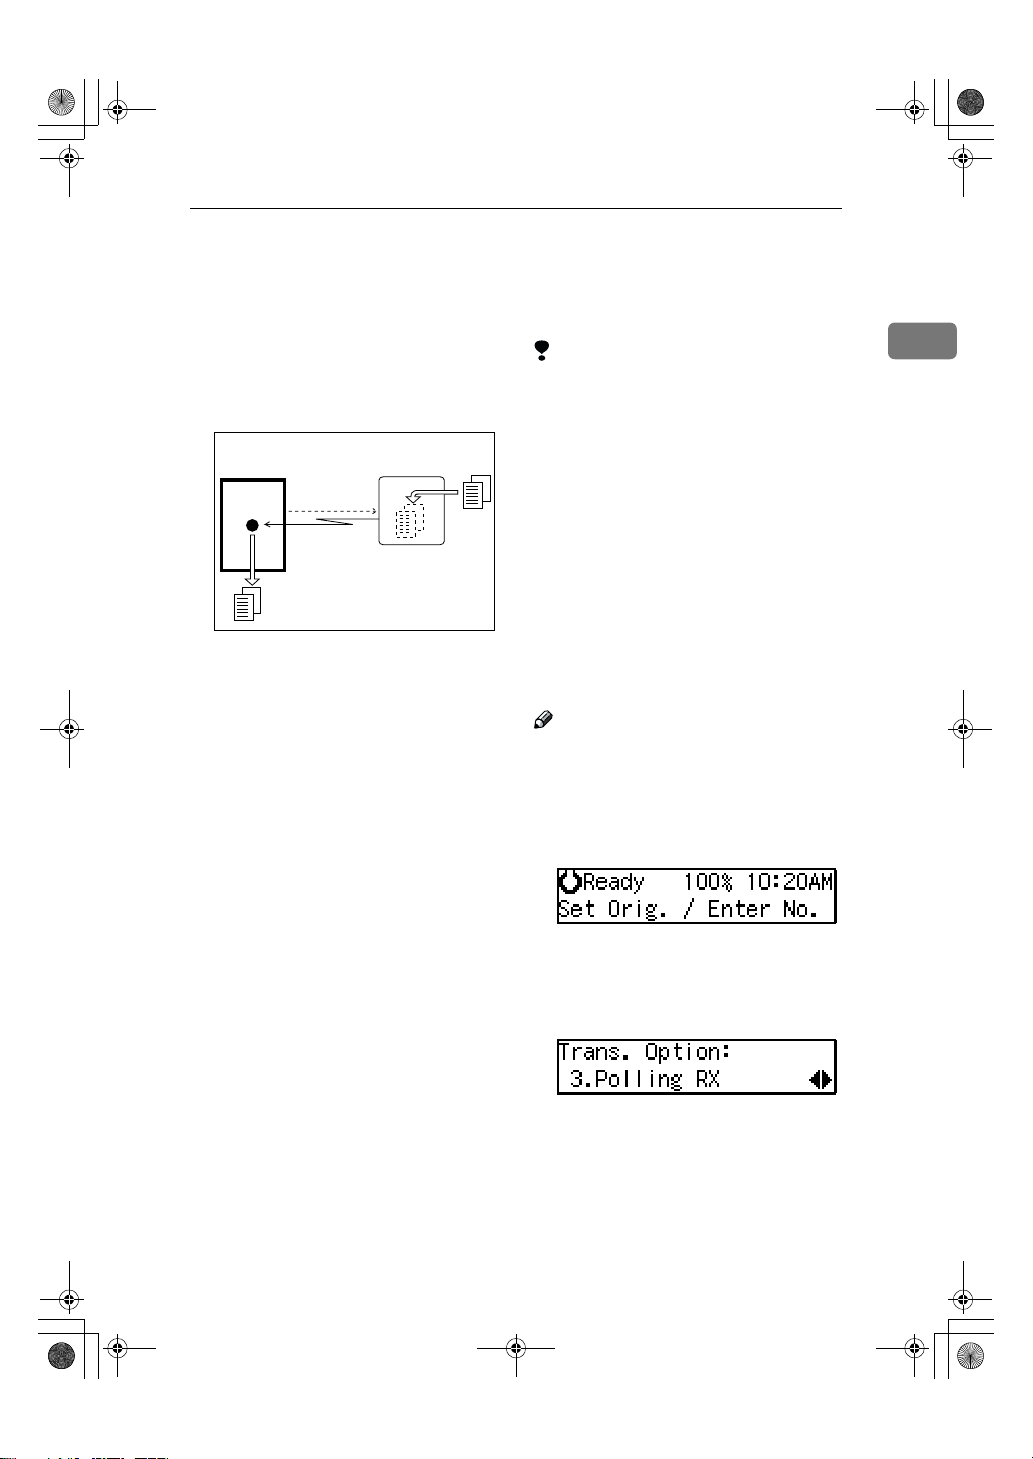
Calling to Request a Message (Polling Reception)
Calling to Request a Message (Polling
Reception)
Use this function if you want to poll a
message from another terminal. You
can also poll documents from many
terminals.
Receiver
(This machine)
There are two types of Polling Reception:
Transmission
Request
Sender
ND1X01E8
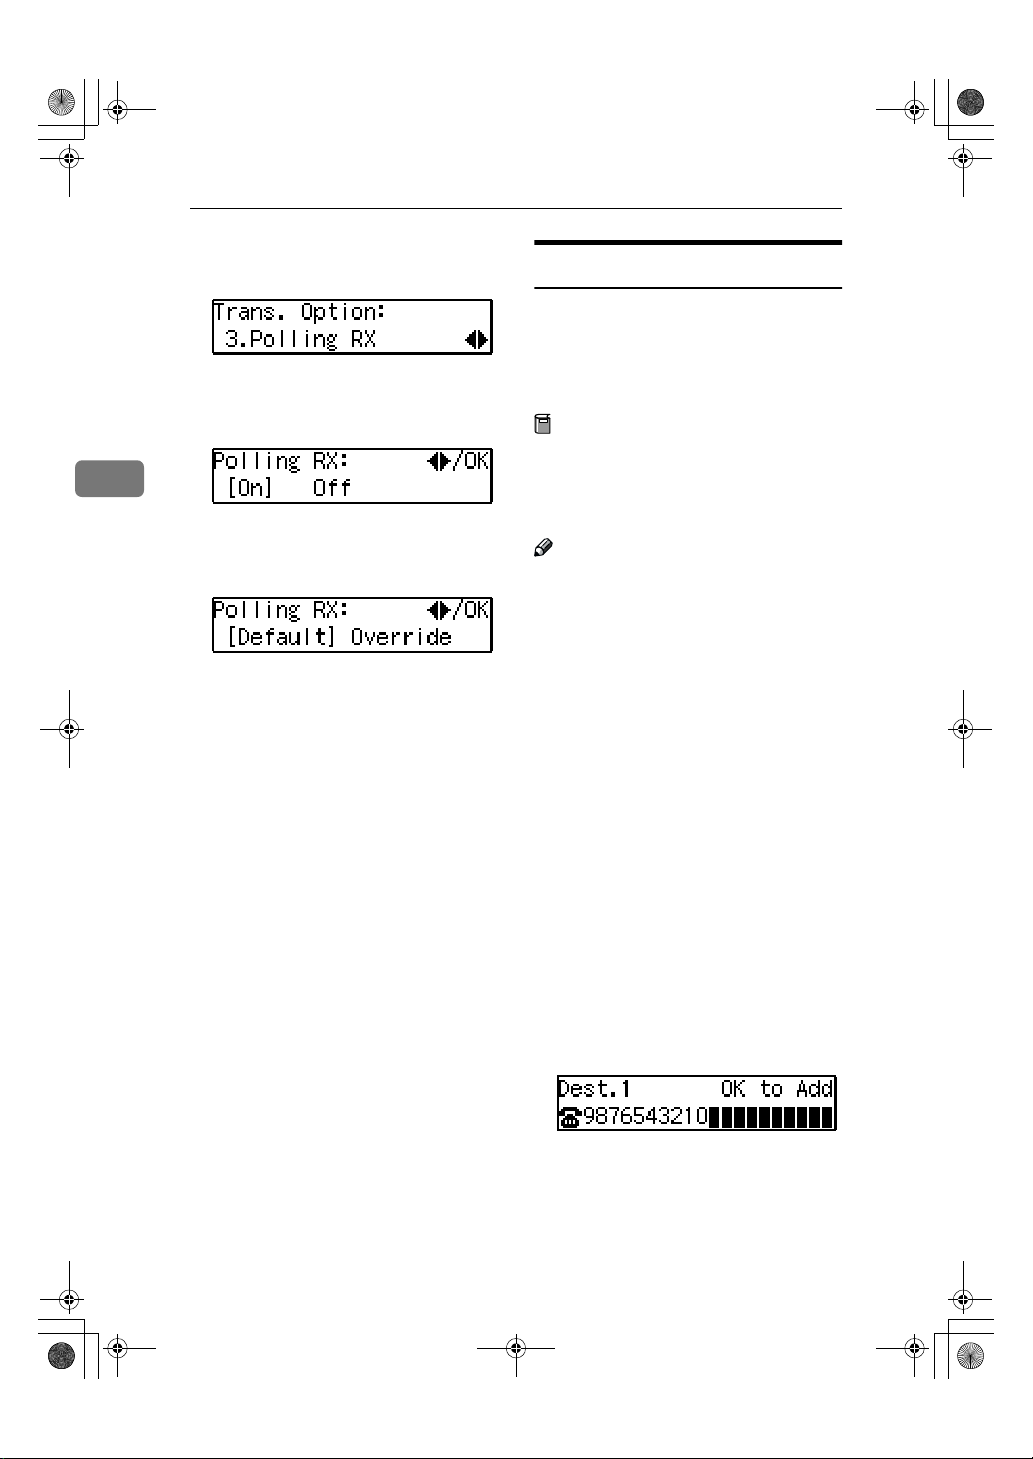
❖❖❖❖ Secured Polling Reception
If the Polling ID is programmed in
your machine, any messages waiting in the transmitting machine
with the same ID are received. If
the other machine does not have
any messages waiting with the
same Polling ID, any messages that
do not require an ID are received
(Free Polling).
Limitation
❒ Polling Reception requires that the
other machine can perform Polling
Transmission.
❒ To receive a message sent by any
Secured Polling Transmission or
Stored ID Override Polling Transmission, it is necessary to specify
the same Polling ID as the sender's.
❒ To receive a message sent by Se-
cured Polling Transmission or
Stored ID Override Polling Transmission, the sender must be a machine of the same manufacturer
and equipped with the Polling Reception function.
Note
❒ The communication fee is charged
to the receiver.
Make sure that the machine is in
AAAA
Facsimile mode and the standby
display is shown.
1
❖❖❖❖ Stored ID Override Polling Reception
You must enter an Override Polling ID unique to this transmission.
This ID overrides the Polling ID.
Your machine will receive any
messages waiting in the transmitting machine with matching ID's.
If no ID's match, any messages that
does not require an ID are received
(Free Polling).
Press the {{{{Transmission Option}}}} key.
BBBB
Press 0000 or 1111 until " 3. Polling RX
CCCC
” is displayed.
Press the {{{{OK}}}} key.
DDDD
5
Page 14

StellaCEN-advanced_V4_FM.book Page 6 Tuesday, July 17, 2001 1:01 PM
Transmission Options
Press 0000 or 1111 to select "On".
EEEE
1
Press the {{{{OK}}}} key.
FFFF
Select the type of Polling Recep-
GGGG
tion.
Secured Polling Reception
AAAA
Press
Stored ID Override Polling
Reception
AAAA
Press
BBBB Press the {{{{OK}}}} key.
or
0000
0000
to select ”Default”.
1111
or
to select ”Override”.
1111
Press the {{{{OK}}}} key.
HHHH
Specify the other party's fax num-
IIII
ber.
Press the {{{{Start}}}} key.
JJJJ
----Polling Documents from Other
Manufacturer's Fax Machines:
Standard Polling Reception only
works with machines of the same
manufacturer that have the Polling
Reception function. However, if the
other party's fax machine supports
SEP Code Polling Reception, you can
receive documents from them using
SEP Code. (See p.19 “SEP Code”.)
CCCC Enter the Polling ID (4 digits)
with the number keys or Quick
Dial keys.
Note
❒ You can enter A to F by the
Quick Dial keys.
❒ You can enter 0 to 9 by the
number keys.
❒ 0000 and FFFF can not be en-
tered.
If you make a mistake, press the
{{{{Clear/Stop}}}} key and try again.
6
Page 15
StellaCEN-advanced_V4_FM.book Page 7 Tuesday, July 17, 2001 1:01 PM
File Reserve Report (Polling RX)
This report is printed after Polling Reception has been set up.
You can check the date and time, Fax
Header, File No., Transmission condition and the Other party's name
with this report.
Note
❒ You can turn this function on or off
with the User Parameters. See p.58
“User Parameters” (Switch03,
Bit3).
Communication Result Report
(Polling RX)
This report is printed after a Polling
Reception has been completed and
shows the result of the Polling Reception.
You can check the date and time, Other party's name and result with this
report.
Calling to Request a Message (Polling Reception)
1
Note
❒ You can also check the result of a
Polling Reception with the Journal.
❒ You can turn this function on or off
with the User Parameters. See p.58
“User Parameters” (Switch03,
Bit4).
7
Page 16
StellaCEN-advanced_V4_FM.book Page 8 Tuesday, July 17, 2001 1:01 PM
Transmission Options
1
8
Page 17
StellaCEN-advanced_V4_FM.book Page 9 Tuesday, July 17, 2001 1:01 PM
2. Job Information
Canceling Transmission or Reception
Transmission files are originals that
have been stored in memory and are
awaiting transmission. The functions
that produce transmission files are
Memory Transmission and Polling
Reception.
If you notice an error in the destination specified or the document content after scanning a document into
memory, you can cancel transmission
of that document. This is done by
searching for the document in the fax
machine's memory and deleting it.
Note
❒ You can cancel Memory Transmis-
sion even while files are being sent.
However, any pages that have already been sent cannot be canceled.
❒ To cancel transmission in progress,
press the {{{{Clear/Stop}}}} key.
❒ You can print out a File List to con-
firm the transmission files stored
in memory.
Reference
For details about Memory Transmission and Polling Reception, see
Chapter 2 “Memory Transmission” in the Basic Features manual,
and p.5 “Calling to Request a Message (Polling Reception)”.
Make sure that the machine is in
AAAA
Facsimile mode and the standby
display is shown.
Press the {{{{Job Information}}}} key.
BBBB
Confirm that " 1. Cancel TX / RX "
is displayed.
Press the {{{{OK}}}} key.
CCCC
Display the file you want to can-
DDDD
cel.
To display the file, enter the file
number with the number keys or
press 0 or 1 until the file number
is displayed.
Note
❒ If you make a mistake, press the
{{{{Cancel}}}} key and try again.
❒ If you cannot find the file you
want to cancel, the document
has already been sent.
Press the {{{{OK}}}} key.
EEEE
Confirm that you have selected
FFFF
the correct file, and press the {{{{OK}}}}
key.
" Trans. Cancelled File Deleted " is
displayed, and the machine returns to the standby display.
9
Page 18

StellaCEN-advanced_V4_FM.book Page 10 Tuesday, July 17, 2001 1:01 PM
Job Information
Printing a List of Files in Memory (Print File List)
Print this list if you wish to find out
which files are stored in memory and
what their file numbers are. Knowing
2
the file number can be useful (for example when erasing files).
Note
❒ The contents of an original stored
in memory can also be printed. See
p.11 “Printing a Stored Message
(Print TX File)”.
Make sure that the machine is in
AAAA
Facsimile mode and the standby
display is shown.
10
Press the {{{{Job Information}}}} key.
BBBB
Press 0000 or 1111 until " 2. Print File
CCCC
List " is displayed.
Press the {{{{OK}}}} key.
DDDD
Press the {{{{Start}}}} key.
EEEE
The File List is printed out and the
machine returns to the standby
display.
Page 19
StellaCEN-advanced_V4_FM.book Page 11 Tuesday, July 17, 2001 1:01 PM
Printing a Stored Message (Print TX File)
Printing a Stored Message (Print TX File)
If you wish to check the contents of a
fax that is stored in memory and has
not been sent yet, use this procedure
to print it out.
Make sure that the machine is in
AAAA
Facsimile mode and the standby
display is shown.
Press the {{{{Job Information}}}} key.
BBBB
The Information menu is shown.
Press 0000 or 1111 until " 3. Print TX
CCCC
File " is displayed, and then press
the {{{{OK}}}} key.
2
Display the file you want to print.
DDDD
The registered name or fax number
appears on the lower line.
Note
❒ Enter the file number with the
number keys or search using 0
or 1.
❒ If you make a mistake, press the
{{{{Cancel}}}} key and try again.
Press the {{{{OK}}}} key.
EEEE
Press the {{{{Start}}}} key.
FFFF
The document is printed and the
machine returns to the standby
display.
11
Page 20
StellaCEN-advanced_V4_FM.book Page 12 Tuesday, July 17, 2001 1:01 PM
Job Information
Printing a Memory-locked Message
This is a security function that prevents unauthorized individuals from
reading printed messages. If Memory
Lock is switched on, all received mes-
2
sages are stored in memory and are
not automatically printed. To print
the messages, you have to enter the
Memory Lock ID code. When your
machine has received a message with
Memory Lock, the "Receive File" indicator flashes. See p.50 “ Memory
Lock” .
Note
❒ Before you start, register your
Memory Lock ID. (See p.66 “ID
Code”.)
❒ Messages received by Polling Re-
ception are automatically printed
even if this function is switched on.
❒ If the main power switch is turned
off for more than 12 hours, all messages protected by Memory Lock
are deleted. If this happens, use the
Power Failure Report to identify
which messages have been lost.
(See p.71 “Power Failure Report”.)
Enter the Memory Lock ID (4 dig-
EEEE
its) with the number keys.
The Memory Lock ID you entered
is not displayed.
Press the {{{{OK}}}} key.
FFFF
Press the {{{{Start}}}} key.
GGGG
The document is printed out and
the machine returns to standby
mode.
12
Make sure that the machine is in
AAAA
Facsimile mode and the standby
display is shown.
Press the {{{{Job Information}}}} key.
BBBB
Press 0000 or 1111 until " 4. Print Mem.
CCCC
Lock " is displayed.
Press the {{{{OK}}}} key.
DDDD
Page 21
StellaCEN-advanced_V4_FM.book Page 13 Tuesday, July 17, 2001 1:01 PM
Printing the Journal
When automatic communication report printing is turned on, the Journal is
printed automatically after every 50 communications (receptions + transmissions). You can also print a copy of the Journal at any time by following the procedure below.
Printing the Journal
Note
❒ The sender's name column of the Journal is useful when you need to register
a Specified Sender.
❒ If you do not want the Journal to be printed automatically, you can turn au-
tomatic printing off. See p.58 “User Parameters” (switch 03, bit 7).
Make sure that the machine is in Facsimile mode and the standby display
AAAA
is shown.
Press the {{{{Job Information}}}} key.
BBBB
Press 0000 or 1111 until " 5. Print Journal " is displayed.
CCCC
Press the {{{{OK}}}} key.
DDDD
Press the {{{{Start}}}} key.
EEEE
The report is printed and the machine returns to the standby display.
2
13
Page 22
StellaCEN-advanced_V4_FM.book Page 14 Tuesday, July 17, 2001 1:01 PM
Job Information
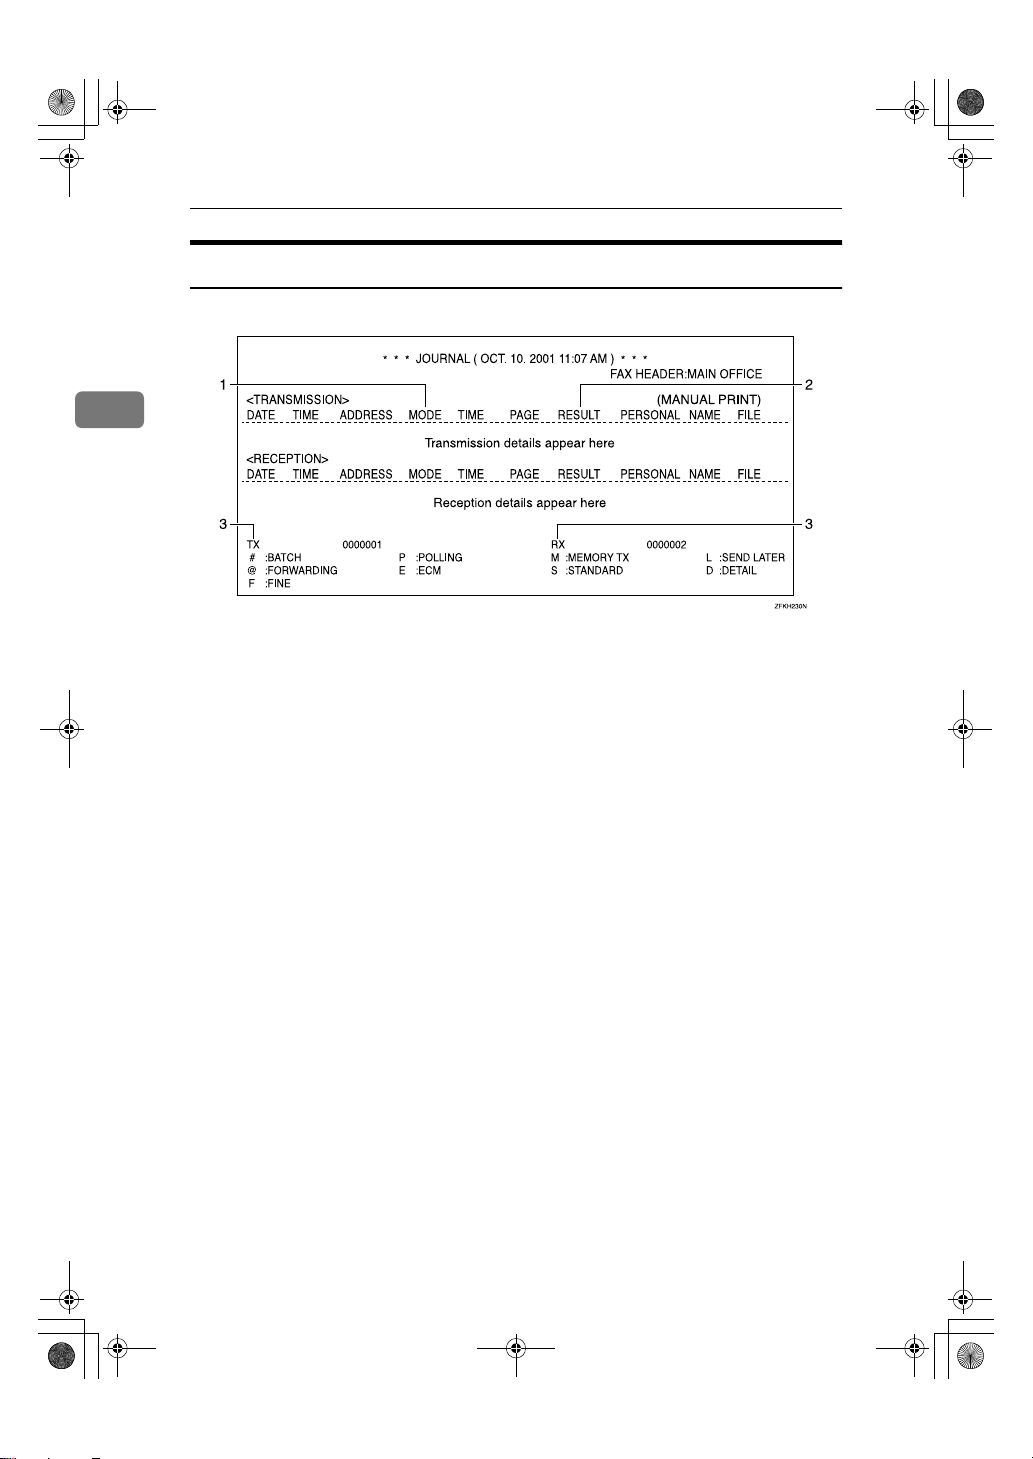
Report Formats
2
1.
The Mode Column
Codes and alphabet on this column inform the type of communication. These
codes are explained on the bottom of the
report.
2.
The Result Column
OK: Successful communication
E: An error occurred
D: Power Failure
3.
The Footnote on the Journal
Transmission counter: Total number of
transmitted pages
Reception counter: Total number of received pages
14
Page 23
StellaCEN-advanced_V4_FM.book Page 15 Tuesday, July 17, 2001 1:01 PM
3. Other Transmission Features
Handy Dialing Functions
Set your original and select any
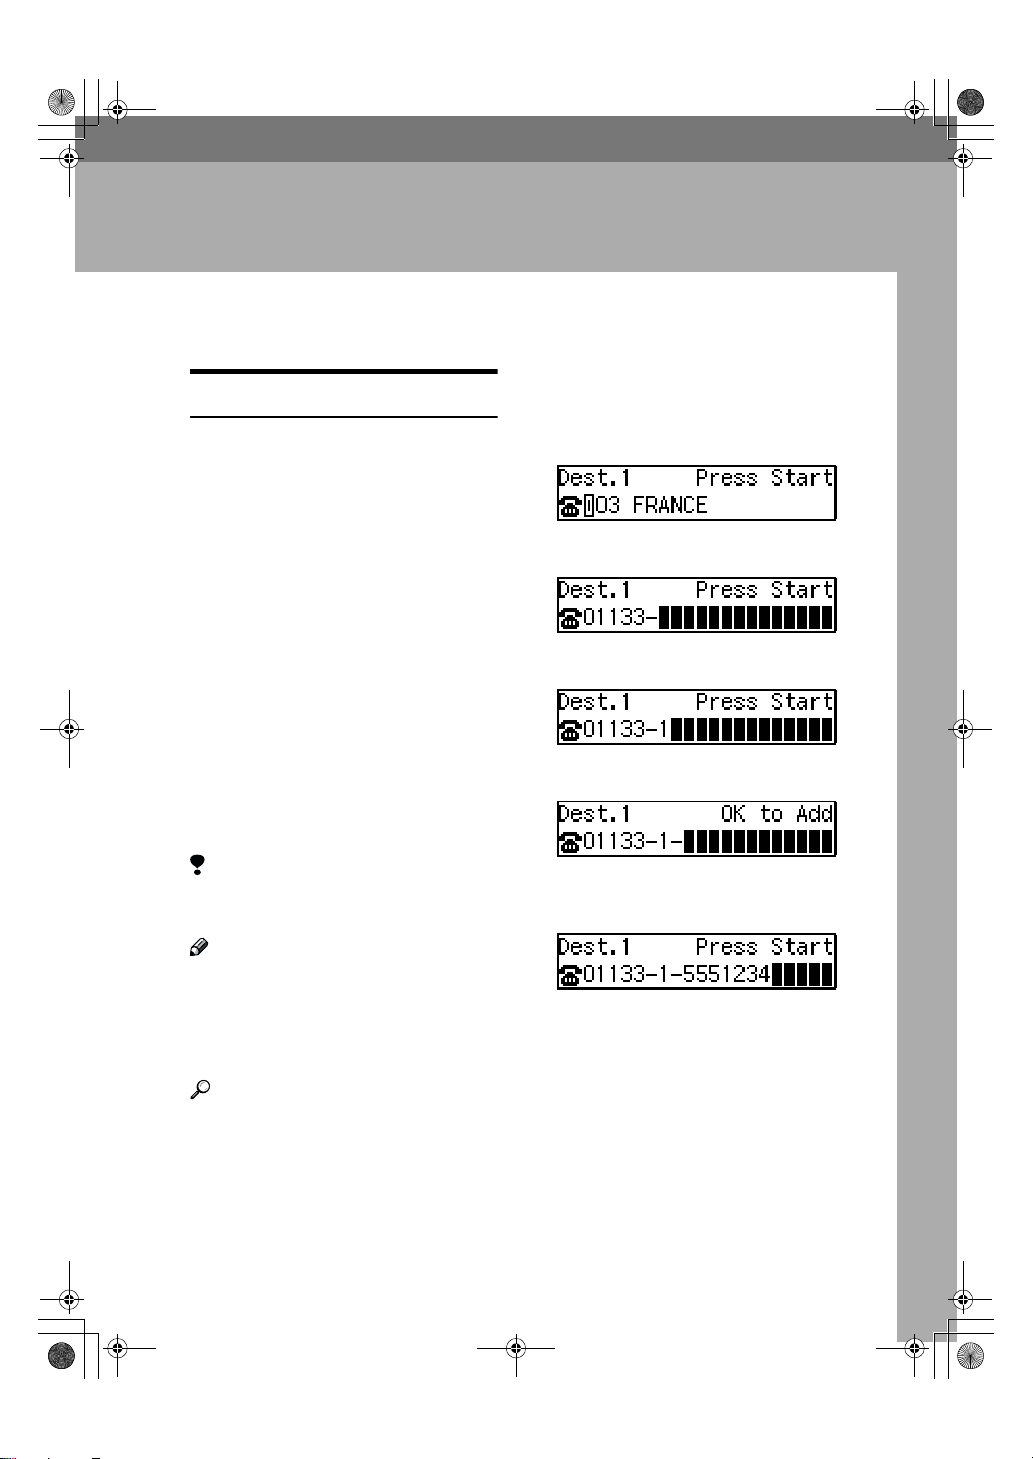
Chain Dial
This function allows you to compose
a telephone number from various
parts, some of which may be registered in Quick Dials or Speed Dials
and some of which may be entered
using the number keys.
You can program commonly used
area or country codes into Speed Dials or Quick Dial keys.
Example: 01133-1-5551234 (From the
United States to Paris).
Assume that the following Quick Dial
and Speed Dial numbers have already been programmed.
• Quick Dial {{{{03}}}} = 01133 (Overseas
to France)
• Quick Dial {{{{02}}}} = 1 (Paris)
• Speed Dial {{{{0}}}} {{{{1}}}} = 5551234
AAAA
scan settings you require.
Press Quick Dial key {{{{03}}}}.
BBBB
Press the {{{{Pause/Redial}}}} key.
CCCC
Press Quick Dial key {{{{02}}}}.
DDDD
Press the {{{{Pause/Redial}}}} key.
EEEE
Limitation
❒ Maximum length of telephone or
fax number: 254 digits
Note
❒ For Memory Transmission and Im-
mediate Transmission, insert a
pause between numbers. For On
Hook Dial and Manual Dial, no
pause is needed.
Reference
For registering fax numbers to
Speed Dials or Quick Dial keys,
See Chapter 3 “Speed Dial” or “
Quick Dial” in the Basic Features
manual.
Press the {{{{Speed Dial}}}} key, and
FFFF
then press {{{{0}}}} {{{{1}}}}.
If you want to send the same fax to
another party, press the {{{{OK}}}} key
and repeat the above steps from
step B.
Press the {{{{Start}}}} key.
GGGG
15
Page 24
StellaCEN-advanced_V4_FM.book Page 16 Tuesday, July 17, 2001 1:01 PM
Other Transmission Features
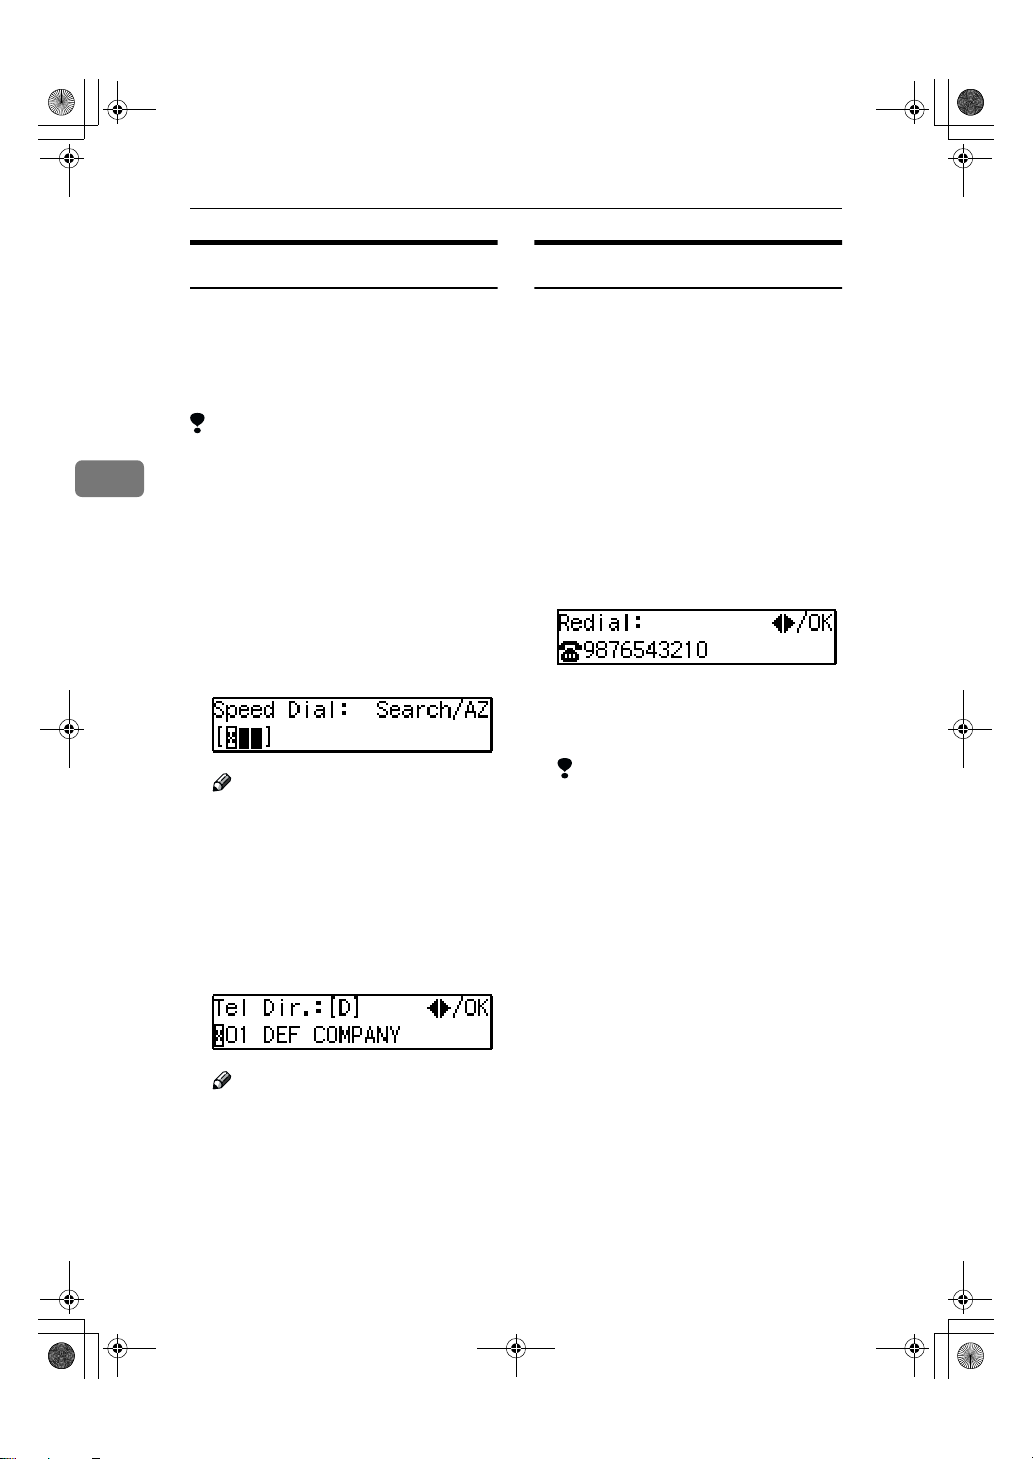
Telephone Directory
This function lets you find a registered Speed Dial quickly by just entering a single letter, for example, the
first letter of the name registered for
that number.
Limitation
❒ Speed Dial codes cannot be
3
searched for by symbol or number.
❒ Names enclosed within brackets
are not searched.
Set your original, and then select
AAAA
any scan settings you require.
Press the {{{{Speed Dial}}}} key.
BBBB
Enter the search letter by pressing
CCCC
one of the Quick Dial keys (A to Z).
Note
❒ The names or fax numbers reg-
istered in Speed Dials are
shown in numerical order on
the display.
Press 0000 or 1111 until the destina-
DDDD
tion you are searching for is displayed, and then press the {{{{OK}}}}
key.
Redial
The machine can recall the last 10 destinations that have been dialed. If you
wish to send a message to a destination which you faxed recently, the Redial function saves you from finding
and entering the number again.
Place your original and select any
AAAA
scan settings you require.
Press the {{{{Pause/Redial}}}} key.
BBBB
Press 0000 or 1111 until the destina-
CCCC
tion you want to redial is displayed.
Press the {{{{OK}}}} key.
DDDD
Press the {{{{Start}}}} key.
EEEE
Limitation
❒ The following kinds of destina-
tions can not be recalled.
• Quick Dials
• Speed Dials
• Group Dials
• Any destinations if multiple
destinations were dialed
• Destinations dialed by Redial (regarded as already memorized)
16
Note
❒ If you make a mistake, press the
{{{{Cancel}}}} key and try again.
❒ If you wish to dial another des-
tination, press the {{{{OK}}}} key and
dial another fax number.
Press the {{{{Start}}}} key.
EEEE
Page 25
StellaCEN-advanced_V4_FM.book Page 17 Tuesday, July 17, 2001 1:01 PM
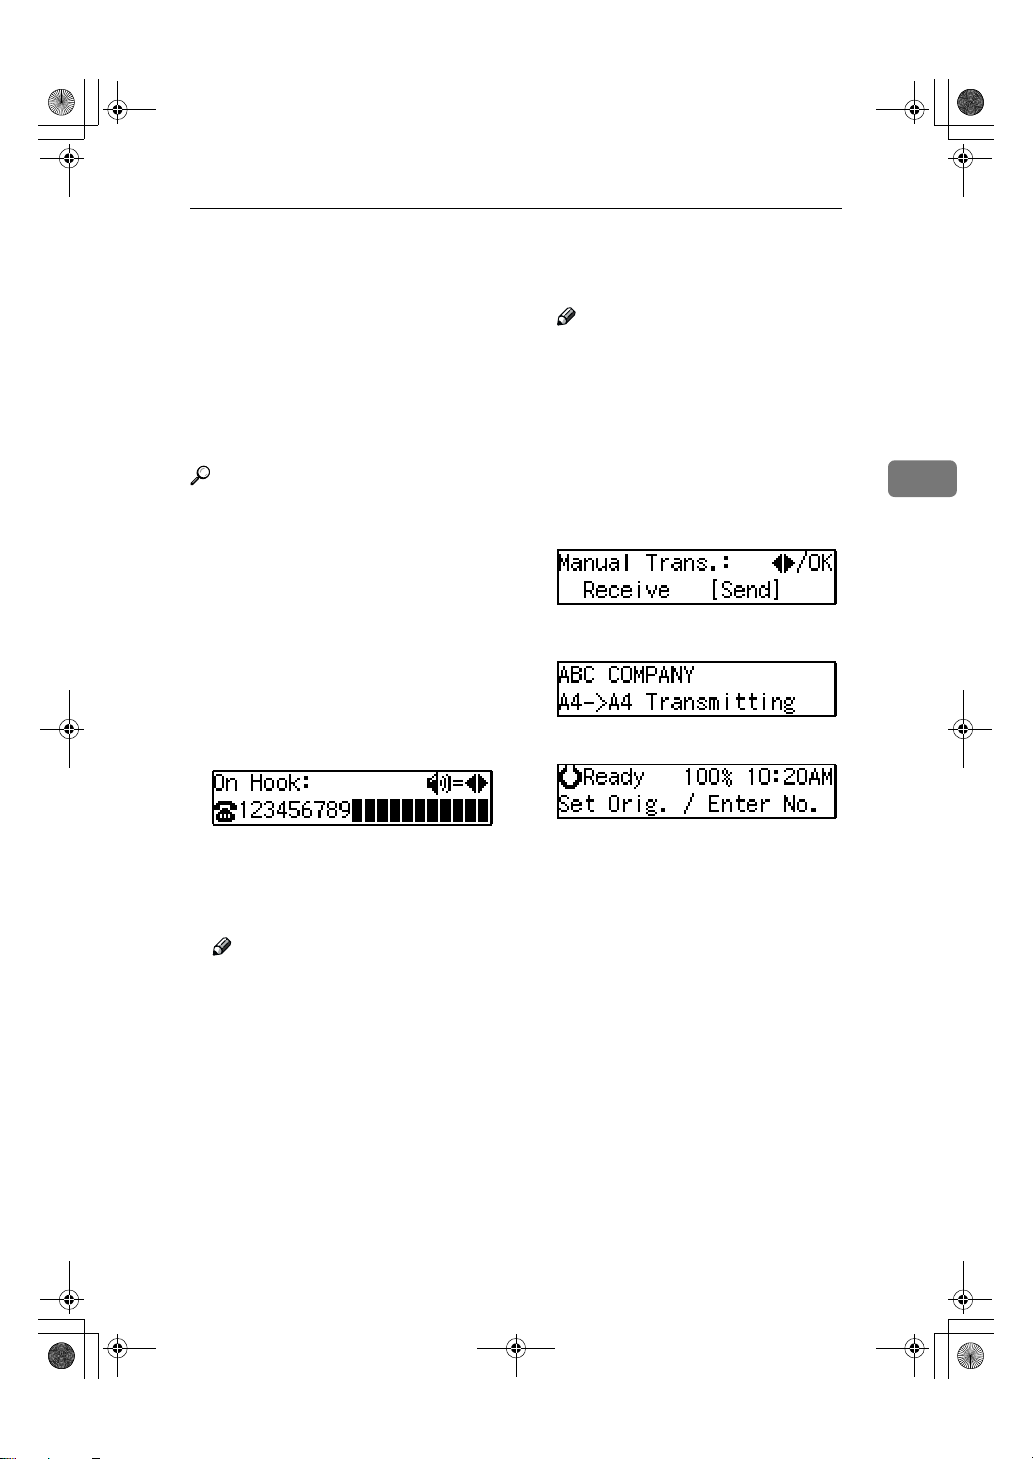
On Hook Dial
On Hook Dial
You can send a fax message without
lifting the receiver, while still listening to the dial tone.
If the other party has a telephone fax
machine, you can talk by lifting the
receiver after your machine has connected to theirs.
Reference
See Chapter 4 “Adjusting Volume”
in the Basic Features manual.
Place your original, and then se-
AAAA
lect any scan settings you require.
Press the {{{{On Hook Dial}}}} key.
BBBB
You will hear a tone from the internal speaker. If you wish to cancel
this operation, press the {{{{On Hook
Dial}}}} key again.
Dial.
CCCC
The machine immediately dials the
destination. If you make a mistake,
press the {{{{On Hook Dial}}}} key and return to step B.
Note
❒ If you hear a voice, pick up the
external telephone before you
press the {{{{Start}}}} key and notify
the destination that you want to
send a fax message (ask them to
switch to Facsimile mode).
When the originals are not placed
EEEE
on the Document Feeder, press 0000
or 1111 to select "Send".
Press the {{{{OK}}}} key.
FFFF
The originals are transmitted.
After transmission, the machine
will return to standby mode.
3
Note
❒ You can change the volume of
sound with 0 or 1.
When the line is connected and
DDDD
you hear a high-pitched tone,
press the {{{{Start}}}} key.
When the originals are placed on
Document Feeder (ADF), the machine starts transmitting the originals. The display will be that
shown for step F.
17
Page 26
StellaCEN-advanced_V4_FM.book Page 18 Tuesday, July 17, 2001 1:01 PM
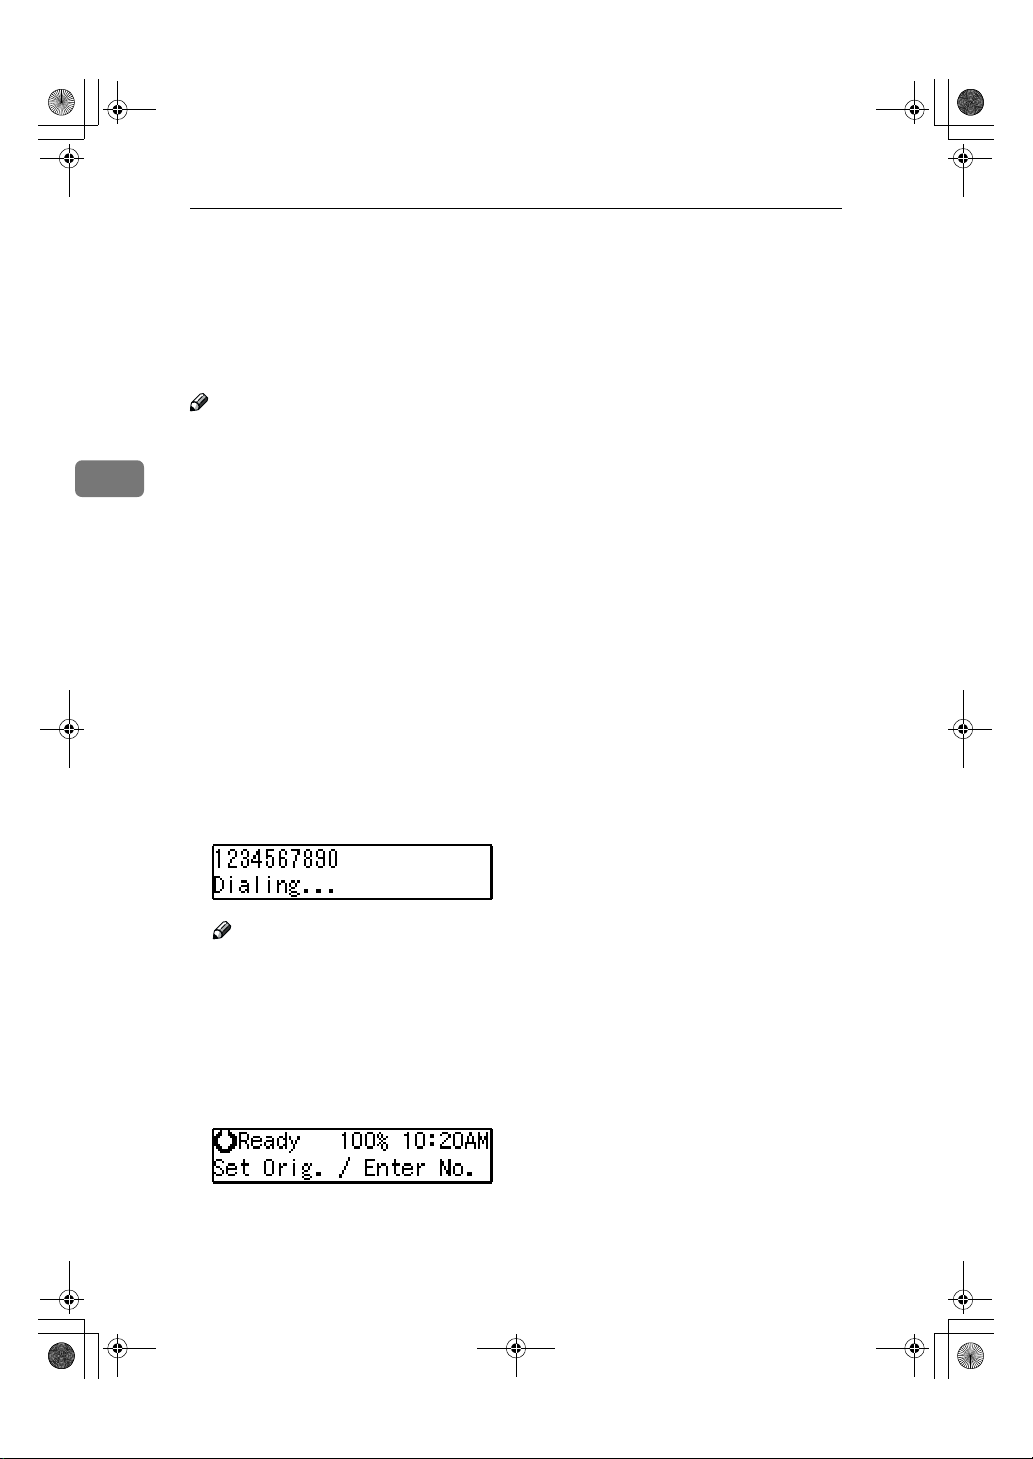
Other Transmission Features
Manual Dial
The external telephone is required.
You can send a fax message using an
external telephone.
Note
❒ The result of transmission with
manual dial is not mentioned in
3
the Transmission Result Report
(Immediate Transmission).
Place your original, and then se-
AAAA
lect any scan settings you require.
Pick up the external telephone.
BBBB
You will hear a tone.
Dial.
CCCC
If you make a mistake, replace the
external telephone and try again
from step B.
18
When the line is connected and
DDDD
you hear a high-pitched tone,
press the {{{{Start}}}} key to send your
fax message.
Note
❒ If the other party answers the
phone, inform them that you
are sending a fax.
Replace the handset of the exter-
EEEE
nal telephone.
After transmission the machine
will return to standby mode.
Page 27
StellaCEN-advanced_V4_FM.book Page 19 Tuesday, July 17, 2001 1:01 PM
Transmission Features
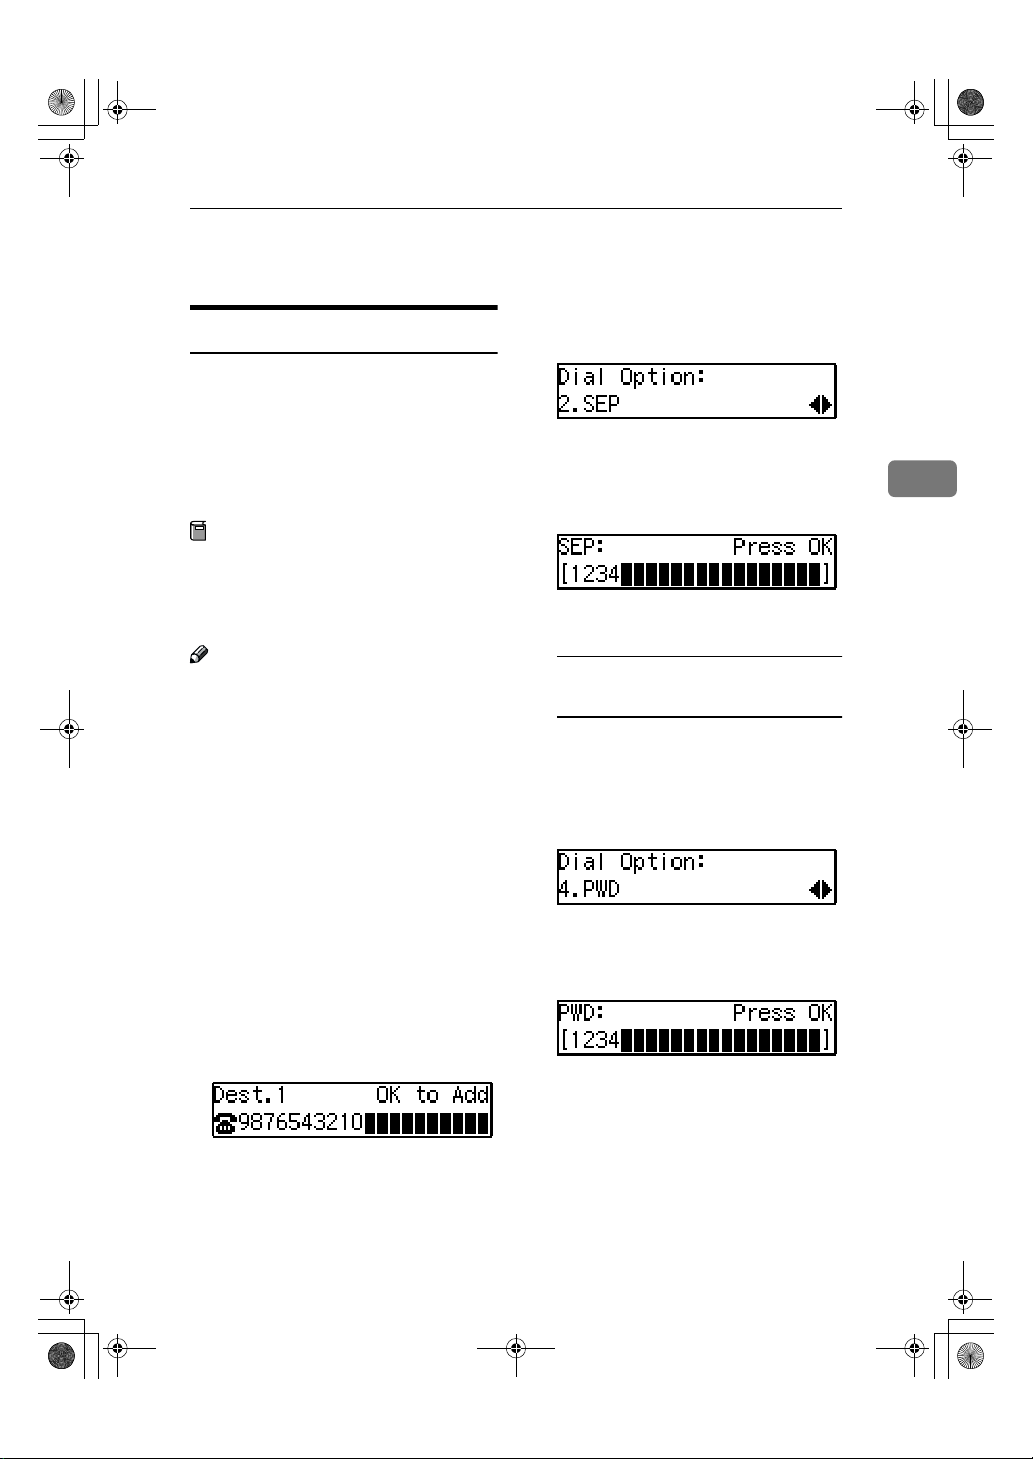
SEP Code
If you want to receive a message
stored in the memory of another party's fax machine, use this function.
The machine will receive the message
with the SEP and PWD code that
matches the SEP and PWD code you
enter in the following procedure.
Preparation
You need to assign the Dial Option
function to a User Function key beforehand. See p.35 “User Function
Keys”.
Note
❒ The ID can be up to 20 digits long
and consist of digits.
❒ Make sure the ID matches the oth-
er terminal of the fax you are receiving from.
❒ You can store IDs in Quick Dials,
Speed Dials, and Groups.
❒ Messages you receive using this
function are marked "SEP" on all
reports.
❒ When you send a fax message with
SEP Code to other makers' machines, sometimes a password
(PWD) is necessary. Use PWD
when it is necessary.
Transmission Features
Press 0000 or 1111 until " 2. SEP " is
CCCC
displayed.
Press the {{{{OK}}}} key.
DDDD
Enter the SEP code with the num-
EEEE
ber keys.
Press the {{{{OK}}}} key.
FFFF
When a password (PWD) is
necessary
AAAA Press the {{{{User Function}}}} key as-
signed with the Dial Option
function.
BBBB Press 0000 or 1111 until " 4. PWD "
is displayed.
CCCC Press the {{{{OK}}}} key.
DDDD Enter the PWD code with the
number keys.
3
Dial the destination fax number
AAAA
using the number keys.
Press the {{{{User Function}}}} key as-
BBBB
signed with the Dial Option function.
EEEE Press the {{{{OK}}}} key
Press the {{{{Transmission Option}}}} key.
GGGG
19
Page 28
StellaCEN-advanced_V4_FM.book Page 20 Tuesday, July 17, 2001 1:01 PM
Other Transmission Features
Press 0000 or 1111 until " 3. Polling RX
HHHH
" is displayed.
Press the {{{{OK}}}} key.
IIII
Press 0000 or 1111 to select "On".
JJJJ
3
Press the {{{{OK}}}} key.
KKKK
Press 0000 or 1111 to select ”Default”.
LLLL
Press the {{{{OK}}}} key.
MMMM
Press the {{{{Start}}}} key.
NNNN
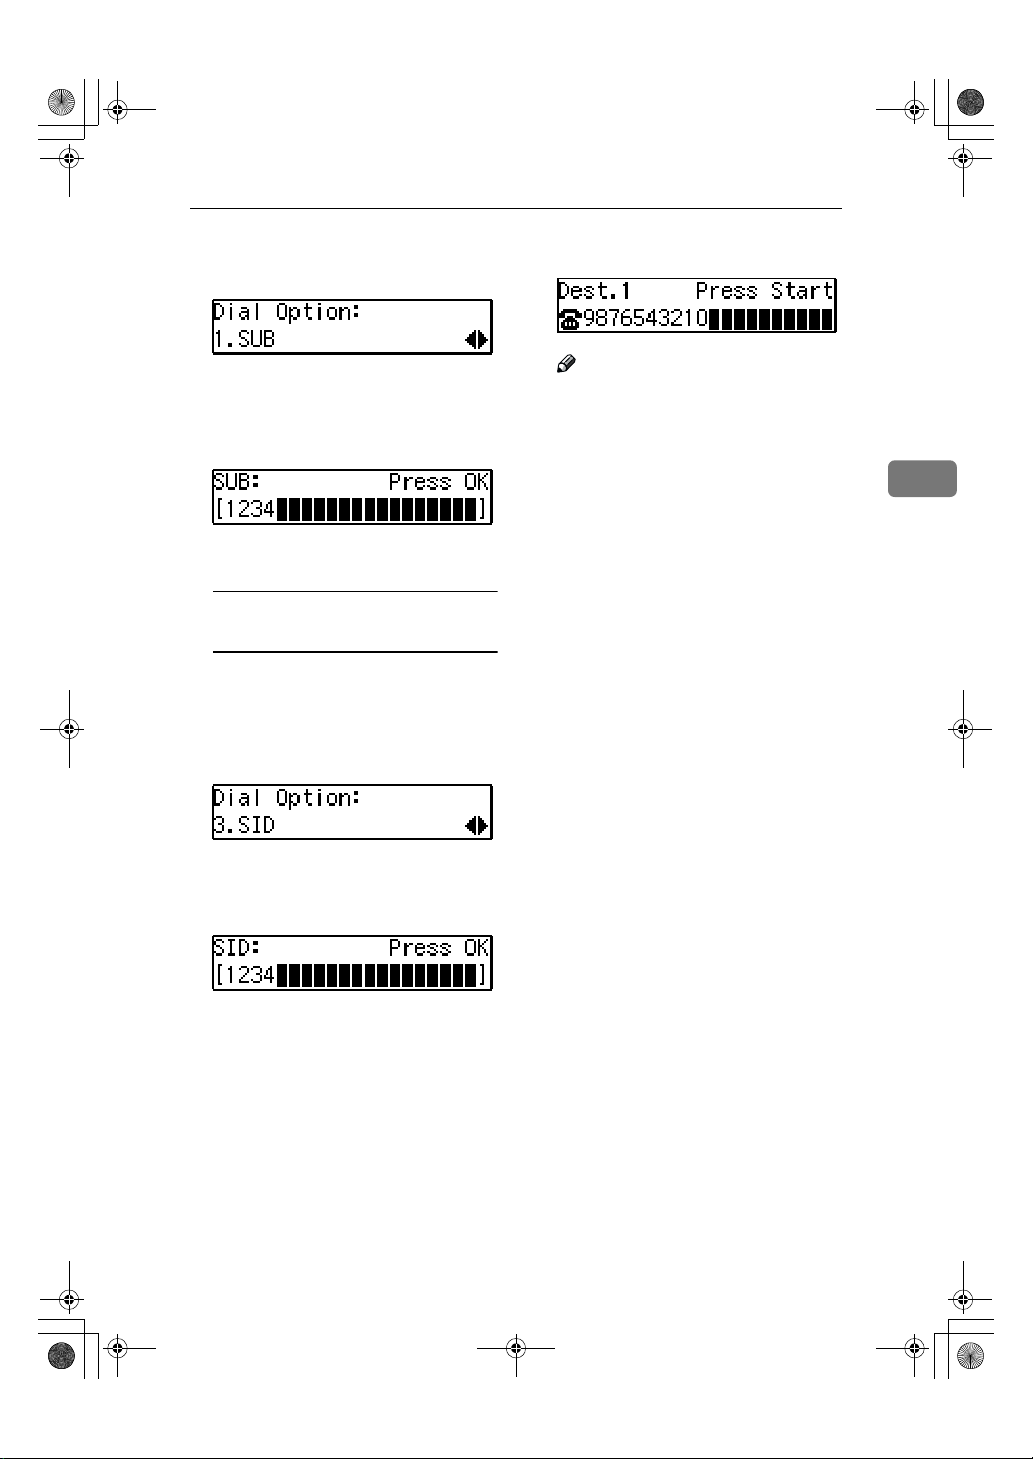
SUB Code
If the other party's machine has functions like Transfer Request and Confidential Transmission with SUB/SID
Code, you can use those functions
with SUB/SID Code.
Preparation
You need to assign the Dial Option
function to a User Function key beforehand. See p.35 “User Function
Keys”.
Note
❒ The ID can be up to 20 digits long
and consist of numbers, spaces,
{{{{qqqq}}}} and {{{{pppp}}}}.
❒ Make sure the ID matches the
specification of the fax you are
sending to.
❒ You can store IDs in Quick Dials,
Speed Dials, and Groups.
❒ Messages you send using this
function are marked "SUB" on all
reports.
❒ When you send fax message with
SUB Code to other makers' machines, sometimes a password
(SID) is necessary. Use SID when it
is necessary.
20
Place your original and make any
AAAA
changes to the scan settings if necessary.
Dial the destination fax number
BBBB
using the number keys.
Press the {{{{User Function}}}} key as-
CCCC
signed with the Dial Option function.
Page 29
StellaCEN-advanced_V4_FM.book Page 21 Tuesday, July 17, 2001 1:01 PM
Transmission Features
Confirm that " 1. SUB " is dis-
DDDD
played.
Press the {{{{OK}}}} key.
EEEE
Enter the SUB code with the num-
FFFF
ber keys.
Press the {{{{OK}}}} key.
GGGG
When a password (SID) is
necessary
AAAA Press the {{{{User Function}}}} key as-
signed with the Dial Option
function.
BBBB Press 0000 or 1111 until " 3. SID " is
displayed.
Press the {{{{Start}}}} key.
HHHH
Note
❒ If you use Immediate Transmis-
sion and the destination fax machine does not support the Dial
Option function, a message will
appear on the display to inform
you of this. In this case, press
the {{{{OK}}}} key to cancel the transmission.
3
CCCC Press the {{{{OK}}}} key
DDDD Enter the SID code with the
number keys.
EEEE Press the {{{{OK}}}} key
21
Page 30

StellaCEN-advanced_V4_FM.book Page 22 Tuesday, July 17, 2001 1:01 PM
Other Transmission Features
More Transmission Functions
If Memory Runs Out While
Storing an Original
If you run out of memory while
AAAA
storing an original (free space
reaches 0%),
3
Full.Storing Stopped.”
played.
Press the {{{{OK}}}} key.
BBBB
When transmitting the stored
pages
AAAA Press 0000 or 1111 to select “Trans-
mit” and press the {{{{OK}}}} key.
Note
❒ Successfully scanned pages
are sent. Check the number
of transmitted pages on
Communication Result Report.
“Memory is
is dis-
Checking the Transmission
Result
• Turn on the printing of the Communication Result Report if you
want a report to be printed after
every successful transmission. See
p.25 “Printed Reports”.
If you leave off the printing of the
Communication Result Report, the
report will not be printed after every transmission. However,
should a transmission fail, a Communication Failure Report will be
printed instead.
• If you turn off the printing of the
Transmission Result Report (Immediate Transmission), the Error
Report will be printed when the
communication on fails.
• You can also check the transmission result by examining the Journal. See p.13 “Printing the
Journal”.
• You can assign the function of
printing Transmission Result Report to User Function Keys.
22
When deleting the stored pages
AAAA Press 0000 or 1111 to select “Delete”
and press the {{{{OK}}}} key.
Page 31

StellaCEN-advanced_V4_FM.book Page 23 Tuesday, July 17, 2001 1:01 PM
More Transmission Functions
Broadcasting Sequence
If you dial several destinations for the
same message (Broadcasting), the
messages are sent in the order in
which they were dialed. If the fax
message could not be transmitted to a
destination, the machine redials that
destination after the last destination
specified for Broadcasting. For example, if you specify four destinations A
through D for broadcasting, and if the
lines to destinations A and C are
busy, the machine dials the destinations in the following order: A, B, C,
D, A, and C.
Sending a Fax Message
Immediately
To send a fax message immediately,
use Immediate Transmission. If you
have just set up an original for broadcasting, Immediate Transmission will
interrupt the current communication.
Your message will not be sent until
previously queued files have been
sent.
Broadcasting : Checking
Progress
To check which destinations the fax
message has been sent to so far, print
the TX file list.
Automatic Redial
If a fax message could not be transmitted because the line was busy or
an error occurred during transmission, redialing is done 4 times at 5
minutes intervals (these figures vary
according to which country you are
in).
If redialing fails after four redials, the
machine cancels the transmission and
prints the Communication Result Report or Communication Failure Report.
Batch Transmission
If you send a fax message by Memory
Transmission and there is another fax
message waiting in memory to be
sent to the same destination, that
message is sent along with your message. Several fax messages can be sent
with a single call, thus eliminating the
need for several separate calls. This
helps save communication costs and
reduces transmission time.
Fax messages for which the transmission time has been set in advance are
sent by Batch Transmission when that
time is reached.
Note
❒ You can switch this function on or
off with the User Parameters. See
p.58 “User Parameters” (Switch06,
Bit4).
3
23
Page 32

StellaCEN-advanced_V4_FM.book Page 24 Tuesday, July 17, 2001 1:01 PM
Other Transmission Features
Dual Access
The machine can scan other messages
into memory even while sending a
fax message from memory, receiving
a message into memory , or automatically printing a report. Since the machine starts sending the second
message immediately after the current transmission terminates, the line
3
will be used efficiently.
Note that during Immediate Transmission or when in User Tools mode,
the machine cannot scan an original.
ECM (Error Correction Mode)
This function automatically resends
data that was not transmitted successfully using a system that complies
with international standards.
ECM requires that the receiver has
the same function.
Parallel Memory Transmission
This function dials while the original
is being scanned. Standard Memory
Transmission stores the original in
memory, then dials the destination.
Parallel Memory Transmission allows you to quickly determine
whether a connection was made. In
addition, this function scans the original faster than Immediate Transmission and is useful when you are in a
hurry and need to use the original for
another purpose.
Limitation
❒ Standard Memory Transmission is
used instead of Parallel Memory
Transmission in the following cases.
• When the line is busy and could
not be connected to
• With Send Later
• When you store an original for
Memory Transmission while another communication is in
progress
• When two or more destinations are
specified
• When the original is set on the exposure glass
Note
❒ If you press the {{{{Clear/Stop}}}} key,
the original jams, or memory becomes full during Parallel Memory
Transmission, the machine stops
transmitting and prints the Communication Result Report. The file
is erased.
❒ Total stored page numbers are not
printed in the Parallel Memory
Transmission. Only the page numbers are printed, such as P.1, P.2
not 1/2, 2/2.
❒ If you run out of memory, normal
Memory Transmission takes place.
❒ File Reserve Report will not be
printed with Parallel Memory
Transmission.
Note
❒ You can switch this function on or
off with the User Parameters. See
p.58 “User Parameters” (Switch07,
Bit2).
24
Page 33

StellaCEN-advanced_V4_FM.book Page 25 Tuesday, July 17, 2001 1:01 PM
Printed Reports
You can obtain reports from your machine either by having your machine
print them out automatically, or by
printing them out yourself.
Note
❒ You can switch on or off the print-
ing of the various reports with the
User Parameters. See p.58 “User
Parameters” (switch 03, bits 7–0).
❒ For reference purposes, the ma-
chine prints part of the original image on the File Reserve Report,
Communication Result Report and
Communication Failure Report.
You can choose whether to include
part of the original image on reports with User Parameters
(Switch 04. Bit 7).
File Reserve Report (Switch 03,
Bit 2)
This report is printed after an original
is stored in memory. Use it to review
the contents and destinations of
stored originals. Even if the machine
is set up not to print this report, it is
still printed if an original could not be
stored.
Note
❒ File Reserve Report will not be
printed with Parallel Memory
Transmission.
Printed Reports
Communication Result Report
(Switch 03, Bit 0)
This report is printed when a Memory Transmission is completed so you
can check the result of the transmission. If two or more destinations are
specified, this report is printed after
the fax message has been sent to all
the destinations. If the machine is set
up not to print this report and the fax
message could not be successfully
transmitted, the Communication Failure Report is printed. See p.25 “Com-
munication Failure Report (Switch 03,
Bit 0)”.
Communication Failure Report
(Switch 03, Bit 0)
This report is only printed if the Communication Result Report is turned
off and a message could not be successfully transmitted with Memory
Transmission. Use it to keep a record
of failed transmissions so you can
send them again.
Note
❒ The "Page" column gives the total
number of pages. The "Not Sent"
column gives the number of pages
that could not be sent successfully.
3
25
Page 34

StellaCEN-advanced_V4_FM.book Page 26 Tuesday, July 17, 2001 1:01 PM
Other Transmission Features
Transmission Result Report
(Immediate Transmission)
(Switch 03, Bit 5)
If you turn on the printing of this report, a report will be printed after every Immediate Transmission so you
have a record of whether the transmission was successful or not. If the
3
machine is set up not to print this report and the fax message could not be
successfully transmitted, the error report is printed instead.
Note
❒ If the page was sent successfully,
the "Page" column gives the total
number of pages that were sent
successfully. The "Not Sent" column gives the number of pages
that could not be sent successfully.
26
Page 35

StellaCEN-advanced_V4_FM.book Page 27 Tuesday, July 17, 2001 1:01 PM
4. Reception Features
General
Immediate Reception
Each page of a received fax message is
printed as soon as it is received. This
method is used for standard fax messages.
❖❖❖❖ Display during reception
The sender's name or fax number
appears on the upper line.
❖❖❖❖ Reception resolution
This machine supports Standard
and Detail resolutions for reception. A fax message may be printed
in a resolution different from the
one specified by the sender.
Note
❒ Reception will not take place if
there is not enough free memory left. If free memory reaches
0% during Immediate Reception, any further reception becomes impossible and the
current communication is terminated.
Memory Reception
The machine waits until all pages of
the message have been received into
memory before printing the message.
This method is used with Substitute
Reception. See p.28 “Printing Documents that have been Received into
Memory (Substitute Reception)” .
Important
❒ All the messages stored in memory
are deleted if the power is switched
off for more than 12 hours.
❒ The machine may not be able to re-
ceive large numbers of messages
or messages with a high data content. In such cases, we recommend
you switch the above functions off.
Limitation
❒ The machine may not be able to re-
ceive fax messages when the free
memory space is low.
Note
❒ If the memory free space reaches
0% during Memory Reception, the
machine can no longer receive the
current fax message and stops
communicating.
27
Page 36

StellaCEN-advanced_V4_FM.book Page 28 Tuesday, July 17, 2001 1:01 PM
Reception Features
Printing Documents that have
been Received into Memory
(Substitute Reception)
If any of the conditions listed below
are met, the machine automatically
switches to Memory Reception mode
and stores messages in memory instead of printing them. This reception
mode, in which a received fax message is stored in memory unprinted,
is called Substitute Reception. Mes-
4
sages received using Substitute Reception are automatically printed
when the condition which caused the
machine to use Substitute Reception
is rectified. Substitute Reception takes
place when:
• Paper runs out
• Toner runs out
• Paper is jammed
• A cover is open
• A fax is received during a copy or
print run
• Memory Lock
Limitation
❒ Reception may not take place if
there is not enough free memory
left.
Note
❒ The Receive File indicator lights to
let you know when message(s)
have been received using Substitute Reception.
❒ If free memory reaches 0% during
Substitute Reception, any further
reception becomes impossible and
the current communication is terminated.
Screening Out Messages from
Anonymous Senders
To help you screen out unwanted
messages that may fill up your memory, the machine can be programmed
to only use Substitute Reception for
messages that arrive with name or fax
number identification.
Two settings are available:
• When a name or fax number is received
• Free
Note
❒ When "When a name or fax num-
ber is received" is selected, the machine only stores messages when
the name or fax number is present.
You can change this with User Parameters. See p.58 “User Parameters” (switch 05, bit 1).
❖❖❖❖ When a name or fax number is re-
ceived
The machine switches to Substitute Reception only when the
sender programs their name or fax
number. If the power is switched
off for more than 12 hours, all the
messages received into memory
are deleted. If this occurs, the Power Failure Report or Journal can be
used to identify which messages
were lost so you can ask the senders to transmit them again.
Important
❒ If a sender does not program
their name or fax number, the
machine may reject an important fax message. We recommend that you ask important
senders to register their name or
fax number in advance.
28
Page 37

StellaCEN-advanced_V4_FM.book Page 29 Tuesday, July 17, 2001 1:01 PM
❖❖❖❖ Free
The machine switches to Substitute
Reception regardless of whether or
not the sender has programmed
their name or fax number.
Receiving Messages in
Telephone Mode
In this mode you have to answer the
call yourself and decide whether it is
a fax or a telephone call.
The procedure for answering a call is
as follows:
Pick up the handset of the exter-
AAAA
nal telephone and listen to the
other end.
If you hear a voice, continue your
BBBB
conversation as you would normally.
General
Auto Fax Reception Power-up
This machine can be set to shut down
automatically if no one uses it for a
while. In this situation, even though
the operation switch is off, the machine can still receive incoming messages as long as the main power
switch is on.
Important
❒ Reception is not possible if both
the operation switch and main
power switch are turned off.
4
If you hear a fax tone, remove any
CCCC
originals from the feeder.
Note
❒ If the function of Manual Recep-
tion is registered to the User
Function Key, press the User
Function key and receive the
message, then go to H.
Make sure that the machine is in
DDDD
Facsimile mode and the standby
display is shown.
Press the {{{{Start}}}} key.
EEEE
Press 0000 or 1111 to select “Receive”.
FFFF
Press the {{{{OK}}}} key.
GGGG
Replace the handset.
HHHH
29
Page 38

StellaCEN-advanced_V4_FM.book Page 30 Tuesday, July 17, 2001 1:01 PM
Reception Features
Printing Options
Center Mark
When this function is turned on,
marks are printed halfway down the
left side and at the top center of each
page received. This makes it easy for
you to position a hole puncher correctly when you file received messages.
Checkered Mark
When this function is turned on, a
checkered mark is printed on the first
page of fax messages to help you separate them.
4
ND1X00E5
Note
❒ You can turn this function on or off
Limitation
❒ The center marks may deviate a lit-
tle from the exact center of the
edge.
Note
❒ You can turn this function on or off
with the User Parameters (Switch
02 Bit 1). See p.58 “User Parameters”.
with the User Parameters (Switch
02 Bit 4) See p.58 “User Parameters”.
TSI Print
Usually the sender's Fax Header is
printed on received messages. If the
sender has not programmed their Fax
Header, you will not be able to identify them. However, if you turn this
function on, the sender's Name or Fax
Number is printed instead so you can
find out where the message came
from. See p.58 “User Parameters”
(Switch 02 Bit 3)
30
Page 39

StellaCEN-advanced_V4_FM.book Page 31 Tuesday, July 17, 2001 1:01 PM
Printing Options
Reception Time
When this function is turned on, you
can have the date and time when a
message was received printed at the
bottom of the received image. Turn it
on or off with the User Parameters
(Switch 02 Bit 2). See p.58 “User Parameters”.
Limitation
❒ When a received message is print-
ed on two or more sheets, the date
and time is printed on the last
page.
Note
❒ The date and time when the mes-
sage was printed can also be recorded on the message. If you need
this function, please contact your
service representative.
Page Separation and Length
Reduction
When the size of a received message
is longer than the paper loaded in the
machine, each page of the message
can be split and printed on several
sheets, or reduced and printed on a
single sheet. For example, When the
paper size is A4 L, this function
splits the message if the message
length is 92mm (3.7”) or longer than
the paper used. The message is reduced if it is less than 92mm (3.7”).
When the paper size is 8
this function splits the message if the
message length is 85mm(3.4”) or
longer than the paper used. The message is reduced if it is less than
85mm(3.4”). When a message is split,
the split mark (*) is inserted at the
split position and about 10mm (0.4”)
of the split area is duplicated on the
top of the second sheet.
1
/2"×11” L,
4
ABC
(Document)
ND1X01E1
Note
❒ This function is not available in
some countries.
❒ Your service representative can
customize this function with the
following settings.
• Reduction
• Print split mark
• Overprinting
• Guideline for split
31
Page 40

StellaCEN-advanced_V4_FM.book Page 32 Tuesday, July 17, 2001 1:01 PM
Reception Features
When There is No Paper of the Correct Size
If there is no paper in your machine that matches the size of a received message,
the machine will choose a paper size based upon the paper you have available.
For example, if your machine has A4L and 8
ceive a A5K size message, check the A5K column of the table below. The paper
size at the top has the highest priority. In this case, since 8
priority than A4L, the message is printed on 8
❖❖❖❖ Priority Table
4
1
/2”×11”L installed and you re-
1
1
/2”×11”L.
/2”×11”L is a higher
• KK and LL indicate that the message is split over two pages of paper with
the orientation and size shown.
Page Reduction Disabled
Reduction in Sub-scan Direction Enabled
Width or Length Priority Width
32
Page 41

StellaCEN-advanced_V4_FM.book Page 33 Tuesday, July 17, 2001 1:01 PM
Limitation
❒ The paper size used to print a received message may be different from the size
of the sent original.
Reference
p.31 “Page Separation and Length Reduction”
Printing Options
4
33
Page 42

StellaCEN-advanced_V4_FM.book Page 34 Tuesday, July 17, 2001 1:01 PM
Reception Features
4
34
Page 43

StellaCEN-advanced_V4_FM.book Page 35 Tuesday, July 17, 2001 1:01 PM
5. Facsimile User Tools
User Function Keys
You can program each of the User Function keys ({{{{F1}}}} to {{{{F3}}}}) with a function
that you use frequently. When you wish to use that function, instead of having
to search through several menus to find it, just press the appropriate User Function key.
Important
❒ When registering and editing User Function keys, we recommend that you
print out a User Function List for reference. (See p.39 “Printing Reports/Lists”.)
Functions You Can Assign to User Function Keys
You can program each of the User Function keys with one of the following functions.
Function Name Function Contents Condition Reference
Manual Reception
Reception Mode Use this mode to switch Reception
Print Journal Use when you want to print out a
TX Result Report Use this to have a result report
Fax H eader Print You c an turn this function on or off.
Group Use when you want to specify a
Tone Use when you want to enter a tone
Use this mode if your line is shared
by a fax machine and a telephone
but you wish to answer all calls
yourself and decide whether they
are fax messages or telephone calls.
modes.
Journal.
printed after every transmission.
group of destinations.
signal.
- See Chapter2, “Reception
Modes” in the Basic Features manual.
- See Chapter 2 ”Reception
Modes” in the Basic Features manual.
- See p.13 “Printing the
Journal”
b
See p.25 “Communica-
tion Result Report
(Switch 03, Bit 0)” and
p.26 “Transmission Result Report (Immediate
Transmission) (Switch
03, Bit 5)”
b
See p.3 “Fax Header
Print”
- See Chapter 2, "Using
Groups" in the Basic Features manual.
- See Chapter 2, “Tone” in
the Basic Features manual.
35
Page 44

StellaCEN-advanced_V4_FM.book Page 36 Tuesday, July 17, 2001 1:01 PM
Facsimile User Tools
Function Name Function Contents Condition Reference
Dial Option Use this function to attach various
information to a fax message.
Batch Trans. You can turn this function on or off.
Forwarding You can turn this function on or off.
Prog. Quick Dial Use when you want to register the
other party's number as a Quick
Dial destination.
Monitor volume Use this to adjust the volume for
the monitor and buzzer.
• The "b" notation indicates that the User Function key lights when that func-
tion is selected ”On”.
To assign a function to a User Function key, perform the following procedure.
- See p.19 “SEP Code”,
p.20 “SUB Code”
b
See p.23 “Batch Transmission”
b
See p.52 “Forwarding”
- See Chapter 3, "Quick Dial" in the Basic Features
manual.
- See Chapter 4, "Adjusting
Volume" in the Basic Features manual.
5
Making a User Function Key
Press 0000 or 1111 to scroll and display
EEEE
" 7. User Functions ".
Assignment
Press the {{{{User Tools}}}} key.
AAAA
Press the {{{{OK}}}} key.
FFFF
Press 0000 or 1111 until ” 4. Fax Fea-
BBBB
tures ” is displayed.
Press the User Function key ({{{{F1}}}}
GGGG
to {{{{F3}}}}) you want to assign.
Press the {{{{OK}}}} key.
CCCC
Confirm that “ 1. Program / Delete
” is displayed
Press the {{{{OK}}}} key.
DDDD
Press 0000 or 1111 to display the func-
HHHH
tion name you want to assign.
36
Page 45

StellaCEN-advanced_V4_FM.book Page 37 Tuesday, July 17, 2001 1:01 PM
Press the {{{{OK}}}} key.
IIII
If you want to register another
User Function key, repeat the
above steps from step F.
Press the {{{{User Tools}}}} key.
JJJJ
The machine returns to standby
mode.
Using a User Function Key
To use a User Function key ({{{{F1}}}} to
{{{{F3}}}}), press the User Function key
that contains the desired registered
function.
User Function Keys
Deleting a User Function Key
To delete a User Function key, perform the following procedure.
Press the {{{{User Tools}}}} key.
AAAA
Press 0000 or 1111 until " 4. Fax Fea-
BBBB
tures " is displayed.
Press the {{{{OK}}}} key.
CCCC
Confirm that " 1. Program / Delete
DDDD
" is displayed.
5
The display for Group function is registered.
The display changes for each assigned function.
Press the {{{{OK}}}} key
EEEE
Press 0000 or 1111 until " 7. User Func-
FFFF
tions " is displayed.
Press the {{{{OK}}}} key
GGGG
Press the User Function key you
HHHH
want to delete.
If you make a mistake, press the
correct User Function key.
37
Page 46

StellaCEN-advanced_V4_FM.book Page 38 Tuesday, July 17, 2001 1:01 PM
Facsimile User Tools
Press 0000 or 1111 to display " None ".
IIII
Press the {{{{OK}}}} key.
JJJJ
If you want to delete another User
Function key, repeat the above
steps from step G.
Press the {{{{User Tools}}}} key.
KKKK
The machine returns to standby
mode.
5
38
Page 47

StellaCEN-advanced_V4_FM.book Page 39 Tuesday, July 17, 2001 1:01 PM
Printing Reports/Lists
Printing Reports/Lists
This function allows you to print the
following reports and lists manually.
Select a report or list as needed.
• Journal
See p.13 “Printing the Journal”.
• TX File List
See p.11 “Printing a Stored Message (Print TX File)”.
• Quick Dial List
See Chapter 3 “Quick Dial” in the
Basic Features manual.
• Speed Dial List
See Chapter 3 “Speed Dial” in the
Basic Features manual.
• Group Dial List
See Chapter 3 “Groups” in the Basic Features manual.
• All Lists
You can print all Dial lists (Quick
Dial List, Speed Dial List and
Group Dial List).
• Quick Dial Label
See Chapter 3 “Quick Dial” in the
Basic Features manual.
• User Function List
See p.35 “User Function Keys”
Press 0000 or 1111 until " 2. Reports /
DDDD
Lists " is displayed.
Press the {{{{OK}}}} key.
EEEE
Printing the Journal
AAAA Confirm that " 1. Journal " is
displayed and press the {{{{OK}}}}
key.
Note
❒ If you make a mistake, press
the {{{{Cancel}}}} key and try
again.
Printing a TX File List
AAAA Press 0000 or 1111 until " 2. TX File
List " is displayed.
5
Press the {{{{User Tools}}}} key.
AAAA
Press 0000 or 1111 until " 4. Fax Fea-
BBBB
tures " is displayed.
Press the {{{{OK}}}} key.
CCCC
BBBB Press the {{{{OK}}}} key.
Note
❒ If you make a mistake, press
the {{{{Cancel}}}} key and try
again.
39
Page 48

StellaCEN-advanced_V4_FM.book Page 40 Tuesday, July 17, 2001 1:01 PM
Facsimile User Tools
Printing the Quick Dial List
AAAA Press 0000 or 1111 until " 3. Dial List
" is displayed.
BBBB Press the {{{{OK}}}} key.
Confirm that " 1. Quick Dial List
" is displayed.
CCCC Press the {{{{OK}}}} key.
5
Note
❒ If you make a mistake, press
the {{{{Cancel}}}} key and try
again.
Printing the Speed Dial List
AAAA Press 0000 or 1111 until " 3. Dial List
" is displayed.
BBBB Press the {{{{OK}}}} key
CCCC Press 0000 or 1111 until " 2. Speed
Dial List " is displayed.
Printing the Group Dial List
AAAA Press 0000 or 1111 until " 3. Dial List
" is displayed.
BBBB Press the {{{{OK}}}} key
CCCC Press 0000 or 1111 until " 3. Group
Dial List " is displayed.
DDDD Press the {{{{OK}}}} key
Note
❒ If you make a mistake, press
the {{{{Cancel}}}} key and try
again.
Printing the All Lists
You can print all Dial Lists (Quick
Dial List, Speed Dial List and
Group Dial List) by the following
operation.
AAAA Press 0000 or 1111 until " 3. Dial List
" is displayed.
BBBB Press the {{{{OK}}}} key.
CCCC Press 0000 or 1111 until “ 4. All Lists
” is displayed.
40
DDDD Press the {{{{OK}}}} key
Note
❒ If you make a mistake, press
the {{{{Cancel}}}} key and try
again.
DDDD Press the {{{{OK}}}} key.
Note
❒ If you make a mistake, press
the {{{{Cancel}}}} key and try
again.
Page 49

StellaCEN-advanced_V4_FM.book Page 41 Tuesday, July 17, 2001 1:01 PM
Printing the Quick Dial Label
AAAA Press 0000 or 1111 until " 4. Quick
Dial Label " is displayed.
BBBB Press the {{{{OK}}}} key.
Note
❒ If you make a mistake, press
the {{{{Cancel}}}} key and try
again.
Printing the User Function List
Printing Reports/Lists
AAAA Press 0000 or 1111 until " 5. U. Func-
tion List " is displayed.
BBBB Press the {{{{OK}}}} key.
Note
❒ If you make a mistake, press
the {{{{Cancel}}}} key and try
again.
Press the {{{{Start}}}} key.
FFFF
Press the {{{{User Tools}}}} key.
GGGG
The machine returns to the standby display.
5
41
Page 50

StellaCEN-advanced_V4_FM.book Page 42 Tuesday, July 17, 2001 1:01 PM
Facsimile User Tools
Adjusting the Display Contrast
Use this function to adjust the brightness of the display.
Press the {{{{User Tools}}}} key.
AAAA
Press 0000 or 1111 until " 4. Fax Fea-
BBBB
tures " is displayed.
Press the {{{{OK}}}} key.
5
CCCC
Press 0000 or 1111 until " 3. Setup " is
DDDD
displayed.
42
Press the {{{{OK}}}} key.
EEEE
Press 0000 or 1111 until " 2. Display
FFFF
Contrast " is displayed.
Press the {{{{OK}}}} key.
GGGG
Press 0000 or 1111 to adjust the bright-
HHHH
ness of the display.
Press the {{{{OK}}}} key.
IIII
Press the {{{{User Tools}}}} key to re-
JJJJ
turn to the standby display.
Page 51

StellaCEN-advanced_V4_FM.book Page 43 Tuesday, July 17, 2001 1:01 PM
Setting the Date and Time
Setting the Date and Time
Use this function to set your machine's internal clock to the current
time and date.
If the current date and time are
wrong, use this procedure to correct
them.
Note
❒ If you make a mistake when enter-
ing numbers, press the {{{{Clear/Stop}}}}
key and try again.
❒ The machine automatically sets the
internal clock one hour ahead
when daylight saving time begins,
and one hour back when it ends.
Press the {{{{User Tools}}}} key.
AAAA
Press 0000 or 1111 until " 4. Fax Fea-
BBBB
tures " is displayed.
Press the {{{{OK}}}} key.
CCCC
Use the number keys to enter the
HHHH
year.
Press the {{{{OK}}}} key
IIII
Press 0000 or 1111 to select the correct
JJJJ
month.
Press the {{{{OK}}}} key.
KKKK
Use the number keys to enter the
LLLL
correct number for the date (1 to
31).
Press the {{{{OK}}}} key.
MMMM
Press 0000 or 1111 to select "AM” or
NNNN
“PM”.
5
Press 0000 or 1111 until " 3. Setup " is
DDDD
displayed.
Press the {{{{OK}}}} key.
EEEE
Press 0000 or 1111 until " 3. Date/Time
FFFF
" is displayed.
Press the {{{{OK}}}} key.
GGGG
Press the {{{{OK}}}} key.
OOOO
Use the number keys to enter the
PPPP
correct time.
Enter the current hour setting (1 to
12), and then use the number keys
to enter a 2-digit number for the
current minute setting (00 to 59)
43
Page 52

StellaCEN-advanced_V4_FM.book Page 44 Tuesday, July 17, 2001 1:01 PM
Facsimile User Tools
Press the {{{{OK}}}} key.
QQQQ
After " Function Accepted " flashes
briefly in the display, the next setting is displayed.
Press the {{{{User Tools}}}} key to re-
RRRR
turn to standby display.
5
44
Page 53

StellaCEN-advanced_V4_FM.book Page 45 Tuesday, July 17, 2001 1:01 PM
Setting the Auto Ring Time
Setting the Auto Ring Time
In Auto Select mode, the machine
rings a number of times to give you
the chance to pick up the handset before taking the call automatically.
You can change the number of rings
with the Auto Ring Time.
Press the {{{{User Tools}}}} key.
AAAA
Press 0000 or 1111 until " 4. Fax Fea-
BBBB
tures " is displayed.
Press the {{{{OK}}}} key.
CCCC
Press 0000 or 1111 until " 3. Setup " is
DDDD
displayed.
Press the {{{{OK}}}} key.
EEEE
Enter the new number using the
HHHH
number keys.
Note
❒ If you make a mistake, press the
{{{{Clear/Stop}}}} key and try again.
Press the {{{{OK}}}} key.
IIII
Press the {{{{User Tools}}}} key to re-
JJJJ
turn to the standby display.
5
Press 0000 or 1111 until " 5. No. of
FFFF
Rings “ is displayed.
Press the {{{{OK}}}} key.
GGGG
45
Page 54

StellaCEN-advanced_V4_FM.book Page 46 Tuesday, July 17, 2001 1:01 PM
Facsimile User Tools
Setting the Fax Reset Timer
This machine automatically returns
to the standby mode if you do not use
the machine for a certain period of
time. You can select this period.
Press the {{{{User Tools}}}} key.
AAAA
Press 0000 or 1111 until " 4. Fax Fea-
BBBB
tures " is displayed.
Press the {{{{OK}}}} key.
IIII
Press the {{{{User tools}}}} key to return
JJJJ
to the standby display.
5
Press the {{{{OK}}}} key.
CCCC
Press 0000 or 1111 until " 3. Setup " is
DDDD
displayed.
Press the {{{{OK}}}} key.
EEEE
Press 0000 or 1111 until " 7. Fax Reset
FFFF
Timer " is displayed.
46
Press the {{{{OK}}}} key.
GGGG
Press 0000 or 1111 to select a period of
HHHH
time.
Page 55

StellaCEN-advanced_V4_FM.book Page 47 Tuesday, July 17, 2001 1:01 PM
On Hook Timeout
On Hook Timeout
This machine automatically cancels
the On Hook Dial mode if you do not
dial a number from the numeric keypad for a certain period of time after
pressing the {{{{On Hook Dial}}}} key. You
can select this period.
Press the {{{{User Tools}}}} key.
AAAA
Press 0000 or 1111 until " 4. Fax Fea-
BBBB
tures " is displayed.
Press the {{{{OK}}}} key.
CCCC
Press 0000 or 1111 until " 3. Setup " is
DDDD
displayed.
Press the {{{{OK}}}} key.
EEEE
Press 0000 or 1111 to select a period of
HHHH
time.
Press the {{{{OK}}}} key.
IIII
Press the {{{{User tools}}}} key to return
JJJJ
to standby display.
5
Press 0000 or 1111 until " 8. On Hook
FFFF
Timeout " is displayed.
Press the {{{{OK}}}} key.
GGGG
47
Page 56

StellaCEN-advanced_V4_FM.book Page 48 Tuesday, July 17, 2001 1:01 PM
Facsimile User Tools
5
48
Page 57

StellaCEN-advanced_V4_FM.book Page 49 Tuesday, July 17, 2001 1:01 PM
6. Key Operator Settings
Function List
Here is a list of the functions that are available for setting. Please refer to the reference page numbers for more information.
Display
(Specs.)
1. Memory
Lock
2. Forwarding Allows y ou to automatically forward fax
3. User Parameters
4. Personal
Code
5. ID Code Allows you to register IDs required for
6. Line Type Allows you to select tone or pulse dial-
7. PSTN Access No.
8. Mem. File
Trans.
9. RDS On/Off Allows you to switch on RDS (Remote
Description Reference
Al low s yo u to have mes sag es fr om S pec ified Senders stored in memory and not
printed as soon as they are received. To
print the fax messages, you must enter
an ID.
messages to the fax machines of Specified Senders.
Allows you to customize various default
settings as required.
Allows you to set up personal codes for
using the Restricted Access. Before using the fax machine, users must enter the
Personal Code. This allows you to limit
transmission to specified users.
various types of transmissions.
ing to match the telephone line connected to your fax machine.
Allows you to specify the code used to
access an outside line when you dialing.
Allows you to send all messages stored
in memory to another fax machine and
print them out there, for example, when
your fax machine runs out of toner.
Diagnostic System) so a service representative can test your fax machine remotely from a service station, diagnose
the problem, and can change your machine settings to correct the problem.
p.50 “Memory Lock”
p.52 “Forwarding”
p.58 “User Parameters”
p.63 “Personal Codes”
p.66 “ID Code”
p.67 “Line Type”
p.68 “PSTN Access Number”
p.69 “Memory File Transfer”
p.70 “RDS (Remote Diagnostic System)”
Copy this table and use it as a quick reference.
49
Page 58

StellaCEN-advanced_V4_FM.book Page 50 Tuesday, July 17, 2001 1:01 PM
Key Operator Settings
Using Key Operator Settings
This chapter explains about functions
the key operator handles.
Memory Lock
This is a security function to prevent
unauthorized individuals from reading printed fax messages. When
Memory Lock is switched on, all received messages are stored in memory and are not automatically printed.
To print the messages, you have to
enter the Memory Lock ID.
Note
❒ Before you can use this function,
you must register the Memory
6
Lock ID. See p.66 “ID Code”
Limitation
❒ Memory Lock cannot be selected
until you have registered the
Memory Lock ID.
❒ To use this function you must
switch Memory Lock on after you
register the Memory Lock ID.
❒ You can select to lock only messag-
es from Specified Users, or you can
select to lock messages from senders other than from Specified Users. See p.58 “User Parameters”
(switch 09, bits 1 and 0).
Press the {{{{OK}}}} key.
CCCC
Press 0000 or 1111 until " 4. Key Op.
DDDD
Tools " is displayed.
Press the {{{{OK}}}} key.
EEEE
Confirm that " 1. Memory Lock " is
displayed.
Press the {{{{OK}}}} key.
FFFF
Follow the procedures below to
GGGG
switch Memory Lock On/Off, register a Specified Sender, delete a
Specified Sender, or print a list of
Specified Senders.
Switching Memory Lock On/Off
AAAA Press the {{{{OK}}}} key.
50
Press the {{{{User Tools}}}} key.
AAAA
Press 0000 or 1111 until " 4. Fax Fea-
BBBB
tures " is displayed.
BBBB Press 0000 or 1111 to "On" to switch
this function on, or select "Off"
to switch this function off.
CCCC Press the {{{{OK}}}} key.
Page 59

StellaCEN-advanced_V4_FM.book Page 51 Tuesday, July 17, 2001 1:01 PM
Using Key Operator Settings
Registering a Specified Sender
for Memory Lock
You can register Specified Senders
for this function.
AAAA Press 0000 or 1111 to display " 2.
Program Sender ".
BBBB Press the {{{{OK}}}} key.
CCCC Enter “Own Name” or “Own
Fax Number” for the Specified
Sender.
Enter the other party's “Own
Name” or “Own Fax Number”
DDDD Press the {{{{OK}}}} key.
EEEE If you want to specify a wild
card, press 0000 or 1111 key to select
"Yes".
Deleting a Specified Sender for
Memory Lock
You can delete Specified Senders
for this function.
AAAA Press 0000 or 1111 to select " 3. De-
lete Sender ".
BBBB Press the {{{{OK}}}} key.
CCCC Press 0000 or 1111 to select the
name of the Specified Sender
that you want to delete.
DDDD Press the {{{{OK}}}} key.
The Specified Sender is deleted.
If you want to delete more Specified Senders, repeat from step
B.
Printing a List of Specified
Senders for Memory Lock
You can print a list of Specified
Senders for Memory Lock.
AAAA Press 0000 or 1111 to display " 4.
Print Sender List ".
6
FFFF Press the {{{{OK}}}} key.
The Specified Sender is registered.
If you want to register another
Specified Sender, repeat from
step B.
BBBB Press the {{{{OK}}}} key.
CCCC Press the {{{{Start}}}} key. The list
prints.
Press the {{{{User Tools}}}} key to re-
HHHH
turn to the standby display.
51
Page 60

StellaCEN-advanced_V4_FM.book Page 52 Tuesday, July 17, 2001 1:01 PM
Key Operator Settings
Forwarding
Use this function to print fax specified
from Specified Senders on your own
machine and then forward the messages to other fax machines. This is
useful, for example, if you are visiting
another office and would like copies
of your messages from the head office
forwarded to you so you can read
them.
In this section, the machines that messages are forwarded to are referred to
as Forwarding Stations. The locations
from which you would like messages
forwarded from are referred to as
Specified Senders.
You can register:
• 5 Forwarding Stations
6
• 30 Specified Senders (maximum 10
per Forwarding Station, up to 24
characters each)
• Wild Cards
Important
❒ We recommend that you print the
Forwarding/Sender list and keep
it when you register or change a receiver or sender.
Note
❒ To register a sender, use an Own
Name or Own Fax Number.
❒ You can find out the Own Name or
Own Fax Number of a sender by
looking in the destination name
column of the Journal.
----Forwarding Mark
You can print a forwarding mark on
forwarded messages. See p.58 “User
Parameters” (Switch02, Bit0).
P.1
GFMTEN0J
Switching Forwarding On/Off
Press the {{{{User Tools}}}} key.
AAAA
Limitation
❒ This function only works if the in-
coming message is from another
party that has been programmed
as a Specified Sender.
❒ The Forwarding function does not
forward messages received with
Polling Reception mode.
❒ You cannot register a sender who
does not have an Own Name or
Own Fax Number.
❒
You can register up to 30 senders for
the Forwarding function. You sometimes cannot register 30 senders depending on the number of senders
registered with other functions.
52
Press 0000 or 1111 until " 4. Fax Fea-
BBBB
tures " is displayed.
Press the {{{{OK}}}} key.
CCCC
Page 61

StellaCEN-advanced_V4_FM.book Page 53 Tuesday, July 17, 2001 1:01 PM
Press 0000 or 1111 until " 4. Key Op.
DDDD
Tools " is displayed.
Press the {{{{OK}}}} key.
EEEE
Press 0000 or 1111 until " 2. Forward-
FFFF
ing " is displayed.
Press the {{{{OK}}}} key.
GGGG
Confirm that ” 1. On/Off ” is displayed.
Press the {{{{OK}}}} key.
HHHH
Using Key Operator Settings
Registering Forwarding Stations
You can register a Forwarding Station
as follows.
Press the {{{{User Tools}}}} key.
AAAA
Press 0000 or 1111 until " 4. Fax Fea-
BBBB
tures " is displayed.
Press the {{{{OK}}}} key.
CCCC
Press 0000 or 1111 until " 4. Key Op.
DDDD
Tools ” is displayed.
6
Press 0000 or 1111 to “On” to switch
IIII
this function on, or select “Off” to
switch this function off.
Press the {{{{OK}}}} key.
JJJJ
Note
❒ If you select “On” and no for-
warding station is registered,
“Press OK to Program Forwarding Station” is displayed. Press
the {{{{OK}}}} key, and then register
a forwarding station by following steps J to P on p.53 “Regis-
tering Forwarding Stations”.
Press the {{{{User Tools}}}} key to re-
KKKK
turn to the standby display.
Press the {{{{OK}}}} key.
EEEE
Press 0000 or 1111 until " 2. Forward-
FFFF
ing " is displayed.
Press the {{{{OK}}}} key.
GGGG
Press 0000 or 1111 until " 2. Prog. Sta-
HHHH
tion " is displayed.
Press the {{{{OK}}}} key.
IIII
53
Page 62

StellaCEN-advanced_V4_FM.book Page 54 Tuesday, July 17, 2001 1:01 PM
Key Operator Settings
Press 0000 or 1111 to display the num-
JJJJ
ber of the forwarding station you
want to register.
If a forwarding station is already
registered, the fax number for that
station is displayed.
Press the {{{{OK}}}} key.
KKKK
Enter the other party's fax number
LLLL
with the number keys.
Press the {{{{OK}}}} key.
MMMM
6
The Forwarding Station's fax number is registered.
Press the {{{{OK}}}} key.
NNNN
Press the {{{{OK}}}} key.
RRRR
To register another Specified Sender, repeat the above steps from
step N.
To register a different Forwarding
Station, press the {{{{Cancel}}}} key and
repeat the above steps from step I.
Limitation
❒ Names for Specified Senders
can be up to 24 characters long.
Note
❒ You can confirm the names and
fax numbers of Specified Senders on the Journal.
❒ You can confirm registered
Specified Senders using the
Specified Sender list.
Press the {{{{User Tools}}}} key to re-
SSSS
turn to the standby display.
Editing a Forwarding Station
To edit a Forwarding Station that is
already registered, perform the following procedure.
54
Enter the other party's name.
OOOO
Press the {{{{OK}}}} key.
PPPP
If you want to register the Speci-
QQQQ
fied Sender as a Wildcard, press
0000 or 1111 to select " Yes ".
Press the {{{{User Tools}}}} key.
AAAA
Press 0000 or 1111 until " 4. Fax Fea-
BBBB
tures " is displayed.
Press the {{{{OK}}}} key.
CCCC
Page 63

StellaCEN-advanced_V4_FM.book Page 55 Tuesday, July 17, 2001 1:01 PM
Using Key Operator Settings
Press 0000 or 1111 until " 4. Key Op.
DDDD
Tools " is displayed.
Press the {{{{OK}}}} key.
EEEE
Press 0000 or 1111 until " 2. Forward-
FFFF
ing ” is displayed.
Press the {{{{OK}}}} key.
GGGG
Press 0000 or 1111 until " 2. Prog. Sta-
HHHH
tion " is displayed.
Press the {{{{OK}}}} key.
IIII
Press 0000 or 1111 to display the fax
JJJJ
number of the Forwarding Station you want to edit.
Press the {{{{User Tools}}}} key to re-
NNNN
turn to the standby display.
Editing a Specified Sender
To edit a Specified Sender, delete the
Specified Sender you want to edit
(Seep.56 “Deleting a Specified Sender” ), and then register it as a new
Specified Sender. (See p.53 “Register-
ing Forwarding Stations”).
Deleting a Forwarding Station
To delete a Forwarding Station, perform the following procedure.
Press the {{{{User Tools}}}} key.
AAAA
Press 0000 or 1111 until " 4. Fax Fea-
BBBB
tures " is displayed.
6
Press the {{{{OK}}}} key.
KKKK
Press the {{{{Clear/Stop}}}} key, and
LLLL
then enter the Forwarding Station's correct fax number.
Press the {{{{OK}}}} key.
MMMM
The fax number is registered.
If you want to edit another Forwarding Station, press the {{{{Can-
cel}}}} key and repeat the above steps
from step I.
Press the {{{{OK}}}} key.
CCCC
Press 0000 or 1111 until " 4. Key Op.
DDDD
Tools “ is displayed.
Press the {{{{OK}}}} key.
EEEE
Press 0000 or 1111 until " 2. Forward-
FFFF
ing " is displayed.
Press the {{{{OK}}}} key.
GGGG
55
Page 64

StellaCEN-advanced_V4_FM.book Page 56 Tuesday, July 17, 2001 1:01 PM
Key Operator Settings
Press 0000 or 1111 until " 3. Delete Sta-
HHHH
tion " is displayed.
Press the {{{{OK}}}} key.
IIII
Press 0000 or 1111 to display the fax
JJJJ
number of the Forwarding Station you want to delete.
Press the {{{{OK}}}} key.
KKKK
The Forwarding Station is deleted.
If you want to delete another Forwarding Station, repeat the proce-
6
dure from step I.
Press the {{{{User Tools}}}} key to re-
LLLL
turn to the standby display.
Deleting a Specified Sender
To delete a Specified Sender, perform
the following procedure.
Press 0000 or 1111 until " 4. Key Op.
DDDD
Tools " is displayed.
Press the {{{{OK}}}} key.
EEEE
Press 0000 or 1111 until " 2. Forward-
FFFF
ing " is displayed.
Press the {{{{OK}}}} key.
GGGG
Press 0000 or 1111 until " 2. Prog. Sta-
HHHH
tion " is displayed.
Press the {{{{OK}}}} key.
IIII
Press 0000 or 1111 to display the fax
JJJJ
number of the Forwarding Station that contains the Specified
Sender you want to delete.
56
Press the {{{{User Tools}}}} key.
AAAA
Press 0000 or 1111 until " 4. Fax Fea-
BBBB
tures " is displayed.
Press the {{{{OK}}}} key.
CCCC
Press the {{{{OK}}}} key.
KKKK
Press the {{{{OK}}}} key.
LLLL
Press 0000 or 1111 until " 2. Delete
MMMM
Sender " is displayed.
Press the {{{{OK}}}} key.
NNNN
Page 65

StellaCEN-advanced_V4_FM.book Page 57 Tuesday, July 17, 2001 1:01 PM
Using Key Operator Settings
Use 0000 or 1111 to display the Speci-
OOOO
fied Sender you want to delete.
Press the {{{{OK}}}} key.
PPPP
The Specified Sender is deleted.
If you want to delete another Specified Sender, repeat the above
steps from step N.
Press the {{{{User Tools}}}} key to re-
QQQQ
turn to the standby display.
Printing the Specified Sender list
You can check which Specified Senders are registered for a Forwarding
Address.
Follow the steps below to print this
list.
Press the {{{{User Tools}}}} key.
AAAA
Press 0000 or 1111 until " 2. Forward-
FFFF
ing " is displayed.
Press the {{{{OK}}}} key.
GGGG
Press 0000 or 1111 until " 4. Print Send-
HHHH
er List " is displayed.
Press the {{{{OK}}}} key.
IIII
Press the {{{{Start}}}} key.
JJJJ
The list is printed.
Press the {{{{User Tools}}}} key to re-
KKKK
turn to the standby display.
6
Press 0000 or 1111 until " 4. Fax Fea-
BBBB
tures " is displayed.
Press the {{{{OK}}}} key.
CCCC
Press 0000 or 1111 until " 4. Key Op.
DDDD
Tools " is displayed.
Press the {{{{OK}}}} key.
EEEE
57
Page 66

StellaCEN-advanced_V4_FM.book Page 58 Tuesday, July 17, 2001 1:01 PM
Key Operator Settings
User Parameters
The User Parameters allow you to customize various settings to match your
needs.
To change the function settings, set the user parameter switches.
Preparation
Access to some User Parameter Settings requires installation of optional
equipment or that other settings be made beforehand.
❖❖❖❖ Switches and Bits
User Parameters are divided into switches and each switch is divided into
eight bits. The right most bit is bit 0 and the left most is bit 7.
Bit
Number
Bit Value
The User Parameter switches are outlined below.
6
Switch Bit Item 1 0
76543210
↓↓↓↓ ↓↓↓ ↓
01000000
00 3,2,1 Image density adjustment level home position (the higher level,
the greater image density)
000: Standard,
001: lighter,
010: darker
101: somewhat lighter
110: somewhat darker
5,4 5, 4: Default resolution when you send a message.
RESOLUTION
00: Standard
01: Detail
10: Fine
6 Default setting for trans-
mission.
TRANSMISSION MODE
7 Home position for the
Original Type.
HALFTONE
01 7 Return the machine to the
default settings after each
communication (
to default after
transmission
Immediate Memory
Photo Text
On Off
Return
)
58
Page 67

StellaCEN-advanced_V4_FM.book Page 59 Tuesday, July 17, 2001 1:01 PM
Switch Bit Item 1 0
02 0 Default setting for printing
the Forwarding Mark.
FORWARDING MARK
1 Default setting for the Cen-
ter Mark.
CENTER MARK
2 Default setting for printing
the Reception Time.
RECEPTION TIME
3 Print Sender Information
(TSI Print)
4 Default setting for the
Checkered Mark.
CHECKERED MARK
03 0 Automatic printing of the
Communication Result Report (Memory TX)
2 Automatic printing of the
File Reserve Report (Memory TX)
3 Automatic printing of the
File Reserve Report (Polling RX)
4 Automatic printing of the
Communication Result Report (Polling RX)
5 Automatic printing of the
Transmission Result Report (Immediate TX)
7 Automatic printing of the
Journal
04 7 Include a portion of the im-
age on the Communication
Result Report, File Reserve
Report, Communication
Failure Report.
Using Key Operator Settings
On Off
On Off
On Off
On Off
On Off
On Off
On Off
6
On Off
On Off
On Off
On Off
On Off
59
Page 68

StellaCEN-advanced_V4_FM.book Page 60 Tuesday, July 17, 2001 1:01 PM
Key Operator Settings
Switch Bit Item 1 0
05 0 Store incoming faxes when
machine is out of supplies.
SUBSTITUTE RECEPTION
1 Default setting for Substi-
tute Reception.
CONDITIONS OF MEMORY RECEPTION
4 Restricts fax machine us-
age to specific users.
RESTRICTED ACCESS
06 0 D efault setting for a header
with each page.
FAX HEADER PRINT
4 Default setting for Batch
Transmission.
BATCH TRANSMISSION
07 2 Parallel Memory Trans-
6
mission
4 Assign the Tone key as the
“*” key on the operation
panel.
TONE SWITCH BY ASTERISK KEY
08 6 Forwarding On Off
7 Forwarding 0: Forward messages from Specified Senders only. 1:
Forward messages from non-Specified Senders only.
09 0 Memory Lock On Off
Memory Lock
1
0: Messages from Specified Senders are not printed unless you enter the Memory Lock ID.
1: Messages from non-Specified Senders are not printed unless
you enter the Memory Lock ID.
ADD DESTINATIONS
6
WITH A SERIES OF
QUICK DIALS
On Off
Reject (If no
name or fax
number is received)
On Off
On Off
On Off
On Off
On Off
On Off
Accept (Free)
60
Page 69

StellaCEN-advanced_V4_FM.book Page 61 Tuesday, July 17, 2001 1:01 PM
Switch Bit Item 1 0
10 7 Use dithering halftone
(SPD) or standard halftone
(STD).
HALFTONE METHOD
11 6 Print the received message
when acting as a Forwarding Station
PRINT MEMORY
TRANSFER FILES
12 1 Distinctive Ring On Off
13 0 Access to the public tele-
phone line
PABX/PSTN G3
Changing the User Parameters
We recommend that you print the
User Parameter list and keep it when
you register or change a user parameter. See p.62 “Printing the User Parameter List”.
Do not change any bit switches other
than those shown on the previous
pages.
Using Key Operator Settings
SPD STD
On Off
PABX PSTN
Press 0000 or 1111 until " 4. Key Op.
DDDD
Tools " is displayed.
Press the {{{{OK}}}} key.
EEEE
Press 0000 or 1111 until " 3. User Pa-
FFFF
rameters " is displayed.
6
Press the {{{{User Tools}}}} key.
AAAA
Press 0000 or 1111 until " 4. Fax Fea-
BBBB
tures " is displayed.
Press the {{{{OK}}}} key.
CCCC
Press the {{{{OK}}}} key.
GGGG
61
Page 70

StellaCEN-advanced_V4_FM.book Page 62 Tuesday, July 17, 2001 1:01 PM
Key Operator Settings
Press the {{{{OK}}}} key.
HHHH
For a list of the switches and settings, see p.58 “User Parameters”.
Use the User Parameters table to
look up the number of the switch
that you want to change, and then
press the 0 or 1 key to display
the number of the switch.
The bits are numbered 7~0. To
change a setting, press the corresponding number key to toggle the
setting between "0" and "1"
Key to
76543210
Press
SW 00:10000110
6
For example, if you want to change
the setting at bit 7, press the 7 number key to toggle the setting between "1" and "0".
When you are finished making
IIII
adjustments, press the {{{{OK}}}} key.
Press 0000 or 1111 until " 4. Fax Fea-
BBBB
tures " is displayed.
Press the {{{{OK}}}} key.
CCCC
Press 0000 or 1111 until " 4. Key Op.
DDDD
Tools " is displayed.
Press the {{{{OK}}}} key.
EEEE
Press 0000 or 1111 until " 3. User Pa-
FFFF
rameters " is displayed.
Press the {{{{OK}}}} key.
GGGG
Press the 0000 or 1111 key until " 2.
HHHH
Print List " is displayed.
Press the {{{{User Tools}}}} key to re-
JJJJ
turn to the standby display.
Printing the User Parameter List
Print this list to see the current User
Parameter settings.
Press the {{{{User Tools}}}} key.
AAAA
62
Press the {{{{OK}}}} key.
IIII
Press the {{{{Start}}}} key to print the
JJJJ
list.
Note
❒ If you press the {{{{Cancel}}}} key be-
fore printing starts, the list will
not be printed and the display
shown in step H appears again.
Page 71

StellaCEN-advanced_V4_FM.book Page 63 Tuesday, July 17, 2001 1:01 PM
Using Key Operator Settings
Press the {{{{User Tools}}}} key to re-
KKKK
turn to the standby display.
Personal Codes
This function allows you to keep
track of machine usage. When Personal Codes are programmed, users
have to enter their Personal Code before they send a fax. This function is
used for the Restricted Access. See
p.65 “Restricted Access”
Important
❒ We recommend that you print the
Personal Code List and keep it
when you register or change a Personal Code. See p.64 “Printing the
Personal Code List”.
Limitation
❒ Personal Codes can be up to 8-dig-
its long, and you can enter the following numbers and symbols : 0 to
9, #, *, and spaces.
❒ You can register up to 10 Personal
Codes. Each Personal Code name
can be up to 20 characters long.
Registering and Editing
Press 0000 or 1111 until " 4. Key Op.
DDDD
Tools " is displayed.
Press the {{{{OK}}}} key.
EEEE
Press 0000 or 1111 until " 4. Personal
FFFF
Code " is displayed.
Press the {{{{OK}}}} key.
GGGG
Confirm that " 1. Prog. Pers. Code "
is displayed.
Press the {{{{OK}}}} key.
HHHH
To register a new Personal Code ,
IIII
enter the Personal Code (8 digits
or less) with the number keys. To
edit a registered personal code,
press 0000 or 1111 to display the desired Personal Code.
6
Press the {{{{User Tools}}}} key.
AAAA
Press 0000 or 1111 until " 4. Fax Fea-
BBBB
tures " is displayed.
Press the {{{{OK}}}} key.
CCCC
Press the {{{{OK}}}} key.
JJJJ
Enter the user name.
KKKK
Press the {{{{OK}}}} key.
LLLL
Press the {{{{User Tools}}}} key to re-
MMMM
turn to the standby display.
63
Page 72

StellaCEN-advanced_V4_FM.book Page 64 Tuesday, July 17, 2001 1:01 PM
Key Operator Settings
Deleting
Press the {{{{User Tools}}}} key.
AAAA
Press 0000 or 1111 until " 4. Fax Fea-
BBBB
tures " is displayed.
Press the {{{{OK}}}} key.
CCCC
Press 0000 or 1111 until " 4. Key Op.
DDDD
Tools " is displayed.
6
Press the {{{{OK}}}} key.
EEEE
Press 0000 or 1111 to display the Per-
JJJJ
sonal Code you want to delete.
Press the {{{{OK}}}} key.
KKKK
The Personal Code is deleted.
If you want to delete another Personal Code, repeat the above steps
from step I.
Press the {{{{User Tools}}}} key to re-
LLLL
turn to the standby display.
Printing the Personal Code List
Print this list to find out the registered
Personal Codes and their names.
Press the {{{{User Tools}}}} key.
AAAA
64
Note
❒ If the key operator code is regis-
tered and turned on, enter the
key operator code, and then
press the {{{{OK}}}} key.
Press 0000 or 1111 until " 4. Personal
FFFF
Code " is displayed.
Press the {{{{OK}}}} key.
GGGG
Press 0000 or 1111 until " 2. Delete " is
HHHH
displayed.
Press the {{{{OK}}}} key.
IIII
Press 0000 or 1111 until " 4. Fax Fea-
BBBB
tures " is displayed.
Press the {{{{OK}}}} key.
CCCC
Press 0000 or 1111 until " 4. Key Op.
DDDD
Tools " is displayed.
Press the {{{{OK}}}} key.
EEEE
Page 73
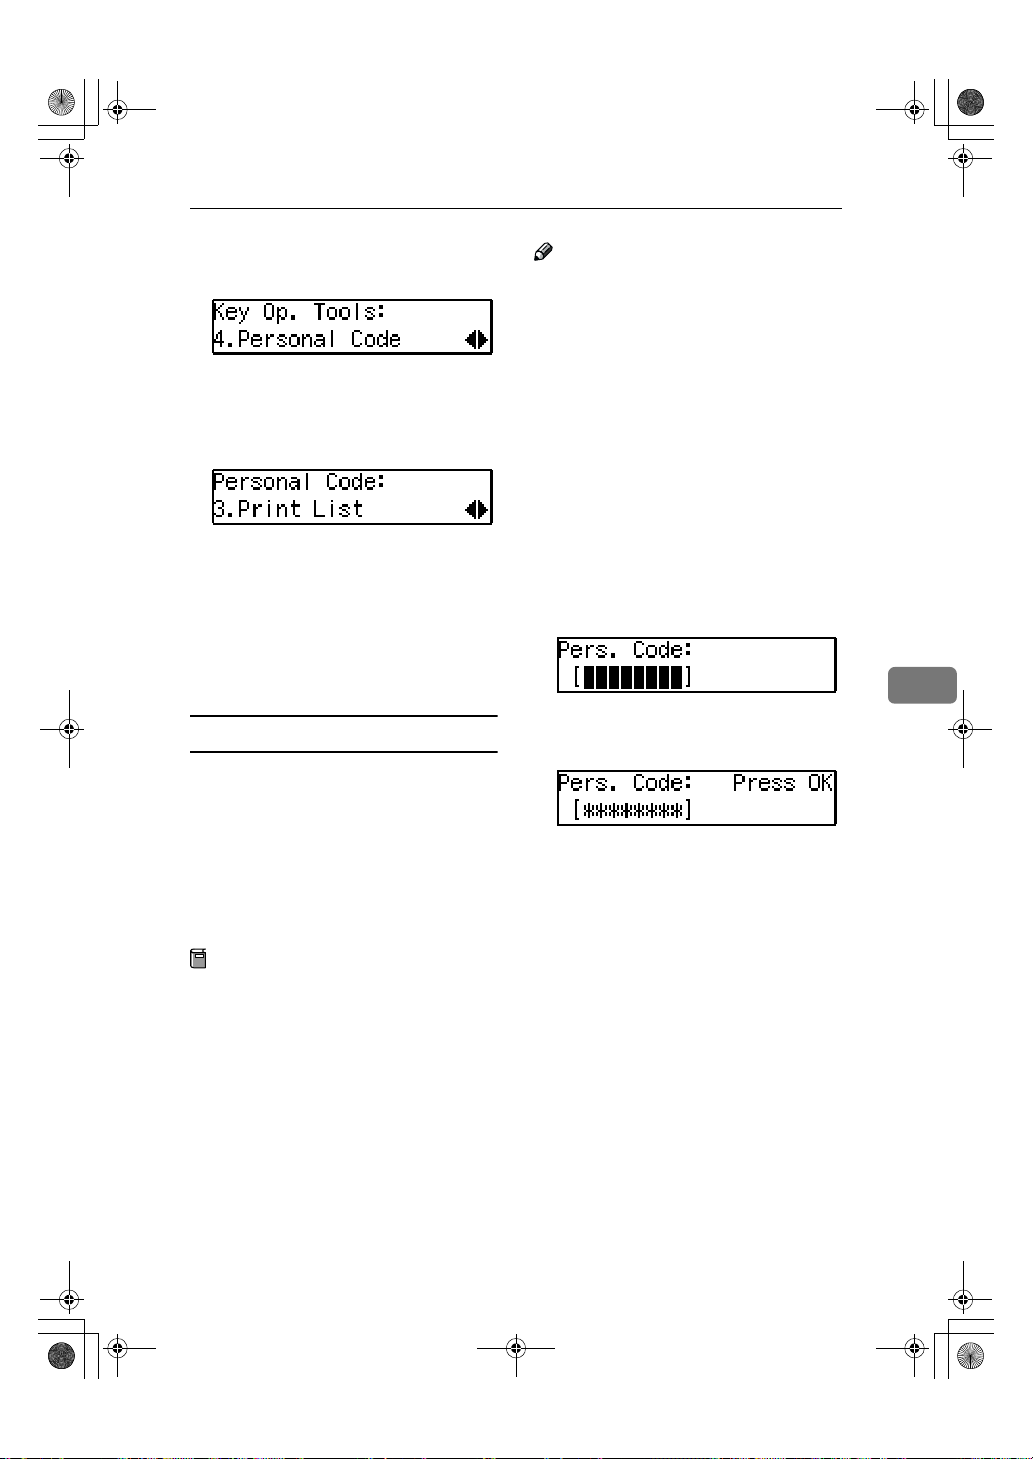
StellaCEN-advanced_V4_FM.book Page 65 Tuesday, July 17, 2001 1:01 PM
Using Key Operator Settings
Press 0000 or 1111 until " 4. Personal
FFFF
Code " is displayed.
Press the {{{{OK}}}} key.
GGGG
Press 0000 or 1111 until " 3. Print List "
HHHH
is displayed.
Press the {{{{OK}}}} key.
IIII
Press the {{{{Start}}}} key.
JJJJ
The list is printed.
Press the {{{{User Tools}}}} key to re-
KKKK
turn to the standby display.
Restricted Access
Use this function to limit transmission to specific users. When turned
on, users must enter a previously assigned Personal Code in order to
transmit documents.
The Restricted Access function makes
it possible to monitor machine usage
by user or department.
Note
❒ The machine returns to the state
where a Personal Code must be entered to use the machine in the following situations:
• The machine is not used for a
certain time
• A previously set document is
removed
• The current operation is completed
❒ When Restricted Access is turned
on, incoming faxes are received
and printed as normal.
Check that the Restricted Access
AAAA
display is shown.
Enter your personal code with the
BBBB
number keys.
Press the {{{{OK}}}} key.
CCCC
6
Preparation
In order to use this function, you
need to register the Personal Code
and turn this function on with the
User Parameters beforehand. See
p.63 “Registering and Editing”.
and p.58 “User Parameters”
(Switch 05, Bit 4).
65
Page 74

StellaCEN-advanced_V4_FM.book Page 66 Tuesday, July 17, 2001 1:01 PM
Key Operator Settings
ID Code
Use this procedure to register the following kinds of ID Codes:
Important
❒ You can confirm ID Codes in the
Parameter Settings list. We recommend you print a new list each
time you register or change ID
Codes.
❒ You can edit registered ID Codes
by performing the steps for registering ID Codes in the following
procedure. Display the ID Code
you want to change, and then
press the {{{{Clear/Stop}}}} key and reenter the ID Code.
❖❖❖❖ Polling ID
6
This ID is required for using Default ID Polling Reception. See p.5
“Calling to Request a Message
(Polling Reception)”
Note
❒ You can enter A to F by the
Quick Dial keys.
❒ You can enter 0 to 9 by the num-
ber keys.
❒ 0000 and FFFF can not be en-
tered.
Registering
To register ID Codes, perform the following procedure.
The following example is for Memory
Lock ID.
Press the {{{{User Tools}}}} key.
AAAA
Press 0000 or 1111 until " 4. Fax Fea-
BBBB
tures " is displayed.
Press the {{{{OK}}}} key.
CCCC
Press 0000 or 1111 until " 4. Key Op.
DDDD
Tools " is displayed.
Press the {{{{OK}}}} key.
EEEE
Press 0000 or 1111 until " 5. ID Code "
FFFF
is displayed.
❖❖❖❖ Memory Lock ID
This ID is required for printing a
message received using the Memory Lock function. See p.12 “Printing a Memory-locked Message”.
❒ You can enter 0 to 9 by the num-
❒ 0000 can not be entered.
66
Note
ber keys.
Press the {{{{OK}}}} key.
GGGG
Press 0000 or 1111 until " 2. Memory
HHHH
Lock ID " is displayed.
Press the {{{{OK}}}} key.
IIII
Page 75

StellaCEN-advanced_V4_FM.book Page 67 Tuesday, July 17, 2001 1:01 PM
Using Key Operator Settings
Enter the Memory Lock ID (4-dig-
JJJJ
its) with the number keys.
If you make a mistake, press the
{{{{Clear/Stop}}}} key and try again.
Press the {{{{OK}}}} key.
KKKK
If you want to enter another item,
repeat the above steps from step I.
Press the {{{{User Tools}}}} key to re-
LLLL
turn to the standby display.
Line Type
You must register the Line Type before you connect the machine to the
line.
Note
❒ This function is not available in
some areas.
❒ If you do not know the type of line
you are connected to, select "Tone"
and dial a trial number. If the connection was successful, your Line
Type is "Tone", if it was not, set the
Line Type to "Pulse" and dial a trial
number. If the connection was successful, your Line Type is "Pulse".
Limitation
❒ If you do not correctly set the Line
Type, you will be able to receive
messages, but you may not be able
to send them.
To register the Line Type, perform the
following procedure.
Press 0000 or 1111 until "4. Fax Fea-
BBBB
tures" is displayed.
Press the {{{{OK}}}} key.
CCCC
Press 0000 or 1111 until "4. Key Op.
DDDD
Tools" is displayed.
Press the {{{{OK}}}} key.
EEEE
Press 0000 or 1111 until "6. Line Type"
FFFF
is displayed.
Press the {{{{OK}}}} key.
GGGG
Press 0000 or 1111 and select "Tone" or
HHHH
"Pulse".
Press the {{{{OK}}}} key.
IIII
Press the {{{{User Tools}}}} key to re-
JJJJ
turn to the standby display.
6
Press the {{{{User Tools}}}} key.
AAAA
67
Page 76

StellaCEN-advanced_V4_FM.book Page 68 Tuesday, July 17, 2001 1:01 PM
Key Operator Settings
PSTN Access Number
Use this setting to save having to enter a pause after the PSTN access
number when dialing. When you program an access number, a pause is automatically added as soon as that
number is pressed. For example, if
you register "0" as the PSTN Access
Number, a pause will be inserted automatically after dialing "0".
Limitation
❒ PSTN access numbers can be up to
2 digits long.
❒ This function does not work when
using On Hook mode or when dialing from an external telephone.
Note
6
❒ After you have registered PSTN
access number, select the line to
PABX on User Parameters (Switch
13 Bit 0).
To register an PSTN access number,
perform the following procedure.
Press the {{{{OK}}}} key.
EEEE
Press 0000 or 1111 until " 7. PSTN Ac-
FFFF
cess No." is displayed.
Press the {{{{OK}}}} key.
GGGG
Enter the PSTN access number (2-
HHHH
digits) with the number keys.
If you make a mistake, press the
{{{{Clear/Stop}}}} key and try again.
Press the {{{{OK}}}} key.
IIII
" Programmed " is displayed.
Press the {{{{User Tools}}}} key to re-
JJJJ
turn to the standby display.
68
Press the {{{{User Tools}}}} key.
AAAA
Press 0000 or 1111 until " 4. Fax Fea-
BBBB
tures " is displayed.
Press the {{{{OK}}}} key.
CCCC
Press 0000 or 1111 until " 4. Key Op.
DDDD
Tools " is displayed.
Page 77

StellaCEN-advanced_V4_FM.book Page 69 Tuesday, July 17, 2001 1:01 PM
Memory File Transfer
If the machine cannot print out a received message, you can send all messages currently stored in memory to
another fax machine and have them
printed out there (for example, when
toner is empty, paper has run out, or
the printing function is out of order).
All messages in memory including
Memory-locked messages can be sent
to another fax machine. Use this function when you are in an urgent situation.
Limitation
❒ Even if a transmission error occurs,
messages are not resent.
Note
❒ All documents are not erased from
memory regardless of whether forwarding was successful or not.
❒ Details of the forwarding opera-
tion are not printed in the Journal.
To transfer all of the messages currently stored in memory, perform the
following procedure.
Using Key Operator Settings
Press 0000 or 1111 until "4. Key Op.
DDDD
Tools" is displayed.
Press the {{{{OK}}}} key.
EEEE
Press 0000 or 1111 to display "8. Mem.
FFFF
File Trans.".
Press the {{{{OK}}}} key.
GGGG
If no files are available, "No Files
Exist" is displayed.
Enter the transfer destination's
HHHH
fax number with the number
keys.
Press the {{{{Start}}}} key.
IIII
File transfer starts.
Once file transfer has finished, the
machine returns to standby mode.
6
Press the {{{{User Tools}}}} key.
AAAA
Press 0000 or 1111 until "4. Fax Fea-
BBBB
tures" is displayed.
Press the {{{{OK}}}} key.
CCCC
69
Page 78

StellaCEN-advanced_V4_FM.book Page 70 Tuesday, July 17, 2001 1:01 PM
Key Operator Settings
RDS (Remote Diagnostic
System)
If your machine has a problem, a service representative can perform various diagnostic tasks over the
telephone line from the service station to try to find out what is wrong
with your machine. The service representative can also use RDS to change
some of your machine's settings if
you request it.
Press the {{{{User Tools}}}} key.
AAAA
Press 0000 or 1111 until "4. Fax Fea-
BBBB
6
tures" is displayed.
Press 0000 or 1111 and select "On" or
HHHH
"Off".
Press the {{{{OK}}}} key.
IIII
Press the {{{{User Tools}}}} key to re-
JJJJ
turn to the standby display.
70
Press the {{{{OK}}}} key.
CCCC
Press 0000 or 1111 until "4. Key Op.
DDDD
Tools" is displayed.
Press the {{{{OK}}}} key.
EEEE
Press 0000 or 1111 until "9. RDS
FFFF
On/Off" is displayed.
Press the {{{{OK}}}} key.
GGGG
Page 79

StellaCEN-advanced_V4_FM.book Page 71 Tuesday, July 17, 2001 1:01 PM
7. Troubleshooting
Reading Reports
Error Report
An error report is printed when a
message could not be successfully
sent or received.
Possible causes include a problem
with your machine or noise on the
telephone line . If an error occurs during transmission, re-send the original.
If an error occurs during reception,
ask the sender to re-send the message.
Note
❒ If the error happens frequently,
contact your service representative.
❒ The "Page" column gives the total
number of pages. The "Page Not
Sent" column gives the number of
pages that were not sent or received successfully.
Power Failure Report
Even if the main power switch is
turned off, the contents of the machine's memory (for example, programmed numbers) will not be lost.
However, if power is lost for about 12
hours through the main power switch
being turned off, a power cut or the
power cable being removed, contents
of the Fax memory will be lost. Lost
items will include any fax messages
stored in memory using Memory
Transmission or Reception.
If a file has been deleted from memory, a Power Failure Report is automatically printed as soon as power is
restored. This report can be used to
identify lost files. If a memory stored
for Memory Transmission was lost,
re-send it. If a message received by
Memory Reception or Substitute Reception was lost, ask the sender to resend it.
Important
❒ Make sure that 100% is shown on
the display before you unplug the
machine. If a lower value is shown,
some data is currently stored in
memory.
❒ Right after a power failure, the in-
ternal battery needs to be sufficiently recharged to guard against
future data loss. Please keep the
machine plugged in and the main
power switch on for about one
week after the power loss occurs.
71
Page 80
StellaCEN-advanced_V4_FM.book Page 72 Tuesday, July 17, 2001 1:01 PM
Troubleshooting
7
72
Page 81

StellaCEN-advanced_V4_FM.book Page 73 Tuesday, July 17, 2001 1:01 PM
8. Appendix
Connecting to a Telephone Line and a Telephone
To connect the machine to a telephone line, use a snap-in modular type connector.
Important
❒ Make sure the connector is the correct type before you start.
❒ By law in the United States, you must program your phone number identifi-
cation (your OWN FAX NUMBER) into your machine before you can connect
the public phone system. See chapter3 “Own Name/Fax Header/Own Fax
Number” in the Basic Features manual.
❖❖❖❖ Where to connect the machine
1.
External Telephone
2.
Line
73
Page 82

StellaCEN-advanced_V4_FM.book Page 74 Tuesday, July 17, 2001 1:01 PM
Appendix
Connecting the Optional Handset and an External Telephone
You can connect the handset and an
external telephone to the machine.
You can use them for telephone calls.
Note
❒ Some telephone may not be con-
nected or may suffer reduced functionality.
Limitation
❒ When you use the handset or an
optional external telephone with
the {{{{On Hook Dial}}}} key for telephone calls, you can not talk with
the other party without pressing
the {{{{On Hook Dial}}}} or {{{{Clear/Stop}}}}
key after taking off the receiver.
❖❖❖❖ Specifying the handset line type
❖❖❖❖ Adjusting the handset bell volume
Adjust the handset ringer volume using the volume switch.
8
The switch on the handset should be
in the appropriate position-TT (Tone
Dialing) or DP (Pulse Dialing).
74
Page 83

StellaCEN-advanced_V4_FM.book Page 75 Tuesday, July 17, 2001 1:01 PM
Specifications
Base Machine
❖❖❖❖ Power Consumption
Standby mode 100W
Immediate Transmission 130W
Immediate Reception 290W
Printing 480W
Night Timer Off mode 2W
Low-Power mode, Auto Off Mode 2W
❖❖❖❖ Protocol:
G3
❖❖❖❖ Resolution:
•Standard: 8×3.85/mm
•Detail: 8×7.7/mm
•Fine: 8×15.4/mm
Specifications
❖❖❖❖ Transmission Time:
3 seconds at 28,800bps, Standard resolution
❖❖❖❖ Data Compression Method:
MH, MR, MMR
❖❖❖❖ Maximum Original Size:
216×1260mm / 8.5”×49.6” (Standard and Detail)
216×600mm / 8.5”×23.7” (Fine)
❖❖❖❖ Maximum Scanning Size:
216×1260mm / 8.5”×49.6” (Standard and Detail)
216×600mm / 8.5”×23.7” (Fine)
❖❖❖❖ Print Process:
Printing on standard paper using a laser
❖❖❖❖ Transmission Speed:
33,600/31,200/28,800/26,400/24,000/21,600/19,200/16,800/14,400/12,000/
9,600/7,200/4,800/2,400bps (auto shift down system)
8
75
Page 84

StellaCEN-advanced_V4_FM.book Page 76 Tuesday, July 17, 2001 1:01 PM
Appendix
Available Options
❖❖❖❖ Expansion Memory (32MB)
Increase memory capacity.
❖❖❖❖ Paper Tray Unit (Option for Model B only)
Holds 500 sheets of paper.
❖❖❖❖ Document Feeder (ADF) (Option for Type1)
Originals will be fed automatically.
❖❖❖❖ Handset (Handset Type 1018)
This permits voice communication.
Originals
Make sure your originals are completely dry before placing them in the machine.
Originals containing wet ink or correcting fluid will mark the exposure glass and
affect the resulting image.
Sizes and weights of Recommended Originals
Where Original is
Placed
8
Exposure glass Maximum A4 (210×297mm)L,
Document Feeder
(ADF)
Acceptable Original Size Maximum
1
/2"×11" (216×279mm)
8
Fax transmission: A5LK to
A4L(up to 1260mm long),
1
/2"×11” L to 81/2" ×14"
8
L
L
Number of
Sheets
1----
30 sheets
2
, 21 lb)
(80g/m
Paper Thickness
52–105g/m2
(45—90kg, 14-28 lb)
Paper Size and Scanned Area
❖❖❖❖ Exposure Glass
76
Page 85

StellaCEN-advanced_V4_FM.book Page 77 Tuesday, July 17, 2001 1:01 PM
❖❖❖❖ Document Feeder (ADF)
Limitation
❒ Even if an original is correctly placed on the exposure glass or in the Docu-
ment Feeder, a margin of 3mm to 5mm (0.1” to 0.2”)around each edge of the
original may not be sent.
❒ There may be a difference in the size of the image when it is printed at the des-
tination.
Note
❒ The maximum scanning area on ADF is 1260mm (49.6”) when the Resolution
is Detail or Standard, 600mm (23.7”)when it is Fine.
❒ If the receiver uses paper narrower than the original, the image will be re-
duced to fit the paper width.
Specifications
77
8
Page 86

StellaCEN-advanced_V4_FM.book Page 78 Tuesday, July 17, 2001 1:01 PM
Appendix
Maximum Values
The following list contains the maximum value for each item.
Item Standard
Memory 1MB
The number of pages that you can store in memory (Using A4
size Standard <ITU-T #1Chart, Resolution: Standard, Original
Type: Text > )
Total number of Memory Transmission files 133
The number of pages per file 500
The number of pages for all files 500
The number of destinations you can specify for one file 133
The number of destinations you can specify for all files 300
The number of Quick Dials you can register 16
The number of Speed Dials you can register 50
The number of Group Dials you can register 5
The number of destinations you can specify by the number keys 67
The number of destinations you can register in a group 133
The number of destinations you can register in all groups 133
The number of personal codes you can register 10
The number of digits for Dials 254
8
80 (32 0 wit h Opt iona l Mem ory)
78
Page 87

StellaCEN-advanced_V4_FM.book Page 79 Tuesday, July 17, 2001 1:01 PM
Advanced Transmission Features
Functions selectable with the {{{{Trans. Option}}}} key are as follows.
Function name Description Reference
Send Later Sets the machine to automati-
cally start transmission or
polling reception at an appointed time.
Fax Header Print You can add a Fax Header
(e.g. registered name) to the
message you send so it appears on the message printed
by the receiving machine.
Polling Reception Use this function if you want
to poll a message from another terminal.
Advanced Transmission Features
p.1 “Sending at a Specific
Time (Send Later)”
p.3 “Fax Header Print”
p.5 “Calling to Request a Message (Polling Reception)”
79
8
Page 88

StellaCEN-advanced_V4_FM.book Page 80 Tuesday, July 17, 2001 1:01 PM
Appendix
Job Information
Functions selectable with the {{{{Job Information}}}} key are as follows.
Function name Description Reference
Canceling Transmission
or Reception
Printing the File List The transmission file list
Printing a Stored Message Prints the contents of a fax
Printing a Memorylocked Message
Printing the Journal The Journal can be man-
This function cancels a
file (reservation) for
Memory Transmission or
Polling Reception.
can be manually printed.
This list allows you to
know what files are
stored in memory and
the file numbers.
that is stored in memory
and has not been sent yet.
The Memory-locked messages can be manually
printed. To print the messages, you have to enter
the Memory Lock ID.
ually printed. This report
shows the results of the
last 50 communications.
8
p.9 “Canceling Transmission or Reception”
p.10 “Printing a List of Files in Memory
(Print File List)”
p.11 “Printing a Stored Message (Print
TX File)”
p.12 “Printing a Memory-locked Message”
p.13 “Printing the Journal”
80
Page 89

StellaCEN-advanced_V4_FM.book Page 81 Tuesday, July 17, 2001 1:01 PM
User Tools
Function name Description Reference
Register/Delete Quick Dial When you register a destina-
tion in a Quick Dial, you can
specify the destination by
only pressing the Quick Dial
key.
Register/Delete Speed Dial When you register a destina-
tion in a Speed Dial, you can
specify the destination by entering the two-digit Speed
Dial code after pressing the
Speed Dial key.
Register/Delete Group Dial If you program several desti-
nations into a Group, you can
dial with just a few keystrokes.
Assigning User Function Keys Stores a frequently used func-
tion in a User Function Key
({{{{F1}}}} to {{{{ F3}}}}).
Reports/Lists This function allows you to
print various reports and lists
manually. You can print the
following reports and lists:
• Journal
• Transmission File List
• Quick Dial list
• Speed Dial list
• Group Dial list
• Quick Dial Label
• User Function List
Monitor Volume Adjusts the volume of moni-
toring and beeper sounds
from the speaker inside the
machine.
Display Contrast Adjust the brightness of the
display.
Date/Time Adjusts the date and the time
as a reference.
Reception Mode The machine can treat incom-
ing fax messages and telephone calls in two ways.
User Tools
Chapter3 “Quick Dial” in the
Basic Features manual.
Chapter3 “Speed Dial” in the
Basic Features manual.
Chapter3 “Groups” in the Basic Features manual.
p.35 “User Function Keys”
p.39 “Printing Reports/Lists”
8
Chapter4 “Adjusting Volume” in the Basic Features
manual.
p.42 “Adjusting the Display
Contrast”
p.43 “Setting the Date and
Time”
Chapter 2 “Reception Modes”
in the Basic Features manual.
81
Page 90
StellaCEN-advanced_V4_FM.book Page 82 Tuesday, July 17, 2001 1:01 PM
Appendix
Function name Description Reference
Setting the Auto Ring Time You can alter the number of
rings by changing the Auto
Ring Time.
Fax Information Registers your Own Name,
Fax Header and Own Fax
Number.
Fax Reset Timer You can select a period of time
before this machine automatically returns to the standby
mode.
On Hook Timeout You can select a period before
the machine cancels the On
Hook Dial mode.
p.45 “Setting the Auto Ring
Time”
Chapter3 “Own Name /Fax
Header / Own Fax Number”
in the Basic Features manual.
p.46 “Setting the Fax Reset
Timer”
p.47 “On Hook Timeout”
8
82
Page 91

StellaCEN-advanced_V4_FM.book Page 83 Tuesday, July 17, 2001 1:01 PM
Key Operator Tools
Function name Description Reference
Memory Lock All received messages are
Forwarding Transfers received mes-
Changing User Parameters
Printing User Parameter
List
Personal Code Personal Code is used for
ID Code Registers the ID required
Line Type Registers the type of line
PSTN Access Number Allows you to specify the
Memory File Transfer You can send all messages
RDS On/Off Allows you to switch on
stored in memory and are
not automatically printed.
sages to a registered receiver (forwarding
destination).
Allows you to change the
function settings to meet
your needs.
Allows you to print and
check User Parameter settings.
Restricted Access. When
turn the Restricted Acc ess
on, users must enter the
Personal Code in order to
transmit documents.
for using Polling Reception and Memory Lock.
(Tone or Pulse) you are
connected to.
code used to access an
outside line when dialing.
currently stored in memory to another fax and have
them printed out there.
RDS (Remote Diagnostic
system) to a service representative can test your fax
machine remotely from a
service station, diagnose
the problem, and can
change your machine settings to correct the problem.
Key Operator Tools
p.50 “Memory Lock”
p.52 “Forwarding”
p.58 “User Parameters”
p.62 “Printing the User Parameter
List”
p.63 “Personal Codes”
p.66 “ID Code”
p.67 “Line Type”
p.68 “PSTN Access Number”
p.69 “Memory File Transfer”
p.70 “RDS (Remote Diagnostic System)”
8
83
Page 92

StellaCEN-advanced_V4_FM.book Page 84 Tuesday, July 17, 2001 1:01 PM
INDEX
A
Adjusting Volume→ Monitor Volume, 81
Advanced Transmission Features
Assigning User Function Keys
Auto Fax Reception Power-up
Automatic Redial
Auto Ring Time
, 23
, 45,
82
79
,
, 36, 81
, 29
B
Batch Transmission, 23
Broadcasting Sequence
, 23
C
Canceling Transmission or Reception
Center Mark
Chain Dial
Changing Key Operator Settings
Changing User Parameters
Checkered Mark
Communication Failure Report
Communication Result Report
Communication Result Report (Polling
RX)
, 7
,
, 30
15
, 30
, 9, 80
, 50
, 83
, 25
, 25
D
Date and Time, 43
Date/Time
Deleting
Display Contrast
Dual Access
81
,
,
, 55
56
Forwarding Station
Specified Sender
Specified Sender for Memory Lock
, 42, 81
, 24
, 51
E
ECM (Error Correction Mode), 24
Editing
Forwarding Station
Specified Sender
Error Report
External Telephone
, 71
, 54
, 55
, 74
F
Fax Header Print, 3, 79
Fax Information
Fax Reset Timer
File Reserve Report
File Reserve Report (Polling RX)
Forwarding
Forwarding Station
Function List
Advanced Transmission Features
Job Information
Key Operator Settings
, 52,
82
,
, 46, 82
, 25
83
, 53, 54, 55
, 80
, 49, 83
G
Group Dial, 81
Group Dial List
, 40
H
Handset, 74
Handy Dialing Functions
, 15
I
ID Code, 66, 83
Immediate Reception
, 27
J
Job Information
Journal
, 13, 39, 80
, 9,
80
K
Key Operator Settings
Key Operator Tools
, 83
,
49
L
Label Insertion, 4
Line Type
, 67, 83
, 7
,
79
84
Page 93

StellaCEN-advanced_V4_FM.book Page 85 Tuesday, July 17, 2001 1:01 PM
M
Manual Dial
Maximum Values
Memory File Transfer
Memory Lock
Memory-locked Message
Memory Lock ID
Memory Reception
Monitor Volume
More Transmission Functions
18
,
, 50, 83
, 81
, 78
, 66
, 27
, 69, 83
, 12, 80
,
22
O
On Hook Dial, 17
On Hook Timeout
Options
, 76
76
Originals
Other Transmission Features
Outside Line Access Number → PSTN
,
Access Number
, 47,
68
,
82
, 15
P
Page Separation and Length Reduction
79
,
, 39
, 83
, 24
7
, 10, 80
, 12, 80
57
Parallel Memory Transmission
Personal Code
Personal Code List
Polling ID
Polling Reception
Polling Reserve Report → File Reserve
Report (Polling RX)
Polling Result Report → Communication
Result Report (Polling RX),
Power Failure Report
Printed Report
Print File List
Printing
Group Dial List
Journal
List of Files in Memory
List of Specified Senders for Memory Lock
Memory-locked Message
Quick Dial Label
Quick Dial List
Reports/Lists
Specified Sender list
Speed Dial List
Stored Message
TX File List
User Function List
User Parameter List
, 63, 83
, 66
, 5,
25
,
, 10
, 13, 39, 80
, 39
,
, 64
, 7
, 71
39
,
, 39
, 39
, 39
, 11, 80
39
, 31
, 51
Printing Options
Print TX File
PSTN Access Number
PWD
, 19
, 11
,
30
, 68, 83
Q
Quick Dial, 81
Quick Dial Label
Quick Dial List
,
, 39
40
R
RDS, 70
RDS On/Off
Reception
Reception Features
Reception Mode
Reception Time
Redial
Register/Delete
Registering
Report
Report Formats
Reports
Reports/Lists
Restricted Access
, 83
Auto Fax Reception Power-up
Immediate Reception
Memory Reception
Receiving Messages in Telephone Mode
Screening Out Messages from
Anonymous Senders
Substitute Reception
, 27
, 81
, 31
, 16
Group Dial
Quick Dial
Speed Dial
Forwarding Station
ID Codes
Specified Sender for Memory Lock
, 81
, 81
, 81
, 66
, 71
, 14
, 25
Communication Failure Report
Communication Result Report
Error Report
File Reserve Report
Journal
Power Failure Report
Reports/Lists
Transmission Result Report
(Immediate Transmission)
, 71
, 13, 14
, 39
, 39, 81
, 65
,
, 27
, 28
, 53
, 25
, 71
27
, 28
, 29
, 26
, 25
, 25
,
, 29
51
85
Page 94

StellaCEN-advanced_V4_FM.book Page 86 Tuesday, July 17, 2001 1:01 PM
S
Secured Polling Reception
Send Later
SEP Code
SID
Specifications
Specified Sender
Specified Sender list
Speed Dial
Speed Dial List
Stored ID Override Polling Reception
Stored Message
SUB Code
Substitute Reception
Switches and Bits
, 20
, 1, 79
, 19
, 81
, 20
, 75
, 55, 56
,
, 11
40
, 58
, 57
, 28
,
5
T
Telephone Directory, 16
Telephone Line
Telephone Mode
Transmission Features
Transmission Options
Transmission Result Report
(Immediate Transmission)
Troubleshooting
TSI Print
TTI Print → Fax Header Print
TX File List
, 30
, 39
, 73
,
,
29
71
, 15, 19
1
,
, 26
,
3
U
, 5
User Function key
Deleting
, 37
Using
, 37
User Function Keys
User Function keys
Making key assignment,
User Function List
User Parameter List
User Parameters
User Tools
, 35, 81
, 35, 81
39
,
, 58, 83
, 58, 83
36
86 UE USA B465
 Loading...