

Ricoh FW780 Owner's Manual

Zfah010e.eps
FW780
Operating Instructions
Read this manual carefully before you use this product and keep it handy for future
reference.
For safety, please follow the instructions in this manual.

RICOH COMPANY, LTD.
15-5, Minami Aoyama 1-chome, Minato-ku, Tokyo 107-8544, Japan Phone: +81-(0)3-3479-3111
FW780 Operating Instructions
Overseas Affiliates
U.S.A.
RICOH CORPORATION
5 Dedrick Place
West Caldwell, New Jersey 07006
Phone: +1-973-882-2000
The Netherlands
RICOH EUROPE B.V.
Groenelaan 3, 1186 AA, Amstelveen
Phone: +31-(0)20-5474111
United Kingdom
RICOH UK LTD.
Ricoh House,
1 Plane Tree Crescent, Feltham,
Middlesex, TW13 7HG
Phone: +44-(0)20-8261-4000
Germany
RICOH DEUTSCHLAND GmbH
Mergenthalerallee 38-40,
65760 Eschborn
Phone: +49-(0)6196-9060
France
RICOH FRANCE S.A.
383, Avenue du Général de Gaulle
BP 307-92143 Clamart Cedex
Phone: +33-(0)-821-01-74-26
Spain
RICOH ESPAÑA S.A.
Avda. Litoral Mar, 12-14,
08005 Barcelona
Phone: +34-(0)93-295-7600
Italy
RICOH ITALIA SpA
Via della Metallurgia 12,
37139 Verona
Phone: +39-045-8181500
Hong Kong
RICOH HONG KONG LTD.
21/F., Tai Yau Building,
181, Johnston Road,
Wan Chai, Hong Kong
Phone: +852-2862-2888
Singapore
RICOH ASIA PACIFIC PTE.LTD.
260 Orchard Road,
#15-01/02 The Heeren,
Singapore 238855
Phone: +65-830-5888
Printed in Japan AE AE B048-8608

Introduction
This manual contains detailed instructions on the operation and maintenance of this machine. To get
maximum versatil ity from this machi ne all operator s shoul d carefully read and follow the i nstruc tions in
this manual. Please keep this manual in a handy place near the machine.
Please read the Safety Information before using this machine. It contains important information related
to USER SAFETY and PREVENTING EQUIPMENT PROBLEMS.
Notes:
Some illustrations might be slightly different from your machine.
Certain options might not be av ailable in some coun trie s. For detai ls , pleas e c on t ac t your loca l d eal er.
Warning:
Use of controls or adjustment or performance of procedures other than those specified in this manual
might result in hazard ou s radia t io n expo su re.
Two kinds of size notation are employed in this manual. With this machine refer to the metric version.
For good copy quality, Ricoh recom me nds that you use genuine Ricoh toner.
Ricoh shall not be respons ible fo r any da mage or e xpens e that m ight res ult from the use o f parts ot her
than genuine Ricoh parts in your Ricoh office product.
Power Source
220V - 240V, 50/60Hz, 7A Please be sure to c onnect t he power c ord to a power sou rce as above. Fo r details a bout pow er source,
⇒ P.76 “Power connection”

Where symbols are used on or near switches, they mean an under in accordance with IEC 60417:
aaaa means POWER ON.
cccc means STAND BY.
Copyright © 2001 Ricoh Co., Ltd.

Safety Information
R
R
When using your equipment, the following safety precautions should always be followed.
Safety During Operation
In this manual, the following important symbols are used:
WARNING:
CAUTION:
Indicates a potentially hazardous situation which, if instructions
are not followed, could result in death or serious injury.
Indicates a pot entially hazar dous situat ion which, if in structions a re not
followed, may r esult in m inor or mode rate inj ury or damage to propert y.
i

R WARNING:
• Connect the power cord directly into a wall outlet and never use an extension cord.
• Only connect the machine to the power source described on the inside front cover of this manual.
• Avoid multi-wiring.
• Do not damage, break or make any modifications to the power cord. Do not place heavy objects on it, pull it hard or bend it more than necessary. These actions could cause an electric
shock or fire.
• Do not plug or unplug the power cord with your hands wet. Otherwise, an electric shock
might occur.
• Disconnect the power plug (by pulling the plug, not the cable) if the power cable or plug becomes frayed or otherwise damaged.
• Make sure the wall outlet is near the machine and freely accessible so that in event of an emergency it can be unplugged easily.
• Turn off the power and disconnect the power plug (by pulling the plug, not the cable) if any
of the following conditions exists:
• You spill something into the equipment.
• You suspect that your equipment needs service or repair.
• Your equipment's cover has been damaged.
• Do not take apart or attempt any modifications to this machine. There is a risk of fire, electric
shock, explosion or l oss of sight. If th e machine h as laser systems, there is a risk o f serious eye
damage.
• To avoid hazardous electric shock or laser radiation exposure, do not remove any covers or
screws other than those specified in this manual.
• Some parts of the machine are at a high voltage and could give you an electric shock. Also, if
the machine has laser systems, direct (or indirect) reflected eye contact with the laser beam
may cause serious eye damage. When the ma chine needs to be checke d, adjusted, or repaired,
contact your service representative.
• Do not keep using the machine with a fault or defect. Contact your service representative.
• If the machine looks damaged or breaks down, smoke is coming out, there is a strange smell
or anything looks unusual, immediately turn off the operation and main power switches then
unplug the power cord from the wall. Do not continue using the machine in this condition.
Contact your service representative.
• Do not put any metal objects or containers holding water (e.g. vases, flowerpots, glasses) on
the machine. If the contents fall inside the machine, a fire or electric shock could occur.
• Do not incinerate spilled toner or used toner. Toner dust might ignite when exposed to an
open flame.
• Disposal can take place at our authorized dealer or at appropriate collection sites.
• Dispose of the used toner cartridge in accordance with the local regulation.
ii

R CAUTION:
• When you pull out the plug from the socket, grip the plug to avoid damaging the cord and
causing fire or electric shock.
• Unplug the power cord from the wall outlet before you move the equipment. While moving
the equipment, you should take care that the power cord will not be damaged under the
equipment.
• When the machine will not be used for a long time, unplug the power cord.
• If you use the machine in a confined space, make sure there is a continuous air turnover.
• Keep the machine away from humidity and dust. A fire or an electric shock might occur.
• Do not place the machine on an unstable or tilted surface. If it topples over, it could cause injury.
• After you move the machine, fix it with the caster fixtu re. Otherwise, the machine might move
or come down to cause a personal injury.
• Protect the equipment from dampness or wet weather, such as rain, snow, and so on.
• Do not allow paper clips, staples, or other small metallic objects to fall inside the equipment.
• Do not reuse stapled paper. Do not use aluminum foil, carbon-containing paper or other conductive paper. Otherwise, a fire might occur.
• Do not eat or swallow toner.
• Keep toner (used or unused) and toner bottle out of the reach of children.
• For environmental reasons, do not dispose of the equipment or expended supply waste at
household waste collection points. Disposal can take place at an authorized dealer or at appropriate collection sites.
• When removing misfed paper, do not touch the fusing section because it could be very hot.
• Do not touch the anti-humidity switch from inside the machine because it could be very hot.
• The inside of the machine could be very hot. Do not touch the parts with a label indicating the
“hot surface”. Otherwise it could cause a personal burn.
• Rolls of paper can be heavy, so you should be careful when loading one.
• This machine has been tested fo r sa fety using this suppl i er' s parts and consumables. We recommend you only use these specified supplies.
• Our products are engineered to meet high standards of quality and functionality, and we recommend that you only use the expendable supplies available at an authorized dealer.
• This equipment is only to be installed by a qualified service personnel.
iii

ENERGY STAR Program
As an ENERGY STAR Partner, we have determined
that this machine model meets the ENERGY STAR
Guidelines for energy efficiency.
The ENERGY STAR Guidelines intend to establish an international energy-saving system for
developing and introducing energy-efficient office equipment to deal with environmental issues, such as glob al warming.
When a product meets the ENERGY STAR Guidelines for energy efficiency, the Partner shall
place the ENERGY STAR logo onto the machine model.
This product was designed to reduce the environmental impact associated with office equipment by means of energy-saving features, such as Low-power mode.
• Auto Off Mode
To conserve energy, this p roduct automatically turns off 1 minute after the
last copying or printing job has been completed. Printing is available in this
mode, but if you use the copier, press the main switch.
For how to change the default interval befo re entering Auto Off mod e, see
Auto Off Time in“User Tools”
⇒
P.40
❖❖❖❖ Specification
FW780
Auto Off mode Power consump-
tion Default interval 30 minute
1.0 W
----Recycled Paper
Please contact your sales or service re presentative for recommended recycled
paper types that may be used in this machine.
iv

How to Read this Manual
R
R
Symbols
In this manual, the following symbols are used:
WARNING:
This symbol indicates a potentially hazardous situation that might result in
death or serious injury when you misuse the machine without following the instructions under this symbol. Be sure to read the instructions, all of which are described in the Safety Information section.
CAUTION:
This symbol indicates a potentially hazardous situation that might result in minor or moderate injury or property damage that does not involve personal injury
when you misuse the machine without following the instructions under this
symbol. Be sure to read the instructions, all of which are described in the Safety
Information section.
* The statements above are notes for your safety.
Important
If this instruction is not followed, paper might be misfed, originals might be
damaged, or data might be lost. Be sure to read this.
Preparation
This symbol indicates the prior knowledge or preparations required before operating.
Note
This symbol indicates precautions for operation, or actions to take after misoperation.
Limitation
This symbol indicates n umerical limits, function s that c annot be u sed togeth er,
or conditions in which a particular function cannot be used.
Reference
This symbol indicates a reference.
[]
Keys that appear on the machine's panel display.
{}
Keys built into the machine's operation panel.
v

TABLE OF CONTENTS
Guide to Components............................................. .................................. 1
Copier Exterior.............................................................................................. 1
Operation Panel............................................................................................ 3
1.Basics
Turning on the Power................................................................................ 5
Turn on the Main Power......................... ....................................................... 5
Turn off the Main Power................................................................................ 5
Recommended Originals.......................................................................... 6
Non-recommended Originals........................................................................ 7
Note for Leading and Side Edges of the Originals........................................ 7
Recommended Paper................................................................................ 8
Anti-humidity Heater...................................................................................... 9
Toner......................................................................................................... 10
Handling Toner............................... ............................................................. 10
Toner Storage............................................................................................. 10
Used Toner ................................................................................................. 10
2.Copying
Basic Copying (Copying to sheets)....................................................... 11
Manual Feed Mode ........................................................................ ............. 16
Using the Rear Table.................................................................................. 19
Copying onto Roll Paper......................................................................... 21
Synchro Cutting........................................................................................... 21
Preset Cutting ........................ ................................................ ..................... 24
Variable Cutting........................................................................................... 25
3.Copy Settings
Copying onto Other Media...................................................................... 27
Adjusting the Fusing Temperature Manually............................................... 28
Adjusting Copy Image Density............................................................... 30
Setting the Number of Copies (Repeated Copying)............................. 31
Setting a Leading/Trailing Edge Margin................................................ 32
Partial Copying........................................................................................ 34
Programming Settings You Often Use.................................................. 37
A) Program key........................................................................................... 37
B) Changing the Default Setting.................................................................. 38
User Tools................................................................................................ 40
Settings You Can Change with User Tools........................................... 42
vi

4.Maintaining Your Copier
Changing The Used Toner Bottle........................... ................................ 47
Adding Toner........................................................................................... 50
Changing the Roll Paper Size................................................................. 54
Removing the Roll Paper Holder................................................................. 54
Setting the Roll Paper Holder...................................................................... 54
Loading A Roll Of Paper......................................................................... 56
5.Troubleshooting
If Something Goes Wrong ...................................... ................................ 61
If Indicator Lights Up................................................................................... 61
If Jams Occur......................................................................... .................. 63
If the Original is Jammed at the exit............................................................ 63
If Sheet Paper is Jammed in the Feed-in Slot............................................. 64
If Sheet Paper is Jammed at the Paper Exit............................................... 65
If Roll Paper Jams....................................................................................... 66
If You Cannot See the Roll Paper Jam ....................................................... 68
Others....................................................................................................... 71
Absolutely Nothing Happens....................................................................... 71
Something Happens, but Set Paper or Paper Select Never Appear........... 71
If Jams Occur Frequently............................................................................ 71
If Copies Look Wrong.................................................................................. 71
White Spots Appear.................................................................................... 71
Creases....................................................................................................... 72
Copies Come Out Dog eared...................................................................... 72
Black Streaks Appear on Copies ................................................................ 72
Daily Maintenance.............................................. ..................................... 73
Clean the Exposure Glass & the Platen Plate............................................. 73
Do's & Don'ts........................................................................................... 74
Where to Put Your Copier................................................ ....................... 75
Machine Environment ................................................................................. 75
Power connection........................................................................................ 76
Access To Machine..................................................................................... 77
6.Specifications
Copier....................................................................................................... 79
Roll Feeder.................................................................................................. 81
Options..................................................................................................... 83
INDEX........................................................................................................ 84
vii

viii

Guide to Components
Copier Exterior
1. Locks
Squeeze both locks (1a&1b) to open the
unit. Open the unit to empty the used
toner bottle and to remove jammed paper.
2. Front Cover
Open the cover (and the unit) to access the toner cartridge.
3.
Original Guides
Use the guides to keep the original straight as yo u feed the origina l into the copier.
4.
Original Table
Place your original face up here. If you
want to copy a stiff original that can't be
bent, use the rear table (see 6).
5. Operation Panel
⇒
P.3 “Operation Panel”.
6. Rear Table
Place stiff originals face down here.
7. Roll Feeder
Feeds paper from a roll to the copier.
8.
Paper Guides
Use the guides to keep the copy paper straight as you feed it into the copier.
9.
Bypass Table
Use this table w hen you want to ma ke copy one by one.
10.
Table
Holds your copier and the Roll Feeder.
1

11.
Main switch
Use this switch to turn the copier on and
off. The copier will need about 3 minutes
to warm up, if it's been turned off fo r a
long time.
12. Copy Exit Guide
Makes sure that copies don't fa ll off as they come out.
13. Anti-humidity Heater Switch
When humidity is high, the paper in the
paper roll tr ay may absorb moisture ,
which can effect the image q uality of
your copies. Th e anti-humidity heater
prevents this . Tu r n on this sw it ch , wh ich
is located rear left corner of the machine,
when humidity is high.⇒ P.9 “Anti-hu-
midity Heater”
2

Operation Panel
1.
Function indicators
These indicators show which setting you
are currently editing. Press the Function
Select key to cycle through them.
• T he top indic ator (Pap er Len gth in dicator) lig hts wh en th e pape r len gth i s
being set.
• The second indicator (Leading Edge indicator) lights when the leading margin is being set.
• The third indicator (Trailing Edge indicator) lights when the trailing margin is being set.
• The fourth indicator (Copy Counter indicator) lights when the number of copies is being set.
2.
Paper Length display
Shows the length of paper the Rol l Feeder will send.
3. {
{Preset Cut}}}} key
{{
Press to scrol l through the pr eset paper lengths for the Roll Feeder.
4. {
{Cut Select}}}} key
{{
Turns Synchro Cut or Preset/Variable Cut on and off.
5.
Energy Saver indicator
Shows that the machine is in a state of wait (Energy Saver). Press key 9.
6. Troub leshooting indicators
⇒
P.61 “Troubleshooting” for details.
7.
Wait indicator
Shows that the copier is not yet ready to copy.
8. Ready ( d
Paper (KKKK), Bypass Select (aaaa) indicator
Ready and Set Original lights up when
the copier is ready to receive an original.The Set Paper indicator and the By-
pass Select indicator go on when you
select Bypass table.
9. {
{Clear Modes/Energy Saver}}}} key
{{
Cancels all current settings. When you
hold down this key for three seconds or
more, the copier enters the Energy Saver
mode power.
To exit Energy Saver mode, press this key again.
10. {
{Program}}}} key
{{
Allows you to recall or se t a program.
d), Set Original(RRRR), Set
dd
3

The program indicator(LED) lights after you store the setting.
11. {
{Function Select}}}} key
{{
Press to change which setting you are editing. The curren t selection is shown by
the indicators above the key:
•Paper Length
•Leading Edge
•Trailing Edge
•Copy Counter
Also used for copying a selected portion of the original.
12. {
{+}}}} and {{{{—}}}} key
{{
Press to increase the value being edited.
Press to decrease the value being edited.
13. Leading Edge/Trailing Edge/
Copy Counter indicator
Displays the m argin settings and the number of copies made.
14. Roll Feeder indicator
Light up when you select Roll Feeder 1 or
2.
18.
Density indicator and {{{{iiii}}}},
{jjjj}}}}keys
Shows the density level the copies will have.
Press the left key to make copies lighter.
Press the right key to make copies d arker.
19. {
{Start}}}} key
{{
Press to start copying when you select
manual feed mode. Otherwise, the copy
job automatically start after you place
both paper and original . For details a bout
manual feed mode, ⇒ P.16 “Manual Feed
Mode”
20. Green indicator
Lights up when you select the manual feed mode.
21. {
{Clear/Stop}}}} key
{{
When entering numbers, press to cancel.
While copying, press to stop copying.
15. {
{Paper Select/Cut}}}} key
{{
Use to select the paper feed type such as
Roll feeder 1, 2 and Bypass Tray. Also
press to stop a copy job.
16. {
{Copy Media}}}} key
{{
Press to select the type of copy paper you are using.
The copier will apply more or less heat accordingly.
• The top indicator-Translucent paper indicator
• The bottom indicator-Film indicat or
17. {
{Emergency Stop}}}} key
{{
Press to stop the copying process immediately.
Use if your original is getting stuck in the copier.
If you stop operation by pressing this key, remove the original.
4

Turning on the Power
To turn the machine on, press the main switch.
Turn on the Main Power
Make sure that the pow er cord is
A
firmly plugged into the wall outlet.
Turn on the main switch.
B
1. Basics
Turn off the Main Power
Turn off the main switch.
A
5

1
Basics
Recommended Originals
• You can set originals with weight in the range 21g/m2 of(6 lb) to 157 g/m2(41
lb).
• You can set original with sizes between 914×3,000m m (W×L), 36"×118" and
210×297mm (W×L), 8.5"×11". (The maximum width that can be fed is 960mm,
38.4")
• You can not use the Repeated Copying function in the following cases:
When using the Carrier Sheet.
When setting an original longer than 1,200mm (48").
• Fix the curl of originals to within the following range:
• For the curl of the leading edge and the trailing edge: R50mm (2.0") or
more, H20mm (0.8") or less.
• For the curl of the whole paper: φ30mm (1.2") or more
• When you copy the following originals, set them in the rear table: ⇒ P.19 “Using the Rear Table”
• Thick originals (0.19mm ~1mm)
• Originals less than 297mm (11") in width and more than 1,200mm (48") in
length.
• When you copy the following originals, use the carrier sheet to set them:
• Piled originals
• Folded originals
• Taped or pasted originals
• Originals which have a hole near the le ading edge 40mm (1.6" ) to the right
or left of the cent e r
• Dog-eared originals
• Creased, torn, or clipped-out originals
• Wavy originals
• Pasted originals
• Originals whose leading edge is not straight
6

• Curled originals
Non-recommended Originals
Recommended Originals
The following types of originals are not recommended.
• Wet originals
• Originals with cardboard stuck on the leading edge
• Originals with clips or staples
• Originals with wet ink or white-out
•Carbon paper
• Originals made of materials other than paper or film
(thermosensitive paper, aluminum foil, etc.)
Note for Leading and Side Edges of the Originals
Margins on the leading and side edges of originals are not copied as shown in the illustration.
•a=0±3mm (0.12”)
•b1+b2<0±2mm (0.08”) (A1L)
1
7

Basics
Recommended Paper
Standard paper sizes that can be used in this copier are shown below.
1
Metric ver-
sion
A0 E (36"×48") KK
A1 D (24"×36") KL KL
A2 C (18"×24") KL KL
A3 B (12"×18") KL KL
A4 A (9"×12") KK
Note
Inch ver-
sion
Bypass Roll Feeder
❒ When you make a copy on a non-standard size of paper, set the paper in the
bypass tray.
❒ Weight of paper suitable for this copier: 51g/m
2
, 14lb to 134g/m2, 36lb.
❒ Do not use the following kinds of paper or a paper jam might occur.
• Bent, folded, or creased paper
•Torn paper
•Perforated paper
•Non-smooth paper
• Slippery paper
• Thin paper that has low stiffness
❒ Do not make a copy on paper with any kind of coating, such as thermosensi-
tive paper, art paper, aluminum foil, and carbon paper. A fault might occur.
❒ Do not use paper with strong curls at the edges or corners. (Curls rising more
than 5mm (1/4") or falling more than 20mm (3/4") over a 40mm (1.5") radius.)
❒ When you make copies on film, take out the copies delivered to the copy exit
guide one sheet at a time and place them on a flat surface.
❒ If copying to natural tracing paper (all pulp, translucent paper) at a relative
humidity of 35% or less
If the paper was left out of its package for 5 minutes or more, remove
A
the first 1000mm (39.3") before copying.
If copies come out wavy or w ith white sp ots, use translucent pa per in-
B
stead of natural tracing paper.
Always keep the paper in a bag when not using it.
C
• Store the paper in a sealed polyvinyl bag if not used for a long period.
If it gets humid, paper will curl or wave which can cause a paper jam or
part of the image not to be copied.
8

Recommended Paper
• When you use paper in high humidity un der hot cond itions, t ake out only
the necessary amount of paper from the bag. Do not take all the paper out
of the bag.
Anti-humidity Heater
• When humidity is high, the paper in the paper roll tray may absorb moisture,
which can effect the image quality of your copies. The anti-humidity heater
prevents this. Set this switch to "On" when the hum idity reaches more than
45%.
1
9

Basics
R
R
R
Toner
1
Handling Toner
WARNING:
• Do not incinerate used toner, toner bottles or toner cartridges.
• Toner dust might ignite when exposed to an open flame.
• Dispose of toner bottles and the used toner cartridges a c -
cording to local regulations.
CAUTION:
• Do not eat or swallow toner.
• Keep toner (used or unused), toner bottles, and toner cartridges
out of reach of children.
CAUTION:
• This machine has been tested for safety using this supplier's
parts and consumables. We recommend you only use these
specified supplies.
• If you use toner other than the recommended, a fault might occur.
• If you want to add toner, ⇒ P.50 “Adding Toner”
Toner Storage
• Store toner cartridges horizontally in a cool, dark place.
• Do not leave toner cartridges in your car on a hot day for a long period of time
or anywhere that they could be subjected to temperatures of over 95° F (35°C).
• Never store toner where it will be exposed to heat.
• Do not lay heavy objec ts on tone r bot tl es.
Used Toner
• Toner cannot be re-used.
• Put the used toner in the plastic bag and dispose of it according to local regulations.
10

2. Copying
Basic Copying (Copying to sheets)
Use bypass table or roll feeder to copy onto paper.
Note
❒ For acceptable types of original and paper, ⇒ P.6 “Recommended Originals”⇒
P.8 “Recommended Paper”.
❒ If you use bypass teble, place one sheet of paper and never insert more than
one sheet of paper.
❒ If the copy paper is curled, place it with the curl facing downwards. ❒ When you set A0 size (36"×48") paper, to make sure the ends do not touch the
floor and get dirty, lay a wide piec e of paper or some other covering on the
floor.
❒ When setting an original or paper longer than 1,200mm (48”), pull down the
Original stopper (option, a part of the copy stacker) and put the edge of your
original or paper on.
❒ Do not use paper which is cut obliquely. When the difference between the
right side and the left side of the paper is more than 5mm(1/5”), creasing or
a paper jam might occur.
❒ You cannot copy to both sides of th e paper at the same time. ❒ The machine needs about 3 minutes to warm up after being turned on before
copies can be made. The machine is warming up when the wait indicator is
lit, but you can still edit settings, insert copy paper or insert your original.
❒ You can set either the paper or an original (from bypass tray or roll feeder)
first. When you have set both of them, the copier starts copying automatically.
If you want to feed manually, manual feed mode is available. Fo r details
about manual feed mode, ⇒ P.16 “Manual Feed Mode”
11

2
R
Copying
❒ Do not lean on the copy table or lay heavy objects on it. ❒ Pick up a sheet of copy, everytime you finish copying.
CAUTION:
• If during copying your original gets stuck in the copier, press the
{Emergency Stop} key.
• If you stop operation by pressing this key, remove the or iginal.
Turn on the main switch.
A
When the Wait indicator goes off and the Ready and the Set Original indi-
B
cator go on, the copier enters the ready condition.
Select any copy settings you require, such as the media type or copy densi-
C
ty.
12
Basic Copying (Copying to sheets)
Press the {Paper Select/Cut} key to select either the Roll Feeder or Bypass Tra y.
Note
❒ If you select two roll feeder, select one of the roll. ❒ If you select the Bypass table, center the paper face up on the bypass table
and slide the paper straight into the copier.
2
Open the guides to keep the edge of the original from slipping into the pa-
D
per entrance.
13
2
Copying
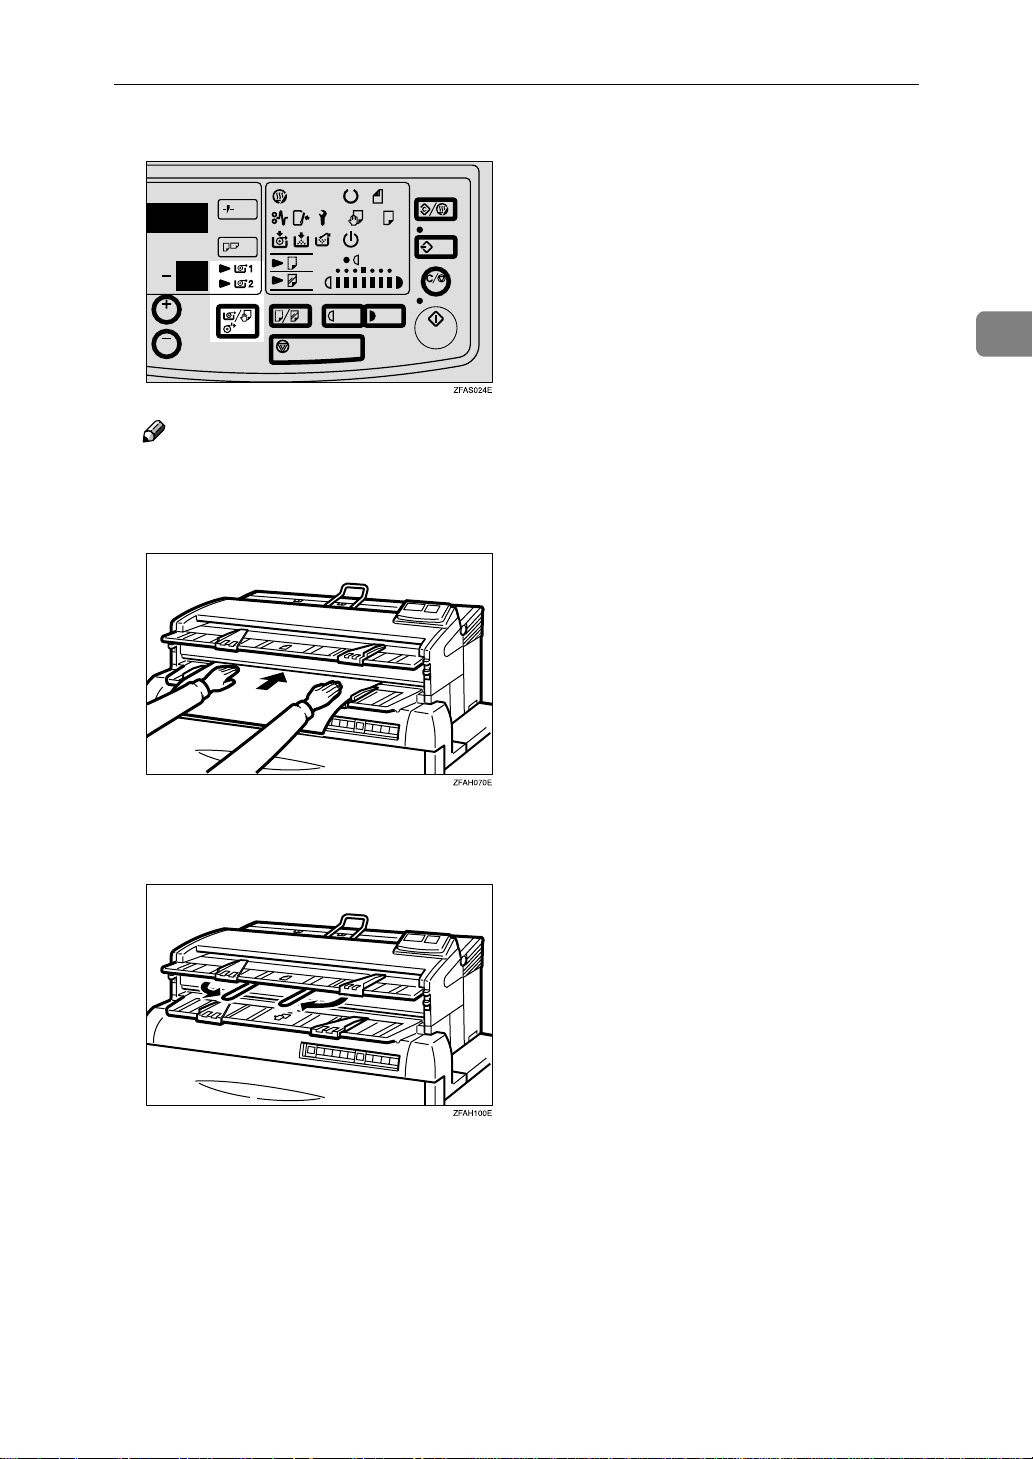
Set the original guide to match the width of the original.
E
Center your original face down on the original table. Slide the original
F
straight into the copier until the copier pulls it in.
Note
❒ If you want to feed manually, use the manual feed mode. Press the {Start}
key for more than 3 seconds to enter the mode. For details about the manual feed mode,⇒ P.16 “Manual Feed Mode” .
14
Basic Copying (Copying to sheets)
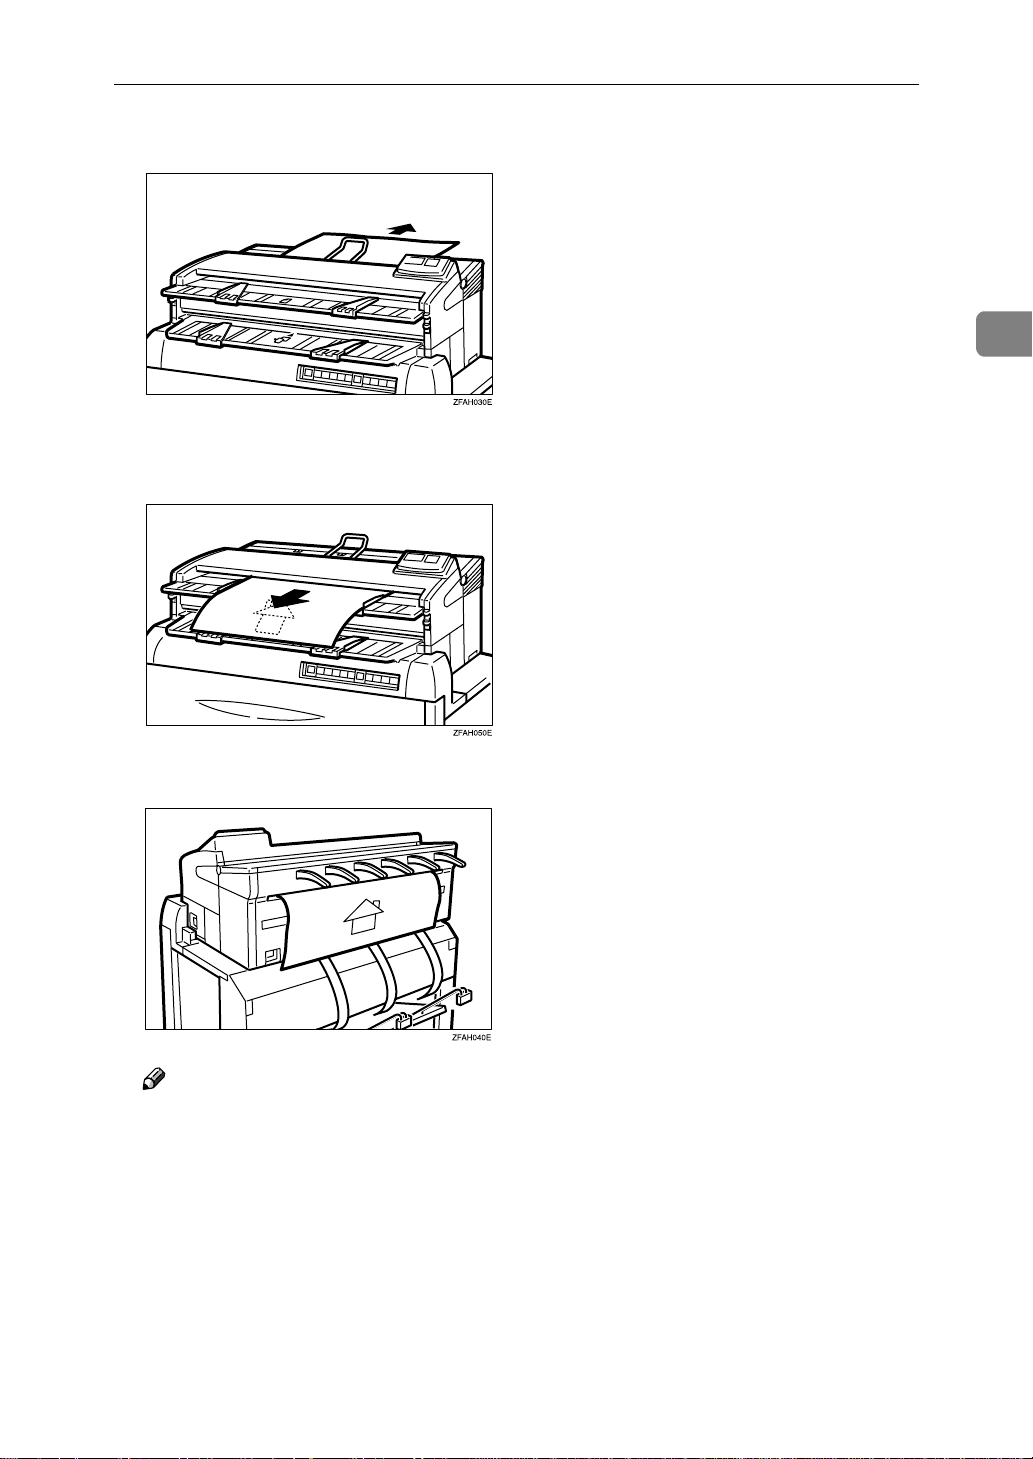
The original is fed through to the rea r table.
G
When the original is being sent back, the machine scans the original and
H
starts copying.
2
The copy is delivered at th e back of the copi er.
I
Note
❒ You must always pick up copies everytime, otherwise copy paper will pile
up without rule.
15

2
Copying
After copying has finished, hold the original with one hand, press the
J
Clear/Stop key, and remove the original.
Note
❒ Do not hold down or pull out the original during copying. Do not put
heavy object on the original table.
❒ If you do not insert the original in a certain interval after inserting the pa-
per, the paper will be ejected automatically.
❒ If you do not insert the paper in a certain interval aft er the original, the
original will be ejected automatically.
❒ If the copier is idle for a certain interval after you have used it, the machine
resets itself to the initial settings (Auto Reset). If the copier is not used for
a long time, it will turn itself off (Auto Off ).
❒ You can preset the initial settings of the copier ⇒ P.38 “B) Changing the De-
fault Setting”
Manual Feed Mode
When you need to make larger sized paper, you can feed paper manually by using this function. If you want to feed manually, use the manual feed mode. This
function helps you to make larger sized copy and protect from the paper skew.
When the Wait indicator goes off and the Ready and the Set Original indi-
A
cator go on, the copier enters the ready condition.
16

Basic Copying (Copying to sheets)
If any previous settings remain, press the {{{{Clear Modes/Energy Saver}}}} key.
B
Press the {{{{Start}}}} key for more than 3 seconds.
C
2
The green indicator, which is next to the start key, goes on.
Note
❒ If you want to use this setting as a default, ⇒ P.42 “Settings You Can Change
with User Tools”
Select any copy settings you require, such as the media type or copy densi-
D
ty.
Press the {Paper Select/Cut} key to select either one of the Roll Feeder or Bypass Tray.
Note
❒ If you select two roll feeder, select one of the roll.
17

2
Copying
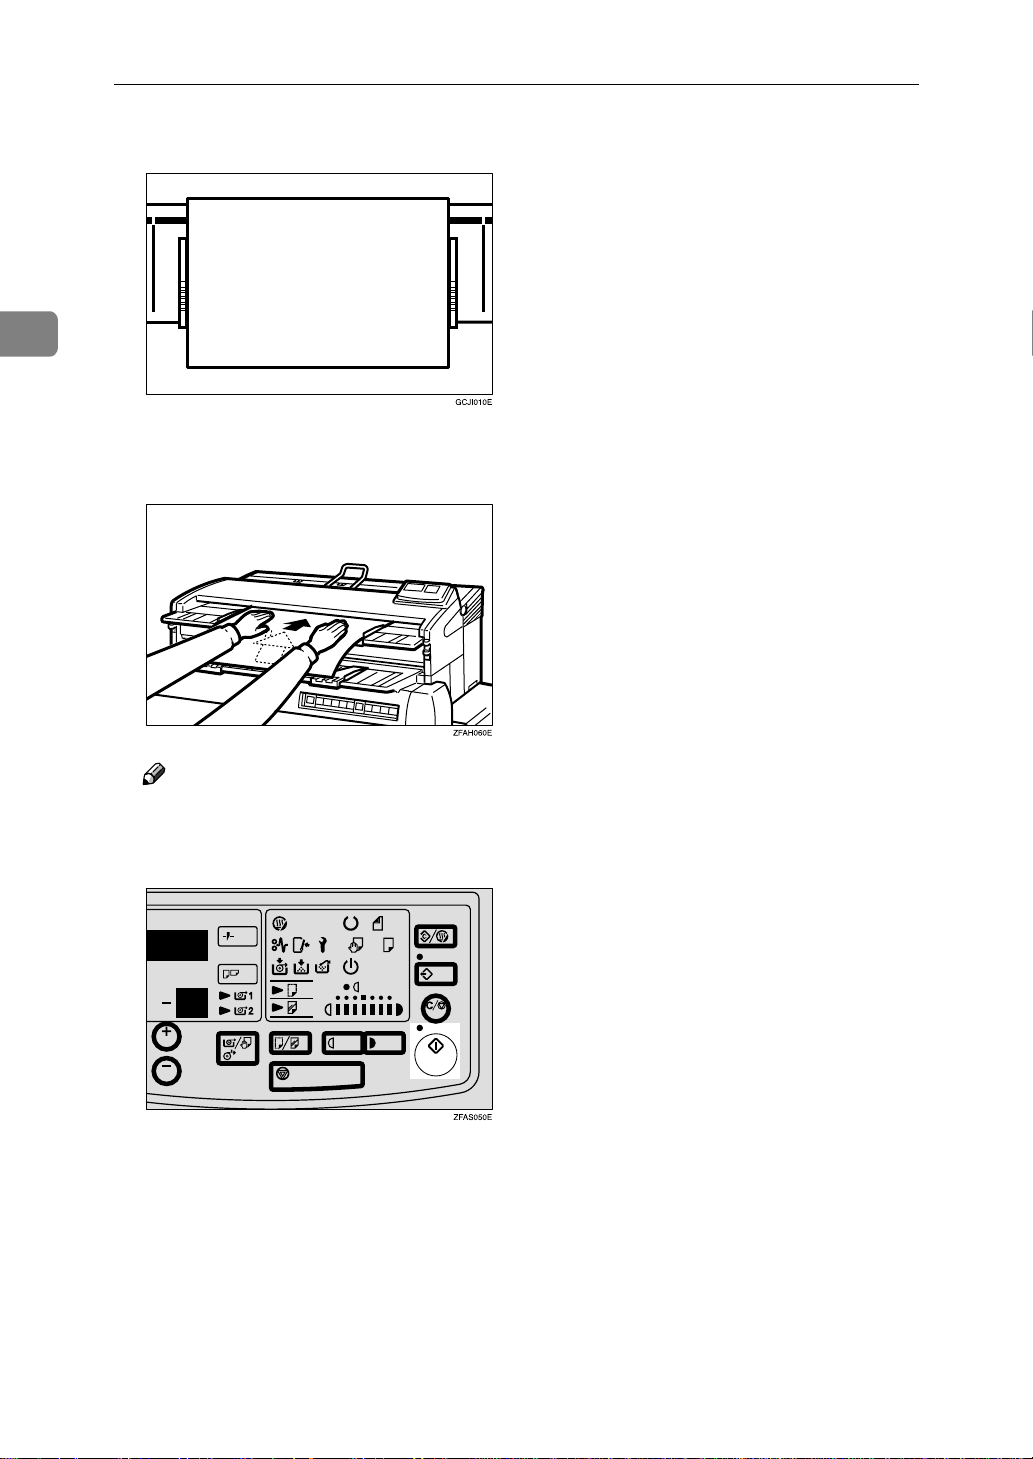
❒ If you select the Bypass table, Center the paper face up on the bypass table
and slide the paper straight into the copier.
Set the original guides to match the original size mark. Place the orig inal
E
face down and slide it straight into the copier along t h e original guides.
Note
❒ Do not force to remove the original once you set it and if you want to
change the posi tion of your original or s et another original. In this case,
press the {Clear/Stop} key to eject the original.
If you are ready to make copy, press the {{{{Start}}}} key.
F
18
 Loading...