

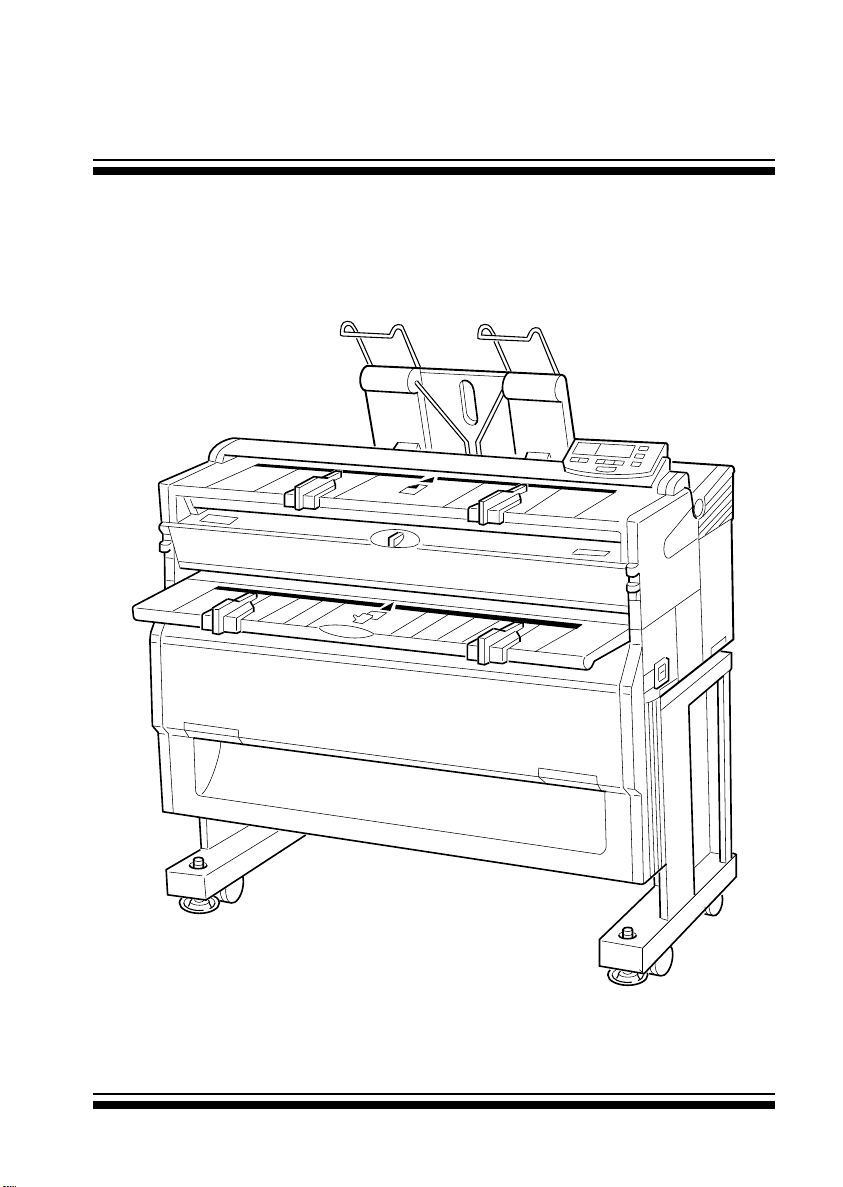
FW740
RICOH
Operating Instructions
© Copyright 1994 Ricoh Company, Ltd.
Power Source: 220 V, 230 V, 240 V, 50 Hz, more than 7 A
Please make sure to connect the power cord to a power source as
above. For details about power source, see page 43.
Power Consumption: 1.4 kW
BESCHEINIGUNG DES HERSTELLERS/IMPORTEURS
Hiermit wird bestätigt, daß der/die/das
RICOH FW740
(Gerät, Typ, Bezeichnung) In Übereinstimmung mit den Bestimmungen der
163, Verfügung 1046/1984
(Amtsblattverfügung) funkenstört ist.
Der Deutschen Bundespost wurde das Inverkehrbringen dieses
Gerätes angezeigt und die Berechtigung zur Überprüfung der Serie
auf Einhaltung der Bestimmungen eingeräumt.
RICOH COMPANY, LTD. (Name des Herstellers/Importeurs)
For good copy quality, Ricoh recommends that you use genuine
Ricoh toner.
Ricoh shall not be responsible for any damage or expense that may
result from the use of parts other than genuine Ricoh parts in your
Ricoh office product.
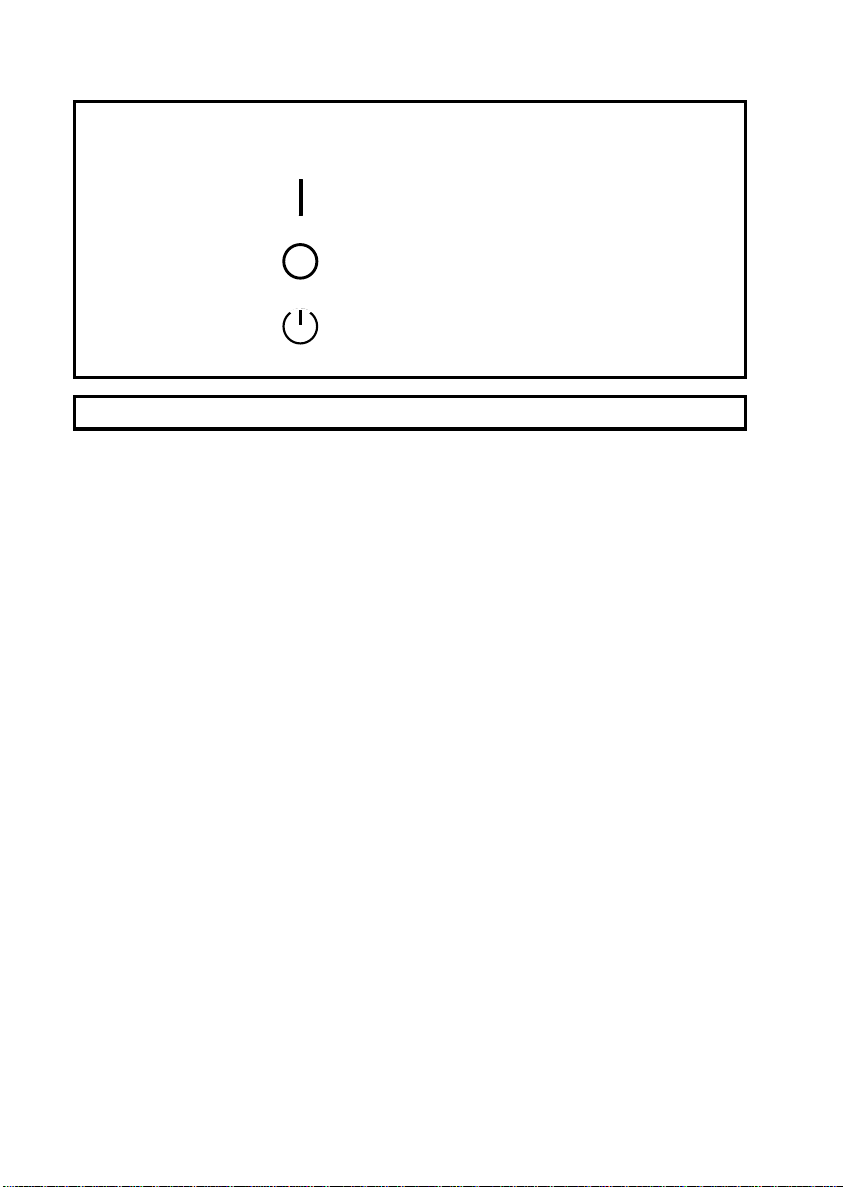
In accordance with ISO Standard 7001, this machine uses the following symbols for the main switch:
means POWER ON.
means POWER OFF.
means STAND BY
Note: Some illustrations may be slightly diff erent from your machine.
Overseas Affiliates
U.S.A.
RICOH CORPORATION
5 Dedrick Place
West Caldwell, New Jersey 07006
(TEL) 201-882-2000
Netherlands
RICOH EUROPE B.V.
Groenelaan 3 P.O. Box 114
1180 AC - Amstelveen Holland
(TEL) 020-5474111
United Kingdom
RICOH U.K. LTD.
Ricoh House
1 Plane Tree Crescent, Feltham,
Middlesex, TW13 7HG
(TEL) 081-751-6611
Germany
RICOH DEUTSCHLAND GMBH
Mergenthalerallee 38-40,
65760 Eschborn
(TEL) (06196) 906-0
France
RICOH FRANCE S.A.
383 Avenue de General de Gaulle,
B.P. 307, 92143 Clamart Cedex
(TEL) 01- 4094-3838
Spain
RICOH ESPAÑA S.A.
Guitard, 45
08014 Barcelona
(TEL) 490-09-60
Italy
RICOH ITALIA S.p.A.
Via della Metallurgia, 12
(zona Basson) - 37139 VERONA
(TEL) 045-851 00 44
Hong Kong
RICOH BUSINESS MACHINES,
LTD.
23/F., China Overseas Building,
139, Hennessy Road,Wan Chai,

SAFETY INFORMATION
Safety During Operation
We’ve identified all safety messages in this manual with the words
and
ing
caution
. These words mean the following.
warn-
WARNING: Important information to alert you to a situation that might
cause serious injury and damage to your property if instruc tions are not
followed properly.
Caution: Important information that tells how to prevent damage to your
equipment, or how to avoid a situation that might cause minor injur y.
WARNINGS
p
Since some parts of the copier are supplied with high electrical
voltage, touch only the parts specified in this manual.
p
Do not modify or replace any parts other than the ones specified
in this manual.
p
Do not incinerate toner or toner containers . Toner dust could ignite when exposed to open flames.
p
Do not store toner where it will be exposed to heat.
p
Do not eat or swallow toner, and keep it out of reac h of children.
p
The fusing unit may be very hot. Be car eful when handling it.
p
When moving the copier across the room , push the copier table,
not the copier itself.
Cautions
p
While copying, do not turn off the main swit ch.
p
While copying, do not open or close the original table, the upper
unit, or any of the covers.
i

p
While copying, do not unplug the power cord.
p
Keep corrosive liquids, such as acid, off the machine.
p
Do not allow paper clips, staples, or other small met allic objects
to fall inside the machine.
General Safety Information
p
Always turn the copier off when you’ve finished copying for the
day, but leave it plugged in.
p
When the copier will not be used for a long period, disconnect
the power cord.
p
If the copier must be transported by vehicle, please contac t your
service representative.
p
This copier can only be instal led by a qualified service representrative.
p
When the copier is plugged in and the main switch is in the
Stand-by position, the anti- condensation heaters are on. In
case of an emergency, unplug the c opier’s power cord.
ii
COPYING
Making One Copy
To make a copy, you should first open the lower table of the copier (the
copy table); then pull out the original guides at the exit; place the copy
paper on the copy table; and last of all set the original on the top table of
the copier (the original table). When you’ve set the original, the copier
will take it in. Follow the steps below.
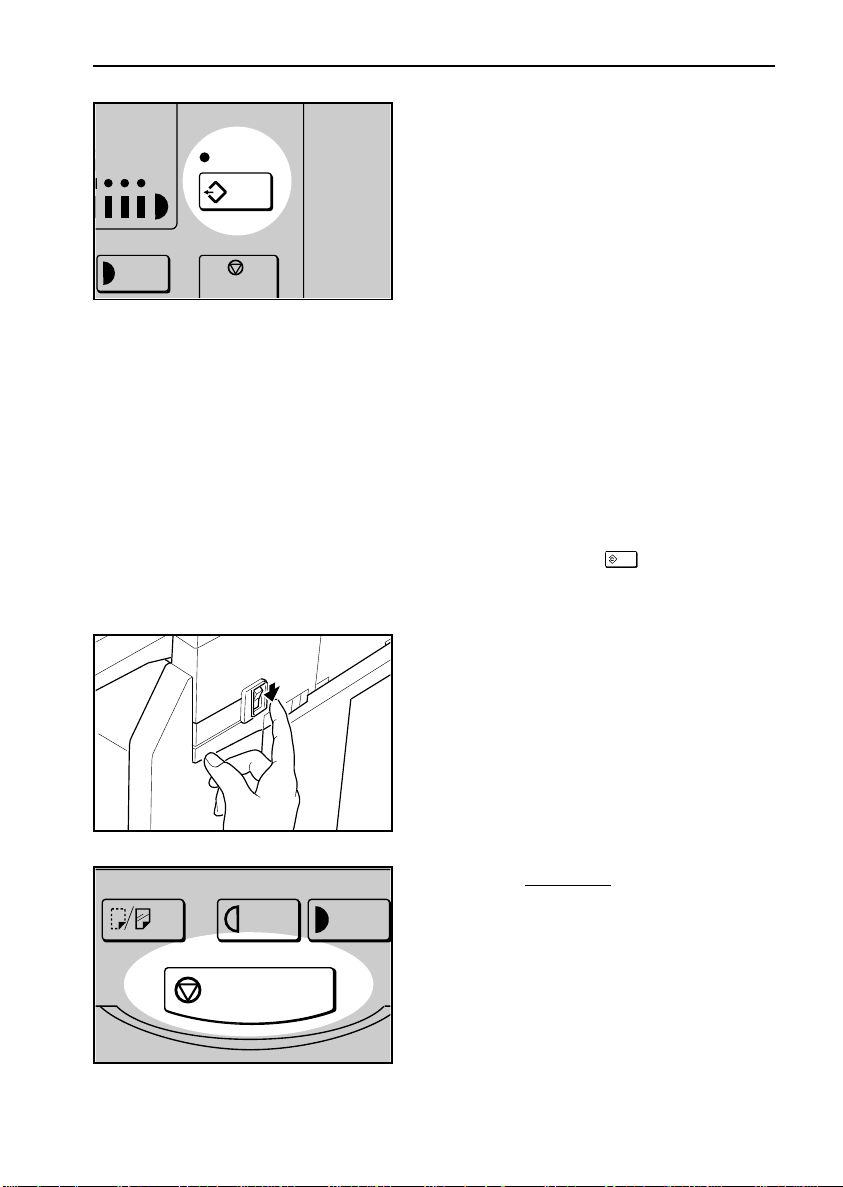
CAUTION: If during copying your original gets stuck in the copier,
press the Emergency Stop key .
1. Open the copy paper table.
2. Open the original gu ides but do
not force them.
3. If you want, set the image density
(page 7) and the leading edge
margin (page 8) or change the
copy media se tting (page 13).
4. Set the copy and original guides
(option) on the copy table to
match the size of your copy pa per and your original.
* Original guides are shown closed
to keep illustrations clear.
1
C
C
COPYING Making One Copy
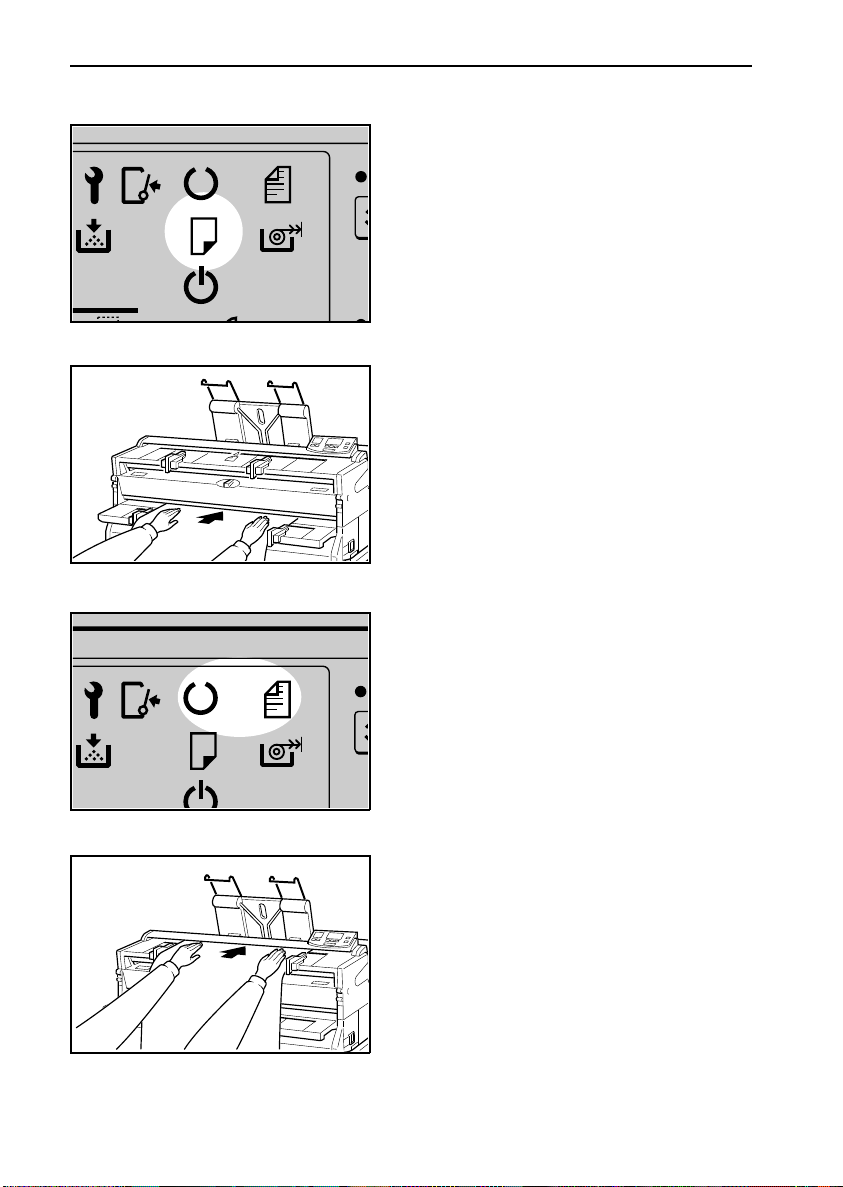
5. Wait until the Set Paper indicator
lights up on the operation panel.
6. Place the sheet of copy paper on
the copy table. Slide the paper
straight into the copier until it stops.
The copier will soon pull it in. Once
the paper is set, the beeper will
sound.
7. Wait un til the Set Original indicator lights up on the operation
panel.
8. Center your original face up on
the original table. Slide the original straight into the copier until
the copier pulls it in.
2
Making One Copy COPYING
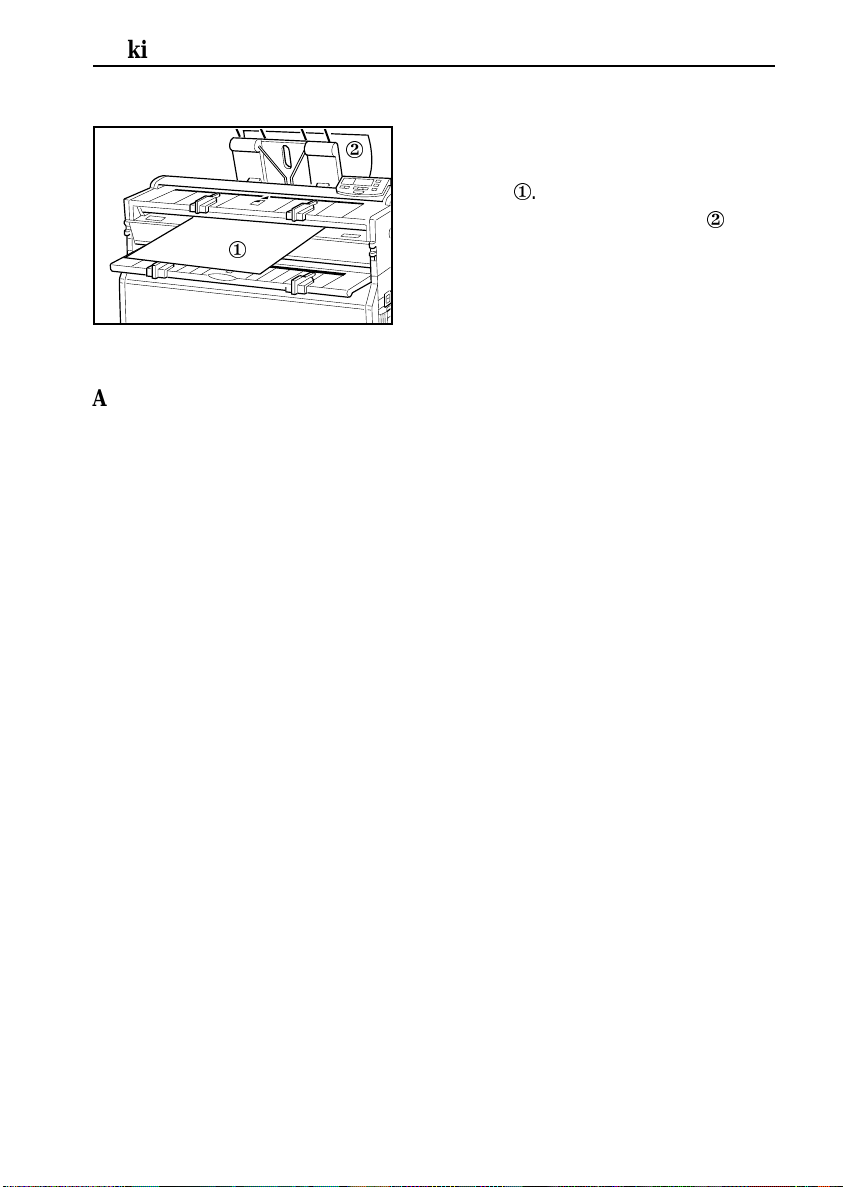
9. The original comes out from the
opening just under the original
table ¬. The copy is delivered from
the slot on top of th e copier .
¬
About the original guides...
The original guides you pulled out at the exit keep the original from going
into the copy paper entrance. Always use the original guides with originals
thinner than 0.1 mm, with very long originals, or wi th very curly orig inals.
When sliding the original into the copier...
When inserting the original in the copier, slide it in carefully , but quickly.
Otherwise, the original might skew as it goes through the machine.
3
COPYING Copying With The Roll Feeder
Copying With The Roll Feeder
To make a copy using the roll feeder option, you do not need t o set paper on the copy ta ble; the paper will be fed to the copier from the roll
feeder. You should first input the paper length and other settings, then
press the RF Select key , and lastly place the original on t he top ta-
ble (the original table). Follow the procedure below.
1. Set the original guides (option) to
match the size of your original.
2. Follow the key strokes below.
Press the Function Select key until
the arrow points at Paper Length.
·
Press the Preset Cut key to choose a
paper length. The length appears in the
display, in millimeters.
¸
If you want to change the size, press
the + and - keys until the size you want
appears in the display.
4
C
C/
¹
If you want, set the image density
(page 7) and the leading edge margin (page 8) or change the copy media setting (page 13).
Copying With The Roll Feeder COPYING
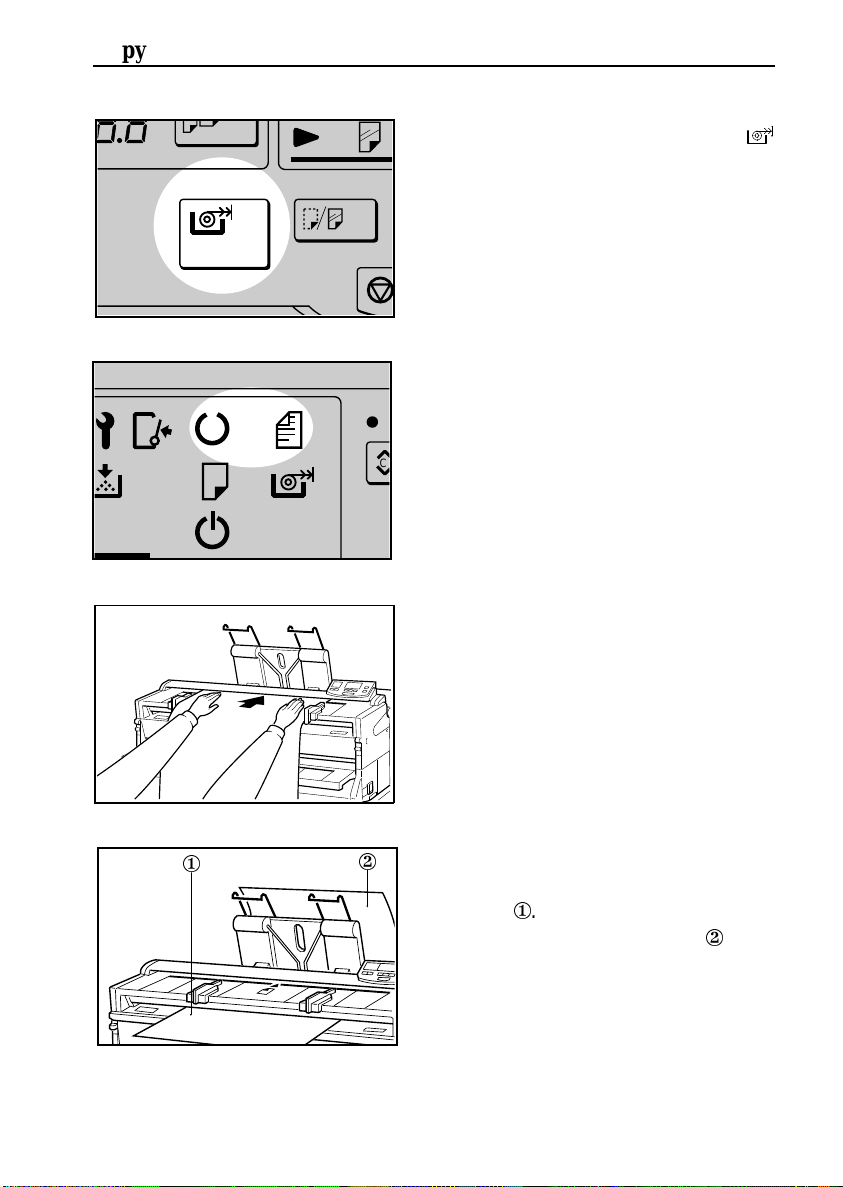
3. When the RF S elect indicator
lights up on th e panel, press the RF
Select key. The roll feeder starts.
Once the copier has set the copy
paper, the beeper w ill sound.
4. Wait until the Set Original indicator lights up on the operation
panel.
C
5. Place your original face up on
the original table. Slide the original straight into the copier until
the copier pulls it in.
¬
6. The original comes out from the
opening just under the original
table ¬. The copy is deliv ered from
the slot on top of th e copier .
5
COPYING Making Several Copies Of The Same Original
Making Several Copies Of The Same Original
To make more than one copy of the same original, you have to reload the
original after each copy. If yo u’re not u sin g the ro ll fe eder opti on, you al so
have to set the copy paper for each copy.
1. Follow the key strokes below.
Press the Function Select key until
the arrow points at Copy Counter.
·
Press the + key until you reach the
number of copies you want to make.
C
C/
¸
If you want to change the number,
press the + or - keys.
¹
If you want to stop copying, press the
Clear/Stop key. The copier will finish
the copy being made, then stop.
2. Proceed as for a usual copy, with sheet paper (page 1) or with
the roll feeder (page 4).
3. When the copy comes out, remove it and repeat step 2. Wait for
the Set Paper indicator to light up before loading a new she et of
paper,
and wait for the Set Original indicator ( ) to light
before reloading the original. You don’t need to press the RF Select
key again.
6

Making Copies Darker Or Lighter COPYING
Making Copies Darker Or Lighter
To make darker or lighter copies, you should change the copier’s density setting. There are 14 density levels: the standard density level,
three darker le vels, and 10 lighter levels. Set the density with the
Lighter and Darker key s ( & ) under the density indicator.
The indicator shows seven levels at a time. When you start from the
standard image density, the middle notch corresponds to the standard
image density, the three right notches correspond to the darker densities, the three left notches to lighter dens ities.
The brighter notch shows which level is now set. If you go lower than the
leftmost notch, the Lighter Copy indicat or lights up. The notches on the
indicator will then correspond to the seven lightest levels.
To set the im age density, follow the keystrokes below
your original.
C
C/
·
Press the Lighter key to make
the image lighter.
Press the Darker key to make
the image darker.
before
setting
7
COPYING Leaving A Blank Margin At The Leading Edge
Leaving A Blank Margin At The Leading Edge
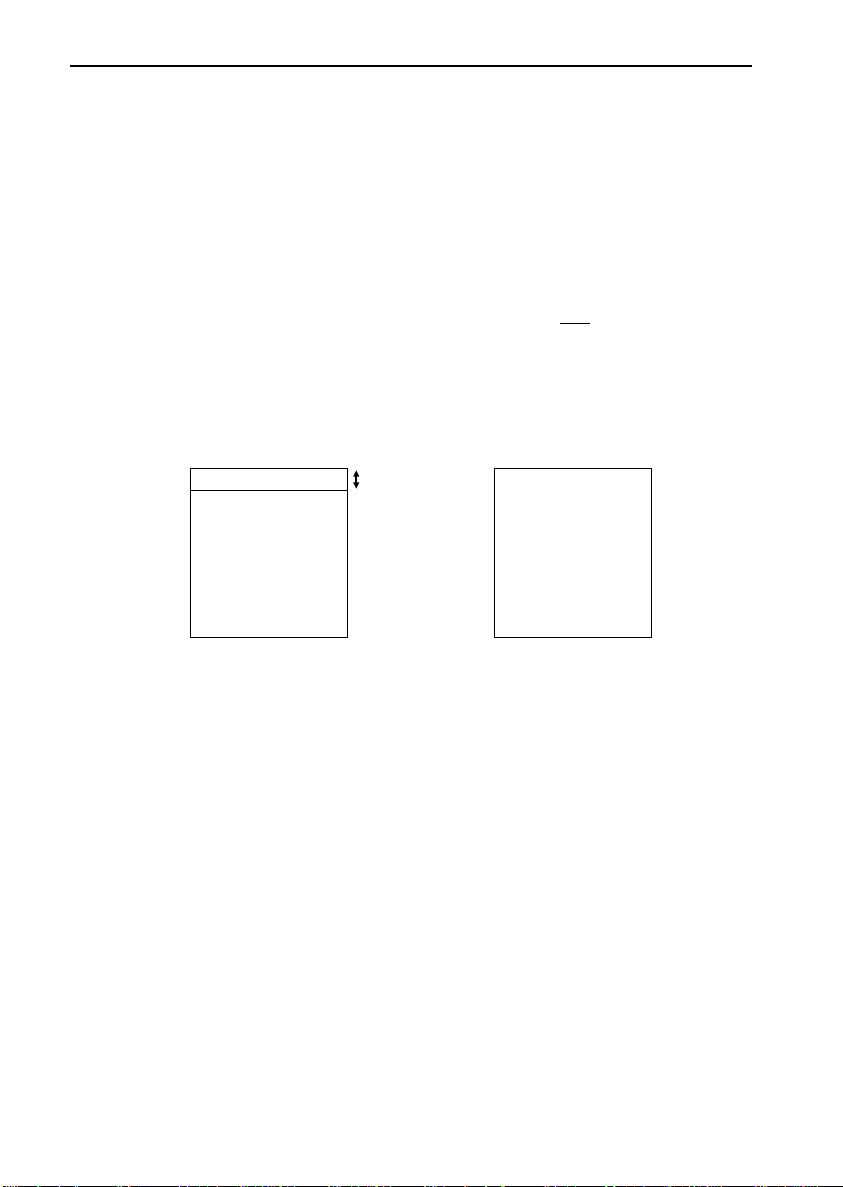
You can create a blank margin at the top of the copy (fig. a, the leading
edge), or have the leading edge of the image bleed off the copy (fig. b) .
The copier does this by shifting the entire image backward or forward
according to the margin you set.
With the roll feeder, the length of the margin does
of the paper. If you want to create a blank margin at the trailing edge,
simply set the paper length a little longer than the total length of the
original and lead margin. Set the margin
M
before
not affect the length
inserting the original.
d
d
b
a) Margin
Example: Leaving a blank margin at the top of your copy
Suppose you are copying a vertical A2 size diagram (about 17" x 22") to
a sheet of the same size. The diagram has a 5 cm (2") margin all around,
but you want a 10 cm (4") margin at the top to give you space to write
notes.
b
b) Bleed image
Make your copy following the instructions on page 1. When you reach
step 3 on page 1, follow the key strokes on the next page.
8
Leaving A Blank Margin At The Leading Edge COPYING
Press the Functi on Select key until the arrow point s at Lead Mar gin.
¸
Press the + key until the display shows 5.0.
When you have the margin y ou want, c ontinue as for any oth er copy. Y ou
will obtain a co py with a 10 cm (4") blank ma rgin at the top (5 cm set by you
plus 5 cm on the original) and no margin at the bottom.
·
The margin is displayed here,
millimeters.
in
C
C/
If the original had no blank margin surrounding it, you would have obtained a copy with a 5 cm blank margin at the leading edge, and with the
bottom 5 cm of the original cut of f the copy.
Example: Leaving a blank margin at the bottom of your copy
Suppose in the first example you had instead wanted the margin at the
bottom of your copy instead of the top. In that case, in step ¸ above, you
would have had to press the - key until -5.0 appeared in the display. The
image would have been shifted forward on the copy and a 10 cm margin
would have been left at the bottom of the copy ( 5 cm set b y you plu s 5 c m
on t he o r ig in al ) and no mar gin at the top.
9
COPYING Copying Only A Selected Portion Of The Original
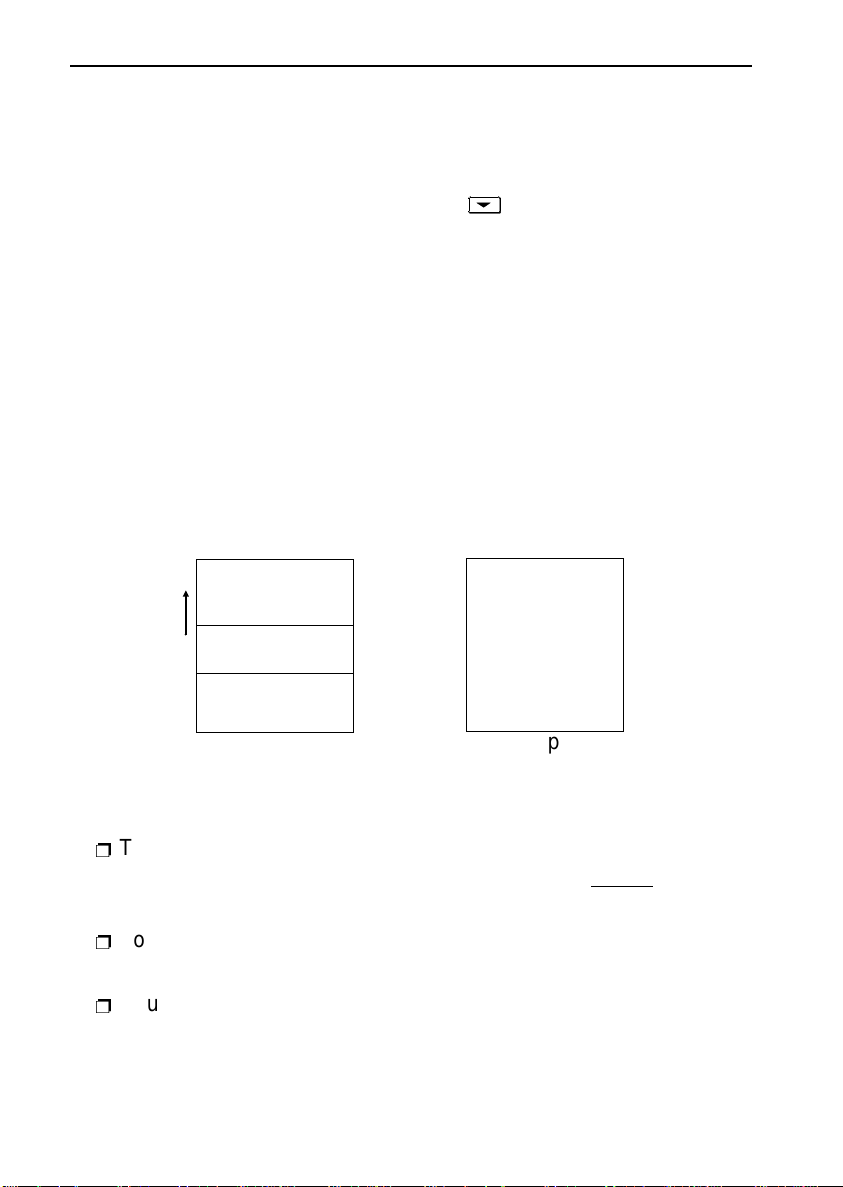
Copying Only A Selected Portion Of The Original
You can copy a portion of the original instead of the entire original.
Press and hold the Function Select key for at least three seconds
to tell the copier to copy only a portion of the or iginal. A “ P” ( for Partial)
will start blinking in the lead margin display. Then, proceed as for a
usual copy, with a sheet of paper or with the roll feeder.
As the origi nal is fed i nto the copier, press the Functio n Select key
when the beginning of the part y ou want t o copy (a) goes in; the “P” will
stop blinking and stay on. Press the Function Select key again when
the end of that part (b ) goes in; the “P” will start blinking again.
Finally, press and hold the Functi on Sel ect key for another 3 seconds
to turn the function off.
a
d
Original
Notes
p
To copy a portion of the original that includes its f irst 15 cm (6") ,
you must press the Function Select key for (a)
the original.
p
To copy the bottom portion of the original, simply skip pres sing
the Function Select key at ( b).
p
You can’t add a margin. The length of the margin affects where
the copier starts and stops copying, so that with a margin, you
can’t set (a) and (b) ac curately.
10
b
d
Copy
before setting
Copying Only A Selected Portion Of The Original COPYING
Example: copying the middle band of an A2 poster
Suppose you are copying an A2 size poster ( about 17" x 22" ) of a seashell, as shown on the pre vious page, and you want to copy only the
middle portion of the shell. Follow the steps below.
Press and hold the Function Select
key for three seconds, then proceed
as for a usual copy. A “P” will blink in
the lead margin display.
·
When the beginn ing of the p ortion yo u
want to copy goes under the cover,
press the Function Select key. The
“P” will stay on, not blinking.
C
¸
When the end of the portion you want to
copy goes under the cover, press the
Function Select key again. The “P” will
start blinking again.
C/
¹
Press and hold the Function Select
key for three seconds to turn the
function off. The “P” will disappear.
11
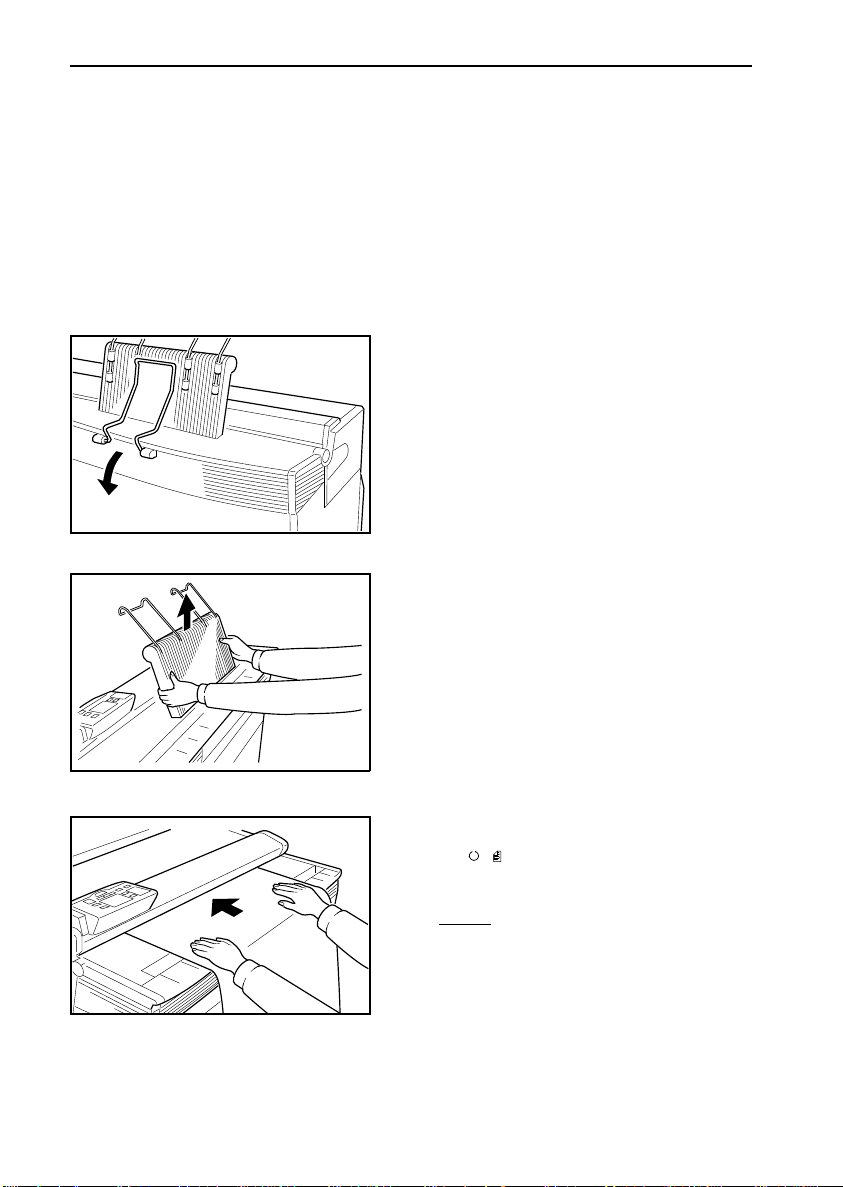
COPYING Using The Rear Table—Originals That Can’t Be Bent
Using The Rear Table—Originals That Can’t Be Bent
You can feed originals from the rear of the copier. This way, the original
will not turn inside the machine, but will trav el s traight through. Use the
rear table to copy originals that can’t or s houldn’t be bent.
Do not insert originals thicker than 3m m (about 1/ 8").
1. Lower the exit copy guide.
2. Remove the exit copy holder.
3. Proceed as for a usual copy with
or without the roll feeder. However, do not set the original on
the original table. See step 4.
4. When the Set Original indicator lights up on the operation
panel, insert the original face
down.
12
5. If your original is longer than
800 mm (31", larger than A0)
hold it up as the copier takes it in.
Copying To Different Media COPYING
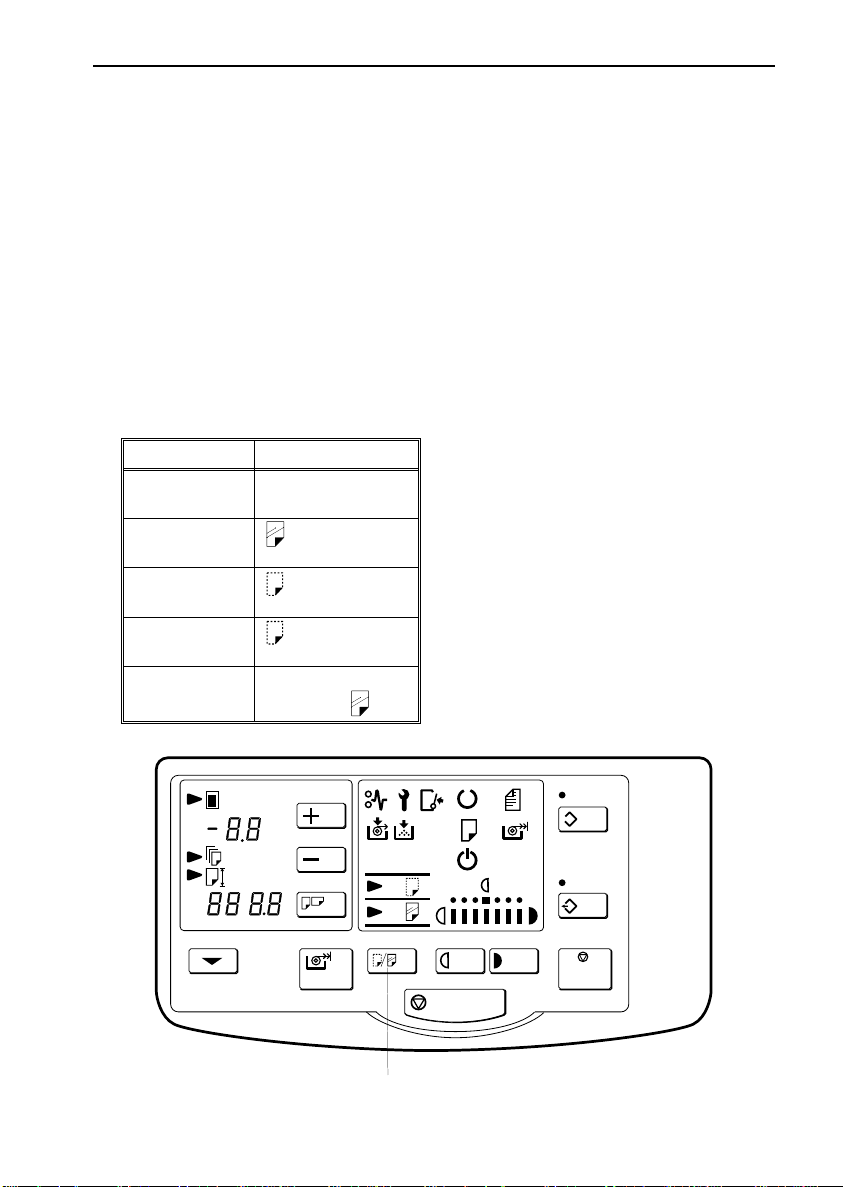
Copying To Different Media
If you copy to film or vellum (translucent or tracing paper) you need to
set the copy media, otherwise the copy might come out creased or
wavy.
To make a copy, the copier deposits a layer of black resin powder,
called toner, on the copy paper. It then applies heat so that the toner
melts and fuses to the paper. Some papers require more heat to fuse
well, others less. Press the copy media key to select a type of paper, but
for most kinds of plain paper both indicators should be of f.
Type of paper Media set ting
Plain paper Both indicators off
This list is not complete. If you are not
Film
on
sure of what type of paper you have,
check the label on the paper package.
Vellum
Heavy paper
Thin paper
on
on
No indicator, or if
necessary, on.
Set the proper fusing temperature with the Copy Media key
If these settings do not match your paper,
try different settings.
C
C/
13
COPYING Programming Settings You Often Use
Programming Settings Y ou Often Use
There are two ways of programming settings you often use. First, you
can link a collection of setti ngs to the Program key ; this way the
copier will recall your settings whenever you pr ess that key.
Second, you can change the copier’s default sett ings so that those you
want appear every time you turn the copier on or press the Clear Modes
key.
1–Programming a collection of settings
If you often find yourself using the same margin and density settings,
you can have these settings appear at the strok e of a single key.
Press the Program key to tell the copier to store the following key
strokes in memory. Input the settings y ou want to program, then make a
copy to store the settings in m emor y.
1. Press the Program key.
14
C/
2. Input the settings you want to
C
program.
3. Make a copy, then press the
C/
Program key again.
Programming Settings You Often Use COPYING
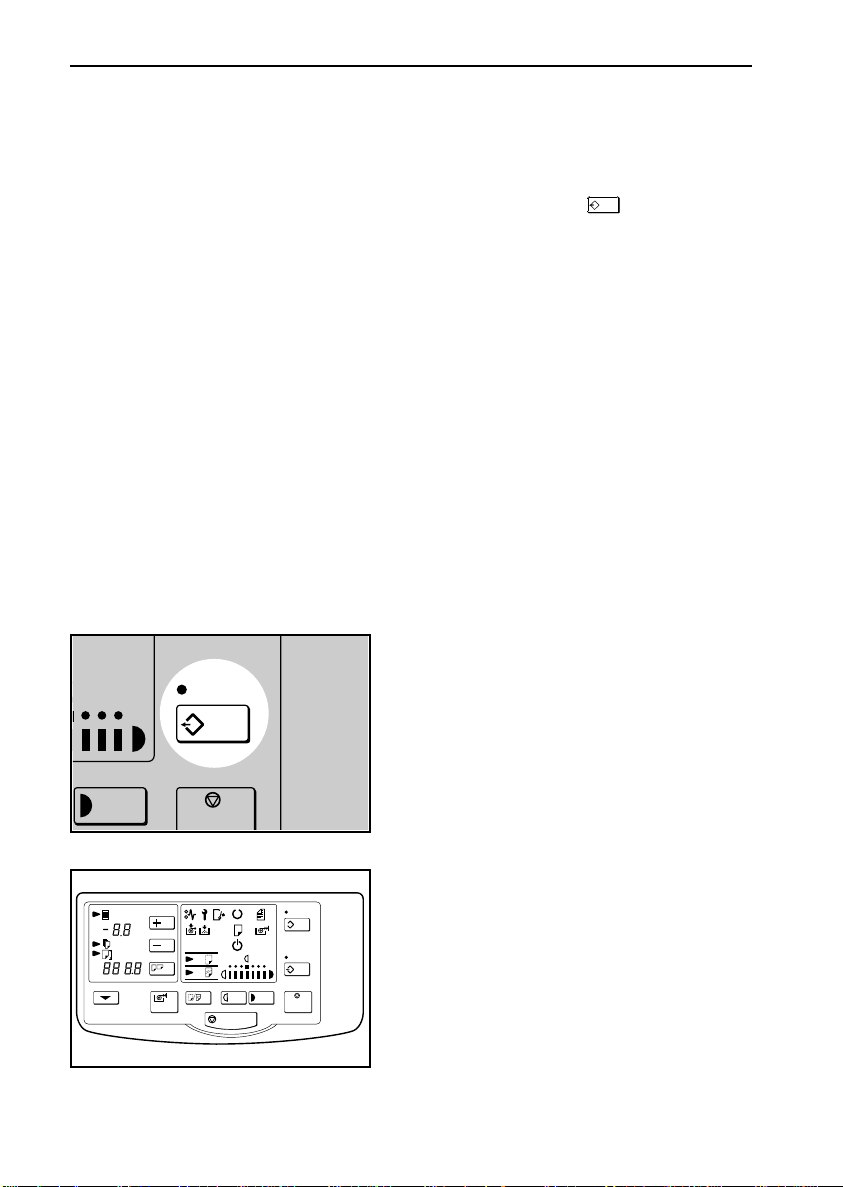
4. To retrieve the programmed s ettings, press the Program key be-
fore copying.
C/
2–Changing The Copier’s Default Settings
You might find that you never use the copier’s default settings, that y ou
always set a lead margin of 10 or 20 mm, or that you always use the roll
feeder with a particular length of paper.
In this case, you might want to change the settings that appear when
you turn on the copier or press the Clear Modes key . To do so, fol-
low the steps below.
1. Turn the main switch off.
2. Press
and hold
the Emergency
Stop key, then turn the copier
back on. The jam and ser vice in dicators blink.
15
COPYING What Your Service Representative Can Change
C
3. Input the settings you want.
4. Turn off the main switch.
C/
The next time you turn the copier on or press the Clear Modes key, the
settings you programmed in s tep 3 will be in effect.
What Your Service Represent ative Can Change
Your service representative can adjust some of your copier’s features.
Here’s a list of changes the servic e representativ e can make for you.
p
Copy media default: The copy media setting can be adjusted
to match the kind of paper you use.
p
Count up and count down: The copy counter can be made to
count up or count down.
p
Beeper: The beeper can be turned off completely; can be
turned off for setting the margin, multiple copies, and paper
length; or it can be left on to emit a tone whenever a key is
pressed.
p
Paper feed out waiting time: When the copier is ready to receive the or iginal, it will wait for a p reset length of time. If no
original is set within this time, the copier will process the copy
paper without copying. T he time can be set to 1, 2, 3, 4, or 5
minutes.
p
Manual feed s tart time: After copy paper is set, the copier
waits for a preset number of s econds bef ore start ing the r ollers
that will pull the paper in. This pause gives you a chance to align
the paper. The time can be set to 0.7, 1, 2, 3, 4, or 5 seconds.
16

What Your Service Representative Can Change COPYING
p
Lead edge increase/decrease speed: The speed at which the
lead edge setting scrolls up or down can be changed. The time
for one increment (or decrement) can be set to 0. 02, 0.05, 0.10,
0.25, or 0.5 second.
p
Auto clear time: If the copier is left alone for a while, it will clear
itself. The time needed can be changed to 1, 2, 3, 4, or 5 minutes. The function can also be turned off.
p
Energy saving: The fusing unit needs to be hot for copying.
When the copier is idle, the fusing unit can be kept hot to save
time or it can be allowed to cool to save energy. The feature can
be set to start automatically, but you can also turn it on y ourself
by pressing and holding the Clear Modes/Stand-by key for
three seconds.
p
Screen message: When the copier is idle, the copy counter can
be made to display a message. There are five possible messages:
“Pre_heat”, “Sleeping”, “0123456789”, “Have a good day”, and
“Hello I love you”. The fea ture can also be turned off.
p
Function step setting: When changi ng the functio n setting (margin, multiple copies, or pa per length) by
the setting will change by a pres et value. This value can be ch anged
to 1, 2, 3 or 10 units.
holding down the + or - key,
p
Paper length count up/down, Paper length up/down speed,
and Paper size pat tern: When you press the preset length
key, the copier scrolls through a select ion of preset paper sizes.
The copier can scroll th rough the preset lengths forward or
backward, and at diffe rent spee ds. There are many sets of
sizes from which to choose. Ask your service representative for
details.
17
MAINTAINING YOUR COPIER
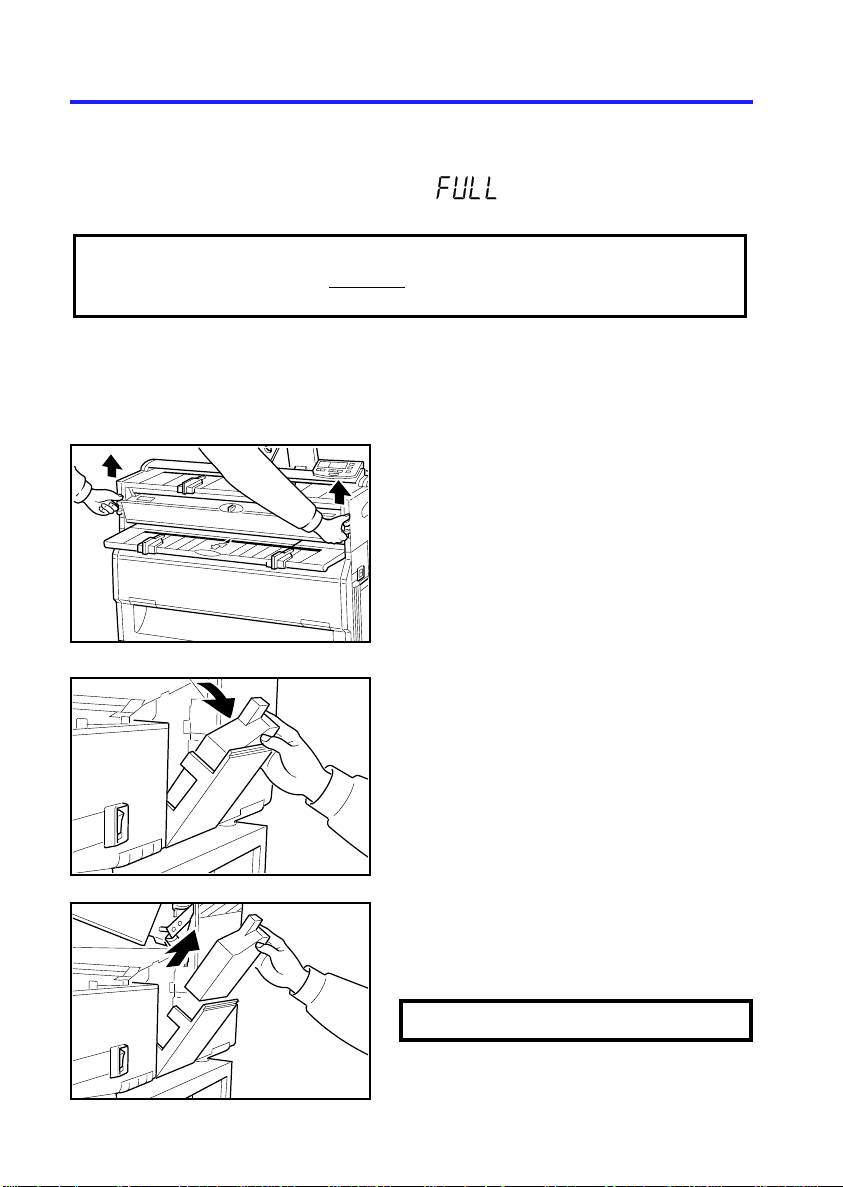
Changing The Toner B ottle
WARNING: You must change the toner bottle whenever you see
FULL in the copy counter.
and closing the copier or turning it on and off.
If the toner bottle overflows, toner particles could get inside the copier
and cause damage. When you install a new bottle make sure it is perfectly set in its holder. Follow the steps below.
NEVER clear this condition by
1. Open the upper unit of the copi er.
2. Open the door on the right side
of the copier.
only
opening
18
3. Carefully remove the plastic bottle and throw it away.
WARNING: Do not incinerate used toner.
Toner dust can ignite suddenly.
Changing The Toner Bottle MAINTAINING YOUR COPIER
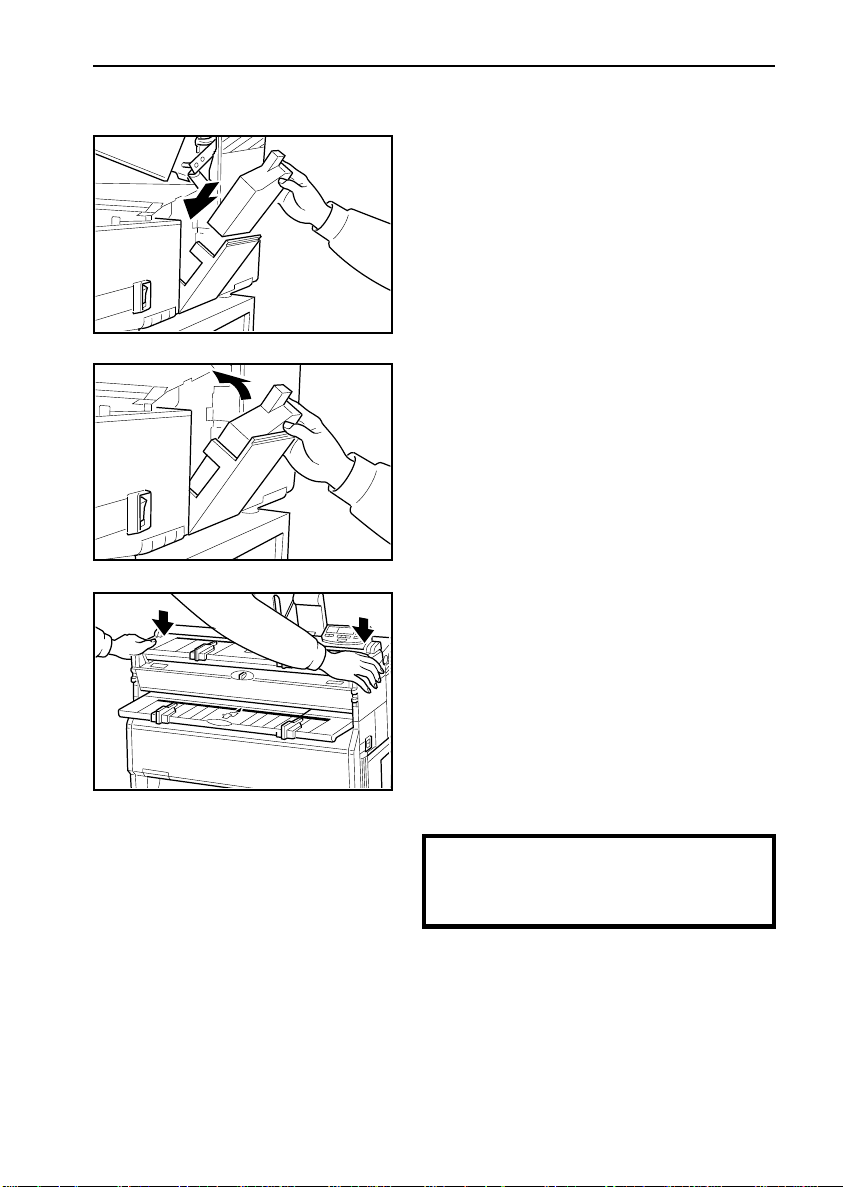
4. Place a new bo ttle in the copier
(supplied by your service representative).
5. Close the door.
6. Close the upper unit.
7. If needed, turn the copier back
on, and press the clear modes
key to clear the FULL message.
WARNING: Always change the toner bottle
before clearing the FULL condition. Otherwise toner will overflow inside the copier and
cause damage.
19
MAINTAINING YOUR COPIER Adding Toner
Adding Toner
The add toner indicator blinks when toner is running short. When the indicator starts blinking, you can still copy about 16 m (about 53’, or 27
A4 size copies). When the indicator stays on, you can’t copy until a new
cartridge is put in. Follow the steps below.
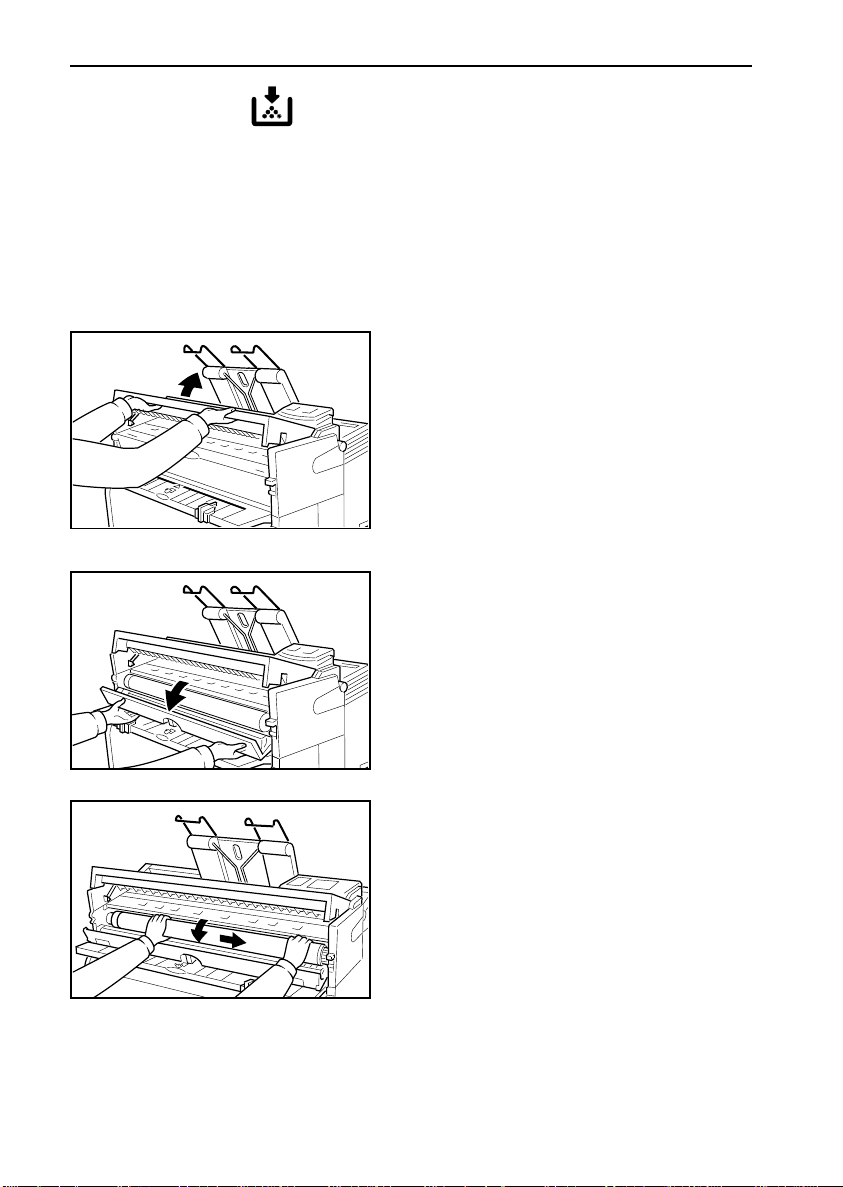
1. Lift the original table until it locks
in place.
2. Open the toner cartridge cover.
3. Turn the old cartidge towards
you. Then, while pressing the
cartridge to the right, lift the left
end and remove the cartridge.
20
Adding Toner MAINTAINING YOUR COPIER
4. Put the old toner cartridge in a vinyl bag and discard it.
WARNING: Do not incinerate used toner
cartridges. Toner dust can ignite suddenly.
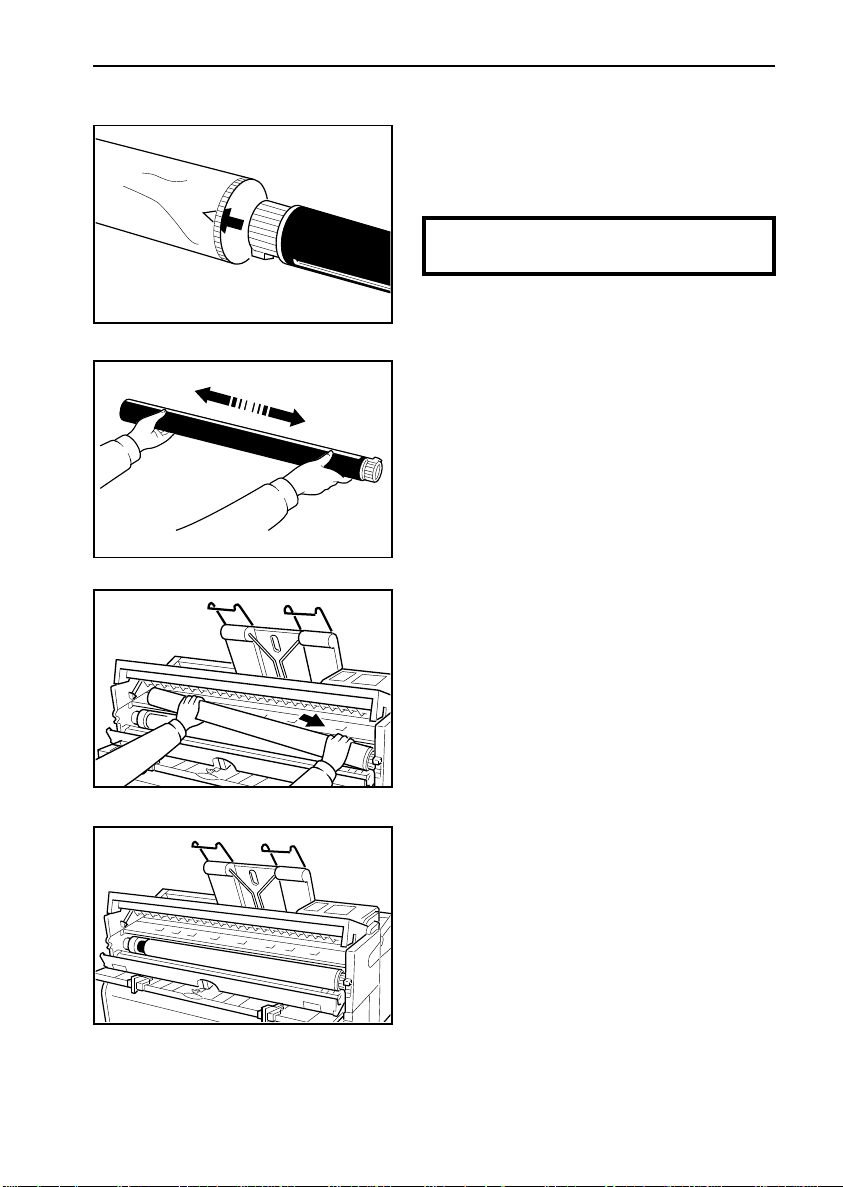
5. Shake the new toner cartridge
lightly 5 to 6 times to remove
lumps.
6. Install the new cartridge. Make
sure that the white circle labeled
1 on the cartridge faces up.
7. Make sure the cartridge is set
well but don’t push it in yet .
21

MAINTAINING YOUR COPIER Adding Toner
8. Take the right edge of the seal
and slowly remove it.
9. Push the toner cartridge all the
way to the left.
10. Turn the toner cartridge all the
way in, as shown.
22
11. Close the toner cartridge cover
and the original table. The copier
will need a few moments to warm
up before it is ready to copy.
Loading A Roll Of Paper MAINTAINING YOUR COPIER
Loading A Roll Of Paper
When the load paper indicator lights, it’s tim e to install a new roll of paper. You’ll need to open the top and bottom covers of the roll feeder, remove any remaining paper, take the old roll out and take it off the spool,
insert the spool in a new roll, and finally load the new roll into the roll
feeder.
CAUTION: Rolls of paper can be heavy, so you should be careful
when loading one. Don’t strain yourself. Ask for help if you think you
need it.
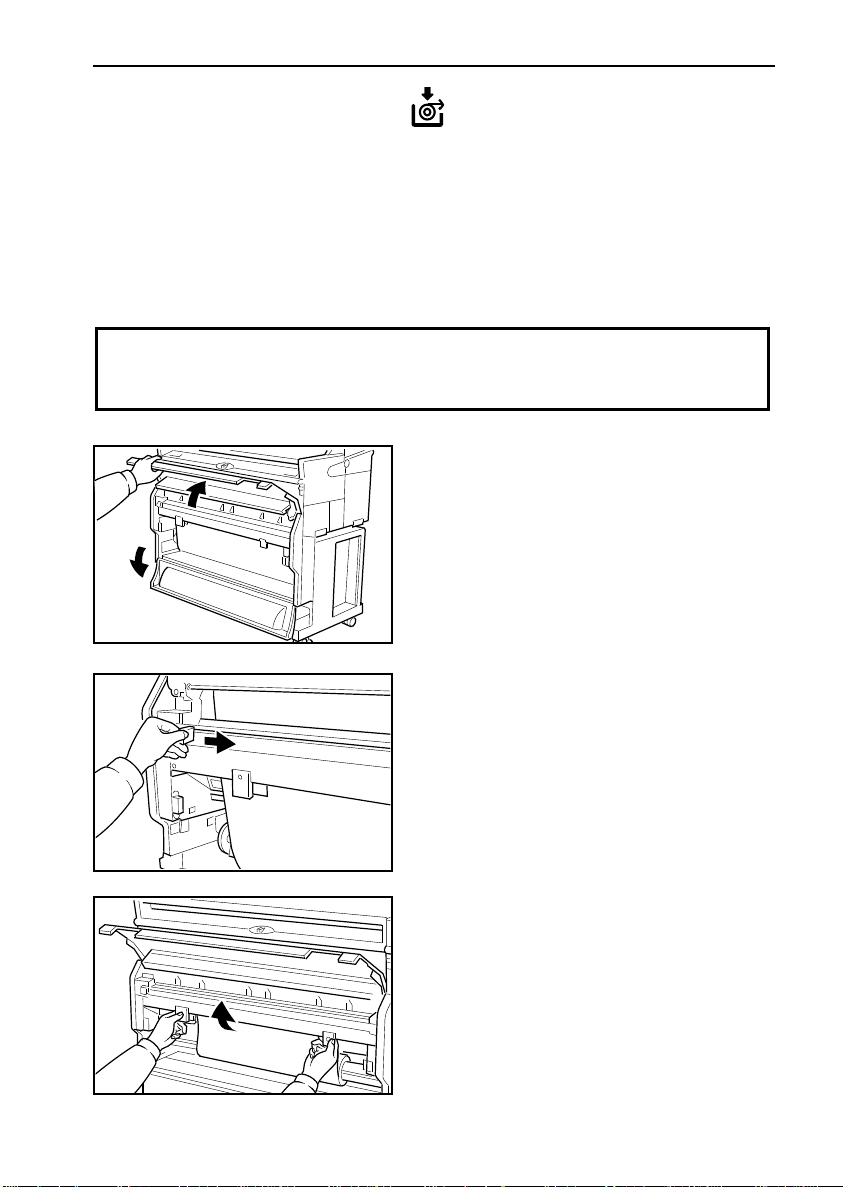
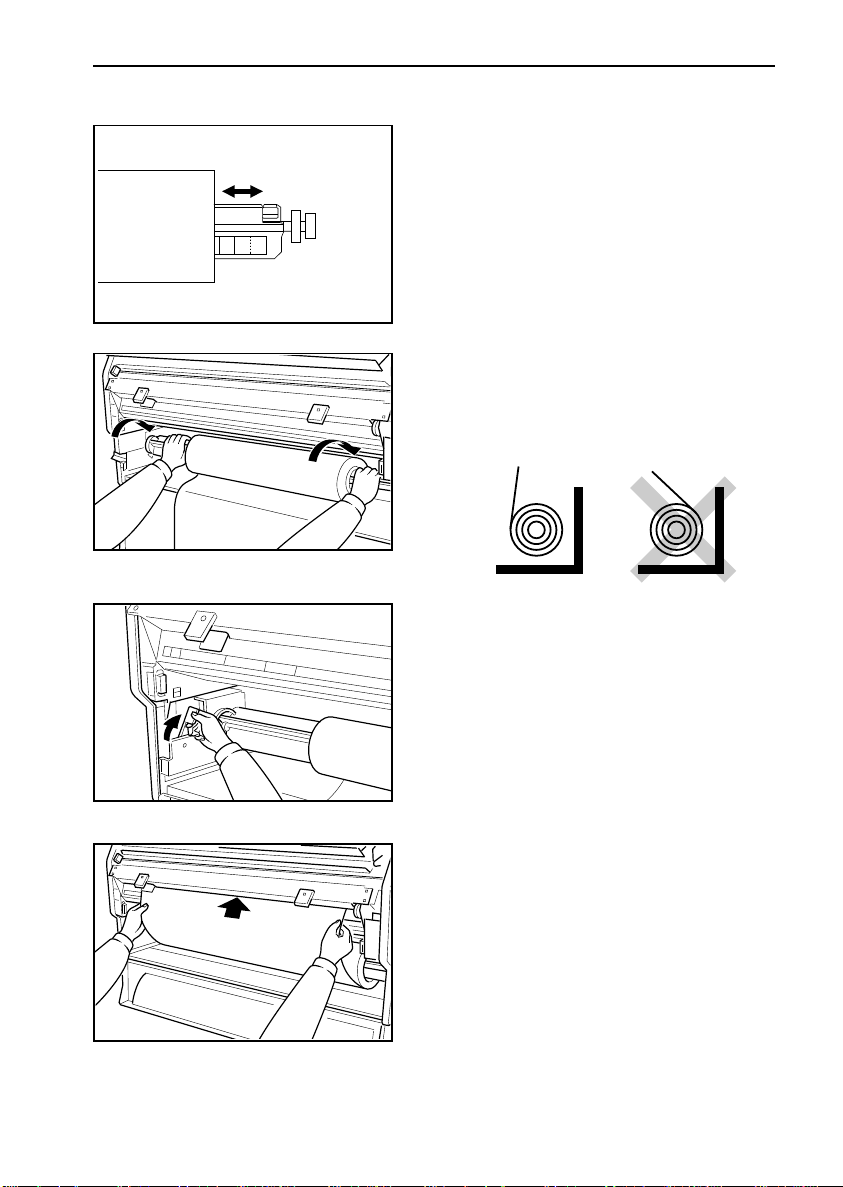
1. Open the top and bottom covers
of the roll feeder.
2. If there is paper left, slide the
blade from side to side and gently pull the paper out of the copier.
3. Unlock and lift the top unit of the
roll feeder.
a) Hold the handles on each side.
b) Squeeze and hold the lock on the left.
c) Raise t he unit just a bit .
d) Hold on to the unit, but let go of the lock.
e) Raise t he unit until it locks in place.
23
MAINTAINING YOUR COPIER Loading A Roll Of Paper
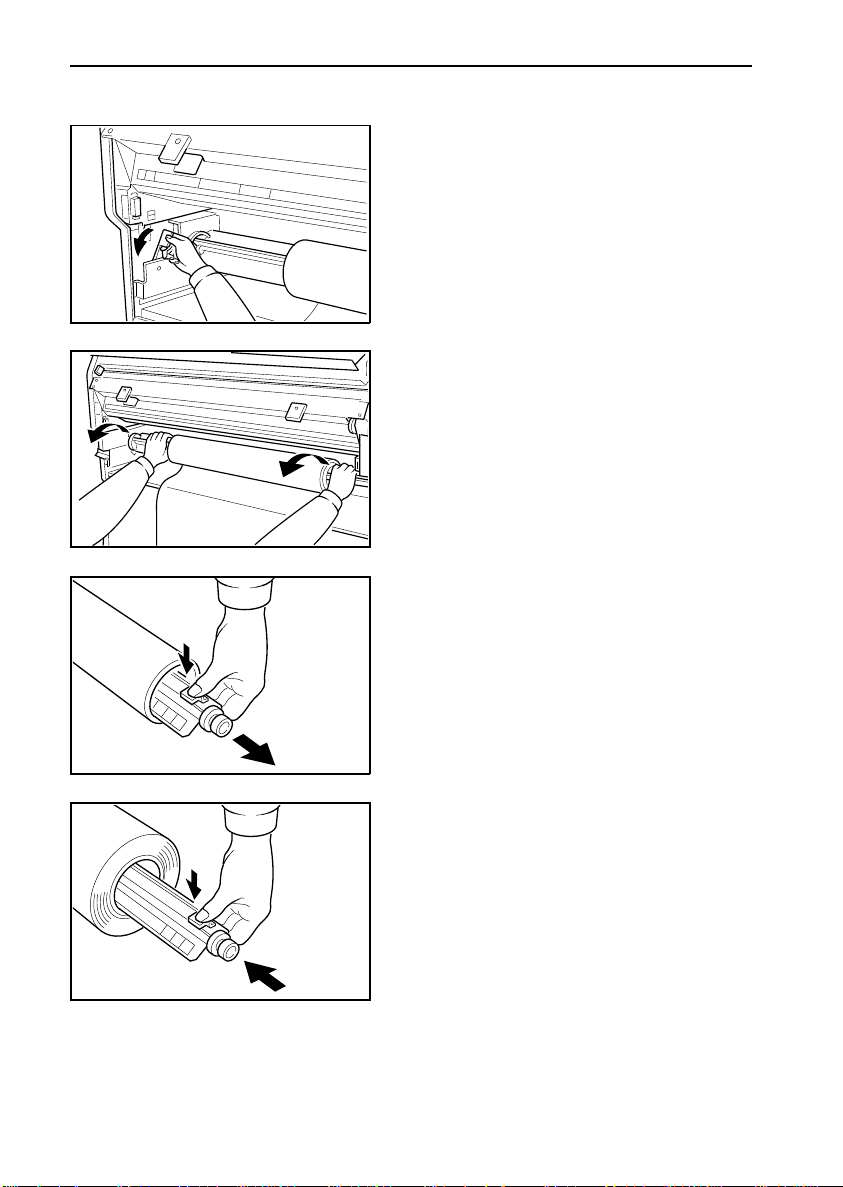
4. Flip the two latches on each side
of the paper spool.
5. Remove the spool.
6. Press and hold the lock on the
spool and pull the spool out of
the roll. Throw the old roll away.
24
7. Press and hold the lock on the
spool and insert the spool into a
new roll.
Loading A Roll Of Paper MAINTAINING YOUR COPIER
8. While holding the lock down,
align the paper roll with the size
marks on the spool.
9. Load the spool back in the roll
feeder so that the paper comes
off the roll from the front, not from
the rear, as shown below.
10. Make sure the spool is pushed
all the way in the grooves and flip
the two latches back in place.
11. Pull the leading edge of the paper roll and slide the paper into
the slot just under the top unit
locks. Make sure the paper is
aligned with the marks on the unit.
25

MAINTAINING YOUR COPIER Loading A Roll Of Paper
12. Turn the wheel on the right side
to bring the paper further in.
13. Lower the top unit of the roll
feeder.
a) Hold the two handles.
b) Squeeze and hold the lock on the left.
c) Lower t he unit just a bit.
d) Hold on to the unit, but let go of the lock.
e) Lower t he unit until it locks in place.
14. Spin the paper roll a bit to tighten
the paper.
26
15. Slide the blade from side to side
and gently pull the paper out of
the copier.
16. Close the roll feeder cov ers.

Things To Do Every Day MAINTAINING YOUR COPIER
Things To Do Every Day
Clean the exposure glass & the platen roller
Clean the exposure glass with a
damp cloth, then wipe it with a dry
cloth.
Clean the platen with a damp cloth,
then wipe it with a dry cloth.
Also, you should clean the copy and original tables with a damp cloth,
then wipe them with a dry cloth.
27

TROUBLESHOOTING
If Something Goes Wrong
If you have problems with your copier, consult the following pages. If a
service indicator lights up, read the section below; if the original or the
copy is stuck in the copier, see page 29; if the copier won’t start, or if
copies don’t look right, see page 34.
If A Service Indicator Lights Up
If one of the service indicators shown below appears on the operation
panel, turn to the appropriate page and follow the ins tructions described
there.
What
appears
28
What it means What to do
The original or copy paper is
jammed somewhere.
The copier needs a technician. Call your technical service
A cover or unit was left open. Close it. See page 40 for a
The paper roll is finished. Put in a new roll of paper.
The toner cartridge is empty,
or almost empty.
Wait until the ready indicator
lights.
The used toner bottle is full. Empty the used toner bottle.
See the following section.
center.
complete list of the places to
check.
See page 23.
Replace the toner cartridge.
See page 20.
Wait. If it stays on for an
unusually long time, call your
technical service center.
See page 18.

If Jams Occur TROUBLESHOOTING
If Jams Occur
If the original is jammed in the feed-in slot
Very gently pull the original out of
the feed-in slot. Be careful not to
tear it.
If the original is jammed at the exit
1. Lift the original table.
2. Very gently pull the original out of
CAUTION: If the original sticks in the ma-
the
chine, or if you don’t think you
can remove it without tearing,
remove the original from the
exit instead. See below.
feed-out slot. Be careful not
to tear it.
29

TROUBLESHOOTING If Jams Occur
3. Close the original table. Press
firmly on both sides until it clicks
into place.
If sheet paper is jammed in the feed-in slot
1. Squeeze the locks on each side
of the copier and lift the unit.
2. Pull out the copy paper. Do not
leave any scraps of paper in the
copier.
30
3. Close the unit. Press firmly on
both sides until it clicks into
place.

If Jams Occur TROUBLESHOOTING
If sheet paper is jammed at the paper exit
1. Squeeze the locks on each side
of the copier and lift the mi ddle
unit between the original table
and the copy table.
2. Open the fusing unit cover.
CAUTION: The fusing unit can be very hot.
Do not touch any parts under
the fusing cover. If necessary,
wait until the fusing unit has
cooled down.
3. Slowly pull the paper out. If there
are scraps left inside, open the
inner cover, wait for the copier to
cool, and remove the scraps.
4. Close the unit and all covers.
Press firmly on both sides until it
clicks into place.
31

TROUBLESHOOTING If Jams Occur
If roll paper jams
If roll paper jams anywhere in the machine, you still m ight need to check
everywhere to remove the entire length of paper.
1. Open the roll feeder top cover.
2. Slide the blade across.
3. If you can, pull the paper out of
the copier.
32
4. Close the roll feeder top cover.
If your were able to remove all
the paper, stop here.
5. Squeeze the locks on each side
of the copier and lift the unit.

If Jams Occur TROUBLESHOOTING
6. Open the fusing unit cover.
CAUTION: The fusing unit can be very hot.
Do not touch any parts under
the fusing cover. If necessary,
wait until the fusing unit has
cooled down.
7. Slowly pull the paper out. If there
are scraps left inside, open the
inner cover, wait for the copier to
cool, and remove the scraps.
8. Close the unit and all covers.
Press firmly on both sides until it
clicks into place.
33

TROUBLESHOOTING Others
Others
If a puzzling or recurring problem occurs, check the following before
calling a service representative. It’s also a good idea to check the Do’s
and Don’ts section on page 36 to make sure the paper and originals
match what the copier can handle.
Absolutely nothing happens
p
Is the main switch on?
p
Is the cord plugged in?
p
Did a breaker or a fuse blow out?
Something happens, but the and indicators never light up
p
Check the indicators on the control panel. If any of them are lit ,
turn to page 28. Check that all covers and units are clos ed.
If Jams Occur Frequen tly
p
Is your paper creased, damp, or otherwise damaged? See the
Do’s and Don’ts section on page 36.
p
Are there visible bits of paper or other objects stuck in the machine? If there are, remov e them.
p
Are you inserting the paper and or iginal in straight? Always feed
paper in straight.
If Copies Look W rong
p
Are copies too dark or too light? Adjust the density (see page 7).
p
Is the background dirty no matter what kind of original you are
copying? Make sure the exposure glass and platen are clean
(see page 27).
34

Others TROUBLESHOOTING
p
Is the image skewed? Make sure to insert the paper and the
original straight into the machine. If you have the original and
copy guides (option), use them.
White spots appear
p
On the copy: try setting your copy paper with the other side facing up.
p
At the leading edge: try setting your copy paper sideways .
p
At the trailing edge: try giving a rising curl to the trailing edge.
The curl should go up, not down.
Creases
p
Try setting your copy paper sideways .
p
If long runny creases appear on copies, try settin g your copy
paper sideways, or try changing the copy media s etting.
p
If creases appear on copies made to transparent film, try s etting
your film sheets sideways.
Copies come out dog eared
p
Try setting your copy paper wit h the other side fac ing up.
p
Make sure your copy paper is undam aged.
Black streaks appear on copies
p
Check that the exposure glass is clean.
35

DO’S & DON’TS
Copying
p
Do not set more than one sheet of paper at a time on the copy
paper table.
p
Center your paper on the copy table using the size marks . Then
slide the paper straight into the copier until it stops.
p
When copying to a long sheet of paper, lightly hold the sheet as
the copier pulls it in so that it goes in well.
p
Do not make two sided copies.
p
If you open the unit make sure you close it within 5 minutes to
keep light from damaging the copy drum .
p
When copying to sheets of 90 cm x 115 cm (35 " x 45 ") or more,
make sure the p aper does not drag directly on the floor as the copier pulls it in. (You can spread some paper on the floor for this.)
p
If your paper has an uneven or slanted edge, do not insert this
edge in first.
p
Do not make copies longer than 2 m (80").
p
Do not insert originals made of paper less than 52.3 g/m
(13.9 lb, or 0.07 mm). For such originals, please use the optional carrier sheet.
2
Toner
p
Store toner cartridges horizontally in a c ool and dark place.
p
Do not leave toner cartridges in your car on a hot day for a long
period of time, or anywhere the toner could be subjected to temperatures of over 35° C (95° F) .
p
Keep toner out of the reach of children.
p
Do not refill toner cartridges. Always use new cartridges.
36

Others DO’S & DON’TS
Paper
p
Keep open reams of pa per in the package and store as you
would unopened packages.
p
Avoid storing paper in humid areas. When it’s hot and humid,
store paper in a vinyl bag.
p
Do not use copy media made of a material oth er than paper,
vellum, or film. Don’t copy to metallic or coat ed paper.
p
Do not use paper with strong curls at the edges or corners.
(Curls rising more than 5 mm [1/4 inch] or falling more than 20 mm
[3/4 inch] over a 40 mm [1.5 inch] radius.)
p
If copying to natural tracing paper (all pulp, translucent paper)
at a relative humidity of 35% or less then:
a) If the paper was left out of its package for 5 minutes or
more, remove the firs t 700 mm before c opying.
b) If copies come out wavy or with white spots, use vellum
tracing paper inst ead of natural tracing paper.
c)
Always keep the paper in a bag when not using it.
Originals
p
Do not feed in torn, wavy, crease d, dog-e ared, or otherwise
damaged originals.
p
Do not feed in two original s at a time. Do not feed in fol ded originals.
p
Do not feed in stapled, or clipped originals. Do not feed in glued
or taped originals (such as a collage), or perforat ed originals.
p
If your original has an uneven or slanted edge, do not insert this
edge in first.
p
Do not feed in originals with strong curls (see above, under Paper).
p
If copying an original that you touched up with correction fluid,
wait until the correction is dry bef ore inserting it in.
p
Do not feed in originals made of a material other than paper,
vellum, or film. Don’t copy from metallic or c oated paper.
p
Do not feed in damp originals.
37

WHERE IS IT & WHAT IS IT
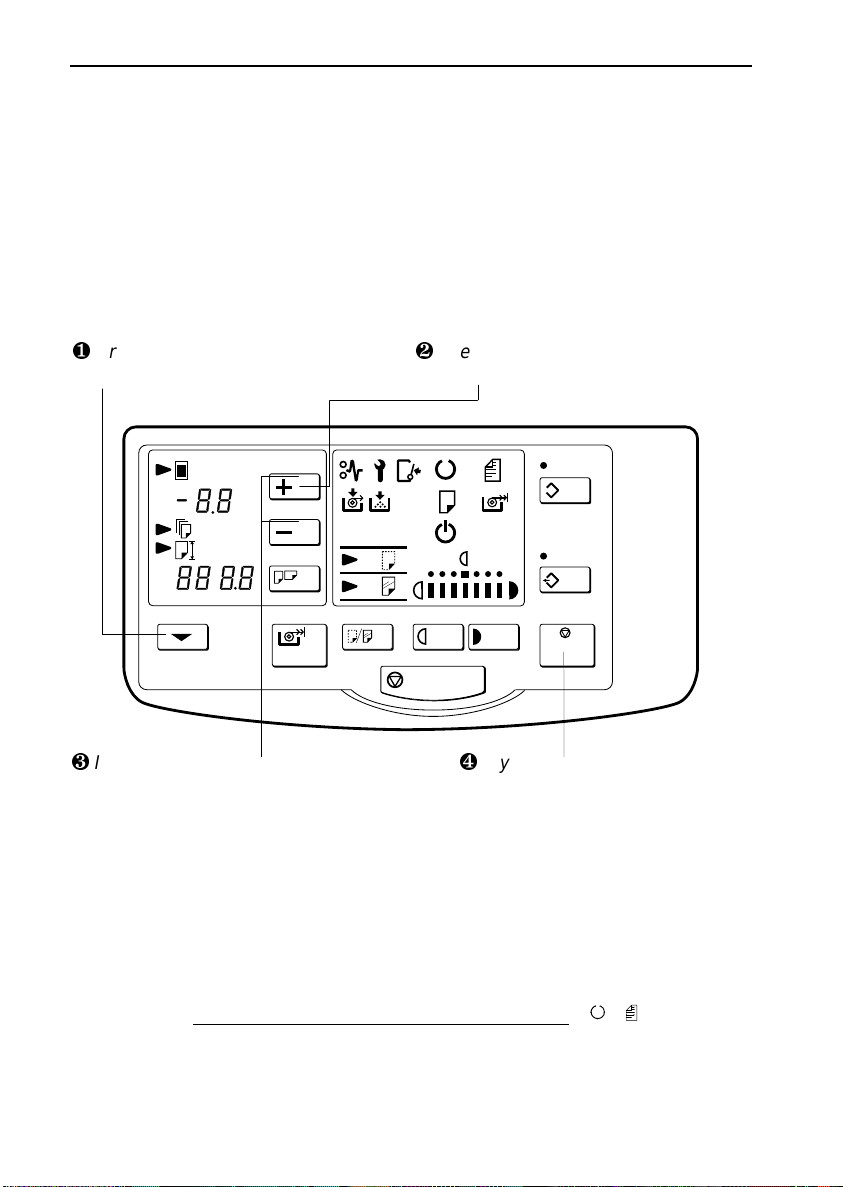
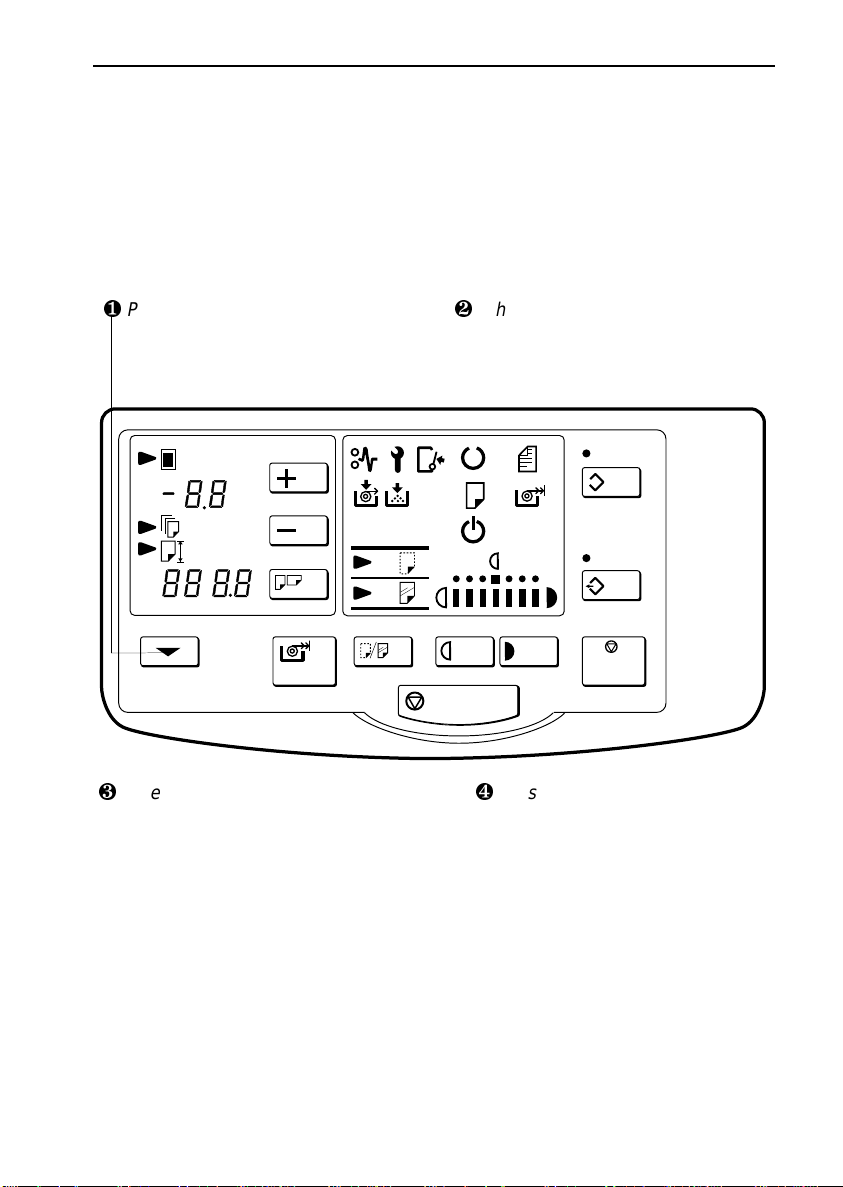
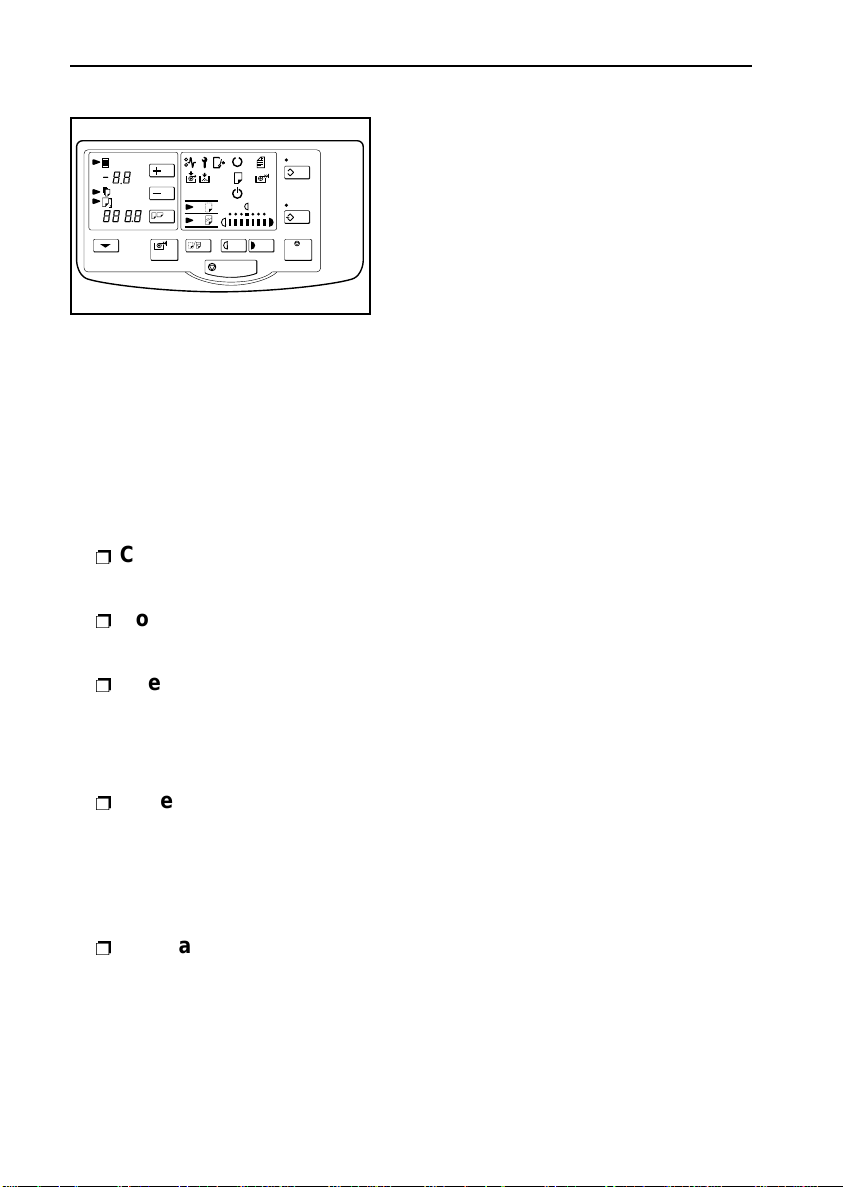
Displays and Keys
1 2 3 4 5 6 7 8
C
C/
9 10 11 12 13 15 16
14
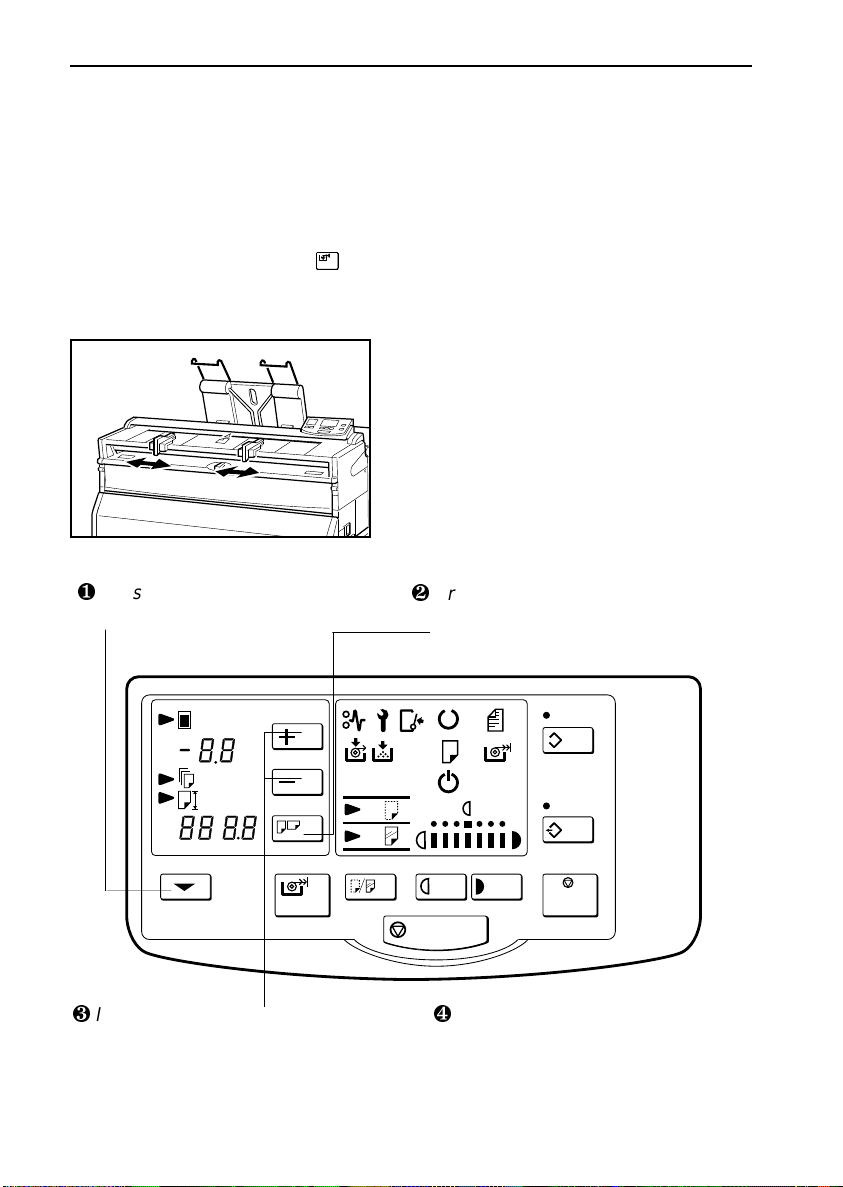
Ref. What it is What it does
The top indicator lights when the lead margin is being set.
Select with key
The middle indicator lights when the number of copies is
being set. Select with key
The bottom indicator lights when the paper length is being
set. Select with key
state of the copier during partial copying.
the above functions.
The minus key (-) decrements the value being set for one
of the above functions.
Lights up when the copier is ready to receive the original,
after the paper has been set or the roll feeder selected.
9
.
9
.
9
.
38
Function
1
indicators
Lead Margin display Displays the lead margin in millimeters. Also indicates the
2
Plus and minus keys The plus key (+) increments the value being set for one of
3
4
Troubleshooting See page 28 for details.
Ready/Set Original
5
indicator

Displays and Keys WHERE IS IT & WHAT IS IT
Ref. What it is What it does
Set Paper
and
RF Select
6
indicators
Wait indicator Shows that the copier is not yet ready to copy.
Clear Modes/Stand-by
7
key
8
Program key Allows you to recall or set a program.
Function Select key Lets you switch your input from, the lead margin, the copy
9
Paper Length
indicator & Copy
10
Counter
11
Preset Cut key Scrolls through the preset paper lengths for the roll feeder.
12
RF Select key Selects the roll feeder as the source of copy paper.
Copy Media key
Vellum Shows when vellum is the selected copy media.
13
and Film Shows when film is the selected copy media.
indicators When both indicators are off, the copier is set for plain
Emergency Stop
14
Density indicator Shows the density level the copies will have.
15
Darker key The Darker key will increase the density.
Lighter key The Lighter key will decrease the density.
Clear Stop key Tells the copier to stop copying and clear the copier. (The
16
These usually light up together. They light when you can
set paper on the table or select and start the roll feeder. If
you don’t have the roll feeder option, the RF Select
indicator will not light.
Returns the copier to the default settings. Press and hold
3 sec. to let the fusing unit cool down. This saves energy,
but increases the waiting time at the next copy job.
counter, or the paper length. (See
copying a selected portion of the original.
1) Shows the length of paper the roll feeder will send.
2) Shows the number of copies to make.
3) Displays FULL when the used toner bottle needs to be
emptied.
Tells the copier what kind of copy paper you are using.
The copier will apply more or less heat accordingly.
copier paper.
Pressing this key will stop the copying process immedi-
ately. Use if your original is getting stuck in the copier.
copier will finish the copy, feed out the original, and stop.)
1
.) Also used for
39

WHERE IS IT & WHAT IS IT The Outside Of The Copier
The Outside Of The Copier
1 23 4 5 67
1a
8 9 10 11 9a 12 13 14
40

The Outside Of The Copier WHERE IS IT & WHAT IS IT
Ref. What it is What it does
1, 1a
9, 9a
*Please!
Locks Squeeze both locks to open the unit. Open the unit to
empty the used toner bottle and to remove jammed paper.
Front cover Open this cover (and the unit) to access the toner
2
Original table Place your original here, face up. If you want to copy a
3
Holder for the
4
operating
instructions
5
Copy exit guide Makes sure the copies don’t fall off as they come out.
6
Operation panel See page 38.
Rear table 1) Place stiff originals here, face down.
7
8
Roll feeder (option) Feeds paper from a roll to the copier.
Guides (option) Use the guides to keep the original and copy paper going
Copy table Open this table if you are copying to sheets, changing the
10
11
Original exit The original will come out from here after it is copied.
Roll feeder covers Open these covers to change the roll of paper and to clear
12
13
Copier table (option) Holds your copier and roll feeder.
14
Main switch
cartridge.
stiff original that can’t be bent, use the rear table (see
Place this booklet here when you’re not reading it.*
2) Open to remove jammed paper from fusing unit.
straight as you feed them into the copier.
toner cartridge, or if you have to open the unit.
paper jams.
Turn on to start the copier and off when you’re done for
the day. The copier will need about 5 minutes to warm up
if it’s been turned off for a long time.
7
).
41

WHERE TO PUT YOUR COPIER
Your copier needs to be installed by a qualified technician. If you need
to transport your copier to a distant location, call your s ervice center before the move.
You can of course move your copier around your office without calling
the service center. If you do, remem ber that the tem perat ure, hum idity ,
and cleanliness of the area around the copier may affect its performance. Choo se th e n ew l oca t ion w it h c ar e a nd fo ll ow th e g ui de li ne s bel ow .
Optimal environment
p
Temperature: 15° to 30° C (59° to 86° F)
p
Humidity: 20 to 80 % RH
p
To avoid possible ozone build-up make sure to install this copier
in a large we ll ventilated r oom ensuring an air turnover of at
3
least 30 m
p
Set your copier on a strong and level base. The copier must be
level within less than 5 mm (1/4") left to right and less than
10 mm (1/2") front to rear.
/hour/person (1000 ft3).
Environments to avoid
p
Locations exposed to direct sunlight or strong light (more than
1500 lux);
p
Dusty areas;
p
Areas with corrosive gases pres ent;
p
Altitudes of over 2000 m (6500 ft) above sea level;
p
Areas prone to strong vibrations;
p
Locations directly exposed to cool air from an air conditioner or
heat from a nearby heater. (Sudden temper ature changes may
lead to condensation within the copier.)
42

Right:
600 mm
(23.6")
WHERE TO PUT YOUR COPIER
Power connection
p
Connect the copier to a power s ource meeting the specifications given on the inside front cover of this m anual.
p
Do not set anything on the power cord.
p
Voltage must not fluctuate mor e than 10%.
p
Make sure the copier is grounded.
p
Avoid multiwiring.
p
Make sure the plug is firmly ins erted into the power out let.
p
Make sure the power outlet is close to t he copier and eas ily accessible at all times.
Clearance
Place the copier near a power source and prov ide c learance as shown
below.
Back
600 mm (23.6")
Left
600 mm
(23.6")
Front
1000 mm (39.4")
43

APPENDIX: PAPER CUTTING RAIL
Cutting a Sheet of Paper
The paper cutting rail allows you to buy paper in rolls and cut your own
sheets. Follow the steps below.
1. Pull a bit of paper out and insert it
between the rail and the double
rod.
2. Pull the length of paper you
want.
44
3. With one hand, hold the paper
firmly against the original table.

Loading a New Roll APPENDIX: PAPER CUTTING RAIL
4. With your other hand, insert the
blade of a paper knife between
the two rods and slide across the
length of the rail.
5 . Make your copy as shown on
page 1. Make sure the curl of the
paper faces
down.
Loading a New Roll
1. Lift the rail.
2. Remove the spool from its support.
45

APPENDIX: PAPER CUTTING RAIL Loading a New Roll
3. Remove one of the end caps and
slide the old roll off the spool.
4. Slide the new roll on the spool
and put the cap over the end of
the roll.
46
5. Place the spool on the holder so
that the paper rolls off the front.
Push it all the way in.
6. Lower the rail.

SPECIFICATIONS
Configuration:
Copy process:
Scanning:
Originals:
Original size:
Copy size:
Copying speed:
First copy:
Warm-up time:
Automatic reset:
Reproduction ratio:
Table top
Electrostatic transfer s ystem
Original moving over a fixed fiber op-
tics array.
Sheet
Maximum, 914 x 2000 mm (36" x 80")
Minimum, A4 (8.5" x 11") lengthwise
Maximum, 914 x 2000 mm (36" x 80")
Minimum, 210 x 280 mm (8.5" x 11")
3 meters per minute(118.1" per minute)
24 seconds (A1 [23" x 35"], sideways)
Within 5 minutes at a room tempera-
ture of 23° C (74° F)
2 minutes (can also be turned off or set
to 1, 3, 4, or 5 m inutes)
1 to 1
Toner replenishment:
Paper feeding:
Self-diagnostic codes:
Power source:
Power consumpt ion:
Cartridge system
Manual feed, optional roll feeder
LED indicators
See inside this manual’s front cover.
See inside this manual’s front cover.
47

SPECIFICATIONS
Noise emission :
Measurements made following ISO 7779
Dimensions (W x D x H):
Weight:
Optional equipment:
Stand by, less than 57 dB
Copy cycle, less than 72 dB
(copier only)
1080 mm x 570 mm x 490 mm
(42.1" x 22.2" x 19.1")
76 kg (167.4 lb)
Roll feeder,
Paper cutting rail,
Original and copy guides,
Copier table
48

INTRODUCTION
This copier is a console plain papercopier carefully manufactured to exacting standards of high
performance. it consistently yields high contrast copies with a superior finish.
This manual contains detailed instructions on the operation and maintenance of this copier. To get
maximum versatility from this copier, all operators should carefully read and follow the instructions in this manual. Please keep this manual in a handy place near the copier.
Please read the next section before using this copier. It contains important information related to
USER SAFETY and PREVENTING EQUIPMENT PROBLEMS.
SAFETY INFORMATION
When using your machine, the following safety precautions should be always be followed.
Safety During Operation
In this manual, the following important symbols are used:
WARNING:
R
Ignoring this warning could cause serious injury or even death.
R
CAUTION:
Ignoring this caution could cause injury or damage to property.
Examples Of Indications
R
v
q
r
Symbol R mean a situation that requires you take care.
Symbol v mean “Hot surface”.
Do NOT carry out the operation represented by this symbol m.
This example means “Do not take apart”.
Symbols l mean you MUST perform this operation.
This example means “Y ou must remove the wall plug”.
i

R R
R W ARNING:
R R
• Only connect the machine to the power source described on the
inside front cover of this manual.
m
• Avoid multi-wiring.
• Do not damage, break or make any modifications to the power
cord. Do not place heavy objects on it, pull it hard or bend it more
than necessary. These actions could cause an electric shock or
fire.
• Do not plug or unplug the power cord with your hands wet. Otherwise, an electric shock might occur.
• Make sure the wall outlet is near the machine and freely accessible so that in event of an emergency it can be unplugged easily.
o
• Do not remove any covers or screws other than those specified
in this manual. Some parts of the machine are at a high voltage
q
and could give you an electric shock. Also, if the machine has
laser systems, direct(or indirect)reflected eye contact with the
laser beam may cause serious eye damage. When the machine
needs to be checked, adjusted, or repaired, contact your service
representatives.
• Do not take apart or attempt any modifications to this machine.
There is a risk of fire, electric shock, explosion or loss of sight. If
the machine has laser systems, there is a risk of serious eye
damage.
ii
r
m
• If the machine looks damaged or breaks down, smoke is coming
out, there is a strange smell or anything looks unusual, immediately turn off the operation and main power switches then unplug
the power cord from the wall. Do not continue using the machine
in this condition. Contact your service representative.
• If metal, liquid, or foreign matter falls into the machine, turn off the
operation and main power switches, and unplug the main power
cord. Contact your service representative. Do not keep using the
machine with a fault or defect.
• Do not put any metal objects or containers holding water(e.g.
vases, flowerpots, glasses) on the machine. If the contents fall
inside the machine, a fire or electric shock could occur.

s
• Do not incinerate used toner, toner bottles or toner cartridges.
Toner dust might ignite when exposed to an open flame. Dispose
of the used toner cartridges according to local regulations for
plastics.
iii

RR
RCAUTION:
RR
• Keep the machine away from humidity and dust. A fire or an
electric shock might occur.
m
o
r
• Do not place the machine on an unstable or tilted surface. If it
topples over, it could cause injury .
• After you move the machine, fix it with the caster fixture. Otherwise, the machine might move or come down to cause a personal injury.
• When you move the machine, unplug the power cord from the
wall outlet to avoid fire or electric shock.
• When the machine will not be used for a long time, unplug the
power cord.
• When you pull out the plug from the socket, grip the plug to avoid
damaging the cord and causing fire or electric shock.
t
• If you use the machine in a confined space, make sure there is a
continuous air turnover.
o
• Do not reuse stapled paper. Do not use aluminium foil, carbon
m
containing paper or other conductive paper. Otherwise, a fire
might occur.
iv
n
R
R
R
• When removing misfed paper, do not touch the fusing section
because it could be very hot.
• This machine has been tested for safety using this supplier’s
parts and consumables. We recommend you only use these specified supplies.
• Do not eat or swallow toner.
• Keep toner(used or unused) and toner cartridges out of reach of
children.
• This equipment is only to be installed by a qualified service
personnel.

R
• Deliver to collection point for waste products. Do not be disposed
of via domestic refuse collection.
v

TABLE OF CONTENTS
1. GETTING STARTED................................................... 1
HOW TO USE THIS COPY MACHINE............................. 1
WHERE IT IS & WHA T IT IS............................................ 4
Copier Exterior ............................................................. 4
Operation Panel ........................................................... 6
RECOMMENDED ORIGINALS ........................................ 8
RECOMMENDED PAPER ............................................ 10
TONER......................................................................... 12
2. COPYING................................................................. 13
BASIC COPYING ......................................................... 13
Using the Rear T able .................................................. 18
COPYING ONTO ROLL PAPER.................................... 19
Semi Synchro Cutting ................................................ 20
Preset Cutting............................................................ 22
V ariable Cutting.......................................................... 23
USING THE ROLL CUTTING RAIL ................................. 24
3. COPY SETTINGS .................................................... 27
COPYING ONTO OTHER MEDIA .................................. 27
ADJUSTING COPY IMAGE DENSITY ........................... 29
MAKING SEVERAL COPIES OF THE
SAME ORIGINAL ......................................................3 0
SETTING A LEADING EDGE MARGIN.......................... 31
PARTIAL COPYING ...................................................... 32
PROGRAMMING SETTING YOU OFTEN USE .............. 34
A) Program key......................................................... 34
B) Changing The Default Setting ................................ 35
vii

USER TOOLS ...............................................................3 6
Semi Synchro Cut Adjustment ....................................36
WHA T YOUR SERVICE REPRESENT A TIVE
CAN CHANGE...............................................................37
4. MAINTAINING YOUR COPIER ..................................3 9
CHANGING THE TONER BOTTLE .................................3 9
ADDING TONER............................................................42
LOADING A ROLL OF PAPER.......................................45
LOADING A NEW ROLL
(ONTO ROLL CUTTING RAIL) ........................................49
5. TROUBLESHOOTING ...............................................5 1
If Something Goes Wrong ...........................................51
If A Service Indicator Lights Up ....................................51
IF JAMS OCCUR ...........................................................5 2
OTHERS .......................................................................5 8
THINGS TO DO EVERY DA Y.........................................6 0
DO’S & DON’TS ............................................................61
WHERE TO PUT YOUR COPIER...................................6 2
6. SPECIFICA TIONS .....................................................65
COPIER ........................................................................65
OPTIONS ......................................................................66
INDEX ...........................................................................67
viii

1. GETTING ST ARTED
HOW TO USE THIS COPY MACHINE
1 Turn the machine switch on.
When the “W ait “ indicator goes off and the ”Set Paper” indicator goes on, the copier enter the
ready condition.
Clear Modes/
Lighter
Cut Select
Preset Cut
RF Select/ Cut
Set
Original
Set
PaperRFSelect
Wait
Lighter Copy
Darker
Energy
Saver
Vellum
Film
Copy Media
Emergency Stop
Lighter
Energy Saver
Program
Clear / Stop
Set
Original
Set
PaperRFSelect
Wait
Lighter Copy
Darker
Clear Modes/
Energy Saver
Program
Clear/ Stop
Energy
Saver
Vellum
Film
PM001
Copy Media
Emergency Stop
2 Select any copy settings you require, such as the media type or copy density.
If you have Roll Feeder (option), press the R/F Select key to select “Roll Feeder”.
Paper Length
Semi Synchro
Preset/
Variable
Leading Edge
Copy Counter
Function Select
3 Center the paper
p These illustrations show the copier with the Original Guides, the Paper Guides, and other
face up on the Copy Paper Table and slide the paper straight into the copier.
PB001
optional equipment.
1

4 Set the Original Guides (option) to match the original size mark. Set the original face up and
slide it straight into the copier along the Original Guides.
PB002
PB003
5 The original comes out from the opening just under the original table À.
The copy is delivered from the slot on top of the copier Á.
PB004
If you make several copies of the same original, when the copy comes out, remove it and repeat
from step3.
2

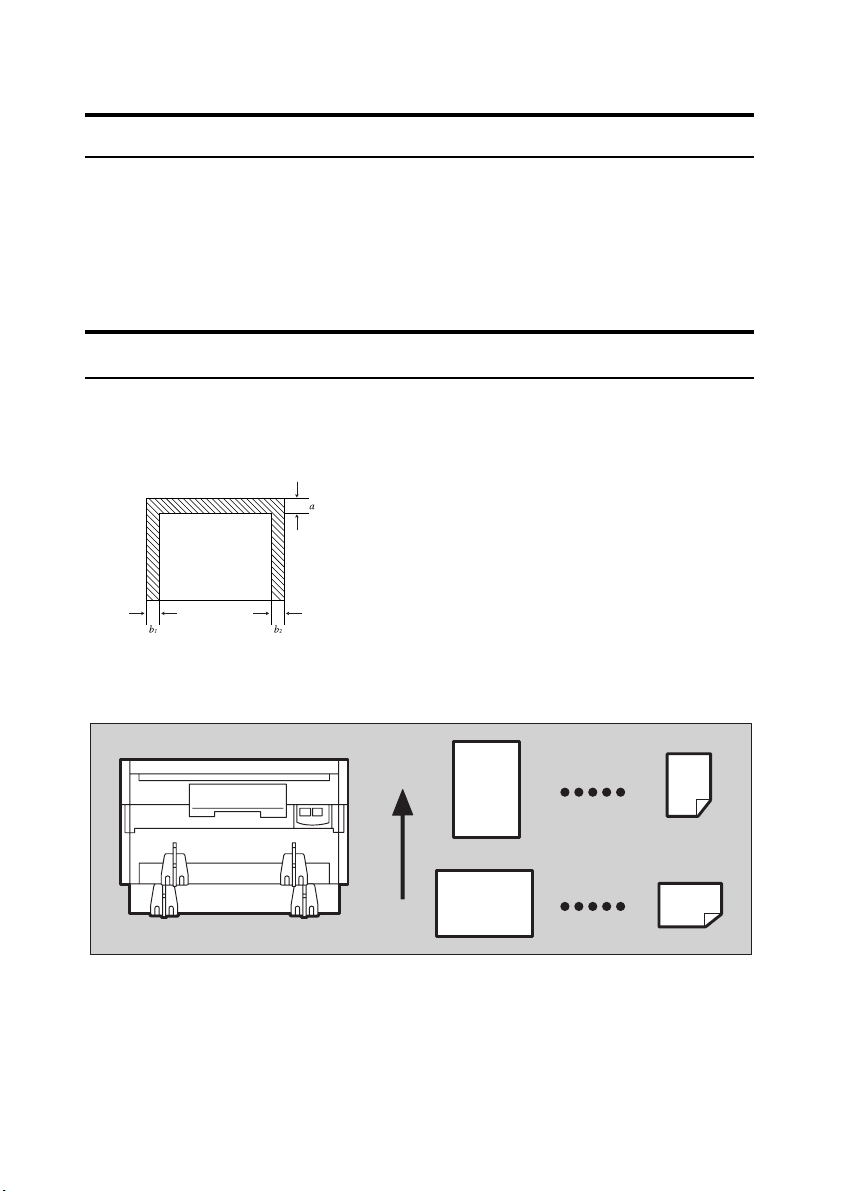
Notes
p If you want to catch copies the back of the
machine, change the copy delivery directions
as shown in the figure.
SB011
3

WHERE IT IS & WHA T IT IS
Copier Exterior
1a 2 4 3 13 5 6
1b
7 8 9 10 11 12
Set the Manual Pocket as shown in the figure.
4
SB001
SB002

1a & 1b Locks
Squeeze both locks to open the unit. Open the unit to empty the used
toner bottle and to remove jammed paper.
2. Front Cover
3. Original Table
4. Original Guides
(option)
5. Operation Panel
6. Rear Table
7. Roll Feeder (option)
8. Paper Guides (option)
9. Copy Paper Table
10.Roll Feeder Covers
11.Table (option)
12.Main switch
Open the cover(and the unit) to access the toner cartridge.
Place your original here, face up. If you want to copy a stiff original
that can’t be bent, use the Rear Table (see 6).
Use the guide to keep the original going straight as you feed the
original into the copier.
See page 6.
Place stiff originals here, face down.
Feeds paper from a roll to the copier.
Use the guides to keep the copy paper going straight as you feed the
into the copier.
Open this table if you are copying to sheets, changing the toner
cartridge, or if you have to open the copier.
Open these covers to change the roll of paper and to clear paper jams.
Holds your copier and the Roll Feeder.
Turn to start the copier and off when you’re done for the day. The
copier will need about 5 minutes to warm up, if it’s been turned off for
a long time.
13.Copy Exit Guide
Makes sure the copies don’t fall off as they come out.
5

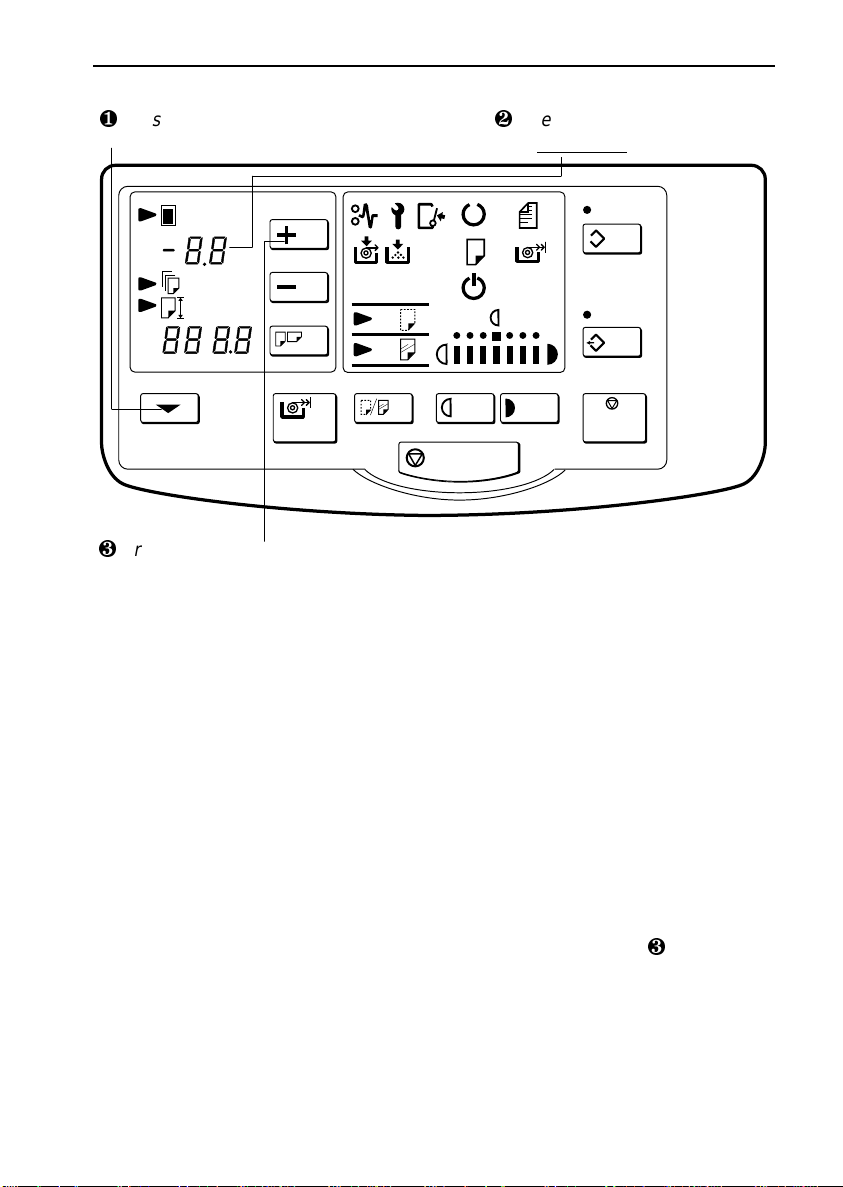
Operation Panel
1234567891011
Paper Length
Semi Synchro
Preset/
Variable
Leading Edge
Copy Counter
Function Select
12 13 14 15 16 17 18 19
1. Function indicators
2. Paper length display
3. Preset Cut key
Cut Select
Preset Cut
RF Select/Cut
Energy
Saver
Vellum
Film
Copy Media
Emergency Stop
Set
PaperRFSelect
Lighter Copy
Lighter
Set
Original
Wait
Darker
Clear Modes/
Energy Saver
Program
Clear / Stop
These indicators show which setting you are currently editing, Press
the Function key to cycle through them.
The top indicator lights when the paper length is being set.
The middle indicator lights when the lead margin is being set.
The bottom indicator lights when the number of copies is being set.
Shows the length of paper the Roll Feeder will send.
Scrolls through the preset paper lengths for the Roll Feeder.
4. Cut Select key
5. Energy Saver indicator
6. Troubleshooting
7. W ait indicator
8. Ready/Set Original
6
Turns Semi synchro Cut, or Preset/Variable Cut on/off.
Shows that it is in a state of wait (Energy Saver). Press key 10.
See page 51 for details.
Shows that the copier is not yet ready to copy.
Lights up when the copier is ready to receive an original.

9. Set Paper or RF
Select indicator
The Set Paper indicator on the left lights when the copier is ready
to receive an paper. The RF Select indicator on the right lights when
you select the Roll Paper.
10. Clear Modes/Energy
Saver key
11. Program key
12. Function Select key
13. Plus and minus key
14. Leading Edge/Copy
Counter indicator
15. RF Select/Cut key
16. Copy Media key
17. Emergency Stop key
Cancels all of current settings. When you hold down this key for
three seconds or more, the copier enters the Energy Saver mode
allowing you to conserve power.
T o exit Energy Saver mode, press this key again.
Allows you to recall or set a program.
Press to change which setting you are editing. The current selection
is shown by the indicators above: Paper Length
Leading Edge
Copy Counter
Also used for copying a selected portion of the original.
Press to increase the setting being edited.
Press to decrease the value being edited.
Displays the margin settings and the number of copies made.
Selects the paper feed type (when the Roll feeder option is installed). Also press to stop a copy job.
Press to select the type of copy paper you are using.
The copier will apply more or less heat accordingly.
Press to stop the copying process immediately.
Use if your original is getting stuck in the copier.
If you stop the operation by pressing this key, remove both the
original and paper.
18. Density indicator
Density keys
19. Clear/Stop key
Shows the density level the copies will have.
Press the left key to make copies lighter.
Press the right key to make copies darker.
While entering numbers, press to cancel a number to have entered.
While copying, press to stop copying.
7

RECOMMENDED ORIGINALS
❐ You can set originals with weight in the range 21g/m2, 6 lb to 157 g/m2, 41 lb in this copier.
❐ Feedable size is between 914×2,000mm (W×L), 36”×80” (maximum width that can be fed:
960mm, 38.4”) and 210×297mm (W×L), 8.5”×11” for minimum.
❐ You can not use the Repeated Copying function in the following cases.
When using the Carrier Sheet (option)
When setting an original longer than 1200mm (47”)
❐ Fix the curl of original to within the following range.
• For the curl of the leading edge and the trailing edge: R50mm (2.0”) or more, H20mm (0.8”)
or less
• For the curl of the whole area of the paper: Ø30mm (1.2”) or more
❐ When you copy the following ori ginals, set them in the Rear Table:
cSee page 18, “Using the Rear Table”
• Thick originals (0.19mm, 35µ~1mm)
• Originals which cannot be folded.
• Originals less than 297mm (12”) in width and more than 1200mm (47”) in length.
❐ When you copy the following originals, use the Carrier Sheet (option) to set them:
• Piled originals • Folded originals
• Taped or pasted originals • Originals which ha ve a hole near the leading edge 40mm
(1.6”) to the right or left of the center
• Dog-eared originals • Creased, torn, or clipped-out originals
• W avy originals • Pasted originals
• Originals whose leading edge is • Curled originals
not straight
8
Non-recommended originals
p The following types of originals are not recommended.
• W et originals • Originals with cardboard stuck on the leading edge
• Originals with clips or staples • Originals with wet ink or white-out
• Carbon paper • Originals made of materials other than paper or film
(thermosensitive paper, aluminum foil,etc)
Notes For Originals
p Margins on the leading and side edges of originals are not copied as shown in the illustration.
a=0±3mm(0.12”)
b1+b2<0±2mm(0.08”)(A1
M)
SB042
9

RECOMMENDED P APER
p Standard paper sizes that can be used in this copier are shown below.
Metric version Inch version Bypass Roll Feeder
A0 E (36” × 48”)
A1 D (24” × 36”)
A2 C (18” × 24”)
A3 B (12” × 18”)
A4 A ( 9” ×12”)
p When you make a copy on a non-standard size of paper, set the paper on the Copy Paper
Table.
p Weight of paper suitable for this copier: 51g/m
p Do not use the following kinds of paper or a paper jam might occur.
• Bent, folded, or creased paper
• Torn paper
• Perforated paper
• Non-smooth paper
• Slippery paper
• Thin paper that has low stiffness
p Do not make a copy on paper with any kind of coating, such as thermosensitive paper, art
paper, aluminium foil, and carbon paper .
A fault might occur.
p Do not use paper with strong curls at the edges or corners. (Curls rising more than 5mm(1/4”)
or falling more than 20mm (3/4”) over a 40mm (1.5”) radius.)
p When you make copies on film, take out the copies delivered to the copy guide one sheet at a
time and place them on a flat surface.
KK
KL KL
KL KL
KL KL
KK
2
, 14lb to 134g/m2, 36lb.
10

p If copying to natural tracing paper (all pulp,translucent paper)at a relative humibity of 35%
or less.
a)If the paper was left out of its package for 5 minutes or more, remove the first 700mm(28”)
before copying.
b)If copies come out wavy or with white spots, use vellum tracing paper instead of natural
tracing paper.
c)Always keep the paper in a bag when not using it.
p Store the paper in a sealed polyvinyl bag if not used for a long period.
If it gets humid, paper will curl or wave causing a paper jam or part of the image not to be
copied.
p When you use paper in high humidity under hot conditions, take out only the necessary
amount of paper at a time from the bag. Do not take all the paper out of the bag.
Dehumidifing Heater
p Under humid conditions, the copier turns on the dehumidifying heater. It is turned on automati-
cally even when the main switch is off. Do not unplug the power .
11

TONER
Handling T oner
R
W ARNING:
• Do not incinerate used toner, toner bottle or toner cartridge.
• Toner dust might ignite when exposed to an open flame.
s
R
Caution:
R
R
Caution:
R
❐ If you use toner other than that recommended, a fault might occur.
❐ If you want to add toner , see ⇒ P.42 ”ADDING TONER”
• Dispose of the toner bottle and the used toner cartridge
according to local regulations for plastics.
• Do not eat or swallow toner.
• Keep toner(used or unused), toner bottle, and toner cartridge out of
reach of children.
• This machine has been tested for safety using this supplier’s parts
and consumables. We recommend you only use these specified supplies.
Toner Storage
❐ Store toner cartridge horizontally in a cool, dark place.
❐ Do not leav e toner cartridge in your car on a hot day for a long period of time, or anywhere the
toner could be subjected temperatures of over 95°F (35°C).
❐ Never store toner where it will be exposed to heat.
❐ Do not lay heavy objects on toner bottles.
Used T oner
❐ Used toner cannot be re-used.
12

2. COPYING
BASIC COPYING (COPYING TO SHEETS)
Use the Copy Paper Table to copy onto paper.
Notes
p For acceptable types of original and paper see ⇒ page 8 and 10.
p Set one sheet of paper at a time on the Copy Paper Table. Never insert more than one
sheet of paper.
p If the copy paper is curled, set it with curl facing downwards.
p When you set A0 size(36” × 48”) paper, to make sure the ends do not touch the floor
and get dirty, lay a wide piece of paper or some other covering on the floor.
p Do not use the paper which is cut obliquely, when the difference between the right
side and the left side of the paper is more than 5mm (4/5”), creasing or a paper jam might occur.
p You cannot copy to both sides of the paper at a time.
p It takes about 5 minutes until you can start copying after you turn the copier on. The
machine is warming up when the “Wait” indicator is lit, but you can still edit settings, insert
copy paper or insert your original.
p You can set either paper or an original first. When you have set both of them, the
copier starts copying automatically.
p Do not lean on the copy table or lay heavy objects on it.
CAUTION : If during copying your original gets stuck in the copier, press the
Emergency Stop key .
If you stop the operation by pressing this key, remove both the
original and paper.
13

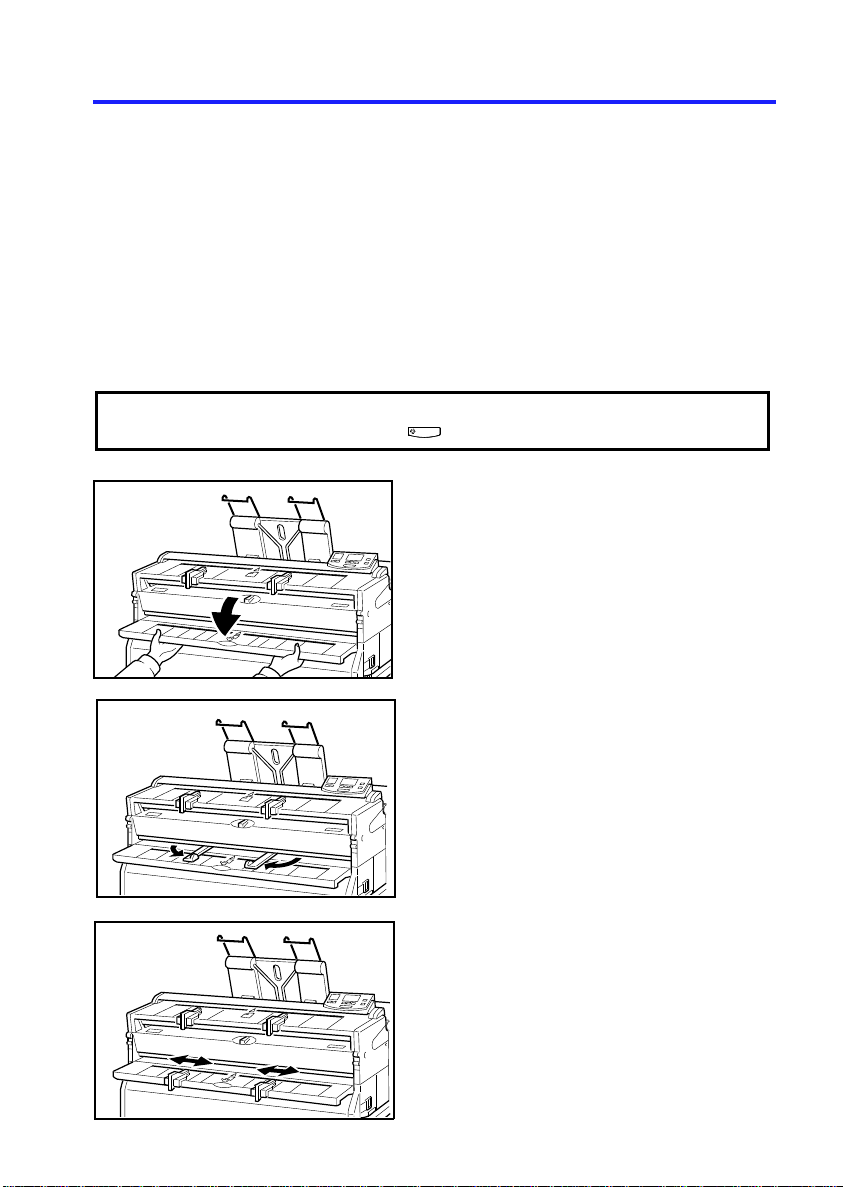
1 Pull down the Copy Paper Table.
2 Set the Paper Guides(options) on the
Copy Paper Table, and set the Original
Guides (option) on the Original Table.
3 Open the guides to keep original away from
the paper entrance so that the edge cannot
slip into the paper entrance.
SB003
SB004
14
SB005

4 Make sure that the “Set Paper” indicator is lit.
If it is off, press the Energy Saver key to exit Energy Saving mode.
5 If any previous settings remain, press the Clear Modes key.
6 Set the density, the number of copies, and other optional settings you require such as Leading
Edge.
Clear Modes/
Set
PaperRFSelect
Lighter Copy
Lighter
Set
Original
Wait
Darker
Energy Saver
Program
Clear / Stop
Paper Length
Semi Synchro
Preset/
Variable
Leading Edge
Copy Counter
Function Select
Cut Select
Preset Cut
RF Select/Cut
Energy
Saver
Vellum
Film
Copy Media
Emergency Stop
7 Set the paper along the size indication on the
Copy Paper Table. Or set the Paper Guides
(option), to match the paper width.
SB007
8 Slide the paper straight into the copier until it
stops. The copier will soon pull it in.
SB008
15

9 Set your original along the size indication on
the Original T able. Or set the Original Guides
(option) to match the original width.
a Make sure that the “Set Original” indicator is
lit.
Energy
Saver
Vellum
Film
Copy Media
Emergency Stop
Set
PaperRFSelect
Lighter Copy
Lighter
Set
Original
Wait
Darker
Clear Modes/
Energy Saver
Program
Clear / Stop
b Center your Original
face up on the Original
T able. Slide the original straight into the copier
until the copier pulls it in.
c The original comes from the opening just
under the Original Table À. The copy is
delivered from the slot on top of the
copier Á.
SB009
2
1
SB010
16

Notes
p Do not hold down or pull out the original during copying. Do not put pressure on the original
cover.
p If you do not insert the original at a certain time after you have inserted the paper,
the paper will exit automatically.
p If you do not insert the paper at a certain time after you have inserted the original, the original
will exit automatically.
p If the copier is idle at a certain time after you have used it, the machine resets itself to the initial
settings (Auto Clear). If applicable, the copier will enter the Energy Saver mode automatically.
p Y ou can preset the initial settings of the copier ⇒ see page 35 "Changing The Default Setting”
p If the copier is not used for a long period, it will turn itself off.
17

Using the Rear T able
When you copy the following originals, set them in the Rear T able.
• Thick originals (0.19mm, 35µ ∼ 1mm).
• Originals which cannot be folded.
• Originals less than 297mm (12”) in width and more than 1200mm (47”) in length.
Notes
p Y ou cannot use the following function using the Rear Table.
Repeated Copying
Semi Synchro Cut with roll paper
Partial Copying
1 Choose any copy setting you require.
2 For mannual copying, set paper.
3 Pull up the holder and turn in the copy exit
guide.
SB012
4 Insert the original
face down from the Rear
Table.
5 Hold and take the original which has been
read and delivered in the front of the copier.
18
SB013

COPYING ONTO ROLL P APER (OPTION)
To make a copy using the Roll Feeder option, you do not need to set paper on the Copy Paper
Table; the paper will be fed to the copier from the Roll Feeder. You can copy onto roll paper using
the following techniques:
•Semi Synchro cutting
•Preset cutting
•V ariable cutting
Notes
p If unused roll paper is left in the copier, cut 700mm (28") from the edge of the paper before you
start copying.
p When you want to copy the long original, the curled originals, or the thin originals (less than
0.1mm) which can be easily bent down, open the guide to keep the original away from the
paper entrance.
SB014
CAUTION : If during copying your original gets stuck in the copier, press the Emergency
Stop key.
If you stop the operation by pressing this key, remove both the original and
paper.
19

Semi Synchro Cut
This feature lets you cut the roll paper manually to a length that approximates to that of the
original. This saves you having to measure and enter the length of every original.
Notes
p Semi Synchro Cut can handle the cut length in the range 410 ~ 2000mm, 16.5” ~ 80.0”.
p If you set the number of copies, Semi Synchro Cut can handle automatically by the length at
your setting for first copy.
1 Press the Cut Select key to turn on the “Semi Synchro” indicator.
2 Choose any copy settings you require.
3 Press the RF Select key to turn on the ”RF Select” indicator.
4 Make sure that the “Set Original” indicator is lit.
Clear Modes/
Set
PaperRFSelect
Lighter Copy
Lighter
Set
Original
Wait
Darker
Energy Saver
Program
Clear / Stop
Paper Length
Semi Synchro
Preset/
Variable
Leading Edge
Copy Counter
Function Select
Cut Select
Preset Cut
RF Select/Cut
Energy
Saver
Vellum
Film
Copy Media
Emergency Stop
5 Set your original along the size indication on
the Original Table, or set the Original Guides
(option) to match the original width.
20
SB007

6 Center your original face up on the Original
Table. Slide the original straight into the copier
until the copier pulls it in.
SB015
7 Just as the trailing edge of the original passes
the horizontal line of the Semi-auto synchro
cut mark, press the Cut key.
SB016
Notes
p To cancel copying, press the Clear/Stop key. The copier finishes the operation in progress, and
delivers the copy and the original.
pTo call off on-going copying, for example, when you have inserted a wrong blueprint, press the
Cut key. The machine interrupts the operation in progress, and delivers the copy and the
original.
21

Preset Cutting
This function cuts roll paper to a selected length. The paper is cut to this length regardless of the
original size.
Notes
p By the default Preset Cut length is as follows. For the change of the Preset Cut length pattern,
please contact your service representatives.
Metric Version: 1189mm, 841mm, 594mm, 420mm, 297mm
Inch Version: 48.0”, 42.0”, 36.0”, 24.0”, 18.0”, 12.0”
1 Press the Preset Cut key. The “Preset/Variable” indicator lights up and the “Paper Length”
display shows the default Preset Cut length. (1189mm, or 48.0”).
2 Press the Preset Cut key several times until the indicator shows the value you want.
3 Choose any copy settings you require.
4 Press the RF select key to turn on the “RF Select” indicator.
Clear Modes/
Set
PaperRFSelect
Lighter Copy
Lighter
Set
Original
Wait
Darker
Energy Saver
Program
Clear / Stop
Paper Length
Semi Synchro
Preset/
Variable
Leading Edge
Copy Counter
Function Select
Cut Select
Preset Cut
RF Select/Cut
Energy
Saver
Vellum
Film
Copy Media
Emergency Stop
5 Continue from step4 of P. 20.
22
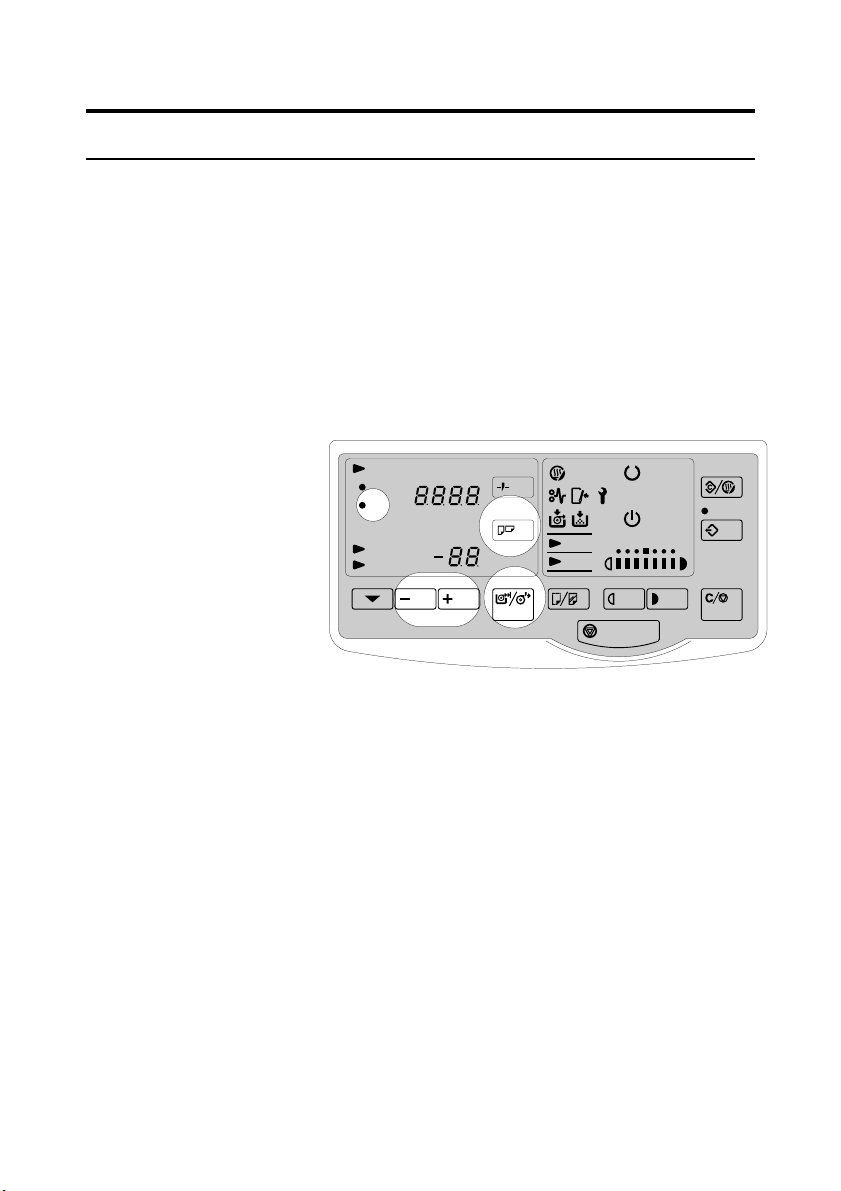
Variable Cutting
This function cuts roll paper in a length you specify.
Notes
p The variable cut can handle the cut length from 245 to2,000mm,9.6”to 78.7”.
1 Press the Preset Cut key. The “Preset/Variable” indicator lights up and the “Paper Length”
display shows the default Preset Cut length. (1189mm, or 48.0”).
2 Press the Preset Cut key to display the nearest value you want.
3 Press + key or - key to specify the most appropriate length.
4 Choose any copy settings you require.
5 Press the RF select key to turn on the “RF Select” indicator.
Clear Modes/
Set
PaperRFSelect
Lighter Copy
Lighter
Set
Original
Wait
Darker
Energy Saver
Program
Clear / Stop
Paper Length
Semi Synchro
Preset/
Variable
Leading Edge
Copy Counter
Function Select
Cut Select
Preset Cut
RF Select/Cut
Energy
Saver
Vellum
Film
Copy Media
Emergency Stop
6 Continue from step4 of P. 20.
23

USING THE ROLL CUTTING RAIL (OPTION)
The ROLL Cutting Rail allows you to buy paper in rolls and cut your own sheets.
1 Pull a bit of paper out and insert it between
the rail and the double rod.
2 Pull the length of paper you want.
3 With one hand, hold the paper firmly against
the Original Table.
SB017
SB018
SB019
24

4 With your other hand, insert the blade of a
paper knife between the two rods and slide
across the length of the rail.
5 Make your copy as shown on page 14.
Make sure the curl of the paper faces down .
SB020
SB021
25

3. COPY SETTINGS
COPYING ONTO OTHER MEDIA
To copy onto vellum (translucent or tracing paper) or film, select the Copy Media function to
match the paper type (see below).
Type of paper Media setting
Plain paper Both indicators off
Film Film indicator on
V ellum Vellum indicator on
Heavy paper Vellum indicator on
Thin paper No indicator, or film, if
This list is not complete. If you are not sure of what type of paper you have, check the label on the
paper package.
1 Press the Copy Media key to turn on the
“V ellum” or “Film” indicator.
The “Wait” indicator goes on and either the
“V ellum” or “Film” indicator lights.
2 When the “Wait” indicator goes off and the
“Ready” indicator goes on, the copier enters
the ready condition.
necessary.
Energy
Saver
Vellum
Film
Copy Media
Emergency Stop
Set
PaperRFSelect
Lighter Copy
Lighter
Set
Original
Wait
Darker
Clear Modes/
Energy Saver
Program
Clear / Stop
Notes
p Even if you have set the Copy Media function correctly, creasing might
occur depending on temperature or humidity. If this happens, adjust the
fusing temperature manually. See the next page.
27

Adjusting the Fusing T emperature Manually
1 Press the Copy Media key to turn on the
“Vellum” or “Film” indicator that you want.
2 Hold down the Copy Media key for at least
3 seconds.
The “Lighter Copy” display will show the
current fusing temperature. The unlit indicator shows the current temperature.
Energy
Saver
Vellum
Film
Copy Media
Emergency Stop
Set
PaperRFSelect
Lighter Copy
Lighter
Set
Original
Wait
Darker
Clear Modes/
Energy Saver
Program
Clear / Stop
3 Press the Lighter key to decrease the tem-
perature, and press the Darker key to increase
the temperature.
The number of temperature levels available
depends on the paper type:
Plain paper : 1234567
V ellum : 1234
Film : 1234
4 After you have finished the setting, press the Copy Media key.
5 Choose any copy settings you require, then start copying.
Notes
p The new fusing temperature for the selected paper type is cleared when you press the Clear
Modes key or turn off the main switch.
28

ADJUSTING COPY IMAGE DENSITY
To make copies darker or lighter, change the density setting. There are 14 density levels: the
standard density level, three darker level, and 10 lighter levels. Set the density with the Lighter and
Darker keys under the density indicator.
Notes
p The indicator shows seven levels at a time. When you start from the standard image density, the
middle notch corresponds to the standard image density , the three right notches correspond to
darker densities, the three left notches to lighter densities.
p The brighter notch shows which level is now set. If you go lower than the leftmost notch, the
words Lighter Copy light up. The notches on the indicator correspond to the seven lightest
levels.
Clear Modes/
1 Press the Lighter or Darker key to adjust copy
density.
Energy
Saver
Vellum
Film
Copy Media
Emergency Stop
Set
PaperRFSelect
Lighter Copy
Lighter
Set
Original
Wait
Darker
Energy Saver
Program
Clear / Stop
2 Each time you press the Lighter key,the indicator moves one step to the left. When the indicator
reaches the left edge, it returns to the right edge and the “Lighter Copy” indicator lights.
29

MAKING SEVERAL COPIES OF THE SAME ORIGINAL
Paper Length
Semi Synchro
Preset/
Variable
Leading Edge
Copy Counter
Function Select
RF Select/Cut
Cut Select
Preset Cut
Repeated copying means making two or more copies of a original. To make more than one copy
of the same original, you have to reload the original after each copy. If you’re not using the Roll
Feeder (option), you also have to set the copy paper for each copy.
Notes
❐ with this feature, the image might be copied at a slant. Whether this happens depends on the
original size, type, and condition(e.g., curled, wavy, originals). In such a case, make one copy
at a time.
❐ You cannot use the repeated copy function in the following cases:
— When using the Carrier Sheet (option).
1 Press the + and - keys to specify the number
of copies.
When you press the Clear/Stop key , the number of copies returns to “1”.
2 Proceed as for a usual copy, with sheet paper
(page 13), or with the Roll Feeder (page 19).
3 When the copy comes out, remove it and
repeat step2. wait for the “Set Paper” indicator
to light up before loading a new sheet of
paper, and wait for the “ Set Original”
indicator to light up before reloading the
original.
30

SETTING A LEADING EDGE MARGIN
Paper Length
Semi Synchro
Preset/
Variable
Leading Edge
Copy Counter
Function Select
RF Select/Cut
Cut Select
Preset Cut
You can set a margin at the leading edge of the copy.
Leading Edge
Margin
Leading Edge Margin
Using the Copy Paper Table, or in the Preset Cut mode,
Variable cut mode
In the Semi Synchro Cut mode
Notes
❐ You can set up to ±99mm, ±4.0” margin in 1mm, 0.1” steps at the leading edge.
❐ The copy image is shifted to the trailing edge, when you make a copy using the Copy paper
table, or in the Preset Cut mode, Variable Cut mode.
❐ In the Semi Synchro Cut mode, the paper extend by the leading mar gin width.
1 Press the Function Select key until the “Lead-
ing Edge” or “Trailing Edge” indicator is lit.
2 Press the + key and - key to specify a edge
margin.
To zero the value, press the Clear/Stop key.
3 Insert the original from the leading edge.
You can get same results using the Rear Table.
31

PARTIAL COPYING
The Partial Copy function copies only a part of an original.
You need to enter start and end points in the original feed direction.
a
Semi Synchro Cut Mode
b
Original Cop y Paper Table
Preset/Variable Cut Mode
Notes
p Y ou cannot use the Partial Copying function using the Rear Table.
p Y ou cannot use the Partial Copying function for originals shorter than 150mm.
p Y ou can use the Partial Copying function for originals longer than 1270mm.
p If you set the start point within 130 mm from the leading edge of the original, the copier will
regard the leading edge as the start point.
p The minimum available space between the start point and the end point is 30 mm.
p If you do not set the end point after setting the start point, the copier will regard the trailing edge
of the original as the end point.
p In the Semi Synchro Cutting function, the paper extend by 140mm from the end point. if you
do not set the end point, the paper extend by 270mm as the trailing margin.
1 Hold down the Function Select key for three
seconds.
A “P” will blink in the copy counter display.
Paper Length
Semi Synchro
Preset/
Variable
Leading Edge
Copy Counter
Function Select
Cut Select
Preset Cut
RF Select/Cut
32

2 Slide the paper straight into the copier until it
stops, or press the RF Select key to turn on
the “RF Select “ indicator.
3 Set the original.
4 Press the Function Select key when the lead-
ing edge of the area to be copied comes to the
position where it is covered with the original
table cover.
The “P” will stay on, not blinking.
The copier starts copying.
5 Press the Function Select key when the trail-
ing edge of the area to be copied comes to the
position where it is covered with the original
table cover.
The “P” will start blinking again.
SB009
a
b
SB043
b
SB044
6 After the paper has been delivered, hold down the Function Select key for three seconds to turn
the function off.
The “P” will disappear.
33

PROGRAMMING SETTING YOU OF TEN USE
There are two ways of programming settings you often use.
A) Store the settings in the Program key. When you press this key, the settings will be restored
instantly.
B) Change the default settings to those you use most frequently. Whenever you turn on the
machine or press the Clear Modes key, these settings will be ready to use.
A) Program key
Storing Setting In The Program Key
Notes
p The number of copies is not stored in the Program key.
1 Press the Program key.
2 Input the settings you want to store.
3 Make a copy, then press the Program key.
Energy
Saver
Vellum
Film
Copy Media
Emergency Stop
Set
PaperRFSelect
Lighter Copy
Lighter
Set
Original
Wait
Darker
Clear Modes/
Energy Saver
Program
Clear / Stop
34

Recalling Settings Stored In The Program key
1 Press the Program key before copying.
2 Enter the number of copies required with the
plus and minus key.
3 Make a copy.
B) Changing The Default Setting
1 Turn the main switch off.
2 Hold down the Emergency Stop key, then
turn the copier back on.
The jam and service indicators will blink.
3 Input the settings you want.
4 Turn the main switch off.
Energy
Saver
Vellum
Film
Copy Media
Emergency Stop
Energy
Saver
Vellum
Film
Copy Media
Emergency Stop
Set
PaperRFSelect
Lighter Copy
Lighter
Set
PaperRFSelect
Lighter Copy
Lighter
Set
Original
Wait
Darker
Set
Original
Wait
Darker
Clear Modes/
Energy Saver
Program
Clear / Stop
Clear Modes/
Energy Saver
Program
Clear / Stop
The next time you turn the copier on or press the Clear Modes key, the settings you programmed
in step 3 will take effect.
35

USER TOOLS
Access the User T ools to make the following adjustments:
A1) Not in use
A2) Semi Synchro Cut Adjustment; Allows you to adjust the cut length.
–25 ~ +25mm (–1.0” ~ –1.0”) (by 1mm, or 0.1")
Without the Roll Feeder, A2) is not in use.
1 Hold down the Program key for at least 3
seconds.
“A.1” blinks on the “Copy Counter” display.
2 Press + key, “A2” blinks on the display
3 Press the Function Select key.
The “Paper Length” display shows the
current value.
4 Use the + and – key to change the value
5 Press the Program key to return to step 2.
6 Press the Clear Modes key to exit this mode.
Energy
Saver
Vellum
Film
Copy Media
Emergency Stop
Paper Length
Semi Synchro
Preset/
Variable
Leading Edge
Copy Counter
Function Select
Set
PaperRFSelect
Lighter Copy
Lighter
Set
Original
Wait
Darker
Clear Modes/
Energy Saver
Program
Clear / Stop
Cut Select
Preset Cut
RF Select/Cut
36

WHA T YOUR SERVICE REPRESENT A TIVE CAN
CHANGE
Y our service representative can adjust some of your copier’s features. Here’s a list of changes
the service representative can make for you.
p Copy media default: The copy media setting can be adjusted to match the kind of paper you
use.
p Count up and count down: The copy counter can be made to count up or count down.
p Beeper: The beeper can be turned off completely; can be turned off for setting the margin,
multiple copies, and paper length; or it can be left on to emit a tone whenever a key is pressed.
p Paper feed out waiting time: When the copier is ready to receive the original, it will wait for
a preset length of time. If no original is set within this time, the copier will process the copy
paper without copying. The time can be set to 1, 2, 3, 4, or 5 minutes.
p Manual feed start time: After copy paper is set, the copier waits for a preset number of
seconds before starting the rollers that will pull the paper in. This pause gives you a chance to
align the paper. The time can be set to 0.7, 1, 2, 3, 4, or 5 seconds.
p Lead edge increase/decrease speed: The speed at which the lead edge setting scrolls up or
down can be changed. The time for one increment (or decrement) can be set to 0.02, 0.05, 0.10,
0.25, or 0.5 second.
p Auto clear time: If the copier is left alone for a while, it will clear itself. The time needed can
be changed to 1, 2, 3, 4, or 5 minutes. The function can also be turned off.
p Energy saving: The fusing unit needs to be hot for copying. When the copier is idle, the fusing
unit can be kept hot to save time or it can be allowed to cool to save energy. The feature can be
set to start automatically, but you can also turn it on yourself by pressing and holding the Clear
Modes/Stand-by key for three seconds.
p Screen message: When the copier is idle, the copy counter can be made to display a message.
There are five possible messages: “Pre_heat”, “Sleeping”, “0123456789”, Have a good day”,
and “Hello I love you”. The feature can also be turned off.
p Function step setting: When changing a function setting (margin, multiple copies, or paper
length) by holding down the + or –key, the setting will change by a preset value. This value can
be changed to 1, 2, 3, or 10 units.
37

p Paper length count up/down, Paper length up/down speed, and Paper size pattern: When
you press the preset length key, the copier scrolls through a selection of preset paper sizes.
The copier can scroll through the preset lengths forward or backward, and at different speeds.
There are many sets of sizes from which to choose. Ask your service representative for details.
p Auto off time: Y ou can set the machine waits after the last operation before switching itself off
automatically. The time can be set by minute from 1 to 240 minutes.
38

4. MAINT AINING YOUR COPIER
CHANGING THE TONER BOTTLE
When “FULL” is displayed, it is time to changing the Toner Bottle.
R
WARNING:
Do not incinerate used toner, toner bottle or toner cartridge.
Toner dust might ignite when exposed to an open flame.
s
R
R
Caution:
R
R
Caution:
R
Dispose of the toner bottle and the used toner cartridge according
to local regulations for plastics.
You must change the toner bottle whenever you see FULL in the
copy counter. NEVER clear this condition by only opening and
closing the copier or turning it on and off.
Do not eat or swallow toner.
Keep toner(used or unused), toner bottle, and toner cartridge out of
reach of children.
This machine has been tested for safety using this supplier’s parts
and consumables. We recommend you only use these specified
supplies.
Notes
p If the toner bottle overflows, toner particles could get inside the copier and cause damage when
you install a new bottle, make sure it is perfectly set in its holder.
p Do not use used toner. This will damage the machine.
1 Open the upper unit of the copier.
SB022
39

2 Open the door on the right side of the copier.
3 Carefully remove the plastic bottle and put
the used toner in a vinyl bag.
Dispose it according to local regulations for
plastics.
4 Place the bottle in the copier.
SM012
SM013
5 Close the door.
40
SM014
SM015

6 Close the upper unit.
7 If needed, turn the copier back on, and press
the Clear Modes key to clear the FULL
message.
SB023
41
 Loading...