

Page 1
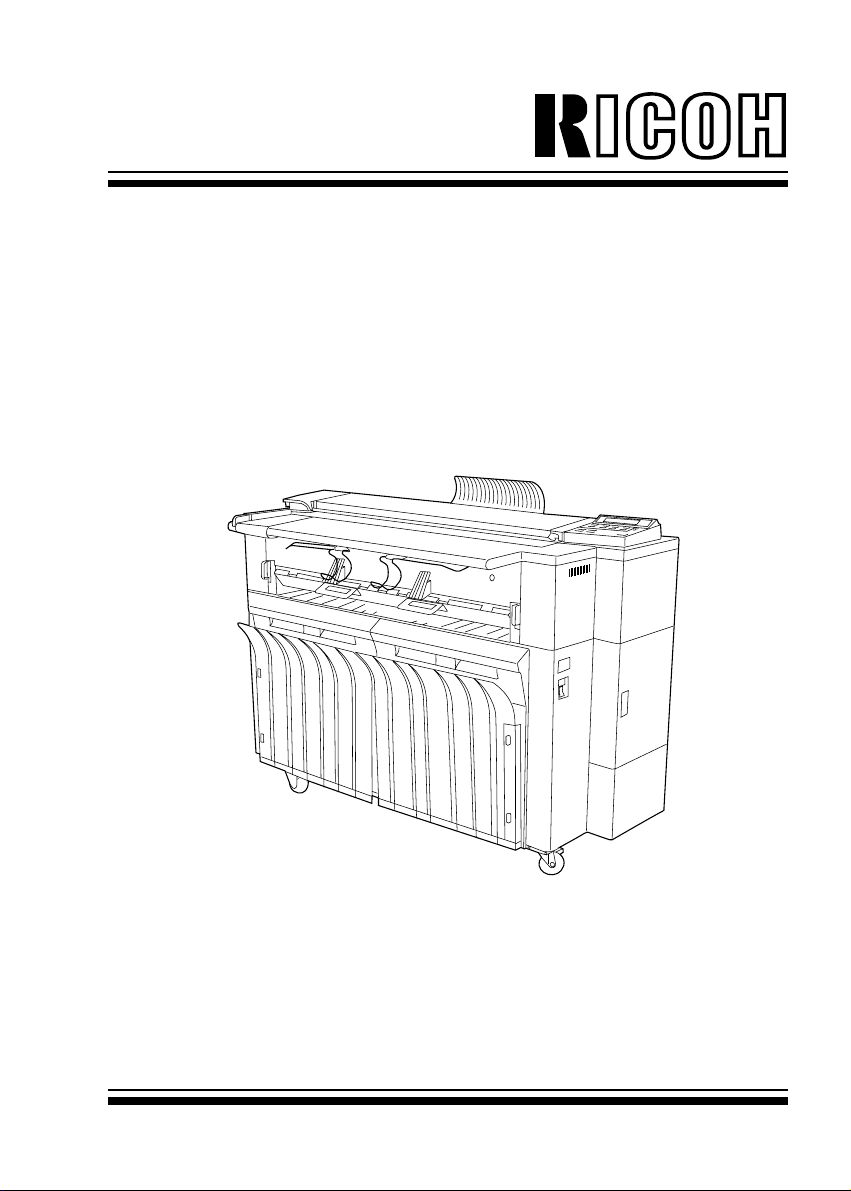
FW7030D
Operating Instructions
Read this manual carefully before you use this product and keep it handy
for future reference.
For safety, please follow the instructions in this manual.
Page 2
In accordance with ISO Standard 7001, this machine uses the following symbols for the
main switch:
As an Energy Star Partner, we have determined that this copier model
meets Energy Star Guidelines for energy efficiency. This product was
designed to reduce the environmental impact associated with copying
equipment by means of energy saving feature such as Auto Off mode.
means POWER ON.
means POWER OFF.
minutes after the last copying job has been completed. To exit the Auto Off mode, turn on
the main switch. To change the Auto Off time, see page 71.
Recycled paper:
Please contact your sales or service representative for recommended recycled paper types
that may be used in this copier.
Two kinds of size notation are employed in this manual. With this machine refer to the inch
version.
For good copy quality, Ricoh recommends that you use genuine Ricoh toner.
Ricoh shall not be responsible for any damage or expense that may result from the use of
parts other than genuine Ricoh parts in your Ricoh office product.
Notes: Some illustrations may be slightly different from your machine.
Power Source: 120V, 60Hz, 13A
Please make sure to connect the power cord to a power source as above.
For details about power source, see page 80.
Auto Off mode: To conserve energy, this copier automatically turns off 30
Copyright © 1998 Ricoh Co., Ltd.
Page 3
INTRODUCTION
This copier is a console plain paper copier carefully manufactured to exacting standards of high
performance. it consistently yields high contrast copies with a superior finish.
This manual contains detailed instructions on the operation and maintenance of this copier. To get
maximum versatility from this copier, all operators should carefully read and follow the instructions in this manual. Please keep this manual in a handy place near the copier.
Please read the next section before using this copier. It contains important information related to
USER SAFETY and PREVENTING EQUIPMENT PROBLEMS.
SAFETY INFORMATION
When using your machine, the following safety precautions should be always be followed.
Safety During Operation
In this manual, the following important symbols are used:
WARNING:
R
Ignoring this warning could cause serious injury or even death.
R
CAUTION:
Ignoring this caution could cause injury or damage to property.
Examples Of Indications
Symbol R mean a situation that requires you take care.
Symbol v mean “Hot surface”.
Do NOT carry out the operation represented by this symbol
This example means “Do not take apart”.
Symbols ● mean you MUST perform this operation.
This example means “You must remove the wall plug”.
.
i
Page 4

R
WARNING:
• Only connect the machine to the power source described on the
inside front cover of this manual.
• Avoid multi-wiring.
• Do not damage, break or make any modifications to the power
cord. Do not place hea vy objects on it, pull it har d or bend it more
than necessary. These actions could cause an electric shock or
fire.
• Do not plug or unplug the power cord with your hands wet. Otherwise, an electric shock might occur.
• Make sure the wall outlet is near the machine and freely accessible so that in event of an emergency it can be unplugged easily.
• Do not remove any covers or screws other than those specified
in this manual. Some parts of the machine are at a high voltage
and could give you an electric shock. Also, if the machine has
laser systems, direct(or indirect)reflected eye contact with the
laser beam may cause serious eye damage. When the machine
needs to be checked, adjusted, or repaired, contact y our service
representatives.
• Do not take apart or attempt any modifications to this machine.
There is a risk of fire, electric shock, explosion or loss of sight. If
the machine has laser systems, there is a risk of serious eye
damage.
• If the machine looks damaged or breaks down, smoke is coming
out, there is a strange smell or anything looks unusual, immediately turn off the operation and main power switches then unplug the power cord from the wall. Do not continue using the
machine in this condition. Contact your service representative.
• If metal, liquid, or foreign matter falls into the machine, turn off
the operation and main power switches, and unplug the main
power cord. Contact your service representative . Do not keep
using the machine with a fault or defect.
• Do not put any metal objects or containers holding water(e.g.
vases, flowerpots, glasses) on the machine. If the contents fall
ii
Page 5

inside the machine, a fire or electric shock could occur.
• Do not incinerate used toner, toner bottles or toner cartridg es.
Toner dust might ignite when exposed to an open flame. Dispose of the used toner cartridges according to local regulations
for plastics.
iii
Page 6

R
CA UTION:
• Keep the machine away fr om humidity and dust. A fire or an electric shock might occur.
• Do not place the machine on an unstable or tilted surface. If it
topples over, it could cause injury.
• After you move the machine, fix it with the caster fixture. Otherwise, the machine might move or come down to cause a personal injury.
• When you move the machine, unplug the power cord from the
wall outlet to avoid fire or electric shock.
• When the machine will not be used for a long time, unplug the
power cord.
• When you pull out the plug from the soc ket, grip the plug to av oid
damaging the cord and causing fire or electric shock.
• If you use the machine in a confined space, make sure there is a
continuous air turnover.
• Do not reuse stapled paper. Do not use aluminium foil, carbon
containing paper or other conductive paper. Otherwise, a fire
might occur.
• When removing misfed paper, do not touch the fusing section
because it could be very hot.
• This machine has been tested for safety using this supplier’s
parts and consumables. We recommend you onl y use these specified supplies.
• Do not eat or swallow toner.
• Keep toner(used or unused) and toner cartridges out of reach of
children.
• This equipment is only to be installed by a qualified service per-
iv
Page 7

sonnel.
• Deliver to collection point for waste products. Do not be disposed
of via domestic refuse collection.
v
Page 8
HOW TO READ THIS MANUAL
Symbols
In this manual, the following symbols are used:
WARNING:
R
This symbol indicates a potentially hazardous situation that might result in death or serious injury
when you misuse the machine without following the instructions under this symbol. Be sure to
read the instructions, all of which are described in the Safety Information section.
CAUTION:
R
This symbol indicates a potentially hazardous situation that might result in minor or moderate
injury or property damage that does not involve personal injury when you misuse the machine
without following the instructions under this symbol. Be sure to read the instructions, all of
which are described in the Safety Information section.
* The statements above are notes for your safety.
Important
If this instruction is not followed, paper might be misfed, originals might be damaged, or data
might be lost. Be sure to read this.
Preparation
This symbol indicates the prior knowledge or preparations required before operating.
Note
This symbol indicates precautions for operation, or action to take after misoperation.
Limitation
This symbol indicates numerical limits, functions that cannot be used together, or conditions in
which a particular function cannot be used.
Reference
This symbol indicates a reference.
{ }
Keys built into the machine’s operation panel.
vi
Page 9

TABLE OF CONTENTS
WHAT YOU CAN DO WITH THIS MACHINE ............................................ x
GUIDE TO COMPONENTS ...................................................................xiii
OPTIONS ...............................................................................................xiv
OPERATION PANEL .............................................................................. xv
1. B ASICS
ORIGINALS .............................................................................................. 1
COPY PAPER ........................................................................................... 4
TONER...................................................................................................... 7
2. COPYING
SETTING UP THE MACHINE ................................................................... 9
BASIC COPYING ...................................................................................10
Memory Copy ..................................................................................... 11
SETTING ORIGINALS............................................................................ 14
Using the Carrier Sheet...................................................................... 15
COPYING ONTO PAPER SET ON THE MANUAL FEED TABLE..........16
Copying Onto Paper Set on The Manual Feed Table(Memory Copy) 17
ADJUSTING COPY IMAGE DENSITY...................................................18
Auto Image Density ............................................................................18
Darker/Lighter..................................................................................... 19
Dark Original/Light Original ................................................................19
Photo .................................................................................................. 20
SELECTING COPY PAPER ................................................................... 21
Paper Tray Select/Auto Paper Select.................................................. 21
Auto Reduce/Enlarge ......................................................................... 22
SETTING THE LENGTH OF ROLL PAPER CUT................................... 23
Synchro Cut........................................................................................ 23
Preset Cut/Variable Cut......................................................................24
FUSING TEMPERA TURE .......................................................................25
PROGRAM .............................................................................................26
Storing/Changing a Program.............................................................. 26
Recalling a Program........................................................................... 26
OTHER FUNCTIONS.............................................................................. 27
Energy Saver Mode............................................................................ 27
Auto Start ............................................................................................27
Interrupt .............................................................................................. 28
vii
Page 10

3. COPYSETTING
PRESET REDUCE/ENLARGE ................................................................29
ZOOM ..................................................................................................... 31
DIRECTIONAL MAGNIFICATION ...........................................................32
ERASE BORDER....................................................................................33
MIRROR ..................................................................................................34
POSITIVE/NEGA TIVE ............................................................................. 34
MARGINS ............................................................................................... 35
IMAGE SHIFT.......................................................................................... 37
PREVIEW COPY .....................................................................................39
COMBINA TION CHART..........................................................................40
4. WHAT TO DO IF SOMETHING GOES WRONG
IF YOU CANNOT START COPYING........................................................ 41
IF YOU CANNOT MAKE CLEAR COPIES .............................................. 44
IF YOUR COPIER DOES NOT OPERATE AS YOU WANT ......................46
IF COPY P APER RUNS OUT ..................................................................48
IF THE WASTE TONER T ANK FULL ....................................................... 51
IF TONER RUNS OUT ............................................................................. 53
IF COPY P APER OR AN ORIGINAL IS MISFED .................................... 56
5. USER TOOLS
ACCESSING THE USER TOOLS OVER VIEW.........................................63
USER TOOLS MENU TREE .................................................................... 64
CHANGING THE USER TOOL SETTING ................................................65
Adjusting the Fusing Temperature ....................................................... 65
Storing a Program ...............................................................................65
Setting Background Image Density .....................................................65
Changing Default Setting .................................................................... 66
Margins ...............................................................................................66
Image Shift..........................................................................................66
Erase Border.......................................................................................66
Magnification Adjustment .................................................................... 67
Fusing Temperature Adjustment .......................................................... 68
Initial Setting ....................................................................................... 69
Copy Length........................................................................................ 73
Roll Width............................................................................................ 73
Setting Preset Reduce/Enlarge ........................................................... 74
Memory Copy...................................................................................... 74
Copy quality setting (Normal/Fine) ......................................................74
Output setting (Sort/Stack) .................................................................. 75
Auto Image Density.............................................................................75
viii
Page 11

WHAT YOU CAN ASK CUSTOMER ENGINEERS TO DO......................76
Changing the Maximum Original Length for Series Copy .................... 76
Changing the Original Delivery Direction .............................................76
Changing the Number of Levels
for Copy Image Density Adjustment .................................................76
6. REMARKS
DO’S AND DON’TS................................................................................. 77
PLACING, MOVING,
AND DISPOSING OF YOUR MA CHINE.............................................. 78
CLEANING YOUR MACHINE .................................................................. 82
7. SPECIFICATIONS
SPECIFICATIONS ................................................................................... 83
OPTIONS ................................................................................................84
INDEX ....................................................................................................
APPENDIX ............................................................................................. 87
85
ix
Page 12
WHAT YOU CAN DO
123
456
789
.0
Program
User Tools
Fusing
Temperature
Synchro
Full Size
Preset /
Variable
Lighter
Darker
Clear/Stop
Emergency Stop
Roll Edge Cut
Preview Copy
Clear Modes
/
Energy Saver
Memory
Copy
Vellum
Film
Positive/
Negative
Dark
Original
Light
Original
Auto Image
Density
Photo
Erase Border
Mirror Image
Auto Paper
Select
Auto Reduce/
Enlarge
Copy Media Image Density
Preset Reduce/
Enlarge
Zoom
Left
Enter
Right
Up
Interrupt
On Line
Down
Direct.Mag.
(%)
Leading
Trailing
Edge Shift Image
Image Edit
1
2
3
Check Display
Preset Reduce/Enlarge
⇒
Page 29
Zoom
⇒
Page 31
Mirror ⇒ Page 34
Vertical
Horizontal
Directional Magnification
⇒
Page 32
B
A
B
A
Edit
Erase Border ⇒ Page 33
Paper-based Reduce/Enlarge
⇒
Page 22
Auto Paper Select
⇒
Page 21
Select Original Type
⇒
Page 19
Adjust Image Density
⇒
Page 19
Fusing Temperature
⇒
Page 25
Select Roll Length
• Synchro Cut ⇒ Page 23
• Preset Cut / Variable ⇒ Page 24
WITH THIS MACHINE (FW7030D MAIN UNIT)
x
Page 13
Program
⇒
Page 26
Image Shift ⇒ Page 37
Image Shift ( Lead )
Margins ⇒ Page 35
Sort ⇒ Page 11
(Memory Unit required.)
3
3
2
2
1
1
Stack ⇒ Page 11
(Memory Unit required.)
3
1
2
1
1
1
Preview Copy
⇒
Page 39
Positive / Negative ⇒
3
2
1
2
2
2
Page 34
Leading edge margin ( + )
3
2
1
Image Shift ( Trail )
Leading edge margin ( - )
3
3
3
Image Shift ( Left )
Trailing edge margin ( + )
Image Shift ( Right )
Trailing edge margin ( - )
xi
Page 14

OPTIONAL MEMOR Y UNIT
If you attach the Memory Unit T ype 7030D option to the main unit, the extra functions described
below become av ailable.
Note that when making copies with the Memory Copy feature, the machine scans in the image
using
either 2 or 4 gradations (Normal or Fine). This is as opposed to standard copying, where 32
gradations are used. Therefore, you should use standard copying when you want to clearly copy
originals containing small numerals or characters, fine graphics or photographs.
To program images into memory and recall them, the HDD is required. If you need the HDD,
please consult your sales or service representatives.
Check Display
Synchro
Full Size
Auto Paper
Preset /
Select
Variable
Auto Reduce/
Enlarge
1
Preset Reduce/
Enlarge
2
Zoom
Direct.Mag.
3
(%)
Copy Media Image Density
Dark
Vellum
Original
Light
Film
Original
Image Edit
Erase Border
Mirror Image
Lighter
Positive/
Negative
Leading
Trailing
Photo
Auto Image
Density
Darker
Up
Down
Edge Shift Image
Left
Right
123
456
789
.0
Temperature
Enter
Clear/ Stop
Fusing
User Tools
Program
Interrupt
Memory
Copy
On Line
Clear Modes
Energy Saver
Preview Copy
Roll Edge Cut
Emergency Stop
{Interrupt} key
If you wish to make a few copies but there is a
long copy job in progress, press this key to tem-
/
porarily stop the job. Then make your copies
and press the {Interrupt} ke y to recall the previous copy settings.
{Memory Copy} key
If you wish to make multiple copy sets of multiple page originals, Memory Copy gives you
control over how the copy sets are delivered. Before you start copying, specify the number of
copy sets and delivery method (Stack or Sort). When you use this feature, the original is scanned
in once, and multiple copies are made from memory.
Stack
1
1
3
2
1
Scan
the originals
Make copies
2
2
Memory
3
3
Sort
1
3
2
Scan
the originals
1
2
3
Memory
Make copies
1
2
3
xii
Page 15
GUIDE TO COMPONENTS
Carrier sheet guides
(left and right)
Extend these guides
when using the optional carrier sheet. If
you are not using a carrier sheet, you can use
them to hold a roll
original when feeding
it in.
Copy guides
(left and right)
Original cover
Original reverse
guide
Guides copies so that
are delivered towards
you.
Upper rear cover
Original table
Set originals here.
Original guide
(left)
Manual copy
guides
Front cover
Copy catch tray
Copied paper is delivered here.
Ventilation grill
Prevents ov erheating.
Do not obstruct the
ventilation grill by
placing or leaning an
object near it. If the
machine overheats, a
fault might occur.
Manual feed table
Insert paper here to feed it manually. You also
use this tray when copying onto non-standard
size paper or film.
Reference
“COPYING ONTO PAPER SET ON THE
MANUAL FEED TABLE” => Page 16
Operation panel
Right side cover
Power switc h
Set this switch to “|”
to turn on the power.
Set this switch to “o”
to turn off the power.
Note that the copier
turns itself off automatically if nobody
uses it for a certain period of time.
Reference
“Auto Off Timer” =>
Page 71
CE6A0100
CE7A0100
xiii
Page 16
OPTIONS
Ricoh Roll Feeder Type 7030D
You can add an extra roll feeder. It is of the
same type as the second standard roll feeder.
CE0A0201
Ricoh Memory Unit Type 7030D
Allows you to use the sort/stack function. This
option also prevents originals from being damaged when making multiple copies or using
the Auto Image Density function.
xiv
CE8A0101
Page 17
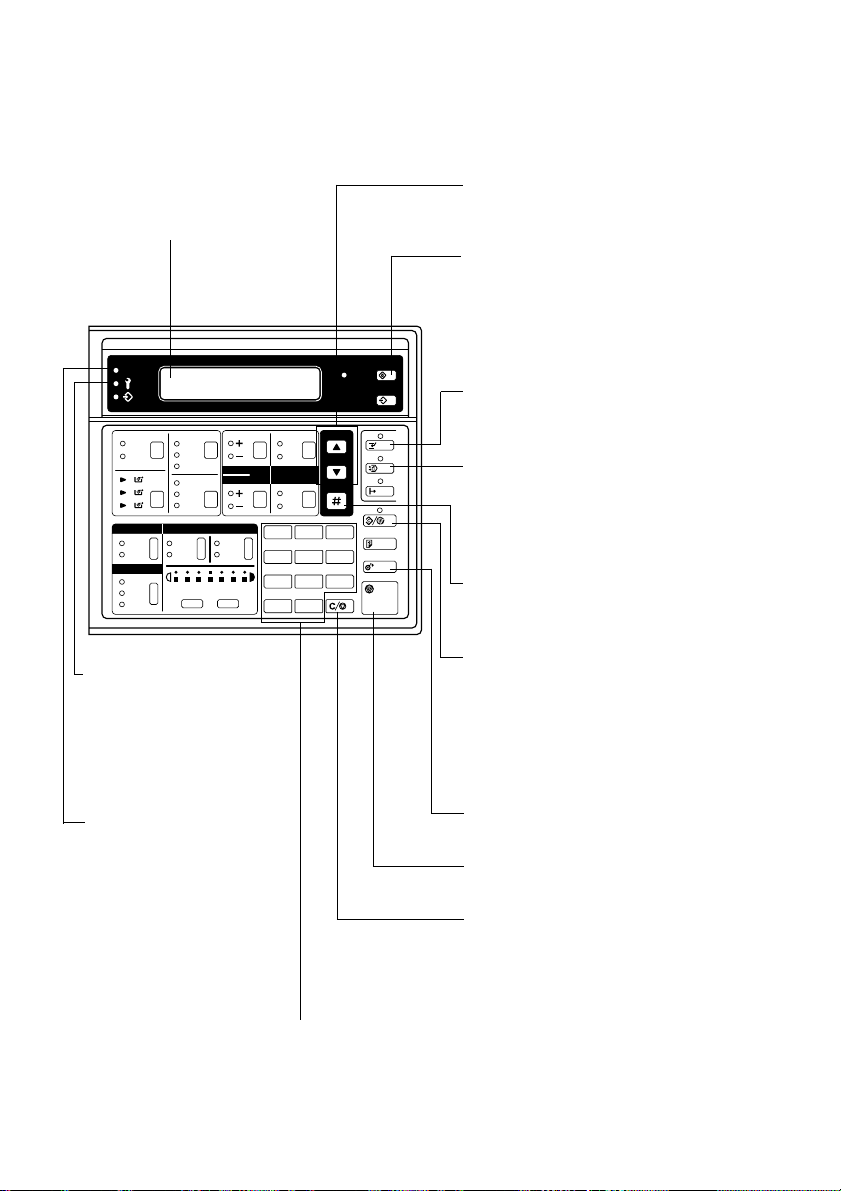
OPERATION PANEL
Screen (panel display)
Shows operation status, error
messages, and function menus.
Check Display
Synchro
Full Size
Auto Paper
Preset /
Select
Variable
Auto Reduce/
Enlarge
1
Preset Reduce/
Enlarge
2
Zoom
Direct.Mag.
3
Vellum
Film
Erase Border
Mirror Image
Positive/
Negative
(%)
Dark
Original
Light
Original
Lighter
Copy Media Image Density
Image Edit
Leading
Trailing
Photo
Auto Image
Density
Darker
Up
Down
Edge Shift Image
Left
Right
123
456
789
.0
Fusing
Temperature
Enter
Clear/ Stop
User Tools
Program
Memory
Copy
Clear Modes
Energy Saver
Preview Copy
Roll Edge Cut
Emergency Stop
These indicators show errors and the machine status.
Page 41, “WHAT TO DO
IF SOMETHING GOES
WRONG”
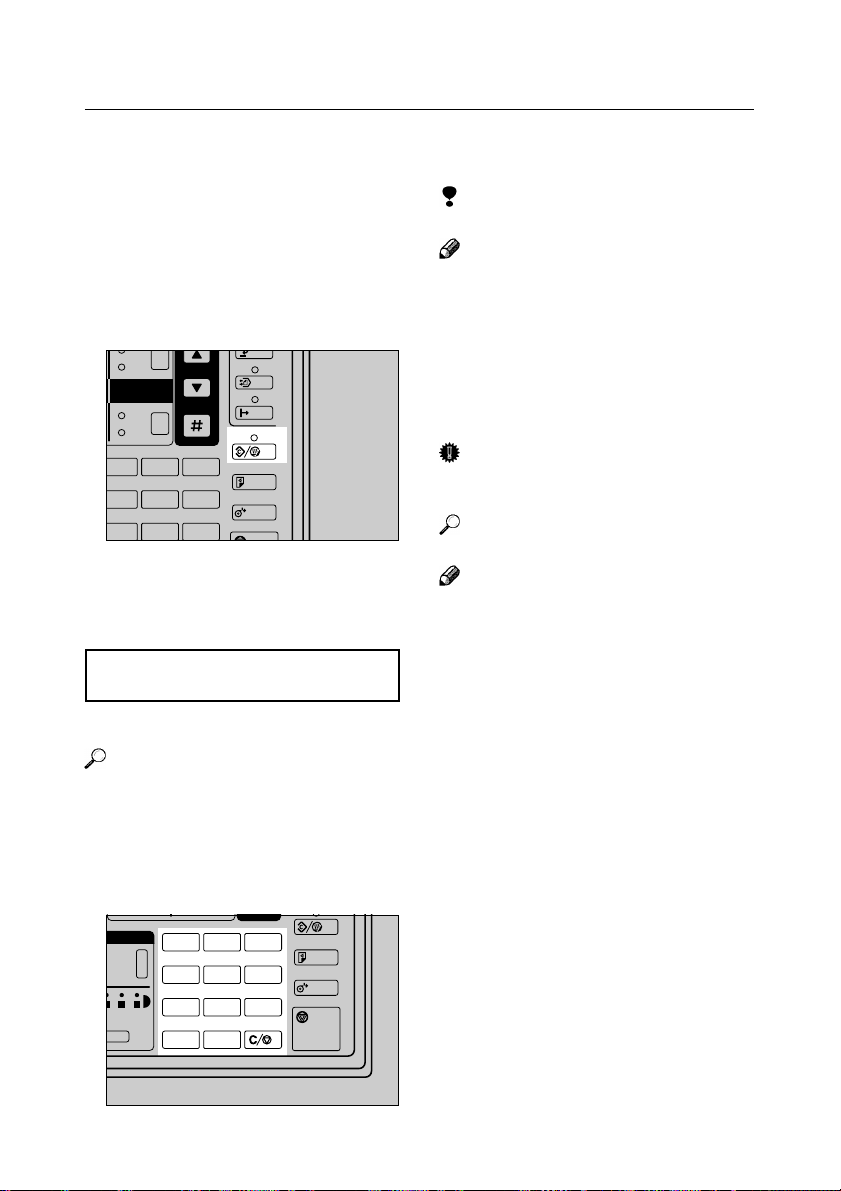
{Check Display}
See the panel display.
{Number} keys
Use to enter numbers such as the number of
copies or a reproduction ratio.
Interrupt
On Line
{U}{T} keys
Press to adjust setting values or select functions.
{User Tools} key
Press to access the User Tools where you
can customize the default settings to meet
your requirements.
=> Page 79, “ACCESSING THE USER
TOOLS OVERVIEW”
{Interrupt} key
Press to make interrupt copies during a
copy run (The Memory Unit is required).
{Memory Copy} key
/
Having multiple page originals scanned
into memory first gives you control over
how copy sets are delivered with the Stack
and Sort features (The Memory Unit is required).
{#} key
Use this key to enter values confirm settings.
{Clear Modes/Energy Saver} key
Press to clear any previously entered copy
job settings. When you hold down this
key for three seconds or more, the copier
enters Energy Saver mode to conserve
power. Press this k ey again to exit Ener gy
Saver mode.
{Cut Leading Edge} key
Cuts the leading edge of the roll paper.
{Emergency Stop} key
Stops originals being fed.
{Clear/Stop} key
Clear Press to cancel a number you have
entered. Stop Press to stop/cancel copying. During a memory copy run, this key
has the following functions: Clear While
entering the number of copies, press to cancel a number you have enteres. Stop Press
to stop a memory copy run and return to
the previous operation.
xv
Page 18

xvi
Page 19
1. BASICS
ORIGINALS
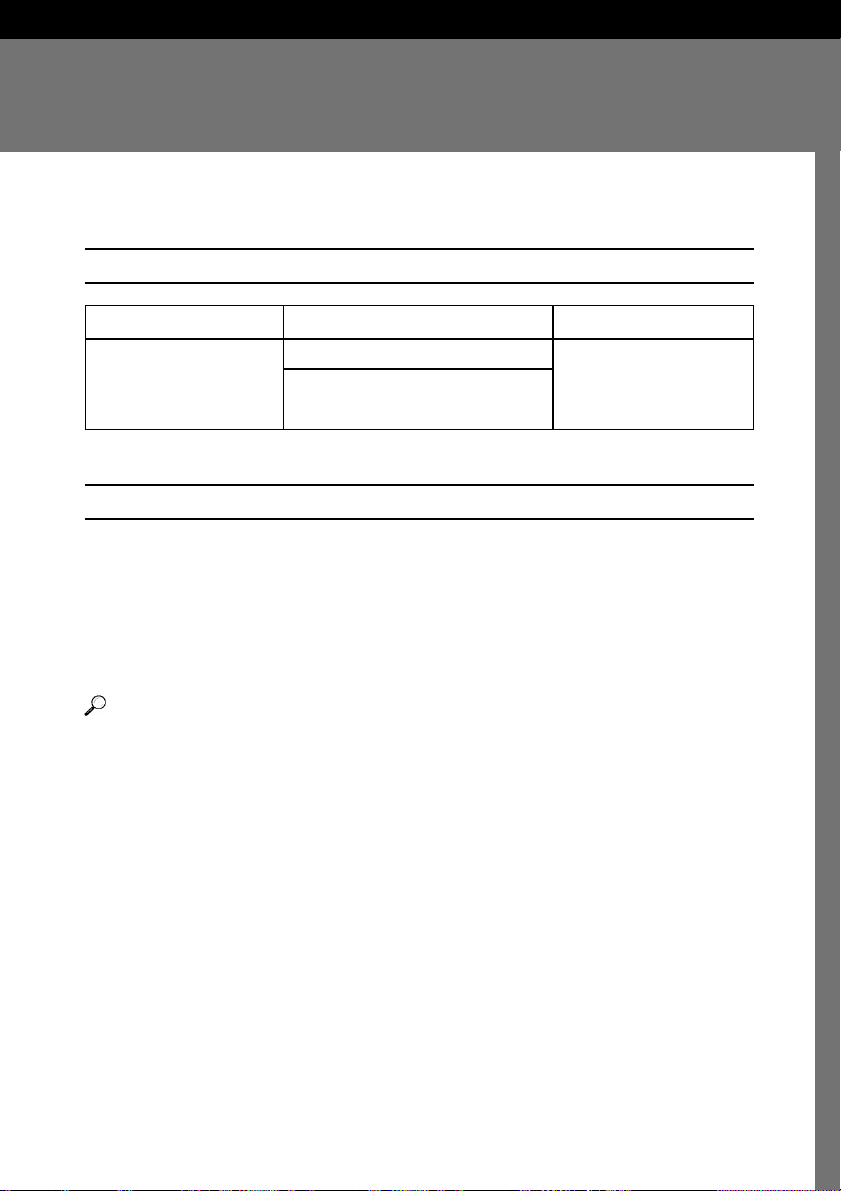
Sizes and Weights of Recommended Originals
Where original is set Original size Original weight
Original table E (36'' × 48'') - A (9'' × 12'') 64 - 150 g/m
Length: 11'' - 197'' (17.0 - 39.9 lb)
Width: 8.5'' - 36''
❒ When making multiple copies, the original length must be between 11'' and 48''.
Originals that Require the Carrier Sheet
Use the carrier sheet when copying types of originals described below. You should also use it
when copying originals you want to handle carefully or originals you use repeatedly.
• Originals that have low stiffness or thin originals
• Carbon paper
• Creased or folded originals
• Punched or perforated originals
• Pasted originals
2
Reference
“Using the Carrier Sheet” => Page 15
1
Page 20

BASICS
Non-recommended Originals for the Original Table
❒ Setting the following originals on the original table might cause paper misfeeds or damage to
the originals:
• Originals other than those specified in “Sizes and Weights of Recommended Originals”
• Stapled or clipped originals
• Perforated or torn originals
• Bent, folded, or creased originals
• Pasted originals
• Originals with any kind of coating, such as thermal fax paper, art paper, aluminum foil,
carbon paper, or conductive paper
• Originals with indexes, tags, or other projecting parts
• Thin originals that have lo w stiffness, such as registers
• Originals of inappropriate weight, such as postcards
• Bound originals such as books
• Damp originals
• Curled originals
• Originals that have parts of different weight
• Originals with adhesive tapes or paste
❒ When you make multiple copies of a translucent original written with a pencil, the original
might be smudged with pencil dust. When you making multiple copies of such an original,
make a copy on bond paper and use it as the original to make the necessary number of copies.
2
Page 21
ORIGINALS
Original and Paper Sizes That Can Be Read Automatically
❒ The machine can only automaticall y detect the width of originals and copy paper. For origi-
nals, the position of the left original guide is used to detect this width, so make sure that the
guide position matches the size of your original. For copy paper, the machine automatically
recognizes the width of roll paper set as one of Engineering or Architecture type sizes.
❒ Depending on whether the size mode setting is set to Engineering sizes or Architecture sizes,
the original and copy paper widths that can be read differ as shown in the table belo w . => Page
71, “Size mode setting”
Original width Engineering 17.0'' 22.0'' 34.0''
Architecture 18.0'' 24.0'' 36.0''
Paper width Engineering 17.0'' 22.0'' 34.0''
Architecture 18.0'' 24.0'' 36.0''
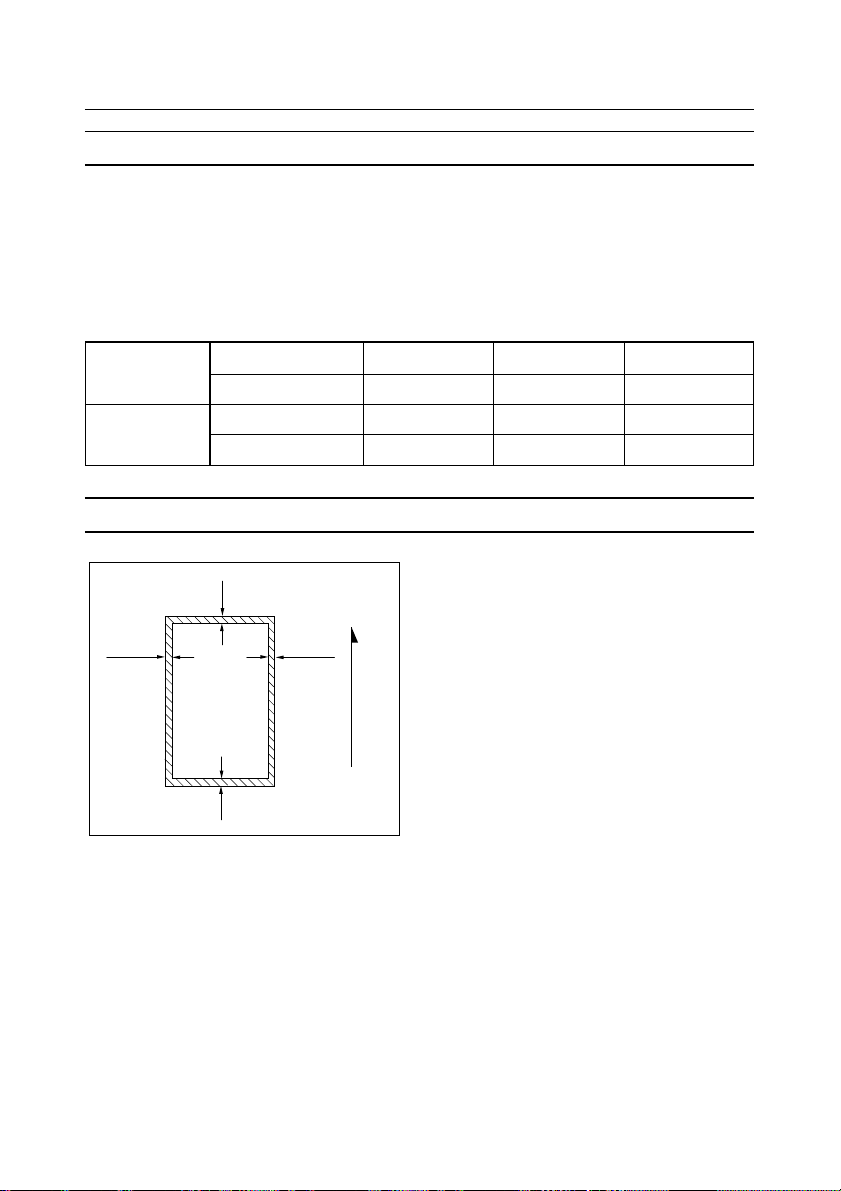
Scanning Area
0~0.4"
~0.16"
0
0~0.16"
0~0.4"
(except for cat errors)
Orginal feed direction
❒ The machine does not copy a small bounding margin around all four sides of originals as
shown in the illustration above (dimensions when using roll paper and full-size copying).
3
Page 22
BASICS
COPY PAPER
Recommended Paper Sizes and Types
❒ The following table shows the sizes and types of copy paper that you can load in this copier:
Tray type Recommended paper type Recommended paper size
Paper tray Bond paper Roll paper diameter: 7.1'' or less
64 - 80 g/m2 (17.0 - 21.3 lb) Internal diameter: 3.0'' +/- 0.04''
Translucent Paper (Vellum) Width: 420 - 920 mm
Film
Manual feed Bond paper E (36'' × 48'') K D (24'' × 36'')
table 64 - 80 g/m2 (17.0 - 21.3 lb) C (18'' × 24'') B (12'' × 18'')
Translucent Paper (Vellum) D (9'' × 12'')
Film Paper width: 8.3'' - 34.6''
Paper length: 11.7'' - 78.7''
K
Number of sheets
that can be set
___
1
Copying onto T ranslucent Paper or Film
❒ After each copy is delivered to the copy catch tray, remo ve it and place on a flat surface.
Roll Paper
r If roll paper is damp due to high humidity, cut off a length of about 40'' immediately before
copying.
4
Page 23

COPY PAPER
Non-recommended Paper
R
CAUTION:
• Do not reuse stapled paper. Do not use aluminum foil, carboncontaining paper, or other conductive paper. Otherwise, a fire
might occur.
Do not use the following types of paper because a paper misfeed might occur:
• Bent, folded, or creased paper • Torn paper
• Perforated paper • Rough paper
• Slippery paper • Thin paper that has low stiffness
• Released paper • OHP sheets
❒ If you make a copy on rough grain paper, the copy image might be blurred.
❒ If you use curled paper, you might not be able to make clear copies.
❒ If you copy onto paper types other than those specified in this manual (in particular, Japanese
chemical paper, saddle paper, or thin film), a paper misfeed might occur and the copy image
might appear faulty or wrinkled.
❒ Do not use copy paper with any kind of coating, such as thermal fax paper, art paper, alumi-
num foil, carbon paper, or conductiv e paper. Otherwise, a fault might occur.
❒ Do not reuse paper that has been already copied on by another machine.
Paper Storage
❒ When storing paper, the following precautions should always be followed:
• Store paper in a location free from direct sunlight.
• Store paper in a location with humidity of 70 % or less.
• Store on a flat surface.
❒ Once you take paper out of the container it was supplied in, store it in a vinyl bag to keep it
away from humidity.
5
Page 24
BASICS
Handling Copy Paper
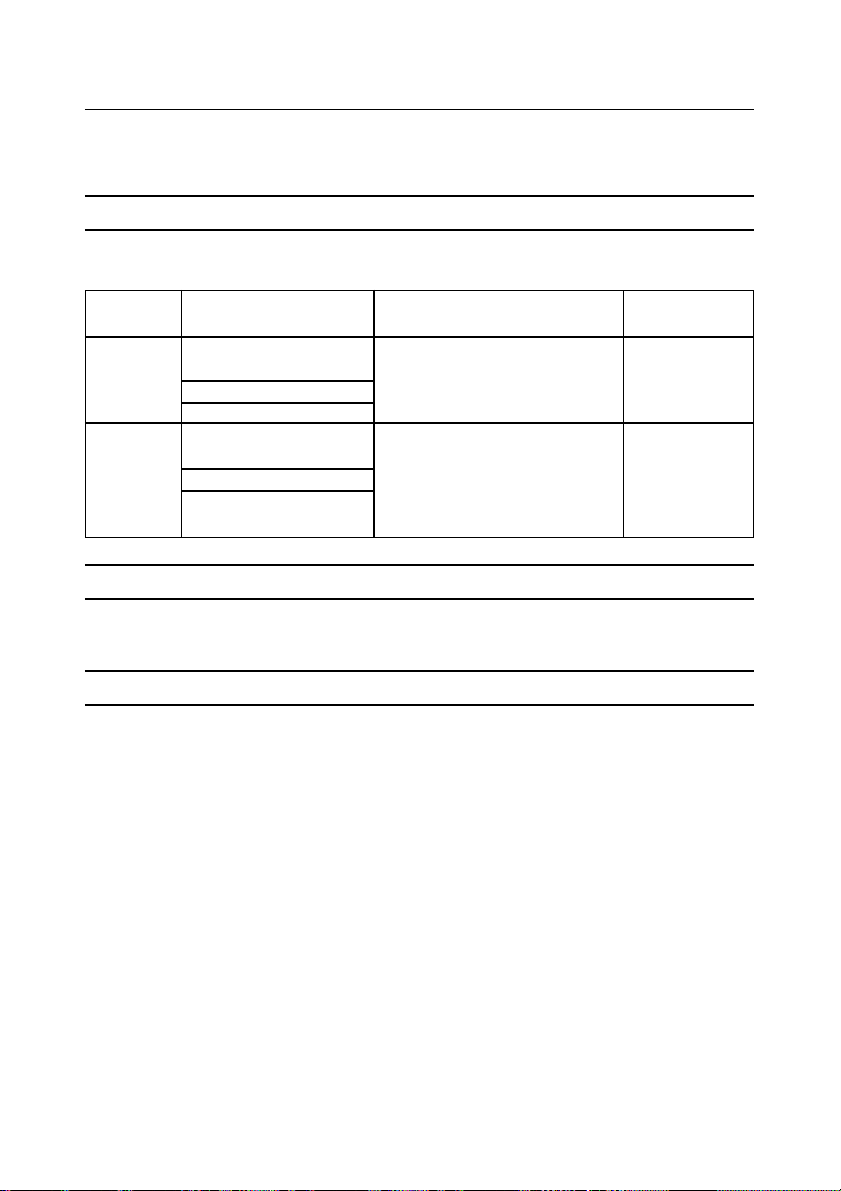
❒ Check the following table for advice on handling copy paper based upon how humid your
locale is.
%
Low humidity
40
(Normal conditions)
70
High humidity
State of copies
Part of the copy image is lost or a
multi-sheet feed or wrinkling occurs both on translucent paper and
normal paper.
Part of the copy image is lost on
translucent paper.
Part of the copy image is lost both
on translucent paper and normal paper.
Part of the copy image is lost or a
muliti-sheet feed or wrinkling occurs both on translucent paper and
normal paper.
Improve the environment where the copier is
placed (e.g., install an air conditioner or humidifier).
Remove paper from the copier immediately after
copying, and store it in a vinyl bag.
When you do not use the copier for a long time,
remove translucent paper from the copier and
store it in a vinyl bag.
Store paper in a vinyl bag when you have finished
copying every day.
When you do not use the copier for a long time,
remove paper from the copier and store it in a vinyl bag.
Improve the environment where the copier is
placed (e.g., install an air conditioner or dehumidifier).
Remove paper from the copier immediately after
copying, and store it in a vinyl bag.
Try this...
Anti-humidity Heater
The copier paper tray has an Anti-humidity Heater . Turn on this heater when humidity is 70 % or
more, or when the temperature changes suddenly.
Important
❒ Turn off the Anti-humidity Heater in cases other than the abo ve.
❒ Turn off the Anti-humidity Heater when using translucent paper or film.
Note
❒ You can turn on the Anti-humidity Heater even when the copier is turned off.
Loading Copy Paper
Reference
“IF COPY PAPER RUNS OUT” => Page 48
6
Page 25
TONER
Handling T oner
R
WARNING:
• Do not incinerate toner or toner containers. When exposed to
open flames, toner dust might ignite causing a burn.
Dispose of the used toner container according to local regulations.
R
CAUTION:
• Keep toner (including used one) and toner containers out of reach
of children.
R
T oner Types : Ricoh Toner T ype 1100W
R
CAUTION:
• This machine has been tested for safety using this supplier’s
R
r If you use toner other than that recommended, a fault might occur.
Toner Storage
parts and consumables. We recommend you only use these
specified supplies.
TONER
r When storing toner, the following precautions should always be followed:
• Store toner containers in a cool, dry place free from direct sunlight.
• Do not store toner where it will be exposed to fire.
• Keep toner out of reach of children.
• Store on a flat surface.
If the waste toner tank full
r When “Check waste toner tank” is displayed, see Page 51.
Note
r Used toner cannot be used.
Adding T oner
Reference
“IF TONER R UNS OUT” => Page 53
7
Page 26

BASICS
8
Page 27

SETTING UP THE MA CHINE
2. COPYING
Attaching the Original Reverse Guide
1Attach the original reverse guide to the
top on the rear side of the machine.
CE1G0200
Note
❒ Remove the original reverse guide when
making multiple copies, using Auto Image
Density, using Pre-scan or when originals
are delivered from the front of the copier.
Attaching the Copy Catch Tray Support Boards
1Change the support board positions de-
pending on the length of copies.
Note
❒ Open the copy catch tray before setting the
support boards.
❒ You can set the support boards in one of
five positions.
❒ When setting the support boards, see the
label describing the procedure. If copied
paper is not delivered to the tray properly,
shift the support boards upward or downward.
Opening the Copy Guides
1Open the copy guides on both sides when
copying onto E (36''
or larger paper.
Note
❒ Be sure to close the copy guides except
when copying onto E (36'' × 48'') or larger
paper.
××
× 48'', length: 48'')
××
CE1G0300
CE3P0100
9
Page 28
COPYING
Up
a
Energy Saver
BASIC COPYING
When you set your original, the machine scans
it in and copies it. If you specified more than
one copy, the machine repeatedly scans the
original for every copy made.
1Press the {Clear Modes/Energy Saver}
key if any previous copy settings remain.
Down
Shift Image
123
456
789
Left
Right
Enter
Memory
Copy
On Line
Clear Modes
Energy Saver
Preview Copy
Roll Edge Cut
Emergency Stop
/
CE2A0117
Limitation
r You can make up to 20 copies.
Note
r If you enter the wrong number, press the
{Clear/Stop} key then try again.
5Load copy paper or select Paper Tray 1
or 2.
6Set your orig inal.
The machine starts copying.
Important
r Do not open the front cover during a copy
run.
Reference
“SETTING ORIGINALS” => Page 14
2Make sur e that the Memory Copy indi-
cator is not lit and the message “Ready”
is shown on the panel display.
Note
r To stop originals being fed right awa y, press
the {Emergency Stop } key.The machine
will immediately stop feeding the current
Ready 1
100.0% 34.0''
××
× 17.0''
××
original. This might result in a paper jam,
so see “IF COPY P APER OR AN ORIGINAL IS MISFED” ( => Page 56) for how
3Select any copy functions you require.
Reference
For more information on functions that are
available, check the table of contents on
page xx.
4Enter the number of copies you wish to
to remove the jammed original.
r To stop the current copy run, press the
{Clear/Stop} key. The machine finishes
copying the current copy and stops.
r The maximum number of copies that can
be received in the copy catch tray is 15 for
E (36'' × 48'')
paper, 20 for D (24'' × 36'')
paper, or 1 for paper of other sizes.
make with the {Number} keys.
7The original is delivered.
123
hoto
uto Image
ensity
10
rker
456
789
.0
Clear/ Stop
Preview Copy
Roll Edge Cut
Emergency Stop
CE2A0102
Originals are delivered from the original
delivery slot on the back of the machine.
Copied paper is delivered from the copy
delivery slot and receiv ed in the copy catch
tray.
Tips
r You can change the initial settings f or ba-
sic functions. => Page 69, “Initial Setting”
Page 29
BASIC COPYING
r The machine returns to its initial condition
automatically if you do not operate it for a
certain period of time after your copy job
is finished. This function is called “Auto
Reset.”
• To change the Auto Reset time:
=> Page 71, “Auto Reset Time”
r The machine turns itself off automatically
if it is not in use for a certain period of time
(30 minutes by default) after your copy job
is finished. This function is called “Auto
Off.”
• To change the Auto Off time:
=> Page 71, “Auto Off Timer”
Memory Copy (Memory
Unit Required)
This function stores several originals (one
original for copying with manual feed) in
memory before making the necessary number
of copies.
Preparation
r The Memory Unit Type 7030D contains
16 MB of memory as standard. You can
extend this memory to a maximum of 64
MB. You can also add an HDD to the
Memory Unit. For more information, contact your sales or service representative.
r The number of originals that you can store
in memory at a time differs depending on
the available memory space in the Memory
Unit, and the original size and image.
r When you add extended memory to the
copier, the Memory Copy is selected by
default when you power on. To c hange
this setting, see “Memory copy mode” on
page 72.
r You should set the image quality level to
“Normal” or “Fine” and the copy delivery
method to “Stack” or “Sort” before starting a memory copy run.
Select “Normal” when you store ordinary
originals in memory. Select “Fine” when
you store originals containing small characters or numbers, fine graphics, photographs, or maps.
Stack
3
1
2
3
2
3
2
3
3
3
2
2
1
1
Sort
2
1
1
1
3
2
1
3
2
1
Limitation
r You cannot select “Dar k Original/Light
Original” or “Photo” with the Memory
Copy function.
r During a memory copy run, originals are
delivered from the original deliv ery slot on
the back of the machine.
Stack/Sort
Limitation
r When copying with manual feed, you can-
not use the Stack/Sort function since it is
not possible to store several originals in
memory. => Page 17, “Copying Onto Paper Set On The Manual Feed Table
(Memory Copy)”
r You can adjust the Copy Image Density
(Lighter/Darker) for each original to be
stored. However, can only specify the paper type, reproduction ratio, and other settings once before scanning the first
original.When you select Auto Reduce/
Enlarge, you can change the reproduction
ratio by fitting the left original guide to an
original size when you set the original (the
reproduction ratio is not displayed while
scanning the original).
11
Page 30
COPYING
1Pr ess the {Clear Modes/Energy Saver}
key if any previous copy settings remain.
2Make sur e that the Memory Copy indi-
cator is lit.
If it is not lit, press the {Memory Copy}
key.
Ready(Normal•Stack) 1
100.0% 34.0'' × 17.0''
3You can set the image quality level to
“Normal” or “Fine” and the copy delivery method to “Stack” or “Sort.”
Reference
=> Page 74, “Copy quality setting” Page
75, “Output Setting”
4Enter the number of copies required
with the {Number} keys.
Limitation
r You can make up to 20 copies.
Note
r If you enter a wrong number, press the
{Clear/Stop} key and enter the cor rect one.
5Select a paper type.
Selecting a Paper Type
There are three ways to select the paper type:
• Select a paper tray.
• Select “Auto Paper Select.”
• Select “Auto Reduce/Enlarge” and
choose a paper tray.
6Specify any other functions you r equire,
such as the reproduction ratio, margins,
editing etc.
7Select {Auto Image Density}, and use
the {Lighter}/{Darker} key as necessary.
Note
r When you select {Auto Image Density},
the copier scans part of the original in order to calculate the image density, then
scans the entire original again. When scanning several originals, you can have this
operation performed only for the first original. => Page 69, “Image Density”
8Feed your orig inal face down along the
original guide.
The copier starts scanning.
CE1C0200
Now scanning
Please wait
Ready to set original
9Feed the ne xt original along the original
guide (you can use the {Lighter}/
{Darker} key before this operation).
Repeat this step to scan all originals you
want to store in memory.
Insert next original 1-5
Last orig. -> #
12
Page 31

BASIC COPING
Note
r Numbers shown on the upper right corner
of the screen represent the following:
Number on the left Number of originals
1-5
Number on the right Number of copies
r The remaining memory space is displayed
on the lower right corner of the screen if it
reaches 64 MB or less.
AWhen you have finished scanning the
originals, press the {#} key.
BT o start copying, press the {#} key again.
Press # for copying 3-5
Note
r If you want to change the copy quantity,
press the {Clear/Stop} key . Then press the
{Clear/Stop} key again and enter a new
quantity with the {Number} keys. To return to the previous screen, press the {#}
key.
Memory copying
take copies one by one out of the copy catch
tray.
D To copy the originals stored in memory
again, press the {#} key then return to
step 4.
➊ Enter the number of copies required with
the {Number} keys.
➋ Press the {#} key.
The copier starts copying.
ETo clear memory, press the {Clear
Modes/Energy Saver} key.
The copier clears memory and returns
to the ready condition for Memory Copy .
CWhen the copier completes copying, the
following message appears on the panel
display:
Ready(Normal•Stack)
Note
r When using the Sort function, the maxi-
mum number of copies that can be received
in the copy catch tray is 15 for E (36'' ×
48'') paper or 20 for D (24'' × 36'') paper.
When copying onto paper of other sizes,
13
Page 32

COPYING
SETTING ORIGINALS
Reference
For information on originals, see “ORIGINALS.” => Page 1
Note
❒ Set originals after correction fluid or ink
has completely dried. Not taking this precaution could mark the exposur e glass and
cause marks to be copied.
1Set your original face do wn while align-
ing it to the reference mark, and fit the
left original guide to the original width.
CE1C0100
Note
❒ Be sure to fit the left and right original
guides to the original width to prevent the
original from being fed at a slant.
❒ Slide the original guides so that the inside
of the transparent part fits the original.
Original guide
Size indicator
Transparent part
24
2Make sur e that the message “Ready” is
shown on the panel display.
Ready 1
100.0% 34.0'' × 17.0''
Note
r The green arrow lights when the copier en-
ters the ready condition. When this arrow
blinks, you can use the A uto Start function.
=> Page 27, “Auto Start”
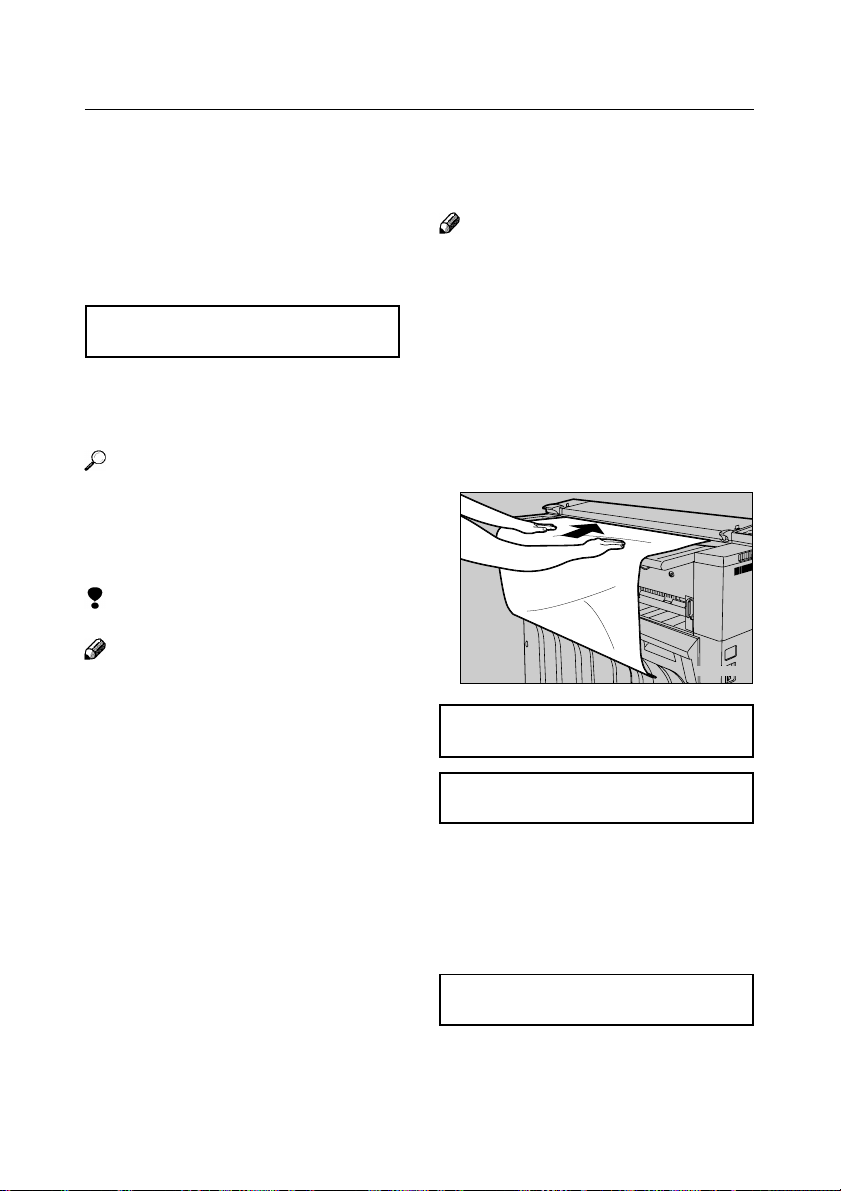
3 Feed the original face down along the
original guide.
The copier starts copying.
CE1C0200
Note
r Release the original when the machine pulls
it slightly into the machine.
r If the original is at a slant, pull it out and
feed it in straight.
r If you wish to stop copying after the origi-
nal has started to be fed, press the {Emer-
gency Stop} key and remove the original
from the copier.
r When copying a long original, prevent the
leading portion of the delivered original
from coming back into the original feed
slot.
14
Page 33

SETTING ORIGINALS
Using the Carrier Sheet
Reference
For original types you should copy with the
optional carrier sheet, see “Originals that Require the Carrier Sheet.” => Page 1
Note
r When you make copies using the carrier
sheet and {Synchro Cut}, they are cut to
the carrier sheet length.
Important
r When using the carrier sheet, specify “1”
for the number of copies (when the
Memory Unit is not attached). If you make
multiple copies with a carrier sheet, originals might be damaged.
r You can use the carrier sheet only when
originals are delivered from the original delivery slot on the back of the machine. If
originals are delivered from the front of the
machine, they might be damaged.
1Open the carrier sheet with the trans-
parent side facing up, and insert your
original face up.
MA9F0100
2Extend the carrier sheet guides.
CE1G0100
3 Insert the folded portion of the carrier
sheet into the original feed slot.
CE1C0200
Note
r Set the carrier sheet with the original face
down.
r Release your hands from the carrier sheet
when it is pulled slightly into the machine.
r if the carrier sheet is fed at a slant, pull it
out and feed it in straight.
r If you wish to stop copying after the origi-
nal has started to be fed, press the {Emer-
gency Stop} key and remove the original
from the copier.
Note
r Align the original to the folded portion of
the carrier sheet.
15
Page 34

COPYING
2
COPYING ONT O PAPER SET ON THE MANUAL FEED TABLE
This function allows you to copy onto paper
of sizes that cannot be handled by the paper
tray, as well as A (9'' × 12'') or other cut sheet
paper.
This section describes the procedure you follow when the Memory Unit is not installed.
Reference
For recommended paper types, orientations,
and capacity of the manual feed table, see
“COPY PAPER.” => Page 4
Limitation
r When copying with manual feed, you can-
not use the following functions:
• Erase Border
• Margins
1Press the k ey shown to turn off all of 1q
to 3q.
The message “Bypass” is shown on the
panel display.
Synchro
Preset /
Variable
1
2
3
Copy Media Image Density
Vellum
Full Size
Auto Paper
Select
Auto Reduce/
Enlarge
Preset Reduce/
Enlarge
Zoom
Direct.Mag.
(%)
Dark
Photo
Add paper 1
100% Bypass
2Select any special functions that you r e-
quire.
Reference
For more information on functions that are
available, check the table of contents on
page xx.
16
Leading
Trailing
Up
Down
Edge Shift Im
Left
Right
1
CE2A0108
3Insert the paper into the manual paper
feed slot while aligning it to the size indicator on the manual feed table.
Note
r Set the paper with the side you wish to copy
face-down.
r Release the paper when the machine pulls
it slightly into the machine.
r If the paper is fed at a slant, pull it out and
feed it in straight.
CE3H0100
4Set your orig inal.
The copier starts copying.
Important
r If the copy curls when it is delivered, it
might enter into the manual paper feed slot
again and cause a paper misfeed. Prevent
the copy from coming back into the manual
paper feed slot.
When a copy is fed out, remove it by holding its edge with both hands.
Note
r You can set either an or iginal or copy pa-
per first.
Page 35

COPYING ONTO PAPER SET ON THE MANUAL FEED TABLE
Memory Copying Onto
Paper Set On
The Manual Feed T able
(Memory Unit Required)
Limitation
r When setting paper on the manual feed
table using the Memory Copy feature, you
can only store a single original.
r You must set your original and scan it in
before you set the copy paper in the manual
feed table.
1Press the {Clear Modes/Energy Saver}
key if any previous copy settings remain.
2Make sur e that the Memory Copy indi-
cator is lit.
If it is not lit, press the {Memory Copy}
key.
Ready (Normal•Stack)
3You can set the image quality level to
“Normal” or “Fine.”
Reference
=> Page 74, “Copy quality setting”
4Press the ke y shown to turn off indica-
tors 1q to 3q.
The {Check Display} indicator lights
prompting you to set your original. The
following message appears on the panel
display:
Set original/paper 1
100% Bypass
5Specify a reproduction ratio, editing, or
any other functions you require. Select
{Auto Image Density}, and use the
{Lighter}/{Darker} key as necessary.
6Set your original.
Now scanning
Plese wait
Add paper 1
Bypass
7Insert copy paper into the manual pa-
per feed slot while aligning it to the size
indicator on the manual feed table.
The copier starts copying.
Memory copying
Bypass
Note
r Release the paper when the machine pulls
it slightly into the machine.
r If the paper is fed at a slant, pull it out and
feed it in straight.
Set original/paper
8Set the next paper.
9When you have made the necessary
number of copies, press the {Clear
Modes/Energy Saver} key.
The copier clears memory and returns to
the ready condition for Memory Copy.
17
Page 36

COPYING
Enlarge
ADJUSTING COPY IMA GE DENSITY
Preparation
r You can adjust the copy image density in
five ways:
{Auto Image Density}
Scans originals based on their image density, allowing you to copy originals with a
dark background, such as newspapers.
{Darker/Lighter}
Allows you to specify 13 levels of image
density manually.
{Dark Original}
Specify this option when copying dark
originals.
{Light Original}
Specify this option when copying light
originals.
{Photo}
Clearly reproduces halftone images such
as photographs.
Note
r By default, {Auto Image Density} is lit for
the copy image density adjustment. You
can change this setting. => Page 69, “Image Density”
r By default, {Lighter} is selected for the
background image density. You can change
this setting. => Page 65, “Setting background Image Density”
r Y ou cannot select {Dark Original}/{Light
Original} or {Photo} while the {Memory
Copy} indicator is lit.
Auto Image Density
1Pr ess the key shown to turn on the {Auto
Image Density} indicator.
2
3
Copy Media Image Density
Vellum
Film
Image Edit
Erase Border
Mirror Image
Positive/
Negative
Zoom
Direct.Mag.
(%)
Dark
Original
Light
Original
Lighter
Photo
Auto Image
Density
Darker
Note
r If you do not wish to select any other func-
tions, set your original and start copying.
r The copier scans a portion of the original
to calculate the appropriate image density,
then copies the entire original. Do not hold
down or pull out the original while it is
moving to and fro.
r Y ou can also use the {Darker} or {Lighter}
key to adjust the copy image density more
subtly when {Auto Image Density} is selected.
Limitation
r Y ou cannot select {Dark Original}/{Light
Original} while the {Auto Image Density}
indicator is lit.
Left
Right
1
4
7
.
CE2A0103
18
Page 37

ADJUSTING COPY IMAGE DENSITY
Enlarge
Enlarge
Enlarge
Darker/Lighter
1Press the k ey shown to turn off the {Auto
Image Density} indicator.
2
3
Copy Media Image Density
Vellum
Film
Image Edit
Erase Border
Mirror Image
Positive/
Negative
Zoom
Direct.Mag.
(%)
Dark
Original
Light
Original
Lighter
Photo
Auto Image
Density
Darker
Left
Right
1
4
7
.
CE2A0126
2Press the {Darker} or {Lighter} key to
select an image density level.
The image density indicator shows the
level.
2
3
Copy Media Image Density
Vellum
Film
Image Edit
Erase Border
Mirror Image
Positive/
Negative
Zoom
Direct.Mag.
(%)
Dark
Original
Light
Original
Lighter
Photo
Auto Image
Density
Darker
Note
r If you do not wish to select any other func-
tions, set your original and start copying.
r When two image density indicators are lit,
the selected density is half way between
these two levels.
Left
Right
1
4
7
.
CE2A0105
Dark Original/Light Original
1Press the k ey shown to turn off the {Auto
Image Density} indicator.
2Press the key shown to turn on the {Dark
Original} or {Light Original} indicator .
2
3
Copy Media Image Density
Vellum
Film
Image Edit
Erase Border
Mirror Image
Positive/
Negative
Zoom
Direct.Mag.
(%)
Dark
Original
Light
Original
Lighter
Photo
Auto Image
Density
Darker
Note
r If you do not wish to select any other func-
tions, set your original and start copying.
r Y ou can use the {Darker} or {Lighter} key
to adjust the copy image density more subtly when {Dark Original} or {Light Original} is selected
Limitation
r Y ou cannot select {Dark Original}/{Light
Original} while the {Memory Copy} indicator is lit.
Left
Right
1
4
7
.
CE2A0106
19
Page 38

COPYING
Enlarge
Photo
1Press the key shown to turn on the
{Photo} indicator.
2
3
Copy Media Image Density
Vellum
Film
Image Edit
Erase Border
Mirror Image
Positive/
Negative
Zoom
Direct.Mag.
(%)
Dark
Original
Light
Original
Lighter
Photo
Auto Image
Density
Darker
Note
r To adjust the copy image density, use the
{Darker} or {Lighter} key.
r If you do not wish to select any other func-
tions, set your original and start copying.
r You can also choose {Dark Original}/
{Light Original} when {Photo} is selected.
Limitation
r You cannot select {Photo} while the
{Memory Copy} indicator is lit.
Left
Right
1
4
7
.
CE2A0104
20
Page 39

SELECTING COPY PAPER
n
m
2
Paper Tray Select/Auto Paper Select
Preparation
r You can select copy paper types in two
ways:
{Auto Paper Select}
The copier automatically selects a paper type
appropriate for a specified original size and
reproduction ratio.
{Paper Tray Select}
You can select a paper tray manually.
Reference
Original and paper widths to be read differ depending on whether Size mode setting is set
to Engineering or Architecture sizes.
See “Original and Paper Sizes That Can Be
Read Automatically.” => Page 3
For the procedure to switch between columns
Engineering sizes or Architecture sizes, see
“Size mode setting.” => P age 71
Selecting Copy Paper A utomatically
Limitation
r Auto Paper Select detects original widths
of 17,0'', 22,0'', and 34,0'' (for Engineering
sizes) based on the left original guide position, and selects paper width automatically
(18,0'', 24,0'', and 36,0'' for Architecture
sizes).
1Press the k ey shown to turn on the {A uto
Paper Select} indicator.
2Set your original while fitting the origi-
nal guide to the original width.
The copier selects a paper type appropriate for the original width, and {1q},
{2q}, or {3q} goes on.
r If the appropriate paper is not loaded, the
r If you do not wish to select any other func-
Selecting a Paper T ray
1Press the key shown to turn on indica-
r The third paper tray is optional.
r When selecting the manual feed table, press
r If you do not wish to select any other func-
SELECTING COPY P APER
Synchro
Preset /
Variable
1
2
3
Copy Media Image Density
Full Size
Auto Paper
Select
Auto Reduce/
Enlarge
Preset Reduce/
Enlarge
Zoom
Direct.Mag.
(%)
Leading
Trailing
Edge Shift I
CE2A0107
1
Note
message “Check paper size” appears on the
panel display.
Check the paper trays and select the correct type of paper.
tions, set your original and start copying.
tor {1q}, {2q}, or {3q} to select the
paper type you require.
Synchro
Preset /
Variable
1
2
3
Copy Media Image Density
Vellum
Full Size
Auto Paper
Select
Auto Reduce/
Enlarge
Preset Reduce/
Enlarge
Zoom
Direct.Mag.
(%)
Dark
Leading
Trailing
Photo
Up
Down
Edge Shift Im
Left
Right
1
CE2A0108
Note
the key shown to turn off indicators {1q}
to {3q}. => Page 16, “COPYING ONT O
PAPER SET ON THE MANUAL FEED
TABLE”
tions, set your original and start copying.
Up
Dow
Left
Right
21
Page 40

COPYING
n
m
2
Auto Reduce/Enlarge
This function enlarges/reduces copies automatically so that they match the specified paper width.
Preparation
r This function is useful when copying origi-
nals of different sizes onto copy paper of
the same size.
Limitation
r This function will use one of the following
reproduction ratios: 200, 129, 100, 65 and
50 % for Engineering sizes, and 200, 133,
100, 67 and 50 % for Architecture sizes.
Preparation
For paper and original widths that can be read
automatically, see “Original and Pa per Sizes
That Can Be Read Automatically.” => Page 3.
2Pr ess the key shown to select a paper tray
containing your desired paper.
Synchro
Preset /
Variable
1
2
3
Copy Media Image Density
Vellum
Full Size
Auto Paper
Select
Auto Reduce/
Enlarge
Preset Reduce/
Enlarge
Zoom
Direct.Mag.
(%)
Dark
Leading
Trailing
Photo
Note
r If you do not wish to select any other func-
tions, set your original and start copying.
Up
Down
Edge Shift Im
Left
Right
1
CE2A0108
1Press the k ey shown to turn on the {Auto
Reduce/Enlarge} indicator.
22
Synchro
Preset /
Variable
1
2
3
Copy Media Image Density
Full Size
Auto Paper
Select
Auto Reduce/
Enlarge
Preset Reduce/
Enlarge
Zoom
Direct.Mag.
(%)
Leading
Trailing
Up
Dow
Edge Shift I
Left
Right
CE2A0109
1
Page 41

SETTING THE LENGTH OF ROLL PAPER CUT
n
m
SETTING THE LENGTH OF ROLL PAPER CUT
Preparation
r You can cut roll paper in three ways:
{Synchro Cut}
Cuts roll paper to the same length as originals.
{Preset Cut}
Cuts roll paper by a length selected from the predefined, fixed lengths and two user-defined
lengths.
{Variable Cut}
Cuts roll paper by the length you enter.
r Roll paper is cut regardless of original sizes (except when using Synchro Cut).
r The predefined, fixed lengths for Preset Cut depend on the paper size type (Engineering sizes
or Architecture sizes) as shown in the following table.
Engineering Cut length 44.0'' 34.0'' 22.0'' 17.0''
Architecture Cut length 48.0'' 36.0'' 24.0'' 18.0''
r When you change Preset Cut/Var iable Cut settings, roll paper will continue to be cut to the
modified length until the Auto Reset function is executed.
r You can specify a Variable Cut length from 11'' to 197'' in 0.1'' steps.
Limitation
r You can cut roll paper to lengths between 11'' and 197'' when using Synchro Cut.
Note
r By default, {Synchro Cut} is lit for the paper cut method. You can change this setting. =>
Page 69, “Set cutting method”
r You can store up to two Preset Cut lengths. => Page 73, “Copy length”
r You can also select whether to show Synchro Cut lengths on the panel display. => Page 70,
“Synchr. cut length”
r You can select the default paper sizes that are available (Engineering sizes or Architecture
sizes). => Page 71, “Size mode setting”
Synchro Cut
1Press the k ey shown to turn on the {Syn-
chro Cut} indicator.
Note
r If you do not wish to select any other func-
tions, set your original and start copying.
Synchro
Preset /
Variable
1
2
3
Copy Media Image Density
Full Size
Auto Paper
Select
Auto Reduce/
Enlarge
Preset Reduce/
Enlarge
Zoom
Direct.Mag.
(%)
Leading
Trailing
Up
Dow
Edge Shift I
Left
Right
CE2A0110
1
23
Page 42

COPYING
n
m
n
m
Preset Cut/V ariable Cut
Preset Cut
1Press the key shown so that the {Preset
Cut/Variable Cut } indicator blinks.
Synchro
Preset /
Variable
1
2
3
Copy Media Image Density
Full Size
Auto Paper
Select
Auto Reduce/
Enlarge
Preset Reduce/
Enlarge
Zoom
Direct.Mag.
(%)
Leading
Trailing
Up
Dow
Edge Shift I
Left
Right
CE2A0111
1
Standard size cut UT→#
100.0%
2Press the {U}/{T} key until the cut
length you require appear s on the panel
display.
3 Press the {#} key.
The {Preset Cut/Variable Cut} indicator
will light.
Note
r If you do not wish to select any other func-
tions, set your original and start copying.
Variable Cut
Preparation
r When entering numbers, add leading ze-
roes as necessary. F or example, if the value
requires 4 digits and you wish to set it to
“299”, enter “0299”.
1Press the key shown so that the {Preset
Cut/Variable Cut} indicator blinks.
Synchro
Preset /
Variable
1
2
3
Copy Media Image Density
Full Size
Auto Paper
Select
Auto Reduce/
Enlarge
Preset Reduce/
Enlarge
Zoom
Direct.Mag.
(%)
Leading
Trailing
Up
Dow
Edge Shift I
Left
Right
CE2A0111
1
2Press the {U}/{T} until “V ariable Cut”
appears on the panel display.
3Press the {#} key. The variable cut
length entry screen is displayed.
Set length Num. UT→#
100.0%
4Use the {U}/{T} or {Number} keys to
select a cut length.
Note
r If you have entered a wrong number, use
the {U}/{T} key or {Number} keys to
enter the correct one.
5Press the {#} key.
The {Preset Cut/Variable Cut} indicator
lights.
Note
r If you do not wish to select any other func-
tions, set your original and start copying.
24
Page 43

FUSING TEMPERATURE
Enlarge
FUSING TEMPERA TURE
This feature lets you select an optimal fusing
temperature for the type of media you are copying onto.
Preparation
r Choose one of the following fusing tem-
perature options that best matches your
copy media:
{Vellum Paper}
Select this option when copying onto translucent paper.
{Film}
Select this option when copying onto film.
{Bond Paper}
This option is selected when both the {Vel-
lum Paper} and {Film} indicators are not
lit.
r Copies might be creased or part of images
might be lost if you make copies with a
fusing temperature inappropriate to your
copy paper.
r When you change the fusing temperature,
it might take a few minutes for the copier
to enter the ready condition.
Note
r You can adjust the fusing temperature in
the range of -5 to +5°C in about 1°C steps.
=> Page 65, “Adjusting the Fusing temp.
Temporary.”
r The specified fusing temperature is cleared
when you press the {Clear Modes/Energy
Saver} ke y or change paper types.
r Y ou can select the def ault fusing tempera-
ture for each paper type. => Page 68, “Fusing temp. adjustment.”
1Press the k ey shown to turn on the {Vel-
lum Paper} or {Film} indicator.
The message “Warming up” appears on the
panel display.
2
3
Copy Media Image Density
Vellum
Film
Image Edit
Erase Border
Mirror Image
Positive/
Negative
Zoom
Direct.Mag.
(%)
Dark
Original
Light
Original
Lighter
Photo
Auto Image
Density
Darker
Left
Right
1
4
7
.
CE2A0114
2Select any copy functions your require
and enter the number of copies.
3Set your original.
You can make copies after the copier finishes warming up.
25
Page 44

COPYING
PROGRAM
If you find that you often use the same group
of copy settings and get tired of selecting them
over and over again for each copy job, store
this group of settings in a Program. Once
stored, you can quickly and easily recall these
settings using the Recall Program key, then
carry out the copy job.
Preparation
r To use the Program function, store copy
job settings you want to use repeatedly.
This operation is called “Store program.”
r You can store up to five programs.
r The programs are numbered 1-5. Note that
if you store settings in a program that has
already been used, the old settings will be
overwritten with the new settings.
Note
r If you choose Auto Paper Select as one of
the settings stored in a program and paper
of the same size is loaded in more than one
roll feeder, the lowest number tray takes
priority.
r Unless you overwrite a program with new
settings, programs remain memorized even
when you turn off the machine or press the
{Clear Modes/Energy Sav e r} key.
Storing/Changing a Program
1Select all the settings and functions that
you wish to store in a program.
2Press the {User Tools} key.
3Press the {U}/{T} key to show “2. Store
program” on the panel display.
User Tools UT→#
Store program
4Press the {#} key
“Program 1” is shown on the panel display
5Press the {U}/{T} key to select the pro-
gram number (1-5) you wish to store
these settings in, then press the {#} key.
6If you wish to store another program,
repeat steps [1] to [5].
Note
r Press the {User Tools} key to return the
copier to the ready condition.
Recalling a Program
1Press the {Program} key.
2Press the {U}/{T} key to select the pro-
gram you wish to recall (1-5).
Recall UT→#
Program 1
3Press the {#} key.
The programmed functions are shown on
the panel display.
4Set your orig inal.
The copier starts copying.
26
Fusing
Temperature
User Tools
Program
Interrupt
CE2A0101
Page 45

O THER FUNCTIONS
Up
OTHER FUNCTIONS
Energy Saver Mode
When you press the {Clear Modes/Energy
Saver} k ey , the display goes blank and the machine enters Energy Saver mode.
Preparation
❒ By default, Energy Saver is set to “Level
2” (the machine returns to the ready condition after about three minutes). => Page
70, “Energy saver”
❒ Energy Saver mode uses less power than
the normal stand-by mode.
Important
r If you press the {Clear Modes/Energy
Saver} ke y while you are specifying a number or function, all settings you have entered will be cleared.
1Hold down the {Clear Modes/Energy
Saver} ke y for about three seconds.
The {Clear Modes/Energy Saver} indicator will light.
Down
Shift Image
123
456
789
Left
Right
Enter
Memory
Copy
On Line
Clear Modes
Energy Saver
Preview Copy
Roll Edge Cut
Emergency Stop
/
CE2A0117
Auto Start
If you set up a copy job while the machine is
warming up ,the machine starts copying automatically as soon as it enters the ready condition.
1Select any functions you require and
enter the number of copies while
“Warming up” and “Auto Start” are
shown alternately on the panel display.
2Set your original.
The message “Please wait” is shown on the
panel display.
Note
❒ When you use Memory Copy, “Ready to
set original” is shown on the panel display .
❒ The center reference mark (arrow) blinks
while “A uto Start” is shown on the screen.
Note
r To exit Energy Saver mode, press the
{Clear Modes/Energy Sav e r} key again.
27
Page 46

COPYING
Interrupt (The Memory Unit
is Required)
If the machine is making copies, you can interrupt the current copy run to copy another
original using Memory Copy, or by recalling
a stored original (with the hard disk).
Preparation
r Y ou can press the {Interrupt} key to inter-
rupt the current copy run when you are performing the following operations using
Memory Copy:
• Scanning an original
• Copying (printing out)
• Recalling a stored original
r When the machine is scanning an original,
it finishes the scan before interrupting the
copy run.
r When the machine is making a copy, it de-
livers the copy before interrupting the cop y
run.
r During a copy interruption, you cannot use
Memory Copy (Sort/Stack) or store/recall
an image.
1Press the {Interrupt} key.
The {Interrupt} indicator lights.
3When you have finished your copy job,
press the {Interrupt} key again.
The {Interrupt} indicator goes off. The
suspended memory copy run will be resumed.
Note
r After interrupting a copy run, follow the
steps shown below.
If you interrupted scanning an original
➊Insert the next original or press the {#} key
to start copying.
If you interrupted copying (printing out)
➊Resume copying.
When the message “Print out?” is displayed,
press the {#} key.
When you interrupted recalling a
stored original
➊Continue the recall operation.
e
r
uce/
Leading
Edge Shift Image
Trailing
duce/
g.
y
Photo
2Carry out your copy job.
28
Up
Down
Enter
Left
Right
123
Interrupt
Memory
Copy
On Line
Clear Modes
Energy Saver
Preview Copy
/
Page 47

3. COPY SETTINGS
n
m
CE2A0116
PRESET REDUCE/ENLARGE
Sizes
You can select a preset magnification/reduction ratio for copying.
Preparation
r This function provides eight fixed repro-
duction ratios (four magnification ratios
and four reduction ratios) and two arbitrary
reproduction ratios:
Relationship between the Fixed Reproduction Ratios and Original/Paper
Engineering
Magnification ratio 314%, 259%, 129%
Reduction ratio 65%, 50%, 32%, 25%,
Arctecture
Magnification ratio 400%, 267%, 133%
Reduction ratio 67%, 50%, 33%, 25%
Note
r Y ou can select a reproduction ratio regard-
less of an original or paper size. With some
ratios, however , part of an image might be
lost, or margins might appear on copies.
r When you reduce a copy of an original hav-
ing thin lines, their thickness might differ
or part of them might be lost.
r When you set the zoom increment to 0.1
%, the fractional portion of numbers is also
shown on the panel display. => Page 70,
“Change zoom inc.”
Tips
r By default, the arbitrary reproduction ra-
tios are 100 % for Magnification Ratio 1
and 200 % for Magnification Ratio 2. You
can change these settings to ratios you use
frequently.
=> Page 74, “Setting Preset Reduce/Enlarge”
1Press the key shown so that the {Preset
Reduce/Enlarge} indicator blinks.
Synchro
Preset /
Variable
1
2
3
Copy Media Image Density
Full Size
Auto Paper
Select
Auto Reduce/
Enlarge
Preset Reduce/
Enlarge
Zoom
Direct.Mag.
(%)
Leading
Trailing
Up
Dow
Edge Shift I
Left
Right
1
29
Page 48

COPY SETTINGS
2Press the {U}/{T} key to select a r epro-
duction ratio.
Preset R/E UT→#
141% 841X ----mm
3Press the {#} key.
The {Preset Reduce/Enlarge} indicator
lights.
4Set your original.
30
Page 49

ZOOM
n
m
The copier starts copying.
You can specify the magnification/reduction
ratio in 1 % or 0.1 % steps to change copy
image sizes more subtly.
ZOOM
1Press the key shown so the {Zoom} in-
dicator blinks.
Preparation
r Use the {U}/{T} key or {Number} keys
to specify the reproduction ratio.
r When entering numbers, add leading ze-
roes as necessary. F or example, if the value
requires 3 digits and you wish to set it to
“50”, enter “050”.
r You can specify the reproduction ratio in
the range of 25 to 400 %.
Tips
r You can also choose a ratio nearest to the
one you require by choosing {Preset Reduce/Enlarge} and then selecting {Zoom}.
Fine-tune the ratio with the {U}/{T} key.
Note
r You can also change the reproduction ra-
tio increment to 1 % or 0.1 %. => Page 70,
“Change zoom inc.”
r When you reduce a copy of an original hav-
ing thin lines, their thickness might differ
or part of them might be lost.
Synchro
Preset /
Variable
1
2
3
Copy Media Image Density
Full Size
Auto Paper
Select
Auto Reduce/
Enlarge
Preset Reduce/
Enlarge
Zoom
Direct.Mag.
(%)
Leading
Trailing
Up
Dow
Edge Shift I
Left
Right
CE2A0113
1
Zoom Num. UT→#
100.0% 34.0''
××
× 17.0''
××
2Press the {U}/{T} key or {Number}
keys to specify a reproduction ratio.
Note
r If you enter a wrong number, use the {U}/
{T} key or {Number} keys to enter the
correct one.
3Press the {#} key.
The {Zoom} indicator becomes lit.
4Set your original.
The copier starts copying.
31
Page 50

COPY SETTINGS
n
m
DIRECTIONAL MA GNIFICA TION
or part of them might be lost.
This feature lets you specify different reproduction ratios for the vertical and horizontal
axes. To put it simply, you can stretch the image horizontally and vertically.
Vertical
Horizontal
Preparation
r Use the {U}/{T} key or {Number} keys
to specify the reproduction ratios.
r When entering numbers, add leading ze-
roes as necessary. F or example, if the value
requires 3 digits and you wish to set it to
“50”, enter “050”.
r You can specify the reproduction ratios in
the range of 25 to 400 %.
Note
r You can also change the reproduction ra-
tio increment to 1 % or 0.1 %. => Page 70,
“Change zoom inc. ”
r When you reduce a copy of an original hav-
ing thin lines, their thickness might differ
1Press the k ey sho wn so the {Directional
Magnification} indicator blinks.
Synchro
Preset /
Variable
Copy Media Image Density
2Press the {U}/{T} key or {Number}
keys to specify a horizontal reproduction ratio.
Direct. Magnif. N. UT→#
Width 120%
Note
r If you enter a wrong number, use the {U}/
{T} key or {Number} keys to enter the
correct one.
3Press the {#} key.
The vertical ratio entry screen is displayed.
4Press the {U}/{T} key or {Number}
keys to specify a vertical reproduction
ratio.
Direct. Magnif . N. UT→#
Length 100%
Full Size
Auto Paper
Select
Auto Reduce/
Enlarge
Leading
1
2
3
Preset Reduce/
Enlarge
Zoom
Direct.Mag.
(%)
Trailing
Up
Dow
Edge Shift I
Left
Right
CE2A0116
1
32
5Press the {#} key.
The {Directional Magnification} indicator
lights.
6Set your orig inal.
Page 51

ERASE BORDER
n
m
Enlarge
The copier starts copying.
ERASE BORDER
This function erases shaded areas around original images.
B
A
B
A
Preparation
r By default, the bounding margin around
all four edges that is erased is 0.4''.
r You can specify erase widths in the range
of 0 to 2'' in 0.1'' steps.
Limitation
r You cannot select Erase Border while the
{Synchro Cut} indicator is lit.
Note
r You can also combine Erase Border and
Positive/Negative when you set the “Image creation” initial setting to “combined
function.” => Page 34, “MIRROR,” Page
34, “POSITIVE/NEGATIVE,” Page 70,
“Image creation”
r Y ou can change the default erase width. =>
Page 66, “Erase Border”
1Pr ess the key sho wn so the {Pr eset Cut/
Variable Cut } indicator blainks and
then select a cut length.
Synchro
Preset /
Variable
1
2
3
Copy Media Image Density
Full Size
Auto Paper
Select
Auto Reduce/
Enlarge
Preset Reduce/
Enlarge
Zoom
Direct.Mag.
(%)
Leading
Trailing
Up
Dow
Edge Shift I
Left
Right
CE2A0111
1
Standrard size cut UT→#
100.0%
Reference
“Preset Cut/Variable Cut” => Page 24
2Press the key shown to turn on the
{Erase Border} indicator.
2
3
Copy Media Image Density
Vellum
Film
Image Edit
Erase Border
Mirror Image
Positive/
Negative
Zoom
Direct.Mag.
(%)
Dark
Original
Light
Original
Lighter
Photo
Auto Image
Density
Darker
Left
Right
1
4
7
.
CE2A0119
3Set your original.
The copier starts copying.
33
Page 52

COPY SETTINGS
Enlarge
Enlarge
POSITIVE/NEGATIVEMIRROR
Like a mirror, this function rev erses copy images from left to right and vice versa.
Note
r You can also combine Mirror with Erase
Border or Positive/Negative when you set
“Image creation” of initial setting to “combined function.” => Page 33, “ERASE
BORDER, ” Page 34, “POSITIVE/NEGATIVE, ” P a ge 70, “Image creation”
1Press the k ey shown to turn on the {Mir -
ror} indicator.
2
3
Copy Media Image Density
Vellum
Film
Image Edit
Erase Border
Mirror Image
Positive/ Negative
Zoom
Direct.Mag.
(%)
Dark
Original
Light
Original
Lighter
Photo
Auto Image
Density
Darker
Left
Right
1
4
7
.
CE2A0120
This function turns positive images to negative ones when copying originals.
Note
r You can also combine Positive/Negative
with Erase Border or Mirror when you set
the “Image creation” of initial setting to
“combined function.” => Page 33,
“ERASE BORDER,” Page 34, “MIRROR,” Page 70, “Image creation”
1Pr ess the key shown to turn on the {P osi-
tive/Negative} indicator.
2
3
Copy Media Image Density
Vellum
Film
Image Edit
Erase Border
Mirror Image
Positive/
Negative
Zoom
Direct.Mag.
(%)
Dark
Original
Light
Original
Lighter
Photo
Auto Image
Density
Darker
Left
Right
1
4
7
.
CE2A0121
2Set your original.
The copier starts copying.
34
2Set your orig inal.
Page 53

MARGINS
The copier starts copying.
This function creates a margin on the top (leading edge) or bottom (trailing edge) of copies
or cuts off unnecessary portions of copies.
Leading edge margin ( + )
Leading edge margin ( - )
Trailing edge margin ( + )
MARGINS
Preparation
❒ This function allows you to select the fol-
lowing four types of margins:
• Leading edge margin (+): Creates a margin on the top (leading edge) of copies.
• Leading edge margin (-): Cuts an unnecessary portion on the top (leading edge)
of copies.
• Trailing edge margin (+): Cre ates a margin on the bottom (trailing edge) of copies.
• Trailing edge margin (-): Cuts an unnecessary portion on the bottom (trailing
edge) of copies.
❒ Use the {U}/{T} key or {Number} keys
to specify margins.
❒ When entering numbers, add leading ze-
roes as necessary. F or example, if the value
requires 3 digits and you wish to set it to
“50”, enter “050”.
❒ You can specify margins in the range of
-8'' to 8'' in 0.1'' steps (negative numbers
represent cut lengths).
❒ A copy length is a paper length plus a mar-
gin or minus a cut length.
Note
❒ You can change the default margin settings.
Trailing edge margin ( - )
35
Page 54

COPY SETTINGS
y
=> Page 66, “Margins”
1Press the key shown so the {+} or {-}
indicator for {Leading Edge} or {Trail-
ing Edge} blinks.
The default margin setting is shown on the
panel display.
ull Size
uto Paper
elect
uto Reduce/
nlarge
reset Reduce/
nlarge
oom
irect.Mag.
)
Density
inal
t
inal
Leading
Trailing
Photo
Auto Image
Density
Up
Down
Edge Shift Image
Left
Right
123
456
Enter
Interrupt
Memor
Copy
On Line
Clear Modes
Energy Saver
Preview Copy
Roll Edge Cut
CE2A0122
Set lead. edge N. UT→#
+2,0''
Set trail. edge N. UT→#
+2,0''
2Press the {U}/{T} key or {Number}
keys to specify a margin or cut length.
Note
r If you have entered a wrong number, use
the {U}/{T} key or {Number} keys to
enter the correct one.
/
3Press the {#} key.
The {+} or {-} indicator lights.
4Set your original.
The copier starts copying.
36
Page 55

IMA GE SHIFT
IMAGE SHIFT
This function shifts a copy image upward/
downward or left/right to make a margin.
Image Shift ( Lead )
Image Shift ( Trail )
Image Shift ( Left )
Preparation
r This function allows you to select the fol-
lowing four types of shift:
• Up: Moves an original image toward the
top (leading edge) of a copy.
• Down: Moves an original imag e toward
the bottom (trailing edge) of a copy.
• Left: Moves an original image to the left
of the original feed direction.
• Right: Moves an original image to the
right of the original feed direction.
r Use the {U}/{T} key or {Number} keys
to specify shift widths.
r When entering numbers, add leading ze-
roes as necessary. F or example, if the value
requires 3 digits and you wish to set it to
“50”, enter “050”.
r You can specify shift widths in the rang e
of 0 to 8'' in 0.1'' steps.
r If you are using roll paper, it is cut by the
length specified for Preset Cut or Variable
Cut. When you specify Image Shift together with Synchro Cut, the copy might
be longer than the original.
Note
r You can change the default shift widths.
=> Page 66, “Image Shift”
Image Shift ( Right )
37
Page 56

COPY SETTINGS
y
1Press the key shown so the {Up},
{Down}, {Left}, or {Right} indicator
blinks.
The default shift width is shown on the
panel display.
ull Size
uto Paper
elect
uto Reduce/
nlarge
Leading
Trailing
reset Reduce/
nlarge
oom
irect.Mag.
)
Density
Photo
inal
t
Auto Image
Density
inal
Up
Down
Edge Shift Image
Left
Right
123
456
Enter
Interrupt
Memor
Copy
On Line
Clear Modes
Energy Saver
Preview Copy
Roll Edge Cut
CE2A0123
Set image shift N. UT→#
Ttail 0.4''
2Press the {U}/{T} key or {Number}
keys to specify a shift width.
Note
r If you enter a wrong number, use the {U}/
{T} key or {Number} keys to enter the
correct one.
/
3Press the {#} key.
The {up}, {Down}, {Left}, or {Right}
indicator becomes lit.
4Set your original.
38
Page 57

PREVIEW COPY
p
PREVIEW COPY
The copier starts copying.
This function makes a partial copy (11'' long
from the leading edge) of an original in the
original feed direction. Use this feature to
check image quality with the current settings
before starting a copy run.
Function Preview
11"
(Example of a preveiew
copy for "Positive /
Negative")
Image Density Preview
11"
Preparation
r Your machine is furnished with two types
of preview feature:
• Function Preview: Allows you to check
the Mirror, Positive/Negative, or other
functions.
• Image Density Preview: Copies the leading portion of an original with seven levels of image density on a 1'' basis.
Note
r When you make an image density preview
copy , the Image Shift (Up/Down), Margins,
and Reduce/Enlarge functions are disabled.
r If you choose {Auto Image Density}, Y ou
cannot select Preview Copy.
1Select any copy functions you wish to
use, then press the {Preview Copy} key .
Leading
Trailing
Photo
Auto Image
Density
Up
Down
Edge Shift Image
Left
Right
123
456
Enter
Memory
Copy
On Line
Clear Modes
Energy Saver
Preview Copy
Roll Edge Cut
Emergency Stop
/
CE2A0124
2Press the {U}/{T} key until “1. Pr eview
image” or “2. Preview contrast” is shown
on the panel display.
Preview cop y UT→#
1. Preview image
Preview cop y UT→#
2. Preview contrast
Note
When using Memory Copy, you can also select “3: full sample.”
3Press the {#} key.
4Set your orig inal.
The copier starts copying.
Note
r When the copy run starts, the original is
fed a little and delivered back to position.
Then it is kept on the original table.
r After preview copying, press the {#} key
when you want to start copying the entire
original with the these copy settings.
r To cancel copying the original, press the
39
Page 58

COPY SETTINGS
COMBINATION CHART
Synchro Cut
Preset Cut/Variable Cut
Auto Paper Select
Auto Reduce/Enlarge
Preset Reduce/Enlarge
Directional Magnification
Leading Edge Margin
Trailing Edge Margin
Image Shift(UP/Down)
Edit
Adjusting
Image
Density
Paper
Feed
Paper
Type
Memory Copy
Image Shift(Left/Right)
Erase Border
Positive/Negative
Auto Image Density
Dark Original
Normal Original
Light Original
Paper Tray
Manual Feed
Bond Paper
Vellum Paper
Already selected mode
Full Size
Zoom
Mirror
Text
Photo
Film
you try to select
Synchro Cut
Preset Cut/Variable Cut
Full Size
Auto Paper Select
Auto Reduce/Enlarge
Preset Reduce/Enlarge
Edit
Zoom
Directional Magnification
Leading Edge Margin
Trailing Edge Margin
Image Shift(UP/Down)
Image Shift(Left/Right)
Adjusting Image Density
Erase Border
Mirror
Positive/Negative
Text
Auto Image Density
Photo
Dark Original
Normal Original
Paper Feed
Paper Type
Light Original
Paper Tray
Manual Feed
Bond Paper
{Emergency Stop} k ey and remove the original.
: These modes can be used together.
: These modes can be used together the when the Image creation initial setting is set to“combined
function” for these modes.
: These modes cannot be used together. The mode you try to select will be the mode you are
working in.
: These modes cannot be used together . The already selected mode will be the mode you are
working in.
: Only the Trailing Edge Margin (+) can be used together with Synchro Cut.
Memory Copy
Vellum Paper
Film
Note: Text means a state in which both Auto Image Density and Photo are not selected.
Normal Original means a state in which both Dark Original and Light Original are not selected.
512345678900-==
40
Page 59

4. WHA T T O DO IF SOMETHING
GOES WRONG
IF YOU CANNOT START COPYING
If a Message Appears
This section describes messages shown on the panel display. If you see a message other
than those in the table below, follow the instructions given in the message.
Message
Warming up
No roll unit
Check paper size
Close original
holder
Close doors and
covers
Close doors and
covers
Please wait
Problem/Cause
This message appears when
you turn on the main
switch.
The roll feeder is not set
firmly in a selected paper
tray.
There is no copy paper that
matches an original you set
when the {Auto Paper Select} indicator is lit.
The original holder is not
fixed with the pins.
The front cover is open.
The main unit is open.
The upper rear cover is
open.
The right side cover is open.
The machine is adjusting its
temperature because you
have changed the fusing
temperature.
Action
W ait for the machine to warm-up.
Y ou can specify copy functions and the number of copies during the warm-up period. =>
Page 27, “Auto Start”
Note
• It takes up to 10 minutes for the machine to
enter the ready condition when you turn on
the main switch.
Open the front cover and push the roll feeder
firmly . => Page 48, “IF COPY P APER RUNS
OUT”
Change the roll paper and start copying. Alternatively, turn on the {Auto Reduce/Enlarge} indicator with the relevant key to enlarge/reduce copies. => Page 48, “IF COPY
PAPER RUNS OUT,” Page 22, “Auto Reduce/Enlarge”
Fix the original holder firmly with the pins
on both sides.
Close the front cover firmly.
Hold the original table with both hands and
push it toward the rear side of the machine to
close the main unit. Make sure that the main
unit release lever is returned to the original
position.
Close the upper rear cover firmly.
Close the right side cover firmly.
Wait f or the machine to adjust to the new temperature.
41
Page 60

WHA T TO DO IF SOMETHING GOES WRONG
Message
Memory full
Eject original?
Memory unit
error
Press any key
Turn on the
memory unit
Select lighter
exposure, set
original again
Paper empty
Remove
remaining paper
Now adding
toner
Please call
service
Maintenance
due.
Problem/Cause
The machine has run out of free
memory space.
You cannot make copies with
memory because the Memory
Unit is not working properly.
The Memory Unit’s power cord
is unplugged from the connector
on the back of the machine.
You are trying to store in
memory a large-size blueprint
original, or an containing many
photographs, maps, or other
halftone images.
The end portion of the roll paper
is stuck to its roll. If the remaining paper is too short, the machine
will not cut it.
The machine adds and shakes the
toner after you supply it.
Machine maintenaice is due.
Action
If you select “Y es, ” the original is ejected.
If you select “No,” remove the original
manually.
When you press the
removing the original, the machine prints
out the originals it has already scanned.
Contact your service representative. However, you can still make copies without using memory. Press any le y to return to the
“Ready” screen.
Plug the power cord in firmly. If the message appears again after you have made sure
that the power cord is plugged in, contact
your service representative.
Lighten the copy image density with the
{Lighter} key, or change the image quality level from “Fine” to “Normal. ” Change
the original feed orientation from L to K.
Open the front cover and remove the paper.
Make sure that the toner is added, and wait
for the message to disappear.
When this message appears with a num-
ber, pull the release lev er to open the main
unit, and then close it. If the message appears again, check the number and other
information given in the message, turn off
the main switch, and unplug the power
cord. Then contact your service representative.
Contact your service representative.
key after ejecting/
{#}
42
Page 61

Others
IF YOU CANNOT START COPYING
Problem
The {Clear Modes/Energy
Saver} indicator is lit and the
panel display is turned off.
Nothing appears on the panel
display even when you turn on
the main switch.
Cause
The machine is in Energy
Saver mode.
The power code is not plugged
in the outlet.
Action
Press the {Clear Modes/
Energy Saver} key.
Plug the power cord in the
outlet.
43
Page 62

WHA T TO DO IF SOMETHING GOES WRONG
IF YOU CANNOT MAKE CLEAR COPIES
Problem
Black lines
appear on
copies.
Cause
The image density
is too dark.
The exposure glass
or original feed
roller is dirty.
There is foreign
matter or dust on
the originals.
Action
Adjust the image density.
=> Page 18, “ ADJUSTING COPY IMA GE DENSITY”
Clean the exposure glass and original feed roller.
Cleaning the Exposure Glass
CE1C0300
Cleaning the Original Feed Roller
Wipe the original feed roller while rotating the part
indicated by (1) in the illustration below.
(1)
CE1C0400
44
The revercse
side of
an original
The image density
is too dark.
Remove the foreign matter or dust from the originals
before copying.
In particular, be careful when copying the following
types of originals:
1. Originals containing characters in pencil, either
handwritten or plotter-generated.
2. Film or translucent paper originals which easily build
up static electricity.
3. Originals long enough to reach the floor.
Adjust the image density.
=> Page 18, “ADJUSTING COPY IMAGE DENSITY”
Page 63

IF YOU CANNOT MAKE CLEAR COPIES
Problem
Copies appear dirty .
A shadow appears on copies if
you use pasted originals.
Something other than original
images is copied
Copy images are blurred.
T oner is not fused properly .
A moire pattern is
produced on copies.
Cause
The image density is
too dark.
The image density is
too dark.
The exposure glass or
original feed roller is
dirty.
The image density is
too light.
Unsuitable paper is
set.
The fusing temperature is too low.
Copies are made onto
thick paper.
The moire pattern is
created because regularly arranged dot patterns or lines overlaps
when the image is processed.
Action
Adjust the image density .
=> Page 18, “ADJUSTING COPY
IMAGE DENSITY”
Adjust the image density .
=> Page 18, “ADJUSTING COPY
IMAGE DENSITY”
• Change the original feed orientation.
• Put mending tape on the pasted part.
Clean the exposure glass and original
feed roller.
=> Page 44
Adjust the image density .
=> Page 18, “ADJUSTING COPY
IMAGE DENSITY”
Check non-recommended paper.
=> Page 5
Note
• If you make a copy on rough-grain,
coated, or damp paper, the copy image might be blurred.
Specify a fusing temperature appropriate to the paper type.
=> Page 25, “FUSING TEMPERATURE,” Page 68, “Fusing temp. adjustment,” P age 65, “ Adjusting the Fusing T emperature T empora rily”
Specify a higher fusing temperature.
=> Page 65, “Adjusting the Fusing
T emperature Temporarily”
The moire pattern might not be produced if you change the original orientation.
Copy the original in the Photo mode.
Copies become lighter
when continually copying
a solid, black image.
Open and close the right side cover and
wait for a while.
45
Page 64

WHA T TO DO IF SOMETHING GOES WRONG
IF YOUR COPIER DOES NOT OPERATE AS Y OU WANT
Problem
Misfeeds occur frequently.
Part of a copy image is lost
when using Erase Border.
Part of a copy image is
lost.
An original image is not
copied.
The copy image is shifted
horizontally on the copy
paper.
The copy image is shifted
in the original feed direction
(on the opposite direction)
Copies are shorter than the
specified length, or they
are cut at some midpoint.
46
Cause
Copy paper is folded or
creased.
Misfed paper or pieces of
paper remain inside the
machine.
The original is curled.
The erase width is too
large.
The original you set has
too narrow a margin.
The original was not set
in the correct position.
An unsuitable paper size
is selected.
Image Shift or Leading
Edge Margin (or Trailing
Edge Margin) is selected.
The original was set with
the wrong side facing down.
The roll paper is not set
properly in the roll feeder.
The original size does not
match the size indicators
on the original table.
The copy paper was not
inserted properly when
copying with manual
feed.
Image Shift or Leading
Edge Margin (or Trailing
Edge Margin) is selected.
Action
Cut the folded or creased portion of the
roll paper.
Remove such paper in an appropriate way .
=> Page 56, “IF COPY PAPER OR AN
ORIGINAL IS MISFED”
Straighten the curled portion of the original before copying.
Set the default erase width to a smaller
value. => Page 66, “Erase Border”
Set the original properly.
=> Page 14, “SETTING ORIGINALS”
Select copy paper of the correct size.
=> Page 4, “Recommended Paper Sizes
and T ypes”
Press the relevant ke y to turn off the {Image Shift} or {Leading Edge Margin} (or
{Trailing Edge Margin}) indicator. =>
Page 37, “IMAGE SHIFT,” => Page 35,
“MARGINS”
Set the paper with the side you wish to
copy face-down.
Align the roll paper properly to the size
indicator on the roll spool. => Page 48,
“IF COPY PAPER RUNS OUT”
Align the original guides to the size indicators and insert the original along them.
=> Page 14, “SETTING ORIGINALS”
Align the copy paper properly to the size
indicator on the manual feed table. =>
Page 16, “COPYING ONTO P APER SET
ON THE MANUAL FEED TABLE”
Press the relevant ke y to turn off the {Image Shift} or {Leading Edge Margin} (or
{Trailing Edge Margin}) indicator. =>
Page 37, “IMAGE SHIFT,” => Page 35,
“MARGINS”
Page 65

IF YOUR COPEIR DOES NOT OPERATE AS YOU WANT
Problem
Copies are creased.
Copies are slanted.
Copies are waved.
(on translucent paper)
The reproduction ratio is inappropriate
for full-size copying.
Data other than original images is copied.
A trailing edge margin is made on a copy
when reducing the
copy image using
Synchro Cut.
A trailing portion of
an image is not copied when copying an
original containing
halftones.
A paper misfeed occurs and the machine
sounds abnormally
when roll paper is
running out.
Cause
The copy paper is
damp.
The originals were not
fed straight.
The fusing temperature
is too low.
The default full-size reproduction ratio is inappropriate.
The hard disk is damaged.
The margin is made
because copy paper is
fed into the machine
first.
The copy is made in
the T ext mode.
A paper misfeed occurs if the end portion
of paper is pasted on
the roll.
Action
Replace the copy paper with new one.
Turn on the anti-condensation heater.
=> Page 6, “Anti-humidity Heater”
Feed the originals straight along the original
guides.
Specify a fusing temperature.
=> Page 68, “Fusing temp. adjustment,” Page
65, “ Adjusting the Fusing Temperature Temporarily.”
Adjust the default full-size reproduction ratio.
=> Page 67, “Magnif. adjustment”
Format the hard disk and store the copy job settings again. Ask your service representative.
Enable the Pre-scan function.=>P.88,”Prescan(Reduction)”
Set Background setting to Lighter and make
copies in the Photo/Light Original mode when
copying an original having text and halftones.
Open the front cover and remove the roll paper .
47
Page 66

WHA T TO DO IF SOMETHING GOES WRONG
IF COPY PAPER RUNS OUT
Reference
For the sizes and types of paper you can set,
see “Recommended Paper Sizes and Types.”
=> Page 4
1Open the front co v e r.
Note
r When opening the front cover, close the
manual feed support table.
2Hold the front part of the roll feeder to
release the lock. Then pull out the feeder .
5Check the paper roll direction and set
the new roll paper on the roll spool.
CE9P0200
3Remove the roll paper.
4Remov e the roll spool while pressing the
lever .
48
CE3R0100
CE3R0300
CE9P0300
Note
r Align the side edge of the roll paper to the
scale on the roll spool.
r When you release the lever, the roll paper
is fixed on the roll spool.
r The scale on the roll spool is the reference
for aligning roll paper. To align roll paper
precisely, set it in position based on actual
copy sizes.
Roll spool
Paper
roll
Size indicator
CE9P0400
Page 67

IF COPY PAPER RUNS OUT
6Set the roll paper in the r oll feeder.
Important
r When setting the roll paper in the roll
feeder, be careful not to pinch your fingers
between the paper and the guide grooves
in which you set it.
CE3R0300
7Open the paper feed guide while hold-
ing the levers.
Setting the Roll Paper in the First Roll
Feeder
➊Feed the paper under the black sheet by
about 0.4''.
CE3R0501
Setting the Roll Paper in the Second/Third
Roll Feeder
➊ Open the paper feed guide while holding
the levers as shown below.
CE3R0800
➋ Pull out the paper edge by about 0.4'' as
shown below. Then close the paper feed
guide while holding the levers.
1cm
CE3R0601
49
Page 68

WHA T TO DO IF SOMETHING GOES WRONG
8Stretch the paper.
9Close the front co v e r.
The paper edge is set in position automatically.
Note
r If a message appears to indicating a paper
misfeed, set the paper again.
A Press the {Cut Leading Edge} key.
The leading portion of the roll paper is cut
by about 1.2'' and delivered from the copy
delivery slot.
Down
Shift Image
Left
Right
23
56
89
Enter
Memory
Copy
On Line
Clear Modes
Energy Saver
Preview Copy
Roll Edge Cut
Emergency Stop
/
CE2A0125
Note
r If the leading portion is cut at a slant or
irregularly, press the {Cut Leading Edge}
key a few more times.
50
Page 69

IF THE WASTE T ONER T ANK FULL
IF THE WASTE TONER T ANK FULL
R
WARNING:
• Do not incinerate used toner, toner tank or toner cartridge.
• Toner dust might ignite when exposed to an open flame.
• Dispose of the toner cartridge and the used toner tank
• according to local regulations for plastics.
R
CAUTION:
• Do not eat or swallow toner.
R
R
CAUTION:
R
Note
r Put the Tank with full of the used toners in the vinyl bag and ask your service representative
the way to dispose of it.
r Used toner cannot be re-used.
• Keep toner(used or unused), toner tank, and toner cartridge out
of reach of children.
• This machine has been tested for safety using this supplier’s
parts and consumables. We recommend y ou only use these specified supplies.
51
Page 70

WHA T TO DO IF SOMETHING GOES WRONG
1Open the Right Cover.
2Remov e the Waste T oner T ank by push-
ing down and pulling out towards you.
3 Seal the Waste Toner Tank Opening
with the seal located on.
4Set a new Waste Toner Tank into the
Copier
5Close the Right Cover.
52
Page 71

IF TONER RUNS OUT
IF T ONER RUNS OUT
This section describes how to supply toner when toner is low or runs out.
WARNING:
R
• Do not incinerate used toner, toner tank or toner cartridge.
• Toner dust might ignite when exposed to an open flame.
• Dispose of the toner cartridge and the used toner tank.
• according to local regulations for plastics.
R
CAUTION:
• Do not eat or swallow toner.
R
R
CAUTION:
R
Important
r If you use toner other than that recommended, a fault might occur.
r Add toner with the power turned on. If you turn off the power , your copy settings are cleared
and you cannot resume a copy run.
r Always add toner after the machine instructs you to add toner.
r Set a toner cartridge in each of the left and right holders (two cartridges in total).
Reference
For information on storing toner, see “Toner Storage.” => Page 7
Note
r You can still make several copies after the message “Toner is nearly empty” is displayed.
However, you should replace the toner as soon as possible.
r If toner runs out, the message “Add toner” appears and you cannot make copies.
r When you supply toner, the copier automatically adds it for up to four minutes and shake it for
up to two minutes. While this is happening, the message “Now adding toner” is displa yed.
r If you have been copying originals of high image density, you may not be able to fully replen-
ish the toner reservoir in one operation.T oner cannot be fully added at a time depending on the
image density of originals you have copied. If the message “Toner is nearly empty” appears
again after supplying toner, open and close the right side co ver. This lets the copierstart adding
the toner again.
• Keep toner(used or unused), toner tank, and toner cartridge out
of reach of children.
• This machine has been tested for safety using this supplier’s
parts and consumables. We recommend you onl y use these specified supplies.
53
Page 72

WHA T TO DO IF SOMETHING GOES WRONG
11
1Loosen both screws on the upper rear
11
cover and open it.
3Shake the new toner cartridge horizon-
tally and vertically 10 to 15 times to remove lumps.
2Open the toner supply cove r.
CE1T0101
CE1T0200
CE1T0300
CE1B0100
CE1B0200
4Remov e the seal from the cap.
CE1B0300
54
Page 73

IF TONER RUNS OUT
5While holding both tabs on the cap, set
the toner cartridge on each of the left
and right holders in the machine.
CE1T0400
6Holding it near the cap, and slide the
toner cartridge to the middle of the machine while tapping its bottom. Then
slide the cartridge back to the original
position.
CE1T0500
8Repeat steps [5] to [7] to add toner fr om
the other holder.
CE1T0700
9Close the toner supply cover.
CE1T0301
AClose the upper rear cover and fasten
both screws on the cover.
Note
r Slide the toner cartridge left and right a few
times for about 15 to 20 seconds, and leave
it for 2 or 3 minutes.
7Remov e the toner cartridge from the ma-
chine while holding both tabs on
thecapas in setting the cartridge.
CE1T0600
CE1T0101
55
Page 74

WHA T TO DO IF SOMETHING GOES WRONG
IF COPY PAPER OR AN ORIGINAL IS MISFED
R
CAUTION:
• Since some parts of the copier are supplied with high electrical
voltage, touch only the parts specified in this manual, otherwise
a burn might occur.
Important
r When clearing misfeeds, do not turn off the power . If you do, your copy settings are clear ed.
r Remove misfed paper carefully not to tear it. If torn scraps of paper remain within the ma-
chine, a paper misfeed might recur or a fault might occur.
r If paper misfeeds occur repeatedly, contact your service representative.
Note
r More than one misfed areas might be indicated. In this case, check every applicable area.
• B, C, or D => Page 57, “When B, C, or D is Displayed”
• S => Page 58, “When S is Displayed”
• P => Page 59, “When P is Displayed”
• A => Page 60, “When A is Displayed”
r You can find a sticker explaining ho w to remove misfed paper in front of the roll feeder.
r If no misfed paper is found in the roll feeders when B, C, or D is displayed, release the lock of
the first and second roll feeders and set them again with the third one fixed. Then check the
third roll feeder.
56
Page 75

IF COPY PAPER OR AN ORIGINAL IS MISFED
When B, C, or D is Displayed
When the following message appears, a paper
misfeed has occurred in the corresponding roll
feeder. Remove the paper by following the
steps shown below.
• B: First roll feeder
• C: Second roll feeder
• D: Third roll feeder (optional)
Clear Misfeed(s):B
Open front doors
1Open the front co v e r.
2Hold the front part of the roll feeder
shown below to release the lock. Then
pull out the feeder.
CE3R0101
4Cut the creased or f olded portion of the
roll paper with a cutter or scissors, if any.
CE3R0900
5Roll the paper to remove slack from it.
CE3R0900
6Feed the pa per under the black sheet by
about 0.4''.
3Open the paper feed guide while hold-
ing the levers.
CE3R0401
CE3R0502
57
Page 76

WHA T TO DO IF SOMETHING GOES WRONG
7Pull out the paper edge by about 1 cm.
Then close the paper feed guide while
holding the levers.
1cm
CE3R0601
8Stretch the paper.
9Press the {Cut Leading Edge} key .
Down
Shift Image
Left
Right
23
56
89
Enter
Memory
Copy
On Line
Clear Modes
Energy Saver
Preview Copy
Roll Edge Cut
Emergency Stop
/
CE2A0125
When S is Displayed
When the following message appears, a paper
misfeed has occurred in the manual paper feed
slot. Remove the paper by following the steps
shown below.
Clear Misfeed(s):S
Remove paper
1Pull the misfed paper from the manual
paper feed slot.
CE4A0100
2Pull down the main unit release levers
lightly to open the main unit.
CE4A0200
Note
r If the leading portion is cut at a slant or
irregularly, press the {Cut Leading Edge}
key a few more times.
58
Page 77

IF COPY PAPER OR AN ORIGINAL IS MISFED
3Remove the paper from inside the ma-
chine. Be careful not to touch the part
labeled “High Temperature. Do Not
Touch.”
CE4A0300
4Close the main unit.
When P is Displayed
When the following message appears, an original misfeed has occurred in the original feed
slot. Remove the original by following the
steps shown below.
Clear Misfeed(s)
Reset original
1Loosen the fixing pins on both sides on
the original cover to release the lock.
CE1D0100
2Open the original cover and r emove the
misfed original carefully without tearing it.
CE1D0200
Note
r When you pull up the original cover to a
certain position, it will lock and will not
close.
3Close the original cover.
59
Page 78

WHA T TO DO IF SOMETHING GOES WRONG
When A is Displayed
When the following message appears, the leading portion of paper is misfed within the
machine. Remove the paper by following the
steps shown below.
Clear Misfeed(s)
Open fusing unit
1Pull down the main unit release levers
lightly to open the main unit.
CE4A0201
2Open the right side co ver and rotate the
paper feed knob clockwise.
3Remove the paper from inside the ma-
chine. Be careful not to touch the part
labeled “High Temperature. Do Not
Touch.”
CE4A0301
60
CE4A0800
Page 79

IF COPY PAPER OR AN ORIGINAL IS MISFED
4 Press the fusing unit release button.
CE4A0600
5Open the fusing unit and remove the
misfed paper from the copy delivery slot.
CE4A0700
6Close the fusing unit and main unit.
61
Page 80

WHA T TO DO IF SOMETHING GOES WRONG
62
Page 81

5. USER T OOLS
ACCESSING THE USER TOOLS OVERVIEW
The User T ools let you change various default
settings to match the kind of copy jobs you
carry out most frequently.
Preparation
r Any changes you make to the User Tool
settings are not cleared even when you turn
off the power, or press the {Clear Modes/
Energy Sav er} ke y (except for “Adjust the
Fusing T emperature Temporarily”).
11
1Make sur e that the copier is in the ready
11
condition.
22
2Press the {User Tools} key.
22
User Tools
Fusing
Temperature
33
3Press the {U}/{T} and {#} keys to find
33
the setting you wish to adjust. The diagram on the next page shows the available settings.
Program
Interrupt
CE2A0101
SETTING” on Page 65 for more details.
“DEFAULT FUNCTION SETTINGS”
on Page 69.
55
5Repeat steps 3 and 4 for all the settings
55
you wish to change.
Exiting the User Tools men u
11
1Press the {User T ools} key.
11
The copier returns to the ready condition.
Note
r You can also pr ess the {Clear Modes/En-
ergy Saver} key to quit the User Tools
menu.
Default setting UT→#
1. Fusing temp. adjust.
44
4Enter or select the new value f or this set-
44
ting.
Note
r How you do this will depend on which set-
ting you are changing. See the section entitled “CHNGING THE USER TOOL
63
Page 82

USER TOOLS
USER TOOLS MENU TREE
Press the User Tools key
Change items with
the U / T key
Change items with
the U / T key
# key
1. Fusing temp. adjust 0 C
Page 65
# key
2. Store program
Page 26
# key
3. Background setting Lighter
Page 65
# key
4. Default setting
Page 66
# key
5. Initial setting
Page 69
# key
6. Copy length
Length 1: 80.0"
Length 2: 100.0"
Page 73
# key
7. Roll width
Roll 1: 0"
Roll 2: 0"
Roll 3: 0"
Page 73
# key
8. Preset R/E
Magnification Ratio 1: 100%
Magnification Ratio 2: 200%
Page 74
# key
9. Memory copy mode
Page 74
1. Copy quality setting
Normal
2. Output setting
Stack
3. Disk formatting
Change items with
the U / T key
Change items with
the U / T key
# key
1. Leading edge +2.0" Page 66
# key
2. Trailing edge +2.0" Page 66
# key
Image shift
UP/DOWN
3.
# key
4. Image shift L/R Right 0.4" Page 66
# key
5. Erase Border 1.0" Page 66
# key
6. Magnif. adjustment Bond Paper: 0.0% Page 67
# key
7. Fusing temp. adjust Bond Paper: 150 C Page 68
# key
1.Image Density Auto Page 69
# key
2.Paper Roll Roll 1 Page 69
# key
3.Set cutting method Synchronized Page 69
# key
4.Change zoom inc. 1% increments Page 70
# key
5.Synchr. cut length Yes Page 70
# key
6. Image creation single function Page 70
# key
7. Energy saver Level 2 Page 70
# key
8. Auto Reset Time 90 sec. Page 71
# key
9. Auto Off Timer 30 min. Page 71
# key
10. Size mode setting Engineering sizes Page 71
# key
11. Copy mode setting 100% Page 72
# key
12. Memory copy mode No Page 72
# key
13. Pre-scan (Reduction) No Page 72
# key
14. Auto Tray Switching No Page 72
Trail 0.4" Page 66
Vellum Paper: 0.0% Page 67
Film: 0.0% Page 67
Vellum Paper: 170 C Page 68
Film: 150 C Page 68
(Default setting)
64
4. Auto Image Density
For every originals
Page 83

CHANGING THE USER TOOL SETTING
CHA GING THE USER TOOL SETTING
Adjusting the Fusing Temperature Temporarily
Follow these steps to temporarily adjust the
fusing temperature. The machine will return
to the default fusing temperature when you
press the {Clear Modes/Energy Sav er} ke y or
change paper types. For how to change the
default fusing temperature permanently , the see
“Fusing temp. adjust.” setting on page 68.
1Press the {User Tools} key.
“1. Fusing temp. adjust.” is displayed.
Default setting UT→#
1. Fusing temp. adjust.
2Press the {#} key.
The default fusing temperature is displayed.
Fusing temp. adjust UT→#
0 °C
3Press the {U}/{T} key to adjust the fus-
ing temperature.
• -5 - +5°C(about 1°C steps)
{T emperature Adjustment} indicator goes
off.
Reference
You can specify the default fusing temperature. => Page 68, “Fusing temp. adjust.”
Storing a Program
Reference
“PROGRAM” => Page 26
Setting background Image Density
1Press the {U}/{T} key until “3. Back-
ground setting” appears.
Default setting UT→#
3. Background setting
2Press the {#} key.
The default background image density is displayed.
4Press the {#} key and then press the
{User Tools} key.
“Warming up” is displayed.
Note
r When “Ready” is displayed, you can start
copying.
r
The {T emperature Adjustment} indicator is
lit when the fusing temperature is not +0 °C.
r When you press the {Clear Modes/Energy
Saver} k ey or change paper types, the specified fusing temperature is cleared and the
Background setting UT→#
2. Lighter
3Press the {U}/{T} key to specify the
background image density.
• Dar ker/Lighter
4Press the {#} key.
Note
r To return the copier to the ready condi-
tion, press the {User Tools} key.
65
Page 84

USER TOOLS
Changing Default Setting
Margins
You can specify margins in the range of -8.0''
to +8.0'' in 0.1'' steps.
1Press the {U}/{T} key to display “1.
Leading edge” or “2. Trailing edge.”
Default setting UT→#
1. Leading edge
Default setting UT→#
2. Trailing edge
2Press the {#} key.
The margin setting (cut length) is displayed.
Set lead. Edge N. UT→#
Set trail. Edge N. UT→#
3Press the {U}/{T} keys to specify the
default margin setting.
4 Press the {#} key.
Note
❒ To return the copier to the ready condition,
press the {User T ools} key.
1Press the {U}/{T} key to display “3.
Image shift UP/DOWN” or “4. Image
shift L/R.”
Default setting UT→#
3. Image shift UP/DOWN
Default setting UT→#
4. Image shift L/R
2Press the {#} key.
The image shift width is displayed.
Set image shift UT→#
Trail 0.4''
Set image shift UT→#
Right 0.4''
3 Press {0} of the{Number} keys three
times.
4Press the {U} key for the upward or left
direction, {T} for the downward or
right direction, or press the {Number}
keys to specify the default shift width.
5Press the {#} key.
Note
❒ To return the copier to the ready condition,
press the {User T ools} key.
Erase Border
Image Shift
You can specify shift widths in the range of
-8.0'' to +8.0'' in 0.1'' steps.
66
Y ou can specify erasing widths in the range of
0 to 2.0'' in 0.1'' steps.
1Press the {U}/{T} key until “5. Erase
Border” appears.
Default setting UT→#
5. Erase Border
Page 85

CHANGING THE USER TOOL SETTING
2Press the {#} key.
The border erasing width is displayed.
Erase border Num./UT→#
1.0''
3 Press the {U}/{T} key or {Number}
keys to specify the default erasing width.
4Press the {#} key.
Note
r To return the copier to the ready condi-
tion, press the {User Tools} key.
Magnification Adjustment
The magnification ratio for full-size copying
differs depending on the paper characteristics.
In particular, when using large-size paper , you
need adjust the magnification ratio because it
differs widely from the default.
Preparation
❒ You can adjust the full-size reproduction
ratio by +/-3 % in 0.1 % steps. You can
specify a ratio separately for the length and
width of paper of three types: bond paper,
vellum paper, and film.
❒ When you enlarge/reduce copies by chang-
ing the default reproduction ratio, the new
ratio is regarded as 100 %.
❒ If you change the default reproduction ra-
tio for each paper type, the specified ratio
is used for {V ellum P aper} or {Film} when
selecting these media types.
1Press the {U}/{T} key until “6. Magnif.
adjustment” appears.
Default setting UT→#
6. Magnif. adjustment
2Press the {#} key.
The reproduction ratio for the bond paper
width is displayed.
Magnif. adjust. UT→#
Bond paper width +0.0%
3 Press the {U}/{T} key to specify your
desired reproduction ratio.
4Press the {#} key.
The reproduction ratio for the bond paper
length is displayed.
Magnif. adjust. UT→#
Bond paper Length +0.0%
5Press the {U}/{T}key to specify your
desired reproduction ratio.
6Press the {#} key.
The reproduction ratio for the vellum paper (translucent paper) width is displayed.
Magnif. adjust. UT→#
Vellum width +0.0%
Note
❒ To return the copier to the ready condi-
tion, press the {User Tools} key.
❒ To change the full-size reproduction ratio
for vellum paper, repeat steps [2] to [6].
❒ To change the full-size reproduction ratio
for film, repeat steps [2] to [6].
67
Page 86

USER TOOLS
Fusing T emperature
Adjustment
1Press the {U}/{T} key until “7. Fusing
temp. adjust” appears.
Default setting UT→#
7. Fusing temp . adjust +0.0 °C
Fusing temp. adjust UT→#
Bond Paper +150 °C
2Press the {#} key.
The fusing temperature for “Bond Paper”
is displayed.
3Press the {U}/{T} key to select a fusing
temperature.
• 150°C/160°C/170°C
4Press the {#} key.
The fusing temperature for “V ellum Paper”
is displayed.
Note
❒ When you press the {User Tools} key,
“Please wait” is displayed. When “Ready”
appears, you can start copying.
❒ To specify the fusing temperature for vel-
lum paper (translucent paper), repeat steps
[2] to [4].
(145°C/160°C/170°C)
❒ To specify the fusing temperature for film,
repeat steps [2] to [4].
(150°C/160°C/170°C)
68
Page 87

CHANGING THE USER TOOL SETTING
Initial Setting
Reference
r The following procedures begin assuming
that the display shows the initial settings
menu. For how to bring up this menu, and
exit the User Tools menu, see “ACCESSING THE USER TOOLS OVERVIEW.”
=> Page 63
Image Density
You can set the default image density setting
to one of the following: Manual Image Density, Auto Image Density, and Photo. You can
also use {Darker} and {Lighter} to adjust the
density more subtly.
Note
r To specify Manual Image Density, make
sure that both the {Photo} and {Auto Image Density} indicators are not lit. Then
use the {Darker} or {Lighter} key to select the density you require.
1Press the {U}/{T} key until “1. Image
Density” appears.
Initial setting UT→#
1. Image Density
2Press the {#} key.
3Press the Image Density key to select
your desired image density.
Manual Image Density/Auto Image Density/Photo (you can also use the {Darker}
or {Lighter} key to adjust the density more
subtly.)
4Press the {#} key.
Paper Roll
Y ou can set the default paper tray(the third one
is optional).
Note
r To specify manual paper feed, make sure
that the {1q}, {2q}, and {3q} indica-
tors are not lit.
1Press the {U}/{T} key until “2. Paper
Roll” appears.
Initial setting UT→#
2. Paper Roll
2Press the {#} key.
3 Press the Paper Roll key to select your
desired paper tray.
1/2/3 (the third tray is optional)/Manual
Feed
4 Press the {#} key.
Set cutting method
You can set the default paper cut method to
Synchro Cut or Preset Cut. For Preset Cut, you
can set the default cut length to one of the
lengths shown in the table below.
Note
r The Preset Cut lengths that can be selected
differ depending on whether the paper size
mode is Engineering sizes or Architecture
sizes.
Engineering
Cut length
Architecture
Cut length
*1: A value specif ied for “Length 1” of Copy
*2: A value specif ied for “Length 2” of Copy
44.0'' 34.0'' 22.0'' 17.0'' 80.0'' 100.0''
48.0'' 36.0'' 24.0'' 18.0'' 80.0'' 100.0''
*1 *2
length (=> Page 73).
length (=> Page 73).
69
Page 88

USER TOOLS
Reference
Size mode setting => Page 71
1Press the {U}/{T} key until “3. Set cut-
ting method” appears.
Initial setting UT→#
3. Set cutting method
2 Press the {#} key.
3Press the {U}/{T} key to select your
desired cut method.
•Synchronized/Std. size cut
4Press the {#} key.
Change zoom inc.
You can set the reproduction ratio zoom increment to 1 or 0.1 %.
1 Press the {U}/{T} key until “4. Change
zoom inc” appears.
Initial setting UT→#
4. Change zoom inc.
1 Press the {U}/{T} key until “5. Synchr.
cut length” appears.
Initial setting UT→#
5. Synchr. cut length
2 Press the {#} key.
3Press the {U}/{T} key to choose
whether to display cut paper lengths.
•No/Yes
4Press the {#} key.
Image creation
You can choose whether multiple edit functions can be used together.
1 Press the {U}/{T} key until “6. Image
creation” appears.
Initial setting UT→#
6. Image creation
2 Press the {#} key.
2Press the {#} key.
3Press the {U}/{T} key to select your
desired zoom increment.
•1% increments/0.1% increments
4Press the {#} key.
Synchro cut length
You can choose whether to have paper cut
lengths shown on the panel display when copying with Synchro Cut.
70
3Press the {U}/{T} key to choose
whether functions can be used together.
•single function/combined function
4Press the {#} key.
Energy saver
You can set the Energy Saver mode to one of
two levels:
•Level 1: The machine returns to the ready
condition paper after about 1 minute.
•Level 2: The machine returns to the ready
condition after about 3 minutes. This
conserves more power than Level 1.
Page 89

CHANGING THE USER TOOL SETTING
1 Press the {U}/{T} key until “7. Energy
saver” appears.
Initial setting UT→#
7. Energy saver
2 Press the {#} key.
3Press the {U}/{T} key to select your the
Energy Saver level
.• Level 1/Level 2
4Press the {#} key.
Auto Reset Time
You can select the interval after which the
machine resets copy mode automatically after
your copy job is finished, or turn off Auto Reset
completely.
1 Press the {U}/{T} key until “8. Auto
Reset Time” appears.
Initial setting UT→#
8. Auto Reset Time
2 Press the {#} key.
3Press the {U}/{T} key to select your
desired auto reset time.
• — (Does not reset)/30/60/90/120/150/
180/210/240/270 seconds
1 Press the {U}/{T} key until “9. Auto
Off Timer” appears.
Initial setting UT→#
9. A uto Off Timer
2 Press the {#} key.
3Press the {U}/{T} key to select the de-
sired Auto Off Time.
• 15/30/45/60/75/90/105/120 minutes
4Press the {#} key.
Size mode setting
You can select Engineering or Architecture
sizes for original and paper sizes.
1 Press the {U}/{T} key until “10. Size
mode setting” appears.
Initial setting UT→#
10. Size mode setting
2 Press the {#} key.
3Press the {U}/{T} key to select A or B
sizes
• Engineering sizes/Architecture sizes
4 Press the {#} key.
4Press the {#} key.
Auto Off Timer
Y ou can select an interv al after which the machine turns itself off automatically after your
copy job is finished.
71
Page 90

USER TOOLS
Copy mode setting
You can select the copy mode to 100 %, Auto
Paper Select, and Auto Reduce/Enlarge.
1Press the {U}/{T} key until “11. Copy
mode setting” appears.
Initial setting UT→#
11. Copy mode setting
2Press the {#} key.
3Press the {U}/{T} key to select the copy
mode.
• 100 %/Auto Paper Select/Auto Reduce/
Enlarge
4Press the {#} key.
Memory copy mode
Y ou can determine whether the machine starts
in the Memory Copy mode ({Memory Copy}
is lit) when you turn on the power or exit the
Energy Saver mode.
(The Memory Unit is required.)
1Press the {U}/{T} key until “12.
Memory copy mode” appears.
Initial setting UT→#
12. Memory copy mode
Pre-scan (Reduction)
When using Synchro Cut, this function scans
an original length and cuts copy paper by reduced copy length.
1Press the {U}/{T} key untill”13.Pre-
scan(Reduction)” appears.
Initial setting UT→#
13. Pre-scan (Reduction)
2Press the {#} key.
3Press the {U}/{T} key to choose
whether to scan an original length.
• Yes/No
4Press the {#} key.
Auto T ray Switching
If roll paper runs out during a copy run, the
machine selects another roll of the same size
automatically to continue copying.
1Press the {U}/{T} key untill”14.Auto
Tray Switching” appears.
Initial setting UT→#
14. Auto Tray Switching
2Press the {#} key.
2Press the {#} key.
3Press the {U}/{T} key to choose
whether the machine enters the Memory
Copy mode.
• Yes/No
4 Press the {#} key.
72
3Press the {U}/{T} key to choose
whether to select another roll of the same
saize.
• Yes/No
4Press the {#} key.
Page 91

CHANGING THE USER TOOL SETTING
Copy Length
1Press the {U}/{T} key until “6. Copy
length” appears.
User Tools UT→#
6. Copy length
2Press the {#} key.
“Length 1” is displayed.
Set copy length N. /UT→#
Length 1 80.0''
3Press the {U}/{T} key or {Number}
keys to specify your desired length.
Note
r If you have entered a wrong number, use
the {U}/{T} key or {Number} keys to
enter the correct one.
4Press the {#} key.
“Length 2” is displayed.
Note
r To return the copier to the ready condition,
press the {User T ools} key.
r By default, lengths 1 and 2 are set to the
following values:
• Length 1 80.0''
• Length 2 100.0''
r To specify a value for “Length 2,” repeat
steps [2] and [3].
Tips
r Y ou can also enter a length approximate to
the length you require with the {Number}
keys, then adjust it with the {U}/{T} key .
Roll Width
You can specify a roll width regardless of roll
paper widths. When using non-standard size
roll paper, specify a roll width that matches
the roll paper width.
Preparation
r If you specify “0,” the machine automati-
cally detects the size (as one of the A or B
sets of paper sizes).
1Press the {U}/{T} key until “7. Roll
width” appears.
User Tools UT→#
7. Roll width
2 Press the {#} key.
“Roll 1” is displayed.
Set roll width N. /UT→#
Roll 1
3Press the {U}/{T} key or {Number}
keys to specify a roll width for Roll 1.
Note
r Y ou can specify roll widths in the range of
17.0'' ∼ 36.0'' in 0.1'' steps.
r If you have entered a wrong number, use
the {U}/{T} key or {Number} keys to
enter the correct one.
4Press the {#} key.
“Roll 2” is displayed.
Note
r To return the copier to the ready condition,
press the {User T ools} key.
r To specify a roll width for Roll 2, repeat
steps [3] and [4].
r When the optional paper tray is added to
your machine, specify a roll width for Roll
3 in the same way .
73
Page 92

USER TOOLS
Setting Preset Reduce/Enlarge
1Press the {U}/{T} key until “8. Preset
R/E” appears.
User setting UT→#
8. Preset R/E
2Press the {#} key.
“Magnification Ratio 1” is displayed.
Reset R/E N. /UT→#
Magnification Ratio 1 100%
3Press the {U}/{T} key or {Number}
keys to specify your desired magnification ratio.
Note
r If you have entered a wrong number, use
the {U}/{T} key or {Number} keys to en-
ter the correct one.
4Press the {#} key.
“Magnification Ratio 2” is displayed.
Note
r To return the copier to the ready condition,
press the {User T ools} key.
r By default, magnification ratios 1 and 2 are
set to the following values:
• Magnification Ratio 1 100 %
• Magnification Ratio 2 200 %
r To specify a value for “Magnification Ra-
tio 2,” repeat steps [3] and [4].
Memory Copy
Note
r When specifying the following function
settings, the Memory Unit is required:
Copy quality setting(Normal/ Fine)
“Memory Copy” allows you to change the
resolution at which the copier scans originals.
Select “Normal” to scan ordinary originals.
Select “Fine” when scanning originals containing small numbers or characters, fine
graphics, photographs, or maps.
Preparation
r Scanning with “Fine” takes up more
memory space than with “Normal”.
=> Page 84, “OPTIONS”
1Press the {U}/{T} key to display “1.
Copy quality setting”. Then press the
{#} key.
Memory copy UT→#
1. Copy quality setting
2Press the {U}/{T} key to display your
desired setting.
UT→#
1. Normal
Note
1. Normal (default)
2. Fine
74
3Press the {#} key.
Note
r To return the copier to the ready condition,
press the {User T ools} key.
Page 93

CHANGING THE USER TOOL SETTING
Output setting(Sort/Stack)
You can specify how to deliver copies when
copying with “Memory Copy.”
1Press the {U}/{T} key to display “2.
Output setting”. Then press the {#} key.
Memory copy UT→#
2. Output setting
2Press the {U}/{T} key to display your
desired setting.
UT→#
1. Sort
Note
1. Sort
2. Stack (default)
3Press the {#} key.
Note
r To return the copier to the ready condition,
press the {User T ools} key.
Auto Image Density
When scanning originals made up of more than
one page using Memory Copy and Auto Image Density, y ou can choose whether the copier
detects the image density for every original or
only for the first original (first time).
1Press the {U}/{T} key to display “4.
Auto Image Density” Then press the {#}
key.
Memory copy UT→#
4. Auto image Density
2Press the {U}/{T} key to display your
desired setting.
UT→#
1. For First orig. only
Note
1. For first orig. only
2. For every originals (default)
3Press the {#} key.
Note
r To return the copier to the ready condition,
press the {User T ools} key.
75
Page 94

USER TOOLS
WHAT YOUR SERVICE REPRESENTATIVES CAN CHANGE
Your service representative can change some
functions to meet your needs and make the
copier easier to use. Please contact your service representative for more details.
The functions that can be changed are shown
below.
Changing the Maximum Original
Length When Making Multiple
Copies
You can specify a maximum original length
between 48'' and 60'' for making multiple copies.
Changing the Original Delivery
Direction
Originals are delivered from the back of the
copier after copying. Y ou can change this function so that they are delivered from the front
of the copier. When Memory Copy is selected,
howeve r, originals are deliv ered only from the
back of the copier.
Limitation
r You cannot make multiple copies when
delivering originals from the front of the
copier.
r Remove the original reverse guide when
delivering originals from the front of the
copier.
Changing the Number of Levels
for Copy Image Density Adjustment
You can change the number of image density
adjustment levels from 13 to 7.
76
Page 95

6. REMARKS
DO’S AND DON’TS
R
CAUTION:
• When you move the machine, unplug the power cord from the
wall outlet to avoid fire or electric shock.
• When the machine is not in use for a long time, unplug the power
cord.
r Do not touch areas on or around the fusing unit. These areas get hot.
r After making copies continuously, you may feel the original table surface is hea ted. But this
is not a malfunction.
r You may feel warm around the ventilation hole. This is caused by exhaust air, and not a
malfunction.
r Do not turn off the main switch while copying. When turning off the main switch, make sure
that copying is completed.
r The machine might fail to produce good copy images if there should occur condensation
inside caused by temperature change. To avoid this condition, the machine has the anticondensation feature. When you turn on the anti-condensation heater, the machine keeps
itself warm even after you turn off the main switch.
r Do not open the front or right side cover while copying. If you do, misfeeds might occur.
r Do not move, slant, or vibrate the machine while copying.
r Do not use for other OA machines paper on which you copied with this machine. Otherwise,
a fault might occur.
r Take a note of your machine settings.
If you operate the machine improperly or a failure occurs on the machine, your machine
settings might be lost. Be sure to take a note of your machine settings.
r Supplier shall not be liable for any loss or damages resulting from a failure on the machine,
loss of machine settings, and use of the machine.
r Use the machine in a well-ventilated location. When you are using the machine, ozone is built
up, but does not affect the human body since its amount is very small. Ho wev er, your w orking
room might be filled with a bad smell if you use the machine for a long period of time or make
a large number of copies without good ventilation. Y ou should ventilate your w orking room to
keep it comfortable.
77
Page 96

REMARKS
PLACING, MO VING, AND DISPOSING OF YOUR MACHINE
When you move the copier if your office changes the equipment layout or moves to another
location, follow the precautions shown below.
Moving the Machine
R
CAUTION:
• When you move the machine, unplug the power cord from the
wall outlet. Otherwise, the cor d might be
damaged causing a fire or electric shock.
• When you move the machine, contact your service representati ve. This is a charged work.
Where to Put the Machine
R
CAUTION:
• Keep the machine away from humidity and dust. A fire or an
electric shock might occur.
• Do not place the machine in an unstable location or on a slope.
Otherwise, the machine might move or fall causing personal injury.
R
CAUTION:
• After you move the machine, fix it in place with the caster fixture.
Otherwise, the machine might move or fall causing personal injury.
Avoid placing the copier in the following locations. If you place it in an improper location, you
cannot make copies normally or a failure might occur.
r Excessively cold and dry or hot and humid locations
The recommended temperature and humidity are as follows.
• Temperature: 38 - 52°F
• Humidity: 15 - 85%
r Locations exposed to direct sunlight
r Locations near a heater, air conditioner, or humidifier.
r Locations where the machine might be subjected to frequent strong vibration
r Locations without good ventilation
r Locations near an oil heater or equipment which generates ammonia (e.g., a diazo copier)
78
Page 97

PLACING, MOVING, AND DISPOSING OF YOUR MACHINE
r Dusty areas
r Unstable floors or bases
• Place the machine in a flat location. The machine must be level within 0.13 degrees both
front to rear and left to right.
• Place the machine on a stable floor . When placing the machine on a base, choose a strong,
level one such as a dedicated table larger than the machine’s area.
Cautions on Jamming
When you place the machine near another electronics equipment, they might adversely affect
each other.
In particular, if the machine is adjacent to a television or radio, it might suf fer their noise.
In this case, take the following actions:
• Keep the machine away from the television or radio.
• Use a different outlet separately for the machine and these products.
• Reorient the television or radio antenna.
For Customers Using an Ultrasonic Humidifier
If you use tap or well water for an ultrasonic humidifier, impurities contained in the wa ter become
white powder and settle on the internal parts of the copier causing copies or copy paper to be dirty .
In particular, when you use the humidifier continuously for a long time, a humidifier demineralizer is recommended.
79
Page 98

REMARKS
Access to Machine
Leave enough space around the copier . This space is necessary for y ou to operate the copier or a
customer engineer to work. When the copier is equipped with options, consult a customer engineer about the space.
Standard setting
30cm 50cm
30cm
Front 32.0''
Rear 12.0''
Left 12.0''
Right 20.0''
80cm
CE0S0100
Power Connection
R
WARNING:
• Connect the machine to a power source meeting the specifications given. Avoid overloading an outlet with too many power
cords. Otherwise, a fire or electric shock might occur.
• Avoid using an extension cord.
• Do not damage, break, or make any modifications to the power
cord. The power cord will be damaged if you set heavy items on
it, pull it, or twist it excessivel y, and a fire or electric shock might
occur.
• Do not plug in or unplug the power cord with wet hands. Otherwise, an electric shock might occur.
80
R
WARNING:
R
CAUTION:
• Make sure that the wall outlet is near the machine and easily
accessible.
• When you unplug the power cord fr om the socket, hold the cord
by the plug. Do not pull the cor d. Otherwise, the cord might be
damaged causing a fire or electric shock.
Page 99

PLACING, MOVING, AND DISPOSING OF YOUR MACHINE
R
CAUTION:
• When the machine is not in use for a long time, unplug the power
cord.
r When you unplug the power cord, the anti-condensation and dehumidification heaters are
turned off.
r Plug the power cord in a wall outlet directly and firmly.
Disposing of the Machine
If you want to dispose of the machine, contact your local dealer or service representative.
81
Page 100

REMARKS
CLEANING YOUR MACHINE
If the exposure glass or original feed roller is
dirty, you cannot make copies as you want.
Clean them if you find them dirty.
Cleaning the Machine
Wipe the machine with a soft, dry cloth. If
contaminants remain, wipe it with a wrung,
damp cloth. If you cannot remove them with
the water, wipe the machine with a neutral
detergent.
After wiping the machine with a damp cloth,
wipe it with a dry cloth to remove the water.
Cleaning the Original Cover
Cleaning the Exposure Glass
Important
r Do not use chemical cleaner or organic sol-
vent, such as thinner or benzine. If they
get into the machine or melt plastic parts, a
failure might occur.
r The internal parts of the machine should
be cleaned by your service representative.
CE1C0300
Cleaning the Original Feed Roller
Wipe the original feed roller while rotating the
part indicated by (1) in the illustration below.
CE1C0400
82
 Loading...