

Ricoh DDP70E-92 User Manual

User’s Guide
© 2007 Ricoh Americas Corporation
5 Dedrick Place
West Caldwell, NJ 07006
A
ugust 2007
338550-003C

© 2007 Ricoh Americas Corporation. All rights reserved.
No part of this document may be reproduced without the expressed pe rmission of Ricoh
Americas Corporation.
The material in this document is for informational purposes and is subject to change
without notice. Ricoh Americas Corporation assumes no responsibility for errors or
omissions in this document. No liability is assumed for any damages resulting from the
use of the information it contains.
TRADEMARK
Adobe and Postscript are registered trademarks of Adobe Systems Incorporated. PCL
is the trademark of Hewlett Packard. Ethernet is a trademark of Xerox Corporation.
Windows XP is a trademark of Microsoft Corporation. Digital Document Publisher and
DDP and its associated logo mark are the trademarks of Ricoh Americas Corporation.
Ricoh and the Ricoh trademark are registered trademarks of Ricoh, Ltd. All rights
reserved.
All other terms and product names may be trademarks or registered tr adema rks of their
respective owners and are hereby acknowledged.
NOTICE TO USER
In an effort to meet the demands of a rapidly changing technology, the manufacturer is
continually developing new featur es and functions to meet changing printing or printer
needs. Please be sure to consult all manual updates or addenda when using this
product’s documentation.
This document contains TrueType fonts from Monotype Imaging Inc. Reproduction of
these fonts is prohibited.
The software embedded in this product is based in part on the work of Independent
JPEG Group.
The software embedded in this product uses softwar e by CMU. Copyright 1988, 1989 by
Carnegie Mellon University. All rights reserved.
The software embedded in this product uses software by Intermate A/S. Copyright 2005.
All rights reserved.
Permission to use, copy, modify, distribute and sell this software and its documentation
for any purpose and without fee is hereby granted, provided that the above copyright
notice appears in all copies and that both the copyright notice and permission notice
appear in supporting documentation, and the name of CMU not be used in advertising
or publicity pertaining to distribution of the software without specific written prior
permission.
The software embedded in this product uses the software by Sam Leffler and Silicon
Graphics.
Copyright (c) 1988-1997 Sam Leffler
Copyright (c) 1991-1997 Silicon Graphics, Inc
Permission to use, copy, modify, distribute and sell this software and its documentation
for any purpose and without fee is hereby granted, provided that the above copyright
notice appear in all copies of the software and related documentation, an d (ii) the names
of Sam Leffler and Silicon Graphics may not be used in advertising or publicity pertaining
to distribution of the software without specific, written prior permission of Sam Leffler and
Silicon Graphics.

Our company, as a partner in the Energy Star Program, considers that this product
satisfies the appropriate standard covered in this program.
NOTE:
The 70 and 92 PPM printers come with the power management mode enabled and
will go into a “Sleep” mode after 7 minutes (70 PPM) or 15 minutes (92 PPM) if there
is no printing or communications with the printer.
These are default settings and should remain in these conditions to get the energy
saving benefits of Energy Star.

i
Revisions
Revision Page No. (Contents) Date
A Original Release - ECO-1772 February 2006
B
Page B-2: Corrected Controller processor speed to 800
MHz (Egret 3R);
Add rev history page, copyright page;
Page 5-1, add "Network Problems" to bulleted list
February 2007
C
Page i, Updated Energy Star page to add Power
Management feature.
Pages 4-9 and 4-31, added RC number to developer p/n
Page 6-2, updated Web Site layout sheet to include IPDS
March 2007

Table of Contents ii
Table of Contents
Introduction
About This Manual. . . . . . . . . . . . . . . . . . . . . . . . . . . . . . . . . . . . . . . . . . . . . . . . . . . . . . . . . . vi
Audience . . . . . . . . . . . . . . . . . . . . . . . . . . . . . . . . . . . . . . . . . . . . . . . . . . . . . . . . . . . . . .
vi
Manual Conventions . . . . . . . . . . . . . . . . . . . . . . . . . . . . . . . . . . . . . . . . . . . . . . . . . . . .
.vii
For More Information . . . . . . . . . . . . . . . . . . . . . . . . . . . . . . . . . . . . . . . . . . . . . . . . . . . .
vii
Chapter 1. Printer Overview
What This Chapter Provides . . . . . . . . . . . . . . . . . . . . . . . . . . . . . . . . . . . . . . . . . . . . . . . . . . . 1-1
Printer Features . . . . . . . . . . . . . . . . . . . . . . . . . . . . . . . . . . . . . . . . . . . . . . . . . . . . . . . . . . . . . 1-2
I/O Configurations . . . . . . . . . . . . . . . . . . . . . . . . . . . . . . . . . . . . . . . . . . . . . . . . . . . . . . . . . . 1-3
Operator Control Panel . . . . . . . . . . . . . . . . . . . . . . . . . . . . . . . . . . . . . . . . . . . . . . . . . . . . . . . 1-4
External View of the Printer . . . . . . . . . . . . . . . . . . . . . . . . . . . . . . . . . . . . . . . . . . . . . . . . . . . 1-5
Internal View of the Printer. . . . . . . . . . . . . . . . . . . . . . . . . . . . . . . . . . . . . . . . . . . . . . . . . . . . 1-6
Chapter 2. Operator Control Panel
What This Chapter Provides . . . . . . . . . . . . . . . . . . . . . . . . . . . . . . . . . . . . . . . . . . . . . . . . . . . 2-1
OCP Description . . . . . . . . . . . . . . . . . . . . . . . . . . . . . . . . . . . . . . . . . . . . . . . . . . . . . . . . . . . . 2-2
Menu Structure . . . . . . . . . . . . . . . . . . . . . . . . . . . . . . . . . . . . . . . . . . . . . . . . . . . . . . . . . . . . . 2-3
Using the Menu Screens . . . . . . . . . . . . . . . . . . . . . . . . . . . . . . . . . . . . . . . . . . . . . . . . . . . . . . 2-9
Main Menu . . . . . . . . . . . . . . . . . . . . . . . . . . . . . . . . . . . . . . . . . . . . . . . . . . . . . . . . . . . 2-10
Information . . . . . . . . . . . . . . . . . . . . . . . . . . . . . . . . . . . . . . . . . . . . . . . . . . . . . . . . . . . 2-11
Printer Menu . . . . . . . . . . . . . . . . . . . . . . . . . . . . . . . . . . . . . . . . . . . . . . . . . . . . . . . . . . 2-12
Setup Menu . . . . . . . . . . . . . . . . . . . . . . . . . . . . . . . . . . . . . . . . . . . . . . . . . . . . . . . . . . . 2-15
Reports Menu . . . . . . . . . . . . . . . . . . . . . . . . . . . . . . . . . . . . . . . . . . . . . . . . . . . . . . . . . 2-17
Finisher Menu for the Container Stacker . . . . . . . . . . . . . . . . . . . . . . . . . . . . . . . . . . . . 2-18
Jobs Menu . . . . . . . . . . . . . . . . . . . . . . . . . . . . . . . . . . . . . . . . . . . . . . . . . . . . . . . . . . . . 2-19
Passwords . . . . . . . . . . . . . . . . . . . . . . . . . . . . . . . . . . . . . . . . . . . . . . . . . . . . . . . . . . . . . . . . 2-20
Chapter 3. Paper Handling
What This Chapter Provides . . . . . . . . . . . . . . . . . . . . . . . . . . . . . . . . . . . . . . . . . . . . . . . . . . . 3-1
Paper . . . . . . . . . . . . . . . . . . . . . . . . . . . . . . . . . . . . . . . . . . . . . . . . . . . . . . . . . . . . . . . . . . . . . 3-2
Paper Weights . . . . . . . . . . . . . . . . . . . . . . . . . . . . . . . . . . . . . . . . . . . . . . . . . . . . . . . . . . 3-2
Paper Color . . . . . . . . . . . . . . . . . . . . . . . . . . . . . . . . . . . . . . . . . . . . . . . . . . . . . . . . . . . . 3-2
Unacceptable Paper . . . . . . . . . . . . . . . . . . . . . . . . . . . . . . . . . . . . . . . . . . . . . . . . . . . . . . 3-2
Storing Paper . . . . . . . . . . . . . . . . . . . . . . . . . . . . . . . . . . . . . . . . . . . . . . . . . . . . . . . . . . . 3-3
Paper Sizes, Paper Types, and Printer Input Trays. . . . . . . . . . . . . . . . . . . . . . . . . . . . . . . . . . 3-4
Loading Paper . . . . . . . . . . . . . . . . . . . . . . . . . . . . . . . . . . . . . . . . . . . . . . . . . . . . . . . . . . . . . . 3-5
Loading Paper in Tray 1 . . . . . . . . . . . . . . . . . . . . . . . . . . . . . . . . . . . . . . . . . . . . . . . . . . 3-5

iii Table of Contents
Loading Paper in Tray 2 or 3 . . . . . . . . . . . . . . . . . . . . . . . . . . . . . . . . . . . . . . . . . . . . . . . 3-7
Loading Paper into the MBT . . . . . . . . . . . . . . . . . . . . . . . . . . . . . . . . . . . . . . . . . . . . . . . 3-9
Loading Paper into the HCF . . . . . . . . . . . . . . . . . . . . . . . . . . . . . . . . . . . . . . . . . . . . . . 3-11
Loading Special Media . . . . . . . . . . . . . . . . . . . . . . . . . . . . . . . . . . . . . . . . . . . . . . . . . . 3-12
Pre-punched Paper . . . . . . . . . . . . . . . . . . . . . . . . . . . . . . . . . . . . . . . . . . . . . . . . . . 3-12
Loading Pre-printed Paper . . . . . . . . . . . . . . . . . . . . . . . . . . . . . . . . . . . . . . . . . . . . 3-14
Loading Tab Stock . . . . . . . . . . . . . . . . . . . . . . . . . . . . . . . . . . . . . . . . . . . . . . . . . . 3-15
Setting the Custom Paper Size Values . . . . . . . . . . . . . . . . . . . . . . . . . . . . . . . . . . . . . . . . . . 3-16
Setting the Tray Adjust Values. . . . . . . . . . . . . . . . . . . . . . . . . . . . . . . . . . . . . . . . . . . . . . . . 3-16
Setting the Default Paper Source . . . . . . . . . . . . . . . . . . . . . . . . . . . . . . . . . . . . . . . . . . . . . . 3-17
Setting the Paper Type . . . . . . . . . . . . . . . . . . . . . . . . . . . . . . . . . . . . . . . . . . . . . . . . . . . . . . 3-17
Setting the Paper Weight. . . . . . . . . . . . . . . . . . . . . . . . . . . . . . . . . . . . . . . . . . . . . . . . . . . . . 3-17
Setting the Paper Color . . . . . . . . . . . . . . . . . . . . . . . . . . . . . . . . . . . . . . . . . . . . . . . . . . . . . . 3-17
Ordered Sets . . . . . . . . . . . . . . . . . . . . . . . . . . . . . . . . . . . . . . . . . . . . . . . . . . . . . . . . . . . . . . 3-18
Define the Ordered Sets . . . . . . . . . . . . . . . . . . . . . . . . . . . . . . . . . . . . . . . . . . . . . . . . . . 3-19
Chapter 4. Care and Maintenance
What This Chapter Provides . . . . . . . . . . . . . . . . . . . . . . . . . . . . . . . . . . . . . . . . . . . . . . . . . . . 4-1
Replacing Consumables . . . . . . . . . . . . . . . . . . . . . . . . . . . . . . . . . . . . . . . . . . . . . . . . . . . . . . 4-2
Adding Toner . . . . . . . . . . . . . . . . . . . . . . . . . . . . . . . . . . . . . . . . . . . . . . . . . . . . . . . . . . . 4-3
Replacing the Toner Collector Bottle . . . . . . . . . . . . . . . . . . . . . . . . . . . . . . . . . . . . . . . . 4-6
Replacing the Developer Mix . . . . . . . . . . . . . . . . . . . . . . . . . . . . . . . . . . . . . . . . . . . . . . 4-7
Exhausting the Developer Mix . . . . . . . . . . . . . . . . . . . . . . . . . . . . . . . . . . . . . . . . . . 4-7
Supplying the Developer Mix . . . . . . . . . . . . . . . . . . . . . . . . . . . . . . . . . . . . . . . . . . . 4-9
Replacing the Drum Unit . . . . . . . . . . . . . . . . . . . . . . . . . . . . . . . . . . . . . . . . . . . . . . . . . 4-12
Replacing the Fuser Cleaning Web . . . . . . . . . . . . . . . . . . . . . . . . . . . . . . . . . . . . . . . . . 4-15
Replacing Staples . . . . . . . . . . . . . . . . . . . . . . . . . . . . . . . . . . . . . . . . . . . . . . . . . . . . . . 4-17
Clearing Paper Jams . . . . . . . . . . . . . . . . . . . . . . . . . . . . . . . . . . . . . . . . . . . . . . . . . . . . . . . . 4-18
Vertical Path (IS) Cover . . . . . . . . . . . . . . . . . . . . . . . . . . . . . . . . . . . . . . . . . . . . . . . . . 4-18
Switch Back Area . . . . . . . . . . . . . . . . . . . . . . . . . . . . . . . . . . . . . . . . . . . . . . . . . . . . . . 4-19
Paper Feed Block Area . . . . . . . . . . . . . . . . . . . . . . . . . . . . . . . . . . . . . . . . . . . . . . . . . . 4-21
Trays 1, 2, and 3 . . . . . . . . . . . . . . . . . . . . . . . . . . . . . . . . . . . . . . . . . . . . . . . . . . . . . . . 4-23
Tray 1 . . . . . . . . . . . . . . . . . . . . . . . . . . . . . . . . . . . . . . . . . . . . . . . . . . . . . . . . . . . . 4-23
Tray 2 or 3 . . . . . . . . . . . . . . . . . . . . . . . . . . . . . . . . . . . . . . . . . . . . . . . . . . . . . . . . . 4-23
Multi-bypass Tray . . . . . . . . . . . . . . . . . . . . . . . . . . . . . . . . . . . . . . . . . . . . . . . . . . . . . . 4-24
High Capacity Feeder . . . . . . . . . . . . . . . . . . . . . . . . . . . . . . . . . . . . . . . . . . . . . . . . . . . 4-24
Tab Stock Jam Recovery . . . . . . . . . . . . . . . . . . . . . . . . . . . . . . . . . . . . . . . . . . . . . . . . . 4-25
Cleaning the Printer. . . . . . . . . . . . . . . . . . . . . . . . . . . . . . . . . . . . . . . . . . . . . . . . . . . . . . . . . 4-26
Cleaning the Printer Covers . . . . . . . . . . . . . . . . . . . . . . . . . . . . . . . . . . . . . . . . . . . . . . . 4-26
Cleaning the Inside of the Printer . . . . . . . . . . . . . . . . . . . . . . . . . . . . . . . . . . . . . . . . . . 4-27
Cleaning Trays 1, 2 and 3, the MBT, and HCF . . . . . . . . . . . . . . . . . . . . . . . . . . . . . . . . 4-27
Cleaning the Toner Bottle Joint . . . . . . . . . . . . . . . . . . . . . . . . . . . . . . . . . . . . . . . . . . . . 4-28
Cleaning the Conveyance Belt Area . . . . . . . . . . . . . . . . . . . . . . . . . . . . . . . . . . . . . . . . 4-28
Cleaning the Toner Collector Bottle Area . . . . . . . . . . . . . . . . . . . . . . . . . . . . . . . . . . . . 4-29
Handling and Storing Supplies and Consumables . . . . . . . . . . . . . . . . . . . . . . . . . . . . . . . . . 4-30

Table of Contents iv
Paper . . . . . . . . . . . . . . . . . . . . . . . . . . . . . . . . . . . . . . . . . . . . . . . . . . . . . . . . . . . . . . . . 4-30
When Loading . . . . . . . . . . . . . . . . . . . . . . . . . . . . . . . . . . . . . . . . . . . . . . . . . . . . . . 4-30
When Storing . . . . . . . . . . . . . . . . . . . . . . . . . . . . . . . . . . . . . . . . . . . . . . . . . . . . . . 4-30
When Paper Jams Frequently Occur . . . . . . . . . . . . . . . . . . . . . . . . . . . . . . . . . . . . . 4-30
Toner and Developer . . . . . . . . . . . . . . . . . . . . . . . . . . . . . . . . . . . . . . . . . . . . . . . . . . . . 4-31
When Purchasing . . . . . . . . . . . . . . . . . . . . . . . . . . . . . . . . . . . . . . . . . . . . . . . . . . . 4-31
Chapter 5. Troubleshooting
What This Chapter Provides . . . . . . . . . . . . . . . . . . . . . . . . . . . . . . . . . . . . . . . . . . . . . . . . . . . 5-1
Guidelines Flowchart . . . . . . . . . . . . . . . . . . . . . . . . . . . . . . . . . . . . . . . . . . . . . . . . . . . . . . . . 5-2
Basic Troubleshooting Tips . . . . . . . . . . . . . . . . . . . . . . . . . . . . . . . . . . . . . . . . . . . . . . . . . . . 5-3
General Printing Problems . . . . . . . . . . . . . . . . . . . . . . . . . . . . . . . . . . . . . . . . . . . . . . . . . . . . 5-4
Print Quality Problems . . . . . . . . . . . . . . . . . . . . . . . . . . . . . . . . . . . . . . . . . . . . . . . . . . . . . . . 5-5
Duplex Printing Problems. . . . . . . . . . . . . . . . . . . . . . . . . . . . . . . . . . . . . . . . . . . . . . . . . . . . . 5-6
Printing Notes . . . . . . . . . . . . . . . . . . . . . . . . . . . . . . . . . . . . . . . . . . . . . . . . . . . . . . . . . . . . . . 5-7
OCP Display Messages. . . . . . . . . . . . . . . . . . . . . . . . . . . . . . . . . . . . . . . . . . . . . . . . . . . . . . . 5-8
Printer Limitations . . . . . . . . . . . . . . . . . . . . . . . . . . . . . . . . . . . . . . . . . . . . . . . . . . . . . . . . . 5-16
Network Problems. . . . . . . . . . . . . . . . . . . . . . . . . . . . . . . . . . . . . . . . . . . . . . . . . . . . . . . . . . 5-18
Chapter 6. Web Utilities
Features. . . . . . . . . . . . . . . . . . . . . . . . . . . . . . . . . . . . . . . . . . . . . . . . . . . . . . . . . . . . . . . . . . . 6-1
Web Utilities Access. . . . . . . . . . . . . . . . . . . . . . . . . . . . . . . . . . . . . . . . . . . . . . . . . . . . . . . . . 6-1
Web Site Layout . . . . . . . . . . . . . . . . . . . . . . . . . . . . . . . . . . . . . . . . . . . . . . . . . . . . . . . . . . . . 6-2
Using the Web Utilities. . . . . . . . . . . . . . . . . . . . . . . . . . . . . . . . . . . . . . . . . . . . . . . . . . . . . . . 6-3
Appendix A. Safety Information
General . . . . . . . . . . . . . . . . . . . . . . . . . . . . . . . . . . . . . . . . . . . . . . . . . . . . . . . . . . . . . . . . . . .A-1
Laser Safety. . . . . . . . . . . . . . . . . . . . . . . . . . . . . . . . . . . . . . . . . . . . . . . . . . . . . . . . . . . . . . . .A-1
Certifications. . . . . . . . . . . . . . . . . . . . . . . . . . . . . . . . . . . . . . . . . . . . . . . . . . . . . . . . . . . . . . .A-3
FCC Notice . . . . . . . . . . . . . . . . . . . . . . . . . . . . . . . . . . . . . . . . . . . . . . . . . . . . . . . . . . . .A-3
Canadian Certification . . . . . . . . . . . . . . . . . . . . . . . . . . . . . . . . . . . . . . . . . . . . . . . . . . . .A-3
VCCI Notice (Japan) . . . . . . . . . . . . . . . . . . . . . . . . . . . . . . . . . . . . . . . . . . . . . . . . . . . . .A-3
Declaration of Conformity for Safety/EMI . . . . . . . . . . . . . . . . . . . . . . . . . . . . . . . . . . . .A-4
70/92 ppm . . . . . . . . . . . . . . . . . . . . . . . . . . . . . . . . . . . . . . . . . . . . . . . . . . . . . . . . . .A-4
Declaration of Conformity for RoHS . . . . . . . . . . . . . . . . . . . . . . . . . . . . . . . . . . . . . . . .A-5
70/92 ppm . . . . . . . . . . . . . . . . . . . . . . . . . . . . . . . . . . . . . . . . . . . . . . . . . . . . . . . . . .A-5
When Installing and Relocating the Printer . . . . . . . . . . . . . . . . . . . . . . . . . . . . . . . . . . . . . . .A-6
Power Specifications . . . . . . . . . . . . . . . . . . . . . . . . . . . . . . . . . . . . . . . . . . . . . . . . . . . . .A-6
Power Cords . . . . . . . . . . . . . . . . . . . . . . . . . . . . . . . . . . . . . . . . . . . . . . . . . . . . . . . . . . .A-6
Positioning the Printer Safely . . . . . . . . . . . . . . . . . . . . . . . . . . . . . . . . . . . . . . . . . . . . . . . . . .A-8
Environmental Limits . . . . . . . . . . . . . . . . . . . . . . . . . . . . . . . . . . . . . . . . . . . . . . . . . . . .A-8
Operating Precautions. . . . . . . . . . . . . . . . . . . . . . . . . . . . . . . . . . . . . . . . . . . . . . . . . . . . . . . .A-9
Safety Precautions. . . . . . . . . . . . . . . . . . . . . . . . . . . . . . . . . . . . . . . . . . . . . . . . . . . . . . . . . . .A-9
Care of Printer Supplies . . . . . . . . . . . . . . . . . . . . . . . . . . . . . . . . . . . . . . . . . . . . . . . . . . . . .A-10

v Table of Contents
Appendix B. Printer Specifications
What This Appendix Contains . . . . . . . . . . . . . . . . . . . . . . . . . . . . . . . . . . . . . . . . . . . . . . . . . B-1
Specifications . . . . . . . . . . . . . . . . . . . . . . . . . . . . . . . . . . . . . . . . . . . . . . . . . . . . . . . . . . . . . .B-2
Base Printer . . . . . . . . . . . . . . . . . . . . . . . . . . . . . . . . . . . . . . . . . . . . . . . . . . . . . . . . . . . .B-2
I/O Configurations . . . . . . . . . . . . . . . . . . . . . . . . . . . . . . . . . . . . . . . . . . . . . . . . . . . . . . .B-3
Consumables . . . . . . . . . . . . . . . . . . . . . . . . . . . . . . . . . . . . . . . . . . . . . . . . . . . . . . . . . . .B-3
Appendix C. Paper Specifications
Media Guidelines . . . . . . . . . . . . . . . . . . . . . . . . . . . . . . . . . . . . . . . . . . . . . . . . . . . . . . . . . . .C-1
General Media Recommendations . . . . . . . . . . . . . . . . . . . . . . . . . . . . . . . . . . . . . . . . . . .C-1
Paper Specifications . . . . . . . . . . . . . . . . . . . . . . . . . . . . . . . . . . . . . . . . . . . . . . . . . . . . .C-2
Paper Weight . . . . . . . . . . . . . . . . . . . . . . . . . . . . . . . . . . . . . . . . . . . . . . . . . . . . . . . . . . .C-3
Paper Color . . . . . . . . . . . . . . . . . . . . . . . . . . . . . . . . . . . . . . . . . . . . . . . . . . . . . . . . . . . .C-3
Paper Composition . . . . . . . . . . . . . . . . . . . . . . . . . . . . . . . . . . . . . . . . . . . . . . . . . . . . . .C-4
Paper Cut . . . . . . . . . . . . . . . . . . . . . . . . . . . . . . . . . . . . . . . . . . . . . . . . . . . . . . . . . . . . . .C-4
Paper Friction . . . . . . . . . . . . . . . . . . . . . . . . . . . . . . . . . . . . . . . . . . . . . . . . . . . . . . . . . .C-4
Paper Smoothness . . . . . . . . . . . . . . . . . . . . . . . . . . . . . . . . . . . . . . . . . . . . . . . . . . . . . . .C-5
Paper Fusing . . . . . . . . . . . . . . . . . . . . . . . . . . . . . . . . . . . . . . . . . . . . . . . . . . . . . . . . . . .C-5
Moisture . . . . . . . . . . . . . . . . . . . . . . . . . . . . . . . . . . . . . . . . . . . . . . . . . . . . . . . . . . . . . . .C-5
Paper Curl . . . . . . . . . . . . . . . . . . . . . . . . . . . . . . . . . . . . . . . . . . . . . . . . . . . . . . . . . . . . .C-6
How to Avoid Paper Curl . . . . . . . . . . . . . . . . . . . . . . . . . . . . . . . . . . . . . . . . . . . . . .C-6
Recycled Paper . . . . . . . . . . . . . . . . . . . . . . . . . . . . . . . . . . . . . . . . . . . . . . . . . . . . . . . . .C-7
Grain Direction . . . . . . . . . . . . . . . . . . . . . . . . . . . . . . . . . . . . . . . . . . . . . . . . . . . . . . . . .C-7
Paper Smoothness . . . . . . . . . . . . . . . . . . . . . . . . . . . . . . . . . . . . . . . . . . . . . . . . . . . . . . .C-7
Special Media . . . . . . . . . . . . . . . . . . . . . . . . . . . . . . . . . . . . . . . . . . . . . . . . . . . . . . . . . . . . . .C-8
Preprinted Paper . . . . . . . . . . . . . . . . . . . . . . . . . . . . . . . . . . . . . . . . . . . . . . . . . . . . . . . .C-8
Ink Recommendations . . . . . . . . . . . . . . . . . . . . . . . . . . . . . . . . . . . . . . . . . . . . . . . . .C-9
Paper Curl in Preprinted Paper . . . . . . . . . . . . . . . . . . . . . . . . . . . . . . . . . . . . . . . . . .C-9
Prepunched Paper . . . . . . . . . . . . . . . . . . . . . . . . . . . . . . . . . . . . . . . . . . . . . . . . . . . . . .C-10
Adhesive Labels . . . . . . . . . . . . . . . . . . . . . . . . . . . . . . . . . . . . . . . . . . . . . . . . . . . . . . .C-11
Adhesive Label Configuration . . . . . . . . . . . . . . . . . . . . . . . . . . . . . . . . . . . . . . . . .C-12
Storing Labels . . . . . . . . . . . . . . . . . . . . . . . . . . . . . . . . . . . . . . . . . . . . . . . . . . . . . .C-12
Adhesive Label Specifications . . . . . . . . . . . . . . . . . . . . . . . . . . . . . . . . . . . . . . . . .C-13
Perforated Paper . . . . . . . . . . . . . . . . . . . . . . . . . . . . . . . . . . . . . . . . . . . . . . . . . . . . . . .C-14
Tab Stock . . . . . . . . . . . . . . . . . . . . . . . . . . . . . . . . . . . . . . . . . . . . . . . . . . . . . . . . . . . . .C-15
Transparencies . . . . . . . . . . . . . . . . . . . . . . . . . . . . . . . . . . . . . . . . . . . . . . . . . . . . . . . . .C-15
Printing Guidelines . . . . . . . . . . . . . . . . . . . . . . . . . . . . . . . . . . . . . . . . . . . . . . . . . . . . . . . . .C-16
Printable Area . . . . . . . . . . . . . . . . . . . . . . . . . . . . . . . . . . . . . . . . . . . . . . . . . . . . . . . . .C-16
Preprinted Lines . . . . . . . . . . . . . . . . . . . . . . . . . . . . . . . . . . . . . . . . . . . . . . . . . . . . . . . .C-16
Proper Paper Handling . . . . . . . . . . . . . . . . . . . . . . . . . . . . . . . . . . . . . . . . . . . . . . . . . . . . . .C-17
Check Paper Quality . . . . . . . . . . . . . . . . . . . . . . . . . . . . . . . . . . . . . . . . . . . . . . . . . . . .C-18
Loading Paper . . . . . . . . . . . . . . . . . . . . . . . . . . . . . . . . . . . . . . . . . . . . . . . . . . . . . . . . .C-19

Introduction vi
Introduction
About This Manual
This manual provides easy access to the information you need to operate the 70 PPM or
92 PPM (Pages Per Minute) laser printer.
To find out about a specific topic, refer to:
Chapter 1: Printer Overview – For printer components and features.
Chapter 2: Operator Control Panel – To access and use the liquid crystal display
(LCD) window and the menus screens.
Chapter 3: Paper Handling – For media recommendations and paper handling
procedures.
Chapter 4: Care and Maintenance – For detailed instructions on replacing
consumables, clearing paper jams, and cleaning and maintaining the printer.
Chapter 5: Troubleshooting – For information on printing problems and printer
error and warning messages.
Chapter 6: Web Utilities – For information on accessing the printer via the
Internet or your company’s Intranet.
Appendix A: Safety Information – For safety information and printer
characteristics, including environmental and electrical requirements.
Appendix B: Printer Specifications – For printer specifications.
Appendix C: Paper Specifications – For media specifications and printing
guidelines.
Glossary – For definitions of terms and acronyms.
Audience
This manual is written for those persons responsible for operating the printer. A basic
understanding of computer equipment and its operations is required.
NOTE:
This User’s Guide is intended to be viewed online. When viewing it online,
use the bookmarks and page reference links for easy navigation
throughout the document.

vii Introduction
Manual Conventions
The following conventions are used in this manual:
Bold and Italics are used sparingly for emphasis.
Information you enter: Looks Like This.
Key Names (or Labels): Look Like This.
System messages: Look Like This.
Variable user information: Looks Like This.
Pay particular attention to Notes, Cautions, and Warnings. These alert you to critical
information, as follows:
For More Information
Refer to the following related documents for more details about your printer.
Read Me First
Unpacking and Setup Instructions
Engine Maintenance Manual
Controller Maintenance Manual
Illustrated Parts List (IPL)
NOTE:
Provides important additional information.
CAUTION!
Alerts you to an operating procedure, practice, or condition that, if not
strictly observed, might result in damage to the equipment.
WARNING!
Alerts you to an operating procedure, practice, or condition that, if not
strictly observed, can result in safety hazards to personnel, severe injury,
or loss of life.

Printer Overview 1-1
Chapter 1
Printer Overview
What This Chapter Provides
This chapter describes the parts and functions of the printer.
Printer Features
I/O Configurations
Operator Control Panel
Printer Views

1-2 Printer Overview
Printer Features
The printers are high-speed, shared-use laser printers for a production printing
environment. They incorporate a wide variety of features:
High-Speed and High-Quality Printing.
Print speed is up to 70 or 92 pages per minute (ppm), A4/Letter (Simplex)
depending on the printer model.
The printing output is at a resolution of 600 dots per inch (dpi), assuring
razor-sharp graphic and text output, even at very small point sizes.
Flexible Paper Source and Delivery.
Paper Source:
Standard – Two 500-sheet universal paper trays and one 2000-sheet universal
paper cassette.
Standard – 150-sheet capacity Multi-bypass Tray (MBT) for automatically
printing small jobs, or manually feeding single sheets (including
transparencies, labels, and odd-sized print media).
Option – High Capacity Feeder with 3000-sheet capacity.
Paper Delivery:
Standard - 2,500-sheet (Elevator Tray), 200-sheet (Upper T ray) capacity
Finisher.
Option – Container Stacker with 1,500 to 6,000-sheet capacity and stacking
capability.
Multiple Original Printing (MOP) – for printing of multiple collated document
sets without multiple file transfers. Processes PCL and PostScript jobs once,
stores the images on disk, and prints each set from disk (after the first set).
Virtual Printer Technology (VPT
®
) – allows a single printer to offer print services,
or virtual printers, each of which is configured by the Network Administrator.
Web Utilities – for remote access to the printer through the Internet or your
company’s Intranet.
Ergonomic operation.
The easy-to-read display clearly shows the operational status of the printer.
Component-based consumables.
User replaceable toner and staples.
High-volume printing.
Three standard paper cassettes with approximately 3000-sheet capacity total
and the Multi-bypass Tray (MBT) with a 150-sheet capacity.
Optional High Capacity Feeder (HCF) adds up to 3000 additional sheets.
Together they allow continuous printing of up to 6150 sheets.

Printer Overview 1-3
Supports a wide-range of media types (copier, bond, letterhead, special
application, recycled, overhead transparencies, labels) and sizes. See “Paper” on
page 2-2 for more information.
Printer Language Support.
Optional PostScript Level III (Adobe) printer language.
Optional IPDS printer language
PCL5e and PCL XL printer language.
TIFF and PDF printer language
Network.
Ethernet 10/100/1000 Base-T.
Network Protocol.
TCP/IP and LPR/LPD with onboard network.
IPP
Easy installation of additional fonts and macros using the PCL Startup File.
I/O Configurations
Bi-directional 1284C Parallel interface with Compatibility, Nibble, Byte, and
ECP Mode support.
Ethernet 10/100/1000 Base-T.

1-4 Printer Overview
Operator Control Panel
The Operator Control Panel (OCP) is your physical interface to the printer's features
and functions. From the control panel, you can monitor the printer's operating status
and configure the specific printer functions.
See Chapter 2 for detailed information about the OCP.
Printer Overview 1-5
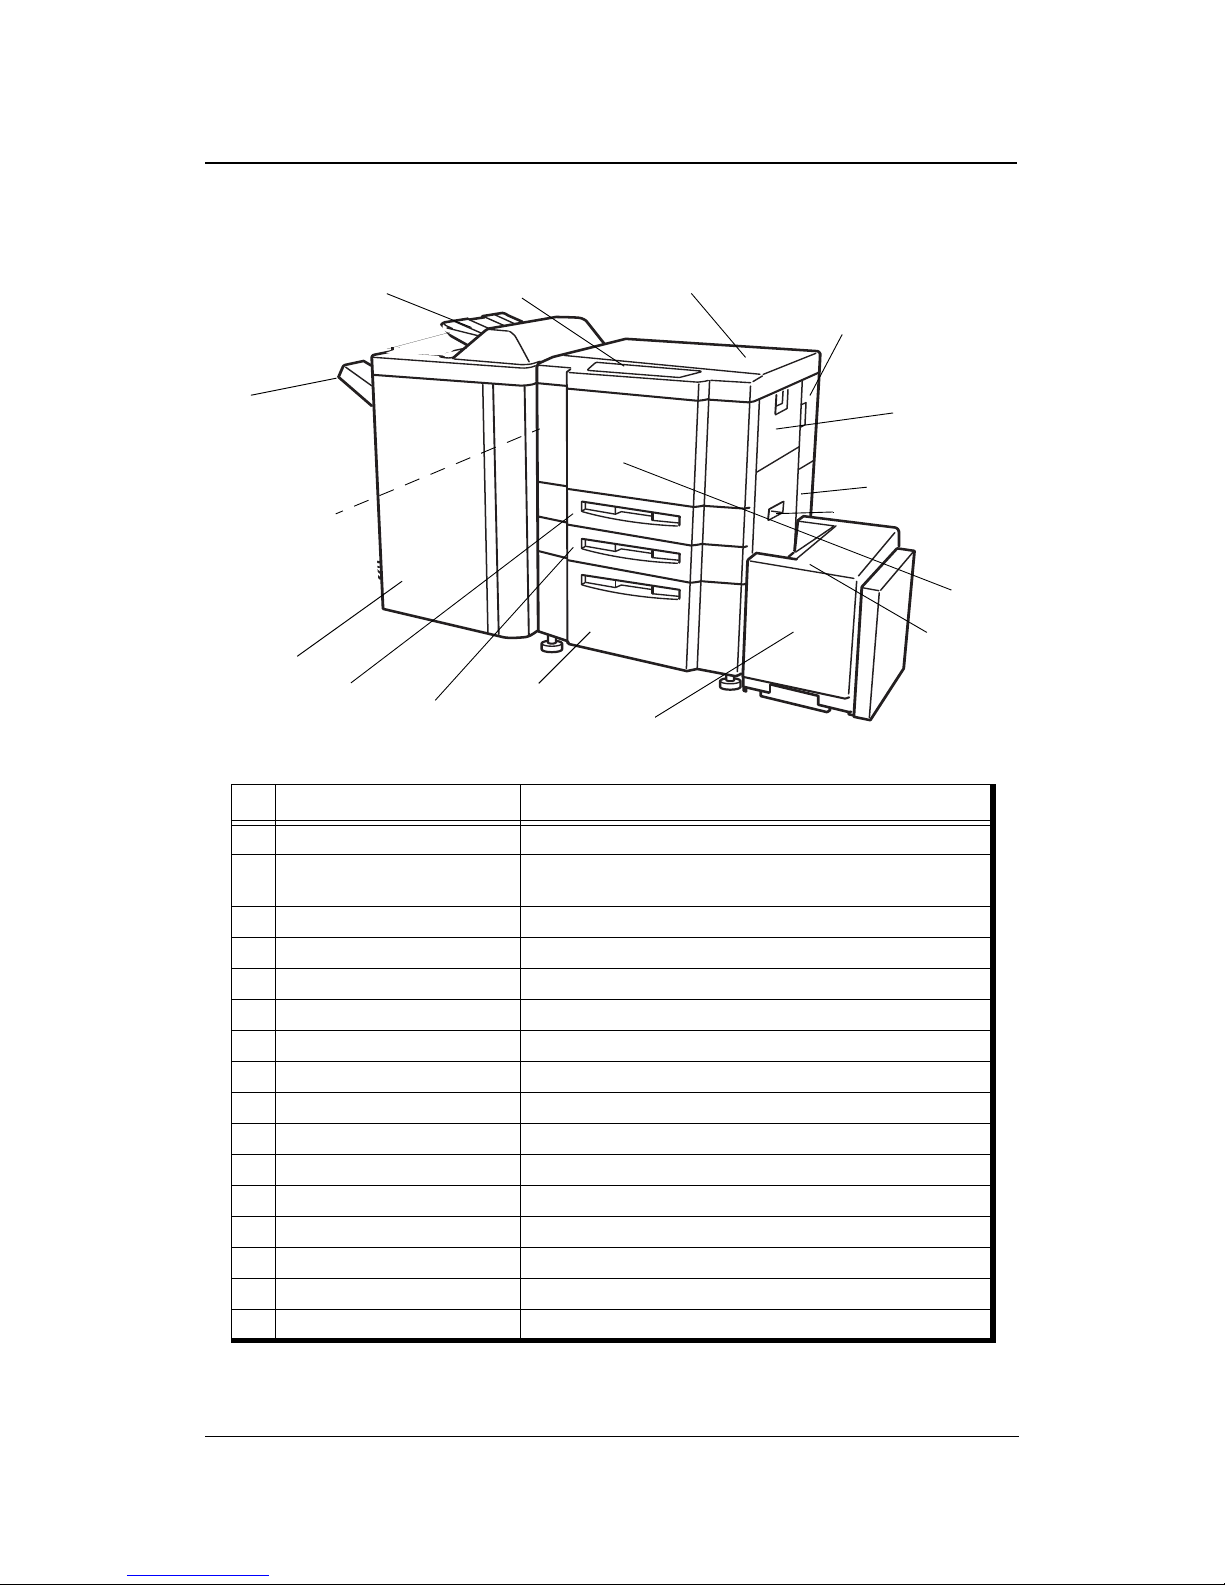
External View of the Printer
Key Component Description
1 Power Switch Press to turn the printer on and off.
2 Front Cover
Open to replace units, clear paper jams, or clean the inside of
the printer.
3 Vertical Path Cover Open to clear paper jams.
4 Multi-bypass Tray (MBT) Holds up to 150 sheets of paper.
5 Toner Supply Cover Open to replenish the toner supply.
6 Operator Control Panel (OCP) Displays printer status and menu information.
7 Tray 1 Holds up to 2,000 sheets of paper.
8 Tray 2 Holds up to 500 sheets of paper.
9 Tray 3 Holds up to 500 sheets of paper.
10 Switch Back Cover Open to clear paper jams.
11 Elevator Tray Output tray.
12 High Capacity Feeder (HCF) Holds up to 3,000 sheets of paper.
13 HCF Top Cover Open to clear paper jams.
14 Toner Collector Bottle Cover Open to replace the toner collector bottle.
15 Finisher For stacking, job offset, and stapling.
16 Upper Tray Output tray.
1. Power Switch
10. Switch Back Cover
2. Front Cover
3. Vertical Path Cover
4. Multi-bypass Tray
5. Toner Supply Cover
6. Operator Control
7. Tray 1
8. Tray 2
9. Tray 3
14. Toner Collector
13. HCF Top
12. High Capacity Feeder
15. Finisher
Bottle Cover
Panel
(Not Shown)
16. Upper Tray
Cover
11. Elevator Tray
1-6 Printer Overview
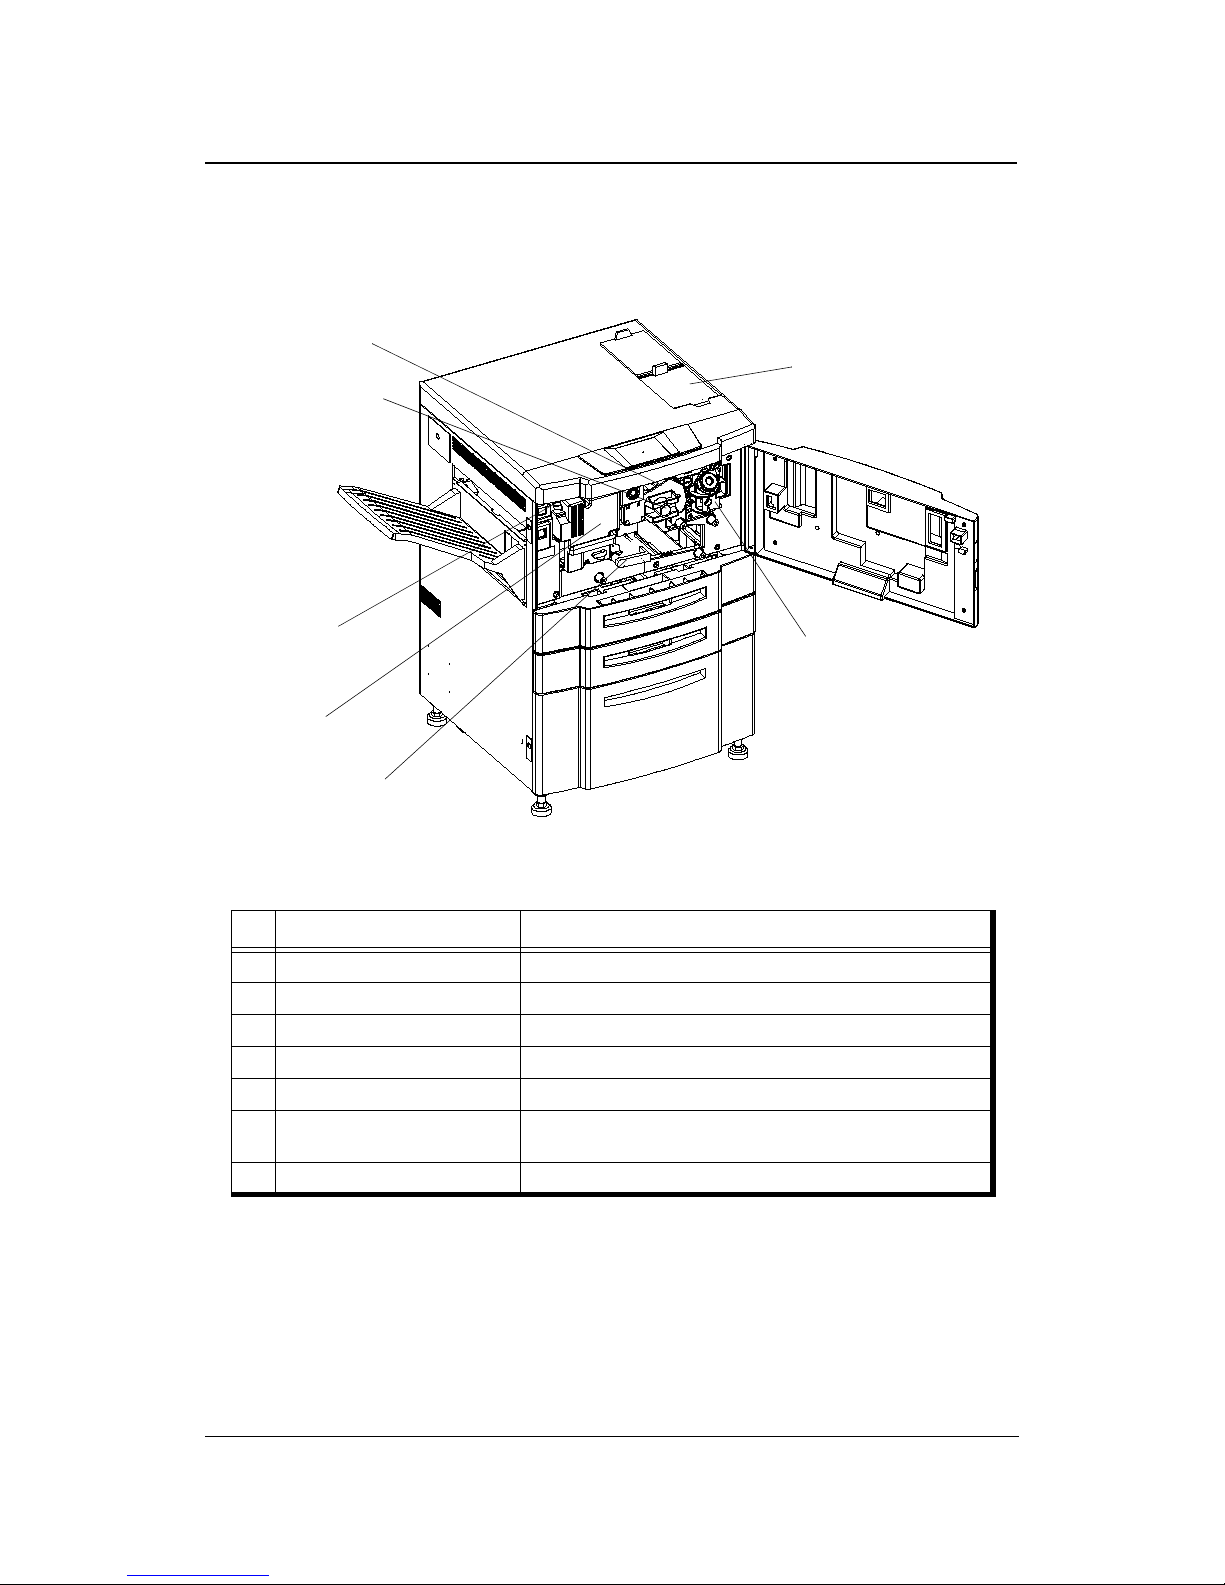
Internal View of the Printer
Key Component Description
1 Toner Hopper Unit Install the toner bottle here.
2 Drum Center Lock Holds the drum in place.
3 Drum Unit OPC drum.
4 Fuser Latch Provides access to the fuser unit.
5 Fuser Unit Fuses the toner on the paper.
6 Developer Duct
Mount the developer bottle onto the developer duct to replace
consumed developer.
7 TH Handle Handle of the toner transfer unit.
5. Fuser Unit
3. Drum Unit
2. Drum Center Lock
4. Fuser Latch
6. Developer Duct
1. Toner Hopper Unit
7. TH Handle

Operator Control Panel 2-1
Chapter 2
Operator Control Panel
What This Chapter Provides
This chapter contains information on the following topics.
OCP Description
Menu Structure
Using the Menu Screens
Passwords

2-2 Operator Control Panel
OCP Description
The Operator Control Panel (OCP) is a touch panel display that you use to set up print
options and monitor job and printer status. It is also used by the Network Administrator
to configure the printer and by the Service Technician to perform maintenance on the
printer.
Operator Control Panel
Operator Control Panel 2-3
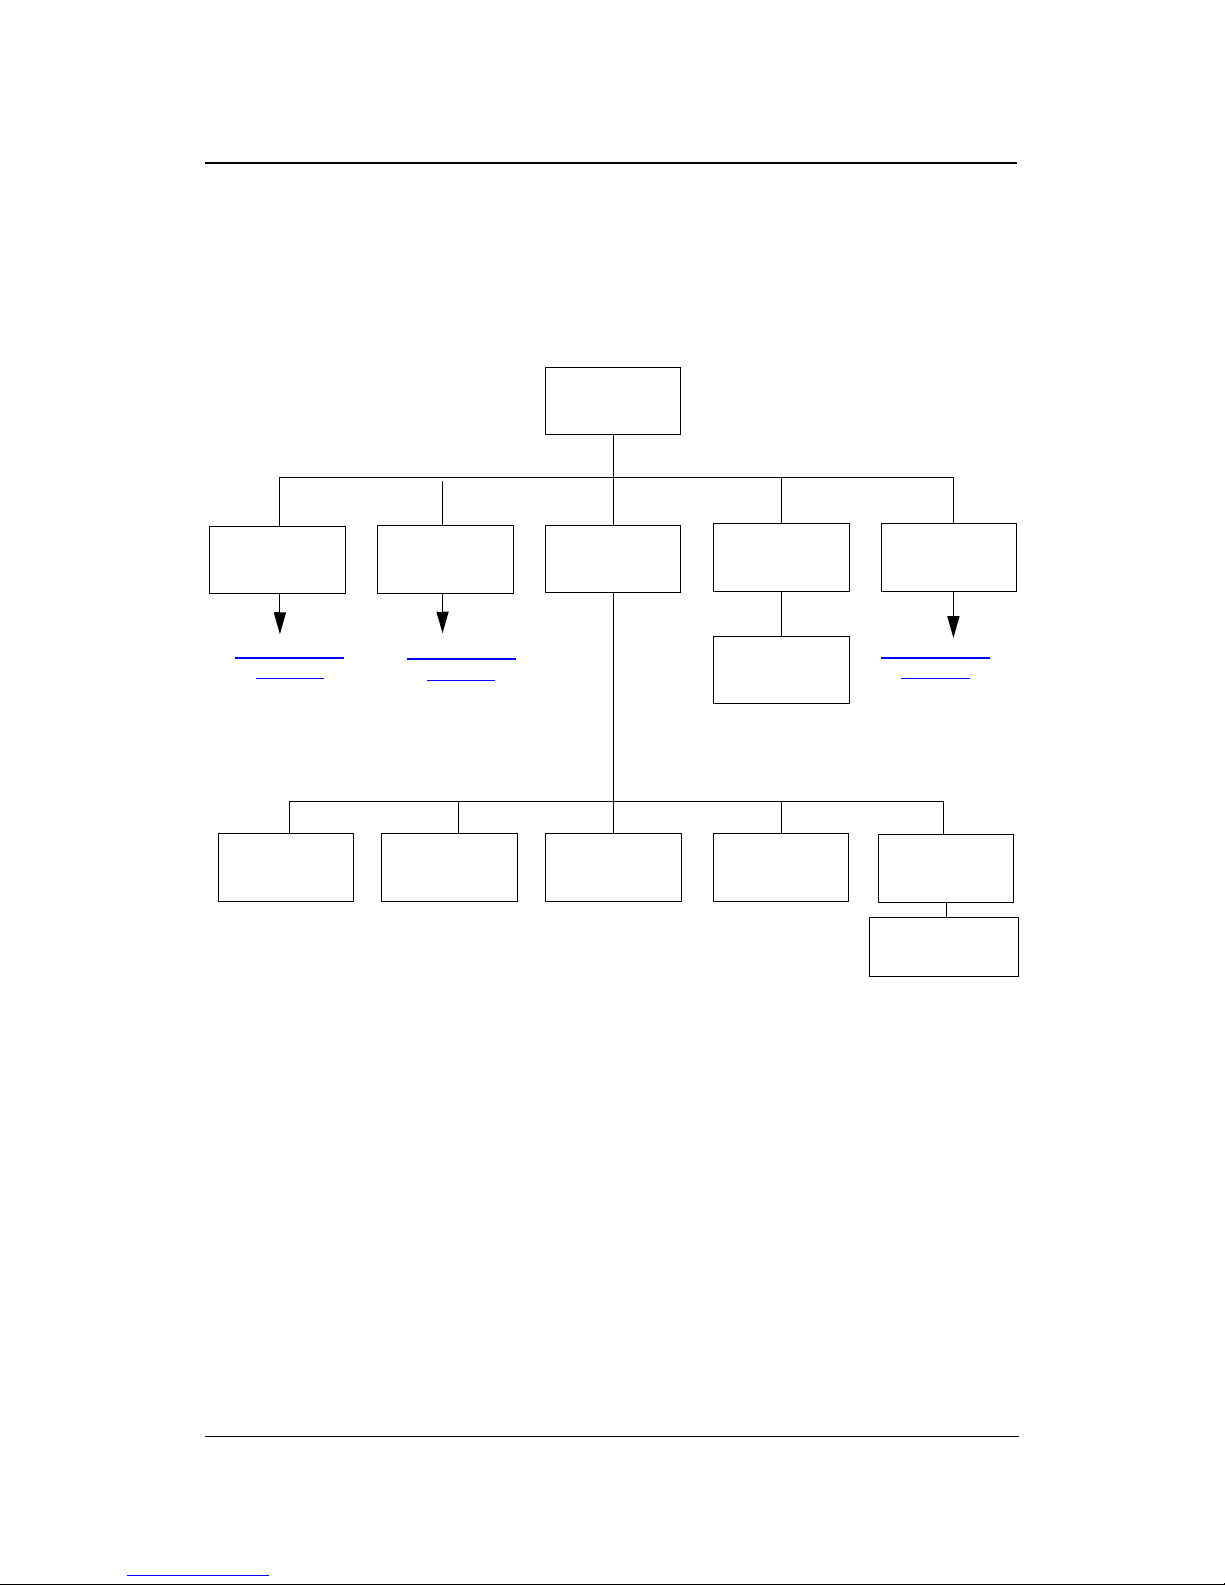
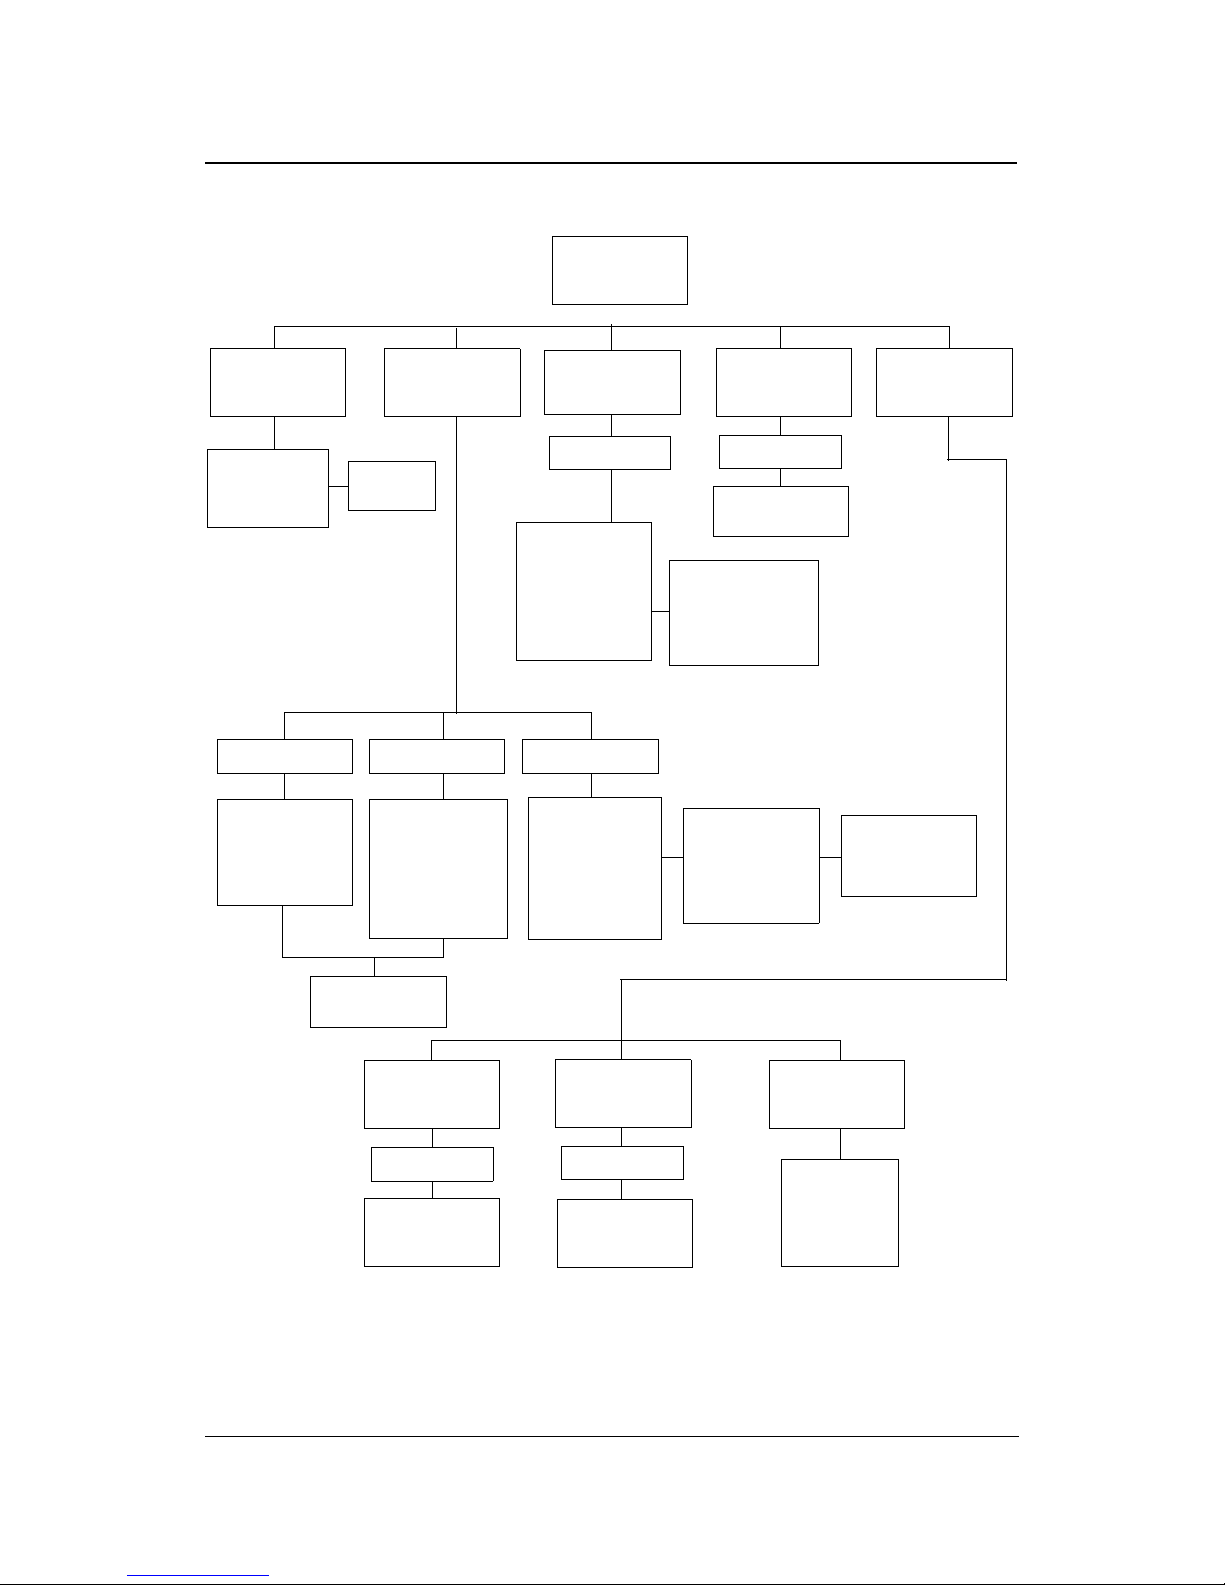
Menu Structure
The OCP menu is structured as shown in the following flowcharts. Each box in the
chart represents an OCP display screen. Use this flowchart to assist you in setting print
job options.
Main Menu
Printer Menu
Setup Menu
Reports Menu
Continued on
page 2-4
Continued on
page 2-6
Disk DirectorySummaryDemoStatus
Cancel Printing
Fonts
• PCL Fonts
• PostScript Fonts
2
Jobs Menu
Finisher Menu
1
Continued on
page 2-8
1
The Finisher Menu is only displayed when a Container Stacker is installed.
2
Available when PostScript is installed.
2-4 Operator Control Panel
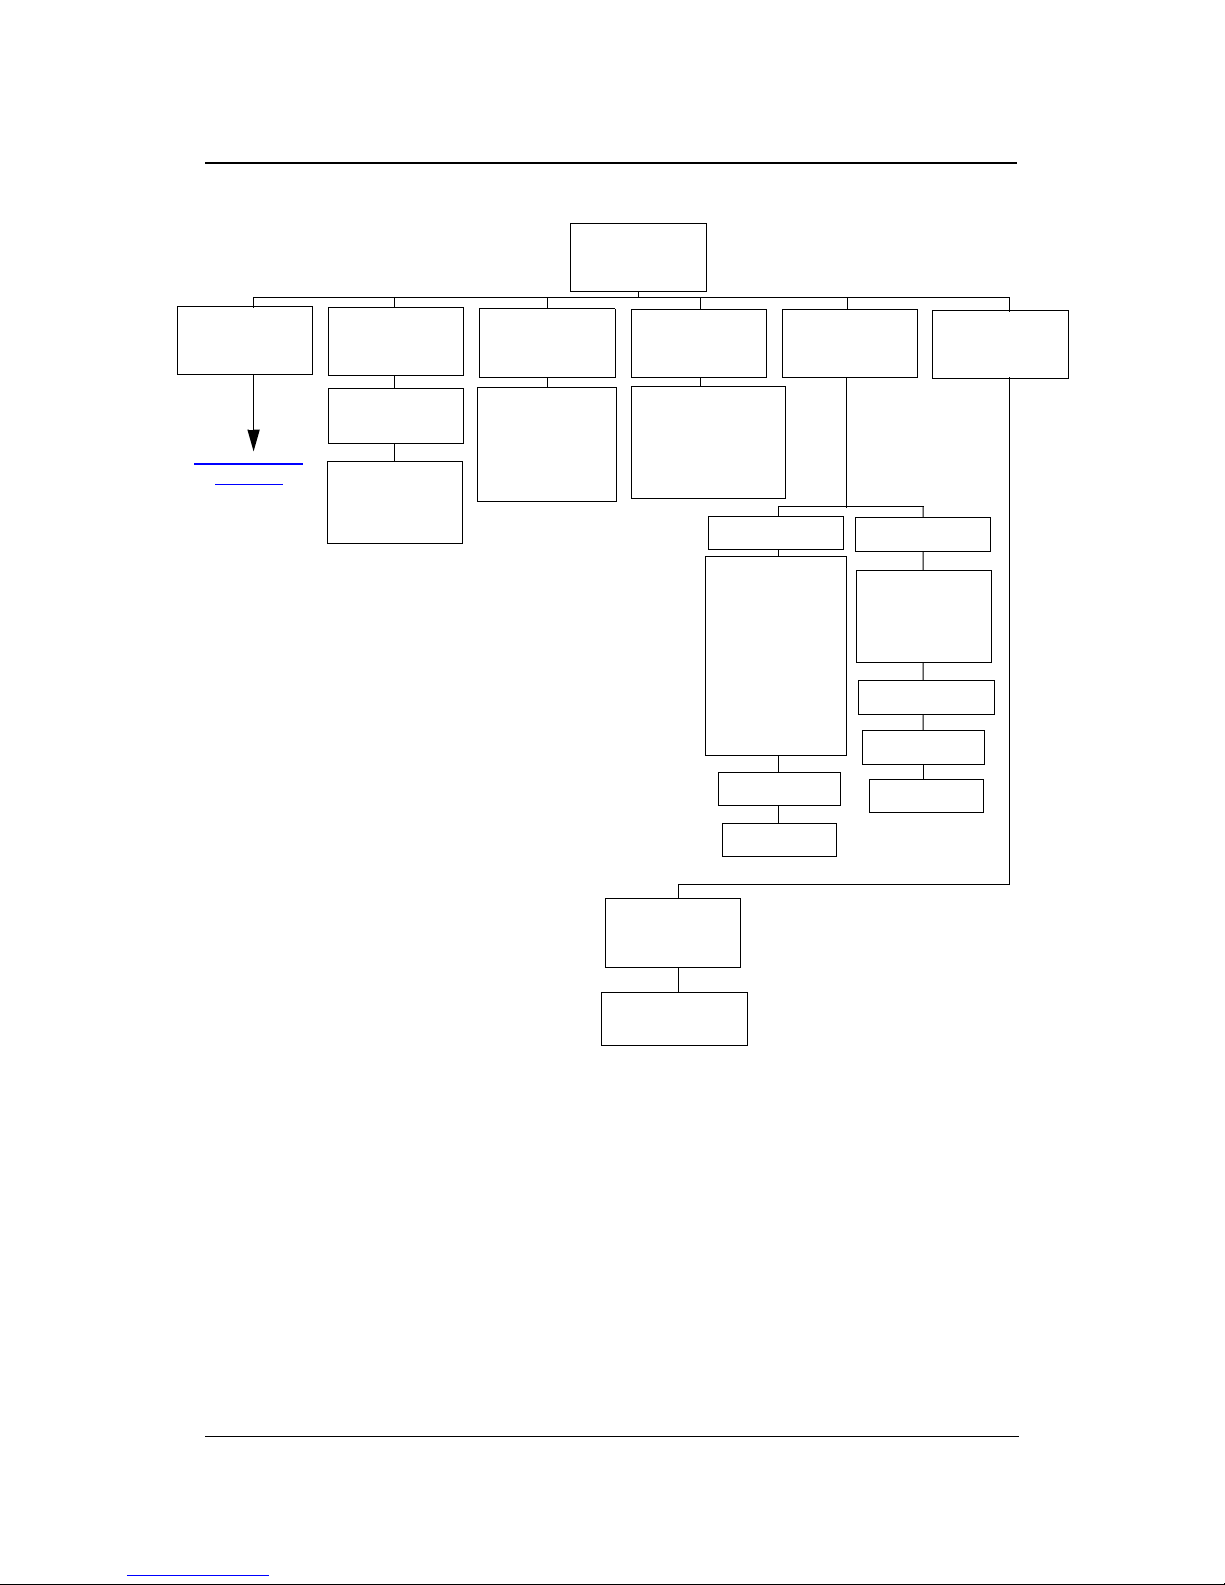
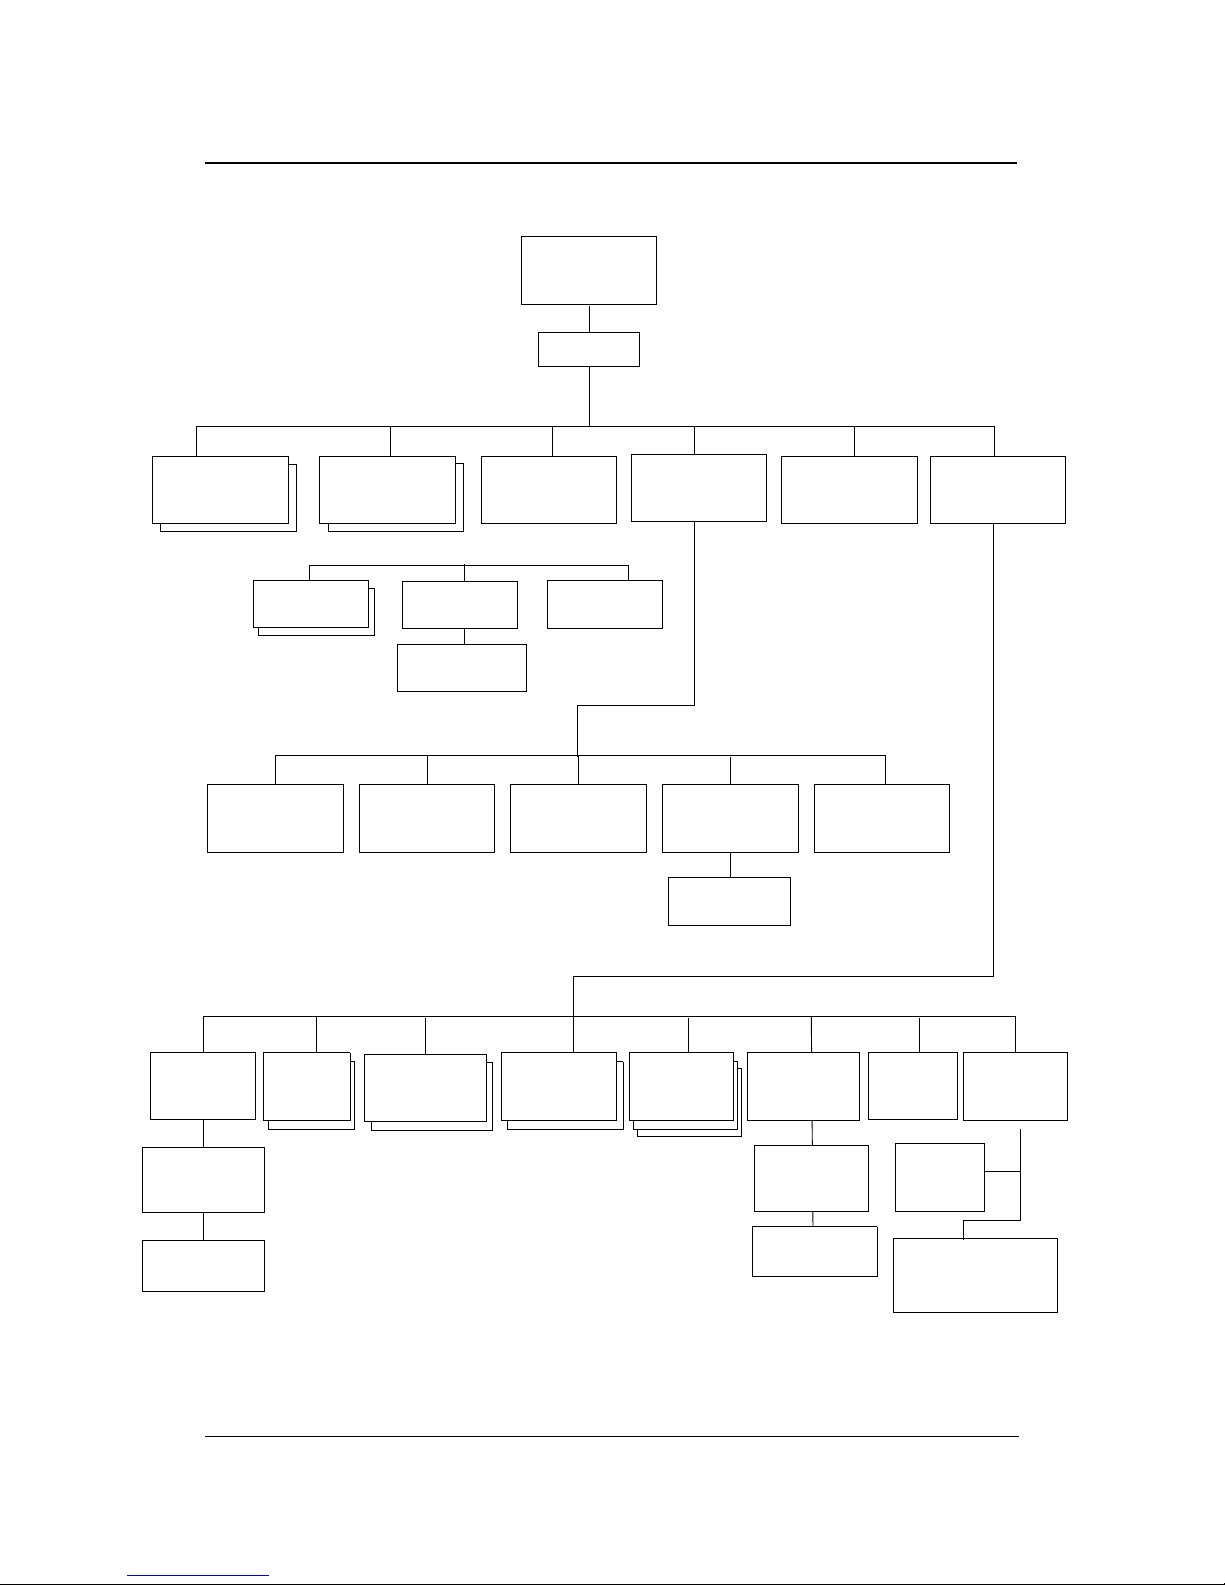
Default
Output
Printer Menu
• Upper Tray
• Elevator Tray
Paper
Source
• Solid Black
• SquareBlk/Skew
• Half Tone
• GhostG
• Jitter
• Large Letters
• Diagonal Lines
• Density Scale
• Small to Large
• Text File 4%
• Cross Pattern
• Staple:Front
• Staple:Rear
• Staple:Booklet
• Jogging
Options
• Wait Timeout
• Duplex-Always
• LPD Queuing
• Auto Proof
Sample
PostScript
1
• Print Errors
• Best Fit
• Job Timeout
• Halftone Density
Select Paper
Output
Select Paper
Source
Test Print
Finishing Test
Print Quality
Select Paper
Source
Select Paper
3
Output
• Stacker 5
2
• Stacker 6
2
• Stacker 7
2
• Stacker 8
2
(More Options)
PCL
• Wide A4
• Requested Tray
Continued on
page 2-5
1
Available when PostScript is installed.
2
Available when the Container Stacker is installed.
•
Jogging
2
Operator Control Panel 2-5
Paper Size
• AutoSelect
• 1
• 2
• 3
• MBT
• HCF
(More Options)
Paper Type
Select Paper
Source
Tray Adjust
Paper Weight
Paper Weight
Settings
• Plain
• Bond
• Color
• Label
1
• Letterhead
• Preprinted
• Prepunched
Tray 1
2
MBT
• A4 LEF
• A4 SEF
• A3 SEF
• A5 SEF
• B5 LEF
• B4 SEF
• Super B SEF
• Letter Tab LEF
• A4 Tab LEF
• Custom Size
• Letter LEF
• Letter SEF
• Ledger SEF
• Executive LEF
• Folio SEF
• Legal SEF
• Statement SEF
Select Paper
Source
• Recycled
• Special
• Transparency
1
• Transparency-pp
1
• Other
Select Paper
Source
Tray Adjust
Settings
1
Available when MBT is selected.
2
Available when the sensor plate in the tray is set to the first position.
3
Available when the HCF is installed.
MBT
Default
• Letter SEF
• A4 SEF
Paper
Source
Ordered Sets
• 1
• 2
• 3
• MBT
• HCF
3
Paper Color
Trays 2, 3
2
• Folio SEF
• Super B SEF
• Statement SEF
• Custom Size
• LetterTab LEF
• A4 Tab LEF
• Executive LEF
• Folio SEF
• Super B SEF
• Letter Tab LEF
• A4 Tab LEF
• Custom Size
Paper Color
Settings
Select Paper
Source

2-6 Operator Control Panel
Setup Menu
Service
1
Password
Drum Unit
• Exhaust
• Supply
Fuser Web
Developer Mix
ConsumablesSystem
Continued on
page 2-7
Password
OCP
• Contrast
• Volume
1
Service menu items are for Service Technicians only and are not discussed in this manual.
Language
• English
• Deutsch
• Français
• Español
Operator Control Panel 2-7
Mode
Parallel
Exit Jam
Recovery
Software
Log
Reset
Gateway
Address
Subnet MaskIP Address
Energy1
Save Time
Country
Code
Password
(More Options)
• Compatible
• Bi-Directional
System
Password
HTTP Port
Ack Pulse
Width
Calendar
• Time Zone
• Date
• Time
• Time Zone
Options
Energy
Save Mode
1
Available when Energy Save Mode is enabled.
2
Available when the Container Stacker is installed
3
Available when PostScript is installed.
• AutoSelec
3
• PostScript
3
• PCL
• PostScript
3
• Options
Boot Method
• DHCP
• STATIC
public
R/W
Emulation
Capture to
File
(More Options)
Auto
Online
• Auto Backup
• Output Cascade
2
• Best Fit Mode
3
Network
2-8 Operator Control Panel
Finisher Menu
1
Short Stacking
• 5
• 6
• 7
• 8
Decurler
• AutoSelect
• Enable
• Disable
1
Available when the Container Stacker is installed.
Operator Control Panel 2-9
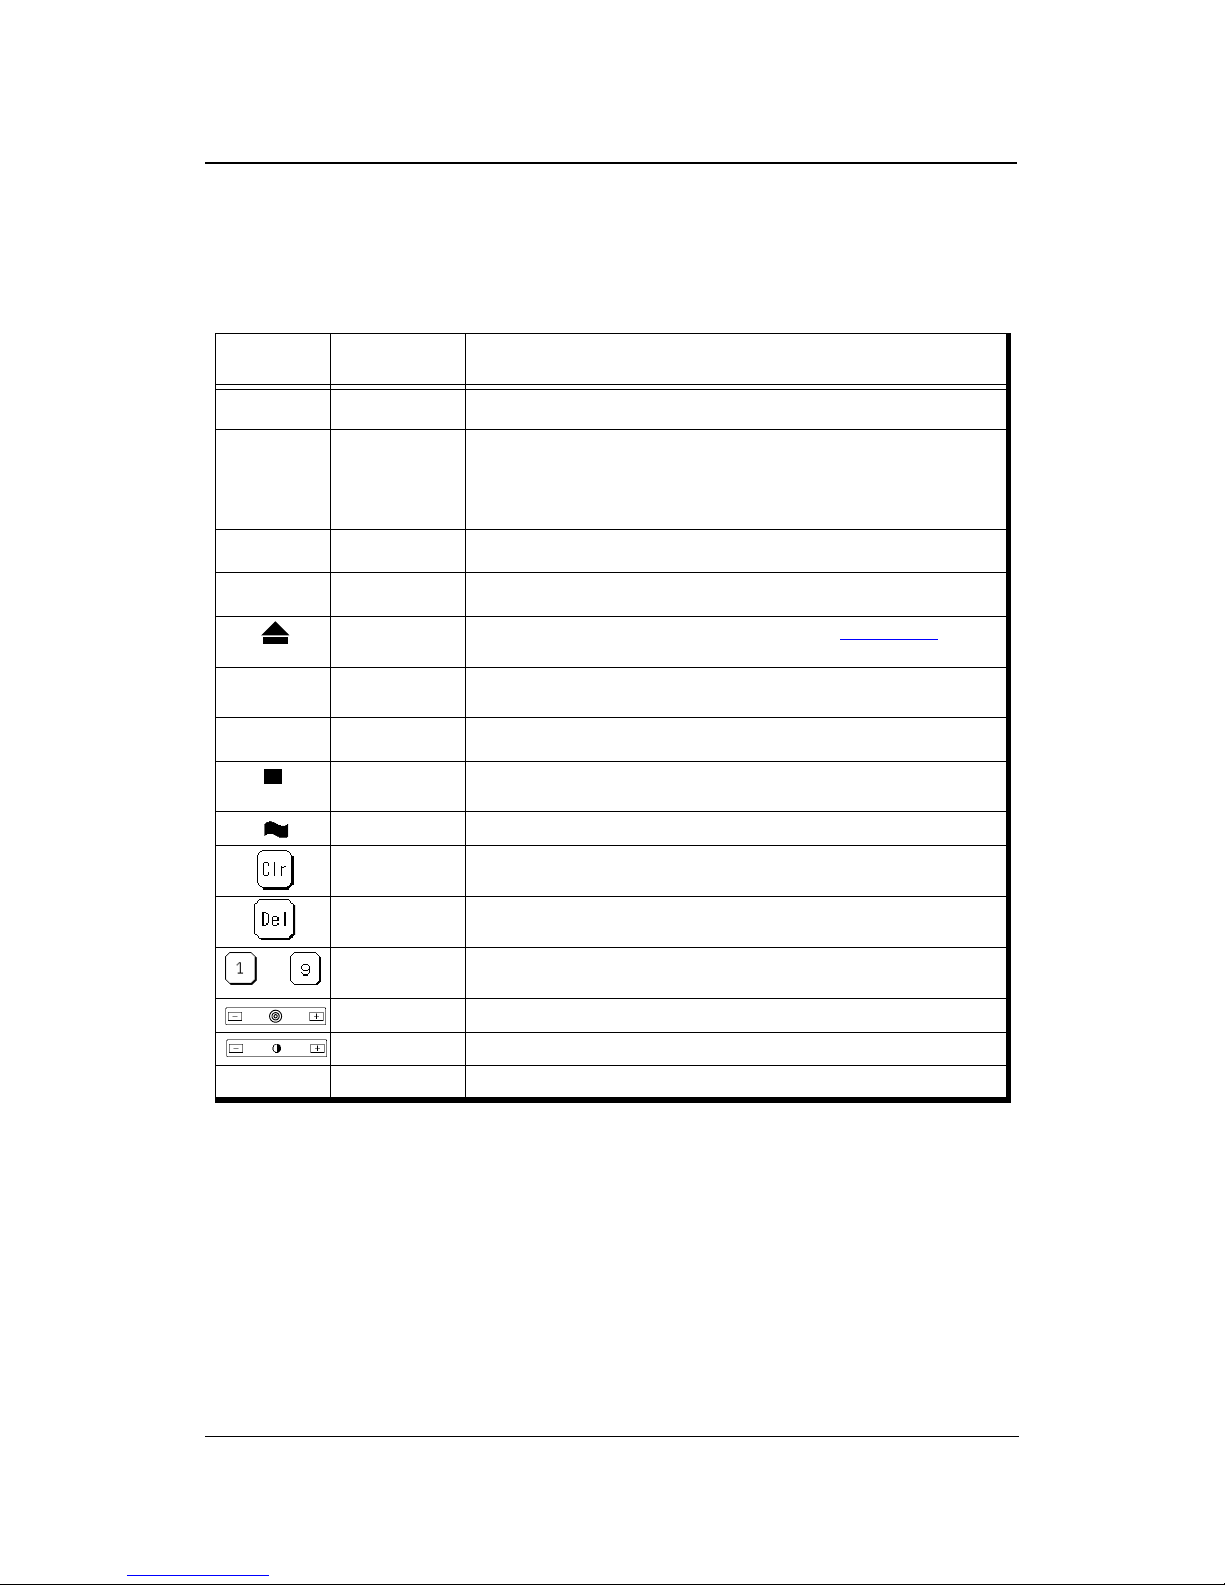
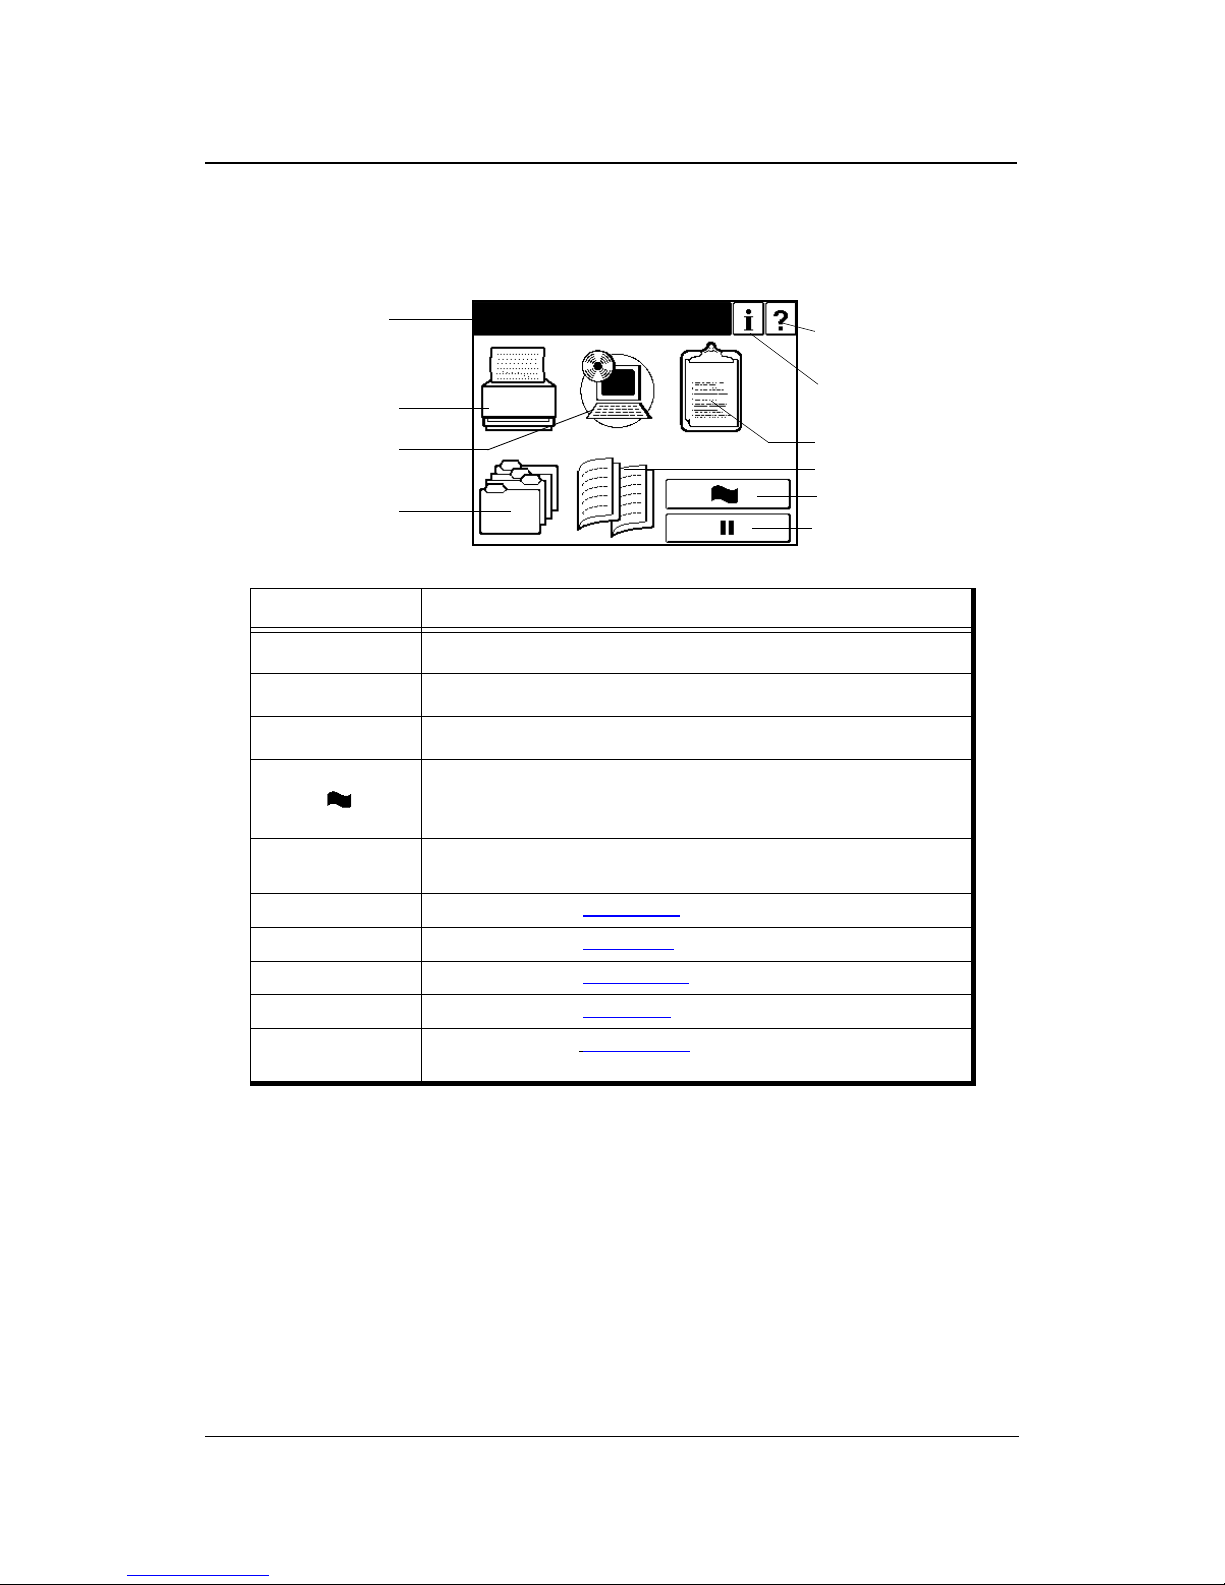
Using the Menu Screens
The menus are accessed via the touch panel. Each OCP screen consists of icons that
you use to make selections. The icons that are used through the OCP screens are shown
below. Examples of the OCP screens are shown on the following pages..
Icon or
Button
Name Function
?
Help Touch to display Help on the current screen.
i
Information From the Main Menu, displays information about the printer and con-
sumables.
From relevant screens, displays an illustration of the paper trays or fin-
isher trays.
Pause/Offline Touch to pause the printer.
Resume/Online When the printer is offline, touch to return to Ready status.
Return to Main
Menu/Cancel
Touch to cancel the current selection and return to the
Main Menu.
Previous Menu Touch to cancel the current selection and return to the previous screen or
menu.
More Options Touch to display additional options for the current selection.
Enter or Accept Confirm or Done. Touch to confirm your selection and return to the previous
screen or menu.
Sample Touch to duplicate a currently printing page and output to the sample tray.
Clear Button Touch to erase entire entry.
Delete Button T ouch to erase last character entered.
Ten Key Use to enter numeric values.
Volume Use to adjust volume of the OCP touch pad.
Contrast Use to adjust the contrast level of the OCPdisplay.
Status Bar Displays the current screen name and/or any system messages.
–
2-10 Operator Control Panel
Main Menu
1.The Main Menu screen is shown below . A description of the elements that make up
the screen follows.
Icon Function
?
Touch to open Main Menu Help.
i
Touch to display information about the printer and consumables.
Touch to pause the printer.
Touch to duplicate a current prin ting page and output to the
•Standard Finisher: Upper tray
•Container Stacker: Sample tray
Status Bar
Consists of one or two lines of text for displaying messages and instructions.
Printer Menu Touch to display the Printer Menu
.
Setup Menu Touch to display the Setup Menu
.
Reports Menu Touch to display the Reports Menu.
Jobs Menu Touch to display the Jobs Menu.
Finisher Menu
Touch to display the
Finisher Menu. Available only when a Container
Stacker is installed.
Status Bar
Printer Menu
Current Screen
Help
Pause/Offline
Information
Setup Menu
Reports Menu
Jobs Menu
Finisher Menu
Sample
Ready
Operator Control Panel 2-11
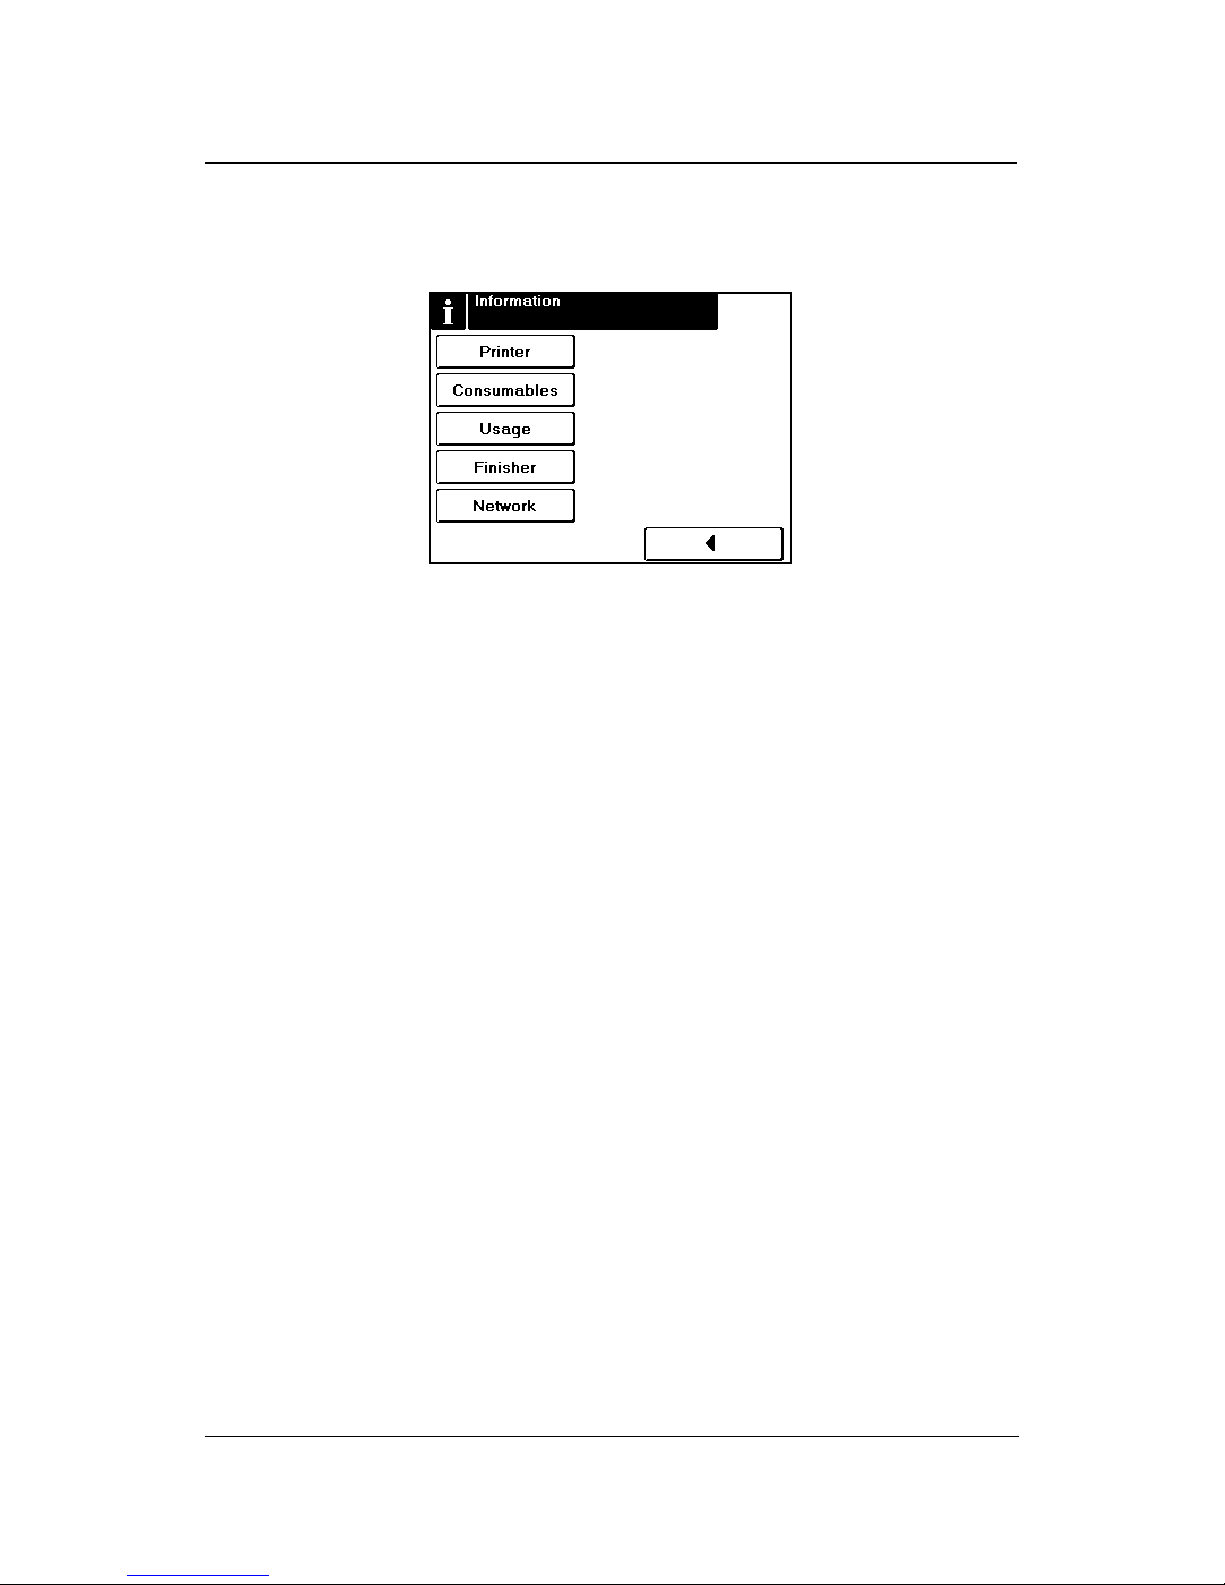
Information
When you select Information from Main Menu, this screen is displayed. You use it to
confirm about printer settings and consumables described as below.
Printer
Displays information about the engine and controller software revision, error
counts, and the current paper type and source settings.
Consumables
Displays the status of the consumables: Toner, Developer Mix., Drum, and Fuser
Web.
Usage
Displays current information regarding print density, preventative maintenance,
and page counts.
Finisher
Displays information regarding the status of the Finisher.
Network
Displays information such as MAC and IP Address, Gateway Address, Subnet
Mask and HTTP Port.

2-12 Operator Control Panel
Printer Menu
When you select Printer from the Main Menu, this screen is displayed. You use the
Printer Menu to gain access to the printing options described in the table below.
Paper Source
Default
Defines the default paper tray. Use this when the paper source is not
designated by a host command. If a command from the host defines the paper
source, the OCP setting is ignored. When “AutoSelect” is selected, tray is
automatically selected according to paper size and/or paper type defined by
host.
Paper Size
When Paper Size is selected the paper size of the currently selected paper
source is displayed. When the “Custom Size Switch” in the tray is set to
“Standard”, paper size is automatically detected. See “Setting the Custom
Paper Size Values” on page 3-16 for more information.
Paper Type
Defines the paper type to desired input tray. The paper type screen displays
currently selected paper type, and the option buttons to select another paper
type. See “Setting the Paper Type” on page 3-17 for more information.
Paper Color
Sets the paper color for the selected input tray . The paper color screen displays
the currently selected paper color, and the option buttons to select another
paper color. There are 7 pre-defined colors and up to 80 custom colors to
choose from. Custom colors are defined using the Web Utilities. See “Setting
the Paper Color” on page 3-17 for more information.
Paper Weight
Defines the paper weight for the input tray. The paper weight screen displays
the currently defined paper weight, and the options to redefine the paper
weight settings. Options include bond, index and g/m
2
. See “Setting the Paper
Weight” on page 3-17 for detailed information and instructions.
PCL

Operator Control Panel 2-13
Tray Adjust
The print position can be adjusted vertically and horizontally using the Tray
Adjust option. When printing in duplex mode, you can set different tray adjust
values for the front side and back side of the paper. See “Setting the Tray
Adjust Values” on page 3-16 for detailed information and instructions.
Ordered Sets
Y ou can define an ordered set by specifying the number of pages in the set and
the paper source tray(s) that contain the ordered set pages. The printer will
support input tray cascading for ordered sets based on paper size and media
type. See “Ordered Sets” on page 3-18 for detailed information and
instructions.
Default Output
Use this option when the output tray is not designated by a host command.
Options include Upper Tray, Elevator T ray and Stacker 5, 6, 7 and 8, (if installed).
If a command from the host defines the output tray, the OCP setting is ignored.
Options
Wait Timeout
Defines the time period (in seconds) from reception of last data to the
reception of next data. If data is not received within the defined period, the job
is
terminated. A command from the host will override the OCP setting.
LPD Queuing
Can be set to enable or disable. The factory default is disabled. When enabled
the printer will accept and queue additional print jobs while a data transfer is
in process for another job.
Duplex Always
Can be set to enable or disable. When set to enable, the printer will always
print in duplex mode.
Auto Proof Sample
This function provides automatic proof sample printing instead of manually
pressing the Sample button on the OCP. The auto proof sample interval is
0 - 5,000 pages in 500 sheet increments (0, 500, 1,000, 1,500, ... 5,000). For
example, if the interval is set to “500”, the printer will automatically output a
proof sample to the sample tray every 500 sheets. If the interval is set to “0”,
the function is disabled.
PostScript
Print Errors
Can be set to enable or disable. When set to enable, the printer will print an
error page when a PostScript error occurs.

2-14 Operator Control Panel
Best Fit
Can be set to enable or disable. When enabled, if the requested paper size is
not present in any tray, the printer will select the closest available paper size
and scale the image to fit. Best Fit works in conjunction with the Best Fit
Mode option in the System Menu.
Job Timeout
Defines the time limit for processing of the PostScript job. The valid range is
0 or 15 - 999.
Halftone Density
Halftone Density can be adjusted to Light, Medium, Dark or Custom.
Test Print
Use this button to print a test pattern for checking the print quality or the print
position. A list of test patterns is shown on page 2-4.
PCL
Wide A4
Can be set to enable or disable. When set to enable, the printer changes the
margin/printable area of A4 paper so that 80 10-pitch characters may be
printed on a line.
Requested Tray
Exclusively - Printer should print from the requested tray only.
First - Printer should print from the requested tray first.
NOTE:
The Halftone Density menu is only displayed when the Halftone Selection
in the Service menu is enabled.
 Loading...