

Ricoh DD 5450 Operating Instructions Manual

Operating
Before Use
Instructions
Basic Operations
Printing with Useful Functions
Other Functions
Replacing Consumables
Troubleshooting
Daily Maintenance
Specifications / Information
Appendix
For safe and correct use, be sure to read the Safety Information in
Read This First before using the machine.


ENERGY STAR Program
ENERGY STAR® Program Requirements for Imaging Equipment
This company is a participant in the ENERGY STAR® Program.
This machine is compliant with the regulations specifi ed by the
ENERGY STAR® Program.
The ENERGY STAR® Program Requirements for Imaging Equipment encourage energy
conservation by promoting energy effi cient computers and other offi ce equipment.
The program backs the development and dissemination of products that feature energy saving
functions.
It is an open program in which manufacturers participate voluntarily.
Targeted products are computers, monitors, printers, facsimiles, copiers, scanners, and digital
duplicator. Energy Star standards and logos are internationally uniform.
Complies with the provisions defi ned by the regulations listed below.
EC Low Voltage Directive (2006/95/EC)
EC Electromagnetic Compatibility Directive (2004/108/EC)
EC Restriction of Hazardous Substances Directive (2011/65/EU)
PLEASE NOTE
Contents of this manual are subject to change without prior notice.
Some illustrations in this manual might be slightly different from the machine.
Certain options might not be available in some countries. For details, please contact your local dealer.
i

User Information on Electrical and Electronic Equipment
Users in the countries where this symbol shown in this section has been specifi ed in national law
on collection and treatment of E-waste.
Our Products contain high quality components and are designed to facilitate recycling.
Our products or product packaging are marked with the symbol below.
The symbol indicates that the product must not be treated as municipal waste. It must
be disposed of separately via the appropriate return and collection systems available.
By following these instructions you ensure that this product is treated correctly and
help to reduce potential impacts on the environment and human health, which could
otherwise result from inappropriate handling. Recycling of products helps to conserve
natural resources and protect the environment.
For more detailed information on collection and recycling systems for this product,
please contact the shop where you purchased it, your local dealer or sales/service
representatives.
Note for the Battery and/or Accumulator Symbol (For EU countries only)
In accordance with the Battery Directive 2006/66/EC Article 20 Information for end-users
Annex II, the above symbol is printed on batteries and accumulators.
This symbol means that in the European Union, used batteries and accumulators should
be disposed of separately from your household waste.
In the EU, there are separate collection systems for not only used electrical and electronic
products but also batteries and accumulators.
Please dis p ose of them correctly at your local community waste collection/recycling ce n t re.
ii

● Pictorial Symbols and Other Notations Used in This Manual
IMPORTANT
REFERENCE
Continue Page....
(“xxxx”→ see p. xx )
: Introduces instructions for correct operation of the machine.
If these instructions are ignored, the machine may not be able to operate at
optimum performance or may break down.
: Introduces information that is useful for operation and maintenance of the
machine, or information about the machine’s performance, etc.
: Indicates that the description of the operating sequence is continued on the
next page.
: Indicates the page number and item containing related information.
iii
Function Index
The followings are a brief introduction of various functions of the machine.
Functions for Master Making
Zoom
Enlarges or reduces the size of
copy as you want.
Scan Darkness
Adjusts the density of scanning
the document.
Image Mode
Sets image mode suitable for the
document.
→P.24 ,
→P.40
→P.44
P.32
Paper Size
Sets paper size.
Nonstandard-size paper is available.
Darkness
Adjusts the density of the master.
Document Size
Sets the size of document to be
printed.
→P.26
→P.41
→P.48
Preview
You can check print image before
master making on the LCD.
2in1
Prints two different documents on
one page.
90° Rotation
Rotates document on the scan
image by 90 degrees.
→P.52
→P.59
→P.73
Multiple Exposure
Prints multiple copies of the
document on one page.
Book Shadow Erasure
Erases shadows by book binding
and around of the periphery of the
document.
180° Rotation
Rotates document on the scan
image by 180 degrees.
→P.56
→P.68
→P.75
iv
Edit Image
→P.77
Document Memory
→P.98
Edits the image of the document
on the preview screen.
Ink Saving Mode
Saves ink when printing by
changing document scanning
density.
Document Misset Detection
Warns you if the document is not
placed correctly on the exposure
glass.
Pre-print
→P.114
→P.128
→P.147
Remakes a master of previous
image without scanning.
Document Darkness Detection
Scans the entire document and
distinguishes the brightest part of
the document.
Fine Start
Makes clear and vivid prints from
the beginning of printing.
Proof Print
→P.119
→P.143
→P.151
Disables counting a specifi ed
number of prints following the start
of printing operation.
Makes one sheet of proof print
after master making and stops.
v
Functions for Printing
Print Speed
Adjusts print speed.
Print Position
Adjusts the position of the printed
image.
Narrow Paper
Enables printing on narrow paper.
→P.29
→P.46
→P.112
Print Darkness
Adjusts print darkness.
Paper Type
Sets mode suitable for printing
paper.
Replenishing Ink
Replenishes ink.
→P.42
→P.110
→P.116
Confi dential Safeguard
Prohibits others from printing
confi dential documents.
Batch Print/
Sequential Batch Print
Makes prints in groups.
Changes the number of prints
made from each document.
→P.117
→P.123
Interval Print
Performs printing at regular
intervals.
Online Mode
Makes prints using a personal
computer.
→P.121
→P.130
vi

Optimize Print
→P.145
Repeat Counter
→P.149
Adjusts printed image to the best
print darkness by print speed.
Print Position Adjustment (While Printing)
Adjusts print position while printing.
Displays the same number of
prints after printing completes.
→P.153
vii
Other Functions
Program
Saves and retrieves settings when
needed.
Shortcut Settings
Retrieves frequently used functions
by touching shortcut icon at the
bottom of the main screen.
Automatic Power Off
Automatically turns off the machine
when it is not operated for a
specifi ed period of time.
→P.100
→P.135
→P.139
Initial Confi guration
Changes settings in Standard
Mode.
Energy Save Mode
Automatically turns off the LCD when it
is not operated for a specifi ed period of
time. This reduces power consumption.
Automatic Reset
Automatically resets the machine
and returns all settings to Standard
Mode.
→P.132
→P.137
→P.141
Display Brightness
Adjusts the brightness of the LCD.
Buzzer
Sets buzzer ON/OFF and buzzer
volume.
→P.155
→P.159
Date & Time
Sets date and time.
Information
Checks total master make count,
total print count, master roll
monitor, used master monitor, date
& time and shortcut settings.
→P.157
→P.161
viii

Contents
Chapter 1
Chapter 2
Function Index
...........................................................................................
Before Use
Part Names and Their Functions
Printer Appearance
Inside of Machine
Outside/Inside of Print Output Side
Control Panel
Main Screen
Setting Screen
Turning Power ON/OFF
Turning Power ON
Turning Power OFF
Standard Mode
Document/Printing Paper Specifi cations
Acceptable Documents
Acceptable Printing Paper
..............................................................................................
...................................................................................
......................................................................................
............................................................................................
..........................................................................................
..............................................................................
....................................................................................
...................................................................................
.........................................................................................
...........................................................................
......................................................................
..............................................................
...........................................................
Basic Operations
...............................................
iv
2
2
3
4
6
7
7
8
8
8
9
10
10
10
Preparing for Printing
How to Set Papers
When no heavy weight paper is fed or two sheets of light weight paper are fed
How to Supply or Replace Paper While Printing
How to Set the Print Tray
How to Set the Jump Plates
Loading Documents
How to Load Document
How to Load Document on the Exposure Glass
Loading Document in Automatic Document Feeder (ADF)(Optional)
Basic Printing
Printing Using Basic Functions
Enlargement / Reduction
Enlargement and Reduction from Standard-Size Documents to Standard-Size Pape
Enlargement and Reduction from Standard-Size Documents to Standard-Size Paper
Selecting Printing Paper Size
Master Making Area by Paper Size [European]
How to Set Paper Size
Master Making Area by Paper Size [U.S.]
How to Set Paper Size
How to Set “CUSTOM” in Paper Size Setting
Print Speed Adjustment
Print Speed Adjustment
How to Adjust Print Speed
How to Set TOP SPEED
...........................................................................................
..............................................................................
..................................................................................
....
.....................................
........................................................................
....................................................................
.................................................................................
..........................................................................
.....................................
.....
...............................................................
.........................................................................
...
r
...
..................................................................
......................................
............................................................................
...............................................
............................................................................
.........................................
...........................................................................
..........................................................................
.....................................................................
.........................................................................
14
14
15
16
17
18
19
19
19
20
22
22
24
24
25
26
26
26
27
27
28
29
29
29
30
ix

Contents
Chapter 3
Printing with Useful Functions
Enlargement / Reduction
Enlargement / Reduction
Minor Reduction
Free Zoom
Custom Scaling
Adjusting Darkness
Adjusting Darkness
Scan Darkness
How to Adjust Scan Darkness
Master Darkness
How to Adjust Master Darkness
Print Darkness
How to Adjust Print Darkness
Printing Photographs and Color Documents
Image Mode
How to Set Image Mode
Adjusting Print Position
Print Position Adjustment
Document Size
Document Size
How to Set Document Size
How to Set “CUSTOM” in Document Size
......................................................................................
..............................................................................................
.......................................................................................
........................................................................................
.....................................................................................
........................................................................................
............................................................................................
..........................................................................................
........................................................................................
.........................................................................
........................................................................
..................................................................................
.................................................................................
.................................................................
..............................................................
.................................................................
.........................................................................
...........................................................................
........................................................................
.....................................................................
..............................................
........................................
32
32
34
36
38
40
40
40
40
41
41
42
42
44
44
44
46
46
48
48
48
49
Chapter 4
Other Functions
Edit Function: Preview
Checking Document To Be Printed
Edit Function: Multiple Exposure
Multiple Exposure on One Page
How to Set Multiple Exposure (2, 4, 8, and 16-up)
......................................................................................................
2 IN 1
How to Set 2 IN 1
How to Set 2 IN 1 Using the ADF (Option)
Custom
How to Set Custom
Cut Line
How to Set Cut Line
Edit Function: Book Shadow Erasure
Book Shadow Erasure
Area of Shadow Erasure
How to Set Book Shadow Erasure
Edit Function: 90° Rotation
90° Rotation
How to Set 90° Rotation
Edit Function: 180° Rotation
180° Rotation
How to Set 180° Rotation
....................................................................................................
...................................................................................................
............................................................................................
..........................................................................................
...........................................................................
.........................................................
...........................................................
.............................................................
....................................................................................
..............................................
.................................................................................
................................................................................
....................................................
............................................................................
.........................................................................
..........................................................
.....................................................................
..........................................................................
...................................................................
........................................................................
.................................
52
52
56
56
58
59
60
63
64
64
66
66
68
68
69
70
73
73
73
75
75
75
x

Contents
Edit Function: Edit Image
Edit Image
Make Up
How to Set Make Up
ADD MAKE UP, SWITCH ERASE AREA, NEW MAKE UP
Trimming
How to Set Trimming
Edit Function: Document Memory
Document Memory
How to Set Document Memory
Special Function: Program
Program
Retrieving Settings
Clearing Settings
Special Function: Paper Type
Paper Type
How to Set Paper Type
Special Function: Narrow Paper
Narrow Paper
How to Set Narrow Paper
Special Function: Ink Saving Mode
Ink Saving Mode
How to Set Ink Saving Mode
Special Function: Replenish Ink
Replenishing Ink
How to Replenish Ink
Special Function: Confi dential Safeguard
Confi dential Safeguard
How to Set Confi dential Safeguard
Special Function: Document Darkness Detection
Document Darkness Detection
How to Set Document Darkness Detection
Special Function: Interval Print
Interval Print
How to Set Interval Print
Special Function: Batch Print Sequential Batch Print
Batch Print / Sequential Batch Print
How to Set Batch Print / Sequential Batch Print
How to Enter Batch Print / Sequential Batch Print
Separating Prints with Tape Strips
(Available only with Tape Dispenser Unit)
Special Function: Document Misset Detection
Document Misset Detection
How to Set Document Misset Detection
Peripheral Function: Online Mode
Making Prints Using Personal Computer
How to Set Online Mode
How to Cancel Reprint When in Manual Setting
Setting Function: Initial Confi guration
Initial Confi guration
How to Set Initial Confi guration
...............................................................................................
..................................................................................................
.................................................................................................
................................................................................................
...................................................................................
............................................................................................
........................................................................................
...................................................................................
...................................................................................
..........................................................................................
........................................................................
...............................................................................
...............................................................................
..........................................................
..................................................................................
...............................................................
....................................................................
................................................................................
...............................................................
.........................................................................
...........................................................
.....................................................................
......................................................
.................................................................
...........................................................
............................................................................
...........................................
.........................................................................
.......................................................
..............................
.............................................................
...........................................
.............................................................
.......................................................................
......................................................
...................................
................................
........................................................
.............................................
...................................
..................................................................
...............................................
........................................................
.............................................
.......................................................................
...................................
.................................................
...............................................................................
.............................................................
....................
........................
77
77
77
79
91
95
95
98
98
98
100
100
105
108
110
110
110
112
112
112
114
114
114
116
116
116
117
117
117
119
119
119
121
121
121
123
123
124
126
127
127
128
128
128
130
130
130
131
132
132
132
xi

Contents
Setting Function: Shortcut Setting
Shortcut Setting
Setting Function: Energy Save Mode
Energy Save Mode
How to Set Energy Save Mode
Setting Function: Automatic Power OFF
Automatic Power OFF
How to Set Automatic Power OFF
Setting Function: Automatic Reset
Automatic Reset
How to Set Automatic Reset
Setting Function: Fine Start
Fine Start
How to Set Fine Start
Setting Function: Optimize Print
Optimize Print
How to Set Optimize Print
Setting Function: Pre-print
Pre-print
How to Set Pre-print
Setting Function: Repeat Counter
Repeat Counter
How to Set Repeat Counter
Setting Function: Proof Print
Proof Print
How to Set Proof Print
Setting Function: Print Position Adjustment (While Printing)
Print Position Adjustment While Printing
How to Set Print Position Adjustment While Printing
Setting Function: Display Brightness
Display Brightness
How to Set Display Brightness
Setting Function: Date & Time
Date & Time
How to Set Date & Time
Setting Function: Buzzer
Buzzer
How to Set Buzzer
Setting Function: Information
Information
How to Confi rm Information
..............................................................................................
................................................................................................
...................................................................................................
....................................................................................
...............................................................................
...........................................................................
....................................................................................
.................................................................
..................................................................
............................................................................
.......................................................................................
.....................................................................
....................................................................
..............................................................................
.....................................................................................
..................................................................
.............................................................................................
..........................................................................
................................................................................
..........................................................................................
........................................................................
.......................................................................
................................................................................
............................................................................................
.................................................................
.......................................................
...................................................
.............................................................
.............................................
........................................................
.......................................................
...........................................................
........................................................
................................................................
...............................................
............................
..................................................
..............................................................
.............................................................
...............................................................
...........
135
135
137
137
137
139
139
139
141
141
141
143
143
143
145
145
145
147
147
147
149
149
149
151
151
151
153
153
153
155
155
155
157
157
157
159
159
159
161
161
161
Chapter 5
xii
Replacing Consumables
Replacing Ink Pack
Replacing Ink Pack
How to Replace Ink Pack
Replacing Roll Master
Replacing Roll Master
How to Replace Roll Master
How to Dispose of Used Masters
How to Dispose of Used Masters
.................................................................................
...............................................................................
......................................................................
...........................................................................
..........................................................................
................................................................
..........................................................
..........................................................
164
164
164
167
167
167
170
170

Contents
Chapter 6
Replacing Drum Unit
Replacing Drum Unit
How to Remove Drum Unit
How to Set Drum Unit
Replacing Separator Unit
Replacing Separator Unit
Replacing Side Separator Unit
Replacing Side Separator Unit
..............................................................................
.............................................................................
...................................................................
...........................................................................
.......................................................................
......................................................................
..............................................................
.............................................................
Troubleshooting
If Trouble Occurs
If Trouble Occurs
When Messages Appear
Supplying Paper While Printing
If Paper Runs Out During Printing
Supplying Paper While Printing
Changing Paper Size
Paper Jams
Paper Jam on the Feeder Side (Feed Tray)
Paper Jam on the Ejection Side (Print Tray Side)
Paper Adhering to Drum
When “MASTER EJECTION ERROR” is Displayed
Removing the Master Adhering to the Drum
When Master Setting Error Has Occurred
How to Remove the Master
When “SET MASTER ROLL PROPERLY” is Displayed
How to Set the Master Roll
....................................................................................
...................................................................................
........................................................................
............................................................
........................................................
............................................................
............................................................................
.............................................................................................
.........................................
.................................
.......................................................................
.............................
.........................................
............................................
..................................................................
...................................................................
.......................
172
172
172
173
175
175
176
176
178
178
179
182
182
182
183
185
185
186
187
189
189
192
192
193
193
Chapter 7
Chapter 8
Chapter 9
Daily Maintenance
Daily Maintenance
..................................................................................
Specifi cations / Information
Specifi cations
Information on Replacing Battery
.........................................................................................
.........................................................
Appendix
........................................................................................................
Index
196
198
201
204
xiii

xiv

Chapter
1
Before Use
This chapter contains essential information such as the names of the machine
parts, the names and functions of keys, etc., on the control panel, and the sizes
of documents and printing papers that you can use. Please be sure to read this
chapter carefully before attempting to use the printer.
1
Before Use
Part Names and Their Functions
Printer Appearance
Inside of Machine
Outside/Inside of Print Output Side
Control Panel
Main Screen
Setting Screen
Turning Power ON/OFF
Turning Power ON
Turning Power OFF
Standard Mode
Document/Printing Paper Specifi cations
Acceptable Documents
Acceptable Printing Paper
.......................................................................................................
............................................................................................
...............................................................................................
.....................................................................................................
...................................................................................................
.........................................................................................
.............................................................................................
............................................................................................
..................................................................................................
....................................................................................
...........................................................................
....................................................................
...............................................................................
.............................................................
2
2
3
4
6
7
7
8
8
8
9
10
10
10
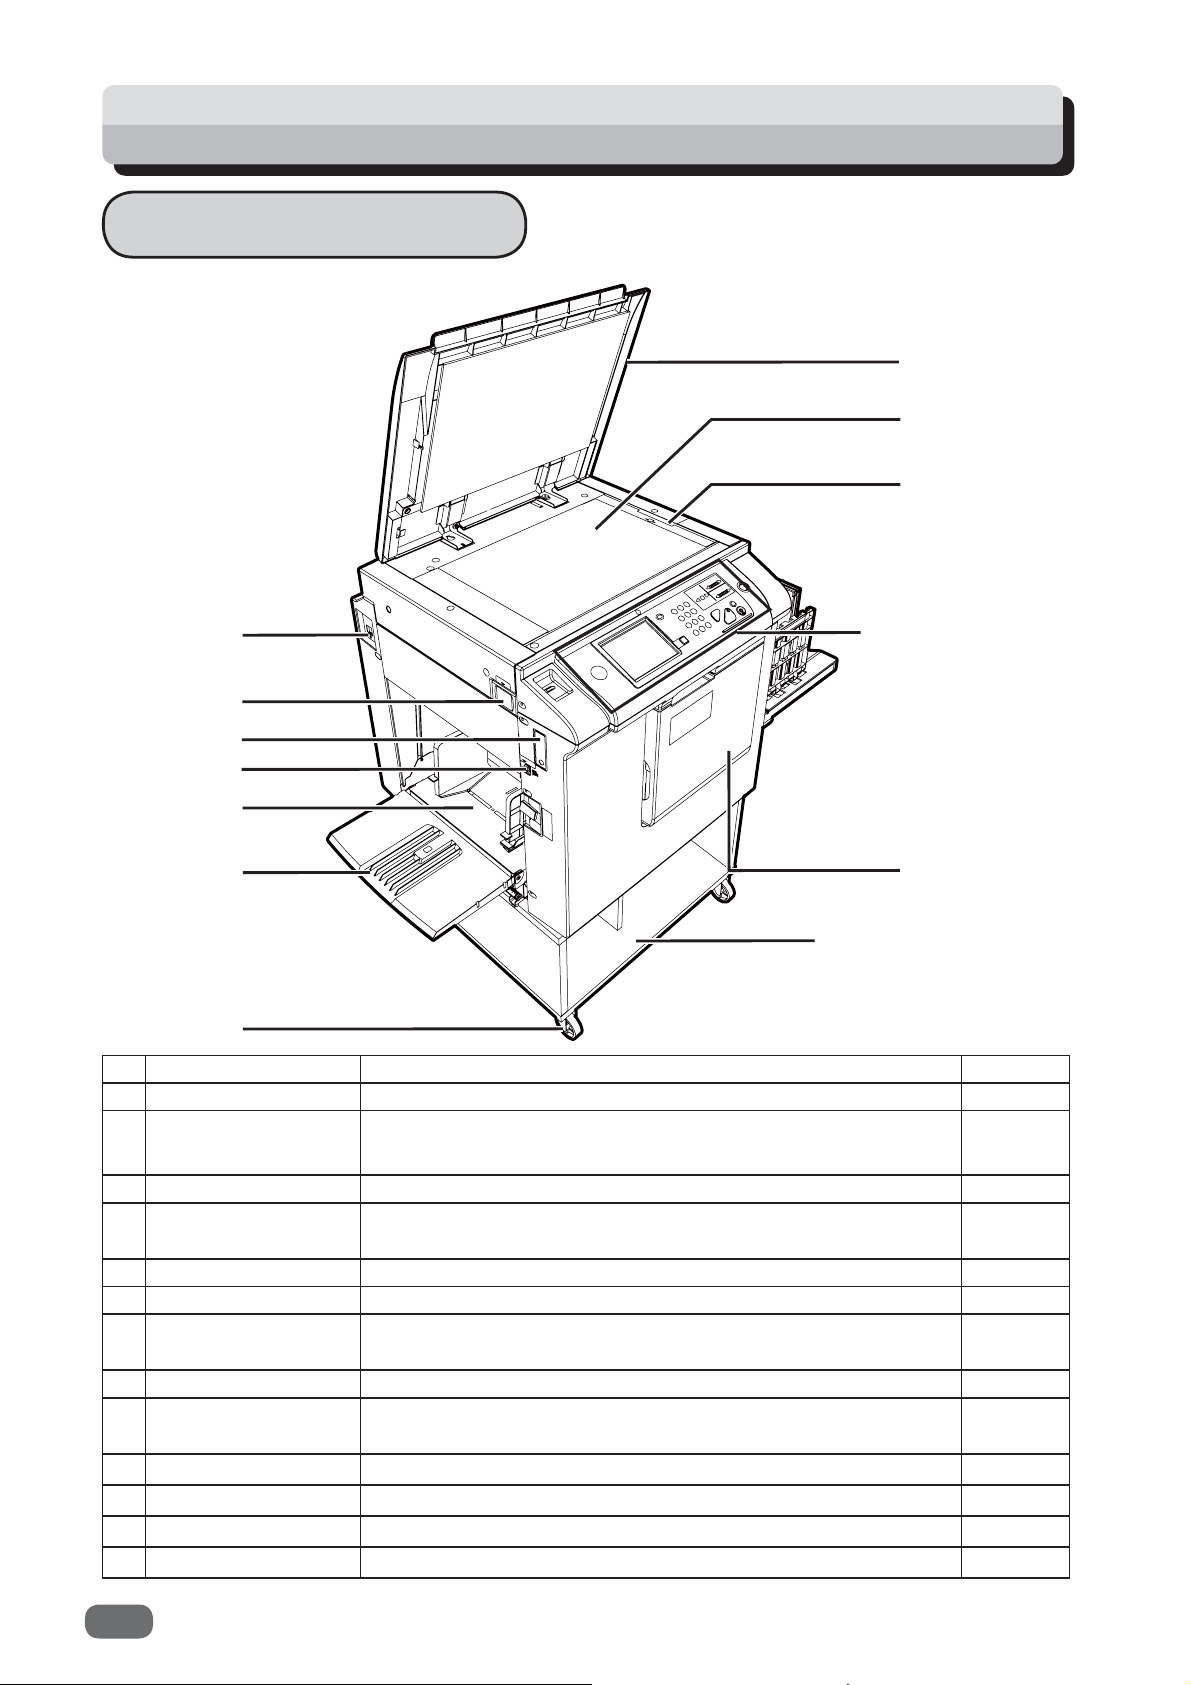
Part Names and Their Functions
Printer Appearance
13
12
11
1
2
3
4
5
6
7
No. Name Function Reference
1 Connector (PC) Use to connect a PC. *It varies by confi guration. -
2 Scanner button Press to open the scanner unit.
3 USB port Use to connect a USB fl ash drive. * It varies by confi guration. -
4 Feed tray descend
switch
5 Feed tray Load papers on this tray. 10,16
6 Support tray Use this when you set the large size papers. 14
7 Caster lock Locks the printer in position on the fl oor. Always lock the
8 Cabinet (Option) Place the printer on this cabinet.
9 Front cover Open to replace ink pack and drum unit, etc.
10 Control panel Displays operations and status, and sets functions. 6
11 Scale Put the document along this scale.
12 Exposure glass The document is placed on this glass.
13 Exposure glass cover Keeps the document in contact with the document exposure glass.
Press to lower the feed tray.
caster locks when installing the printer.
*It varies by confi guration. -
10
9
8
167,192,
193
16,182,
183,185
-
164,172,
189
19
19
19
2
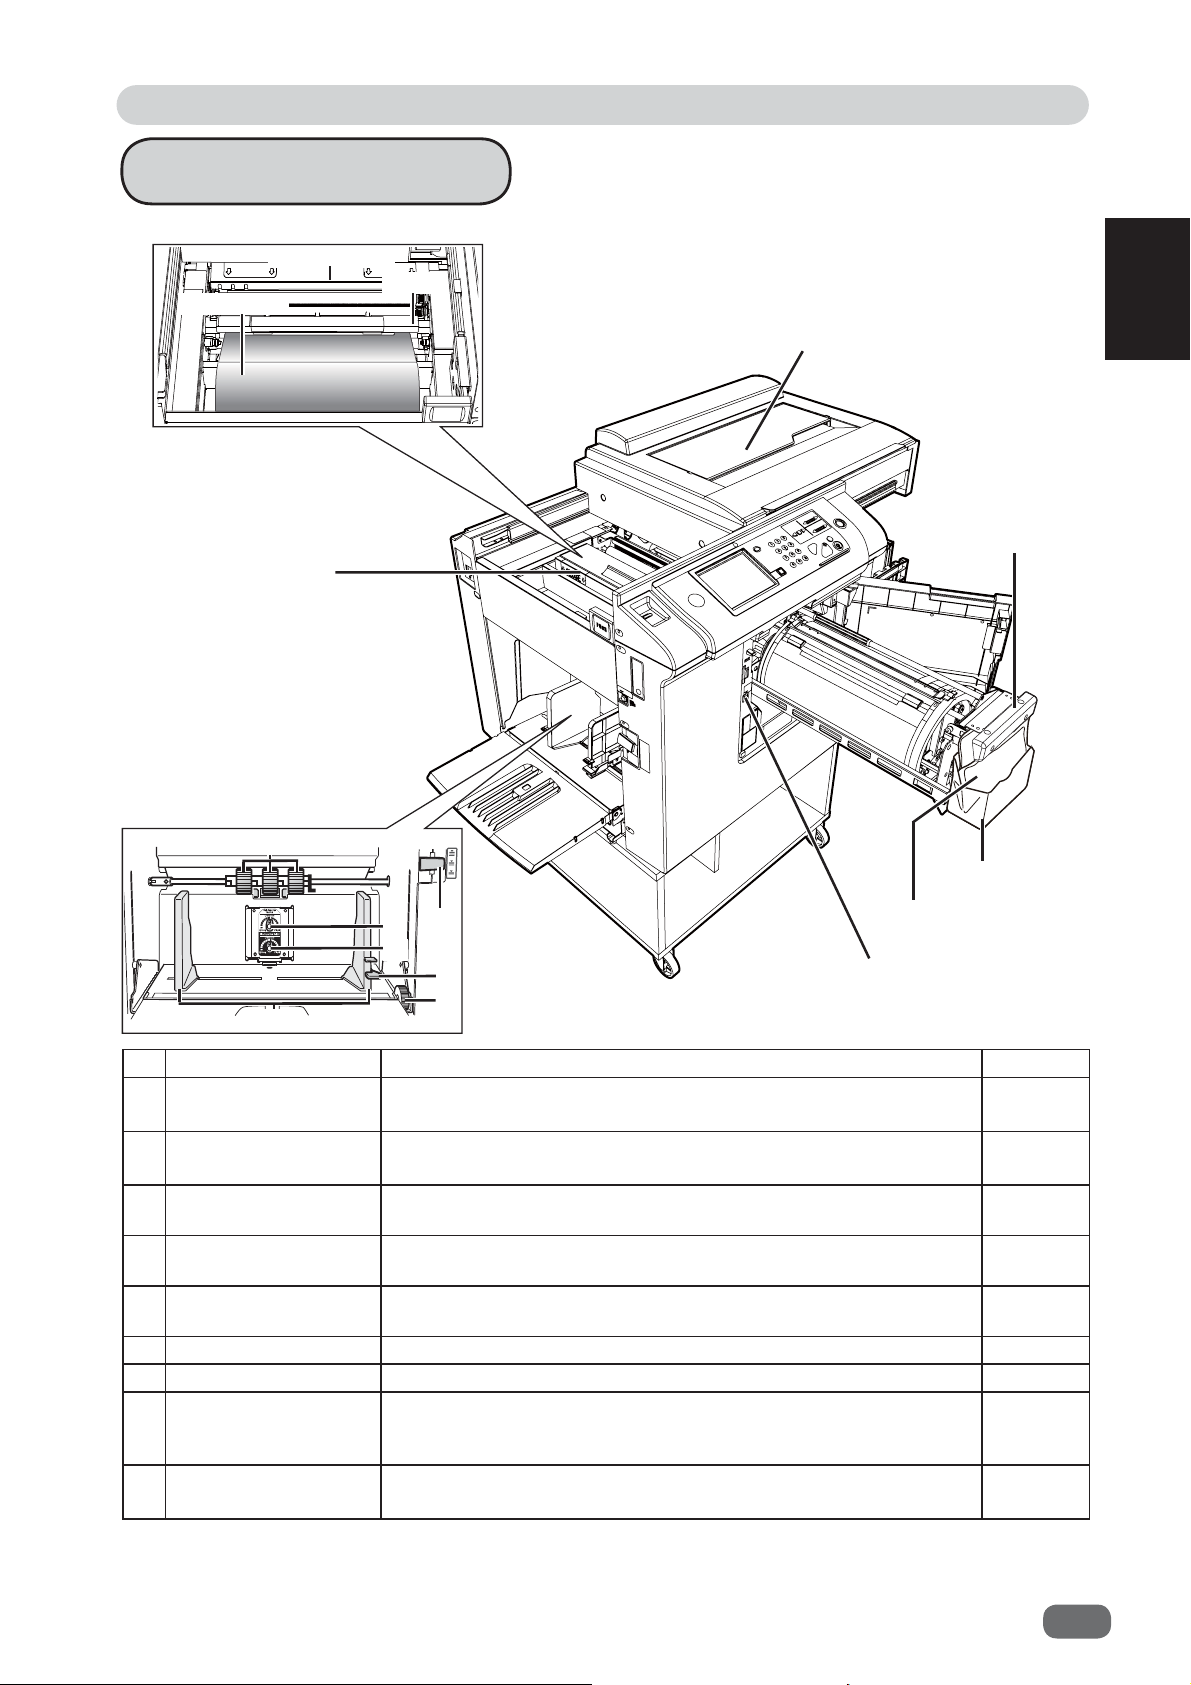
Inside of Machine
Inside of the master cover area.
Master cover
Cutter
Roll master
15
Part Names and Their Functions
22
Drum release lever
1
1
Before Use
Paper feed rollers
Ink holder
16
17
18
20
19
No. Name Function Reference
Drum removal button Pressing this button rotates the drum and stops it in position
14
Master cover open
15
lever
Feed pressure
16
adjuster lever
Separation pressure
17
adjuster knob
Side separator
18
height adjuster knob
19 Side guide Slide to match the width of the paper. 14
Side guide lever Adjusts the side guides to paper size.
20
Feed tray horizontal
21
registration adjuster
dial
22 Scanner unit Open to set the roll master.
21
to be removed. And then LED lights up.
Press to open the master cover. Used when replacing the
master, etc.
Adjusts paper feed pressure according to paper thickness. 15
Adjusts separation pressure according to paper thickness. 15
Adjusts side separator height according to paper thickness.
Use to adjust the print position (horizontal). 47
Ink pack
14
172,
189
167,
192
15
14
167,192,
193
3
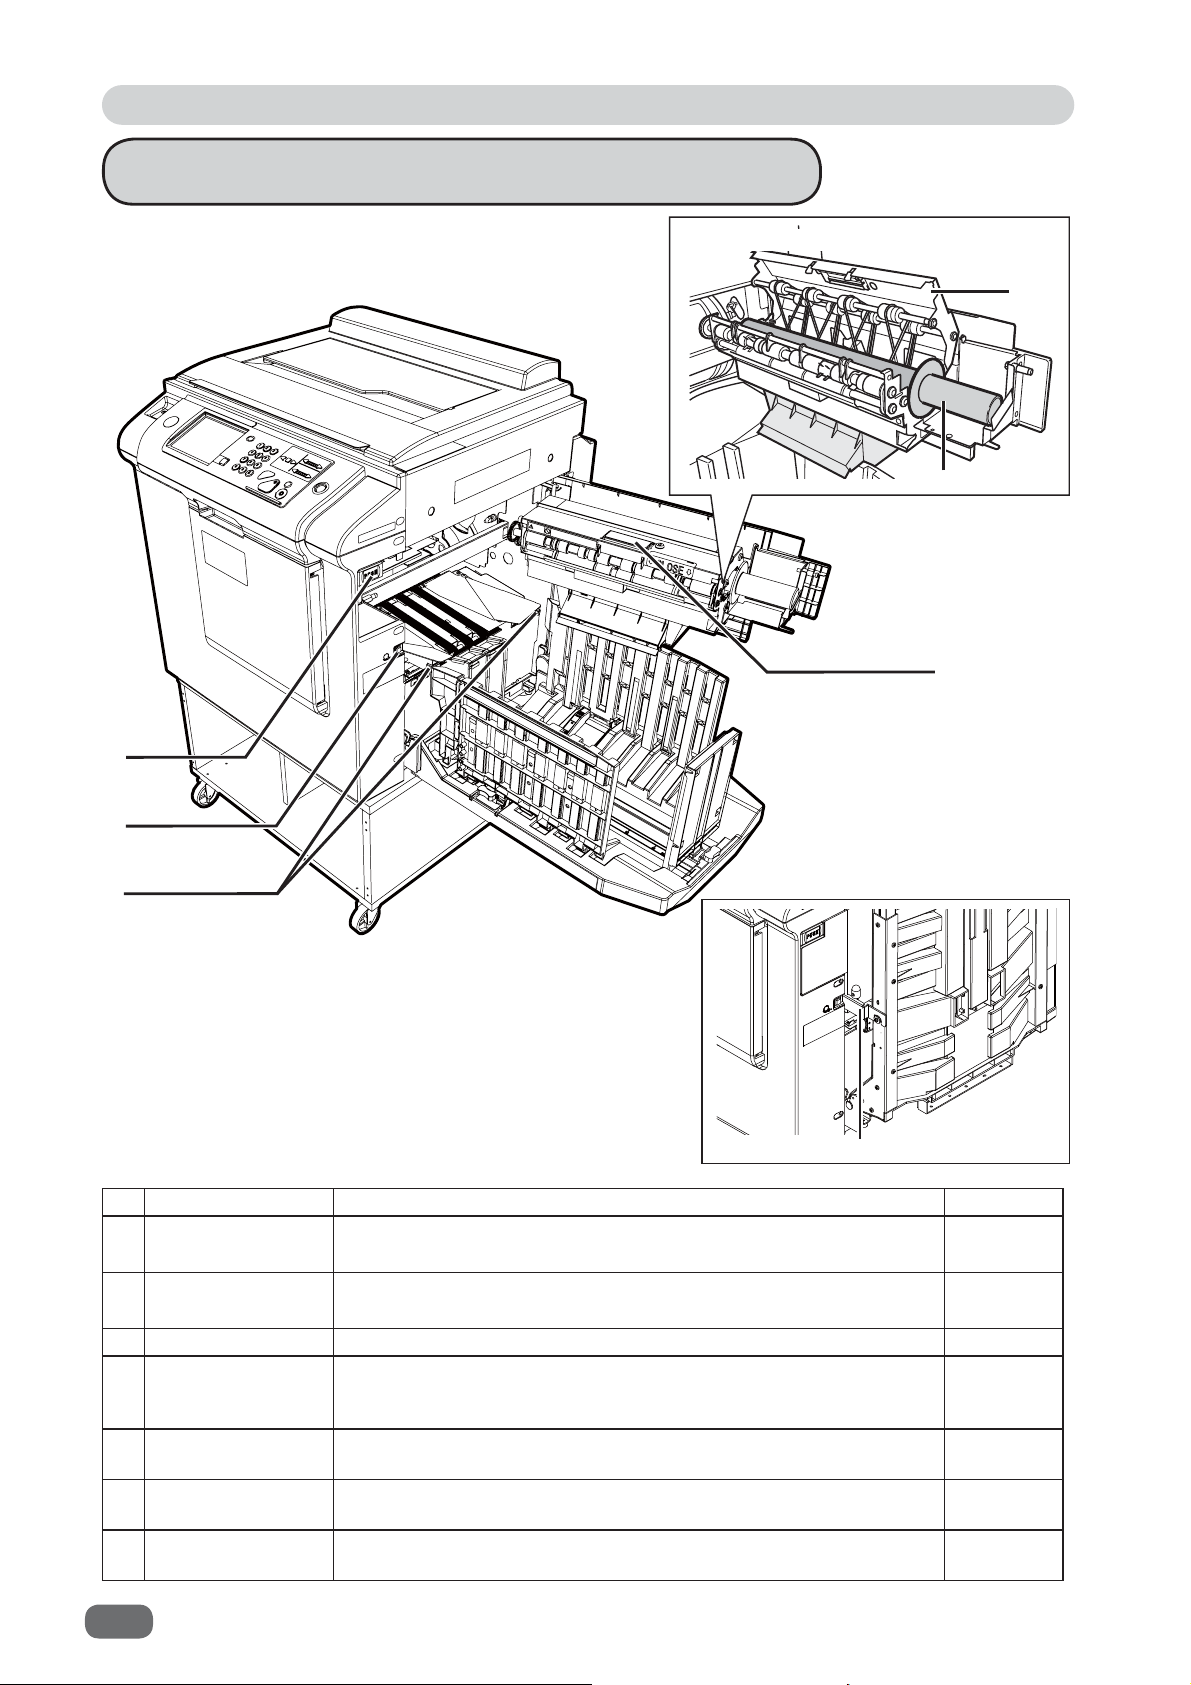
Part Names and Their Functions
Outside/Inside of Print Output Side
Master ejection section
28
27
26
23
24
25
29
No. Name Function Reference
Master ejection
23
box open button
24 Paper eject switch
25 J ump plate lever Slide to match the size of printed paper. 18
Master ejection
26
box cover open
lever
Master ejection
27
core
Master ejection
28
box cover
Print tray lock
29
lever
Press to open the master ejection box.
Press and hold to rotate the drum for the set time.
Use to remove paper jams, etc.
Press to open the master ejection box cover.
Use when disposing of used master, etc.
Use when disposing of used master. 170
Open when disposing of used master. 170
Locked when closing the print tray. 17
170,
186, 187
185,
186, 187
170
4
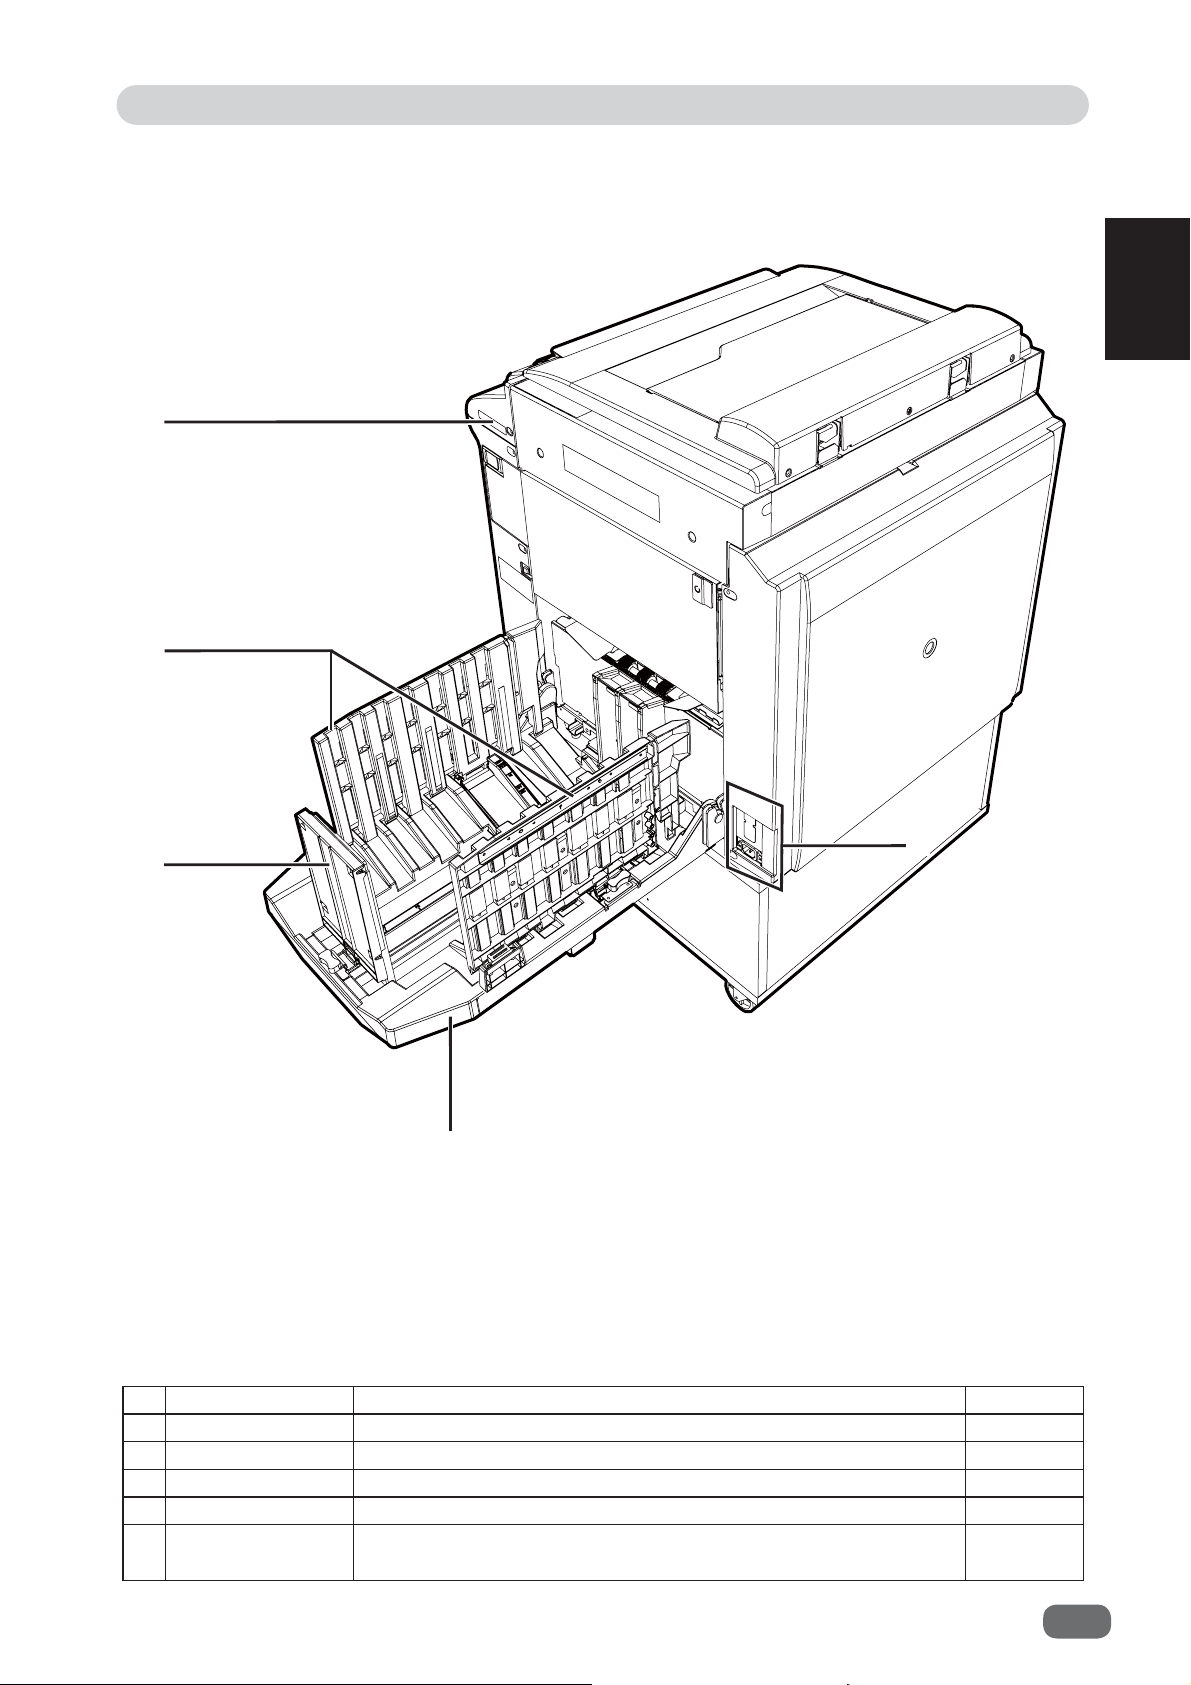
30
31
Part Names and Their Functions
1
1
Before Use
32
33
No. Name Function Reference
30 Key card slot Slot a key card. *It varies by confi guration. -
31 Side fence Slide to match the size of printed paper. 17
32 Paper stopper Slide to match the size of printed paper. 17
33 Print tray Holds printed papers. 17
Connectors
34
(Optional)
Use to connect options. -
34
5
Part Names and Their Functions
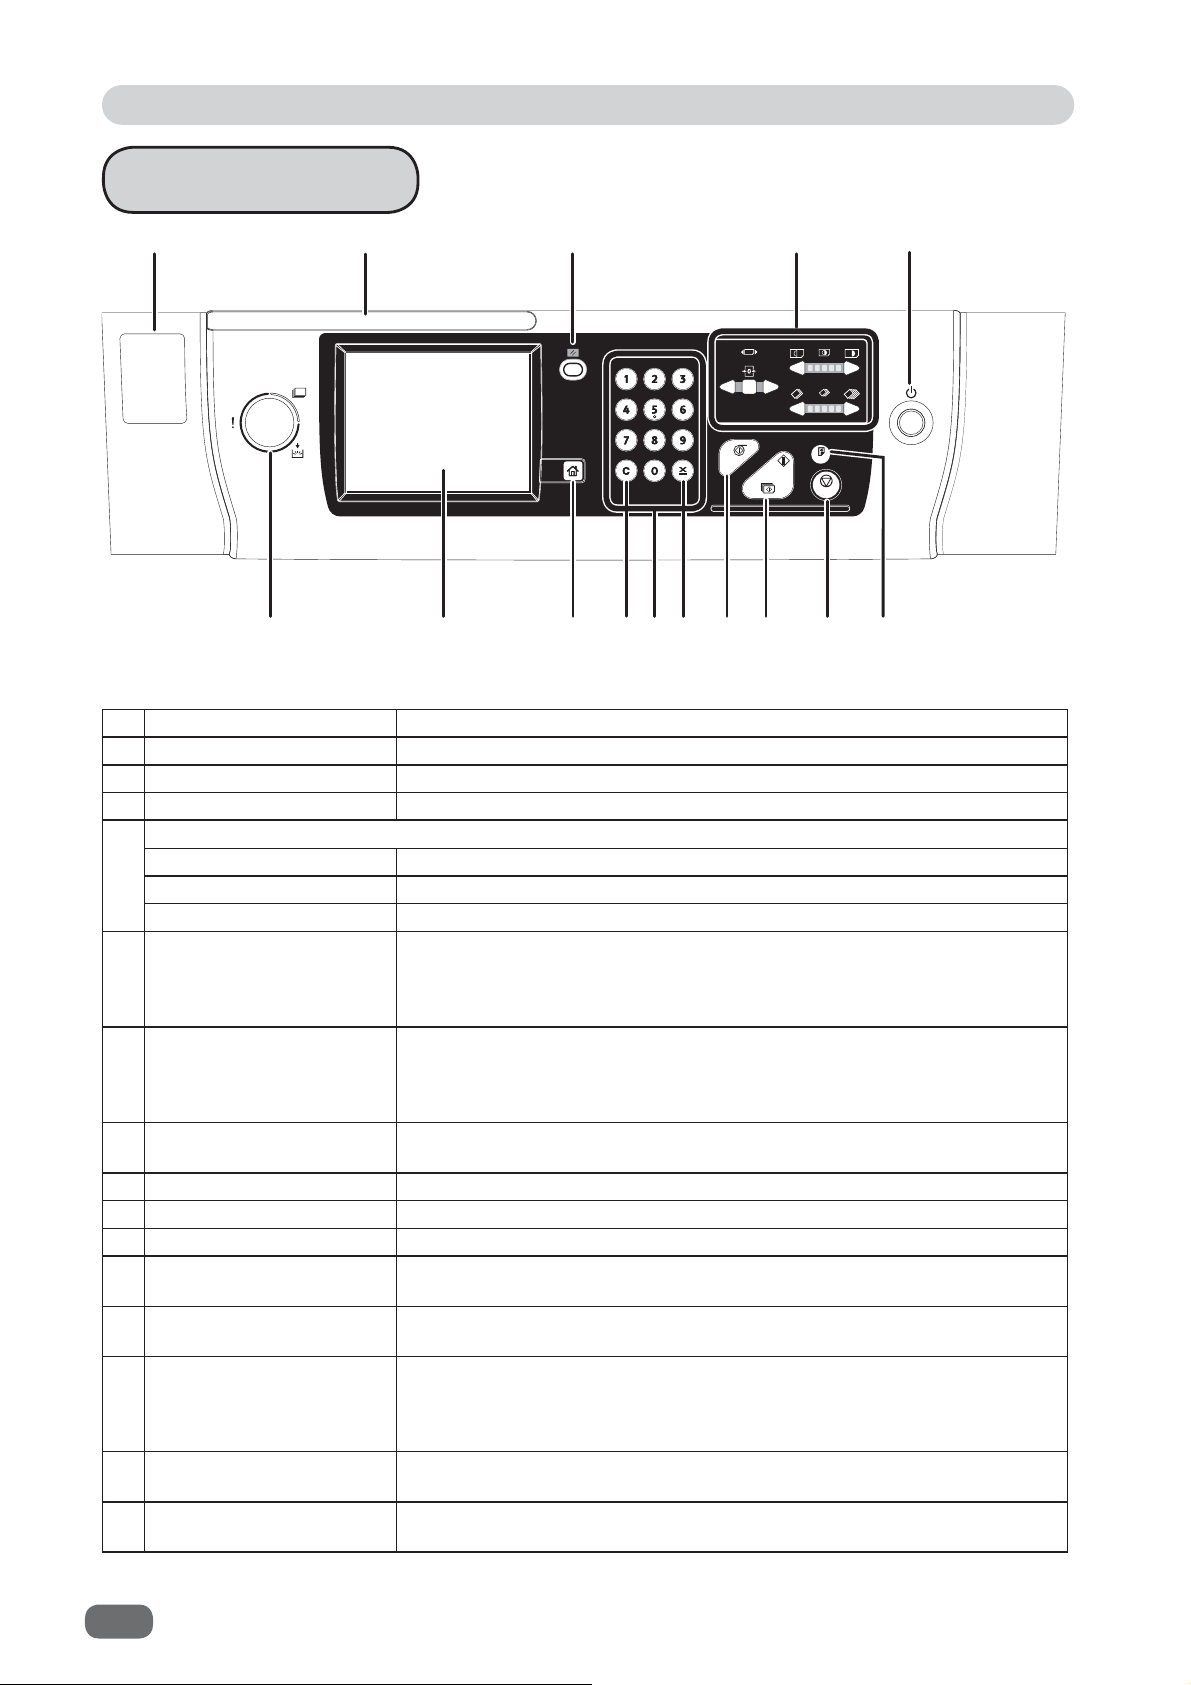
Control Panel
1
6
2
789101112131415
3
4
5
No. Name Function
1 Clip holder
2 Pen holder
3 RESET key
Holds clips.
Hold a pen.
Returns setting to standard mode. Setting not stored is cleared.
4 Control keys
PRINT DARKNESS keys
Controls print darkness.
PRINT POSITION keys Controls print position (horizontal).
PRINT SPEED keys Controls print speed.
5 Power switch Press to turn the power ON and OFF.
The power switch lamp lights up when the power is ON, goes out
when it is OFF, and blinks when the machine is in energy save
mode.
6 LAMP Blue (lights up): Operating
Whole LAMP is blinking in red.: Error message is displayed.
Lower part of LAMP is blinking in red.: Message replacing
consumables is displayed.
7 LCD (touch panel) Displays current settings such as number of printed sheet.
Touch to change settings. Displays error messages in case of error.
8 HOME key The main screen will be displayed when this key is pressed.
9 CLEAR key Returns the number of prints and the entered values to 0.
10 NUMERIC keys Enters the number of prints.
×
11
=
key
Enters the number of prints and sets in batch printing/sequential
batch print.
12 MASTER MAKING key Starts making a master. Master making cannot be performed during
printing. Clear the number of prints before master making.
13 PRINT key
Starts printing. Master making is not performed. Printing cannot start
when the light of the START key is red (When confi dential function is
set, when a master is not set on the drum, when error is displayed,
when the number of prints is not entered.)
14 STOP key Stops printing. When this key is pressed during making a master,
the machine stops after making a master.
TEST PRINT key
15
Prints 1 copy to check the image position and density. The machine
keeps printing while this key is pressed.
6
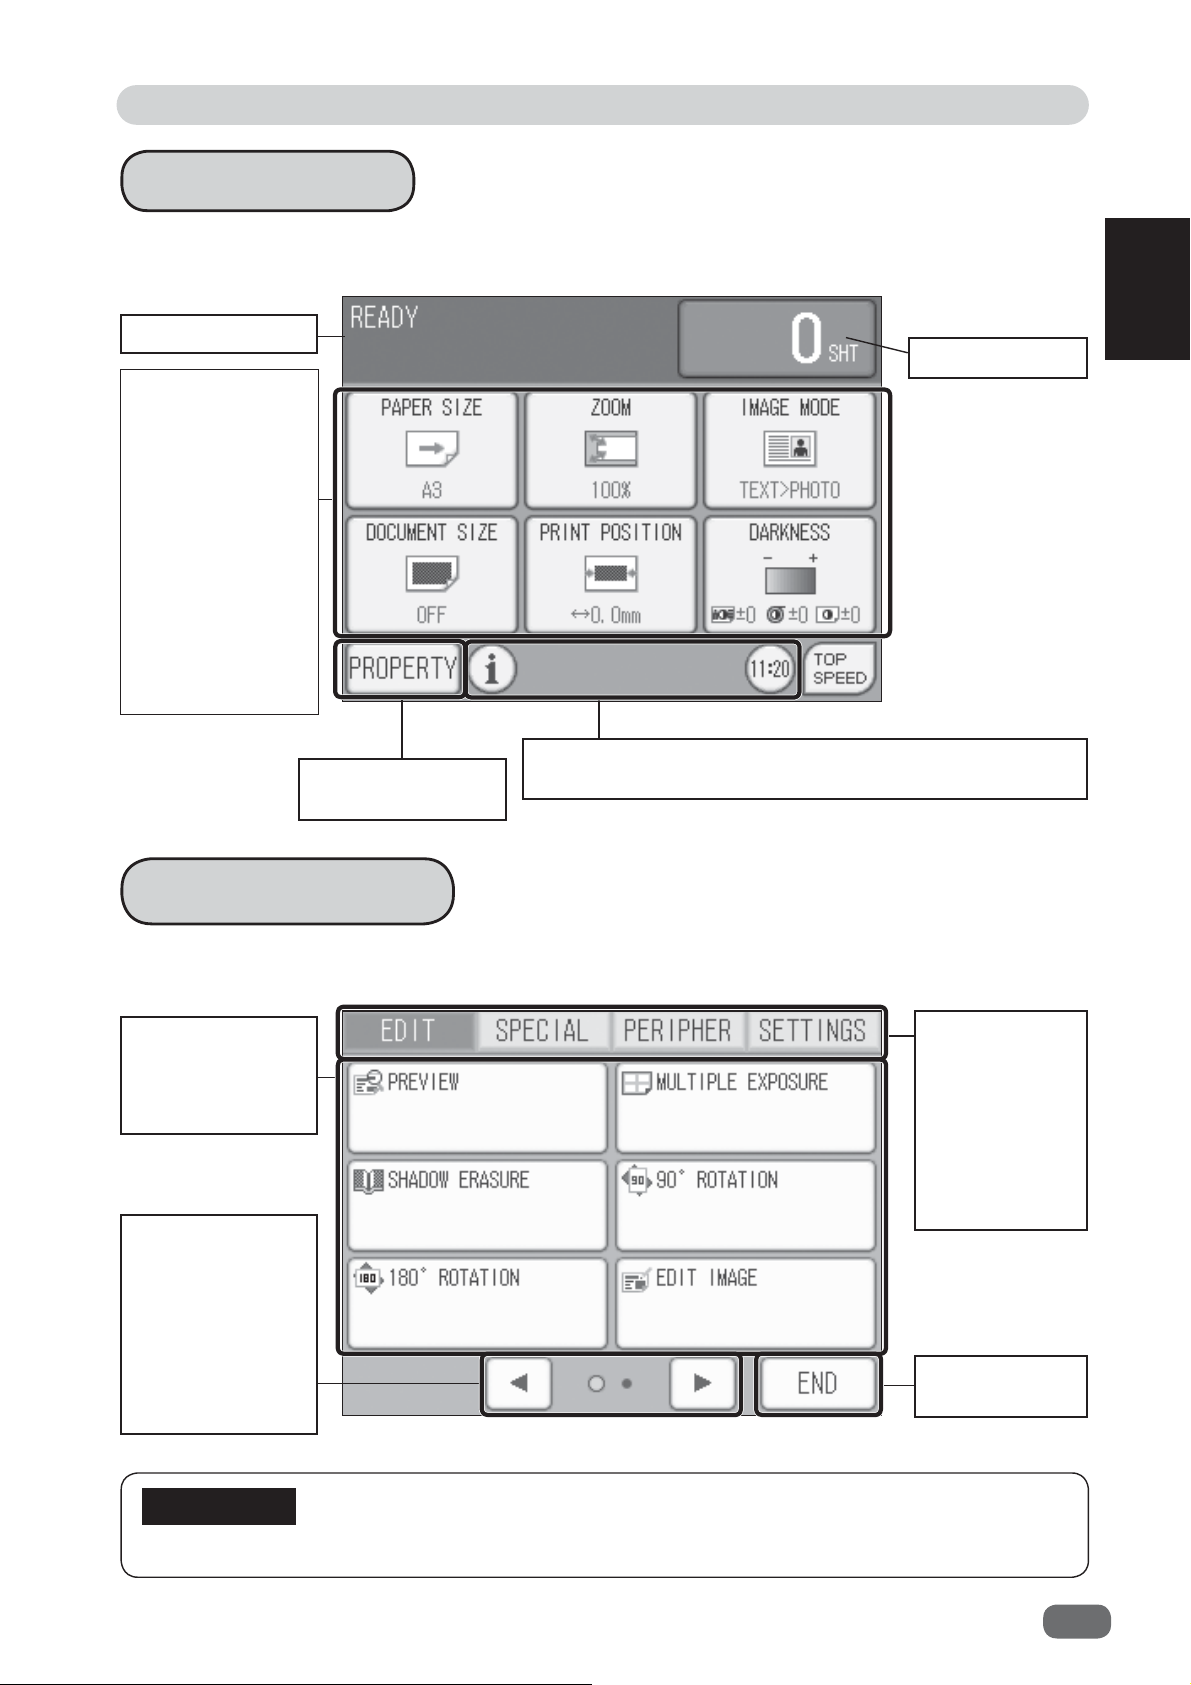
Part Names and Their Functions
Main Screen
● The operation status or messages appear on the touch panel LCD.
Message appears.
The current
setting of PAPER
SIZE, ZOOM,
IMAGE MODE,
DOCUMENT
SIZE, and
DARKNESS is
displayed with
an icon and
characters.
PRINT POSITION
is displayed with
numbers.
Number of prints
1
1
Before Use
● When shortcut is set, the set function icon is displayed.
Touch when you set
various functions.
● When function is set, the set function icon is displayed.
Setting Screen
● When you touch PROPERTY on the main screen, the setting screen appears.
Various functions
are displayed.
Touch a function
to set.
● When you touch
the button, the
page switches.
● The number of
pages of each
tab and page
position are
shown.
When you touch
each tab (EDIT,
SPECIAL,
PERIPHER,
SETTINGS),
the screen of
the selected tab
appears.
The main screen
reappears.
IMPORTANT
DO NOT PRESS the touch panel LCD and buttons strongly.
7
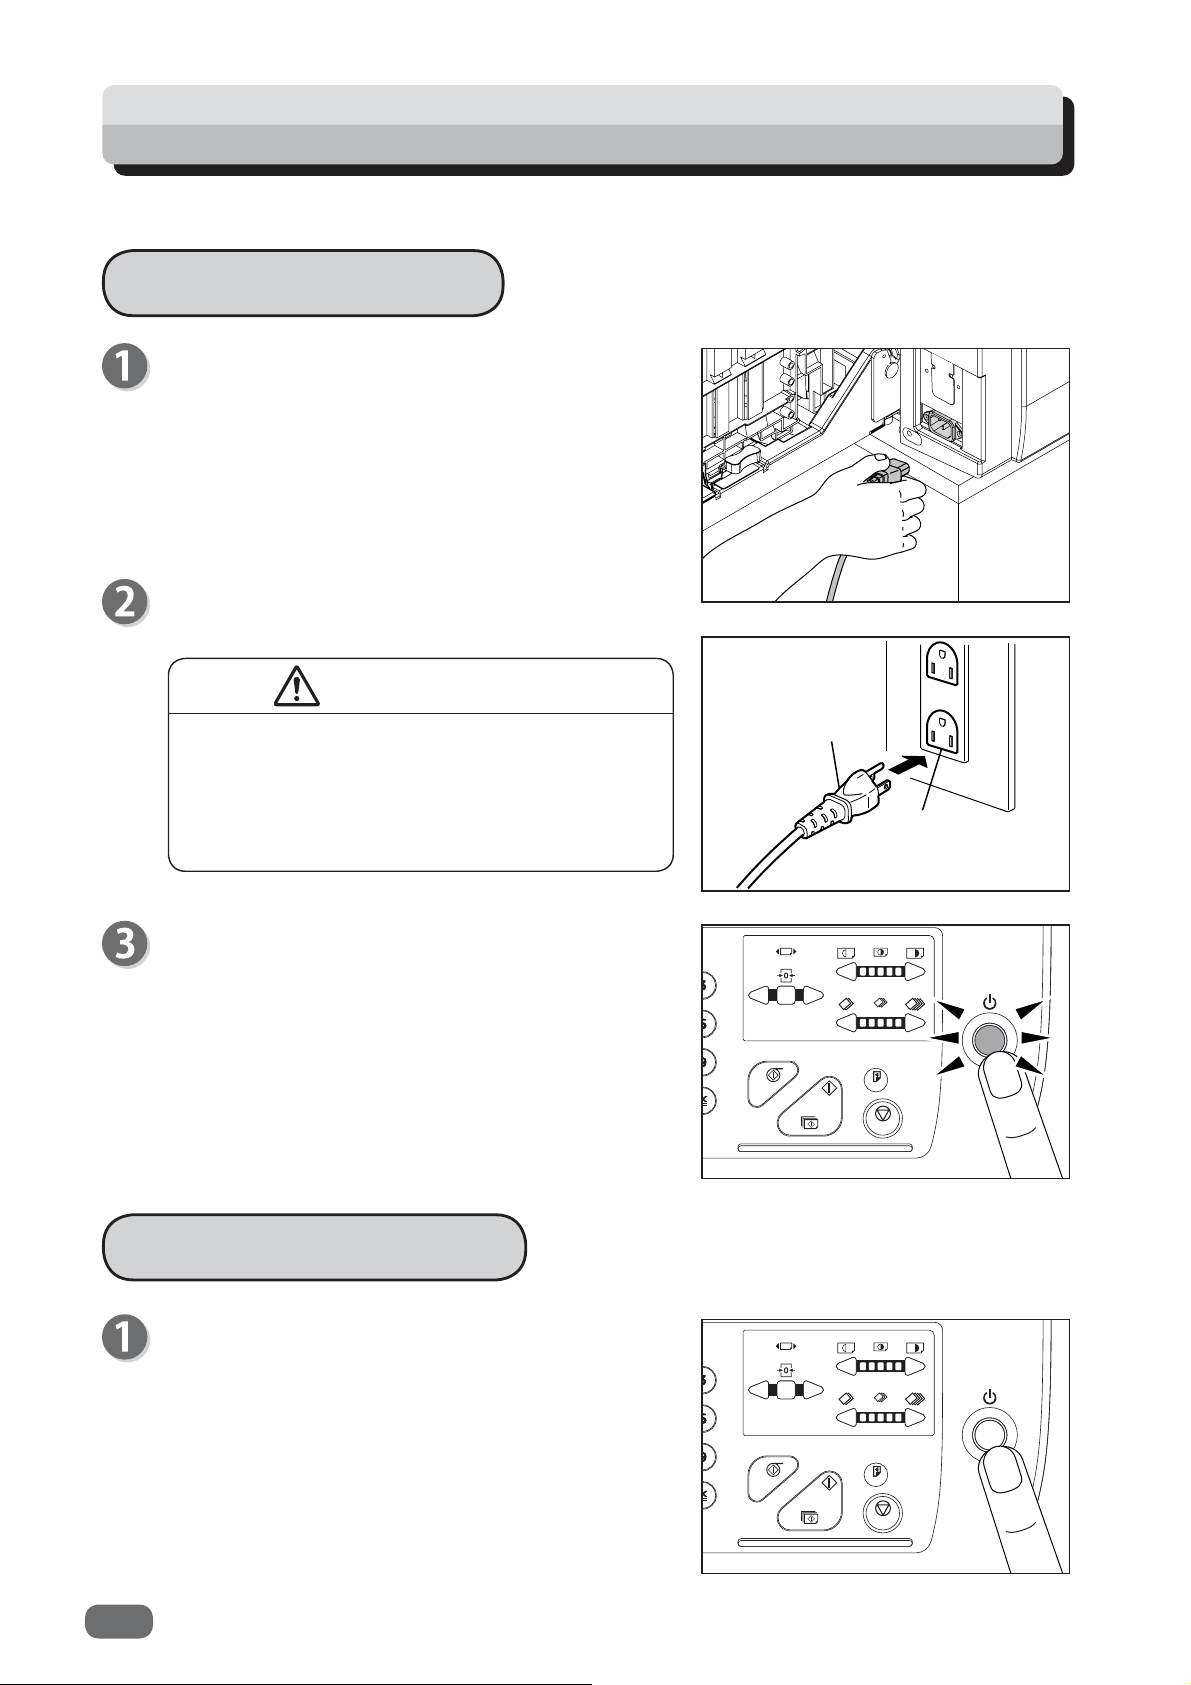
Turning Power ON/OFF
The following describes how to turn the power ON and OFF.
Turning Power ON
Connect the “female plug” of the power cord to the
“inlet”.
Connect the “male plug” of the power cord to the
“outlet”.
CAUTION
● Insert the power cord plug fi rmly into the
socket, so that proper electrical contact
is effected. If grounding is imperfect and
electrical leakage occurs, fi re or electric
shock could result.
Press the power switch on the control panel.
Warm-up starts.
The printer is ready when the main screen appears
on the touch panel LCD.
“Standard Mode” is set for each function.
(“Standard Mode” → see p.9)
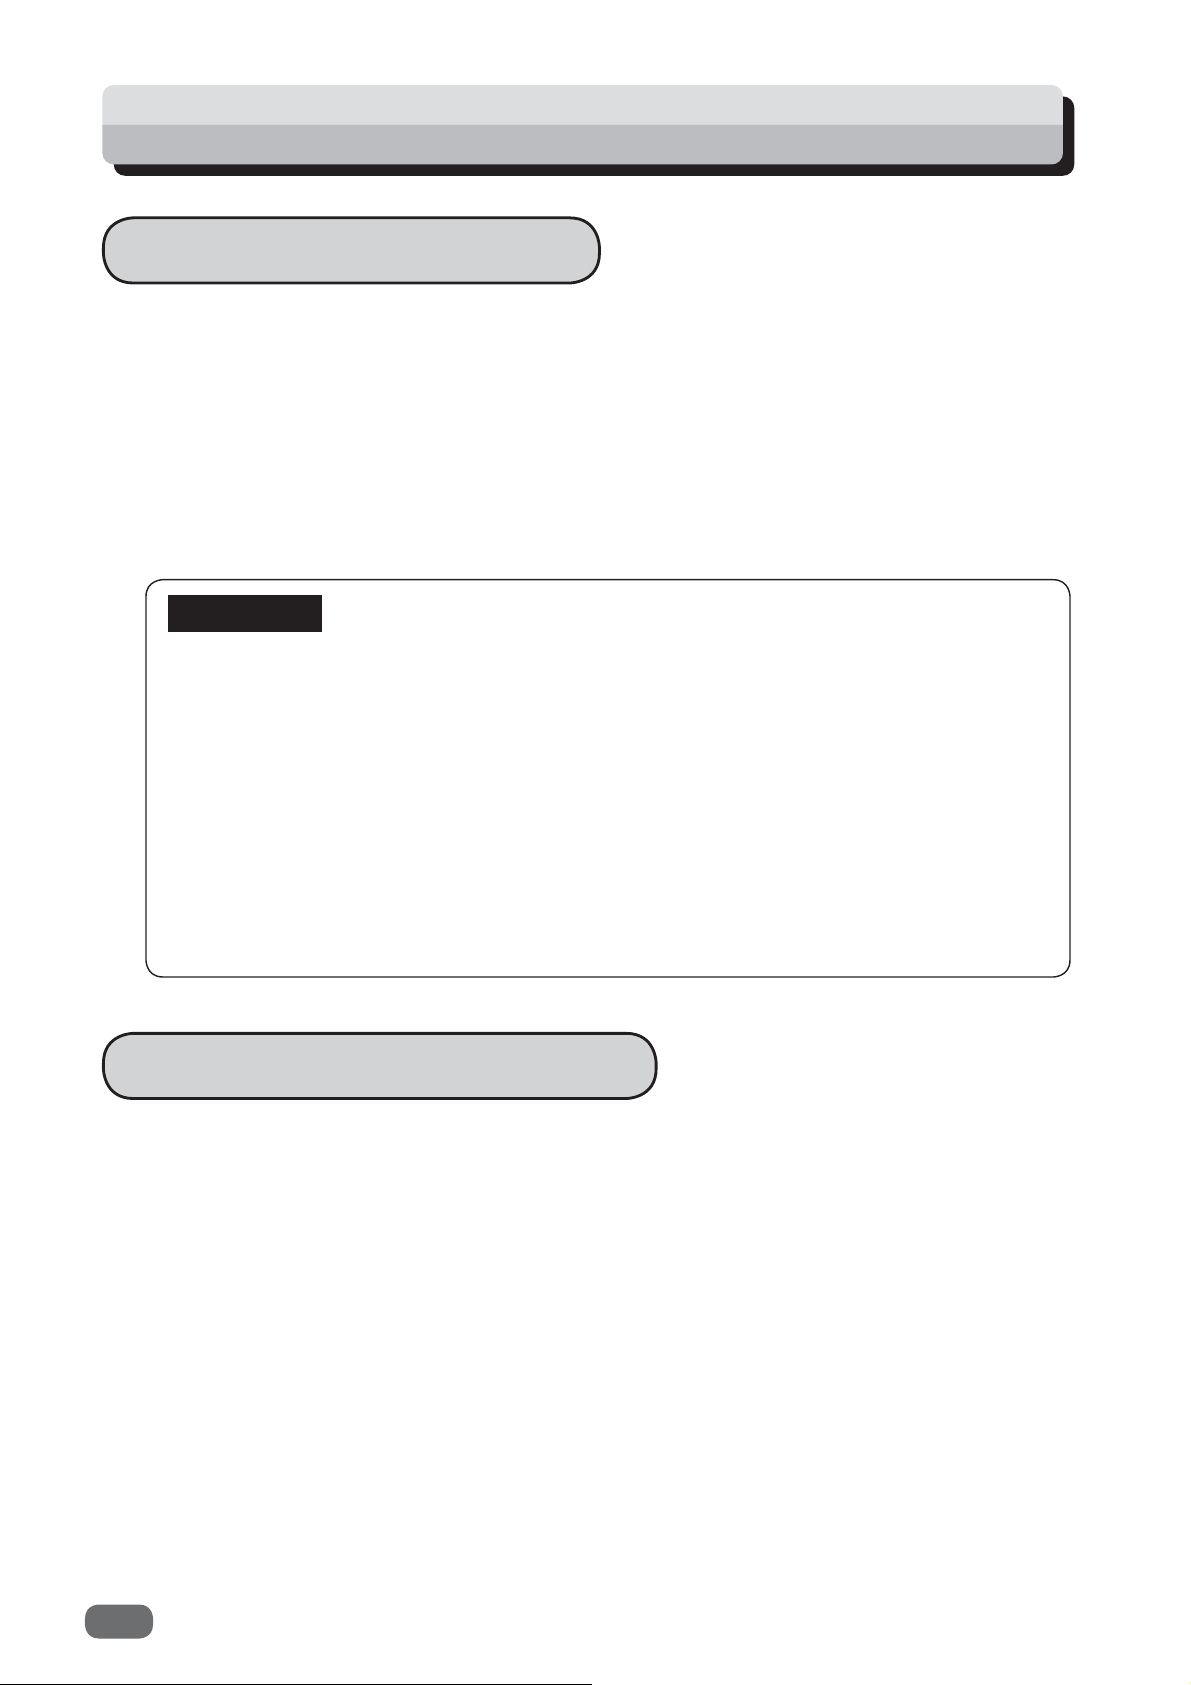
Turning Power OFF
Male plug of
the power
supply cord
Outlet
Press the power switch on the control panel.
The printer is turned off and the power switch light
goes out.
8

Turning Power ON/OFF
Standard Mode
When the power is turned ON or the RESET key is pressed, the functions are set to Standard
Mode.
Standard Mode settings are as follows:
If default settings are changed, the settings are the changed ones.
Print quantity : 0
Paper size : A3
Zoom : 100%
Master darkness : ±0
Scan darkness : ±0
Image mode : TEXT
Document size : Off
Print position : 0.0 mm
Print darkness : ±0
Print speed : Speed 3
Ink saving mode : OFF
1
1
Before Use
9
Document/Printing Paper Specifi cations
Acceptable Documents
● Exposure glass
Documents and books not exceeding 10 kg
Document Size: 297×432 mm (max.)
● Automatic document feeder (ADF) (optional)
Document weight: 64–28 gsm
Document size : 297×432 mm (max.)
100×148 mm (min.)
Stacking capacity in document tray: 100 sheets (64 gsm), 85 sheets (80 gsm/20 lb Bond)
IMPORTANT
● The following types of document cannot be used :
* Documents with large fi le-binding holes
* Documents with staples or paper clips attached
* Documents with markedly curling ends/sides, or marked folds
* Documents with tears or rough edge
* Chemically treated documents with such as thermal paper and carbon paper, etc.
* Highly transparent documents such as OHP fi lm and tracing paper, etc.
* Documents which surface is slippery such as art paper and coated paper, etc.
* Documents with correction fl uid and glue, etc.
* Documents with smaller pieces of glued paper
● Always use documents of the same size. If you load documents in different length, the
printer may not operate correctly.
Acceptable Printing Paper
● Acceptable printing paper and capacity on the feed tray and print tray
Paper weight : 45–210 gsm (12 lb Bond–110 lb Index)
Paper size : 320×450 mm (max.)
100×150 mm (min.)
Paper stacking capacity : Feed tray : 1,500 sheets (64 gsm), 1,280 sheets (20 lb Bond)
1,200 sheets (80 gsm)
Print tray : 1,500 sheets (64 gsm), 1,280 sheets (20 lb Bond)
1,200 sheets (80 gsm)
* 1500 sheets may not be loaded depending on paper condition such as paper type, etc.
* Recycled paper of 100% recycled pulp with different basis weight can be used.
* Some types of envelope cannot be used.
10

Document / Printing Paper Specifi cations
IMPORTANT
The following types of paper cannot be used.
* Paper with large fi le-binding holes
* Paper with staples or paper clips attached
* Paper with markedly curling ends/sides, or marked folds
* Paper with tears or rough edge
* Chemically treated paper with such as thermal paper, carbon paper, and stickers, etc.
* Highly transparent paper such as OHP fi lm and tracing paper, etc.
* Paper with correction fl uid and glue, etc.
* Paper with smaller pieces of glued paper
1
1
Before Use
11

Chapter
2
Basic Operations
This chapter describes basic operations such as basic printing, how to set a
document and how to enlarge/reduce the size of copy, etc.
Preparing for Printing
How to Set Papers
When no heavy weight paper is fed or two sheets of light weight paper are fed
How to Supply or Replace Paper While Printing
How to Set the Print Tray
How to Set the Jump Plates
Loading Documents
How to Load Document
How to Load Document on the Exposure Glass
Loading Document in Automatic Document Feeder (ADF)(Optional)
Basic Printing
Printing Using Basic Functions
Enlargement / Reduction
Enlargement and Reduction from Standard-Size Documents to Standard-Size Paper
Enlargement and Reduction from Standard-Size Documents to Standard-Size Paper
Selecting Printing Paper Size
Master Making Area by Paper Size [European]
How to Set Paper Size
Master Making Area by Paper Size [U.S.]
How to Set Paper Size
How to Set “CUSTOM” in Paper Size Setting
Print Speed Adjustment
Print Speed Adjustment
How to Adjust Print Speed
How to Set TOP SPEED
.......................................................................................................
...........................................................................................
...........................................................................................
..............................................
.................................................................................
.............................................................................
.............................................................................................
...................................................................................
..............................................
..............
........................................................................
.....................................................................................
..............................................................................
...............................................
.....................................................................................
........................................................
.....................................................................................
..................................................
.......................................................................................
...................................................................................
..............................................................................
..................................................................................
..
..
..
2
Basic Operations
14
14
15
16
17
18
19
19
19
20
22
22
24
24
25
26
26
26
27
27
28
29
29
29
30
Preparing for Printing
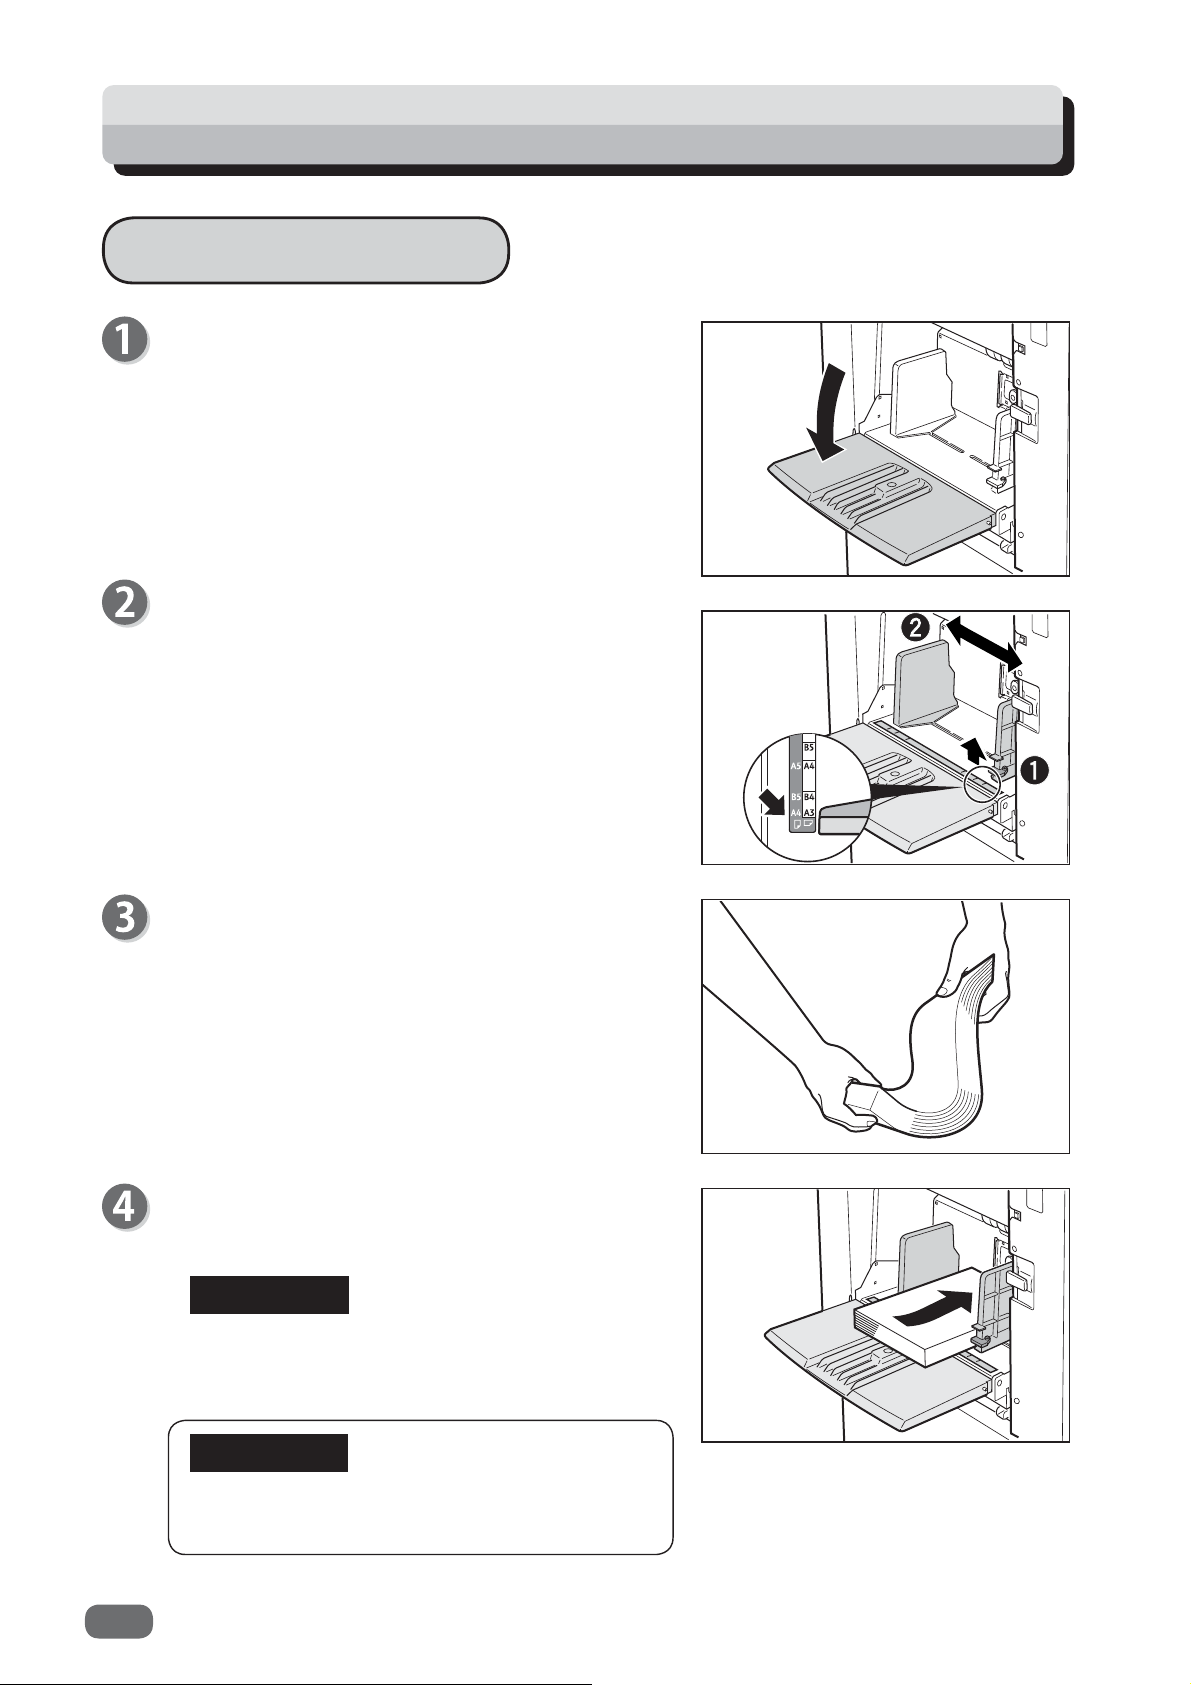
How to Set Papers
Open the “ support tray”.
Hold the “ side guide lever” and adjust the “ side
guide” according to the paper size.
Loosen sheets and align them.
Put the sheets between the “side guides” and push
them to the inside of the machine.
REFERENCE
B5
A5
A4
B4
A3 /A4
R
R
B5
/
14
About 1500 sheets of 64 gsm high-quality
paper can be loaded.
IMPORTANT
1,500 sheets may not be loaded depending on
paper conditions such as paper type, etc.
 Loading...