

Page 1
1
AL-C2 Training
Slide 1
D129/D130
Service Training
AL-C2
Version 1.01
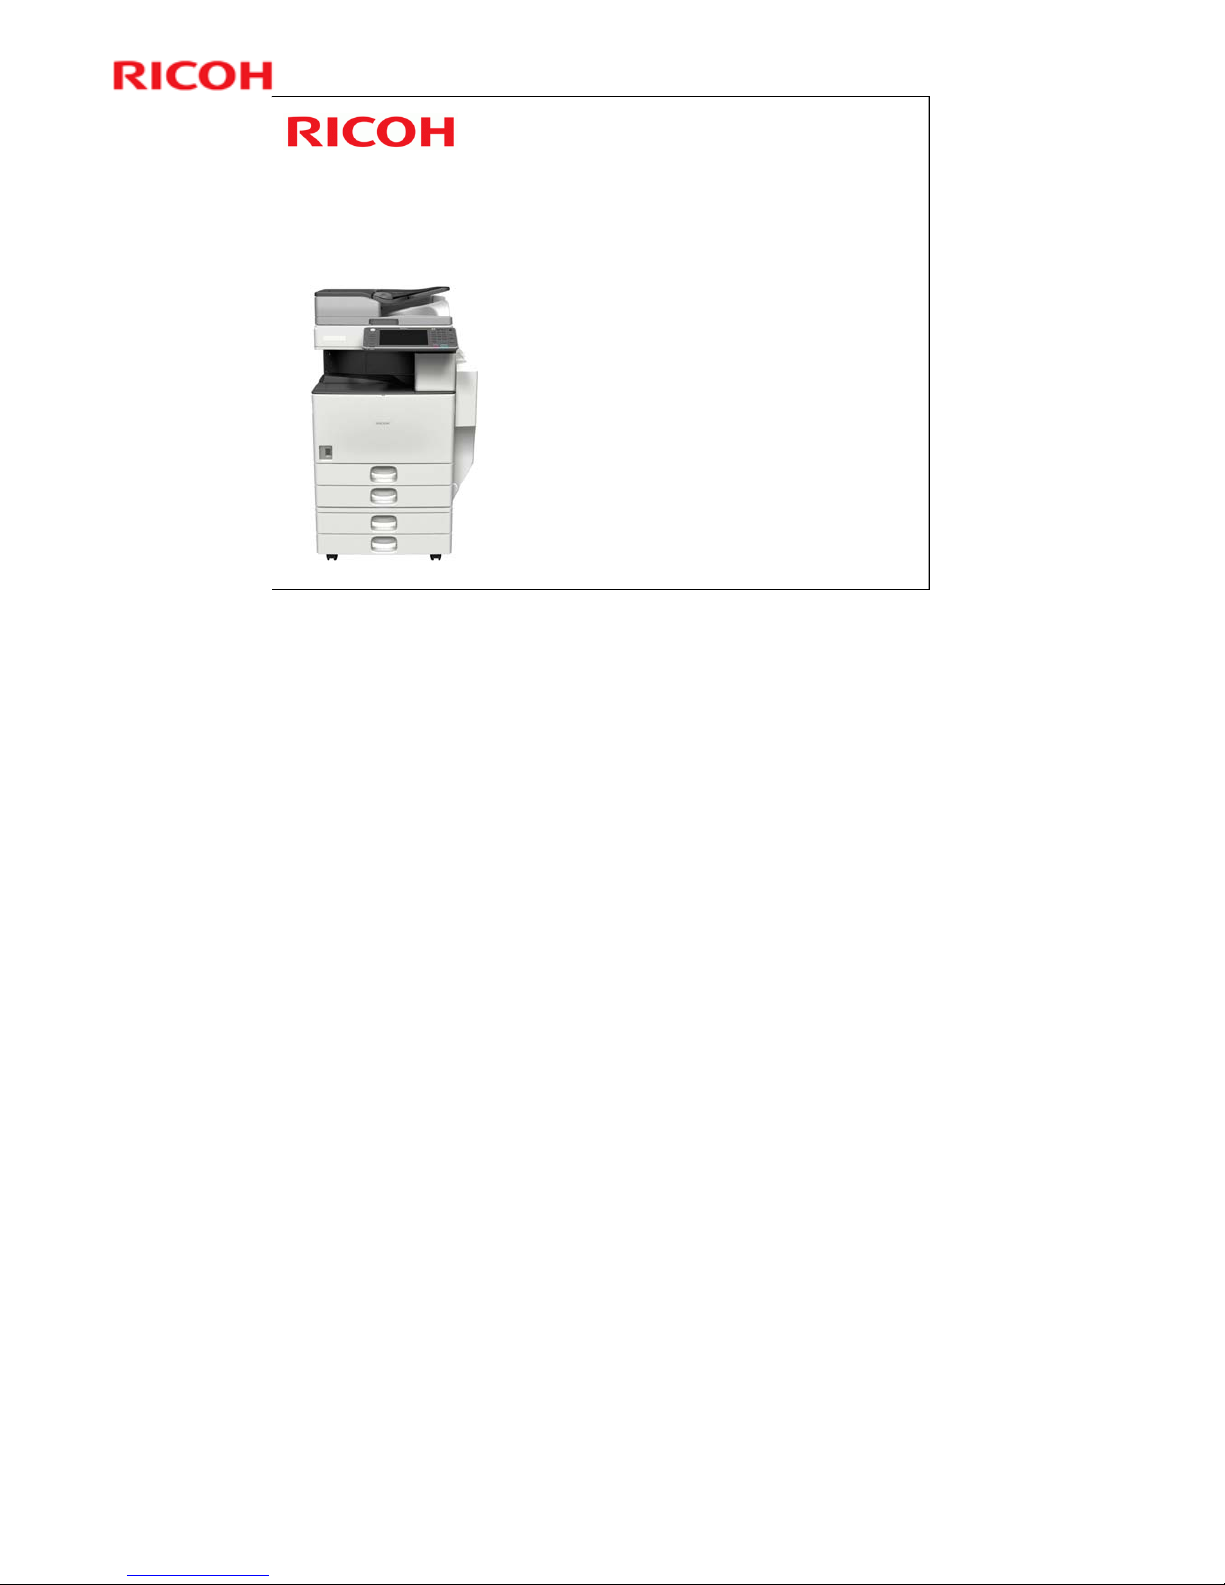
This training course provides service technician training for the AL-C2 series. It
only explains the differences from the AL-C1, so knowledge of that model is
required.
Version 1.01: Slide 12 (Copy Data Security Unit)
Page 2
2
AL-C2 Training
Slide 2
D129/D130
Service Training
Product Overview
This section provides an overview of the machine, and the options that can be
installed.
Page 3

3
AL-C2 Training
Slide 3
What Models are there in the Series?
AL-C2b (D129)
40 cpm
Available in a Basic model and an SP Model
» The basic model does not have a built-in hard disk or built-in
printer and scanner kits.
AL-C2c (D130)
50 cpm
Available in a Basic model and an SP Model
» The basic model does not have a built-in hard disk or built-in
printer and scanner kits.
All models contain a duplex unit and a bypass tray as
standard equipment.
ARDF
North America: All models have a built-in ARDF
Other regions: The ARDF is an option.
All models contain a color scanner.
Basic models can be upgraded to SP models.
No additional notes
Page 4
4
AL-C2 Training
Slide 4
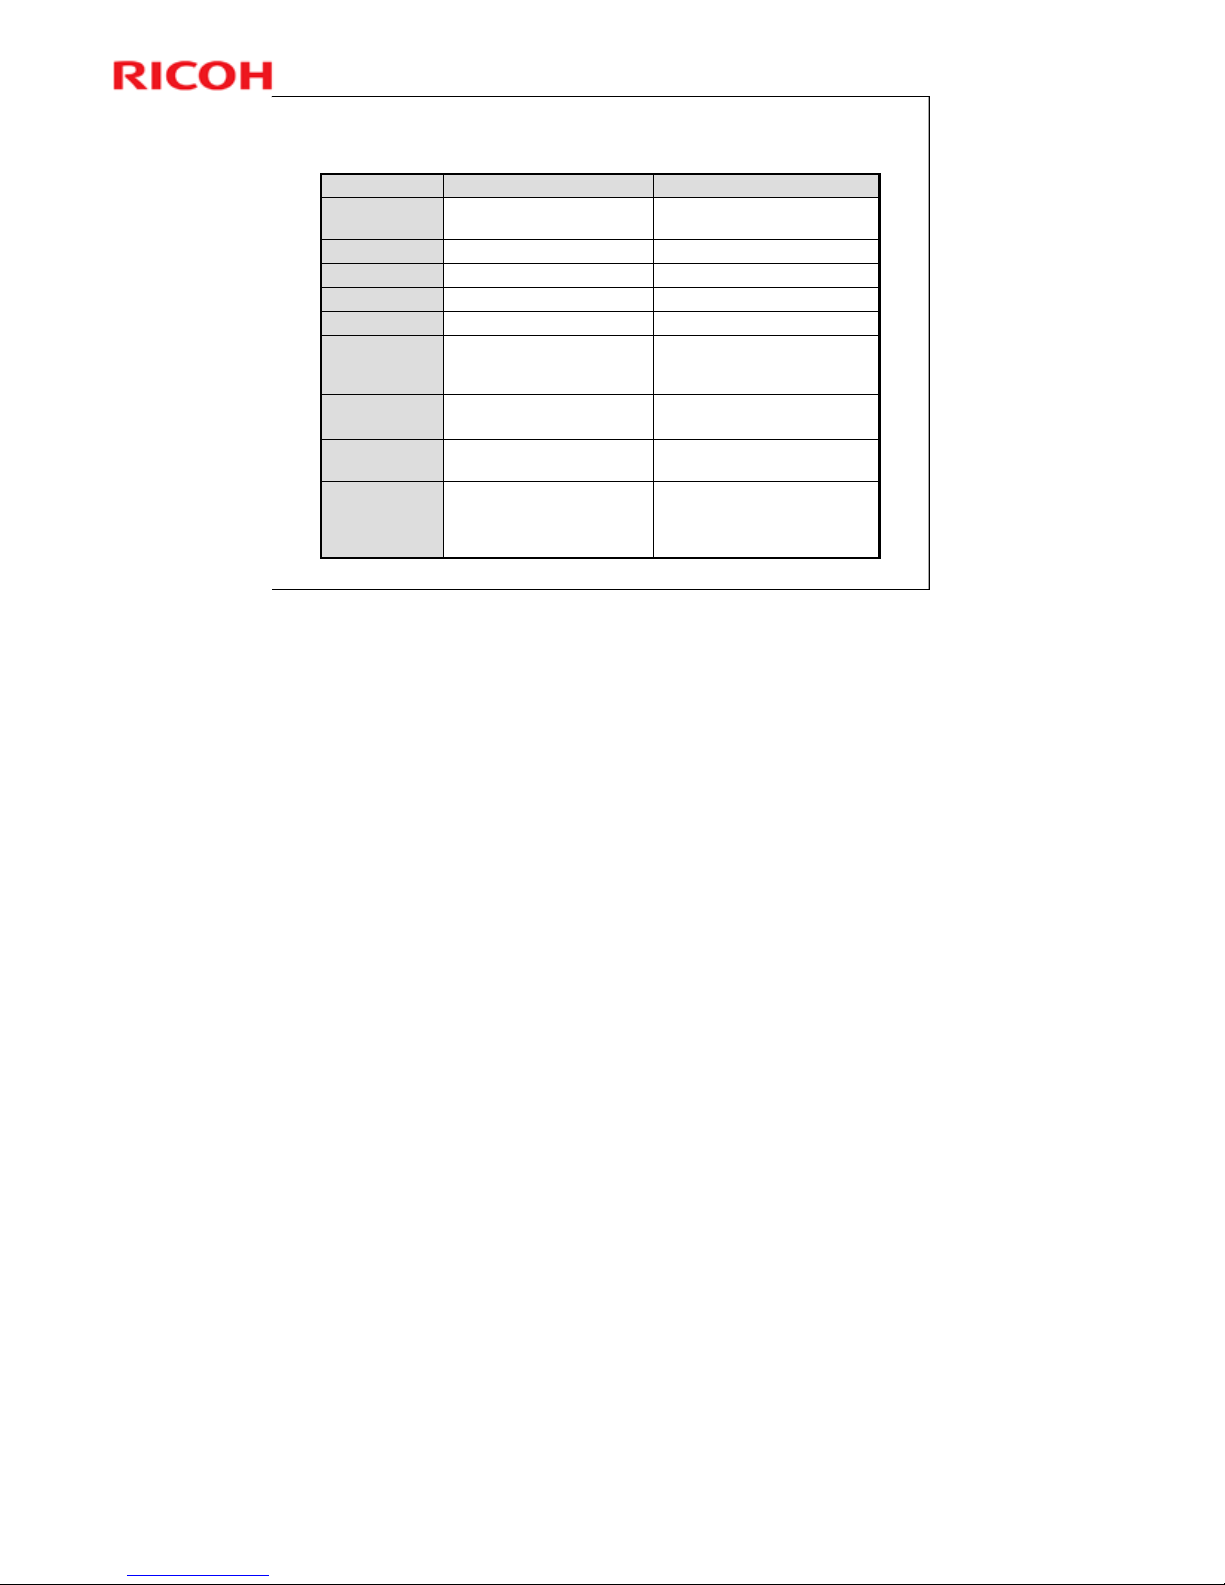
Differences between Basic and SP Models
StandardOptionalPDF direct
print
Standard; included on the
controller board
Standard; included on the
controller board
Data overwrite
security
1GB standard512MB standardMemory
160GB standardOptionalHDD
StandardOptionalVM card
StandardNot included; download from
web site after installing the
optional VM card
App2Me
Standard; included on the
controller board
Standard; included on the
controller board. Can be
activated after the optional
HDD is installed.
HDD
encryption
Copy, Printer (PCL), ScannerCopy (Printer and Scanner
are optional)
Function
Standard
Basic models
Standard
SP models
Duplex
Optional memory and hard disk
For a customer who has a basic model, install the optional HDD if the customer
wants to use the document box features.
When a customer wishes to upgrade a basic model with a printer/scanner or
printer enhance kit, the optional 512 MB must be installed.
Page 5
5
AL-C2 Training
Slide 5
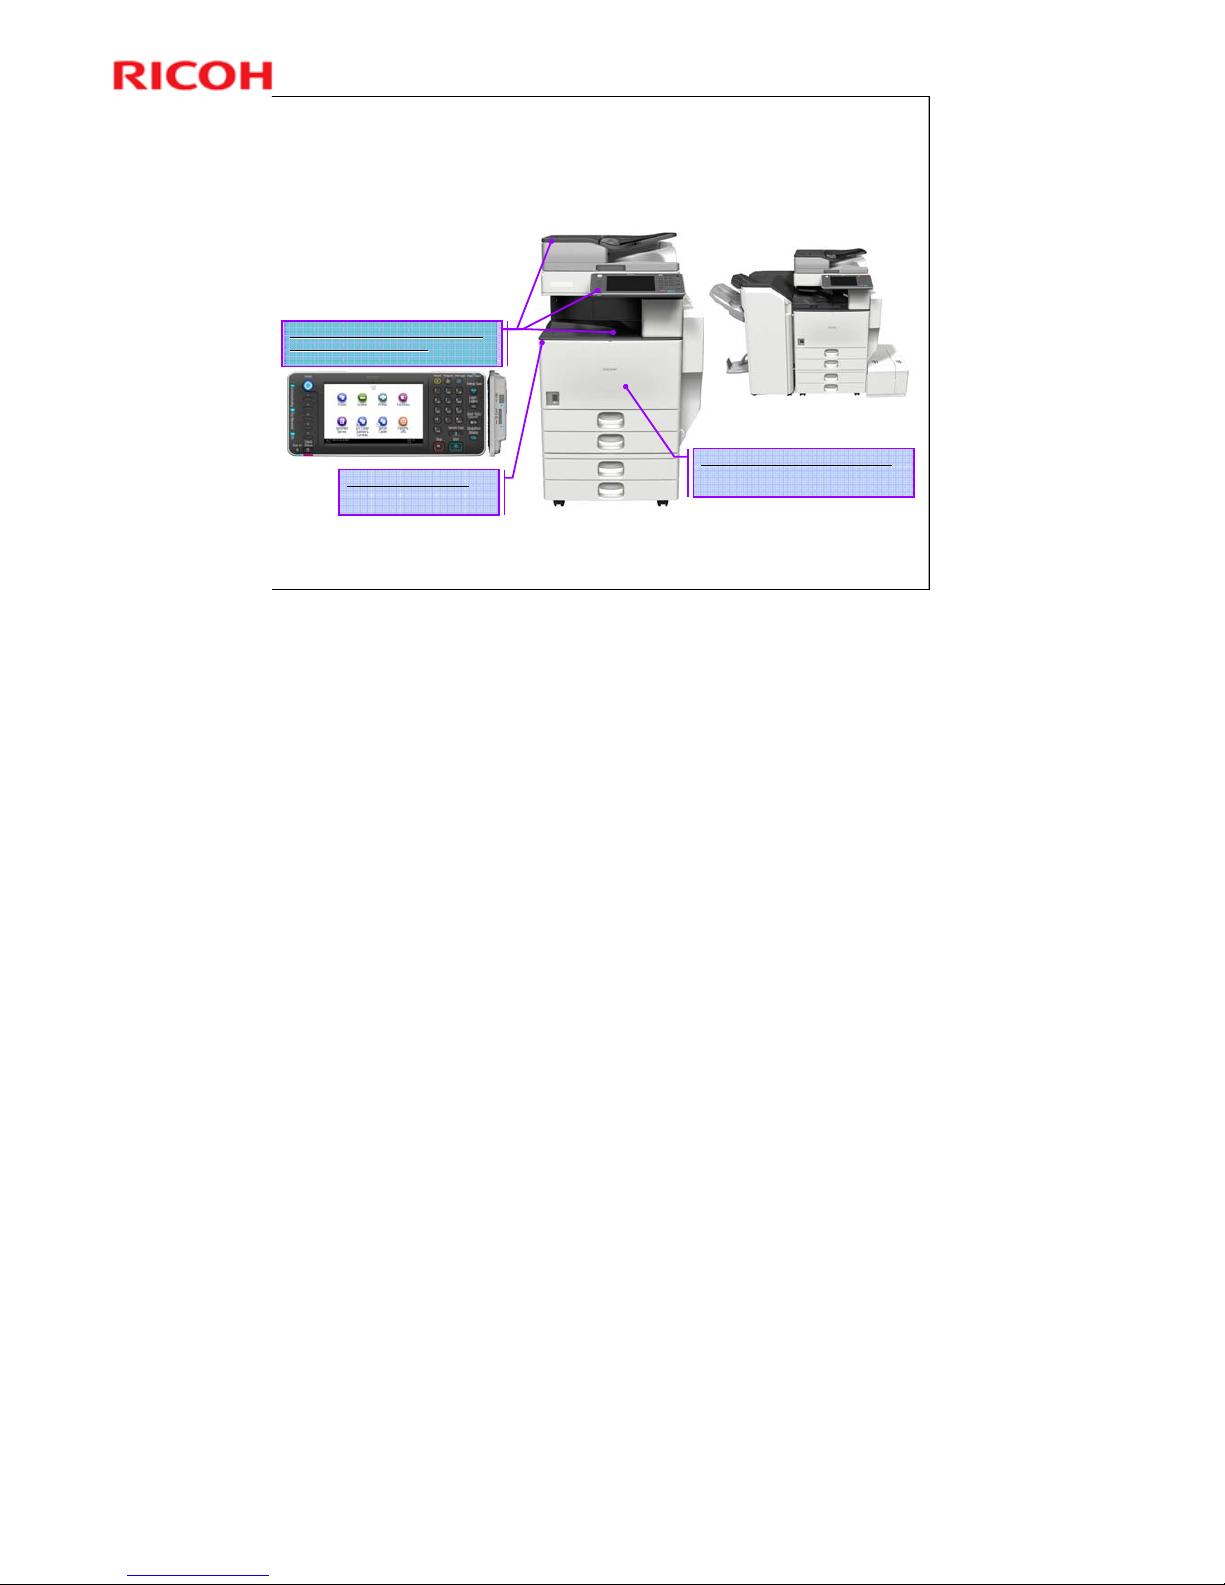
Appearance (1)
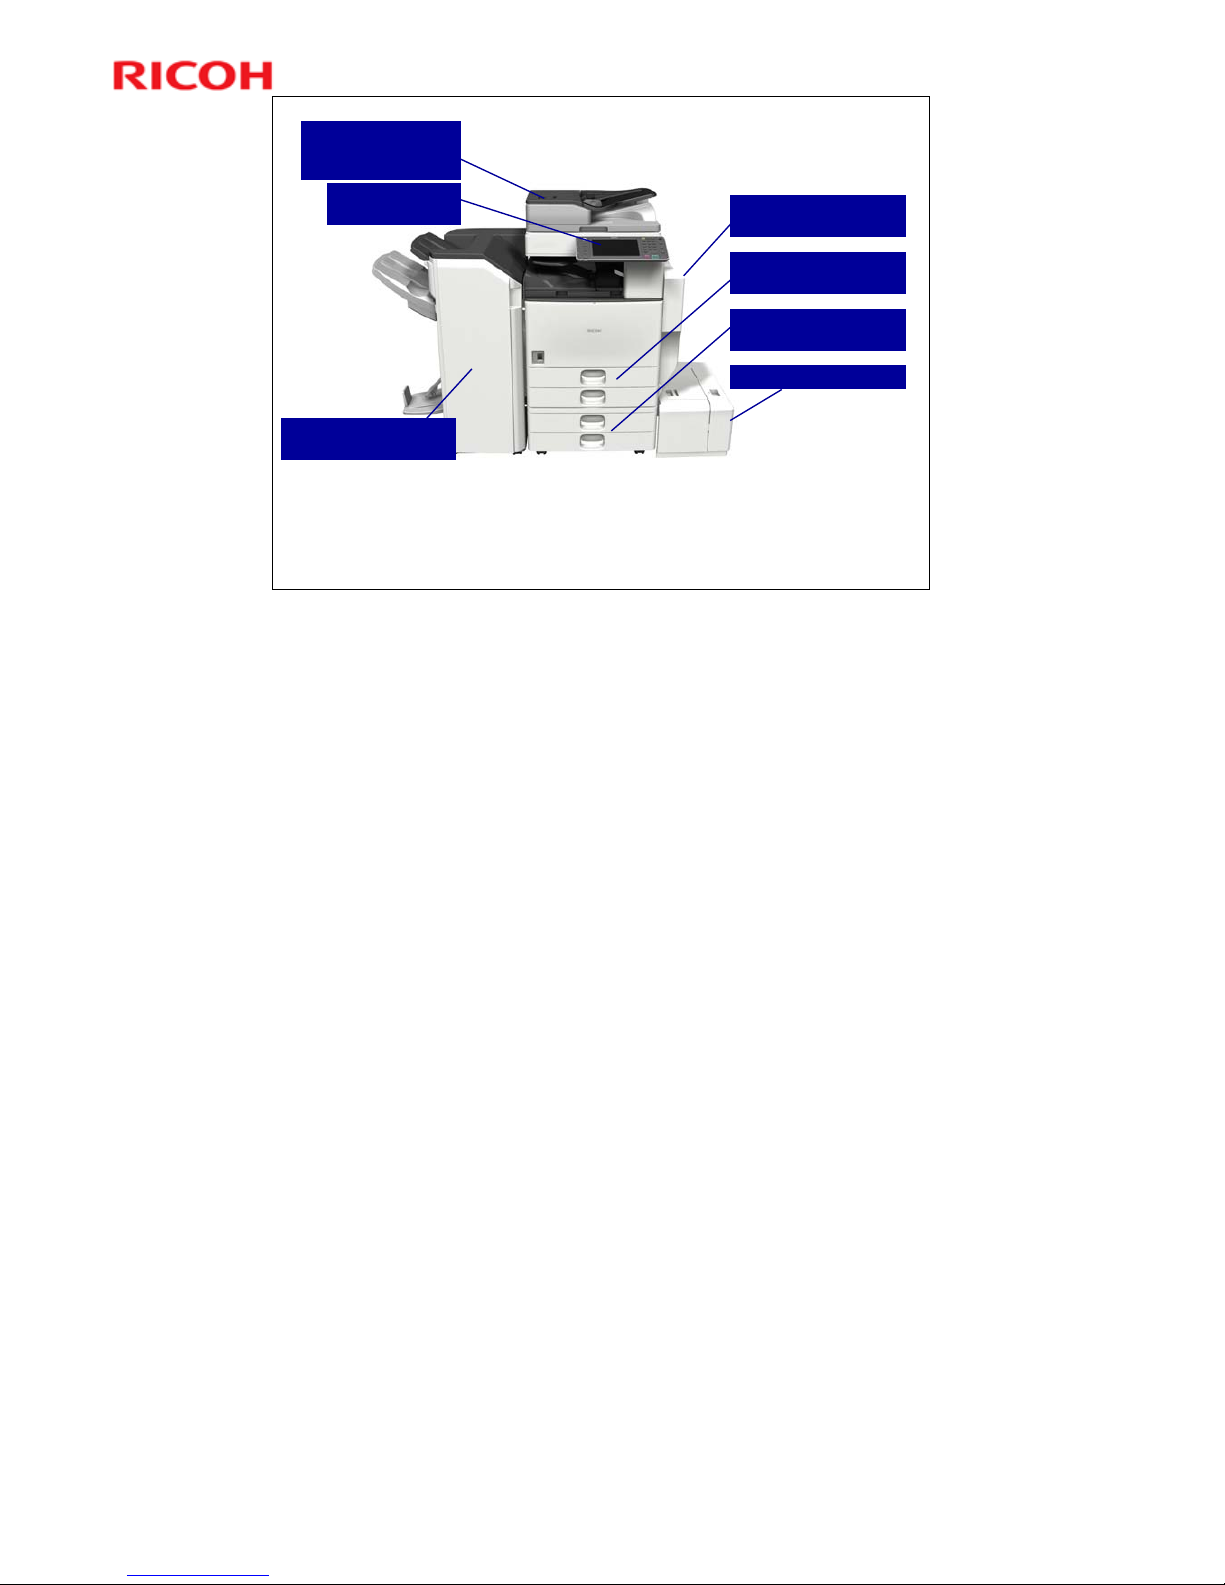
Either of the following paper tray options can be installed below the main unit.
Two-tray paper feed unit
Tandem LCT
If either of the above is installed, a 1200-sheet side LCT can also be installed.
A platen cover can be installed instead of the ARDF (exc ept for the NA version).
ARDF
NA: Standard
EU/AA/CHN: Option
Optional two-tray feed
unit
Two paper trays
are standard
Duplex and bypass are
standard
8.5-inch WVGA
Color LCD
Optional Side LCT
Optional Finisher
(three types available)
No additional notes
Page 6

6
AL-C2 Training
Slide 6
Appearance (2)
Three possible types of finisher
1000-sheet Finisher
2000-sheet Booklet Finisher
3000-sheet Finisher
Each finisher requires an optional bridge unit and either an optional
tandem LCT or two-tray paper feed unit.
1000-sheet Finisher
2000-sheet Booklet
Finisher
3000-sheet Finisher
No additional notes
Page 7
7
AL-C2 Training
Slide 7
Appearance (3)
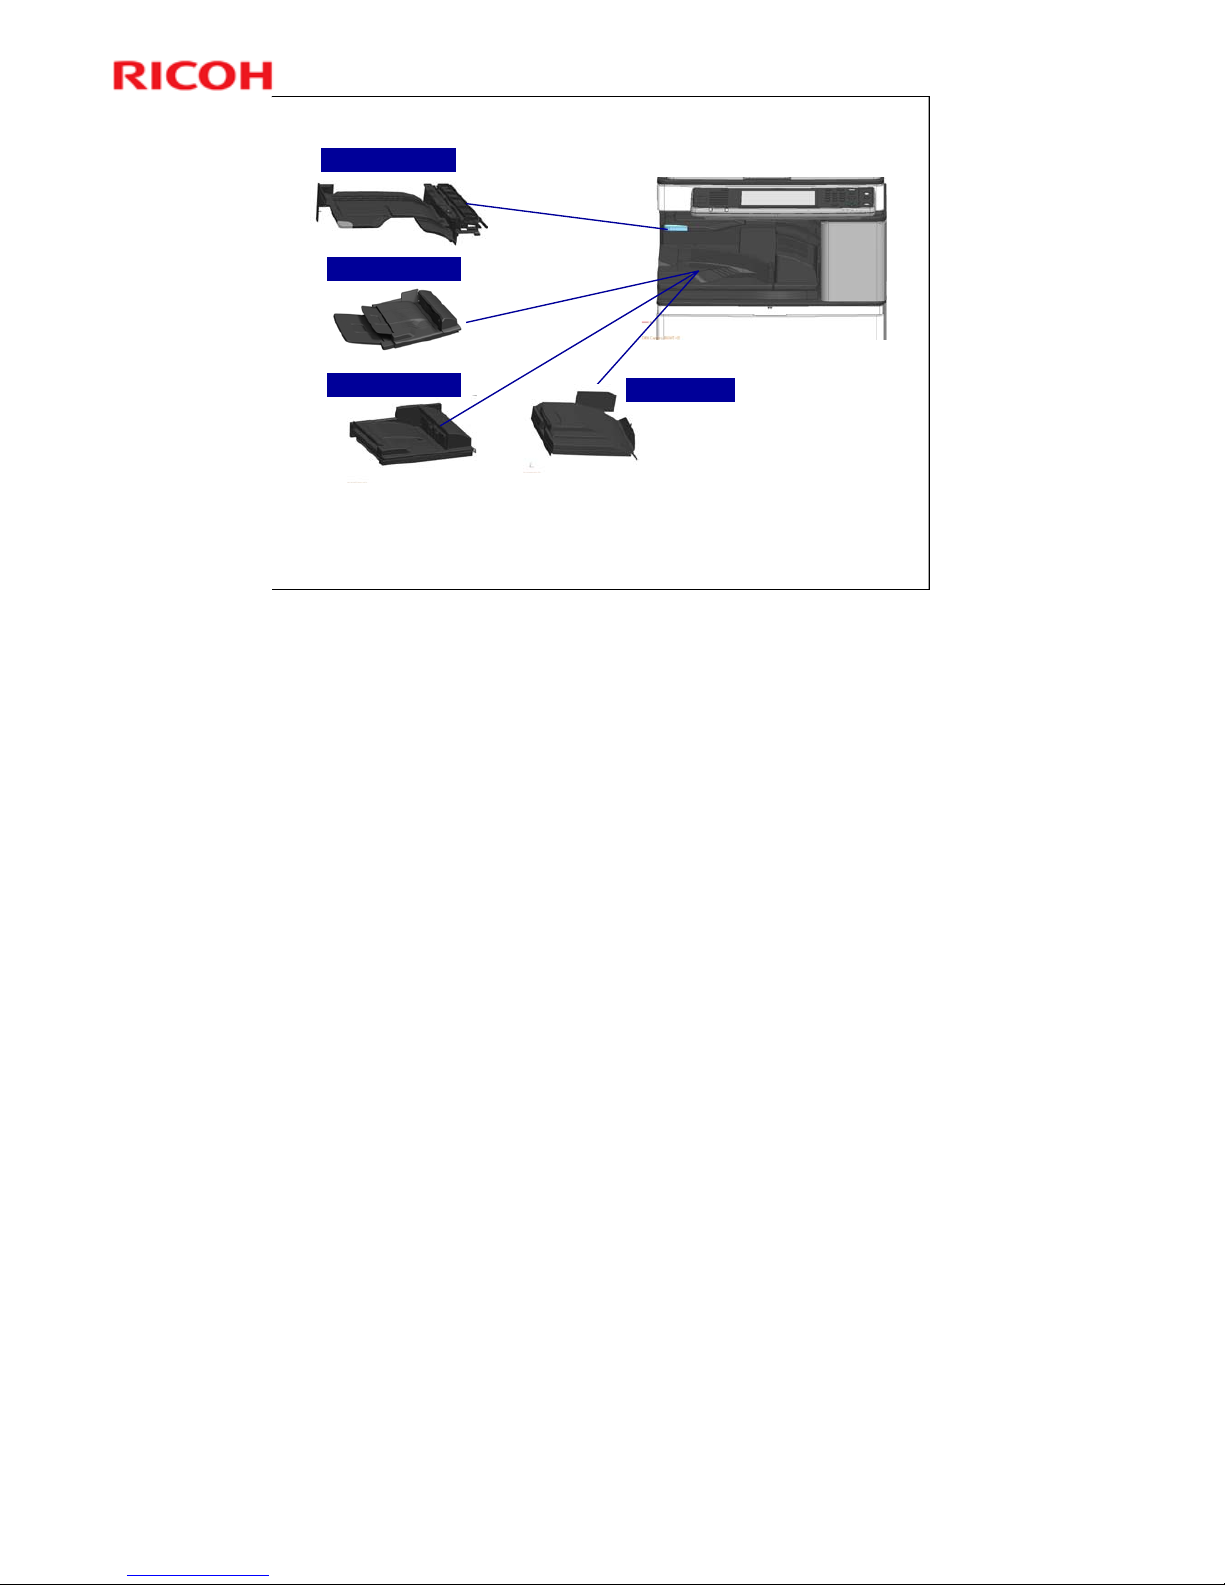
The gap between the operation panel and the paper trays can hold two
options.
Upper compartment: One-bin tray
Lower compartment: Bridge unit (required if an external finisher is
installed), shift tray, or side tray
Side Tray
One-bin Tray
Bridge Unit
Shift Tray
No additional notes
Page 8
8
AL-C2 Training
Slide 8
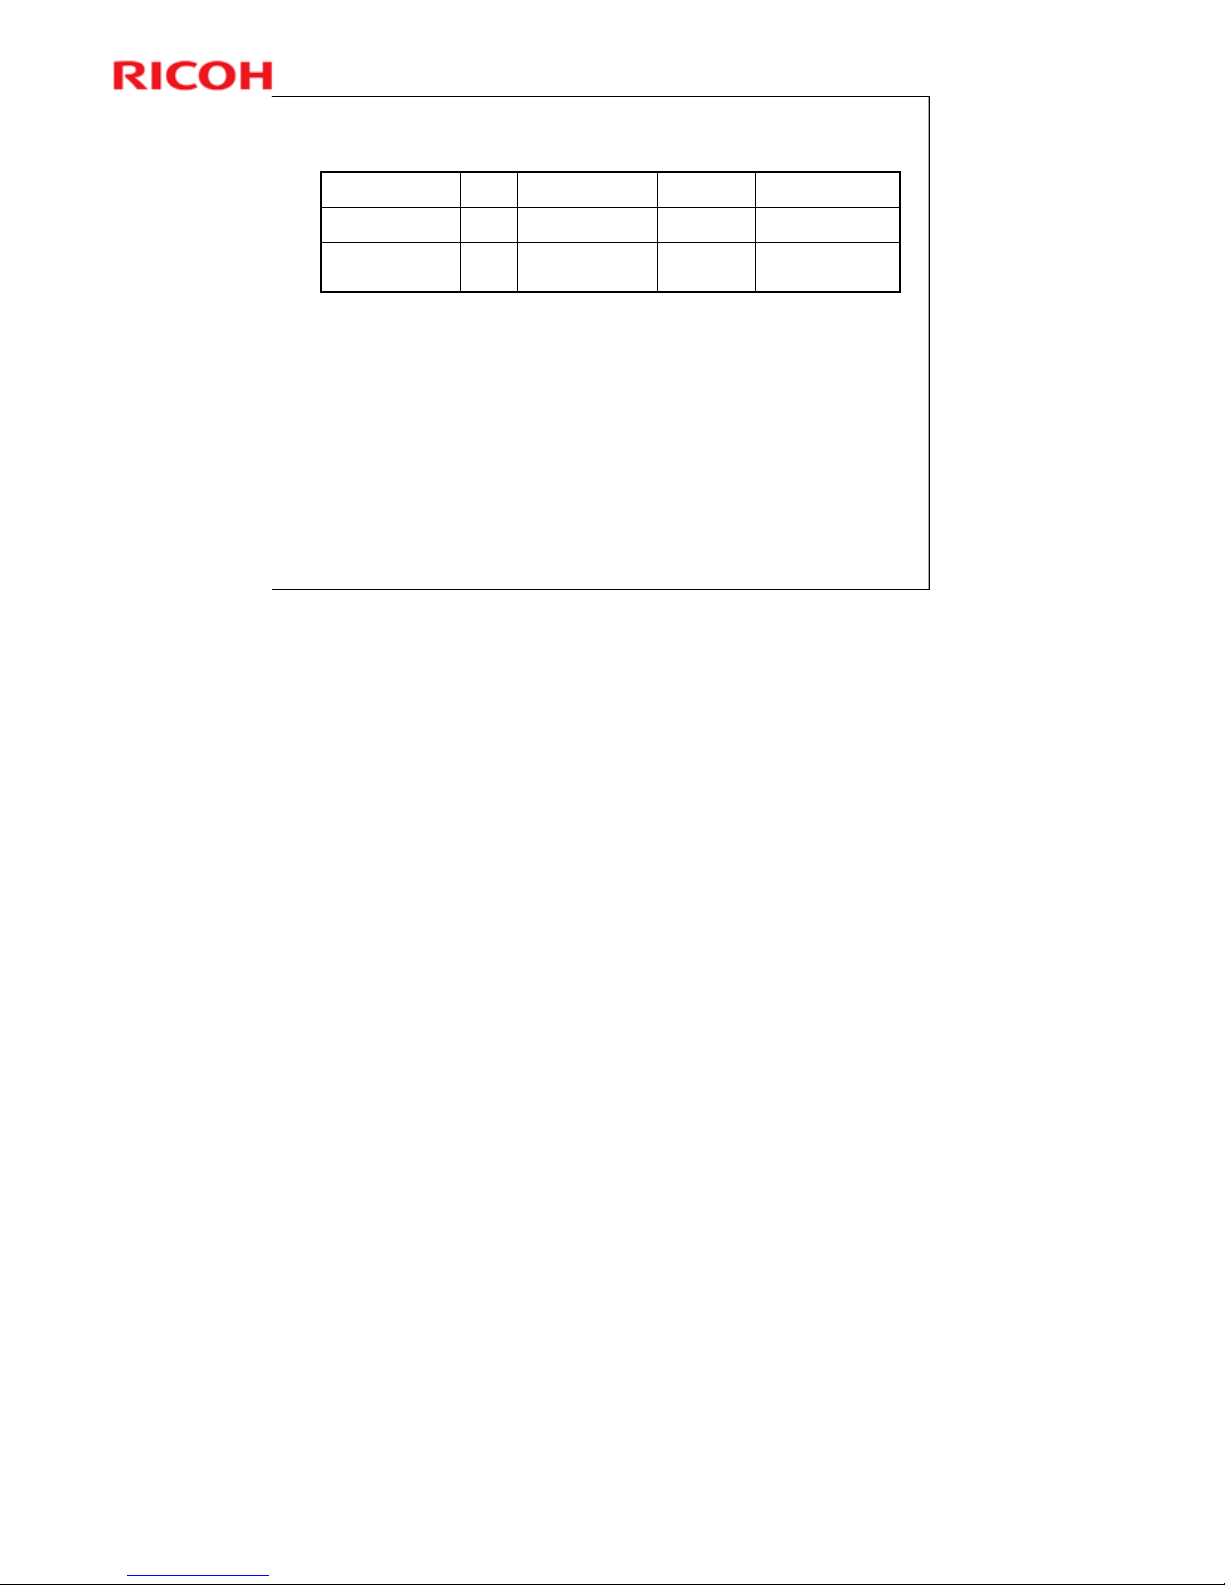
Options: Original Feed
Cover color changedAL-C1OR-C1, AP-C3, AT-C3NewPlaten cover (D593):
Platen Cover Type
3352
Cover color changedAL-C1, AP -
C2.5
AP-C3NewARDF (D630): DF3070
Also used with these
new models:
NoteSimilar to:
No additional notes
Page 9
9
AL-C2 Training
Slide 9
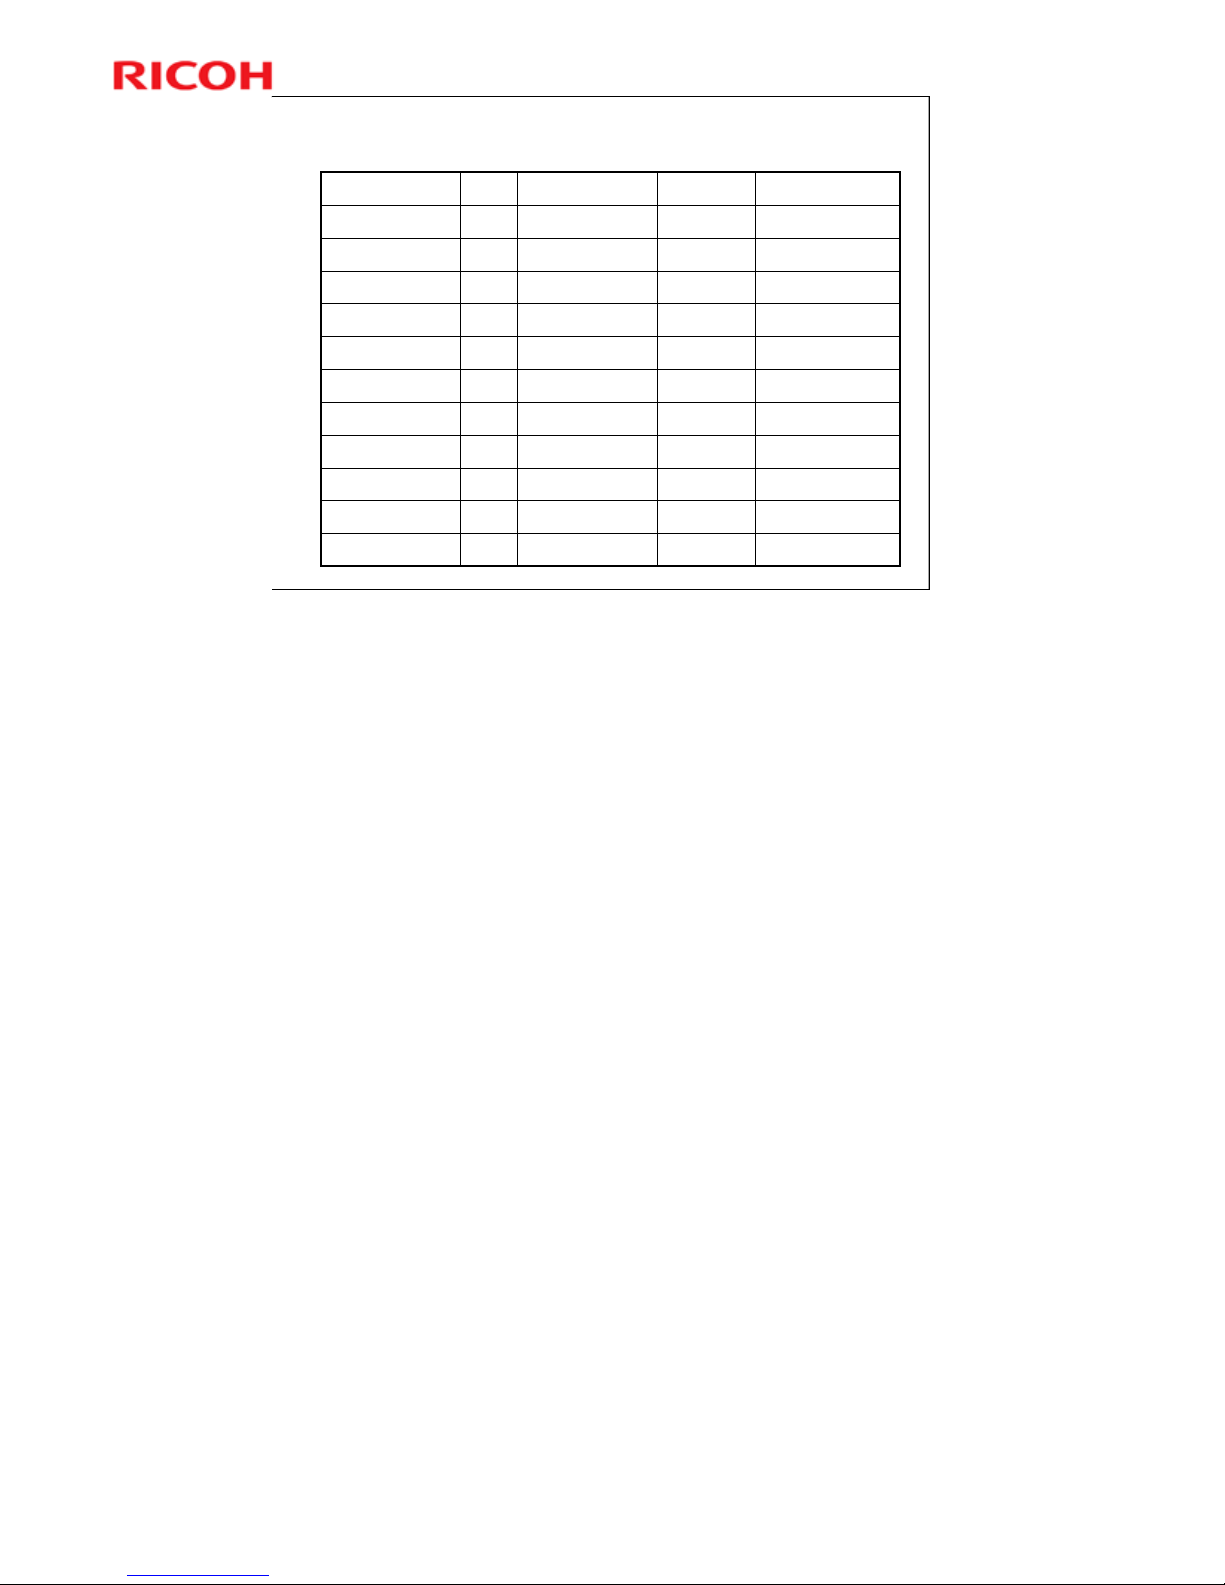
Options: Paper Feed and Finishing
AL-C1, AP-C2.5AP-C3New3000-sheet finisher
(D636): SR3120
AL-C1OR-C1, AP-C3, AT-C3New1000-sheet finisher
(D588): SR3090
AP-C3
AP-C3
AP-C3, AT-C3
AP-C3, AT-C3
AP-C3, AT-C3
AP-C3, AT-C3
AP-C3, AT-C3
OR-C1, AP-C3, AT-C3
OR-C1, AP-C3, AT-C3
Also used with these
new models:
AP-C2.5NewPunch unit (D570):
Punch Unit PU3030
AL-C1, AP-C2.5New2000-sheet booklet
finisher (D637): SR3110
AP-C2.5NewSide tray (D635): Side
Tray Type C5502
Cover color changedAL-C1, AP-C2.5NewBridge unit (D634):
BU3060
Cover color changedAP-C2.5NewShift tray (D633):
SH3060
Cover color changed,
LED position changed
AL-C1, AP-C2.5NewOne-bin tray (D632):
BN3100
Cover color changedAL-C1, AP-C2.5NewSide LCT (D631):
RT3020
Cover color changedAL-C1, AP-C2.5NewTandem LCT (D581):
PB3140
Cover color changedAL-C1, AP-C2.5NewTwo-tray paper feed
unit (D580): PB3130
NoteSimilar to:
No additional notes
Page 10
10
AL-C2 Training
Slide 10
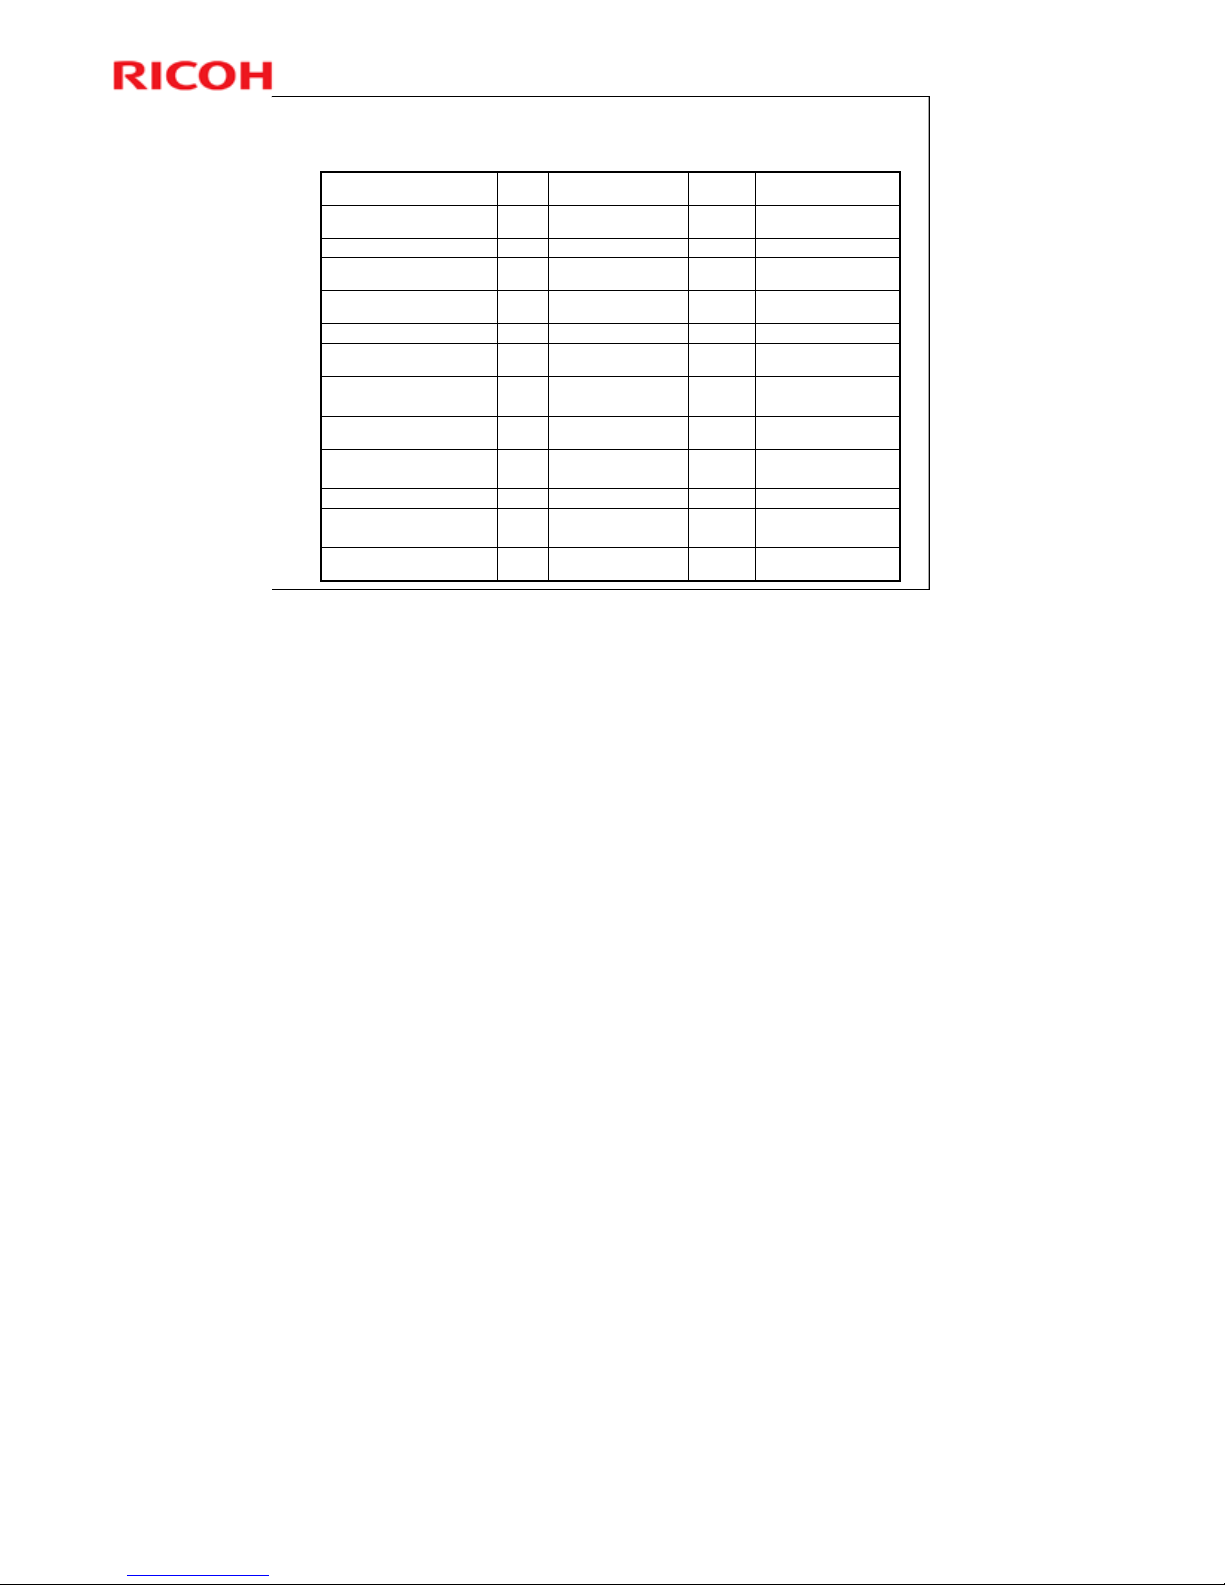
Options: Printer, Scanner, & Fax Units
For the Remote Fax
feature (new function)
AL-C2 onlyNewD629: Fax Connection Unit
Type A
AL-C2 onlyNewD629: G3 Interface Unit Type
5002
Printer/scannerOR-C1D594: Memory Unit Type L
512MB
AL-C2 onlyNewD629: Fax Option Type 5002
AL-C2 onlyNewD640: Hard Disk Drive Option
Type 5002
For faxOR-C1, AP-C3, AT-C3G578: Memory Unit Type B
32MB
Color is differentAP-C3, AT-C3D645: Handset Type C5502
AL-C2 only
AL-C2 only
AL-C2 only
AL-C2 only
AL-C2 only
Also used with these
new models:
NewD641: IPDS Unit Type 5002
NewD641: PostScript3 Unit Type
5002
NewD641: Scanner Enhance
Option Type 5002
NewD641: Printer Unit Type 5002
NewD641: Printer/Scanner Unit
Type 5002
NoteSimilar to:
No additional notes
Page 11
11
AL-C2 Training
Slide 11
Options: Controller
OR-C1, AP-C3, AT-C3D377: IEEE 802.11a/g
Interface Unit Type J
AL-C2 onlyNewD629: SD card for NetWare
printing Type K
AL-C2 only
AL-C2 only
OR-C1
OR-C1, AP-C3, AT-C3
OR-C1, AP-C3, AT-C3
OR-C1, AP-C3, AT-C3
Also used with these
new models:
NewD640: VM Card Type U
NewD640: Browser Unit Type I
G874: Gigabit Ethernet
Board Type A
D377: IEEE 802.11g
Interface Unit Type K
B679: IEEE 1284 Interface
Board Type A
New type, uses USBNewD566: Bluetooth Interface
Unit Type D
NoteSimilar to:
No additional notes
Page 12
12
AL-C2 Training
Slide 12
Options: Other
OR-C1, AT-C3
AP-C3, AT-C3
OR-C1, AP-C3, AT-C3
OR-C1, AP-C3, AT-C3
OR-C1, AP-C3, AT-C3
Also used with these
new models:
D377: File Format
Converter Type E
D640: Copy Data
Security Unit Type G
B870: Optional Counter
Interface Unit Type A
D593: Card Reader
Bracket Type 3352
A674: Key Counter
Bracket Type H
NoteSimilar to:
No additional notes
Page 13

13
AL-C2 Training
Slide 13
Controller Options
Printer/Scanner
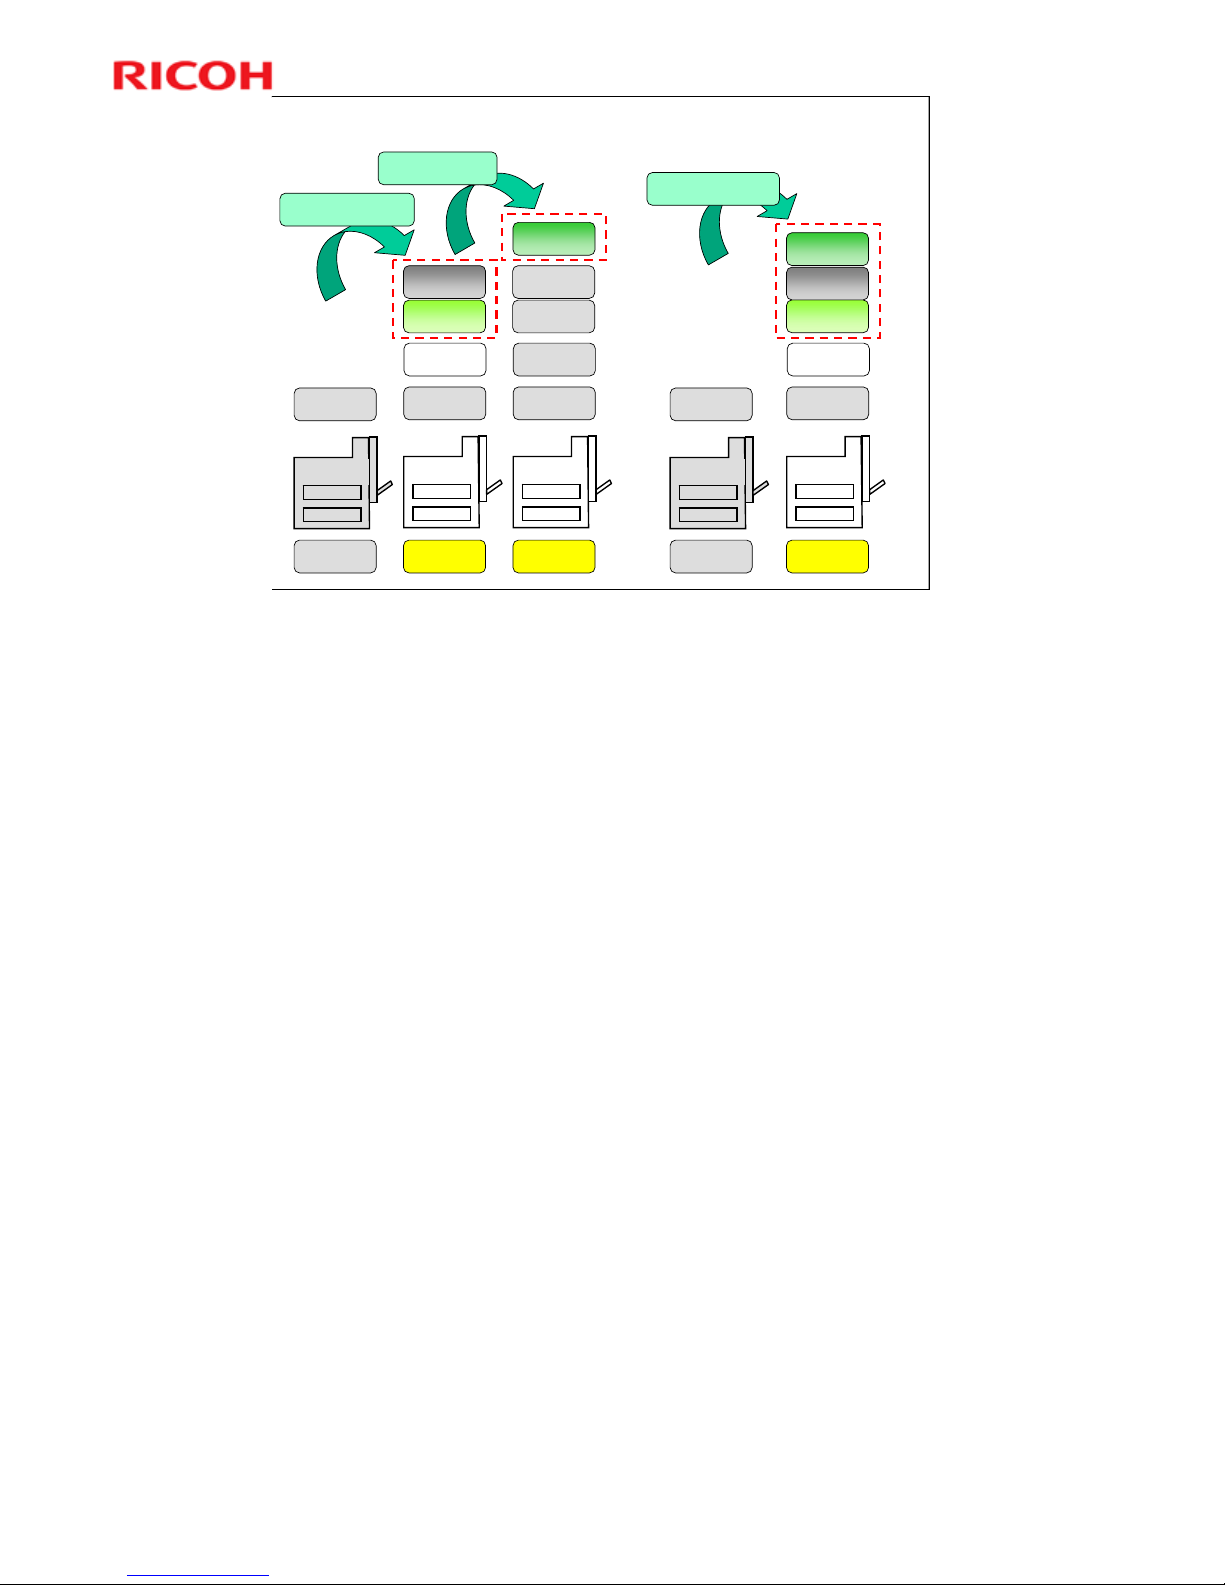
The SP model already contains printer and scanner features.
No set-up is needed at installation.
The basic models can be upgraded as follows:
To the basic model, add a printer unit and 512 MB memory, to make a
copier/printer model.
Then, to the copier/printer model, you can add a scanner enhanceoption,
to make an SP model.
-or –
To the basic model, add a printer/scanner unit and 512 MB memory to
make an SP model.
-also -
To add Document Box to the basic model without upgrading to an SP
model, the optional hard disk must be installed.
The printer enhance option and the printer/scanner option both contain a
hard disk.
It is not possible to install a scanner option without the printer option.
NA models only: Note that the 512 MB memory is included in the printer
and printer/scanner upgrade kits.
The options mentioned on this slide are all new.
The next slide shows the above in a graphic format.
Printer drivers are PCL and PDF direct. Postscript 3 is an option. There is no
RPCS.
The procedures in the service manual for installing printer/scanner and printer
enhance options apply only to the basic model, and not the SP model.
Page 14
14
AL-C2 Training
Slide 14
Basic
512MB
standard
Basic
512MB
Standard
PCL
With PDF direct
HDD
Basic
512MB
Standard
Scanner
Basic
Printer
enhanced
SP
Basic
512MB
Standard
Basic
512MB
Standard
PCL
With PDF direct
HDD
Scanner
Basic SP
PCL
With PDF direct
HDD
Printer Unit
with PDF direct
Scanner enhance
option
Printer/Scanner unit
with PDF direct
512MB
Option
512MB
Option
512MB
Option
Controller Options
Printer/Scanner
NA models only: Note that the 512 MB memory is included in the printer and
printer/scanner upgrade kits.
Page 15
15
AL-C2 Training
Slide 15
7
Basic model
Basic model
Copier
Copier
1
1
Copy/Printer model
Copy/Printer model
Upgradeable
by Scanner upgrade option
Upgradeable
by Printer option
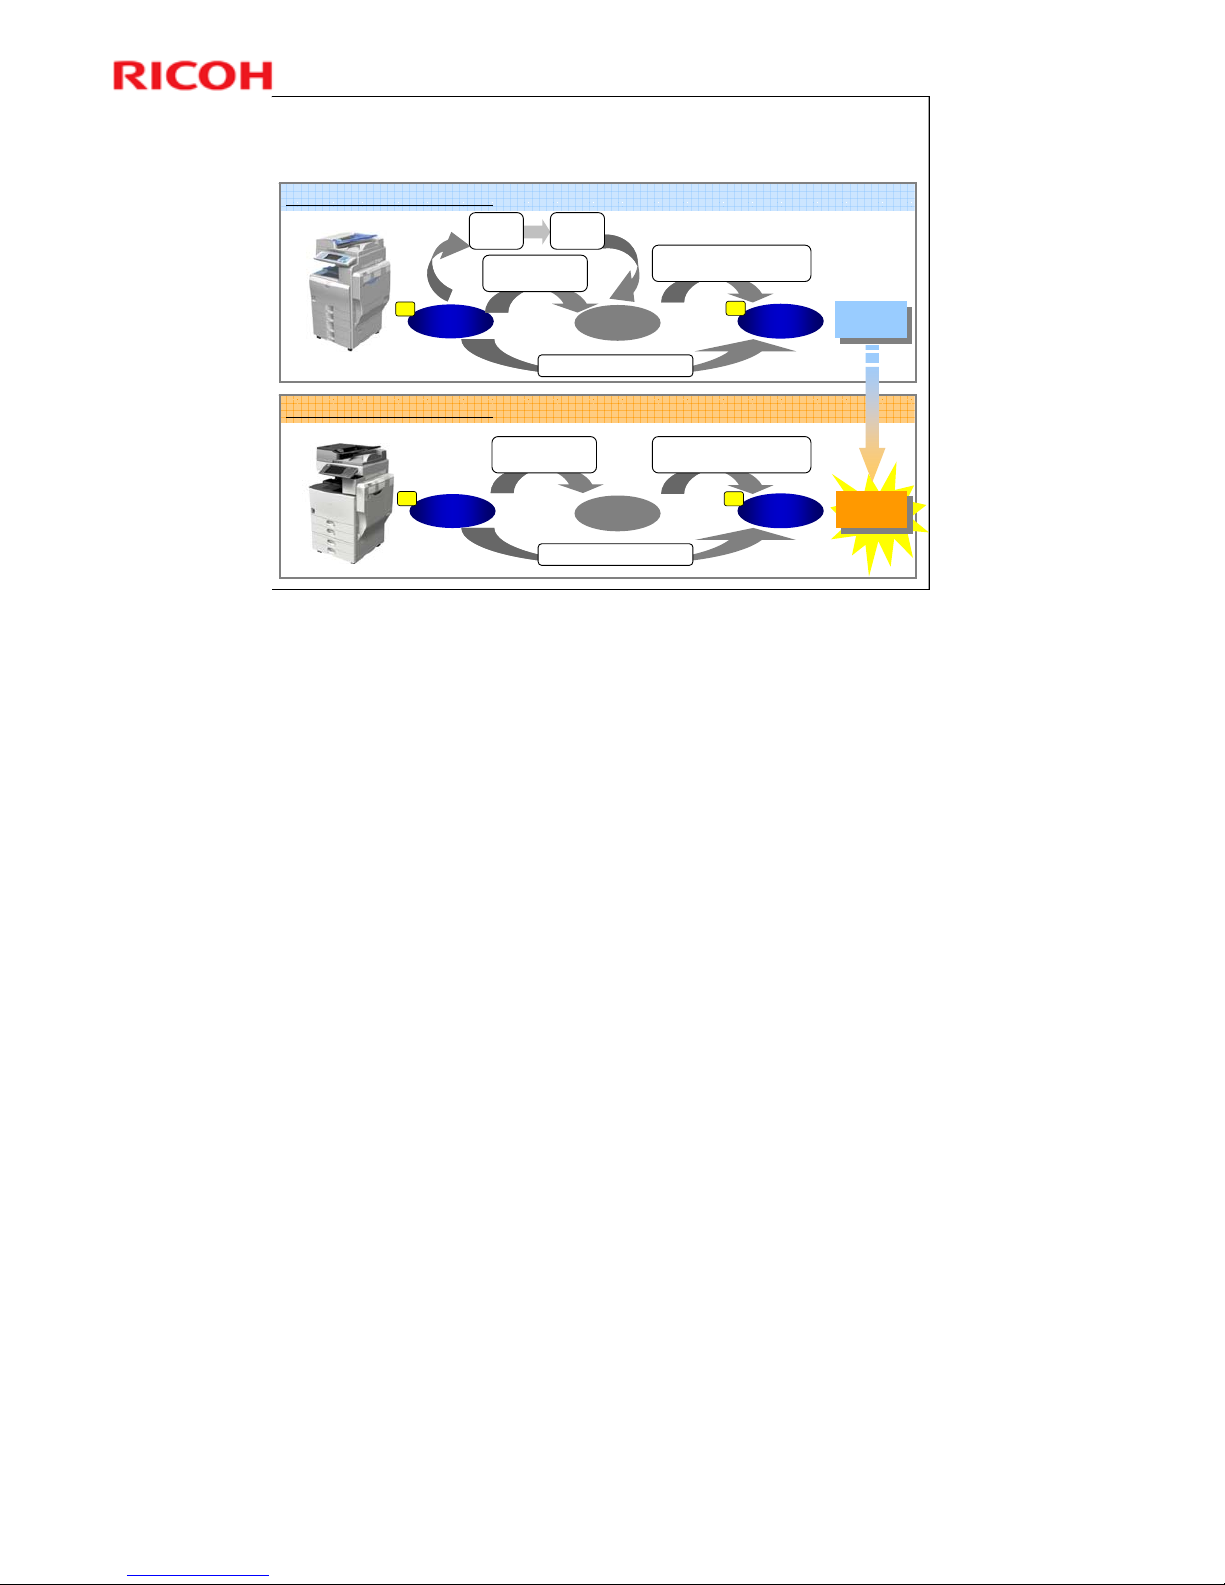
Alex-C2 (Basic Model -> SP Model)
SP model
SP model
Copy / Printer / Scanner
Copy / Printer / Scanner
2
2
Upgradeable by P/S option
Basic model
Basic model
Copier
Copier
1
1
Copy/Printer model
Copy/Printer model
Upgradeable
by Scanner upgrade option
Upgradeable
by Printer option
Alex-C1 (Basic Model -> SP Model)
SP model
SP model
Copy / Printer / Scanner
Copy / Printer / Scanner
2
2
Upgradeable by P/S option
RPCS
option
PCL
option
Mono
Scanner
Mono
Scanner
Color
Scanner
Color
Scanner
Controller Options
Printer/Scanner
This slide compares the old system with the new one.
Page 16

16
AL-C2 Training
Slide 16
Controller Options
Memory Upgrade Options for the Basic Model
Optional memory and hard disk
For a customer who has a basic model, install the
optional 160GB hard disk if the customer wants to
use the document box features.
When a customer wishes to upgrade a basic
model with a printer/scanner or printer enhance
kit, the optional 512 MB memory must be
installed.
There are no memory upgrades for the SP model.
No additional notes
Page 17

17
AL-C2 Training
Slide 17
Controller Options
Fax Unit
In this fax unit, the FCU and MBU boards have been
combined. Because of this, the data backup procedure has
been changed.
The optional memory module is the same as previous
models.
The FCU contains the ROM, SRAM and NCU circuits.
Fax Options:
Handset (for the USA): This is a new model.
Extra G3 Interface option: This provides one more analog
line interface. This allows full dual access. Two extra G3
interface options can be installed.
Memory Expansion: This expands the SAF memory and the
page memory (used for image rotation); without this
expansion, the page memory is not big enough for image
rotation at 400 dpi, so transmission at 400 dpi is not
possible.
No additional notes
Page 18

18
AL-C2 Training
Slide 18
Controller Options
SD Cards
Data Overwrite Security, HDD Encryption: Standard (included in the controller ROM)
VM card: New
SP models: Included on the printer/scanner SD card, which is shipped with the
machine in slot 1; contains App2Me
» App2Me must be enabled with user tools: Service Manual > Installation > Copier Installation >
Installation Procedure > App 2 Me Setting (SP Models only)
Basic models: Option (SD card slot 2 only). App2Me is not shipped with the machine.
To use App2Me, the VM card must be installed in slot 2 and App2Me must be
downloaded from a website. The VM card can be merged with the card in slot 1.
Printer/scanner unit: New
SP models: Included with the machine (in SD card slot 1). Contains VM, PDF Direct,
and App2Me. No installation or setup needed (except for App2Me; see above).
Basic models: Option (SD card slot 1). Contains PDF Direct
Printer unit: New
For basic models only. Contains PDF Direct . Goes in SD card slot 1
Scanner enhance unit: New
For basic models only. Goes in SD card slot.
Postscript 3: New
Contains PDF Direct. Goes in SD card slot 1.
IPDS unit: New
Goes in SD card slot 1.
Browser unit: New
Goes in SD card slot 1.
Remove after installation.
Slot 1 is the upper slot and slot 2 is the lower slot.
Basic models: App2Me is not shipped with the machine. It must be downloaded
from a website, and an VM card must be installed.
Page 19
19
AL-C2 Training
Slide 19
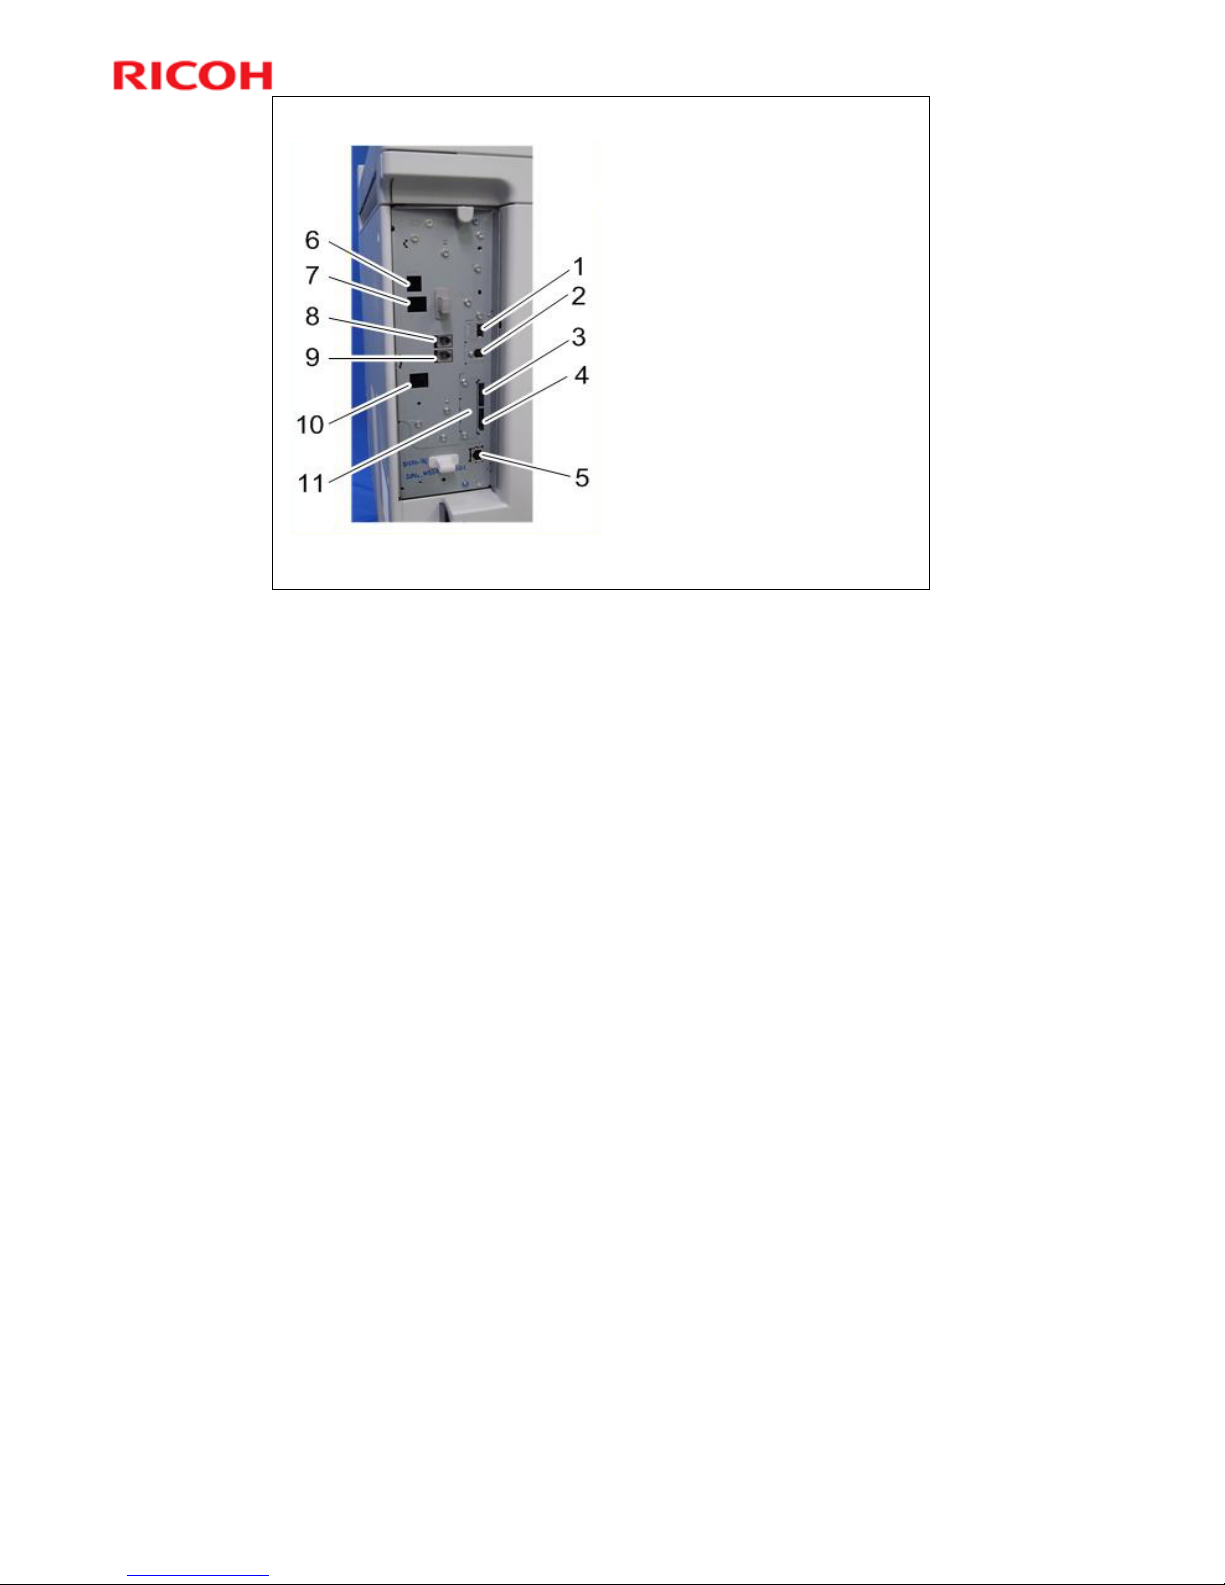
Slots
1. USB-A: Both USB slots can be used
for the Bluetooth option or a card
authentication device.
2. USB-B: Built-in for connection of USB
devices (USB 2.0)
3. SD Card Slot 1 (upper slot)
4. SD Card Slot 2 (lower slot)
5. Ethernet, standard LAN connection
point for a 100BaseT LAN
6. ISDN: Jack for ISDN connection
(Japan Only)
7. Line 3: Jack for a 3rd optional Fax
Interface Unit.
8. Line 1: Jack for the main telephone
line from the outside for connection
to the Fax Option (D596).
9. TEL1: Jack for telephone connection
10. Line 2: Jack for a 2nd optional Fax
Interface Unit.
11. Board Slot: A slot for one optional
interface board.
Board Slot: One of the following can be installed.
¾ File Format Converter Type E
¾ Gigabit Ethernet Board Type A
¾ IEEE 802.11a/g Interface Unit Type J or IEEE 802.11g Interface Unit Type
K
¾ IEEE 1284 Interface Board Type A
The SD Card slots are discussed in more detail on the next few slides.
Page 20

20
AL-C2 Training
Slide 20
SD Card Slots (1)
Slot 1 (upper slot) can be used for the following:
Use when installing the following options
» Basic model: Scanner/printer unit (with PDF Direct),
printer unit (with PDF Direct), scanner enhancement unit
»PostScript
»IPDS
» Browser unit
» SD card for Netware printing
» Copy data security unit
The SP model has the printer/scanner SD card in
slot 1 when shipped.
If the number of options that you wish to install is
more than the number of available SD card slots,
move them onto one SD card.
The manual for the printer/scanner unit shows the
contents of all SD cards used with the machine,
and which merging operations are allowed.
Printer/Scanner Unit Service manual, SD Card Appli Move
Note that PostScript 3 and PDF Direct can now be moved to another SD card. In
previous models, this is not possible because of licensing restrictions.
Page 21

21
AL-C2 Training
Slide 21
SD Card Slots (2)
Slot 2 (lower slot)
Empty when shipped
» Basic models: Install the optional VM card here
Use this slot for service procedures, such as
firmware update and NVRAM backup.
No additional notes
Page 22

22
AL-C2 Training
Slide 22
Data Overwrite Security, HDD Encryption
These features are built into the controller board
for all models.
There is no Security SD Card.
At installation, these features must be enabled
with SP mode.
Service Manual > Installation > Copier Installation
> Installation Procedure > Data Overwrite
Security
Service Manual > Installation > Copier Installation
> Installation Procedure > HDD Encryption
Then the user must switch them on with a User
Tool.
No additional notes
Page 23
23
AL-C2 Training
Slide 23
D129/D130
Service Training
Improved Features and Specifications
This section provides an overview of the main specifications and explains
improvements over the models in the AL-C1.5 series.
Page 24

24
AL-C2 Training
Slide 24
Specifications
Original Size: Maximum A3/11" x 17"
Copy Paper Size - Paper trays:
A3/11" x 17" - A5 LEF
Non-standard sizes:
» Width: 182 - 297 mm (7.2" -11.7"), Length: 148 mm - 432 mm (5.8" - 17")
Copy Paper Size - By-pass tray:
12" x 18"/305 x 457.2 mm, A3/11" x 17" - A6 SEF
Non-standard sizes:
» Width: 90 - 305 mm (3.6" -12"), Length: 148 - 600 mm (5.8" - 23.6")
Copy Paper Size - Duplex:
A3/11" x 17" - A6 SEF
Non-standard sizes:
» Width: 90 - 297 mm (3.6" -11.7"), Length: 148 - 432 mm (5.8" - 17")
Copy Paper Weight
Paper trays: 60 - 216 g/m2 (16 lb. Bond - 80 lb. Cover)
By-pass: 52 - 216 g/m2 (14 lb. Bond - 80 lb. Cover)
Duplex: 60 - 160 g/m2 (16 lb. Bond - 60 lb. Cover)
Copying Speed: A4, 81/2" x 11" LEF, 1-to-1 (ADF):
40 cpm (D129), 50 cpm (D130)
First Copy Time (1st Tray, A4/81/2" x 11" LEF):
4.1 s (D129), 3.5 s (D130)
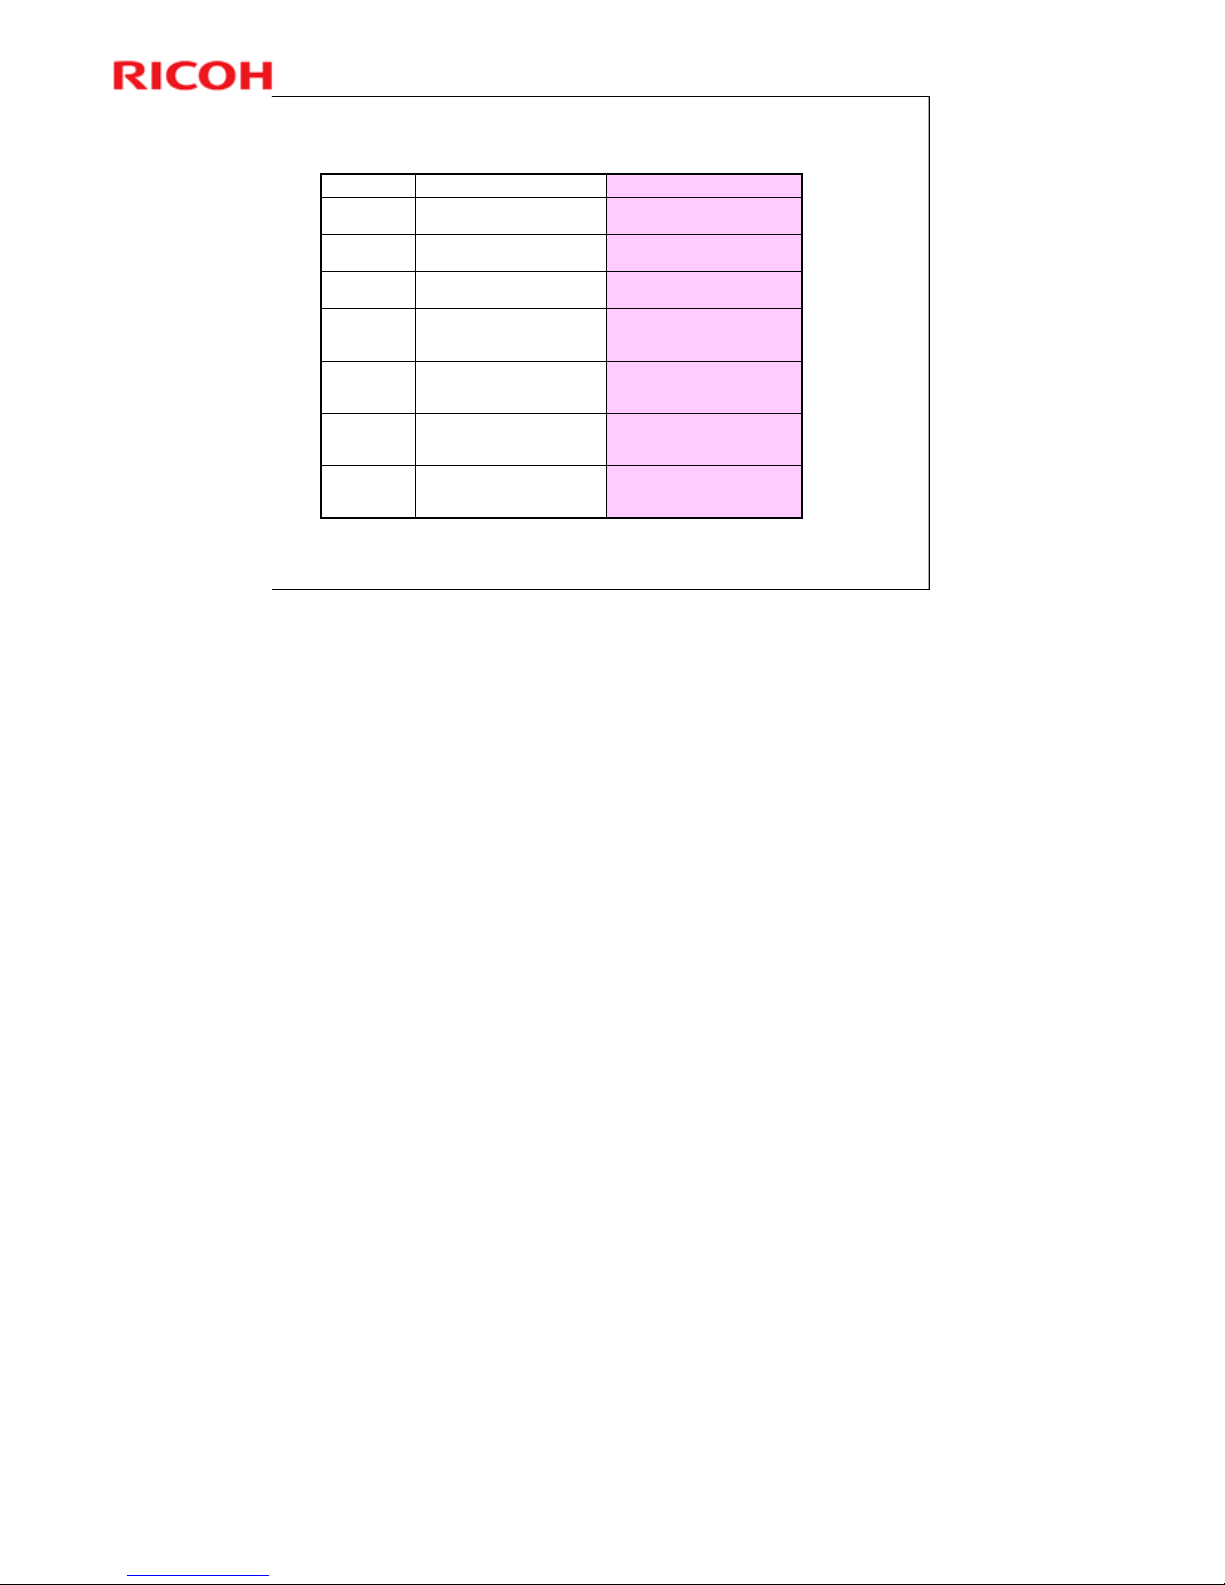
Copy speed: Same as the AL-C1.5 series
Copy paper weight: This machine supports thick paper feeding (up to 216g/m2)
from the standard tray. (AL-C1.5: Up to 169g/m2)
Hard disk: Capacity increased from 40GB (AL-C1.5) to 120GB
Page 25
25
AL-C2 Training
Slide 25
Comparing Specifications with Previous Models
44004400Paper feed
capacity
(maximum)
500 sheets (A4/DLT)
250 sheets (A3/DLT)
Face down
500 sheets (A4/DLT)
250 sheets (A3/DLT)
Face down
Output tray
capacity
(standard)
3625 sheets (with 3000-sheet
finisher) + 250 (bridge unit) +
125 (one-bin tray)
3625 sheets (with 3000-sheet
finisher) + 250 (bridge unit) +
125 (one-bin tray)
Output tray
capacity
(maximum)
550 x 4 or 550 x 2 + 1000
Basic: TBD
SP: 19s
Basic: 13s
SP: 22s
Warm-up time
550 x 4 or 550 x 2 + 1000Paper feed
capacity
(standard)
First copy
time
Copy speed
C2b: 4.1s
C2c: 3.5s
C1.5b: 4.1s
C1.5c: 3.5s
C2b: 40cpm
C2c: 50cpm
C1.5b: 40cpm
C1.5c: 50cpm
AL-C2AL-C1.5
No additional notes
Page 26
26
AL-C2 Training
Slide 26
Targets
C2b : 58.7K
C2c : 70.8K
C1.5b : 58.7K
C1.5c : 70.8K
MCBC (Mean
Copies
Between
Calls)
3,200k or 5 years whichever
comes first
3,200k or 5 years whichever
comes first
Estimated
Unit Life
160k160kPM Cycle
ACV, per
month
C2b : 10K
C2c : 20K
C1.5b : 10K
C1.5c : 20K
AL-C2AL-C1.5
No additional notes
Page 27

27
AL-C2 Training
Slide 27
Yield of Consumables
Toner – same as AL-C1.5
Capacity: 630 g
Yield: 30,000 prints per cartridge (A4/LT, 6%
coverage)
Developer
Yield: 320,000 prints per bag
No additional notes
Page 28
28
AL-C2 Training
Slide 28
2
Top board, operation panel and
Top board, operation panel and
inner tray in dark gray
inner tray in dark gray
Unified color emphasizes operation areas.
Simple Cube Design
Simple Cube Design
Simple cube design will fit
into office space flexibly.
Harmony in office environment
Harmony in office environment
White and gray color matches other office
equipment.
New Feature for this Series
New PDI Concept (Product Design Identity Concept)
No additional notes
Page 29
29
AL-C2 Training
Slide 29
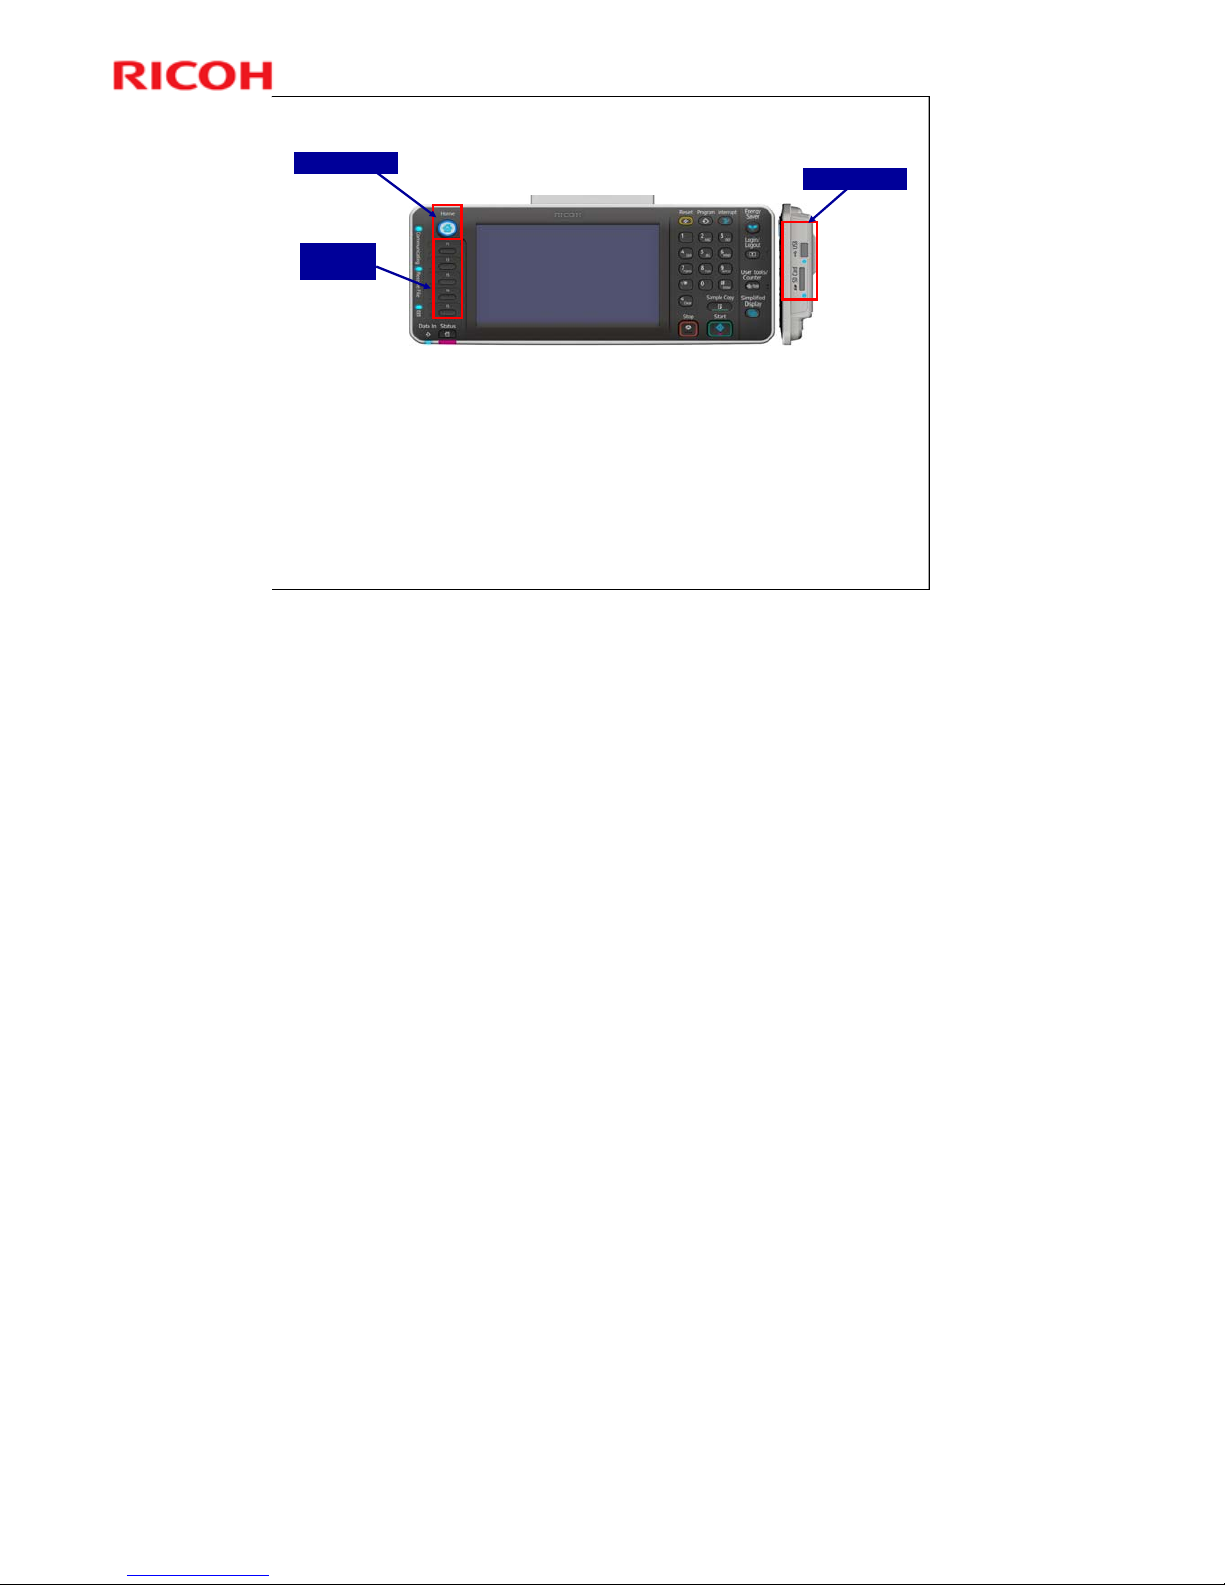
New Feature for this Series
Operation Panel
The angle of the operation panel can be changed.
A home button is added. You can return to the home screen from
anywhere.
Five function keys are available, to which you can assign your
own designated functions.
An SD/USB slot is built-into the right side of the panel as
standard equipment (not an optional unit).
The Basic models cannot use the full range of functions that this
SD/USB slot provides.
Home Button
Function
Keys
SD/USB Slot
No additional notes
Page 30
30
AL-C2 Training
Slide 30
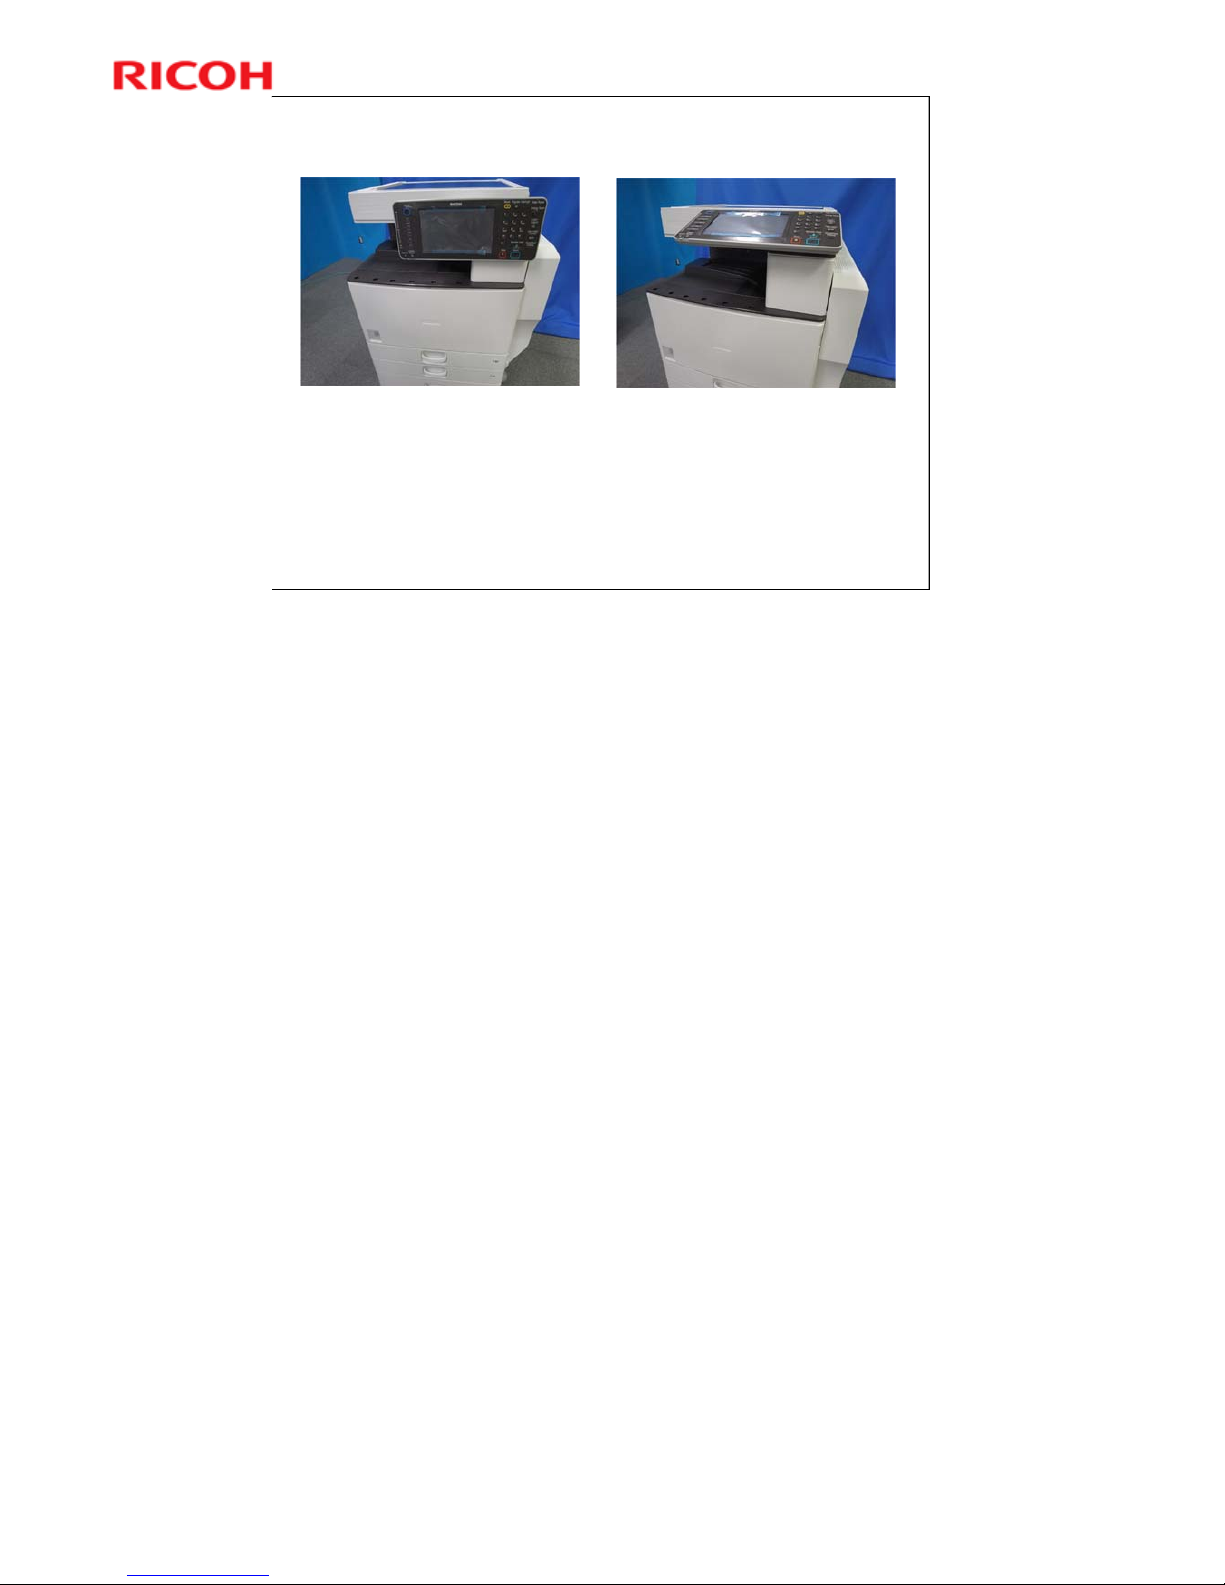
New Feature for this Series
Operation Panel
The angle of the operation panel can be changed.
No additional notes
Page 31

31
AL-C2 Training
Slide 31
New Feature for this Series
GW+ Controller
An enhanced GW controller is used in this series.
List of features provided by this new controller.
Workflow Improvement
¾ Customizable Home Screen
¾ MFP Full Browser
¾ External USB Keyboard Support
¾ Auto Job Promotion
¾ Enhanced Media Print
¾ Scheduled Print
¾ Layout + Booklet Print
¾ Banner Page Print
¾ JBIG2 Compression Support
¾ Reduce/Enlarge Scan
¾ Enhanced Batch Scan
¾ Split Scan from Book Type original
¾ Import/Export of Preference Settings
¾ Expanded the number of User Code
¾ Scheduling of Quota Management
¾ Homefolder over LDAP
¾ Setting Bypass Tray as Priority Tray
¾ QWERTZ Layout Keyboard support
¾ Newly Supported languages: Brazilian Portuguese/ Greek
TCO Reduction
¾ Remote Fax
¾ Separate A3/DLT counter
Environment
¾ Information Screen (Eco-Friendly Indicator)
Security
¾ Unauthorized Copy Control (PCL6/PS)
¾ Enhanced Print Functions using HDD
¾ Mandatory Security Information Print
¾ Output Mode Switch Timer for Received FAX
¾ Enhanced Encryption Level (AES256bit, SHA-2)
Compliance
¾ Bates Numbering
¾ Scan to PDF-A/digitally signed PDF
¾ Introduction of accessibility features
Page 32

32
AL-C2 Training
Slide 32
New Feature for this Series
Print from USB/SD - 1
In previous models, the optional USB/SD card
slot can only be used for scanning data to an SD
card or USB device.
However, in this new series, it is also possible to
print from data stored on an SD card or USB
device.
Works for PDF, JPG, and TIFF.
Some USB devices will not be recognized.
If the customer wants to print PDF files from the
USB/SD card slot on a basic model, PDF Direct
(built-into the printer/scanner unit or printer unit)
or Postscript 3 must be installed.
The SP model has PDF Direct built in.
This is the same as for AP/AT-C2.5.
Page 33
33
AL-C2 Training
Slide 33
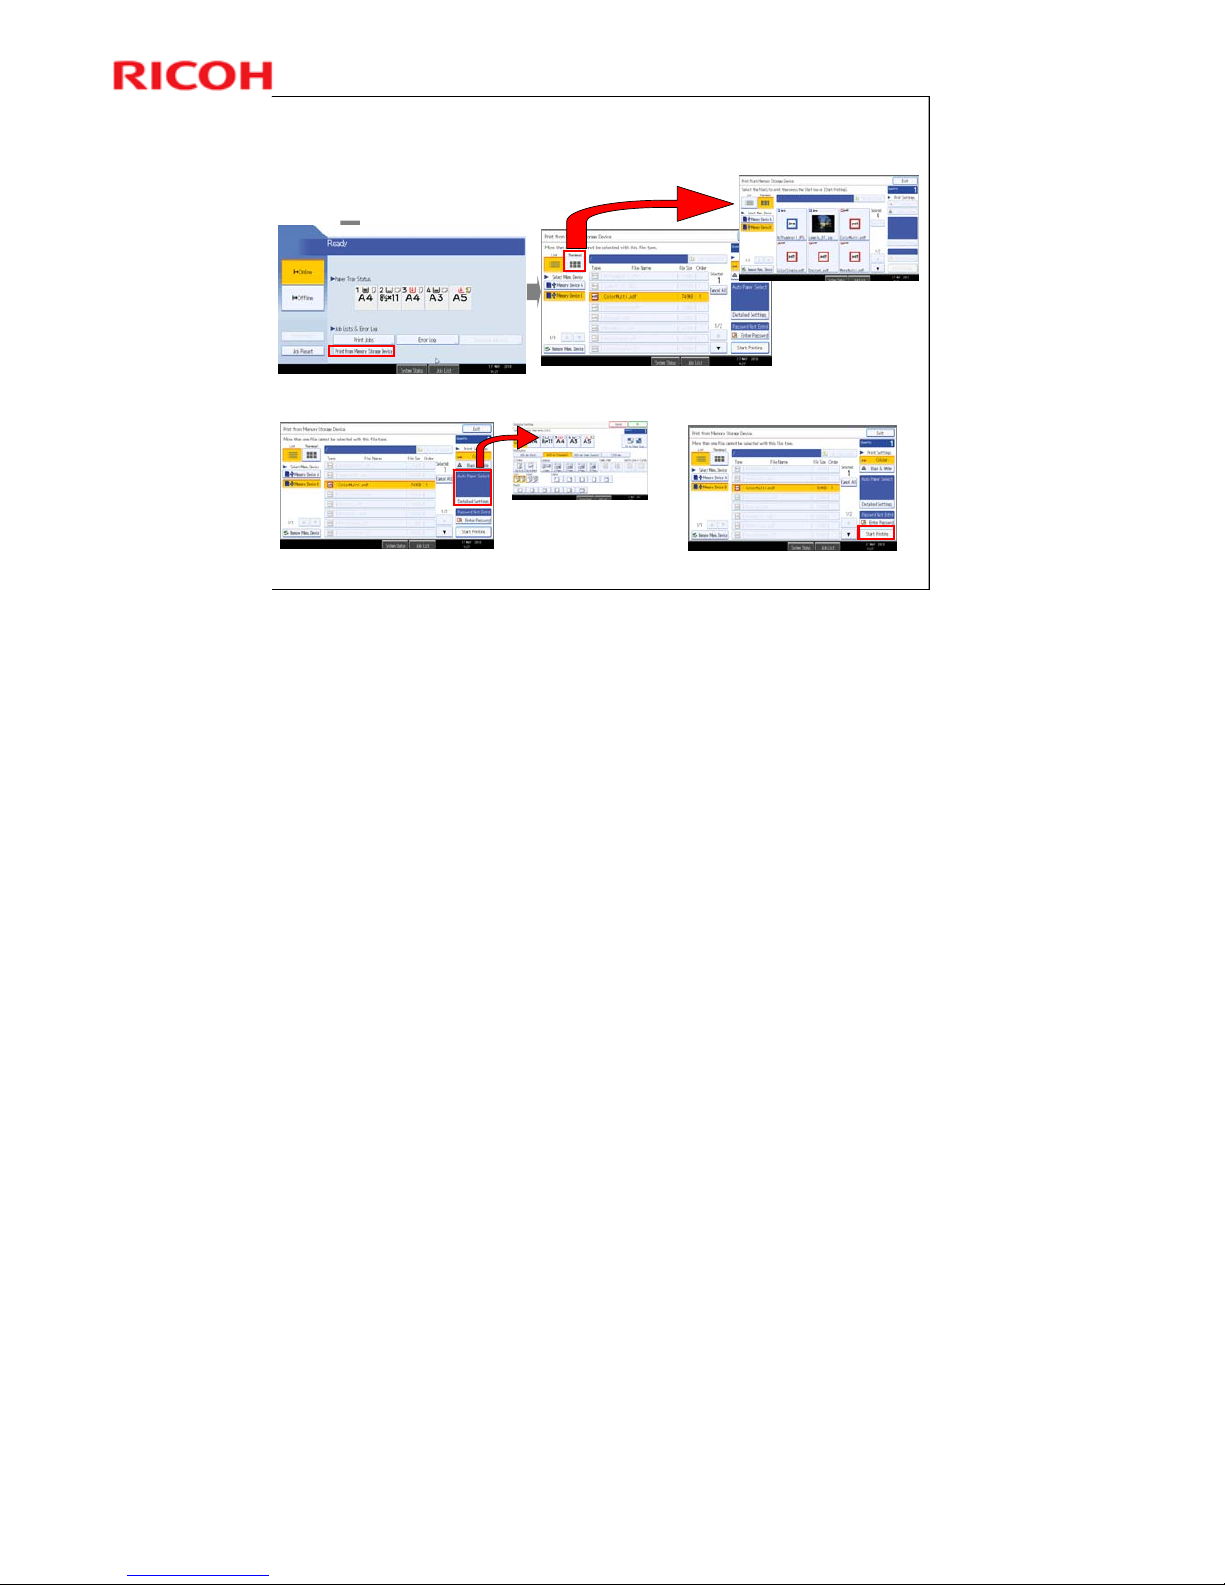
Detailed settings
Detailed settings
Push “Print from Memory Storage Device”.
Select “Detailed settings”.
Push the “Print” button.
Select the data you want to print.
Note: Multiple JPEG / PDF / TIFF files in same folder can be selected
at the same time. (Max: 999)
* Multiple selections of different file formats is not available.
Note: Thumbnail images are
displayed for JPEG files which
have thumbnail information.
*JPEG files generat ed by digital
still cameras generally have
thumbnail information.
How to start Print from USB/SD
How to start Print from USB/SD
New Feature for this Series
Print from USB/SD - 2
2
To print, click ‘Start Printing’.
No additional notes
Page 34
34
AL-C2 Training
Slide 34
New Feature for this Series
Print from USB/SD - 3
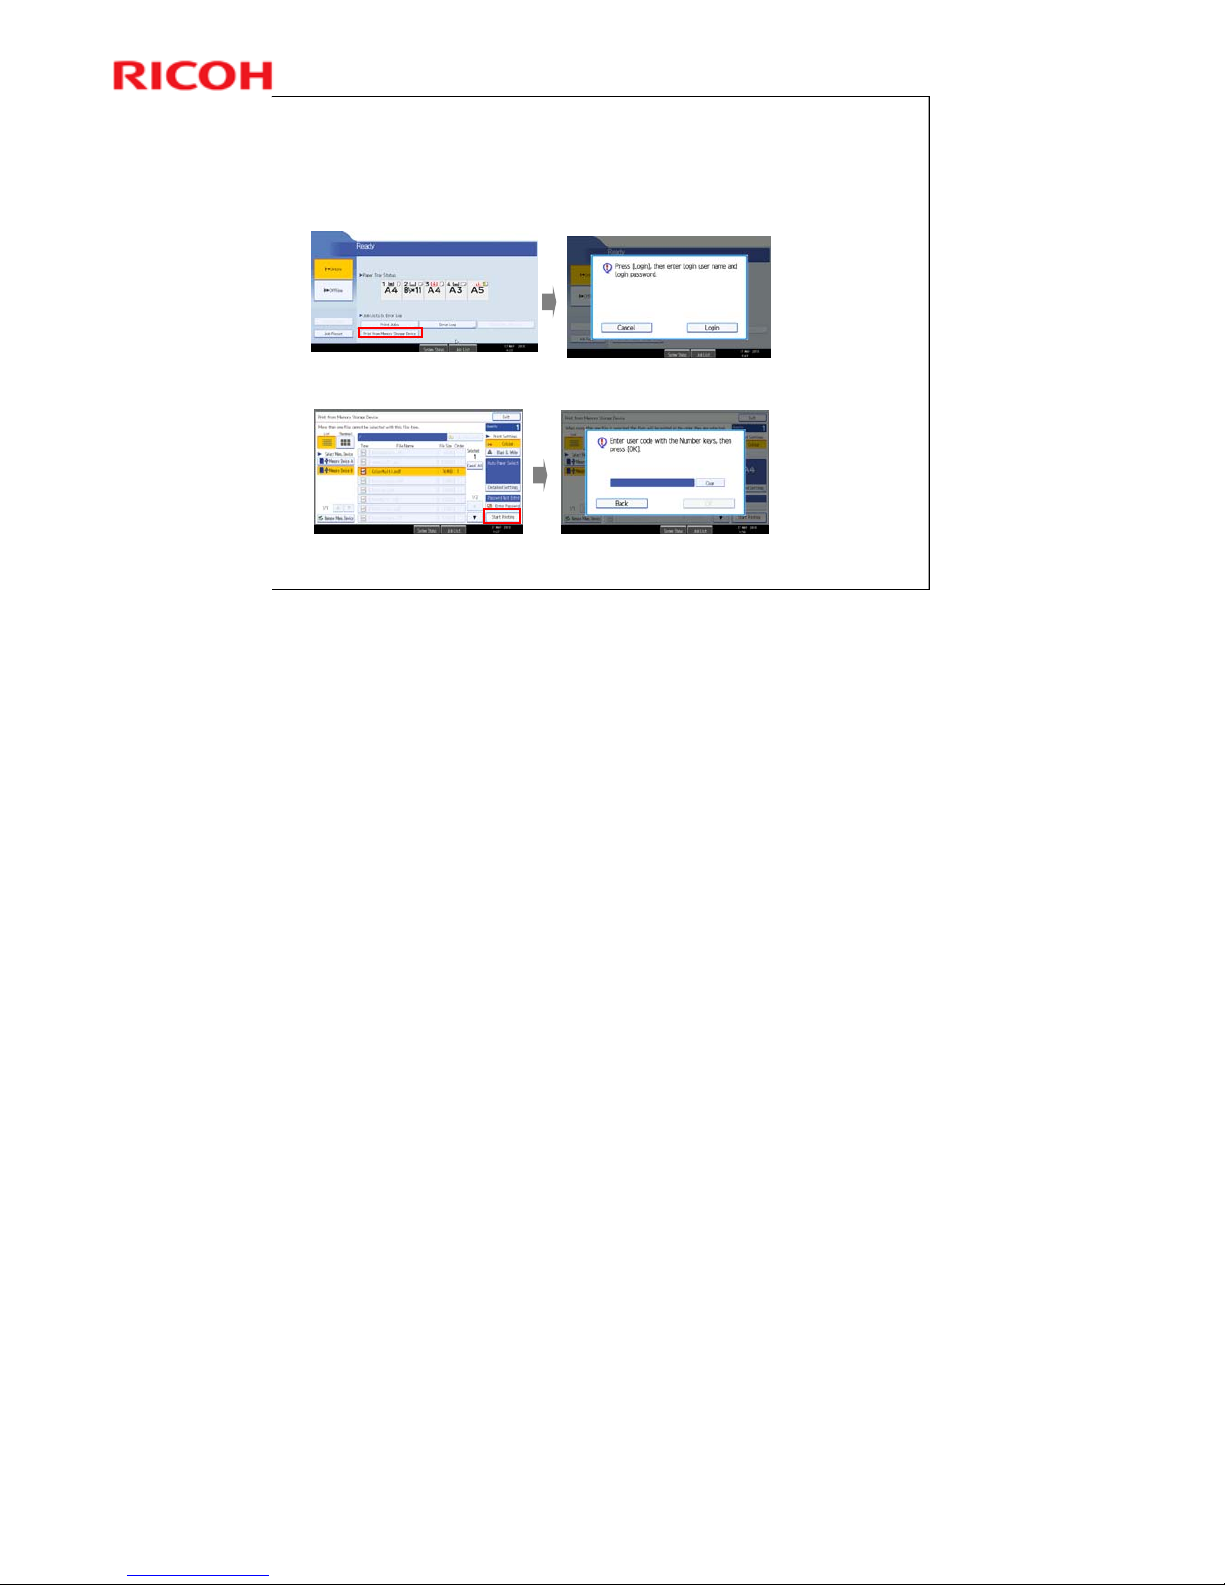
If “Basic authentication” is enabled, users must input login user
name and password after pressing “Print from Memory Storage
Device”.
If “User Code authentication” is enabled, users must input login
user name and password after pressing “Start Printing”.
2
No additional notes
Page 35
35
AL-C2 Training
Slide 35
New Feature for this Series
Print from USB/SD - 4
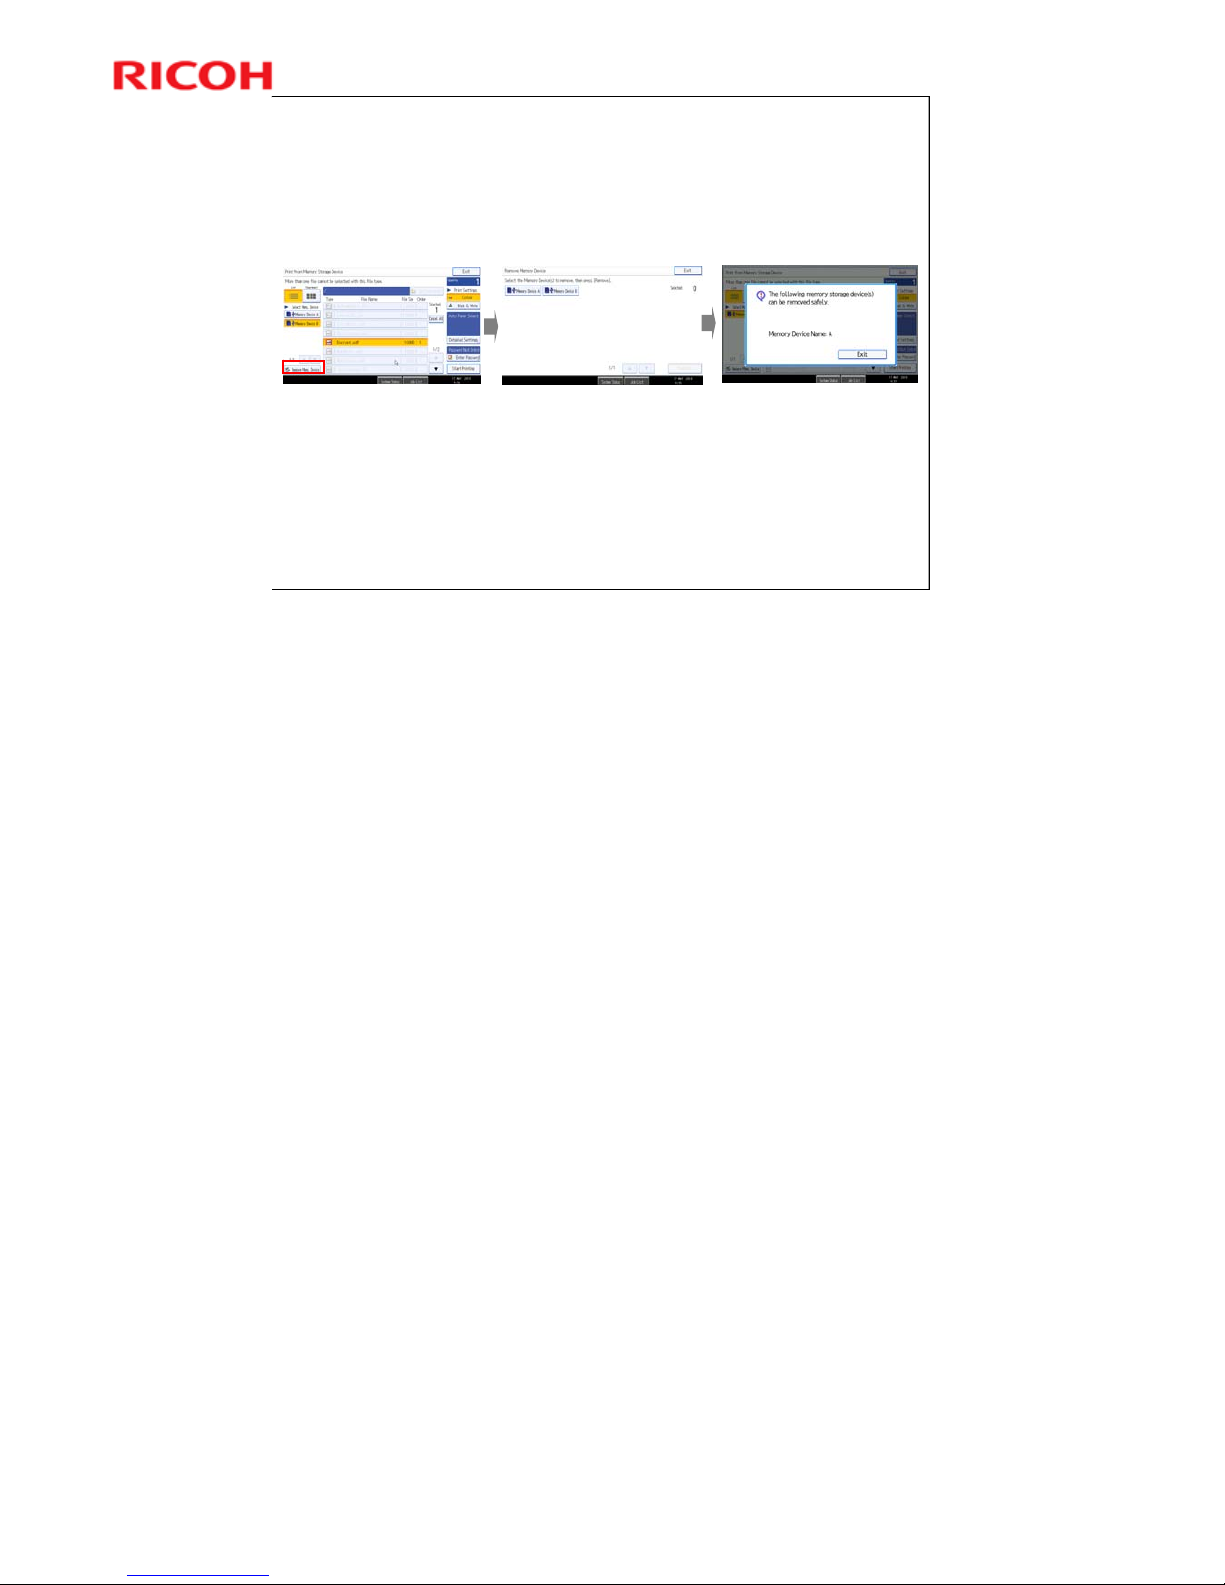
When removing the USB/SD device, press
“Remove Mem. Device” first, and follow the
instructions.
2
No additional notes
Page 36

36
AL-C2 Training
Slide 36
New Feature for this Series
Print from USB/SD - 5
The following enhancements have been made to this
feature since the AP/AT-C2.5.
Print preview: There is a Preview button on the display
panel. Press this to see a preview of the file that you want
to print.
Booklet printing: PDF only
Sort/stack/staple for JPEG files
Print multiple PDF or TIFF files: In addition to JPEG files,
multiple selection of PDF or TIFF files in same folder
becomes available from this model (max: 999).
» Selecting multiple different format files or files stored in
different folders is not possible.
Some PDF files whose file size is big can’t be printed
directly from USB/SD.
Only the first page is displayed in the preview screen for
files with multiple pages.
No additional notes
Page 37
37
AL-C2 Training
Slide 37
5
Center Machine: A
Center Machine: A
with Fax option
with Fax option
Machine: B
Machine: B
w/o Fax option
w/o Fax option
Fax Receiving
Fax Sending
Network
Machine: C
Machine: C
w/o Fax option
w/o Fax option
Machine: D
Machine: D
w/o Fax option
w/o Fax option
Same Network
New Feature for this Series
Remote Fax - 1
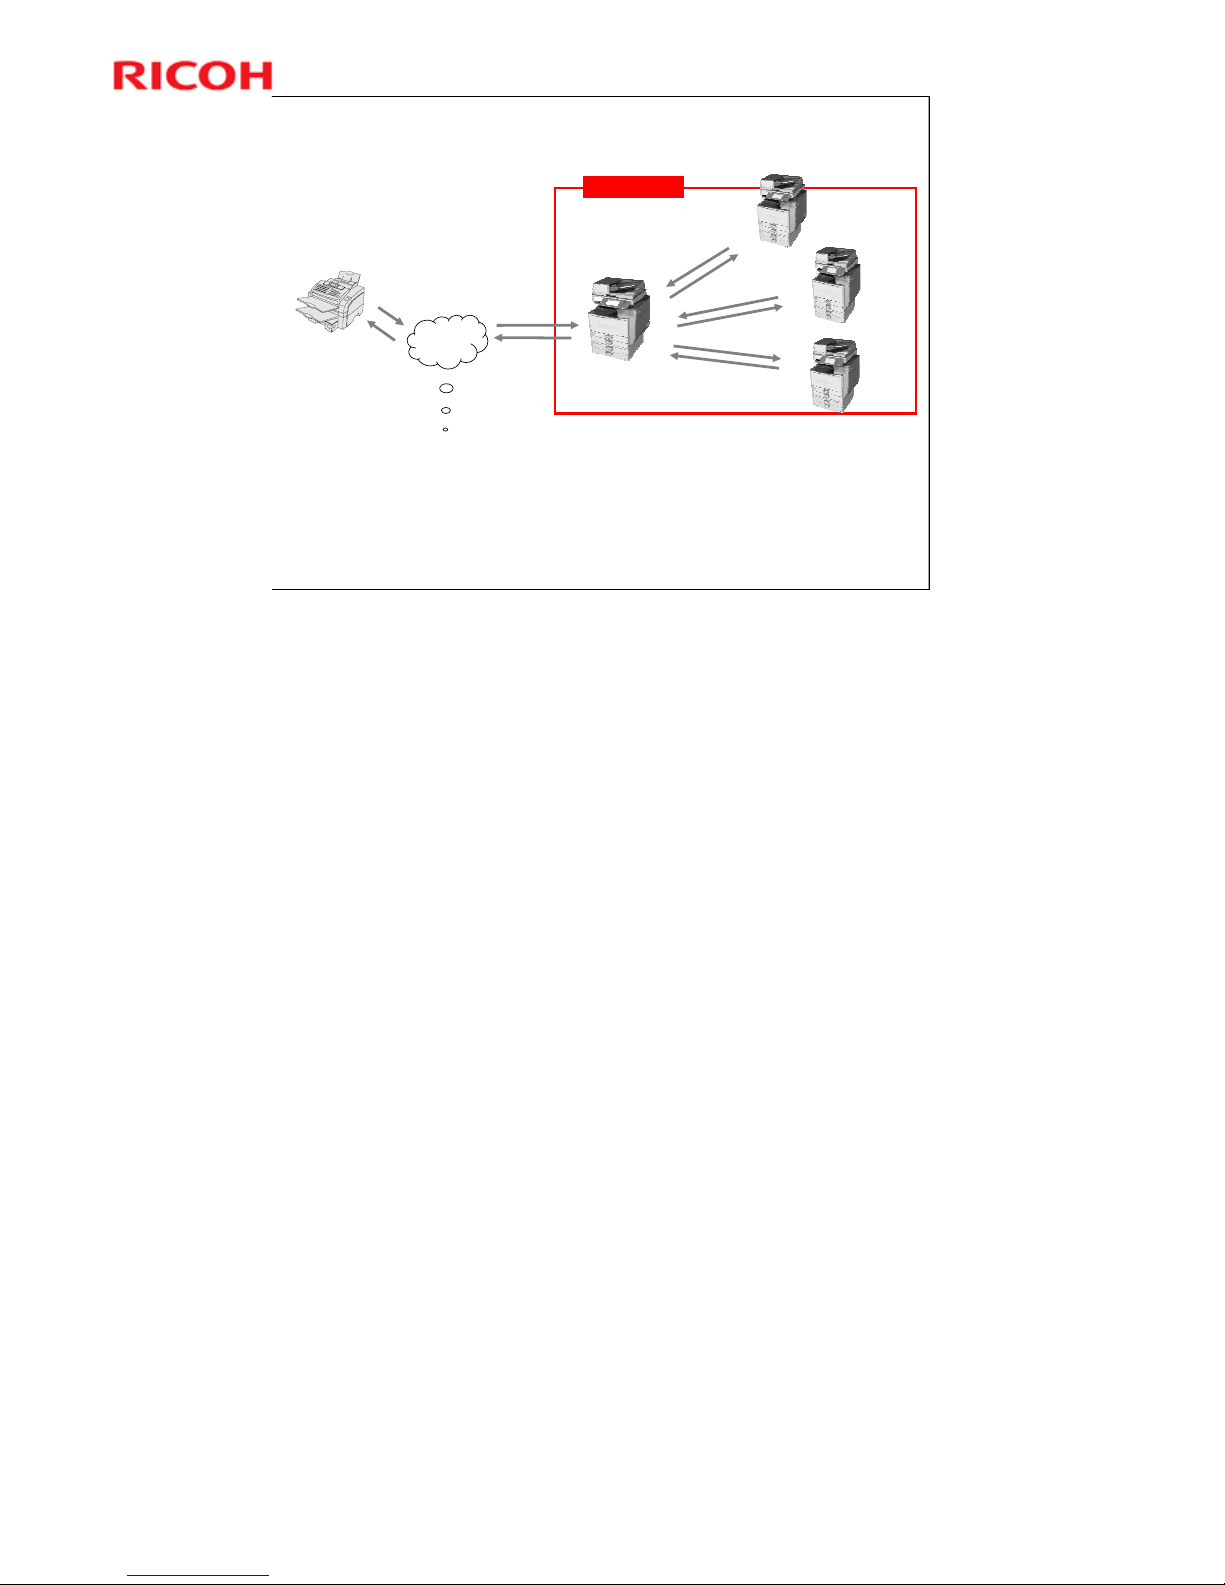
With this feature, GW+ machines can send or receive faxes
through a central GW+ machine with a fax option.
Users can share the fax function with the central machine if it is
on the same network. They don’t have to buy multiple fax options
and can reduce the number of fax lines.
Note: HDD and printer option are required for both centre
machine and sub machines.
No additional notes
Page 38
38
AL-C2 Training
Slide 38
7
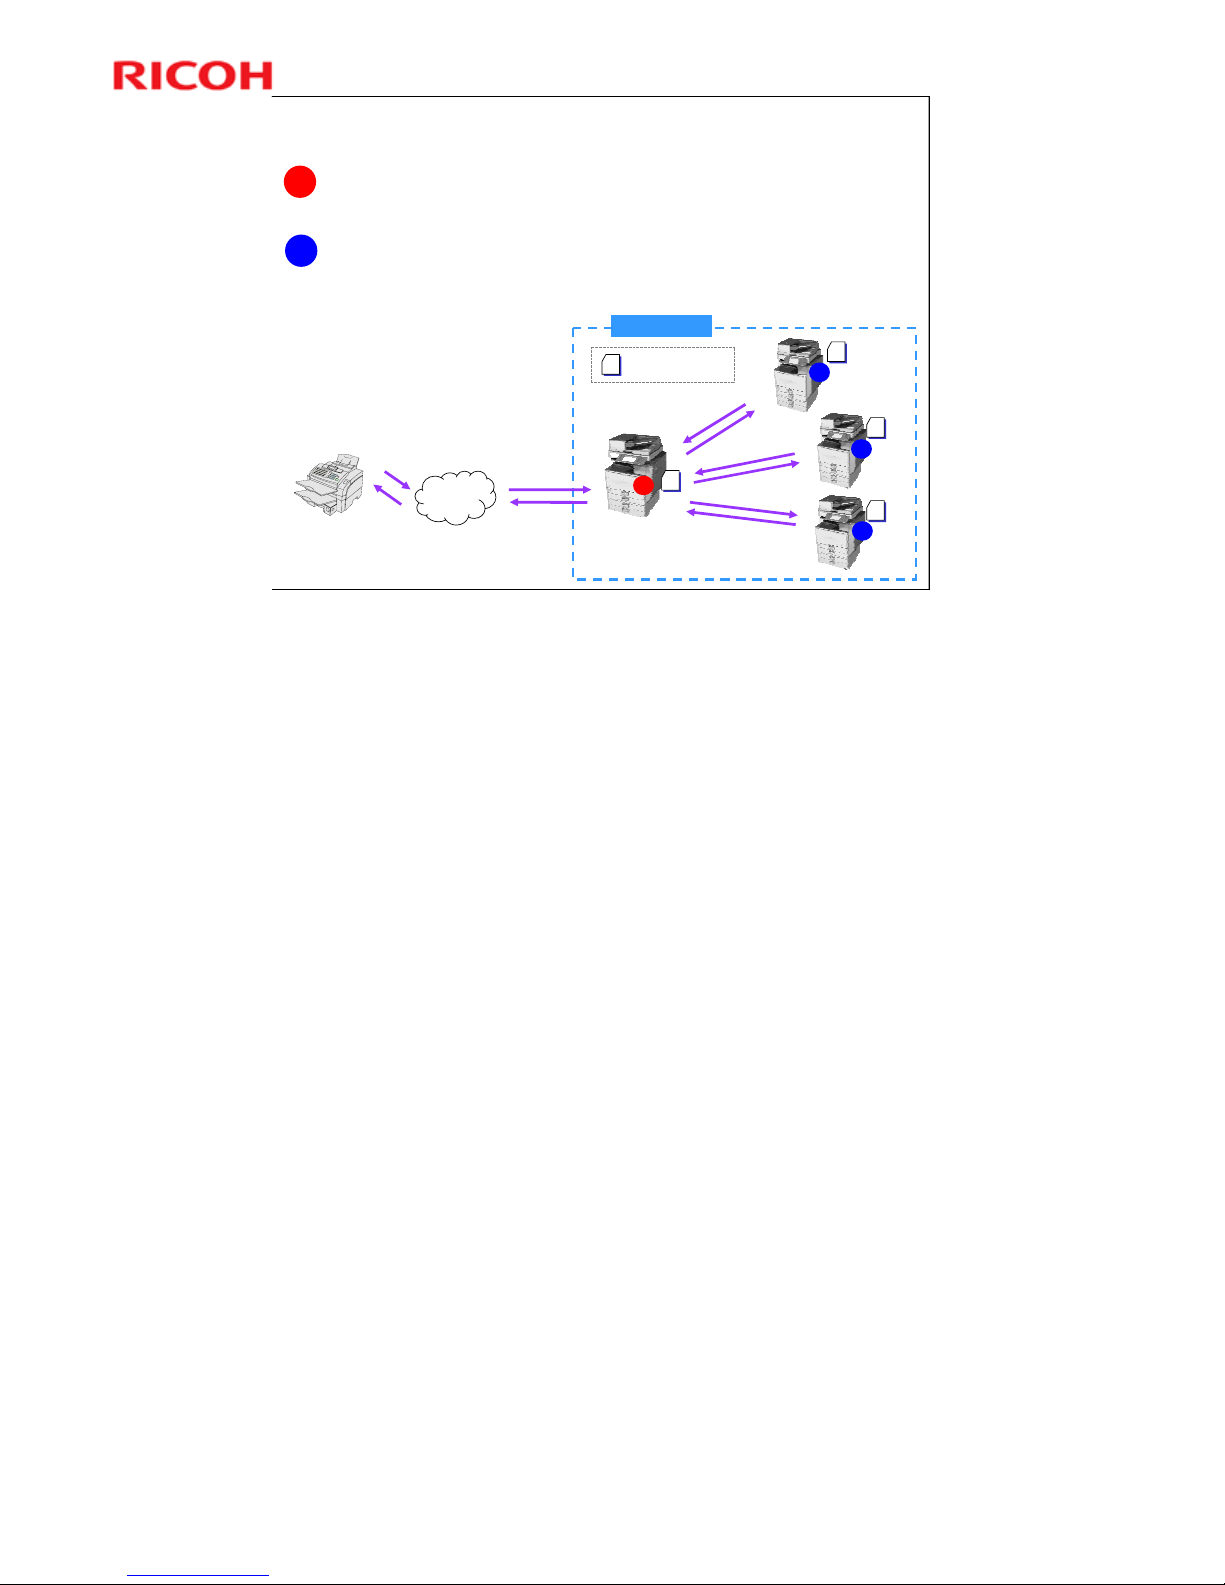
Sub Machines
•HDD and printer option must be installed.
•“Fax Connection Unit (SD card option for MFP)” must be installed.
* In order to receive fax document on sub mac hines, operators must register the addresses of
specific senders as default settings.
Center Machine
•Fax Option must be installed.
•HDD and printer option must be installed.
* “Fax Connection Unit (SD card option for MFP)” must be installed.
Center Machine:
Center Machine: A A
with Fax option
with Fax option
Machine:
Machine: BB
w/o Fax option
w/o Fax option
Fax Receiving
Fax Sending
Machine:
Machine: CC
w/o Fax option
w/o Fax option
Machine:
Machine: DD
w/o Fax option
w/o Fax option
Same Network
SD Fax Connection Unit
SD
SD
SD
SD
On Line
New Feature for this Series
Remote Fax - 2
Sub machines can select and register multiple center machines beforehand, but
can only transmit to one center machine at a time.
Sub machines must have their own address books. Sub machines cannot use
the center machine’s address book.
Page 39
39
AL-C2 Training
Slide 39
7
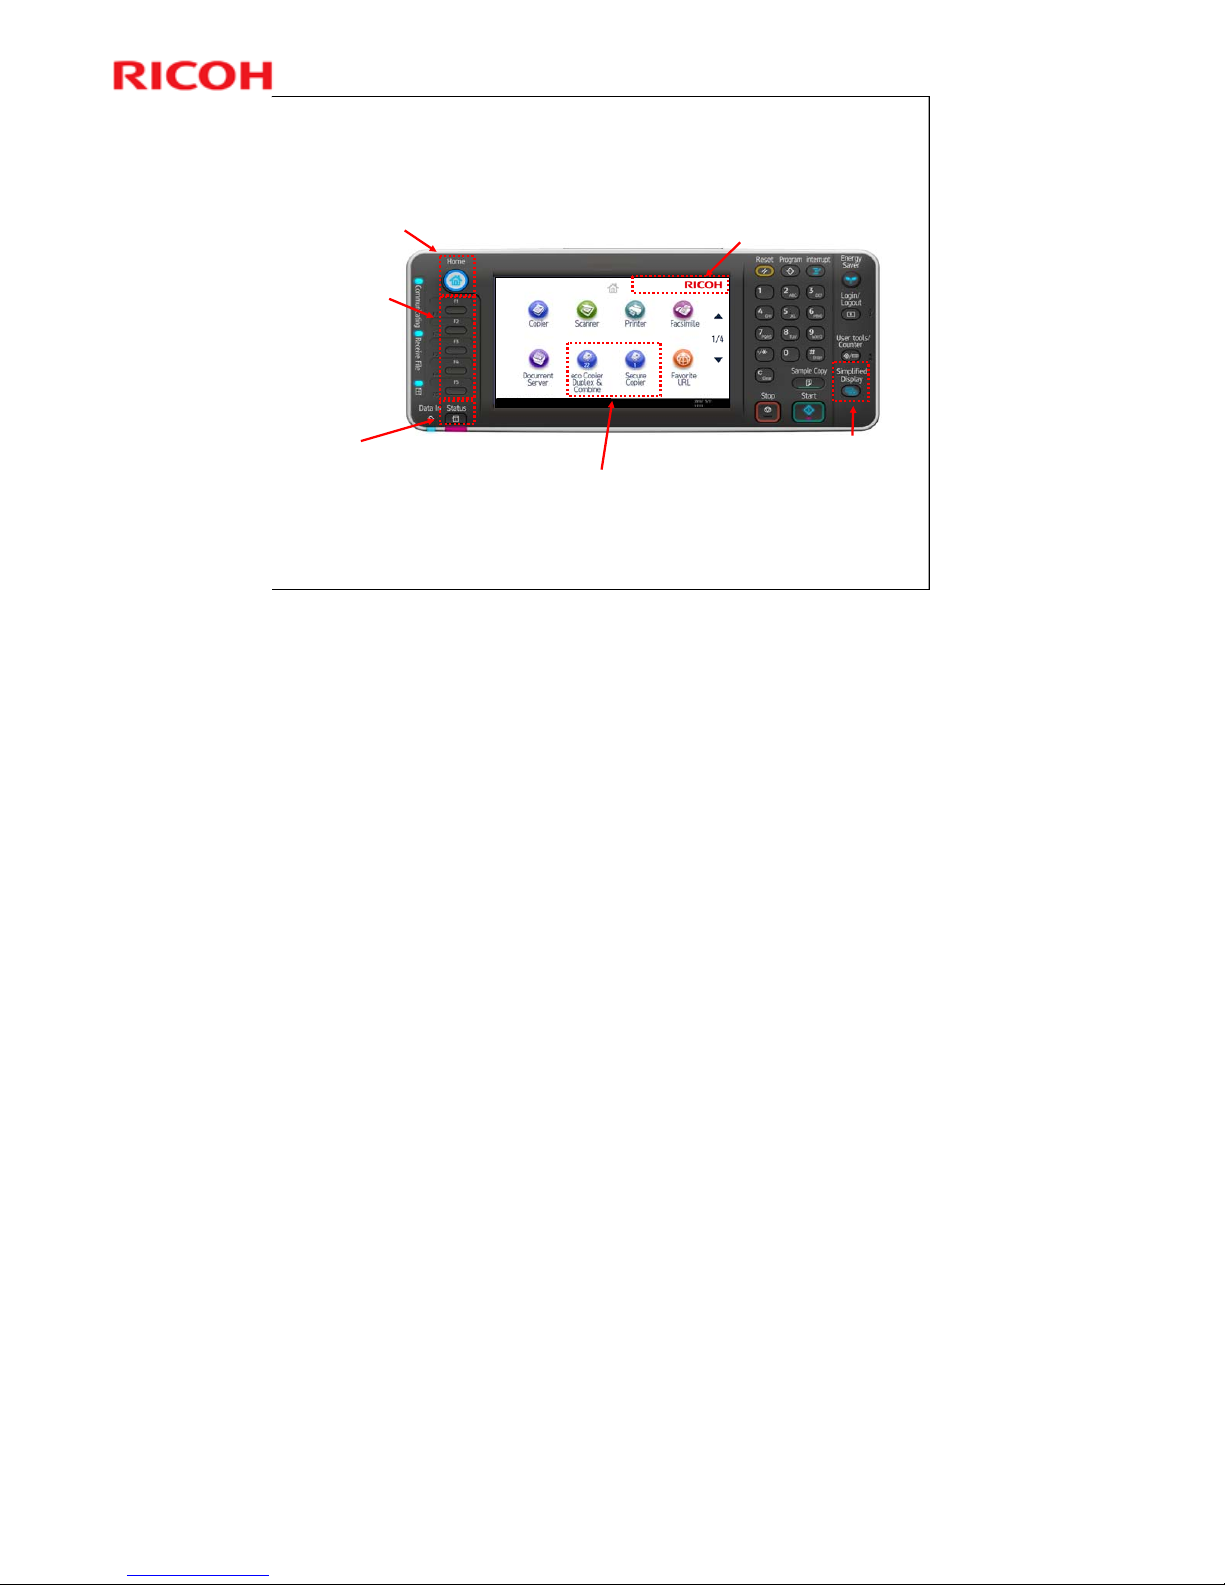
Customizable image area
Users can display an image here, such as a
corporate logo.
Programmed shortcut icons
Users can add shortcuts to programs or Web pages to
the Home screen. The program number appears on the
bottom of the shortcut icon.
*No shortcut icons are registered in the Factory default.
Hard function keys
In the Factory default, no
functions are registered.
Users can register often
used functions including
SDK, programmed
shortcuts and Web pages.
Home key
Press to display the Home Screen.
Status key
Press to check the machine's system status,
operational status of each function, current
jobs and the job history.
Key for switching Home
screen layout
Press to switch the layout of
Home screen to 4 icons x 3
lines.
*Simplified layo ut (4 icons x 2 lines)
to be displayed as the default setting.
New Feature for this Series
Customizable Home Screen - 1
Up to 72 icons can be registered on the home screen.
Page 40

40
AL-C2 Training
Slide 40
New Feature for this Series
Customizable Home Screen - 2
The displayed function icons and their order are
customizable, and a bitmap such as a customer’s
corporate logo can be inserted at the upper right
corner of the screen.
In combination with user authentication, each
user can have their own personal home screen
that only displays those icons that he/she uses.
Personal home screens require a hard disk.
Also a program short cut can be set on the home
screen. Users can program a frequently used job
operation on the home screen so that they can
execute it with just one step.
No additional notes
Page 41
41
AL-C2 Training
Slide 41
7
Types of Home screen
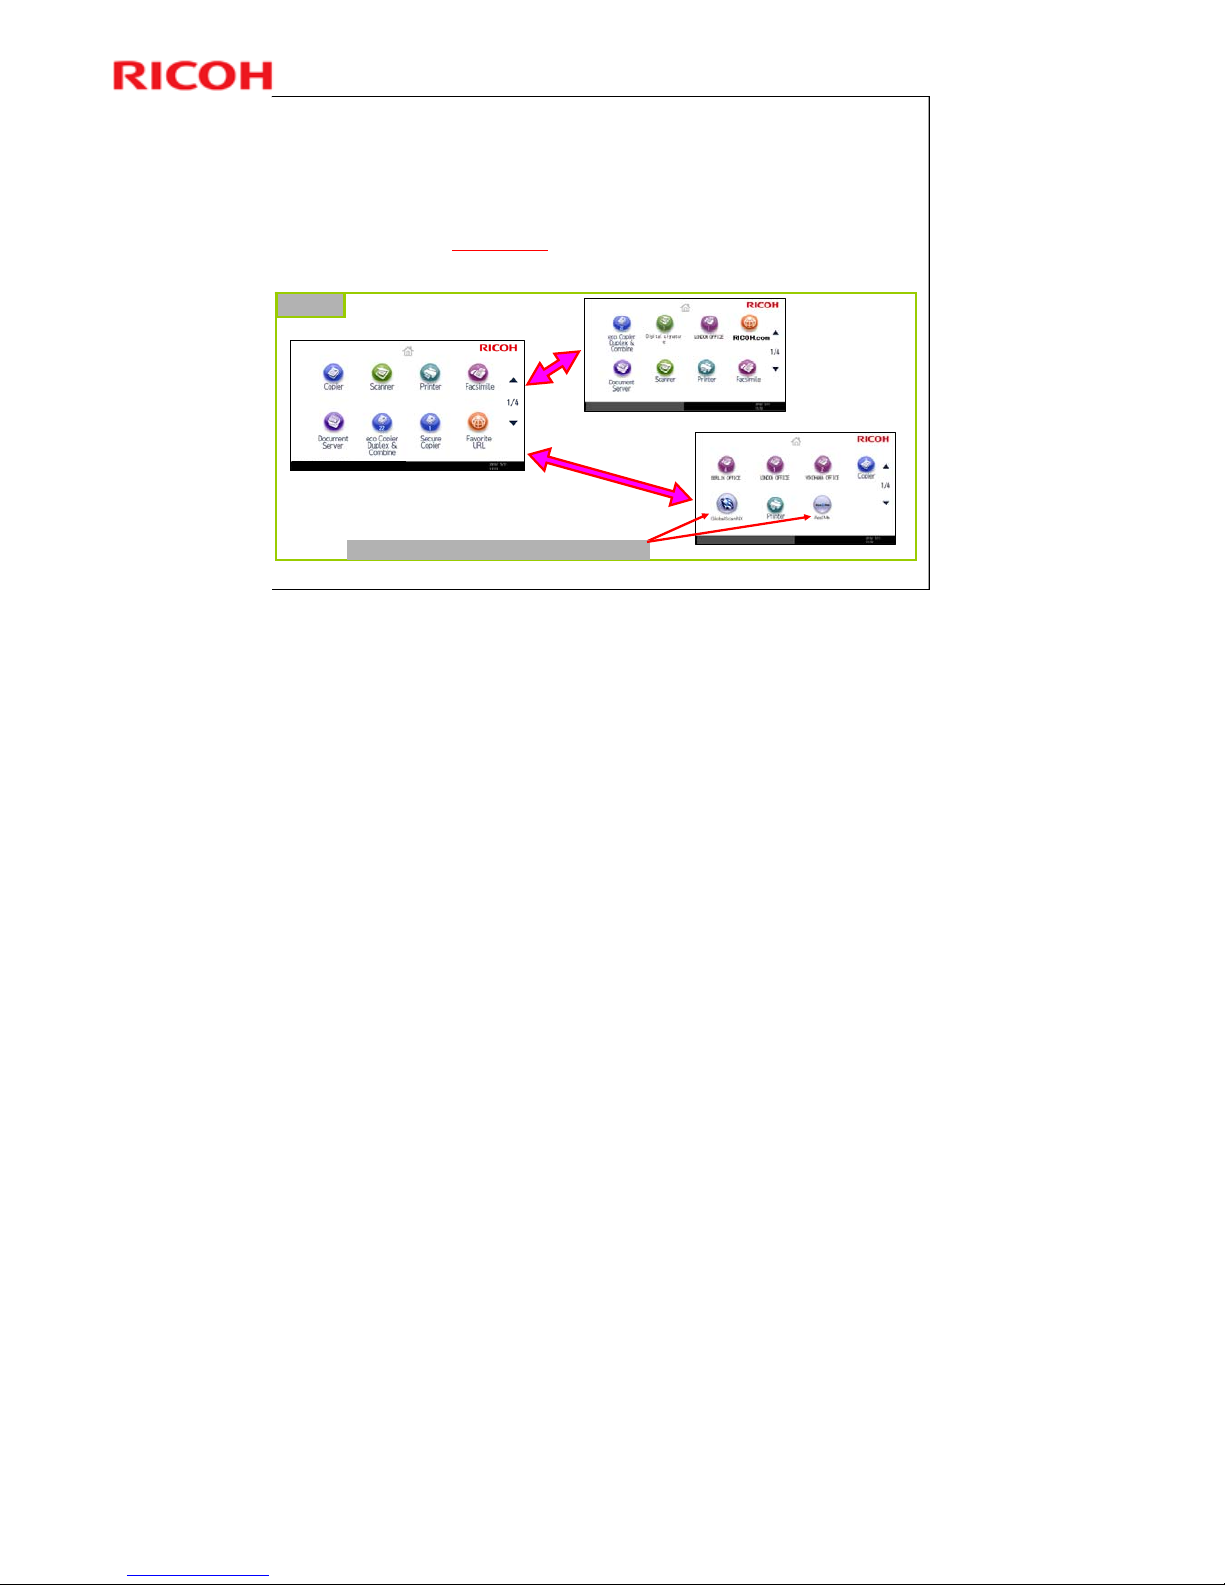
There is two types of Home screen, “Default Home screen”and “User’s Home screen”. “Default Home screen” is
displayed when the authentication function is not active or when the authentication function is active and you are logged in
as an administrator. The machine administrator can customize displayed icons and the layout on the “Default Home
screen” from the operation panel or Web Image Monitor
.
On the other hand, “User’s Home screen” is available when user authentication is enabled, and it can becustomized by
each log-in user to make it more accessible!
Default Home screen
Example
User’s Home screen for user A
User’s Home screen for user B
SDK applications can be activated with one touch operation!
New Feature for this Series
Customizable Home Screen - 3
No additional notes
Page 42
42
AL-C2 Training
Slide 42
7
New Feature for this Series
External USB Keyboard
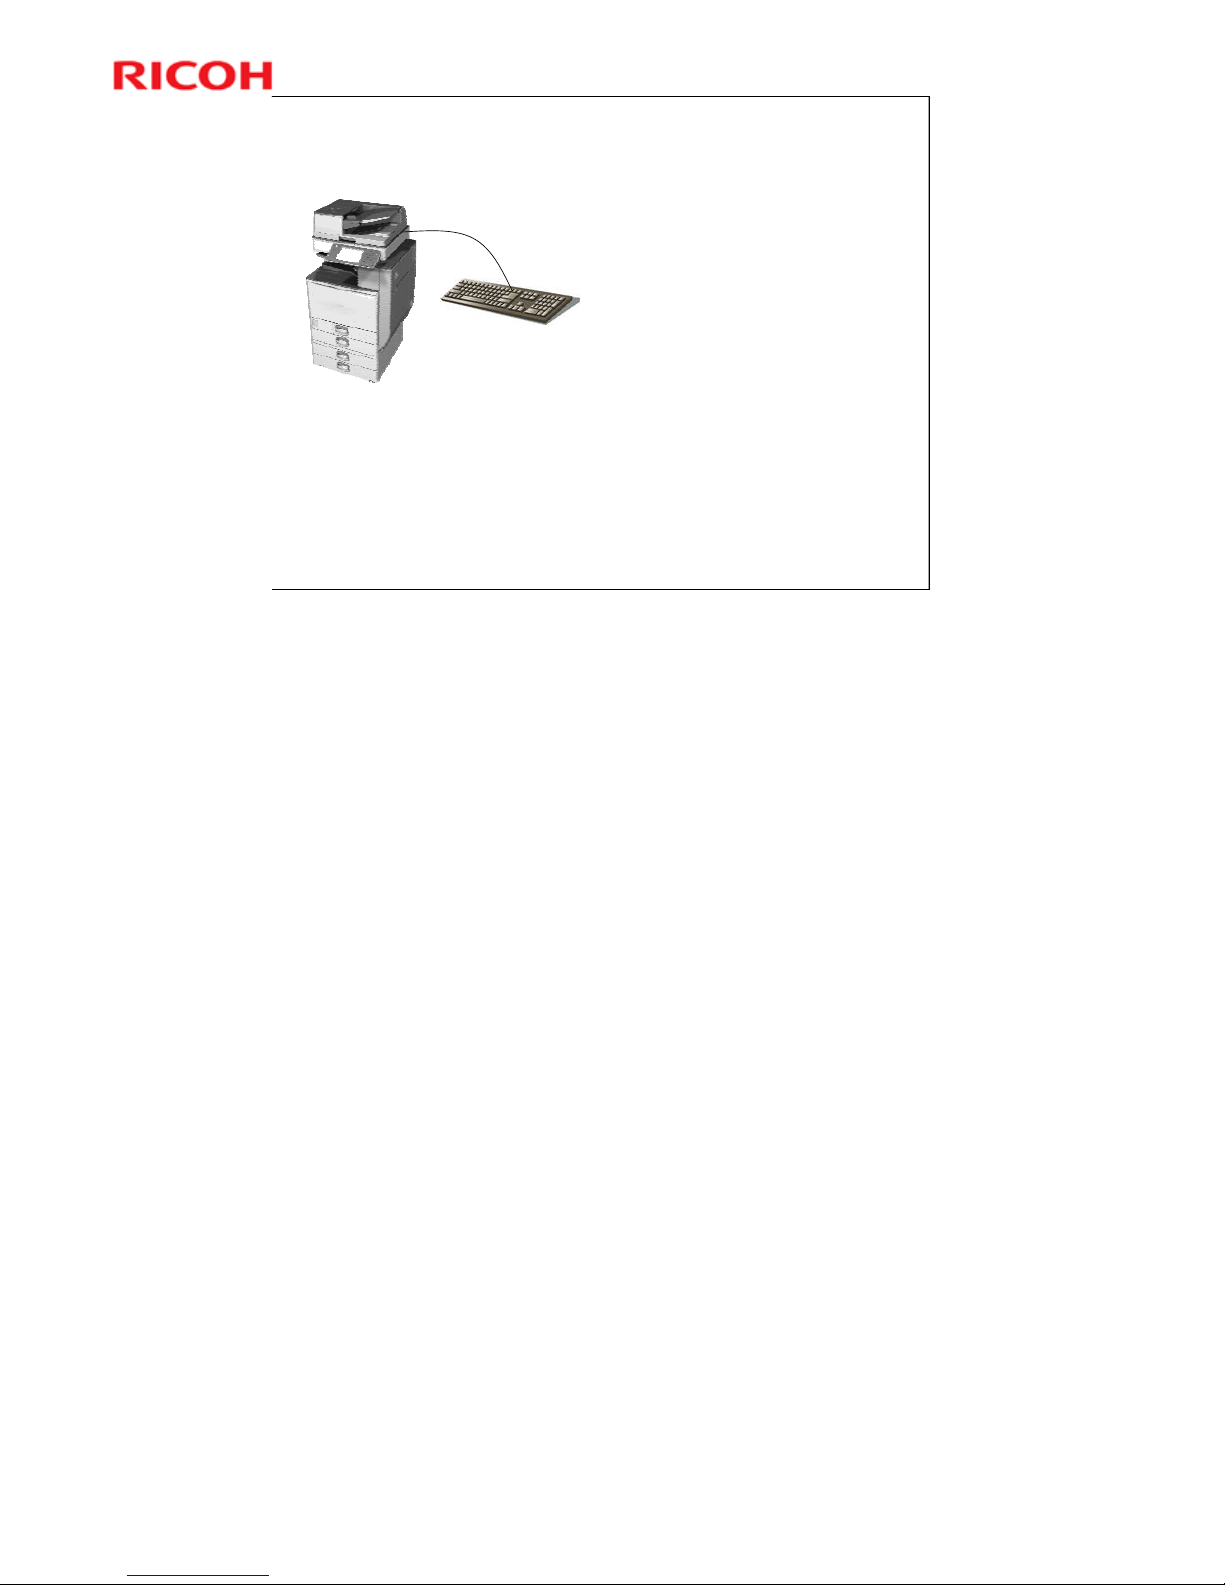
This lets you use a Windows-
compatible external USB
Keyboard for typing when the
software keyboard is displayed
in GW applications.
Before you can use an external
USB keyboard for GW
applications, it must be enabled
in SP mode. (Default setting: for
SDK applications)
You cannot type in both SDK
applications and GW
applications from one
keyboard. If the USB keyboard
is used for GW applications, it
can’t be used for SDK
applications.
The external USB keyboard can
be connected to the USB port on
the operation panel or the USB
port on the back of the controller
board.
Keyboards and tables are not
provided as options.
No additional notes
Page 43

43
AL-C2 Training
Slide 43
New Feature for this Series
MFP Full Browser - 1
This function lets users browse external web
sites and print the displayed page directly from
the machine’s operation panel.
Web page addresses can be registered as
bookmark icons on the home screen.
Example of use: If Ricoh’s support web pages
are bookmarked, users can check the machine’s
manuals at the operation panel.
Requires the optional browser unit.
Basic models must also be upgraded with a hard
disk and printer option.
Paper size for HTML direct printing is fixed to A4/Letter.
The 10 key pad on the operation panel can't be used for entering numbers in the
url. Use the displayed character entry screen or the USB keyboard.
Page 44
44
AL-C2 Training
Slide 44
7
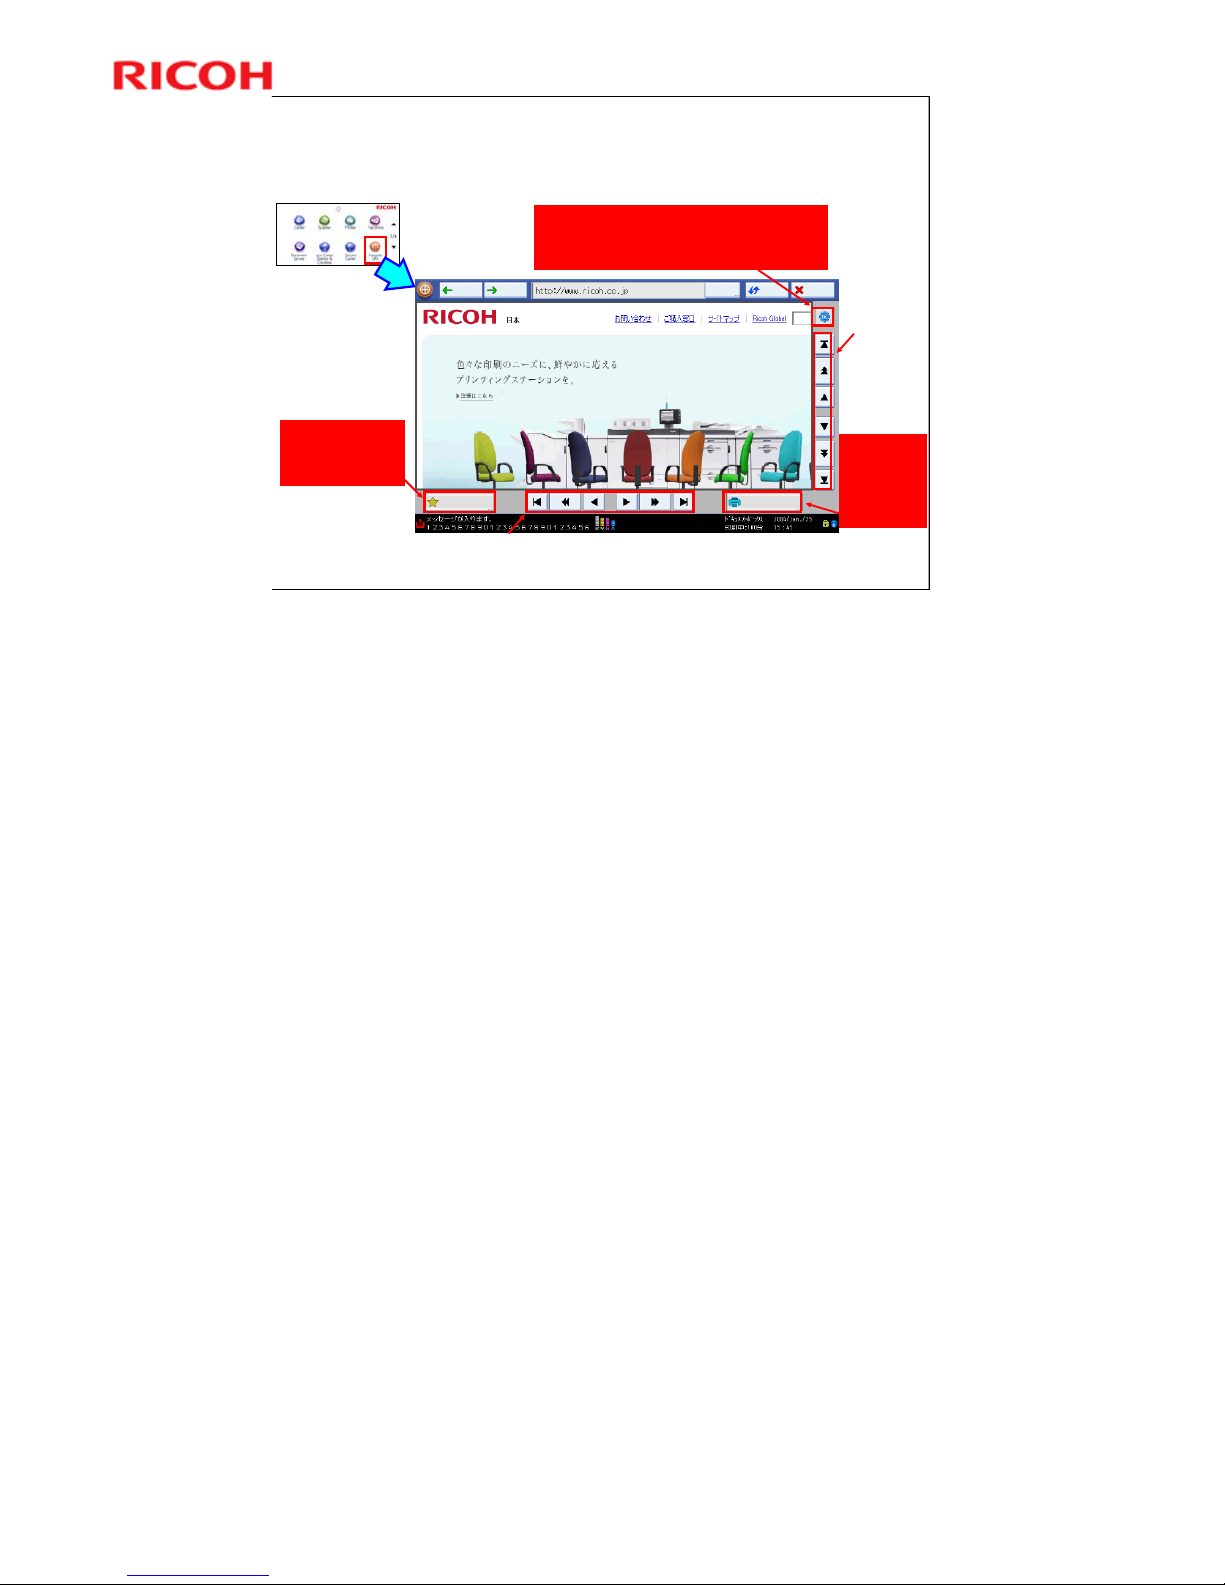
Back Forward Input Refresh Stop
Favorites Print this page
Horizontal scroll bar
Vertical
scroll bar
Administrators can do the following by pressing this icon.
- Setting a specified URL as homepage
- Changing the character code and text size
- Managing Histories and Cookies
- Specifying Proxy server
Users can print
the displayed
web page directly.
Available print
settings are
shown in the next
page.
Users can register a
displayed web page in
Favorites. Up to 100
URLs can be registered
as “Favorites” per device.
New Feature for this Series
MFP Full Browser - 2
Bookmarks for each user is not supported.
Simultaneous usage with an external billing system such as a coin lock is not
supported.
Preview screen before printing web pages is not available.
Page numbers and URL address of web pages are not printed.
Page 45
45
AL-C2 Training
Slide 45
New Feature for this Series
Auto Job Promotion - 1
The machine can skip specific defective jobs and start printing the
subsequent jobs.
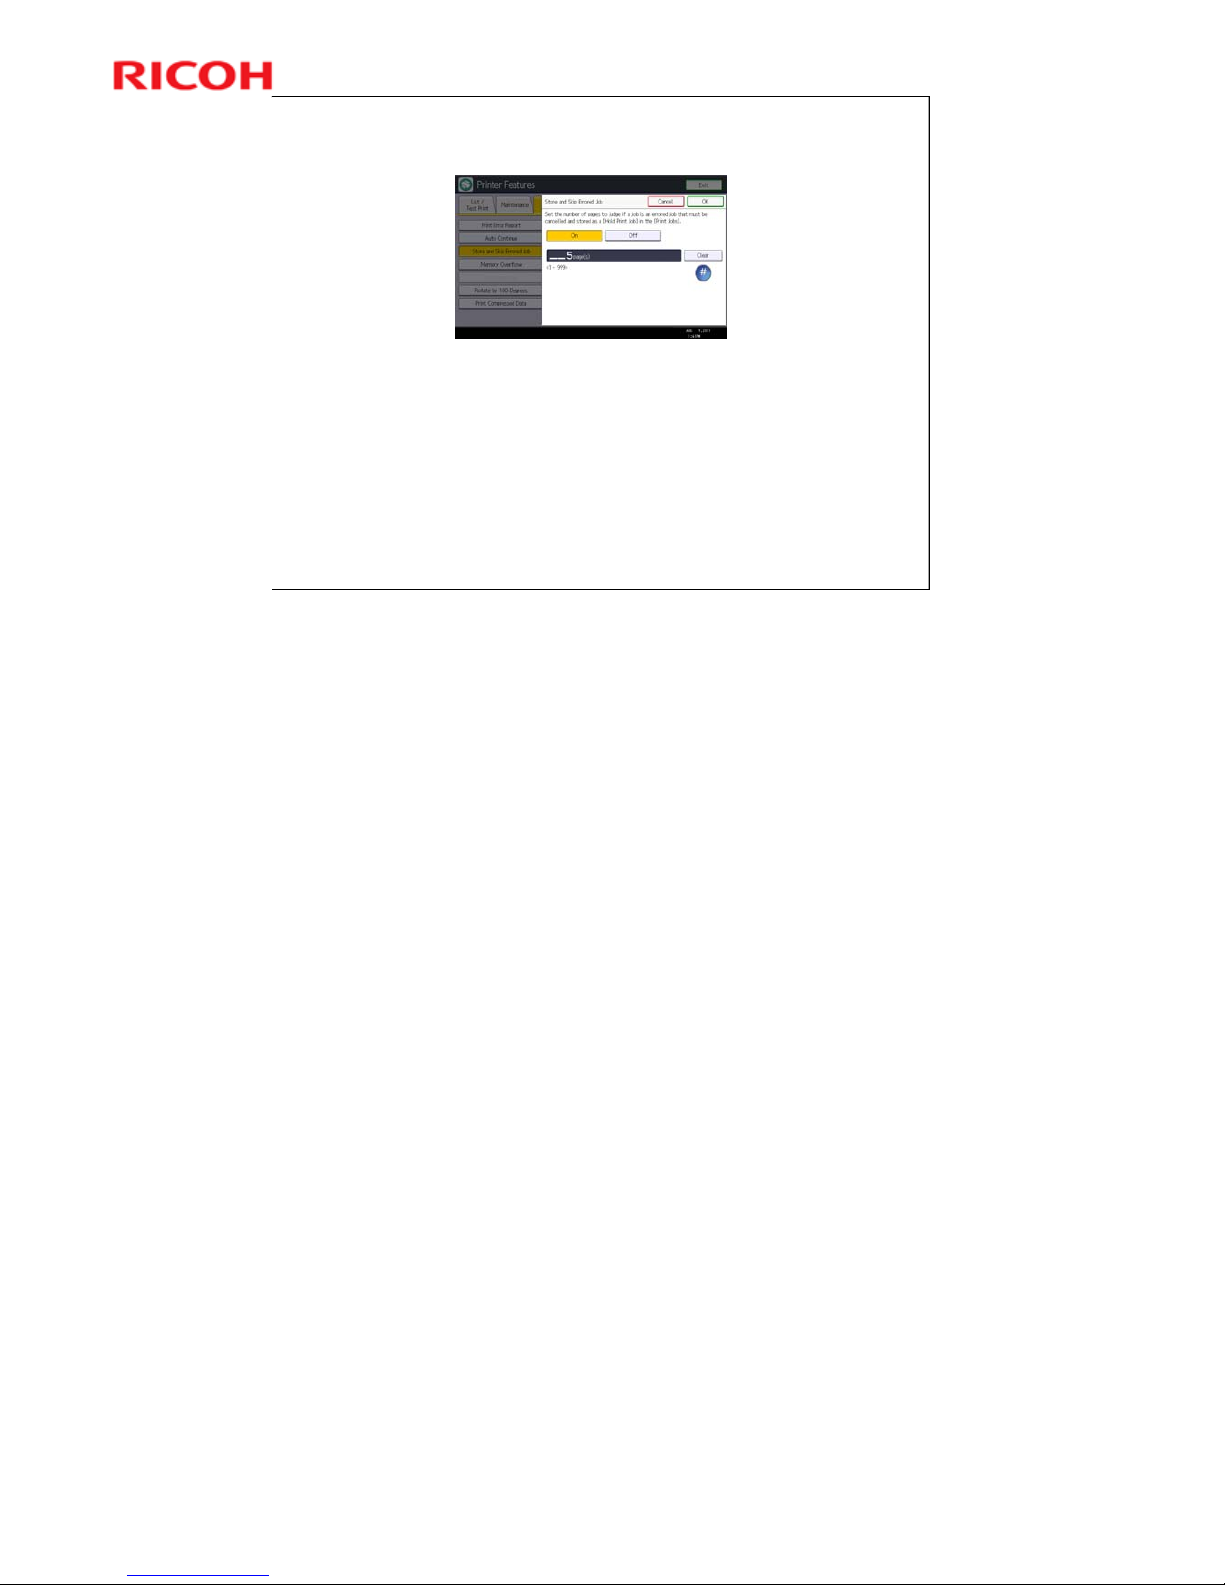
Before using this function, turn on 'Store and Skip Error Jobs' (in the
'System' menu of 'Printer Features'.
When the following errors occur, the job will be skipped and the next job
will be printed.
Specified paper size is not available.
Specified paper type is not available.
No paper on the specified paper tray
No staples (*This is not covered by pre-detection of errors.)
Hole punch receptacle is full (*This is not covered by pre-detection of
errors.)
Jobs that are skipped will be stored as 'Hold Print' jobs (max: 200 jobs).
Skipped print jobs can be reprinted from the operation panel or Web Image
Monitor after the cause of the error is resolved.
If the number of pages for pre-detection of errors is increased, a longer time will
be required until the first page of the job is printed.
Print jobs that use IPDS can't be skipped.
When a Fiery controller or optional Counter Interface Unit is installed, t his
function is not available.
Page 46

46
AL-C2 Training
Slide 46
New Feature for this Series
Auto Job Promotion - 2
Although specific error jobs can be skipped, when an error
occurs during printing a job, the job cannot be skipped and
the machine will stop with an error message.
To reduce the occurrence of such situations,
administrators can set the number of pages for predetection of errors.
Example: If 4 sheets of paper are left and a 10-page
simplex print job is sent to the machine:
i) when the number of pages for pre-detection of errors is 2
» It is confirmed that more than 2 sheets of paper are left, and
the machine judges that no error will occur and starts printing.
But paper end occurs and the machine will stop.
ii) when the number of pages for pre-detection of errors is 5
» The machine predicts that paper end will occur, so the job will
be skipped and handled as 'Hold Print'.
No additional notes
Page 47
47
AL-C2 Training
Slide 47
New Feature for this Series
Scheduled Print
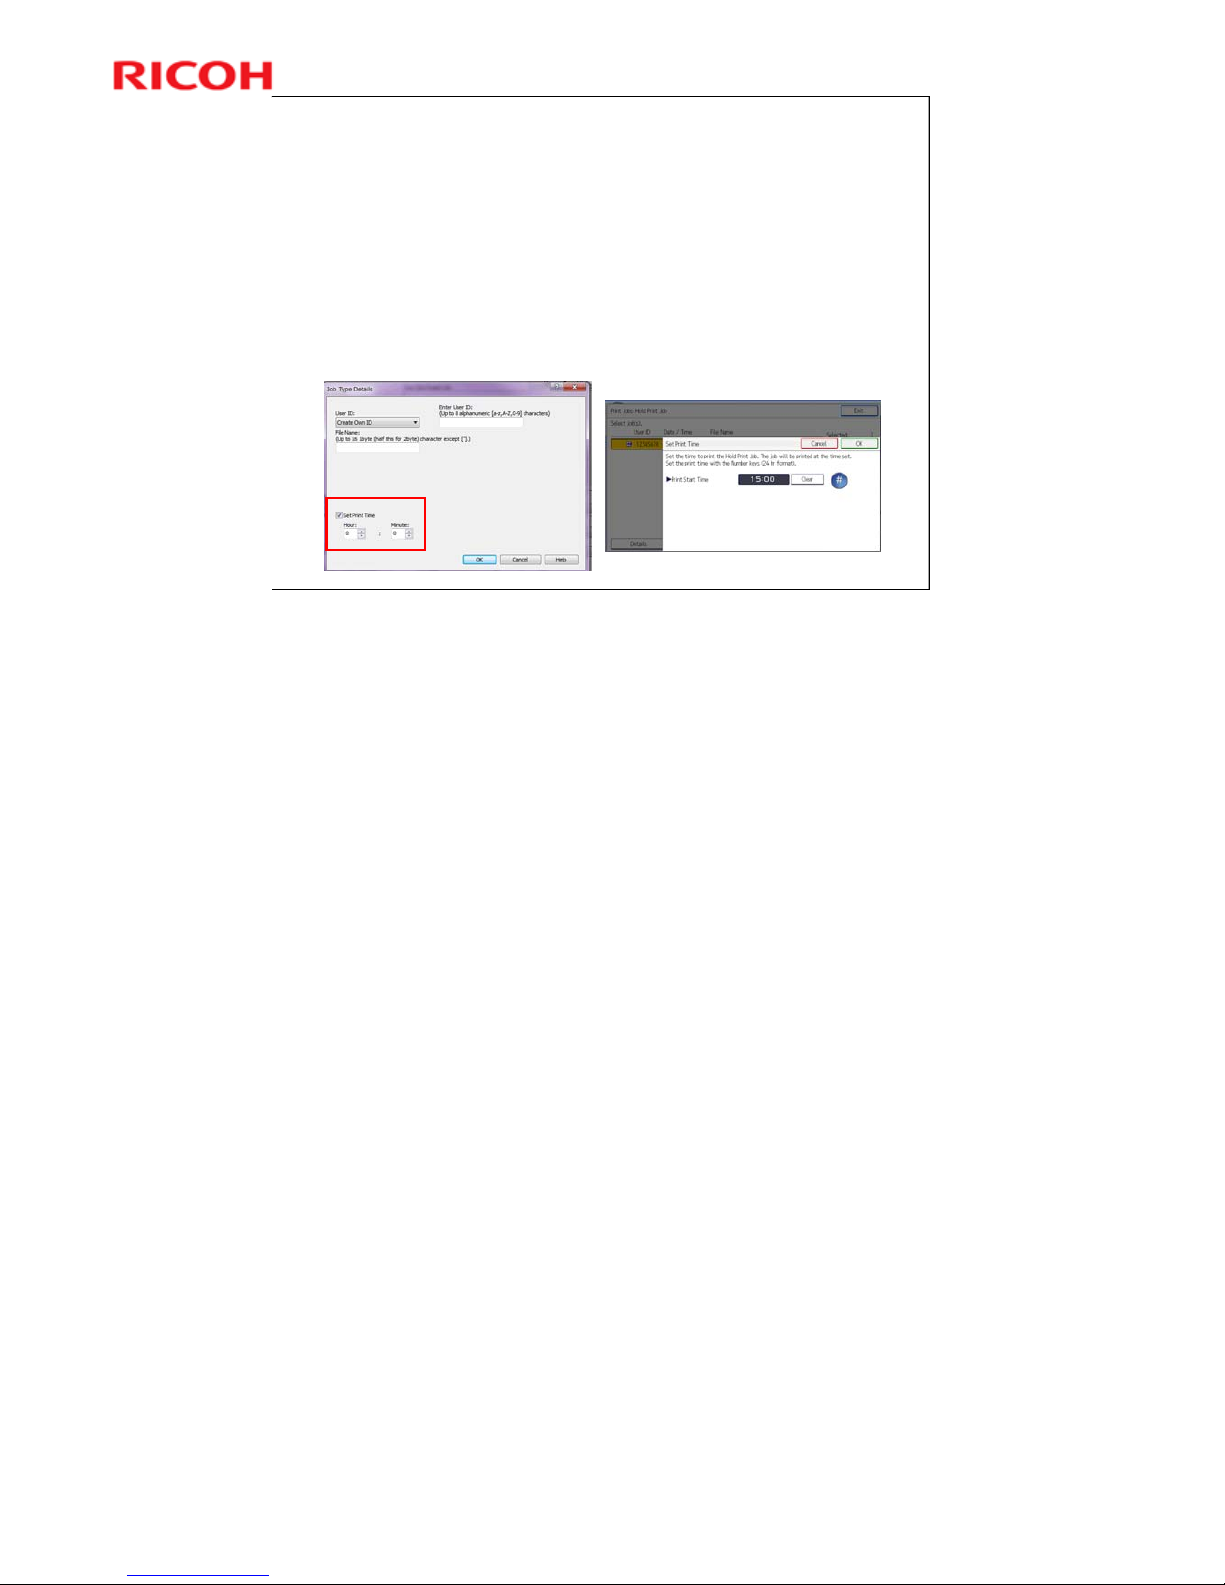
This lets users delay printing to a specified time.
The time can be input with the printer driver, as shown
below left.
The time can be changed at the operation panel or with
Web Image Monitor, as shown below right.
Use this to print large jobs after office hours, so that others will not be prevented
from using the machine.
When the main power of the machine is turned off if the specified time has
arrived, the Scheduled Print jobs are stored as Hold Print jobs.
Page 48
48
AL-C2 Training
Slide 48
New Feature for this Series
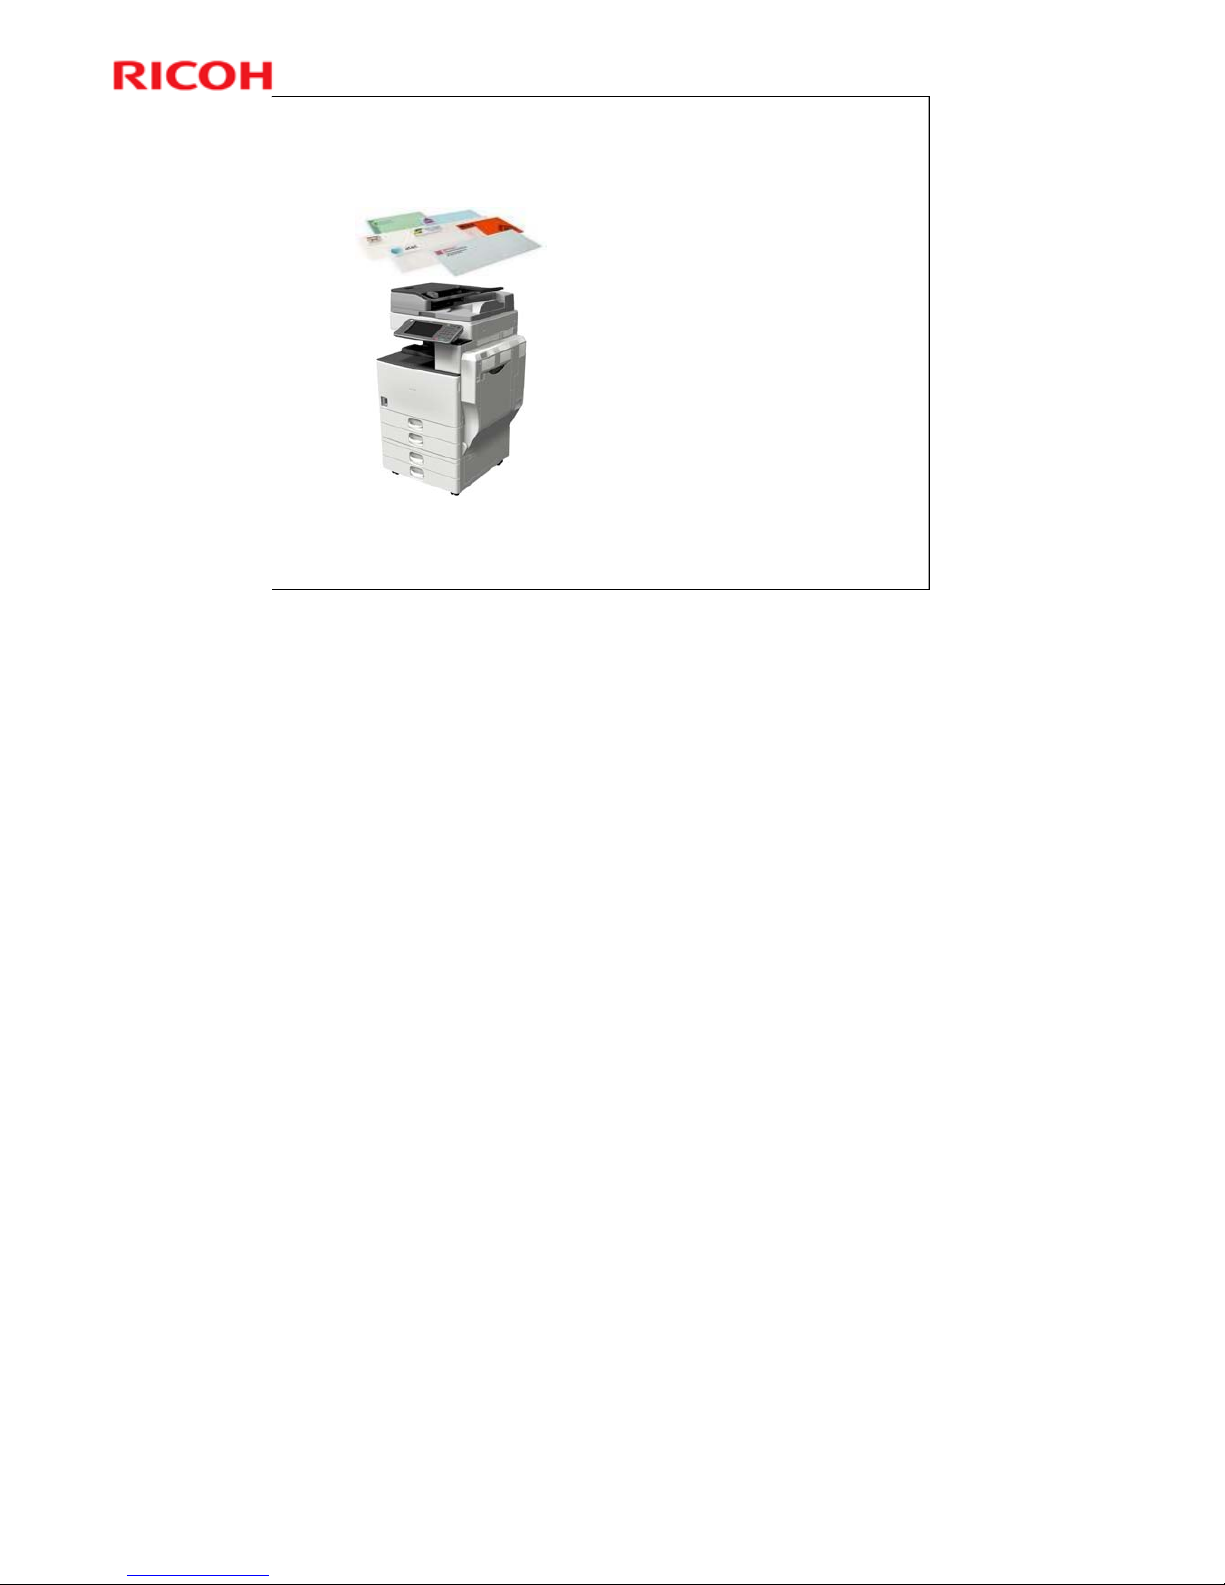
Envelope Printing
The standard tray and the
bypass tray support
printing on envelopes.
No additional notes
Page 49
49
AL-C2 Training
Slide 49
7
2 in 1 + booklet
1 2
・・・・・
15
1215 13143
4
5611
12
9107
8
外側
内側
外側
内側
Inside
Inside
Outside
Outside
4 in 1 + booklet
Examples of output
1 2
・・・・・
30
外側
内側
外側
内側
1 2
3 4
29 30 25 26
27 28
5 6
7 8
9 10
11 12
21 22
23 24
17 18
19 20
13 14
15 16
Inside
Inside
Outside
Outside
New Feature for this Series
Booklet Printing with Layout
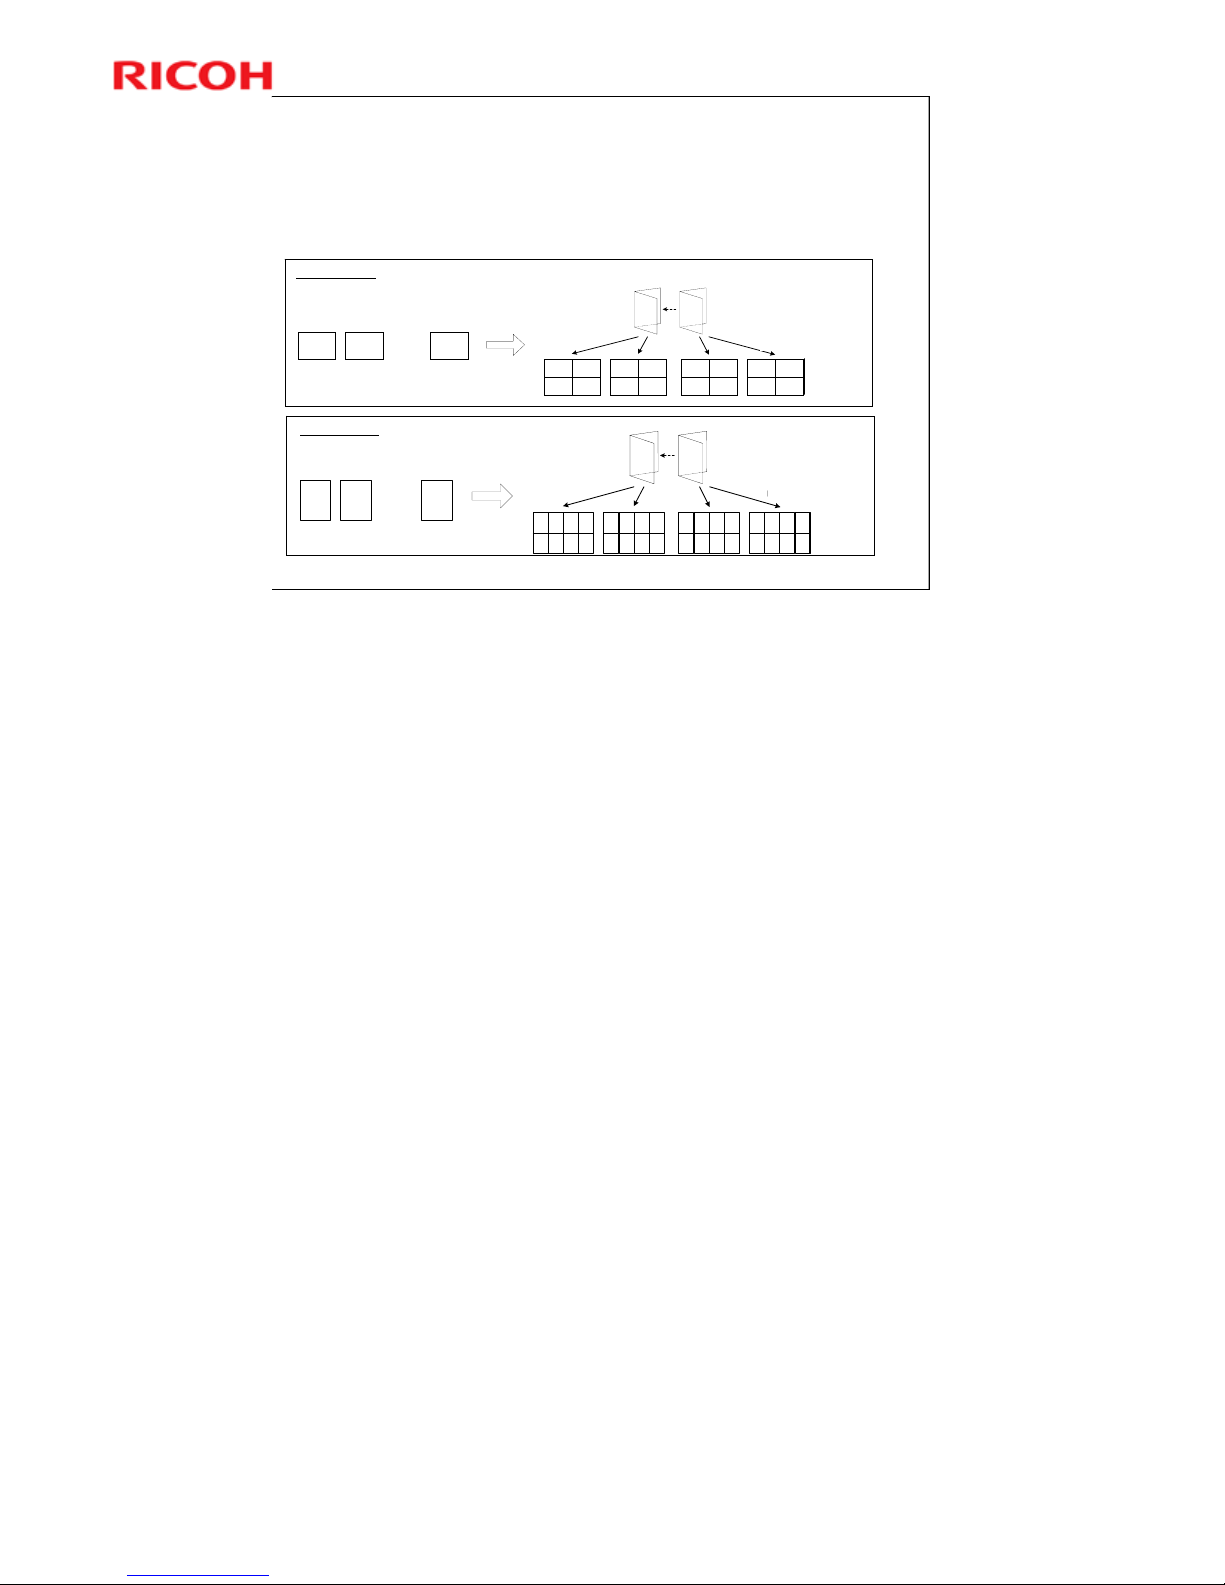
This allows printing of booklets that have more
than one image on each page.
This function is not available with PCL5 or XPS driver.
It is available for the Mac OS (booklet printing was not available on the Mac
before).
First print output time will be slightly delayed when booklet printing with the PS3
driver.
Specifying input tray and feeding paper from bypass tray are not possible for
booklet printing with the PS3 driver.
When printing files including PASSTHROUGH objects from Mac OS, this
function will not work correctly.
Page 50
50
AL-C2 Training
Slide 50
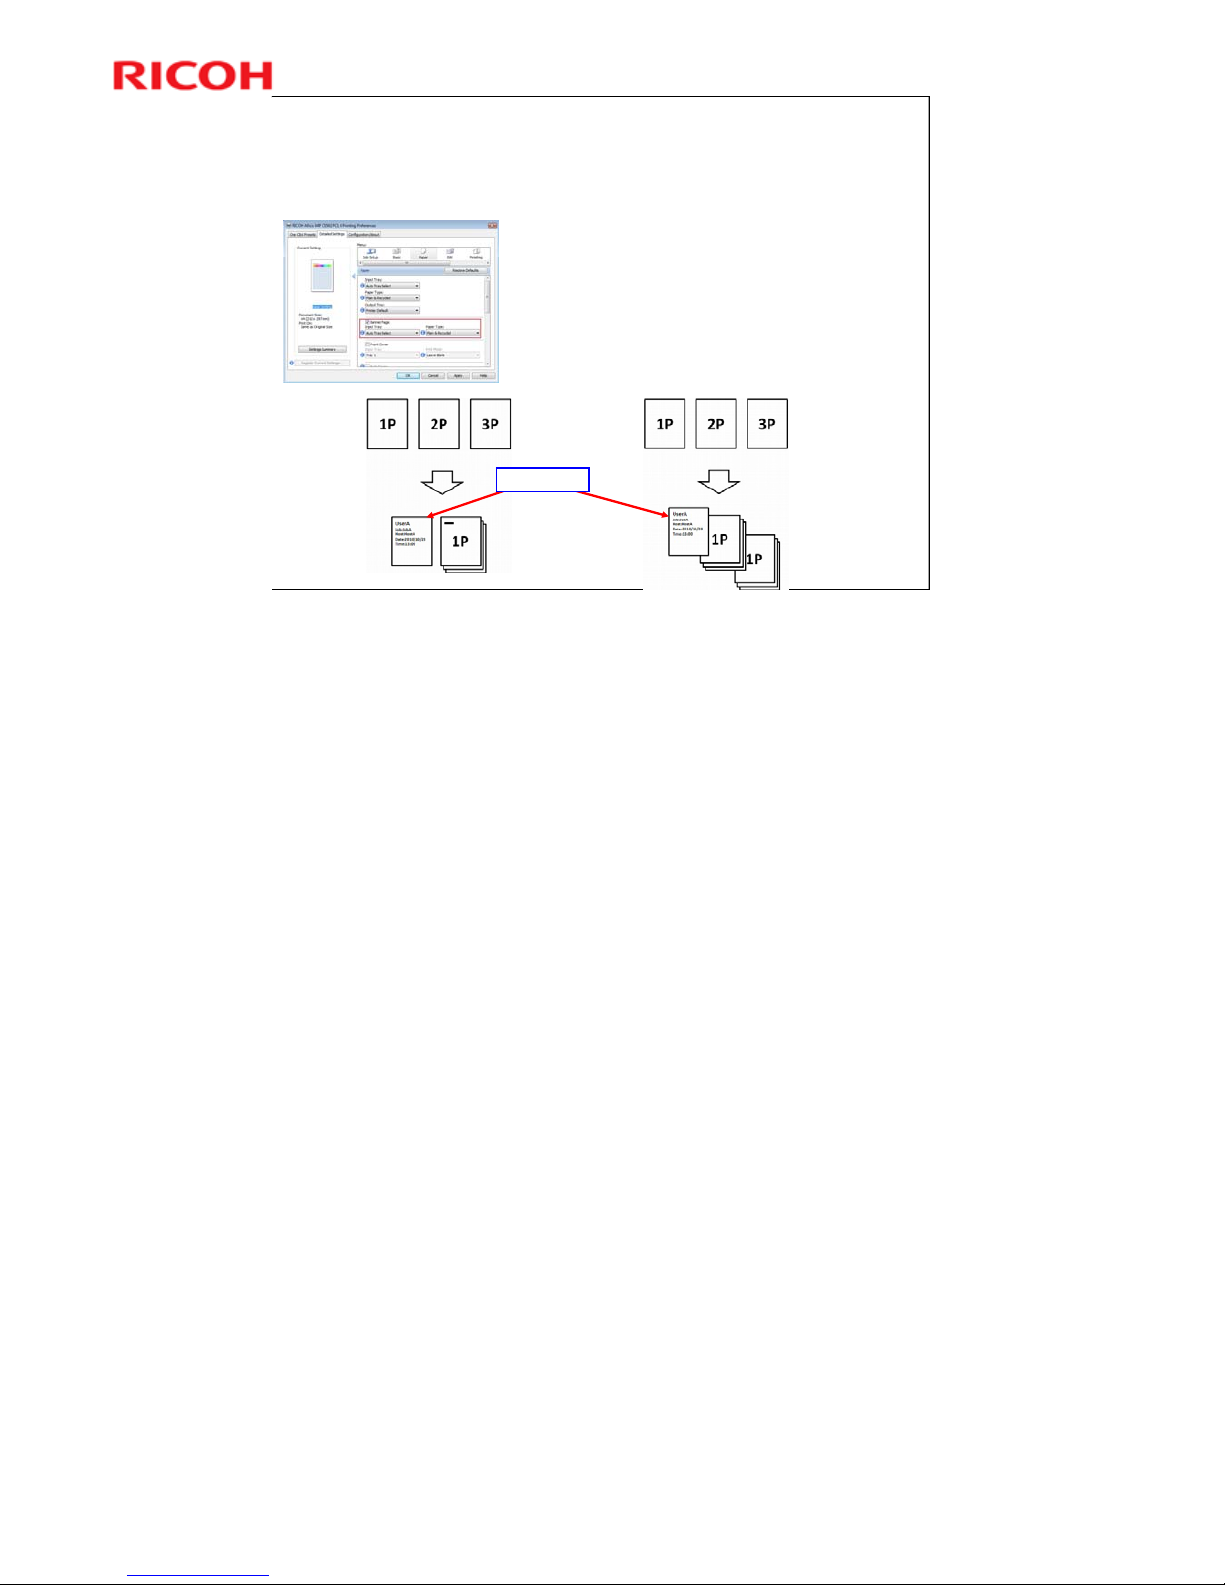
Users can activate this function on the property screen of printer
drivers (PCL5, 6 & PS). This function is also available from Mac
OS X 10.2or later.
The following items are printed on a banner page.
- Log-in User Name, User ID or Windows/Mac account name
- The Date and Time the document was printed
- The originating computer hostname (server hostname will be
printed when “Point & Print” is used).
- The Job name
7
Example: 3-page job with stapling
Example: 2 sets of a 3-page job
Banner Page
New Feature for this Series
Banner Page
A banner page is a page that is printed before the job, and
contains information about the job.
A banner page is used in network printing in order to separate documents (or
"print jobs") from each other and to identify the originator of the print by user
name.
¾ In some cases, print jobs are sent to a central processing area where
messengers take the printouts back to the owner, but the usual practice in
modern office environments is for the user to retrieve his or her own
documents. The banner page makes it clear who printed each job.
Printed banner pages are counted as B&W jobs.
The banner page is not available for “Sample print”, “Locked print”, “Stored
print”, “Hold print” and “Send to Document Server”. Although exclusive control on
printer driver UI is available on Windows OS, it doesn’t work on Mac OS. This
means that if both banner page and “Locked print” are selected at the same time
on Mac OS, but the banner page setting is ignored.
Landscape can’t be selected as the orientation of banner pages.
The NetBIOS name will be used as the Host name on banner pages. If users set
a computer name which is longer than 15 bytes on a Windows OS, only the first
15 bytes of the computer name will be printed as Host name because of
Windows OS specifications.
If languages which are not supported by MFPs ar e included in the account
name, computer host name or job name, the characters will be garbled.
When users print multiple copies, just one sheet of banner page will be printed
before the first copy. But please note that there are some applications which
handle multiple copies as multiple jobs. In this case, banner pages will be printed
before each copy.
Page 51
51
AL-C2 Training
Slide 51
New Feature for this Series
Setting Quotas - 1
This function allows the customer to
set limits on the number of outputs
for each individual user or group.
The following applications can be
managed with this function.
Copy
Print (including “Print from
USB/SD”)
Document Server
SDK
» Fax related jobs and “Mail to Print”
jobs can’t be limited.
User authentication must be enabled.
Possible Settings
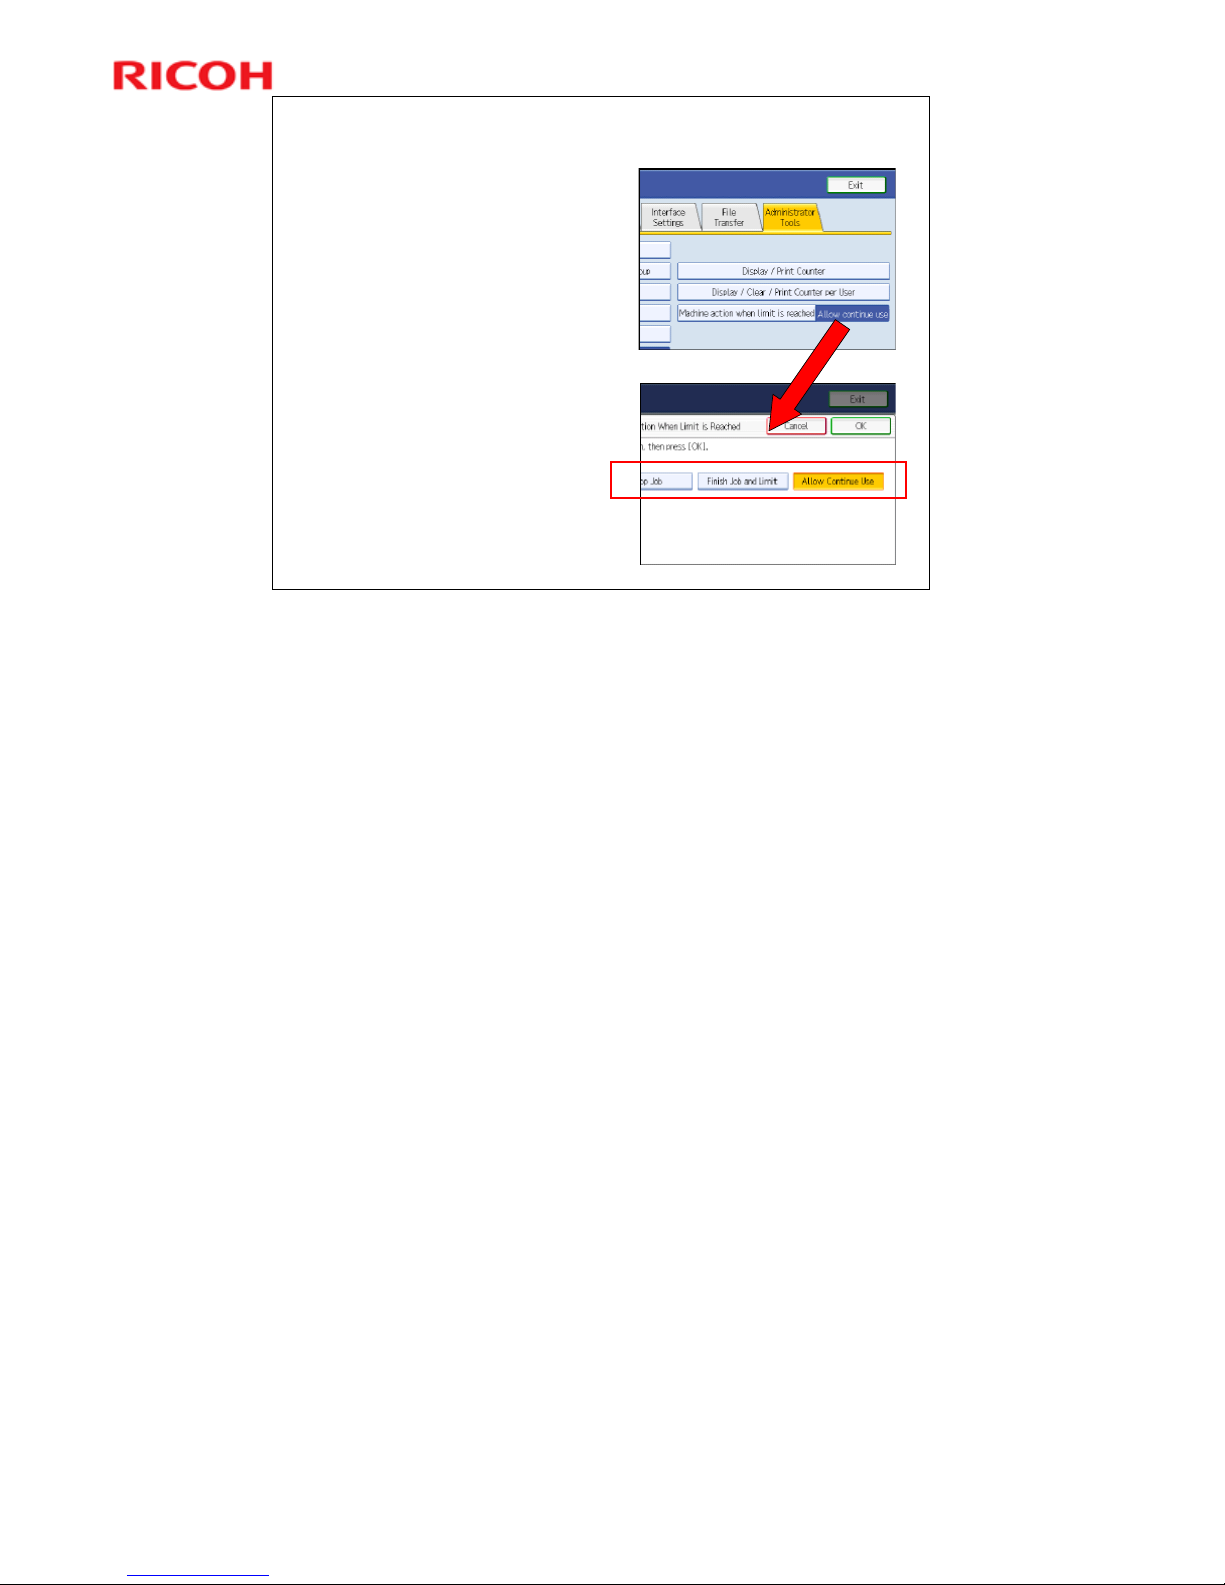
Stop Job: When the maximum print
volume is reached, both the
current job and waiting jobs are
canceled.
Finish Job and Limit: When the
maximum print volume is reached,
the current job is allowed to finish,
but waiting jobs are canceled.
Allow Continue Use (Default
setting): Print volume is not limited.
This is the same as for AP/AT-C2.5.
Page 52
52
AL-C2 Training
Slide 52
New Feature for this Series
Setting Quotas - 2
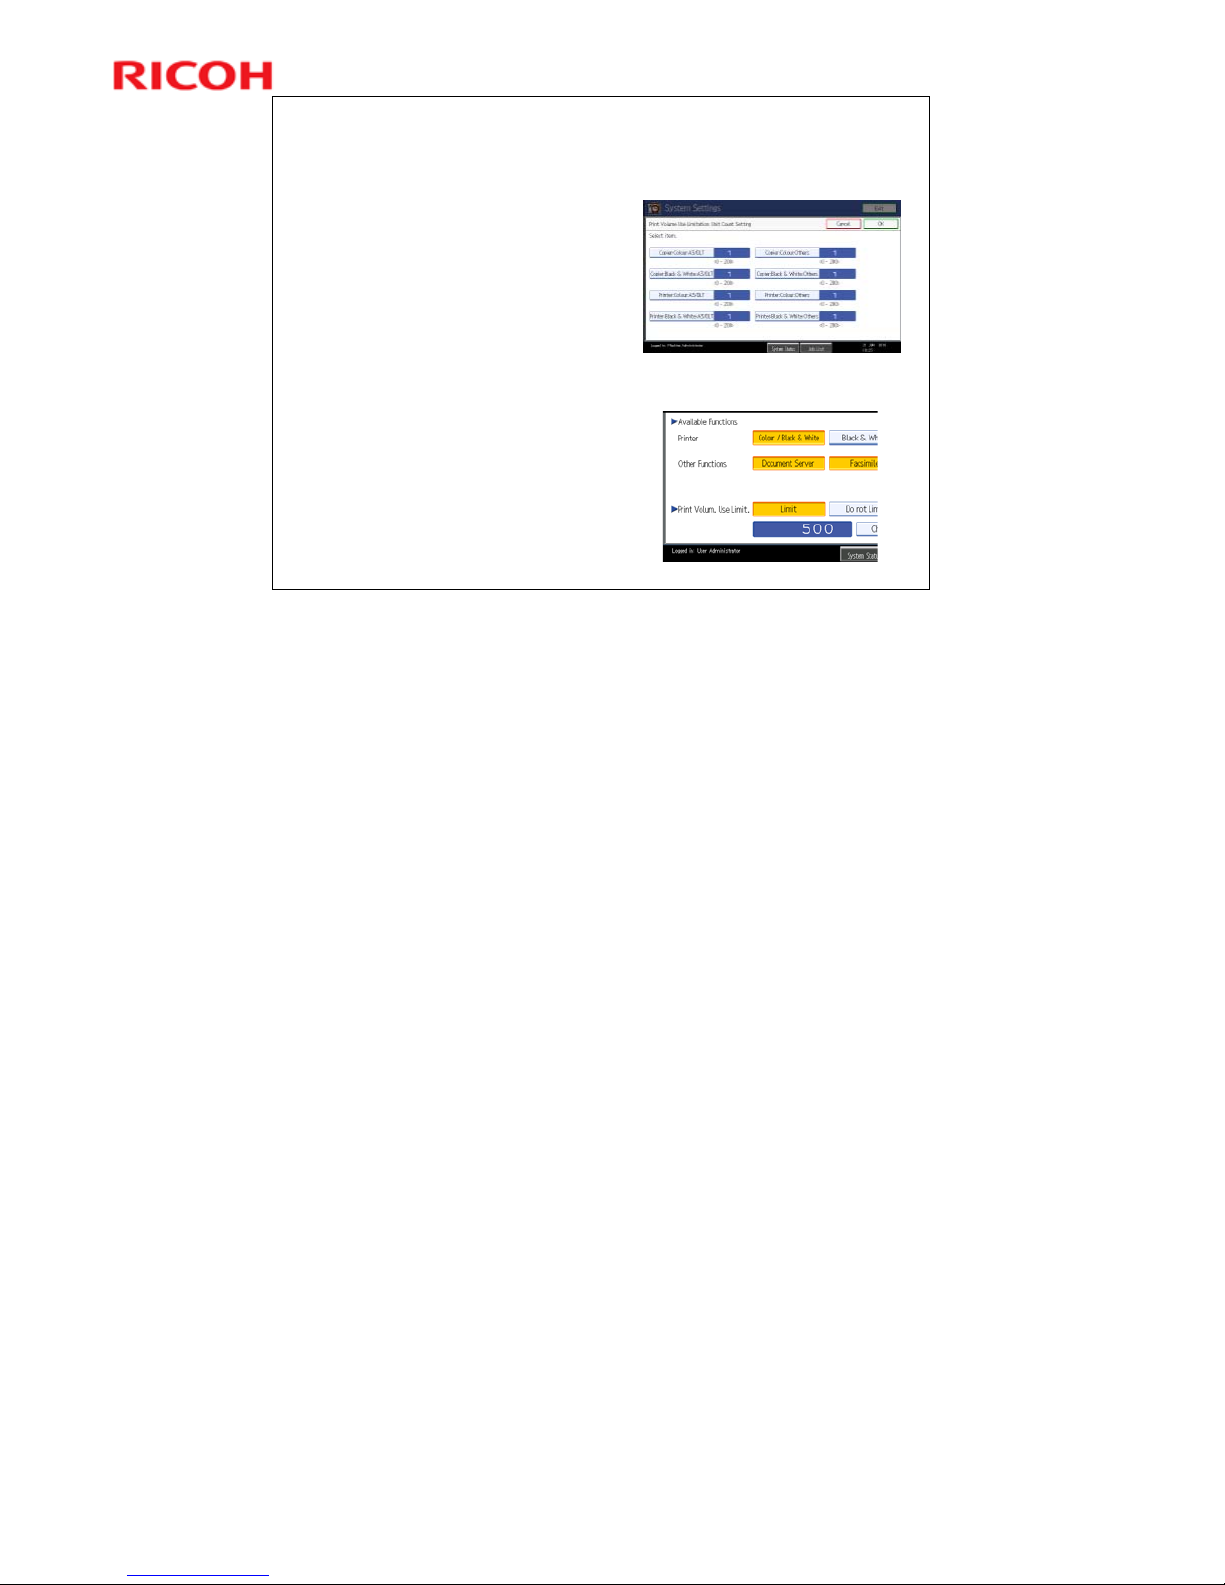
Specify a per-page unit count
between “0” and “200” for each of the
shown print conditions.
Note: The display is for a color
copier.
”Others” means paper sizes other
than A3 and DLT (11 x 17 inch).
The default per-page unit count for
every print condition is “1”.
If you specify "0" for a print
condition, no volume restriction is
applied to jobs matching that
condition.
This setting can be done from
“Web Image Monitor” also.
Specify the Maximum Count per User.
A value between "0" and "999,999“
can be set for each user as the
maximum available print volume.
The maximum print volume for an
individual user can also be
specified in [Address Book] in
“Web Image Monitor”.
This is the same as for AP/AT-C2.5.
Example
¾ If print conditions and Maximum Use Count of “User A” are specified as
follows…
Copier: A3/DLT, B&W 10
Printer: A3/DLT, B&W 10
Copier: Others, B&W 5
Printer: Others, B&W 5
Maximum Use count of “User A”: 500
¾ The following printing pattern is available for “User A”.
50 pages of “Copier/Printer: A3/DLT, B&W”
100 pages of “Copier/Printer: Others, B&W”
Page 53

53
AL-C2 Training
Slide 53
New Feature for this Series
Setting Quotas - 3
Users need to log in with Basic, Windows, LDAP or User
Code authentication.
When a user reaches his/her assigned print volume limit,
the machine will suspend the current job or display a
message. After a user has reached his/her limit, all
subsequent print/copy jobs will be cancelled.
Printing of received faxes is always allowed. Manual print
out of fax transmission reports, and fax documents stored
in the document server are also allowed.
When a paper jam occurs, the last page that is jammed will
not be counted.
Print out of reports will not be counted.
Printing from Mac/Linux can’t be managed.
No additional notes
Page 54

54
AL-C2 Training
Slide 54
New Feature for this Series
Scheduling of Quota Management
This function enables administrators to reset the print
volume counters of each individual user or groups
automatically after a set interval.
Administrators can set the timing for auto-reset as follows:
At a designated date and time
Every xx days from the designated date and time (xx can
be 1 day - 180 days )
At a designated time on the designated date of every month
The time that the last auto-reset was done and the last print
volume counter can be checked at the operation panel or
Web Image Monitor.
If the machine is turned off or in sleep mode at the
designated time, auto-reset will be done when the machine
is in ready mode.
A hard disk is required.
No additional notes
Page 55
55
AL-C2 Training
Slide 55
New Feature for this Series
Safe Shutdown
In this machine, a board (the SDB) protects the
HDD unit.
After the main power switch of the machine has
been turned off, the SDB keeps the power supply
to the controller until the HDD unit has been
shutdown safely.
When shutting down from normal stand-by
mode, if the safe shutdown takes more than 2
minutes, there is a problem with the controller
board. It may be necessary to replace this board.
This is the same as for AP/AT-C2.5.
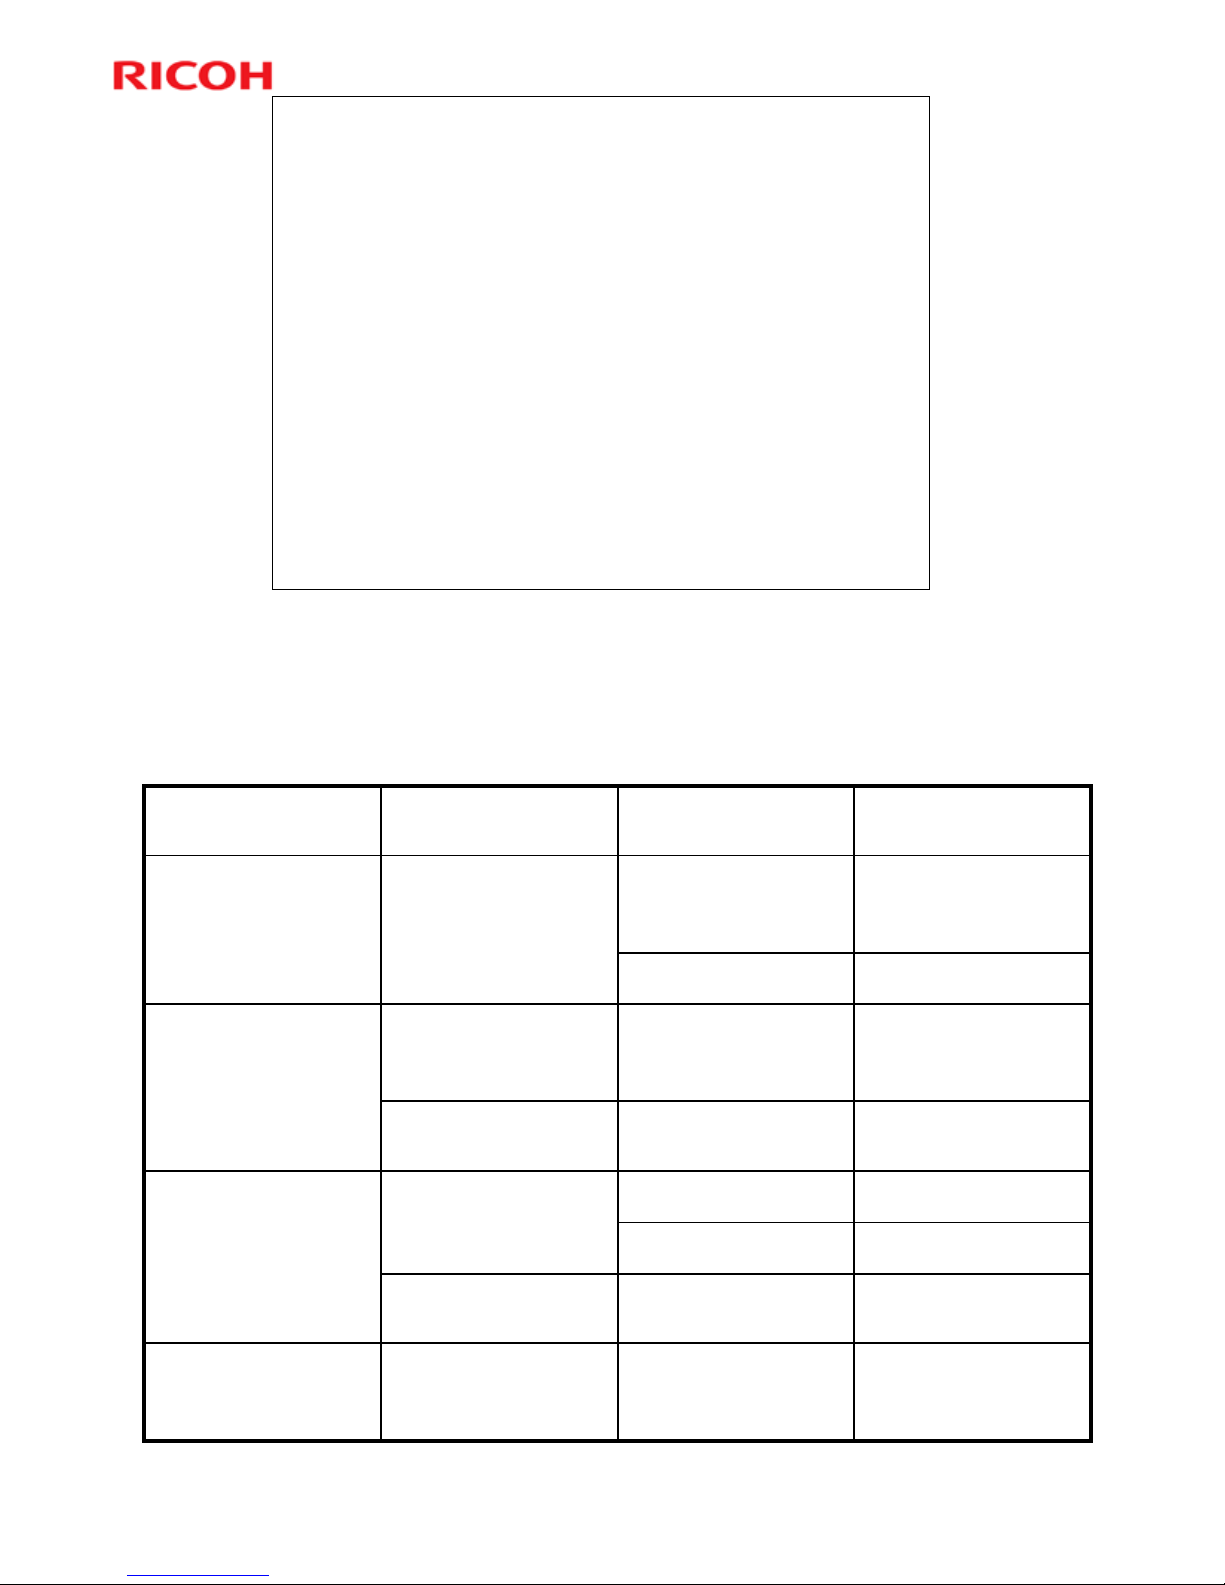
This table shows how long it takes to shut down from various machine
conditions.
SDB: Shutdown Board
Less than 80 sDuring 1 min. after
application screen is
displayed
Starting upStarting up
Less than 360 sApplication SD
Removed
Application error
Less than 10 sSC level B, C
Less than 360 sSC level A, DSC issuedError
Less than 360 s
-
Firmware updating
HDD encrypting
Less than 20 s
-
Scanning
Copying/Printing
HDD deleting
Operation
0 sOperation SW off
Less than 10 sStand-by
Panel off
Low power
Stand-byStand-by
Time to Shut DownDetailsStatusMode
Page 56
56
AL-C2 Training
Slide 56
New Feature for this Series
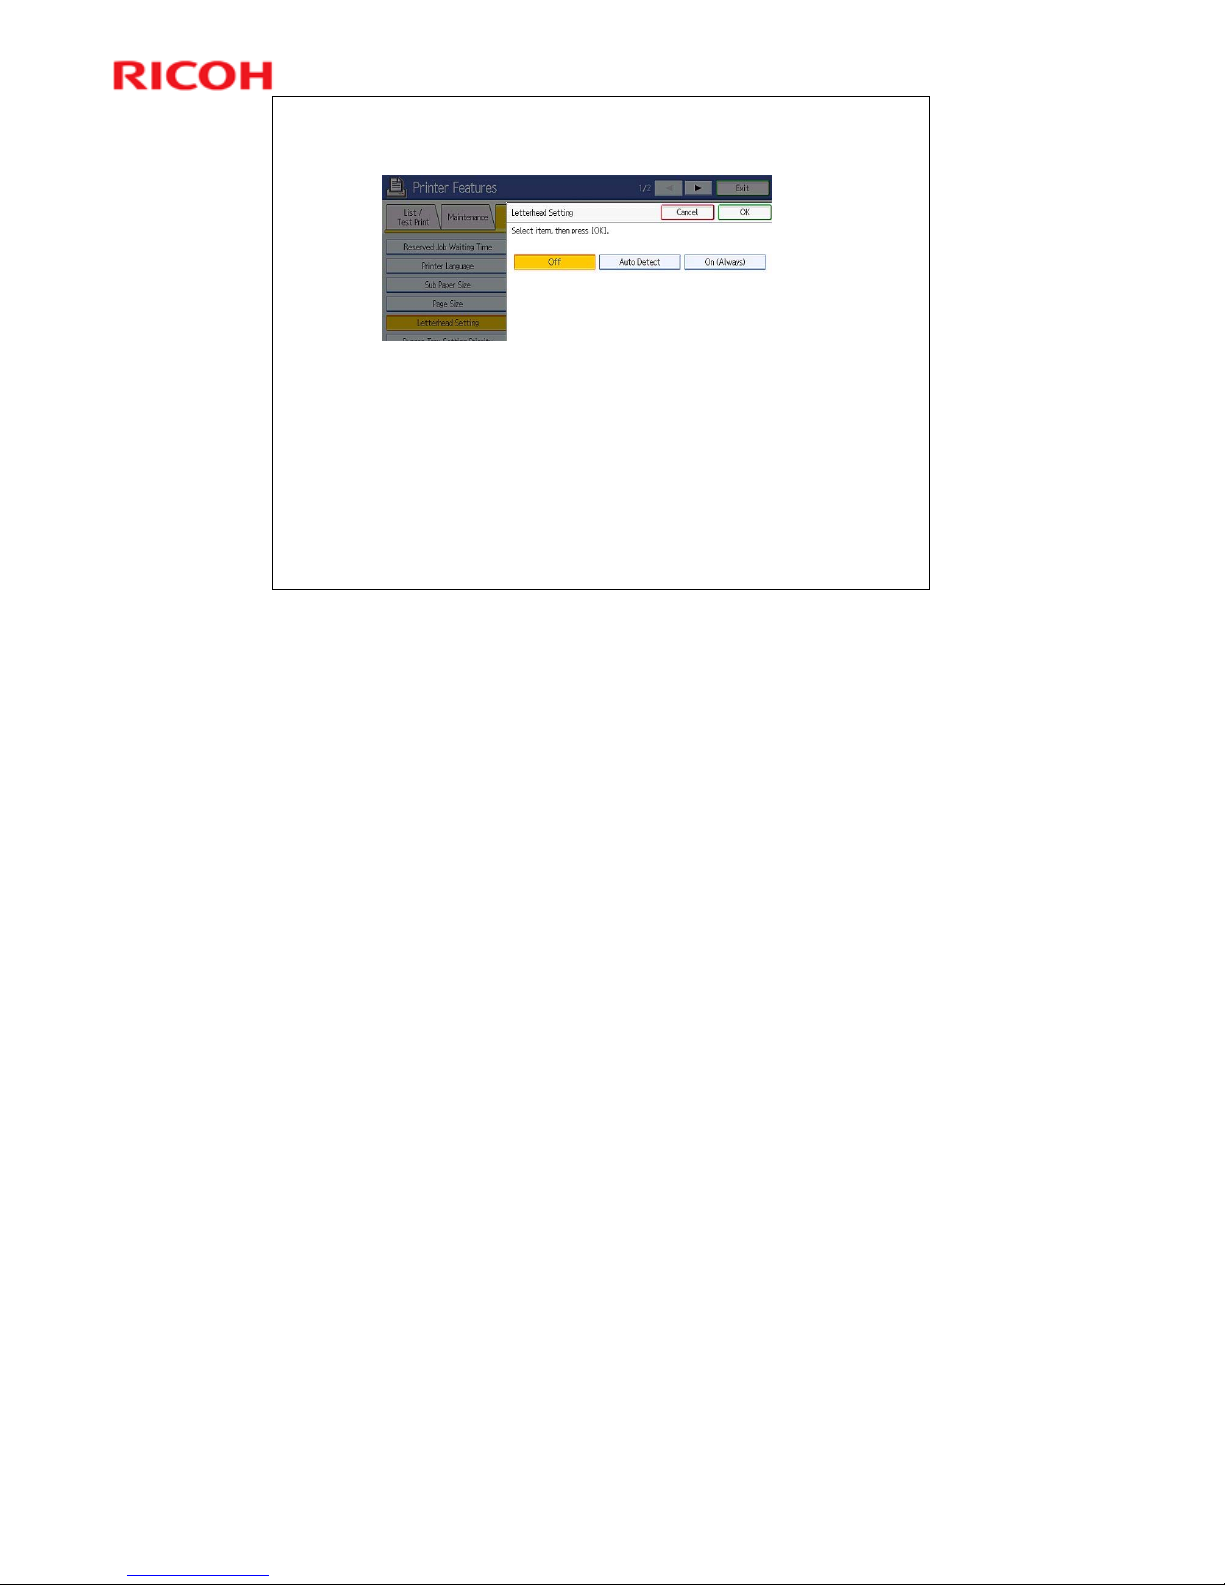
Printing on Letterhead Paper
This setting changes the paper path.
Off: Simplex pages go through the simplex path and duplex
pages go through the duplex path.
Auto Detect: The paper path for simplex jobs with a paper
type of "Letterhead", "Pre-printed" or "Pre-punched“is
changed to the duplex path.
On (Always): The paper path for all simplex jobs with all
types of paper is changed to the duplex path.
Simplex pages will still be counted as simplex jobs by the
internal counter even if this setting is enabled.
This is enabled with a printer bit switch.
The purpose of the synchronizing the simplex and duplex paths is so that a
single tray of preprinted paper can be used for both simplex and duplex pages.
With the default setting, at least 2 separate trays are required for preprinted
paper (one for simplex printing and the other for duplex printing). The paper is
loaded face-up in one tray and face-down in the other. This can be a annoyance
for customers.
¾ The default setting is Off is to reduce wear on the duplex unit. The duplex
unit may wear out early when this setting is always enabled. The degree of
extra wear depends on print volume.
¾ Note: If the preprinted paper is the same on both sides, then a single tray
can be used and this setting will probably not need to be changed.
If this feature is enabled, only a single tray of preprinted paper is needed for both
simplex and duplex pages.
Page 57
57
AL-C2 Training
Slide 57
New Feature for this Series
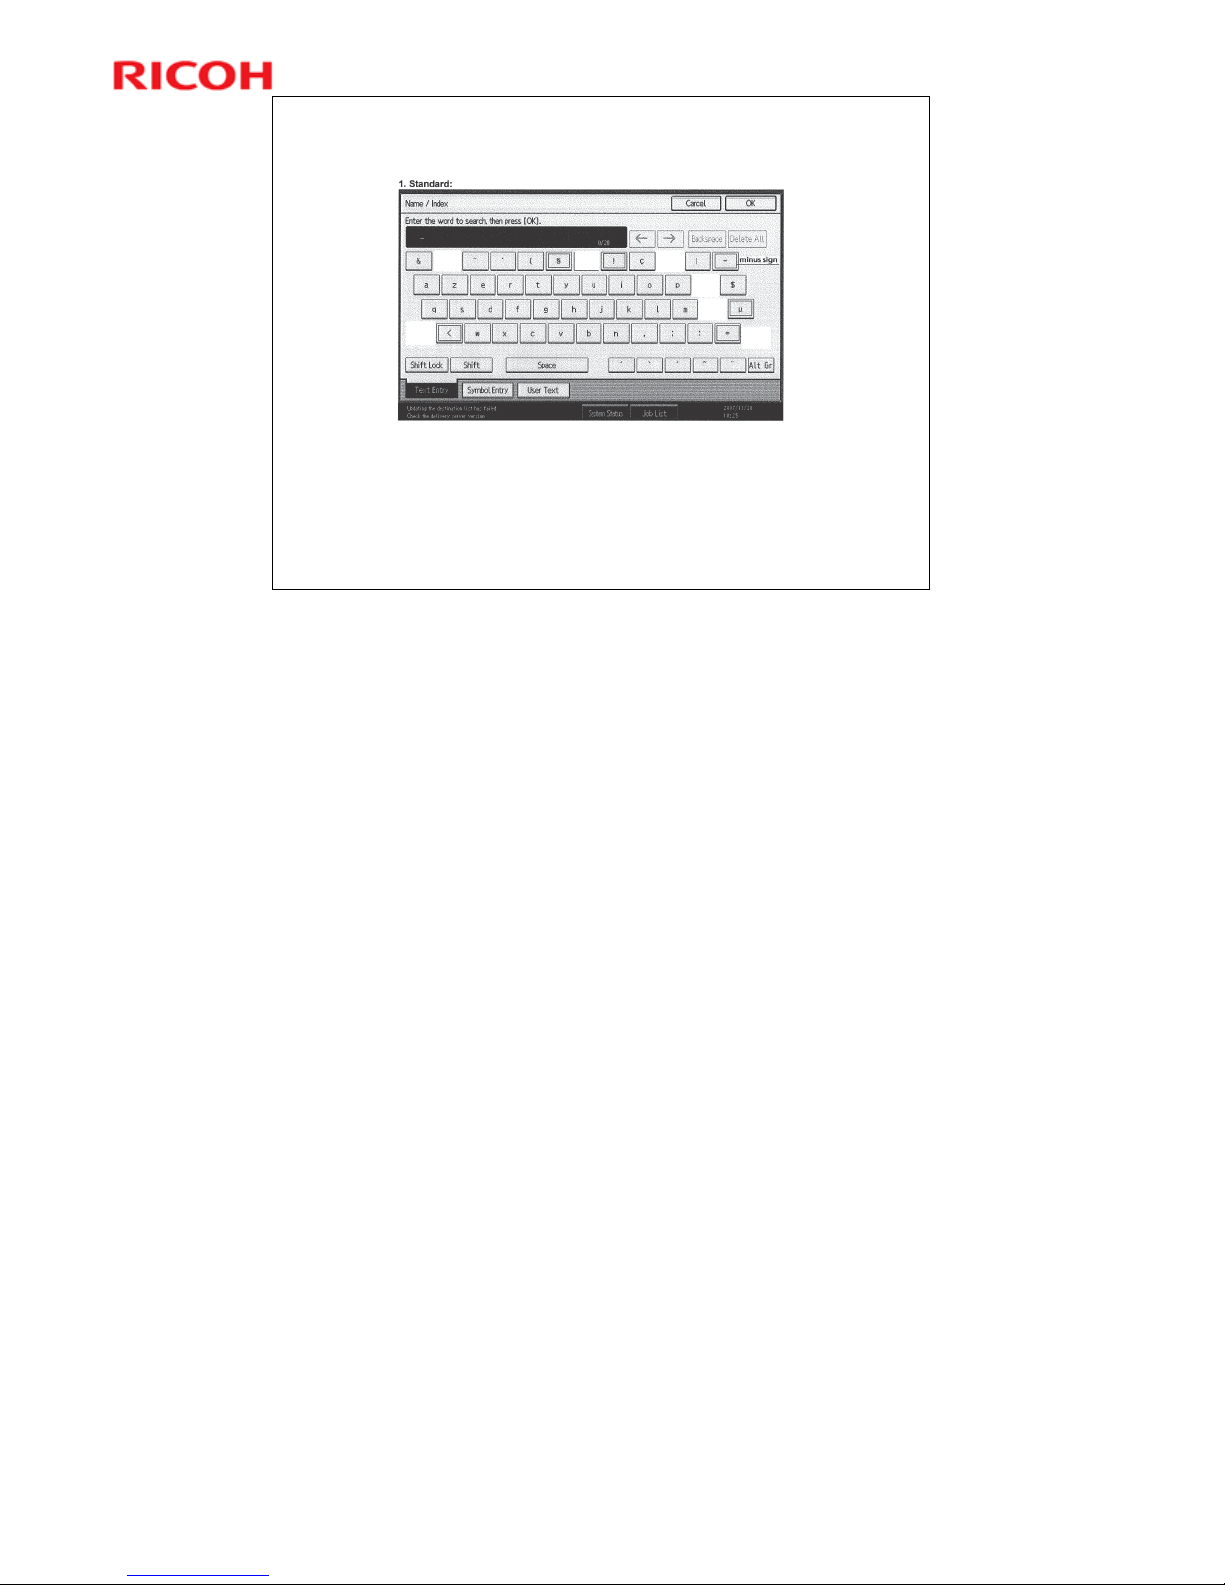
AZERTY Keyboard
If the language is changed to French, the keyboard
changes as shown above.
It is possible to switch to a QWERTY keyboard.
This feature is for Europe only. The North American model will use the QWERTY
keyboard, which is widely used in Quebec.
Page 58
58
AL-C2 Training
Slide 58
New Feature for this Series
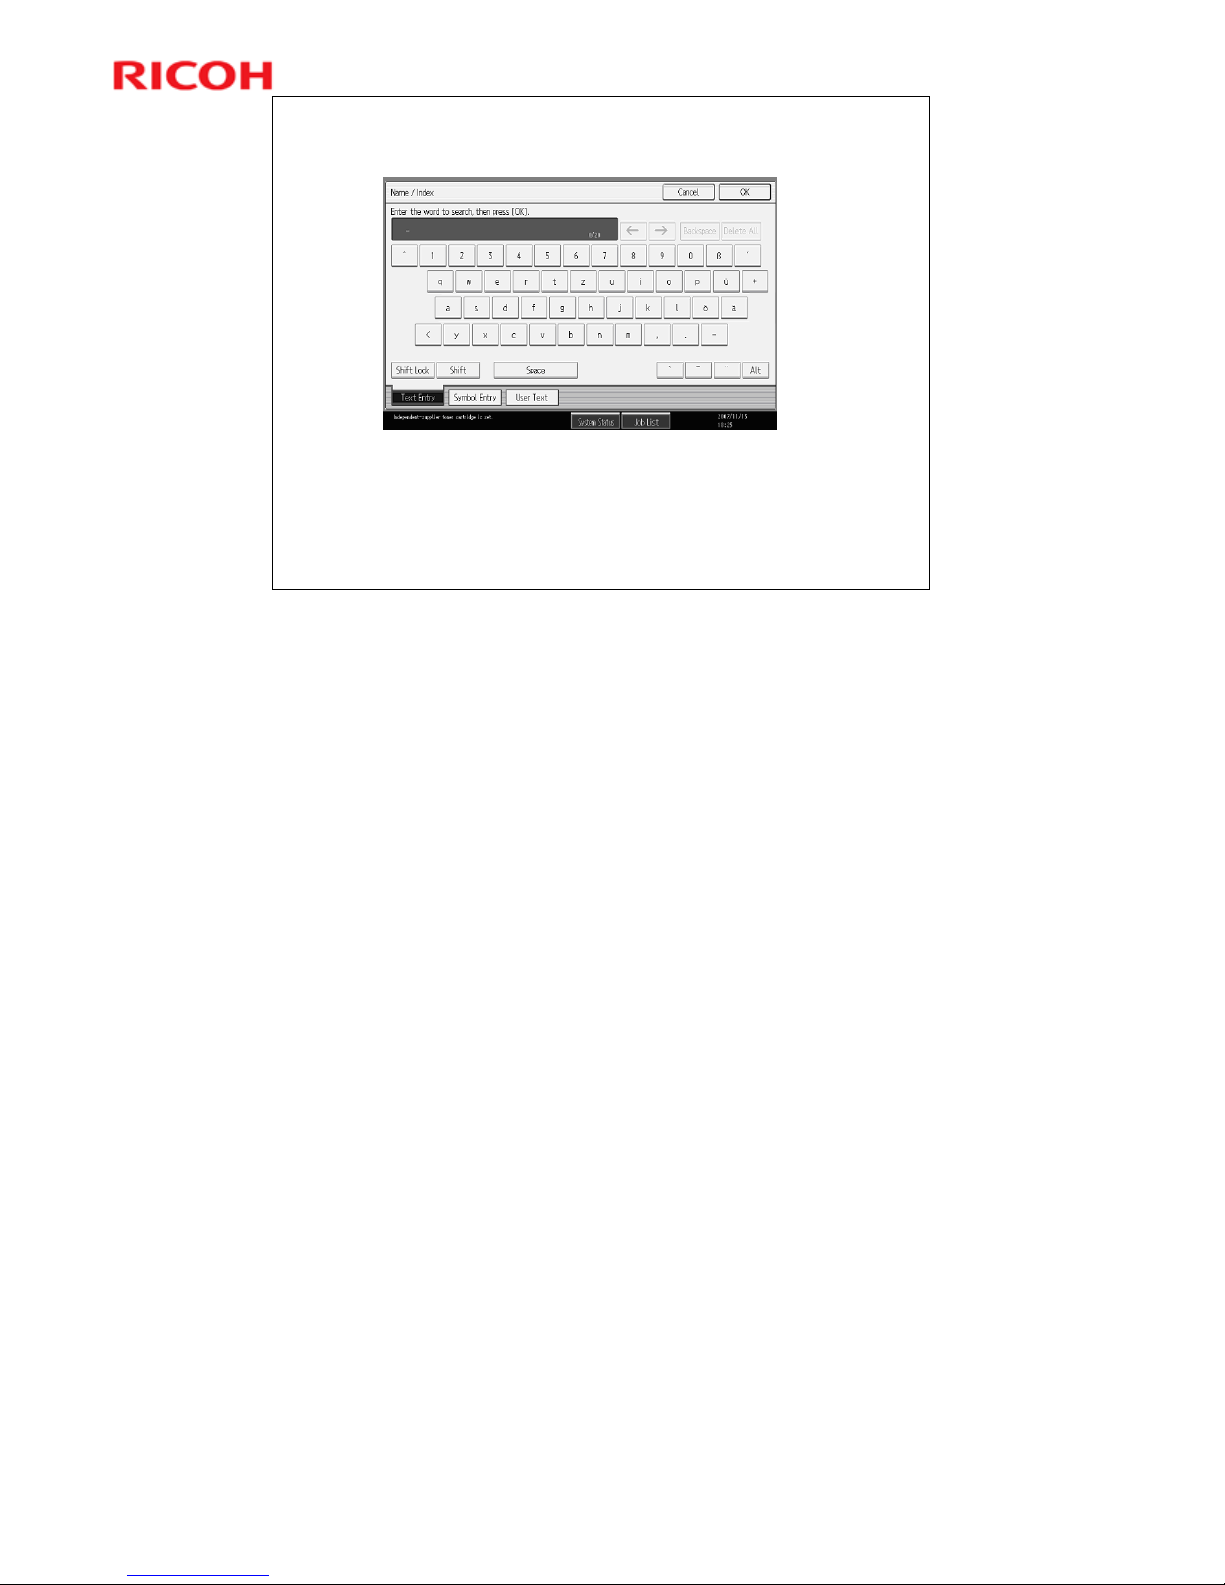
QWERTZ Keyboard
If the language is changed to German, the keyboard
changes as shown above.
It is not possible to switch to a QWERTY keyboard.
Page 59

59
AL-C2 Training
Slide 59
New Feature for this Series
Fax Line Assignment
When optional G3 lines are equipped, you can route faxes
that come in on each line to a different receiver.
You need to register a SUB code for each line before using
this function.
Example:
Users can specify that incoming faxes through Line 1 are
printed on paper, the ones through Line 2 are forwarded to
designated users by email, the ones through Line 3 are
forwarded to a designated user’s shared folder.
One or more optional G3 Fax lines must be installed.
Documents received through Internet Fax and IP-Fax
cannot be routed.
No additional notes
Page 60

60
AL-C2 Training
Slide 60
New Feature for this Series
JBIG2 Compression
JBIG2 typically generates files one third to one fifth the size of
conventional compression methods.
Before using this function, select “JBIG2” for ”Compression
Method (Black & White)” in “Send Settings” of “Scanner
Features”.
JBIG2 compression works in the following scanning conditions.
Scan settings: Black and White
Scan File Type: PDF/ PDF-A (single page/ multi page)
Scan method: Scan to Folder/ email/ USB/ SD
Tiff file format doesn’t support JBIG2 compression. MH
compression will be applied when scanning to Tiff.
When a scanned document is stored in the Document Server, the
applied compression method will be MH.
JBIG2 compression can’t be used in TWAIN scanning and WSD
scanning.
When JBIG2 compression is selected, the preview function is not
available.
Acrobat Reader version 5 or later is required to open files which
were compressed with JBIG2.
No additional notes
Page 61
61
AL-C2 Training
Slide 61
New Feature for this Series
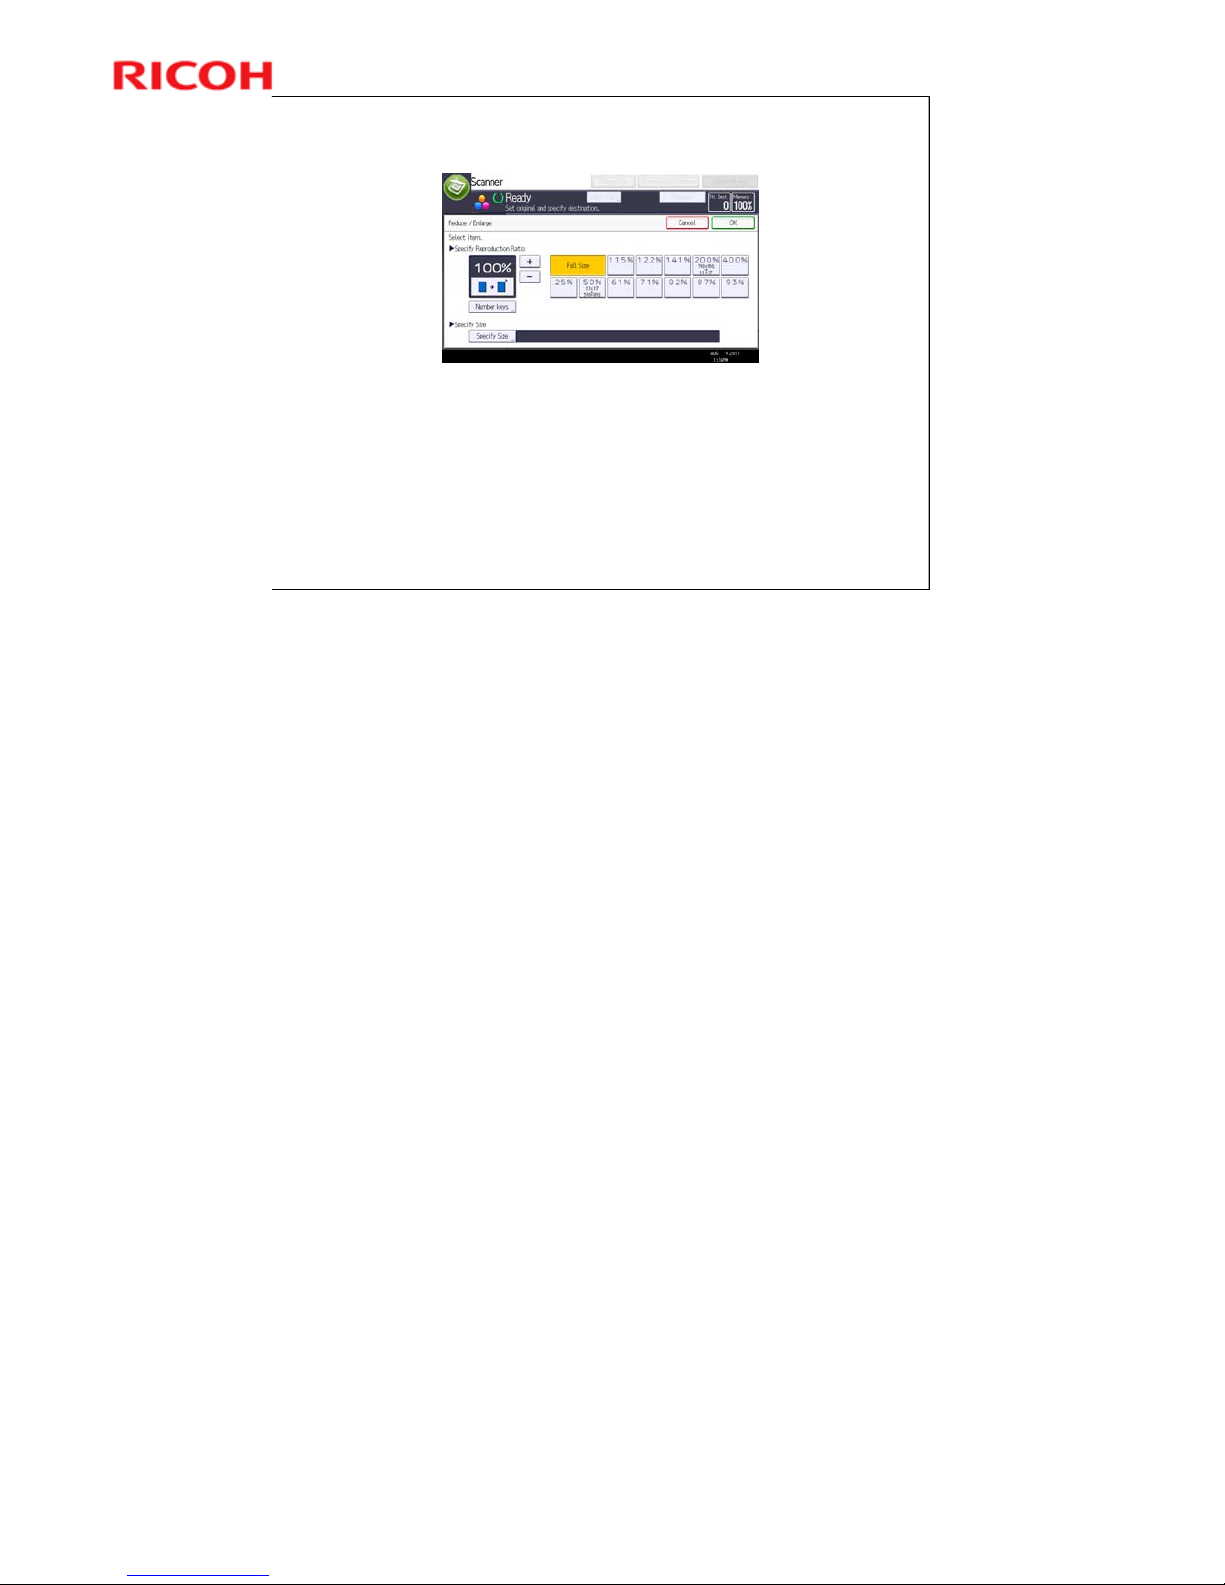
Reduce/Enlarge Scan
With this function, users can reduce or enlarge a standard
paper size to another standard paper size, for example,
scanning A5 originals and changing to A4 sized data. Also,
scanning can be done with an arbitrary reduction or
enlargement ratio.
When using ‘Specify Size’, if the originals are all different
sizes, the image sizes will all be the same.
This function is not available for TWAIN scanning or WSD scanning.
When using this function, “High Compression PDF” can’t be selected as the file
type.
It is not possible to specify different reduction/enlargement ratios for height and
width.
Page 62
62
AL-C2 Training
Slide 62
New Feature for this Series
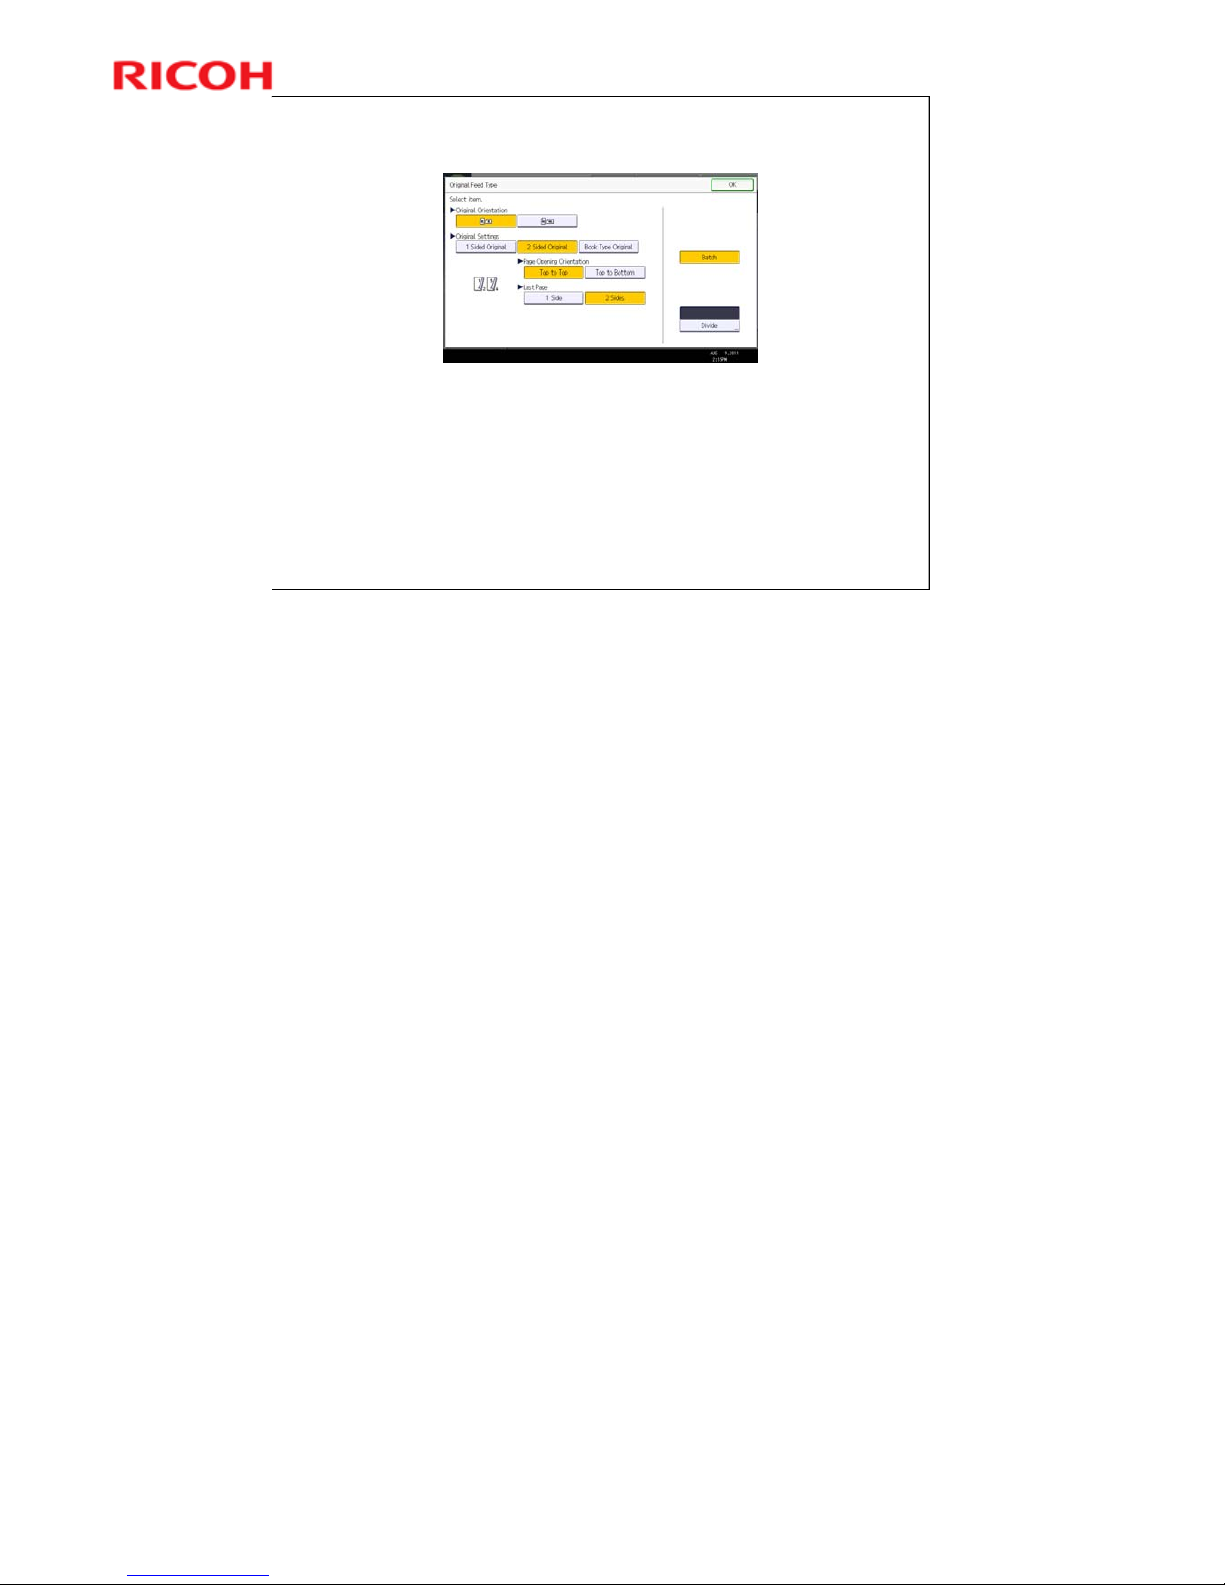
Enhanced Batch Scan
When one sided originals and two sided originals are mixed, users can
switch the scanning to one side or both sides in a single batch scan job.
Separate one sided originals from two sided originals within your stack of
originals
Select “Batch” mode for and specify “Original Settings”
Set the correct portion of the batch of originals on the ADF and start
scanning
When scanning of the first portion is finished, change “Original Settings”
and set the other portion.
If this is done correctly, blank sides of one-sided originals in the batch
will not be scanned.
An ARDF is required for this function.
No additional notes
Page 63
63
AL-C2 Training
Slide 63
7
A
D
C
B
or
Preference Settings
Preference Settings
Import
Export
New Feature for this Series
Import/Export of Preference Settings
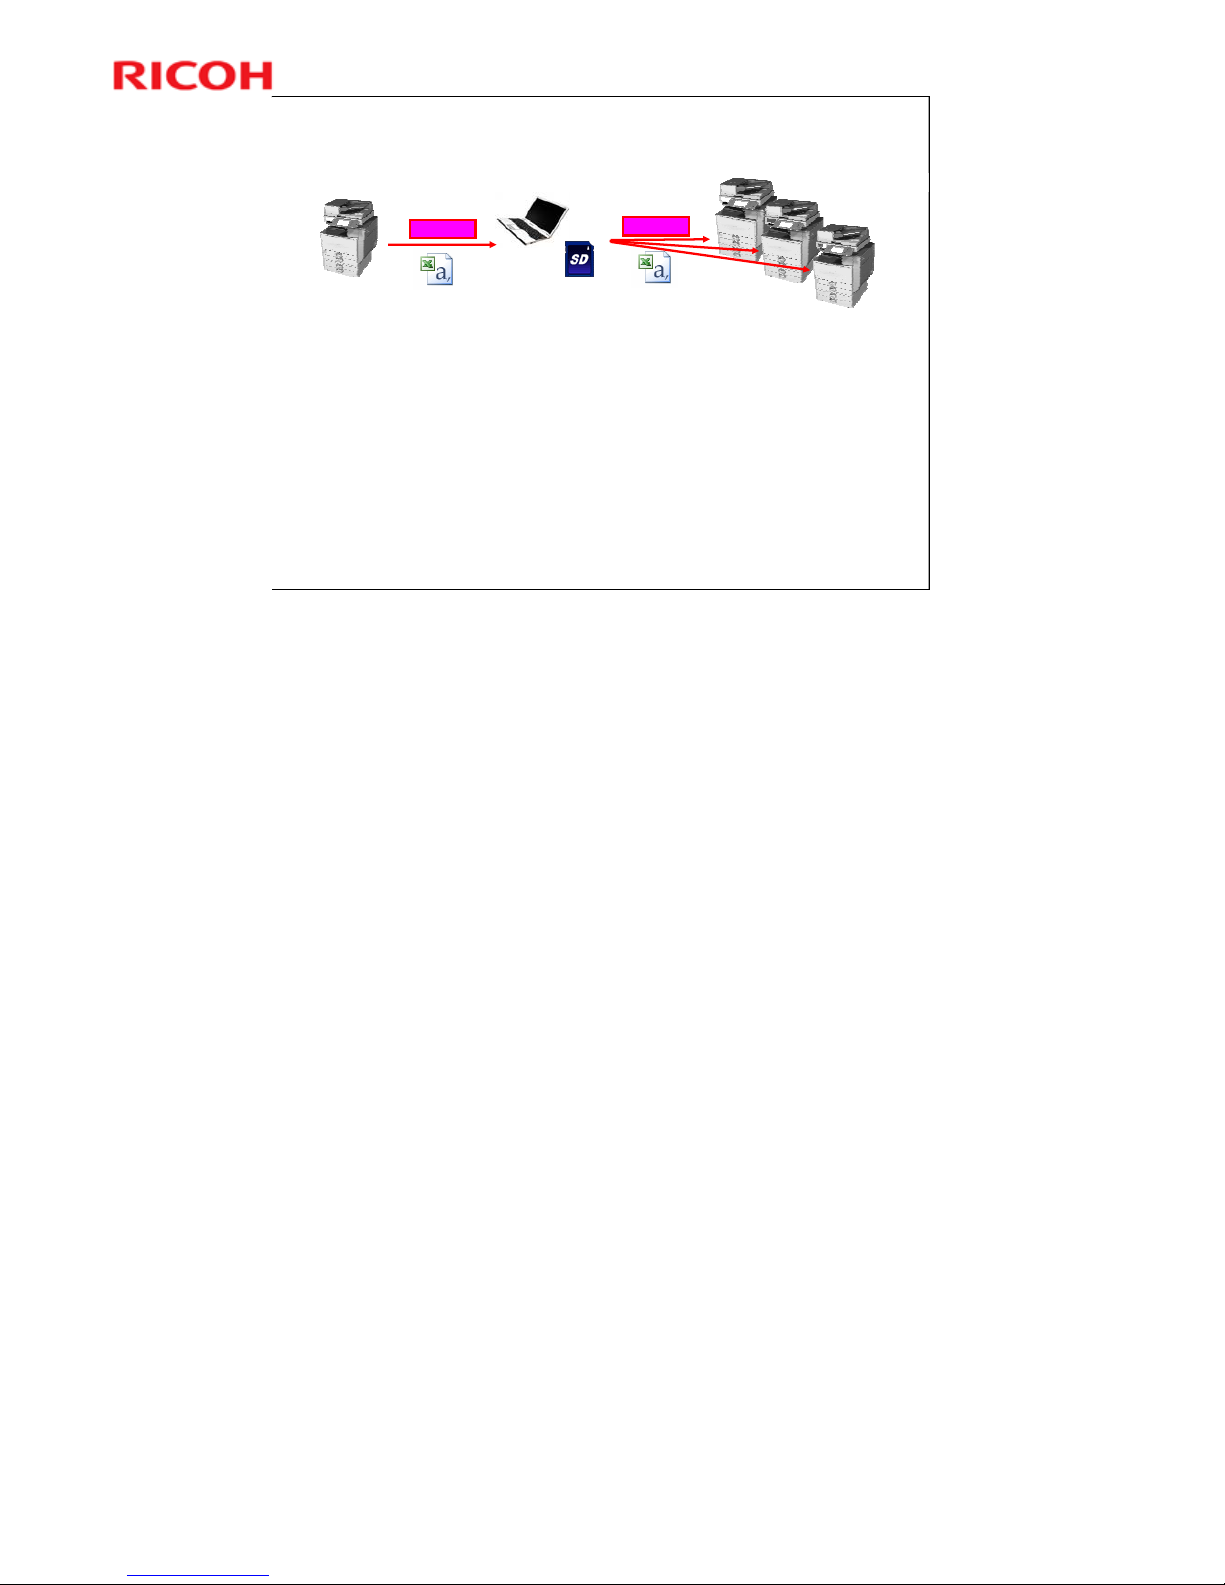
Users can output settings such as “System Settings”, “Application
Settings” and shortcut programs to an SD card or a local folder of a client
PC via Web Image Monitor, and they can apply these settings to other
machines that have a GW+ controller.
A Machine Administrator can export/import User Program (UP) settings,
shortcut programs and the image displayed on the home screen, and a
Customer Engineer can export/import Service Program (SP) settings.
Exported settings will be in CSV format.
The image displayed on the home screen will be exported in JPG format.
Exported settings can be encrypted. *Factory Default: “Encrypt”
Users or Customer Engineers can apply the same settings of an existing
GW+ machine to other GW+ machines quickly. Therefore, users can
reduce the amount of work when they install new machines.
SP settings can be imported/exported between the same models with the same
EDP code only.
Import/export cannot be suspended once it has begun.
A log of the Export/Import operation will be saved in CSV file format in the same
folder in which the preference settings are exported.
Importing/exporting address book information or shortcut programs which use
address book information is not supported by this function. Please use an
existing solution for copying address book information.
Page 64
64
AL-C2 Training
Slide 64
New Feature for this Series
Information Screen (Eco-Friendly Indicator)
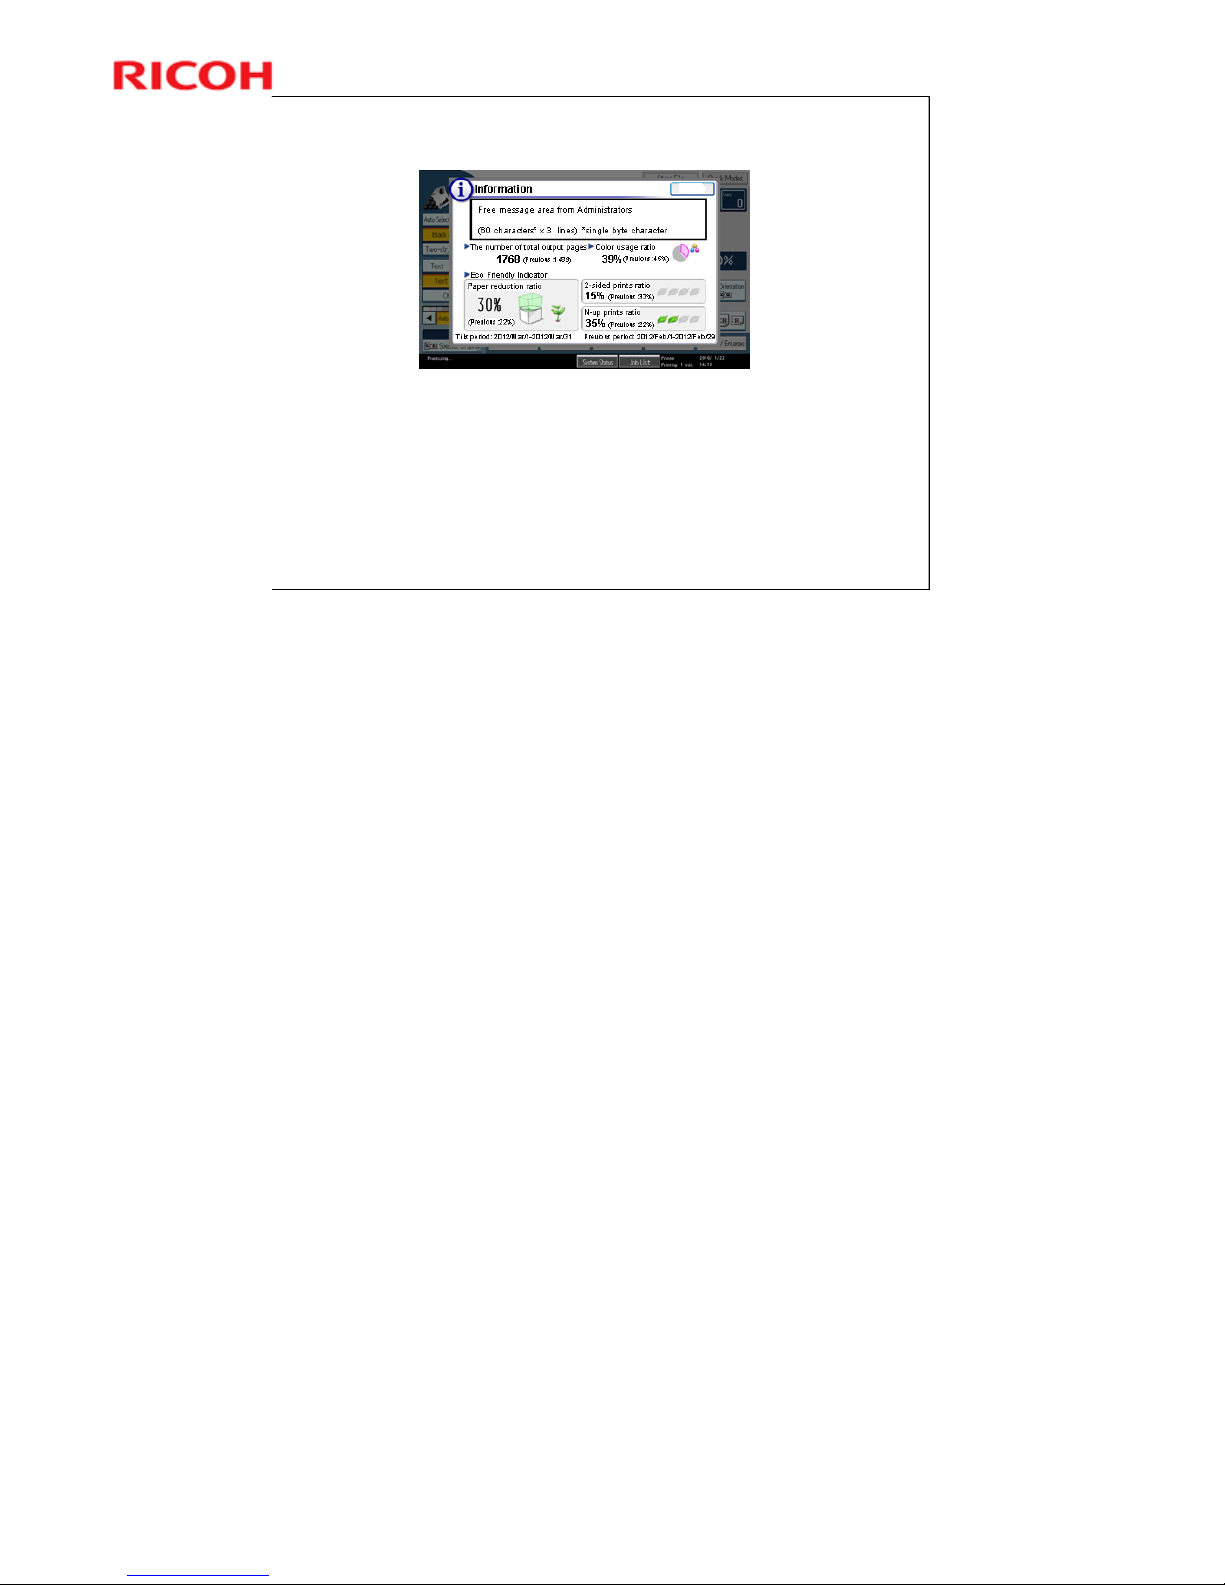
When the user logs on, information about machine usage
will appear. There is also a space for an administrator’s
message to appear.
This may be used to improve the awareness of users to
how heavily they are using the machine.
This function is only available if the machine has a hard
disk.
Close
Displayed data depends on whether user authentication is disabled or enabled.
¾ If user authentication is enabled => Eco counter for each user is displayed.
¾ If user authentication is disabled => Eco counter for system (all users of the
machine) is displayed.
The Eco-Friendly Indicator is shown at these times
¾ After log-in
¾ After recovering from energy save mode (when user authentication is
disabled)
¾ After system auto reset (when user authentication is disabled)
Page 65
65
AL-C2 Training
Slide 65
7
New Feature for this Series
Mandatory Security Information Print
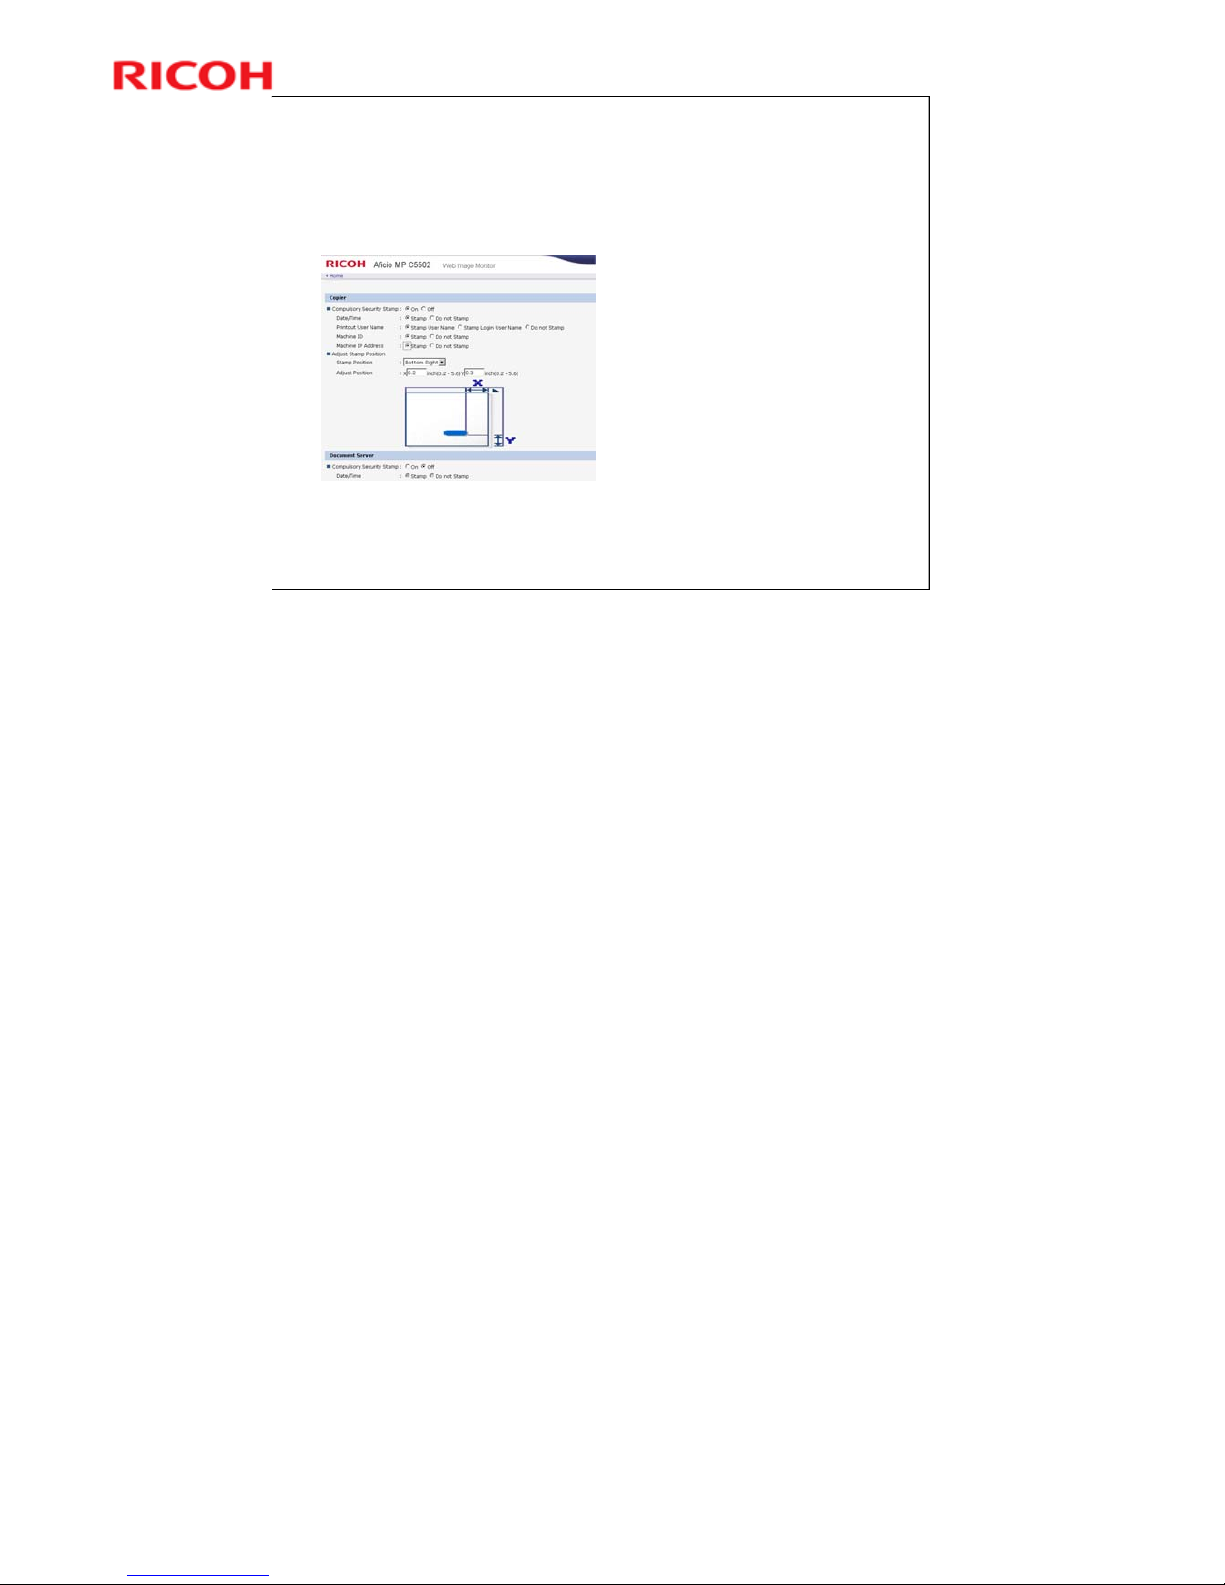
If this feature is turned on,
security information will be
printed on the output.
Before using this function, an
administrator must activate this
function at the operation panel
or Web Image Monitor.
Administrators can select which
security information will be
included.
Date and Time when the job
was printed
Name or Log-in User ID of the
user who printed the job
IP address of the device which
printed the job
Serial number of the device
which printed the job
Also, the print position can be
changed to upper left, upper
right or lower left. (Default
setting: lower right)
When printing on small sized paper such as A6 or envelopes, a part of the
security information may not be printed.
If print fonts which are not supported by the device such as Chinese, Arabic,
Korean or Thai are included, the security information can’t be printed correctly.
The directions of image and security information may not match when printing
from a PS driver or IPDS.
Page 66
66
AL-C2 Training
Slide 66
7
New Feature for this Series
Output Mode Switch Timer for Received Faxes
Users can specify whether
faxes received in a
specific period are to be
printed, to stand by to
print, to be forwarded to a
registered receiver, or to
be saved on the HDD.
Also, prohibiting
automatic printing of
received faxes can be set
manually on the operation
panel when this timer
function is disabled.
By utilizing this function, received faxes are not printed when users are not in their office, so they
can reduce the risk of information leak from uncontrolled outputs.
And also, it will be possible to forward faxes received when the office is closed to another working
office.
Printing from the LAN-FAX driver is always possible regardless of output mode switch timer
setting.
The machine must have a HDD.
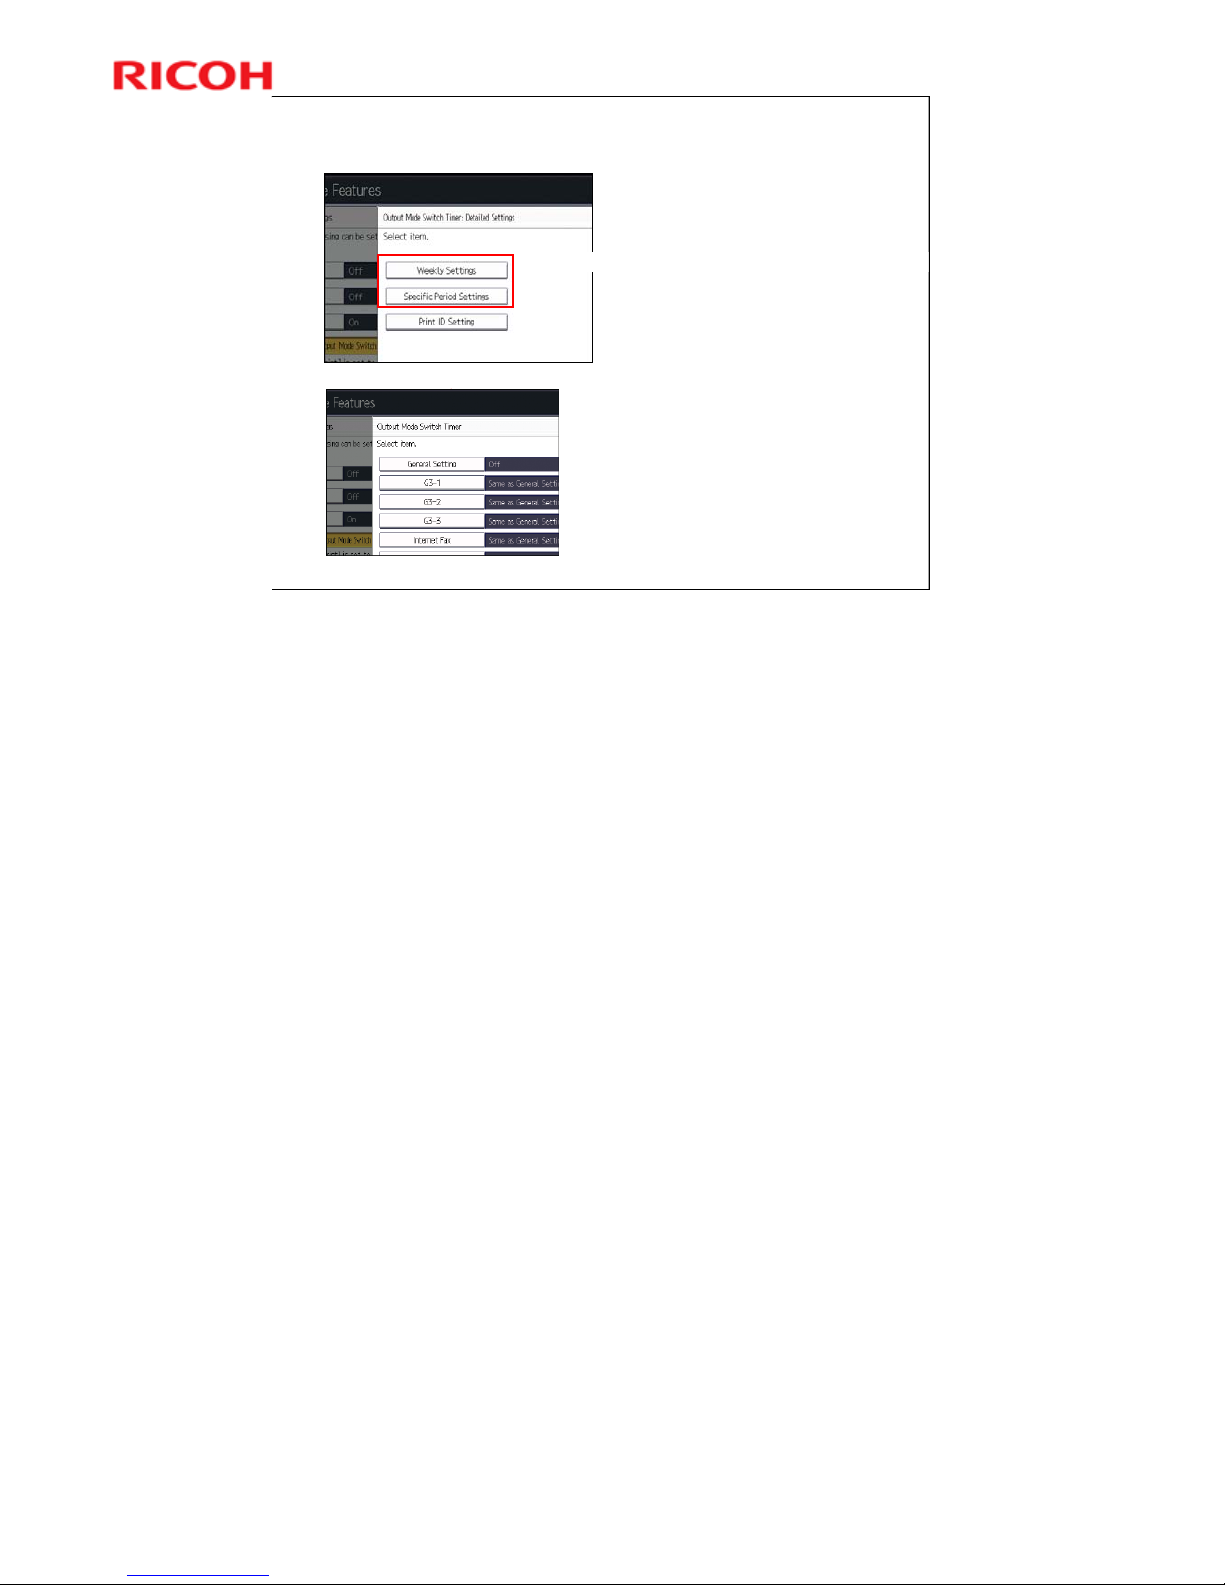
To use this function, specify the period of time to switch the output mode in "Timer: Detailed
Settings", and then specify the output mode in "Output Mode" when the Output Mode Switch
Timer function is enabled.
Jobs affected by this timer
¾ Received fax/ Internet fax/ IP fax documents
¾ Mail to Print
¾ Auto Report related fax application
Available Timer settings
¾ Weekly settings (set output mode switch timer for each day of the week)
¾ Specific Period Settings (This timer is used when the office is closed for a long time.)
Available Output Mode
¾ Not Set (Default)
¾ Print
¾ Standby to Print (Printing received fax documents will be suspended.)
¾ ID Required Print (an ID will be required to print suspended fax jobs.)
¾ Forwarding (Received fax documents will be forwarded to a specified email address.)
¾ Store (Received fax documents will be stored in Document Server.)
These timer settings and output modes can be assigned for each fax line and type.
Page 67
67
AL-C2 Training
Slide 67
New Feature for this Series
Output Mode Switch Timer for Received Faxes
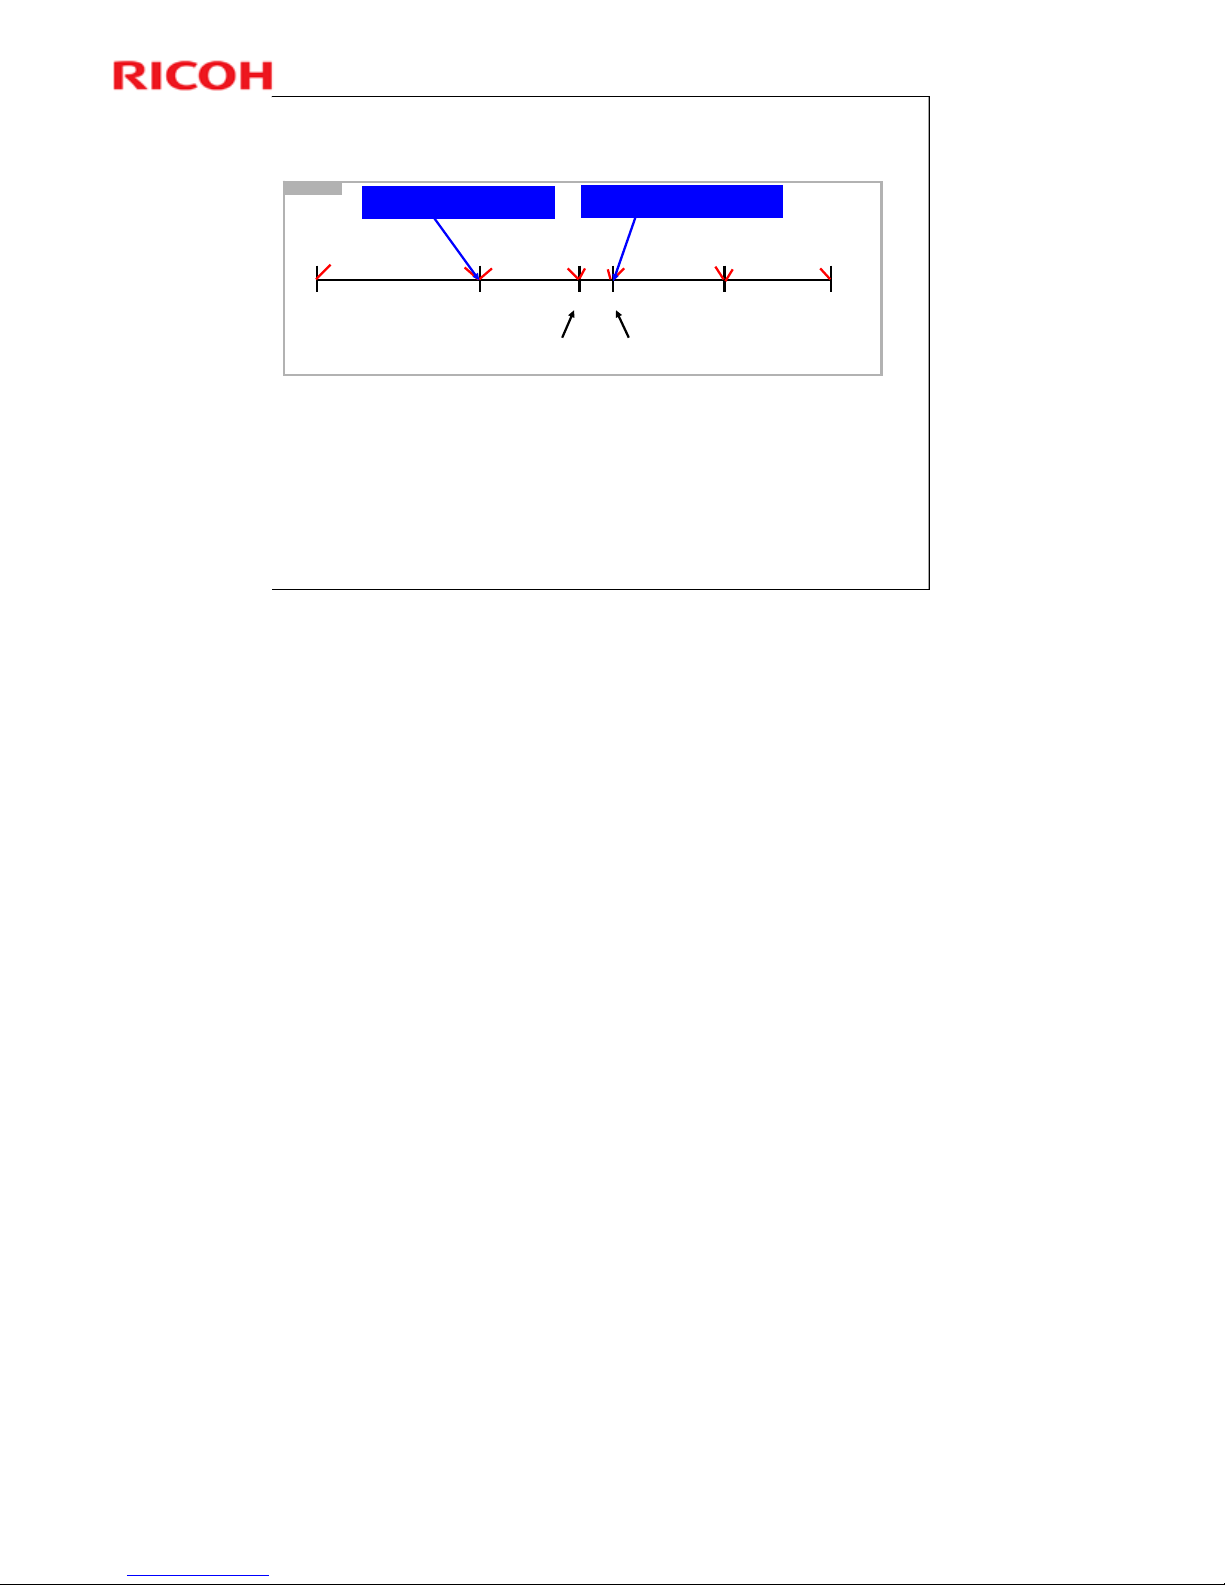
Up to 5 timers can be set per day.
Example
0:00
Setting 1: Standby to Print
8:00
Setting 2: Print
12:00 13:00
24:00
19:00
Setting 5: Forward
Setting 3: Standby to Print
Setting 4: Print
Not printed
Printed
automatically
Not
printed
Forwarded to
specified address
Printed
automatically
Received fax between 0:00 and 8:00
will be printed automatically at 8:00.
Received fax between 12:00 and 13:00
will be printed automatically at 13:00.
No additional notes
Page 68
68
AL-C2 Training
Slide 68
New Feature for this Series
Output Mode Switch Timer for Received Faxes
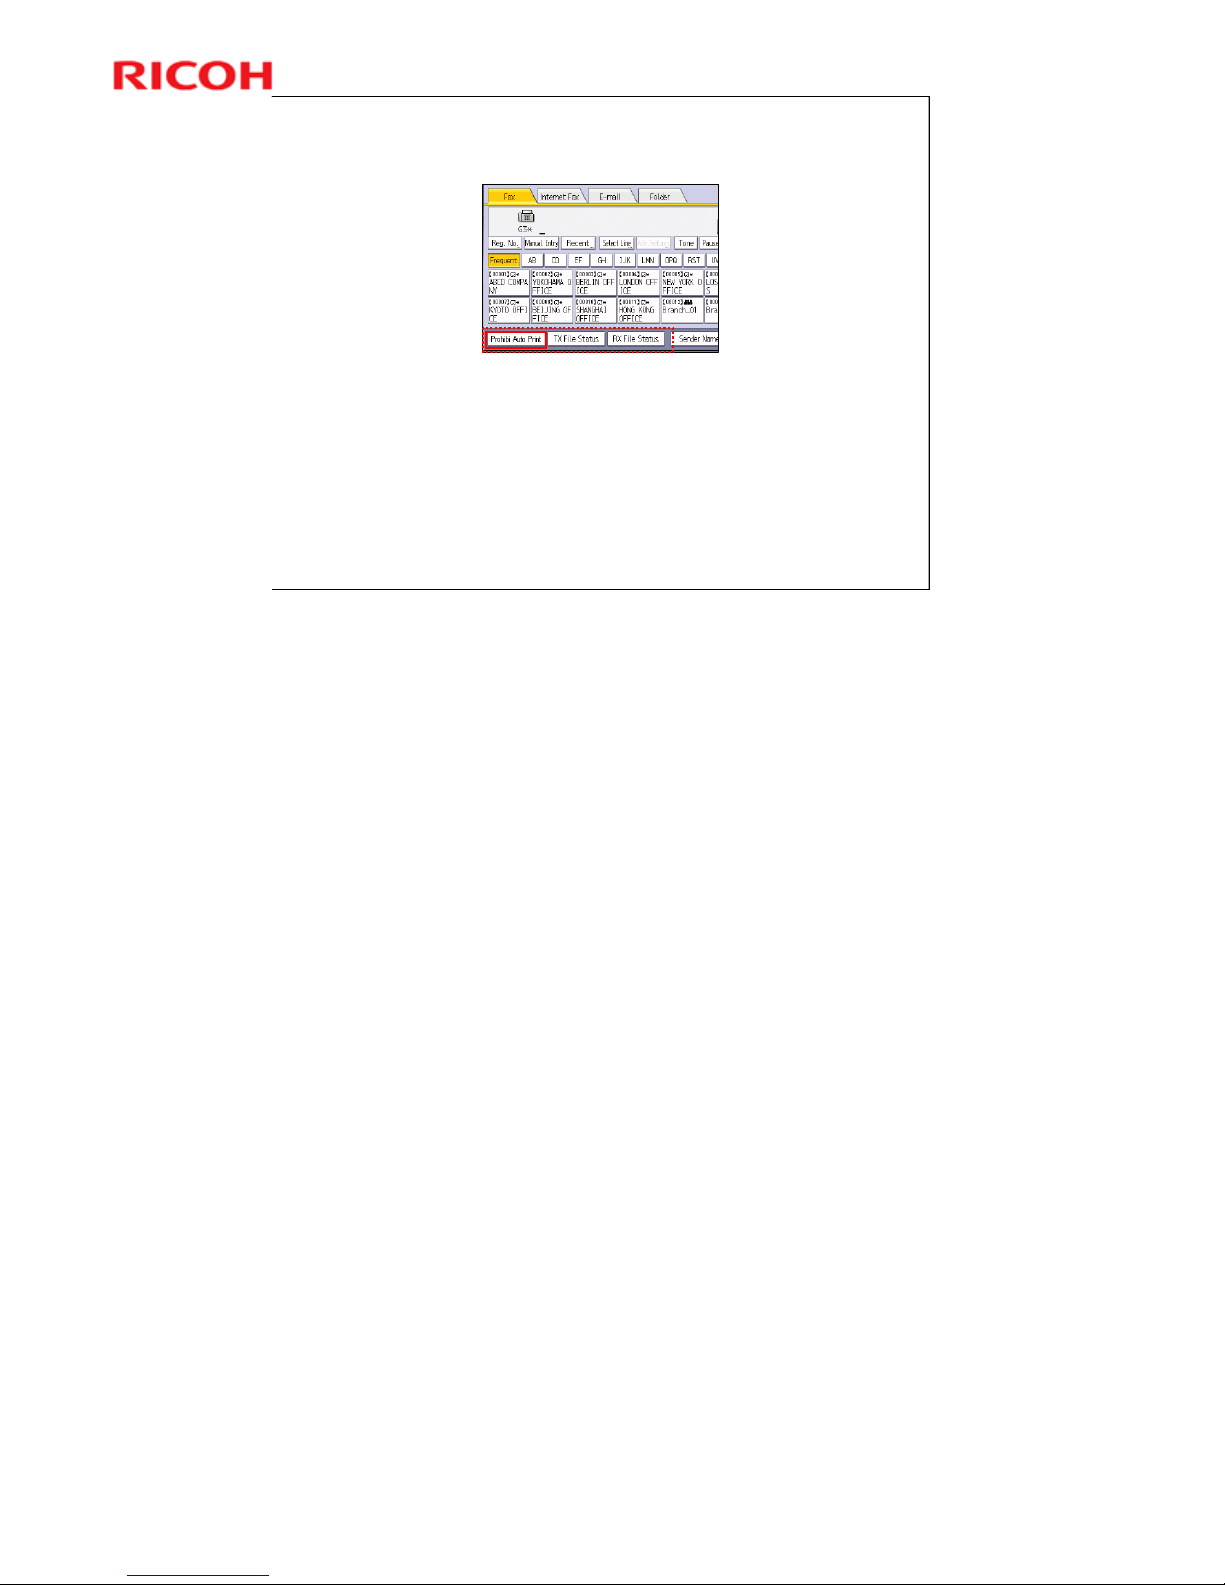
When this feature is disabled:
Users can specify whether or not to print the received faxes
immediately with the “Prohibit Auto Print” setting.
Also, this setting can be registered as a Quick Operation
Key, so users can easily switch the output mode of received
faxes.
No additional notes
Page 69
69
AL-C2 Training
Slide 69
7
New Feature for this Series
Enhanced Encryption
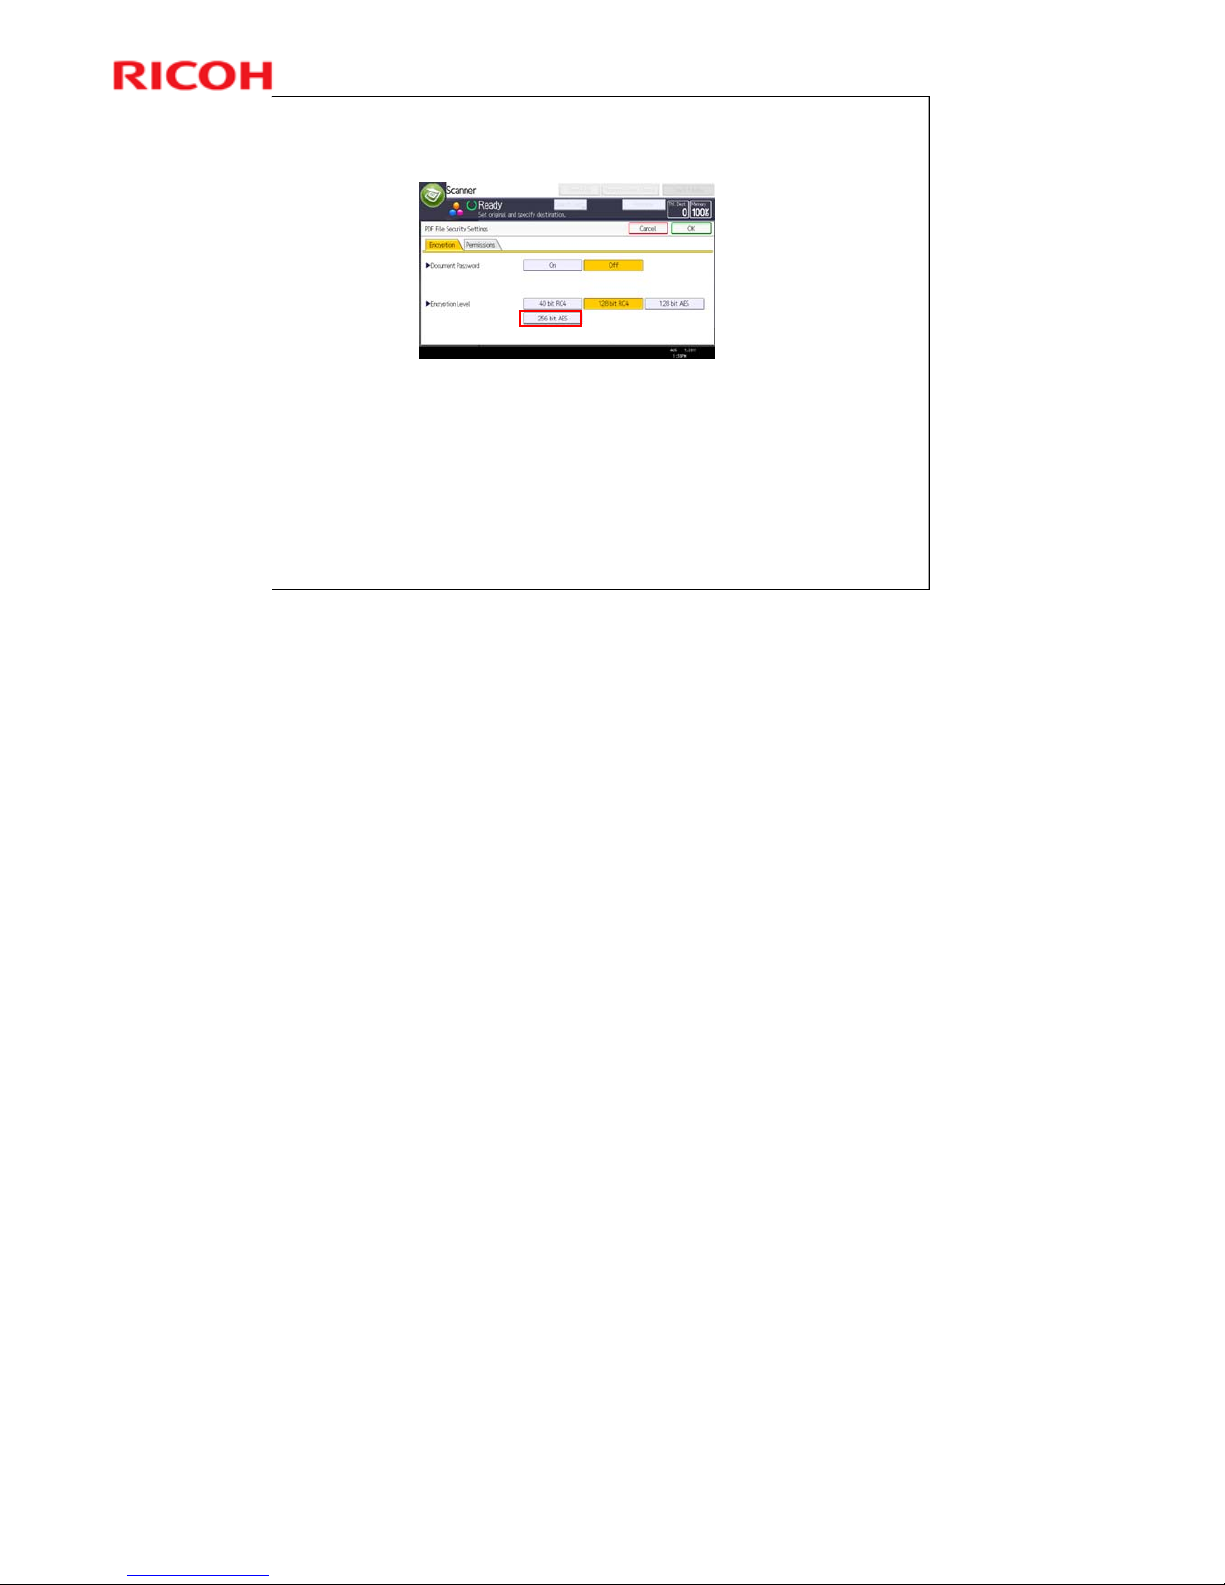
This function lets users select safer encryption algorithms,
AES256bit and SHA-2.
AES256bit
The Advanced Encryption Standard (AES) is a symmetric-key encryption
standard adopted by the U.S. government. AES is also adopted by NESSIE in
EU and CRYPTREC in Japan.
There are 3 types of AES, and each of these ciphers has a 128-bit block size,
with key sizes of 128, 192 and 256 bits, respectively. DES, the previous
encryption standard, has a 56-bit key size, so AES with a 256-bit key size is
much safer than DES.
SHA-2
Secure Hash Algorithm-2 (SHA-2) is a set of cryptographic hash functions
designed by the National Security Agency (NSA).
SHA-2 has 224, 256, 384, and 512 bit hashes. Since SHA-2’s hashes are longer
than SHA-1 (160 bits), SHA-2 is safer than SHA-1. Ricoh basically adopts the
256-bit hash.
Page 70

70
AL-C2 Training
Slide 70
New Feature for this Series
Bates Numbering
Bates numbering is used in the legal, medical,
and business fields to place identifying numbers
on documents as they are scanned or processed.
Bates stamping can be used to mark and identify
images with copyrights by putting a company
name on them.
“Auto Start”, “Interrupt Copy” and “Printing from Document Server” cannot be
used with Bates numbering.
Zero suppression for auto-increment numbering is available on SP mode.
If the arbitrary text is long and its size is big, latter subset of numbering may not
be printed.
When this function is enabled, collated output is not available in copying multiple
sets of multiple page document.
Page 71
71
AL-C2 Training
Slide 71
New Feature for this Series
Bates Numbering
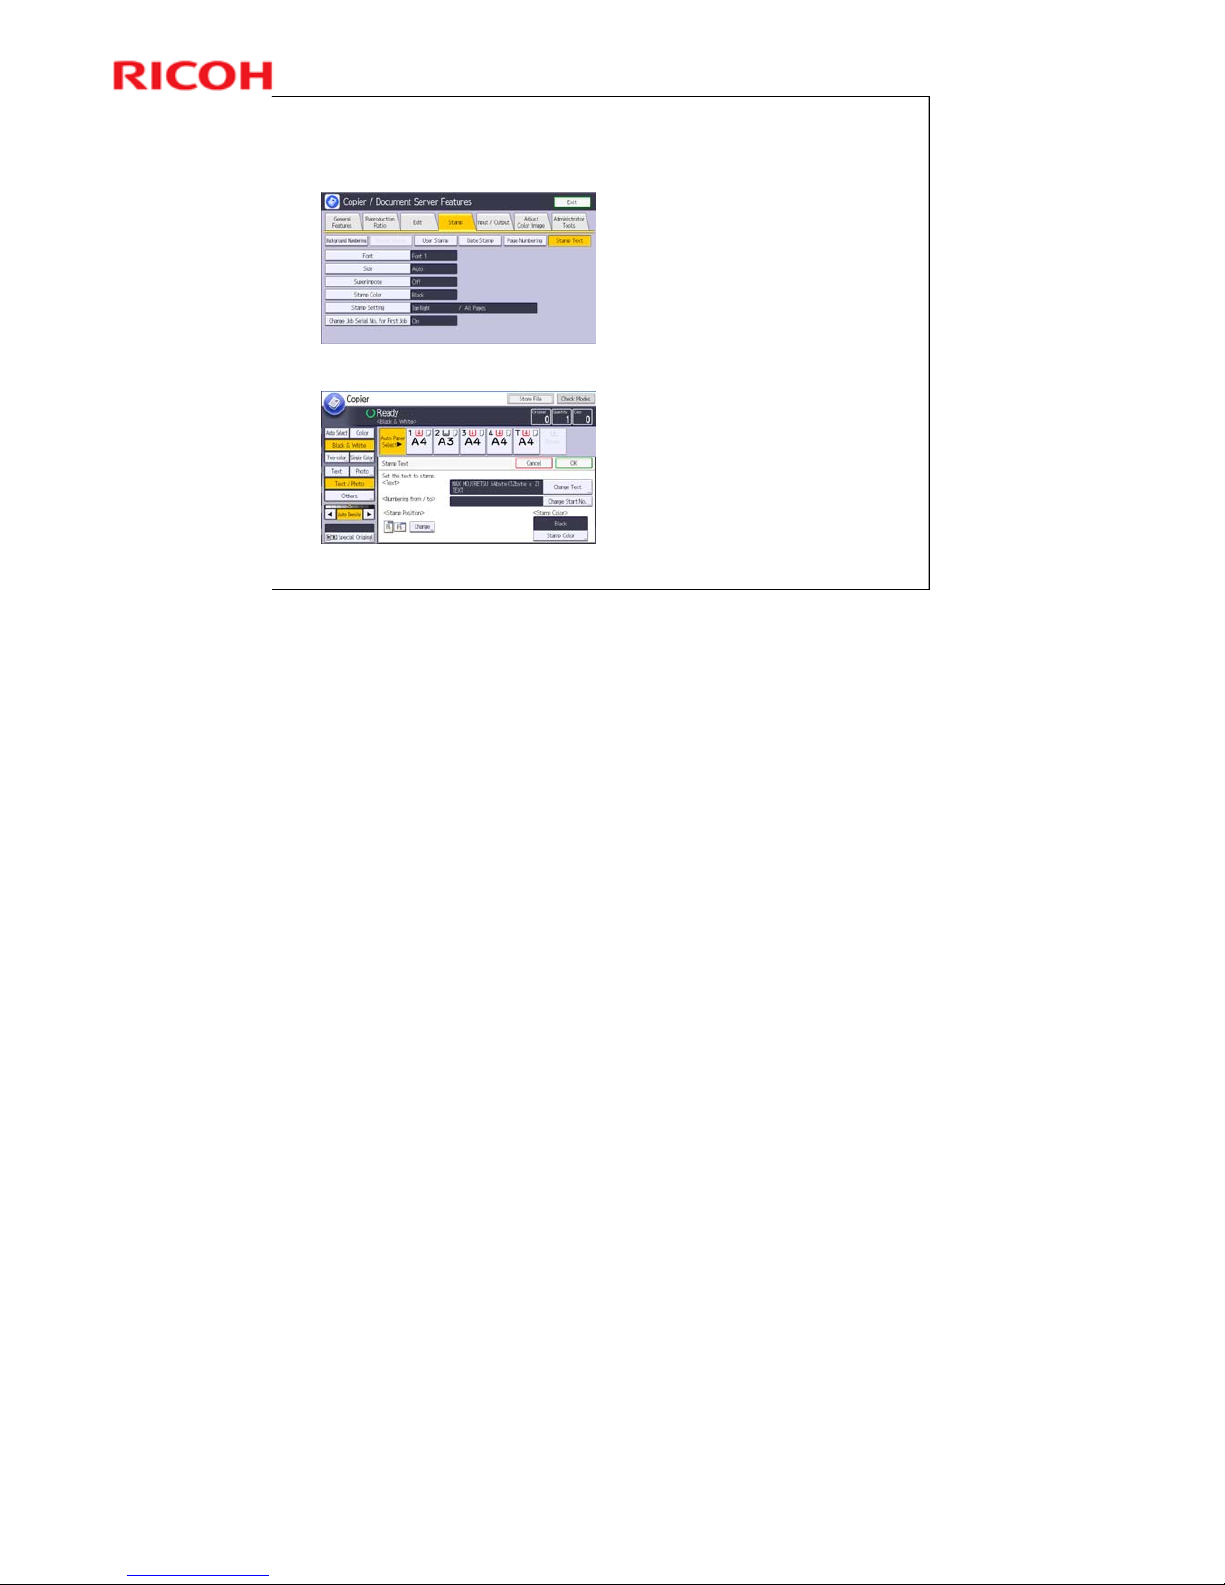
Bates numbering is provided
as a stamp function of the
Copier application.
By setting arbitrary text such
as a company name, a ninedigit start number for autoincrement numbering, and
stamp position, users can
add Bates numbering on
each page of copy output.
The total number of digits
of arbitrary text and autoincrement numbering must
be less than 64 bytes.
To use this function, change
the default setting of “Stamp
Text” in “Copier / Document
Server Features”.
No additional notes
Page 72
72
AL-C2 Training
Slide 72
New Feature for this Series
Scan to PDF/A & Digitally Signed PDF
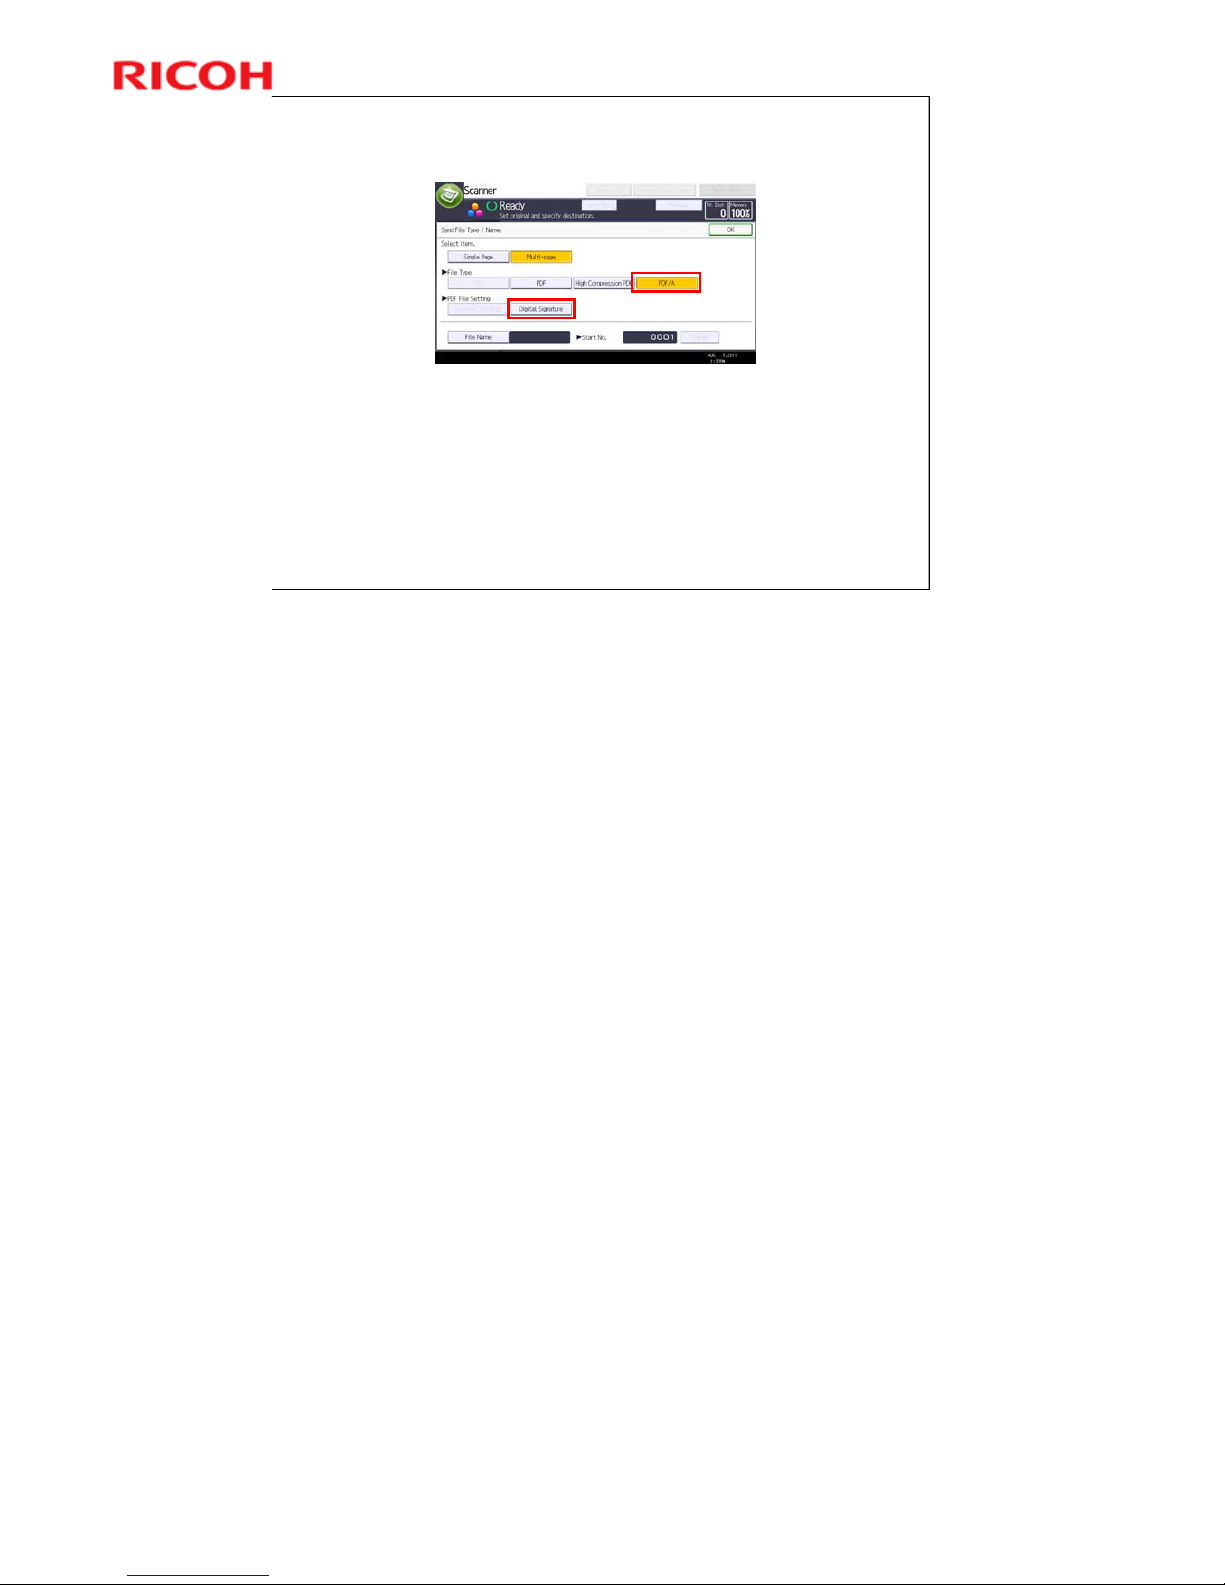
This function enables users to scan paper documents to PDF/A format. Also, users
can make digitally signed PDF files.
Scan to PDF/A or Scan to Digitally Signed PDF is available for the following jobs.
Scan to mail
Scan to Folder (SMB/FTP/NCP)
Scan to USB/SD
Universal send to mail address destination / Folder destination from fax function
Although Scan to PDF/A is available, adding a digital signature to PDF is not
available for the following jobs.
Scan to Document Server
Forwarding incoming fax to mail address
PDF/A is a file format and an ISO Standard for the long-term archiving of
electronic documents. Users can utilize this function when scanning paper
documents related to quality management, or when submitting electronic
documents with PDF/A format is required by governments.
Also, users can avoid manipulation by utilizing the digitally signed PDF function
when scanning receipts or contracts for which keeping the original content is
needed.
Some PDF viewer applications cannot open PDF/A files. (example: Acrobat 4.0
or earlier)
Locked PDF/A function is not available on some SDK applications.
Page 73
73
AL-C2 Training
Slide 73
New Feature for this Series
Scan to PDF/A & Digitally Signed PDF
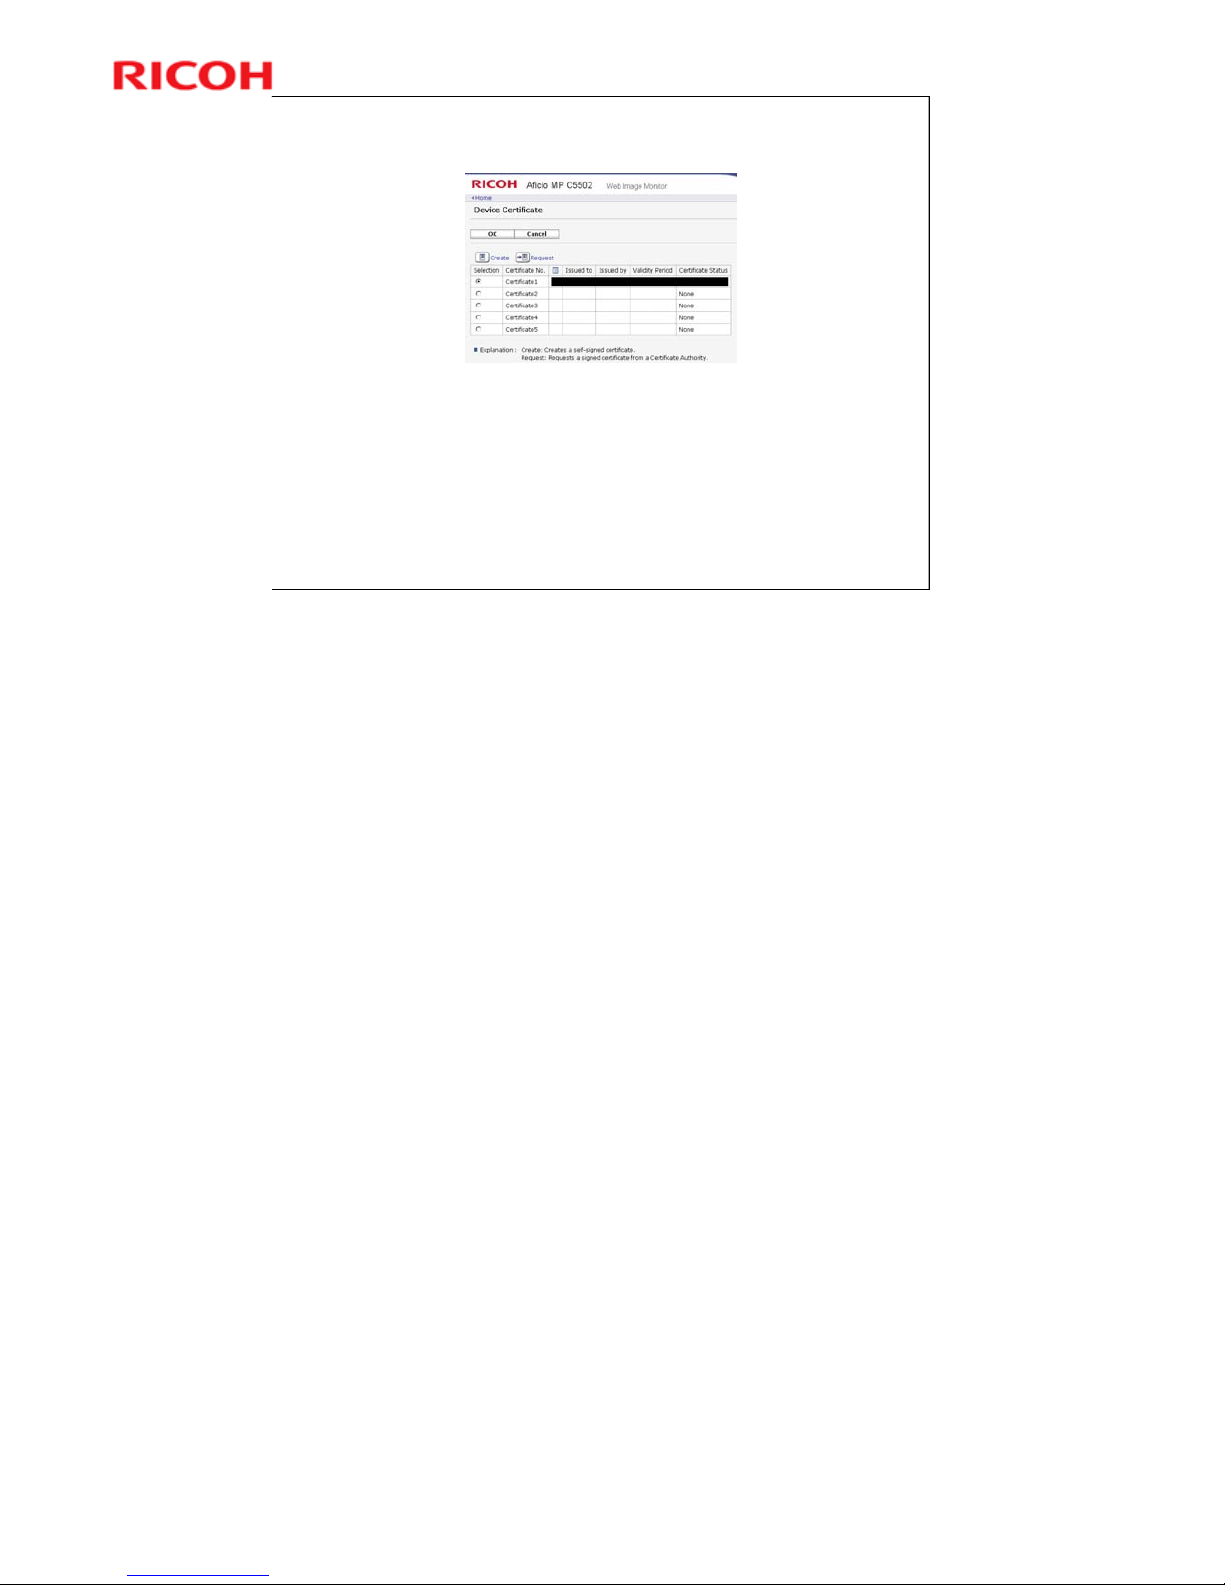
Registering a “Device Certificate” is required for making
digitally signed PDF.
Please add a certificate with Web Image Monitor. If the
certificate is expired or the mail address of the certificate is
wrong, users can’t generate a digitally signed PDF.
Also, if the certificate is about to expire, users can select
either continuing the job or canceling the job.
No additional notes
Page 74
74
AL-C2 Training
Slide 74
Improved Feature
Split Scan from Book Original
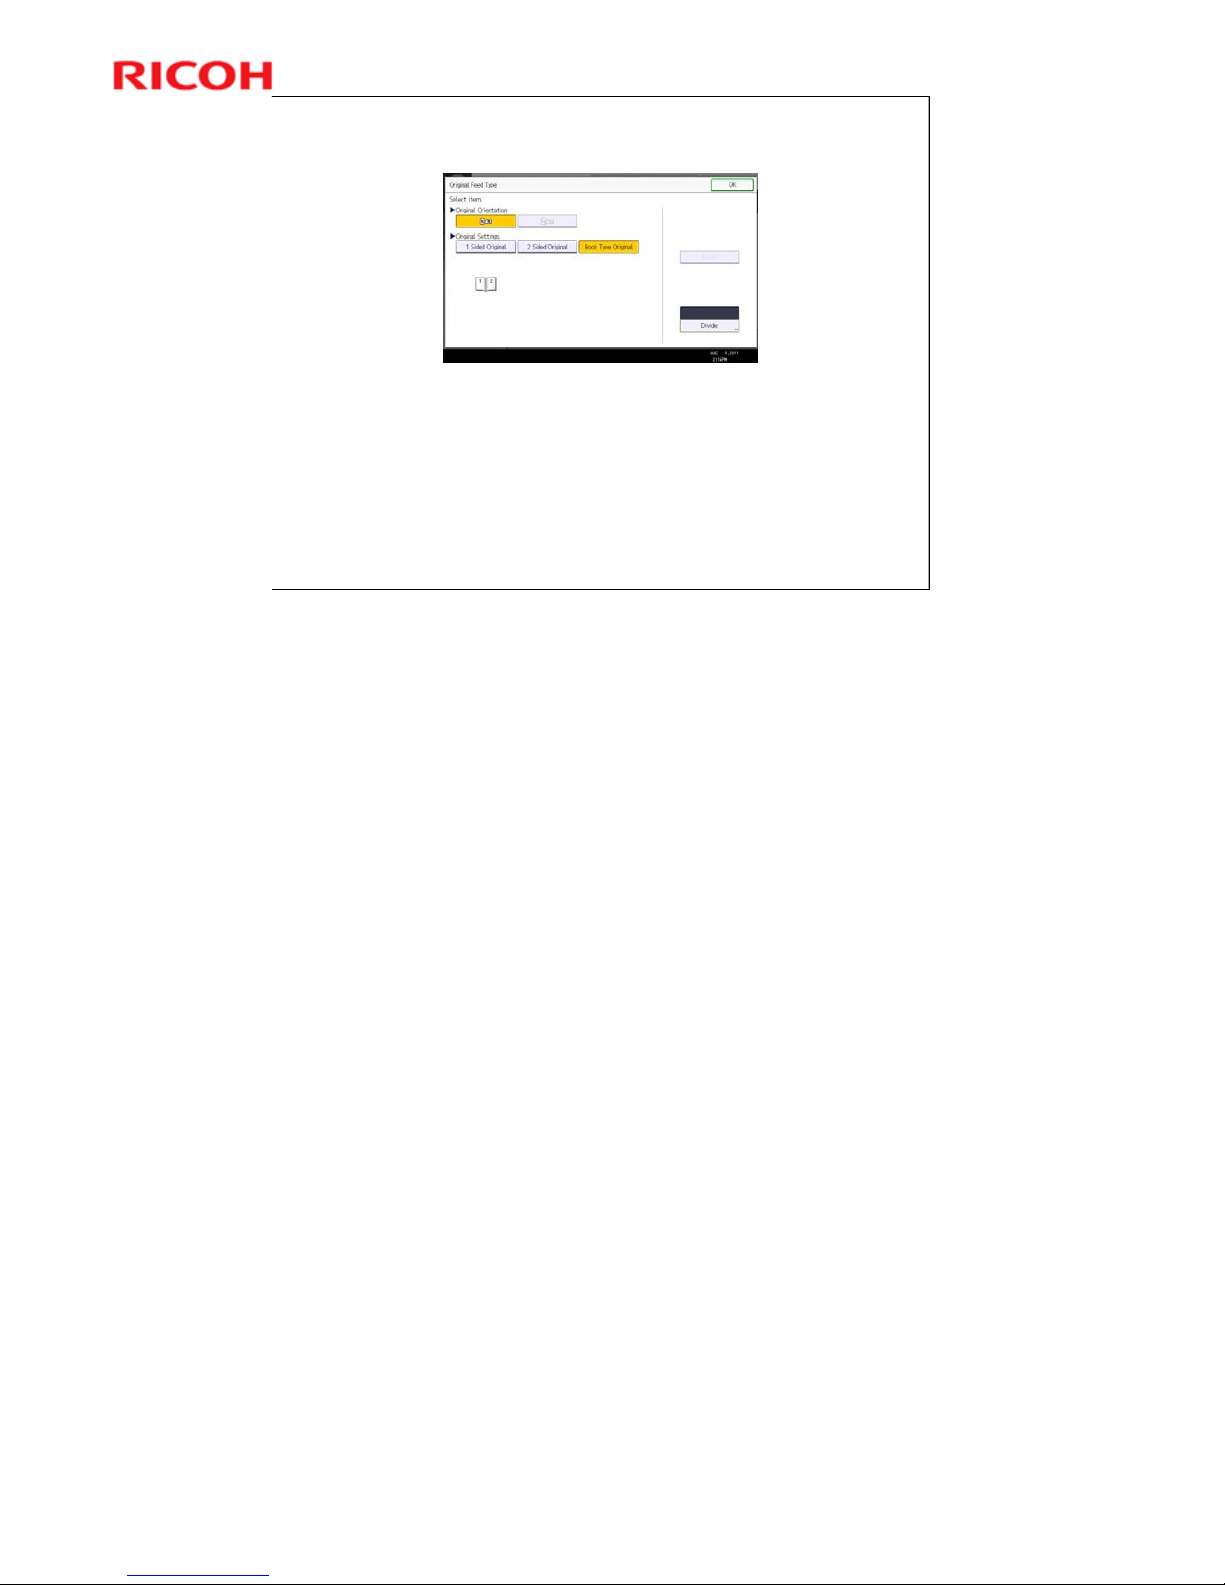
This function scans the left page and right page of a
double-page spread original separately. Users will receive
the left and right pages as separate images.
1. Set a book type original on the glass.
2. Select “Book Type Original” at “Original Settings” in
“Original Feed Type”.
3. Press “Start”
No additional notes
Page 75

75
AL-C2 Training
Slide 75
Improved Feature
Scan to Web Mail (SSL over SMTP)
SSL encryption is supported when using scan to
E-mail via SMTP server.
Setting SSL for SMTP connection can be
specified by the network administrator.
When SMTP over SSL is enabled, Internet Fax to
Ricoh GW models is not available because GW
models do not comply with SSL reception at this
time.
No additional notes
Page 76
76
AL-C2 Training
Slide 76
Improved Feature
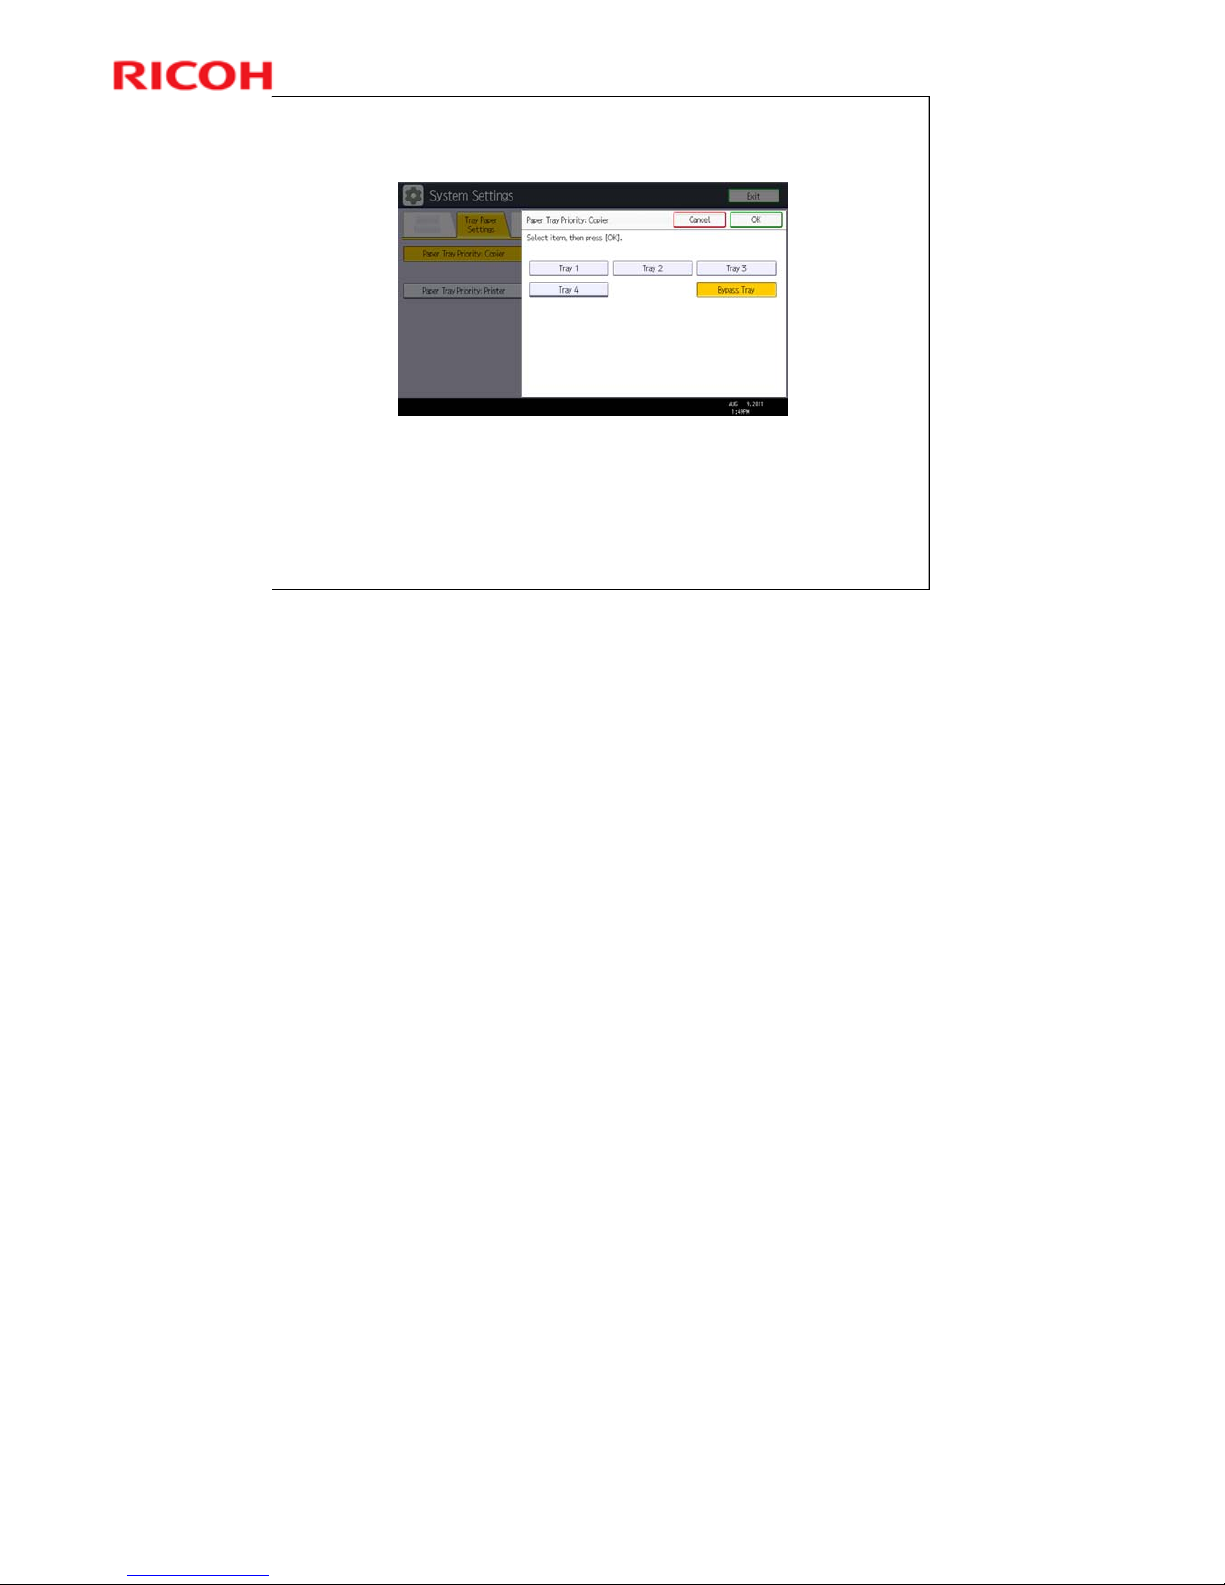
Paper Tray Priority
From this model, the bypass tray can be set as the priority
tray.
No additional notes
Page 77

77
AL-C2 Training
Slide 77
Improved Feature
User Codes
For the GW+ controller, the number of user
codes is increased from 500 to 1000.
No additional notes
Page 78

78
AL-C2 Training
Slide 78
Improved Feature
Page Counters
An A3/DLT billing counter has been added.
This counter counts up by 1 for every A3 or DLT
sheet.
The copy and total counters also count up by 2,
as before.
Old system
Total count = A4/LT sheets + (A3/DLT sheets x 2)
New system
Total count = A4/LT sheets + (A3/DLT sheets x 2)
A3/DLT counter = A3/DLT sheets x 1
Page 79

79
AL-C2 Training
Slide 79
Improved Feature
Language Support
NA models: Brazilian Portuguese is now
supported
EU models: Greek is now supported
No additional notes
Page 80
80
AL-C2 Training
Slide 80
Improved Feature
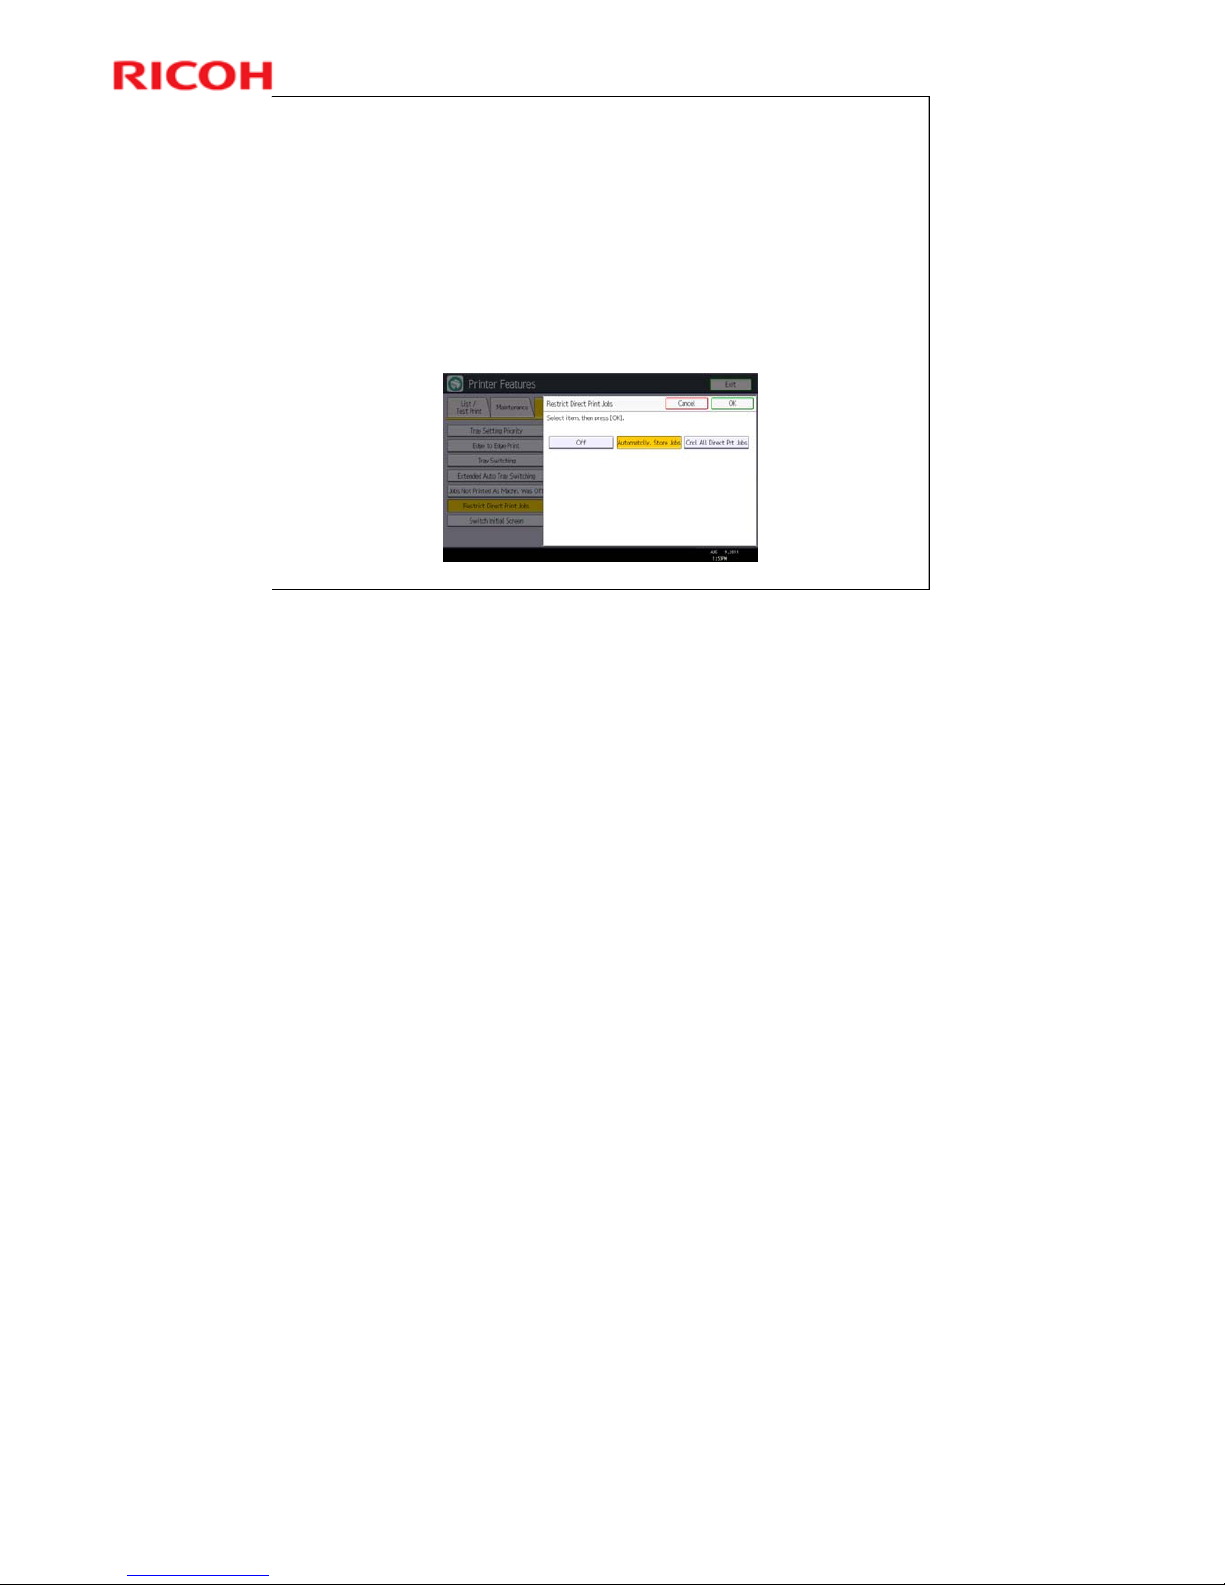
Enhanced Print Functions using HDD
Mandatory Hold Print mode
Select “Automatically. Store Jobs” to enable Mandatory Hold Print
mode.
If “Cncl All Direct Prt Jobs” is selected, print jobs which are not
stored in the HDD will be cancelled.
When printing hold print jobs, users must select single or multiple
print jobs from the job list on the operation panel and press “Print”.
Users can also delete them from operation panel when the jobs
are no longer necessary or users find some wrong print settings.
No additional notes
Page 81

81
AL-C2 Training
Slide 81
Improved Feature
Enhanced Print Functions using HDD
Changing Print Settings on the operation panel
When “Sample Print”, “Locked Print”, “Hold Print”
or “Stored Print” is selected in printer drivers,
users can change the print settings such as
number of copies, color/monochrome, duplex,
staples and so on at the operation panel before
printing.
Please note that users can’t use the operation
panel to change the print settings of jobs that are
stored in Mandatory Hold Print mode.
Color print jobs can be printed in B&W by
changing the print setting on the operation panel,
but the reverse is not available.
Print settings cannot be changed when print jobs are sent via Centronics
interface, USB or Bluetooth.
Page 82
82
AL-C2 Training
Slide 82
D129/D130
Service Training
Installation
This section explains important changes to the installation procedure since AL-
C1.5.
Installation for the copier is very similar to the AL-C1.5. However, the procedures
for the options have some changes. Make sure that y ou use th e correct
procedures for the machine you are working on.
Page 83

83
AL-C2 Training
Slide 83
Overview
Installation for the main machine and peripherals
is basically the same as for the AL-C1.5.
This section of the course shows the main
changes.
Some details are different, and some of the SP
modes to use after installing peripherals such as
paper trays have been changed.
Always refer to the AL-C2 service manual when
installing the machine and peripherals.
No additional notes
Page 84
84
AL-C2 Training
Slide 84
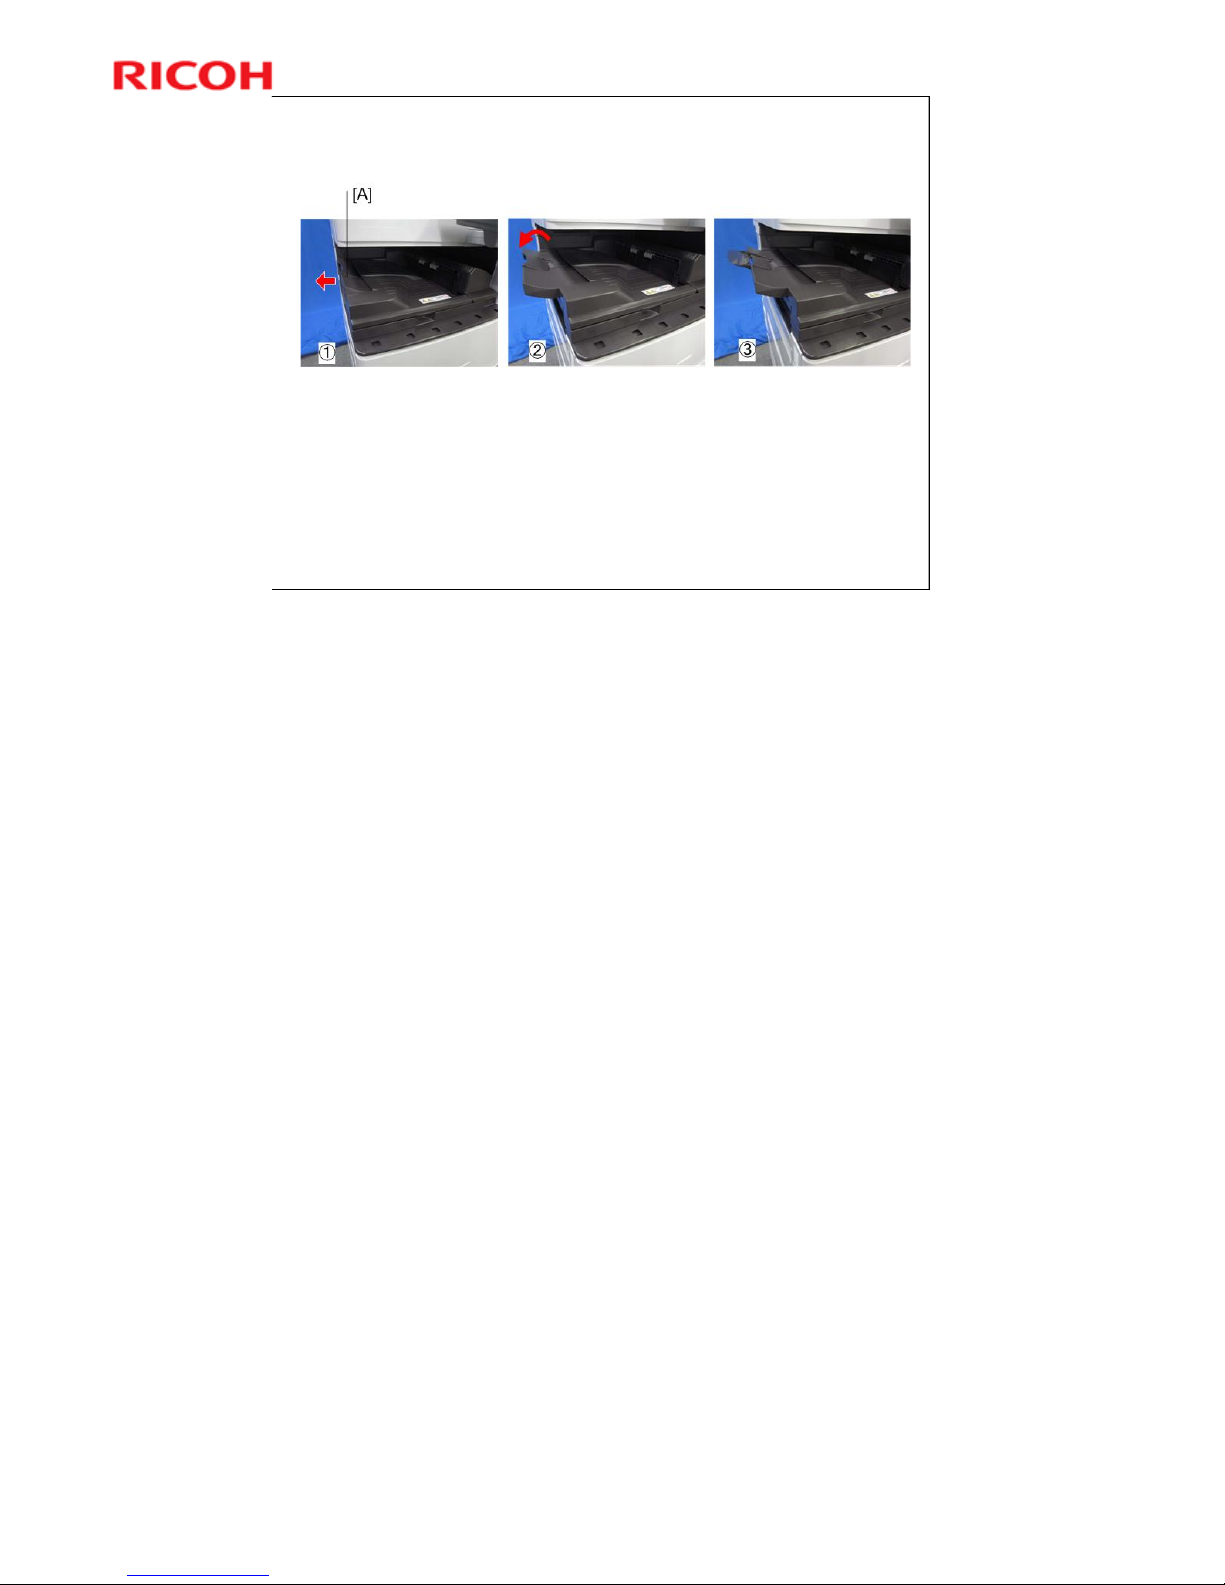
Bridge Unit – Extension Tray
Pull out the extension tray [A] if the 1000-sheet finisher
(D588) is to be installed.
This is new.
Page 85

85
AL-C2 Training
Slide 85
Fax Connection Unit
This option is required for the new Remote Fax
feature (described earlier in the presentation).
The feature is on an SD card. There is no need to
set up any bit switches or SPs.
No additional notes
Page 86
86
AL-C2 Training
Slide 86
D129/D130
Service Training
Changes to the Engine
No additional notes
Page 87
87
AL-C2 Training
Slide 87
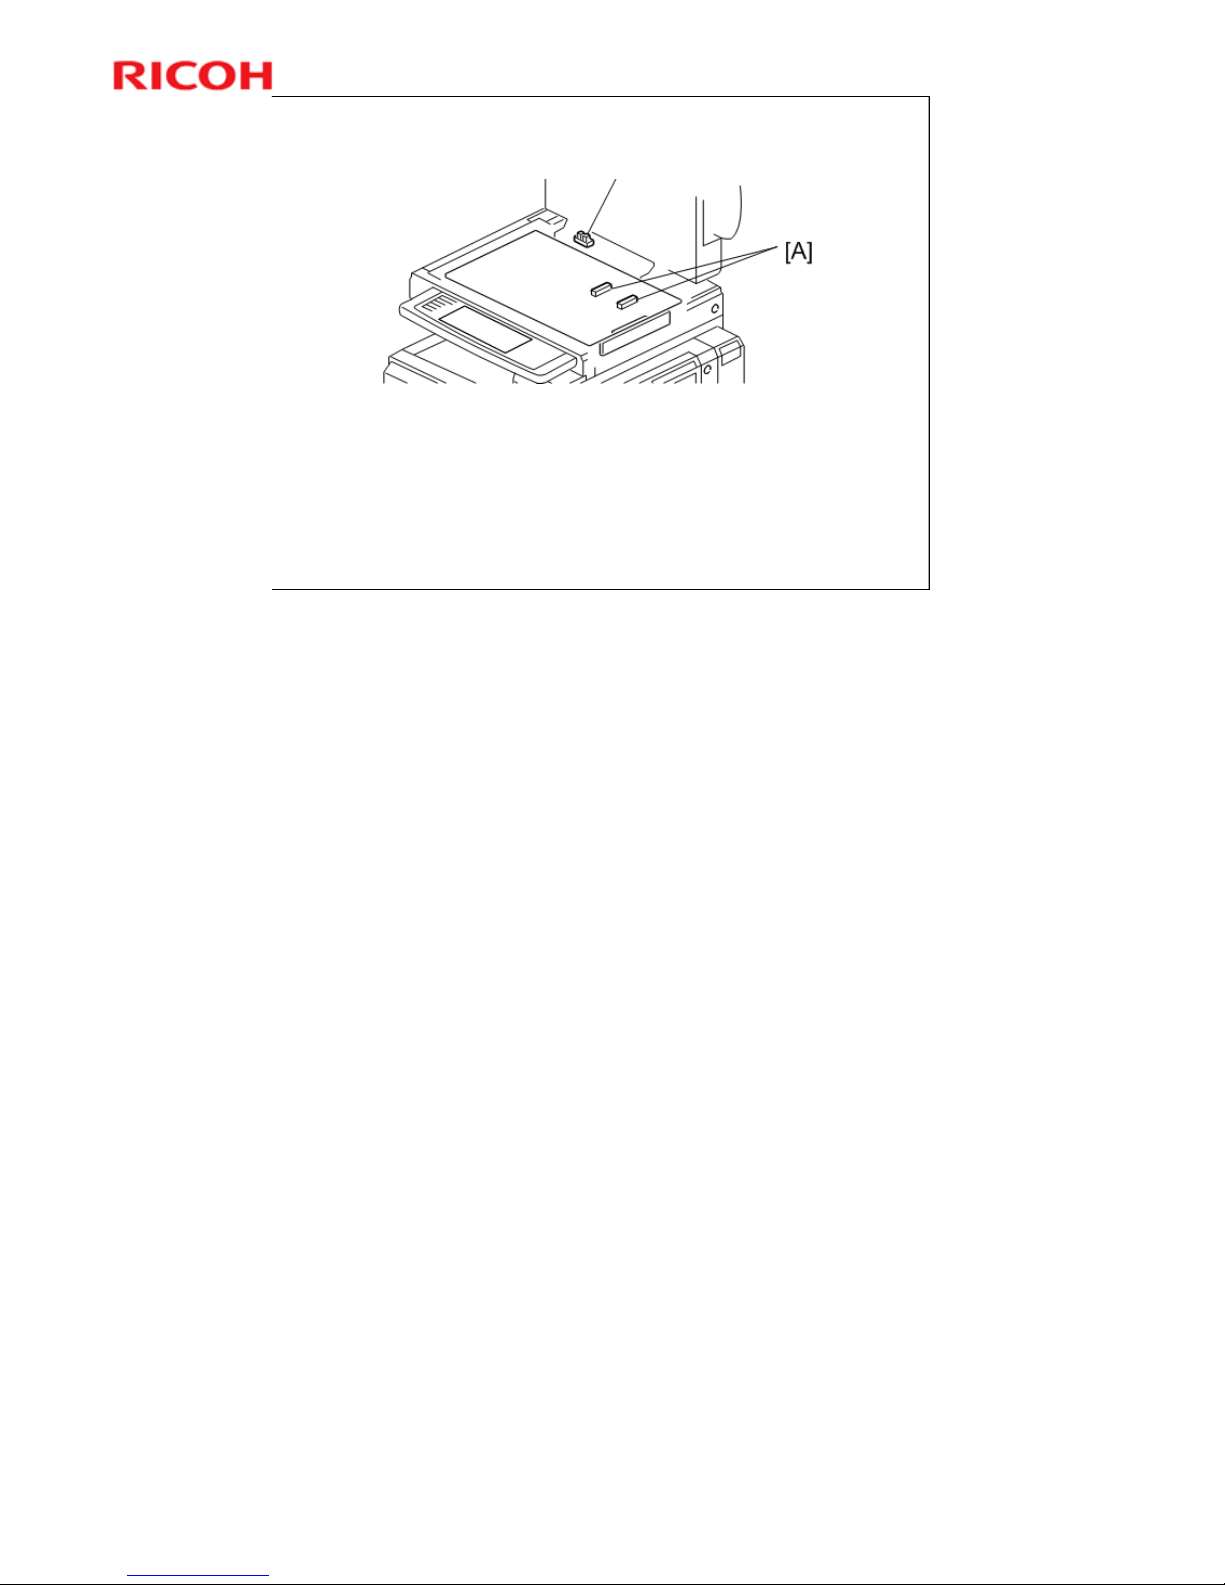
Scanner
All models have a color CCD.
The lamp has been changed to an LED array.
There is no APS width sensor. The machine detects the
document width with the CCD before scanning starts.
The original length sensors [A] (for EU models) [B] (for NA
models) detect the original length.
No additional notes
Page 88

88
AL-C2 Training
Slide 88
Original Width Detection Failure
There is no original width sensor.
The CCD detects the width of the paper before scanning
(this is known as ‘pre-scanning’).
If the original has punch holes, or is thin or transparent, the
CCD may detect the incorrect width.
The following problem may occur for thin originals:
If the user opens the cover during pre-scanning, they may
get a strong light from the scanner lamp in their eyes.
To prevent this, the lamp power is less during pre-scanning
(default: 60%).
However, with the reduced setting, sometimes the machine
cannot detect the original size.
If this happens, increase the setting using SP4-309-004.
No additional notes
Page 89
89
AL-C2 Training
Slide 89
Scanner
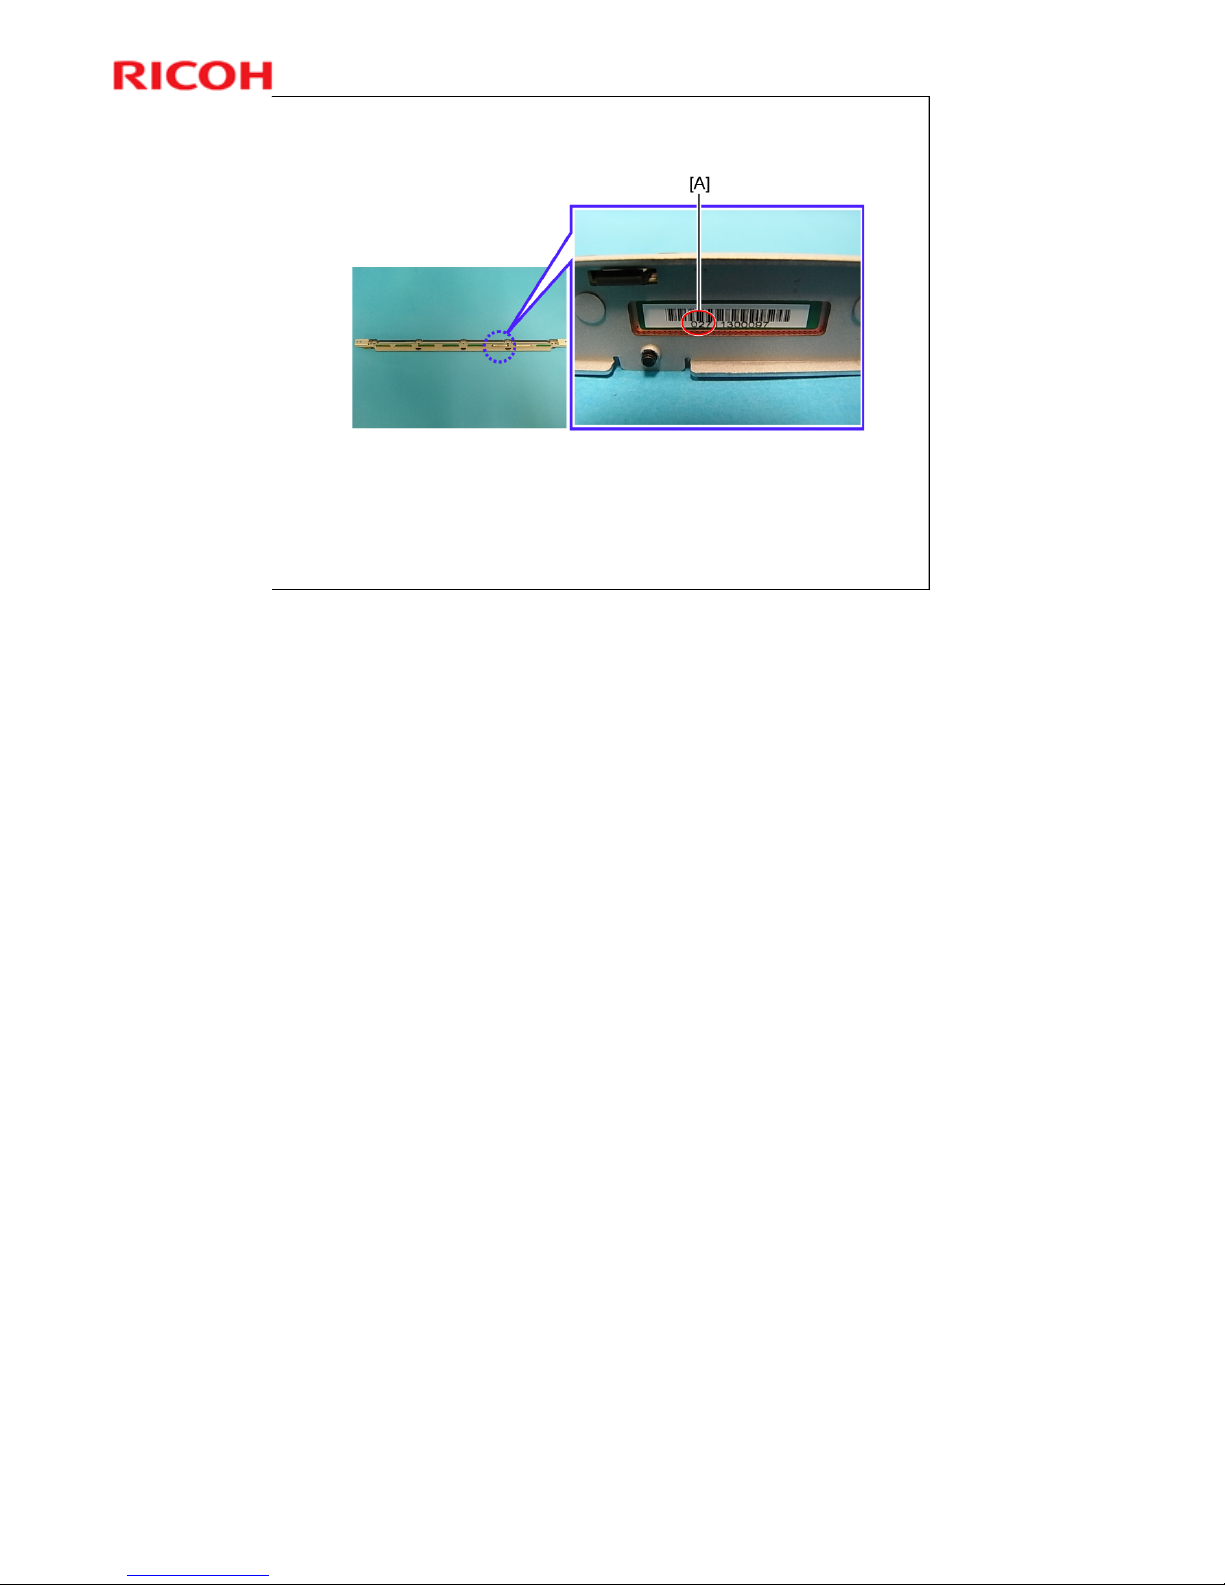
Exposure Lamp Replacement
Before installing the new exposure lamp, check the first
three digits [A] in the bar-code on the new lamp.
After installing the new lamp, go to SP4-954-005 and adjust
the setting, referring to the table in the service manual.
Service Manual, Replacement and Adjustment, Scanner Unit,
Exposure Lamp
This setting is called the ‘chromaticity rank’, and needs to be adjusted for each
lamp.
Page 90
90
AL-C2 Training
Slide 90
PCU
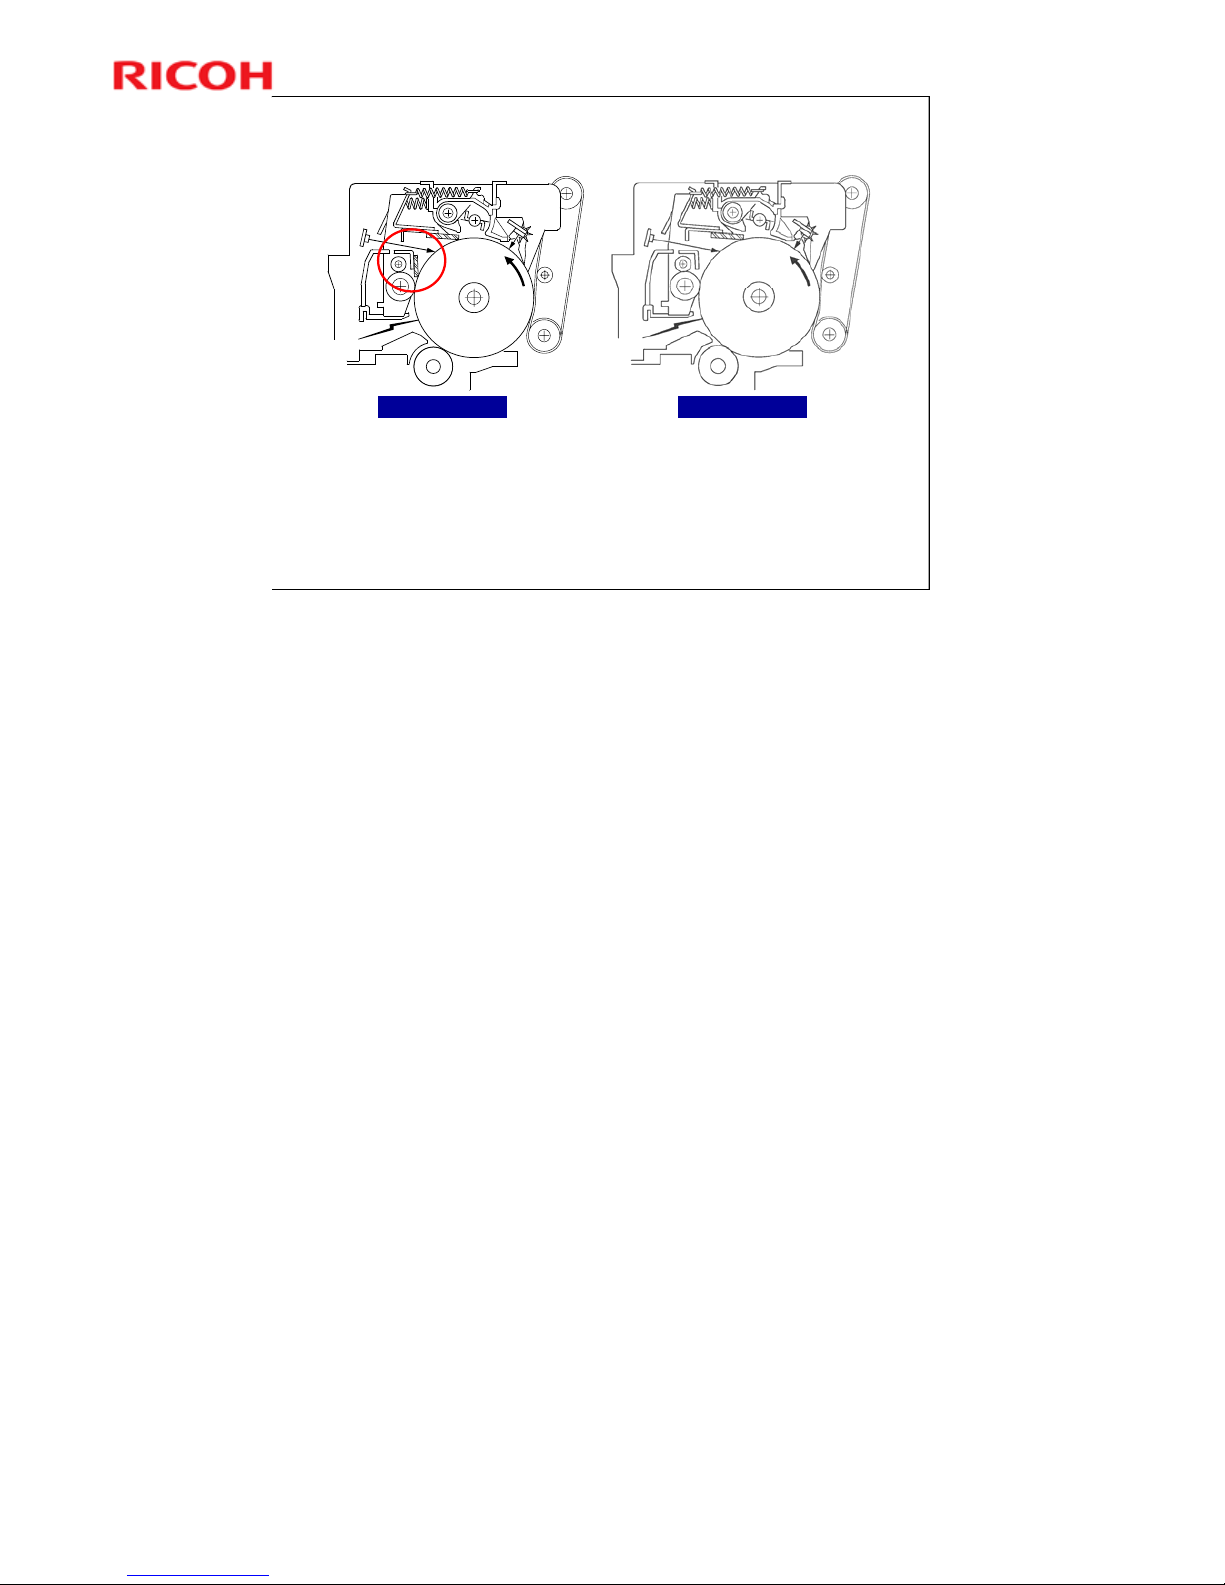
Drum cleaning blade 2 has been removed.
This simplifies PCU replacement and cleaning, because it is
not necessary to move springs to retract the cleaning blade
away from the drum
AL-C1. AL–C1.5
AL-C2
No additional notes
Page 91
91
AL-C2 Training
Slide 91
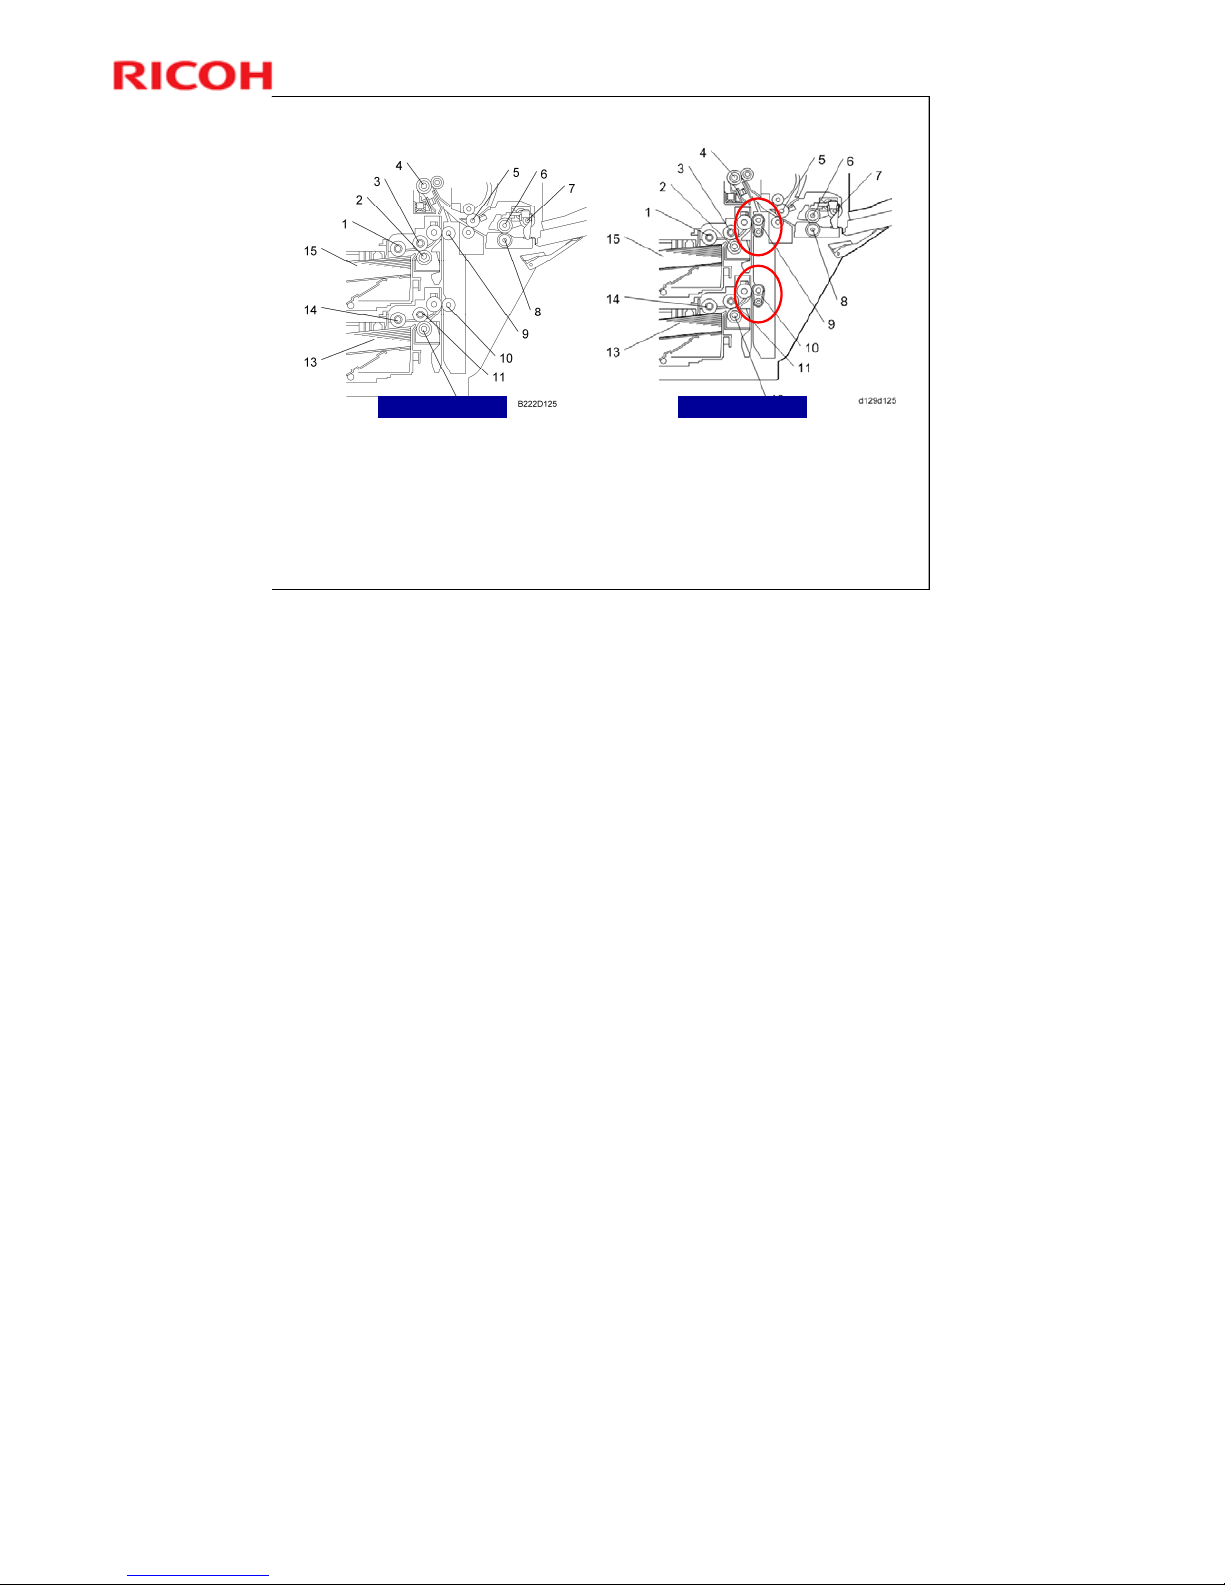
Paper Feed
A belt has been added at each vertical transport roller.
These are called the upper and lower relay belts.
AL-C1. AL–C1.5
AL-C2
No additional notes
Page 92
92
AL-C2 Training
Slide 92
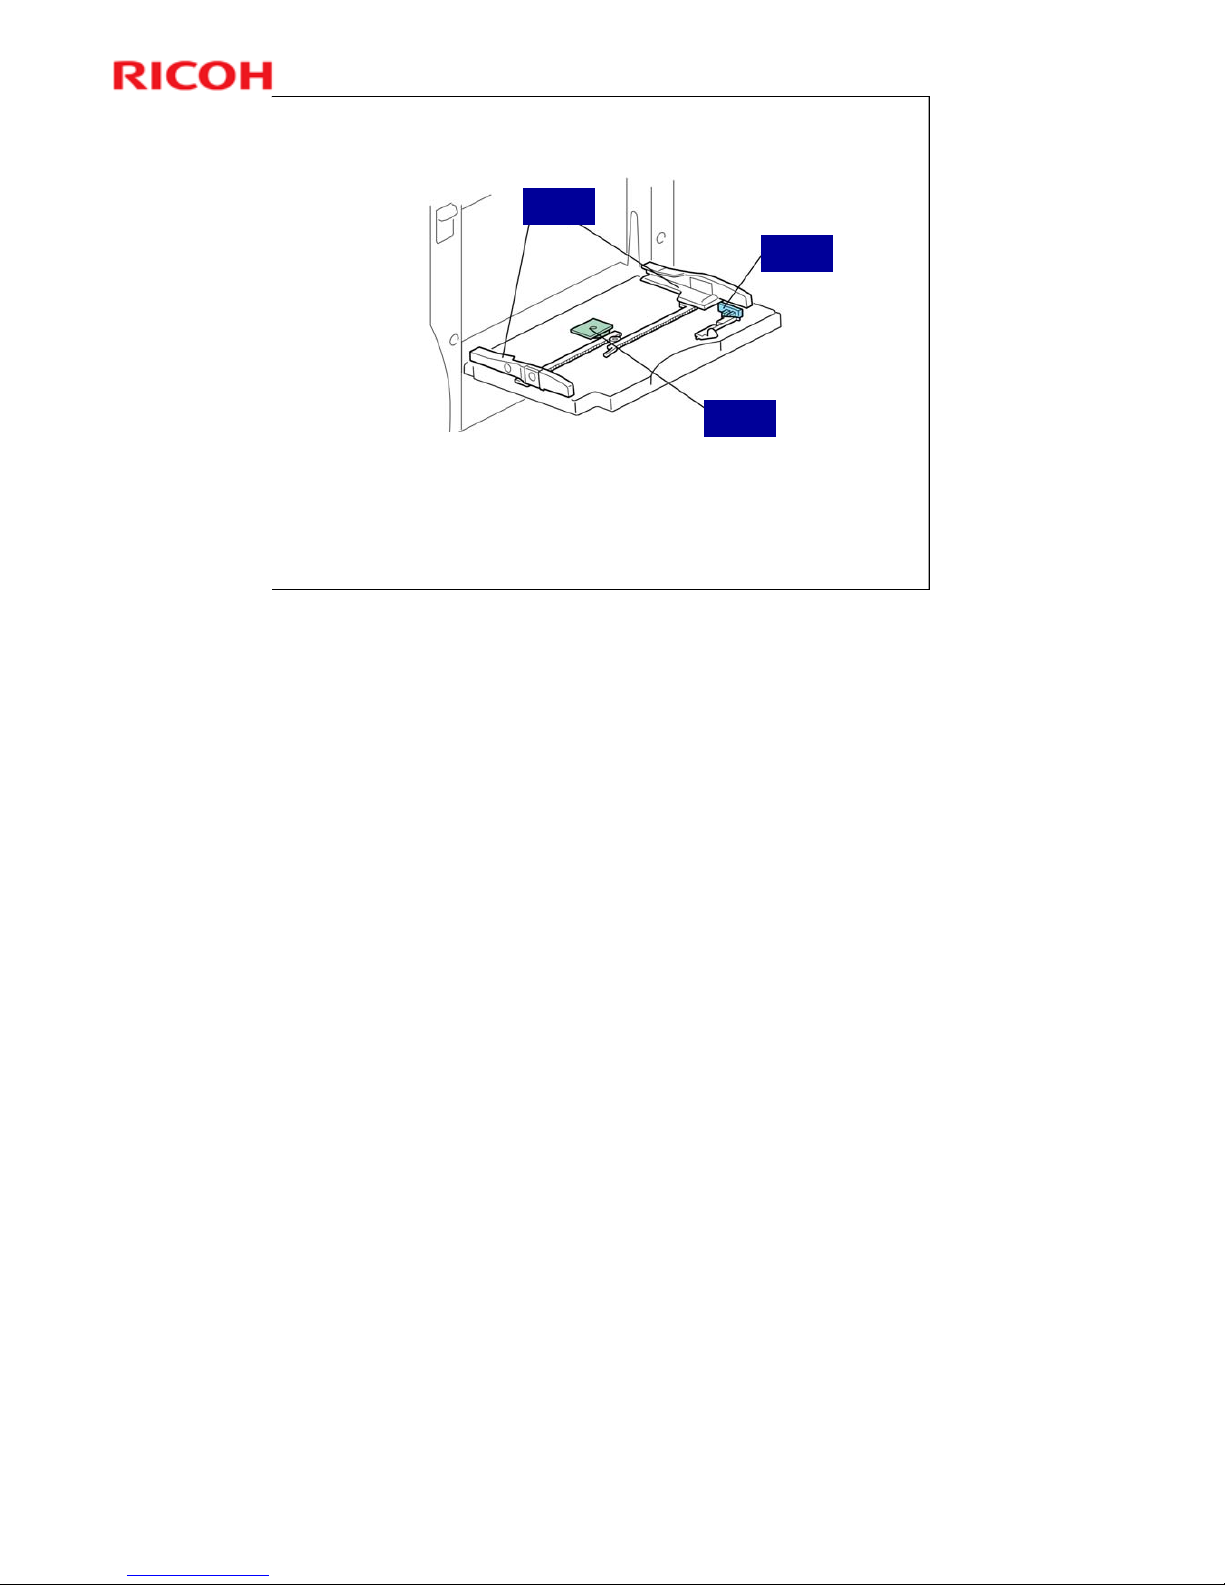
Bypass Tray
A length sensor has been added to the bypass tray.
In North America models, the sensors cannot distinguish LG SEF
from LT SEF. The paper size (LT or LG) must be selected with
SP1-007-002 in advance.
Side
Plates
Width
Sensor
Length
Sensor
No additional notes
Page 93

93
AL-C2 Training
Slide 93
Boards
The BICU has been divided into two boards:
BCU, and IPU.
The same BCU board is used for the following
three models: AL-C2, AP-C2, AT-C2
No additional notes
Page 94

94
AL-C2 Training
Slide 94
Fax Unit
The MBU and FCU are combined into one board.
After you replace the FCU, you must transfer the
SRAM data from the old FCU to the new one.
This is done by connecting the old FCU to the
new one with a flat cable.
A flat cable is provided with the new FCU service
part.
The following data will be transferred: TTI, RTI,
CSI, bit switch settings, RAM address settings,
NCU parameter settings
See the fax unit’s service manual for the procedure.
Page 95
95
AL-C2 Training
Slide 95
 Loading...