


Camera User Guide
The serial number of this product is
given on the bottom face of the camera.
Basic Operations
If you are using the camera for the first time, read this section.
This section provides a basic overview of how to turn on the camera, take pictures and
play back pictures.
Advanced Operations
Read this section when you want to learn more about the different
camera functions.
This section provides more detailed information about the functions used to take pictures
and play back pictures, as well as information on how to customize the camera settings,
print pictures, and use the camera with a computer.

Preface
This manual provides information on how to use the shooting and playback
functions of this product, as well as warnings on its use.
To make the best use of this product’s functions, read this manual thoroughly
before use. Please keep this manual handy for ease of reference.
Ricoh Co., Ltd.
Safety Precautions For the safe use of your camera, be sure to read the safety precautions
thoroughly.
Test Shooting Please be sure to do some test shooting to make sure it is recording
properly before normal use.
Copyright Reproduction or alteration of copyrighted documents, magazines, music
and other materials, other than for personal, home or similarly limited
purposes, without the consent of the copyright holder is prohibited.
Exemption from Liability Ricoh Co., Ltd. assumes no liability for failure to record or play back images
caused by malfunction of this product.
Warranty This product is manufactured to local specifications and the warranty is valid
within the country of purchase. Should the product fail or malfunction while
you are abroad, the manufacturer assumes no responsibility for servicing
the product locally or bearing the expenditure incurred thereof.
Radio Interference Operating this product in the vicinity of other electronic equipment may
adversely affect the performance of both devices. In particular, operating
the camera close to a radio or television may lead to interference. If
interference occurs, follow the procedures below.
• Move the camera as far away as possible from the TV, radio or other
device.
• Reorient the TV or radio antenna.
• Plug the devices into separate electrical outlets.
This publication may not be reproduced in whole or in part without the express written permission of Ricoh.
© 2007 RICOH CO., LTD. All rights reserved.
The contents of this document may be changed in the future, without prior notice.
This booklet was created with thorough attention to its content. If, however, you have a question, spot an
error, or find a description lacking, please refer to the end of this booklet for information on how to contact us.
Microsoft, MS, Windows, and Windows Vista are registered trademarks of Microsoft Corporation in the
United States of America and other countries.
Macintosh, Power Macintosh, and Mac OS are registered trademarks of Apple Inc. in the United States of
America and other countries.
Adobe and Adobe Acrobat are trademarks of Adobe Systems Incorporated.
All trademarked company and product names mentioned in this manual are the property of their respective
owners.
Using the Manuals
The following two manuals are included with your Caplio R7.
“Camera User Guide” (This booklet)
This guide explains the usage and functions of the camera. It
also explains how to install the provided software on your
computer.
* The “Camera User Guide” (English edition) is available from
the provided CD-ROM as a PDF file.
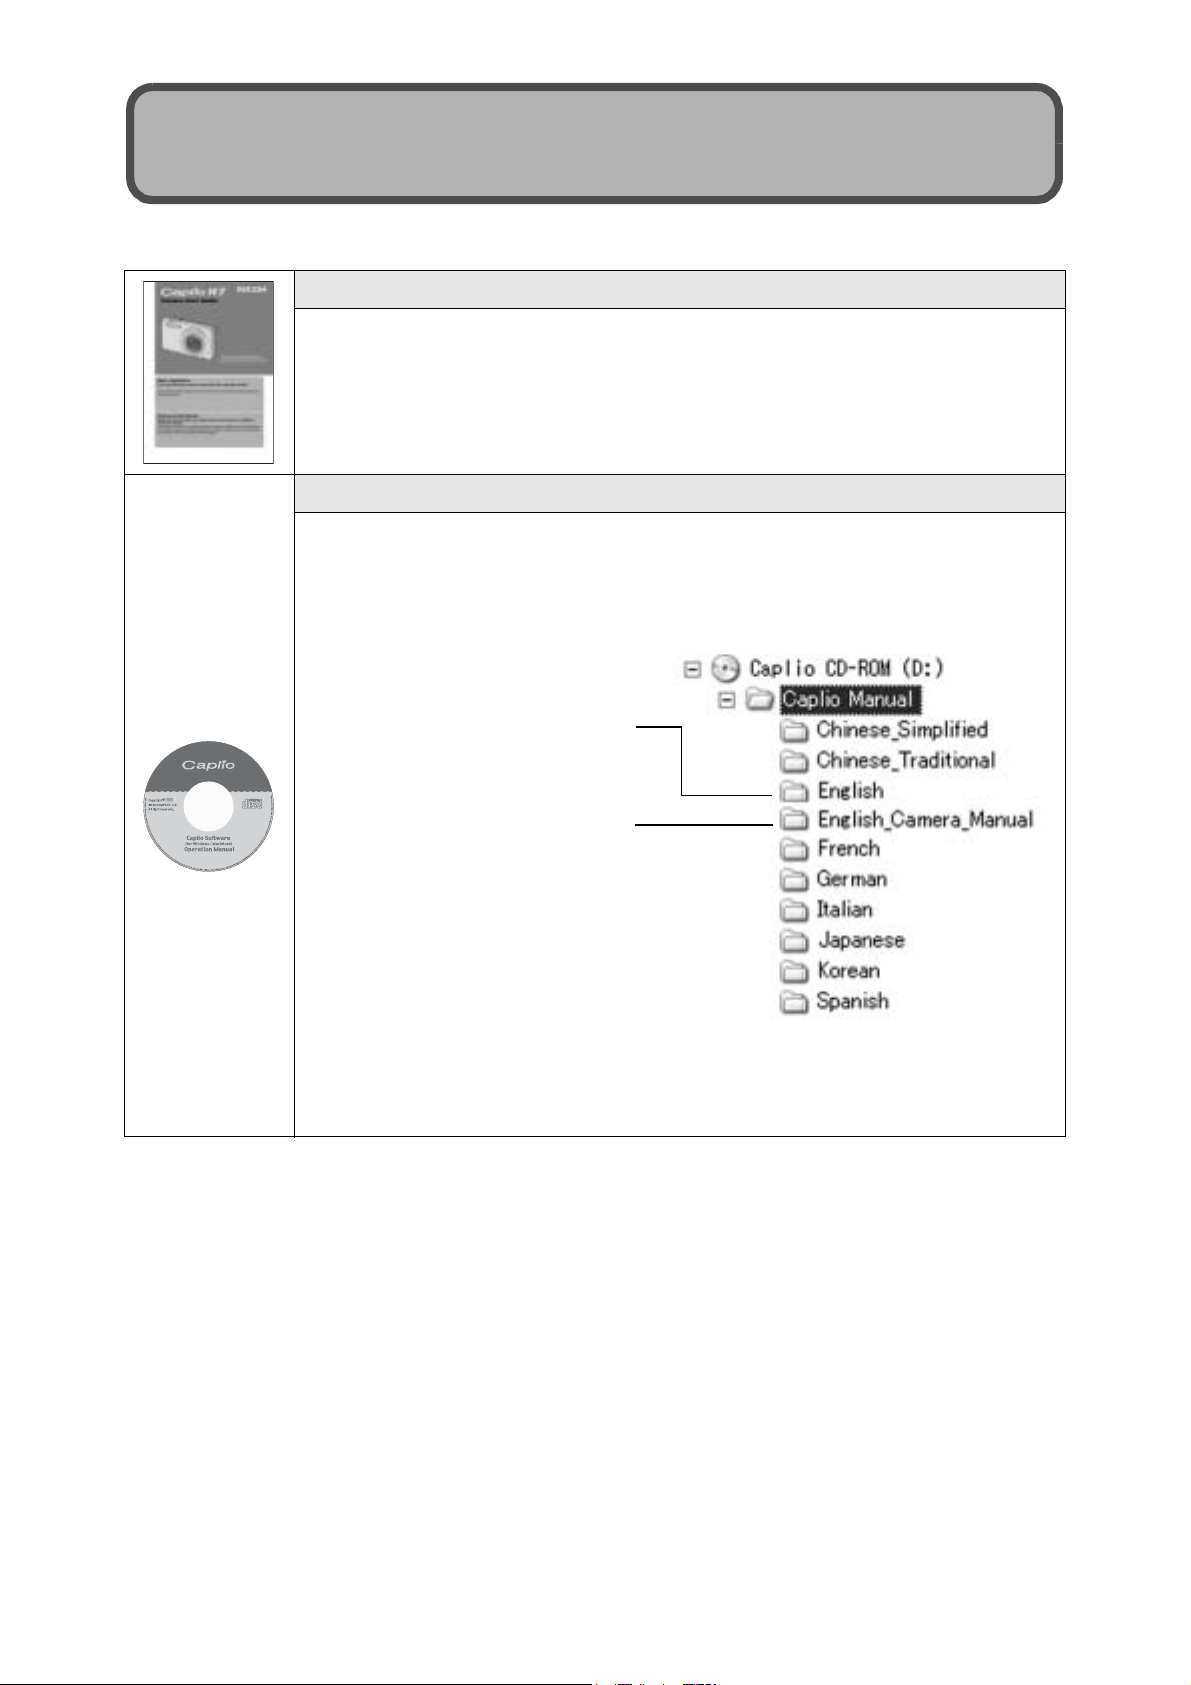
“Software User Guide” (PDF file)
This guide explains how to download images from the camera
to your computer and display and edit them on your computer.
* The “Software User Guide” is available in the following
folders on the provided CD-ROM.
Each language has its own
“Software User Guide” in
the respective folder.
“Camera User Guide”
(English edition) (PDF file)
To copy the Software User Guide onto your hard disk, copy
the PDF file from the respective folder directly to your hard
disk.
The camera is provided with the Irodio Photo & Video Studio software that
allows you to display and edit images on your computer. For how to use Irodio
Photo & Video Studio, see the displayed “Help”.
For more information on Irodio Photo & Video Studio, contact the Customer
Support Center below.
North America (U.S.) TEL: (Toll Free) +1-800-458-4029
Europe
UK, Germany, France and Spain: TEL: (Toll Free) +800-1532-4865
Other Countries: TEL: +44-1489-564-764
Asia TEL: +63-2-438-0090
China TEL: +86-21-5450-0391
Business hours: 9:00 AM to 5:00 PM
1
Key Features
The illustrations in this manual may differ from the actual product.
Equipped with a high magnification 7.1×
wide angle zoom lens
This camera has a compact body, featuring
a 28-mm* (Wide-angle) to 200-mm*
(Telephoto) 7.1× optical zoom lens that
covers a wide range of shooting. This lens
can be used to take pictures in various
indoor and outdoor situations.
*Equivalent to that on a 35mm camera
Camera shake correction function
reduces blurring (P.98)
The camera comes with a camera shake
correction function to allow you to take
clearer pictures with minimized blurring
even indoors, at night and in other
situations where camera shake may occur.
Macro shooting at 1 cm (P.35) and closeup flash shooting at 25 cm (Telephoto)
or 20 cm (Wide-angle) (P.36)
The unsurpassed macro shooting function
allows you to capture details from a very
close distance at only 1 cm.
The camera also has a built-in flash for
close-up shots at 25 cm (Telephoto) or
20 cm (Wide-angle). This combination
gives you clear macro shots even under low
light conditions.
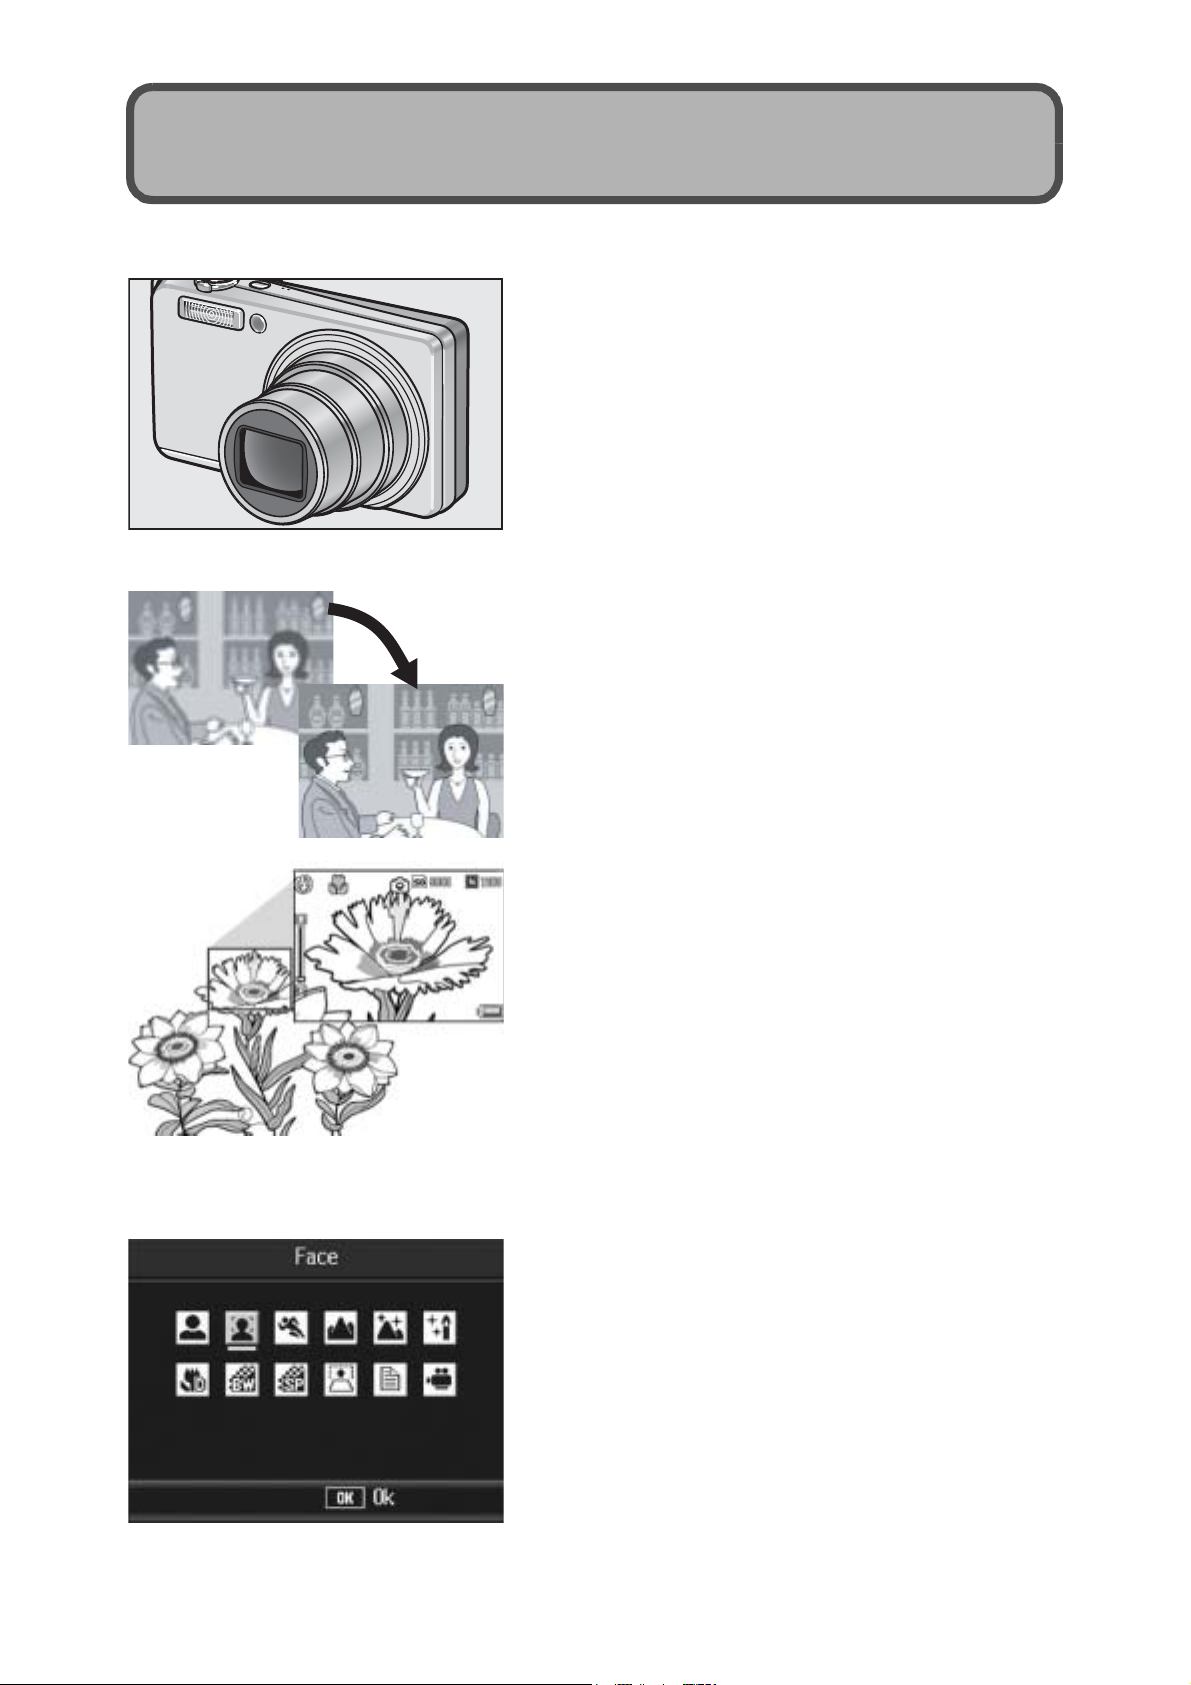
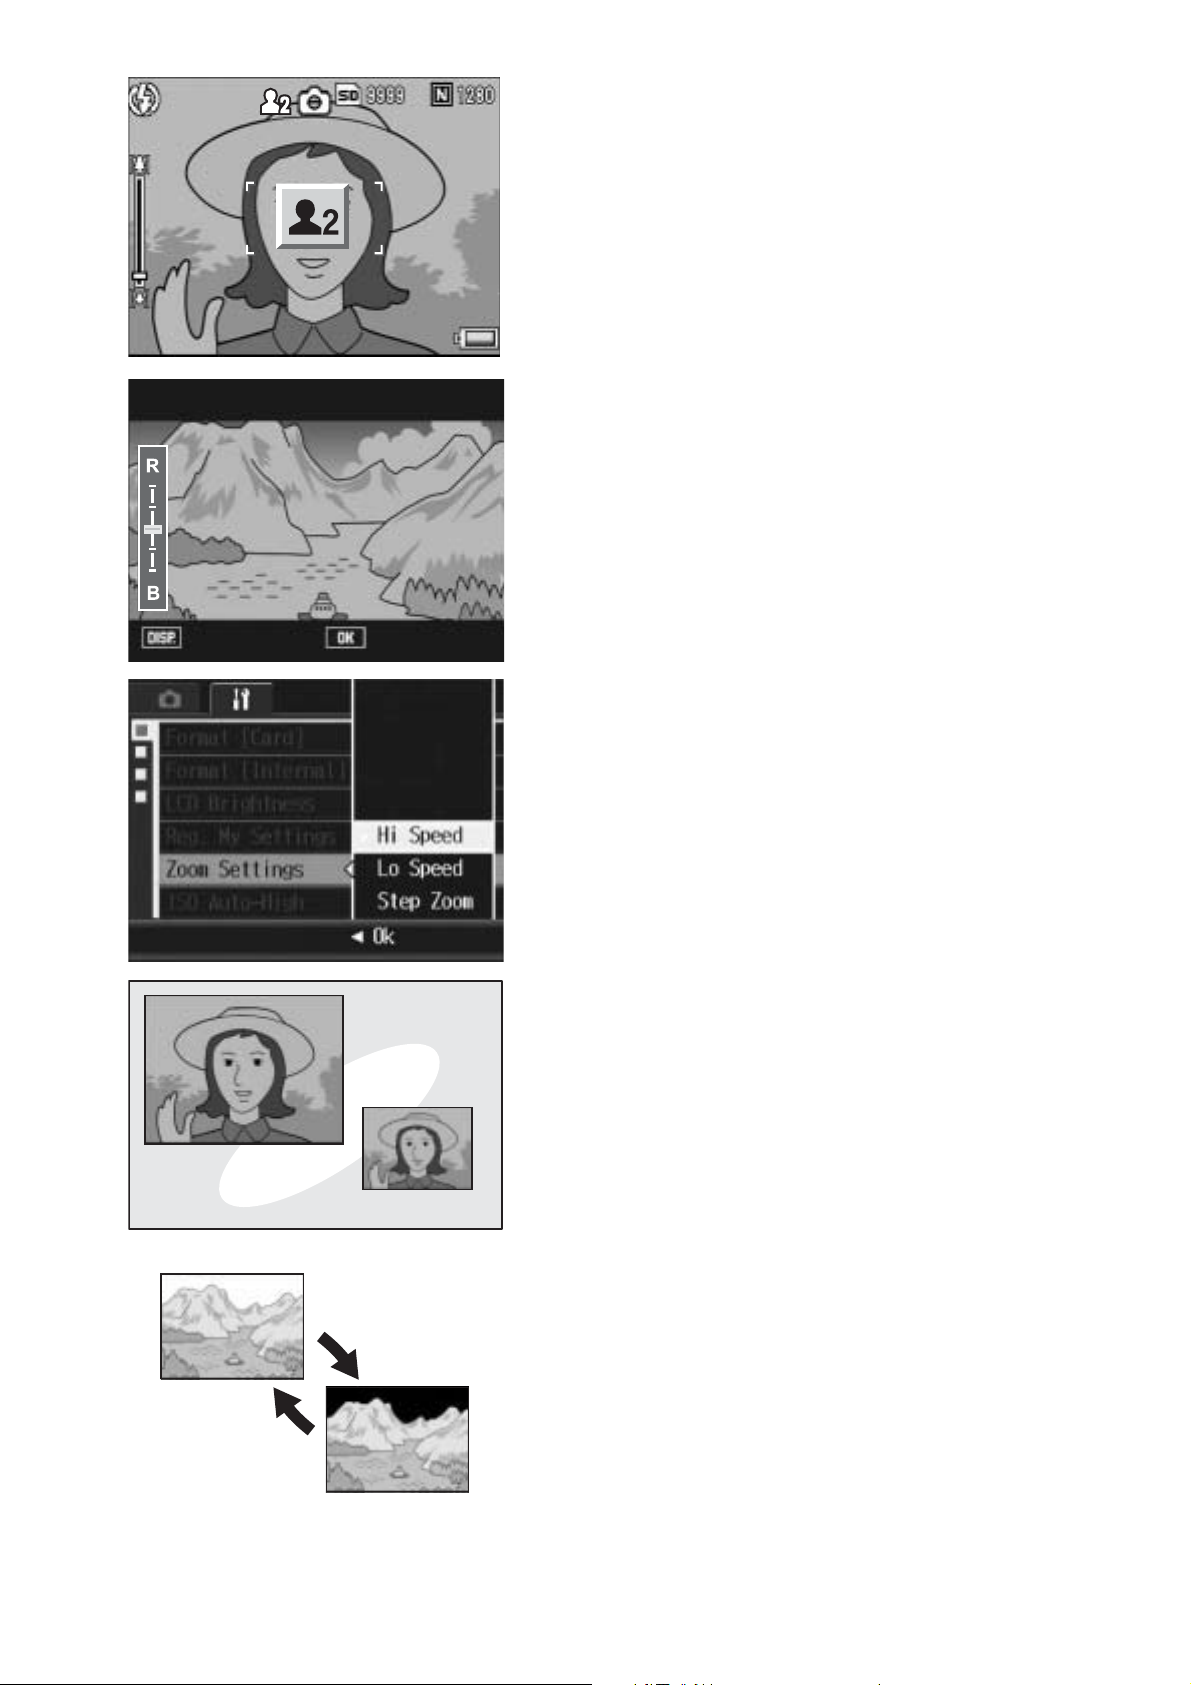
Face recognition mode enables optimal
shooting of the subject’s face (P.39)
The camera automatically focuses on the
subject’s face and adjusts the exposure and
white balance to the optimal settings.
2
My Setting 2
My Setting 2
Easily customize your favorite shooting
settings with My Settings mode (P.38)
You can customize two groups of settings,
and then switch the mode selector to MY to
easily shoot with either group of registered
settings.
Correct Tone
Brightness and color tone of shot
images can be easily edited on the
camera (P.109, 111)
You can adjust the brightness and color
tone of a shot still image on the camera,
and record it as a new file.
OkCancel
Customize zoom settings to your
preference (P.140)
Customize the zoom settings by changing
the zoom speed or by fixing the focal
length.
3264×2448
Use the dual size recording function to
capture the image at two different sizes
(P.99)
Each time you shoot an image with this
function, you can record the still image at
the original size and a smaller subfile at the
same time.
1280 (1M)
White saturation highlights display
function (P.57)
Press the DISP. button during quick review
or in playback mode to switch to the white
saturation highlights display screen so you
can check the white saturation highlights in
the shot image.
3
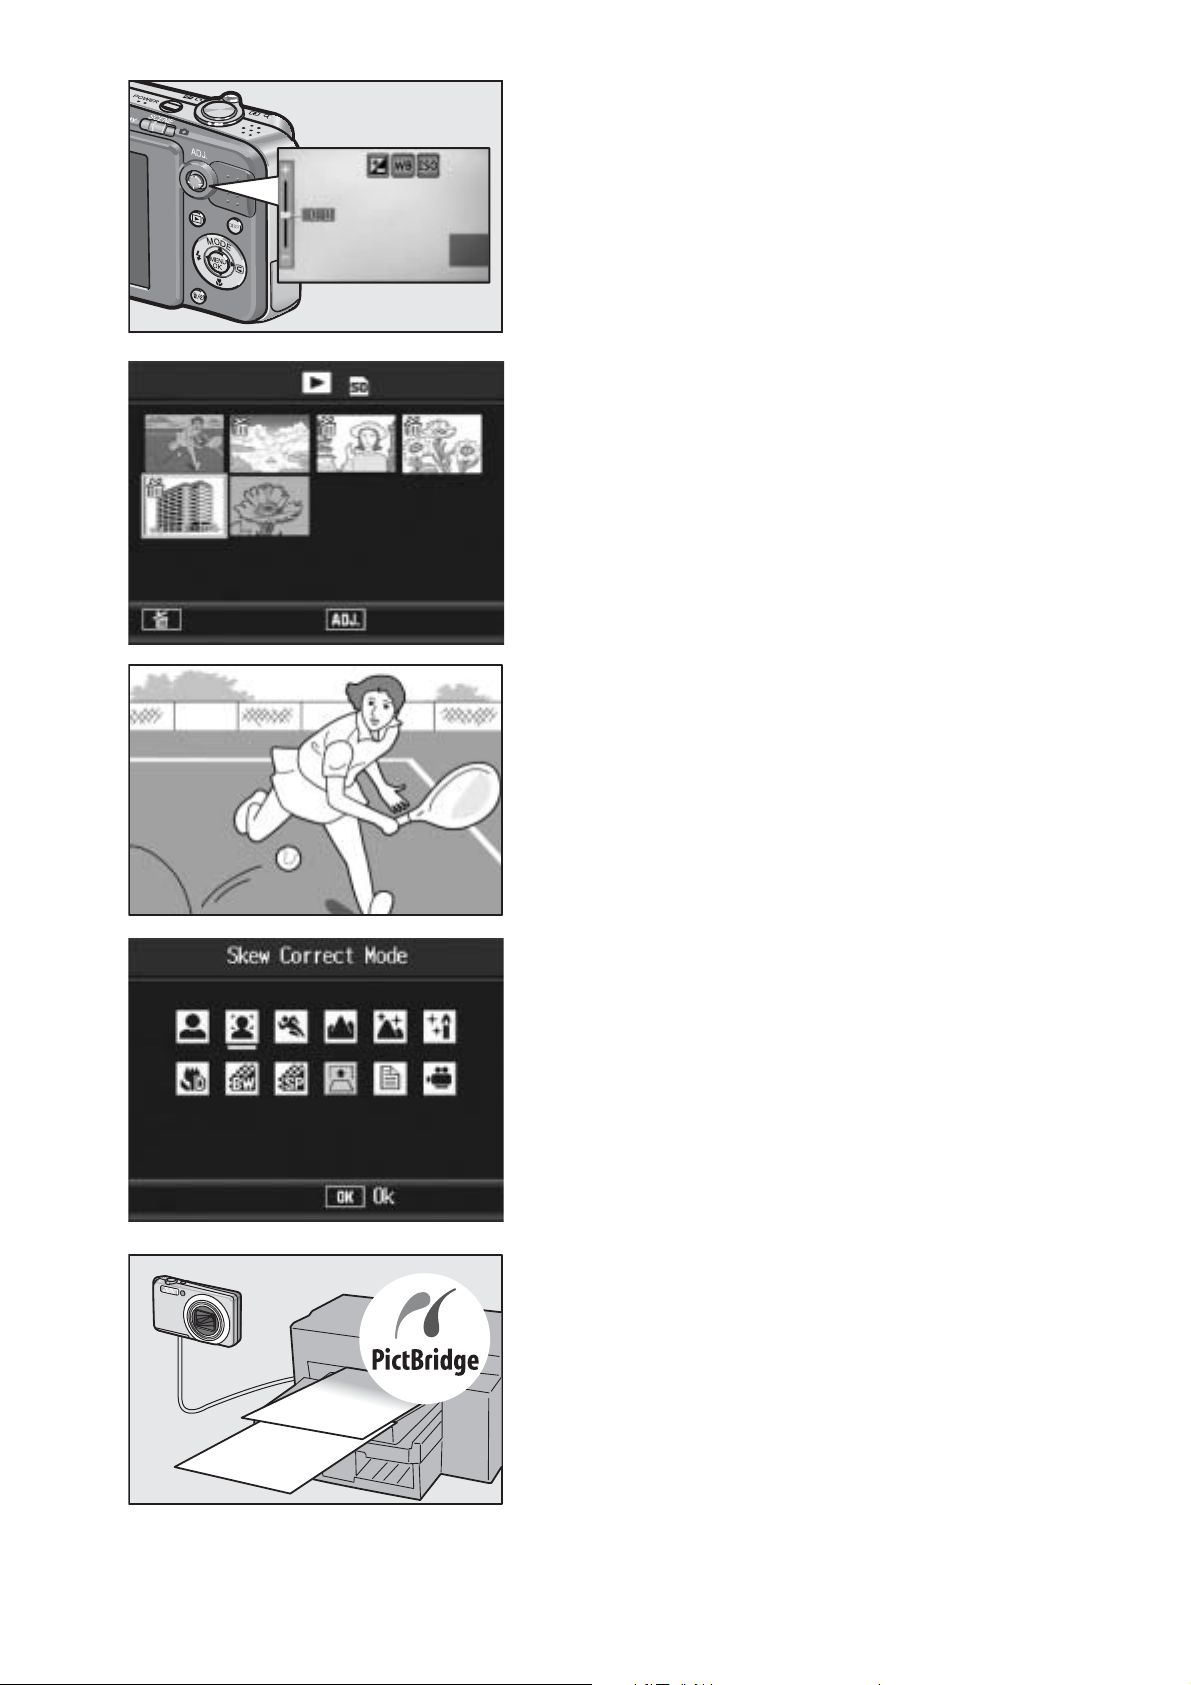
ADJ. (Adjust) button enables easier
camera operations (P.62)
The ADJ. button simplifies the camera
setting procedures. By assigning your
favorite functions to the ADJ. button, you
can easily make various settings just by
pressing the ADJ. button up, down, left, and
right.
Delete
5/6
Easier deletion of multiple files (P.53)
You can easily delete unnecessary files by
specifying a range of files to be deleted.
Switch SelStart
30 fps or 15 fps high-quality movies with
sound (P.101)
Record high-quality movies with 640 × 480
pixels at 30 frames per second and with full
sound.
Skew correction mode helps straighten
skewed images (P.40)
In skew correction mode, a rectangular
object shot at an angle can be straightened
to look as if it were shot squarely. With the
simple touch of a button, you can straighten
skewed images of objects such as a
message board, a display panel, or a name
card.
Direct printing without the use of a
computer (P.126)
A Direct Print-compatible printer can be
connected to the camera with the USB
cable to directly transfer images to the
printer. This allows for easy printing without
using a computer.
You can also print reports.
4

Contents
Using the Manuals......................................................................... 1
Key Features ................................................................................. 2
Contents ........................................................................................ 5
Basic Operations 11
If you are using the camera for the first time, read this section.
Packing List ................................................................................. 12
Names of Parts............................................................................ 14
How to Use the Mode Selector.................................................... 16
LCD Monitor Display ................................................................... 17
Getting Ready ............................................................................. 20
About the Battery ....................................................................................20
SD Memory Card (available in stores) ....................................................21
Charging the Rechargeable Battery........................................................23
Loading the Rechargeable Battery and SD Memory Card......................24
Turning the Power On/Off .......................................................................26
Setting the Language ..............................................................................27
Setting the Date and Time ......................................................................28
Basic Shooting ............................................................................ 29
Holding the Camera ................................................................................29
Shooting ..................................................................................................31
Using the Zoom Function........................................................................34
Shooting Close-Ups (Macro Shooting)....................................................35
Using the Flash .......................................................................................36
Shooting with My Settings Mode.............................................................38
Shooting with Optimal Settings According to Shooting Conditions.........39
t Using the Self-Timer ...........................................................................45
Playing Back Images ................................................................... 46
Reviewing the Image You Just Took (Quick Review) .............................46
Viewing Your Images ..............................................................................47
Three-frame View/Grid View (Thumbnail Display) ..................................49
Magnifying Images..................................................................................51
Deleting Files............................................................................... 52
Deleting a File .........................................................................................52
Deleting All Files .....................................................................................53
Deleting Multiple Files at One Time ........................................................53
Changing the Display with the DISP. Button ............................... 56
Maximizing the LCD Monitor Brightness .................................................58
Histogram................................................................................................58
5

Advanced Operations 61
Read this section when you want to learn more about the different camera
functions.
1 Various Shooting Functions 62
Using the ADJ. Button ................................................................. 62
Functions That Can Be Set in Scene Mode............................................63
Changing the Text Density (Scene Mode) ..............................................64
Shifting the AF Target (Macro)................................................................65
Shooting Menu ............................................................................ 66
Using the Menu .......................................................................................68
Choosing Picture Quality Mode/Image Size (Pic Quality/Size) ... 69
Changing the Focusing Mode (Focus) ........................................ 71
Manual Focus Shooting (MF)..................................................................72
Changing the Light Metering (AE Metering) ................................ 74
Changing the Edge Quality of Still Images (Sharpness) ............. 75
Shooting with Multi-Shot (Continuous/S-Cont/M-Cont) ............... 76
Viewing an S-Cont or M-Cont Still Image in Enlarged Display Mode......79
Setting the Color Depth (Color Depth) ........................................ 80
Shooting Consecutively with Different Exposures
(Auto Bracket).......................................................................... 81
Shooting Consecutively with Different White Balance (WB-BKT) ...........82
Shooting Consecutively with Different Colors (CL-BKT).........................84
Using Long Time Exposure (Time Exposure).............................. 86
Shooting Pictures Automatically at Set Intervals (Interval).......... 87
Inserting the Date into a Still Image (Date Imprint)...................... 89
Changing the Exposure (Exposure Comp.)................................. 90
Using Natural and Artificial Lighting (White Balance) .................. 92
Setting the White Balance Manually (Manual Settings) ..........................94
Changing the Sensitivity (ISO Setting) ........................................ 95
Limiting the Shutter Speed (Slow Shutter Lmt) ........................... 97
Using the Camera Shake Correction Function to Prevent
Camera Shake (Camera Shake Cor) ...................................... 98
Shooting a Still Image with a Subfile (Record Dual Size)............ 99
Returning the Shooting Menu Settings to their Defaults
(Restore Defaults) ................................................................. 100
2 Shooting/Playing Back Movies 101
3 Shooting Movies ..............................................................................101
Setting the Frame Rate (Frame Rate)...................................................102
Playing Back Movies .............................................................................104
6

3 Other Playback Functions 105
Playback Menu.......................................................................... 105
Using the Menu .....................................................................................105
Rotating Images (Rotation) ....................................................... 107
Changing the Image Size (Resize)............................................ 108
Correcting the Image Brightness and Contrast
(Correct Contrast).................................................................. 109
Correcting the Image Color Tone (Correct Tone)...................... 111
Straightening Skewed Images (Skew Correction) ..................... 113
Preventing the Deletion of Files (Protect).................................. 115
Protecting a File ....................................................................................115
Protecting All Files ................................................................................116
Protecting Multiple Files at Once ..........................................................117
Displaying Photos in Order Automatically (Slide Show) ............ 118
Copying the Contents of the Internal Memory to an
SD Memory Card (Copy To Card) ......................................... 119
Using a Printing Service (DPOF)............................................... 120
Setting DPOF for the Displayed Still Image ..........................................120
Setting DPOF for All Still Images ..........................................................121
Setting DPOF for Multiple Still Images..................................................122
Restoring Deleted Files (Recover File)...................................... 123
Viewing on a Television............................................................. 124
4 Direct Printing 126
Direct Print Function.................................................................. 126
Connecting the Camera to a Printer.......................................... 127
Printing Still Images................................................................... 128
Printing One or All Still Images .............................................................128
Printing Several Still Images .................................................................130
7

5 Changing Camera Settings 132
Setup menu ............................................................................... 132
Using the Setup menu ..........................................................................133
Preparing the SD Memory Card (Format [Card])....................... 135
Formatting the Internal Memory (Format [Internal])................... 136
Adjusting the Brightness of the LCD Monitor
(LCD Brightness) ................................................................... 137
Registering Custom Settings (Reg. My Settings) ...................... 138
Changing the Zoom Setting (Zoom Settings) ............................ 140
Changing the ISO Auto-High Setting (ISO Auto-High) .............. 141
Changing the Size for Record Dual Size (Sub File Size) .......... 142
Changing the Auto Power Off Setting (Auto Power Off)............ 143
Changing the Beep Sound Setting (Beep Sound)..................... 144
Changing the Beep Sound Volume (Vol. Settings) ................... 145
Changing Image Confirmation Time (LCD Confirm.)................. 146
Using the Auto Resize Zoom (Digital Zoom Img) ...................... 147
Assigning Functions to the ADJ. Button (ADJ Btn. Set.) ........... 149
Changing the AF Auxiliary Light Setting (AF Aux. Light)........... 150
Enlarging Icon Display (Enlrge Photo Icon)............................... 151
Changing File Name Settings (Sequential No.)......................... 152
Setting the Date and Time (Date Settings)................................ 154
Changing the Display Language (Language/N) ................... 155
Changing the Playback Method for Viewing on TV
(Video Out Mode) .................................................................. 156
6 Downloading Images to Your Computer 157
For Windows ............................................................................. 157
Using the Caplio Software CD-ROM.....................................................158
System Requirements for Using Caplio Software CD-ROM .................160
Installing Image Batch Downloading and Editing Software...................161
Installing the DeskTopBinder Lite .........................................................164
Installing Other Software on Your Computer ........................................166
Uninstalling the Software ......................................................................167
Downloading Images Using the RICOH Gate La..................................169
Downloading Images Without Using RICOH Gate La...........................170
Disconnecting the Camera from Your Computer ..................................172
For Macintosh............................................................................ 173
Downloading Images to Your Computer ...............................................173
Disconnecting the Camera from Your Computer ..................................174
8

7 Appendices 175
Troubleshooting......................................................................... 175
Error Messages.....................................................................................175
Camera Troubleshooting ......................................................................176
Software and Computer Troubleshooting .............................................181
Specifications ............................................................................ 183
Number of Images That Can be Stored in Internal Memory/
SD Memory Card ..............................................................................185
Optional Accessories................................................................. 186
Functions Whose Defaults are Restored When Camera is
Turned Off ............................................................................. 187
About Scene Mode .................................................................... 189
Shooting Menu Items by Scene Mode ..................................................190
Using Your Camera Abroad ...................................................... 191
Cautions on Use........................................................................ 192
Care and Storage ...................................................................... 193
Warranty and Servicing ............................................................. 194
Index ......................................................................................... 196
9

10

Basic
Operations
If you are using the
camera for the first time,
read this section.
Packing List......................................12
Names of Parts.................................14
How to Use the Mode Selector
...........................................................16
LCD Monitor Display .......................17
Getting Ready ..................................20
Basic Shooting.................................29
Playing Back Images .......................46
Deleting Files ...................................52
Changing the Display with the DISP.
Button ...............................................56
Packing List
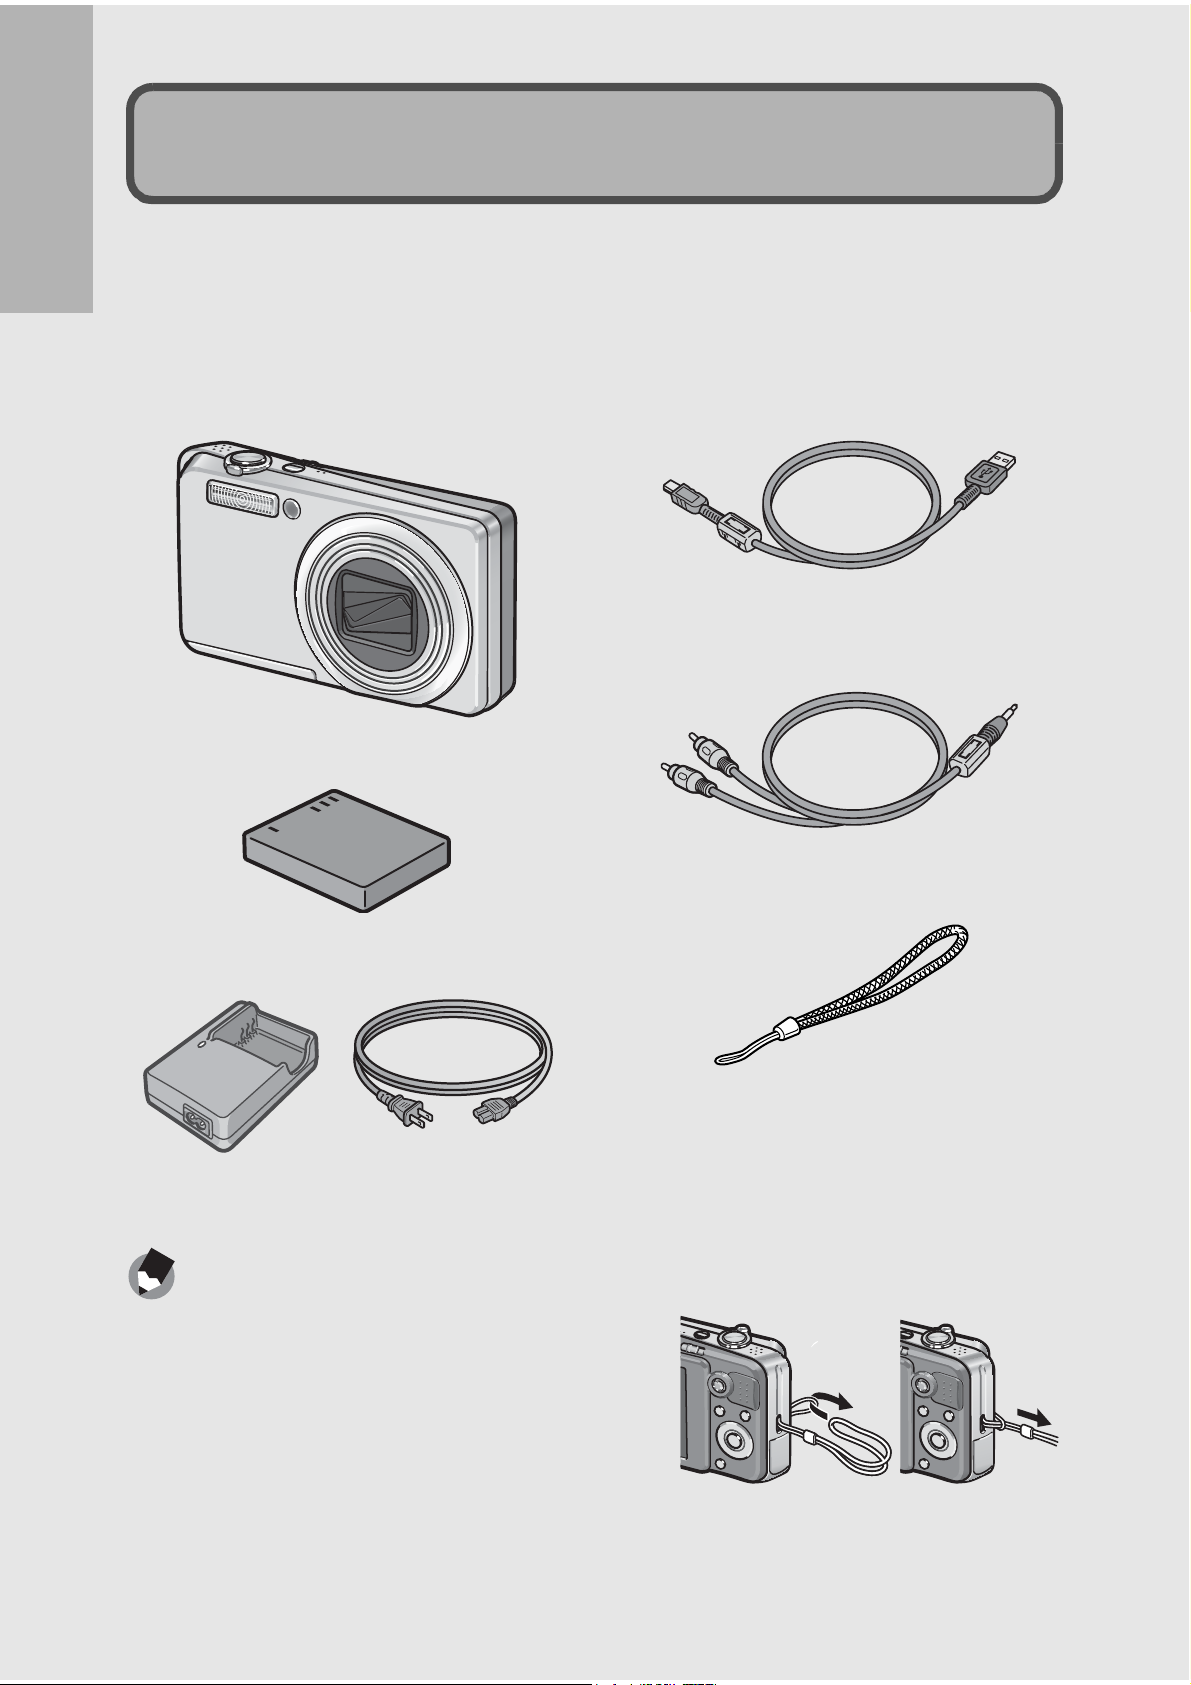
Open the package and make sure all the items are included.
Caplio R7
If you are using the camera for the first time, read this section.
The serial number of the camera is
provided on the bottom face of the
camera.
USB Cable (Mini B cable)
Used to connect the camera to a
computer or Direct Printcompatible printer.
AV Cable
Used to view your images on a TV.
Rechargeable Battery
Battery Charger
Note ---------------------------------------------------------------------------------------------------
Attaching the handstrap to the camera
Thread the small end of the strap through the
strap eyelet on the camera and loop the ends
as shown.
Handstrap
12

Camera User Guide
(This booklet)
Safety
Optional Accessories
Rechargeable Battery (DB-70)
If you are using the camera for the first time, read this section.
Battery Charger (BJ-7)
Warranty
Precautions
Caplio Software CD-ROM
The provided software and the
“Software User Guide” are
included on this CD-ROM.
Soft Case (SC-70, SC-70R)
Caution-----------------------------------------------------------------------------------------------
The Caplio Software supports the following languages. Operations are not guaranteed
on operating systems with languages other than those listed below.
English, French, German, Spanish, Italian, Chinese (Traditional, Simplified), Korean
Note ---------------------------------------------------------------------------------------------------
For the latest information about accessories, visit the Ricoh website at
http://www.ricohpmmc.com.
13
Camera
Names of Parts
If you are using the camera for the first time, read this section.
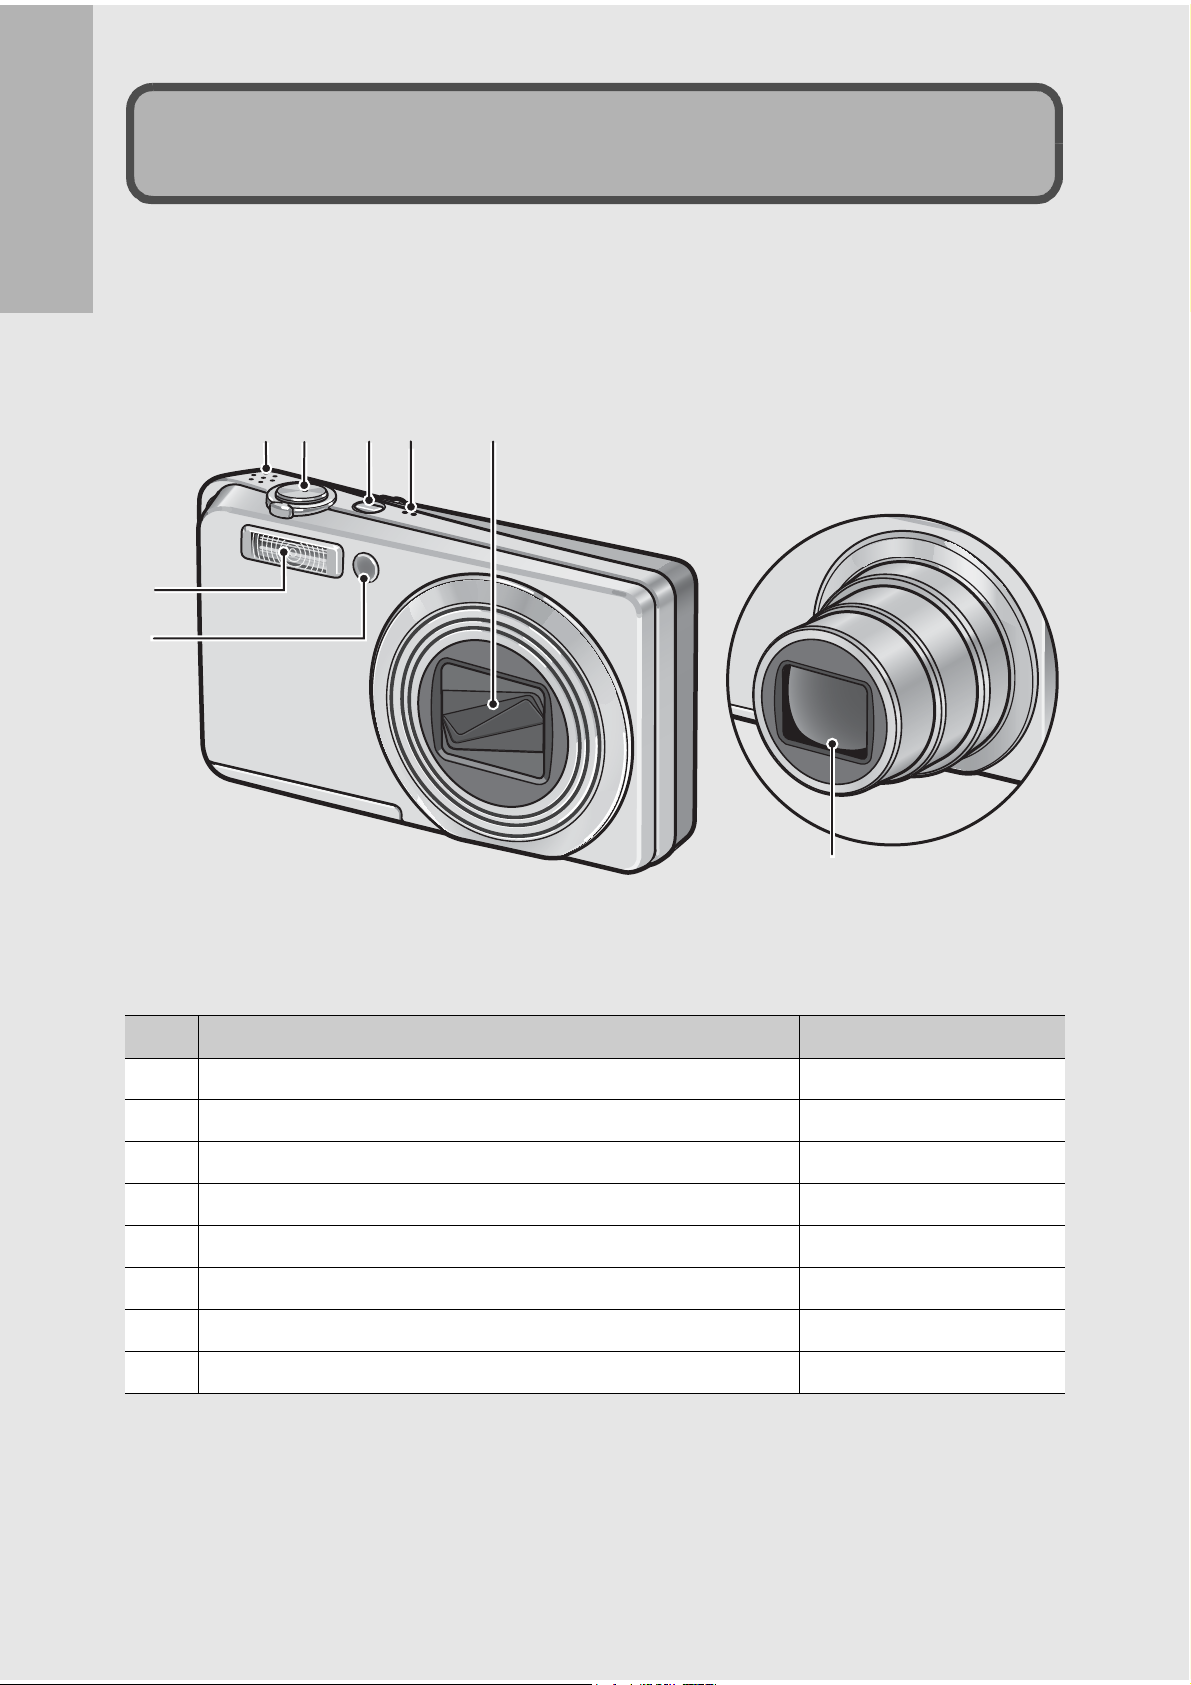
Front View
7
2
1 6
5
3
4
8
14
Item Name Refer to
1 POWER Button P.26
2 Shutter Release Button P.31
3 Flash P.36
4 AF Auxiliary Light/Self-Timer Lamp P.45, 150
5 Lens Cover -
6 Microphone -
7 Speaker P.104
8 Lens P.29
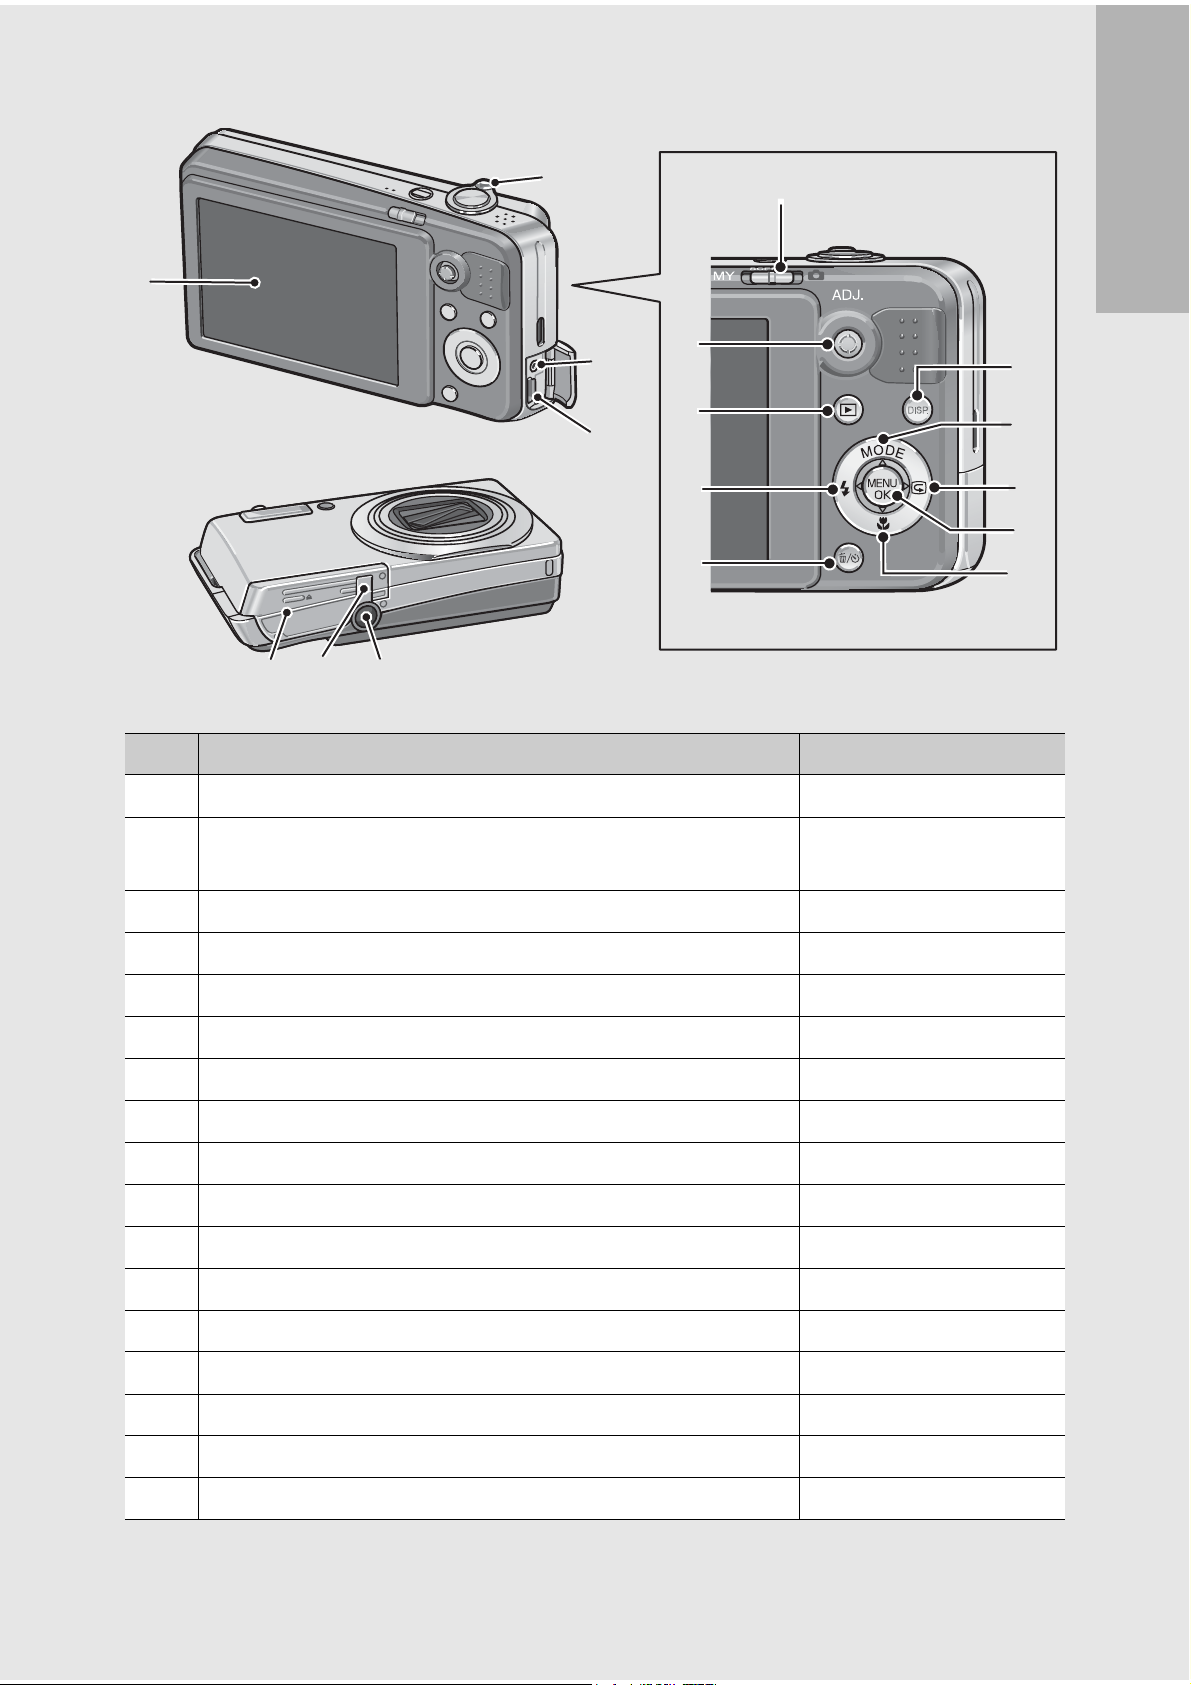
Rear View
1
16
17
15
2
13
4
3
5
14
11
12
Item Name Refer to
If you are using the camera for the first time, read this section.
6
7
8
9
10
1 LCD Monitor P.17
2 Zoom lever z (Telephoto)/Z (Wide-angle)
8 (Enlarged View)/9 (Thumbnail Display)
3 Mode Selector P.16, 38, 39
4 ADJ. Button P.62
5 6 (Playback) Button P.47
6 DISP. Button P.56
7 !/MODE Button
8 $/Q (Quick Review) Button P.46
9 MENU/OK Button P.68, 105, 133
10 "/N (Macro) Button P.35
11 #/F (Flash) Button P.36
12
13 AV Output Terminal P.124
14 USB Terminal P.127, 169
(Delete)/t (Self-timer) Button
D
*
P.34, 49, 51
P.38, 39
P.52, 45
15 Tripod Screw Hole P.183
16 Battery/Card Cover P.24,
17 Power (DC input) Cable Cover -
* The MODE button is only available during scene mode or My Settings
mode.
15
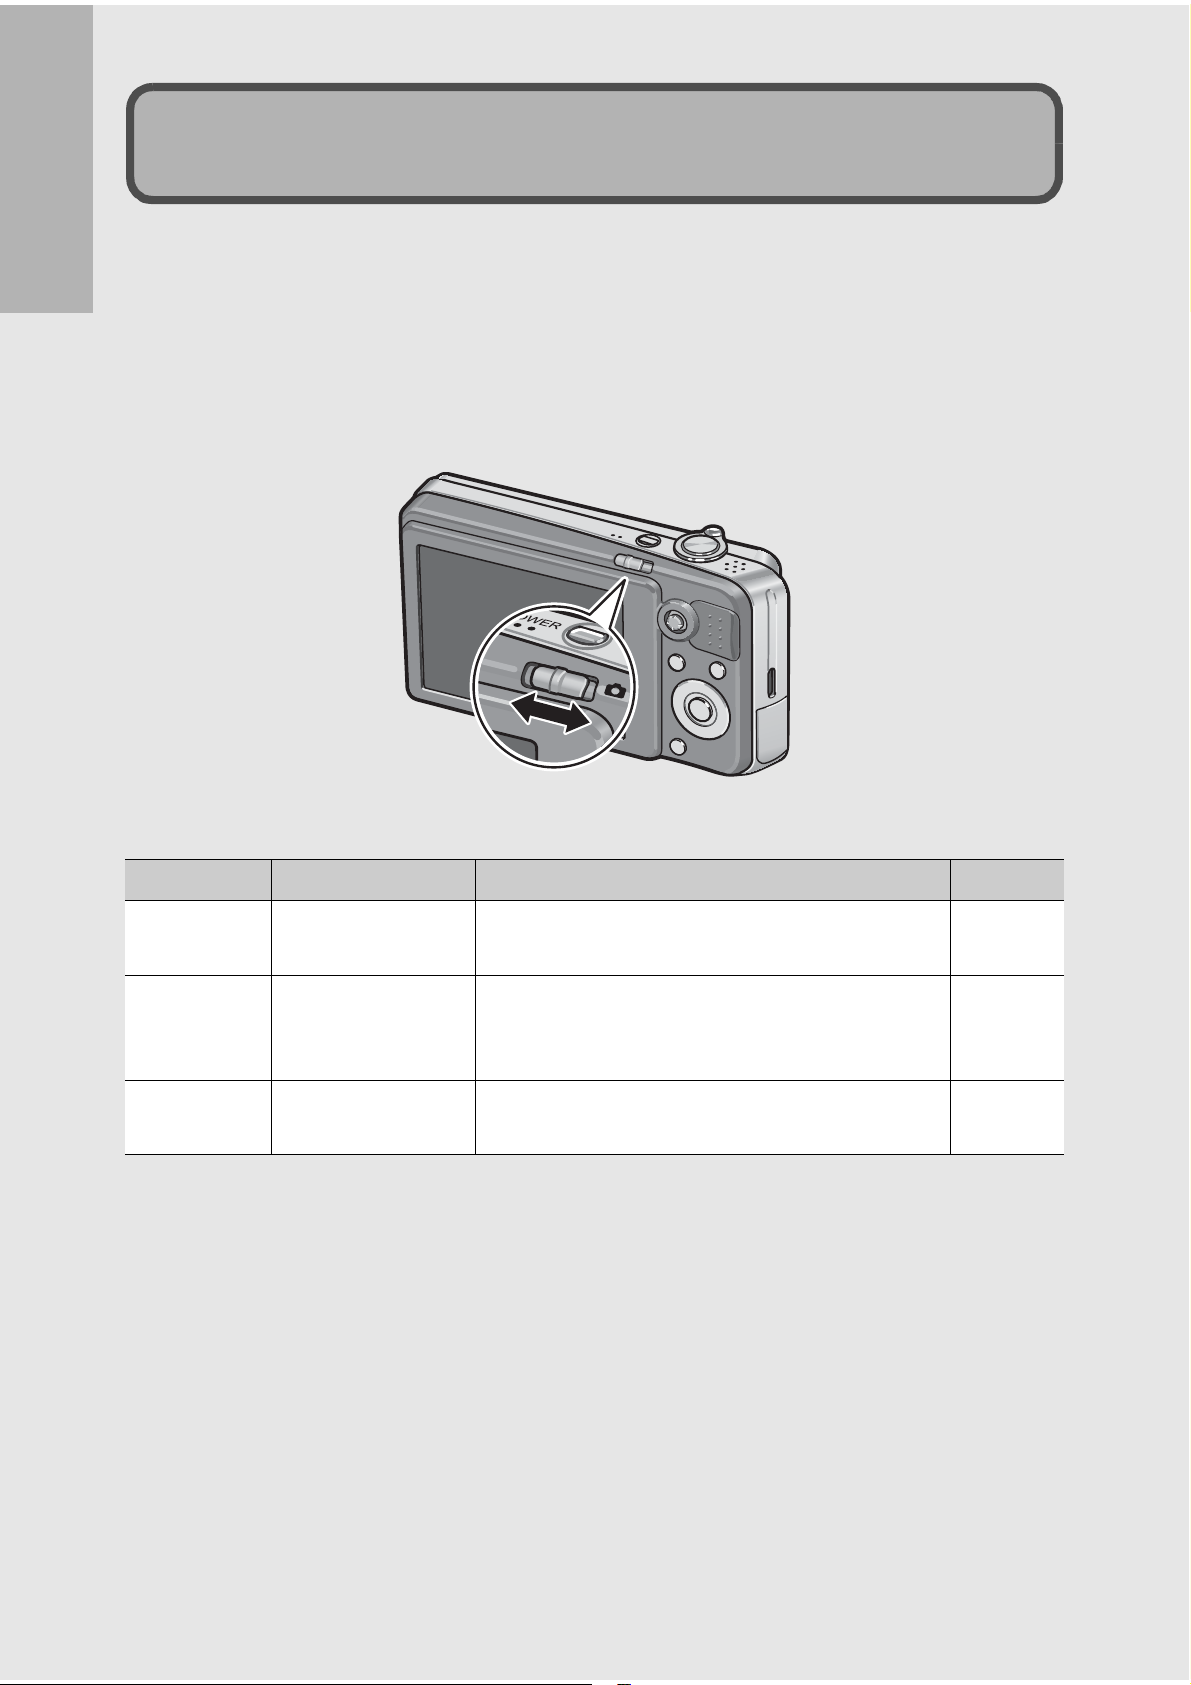
How to Use the Mode Selector
MY
SCENE
Set the mode selector to the desired mode before shooting still
images or movies.
If you are using the camera for the first time, read this section.
1
Switch the mode selector to the symbol of the
function you want to use.
Mode Selector Symbols and Descriptions
Symbol Function Description Refer to
MY
My Settings
Mode
You can shoot using the settings registered
in [Reg. My Settings].
P.38
SCENE Scene Mode
5
Auto Shooting
Mode
Allows you to shoot with settings optimized
for the shooting scene. This also allows you
to shoot movies with sound.
Automatically sets the optimal aperture value
and shutter speed depending on the subject.
P.39
P.31
16
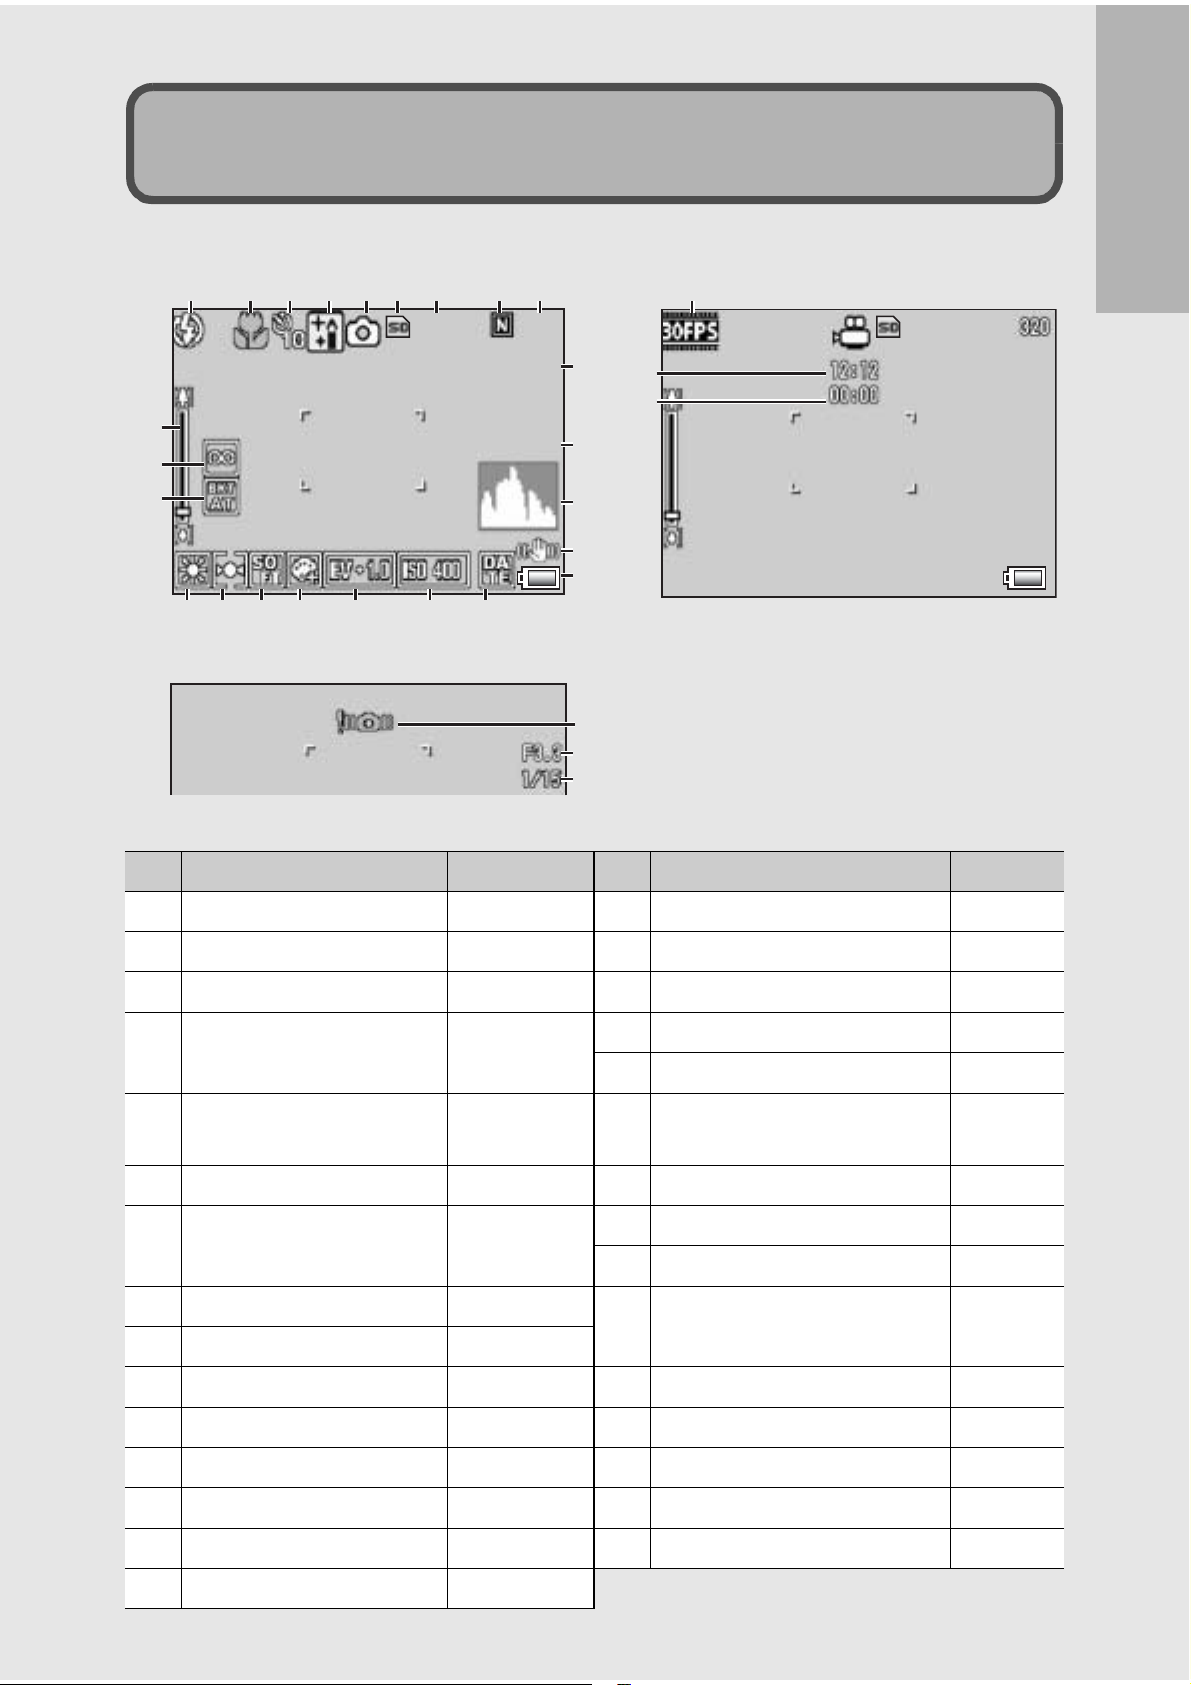
LCD Monitor Display
Shtr Btn:Start
Interval
9999
1280
1Sec
Example of LCD Monitor Display when Shooting Pictures
123 567 89
10
11
12
13
14 15 16 17 18 19
4 28
9999
Still Image Mode
1280
Interval
1 Sec
20
21
22
23
24
25
26
27
If you are using the camera for the first time, read this section.
29
30
Shtr Btn:Start
Movie Mode
Item Name Refer to Item Name Refer to
1 Flash P.36 16 Color Depth P.80
2 Macro Shooting P.35 17 Exposure Compensation P.90
3 Self-timer P.45 18 ISO Setting P.95
4 Scene Modes
My Settings Modes
5 Mode Types P.16, 39,
P.39
P.38
19 Date Imprint P.89
20 Interval P.87
21 Time Exposure P.86
101
6 Recording Destination P.21 22 Histogram P.58
7 Remaining Number of
Still Images
8 Picture Quality P.69 25 Camera Shake Warning
9 Image Size P.69
P.185 23
24 Battery Mark P.19
Camera Shake Correction
Mark
P.98
P.30
10 Zoom Bar P.34 26 Aperture Value P.183
11 Focus P.71 27 Shutter Speed P.97
12 Auto Bracket P.81, 82, 84 28 Frame Rate P.102
13 White Balance P.92 29
Remaining Recording Time
P.185
14 AE Metering P.74 30 Recording Time P.185
15 Sharpness P.75
17

Note ---------------------------------------------------------------------------------------------------
05:12
12:00
2007/09/01
12:00
2007/09/01
:
Stop
• The number of remaining shots available may differ from the actual number of shots,
depending on the subject.
• Movie recording time and the maximum number of still pictures may vary depending
on the capacity of the recording destination (internal memory or SD memory card),
shooting conditions, and the type and manufacturer of the SD memory card.
• When the number of remaining shots is 10,000 or more, “9999” is displayed.
If you are using the camera for the first time, read this section.
Example of LCD Monitor Display During Playback
12 3 4 56
7
2007/09/01
12
12:00
Still Image Mode
8, 9
10
11
14
ADJ.
2007/09/01
:
Stop
13
05:12
12:00
Movie Mode
Item Name Refer to Item Name Refer to
1 Protect P.115 8 Picture Quality P.69
2 DPOF P.120 9 Image Size P.69
3 Mode Types - 10 File No. -
4 Playback Data Source P.48 11 Battery Mark P.19
5 Number of Playback Files - 12 Date at Shooting P.89,
154
6 Total Number of Files - 13 Recording Time or
-
Lapsed Time
7 Setting at Shooting
- 14 Indicator -
(Recording)
Note ---------------------------------------------------------------------------------------------------
The LCD monitor may display messages to inform you of operational instructions or the
camera’s status while in use.
18
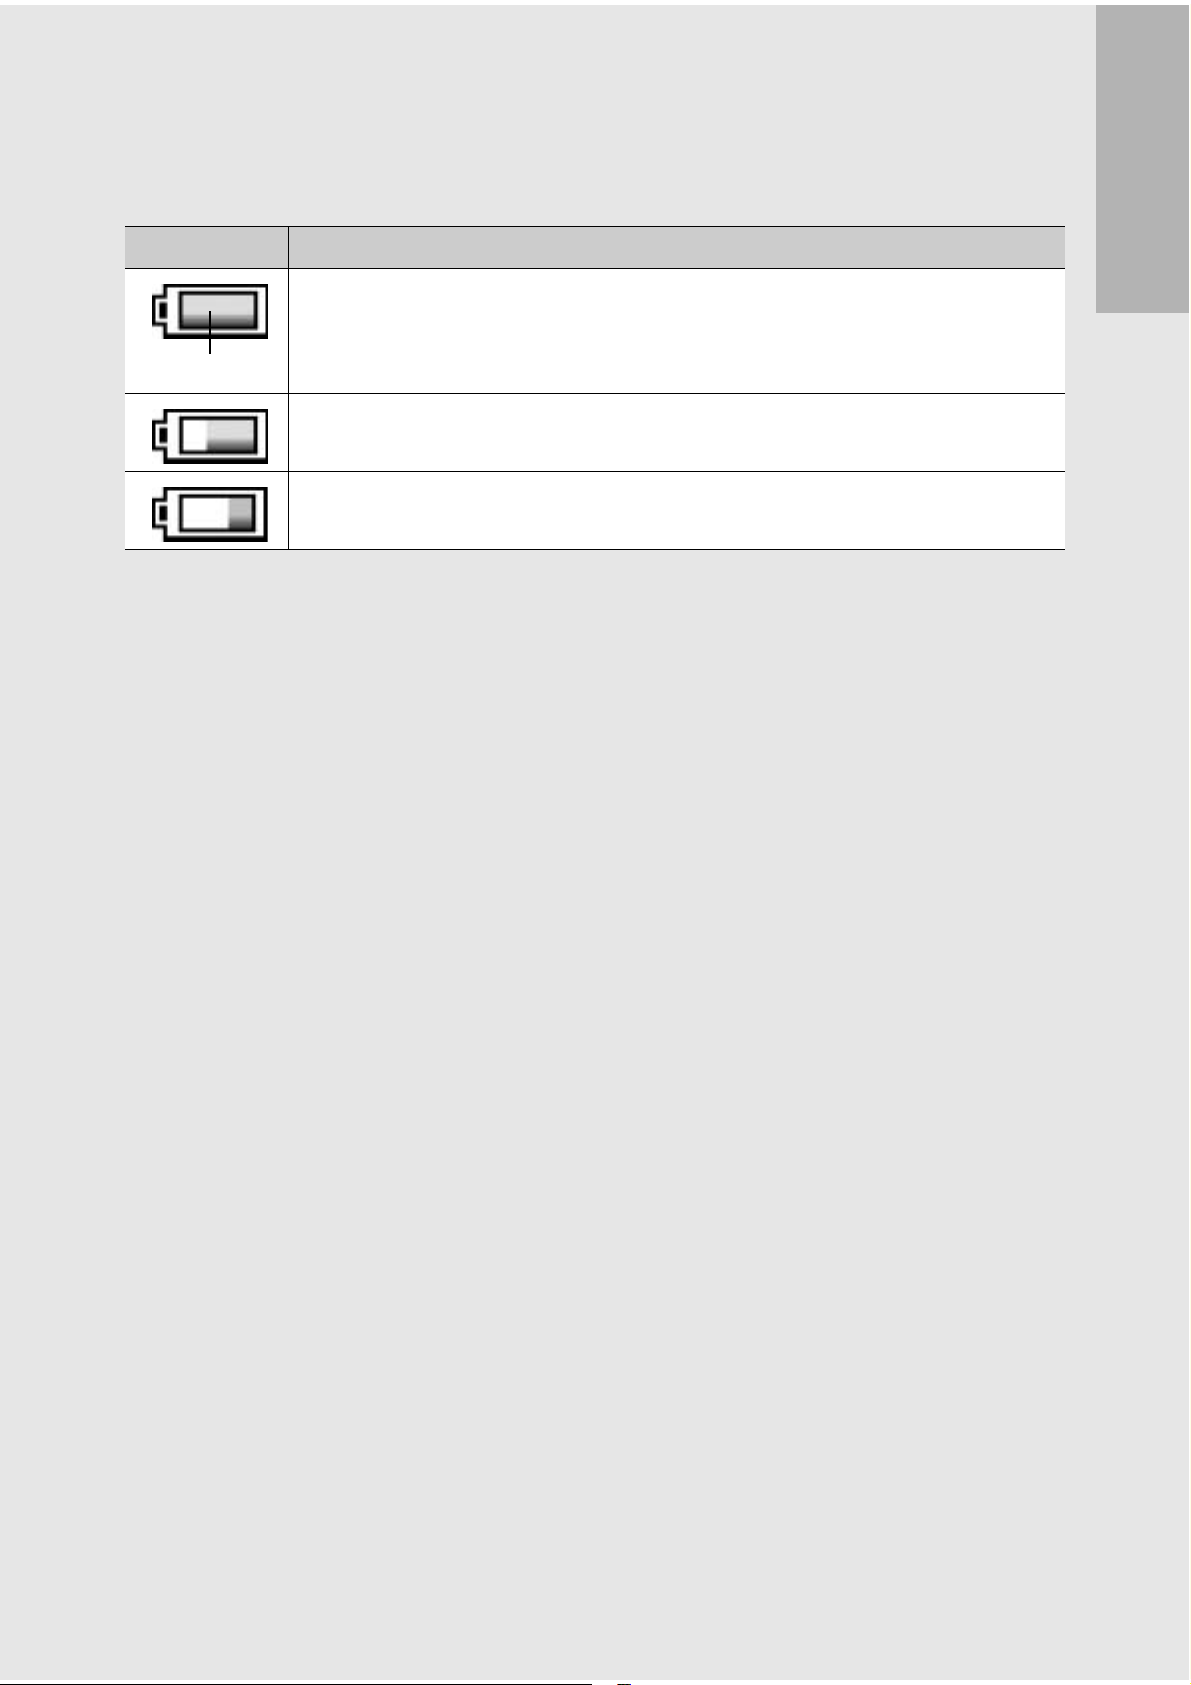
Battery Level Indication
A battery mark appears at the lower right of the LCD monitor to
indicate the battery level. Recharge the battery before it is depleted.
Battery Mark Description
The battery is sufficiently charged.
Green
The battery level begins to drop. Recharging is recommended.
The battery level is low. Recharge the battery.
If you are using the camera for the first time, read this section.
19
Getting Ready
Turn the power on and get ready to shoot.
Note ---------------------------------------------------------------------------------------------------
• If the camera is on, make sure it is turned off before inserting or removing the battery.
If you are using the camera for the first time, read this section.
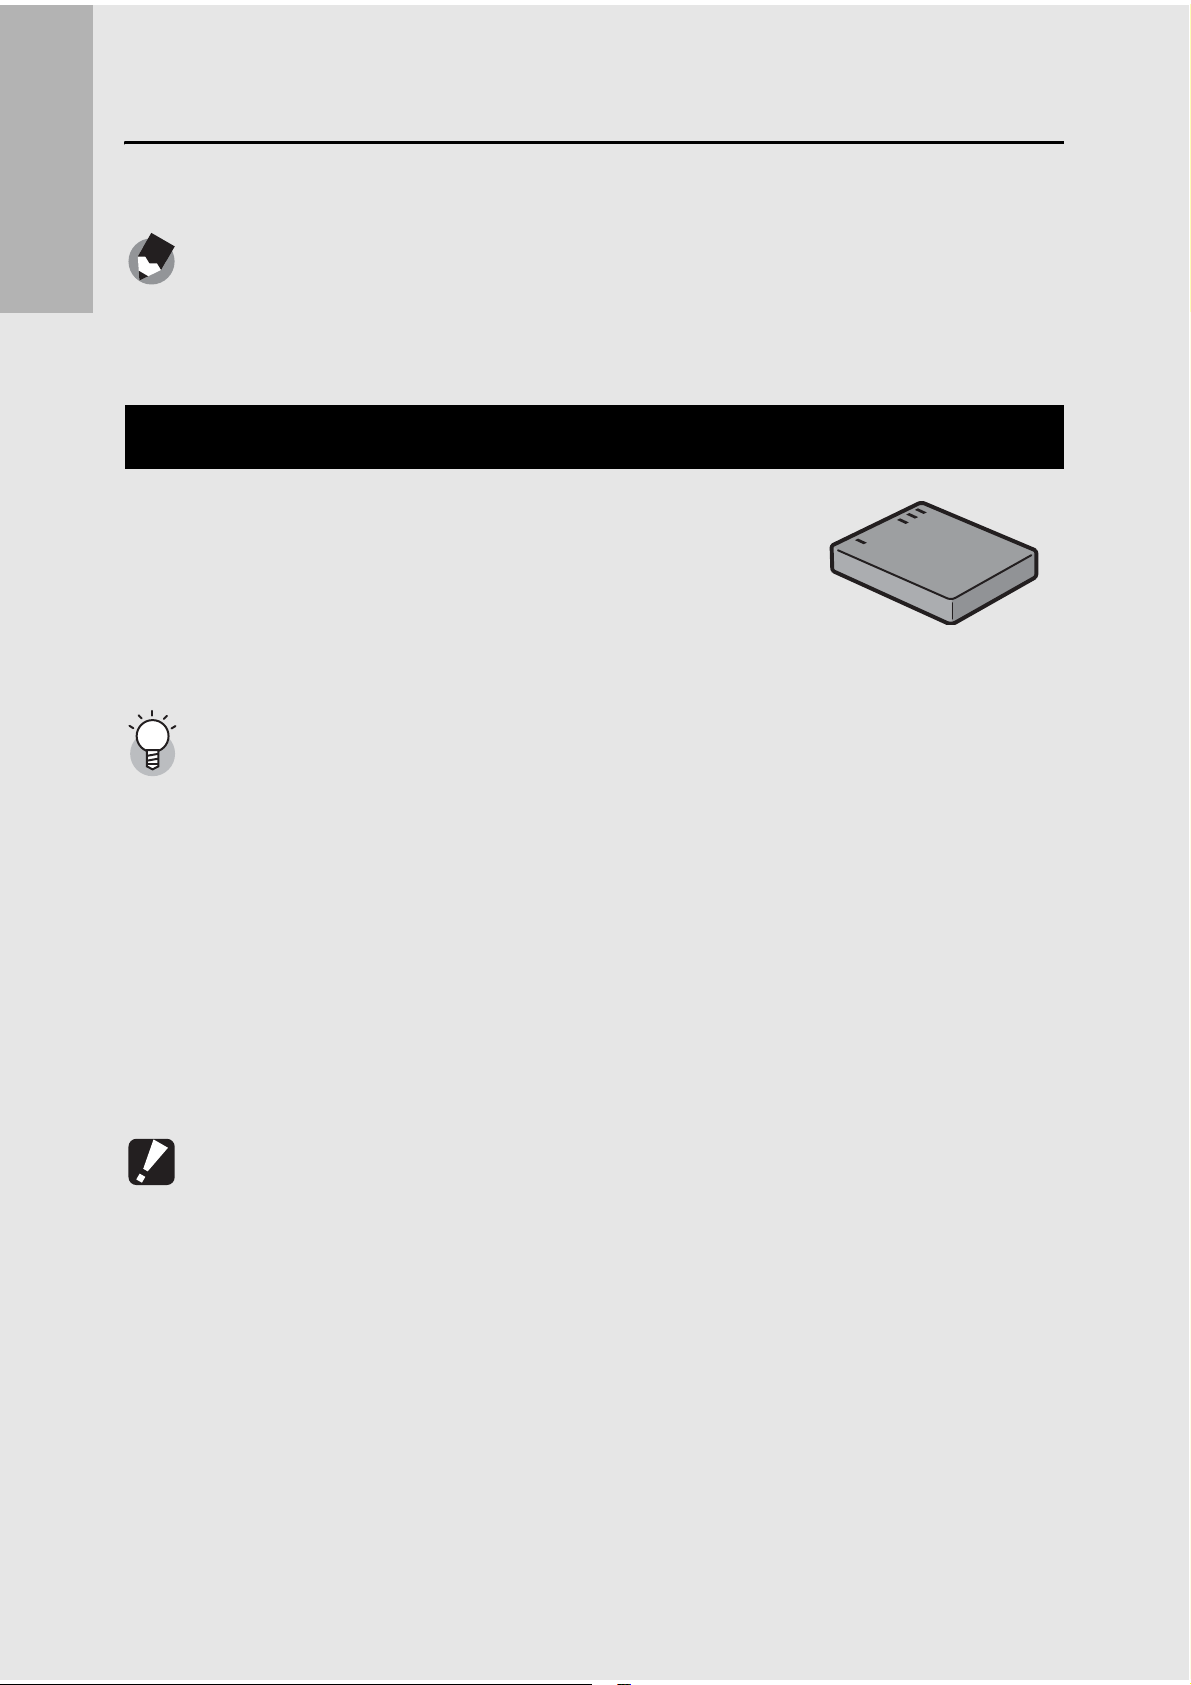
About the Battery
This camera uses the Rechargeable Battery
DB-70, a dedicated lithium-ion battery supplied
with the camera. It is economical because you
can recharge it using the battery charger and
use it over and over again.
• For information on how to turn the camera off, see P.26.
Number of shots you can take ---------------------------------------------------------------
Approximate number of shots you can take on a single charge: Approx. 300
• Based on CIPA standard (Temperature: 23 degrees Celsius, LCD monitor on, 30
seconds between shots, changing the zoom setting from telephoto to wide-angle or
wide-angle to telephoto for each shot, 50% flash usage, turning the power off after
each 10 shots).
• Set the camera to synchro-monitor mode to increase the number of shots you can
take. (GP.56)
• The number of shots is for reference only. If the camera is used for long periods of
time for setting and playback, the shooting time (the number of shots) will decrease.
If you intend to use the camera for a long period of time, we recommend carrying a
spare battery.
Caution-----------------------------------------------------------------------------------------------
• The battery may become very hot immediately after operation. Turn the camera off
and leave it to cool down sufficiently before removing the battery.
• Please remove the batteries if you are not going to use the camera for a long period
of time.
20
• When using a lithium-ion battery, use only the specified rechargeable lithium-ion
battery (DB-70). Do not use other rechargeable lithium-ion batteries.

SD Memory Card (available in stores)
You can store still images you have taken either in the camera’s
internal memory or on an SD memory card (available in stores).
The internal memory capacity is 24 MB.
To record a lot of still images or movies at high resolutions, use a
high-capacity SD memory card.
Where images are recorded-------------------------------------------------------------------
When no SD memory card is loaded, the camera records images to the internal
memory; when an SD memory card is loaded, it records images to the SD memory
card.
When no SD memory card is loaded When an SD memory card is loaded
If you are using the camera for the first time, read this section.
Records to the internal memory Records to the SD memory card
Caution-----------------------------------------------------------------------------------------------
• If an SD memory card is loaded, the camera does not record to the internal memory,
even if the card is full.
• Take care not to get the contacts of the card dirty.
Write-protecting your images ----------------------------------------------------------------
Move the write-protection switch on the SD memory card to
LOCK to prevent your still images from being accidentally erased
or the card from being formatted. If you unlock the card (by
returning the switch to its original position), it is once again
possible to erase images and format the card.
It is recommended to move the write-protection switch to LOCK
when you have some important data recorded.
Note that you cannot shoot images on a locked card because no
data can be recorded to the card. Unlock the card before shooting.
21

Note ---------------------------------------------------------------------------------------------------
• For information on switching between the SD memory card and internal memory
during playback, see P.48.
• Movie recording time and the maximum number of still pictures varies depending on
the capacity of the SD memory card. (GP.185)
• Before using a new SD memory card, be sure to format it with this camera.
(GP.135)
If you are using the camera for the first time, read this section.
• You can copy images recorded in the internal memory to the SD memory card.
(GP.119)
• When using an SD memory card previously used with another camera, be sure to
back up any necessary data on the card before formatting it. (GP.135)
• SDHC memory card (4 GB) can also be used.
22
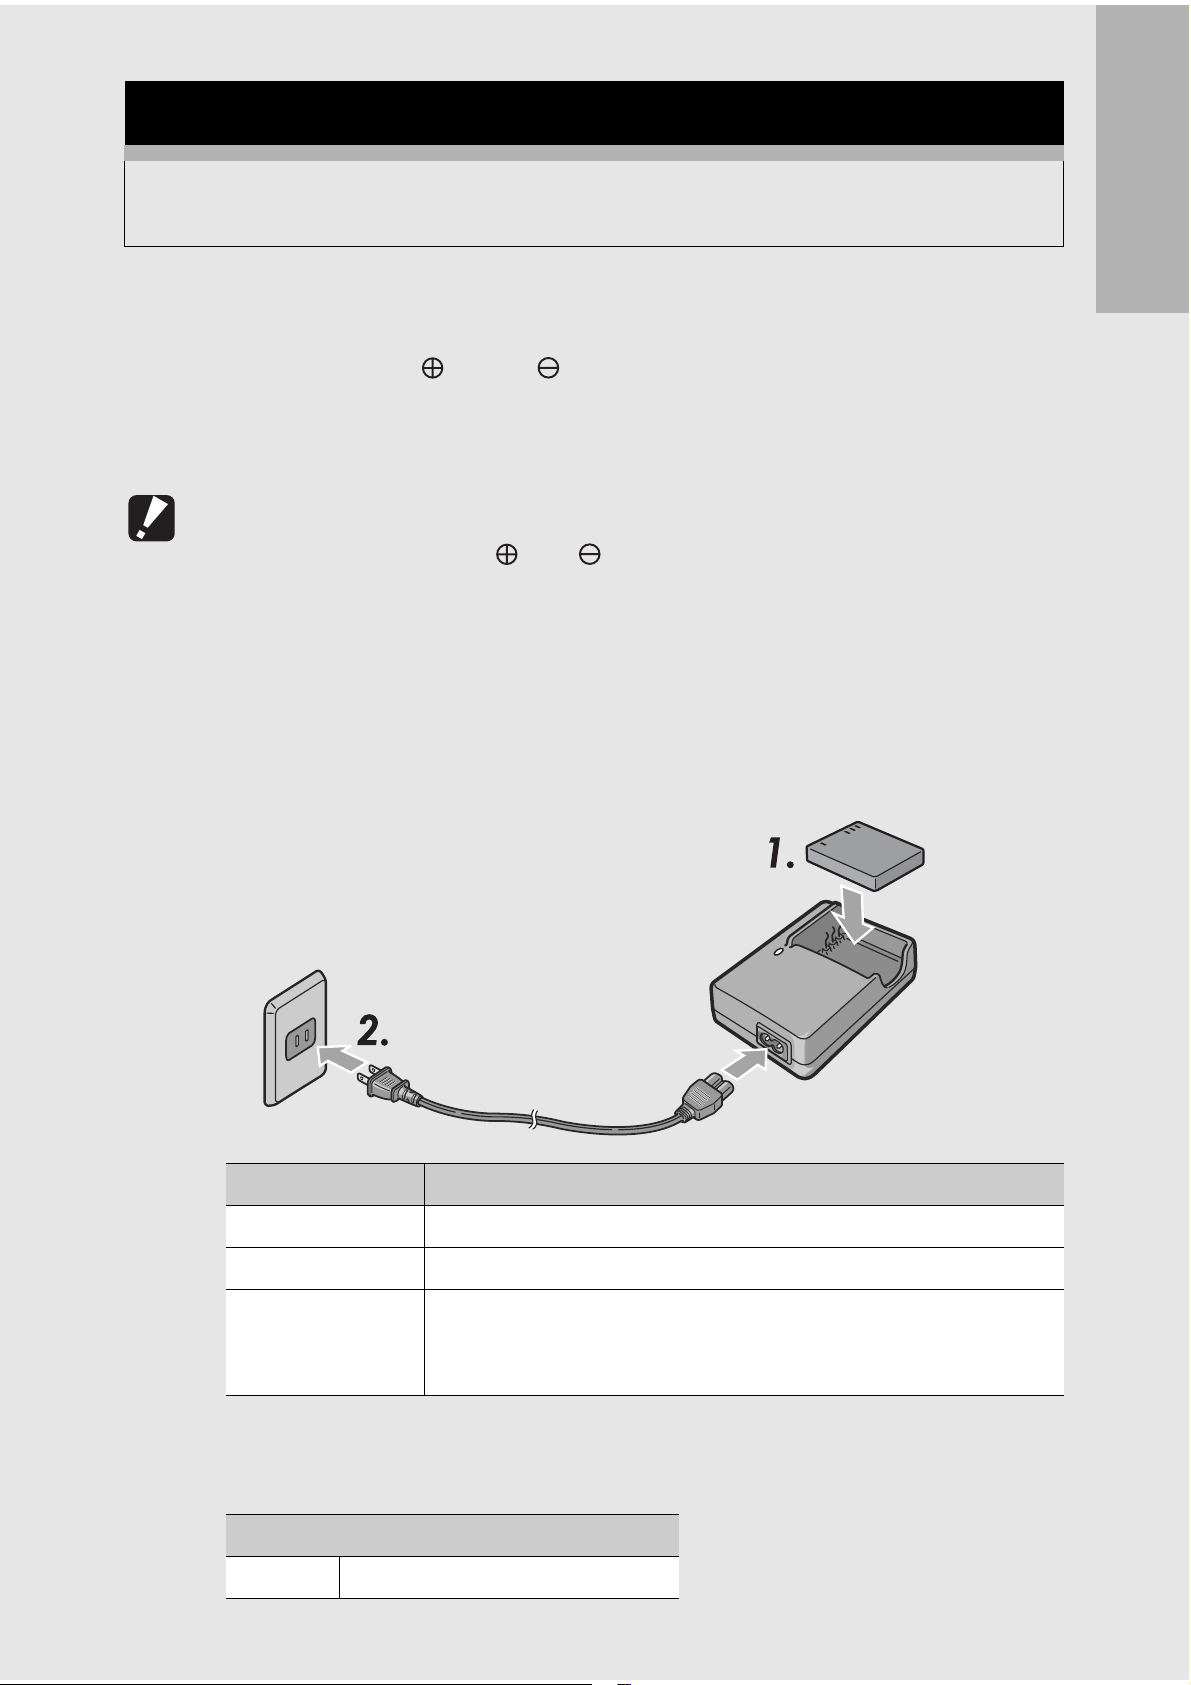
Charging the Rechargeable Battery
The rechargeable battery needs to be charged before use. The
battery is not charged at the time of purchase.
1
2
Insert the battery into the battery charger, making
sure that the and markings on the battery
match those on the battery charger.
• The battery label should face up.
Caution-----------------------------------------------------------------------------------------------
Be careful not to reverse the and sides.
Plug the battery charger into an outlet.
• Use the battery charger (BJ-7) to recharge the battery.
• Charging starts, and the charger lamp indicates the progress, as
shown below. Once charging has finished, unplug the power
cable from the power outlet.
If you are using the camera for the first time, read this section.
Charger Lamp Description
Lit Charging started
Off Charging complete
Flashing Battery charger or battery may be faulty (unplug the battery
charger from the power outlet and remove the battery from the
battery charger).
• The estimated battery charging time is shown below. Depending
on the battery level, the charging time differs.
Rechargeable battery charging time
DB-70 About 100 min. (25 °C)
23
Loading the Rechargeable Battery and SD
Memory Card
After recharging the rechargeable battery, load the rechargeable
battery and the SD memory card. If the camera is on, make sure
If you are using the camera for the first time, read this section.
to turn it off before loading or removing the battery and card.
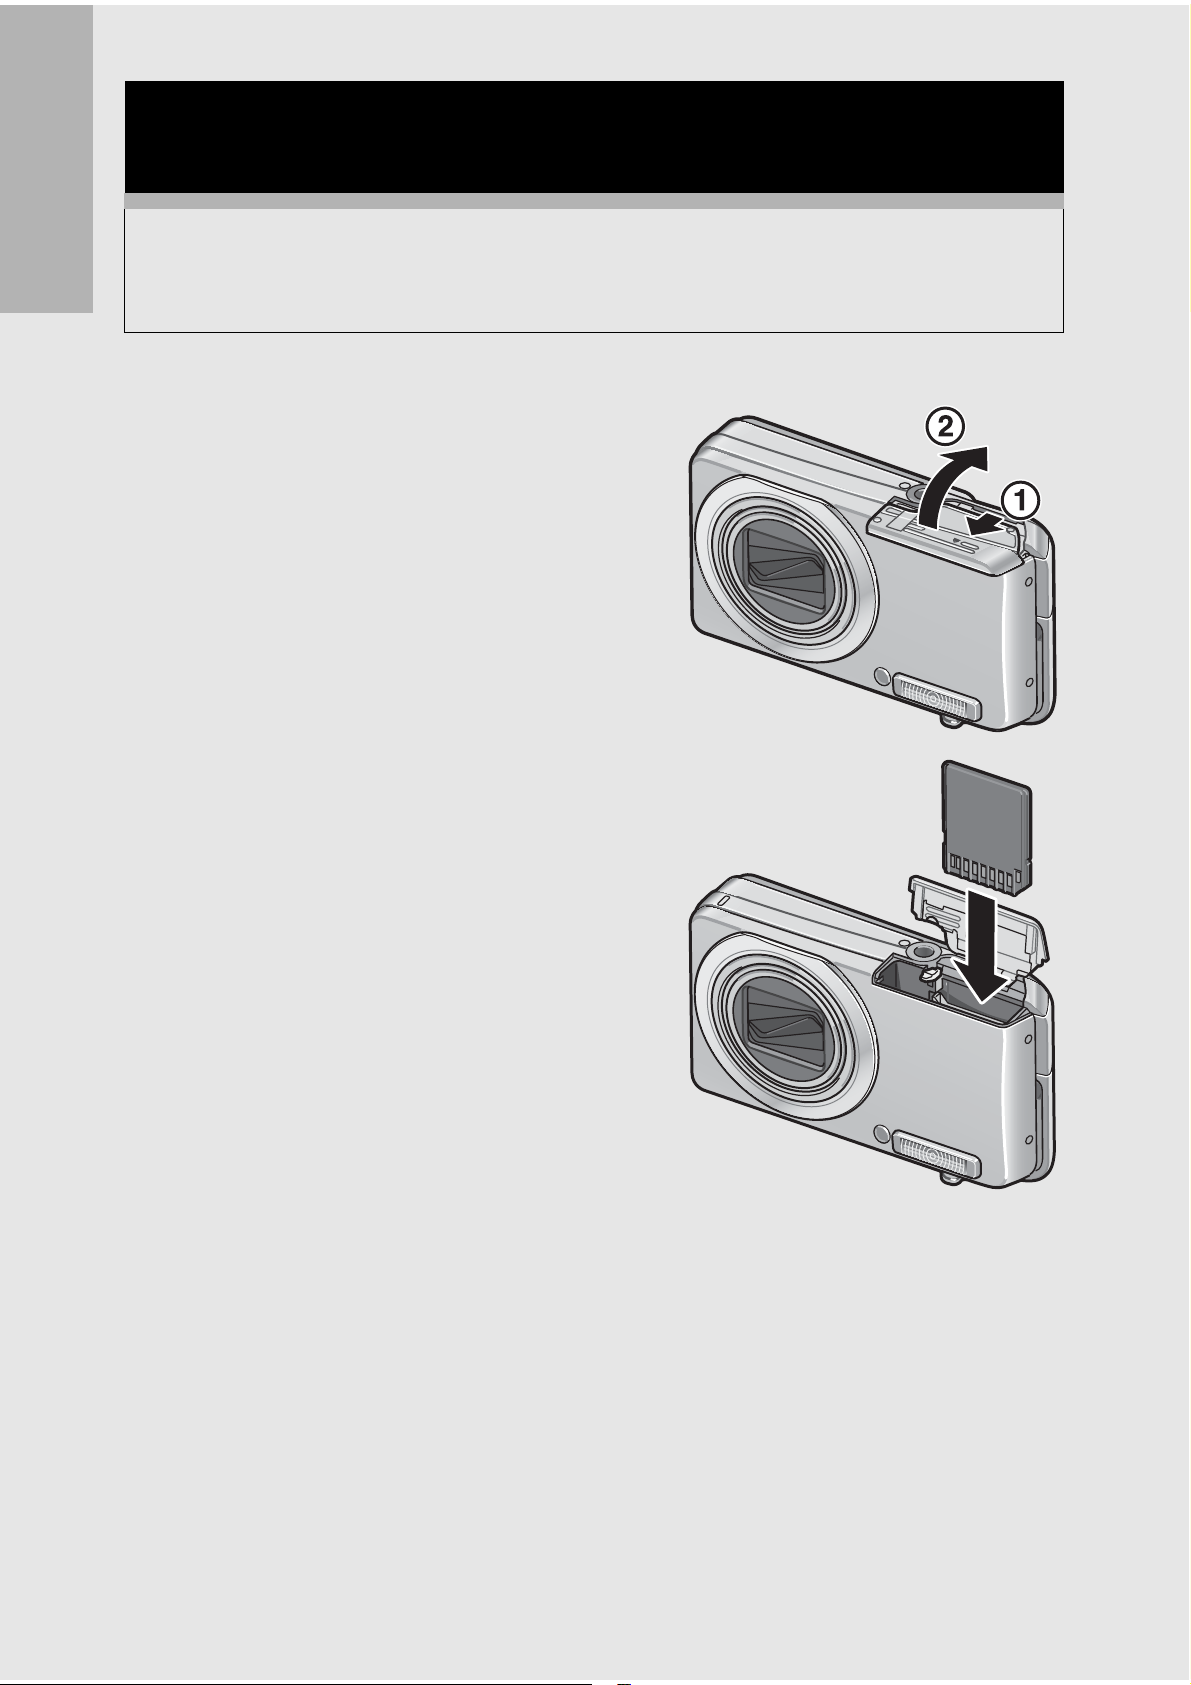
1
2
Open the battery/card
cover.
Make sure the SD memory
card is facing the right way
and then push the card all
the way in until it clicks.
• The rechargeable battery may be
inserted first.
24
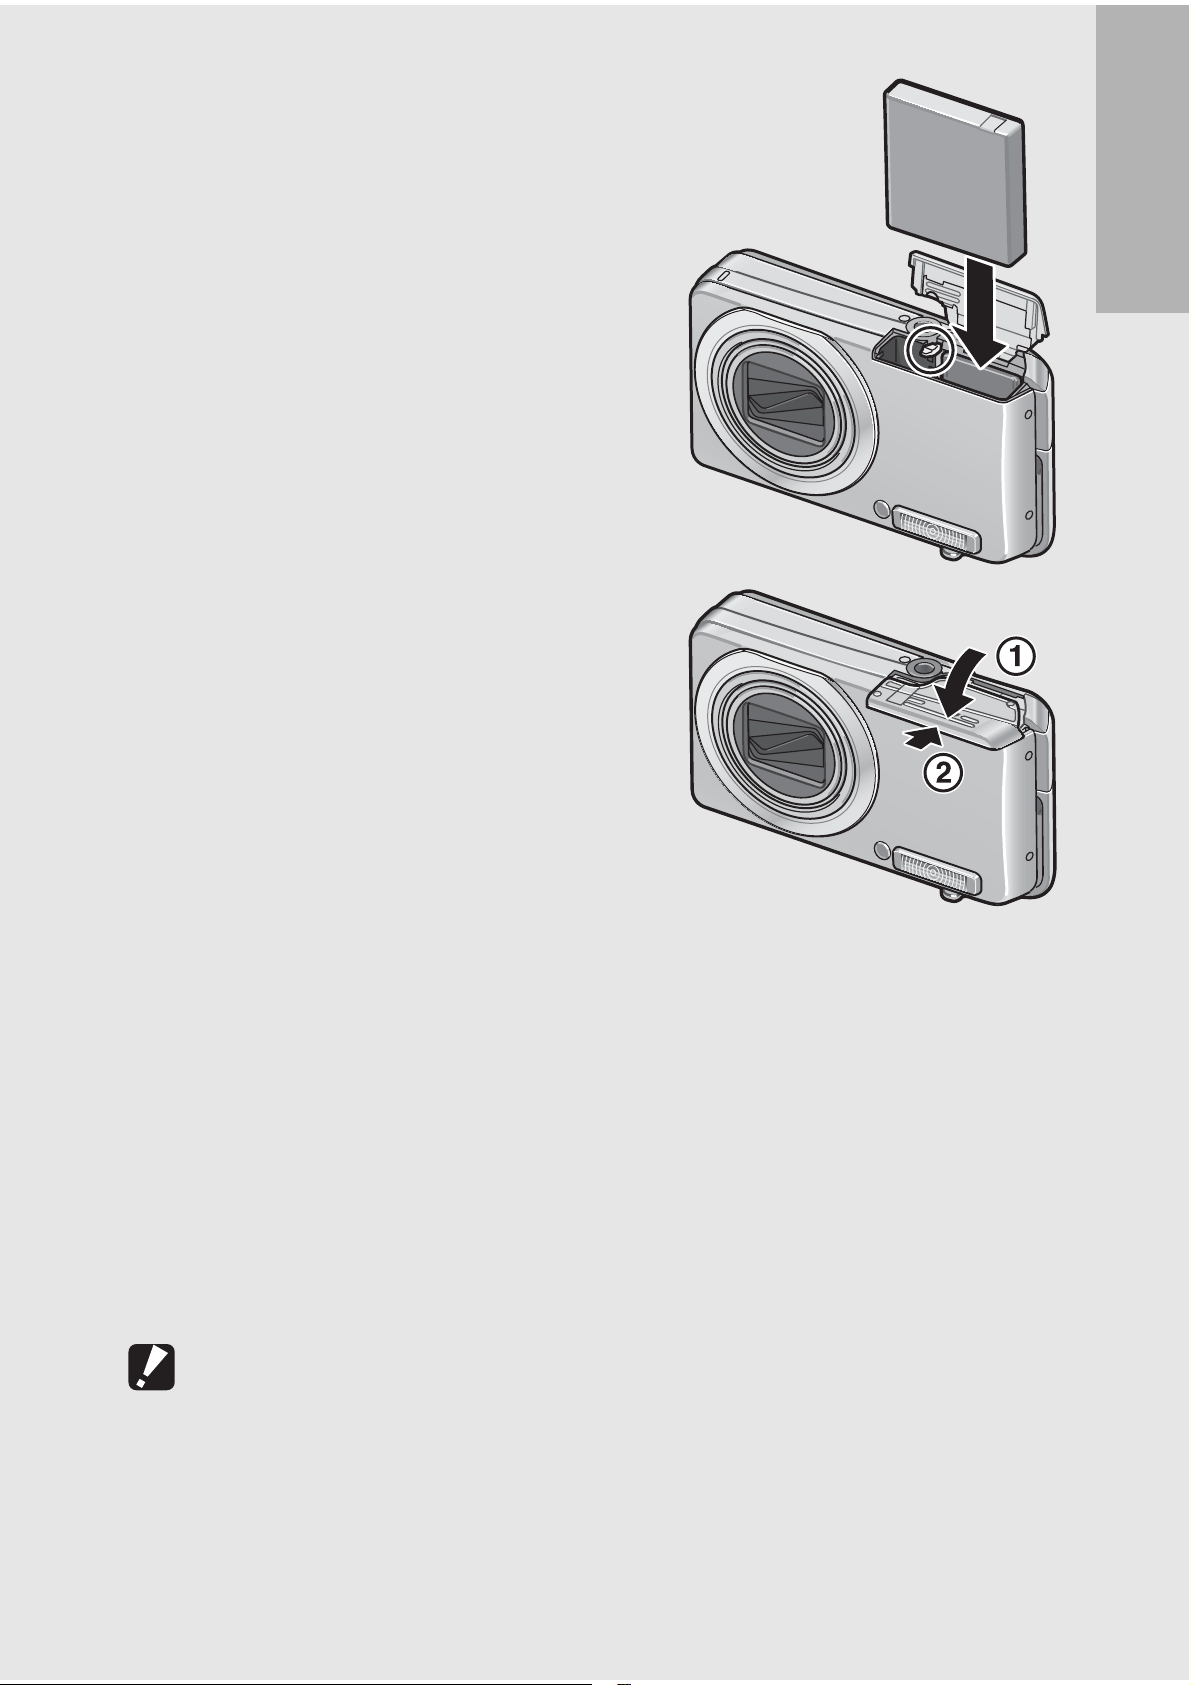
3
Insert the rechargeable
battery.
• When the rechargeable battery is
loaded in place, it is locked with
the hook shown in the figure.
If you are using the camera for the first time, read this section.
4
Removing the Rechargeable Battery
Open the battery/card cover. Release the hook that locks the
rechargeable battery. The battery is ejected. Pull the battery out of
the camera. Be careful not to drop the battery when removing it from
the camera.
Close the battery/card
cover and slide it back into
place.
Removing the SD Memory Card
Open the battery/card cover. Push in the SD Memory Card and
gently release to eject it. Pull the card out of the camera.
Caution-----------------------------------------------------------------------------------------------
Remove the batteries if you are not going to use the camera for a long period of time.
Store the removed batteries in a dry cool place.
25
Turning the Power On/Off
To turn the power on:
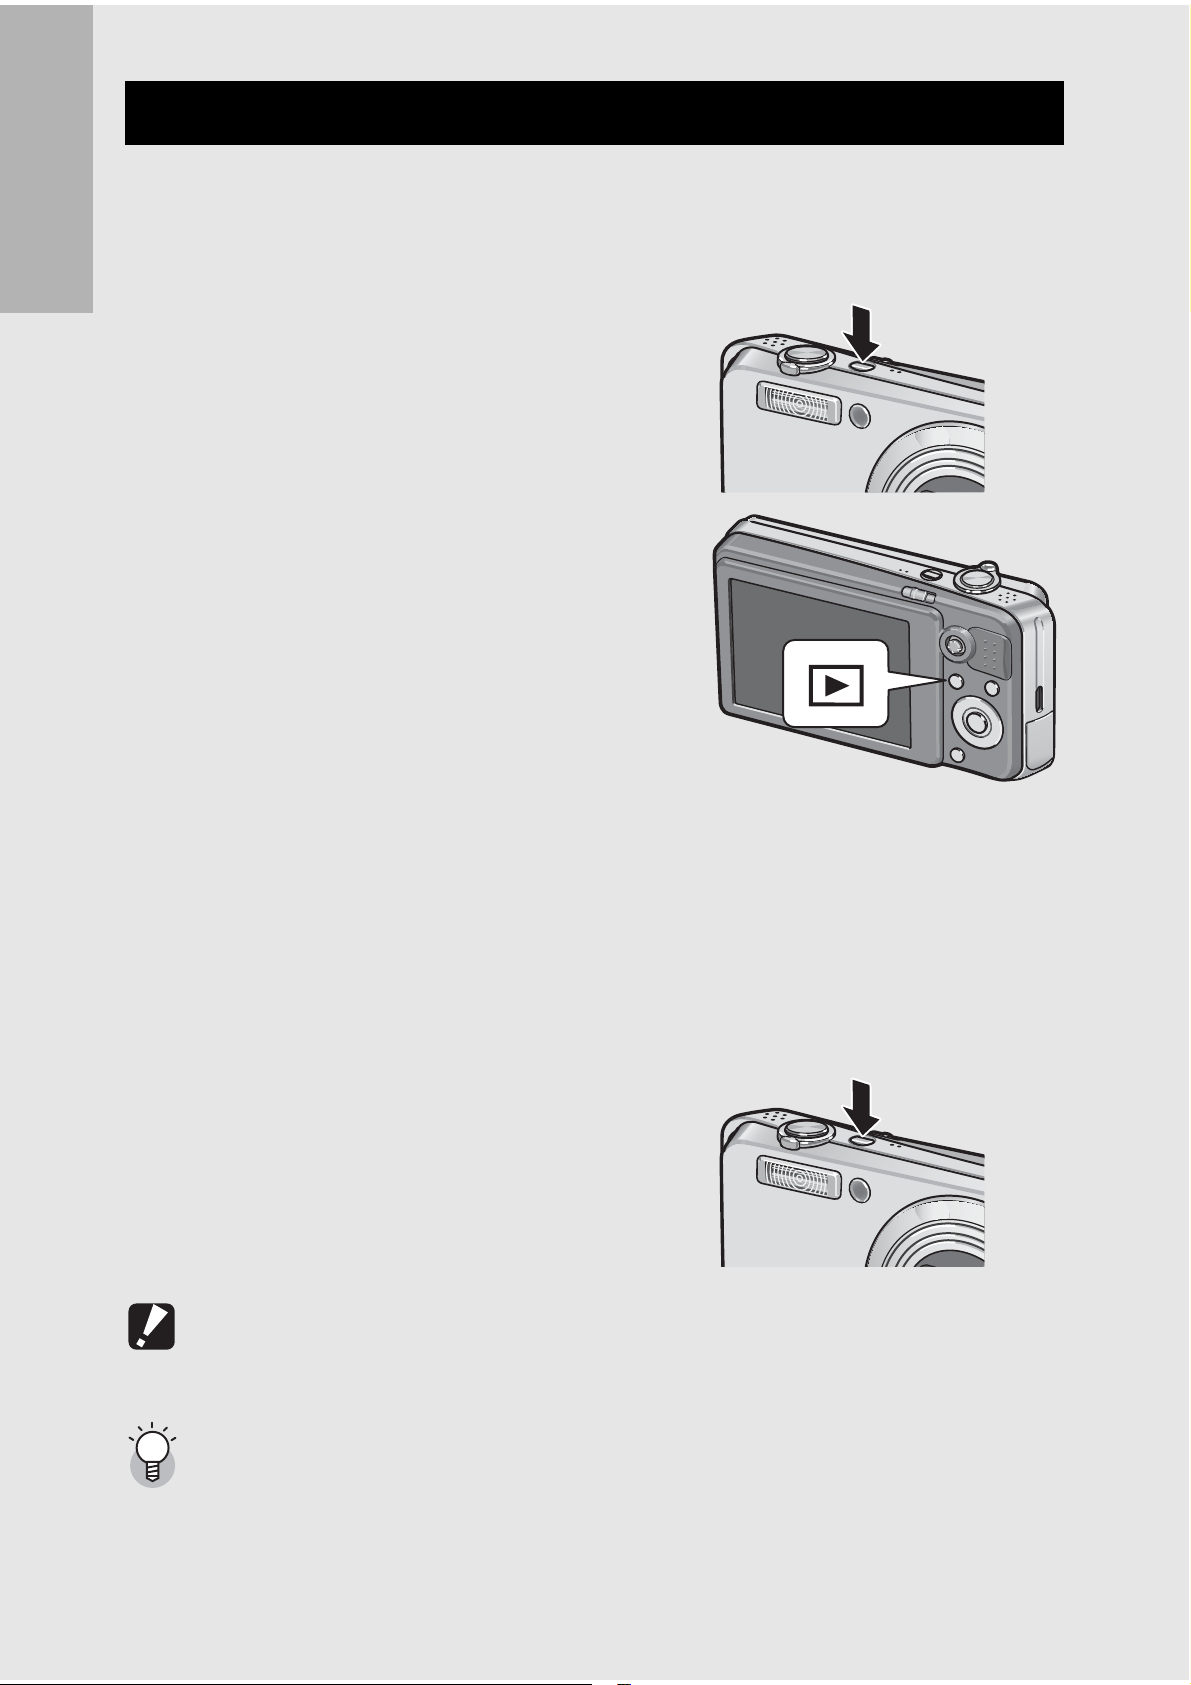
1
If you are using the camera for the first time, read this section.
Press the POWER button.
• After the start sound, the LCD
monitor turns on.
Using the Camera in Playback
Mode
• Pressing the 6 (Playback) button
for more than one second turns on
the camera in playback mode,
allowing you to start playback at
once.
• When the camera is turned on with
the 6 (Playback) button, pressing the 6 (Playback) button
again switches playback mode to recording mode.
To turn the power off:
1
Press the POWER button.
Caution-----------------------------------------------------------------------------------------------
After the camera is turned on, it may take longer for the camera to become ready for
shooting when using the flash than when not using the flash.
Auto Power Off ------------------------------------------------------------------------------------
• If the camera goes unused for a set period of time, it automatically turns itself off to
save power. (Auto Power Off)
26
• The auto power off setting can be changed. (GP.143)
Setting the Language
When the power is turned on for the first time, the language
setting screen appears (for the LCD monitor display language).
After setting the language, go on to the date/time setting (for
printing the date and time on your photos).
You can shoot without these settings. However, be sure to set the
language, and the date/time later. Use the Setup menu for these
settings.
If you are using the camera for the first time, read this section.
1
2
3
Turn the power on for the first time after purchase.
• The language selection screen appears.
• To skip language setting, press the MENU/OK button.
• When the MENU/OK button is pressed, the language setting is
cancelled and the video signal format-setting screen appears.
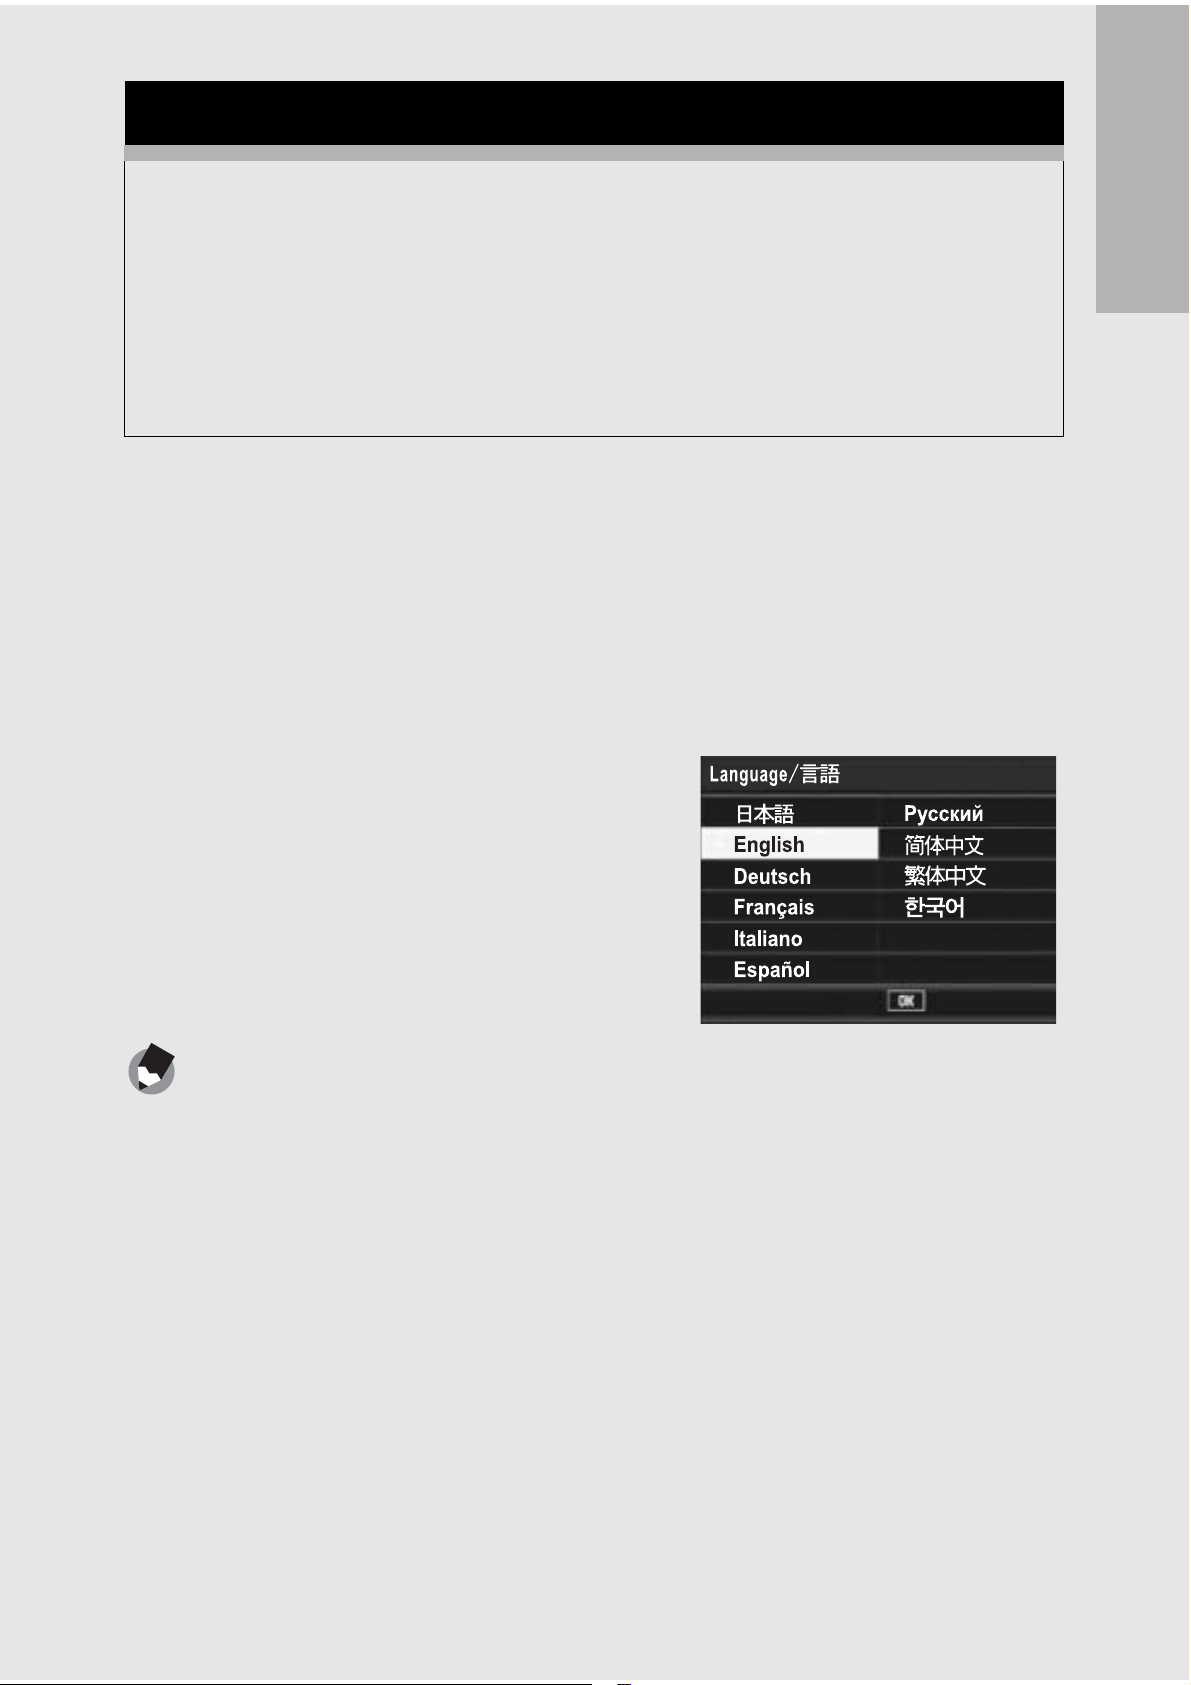
Press the !"#$ buttons to
select a language.
Press the MENU/OK button.
• The display language is set, and
the date/time setting screen
appears.
Note ---------------------------------------------------------------------------------------------------
Ok
For how to set the display language and date/time on the Setup menu, see “Changing
the Display Language (Language/N)” (P.155) and “Setting the Date and Time
(Date Settings)” (P.154) in this guide.
27
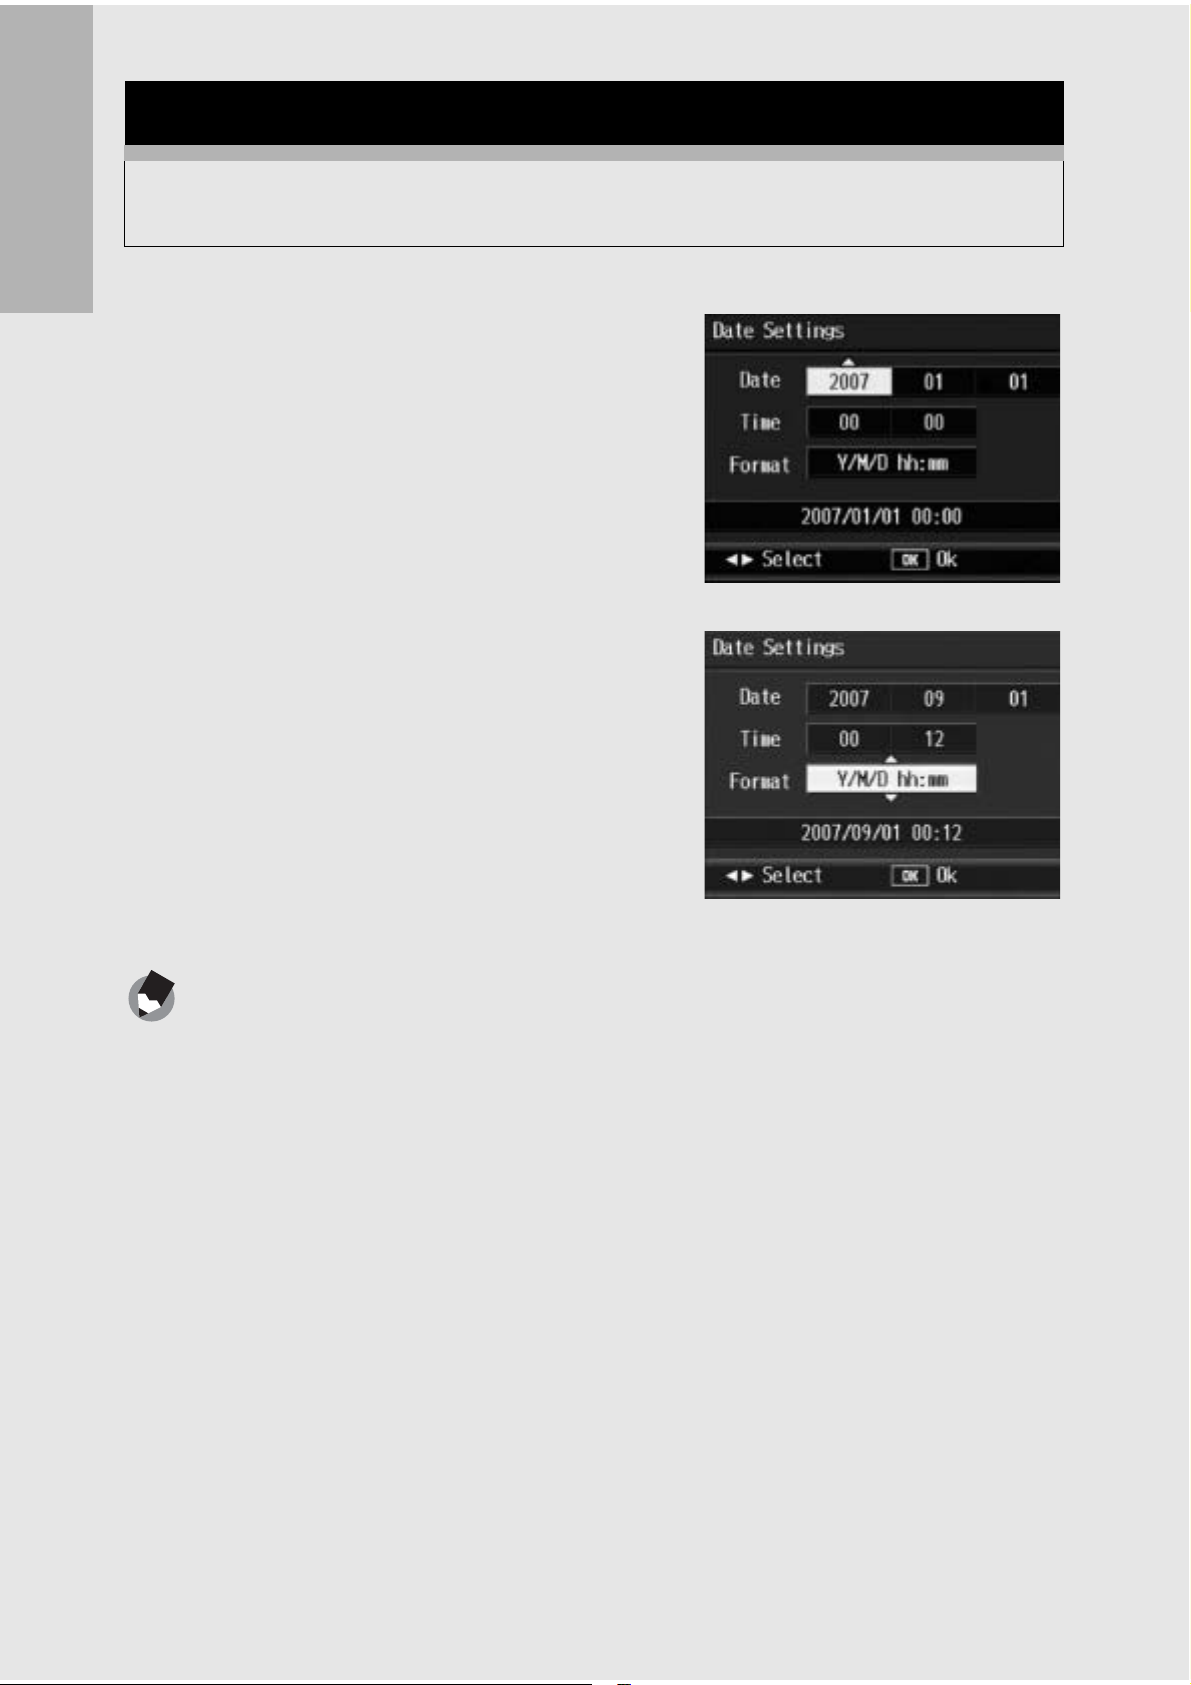
Setting the Date and Time
When the power is turned on for the first time, the date/time
setting screen appears.
If you are using the camera for the first time, read this section.
1
2
3
Press the !"#$ buttons to
set the year, month, date and
time.
• Change the value with !" and
move the frame with #$.
Setting at shipping
In [Format], choose the date
and time format.
• Select the date and time format
with !".
Check the display and then
press the MENU/OK button.
• The date is set.
Note ---------------------------------------------------------------------------------------------------
• If the battery is removed for more than one week, the date and time settings will be
lost. These settings must be made again.
• To retain the date and time settings, load a battery with adequate remaining power
for more than two hours.
• The set date and time can be changed later. (GP.154)
• The date and time can be inserted into images. (GP.89)
28
 Loading...