

Ricoh Caplio R1 Owner Manual
Camera User Guide
Caution!
Do not connect the USB cable yet!
If you connect the camera to a computer through the
USB cable before installing the provided software on the
computer, the software required for connection between
camera and computer may not be installed
appropriately.
Be sure to connect the camera to your computer after
installing the provided software.
For how to install the software, see P.112.
About other documentation
Detailed explanations on how to use the provided
software can be found in "Software User Guide" (PDF
format file) included in the attached CD-ROM.
For how to display the PDF file, see P.113.
Quick Guide
A Variety of Shooting
Techniques/Playback
Changing Camera
Settings
Installing Software
Troubleshooting

Preface
This manual provides information on how to use the shooting and playback functions of this
product, as well as warnings on its use. To make the best use of this product's functions, read
this manual th oroughly before use. Please keep this manual handy for ease o f r eference.
Safety Precautions For the safe use of your camera, be sure to read Safety
Test shooting Please be sure to do some test shooting to make sure it
Copyright Reproduction or alteration of copyrighted documents,
Exemption from
Liability
Warranty This product is manufactured to local specifications and
Radio Interference Operating this product in the vicinity of other electronic
• This publication may not be reproduced in whole or in part without the express written permission of Ricoh.
©
2004 RICOH CO.,LTD. All rights reserved.
• The contents of this document may be changed in the future, without prior notice.
• This booklet was created with thorough attent i on to the co ntent. If, however, you have a question, spot an
error, or find a description lacking, please refer to the end of this booklet for information on how to contact us.
Microsoft, MS, Windows and DirectX are registered tr adem arks of Microsoft Corporation in the United States of
America and other countries.
Adobe and Adobe Acrobat are trademarks of Adobe Systems Incorporated.
All trademarked company and product name s mentioned in this manual are the property of their respecti ve
owners.
Precautions thoroughly before use.
is recording properly before using it for real.
magazines, music and other materials, other than for
personal, home or similarly limited purposes, without the
consent of the copyright holder is prohibited.
Ricoh Co., Ltd. assumes no liability for failure to record or
play back images caused by malfunction of this product.
the warranty is valid within the country of purchase.
Should the product fail or malfunction while you are
abroad, the manufacturer assumes no responsibility for
servicing the product locally or bearing the expenditure
incurred therefore.
equipment may adversely affect the performance of both
devices. In particular, operating the camera close to a
radio or television may lead to interference. If
interference occurs, follow the procedures below.
• Move the camera as far away as possible from the TV, radio or other
device.
• Reorient the TV or radio antenna.
• Plug the devices into separate electica l outlet s.
Ricoh Co., Lt d.
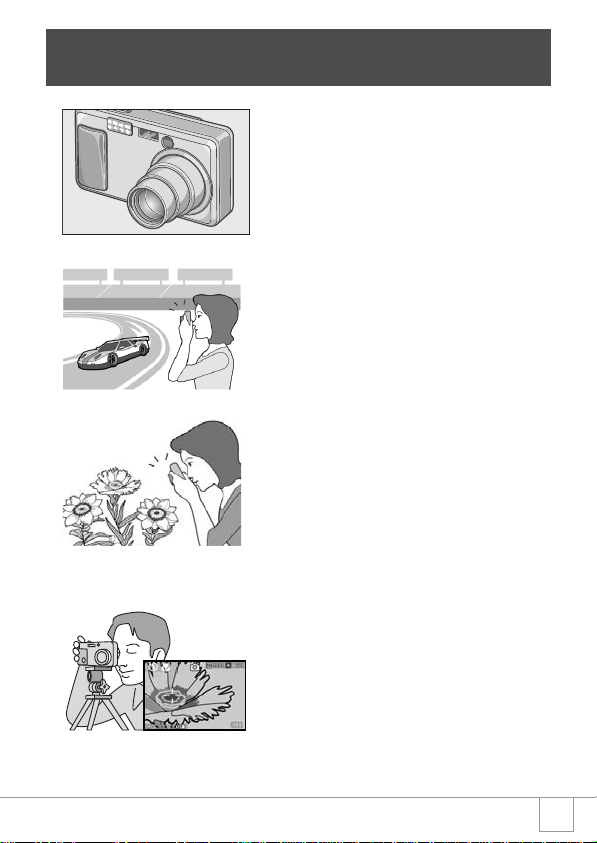
Key Features
Equipped with a wide zoom lens in
4.8x high magnification
This product has a compact body only 25
mm thick, featuring a 28- to 135-mm* wide
4.8x lens that applies to most normal
shooting. The lens supports the shooting of
various indoor and outdoor scenes.
* Equivalent to that on a 35mm camera
Rapid shutter response to capture a
moment (P.26)
The shutter release time lag is as short as
0.1 seconds.
Ricoh's patented hybrid auto focusing
system technology even keeps action shots
looking good.
1-cm macro (P.32) and close
flashing for 13 cm (for Telephoto)
or 20 cm (for Wide-angle) (P.33)
The unsurpassed macro function allows you
to capture details from a very close distance
at only 1 cm. The camera also has a built-in
flash for very close shots within 13 cm (for
Telephoto) and 20 cm (for Wide-angle). This
combination will give you clear macro shots
even under low light conditions.
AF target shift function for easy
focus lock even on a tripod (P.63)
The camera has an AF target shift function.
At macro shooting, the AF target shift
function allows you to lock the focus only by
button operation without moving the camera
itself.
1
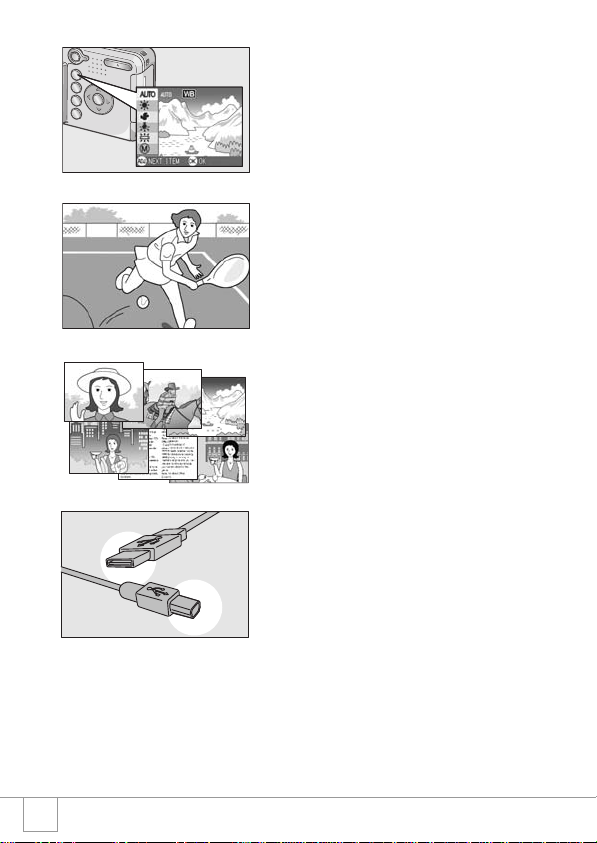
Adjust (ADJ.) button for easy
customizing to optimum setting
(P.49)
The ADJ. button reduces button operation
steps. It allows you to quickly adjust the
exposure, white balance, and ISO sensitivity
with minimum steps. You can also assign a
function as required.
High-quality movie with sound of 30
frames/second (P.79)
A high-quality movie of 320 x 240 pixels can
be shot at 30 frames/second with sound.
Scene mode for easy and beautiful
shooting (P.34)
In Scene Mode, you need only to select from
among six types of shooting modes for
shooting with optimal settings for the scene.
Instant transfer to PC through the
USB cable
If the provided software is installed on your
computer, just connecting the camera to
your computer with the provided USB cable
will automatically transfer images to your
computer.
2
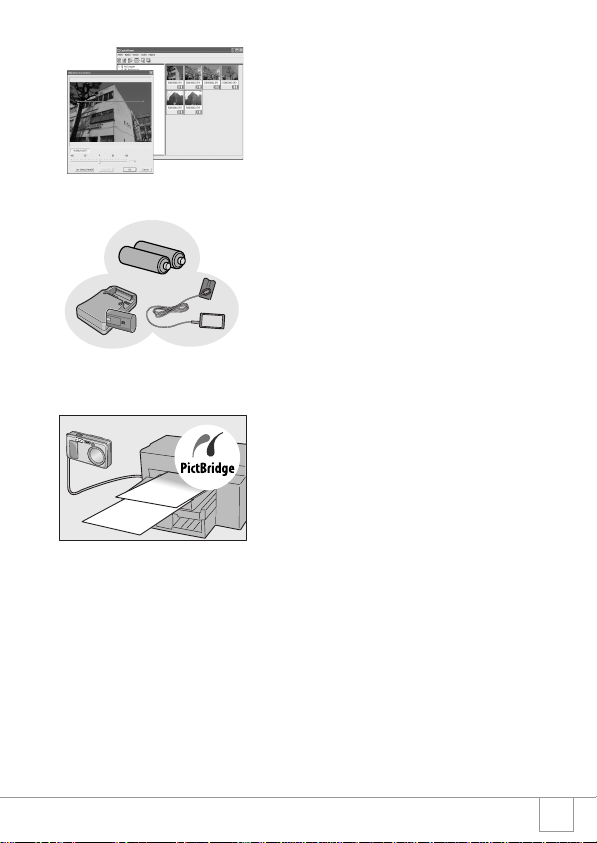
Provided with software having an
image correction function for
finishing images more beautifully
The provided image editing software
CaplioViewer has an automatic image
correction function for correcting the
brightness, hue, and contrast automatically.
You can partially crop an image (trimming) or
change its size.
Choice of three power sources
makes sure you wont miss any
shooting opportunities (P.16)
The camera can be used with one of three
power supplies: AA alkaline battery easily
available anywhere, a large-capacity
rechargeable battery (sold separately) for
continuous shooting up to 5,000 pictures,
and an economical AC adapter (sold
separately) useful for transfer to a computer.
Direct printing without requiring any
computer (P.44)
A direct print compatible printer can be
connected to the camera with the USB cable
for direct transfer. This allows for easy
printing without using a computer.
3

Contents
Chapter 1 Quick Guide
Before Shooting ...........................................................................10
Packing List ..................................................................................................................10
Names of parts ............................................................................................................. 12
About LCD Monitor Display ..........................................................................................14
Getting Ready to Shoot ...............................................................16
About the Batteries .......................................................................................................16
About an SD Memory Card (available in stores) .......................................................... 19
Loading the Batteries and SD Memory Card ................................................................20
Turning the Power On/Off ............................................................................................21
Setting the language ....................................................................................................22
Setting the date and time .............................................................................................23
Changing the Display ...................................................................................................24
Basic Shooting .............................................................................25
How to Hold the Camera ..............................................................................................25
Capturing the Moment Shooting (Full-press) ...............................................................26
Checking the Focus and Shooting (Half-press) ............................................................27
When the Subject is not Centered (Shooting with Focus-lock) ....................................29
Using the Zoom Function .............................................................................................31
Shooting Close-Ups (Macro-Mode) ..............................................................................32
Using the Flash ............................................................................................................33
Shooting with Scenery-Matching ..................................................................................34
Playing Back ................................................................................35
Viewing Your Images ...................................................................................................35
Thumbnail Display ........................................................................................................36
Magnifying Images .......................................................................................................37
Viewing on a Television.................................................................8
Erasing ..........................................................................................40
Erasing Unwanted Images ...........................................................................................40
Erasing Multiple Frames at One Time ..........................................................................41
Chapter 2 A Variety of Shooting
Techniques/Playback
Direct Printing ..............................................................................44
Direct Print Function .....................................................................................................44
Connecting the Camera to a Printer .............................................................................44
Printing Still Images ......................................................................................................45
A Variety of Shooting Techniques .............................................49
Using the ADJ. (Adjust) Button .....................................................................................49
4

Shooting Setting Menu .................................................................................................50
Using the Shooting Setting Menu .................................................................................51
Changing the Exposure (EXPOSURE COMP.) ............................................................52
Using Natural and Artificial Lighting (WHITE BALANCE) .............................................53
Changing Sensitivities (ISO SETTING) ........................................................................ 55
Changing Shading for Shooting Text (DENSITY) ........................................................56
Shooting Consecutively with Different White Balance (WHITE BALANCE BRACKET) ....... 57
Choosing Picture Quality Mode/Image Size (PIC QUALITY/SIZE) .............................. 59
Manual Focus Shooting (FOCUS) ................................................................................61
Using the AF Target Shift Function ..............................................................................63
Changing the Edge Quality of Still Images (SHARPNESS) ......................................... 64
Changing the Light Metering (PHOTOMETRY) ........................................................... 65
Shooting Consecutively with Different Exposures (AUTO BRACKET) ........................ 66
Using the Self-Timer .....................................................................................................67
Using Long Time Exposure (TIME EXPOSURE) ......................................................... 68
Shooting Pictures Automatically at Set Intervals (INTERVAL) .....................................69
Limiting the Shutter Release Speed (SLOW SHUTTER LMT) .....................................71
Inserting the Date into a Still Image (DATE IMPRINT) .................................................72
Shooting a Still Image with Sound (IMAGE WITH SOUND) ........................................73
Returning the Shooting Setting Menu Settings to their Defaults (RESTORE DEFAULTS) ......... 74
Shooting with Multi-Shot ............................................................75
CONT ...........................................................................................................................77
SCONT (S Multi-Shot) ..................................................................................................77
MCONT (M Multi-Shot) 77
Viewing an S Multi-Shot or M Multi-Shot Still Image in Enlarged Display Mode .......... 78
Shooting/Playing Back Movies ...................................................79
Shooting Movies ...........................................................................................................79
Playing Back Movies ....................................................................................................80
Recording/Playing Back Sound 81
Recording Sound (Voice Memo) ..................................................................................81
Playing Back Sound .....................................................................................................82
Other Functions Available in Playback Mode ...........................83
Playback Setting Menu .................................................................................................83
Using the Playback Menu .............................................................................................83
Showing Photos in Order Automatically (SLIDE SHOW) .............................................84
Write-protecting Your Images (PROTECT) ..................................................................85
Using a Printing Service (DPOF: Dee-Pof) ..................................................................88
Changing the Image Size (RESIZE) .............................................................................91
Copying the Contents of Internal Memory to a Memory Card (COPY TO CARD) .......92
Chapter 3 Changing Camera Settings
Changing Camera Settings .........................................................94
SETUP Menu ...............................................................................................................94
Using the SETUP Menu ...............................................................................................95
Getting the SD Memory Card Ready for Use (FORMAT [CARD]) ...............................96
Formatting Internal Memory (FORMAT [INT. MEM.]) .................................................. 97
Adjusting the Brightness of the LCD Monitor (LCD BRIGHTNESS) ............................98
Setting a Function to the ADJ. Button (ADJ BTN.SET.) ...............................................99
5

Changing the Beep Sound Setting (BEEP SOUND) ..................................................100
Changing Image Confirmation Time (LCD CONFIRM.) ............................................101
Changing Auto Power-Off Settings (AUTO POWER OFF) ........................................ 102
Changing File Name Settings (SEQUENTIAL NO.) ...................................................103
Changing Power-Save Mode Settings (POWER-SAVE) ............................................104
Setting the Date and Time (DATE SETTINGS) ..........................................................106
Changing the Display Language (LANGUAGE) .........................................................107
Changing the Playback Method for Viewing on TV (VIDEO OUT MODE) ................. 108
Changing the Setting of Step Zooming (STEP ZOOM) ..............................................109
Displaying a Setting Change Warning (SHTG STGS WARNG.) ................................110
Chapter 4 Installing Software
Installing the Provided Software (For Windows) ....................112
System Requirements for Using the Provided Software ............................................114
Installing the Software on Your Computer (Windows XP) ..........................................115
Installing the Software on Your Computer (Windows 98/98SE/Me/2000) .................117
Connecting the Camera to Your Computer ................................................................119
Installing Other Software ............................................................................................ 121
Uninstalling the Software ............................................................................................123
Installing the Provided Software (For Macintosh) ..................124
System Requirements for Using the Provided Software ............................................126
Installing the Software on Your Computer (Mac OS 8.6 to 9.2.2) ..............................127
Installing the Software on Your Computer (Mac OS X 10.1.2 to 10.3) ....................... 128
Chapter 5 Troubleshooting
Troubleshooting ........................................................................132
Troubleshooting the Camera ......................................................................................132
Appendices ................................................................................137
A. Specifications .........................................................................................................137
B. Optional Accessories .............................................................................................139
C. Combination of Scene Mode and Function ............................................................141
D. Menu Items By Mode .............................................................................................142
E. Functions Whose Defaults will be Restored upon Power-off .................................143
F. Number of Images That Can be Stored in Internal Memory/SD Memory Card ......144
G. Using Your Camera Abroad .................................................................................. 145
H. Cautions on Use ....................................................................................................146
I. Care and Storage .................................................................................................... 147
J. Error Messages ...................................................................................................... 148
K. Warranty and Servicing ..........................................................................................149
Index ...........................................................................................................................151
6
Using Manuals
The two manuals included are for your Caplio R1.
Camera User Guide (This booklet)
This guide explains the usage and functions of the camera.You will
also see how to install the provided software on your computer.
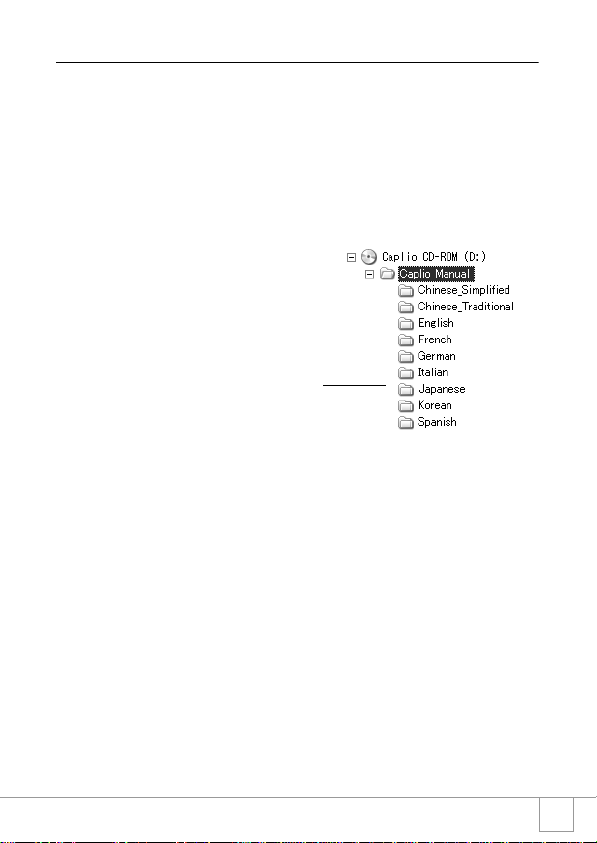
Software User Guide (PDF file)
This guide explains how to download images from the camera to
your computer, and display and edit them on your computer.
*The Software User Guide is
available from the following folder on
the provided CD-ROM.
Each language has its own Software User
Guide in the respective folder.
To copy the Software User Guide onto your hard disk
Copy the PDF file from the above folder.
7
How to Use This Guide
Chapter 1 explains the basic operations of this product.
If you are using the camera for the first time, read from this chapter.
The following symbols are also used in this guide:
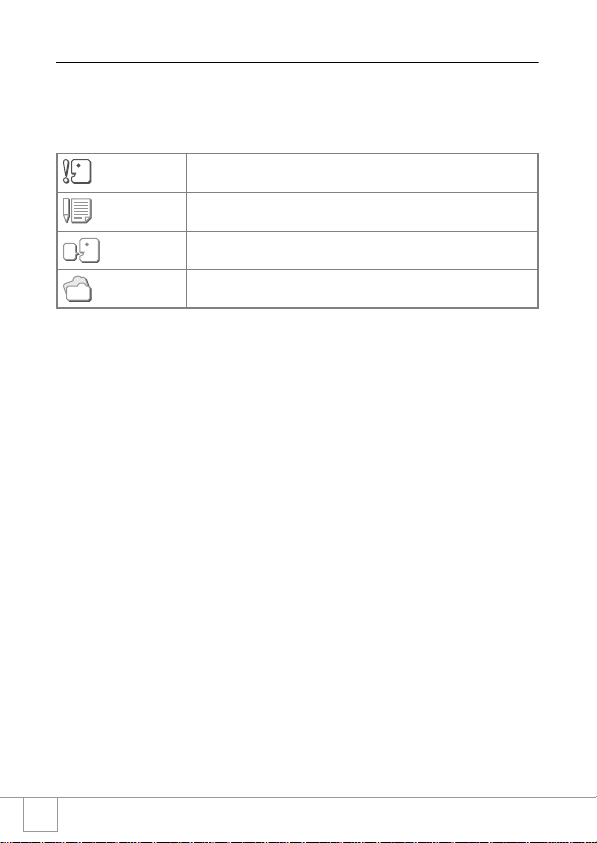
Important
Note
Term
Reference
The LCD Monitor Display examples may be different from actual
display screens.
This indicates important notices and restrictions for using this camera.
This indicates supplementary explanat ions and useful tips about camera
operations.
This indicates terms that are useful for understanding the explanations.
This indicates page(s) relevant to a particular function.
8

Chapter 1
Quick Guide
If you are using the camera for the first time,
read from this chapter.
Before Shooting ..................................... 10
Getting Ready to Shoot ......................... 16
Basic Shooting....................................... 25
Playing Back...........................................35
Viewing on a Television......................... 38
Erasing....................................................40
Before Shooting
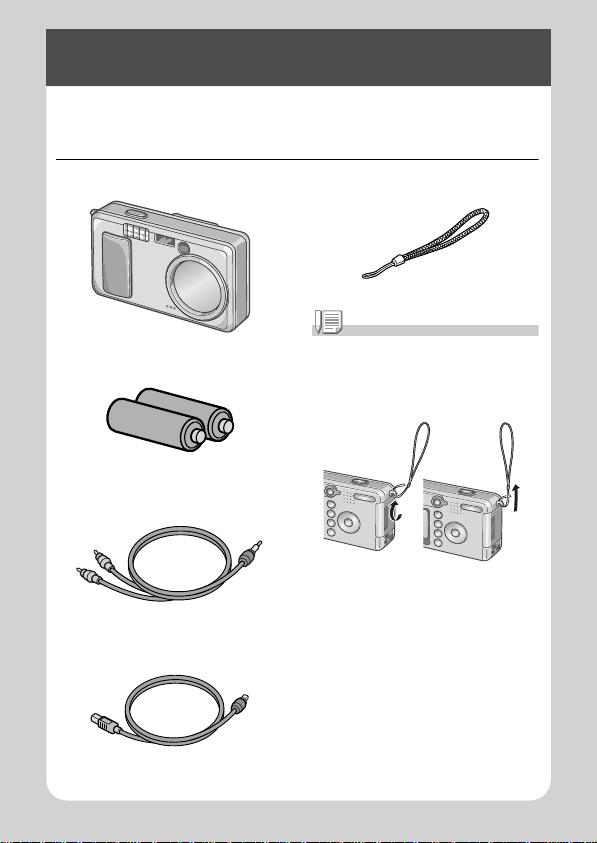
Open the package and make sure all the items are included.
Packing List
• Caplio R1
• AA Alkaline Batteries (LR6)
(2)
• AV Cable
Used when viewin g y our images on a TV
unit.
• USB Cable
Used to connect the camera to a c omput er
or Direct Print supported printer.
• Handstrap
Note
Attaching the hand strap to the camera
Thread the tips of the strap throu g h the
camera's stra p ey elet and loop them as
shown.
10
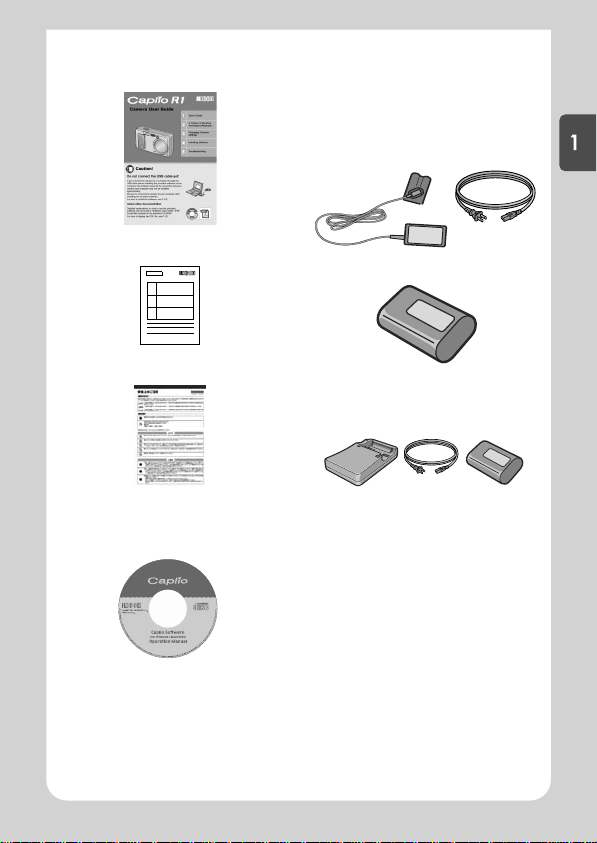
• Camera User Guide
(This booklet)
• Warranty
Optional Accessories
• AC Adapter (AC-4b)
Used for power supply from a home outlet
to the camera. Connect this a d apter for
long time play or image transfer to a
personal computer.
Quick Guide
• Rechargeable Battery (DB-50)
• Safety Precautions
• Caplio Software CD-ROM
The provided sof tware and the Software
User Guide are in cluded on this CD-ROM.
• Rechargeable Battery Set (BS-5)
Includes the Rechargeable Battery (DB-
50) and Battery Cha r ge r.
• PC Card Adapter (FM-SD53)
For when you want to lo ad an SD Me mor y
Card directly into your computer's PC
Card Slot.
• Soft Case (SC-50)
• SD Memory Card (available in
stores)
11
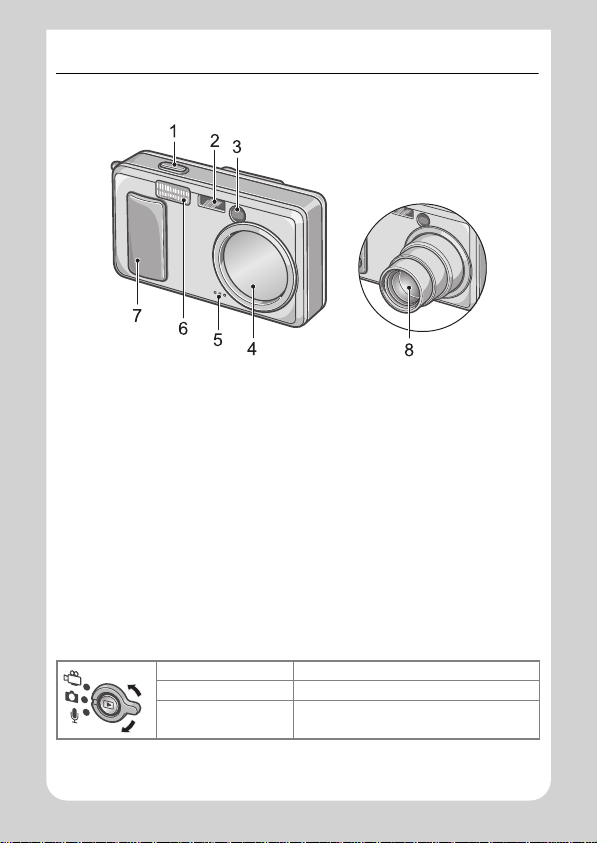
Names of parts
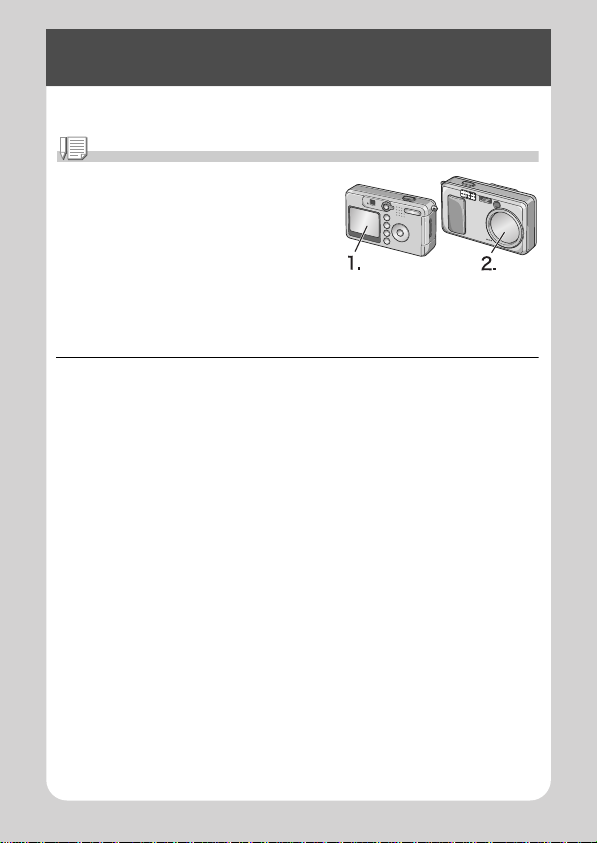
Camera
Front View
1. Shutter Release Button (P.25)
2. AF Window
3. Viewfinder
4. Lens Cover
5. Microphone (P.81)
6. Flash (P.33)
7. Power Switch (P.21)
8. Lens (P.25)
About the Mode Selector
You can select one of three modes with the mode selector.
Movie Mode Allows you to shoot movies.
Still Image Mode Allows you to shoot still images.
Voice Memo Mode Allows you to record sounds.
12
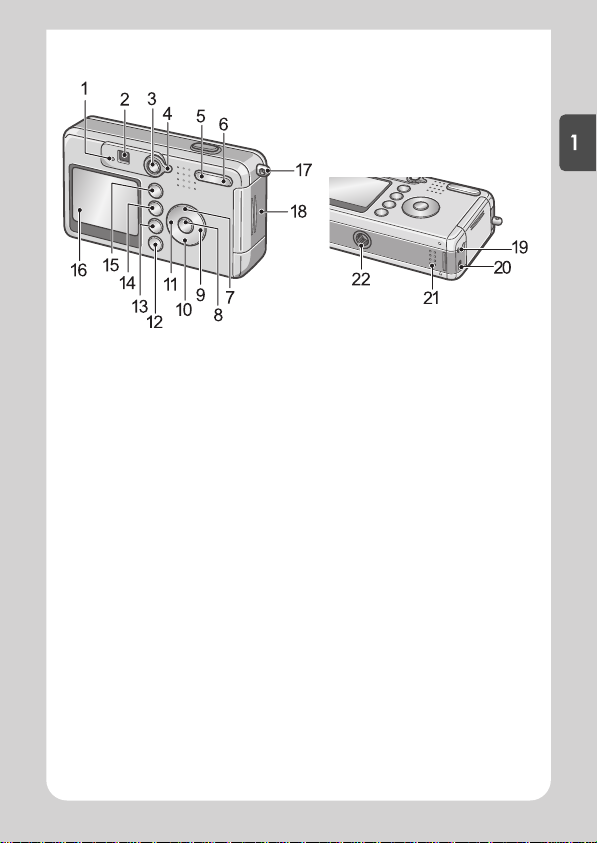
Rear View
Quick Guide
1. Auto Focus (P.27)/Flash Lamp (P .3 3)
2. Viewfinder
3. Playback Button (P.35)
4. Mode Selector (P.12)
5. Z (Wide-angle) (P.31)/9 (Thumbnail
Display) Butt on ( P.36)
6. z (Telephoto)(P.31)/8 (Enlarged Vi ew)
Button (P.37)
7. !/ MODE Button (P.34)
8. O Button
9. $ Button
10."/N (Macro) Button (P.32)
11. #/F(Flash) Button (P.33)
12. DIS P. Button (P.24)
13.D (Delete) (P.40)/T (Self-timer) Button
(P.67)
14.M Button (P.51, P.83, P.94)
15.ADJ. Button (P.49)
16.LCD Monitor
17.Strap Eyelet (P.10)
18.Battery/Card Cover
19.AV Output Terminal (P.38)
20.USB Terminal (P.119)
21.Speaker (P.80, P.82)
22.Tripod Screw Hole (underside)
13
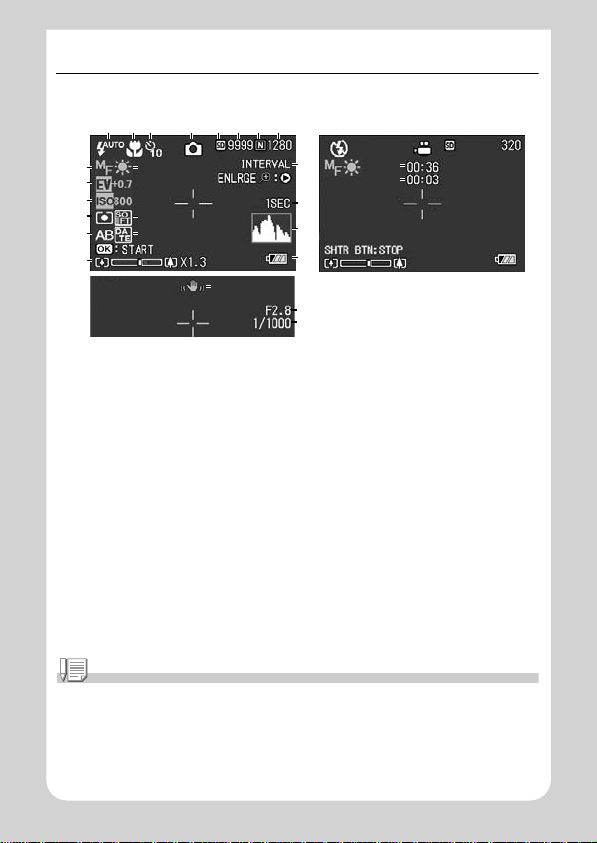
About LCD Monitor Display
Screen Examples when Shooting Pictures
123 4 5678
9
11
12
13
15
17
1. Flash (P.33) 14. Sharpness (P . 64)
2. Macro Shooting (P.32) 15. Auto Bracket (P.66)
3. Self-timer (P.67) 16. Date/Time (P.72)
4. Mode Types 17. Zoom Bar (P.31)
5. Recording Destination (P.19) 18. Interval (P.69)
6. Remaining Number of Still Images (P.144) 19. Time Exposure (P. 68)
7. Picture Quality (P.59) 20. Histogram (P. 2 4)
8. Image Size (P.59) 21. Battery (P . 16)
9. Focus (P. 61) 22. Camera Shake (P.25)
10. White Balance (P.53) 23. Aperture Value (P.27)
11. Exposure Comp. (P.52) 24. Shutter Speed (P.27)
12. ISO Setting (P.55) 25. Remaining Recording Time (P.144)
13. Photometry (P.65) 26. Recording Time (P.144)
1010
1414
1616
2222
Still Image Mode
18
19
20
21
23
24
2525
2526
Movie Mode
Note
The approximate number of remaining sho ts available is displayed. Further shooting may be
possible depen ding on the subject. Si nce the remaining number of shots is recalculated at
power-on or mode c hange (Still Image Mode or Playback Mode) , the displayed val ue may
change.
14
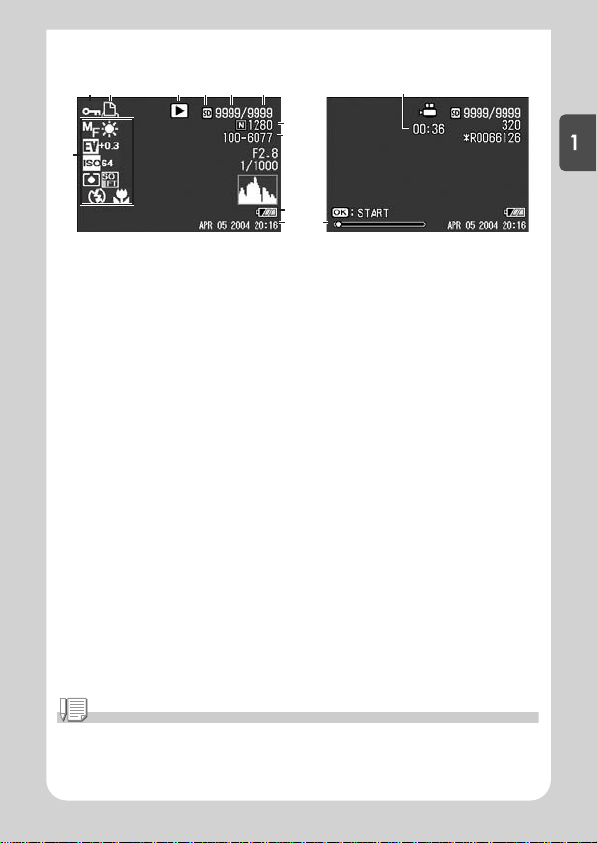
The Screen During Playback
12 3 4 5 6
8, 9
7
Still Image Mode
1. Protect (P.85) 8. Picture Quality (P.59)
2. DPOF (P.88) 9. Image Size (P.59)
3. Mode Types 10. File No.
4. Playback Data Source (P.35) 11 . Battery (P.16)
5. Number of Playback Files 12. Date at Shooting (P.72, P.106)
6. Tot al Num ber of Files 13. Recording Time or Lapsed Time
7. Setting at Shooting (Recording) 14. Indicator
10
11
14
12
13
Movie Mode
Quick Guide
Note
The LCD monitor may display messages to inform you of operational instructions or the
camera’s status while in use.
15
Getting Ready to Shoot
Turn the power on and get ready to shoot.
Note
If you have already used this camera, follow the
steps below to make sure it is turned off before
removing or loading batteries.
1. Make sure the LCD moni tor is turned off.
2. Make sure the lens cover is closed.
For how to turn the camera off, see P.21.
About the Batteries
The following batteries can be used in the camera. Please choose
which kind to use according to your needs.
• AA Alkaline Batteries (LR6) (included)
You can obtain them anywhere, so they are convenient for travel.
However, in a low-temperature environment the number of shots
you can take will decrease. Warm the batteries before use. It is
recommended that you use the rechargeable battery when using
the camera for a long time.
• Rechargeable Battery (DB-50) (sold separately)
This is a lithium-ion battery. This is economical because you can
recharge it using the battery charger BJ-5 (sold separately) and
use it over and over again. They last a long time, so they are
convenient for travel.
• AA Nickel Batteries (available in stores)
These batteries are not rechargeable. However, they last a long
time as compared with AA Alkaline Batteries when used with a
digital camera.
16
• Nickel-Hydrogen Battery (available in stores)
This is economical because you can recharge and use it over and
over again. Use a charger (available in stores) for charging.
The battery may be inert and consequently it may not supply
power immediately after it is purchased or left unused for more
than a month. In such a case, recharge the battery two or three
times before use. The battery self-discharges with time even if the
camera is not used, so recharge it before use.
In addition to the batteries, you can use the AC Adapter (P.139).
Note
Indication of the number of images you can take
Battery Type Number of Shots
Rechargeable Battery (DB-50) Approx. 500
AA Alkaline Batteries (LR6) Approx. 200
• The number of shots is base d on a temperature of 22 degrees Celsius, shooting at 30
second interva ls and o ne out o f ev er y t wo bei ng sh ot wit h the f las h. If yo u set the ca mer a t o
the Power-Save or Synchro-Monitor mode, the number of shots y ou can take will incre as e.
• The number of shots is for reference only. If the camera is used for long periods of time for
setting and playback, the shooting time (the number of sho ts) will decrease.
Quick Guide
Reference
• For how to insert the Rec h argeable Battery , s ee P.139.
• For how to use the AC Adapter, see P.140.
17

Caution
• Other batteries, suc h as manganese dry cell ( R6) and Ni-Cd, cannot be used.
• You may not use CR-V3.
• Please remove the batteries if you are not going to use the camera for a long period of
time.
• The life of an AA alkaline ba tter y (LR6 ) depen ds on th e bra nd and th e stor age tim e fro m the
date of production. In addition, the life of an alkaline battery becomes shorter at low
temperatures.
• The Nickel-Hydrogen Battery is not factory-charged. Charge it before use.
Immediately aft er the purch ase or af ter a lo ng sto rage, the ba tte ry may not be char ged ful ly.
Repeat chargi ng a nd di sc har gi ng b ef ore u se. Fo r de t ail s, se e th e doc ume nt at ion th at c ame
with the battery or ch ar g er.
• The battery may become very hot immediately after operation. Turn the camera off and
leave it to cool down sufficiently before removing the battery.
Note
Battery level indication
A battery mark appears at the lower left of the LCD monitor to indicate the battery level.
Prepare new batteries before the ba tteries wear out.
Battery Mark Description
Sufficient battery char ge
Low remaining charge: Prepare new batteries.
No remaining charge: Replace the batteries.
Caution
• If you are using nickel metal hydride batteri es , may not appear or or
may appear immediately depending on the battery type and environmental
conditions. Ch ec k the batteries at hand before use.
• If you are using the AC Adapter, may appear. This does not indicate malfunction
and you can contin ue to use the camera.
18
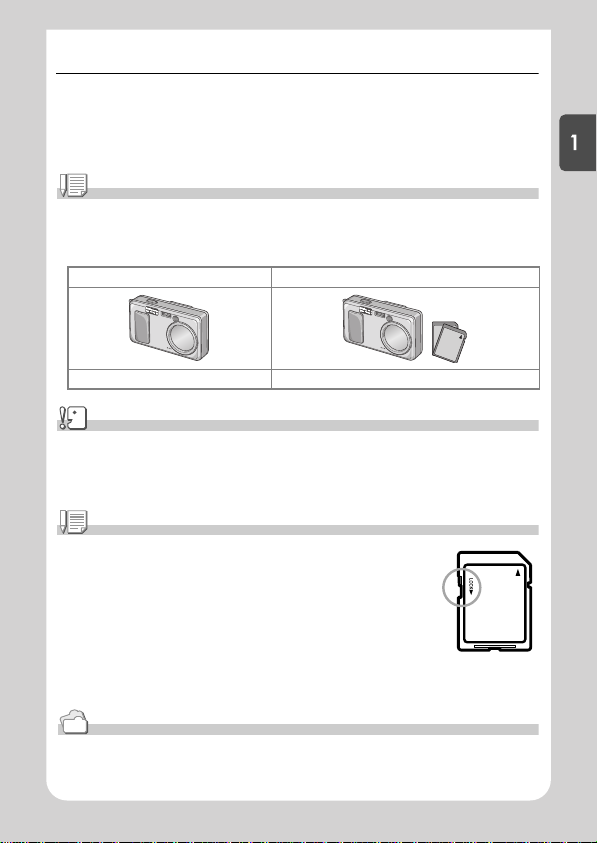
About an SD Memory Card (available in stores)
You can store still images you have taken either in the camera's internal memory or on
an SD Memory Card (available in stores). The internal memory capacity is 12 MB.
When you want to record a lot of images, or images at high resolutions, use a highcapacity SD Memory Card.
Note
Where images are recorded
When no SD memory card is inserted, the camera records images in the internal memory;
when an SD memory card is inserted, it records images on the memory card.
When no memory card is loaded When an SD Memory Card is loaded
Records to internal memory Records to the SD memory card
Caution
• If an SD memory card is loaded, the camera will not record to the internal memory, even if
the card is full.
• Take care not to get the metal parts of the card dirty.
Note
Write-protecting your images
If you move the card's write-protection swi tch to L OCK, your still im ages can not
be accidentally erased and the memory card cannot be formatted. If you
release the protection (by returning the switch to its original position), it is once
again possible to erase images and format the card.
So it's a good idea to switch to LOCK when you have some important data
recorded.
Note that you cannot shoot images in the LOCK state because no data can be recorded on the card.
Unlock the card when shooting.
Reference
• F or switching between the SD Memory Card and internal memo ry dur ing play back, see P.35.
• F or recording capacities, see P.144.
Quick Guide
19

Loading the Batteries and SD Memory Card
If you have already used this camera, make sure it is turned off
before loading batteries and memory card.
1. Open the battery/card cover.
2. Make sure the card is facing the
right way and then push the card
all the way in until it clicks.
You may load the batteries first.
3. Insert the two batteries, making
sure they are facing the correct
way.
4. Close the battery/card cover and
slide it back into place.
Reference
For how to format an SD memory card, see P.96.
20
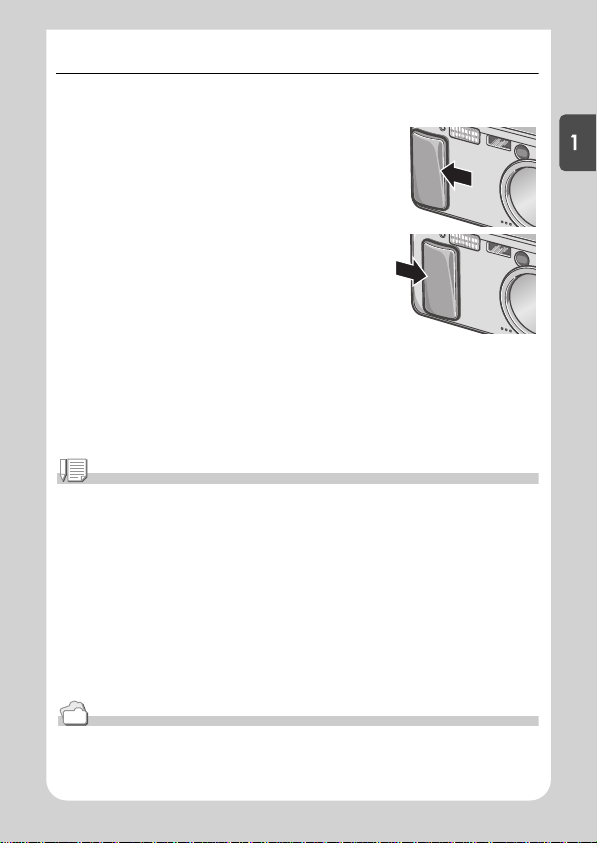
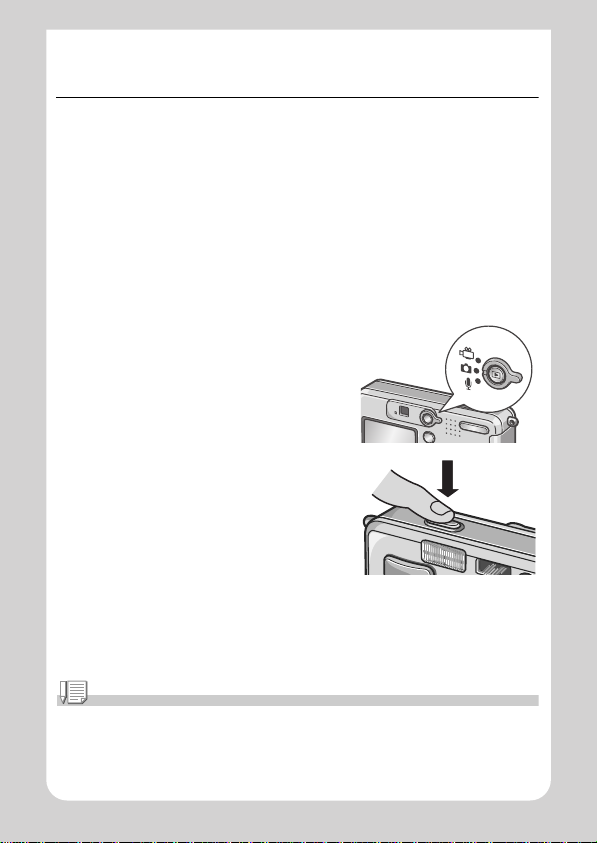
Turning the Power On/Off
To turn the power on:
1. Slide the power switch to open the
lens cover.
After the start sound, the auto-focus/flash
lamp blink for several seconds.
Using the Camera in Playback Mode
If the Playback button is pressed with the lens
cover closed, the power is turn on in Playback
Mode and the camera can be used in this
mode.
To turn the power off:
1. Slide the power switch to close the lens cover.
Note
If the LCD monitor does not come on
When the Power-Save mode is set to ON, the LCD monitor does not come on during the Still
Image/Movie mode. Display the SETUP menu to turn the Power-Save mode OFF.
Power-Save Mode
The power consumption of the LCD monitor can be reduced and the battery lif e extended by
setting the Powe r Saving mode to on.
Auto Power Off
If the camera goes unused for a set period of time, it will automatically turn itself off to save
power. To continue on using the camera, slide the power switch to c l ose the lens cover o nce
(power-off) and slide it again to open (power-on).
Reference
• For how to activate Power Save Mode, see P.104.
• For how to change the Auto Power Off setting, see P.102.
Quick Guide
21

Setting the language
When the power is turned on for the first time, the language setting
screen appears (for the LCD monitor display language). After setting
the language, go on to the date/time setting (for printing the date and
time on your photos).
You can shoot without these settings. However, be sure to set the
language, and the date/time later. Use the SETUP screen for these
settings.
Note
To display the SETUP screen, turn the mode dial to SETUP.
1. Turn the power on for the first time after purchase.
The language selection screen appears.
To skip language setting, press the MENU button.
When the MENU button is pressed, the language setting is cancelled and
the video signal format-setting screen appears.
2. Press the !"
3. Press the O
The display language is set, and the date/
time setting screen appears.
!"#$
#$ buttons to select a language.
!"!"
#$#$
O button.
OO
Reference
For how to set the display language and date/time on the SETUP screen, see " Changing the
Display Language (LAN GUAGE)" a nd "S ett ing t he D ate a nd Ti me (DATE SETTINGS)" in this
guide.
22
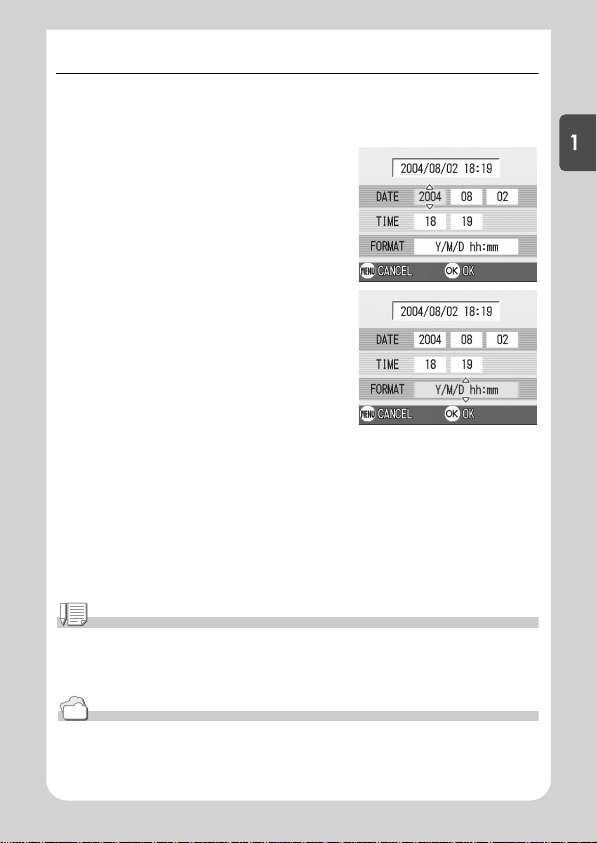
Setting the date and time
When the power is turned on for the first time and the language
setting is completed, the date/time setting screen appears.
1. Press the !"
!"#$
#$ buttons to set
!"!"
#$#$
the year, month, date and time.
Change the value with !" and move
the frame with #$.
2. In [FORMAT], choose the Date and
Time format.
Select the format with !".
3. Check the display on the bottom of
the screen and then press the OOOO
button.
The date is set.
Note
If the batteries are removed for more than one week, the date and time settings will be lost.
These settings mu st be made again. Any other c hanges you made with the Setup mode and
Shooting setup menu will also be reset.
Reference
• For how to correct the date and time, see P.106.
• For how to put a date stamp on each frame, see P.72.
Quick Guide
23
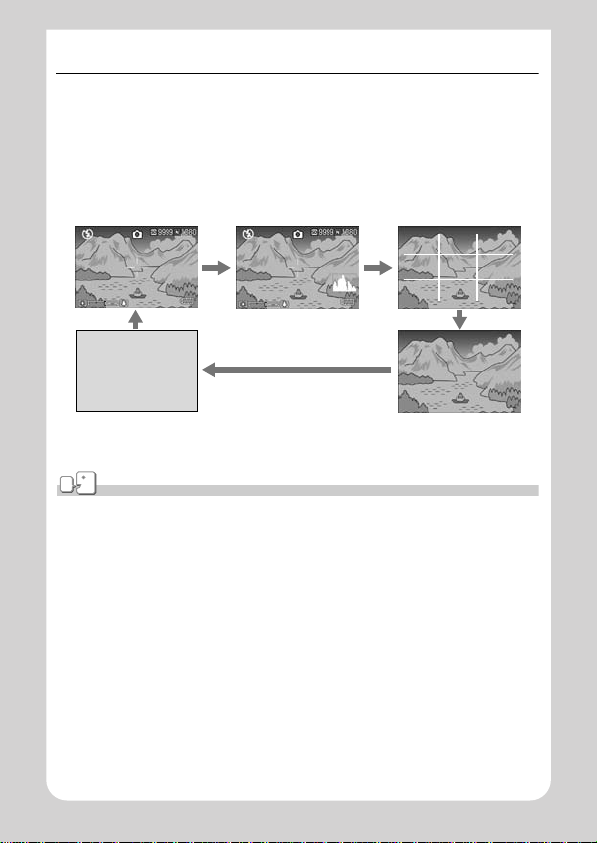
Changing the Display
If you press DISP., you can change the screen display mode, such
as switching between display/no display of symbols, etc.
Every time you press the DISP. button, the view cycles in the order
of Histogram On, Grid Guide, No Display, LCD Monitor Off, and
Normal Symbol Display.
Normal Symbol Display
Histogram On
Switches screens with the
DISP button
Grid Guide
LCD Monitor Off
(Synchro-Monitor Mode)
No Display
Ter m
Histogram On
The LCD monitor displays a histogram at the lower right of the screen. A histogram is a kind
of graph indicating image brightness. By using a histogram, you can prevent voids and solids.
*The histogram displayed on the LCD monitor is for ref erence only. Depending on the s hoot i ng condition
(flashing is required, the surrounding light is dark, and so on), the exposure level indicated i n the histogram
may not correspond to the brightne ss of the shot image.
Grid Guide
Displays auxiliary lines on the LCD monitor to help shoo ting. These lines ar e not recorded
with images.
Synchro-Monitor Mode
Keeps the LCD monitor off except when the camera is operated. This mode is effective for
saving power cons um pti on . Wit h this mode, ha lf -p ress ing th e shu t ter rel ea se bu t ton t urn s th e
LCD monitor on. Subsequently, full-pressing the shutter relea se button displays t h e shot
image on the LCD moni to r, and then turn s the LCD mo n ito r off.
24

Basic Shooting
Now you are ready. Let's shoot!
How to Hold the Camera
If the camera moves when you press the shutter button, the still
image might not come out clearly (due to camera shake). The
mark displayed on the LCD monitor indicates that camera shake
should be avoided under the current shooting condition.
Hold the camera as illustrated below for best results.
1. Hold the camera with both hands and lightly
press both elbows against your body.
2. Put your finger on the shutter button.
Note
• Be careful when you are shooting not to get a finger, your hair , or the strap in front of the
lens or the flash.
• To prevent camera shake, hold the camera securely with both hands when y ou shoot or
use a tripod.
• Consider using a tripod to prevent camera shake in the following situations:
- When shooting in a dark place without using the flash or in Slow Sync Mode (P.33)
- When shooting with the zoom
Quick Guide
25
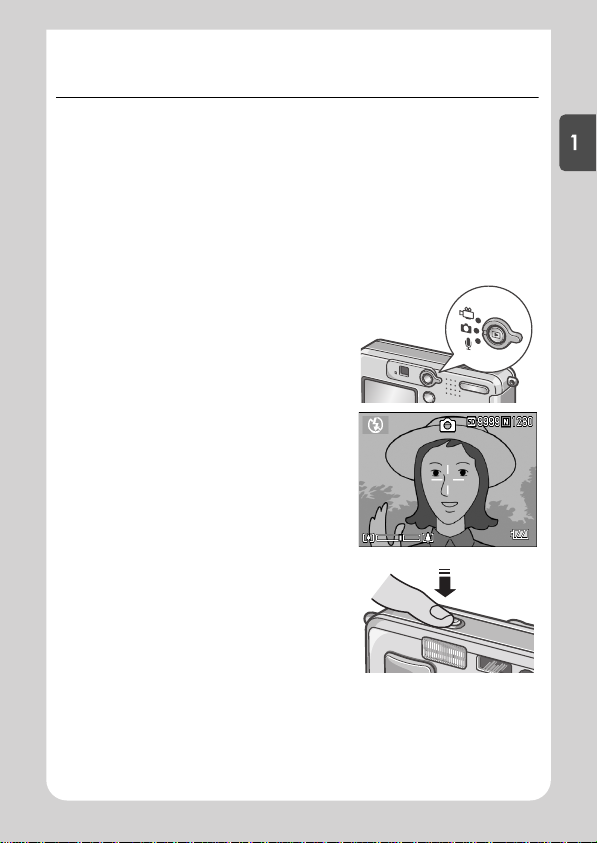
5555 Capturing the Moment Shooting
(Full-press)
The shutter release button works in two steps.
There are two methods of using the shutter button; pressing the
shutter button all the way down at once (full-press) and pressing it
halfway (half-press).
Full-press the shutter release button for quick focusing not to miss a
shooting opportunity.
1. To turn the power on, slide the power switch to open the
lens cover.
For how to turn the power on, see P.21.
2. Turn the Mode Selector to 5
5.
55
3. Compose your shot either by
looking through the Viewfinder or
at the LCD Monitor.
4. Put the subject of your photo right
in the middle and press the
shutter release button fully.
Note
• The sti ll image you have taken freez e s fo r a mom en t on th e LCD Mo ni to r an d is re c orded.
(P.101)
• Full-press is apt to c a use cam era s hake. Hold the camer a f irm l y wi th bo t h ha nd s an d sh oo t.
26
5555 Checking the Focus and Shooting
(Half-press)
When you press the shutter release button halfway (half-press), the
autofocus function is triggered to determine the focal distance.
Subsequently press it all the way down (full-press) to shoot.
This is useful when the subject is not in the middle (see P.29).
1. To turn the power on, slide the power switch to open the
lens cover.
For how to turn the power on, see P.21.
2. Turn the Mode Selector to 5
5.
55
3. Compose your shot either by
looking through the Viewfinder or
at the LCD Monitor.
4. Since the focus is adjusted at the
center of the screen, position the
subject at the center of the screen
and half-press the shutter.
Once focused, the exposure and white
balance are fixed.
If the automatic focusing fails, the
crosshairs in the center of the LCD
monitor turn red and the auto-focus
lamp in the upper left of the viewfinder
blinks in green.
Quick Guide
27
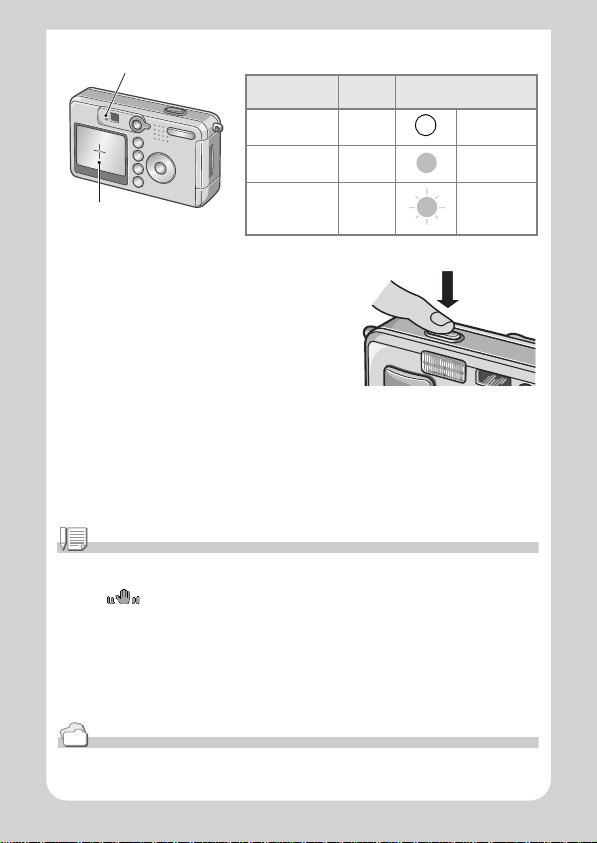
Auto Focus/Flash Lamp
Before focusing White Off
Focused Green On (green)
Focusing failure Blink (red) Blink (green)
Crosshair
Color of
crosshairs
Auto Focus/Flash Lamp
5. Gently press the shutter button all
the way.
The still image you have taken freezes
for a moment on the LCD Monitor and is
recorded.
Note
• Press gently to preve nt camera shake when you press the shutter release button.
• The mark indicates that blurring may occur. Hold the camera still and focus the
camera again.
• When shooting in a dark place, the camera raises the focusing performance (auto focus
precision) by preliminary flashing immediately before shooting. This pre liminary flashing is
skipped for shooting in no-flash mode.
• When the [LCD CONFIRM] is set to OFF in the setup screen, the still image shot will not be
displayed on the LCD monitor.
Reference
For how to change the image confirmation time, see P.101.
28
 Loading...