

Page 1
For safe and correct use, be sure to read the Safety Information in
"Read This First" before using the machine.
For information not in this manual, refer to
the HTML/PDF files on the supplied
CD-ROM.
Information for This Machine
Troubleshooting
Adding Paper and Toner
Web Image Monitor
Getting Started
What You Can Do with This Machine
User Guide
Page 2

Page 3

TABLE OF CONTENTS
How to Read the Manuals................................................................................................................................. 4
Symbols Used in the Manuals.......................................................................................................................4
Model-Specific Information............................................................................................................................... 5
Names of Major Features..................................................................................................................................6
1. What You Can Do with This Machine
Searching by What You Want to Do................................................................................................................7
Reducing My Costs........................................................................................................................................ 7
Operating the Machine More Effectively.....................................................................................................8
What You Can Do with This Machine...............................................................................................................9
Customizing the [Home] Screen....................................................................................................................9
Preventing Information Leakage (Security Functions)..................................................................................9
Monitoring and Setting the Machine Using a Computer......................................................................... 10
2. Getting Started
Guide to Names and Functions of Components............................................................................................11
Guide to Functions of the Attention Light....................................................................................................13
Guide to Functions of the Machine's Options................................................................................................15
Guide to Functions of the Machine's External Options.............................................................................15
Guide to the Names and Functions of the Machine's Control Panel........................................................... 17
Changing the Display Language.................................................................................................................... 20
How to Use the [Top] Screen and the [Home] Screen..................................................................................21
Adding Icons to the [Home] Screen........................................................................................................... 23
Turning On/Off the Power..............................................................................................................................27
Turning On the Main Power........................................................................................................................27
Turning Off the Main Power........................................................................................................................28
Logging In the Machine...................................................................................................................................29
When the Authentication Screen Is Displayed.......................................................................................... 29
User Code Authentication Using the Control Panel.................................................................................. 29
Logging In Using the Control Panel............................................................................................................29
Logging Out Using the Control Panel.........................................................................................................30
3. Web Image Monitor
Displaying Top Page........................................................................................................................................31
4. Adding Paper and Toner
Loading Paper.................................................................................................................................................. 33
1
Page 4

Precautions for Loading Paper....................................................................................................................33
Loading Paper into Trays 1, 2, and the Wide Large Capacity Tray....................................................... 35
Loading Paper into the Multi Bypass Tray (Tray A)...................................................................................36
Loading Paper into the Interposer.............................................................................................................. 39
Loading Cover Sheets into the Interposer of the Perfect Binder............................................................... 40
Loading Orientation-fixed Paper or Two-sided Paper..............................................................................42
Recommended Paper.......................................................................................................................................44
Recommended Paper Sizes and Types......................................................................................................44
Registering a Custom Paper............................................................................................................................ 57
Selecting the Paper's Name from the Paper Library................................................................................. 57
Registering a Paper Whose Paper Name Is Not Displayed in the Paper Library.................................. 58
Registering a New Custom Paper by Modifying an Existing Paper........................................................ 61
Adding Toner....................................................................................................................................................64
Disposing of Used Toner............................................................................................................................. 66
Menu Items and Functions...............................................................................................................................67
5. Troubleshooting
When a Status Icon Is Displayed....................................................................................................................71
When the Indicator Lamp for the [Check Status] Key Is Lit or Flashing........................................................72
When the Machine Makes a Beeping Sound............................................................................................... 74
When You Have Problems Operating the Machine..................................................................................... 75
When Other Messages Appear..................................................................................................................... 82
When the Home Screen Cannot Be Edited............................................................................................... 83
When Problems Occur While Logging In..................................................................................................83
When the User Lacks Privileges to Perform an Operation........................................................................83
6. Information for This Machine
Information on Environmental Regulations.....................................................................................................85
ENERGY STAR Program..............................................................................................................................85
Energy Saving Functions............................................................................................................................. 85
User Information on Electrical and Electronic Equipment (mainly Europe).........................87
Note for the Battery and/or Accumulator Symbol (For EU countries Only) (mainly
Europe)......................................................................................................................................................... 88
Environmental Advice for Users (mainly Europe)..................................................................89
2
Page 5

Notes to Users in the State of California (Notes to Users in USA) (mainly North America)...
.......................................................................................................................................................................90
INDEX............................................................................................................................................................. 91
3
Page 6
How to Read the Manuals
Symbols Used in the Manuals
This manual uses the following symbols:
Indicates points to pay attention to when using the machine, and explanations of likely causes of paper
misfeeds, damage to originals, or loss of data. Be sure to read these explanations.
Indicates supplementary explanations of the machine's functions, and instructions on resolving user
errors.
This symbol is located at the end of sections. It indicates where you can find further relevant information.
[ ]
Indicates the names of keys on the machine's display or control panels.
(mainly Europe and Asia), (mainly Europe), or (mainly Asia)
(mainly North America)
Differences in the functions of Region A and Region B models are indicated by two symbols. Read the
information indicated by the symbol that corresponds to the region of the model you are using. For
details about which symbol corresponds to the model you are using, see page 5 "Model-Specific
Information".
4
Page 7
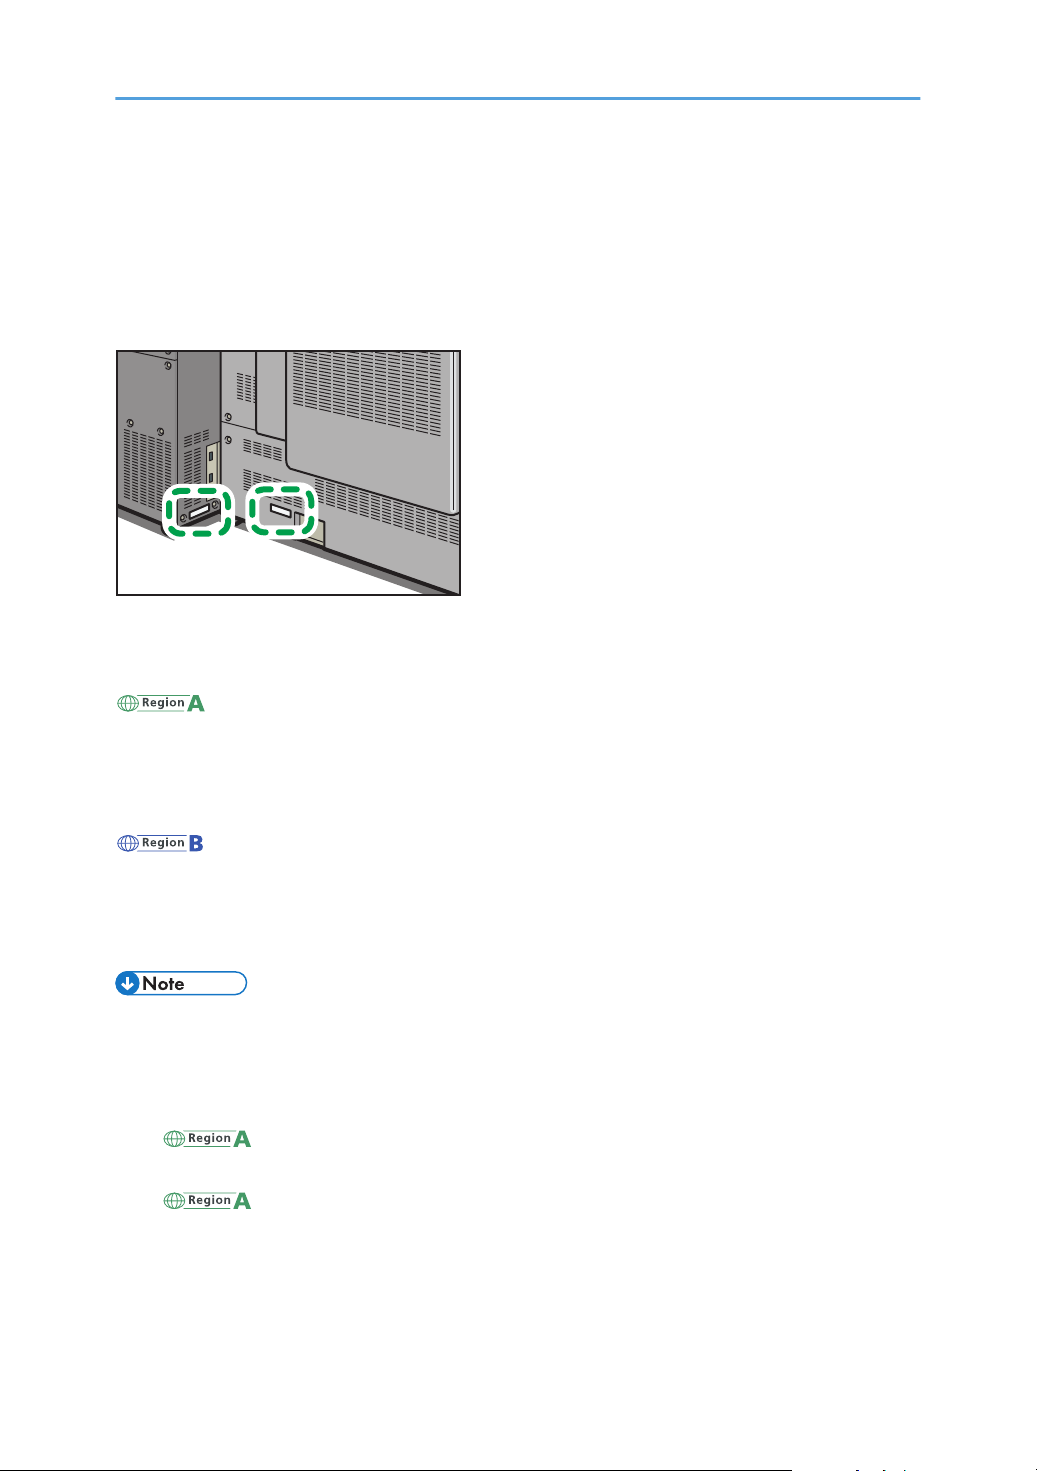
Model-Specific Information
DET001
This section explains how you can identify the region your machine belongs to.
There is a label on the rear of the machine, located in the position shown below. The label contains
details that identify the region your machine belongs to. Read the label.
The following information is region-specific. Read the information under the symbol that corresponds to
the region of your machine.
(mainly Europe and Asia)
If the label contains the following, your machine is a Region A model:
• CODE XXXX -27, -29
• 220–240 V
(mainly North America)
If the label contains the following, your machine is a Region B model:
• CODE XXXX -17
• 208–240 V
• Dimensions in this manual are given in two units of measure: metric and inch. If your machine is a
Region A model, refer to the metric units. If your machine is a Region B model, refer to the inch
units.
• If your machine is a Region A model and "CODE XXXX -27" is printed on the label, see
" (mainly Europe)" also.
• If your machine is a Region A model and "CODE XXXX -29" is printed on the label, see
" (mainly Asia)" also.
5
Page 8

Names of Major Features
In this manual, major features of the machine are referred to as follows:
• Multi Bypass Tray BY5010 Multi bypass tray (Tray A)
• Vacuum Feed LCIT RT5100 Wide Large Capacity Tray (Wide LCT)
• Multi-Folding Unit FD5020 Multi-folding unit
• Ring Binder RB5020 Ring binder
• High Capacity Stacker SK5030 High capacity stacker
• Trimmer Unit TR5040 Trimmer unit
• Cover Interposer Tray CI5030 Interposer
• Perfect Binder GB5010 Perfect binder
6
Page 9
1. What You Can Do with This Machine
BRL059S
You can search for a description by what you want to do.
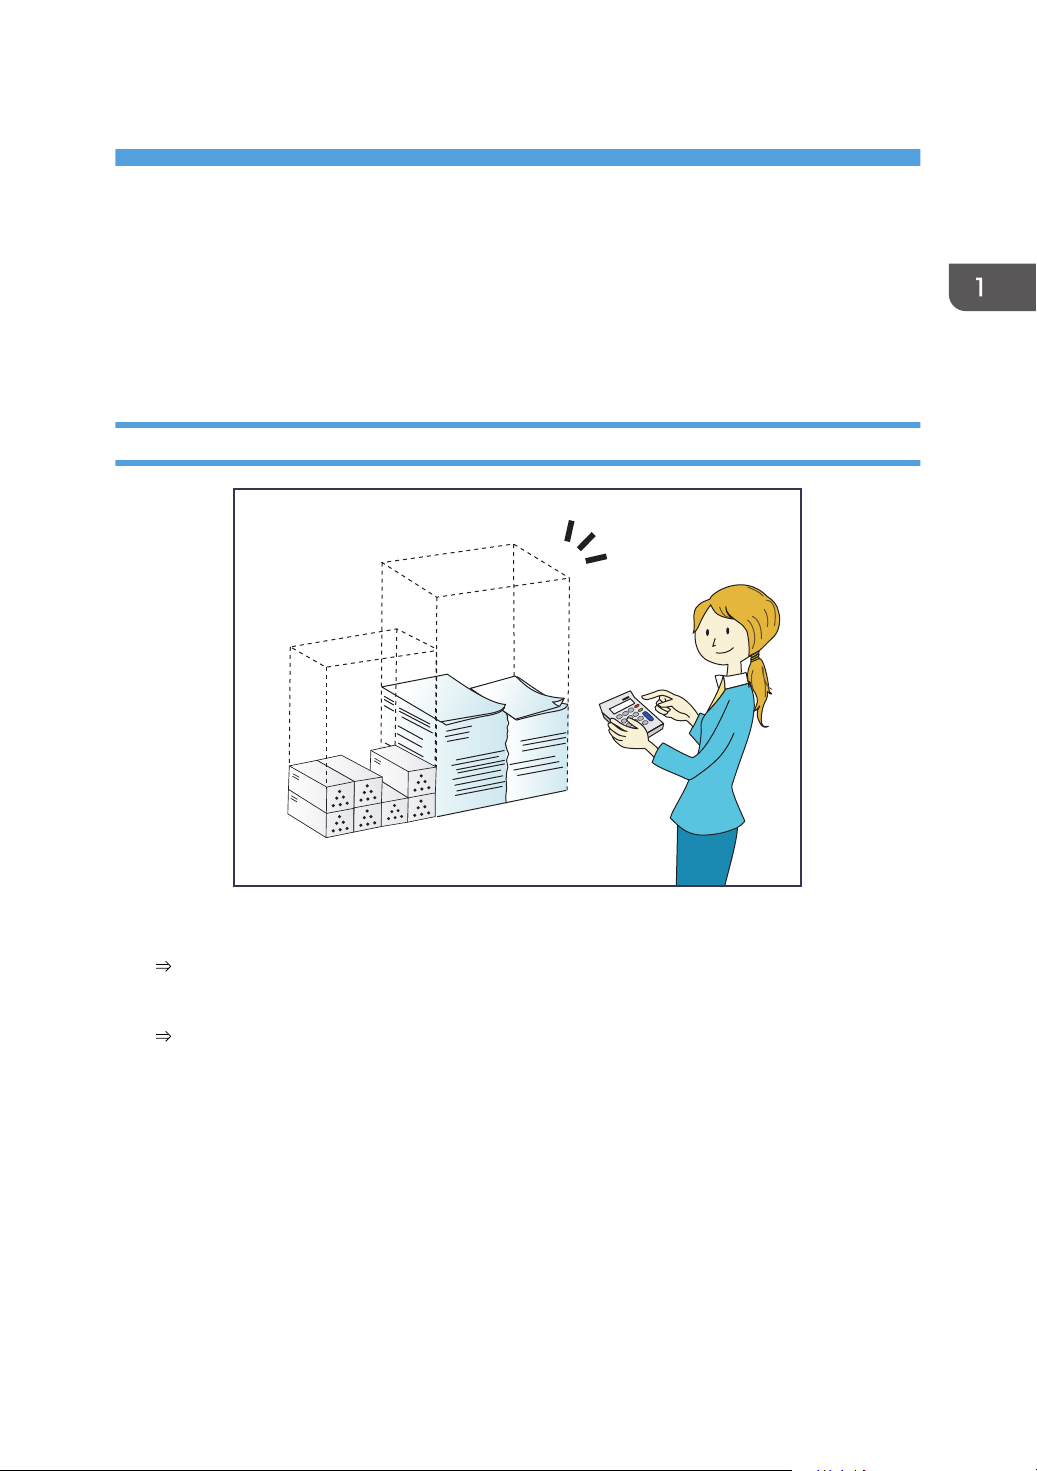
Searching by What You Want to Do
You can search for a procedure by what you want to do.
Reducing My Costs
Checking how much paper is saved ([Information] screen)
See "How to Use the [Information] Screen", Getting Started.
Reducing electricity consumption
See "Saving Energy", Getting Started.
7
Page 10
BQX139S
1. What You Can Do with This Machine
Operating the Machine More Effectively
Adding the function and shortcut icons
See "Adding Icons to the [Home] Screen", Convenient Functions.
Changing the order of the function and shortcut icons
See "Changing the Order of Icons on the [Home] Screen", Convenient Functions.
8
Page 11
CWW108
What You Can Do with This Machine
What You Can Do with This Machine
This section describes the features of this machine.
Customizing the [Home] Screen
The icons of each function are displayed on the [Home] screen.
• You can add shortcuts to often used Web pages to the [Home] screen. The Web pages can be
recalled easily by pressing the shortcut icons.
• You can display only the icons of functions and shortcuts that you use.
• You can change the order of the function and shortcut icons.
• For details about the features on the [Home] screen, see "How to Use the [Top] Screen and the
[Home] Screen", Getting Started.
• For details about how to customize the [Home] screen, see "Types of [Home] Screens and How to
Customize Them", Convenient Functions.
Preventing Information Leakage (Security Functions)
• You can protect documents from unauthorized access and stop them from being copied without
permission.
• You can control the use of the machine, as well as prevent machine settings from being changed
without authorization.
• By setting passwords, you can prevent unauthorized access via the network.
• You can erase or encrypt the data on the hard disk to minimize the risk of information leakage.
• You can limit the usage of functions for each user.
9
Page 12
CWW110
1. What You Can Do with This Machine
• See Security Guide.
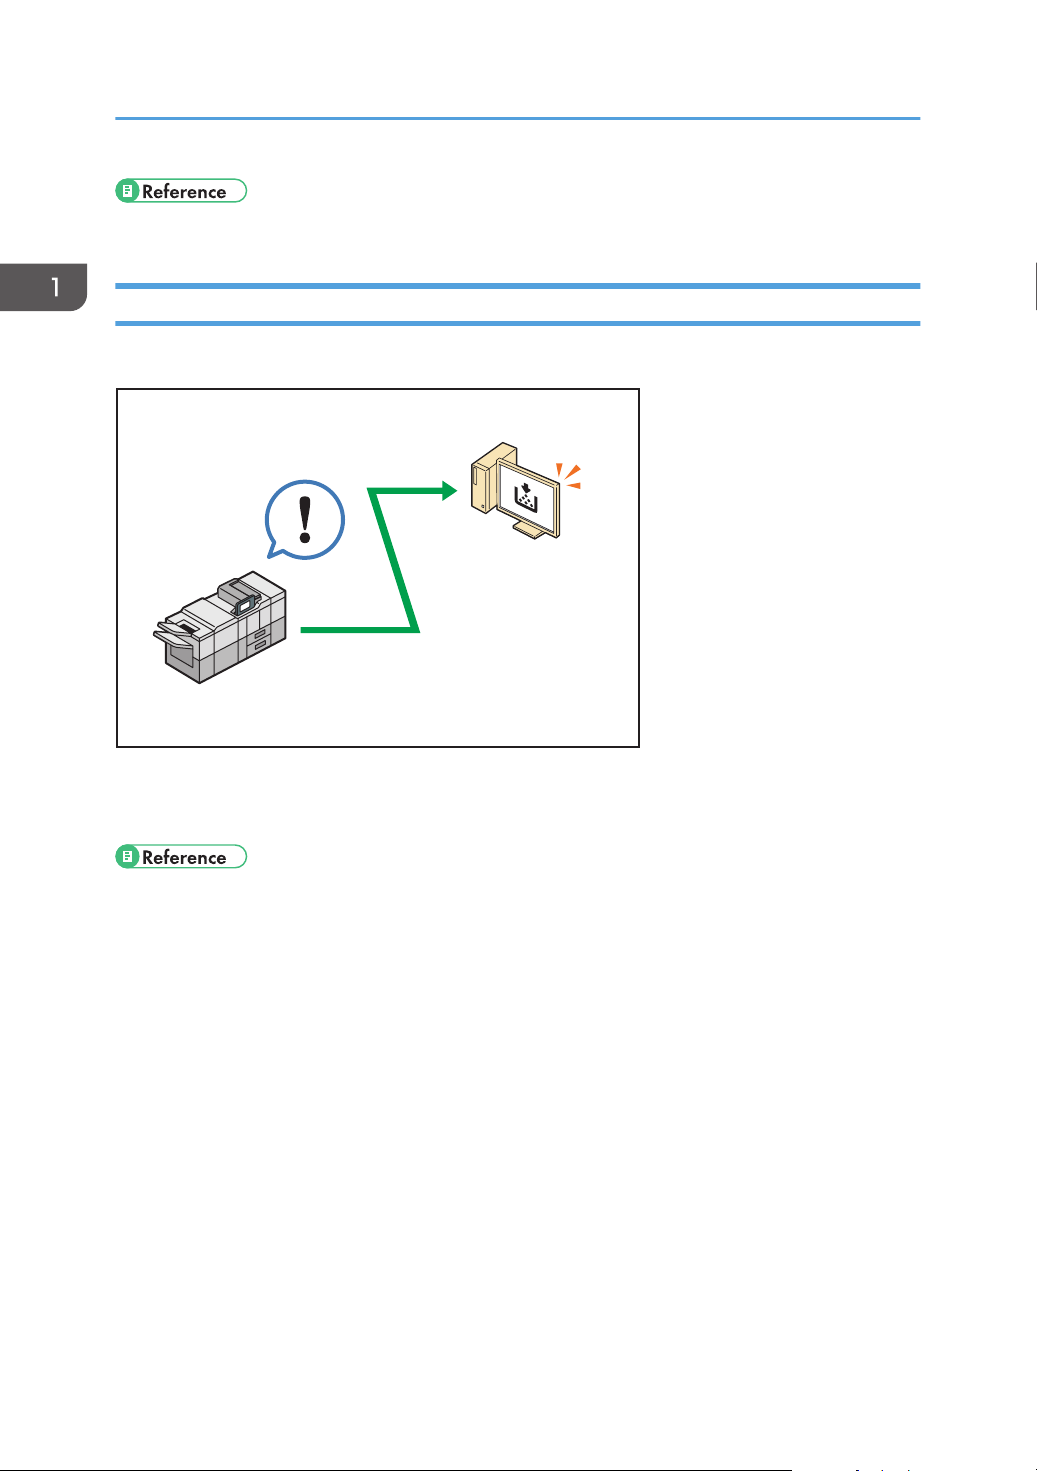
Monitoring and Setting the Machine Using a Computer
Using Web Image Monitor, you can check the machine's status and change the settings.
You can check which tray is running out of paper, register information in the Address Book, specify the
network settings, configure and change the system settings, and configure the authentication settings.
• See "Using Web Image Monitor", Connecting the Machine/ System Settings.
• See Web Image Monitor Help.
10
Page 13
2. Getting Started
DET029
5
4
6
7
7
8
3
1
2
This chapter describes how to start using this machine.
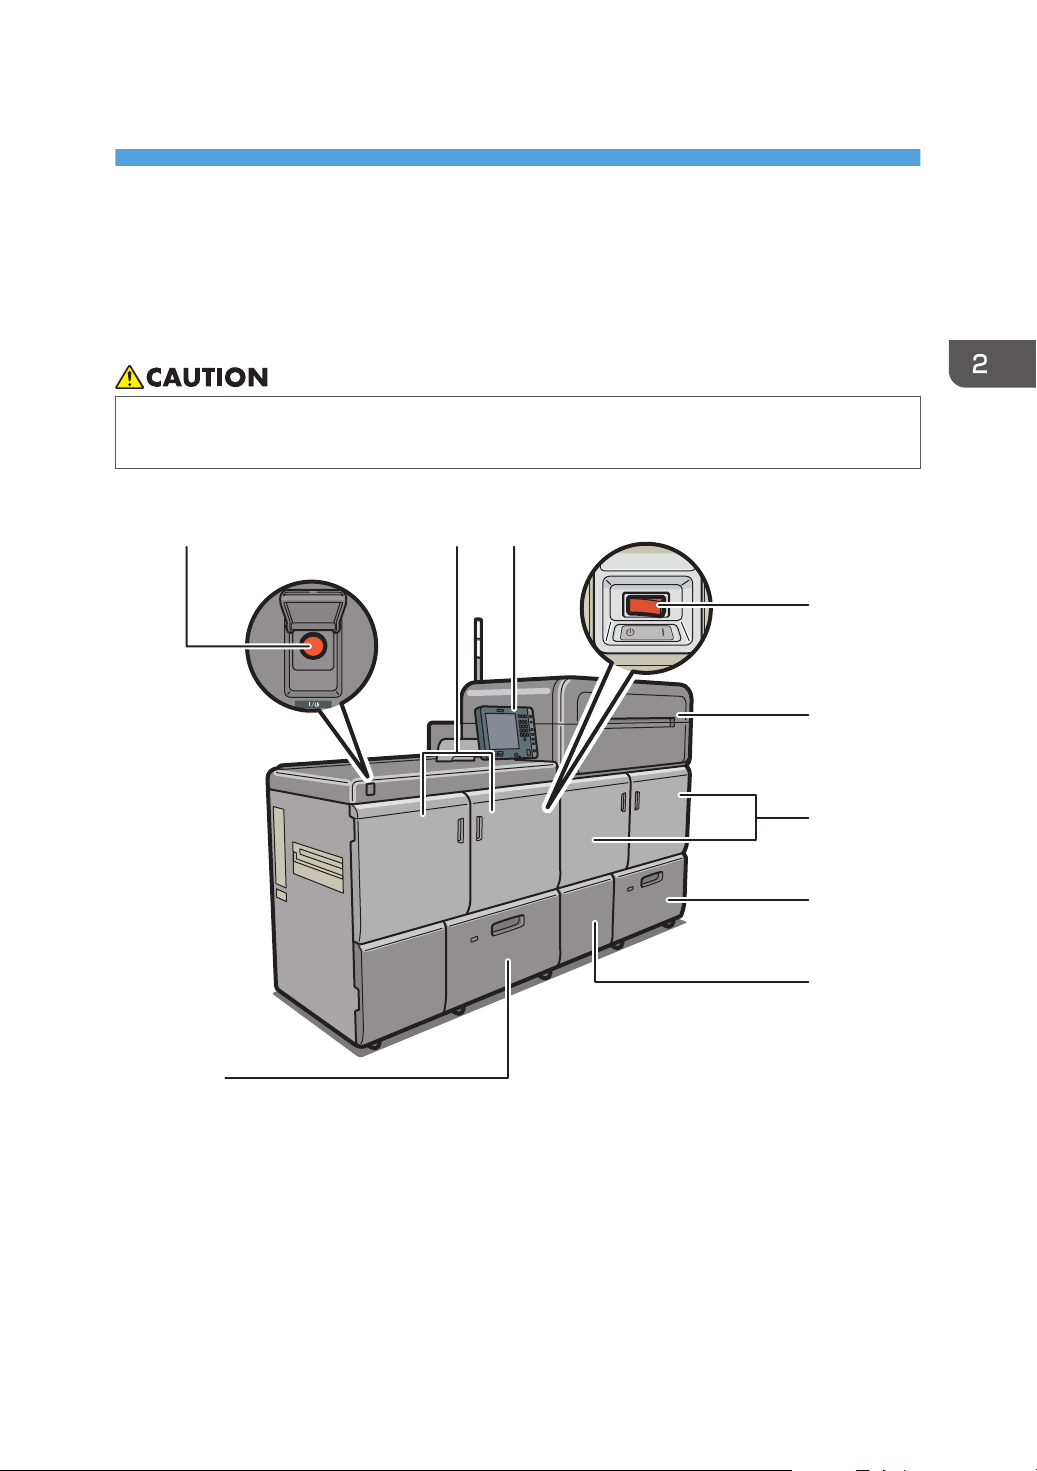
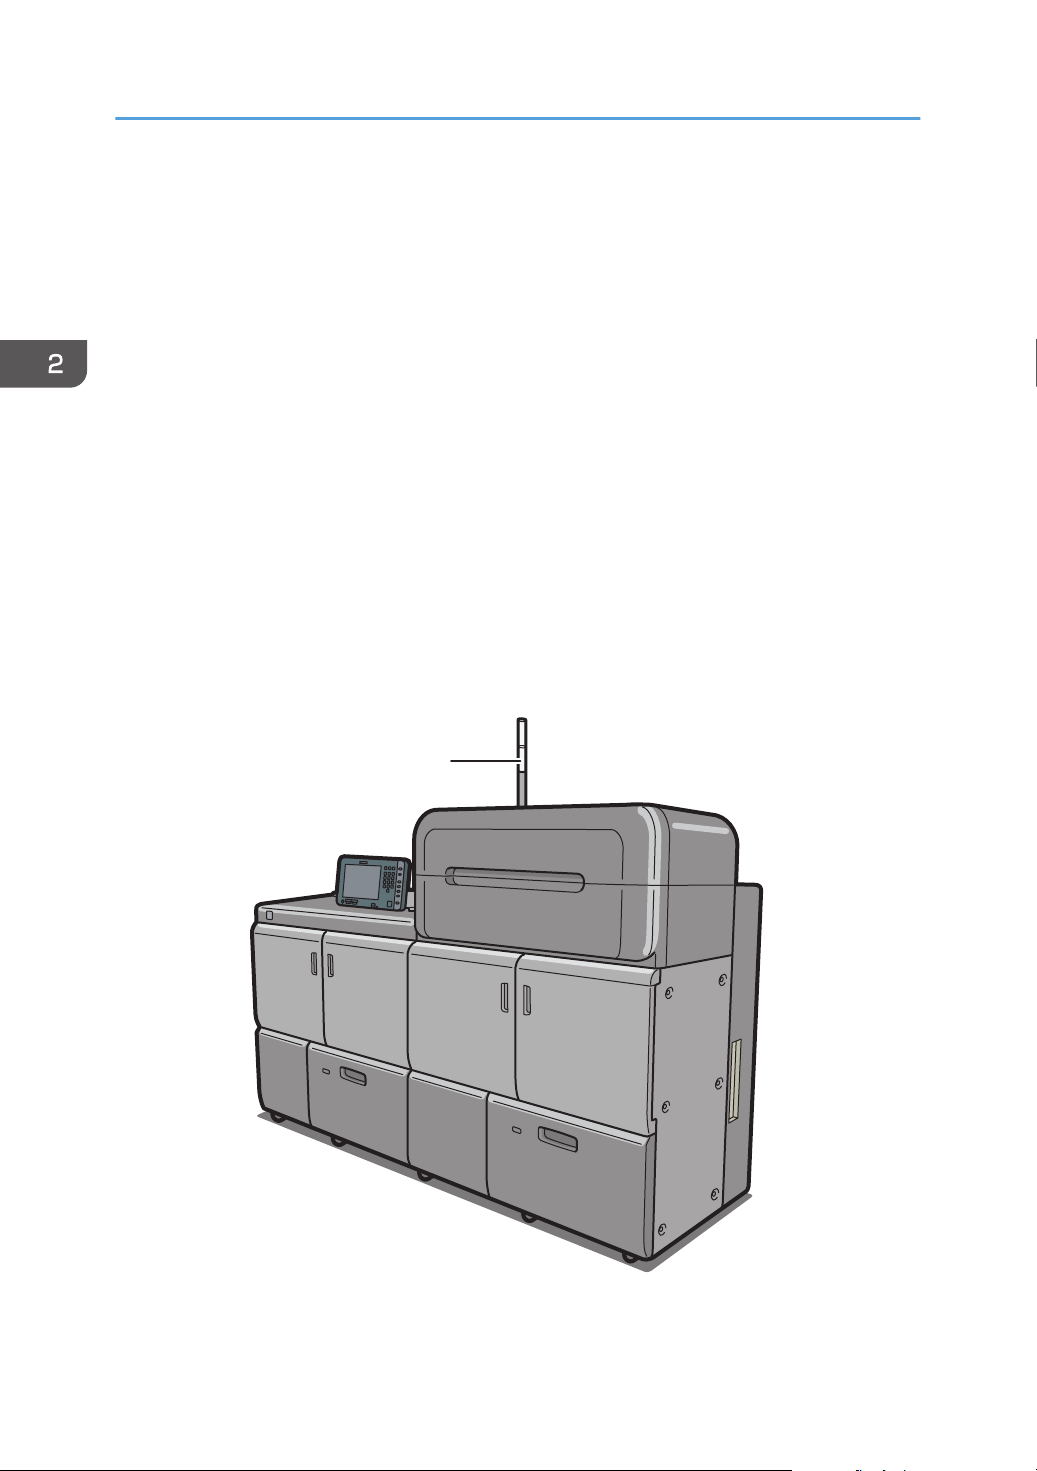
Guide to Names and Functions of Components
• Do not obstruct the machine's vents. Doing so risks fire caused by overheated internal
components.
Front and left view
1. Main power switch
To operate the machine, the main power switch must be on. If it is off, open the main power switch's cover and
turn the switch on.
2. Left mainframe front cover
Open to remove paper jams or turn on/off the AC power switch.
11
Page 14
1
DET003
2. Getting Started
3. Control panel
See page 17 "Guide to the Names and Functions of the Machine's Control Panel".
4. AC power switch
Press to completely turn off the power of the machine. The AC power switch must be kept on in normal use.
The switch is inside the left mainframe front cover. For details, see "Dos and Don'ts", Maintenance and
Specifications.
5. Toner cartridge compartment
Install toner cartridges here.
Open the cover to replace toner cartridges.
6. Right mainframe front cover
Open to remove paper jams.
7. Paper trays (Trays 1–2)
Load paper here.
8. Waste toner cartridge cover
Open to replace the waste toner bottle.
Front and right view
12
Page 15
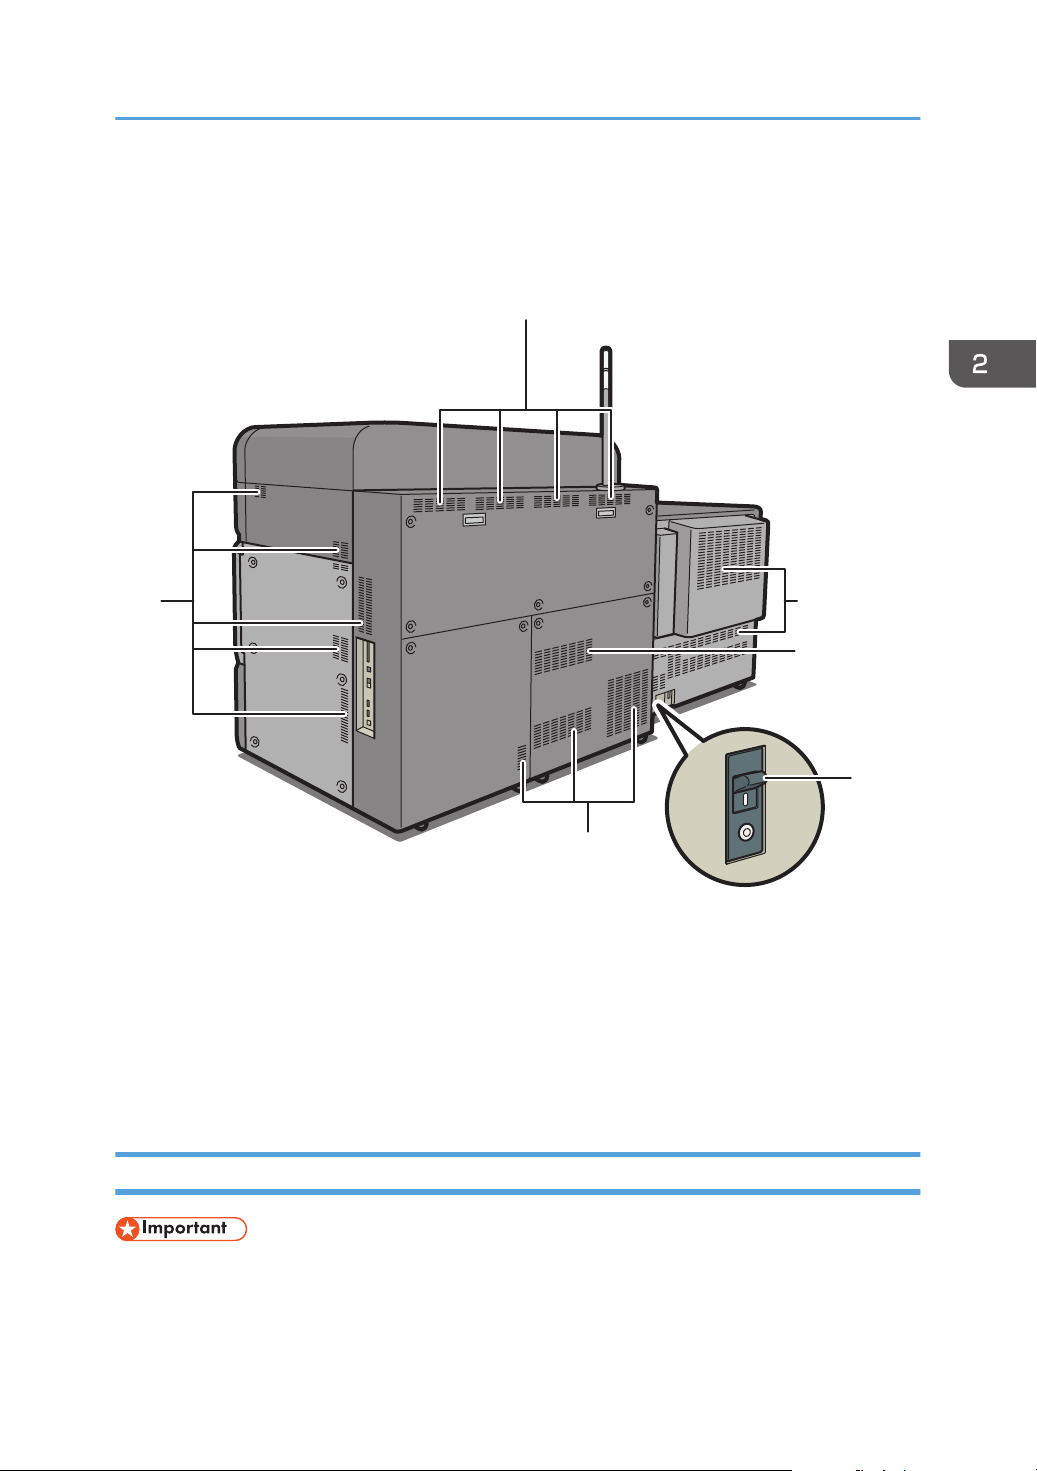
1. Attention light
1
1
1
DET004
2
1
1
See page 13 "Guide to Functions of the Attention Light".
Rear and right view
Guide to Names and Functions of Components
1. Vents
Prevent overheating.
2. Earth leakage breaker
Protects users from electric shock. For details about checking the earth leakage breaker, see "Checking the
Earth Leakage Breakers", Maintenance and Specifications.
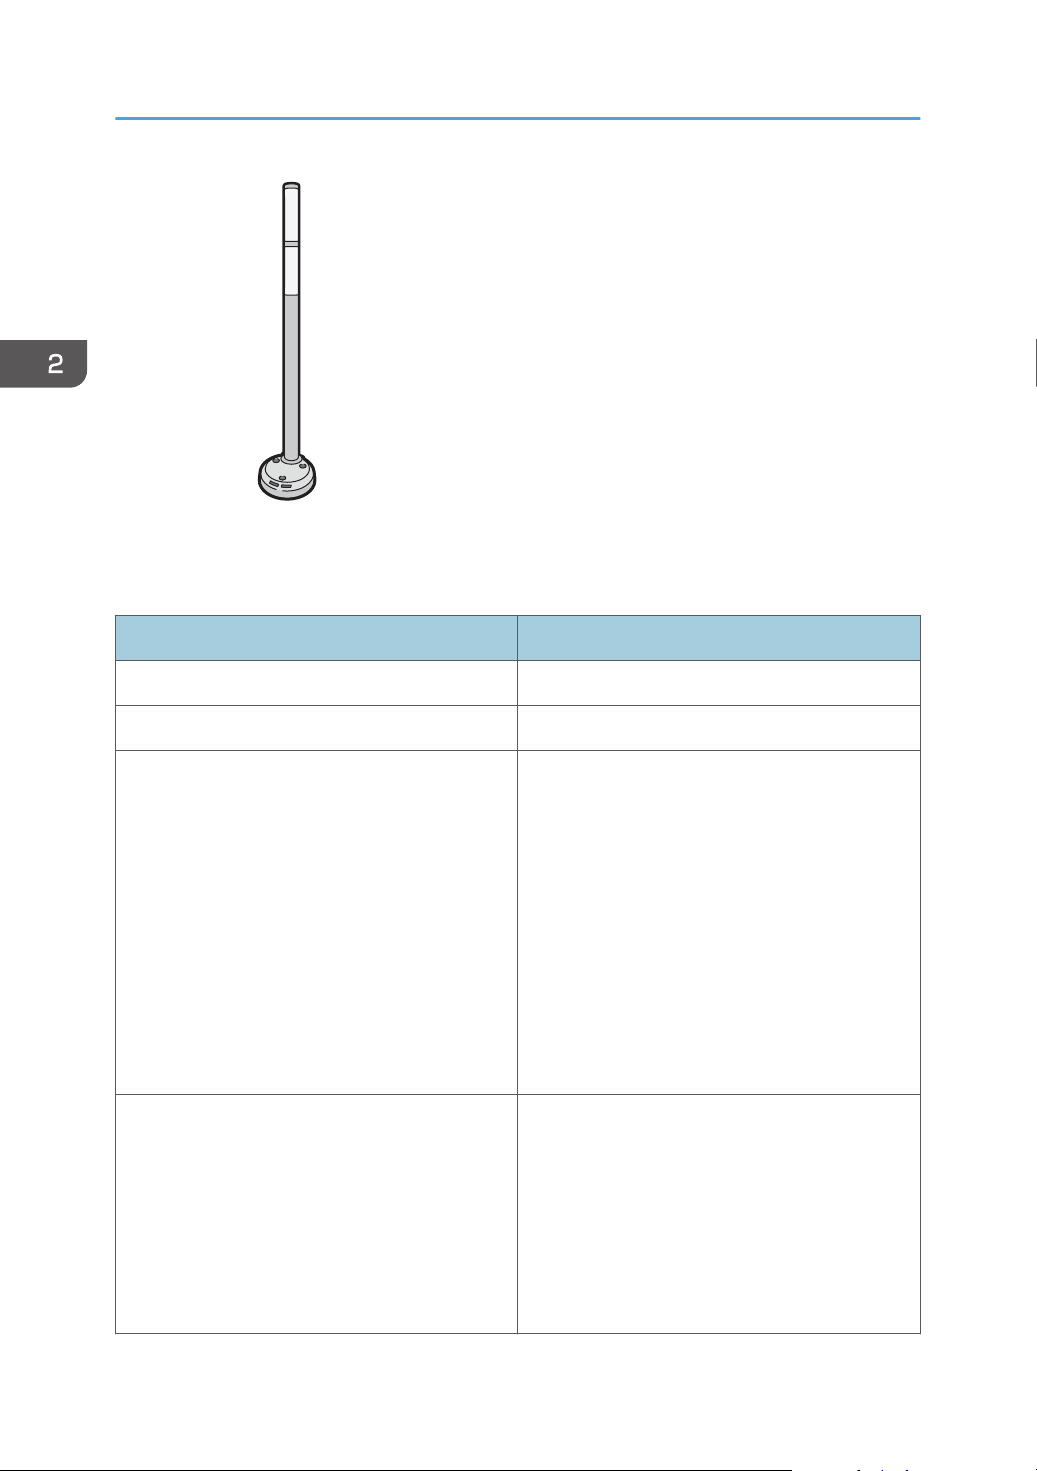
Guide to Functions of the Attention Light
• Do not push or pull the attention light when installed to the machine. Doing so may result in
damage or malfunction of the attention light or the machine.
13
Page 16
CUV121
2. Getting Started
The attention light notifies the user by light when there is a paper jam or no paper is left.
The colors of the lamp and their meanings are as follows:
Lamp Status
The bottom lamp lights blue. Printing
The bottom lamp flashes blue. Data in
The top lamp lights red. Error occurred
(Example)
• When the service call message appears
• Paper jam
• Out of paper
• Out of toner
• Memory overflow
Read the message on the display panel, and then
take appropriate action. For details, see "When
Messages Appear", Troubleshooting.
The top lamp flashes yellow. Warning
(Example)
• Toner has nearly run out.
• Waste toner bottle is nearly full.
Read the message on the display panel, and then
take appropriate action. For details, see "When
Messages Appear", Troubleshooting.
14
Page 17
14356
2
1110
7
9
8
1212 13
14
DET005
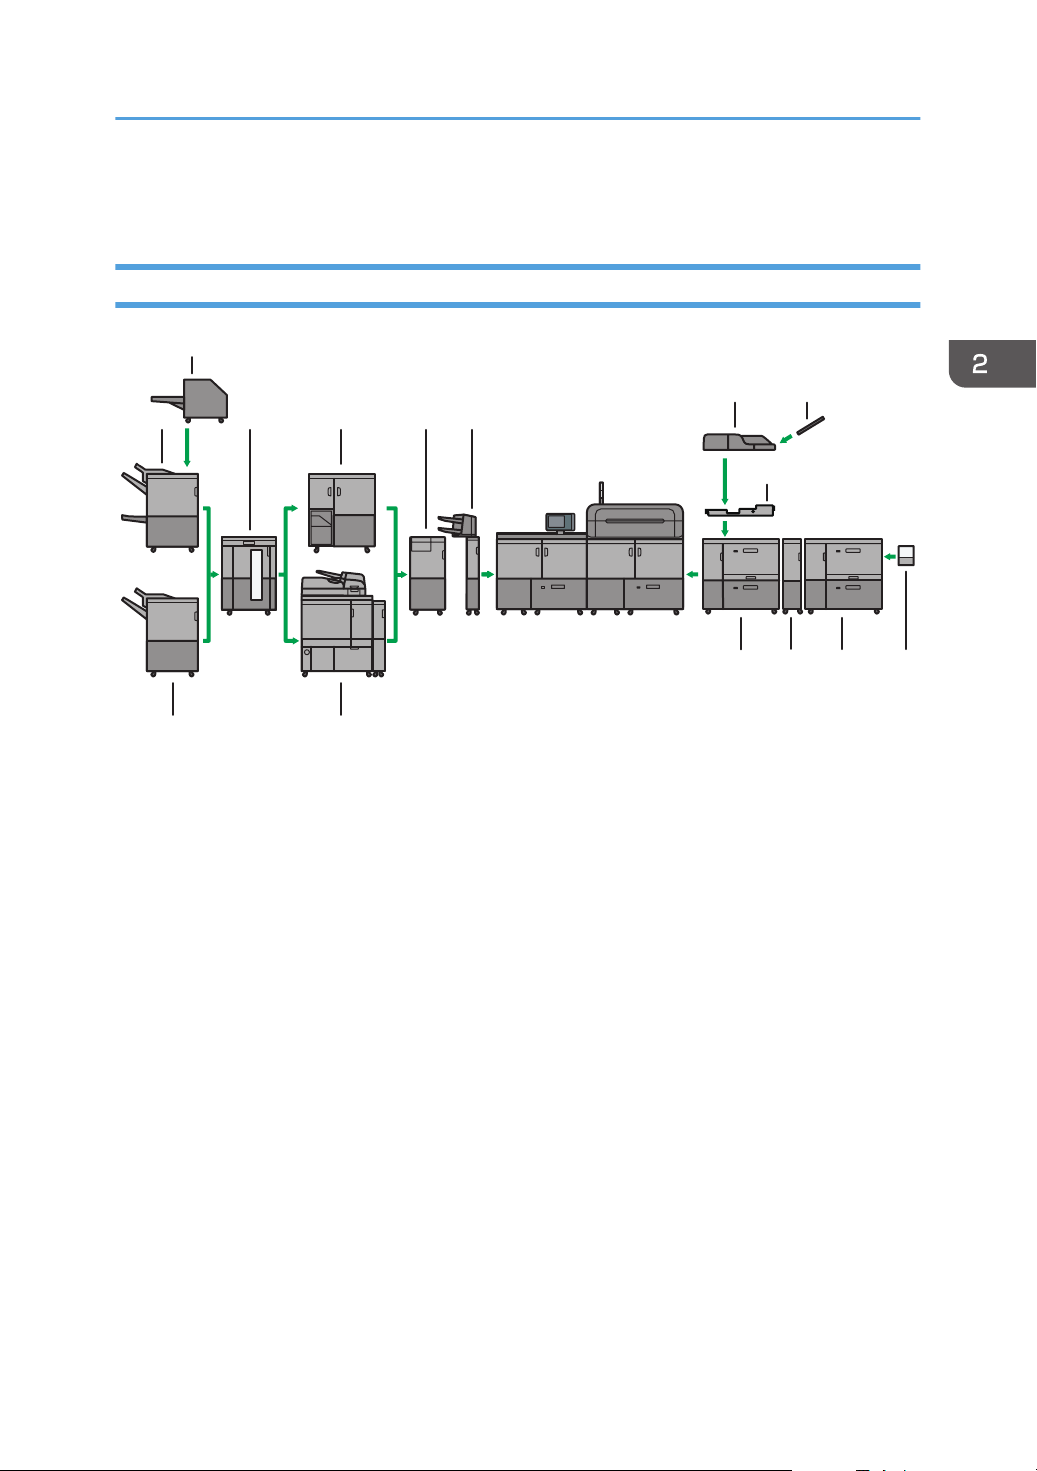
Guide to Functions of the Machine's Options
Guide to Functions of the Machine's Options
Guide to Functions of the Machine's External Options
1. Booklet Finisher SR5060
Sorts, stacks, and staples multiple sheets of paper. The saddle stitch function can staple multiple sheets of
paper in the center and fold them into booklets. Consists of the following paper trays:
• Finisher upper tray
• Finisher shift tray
• Finisher booklet tray
Prints can be punched if the optional punch unit is installed on the finisher.
2. Trimmer
Cuts the fore edge of the book block after the book block is saddle stitched.
3. High capacity stacker
Consists of the following paper trays:
• Stacker upper tray
• Stacker tray
The stacker upper tray can hold up to 250 sheets of paper, and stacker tray can hold up to 5,000 sheets of
paper. You can connect up to two high capacity stackers.
4. Ring binder
Binds sheets of paper with a ring comb.
15
Page 18

2. Getting Started
5. Multi-folding unit
Applies the following folds: Half Fold, Letter Fold-out, Letter Fold-in, Double Parallel Fold, Gate Fold, and Zfold.
6. Interposer
Inserts cover or slip sheets into printed paper.
7. Multi bypass tray (Tray A)
Holds up to 500 sheets of paper.
8. Multi bypass attachment kit
Attaches the multi bypass tray (Tray A) to the wide LCT.
9. Banner sheet tray of multi bypass tray (Tray A)
Allows you to load large-sized paper in the multi bypass tray (Tray A).
10. Finisher SR5050
Sorts, stacks, and staples multiple sheets of paper. Consists of the following paper trays:
• Finisher upper tray
• Finisher shift tray
Prints can be punched if the optional punch unit is installed on the finisher.
11. Perfect binder
Applies adhesive to the spine of gathered pages to bind them in a booklet.
12. Wide LCT
Holds up to 4,800 sheets of paper. You can load paper whose sizes are up to SRA3 or 13 × 191/5. You can
connect up to three wide LCTs.
13. Bridge unit of wide LCT
Connects a wide LCT to an additional wide LCT.
14. Banner sheet tray of wide LCT
Allows you to load large-sized paper in the wide LCT.
16
Page 19
DER011
18
21
17
4
3
5
6
7
8
9
10
11121314
1516
19
20
21
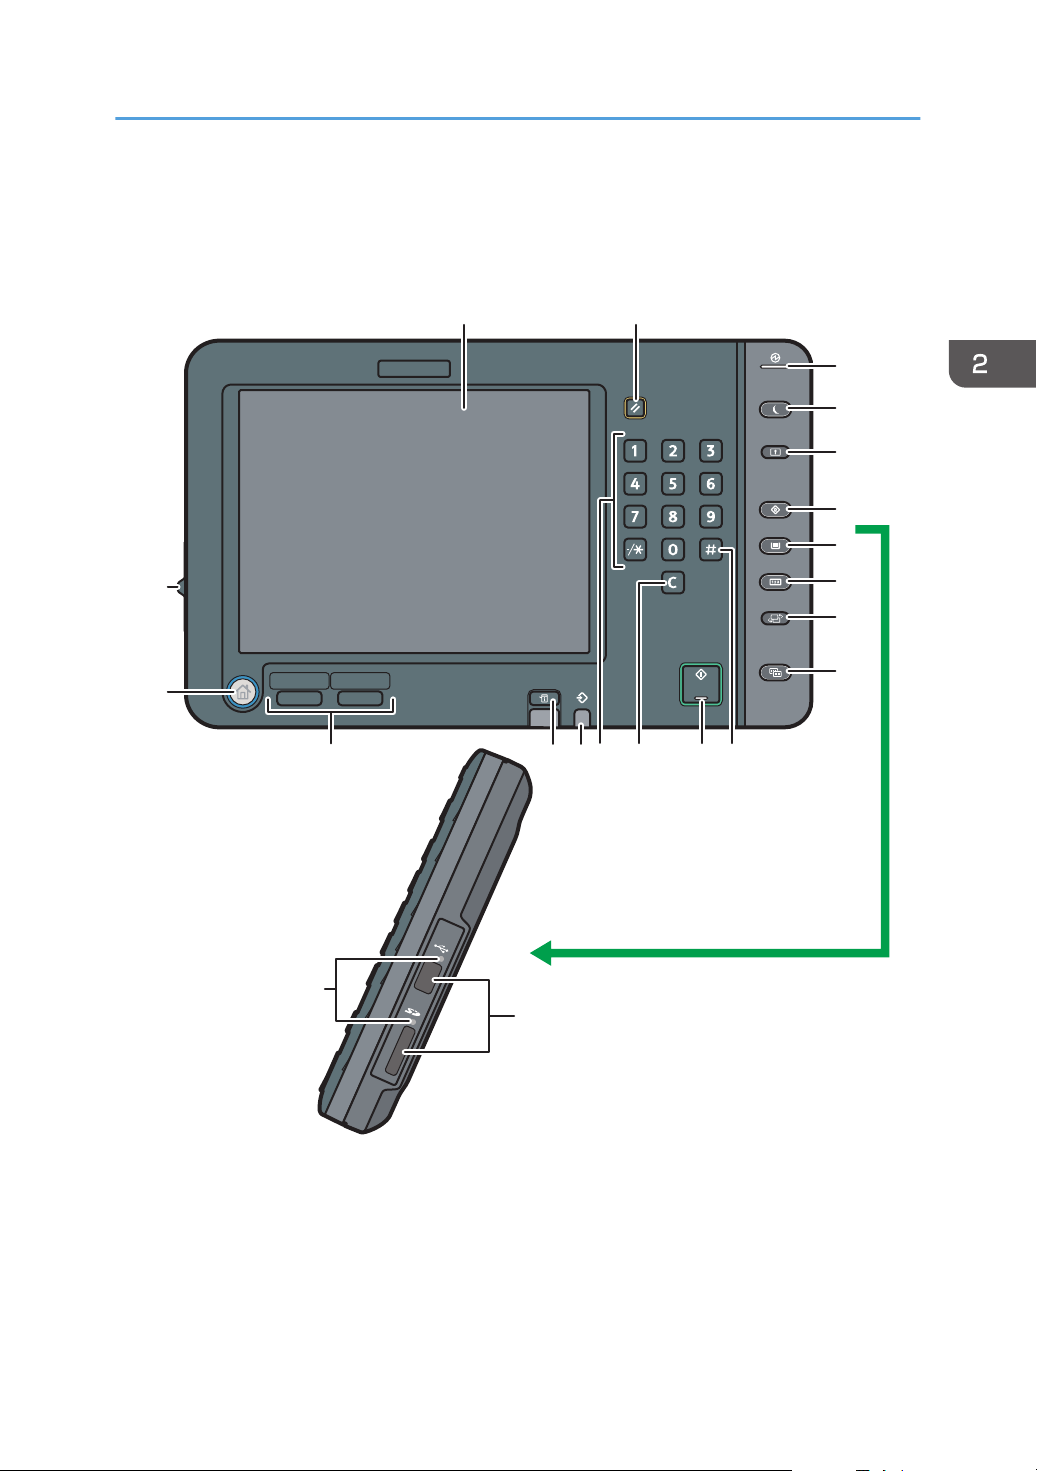
Guide to the Names and Functions of the Machine's Control Panel
Guide to the Names and Functions of the
Machine's Control Panel
1. Display panel
Displays keys for each function, operation status, or messages. See "How to Use the Screens on the Control
Panel", Getting Started.
2. [Reset] key
Press to clear the current settings.
17
Page 20

2. Getting Started
3. Main power indicator
The main power indicator goes on when you turn on the main power switch.
4. [Energy Saver] key
Press to switch to and from Low Power mode or Sleep mode. See "Saving Energy", Getting Started.
When the machine is in Low Power mode, the [Energy Saver] key is lit. In Sleep mode, the [Energy Saver] key
flashes slowly.
5. [Login/Logout] key
Press to log in or log out.
6. [User Tools] key
Press to change the default settings to meet your requirements. See "Accessing User Tools", Connecting the
Machine/ System Settings.
You can find out where to order expendable supplies and where to call when a malfunction occurs. You can
also print these details. See "Checking Inquiry using the User Tools", Maintenance and Specifications.
7. [Paper Setting] key
Specify settings for the paper tray. See Paper Settings.
8. [Counter] key
Press to check or print the counter value. See "Counter", Maintenance and Specifications.
9. [Language] key
Press to change the language of the display. See page 20 "Changing the Display Language".
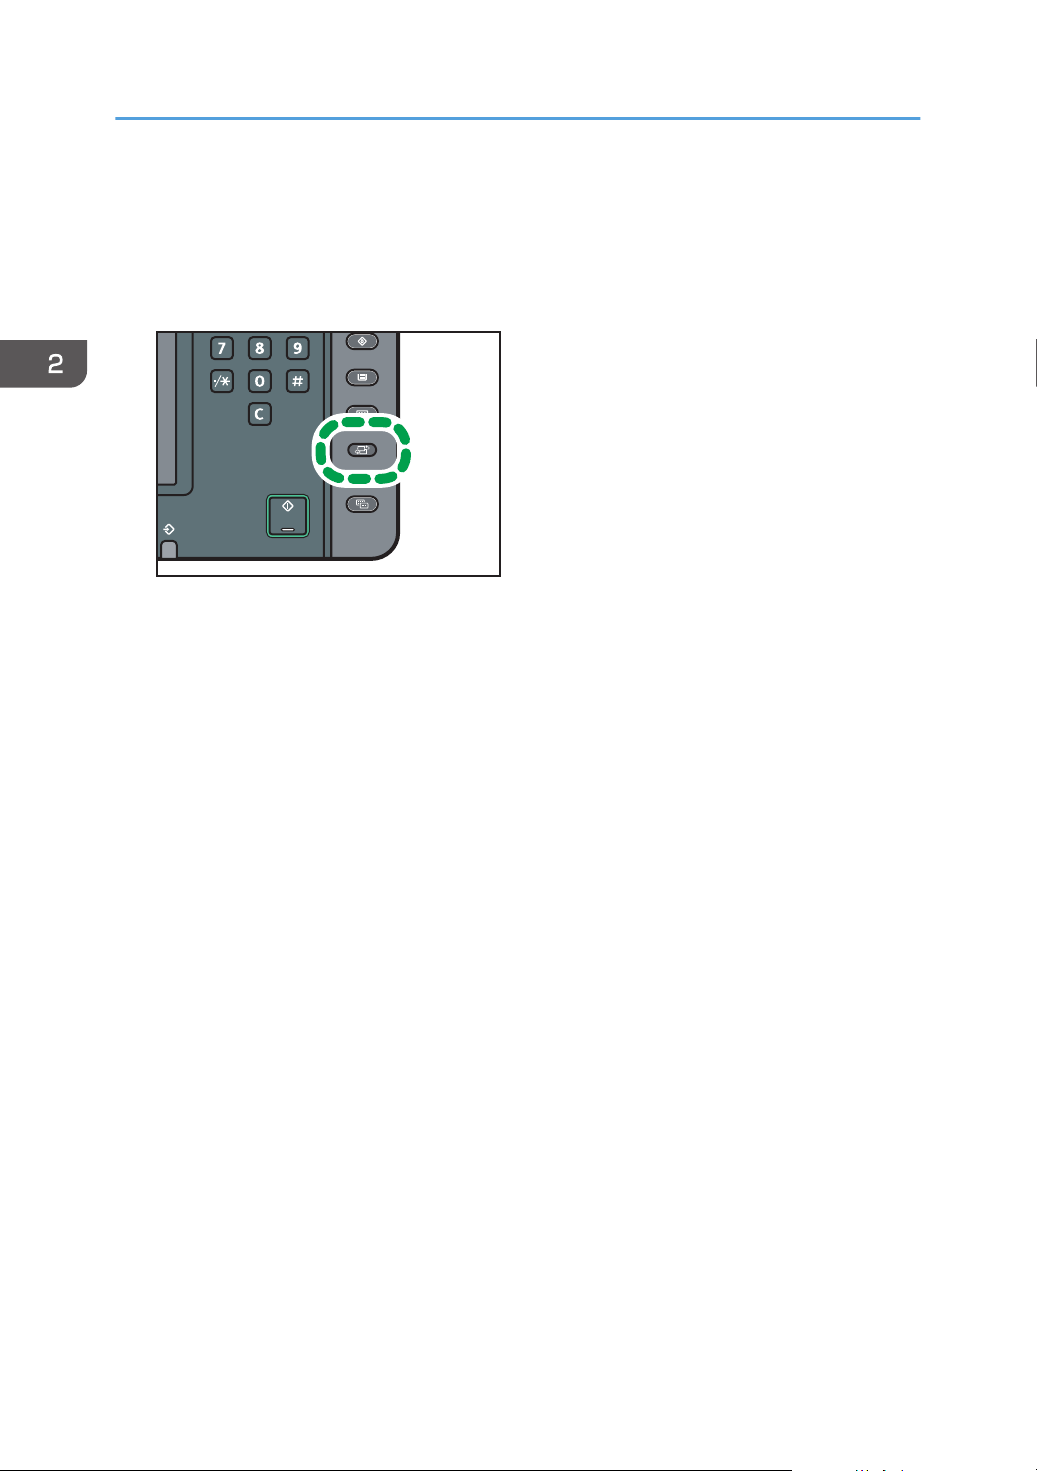
10. [Simple Screen] key
Press to switch to the simple screen. See "Switching Screen Patterns", Getting Started.
11. [ ] key (Enter key)
Press to confirm values entered or items specified.
12. [Start] key
Press to start printing a counter list, an inquiry list, or another list.
13. [Clear] key
Press to delete a number entered.
14. Number keys
Use to enter the numbers for copies and data for the selected function.
15. Data In indicator (printer mode)
Flashes when the machine is receiving print jobs from a computer.
16. [Check Status] key
Press to check the machine's system status, operational status of each function, and current jobs. You can also
display the job history and the machine's maintenance information.
17. Function keys
No functions are registered to the function keys as a factory default. You can register often used functions and
Web pages. For details, see "Configuring function keys", Getting Started.
18
Page 21

Guide to the Names and Functions of the Machine's Control Panel
18. [Home] key
Press to display the [Home] screen. For details, see page 21 "How to Use the [Top] Screen and the [Home]
Screen".
19. Screen brightness slider
Adjusts display panel brightness.
20. Media access lamp
Lights up when a memory storage device is inserted in the media slot.
21. Media slots
Use to insert an SD card or a USB flash memory device.
19
Page 22
DER048
2. Getting Started
Changing the Display Language
You can change the language used on the display. English is set as default.
1. Press the [Language] key until the language you want to display appears.
20
Page 23
4
7
9
8
DET010
253
6
1
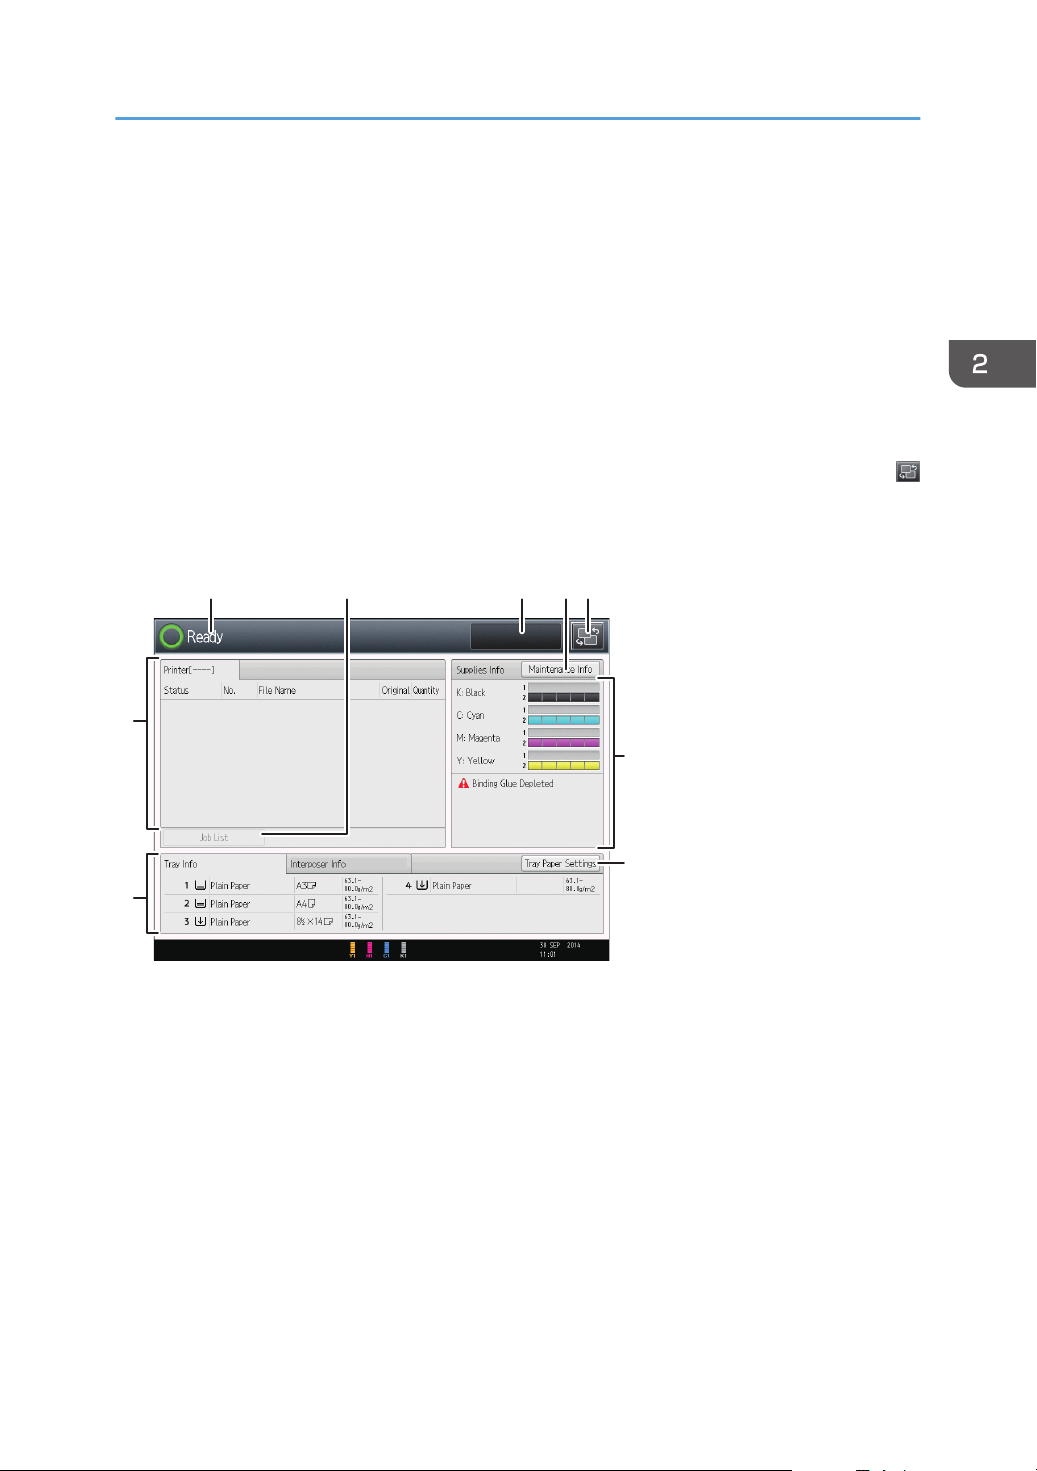
How to Use the [Top] Screen and the [Home] Screen
How to Use the [Top] Screen and the [Home]
Screen
When you press the [Home] key just after the machine is turned on, the [Top] screen is displayed.
Using the [Top] screen, you can check the toner status and paper status.
The icons of each function are displayed on the [Home] screen.
You can add shortcuts to Web pages to the [Home] screen. The icons of added shortcuts appear on the
[Home] screen. Web pages can be recalled easily by pressing the shortcuts.
To display the [Home] screen, press the [Home] key. If the [Home] screen does not appear, press the
icon at the upper right corner of the screen to switch to the menu screen.
[Top] screen
21
Page 24
DET011
121110 5
13
2. Getting Started
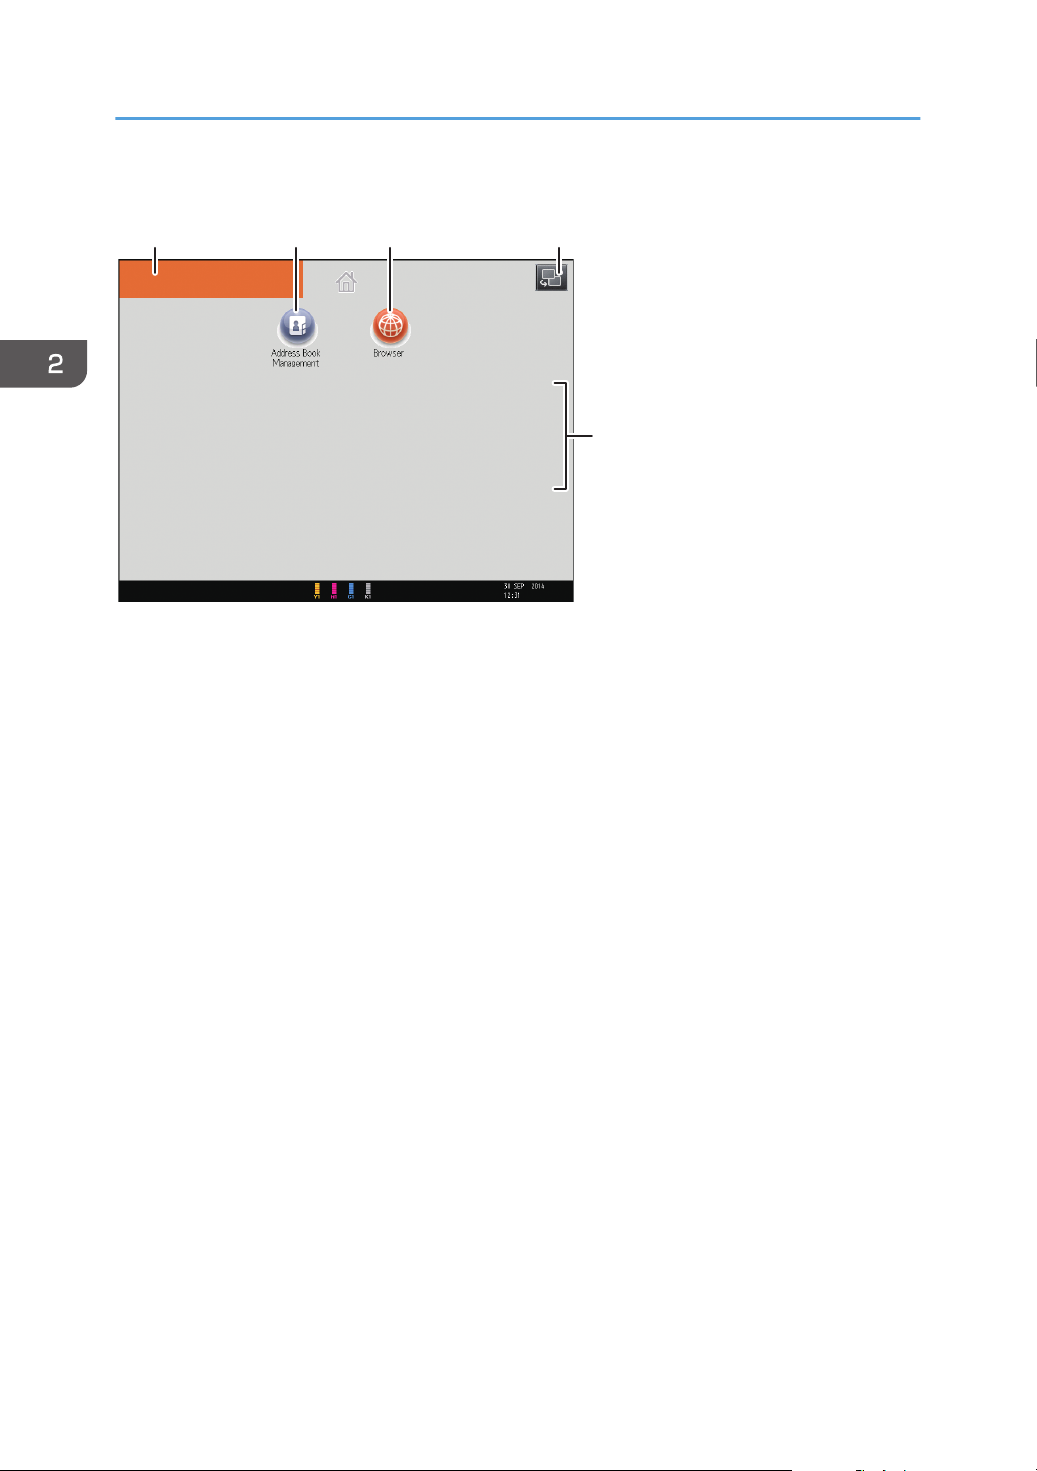
[Home] screen
1. Operational status and messages
Displays operational status and messages.
2. [Job List]
Press to display the job list screen for the color controller.
3. Estimated time
Refer to the job list screen for the color controller.
4. [Maintenance Info]
Press to display the [Maintnc./Inquiry/Mach. Info] tab on the [Check Status] screen.
5. Switch screens
Press to switch between the [Home] screen and the [Top] screen.
6. [Supplies Info]
Displays the information about supplies, such as the remaining amount of toner.
7. [Tray Paper Settings]
Press to display the [Tray Paper Settings] screen.
8. [Tray Info]/ [Interposer Info]
Displays the status of the paper trays and the interposer.
9. [Job List]
Refer to the job list screen for the color controller.
10. Home screen image
You can display an image on the [Home] screen, such as a corporate logo. To change the image, see
"Displaying an Image on the [Home] Screen", Convenient Functions.
22
Page 25
How to Use the [Top] Screen and the [Home] Screen
11. [Address Book Management]
Press to display the Address Book.
For details about how to use the Address Book, see "Address Book", Connecting the Machine/ System
Settings.
12. [Browser]
Press to display Web pages.
For details about how to use the browser function, see "Using the Browser Function", Convenient Functions.
13. /
Press to switch pages when the icons are not displayed on 1 page.
Adding Icons to the [Home] Screen
You can add the function and shortcuts to Web pages.
You can also review icons of functions and embedded software applications that you deleted from the
[Home] screen.
• Shortcut names of up to 32 characters can be displayed in a standard screen. If the name of the
shortcut is longer than 32 characters, the 32nd character is replaced with "...". Only 30 characters
can be displayed in a simple screen. If the name of the shortcut is longer than 30 characters, the
30th character is replaced with "...".
• For details about the procedure for registering Web pages to Favorites, see "Specifying the
Settings for Favorites", Convenient Functions.
• Shortcuts to Web pages that are registered to Common Favorites can be registered to the [Home]
screen. When user authentication is enabled, shortcuts to Web pages that are registered to
Favorites by User can also be registered to a user's [Home] screen.
• You can register up to 72 function and shortcut icons. Delete unused icons if the limit is reached. For
details, see "Deleting an Icon on the [Home] Screen", Convenient Functions.
• You can change the position of icons. For details, see "Changing the Order of Icons on the [Home]
Screen", Convenient Functions.
Adding icons to the [Home] screen using Web Image Monitor
1. Start Web Image Monitor.
For details, see "Using Web Image Monitor", Connecting the Machine/ System Settings.
2. Log in to Web Image Monitor.
23
Page 26
DER029
2. Getting Started
3. To add icons to the default [Home] screen, point to [Device Management], and then click
[Device Home Management]. To add icons to a user's [Home] screen, point to [Customize
Screen per User].
4. Click [Edit Icons].
5. Point to [ Icon can be added.] of the position that you want to add, and then click [
Add].
6. Select the function or shortcut icon you want to add.
7. Click [OK] four times.
Adding icons to the [Home] screen using the User Tools
In the following procedure, a shortcut icon is registered to the [Home] screen.
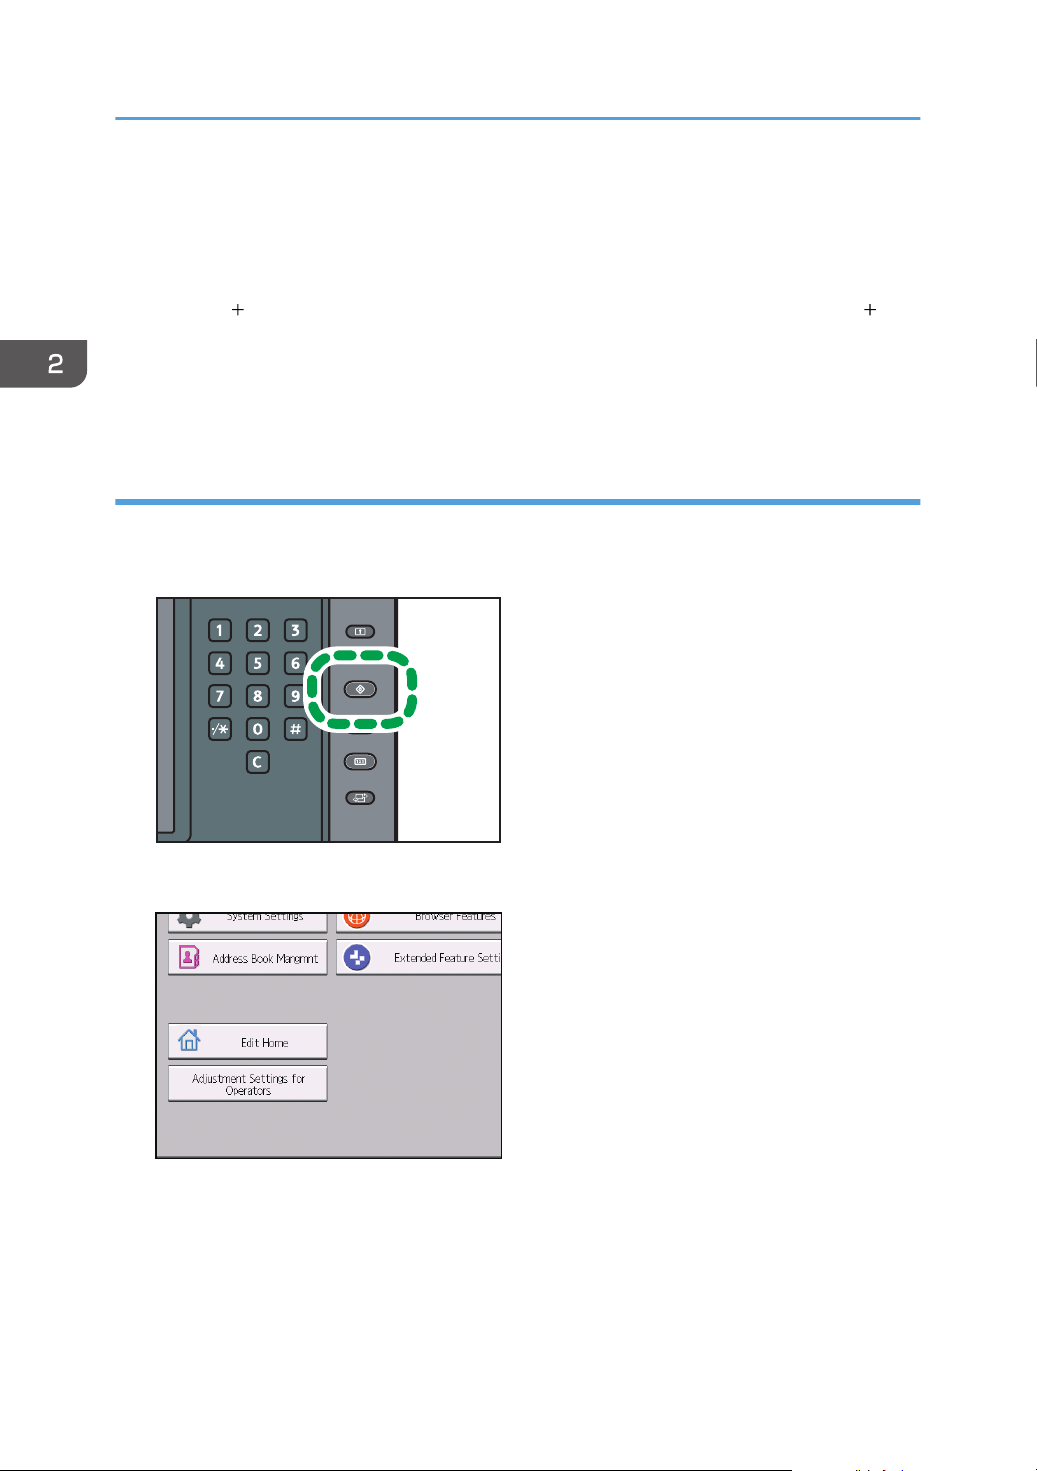
1. Press the [User Tools] key.
24
2. Press [Edit Home].
Page 27
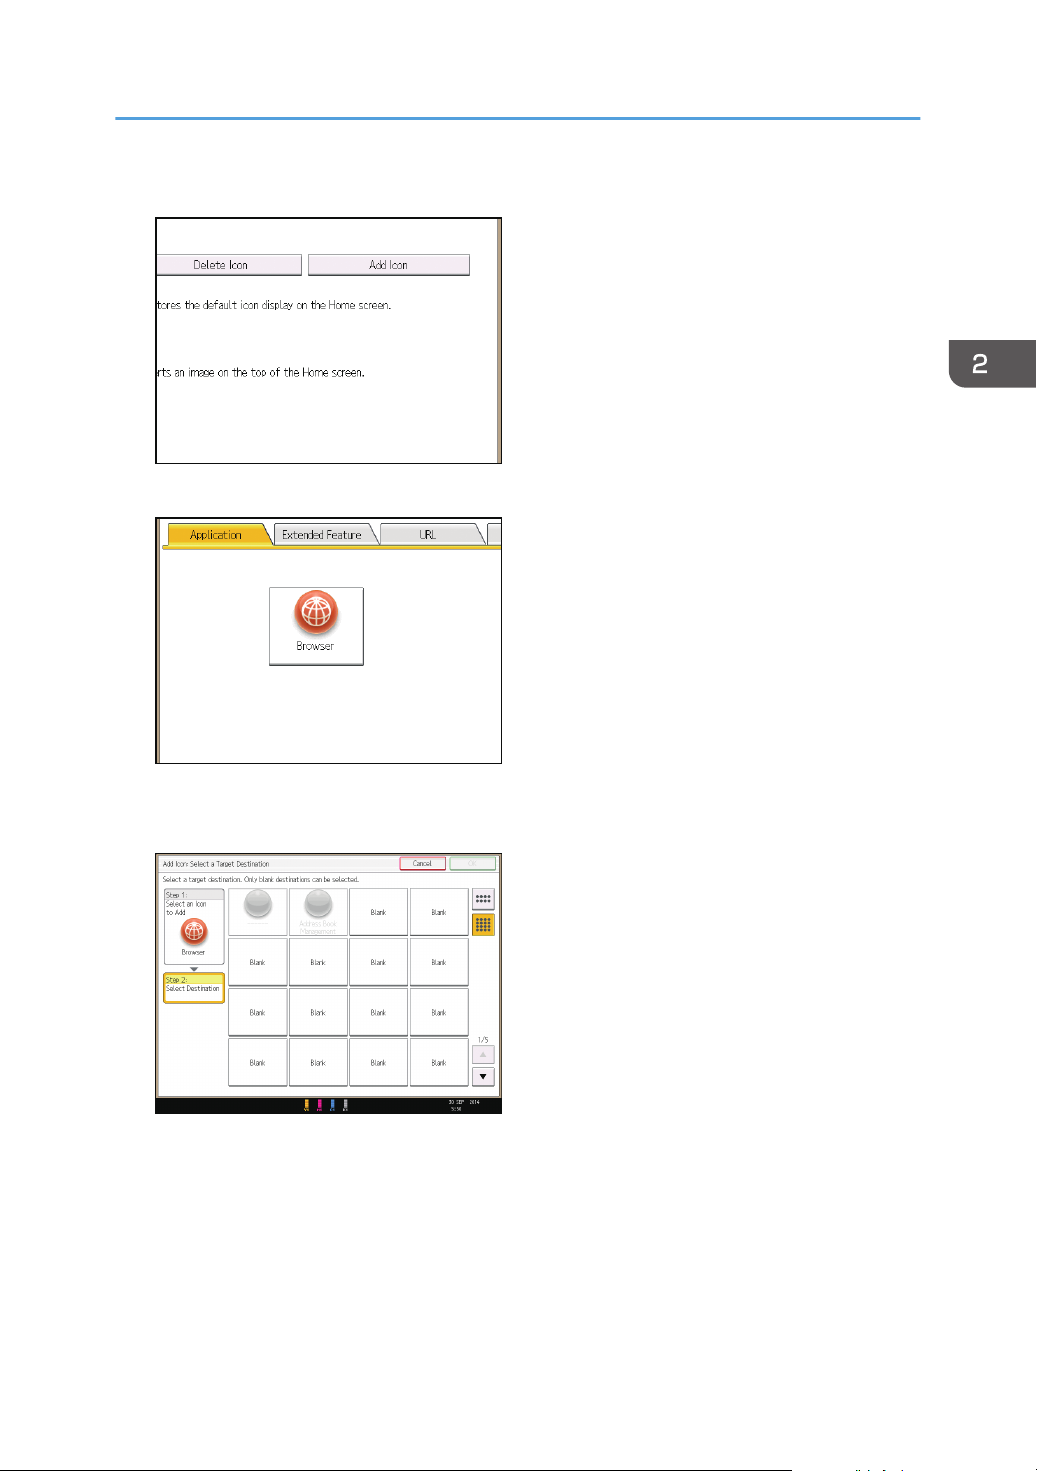
3. Press [Add Icon].
4. Press the [Application] tab.
How to Use the [Top] Screen and the [Home] Screen
5. Select the application you want to add.
6. Specify the position where [Blank] is displayed.
25
Page 28

2. Getting Started
7. Press [OK].
8. Press the [User Tools] key.
• Press on the upper-right corner of the screen to check the position on the simple screen.
26
Page 29
DET016
Turning On/Off the Power
Turning On/Off the Power
• Do not repeatedly push the main power switch.
• When you push the main power switch, wait at least 20 seconds after you confirm the main power
indicator has lit up or gone out.
• If the main power indicator does not light up or go out in 10 minutes after you push the main power
switch, contact your service representative.
The main power switch is on the left side of the machine. When this switch is turned on, the main power
turns on and the main power indicator on the right side of the control panel lights up. When this switch is
turned off, the main power turns off and the main power indicator on the right side of the control panel
goes out. When this is done, machine power is off.
This machine uses two power cords. Connect each power plug to separate power sources with
independent breakers.
Confirm how much power the options draw, and then plug them into an outlet that is nearby but
separate from the outlet that the main machine is plugged into.
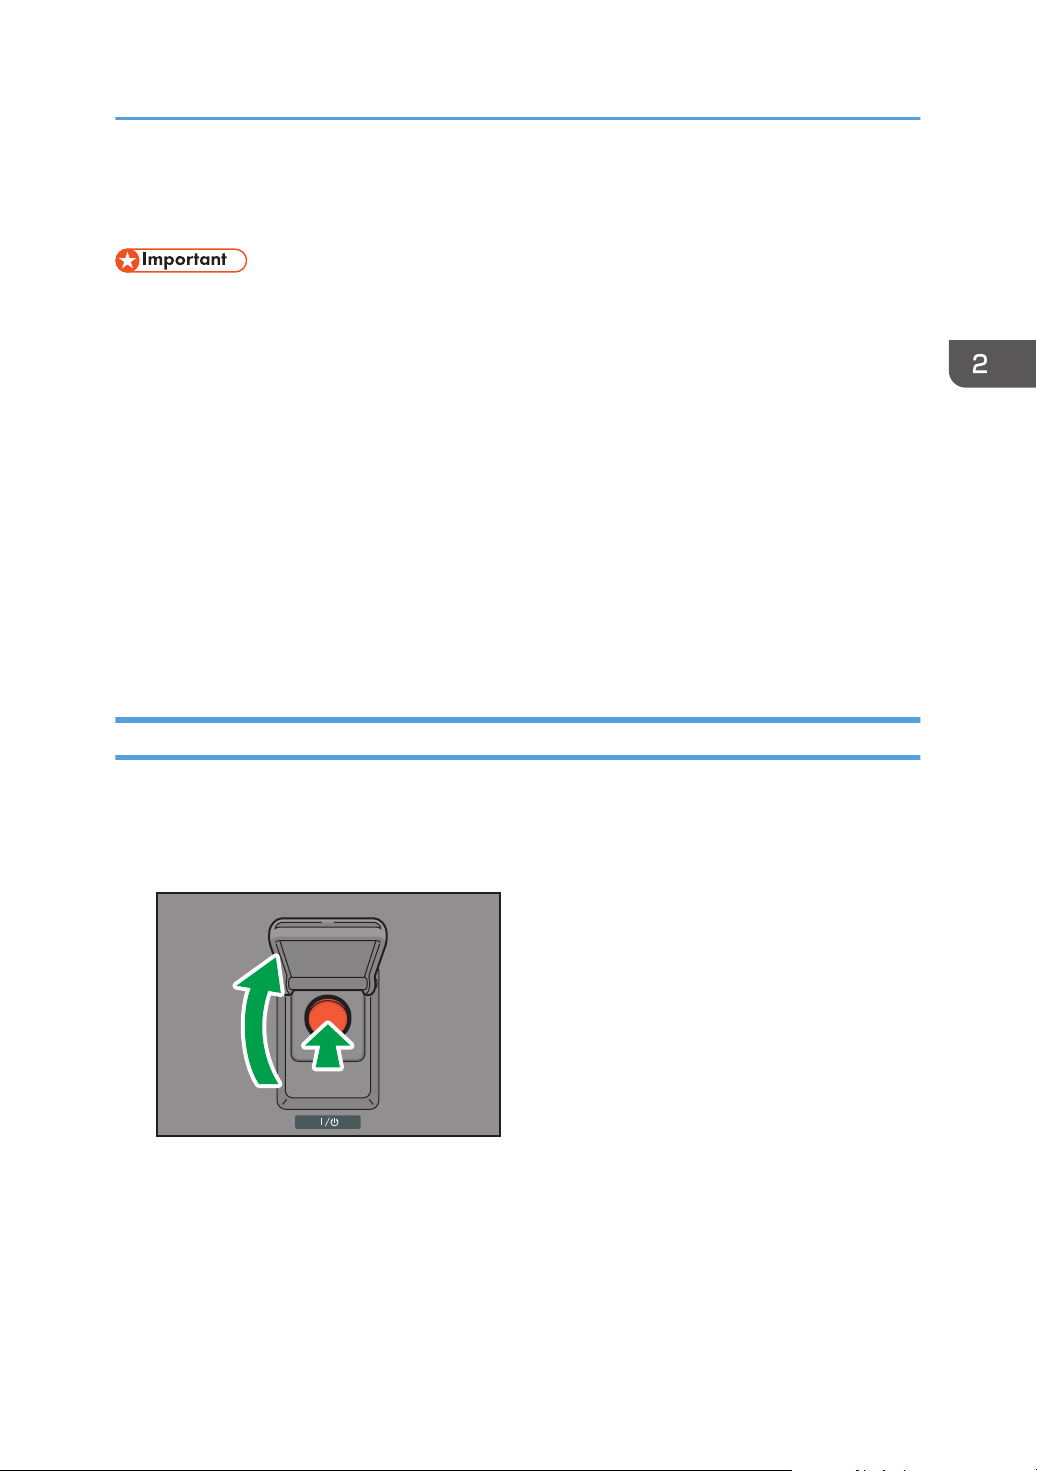
Turning On the Main Power
1. Make sure the power cord is firmly plugged into the wall outlet.
2. Open the main power switch cover, and then push the main power switch.
The main power indicator goes on.
27
Page 30

2. Getting Started
Turning Off the Main Power
• When disconnecting the power cord from the wall outlet, always pull the plug, not the cord.
Pulling the cord can damage the power cord. Use of damaged power cords could result in fire
or electric shock.
• Do not turn off the power while the machine is in operation.
• Do not hold down the main power switch while turning off the main power. Doing so forcibly turns
off the machine's power and may damage the hard disk or memory and cause malfunctions.
1. Open the main power switch cover, and then push the main power switch.
The main power indicator goes out. The main power turns off automatically when the machine shuts
down. If the screen on the control panel does not disappear, contact your service representative.
28
Page 31

Logging In the Machine
Logging In the Machine
When the Authentication Screen Is Displayed
If Basic Authentication, Windows Authentication, or LDAP Authentication is active, the authentication
screen appears on the display. The machine only becomes operable after entering your own Login User
Name and Login Password. If User Code Authentication is active, you cannot use the machine until you
enter the User Code.
If you can use the machine, you can say that you are logged in. When you go out of the operable state,
you can say that you are logged out. After logging in the machine, be sure to log out of it to prevent
unauthorized usage.
• Ask the user administrator for the Login User Name, Login Password, and User Code. For details
about user authentication, see Security Guide.
• User Code to enter on User Code Authentication is the numerical value registered in the Address
Book as "User Code".
User Code Authentication Using the Control Panel
If User Code Authentication is active, a screen prompting you to enter a User Code appears.
1. Enter a User Code (up to eight digits), and then press [OK].
Logging In Using the Control Panel
This section explains the procedure for logging in to the machine when Basic Authentication, Windows
Authentication, or LDAP Authentication is set.
29
Page 32

DER049
2. Getting Started
1. Press [Login].
2. Enter a Login User Name, and then press [OK].
3. Enter a Login Password, and then press [OK].
When the user is authenticated, the screen for the function you are using appears.
Logging Out Using the Control Panel
This section explains the procedure for logging out the machine when Basic Authentication, Windows
Authentication, or LDAP Authentication is set.
• To prevent use of the machine by unauthorized persons, always log out when you have finished
using the machine.
1. Press the [Login/Logout] key.
2. Press [Yes].
30
Page 33

3. Web Image Monitor
1
2
3
5
4
DFN002
This chapter describes frequently used Web Image Monitor functions and operations. For the
information not included in this chapter, see Connecting the Machine/ System Settings on the supplied
CD-ROM or Web Image Monitor Help.
Displaying Top Page
This section explains the Top Page and how to display Web Image Monitor.
• When entering an IPv4 address, do not begin segments with zeros. For example: If the address is
"192.168.001.010", you must enter it as "192.168.1.10".
1. Start your web browser.
2. Enter "http://(machine's IP address or host name)/" in your web browser's URL bar.
Top Page of Web Image Monitor appears.
If the machine's host name has been registered on the DNS or WINS server, you can enter it.
When setting SSL, a protocol for encrypted communication, under environment which server
authentication is issued, enter "https://(machine's IP address or host name)/".
Web Image Monitor is divided into the following areas:
1. Menu area
If you select a menu item, its content will be shown.
2. Header area
Display icons for the links to Help and the keyword search function. This area also displays [Login] and
[Logout], which allows you to switch between the administrator and guest mode.
31
Page 34

3. Web Image Monitor
3. Refresh/Help
(Refresh): Click at the upper right in the work area to update the machine information. Click the web
browser's [Refresh] button to refresh the entire browser screen.
(Help): Use Help to view or download Help file contents.
4. Basic Information area
Display the basic information of the machine.
5. Work area
Display the contents of the item selected in the menu area.
32
Page 35

4. Adding Paper and Toner
This chapter describes how to load paper into the paper tray and recommended paper sizes and types.
Loading Paper
Precautions for Loading Paper
• When loading paper, take care not to trap or injure your fingers.
• Do not stack paper over the limit mark.
Jams and misfeeds can occur when printing on thick glossy sheets. To prevent such problems, be sure to
fan glossy sheets thoroughly before loading them.
When loading paper, set the paper direction according to its grain, as shown in the following diagram:
Direction of paper grain Trays 1-2 or the wide LCT Multi bypass tray (Tray A)
• Even if paper is loaded as described above, normal operations and print quality might still not be
possible, depending on the paper type.
• Prints might be noticeably curled. Flatten out prints if they are creased or curled. For details about
settings for flattening out curled paper, see "Adjustment Settings for Operators", Paper Settings.
• To prevent multiple sheets from being fed at once, fan the paper before loading it.
• If you load paper when only a few sheets of paper remain in the tray, multiple sheet feeding may
occur. Remove any remaining paper, stack them with the new sheets of paper, and then fan the
entire stack before loading it into the tray.
33
Page 36

CVA068
CVA069
4. Adding Paper and Toner
• Straighten curled or warped paper before loading.
• When paper in trays that are set to automatically eject unnecessary tab stock sheets runs out,
reload the tab stock from the beginning of the cycle (the first sheet).
• When you load paper into the paper tray for the first time or when you change the size or type of
paper in the paper tray, be sure to specify the appropriate paper settings in Tray Paper Settings.
For details, see "Changing Tray Paper Settings", Paper Settings.
• For details about the paper sizes and types that can be used, see page 44 "Recommended
Paper Sizes and Types".
• You might at times hear a rustling noise from paper moving through the machine. This noise does
not indicate a malfunction.
Fanning the paper
1. Loosen the stack by riffling the sheets.
34
2. Holding its shorter ends, flex the stack back and forth to create space between the sheets.
Repeat this several times.
Page 37

CVA070
3. Make sure there is space between the sheets.
CVA071
DER088
Loading Paper
Loading Paper into Trays 1, 2, and the Wide Large Capacity Tray
Each paper tray is loaded in the same way.
The wide LCT is identified as Tray 3, Tray 4, Tray 5, Tray 6, Tray 7, and Tray 8.
• Check the paper edges are aligned at the left side.
1. Check that paper in the paper tray is not being used, and then pull the tray carefully out
until it stops.
35
Page 38

DER089
4. Adding Paper and Toner
2. Load paper into the paper tray with print side up.
Do not stack paper over the limit mark.
3. Carefully push the paper tray fully in.
• Various sizes of paper can be loaded in Trays 1, 2, and the wide LCT by adjusting the positions of
side fence and end fence. For details, see "Changing the Paper Size in Trays 1, 2, and the Wide
Large Capacity Tray", Paper Specifications and Adding Paper.
• You can load envelopes in Trays 1, 2, and the wide LCT. When loading envelopes, place them in
the correct orientation. For details, see page 55 "Envelopes".
Loading Paper into the Multi Bypass Tray (Tray A)
Use the multi bypass tray (Tray A) to use transparencies, translucent paper, and paper that cannot be
loaded in the paper trays.
• The maximum number of sheets you can load at the same time depends on paper type. Do not
stack paper over the limit mark. For the maximum number of sheets you can load, see page 44
"Recommended Paper Sizes and Types".
• Check the paper edges are aligned at the left side.
• When loading a low number of sheets, be sure not to squeeze the side fences in too tightly. If the
side fences are squeezed too tightly against the paper, the edges may crease, the paper may
misfeed, or if it weighs between 52.3–63.0 g/m2 (14.0–16.9 lb. Bond), it may wrinkle.
1. Set the side fences to the paper size, and then square the paper and load it print side up.
Do not stack paper over the limit mark.
36
Page 39

DER069
2. Set the end fence.
2
2
2
DER070
1
CWW312
Loading Paper
1. End fence
2. Extender
To remove the end fence, slide it to the right by pressing the stopper down.
37
Page 40

DER072
1
1
4. Adding Paper and Toner
3. Press the elevator switch on the multi bypass tray (Tray A).
1. Elevator switch
The lamp of the elevator switch is blinking while the tray is going up, and keeps lit when it stops.
Press the elevator switch to move down the tray if you want to either add paper or remove jammed
ones.
• Pull the extender out when loading A4 , 81/2 × 11 or larger sheets in the multi bypass tray
(Tray A).
• Letterhead paper must be loaded in a specific orientation. For details, see page 42 "Loading
Orientation-fixed Paper or Two-sided Paper".
• You can load envelopes into the multi bypass tray (Tray A). Envelopes must be loaded in a specific
orientation. For details, see page 55 "Envelopes".
• Specify the sizes of paper that are not automatically detected. For details about the sizes that can
be detected automatically, see page 44 "Recommended Paper Sizes and Types". For details
about how to specify sizes, see "Changing to a Size That Is Not Automatically Detected", Paper
Specifications and Adding Paper.
Loading tab stock into the multi bypass tray (Tray A)
When setting tab stock, always use the tab fence. Tabs must be set at the right side of the multi bypass
tray (Tray A).
38
Page 41

DER073
1
2
2
2
DER099
Loading Paper
1. Tab fence
2. End fence
Loading Paper into the Interposer
• Do not place anything on top of or leave documents on the sensor. This may lead to the paper size
not being correctly scanned or paper jams.
1. While pressing the release lever, align the side fences with the paper size to be loaded.
2. Load paper orderly.
Do not stack paper over the limit mark.
Align the side fences gently against the paper you loaded, if necessary.
39
Page 42

DER100
1
4. Adding Paper and Toner
1. Paper extender
• Load paper with its printed side up (the front side). If you are using the booklet finisher, load sheets
print side down.
• Load paper in the interposer in the same orientation as paper in the paper tray.
• The staple position or punch hole position will be on the left side of the paper, when you are facing
the machine.
• When loading paper larger than A4 (81/2 × 11) , pull out the paper extender.
Loading Cover Sheets into the Interposer of the Perfect Binder
• The length/size of cover sheets depends on the thickness of the spine.
• Load paper in the orientation.
• Do not place anything on top of or leave documents on the sensor. This may lead to the paper size
not being correctly detected or paper jams.
Estimating the thickness of the spine
This section explains how to calculate the approximate spine thickness and the cover sheet length
and size.
Note that the length and size of a cover sheet depends on the thickness of the book block spine.
The following list shows examples for A4 or 81/2 × 11 size, 80.0 g/m2 (20.0 lb. Bond) paper:
• 10-sheet book block: 1 mm (0.04 inches)
• 30-sheet book block: 3 mm (0.12 inches)
• 50-sheet book block: 5 mm (0.20 inches)
• 80-sheet book block: 8 mm (0.32 inches)
40
• 100-sheet book block: 10 mm (0.40 inches)
Page 43

CWW369
1
1
2
2
2
2
3
3
CWW323
Loading Paper
• 200-sheet book block: 20 mm (0.80 inches)
Specify the cover sheet size based on the thickness of the book block spine. Use the following
equation to calculate the length of the cover sheet:
Minimum length of cover sheet (mm/inch) = "length of book block sheet (mm/inch)" × 2 +
"thickness of spine (mm/inch)"
To perfect bind a booklet with the following dimensions, specify a cover sheet length of at least
440 mm (17.4 inches):
1. Length of book block sheet
2. Thickness of spine
3. Length of cover sheet
1. While lightly pinching the side fence, align it with the paper size to be loaded.
2. Load paper face up and neatly stacked.
Do not stack paper over the limit mark.
41
Page 44

CWW324
4. Adding Paper and Toner
• You cannot perfect bind a booklet if the thickness of the book block's spine exceeds 23 mm (0.9
inches).
• Depending on your machine, the procedure for selecting the orientation of covers and originals
might be slightly different. For details, refer to the procedure for your machine.
• When loading thick paper of 251.0 g/m2 (138.8 lb. Index) or heavier in the interposer trays of
the perfect binder, make sure the grain of the paper is perpendicular to the feed direction.
• If you are loading sheets that are likely to stick together (such as sheets of coated paper), be sure
to fan them thoroughly before loading. Fanning them will help prevent jams and allow them to be
fed in one sheet at a time.
• The perfect binding process may scratch glossy paper.
Loading Orientation-fixed Paper or Two-sided Paper
Use the settings and paper orientations shown below to ensure the printer prints onto orientation-fixed
paper (such as letterhead or continuous stationery) correctly. Place paper as shown below.
Paper orientation
The meanings of the icons are as follows:
Icon Meaning
Load paper printed side face up.
42
Page 45

Loading Paper
Print side
Trays 1-2, Multi bypass tray (Tray
A), or wide LCT
One-sided
Two-sided
• To print on letterhead paper, specify the appropriate paper type in the printer driver's settings.
• Press the [Paper Setting] key, specify [Letterhead] as "Paper Type" for the paper tray you want to
use. See "Changing Tray Paper Settings", Paper Settings.
43
Page 46

4. Adding Paper and Toner
Recommended Paper
Recommended Paper Sizes and Types
This section describes recommended paper sizes and types.
• If you use paper that curls, either because it is too dry or too damp, a staple clogging or paper jam
may occur.
• Do not use paper designed for inkjet printers, as these may stick to the fusing unit and cause a
misfeed.
• When you load transparencies, check the front and back of the sheets, and place them correctly,
or a misfeed might occur.
Trays 1, 2, and Wide LCT (Trays 3 to 8)
Paper type and weight Paper size Paper capacity
*1
52.3–400.0 g/m2 (14.0 lb.
Bond–221.0 lb. Index)
Paper Weight 1–Paper
Weight 9
*2
Paper sizes that can be detected
automatically:
*3
A3*4, A4 , A5 , B4 JIS
, 11 × 17
*4
, 81/2 × 14
81/2 × 11 , 8 × 13 , 71/4 ×
101/2, 51/2 × 81/2, 12 ×
18
*4
, SRA4
*4
, 13 × 191/
*4
, SRA3
5
A3*4, A4 , A5 , B4 JIS ,
11 × 17*4, 81/2 × 14 , 81/
× 11 , 8 × 13 , 71/4 ×
101/2, 51/2 × 81/
18*4, 13 × 191/
*4
, SRA4
, 12 ×
2
*4
, SRA3
5
2,400 sheets
,
2
44
Page 47

Recommended Paper
Paper type and weight Paper size Paper capacity
52.3–400.0 g/m2 (14.0 lb.
Bond–221.0 lb. Index)
Paper Weight 1–Paper
Weight 9
*2
Select the paper size using the
Tray Paper Settings menu:
B5 JIS
81/2 × 11
*5
, 81/2 × 13*5,
*5
, 81/4 × 14*5,
81/4 × 13*5, 8 × 10*5,
71/4 × 101/
*5
, 8K*5, 16K
11 × 15
*5
, 51/2 × 81/
2
*5
, 11 × 14*5, 10 ×
*5
,
15*5, 10 × 14*5, 13 × 19
, 123/5 × 191/5, 123/5 ×
181/2, 13 × 18 , SRA4*5,
226 × 310 mm
432 mm , 41/5 × 51/
A4*5, A5*5, B5 JIS
*5
, 310 ×
*5
2
*5
,
81/2 × 13*5, 81/4 × 14*5,
81/4 × 13*5, 8 × 10*5,
71/4 × 101/
*5
, 11 × 15*5, 11 × 14
*5
,
*5
, 8K*5, 16K
2
2,400 sheets
2
52.3–400.0 g/m2 (14.0 lb.
Bond–221.0 lb. Index)
Paper Weight 1–Paper
Weight 9
*2
10 × 15*5, 10 × 14*5, 13 ×
19 , 123/5 × 191/5, 123/
× 181/2, 13 × 18 , SRA4
*5
, 226 × 310 mm
432 mm , 41/5 × 51/
Custom size:
*6
*5
, 310 ×
2
*5
Vertical: 100.0–330.2 mm
Horizontal: 139.7–487.7 mm
Vertical: 3.94–13.00 inches
Horizontal: 5.50–19.20 inches
5
2,400 sheets
*7
45
Page 48

4. Adding Paper and Toner
Paper type and weight Paper size Paper capacity
Coated: Glossy
Coated: Matte
Coated: Glossy
Coated: Matte
Paper sizes that can be detected
automatically:
A3 , A4 , A5 , B4 JIS ,
11 × 17 , 81/2 × 14 , 81/2 ×
11 , 8 × 13 , 71/4 × 101/2,
51/2 × 81/2, 12 × 18 , 13 ×
191/5, SRA3 , SRA4
A3 , A4 , A5 , B4 JIS , 11
× 17 , 81/2 × 14 , 81/2 × 11
, 8 × 13 , 71/4 × 101/2,
51/2 × 81/
, 12 × 18 , 13
2
× 191/5, SRA3 , SRA4
Select the paper size using the
Tray Paper Settings menu:
B5 JIS , 81/2 × 13 , 81/2 ×
11 , 81/4 × 14 , 81/4 × 13
, 8 × 10 , 71/4 × 101/2,
51/2 × 81/2, 8K , 16K ,
–
–
46
11 × 15 , 11 × 14 , 10 × 15
, 10 × 14 , 13 × 19 ,
123/5 × 191/5, 123/5 ×
181/2, 13 × 18 , SRA4
A4 , A5 , B5 JIS , 81/2 ×
13 , 81/4 × 14 , 81/4 × 13
, 8 × 10 , 71/4 × 101/2,
8K , 16K ,
11 × 15 , 11 × 14 , 10 × 15
, 10 × 14 , 13 × 19 ,
123/5 × 191/5, 123/5 ×
181/2, 13 × 18 , SRA4
Page 49

Recommended Paper
Paper type and weight Paper size Paper capacity
Coated: Glossy
Custom size:
Coated: Matte
Vertical: 139.7–330.2 mm
Horizontal: 139.7–487.7 mm
Vertical: 5.50–13.00 inches
Horizontal: 5.50–19.20 inches
Translucent paper A3 , A4 , B5 JIS
Transparencies A4 , 81/2 × 11
Tab stock
*10
A4 , 81/2 × 11 –
Label paper A4 , 81/2 × 11 –
Envelopes
*8 *11, *12, *13
240 × 332 mm, 235 × 120 mm,
120 × 235 mm, 105 × 241 mm,
110 × 220 mm
–
*9
*9
10 sheets
You can install the banner sheet tray for Tray 3, 5, or 7.
*1
When paper whose horizontal length is 487.8 mm (19.20 inches) or more is specified, the maximum
*2
paper weight of the tray is Paper Weight 7.
When the banner sheet tray is installed, paper sizes are not detected automatically.
*3
When the banner sheet tray is installed, select the paper size using the Tray Paper Settings menu.
*4
When the banner sheet tray is installed, you cannot select paper sizes.
*5
You can print on paper whose size is between 210.0-330.2 mm (8.27-13.00 inches) vertically and
*6
420.0-700.0 mm (16.54-27.55 inches) horizontally if the banner sheet tray is installed.
When the horizontal length of paper is 420.0–559.9 mm (16.54–22.00 inches), paper capacity is
*7
800 sheets. When the horizontal length of paper is 560.0–700.0 mm (22.00–27.55 inches), paper
capacity is 1,100 sheets.
When the banner sheet tray is installed, you cannot select paper types.
*8
The maximum number of sheets you can set at once depends on the paper's thickness and condition.
*9
The tab fence is required.
*10
Open the flaps, and load the envelopes with their flaps pointed toward the right side of the paper tray.
*11
Enter the sizes of the envelopes including their flap sizes using the Tray Paper Settings function.
*12
47
Page 50

4. Adding Paper and Toner
Sizes do not include flap sizes.
*13
Multi bypass tray (Tray A)
Paper type and weight Paper size Paper capacity
52.3–216.0 g/m2 (14.0 lb.
Bond–79.9 lb. Cover)
Paper Weight 1–Paper
Weight 5
Paper sizes that can be detected
automatically:
A3 , A4 , A5 , A6 , B4
JIS , B5 JIS , 11 × 17 , 81/
× 11 , 8 × 13 , 51/2 × 81/
12 × 18
,
2
A3 , A4 , A5 , A6 , B4 JIS
, B5 JIS , 11 × 17 , 81/2 ×
11 , 8 × 13 , 51/2 × 81/
2
, 12 × 18
500 sheets
2
48
Page 51

Recommended Paper
Paper type and weight Paper size Paper capacity
52.3–216.0 g/m2 (14.0 lb.
Bond–79.9 lb. Cover)
Paper Weight 1–Paper
Weight 5
*1
B5 JIS , B6 JIS , 81/2 × 14 ,
81/2 × 13 , 81/2 × 11 , 81/
× 14 , 81/4 × 13 , 8 × 10 ,
71/4 × 101/
, 51/2 × 81/
2
, 8K , 16K , 11 × 15 ,
11 × 14 ,
10 × 15 , 10 × 14 , 13 ×
191/5, 13 × 19 , 123/5 ×
191/5, 123/5 × 181/2, 13
× 18 , SRA3 , SRA4 , 226
× 310 mm , 226 × 310 mm ,
310 × 432 mm , 41/5 × 51/
2
A4 , A5 , B5 JIS , B6 JIS ,
81/2 × 14 , 81/2 × 13 , 81/
× 14 , 81/4 × 13 , 8 × 10 ,
71/4 × 101/
2
, 8K , 16K
, 11 × 15 , 11 × 14 , 10 ×
15 ,
500 sheets
4
2
4
52.3–216.0 g/m2 (14.0 lb.
Bond–79.9 lb. Cover)
Paper Weight 1–Paper
Weight 5
10 × 14 , 13 × 191/5, 13 ×
19 , 123/5 × 191/5, 123/
× 181/2, 13 × 18 , SRA3 ,
SRA4 , 226 × 310 mm ,
310 × 432 mm , 41/5 × 51/
Custom size:
*2
Vertical: 100.0–330.2 mm
Horizontal: 139.7–487.7 mm
*3
Vertical: 3.94–13.00 inches
Horizontal: 5.50–19.20 inches
5
2
500 sheets
*3
49
Page 52

4. Adding Paper and Toner
Paper type and weight Paper size Paper capacity
Translucent paper A3 , A4 , B5 JIS
Transparencies A4 , 81/2 × 11
Tab stock
*5
A4 , 81/2 × 11 , 81/2 × 14 –
Envelopes
*4
*4
10 sheets
Vertical: 100.0–330.2 mm
Horizontal: 139.7–487.7 mm
Vertical: 3.94–13.00 inches
Horizontal: 5.50–19.20 inches
Select the paper size. For details, see "Changing Tray Paper Settings", Paper Settings.
*1
Enter the paper size. For details, see "Changing Tray Paper Settings", Paper Settings.
*2
When the banner sheet tray is installed, the maximum horizontal length of custom size paper is 700.0
*3
mm (27.55 inches).
The maximum number of sheets you can set at once depends on paper thicknesses and conditions.
*4
The tab fence is required.
*5
50
Interposer
Paper type and weight Paper size Paper capacity
64.0–216.0 g/m2 (17.1 lb.
Bond–79.9 lb. Cover)
Paper Weight 2–Paper
Weight 5
Paper sizes that can be detected
automatically:
A3 , A4 , A5 , B4 JIS ,
B5 JIS , 11 × 17 , 81/2 × 11
, 8 × 13 , 51/2 × 81/2, 12
× 18
A3 , A4 , A5 , B4 JIS , B5
JIS , 11 × 17 , 81/2 × 11 ,
8 × 13 , 51/2 × 81/
, 12 ×
2
18
200 sheets × 2
Page 53

Recommended Paper
Paper type and weight Paper size Paper capacity
64.0–216.0 g/m2 (17.1 lb.
Bond–79.9 lb. Cover)
Paper Weight 2–Paper
Weight 5
Select the paper size using the
Tray Paper Settings menu:
B5 JIS , 81/2 × 14 , 81/2 ×
13 , 81/2 × 11 , 81/4 × 14
, 81/4 × 13 , 8 × 10 , 71/
× 101/
, 51/2 × 81/2, 8K
2
, 16K ,
11 × 15 , 11 × 14 , 10 × 15
, 10 × 14 , 13 × 191/5,
13 × 19 , 123/5 × 191/5,
123/5 × 181/2, 13 × 18 ,
SRA3 , SRA4 , 226 × 310
mm , 310 × 432 mm
A4 , A5 , B5 JIS , 81/2 × 14
, 81/2 × 13 , 81/4 × 14 ,
81/4 × 13 , 8 × 10 , 71/4 ×
101/
, 8K , 16K , 11 ×
2
15 ,
200 sheets × 2
4
64.0–216.0 g/m2 (17.1 lb.
Bond–79.9 lb. Cover)
Paper Weight 2–Paper
Weight 5
11 × 14 , 10 × 15 , 10 × 14
, 13 × 191/5, 13 × 19 ,
123/5 × 191/5, 123/5 ×
181/2, 13 × 18 , SRA3 ,
SRA4 , 226 × 310 mm ,
310 × 432 mm
Custom size:
Vertical: 139.7–330.2 mm
Horizontal: 139.7–487.7 mm
Vertical: 5.50–13.00 inches
Horizontal: 5.50–19.20 inches
200 sheets × 2
51
Page 54

4. Adding Paper and Toner
Interposer of the perfect binder
Paper type and weight Paper size Paper capacity
90.0–300.0 g/m2 (24.1 lb.
Bond–165.0 lb. Index)
Paper Weight 4–Paper
Weight 7
90.0–300.0 g/m2 (24.1 lb.
Bond–165.0 lb. Index)
Paper Weight 4–Paper
Weight 7
Paper sizes that can be
detected automatically:
A3 , 13 × 19
11 × 17 , 13 × 19
Select the paper size using the
Tray Paper Settings menu:
B4 JIS , 11 × 17 , 8K ,
12 × 18 , 11 × 15 , 13 ×
191/5, 123/5 × 191/5,
123/5 × 181/2, 13 × 18
, SRA3 , 310 × 432 mm
A3 , B4 JIS , 8K , 12 ×
18 , 11 × 15 , 13 ×
191/5, 123/5 × 191/5,
123/5 × 181/2, 13 × 18
, SRA3 , 310 × 432 mm
200 sheets (or up to 24 mm in
height) × 2
200 sheets (or up to 24 mm in
height) × 2
52
90.0–300.0 g/m2 (24.1 lb.
Bond–165.0 lb. Index)
Paper Weight 4–Paper
Weight 7
Custom size:
Vertical: 257.0–330.2 mm
Horizontal: 364.0–487.7 mm
Vertical: 10.12–13.00 inches
Horizontal: 14.34–19.20
inches
200 sheets (or up to 24 mm in
height) × 2
Page 55

Paper thickness
Recommended Paper
Paper
thickness
*1
Paper Weight
*2
1
Paper Weight 2
Paper Weight 3
Paper Weight 4
Paper Weight 5
Paper Weight 6
Paper Weight 7
Paper Weight 8
Metric Bond paper Cover paper Index paper
52.3–63.0
2
g/m
63.1–80.0
2
g/m
80.1–105.0
2
g/m
105.1–163.0
2
g/m
163.1–220.0
2
g/m
220.1–256.0
2
g/m
256.1–300.0
2
g/m
300.1–350.0
2
g/m
14.0–16.9 lb.
Bond
17.0–21.0 lb.
Bond
21.1–28.0 lb.
Bond
28.1–43.0 lb.
Bond
43.1–58.9 lb.
Bond
59.0–68.0 lb.
Bond
68.1–80.0 lb.
Bond
80.1–93.3 lb.
Bond
19.0–23.0 lb.
Cover
23.1–29.9 lb.
Cover
30.0–38.9 lb.
Cover
39.0–60.0 lb.
Cover
60.1–80.9 lb.
Cover
81.0–94.0 lb.
Cover
94.1–110.0 lb.
Cover
110.1–128.8 lb.
Cover
29.0–34.9 lb.
Index
35.0–44.0 lb.
Index
44.1–58.0 lb.
Index
58.1–90.0 lb.
Index
90.1–121.0 lb.
Index
121.1–141.0 lb.
Index
141.1–165.0 lb.
Index
165.1–193.3 lb.
Index
Paper Weight 9
Print quality will decrease if the paper you are using is close to the minimum or maximum weight.
*1
Change the paper weight setting to thinner or thicker.
When loading paper of 52.3–63.0 g/m2 (14.0–16.9 lb. Bond), the edges may crease or the paper
*2
misfeed depending on the paper type.
350.1–400.0
2
g/m
93.4–106.9 lb.
Bond
128.9–147.0 lb.
Cover
193.4–221.0 lb.
Index
• Certain types of paper, such as translucent paper or transparencies, may produce noise when
delivered. This noise does not indicate a problem and print quality is unaffected.
• The paper capacity described in the tables above is an example. Actual paper capacity might be
lower, depending on the paper type.
• When loading paper, make sure the stack height does not exceed the limit mark of the paper tray.
• If multiple sheet feeding occurs, fan sheets thoroughly or load sheets one by one from the multi
bypass tray (Tray A).
53
Page 56

4. Adding Paper and Toner
• You can specify whether or not the machine auto detects multi-sheet feeds in paper from every tray.
In the Adjustment Settings for Operators menu, you can also specify whether current jobs are
suspended or continued when a multi-sheet feed is detected. However, depending on the condition
of the paper, the machine may not detect a multi-sheet feed correctly. For details about Adjustment
Settings for Operators, see "Adjustment Settings for Operators", Paper Settings.
• Flatten out curled sheets before loading them.
• The Adjust Paper Curl function might not be able to fully remove curl, depending on the type of
paper and the direction of its grain. If long grain paper does not uncurl properly, try short grain
paper instead. For details about the Adjust Paper Curl function, see "Adjustment Settings for
Operators", Paper Settings.
• Depending on the paper's size, the print speed may be slower than usual.
• When loading envelopes, see page 55 "Envelopes".
• When printing onto letterhead paper, the paper placing orientation is different depending on
which function you are using. For details, see page 42 "Loading Orientation-fixed Paper or Twosided Paper".
• The paper types you can select in Tray Paper Settings are only general classifications. Print quality
for every kind of paper in a classification is not guaranteed. For details, see "Unusable Paper",
Paper Specifications and Adding Paper.
• If the surface of the paper is dusty, white spots might appear on prints. To remove dust, fan the
paper thoroughly.
• When loading label paper:
• Select [Label Paper] for [Paper Type] in [Tray Paper Settings], and select an appropriate
paper thickness under [Paper Weight].
• When loading transparencies:
• To print on transparencies, select [Transparency] for [Paper Type] in [Tray Paper Settings].
• When you load transparencies, check the front and back of the sheets, and place them
correctly, or a misfeed might occur.
• Fan transparencies thoroughly whenever you use them. This prevents transparencies from
sticking together, and from feeding incorrectly.
• Remove printed sheets one by one.
• When loading translucent paper:
• When loading translucent paper, always use long grain paper, and set the paper direction
according to the grain.
• Translucent paper easily absorbs humidity and becomes curled. Remove curl in the translucent
paper before loading. For details about settings for flattening out curled paper, see
"Adjustment Settings for Operators", Paper Settings.
• Remove printed sheets one by one.
54
Page 57

CDL070
Recommended Paper
• When loading coated paper:
• If you want to use glossy paper, select [Coated: Glossy] for [Paper Type]. If you want to use
matted paper (including silk, dull, and satin paper), select [Coated: Matte] for [Paper Type].
For details about the settings for using coated paper with custom paper, see page 57
"Registering a Custom Paper".
• When loading coated paper or glossy paper, always fan the paper before using it.
• If a paper jam occurs or if the machine makes a strange noise when feeding stacks of coated
paper, feed the coated paper one sheet at a time.
• To load coated paper into the wide LCT, you must specify [Coated: Glossy], [Coated: Matte],
or [Coated: High Gloss] as the paper type and select an appropriate paper thickness under
[Paper Weight].
Envelopes
This section describes loading envelopes.
• Misfeeds might occur depending on the length and shape of the flaps.
• Only envelopes that are at least 139.7 mm (5.5 inches) wide can be loaded.
To print on envelopes, load them into the Wide LCT or multi bypass tray (Tray A), and be sure to specify
an appropriate paper type.
To load envelopes, be sure to unfold their flaps and set them in the orientation with print side face up.
If you are printing onto side-opening envelopes, be sure to unfold their flaps and set them in the
orientation with print side face up. Flaps must be at the right side of the Wide LCT or multi bypass tray
(Tray A).
55
Page 58

CDL081
4. Adding Paper and Toner
Recommended envelopes
For information about recommended envelopes, contact your local dealer.
Storage of envelopes
Keep envelopes stored in sealed plastic bags and remove only the quantity needed. Do not add
envelopes during printing, as this might cause misfeeds.
• Be sure to specify the size of the envelope and flap size in [Tray Paper Settings]. For details, see
"Changing to a Custom Paper Size", Paper Specifications and Adding Paper.
• When using envelopes, set [Paper Weight] in [Tray Paper Settings] to the same value as two sheets
of the paper used for the envelopes.
• Before loading envelopes, press down on them to remove any air inside and to flatten any edges
or creases. When loading envelopes, make sure they do not go over the limit mark.
• Place one envelope at a time if you still get any of the following results:
• The envelope jams
• The envelope is not fed
• Multiple envelopes are fed at the same time
• Humidity levels of over 50% can cause envelopes to come out creased or misprinted.
• Certain types of envelopes might come out creased, dirtied, or misprinted. If you are printing a
solid color or image on an envelope, lines may appear where the overlapped edges of the
envelope make it thicker.
• If the horizontal size of the envelope is 297 mm (11.7 inches) or less, a paper misfeed might occur.
If this happens, turn off Skew Detection. For details, see "Adjustment Settings for Operators", Paper
Settings.
• When printing on envelopes thicker than 127.0 g/m2 (47.0 lb. Cover), do not use [Adjust Curl:
Strong] or [Adjust Curl: Strong] for [Adjust Paper Curl] of [Adjustment Settings for Operators].
56
Page 59

DER122
Registering a Custom Paper
Registering a Custom Paper
You can register up to 100 custom papers.
Check the product name, size, and type of your paper before registering it.
Check that the size and type of your paper are compatible with the paper tray that you want to use. Tray
compatibility depends on the paper's size and type. For details about the paper sizes and types that can
be used, see page 44 "Recommended Paper Sizes and Types".
• When the number of registered custom papers reaches the maximum, you will not be able to
register a new custom paper. Delete any unnecessary custom papers from the list, and then try
registering again. For details, see "Deleting a Custom Paper", Paper Settings.
Selecting the Paper's Name from the Paper Library
1. Press the [Paper Setting] key.
2. Press [Edit Custom Paper].
3. Press [Recall from Paper Library].
4. Select the name of the paper that you want to register.
Press [ Previous] or [ Next] to scroll through the list to find the paper that you want to select.
You can select two or more types of paper.
57
Page 60

4. Adding Paper and Toner
5. Press [Program to Custom Paper].
6. Press [Yes].
7. Press [Exit] twice.
8. Press the [Paper Setting] key.
You can also close the [Tray Paper Settings] screen by pressing [Exit].
• You can check and change the settings of the registered custom paper such as the paper size
setting on the [Edit Custom Paper] screen. For details about modifying the custom paper, see
"Modifying a Custom Paper", Paper Settings.
Registering a Paper Whose Paper Name Is Not Displayed in the Paper Library
If the paper you want is not in the library's paper list or you don't know the name of the paper, use the
following procedures:
• Selecting the paper's type from the paper library
The paper library contains the optimum printing conditions not only for each commercially
available paper but also for each type of paper.
You can select the type of paper from the paper library and register it as a custom paper even if
you don't know the name of the paper. The selectable paper types are as follows: Plain, Gloss
coated, Matte coated, Envelope, Light colored, Dark colored, and Textured. Each type is divided
into several categories according to weight.
• Manually specifying a paper's type and weight
You can register a custom paper by manually specifying its type and weight.
Selecting the paper's type from the paper library
You can select the type of paper from the paper library and register it as a custom paper.
58
Page 61

DER122
Registering a Custom Paper
The selectable paper types are as follows: Plain, Gloss coated, Matte coated, Envelope, Light colored,
Dark colored, and Textured.
1. Press the [Paper Setting] key.
2. Press [Edit Custom Paper].
3. Press [Recall from Paper Library].
4. Select the most appropriate combination of type and weight for your paper.
The list of paper types appears on the first and following pages in the paper library.
Press [
Previous] or [ Next] to scroll through the list to find the paper that you want to select.
5. Press [Program to Custom Paper].
6. Press [Yes].
7. Press [Exit] twice.
8. Press the [Paper Setting] key.
You can also close the [Tray Paper Settings] screen by pressing [Exit].
• You can check and change the settings of the registered custom paper such as the paper size
setting on the [Edit Custom Paper] screen. For details about modifying the custom paper, see
"Modifying a Custom Paper", Paper Settings.
59
Page 62

DER122
4. Adding Paper and Toner
Manually specifying a paper's type and weight
1. Press the [Paper Setting] key.
Press [Edit Custom Paper].
2.
3. Select a number that is [
Not Programd.].
Press [ Previous] or [ Next] to scroll through the list.
4. Press [Change] for [Custom Paper Name].
5. Enter the name of the paper, and then press [OK].
6. Press [Change] for [Paper Size].
7. Select a paper size, and then press [OK].
8. Press [Change] for [Paper Weight].
9. Specify the paper's weight, and then press [OK].
Press [Change] if you changed the paper weight.
10. Press [Change] for [Paper Type].
11. Specify the paper type, and then press [OK].
Press [Change] if you changed the paper type.
60
Page 63

Registering a Custom Paper
12. Specify other items, such as [Coated Paper Type], [Paper Color], [Prepunched or Not],
[Textured or Not], [Apply Duplex], and [Apply Auto Paper Select] as necessary.
If you change the [Coated Paper Type], [Paper Color], [Prepunched or Not], or [Textured or Not]
and press [OK], a message appears to notify you that the [Advanced Settings] will be initialized.
To apply the changes for those settings, select [Change]. To cancel the changes, select [Do not
Change].
13. Press [OK].
14. Press [Exit].
15. Press the [Paper Setting] key.
You can also close the [Tray Paper Settings] screen by pressing [Exit].
• If you want to use glossy paper, select [Glossy] for [Coated Paper Type]. If you want to use matte
paper (including silk, dull, and satin paper), select [Matte] for [Coated Paper Type].
• For details about custom paper settings, see "Custom Paper Settings", Paper Settings.
• For details about [Advanced Settings], contact your machine administrator.
Registering a New Custom Paper by Modifying an Existing Paper
You can open and modify the settings of a registered custom paper and register them as a new custom
paper.
This function is useful when registering paper that is the same type as an existing paper, but a different
size.
Depending on which settings you modify, details of a newly registered custom paper will be as follows:
• When the settings of the selected custom paper are not changed:
All settings of the selected custom paper ([Custom Paper Name], [Paper Size], [Paper Weight],
and [Paper Type], including the attributes specific to the color controller) are copied to the newly
registered custom paper.
• When the settings [Custom Paper Name], [Paper Size], [Apply Duplex], [Apply Auto Paper
Select], or [Advanced Settings] of the selected custom paper are changed:
The changes are applied to the newly registered custom paper.
• When the settings [Paper Weight], [Paper Type], [Coated Paper Type], [Paper Color],
[Prepunched or Not], or [Textured or Not] of the selected custom paper are changed:
The changes are applied to the newly registered custom paper and its advanced settings are reset
to their default values according to the changes that are applied to the settings.
When modifying a custom paper that is registered from the paper library, you can change its [Custom
Paper Name], [Paper Size], [Apply Duplex], and [Apply Auto Paper Select] settings. You can also
confirm the brand name and the version of data from [Product Name in Paper Library].
61
Page 64

DER122
4. Adding Paper and Toner
1. Press the [Paper Setting] key.
2. Press [Edit Custom Paper].
3. Select a number that is [ Not Programd.].
Press [ Previous] or [ Next] to scroll through the list.
4. Press [Use Another Custom Paper's Settings].
5. Select the custom paper whose settings you want to modify.
6. Press [OK].
7. Change the settings for custom paper (such as paper's name, size, and type), as
necessary.
If you change the [Paper Weight], [Paper Type], [Coated Paper Type], [Paper Color], [Prepunched
or Not], or [Textured or Not] and press [OK], a message appears to notify you that the [Advanced
Settings] will be initialized. To apply the changes for those settings, select [Change]. To cancel the
changes, select [Do not Change].
8. Press [OK].
9. Press [Exit].
10. Press the [Paper Setting] key.
You can also close the [Tray Paper Settings] screen by pressing [Exit].
62
Page 65

Registering a Custom Paper
• For details about custom paper settings, see "Custom Paper Settings", Paper Settings.
• For details about [Advanced Settings], contact your machine administrator.
63
Page 66

4. Adding Paper and Toner
Adding Toner
This section explains precautions when adding toner and how to dispose of used toner.
• Do not incinerate toner (new or used) or toner containers. Doing so risks burns. Toner will ignite
on contact with naked flame.
• Do not store toner (new or used) or toner containers anywhere near naked flames. Doing so
risks fire and burns. Toner will ignite on contact with naked flame.
• The following explains the warning messages on the plastic bag used in this product's
packaging.
• Keep the polythene materials (bags, etc.) supplied with this machine away from babies
and small children at all times. Suffocation can result if polythene materials are brought into
contact with the mouth or nose.
• Do not use a vacuum cleaner to remove spilled toner (including used toner). Absorbed toner
may cause a fire or explosion due to electrical contact flickering inside the vacuum cleaner.
However, it is possible to use a vacuum cleaner that is explosion-proof and dust ignition-proof. If
toner is spilled on the floor, remove the spilled toner slowly using a wet cloth, so that the toner is
not scattered.
64
• Do not crush or squeeze toner containers. Doing so can cause toner spillage, possibly resulting
in dirtying of skin, clothing, and floor, and accidental ingestion.
• Store toner (new or used), toner containers, and components that have been in contact with
toner out of reach of children.
• If toner or used toner is inhaled, gargle with plenty of water and move into a fresh air
environment. Consult a doctor if necessary.
• If toner or used toner gets into your eyes, flush immediately with large amounts of water. Consult
a doctor if necessary.
• If toner or used toner is swallowed, dilute by drinking a large amount of water. Consult a doctor
if necessary.
Page 67

Adding Toner
• When removing jammed paper or replacing toner, avoid getting toner (new or used) on your
clothing. If toner comes into contact with your clothing, wash the stained area with cold water.
Hot water will set the toner into the fabric and make removing the stain impossible.
• When removing jammed paper or replacing toner, avoid getting toner (new or used) on your
skin. If toner comes into contact with your skin, wash the affected area thoroughly with soap and
water.
• When replacing a toner or waste toner container or consumables with toner, make sure that the
toner does not splatter. Put the waste consumables in a bag after they are removed. For
consumables with a lid, make sure that the lid is shut.
• Always replace the toner cartridge when a notification appears on the machine.
• Fault may occur if you use toner other than the recommended type.
• When adding toner, do not turn off the main power. If you do, settings will be lost.
• Store toner where it will not be exposed to direct sunlight, temperatures above 35°C (95°F), or
high humidity.
• Store toner horizontally.
• Do not repeatedly install and remove toner cartridges. This will result in toner leakage.
• Do not use recycled toner. This will damage the machine.
• During toner adding, the toner container is rotating. Do not touch the toner container.
• If toner remains in the container, you cannot remove the container. Do not remove the container
forcibly.
Follow the instruction on the screen regarding how to replace a toner cartridge.
• You can still make about 2,000 prints after the messages "No Toner." and "Replace Toner
Cartridge." appear cyclically, but replace toner soon to prevent poor print quality.
• You can check the name of the required toner and the replacement procedure using the [ Add
Toner] screen.
• You can change the toner containers during printing.
• If toner remains in the container, you cannot pull it out.
• Press the [Check Status] key to check contact number where you can order supplies. See "Checking
Machine Status and Settings", Convenient Functions.
• You can add all four color toners in the same way.
65
Page 68

4. Adding Paper and Toner
Disposing of Used Toner
This section describes what to do with used toner.
Toner cannot be re-used.
Pack used toner containers in the container's box or a bag to prevent the toner from leaking out of the
container when you dispose of it.
(mainly Europe and Asia)
If you want to discard your used toner container, please contact your local sales office. If you discard it
by yourself, treat it as general plastic waste material.
(mainly North America)
Please see our local company website for information on the recycling of supply products, or you can
recycle items according to the requirements of your local municipalities or private recyclers.
66
Page 69

Menu Items and Functions
Menu Items and Functions
All items in Adjustment Settings for Operators appear regardless of which of the machine's optional
components are installed. If you change the settings of options that are not installed, the changes will
have no effect.
Machine: Image Position
For details about the following items, see "Machine: Image Position", Paper Settings.
No. Item Description
0101 Adjust Image Position
Across Feed Direction
0102 Adjust Image Position With
Feed Direction
0104 Skew Detection Specify whether or not to detect paper skew.
Machine: Image Quality
For details about the following items, see "Machine: Image Quality", Paper Settings.
No. Item Description
0201 Adjust Image Density/
DEMS
0203 Adjust Maximum Image
Density
0205 Adjust Density Difference
Across Feed Direction
Adjust the vertical position of the print image.
Adjust the horizontal position of the print image.
Execute image density control manually.
DEMS can reduce the variations in thickness that occur in
the intervals between the photoconductor and
development sleeve operations.
Specify the adhesion of toner to the drum surface and
intermediate transfer belt when image density adjustment
is executed.
Adjust the image density difference between the top and
bottom of the image.
0207 Adjust Image Density
Before Auto Color
Calibration
0208 Feedback Rate of Auto Img
Dens Adj & Color Calib
Adjust to the maximum density.
Specify the feedback rate of auto image density
adjustment and color calibration.
67
Page 70

4. Adding Paper and Toner
Machine: Paper Feed/ Output
For details about the following items, see "Machine: Paper Feed/ Output", Paper Settings.
No. Item Description
0301 Adjust Paper Curl Specify the method for straightening curled sheets.
Select the method according to the direction and degree
of curl.
0302 Illumination Mode for
Color Paper Detection
Specify a detection method of the contact image sensor
(CIS).
0304 Double Feed Detection Specify whether or not to detect double feeding of
paper.
0305 When Double Feed is
Detected
0306 Activate Auto Corrctn. Snsr.
for 2 Sided Magnif. Adjust.
Specify how the machine responds when it detects a
double feed.
The machine measures the length and width of both
sides of the paper and specifies the magnification ratio
of the image on the back side according to the shrinking
or transfiguration of the image.
Machine: Maintenance
For details about the following items, see "Machine: Maintenance", Paper Settings.
No. Item Description
0502 Execute Photoconductor
Remove dust on the drum surface.
Refreshing
0509 Temperature / Humidity
Display the internal temperature and humidity.
inside the Machine
Finishing: Finisher
68
0510 Temperature / Humidity
Display the external temperature and humidity.
outside the Machine
0513 Execute Developer
Refreshing
The machine uses degraded toner in the development
unit and adds new toner from the toner bottle.
0520 Execute Charger Cleaning Clean the charger.
For details about the following items, see "Finishing: Finisher", Paper Settings.
Page 71

No. Item Description
Menu Items and Functions
0601 Adjust Staple Position
Across Feed Direction 1
0602 Adjust Staple Position
Across Feed Direction 2
0603 Adjust Staple Position With
Feed Direction
0607 Adjust Punch Position
Across Feed Direction
0608 Adjust Punch Position With
Feed Direction
0618 Adjust Staple Position for
Booklet
0619 Adjust Folding Position for
Booklet
0622 Set Number of Folds for
Booklet
Adjust the vertical position of the staple (applied at an
edge) when using Finisher SR5050 or Booklet Finisher
SR5060.
Adjust the vertical position of the staples (dual) when
using Finisher SR5050 or Booklet Finisher SR5060.
Adjust the horizontal position of the staples when using
Finisher SR5050 or Booklet Finisher SR5060.
Adjust the vertical position of the punch holes when using
Finisher SR5050 or Booklet Finisher SR5060.
Adjust the horizontal position of the punch holes when
using Finisher SR5050 or Booklet Finisher SR5060.
Adjust the horizontal position of the booklet staples when
using Booklet Finisher SR5060.
Adjust the horizontal position of the folding when using
Booklet Finisher SR5060.
Specify the number of booklet folds to be performed
when using Booklet Finisher SR5060.
Finishing: Fold
For details about the following items, see "Finishing: Fold", Paper Settings.
No. Item Description
0701 Half Fold Position (Multi-
sheet Fold)
0702 Letter Fold-out Position 1
(Multi-sheet Fold)
0703 Letter Fold-out Position 2
(Multi-sheet Fold)
0704 Letter Fold-in Position 1
(Multi-sheet Fold)
0705 Letter Fold-in Position 2
(Multi-sheet Fold)
Adjust the fold position of half folded sheets when using
the multi-folding unit.
Adjust the fold position for the bottom segment of letter
fold-out sheets when using the multi-folding unit.
Adjust the overall fold size of letters fold-out sheets when
using the multi-folding unit.
Adjust the fold position of the bottom segment of letter
fold-in sheets when using the multi-folding unit.
Adjust the fold position of letters fold-in sheets when
using the multi-folding unit.
69
Page 72

4. Adding Paper and Toner
Finishing: Perfect Binder
For details about the following items, see "Finishing: Perfect Binder", Paper Settings.
No. Item Description
0801 Cover Sheet Position for
Perfect Binding Across
Adjust the vertical alignment of the cover sheet position
when performing perfect binding.
Feed Dir
0802 Cover Sheet Position for
Perfect Binding With Feed
Adjust the horizontal alignment of the cover sheet
position when performing perfect binding.
Dir
0803 Adjust Perfect Binding
Finishing Angle
0804 Adjust Applying Binding
Square the top, bottom, and outside edges when
trimming a deck of paper.
Adjust the amount of binding glue for perfect binding.
Glue
Finishing: Stacker
For details about the following items, see "Finishing: Stacker", Paper Settings.
No. Item Description
0907 Maximum Stack Quantity
Set the maximum number of sheets for the stacker tray.
in Stacker Tray
70
Page 73

5. Troubleshooting
This chapter describes basic troubleshooting procedures.
When a Status Icon Is Displayed
This section describes the status icons displayed when the machine requires the user to remove misfed
paper, to add paper, or to perform other procedures.
Status Icon Status
: Paper Misfeed icon Appears when a paper misfeed occurs.
For details about removing jammed paper, see "Removing
Jammed Paper", Troubleshooting.
: Load Paper icon Appears when paper runs out.
For details about loading paper, see "Loading Paper",
Paper Specifications and Adding Paper.
: Add Toner icon Appears when toner runs out.
For details about adding toner, see "Adding Toner",
Maintenance and Specifications.
: Add Staple icon Appears when staples run out.
For details about adding staples, see "Adding Staples",
Maintenance and Specifications.
: Waste Toner Full icon Appears when the waste toner bottle is full.
Contact your service representative.
: Hole Punch Receptacle Full icon Appears when the hole punch receptacle is full.
For details about removing punch waste, see "Removing
Punch Waste", Troubleshooting.
: Waste Staple Full icon Appears when the waste staple receptacle is full. For details
about removing staple waste, see "Removing Staple
Waste", Troubleshooting.
: Service Call icon Appears when the machine is malfunctioning or requires
maintenance.
: Open Cover icon Appears when one or more covers of the machine are
open.
71
Page 74

1
43
2
DFL003
5. Troubleshooting
When the Indicator Lamp for the [Check Status] Key Is Lit or Flashing
If the indicator lamp for the [Check Status] key lights up or flashes, press the [Check Status] key to
display the [Check Status] screen. Check the status of each function in the [Check Status] screen.
[Check Status] screen
1. [Mach./Applic. Stat] tab
Indicates the status of the machine.
2. [Check]
If an error occurs in the machine, press [Check] to view details.
Pressing [Check] displays an error message or the screen. Check the error message displayed on the screen
and take the appropriate action. For details about how to resolve the problems described in error messages,
see "When Messages Appear", Troubleshooting.
3. Messages
Displays a message that indicates the status of the machine.
4. Status icons
The status icons that can be displayed are described below:
: The machine is performing a job.
: An error has occurred on the machine.
: The machine cannot be used because an error has occurred in the machine. This icon may also appear if
the toner is running low.
The following table explains problems that cause the indicator lamp for the [Check Status] key to light or
flash.
72
Page 75

When the Indicator Lamp for the [Check Status] Key Is Lit or Flashing
Problem Cause Solution
Documents and reports do
The paper output tray is full. Remove the prints from the tray.
not print out.
Documents and reports do
There is no paper left. Load paper. For details about loading
not print out.
An error has occurred. A function which has the
status "Error Occurred" in
the [Check Status] screen is
defective.
The machine is unable to
connect to the network.
A network error has
occurred.
paper, see "Loading Paper", Paper
Specifications and Adding Paper.
Press [Check], read the displayed
message, and then take the
appropriate action. For details about
error messages and their solutions, see
"When Messages Appear",
Troubleshooting.
• Check that the machine is
correctly connected to the
network and that the machine is
correctly set. For details about
how to connect the network, see
"Interface Settings", Connecting
the Machine/ System Settings.
• For details about connecting to
the network, contact your
administrator.
• If the indicator lamp is still lit even
after you try to solve the problem
as described here, contact your
service representative.
73
Page 76

5. Troubleshooting
When the Machine Makes a Beeping Sound
The following table describes the meaning of the various beep patterns that the machine issues to alert
users about machine conditions.
Beep pattern Meaning Cause
Single short beep Panel/screen input
accepted.
Short, then long beep Panel/screen input rejected. An invalid key was pressed on the
2 long beeps Machine has warmed up. When the power is turned on or the
5 long beeps repeated four
times.
5 short beeps repeated five
times.
• Users cannot mute the machine's beep alerts. When the machine beeps to alert users of a paper
jam or toner request, if the machine's covers are opened and closed repeatedly within a short
space of time, the beep alert might continue, even after normal status has resumed.
Soft alert Paper tray is empty.
Strong alert The machine requires user attention
A control panel or screen key was
pressed.
control panel or screen, or the entered
password was incorrect.
machine exits Sleep mode, the
machine has fully warmed up and is
ready for use.
because paper has jammed, the toner
needs replenishing, or other problems
have occurred.
74
• You can enable or disable beep alerts. For details about Panel Key Sound, see "General
Features", Connecting the Machine/ System Settings.
Page 77

When You Have Problems Operating the Machine
When You Have Problems Operating the
Machine
Problem Cause Solution
The machine does not turn
on.
The indicator lamp remains
lit and the machine does not
enter Sleep mode even
though the [Energy Saver]
key was pressed.
The display is turned off. The machine is in Low Power
The display is turned off. The machine is in Sleep
Nothing happens when the
[Check Status] key or the
[Energy Saver] key is
pressed.
The power turns off
automatically.
The AC power switch has
not been turned on.
In some cases, the machine
does not enter Sleep mode
when the [Energy Saver] key
is pressed.
mode.
mode.
The power is turned off. Make sure the main power indicator is
The Weekly Timer setting is
set to [Main Power Off].
Turn on the AC power switch. For
details about the AC power switch, see
"General Requirements", Maintenance
and Specifications.
Before you press the [Energy Saver]
key, check that Sleep mode can be
enabled. For details about enabling
Sleep mode, see "Saving Energy",
Getting Started.
Touch the display panel or press one
of the keys on the control panel to
cancel Low Power mode.
Press the [Energy Saver] key or the
[Check Status] key to exit Sleep mode.
off, and then turn on the power.
Change the Weekly Timer setting. For
details about the Weekly Timer setting,
see "Timer Settings", Connecting the
Machine/ System Settings.
The user code entry screen is
displayed.
The Authentication screen
appears.
Users are restricted by User
Code Authentication.
Basic Authentication,
Windows Authentication, or
LDAP Authentication is set.
For details about how to log in when
User Code Authentication is enabled,
see "When the Authentication Screen is
Displayed", Getting Started.
Enter your login user name and user
password. For details about the
Authentication screen, see "When the
Authentication Screen is Displayed",
Getting Started.
75
Page 78

5. Troubleshooting
Problem Cause Solution
An error message is still
displayed, even if misfed
Paper is still jammed in the
tray.
paper is removed.
An error message is still
displayed, even if the
One or more covers that are
not indicated are still open.
indicated cover is closed.
Images are printed on the
reverse side of the paper.
You may have loaded the
paper incorrectly.
Misfeeds occur frequently. Using curled paper often
causes misfeeds, soiled
paper edges, or slipped
positions while staple or
stack printing is performed.
Remove the jammed paper by
following the procedures displayed on
the control panel. For details about
removing jammed paper, see
"Removing Jammed Paper",
Troubleshooting.
Close all the covers of the machine.
Load the paper correctly. For details
about loading paper, see "Loading
Paper", Paper Specifications and
Adding Paper.
• Flatten the paper with your hands
to straighten out the curl.
• Load the paper up side down so
that the curled edges face
downward. For details about
recommended paper, see
"Recommended Paper", Paper
Specifications and Adding Paper.
76
• Place cut paper on a flat surface
to prevent paper from curling,
and do not lean it against the
wall. For details about the proper
way to store paper, see "Paper
Storage", Paper Specifications
and Adding Paper.
Page 79

When You Have Problems Operating the Machine
Problem Cause Solution
Misfeeds occur frequently. The tray's side or end fences
may not be set properly.
Misfeeds occur frequently. Paper of undetectable size
has been loaded.
• Remove the misfed paper. For
details about removing jammed
paper, see "Removing Jammed
Paper", Troubleshooting.
• Check that the side or end fences
are set properly. Also, check that
the side fences are locked. For
details about setting the side and
end fences, see "Changing the
Paper Size", Paper Specifications
and Adding Paper.
• Remove the misfed paper. For
details about removing jammed
paper, see "Removing Jammed
Paper", Troubleshooting.
• If you load a paper size that is not
selected automatically, you need
to specify the paper size with the
control panel. For details about
specifying paper size using the
control panel, see "Changing to a
Size That Is Not Automatically
Detected", Paper Specifications
and Adding Paper.
Misfeeds occur frequently. There is a foreign object on
the output tray.
Misfeeds occur frequently. The staple cartridge is not set
correctly.
• Remove the misfed paper. For
details about removing jammed
paper, see "Removing Jammed
Paper", Troubleshooting.
• Do not place anything on the
output tray.
Set the staple cartridge properly. For
details about how to add staples, see
"Adding Staples", Maintenance and
Specifications.
77
Page 80

5. Troubleshooting
Problem Cause Solution
Misfeeds occur when
printing to envelopes.
Misfeeds occur when
printing to envelopes.
When printing to envelopes,
the envelopes may be fed in
together, or the envelopes
may not be fed.
The envelopes are curled. Make sure you fully flatten curled
envelopes before you load them. Do
not stack envelopes over the specified
limit for the paper tray. If misfeeds still
occur after the envelopes have been
flattened, load envelopes on the tray
one at a time and print them
individually. For details about how to
load envelopes, see "Envelopes",
Paper Specifications and Adding
Paper.
You printed envelopes with
a non-rectangular flap when
[Skew Detection] was set to
[On].
Make sure you set [Skew Detection] to
[Off] when printing envelopes with a
non-rectangular flap. For details about
setting of skew detection, see
"Adjustment Settings for Operators",
Paper Settings.
The envelopes are curled. Make sure you fully flatten curled
envelopes before you load them. Do
not stack envelopes over the specified
limit for the paper tray. If misfeeds still
occur after the envelopes have been
flattened, load envelopes on the tray
one at a time and print them
individually. For details about how to
load envelopes, see "Envelopes",
Paper Specifications and Adding
Paper.
78
Cannot print in duplex
mode.
You have selected a paper
tray that is not set for duplex
printing.
Change the setting for "Apply Duplex"
in "Tray Paper Settings" to enable
duplex printing for the paper tray. For
details about setting "Apply Duplex",
see "Tray Paper Settings", Paper
Settings.
Page 81

When You Have Problems Operating the Machine
Problem Cause Solution
Cannot print in duplex
mode.
You have selected a paper
type that cannot be used for
duplex printing.
The machine does not turn
off in 6 minutes after the
The machine cannot perform
the shutdown procedure.
main power is turned off.
An error has occurred when
the Address Book is
changed from the display
panel or Web Image
The Address Book cannot be
changed while you delete
the multiple stored
documents.
Monitor.
Paper is bent. Paper may be bent when it is
ejected from the finisher
upper tray.
The print image is not
properly positioned on the
paper.
• The machine has not
detected the paper
type and/or width
correctly.
In "Tray Paper Settings", select a paper
type that can be used for duplex
printing. For details about setting
"Paper Type", see "Tray Paper
Settings", Paper Settings.
Repeat the shutdown procedure. If the
machine does not turn off, turn off the
AC power switch.
Wait a while, and then retry the
operation.
Change the output tray to the finisher
shift tray.
Contact the machine administrator or
your service representative.
• The print position is not
aligned properly.
79
Page 82

5. Troubleshooting
Problem Cause Solution
Paper delivered to the high
capacity stacker is curled,
causing it to not align
properly.
Output paper to the stacker
tray does not align properly.
Paper is curled. • When the paper is curled
downward, select [Adjust
Curl: Weak], [Adjust Curl:
Medium], or [Adjust Curl:
Strong] under [Adjust Paper Curl]
in "Adjustment Settings for
Operators".
• When the paper is curled
upward, select [Adjust Curl:
Weak], [Adjust Curl:
Medium], or [Adjust Curl:
Strong] under [Adjust Paper Curl]
in "Adjustment Settings for
Operators".
For details about Adjustment Settings
for Operators, see "Adjustment Settings
for Operators", Paper Settings.
• When using coated
paper, the output
paper to the stacker
tray might fail to align
properly.
• When the paper weight
is 280.0 g/m2 or
Select [Adjust Curl: Weak], [Adjust
Curl: Medium], or [Adjust Curl:
Strong] under [Adjust Paper Curl] in
"Adjustment Settings for Operators".
For details about Adjustment Settings
for Operators, see "Adjustment Settings
for Operators", Paper Settings.
more, and the paper
size is A3, SRA3 or
larger, the output
paper to the stacker
tray might fail to align
properly.
80
Page 83

Fold
When You Have Problems Operating the Machine
Problems Causes Solutions
Wrinkling occurs when Gate
Fold, Letter Fold-in, or Letter
Fold-out is applied.
When you print Z-folded
paper, the machine
indicates that the output tray
is full even though the
amount of output paper on
the tray is less than the stack
capacity.
The multi-folding unit outputs
sheets with creased edges
when Gate Fold is applied.
The position of the fold is
incorrect when Letter Fold-in
is applied to a B5 JIS sheet.
Wrinkling can occur if Gate
Fold, Letter Fold-in, or Letter
Fold-out is applied to B4 JIS
(Japanese Industrial
Standard) , A3 , 8 1/2"
When applying Gate Fold, Letter Foldin, or Letter Fold-out to paper larger
than A4, we recommend you enable
image reduction and use paper no
larger than A4 .
14" , 11" 17" , 12"
18" , 8K , or larger
sizes of paper.
The Z-fold support tray is not
set.
Set the Z-fold support tray for finisher
or multi-folding unit. For details about
how to add the Z-fold support tray, see
"When using the Z-fold function",
Getting Started.
The paper is curled. • Remove the paper, and then
reload it upside down.
• Remove the paper, and then
reload it in the opposite direction.
Multi-sheet Fold has been
specified when only one
sheet is being printed.
Change the printer driver Letter Fold-in
settings so that Multi-sheet Fold is not
specified.
• There are times when images might not turn out as you want because of paper type, paper size, or
paper capacity problems. Use the recommended paper. For details about recommended paper,
see page 44 "Recommended Paper Sizes and Types".
81
Page 84

5. Troubleshooting
When Other Messages Appear
Message Cause Solution
"Following output tray is full.
Remove paper."
"Internal cooling fan is
active."
The output tray is full. • Remove paper from the output
tray to resume printing. If paper is
delivered to the finisher shift tray
and you want to prevent paper
from falling off the tray, press the
[Stop] key to suspend printing,
and then remove the paper. Press
[Continue] on the display panel to
resume printing.
• When using the multi-folding unit,
the number of sheets per paper
stack depends on the paper type
and fold type.
Large print runs will cause
the machine's interior to heat
up, triggering the cooling
fan.
The fan will emit noise, but this is
normal and the machine will be
operable while the fan is running.
The amount of paper that can be
printed and the total operation time
until the fan starts running depends on
the temperature of the location at
which the machine is installed.
82
"Self checking..." The machine is performing
image adjustment
operations.
The machine may perform periodic
maintenance during operations. The
frequency and duration of
maintenance depends on the humidity,
temperature, and printing factors such
as number of prints, paper size, and
paper type. Wait for the machine to
resume operation.
Page 85

When the Home Screen Cannot Be Edited
Message Cause Solution
When Other Messages Appear
"The image data size is not
valid. See the manual for
required data."
"The format of the image
data is not valid. See the
manual for required data."
The image data size is not
valid.
The file format of the shortcut
image to be added is not
supported.
When Problems Occur While Logging In
Message Cause Solution
"Authentication has failed." The entered login user name
or login password is not
correct.
"Authentication has failed." The machine cannot perform
authentication.
For details about file size for shortcut
image, see "Displaying an Image on
the [Home] Screen", Convenient
Functions.
The file format of shortcut images to be
added must be PNG. Specify the
image again.
For details about the correct login user
name and login password, see
Security Guide.
For details about authentication, see
Security Guide.
When the User Lacks Privileges to Perform an Operation
Message Cause Solution
"You do not have the
privileges to use this
function."
"The selected file(s)
contained file(s) without
access privileges. Only
file(s) with access privileges
will be deleted."
The logged in user name
does not have permissions
for the selected function.
You have tried to delete files
without the permission to do
so.
For details about how to set
permissions, see Security Guide.
To check your access permission for
stored documents, or to delete a
document you do not have permission
to delete, see Security Guide.
83
Page 86

5. Troubleshooting
84
Page 87

6. Information for This Machine
This chapter describes environmental precautions and regulations.
Information on Environmental Regulations
ENERGY STAR Program
®
ENERGY STAR
Program Requirements for Imaging Equipment
This company is a participant in the ENERGY STAR® Program.
This machine is compliant with the regulations specified by the
ENERGY STAR® Program.
The ENERGY STAR® Program Requirements for Imaging Equipment encourage energy conservation
by promoting energy efficient computers and other office equipment.
The program backs the development and dissemination of products that feature energy saving
functions.
It is an open program in which manufacturers participate voluntarily.
Targeted products are computers, monitors, printers, facsimiles, copiers, scanners, and multi-function
devices. Energy Star standards and logos are internationally uniform.
• For details about the "default delay time", see page 85 "Energy Saving Functions".
Energy Saving Functions
To reduce its power consumption, this machine has the following functions:
Low Power mode
• If this machine remains idle for a specified period, it automatically reduces its electrical
consumption.
85
Page 88

6. Information for This Machine
• The default period the machine waits before entering Low Power mode is 15 minutes. This
default time can be changed.
Sleep mode
• If this machine remains idle for a specified period or when the [Energy Saver] key is pressed, it
enters Sleep mode to further reduce its electrical consumption.
• The default delay time the machine waits before entering Sleep mode is 59 minutes. This
default time can be changed.
• The machine can print jobs from computers while in Sleep mode.
Specification
• (mainly Europe and Asia)
Type 1 Type 2
Reduced electrical consumption in Low
Power mode
*1
419.8 W 421.5 W
Time of switch into Low Power mode 15 minutes 15 minutes
Time of switch out from Low Power
*1
mode
Reduced electrical consumption in
Sleep mode
*1
160 seconds 160 seconds
2.0 W 2.0 W
Time of switch into Sleep mode 59 minutes 59 minutes
Time of switch out from Sleep mode
Duplex Function
The time it takes to switch out from energy saving functions and electrical consumption may differ
*1
depending on the conditions and environment of the machine.
Achieves ENERGY STAR energy savings; product fully qualifies when packaged with (or used
*2
with) a duplex tray and the duplex function is enabled as an option.
*2
*1
540 seconds 540 seconds
Standard Standard
• (mainly North America)
Type 1 Type 2
86
Reduced electrical consumption in Low
Power mode
*1
425.4 W 455.6 W
Time of switch into Low Power mode 15 minutes 15 minutes
Page 89

Information on Environmental Regulations
Type 1 Type 2
Time of switch out from Low Power
*1
mode
Reduced electrical consumption in
Sleep mode
*1
160 seconds 160 seconds
2.4 W 2.4 W
Time of switch into Sleep mode 59 minutes 59 minutes
Time of switch out from Sleep mode
Duplex Function
The time it takes to switch out from energy saving functions and electrical consumption may differ
*1
depending on the conditions and environment of the machine.
Achieves ENERGY STAR energy savings; product fully qualifies when packaged with (or used
*2
with) a duplex tray and the duplex function is enabled as an option.
*2
*1
540 seconds 540 seconds
Standard Standard
• Specifications can vary depending on which options are installed on the machine.
• For details about how to change the default interval, see "Timer Settings", Connecting the
Machine/ System Settings.
• The machine enters sleep mode directly in the following situations:
• Low Power Mode Timer and Sleep Mode Timer are set to the same time
• Sleep Mode Timer is set to a shorter time than Low Power Mode Timer
• Depending on which embedded software application is installed on it, the machine might take
longer than indicated to enter Sleep mode.
User Information on Electrical and Electronic Equipment
(mainly
Europe)
Users in the countries where this symbol shown in this section has been specified in national law on collection and treatment of E-waste
Our Products contain high quality components and are designed to facilitate recycling.
Our products or product packaging are marked with the symbol below.
87
Page 90

6. Information for This Machine
The symbol indicates that the product must not be treated as municipal waste. It must be disposed of
separately via the appropriate return and collection systems available. By following these instructions
you ensure that this product is treated correctly and help to reduce potential impacts on the environment
and human health, which could otherwise result from inappropriate handling. Recycling of products
helps to conserve natural resources and protect the environment.
For more detailed information on collection and recycling systems for this product, please contact the
shop where you purchased it, your local dealer or sales/service representatives.
All Other Users
If you wish to discard this product, please contact your local authorities, the shop where you bought this
product, your local dealer or sales/service representatives.
Note for the Battery and/or Accumulator Symbol (For EU countries Only)
(mainly Europe)
In accordance with the Battery Directive 2006/66/EC Article 20 Information for end-users Annex II,
the above symbol is printed on batteries and accumulators.
This symbol means that in the European Union, used batteries and accumulators should be disposed of
separately from your household waste.
In the EU, there are separate collection systems for not only used electrical and electronic products but
also batteries and accumulators.
Please dispose of them correctly at your local community waste collection/recycling centre.
88
Page 91

Information on Environmental Regulations
Environmental Advice for Users (mainly Europe)
Users in the EU, Switzerland and Norway
Consumables yield
Please refer to either the User's Manual for this information or the packaging of the consumable.
Recycled paper
The machine can use recycled paper which is produced in accordance with European standard
EN 12281:2002 or DIN 19309. For products using EP printing technology, the machine can print
on 64 g/m2 paper, which contains less raw materials and represents a significant resource
reduction.
Duplex printing (if applicable)
Duplex printing enables both sides of a sheet of paper to be used. This saves paper and reduces
the size of printed documents so that fewer sheets are used. We recommend that this feature is
enabled whenever you print.
Toner and ink cartridge return program
Toner and ink cartridge for recycling will be accepted free of charge from users in accordance with
local regulations.
For details about the return program, please refer to the Web page below or consult your service
person.
https://www.ricoh-return.com/
Energy efficiency
The amount of electricity a machine consumes depends as much on its specifications as it does on
the way you use it. The machine is designed to allow you to reduce electricity costs by switching to
Ready mode after it prints the last page. If required, it can immediately print again from this mode.
If no additional prints are required and a specified period of time passes, the device switches to an
energy saving mode.
In these modes, the machine consumes less power (watts). If the machine is to print again, it needs
a little longer to return from an energy saving mode than from Ready mode.
For maximum energy savings, we recommend that the default setting for power management is
used.
Products that comply with the Energy Star requirement are always energy efficient.
89
Page 92

6. Information for This Machine
Notes to Users in the State of California (Notes to Users in USA) (mainly North America)
Perchlorate Material - special handling may apply. See: www.dtsc.ca.gov/hazardouswaste/
perchlorate
90
Page 93

INDEX
A
AC power switch................................................... 12
Adjustment Settings for Operators....................... 67
Attention light.........................................................13
Authentication screen............................................29
B
Banner sheet tray of multi bypass tray (Tray A)..16
Banner sheet tray of wide LCT..............................16
Beeping pattern..................................................... 74
Booklet finisher...................................................... 15
Bridge unit of wide LCT.........................................16
C
Changing the display language.......................... 20
Check Status key.............................................18, 72
Clear key................................................................18
Control panel.................................................. 12, 17
Counter key............................................................18
Custom paper........................................................ 57
D
Data In indicator....................................................18
Display panel.........................................................17
E
Earth leakage breaker.......................................... 13
Edit Custom Paper.................................... 57, 58, 61
Energy Saver key.................................................. 18
Energy saving functions........................................ 85
ENERGY STAR program.......................................85
Enter key.................................................................18
Envelope................................................................ 55
Environmental advice for users.............................89
F
Fanning the paper................................................. 34
Finisher................................................................... 16
Function keys......................................................... 18
H
High capacity stacker....................................... 6, 15
Home key...............................................................19
Home screen............................................... 9, 21, 83
How to Read the Manuals......................................4
I
Icon............................................................21, 23, 24
Indicator................................................................. 72
Information on environmental regulations...........85
Information screen................................................... 7
Interposer.................................................... 6, 16, 39
Interposer of the perfect binder............................40
L
Language key........................................................ 18
Left mainframe front cover.................................... 11
Loading cover sheets.............................................40
Loading paper............................. 33, 35, 36, 39, 42
Loading tab stock.................................................. 38
Logging in.............................................................. 83
Logging in the machine.........................................29
Logging out the machine.......................................30
Login/Logout key..................................................18
M
Main power indicator........................................... 18
Main power switch...................................11, 27, 28
Media access lamp...............................................19
Media slots............................................................ 19
Message....................................................75, 82, 83
Model-specific information.....................................5
Multi bypass tray (Tray A)...................6, 16, 36, 38
Multi-folding unit............................................... 6, 16
N
Note for the battery and/or accumulator symbol..
................................................................................ 88
Notes to users in the state of California...............90
Number keys..........................................................18
O
Options...................................................................15
Orientation-fixed paper........................................42
P
Paper capacity.......................................................44
Paper Setting key...................................................18
Paper size...............................................................44
91
Page 94

Paper thickness...................................................... 44
GB
US
AU
Paper type..............................................................44
Perfect binder.................................................... 6, 16
Preventing information leakage..............................9
Problem.................................................................. 75
R
Recommended paper........................................... 44
Reduce my costs...................................................... 7
Region A...................................................................5
Region B................................................................... 5
Reset key................................................................ 17
Right mainframe front cover................................. 12
Ring binder........................................................ 6, 15
S
Screen brightness slider........................................ 19
Searching by what you want to do........................7
Shortcut icon............................................... 8, 23, 24
Simple Screen key.................................................18
Start key................................................................. 18
Status icon..............................................................71
Symbols.................................................................... 4
W
Web Image Monitor.......................................10, 31
What you can do with this machine.......................9
Wide large capacity tray...........................6, 16, 35
Wide LCT.....................................................6, 16, 35
T
Toner.......................................................................64
Toner cartridge compartment...............................12
Top screen..............................................................21
Tray 1..................................................................... 12
Tray 2..................................................................... 12
Trimmer...................................................................15
Trimmer unit..............................................................6
Turning off the power......................................27, 28
Turning on the power............................................ 27
Two-sided paper................................................... 42
U
Used toner..............................................................66
User Code Authentication.....................................29
User information on electrical and electronic
equipment.............................................................. 87
User Tools key....................................................... 18
V
Vents....................................................................... 13
92 EN
EN
EN
M238-1013
Page 95

© 2014
Page 96

M238-1013AU
EN
US
EN
GB
EN
 Loading...